

Page 1

i
Page 2

VGX-XL1 Disclaimers, Notes, Warnings
NOTICE
© 2005 Sony Electronics Inc. Reproduction in whole or in part without written permission is prohibited. All rights reserved. This
manual and the software described herein, in whole or in part, may not be reproduced, translated, or reduced to any machinereadable form without prior written approval.
SONY ELECTRONICS INC. PROVIDES NO WARRANTY WITH REGARD TO THIS MANUAL, THE
SOFTWARE, OR OTHER INFORMATION CONTAINED HEREIN AND HEREBY EXPRESSLY DISCLAIMS ANY IMPLIED
WARRANTIES OF MERCHANTABILITY OR FITNESS FOR ANY PARTICULAR PURPOSE WITH REGARD TO THIS
MANUAL, THE SOFTWARE, OR SUCH OTHER INFORMATION. IN NO EVENT SHALL SONY ELECTRONICS INC. BE
LIABLE FOR ANY INCIDENTAL, CONSEQUENTIAL, OR SPECIAL DAMAGES, WHETHER BASED ON TORT, CONTRACT,
OR OTHERWISE, ARISING OUT OF OR IN CONNECTION WITH THIS MANUAL, THE SOFTWARE, OR OTHER
INFORMATION CONTAINED HEREIN OR THE USE THEREOF.
SONY CANNOT WARRANT THAT THE FUNCTIONS DESCRIBED IN THIS GUIDE WILL BE
UNINTERRUPTED OR ERROR-FREE. SONY ALSO ASSUMES NO RESPONSIBILITY, AND SHALL NOT BE LIABLE FOR
ANY DAMAGES TO, OR VIRUSES THAT MAY INFECT, YOUR COMPUTER EQUIPMENT, OR OTHER PROPERTY ON
ACCOUNT OF YOUR ACCESS TO, USE OF, OR BROWSING IN ANY DESCRIBED WEB SITE, OR YOUR DOWNLOADING
OF ANY MATERIALS, DATA, TEXT, IMAGES, VIDEO, OR AUDIO FROM ANY DESCRIBED WEB SITE. WEB SITE
INFORMATION IS OBTAINED FROM VARIOUS SOURCES AND MAY BE INACCURATE. COPIES OF COPYRIGHTED
INFORMATION MAY ONLY BE MADE FOR LEGALLY PERMISSIBLE PURPOSES.
Sony Electronics Inc. reserves the right to make any modification to this manual or the information contained herein at any time
without notice. The software described herein is governed by the terms of a separate user license agreement.
This product contains software owned by Sony and licensed by third parties. Use of such software is subject to the terms and
conditions of license agreements enclosed with this product. Some of the software may not be transported or used outside the
United States. Software specifications are subject to change without notice and may not necessarily be identical to current retail
versions.
Certain product(s) included with this computer may include features such as copy protection and content
management technology. USE OF THE SOFTWARE PRODUCT(S) REQUIRES AGREEMENT TO
APPLICABLE END USER AGREEMENTS AND FULL COMPLIANCE WITH APPLICABLE PRODUCT ACTIVATION
PROCEDURES. Product activation procedures and privacy policies will be detailed during initial launch of the software
product(s), or upon certain reinstallations of the software product(s), or reconfigurations of the computer, and may be completed
by Internet or telephone (toll charges may apply). Updates and additions to software may require an additional charge.
Subscriptions to online service providers may require a fee and credit card information. Financial services may require prior
arrangements with participating financial institutions.
ii
Page 3

Important information for Canadian customers: Your new Media Changer/Recorder includes certain software versions
or upgrades, and Internet services or offers that are available to U.S. customers only.
Sony, VAIO, the V AIO logo, VAIO Digital Studio, VAIO Media, V AIO Media Music Server, VAIO Media Photo Server , VAIO Media
Video Server, VAIO Zone, Click to DVD, CLIÉ, DVgate Plus, Handycam, MagicGate, Memory Stick, Memory Stick Duo, the
Memory Stick logo, OpenMG, MICROMV, SonicStage, PictureGear, ImageStation, ATRAC3, and i.LINK are trademarks or
registered trademarks of Sony.
Intel and Pentium are trademarks or registered trademarks of the Intel Corporation.
Microsoft, Windows, and the Windows logo are trademarks or registered trademarks of the Microsoft Corporation.
PS/2 is a registered trademark of the IBM Corporation.
All other trademarks are trademarks or registered trademarks of their respective owners.
iii
Page 4

iv
Page 5

Contents
Welcome .................................................................................................................... 1
What is VGX-XL1? .................................................................................................................................2
Benefits of the VGX-XL1 ........................................................................................................................3
VGX-XL1A Features ..............................................................................................................................4
VGP-XL1B Features ..............................................................................................................................5
Getting Started............................................................................................................................... ... ... . 6
Using the Remote Control ..............................................................................................................7
Using the Wireless Keyboard .......................................................................... ... ... .... ... ... ... .... ........8
Getting Around Media Center .........................................................................................................9
Adding files to Media Center ........................................................................................................10
Using the Search Feature .............................................................................................................11
Support Resources ............. ... .......................................... ... .......................................... ... .............12
Media Center Setup ................................................................................................ 13
Settings ................................................................................................................................................14
General ..................................... .......................................................... ..........................................15
Set Up and Window Behavior ................................................................................................16
Visual and Sound Effects .......................................................................................................17
More Programs Options ............................................................................ ... ... .... ... ... .............18
Media Center Setup ........ ... ... .......................................... ... .......................................... .... ......19
Set Up Internet Connection .............................................................................................20
Set Up TV Signal .............................................................................................................21
Set Up Your Speakers .....................................................................................................22
Configure Your TV or Monitor ..........................................................................................23
v
Page 6

Set Up Remote Desktop ................................................................................................. 24
Automatic Updates .......................................................................................................... 25
Join Wireless Network ........................ ... .......................................... .... ... ......................... 26
Run Media Center Setup Again ................................................................ ... .... ... ... ... ... ... 27
Restore Start Page Defaults ........................................................................................... 28
Parental Controls ............................................................................................................ 29
Automatic Download Options .......................................................................................... 30
Optimization .................................................................................................................... 31
About Media Center ........................................................................................................ 32
Privacy ............................................................................................................................ 33
TV ....................................... ... .... ................................................................................................... 34
Recorder ...................................... ....................................................... ................................... 35
History ................................... ....................................................................... ...................36
Recorder Storage ............................................................................................................ 37
Recording Defaults .......................................................................................................... 38
Guide ..................................................................................................................................... 39
Edit Channels ..................................................................................................................40
Add Missing Channels .................................................................................................... 41
Set Up Guide Listings ..................................................................................................... 42
Additional Guide Information . .... ... ... ... ... .... ... ... ... .... ... ... ... .... ... ... ... ... .... ... ......................... 43
Set Up TV Signal ................................................................................................................... 44
Configure Your TV or Monitor ................................................................................................ 45
Audio ..................................................................................................................................... 46
Pictures ........................................................................................................................................ 47
Music .................................. ............................. ................................. ............................................ 48
Visualizations ............................... ....................... ....................... ...................... ...................... 49
Visualizations Options ........................................................................................................... 50
DVD .................................... ... .... ................................................................................................... 51
DVD Language ................................... ... ... ... .... ... ... ... .... ... .......................................... ... ... ...... 52
DVD Audio ............................. .......................................... ... ... ................................................ 53
Closed Captioning .... ... ... .......................................... .... ... ... ... .... ............................................ 54
vi
Page 7

Remote Control Options .........................................................................................................55
Messenger and Caller ID Settings ................................................................................................56
Help ..............................................................................................................................................57
Media Center Features ...........................................................................................61
Experience Media Center .....................................................................................................................62
My DVDs ..............................................................................................................................................64
Loading and Unloading Discs .......................................................................................................65
Viewing DVD Movies ....................................................................................................................67
DVD Movie Controls..................................................................................................................... 68
Online Spotlight ....................................................................................................................................70
My Videos ............................................................................................................................................71
Organize Your Videos Media Center ............................................................................................72
Play Your Videos ..........................................................................................................................73
More Information ...................................... ... .... ... .......................................... ... .............................74
Create a DVD/CD .........................................................................................................................75
Import/Edit Video ............................ .... ... ... ... .... ... ... ... .......................................... ... .... ... ................76
My Pictures ..........................................................................................................................................78
Organize Your Pictures ................................................................................................................79
View Your Pictures .......................................................................................................................80
Edit Your Pictures .........................................................................................................................81
Play a Slide Show .........................................................................................................................82
Create a CD/DVD .........................................................................................................................83
Picture Details ................................ .... ... ... ....................................................................................84
My TV ...................................................................................................................................................86
My TV Features............................................................................................................................ 87
Watch Live TV ..............................................................................................................................88
View the Guide .............................................................................................................................89
Record and Schedule Programs .................................................................................................. 91
Watch Recorded Programs ..........................................................................................................93
vii
Page 8

Search for a Program ................................................................................................................... 94
Search for a Feature Movie .......................................................................................................... 95
My Music ............................................................................................................................................. 96
Organize Your Music Files ........................................................................................................... 97
Play Music .................................................................................................................................... 98
Queue Music ................................................................................................................................ 99
Add Music .................................................................................................................................. 100
Create and Organize Playlists .................................................................................................... 101
Create DVD ....................................................................................................................................... 103
Main Screen ............................................................................................................................... 104
My Changer ....................................................................................................................................... 105
My Changer Music ..................................................................................................................... 106
Copy Music ................................................................................................................................ 107
Archive TV ............................. ....................................... ... .... ... ... ... .............................................. 109
More Programs .................................................................................................................................. 111
Manage Discs ............................................................................................................................ 112
Manage Discs: Media Types ........................................................................... ... .... ............. 113
Loading & Unloading Media Discs ....................................................................................... 114
viii
Page 9

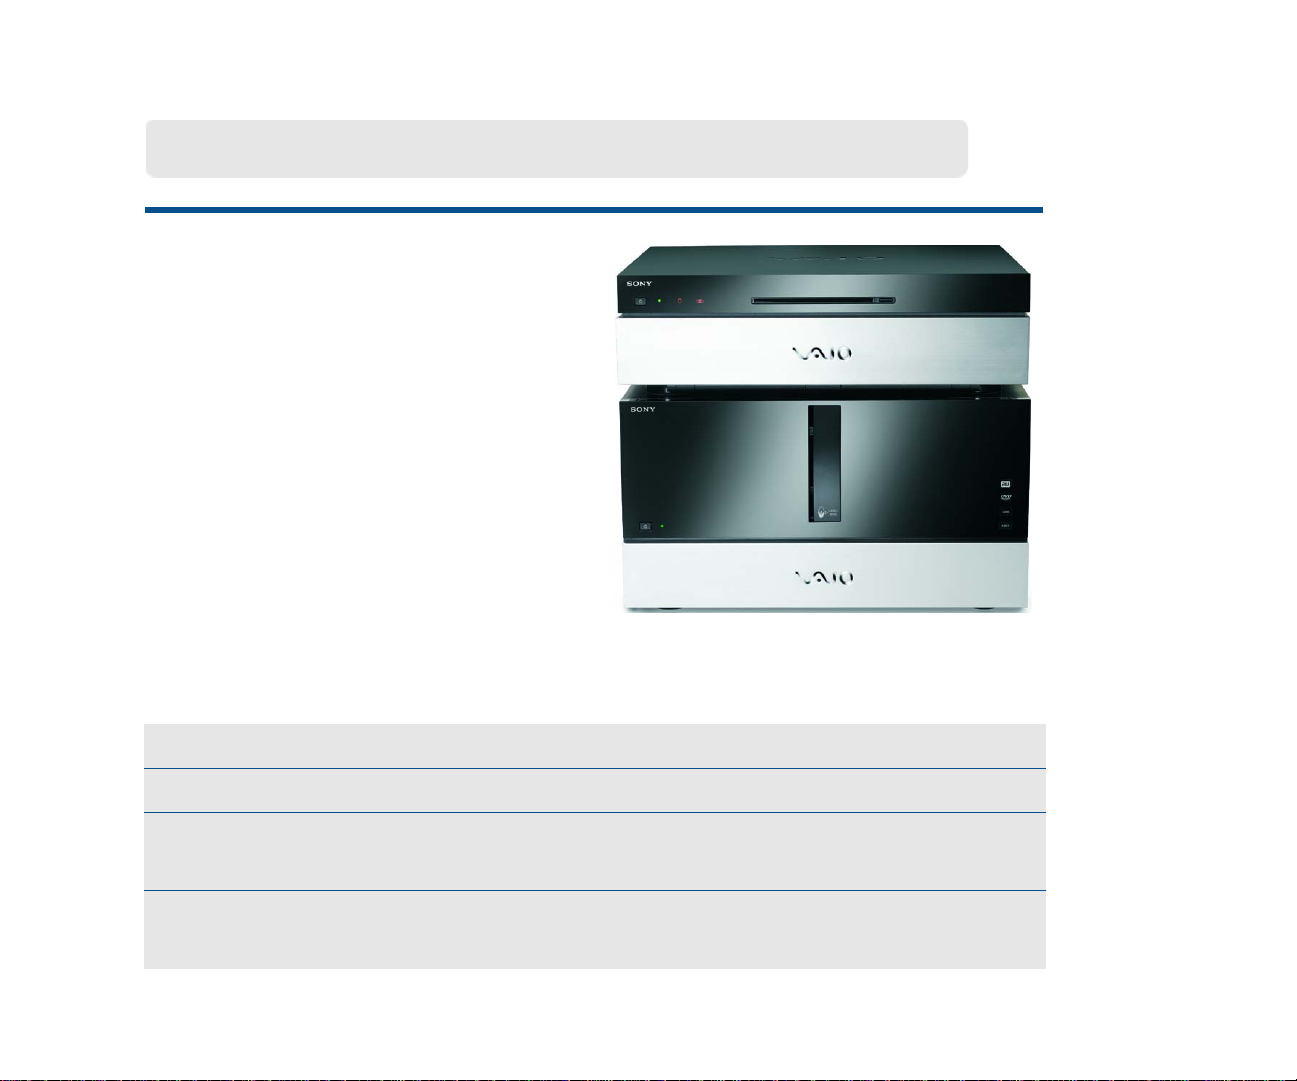
VAIO® PC VGX-XL1
Welcome to the VGX-XL1: Sony’s Digital Living System™
Welcome
What is VGX-XL1?........................ 2
What are the Benefits ................. 3
What are the Features ................. 4
Getting Started ............................ 6
Using the Remote Control .......... 7
Using the Wireless Keyboard ..... 8
Getting Around Media Center .... 9
Adding Files to Media Center ..... 10
Using the Search Feature ........... 11
Support Resources ..................... 12
The VGX-XL1 is both a powerful
computer and a state of the art home
entertainment system.
Let VGX-XL1 lead you into the exciting
world of VAIO where new standards are
established for digital content
management.
The design of VGX-XL1 allows it to
easily fit into any decor, thus completing
your video, audio, and Internet
experience by bringing powerful PC
capabilities to your home theatre—all in
the comfort of your living room.
1
Page 10
What is VGX-XL1?
What is VGX-XL1?
The VGX-XL1 is composed of two
products combined to bring you the
ultimate experience in digital home
entertainment.
VGX-XL1 works just like any other
computer, EXCEPT IT OFFERS MORE!
More of the latest technology and
excellence you have come to expect
from Sony.
XL1A XL1B
• Controls the combined products • 200 disc Media Changer/Recorder
• Leverages the latest Intel components • Burning of content to optical media
• Uses the latest Microsoft® Windows®
XP Media Center operating system
• Offers High Definition connectivity for
Sony HD Camcorders
2
• S torage, archiving, and playback of
your CD/DVD library
• Easily connects to the XL1A computer
through a single i.LINK® cable
Page 11

Benefits of the VGX-XL1
Sony establishes new standards in video and audio home entertainment, and digital
content management with the VGX-XL1 Digital Living System™.
Playback and manage your entire media
library through your home theatre, using
a remote control or wireless keyboard.
View it all on your TV or monitor for the
optimal entertainment experience.
• Packaged Content
Music CD’s
Movie DVD’s
• Personal Content
Digital Pictures
HD Camcorder
Mini DV Camcorder
• Internet Content
downloaded Music
Movies
Pictures
Recorded TV
Streaming Video
Full Digital Living System functionality for
the living room or den.
• Operates using the latest Microsoft®
Windows® XP operating system
(MCE) augmented with advanced
VAIO® functionality.
• Enjoy the content of your media library
through your TV/monitor and your
home theatre.
• Multi-disc audio CD-ROM copying
• Multi-disc DVD burning
• HD connectivity with Sony HD
Camcorder
• Simplified TV series archiving through
sequential copying to DVD.
3
Page 12
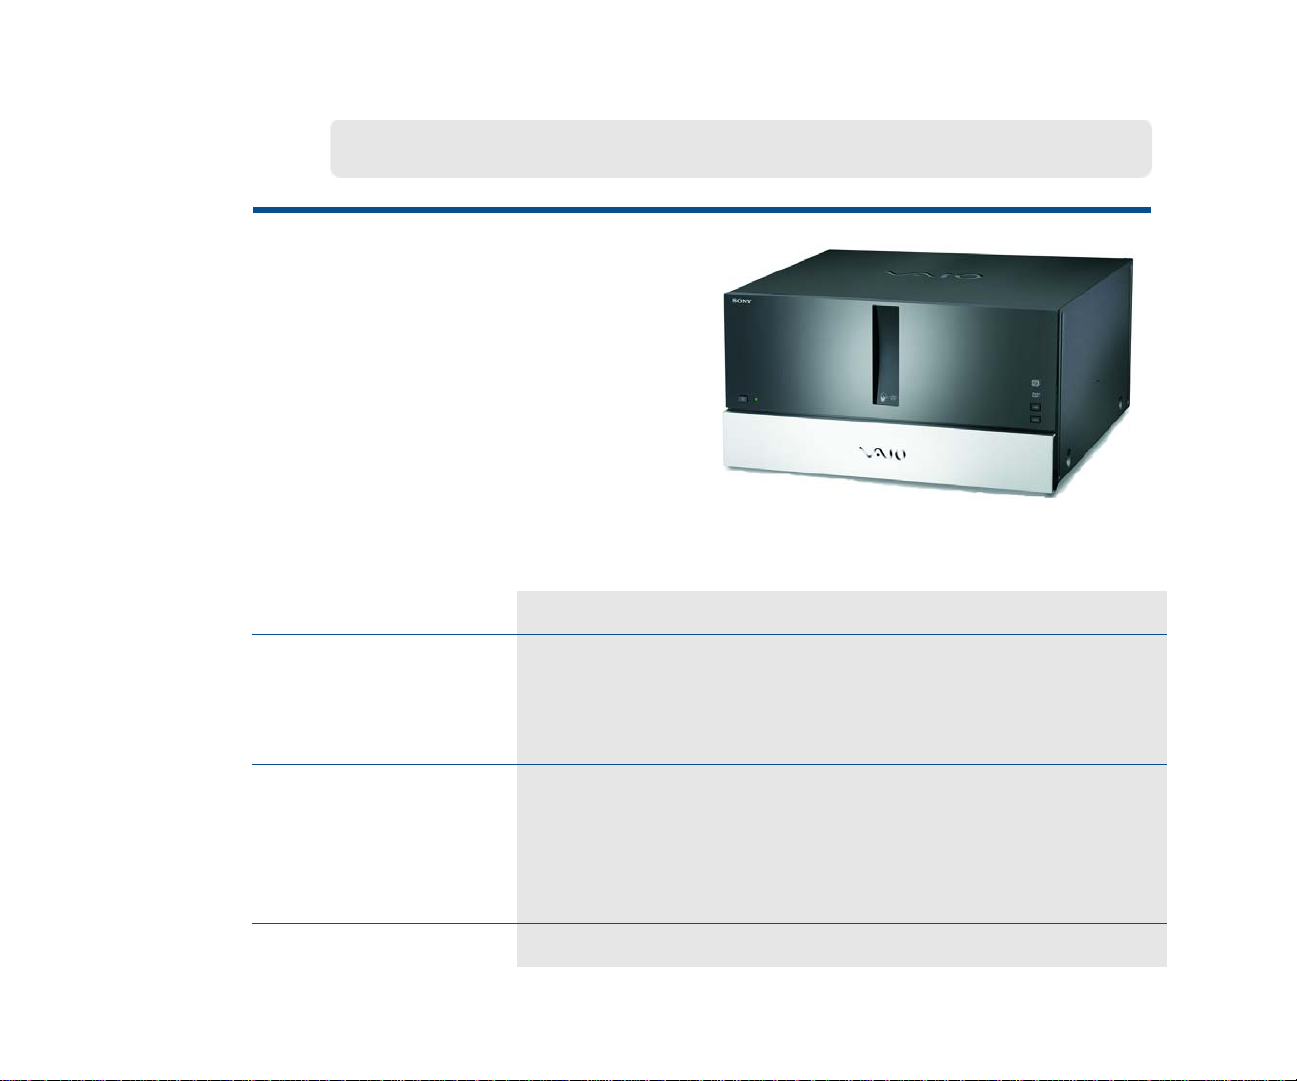
VGX-XL1A Features
The XL1A is a technologically advanced
and powerful computer that will be right at
home in your living room or den. Surf the
Internet, download music and movies,
record TV, watch videos, make copies of
media files, and more— all managed
using the wireless keyboard w/intragrated
pointing device and the remote control.
The XL1A is equipped with the following additional features:
Cutting Edge IT Architecture Pentium D, DDR 2 RAM, PCI-E graphics, S-ATA
drives, RAID enabled, and multitasking.
High Storage Capacity Internal storage to 1.5 TB (one trillion bytes) w/RAID.
Enhanced Connectivity PC, wired, and wireless connectivity.
Combination Optical Drive Allows for fast disk access and System Recovery.
Note: This drive is read only, not write. To write files,
use the Media Changer/Recorder.
Enhanced Remote Control Control MCE features, including surfing the Internet.
Improved Web Surfing Remote Control navigation and alphanumeric input.
4
Page 13
VGP-XL1B Features
The VGP-XL1B is a disc media changer
and recorder with an impressive ability to
store 200 CD/DVD media discs. Enjoy a
media library where you can view your
DVD movies, listen to your CDs and
have access to enhanced V AIO sof tware
that lets you do multi-disc ripping of CDs
and burning of CD/DVDs.
The VGP-XL1B is equipped with the following additional features:
Disc Media Storage 200 Disc capacity.
Disc Media Support CD-R, CD-RW, DVD+/-R/RW, DVD+R DL Double Layer
media, Redbook Audio CDs, Movie DVDs (U.S. is default)
Ease of Use
Remote Control
Note: This unit does not support DualDisc media.
Simple iLINK® connection to XL1A. Customized software
features: Manage Discs and My Changer - gives you
control of the discs in the media changer including auto
ripping and multi-disc burning, and multi loading/ ejecting.
Specific remote-control-friendly operations.
5
Page 14
Getting Started
VGX-XL1 uses the Mircosoft® Windows® XP Media Center Edition operating system
(MCE). This version has all of the features and capabilities of other XP operating
systems, with one major difference—Media Center . This group of advanced features
takes you into the world of digital home entertainment, bringing all of your
entertainment sources together in a single location, easily managed by the VAIO®
remote control or the VAIO® wireless keyboard.
This guide provides an overview of Media Center and
additional advanced features unique to VGX-XL1
Digital Living System™.
This guide will focus on the “living room” experience, using Media Center and the
remote control to perform all tasks. The next few pages provide examples of how to
get around and perform tasks in Media Center. Then, you will be guided through
setting up Media Center, and finally, an overview of available features.
6
Page 15
Using the Remote Control
Press a Remote Control button to do the following:
Start MY TV, MY MUSIC, MY PICTURES, MY VIDEO in Media
1
Center. Press
mode.
Control the playback for TV, MUSIC , VIDEOS, and ends a side
2
show. Buttons include:
REW, and RECORD. The right arrow button serves as a PLAY
button.
STANDBY to place your computer in Standby
STOP, PAUSE, FWD, SKIP, REPLAY,
1
2
Use the arrow buttons to move to a specific location, the OK
3
button to make your selection, the
previous screen, and the
MORE button to view additional
BACK button to go to the
information.
Use the START button to open Media Center. Volume Controls
4
VOL) are on the left and Channel (CH) or Page (PG) on the
(
right of the
START button. A MUTE button is also provided to
suppress sound.
Important Note: The VAIO
®
remote control will NOT control
the sound for your TV. You must use the remote control that
you are currently using to control the sound for your TV.
Open the following screens RECORDED TV, GUIDE, LIVE TV,
5
DVD MENU. (DVD MENU is available only when Media Center
is active.)
Use these buttons to change channels and enter text or
6
numbers in a specific location.
3
4
5
6
7
Page 16
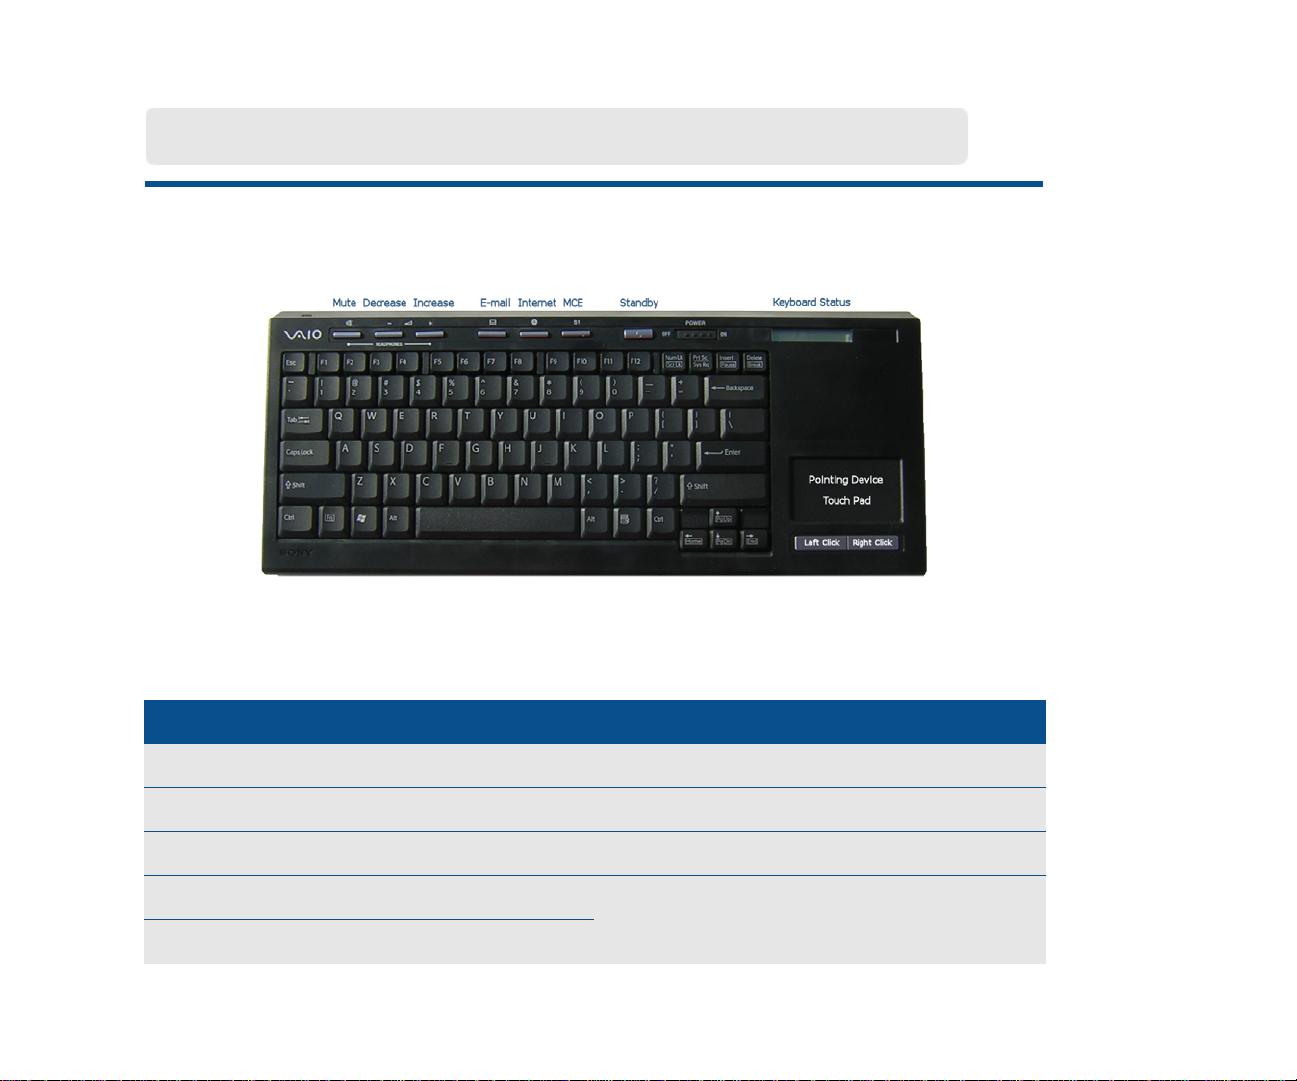
Using the Wireless Keyboard
Below is a picture of your wireless keyboard and built-in touch pad (mouse) with
specialized functions identified.
Before using the keyboard, you must activate communication between the computer
and the keyboard. Please complete the following steps for keyboard installation.
Step 1: Insert the batteries Step 2: Activate Communication
• Turn the keyboard over • Slide the Power button to On
• Open the battery compartment • Turn the keyboard over
• Insert supplied batteries as indicated • Slide Pointing Device button to On
• Replace battery compartment cover • Press Connect on computer and on
• Return keyboard to its upright position
8
back of keyboard at the same time.
Page 17
Getting Around Media Center
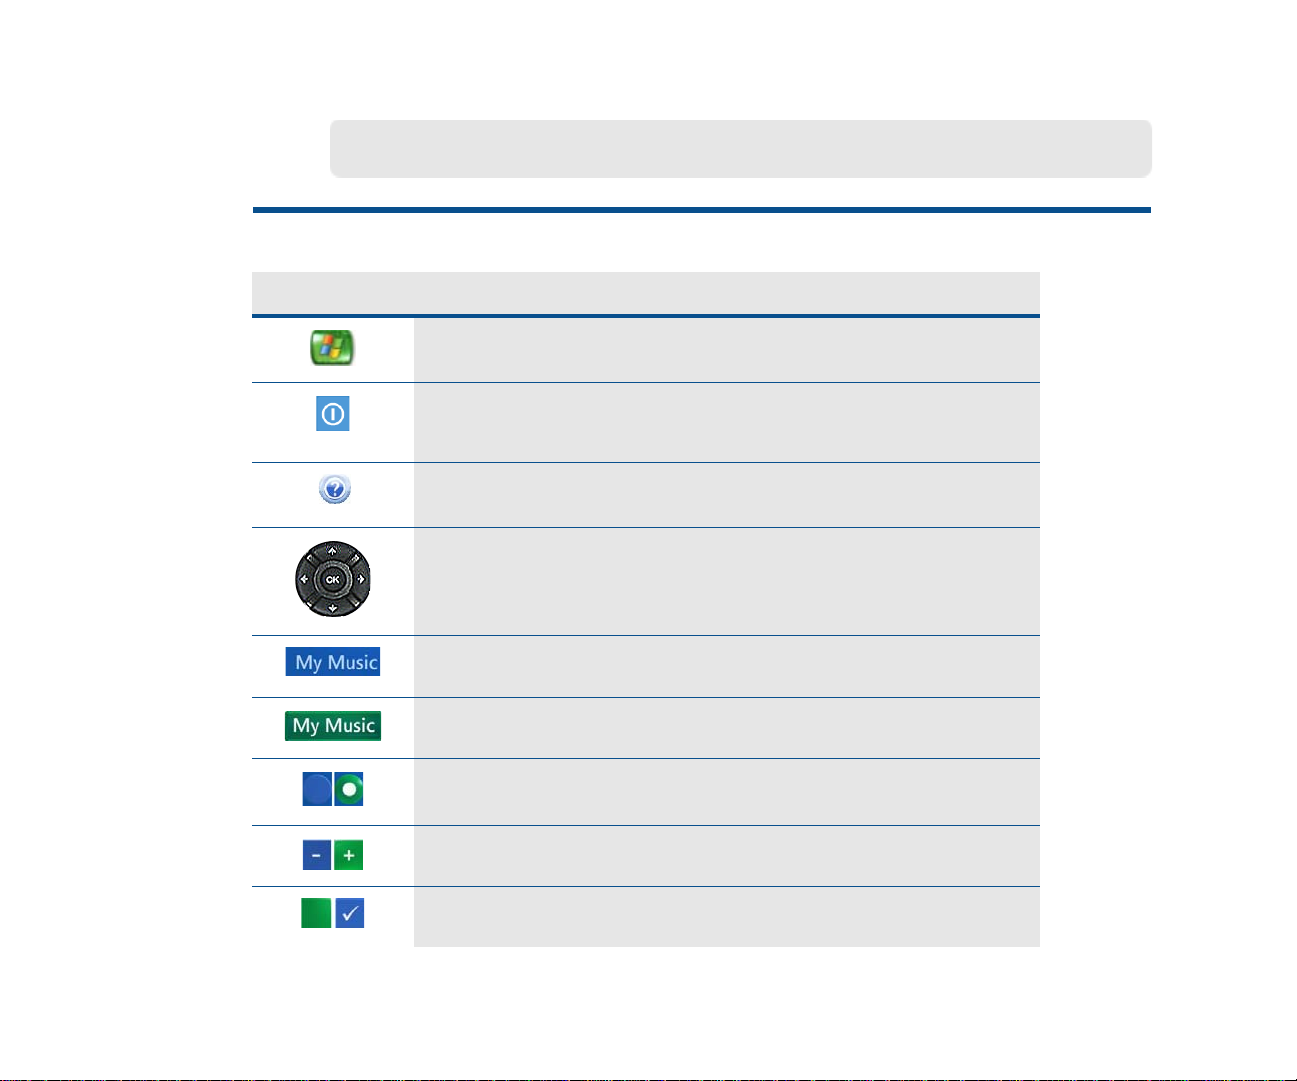
From inside Media Center:
Select this... To do this...
Start Media Center and return to Start menu.
Close Media Center. Options for close include Media
Center, Log Off, Shut Down, Restart, and Standby.
Open Media Center Help.
Press an arrow to move to a specific command or option.
Then press OK to make your selection.
Highlighted command button - Performs a function.
Green Highlight - Indicates selected object. Press OK.
Option button: Highlight, then press OK to select.
Minus/Plus button: Press OK for more options in a list.
Check boxes: Highlight, then press OK to select.
9
Page 18
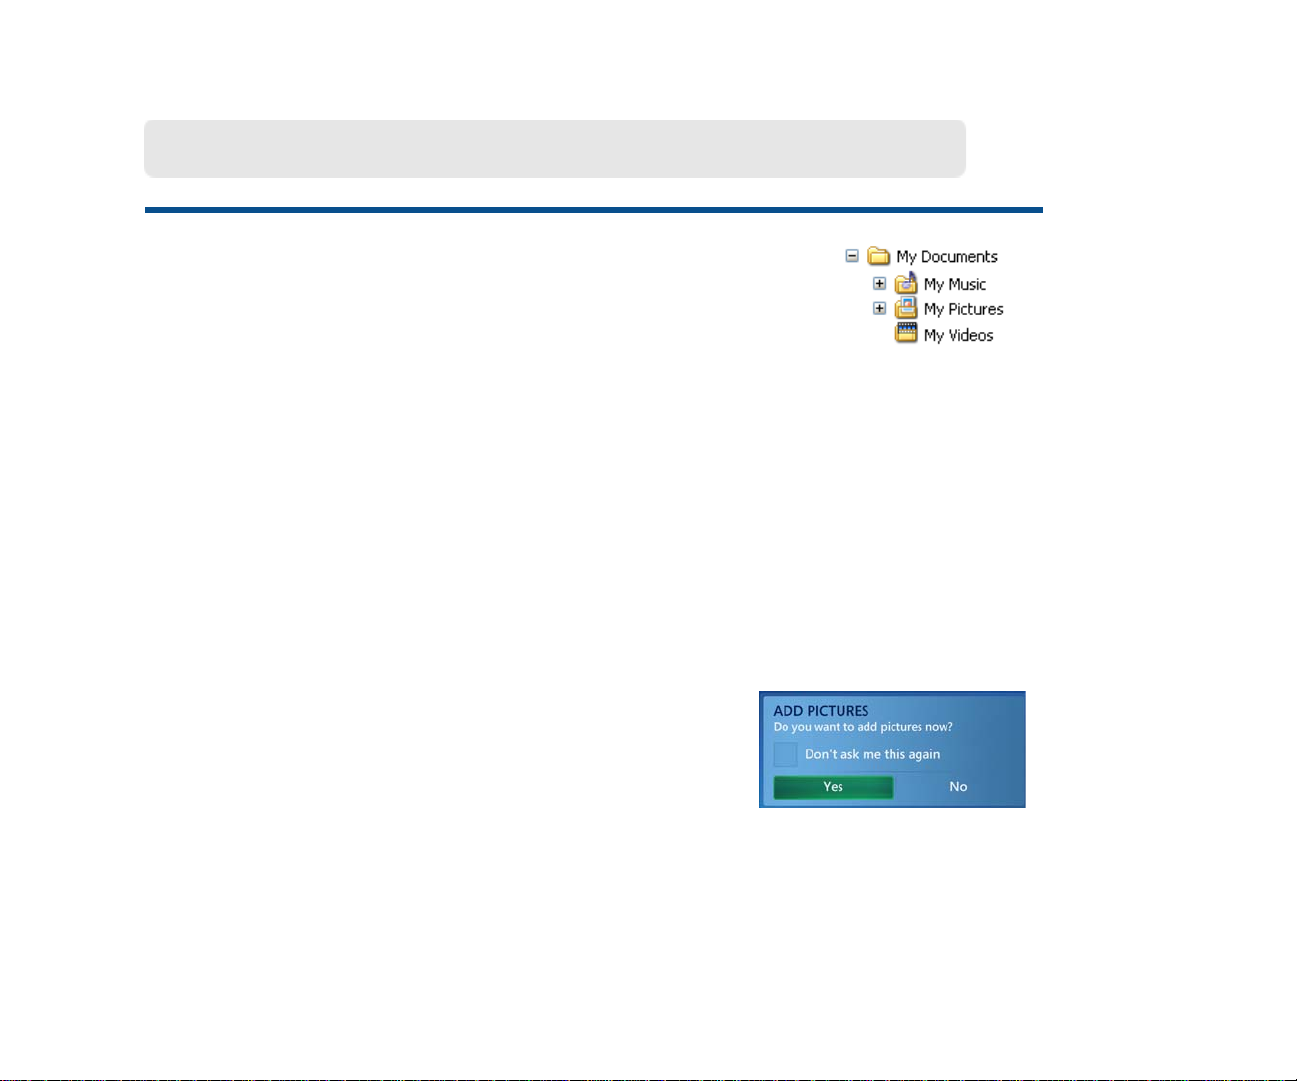
Adding files to Media Center
In order to access your media files to view pictures, videos,
recorded TV, or listen to music you must place the files in a
folder recognized by Media Center. Media Center recognizes
the following folders located in the My Documents directory.
Note: The Recorded TV folder may be located in a separate partition on your hard drive.
You can add media files to recognized folders in the following ways:
• Copy files or folders directly to recognized folders using Windows Explorer.
• Download media files (Internet, Music CD’s, Video) directly to recognized folders.
• Add additional folders, or shared folders for Media Center to recognize by pressing
the MORE button and selecting Add Pictures/Videos/Music/Recording from the
menu. Then follow the on-screen instructions.
Each time you open My Pictures, My Videos, or My
Music a message appears asking if you would like to
add new media files. You must respond to continue. To
add files, select Yes and follow the on-screen
instructions. This method will allow you to add folders, not individual files for Media
Center to recognize. If you select the Don’t ask me this again check box, you must
add media files by pressing the MORE button and selecting the “Add” menu
command.
10
Page 19
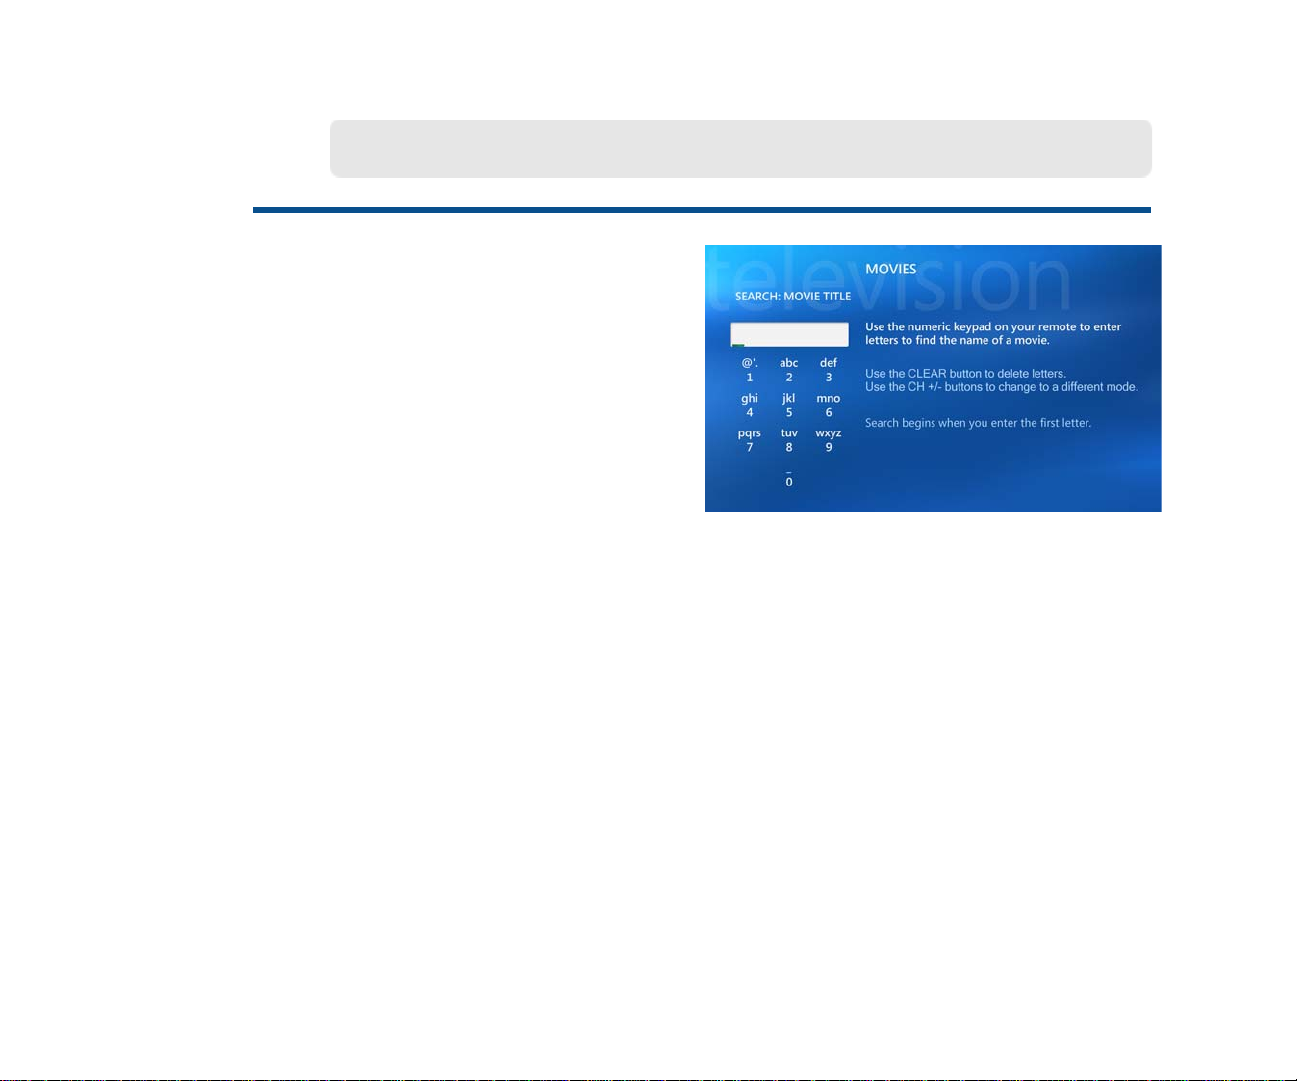
Using the Search Feature
In Media Center, you can search
through the TV listings or your media
library to find just the right TV show or
movie to watch, or just the right song to
listen too—all by remote control.
Use the keypad on the remote control
to enter text, much like you would using
an address book on a cellular phone.
Each time you press a button on the numeric keypad on the remote, you scroll
through the characters that are available for that button.
Press a number repeatedly to scroll through the choices that are available for that
number . With each repeated press of a number, a different character appears. When
entering text, you can also do the following:
• To switch between uppercase, lowercase, and symbol modes, press the CH/PG+
or CH/PG- button on the remote.
• To backspace, press the CLEAR button on the remote.
• To enter a space between words, press the (0) button on the remote.
• When you find the character you want, press the ENTER button on the remote.
11
Page 20

Support Resources
VAIO® Support Central
provides you with a single
location for all of your support
needs and allows you to easily
access valuable support and
technical information from
Sony and Microsoft.
Keep your VAIO computer’s
system software and operating
system updated using VAIO
Web Support and Microsoft
Update.
To access VAIO Support Central, do the following:
1 Using your wireless keyboard with intragrated pointing device, click the Windows
Start button.
2 From the Start menu, click All Programs.
3 From the All Programs menu, click VAIO Support Central.
Note: You must be connected to the Internet to access some of the VAIO Support Central features.
12
Page 21
Welcome to Sony VAIO and Microsoft Windows XP Media Center
Media Center Setup
Sony VAIO® and Microsoft®
Windows® XP Media Center
Edition 2005 lets you do amazing
things with your VAIO Digital
Living System™ Personal
Computer. With a full range of
powerful, yet easy-to-use digital
entertainment features, you can
experience TV, movies, music,
and photos like never before.
With VAIO and Media Center, you can bring all of your entertainment
sources—TV, Recording, Music, Pictures, CD/DVD Player, Internet— together in a
single location. This guide will assist you in setting up Media Center for your distinct
entertainment needs, and then provide you with an overview of the major features.
13
Page 22
Start Menu | Settings
Settings
General........................... 15
TV..................................... 34
Pictures........................... 47
Music............................... 48
DVD................................. 51
Messenger and Caller ID 56
Help................................. 57
Note: The Media Center Radio
feature is not supported by
Sony VAIO.
Once you have set up your computer and have
connected the Media Changer/Recorder and any
additional hardware devices, you are ready to
set up your Media Center preferences.
The first time you start Media Center, a setup
“wizard” (a series of setup screens) opens. To
enjoy the full benefit of Media Center , it is best to
complete all screens. You may return to Settings
at any time to change your preferences.
Please note: The Media Center setup wizard
requires Internet connection to complete the
process. Also, remember to check for Windows
updates before you begin to make sure Media
Center has the most recent software and
security updates.
14
Page 23
Start Menu | Settings | General
General
Start Up and Window Behavior... 16
Visual and Sound Effects............ 17
More Programs Options.............. 18
Media Center Setup..................... 19
Parental Controls......................... 29
Automatic Downloads Options... 30
Optimization................................. 31
About Media Center..................... 32
Privacy.......................................... 33
The General settings are a series of
options that effect Media Center and
some general preferences for your
computer.
You might want to take the time to
review all of the General settings
options to see what might improve your
entertainment experience.
15
Page 24

Set Up and Window Behavior
Start Menu | Settings | General
Start Up and Window
Behavior
You can decide how Media
Center starts and reacts to your
environment. You can determine
if Media Center:
• is always the top window.
• will warn you if a file or action
is not designed for Media
Center.
• starts when Windows starts.
• shows task bar notification.
•shows TV tips.
Use the arrow keys on your remote control to move to the buttons for each option.
Press the OK button to select (add a check mark) or deselect (remove a check mark).
When finished, select Save.
16
Page 25
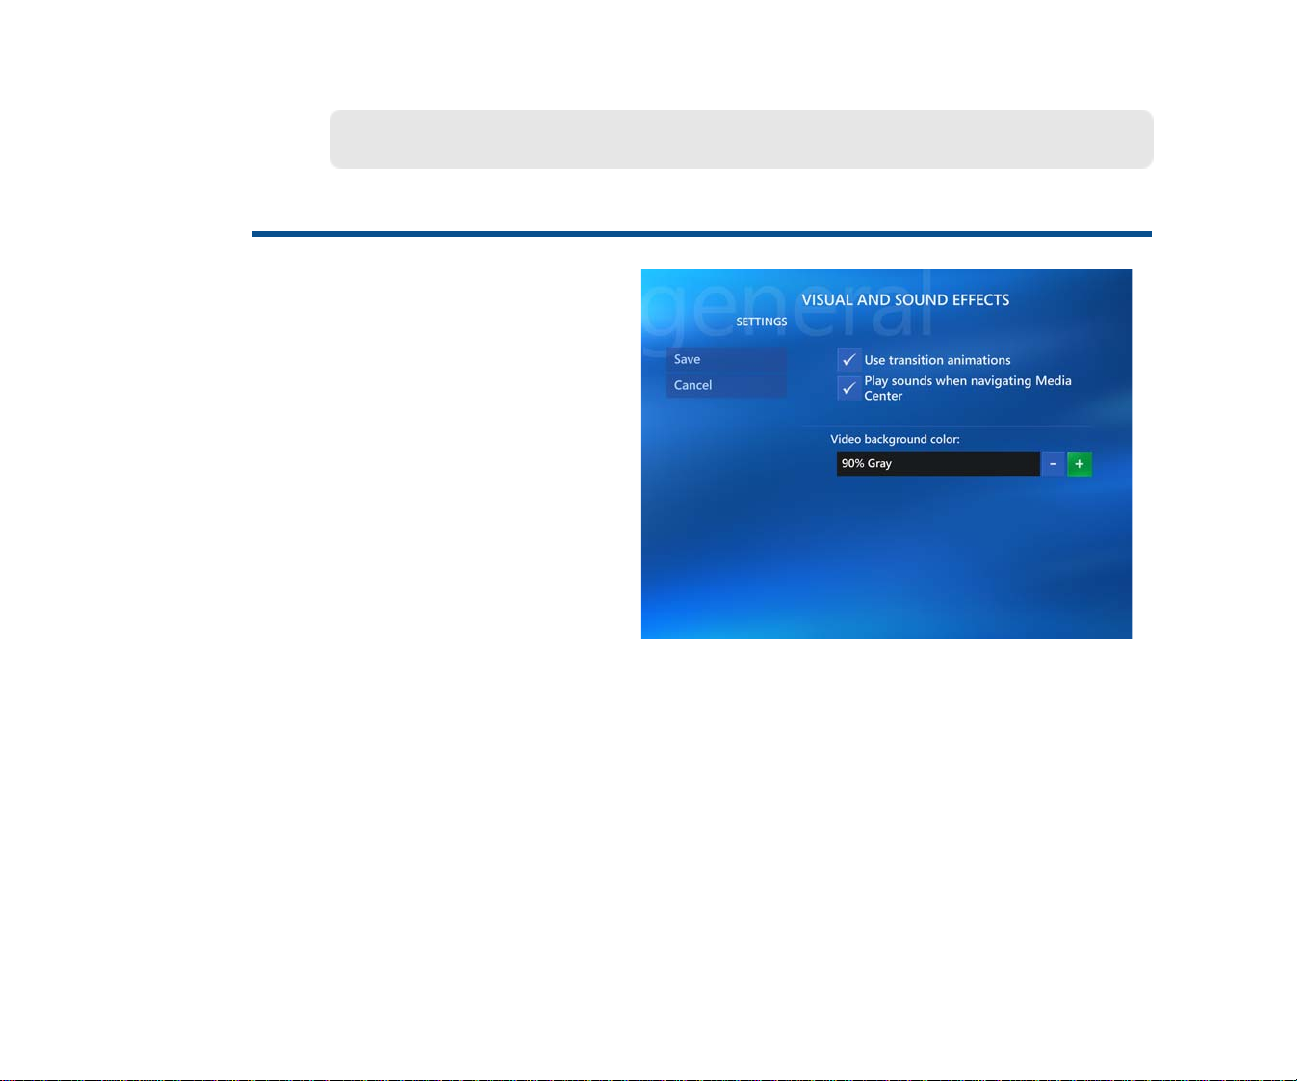
Visual and Sound Effects
Visual and Sound Effects
Adding visual and sound effects
can add a new dimension to your
entertainment enjoyment.
Here you can add transition
animations, play sounds when
navigating Media Center, and
even change your video
background color.
(Background colors include
Black, White and various shades
of Gray.)
Start Menu | Settings | General
Use the arrow keys on your remote control to move to the buttons for each option.
Press the OK button to select (add a check mark) or deselect (remove a check mark).
To change the video background color, select the (+) or (-) button and press the OK
button. When finished, select Save.
17
Page 26

More Programs Options
Start Menu | Settings | General
More Programs Options
Media Center has teamed with
other applications and Internet
sites to not only make your
entertainment experience better,
but to also make it easier to
create media, and to have
access to more entertainment
information.
You can control the media
experience in Media Center and
which application you can access
within Media Center.
Use the arrow keys on your remote control to move to the buttons for each option.
Press the OK button to select (add a check mark) or deselect (remove a check mark).
When finished, select Save.
18
Page 27

Start Menu | Settings | General
Media Center Setup
Set Up Internet Connection........ 20
Set Up TV Signal.......................... 21
Set Up Your Speakers................. 22
Configure Your TV or Monitor... 23
Set Up Remote Desktop............. 24
Automatic Updates...................... 25
Join Wireless Network................. 26
Run Media Center Setup Again. 27
Restore Start Page Defaults....... 28
Media Center Setup takes you to the
basic level of settings that are required
for you to use Media Center.
Most of these options will guide you
through a “wizard” (a series of screens)
to make it easier for you to set up Media
Center and your entertainment
preferences.
19
Page 28
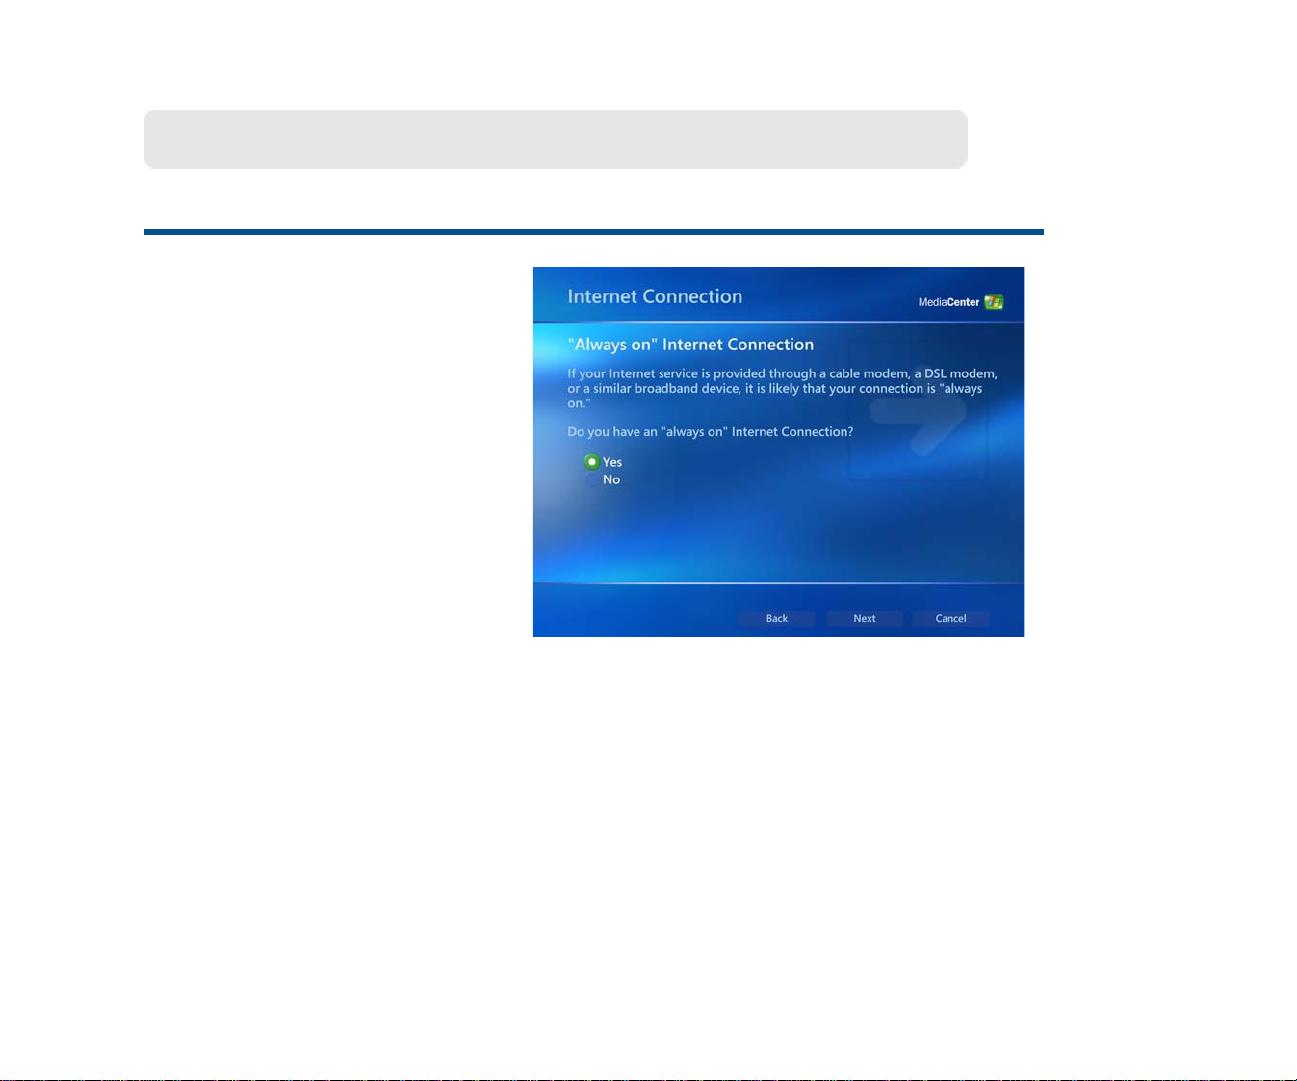
Set Up Internet Connection
Start Menu | Settings | Media Center Setup
Set Up Internet
Connection
Media Center makes it easy to
set up your Internet connection.
Just read the on-screen
information and answer a few
questions—Media Center does
the rest!
The first thing you need to know
is if your Internet connection is
“always on”. If you do, the
computer will detect the signal
and finish most of the setup for
you.
20
Use the arrow keys on your remote control to
move the Yes or No option. Press the OK button
to select the option. Select Next to continue.
Page 29
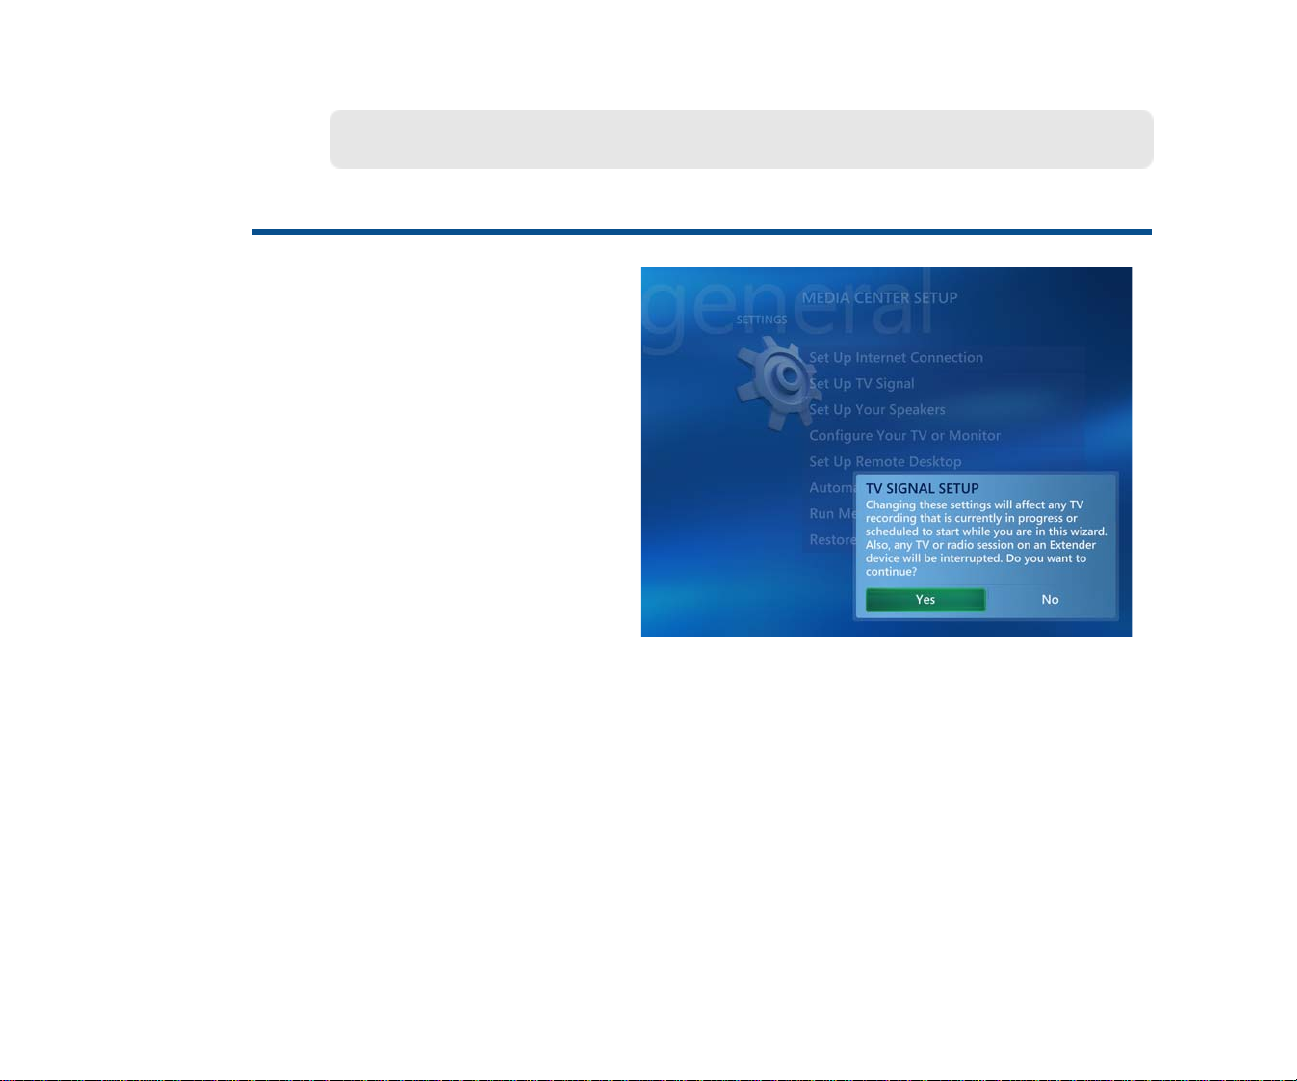
Set Up TV Signal
Media Center makes it easy to
set up your TV signal for viewing.
Just read the on-screen
information and answer a few
questions—Media Center does
the rest!
You will need to confirm the
region that you live in and then
decide if you want Media Center
to automatically configure your
TV signal (recommended) or if
you want do it yourself.
Set Up TV Signal
Start Menu | Settings | Media Center Setup
If you choose Yes to let Media Center configure your TV signal, make sure you read
the Prepare for Automatic Configuration screen carefully before continuing.
21
Page 30
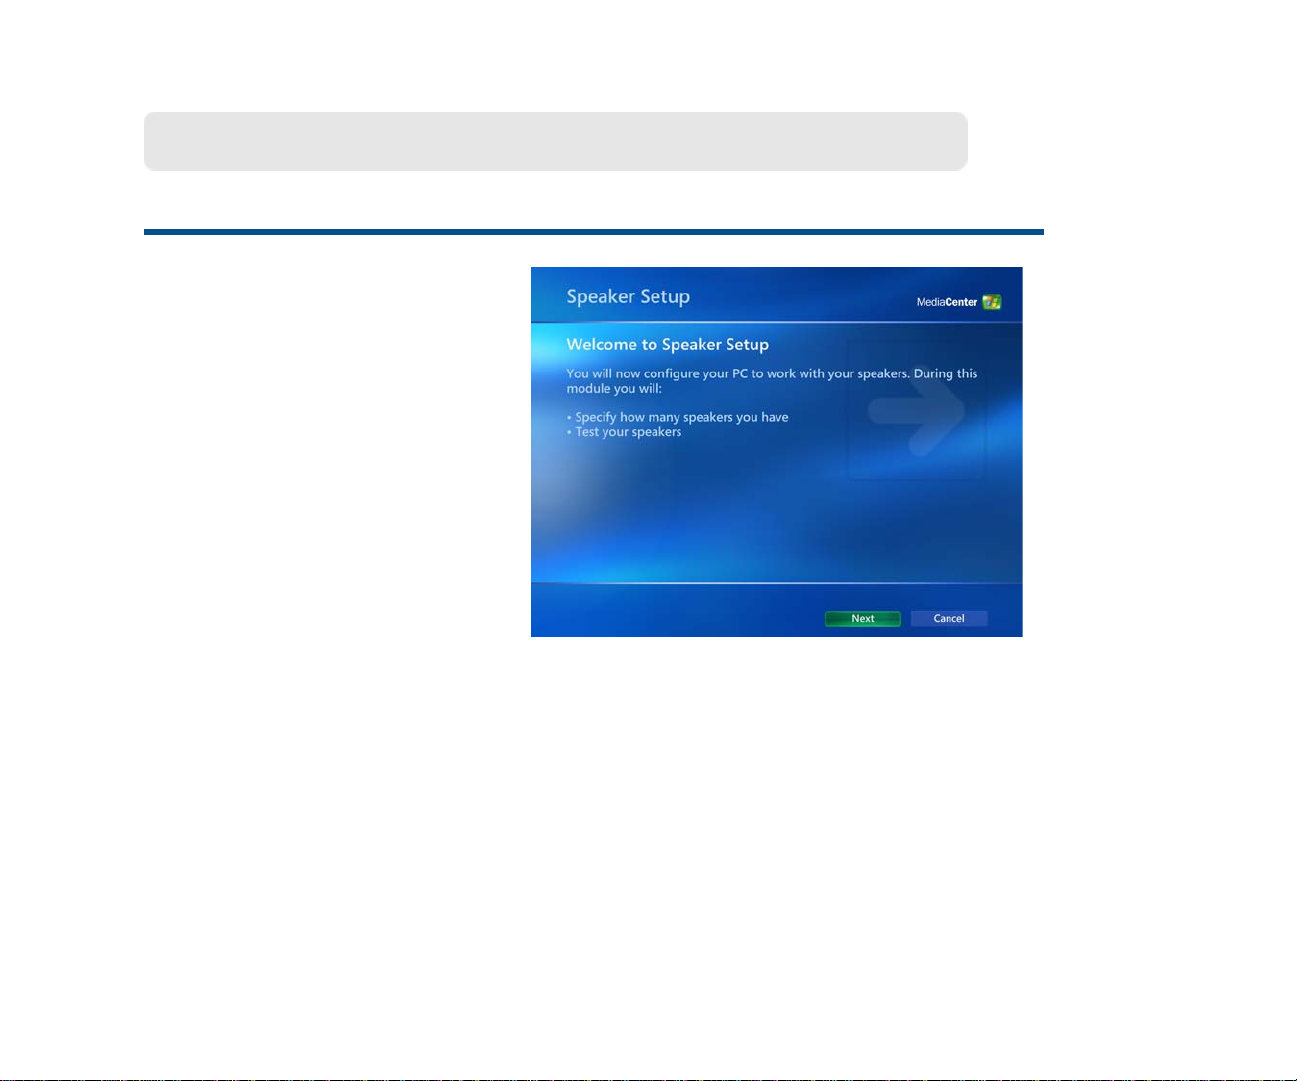
Set Up Your Speakers
Start Menu | Settings | Media Center Setup
Set Up Your Speakers
Media Center makes it easy to
set up your speakers for your
listening pleasure. Just read the
on-screen information and
answer a few questions—Media
Center does the rest!
Media Center will ask you for the
number (or type) of speakers you
have and then select the Test
button.
After the test, select whether or not you heard sound coming from all your speakers
and select Next to continue. If the test was successful, you’re done! If not, Media
Center will provide you with additional setting options.
Installation Note: For the best possible sound, use the HDMI cable (if possible)
when connecting your speakers.
22
Page 31

Configure Your TV or Monitor
Configure Your TV or
Monitor Settings
Media Center makes it easy to
set up your TV or monitor for
viewing. Just read the on-screen
information and answer a few
questions—Media Center does
the rest!
Select Watch Video or Next to
continue.
A video is provided that contains
Start Menu | Settings | Media Center Setup
additional information on setting
up your display and improving
the quality of your video viewing.
23
Page 32

Set Up Remote Desktop
Start Menu | Settings | Media Center Setup
Set Up Remote Desktop
Media Center makes it easy to
set up your Remote Desktop. For
each step, read the
on-screen information and
answer a few questions—Media
Center does the rest!
Select Next to Continue.
24
Page 33

Automatic Updates
Media Center can help you keep
your computer secure and
running efficiently by
automatically downloading and
installing critical updates from
Microsoft.
You should also continue to
check for additional software and
driver updates on a regular basis
by selecting Windows Update
from the Start | All Programs
menu.
Automatic Updates
Start Menu | Settings | Media Center Setup
Use the arrow keys on your remote control to
move the Yes or No option. Press the OK button
to select the option. Select Next to continue.
.
25
Page 34

Join Wireless Network
Start Menu | Settings | Media Center
Join Wireless Network
The advanced features of Media
Center and the Digital Living
System™ personal computer let
you easily connect to an existing
wireless local area network.
Media Center will guide you
through a series of screens that
provide step-by step instructions
for connecting to your network.
Important Note: You must already have a working wireless local area network to use
this feature. Selections made on these screens may overwrite your existing wireless
network settings. Please follow the on-screen instructions carefully.
26
Page 35

Run Media Center Setup Again
Run Media Center Setup
Again
The first time you started Media
Center , you were guided through
a series of screens that helped
you set up Media Center.
To go through the entire set up of
Media Center again—screen by
screen, select Yes.
You will be guided through two
sections: Required Setup
(checks for components like
Start Menu | Settings | Media Center Setup
networking and Internet) and
Optional Setup (advanced
settings and features).
Select Next to Continue.
27
Page 36

Restore Start Page Defaults
Start Menu | Settings | Media Center Setup
Restore Start Page
Defaults
During the course of working with
various software programs and
many different types of
entertainment components, you
might find it advantageous or
necessary to restore the Start
page defaults.
Doing this will remove any
changes you may have made to
the Start menu and restore it
back to its original state.
Selecting Yes or No is the only action available for this option. Selecting Yes will
automatically restore your Start page to its default settings.
28
Page 37

Parental Controls
Start Menu | Settings | General
Parental Controls
Media Center provides a process by which selected programs can be blocked from
viewing. The first time you enter Parental Control, you will be asked to enter , and then
confirm a new four digit access code. Once complete, you will be given access to the
following parental controls:
If you turn on TV blocking, you can then select allowable
TV ratings for viewing, and by selecting Advanced, you
can choose more restrictive rating than TV-MA for specific
types of content.
If you turn on movie blocking, you can then select the
maximum allowed movie rating for viewing.
To change the access code, enter and then confirm a new
code. You must be logged on as Administrator.
Resets the Parental Control back to the default settings.
Use the arrow keys on your remote control to move to the buttons for each option.
Press the OK button to select (add a check mark) or deselect (remove a check mark).
When finished, select Save.
29
Page 38

Automatic Download Options
Start Menu | Settings | General
Automatic Download
Options
With Media Center and your
Internet connection, you can
view media information for your
CDs, DVDs, and movies. Learn
interesting new details about the
music and movies you listen to
and watch.
You also have the option to
download Guide information
automatically every time you
start your computer, or you can
choose to download manually.
Media Changer/Recorder Note: Make sure you select the Retrieve media
information... option for proper functioning of the Media Changer/Recorder. This
option must be selected to download view additional CD and DVD information.
30
Use the arrow keys on your remote control to
move to the buttons for each option. Press the
OK button to select (add a check mark or dot) or
deselect (remove a check mark or dot). When
finished, select Save.
Page 39

Optimization
Start Menu | Settings | General
Optimization
The Optimization feature is
designed help you keep your
system running efficiently and
smoothly.
Select the Perform
Optimization check box and
then select the plus (+) or minus
(-) options to set a schedule time.
You might want to set the Optimization schedule to run when you are certain you will
not need to access Media Center.
For additional information, go to Media Center help.
31
Page 40

About Media Center
Start Menu | Settings | General
About Media Center
About Media Center provides
you with information concerning
the version of Media Center that
you are currently using, and
Internet connections to the Guide
Terms of Service from your TV
signal provider, and Data
Provider Credits.
Simply select an option to view
the information.
Use the arrow keys on your remote control to move to the About Media Center menu
button of your choice. Press the OK button to view your selection. When finished,
select Save/Done or the Back button.
32
Page 41

Privacy Settings
Your privacy is very important to
us. You can view Media Center
and Guide privacy statements in
detail directly from the vendor
with your Internet connection.
You can also use the Guide and
an Internet connection to
anonymously send information to
Microsoft for the purpose of
improving the quality and
accuracy of services.
Privacy
Start Menu | Settings | General
Use the arrow keys on your remote control to move to the Privacy menu button of
your choice. Press the OK button to view your selection. When finished, select Save/
Done or the Back button.
33
Page 42

Start | Menu | Settings | TV
TV
Recorder....................................... 35
Guide............................................. 39
Set Up TV Signal.......................... 44
Configure Your TV or Monitor..... 45
Audio............................................. 46
You can control your TV entertainment
experience. Each of these options allow
you to set up TV viewing preferences to
make sure you get the most out of your
TV viewing.
• Record shows for viewing at a later
date.
• Locate a show and review a brief
description.
• Connect you TV signal and set up
your TV or monitor with ease.
• Set preferences for your sound
system.
34
Page 43

Recorder
Start Menu | Settings | TV
Recorder
— History................................... 36
— Recorder Storage............... 37
— Recorder Default................ 38
Please note the following:
IMPORTANT: Sony supports the
lawful use of technology and does not
endorse or encourage the use of our
products for purposes other than
those permitted by copyright law.
The TV Recorder options provide you with:
• a complete history of recorded shows.
• the location, limit, and quality of recorded
shows.
• general programing defaults.
. TV programs that have been
encrypted (protected) by the
broadcaster cannot be copied and
played back on any player other than
the one recorded to.
35
Page 44

History
Start Menu | Settings | TV | Recorder
History
Media Center stores a complete
history of all recorded
programing. Information such as
the recording date, name of the
program and the current status is
stored.
The list can be sorted by Date,
Status, and Title.
The information for every
recording remains in the list until
you select Clear History.
Use the arrows on your remote control to move to the menu options and each
recorded program in the history list. Press the OK button to perform a menu
command or to view status information about the selected show.
36
Page 45

Recorder Storage
Start Menu | Settings | TV | Recorder
Recorder Storage
Media Center provides you with
complete information about
where and how your recorded
programs are stored. You also
have the ability manage that
information and make changes, if
necessary.
The Available recording time
graph moves in relation to the
Maximum TV limit selection.
Use the arrow keys on your remote control to move to the (+) or (-) buttons
associated with the option of your choice. Press the OK button to change the option.
When finished, select Save.
37
Page 46

Recording Defaults
Start Menu | Settings | TV | Recorder
Recording Defaults
Media Center lets you create a
list of defaults or conditions that
determine the actions Media
Center takes with your recorded
programs. There are also
specific defaults or conditions
that are specific to the recording
of a TV series.
Use the arrow keys on your remote control to move to the (+) or (-) buttons
associated with the option of your choice. Press the OK button to change the option.
When finished, select Save.
38
Page 47

Guide
Start Menu | Settings | TV
Guide
Edit Channels............................... 40
Add Missing Channels................ 41
Set Up Guide Listings.................. 42
Additional Guide Information..... 43
The Media Center Guide gives you the
control you need to manage your TV
channels and your TV guide listing.
View a channel listing from your TV
signal provider where you can add,
remove, and even rename channels.
Have Media Center automatically
download new listings every time you
start Media Center, or download the
guide listings at your convenience.
Media Center puts you in control!
39
Page 48

Edit Channels
Start Menu | Settings | TV | Guide
Edit Channels
With Media Center, you can
control what channels you and
your family can access. Once
you select Edit Channels, a list
of channels from your TV signal
provider shows on your screen.
From here you can add, remove,
and if needed, correct a channel
number. If something goes
wrong, simply select Restore
Default to return the channel list
to its original state.
Use the arrow keys on your remote control to move to the buttons for each option.
Press the OK button to select (add a check mark) or deselect (remove a check mark)
a channel. Use the keypad to change the channel number, if necessary. When
finished, select Save.
40
Page 49

Add Missing Channels
If for any reason you need to add
a channel to your list of available
channels, you can do so through
Add Missing Channels. For
example, you previously deleted
a channel and now want to add it
back.
Simply select Add Channel and
then enter the channel name.
Then select Next and enter the
channel number. Finally select
Done. Your added channel will
Add Missing Channels
Start Menu | Settings | TV | Guide
be listed on the Add Missing
Channels first screen.
Use the arrows on your remote control to move to a menu option and press the
OK button to make your selection. Use the numeric keypad to enter a channel name
and number. When finished. select Done.
41
Page 50

Set Up Guide Listings
Start Menu | Settings | TV | Guide
Set Up Guide Listings
Media Center makes it easy to
set up to download and view your
TV Program Guide. Just read
the on-screen information and
answer a few questions—Media
Center does the rest!
Media Center will ask you:
• If you want to use the Guide
• if you agree with the Guide
Terms of Service
• for your ZIP Code
To get started, Select Next.
Then, Media Center will locate
and download your TV Program
Guide.
42
Page 51

Additional Guide Information
To immediately download TV
Program Guide listings, select
To download and view Guide
Terms of Service, select
Use the arrow key on your remote control to move to a menu option and press the
OK button to select the option.
To download and view About
Guide Listings, select
43
Page 52

Set Up TV Signal
Start Menu | Settings | TV
Set Up TV Signal
Media Center makes it easy to
set up your TV Signal for
viewing. Just read the on-screen
information and answer a few
questions—Media Center does
the rest!
As you answer the questions and
progress through the screens,
you are required to Confirm
Your Region and decide
whether to use Automatic TV
Signal Setup (recommended) or
complete a Manual Setup.
44
If you are notified that Media Center cannot
detect a TV signal, you cannot watch or record
TV. Please go to Media Center Help for
additional instructions.
Page 53

Configure Your TV or Monitor
Configure Your TV or
Monitor
Media Center makes it easy to
set up your TV or monitor for
viewing. Just read the on-screen
information and answer a few
questions—Media Center does
the rest!
A video is provided that contains
additional information on setting
up your display and improving
the quality of your video viewing.
Start Menu | Settings | TV
As you answer the questions and progress through the screens, you are required to
Identify Your Display Type, identify your Connection Type, decide how to
Optimize Media Center for your Display , and Adjust your Display Settings. From
here, select Adjust Display Controls, then select Next to view the screen Display
Calibration. Here you can adjust the characteristics of your TV or monitor.
Note: Display setting may need to be refined using the nVIDIA® utiltiy program. To access
the utility program, right-click anywhere on your desktop and select nVIDIA DISPLAY.
45
Page 54

Audio
Start Menu | Settings | TV
Audio
With Media Center, you can set
up options, such as Audio
(Stereo,SAP), Captioning (CC1,
CC2) and Caption Display (On,
Off, On when muted) that affect
your TV viewing.
Use the arrow keys on your remote control to move to the Audio, Captioning, or
Caption Display (+) or (-) buttons. Press the OK button to change the TV audio
selection. When finished, select Save.
46
Page 55

Start Menu | Settings
Pictures
Gain complete control over how
you view your digital pictures.
• Choose to view your pictures
in order or randomly.
• Choose to show pictures in
sub folders or the main folder.
• Choose to view picture
captions.
• Choose a slide transition type.
• Choose to add animation
when viewing your pictures
Once you decide how you want to view your pictures, select the appropriate buttons.
Use the arrows on your remote control to move to the desired option, then press the
OK button. When finished, select Save.
47
Page 56

Start Menu | Settings
Music
With Media Center , you can add a visual
component to your listening pleasure
Visualizations............................... 49
Visualizations Options................ 50
with Visualizations.
Visualizations are visual interpretations
of an artist’s music that plays on your TV
or computer screen while you listen to
the music.
To enjoy Visualizations while you are listening to your favorite music, select one or
more viewing samples from the Visualizations page, and then make your selections
from the Visualization Options page.
48
Page 57

Visualizations
Start Menu | Settings | Music
Visualizations
To enhance your music enjoyment, Media Center provides eight different visual
interpretations of the musical performance.
Alchemy Ambience Bars and Waves Battery
Particle Plenoptic Spikes Musical Colors
49
Page 58

Visualizations Options
Start Menu | Settings | Music
Visualizations Options
Media Center “Visualizations” are
visual interpretations of an artist’s
music that play on your TV or
computer screen while you listen
to the music.
You decide if you want the
visualizations to start when the
music plays, and if song
information can be viewed during
the visualizations.
Once you decide on your visualizations and how they are viewed, select the
appropriate buttons. Use the arrows on your remote control to move to the desired
option, then press the OK button. When finished, select Save.
50
Page 59

Start Menu | Settings | DVD
DVD
DVD Language............................. 52
DVD Audio.................................... 53
Closed Captioning....................... 54
Remote Control Options.............. 55
Media Center gives you the control to
determine how best to create your
cinematic experience.
Enhance your experience by selecting
from these four topics that allow you to
choose and define how to view your
DVD movies.
51
Page 60

DVD Language
Start Menu | Settings | DVD
DVD Language
When viewing a DVD, Media
Center give you the option of
changing the language for
subtitles, the audio track, and
menus. Choose from a list of 70
different languages, or select
Title Default to play the DVD in
the original language it was
created in.
Use the arrow keys on your remote control to move to the Subtile, Audio track, or
Menu (+) or (-) buttons. Press the OK button to change the language selection. When
finished, select Save.
52
Page 61

DVD Audio
Imagine yourself fully immersed
in rich Dolby® Digital surround
sound—not in a theatre, but in
your home. Sony , InterVideo, and
your Dolby Digital sources for
sound bring the theatre
experience to your living room.
Media Center and InterVideo
helps you set up your speakers
and environment to fully create
the cinematic experience.
DVD Audio
Start Menu | Settings | DVD
Note: You must have a multi-channel sound
system to experience this feature.
Select Configuration to set up your speakers and channel mode, and select
Environment to choose your listening experience (Theatre, Normal, Late Night).
53
Page 62

Closed Captioning
Start Menu | Settings | DVD
Closed Captioning
Media Center gives you the
option of adding closed
captioning to your DVD viewing.
Enjoy DVD movies with those
who are hearing impaired, or
when sound in your environment
becomes a viewing factor.
You can choose the type of
captioning (CC1 or CC2), and
how the captions display (On,
Off, or On when muted).
Use the arrow keys on your remote control to move to the Captioning or Caption
Display (+) or (-) buttons. Press the OK button to change the selection. When
finished, select Save.
54
Page 63

Remote Control Options
Remote Control Options
When watching your favorite
DVD’s, you might want to watch
only certain parts of a movie or
skip forward or backward to
locate a specific scene. Media
Center makes this easy. You can
set your remote control to skip
chapters and skip forward and
back, giving you the control and
flexibility to watch exactly what
Main Menu | Settings | DVD
you want to.
Once you decide on your remote control options, select the appropriate buttons. Use
the arrows on your remote control to move to the desired option, then press the OK
button. When finished, select Save.
For additional information on using your remote control, go to the chapter titled
Getting Started.
For detailed information about these settings,
select Help.
55
Page 64

Start Menu | Settings
Messenger and Caller ID Settings
Enjoy Media Center and keep in
contact with friends and family.
You can sign in or sign out of
Messenger at any time while in
Media Center. You can also:
• Turn on and off the Do Not
Disturb mode.
• Switch between Messenger
conversations.
• Turn off Messenger sounds.
Once you decide your options, select the appropriate buttons. Use the arrows on your
remote control to move to the desired option, then press the OK button.
56
Page 65

Help
Windows Media Center is very
easy to use when you follow the
on-screen instructions. However,
when you do need additional
information, Media Center
provides you with four areas of
assistance.
Media Center Help
Community Forums
Start Menu | Settings
Latest Tips
Help with your Hardware
Please visit each of these areas and experience
the quality assistance Media Center provides to
you and your family.
57
Page 66

Additional Help
Start Menu | Settings | Help
You can access Media’s Center’s Help areas by the following methods:
Remote Control - Press the More button, select Settings, then Help.
Remote Mouse - Move the Mouse to activate the Media Center tool bar, which
appears at top of the screen. Then click the Help icon.
VAIO
®
Support Central
provides you with a single
location for all of your support
needs and allows you to easily
access valuable support and
technical information from Sony
and Microsoft.
Keep your VAIO computer’s
system software and operating
system updated using VAIO Web
Support and Microsoft Update.
58
To access VAIO Support Central:
1 Using your wireless keyboard with integrated pointing
device, click the Windows Start button.
2 From the Start menu, click All Programs.
3 From All Programs menu, click VAIO Support
Central.
Page 67

Helpful Hints
Windows® Updates
Remember to check regularly for
Windows updates to keep the
operating system updated with the
latest software releases and security
updates.
To start the Windows Update utility,
connect to the Internet, click Start, All
Programs, then click Windows
Update. The Windows Update Web
site opens. Follow the on-screen
instructions.
Support Internet Sites
Windows Updates
http://microsoft.com/windowsxp/mediacenter/
VAIO Updates
http://esupport.sony.com
VAIO® Updates
Sony Support provides updates
designed specifically for your
computer. All you need to do is go to
Sony’s Internet support site and enter
the model number of your computer.
If you do not know your model
number, go to the Products menu and
select Computers & Peripherals, then
Desktops. Finally, click Detect my
model. Sony Support will show you
information specific to your computer.
Contact Sony Support
Internet Support
http://esupport.sony.com
Customer Support
(888) 476-6972
59
Page 68

60
Page 69

Start Menu
Media Center Features
My DVDs..................................... 64
Online Spotlight......................... 70
My Videos................................... 71
My Pictures................................ 78
My TV.......................................... 86
My Music.................................... 96
Create DVD................................. 103
My Changer................................ 105
More Programs.......................... 111
—Manage Discs................... 112
VAIO personal computers equipped
with Microsoft® Windows® XP Media
Center Edition 2005 lets you
experience the new and exciting world
of digital home entertainment.
Experience movies, TV, music, and
photos like never before.
Combine the easy to use, yet powerful
features of V AIO, an d you can enjoy an
even more dynamic entertainment
experience.
Note: For information not shown in this
guide, go to Media Center Help.
61
Page 70

Experience Media Center
Review the following list for a
high-level overview of the
exciting features in Media
Center.
For in-depth information about
each feature, go to the specific
topic in this book or to the Media
Center help file.
View all the DVDs in your media library. Select a DVD to
view programing information or to watch.
62
The Online Spotlight provides Internet access to the
latest entertainment news and events.
Page 71

You can categorize your pictures in as many folders as
you wish. Then, select a group to view a single picture or
a slide of all pictures in the folder.
Take control of your TV viewing experience. Watch live
TV or record your favorite show for later viewing.
Enjoy access to all the music stored on your hard drive.
Organize, locate, and play your favorite music files in
Media Center.
Create DVDs from your favorite recorded TV series.
Select only the episodes you want to burn to DVD.
Manage your media library from your remote control,
including auto-ripping and multi-disk burning.
To enhance you entertainment experience, links have
been included to additional programs for your enjoyment.
Manage Discs is an important program found in More
Programs that gives you the tools you need to control the
discs stored in the Media Changer/Recorder .
Review this section carefully to get the most out of your
digital entertainment experience.
Watch digital videos that you’ve previously loaded in a
folder on the hard disk drive recognized by Media Center.
63
Page 72

Start Menu | My DVD
My DVDs
Loading and Unloading DVDs..... 65
Viewing DVD Movies 67
DVD Movie Controls.................... 68
Helpful Hints.................. 69
Watching DVD movies in Media Center
lets you take control of your movie
experience.
Sit back and use the remote control to
play, pause, rewind, fast forward, stop,
and even eject your DVD movie.
The Media Changer/Recorder lets you
create your own movie library where
you can store and manage up to 200
discs in a single location. Select a
movie to enjoy without ever leaving the
comfort of your favorite chair.
64
Page 73

Loading and Unloading Discs
Start Menu | My DVD
Loading discs in the Media Changer/Recorder creates your own personal media
library that you can access from Windows Media Center with the touch of a button.
Your library can contain the following types of media:
DVDs Store DVDs that you buy or create
CDs Store CDs that you buy or create
Data Discs Store any type of data that you have a CD or DVD. Data discs
can be viewed by selecting the Windows Start button, then My
Computer, and finally selecting the drive from Devices with
Removable Storage.
Blank Discs Store blank discs for creating your own CDs and DVDs. For
example, when archiving or copying recorded TV shows to disc,
a message will inform you of the number of discs required to
copy the selected recordings
When you load discs to the Media Changer, the
discs must be recognized by Media Center before
viewing. Go to More Programs and select the
Manage Discs option or to directly to My DVDs to
view the following message. Click Yes to continue.
65
Page 74

Loading Media Changer Unloading Media Changer
1 Make sure the Changer/Recorder is
properly connected to the Personal
Computer and is turned on.
Note: When loading discs, make
sure that the label is facing to the
right of the slot.
2 To load a single disc, press the
Load button once and insert the disc
in the slot. To load multiple discs,
press the Load button twice and
insert each disc in the slot one at a
time. The drive will be blocked until
the system is ready for the next disc.
3 Once the discs have been inserted,
they must be scanned by Media
Center before they can be viewed.
Go to More Programs and select
Manage Discs or to My DVDs
4 Click Yes on the NEW DISCS
FOUND message to update your
library with the new disc(s)
information.
To eject discs using Media Center:
1 From Media Center, go to My
Changer and select Manage Discs.
2 Select the Eject button associated
with the disc you want to eject.
To eject discs manually:
1 Press the Eject button one time to
eject the last inserted disc.
or
2 Press the Eject button two times to
eject all discs in the changer slots.
This will not eject the engaged disc
in the changer drive. You must go to
Media Center to eject the last disc.
See steps 1 through 2 of To eject
discs using Media Center.
Loading Media Note: It will take about 30 seconds for Media Center to scan each disc. It is
recommended to insert each disc into the changer, and then let them all scan one after the other. For
additional information, go to the Manage Discs topic in My Changer.
66
Page 75

Once you have loaded your DVD
movies into the Media Changer/
Recorder, and they have been
identified by Media Center, you
can view any movie in My DVDs
with your remote control.
Sort the list by title, year, or
genre and then select a movie.
Media Changer/Recorder will
locate the movie and place it in
the drive for viewing. Movies in
the drive of Media Changer or
Viewing DVD Movies
Start Menu | My DVD
the Personal Computer appear
with a disc next to the movie
icon. Select the movie with the
disc and then select Watch from
the MOVIE INFO screen.
You can also view a movie from the personal
computer by placing a disc in the optical drive.
67
Page 76

DVD Movie Controls
Start Menu | My DVD
Media Center offers you the flexibility of using the remote control, or keyboard and
mouse commands to simplify your DVD movie watching experience.
If you are enjoying the TV, Video, or Music options in Media Center and wish to view
a DVD movie, simply insert the DVD and the following image appears.
Using your remote control, select Play DVD. Your movie
automatically begins to play in full screen mode.
If you stop your movie using the remote control, the following options appear:
Continues playing from the stopping point.
Restarts the DVD movie from the beginning.
Returns to the DVD movie’s title or beginning menu.
Select the language preference for the Subtitle,
Audio track, and Menu for the DVD movie.
Ejects the DVD movie.
Notes: (1) For DVDs, you can edit the movie title as it appears in Manage Disks or My DVDs by going
to Movie Info and editing as desired.(2) You can view your DVD movies in full screen, windowed, or in
a viewport window. Select the Windows Resize button to change the viewing screen size.
68
Page 77

Helpful Hints
Resize the Viewing Screen
You can watch your DVD movie in a
small viewport screen, which allows
you access to other areas of Media
Center, by pressing the Windows
button on your remote control.
If you want to work and watch your
DVD movie and the same time, move
your mouse for the Windows resize
buttons to appear. Select the Resize
button.
More Movie Information
View additional information about the
DVD movie you are watching by
pressing the MORE INFO button on
the remote control.
Information includes title, chapter title,
genre, parental rating, length and
current position.
Change DVD Languages
Change the language that your DVD
movie displays for subtitles, the audio
track and menus. If the movie is
playing, press Stop on the remote
control and then select DVD
Languages. Select the + or - buttons
to choose a language.
You can also change the DVD
languages in Media Center. Go to
Start menu | Settings | DVD.
Additional Settings for DVD
Viewing
For these additional settings that can
enhance your movie viewing, go to
Start menu | Settings | DVD.
•Audio
• Closed Captioning
• Remote Control Options
69
Page 78

Start Menu | Online Spotlight
Online Spotlight
Media Center and Online
Spotlight provide you direct
access to various Internet
entertainment sites. You can
view the sites by category by
selecting a menu option.
Use the arrows on your remote
control to move to a site button.
Information about the site
displays below the list. To select
the site, press the OK button.
70
Page 79

Start Menu | My Videos
My Videos
Organize Your Videos.................. 72
Play Your Videos.......................... 73
More Information/View Details.... 74
Create a DVD/CD.......................... 75
Import/Edit Video......................... 76
Helpful Hints................................. 77
Watch your home movies and digital
videos stored on your hard disk drive
using the Media Center remote control
or your keyboard and mouse. View the
videos in full screen mode, within a
window , or from a viewport window.
Organize, store, and play videos stored
on your hard drive that you have
created, downloaded from the Internet,
or recorded from TV.
Share your video files with others by
creating DVDs or CDs.
71
Page 80

Organize Your Videos
Start Menu | My Videos
With Media Center , it is easy to store and organize videos that you have created with
your digital camera, digital recorder, or downloaded from the Internet.
For you to view your videos in Media
Center, the files must be stored in a
location that Media Center looks in.
To view videos in My Videos, first
copy and organize the files into the My
Videos or Shared Video folder.
In the My Videos folder, you can
create new folders or copy in other
folders to better organize your files.
If you are connected to a home
network and wish to share your video
files with others, copy the files to the
Shared Video folder.
If a video file is downloaded or stored
in a folder other than My Videos or
Shared Videos, you can add that
folder(s) to the folder list that Media
Center looks in.
From your remote
control, press the
More Info button,
or if you are using
your mouse, right
click anywhere in
My Videos to view this menu. Select
Add Videos and follow the on-screen
instructions.
72
Page 81

Play Your Videos
Start Menu | My Videos
With Media Center, it is easy to select and play a video stored anywhere on your hard
drive. You can view your videos in full screen, windowed, or in a viewport window.
Viewing from an viewport window gives you access to your computer or the Internet
outside of Media Center.
To view a video, do the following using your remote control:
3 Press the My Videos button.
4 Select the folder where the video is stored and press OK.
5 Select a video and press OK.
The video you selected will begin to play automatically.
When the video is finished playing, the following menu appears:
Restart: Restarts the video from the beginning.
Delete: Deletes the video from your computer.
Done: Returns you to your video list.
73
Page 82

More Information
Start Menu | My Videos
In Media Center , it’ s easy to find
out more information about any
digital video in your library. It
doesn’t matter if you just want to
see the information before you
watch it, or if you’re already
watching the video.
Use the arrow keys on your
remote control to move to a
video icon button. Press the OK
button to select the video. From
here, you can press the OK
button again, or press MORE
and select View Details.
If are already watching a video,
simply press the MORE button
on your remote control.
74
You can view the following video information:
• Thumbnail of the cover, if available
• Video title
• video description
• Date the video was last created or modified.
• Video length. (h:mm:ss format)
Page 83

Create a DVD/CD
Start Menu | My Videos
With Media Center, its easy to copy your digital videos to a CD or DVD for safe
keeping or to share with family and friends. Select a video, and then select Create
CD / DVD. Media Center will then take you through a series of screens, which contain
simple instructions to assist you in performing such tasks as:
You can Select
Select your disc format. Make
sure you select the Data CD/
DVD format.
Give your video disc a title.
When you have finished
your choices, select
All Videos or
only the ones
you want,
Create CD.Then select
Yes for Initiate Copy.
You can view the creation progress and when
View CD / DVD information.
complete, select Finish. Use the remote control
arrows and OK button to make your selections.
Note: You must insert a blank CD/DVD before starting Create CD/DVD.
75
Page 84

Import/Edit Video
Start Menu | My Videos
Your computer comes equipped
with DVgate Plus™ software,
which allows you to import and
edit videos from an external
device or from recorded TV
programs created with Media
Center's My TV feature. Y ou can
edit the video and export it into
specific folders to play back with
My Videos.
For details on how to connect
your digital video camera to your
computer, refer to the
documentation supplied with
your camera or see the online
VAIO® Computer User Guide.
76
To access DVgate Plus, click Start, point to All
Programs, DVgate Plus, and then click
DVgate Plus. For additional operating\editing
instructions for DVgate PLus, see the DVgate
Plus help file. (For help, press the F1 key or
click Help on the menu bar or topic screen.)
Page 85

Helpful Hints
Resize the Viewing Screen
You can watch your DVD movie in an
viewport screen, which allows you
access to other areas of Media Center, by pressing the Windows button
on your remote control.
If you want to work and watch your
DVD movie at the same time, move
your mouse for the Windows resize
buttons to appear. Select the Resize
button.
Separate My Videos Folders
If you set up multiple users on your
computer, each user will have a
separate My Videos folder that can
only be opened by that user and a
Shared Videos folder for sharing
your videos with others.
Playing from an External Source
Media Center allows you to play video
off a disc, from a external storage
device (such as the Media Changer/
Recorder), or off a network drive.
Change Display View Quality
You can adjust your TV and monitor
from Settings | General | Media
Center Setup | Configure Your TV
or Monitor. Just follow the on-screen
instructions.
Supported File Types
Windows Media file - .wm, .asf
Windows Media A/V - .wmv,
Video file - .avi
Movie file - .mpeg, mpg, mpe, .mp1,
mp2, mpv2
77
Page 86

Start Menu | My Pictures
My Pictures
Organize Your Pictures................ 79
View Your Pictures....................... 80
Edit Your Pictures........................ 81
Play a Slide Show......................... 82
Create a CD/DVD.......................... 83
More Information.......................... 84
Helpful Hints................................. 85
Media Center makes it easy and fun to
look at your digital photos. From My
Photos you can:
• View your pictures individually or as
a slide show.
• Edit, organize and sort your pictures
by name or date.
• Share your pictures with others
• Create CDs or DVDs
• Print your pictures
• Protect your digital images
78
Page 87

Organize Your Pictures
Start Menu | My Pictures
Using My Pictures in Media Center , it is easy to store and organize pictures that you
have created with your digital camera or downloaded from the Internet.
For you to view your pictures in Media
Center, the files must be stored in a
location that Media Center looks in.
First, copy and organize the image
files into the My Pictures or Shared
Pictures folder.
In the My Pictures folder, you can
create new folders or copy in other
folders to better organize your files.
If you are connected to a home
network and wish to share your video
files with others, copy the files to the
Shared Pictures folder.
If an image file is downloaded or
stored in a folder other than My
Pictures or Shared Pictures, you can
add that folder(s) to the folder list that
Media Center looks in.
From your remote
control, press the
MORE INFO
button, Select Add
Pictures and
follow the on-screen instructions.
When you save pictures from your
digital camera or scanner, Windows
automatically stores them in the My
Pictures folder .
Note: Pictures stored on media in the Changer will not have access to these features.
79
Page 88

View Your Pictures
Start Menu | My Pictures
With Media Center, it is easy to
select and view digital images
stored in My Pictures or
anywhere else on your hard
drive. Before opening Media
Center and viewing your
pictures, you may want to spend
some time in Windows Explorer
organizing your pictures by
creating various subject folders
in the My Pictures folder,
Use the arrows on the remote
control to move to a menu
option or a picture folder.
Press OK to open a folder and view thumbnails of your pictures. Move to the picture
you want to view and press OK again. Press BACK to return to the list of thumbnails.
80
Page 89

Edit Your Pictures
Start Menu | My Pictures
Picture Details: Edit Your Pictures
It’s easy to edit your pictures directly in Media Center’s My Pictures. Use the arrow
keys on the remote control and move to a picture. Press MORE INFO and then select
Picture Details. From here you can:
Rotates picture
45 degrees.
If you select Touch Up, you can then choose the following:
Automatically removes red eye from people and pets.
Automatically sharpens the contrast or clarity of your picture.
The following tools are provided:
Shifts crop box in the direction of
the selected arrow .
Zooms picture in and out.
Shifts orientation of picture.
81
Page 90

Play a Slide Show
Start Menu | My Pictures
Instead of viewing your digital
pictures individually, why not
add some fun. It’s easy to create
a slide show and even add
background music.
From Settings | Pictures, you
can customize the settings for
picture and song captions,
transition type and length,
background color, how pictures
are displayed, and what pictures
display.
Use the arrows on your remote
control to select a folder, single
picture or Play Slide Show
Press the OK button to select your option. For more information, see Helpful Hints.
82
Page 91

Create a CD/DVD
Start Menu | My Pictures
With Media Center, its easy to copy your digital pictures to a CD or DVD for safe
keeping or to share with family and friends. Simply select or open a picture folder, and
then select Create CD / DVD. Media Center will then take you through a series of
screens, which contain simple instructions to assist you in performing such tasks as:
You can Select
Select disc format. Make sure
you select the Data CD/DVD
format. Data DVD also lets
you create a DVD slide show.
Give your picture disc a title.
When you have finished
All Pictures or
only the ones
you want.
View CD / DVD information.
your choices, select
Create CD.Then select
Yes for Initiate Copy.
You can view the creation progress and when
complete, select Finish. Use the remote control
arrows and OK button to make your selections.
83
Page 92

Picture Details
Start Menu | My Pictures
In Media Center , it’ s easy to find
out more information about any
digital picture in your library.
Use the arrow keys on your
remote control to move to a
picture icon button. Press the
OK button to select the picture.
From here, you can press the
OK button again, or press
MORE and select View Details.
If are already viewing a picture,
simply press the MORE button
on your remote control.
You can also edit your pictures
within Media Center . See the
next page Picture Details:
Editing your Picutres.
84
You can view the following picture information:
• Picture title
• Folder name, if stored in a folder
• Date the picture was created or modified
• Picture resolution
Page 93

Helpful Hints
Picture Zooming and Panning
Select a picture from My Pictures.
Press OK once to magnify 150%.
Press OK again to magnify 225%.
Now you can use the arrows to pan
around the picture.
Press OK again to return the picture
to its original size
Printing Pictures in Media Center
Start Media Center and from My
Pictures, select the pictures you want
to print.
Press the MORE button and then
select Pictures Details.
Select Print and then select Print
again.
Adding Music to a Slide Show
Select music from your Media Library .
Play a CD or select a Playlist.
Use the remote control to open My
Pictures and select the picture folder
you want to watch as a slide show.
Select Play Slide Show. Press OK.
Supported File Types
Joint Photographic Experts Group -
.jpg, .jpeg
Tagged Image File - .tif
Graphics Interchange Format - .gif
Bitmap - .bmp
Windows Meta File - .wmf
Follow any on-screen instructions.
Portable Networks Graphics - .png
85
Page 94

Start Menu | My TV
My TV
Watch Live TV............................... 88
View the Guide............................. 89
Guide Helpful Hints...................... 90
Record and Schedule Programs.91
Record/Schedule Helpful Hints... 92
Watch Recorded Programs......... 93
Search for a Program................... 94
Search for a Featured Movie....... 95
Watching your favorite TV program or
movie in Media Center puts you in
complete control of your viewing
experience.
What do you want to do? Media Center
makes it easy to locate, watch, or
record your favorite TV program,
sporting event, or movie.
And best of all, you can do all of this
directly from your VAIO® computer and
a TV signal connection.
86
Page 95

My TV Features
Live TV Watch your favorite TV show or movie LIVE. Use the Media
Center buffer feature to pause, rewind, fast forward, or continue
viewing your live program in progress. Use the MORE INFO
button on the remote control to display TV show information.
Recorded TV Record any TV show or program for later viewing. Plus, view
a list of recorded programs by date or title, a list of programs
scheduled to be recorded, play a recorded program, find out why
a program wasn’t recorded, or add a TV recording
Guide Download a listing of current television programming from
your local television service provider. Set Media Center to
automatically update the program guide, or manually update
whenever you are connected to the Internet.
Search Quickly find a TV program or a series to watch or record by
entering a descriptive word, program title, or program category.
Movies Go online to find movies on TV to watch now or later. Get the
latest movie information, read reviews, see cast lists, find other
times the movie is broadcast, browse for related movies, and find
other movies with the same cast members.
87
Page 96

Watch Live TV
Start | My TV
Watch live TV or record your
favorite shows to view later. Use
the Guide to find the show you
want to watch or record.
When you watch live TV, Media
Center continuously captures 30
minute increments of the
program. This enables you to
rewind, replay, and fast forward
in a TV program. This TV
programming buffer is
temporary and is not saved.
To view TV, press LIVE TV on
your remote control or select the
LIVE TV menu option.
Note: You can watch TV in full screen, windowed, or in an viewport window.
88
Page 97

View the Guide
Start Menu | My TV
The Guide displays TV channel
and program information,
including titles, descriptions,
categories, ratings, and program
times.
You can view and scroll through
the list of current and future TV
shows in the Guide. When you
select a program, information
about the program displays
below the program listings.
You can choose to have Media Center download the Guide from your local
provider automatically, or download updated information yourself.
You can view the Guide listings at any time by pressing the Guide button on your
remote control. Use the arrows to move to a show time, and use the CHAN/PAGE
(+/-) buttons to move to any available channel. Press the OK button to select a
program. Press the MORE button to view program details or record the program.
89
Page 98

Guide Helpful Hints
Important Information
Guide data may not be available in all
countries or regions. Please consult
your local TV signal provider.
Make sure you are connected to the
Internet and check your TV signal and
guide settings in the Settings menu.
Add Missing Channels
From Media Center, select Settings,
TV, Guide, and then Add Missing
Channels.
Select Add Channels and enter the
name of the missing channel.
Enter the correct channel number and
select Add.
Repeat to add all missing channels.
Removing Channels from Guide
From Media Center, select Settings,
TV, Guide, and then Edit Channels.
Follow the on-screen instructions to
remove channels from the Guide
listing.
Downloading the Guide
Automatically - Determine settings
for retrieving information for media
and Method of Download for the
Guide. From Media Center , select
Settings, General, and then
Automatic Downloads Options.
Manually - From Media Center , select
Settings, General, TV, Guide, and
then Get Latest Guide Listings.
Select Done when complete.
90
Page 99

Record and Schedule Programs
Media Center lets you record the
program you are watching, one
scheduled to broadcast later, or
a recurring program series.
To verify your program is being
recorded, select My TV,
Recorded TV, and then select
Scheduled. The Record icon
appears next to the program
while you are recording.
Main Menu | My TV
• Record the program you are watching by pressing REC on the remote control.
• Record from the Guide by selecting a program, then select Record.
• Record from the Search menu, which allows you to define search criteria.
• Record manually by selecting Add Recording, then select Channel and Time.
The Add Recording button shows when no other recordings are scheduled.
91
Page 100

Record and Schedule Helpful Hints
Standby Mode and Scheduled
Recordings
Media Center will continue to record
your scheduled TV shows even if you
place the computer in standby or in
hibernation state. The recording of TV
shows will also continue even if Media
Center is closed.
Copying Recorded Programs to
DVD or CD
If you would like to copy or archive
your recorded TV shows to CD or
DVD, go to Create DVD located on
the Media Center Start menu and
follow all on-screen instructions.
Make sure you load blank discs in the
Media Changer/Recorder before
you begin.
Set Up Recording Preferences
From Media Center, select Settings,
General, TV, and then Recorder.
From Recorder you can define or
change settings for History,
Recorder Storage, and Recording
Defaults.
Recording Quality and Hard Disk
Drive Storage Space
Quality Space
Best 2.7 GB/hr
Better 2.4 GB/hr
Good 1.4 GB/hr
Fair 1.2 GB/hr
Select Stop if you need to stop or
cancel a current recording.
92
 Loading...