

Sony VGX-TP20E, VGX-TP20EB, VGX-TP20EW, VGX-TP25E/B User Manual

User Guide
Personal Computer
VGX-TP20 Series
N

Contents
Before Use .........................................................................................................................................................................5
Documentation .............................................................................................................................................................6
Getting Started .................................................................................................................................................................10
Locating Controls and Ports.......................................................................................................................................11
About the Indicator Lights ..........................................................................................................................................16
Setting Up Your Computer.........................................................................................................................................17
Shutting Down Your Computer Safely .......................................................................................................................28
Using Your VAIO Computer .............................................................................................................................................29
Using the Keyboard ...................................................................................................................................................30
Using the Touch Pad .................................................................................................................................................34
Using the Optical Disc Drive ......................................................................................................................................35
Using the TV Function ...............................................................................................................................................45
Using the Memory Stick Media ..................................................................................................................................66
Using Other Memory Cards .......................................................................................................................................72
Using the Internet.......................................................................................................................................................76
Using Wireless LAN (WLAN) .....................................................................................................................................77
2
nN

3
nN
Using Peripheral Devices .................................................................................................................................................86
Selecting Display Modes............................................................................................................................................87
Using the Multiple Monitors Function .........................................................................................................................88
Connecting a Universal Serial Bus (USB) Device......................................................................................................90
Connecting a Printer ..................................................................................................................................................93
Connecting an i.LINK Device .....................................................................................................................................94
Connecting to a Network (LAN) .................................................................................................................................96
Customizing Your VAIO Computer ..................................................................................................................................98
Setting the Password .................................................................................................................................................99
Setting Up Your Computer with VAIO Control Center..............................................................................................102
Using the Power Saving Mode.................................................................................................................................103
Upgrading Your VAIO Computer....................................................................................................................................106
Adding and Removing Memory................................................................................................................................107
Precautions ....................................................................................................................................................................114
On Using the Power Source ....................................................................................................................................115
On Handling Your Computer....................................................................................................................................116
On Handling Floppy Disks .......................................................................................................................................119
On Handling Discs ...................................................................................................................................................120
On Using Headphones.............................................................................................................................................121
On Handling Memory Stick Media............................................................................................................................122
On Handling the Hard Disk ......................................................................................................................................123
On Updating Your Computer ...................................................................................................................................124

4
nN
Troubleshooting .............................................................................................................................................................125
Computer .................................................................................................................................................................126
System Security .......................................................................................................................................................133
Networking ...............................................................................................................................................................135
Optical Discs ............................................................................................................................................................138
Display .....................................................................................................................................................................142
Printing.....................................................................................................................................................................145
Microphone ..............................................................................................................................................................146
Speakers..................................................................................................................................................................147
Keyboard..................................................................................................................................................................149
Touch Pad................................................................................................................................................................150
Floppy Disks ............................................................................................................................................................151
Audio/Video..............................................................................................................................................................152
Memory Stick Media ................................................................................................................................................155
Peripherals ...............................................................................................................................................................156
Support Options .............................................................................................................................................................157
Sony Support Information ........................................................................................................................................157
Program Support Information...................................................................................................................................161
Trademarks..............................................................................................................................................................173

nN
Before Use
Before Use
Congratulations on your purchase of this Sony VAIO® computer, and welcome to the on-screen User Guide. Sony has
combined leading-edge technology in audio, video, computing, and communications to provide state-of-the-art personal
computing experience.
!
External views illustrated in this manual may look slightly different from those of your computer.
5

6
nN
Before Use
Documentation
Your documentation includes printed information and user guides to read on your VAIO computer.
Printed Documentation
❑ Welcome mat — Contains an overview of components connection, set-up information, etc.
❑ Safety Information — Contains safety guidelines and owner information.
Non-printed Documentation
❑ User Guide (this manual) — Explains features of your computer. It also includes information about the software programs
included with your computer, as well as information on solving common problems.
✍
To go to Web sites described in this manual by clicking their respective URLs beginning with http://, your computer must be connected to the Internet.
❑ Specifications — The online specifications describe the hardware and software configurations of your VAIO computer.
To view the online specifications:
1 Connect to the Internet.
2 Go to the Sony online support Web site at the following URLs:
http://esupport.sony.com/EN/VAIO/
http://sony.ca/view/Computers_Bulletins.htm
http://esupport.sony.com/ES/VAIO/
http://esupport.sony.com/ES/VAIO/BR/
for customers in USA
for customers in Canada
for customers in Spanish speaking Latin American countries or areas
for customers in Brazil

nN
Before Use
❑ VAIO Recovery Center User Guide — Provides information about restoring individual software programs, software
drivers, and drive partition(s) or your entire hard disk drive to the original factory installed settings.
To access this on-screen guide:
1 Click Start and Help and Support.
2 Click Manuals & Specifications.
3 Click VAI O Recovery Center User Guide.
❑ Media Center User Guide (Selected models only) — Provides information about using Windows Media Center.
To access this on-screen guide:
1 Click Start and Help and Support.
2 Click Manuals & Specifications.
3 Click Media Center User Guide.
7

8
nN
Before Use
Help and Support
Help and Support is easy to access and provides a single location for information and technical assistance for your VAIO
computer. Choose from the following categories to find the answers you need.
To access Help and Support, click Start and Help and Support.
❑ Manuals & Specifications
Here you will find the on-screen User Guide, warranty information, other VAIO documents, and system and software
information for your computer.
❑ VAIO Support
Access interactive help in the form of VAIO tutorials, an escalation page containing support and contact information, and
various links to VAIO online support Web sites.
❑ Backup & Recovery
Find information on how to back up and restore your operating system, system software, and your personal data.
❑ Wireless & Networking
Learn about wireless connections including Bluetooth Wireless technology and Wireless LAN. Run utilities that include
VAIO Media Setup and Windows Network and Sharing Center, and access to wireless tutorials.
❑ Security
Keep your data safe and your computer running efficiently with updates and maintenance programs from Microsoft and
Sony.
❑ VAIO Sites
Contains links to other Internet sites you might find interesting and useful.
❑ VAIO Tutorials
Sony provides guided help tutorials that help you accomplish a task. It can either perform the task for you or show you
how to do it step by step.

❑ VAIO Registration
Please take a moment to register your VAIO computer to enjoy the following benefits:
❑ Your computer will be registered with Sony Product Support.
❑ You will receive an e-coupon good for purchase of eligible accessories at SonyStyle.com.
❑ Extended Service Plan
Sony VAIO products come with a 1 year Limited Warranty. Protect your investment further by purchasing an optional
Extended Service Plan.
9
nN
Before Use

Getting Started
Getting Started
This section describes how to get started using your VAIO computer.
!
Before starting your computer for the first time, do not connect any other hardware, except a display (TV), that did not originally come with your
computer. Be sure to start up your computer with only the supplied accessories connected and set up your system. Upon completion, connect one
device (for example, a printer, an external hard disk drive, a scanner, and so on) at a time, following the manufacturers' instructions.
❑ Locating Controls and Ports (page 11)
❑ About the Indicator Lights (page 16)
❑ Setting Up Your Computer (page 17)
❑ Shutting Down Your Computer Safely (page 28)
10
nN

Getting Started
Locating Controls and Ports
Take a moment to identify the controls and ports shown on the following pages.
!
The appearance of your computer may be different from those illustrated in this manual due to variations in specifications. It may also vary in some
countries or areas.
11
nN
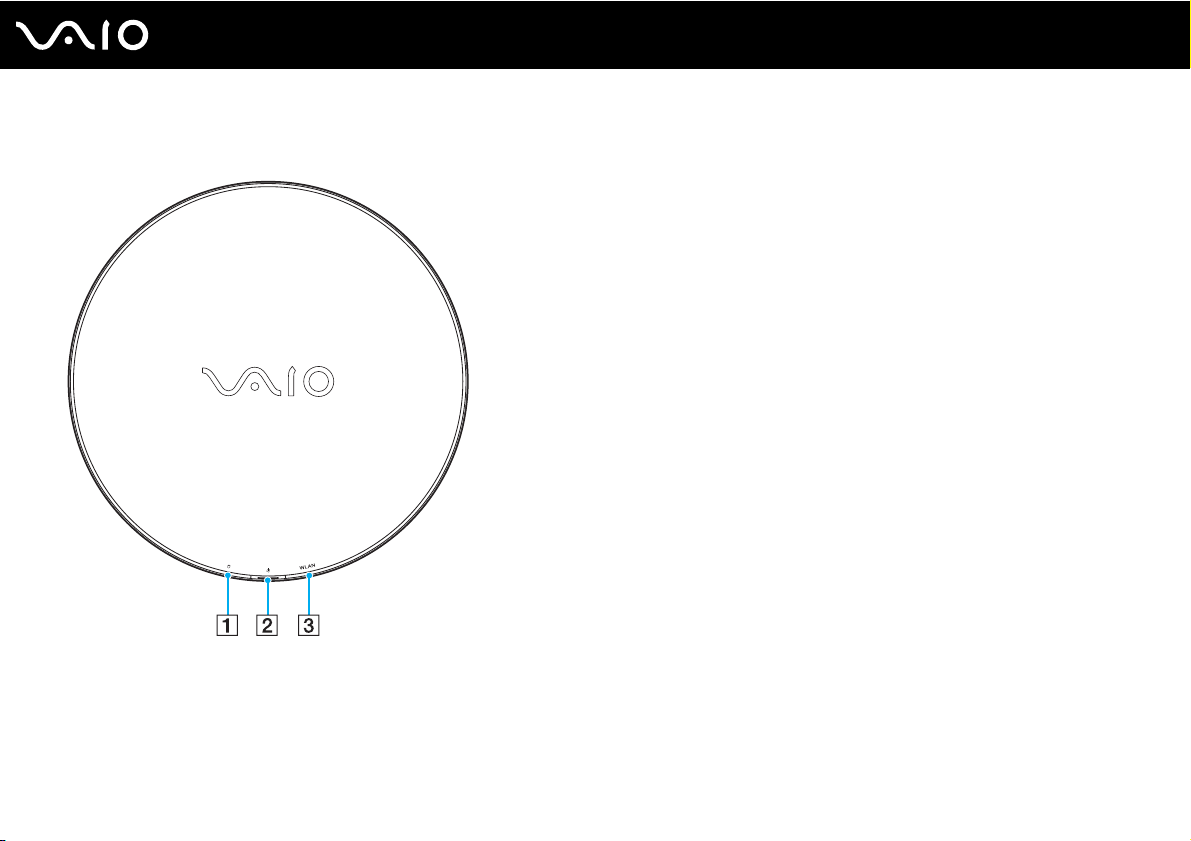
Top
Getting Started
A Hard disk drive/Optical disc drive indicator (page 16)
B Power button/Power indicator (page 16)
C WLAN (Wireless LAN) indicator (page 16)
12
nN

Front
Getting Started
A SD memory card slot (page 72)
B WLAN (Wireless LAN) switch (page 77)
C Remote sensor
Point the supplied remote commander to this sensor for
operations.
D Optical disc drive (page 35)
E Memory Stick slot
*1
(page 66)
F Air vent
G Media Access indicator (page 16)
H Hi-Speed USB (USB 2.0) ports
*2
(page 90)
I i.LINK (IEEE 1394) S400 port (page 94)
J CONNECT button (page 25)
K Front panel door
To open the front panel door, put your fingertip on the left end
of the door and slide it half way to the right. The door will
automatically be retracted under the panel. To close the door,
slide it half way to the left. The door will keep sliding on its own
and shut.
*1
Your computer supports both standard- and Duo-size Memory Stick media.
*2
Support high-/full-/low- speeds.
13
nN
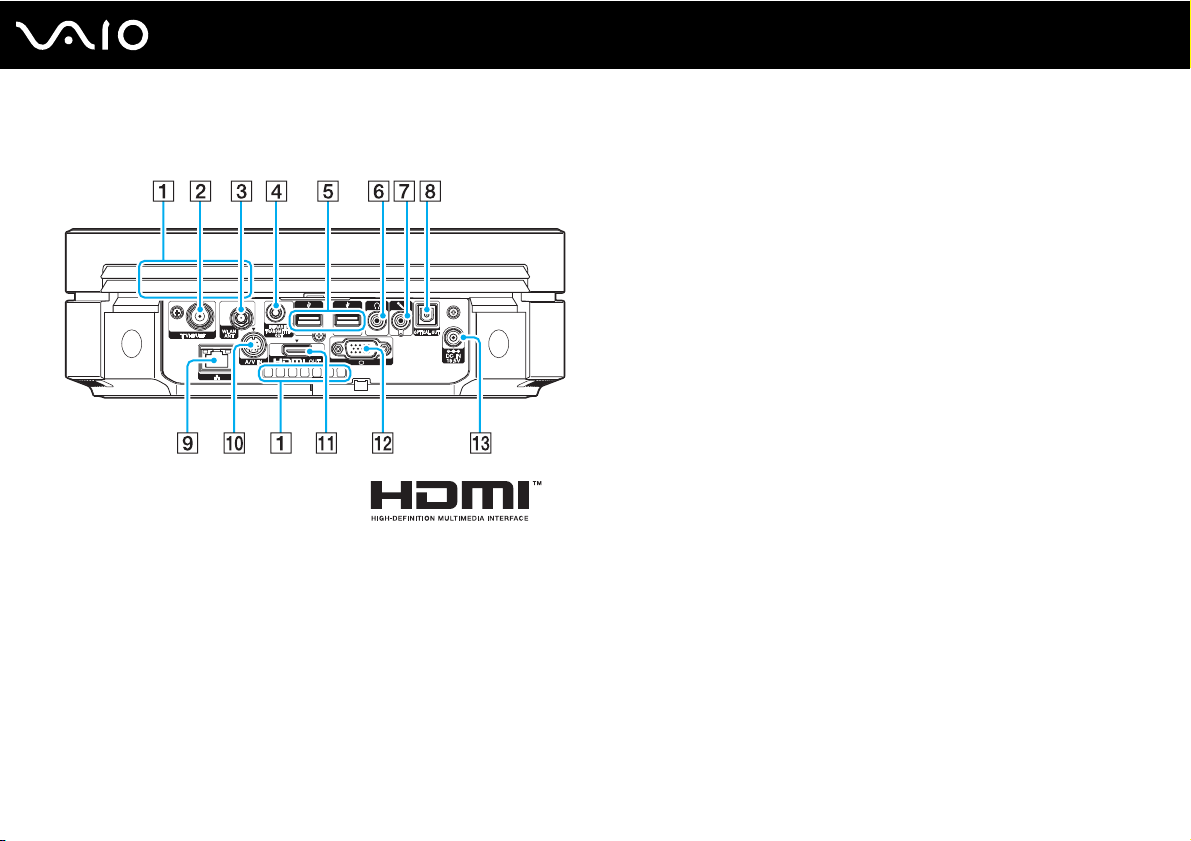
Back
!
The area around the air vent (1) becomes hot while your computer is on. Be sure to
wait until the computer cools down before you touch it.
HDMI, the HDMI logo and High-Definition Multimedia Interface are trademarks or
registered trademarks of HDMI Licensing LLC.
Getting Started
A Air vents
B VHF/UHF input port
*1
(page 46)
C WLAN ANT port (page 79)
*2
(page 90)
*1
(page 57)
D INFRARED TRANSMITTER OUT jack
E Hi-Speed USB (USB 2.0) ports
F Headphones jack
Connect external headphones.
G Microphone jack
Connect an external microphone.
H OPTICAL OUT port
(Output Sampling Rate: 44.1 KHz/48.0 KHz/96.0 KHz)
Connect an S/PDIF device such as digital headphones or an AV
amplifier.
I Network (Ethernet) port (page 96)
J A/V IN port
*1
(page 53)
K HDMI OUT port (page 18)
L Monitor (VGA) port (page 20)
M DC IN port (page 21)
*1
On selected models only.
*2
Support high-/full-/low- speeds.
14
nN
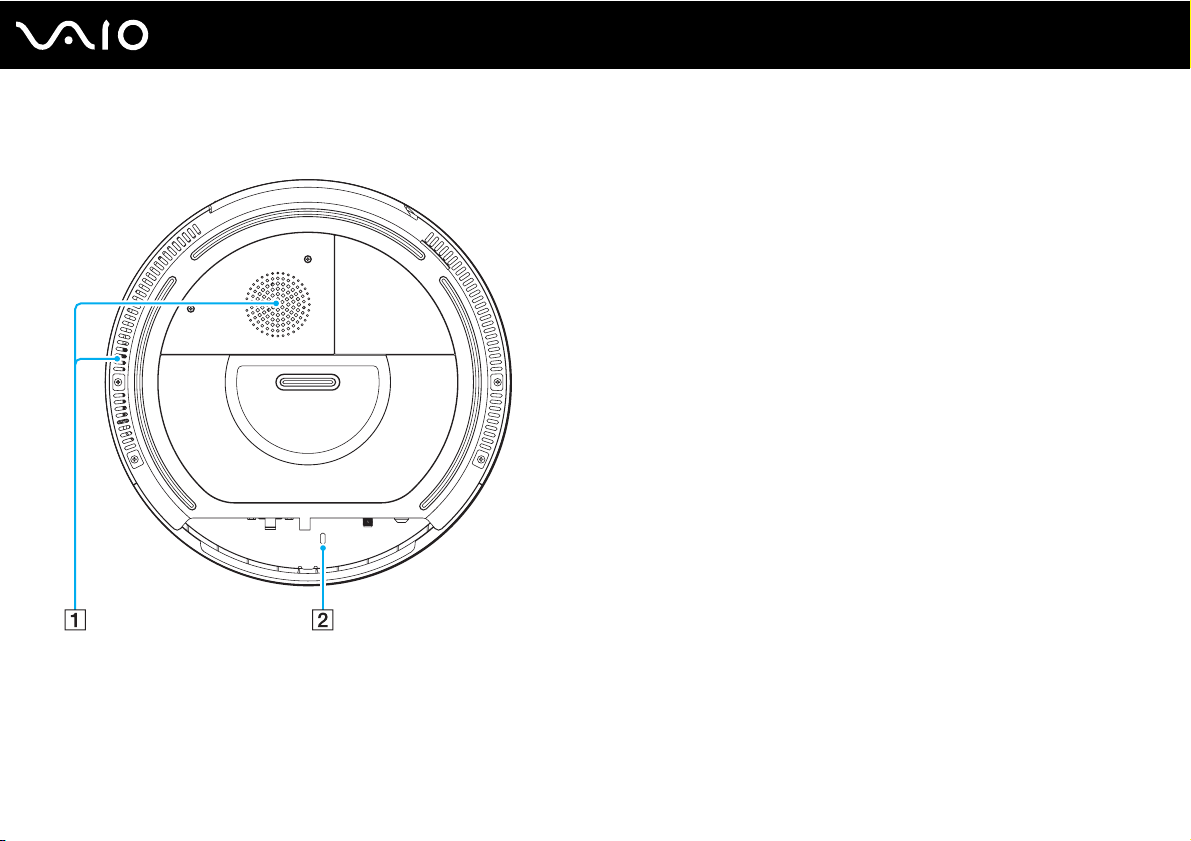
Bottom
A Air vents
B Security slot
15
nN
Getting Started

About the Indicator Lights
Your computer is equipped with the following indicator lights.
Indicator Functions
Power 1 The indication behavior varies depending on the state of your computer:
Green lit: the computer is on.
Orange lit: the computer is in Sleep mode.
Off: the computer is off.
Media Access Illuminates when data is read from or written to a memory card. (Do not enter Sleep mode or turn off the
Hard disk drive/Optical disc drive
Wireless LAN Illuminates when the wireless LAN functionality is enabled.
computer when this indicator is on.) When the indicator is off, the memory card is not being used.
Illuminates when data is read from or written to the hard disk drive or the optical disc media. Do not enter Sleep
mode or turn off the computer when this indicator is on.
16
nN
Getting Started

17
nN
Getting Started
Setting Up Your Computer
Connecting a Display
Connect a display (not supplied) to your computer. When connecting it, see the manual that came with your display as well.
✍
Connect the power cord of your display after connecting all other cables.

To connect a display (HDMI-compatible TV)
1 Plug one end of the HDMI cable (supplied) (1) to the HDMI OUT port (2) on the computer.
2 Plug the other end to the display (TV) (3).
18
nN
Getting Started

19
nN
Getting Started
✍
See the manual that came with your TV for more information on installation and use.
If your TV is equipped with a DVI-D port, you can use the HDMI cable and the HDMI to DVI-D adapter (both supplied) for connection. To use them for
connection, however, you also need an audio cable (not supplied) since no audio signals are carried through the DVI-D port.
If your TV is equipped with an HDMI port and a DVI-D port, we recommend that you use the HDMI port.
The HDMI cable carries both video and audio signals.
!
If a device driver other than the one provided by Sony is used, the image will not be displayed and the audio will not be heard. Always use the device
driver provided by Sony for updates.
Your computer is compliant with the HDCP standard and capable of encrypting the transmission channel of digital video signals for the purpose of
copyright protection, which enables you to play and view a wide variety of copyright protected, high-quality contents. Note that you need to connect an
HDCP-compliant external display to your computer to view the copyright protected contents. If your computer has a non-compliant display connected,
you will not be able to play or view any copyright protected contents.
To change the sound output device
If you do not hear sound from the device connected to the HDMI OUT port, you need to change the device for sound output.
1 Close all open programs.
2 Click Start and Control Panel.
3 Click Hardware and Sound.
4 Click Manage audio devices under Sound.
5 On the Playback tab, select the desired device for sound output and click Set Default.
20
nN
Getting Started
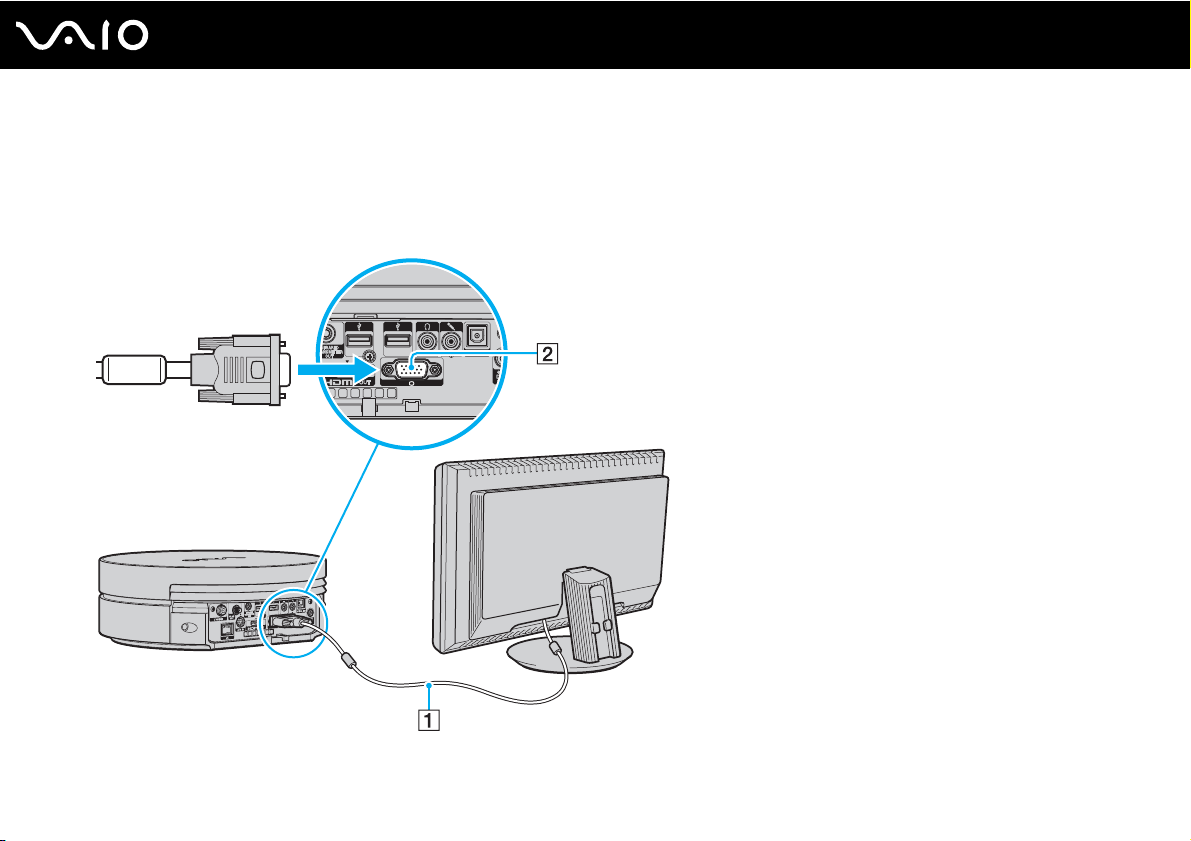
To connect a display (monitor)
1 If you want to connect a VGA monitor, connect the display cable (1) (not supplied) into the monitor (VGA) port (2) on the
back of the computer.
2 If necessary, plug the display cable into the display.

21
nN
Getting Started
Connecting a Power Source
You need an AC adapter to connect to an AC power source and it must be plugged into the power source before you can
establish communication with your wireless keyboard.
✍
Use your computer only with the supplied AC adapter.
To connect the AC adapter
1 Plug one end of the power cord (1) into the AC adapter (3).
2 Plug the other end of the power cord and the power cord from your display (TV) into AC outlets (2).
3 Route the cable from the AC adapter (3) through the hooks (4) on the back of your computer and plug it into the DC IN
port (5).

22
nN
Getting Started

✍
To disconnect your computer completely from AC power, unplug the power cord when the computer is off.
Make sure that the AC outlets are easily accessible.
!
If you unplug the AC adapter from your computer while the computer is on or in Sleep mode, you may lose all unsaved data.
23
nN
Getting Started
24
nN
Getting Started
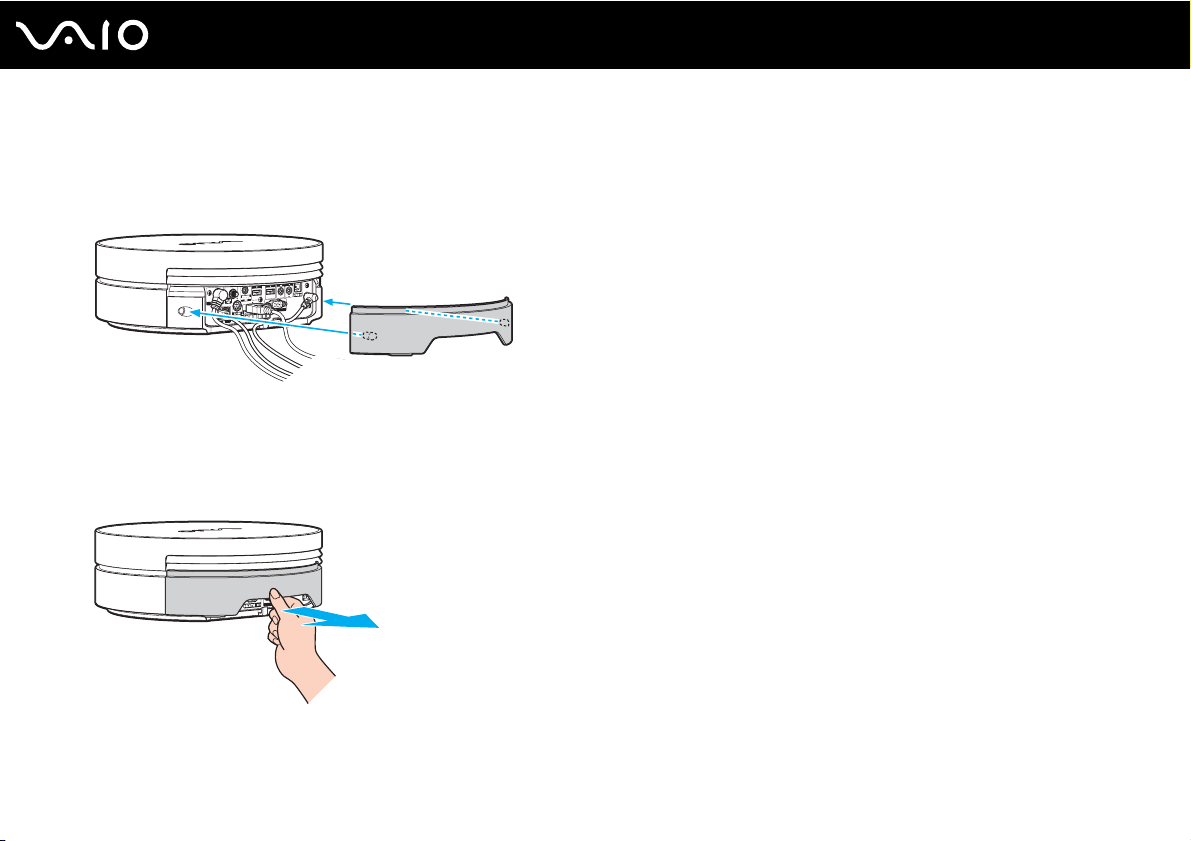
Attaching the Rear Cover
An exclusively designed rear cover is supplied with your computer for port protection and tidy cabling. Once you have set up
your computer, attach the rear cover. Be sure to hold the cover with your both hands when attaching it.
!
You may not be able to attach the rear cover depending on the shape or size of connected cable plugs. In such a case, leave the back of your computer
uncovered and keep the rear cover at hand.
To remove the rear cover, grasp the cover as illustrated below and pull it away from the computer.
!
Do not leave the removed rear cover on the floor. Stepping on it may hurt your foot.
25
nN
Getting Started
Connecting the Wireless Keyboard
A wireless keyboard and four AA alkaline batteries for use in the keyboard are supplied with your computer. Before attempting
to use the wireless keyboard, you must install the batteries and establish communication between the computer and the
keyboard.
✍
If you find your keyboard not working, for example after replacement of the keyboard batteries, try the following steps for reconnection.
To connect the wireless keyboard
!
To connect the wireless keyboard, it must be located within a range of approximately 11 inches (30 cm) to 40 inches (1 m) from the computer.
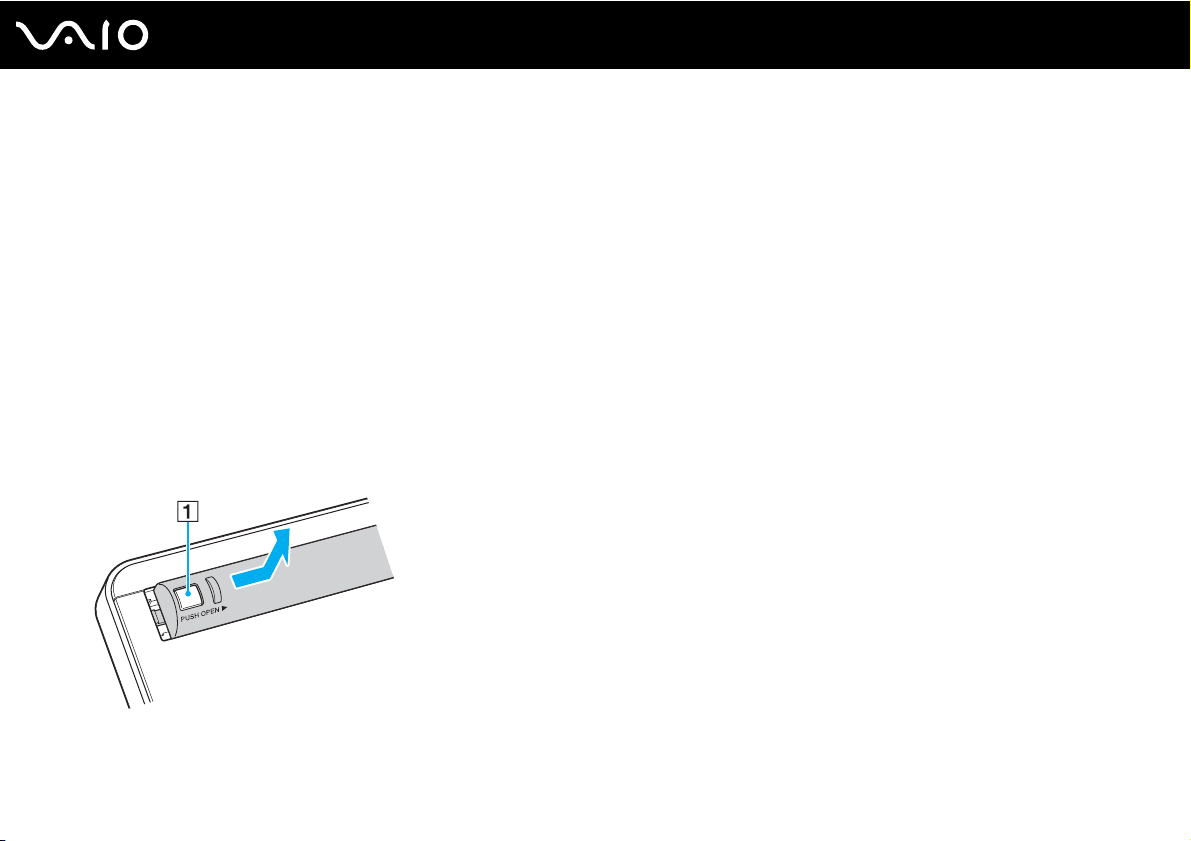
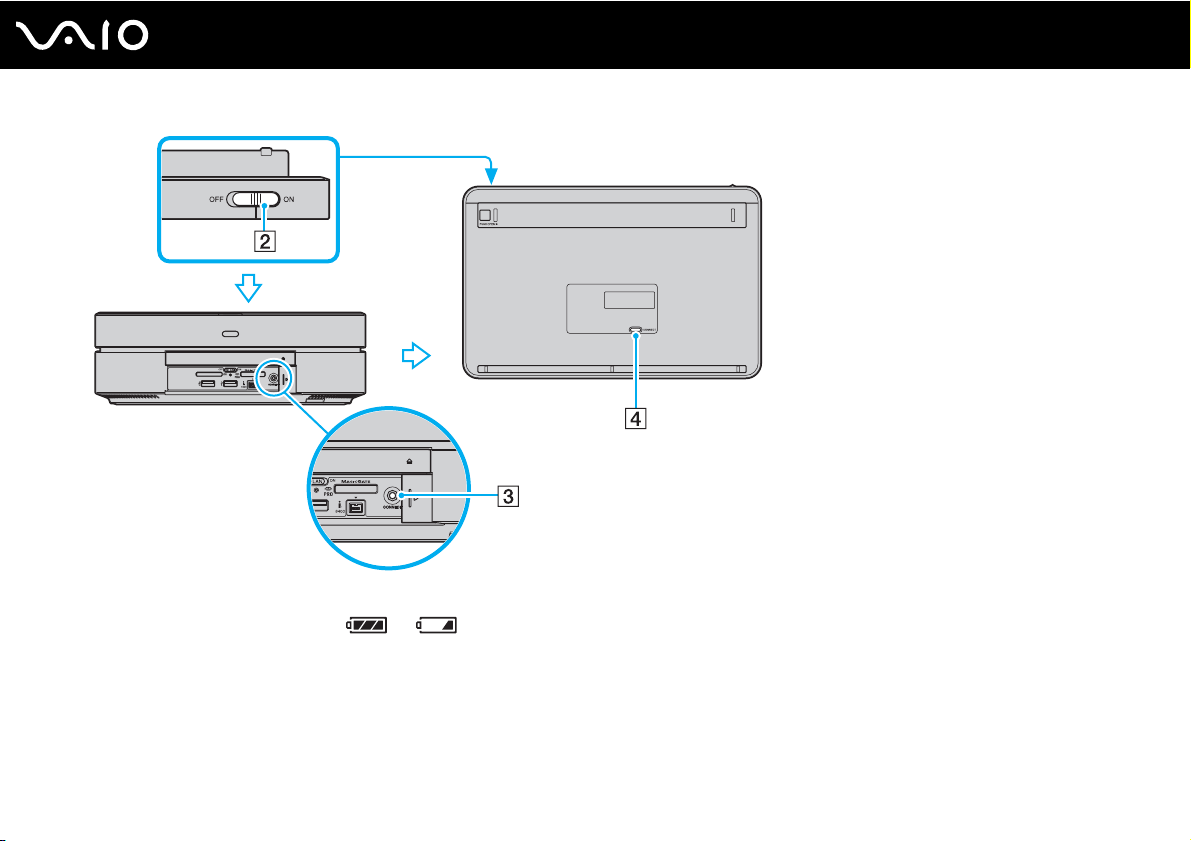
1 Turn over the wireless keyboard.
2 Press the button (1) on the battery compartment cover and slide and lift the cover in the direction of the arrow to remove
the cover.
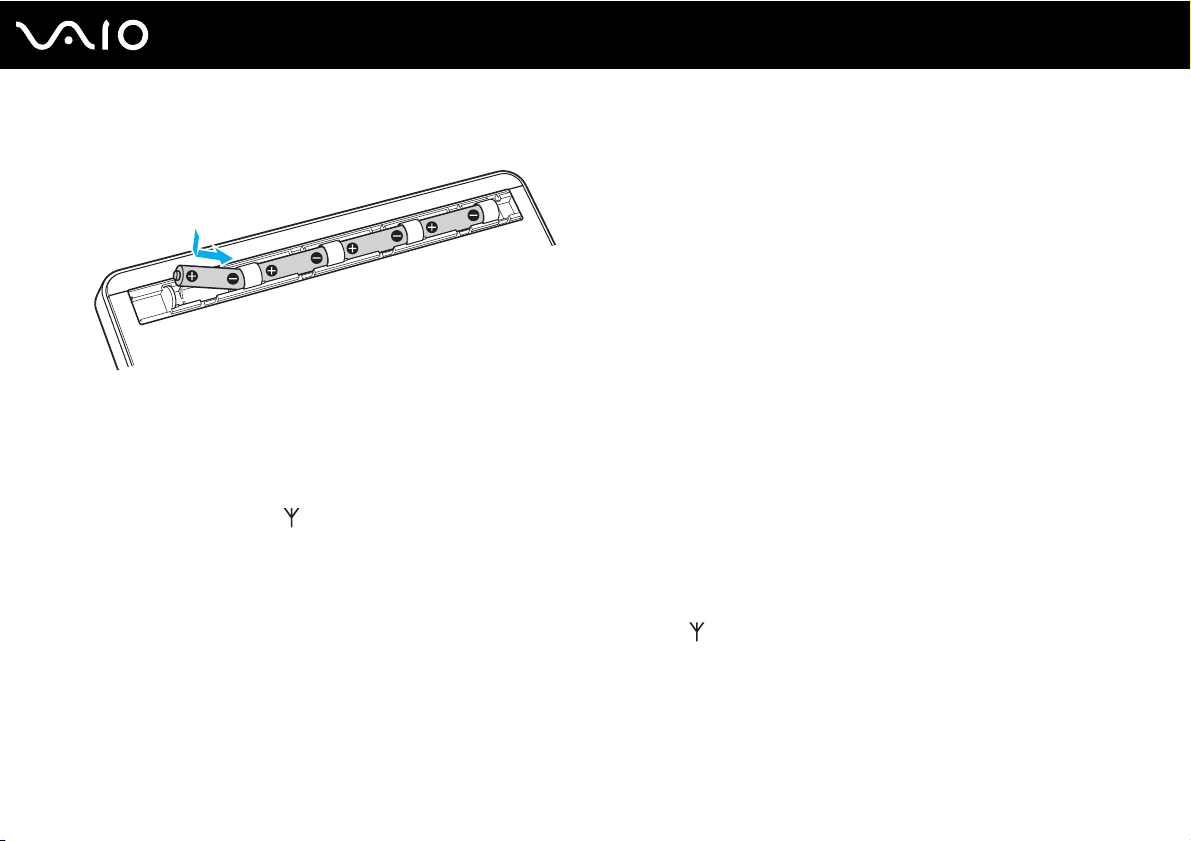
3 Insert the supplied four AA batteries into the battery compartment as illustrated below:
4 Turn on the computer.
5 Slide the power switch (2) on the keyboard to the ON position.
6 Press the CONNECT button (3) on the front of the computer.
7 Press the CONNECT button (4) on the bottom of the keyboard.
The connect indicator turns on in the LCD window on the keyboard when connection is established between the
computer and the keyboard. If not, repeat the procedure.
!
Steps 6 and 7 must be completed within 10 seconds of each other.
26
nN
Getting Started
If the wireless keyboard is left unused for 20 minutes or longer, the connect indicator will turn off. This could indicate that the connection between
your computer and the keyboard is lost. Press the Fn key to check that the connect indicator turns on before using the keyboard.
27
nN
Getting Started
✍
You can check the battery indicator ( or ) in the LCD window on the wireless keyboard for its battery power level.
If the wireless keyboard does not operate properly, the batteries may need to be replaced. If the wireless keyboard is not being used for an extended
period of time, remove the batteries to avoid possible damage from battery leakage.

28
nN
Getting Started
Shutting Down Your Computer Safely
To avoid losing unsaved data, be sure to shut down your computer properly, as described below.
To shut down your computer
1 Turn off any peripherals connected to the computer.
2 Click Start, the arrow next to the Lock button, and Shut Down.
3 Respond to any prompts warning you to save documents or to consider other users and wait for the computer to turn off
automatically.
The power indicator light turns off.

Using Your VAIO Computer
This section describes how to get the most out of using your VAIO computer.
❑ Using the Keyboard (page 30)
❑ Using the Touch Pad (page 34)
❑ Using the Optical Disc Drive (page 35)
❑ Using the TV Function (page 45)
❑ Using the Memory Stick Media (page 66)
❑ Using Other Memory Cards (page 72)
❑ Using the Internet (page 76)
❑ Using Wireless LAN (WLAN) (page 77)
29
nN
Using Your VAIO Computer

Using Your VAIO Computer
Using the Keyboard
A wireless keyboard is supplied with your computer.
The wireless keyboard uses a standard key arrangement with additional keys that perform specific functions.
Using the Wireless Keyboard
!
To maintain good communication, operate the wireless keyboard within the distance limitations of keyboard: approximately 32.8 feet (10 m) from your
computer.
Confirm that the supplied AA batteries are properly installed.
Press the CONNECT button located on the front of your computer first, and then press the CONNECT button on the bottom of the wireless keyboard.
If you find your keyboard not working after replacement of the keyboard batteries, reconnect the keyboard. See Connecting the Wireless Keyboard
(page 25) for the detailed procedure.
Avoid using any wireless devices that exchange radio signals on the 2.4 GHz frequency band near the wireless keyboard. These devices may cause
interference, causing the keyboard to stop working properly.
Do not place metal furniture or objects near your computer or wireless keyboard, as this may create interference, causing the keyboard to stop working
properly.
30
nN
Do not mix old (used) and new batteries when replacing batteries in the wireless keyboard. Always use the same type and manufacture of battery.
Do not mix alkaline with manganese batteries. Using incompatible batteries or mixing used, new or different types of batteries can damage the wireless
keyboard.
 Loading...