

Sony UP-D9500 Instructions For Use Manual

3-861-579-13 (2)
Digital Color Printer
Instructions for Use
Before operating this unit, please read this manual
thoroughly and retain it for future reference.
UP-D9500
1997 by Sony Corporation

Owner’s Record
The model and serial numbers are located at the rear.
Record these number in the space provided below.
Refer to these numbers whenever you call upon your
Sony dealer regarding this product.
Model No.
Serial No.
WARNING
To prevent fire or shock hazard, do not
expose the unit to rain or moisture.
To avoid electrical shock, do not open
the cabinet. Refer servicing to qualified
personnel only.
WARNING
This unit has no power switch.
When installing the unit, incorporate a readily accessible
disconnect device in the fixed wiring, or connect the
power cord to a socket-outlet which must be provided
near the unit and easily accessible.
If a fault should occur during operation of the unit,
operate the discconect device to switch the power supply
off, or disconnect the power cord.
For the customers in the U.S.A.
This equipment has been tested and found to comply
with the limits for a Class A digital device, pursuant to
Part 15 of the FCC Rules. These limits are designed to
provide reasonable protection agaist harmful interference
when the equipment is operated in a commercial
environment. This equipment generates, uses, and can
radiate radio frequency energy and, if not installed and
used in accordance with the instruction manual, may
cause harmful interference to radio communications.
Operation of this equipment in a residential area is likely
to cause harmful interference in which case the user will
be required to correct the interference at his own
expense.
You are cautioned that any changes or modifications not
expressly approved in this manual could void your
authority to operate this equipment.
This device requires shielded interface cables to comply
with FCC emission limits.
2

Table of Contents
Introduction
Preparation
About this Manual .............................................................5
Features .............................................................................6
Handling Precautions .......................................................7
Location and Function of Parts and Control ..................8
Front ................................................................................. 8
Inside .............................................................................. 10
Rear ................................................................................ 11
Supplied Accessories.....................................................12
Assembly .........................................................................13
Connections ....................................................................15
Making AppleTalk Connections .................................... 15
Parallel Interface Connection ......................................... 17
Ethernet Connection....................................................... 17
SCSI Interface Connection............................................. 19
Operation
Power Cord Connection ................................................. 20
Turning the Printer On and Off ...................................... 21
Installing the Ink Ribbon ................................................22
Replacing a Used Ribbon with a New Ribbon............... 22
Changing the Ribbon Type ............................................ 24
Loading Paper .................................................................27
Test Printing ....................................................................29
Printing.............................................................................30
Reprinting the Same Image ............................................ 31
Table of Contents
3

Table of Contents (continued)
Miscellaneous
Printing Packs .................................................................32
Adding Memory ...............................................................33
Confirming Internal Printer Configuration.................... 35
Error Messages ...............................................................36
Clearing Paper Jams.......................................................37
Printer Maintenance........................................................40
Dealing with Mechanical Problems ............................... 42
Repacking the Printer .....................................................43
Specifications..................................................................46
Warranty and After-Sales Service .................................47
Warranty......................................................................... 47
After-Sales Service......................................................... 47
Determining Whether the Product
is Damaged ................................................. Back cover
Table of Contents
4

Introduction
About this Manual
This section provides an overview of each chapter, and describes the notational
conventions used in this manual.
Introduction
In addition to this chapter overview and the notational conventions, this chapter
describes the printer features and important issues with which you should be
familiar before using the printer. Also, “Location and Function of Parts and
Control” required for operation are described.
Preparation
Describes installation of accessories, first-time installation and connection, and
settings related to connection. These preparatory procedures are performed only
when installing the printer.
Operation
This chapter describes installation of ribbon and paper, and printing operations
needed after the preparations of the previous chapter, and before actual printing.
Miscellaneous
Describes technical details such as specifications and troubleshooting procedures
that can be performed by the user.
Notational Conventions
Information related to operation is presented according to the following
conventions.
Reference Information
Internal references in this manual refer to that material by the title of the section
where that material is located.
About Special Notes
Note
is used in this manual to indicate precautions for correct use of the printer.
To prevent damage and avoid trouble or unexpected results, pay careful attention to
these precautions, and the “Handling Precautions” on page 7.
• Macintosh, AppleTalk, EtherTalk and LocalTalk are trademarks of Apple
Computer Inc.
• Windows95 and WindowsNT are registered trademarks of Microsoft Corporation
• Adobe and PostScript are registered trademarks of Adobe Systems Incorporated.
Introduction
5

Features
High Quality Color Printer
The UP-D9500 Digital Color Printer offers high quality, high resolution (300 x 300
dpi and 300 x 600 dpi) and high speed printing of computer image data with full
color (256 gradations and 16.7 million colors).
Two Printing Systems
The printer offers two types of color printing: dye sublimation thermal transfer and
variable dot thermal transfer, simply by changing the ribbon and paper type.
Wide Printing Area
Using A3++ paper, the wide printing area amply allows for printing crop marks
around tabloid or A3-size pages. A printing pack is also available that printing crop
marks for letter and A4-size pages.
Built-In Adobe Pure PostScript Interpreter
High-precision PostScript data can be printed using the internal pure PostScript
interpreter.
Compatible with Major Networks
Network interfaces for all major network systems are provided.
Color Calibration Function
Consistent color rendition is assured by calibration data to compensate for ink
ribbon variations from the factory, stored in memory and read automatically. Color
matching software is supplied for precise color matching.
Easy Operation
Easy operating functions are included, such as automatic print mode switching by
detecting the type of ribbon and paper installed.
Network Control
Printer settings for network connections are set by supplied software, and can be
changed from the computer.
6
Introduction

Handling Precautions
Storing and Moving
• When the printer is not going to be used for a long time, turn off the power
switch, unplug the power cord from the outlet, and remove the ink ribbon and
paper from the printer for storage.
• Before moving the printer, remove the supplied expendables and return them to
the packaging in which they were originally supplied. Moving the printer with
expendables installed could cause damage.
Condensation
Moisture may condense inside the printer if it is moved to a warm location from a
cold one, or if it is placed in a heated room that is steamy or humid. This is referred
to as condensation. If the printer is operated under this condition, it may
malfunction and be damaged. Therefore, if there is any possibility of condensation,
the printer should be turned off and allowed time to reaqch equilibrium with the
environment.
Cleaning
• Refer to “Printer Maintenance” (page 40) for cleaning inside the printer.
• Before cleaning, always turn the printer off and unplug the power cord.
• To clean the cabinet, wipe with a cloth moistened with water or a solution of
synthetic detergent (after wringing out any excess liquid). Then wipe with a dry
cloth.
• Do not use thinner, cleaning fluid, alcohol or chemically treated cloths, as these
could damage the finish.
Introduction
7
Location and Function of Parts and Control
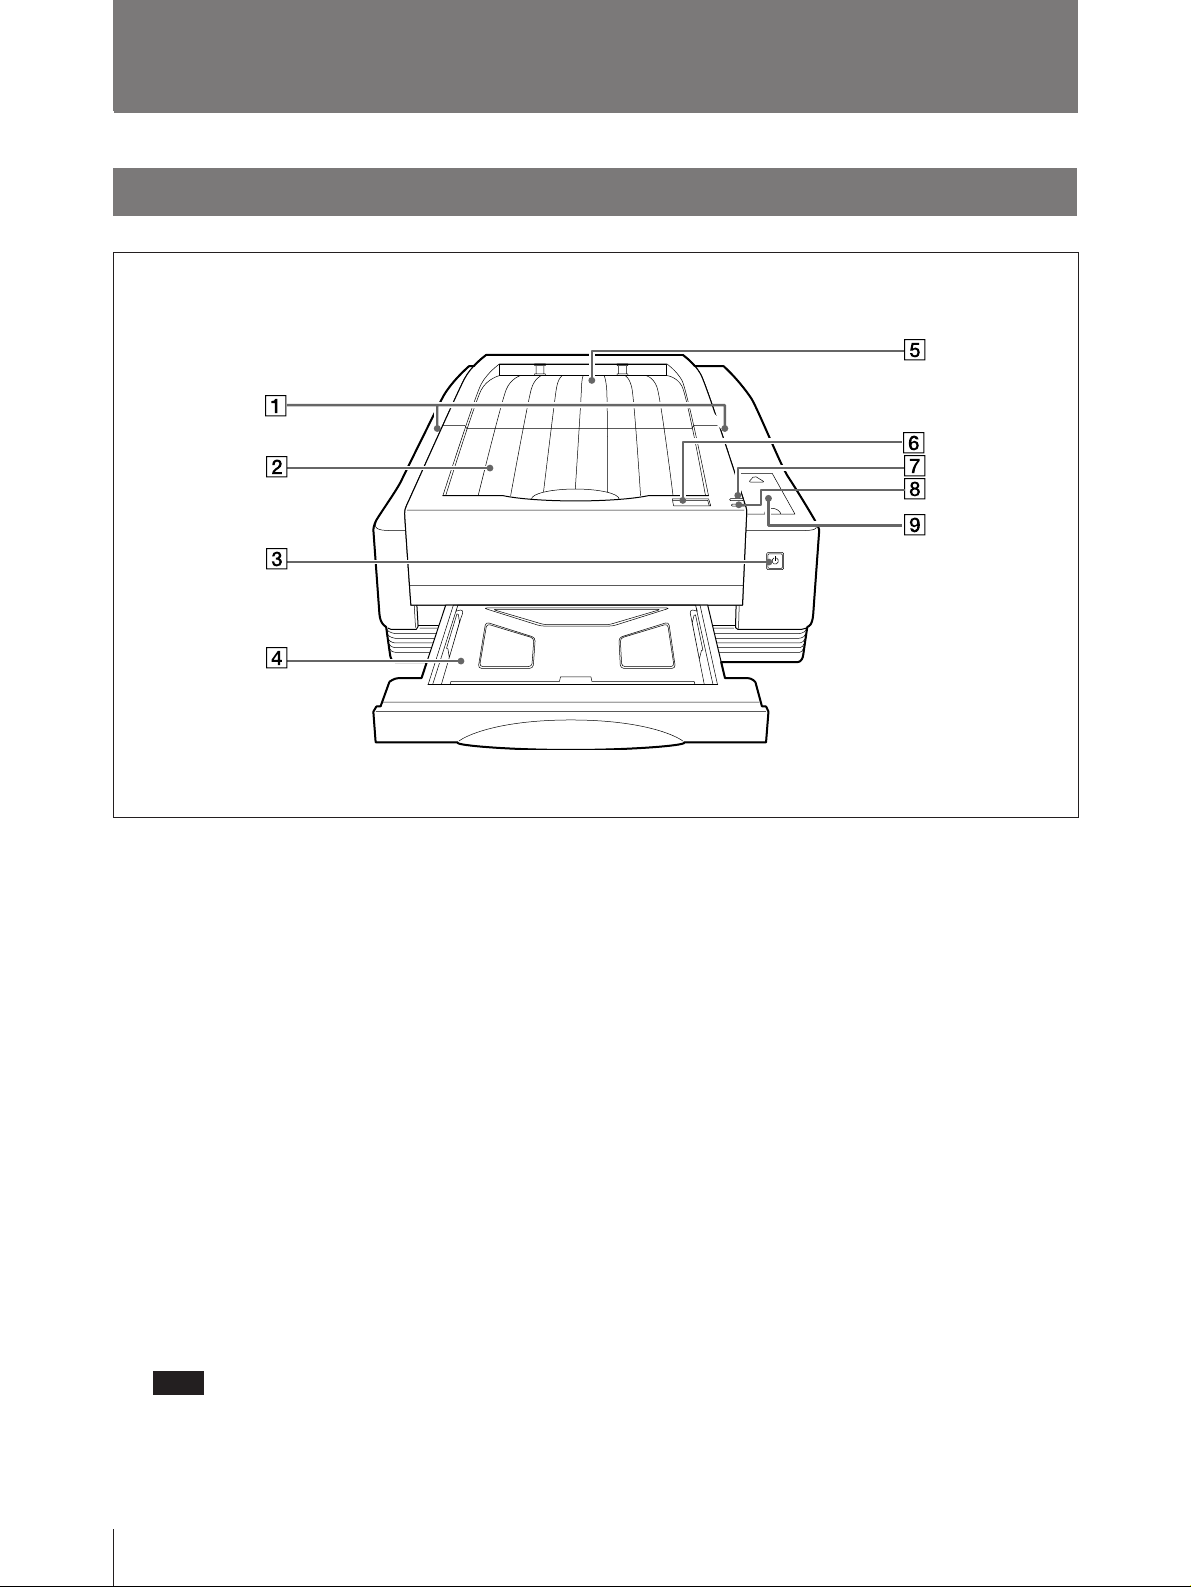
Front
1 RELEASE Lever
Pull this lever to open the top cover when
necessary, such as to replace the ribbon.
2 Front Cover
Printed paper outlet . Open this cover when
necessary to access the inside of the printer to
clear paper jams.
3 POWER Switch
4 Paper Tray
Paper to be printed is placed here.
5 Top Cover
Printed paper outlet. Open this cover when
necessary to access the inside of the printer,
such as when exchanging the ribbon.
Note
Do not open the top cover while the printer is
operating.
6 Printer Window Display
Displays the printer status and menus, and an
error message when an error occurs.
7 ALARM Indicator
Lights when an error, such as a paper jam,
occurs.
8 POWER Indicator
Lights when the printer is on.
8
Introduction
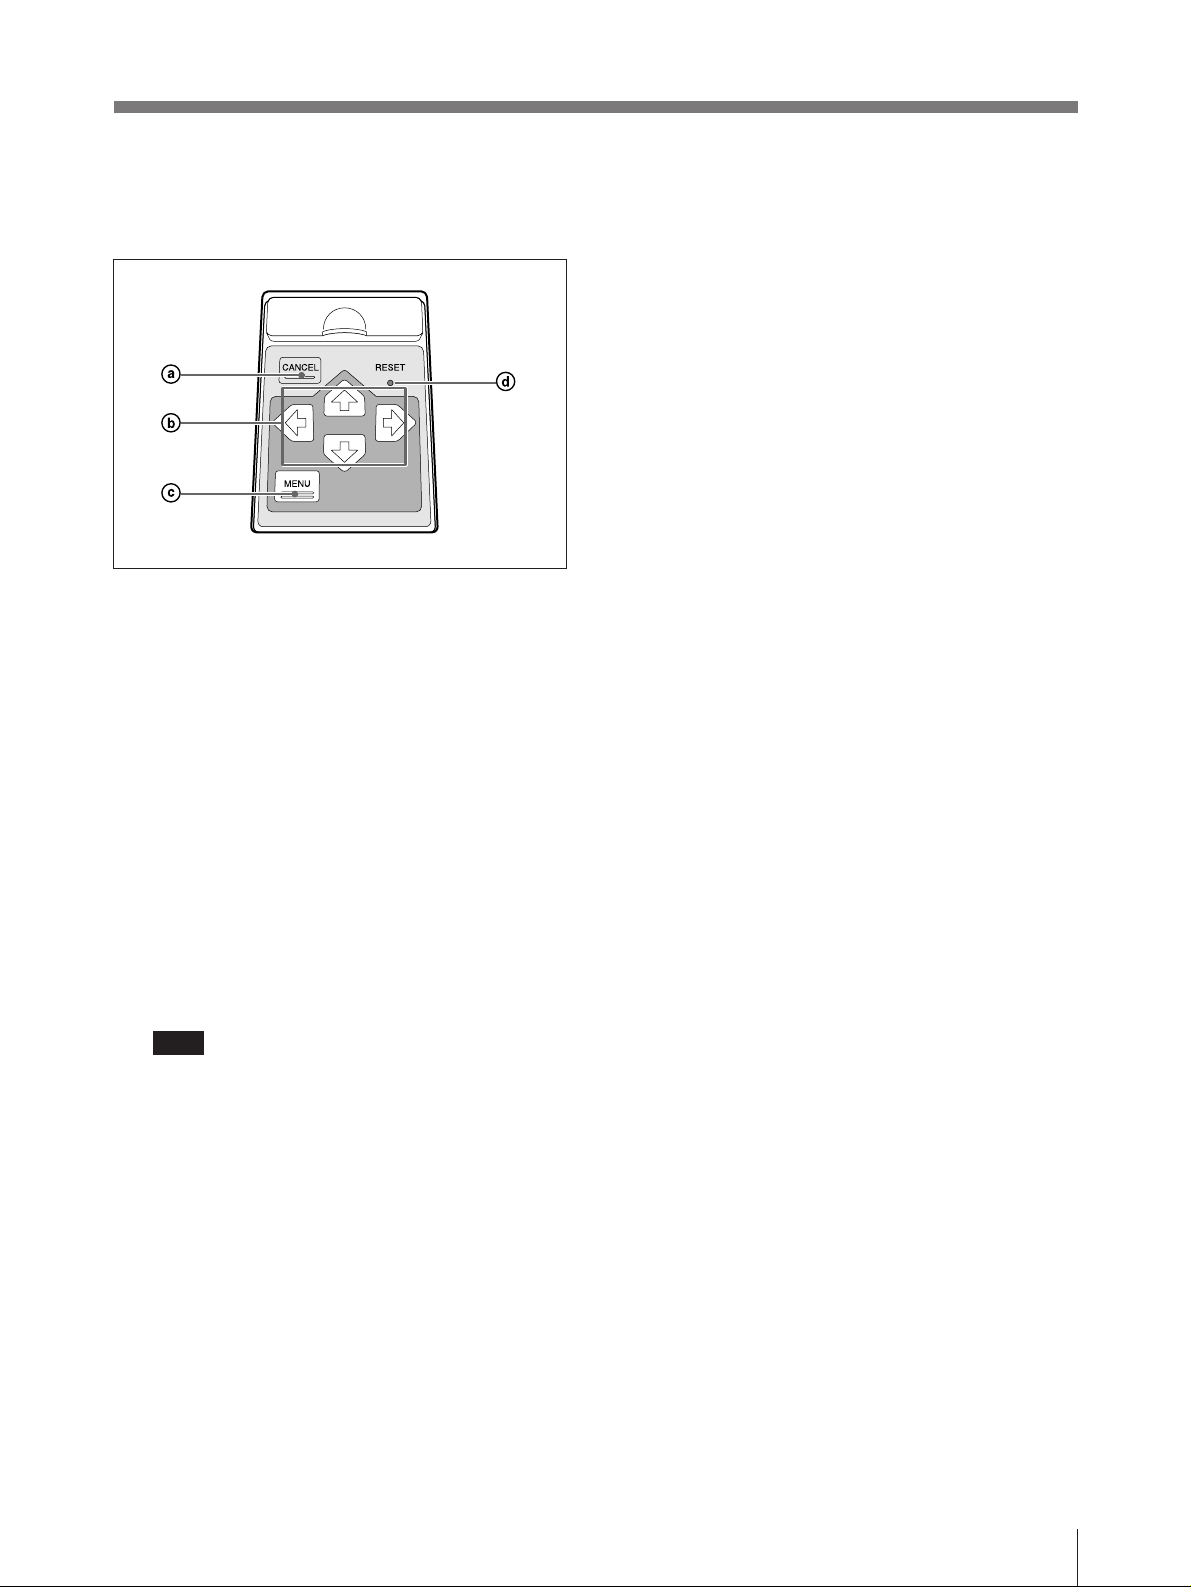
9 Sliding Cover
Open this cover to access the buttons used for
menu operations.
a CANCEL Button
Press to cancel printing.
b Cursor Buttons
Press these buttons to navigate the menus.
c MENU Button
Press to display the MENU screen.
Press again to return to the operating screen
from the MENU screen.
d RESET Switch
Pressing this switch stops all printer
processing and turns the power off.
A thin, pointed tool such as a straightened
paperclip is required to press this switch.
Note
The internal hard disk could be damaged by
pressing the RESET switch at the wrong time.
Press this switch only after operation has been
interrupted by a malfunction.
Introduction
9
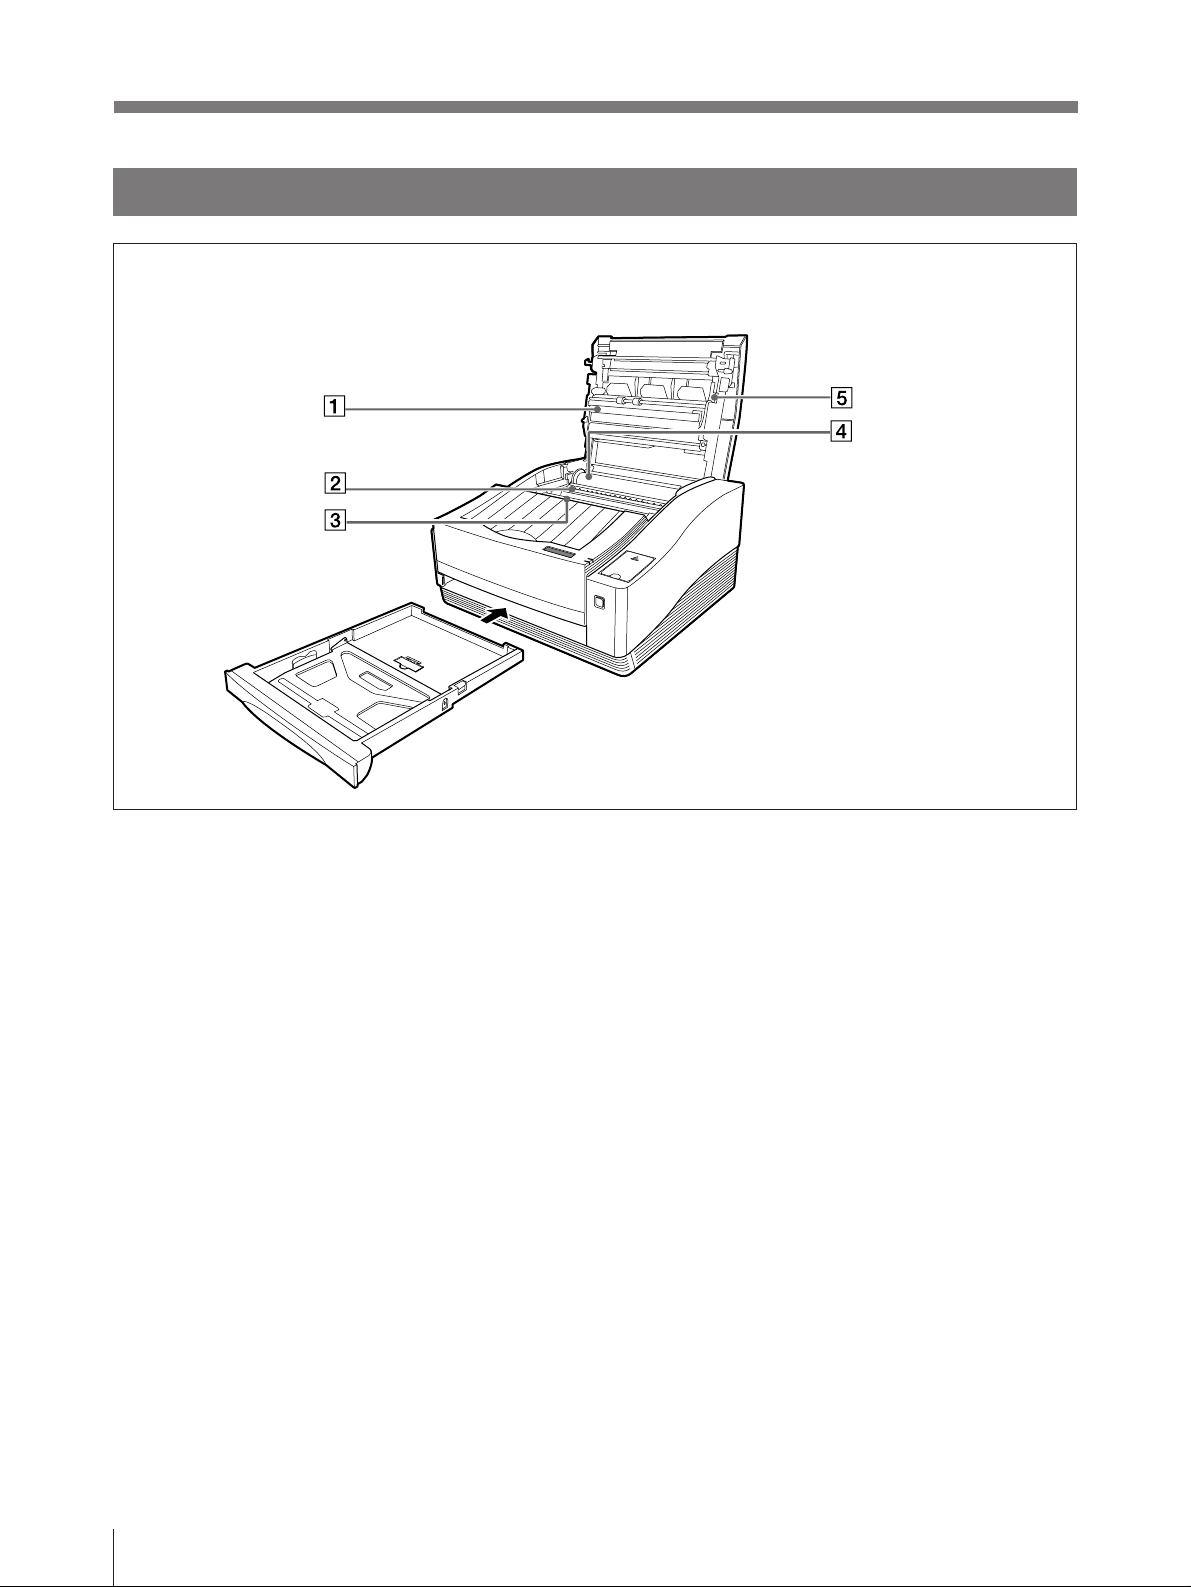
Location and Function of Parts and Control (continued)
Inside
1 Thermal Head
Heats the ink on the ribbon. Do not touch the
head, as you could get burned and degrade
print quality.
2 Ink Ribbon Holder
Holds the ribbon.
3 Lever
Pull this lever to open the front cover when
necessary to clear paper jams.
4 Ink Ribbon
Two types of ribbon can be used: for Dye
Sublimation and Variable Dot Systems.
5 Memory read terminal
Terminal for reading data that is stored in the
ribbon. Avoid touching this terminal, as
damage may result.
10
Introduction
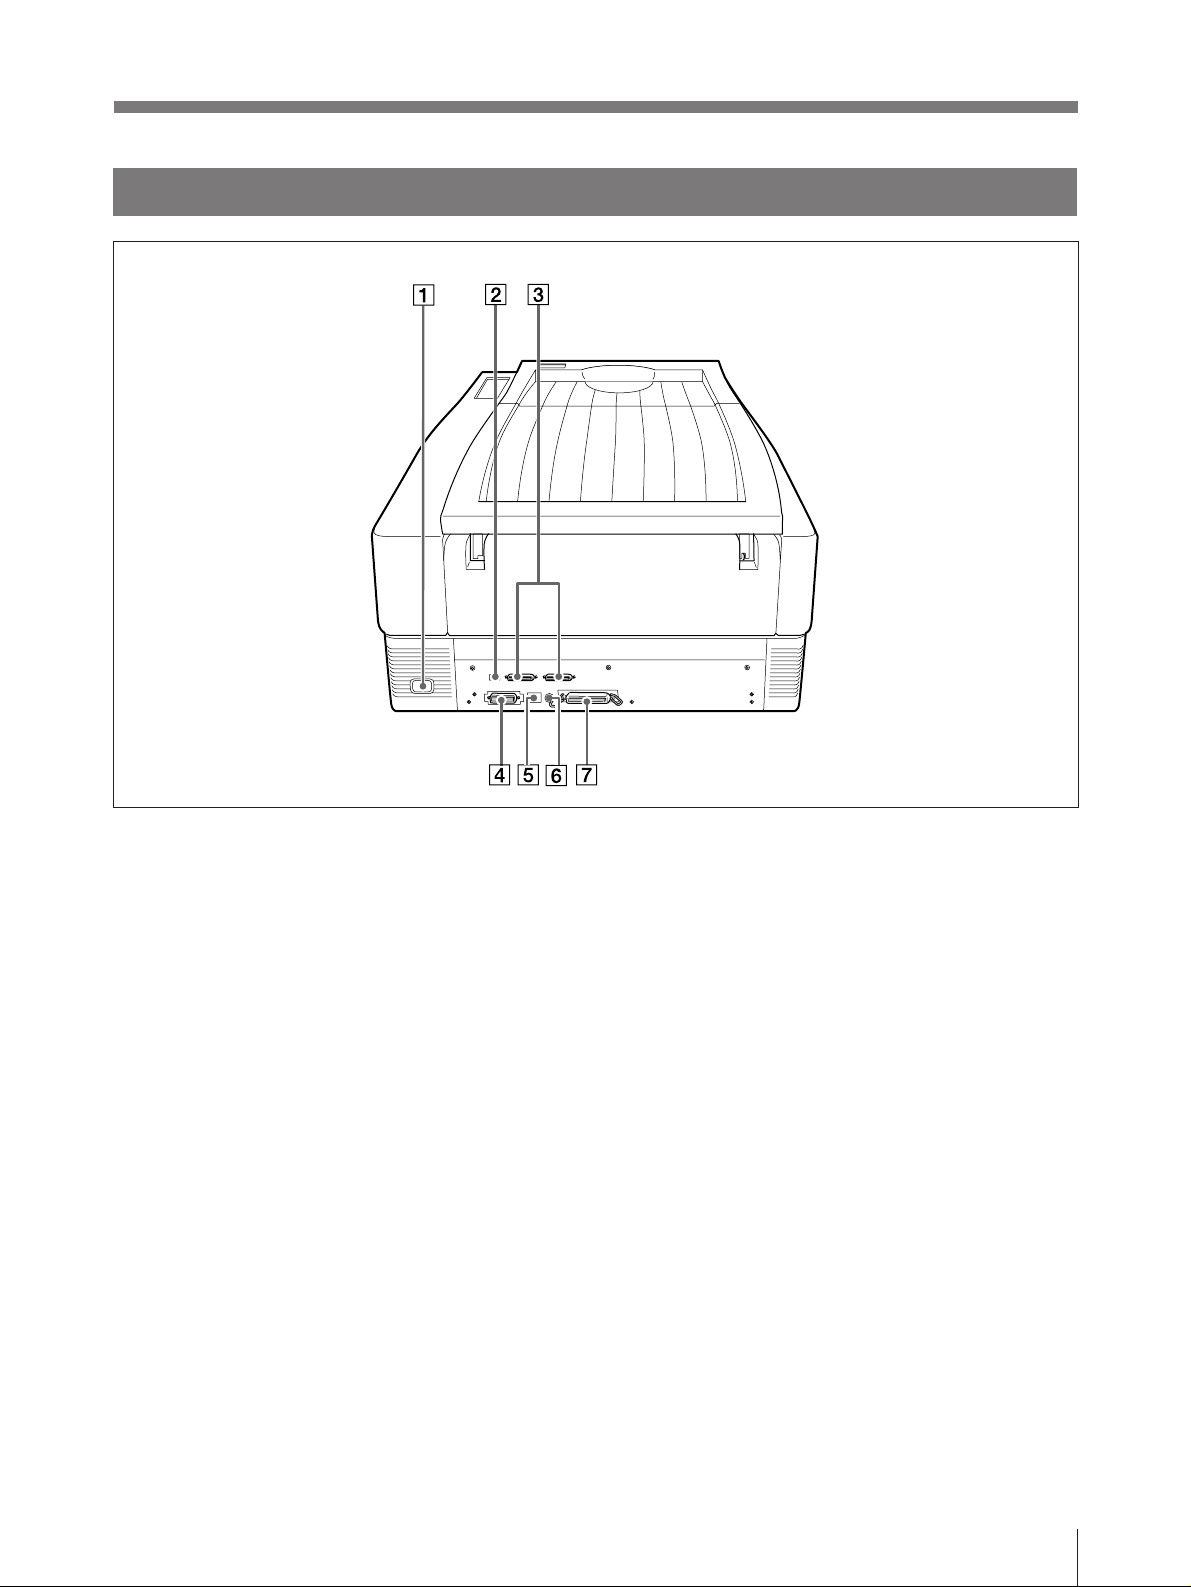
Rear
1 AC Inlet
Connect the supplied power cord here.
2 DIP Switch
Determines the SCSI device ID number of the
printer, and sets the internal terminator on or
off.
3 SCSI Connectors (50-pin, half pitch)
Connect the computer to control the printer
and other SCSI devices with SCSI cables. If
only one of the SCSI connectors on the printer
is used, the internal terminator should be
enabled by the DIP switch.
4 10BASE 5 Connector
The printer may be connected to an Ethernet
network by 10BASE 5 cable connected here.
5 10BASE-T Connector
The printer may be connected to an Ethernet
network by 10BASE-T cable connected here.
6 LocalTalk Connector
The printer may be connected to an AppleTalk
network with a LocalTalk cable connected
here.
7 Parallel Interface Connector
(36-Pin Amphenol)
When the printer is controlled via a PC
parallel port, the parallel printer cable connects
here.
Introduction
11
Preparation
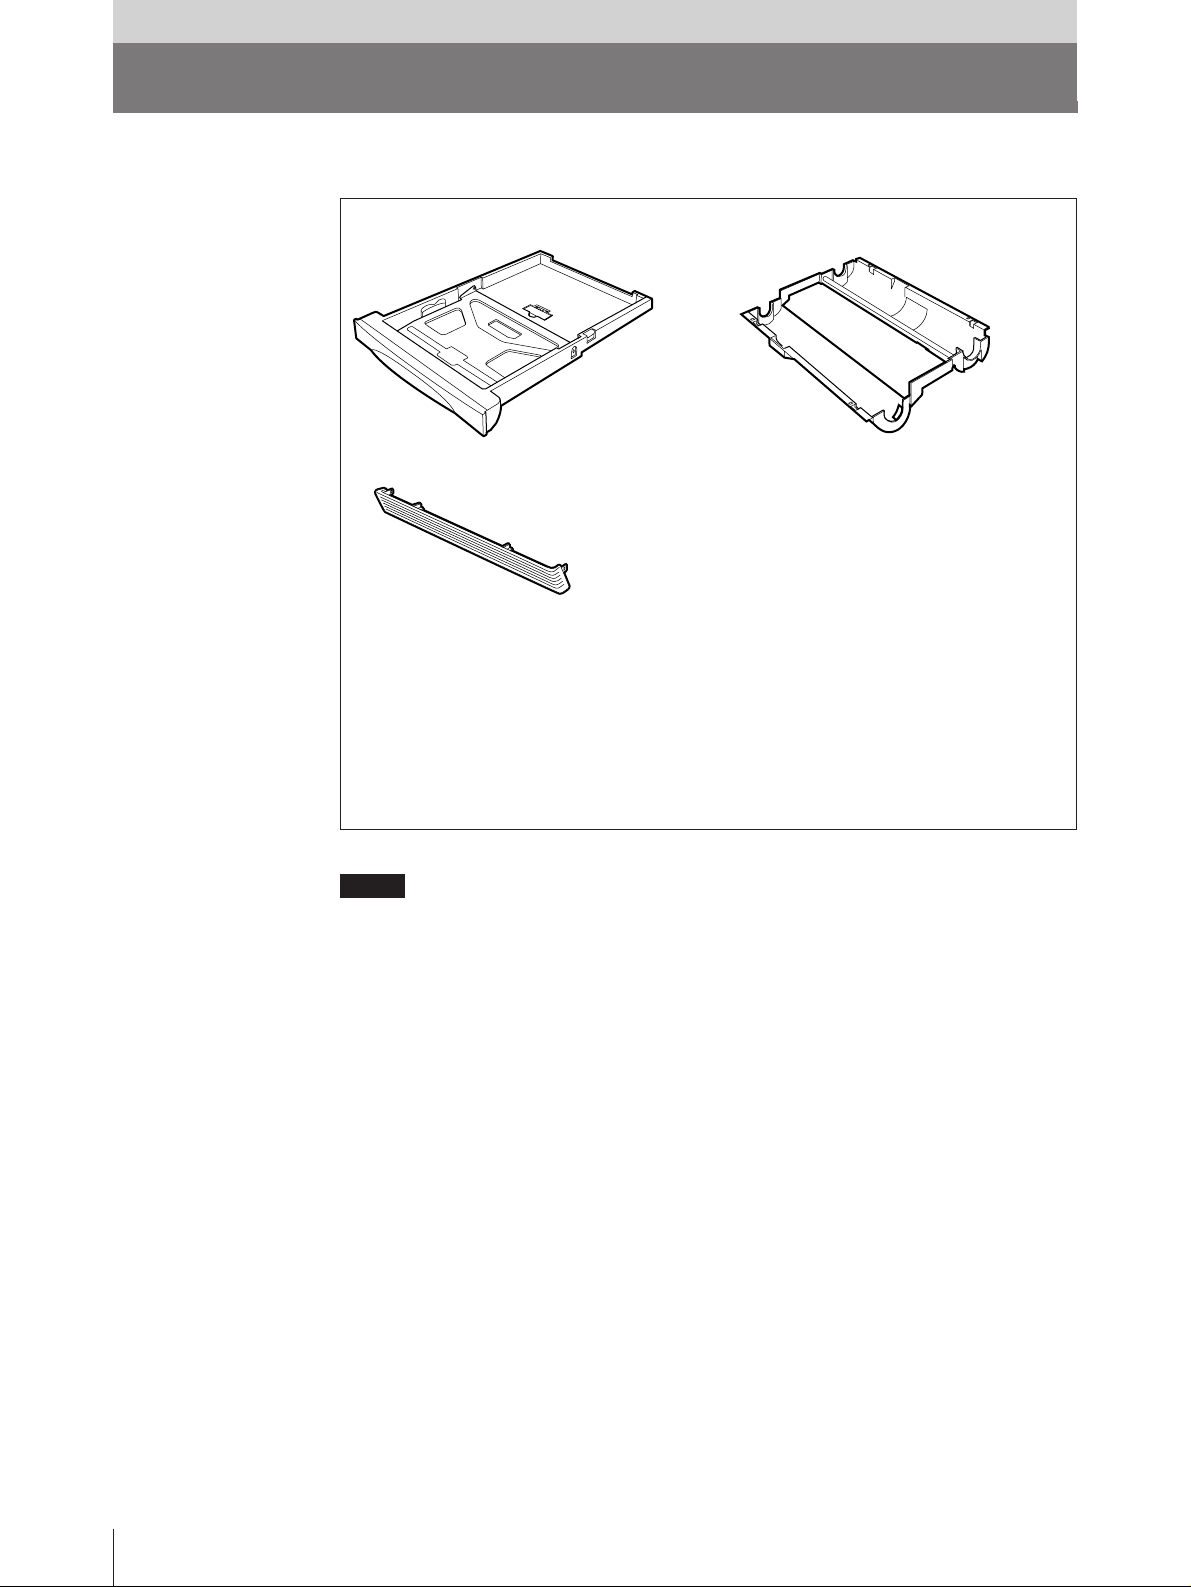
Supplied Accessories
Make certain you have received the following accessories:
Paper Tray (1) Ribbon Holder (1)
Bottom Cover (1)
Power Cord (1)
CD-ROM (1)
Instruction for use
English (2), French (2) (for USA and Canada)
English (2), French (2), German (2) (for Europe)
Warranty Card (1) (USA and Canada only)
Software License Agreement (1)
Registration Card (1) (USA and Canada only)
Head Cleaner (1)
Ribbon holder label (1)
Notes
• The packaging materials are needed when transporting the printer, so we suggest
you keep them. When repacking the printer, see “Repacking the Printer” on page
43.
• Before moving the printer, remove the ribbon holder, bottom cover, and paper
tray.
12
Preparation
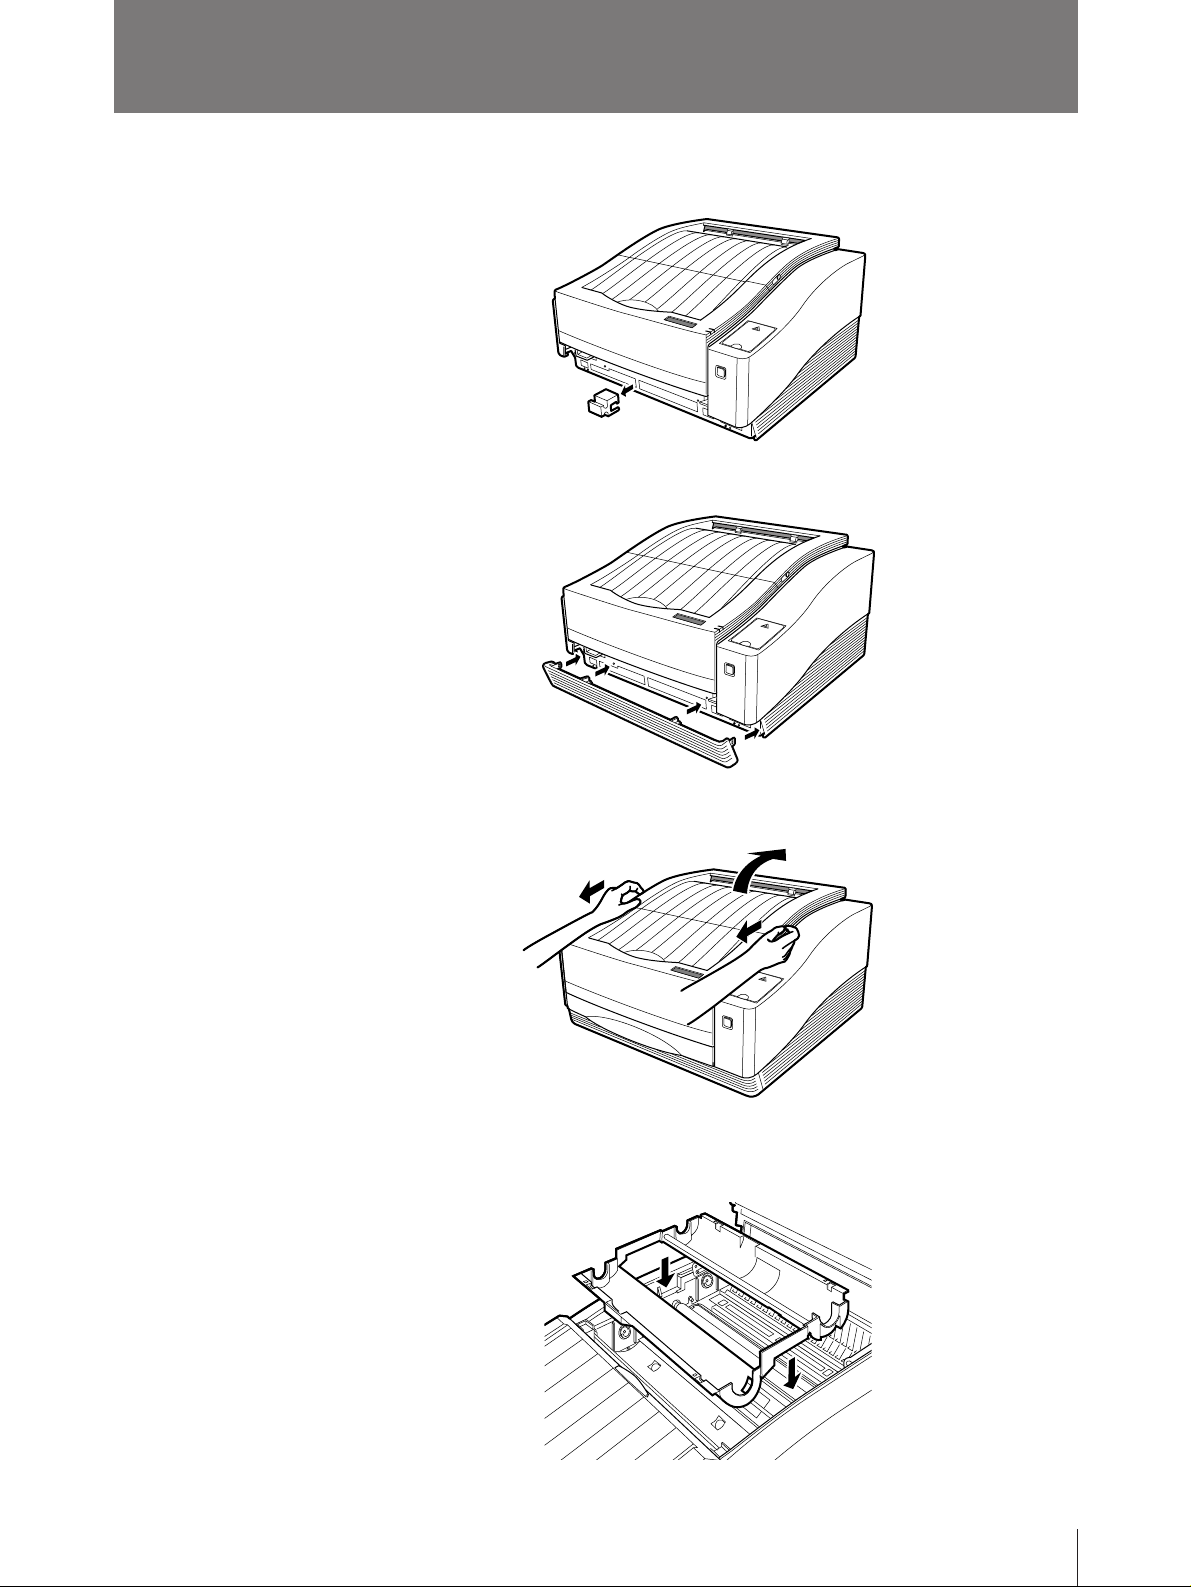
Assembly
1 Remove the protective block from the printer.
2 Install the bottom cover.
3 Pull the release latch and open the top cover.
4 Install the ink ribbon holder.
Refer to “Installing the Ink Ribbon” (page 22) for details.
Preparation
13
Assembly (continued)
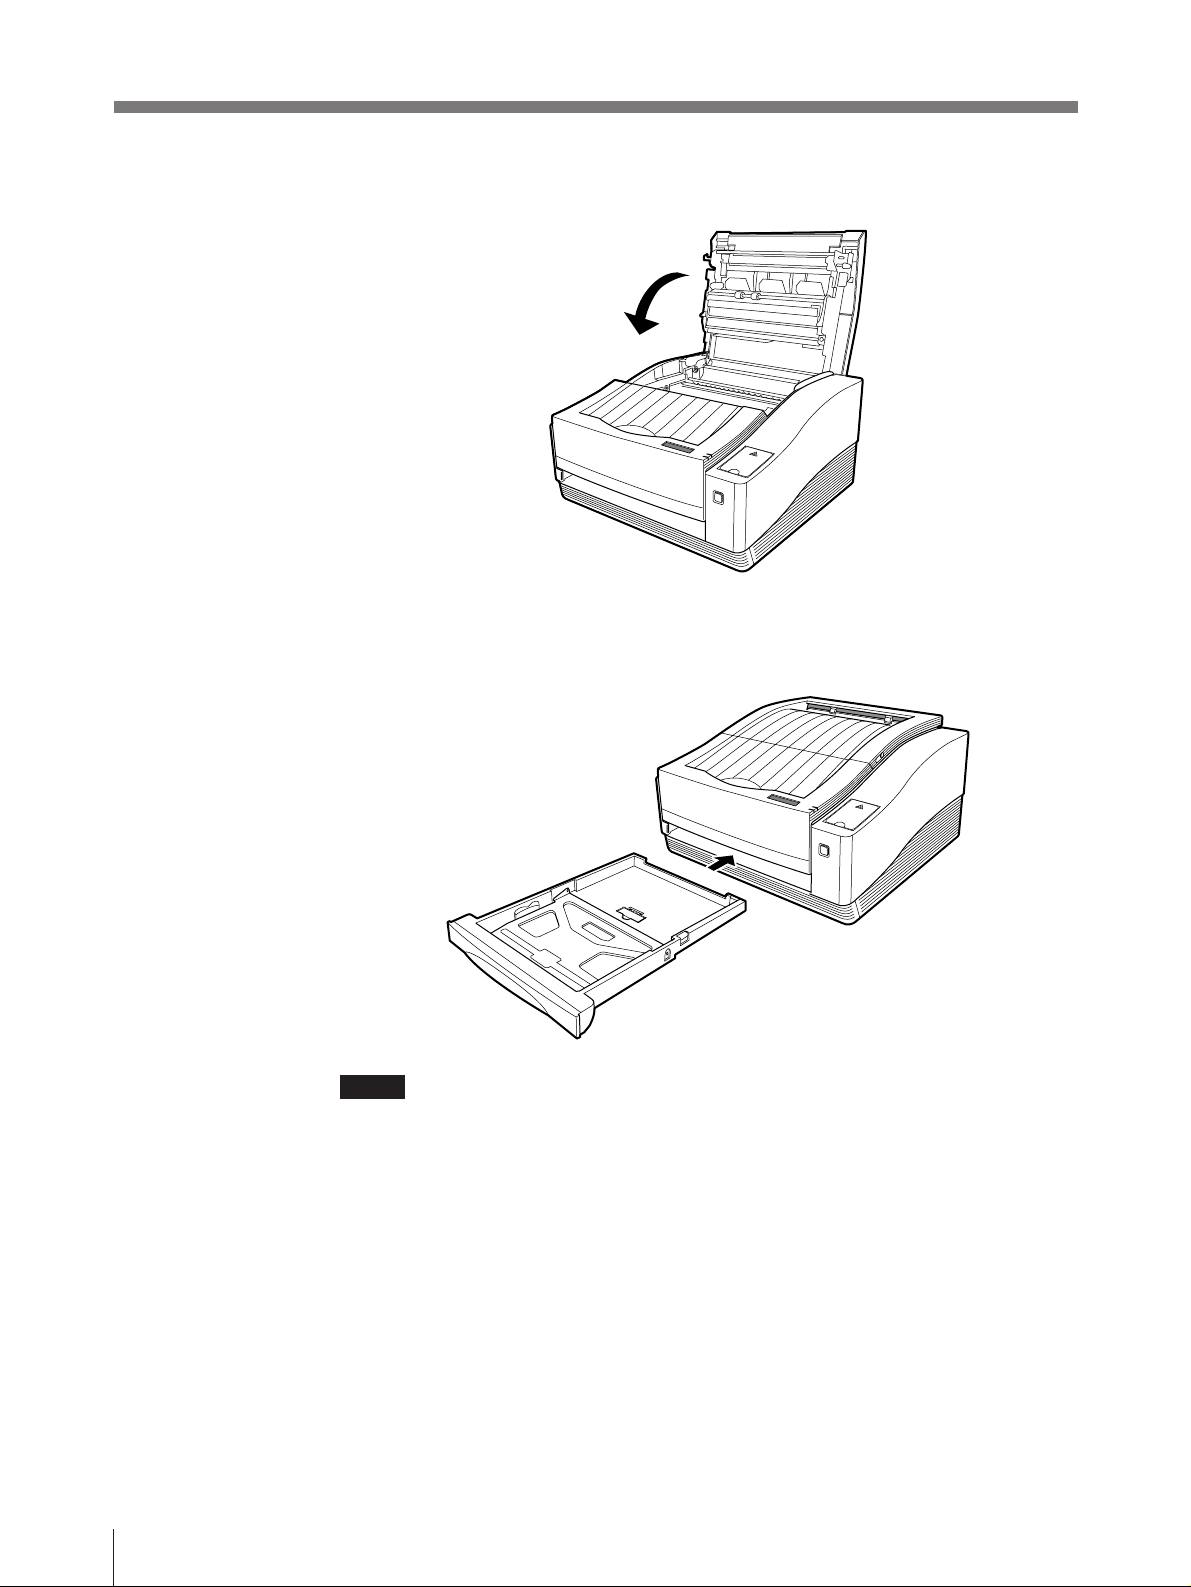
5 Close the top cover.
6 Set the paper tray into the printer.
Refer to “Loading Paper” (page 27) for details.
14
Notes
• Only special ribbon and paper designed for this printer can be used.
• The type of ribbon and paper both depend on the Printing System to be used.
Make sure both match the System you want to use.
Preparation
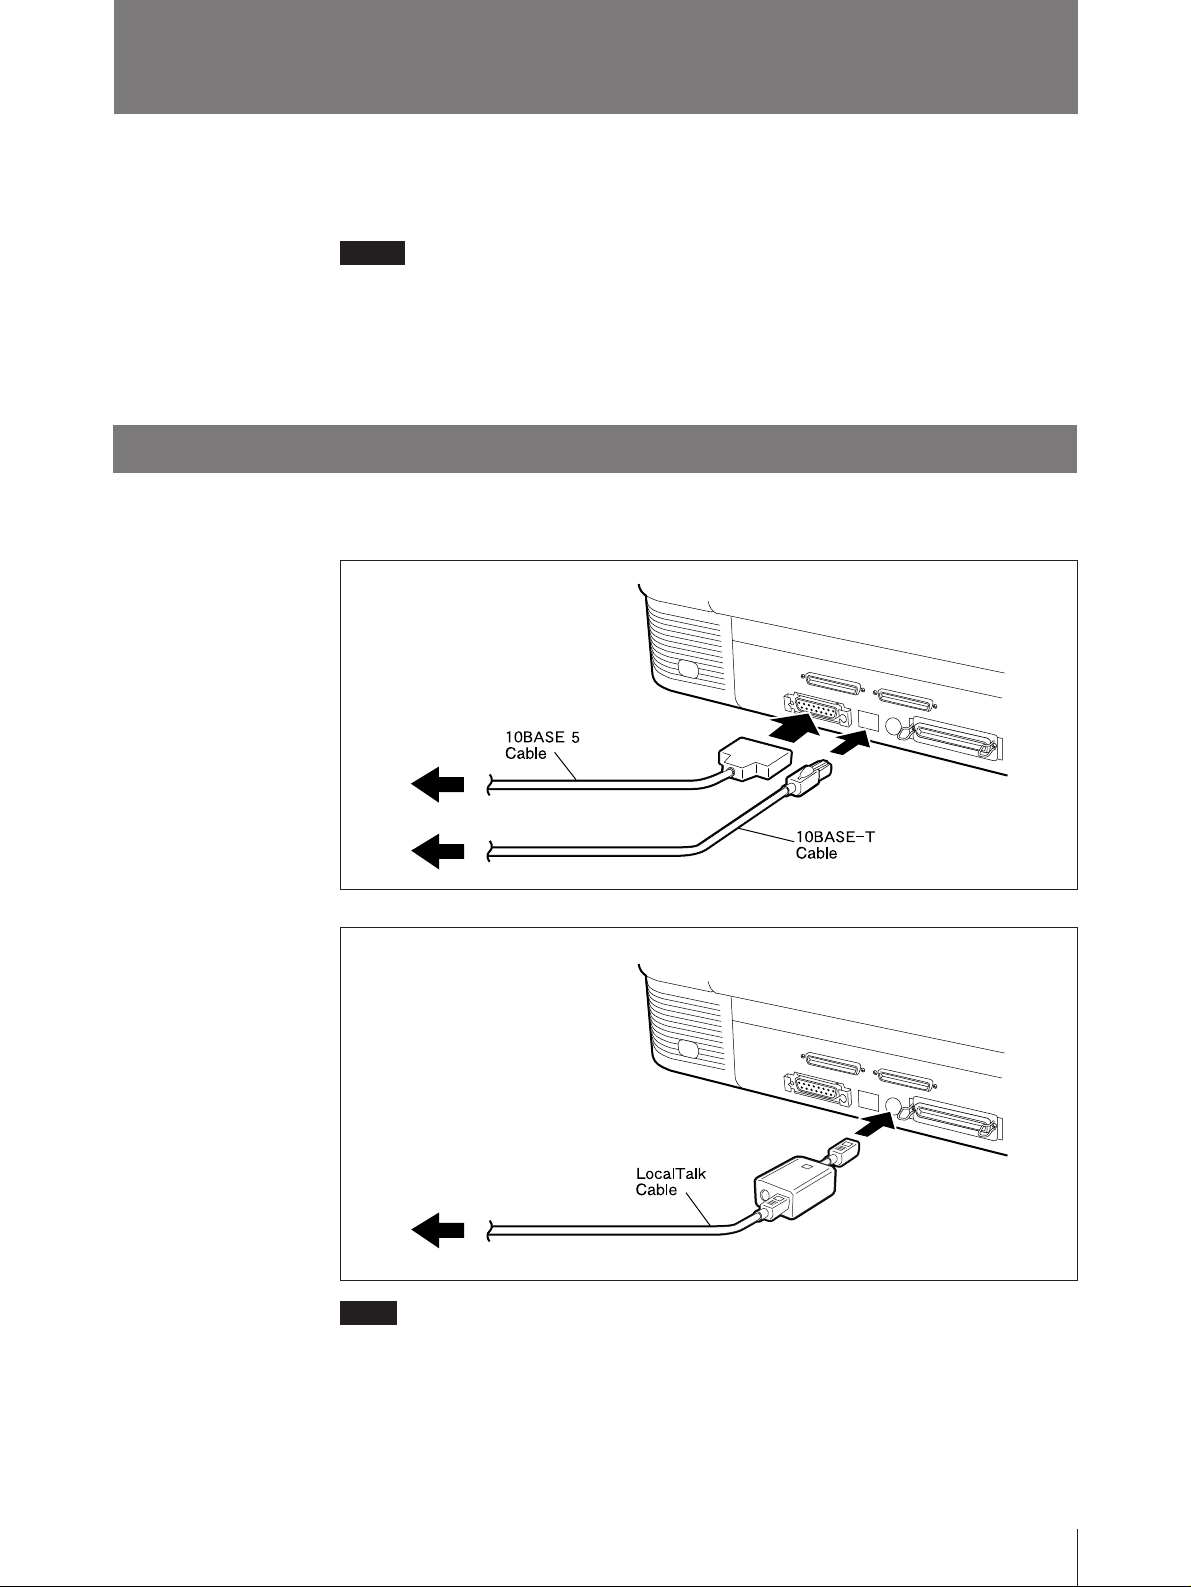
Connections
The UP-D9500 can be connected to networks such as LocalTalk and Ethernet, and
to computers equipped with a parallel or SCSI interface.
Notes
• Be sure to turn off the power to all devices before making connections to the
computer or peripherals.
• Connect the power cord last.
• Refer to the respective manuals for connection of the printer to the computer and
other peripheral devices.
Making AppleTalk Connections
Connect the interface cable to either the 10BASE5 or 10BASE-T connector, as
appropriate.
EtherTalk
LocalTalk
Note
Use only the LocalTalk cable provided by Apple Computer Inc.
Do not connect both 10BASE5 and 10BASE-T cables at the same time.
1 Connect the power cord.
2 Turn on the printer power.
Press and hold the POWER switch for about 3 seconds.
Preparation
15
 Loading...