

Sony UP-CR25L Owner's Manual
Printed in Japan
Digital Photo Printer
4-198-677-01 (1)
ご使用になる前に ________________ JP
Before Using This Printer __________ GB
Avant d’utiliser cette imprimante ___ FR
Vor Verwendung dieses Druckers __ DE
Prima di usare la stampante _______ IT
Antes de utilizar la impresora ______ ES
_ GR
Bu Yazıcıyı Kullanmadan Önce ______ TR
UP-CR25L
お買い上げいただきありがとうございます。
電気製品は安全のための注意事項を守らないと、
火災や人身事故になることがあります。
この取扱説明書には、事故を防ぐための重要な注意事項と製品の取り扱いかたを示しています。
この取扱説明書をよくお読みのうえ、製品を安全にお使いください。お読みになったあとは、
いつでも見られるところに必ず保管してください。
© 2010 Sony Corporation
日本語
安全のために
ソニー製品は安全に充分配慮して設計されています。しかし、電気製品は、まち
がった使いかたをすると、火災や感電などにより死亡や大けがなど人身事故につ
ながることがあり、危険です。
事故を防ぐために次のことを必ずお守りください。
安全のための注意事項を守る
4 〜 6 ページの注意事項をよくお読みください。
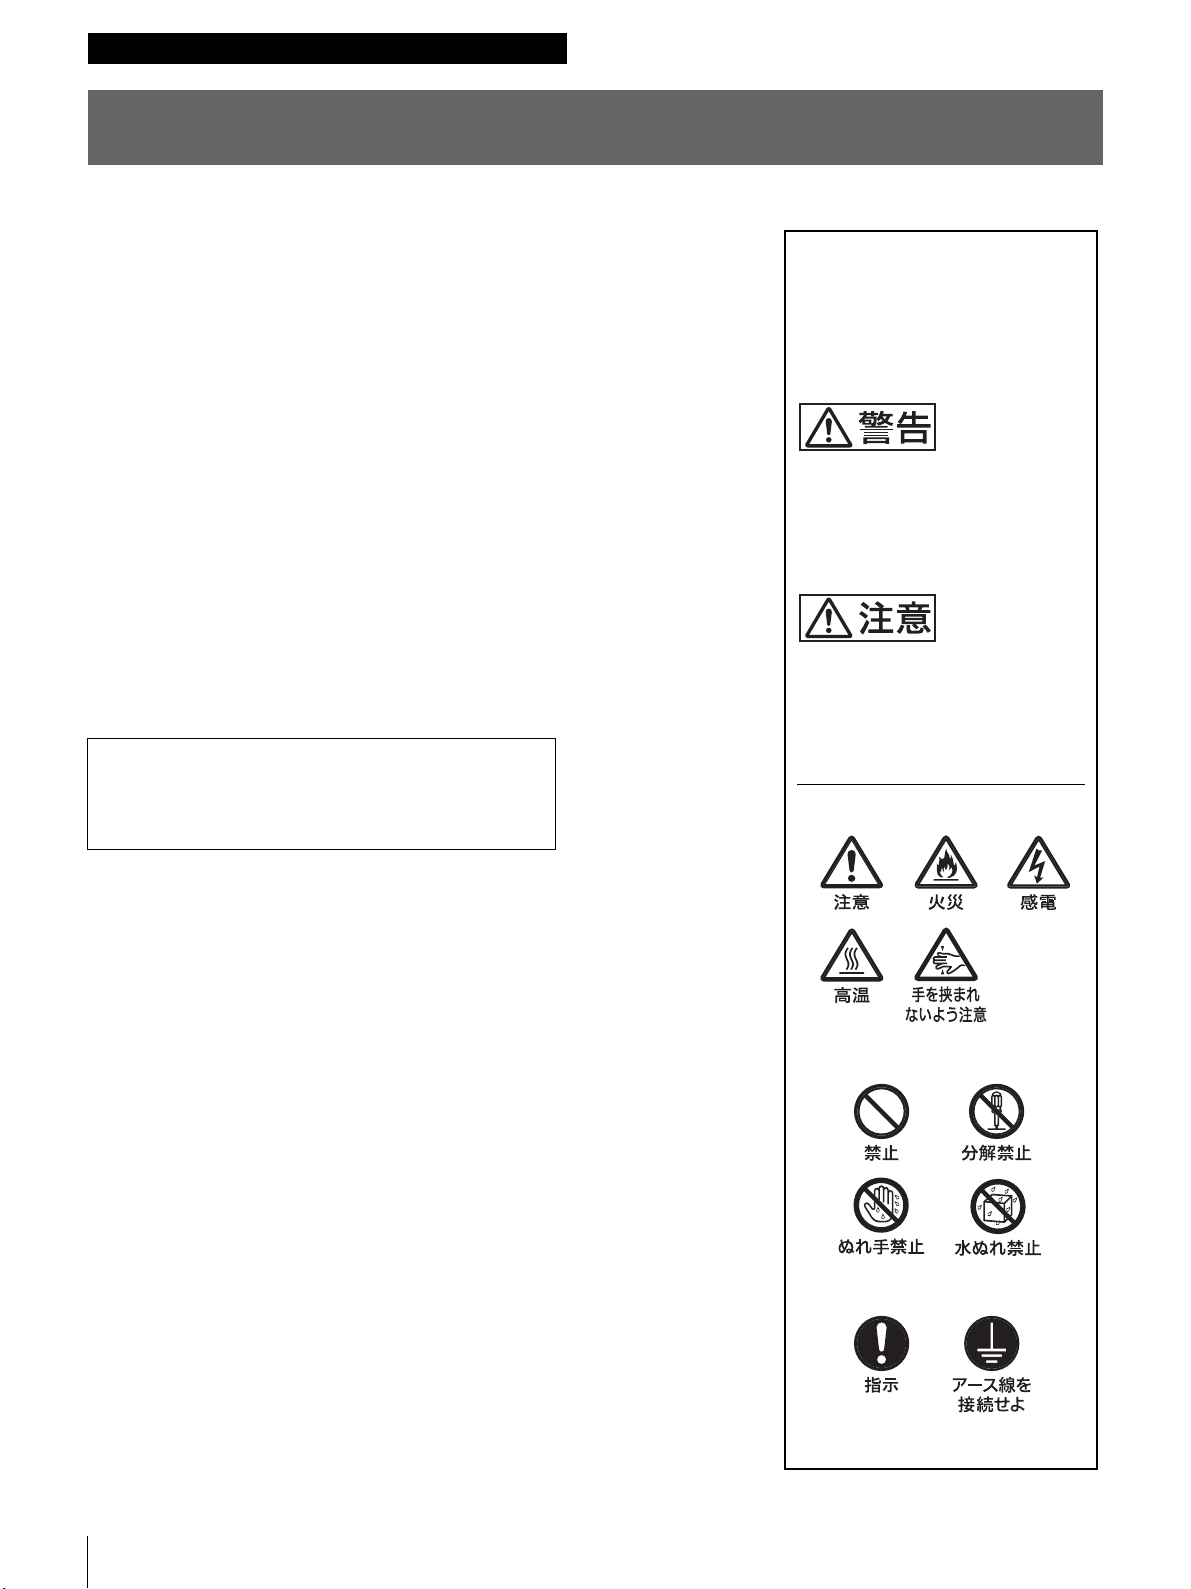
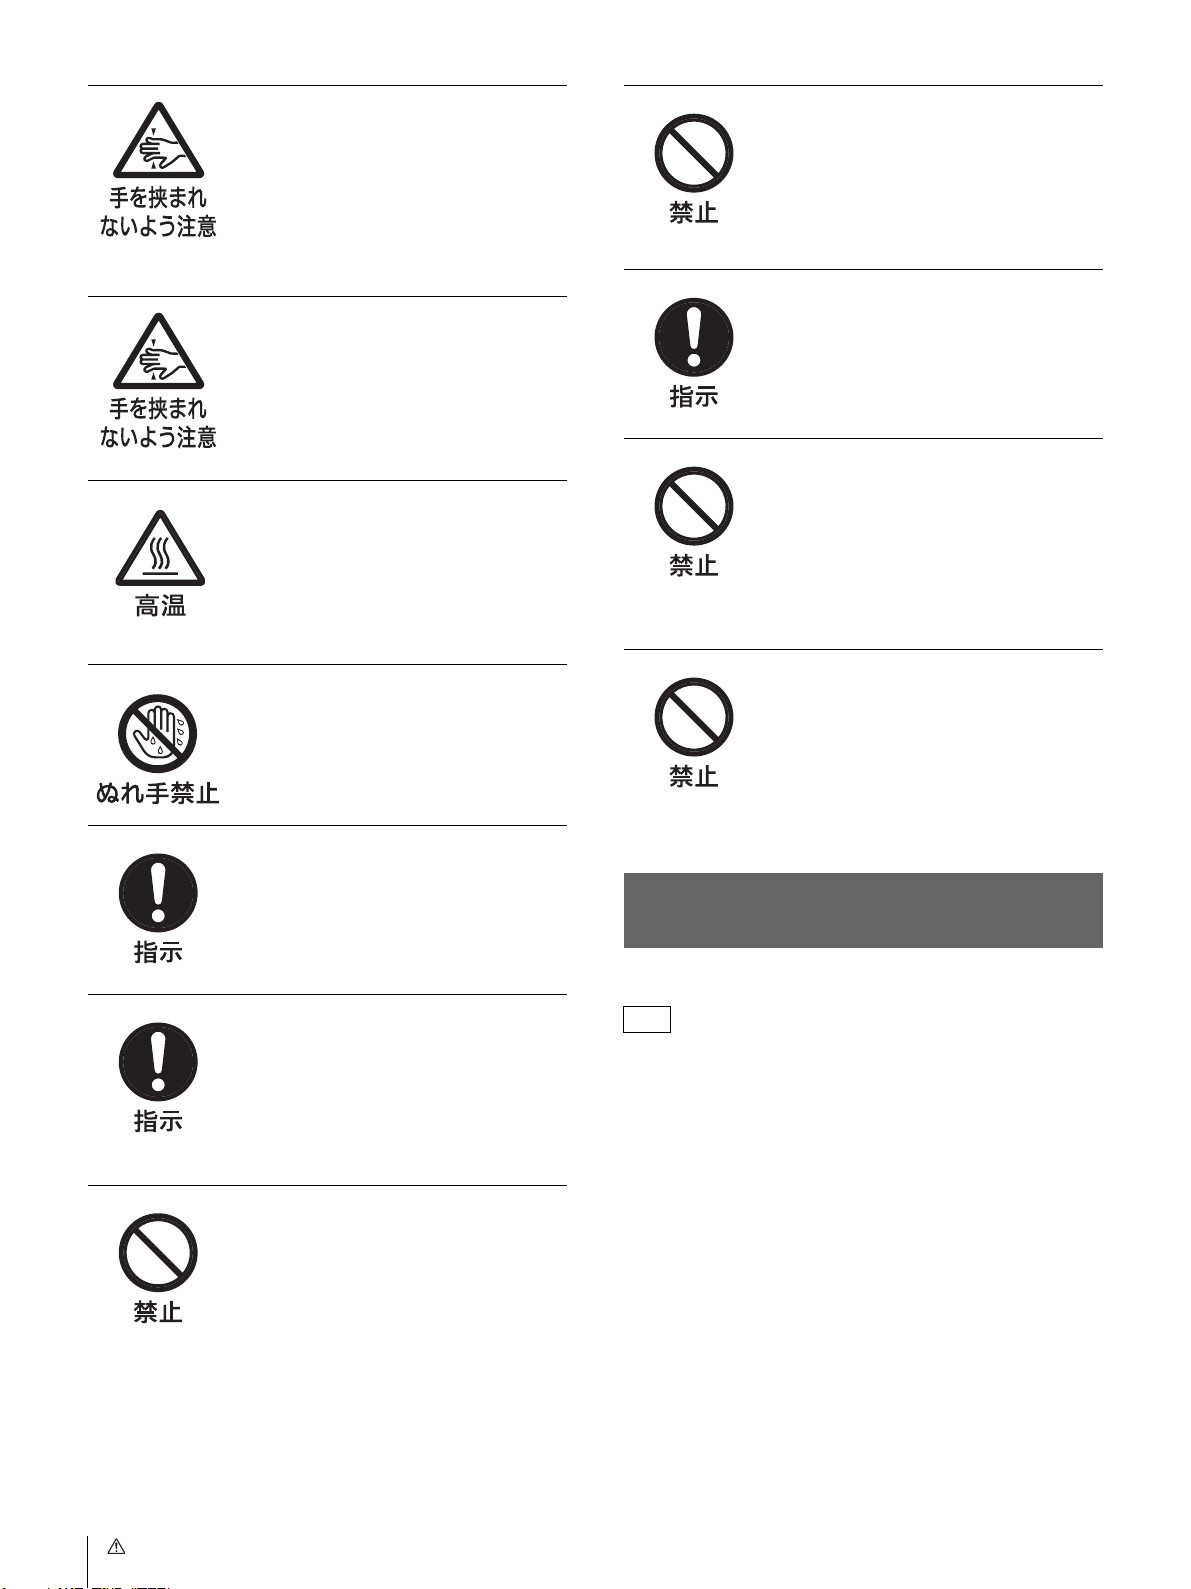
警告表示の意味
取扱説明書および製品では、次の
ような表示をしています。表示の
内容をよく理解してから本文をお
読みください。
定期点検をする
長期間、安全にお使いいただくために、定期点検をすることをおすすめします。
点検の内容や費用については、お買い上げ店またはソニーのサービス窓口にご相
談ください。
故障したら使わない
すぐに、お買い上げ店またはソニーのサービス窓口にご連絡ください。
万一、異常が起きたら
• 煙が出たら
• 異常な音、においがしたら
• 内部に水、異物が入ったら
• 製品を落としたり、キャビネットを破損したときは
m
a 電源を切る。
b 電源コードや接続コードを抜く。
c お買い上げ店またはソニーのサービス窓口に連絡する。
この表示の注意事項を守らないと、
火災や感電などにより死亡や大け
がなど人身事故につながることが
あります。
この表示の注意事項を守らないと、
感電やその他の事故によりけがを
したり周辺の物品に損害を与えた
りすることがあります。
注意を促す記号
行為を禁止する記号
行為を指示する記号
2

目次
警告.............................................................................. 4
注意.............................................................................. 5
CD-ROM マニュアルの使いかた ....................................... 7
準備............................................................................ 7
取扱説明書を読むには............................................... 7
こんなことができます........................................................ 8
最新の情報について ........................................................... 9
設置する............................................................................ 10
電源コードを接続する............................................. 10
起動と終了............................................................... 10
プリント紙・インクリボンを取り付ける ......................... 11
リボンドアのロックを解除する .............................. 11
プリント紙・インクリボンを取り付ける ................ 12
スクラップボックスを取り付ける........................... 14
排紙トレイを取り付ける ......................................... 14
排紙カバーを取り付ける ......................................... 15
管理画面を表示する ......................................................... 15
仕様................................................................................... 16
目次
JP
3
警告
電源コードを傷つけない
電源コードを傷つけると、火災や感電の
原因となることがあります。
• 設置時に、製品と壁やラック、棚など
の間に、はさみ込まない。
• 電源コードを加工したり、傷つけたり
しない。
• 重いものをのせたり、引っ張ったりし
ない。
• 熱器具に近づけたり、加熱したりしな
い。
表示された電源電圧で使用す
る
日本国内では 100 V でお使いください。
製品の表示と異なる電源電圧で使用する
と、火災や感電の原因となります。
• 電源コードを抜くときは、必ずプラグ
をもって抜く。
万一、電源コードが傷んだら、お買い上
げ店またはソニーのサービス窓口に交換
をご依頼ください。
油煙、湯気、湿気、ほこりの
多い場所では設置・使用しな
い
上記のような場所に設置すると、火災や
感電の原因となります。
取扱説明書に記されている使用条件以外
の環境での使用は、火災や感電の原因と
なります。
水にぬれる場所で使用しない
水ぬれすると、漏電による感電発火の原
因となることがあります。
分解や改造をしない
分解や改造をすると、火災や感電、けが
の原因となることがあります。
内部の点検や修理は、お買い上げ店また
はソニーのサービス窓口にご依頼くださ
い。
内部に水や異物を入れない
水や異物が入ると火災や感電の原因とな
ることがあります。
万一、水や異物が入ったときは、すぐに
電源を切り、電源コードや接続コードを
抜いて、お買い上げ店またはソニーの
サービス窓口にご相談ください。
4
警告
注意
安全アースを接続する
安全アースを接続しないと、感電の原因
となることがあります。
次の方法でアースを接続してください。
• 電源コンセントが 3 極の場合
付属の電源コードを使用することで安
全アースが接続されます。
• 電源コンセントが 2 極の場合
付属の 3 極→ 2 極変換プラグを使用
し、変換プラグから出ている緑色の
アース線を建物に備えられているアー
2 人以上で運搬する
本機は重量物ですので、1 人で運搬する
と腰を痛めたり、けがをすることがあり
ます。運搬は本機側面の上側のくぼみを
使用してください。下側のくぼみを使用
すると、手がすべったり、バランスをく
ずしたりして落下し、けがの原因となる
ことがあります。
ス端子に接続してください。
安全アースを取り付けることができない
場合は、お買い上げ店またはソニーの
サービス窓口にご相談ください。
付属の電源コードを使う
付属の電源コードを使わないと、火災や
感電の原因となることがあります。
不安定な場所に設置しない
ぐらついた台の上や傾いたところに設置
すると、倒れたり落ちたりしてケガの原
因となることがあります。また、設置・
取付け場所の強度を充分にお確かめくだ
さい。
通気孔をふさがない
通気孔をふさぐと内部に熱がこもり、火
災や故障の原因となることがあります。
風通しをよくするために次の項目をお守
りください。
• 壁から 10cm 以上離して設置する。
• 密閉された狭い場所に押し込めない。
• 毛足の長い敷物(じゅうたんや布団な
ど)の上に設置しない。
• 布などで包まない。
• あお向けや横倒し、逆さまにしない。
コード類は正しく配置する
電源コードや接続ケーブルは、足に引っ
かけると本機の落下や転倒などによりけ
がの原因となることがあります。
充分注意して接続・配置してください。
製品の上に乗らない、重いも
のを乗せない
倒れたり、落ちたり、壊れたりして、け
がの原因となることがあります。
プリント紙排出口をのぞかな
い
プリント紙排出口からプリントされたプ
リント紙が排出されますので、のぞきこ
むと失明やけがの原因となることがあり
ます。
プリント紙の排出口はのぞがないでくだ
さい。
注意
5
前扉の開閉の際に手や指をは
さまない
プリンター内部に手を入れな
い
前扉を開閉するときに手や指をはさみ、
けがの原因となることがあります。
また、前扉を開いたままで使用しないで
ください。
表示パネルを閉めるときに指
を挟まないように注意する
表示パネルを閉めるときは、表示パネル
と本体の間に指を挟まれないように注意
してください。
プリント直後サーマルヘッド
に触れない
プリント直後は、サーマルヘッドが熱く
なっている場合があり、触れるとやけど
の原因となることがあります。
ぬれた手で電源プラグをさわ
らない
ぬれた手で電源プラグを抜き差しする
と、感電の原因となることがあります。
リボン交換時に開口部から手を無理に奥
に入れると、内部の突起や可動部によっ
て、けがをするおそれがあります。
プリント紙は縦置きする
横に置くと回転して落下し、けがの原因
となることがあります。
DVD トレイやメモリーカー
ドスロットをのぞかない
DVD トレイやメモリカードスロットを
のぞき込むと、排出されたトレイやメモ
リカードで失明やけがの原因となること
があります。
表示パネルに無理な力をかけ
ない
表示パネルのガラスが割れて、けがの原
因となることがあります。
お手入れの際は、電源を切る
電源を接続したままお手入れをすると、
感電の原因となることがります。
電源コードのプラグ及びコネ
クターは突き当たるまで差し
込む
真っ直ぐに突き当たるまでさしこまない
と、火災や感電の原因となります。
排紙トレイは、人通りの妨げ
になる場所には設置しない
設置された排紙トレイが通路に飛び出し
ていると、通行人がぶつかってけがをす
るおそれがあります。
その他安全上のご注意
注意
ここに規定した以外の手順による制御および調整は、危険
なレーザー放射の被爆をもたらします。
本機は「クラス 1 レーザー製品」です。
6
注意

CD-ROM マニュアルの
使いかた
付属の CD-ROM には UP-CR25L の取扱説明書が記録され
ています(日本語、英語、フランス語、ドイツ語、イタリ
ア語、スペイン語、ギリシャ語およびトルコ語)。
この取扱説明書は PDF(PortableDocumentFormat) ファイ
ルで作成されています。
準備
付属の CD-ROM に収納されているオペレーションマニュア
ルを使用するためには、以下のソフトウェアがコンピュー
ターにインストールされている必要があります。
• AdobeReader6.0以上
メモ
AdobeReader がインストールされていない場合は、下記
URL よりダウンロードできます。
http://www.adobe.com/jp/
窓口のご案内(付属)にあるソニーのご相談窓口にご依頼
ください(有料)。
Adobe および AdobeReader は、AdobeSystemsIncorporated(アド
ビシステムズ社)の商標です。
取扱説明書を読むには
CD-ROM に収納されている取扱説明書を読むには、次のよ
うにします。
1
CD-ROM を、CD-ROM ドライブに入れます。
2
InstructionsForUse フォルダ内の、読みたい言語の取
扱説明書を選択します。
メモ
• ほかの説明書をお読みになる場合は、CD-ROM に収納さ
れている Readme ファイルで説明書の収納先フォルダを
確認してください。
• AdobeReader のバージョンによって、ファイルが正しく
表示されないことがあります。正しく表示されない場合
は、「準備」の項の URL より最新のソフトウェアをダウ
ンロードしてください。
ご注意
CD-ROM が破損または紛失したため、新しい CD-ROM を
ご希望の場合は、お買い上げ店、または業務用製品ご相談
CD-ROM マニュアルの使いかた
7

ワイヤレス機器を使って簡単にプリント
こんなことができます
本機は、デジタルカメラなどで撮影した画像データをメモ
リーカードや CD/DVD などから読み込んで手軽にプリン
トできます。
本機には次の特長があります。
多彩なプリントサービス
通常のプリントに加え、分割写真やフレームつきプリント、
インデックスプリントができます。
また、トリミングや色の調整など、撮影した画像を編集し
てプリントできます。
オーダー番号やファイル名を透かし状にプリントでき、プ
リントの仕分けが容易になります。
選べる操作モード
本機を使用する用途に合わせて、フル機能モード、簡易
モード、イベントモードの 3 つの操作モードが選べます。
各種のメモリーカードや CD/DVD に対応
デジタルカメラ用の主要な記憶メディアである、メモリー
スティックや xD- ピクチャーカード、SD カード、マル
チメディアカード、コンパクトフラッシュ、マイクロドラ
イブに対応しています。
また、USB メモリーやパソコンで作成した CD/DVD にも
対応しています。
高速で高画質なプリント
新開発の昇華熱転写方式のプリントエンジンにより、保存
性に優れた美しい画像がすばやくプリントできます。
タッチパネルで簡単操作
10.4 インチタッチパネル式ディスプレイを採用し、画面に
触れるだけで簡単に操作できます。
別売りの BluetoothUSB アダプター1)を使用すると、携帯
電話などの Bluetooth 対応機器からワイヤレスで画像を転
送してプリントできます。Bluetooth 通信を使って画像を転
送した場合も、メモリーカードから読み込んでプリントす
る場合と同様の多彩なプリントサービスが利用できます。
別売りのワイヤレスアダプター
作なしに、ワイヤレス機能を搭載したデジタルカメラから
画像を転送してプリントすることができます。
なお、この機能を使う場合は拡張コンパクトフラッシュが
必要です。
1) ご使用になれる BluetoothUSB アダプターについては、「仕様」
の「別売り品」(18 ページ)をご覧ください。なお、ご使用の
国・地域によっては、販売しておりません。お買い上げ店、ま
たはお近くのソニーサービス窓口にご相談ください。
2) サイレックステクノロジー社製 SX-WSG1 が必要です。ご使用の
国・地域によっては販売しておりません。お買い上げ店、また
はお近くのソニーサービス窓口にご相談ください。
対応するデジタルカメラや本機の詳細情報については、UPCR25L のサポートページ(http://www.sony.co.jp/snaplab)を
ご覧ください。
2)
を使用すると、本機の操
ロゴや文字などの透かしプリント
ロゴや文字などお好みのデザインを拡張コンパクトフラッ
シュに入れてセットしておくと、そのデザインを写真上に
透かしのように入れてプリントすることができます
(ウォーターマーク)。
プリンターの増設
本機の USB 端子に、別のプリンターを接続することができ
1)
ます。
ズの用紙をセットしてプリントサイズを増やしたり、本機
と同じサイズの用紙をセットして本機の用紙がなくなった
ときに自動的に増設プリンターに切り替えてプリントする
ことができます。
1) 対応するプリンターや詳細情報については、UP-CR25L のサ
これにより、増設プリンターに本機と異なるサイ
ポートページ(http://www.sony.co.jp/snaplab)をご覧くださ
い。
オリジナルデータでカスタマイズ
プロモーション用の画像やフレームデータの入ったメモ
リーカード(拡張コンパクトフラッシュ)を拡張スロット
にセットしておけば、待機時に広告を表示したり、フレー
ムを合成したプリントができます。
タにはオリジナルの画像が使えます。
1) 市販のコンパクトフラッシュやマイクロドライブが必要です。
こんなことができます
8
1)
広告やフレームデー
パソコンからプリント
付属の USB ケーブルを使って本機とパソコンを接続すると、
パソコンから送ったデータを本機でプリントできます。
1) パソコンと本機を接続する前に、付属のプリンタードライバー
をインストールする必要があります。プリンタードライバーの
最新情報については UP-CR25L のサポートページ(http://
www.sony.co.jp/snaplab)をご覧ください。
1)

一体型のコンパクトなボディ
ディスプレイとプリンターが一体になったコンパクトなボ
ディなので、店頭のカウンターなど、限られたスペースに
も設置できます。
また、ディスプレイは操作スタイルに合わせて 4 段階に角
度を調整できます。
最新の情報について
最新の情報については、UP-CR25L のサポートページ
(http://www.sony.co.jp/snaplab)をご覧ください。
最新の情報について
9
設置する
電源コードを接続する
付属の電源コードの電源プラグを本機の〜 ACIN 端子に接
続し、もう一方をコンセントに差し込みます。
コンセントが 2 芯の場合は、コンセント側の電源プラグに
付属の 3 極→ 2 極変換プラグを装着してください。このと
き、変換プラグに付いている緑色のアース線を必ず建物の
アース端子に接続してください。
3 極→ 2 極変換プラグをご使用になる場合のご注意
アースの接続は、必ず電源プラグをコンセントへ差し込む
前に行ってください。アースを取りはずす場合は、必ず電
源プラグをコンセントから抜いてから行ってください。
本機
起動と終了
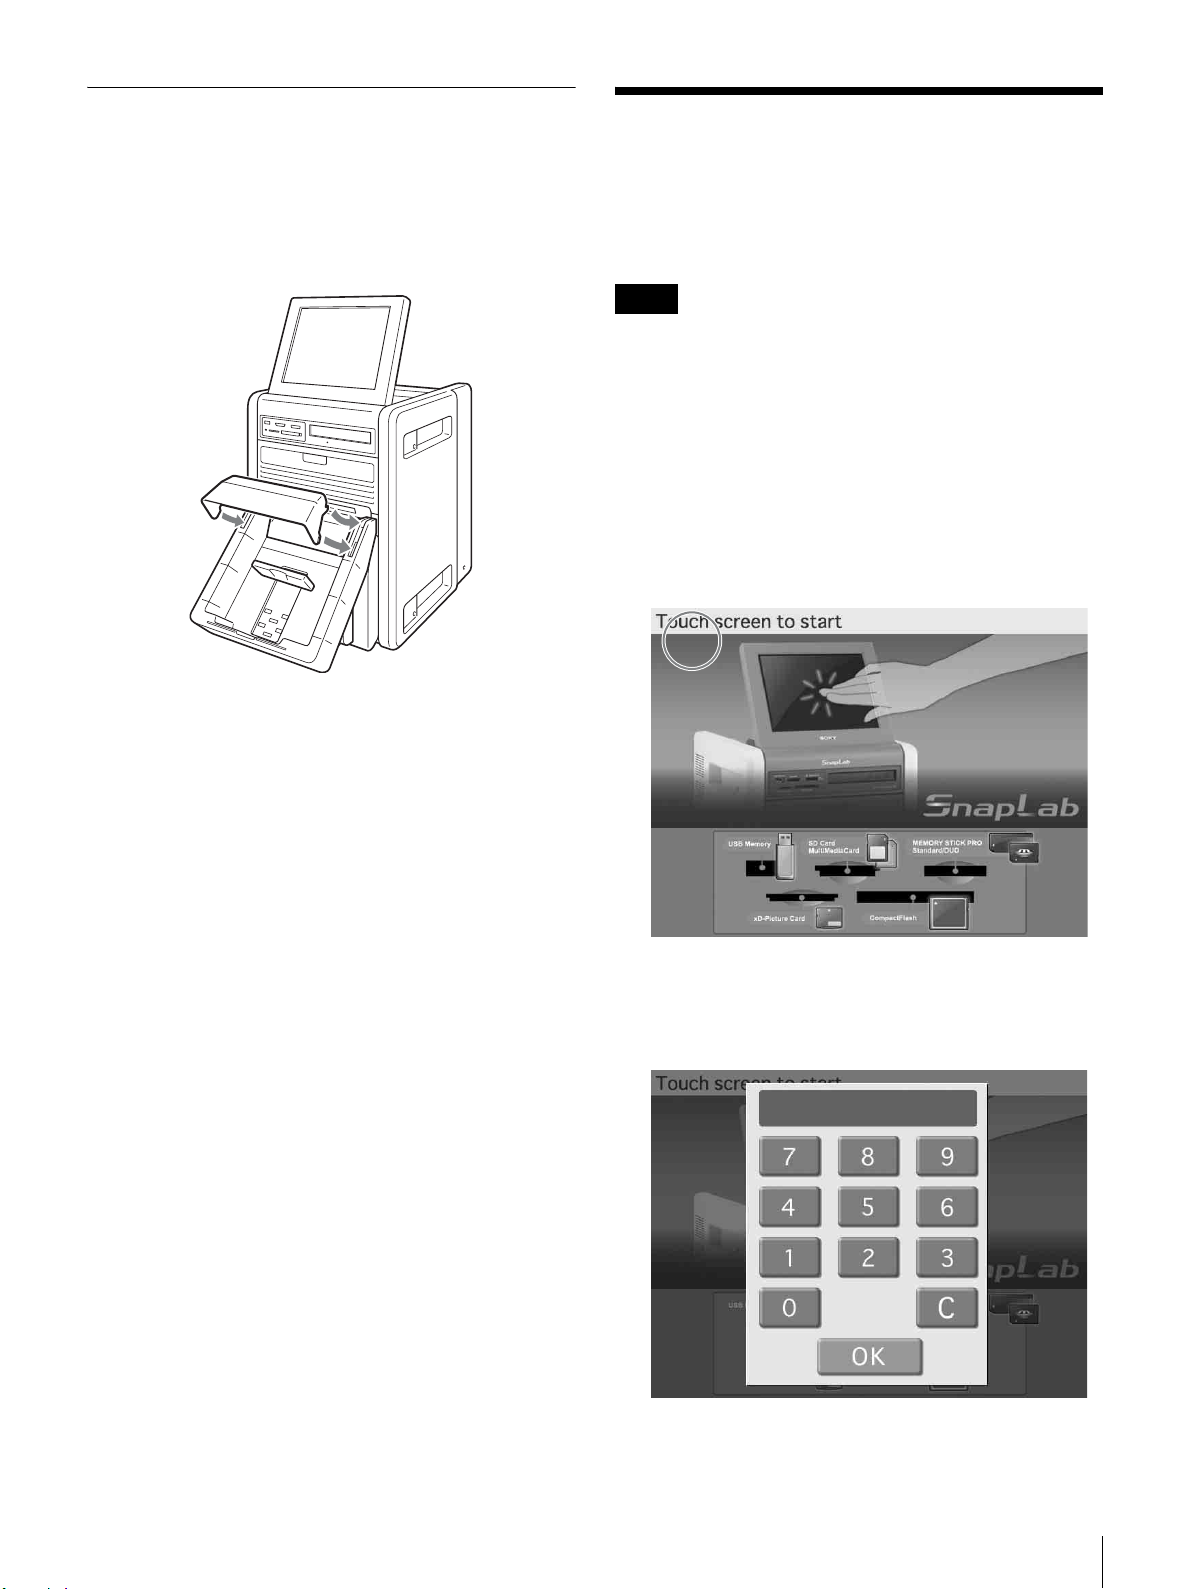
起動
1
本機前面のスロットにメモリーカードが挿入されてい
ないことを確認し、POWER スイッチを ON にする。
本機が起動し、次のスタートガイドが表示されます。
-ACIN 端子へ
電源コード(付属)
電源コンセントへ
電源コードを固定するには
ケーブルクランプを電源コードに巻き付けてから、図のよ
うに締めて固定します。
プリント紙・インクリボンが無い場合は、次の画面が
表示されます。
10
設置する
終了
1
操作中の場合は操作を終了させ、スタートガイド画面
を表示させる。
2
本機前面のスロットにメモリーカードが挿入されてい
ないことを確認し、POWER スイッチを OFF にする。
ご注意
本機の電源を切った後再び電源を入れる場合は、5 秒以上
経過してから電源を入れてください。
プリント紙・インクリボ
ンを取り付ける
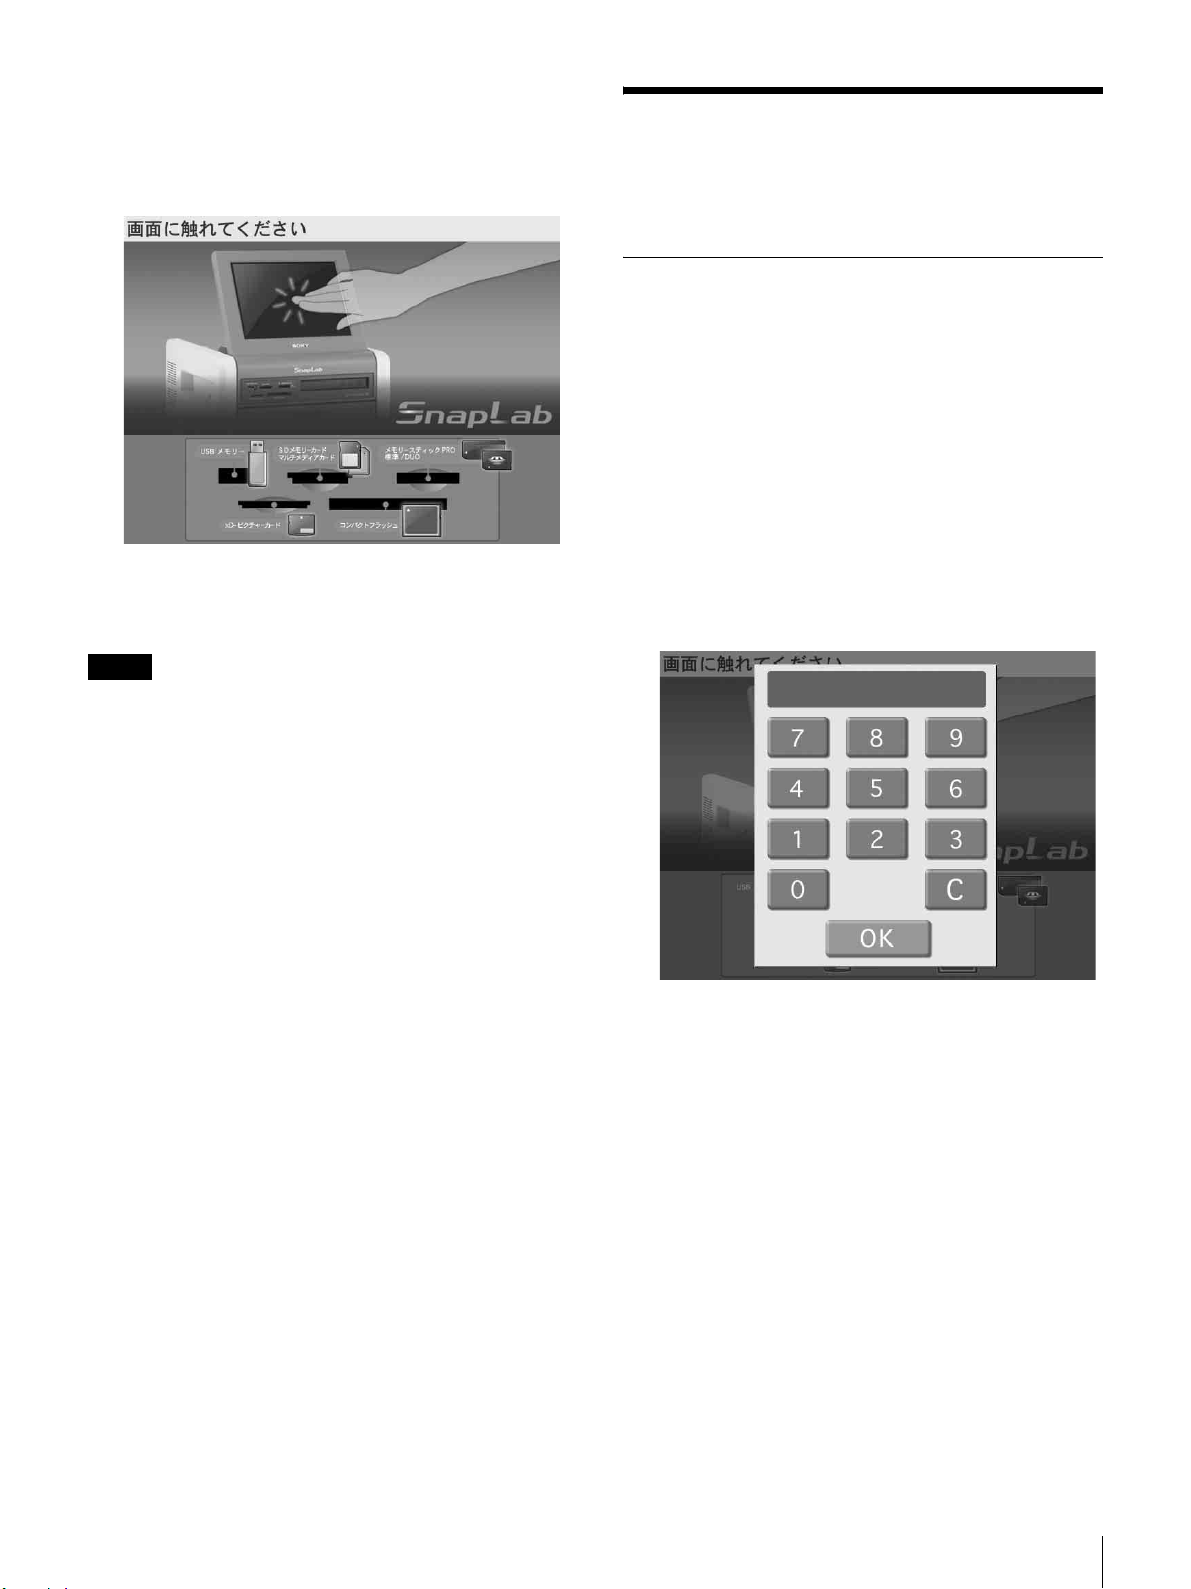
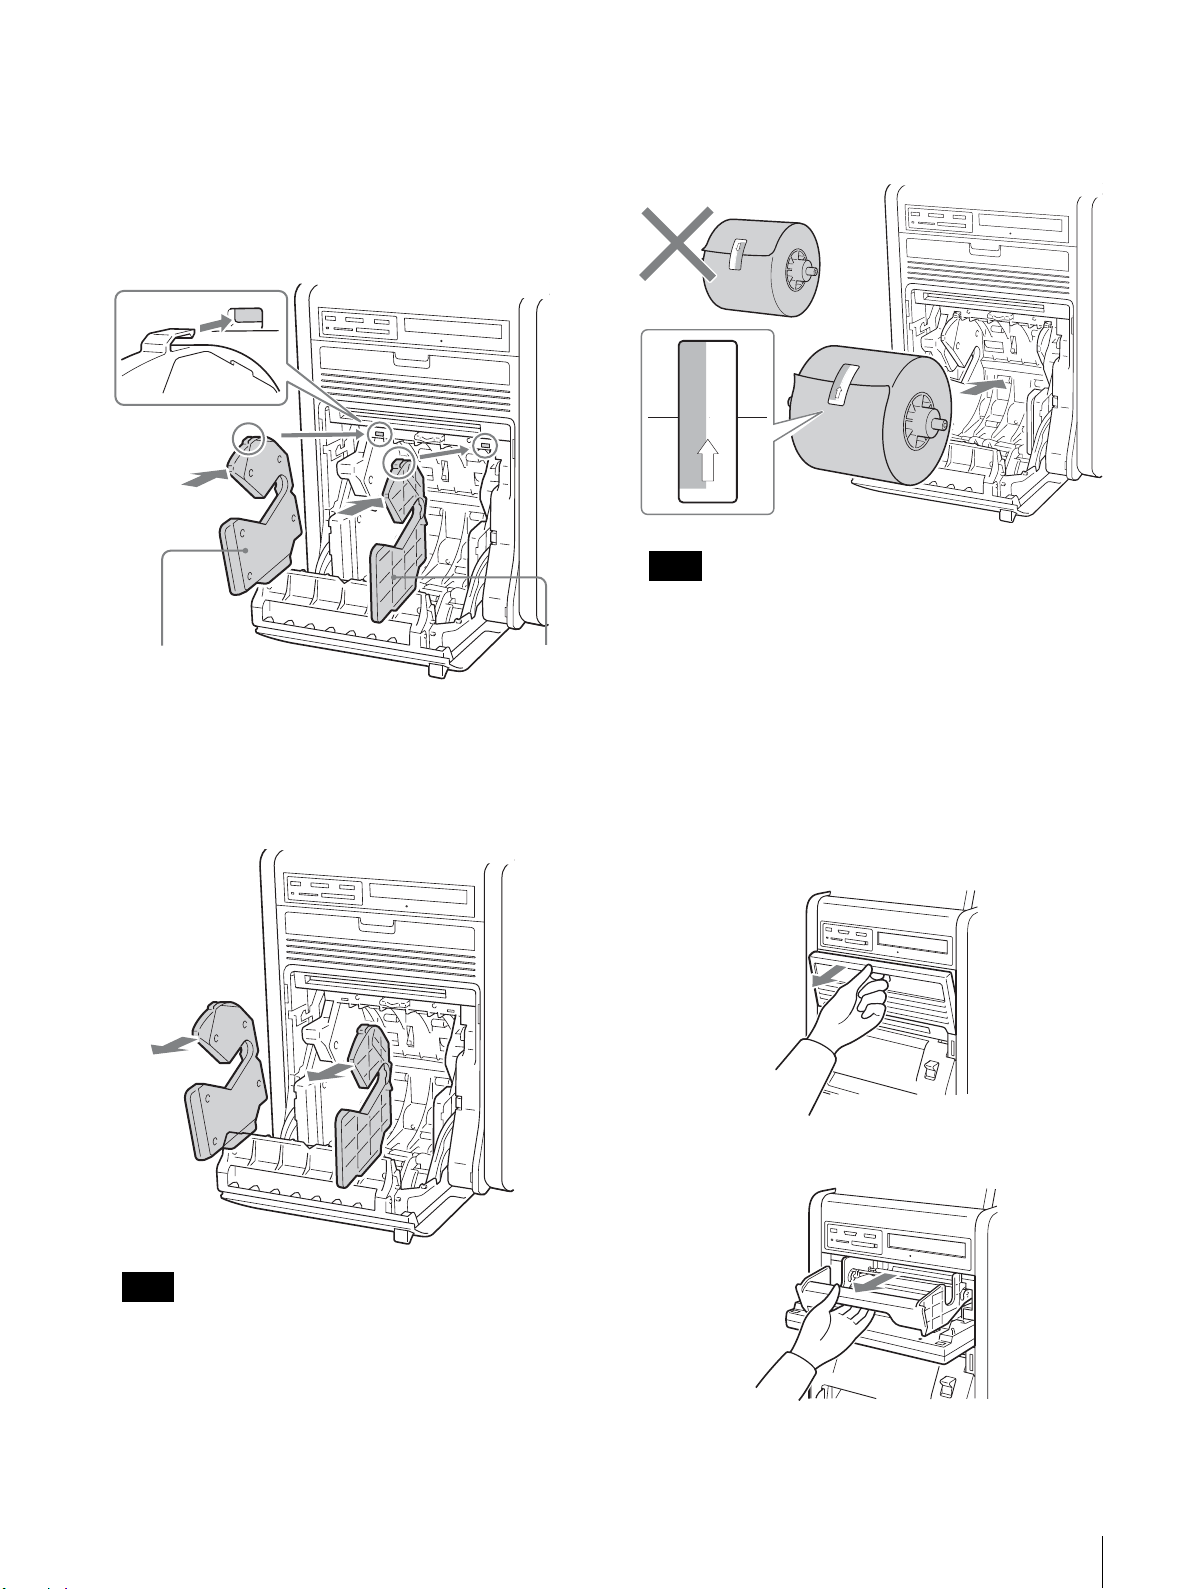
リボンドアのロックを解除する
リボンドアは、安全のため電源が入っている間はロックさ
れています。ロックを解除するには、次の手順で管理者画
面を表示します。
1
電源を入れて、本機を起動する。
スタートガイド画面が表示されます。
プリント紙・インクリボンがセットされていない場合
は、エラーメッセージ画面が表示されます。
2
画面左上隅に 2 回続けてタッチする。
パスワード入力画面が表示されます。
プリント紙・インクリボンを取り付ける
11
3
画面上のテンキーを使って管理者用のパスワードを入
力して、[OK]にタッチする。
(パスワードの出荷時の初期設定は「9999」です。)
管理者画面が表示されます。
管理者画面が表示されると、リボンドアのロックが解
除されます。
2
ペーパーコアを取り出す。
3
プリント紙にペーパーコアを差し込む。
プリント紙・インクリボンを取り付け
る
初めて本機をお使いになる場合は、まずプリント紙および
インクリボンを取り付けてください。
プリント紙の取り付け
ご注意
ペーパードアやドア開口部の突起に、手や洋服がはさまれ
たり、引っ掛かったりしないようにしてください。
1
ペーパードアレバーを押し下げた後、ペーパードアを
ロックするまでドア中央部を手前に引いて開ける。
ペーパーコアは左右の形が同じです。どちら側から差
し込んでも使用できます。
プリント紙・インクリボンを取り付ける
12
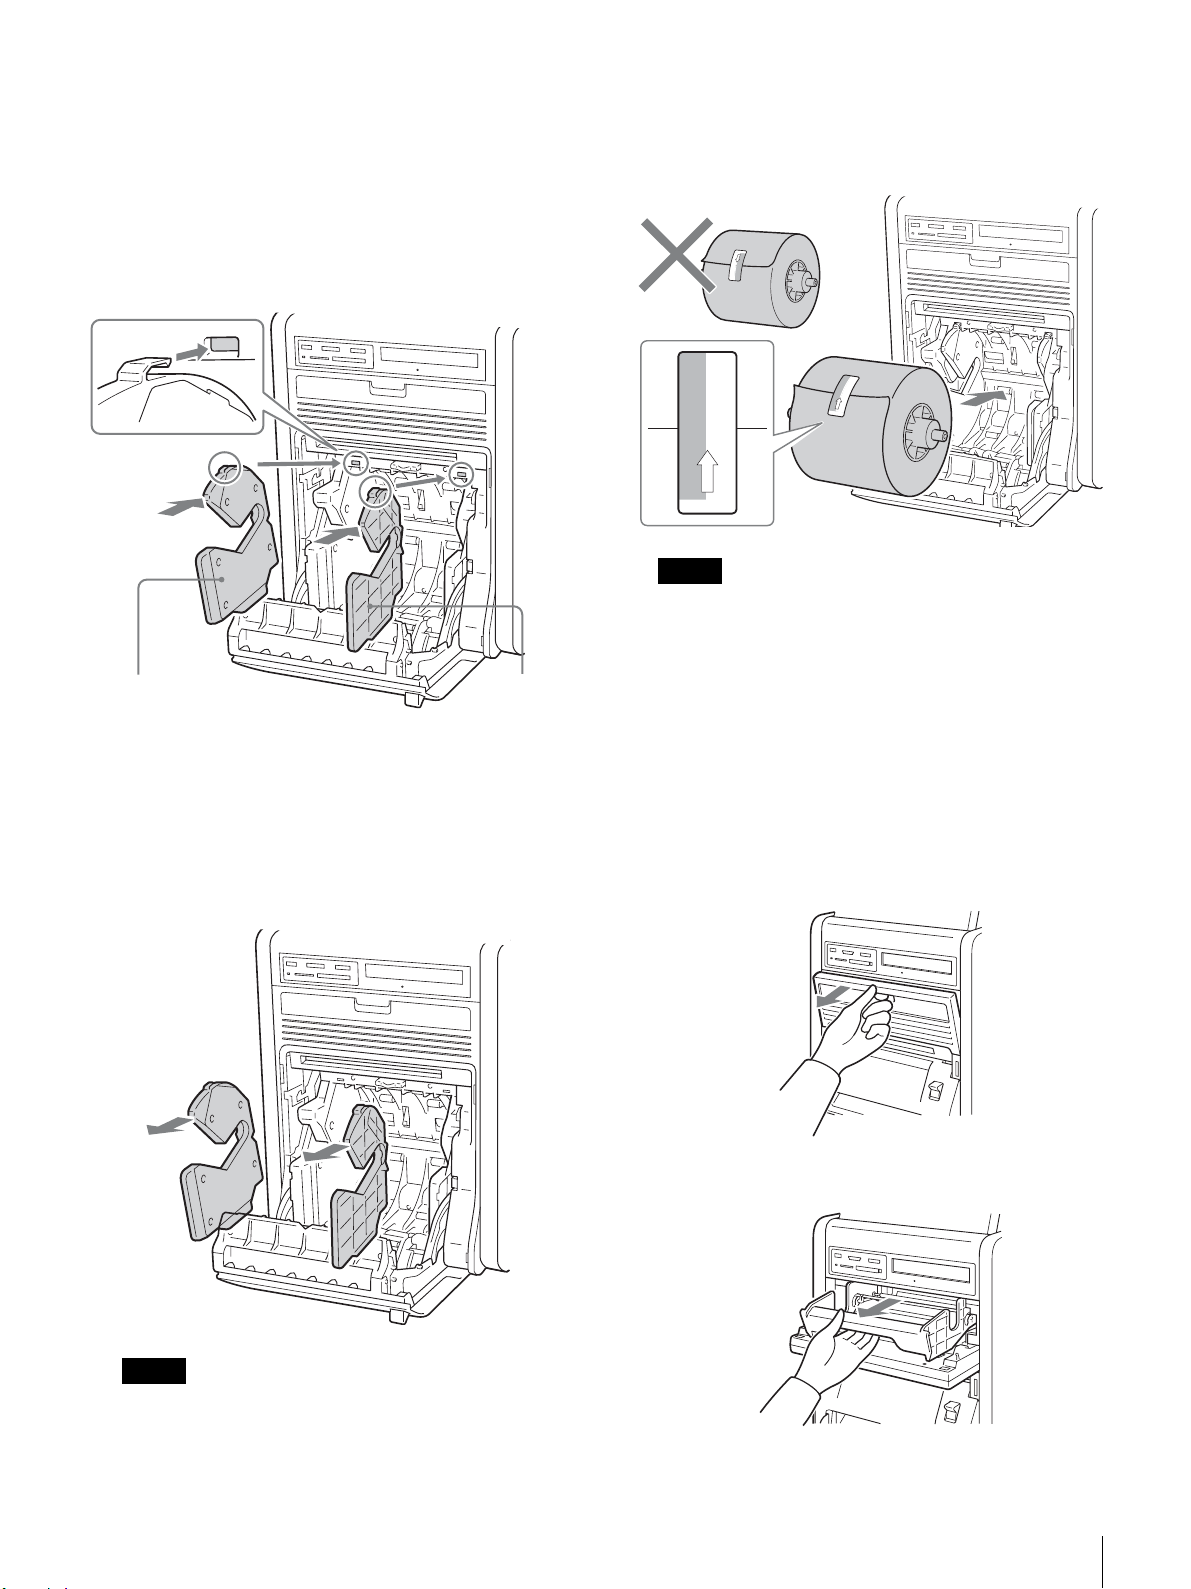
4
使用するプリント紙の紙幅に合わせて、ペーパーアダ
プターを着脱する。
紙幅 127mm(5インチ)のプリントパック2UPCR253/2UPC-R255 シリーズの場合
左側にペーパーアダプター(青)を、右側にペーパーアダ
プター(ピンク)を取り付けて使用します。(工場出荷時は
ペーパーアダプターが取り付けられています。)
5
プリント紙を取り付ける。
プリント紙の中央にあるシールの矢印が、奥を向くよ
うに入れます。
ご注意
ペーパーコアは、プリント紙から外れないように、両
端を押さえながら、取り付けてください。
6
青ピンク
上部のつめがロックするまで矢印部分を押して取り付けま
す。
紙幅 152mm(6インチ)のプリントパック2UPCR254/R256/C560 シリーズの場合
ペーパーアダプター(青)とペーパーアダプター(ピンク)
を取りはずします。
プリント紙に付いているシールをゆっくりはがす。
7
ペーパードアの中央部をカチッと音がするまで押して
閉める。
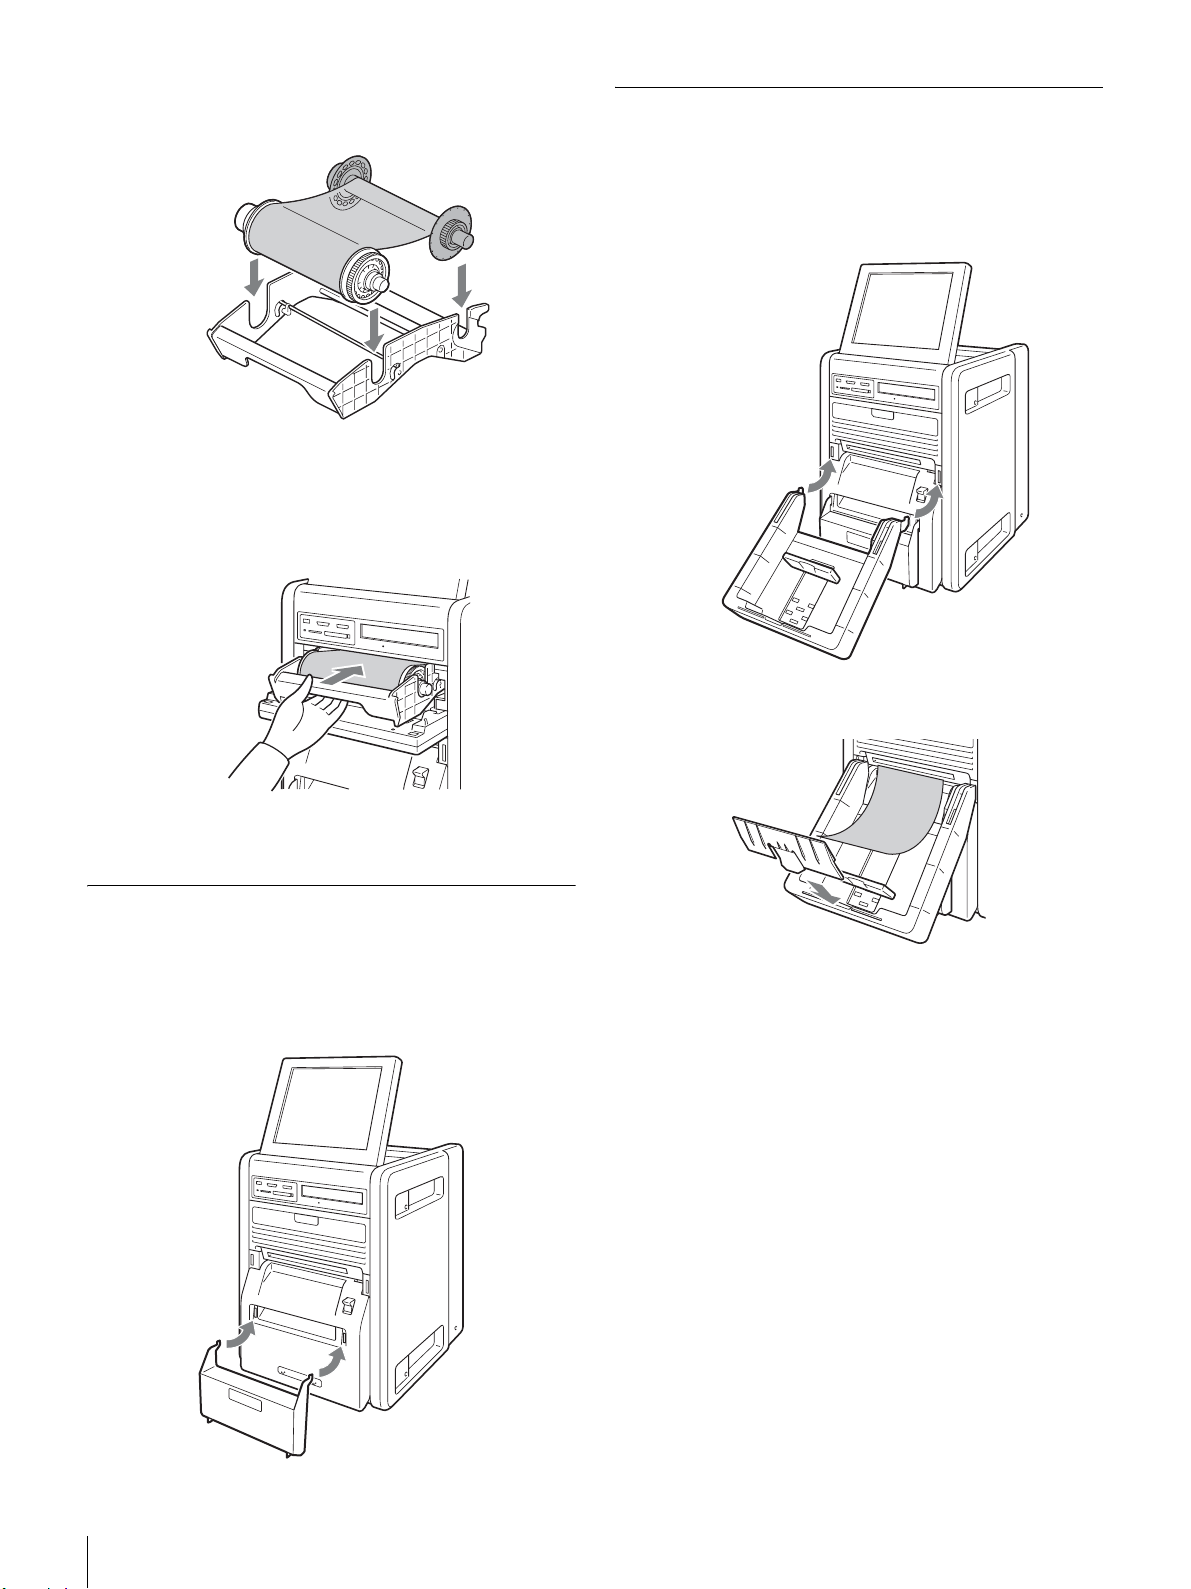
インクリボンの取り付け
1
リボンドアを手前に引いて開ける。
2
リボントレイを取り出す。
ご注意
取りはずしたペーパーアダプターはなくさないように
保管してください。
プリント紙・インクリボンを取り付ける
13
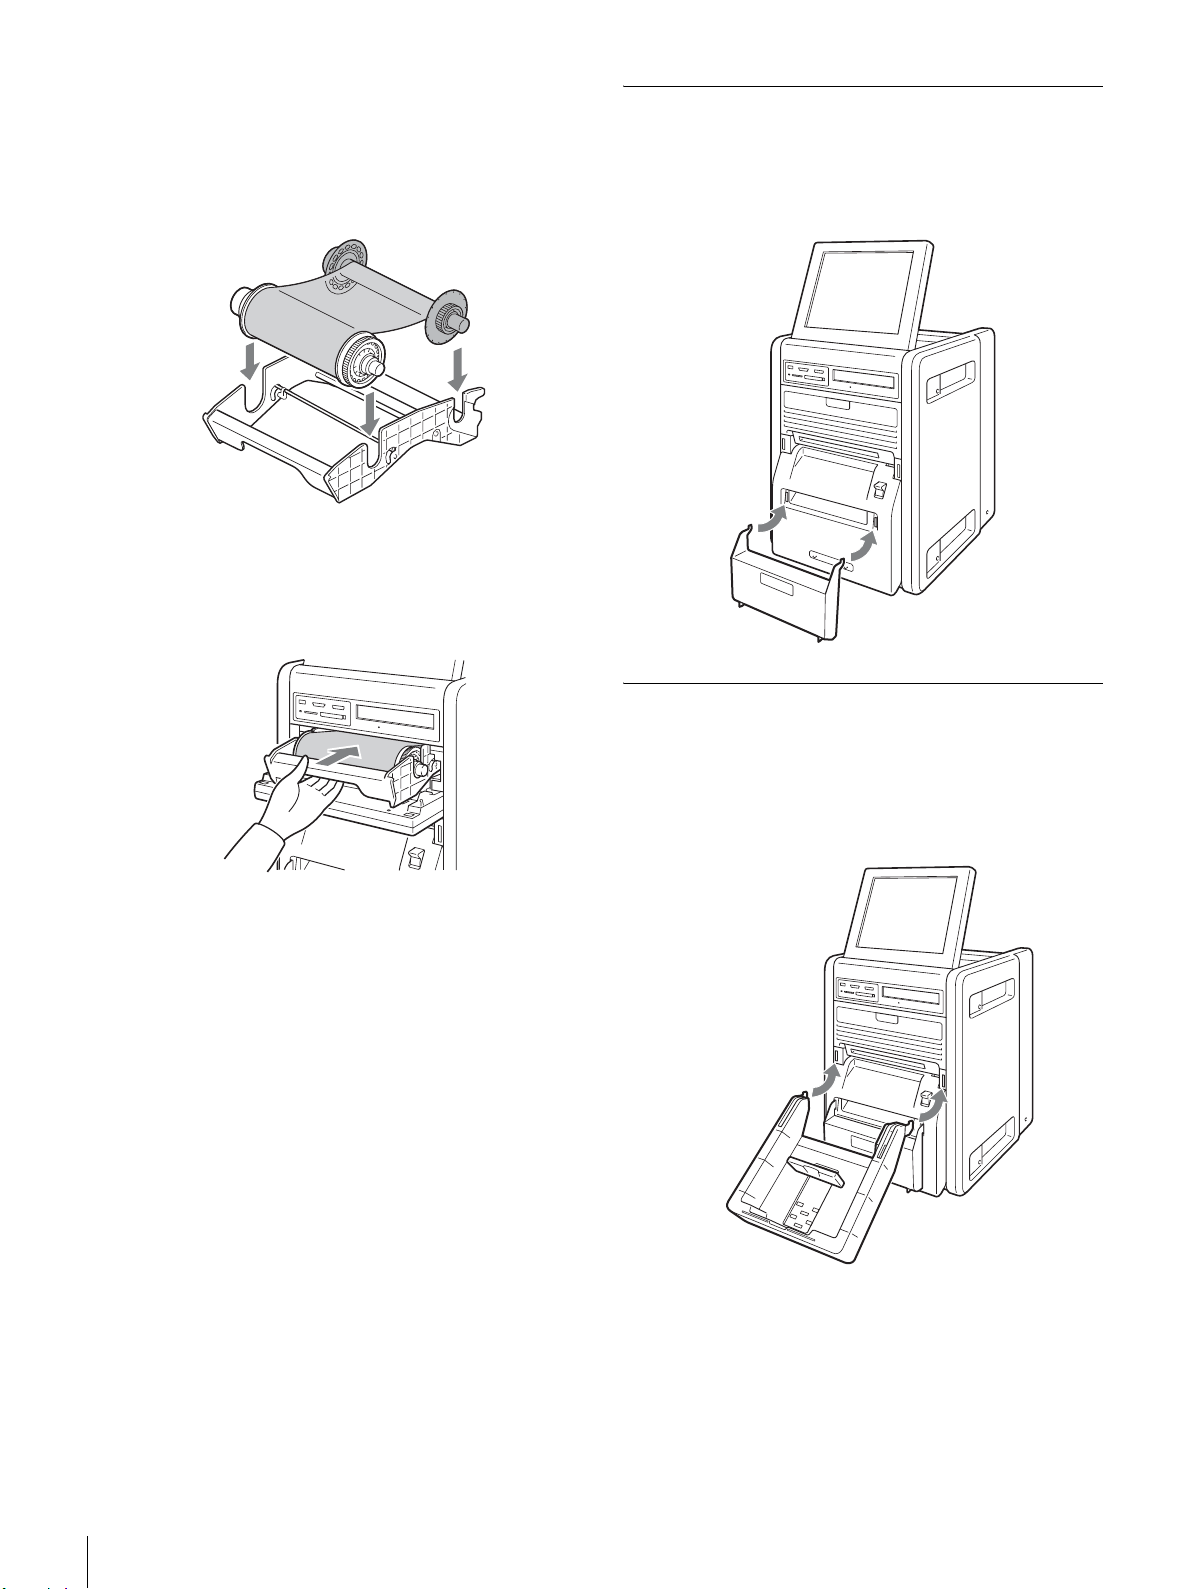
3
インクリボンの白のスプールを黒のスプールから引き
抜く。
4
リボンがゆるまないように巻きほどき、リボントレイ
に取り付ける。
図のように白のスプールを手前側に、黒のスプールを
奥側に取り付けてください。
5
リボントレイの中央を持って、本機に挿入する。
スクラップボックスを取り付ける
プリント画とプリント画の間には余白ができます。プリン
トするとこの余白が切り取られ、このボックスの中にたま
ります。たまった紙片は早めに取り除いてください。
6
リボンドアを閉める。
排紙トレイを取り付ける
プリントすると、プリント画が排出され、排紙トレイにた
まります。
1
排紙トレイを取り付ける。
プリント紙・インクリボンを取り付ける
14
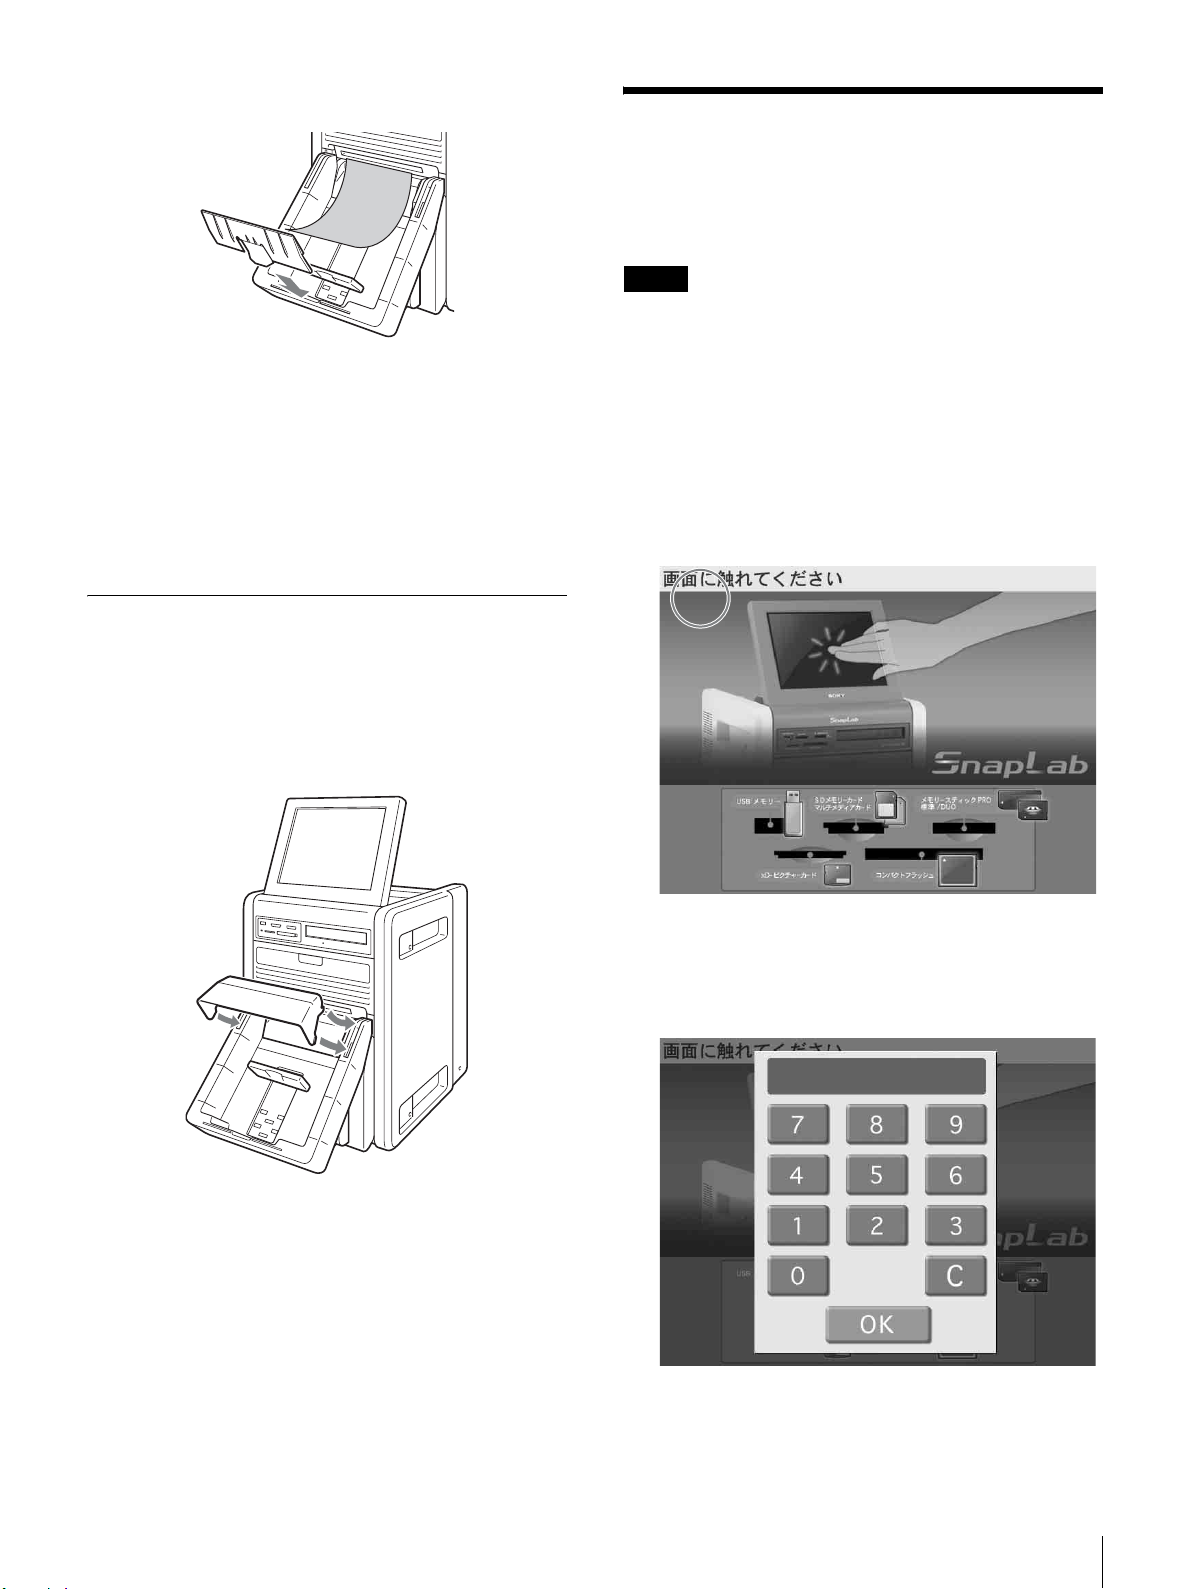
排紙トレイアダプターを取り付ける
排紙トレイからプリント画がはみ出すのを防ぎます。
プリント画の反りが、図のようになっている場合にお使い
ください。
排紙ストッパーの位置を調整する
プリント画のサイズや反りの大きさによって、排紙ストッ
パーの位置を調節します。位置は 3 段階に調節できます。
排紙カバーを取り付ける
排紙カバーを排紙トレイに取り付けます。プリント中に排
紙口から前に飛び出したプリント紙が手や体に触れたり、
排紙口をのぞきこんで顔に当たることを防ぎます。
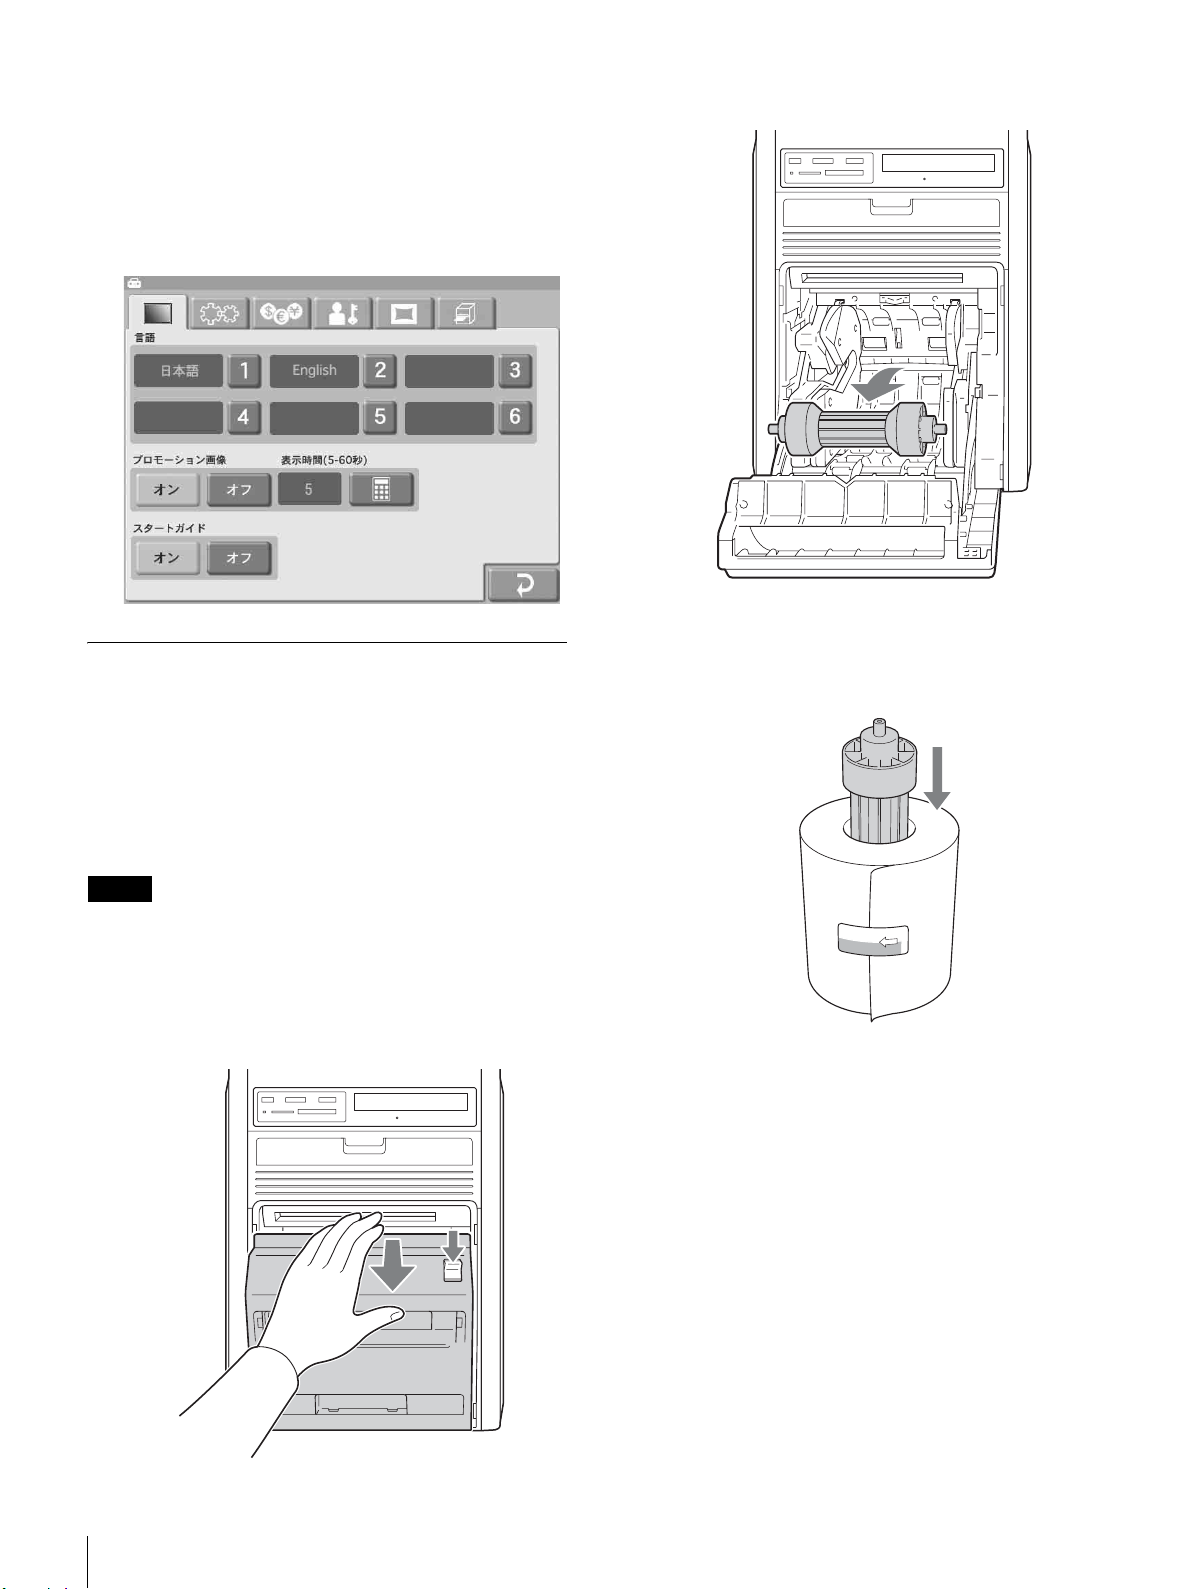
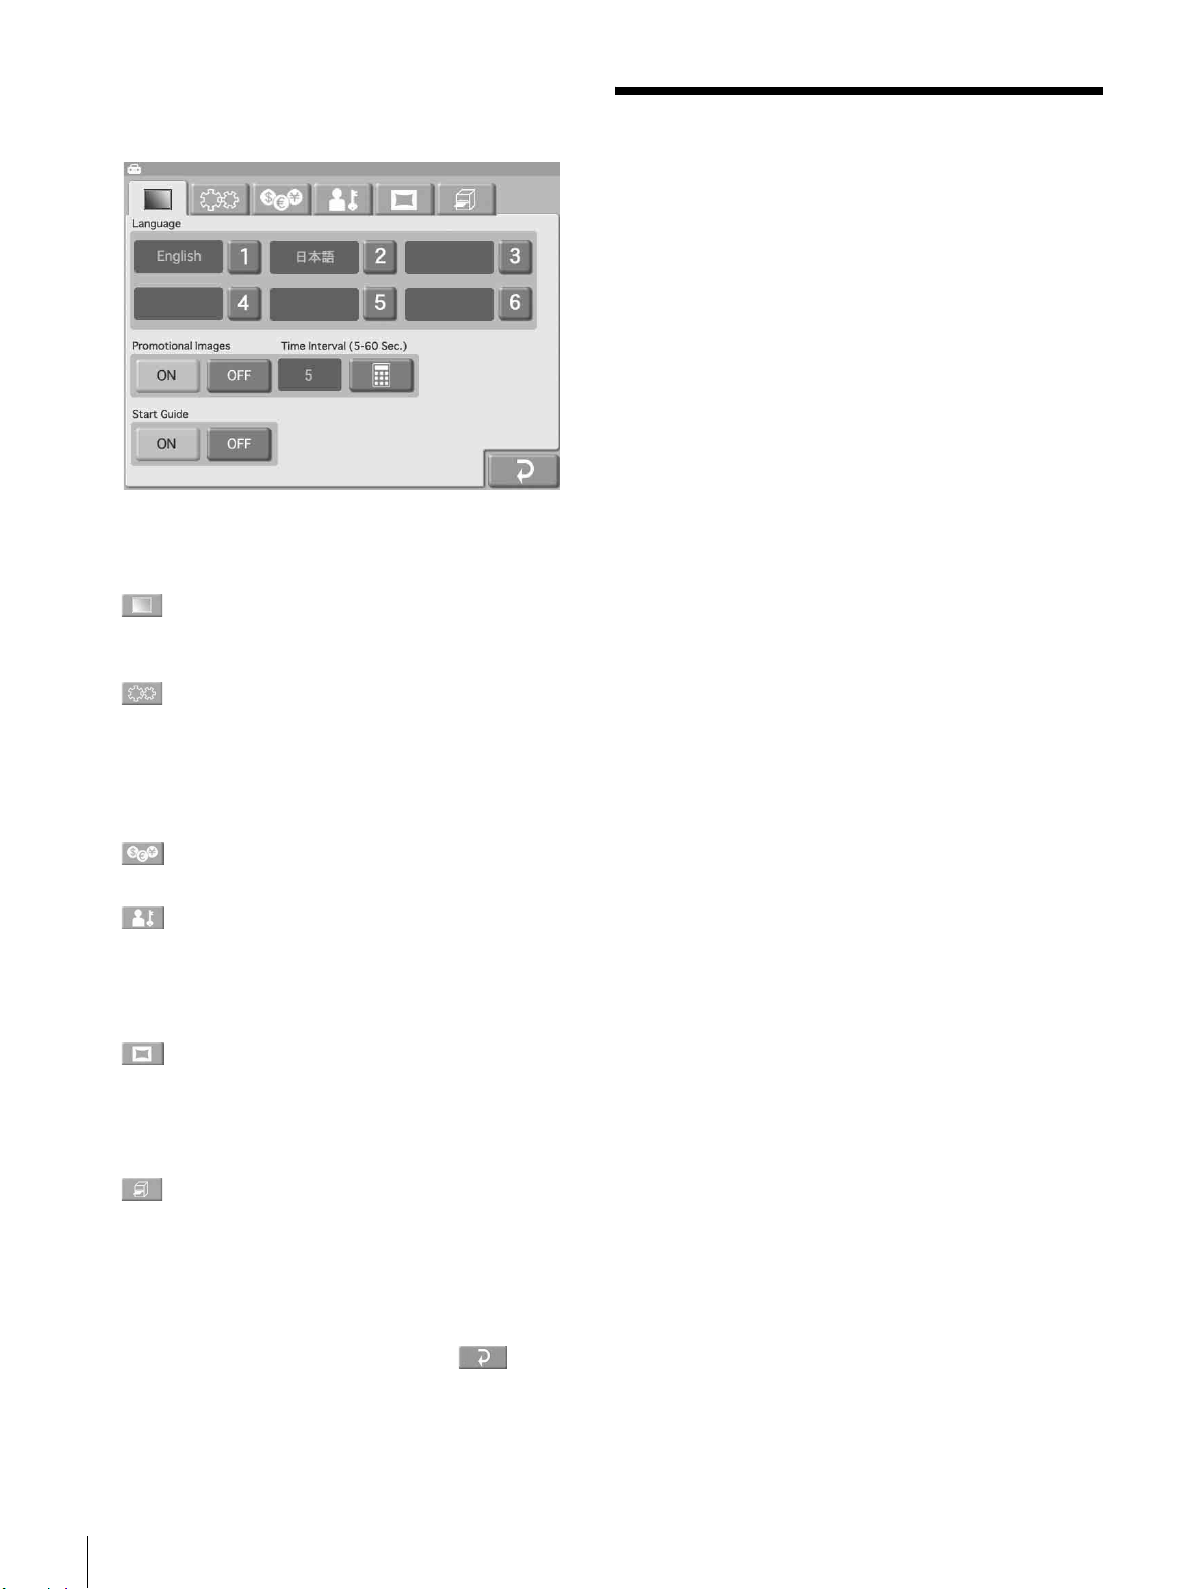
管理画面を表示する
管理画面は次の手順で表示します。
ご注意
• 管理画面で本機の設定を行うには、管理者パスワードの
入力が必要です。出荷時には、「9999」が管理者パスワー
ドとして設定されています。
• 本機前面のスロットにメモリーカードが挿入されている
と、管理画面を表示できません。メモリーカードを抜い
てから、再度操作してください。
1
スタートガイド画面で、画面の左上隅に 2 回続けてタッ
チする。
排紙カバーを取り付けるには
パスワード入力画面が表示されます。
2
画面上のテンキーを使って、管理者パスワードを入力
する。
管理画面を表示する
15
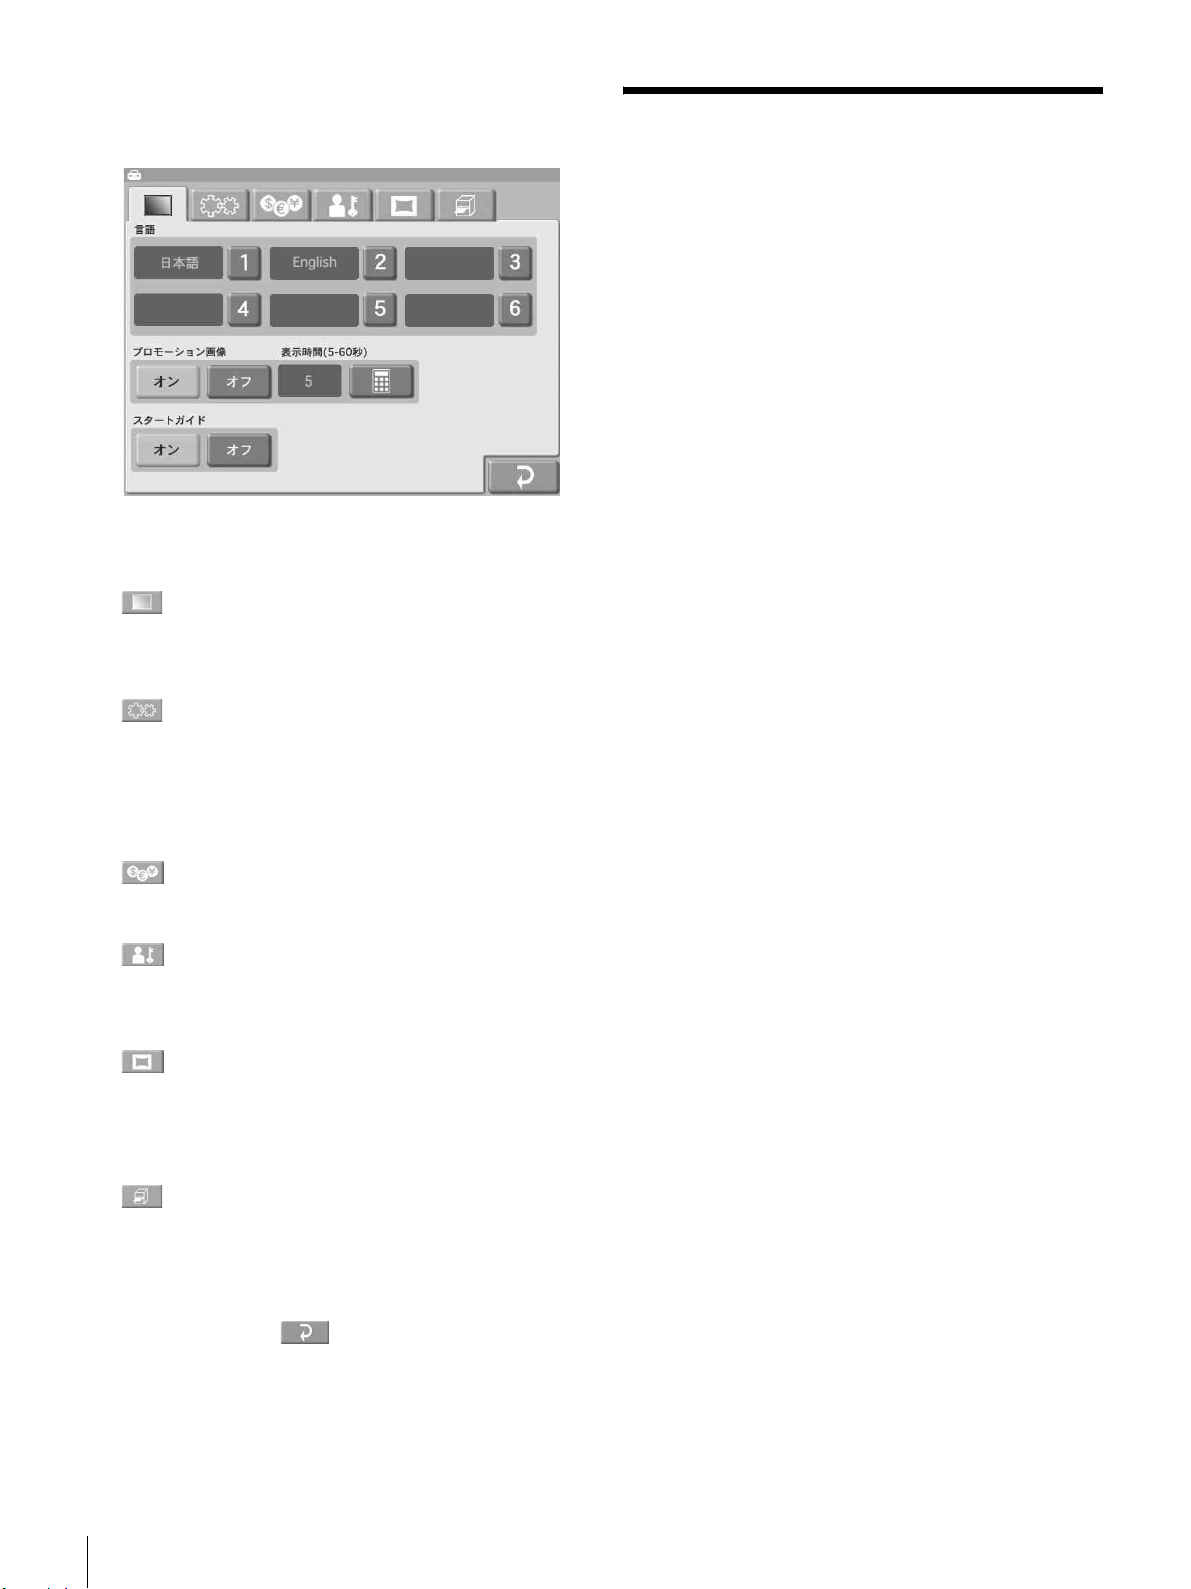
3
[OK]ボタンにタッチする。
管理画面が表示されます。
この画面で各タブにタッチして画面を選択し、設定を
行います。
(画面表示)タブ
画面に表示する言語の選択やスクリーンセーバーの設
定を行います。
(システム)タブ
操作モードの選択や時計の設定、パソコンとの接続の
設定などを行います。
また、サーマルヘッドのクリーニングやタッチパネル
の調整も、このタブから行います。
(料金)タブ
使用する通貨や料金について設定します。
(管理)タブ
プリントの上限枚数やパスワードを設定します。
また、プリント履歴やシステム履歴を表示します。
仕様
電源 AC100 V50/60 Hz
消費電流 最大 6.3 A
動作温度 10 ℃〜 35 ℃
動作湿度 20% 〜 80%(結露なきこと)
最大外形寸法 約 338 × 442 × 454 mm
(幅/高さ/奥行き)
(最大突起含まず)
質量 約 23 kg(本体のみ)
プリント方式 昇華熱転写型
プリント解像度 330 dpi
プリント階調 YMC 各色 8 ビット(256 階調)処理
プリントサイズ 2UPC-R253 シリーズ:
89 × 127 mm± 2 mm(L サイズ)
2UPC-R254 シリーズ:
102 × 152 mm± 2 mm(KG(はが
き)サイズ)
49 × 152 mm± 2 mm(5 × 15 cm サ
1)
イズ)
2UPC-R255 シリーズ:
127 × 178 mm± 2 mm(2L サイズ)
127 × 127 mm± 2 mm(13 × 13 cm
サイズ)
89 × 127 mm± 2 mm(L サイズ)
2UPC-R256/C560 シリーズ:
152 × 203 mm± 2 mm(15 × 20 cm
サイズ)
152 × 178 mm± 2 mm(15 × 18 cm
サイズ)
102 × 152 mm± 2 mm(KG(はが
き)サイズ)
1)
1)
16
(テンプレート)タブ
フレームつきプリントのテンプレートなどのデータを
拡張コンパクトフラッシュへコピーします。
また、画像と合成するテキストを入力します。
(プリンターの設定)タブ
オーダー番号やファイル名のプリント、およびカット
モードについて設定します。
また、プリンターの画質調整を行います。
4
設定が終了したら、 ボタンにタッチします。
仕様
1) プリンタードライバー使用時のみ印刷できます。
プリント画素数 2UPC-R253 シリーズ:
1,210 × 1,728 ドット(L サイズ)
2UPC-R254 シリーズ:
1,382 × 2,048 ドット(KG(はがき)
サイズ)
691 × 2,048 ドット(5 × 15 cm サイ
1)
ズ)
2UPC-R255 シリーズ:
1,728 × 2,380 ドット(2L サイズ)
1,728 × 1,728 ドット(13 × 13 cm サ
1)
イズ)
1,210 × 1,728 ドット(L サイズ)

2UPC-R256/C560 シリーズ:
2,048 × 2,724 ドット(15 × 20 cm サ
イズ)
2,048 × 2,380 ドット(15 × 18 cm サ
1)
イズ)
1,382 × 2,048 ドット(KG(はがき)
サイズ)
(ただし、左右上下各およそ 2.5 mm はプ
リントされません。)
1) プリンタードライバー使用時のみ印刷できます。
プリント時間(光沢)
2UPC-R253 シリーズ:
約 8 秒(L サイズ)
2UPC-R254 シリーズ:
約 8 秒(KG(はがき)サイズ)
2UPC-R255 シリーズ:
約 14 秒(2L サイズ)
2UPC-R256/C560 シリーズ:
約 17 秒(15 × 20 cm サイズ)
(ご使用になる条件によっては、プリント
時間が異なる場合があります。)
プリント時間(マット)
2UPC-R253 シリーズ:
約 14 秒(L サイズ)
2UPC-R254 シリーズ:
約 14 秒(KG(はがき)サイズ)
2UPC-R255 シリーズ:
約 23 秒(2L サイズ)
2UPC-R256/C560 シリーズ:
約 27 秒(15 × 20 cm サイズ)
(ご使用になる条件によっては、プリント
時間が異なる場合があります。)
入力端子 ACIN(電源入力用)
制御端子 RS-232C(外部制御用、D-Sub9 ピン)(1)
USB ポート(デバイス)
Hi-SpeedUSB(USB2.0 準拠)
USB ポート(ホスト)
USB メモリー用(3)(フロント 1、リア
2)
メモリーカードスロット
メモリースティック用(1)
SD カード用(1)
(SDXC には対応していません)
コンパクトフラッシュ用(2)
(1 か所は拡張用スロットです)
xD- ピクチャーカード用(1)
CD/DVD ドライブ
1)
CD-R/RW、DVD-R/RW 用
1) DVD+R(DL)/RW および DVD-RAM には対応していません。
CD および DVD への書き込みには対応していません。
WindowsXP、WindowsVista および Windows7(UDFバー
ジョン 2.01、マスター形式)で作成したディスクの読み込みを
検証済です。
すべてのライティングソフトで書き込まれたディスクの読み込
みを保証するものではありません。
対応画像フォーマット
JPEG:JFIF4:4:4,4:2:2,4:2:0(ベースライ
ン JPEG)
Exif2.2.1 準拠
DCF2.0 準拠
(プログレッシブ JPEG およびグレース
ケール(8bit)JPEG には対応していま
せん)
TIFF:Exif2.2.1 準拠(RGB 非圧縮)
BMP:24 ビット Windows 形式
(各フォーマットのバージョンによって
は、対応していないことがあります)
最大ピクセル数 JPEG:横 8,000×縦 6,000 ピクセルまたは
縦 8,000×横 6,000 ピクセル
TIFF:横 8,000×縦 6,000 ピクセルまたは
縦 8,000×横 6,000 ピクセル
BMP:横 8,000×縦 6,000 ピクセルまたは
縦 8,000×横 6,000 ピクセル
最大ファイル数 各メディア 9,999 ファイル
液晶ディスプレイ
10.4 インチ TFT カラー液晶タッチスク
リーンディスプレイ
640 × 480 ドット、RGB
付属品 排紙トレイ(1)
排紙トレイアダプター(1)
排紙カバー(1)
スクラップボックス(1)
クリーニングリボン(1)
リボントレイ(1)
ペーパーコア(1)
ペーパーアダプター(青)(1)
ペーパーアダプター(ピンク)(1)
電源コード(1)
USB ケーブル(1-790-081-71(Sony))(1)
3極t2 極変換プラグ(1)
CD-ROM(1)
ソフトウェアライセンス契約書(1)
ご使用になる前に(1)
保証書(1)
注意
付属の電源コードは本機の専用品です。
他の機器には使用できません。
仕様
17
別売り品
使用インクリボン/プリント紙
ラミネートカラープリントパック
2UPC-R253 シリーズ
2UPC-R254 シリーズ
2UPC-R255 シリーズ
2UPC-R256 シリーズ1)
1)
2UPC-C560 シリーズ
BluetoothUSB アダプター
DPPA-BT1
1) ご使用の国・地域によっては、販売しておりません。お買い上
げ店、またはお近くのソニーサービス窓口にご相談ください。
2) 本機の Bluetooth 通信機能は DPPA-BT1 との組み合わせでのみ
使用することができます。
他の BluetoothUSB アダプターはご使用になれません。
1)2)
本機は「高調波電流規格 JISC61000-3-2 適合品」です。
この装置は、クラス A 情報技術装置です。この装置を家
庭環境で使用すると電波妨害を引き起こすことがありま
す。この場合には使用者は適切な対策を講ずるよう要求
されることがあります。
VCCI-A
• お使いになる前に、必ず動作確認を行ってください。
本機や付属のソフトウエア、記録メディア、外部スト
レージなどを使用中、万一これらの不具合により正常
に動作しなかった場合のプリント結果や記録データの
補償については、ご容赦ください。
• 故障その他に伴う営業上の機会損失等は保証期間中お
よび保証期間経過後にかかわらず、補償はいたしかね
ますのでご了承ください。
• 本機の液晶パネルは有効画素 99.99%以上の非常に精密
度の高い技術で作られていますが、画面上に黒い点が
現れたり(画素欠け)、常時点灯している輝点(赤、
青、緑など)や滅点がある場合があります。また、液
晶パネルの特性上、長期間ご使用の間に画素欠けが生
じることもあります。これらの現象は故障ではありま
せんので、ご了承の上本機をお使いください。
本機の仕様および外観は、改良のため予告なく変更するこ
とがありますが、ご了承ください。
18
仕様
English
Owner’s Record
The model and serial numbers are located at the rear.
Record these number in the space provided below.
Refer to these numbers whenever you call upon your Sony
dealer regarding this product.
Model No. ____________________
Serial No. ____________________
WARNING
To reduce the risk of fire or electric shock, do not
expose this apparatus to rain or moisture.
To avoid electrical shock, do not open the
cabinet. Refer servicing to qualified personnel
only.
THIS APPARATUS MUST BE EARTHED.
To disconnect the main power, unplug the AC IN
connector.
CAUTION
Use of controls or adjustments or performance of
procedures other than those specified herein may result in
hazardous radiation exposure.
If you have questions on the use of the above Power Cord /
Appliance Connector / Plug, please consult a qualified
service personnel.
For the customers in the U.S.A.
This equipment has been tested and found to comply with
the limits for a Class A digital device, pursuant to Part 15
of the FCC Rules. These limits are designed to provide
reasonable protection against harmful interference when
the equipment is operated in a commercial environment.
This equipment generates, uses, and can radiate radio
frequency energy and, if not installed and used in
accordance with the instruction manual, may cause
harmful interference to radio communications. Operation
of this equipment in a residential area is likely to cause
harmful interference in which case the user will be
required to correct the interference at his own expense.
You are cautioned that any changes or modifications not
expressly approved in this manual could void your
authority to operate this equipment.
All interface cables used to connect peripherals must be
shielded in order to comply with the limits for a digital
device pursuant to Subpart B of Part 15 of FCC Rules.
For the customers in Europe
The manufacturer of this product is Sony Corporation, 17-1 Konan, Minato-ku, Tokyo, Japan.
The Authorized Representative for EMC and product
safety is Sony Deutschland GmbH, Hedelfinger Strasse
61, 70327 Stuttgart, Germany.
For any service or guarantee matters, please refer to the
addresses given in separate service or guarantee
documents.
This digital photo printer is classified as CLASS 1 LASER
PRODUCT.
CAUTION
The use of optical instruments with this product will
increase eye hazard.
Warning on power connection
Use a proper power cord for your local power supply.
1. Use the approved Power Cord (3-core mains lead) /
Appliance Connector / Plug with earthing-contacts that
conforms to the safety regulations of each country if
applicable.
2. Use the Power Cord (3-core mains lead) / Appliance
Connector / Plug conforming to the proper ratings
(Voltage, Ampere).
This apparatus shall not be used in the residential area.
For the customers in Europe, Australia and
New Zealand
WARNING
This is a Class A product. In a domestic environment, this
product may cause radio interference in which case the
user may be required to take adequate measures.
For kundene i Norge
Dette utstyret kan kobles til et IT-strømfordelingssystem.
For the customers in the U.S.A.
Lamp in this product contains mercury. Disposal of these
materials may be regulated due to environmental
considerations. For disposal or recycling information,
please contact your local authorities or the
Telecommunications Industry Association
(www.eiae.org).
GB
19

For the State of California, USA only
Perchlorate Material - special handling may apply, See
www.dtsc.ca.gov/hazardouswaste/perchlorate
Perchlorate Material : Lithium battery contains
perchlorate.
For the customers in Taiwan only
20

Table of Contents
Using the CD-ROM Manual.......................22
Preparations ................................................... 22
Reading the CD-ROM Manual...................... 22
What This Product Can Do.......................22
Information Updates .................................23
Installation .................................................24
Connecting the Power Cord........................... 24
Startup and Shutdown.................................... 24
Loading the Paper Roll and Ink
Ribbon........................................................25
Unlocking the Ribbon Door .......................... 25
Loading the Paper Roll and Ink Ribbon........ 26
Attaching the Scrap Receptacle..................... 28
Attaching the Output Tray............................. 28
Attaching the Output Cover........................... 29
Displaying the Administration Screen ....29
Specifications............................................30
Table of Contents
21

Using the CD-ROM
What This Product Can
Manual
The supplied CD-ROM includes manuals for this printer
(in Japanese, English, French, German, Italian, Spanish,
Greek and Turkish). The copies of these manuals are
created in pdf (Portable Document Format).
Preparations
One of the following programs must be installed on your
computer in order to use the operation manuals contained
on the CD-ROM disc.
• Adobe Reader Version 6.0 or higher
Memo
If Adobe Reader is not installed, you can download it from
the following URL:
http://www.adobe.com/
Adobe and Adobe Reader are trademarks of Adobe Systems
Incorporated in the United States and/or other countries.
Reading the CD-ROM Manual
To read the manual on the CD-ROM, proceed as follows.
1
Insert the CD-ROM disc in your CD-ROM drive.
The manuals are saved in the Instructions For Use
folder.
2
Select and click the manual that you want to read.
Do
This unit reads image data stored on a memory card, CD,
or DVD and allows quick and easy printing of photos taken
with a digital camera or other device.
The product has the following features.
Versatile print services
Besides regular photo printout, the unit can produce split
image prints, prints with borders, and index prints. It also
allows the user to edit images before printing with
functions such as trimming and color adjustment.
Order numbers and file names can be printed as a
watermark, making print sorting easy.
Selectable operation modes
To fit the specific purpose for which the unit is used, Full
mode, Quick Print mode, and Event mode can be selected.
Support for a wide range of memory cards
and CD/DVD support
All major memory card formats used in digital cameras are
supported: “Memory Stick,” xD-Picture Card, SD Card,
MultiMediaCard, CompactFlash card, and Microdrive.
The unit also supports USB memory, CDs and DVDs
created using a computer.
High-speed high-quality printing
Using a newly developed print engine that features a
dyesublimation thermal transfer technology, it is possible
to print images of lasting beauty at high speed.
Memos
• Open the Readme file on the CD-ROM to confirm the
storage folders for any other manuals you want to read.
• The files may not be displayed properly, depending on
the version of Adobe Reader. In such a case, install the
latest version you can download from the URL
mentioned in “Preparations” above.
Note
If you lose the CD-ROM disc or you cannot read it for
some reason, you can purchase a new CD-ROM disc.
Contact your nearest Sony service representative.
22
Using the CD-ROM Manual / What This Product Can Do
Easy operation by touch panel
A 10.4-inch touch panel display is used, allowing for easy
operation with just a touch of the screen.
Customizable with original data
By inserting a memory card (expansion CompactFlash
card) carrying promotional images and border data into the
expansion slot, screen savers can be displayed and photos
can be combined with borders for printing.
images can be used for the advertisement and border data.
1) A commercially available CompactFlash card or Microdrive is required.
1)
Original

Printing from wireless devices
Using an optional Bluetooth USB adaptor1), you can
wirelessly send images from Bluetooth-compatible
devices such as mobile phones and print. The versatile
print services available when printing from a memory card
are also available when sending images via Bluetooth
communication.
Using an optional wireless adapter
2)
, you can send images
from a digital camera with wireless functions and print the
images without touching the unit.
An expansion CompactFlash card is necessary to use this
function.
1) For more on compatible Bluetooth USB adaptors, see “Optional
accessories” on page 31 of “Specifications.” The adaptor may not be
commercially available depending on your country or region. Consult
your local Sony dealer.
2) A Silex Technologies SX-WSG1 is required. This device may not be
commercially available depending on your country or region. Consult
your local Sony dealer.
For information on supported digital cameras and further details on this
unit, please visit the UP-CR25L support page at
http://www.sony.net/snaplab.
Printing watermarks for logos and text
By storing logos, text, and other custom designs on an
expansion CompactFlash card and installing the card, you
can print the designs onto photos as watermarks.
Information Updates
For the latest information, please visit the UP-CR25L
support page at http://www.sony.net/snaplab.
Printer expansions
You can connect an additional printer to the USB ports on
the unit.
size different from the unit to increase the number of print
sizes that are available, or load the same paper size to
enable the expansion printer to continue printing
automatically when the unit runs out of paper.
1) For information on supported printers and further details, please visit the
1)
You can load an expansion printer with a paper
UP-CR25L support page at http://www.sony.net/snaplab.
Printing from computers
By connecting the unit to a computer using the supplied
USB cable, data sent from the computer can be printed on
the unit.
1) The supplied printer driver must be installed on the computer before
1)
connecting it to the unit. For the latest information on the printer driver,
please visit the UP-CR25L support page at http://www.sony.net/snaplab.
Compact, integrated body
The display and printer are housed in a single enclosure
which does not take up much space and easily fits on a
shop counter or similar.
In addition, the screen angle can be adjusted to four
different settings to fit operation conditions.
Information Updates
23
Installation
Startup and Shutdown
Startup
Connecting the Power Cord
Connect the power cord to the ~ AC IN connector on the
back of the unit, and then connect the plug to a power
outlet.
UP-CR25L
to - AC IN
connector
AC power cord
(not supplied)
1
Verify that no memory card is inserted in any of the
front-side memory card slots of the unit. Then turn on
the POWER switch.
The unit starts up, and the Start Guide screen appears.
To secure the power cord
Wrap the cable clamp around the power cord, and fasten it
securely as shown.
If the ink ribbon or paper roll is empty, the following
screen appears.
24
Installation

Shutdown
1
Complete any pending operations, and then bring up
the Start Guide screen.
2
Verify that no memory card is inserted in any of the
front-side memory card slots of the unit. Then turn off
the POWER switch.
Note
Loading the Paper Roll
and Ink Ribbon
Unlocking the Ribbon Door
The ribbon door is locked for safety when the unit is turned
on. To unlock the door, proceed as follows and display the
administration screen.
1
Turn on the power and start the unit.
The Start Guide screen appears.
If an ink ribbon or paper roll is not loaded, an error
message appears.
2
Touch the top left corner of the screen twice in
succession.
The password entry screen appears.
After turning off the unit, wait at least 5 seconds before
turning it on again.
3
Enter the administrator password using the numeric
keypad, and touch [OK].
(The factory default setting for the password is
“9999.”)
The administration screen appears.
When the administration screen appears, the ribbon
door will unlock.
Loading the Paper Roll and Ink Ribbon
25
Loading the Paper Roll and Ink
Ribbon
When you use the unit for the first time, load the paper roll
and ink ribbon.
2
Remove the paper core.
3
Insert the paper core into the paper roll.
To load the paper roll
Note
Be careful that your fingers and clothing are not caught in
the paper door or on the protuberance in the opening of the
door.
1
Press and lower the paper door lever, hold the paper
door at the center portion, and pull the door forward
until it locks into the open position.
The two sides of the paper core are the same shape.
You can insert either side.
26
Loading the Paper Roll and Ink Ribbon
4
Depending on the width of your paper roll, attach or
remove the paper adapters.
Paper with 127-mm (5-inch) width: 2UPC-R253/
R255 series Printing Pack
Attach the blue paper adapter to the left side of the unit,
and the pink paper adapter to the right side. (The unit is
factory shipped with the paper adapters attached.)
blue pink
Press the portions indicated by the arrows until the tabs at
the top lock into place.
Paper with 152-mm (6-inch) width: 2UPC-R254/
R256/C560 series Printing Pack
Remove the blue and pink paper adapters.
5
Load the paper roll.
Be sure to load the paper roll with the arrow on the seal
pointing inside the unit.
Note
To prevent the paper roll from sliding off, hold both
sides of the paper core when loading it into the unit.
6
Remove the seal affixed to the paper roll.
7
Close the paper door, and press the center of the door
until it clicks into place.
To load the ink ribbon
Note
Store removed paper adapters in a safe place.
1
Pull the ribbon door toward you to open it.
2
Remove the ribbon tray.
3
Detach the white spool of the ink ribbon from the black
spool.
Loading the Paper Roll and Ink Ribbon
27
4
Gently unravel the ribbon without loosening it, and
place it in the ribbon tray.
Place the white spool in the front holder and the black
spool in the rear holder as shown.
5
Hold the center of the ribbon tray, and load it into the
unit.
Attaching the Output Tray
When printing, printouts are ejected from the printer and
collect in the output tray.
1
Attach the output tray to the printer.
6
Close the ribbon door.
Attaching the Scrap Receptacle
When printing, a margin of empty space is left between
each printout. These excess portions are cut off and
dropped into the scrap receptacle. Remove scraps from the
receptacle as soon as possible.
Attaching the output tray adapter
The output tray adapter prevents printouts from sticking
out of the output tray.
Use the adapter when printouts curl as shown.
Adjusting the output stopper position
Adjust the position of the output stopper according to the
printout size and amount of curling. There are three
positions to which to adjust.
28
Loading the Paper Roll and Ink Ribbon
Attaching the Output Cover
Attach the output cover to the output tray. Doing so
prevents minor cuts and injuries that may result from
printouts ejecting quickly out of the output slot while
printing.
To attach the output cover
Displaying the
Administration Screen
Proceed as follows to display the administration screen.
Notes
• Before you can make settings on the administration
screen, you must enter the administrator password. In the
factory default condition, the administrator password is
set to “9999.”
• If a memory card is inserted in any of the front-side
memory card slots of the unit, the administration screen
does not come up. Remove any memory cards first, and
then repeat the procedure.
1
At the Start Guide display, touch the top left corner of
the screen twice in succession.
The password entry screen appears.
2
Enter the administrator password using the numeric
keypad.
Displaying the Administration Screen
29
3
Touch the [OK] button.
The administration screen appears.
By touching one of the tabs at the top of this screen,
you can select the respective category to make
settings.
(Screens) tab
Lets you select the language display and configure
settings such as those for the screen saver.
(System) tab
Let’s you select the operation mode, set the clock, and
configure settings such as those for connecting the unit
to a computer.
You can also perform thermal head cleaning and touch
panel adjustment from this tab.
(Pricing) tab
Lets you set the currency to use and the price of prints.
(Administration) tab
Lets you limit the number of prints per order and make
password settings.
The print logs and system logs can also be displayed
from this tab.
(Template) tab
Lets you copy data such as templates for border prints
onto an expansion CompactFlash card.
You can also enter the text that will be added to images
from this tab.
(Printer settings) tab
Lets you configure settings such as those for printing
by order number or file name, as well as cutting mode
settings.
You can also perform print quality adjustment from
this tab.
4
When the setting is complete, touch the button.
Specifications
Power requirements
100 to 240 V AC, 50/60 Hz
Input current 6.3 to 3.2 A max. (while printing)
Operating temperature range
10 to 35 °C
Operating humidity range
20 to 80% (no condensation)
External dimensions
Approx. 338 × 442 × 454 mm (WHD)
3
(13
/8 × 17 1/2 × 17 7/8 inches)
(excluding the maximum projecting
parts)
Mass Approx. 23 kg (50.71 lb) (printer only)
Printing system Dye sublimation thermal transfer
Resolution 330 dpi
Gradation 8 bits (256 levels) each for Yellow,
Magenta, Cyan
Picture size 2UPC-R253 series:
89 × 127 mm ±2 mm
(3.5 × 5 inches ±
2UPC-R254 series:
102 × 152 mm ±2 mm
(4 × 6 inches ±
49 × 152 mm ±2 mm
(2 × 6 inches ±
2UPC-R255 series:
127 × 178 mm ±2 mm
(5 × 7 inches ±
127 × 127 mm ±2 mm
(5 × 5 inches ±
89 × 127 mm ±2 mm
(3.5 × 5 inches ±
2UPC-R256/C560 series:
152 × 203 mm ±2 mm
(6 × 8 inches ±
152 × 178 mm ±2 mm
(6 × 7 inches ±
102 × 152 mm ±2 mm
(4 × 6 inches ±
1) Printable only when using the printer driver.
Printable pixels 2UPC-R253 series:
1,210 × 1,728 dots (3.5 × 5 inches)
2UPC-R254 series:
1,382 × 2,048 dots (4 × 6 inches)
691 × 2,048 dots (2 × 6 inches)
2UPC-R255 series:
1,728 × 2,380 dots (5 × 7 inches)
1,728 × 1,728 dots (5 × 5 inches)
1,210 × 1,728 dots (3.5 × 5 inches)
2UPC- R256/C560 series:
2,048 × 2,724 dots (6 × 8 inches)
3
/32inches)
3
/32inches)
3
/32inches)
3
/32inches)
3
/32 inches)
3
/32inches)
3
/32inches)
3
/32inches)
3
/32 inches)
1)
1)
1)
1)
1)
30
Specifications
 Loading...