

Page 1
UP-897MD
2-345-262-11 (2)
Video Graphic
Printer
取扱説明書 2 ページ _____________________________________
Instructions for Use Page 28 _______________________________
Mode d’emploi Page 54 ___________________________________
Gebrauchsanweisung Seite 82 _____________________________
Istruzioni per l’uso pagina 108 ______________________________
Manual de instrucciones página 134 _________________________
お買い上げいただきありがとうございます。
電気製品は安全のための注意事項を守らないと、
火災や人身事故になることがあります。
この取扱説明書には、事故を防ぐための重要な注意事項と製品の取り扱いかたを示してあり
ます。この取扱説明書をよくお読みのうえ、製品を安全にお使いください。お読みになった
あとは、いつでも見られるところに必ず保管してください。
JP
GB
FR
DE
IT
ES
UP-897MD
© 2005 Sony Corporation
Page 2
安全のために
本機は正しく使用すれば事故が起きないように、安全に
は充分配慮して設計されています。しかし、間違った使
いかたをすると、火災や感電などにより死亡や大けがな
ど人身事故につながることがあり、危険です。
事故を防ぐために次のことを必ずお守りください。
安全のための注意事項を守る
4 ~ 5 ページの注意事項をよくお読みください。製品全
般の安全上の注意事項が記されています。
21 ページの「本機の性能を保持するために」も併せてお
読みください。
故障したら使わない
すぐに、ソニーのサービス窓口または営業担当者にご連
絡ください。
万一、異常が起きたら
・ 煙が出たら
・ 異常な音、においがしたら
・ 内部に水、異物が入ったら
・ 製品を落としたり、キャビネットを破損したと
きは
警告表示の意味
取扱説明書および製品では、次のような表示をし
ています。表示の内容をよく理解してから本文を
お読みください。
この表示の注意事項を守らないと、火災・感電な
どにより死亡や大けがなどの人身事故につながる
ことがあります。
この表示の注意事項を守らないと、感電やその他
の事故によりけがをしたり周辺の物品に損害を与
えたりすることがあります。
注意を促す記号
1 電源を切ります。
2 電源コードや接続ケーブルを抜きます。
3 ソニーのサービス窓口または営業担当者までご相談く
ださい。
行為を禁止する記号
行為を指示する記号
2
Page 3
目次
警告 ................................................................................................4
注意 ................................................................................................5
はじめに
本機の特長 ...................................................................................6
各部の名称と働き ....................................................................... 6
フロントパネル ..................................................... 6
裏面 ....................................................................... 7
接続する ........................................................................................8
プリンター用紙について .......................................................... 8
プリンター用紙の種類 ...........................................8
プリンター用紙を取り付ける ................................................. 9
取り付けるには ..................................................... 9
操作
メニューで行う調節と設定 ...................................................11
メニューフロー .................................................. 11
メニュー一覧 ...................................................... 12
メニューの操作方法 ........................................... 14
メニューの設定値を登録する ............................. 16
メニュー一覧をプリントする ............................. 16
プリントする ............................................................................ 17
プリントする ...................................................... 17
プリント画の向き/大きさを選択する ............... 19
明るさやコントラストを調節する ...................... 20
JP
その他
本機の性能を保持するために .............................................. 21
電源について ...................................................... 21
安全のために ...................................................... 21
置き場所について ............................................... 21
持ち運びについて ............................................... 21
お手入れ .....................................................................................22
キャビネットのクリーニング ............................. 22
ヘッドのクリーニング ........................................ 22
プラテンローラーのクリーニング ...................... 22
主な仕様 .....................................................................................23
故障とお考えになる前に ....................................................... 24
エラーメッセージ一覧 ........................................................... 25
アフターサービス .................................................................... 26
索引 .............................................................................................27
3
Page 4
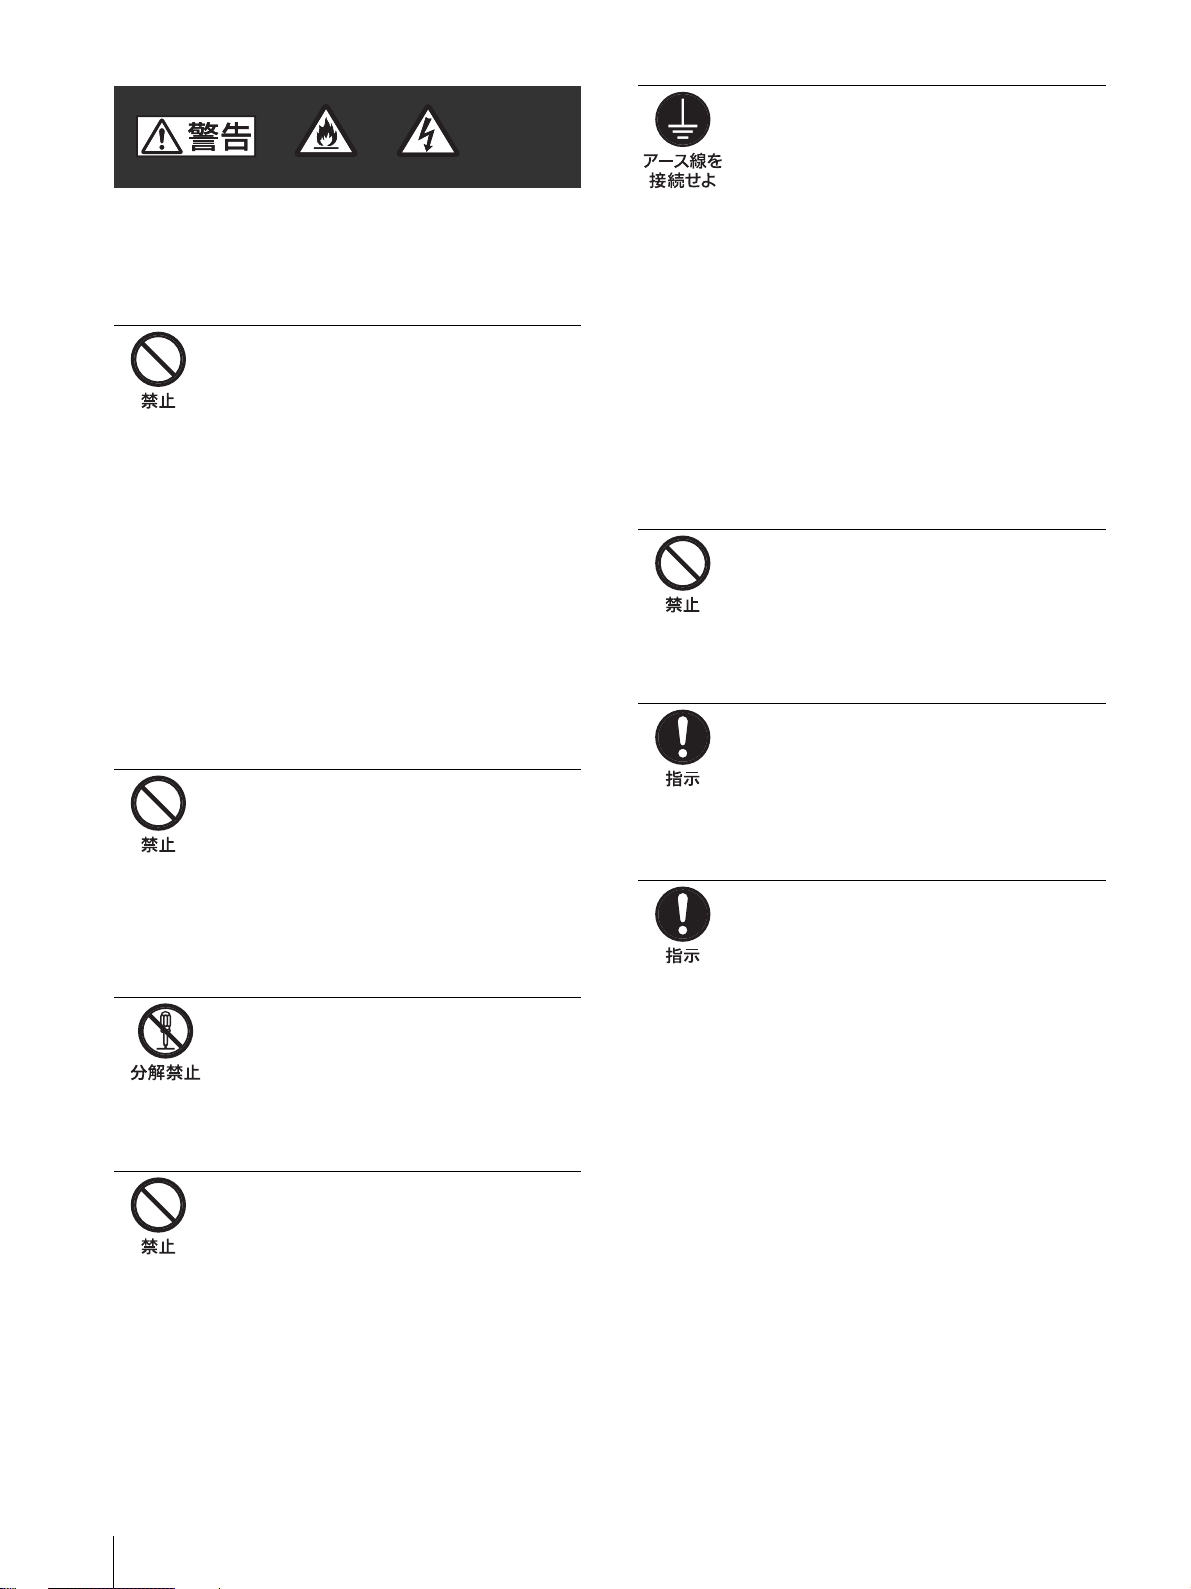
火災 感電
下記の注意を守らないと、
火災や感電により死亡や大けがに
つながることがあります。
電源コードを傷つけない
電源コードを傷つけると、火災や感電の原
因となることがあります。
・ 設置時に、製品と壁やラック、棚などの
間に、はさみ込まない。
・ 電源コードを加工したり、傷つけたりし
ない。
・ 重いものをのせたり、引っ張ったりしな
い。
・ 熱器具に近付けたり、加熱したりしない。
・ 電源コードを抜くときは、必ずプラグを
もって抜く。
万一、電源コードが傷んだら、ソニーの
サービス窓口または営業担当者に
交換をご依頼ください。
内部に水や異物を入れない
水や異物が入ると火災や感電の原因となる
ことがあります。
万一、水や異物が入ったときは、すぐに電
源を切り、電源コードや接続コードを抜い
て、ソニーのサービス窓口または営業担当
者にご相談ください。
警告
安全アースを接続する
安全アースを接続しないと、感電すること
があります。
次の方法でアースを接続してください。
・ 電源コンセントが 3 極の場合
指定の電源コードを使用することで安全
アースが接続されます。
・ 電源コンセントが 2 極の場合
指定の 3 極 t2 極変換プラグを使用し、
変換プラグから出ている緑色のアース線
を建物に備えられているアース端子に接
続してください。
安全アースを取りつけることができない場
合は、ソニーのサービス窓口または営業担
当者にご相談ください。
不安定な場所に設置しない
ぐらついた台の上や傾いたところに設置す
ると、倒れたり落ちたりしてけがの原因と
なることがあります。また、設置・取り付
け場所の強度を充分にお確かめください。
移動の際は電源コードや接続コード
を抜く
コード類を接続したまま本機を移動させる
と、コードに傷がついて火災や感電の原因
となることがあります。
表示された電源電圧で使用する
製品の表示と異なる電源電圧で使用すると
火災や感電の原因となります。
分解や改造をしない
分解や改造をすると、火災や感電、けがの
原因となることがあります。
内部の点検や修理は、ソニーのサービス窓
口または営業担当者にご依頼ください
雨のあたる場所や、油煙、湯気、湿
気、ほこりの多い場所には設置しな
い
上記のような場所や取扱説明書に記されて
いる使用条件以外の環境に設置すると、火
災や感電の原因となることがあります。
警告
4
Page 5
注意
下記の注意を守らないと、
けがをしたり周辺の物品に損害を与える
ことがあります
ぬれた手で電源プラグをさわらない
ぬれた手で電源プラグを抜き差しすると、
感電の原因となることがあります。
指定された電源コードを使用する
指定以外の電源コードを使用すると、火災
や感電の原因となります。
製品の上に乗らない、重いものを乗
せない
倒れたり、落ちたり、壊れたりして、けが
の原因となることがあります。
コード類は正しく配置する
電源コードや接続ケーブルは、足に引っか
けると本機の落下や転倒などによりけがの
原因となることがあります。
充分注意して接続・配置してください。
電源コードのプラグ及びコネクター
は突き当たるまで差し込む
真っ直ぐに突き当たるまで差し込まないと、
火災や感電の原因となります。
カッターの刃には触れない
カッターの刃に触れると、けがをすること
があります。
通風孔をふさがない
通風孔をふさぐと内部に熱がこもり、火災
や故障の原因となることがあります。風通
しをよくするために次の項目をお守りくだ
さい。
・ 壁から 10cm 以上離して設置する。
・ 密閉された狭い場所に押し込めない。
・ 毛足の長い敷物(じゅうたんや布団など)
の上に設置しない。
・ 布などで包まない。
・ あお向けや横倒し、逆さまにしない。
ドアパネルの上に指を置かない
ドアパネルを閉める際はドアパネルの上に
指を置かないでください。
フロントパネルとの間に挟んでけがの原因
となることがあります。
お手入れの際は、電源を切って電源
プラグを抜く
電源を接続したままお手入れをすると、感
電の原因となることがあります。
プリント直後サーマルヘッドに触れ
ない
プリント直後は、サーマルヘッドが熱く
なっている場合があり、
触れるとやけどの原因となることがありま
す。
プラテンローラーを連続回転させな
がらクリーニングしない
プラテンローラーをクリーニングする際は
プラテンローラーを連続回転させながらク
リーニングしないでください。ドアパネル
との間に指を巻き込んでけがの原因となる
ことがあります。
注意
5
Page 6

はじめに
はじめに
本機の特長
静かな高画質・高速プリント
・ 高速ドライブ IC 内蔵の薄膜サーマルヘッドを採用。
12.8 ドット /mm の高密度印画が可能です。
・ 実印画時間約 2 秒 /1 画面(A7 サイズ)で高画質プリ
ントができます。(メニューの「SPEED」で「SP:HI」
選択時)
・ 白黒 256 階調表現が可能です。
・ 温度差による印画ムラを防ぐ温度補正回路を内蔵してい
ます。
メニューによる各種設定
メニュー操作でご使用になる状況に合わせた設定ができ
ます。設定を 3 種類まで保存できます。
プリンター用紙の取り付けが簡単
ドアパネルを開けてプリンター用紙を落とし込むだけで、
簡単に取り付けることができます。
各部の名称と働き
( )内の数字は参照ページを示します。
フロントパネル
A ! 電源 ON/OFF スイッチ(9、14、17、22)
スイッチを ON にして電源を入れると、液晶ディス
プレイのバックライトが点灯します。
B 液晶ディスプレイ(11、17)
正常に動作しているときは、バックライトが緑色に
点灯しています。また、矢印が、メニューで選択さ
れているプリンター用紙の種類をさしています。
プリンター用紙について詳しくは、「プリンター用紙
について」 (8 ページ)、および「現在選択されてい
るプリンター用紙について」 (17 ページ)をご覧く
ださい。
エラー発生時は、エラーメッセージを表示します。
メニュー操作時は、メニューを表示します。
C ジョグダイヤル(14、22)
メニュー操作を行うときに使用します。
D CONTR(コントラスト)つまみ(20)
プリント画のコントラストを調節します。
E BRIGHT(明るさ)つまみ(20)
プリント画の明暗を調節します。
F FEED(紙送り)ボタン(10、17)
用紙を送るとき押します。
押している間だけ用紙が送られます。プリント中に
押すとプリントを中断できます。
本機の特長 / 各部の名称と働き
6
Page 7
G COPY(複写)ボタン(18)
最後にプリントした画像を再度プリントするときに
押します。
プリント枚数の設定にかかわらず、1 回押すごとに
1 枚プリントされます。
モニターのビデオ(映像)入力に接続します。
VIDEO IN 端子から入力した信号またはプリンター
で信号処理した信号が出力されます。出力する信号
の種類は、メニューの VIDEO 設定により決まりま
す。
はじめに
H PRINT(プリント)ボタン
モニター上に表示されている画像をプリントすると
きに押します。PRINT ボタンを押した瞬間の画像が
メモリーに記憶されます。
I OPEN(開く)ボタン(10、17)
ドアパネルを開けるときに押します。プリント中に
押すとプリントを中断できます。
J ペーパーカッター
プリンター用紙を出口でカットするための刃です。
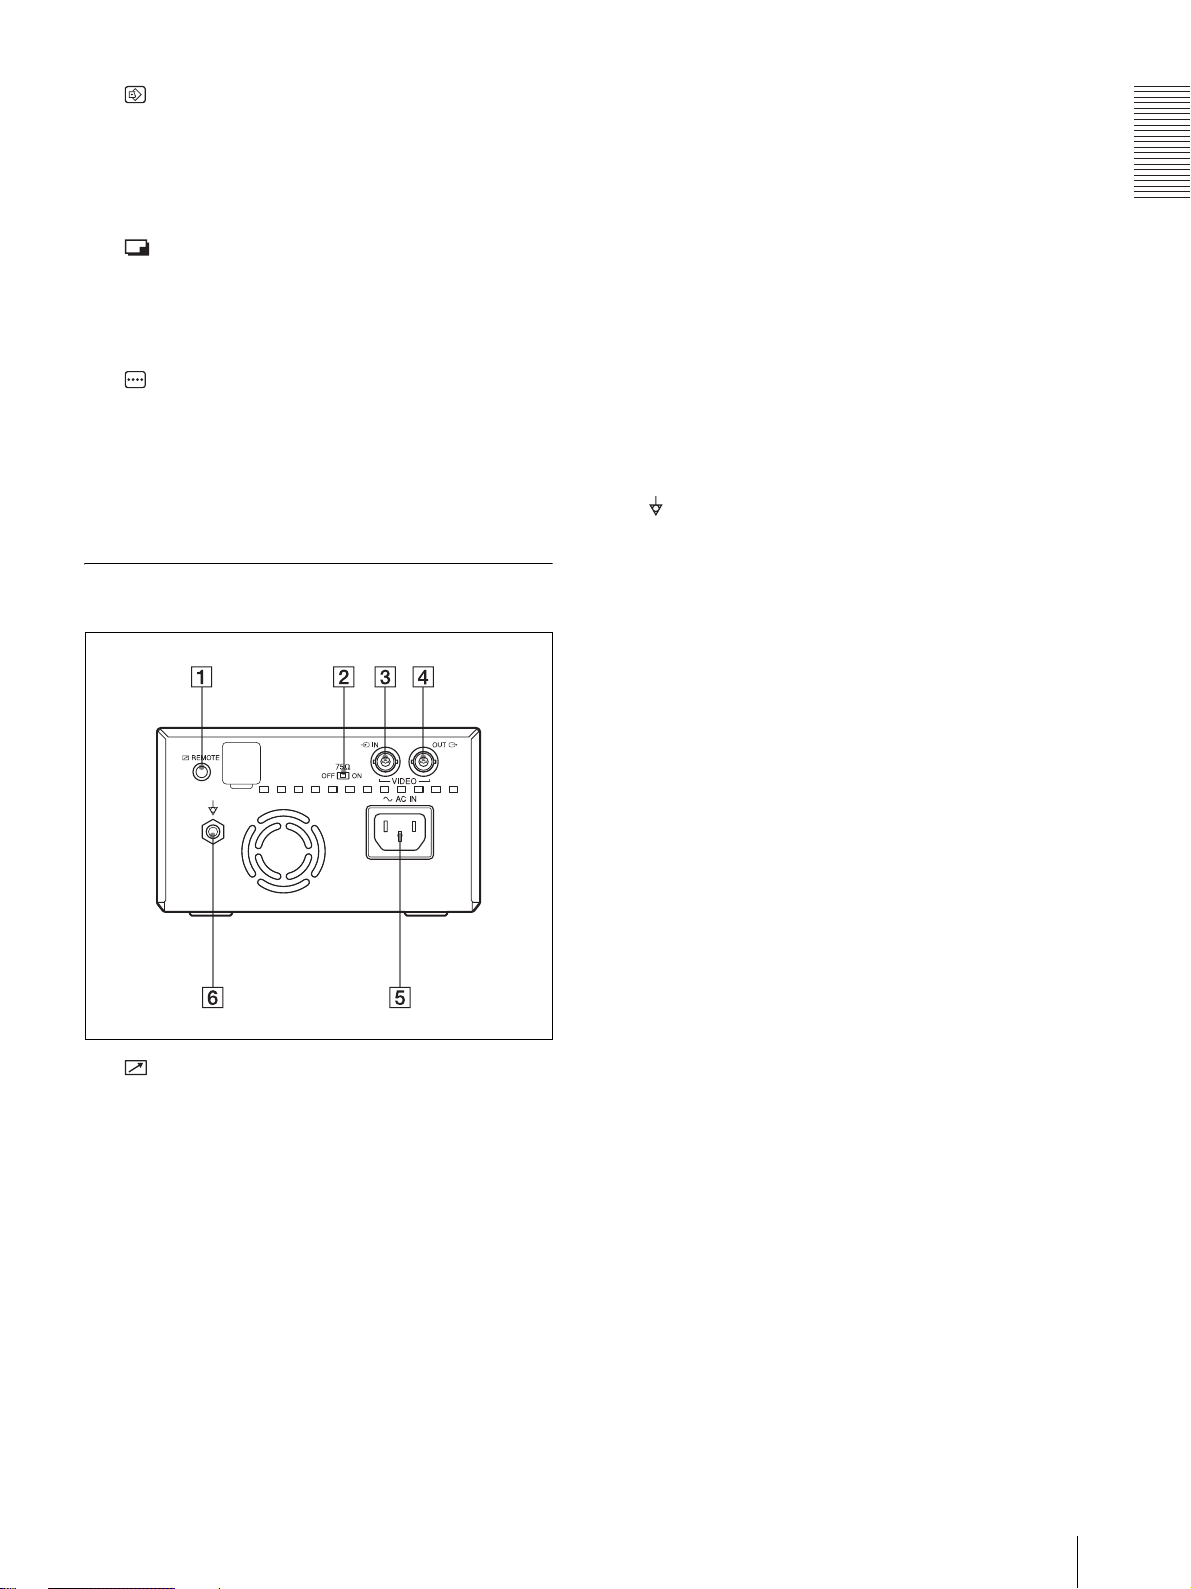
裏面
E -AC IN(電源)端子
指定の電源コードをつなぎます。
3極t 2 極変換プラグをお使いになる場合のご注
意
アースの接続は、必ず電源プラグを電源コンセント
へ接続する前に行ってください。アースの接続をは
ずす場合は、必ず電源プラグを電源コンセントから
抜いてから行ってください。
F 等電位端子
本機に接続したすべての機器の電位が等しくなりま
す。
A REMOTE(リモコン)端子(8)
別売りのリモートコントロールユニット RM-91、ま
たはフットスイッチを接続します。
B 75Ω 切り換えスイッチ
ON:VIDEO OUT コネクターに何も接続しないと
きは、この位置にします。
OFF:VIDEO OUT コネクターからの出力信号をモ
ニターテレビまたは他のビデオ機器に接続するとき
は、この位置にします。
C t VIDEO IN(ビデオ入力)端子
ビデオ機器のビデオ(映像)出力端子に接続します。
D T VIDEO OUT(ビデオ出力)端子
各部の名称と働き
7
Page 8
接続する
プリンター用紙について
はじめに
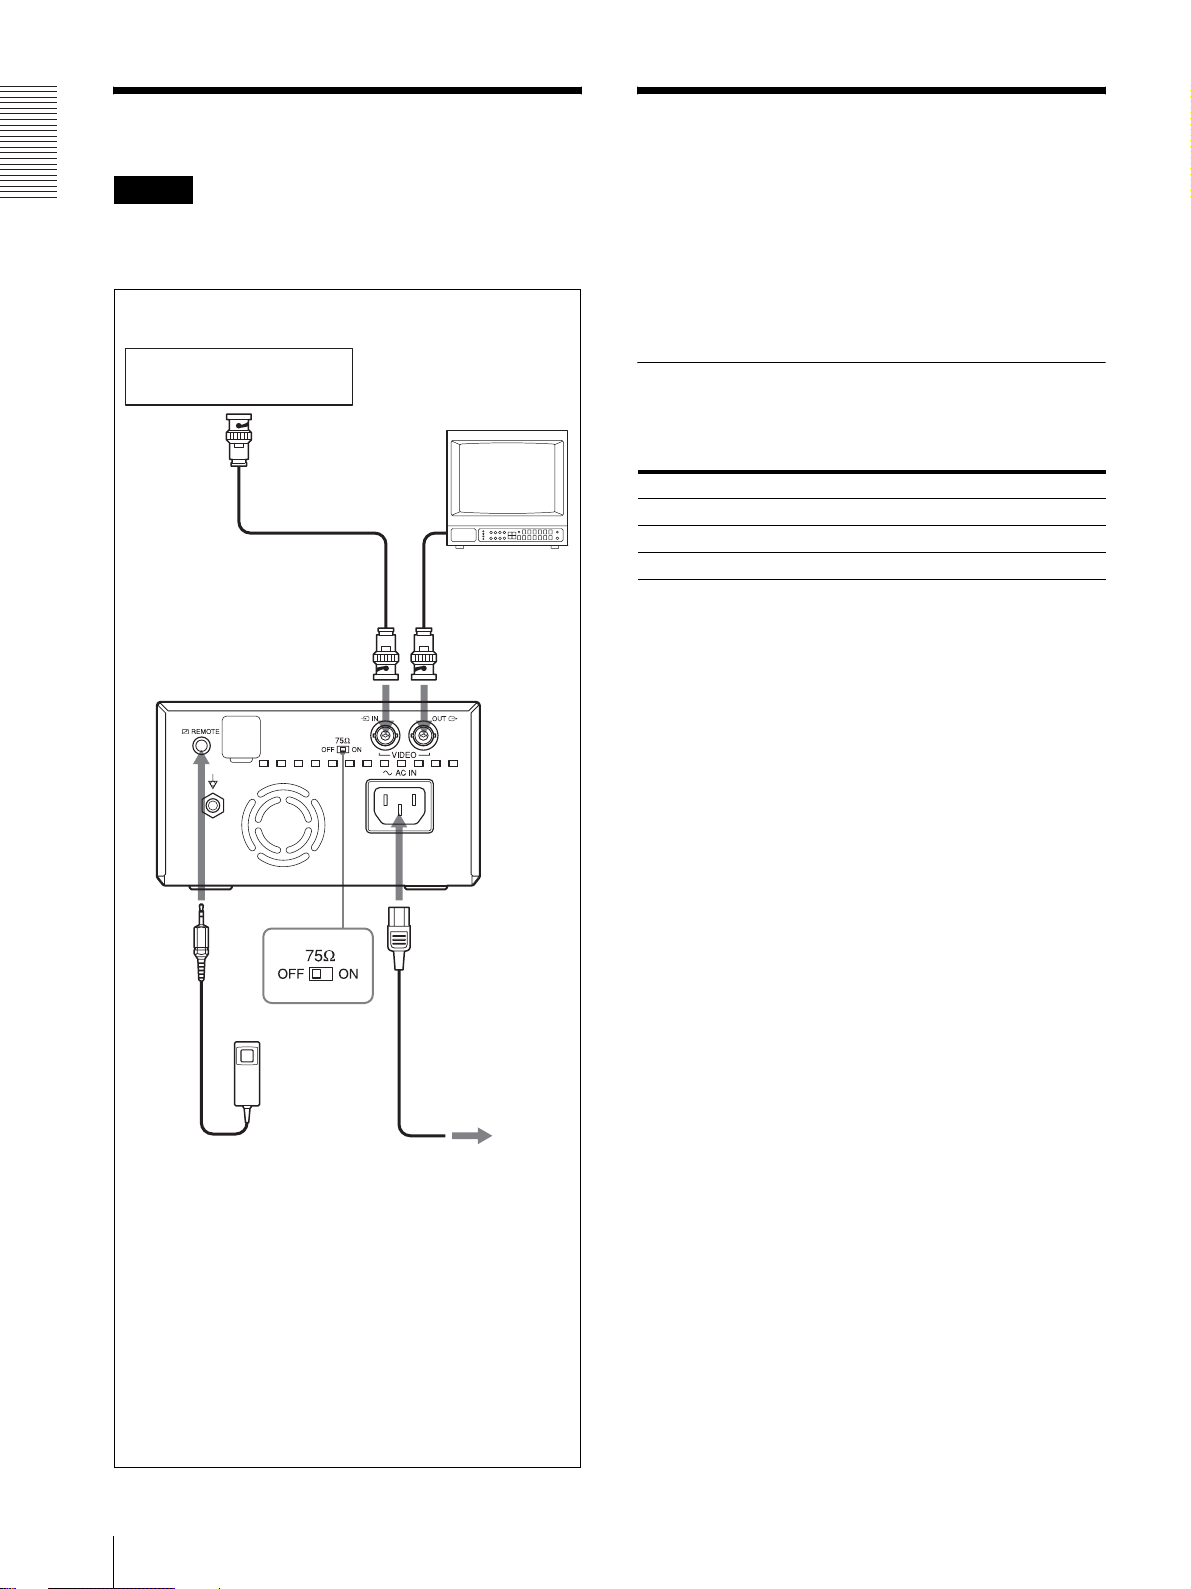
ご注意
・ 各機器の電源を切ってから、接続してください。
・ 電源コードは最後に接続してください。
ビデオ機器
カラー/白黒
モニター
ビデオ出力端子へ
ビデオ入力へ
接続ケーブル
(BNC
y BNC)
(別売り)
VIDEO IN へ
接続ケーブル
(別売り)
VIDEO OUT へ
プリンター用紙は、必ず専用のソニー UPP-110S/
110HD/110HG をお使いください。他のプリンター用
紙をお使いになると、印画品質の保証ができないばかり
でなく、プリンターの故障の原因にもなります。
UP-880/890MD 用のプリンター用紙、UPP-110HA
もお使いになれませんのでご注意ください。
プリンター用紙の種類
プリンター用紙には次のような特性があります。
印画特性 用紙の種類
TYPE I(Normal =標準) UPP-110S
TYPE II(High Density =高濃度) UPP-110HD
TYPE V(High Glossy =高光沢) UPP-110HG
プリンター用紙についてのご注意
未使用のプリンター用紙を保管する場合:
下記の場所に保管してください。下記以外の場所に保管
すると、プリンター用紙が変色することがあります。
・ 30 ℃以下の冷暗な場所
・ 湿度が低く、日光や室内光があたらない場所
・ アルコールなどの揮発性有機溶剤やセロハンテープ、塩
化ビニールなどに触れない場所
REMOTE へ
75Ω 切り換え
スイッチ
リモートコントロール
ユニット
RM-91(別売り)
a) 75Ω 切り換えスイッチを以下のように切り換えて
ください。
ON:VIDEO OUT コネクターに何も接続しないと
きは、この位置にします。
OFF:VIDEO OUT コネクターからの出力信号をモ
ニターテレビまたは他のビデオ機器に接続するとき
は、この位置にします。
a)
-AC IN へ
電源コード(別売り)
電源コンセントへ
プリンター用紙を取り付ける場合:
・ プリンターに取り付ける際にプリンター用紙の表面に触
れないよう注意してください。指紋や汗、折り目などが
つくと印画ムラの原因になります。
・ プリンター用紙の先端に付いているラベルをはがした
ら、必ず先端の 15 ~ 20cm を引き出してください。
ラベルの跡が残っていると印画ムラの原因になります。
プリントした用紙を保管する場合:
・ 下記の場所に保管してください。下記以外の場所に保管
すると、プリンター用紙が変色したり、プリントした画
面が薄くなることがあります。
- 30 ℃以下の冷暗な場所(可塑材を含まない紙
や、ポリプロピレンの袋などにはさんで保管
してください。)
- 湿度が低く、直射日光や室内光があたらない
場所
- アルコールなどの揮発性有機溶剤やセロハン
テープ、塩化ビニールなどに触れない場所
接続する / プリンター用紙について
8
Page 9
・ ジアゾ式の湿式コピー(青焼)と重ねないでください。
また、プリント面どうしを重ねないでください。プリン
ター用紙が変色したり、プリントした画面が薄くなるこ
とがあります。
・ プリンター用紙を接着する場合には、両面テープまたは
水性のりをお使いください。
プリンター用紙を廃棄する場合:
不燃物として廃棄してください。
プリンター用紙を取り付
ける
はじめに
ご注意
・ プリンター用紙を取り付ける前に、「プリンター用紙に
ついて」 (8 ページ)をご覧ください。
・ プリンター用紙を取り付ける際は、プリンター用紙の表
面には触れないでください。指紋や汗、折り目などがつ
くと、印画ムラなど、プリントした画面の品質の低下に
つながります。
・ プリンター用紙には専用の UPP-110S/110HD/
110HG 以外は使用しないでください。(8 ページ)
・ お使いになる用紙に合わせて、必ずメニューの
「MEDIA」の項目を設定してください。(13 ページ)
現在選択されているメディアは液晶ディスプレイで確認
できます。詳しくは、「現在選択されているプリンター
用紙について」 (17 ページ)をご覧ください。
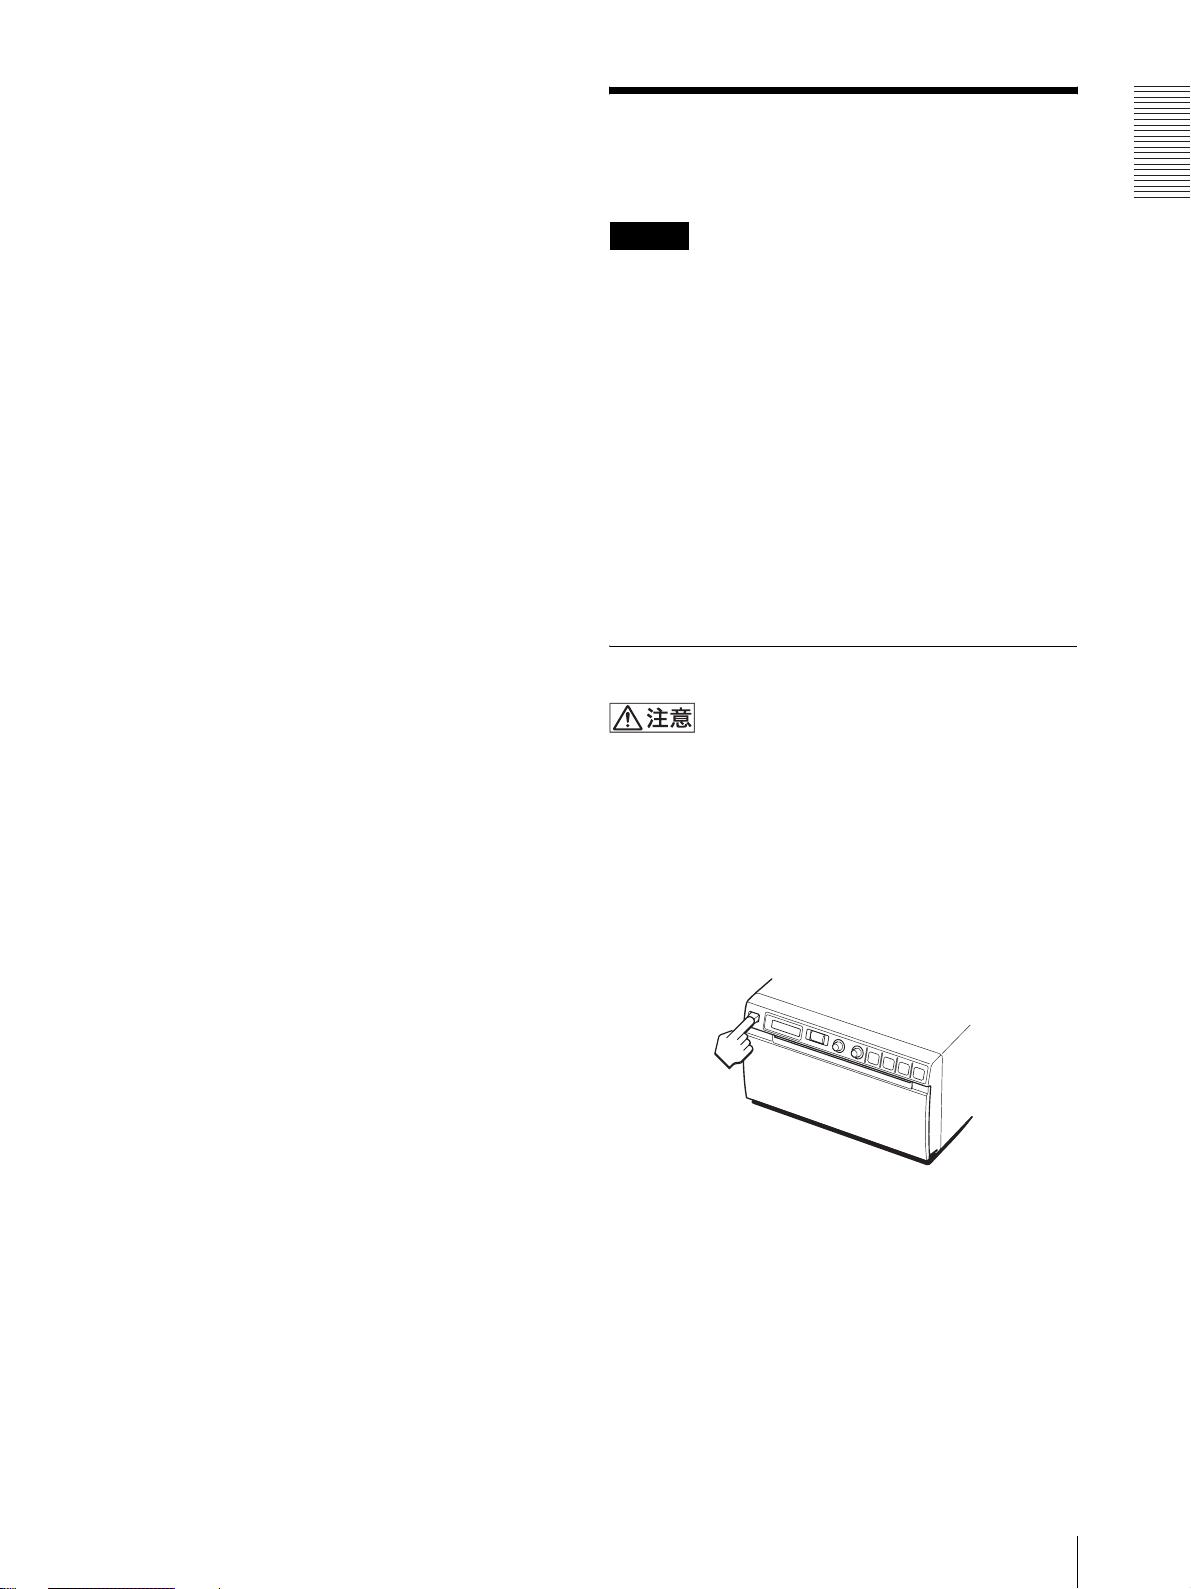
取り付けるには
本機には、ペーパーカッターが装備されています。プリ
ンター用紙を取り付ける際、カッター部に触れるとけが
の原因となることがあります。充分ご注意ください。
1
電源 ON/OFF スイッチを ON にし、電源を入れる。
プリンター用紙が取り付けられていない場合は、液
晶ディスプレイのバックライトがアンバー色に点灯
し、「EMPTY」というメッセージが表示されます。
プリンター用紙を取り付ける
9
Page 10

はじめに
2
OPEN ボタンを押して、ドアを開ける。
3
プリンター用紙の先端についているラベルをはがし、
15 ~ 20cm 程度引き出してから、プリンター用紙
トレイに用紙を入れる。
ご注意
プリンター用紙を引き出すときや、トレイ内に入れ
るときは、プリンター用紙を落とさないようお気を
つけください。ごみなどがつき、使用できなくなる
ことがあります。
プリンター用紙がまっすぐにな
るように入れる。
4
ドアを手で押して閉める。
ラベルをはがし、
15 ~ 20cm 程度
引き出す。
感熱部を上にして入れる。逆に入
れるとプリントされない。
ご注意
・ プリンター用紙が斜めに取り付けられていると、紙づま
りなどの原因になります。
・ 手順 3 でプリンター用紙を十分引き出さなかった場合
は、プリンター用紙を引っ張らずに、前面パネルの
FEED ボタンを押してプリンター用紙を送ってくださ
い。
プリンター用紙を取り付ける
10
Page 11
操作
メニューで行う調節と設
定
また、設定した内容を、接続する機器や、個人の好みに
合わせてあらかじめユーザー設定として 3 種類まで記憶
させておくことができます。
メニューを使って使用状況に合わせたプリンターの各種
調節や設定ができます。設定した内容は、プリンターの
電源を切っても保持されます。
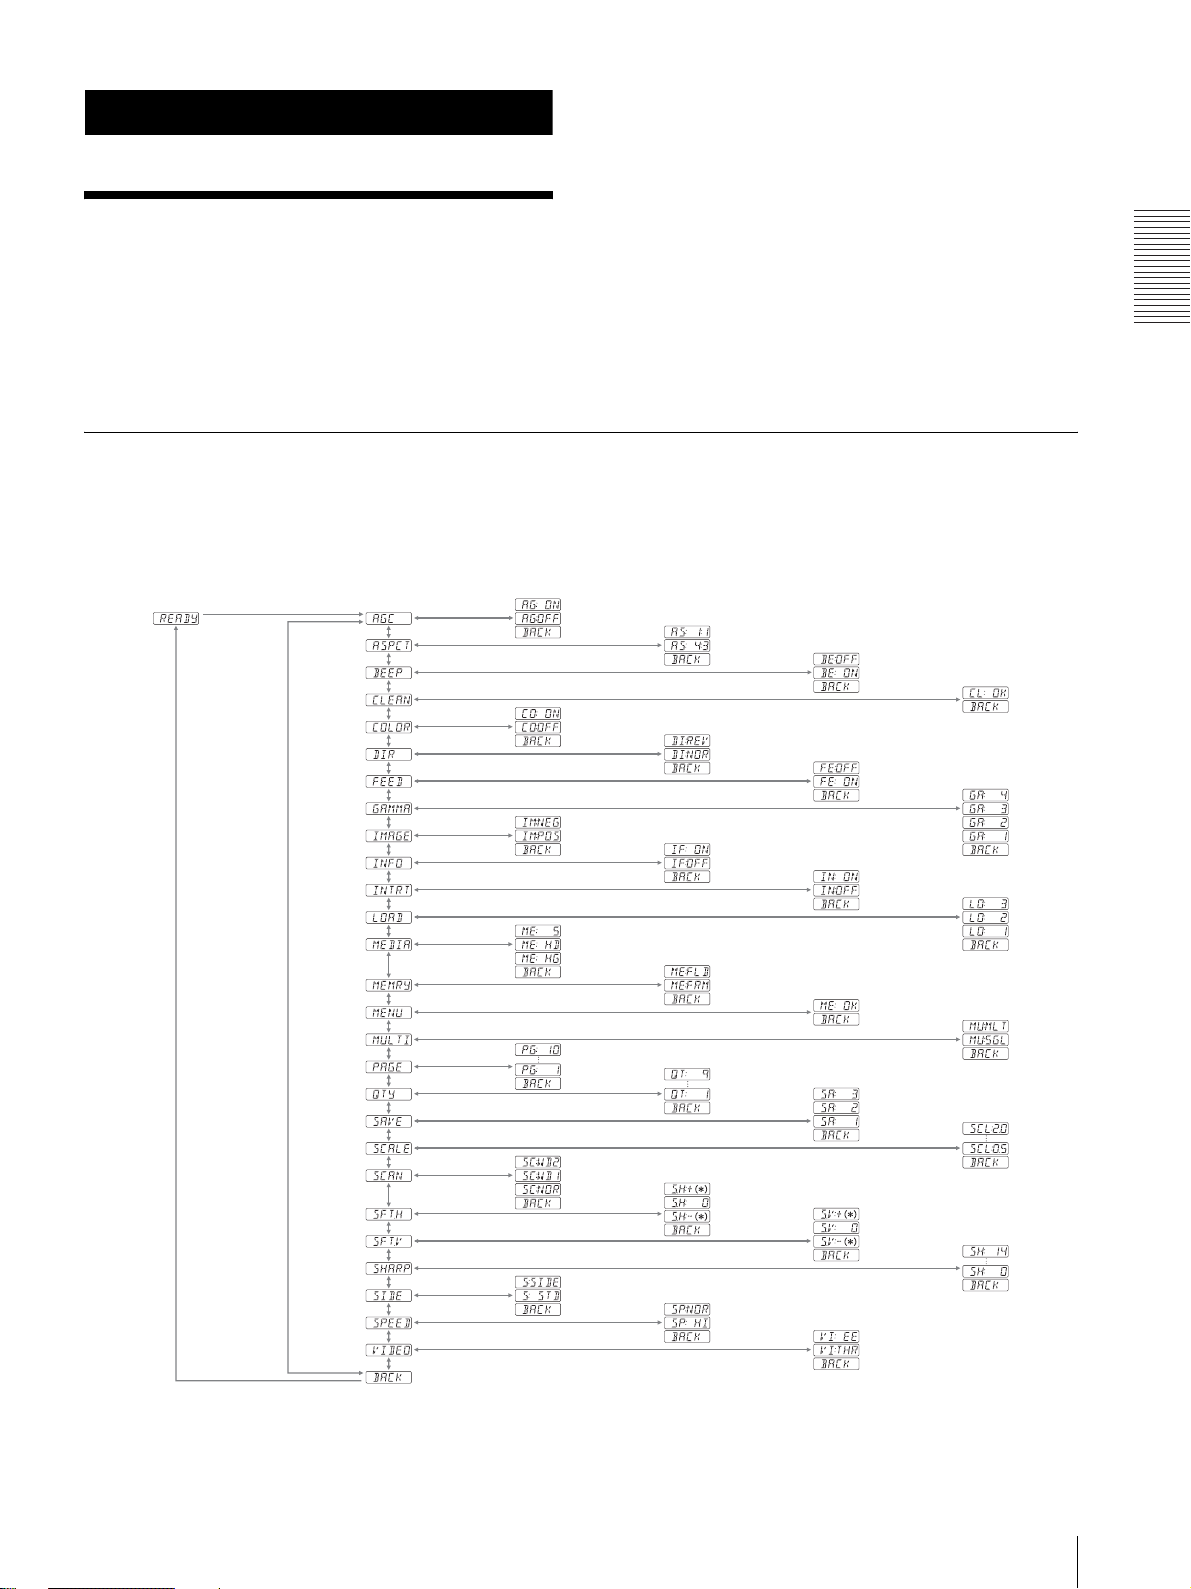
メニューフロー
液晶ディスプレイパネルは、ジョグダイヤルを押すと、
以下のフローのようにメニューの表示内容が変わり、各
種設定を行うことができます。
操作
メニュー項目「SFT.H」、「SFT.V」の*マークについて
上記項目を設定中、ジョグダイヤルを回して表示される数値を示しています。この数値は、「SCALE」、「SCAN」、「SIDE」
の設定値および取り込む画像の映像方式によって変化します。
メニューで行う調節と設定
11
Page 12
操作
メニュー一覧
メニュー項目の設定内容を一覧表で説明します。
一覧表の中 で囲んである設定は、初期設定です。
項目 内容 設定
AGC 不適正なレベルの
入力信号を、適切な
レベルに補正しま
す。
a)
ASPCT
BEEP 操作音とアラーム
CLEAN ヘッドのクリーニ
COLOR 入力信号に従って
b)
DIR
アスペクト比を切
り換えます。
音が鳴るか鳴らな
いかを切り換えま
す。
ングをします。
切り換えます。
プリント方向を切
り換えます。
AG:ON:プリント画が全体
的に白とび・黒つぶれを起こ
している場合。
[AG:OFF]:通常はこの位置に
します。
BACK:設定変更をキャンセ
ルして項目欄に戻る場合。
AS:1:1:アスペクト比が 1:1
の画面をプリントする場合。
[AS:4:3]:通常はこの位置にし
ておきます。
BACK:設定変更をキャンセ
ルして項目欄に戻る場合。
BE: OFF:操作音を鳴らさな
い場合。
[BE: ON]:操作音とアラーム
音を鳴らす場合。
BACK:設定変更をキャンセ
ルして項目欄に戻る場合。
[CL:OK]:ヘッドのクリーニン
グを開始する場合。 必ず付属
のクリーニングシートをご使
用ください。
BACK:クリーニングをキャ
ンセルして項目欄に戻る場
合。
CO:ON:印画するビデオ信
号がカラーの場合。
[CO:OFF]:印画するビデオ信
号が白黒の場合。
BACK:設定変更をキャンセ
ルして項目欄に戻る場合。
DI:REV:画像を逆方向(画
面の上から先)にプリントす
る場合。
[DI:NOR]:画像を正方向(画
面の下から先)にプリントす
る場合
BACK:設定変更をキャンセ
ルして項目欄に戻る場合。
a)
項目 内容 設定
FEED プリント後のプリ
ンター用紙の送り
かたを切り換えま
す。
GAMMA
(「MEDIA」で
「ME: S」が選
択されている
場合は、
TONE 1 に固
定されます。)
IMAGE 白黒反転を切り換
INFO プリントの条件
INTRT プリントの中断の
トーンを切り換え
ます。
えます。
(コントラスト、ブ
ライト、ガンマ、
シャープネス情報)
をプリント画の下
にプリントします。
動作を切り換えま
す。
FE:OFF:余白をすくなくす
るとき、または複数枚まとめ
てプリントする場合。プリン
ター用紙 1 枚あたりの余白が
短いので、用紙の 1 巻あたり
の印画枚数を多くとることが
できます。ただし、ペーパー
カット時は FEED ボタンを押
して、用紙を送ってカットし
てください。
[FE:ON]:プリント後に余白を
つけてプリンター用紙を送る
場合。
BACK:設定変更をキャンセ
ルして項目欄に戻る場合。
GA: 4:TONE 4 最軟調
GA: 3:TONE 3 硬調
[GA: 2]:TONE 2 標準
GA: 1:TONE 1 軟調
BACK:設定変更をキャンセ
ルして項目欄に戻る場合。
IM:NEG:白黒反転したプリ
ント画を作成する場合。
[IM:POS]:白黒反転させずに、
普通にプリントする場合。
BACK:設定変更をキャンセ
ルして項目欄に戻る場合。
IF:ON:プリント情報を印刷
する場合。
[IF:OFF]:印刷しない場合。
BACK:設定変更をキャンセ
ルして項目欄に戻る場合。
IN:ON:プリント中に再度
PRINT ボタンを押して、プリ
ントを中断し、PRINT ボタ
ンを押した瞬間の画像を新た
にプリントする場合。
[IN:OFF]:プリント中に再度
PRINT ボタンを押してもプ
リントを中断せず、そのプリ
ントが完了した後、プリント
中に PRINT ボタンを押した
瞬間の画像のプリントを行う
場合。
BACK:設定変更をキャンセ
ルして項目欄に戻る場合。
メニューで行う調節と設定
12
Page 13

項目 内容 設定
LOAD 登録されている設
定を呼び出します。
MEDIA ご使用になるプリ
ンター用紙に合わ
せて切り換えます。
MEMRY メモリーモードを
切り換えます。
MENU 現在の設定値をメ
ニュー一覧で印刷
します。
MULTI 1 枚のプリンター
用紙にプリントす
る画像の数を指定
します。
PAGE
(「MULTI」で
「MU:MLT」
が選択されて
いる場合は、本
メニュー項目
は表示されま
せん。)
QTY プリント枚数を設
PRINT ボタンを押
すごとに画像がメ
モリーに記憶され
ます。10 回分まで
記憶されます。メ
モリーに保存され
ている画像を選択
してプリントしま
す。
定します。
(ボールがバットに当たる瞬
LO: 3:「SAVE」で保存した
番号 3 の設定を呼び出す場
合。
LO: 2:「SAVE」で保存した
番号 2 の設定を呼び出す場
合。
[LO: 1]:「SAVE」で保存した
番号 1 の設定を呼び出す場
合。
BACK:設定変更をキャンセ
ルして項目欄に戻る場合。
ME: S:UPP-110S を使用す
る場合。
ME:HD:UPP-110HD を使
用する場合。
[ME:HG]:UPP-110HG を使
用する場合。
BACK:設定変更をキャンセ
ルして項目欄に戻る場合。
ME:FLD:動きの速い画像
間など)をプリントすると、
画像がぶれて二重になること
がある場合。
[ME:FRM]:通常はこの位置に
しておきます。
BACK:設定変更をキャンセ
ルして項目欄に戻る場合。
[ME:OK]:メニュー一覧をプリ
ントする場合。
BACK:メニュー一覧の印刷
をキャンセルして項目欄に戻
る場合。
MU:MLT:画像を 2 つプリ
ントする(2 分割画面)
[MU:SGL]:画像を 1 つプリン
トする(フル画面)。
BACK:設定変更をキャンセ
ルして項目欄に戻る場合。
[PG:1] ~ PG:10:1 つの画像を
選択し、 COPY ボタンを押す
とプリントします。
BACK:設定変更をキャンセ
ルして項目欄に戻る場合。
[QT: 1] ~ QT:9:同じプリント
画のプリントを 1 枚から 9 枚
の間で選択できます。
BACK:設定変更をキャンセ
ルして項目欄に戻る場合。
項目 内容 設定
SAVE メニューの設定値
を 3 通り登録しま
す。
SCALE プリント画を拡大、
または縮小します。
c)
SCAN
SFT.H プリントする画像
SFT.V プリントする画像
SHARP プリント画の輪郭
d)
SIDE
プリントする画像
の範囲を切り換え
ます。
の水平方向の位置
を指定します。
の垂直方向の位置
を指定します。
を強調します。
プリント画の向き
を切り換えます。
SA: 3:設定番号 3 として登
録する場合。
SA: 2:設定番号 2 として登
録する場合。
[SA: 1]:設定番号 1 として登録
する場合。
BACK:設定変更をキャンセ
ルして項目欄に戻る場合。
SCL:2.0(2 倍)から
SCL:0.5(1/2 倍)まで、
0.1 刻みで設定します。
[SCL:1.0] が初期設定値です。
BACK:設定変更をキャンセ
ルして項目欄に戻る場合。
SC:WD2、[SC:WD1]、
SC:NOR の順にプリントする
範囲が広くなります。
BACK:設定変更をキャンセ
ルして項目欄に戻る場合。
[S.H:0]:水平位置を調節しま
す。ジョグダイヤルを回して
表示される数値は、
「SCALE」、「SCAN」、
「SIDE」の設定、および取り
込む画像の映像方式によって
変化します。
BACK:設定変更をキャンセ
ルして項目欄に戻る場合。
[S.V: 0]:垂直位置を調節しま
す。ジョグダイヤルを回して
表示される数値は、
「SCALE」、「SCAN」、
「SIDE」の設定、および取り
込む画像の映像方式によって
変化します。
BACK:設定変更をキャンセ
ルして項目欄に戻る場合。
0~14の15段階で切り換
えます。「0」はオフです。初
期設定値は「2」です。
BACK:設定変更をキャンセ
ルして項目欄に戻る場合。
S:SIDE:画像を横向きにする
場合。
[S:STD]:画像をモニター画面
に映し出されている向きでプ
リントする場合。
BACK:設定変更をキャンセ
ルして項目欄に戻る場合。
操作
メニューで行う調節と設定
13
Page 14
操作
項目 内容 設定
SPEED
(「MEDIA」で
「ME:HD」が
選択されてい
ると、印画ス
ピードは、標準
に設定され、こ
のメニュー項
目は表示され
ません。)
VIDEO 裏面の VIDEO
BACK メニューモードか
プリンターの印画
スピードを切り換
えます。
「SP:HI」に設定した場合、印
「SP:NOR」に設定した場合
OUT 端子からの出
力信号を切り換え
ます。
ら抜けます。
「READY」表示に戻ります。
SP:NOR:標準のスピードで
プリントする場合。
[SP:HI]:高速でプリントする
場合。
BACK:設定変更をキャンセ
ルして項目欄に戻る場合。
ご注意
画中の消費電力が
よりやや高くなります。
VI:EE:VIDEO IN 端子に入
力した信号を信号処理させて
出力させる場合。
[VI:THR]:VIDEO IN 端子に
入力した信号を信号処理の電
気回路を通さずにそのまま出
力させる場合。
BACK:設定変更をキャンセ
ルして項目欄に戻る場合。
選択して、ジョグダイヤルを
押すと、メニューモードから
抜け、液晶ディスプレイは、
c)
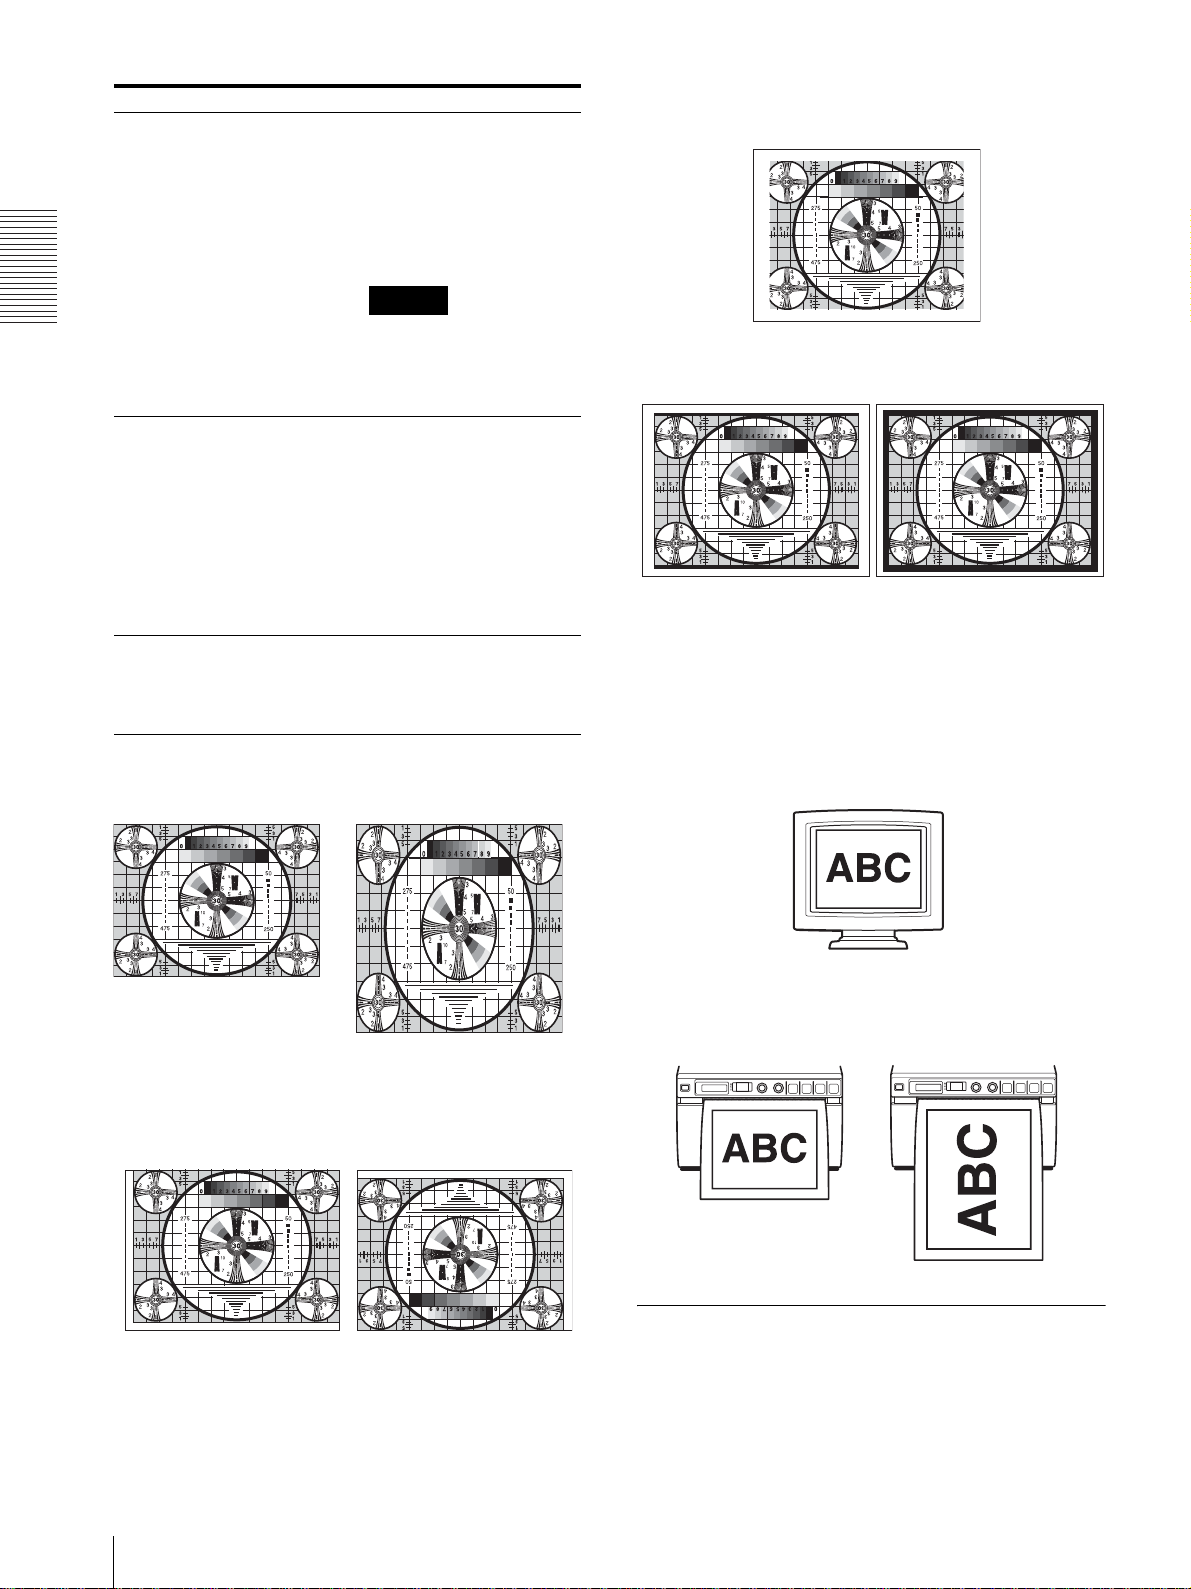
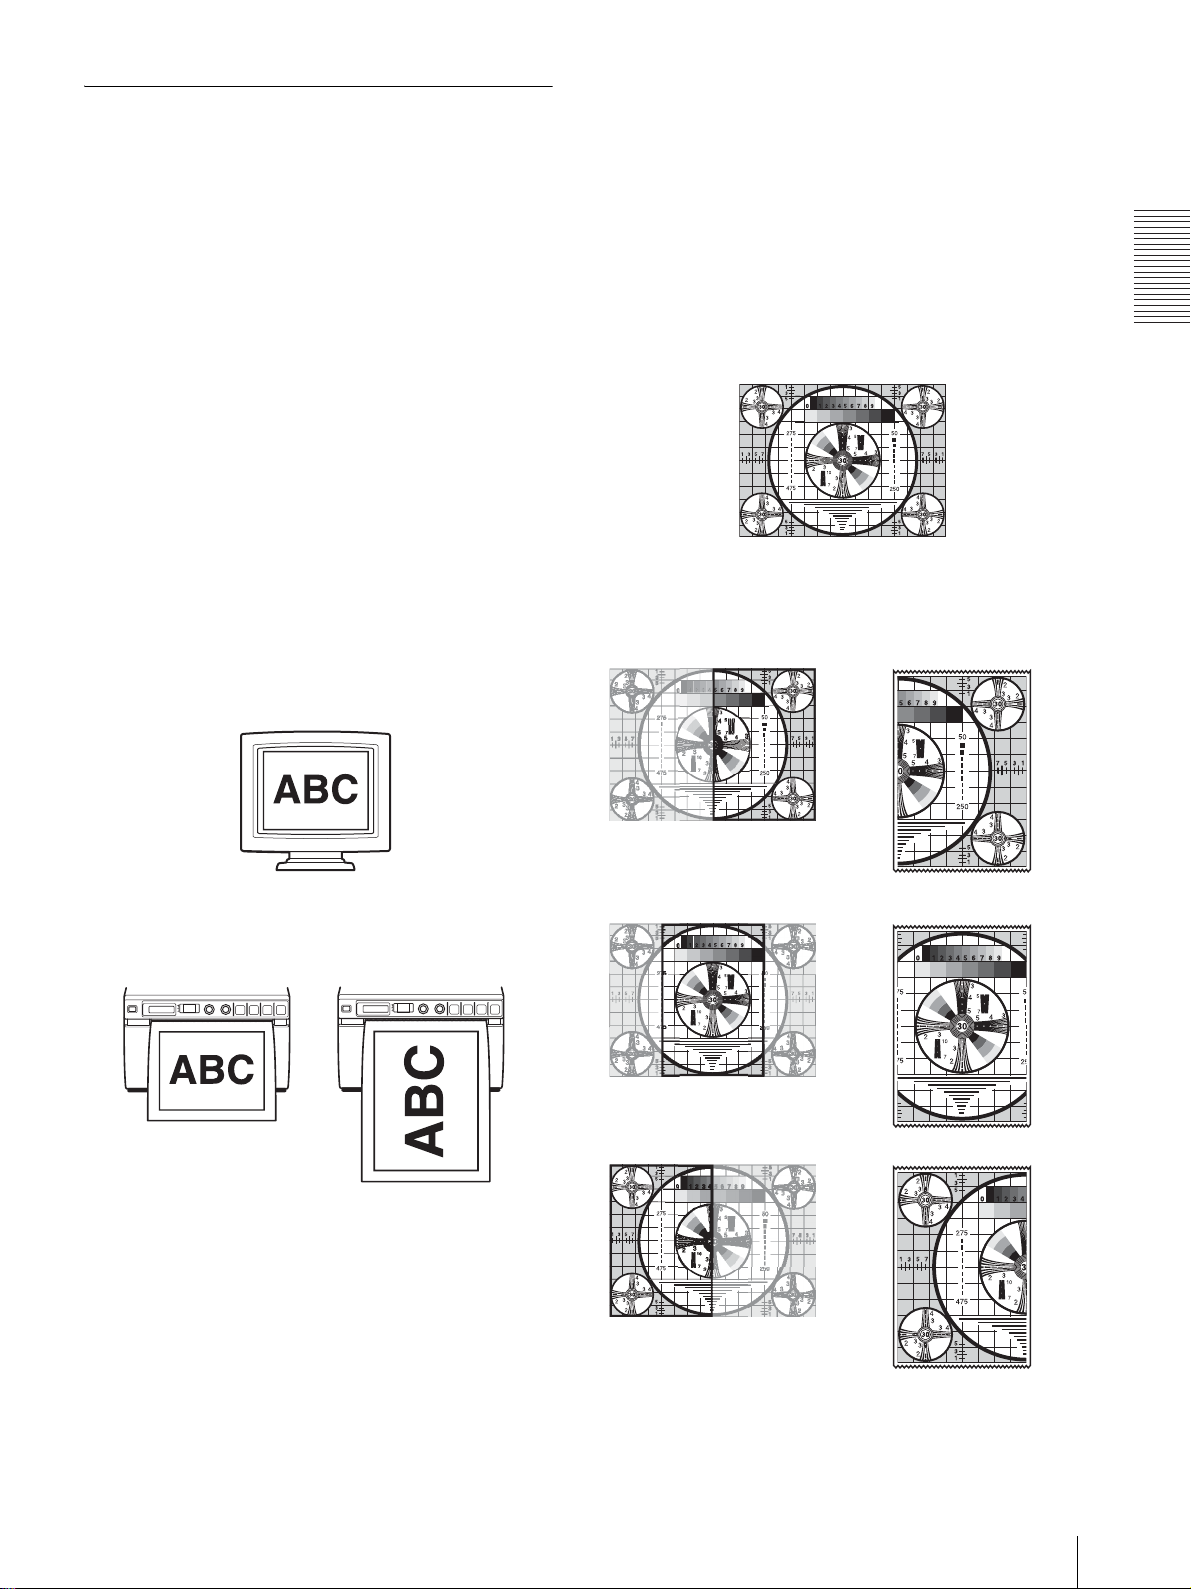
プリントする範囲は以下のようになります。
「SC:NOR」の場合
「SC:WD1」の場合 「SC:WD2」の場合
d)
プリント画の向きは以下のようになります。
a)
アスペクト比は以下のようになります。
「AS:4:3」の場合
「AS:1:1」の場合
b)
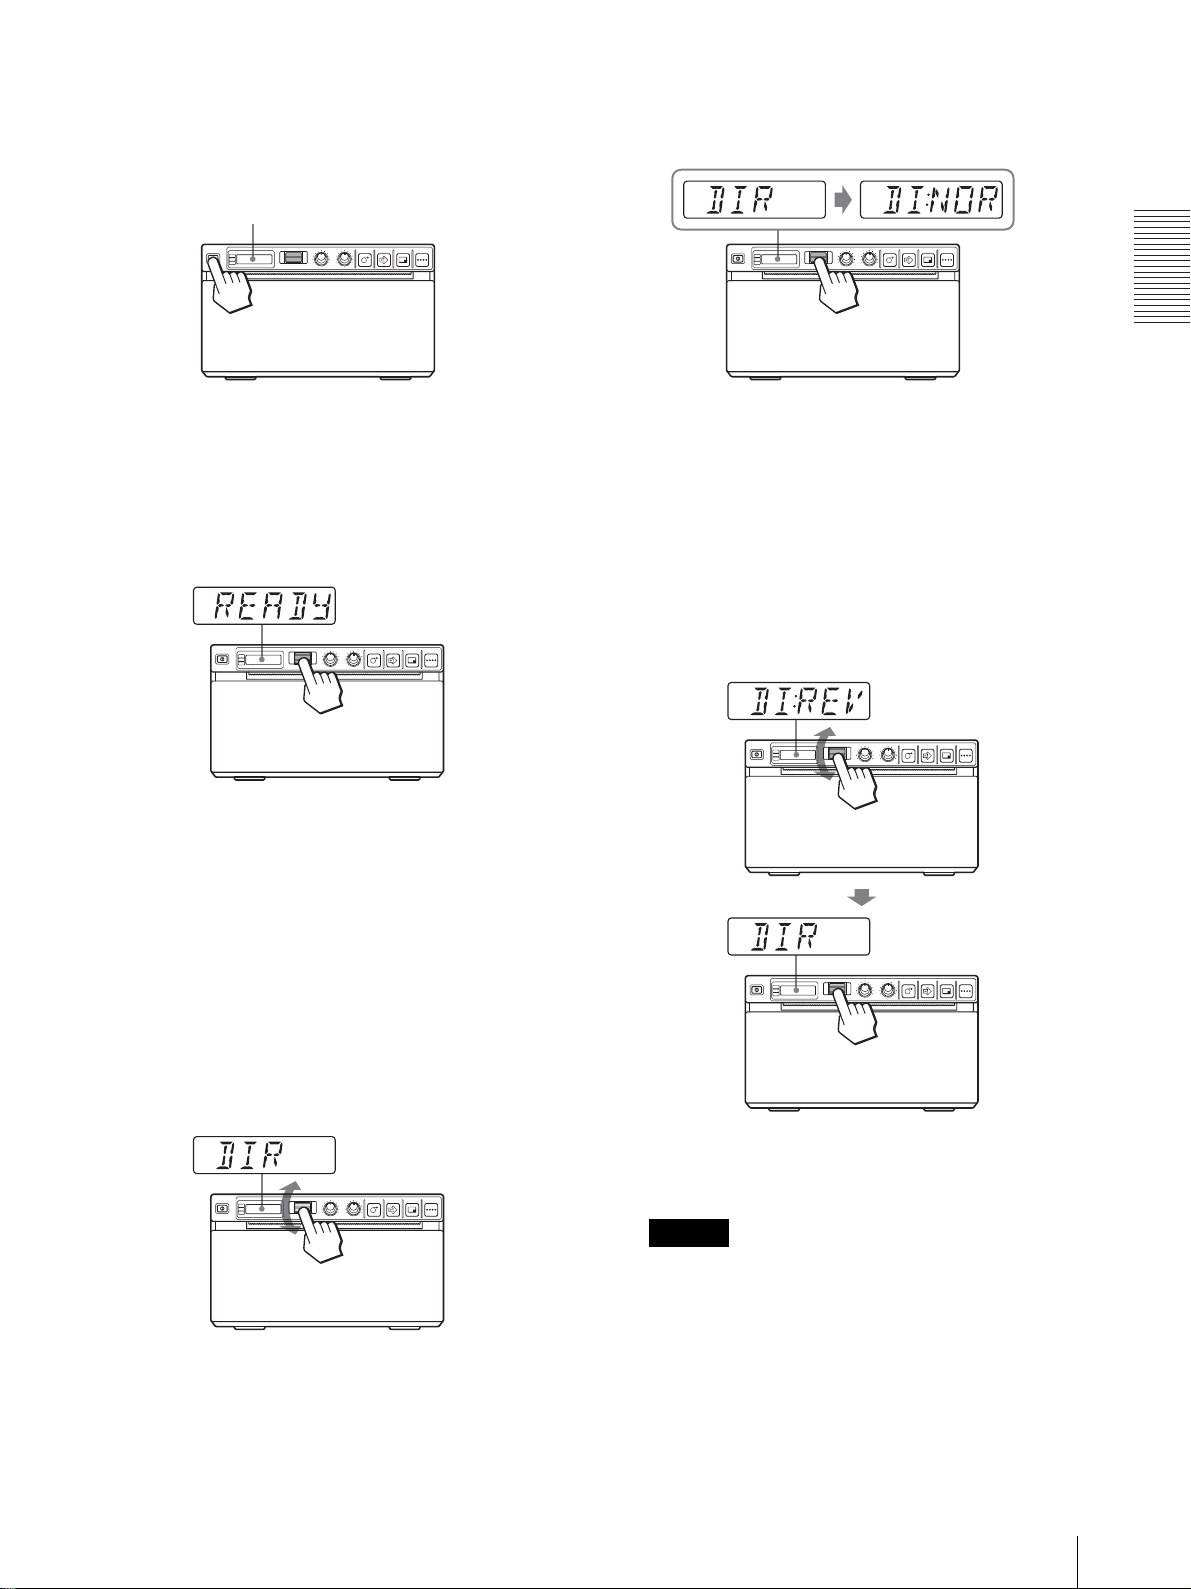
プリント方向は以下のようになります。
「DI: NOR」の場合
「DI: REV」の場合
モニター画面に映し出されている画像
プリント画
「S:STD」の場合
「S:SIDE」の場合
メニューの操作方法
ここでは、プリント方向の設定を例にとって、メニュー
の基本操作を説明します。
メニューで行う調節と設定
14
1
電源 ON/OFF スイッチを ON にし、電源を入れる。
Page 15
液晶ディスプレイのバックライトが緑色に点灯しま
す。
液晶ディスプレイ
2
液晶ディスプレイに「READY」が表示されているこ
とを確認し、ジョグダイヤルを押す。
4
ジョグダイヤルを押す。
プリント方向の設定モードに入ります。
液晶ディスプレイには、工場出荷時の設定
「DI:NOR」が表示されています。「DI:NOR」が現
在の設定です。
この設定を「DI:REV」に変更します。
5
ジョグダイヤルを上下に回して、「DI:REV」を表示
させ、ジョグダイヤルを押す。
操作
メニューモードに入ります。
ご購入後メニュー操作を初めて行った場合は、液晶
ディスプレイに、最初のメニュー項目「AGC」が表
示されます。
既にメニュー操作を行った場合は、最後に設定した
メニュー項目が表示されます。
3
ジョグダイヤルを上下に回転させて、「DIR」を表示
させる。
プリント方向として、「DI:REV」が登録されます。
液晶ディスプレイの表示は「DIR」に戻ります。
ご注意
メニュー項目、または設定を表示させてから、ジョ
グダイヤルを押さずに約 20 秒たつと、「READY」
表示に戻り、メニューモードから抜けます。
この場合は、DIR の設定は変更されません。
設定をキャンセルするには
1 手順 5 でジョグダイヤルを回して、「BACK」を
表示させる。
メニューで行う調節と設定
15
Page 16

操作
2 ジョグダイヤルを押す。
液晶ディスプレイの表示は「DIR」に戻ります。
引き続きメニュー操作を行うには
手順 3 ~ 5 を繰り返して残りの項目を設定します。
メニュー操作を終了するには
1
手順 5 の後、ジョグダイヤルを回し、「BACK」を表
示させる。
2
ジョグダイヤルを押す。
液晶ディスプレイの表示は、「READY」に変わりま
す。
本機は、メニューモードから抜けます。
メニュー操作のロック機能について
ジョグダイヤルを押したときにアラーム音が鳴り、液晶
ディスプレイに「LOCK」と表示された場合メニュー操作
機能がロックされジョグダイヤルが働きません。メ
ニュー操作を行いたい場合は、お近くの代理店、または
ソニー営業担当者にお問い合わせください。
1
液晶ディスプレイに「READY」が表示されているこ
とを確認して、ジョグダイヤルを押す。
2
ジョグダイヤルを回して、「LOAD」を表示させ、
ジョグダイヤルを押す。
3
ジョグダイヤルを回して希望の設定内容の番号を選
び、ジョグダイヤルを押す。
手順 3 で選んだ番号の設定が呼び出されます。
呼び出した番号の設定値を変更した場合
プリンターは設定し直した値で動作します。この場合は、
電源を切っても新たに別の番号を呼び出さない限り、電
源を切る前の設定でプリンターは動作します。
別の番号を呼び出した場合は、修正した内容は消えてし
まいます。
変更した内容を残して保存するには
例:設定 1 を呼び出して変更し、設定 1 はそのまま残し
ておき、変更した設定値を設定 2 として登録します。
1
「設定内容を呼び出すには」の手順で、「LO:1」を呼
び出す。
メニューの設定値を登録する
メニューで設定した値をプリンターに登録して、あとか
ら呼び出すことができます。3 通りの設定内容を登録する
ことができます。
登録された設定値は、プリンターの電源を切っても保持
されます。
ご注意
プリンターを初めてお使いになるときは、工場出荷時の
値がすべての番号にあらかじめ登録されています。
設定内容を登録するには
1
すべての項目を希望の値に設定する。
2
ジョグダイヤルを回して、「SAVE」を表示させ、
ジョグダイヤルを押す。
3
ジョグダイヤルを回して希望の番号を選び、ジョグ
ダイヤルを押す。
手順 1 で行った設定値が手順 3 で選んだ番号に登録
されます。
2
メニュー項目を必要に応じて変更する。
3
「設定内容を登録するには」の手順で「SA:2」を選
択する。
4
ジョグダイヤルを押す。
手順 2 で変更した設定値が設定 2 の設定値として登
録されます。
メニュー一覧をプリントする
現在のメニューの設定をプリントできます。
1
ジョグダイヤルを押す。
最後に設定したメニュー項目が表示されます。
2
ジョグダイヤルを回して、「MENU」を表示させ、
ジョグダイヤルを押す。
3
ジョグダイヤルを回して、「ME: OK」を表示させ、
ジョグダイヤルを押す。
現在のメニューの設定のプリントが開始されます。
液晶ディスプレイに「MENU」が表示されます。
設定内容を呼び出すには
登録した設定内容を呼び出します。
メニューで行う調節と設定
16
4
ジョグダイヤルを回して、「BACK」を表示させ、
ジョグダイヤルを押す。
「READY」が表示され、通常モードに戻ります。
Page 17

プリントする
プリント前の確認
・ プリントする前に次のことを確認してください。
・ 接続は正しいですか?(8 ページ)
・ プリンター用紙は正しく取り付けてありますか?(9
ページ)
・ メニューでの調節は済んでいますか?(11 ページ)
・ ビデオ信号が入力されていますか?
プリントする
本機では、メニューを使って、プリント画の向きや大き
さ、プリント方法などが設定できます。
ここでは、これらの各種設定が済んだあとの操作につい
て説明します。
1
電源 ON/OFF スイッチを ON にし、電源を入れる。
液晶ディスプレイのバックライトが緑色に点灯しま
す。「READY」が表示されます。
プリント中にプリントしなくなった場合
真っ黒に近い画像を連続してプリントし続けると、液晶
ディスプレイに「COOL」というメッセージが表示され、
プリントしなくなる場合があります。これは、サーマル
ヘッドの温度上昇をふせぐためです。メッセージが消え
るまでお待ちください。
プリントを中断するには
プリント中に、OPEN もしくは FEED ボタンを押しま
す。プリント動作が止まります。
プリンター用紙を送るには
FEED ボタンを押します。押している間、プリンター用
紙が送られます。プリンター用紙は引っ張らないでくだ
さい。
現在選択されているプリンター用紙について
液晶ディスプレイ上で、現在使用しているプリンター用紙
を確認できます。液晶ディプレイ内の矢印が、現在メ
ニューで選択されているプリンター用紙を指しています。
下図の例では、現在選択されているプリンター用紙は
、 UPP-110S です。
操作
液晶ディスプレイ
2
ビデオ機器などの入力源からの画像をモニターに映
し出す。
3
プリントしたい画像が映っているときに、PRINT ボ
タンを押す。
押した瞬間の画面がプリントされます。
PRINT ボタンを押した瞬間の画像は、メモリーに保
存されます。10 枚まで保存され、10 枚を超えると
一番最初に取り込んだ画像から上書きされていきま
す。
液晶ディスプレイにメッセージが表示された場合
異常が起こると、液晶ディスプレイのバックライトがア
ンバー色に点灯し、以下のメッセージが表示されます。
メッセージ 意味
EMPTY 用紙が入っていません。用紙を入れてください。
DOOR ドアが開いています。きちんと閉めてください。
UPP-110S の略
UPP-110HD の略
UPP-110HG の略
プリント画がぶれていたら
速く動いている画像を取り込むと、画像がぶれてしまうこ
とがあります。このとき、メニューの「MEMRY」の設
定をを「ME:FLD」に変えてプリントすることにより、プ
リント画からぶれを取り除くことができます。この場合、
解像度が少し落ちます。
メモリーに記憶されている画像を呼び出し
てプリントするには
PRINT ボタンを押すごとに画像がメモリーに記憶されま
す。10 回分の画像がメモリーに記憶されていき、上書き
されていきます。
常に、メモリーには、 10 枚分の画像が記憶されています。
この画像を呼び出してプリントできます。
プリントする
17
Page 18
操作
1
メニュー項目の「PAGE」を選択する。
メニュー操作については、「メニューの操作方法」
(14 ページ)をご覧ください。
2
ジョグダイヤルを押す。
液晶ディスプレイには、「PG:1」が表示され、最後
にプリントした画像がモニター画面に表示されてい
ます。
「PG」の数が増えるに従い、古い画像になります。
3
ジョグダイヤルを上下に回して、プリントしたい画像
をモニターに表示させる。
4
ジョグダイヤルを押す。
手順 3 で選択した画像が選択されます。
5
COPY ボタンを押す。
手順 3 で選択した画像がプリントされます。
1 枚に 2 画面をプリントするには
メニューの「MULTI」項目を「MU:MLT」に設定してお
くと異なる 2 つの画像を取り込んで 1 度にプリントでき
ます。
1
メニューの「MULTI」を「MU:MLT」に設定する。
ご注意
・ 電源を入れた直後など、プリンターに画像が記憶されて
いない状態で COPY ボタンを押すと、アラームブザーが
鳴り、コピーできません。
・ 電源を OFF にしたときには、保存された画像は消えて
しまいます。
同じ画像を連続してコピーするには
COPY ボタンを押して、 1 枚目をプリント中に COPY ボ
タンを押します。COPY を押したときにブザーがピッと
鳴り、COPY ボタンを押した数だけ、連続してコピーでき
ます。枚数は、最初の 1 枚を含めて最大 20 枚までです。
ご注意
この最大枚数は、 PRINT ボタンを押してプリントした枚
数も含まれます。例えば、 5 回 PRINT ボタンを押してプリ
ントした後、最後に PRINT ボタンを押してプリントした
ものを COPY ボタンを押して連続コピーする場合、最大
枚数は 15 枚となります。
途中で止めるには
プリント中に、OPEN もしくは FEED ボタンを押しま
す。
2
[プリントする」の手順 3(17 ページ)で PRINT ボ
タンを押す。
そのときの画像が取り込まれます。
3
再度、プリントしたい画像が映っているときに、
PRINT ボタンを押す。
プリントが開始されます。
手順 2 で取り
込んだ画像
メニューの「INFO」を「IF:ON」に設定した場合、
プリント情報のコントラストとブライトについては、
手順 3 で取り込んだ画像の情報がプリントされます。
手順 3 で取り
込んだ画像
同じ画像をもう 1 度プリントするには
COPY ボタンを押します。最後にプリントした画像と同
じものがプリントされます。この場合、プリント枚数の設
定にかかわらず、 1 枚だけプリントされます。
画像の向き/大きさを変えてコピーするには
最後にプリントした画像を違う向き/大きさでコピーす
ることができます。「プリント画の向き/大きさを選ぶ」
で向き/大きさを選んでから COPY ボタンを押します。
18
プリントする
Page 19
プリント画の向き/大きさを選択す
画像
画面 プリント画
る
メニューの以下の項目を使ってプリント画の向き、大き
さを選択できます。
・ SIDE:プリント画の向きを選択します。
・ SCALE:プリント画を拡大または縮小します。
・ SFT.H、SFT.V:プリントする範囲を水平方向、および
垂直方向に指定します。
プリント画の向きを決めるには
メニューの「SIDE」でモニター画面の向きか、横向きか
を選択できます。
画像をモニター画面に映し出されている向きでプリント
する場合
「S:STD」を選択します。
プリントする範囲の位置を決めるには
メニュー項目の「SFT.H」「SFT.V」でプリントする範囲
を水平方向、垂直方向に設定できます。モニター画面を見
ながら設定できます。
モニター画面上に表示される枠が、設定値を変更するにし
たがって移動します。枠内の画像がプリントされます。
例:「SIDE」が「S:STD」、「SCALE」が「 SCL:2.0」
に設定されている場合
操作
元の
画像を横向きにするとき
「S:SIDE」を選択します。
モニター画面に映し出されている画像
プリント画
「S:STD」の場合
モニター
「S.H:+(*)」の場合
Y
「S.H:0」の場合
「S:SIDE」の場合
Y
「S.H:-(*)」の場合
画像の大きさを決めるには
メニュー項目の「SCALE」で画像を拡大したり、縮小した
りできます。
最大 2 倍の大きさ、最小 0.5 倍の大きさで 0.1 刻みで設定
できます。
(*) の値は、「SCALE」および「SCAN」の設定値および取り込む画
像の映像方式によって変化します。
プリントする
19
Page 20

「SCALE」の設定によるプリント画の大きさの違い
操作
SIDE」が「S:STD」、
「SCALE」が「 SCL:2.0」
「SCL:1.0」の
2 倍の長さ
「SIDE」が「S:STD」、
「SCALE」が「 SCL:1.0」
明るさやコントラストを調節する
本機前面の CONTR つまみ/ BRIGHT つまみを使って
プリント画の明るさとコントラストを調節できます。
コントラストを調節するには
プリンター前面の CONTR つまみを使って調節します。
コントラストを強くするには:CONTR つまみを時計方
向に回します。
コントラストを弱くするには:CONTR つまみを反時計
方向に回します。
明るさを調節するには
プリンタ-前面の BRIGHT つまみを使って調節します。
明るくするには:BRIGHT つまみを時計方向に回します。
暗くするには:BRIGHT つまみを反時計方向に回します。
ご注意
メニュー操作機能がロックされている場合、ジョグダイヤ
ルに加えて、 CONTR つまみ、BRIGHT つまみも働きま
せん。操作を行いたい場合は、お近くの代理店、またはソ
ニー営業担当者にお問い合わせください。
プリントする
20
Page 21

その他
本機の性能を保持するた
めに
電源について
・ 電源は AC100V をお使いください。
・ 電源コンセントが 2 芯の場合は、3 極
グをご使用ください。
t 2 極変換プラ
温度の低い場所から暖かい場所に移動したり、暖房で湯
気や湿気がたち込めた部屋に置くと、本機の内部に水滴
がつくことがあります。これを結露といいます。この状
態で本機を使用すると、正常に動かないばかりでなく、
故障の原因になります。結露の可能性のあるときは、電
源を切り、しばらくそのまま放置してください。
・ プリンター内部の温度上昇を防ぐために、プリンター周
囲はスペースを充分に空けてください。特に、プリン
ター左側面の吸気孔と裏面にある排気孔の間を空気が充
分に流れるように注意して設置してください。
その他
吸気孔
アースの接続は、必ず変換プラグを電源コンセントへ接
続する前に行ってください。アースの接続をはずす場合
は、必ず変換プラグを電源コンセントから抜いてから
行ってください。
・ 電源コードは傷つけないでください。
・ 長い間使わないときは、電源コードを抜いておいてくだ
さい。
・ 電源コードを抜くときは、電源プラグを持って抜いてく
ださい。
安全のために
・ キャビネットは絶対に開けないでください。内部に触れ
ると危険です。
・ 内部にものを落とさないでください。
・ 本機には、ペーパーカッターが装備されています。プリ
ンター用紙を取り付ける際、カッター部に触れるとけが
の原因となることがあります。十分ご注意ください。
排気孔
持ち運びについて
・ ぶつけたり、落としたりしないように気をつけてください。
・ 持ち運びの際は、プリンター用紙を取り外してくださ
い。プリンター用紙を取り付けたまま持ち運ぶと故障の
原因になることがあります。
置き場所について
・ 水平な場所に置いてください。傾けた状態で本機を使用
すると故障の原因になります。
・ 暑い所や湿気の多い所に置かないでください。
・ 湿気の低い冬場では、湿度 35% 以上の環境で使うこと
をおすすめします。
・ 結露にご注意ください。
本機の性能を保持するために
21
Page 22

お手入れ
キャビネットのクリーニング
キャビネットの汚れは、水または水で薄めた中性洗剤溶
液で湿らせた布をかたくしぼってから拭き取ってくださ
い。シンナーやベンジン、アルコールなどは表面の仕上
げを傷めることがありますので使用しないでください。
ヘッドのクリーニング
3
付属のヘッドクリーニングシートの黒い面を下にし
て、トレイ内にある窪みに差し込む。
トレイ内にある
くぼみに差し込
む。
付属のクリー
ニングシート
その他
プリント画に白いスジが生じたら、付属のヘッドクリー
ニングシートでヘッドをきれいにしてください。
ヘッドのクリーニングは、メニューを使用します。
本機には、ペーパーカッターが装備されています。ヘッ
ドをクリーニングする際、カッター部に触れるとけがの
原因となることがあります。充分ご注意ください。
1
電源 ON/OFF スイッチを ON にし、電源を入れる。
2
OPEN ボタンを押し、ドアを開ける。
4
ドアを手で押して閉める。
5
ジョグダイヤルを押す。
最後に設定したメニュー項目が表示されます。
6
ジョグダイヤルを回して、「CLEAN」を表示させ、
ジョグダイヤルを押す。
7
「CL: OK」が表示されていることを確認し、ジョグ
ダイヤルを押す。
ヘッドのクリーニングが開始されます。
液晶ディスプレイには「CLEAN」が表示されます。
クリーニングシートが止まり、アラーム音が鳴った
ら、クリーニングが終了です。
8
OPEN ボタンを押してドアを開け、ヘッドクリーニ
ングシートを取り除く。
9
ドアを手で押して閉める。
22
プリンター用紙が入っていたら取り除いてください。
お手入れ
ご注意
ヘッドクリーニングシートは必要に応じてお使いくださ
い。ヘッドのクリーニングを頻繁に行うと、故障の原因
になる場合があります。
プラテンローラーのクリーニング
プラテンローラーが汚れてくると、プリンター用紙がス
ムーズに送られなくなってきます。スムーズに送られな
くなったら、水で薄めた中性洗剤溶液で湿らせた布で、プ
ラテンローラーの汚れをふき取ってください。
1
電源 ON/OFF スイッチを ON にし、電源を入れる。
2
OPEN ボタンを押し、ドアを開ける。
プリンター用紙が入っていたら取り除いてください。
Page 23

3
水で薄めた中性洗剤で湿らせた布でプラテンロー
ラーを軽く拭く。
プラテンローラー
ご注意
・ 拭いた面が完全に乾いてから、プラテンローラー
を回して他の部分を拭いてください。
・ プラテンローラーは手で回さないでください。必
ず FEED ボタンを使って回してください。FEED
ボタンを押すと、プラテンローラーが自動的に回り
ます。
・ 本機には、ペーパーカッターが装備されています。
カッター部に触れるとけがの原因となることがあ
ります。充分ご注意ください。
4
FEED ボタンを押し、プラテンローラーの掃除した
い面が現れたら、FEED ボタンを離す。
プラテンローラーが回転しているとき、指を挟ま
れないようご注意ください。
ご注意
・ FEED ボタンを押している間は、プラテンローラー
が回っています。指を挟まれないようご注意くだ
さい。
・ 必ず、プラテンローラーが停止してから掃除してく
ださい。
主な仕様
電源 AC100 V、50/60 Hz
入力電流 1.5 A
動作環境 温度:5 ℃~ 35 ℃
湿度:20 % ~ 80 %
輸送保存環境時
温度:- 20 ℃~ + 60 ℃
湿度:20 % ~ 90 %
最大外形寸法 154 × 88 × 240 mm(幅 / 高さ / 奥
行き)
質量 2.6 kg(本体のみ)
感熱ヘッド 薄膜サーマルヘッド 1280 ドット
階調数 256 階調(8 ビット)
解像度(「SCAN」が「SC:WD1」のとき)
EIA:1210 × 490 ドット
CCIR:1210 × 582 ドット
画面寸法(「SCAN」が「SC:WD1」のとき )
「SIDE」が「S:STD」の場合
EIA:94 × 73 mm
CCIR:94 × 71 mm
「SIDE」が「S:SIDE」の場合
EIA:124 × 96 mm
CCIR:127 × 96 mm
プリント速度 約 2 秒 /1 画面(標準設定時)(メ
ニュー項目の「SPEED」で「SP:HI」
設定時)
約 3.3 秒 /1 画面(標準設定時)(メ
ニュー項目の「SPEED」で
「SP:NOR」設定時)
ピクチャーメモリー
10 フレーム(800 k × 8 bit 相当)
入力端子 VIDEO IN(BNC)
EIA または CCIR 方式コンポジットビ
デオ信号:1.0V p-p、75 Ω /ハイ
インピーダンス切り換え方式(EIA/
CCIR 自動判別方式)
出力端子 VIDEO OUT(BNC)
EIA または CCIR 方式コンポジットビ
デオ信号:1.0 Vp-p、75 Ω ループ
スルー/ EE 切り換え方式
その他
5
手順 3、4 を繰り返して、プラテンローラーの全表面
をクリーニングする。
6
プラテンローラーが完全に乾いてからドアを手で押
して閉める。
主な仕様
23
Page 24
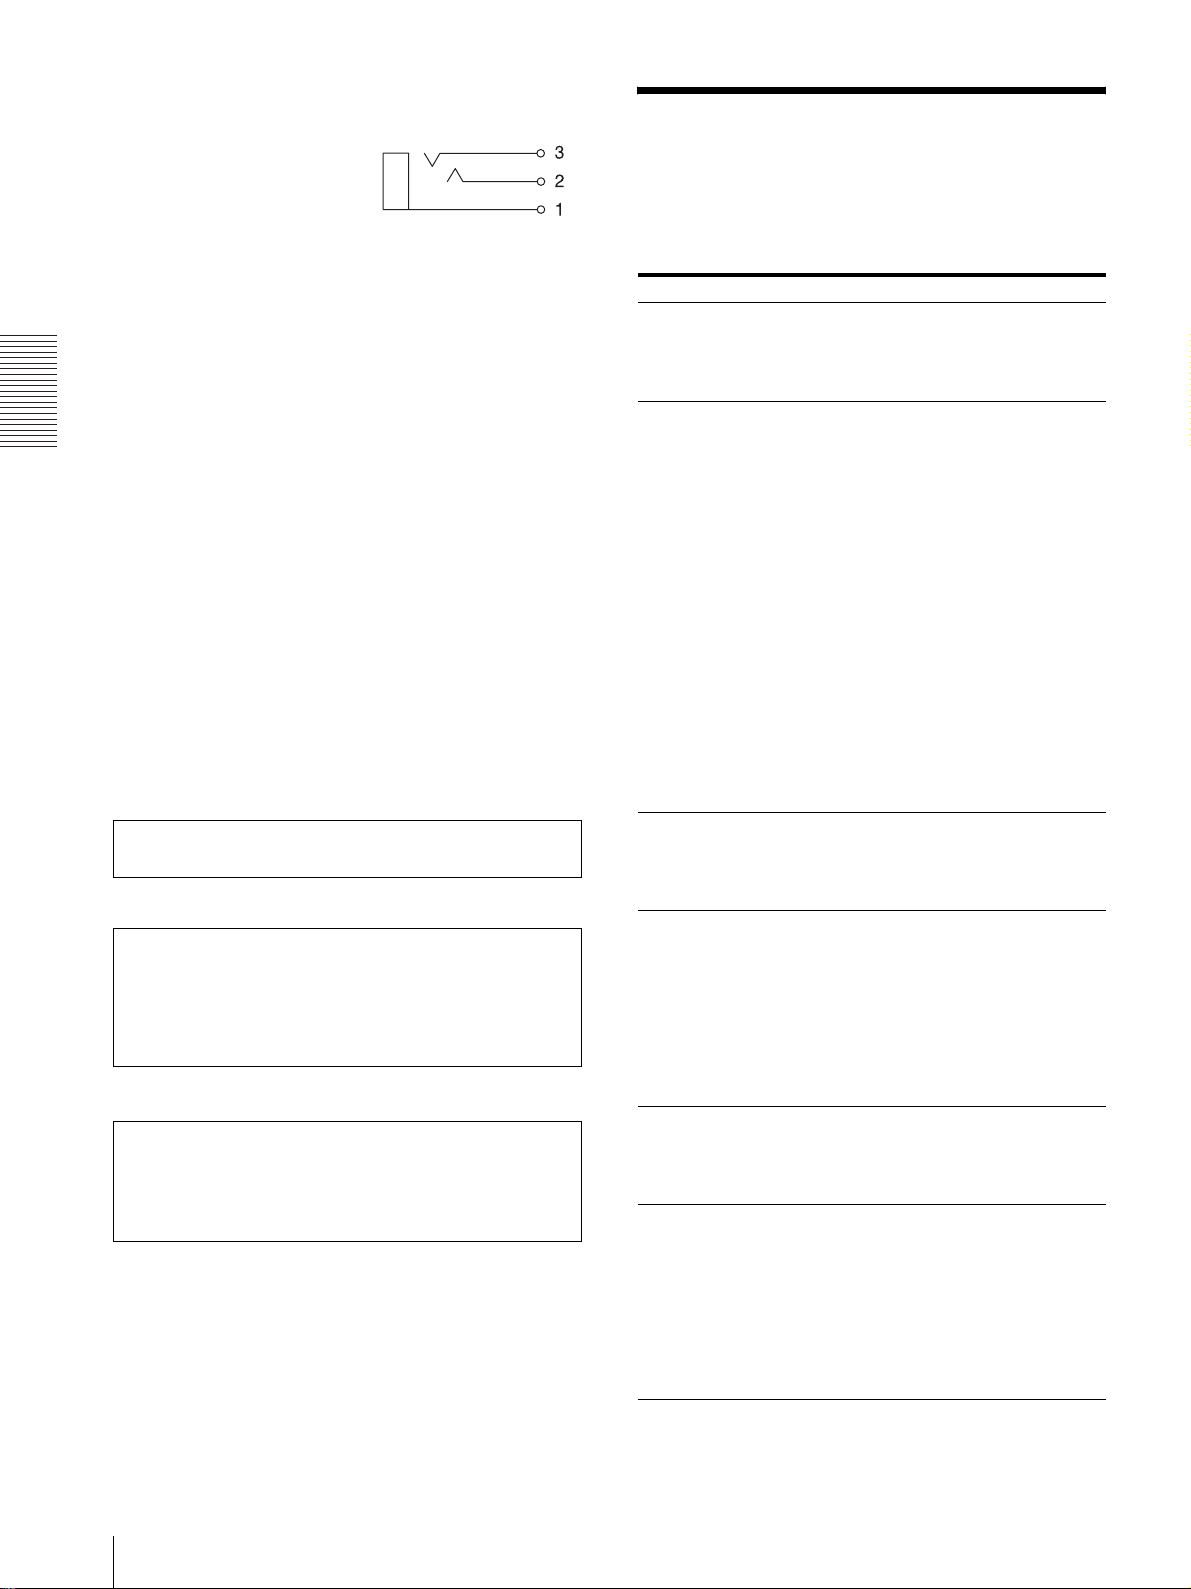
リモート端子 REMOTE(ステレオミニジャック)
端子仕様
故障とお考えになる前に
修理にお出しになる前にもう一度点検してください。そ
れでも正常に動作しないときは、ソニーのサービス窓口
または営業担当者にお問い合わせください。
その他
1GND
2 PRINT SIGNAL (TTL)
100msec 以上 LOW のパルスが入
力されるとプリントが開始されます。
3PRINT BUSY (TTL)
プリント中は HIGH レベルになりま
す。
付属品 ヘッドクリーニングシート (1)
メディアラベル (1)
取扱説明書 (1)
ご相談窓口のご案内 (1)
別売りアクセサリー
AC 電源コード
部品番号 1-791-041-xx
t 2 極変換プラグ
3極
部品番号 1-793-461-xx
本機の仕様および外観は、改良のため予告なく変更する
ことがありますが、ご了承ください。
本機は「高調波電流規格 JIS C 61000-3-2 適合品」で
す。
この装置は、情報処理装置等電波障害自主規制協議会
(VCCI)の基準に基づくクラス A 情報技術装置です。
この装置を家庭環境で使用すると電波妨害を引き起こす
ことがあります。この場合には使用者が適切な対策を講
ずるよう要求されることがあります。
注意
日本国内で使用する電源コードセットは、電気用品安全
法で定める基準を満足した承認品が要求されます。ソ
ニー推奨の電源コードセットをご使用ください。
こんなときは ご確認ください
細かいゴミが最初
にプリントした数
枚に現れる。
PRINT ボタンを押
してもプリントし
ない。
プリント画の周囲
に黒い線ができる。
または周囲が欠け
ている。
紙詰まりが起きた。 ・ OPEN ボタンを押してドアパネルを開け、
印画ムラが起きる。 ヘッドが汚れていませんか?
全面が真っ黒に近
い画像を連続して
プリントしたら、
プリントしなく
なってしまった。
液晶ディスプレイ
に「COOL」と表
示された。
プリンター用紙を交換したばかりではありま
せんか?
→FEED ボタンを押して、紙を 15 ~ 20 cm
引き出してからプリントしてください。
・ 用紙が送られない場合
→ 電源は入っていますか?
→ 正しく接続されていますか?
→ 用紙がたるんでいませんか?
→ メニュー「MULTI」の項目が
「MU:MLT」になっていませんか?
・ アラームブザーが鳴った場合
→ サーマルヘッドが温度上昇していません
か ? 真っ黒に近い画像を連続してプリン
トすると、サーマルヘッドの温度が上昇
する場合があります。しばらくプリント
をやめてください。
→ ビデオ信号は入力されていますか?
→ 用紙は正しく取り付けてありますか?
・ 用紙は送られるがプリントされない場合
→ 用紙の感熱面を上にして取り付けました
か?(9 ページ)
メニュー「SCAN」の項目の設定を変えてく
ださい。
プリンター用紙を取り出してから、詰まっ
た紙を手でゆっくり引き出してください。
・ プリンターが結露していませんか?
→ 寒い所から急に暑い所にプリンターを移
すと、内部に水滴がつくこと(結露)が
あります。結露したら電源を切ったまま
1~2時間放置してください。
→ 付属のヘッドクリーニングシートを使って、
ヘッドをきれいにしてください。(22 ペー
ジ)
真っ黒に近い画像を連続してプリントし続け
ると、それ以上プリントしなくなることがあ
ります。サーマルヘッドの温度上昇を抑える
ために保護回路が動作しているためです。
→ メッセージが消えるまでお待ちください。
故障とお考えになる前に
24
Page 25

こんなときは ご確認ください
白い線や小さい文
字がぼけたり、二重
になって見える。
全体的に細かい
チェック模様が見
える。
プリント画が明る
すぎる、または暗
すぎる。
プリントされた画
像が長い。
プリンター用紙が
スムーズに送られ
ない。
白黒ビデオ信号に対して、メニュー「COLOR」
の項目が「CO:ON」に設定されていません
か?
→「CO:OFF」に設定してください。
カラービデオ信号に対して、メニュー
「COLOR」の項目が「CO:OFF」に設定され
ていませんか?
→「CO:ON」に設定してください。
・75Ω 切り換えスイッチは正しく設定してあ
りますか?
・ メニューの「MEDIA」項目は正しく設定し
てありますか?
・ メニューの「GAMMA」項目は正しく設定
してありますか?
メニューの「ASPCT」項目で、「AS:1:1」が
選択されていませんか?
→「AS:4:3」にしてください。
プラテンローラーが汚れていませんか?
→ プラテンローラーをクリーニングしてくだ
さい。(22 ページ)
エラーメッセージ一覧
液晶ディスプレイに表示されるメッセージは以下のとお
りです。メッセージに従って次に示す処置をしてくださ
い。
エラーメッセージ 意味/対処
DOOR ドアが開いています。
→ ドアをロックされるまできちんと閉めてく
ださい。
EMPTY ・ プリンター用紙がありません。
・ プリンター用紙を使い切りました。
→ プリンター用紙を取り付けてください。
COOL サーマルヘッドの温度上昇を抑えるために、保
護回路が動作しています。
→ メッセージ消えるまでお待ちください。自
動的にプリントを開始します。
LOCK メニュー操作機能がロックされています。
ジョグダイヤル、 CONTR つまみ、および
BRIGHT つまみは働きません。
→ メニュー操作を行いたい場合は、お近くの代
理店、またはソニー営業担当者にお問い合
わせください。
その他
エラーメッセージ一覧
25
Page 26

その他
アフターサービス
調子が悪いときはまずチェックを
この説明書をもう一度ご覧になってお調べください。
それでも調子の悪いときはサービスへ
お買い上げ店、またはお近くのソニーの業務用ご相談窓
口にご相談ください。
26
アフターサービス
Page 27

索引
あ
アフターサービス......................... 26
安全のために.................................. 2
え
エラーメッセージ......................... 17
か
各部の名称と働き
フロントパネル......................... 6
裏面 .......................................... 7
く
クリーニング
キャビネット .......................... 22
プラテンローラー ................... 22
ヘッド..................................... 22
クリーニングシート ..................... 22
こ
故障とお考えになる前に .............. 24
この取扱説明書について ......... 6, 11
プリントする.......................... 17
用紙を送る ............................. 17
め
メニュー
一覧........................................ 12
一覧をプリントする ............... 16
基本操作................................. 14
設定値の登録.......................... 16
設定を呼び出す ...................... 16
フロー .................................... 11
索引
し
仕様.............................................. 23
使用上のご注意
安全 ........................................ 21
置き場所 ................................. 21
警告 .......................................... 4
注意 .......................................... 5
電源 ........................................ 21
持ち運び ................................. 21
せ
接続................................................ 8
ご注意....................................... 8
と
特長................................................ 6
は
はじめに.................................. 6, 11
ふ
プリンター用紙
ご注意....................................... 8
種類 .......................................... 8
取り付け ................................... 9
プリント
コントラストを調節................ 20
明るさを調節 .......................... 20
同じ画像をプリントする......... 18
中断する ................................. 17
索引
27
Page 28

Owner's Record
The model and serial numbers are located at the rear.
Record these numbers in the space provided below.
Refer to these numbers whenever you call upon your
Sony dealer regarding this product.
Model No. ____________________
Serial No. ____________________
For the customers in Canada
This unit has been certified according to Standard CSA
C22.2 No.601.1.
For the customers in the U.S.A. and
Canada
Model UP-897MD is Non-Patient Equipment.
This unit can not be used in the vicinity of patients.
WARNING
To reduce the risk of fire or electric shock, do
not expose this apparatus to rain or moisture.
To avoid electrical shock, do not open the
cabinet. Refer servicing to qualified personnel
only.
THIS APPARATUS MUST BE EARTHED.
This symbol indicates the equipotential
terminal which brings the various parts of a
system to the same potential.
This symbol is intended to alert the user to
the presence of important operating and
maintenance (servicing) instructions in the
literature accompanying the appliance.
For the customers in the U.S.A.
This equipment has been tested and found to comply
with the limits for a Class A digital device, pursuant to
Part 15 of the FCC Rules. These limits are designed to
provide reasonable protection against harmful
interference when the equipment is operated in a
commercial environment. This equipment generates,
uses, and can radiate radio frequency energy and, if not
installed and used in accordance with the instruction
manual, may cause harmful interference to radio
communications. Operation of this equipment in a
residential area is likely to cause harmful interference in
which case the user will be required to correct the
interference at his own expense.
You are cautioned that any changes or modifications not
expressly approved in this manual could void your
authority to operate this equipment.
The shielded interface cable recommended in this
manual must be used with this equipment in order to
comply with the limits for a digital device pursuant to
Subpart B of Part 15 of FCC Rules.
* Patient Vicinity
R1.83m
(6 feet)
Important safeguards/notices for use in
the medical environments
1. All the equipments connected to this unit shall be
certified according to Standard IEC60601-1,
IEC60950-1, IEC60065 or other IEC/ISO Standards
applicable to the equipments.
2. When this unit is used together with other equipment
in the patient area*, the equipment shall be either
powered by an isolation transformer or connected via
an additional protective earth terminal to system
ground unless it is certified according to Standard
IEC60601-1.
* Patient Area
R1.5m
3. The leakage current could increase when connected
to other equipment.
4. This equipment generates, uses, and can radiate
frequency energy. If it is not installed and used in
accordance with the instruction manual, it may cause
interference to other equipment. If this unit causes
interference (which can be determined by
unplugging the power cord from the unit), try these
measures: Relocate the unit with respect to the
susceptible equipment. Plug this unit and the
susceptible equipment into different branch circuit.
28
Page 29

Consult your dealer. (According to standard
EN60601-1-2 and CISPR11, Class B, Group 1)
Caution
When you dispose of the unit or accessories, you must
obey the law in the relative area or country and the
regulation in the relative hospital.
Warning on power connection
Use a proper power cord for your local power supply.
1. Use the approved Power Cord (3-core mains lead) /
Appliance Connector / Plug with earthing-contacts
that conforms to the safety regulations of each
country if applicable.
2. Use the Power Cord (3-core mains lead) / Appliance
Connector /Plug conforming to the proper ratings
(Voltage, Ampere).
If you have questions on the use of the above Power
Cord/Appliance Connector/Plug, please consult a
qualified service personnel.
Warning on power connection for
medical use
Please use the following power supply cord.
With connectors (plug or female) and cord types other
than those indicated in this table, use the power supply
cord that is approved for use in your area.
United States Canada
Plug Type HOSPITAL GRADE* HOSPITAL GRADE*
Female end E62405, E35708 LR53182, LL022442,
Cord type E159216, E35496
Minimum cord set
rating
Safety approval UL Listed CSA
*Note: Grounding reliability can only be achieved when the equip-
ment is connected to an equivalent receptacle marked ‘Hospital Only’
or ‘Hospital Grade’.
Min.Type SJT
Min.18 AWG
10A/125V 10A/125V
LL088408
LL112007-1, LL20262,
LL32121, LL84494
Min.Type SJT
Min.18AWG
GB
29
Page 30

Table of Contents
Getting Started
Overview .............................................................. 31
Location and Function of Parts and Controls .. 31
Front Panel ....................................................... 31
Rear Panel ........................................................ 32
Connections .......................................................... 33
Connecting to the USB Connector ................... 33
Paper ..................................................................... 33
Paper You Can Use ........................................... 33
Loading Paper in the Unit .................................. 34
Loading Paper .................................................. 34
Operation
Adjustments and Settings Using the Menu ....... 36
Menu Flow ....................................................... 36
Menu List ......................................................... 37
Basic Menu Operations .................................... 40
Registering Menu Settings ............................... 41
Printing the Menu List ..................................... 42
Printing ................................................................. 42
Starting a Print Job ........................................... 42
Selecting the Printing Direction and
Image Size ...................................................... 44
Adjusting the Contrast and Brightness ............. 45
Others
Precautions ........................................................... 47
On Safety ..........................................................47
On the Printer Carriage .................................... 47
On Installation .................................................. 47
Maintenance ......................................................... 48
Cleaning the Cabinet ........................................ 48
Cleaning the Thermal Head ............................. 48
Cleaning the Platen Roller ............................... 48
Specifications ....................................................... 49
Troubleshooting ................................................... 50
Error Messages ....................................................51
Index ..................................................................... 52
30
Page 31

Getting Started
Location and Function
of Parts and Controls
Overview
Quiet, High Quality, Fast Printing
• Employs a thin thermal head with a built-in high speed
drive IC, capable of high resolution images of 12.8
dots/mm.
• Print speeds of approximately 1 high quality image
(A-7 size single printout) every 2 seconds when
printing at high speed (when “SP:HI” is selected in
“SPEED” menu item).
• Monochrome printing with up to 256 shades of
gradation.
• Built-in temperature correction circuits prevent
temperature changes which could cause blurred prints.
Easy printer settings using a menu
You can make up the settings to meet your requirements
using a menu. You can store up to three settings as a set
of user settings.
Easy Paper Loading
Free access to the door panel allows you to drop paper
into the unit for easy loading.
For more details, see the referenced page numbers
enclosed in parentheses ().
Front Panel
A !Power ON/OFF Switch (34, 40, 42, 48)
Press to switch to ON to turn the power on. The
back light on the LCD lights in green.
Getting Started
B Printer window display (LCD: liquid crystal
display) (36, 42)
The back light lights in green when the unit
operates normally. Also, in normal operation, the
paper currently selected is indicated by the pointer
on the LCD.
For detailed information on the paper, see “Paper”
on page 33 and “Paper currently selected” on page
43.
If an error occurs, a corresponding alarm message
is displayed.
During menu operations, menu items and settings
are displayed
C Jog dial (40, 48)
Used to make menu operations.
D CONTR (contrast) control (45)
Adjusts the contrast of the printouts.
E BRIGHT (brightness) control (45)
Adjusts the brightness of the printouts.
F FEED button (35, 43)
Hold down to feed paper. While a print job is in
progress, press to cancel the print job.
Overview / Location and Function of Parts and Controls
31
Page 32

G COPY button (43)
Prints another copy of the previous printout.
You can make only one copy each time you press
Connect to the video input connector of the video
monitor. The output signal depends on the setting of
the “VIDEO” item of the menu.
this button regardless of the print quantity set using
the menu.
Getting Started
H PRINT button
Prints the image currently displayed on the video
monitor. The image displayed when you press the
PRINT button is stored in memory.
E - AC IN connector
Use a proper power cord for your local power
supply (not supplied).
Refer to “Warning on power connection” on page
29 and “Warning on power connection for medical
use” on page 29.
I OPEN button (34, 43)
Press to open the paper door. While a print job is in
progress, press to cancel the print job.
J Paper cutter
Cuts the paper as each image is printed.
Rear Panel
F Equipotential terminal
Used to connect to the equipotential plug to bring
the various parts of a system to the same potential.
Refer to “Important safeguards/notices for use in
the medical environments” on page 28.
A REMOTE connector (33)
Connects the RM-91 remote control unit or the foot
switch for controlling print operation from a
distance.
B 75 Ω select switch
ON: When nothing is connected to the VIDEO
OUT connector, set the switch to this position.
OFF: When a video monitor or other video
equipment is connected to the VIDEO OUT
connector, set the switch to this position.
C t VIDEO IN (input) connector (BNC type)
Connect to the video output connector of the video
equipment.
D T VIDEO OUT (output) connector (BNC type)
32
Location and Function of Parts and Controls
Page 33

Connections
Paper
Notes
• Turn off the power to each device before making any
connections.
• Connect the AC power cord last.
Connecting to the USB Connector
Video equipment
Color/black and
to video output
connector
Connecting cable
(BNC y BNC)
(not supplied)
white video monitor
to video input
connector
Connecting cable
(not supplied)
to VIDEO OUTto VIDEO IN
Use only Sony UPP-110S/110HD/110HG paper
designed for use with this unit. High print quality cannot
be guaranteed if any other paper is used with this unit,
and such paper could damage the unit.
You cannot use the UPP-110HA as specified for the
UP-880/890MD series printer.
Paper You Can Use
Print paper characteristics are as follows.
Print Characteristics Paper Type
TYPE I (Normal) UPP-110S
TYPE II (High Density) UPP-110HD
TYPE V (High Glossy) UPP-110HG
Notes on storing and handling paper
Storing unused paper
• Stored unused paper at a temperature below 30°C
(86°F) in a dry location that is not exposed to direct
sunlight.
• Do not store unused paper near volatile liquids or
allow the paper to contact any organic volatile liquid,
cellophane tape, or any compound of vinyl chloride.
Getting Started
to REMOTE
75 Ω select
a)
switch
RM-91 remote
control unit (not
supplied)
a) Set the 75 Ω select switch as follows.
ON: When nothing is connected to the VIDEO OUT
connector, set the switch to this position.
OFF: When a video monitor or other video equipment is
connected to the VIDEO OUT connector, set the switch
to this position.
to - AC IN
AC power cord
(not supplied)
to wall outlet
Loading paper
• Handle the paper carefully when loading to avoid
touching the printing surface with your fingers.
Perspiration or oil from you hands could cause
pictures to blur.
• After removing the label from the leading edge of the
paper, pull the paper out 15~20 cm (about 6~8 in.)
before printing. Label adhesive remaining on the
paper could spoil a picture.
Storing printouts
• To prevent printouts from fading or changing color,
store them in a cool, dry location where the
temperature is not higher than 30°C (86°F).
• Store printouts in a polypropylene pouch or between
sheets of paper that contain no plastic.
• Do not store printouts where they will be exposed to
direct sunlight or high humidity.
• Do not store printouts near volatile liquids or allow the
prints to contact any organic volatile liquid,
cellophane tape, or any compound of vinyl chloride.
• To prevent fading, do not stack printouts on or under a
diazo copy sheet.
• To mount printouts on another sheet of paper, use
double-sides tape or a water base adhesive.
• Do not incinerate waste printer paper.
Connections / Paper
33
Page 34

2
Press the OPEN button to open the paper door.
Loading Paper in the
Unit
Getting Started
Notes
• Before loading paper in the unit, see “Notes on storing
and handling paper” (page 33).
• Always handle paper carefully when loading to avoid
adversely affecting the quality of the printouts. Never
bend or crease the paper and never touch the printing
surface with your fingers. Fingerprints perspiration
can blur printing.
• Do not use any paper other than UPP-110S/110HD/
110HG paper. (page 33)
• Be sure to set the “MEDIA” menu item to the paper to
be used. You can confirm the media currently selected
on the LCD. (page 38)
Loading Paper
Caution
A paper cutter is mounted with the unit. When loading
paper, be careful not to touch the paper cutter. Touching
the paper cutter may cause injury.
3
Remove the label from the leading edge of the
paper, pull out about 15~20 cm (about 6~8 in.) of
the paper, and then set the paper roll in the paper
tray.
Note
To avoid exposing the paper to dust, dirt, etc.
always handle it carefully when removing from its
package and loading it in the unit. Paper exposed to
dirt or dust cannot be used for printing.
1
Press the power ON/OFF switch to turn the unit on.
When paper is not loaded yet, the back light on the
LCD lights in umber and the message “EMPTY” is
displayed.
Remove label and pull
out 15 to 20 cm (about 6
to 8 inches).
Load the paper with the printing side (heat
sensitive side) up. Printing is not possible if the
paper is reversed.
34
Loading Paper in the Unit
Page 35

Make sure that the paper is set
straight.
4
Close the paper door and press on it to shut it.
Getting Started
Notes
• Make sure that the paper is loaded straight. If it is
skewed, this could cause the paper to jam.
• If you did not pull out enough paper in step 3, press the
FEED button on the operation panel to feed some
more paper out of the unit without pulling out the
paper.
Loading Paper in the Unit
35
Page 36

Operation
Adjustments and
Settings Using the Menu
You can set up the unit according to its intended
purpose, connected equipments or your individual
preferences.
You can store up to three settings as a set of user settings.
Operation
You can carry out adjustments and settings to meet your
requirements. Those settings and adjustments are
retained even if the unit is turned off.
Menu Flow
The contents displayed on the LCD changes in sequence
as you turn the jog dial as shown in the following menu
flow chart, and you can make the settings for each menu
item.
About * in the “SFT:H” and “SFT:V” menu items
* means the numeric value displayed by turning the jog dial. This numeric value changes depending on the settings of
“SCALE”, “SCAN” and “SIDE”, and the signal system of the image to be captured.
36
Adjustments and Settings Using the Menu
Page 37

Menu List
This section describes the menus displayed as you turn
the jog dial. The setting surrounded by
indicates the factory setting.
Item Function Settings
AGC To adjust the
input signal to the
optimum printing
level
a)
ASPCT
BEEP To select whether
CLEAN To start head
COLOR To select the
b)
DIR
To select the
aspect ratio
the operation and
error tones sound
cleaning
input signal to be
printed
To select whether
the top or bottom
of the screen is to
be printed first
AG:ON: Adjusts the input
signal to the optimum level,
when the printout image
appears too dark or too
light.
[AG:OFF]: Normally select
this setting.
BACK: Cancels the setting
change and returns to the
item selection column.
AS:1:1: Prints a video
signal with an aspect ratio
of 1:1.
[AS: 4:3]: Normally select
this setting.
BACK: Cancels the setting
change and returns to the
item selection column
BE: OFF: The operation
tone does not sound.
[BE: ON]: The operation
and error tones sound.
BACK: Cancels the setting
change and returns to the
item selection column.
[CL: OK]: Starts the head
cleaning. Be sure to use the
supplied cleaning sheet.
BACK: Cancels the head
cleaning and returns to the
item selection column.
CO:ON: Prints the color
signal.
[CO:OFF]: Prints the black
and white signal.
BACK: Cancels the setting
change and returns to the
item selection column.
DI: REV: Starts to print in
the reverse direction (from
the top of the screen).
[DI: NOR]: Starts to print in
the normal direction (from
the bottom of the screen).
BACK: Cancels the setting
change and returns to the
item selection column.
Item Function Settings
FEED To select the
paper feed
method to be used
after printing
GAMMA
(When the
“ME:S” is
selected in
“MEDIA” is
selected,
GAMMA is
fixed to
TONE 1.)
IMAGE To set the printout
INFO To select whether
INTRT To change the
To select the tone
of the printouts
(density
gradation)
to either positive
printout or
negative printout
or not the print
conditions (such
as contrast,
brightness,
gammas and
sharpness
information) are
printed under the
image
operation of
printing
interruption
FE: OFF: Feeds less paper
between prints to conserve
paper, or when printing
multiple pictures on the
same sheet. More pictures
can be printed on one sheet,
but because there is so little
space between printed
pictures, you must press the
FEED button before cutting
the paper.
[FE: ON]: Feeds extra blank
paper between prints.
BACK: Cancels the setting
change and returns to the
item selection column.
GA:4: TONE 4 Softest
gradation
GA:3: TONE 3 Hard
gradation
[GA:2]: TONE 2 Standard
GA:1: TONE 1 Soft
gradation
BACK: Cancels the setting
change and returns to the
item selection column.
IM:NEG: Makes negative
printouts.
[IM:POS]: Makes normal
printouts.
BACK: Cancels the setting
change and returns to the
item selection column.
IF:ON: Prints the
information.
[IF:OFF]: Does not print the
information.
BACK: Cancels the setting
change and returns to the
item selection column.
IN:ON: Stops printing by
pressing the PRINT button
during printing and prints a
new image captured at
instant you pressed the
PRINT button.
[IN:OFF]: Does not stop
printing even if the PRINT
button is pressed. After
completing the current
printing, the unit prints the
image captured at instant
you pressed the PRINT
button.
BACK: Cancels the setting
change and returns to the
item selection column.
Operation
Adjustments and Settings Using the Menu
37
Page 38

Operation
Item Function Settings
LOAD To load the
registered settings
LO:3: Loads the “SA:3”
settings registered using the
“SAVE” menu item.
LO:2: Loads the “SA:2”
settings registered using the
“SAVE” menu item.
[LO:1]: Loads the “SA:1”
settings registered using the
“SAVE” menu item
BACK: Cancels the setting
change and returns to the
item selection column.
MEDIA To select the type
of paper
ME:S: Uses the UPP-110S.
ME:HD: Uses the UPP110HD.
[ME: HG]: Uses the UPP110HG
BACK: Cancels the setting
change and returns to the
item selection column.
MEMRY To select the
memory mode
ME:FLD: When printing
fast-moving images (such
as a ball being thrown), the
printout may be blue. If this
happens, select this setting.
[ME:FRM]: Normally
select this setting.
BACK: Cancels the setting
change and returns to the
item selection column.
MENU To print the menu
settings currently
selected
[ME:OK]: Prints the menu
list currently set.
BACK: Cancels printing
and goes back to its item
column.
MULTI To specify the
number of images
to be printed on
one sheet of the
printout
MU:MLT: Prints two
images on one sheet of the
printout (two reduced
images).
[MU:SGL]: Prints one
image. (full-size image).
BACK: Cancels the setting
change and returns to the
item selection column.
PAG E
(This item is
not displayed
when
“MU:MLT”
is selected in
“MULTI.”
Each time you
press the PRINT
button, the image
is stored in
memory. Up to
ten images can be
stored.
You can select the
[PG:1] to PG:10: Prints by
selecting the desired ONE
image from among images
1 to10 and pressing the
COPY button.
BACK: Cancels the setting
change and returns to the
item selection column.
desired image
from 10 kinds of
images stored in
memory and
make a printout.
Item Function Settings
QTY To set the print
quantity
[QT:1] to QT:9: Makes the
same printouts. You can
select the desired number of
same printongs between 1
and 9.
BACK: Cancels the setting
change and returns to the
item selection column.
SAVE To register up to
three kinds of
settings
SA:3: Registers the menu
settings as No.3.
SA:2: Registers the menu
settings as No.2.
[SA:1]: Registers the menu
settings as No.1.
BACK: Cancels the setting
change and returns to the
item selection column.
SCALE To enlarge or
reduce the image
to be printed
The scale can be set
between SCL:2.0 (two
times) and SCL:0.5 (one
half) in increments of 0.5.
[SCL:1.0] is the factory
setting.
BACK: Cancels the setting
change and returns to the
item selection column.
SCAN
c)
To set the range
of the image to be
printed
The range is widened in the
sequence of SC:NOR,
[SC:WD1] and SC:WD2.
BACK: Cancels the setting
change and returns to the
item selection column.
SFT.H To specify the
horizontal
position of the
image to be
printed
[S.H:0]: Adjusts the
horizontal position. The
numeric value displayed by
turning the jog dial depends
on the settings of
“SCALE”, “SCAN”, and
“SIDE”, and the signal
system of the image to be
captured.
BACK: Cancels the setting
change and returns to the
item selection column.
SFT.V To specify the
vertical position
of the image to be
printed
[S.V:0]: Adjusts the vertical
position. The numeric value
displayed by turning the jog
dial depends on the settings
of “SCALE”, “SCAN”, and
“SIDE”, and the signal
system of the image to be
captured.
BACK: Cancels the setting
change and returns to the
item selection column.
38
Adjustments and Settings Using the Menu
Page 39

Item Function Settings
SHARP To adjust the
sharpness of the
printout
You can set the sharpness to
any of 15 steps, from 0 to
14.
At a setting of 0, the outline
of the printout is not
emphasized.
A setting of step 2 is the
factory setting.
BACK: Cancels the setting
change and returns to the
item selection column.
SIDE
d)
To select the
direction in which
the image is to be
printed
S:SIDE: Prints the image
rotated by 90 degrees
counterclockwise.
[S:STD]: Prints the image in
the same direction as that
displayed on the monitor.
BACK: Cancels the setting
change and returns to the
item selection column.
SPEED
(When
“ME:HD” is
selected in
“MEDIA,”
the printing
speed is fixed
To select the
printing speed
SP:NOR: Prints at the
normal speed.
[SP:HI]: Prints at high
speed.
BACK: Cancels the setting
change and returns to the
item selection column.
to “SP:NOR”
and this item
is not
displayed.)
Note
When “SP:HI” is selected,
the power consumption is a
little higher, compared with
printing at the normal
speed.
VIDEO To select the
video signal
output from the
VIDEO OUT
connector on the
rear panel
VI:EE: Outputs the signal
after it is processed by the
printer.
[VI:THR]: Outputs the signal
directly without processing.
BACK: Cancels the setting
change and returns to the
item selection column.
BACK To exit menu
mode
Display this item and then
press the jog dial. The unit
exits the menu mode and
“READY” is displayed on
the LCD.
a) The aspect ratio is as follows.
When AS:4:3 is selected
Operation
When AS:1:1 is selected
b) The printing direction is as follows.
When DI:NOR is selected When DI: REV is selected
c) The range of the image to be printed is as follows.
When SC:NOR is selected
When SC:WD1 is selected
Adjustments and Settings Using the Menu
When SC:WD2 is selected
39
Page 40

Operation
I
d) The print direction of the images printed is as follows.
mage displayed on the monitor
Printouts
When S:STD is selected. When S:SIDE is selected
2
Confirm that “READY” is displayed on the LCD,
and press the jog dial.
The unit enters the menu mode.
When you perform a menu operation for the first
time after you purchase the unit, the top item of the
“AGC” menu is displayed.
If you have performed a menu operation already,
the item that you set last is displayed.
3
Display “DIR” by turning the jog dial up or down.
Basic Menu Operations
This section describes the basic menu operation which
are common to each menu, taking “How to set the
printing direction” as an example.
1
Press the power ON/OFF switch to ON to turn the
unit on.
The back light on the LCD lights in green.
LCD
4
Press the jog dial.
The unit enters the mode in which you can select
the printing direction.
“DI:NOR,” which is the factory setting, is
displayed on the LCD. “DI:NOR” is the currently
selected setting.
In this menu operation, you will change the setting
to “DI:REV.”
40
Adjustments and Settings Using the Menu
Page 41

5
Display “DI:REV” in the LCD by turning the jog
dial up or down, and then press the jog dial.
If you want to perform a menu operation, contact the
nearest authorized dealer.
Registering Menu Settings
You can store up to three sets of settings made using the
menu, and you can load the desired setting when needed.
The unit retains these settings even if you turn off the
power.
“DI:REV” is registered as the printing direction.
Note
If about 20 seconds elapse without making any
menu operation after you have displayed the menu
item or setting, the display returns to “READY” on
the LCD and the unit exits the menu mode. In such
a case, the setting of “DIR” is not changed.
To cancel the setting
Note
When you use the unit for the first time after you
purchase it, factory settings are registered in all three of
the stored selections.
Registering new settings
1
Make all of the required settings.
2
Display “SAVE” by turning the jog dial, and then
press the jog dial.
3
Display the desired number by turning the jog dial,
and then press the jog dial, again.
The settings made in step 1 are registered in the
number selected in step 3.
Loading the desired settings
You can load the desired settings and make printouts
with the loaded settings.
1
Confirm that “READY” is displayed on the LCD,
and press the jog dial.
Operation
1
Display “BACK” by turning the jog dial in step 5.
2
Press the jog dial.
The display on the LCD returns to “DIR.”
To continue menu operations
Make settings by repeating steps 3 to 5.
To end the menu operation
1
Display “BACK” by turning the jog dial after
performing the operation of step 5.
2
Press the jog dial.
The display returns to “READY.”
The unit exits the menu mode.
Menu lock function
If the message “LOCK” is displayed and you hear the
alarm sound when you press the jog dial, the jog dial is
disabled because the menu operation function is locked.
2
Display “LOAD” by turning the jog dial, and then
press the jog dial again.
3
Display the number corresponding to the desired
settings, and then press the jog dial.
Settings corresponding to the number selected in
step 3 are loaded.
When you change the loaded settings
The unit operates according to the changed settings. In
this case, the unit operates according to these settings
until you load another set of settings, even if you turn off
the unit. When you load another group of settings, the
settings loaded previously are cleared.
To retain previously loaded settings
Example: Settings registered as “SA:1” are loaded and
settings are to be changed. To retain the original settings
of “SA:1” and to register the new settings as “SA:2,”
proceed as follows.
Adjustments and Settings Using the Menu
41
Page 42

Operation
1
Load the settings of “LO:1” following the
procedure for loading the desired settings.
2
Change the loaded settings as required.
3
Select “SA:2” following procedure for registering
the settings.
4
Press the jog dial.
The settings, changed in step 2, are registered as
“SA:2” (No.2).
Printing
Before Starting a Print Job
Always check the following points:
• unit connected correctly? (page 33)
• Paper loaded correctly? (page 34)
• Menu settings and menu adjustments done correctly?
(page 36)
• Video source being input? (page 33)
Printing the Menu List
You can make a printout of the current menu settings.
1
Press the jog dial.
The menu item you changed last is displayed.
2
Display “MENU” by turning the jog dial, and then
press the jog dial.
3
Display “ME:OK” by turning the jog dial and then
press the jog dial.
The unit starts printing the current menu settings.
“MENU” is displayed on the LCD.
4
Display “BACK” by turning the jog dial, and then
press the jog dial.
The message “READY” is displayed on the LCD,
and the unit returns to the normal printing mode.
Starting a Print Job
You can set up the printing direction, image size, all
sorts of settings for printing, using the menu. This
section describes operations after completing all sorts of
settings using the menu.
1
Press the power ON/OFF switch to turn the unit on.
The back light on the LCD lights in green, and
“READY” is displayed on the LCD.
LCD
2
Start the video source.
This operation is done using the controls of the
video equipment which you are using as a source.
42
Printing
3
Press the PRINT button when the image you want
to print is on the video monitor.
The image displayed at the instant you press the
PRINT button is captured into memory and is
printed out immediately. Up to 10 captured images
are stored in memory. When captured image
exceeds 10, the oldest data is overwritten with the
latest one in sequence.
When the message is displayed on the LCD
If a problem occurs, the back light on the LCD lights in
umber and the error message stating the problem is
displayed on the LCD.
Page 43

Message Cause and remedy
EMPTY Paper is not loaded. Load paper.
DOOR The door is open. Close the door.
When the unit stops printing during printing
When printing almost black images continuously, the
thermal head protection circuit may shut down the unit
to prevent the thermal head from overheating. In such a
case, the message “COOL” is displayed on the LCD.
Leave the unit until the head cools down and this
message disappears.
To cancel a print job in progress
To cancel a print job in progress, press the OPEN button
or the FEED button.
To feed paper
To feed paper, press the FEED button. The unit will
continue to feed paper as long as you hold down the
FEED button. Do not attempt to pull paper out of the
unit with your hand.
Paper currently selected
You can confirm the paper currently selected on the
LCD. The pointer points to the paper currently selected.
In the following figure, the currently selected paper is
the UPP-110S paper.
Indicates the UPP-110S
Indicates the UPP-110HD
For detailed information on menu operation, see
“Basic Menu Operations” on page 40.
2
Press the jog dial.
“PG:1” is displayed on the LCD, and the image
printed last is displayed on the monitor.
As the number increases, the image displayed
becomes older.
3
Display the image that you want to print by turning
the jog dial up or down.
4
Press the jog dial.
The image selected in step 3 is loaded.
5
Press the COPY button.
The image selected in step 3 is printed.
Printing two different images on one
sheet
“MU:MLT” selected in the “MULTI” menu item allows
you to capture two different images and print them on
one sheet.
1
Select “MU:MLT” in the “MULTI” menu item.
2
Press the PRINT button in step 3, following the
operations outlined in “Starting a Print Job” on
page 42.
The image displayed at the instant you press the
PRINT button is captured.
Operation
Indicates the UPP-110HG
If the printout image is blurred
A rapidly moving image may be blurred when printed.
Should this occur, make a printout with “ME:FLD”
selected in the “MEMRY” menu item.
Printing images stored in memory
Each time you press the PRINT button, the image is
stored in memory. After 10 images have been stored, the
oldest image data is overwritten with the newest
captured image in sequence. There are always 10 images
stored in memory. You can load the desired one from
among them and print it using the menu.
1
Select “PAGE” from among the menu items.
3
Press the PRINT button again when the image you
want to print is on the video monitor.
The printer start printing two images on one sheet
as follows.
Image captured
in step 2
When “IF:ON” is selected in “INFO,” data on the
contrast and brightness of the image captured in
step 3 is printed under the image.
Image captured
in step 3
Making Copies of the Last Printout
Press the COPY button. The unit makes a copy of the
last printout. The image of the last printout is retained in
the unit’s memory until you make a printout of another
image or turn the power off. You can make only one
copy regardless of the print quantity set using the menu.
Printing
43
Page 44

Operation
I
Notes
• If you press the COPY button immediately after
turning the power on, the alarm buzzer will sound as
nothing is stored in memory.
• Turning off the power of the printer will cause the
image stored in memory to be lost.
To make multiple copies of the same printout
Press the COPY button as many times as necessary
(maximum 20 copies including the first printout) while
copying the first printout. Each time you press the
COPY button, a short buzzer sounds.
Note
The number of printouts printed by pressing the PRINT
button is also included in the maximum number. For
example, If you press the COPY button after you
pressed the PRINT button five times and made five
printouts, the number of multiple copies of the same
printout becomes 15.
To interrupt copying
Press the OPEN or FEED button while copying.
To print the image rotated by 90 degree
counterclockwise
Select “S:SIDE” from “SIDE.”
mage displayed on the video monitor
Printouts
When “S:STD” is selected
When “S:SIDE” is selected
To make copies in different directions and sizes
You can copy the image stored last in a different
direction and size. Before pressing the COPY button,
select the printing direction and size.
Selecting the Printing Direction and
Image Size
You can select the printing direction and image size
using the following menu items.
“SIDE”: Selects the direction in which the image is to be
printed.
“SCALE”: Enlarges or reduces the size of the image to
be printed.
SFT.H and SFT.V: Sets the printing range vertically and
horizontally.
Selecting the printing direction
You can select the printing direction using the “SIDE”
menu item.
To print in the same direction as the one
displayed on the video monitor
Select “S:STD” from “SIDE.”
Selecting the image size
The “SCALE” menu item allows you to enlarge or
reduce the size of the image. You can set the image size
from half the normal size of the image up to two times
the size of the image in 0.1 step increments.
To set the range of the image to be printed
You can set the printing range vertically and horizontally
using “SFT.V” and “SFT.H” menu items.
You can set the range while watching the image
displayed on the monitor.
The frame displayed on the monitor moves according to
the value being changed using the jog dial. The image
within the frame is printed.
44
Printing
Page 45

Example: “S:STD” selected from “SIDE” and
I
Printout
Wh
STD” i
Wh
STD” i
“SCL:2.0” selected from “SCALE”
Difference of the size of the printout depending
on the setting of “SCALE”
Original image
mages on the
en “S:
from “SIDE” and “SCL:2.0”
is selected from “SCALE”
s
s selected
The length
is two tim es
longer than
the length
when
“SCL:1.0”
is selected.
en “S:
from “SIDE” and “SCL:1.0”
is selected from “SCALE”
s selected
Operation
monitor
When “S.H:+(*)” is selected
Adjusting the Contrast and
Brightness
You can adjust the contrast and brightness of the unit
using the CONTR control and BRIGHT control on the
front panel.
Y
When “S.H:0” is selected
Y
When “S.H:–(*)” is selected
To adjust the contrast
You can adjust the contrast of printouts using the
CONTR control.
To make the contrast stronger: Turn the CONTR
control clockwise.
To make the contrast weaker: Turn the CONTR
control counterclockwise.
To adjust the brightness
You can adjust the brightness of printouts using the
BRIGHT control.
To make the image brighter: Turn the BRIGHT
control clockwise.
To make the image darker: Turn the BRIGHT control
counterclockwise.
Printing
45
Page 46

Operation
Note
When the menu operation function is locked, CONTR
and BRIGHT controls are also disabled in addition to
the jog dial. If you want to use the CONTR and
BRIGHT controls, contact the nearest authorized dealer.
46
Printing
Page 47

Others
Precautions
On Safety
• Check the operating voltage before operation.
Operate the unit only with a power source specified in
“Specifications”.
• Stop operation immediately if any liquid or solid
object falls into the cabinet. Unplug the unit and have
it checked by qualified personnel.
• Unplug the unit from the wall outlet if you will not be
using it for a long time. Disconnect the power cord by
grasping the plug. Never pull the cord itself.
• Do not disassemble the cabinet. Refer servicing to
qualified personnel only.
• Connect the power plug of the unit to a wall outlet
with a protective earth terminal. The safety earth
should be properly established.
Caution on the paper cutter
A paper cutter is mounted with the unit. When loading a
paper or cleaning the unit, be careful not to touch the
paper cutter. Touching the paper cutter may cause injury.
ventilation holes (intake) on the left hand side and the
ventilation holes (exhaust) on the rear of the cabinet.
Ventilation holes (intake)
Ventilation holes (exhaust)
Others
• If the unit is subjected to wide and sudden changes in
temperature, such as when it is moved from a cold
room to a warm room or when it is left in a room with
a heater that tends to produce large amounts of
moisture, condensation may form inside the unit. In
such cases the unit will probably not work properly,
and may even develop a fault if you persist in using it.
If moisture or condensation forms, turn off the power
and allow the unit to stand for at least one hour.
On the Printer Carriage
Do not carry or move the unit when the paper roll is
placed in the unit. Doing so may cause a malfunction.
On Installation
• Place the unit on a level and stable surface.
If you use the unit with placed on an uneven surface,
malfunction of the unit is likely to occur.
• Do not install the unit near heat sources. Avoid
locations near radiators or air ducts, or places subject
to direct sunlight or excessive dust, humidity,
mechanical shock or vibration.
• Provide adequate air circulation to prevent heat buildup. Do not place the unit on surfaces such as rugs,
blankets, etc., or near materials such as curtains and
draperies.
• To prevent internal heat built-up, leave enough room
around the printer for air to circulate through the
Precautions
47
Page 48

Maintenance
Cleaning the Cabinet
Use a wrung out damp cloth, or a damp cloth soaked in
water and a mild detergent, to clean the cabinet surface.
To avoid damaging the cabinet of the unit, never use
alcohol, thinner, or any other type of organic solvent, or
any type of abrasive cleaner, to clean the cabinet.
Cleaning the Thermal Head
3
Insert the cleaning sheet, with the black surface
facing down, into the groove of the paper tray.
Insert the
cleaning
sheet into the
groove
located over
the slide
switch in the
tray.
Cleaning sheet
supplied
Others
If the printout is dirty or white stripes appear on the
printouts, clean the thermal head using the cleaning
sheet supplied.
Carry out the head cleaning operation using the menu.
Note
A paper cutter is mounted with the unit. When cleaning
the thermal head, be careful not to touch the paper cutter.
Touching the paper cutter may cause injury.
1
Press the power ON/OFF switch to ON to turn the
unit on.
2
Press the OPEN button to open the door.
4
Close the door by pushing it.
5
Press the jog dial.
The menu item changed last is displayed.
6
Display “CLEAN” by turning the jog dial, and then
press the jog dial.
7
Confirm that “CL:OK” is displayed, and then press
the jog dial.
The unit starts cleaning the thermal head.
“CLEAN” is displayed on the LCD.
When the cleaning sheet stops and the alarm
sounds, the cleaning is completed.
8
Press the OPEN button to open the door and remove
the cleaning sheet.
9
Close the door by pushing it.
Note
Clean the thermal head only when necessary. If you
clean the thermal head too frequently, it may cause a
malfunction.
48
If the paper is loaded in the paper tray, remove it.
Maintenance
Cleaning the Platen Roller
If the paper cannot be ejected smoothly after printing,
the platen roller may be dirty.
In such a case, clean the platen roller with a soft cloth
moistened with a damp clothe soaked in water and a
mild detergent.
1
Press the power ON/OFF switch to ON to turn the
unit on.
2
Press the OPEN button to open the door.
If the paper is loaded in the paper tray, remove it.
Page 49

3
Clean the platen roller gently with a damp clothe
soaked in water and a mild detergent.
Platen roller
Notes
• After the surface of the platen roller wiped has
been dried completely, turn the platen roller to
clean another portion.
• Do not turn the platen roller with hands. Use the
FEED button to turn it. To clean another part of
the surface of the platen roller, go to the next step.
4
Press and hold down the FEED button so that the
platen roller turns automatically. Release the FEED
button when the surface of the platen roller to be
cleaned appears.
Be careful so that you have your fingers caught
in the turning platen roller.
Notes
• The platen roller is turning while you are pressing
the FEED button. Be careful so that you have
your fingers caught in the turning platen roller.
• Be sure to start cleaning only after the platen
roller has stopped completely.
5
Repeat steps 3 and 4 until the platen roller becomes
clean.
Specifications
Power requirement
100 to 240 V AC, 50/60 Hz
Input current 1.5 A to 0.8 A
Operating temperature
5 °C to 35 °C (41 °F to 95 °F)
Operating humidity
20 % to 80 %
Storage and transport temperature
–20 °C to +60 °C (–4 °F to +140 °F)
Storage and transport humidity
20 % to 90 %
Dimensions 154 × 88 × 240 mm (w/h/d)
(6 1/6 × 3 1/2 × 9 1/2 inches)
Mass 2.6 kg (5 lb 11 oz) (printer only)
Thermal head Thin-film thermal head, 1280 dots
Gradation 256-level gradation (8-bit)
Resolution (when “SC:WD1” is selected from “SCAN”)
EIA: 1210 × 490 dots
CCIR: 1210 × 582 dots
Picture size (when “SC:WD1” or “SC:NOR” is selected
from “SCAN”)
When “S:STD” is selected from
“SIDE”
EIA: 94 × 73 mm
CCIR: 94 × 71 mm
When “S:SIDE” is selected from
“SIDE”
EIA: 124 × 96 mm
CCIR: 127 × 96 mm
Printing speed About 2 sec./image (at standard
setting) (when “SP:HI” is selected
from “SPEED”)
About 3.3 sec./image (at standard
setting) when “SP:NOR” is selected
from “SPEED”)
Picture memory 10 frames (800 k × 8 bits for one frame)
Input connector VIDEO IN (BNC type)
EIA or CCIR composite video signals
1.0 Vp-p, 75 ohms/high-impedance
(EIA/CCIR automatically
discriminated)
Output connector
VIDEO OUT (BNC type)
EIA or CCIR composite video signals
1.0 Vp-p, 75 ohm loop-through/EE
switchable
REMOTE connector (stereo mini jack)
Others
6
After the platen roller has been dried completely,
close the door by pushing it.
1GND
Specifications
49
Page 50

2 PRINT SIGNAL (TTL)
Input of LOW pulse over 100 msec.
initiates print.
3PRINT BUSY (TTL)
Goes HIGH during printing
Accessories provided
Troubleshooting
Before you call for service, please check the problems
and solutions described below. If you cannot solve the
problem, contact the nearest authorized dealer.
Thermal head cleaning sheet (1)
Media label (1)
Operating Instructions (1)
Service Contact List (1)
Medical Specifications
Protection against electric shock:
Class I
Protection against harmful ingress of
Others
water:
Ordinary
Degree of safety in the presence of
flammable anesthetics or oxygen:
Not suitable for use in the presence
of flammable anesthetics or oxygen
Mode of operation:
Continuous
The design and these specifications are subject to
change without prior notification.
Symptom Causes/remedies
First few prints
spotted with small
dots.
Print job does not
start.
Black borders or
missing portions
around the printout
Paper Jams • Jammed paper visible?
Printouts dirty. Thermal head dirty?
Paper is not fed
smoothly.
New paper roll just installed?
tIf a new roll of paper has just been
loaded, paper dust may cause white
spots in printed images. Press the
FEED button and hold it down to
feed about 15~20 cm (6~8 in.) and
then release.(page 34)
• Paper does not feed.
tPower switched on?
tUnit connected correctly?
(page 33)
tPaper roll loose? (page 34)
t“MU:MLT” selected from the
“MULTI” menu item? (page 38)
• Alarm sounds.
tPaper loaded correctly?
(page 34)
tHas the thermal head
overheated? The thermal head
may overheat when the unit
prints dark image continuously.
Wait until the head cools down.
tIs the video signal of the image
input? (page 33)
• Paper feeds but printing does not
start.
tPaper loaded with the wrong
side up? (page 34)
This problem may result from the
video signal input to the unit.
tChange the setting of the “SCAN”
menu item. (page 38)
tPress the OPEN button to open
the paper door, remove the
printout or the paper roll, and
then gently pull the jammed
paper out of the unit.
• Condensation collected in unit?
tIf the unit has just been brought
into a warm room from a cold
location, condensation may have
formed inside the unit. Switch
the unit off and let it set for 1 - 2
hours (until it warms to room
temperature), then try printing
again.
tUse the head cleaning sheet
provided with the unit to clean the
thermal head. (page 48)
Platen roller dirty?
tClean the platen roller. (page 48)
50
Troubleshooting
Page 51

Symptom Causes/remedies
The unit stops printing
while printing almost
black images and the
message “COOL” is
displayed on the LCD.
White lines or small
letters on the screen
are not printed clearly.
Small squares appear
over the whole screen.
The printout is too
dark or too light.
The printout seems
stretched or enlarged.
When printing almost black images
continuously, the thermal head
protection circuit may shut down the
unit to prevent the thermal head from
overheating.
tStop printing and allow the thermal
head to cool.
Is “CO:ON” selected in the “COLOR”
menu item for black and white input
signals?
tSelect “CO:OFF” in “COLOR”
when the input signal is a black and
white signal. (page 37)
Is “CO:OFF” selected in the
“COLOR” menu item for color input
signals?
Select “CO:ON” in “COLOR” when
the input signal is a color signal.
(page 37)
• Is the 75 Ω select switch set
correctly? (page 33)
• Is the “MEDIA” menu item set
correctly? (page 38)
• Is the “GAMMA” menu item set
correctly? (page 37)
Is “AS:1:1” selected in the “ASPCT”
menu item?
tSelect “AS:4:3.” (page 37)
Error Messages
Messages appear on the LCD under the following
conditions. Take the remedial actions shown next to the
messages to correct the problem.
Messages Description and remedy
DOOR The paper door is open.
tClose the paper door until it is
locked securely.
EMPTY • There is no paper loaded.
• Paper has been used up.
tLoad some paper. (page 34)
COOL The protection circuit that prevents the
thermal head from overheating has
been activated.
tWait for the message to disappear.
Printing will then resume
automatically.
LOCK The menu operation function is locked.
The jog dial, CONTR control and
BRIGHT control are disabled.
tIf you want to perform menu
operations or use those controls,
contact the nearest authorized
dealer.
Others
Error Messages
51
Page 52

Index
S
Specifications 49
C
Connections 33
T
Troubleshooting 50
E
Error messages 51
G
Getting Started 31
L
Location and function of parts and
controls
front panel 31
rear panel 32
Index
M
Maintenance
cleaning the cabinet 48
cleaning the platen roller 48
cleaning the thermal head 48
Menu
basic operations 40
list 37
loading the menu settings 41
menu flow 36
printing the menu list 42
storing the menu settings 41
O
Overview 31
P
Paper
loading 34
notes on storing and handling 33
paper you can use 33
Precautions
on installation 47
paper cutter 47
printer carriage 47
safety 47
Printing
adjusting the brightness 45
adjusting the contrast 45
cancelling 43
staring a print job 42
52
Index
Page 53

Index
Index
53
Page 54

AVERTISSEMENT
Afin de réduire les risques d’incendie ou
d’électrocution, ne pas exposer cet appareil à la
pluie ou à l’humidité.
la terre du système par une borne de terre de
protection sauf s’ils sont agréés suivant la norme
IEC60601-1.
* Proximité d’un patient
Pour prévenir tout risque d’électrocution, ne
pas ouvrir le boîtier. Confier l’entretien de cet
appareil exlusivement à un personnel qualifié.
CET APPAREIL DOIT ÉTRE RELIÉ À LA TERRE.
Symbole
Ce symbole indique la borne équipotentielle
qui ramène les différentes parties d’un
système à la même tension.
Ce symbole est destiné à attirer l’attention de
l’utilisateur sur la présence d’instructions
d’utilisation et de maintenance (réparation)
importantes dans la documentation
accompagnant l’appareil.
Pour les utiisateurs au Canada
Cet appareil a été homologué conformément à la norme
CSA C22.2 No.601.1.
Pour les clients des Etats-Unis et du
Canada
L’imprimante UP-897MD est un équipement de type
non patient.
Elle ne doit pas être utilisée à proximite des patients.
* Proximité des patients
R1.5m
3. Dans le cas d’une connexion à d’autres équipements,
le courant de fuite peut augmenter.
4. Cet appareil génère, utilise et peut émettre des
radiofréquences. S’il n’est pas installé et utilisé
conformément au mode d’emploi, il peut provoquer
des interférences avec d’autres appareils. Si cet
appareil génère des interférences (ce que l’on peut
facilement contrôler en débranchant le cordon
d’alimentation de l’appareil), appliquez l’une des
mesures suivantes : installez cet appareil à un autre
endroit en tenant compte de l’autre équipement.
Branchez cet appareil et l’autre équipement sur des
circuits d’alimentation différents. Consultez votre
revendeur. (Suivant les normes EN60601-1-2 et
CISPR11, Classe B, Groupe 1.)
Attention
Lorsque vous éliminez l’appareil ou ses accessoires,
vous devez vous conformer aux dispositions légales
applicables en la matière dans votre zone géographique
ou dans votre pays ainsi qu’au règlement de l’hôpital en
question.
R1.83m
(6 feet)
Instructions de sécurité importantes en
vue d’une utillsation dans un
environnement médical
1. Tous les équipements raccordés à cet appareil
doivent être agréés suivant les normes IEC60601-1,
IEC60950-1, IEC60065 ou les autres normes IEC/
ISO applicables à ces équipements.
2. Si cet appareil est utilisé conjointement avec d’autres
équipements à proximité d’un patient*, ces
équipements doivent être alimentés par un
transformateur d’isolement ou raccordés à la mise à
Avertissement sur le connecteur
d’alimentation
Utiliser un cordon d’alimentation approprié à votre
tension d’alimentation secteur locale.
1. Utiliser un cordon d’alimentation approuvé
(conducteur d’alimentation 3 âmes)/connecteur
d’appareil/prise avec contacts de mise à la terre
conforme aux règles de sécurité de chaque pays si
applicable.
2. Utiliser un cordon d’alimentation approuvé
(conducteur d’alimentation 3 âmes)/connecteur
d’appareil/prise conforme aux valeurs nominales
(tension, ampérage) correctes.
Pour toute question concernant l’utilisation du cordon
d’alimentation/connecteur/fiche ci-dessus, veuillez
consulter un personnel de service après-vente qualifié.
54
Page 55

Avertissement sur le connecteur
d’alimentation pour usage médical
Prière d’utiliser le code d’alimentation électrique
suivant.
Avec des connecteurs (fiche ou fiche femelle) et des
types de câbles différents de ceux indiqués dans ce
tableau, utiliser le câble d’alimentation électrique agréé
pour votre secteur.
Etats-Unis Canada
Type de fiche CLASSE HOPITAL* CLASSE HOPITAL*
Fiche femelle E62405, E35708 LR53182, LL022442,
Type de câble E159216, E35496
Intensité nominale
du câble minimale
Agréation de
sécurité
*Remarque : la fiabilité de la mise à la terre n’est réalisable que
si l’équipement est branché sur une prise de courant équivalente
identifiée « Hôpital uniquement» ou « Classe hôpital ».
Min.Type SJT
Min.18 AWG
10A/125V 10A/125V
UL Listed CSA
LL088408
LL112007-1, LL20262,
LL32121, LL84494
Min.Type SJT
Min.18AWG
FR
55
Page 56

Table des matières
Prise en main
Généralités ........................................................... 57
Emplacement et fonction des composants et
commandes ........................................................... 57
Panneau avant ................................................... 57
Panneau arrière ................................................. 58
Connexions ........................................................... 59
Connexion au port USB ................................... 59
Papier .................................................................... 59
Papiers Supportés ............................................. 59
Chargement du papier dans l’imprimante ....... 60
Chargement du papier ...................................... 60
Utilisation
Réglages à l’aide du menu .................................. 62
Menu déroulant ................................................ 62
Liste de menu ...................................................63
Fonctionnement du menu de base .................... 66
Enregistrement des réglages de menu .............. 68
Impression de la liste de menu ......................... 68
Impression ............................................................ 69
Lancement d’un travail d’impression ............... 69
Sélection du sens d’impression et de la taille
de l’image ....................................................... 71
Ajustement du contraste et de la luminosité .... 72
Autres
Précautions ........................................................... 74
Sécurité ............................................................. 74
Transport de l’imprimante ................................ 74
Installation ........................................................ 74
Entretien ............................................................... 75
Nettoyage du châssis ........................................ 75
Nettoyage de la tête thermique ......................... 75
Nettoyage du rouleau du plateau ...................... 76
Spécifications ....................................................... 77
Dépannage ............................................................ 78
Messages d’erreur ............................................... 79
Index ..................................................................... 80
56
Page 57

Prise en main
Emplacement et
fonction des
Généralités
Impression rapide, silencieuse, de haute
qualité
• Tête thermique pour papier mince équipée d’un IC
très rapide, capable de produire des images haute
résolution à 12,8 points/mm.
• Vitesses d’impression d’environ 1 image de haute
qualité (tirage unique au format A-7) toutes les 2
secondes lors de l’impression à haute vitesse (si
« SP:HI » est sélectionné dans l’élément « SPEED »
du menu).
• Impression monochrome : jusqu’à 256 niveaux de
gris.
• Circuits de correction de température intégrés
permettant d’éviter les variations de température
susceptibles de maculer les impressions.
Simplicité des réglages d’impression grâce à
un menu
Vous pouvez effectuer les réglages souhaités au moyen
d’un menu. Vous pouvez stocker jusqu’à trois réglages
qui seront conservés comme réglages d’utilisateur
prédéfinis.
Facilité de chargement du papier
L’accès au magasin est aisé ce qui facilite le chargement
du papier dans l’appareil.
composants et
commandes
Pour plus de détails, reportez-vous aux numéros de page
indiqués entre parenthèses ().
Panneau avant
A !Interrupteur ON/OFF (60, 66, 69, 75)
Appuyez sur l’interrupteur ON pour mettre
l’appareil sous tension. Le voyant de l’écran LCD
affiche une lumière verte.
Prise en main
B Ecran LCD de l’imprimante (LCD : affichage à
cristaux liquides) (62, 69)
Le voyant affiche une lumière verte lorsque
l’appareil fonctionne normalement. De même,
lorsque l’appareil fonctionne normalement, le
papier en cours de sélection est indiqué par le
pointeur sur l’écran LCD.
Pour plus d’informations sur les types de papier,
reportez-vous aux rubriques « Papier » à la page 59
et « Papier en cours de sélection » à la page 69.
En cas d’erreur, le message d’avertissement
approprié s’affiche.
Lorsque des opérations sont effectuées dans les
menus, les éléments et réglages des menus
s’affichent.
C Molette Jog (66, 75)
Utilisée pour effectuer des opérations de menu.
D Bouton CONTR (contraste) (72)
Ajuste le contraste des impressions.
Généralités / Emplacement et fonction des composants et commandes
57
Page 58

E Bouton BRIGHT (luminosité) (72)
Ajuste la luminosité des impressions.
B Sélecteur 75 Ω
ON : Lorsque rien n’est branché sur le connecteur
VIDEO OUT, réglez le sélecteur sur cette position.
F Touche FEED (61, 69)
Permet d’alimenter le papier lorsque vous la
Prise en main
maintenez enfoncée. En cours d’impression, cette
OFF : Lorsqu’un moniteur vidéo ou un autre
appareil vidéo est branché sur le connecteur
VIDEO OUT, réglez le sélecteur sur cette position.
touche permet d’annuler le travail.
C t Connecteur VIDEO IN (entrée) (type BNC)
G Touche COPY (70)
Imprime un exemplaire supplémentaire de la
Pour brancher le connecteur de sortie vidéo de
l’appareil vidéo.
dernière impression effectuée.
Vous ne pouvez effectuer qu’une seule copie
lorsque vous appuyez sur cette touche,
indépendamment du nombre d’exemplaires défini
au moyen du menu.
D T Connecteur VIDEO OUT (sortie) (type
BNC)
Pour brancher le connecteur d’entrée vidéo du
moniteur vidéo. Le signal de sortie dépend du
réglage de l’élément « VIDEO » du menu.
H Touche PRINT
Imprime l’image actuellement affichée sur le
moniteur vidéo. L’image affichée lorsque vous
appuyez sur la touche PRINT est enregistrée en
mémoire.
E - Connecteur AC IN
Utilisez un cordon d’alimentation adéquat pour
votre alimentation secteur locale (non fourni).
Reportez-vous à la section « Avertissement sur le
connecteur d’alimentation » à la page 54 et
I Touche OPEN (61, 69)
Permet d’ouvrir le magasin. En cours d’impression,
« Avertissement sur le connecteur d’alimentation
pour usage médical » à la page 55.
cette touche permet d’annuler le travail.
F Borne équipotentielle
J Massicot
Coupe le papier après l’impression d’une image.
Permet de raccorder l’appareil à la prise
équipotentielle pour amener les différentes parties
du système au même potentiel. Reportez-vous à la
section « Instructions de sécurité importantes en
Panneau arrière
vue d’une utillsation dans un environnement
médical » à la page 54.
A Connecteur de (REMOTE) télécommande
(59)
Permet de raccorder la télécommande RM-91 ou le
commutateur au pied afin de commander
l’impression à distance.
58
Emplacement et fonction des composants et commandes
Page 59

Connexions
Papier
Remarques
• Mettez tous les périphériques hors tension avant de
procéder à quelque raccordement que ce soit.
• Raccordez le cordon d’alimentation secteur en
dernier.
Connexion au port USB
Appareil vidéo
Moniteur vidéo
vers le connecteur
de sortie vidéo
Câble de
connexion
(BNC y BNC)
(non fourni)
couleur/noir et blanc
vers le connecteur
d’entrée vidéo
Câble de
raccordement
(non fourni)
vers VIDEO OUTvers VIDEO IN
Il est recommandé d’utiliser uniquement du papier Sony
UPP-110S/110HD/110HG conçu pour cette
imprimante. La qualité d’impression ne peut être
garantie si vous utilisez d’autres papiers. En outre, ces
derniers peuvent endommager l’imprimante.
Vous ne pouvez pas utiliser le papier UPP-110HA
spécifié pour l’imprimante UP-880/890MD.
Papiers Supportés
Les caractéristiques des papiers imprimante sont les
suivantes.
Caractéristiques d’impression Type de papier
TYPE I (Normal) UPP-110S
TYPE II (Haute densité) UPP-110HD
TYPE V (Glacé) UPP-110HG
Remarques sur le stockage et la
manipulation du papier
Stockage du papier non utilisé
• Le papier inutilisé doit être stocké dans un endroit sec,
d’une température inférieure à 30°C (86°F), à l’abri de
la lumière directe du soleil.
• Le papier inutilisé doit être tenu éloigné des liquides
volatils et ne doit pas entrer en contact avec un liquide
volatil organique, un ruban adhésif en bobine ou un
composant de chlorure de vinyle.
Prise en main
vers REMOTE
Sélecteur 75 Ω
Télécommande RM-91
(non fournie)
a) Réglez le sélecteur 75 Ω comme suit.
ON : Lorsque rien n’est branché sur le connecteur
VIDEO OUT, réglez le sélecteur sur cette position.
OFF : Lorsqu’un moniteur vidéo ou un autre appareil
vidéo est branché sur le connecteur VIDEO OUT, réglez
le sélecteur sur cette position.
Cordon
d’alimentation
secteur (non
a)
fourni)
vers prise
murale
vers - AC IN
Chargement du papier
• Manipulez le papier avec précaution lorsque vous le
chargez dans l’imprimante en veillant à ne pas toucher
la surface d’impression avec les doigts. Les traces de
transpiration ou de graisse provenant de vos doigts
risquent de maculer les impressions.
• Après avoir retiré l’étiquette du bord d’attaque du
papier, tirez le papier de 15 à 20 cm (environ 6 à 8 po.)
environ avant de lancer l’impression. a substance
adhésive de l’étiquette risquerait d’altérer l’image.
Stockage des tirages
• Pour éviter l’atténuation ou l’altération des niveaux de
gris des tirages, stockez ces dernières dans un endroit
sec et frais, où la température ne dépasse pas 30°C
(86°F).
• Stockez les tirages dans une pochette en
polypropylène ou entre des feuilles de papier
dépourvues de substance plastique.
• Conservez les tirages à l’abri d’une humidité
excessive et de la lumière directe du soleil.
Connexions / Papier
59
Page 60

• Les tirages doivent être tenus éloignés des liquides
volatils et ne doivent pas entrer en contact avec un
liquide volatil organique, un ruban adhésif en bobine
ou un composant de chlorure de vinyle.
• Pour éviter l’atténuation des couleurs, n’empilez pas
Prise en main
les tirages sur ou sous une feuille diazo.
• Pour coller les tirages sur une autre feuille de papier,
utilisez du ruban adhésif double face ou un ruban
adhésif à base d’eau.
• Ne brûlez pas le papier imprimante à jeter.
Chargement du papier
dans l’imprimante
Remarques
• Avant de procéder au chargement du papier dans
l’imprimante, reportez-vous à la section « Remarques
sur le stockage et la manipulation du papier »
(page 59).
• Veillez à toujours manipuler le papier avec précaution
lors de son chargement afin d’éviter toute altération de
la qualité des tirages. Veillez à ne jamais plier ni
froisser le papier ou encore à toucher la surface
d’impression avec les doigts. En effet, les traces de
transpiration provenant des doigts peuvent maculer
l’impression.
• Veuillez uniquement utiliser du papier UPP-110S/
110HD/110HG. (page 59)
• Veillez à sélectionner le papier utilisé dans l’élément
« MEDIA » du menu. Vous pouvez vérifier le type de
papier actuellement sélectionné grâce à l’écran LCD.
(page 64)
Chargement du papier
Avertissement
L’imprimante est dotée d’un massicot. Lorsque vous
chargez du papier, prenez soin à ne pas toucher le
massicot. Le massicot peut causser des blessures.
1
Mettez l’imprimante sous tension en appuyant sur
l’interrupteur ON/OFF.
Quand le papier n’est pas encore chargé, le voyant
de l’écran LCD s’allume de façon ombrée et le
message « EMPTY » s’affiche.
60
Chargement du papier dans l’imprimante
Page 61

2
Ouvrez le magasin en appuyant sur la touche
OPEN.
3
Retirez l’étiquette du bord d’attaque du papier
imprimante, tirez environ 15 à 20 cm (environ 6 à
8 po.) environ de papier, puis placez le rouleau de
papier dans le magasin.
Remarque
Pour éviter d’exposer le papier à la poussière, la
saleté, etc., veillez à toujours le manipuler avec
précaution lorsque vous le déballez puis le chargez
dans l’imprimante. Le papier sale ou poussiéreux
ne peut être utilisé pour l’impression.
Vérifiez que le papier est droit.
4
Refermez le magasin et appuyez sur son capot.
Prise en main
Retirez l’étiquette du
bord d’attaque du
papier imprimante, tirez
15 à 20 cm (environ 6
8 po.) de papier, puis
placez le rouleau de
papier dans le magasin.
Chargez le papier face impression (face
thermosensible) dessus. L’impression n’est pas
possible si le papier est sur la mauvaise face.
à
Remarques
• Vérifiez que le papier est correctement chargé et droit.
Un papier en biais est susceptible d’entraîner un
bourrage.
• Si vous n’avez pas fait avancer suffisamment de papier
à l’étape 3, appuyez sur la touche FEED du panneau
de commande pour extraire davantage de papier de
l’imprimante sans tirer sur le papier.
Chargement du papier dans l’imprimante
61
Page 62

Utilisation
Réglages à l’aide du
menu
La configuration choisie dépend de l’utilisation prévue,
des appareils raccordés et de vos préférences.
Vous pouvez stocker jusqu’à trois réglages qui seront
conservés comme réglages d’utilisateur prédéfinis.
Utilisation
Vous pouvez effectuer des réglages à votre convenance.
Ces réglages seront conservés en mémoire une fois
l’imprimante éteinte.
Menu déroulant
Les éléments affichés sur l’écran LCD changent au fur
et à mesure que vous tournez la molette Jog, comme le
montre le diagramme suivant, et vous pouvez effectuer
des réglages pour chaque élément de menu.
62
Réglages à l’aide du menu
A propos de * dans les éléments « SFT:H » et « SFT:V » du menu
* indique la valeur numérique affichée lorsque l’on tourne la molette Jog. Cette valeur numérique change selon les
réglages de « SCALE», « SCAN » et « SIDE » et le système de signal de l’image à capturer.
Page 63

Liste de menu
Cette rubrique décrit les menus qui s’affichent à l’écran
lorsque vous tournez la molette Jog. Un réglage entouré
par désigne un réglage usine.
Elément Fonction Paramètres
AGC Pour régler le
signal d’entrée
sur le niveau
optimal
d’impression
ASPCT
BEEP Permet d’activer
CLEAN Pour lancer
COLOR Pour sélectionner
DIR
a)
Pour sélectionner
le format de
l’image
ou de désactiver
les bips de
confirmation et
d’erreur
l’opération de
nettoyage de la
tête d’impression
le signal d’entrée
à imprimer
b)
Pour sélectionner
si l’impression
doit commencer
par le haut ou le
bas de la page
AG:ON : Règle le signal
d’entrée sur le niveau
optimal lorsque l’image
imprimée apparaît trop
sombre ou trop claire.
[AG:OFF] : En principe,
sélectionnez cette position.
BACK : Annule la dernière
modification effectuée et
renvoie à la colonne de
sélection d’un élément.
AS:1:1 : Imprime un signal
vidéo au format 1:1.
[AS: 4:3] : En principe,
sélectionnez cette position.
BACK : Annule la dernière
modification effectuée et
renvoie à la colonne de
sélection d’un élément.
BE: OFF : Le bip de
confirmation est désactivé.
[BE: ON] : Les bips de
confirmation et d’erreur
sont activés.
BACK : Annule la dernière
modification effectuée et
renvoie à la colonne de
sélection d’un élément.
[CL: OK] : Démarre le
nettoyage de la tête.
Assurez-vous d’avoir bien
utilisé la feuille de
nettoyage fournie.
BACK : Annule le
nettoyage de la tête
effectuée et renvoie à la
colonne de sélection d’un
élément.
CO: ON : Imprime le signal
couleur.
[CO:OFF] : Imprime le
signal noir et blanc.
BACK : Annule la dernière
modification effectuée et
renvoie à la colonne de
sélection d’un élément.
DI: REV : Lance
l’impression dans le sens
inverse (commence par le
haut de l’écran).
[DI: NOR] : Lance
l’impression dans le sens
normal (commence par le
bas de l’écran).
BACK : Annule la dernière
modification effectuée et
renvoie à la colonne de
sélection d’un élément.
Elément Fonction Paramètres
FEED Pour sélectionner
la méthode
d’alimentation du
papier devant être
utilisée après
l’impression
GAMMA
(Lorsque
« ME:S » est
sélectionné
dans
« MEDIA »,
GAMMA est
réglé sur
TONE 1.)
IMAGE Pour sélectionner
INFO Pour sélectionner
Pour sélectionner
le ton des
impressions
(niveaux de
densité)
si l’impression
doit être positive
ou négative
si les conditions
d’impression
(telles que les
informations sur
le contraste, la
luminosité, les
gammas et la
netteté) doivent
être imprimées
en-dessous de
l’image
FE: OFF : Alimente moins
de papier entre les
impressions par souci
d’économie, ou lors de
l’impression de plusieurs
images sur la même feuille.
Vous pouvez imprimer
plusieurs images sur une
même feuille. Toutefois, en
raison de l’espace réduit qui
existe entre chaque image,
vous devez appuyer sur la
touche FEED avant de
couper le papier.
[FE: ON] : Alimente du
papier blanc entre les
impressions.
BACK : Annule la dernière
modification effectuée et
renvoie à la colonne de
sélection d’un élément.
GA:4 : TONE 4 niveau le
moins dense
GA:3 : TONE 3 densité
élevée
[GA:2] : TONE 2 densité
standard
GA:1 : TONE 1 densité
moyenne
BACK : Annule la dernière
modification effectuée et
renvoie à la colonne de
sélection d’un élément.
IM:NEG : Effectue des
impressions négatives.
[IM:POS] : Effectue des
impressions normales.
BACK : Annule la dernière
modification effectuée et
renvoie à la colonne de
sélection d’un élément.
IF:ON : Imprime les
informations.
[IF:OFF] : N’imprime pas
les informations.
BACK : Annule la dernière
modification effectuée et
renvoie à la colonne de
sélection d’un élément.
Utilisation
Réglages à l’aide du menu
63
Page 64

Utilisation
Elément Fonction Paramètres
INTRT Pour changer le
fonctionnement
de la fonction
d’interruption de
l’impression
LOAD Pour charger les
réglages
enregistrés
MEDIA Pour sélectionner
le type de papier
MEMRY Pour sélectionner
le mode de
mémoire
IN:ON : Arrête
l’impression en cas d’appui
sur la touche PRINT
pendant l’impression et
impression de la nouvelle
image capturée au moment
de l’appui sur la touche
PRINT.
[IN:OFF] : N’arrête pas
l’impression même si la
touche PRINT est
actionnée. Après avoir
terminé l’impression en
cours, l’imprimante
imprime l’image capturée
au moment de l’appui sur la
touche PRINT.
BACK : Annule la dernière
modification effectuée et
renvoie à la colonne de
sélection d’un élément.
LO:3 : Charge les réglages
« SA:3 » enregistrés au
moyen de la fonction
« SAVE » du menu.
LO:2 : Charge les réglages
« SA:2 » enregistrés au
moyen de la fonction
« SAVE » du menu.
[LO:1] : Charge les réglages
« SA:1 » enregistrés au
moyen de la fonction
« SAVE » du menu.
BACK : Annule la dernière
modification effectuée et
renvoie à la colonne de
sélection d’un élément.
ME:S : Utilise le type UPP110S.
ME:HD : Utilise le type
UPP-110HD.
[ME: HG] : Utilise le type
UPP-110HG.
BACK : Annule la dernière
modification effectuée et
renvoie à la colonne de
sélection d’un élément.
ME:FLD : Lors de
l’impression d’images
rapides (comme le
lancement d’une balle), le
tirage peut être flou. Si
cette situation se produit,
sélectionnez ce réglage.
[ME:FRM] : En principe,
sélectionnez cette position.
BACK : Annule la dernière
modification effectuée et
renvoie à la colonne de
sélection d’un élément.
Elément Fonction Paramètres
MENU Pour imprimer les
réglages de menu
actuellement
sélectionnés
MULTI Pour spécifier le
PAG E
(Cet élément
n’est pas
affiché
lorsque
« MU:MLT »
est
sélectionné
dans
« MULTI »)
QTY Pour définir le
SAVE Pour enregistrer
nombre d’images
à imprimer sur
une feuille du
tirage
Chaque fois que
vous appuyez sur
la touche PRINT,
l’image est
enregistrée en
mémoire.
Possibilité
d’enregistrer
jusqu’à dix
images.
Vous pouvez
sélectionner
l’image voulue
parmi 10 types
d’images en
mémoire et
effectuer une
impression.
volume
d’impression
jusqu’à trois
sortes de réglages
[ME:OK] : Imprime la liste
de menu actuellement
sélectionnée.
BACK : Annule
l’impression et renvoie à sa
colonne d’élément.
MU:MLT : Imprime deux
images sur une feuille du
tirage (deux images
réduites).
[MU:SGL] : Imprime une
image. (image pleine page).
BACK : Annule la dernière
modification effectuée et
renvoie à la colonne de
sélection d’un élément.
[PG:1] à PG:10 : Imprime
lorsque vous sélectionnez
l’image UNIQUE voulue
parmi les images 1 à 10 et
que vous appuyez sur la
touche COPY.
BACK : Annule la dernière
modification effectuée et
renvoie à la colonne de
sélection d’un élément.
[QT:1] à QT:9 : Réalise les
mêmes tirages. Vous
pouvez sélectionner le
nombre voulu
d’impressions entre 1 et 9.
BACK : Annule la dernière
modification effectuée et
renvoie à la colonne de
sélection d’un élément.
SA:3 : Enregistre les
réglages de menu sous le
No.3.
SA:2 : Enregistre les
réglages de menu sous le
No.2.
[SA:1] : Enregistre les
réglages de menu sous le
numéro 1.
BACK : Annule la dernière
modification effectuée et
renvoie à la colonne de
sélection d’un élément.
64
Réglages à l’aide du menu
Page 65

Elément Fonction Paramètres
SCALE Pour agrandir ou
réduire l’image à
imprimer
L’échelle peut être réglée
entre SCL:2,0 (deux fois) et
SCL:0,5 (la moitié) par pas
de 0,5.
[SCL:1,0] est le réglage
d’usine.
BACK : Annule la dernière
modification effectuée et
renvoie à la colonne de
sélection d’un élément.
c)
SCAN
Pour régler la
plage de l’image
à imprimer
La plage est élargie dans
l’ordre SC:NOR, [SC:WD1]
et SC:WD2.
BACK : Annule la dernière
modification effectuée et
renvoie à la colonne de
sélection d’un élément.
SFT.H Pour régler la
position
horizontale de
l’image à
imprimer
[S.H:0] : Règle la position
horizontale. La valeur
numérique affichée lorsque
l’on tourne la molette Jog
dépend des réglages de
« SCALE », « SCAN » et
« SIDE » et du système de
signal de l’image à
capturer.
BACK : Annule la dernière
modification effectuée et
renvoie à la colonne de
sélection d’un élément.
SFT.V Pour régler la
position verticale
de l’image à
imprimer
[S.V:0] : Règle la position
verticale. La valeur
numérique affichée lorsque
l’on tourne la molette Jog
dépend des réglages de
« SCALE », « SCAN » et
« SIDE » et du système de
signal de l’image à
capturer.
BACK : Annule la dernière
modification effectuée et
renvoie à la colonne de
sélection d’un élément.
SHARP Pour ajuster la
netteté de
l’impression
Vous pouvez régler la
netteté sur l’un des 15
niveaux, sur une une
échelle de 0 à 14.
Un réglage de 0 signifie que
l’impression n’est pas
accentuée.
Le réglage de 2 est le
réglage d’usine.
BACK : Annule la dernière
modification effectuée et
renvoie à la colonne de
sélection d’un élément.
Elément Fonction Paramètres
SIDE
d)
Pour sélectionner
le sens dans
lequel l’image
doit être
imprimée
S:SIDE : Imprime l’image
orientée selon un angle de
90 degrés dans le sens
contraire des aiguilles
d’une montre.
[S:STD] : Imprime l’image
dans le même sens que
celui affiché sur le
moniteur.
BACK : Annule la dernière
modification effectuée et
renvoie à la colonne de
sélection d’un élément.
SPEED
(Lorsque
« ME:HD »
est
sélectionné
dans
« MEDIA »,
la vitesse
Pour sélectionner
la rapidité
d’impression
SP:NOR : Imprime à
vitesse normale.
[SP:HI] : Imprime à grande
vitesse.
BACK : Annule la dernière
modification effectuée et
renvoie à la colonne de
sélection d’un élément.
d’impression
est réglée sur
« SP:NOR »
et cet élément
n’est pas
affiché.)
Remarque
Lorsque « SP:HI » est
sélectionné, la
consommation est
légèrement supérieure par
rapport à la consommation
à la vitesse d’impression
normale.
VIDEO Pour sélectionner
la sortie de signal
vidéo au
connecteur
VIDEO OUT sur
le panneau arrière
VI:EE : Sort le signal après
son traitement par
l’imprimante.
[VI:THR] : Sort le signal
directement, sans
traitement.
BACK : Annule la dernière
modification effectuée et
renvoie à la colonne de
sélection d’un élément.
BACK Pour quitter le
mode menu
Affichez cet élément puis
appuyez sur la molette Jog.
Le menu mode est fermé et
« READY » s’affiche sur
l’écran LCD.
a) Le format est le suivant.
Utilisation
Lorsque AS:4:3 est
sélectionné
Lorsque AS:1:1 est
sélectionné
Réglages à l’aide du menu
65
Page 66

b) Le sens d’impression est le suivant.
I
ffiché
d) Le sens d’impression des images imprimées est le
suivant.
Utilisation
Lorsque DI:NOR est
sélectionné
Lorsque DI: REV est
sélectionné
c) La plage de l’image à imprimer est la suivante.
Lorsque SC:NOR est
sélectionné
mage a
Tirages
Quand le mode S:STD est
sélectionné.
e sur le moniteur
Quand le mode S:SIDE est
sélectionné
Lorsque SC:WD1 est
sélectionné
Lorsque SC:WD2 est
sélectionné
Fonctionnement du menu de base
Cette section décrit les opérations de menu de base
communes à chaque menu, en prenant pour exemple la
rubrique « Détermination du sens d’impression ».
1
Mettez l’interrupteur ON/OFF sur ON pour mettre
l’imprimante sous tension.
Le voyant de l’écran LCD affiche une lumière
verte.
Ecran LCD
66
Réglages à l’aide du menu
Page 67

2
Vérifiez que « READY » s’affiche sur l’écran LCD,
puis appuyez sur la molette Jog.
L’imprimante passe en mode menu.
Lorsque vous effectuez la toute première opération
de menu après avoir installé l’imprimante,
l’élément supérieur du menu « AGC » s’affiche.
Si vous avez déjà effectué une opération de menu,
l’élément que vous avez défini en dernier s’affiche.
3
Affichez « DIR » en tournant la molette Jog.
5
Affichez « DI:REV » sur l’écran LCD en tournant
la molette Jog, puis appuyez sur la molette Jog.
Utilisation
4
Appuyez sur la molette Jog.
L’imprimante passe au mode dans lequel vous
pouvez sélectionner le sens d’impression.
Le réglage d’usine « DI:NOR » s’affiche sur l’écran
LCD. Le réglage actuellement sélectionné est
« DI:NOR ».
Dans cet exemple, vous allez modifier le réglage
pour le définir sur « DI:REV ».
« DI:REV » est maintenant le sens d’impression
enregistré.
Remarque
Si environ 20 secondes s’écoulent sans qu’aucune
opération de menu n’ait été effectuée après
l’affichage d’un élément ou réglage de menu,
l’écran LCD revient à l’affichage « READY » et
l’imprimante quitte le mode menu. Dans ce cas, le
réglage de « DIR » n’est pas modifié.
Annulation du réglage
1
Affichez « BACK » en tournant la molette Jog à
l’étape 5.
2
Appuyez sur la molette Jog.
L’écran LCD revient à l’affichage « DIR ».
Pour poursuivre les opérations de menu
Effectuez les réglages en répétant les étapes 3 à 5.
Pour achever les opérations de menu
1
Affichez « BACK » en tournant la molette Jog après
avoir effectué l’opération de l’étape 5.
2
Appuyez sur la molette Jog.
L’affichage revient à « READY ».
L’imprimante quitte le mode menu.
Réglages à l’aide du menu
67
Page 68

Utilisation
Fonction de verrouillage du menu
Si le message « LOCK » s’affiche et que l’alarme se
déclenche lorsque vous appuyez sur la molette
d’accélération, la molette d’accélération est désactivée
parce que la fonction d’utilisation du menu est
verrouillée. Si vous souhaitez utiliser une fonction du
menu, contactez votre revendeur.
Enregistrement des réglages de
menu
Vous pouvez stocker jusqu’à trois ensembles de réglages
au moyen du menu, que vous pouvez charger quand
vous en avez besoin. L’imprimante conserve ces
réglages même en cas de mise hors tension.
Remarque
Lorsque vous utilisez l’imprimante pour la première fois
avoir l’avoir achetée, les réglages d’usine sont enregistrés
dans les trois sélections conservées en mémoire.
Enregistrement de nouveaux réglages
chargez un autre groupe de réglages, les réglages
précédemment chargés ne sont plus appliqués.
Pour conserver des réglages précédemment
chargés
Exemple : Les réglages enregistrés sous le numéro
« SA:1 » sont chargés et doivent être modifiés. Pour
conserver les réglages originaux de « SA:1 » et
enregistrer les nouveaux réglages à l’emplacement
« SA:2 », procédez comme suit.
1
Chargez les réglages de « LO:1 » en suivant la
procédure de chargement des réglages désirés.
2
Modifiez les réglages chargés en fonction de vos
besoins.
3
Sélectionnez « SA:2 » en suivant la procédure
d’enregistrement des réglages.
4
Appuyez sur la molette Jog.
Les réglages modifiés à l’étape 2 sont enregistrés
sous « SA:2 » (numéro 2).
1
Effectuez l’ensemble des réglages désirés.
2
Affichez « SAVE » en tournant la molette Jog puis
appuyez sur celle-ci.
3
Affichez le numéro d’enregistrement désiré en
tournant la molette Jog puis appuyez sur celle-ci.
Les réglages effectués au cours de l’étape 1 sont
enregistrés dans le numéro sélectionné au cours de
l’étape 3.
Chargement des réglages désirés
Vous pouvez charger les réglages désirés et effectuer les
impressions selon les réglages chargés.
1
Vérifiez que « READY » s’affiche sur l’écran LCD,
puis appuyez sur la molette Jog.
2
Affichez « LOAD » en tournant la molette Jog puis
appuyez sur celle-ci.
3
Affichez le numéro correspondant aux réglages
désirés puis appuyez sur la molette Jog.
Les réglages correspondant au numéro sélectionné
lors de l’étape 3 sont chargés.
Impression de la liste de menu
Vous pouvez effectuer une impression des réglages de
menu actuels.
1
Appuyez sur la molette Jog.
L’élément de menu que vous avez modifié pour la
dernière fois s’affiche.
2
Affichez « MENU » en tournant la molette Jog puis
appuyez sur celle-ci.
3
Affichez « ME:OK » en tournant la molette Jog
puis appuyez sur celle-ci.
L’imprimante démarre l’impression des réglages de
menu actuels.
« MENU » s’affiche sur l’écran LCD.
4
Affichez « BACK » en tournant la molette Jog puis
appuyez sur celle-ci.
Le message « READY » s’affiche sur l’écran LCD
et l’imprimante revient au mode d’impression
normal.
Lorsque vous modifiez les réglages chargés
L’imprimante effectue les travaux d’impression en
fonction des réglages modifiés. Dans ce cas,
l’imprimante effectue les travaux en fonction de ces
réglages jusqu’à ce que vous chargiez un autre ensemble
de réglages, même si vous l’éteignez. Lorsque vous
68
Réglages à l’aide du menu
Page 69

Impression
Avant de lancer un travail d’impression
Veillez à toujours vérifier les points suivants :
• L’imprimante est-elle connectée correctement ?
(page 59)
• Le papier est-il chargé correctement ? (page 60)
• Les réglages de menus désirés ont-ils été effectués ?
(page 62)
• Source vidéo en cours d’entrée ? (page 59)
Lancement d’un travail
d’impression
Vous pouvez définir le sens d’impression, la taille de
l’image et toutes sortes de réglages pour l’impression à
l’aide du menu. Cette section décrit le fonctionnement
après les différents réglages effectués à l’aide du menu.
Message Cause et solution
EMPTY Le papier n’est pas chargé. Chargez du
papier.
DOOR Le magasin est ouvert. Fermez le
magasin.
Si l’imprimante s’arrête d’imprimer en cours
d’impression
En cas d’impression d’images presque noires en
continu, le circuit de protection de la tête thermique peut
arrêter l’imprimante pour éviter la surchauffe de la tête
thermique. Dans ce cas, le message « COOL » s’affiche
sur l’écran LCD.
Attendez que la tête refroidisse et que ce message
disparaisse.
Pour annuler une tâche d’impression en cours
Pour annuler un travail d’impression en cours, appuyez
sur la touche OPEN ou FEED.
Utilisation
1
Mettez l’interrupteur ON/OFF sur ON pour mettre
l’imprimante sous tension.
Le voyant de l’écran LCD affiche une lumière
verte, et « READY » s’affiche sur l’écran LCD.
Ecran LCD
2
Démarrez la source vidéo.
Cette opération s’effectue à l’aide des commandes
de l’appareil vidéo faisant office de source.
3
Appuyez sur la touche PRINT lorsque l’image à
imprimer apparaît sur le moniteur vidéo.
L’image affichée à l’instant où vous appuyez sur la
touche PRINT est enregistrée en mémoire et
imprimée immédiatement. Jusqu’à 10 images
capturées peuvent être enregistrées dans la
mémoire. Lorsque ce nombre est dépassé, les
anciennes images sont successivement écrasées par
les nouvelles.
Lorsque le message s’affiche sur l’écran LCD
Si un problème survient, le voyant de l’écran LCD
s’affiche de façon ombrée et le message d’erreur
indiquant le type de problème s’affiche sur l’écran LCD.
Pour alimenter l’imprimante en papier
Pour alimenter l’imprimante en papier, appuyez sur la
touche FEED. L’imprimante continue à faire avancer le
papier tant que vous maintenez la touche FEED
enfoncée. Veillez à ne pas tirer le papier de l’imprimante
manuellement.
Papier en cours de sélection
Vous pouvez vérifier le type de papier actuellement
sélectionné grâce à l’écran LCD. Le pointeur pointe vers
le papier en cours de sélection. Dans la figure suivante,
le papier en cours de sélection est le papier UPP-110S.
Indique le type UPP-110S
Indique le type UPP-110HD
Indique le type UPP-110HG
Si le tirage est flou
Une image animée d’un mouvement rapide peut être
floue à l’impression. Si cette situation se produit,
réalisez une impression en ayant sélectionné
« ME:FLD » dans l’élément « MEMRY » du menu.
Impression
69
Page 70

Impression d’images enregistrées en
mémoire
Chaque fois que vous appuyez sur la touche PRINT,
l’image est enregistrée en mémoire. Lorsque 10 images
ont été enregistrées, l’image la plus ancienne est écrasée
par l’image nouvellement saisie et ainsi de suite. Il y a
toujours 10 images en mémoire. Vous pouvez charger
l’image voulue parmi elles et l’imprimer à l’aide du
menu.
L’imprimante commence à imprimer deux images
sur une seule feuille comme suit.
Image saisie à
l’étape 2
Image saisie à
l’étape 3
Utilisation
1
Sélectionnez « PAGE » parmi les éléments du
menu.
Pour des informations détaillées sur l’utilisation du
menu, reportez-vous à « Fonctionnement du menu
de base » à la page 66.
2
Appuyez sur la molette Jog.
« PG:1 » est affiché sur l’écran LCD et l’image
imprimée en dernier est affichée sur le moniteur.
L’image affichée vieillit lorsque le nombre
augmente.
3
Affichez l’image à imprimer en tournant la molette
Jog vers le haut ou le bas.
4
Appuyez sur la molette Jog.
L’image saisie à l’étape 3 est chargée.
5
Appuyez sur la touche COPY.
L’image sélectionnée à l’étape 3 est imprimée.
Impression de deux images différentes
sur une seule feuille
Lorsque vous sélectionnez « MU:MLT » dans l’élément
« MULTI » du menu, vous pouvez saisir deux images
différentes et les imprimer sur une seule page.
Lorsque « IF:ON » est sélectionné dans « INFO »,
les données sur le contraste et la luminosité de
l’image capturée à l'étape 3 sont imprimées endessous de l’image.
Exécution de copies du dernier tirage
Appuyez sur la touche COPY. L’imprimante effectue
une copie du dernier tirage. L’image du dernier tirage est
conservée dans la mémoire de l’imprimante jusqu’à ce
que vous effectuiez un tirage d’une autre image ou que
vous mettiez l’appareil hors tension. Vous pouvez
effectuer une copie uniquement, indépendamment du
nombre d’exemplaires défini au moyen du menu.
Remarques
• Si vous appuyez sur la touche COPY juste après avoir
mis l’imprimante sous tension, le signal d’alarme
retentit car la mémoire est vide.
• La mise hors tension de l’imprimante provoque
l’effacement de l’image enregistrée en mémoire.
Pour effectuer plusieurs copies du même tirage
Appuyez autant de fois que nécessaire sur la touche
COPY (20 copies maximum, premier tirage inclus)
pendant la copie du premier tirage. Chaque fois que vous
appuyez sur la touche COPY, un signal bref retentit.
70
1
Sélectionnez « MU:MLT » dans l’élément
« MULTI » du menu.
2
Appuyez sur la touche PRINT à l’étape 3 en suivant
les opérations décrites dans la section « Lancement
d’un travail d’impression » à la page 69.
L’image affichée à l’instant où vous appuyez sur la
touche PRINT est saisie.
3
Appuyez sur la touche PRINT de nouveau lorsque
l’image à imprimer apparaît sur le moniteur vidéo.
Impression
Remarque
Le nombre de tirages imprimés en appuyant sur la
touche PRINT est également inclus dans le nombre
maximum. Par exemple, si vous appuyez sur la touche
COPY après avoir appuyé sur la touche PRINT cinq fois
et fait cinq tirages, le nombre de copies multiples du
même tirage devient 15.
Pour interrompre la copie
Appuyez sur la touche OPEN ou FEED pendant la
copie.
Pour effectuer des copies dans différents sens
et tailles
Vous pouvez imprimer l’image enregistrée en dernier
dans différents sens et tailles. Avant d’appuyer sur la
touche COPY, sélectionnez le sens et la taille
d’impression.
Page 71

Sélection du sens d’impression et
I
ffiché
idé
de la taille de l’image
Vous pouvez sélectionner le sens d’impression et la
taille de l’image à l’aide des éléments suivants du menu.
« SIDE » : Sélectionne le sens dans lequel l’image doit
être imprimée.
« SCALE » : Elargit ou réduit la taille de l’image à
imprimer.
SFT.H et SFT.V : Sélectionne la plage d’impression
verticalement et horizontalement.
Sélection du sens d’impression
Vous pouvez sélectionner le sens d’impression à l’aide
de l’élément « SIDE » du menu.
Pour imprimer dans le même sens que celui
affiché sur le moniteur vidéo
Sélectionner « S:STD » dans l’élément « SIDE » du
menu.
Pour imprimer l’image tournée de 90 degrés
dans le sens contraire des aiguilles d’une
montre
Sélectionner « S:SIDE » dans l’élément « SIDE » du
menu.
Pour régler la plage de l’image à imprimer
Vous pouvez régler la plage d’impression verticalement
et horizontalement à l’aide des éléments « SFT.V » et
« SFT.H » du menu.
Vous pouvez définir la plage tout en observant l’image
affichée sur le moniteur.
L’image affichée sur le moniteur se déplace selon la
valeur modifiée à l’aide de la molette Jog. L’image dans
le cadre est imprimée.
Utilisation
mage a
Tirages
Quand le mode « S:STD » est
sélectionné
e sur le moniteur v
Quand le mode « S:SIDE » est
sélectionné
o
Sélection de la taille de l’image
L’élément « SCALE » du menu permet d’élargir ou de
réduire la taille de l’image. Vous pouvez régler la taille
de l’image entre la moitié de la taille normale de l’image
jusqu’à deux fois sa taille par pas de 0,1.
Impression
71
Page 72

Exemple : « S:STD » sélectionné dans « SIDE »
I
Ti
et « SCL:2.0 » sélectionné dans « SCALE »
Différence de taille du tirage selon le réglage de
« SCALE »
Lorsque « S:STD » est
sélectionné dans « SIDE »
et « SCL:1.0 » est
sélectionné dans « SCALE »
Utilisation
Image d’origine
mages sur le
moniteur
Lorsque « S.H:+(*) » est
sélectionné
rages
Lorsque « S:STD » est
sélectionné dans « SIDE »
et « SCL:2.0 » est
sélectionné dans « SCALE »
La longueur
est deux
fois
supérieure
à la
longueur
lorsque
« SCL:1.0 »
est
sélectionné.
Ajustement du contraste et de la
luminosité
Vous pouvez ajuster le contraste et la luminosité de
l’imprimante au moyen des boutons CONTR et
BRIGHT situés sur le panneau avant.
Y
Lorsque « S.H:0 » est
sélectionné
Y
Lorsque « S.H:–(*) » est
sélectionné
Pour ajuster le contraste
Ajustez le contraste des impressions au moyen du
bouton CONTR.
Pour accentuer le contraste : Tournez le bouton
CONTR dans le sens des aiguilles d’une montre.
Pour atténuer le contraste : Tournez le bouton
CONTR dans le sens contraire des aiguilles d’une
montre.
Pour ajuster la luminosité
Ajustez la luminosité des impressions au moyen du
bouton BRIGHT.
Pour accentuer la luminosité : Tournez le bouton
BRIGHT dans le sens des aiguilles d’une montre.
72
Impression
Page 73

Pour atténuer la luminosité : Tournez le bouton
BRIGHT dans le sens contraire des aiguilles d’une
montre.
Remarque
Lorsque la fonction d’utilisation du menu est
verrouillée, les boutons CONTR et BRIGHT sont
également désactivés en plus de la molette Jog. Si vous
souhaitez utiliser les commandes CONTR et BRIGHT,
contactez votre revendeur.
Utilisation
Impression
73
Page 74

• Pour éviter que l’imprimante ne surchauffe, laissez
Autres
suffisamment d’espace afin de permettre à l’air de
circuler à travers les orifices de ventilation (entrée)
situés à gauche et les orifices de ventilation (sortie)
situés à l’arrière du châssis.
Précautions
Sécurité
• Vérifiez la tension secteur avant toute utilisation.
Faites uniquement fonctionner l’appareil avec l’une
des sources d’alimentation spécifiées dans les
« Spécifications ».
Autres
• Interrompez immédiatement le fonctionnement de
l’imprimante si un liquide ou un solide tombe à
l’intérieur du châssis. Débranchez l’appareil et faitesle vérifier par le personnel qualifié.
• Débranchez l’appareil de la prise murale si vous
prévoyez de ne pas l’utiliser pendant une période
prolongée. Débranchez le câble d’alimentation en le
saisissant par la fiche. Ne jamais tirer sur le câble
proprement dit.
• Ne démontez pas le châssis. Confier l’entretien de cet
appareil exclusivement à un personnel qualifié.
• Branchez la fiche du câble d’alimentation sur une
prise murale mise à la terre. L’imprimante doit être
correctement reliée à la terre.
Précaution relative au massicot
L’imprimante est dotée d’un massicot. Lorsque vous
chargez du papier ou que vous nettoyez l’imprimante,
prenez soin à ne pas toucher le massicot. Le massicot
peut causser des blessures.
Orifices de ventilation (entrée)
Orifices de ventilation (sortie)
• Si l’imprimante est soumise à des variations brusques
et importantes de température, par exemple lorsqu’elle
est transportée d’un local froid à un local chaud ou
lorsqu’elle reste dans un local avec un chauffage ayant
tendance à produire une forte humidité, de la
condensation risque de se former à l’intérieur de
l’imprimante. Cela risque d’entraîner son
dysfonctionnement, voire de provoquer une
défaillance si vous persistez à vouloir l’utiliser. Si de
l’humidité ou de la condensation se forme, mettez
l’imprimante hors tension et laissez-la reposer
pendant au moins une heure.
Transport de l’imprimante
Ne transportez et ne déplacez pas l’imprimante quand le
rouleau de papier est installé à l’intérieur. Cela risquerait
de provoquer un dysfonctionnement.
Installation
• Installez l’imprimante sur une surface plane et stable.
Si vous utilisez l’imprimante placez sur une surface
inégale, l’imprimante risque de présenter une
défaillance.
• N’installez pas l’imprimante à proximité de sources
de chaleur. Evitez les emplacements proches de
radiateurs ou de conduites d’air chaud ou soumis aux
rayons de soleil ou à de la poussière, à une humidité
excessive, à des chocs mécaniques ou à des vibrations.
• Veillez à assurer une circulation de l’air adéquate pour
éviter toute surchauffe. Ne placez pas l’imprimante
sur des surfaces telles que des tapis, etc., ou à
proximité de rideaux et de draperies.
74
Précautions
Page 75

Entretien
3
En orientant la face noire vers le bas, insérez la
feuille de nettoyage dans la rainure située à
l’intérieur du magasin.
Nettoyage du châssis
Pour nettoyer la surface de l’imprimante, utilisez un
chiffon humide ou un chiffon imbibé d’eau et d’un
détergent doux.
Pour nettoyer le boîtier de l’imprimante en évitant de
l’endommager, veillez à ne jamais utiliser d’alcool ni
diluant ni tout solvant organique ou produit abrasif.
Nettoyage de la tête thermique
Si une impression est sale ou si elle contient des bandes
blanches, nettoyez la tête thermique à l’aide de la feuille
de nettoyage fournie avec l’imprimante.
Effectuez la procédure de nettoyage de la tête à l’aide du
menu.
Remarque
L’imprimante est dotée d’un massicot. Prenez garde à ne
pas toucher la lame du massicot lorsque vous nettoyez la
tête thermique. Le massicot peut causser des blessures.
1
Mettez l’interrupteur ON/OFF sur ON pour mettre
l’imprimante sous tension.
Insérez la
feuille de
nettoyage
dans la
rainure située
au-dessus du
commutateur
à l’intérieur du
magasin.
Feuille de
nettoyage
fournie
4
Refermez le magasin et appuyez sur son capot
jusqu’à ce qu’il s’enclenche.
5
Appuyez sur la molette Jog.
L’élément de menu que vous avez modifié pour la
dernière fois s’affiche.
6
Affichez « CLEAN » en tournant la molette Jog
puis appuyez sur celle-ci.
Autres
2
Ouvrez le magasin en appuyant sur la touche
OPEN.
7
Confirmez que « CL:OK » est affiché, puis appuyez
sur la molette Jog.
L’imprimante commence à nettoyer la tête
d’impression.
« CLEAN » s’affiche sur l’écran LCD.
Lorsque la feuille de nettoyage s’arrête et que le bip
d’alerte sonne, le nettoyage est terminé.
8
Ouvrez le magasin en appuyant sur la touche OPEN
puis retirez la feuille de nettoyage.
9
Refermez le magasin et appuyez sur son capot
jusqu’à ce qu’il s’enclenche.
Remarque
Vous ne devez nettoyer la tête thermique que lorsque
cela est nécessaire. En effet, un nettoyage trop fréquent
de la tête thermique risque d’endommager cette
dernière.
Si le papier est chargé dans le magasin, retirez-le.
Entretien
75
Page 76

Nettoyage du rouleau du plateau
Si le papier ne s’éjecte pas en douceur après
l’impression, le rouleau du plateau est peut-être
encrassé.
Dans ce cas, nettoyer le rouleau du plateau avec un
chiffon doux humide ou un chiffon humide imbibé d’eau
et un détergent doux.
1
Mettez l’interrupteur ON/OFF sur ON pour mettre
l’imprimante sous tension.
2
Ouvrez le magasin en appuyant sur la touche
OPEN.
Si le papier est chargé dans le magasin, retirez-le.
Autres
3
Nettoyez le rouleau du plateau délicatement avec
un chiffon imbibé d’eau et un détergent doux.
automatiquement. Relâchez la touche FEED
lorsque la surface à nettoyer apparaît.
Veillez à ne pas vous coincer les doigts dans le
rouleau de plateau en rotation.
Remarques
• Le rouleau de plateau tourne lorsque vous
appuyez sur la touche FEED. Veillez à ne pas
vous coincer les doigts dans le rouleau de plateau
en rotation.
• Commencez à nettoyer uniquement une fois que
le rouleau de plateau s’est arrêté complètement.
Rouleau de plateau
Remarques
• Après séchage complet de la surface nettoyée du
rouleau de plateau, tournez le rouleau pour en
nettoyer une autre partie.
• Ne pas tourner le rouleau de plateau à la main.
Utiliser la touche FEED pour le tourner. Pour
nettoyer une autre partie de la surface du rouleau
de plateau, passer à l’étape suivante.
4
Appuyez sur la touche FEED et maintenez-la
enfoncée pour que le rouleau de plateau tourne
5
Répétez les étapes 3 et 4 jusqu’à ce que le rouleau
de plateau soit propre.
6
Une fois que vous avez complètement séché le
rouleau de plateau, refermez le magasin en
poussant dessus.
76
Entretien
Page 77

Spécifications
Alimentation Secteur de 100 à 240 V AC, 50/60 Hz
Courant d’entrée
1,5 A à 0,8 A
Température d’utilisation
5°C à 35°C (41°F à 95°F)
Humidité de fonctionnement
20% à 80%
Température de stockage et de transport
-20°C à 60°C (-4°F à 140°F)
Humidité de stockage et de transport
20% à 90%
Dimensions 154 × 88 × 240 mm (l/h/p)
(6 1/6 × 3 1/2 × 9 1/2 pouces)
Poids 2,6 kg (5 lb 11 oz) (imprimante
uniquement)
Tête thermique Tête thermique pour papier mince,
1 280 points
Niveaux de gris 256 niveaux de gris (8 bits)
Résolution (si « SC:WD1 » est sélectionné dans
« SCAN »)
EIA : 1 210 × 490 points
CCIR : 1 210 × 582 points
Taille de l’image (si « SC:WD1 » ou « SC:NOR » est
sélectionné dans « SCAN »)
Quand « S:STD » est sélectionné dans
« SIDE »
EIA : 94 × 73 mm
CCIR : 94 × 71 mm
Quand « S:SIDE » est sélectionné dans
« SIDE »
EIA : 124 × 96 mm
CCIR : 127 × 96 mm
Vitesse d’impression
Environ 2 sec./image (au réglage
standard) (lorsque « SP:HI » est
sélectionné dans « SPEED »)
Environ 3,3 sec./image (au réglage
standard) (lorsque « SP:NOR » est
sélectionné dans « SPEED »)
Mémoire d’images
10 images (800 k × 8 bits par image)
Connecteur d’entrée
VIDEO IN (type BNC)
Signaux vidéo composites EIA ou
CCIR
1,0 Vp-p, 75 ohms/haute impédance
(différenciation EIA/CCIR
automatique)
Connecteur de sortie
VIDEO OUT (type BNC)
Signaux vidéo composites EIA ou
CCIR
1,0 Vp-p, 75 ohm en boucle/
commutable EE
Connecteur REMOTE (miniprise stéréo)
1GND
2 PRINT SIGNAL (TTL)
L’entrée d’impulsion LOW sur
100 msec. lance l’impression.
3PRINT BUSY (TTL)
Devient HIGH pendant l’impression
Accessoires fournis
Feuille de nettoyage de la tête
thermique (1)
Etiquette des supports (1)
Mode d’emploi (1)
Liste des services de maintenance (1)
Spécifications médicales
Protection contre les décharges
électriques :
Classe I
Protection contre la pénétration néfaste
d’eau :
Ordinaire
Degré de sécurité en présence
d’anesthésiants inflammables ou
d’oxygène :
Ne convient pas à une utilisation en
présence d’anesthésiques ou
d’oxygène inflammables
Mode de fonctionnement :
Continu
La conception et les spécifications de l’imprimante sont
susceptibles d’être modifiées sans préavis.
Autres
Spécifications
77
Page 78

Symptôme Causes/solutions
Dépannage
Avant d’appeler un technicien de maintenance,
consultez le tableau ci-dessous. Si vous ne parvenez pas
à résoudre l’incident, contactez votre revendeur agréé le
plus proche.
Symptôme Causes/solutions
Des petits points
apparaissent sur les
premières
impressions.
Autres
Le travail
d’impression ne
démarre pas.
Bordures noires ou
parties manquantes sur
le pourtour du tirage
Venez-vous juste d’installer un
nouveau rouleau de papier ?
tSi vous venez d’installer un
nouveau rouleau de papier, il se
peut que la poussière de papier soit
à l’origine de ces quelques points
sur les images imprimées. Appuyez
sur la touche FEED et maintenez-la
enfoncée afin de faire avancer 15 à
20 cm (6 à 8 po.) environ de papier,
puis relâchez la touche. (page 61)
• Le papier n’avance pas.
tL’imprimante est-elle sous
tension ?
tL’imprimante est-elle connectée
correctement ? (page 59)
tRouleau de papier détaché ?
(page 60)
t« MU:MLT » sélectionné dans
l’élément « MULTI » du menu ?
(page 64)
• Signaux sonores.
tLe papier est-il chargé
correctement ? (page 61)
t
Surchauffe de la tête thermique ?
La tête thermique peut être en
surchauffe lorsque l’imprimante
imprime en continu des images
sombres. Attendre qu’elle ait
refroidi.
tLe signal vidéo de l’image est-il
transmis ? (page 59)
• Le papier avance mais l’impression
ne démarre pas.
tL’orientation du papier dans le
magasin est-elle correcte ?
(page 61)
Ce problème peut être dû à l’entrée de
signal vidéo de l’appareil.
tModifier le réglage de l’élément
« SCAN » du menu. (page 65)
Bourrages papier • Le bourrage est-il visible ?
tOuvrez le magasin en appuyant
sur la touche OPEN, retirez le
tirage ou le rouleau de papier,
puis extrayez délicatement le
papier coincé.
• Existe-t-il des traces de
condensation dans l’imprimante ?
tSi l’imprimante vient d’être
déplacé d’un endroit frais vers
une pièce chaude, il se peut que
de la condensation se soit
formée à l’intérieur de
l’imprimante. Eteignez
l’imprimante et laissez-la
reposer pendant 1 à 2 heures
(jusqu’à ce qu’elle atteigne la
température de la pièce) puis
réessayez d’imprimer.
Les impressions sont
sales.
L’alimentation en
papier ne s’effectue
pas en douceur.
L’imprimante s’arrête
pendant l’impression
d’images presque
noires et le message
« COOL » s’affiche
sur l’écran LCD.
Les lignes blanches ou
petites lettres à l’écran
ne s’impriment pas
clairement.
Des petits carrés
apparaissent sur tout
l’écran.
Le tirage est trop
sombre ou trop clair.
Le tirage semble étiré
ou élargi.
La tête thermique est-elle sale ?
tNettoyez la tête thermique à l’aide
de la feuille de nettoyage fournie à
cet effet. (page 75)
Rouleau de plateau encrassé ?
tNettoyer le rouleau du plateau.
(page 76)
En cas d’impression d’images presque
noires en continu, le circuit de
protection de la tête thermique peut
arrêter l’imprimante pour éviter la
surchauffe de la tête thermique.
tArrêtez l’impression et attendez
que la tête thermique refroidisse.
« CO:ON » est-il sélectionné dans
l’élément « COLOR » du menu pour
les signaux d’entrée noirs et blancs ?
tSélectionnez « CO:OFF » dans
« COLOR » lorsque le signal
d’entrée est un signal noir et blanc.
(page 63)
« CO:OFF » est-il sélectionné dans
l’élément « COLOR » du menu pour
les signaux d’entrée en couleur ?
Sélectionnez « CO:ON » dans
« COLOR » lorsque le signal d’entrée
est un signal couleur. (page 63)
• Le sélecteur 75 Ω est-il
correctement réglé ? (page 59)
• L’élément « MEDIA » du menu estil correctement réglé ? (page 64)
• L’élément « GAMMA » du menu
est-il correctement réglé ?
(page 63)
« AS:1:1 » est-il sélectionné dans
l’élément « ASPCT » du menu ?
tSélectionnez « AS:4:3 ». (page 63)
78
Dépannage
Page 79

Messages d’erreur
Les messages apparaissent sur l’écran LCD dans les
conditions suivantes. Suivez les instructions indiquées
en regard des messages pour résoudre le problème.
Messages Description et remède
DOOR Le panneau du magasin papier est
ouverte.
tFermez-la complètement.
EMPTY • Il n’y a pas de papier.
• Il n’y a plus de papier.
tMettez en place du papier.
(page 60)
COOL Le circuit de protection qui empêche la
tête d’impression thermique de
surchauffer a été activé.
tAttendez que le message
disparaisse. L’impression reprend
automatiquement.
LOCK La fonction d’utilisation du menu est
verrouillée. La molette Jog ainsi que
les boutons CONTR et BRIGHT sont
désactivés.
tSi vous souhaitez effectuer des
opérations de menu ou utiliser ces
commandes, contactez votre
revendeur agréé le plus proche.
Autres
Messages d’erreur
79
Page 80

Prise en main 57
Index
S
C
Connexions 59
D
Dépannage 78
E
Emplacement et fonction des
composants et commandes
panneau arrière 58
panneau avant 57
Entretien
nettoyage de la tête thermique 75
nettoyage du châssis 75
nettoyage du rouleau du plateau
Index
76
G
Généralités 57
Spécifications 77
I
Impression
ajustement de la luminosité 72
ajustement du contraste 72
annulation 69
lancement d'un travail
d'impression 69
M
Menu
chargement des réglages de menu
68
fonctionnement de base 66
impression de la liste de menu 68
liste 63
menu déroulant 62
stockage des réglages de menu 68
Messages d’erreur 79
P
Papier
chargement 60
papiers supportés 59
remarques sur le stockage et la
manipulation 59
Précautions
installation 74
massicot 74
sécurité 74
transport de l'imprimante 74
80
Index
Page 81

Index
Index
81
Page 82

VORSICHT
Um die Gefahr von Bränden oder elektrischen
Schlägen zu verringern, darf dieses Gerät nicht
Regen oder Feuchtigkeit ausgesetzt werden.
Um einen elektrischen Schlag zu vermeiden,
darf das Gehäuse nicht geöffnet werden.
Überlassen Sie Wartungsarbeiten stets nur
qualifiziertem Fachpersonal.
DIESES GERÄT MUSS GEERDET WERDEN.
Symbol
Dieses Symbol kennzeichnet den Anschluss
für Potenzialausgleichsleiter.
Sinn des Potenzialausgleichsleiters ist das
Herstellen einer potenzialgleichen
Umgebung für den Patienten.
Dieses Symbol weist den Benutzer auf das
Vorhandensein wichtiger Informationen zur
Bedienung und Wartung (Service) in den bei
diesem Gerät mitgelieferten Dokumenten
hin.
Wichtige Sicherheitshinweise für den
Gebrauch in medizinischen Umgebungen
1. Alle Geräte, die an diese Einheit angeschlossen sind,
müssen den Standards IEC60601-1, IEC60950-1
und IEC60065 oder anderen IEC-/ISO-Standards,
die für die Geräte gelten, entsprechen.
2. Wenn diese Einheit zusammen mit anderen Geräten
in der Patientenumgebung* verwendet wird, müssen
die Geräte entweder mit einem
Isolationstransformator betrieben oder über einen
zusätzlichen Schutzleitungsanschluss mit der
Gehäusemasse verbunden werden, es sei denn, sie
entsprechen dem Standard IEC60601-1.
3. Der Ableitstrom kann sich beim Zusammenschluss
mehrerer Geräte summieren und höhere Werte
annehmen.
4. Dieses Gerät erzeugt und verwendet
Hochfrequenzenergie und kann diese auch
abstrahlen. Wenn das Gerät nicht entsprechend den
Anweisungen in dieser Anleitung installiert und
verwendet wird, kann es Interferenzen mit anderen
Geräten hervorrufen. Dies können Sie leicht
feststellen, indem Sie das Netzkabel vom Gerät
lösen. Versuchen Sie bei Interferenzen Folgendes:
Stellen Sie das Gerät weiter entfernt vom gestörten
Gerät auf. Schließen Sie dieses Gerät und das andere
Gerät an verschiedene Stromkreise an. Wenden Sie
sich für weitere Informationen an Ihren Händler.
(Entspricht Standard EN60601-1-2 und CISPR11,
Klasse B, Gruppe 1)
Vors ich t
Beachten Sie bei der Entsorgung des Geräts bzw. des
Zubehörs die gesetzlichen Vorschriften des jeweiligen
Landes oder der Region und die Vorschriften im
betreffenden Krankenhaus.
Warnhinweis zum Netzanschluss
Verwenden Sie das für die Stromversorgung in Ihrem
Land geeignete Netzkabel.
1. Verwenden Sie ein geprüftes Netzkabel (3-adriges
Stromkabel)/einen geprüften Geräteanschluss/einen
geprüften Stecker mit Schutzkontakten entsprechend
den Sicherheitsvorschriften, die im betreffenden
Land gelten.
2. Verwenden Sie ein Netzkabel (3-adriges
Stromkabel)/einen Geräteanschluss/einen Stecker
mit den geeigneten Anschlusswerten (Volt, Ampere).
Wenn Sie Fragen zur Verwendung von Netzkabel/
Geräteanschluss/Stecker haben, wenden Sie sich bitte an
qualifiziertes Kundendienstpersonal.
* Patientenumgebung
82
R1.5m
Page 83

Inhalt
Vorbereitungen
Kurzbeschreibung ...............................................84
Positionen und Funktionen der Teile und
Bedienelemente ....................................................84
Frontplatte ........................................................84
Rückwand ......................................................... 85
Anschlüsse ............................................................86
Verbinden mit dem USB-Anschluss ................. 86
Papier ....................................................................86
Geeignetes Papier .............................................86
Einlegen von Papier in das Gerät ....................... 87
Einlegen von Papier ..........................................87
Bedienung
Einstellen und Anpassen des Geräts mit dem
Menü .....................................................................89
Menüaufbau ......................................................89
Menüliste .......................................................... 90
Grundfunktionen des Menüs ............................94
Speichern von Menüeinstellungen ................... 95
Ausdrucken der Menüliste ...............................96
Druckvorgang ...................................................... 97
Starten eines Druckvorgangs ............................ 97
Druckrichtung und Bildgröße auswählen ......... 99
Anpassen von Kontrast und Helligkeit ........... 100
DE
Sonstiges
Sicherheitsmaßnahmen .....................................101
Sicherheit ........................................................ 101
Transport ........................................................101
Aufstellung .....................................................101
Pflege ...................................................................102
Reinigen des Gehäuses ...................................102
Reinigen des Thermodruckkopfes .................. 102
Reinigen der Führungswalze .......................... 103
Technische Daten ...............................................104
Fehlersuche ........................................................105
Fehlermeldungen ...............................................106
Index ...................................................................107
83
Page 84

Vorbereitungen
Positionen und
Funktionen der Teile und
Vorbereitungen
Kurzbeschreibung
Ruhiges und schnelles Drucken mit hoher
Qualität
• Hochauflösende Bilder mit 12,8 Punkten/mm dank
eines schmalen Thermodruckkopfes mit eingebauter
Hochgeschwindigkeitsansteuerung-IC.
• Druckgeschwindigkeit für ein hochauflösendes Bild
(Einzelausdruck im Format A7): 2 Sekunden beim
Drucken mit hoher Geschwindigkeit (wenn für die
Menüoption „SPEED“ die Einstellung „SP:HI“
gesetzt ist).
• Einfarbiger Ausdruck mit 256 Graustufen.
• Eingebauter temperaturkorregierender Schaltkreis
verhindert Temperaturänderungen, die einen
unscharfen Ausdruck zur Folge haben könnten.
Leichte Einstellung des Druckers über ein
Menü
Sie können über das Menü Ihren Anforderungen
entsprechende Einstellungen vornehmen. Sie können bis
zu drei Einstellungssätze speichern.
Einfaches Einlegen von Papier
Ein freier Zugang zum Deckel gewährleistet ein
einfaches Einlegen von Papier.
Bedienelemente
Schlagen Sie für detaillierte Informationen auf den in
Klammern () angegebenen Seiten nach.
Frontplatte
A !Netzschalter ON/OFF (87, 94, 97, 102)
Schalten Sie den Drucker mit dem Netzschalter auf
ON ein. Die LCD-Anzeige leuchtet grün auf.
B Druckerdisplay (LCD: Flüssigkristallanzeige)
(89, 97)
Bei normalem Betrieb ist die Beleuchtung grün.
Außerdem wird bei normalem Betrieb das zurzeit
gewählte Papier durch den Pfeil auf der LCDAnzeige angezeigt.
Detaillierte Informationen zum Papier finden Sie in
„Papier“ auf Seite 86 und „Zurzeit gewähltes
Papier“ auf Seite 97.
Wenn ein Fehler auftritt, wird die entsprechende
Warnmeldung angezeigt.
Bei Menüvorgängen werden die Menüoptionen und
Einstellungen angezeigt.
C Cursor-Steuerung (94, 102)
Hiermit werden Menüvorgänge ausgeführt.
D Regler CONTR (Kontrast) (100)
Dient zum Einstellen des Kontrasts der Ausdrucke.
E Regler BRIGHT (Helligkeit) (100)
Dient zum Einstellen der Helligkeit der Ausdrucke.
84
Kurzbeschreibung / Positionen und Funktionen der Teile und Bedienelemente
Page 85

F Taste FEED (88, 97)
Halten Sie die Taste gedrückt, um Papier
einzuziehen. Drücken Sie diese Taste, um einen
Druckvorgang zu stoppen.
G Taste COPY (98)
Druck ein weiteres Exemplar des vorherigen
Ausdrucks.
Bei jeder Betätigung dieser Taste können Sie nur
eine Kopie anfertigen, unabhängig von der
Einstellung der Druckmenge über das Menü.
B 75 Ω Wahlschalter
ON: Bringen Sie den Schalter in diese Stellung,
wenn der Anschluss VIDEO OUT nicht belegt ist.
OFF: Bringen Sie den Schalter in diese Stellung,
wenn ein Videomonitor oder ein anderes
Videogerät am Anschluss VIDEO OUT
angeschlossen ist.
C t Anschluss VIDEO IN (Eingang) (BNC-Typ)
Schließen Sie hier den Video-Ausgang des
Videogeräts an.
Vorbereitungen
H Taste PRINT
Druckt das auf dem Videomonitor momentan
angezeigte Bild aus. Das Bild, das beim Betätigen
der Taste PRINT angezeigt wird, wird im Speicher
abgelegt.
I Taste OPEN (88, 97)
Zum Öffnen des Deckels. Drücken Sie diese Taste,
um einen Druckvorgang zu stoppen.
J Schneidevorrichtung
Schneidet das Druckpapier nach dem Drucken
eines Bildes ab.
Rückwand
D T Anschluss VIDEO OUT (Ausgang) (BNC-
Typ)
Schließen Sie hier den Video-Eingang des
Videomonitors an. Das Ausgangssignal hängt von
der Einstellung des Menüoption „VIDEO“ ab.
E - AC IN-Buchse
Verwenden Sie das für die Stromversorgung in
Ihrem Land geeignete Netzkabel (nicht im
Lieferumfang enthalten).
Lesen Sie „Warnhinweis zum Netzanschluss“ auf
Seite 82.
F Anschluss für Potenzialausgleichsleiter
Zum Anschluss des Masseleiters, der die
verschiedenen Teile eines Systems mit einer
gemeinsamen Erde verbindet. Siehe „Wichtige
Sicherheitshinweise für den Gebrauch in
medizinischen Umgebungen“ auf Seite 82.
A Anschluss REMOTE (86)
Zum Anschluss einer Fernbedienung RM-91 oder
eines Fußschalters für die Fernsteuerung der
Druckfunktion.
Positionen und Funktionen der Teile und Bedienelemente
85
Page 86

Anschlüsse
Papier
Vorbereitungen
Hinweise
• Schalten Sie jedes Gerät aus, bevor Sie dort Kabel
anschließen.
• Schließen Sie das Netzkabel zuletzt an.
Verbinden mit dem USB-Anschluss
Videogerät
Farb-/Schwarz-
an Videoausgangsanschluss
Verbindungskabel
(BNC y BNC)
(nicht mitgeliefert)
Weiß-Videomonitor
an Videoeingangsanschluss
Verbindungskabel
(nicht mitgeliefert)
an VIDEO OUTan VIDEO IN
Verwenden Sie ausschließlich Papier der Serie UPP110S/110HD/110HG von Sony, das für dieses Gerät
bestimmt ist. Bei anderem Papier kann sich die
Druckqualtität verschlechtern, und es kann zu
Fehlfunktionen des Geräts kommen.
Das für den UP-880/890MD bestimmte Druckpapier
UPP-110HA kann nicht verwendet werden.
Geeignetes Papier
Das Druckpapier hat die folgenden Eigenschaften:
Druckeigenschaften Papiertyp
TYPE I (Normal) UPP-110S
TYPE II (Hohe Dichte) UPP-110HD
TYPE V (Hochglanz) UPP-110HG
Hinweise zum Lagern und Verarbeiten
von Papier
Lagern von unbenutztem Papier
• Lagern Sie unbenutztes Papier unter 30 °C und
trocken und setzen Sie es nicht direktem Sonnenlicht
aus.
• Lagern Sie unbenutztes Papier nicht in der Nähe von
flüchtigen Flüssigkeiten und achten Sie darauf, dass
weder flüchtiges organisches Lösungsmittel noch
Zellophanfolie oder andere Vinylchloridverbindungen
auf das Papier gelangen.
an REMOTE
75 Ω
Wahlschalter
Fernbedienung RM-91
(nicht mitgeliefert)
a) Stellen Sie den 75 Ω Wahlschalter folgendermaßen ein.
ON: Bringen Sie den Schalter in diese Stellung, wenn der
Anschluss VIDEO OUT nicht belegt ist.
OFF: Bringen Sie den Schalter in diese Stellung, wenn
ein Videomonitor oder ein anderes Videogerät am
Anschluss VIDEO OUT angeschlossen ist.
an -AC IN
Netzkabel
a)
(nicht mitgeliefert)
an Steckdose
Einlegen von Papier
• Beim Einlegen des Papiers den zu bedruckenden
Bereich nicht mit den Fingern anfassen.
Verschmutzungen auf dem Papier kann zu unscharfen
Bildern führen.
• Ziehen Sie vor dem Druckvorgang das Papier um
15~20 cm heraus, nachdem Sie den Klebestreifen von
der vordersten Kante entfernt haben. Rückstände des
Etikettenklebers auf dem Papier können die
Ausgabequalität beeinträchtigen.
Lagern von gedruckten Bildern
• Um ein Ausbleichen oder eine Farbänderung der
Ausdrucke zu vermeiden, sollten sie an einem kühlen,
trockenen Ort aufbewahrt werden, an dem die
Temperatur nicht höher als 30 °C ist.
• Lagern Sie Ausdrucke in einem Polypropylenbeutel
oder zwischen Blättern, die keinen Kunststoff
enthalten.
• Lagern Sie Ausdrucke nicht an einem Ort, an dem sie
direktem Sonnenlicht oder einer hoher
Luftfeuchtigkeit ausgesetzt sind.
86
Anschlüsse / Papier
Page 87

• Lagern Sie Ausdrucke nicht in der Nähe von
flüchtigen Flüssigkeiten und achten Sie darauf, dass
weder flüchtiges organisches Lösungsmittel noch
Zellophanfolie oder andere Vinylchloridverbindungen
auf die Ausdrucke gelangen.
• Legen Sie Ausdrucke auf oder unter ein
Lichtpauspapier, um ein Ausbleichen zu vermeiden.
• Wenn Sie Ausdrucke auf anderem Papier befestigen
wollen, verwenden Sie doppelseitiges Klebeband oder
einen Klebstoff auf Wasserbasis.
• Verbrennen Sie Restpapier nicht.
Einlegen von Papier in
das Gerät
Vorbereitungen
Hinweise
• Schlagen Sie vor dem Einlegen von Papier im Kapitel
„Hinweise zum Lagern und Verarbeiten von Papier“
(Seite 86) nach.
• Gehen Sie beim Einlegen von Papier stets vorsichtig
vor, um die Qualität der Ausdrucke nicht zu mindern.
Vermeiden Sie, dass das Papier gebogen oder
zerknittert wird. Die Oberfläche sollte nicht mit den
Fingern berührt werden. Verschmutzungen auf dem
Papier können die Ausgabequalität beeinträchtigen.
• Verwenden Sie ausschließlich Papier der Serie UPP110S/110HD/110HG. (Seite 86)
• Vergewissern Sie sich, dass in der Menüoption
„MEDIA“ das gewünschte Papier eingestellt ist. Über
die LCD-Anzeige können Sie das aktuell gewählte
Druckmaterial überprüfen. (Seite 91)
Einlegen von Papier
Vors ic ht
Das Gerät ist mit einer Schneidevorrichtung
ausgestattet. Achten Sie beim Einlegen des Papiers
darauf, nicht die Schneidevorrichtung zu berühren. Ein
Berühren der Schneidevorrichtung könnte eine
Verletzung verursachen.
1
Schalten Sie das Gerät mit dem Netzschalter ON/
OFF ein.
Wenn noch kein Papier eingelegt wurde, leuchtet
die LCD-Anzeige braun und die Meldung
„EMPTY“ wird angezeigt.
Einlegen von Papier in das Gerät
87
Page 88

Vorbereitungen
2
Öffnen Sie den Papierfachdeckel mit der Taste
OPEN.
3
Entfernen Sie das Etikett von der Vorderkante des
Papiers und ziehen Sie das Papier um 15~20 cm
heraus. Legen Sie dann die Papierrolle in das
Papierfach ein.
Hinweis
Gehen Sie stets vorsichtig mit dem Papier um,
wenn Sie es aus der Packung entnehmen und in das
Gerät einlegen, damit das Papier nicht in Kontakt
mit Staub, Schmutz etc. kommt. Andernfalls kann
es für das Drucken nicht mehr verwendet werden.
Stellen Sie sicher, dass das
Papier gerade eingelegt ist.
4
Drücken Sie den Papierfachdeckel in die
Verriegelung, um das Fach zu schließen.
Entfernen Sie das
Etikett und ziehen Sie
das Papier um 15 bis
20 cm heraus.
Legen Sie das Papier mit der zu bedruckenden
Seite (Thermoseite) nach oben ein. Das
Drucken ist nicht möglich, wenn das Papier
falsch eingelegt wird.
Hinweise
• Stellen Sie sicher, dass das Papier gerade eingelegt ist.
Es könnte ein Papierstau auftreten, wenn das Papier
schräg eingelegt ist.
• Haben Sie bei Schritt 3 nicht genügend Papier
herausgezogen, drücken Sie, ohne am Papier zu
ziehen, auf die Taste FEED auf dem Bedienfeld.
88
Einlegen von Papier in das Gerät
Page 89

Bedienung
Einstellen und
Anpassen des Geräts
Einstellungen und Anpassungen bleiben auch nach dem
Ausschalten des Geräts erhalten.
Sie können das Gerät seinem beabsichtigten Zweck, den
angeschlossenen Geräten oder Ihren individuellen
Wünschen entsprechend konfigurieren.
Sie können bis zu drei Einstellungssätze speichern.
mit dem Menü
Sie können das Gerät Ihren Anforderungen
entsprechend einstellen und anpassen. Diese
Menüaufbau
Mit dem Drehen der Cursor-Steuerung ändert sich die
LCD-Anzeige entsprechend der folgenden
Bedienung
Menüaufbauübersicht und Sie können zu jeder
Menüoption die gewünschte Einstellung vornehmen.
Bedeutung von * in den Menüoptionen „SFT:H“ und „SFT:V“
* ist der numerische Wert, der durch Drehen der Cursor-Steurung angezeigt wird. Dieser numerische Wert verändert sich in
Abhängigkeit von den Einstellungen von „SCALE“, „SCAN“ und „SIDE“ sowie des Signalsystems des Bildes, das erfasst werden
soll.
Einstellen und Anpassen des Geräts mit dem Menü
89
Page 90

Bedienung
Menüliste
In diesem Abschnitt werden die Menüs beschrieben, die
beim Drehen der Cursor-Steuerung angezeigt werden.
Die mit markierte Einstellung ist die
werkseitige Einstellung.
Option Funktion Einstellungen
AGC Einstellung des
Eingangssignals
auf den optimalen
Pegel zum
Drucken
ASPCT
BEEP Auswahl der
CLEAN Starten der
a)
Auswahl des
Seitenverhältnisses
akustischen
Betriebs- und
Fehlersignale
Druckkopfreinigung
AG:ON: Stellt das
Eingangssignal auf den
optimalen Pegel zum
Drucken ein, wenn der
Ausdruck zu dunkel oder
zu hell ist.
[AG:OFF]: Wählen Sie
normalerweise diese
Einstellung.
BACK: Die
Optionsauswahl wird
wieder angezeigt, ohne
dass die
Einstellungsänderung
gespeichert wird.
AS:1:1: Druckt ein
Videosignal im
Seitenverhältnis 1:1.
[AS: 4:3]: Wählen Sie
normalerweise diese
Einstellung.
BACK: Die
Optionsauswahl wird
wieder angezeigt, ohne
dass die
Einstellungsänderung
gespeichert wird.
BE: OFF: Das akustische
Betriebssignal ist
deaktiviert.
[BE: ON]: Die akustischen
Betriebs- und
Fehlersignale sind
aktiviert.
BACK: Die
Optionsauswahl wird
wieder angezeigt, ohne
dass die
Einstellungsänderung
gespeichert wird.
[CL: OK]: Startet die
Druckkopfreinigung.
Achten Sie darauf, dass
mitgelieferte
Reinigungsblatt zu
verwenden.
BACK: Die
Druckkopfreinigung wird
abgebrochen und die
Optionsauswahl wird
wieder angezeigt.
Option Funktion Einstellungen
COLOR Auswahl des zu
druckenden
Eingangssignals
b)
DIR
FEED Auswahl der nach
GAMMA
(Wenn in
„MEDIA“ die
Option
„ME:S“
ausgewählt
ist, wird für
GAMMA
TONE 1
vorgegeben.)
Auswahl, ob der
Druckvorgang am
oberen oder
unteren
Bildschirmrand
beginnt
dem Druck zu
verwendenden
Papiereinzugsmethode
Auswahl der
Graustufen für den
Ausdruck
CO:ON: Druckt das
Farbsignal.
[CO:OFF]: Druckt das
Schwarz-Weiß-Signal.
BACK: Die
Optionsauswahl wird
wieder angezeigt, ohne
dass die
Einstellungsänderung
gespeichert wird.
DI: REV: Der Druck
erfolgt in umgekehrter
Richtung (vom oberen
Bildschirmrand).
[DI: NOR]: Der Druck
erfolgt in normaler
Richtung (vom unteren
Bildschirmrand).
BACK: Die
Optionsauswahl wird
wieder angezeigt, ohne
dass die
Einstellungsänderung
gespeichert wird.
FE: OFF: Um Papier zu
sparen, wird zwischen
Drucken weniger Papier
eingezogen. Es können
mehrere Bilder auf einem
Blatt gedruckt werden,
aber da sich zwischen den
gedruckten Bildern nur ein
schmaler Zwischenraum
befindet, muss die Taste
FEED gedrückt werden,
bevor das Papier
abgeschnitten wird.
[FE: ON]: Nach jedem
Druck wird zusätzliches
Papier eingezogen.
BACK: Die
Optionsauswahl wird
wieder angezeigt, ohne
dass die
Einstellungsänderung
gespeichert wird.
GA:4: TONE 4 Weicheste
Abstufung
GA:3: TONE 3 Harte
Abstufung
[GA:2]: TONE 2 Standard
GA:1: TONE 1 Weiche
Abstufung
BACK: Die
Optionsauswahl wird
wieder angezeigt, ohne
dass die
Einstellungsänderung
gespeichert wird.
90
Einstellen und Anpassen des Geräts mit dem Menü
Page 91

Option Funktion Einstellungen
IMAGE Auswahl des
positiven oder
negativen
Ausdrucks
INFO Auswahl, ob die
Druckbedingungen
(wie etwa
Angaben zu
Kontrast,
Helligkeit,
Gammas and
Schärfe) unter dem
Bild ausgedruckt
werden
INTRT Festlegen des
Verfahrens für die
Druckunterbrechung
LOAD Laden der
gespeicherten
Einstellungen
IM:NEG: Negativer
Ausdruck.
[IM:POS]: Normaler
Ausdruck.
BACK: Die
Optionsauswahl wird
wieder angezeigt, ohne
dass die
Einstellungsänderung
gespeichert wird.
IF:ON: Die Angaben
werden ausgedruckt.
[IF:OFF]: Die Angaben
werden nicht ausgedruckt.
BACK: Die
Optionsauswahl wird
wieder angezeigt, ohne
dass die
Einstellungsänderung
gespeichert wird.
IN:ON: Bricht den Druck
ab, wenn Sie die Taste
PRINT während eines
Druckvorgangs betätigen,
und druckt ein neues Bild
aus, das in dem Moment
erfasst wurde, an dem Sie
die Taste PRINT betätigt
haben.
[IN:OFF]: Der Druck wird
nicht abgebrochen, auch
wenn die Taste PRINT
betätigt wird. Nachdem
der aktuelle Druckvorgang
abgeschlossen ist, druckt
das Gerät ein neues Bild
aus, das in dem Moment
erfasst wurde, an dem Sie
die Taste PRINT betätigt
haben.
BACK: Die
Optionsauswahl wird
wieder angezeigt, ohne
dass die
Einstellungsänderung
gespeichert wird.
LO:3: Lädt den mit der
Menüoption „SAVE“
gespeicherten
Einstellungssatz „SA:3“.
LO:2: Lädt den mit der
Menüoption „SAVE“
gespeicherten
Einstellungssatz „SA:2“.
[LO:1]: Lädt den mit der
Menüoption „SAVE“
gespeicherten
Einstellungssatz „SA:1“.
BACK: Die
Optionsauswahl wird
wieder angezeigt, ohne
dass die
Einstellungsänderung
gespeichert wird.
Option Funktion Einstellungen
MEDIA Auswahl des
Papiertyps
MEMRY Auswahl des
Speichermodus
MENU Ausdrucken der
MULTI Festlegen der
PAG E
(Diese Option
wird nicht
angezeigt,
wenn in
„MULTI“ die
Einstellung
„MU:MLT“
ausgewählt
wurde.
momentan ausgewählten Menüeinstellungen
Anzahl der Bilder,
die auf einem Blatt
ausgedruckt
werden sollen
Bei jedem
Betätigen der Taste
PRINT wird das
Bild im Speicher
abgelegt. Es
können maximal
zehn Bilder
abgespeichert
werden.
Sie können aus den
im Speicher
abgelegten 10
Bildern das
gewünschte Bild
auswählen und
ausdrucken.
ME:S: Verwendet UPP110S.
ME:HD: Verwendet UPP110HD.
[ME: HG]: Verwendet
UPP-110HG.
BACK: Die
Optionsauswahl wird
wieder angezeigt, ohne
dass die
Einstellungsänderung
gespeichert wird.
ME:FLD: Beim Drucken
von Bildern, die schnelle
Bewegungen erfassen
(z.B. ein Ball in
Wurfbewegung) kann der
Ausdruck blau erscheinen.
In diesem Fall diese
Einstellung auswählen.
[ME:FRM]: Wählen Sie
normalerweise diese
Einstellung.
BACK: Die
Optionsauswahl wird
wieder angezeigt, ohne
dass die
Einstellungsänderung
gespeichert wird.
[ME:OK]: Druckt die
momentan ausgewählte
Menüliste.
BACK: Der Ausdruck
wird abgebrochen und die
Optionsauswahl wird
wieder angezeigt.
MU:MLT: Druckt zwei
Bilder auf einem
Ausdruckblatt aus (zwei
verkleinerte Bilder).
[MU:SGL]: Druckt ein
Bild aus. (Bild in voller
Größe).
BACK: Die
Optionsauswahl wird
wieder angezeigt, ohne
dass die
Einstellungsänderung
gespeichert wird.
[PG:1] bis PG:10: Nach
Auswahl aus den Bildern 1
bis 10 wird durch Drücken
der Taste COPY das ONE
gewünschte Bild
ausgedruckt.
BACK: Die
Optionsauswahl wird
wieder angezeigt, ohne
dass die
Einstellungsänderung
gespeichert wird.
Bedienung
Einstellen und Anpassen des Geräts mit dem Menü
91
Page 92

Bedienung
Option Funktion Einstellungen
QTY Festlegen der
Druckmenge
[QT:1] bis QT:9: Druckt
ein und dasselbe Bild aus.
Sie können die Anzahl der
Ausdrucke ein und
desselben Bildes zwischen
1 und 9 festlegen.
BACK: Die
Optionsauswahl wird
wieder angezeigt, ohne
dass die
Einstellungsänderung
gespeichert wird.
SAVE Speichert bis zu
drei
Einstellungssätze
SA:3: Speichert die
Menüeinstellungen unter
3.
SA:2: Speichert die
Menüeinstellungen unter
2.
[SA:1]: Speichert die
Menüeinstellungen unter
1.
BACK: Die
Optionsauswahl wird
wieder angezeigt, ohne
dass die
Einstellungsänderung
gespeichert wird.
SCALE Vergrößern oder
Verkleinern des zu
druckenden Bildes
Der Maßstab kann
zwischen SCL:2,0
(zweifach) und SCL:0,5
(halbiert) in Schritten von
0,5 eingestellt werden.
[SCL:1,0] ist die
Werkseinstellung.
BACK: Die
Optionsauswahl wird
wieder angezeigt, ohne
dass die
Einstellungsänderung
gespeichert wird.
c)
SCAN
Einstellung des
Druckbereichs des
Bildes
Der Druckbereich wird
aufsteigend in der
Reihenfolge SC:NOR,
[SC:WD1] und SC:WD2
vergrößert.
BACK: Die
Optionsauswahl wird
wieder angezeigt, ohne
dass die
Einstellungsänderung
gespeichert wird.
Option Funktion Einstellungen
SFT.H Einstellung der
horizontalen
Position des zu
druckenden Bildes
[S.H:0]: Stellt die
horizontale Position ein.
Der numerische Wert, der
durch Drehen der
Cursorsteuerung angezeigt
wird, verändert sich in
Abhängigkeit von den
Einstellungen von
„SCALE“, „SCAN“ und
„SIDE“ sowie des
Signalsystems des Bildes,
das erfasst werden soll.
BACK: Die
Optionsauswahl wird
wieder angezeigt, ohne
dass die
Einstellungsänderung
gespeichert wird.
SFT.V Einstellung der
vertikalen Position
des zu druckenden
Bildes
[S.V:0]: Stellt die vertikale
Position ein. Der
numerische Wert, der
durch Drehen der
Cursorsteuerung angezeigt
wird, verändert sich in
Abhängigkeit von den
Einstellungen von
„SCALE“, „SCAN“ und
„SIDE“ sowie des
Signalsystems des Bildes,
das erfasst werden soll.
BACK: Die
Optionsauswahl wird
wieder angezeigt, ohne
dass die
Einstellungsänderung
gespeichert wird.
SHARP Anpassen der
Ausdruckschärfe
Die Schärfe kann in 15
Schritten auf einen Wert
zwischen 0 und 14
eingestellt werden.
Bei 0 wird der Umriss des
Ausdrucks nicht betont.
2 ist die werkseitige
Einstellung.
BACK: Die
Optionsauswahl wird
wieder angezeigt, ohne
dass die
Einstellungsänderung
gespeichert wird.
d)
SIDE
Auswahl der
Richtung, in der
das Bild gedruckt
wird
S:SIDE: Das Bild wird
beim Druck um 90 Grad
gegen den Uhrzeigersinn
gedreht.
[S:STD]: Das Bild wird in
derselben Richtung
ausgedruckt, in der es auf
dem Bildschirm angezeigt
wird.
BACK: Die
Optionsauswahl wird
wieder angezeigt, ohne
dass die
Einstellungsänderung
gespeichert wird.
92
Einstellen und Anpassen des Geräts mit dem Menü
Page 93

Option Funktion Einstellungen
SPEED
(Wenn unter
„MEDIA“ die
Einstellung
„ME:HD“
gewählt
wurde, ist die
Druckgeschwindigkeit
fest auf
„SP:NOR“
eingestellt
und diese
Option wird
nicht
angezeigt.)
VIDEO Zur Auswahl des
BACK Zum Beenden des
Auswahl der
Druckgeschwindigkeit
Videosignalausgangs über den
Anschluss VIDEO
OUT an der
Rückseite
Menümodus
SP:NOR: Druckt mit
normaler
Geschwindigkeit.
[SP:HI]: Druckt mit hoher
Geschwindigkeit.
BACK: Die
Optionsauswahl wird
wieder angezeigt, ohne
dass die
Einstellungsänderung
gespeichert wird.
Hinweis
Wenn „SP:HI“ gewählt
wurde, steigt der
Stromverbrauch im
Vergleich zum Druck mit
normaler Geschwindigkeit
etwas an.
VI:EE: Gibt das Signal
aus, nachdem es durch den
Drucker verarbeitet
worden ist.
[VI:THR]: Gibt das Signal
direkt ohne Verarbeitung
aus.
BACK: Die
Optionsauswahl wird
wieder angezeigt, ohne
dass die
Einstellungsänderung
gespeichert wird.
Zeigen Sie diese Option an
und drücken Sie auf die
Cursor-Steuerung. Das
Gerät verlässt den
Menümodus und auf der
LCD-Anzeige wird
„READY“ angezeigt.
b) Die Druckrichtung ist wie folgt.
Bei Auswahl von DI:NOR Bei Auswahl von DI: REV
c) Der Druckbereich des zu druckenden Bildes ist wie
folgt.
Bei Auswahl von SC:NOR
Bei Auswahl von SC:WD1
Bei Auswahl von SC:WD2
Bedienung
a) Das Seitenverhältnis ist wie folgt.
Bei Auswahl von AS:4:3
Bei Auswahl von AS:1:1
Einstellen und Anpassen des Geräts mit dem Menü
93
Page 94

Bedienung
d) Die Druckrichtung der Druckbilder ist wie folgt.
Auf dem Bildschirm angezeigtes Bild
Ausdrucke
2
Bestätigen Sie, dass „READY“ auf der LCDAnzeige angezeigt wird und drücken Sie dann auf
die Cursor-Steuerung.
Bei Auswahl von S:STD Bei Auswahl von S:SIDE
Grundfunktionen des Menüs
In diesem Abschnitt werden die allen Menüs
gemeinsamen Grundfunktionen beschrieben, wobei
„Einstellen der Druckrichtung“ als Beispiel verwendet
wird.
1
Stellen Sie den Netzschalter ON/OFF auf ON, um
das Gerät einzuschalten.
Die LCD-Anzeige leuchtet grün auf.
Das Gerät wechselt in den Menümodus.
Wenn Sie zum ersten Mal einen Menüvorgang nach
dem Kauf des Geräts ausführen, wird die erste
Option im Menü „AGC“ angezeigt.
Wenn Sie bereits einen Menüvorgang ausgeführt
haben, wird die zuletzt eingestellte Option
angezeigt.
3
Drehen Sie die Cursor-Steuerung aufwärts oder
abwärts, um „DIR“ anzuzeigen.
4
Drücken Sie auf die Cursor-Steuerung.
LCD
94
Einstellen und Anpassen des Geräts mit dem Menü
Das Gerät wechselt in den Modus, in dem Sie die
Druckrichtung auswählen können.
„DI:NOR“ (die werkseitige Einstellung) wird auf
der LCD-Anzeige angezeigt, d. h. die aktuell
gewählte Einstellung ist „DI:NOR“ .
In diesem Menüvorgang ändern Sie die Einstellung
in „DI:REV“ .
Page 95

5
Drehen Sie die Cursor-Steuerung aufwärts oder
abwärts, um „DI:REV“ anzuzeigen, drücken Sie
dann auf die Cursor-Steuerung.
Damit wurde „DI:REV“ als Druckrichtung
gespeichert.
Hinweis
Wenn nach der Anzeige einer Menüoption oder
Einstellung 20 Sekunden ohne weitere Aktivität
verstreichen, verlässt das Gerät den Menümodus
und auf der LCD-Anzeige wird wieder „READY“
angezeigt. In einem solchen Fall wird die
Einstellung von „DIR“ nicht geändert.
So brechen Sie eine Einstellung ab
1
Drehen Sie die Cursor-Steuerung wie in Schritt 5,
um „BACK“ anzuzeigen.
2
Drücken Sie auf die Cursor-Steuerung.
Auf der LCD-Anzeige wird wieder „DIR“
angezeigt.
So setzen Sie Menüvorgänge fort
Wiederholen Sie die Schritte 3 bis 5, um die
gewünschten Einstellungen vorzunehmen.
So beenden Sie die Menüfunktionen
2
Drücken Sie auf die Cursor-Steuerung.
Auf der LCD-Anzeige wird wieder „READY“
angezeigt.
Das Gerät verlässt den Menümodus.
Menüsperre
Wenn beim Drücken der Cursor-Steuerung die Meldung
„LOCK“ angezeigt und ein Warnton ausgegeben wird,
ist die Cursor-Steuerung deaktiviert, da die
Menübedienfunktion gesperrt ist. Wenn Sie einen
Menüvorgang ausführen wollen, kontaktieren Sie einen
nahe gelegenen autorisierten Vertragshändler.
Speichern von Menüeinstellungen
Sie können bis zu drei über das Menü vorgenommene
Einstellungssätze speichern und den gewünschten
Einstellungssatz bei Bedarf laden. Diese Einstellungen
bleiben erhalten, selbst wenn das Gerät ausgeschaltet
wird.
Hinweis
Wenn Sie das Gerät zum ersten Mal nach dem Kauf
verwenden, enthalten alle drei gespeicherten Sätze die
werkseitigen Einstellungen.
Speichern neuer Einstellungen
1
Nehmen Sie alle gewünschten Einstellungen vor.
2
Drehen Sie die Cursor-Steuerung, um „SAVE“
anzuzeigen, und drücken Sie dann auf die CursorSteuerung.
3
Drehen Sie die Cursor-Steuerung erneut, um die
gewünschte Zahl anzuzeigen, und drücken Sie dann
auf die Cursor-Steuerung.
Die in Schritt 1 vorgenommenen Einstellungen
werden unter der in Schritt 3 ausgewählten Zahl
gespeichert.
Laden der gewünschten Einstellungen
Sie können die gewünschten Einstellungen laden, um
mit ihnen Ausdrucke anzufertigen.
1
Bestätigen Sie, dass „READY“ auf der LCDAnzeige angezeigt wird und drücken Sie dann auf
die Cursor-Steuerung.
Bedienung
1
Drehen Sie die Cursor-Steuerung, um „BACK“
anzuzeigen, nachdem Sie Schritt 5 ausgeführt
haben.
2
Drehen Sie die Cursor-Steuerung erneut, um
„LOAD“ anzuzeigen, und drücken Sie dann auf die
Cursor-Steuerung.
Einstellen und Anpassen des Geräts mit dem Menü
95
Page 96

Bedienung
3
Zeigen Sie die Zahl unter der die gewünschten
Einstellungen gespeichert wurden an und drücken
Sie dann auf die Cursor-Steuerung.
Die in Schritt 3 gespeicherten Einstellungen
werden geladen.
Ändern der geladenen Einstellungen
Das Gerät verhält sich gemäß der geänderten
Einstellungen, und zwar bis ein anderer Einstellungssatz
geladen wird, selbst wenn Sie das Gerät ausschalten.
Durch das Laden eines anderen Einstellungssatzes
werden die zuvor geladenen Einstellungen entfernt.
Beibehalten von zuvor geladenen
Einstellungen
Beispiel: Die unter „SA:1“ gespeicherten Einstellungen
wurden geladen und sollen geändert werden. Gehen Sie
folgendermaßen vor, um die ursprünglichen
Einstellungen von „SA:1“ beizubehalten und die neuen
Einstellungen unter „SA:2“ zu speichern.
1
Laden Sie die Einstellungen unter „LO:1“ gemäß
dem Verfahren zum Laden der gewünschten
Einstellungen.
4
Drehen Sie die Cursor-Steuerung, um „BACK“
anzuzeigen, und drücken Sie dann auf die CursorSteuerung.
Auf der LCD-Anzeige wird „READY“ angezeigt
und das Gerät kehrt zurück in den normalen
Druckmodus.
2
Ändern Sie die geladenen Einstellungen Ihren
Anforderungen entsprechend.
3
Wählen Sie „SA:2“ gemäß dem Verfahren zum
Speichern der Einstellungen.
4
Drücken Sie auf die Cursor-Steuerung.
Die in No.2 geänderten Einstellungen werden unter
„SA:2“ gespeichert.
Ausdrucken der Menüliste
Sie können die aktuellen Menüeinstellungen
ausdrucken.
1
Drücken Sie auf die Cursor-Steuerung.
Die zuletzt geänderte Menüoption wird angezeigt.
2
Drehen Sie die Cursor-Steuerung, um „MENU“
anzuzeigen, und drücken Sie dann auf die CursorSteuerung.
3
Drehen Sie die Cursor-Steuerung, um „ME:OK“
anzuzeigen, und drücken Sie dann auf die CursorSteuerung.
Die aktuellen Menüeinstellungen werden
ausgedruckt.
Auf der LCD-Anzeige wird „MENU“ angezeigt.
96
Einstellen und Anpassen des Geräts mit dem Menü
Page 97

Druckvorgang
Vor dem Starten eines Druckvorgangs
Überprüfen Sie stets die folgenden Punkte:
• Ist das Gerät richtig angeschlossen? (Seite 86)
• Ist das Papier richtig eingelegt? (Seite 87)
• Wurden Menüeinstellungen und -anpassungen korrekt
ausgeführt? (Seite 89)
• Liegt das Eingangssignal der Videoquelle an?
(Seite 86)
Starten eines Druckvorgangs
Über das Menü können Sie Druckrichtung, Bildgröße,
und alle anderen Druckeinstellungen vornehmen. Dieser
Abschnitt beschreibt die Schritte, die nach Abschluss
der Einstellungen über das Menü durchzuführen sind.
1
Schalten Sie das Gerät mit dem Netzschalter ON/
OFF ein.
Die LCD-Anzeige leuchtet grün und die Meldung
„READY“ wird angezeigt.
LCD
Meldung Ursache und Abhilfemaßnahme
EMPTY Es ist kein Papier eingelegt. Legen Sie
Papier ein.
DOOR Die Geräteklappe ist geöffnet.
Schließen Sie die Geräteklappe.
Das Gerät hält während des Drucks an
Beim andauernden Ausdrucken von fast schwarzen
Bildern kann die Schutzschaltung des
Thermodruckkopfs eine Überhitzung verhindern. In
diesem Fall wird auf der LCD-Anzeige die Meldung
„COOL“ angezeigt.
Warten Sie, bis der Druckkopf sich abgekühlt hat und
die Meldung verschwindet.
So brechen Sie einen laufenden Druckvorgang
ab
Drücken Sie die Taste OPEN oder FEED, um einen
Druckvorgang, der bereits ausgeführt wird,
abzubrechen.
Einziehen von Papier
Halten Sie die Taste FEED gedrückt, um Papier
einzuziehen. Es wird Papier eingezogen, so lange Sie die
Taste FEED gedrückt halten. Versuchen Sie nicht, das
Papier mit den Händen herauszuziehen.
Bedienung
2
Starten Sie die Videoquelle.
Benutzen Sie für diese Schritte die Bedienelemente
am Videogerät, das als Videoquelle benutzt wird.
3
Drücken Sie die Taste PRINT, wenn auf dem
Videomonitor das Bild angezeigt wird, das Sie
drucken möchten.
Das Bild, das beim Drücken der Taste PRINT
angezeigt wurde, wird im Speicher abgelegt und
sofort ausgedruckt. Es werden maximal 10 Bilder
im Speicher abgelegt. Bei Überschreitung der
maximalen Anzahl von 10 Bildern im Speicher
wird das älteste Bild überschrieben.
Anzeige einer Fehlermeldung auf der LCDAnzeige
Wenn ein Problem auftritt, wechselt die Beleuchtung der
LCD-Anzeige zu braun und eine das Problem
beschreibende Meldung wird angezeigt.
Zurzeit gewähltes Papier
Sie können das zurzeit gewählte Papier auf der LCDAnzeige ablesen. Der Pfeil zeigt auf das zurzeit
gewählte Papier. In der folgenden Abbildung handelt es
sich beim zurzeit gewählten Papier um UPP-110S.
Zeigt UPP-110S an
Zeigt UPP-110HD an
Zeigt UPP-110HG an
Der Ausdruck ist unscharf
Ein Bild mit schnellen Bewegungen kann beim
Ausdrucken unscharf sein. Ist dies der Fall, Ausdruck
mit der Einstellung „ME:FLD“ in der Menüoption
„MEMRY“ durchführen.
Druckvorgang
97
Page 98

Bedienung
Im Speicher abgelegte Bilder ausdrucken
Bei jedem Betätigen der Taste PRINT wird das Bild im
Speicher abgelegt. Nachdem 10 Bilder abgespeichert
worden sind, wird das älteste Bild mit dem neuesten in
der zeitlichen Reihenfolge überschrieben. Im Speicher
werden stets 10 Bilder abgelegt. Aus diesen Bildern
können Sie das gewünschte auswählen und über das
Menü ausdrucken.
1
Wählen Sie die Menüoption „PAGE“ aus.
Weitere Einzelheiten zu Menüfunktionen finden
Sie unter „Grundfunktionen des Menüs“ auf
Seite 94.
2
Drücken Sie auf die Cursor-Steuerung.
Auf dem LCD-Anzeige wird „PG:1“ angezeigt,
und auf dem Monitor erscheint das zuletzt
gedruckte Bild.
Bei steigender Zahl wird das angezeigte Bild älter.
3
Drehen Sie die Cursor-Steuerung nach unten oder
oben, um das Bild anzuzeigen, das Sie drucken
möchten.
4
Drücken Sie auf die Cursor-Steuerung.
Das in Schritt 3 abgelegte Bild wird geladen.
5
Drücken Sie die Taste COPY.
Das in Schritt 3 abgelegte Bild wird gedruckt.
Zwei unterschiedliche Bilder auf einem
Blatt ausdrucken
Mit der Einstellung „MU:MLT“ in der Menüoption
„MULTI“ können Sie zwei unterschiedliche Bilder
erfassen und auf ein und demselben Blatt ausdrucken.
1
Wählen Sie „MU:MLT“ in der Menüoption
„MULTI“.
Der Drucker beginnt mit dem Ausdruck von zwei
Bildern auf einem Blatt wie folgt.
Das in Schritt 2
erfasste Bild
Wenn „IF:ON“ unter „INFO“ ausgewählt ist,
werden die Daten zu Kontrast und Helligkeit des
bei Schritt 3 erfassten Bildes unten auf dem Bild
angegeben.
Das in Schritt 3
erfasste Bild
Anfertigen einer Kopie des vorherigen
Ausdrucks
Drücken Sie die Taste COPY. Das Gerät druckt ein
weiteres Exemplar des vorherigen Ausdrucks. Das Bild
des vorherigen Ausdrucks bleibt im Gerätespeicher
erhalten, bis ein weiteres Bild gedruckt, oder das Gerät
ausgeschaltet wird. Sie können nur eine Kopie
anfertigen, unabhängig von der Einstellung der
Druckmenge im Menü.
Hinweise
• Wenn Sie die Taste COPY sofort nach dem
Einschalten des Geräts drücken, ertönt der
Warnsummer, da im Gerätespeicher keine Daten
vorhanden sind.
• Beim Ausschalten des Druckers geht das im Speicher
abgelegte Bild verloren.
Anfertigen mehrerer Kopien eines Ausdrucks
Drücken Sie die Taste COPY so oft wie erforderlich,
während der erste Ausdruck kopiert wird (maximal 20
Kopien einschließlich des ersten Ausdrucks). Bei jedem
Drücken der Taste COPY ertönt ein kurzer Summton.
98
2
Nachdem Sie die in „Starten eines Druckvorgangs“
auf Seite 97 beschriebenen Schritte durchgeführt
haben, drücken Sie die Taste PRINT in Schritt 3.
Das Bild, das beim Drücken der Taste PRINT
angezeigt wurde, wird erfasst.
3
Drücken Sie die Taste PRINT erneut, sobald auf
dem Videomonitor das Bild angezeigt wird, das Sie
drucken möchten.
Druckvorgang
Hinweis
Die Maximalanzahl enthält auch die Anzahl der
Ausdrucke, die durch Drücken der Taste PRINT erstellt
wurden. Wenn Sie z.B. die Taste COPY drücken,
nachdem Sie die Taste PRINT fünf Mal gedrückt und
fünf Ausdrucke erstellt haben, wird ein und derselbe
Ausdruck in 15 Kopien vervielfältigt.
Abbrechen des Kopiervorgangs
Drücken Sie die Taste OPEN oder FEED während des
Kopiervorgangs.
Kopien mit unterschiedlicher Druckrichtung
und Größe erstellen
Sie können vom zuletzt gespeicherten Bild eine Kopie in
unterschiedlicher Druckrichtung und Größe erstellen.
Wählen Sie zunächst Druckrichtung und Größe, bevor
Sie die Taste COPY drücken.
Page 99

Druckrichtung und Bildgröße
auswählen
Mit den folgenden Menüoptionen können Sie
Druckrichtung und Bildgröße auswählen.
„SIDE“: Wählt die Richtung aus, in der das Bild
gedruckt wird.
„SCALE“: Vergrößert oder verkleinert das zu druckende
Bild.
SFT.H und SFT.V: Stellt den Druckbereich horizontal
und vertikal ein.
Druckrichtung auswählen
Sie können die Druckrichtung mit der Menüoption
„SIDE“ auswählen.
Ausdruck in derselben Richtung wie die
Anzeige auf dem Videomonitor
Wählen Sie „S:STD“ in „SIDE.“
Sie können den Druckbereich einstellen, während Sie
das auf dem Monitor angezeigte Bild betrachten.
Der auf dem Monitor angezeigte Rahmen bewegt sich
entsprechend dem über die Cursorsteuerung
eingegebenen Wert. Das Bild innerhalb des Rahmens
wird gedruckt.
Beispiel: Auswahl von „S:STD“ in „SIDE“ und
Auswahl von „SCL:2,0“ in „SCALE“
Originalbild
Bedienung
Bild beim Druck um 90 Grad gegen den
Uhrzeigersinn drehen
Wählen Sie „S:SIDE“ in „SIDE.“
Auf dem Videomonitor angezeigtes Bild
Ausdrucke
Bei Auswahl von „S:STD“
Bei Auswahl von „S:SIDE“
Bilder auf dem
Monitor
Bei Auswahl von „S.H:+(*)“
Y
Bei Auswahl von „S.H:0“
Ausdrucke
Bildgröße auswählen
Mit der Menüoption „SCALE“ können Sie Bilder
vergrößern oder verkleinern. Die Bildgröße kann von
der halben Normalgröße bis zur zweifachen
Normalgröße in Schritten von 0,1 eingestellt werden.
Druckbereichs des Bildes einstellen
Mit den Menüoptionen „SFT.V“ und „SFT.H“ können
Sie den Druckbereich des Bildes vertikal und horizontal
einstellen.
Y
Bei Auswahl von „S.H:–(*)“
Druckvorgang
99
Page 100

Unterschiedliche Bildgröße des Ausdrucks je
nach Einstellung von „SCALE“
Hinweis
Wenn die Menübedienfunktion gesperrt ist, sind die
Bei Auswahl von „S:STD“ in
„SIDE“ und Auswahl von
„SCL:2,0“ in „SCALE“
Bei Auswahl von „S:STD“ in
„SIDE“ und Auswahl von
„SCL:1,0“ in „SCALE“
Regler CONTR und BRIGHT zusätzlich zur CursorSteuerung ebenfalls gesperrt. Wenn Sie die Regler
CONTR und BRIGHT verwenden möchten,
kontaktieren Sie einen nahe gelegenen autorisierten
Doppelte
Länge im
Vergleich zur
Bedienung
Länge bei
Auswahl von
„SCL:1,0“.
Vertragshändler.
Anpassen von Kontrast und
Helligkeit
Sie können den Kontrast und die Helligkeit mit den
Reglern CONTR und BRIGHT auf der Frontplatte
anpassen.
So passen Sie den Kontrast an
Sie können den Kontrast von Ausdrucken mit dem
Regler CONTR anpassen.
Stärkerer Kontrast: Drehen Sie den Regler CONTR
im Uhrzeigersinn.
Schwächerer Kontrast: Drehen Sie den Regler
CONTR gegen den Uhrzeigersinn.
So stellen Sie die Helligkeit ein
Sie können die Helligkeit von Ausdrucken mit dem
Regler BRIGHT anpassen.
Helleres Bild: Drehen Sie den Regler BRIGHT im
Uhrzeigersinn.
Dunkleres Bild: Drehen Sie den Regler BRIGHT gegen
den Uhrzeigersinn.
100
Druckvorgang
 Loading...