

Sony UP-2800 Operating Instructions Manual

Operating Instructions Page 2
Before operating this unit, please read this manual
thoroughly and retain it for future reference.
Mode d’emploi Page 116
Avant la mise en service de cet appareil, prière de lire
attentivement ce mode d’emploi que l’on conservera
pour toute référence ultérieure.
3-860-608-11 (1)
1997 by Sony Corporation
UP-2300
UP-2800
Color Video Printer

2
English
Owner’ s Record
The model and serial numbers are located at the rear.
Record these number in the space provided below.
Refer to these numbers whenever you call upon your
Sony dealer regarding this product.
Model No.
Serial No.
WARNING
To prevent fire or shock hazard, do not expose the unit
to rain or moisture.
To avoid electrical shock, do not open the cabinet. Refer
servicing to qualified personnel only.
For the customers in the U.S.A.
This equipment has been tested and found to comply
with the limits for a Class A digital device, pursuant to
Part 15 of the FCC Rules. These limits are designed to
provide reasonable protection agaist harmful interference
when the equipment is operated in a commercial
environment. This equipment generates, uses, and can
radiate radio frequency energy and, if not installed and
used in accordance with the instruction manual, may
cause harmful interference to radio communications.
Operation of this equipment in a residential area is likely
to cause harmful interference in which case the user will
be required to correct the interference at his own
expense.
You are cautioned that any changes or modifications not
expressly approved in this manual could void your
authority to operate this equipment.
This device requires shielded interface cables to comply
with FCC emission limits.

3
Tabel of Contents
Tabel of Contents
Introduction
About This Manual ............................................................5
System Overview ..............................................................7
System Configuration....................................................... 8
Operation
Before Printing ..................................................................9
Loading an Ink Ribbon Cartridge .................................... 9
Loading Paper ................................................................ 12
Selecting the Input Signal .............................................. 14
Making Full-Size Printouts .............................................16
Making Multiple Copies of Identical Printouts.............. 19
Capturing Another Image While Printing ...................... 22
Making Variations of Printouts ......................................24
Selecting the Printer Application Mode......................... 25
About the Memory ......................................................... 28
Making a Printout of Multiple Different Reduced
Images ....................................................................... 32
Making Printouts for Stickers ........................................ 42
Making Printouts for Identification Photographs........... 43
Making Printouts With a Caption...................................50
Entering a Caption.......................................................... 51
Deleting the Images Stored to Memory Pages .............56
Setting the Function of the CLEAR Button ................... 56
Deleting Images ............................................................. 59
Installation and
Adjustment
Supplied Accessories.....................................................61
Assembly........................................................................ 62
Preparing the Remote Control Unit................................ 63
Connections ....................................................................65
Making Connections for Storing Video Images............. 65
Making Connections for Viewing Images to be Printed 66
Making Connections to Enable Remote Control ........... 67

4
Tabel of Contents
Tabel of Contents
Setting Up the Printer .....................................................68
Compensating for the Input Signals ............................... 69
Matching the Video Monitor Color to
the Printer Color........................................................ 72
Adjusting the Printout Color .......................................... 75
Changing the Printout Size/Printout Area...................... 82
Selecting the Operation Mode for Automatic Printing
Capabilities................................................................ 85
Erasing the Screen Display ............................................ 89
Adjusting the Brightness of the Printer Window
Display ...................................................................... 91
Selecting Whether the Operation and
Error Tones Sound .................................................... 93
Setting the Baud Rate for Computer Communication ... 95
Others
Precautions......................................................................97
Safety.............................................................................. 97
Installation...................................................................... 97
Cleaning ......................................................................... 98
Ink Ribbon Cartridge and Paper ....................................99
Specifications................................................................100
Error/Warning Messages..............................................102
If the paper jams........................................................... 104
Troubleshooting............................................................106
Location and Function of Parts and Controls ............ 107
Front ............................................................................. 107
Sub Panel...................................................................... 109
Rear .............................................................................. 110
Monitor Display ........................................................... 111
Index...............................................................................113
Installation and
Adjustment
(Continued)

5
Introduction
About This Manual
This manual covers the following UP-2000 series color video printers.
• UP-2300
• UP-2800
The difference among models is as follows.
In this manual, the UP-2800 is used for illustrations.
Also, the monitor display and printer window display are used to explain the
operation. If your printer is a UP-2300 which is not equipped with the printer
window display, perform operations according to the monitor display explanation.
Wherever the operation or any other item differs between the models, this manual
clearly describes those differences.
Organization of this manual
This manual is divided into four chapters. This section explains the organization of
this manual.
Introduction
Describes the features and system configuration of the color video printer.
Operation
Describes actual printing once all connections and adjustments have been made, as
explained in the next chapter. You will be able to make various types of printouts
after reading through this chapter.
Installation and adjustment
Describes how to make connections and make adjustments using the menus
displayed on the video monitor and printer window display. Once all connections
and adjustments have been made, there should be no need to perform these
operations again during normal printing operations. These operations must,
however, be performed after reinstalling, or if the picture quality degrades, or if
adjustment becomes necessary because the peripheral equipment is changed. Also
covered is the use of the printer’s remote control unit (not supplied).
Others
Notes the precautions to be observed when using the printer, lists errors, warnings
and their handling, and explains troubleshooting. Also provided is information on
the locations and functions of parts and controls, and the on-screen messages and
menus used to operate the printer. Should you encounter any unfamiliar terms or
items while reading this manual, consult the index at the end of the manual.
Introduction
No. of memories RGG SYNC connector Printer window display
UP-2300 1 None None
UP-2800 1 Yes Yes

6
Introduction
About This Manual (continued)
Conventions used
Cross references
Throughout this manual you will find references to other sections of the manual
that contain related information.
Important note
Be sure to read the sections of the manual marked Note . They explain points that
you should be aware of to operate the printer correctly and prevent malfunctions.
Index
Use the index, in addition to the table of contents, to find information you need
when using the printer.
Monitor displays
Some monitor displays illustrated in this manual may differ slightly from the acutal
display. The operation of the printer, however, remains as described in this manual.
Note
7
Introduction
System Overview
The UP-2300/2800 color video printer is designed for capturing images from video
equipment such as VTR and for printing out high-resolution images, either in 256
shades in full color (about 300 dpi). You can make various types of printouts. You
can also add a caption onto the printout. You can operate the daily printer operation
by using the buttons and setup the printer interactively by picking from displayed
menus.
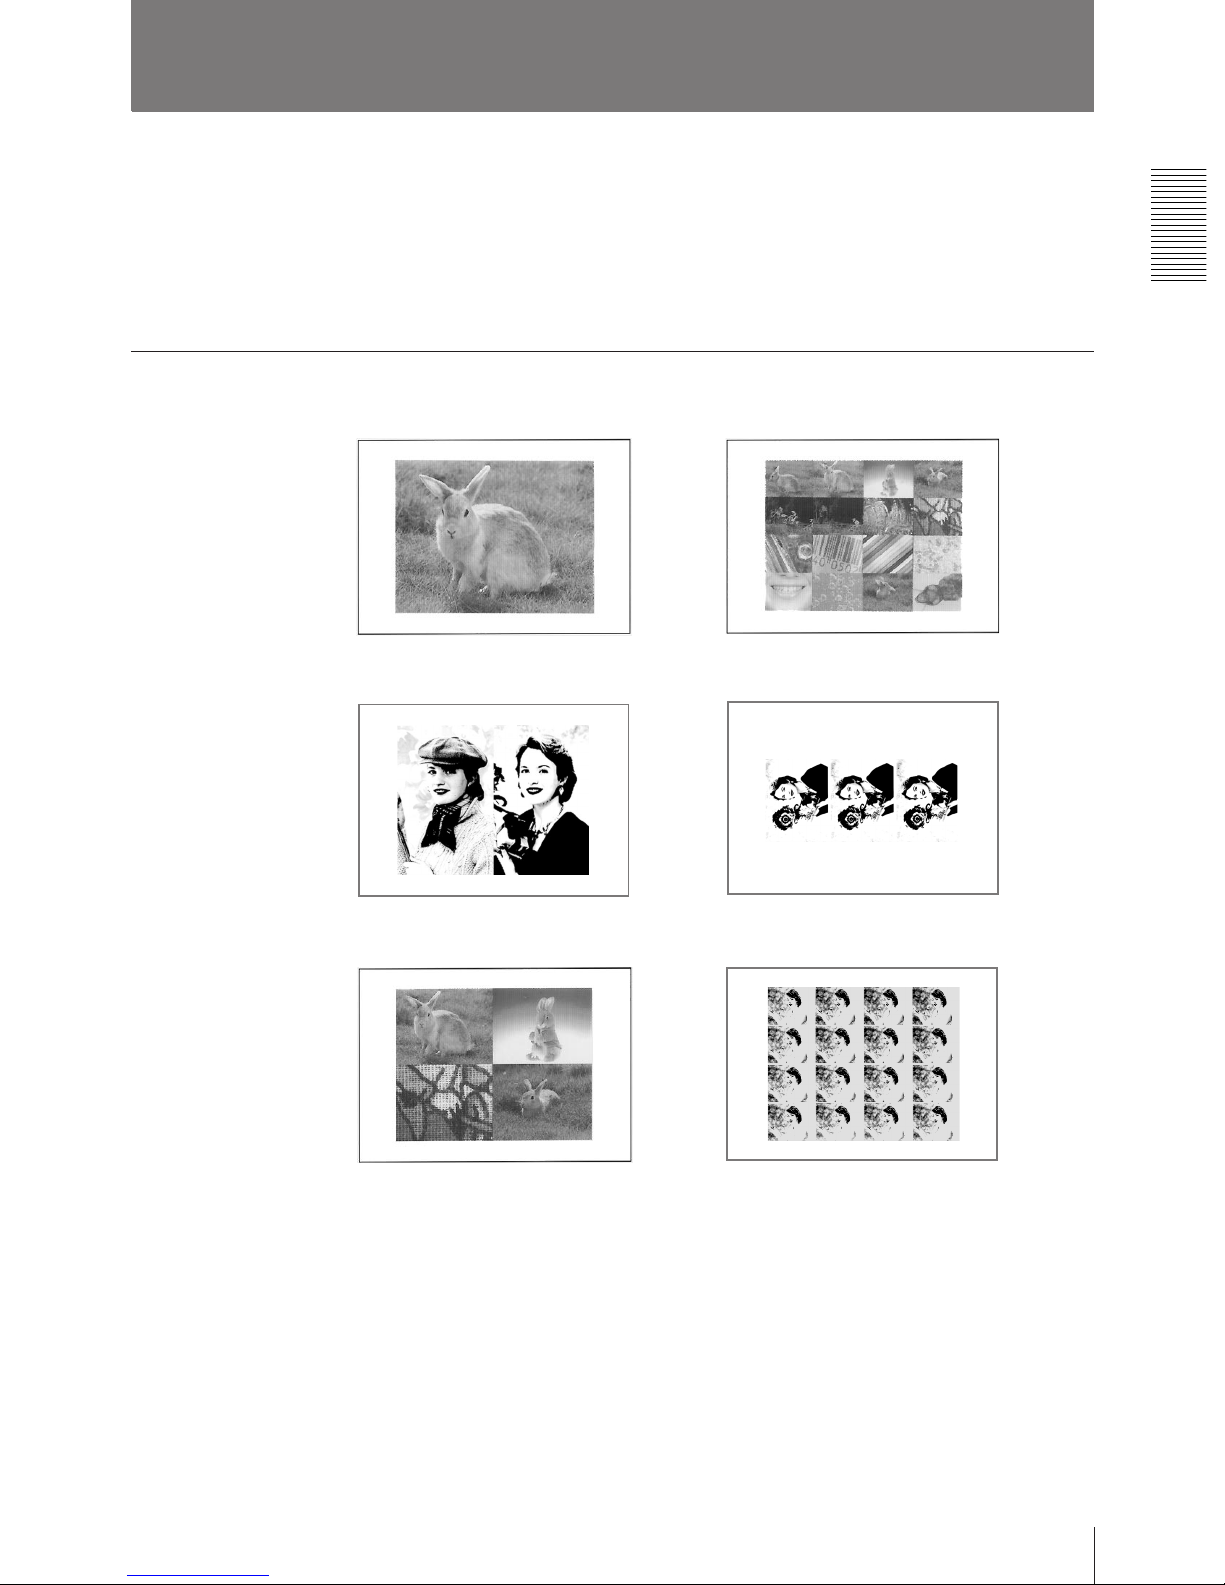
Printouts that can be made with the printer
a) This can be used for identification photographs and there are two types.
In one type, the size of one image in one printout can be adjusted freely. In the other, the size of one
image is fixed.
For details, see page 43.
b) There are two types of sticker-printouts.
In one type, all images in a single printout are identical. In the other, all images in a single printout
are different.
For details, see page 42.
Printout of a full-size image (page 16)
Printout of two reduced images
(page 33)
Printout of four reduced images
(page 32)
Printout of 16 reduced images (page 32)
Printout of identical images a) (page 43)
Printout for stickers b) (page 42)
You can add a caption onto printouts introduced here.
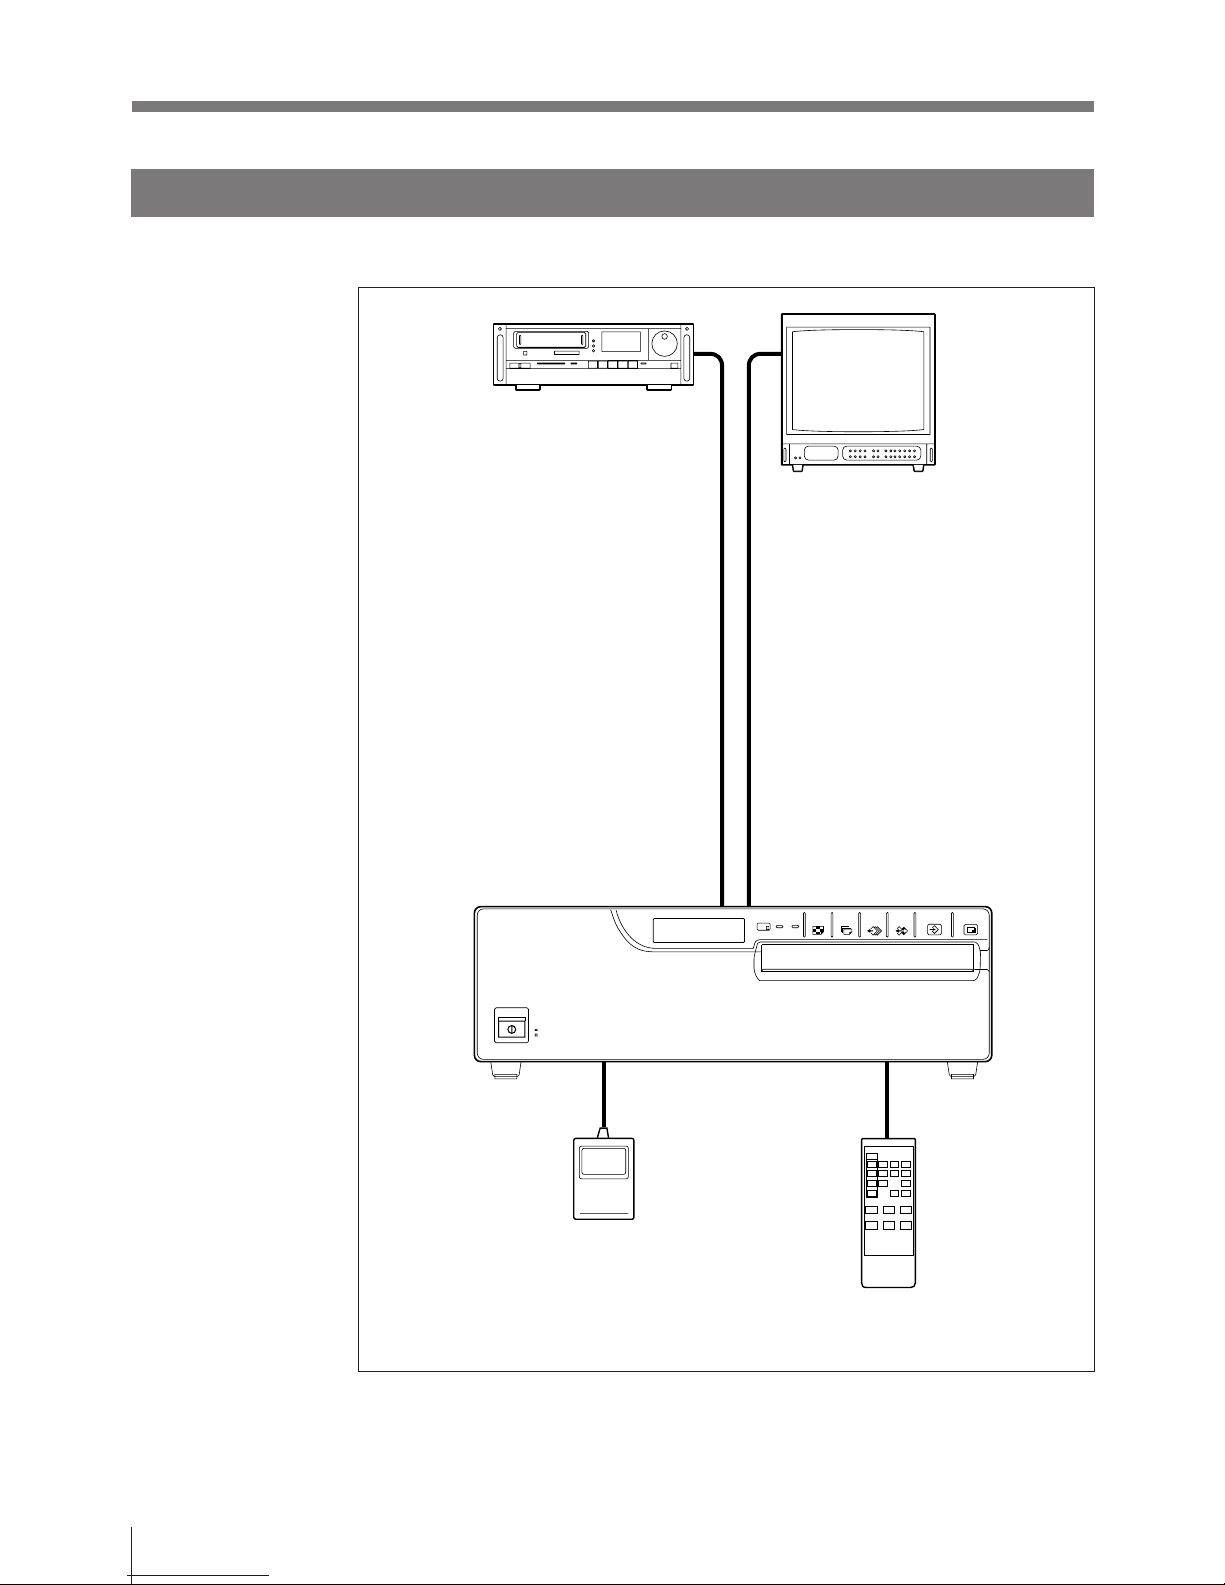
8
Introduction
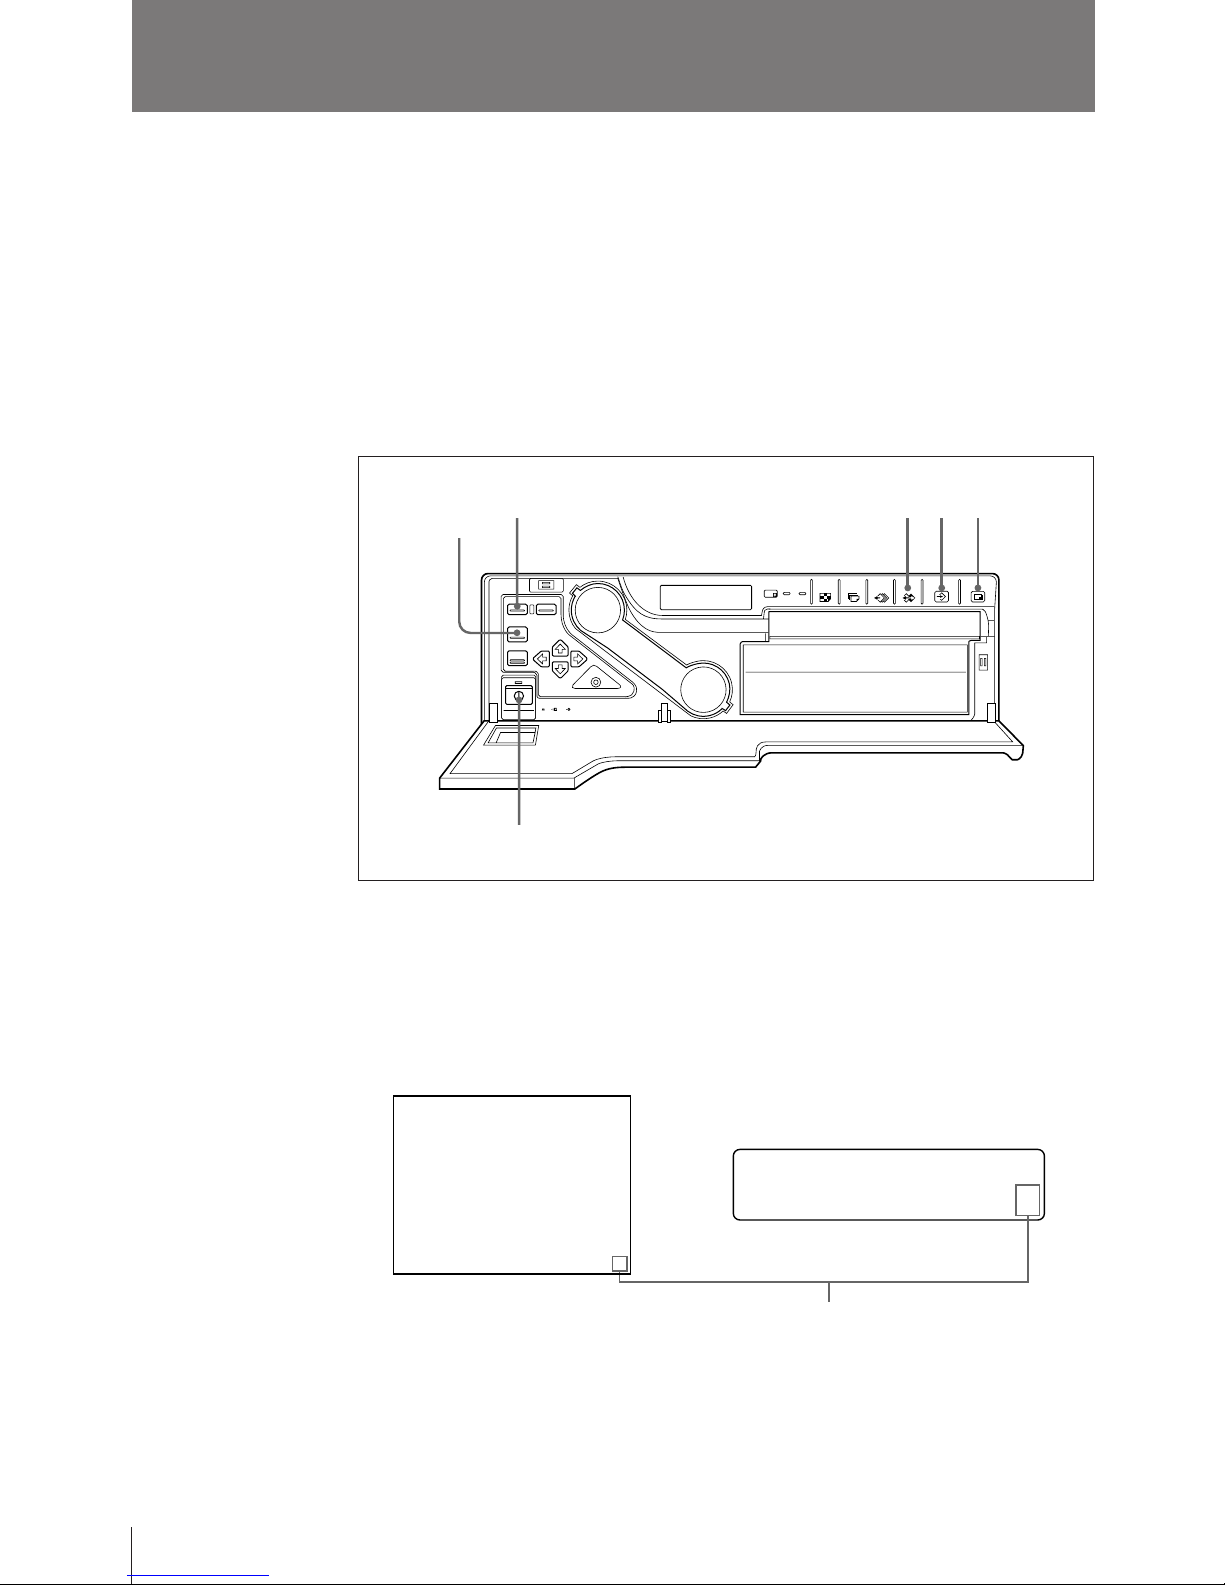
Video source
Provides the video input for
printing. Connect a video
source such as video
recorder, video disk player
or similarly.
System Configuration
The following shows an example printer system configuration.
Remote control unit (not supplied)
allows you to operate the printer
remotely.
Foot switch (not supplied)
allows you to operate the
printer remotely.
Video monitor
Displays the images received
from the video source (source
image) and the image to be
printed (memory source). Also
displays the printer menus and
messages.
When the printer power switch is
set to off, you can view the image
of the video source.
Color Video Printer
System Overview (continued)
9
Operation
Operation
Before Printing
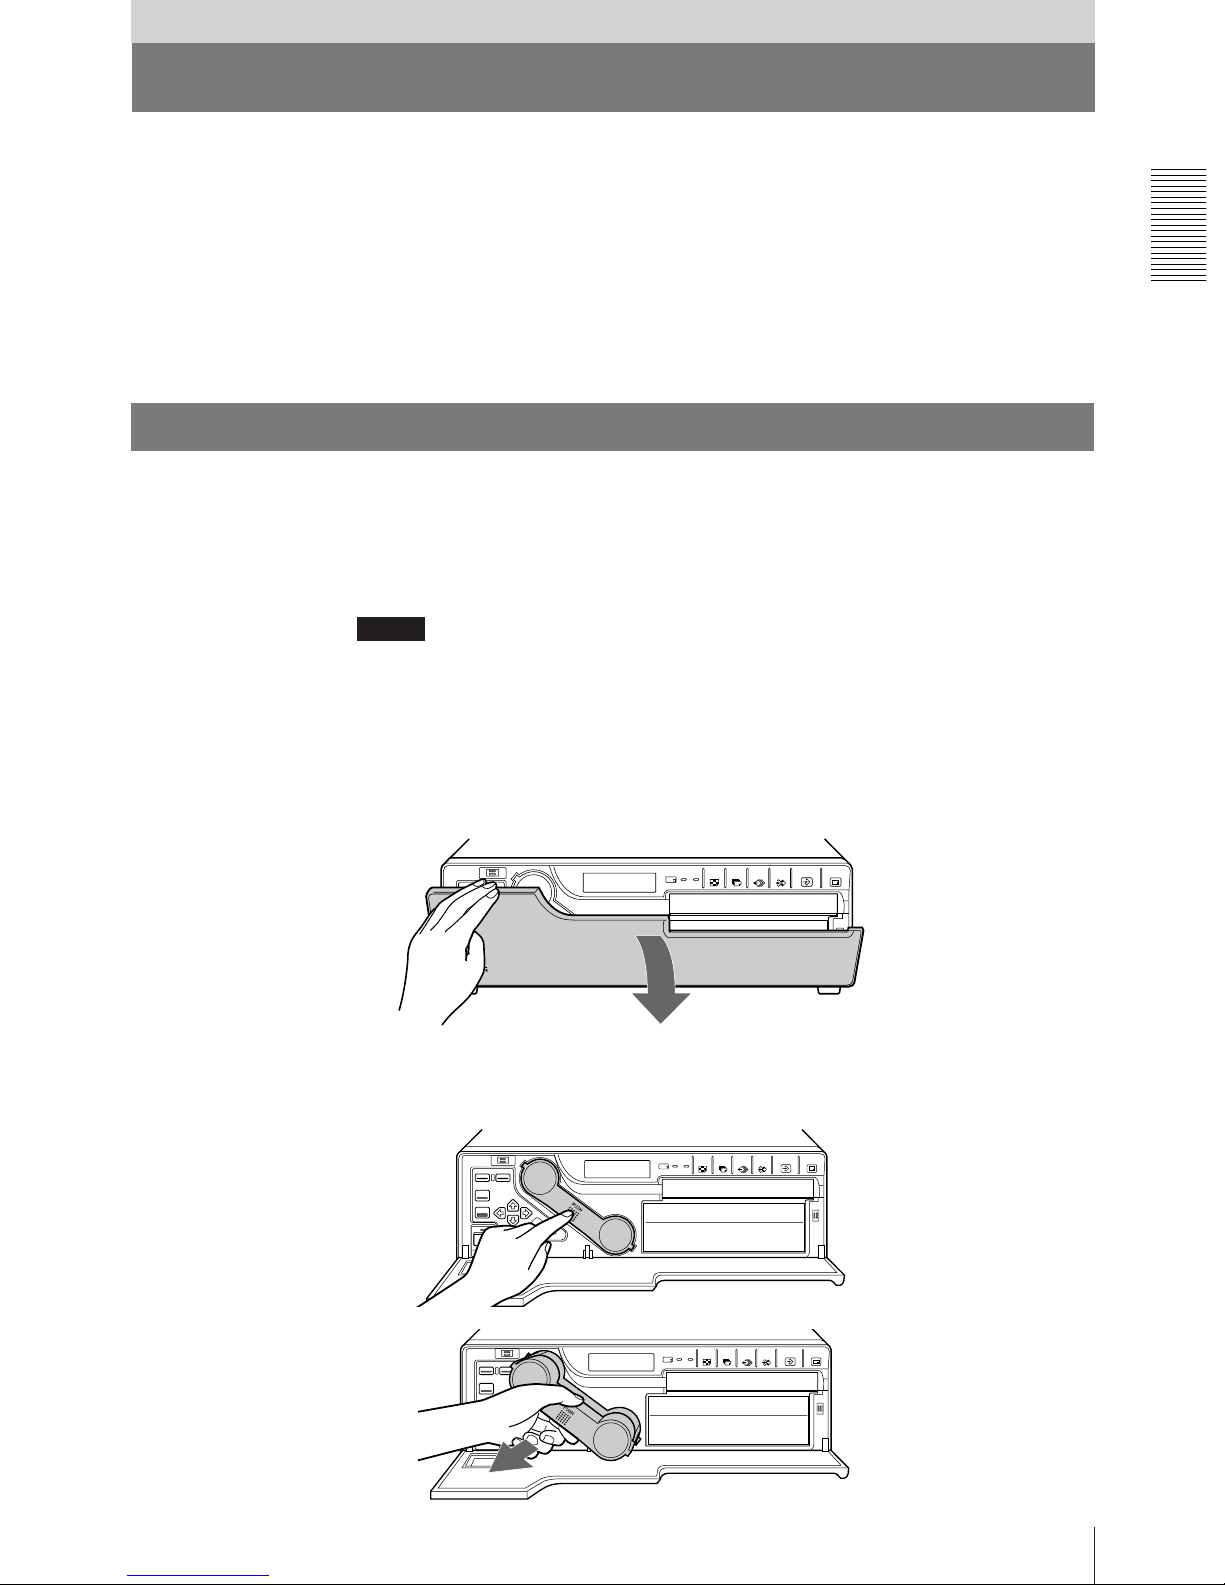
2 Remove the ink ribbon cartridge by pushing the ink ribbon cartridge itself.
The ink ribbon cartridge pops out.
When you use the printer first, this operation is not required.
This section describes the following operations that must be made prior to starting
printing after mounting the paper tray and paper cover on the printer and making
the necessary connections.
• Loading an ink ribbon cartridge (see below)
• Loading paper (see page 12)
• Selecting the input signal (see page 14)
Once the above operations have been completed, there should be no need to repeat
them during routine printing. Perform them only when absolutely necessary.
Loading an Ink Ribbon Cartridge
To make printouts, an ink ribbon cartridge and paper (which are compaticble) must
be loaded. (see “Ink Ribbon Cartridge and Paper” page 99)
If the printer detects an incompatible combination, an error message appears.
Use the ink ribbon cartridge and print paper (supplied) to check if the video printer
functions properly.
Notes
• Use only ink ribbon cartridge and paper that are designed for use with this
printer. Failing to do so is likely to result in unsatisfactory printing or
malfunctions.
• When replacing the ink ribbon cartridge, do not turn off the power. Turning off
the power will cause the image stored in the memory to be lost.
1 Open the front panel by pulling the front panel top toward you.
Continue to next page m
10
Operation
Before Printing (continued)
Note
Never put your hand into the ink ribbon compartment. The thermal head
becomes very hot. You may burn yourself if you touch it.
When the ink ribbon cartridge cannot be ejected
Turn the power off, then back on again. Then, after a while, press the ink ribbon
cartridge.
In this case, the image in memory will be lost.
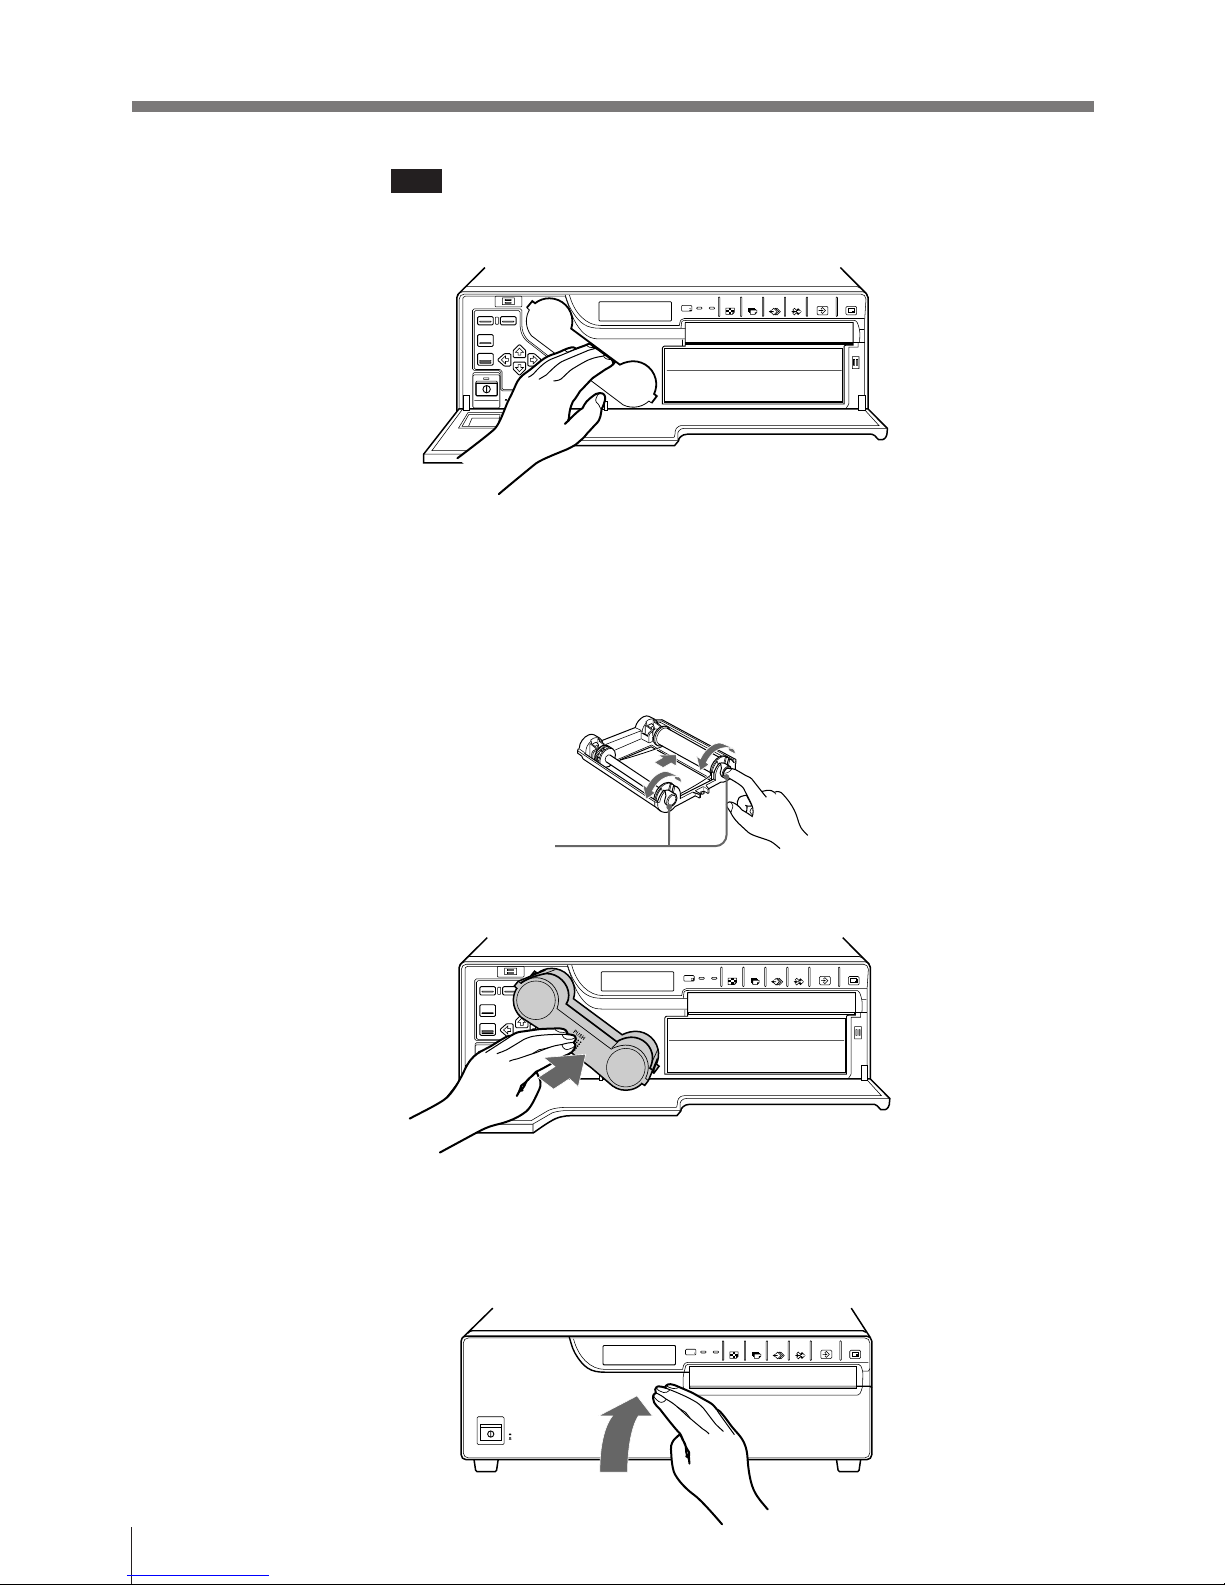
3 Remove any slack from the ink ribbon.
If the ribbon is left slack, it may be damaged when inserted.
4 Insert the ink ribbon cartridge firmly until it stops.
When the ink ribbon cartridge cannot be inserted
Turn the power off, then back on gain. Then, insert the ink ribbon holder.
5 Close the front panel.
Wind the spool until
the not-used pont
comes to the right end.

11
Operation
Turn the spool in the direction of
the arrow to remove any slack
until the transparent tape cannot
be seen.
Notes
When using ink ribbon cartridge
• Once an ink ribbon cartridge has been completely used, replace it. Ink ribbon
cartridges are not reusable.
• Do not touch the ink ribbon cartridge or place it in a dusty location. Finger prints
or dust on the ink ribbon will result in imperfect printing or malfunction of the
head.
When storing ink ribbon cartridge
• Avoid placing the ink ribbon in a location subject to:
— high temperatures
— high humidity
— excessive dust
— direct sunlight
• Store a partially used ink ribbon cartridge in its original packaging.
If your ink ribbon should tear
Repair the tear with transparent tape. There should be no problem with using the
remaining portion of the ribbon.
Transparent tape
12
Operation
Before Printing (continued)
Loading Paper
To load paper, follow the procedure below. Be careful not to touch the printing
surface.
Notes
• When loading the paper while the printer is operating, do not turn off the power.
Turning off the power will cause the image stored in memory to be lost.
• Do not touch the ink ribbon when handling the paper.
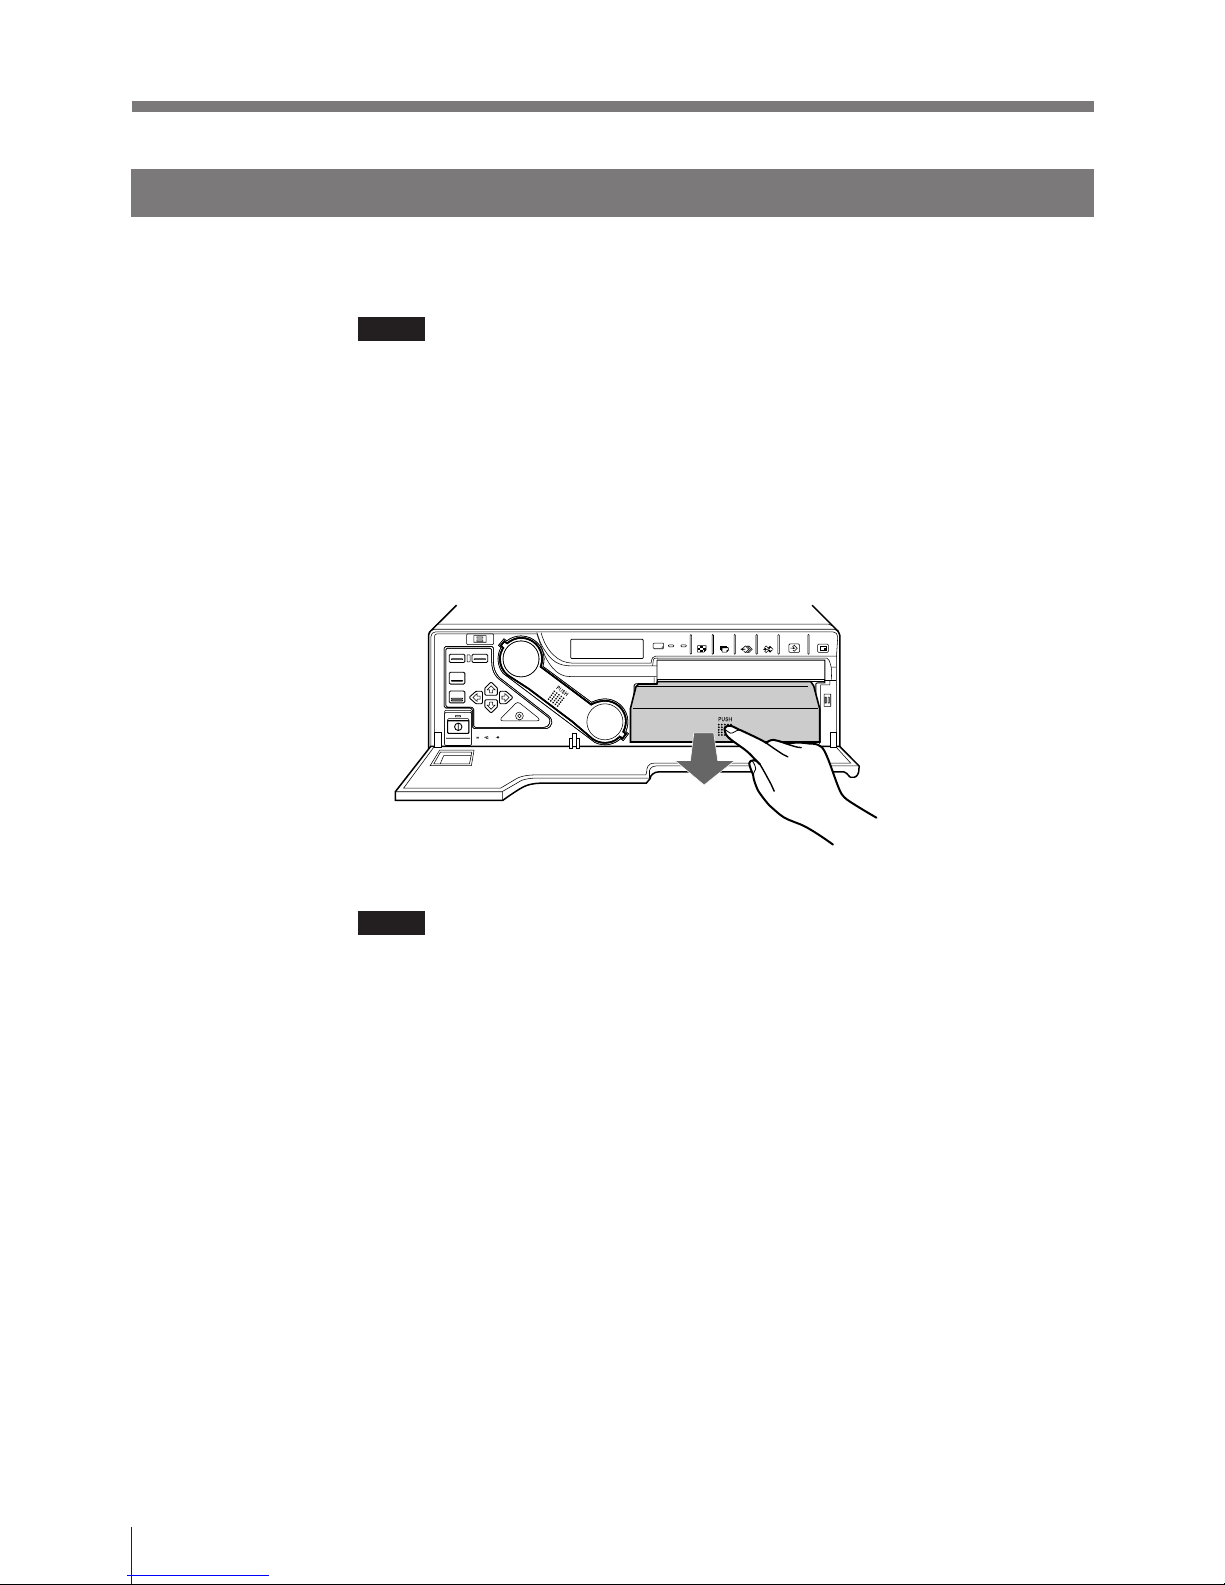
1 Open the front panel by pulling the front panel top towards you.
2 Push the part marked with PUSH on the paper tray.
The paper tray pops out.
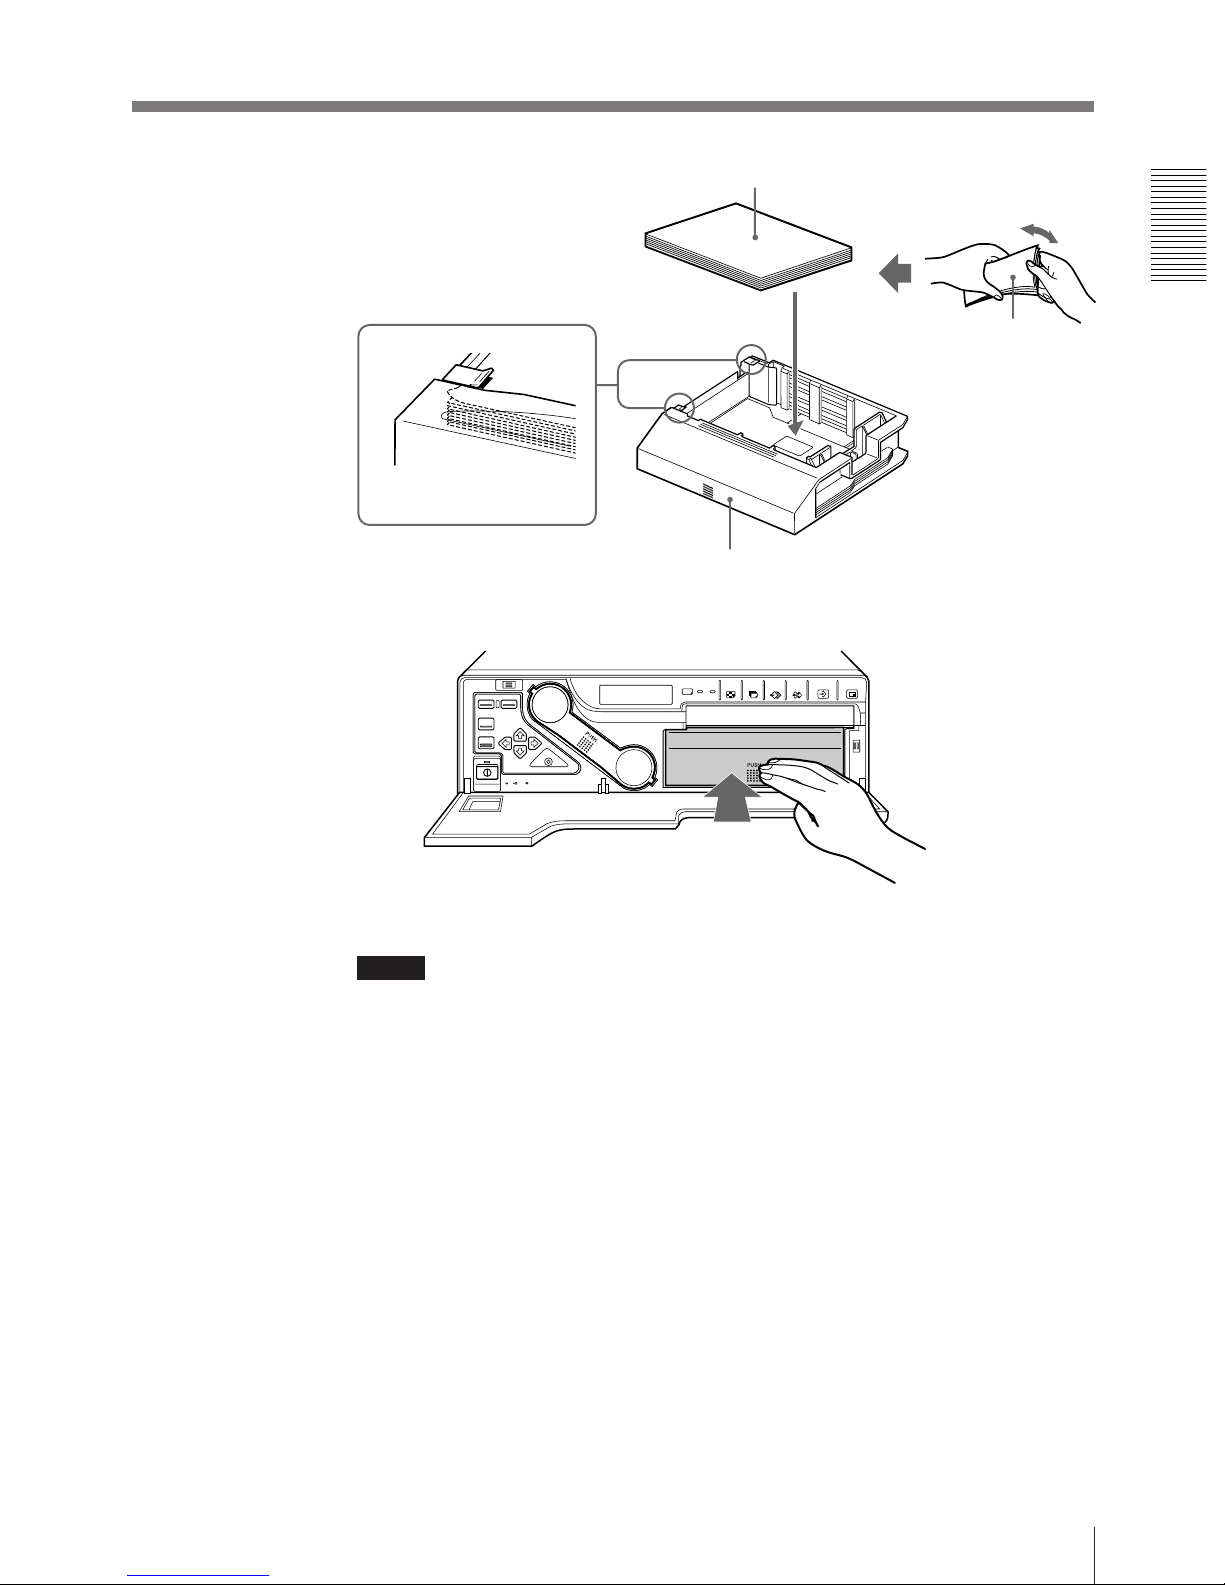
3 Place the paper in the paper tray.
Notes
• The amount of paper that the paper tray holds depends on the paper in use. When
adding paper to a partly full tray, be careful that the total number of sheets does
not exceed the limit. If you exceed this limit, paper jams may occur.
The limit is the amount of paper coutained in one printing pack.
For detailed information on the maximum amount of paper that the paper tray
can hold, see “Ink Ribbon Cartridge and Paper” page 99.
• Do not place different types of paper in the tray. Doing so may cause paper jams
to occur.
• Load the paper so that it lays flat in the paper tray. If the paper is curled, it will
overflow from the paper tray and the printing position may shift. If this happens,
load fewer sheets in the paper tray.
13
Operation
PUSH
Front
Place the paper in the paper tray
with the printing surface facing up
Set the paper securely under
the tab.
Riffle the paper
4 Slide the paper tray back into the printer until it clicks into place.
5 Close the front panel.
Notes
When handling the paper
Do not touch the printing surface. Dust or finger prints are likely to cause
unsatisfactory printing or malfunction of the head. Hold the paper by the printing
surface protection sheet.
When storing the paper
• Avoid storing the paper in a location subject to:
— high temperatures
— high humidity
— excessive dust
— direct sunlight
• Use the original package for storing unused paper.
Printing surface
14
Operation
INPUT SETUP
/ c / I /p/IN/o/
I NP U T SE T UP COLOR n n n
GAI N
I NP U T SE L
/ COL / LAY / PRN/ I N / OUT /
HUE
COLOR
OFFSET
Q 1 A
1
S
0
0
0
2
V/ SV/ RGB
AGC
OFF
/
OFF
Before Printing (continued)
Selecting the Input Signal
Before printing, select the input signal (the input connector to which the signal to
be printed is being input—VIDEO, S-VIDEO, or RGB (only for the UP-2800).
Once you have selected the input signal, this setting remains effective until you
select another source.
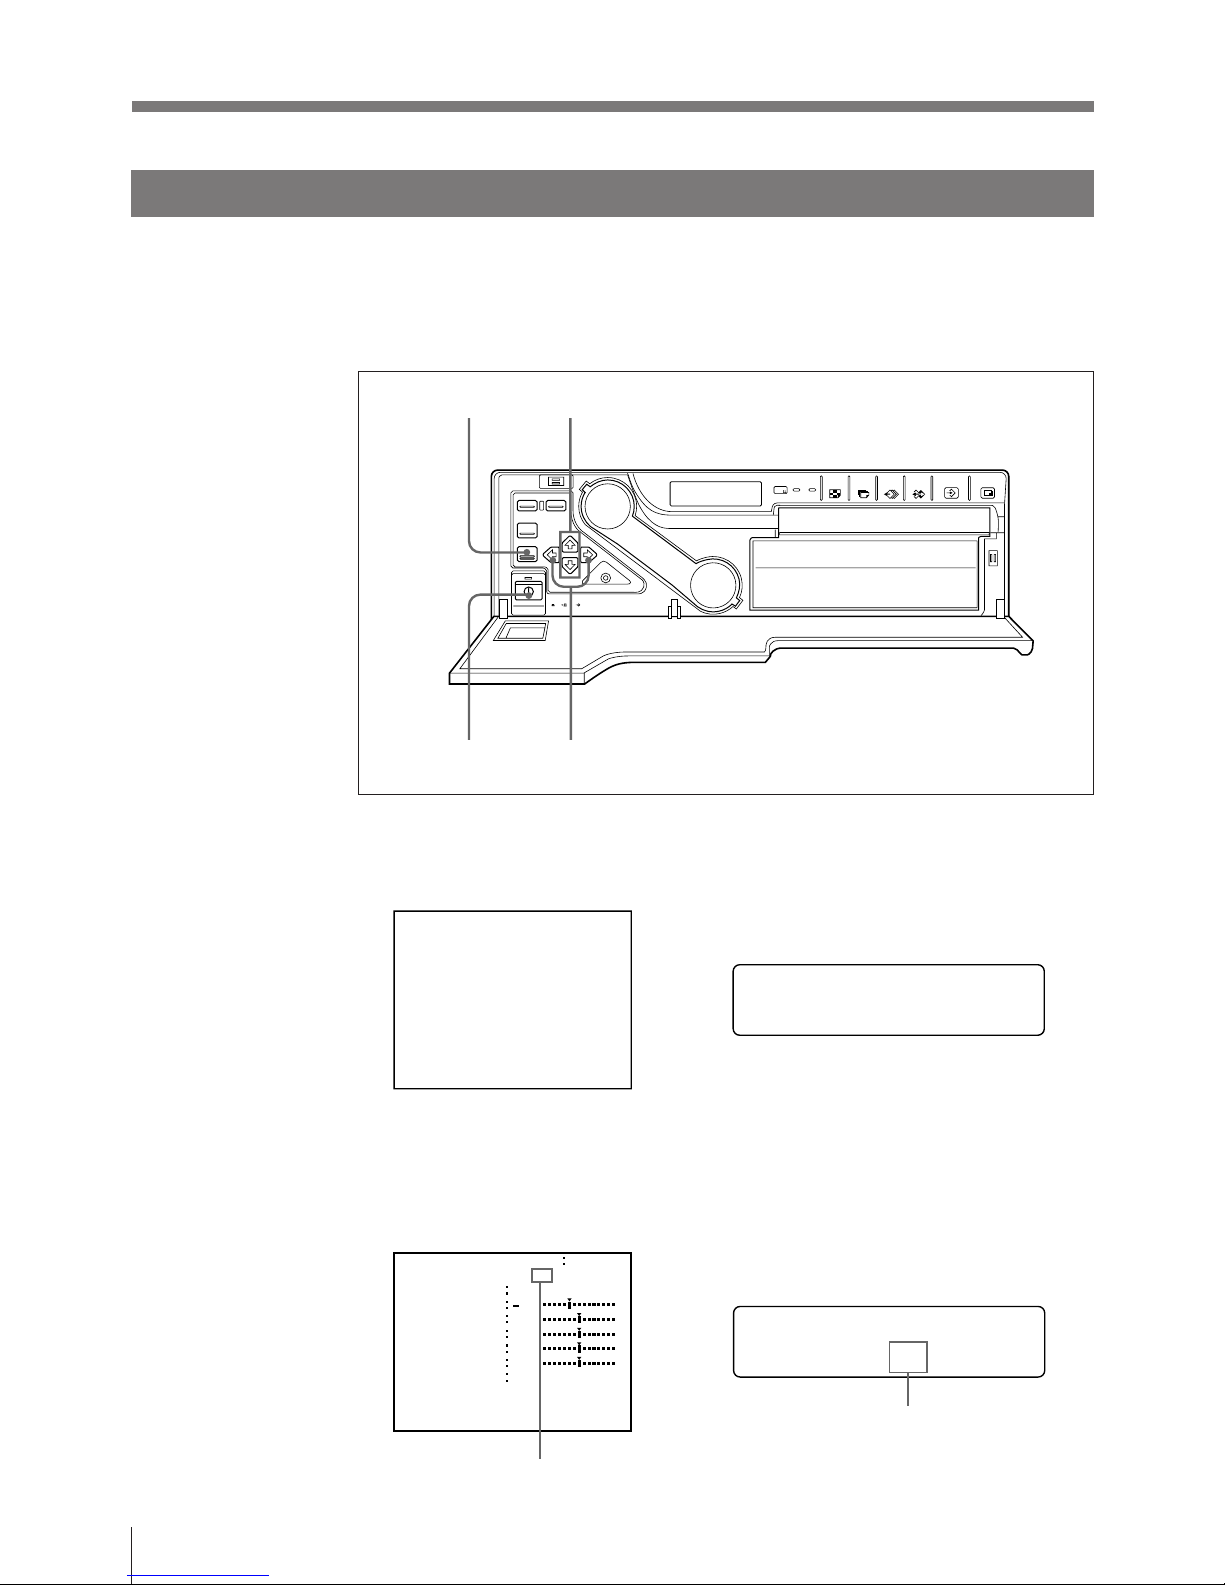
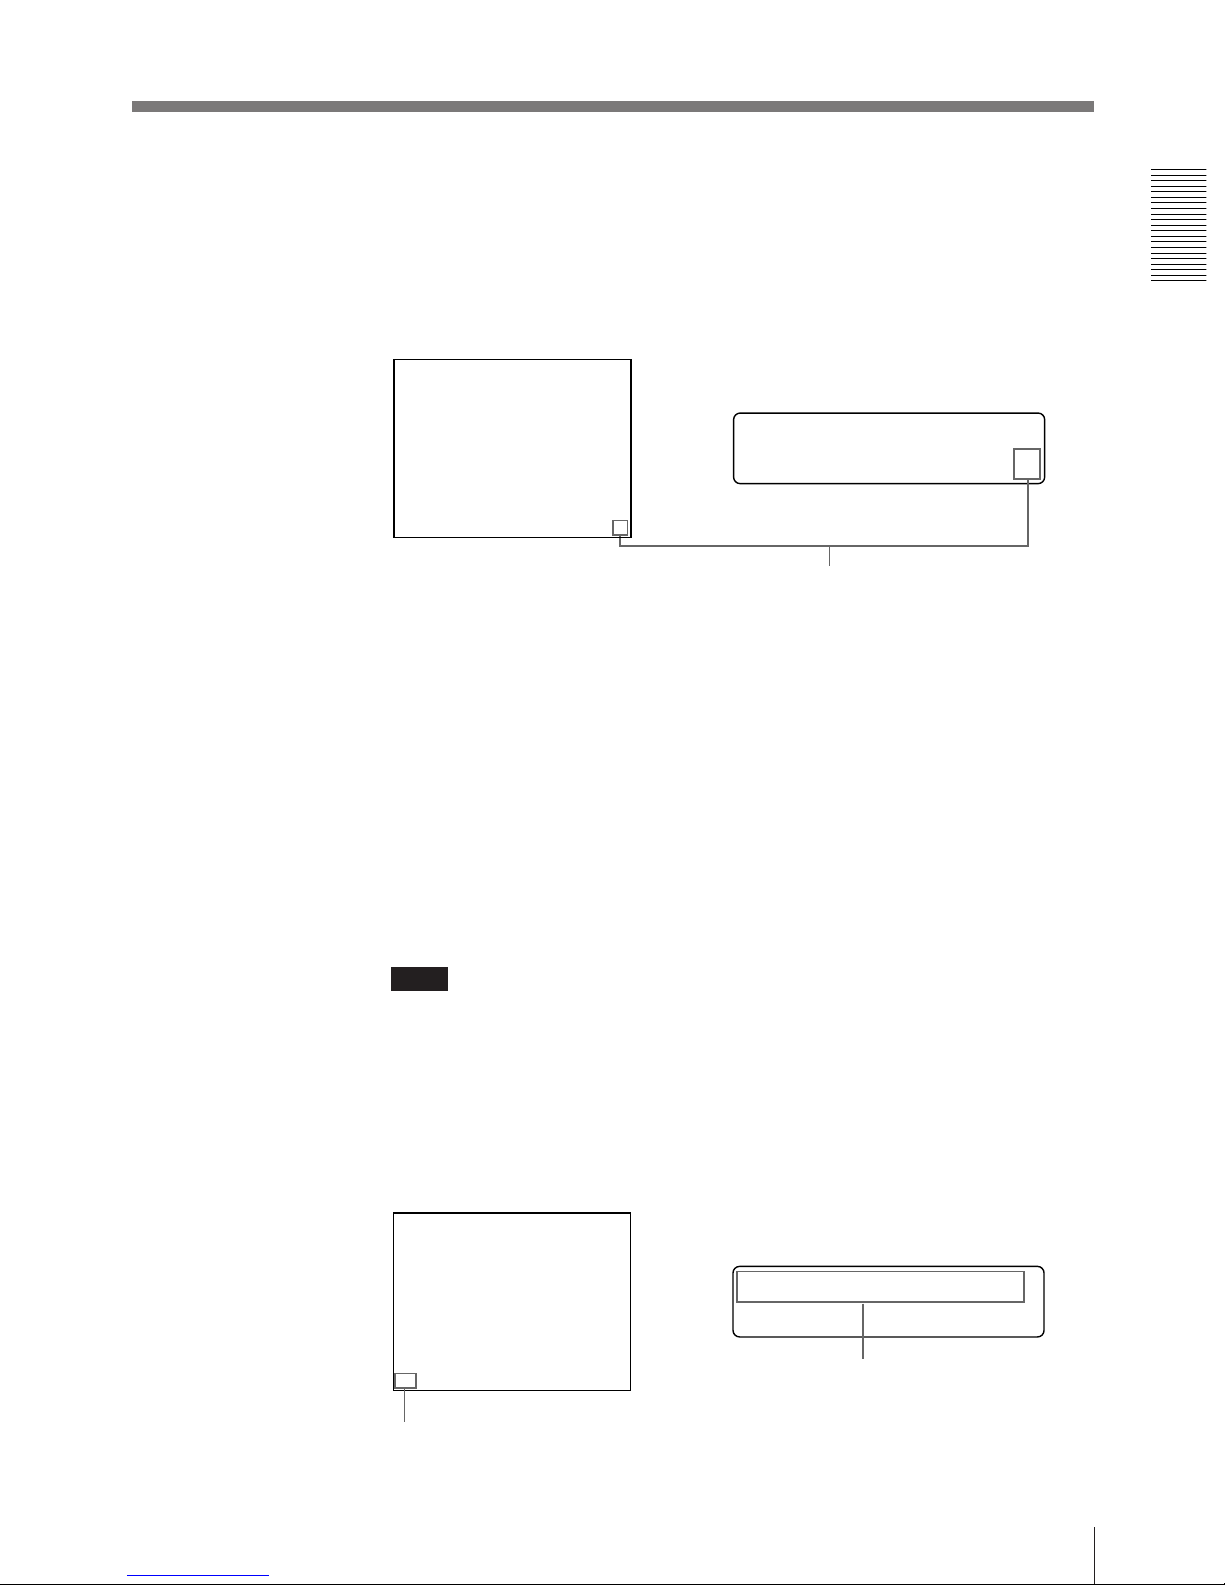
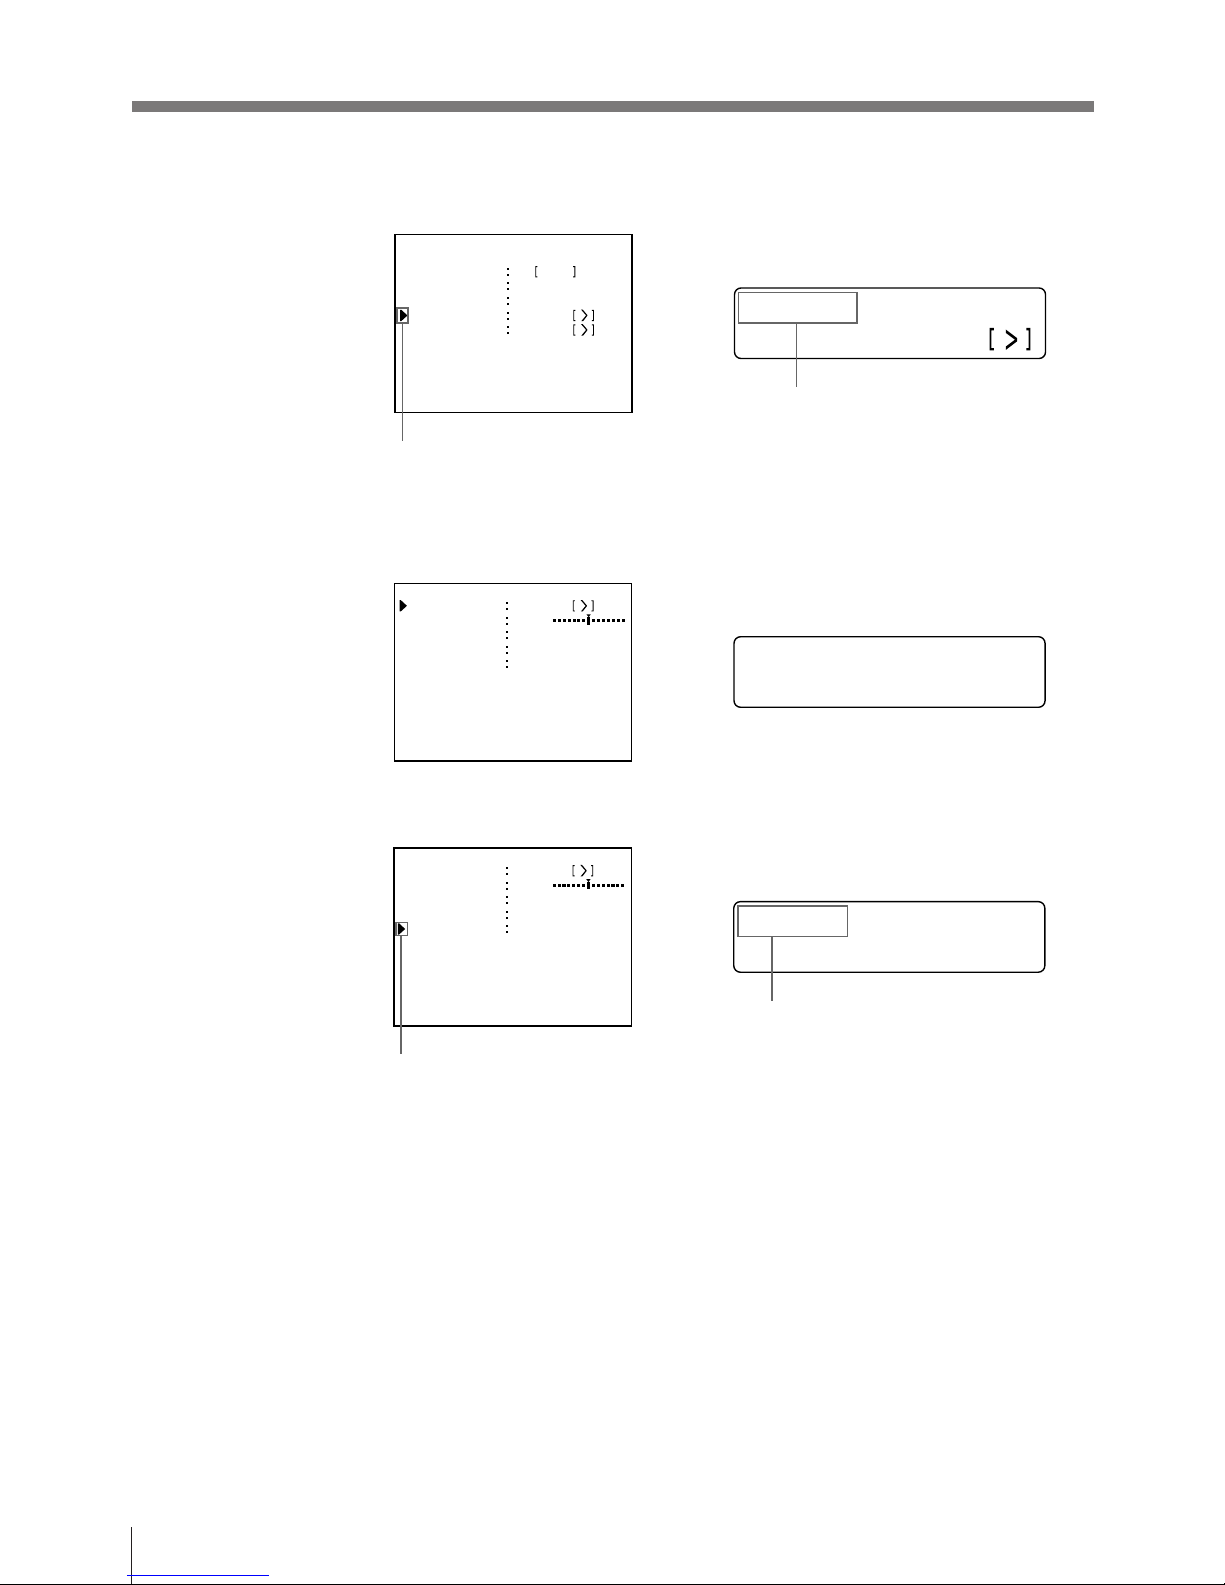
1 Turn on the video monitor and the printer.
The following appears.
Display IN in capital letters by pressing the ı
or ∫ button, INPUT SETUP appears.
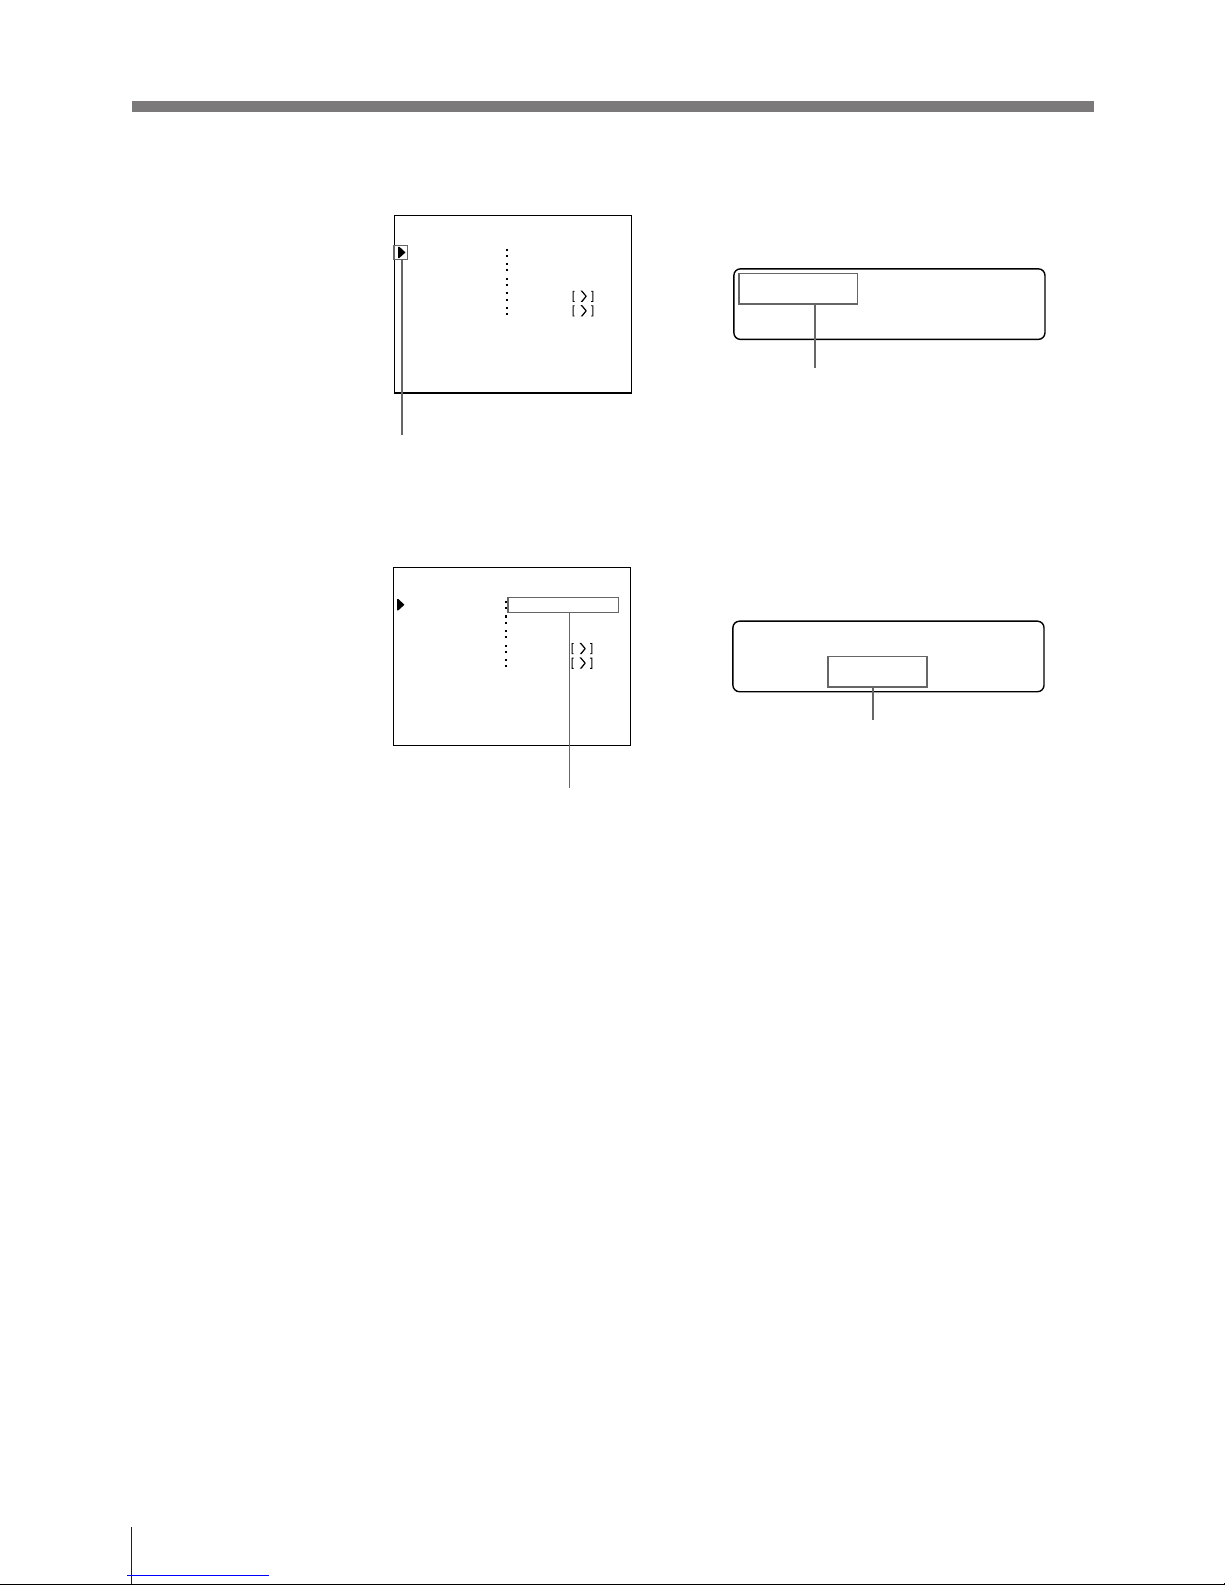
2 Press the MENU button.
The screen previously poened appears.
3 Select IN by pressing the ı or ∫ button.
By switching IN to green with the
ı or ∫ button, INPUT SETUP
appears.
Printer window display
Video monitor screen
2, 6 4
1
3, 5
Q 1 A
1
S
Q1 A 1 S
15
Operation
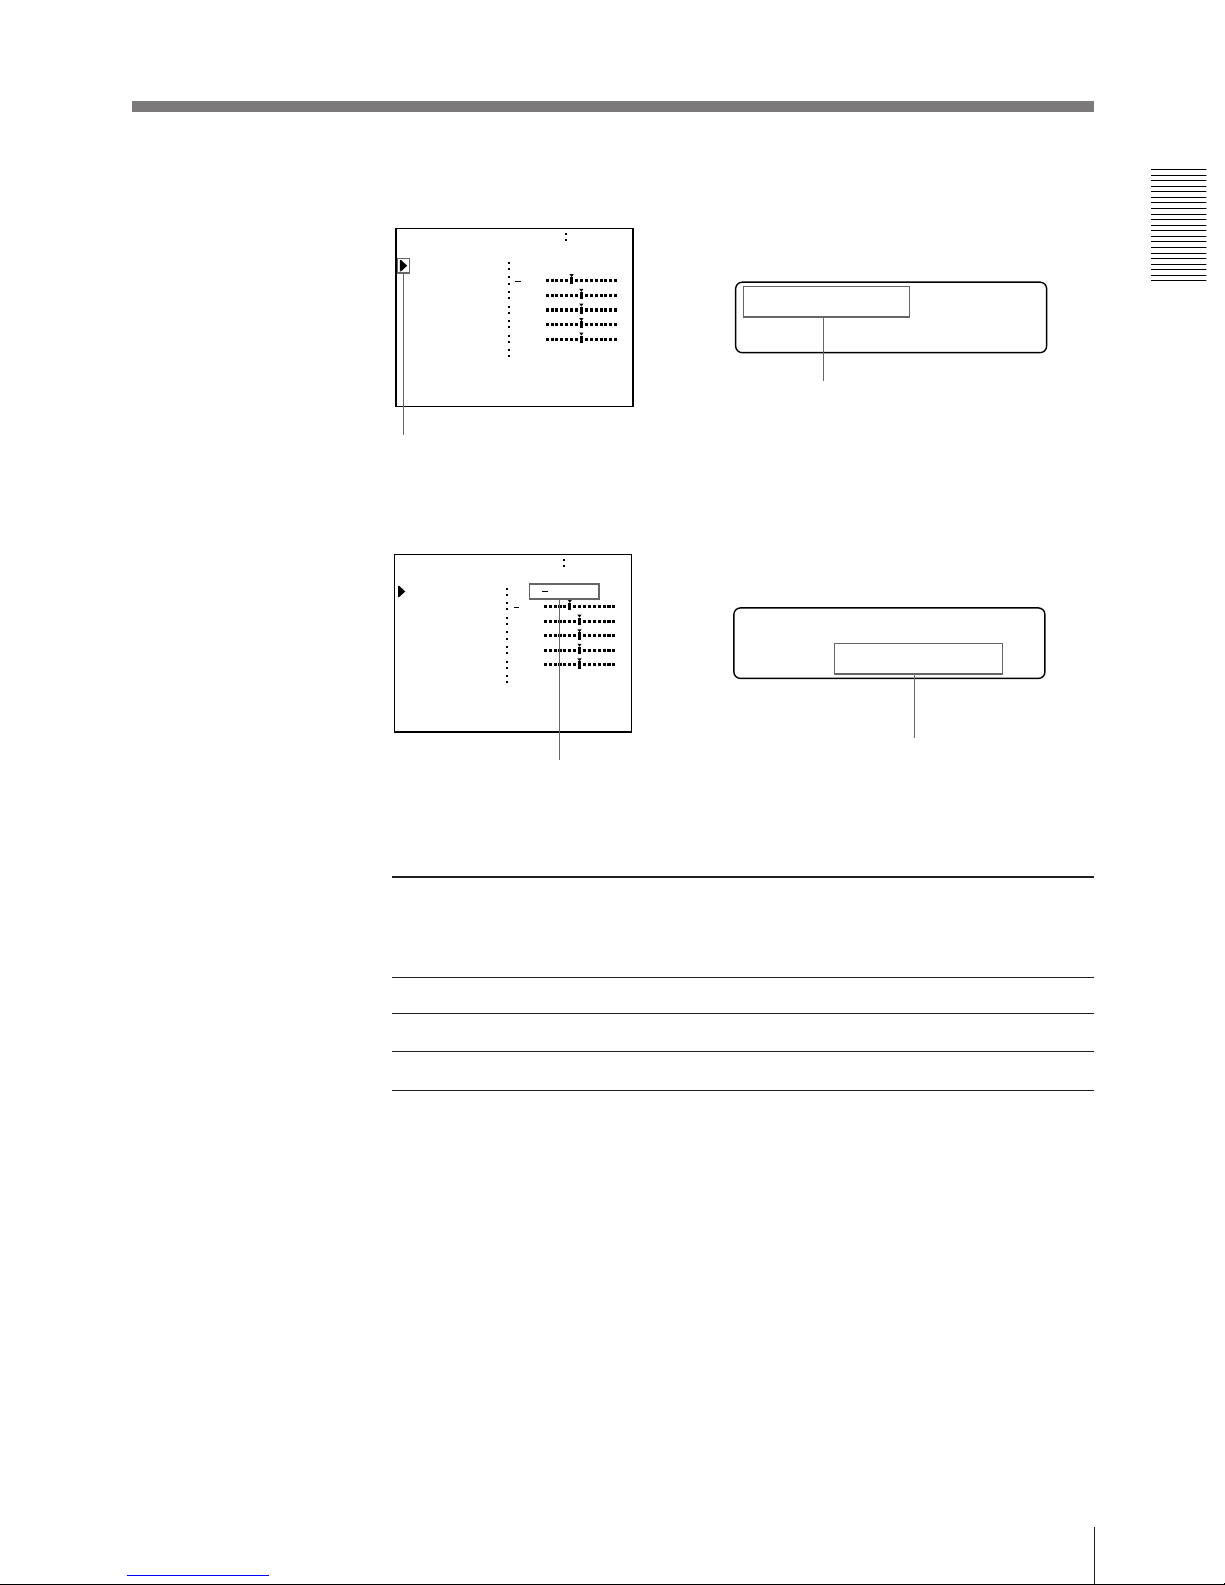
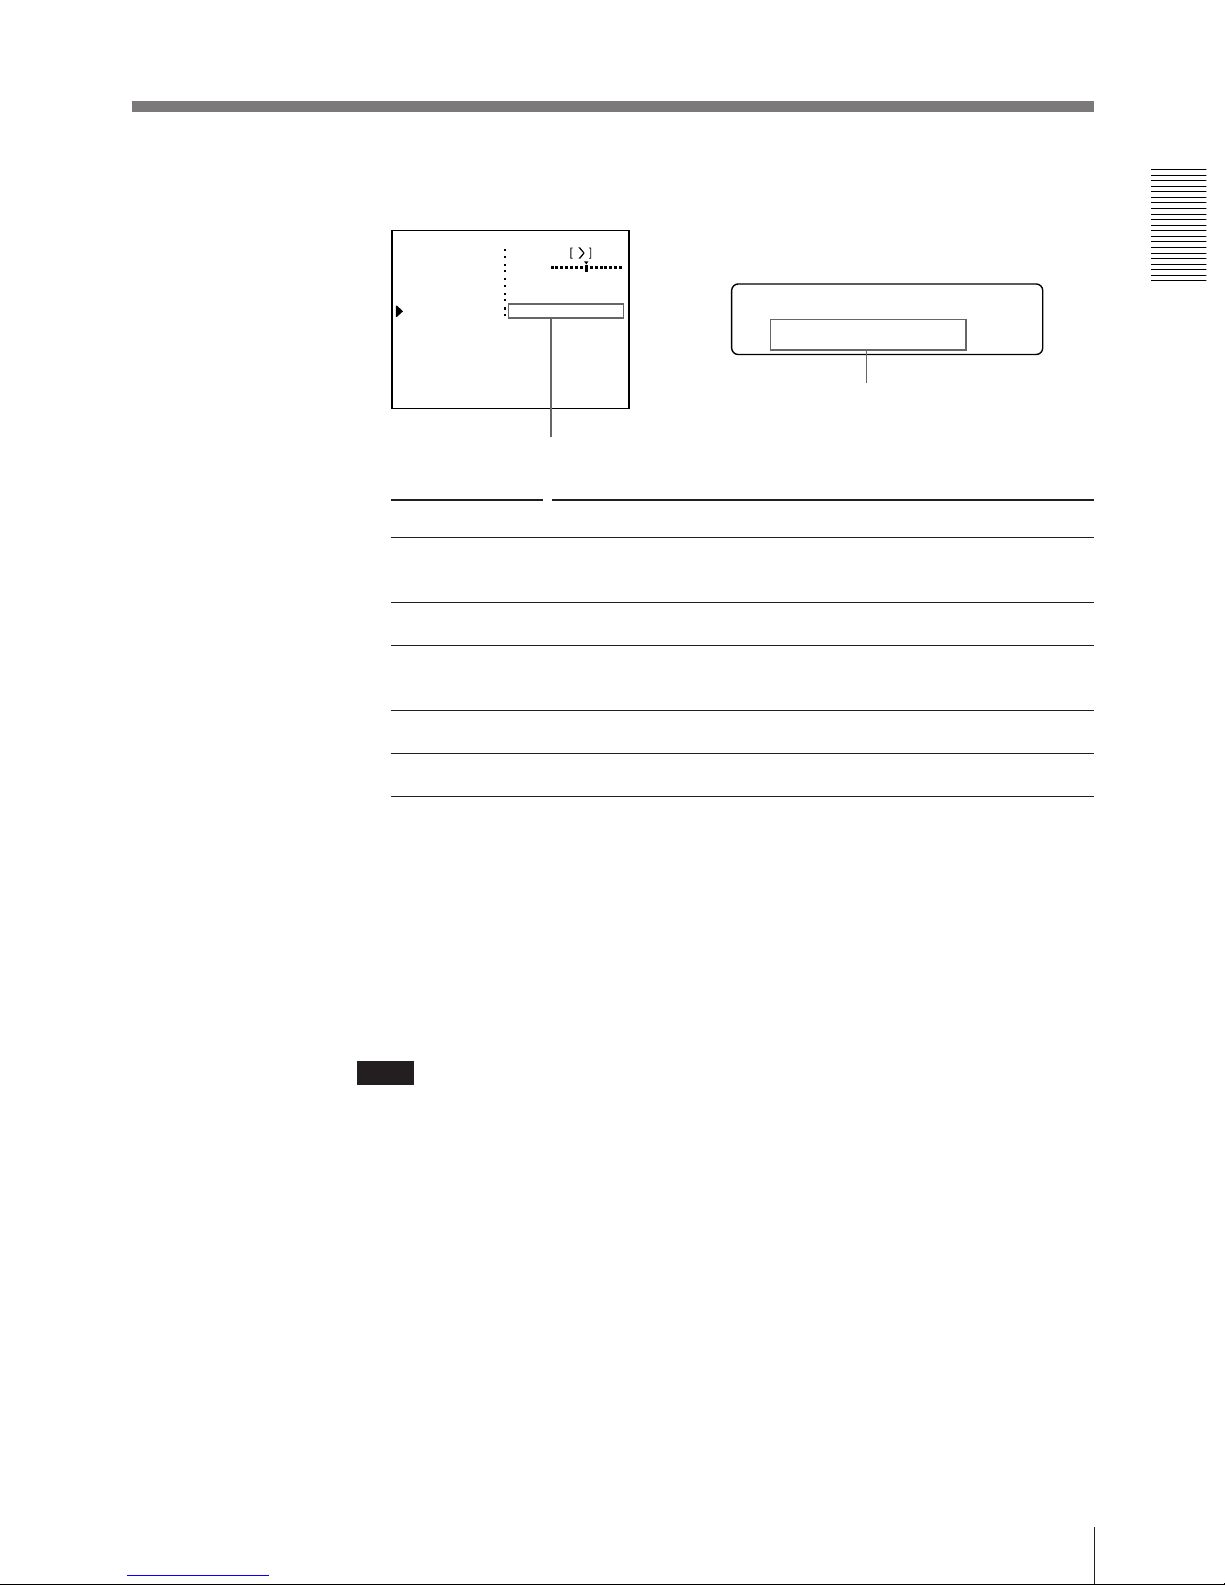
4 Select INPUT SEL by pressing the ◊ or √ button.
Press the ◊ or √ button until INPUT
SEL appears.
5 Select the input signal by pressing the ı or ∫ button.
Switch the desired input signal
to green by pressing the ı or ∫
button. The selected input
signal turns green and is
spelled out.
Disply the apelled-out input signal by
pressing the ı or ∫ button. The selected
input signal turns green and is spelled out.
Source signal of the image to be printer Video monitor and
printer window
display (the selected
input signal is
spelled out)
Signal from video equipment connected to the VIDEO INPUT connector V n VIDEO
Signal from video equipment connected to the S-VIDEO INPUT connector S n S VIDEO
Signal from video equipment connected to the RGB/SYNC INPUT connectorsa)R n RGB
a) only for the UP-2800.
INPUT SEL
:
VIDEO/ sv / r
I NP U T SE T UP COLOR n n n
GAI N
I NP U T SE L
/ COL / LAY / PRN/ I N / OUT /
HUE
COLOR
OFFSET
Q 1 A
1
S
0
0
0
2
VIDEO/ SV/RGB
AGC
OFF
/
OFF
Position the cursor to INPUT SEL
by pressing the ◊ or √ button.
6 Press the MENU button.
The regular screen appears.
INPUT SEL
:
v/S_VIDEO/r
I NP U T SE T UP COLOR n n n
GAI N
I NP U T SE L
/ COL / LAY / PRN/ I N / OUT /
HUE
COLOR
OFFSET
Q 1 A
1
S
0
0
0
2
V/S VI DEO/R
AGC
OFF
/
OFF
16
Operation
Making Full-Size Printouts
This section explains how to make a full-size printout. The operations described
here constitute the basic procedure for making a printout.
Before making a full-size printout
• All connections should have already been made. (see page 65)
• Ensure that the appropriate ink ribbon cartridge/paper set is being used and that
they are correctly loaded. (see pages 9, 12 and 99)
• Select the input signal to be used to make a printout. (see page 14)
• Set the printer to store one full-size image into memory. (see page 32)
• Select the appropriate memory page. (see page 31)
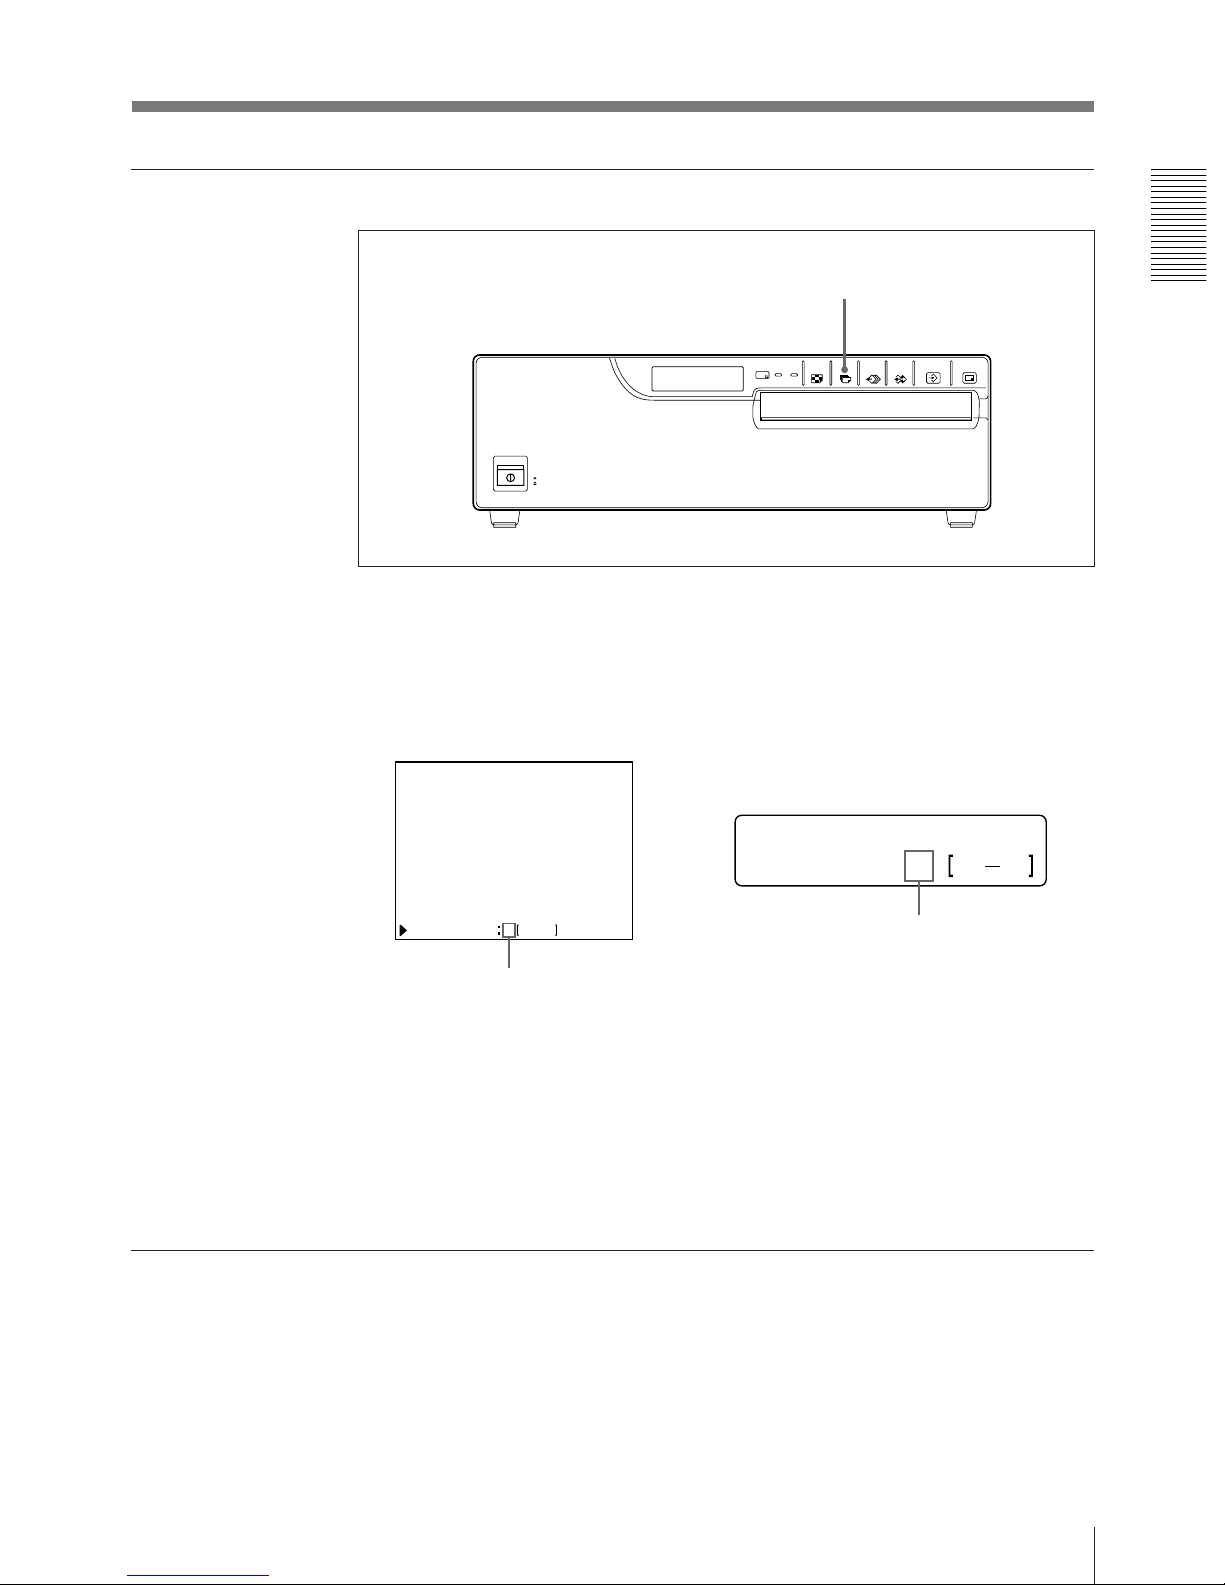
1 Turn on the video monitor and the printer.
2 Start the video source.
This operation is done using the controls of the video equipment acting as the
source.
Video monitor screen
Printer window display
Shows that the image from source equipment is
displayed on the screen.
1
3
4
Q1 A 1 S
Q 1 A 1 S
STOP button
SOURCE/MEMORY button
DISPLAY
OFF
button
17
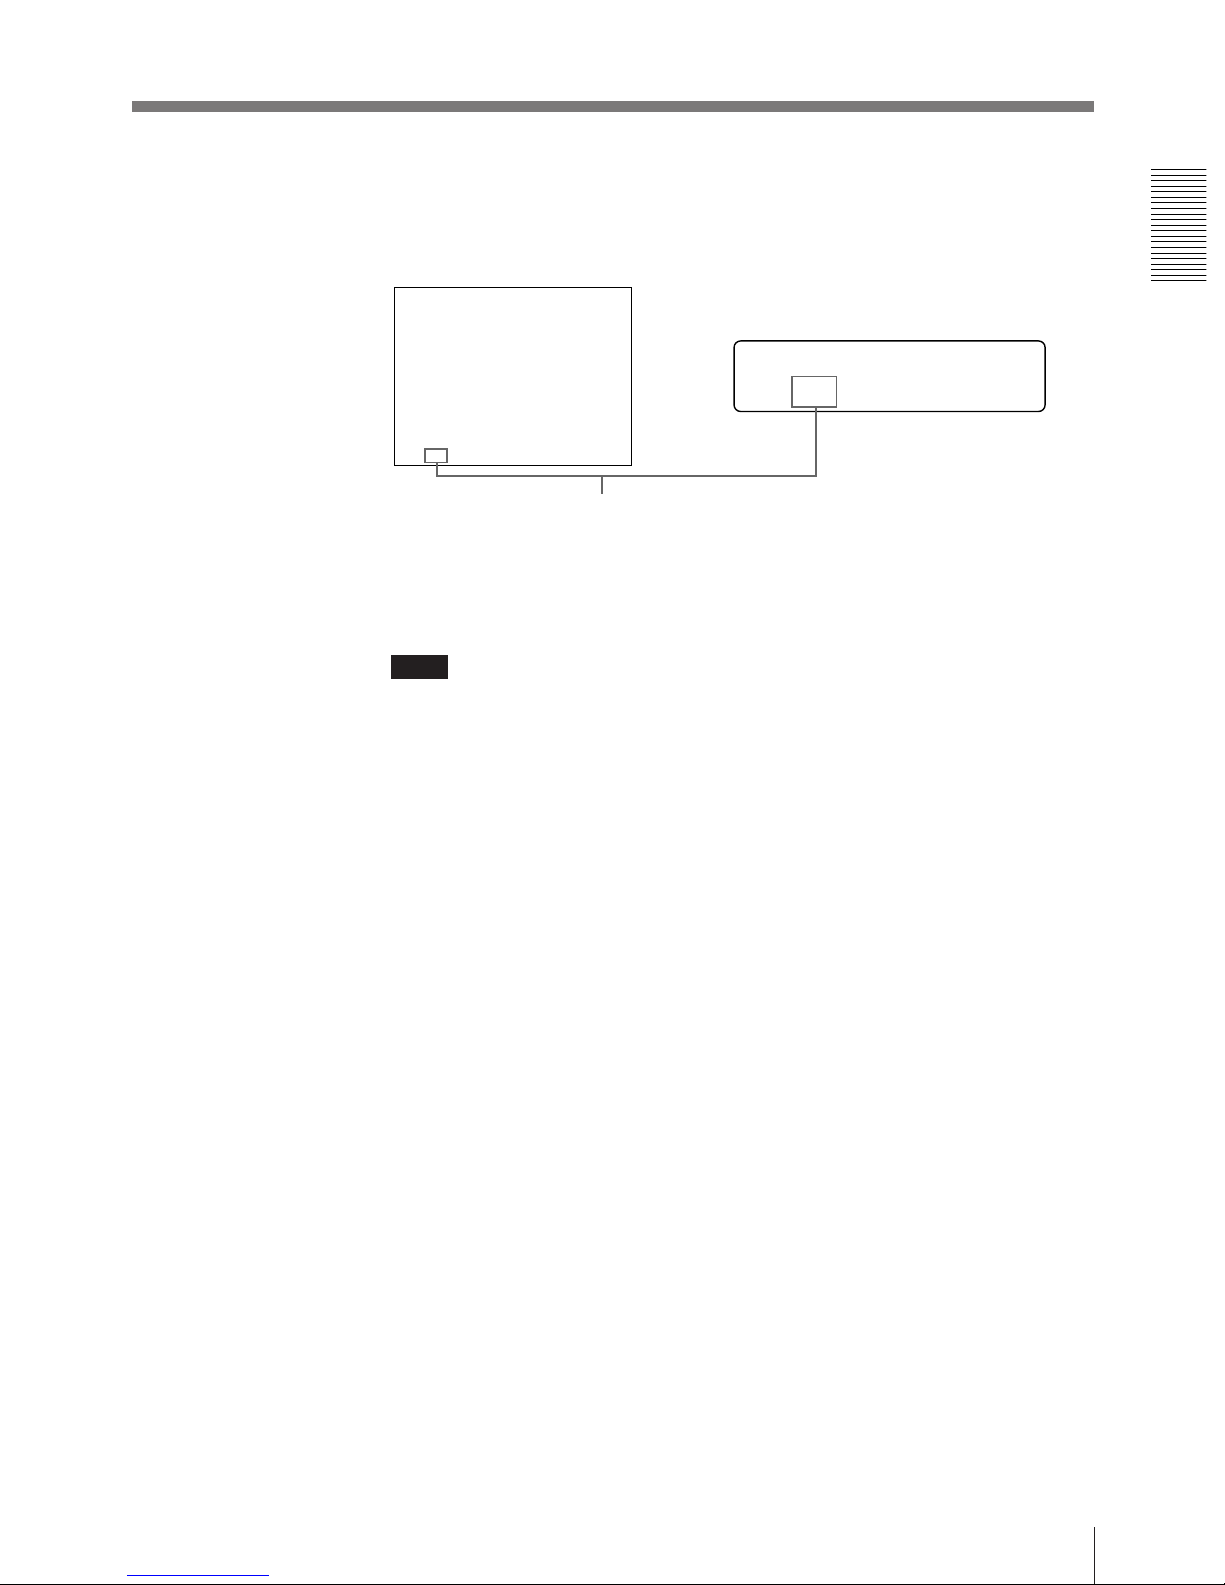
Operation
Blinks while printing
During color printing: Printing start - yellow - magenta cyan - printing end
During black and white printing: Printing start - white printing end
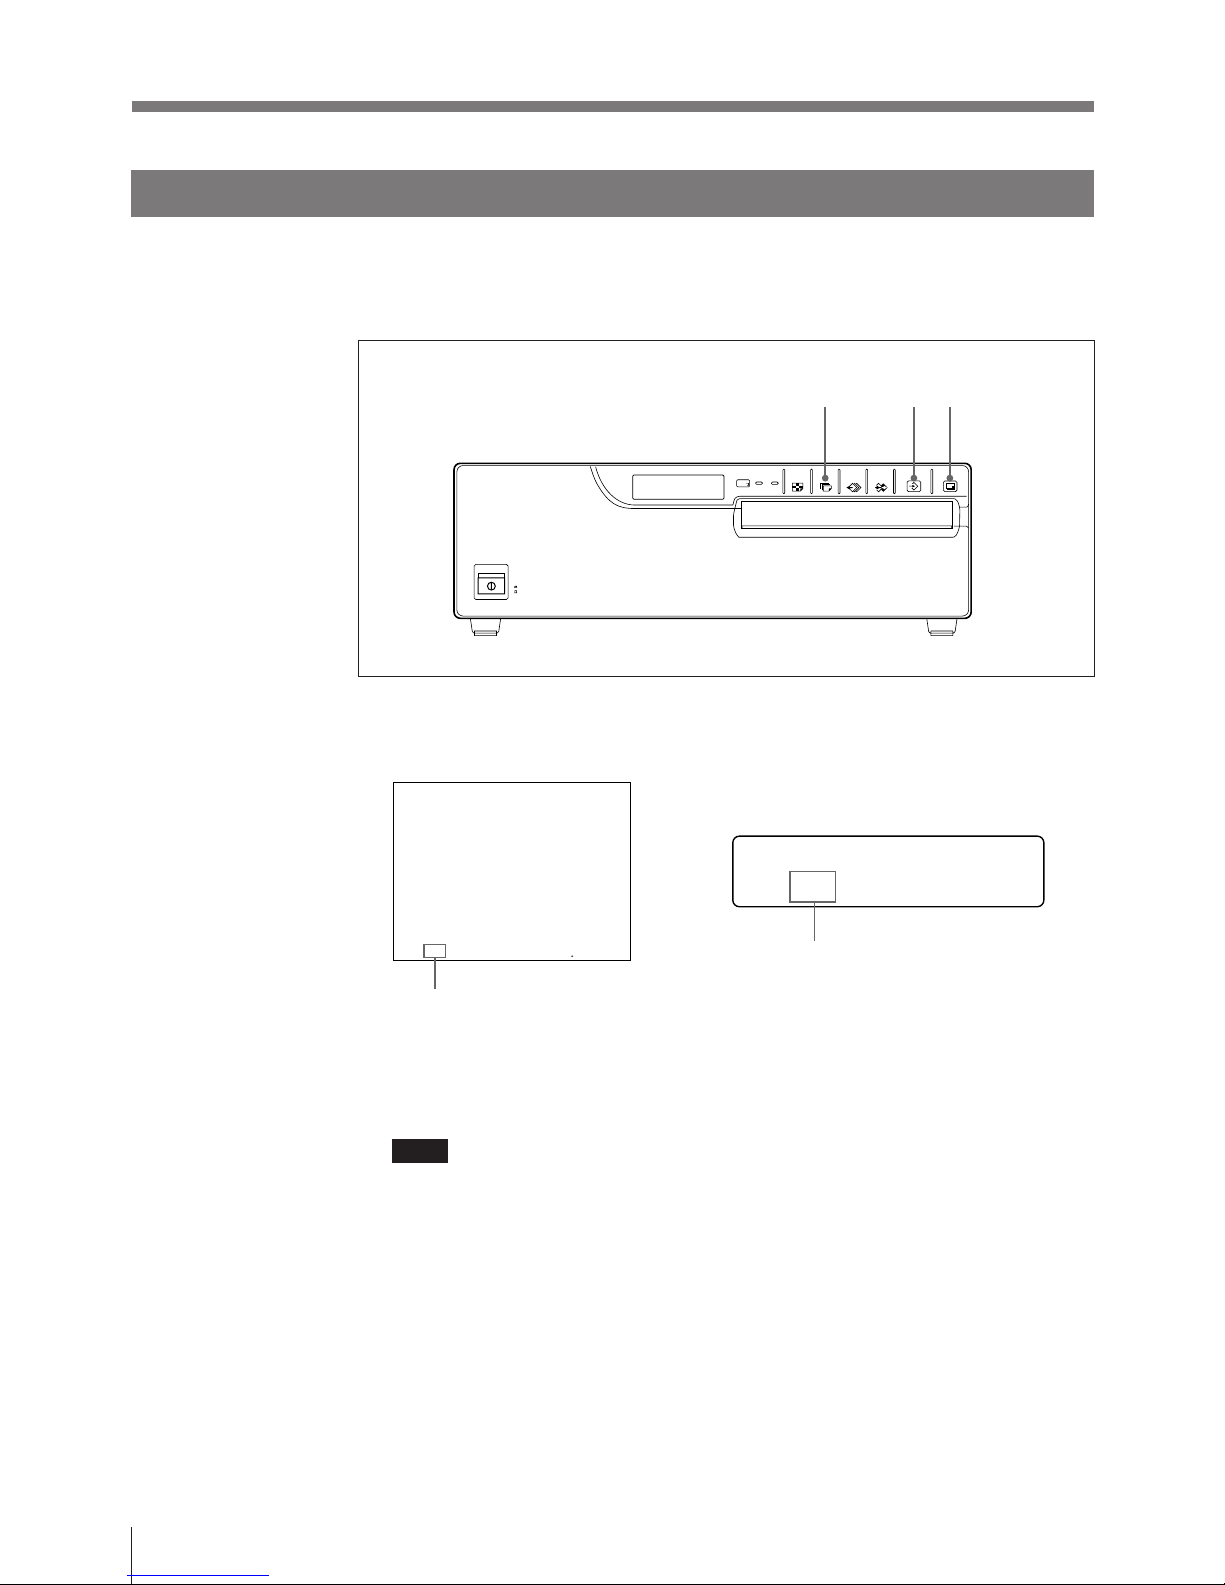
Does not blink while printing
Shows that the image captured in memory is
displayed on the monitor.
Q1 A 1 M
Q 1 A 1 M
3 Press the CAPTURE button at the instant when the image you want to print
appears on the screen.
The image is captured into memory. The memory image is displayed on the
screen. Which image appears after this, the source image or memory image,
depends on the setting made with AUTO LIVE on the FUNCTION SETUP
menu (page 36).
If the stored image is blurred
A quickly moving image may be blurred when printed. Should this occur,
change the MEMORY setting to FIELD on the LAYOUT SETUP menu.
Although the blur should be eliminated, the ultimate print quality will be
slightly degraded.
For details, see page 29.
To change the image in memory
1 To display the source image when the memory image is displayed on the
screen, press the SOURCE/MEMORY button .
2 Press the CAPTURE button at the instant the image you want to print
appears. The previous image is replaced with the new one.
Note
If you turn off the power, the image stored in memory will be lost. Should this
happen, store the image into memory again after turning on the power. If no
image is stored in memory, the printer will not print even if you press the
PRINT button.
4 Press the PRINT button.
It takes about 35 seconds to make a printout.
The printout pops out from the paper tray.
The color which is currently being printed is
displayed. This indication changes as
printing progress.
Q1 A 1 M
Q 1 A 1 M
YE L L OW PR I N T I NG
Continue to next page m

18
Operation
Making Full-Size Printouts (continued)
Note
• Do not turn off the power during printing.
If you do so, paper may not be ejected and may jam in the printer.
• Do not pull the paper from the paper cover until printing has been completed.
• You can not change the printer application mode or settings on the WINDOW
SETUP menu during printing.
To stop printing
Press the STOP button. Printing is abandoned and the paper is ejected to the print
tray.
If the printer does not print
The printer will fail to print in the following cases:
• While an error message is displayed on the monitor screen and printer window
display.
— In this case, the paper is ejected without printed even if you press the PRINT
button. Proceed as described in “Error/Warning Messages” on page 103.
• Image is not stored in the memory.
— Image data stored in the memory is lost if you turn off the power. Cature the
image into memory again, then press the PRINT button.
When you want to see an image that is hidden below a screen
message
You can erase the screen message from the video monitor screen by pressing the
DISPLAY OFF button. The screen message disappears. To disply a scerrn
message, press the DISPLAY OFF buton again.
If a black line appears on the printout
Sometimes, a black line appears on the printout, although it does not appear on the
video monitor. This black line can be eliminated from the printout. (see “Changing
the Printout Size/Printout Area” page 82)
If the image quality of printouts is not satisfactory
You can adjust the image quality of the printouts. (See “Adjusting the Printout
Color” pages 75)
Notes
When storing your printouts:
• Avoid storing the printout in a location subject to high temperatures, high
humidity, excessive dust and direct sunlight.
• Do not stick tape on a printout. Also, avoid leaving a plastic eraser on a printout
or placing a printout in contact with materials which contain plasticizer (under a
desk mat, for example).
• Do not allow alcohol or other volatile organic solvents to come into contact with
the printouts.
19
Operation
Making Multiple Copies of Identical Printouts
You can make up to 9 copies of identical printouts.
The following two methods are available to set the number of printouts.
• On the menu
• Using the PRINT QTY button. However, you cannot decrease the number of
printouts.
The following steps can be performed either before you start printing or while
printing. You can change the designated number of copies any time during
printing.
Setting the printout quantity on the menu
1, 5
3
2, 4
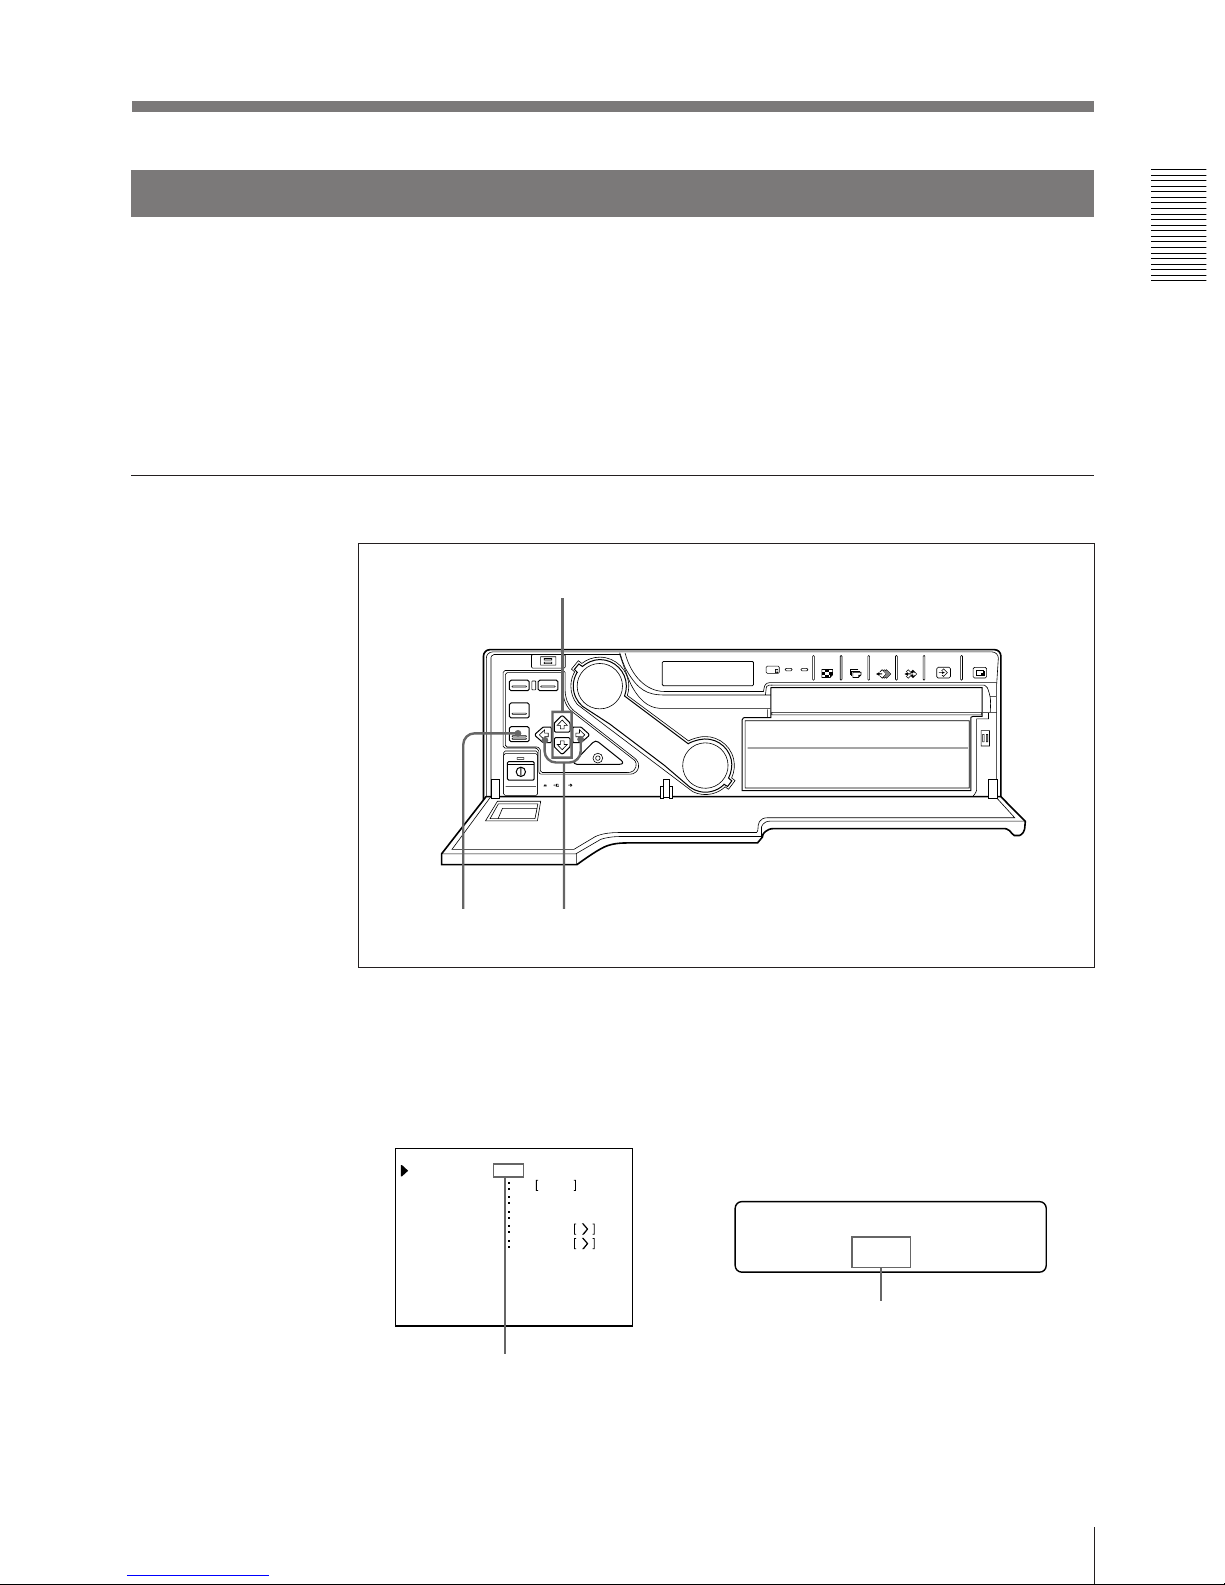
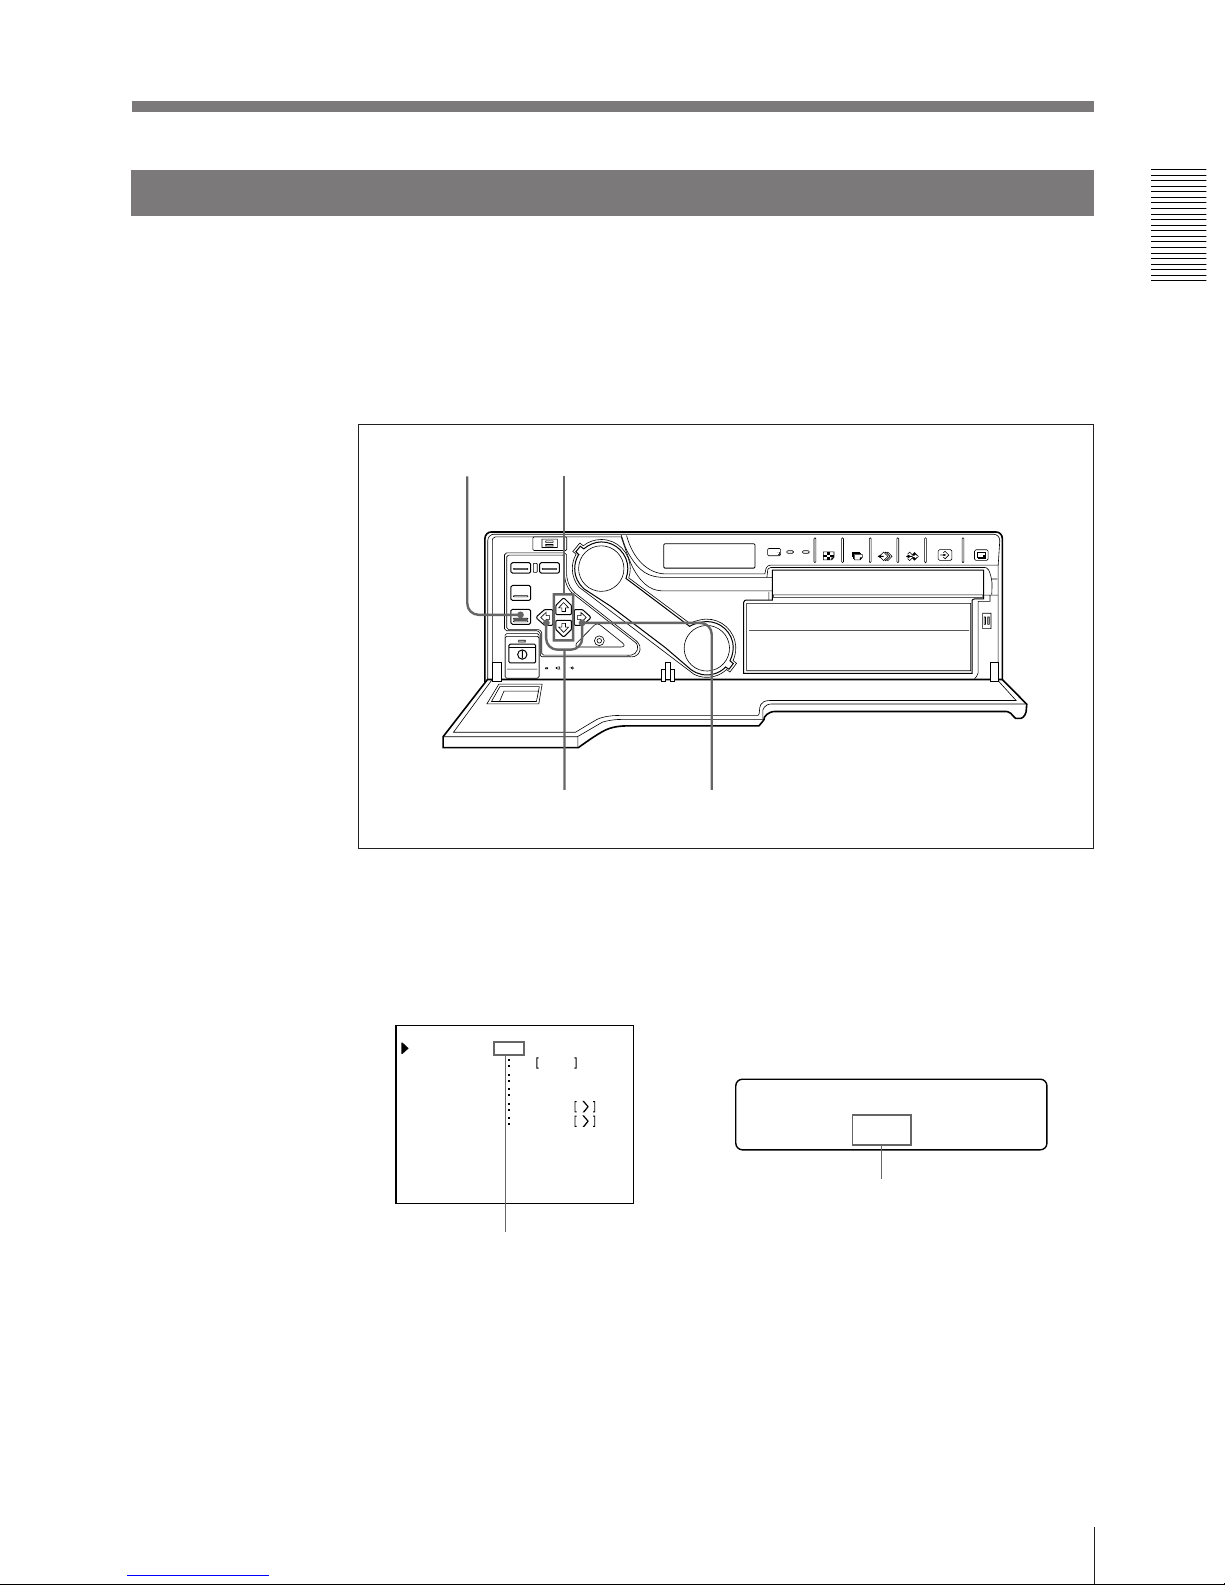
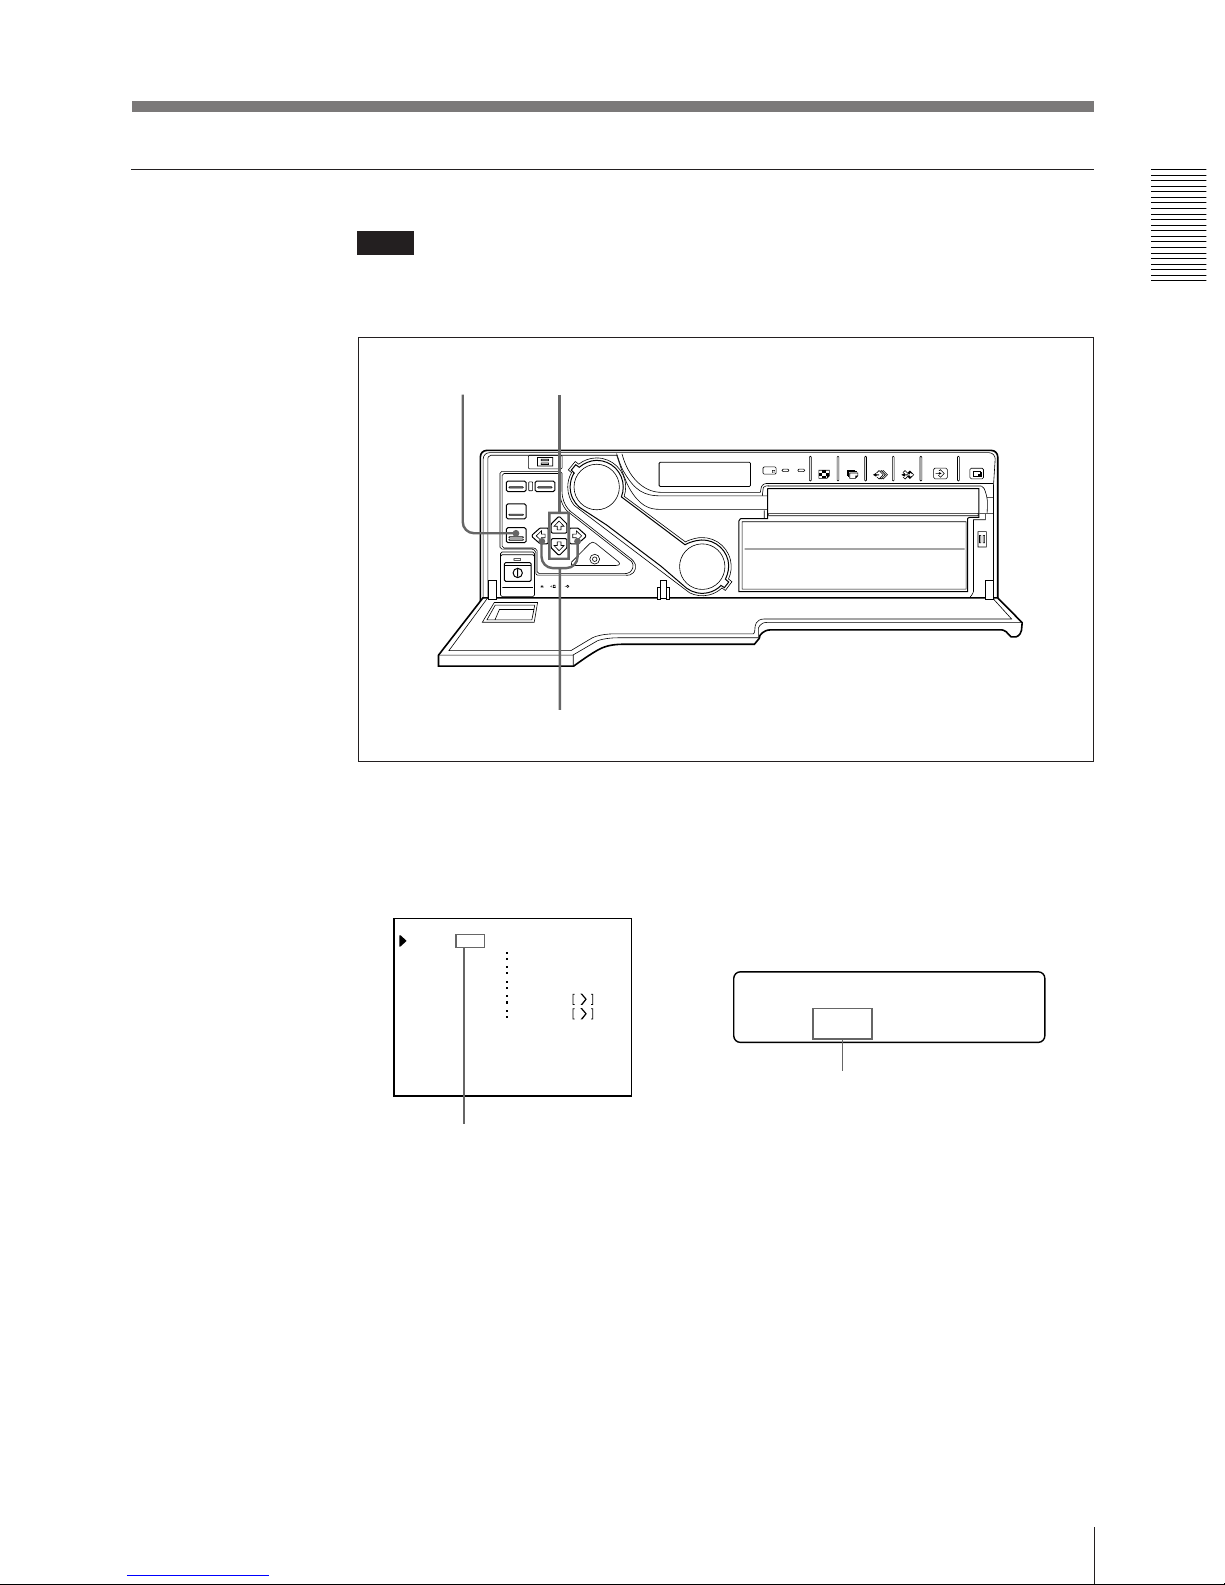
1 Press teh menu botton.
The menu previously opened appears.
2 Select PRN by pressing the ı or ∫ button.
The PRINTER SETUP menu arrears.
Display PRN in capital letters by
pressing the ı or ∫ button.
By switching PRN to green by
pressing the ı or ∫ button,
PRINTER SETUP appears.
PRINTER SETUP
/ c / I / PRN / i / o /
PR I NTER SETUP CO LOR n n n
/ COL / LAY / PRN/ I N / OUT /
Q 1 A 1
2
HF S
9 1~9
SYSTEM PRE SS
P R I NT QT Y
INTERVA L
OFF / ON
GAMMA
S / NORMA L / H
FUNCT ION PRESS
Continue to next page m
20
Operation
Making Full-Size Printouts (continued)
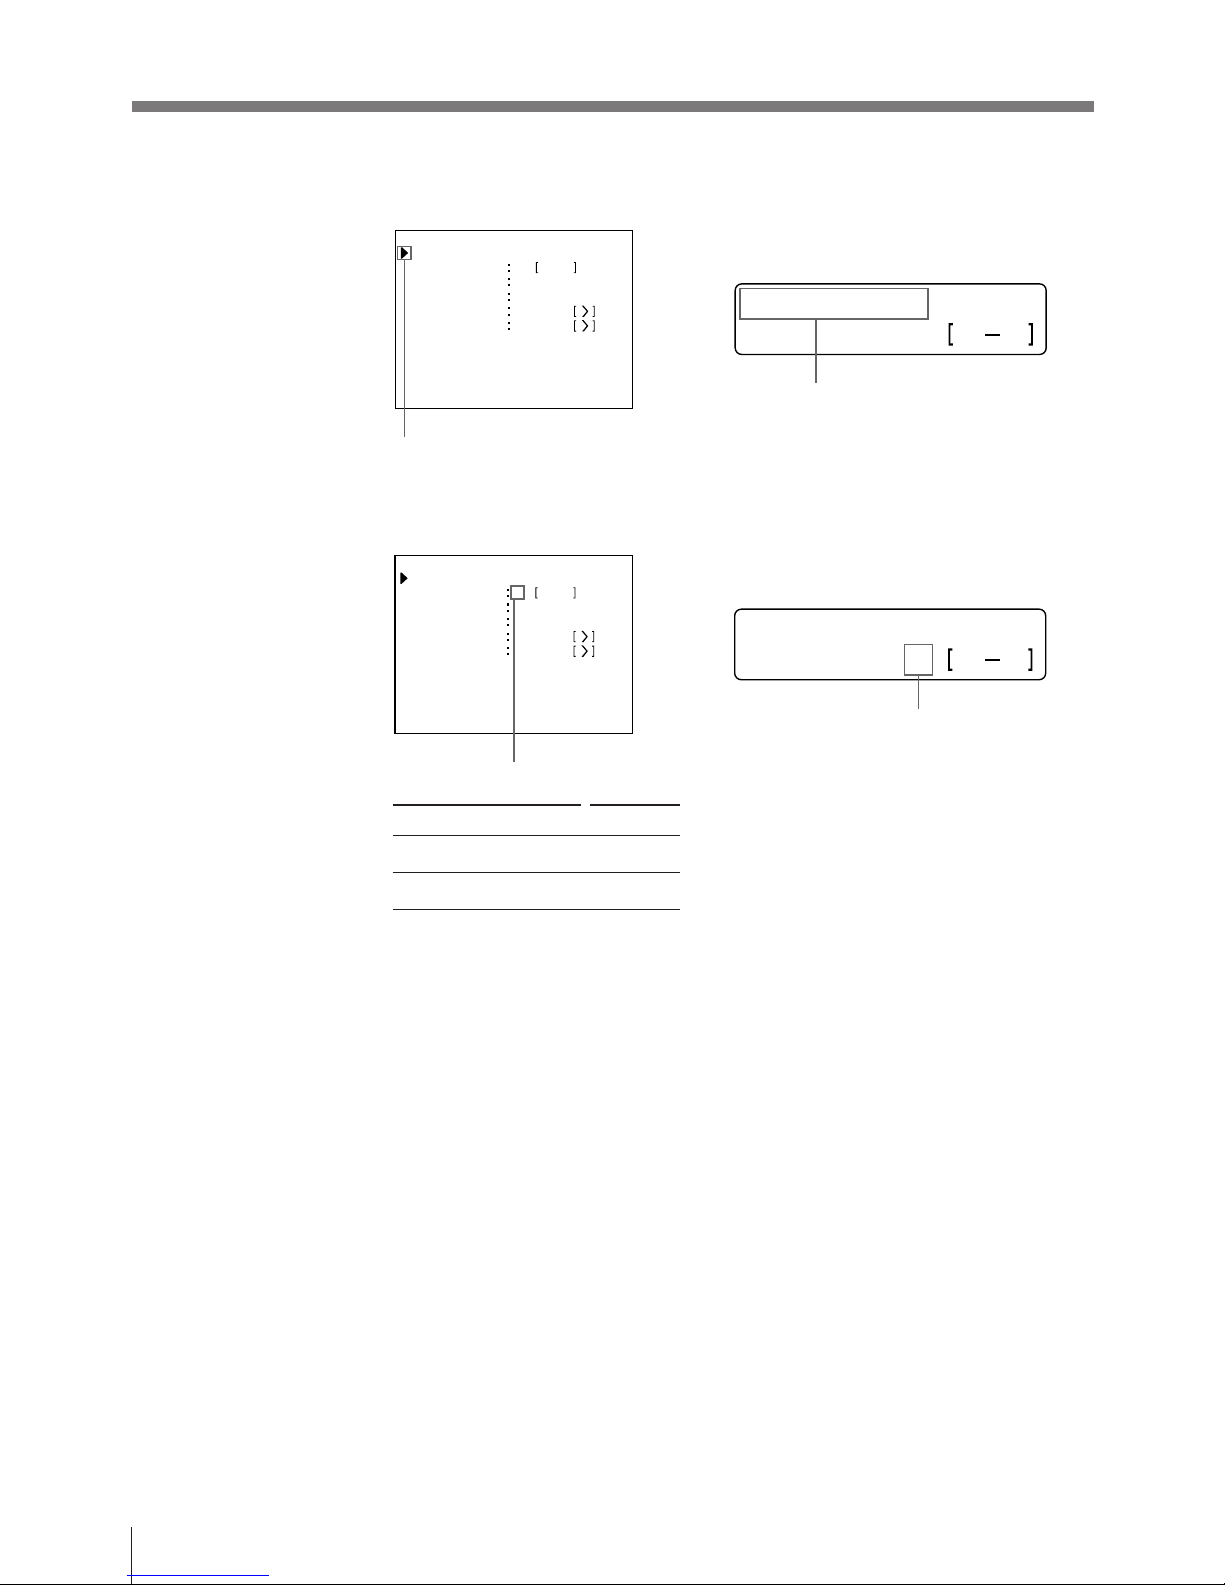
3 Select PRINT QTY by pressing the ◊ or √ button.
4 Set the number of copies by pressing the ı or ∫ button.
Press the ◊ or √ button until PRINT QTY appears.
When setting Button
To increase the quantity ∫
To decrease the quantity ı
Quantity of copies
5 Press the MENU button.
The regular screen appears.
PR I NT QTY
:
9
PR I NTER SETUP CO LOR n n n
/ COL / LAY / PRN/ I N / OUT /
Q 1 A 1
2
HF S
9 1~9
SYSTEM PRE SS
P R I NT QT Y
INTERVA L
OFF / ON
GAMMA
S / NORMA L / H
FUNCT ION PRESS
19
PR I NT QTY
:
9
PR I NTER SETUP CO LOR n n n
/ COL / LAY / PRN/ I N / OUT /
Q 1 A 1
2
HF S
9 1~9
SYSTEM PRE SS
P R I NT QT Y
INTERVA L
OFF / ON
GAMMA
S / NORMA L / H
FUNCT ION PRESS
19
Position the cursor to PRINT QTY
by pressing the ◊ or √ button.
Quantity of copies
21
Operation
Setting the print out quantity by using the PRINT QTY button
1 Press the PRINT QTY button.
The following screen appears.
If you do not perform any operation after you press the PRINT QTY button,
the currently set number of copies appears for 2 or 3 seconds, after which it
disappears.
PR I NT QTY
:
9
1 1–9
P R I NT QT Y
11
2 Press the PRINT QTY button until the desired number appears.
Repeatedly pressing the PRINT QTY button increases the quantity up to 9 and
stops.
To decrease the number of copies
When decreasing the number of copies, you have to change the number on the
menu.
If the paper runs out during printing
Load the paper into the paper tray and press the PRINT button. The printer prints
the remaining copies.
1, 2
The currently set number of copies
appears whin a couple of seconds.
The currently set number of copies
appears whin a couple of seconds.
22
Operation
Making Full-Size Printouts (continued)
1
Capturing Another Image While Printing
While the printer is printing, you can capture another image into another memory
page to be printed once the printer becomes free, if you select field memory mode
(page 29).
23
1
Select the desired memory page by pressing the MEMORY PAGE button.
Pressing the MEMORY PAGE button switches the memory page.
The available memory
pages appear in white.
2 Press the CAPTURE button at the instant the image you want to print appears
on the screen.
Note
If you press the CAPTURE button to caputwe the image into memor page
whose image is being printed, “PLEASE WAIT PRINTING MEMORY”
appears and the image cannot be captured.
The currently selected memory page.
Q 1 A1
1
S
S
Q1 A1
1
23
Operation
3 Press the PRINT button.
The image captured in step 2 is queued. The image is printed as soon as all
previous printing jobs have been completed.
Memory page whose image has been queued for printing
(blinks white on the video monitor)
The memory page display returns to white on the video
monitor once printing has been completed.
4 To queue another memory page, repeat steps 1, 2 and 3.
Note
Another image cannot be stored into a memory page into which an image has
already been queued for printing. In such a case, the “PLEASE WAIT
RESERVED MEMORY” appears.
Q1 A1
Q 1 A 1
1
1
M
M

24
Operation
A B C
SYU
SYU
SYU
ABC
123
A B C 123
XYZ 456
DEF DEF
DEF DEF
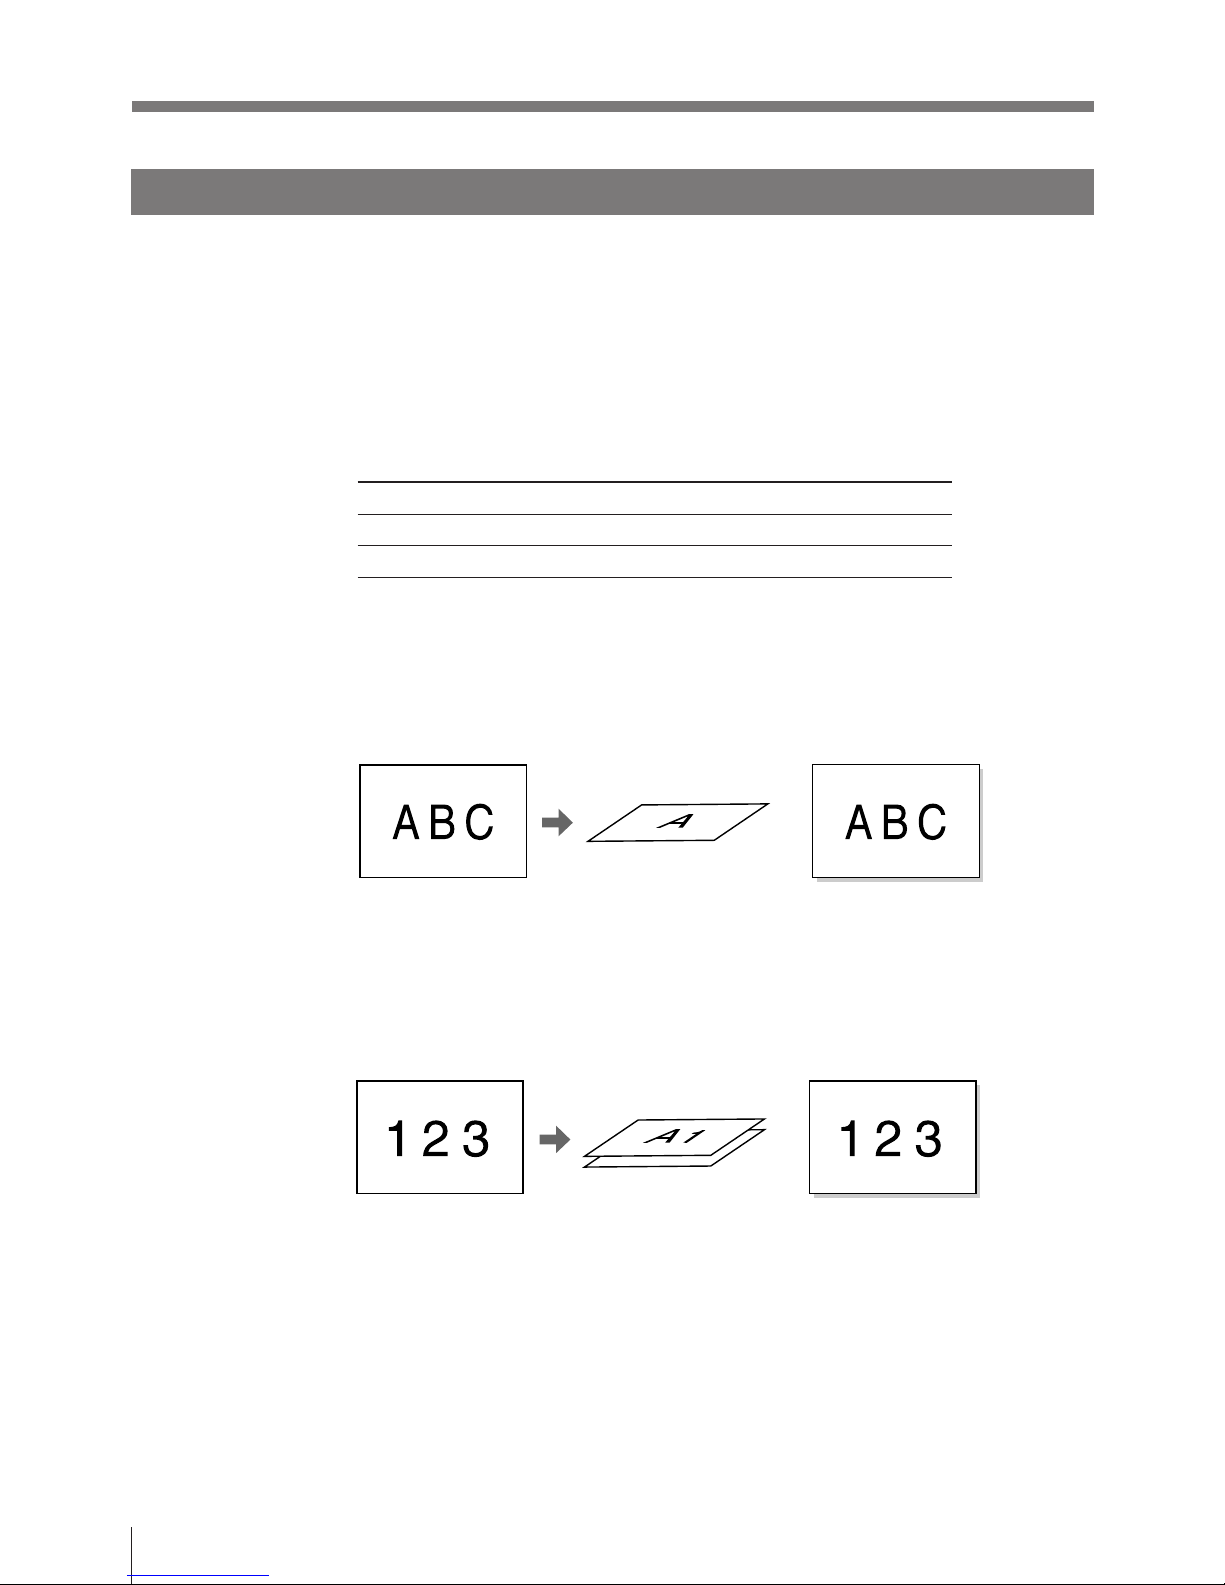
Making Variations of Printouts
You can store various kinds of images into memory and make variations of
printouts using the images captured into memory.
Variations of printouts that the printer can produce
The following variations of printout of the images stored in memory can be made.
Printout of a full-size
image
Printout of four
reduced images
Printout of 16
reduced images
Printout of identical
images
c)
a) In this 2H mode (to make two reduced images), the image in the center of the screen is captured in
memory.
Printout for stickers
b)
2H of MULTI PIX
The range to be
captured
Printout
Video monitor
Printout of two
reduced images
a)
ABC
123
ABC
123
b) There are two types of sticker-printouts.
In one type, all images in one printout are identical. In the other, all images in one printout are
different.
c) This can be used for identification photographs and there are two types.
In one type, the size of one image in one printout can be adjusted freely. In the other, the size of one
image is fixed.
25
Operation
Selecting the Printer Application Mode
The unit allows you to make printouts according to your need, such as regular
printouts, printouts for identification photograph and printouts for sticker.
You can select the application mode of the printer on the SYSTEM SETUP menu.
When you use the printer first time, the standard application mode for regular
printouts is selected.
Select the application mode according to what kind of printouts you want to make.
1 Press the MENU button.
The menu previouly opened appears.
2 Select PRN by pressing the ı or ∫ button.
The PRINTER SETUP menu apperas.
By switching PRN to green by
pressing the ı or ∫ button,
PRINTER SETUP appears.
Display PRN in capital letters by
pressing the ı or ∫ button.
1, 9
3, 5, 7
2,6 4,6
PRINTER SETUP
/ c / I / PRN / i / o /
PR I NTER SETUP CO LOR n n n
/ COL / LAY / PRN/ I N / OUT /
Q 1 A 1
2
HF S
9 1~9
SYSTEM PRE SS
P R I NT QT Y
INTERVA L
OFF / ON
GAMMA
S / NORMA L / H
FUNCT ION PRESS
Continue to next page m
26
Operation
Making Variations of Printouts (continued)
3 Select SYSTEM by pressing the ◊ or √ button.
4 Press the ∫ button.
The SYSTEM SETUP menu appears.
Position the cursor to APPLI. by
pressing the ◊ or √ button.
Press the ◊ or √ button until APPLI. appears.
SYSTEM
:
PRESS
PR I NTER SE T UP CO L OR n n n
/ COL / LAY / PRN/ I N / OUT /
Q 1 A 1
2
HF S
9 1~9
SYSTEM PRE SS
P R I NT QT Y
INTERVA L
OFF / ON
GAMMA
S / NORMA L / H
FUNCT ION PRESS
SYSTEM SETUP
SY ST EM SE T UP COLOR n n n
PRN SE TUP
Q 1 A 1
2
HF S
PRESS
LCD–CN TR.
5
BAUDRA TE
/ 24/4800 / 96
BEEP OF F / ON
APPLI.
STANDA RD /
SY ST EM SE T UP COLOR n n n
PRN SE TUP
Q 1 A 1
2
HF S
PRESS
LCD–CN TR.
5
BAUDRA TE
/ 24/4800 / 96
BEE P OF F / ON
APPLI.
STANDA RD /
AP PL I .
:
STANDARD /
Position the cursor to SYSTEM by
pressing the ◊ or √ button.
Press the ◊ or √ button until
SYSTEM appears.
5 Select APPLI. by pressing the ◊ or √ button.
27
Operation
6 Select the desired application mode by pressing the ı or ∫ button.
Switch the desired mode to green
by pressing the ı or ∫ button.
Display the desired mode in capital letters
by pressing the ı or ∫ button.
SY ST EM SE T UP COLOR n n n
PRN SE TUP
Q 1 A 1
2
HF S
PRESS
LCD–CN TR.
5
BAUDRA TE
/ 24/4800 / 96
BEE P OF F / ON
APPLI.
/FLEX IPP M/
AP PL I .
:
/ F L EX I P P M
/
7 Select PRN SETUP by pressing the ◊ or √ button.
8 Press the ∫ button.
The PRINTER SETUP menu appears.
9 Press the MENU button.
The regular screen appears.
Note
Chaning the appliction mode results in clearing images stored in all of memory
pages.
Application mode Printout
Standard Printout with a full-size image, two different reduced images, four different
reduced images and 16 different reduced images
FLEX IPP
a)
Printout with identical images of the desired size
FIXED IPP Printouts of a full-size image, four identical reduced images and 16 identical
reduced images
STICK DIF Sticker-type printouts with different reduced images
STICK DUP Sticker-type printouts with identical reduced images
a) As a unit of the imge, either “mm” or “inches” can be selected.
28
Operation
The image displayed in the
left video monitor is
captured in the memory
page A.
A still subject can be printed with
high resolution.
Video monitor
Printout
A quickly moving subject can be
printed without blurring.
Printout
About the Memory
To make printouts, it is first necessary to capture the image into memory.
When capturing the image, there are two ways to use the memory, one is frame
mode and the other is field mode.
Frame mode: A image is captured in one memory.
Field mode: A memory is divided into two, and images can be captured in each.
A memory in which an image is captured is called memory page in this manual.
The number of usable memory pages depends on the type of the selected reduced
images and memory mode.
Reduced image Memory mode Number of memory pages
1/2H/4/16 Frame 1 (A)
1/2H Field 2 (A1, A2)
When you select four-reduced image mode or 16-reduced image mode, the unit
selects automatically frame mode regardless of the setting of MEMORY on the
LAYOUT SETUP menu.
In frame mode
The image displayed in
the left video monitor is
captured in the memory
page A1.
In field mode
Video monitor
Making Variations of Printouts (continued)
Q 1 A
1
S
Q 1 A 1
1
S
29
Operation
1, 5
2, 4
3
Switch LAY to green by pressing
the ı or ∫ button, LAYOUT SETUP
appears.
Display LAY in capital letters by
pressing the ı or ∫ button.
Selecting the memory mode
Note
You can select the desired memory page only when 1 or 2H is selected in
STANDARD mode.
1 Press the MENU button.
The menu just before opened appears.
2 Select LAY by pressing the ı or ∫ button.
Continue to next page
m
L AY OU T SETUP CO L OR n n n
/ COL / LAY / PRN/ I N / OUT /
Q 1 A 1
2
HF S
WI N DOW PRESS
MEMORY
MUL T I P I X
1/2H/4/
16
SEPARATE OFF / ON
CAPT I ON PRESS
FRAME/FI ELD
LAYOUTSETUP
/ c / LAY /p/IN/o/
30
Operation
Position the cursor to MEMORY
by pressing the ◊ or √ button.
Press the ◊ or √ button until MEMORY
appears.
Switch the desired memory mode to
green by pressing the ı or ∫ button.
Display the desired memory mode in capital
letters by pressing the ı or ∫ button.
3 Select MEMORY by pressing the ◊ or √ button.
4 Select the desired memory mode by pressing the ı or ∫ button.
Frame: We recommend that, whenever possible, you print in this mode.
Field: Select this mode to reduce blurring when you print a quickly moving
image.
5 Press the MENU button.
The regular screen appears.
Making Variations of Printouts (continued)
L AY OU T SETUP CO L OR n n n
/ COL / LAY / PRN/ I N / OUT /
Q 1 A 1
2
HF S
WI N DOW PRESS
MEMORY
MUL T I P I X
1/2H/4/
16
SEPARATE OFF / ON
CAPT I ON PRESS
FRAME/FI ELD
MEMORY
:
FR AME / f i e l d
L AY OU T SETUP CO L OR n n n
/ COL / LAY / PRN/ I N / OUT /
Q 1 A 1
2
HF S
WI N DOW PRESS
MEMORY
MUL T I P I X
1/2H/4/
16
SEPARATE OFF / ON
CAPT I ON PRESS
FRAME/FI ELD
MEMORY
:
FR AME / f i e l d
 Loading...