

Sony TS-DSC-P41-01 User Manual

TrackSnap Manual
Sony DSC-P41
Model TS-DSC-P41-01
Document Author: Paul Skelly
Version: TS P41.2
Issue Date: 01/01/06
Status: Released
Document Location: http://www.tracksnap.com/
http://www.tracksnap.com

TrackSnap Manual
Model TS-DSC-P41-01
Introduction
Congratulations on the purchase of a new TrackSnap camera system. This manual provides detailed
information for the setup and use of your system.
Please read this manual before using your TrackSnap camera. The information provided will give you good
service from your system.
At the heart of any motion sensing camera is a controller board. All TrackSnap cameras use a PixController
PIR (Pryoelectric Infra-Red) motion detection sensor. The PixController motion sensor electronics is a
unique design. With this design you will get the minimum number of false triggers (blank photos), and the
PIR electronics will shut down when the board battery gets low also minimising false photos. It can detect the
target in any vector of travel (say up and down target movement), which is very important if you plan to
mount your sensor in an elevated position.
Knowing your system is working in the field all the time is what you expect from our high quality products!
TrackSnap Setup Tips
• Ensure the DSC-P41 camera is set up correctly, Camera Mode Selector is in the Still Image
position and turned off as per page 11 of this manual. The TrackSnap controller will power the
camera when required and will not function correctly without these correct settings..
• Utilise the Auto Walk-Test Mode to confirm settings after positioning the camera as suggested
below. See top of page 4 for auto walk-test mode information.
• Position the camera correctly
• Point the sensor away from the rising or setting sun. In general, North or South works well,
but your local site conditions could dictate otherwise.
• Keep the sensor aimed at an area that will not have intense, direct sunlight warming all or
part of the detection area. Shadows of trees or clouds moving across a sun-warmed area can
cause a momentary temperature drop which could cause a false event to be recorded. The
warmed air rising from the ground can cause problems too.
• Tall, sun-warmed grasses or other vegetation blowing in a breeze can be detected. Point the
sensor away from dense, sun-warmed vegetation which can trap heat.
• Even in a shaded area, keep the sensor pointed away from dense shrubs or trees that can
retain the day’s warmth. A warm evergreen or other dense shrub will hold the day’s heat. If
the air temperature drops at night - and the still warm shrub moves in the wind, this
movement could be detected.
• If the area is known to have many small birds / mammals, you will surely get many empty
pictures, as these active, fast animals will often leave the frame before a picture can be
taken. Orient your sensor to your target.
• Wind (moving air) can cause false events. The moving air might be warmer or cooler than
the background. Place the sensor in an area sheltered from strong winds when you use your
PIR sensor equipped cameras in a location prone to high winds.
• Wind can also cause movement of the tree or other object you have your sensor mounted to.
Make sure to secure your sensor to an object that will not sway in strong winds. Trees
should be a minimum of 25 cm in diameter.
• Make sure your equipment is fastened securely. Movement of the equipment can be
interpreted as motion by the sensor.
Page 2 of 12 Version
Released
TS P41.2 This document comprises information provided by Suppliers and is
assumed to be correct.
TrackSnap Manual
Model TS-DSC-P41-01
PIR Motion Sensors Basic Overview for Effective Use
All TrackSnap cameras use a PixController PIR motion detection sensor. PIR stands for Pryoelectric Infra-
Red, which detects warm targets in motion over ambient background temperature. A stationary target or a
target not moving can not be detected. The target must also have a warmer surface temperature than the
ambient background temperature in order to be detected.
The size of the target and the distance of the target from the PIR sensor will also effect if the target can be
detected or not. Smaller targets such as birds and small mammals may not be detected especially if they are
moving fast or are at a great distance from the PIR sensor. Larger targets such as medium size and large
size mammals are easily detected within the range of the PIR detection area (see below). However, if you
increase the sensitivity of the PIR sensitivity POT you can detect smaller targets, but you run the risk of a
greater chance of false triggers.
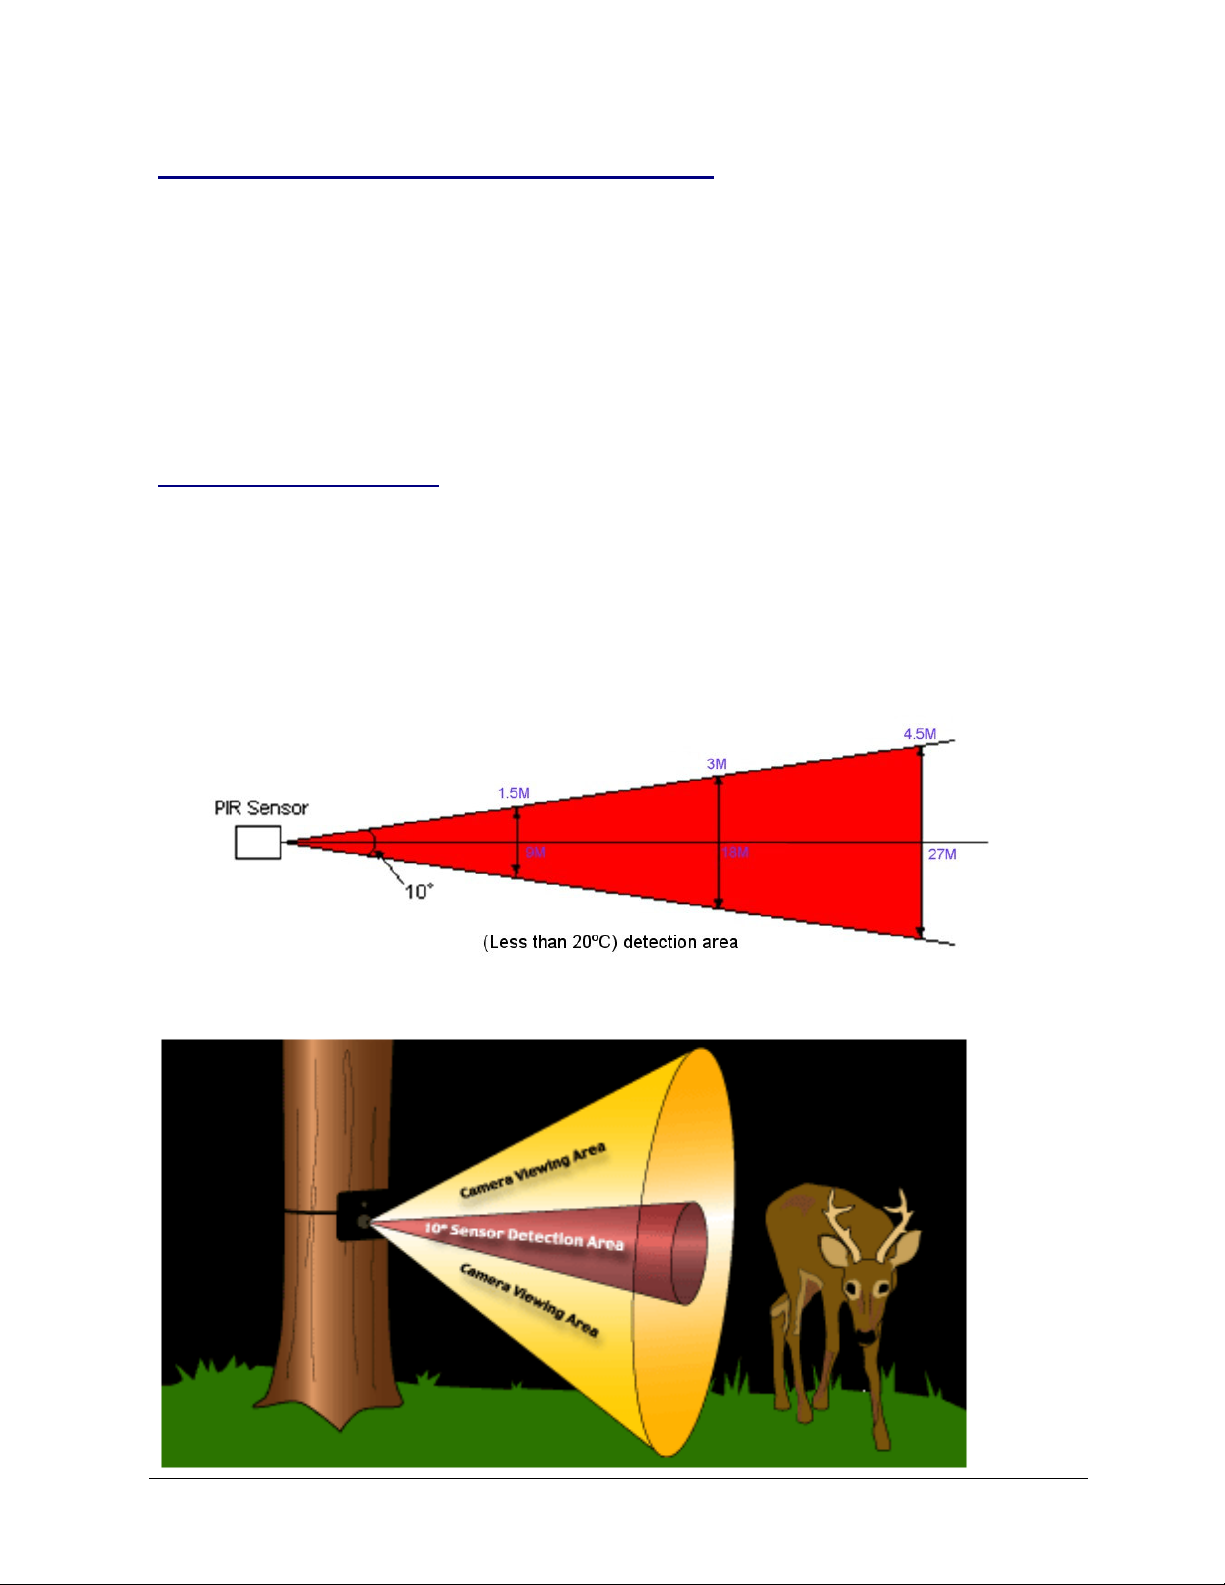
PIR Sensor Detection Area
As ambient background temperatures rise to near 35.5ºC, the difference between the target and ambient
background temperature decreases for warm-blooded targets. The sensitivity of the PIR sensor declines in
this instance. However, as ambient background temperature decrease the opposite is true and the sensor
PIR becomes more sensitive. Under these conditions you can adjust the PIR sensitivity POT to
accommodate your detection range needs. The graphics below show an example of the PIR detection area
at around 20ºC. The PixController PIR sensor is unique in that the target does not need to be moving from
right to left, or left to right. The sensor can detect the target in any vector of travel (say up and down target
movement), which is very important if you plan to mount your camera in an elevated position for security
reasons.
The red area is the PIR detection area in the above graphic.
Page 3 of 12 Version
Released
TS P41.2 This document comprises information provided by Suppliers and is
assumed to be correct.
TrackSnap Manual
Model TS-DSC-P41-01
Auto Walk-Test mode on power up
When turning power on to your TrackSnap both the red and green LED will light up. They will both stay on
for 30 seconds. This time will allow the PIR circuit to warm up. After this time expires the green LED will turn
off and the red LED will blink 5 times letting you know that the board is entering a 1 minute automatic walk-
test phase. At this point you can move around the camera setup and check out the PIR area. Both the green
and red LED’s will light when motion is detected. After the 1 minute automatic walk-test phase expires the
red LED will blink 5 times letting you know the camera system will now become active.
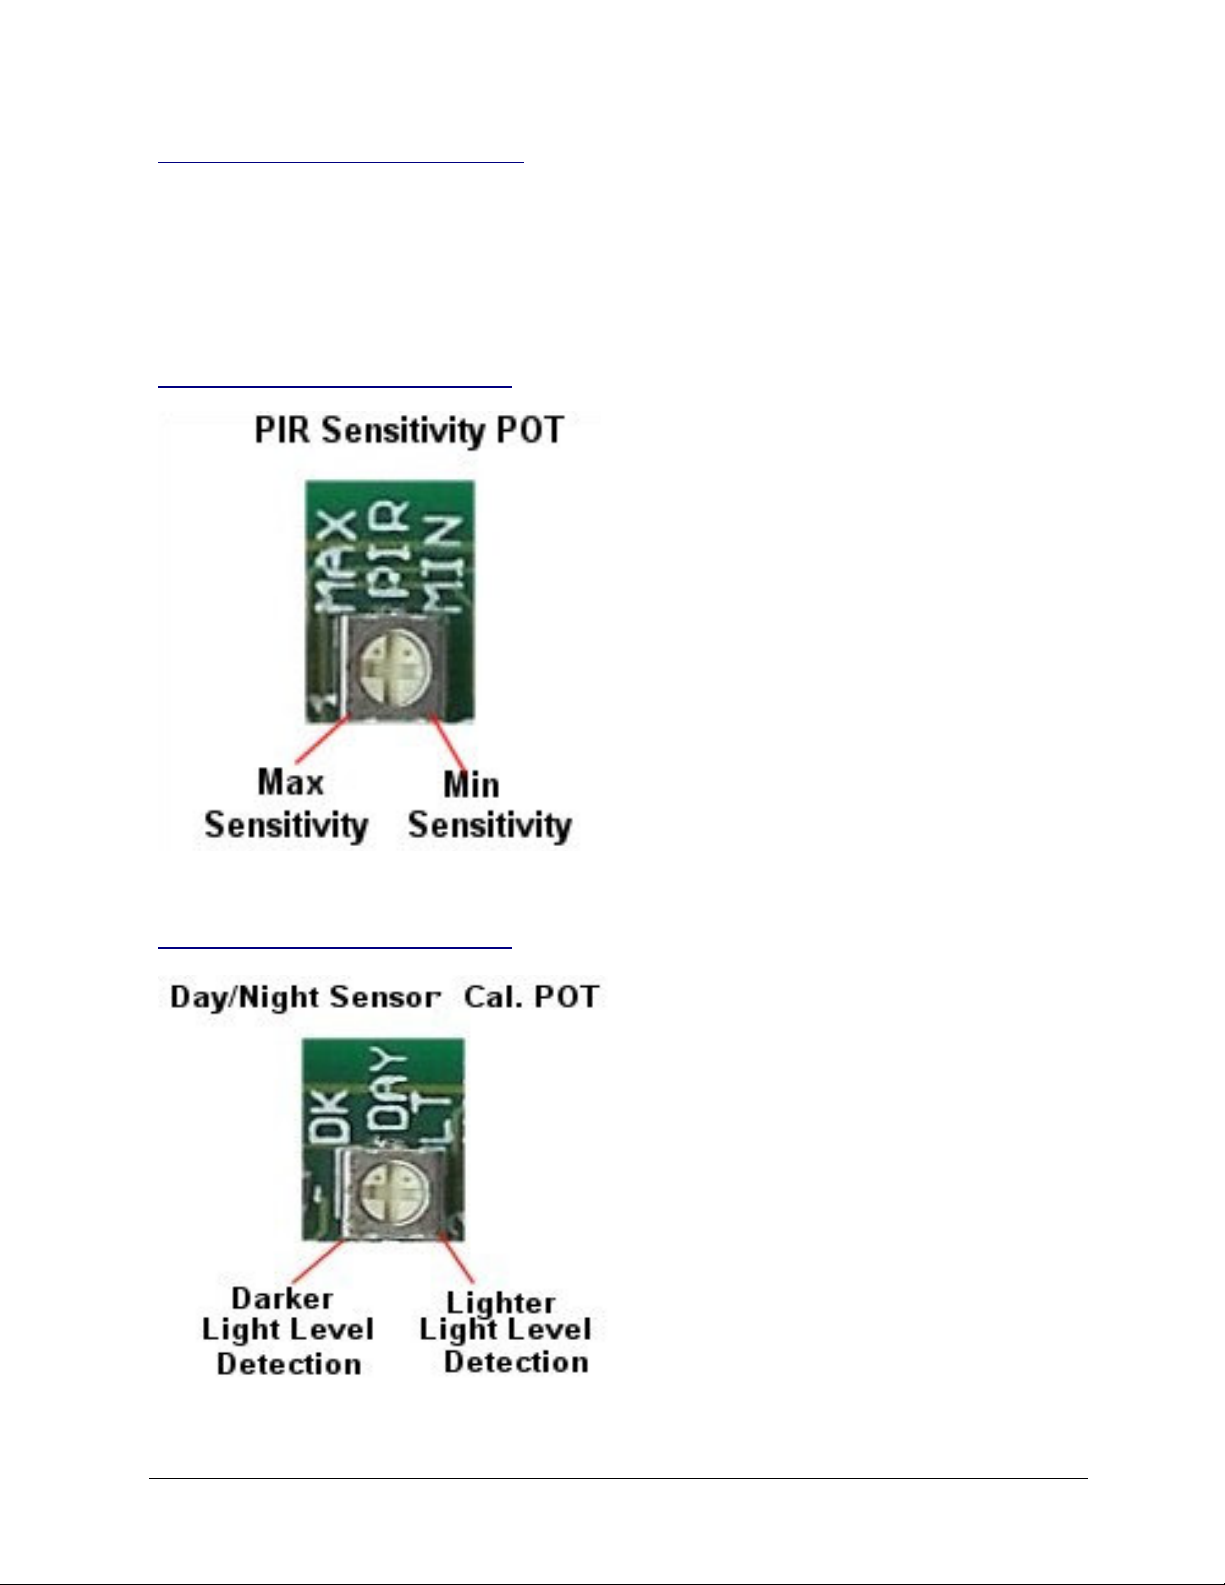
Adjusting the PIR Sensitivity POT
To adjust the PixController PIR detection range
simply turn the single turn POT shown to the left to
your desired range. The default setting is in the
middle, as shown. The two “dots” on the Philips head
screw show the actual location.
The default setting is desirable for almost all weather
conditions. In very hot summer months, or setups
over fields with no shading cover you should reduce
the PIR sensitivity.
Note: Turning the sensitivity to the minimum setting
will turn the PIR detection off.
Adjusting the Day/Night Cal. POT
When adjusting the Day/Night Sensor POT you
must first set the DIP switches 3 & 4 “Up” when the
board is powered down, and then turn the board
on. The “Red Control LED” will light up when the
detection level detects darkness. You may want to
adjust this in the darkest setting you want to run
your system at when adjusting this POT. When
finished you will need to return DIP switches 3 & 4
back to their original setting.
Page 4 of 12 Version
Released
TS P41.2 This document comprises information provided by Suppliers and is
assumed to be correct.
 Loading...