

Page 1

3-877-710-22(1)
_
_
_
DIGITAL MEDIA PORT
Adapter
Operating Instructions_______
Mode d’emploi ______________
Manual de instrucciones_______
TDM-iP50
©2008 Sony Corporation
US
FR
ES
Page 2

WARNING
Do not install the appliance in a
confined space, such as a bookcase or
built-in cabinet.
The nameplate is located on the bottom
exterior.
Install this system so that the power
cord can be unplugged from the wall
socket immediately in the event of
trouble.
The unit is not disconnected from the
AC power source (mains) as long as the
connected AV system is connected to
the wall outlet.
Notice for the customers in the
U.S.A.
WARNING
This equipment has been tested and
found to comply with the limits for a
Class B digital device, pursuant to Part
15 of the FCC Rules. These limits are
designed to provide reasonable
protection against harmful interference
in a residential installation. This
equipment generates, uses, and can
radiate radio frequency energy and, if
not installed and used in accordance
with the instructions, may cause
harmful interference to radio
communications. However, there is no
guarantee that interference will not
occur in a particular installation. If this
equipment does cause harmful
interference to radio or television
reception, which can be determined by
turning the equipment off and on, the
user is encouraged to try to correct the
interference by one or more of the
following measures:
– Reorient or relocate the receiving
antenna.
– Increase the separation between the
equipment and receiver.
US
2
– Connect the equipment into an outlet
on a circuit different from that to
which the receiver is connected.
– Consult the dealer or an experienced
radio/TV technician for help.
CAUTION
You are cautioned that any changes or
modifications not expressly approved in
this manual could void your authority to
operate this equipment.
Notice for the customers in
Canada
This class B digital apparatus complies
with Canadian ICES-003.
On copyrights
• iPod is a trademark of Apple Inc.,
registered in the U.S. and other
countries.
• iPhone is a trademark of Apple Inc.
• All other trademarks and registered
trademarks are of their respective
holders. In this manual, ™ and ®
marks are not specified.
Page 3
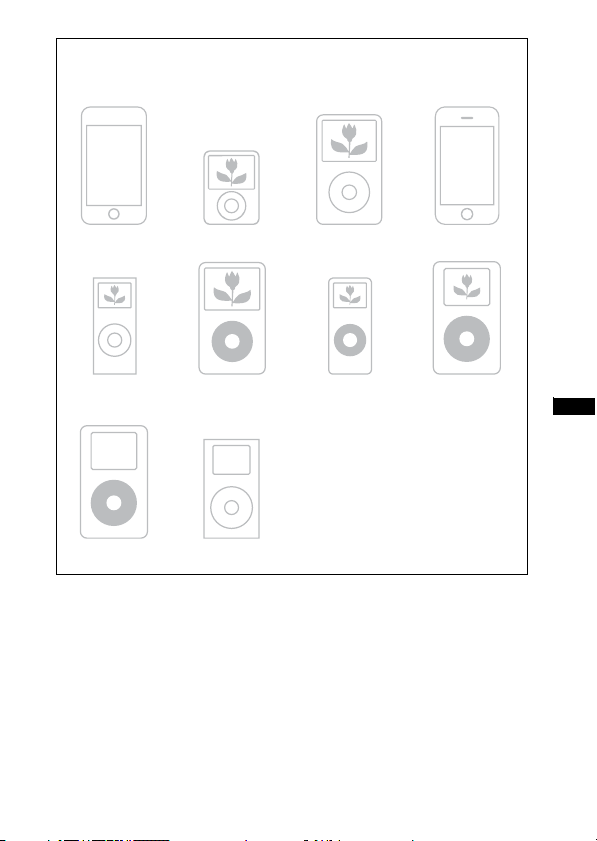
Compatible iPod models
The compatible iPod models are as follows. Update your iPod to use the
latest software before you use it.
iPod touch iPod nano 3rd
iPod nano
2nd generation
(aluminum)
iPod
4th generation
Notes
• This unit is designed for iPod only. You can not connect any other portable audio
players.
generation (video)
iPod
5th generation
(video)
iPod mini
iPod classic iPhone
iPod nano
1st generation
iPod
4th generation
(color display)
• In these Operating Instructions, “iPod” is used as a general reference for the iPod
functions on the iPod and iPhone, unless otherwise specified by the text or illustrations.
• Sony cannot accept responsibility in the event that data recorded to iPod is lost or
damaged when using an iPod connected to this unit.
• For details on supplied iPod Dock Adapters, refer to the instructions supplied with
the Dock Adapters. When you use other iPod models, a compatible Dock Adapter
from Apple Inc. will need to be purchased separately.
• This product has been designed specifically to work with iPhone and iPod and has
been certified to meet Apple performance standards.
US
US
3
Page 4

Table of Contents
Overview...............................5
Getting Started
1: Checking supplied items...6
2: List of parts locations........6
3: Installing the TDM-iP50...7
Operating the Unit
Selecting the operating
mode.................................10
Using iPod Display mode....10
Using the On Screen Display
mode.................................12
Additional Information
Troubleshooting ..................16
Precautions ..........................18
Specifications......................19
US
4
Page 5
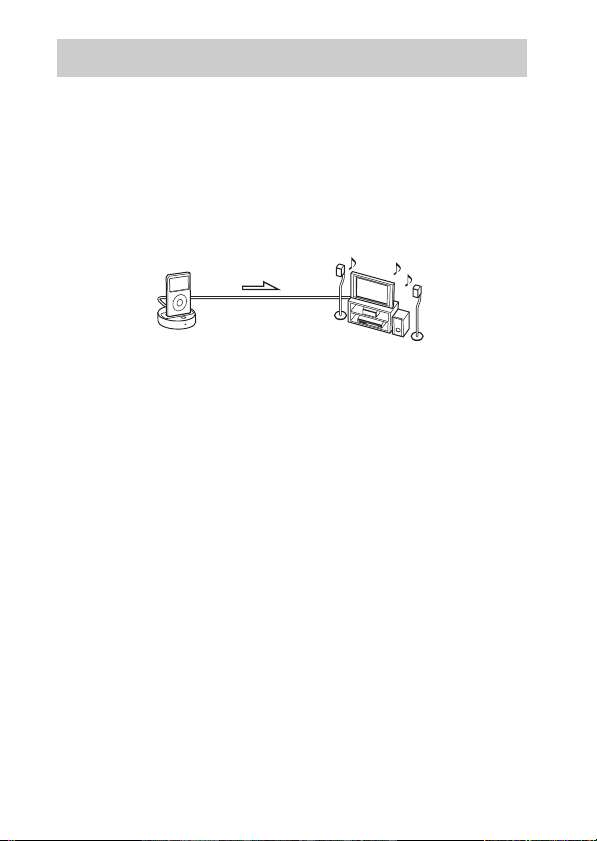
Overview
You can enjoy iPod audio, video and photo contents by connecting this
unit to an AV system with DIGITAL MEDIA PORT interface (Sony DAV
series, etc.).
• You can operate your iPod by its control buttons, the control buttons of
the AV system and the remote supplied with the AV system (page 10).
• While browsing information on the iPod screen or on your TV screen in
On Screen Display mode, you can operate your iPod (pages 10, 12).
• You can also use this unit as a battery charger (page 9).
iPod and TDM-iP50 AV system
Note
DIGITAL MEDIA PORT is occasionally abbreviated as DMPORT.
US
5
Page 6
Getting Started
1: Checking supplied items
Unit (1)
Operating Instructions (1)
iPod Dock Adapters (1 set)
For details on supplied iPod Dock Adapters, refer to the instructions supplied with
the Dock Adapters.
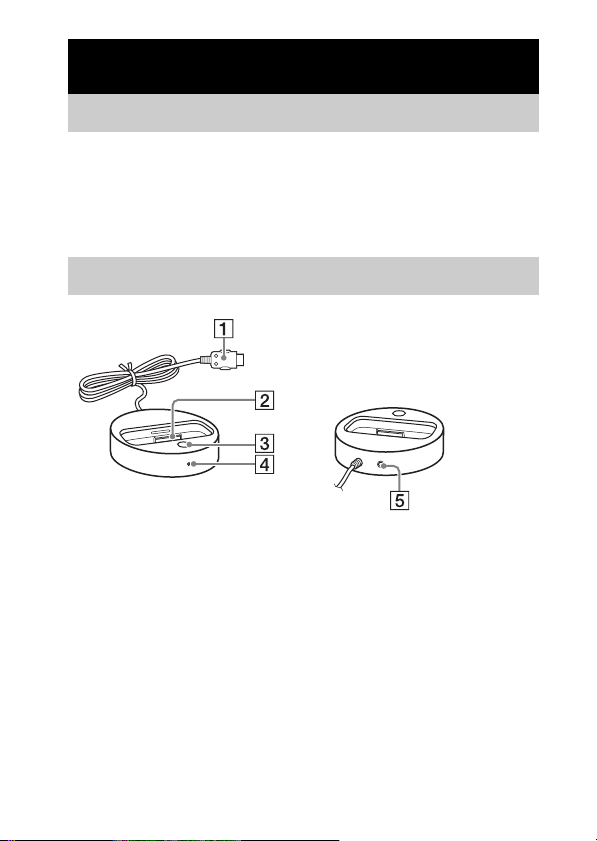
2: List of parts locations
1 DIGITAL MEDIA PORT cable (page 7)
2 iPod connector (page 8)
3 OPR MODE button (page 10)
4 LED status indicator (page 10)
iPod Display mode (page 10): Lights up in amber.
On Screen Display mode (page 12): Lights up in green.
5 VIDEO OUT jack (page 7)
US
6
Page 7
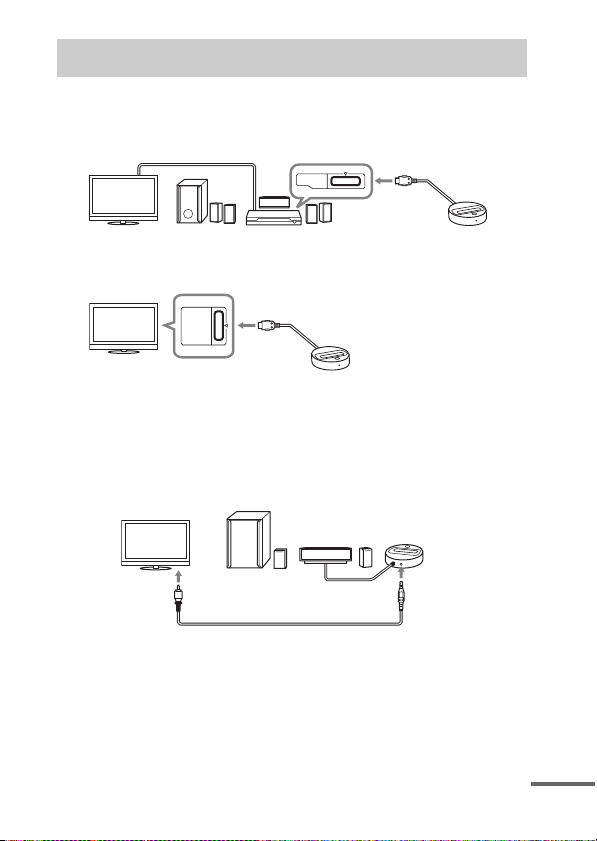
3: Installing the TDM-iP50
Connect and position the TDM-iP50 as illustrated below.
Video cable
(not supplied)
DMPORT
DIGITAL MEDIA
PORT cable
TV AV system
TV
If your AV system cannot output video signals when the system is
in DMPORT function
(Sony DAV series, STR series, etc.)
DIGITAL MEDIA PORT cable
DMPORT
TDM-iP50
TDM-iP50
Connect the composite video cable (not supplied) to the VIDEO OUT jack
of this unit.
Refer to the user’s guide of your AV system for further information.
AV system
(Sony HT series, etc.)
TDM-iP50
TV
Composite video cable (not supplied)
Notes
• This unit turns on/off automatically whenever the connected AV system (DAV
series, etc.) turns on/off.
• When connecting a video cable to a TV that has a SCART (EURO AV) jack, use a
commercially available conversion connector.
• When connecting the composite video cable to the VIDEO OUT jack of the unit,
no image is output from the DIGITAL MEDIA PORT cable of the unit.
DIGITAL MEDIA
PORT cable
continued
US
7
Page 8
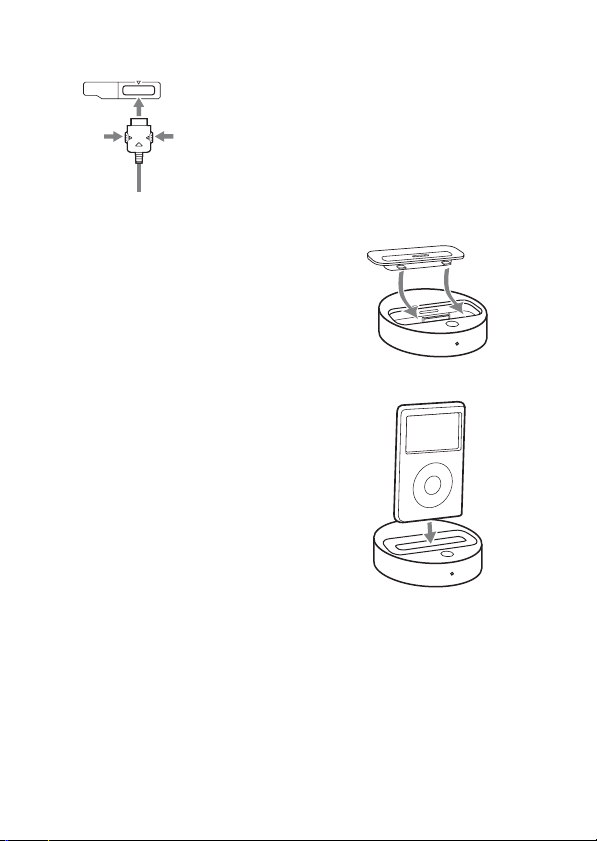
To connect/disconnect
the unit
DMPORT
To remove the DIGITAL MEDIA PORT
cable from the DMPORT jack, press
both side buttons and pull it out.
Connecting
To DMPORT jack
Connect the cable
so that both f
marks are aligned.
1 Connect the DIGITAL MEDIA
PORT cable of this unit to the
DIGITAL MEDIA PORT jack of
an AV system (DAV series,
etc.). Make sure the AV system
is turned off before connecting.
2 Turn on the AV system with a
DIGITAL MEDIA PORT jack
connected to this unit, and
select the DIGITAL MEDIA
PORT function.
Disconnecting
Before disconnecting, turn off the
AV system.
To put the iPod into the
unit
1 Choose the iPod Dock Adapter
that fits your iPod. For details
on supplied iPod Dock
Adapters, refer to the
instructions supplied with the
Dock Adapters.
2 Insert the Dock Adapter into
the unit.
3 Place the iPod into the unit.
US
8
Page 9

Notes
• When placing or removing the iPod,
handle the iPod in the same angle as
that of the iPod connector on this unit
and do not twist or sway the iPod to
prevent connector damage.
• Do not carry the unit with an iPod set
on the connector. Doing so may cause
a malfunction.
• When placing or removing the iPod,
brace the unit with one hand and take
care not to press the controls of the
iPod by mistake.
To use the unit as a
battery charger
You can use the unit as a battery
charger. While the POWER
indicator is lit, the battery can be
charged. The charging status
appears in the iPod display. For
details, see the user’s guide of your
iPod.
To remove the iPod Dock
Adapter
To remove the iPod Dock Adapter, pull
it up with your fingernail or a flat object
using the slot inside the adapter.
US
9
Page 10

Operating the Unit
Selecting the
operating mode
You can operate your iPod by the
AV system with DIGITAL
MEDIA PORT interface (Sony
DAV series, etc.).
Switch the operating mode
by pressing OPR MODE on
the unit.
x iPod Display mode
You can operate the unit by the
connected iPod’s buttons, the
connected AV system’s buttons or
its remote.
x On Screen Display mode
You can operate the unit by the
connected AV system’s buttons or
its remote while displaying the
iPod information menu screen on
the TV.
Note
The mode cannot be switched, except
for the DIGITAL MEDIA PORT
function.
Using iPod Display
mode
Press OPR MODE on the unit
to switch the mode to iPod
Display mode.
While the unit is in iPod Display
mode, the unit’s LED indicator
lights up in amber.
Notes
• To use an iPod, refer to the user’s
guide of your iPod.
• Before disconnecting the iPod, pause
playback.
Basic Operations
Press To
N Start play.
X/x Pause play.
X/x Select a menu or track
c//
ENTER
./> Press and release to
m/M Fast-forward (fast-
C/MENU/
DISPLAY/
RETURN
for playback.
Execute the selected
menu or play the
selected track.
skip to the next
(previous) song/video
or chapter of
audiobook/podcast.
Hold down to fastforward (fast-rewind).
rewind) play.
Works much like the
Menu button on the
iPod.
10
US
Page 11

Press To
OPR MODE/
MODE
VOLUME
+/–
Notes
• Point the remote at the AV system.
• Depending on the connected AV
Switch the operating
modes.
Adjust the volume
level.
system, the operation or buttons may
differ. Refer to the AV system’s
operating instructions.
• Depending on the connected iPod,
operations may differ.
• Before enjoying video, adjust the
video settings on the iPod to the
appropriate settings according to your
situation.
• It may take time to start playback
depending on the contents.
• The volume (except for the iPhone
ring volume) cannot be adjusted using
the volume control on the iPod when
it is connected to the AV system.
• Hold down ./> to fast-forward
(fast-rewind) while playing video if
m/M does not function.
• When the iPhone is connected to the
AV system and you receive a call
during playback, playback will pause
and you can take an incoming call.
• The iPhone rings as the ring volume
set on the iPhone even when it is
connected to the AV system. Adjust
the ring volume to the appropriate
setting on the iPhone.
11
US
Page 12
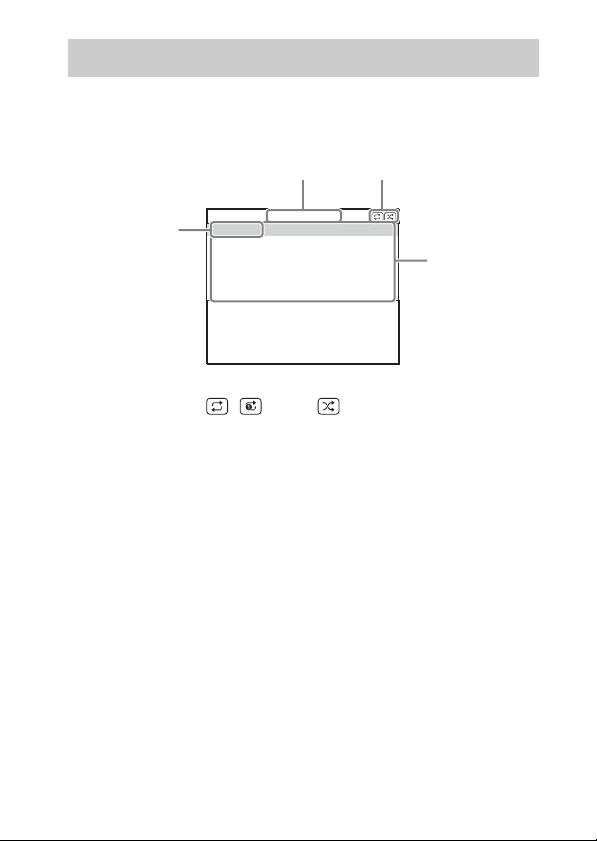
Using the On Screen Display mode
Press OPR MODE on the unit to switch the mode to On Screen
Display mode.
While the unit is in this mode, the unit’s LED indicator lights up in green.
1
2
Main Menu
Music
4
Videos
Settings
DIGITAL
MEDIA
P O R T
1 Selected menu title
2 Current settings ( , Repeat, Shuffle)
3 [Main Menu] list ([Music], [Videos], [Settings])
4 Selected menu
US
12
>
>
>
3
Page 13
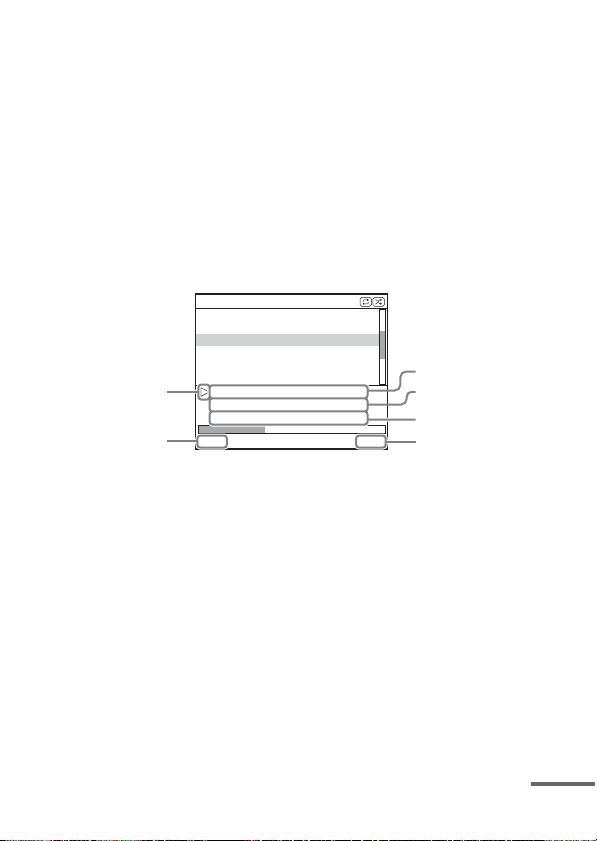
To enjoy music and video while browsing information
on the on screen display
Example: Music playlists
1 Select [Music] from [Main Menu], then press ENTER.
The [Music] menu display appears.
2 Select [Playlists] from [Music] menu, then press ENTER.
The [Playlists] menu display appears.
3 Select the desired playlist, then press ENTER.
Tracks in the selected playlist appear.
4 Select the desired track, then press ENTER.
The selected track starts playback.
My Favorites
Jack and Paul
Somebody
Colors
To Marble
Woman in Red
Joy
6
5
Colors
Jennifer G
My Best Album
1/ 16 1: 30
1 Current playing track
2 Artist name
3 Album name
4 Elapsed time
5 Currently playing track number/total number of tracks
6 Playback status (Play, Pause, Fast-forward, Fast-rewind)
Notes
• In this mode, you cannot use the iPod’s control buttons.
• When the TDM-iP50 cannot display a character, it is displayed as “*”.
• Depending on the connected iPod, switching to iPod Display mode (page 10) will
be necessary in order to display video/photo images.
• Before disconnecting the iPod, pause playback.
• While “Loading…” is displayed on the TV, do not disconnect the iPod.
• It may take time to start playback depending on the contents.
• Before enjoying video, adjust the video settings on the iPod to the appropriate
settings according to your situation.
1
2
3
4
continued
13
US
Page 14

Basic operations
Press To
N Start play.
X/x Pause play.
c//
ENTER
C/MENU/
DISPLAY/
RETURN
X/x Move cursor.
./> Press and release to
m/M Fast-forward (fast-
OPR MODE/
MODE
VOLUME
+/–
Select the menu/go to
the next menu display/
start playback.
Go to previous menu
display.
skip to the next
(previous) song or
chapter of audiobook/
podcast.
Hold down to fastforward (fast-rewind).
rewind) play.
Switch the operating
modes.
Adjust the volume
level.
Settings menu
In the Settings menu, you can
select this unit’s settings: [Screen
Saver], [Color Theme], [Shuffle],
[Repeat], [Audiobooks]. The
setting switches by pressing
ENTER, , or c repeatedly.
The default settings are
underlined.
Note
[Screen Saver] and [Color Theme] can
be selected by pressing ENTER, and
their settings can be changed eve n when
the iPod is not placed into the unit.
x Screen Saver
The screen saver image appears on
the TV after about 15 minutes of
inactivity. Press any button to
cancel the screen saver.
[ON] Turns on the screen saver.
[OFF] Turns off the screen saver.
The display does not switch to the
screen saver image while playing
video.
x Color Theme
Selects the on screen display color
on the connected TV.
[Auto] The color is selected
[White] The color is white.
[Black] The color is black.
[Green] The color is green.
[Red] The color is red.
[Blue]
automatically according to
your iPod.
The color is blue.
x Shuffle
Plays the songs/albums in random
order.
The setting is determined by the
iPod settings.
[OFF] Does not play in random
[Songs] Plays songs in random
[Albums] Plays albums in random
order.
order.
order.
14
US
Page 15

Note
When video contents are played, the
[Shuffle] setting turns [OFF]
automatically.
x Repeat
Plays songs repeatedly.
The setting is determined by the
iPod settings.
[OFF] Does not play repeatedly.
[Repeat
to One]
[Repeat
to All]
Repeat one song.
Repeat all songs.
x Audiobooks
Changes the Audiobook playback
speed.
The setting is determined by the
iPod settings.
[Slower] Plays Audiobook slowly.
[Normal] Plays Audiobook at normal
[Faster] Plays Audiobook rapidly.
speed.
15
US
Page 16

Additional Information
Troubleshooting
Should you encounter a problem
with your unit, find your problem
in the troubleshooting checklist
below and take the indicated
corrective action. If the problem
persists, contact your Sony dealer.
Note that if service personnel
changes some parts during repair,
these parts may be retained.
When bringing the system in for
repairs, be sure to bring in the
entire system.
This product is a system product,
and the entire system is needed to
determine the location requiring
repair.
The LED indicator flashes.
• Remove the iPod, and turn the
AV system off, then on again.
If the LED indicator still flashes,
consult your nearest Sony dealer.
The remote does not function.
• Update your iPod to use the
latest software before you use it.
• Remove any obstacles.
• Point the remote at the AV
system (DAV series, etc.)’s
sensor.
• The distance between the
remote and the AV system is too
far.
• Replace the battery.
• Make sure the iPod* is securely
connected.
• Select the DMPORT function
on the AV system.
• Turn on and off the AV system.
Video/photo image from the
iPod does not appear on the TV
screen.
• Set the operating mode to iPod
Display mode to display photo
images (page 10).
• Make the connection according
to your AV system (page 7).
• When browsing the on screen
display through the DIGITAL
MEDIA PORT cable:
Disconnect the video cable fro m
the VIDEO OUT jack.
• When browsing the on screen
display through the VIDEO
OUT jack:
Switch the TV input to the video
input connected to this unit.
• Check that the T V output setting
on the iPod is on (Refer to the
user’s guide of your iPod).
• Check that the iPod* is
compatible with video output
(Refer to the user’s guide of
your iPod).
Video/photo image from the
iPod does not appear on the
iPod display.
• Adjust the video/photo image
output settings to the
appropriate settings.
16
US
Page 17

On screen display does not
appear on the TV screen.
• Check that the operating mode
is set to On Screen Display
mode (page 12).
• Make the connection according
to your AV system (page 7).
• When browsing the on screen
display through the DIGITAL
MEDIA PORT cable:
Disconnect the video cable from
the VIDEO OUT jack.
• When browsing the on screen
display through the VIDEO
OUT jack:
Switch the TV inpu t to the video
input connected to this unit.
There is no sound.
• Update your iPod to use the
latest software before you use it.
• Check the connections.
• Make sure the unit is securely
connected.
• Make sure the iPod* is securely
connected.
• Make sure the iPod* is playing
music.
• It may take time to start
playback depending on the
contents.
There is severe hum or noise.
• Move the unit away from the
source of noise.
The sound is distorted.
• Reduce the volume of the
connected AV system.
• Set the “EQ” setting of the iPod
to “Off” or “Flat”.
Ring volume of the iPhone
does not change.
• Adjust the ring volume on the
iPhone.
* See “Compatible iPod models”
(page 3).
17
US
Page 18

Precautions
On safety
Should any solid object or liquid
fall into the system, unplug the
system and have it checked by
qualified personnel before
operating it any further.
On placement
• Do not place the unit in an
inclined position.
• Do not place the unit in
locations where it is;
– Extremely hot or cold
– Dusty or dirty
– Very humid
– Subject to vibrations
– Subject to direct sunlight.
• Use caution when placing the
unit on surfaces that have been
specially treated (with wax, oil,
polish, etc.) as staining or
discoloration of th e surface may
result.
On heat buildup
• Although the unit heats up
during operation, this is not a
malfunction.
• Place the unit in a location with
adequate ventilation to prevent
heat buildup in the unit.
Cleaning the unit
Clean the unit with a soft cloth
slightly moistened with mild
detergent solution. Do not use any
type of abrasive pad, scouring
powder or solvent such as thinner,
benzine or alcohol.
If you have any questions or
problems concerning your unit,
please consult your nearest Sony
dealer.
US
18
Page 19

Specifications
Output
Video: 1 Vp-p 75 ohm
General
Power requirements:
Dimensions: Approx. φ 95 ×
Mass: Approx. 225 g
Cable length: Approx. 1.5 m
Design and specifications are subject
to change without notice.
(Composite Video
out)
DC IN: 5 V,
0.7 A (via
DIGITAL MEDIA
PORT)
23(h) mm
3
/4 ×
(φ 3
29
/32(h) inch)
(7.3 oz)
(includes cable)
(5 ft)
19
US
Page 20

AVERTISSEMENT
N’installez pas l’appareil dans un
endroit exigu tel qu’une bibliothèque ou
un meuble encastré.
La plaque signalétique se trouve sur la
face inférieure de l’appareil.
Installez cette chaîne afin de pouvoir
débrancher immédiatement le cordon
d’alimentation de la prise secteur e n cas
de problème.
La chaîne n’est pas isolée du secteur
tant que le système AV connecté reste
branché à la prise murale.
Pour les utilisateurs aux ÉtatsUnis
AVERTISSEMENT
Cet appareil a été contrôlé et satisfait
aux limites imposées pour les unités
numériques de classe B, conformément
à la Partie 15 de la réglementation de la
FCC. Ces restrictions sont conçues pour
fournir une protection raisonnable
contre les interférences nuisibles dans
les lieux résidentiels. Cet appareil
génère, utilise et peut émettre de
l’énergie radioélectrique et, s’il n’est
pas installé ou utilisé selon les
directives, peut causer des interférences
nuisibles aux communications radio.
Cependant, il n’existe aucune garantie
que des interférences ne se produiront
pas dans une installation particulièr e. Si
ce matériel est source d’interférences
nuisibles pour la réception radio ou
télévisée, ce qui peut être déterminé en
mettant l’appareil hors tension, puis
sous tension, il est recommandé de
tenter d’éliminer ces interférences en
appliquant l’une ou plusieurs des
mesures suivantes :
– Réorienter ou déplacer l’antenne
réceptrice ;
– Éloigner l’appareil du récepteur ;
FR
2
– Brancher l’appareil à une prise de
courant sur un circuit distinct de celui
sur lequel le récepteur est branché ;
– Consulter le concessionnaire ou un
technicien radio/TV compétent pour
obtenir de l’aide.
ATTENTION
L’utilisateur est avisé que toute
modification non expressément
approuvée dans ce manuel pourrait
entraîner l’annulation des droits
d’utilisation de cet appareil.
AVERTISSEMENT POUR LES
UTILISATEURS AU CANADA
Cet appareil numérique de la classe B
est conforme à la norme NMB-003 du
Canada.
A propos des droits d’auteur
• iPod est une marque de Apple Inc.,
déposée aux Etats-Unis et dans
d’autres pays.
• iPhone est une marque de Apple Inc.
• Toutes les autres marques et marques
déposées appartiennent à leurs
détenteurs respectifs. Dans ce
manuel, les sigles ™ et ® ne sont pas
spécifiés.
Page 21

Modèles iPod compatibles
Les modèles iPod compatibles sont les suivants. Avant d’utiliser votre
iPod, mettez-le à jour afin d’utiliser le logiciel le plus récent.
iPod touch iPod nano
iPod nano
2ème génération
(aluminium)
iPod
4ème génération
3ème génération
5ème génération
iPod mini
(vidéo)
iPod
(vidéo)
iPod classic iPhone
iPod nano
1ère génération
4ème génération
(écran cou leur)
iPod
Suite
FR
FR
3
Page 22

Remarques
• Cet appareil est uniquement conçu pour l’iPod. Vous ne pouvez pas connecter
d’autres lecteurs audio portables.
• Dans ce mode d’emploi, « iPod » fait référence de manière générale aux fonctions iPod
sur l’iPod et l’iPhone, sauf indication contraire du texte ou des illustrations.
• Sony n’assume aucune responsabilité en cas de perte ou d’altération des données
enregistrées sur l’iPod, alors qu’un iPod est raccordé à cette unité.
• Pour plus d’informations sur les adaptateurs de socles pour iPod fournis, reportezvous aux instructions accompagnant les adaptateurs de socles. Si vous utilisez un
autre modèle iPod, vous devez acheter séparément un adaptateur de socle Apple
Inc. compatible.
• Ce produit a été conçu spécifiquement pour fonctionner avec l’iPhone et l’iPod. Il
a également été certifié comme répondant aux normes de performance d’Apple.
FR
4
Page 23

Table des matières
Aperçu...................................6
Mise en service
1 : Vérification des pièces
fournies..............................7
2 : Liste des emplacements
des pièces...........................7
3 : Mise en place du
TDM-iP50..........................8
Commande de l’unité
Sélection du mode
opérationnel .....................11
Utilisation du mode
d’affichage iPod...............11
Utilisation du mode
d’affichage à l’écran........13
Informations
supplémentaires
Dépannage ..........................18
Précautions..........................20
Spécifications......................21
FR
5
Page 24

Aperçu
Vous pouvez bénéficier du contenu audio, vidéo et photo d’un iPod en
connectant cet appareil à un système AV à l’aide de l’interface DIGITAL
MEDIA PORT (série DAV Sony, etc.).
• Vous pouvez actionner votre iPod au moyen de ses touches de
commande, des touches de commande du système AV et de la
télécommande fournie avec le système AV (page 11).
• Tout en consultant les informations affichées sur l’écran de votre iPod
ou de votre téléviseur en mode d’affichage à l’écran, vous pouvez
commander votre iPod (pages 11, 13).
• Vous pouvez également utiliser cette unité comme chargeur de batterie
(page 10).
iPod et TDM-iP50 Système AV
Remarque
Occasionnellement, l’abréviation DMPORT est utilisée pour désigner DIGITAL
MEDIA PORT.
FR
6
Page 25

Mise en service
1 : Vérification des pièces fournies
Unité (1)
Mode d’emploi (1)
Adaptateurs de socles pour iPod (1 jeu)
Pour plus d’informations sur les adaptateurs de socles pour iPod fournis, reportezvous aux instructions accompagnant les adaptateurs de socles.
2 : Liste des emplacements des pièces
1 Câble DIGITAL MEDIA PORT (page 8)
2 Connecteur iPod (page 9)
3 Bouton OPR MODE (page 11)
4 Témoin lumineux de statut (page 11)
Mode d’affichage iPod (page 11) : S’allume en orange.
Mode d’affichage à l’écran (page 13) : S’allume en vert.
5 Prise VIDEO OUT (page 8)
FR
7
Page 26

3 : Mise en place du TDM-iP50
Connectez et placez le TDM-iP50 tel qu’illustré ci-dessous.
Câble vidéo
(non fourni)
DMPORT
Câble DIGITAL
MEDIA PORT
Téléviseur Système AV
Téléviseur
Dans le cas où votre système AV ne peut pas émettre de signaux
vidéo lorsque la fonction DMPORT est sélectionnée sur le système
(Série DAV, série STR Sony, etc.)
Câble DIGITAL MEDIA PORT
DMPORT
TDM-iP50
Branchez le câble vidéo composite (non fourni) à la prise VIDEO OUT de
cette unité.
Reportez-vous au mode d’emploi de votre système AV pour de plus
amples informations.
Système AV
(série Sony HT, etc.)
TDM-iP50
Téléviseur
Câble vidéo composite (non fourni)
Remarques
• Cette unité se met automatiquement sous/hors tension chaque fois que le système
AV connecté (série DAV, etc.) se met sous/hors tension.
• Pour brancher un câble vidéo sur un téléviseur équipé d’une prise SCART (EURO
AV), utilisez un connecteur de conversion en vente dans le commerce.
• Lorsque vous branchez le câble vidéo composite à la prise VIDEO OUT de l’unité,
aucune image n’est émise du câble DIGITAL MEDIA PORT de l’unité.
FR
8
Câble DIGITAL
MEDIA PORT
TDM-iP50
Page 27

Pour connecter/
déconnecter l’unité
DMPORT
Pour retirer le câble DIGITAL MEDIA
PORT de la prise DMPORT, appuyez
sur les boutons des deux côtés et tirezle.
Connexion
Vers prise DMPORT
Connectez le câble
de sorte que les
deux marques f
soient alignées.
1 Connectez le câble DIGITAL
MEDIA PORT de cette unité à
la prise DIGITAL MEDIA PORT
d’un système AV (série DAV,
etc.). Veillez à ce que le
système AV soit hors tension
avant d’effectuer la connexion.
2 Mettez le système AV sous
tension avec une prise
DIGITAL MEDIA PORT
connectée à cette unité, puis
sélectionnez la fonction
DIGITAL MEDIA PORT.
Déconnexion
Avant la déconnexion, mettez le
système AV hors tension.
Pour placer l’iPod sur
l’unité
1 Choisissez l’adaptateur de
socle pour iPod qui correspond
à votre iPod. Pour plus
d’informations sur les
adaptateurs de socles pour
iPod fournis, reportez-vous
aux instructions
accompagnant les adaptateurs
de socles.
2 Insérez l’adaptateur de socle
dans l’unité.
3 Placez l’iPod sur l’unité.
Suite
FR
9
Page 28

Remarques
• Lorsque vous placez ou retirez l’iPod,
tenez l’iPod au même angle que celui
du connecteur iPod sur l’unité et ne
tournez ni ne faites osciller l’iPod afin
d’éviter d’endommager le
connecteur.
• Ne transportez pas l’unité si un iPod
est placé sur le connecteur. Cela
risque de provoquer un
dysfonctionnement.
• Lorsque vous placez ou retirez l’iPod,
maintenez l’unité d’une main et
veillez à ne pas appuyer par
inadvertance sur les commandes de
l’iPod.
Pour utiliser l’unité
comme chargeur de
batterie
Vous pouvez également utiliser
l’unité comme chargeur de
batterie. La batterie peut être
chargée pendant que le témoin
POWER est allumé. L’état de
chargement s’affiche dans l’écran
de l’iPod. Pour plus
d’informations, consultez le mode
d’emploi de votre iPod.
Pour retirer l’adaptateur
de socle pour iPod
Pour retirer l’adaptateur de socle pour
iPod, tirez-le avec un ongle ou un objet
plat au moyen de la fente à l’intérieur de
l’adaptateur.
10
FR
Page 29

Commande de l’unité
Sélection du mode
opérationnel
Vous pouvez commander votre
iPod par le biais du système AV au
moyen de l’interface DIGITAL
MEDIA PORT (série Sony DAV,
etc.).
Changez de mode
opérationnel en appuyant sur
OPR MODE de l’unité.
x Mode d’affichage iPod
Vous pouvez commander l’unité
au moyen des touches de l’iPod
connecté, des touches du système
AV connecté ou de sa
télécommande.
x Mode d’affichage à l’écran
Vous pouvez commander l’unité
au moyen des touches du système
AV connecté ou de sa
télécommande tout en affichant
sur le téléviseur l’écran de menu
des informations de l’iPod.
Remarque
Il est impossible de commuter le mode
sauf pour la fonction DIGITAL
MEDIA PORT.
Utilisation du mode
d’affichage iPod
Appuyez sur OPR MODE de
l’unité pour passer au mode
d’affichage iPod.
Lorsque l’unité est en mode
d’affichage iPod, le témoin
lumineux de l’unité s’allume en
orange.
Remarques
• Pour utiliser un iPod, reportez-vous
au mode d’emploi de votre iPod.
• Avant de débrancher l’iPod, mettez la
lecture en pause.
Opérations de base
Appuyez sur Pour
N Commencer la lecture.
X/x Interrompre la lecture.
X/x Sélectionner un menu
c//
ENTER
./> Appuyez sur cette
ou une plage à lire.
Exécuter le menu
sélectionné ou
procéder à la lecture de
la plage sélectionnée.
touche, puis relâchezla pour passer à la
vidéo/au morceau ou
au chapitre suivant
(précédent) du livre
audio/podcast.
Maintenez cette touche
enfoncée pour avancer
rapidement (reculer
rapidement).
Suite
11
FR
Page 30

Appuyez sur Pour
m/M Avancer rapidement
(reculer rapidement).
C/MENU/
DISPLAY/
RETURN
OPR MODE/
MODE
VOLUME
+/–
Remarques
Fonctionne de la même
façon que la touche
Menu de l’iPod.
Changer de mode
opérationnel.
Régler le niveau du
volume.
• Dirigez la télécommande vers le
système AV.
• En fonction du système AV connecté,
le fonctionnement ou les touches
peuvent varier. Reportez-vous au
mode d’emploi du système AV.
• En fonction de l’iPod connecté, les
opérations peuvent varier.
• Avant de regarder une vidéo, ajustez
correctement les réglages vidéo sur
l’iPod selon la situation.
• Le démarrage de la lecture peut
prendre du temps. Cela dépend du
contenu.
• Il est impossible de régler le volume
(sauf pour la sonnerie de l’iPhone) au
moyen des commandes de volume sur
l’iPod lorsqu’il est connecté au
système AV.
• Maintenez ./> enfoncée pour
avancer rapidement (reculer
rapidement) pendant la lecture d'une
vidéo si m/M ne fonctionne pas.
• Lorsque l’iPhone est connecté au
système AV et que vous recevez un
appel pendant la lecture, la lecture est
mise en pause et vous pouvez
répondre à l’appel.
• L’iPhone sonne d’après le volume de
la sonnerie réglé sur celui-ci même
lorsqu’il est connecté au système AV.
Ajustez le volume de la sonnerie au
réglage approprié sur l’iPhone.
12
FR
Page 31

Utilisation du mode d’affichage à l’écran
Appuyez sur OPR MODE de l’unité pour passer au mode
d’affichage à l’écran.
Lorsque l’unité est dans ce mode, le témoin lumineux de l’unité s’allume
en vert.
1
2
4
Music
Videos
Settings
Main Menu
>
>
>
DIGITAL
MEDIA
P O R T
1 Titre du menu sélectionné
2 Réglages actuels ( , Répétée, Aléatoire)
3 Liste [Main Menu] ([Music], [Videos], [Settings])
4 Menu sélectionné
3
Suite
13
FR
Page 32

Pour écouter de la musique et regarder une vidéo tout
en consultant les informations sur l’affichage à l’écran
Exemple : Listes de lecture musicale
1 Sélectionnez [Music] dans [Main Menu], puis appuyez sur ENTER.
L’affichage du menu [Music] apparaît.
2 Sélectionnez [Playlists] dans le menu [Music], puis appuyez sur
ENTER.
L’affichage du menu [Playlists] apparaît.
3 Sélectionnez la liste de lecture désirée, puis appuyez sur ENTER.
Les plages présentes sur la liste de lecture sélectionnée apparaissent.
4 Sélectionnez la plage désirée, puis appuyez sur ENTER.
La plage sélectionnée est lue.
My Favorites
Jack and Paul
Somebody
Colors
To Marble
Woman in Red
Joy
6
5
Colors
Jennifer G
My Best Album
1/ 16 1: 30
1 Plage actuellement lue
2 Nom de l’artiste
3 Nom de l’album
4 Temps écoulé
5 Numéro de la plage actuellement lue/nombre total de plages
6 Statut de lecture (Lecture, pause, avance rapide, recul rapide)
1
2
3
4
14
FR
Page 33

Remarques
• Dans ce mode, il est impossible
d’utiliser les touches de comm ande de
l’iPod.
• Lorsque le TDM-iP50 ne peut pas
afficher un caractère, « * » est
indiqué.
• Selon l’iPod connecté, il peut être
nécessaire de passer au mode
d’affichage iPod (page 11) pour
afficher les images de vidéo/photo.
• Avant de débrancher l’iPod, mettez la
lecture en pause.
• Ne débranchez pas l’iPod tant que
« Loading… » est affiché sur le
téléviseur.
• Le démarrage de la lecture peut
prendre du temps. Cela dépend du
contenu.
• Avant de regarder une vidéo, ajustez
correctement les réglages vidéo sur
l’iPod selon la situation.
Opérations de base
Appuyez sur Pour
N Commencer la lecture.
X/x Interrompre la lecture.
Appuyez sur Pour
c//
ENTER
C/MENU/
DISPLAY/
RETURN
Sélectionner le menu/
avancer à l’affichage
du menu suivant/lancer
la lecture.
Reculer à l’affichage
du menu précédent.
X/x Déplacer le curseur.
./> Appuyez sur cette
touche, puis relâchezla pour passer au
morceau ou au chapitre
suivant (précédent) du
livre audio/podcast.
Maintenez cette touche
enfoncée pour avancer
rapidement (reculer
rapidement).
m/M Avancer rapidement
(reculer rapidement).
OPR MODE/
MODE
VOLUME
+/–
Changer de mode
opérationnel.
Régler le niveau du
volume.
Suite
15
FR
Page 34

Menu des réglages
Le menu des réglages vous permet
de sélectionner les réglages de
l’unité : [Screen Saver], [Color
Theme], [Shuffle], [Repeat],
[Audiobooks]. Vous pouvez
changer de réglage en appuyant
plusieurs fois sur ENTER, ou
c.
Les réglages par défaut sont
soulignés.
Remarque
Il est possible de sélectionner [Screen
Saver] et [Color Theme] en appuyant
sur ENTER et de modifier leurs
réglages même si l’iPod n’est pas placé
sur l’unité.
x Screen Saver
L’image de l’économiseur d’écran
apparaît sur le téléviseur au bout
de 15 minutes d’inactivité.
Appuyez sur l’une des touches
pour annuler l’économiseur
d’écran.
[ON]
[OFF] Permet de désactiver
Permet d’activer
l’économiseur d’écran.
l’économiseur d’écran.
L’affichage ne passe pas à l’image
de l’économiseur d’écran pendant
la lecture d’une vidéo.
x Color Theme
Permet de sélectionner la couleur
de l’affichage à l’écran sur le
téléviseur connecté.
[Auto] La couleur est
[White] La couleur est blanche.
[Black] La couleur est noire.
[Green] La couleur est verte.
[Red] La couleur est rouge.
[Blue]
automatiquement
sélectionnée en fonction de
l’iPod.
La couleur est bleue.
x Shuffle
Permet de lire les morceaux/
albums dans un ordre aléatoire.
Le réglage dépend des réglages de
l’iPod.
[OFF] La lecture dans un ordre
[Songs] Les morceaux sont lus dans
[Albums] Les albums sont lus dans un
Remarque
Lorsqu’un contenu vidéo est lu, le
réglage [Shuffle] est automatiquement
désactivé ([OFF]).
aléatoire est désactivée.
un ordre aléatoire.
ordre aléatoire.
16
FR
Page 35

x Repeat
Permet de lire les morceaux en
boucle.
Le réglage dépend des réglages de
l’iPod.
[OFF] La lecture en boucle est
[Repeat
to One]
[Repeat
to All]
désactivée.
Pour répéter un morceau.
Pour répéter tous les
morceaux.
x Audiobooks
Permet de modifier la vitesse de
lecture des livres audio.
Le réglage dépend des réglages de
l’iPod.
[Slower] Le livre audio est lu
[Normal] Le livre audio est lu à la
[Faster] Le livre audio est lu
lentement.
vitesse normale.
rapidement.
17
FR
Page 36

Informations
supplémentaires
Dépannage
Si vous rencontrez un problème
avec votre unité, recherchez votre
problème dans la liste de contrôle
de dépannage ci-dessous et
appliquez la mesure corrective
indiquée. Si le problème persiste,
contactez votre revendeur Sony.
Notez que si un technicien
remplace certaines pièces lors
d’une réparation, celles-ci
pourront être conservées.
Lorsque vous apportez le système
pour une réparation, apportez tous
ses éléments.
Ce produit forme un ensemble et
tous les éléments du système sont
nécessaires pour déterminer le
point nécessitant une réparation.
Le témoin lumineux clignote.
• Retirez l’iPod et éteignez le
système AV, puis rallumez-le.
Si témoin lumineux clignote
toujours, adressez-v ous au revendeur
Sony le plus proche.
La télécommande ne
fonctionne pas.
• Mettez votre iPod à jour avant
de l’utiliser afin de profiter du
tout dernier logiciel.
• Enlevez tout obstacle.
• Dirigez la téléc ommande vers le
capteur du système AV (série
DAV, etc.).
• La distance entre la
télécommande et le système AV
est trop importante.
• Remplacez la pile.
• Assurez-vous que l’iPod* est
correctement connecté.
• Sélectionnez la fonction
DMPORT sur le système AV.
• Mettez le système AV sous et
hors tension.
L’image vidéo/photo de l’iPod
ne s’affiche pas sur l’écran du
téléviseur.
• Placez le mode opérationnel sur
le mode d’affichage iPod pour
afficher les images de photo
(page 11).
• Procédez au raccordement
d’après votre système AV
(page 8).
• Lorsque vous consultez
l’affichage à l’écran via le câble
DIGITAL MEDIA PORT :
Débranchez le câble vidéo de la
prise VIDEO OUT.
18
FR
Page 37

• Lorsque vous consultez
l’affichage à l’écran via la prise
VIDEO OUT :
Passez de l’entrée TV à l’entrée
vidéo connectée à cette unité.
• Vérifiez que le réglage de sortie
TV sur l’iPod est activé
(reportez-vous au mode
d’emploi de votre iPod).
• Vérifiez que l’iPod* est
compatible avec la sortie vidéo
(reportez-vous au mode
d’emploi de votre iPod).
L’image vidéo/photo de l’iPod
ne s’affiche pas sur l’écran de
l’iPod.
• Ajustez correctement les
réglages de sortie vidéo/photo.
L’affichage à l’écran n’apparaît
pas sur l’écran du téléviseur.
• Vérifiez que le mode
opérationnel se trouve sur le
mode d’affichage à l’écran
(page 13).
• Procédez au raccordement
d’après votre système AV
(page 8).
• Lorsque vous consultez
l’affichage à l’écran via le câble
DIGITAL MEDIA PORT :
Débranchez le câble vidéo de la
prise VIDEO OUT.
• Lorsque vous consultez
l’affichage à l’écran via la prise
VIDEO OUT :
Passez de l’entrée TV à l’entrée
vidéo connectée à cette unité.
Il n’y a pas de son.
• Mettez votre iPod à jour avant
de l’utiliser afin de profiter du
tout dernier logiciel.
• Vérifiez les connexions.
• Assurez-vous que l’unité est
correctement connectée.
• Assurez-vous que l’iPod* est
correctement connecté.
• Assurez-vous que l’iPod* lit de
la musique.
• Le démarrage de la lecture peut
prendre du temps. Cela dépend
du contenu.
Ronflement ou parasites
importants.
• Éloignez l’unité de la source de
parasites.
Il y a une distorsion du son.
• Réduisez le volume du système
AV connecté.
• Placez le réglage « Égaliseur »
de l’iPod sur « Désactivé » ou
«Plat».
Le volume de la sonnerie de
l’iPhone ne change pas.
• Ajustez le volume de la sonnerie
sur l’iPhone.
* Voir « Modèles iPod
compatibles » (page 3).
19
FR
Page 38

Précautions
Sécurité
Si un objet ou du liquide tombe à
l’intérieur de l’unité, débranchezla et faites-la contrôler par un
technicien qualifié avant de la
réutiliser.
Lieu d’installation
• Ne placez pas l’unité en
position inclinée.
• Ne placez pas l’unité dans un
endroit :
– extrêmement chaud ou froid
– poussiéreux ou sale
– très humide
– soumis à des vibrations
– en plein soleil.
• Prenez les précautions
nécessaires lors de l’installation
de l’unité sur des surfaces
traitées (cirées, huilées, vernies,
etc.) pour éviter l’apparition de
taches ou la décoloration de la
surface.
Accumulation de chaleur
• L’unité chauffe pendant le
fonctionnement, mais ce n’est
pas une anomalie.
• Placez l’unité dans un endroit
bien aéré pour éviter toute
accumulation de chaleur à
l’intérieur.
Pour toute question au sujet de
cette unité ou tout problème,
adressez-vous au revendeur Sony
le plus proche.
Nettoyage de l’unité
Nettoyez l’unité avec un chiffon
doux légèrement imbibé d’une
solution détergente douce.
N’utilisez pas de tampons abrasifs,
de poudre à ré curer ou des solvants
tels que diluants, benzène ou
alcool.
20
FR
Page 39

Spécifications
Sortie
Vidéo : 1 Vc-c 75 ohms
Généralités
Alimentation requise :
Dimensions : Environ φ 95 ×
Poids : Environ 225 g
Longueur du câble :
La conception et les spécifications
peuvent être modifiées sans préavis.
(Sortie vidéo
composite)
DC IN : 5 V,
0,7 A (via
DIGITAL MEDIA
PORT)
23 (h) mm (φ 3
29
32
/
×
3
(h) pouces)
(7,3 oz) (câble
inclus)
Environ 1,5 m
(5 pieds)
/4
21
FR
Page 40

Advertencia
No instale la unidad en un lugar de
espacio reducido, tal como en una
estantería para libros o vitrina
empotrada.
La placa de características está ubicada
en la parte inferior exterior.
Instale este sistema de forma que el
cable de alimentación pueda ser
desenchufado de la toma de corriente de
la pared inmediatamente en caso de
problema.
La unidad no estará desconectada de la
fuente de alimentación de ca mientr as el
sistema de audio y vídeo conectado se
halle conectado a la toma de corriente
de la pared.
Aviso para los clientes en los
EE. UU.
ADVERTENCIA
Este equipo se ha probado y cumple con
las restricciones de los aparatos
digitales de Clase B, de acuerdo con la
sección 15 del reglamento de la FCC.
Estas restricciones se han diseñado para
proporcionar protección suficiente
contra interferencias nocivas en
instalaciones domésticas. Este equipo
genera, utiliza y puede irradiar energía
de radio frecuencia y, si no se instala y
utiliza siguiendo las instrucciones,
puede provocar interferencias en las
radiocomunicaciones. Sin embargo, no
se garantiza que no se produzcan
interferencias en una instalación
determinada. Si el equipo produce
interferencias en la recepción de radio y
televisión, lo que se puede determinar
conectando y desconectando el equipo,
el usuario debería intentar corregir las
interferencias siguiendo uno o varios de
los siguientes procedimientos:
– Reorientar o reubicar la antena
receptora.
– Aumentar la separación entre el
equipo y el receptor.
– Conectar el equipo a una toma o a un
circuito distinto al que está
conectado el receptor.
– Ponerse en contacto con el
distribuidor o con un técnico con
experiencia en radio y televisión
para obtener asistencia.
PRECAUCIÓN
Le advertimos de que cualquier cambio
o modificación que no se apruebe de
modo explícito en este manual podría
anular su autorización para utilizar este
equipo.
Para los clientes en Canadá
Este aparato digital de clase B cumple
con la norma ICES-003 canadiense.
Derechos de autor
• iPod es una marca comercial de
Apple Inc., registrada en los Estados
Unidos y en otros países.
• iPhone es una marca comercial de
Apple Inc.
• Todas las demás marcas comerciales
y marcas comerciales registradas
pertenecen a sus respectivos
propietarios. En este manual, no se
especifican los símbolos ™ y ®.
ES
2
Page 41

Modelos de iPod compatibles
Los modelos de iPod compatibles son los siguientes. Se recomienda la
actualización del software del iPod a la última versión antes de proceder
a su utilización con esta unidad.
iPod touch iPod nano
generación (vídeo)
iPod nano
de segunda
generación (aluminio)
iPod
de cuarta generación
de quinta generación
de tercera
iPod
(vídeo)
iPod mini
iPod classic iPhone
iPod nano
de primera
generación
iPod
de cuarta generación
(pantalla en color)
Continúa
ES
ES
3
Page 42

Notas
• Esta unidad se ha diseñado para utilizarse únicamente con el iPod. No es posible
conectar ningún otro reproductor de audio portátil.
• En este manual de instrucciones, “iPod” es utilizado como referencia general para las
funciones iPod del iPod e iPhone, a menos que se especifique lo contrario en el texto o
las ilustraciones.
• Sony declina toda responsabilidad en caso de que se produzcan pérdidas o daños
en los datos grabados en el iPod al utilizarlo conectado a esta unidad.
• Para ver detalles sobre los adaptadores de acoplamiento de iPod suministrados,
consulte las instrucciones suministradas con los adaptadores de acoplamiento. Si
utiliza otros modelos de iPod, necesitará adquirir un adaptador de acoplamiento
compatible de Apple Inc. por separado.
• Este producto ha sido diseñado específicamente para ser utilizado con iPhone e
iPod y se ha certificado que satisface los estándares de rendimiento de Apple.
ES
4
Page 43

Índice
Descripción general ..............6
Preparativos
1: Comprobación de los
artículos suministrados......7
2: Lista de ubicación de los
componentes......................7
3: Instalación del
TDM-iP50..........................8
Operación de la
unidad
Selección del modo de
operación .........................11
Utilización del modo de
visualización del iPod......11
Utilización del modo de
visualización en
pantalla ............................13
Información adicional
Solución de problemas........18
Precauciones .......................20
Especificaciones..................21
ES
5
Page 44

Descripción general
Puede disfrutar de los contenidos de audio, vídeo y fotos del iPod
conectando esta unidad a un sistema de audio y vídeo que cuente con una
interfaz DIGITAL MEDIA PORT (serie DAV de Sony, etc.).
• Es posible utilizar el iPod mediante sus propios botones de control, los
botones de control del sistema de audio y vídeo y el mando a distancia
suministrado con dicho sistema (página 11).
• Mientras examina información en la pantalla del iPod o en la pantalla del
televisor en modo de visualización en pantalla, puede realizar
operaciones en su iPod (páginas 11, 13).
• Asimismo, es posible utilizar esta unidad como un cargador de batería
(página 10).
iPod y TDM-iP50 Sistema de audio y vídeo
Nota
DIGITAL MEDIA PORT aparece abreviado en ocasiones como DMPORT en este
manual.
ES
6
Page 45

Preparativos
1: Comprobación de los artículos
suministrados
Unidad (1)
Manual de instrucciones (1)
Adaptadores de acoplamiento de iPod (1 unidad)
Para ver detalles sobre los adaptadores de acoplamiento de iPod suministrados,
consulte las instrucciones suministradas con los adaptadores de acoplamiento.
2: Lista de ubicación de los componentes
1 Cable DIGITAL MEDIA PORT (página 8)
2 Conector para iPod (página 9)
3 Botón OPR MODE (página 11)
4 Indicador de estado LED (página 11)
Modo de visualización del iPod (página 11): Se ilumina en ámbar.
Modo de visualización en pantalla (página 13): Se ilumina en verde.
5 Toma VIDEO OUT (página 8)
ES
7
Page 46

3: Instalación del TDM-iP50
Conecte y posicione el TDM-iP50 como se muestra en la ilustración de
abajo.
Cable de vídeo
(no suministrado)
DMPORT
Cable DIGITAL
MEDIA PORT
Televisor Sistema de audio y vídeo
Televisor
Si su sistema de audio y vídeo no puede sacar señales de vídeo
cuando el sistema está en función DMPORT
(Serie DAV, serie STR de Sony, etc.)
Cable DIGITAL MEDIA PORT
DMPORT
TDM-iP50
Conecte el cable de vídeo compuesto (no suministrado) a la toma VIDEO
OUT de esta unidad.
Para obtener más información, consulte la guía del usuario de su sistema
de audio y vídeo.
Sistema de audio y vídeo
(serie HT de Sony, etc.)
TDM-iP50
Televisor
Cable de vídeo compuesto (no suministrado)
Notas
• La unidad se encenderá y se apagará automáticamente siempre que se encienda o
se apague el sistema de audio y vídeo (serie DAV, etc.).
• Cuando conecte un cable de vídeo a un televisor que tenga toma SCART (EURO
AV), utilice un conector de conversión disponible en el comercio.
• Cuando conecte el cable de vídeo compuesto a la toma VIDEO OUT de la unidad,
no saldrá imagen por el cable DIGITAL MEDIA PORT de la unidad.
ES
8
Cable DIGITAL
MEDIA PORT
TDM-iP50
Page 47

Para conectar o
desconectar la unidad
DMPORT
Para retirar el cable DIGITAL MEDIA
PORT de la toma DMPORT, pulse
ambos botones laterales y
desenchúfelo.
Conexión
A la toma DMPORT
Conecte el cable de
forma que ambas
marcas f estén
alineadas.
1 Conecte el cable DIGITAL
MEDIA PORT de esta unidad a
la toma DIGITAL MEDIA
PORT de un sistema de audio
y vídeo (serie DAV, etc.).
Compruebe que el sistema de
audio y vídeo esté apagado
antes de iniciar la conexión.
2 Encienda el sistema de audio y
vídeo con la toma DIGITAL
MEDIA PORT conectado a
esta unidad y seleccione la
función DIGITAL MEDIA
PORT.
Desconexión
Antes de realizar la desconexión,
apague el sistema de audio y vídeo.
Para colocar el iPod en la
unidad
1 Elija el adaptador de
acoplamiento de iPod que
sirva para su iPod. Para ver
detalles sobre los adaptadores
de acoplamiento de iPod
suministrados, consulte las
instrucciones suministradas
con los adaptadores de
acoplamiento.
2 Inserte el adaptador de
acoplamiento en la unidad.
3 Coloque el iPod en la unidad.
Continúa
ES
9
Page 48

Notas
• Cuando ponga o quite el iPod, maneje
el iPod en el mismo ángulo que el del
conector para iPod de esta unidad y
no retuerza ni balancee el iPod para
evitar que se dañe el conector.
• No traslade la unidad con el iPod
colocado en el conector, ya que
podría provocar un fallo de
funcionamiento.
• Cuando coloque o extraiga el iPod,
sujete la unidad con una mano e
intente no pulsar ninguno de los
controles del iPod por error.
Para utilizar la unidad
como un cargador de
batería
Es posible utilizar la unidad como
un cargador de batería. Mientras el
indicador POWER está iluminado,
se puede cargar la batería. El
estado de carga aparece en la
pantalla del iPod. Para obt ener más
información, consulte la guía del
usuario del iPod.
Para retirar el adaptador
de acoplamiento para
iPod
Para quitar el adaptador de
acoplamiento de iPod, álcelo con la uña
o un objeto plano utilizando la ranura de
dentro del adaptador.
10
ES
Page 49

Operación de la unidad
Selección del modo
de operación
Puede operar su iPod mediante el
sistema de audio y vídeo con la
interfaz DIGITAL MEDIA PORT
(serie DAV de Sony, etc.).
Cambie el modo de
operación pulsando OPR
MODE en la unidad.
x Modo de visualización del
iPod
Puede operar la unidad mediante
los botones del iPod c onectado, los
botones del sistema de audio y
vídeo conectado o el mando a
distancia del mismo.
x Modo de visualización en
pantalla
Puede operar la unidad mediante
los botones del sistema de audio y
vídeo conectado o el mando a
distancia del mismo mientras
visualiza la pantalla de menú de
información del iPod en el
televisor.
Nota
El modo no puede ser cambiado,
excepto para la función DIGITAL
MEDIA PORT.
Utilización del modo
de visualización del
iPod
Pulse OPR MODE en la
unidad para cambiar el modo
al modo de visualización del
iPod.
Mientras la unidad está en modo
de visualización del iPod, el
indicador LED de la unidad se
ilumina en ámbar.
Notas
• Para utilizar un iPod, consulte la guía
del usuario suministrada con éste.
• Antes de desconectar el iPod,
introduzca una pausa en la
reproducción.
Funcionamiento básico
Pulse Para
N Iniciar la reproducción.
X/x Introducir una pausa en
X/x Seleccionar un menú o
c//
ENTER
la reproducción.
pista para reproducir.
Ejecutar el menú
seleccionado o
reproducir la pista
seleccionada.
Continúa
11
ES
Page 50

Pulse Para
./> Púlselo y suéltelo para
pasar a la canción/
vídeo o capítulo de
audiolibro/podcast
siguiente (o anterior).
Mantenga pulsado para
avance rápido
(rebobinado rápido).
m/M Reproducir en avance
rápido (rebobinado
rápido).
C/MENU/
DISPLAY/
RETURN
OPR MODE/
MODE
VOLUME
+/–
Notas
• Oriente el mando a distancia hacia el
sistema de audio y vídeo.
Funciona de forma
muy parecida al botón
de menú del iPod.
Cambiar los modos de
operación.
Ajustar el nivel del
volumen.
• En función del sistema de audio y
vídeo conectado, es posible que el
funcionamiento o los botones difieran
de los indicados. Consulte el manual
de instrucciones del sistema de audio
y vídeo.
• Dependiendo del iPod conectado, es
posible que las operaciones varíen.
• Antes de disfrutar de vídeo, haga los
ajustes de vídeo apropiados en el iPod
de acuerdo con su situación.
• Es posible que la reproducción tarde
unos instantes en iniciarse en función
del contenido.
• El volumen (excepto para el volumen
de timbre del iPhone) no puede ser
ajustado utilizando el control de
volumen del iPod cuando éste está
conectado al sistema de audio y
vídeo.
• Mantenga pulsado ./> para
avance rápido (rebobinado rápido)
mientras reproduce vídeo si m/M
no funciona.
• Cuando el iPhone esté conectado al
sistema de audio y vídeo y se reciba
una llamada durante la reproducción,
la reproducción hará una pausa y
podrá recibir una llamada entrante.
• El timbre del iPhone sonará con el
volumen de timbre ajustado en el
iPhone aun cuando éste esté
conectado al sistema de audio y
vídeo. Ajuste el volumen de timbre al
ajuste apropiado en el iPhone.
12
ES
Page 51

Utilización del modo de visualización en
pantalla
Pulse OPR MODE en la unidad para cambiar el modo al modo
de visualización en pantalla.
Mientras la unidad está en este modo, el indicador LED de la unidad se
ilumina en verde.
1
2
4
Music
Videos
Settings
Main Menu
>
>
>
DIGITAL
MEDIA
P O R T
1 Título de menú seleccionado
2 Ajustes actuales ( , Repetir, Aleatorio)
3 Lista de [Main Menu] ([Music], [Videos], [Settings])
4 Menú seleccionado
3
Continúa
13
ES
Page 52

Para disfrutar de música y vídeo mientras examina
información en la visualización en pantalla
Ejemplo: Listas de reproducción de música
1 Seleccione [Music] en [Main Menu], después pulse ENTER.
Aparece la visualización del menú [Music].
2 Seleccione [Playlists] en el menú [Music], después pulse ENTER.
Aparece la visualización del menú [Playlists].
3 Seleccione lista de reproducción deseada, después pulse ENTER.
Aparecen las pistas de la lista de reproducción seleccionada.
4 Seleccione la pista deseada, después pulse ENTER.
La pista seleccionada empieza a reproducirse.
My Favorites
Jack and Paul
Somebody
Colors
To Marble
Woman in Red
Joy
6
5
Colors
Jennifer G
My Best Album
1/ 16 1: 30
1 Pista de reproducción en curso
2 Nombre del artista
3 Nombre del álbum
4 Tiempo transcurrido
5 Número de la pista de reproducción en curso/número total de pistas
6 Estado de la reproducción (Reproducción, Pausa, Avance rápido,
Rebobinado rápido)
1
2
3
4
14
ES
Page 53

Notas
• En este modo, no se pueden utilizar
los botones de control del iPod.
• Cuando el TDM-iP50 no pueda
visualizar un carácter, éste se
visualizará como “*”.
• Dependiendo del iPod conectado,
será necesario cambiar al modo de
visualización del iPod (página 11)
para poder visualizar imágenes de
vídeo/fotos.
• Antes de desconectar el iPod,
introduzca una pausa en la
reproducción.
• Mientras “Loading…” esté
visualizado en el televisor, no
desconecte el iPod.
• Es posible que la reproducción tarde
unos instantes en iniciarse en función
del contenido.
• Antes de disfrutar de vídeo, haga los
ajustes de vídeo apropiados en el iPod
de acuerdo con su situación.
Funcionamiento básico
Pulse Para
N Iniciar la reproducción.
X/x Introducir una pausa en
la reproducción.
Pulse Para
c//
ENTER
Seleccionar el menú/ir
a la siguiente
visualización del
menú/iniciar la
reproducción.
C/MENU/
DISPLAY/
RETURN
Ir a la anterior
visualización del
menú.
X/x Mover el cursor.
./> Púlselo y suéltelo para
pasar a la canción o
capítulo de audiolibro/
podcast siguiente
(anterior).
Mantenga pulsado para
avance rápido
(rebobinado rápido).
m/M Reproducir en
retroceso rápidos
(avance rápido).
OPR MODE/
MODE
VOLUME
+/–
Cambiar los modos de
operación.
Ajustar el nivel del
volumen.
Continúa
15
ES
Page 54

Menú de ajustes
En el menú de ajustes, puede
seleccionar los ajustes de esta
unidad: [Screen Saver], [Color
Theme], [Shuffle], [Repeat],
[Audiobooks]. El ajuste cambia
pulsando ENTER, , o c
repetidamente.
Los ajustes predeterminados están
subrayados.
Nota
[Screen Saver] y [Color Theme] pueden
seleccionarse pulsando ENTER, y sus
ajustes pueden ser cambiados incluso
cuando el iPod no está colocado en la
unidad.
x Screen Saver
Después de unos 15 minutos de
inactividad, aparecerá la imagen
del protector de pantalla en el
televisor. Pulse cualquier botón
para cancelar el protector de
pantalla.
[ON]
[OFF] Desactiva el protector de
Activa el protector de
pantalla.
pantalla.
La pantalla no cambia a la imagen
del protector de pantalla mientras
se reproduce vídeo.
x Color Theme
Selecciona el color de la
visualización en pantalla para el
televisor conectado.
[Auto] El color se selecciona
[White] El color es blanco.
[Black] El color es negro.
[Green] El color es verde.
[Red] El color es rojo.
[Blue]
automáticamente de acuerdo
con su iPod.
El color es azul.
x Shuffle
Reproduce las canciones/álbumes
en orden aleatorio.
El ajuste se determina med iante los
ajustes del iPod.
[OFF] No reproduce en orden
[Songs] Reproduce canciones en
[Albums] Reproduce álbumes en
Nota
Cuando se reproducen contenidos de
vídeo, el ajuste [Shuffle] se pone
automáticamente en [OFF].
aleatorio.
orden aleatorio.
orden aleatorio.
16
ES
Page 55

x Repeat
Reproduce canciones
repetidamente.
El ajuste se determina mediante los
ajustes del iPod.
[OFF] No reproduce
[Repeat
to One]
[Repeat
to All]
repetidamente.
Repite una canción.
Repite todas las canciones.
x Audiobooks
Cambia la velocidad de
reproducción del audiolibro.
El ajuste se determina mediante los
ajustes del iPod.
[Slower] Reproduce el audiolibro
[Normal] Reproduce el audiolibro a
[Faster] Reproduce el audiolibro
despacio.
velocidad normal.
rápidamente.
17
ES
Page 56

Información adicional
Solución de
problemas
Si experimente algún problema
con la unidad, localice el problema
en la lista de solución de
problemas que encontrará a
continuación y realice la acción
correctiva indicada. Si el problema
persiste, póngase en contacto con
su distribuidor Sony.
Tenga en cuenta que si el personal
de servicio cambia alguna pieza
durante la reparación, es posible
que conserve las piezas
sustituidas.
Cuando lleve el sistema a reparar,
asegúrese de llevarlo completo.
Este producto corresponde a un
sistema y se necesita el sistema
completo para determinar la
ubicación que precisa reparación.
El indicador LED parpadea.
• Retire el iPod, y apague el
sistema de audio y vídeo,
después enciéndalo otra vez.
Si el indicador LED todavía
parpadea, consulte con el
distribuidor Sony más cercano.
El mando a distancia no
funciona.
• Actualice su iPod antes de
utilizarlo para usar el software
más reciente.
• Retire cualquier obstáculo
existente.
• Oriente el mando a distancia
hacia el sensor del sistema de
audio y vídeo (serie DAV, etc.).
• La distancia entre el mando a
distancia y el sistema de audio y
vídeo es excesiva.
• Sustituya la pila.
• Asegúrese de que el iPod* está
conectado firmemente.
• Seleccione la función DMPORT
en el sistema de audio y vídeo.
• Encienda y apague el sistema de
audio y vídeo.
No aparece la imagen de vídeo
o fotografía del iPod en la
pantalla del televisor.
• Ajuste el modo de operación al
modo de visualización del iPod
para visualizar imágenes de
fotos (página 11).
• Haga la conexión de acuerdo
con su sistema de audio y vídeo
(página 8).
• Cuando examine la
visualización en pantalla a
través del cable DIGITAL
MEDIA PORT:
Desconecte el cable de vídeo de
la toma VIDEO OUT.
18
ES
Page 57

• Cuando examine la
visualización en pantalla a
través de la toma VIDEO OUT:
Cambie la entrada de televisión
a la entrada de vídeo conectada a
esta unidad.
• Compruebe que el ajuste de
salida de televisión d el iPod está
activado (Consulte la guía del
usuario de su iPod).
• Compruebe que el iPod* es
compatible con salida de video
(Consulte la guía del usuario de
su iPod).
No aparece la imagen de vídeo
o fotografía del iPod en la
pantalla del iPod.
• Haga los ajustes de salida de
imagen de vídeo/fotografía
apropiados.
La visualización en pantalla no
aparece en la pantalla del
televisor.
• Compruebe que el modo de
operación está ajustado al modo
de visualización en pantalla
(página 13).
• Haga la conexión de acuerdo
con su sistema de audio y vídeo
(página 8).
• Cuando examine la
visualización en pantalla a
través del cable DIGITAL
MEDIA PORT:
Desconecte el cable de vídeo de
la toma VIDEO OUT.
• Cuando examine la
visualización en pantalla a
través de la toma VIDEO OUT:
Cambie la entrada de televisión
a la entrada de vídeo conectada a
esta unidad.
No hay sonido.
• Actualice su iPod antes de
utilizarlo para usar el software
más reciente.
• Compruebe las conexiones.
• Asegúrese de que la unidad está
conectada firmemente.
• Asegúrese de que el iPod* está
conectado firmemente.
• Asegúrese de que el iPod* está
reproduciendo música.
• Es posible que la reproducción
tarde unos instantes en iniciarse
en función del contenido.
Hay zumbido o ruido
considerable.
• Aleje la unidad del origen del
ruido.
El sonido aparece
distorsionado.
• Baje el volumen del sistema de
audio y vídeo conectado.
• Establezca el ajuste “EQ” del
iPod a “Desactivado” o “Flat”.
El volumen de timbre del
iPhone no cambia.
• Ajuste el volumen de timbre en
el iPhone.
* Consulte “Modelos de iPod
compatibles” (página 3).
19
ES
Page 58

Precauciones
Seguridad
Si cae algún objeto só lido o líquido
dentro del sistema, desenchufe el
sistema y llévelo a personal
cualificado para que se lo revisen
antes de volver a utilizarlo.
Instalación
• No instale la unidad en una
posición inclinada.
• No instale la unidad en lugares:
– extremadamente cálidos o
fríos
– polvorientos o sucios
– muy húmedos
– expuestos a vibraciones
– expuestos a la luz solar
directa.
• Tenga cuidado si coloca la
unidad sobre superficies
tratadas de manera espec ial (con
cera, aceite o pulidas, etc.) ya
que es posible que aparezcan
manchas o se descolore la
superficie.
Acumulación de calor
• Aunque la temperatura de la
unidad aumenta durante su
utilización, no se trata de un
fallo de funcionamiento.
• Coloque la unidad en un lugar
con ventilación adecuada para
evitar la acumulación de calor
en su interior.
Si tiene alguna pregunta o
problema en relación con esta
unidad, consulte al distribuidor
Sony más cercano.
Limpieza de la unidad
Limpie la unidad con un paño
suave ligeramente humedecido
con una solución de detergente
neutro. No utilice ningún tipo de
estropajo, polvo abrasivo ni
disolventes tales como diluyente,
bencina o alcohol.
20
ES
Page 59

Especificaciones
Salida
Vídeo: 1 Vp-p 75 ohm
Generales
Requisitos de alimentación:
Dimensiones: Aprox. φ 95 ×
Peso: Aprox. 225 g
Longitud del cable:
El diseño y las especificaciones están
sujetos a cambios sin previo aviso.
(Salida de vídeo
compuesto)
Entrada de cc 5 V,
0,7 A (a través del
DIGITAL MEDIA
PORT)
23(al) mm (φ 3
29
/32(al)
×
pulgadas)
(7,3 oz) (incluido
el cable)
Aprox. 1,5 m (5 ft)
3
/4
21
ES
Page 60

*387771022 *
(1)
Sony Corporation Printed in Malaysia
 Loading...