

Page 1
For: PlayStation®3
User Manual
1/16
Page 2
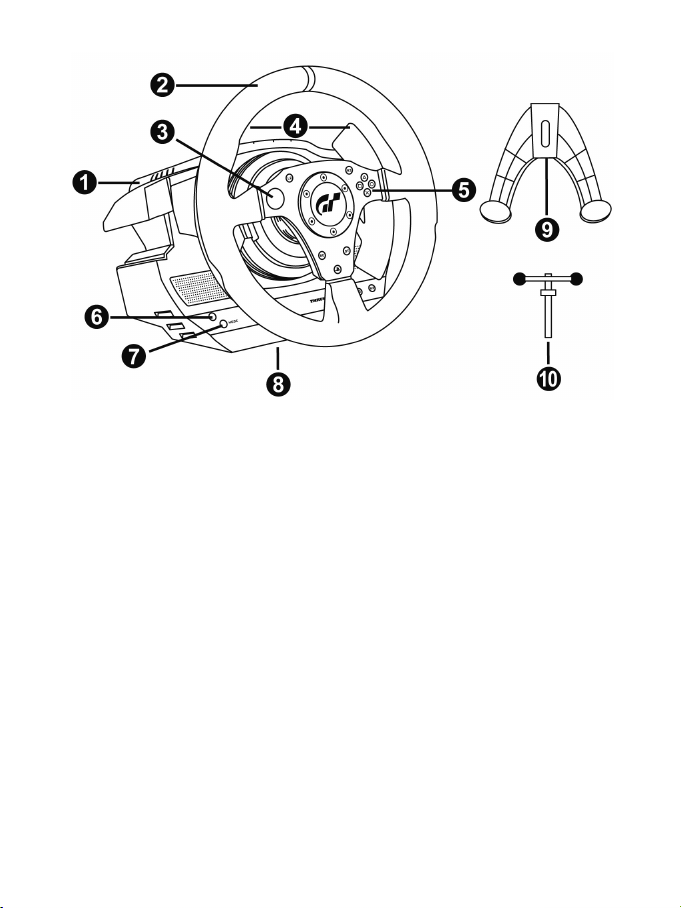
1 Steering wheel base
6 LED
10 Metal clamp screw
TECHNICAL FEATURES
2 Steering wheel
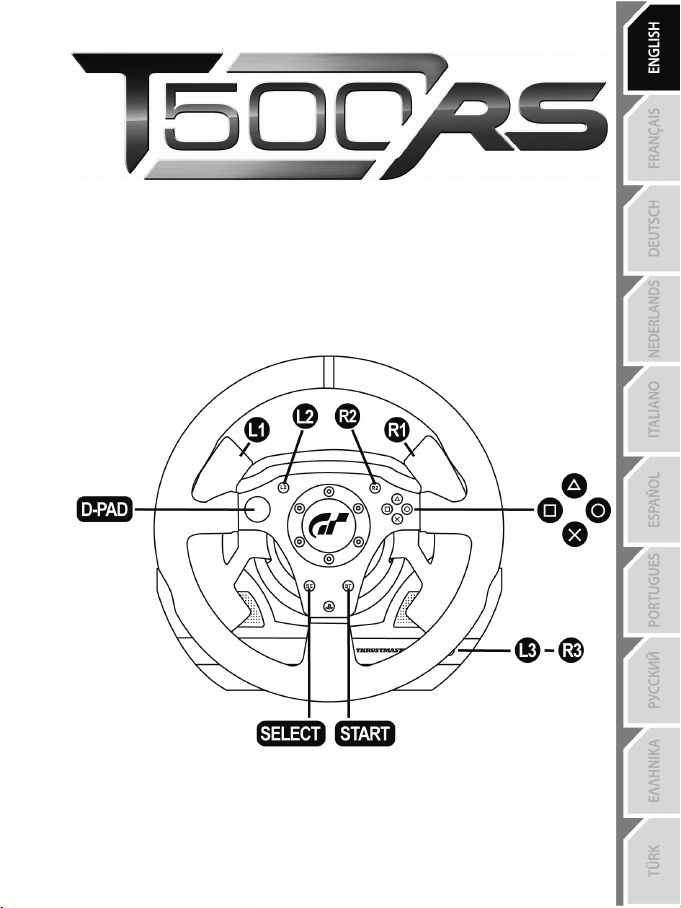
3 D-pad
4 2 digital gearshift levers (Up & Down)
5 Action buttons
7 MODE button
8 Large screw thread (for the clamping
system and the clamp screw)
9 Clamping system
2/16
Page 3
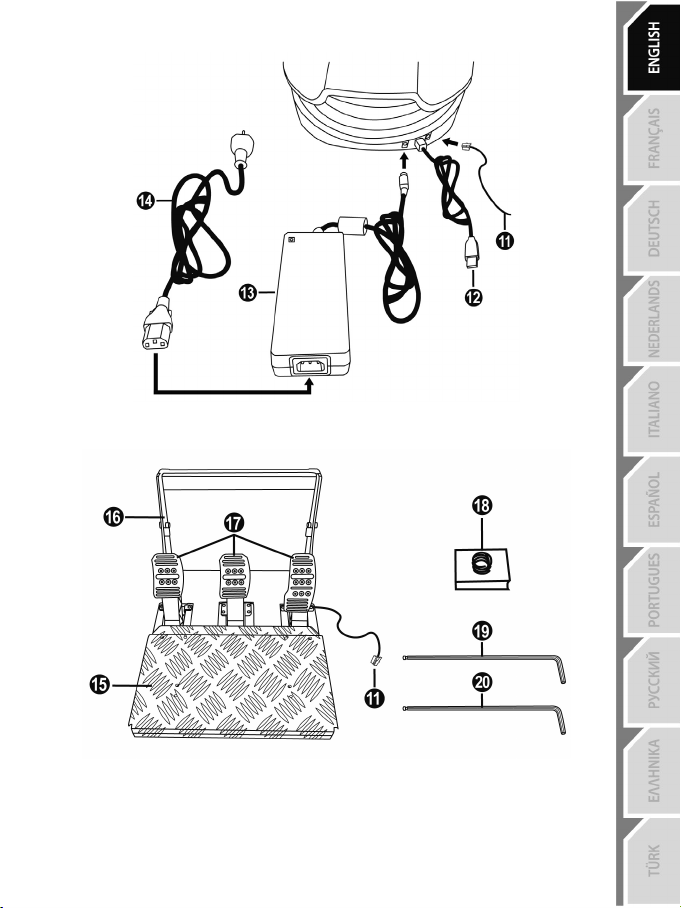
11 Pedal set cable and connector
13 Mains adaptor
11 Pedal set cable and connector
17 Removable pedal head
18 Removable “Realistic Brake” MOD
20 2.5mm Allen key, supplied
12 Steering wheel cable and USB
connector
14 Mains adaptor power cable
15 Removable foot rest
16 Arch
(not installed by default)
19 2mm Allen key, supplied
3/16
Page 4

WARNING
Before you use this product, please read this documentation carefully and keep it safe should you need to
consult it later.
Warning – Electric shock
* Store the product in a dry location and do not expose it to dust or sunlight.
* Respect the connection direction.
* Do not twist or pull the connectors and cables.
* Do not spill any liquid on the product or its connectors.
* Do not short-circuit the product.
* Never dismantle the product (except to adjust the pedal set if necessary); do not throw it onto a fire and
do not expose it to high temperatures.
* Do not use any adaptors other than the main adaptor provided with the “T500 RS”.
* Do not use the mains adaptor if its connectors or cables are damaged, split or broken.
* Make sure that the mains adaptor’s power cable is perfectly inserted into the wall socket.
* If the steering wheel is operating unusually (if it is emitting any abnormal sounds, heat or odours), stop
using it immediately, disconnect the power cable from the socket and disconnect the other cables.
* If you are not going to be using the steering wheel for an extended period, disconnect the mains adaptor
from the wall socket.
Air vents
Make sure that you do not block any of the air vents on the steering wheel base. For optimum ventilation,
respect the points below:
* Position the base at least 10 cm away from any wall surfaces.
* Do not place the base in any tight spaces.
* Do not cover the base.
* Do not let any dust build up on the air vents.
4/16
Page 5

Warning – Injuries due to force feedback and repeated movements
Playing with a force-feedback steering wheel may cause muscle or joint pain. To avoid any problems:
* Avoid lengthy gaming periods.
* Take 10 to 15 minute breaks after each hour of play.
* If you feel any fatigue or pain in your hands, wrists, arms, feet or legs, stop playing and rest for a few
hours before you start playing again.
* If the symptoms or pain indicated above persist when you start playing again, stop playing and
consult your doctor.
* Keep out of children’s reach.
* During game phases, always leave both hands correctly positioned on the steering wheel without
letting it go completely.
* During game calibration phases, never place your hand or arm inside the steering wheel.
ALWAYS
NEVER NEVER
5/16
Page 6

INSTALLING THE WHEEL
CAUTION: Never screw the clamp screw into the clamping system on its own!
Fixing the wheel to a Table or Desk
1. Place the wheel on a table or another flat surface.
2. Place the clamp screw (10) in the table clamp (9) then screw the clamping unit (anti-clockwise)
into the large screw thread (8) located under the wheel until it is perfectly stable.
ALWAYS NEVER
(this may damage the steering wheel).
6/16
Page 7

ASSEMBLY /
DISASSEMBLY
To tighten:
Screw
anti-
clockwise
To loosen:
Unscrew
clockwise
Attaching the steering wheel and pedal set to a cockpit
1. Place the steering wheel on the Cockpit’s tablet.
2. Tighten 2 “M6” screws (not supplied) into the Cockpit table and into the 2 small screw threads
under the wheel.
Important note for the Wheel
the components inside the base.
3. If necessary, screw in the standard clamping system (into the large screw thread).
4. In the same way, attach the Pedal set using the small screw threads underneath it.
Note for the Pedal set
On others the “Suspended position (GT/Rally type)" will be more comfortable.
Do not hesitate to test the different possible settings for more comfort.
: These screws must not be longer than 12mm to avoid damaging
: In certain cockpits the “Floor position” (F1 type) will be more user-friendly.
7/16
Page 8

INSTALLATION ON PLAYSTATION®3
1. Connect the pedal set to the steering wheel by plugging in its connector (11) at the back of the
wheel.
2. Connect the mains adaptor to the wheel (13) by plugging in its connector to the back of the wheel.
3. Connect the mains adaptor to its power cable (14).
Note: To be sure that the 2 elements are perfectly connected, push the power cable’s connector into
the mains adaptor socket firmly.
4. Connect the mains cable (14) to a socket.
5. Connect the wheel’s USB connector (12) to the console’s No. 1 port.
You are now ready to play!
AUTOMATIC CALIBRATION FOR THE WHEEL AND PEDALS
The wheel calibrates itself automatically once the mains adaptor and the USB connector are connected.
This operation will cause the steering wheel to move quickly 1080° to the left and right before coming
to its final position in the centre.
When calibrating the steering wheel
The pedals are also programmed automatically once they have been pressed a few times.
(this may mislead the calibration or cause injury).
CAUTION:
never touch the wheel
TROUBLESHOOTING & TIPS
- My wheel and my pedals don’t work correctly or appear to be improperly calibrated:
Switch off your console, completely disconnect your wheel including all cables (with the mains
adaptor and the pedal set) and restart your game.
- There are various tips and help features (not included in this manual) available on the
website
http://ts.thrustmaster.com in the Technical Support category.
8/16
 Loading...