

Page 1
4-233-502-32(1)
FM Ster eo
FM-AM Receiver
Operating instructions
Mode d’emploi
Gebruiksaanwijzing
Bruksanvisning
GB
FR
NL
SE
STR-DE375
© 2001 Sony Corporation
Page 2

Getting Started
WARNING
To prevent fire or shock
hazard, do not expose
the unit to rain or
moisture.
To avoid electrical shock, do not open
the cabinet. Refer servicing to qualified
personnel only.
Do not install the appliance in a
confined space, such as a bookcase or
build-in cabinet.
Don’t throw a battery,
dispose it as the
injurious wastes.
Precautions
On safety
• Should any solid object or liquid fall
into the cabinet, unplug the receiver
and have it checked by qualified
personnel before operating it any
further.
• To prevent fire, do not cover the
ventilation of the receiver with
newspapers, table cloths, curtains,
etc. And don’t place lighted candles
on the receiver.
• To prevent fire or shock hazards, do
not place vases on the receiver.
On power sources
• Before operating the receiver, check
that the operating voltage is identical
with your local power supply. The
operating voltage is indicated on the
nameplate at the rear of the receiver.
• The unit is not disconnected from the
AC power source (mains) as long as it
is connected to the wall outlet, even if
the unit itself has been turned off.
• If you are not going to use the
receiver for a long time, be sure to
disconnect the receiver from the wall
outlet. To disconnect the mains lead,
grasp the plug itself; never pull the
cord.
• AC power cord must be changed only
at the qualified service shop.
• The mains switch is located on the
front exterior.
On placement
• Place the receiver in a location with
adequate ventilation to prevent heat
build-up and prolong the life of the
receiver.
• Do not place the receiver near heat
sources, or in a place subject to direct
sunlight, excessive dust or
mechanical shock.
• Do not place anything on top of the
cabinet that might block the
ventilation holes and cause
malfunctions.
• Although the receiver heats up
during operation, this is not a
malfunction. If you continuously use
this receiver at a large volume, the
cabinet temperature of the top, side
and bottom rises considerably. To
avoid burning yourself, do not touch
the cabinet.
On operation
• Before connecting other components,
be sure to turn off and unplug the
receiver.
On cleaning
• Clean the cabinet, panel and controls
with a soft cloth slightly moistened
with a mild detergent solution. Do
not use any type of abrasive pad,
scouring powder or solvent such as
alcohol or benzine.
If you have any question or problem
concerning your receiver, please
consult your nearest Sony dealer.
GB
2
Page 3

Getting Started
About This Manual
The instructions in this manual is for
model STR-DE375. Check your model
number by looking at the lower right
corner of the front panel.
Conventions
• The instructions in this manual
describe the controls on the receiver.
You can also use the controls on the
remote if they have the same or
similar names as those on the
receiver.
• A “Quick Reference Guide” is
supplied on page 28.
• The “Remote Button Descriptions”
section on page 26 provides an
overview of the remote buttons.
• The following icons are used in this
manual:
Indicates that you can use only the
remote to do the task.
Indicates hints and tips for making
the task easier.
This receiver contains a Dolby Pro Logic
Surround decoder.
Manufactured under license from Dolby
Laboratories.
“Dolby”, “Pro Logic” and the double-D
symbol ; are trademarks of Dolby
Laboratories.
TABLE OF CONTENTS
Getting Started
Unpacking 4
Hookup Overview 4
Aerial Hookups 5
Audio Component Hookups 5
Video Component Hookups 6
Speaker System Hookups 7
AC Hookups 8
Before You Use Your Receiver 9
Storing FM Stations Automatically in Alphabetical Order
(“Auto-betical”) 9
Receiver Operations
Selecting a Component 10
Receiving Broadcasts 12
Presetting Radio Stations 13
Using the Radio Data System (RDS) 14
Recording 16
Using the Sleep Timer 16
Using Surround Sound
Choosing a Sound Field 17
Getting the Most Out of Dolby Pro Logic Surround Sound 18
Additional Information
Troubleshooting 21
Specifications 22
Glossary 23
GB
FR
NL
SE
Index 24
Rear Panel Descriptions 25
Remote Button Descriptions 26
Quick Reference Guide 28
GB
3
Page 4
Getting Started
Getting Started
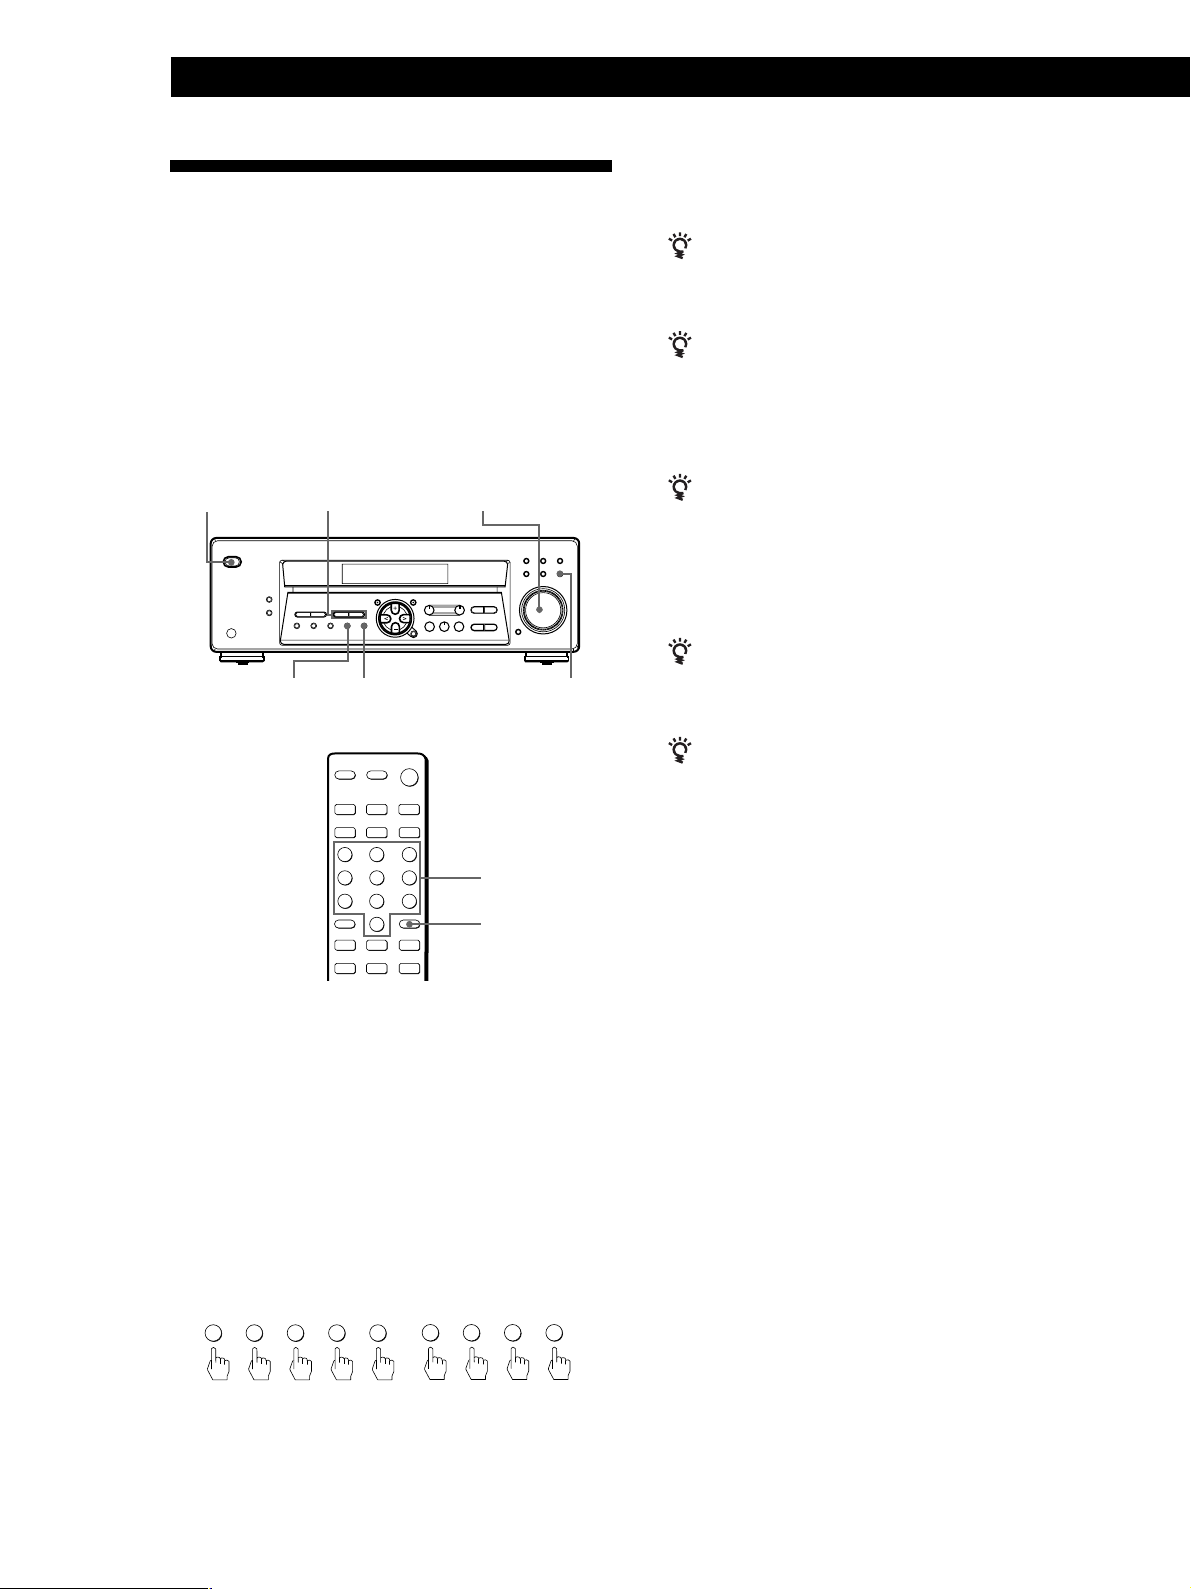
Unpacking
Check that you received the following items with the
receiver:
• FM wire aerial (1)
• AM loop aerial (1)
• Remote commander (remote) (1)
• Size AA (R6) batteries (2)
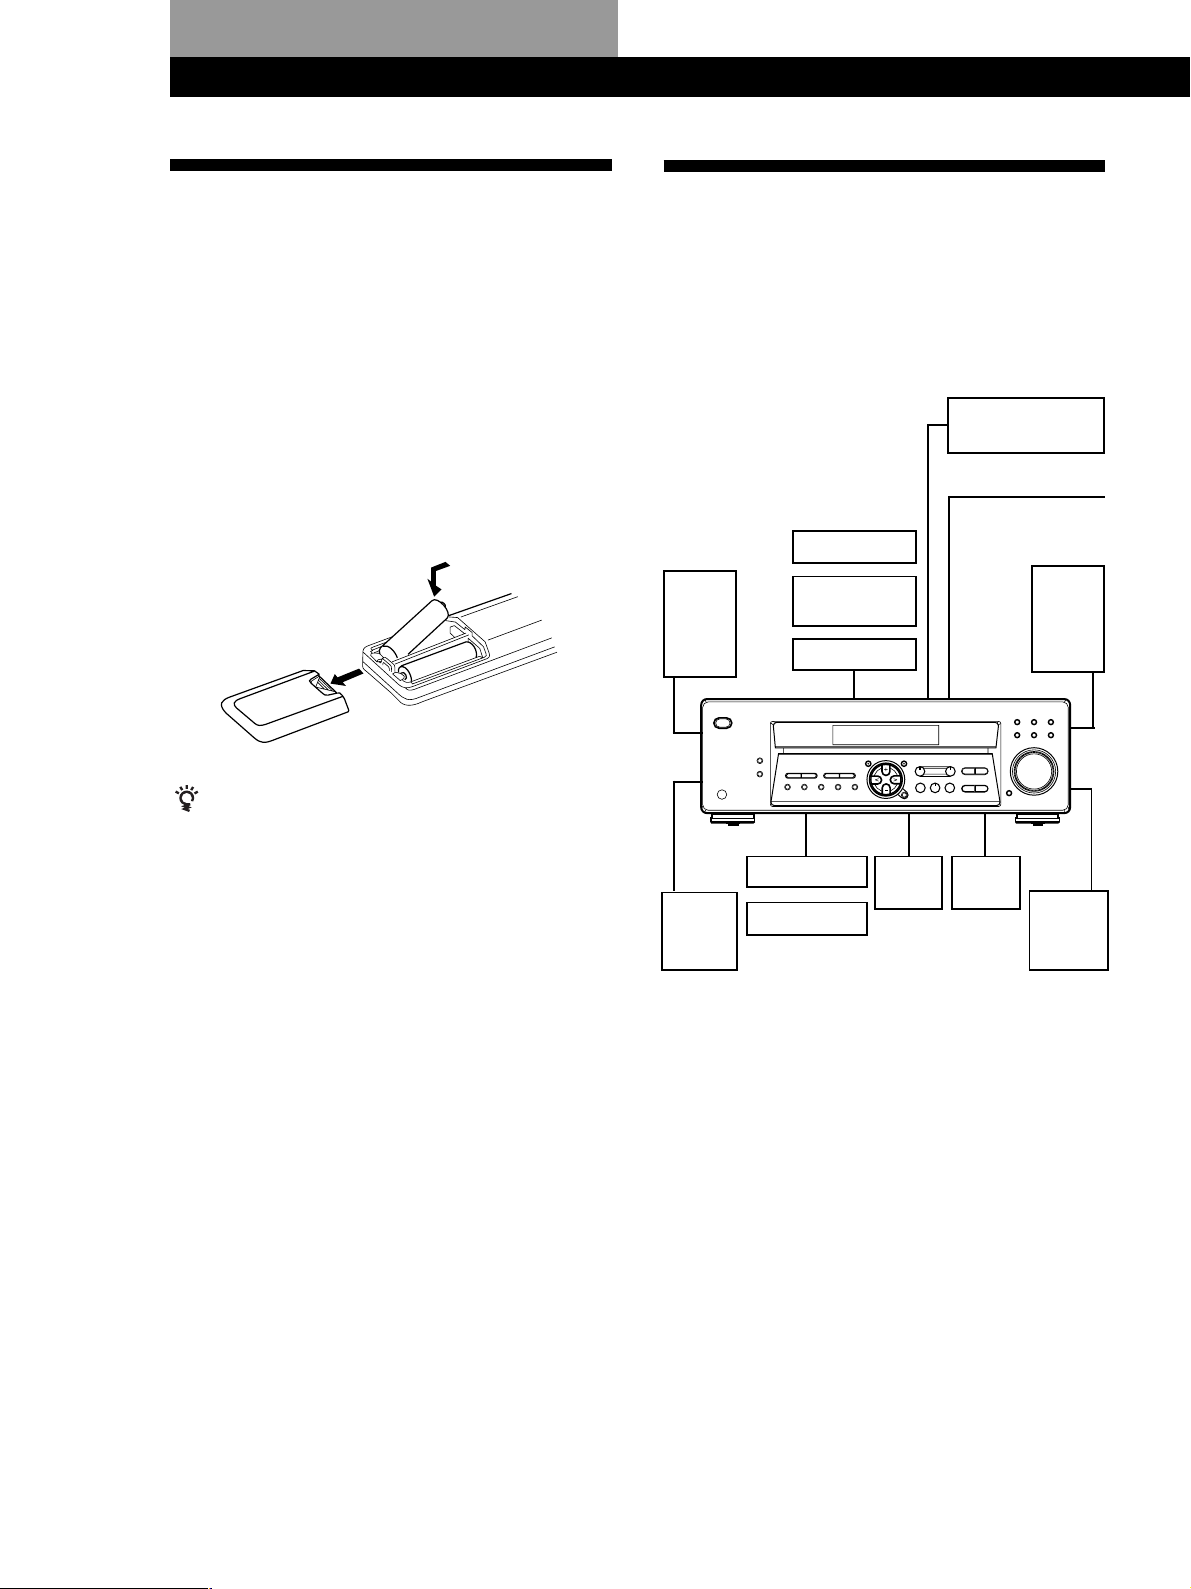
Inserting batteries into the remote
Insert two size AA (R6) batteries in accordance with
the + and – markings on the battery compartment.
When using the remote, point it at the remote sensor g
on the receiver.
]
}
}
]
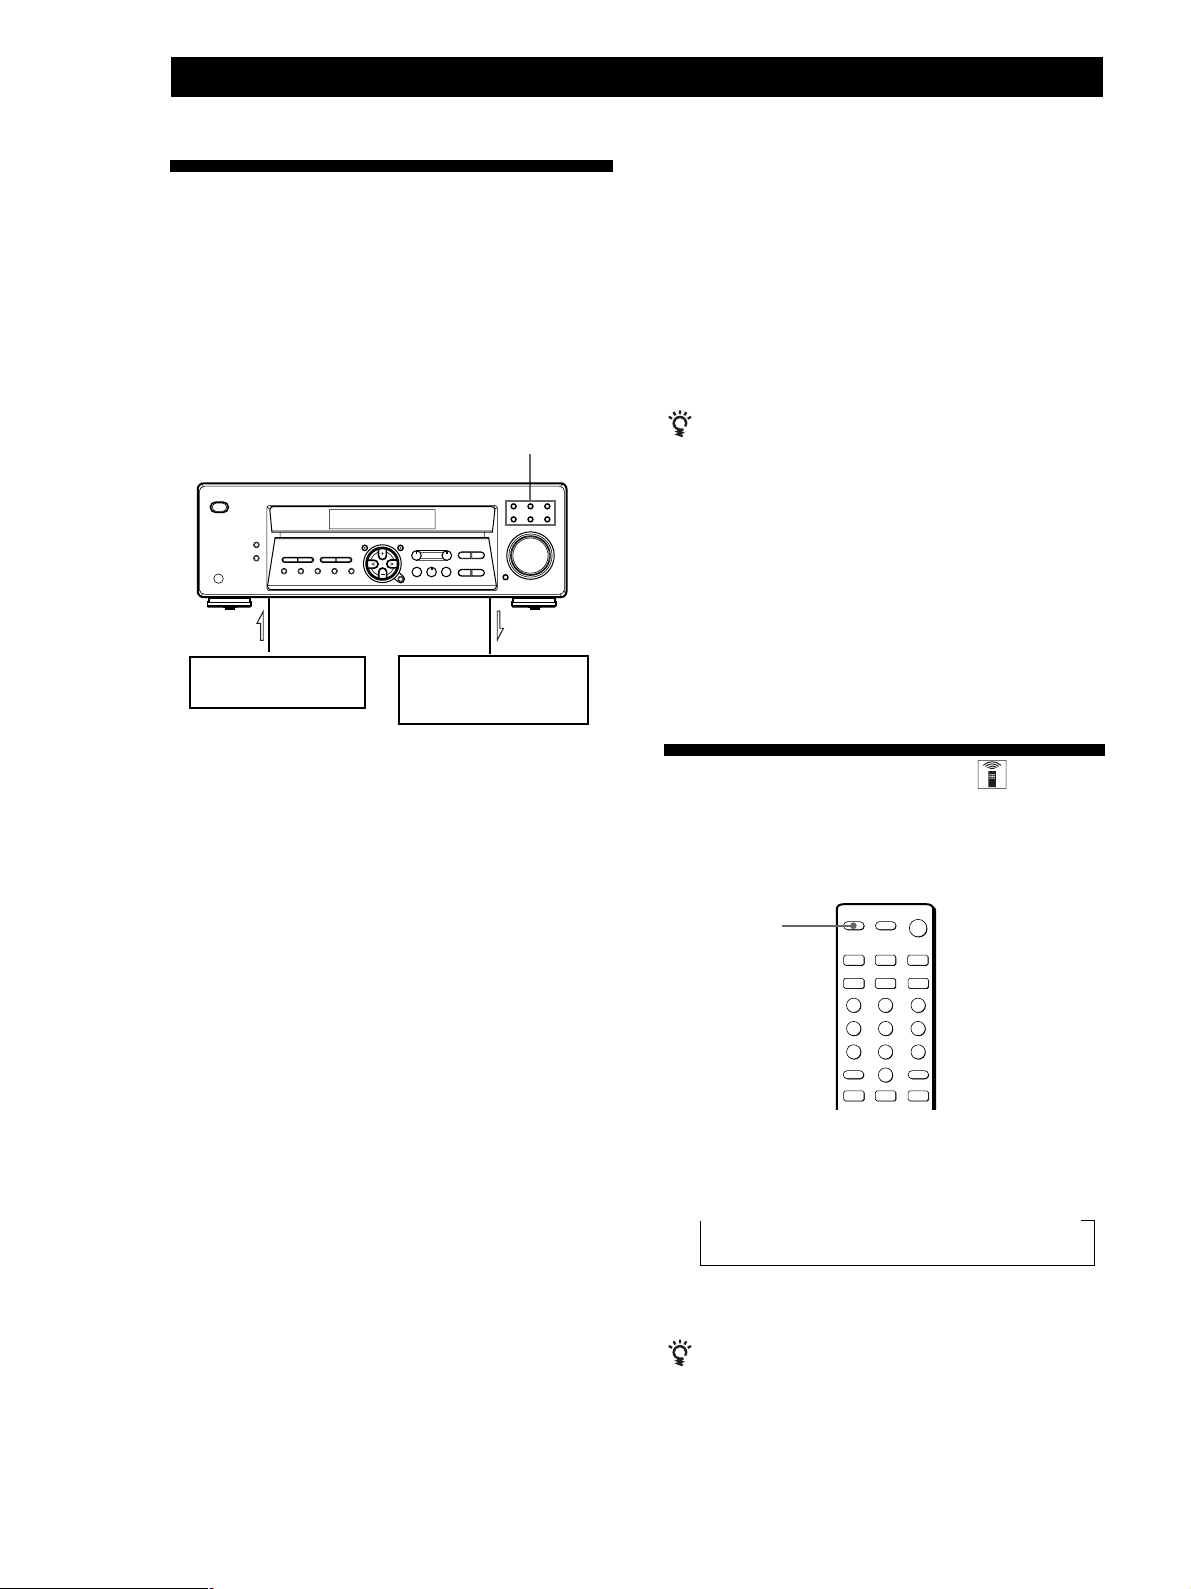
Hookup Overview
The receiver allows you to connect and control the
following audio/video components. Follow the
hookup procedures for the components that you want
to connect to the receiver on the pages specified. To
learn the locations and names of each jack, see “Rear
Panel Descriptions” on page 25.
DVD player/Dolby
Digital decoder
Aerial Hookups (5)
AM/FM aerial
Front
speaker
(R)
Speaker
System
Hookups (7)
Front
speaker
(L)
Video Component
Hookups (6)
TV tuner
SAT (Satellite
receiver)
VCR
When to replace batteries
Under normal use, the batteries should last for about 6
months. When the remote no longer operates the
receiver, replace both batteries with new ones.
Notes
• Do not leave the remote in an extremely hot or humid
place.
• Do not use a new battery with an old one.
• Do not expose the remote sensor to direct sunlight or
lighting apparatuses. Doing so may cause a malfunction.
• If you don’t use the remote for an extended period of time,
remove the batteries to avoid possible damage from
battery leakage and corrosion.
Centre
speaker
Active
woofer
Surround
speaker
(R)
Surround
speaker
(L)
CD player
MD/TAPE deck
Audio Component
Hookups (5)
Before you get started
• Turn off the power to all components before making
any connections.
• Do not connect the mains lead until all of the
connections are completed.
• Be sure to make connections firmly to avoid hum
and noise.
• When connecting an audio cable, be sure to match
the color-coded pins to the appropriate jacks on the
components: White (left, audio) to White; and Red
(right, audio) to Red.
GB
4
Page 5
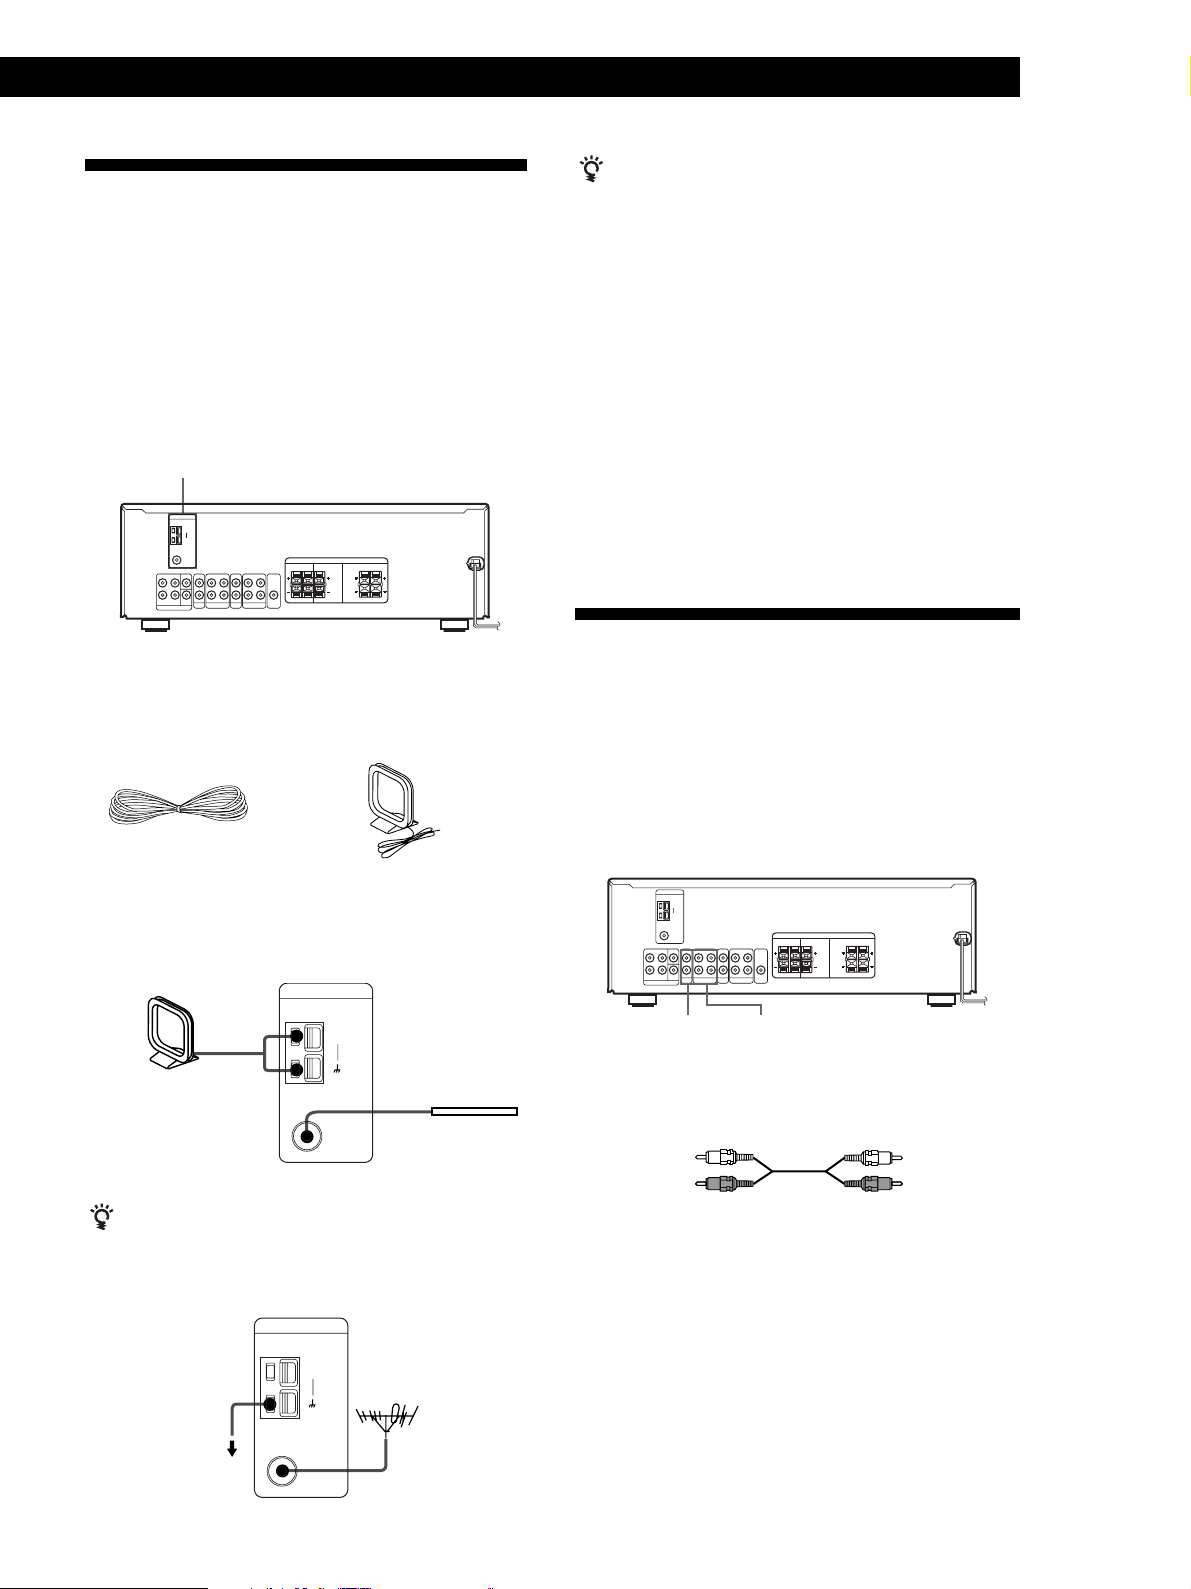
Aerial Hookups
Overview
Getting Started
If you have poor AM reception
Connect a 6 to 15-meter (20 to 50 ft.) insulated wire (not
supplied) to the AM aerial terminal in addition to the
AM loop aerial. Try to extend the wire outdoors and
keep it horizontal.
This section describes how to connect AM and FM
aerials to the receiver. If you want to receive radio
broadcasts with the receiver, complete these
connections first, then go to the following pages.
For specific locations of the terminals, see the
illustration below.
ANTENNA
What aerials will I need?
• FM wire aerial
(supplied) (1)
• AM loop aerial
(supplied) (1)
Connecting a ground wire
If you connect the receiver to an outdoor aerial, ground
it against lightning as shown in the illustration in the
left column. To prevent a gas explosion, do not connect
the ground wire to a gas pipe.
Where do I go next?
If you want to connect other components, go on to the next
section. If you’re only planning to use the receiver to listen to
the radio, go to “Speaker System Hookups” on page 7.
Audio Component Hookups
Overview
This section describes how to connect your audio
components to the receiver. If you want to use the
receiver as an amplifier, complete these connections.
For specific locations of the jacks, see the illustration
below.
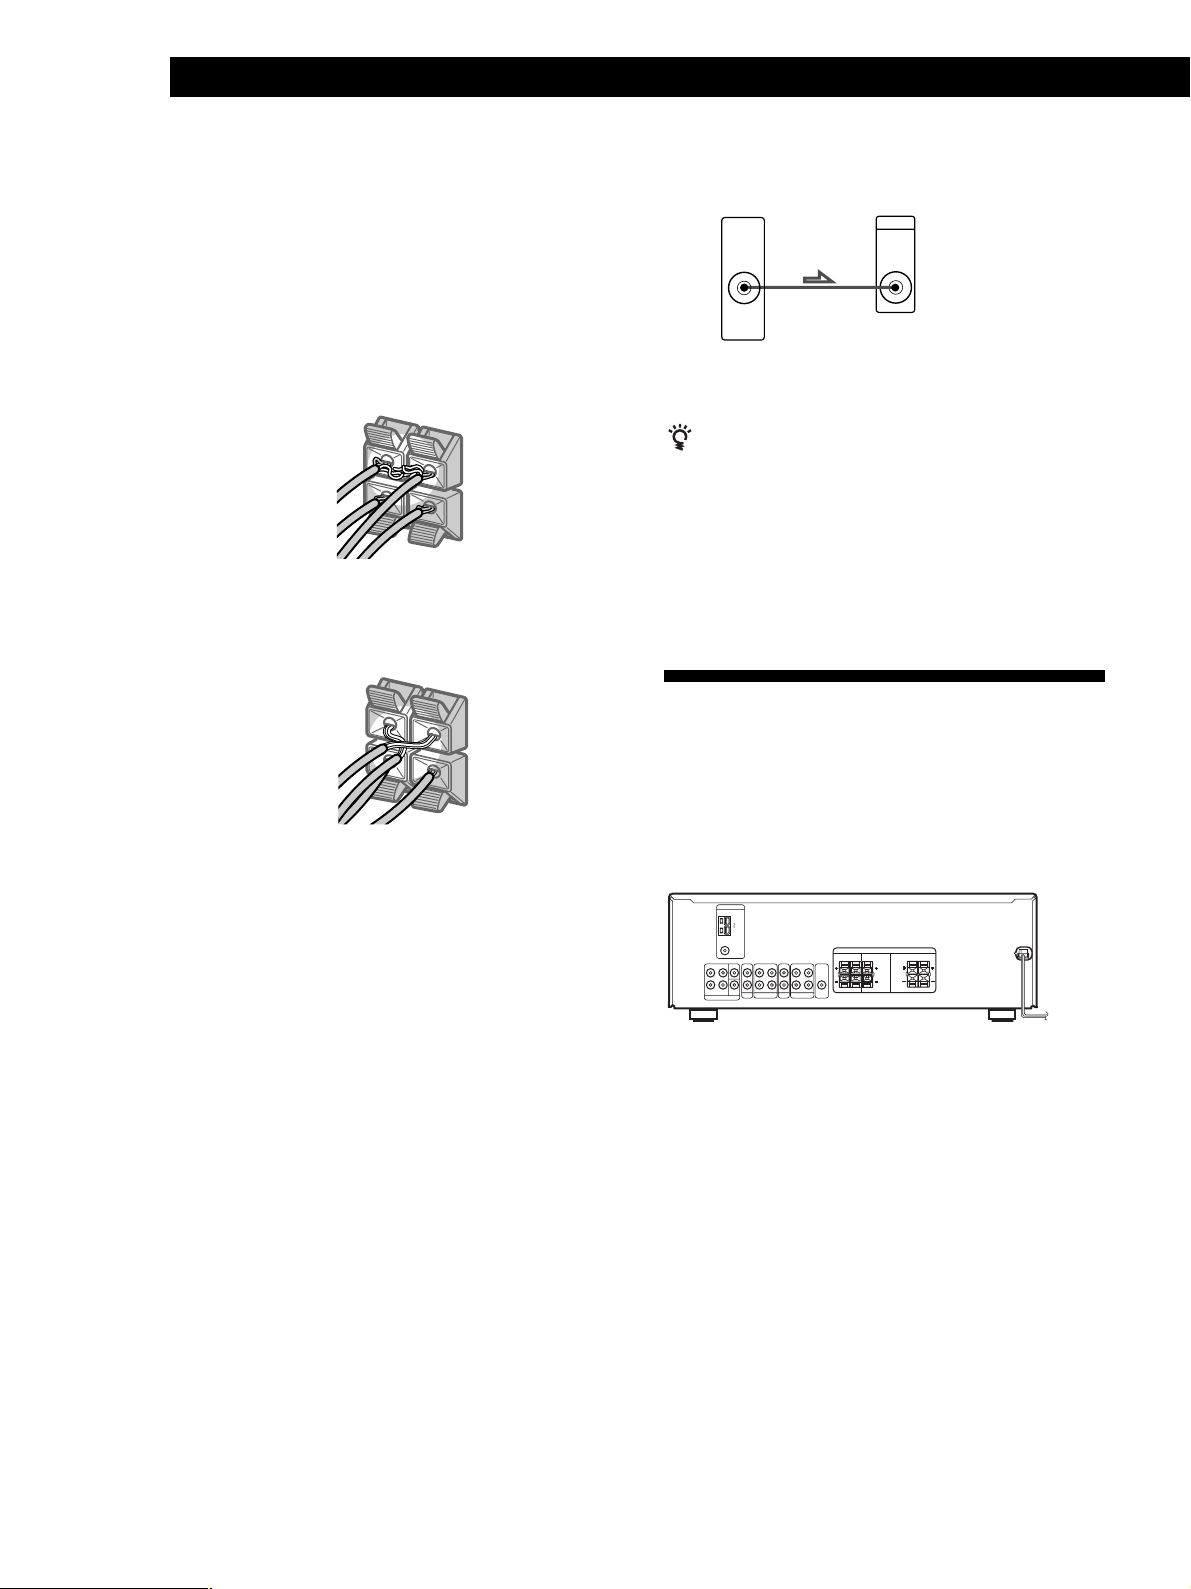
Hookups
AM loop aerial
Receiver
ANTENNA
COAXIAL
If you have poor FM reception
Use a 75-ohm coaxial cable (not supplied) to connect the
receiver to an outdoor FM aerial as shown below.
Receiver
ANTENNA
AM
Ground wire
(not supplied)
to ground
FM
75
Ω
COAXIAL
After connecting
the wire aerial,
keep it as
horizontal as
AM
possible.
FM wire aerial
FM
Ω
75
FM outdoor aerial
MD/TAPE
CD
What cords will I need?
Audio cords (not supplied) (1 for CD player; 2 for each MD
deck or tape deck)
White (L)White (L)
Red (R)Red (R)
(continued)
GB
5
Page 6

Getting Started
Hookups
The arrow l indicates signal flow.
CD player
Receiver
IN
CD
L
R
CD player
OUTPUT
LINE
L
R
MD deck or Tape deck
Receiver
IN
OUT
MD/TAPE
L
R
MD deck or Tape deck
OUTPUT
INPUT
LINE
LINE
L
R
Where do I go next?
Go on to the next section to connect video components to
enjoy surround sound when watching/listening to TV
programmes or video tapes.
Video Component Hookups
Hookups
The arrow l indicates signal flow.
You can listen to the sound from VCR or TV/SAT by
connecting the audio signal from VCR or TV/SAT to
the receiver.
TV/SAT
Receiver
AUDIO IN
TV/SAT
VCR
Receiver VCR
AUDIO IN
AUDIO OUT
VIDEO
Use the function buttons (TV/SAT, CD, MD/TAPE, or
TUNER) to select the VIDEO AUDIO OUT signal. You
can record this audio signal by connecting a recording
component such as a cassette deck (to the VIDEO
AUDIO OUT jack).
TV tuner or Satellite
L
R
L
R
receiver
AUDIO
OUTPUT
AUDIO
OUTPUT INPUT
L
R
L
R
AUDIO
Overview
This section describes how to connect video
components to the receiver. For specific locations of the
jacks, see the illustration below.
TV/SAT
DVD/MULTI CH
What cords will I need?
• Audio/video cords (not supplied) (1 for each TV tuner or
Satellite receiver; 2 for the VCR)
VIDEO
White (L)White (L)
Red (R)Red (R)
DVD player/Dolby Digital decoder
What cords will I need?
• Audio cords (not supplied) (1 for each DVD/MULTI
CH FRONT and SURROUND jacks)
White (L)
Red (R)
White (L)
Red (R)
• Monaural audio cord (not supplied) (1 for each
DVD/MULTI CH CENTER and SUB WOOFER
jacks)
Black Black
GB
6
Page 7
Getting Started
You can play decoded Dolby Digital soundtracks through the
speakers connected to the receiver.
If you have a DVD player or a Dolby Digital decoder
with 5.1 CH output, you can amplify a decoded Dolby
Digital soundtrack with the following connections.
Receiver
L
R
FRONT SURROUND
DVD/MULTI CH
CENTER
SUB
WOOFER
DVD player
PRE OUT
CENTER
SUB
WOOFER
SURROUND
FRONT
Note
If you have a DVD player with 2 CH analog output, connect
it to another function jack.
Where do I go next?
Go on to the next section to connect the speakers.
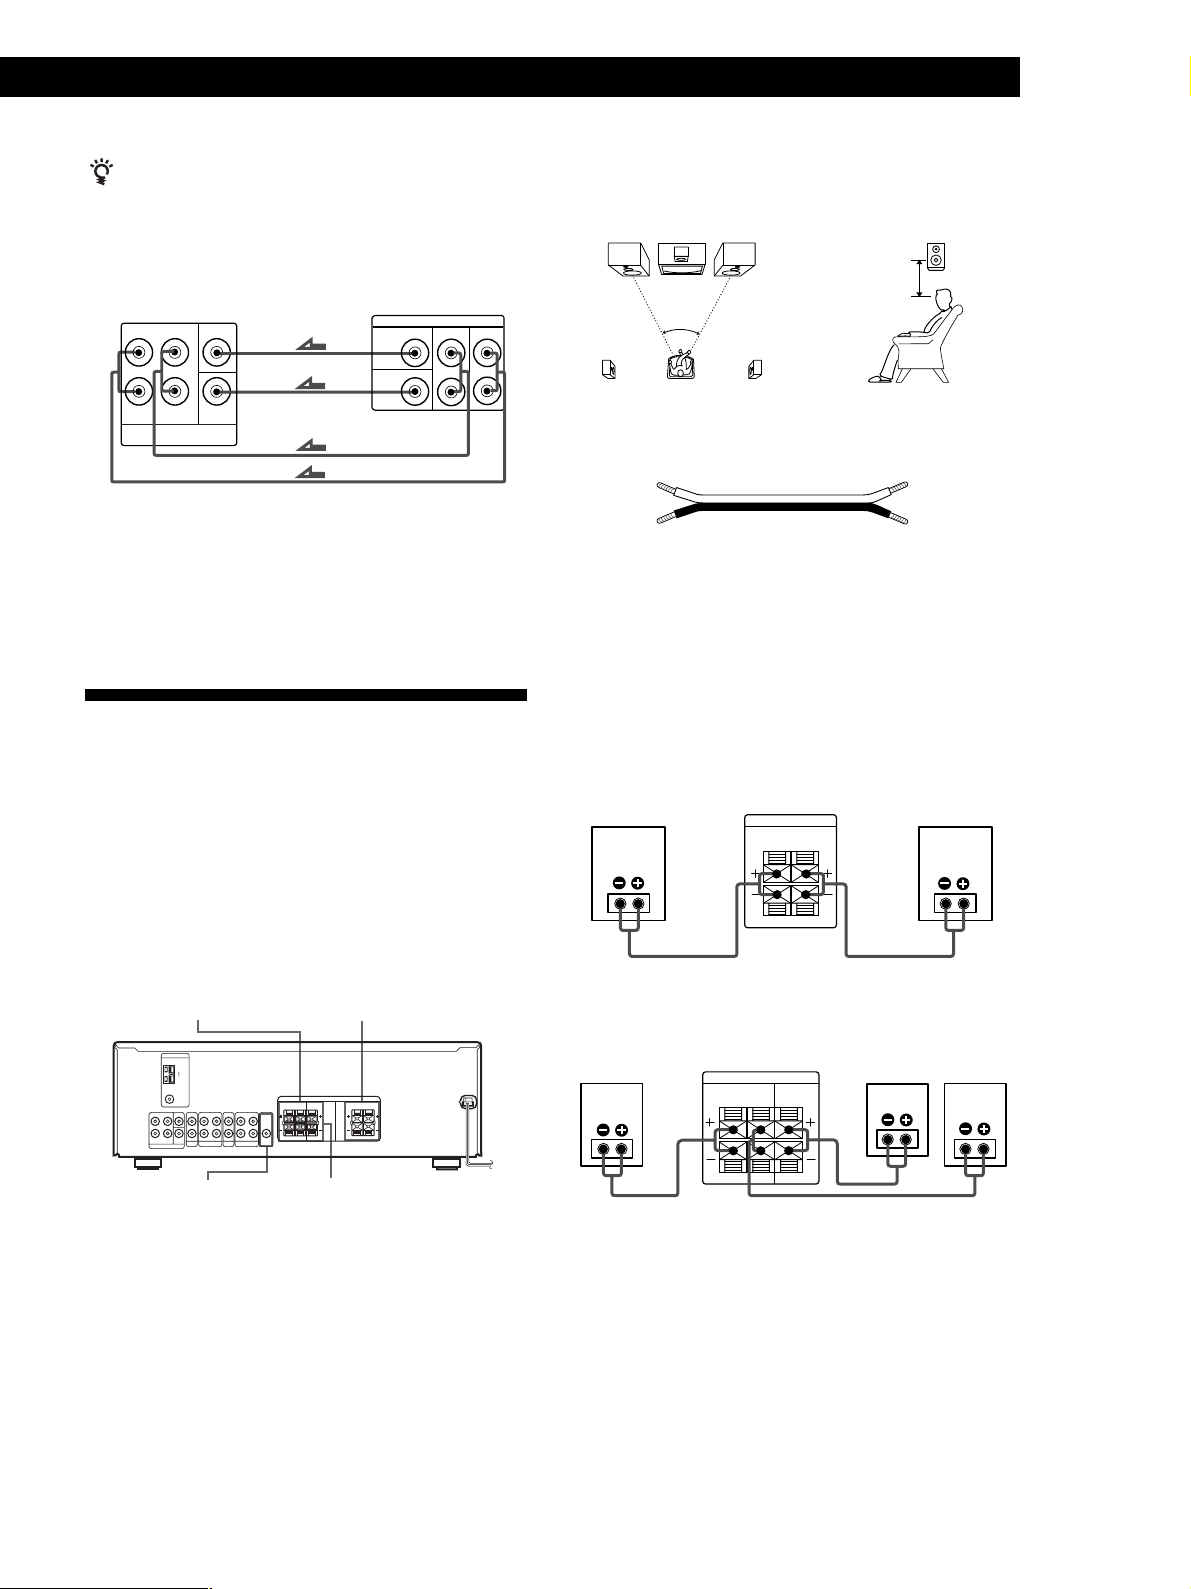
Speaker System Hookups
For optimum surround sound effect, place your
speakers as shown below.
Surround
speaker
60 - 90 cm
45°
What cords will I need?
Speaker cord (not supplied) (1 for each speaker)
(+)(+)
(–)
(–)
Twist the stripped ends of the cord about 15 mm (2/3 inch).
Be sure to match the speaker cord to the appropriate
terminal on the components: + to + and – to –. If the cords
are reversed, the sound will be distorted and will lack bass.
Hookups
Front Speakers
Overview
This section describes how to connect your speakers to
the receiver. Although front (left and right) speakers
are required, centre and surround speakers are
optional. Adding centre and surround speakers will
enhance the surround effects. Connecting an active
woofer will increase bass response. For specific
locations of the terminals, see the illustration below.
SPEAKERS SURROUND
SUB WOOFER
SPEAKERS FRONT
SPEAKERS CENTER
Front speaker
(R)
Receiver
SPEAKERS
FRONT
R
Surround and centre speakers
Surround
speaker
(R)
Receiver
SPEAKERS
SURROUNDLRCENTER
L
Centre speaker
Front speaker
(L)
Surround
speaker
(L)
(continued)
GB
7
Page 8
Getting Started
–
To avoid short-circuiting the speakers
Short-circuiting of the speakers may damage the
receiver. To prevent this, make sure to take the
following precautions when connecting the speakers.
Make sure the stripped ends of each speaker cord does
not touch another speaker terminal or the stripped end
of another speaker cord.
Examples of poor conditions of the speaker cord:
S
P
E
A
K
E
R
S
F
R
O
N
T
R
L
+
–
Stripped speaker cord is touching another speaker
terminal.
SPEAKERS
FRONT
R
L
+
Active woofer
Receiver
AUDIO OUT
SUB
WOOFER
Active Woofer
INPUT
Note
Do not connect any other component.
If your TV monitor uses separate speakers
You can connect one of them to the SPEAKERS
CENTER terminals for use with Dolby Pro Logic
Surround sound (see page 18).
Where do I go next?
To complete your system, go to “AC Hookups” on this page.
AC Hookups
Stripped cords are touching each other due to excessive
removal of insulation
After connecting all the components, speakers and AC
power cord, output a test tone to check that all the
speakers are connected correctly. For details on
outputting a test tone, refer to ”Adjusting the speaker
volume”, on page 19.
If you have connected surround speakers, be sure to
press the DVD/MULTI CH button and turn off sound
field on the receiver before outputting a test tone so
that the tone is output individually from the left and
right surround speakers.
If no sound is heard from a speaker while outputting a
test tone or a test tone is output from a speaker other
than the one whose name is currently displayed on the
receiver, the speaker may be short-circuited. If this
happens, check the speaker connection again.
Connecting the mains lead
Connect the mains lead from this receiver and from
your audio/video components to a wall outlet.
to a wall outlet
,
Where do I go next?
Before you use the receiver, go to the next section to make
sure that all the controls are set to the appropriate positions.
GB
8
Page 9
Getting Started
Before You Use Your Receiver
Before you use your receiver for the first time or when
you want to clear the receiver's memory, do the
procedure below:
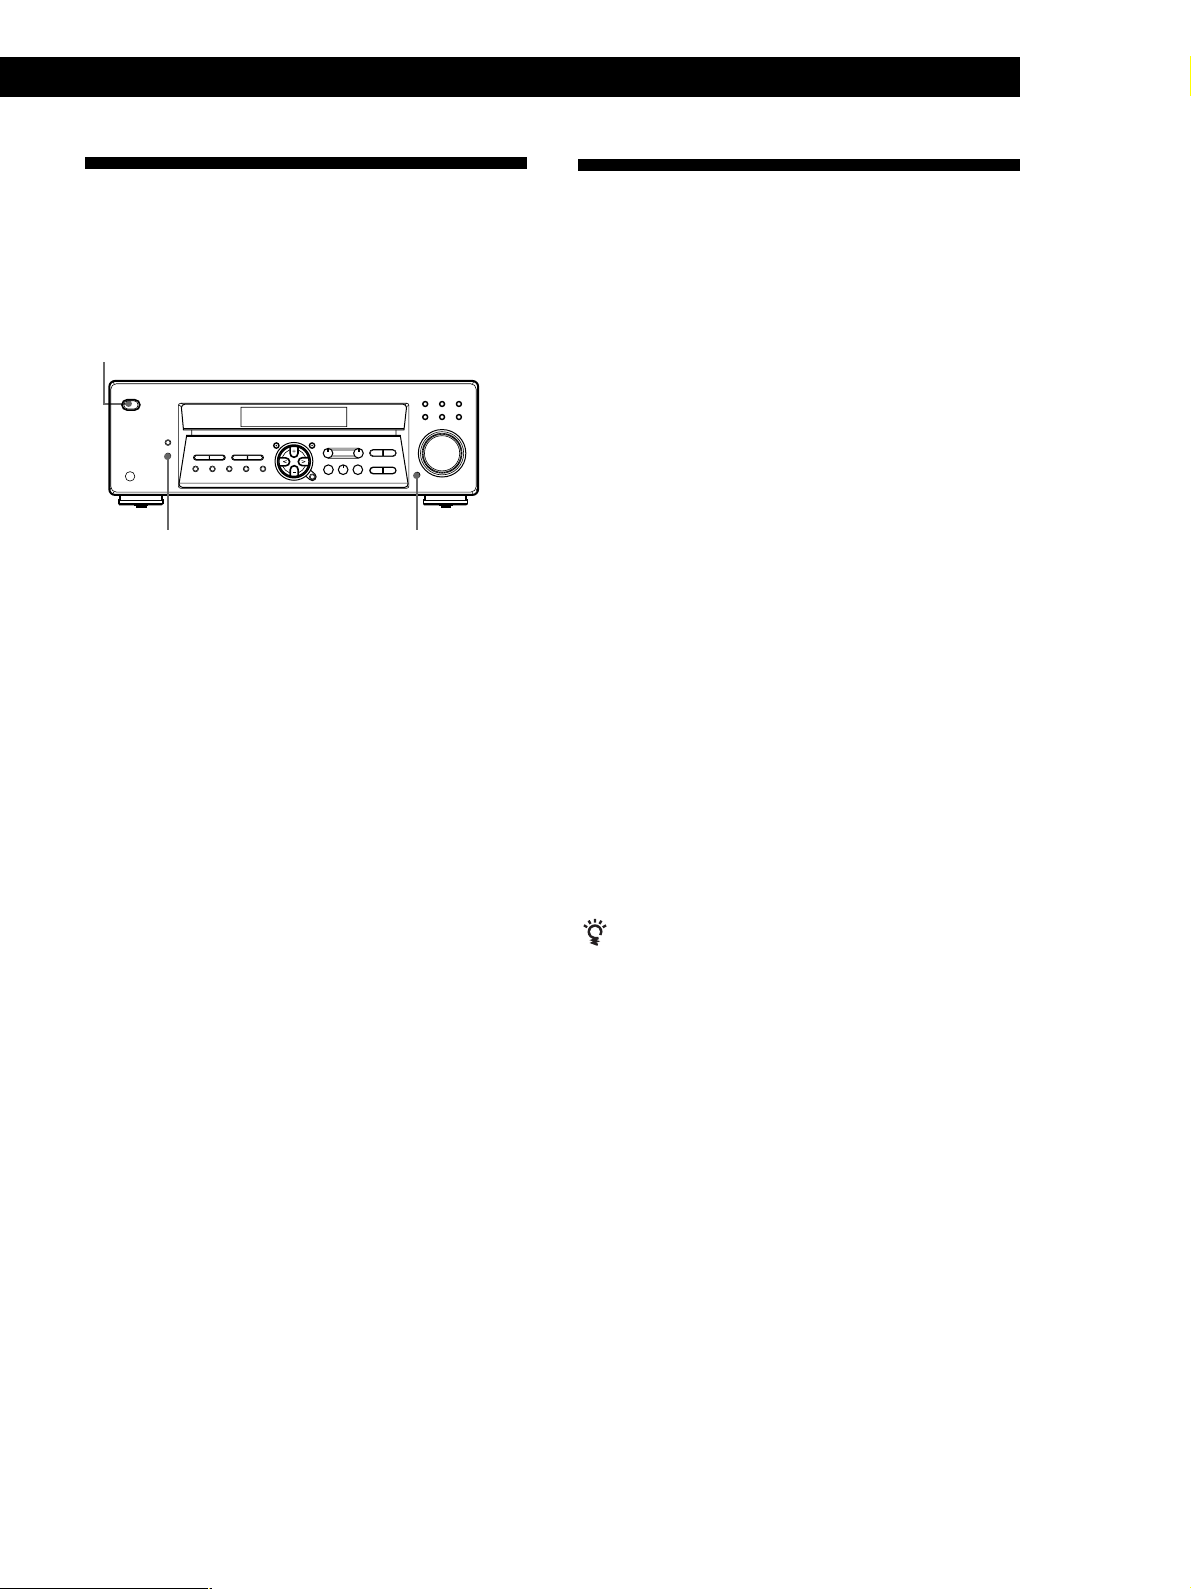
?/1 (power)
DIMMER
1 Turn off the receiver.
2 Press ?/1 (power) for more than 4 seconds.
“INITIAL” appears in the display and the items
including the following are reset or cleared:
• All preset stations are reset to their factory
settings.
• All sound field parameters are reset to their
factory settings.
• All index names (of preset stations and
programme sources) are cleared.
• All adjustments made with the SET UP button are
reset to their factory settings.
• The sound field memorized for each programme
source and preset station is cleared.
Turn on the receiver and check the following indicator.
• Press MUTING if MUTING appears on the
display.
• Press DIMMER repeatedly to set the display at any
of four levels of brightness.
MUTING
Storing FM Stations
Automatically in Alphabetical
Order (“Auto-betical”)
With “Auto-betical select” you can automatically store
up to 30 FM and FM RDS stations in alphabetical order
without redundancy. Additionally, “Auto-betical
select” only stores the stations with the clearest signals.
If you want to store FM or AM (MW) stations one by
one, see “Presetting Radio Stations” on page 13.
FM RDS stations are stored first, in alphabetical order
by their Station Name, followed by regular FM stations
in order of frequency. (For more details on RDS, see
page 14.)
1 Press ?/1 (power) to turn off the receiver.
2 Hold down MEMORY and press ?/1 (power) to
turn the receiver on.
”AUTOBETICAL SELECT” appears and the
receiver scans and stores all the FM and FM RDS
stations in the broadcast area.
“FINISH” appears when the receiver has finished
storing the FM and FM RDS stations.
To change a preset code to another station
See ”Presetting Radio Stations” on page 13.
To stop Auto-betical before storing all the stations
Press ?/1 (power) to turn the receiver off.
Stations currently stored in the preset memory are
shifted to the rear (toward C0) and may be erased,
depending on the number of stations received by Autobetical select.
Notes
• If you move to another area, repeat this procedure to store
stations in your new area.
• For details on tuning to the preset stations, see page 13.
• Once “FINISH” appears, all the previous preset memories
are cleared. Preset AM stations again if necessary.
GB
9
Page 10
Receiver Operations
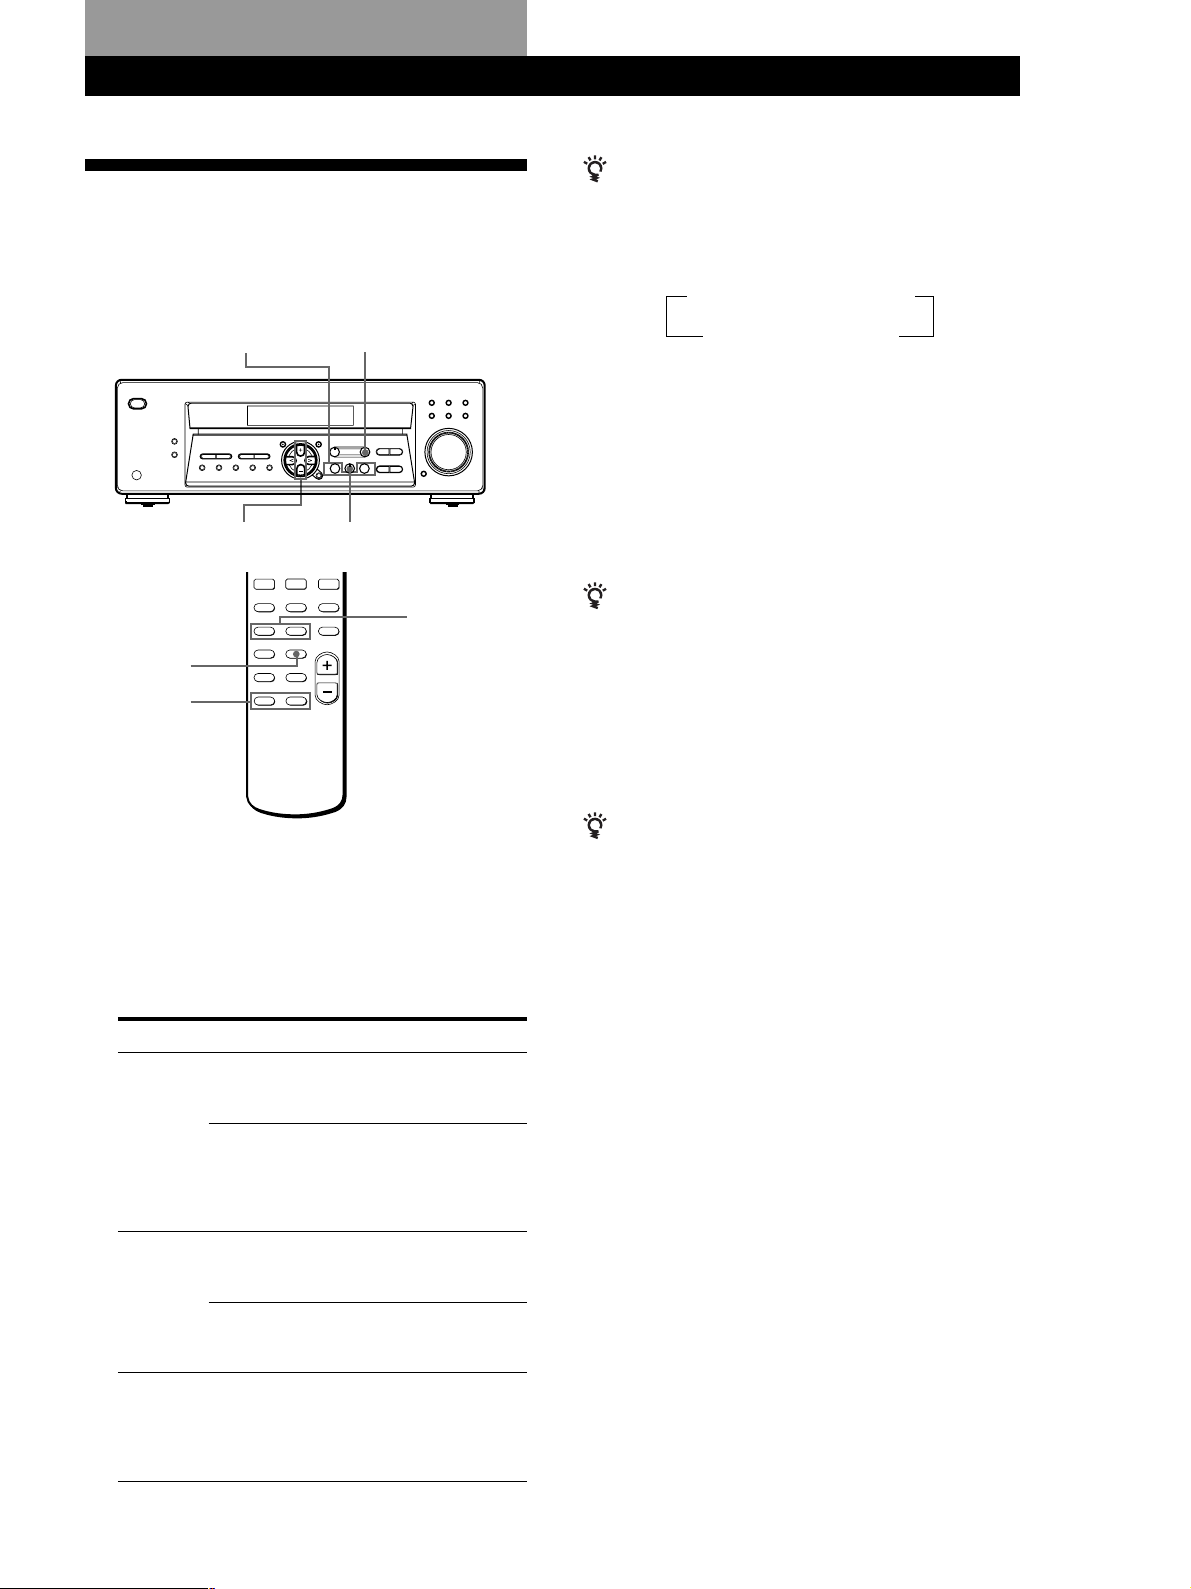
Selecting a Component
To listen to or watch a connected component, first
select the function on the receiver or with the remote.
Before you begin, make sure you have:
• Connected all components securely and correctly as
indicated on pages 5 to 8.
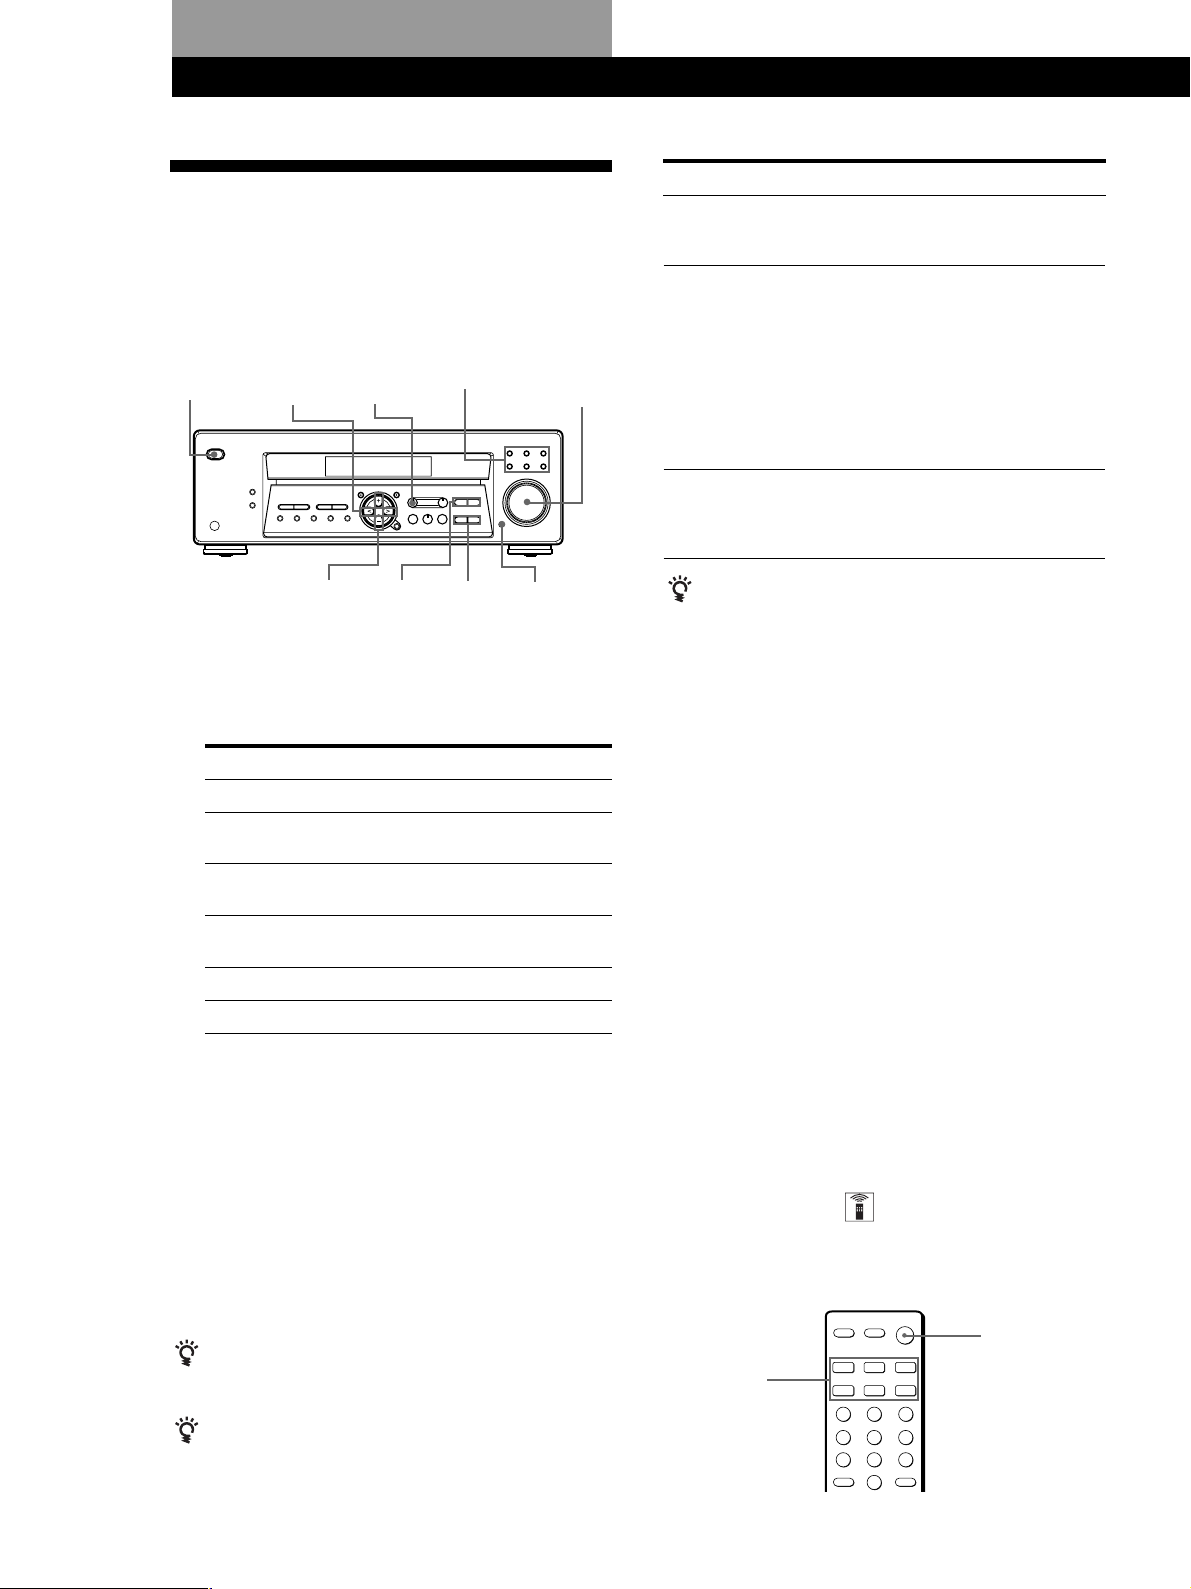
?/1
(power)
MENU </>
MENU
+/–
1 Press ?/1 (power) to turn on the receiver.
2 Press a function button to select the component
you want to use:
To listen to or watch
Video tapes
TV programmes or
Satellite receiver
DVD player/Dolby Digital
decoder
MiniDisc (MD) or Audio
tapes
Compact discs (CD)
Radio programmes
3 Turn on the component, for example, a CD player,
and then start playing.
To tune in radio stations on this receiver, see
“Receiving Broadcasts” on page 12.
Function buttons
LEVEL
TREBLE
+/–
BASS
MUTING
+/–
Press
VIDEO
TV/SAT
DVD/MULTI CH
MD/TAPE
CD
TUNER
MASTER
VOLUME
To
Mute the sound
Adjust the balance
Adjust the tone quality
Do this
Press MUTING. Press again or
turn up the volume to restore
the sound.
1 Press LEVEL or MAIN
MENU on the remote
repeatedly until the LEVEL
indicator lights up.
2 Press MENU < or >
repeatedly until
“BALANCE” appears on the
display.
3 Press MENU + or – to adjust
the balance right or left.
Press BASS +/– and TREBLE
+/– to adjust the tone level.
You can select a tone level of -6
dB to +6 dB in 2-dB steps.
When you listen with headphones
Connect the headphones to the PHONES jack. No
sound will come from the speakers.
Watching/listening to video programmes
When you watch/listen to TV or video programmes,
we recommend you play audio portion through the
receiver instead of your TV’s speaker. This lets you
take advantage of the receiver’s surround sound
effects, such as Dolby Pro Logic Surround and lets you
use the receiver’s remote to control the audio. Turn off
the speakers on your TV before you start so you can
enjoy the surround sound from your receiver.
To watch/listen to TV programmes, turn on the TV, TV
tuner and the receiver and press TV/SAT on the receiver.
To watch videos, do the following:
1 Press VIDEO to select the VCR.
2 Turn on the TV and set the TV’s video input to
match your video component.
10
GB
4 Turn MASTER VOLUME to adjust the volume.
Every time you turn MASTER VOLUME, the
display changes as follows:
VOL MIN y VOL 1 y … y VOL 30 y
VOL MAX
To adjust the volume of the TV's speaker
Use the volume control on the TV.
To avoid damaging your speakers
Make sure that you turn down the volume before you
turn off the receiver. When you turn on the receiver, the
volume remains at the level you turn off the receiver.
3 Turn on the VCR, and start playback.
Using the remote
The remote lets you operate the receiver and the Sony
components that are connected to it.
?/1
Function
buttons
Page 11
Receiver Operations
1 Press one of the Function buttons to select the
component you want to use.
The Function buttons on the remote are factoryset as follows:
To listen or to watch
Radio programmes
Compact discs (CD)
MiniDisc (MD) or
Audio tapes
TV programmes or
Satellite receiver
VHS Video tapes
(VTR-3 mode)
DVD player/
Dolby Digital decoder
with MULTI CH OUTPUT
* VIDEO 1, VIDEO 2, VIDEO 3, PHONO and MD/
TAPE function is a 2-key operation. To select the
above function, press FN SHIFT (function shift) and
the function key you want simultaneously.
For example, press FN SHIFT and CD/SACD to
select MD/TAPE function.
Press
TUNER
CD/SACD
MD/TAPE and FN SHIFT*
(INITIAL-MD MODE)
TV/SAT
(INITIAL-TV MODE)
VIDEO
DVD/LD
(INITIAL-DVD MODE)
If you want to change the factory setting of a
button, see the next section.
The receiver and the selected component turn on.
If the component does not turn on
Press the power switch on the component.
2 Start playing.
Refer to “Remote Button Descriptions” on page 26
for details.
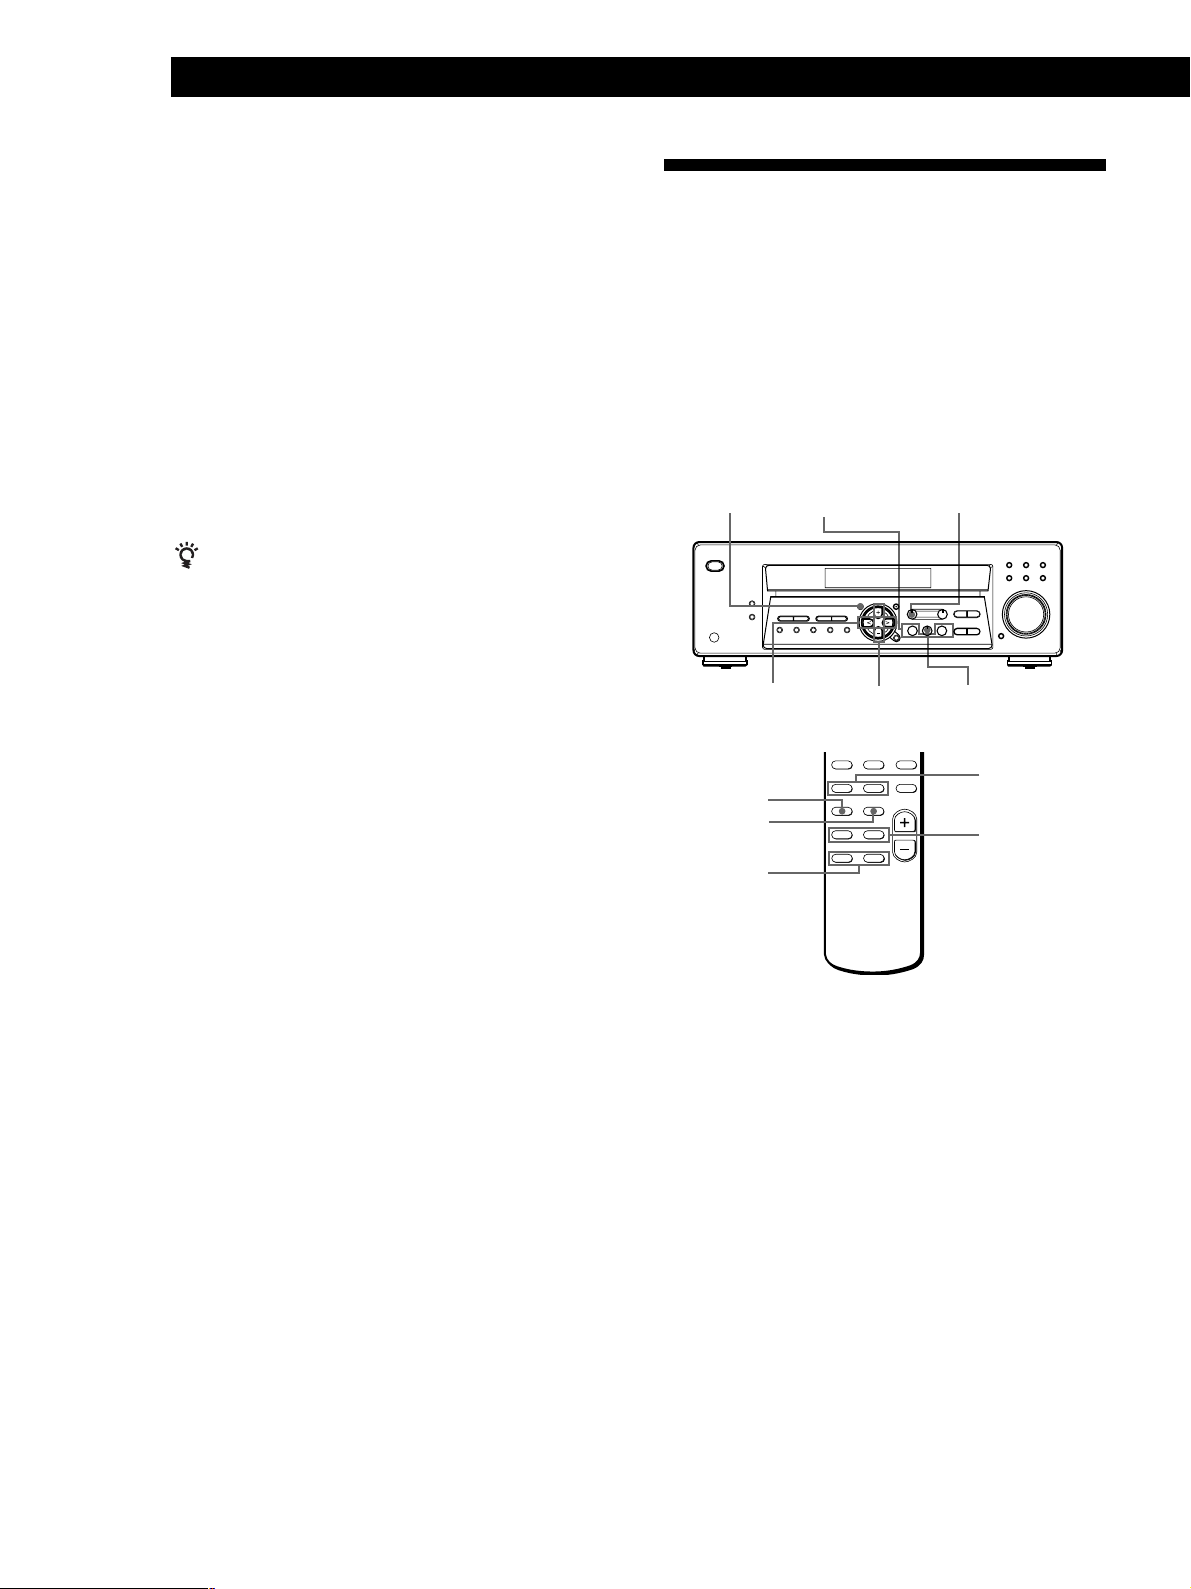
Changing the factory setting of a
function button
If the factory settings of the FUNCTION buttons don’t
match your system components, you can change them.
For example, if you have an MD player and a tape deck
and you don’t have a CD player, you can assign the
CD/SACD button to your tape deck.
Note that the settings of the TUNER and FN SHIFT
functions (VIDEO 1, VIDEO 2, VIDEO 3, PHONO and
MD/TAPE) cannot be changed.
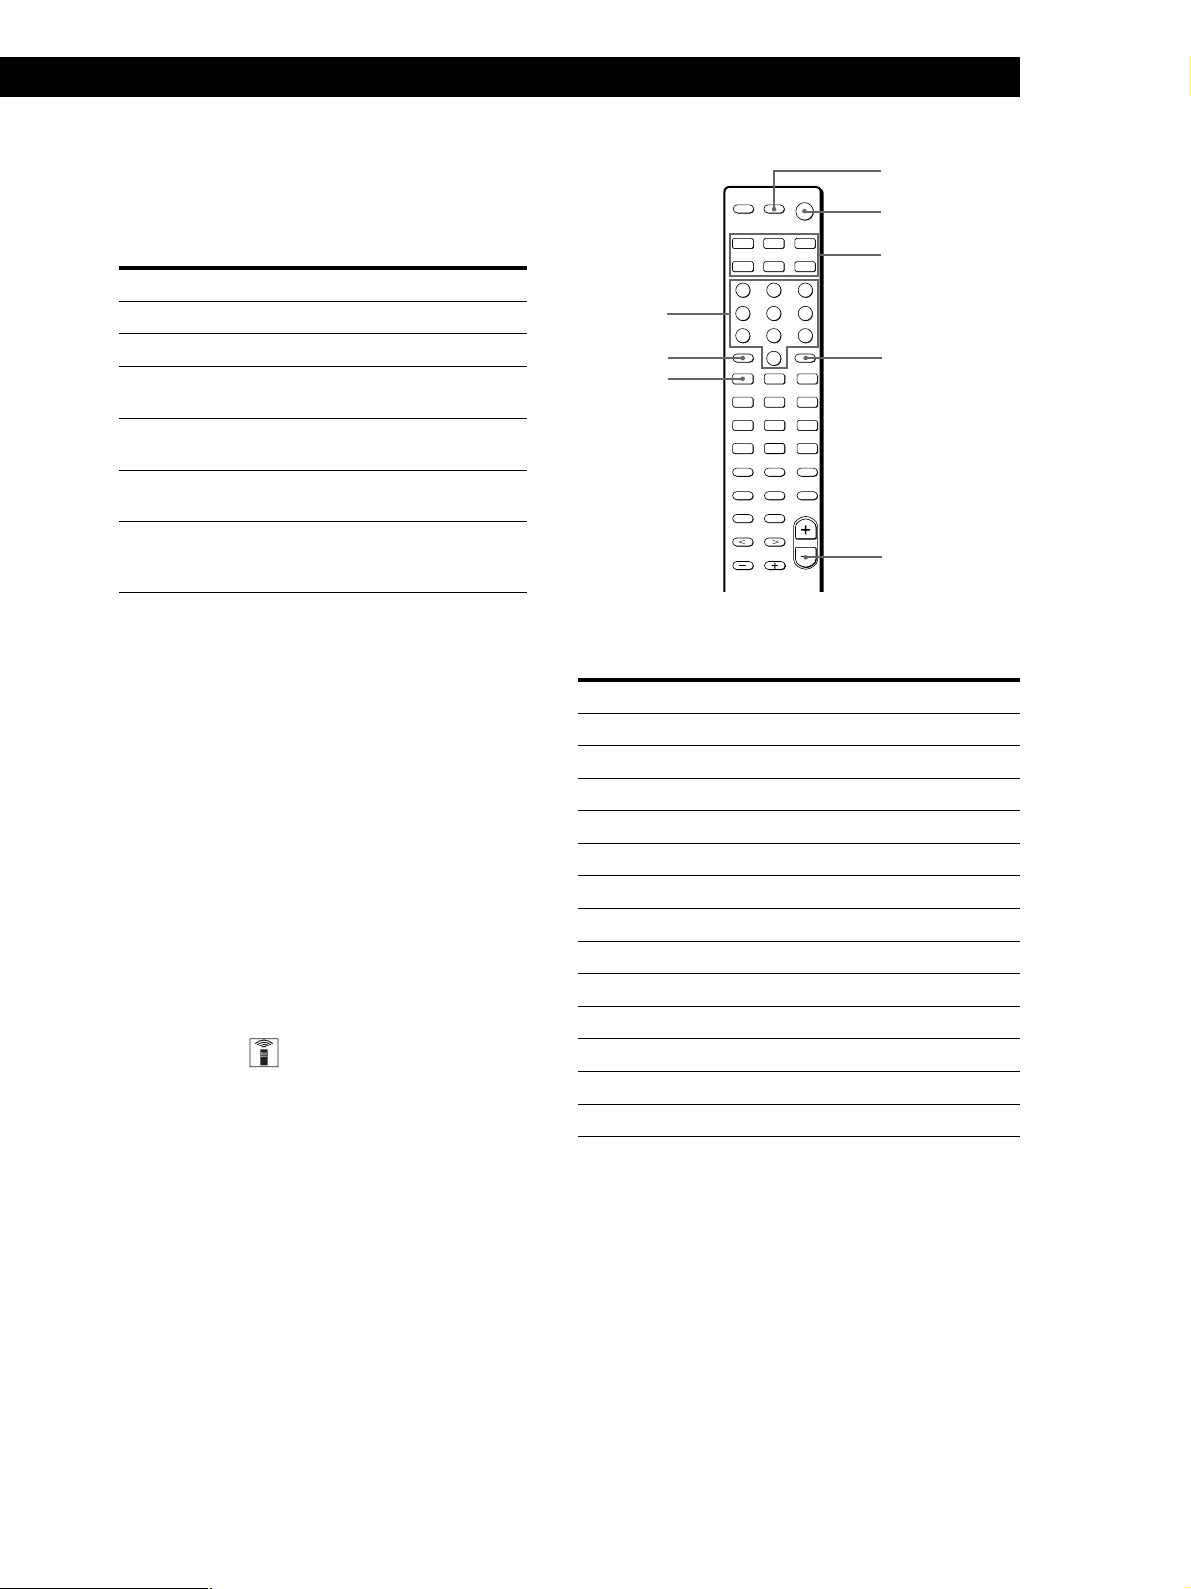
AV ?/1
?/1
Function
buttons
Numeric
buttons
> 10
.
ENTER
MASTER VOL –
The following buttons are assigned to select the
functions:
To operate
CD player
DAT deck
MD deck
Tape deck A
Tape deck B
LD player
VCR (remote control mode VTR 1*)
VCR (remote control mode VTR 2*)
VCR (remote control mode VTR 3*)
TV
DSS (Digital Satellite System)
DVD
VCD player
* Sony VCRs are operated with a VTR 1, 2 or 3 setting.
These correspond to Beta, 8mm and VHS respectively.
Press
1
2
3
4
5
6
7
8
9
0
> 10
ENTER
.
Now you can use the CD/SACD button to control
the tape deck.
1 Hold down the Function button whose function
you want to change (for example, CD/SACD).
2 Press the corresponding button of the component
you want to assign to the Function button (for
example, 4 - Tape Deck).
To reset a button to its factory setting
Repeat the above procedure.
To reset all the function buttons to their factory setting
Press ?/1, AV ?/1 and MASTER VOL – at the same time.
11
GB
Page 12
Receiver Operations
Receiving Broadcasts
To receive other stations
Repeat Steps 3 to 5.
This receiver lets you enter a station’s frequency
directly by using the numeric buttons on the remote
(direct tuning). If you don’t know the frequency of the
station you want, see “Receiving broadcasts by
scanning stations (automatic tuning)”.
Before you begin, make sure you have:
• Connected an FM/AM aerial to the receiver as
indicated on page 5.
?/1 (power)
FM/AMFM MODE
MASTER VOLUMETUNING +/–
TUNER
If the STEREO indicator remains off
Press FM MODE when an FM stereo broadcast is
received.
If an FM stereo programme is distorted
The STEREO indicator flashes. Press FM MODE to
change to monaural (MONO). You will not have the
stereo effect but the distortion will be reduced. To
return to stereo mode, press this button again.
If you cannot tune in a station and the entered
numbers are flashing
Make sure you’ve entered the right frequency. If not,
press D. TUNING and re-enter the frequency you want
on the remote. If the entered numbers still flash, the
frequency is not used in your area.
To watch FM simulcast TV programmes
Make sure that you tune in the simulcast programme
both on the TV (or the VCR) and on the receiver.
If you enter a frequency not covered by the tuning
interval
The entered value is automatically rounded up or down
to the closest covered value.
Numeric
buttons
D. TUNING
1 Press ?/1 (power) to turn on the receiver.
2 Press TUNER.
The last received station is tuned in.
3 Press FM/AM to select FM or AM stations.
4 Press D. TUNING on the remote.
5 Press the numeric buttons on the remote to enter
the frequency.
Example 1: FM 102.50 MHz Example 2: AM 1350 kHz
02501
35001
6 When you tune in AM stations, adjust the
direction of the AM loop aerial for optimum
reception.
Tuning intervals for direct tuning are:
FM: 50 kHz intervals
AM: 9 kHz intervals
Receiving broadcasts by scanning stations
(automatic tuning)
If you don’t know the frequency of the radio station
you want, you can have the receiver scan all the
receivable stations to locate the one you want.
1 Press TUNER.
The last received station is tuned in.
2 Press FM/AM to select FM or AM.
3 Press TUNING + or –.
Press the + button for a higher frequency; press
the – button for a lower one. When you tune past
either end of the band, the receiver automatically
jumps to the opposite end. Every time a station is
received, the receiver stops scanning. To continue
scanning, press the button again.
12
GB
Page 13

Presetting Radio Stations
You’ll most likely want to preset the receiver with the
radio stations you listen to often so that you don’t have
to tune in the station every time. The receiver can store
a total of 30 FM or AM stations. You can store the
stations on preset numbers combining three characters
(A, B, C) and numbers (0 - 9). For example, you can
store a station as preset number A1, B6 or C9, etc.
PRESET/PTY SELECT +/–
DISPLAY
MEMORY SHIFT ENTER TUNER
MENU </> NAME
MENU +/–
Receiver Operations
Tuning preset stations (preset tuning)
You can tune directly to a preset station by entering its
preset number. If you don’t know which stations are
preset on which numbers, you can tune by scanning
the preset stations.
1 Press TUNER.
The last received station is tuned in.
2 Press SHIFT to select a character (A, B or C), then
press the number on the remote.
For example, to tune in the station preset as A7,
select A and then press 7.
You can tune by scanning the preset stations
First press TUNER and then press PRESET/PTY
SELECT + or – to select the station you want. Each time
you press the buttons, the preset numbers change as
follows:
n A1 ˜ A2 ˜… ˜ A0 ˜ B1 ˜ B2 ˜ … ˜ B0 N
1 Press TUNER.
The last received station is tuned in.
2 Tune in the station you want.
If you are not familiar with how to tune in a
station, see “Receiving Broadcasts” on the
previous page.
3 Press MEMORY.
“MEMORY” appears for a few seconds.
Do steps 4 to 6 before “MEMORY” goes out.
4 Press SHIFT to select a character (A, B or C).
Each time you press SHIFT, the letter “A”, “B” or
“C” appears in the display.
If “MEMORY” disappears, start again from step 3.
5 Select a preset number by pressing PRESET/PTY
SELECT +/– or TUNING +/–.
6 Press MEMORY again to store the station.
7 Repeat Steps 2 to 6 to preset other stations.
n C0 ˜ … ˜ C2 ˜ C1 N
Naming preset stations
You can store names (index names), up to 8 characters
long, for your preset stations (except for FM RDS
stations). Once you name a preset station, the name
appears in the display instead of the frequency when
you tune to that preset station. The characters you can
use include letters, numbers and symbols.
1 Tune to the preset station you want to name.
2 Press NAME.
The cursor blinks in the display.
3 Use MENU + or – to select the character you
desire.
4 Press MENU </> to move the cursor into position
for the next character.
5 Repeat steps 3 and 4 to enter up to 8 characters.
6 Press ENTER to store the names.
To change a preset station
Preset a new station on the number you want to change.
Note
If the mains lead is disconnected for about one week, the
preset stations will be cleared from the receiver’s memory,
and you will have to preset the stations again.
If you make a mistake
Press MENU </> repeatedly so that the character you want
to change blinks in the display, then use MENU + or – to
select the desired character.
Notes
• You can also enter a name of up to 8 characters for
programme sources. Select the programme source you
want and repeat steps 2 to 6.
• To clear programme source name, press NAME and then
press the same programme source button. Press ENTER to
delete the name (except TUNER).
13
GB
Page 14

Receiver Operations
Using the Radio Data System
(RDS)
What you can do with the Radio Data
System
Radio Data System (RDS) is a broadcasting service that
allows radio stations to send additional information
along with the regular radio programme signal. This
receiver offers you two convenient RDS features:
Displaying the RDS information and Locating a station
by programme type. RDS is available only on FM
stations.*
Note
RDS may not work properly if the station you are tuned to is
not transmitting the RDS signal properly or if the signal
strength is weak.
* Not all FM stations provide RDS service, nor do they
provide the same types of services. If you are not familiar
with the RDS system, check with your local radio stations
for details on RDS services in your area.
Notes
• If there is an emergency announcement by governmental
authorities, ALARM flashes in the display.
• When the message consists of 9 characters or more, the
message scrolls across the display.
• The following messages appear if a station is not
providing a particular RDS service:
“NO PTY” (the selected programme type is not available)
“NO TEXT” (text data is not available)
“NO TIME” (clock time data is not available)
• Depending on the method used by the radio station to
send the text, some text messages may be incomplete.
Locating a station by programme type
(PTY)
You can locate a station you want by selecting a
programme type. The receiver tunes in the type of
programmes currently being broadcast from the RDS
stations stored in the receiver's preset memory.
1 Press PTY to display the current PTY type. Press
PRESET/PTY SELECT + or – until the programme
type you want appears in the display.
See the following table for the programme types
you can select.
Receiving RDS broadcasts
Simply select a station from the FM band.
When you tune in a station that provides RDS services,
the station name appears in the display.
Displaying the RDS Information
Press DISPLAY. Each time you press DISPLAY, the
display advances one step through the following
information.
Information displayed
Station Name**
Frequency**
Programme Type
Radio Text
Clock (24-hour system)
Sound field mode**
You can:
Locate each station by name
(e.g., WDR) instead of
frequency.
Locate each station by
frequency.
Locate a specific type of
programme being broadcast.
(See page 15 for the types of
programmes you can select.)
Display the text messages sent
by the RDS station.
Display the current time
Display the current sound field
mode
2 Press PTY while the programme type appears in
the display.
The tuner starts searching the preset RDS stations
for the programme (“SEARCH” and the
programme type are displayed alternately).
When the receiver finds the programme you are
looking for, it stops searching. The preset number
of the preset station currently broadcasting the
selected programme type flashes, and the receiver
receives the station.
Note
“NO PTY” appears when the programme type that you've
selected is not being broadcast and the receiver returns to
the original station.
14
**This information also appears for non-RDS FM stations.
GB
Page 15

Receiver Operations
You can select the following programme types:
Programme
What you hear
type
NONE
NEWS
AFFAIRS
INFO
SPORT
EDUCATE
DRAMA
CULTURE
SCIENCE
VARIED
POP M
ROCK M
EASY M
LIGHT M
CLASSICS
OTHER M
WEATHER
FINANCE
CHILDREN
SOCIAL
RELIGION
PHONE IN
TRAVEL
LEISURE
Any programmes not defined below.
News programmes.
Topical programmes that expand on
current news.
Programmes about consumer affairs and
professional advice (eg. medical advice).
Sports programmes.
Educational programmes, such as a “how-
to” programme and advice.
Radio plays and serials.
Programmes about national or regional
culture, such as religion, language, and
societal concerns.
Programmes about the natural sciences.
Programmes containing celebrity
interviews, panel games, and comedy.
Popular music programmes.
Rock music programmes.
Easy listening (middle of the road music).
Classical music, such as instrumental,
vocal, and choral.
Performances of major orchestras,
chamber music, opera, etc.
Music that does not fit into any of the
above categories, such as rhythm & blues
and reggae.
Programmes about the weather report.
Stock Market reports, commerce, trading
etc.
Programmes targeted at young audience
for entertainment and interest.
Programmes on sociology, history,
geography, psychology and society.
Aspect of beliefs and faiths.
Expression of views by phone or at a
public forum.
Programmes on package tours,
destinations, travel ideas and
opportunity.
Programmes on recreational activities
which listeners might participate.
Programme
type
JAZZ
COUNTRY
NATION M
OLDIES
FOLK M
DOCUMENT
What you hear
Polyphonic, syncopated music.
Songs originating from American
Southern States.
Current popular music of the Nation or
Region.
“Golden age” music.
Music which has roots in the musical
culture of a particular nation.
Programme concerning factual matters.
15
GB
Page 16
Receiver Operations
Recording
This receiver makes it easy to record to and from the
components connected to the receiver. You don’t have
to connect playback and recording components
directly: once you select a programme source on the
receiver, you can record and edit as you normally
would using the controls on each component.
Before you begin, make sure you’ve connected all
components properly.
Function buttons
Playback component
(programme source)
l: Audio signal flow
Recording component
(MD deck, Tape deck,
VCR)
1 Press TV/SAT to select the programme source.
2 Set the component to be ready for playing.
For example, turn on the TV and TV tuner.
3 Insert a blank video tape into the VCR for
recording.
4 Start recording on the VCR.
You can replace audio while editing a video tape
At the point you want to start adding different sound,
press another function button (for example, CD) and
start playback. The sound from the selected component
will be recorded over the original audio.
To resume recording the original sound, press the
TV/SAT function button.
Note
You cannot record the audio signal during DVD/MULTI CH
mode.
Recording on a MiniDisc or audio tape
You can record on a MiniDisc or cassette tape using the
receiver. See the instruction manual of your MD deck
or tape deck if you need help.
1 Press one of the function buttons to select the
programme source.
2 Set the component to be ready for playing.
For example, insert a CD into the CD player.
3 Insert a blank disc or tape into the recording deck
and adjust the recording level, if necessary.
4 Start recording on the recording deck and then
start playing the component.
Recording on a video tape
You can record from a TV or a Satellite receiver using
the receiver. You can also add audio from a variety of
audio sources when editing a video tape. See your
VCR’s instruction manual if you need help.
Using the Sleep Timer
You can set the receiver to turn off automatically at a
time you specify.
SLEEP
Press SLEEP on the remote while the power is on.
Each time you press SLEEP, the time changes as shown
below.
n 2-00-00 n 1-30-00 n 1-00-00 n 0-30-00 n OFF
The display dims after you specify the time.
You can check the time remaining before the
receiver turns off
Press SLEEP on the remote. The remaining time appears
in the display.
16
GB
Page 17
Using Surround Sound
Choosing a Sound Field
You can take advantage of surround sound simply by
selecting one of the pre-programmed sound field
according to the type of music you wish to play.
SOUND FIELD
MODE +/–
SURR
Using Surround Sound
When you use the remote
Each time you press SOUND FIELD MODE +/–, sound
field changes as follows:
When selecting programme source
t PRO LOGIC* ˜ C STUDIO T
t HALL ˜ DOLBY V T
When using DVD/MULTI CH
C STUDIO ˜ V SURR
* “DOLBY PL” appears on the display.
MAIN
MENU
MENU
MENU +/–
+/–
SOUND FIELD
ON/OFF
SOUND FIELD
MODE +/–
1 Press SOUND FIELD ON/OFF to turn on the
sound field.
The sound field indicator lights up.
2 Press SOUND FIELD MODE +/– repeatedly until
the sound field you want appears on the display.
Select the appropriate sound field as follows:
Type
CINEMA
VIRTUAL
MUSIC
MODE (Sound field)
PRO LOGIC*
C STUDIO
(Cinema Studio)
DOLBY V
V SURR**
HALL
Effects
Decodes programmes
encoded in Dolby
Surround.
Reproduces the sound
characteristics of a
movie theater. Good for
watching standard
movies.
Uses front speakers to
create surround sound
effects.
Uses front speakers and
centre speaker to create
surround sound effects.
Reproduces the
acoustics of a
rectangular concert hall.
Ideal for soft acoustic
sounds.
To turn off sound field
Press SOUND FIELD ON/OFF or 2CH/OFF on the remote.
The receiver memorizes the last sound field selected
for each programme source (Sound Field Link)
Whenever you select a programme source, the sound
field that was last applied is automatically applied
again. For example, if you listen to CD with HALL as
the sound field, change to different programme source,
then return to CD, HALL will be applied again. In the
case of the tuner, the sound fields for AM or FM band
and for all the preset stations are memorized separately.
You can find Dolby Surround-encoded software by
looking at the packaging
However, some videos and laser discs may use Dolby
Surround sound even if it’s not indicated on the
package.
* “DOLBY PL” appears on the display.
** When using DVD/MULTI CH only.
(continued)
17
GB
Page 18
Using Surround Sound
SOUND FIELD
MODE +/–
TEST TONE
MAIN
MENU
MENU
+/–
MENU </>
Adjusting the Effect Level (all sound fields
except PRO LOGIC)
You can make the surround sound more prominent by
increasing the EFFECT level. This control lets you
adjust the “presence” of the surround effect in six steps
(1-6).
1 Start playing a programme source.
Getting the Most Out of Dolby
Pro Logic Surround Sound
To obtain the best possible Dolby Pro Logic Surround
sound, first select the centre mode according to the
speaker system you have. Then, adjust each speaker
volume and delay time.
2 Press SURR.
The effect level (“EFFECT 1” … “EFFECT 6”)
appears on the display.
3 Press MENU +/– to select the level you prefer.
When you use the remote
Press MAIN MENU on the remote repeatedly until the
SURR indicator lights up. Each time you press MENU
+/–, the effect level changes as follows:
EFFECT 1 y EFFECT 2 y … y EFFECT 6
Note
Changing the effect level may not produce major variations
in the surround effect when used with certain playback
sources.
Note that you must have at least one additional pair of
speakers and/or one centre speaker to do the following
adjustments.
SET UP
MENU </> MENU +/–
SOUND FIELD
MODE +/–
LEVEL
SOUND FIELD
ON/OFF
18
GB
Selecting the centre mode
The receiver offers you four centre modes: Phantom,
Normal, Wide and 3 STEREO. Each mode is designed
for a different speaker configuration. Select the mode
that best suits your speaker’s system configuration:
1 Press SOUND FIELD ON/OFF to turn on the
sound field.
2 Press SOUND FIELD MODE +/– repeatedly to
select the Dolby surround sound field (PRO
LOGIC or C STUDIO mode).
3 Press SET UP.
4 Press MENU < or > repeatedly until “CTR
MODE” appears on the display.
Page 19

Using Surround Sound
5 Press MENU +/– repeatedly until the centre
mode you want appears on the display. Select the
centre mode as follows:
If you have
Front and
surround
speakers, and a
small centre
speaker
Front and centre
speakers, no
surround
speaker
Front and
surround
speakers, no
centre speaker
Front and
surround
speakers, and a
large centre
speaker
Select
NORMAL
3 STEREO
(3 Channel Logic)
PHANTOM
WIDE
So that
The bass sound of the
centre channel is
output from the front
speakers (because a
small speaker cannot
produce enough
bass).
The sound of the
surround channel is
output from the front
speakers.
The sound of the
centre channel is
output from the front
speakers.
The centre channel
fully reproduces the
entire audio
spectrum.
Adjusting the speaker volume
The test tone feature lets you set the volume of your
speakers to the same level. (If all of your speakers have
equal performance, you don’t have to adjust the
speaker volume.)
Using the controls on the remote lets you test the
speaker connection and adjust the volume level from
your listening position.
1 Press SOUND FIELD ON/OFF to turn on the
sound field.
Press SOUND FIELD MODE +/– repeatedly to
select “DOLBY PL”.
2 Press TEST TONE on the remote.
You will hear the test tone from each speaker
sequentially.
3 Adjust the volume level so that the volume of test
tone from each speaker sounds the same when
you are in your main listening position.
• Press MENU < or > to select “CTR xxdB” or
“SURR xxdB”.
• Press MENU +/– to adjust the level.
You can adjust all speakers at one time
Adjust MASTER VOL on the remote or MASTER
VOLUME on the receiver.
You can also adjust the volume level with the
controls on the receiver
After pressing TEST TONE on the remote:
• Press MENU < or > repeatedly to select “CTR xxdB”.
Press MENU +/– to adjust the centre speaker level.
• Press MENU < or > repeatedly to select “SURR
xxdB”.
Press MENU +/– to adjust the surround speaker
level.
You can select a volume level of -15 dB to +10 dB in
1-dB steps.
You can adjust the volume level of the sub woofer
• Press LEVEL or MAIN MENU on the remote
repeatedly until the LEVEL indicator lights up.
• Press MENU < or > repeatedly to select “SW xxdB”.
• Press MENU +/– to adjust the level.
You can select a volume level of -15 dB to +10 dB in
1-dB steps.
You can increase the output level of the surround
speakers
The adjustment range of the surround speakers is preset
from –15 to +10, but you can shift the range up 5 levels
(–10 to +15).
• Press SET UP.
• Press MENU < or > repeatedly until “SURR SET UP”
appears on the display.
• Press MENU +/– repeatedly until “NORMAL”
appears on the display.
The values for the surround level remain fixed at –15 to
+10 in the display, but you will be able to hear the
difference in the actual output level.
To reset the surround level adjustment range, repeat
this procedure to display “GAIN LOW”.
You can reset all sound field settings to initial
setting
• Turn off the receiver.
• Hold down SOUND FIELD ON/OFF and then press
?/1 (power). "SF CLR" appears on the display.
All sound field settings will be cleared and set to sound
field off.
4 Press TEST TONE on the remote to turn off the
test tone.
(continued)
19
GB
Page 20

Using Surround Sound
Adjusting the delay time
(PRO LOGIC sound field only)
You can make the surround sound more effective by
delaying the output from the surround speakers (delay
time). You can select from three delay times, S (15 mS),
M (20 mS), and L (30 mS). For example, if you’ve
placed the surround speakers in a large room or apart
from your listening position, set the delay time shorter.
1 Start playing a programme source encoded with
Dolby Surround sound.
2 Press SURR.
The current delay time appears in the display.
3 Press MENU +/– to select the level you prefer,
such as “DELAY S”, “DELAY M” or “DELAY L”.
Adjustable parameters for each sound field when selecting programme source
Sound field mode
Off
On
Type
––
CINEMA
VIRTUAL
MUSIC
MODE
––
PRO LOGIC
C STUDIO
DOLBY V
HALL
DELAY EFFECT SURROUND CENTER SUB WOOFER
r r
Parameters
r
a)
r ra) r
rr
r r r
r
b)
r
b)
r
Adjustable parameters for each sound field when using DVD/MULTI CH
Sound field mode
Off
On
a) Adjustable only when the centre mode is set to PHANTOM,
NORMAL or WIDE (see page 18).
b) Adjustable only when the centre mode is set to 3 STEREO,
NORMAL or WIDE (see page 18).
Type
––
CINEMA
VIRTUAL
MODE
––
C STUDIO
V SURR
DELAY EFFECT SURROUND CENTER SUB WOOFER
Parameters
r r r
rr rr
r rr
Note
To adjust the speaker volume using a test tone as described
on page 19, select the PRO LOGIC sound field. The test tone
output in all other sound fields is used for verifying whether
there is output from speakers or not.
Test tone output
No sound
Depends on centre mode (see
page 18)
No sound
From the front and the
surround speakers alternately
Test tone output
In the following order:
front (L), centre, front (R),
surround (R) and surround (L)
In the following order: front
(L), centre and front (R)
20
GB
Page 21

Additional Information
Troubleshooting
If you experience any of the following difficulties while
using the receiver, use this troubleshooting guide to
help you remedy the problem. Should any problem
persist, consult your nearest Sony dealer.
There’s no sound or only a very low-level sound is heard.
, Check that the speakers and components are
connected securely.
, Make sure you select the correct component
on the receiver.
, Press MUTING if MUTING appears on the
display.
, The protective device on the receiver has been
activated because of a short circuit
(“PROTECT” flashes). Turn off the receiver,
eliminate the short-circuit problem and turn
on the power again.
The left and right sounds are unbalanced or reversed.
, Check that the speakers and components are
connected correctly and securely.
, Adjust the balance (see page 10).
Severe hum or noise is heard.
, Check that the speakers and components are
connected securely.
, Check that the connecting cords are away
from a transformer or motor, and at least
3 meters (10 feet) away from a TV set or
fluorescent light.
, Place your TV away from the audio
components.
, Make sure you connect a ground wire to the
aerial ground terminal.
, The plugs and jacks are dirty. Wipe them
with a cloth slightly moistened with alcohol.
RDS isn’t working.
, Make sure you're tuning an FM station.
, Select a stronger FM station.
The appropriate display or information does not appear.
, Contact the radio station and find out
whether or not they actually provide the
service in question. If so, the service may be
temporarily out of service.
Additional Information
The station name does not appear in the display.
, Press DISPLAY until the station name
appears.
Radio stations cannot be tuned in.
, Check that the aerials are connected securely.
Adjust the aerials and connect an outdoor
aerial if necessary.
, The signal strength of the stations is too weak
(when you tune in with automatic tuning).
Use direct tuning.
, No stations have been preset or the preset
stations have been cleared (when you tune in
with scanning preset stations). Preset the
stations (see page 13).
No sound or only a very low-level sound is heard from
the surround speakers.
, Select the appropriate centre mode (see
page 18).
, Adjust the speaker volume appropriately (see
page 19).
, Make sure you turn on the sound field
surround mode function.
No sound is heard from the centre speaker.
, Select the appropriate centre mode (see page
18).
, Adjust the speaker volume appropriately (see
page 19).
Surround effect cannot be obtained.
, Make sure you turn on the sound field
function.
Recording cannot be made.
, Check that the components are connected
correctly.
, You cannot record audio from a programme
source connected to the DVD/MULTI CH
jacks.
The remote does not function.
, Point the remote at the remote sensor g on
the receiver.
, Remove the obstacles in the path of the
remote and the receiver.
, Replace both batteries in the remote with new
ones if they are weak.
, Make sure you select the correct function on
the remote.
21
GB
Page 22

Additional Information
Specifications
Amplifier section
Rated Power
Output at
Stereo Mode
Reference
Power Output
Frequency
response
Inputs
CD,
DVD/
MULTI CH,
MD/TAPE,
TV/SAT,
VIDEO
(DIN 1 kHz, 4 ohms)
50 W + 50 W
(DIN 1 kHz, 4 ohms)
Front: 50 W/ch
Centre: 50 W
Surround: 50 W/ch
TV/SAT, CD, MD/TAPE,
VIDEO, DVD/MULTI CH:
10 Hz - 50 kHz dB
Sensitivity
150 mV
Impedance
kilohms
50
+0.5
–2
S/N
85 dB
Outputs
Muting
TONE
MD/TAPE OUT:
Voltage: 150 mV,
Impedance: 10 kilohms
VIDEO AUDIO OUT:
Voltage: 150 mV,
Impedance: 10 kilohms
SUB WOOFER:
Voltage: 2 V
Impedance: 1 kilohms
PHONES: Accepts low and
high impedance
headphones
Full mute
±6 dB at 100 Hz and
10 kHz
Tuner section
FM stereo, FM/AM superheterodyne tuner
FM tuner section
Tuning range
Aerial terminals
Intermediate
frequency
Sensitivity
87.5 - 108.0 MHz
75 ohms, unbalanced
10.7 MHz
Mono: 18.3 dBf,
2.2 µV/75 ohms
Stereo: 38.3 dBf,
22.5 µV/75 ohms
AM tuner section
Tuning range
Aerial
Intermediate
frequency
Usable
sensitivity
S/N
Harmonic
distortion
Selectivity
General
System
Power
requirements
Power
consumption
531 - 1602 kHz
Loop aerial
450 kHz
50 dB/m (at 999 kHz)
54 dB (at 50 mV/m)
0.5 % (50 mV/m,
400 Hz)
35 dB
Tuner section: PLL quartz-
locked digital synthesizer
system
Preamplifier section: Low-
noise NF type equalizer
Power amplifier section:
Pure-complimentary
SEPP
230 V AC, 50/60 Hz
160 W
Standby mode: 0.5 W
Usable
sensitivity
S/N
Harmonic
distortion at
1 kHz
Separation
Frequency
response
Selectivity
11.2 dBf,
1 µV /75 ohms (IHF)
Mono: 76 dB
Stereo: 70 dB
Mono: 0.3 %
Stereo: 0.5 %
45 dB at 1 kHz
30 Hz - 15 kHz dB
60 dB at 400 kHz
+0.5
–2
Dimensions
Mass (Approx.)
Supplied
accessories
Specifications indicated are measured at
230 VAC, 50 Hz.
Design and specifications are subject to
change without notice.
430 x 145 x 298 mm
5.6 kg
See page 4
22
GB
Page 23
Additional Information
Glossary
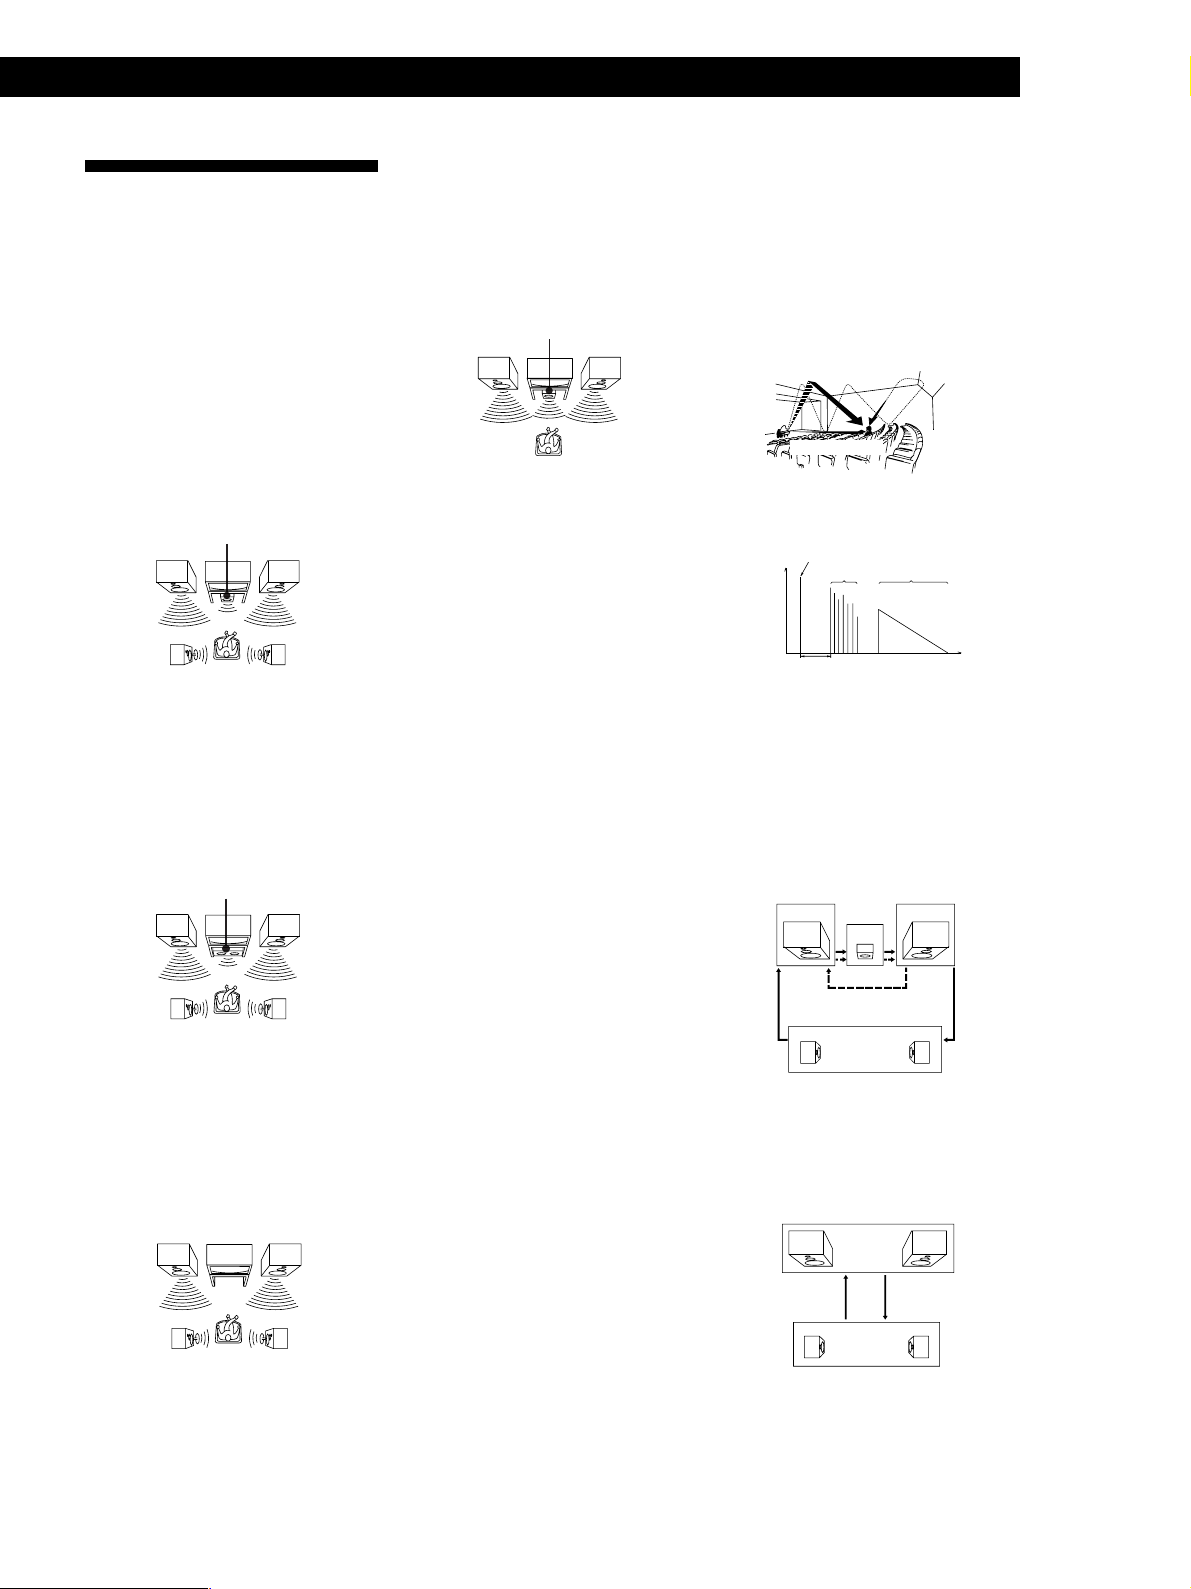
Centre mode
Setting of speakers to enhance Dolby Pro
Logic Surround mode. To obtain the best
possible surround sound, select one of the
following four centre modes according to
your speaker system.
• NORMAL mode
Select NORMAL mode if you have front
and surround speakers and a small centre
speaker. Since a small speaker cannot
produce enough bass, the bass sound of
the centre channel is output from the front
speakers.
Front
speaker (L)
Surround
speaker (L)
Centre
speaker
• WIDE mode
Select WIDE mode if you have front and
surround speakers and a large centre
speaker. With the WIDE mode, you can
take full advantage of Dolby Surround
sound.
Front
speaker (L)
Centre
speaker
Surround
speaker (L)
• PHANTOM mode
Select PHANTOM mode if you have front
and surround speakers but no centre
speaker. The sound of the centre channel is
output from the front speakers.
Front
speaker (L)
Surround
speaker (L)
Front
speaker (R)
Surround
speaker (R)
Front
speaker (R)
Surround
speaker (R)
Front
speaker (R)
Surround
speaker (R)
• 3 STEREO mode
Select 3 STEREO mode if you have front
and centre speakers but no surround
speaker. The sound of the surround
channel is output from the front speakers
to let you experience some of the surround
sound without using surround speakers.
Front
speaker (L)
Centre
speaker
Front
speaker (R)
Delay time
Time lag between the surround sound output
from front speakers and surround speakers.
By adjusting the delay time of the surround
speakers, you can obtain the feeling of
presence. Make the delay time longer when
you have placed the surround speakers in a
small room or close to your listening position,
and make it shorter when you have placed
them in a large room or apart from your
listening position.
Direct tuning
Tuning method to let you directly enter a
station’s frequency using the numeric buttons
on the remote. Use this method if you know
the frequency of the station you want.
Dolby Pro Logic Surround
As one method of decoding Dolby Surround,
Dolby Pro Logic Surround produces four
channels from two channel sound. Compared
with the former Dolby Surround system,
Dolby Pro Logic Surround reproduces left-to
right panning more naturally and localizes
sounds more precisely. To take full
advantage of Dolby Pro Logic Surround, you
should have one pair of surround speakers
and a centre speaker. The surround speakers
output monaural sound.
DVD/MULTI CH
These jacks are used to input multi channel
audio signals, allowing you to enjoy 5.1
channel surround sound. Use these jacks to
connect a Dolby Digital decoder, a DVD
player with a built-in Dolby Digital decoder
or TV satellite receiver.
Preset station
A radio broadcasting station that is stored in
memory of the receiver. Once you “preset”
stations, you no longer have to tune in the
stations. Each preset station is assigned its
own preset number, which lets you tune
them in quickly.
Surround sound
Sound that consists of three elements: direct
sound, early reflected sound (early
reflections) and reverberative sound
(reverberation). The acoustics where you hear
the sound affect the way these three sound
elements are heard. These sound elements are
combined in such a way that you can actually
feel the size and the type of a concert hall.
• Types of sound
Early reflections
Direct sound
Reverberation
• Transition of sound from surround
speakers
Direct sound
Level
Early reflection time
Early
reflections
Reverberation
Time
Test tone
Signal given out by the receiver for adjusting
the speaker volume. The test tone will come
out as follows:
• In a system with a centre speaker
(NORMAL/WIDE/3 STEREO modes)
The test tone is output from the front L
(left), centre, front R (right), and surround
speakers in succession.
Front (L)
3 STEREO
Surround
NORMAL/WIDE
Front (R)
Centre
(L, R)
• In a system without a centre speaker
(PHANTOM mode)
The test tone is output from the front and
the surround speakers alternately.
Front (L, R)
PHANTOM
Surround
(L, R)
23
GB
Page 24

Index
A, B
Adjusting
delay time 20
effect level 18
speaker volume 19
volume 10
Aerial hookups 5
Audio component hookups 5
Auto-betical select 9
Automatic tuning 12
C
Centre mode 18, 23
NORMAL mode 19, 23
PHANTOM mode 19, 23
3 STEREO mode 19, 23
WIDE mode 19, 23
Character 13
Connecting. See Hookups
D
Delay time 20, 23
Direct tuning 12, 23
Display 14
Dolby Pro Logic
Surround 18, 23
centre mode 18, 23
Dubbing. See Recording
E, F, G
Editing. See Recording
Effect level 18
H, I, J, K, L, M
Hookups
aerials 5
audio components 5
mains lead 8
overview 4
speakers 7
video component 6
N, O
Naming preset stations 13
NORMAL mode 19, 23
P
PHANTOM mode 19, 23
Preset station 13
Presetting
radio stations 13
Preset tuning 13
Programme source
selecting 10
PTY 14
Q
Quick reference guide 28
R
RDS 14
Rear panel 5–8, 25
Receiving broadcasts
directly 12
using preset stations 13
Recording on a tape 16
Remote buttons 10, 16, 26
S
Scanning
preset stations 13
radio stations 13
Selecting a programme source
10
using the remote 10, 11
Sleep Timer 16
Speakers
connection 7
placement 7
Storing radio stations. See
Presetting
Surround sound 17, 23
T
Test tone 19
3 STEREO mode 19, 23
Troubleshooting 21
Tuning. See Receiving
broadcasts
U
Unpacking 4
V
Video component hookups 6
W, X, Y, Z
Watching/listening to video
programmes 10
WIDE mode 19, 23
24
GB
Page 25
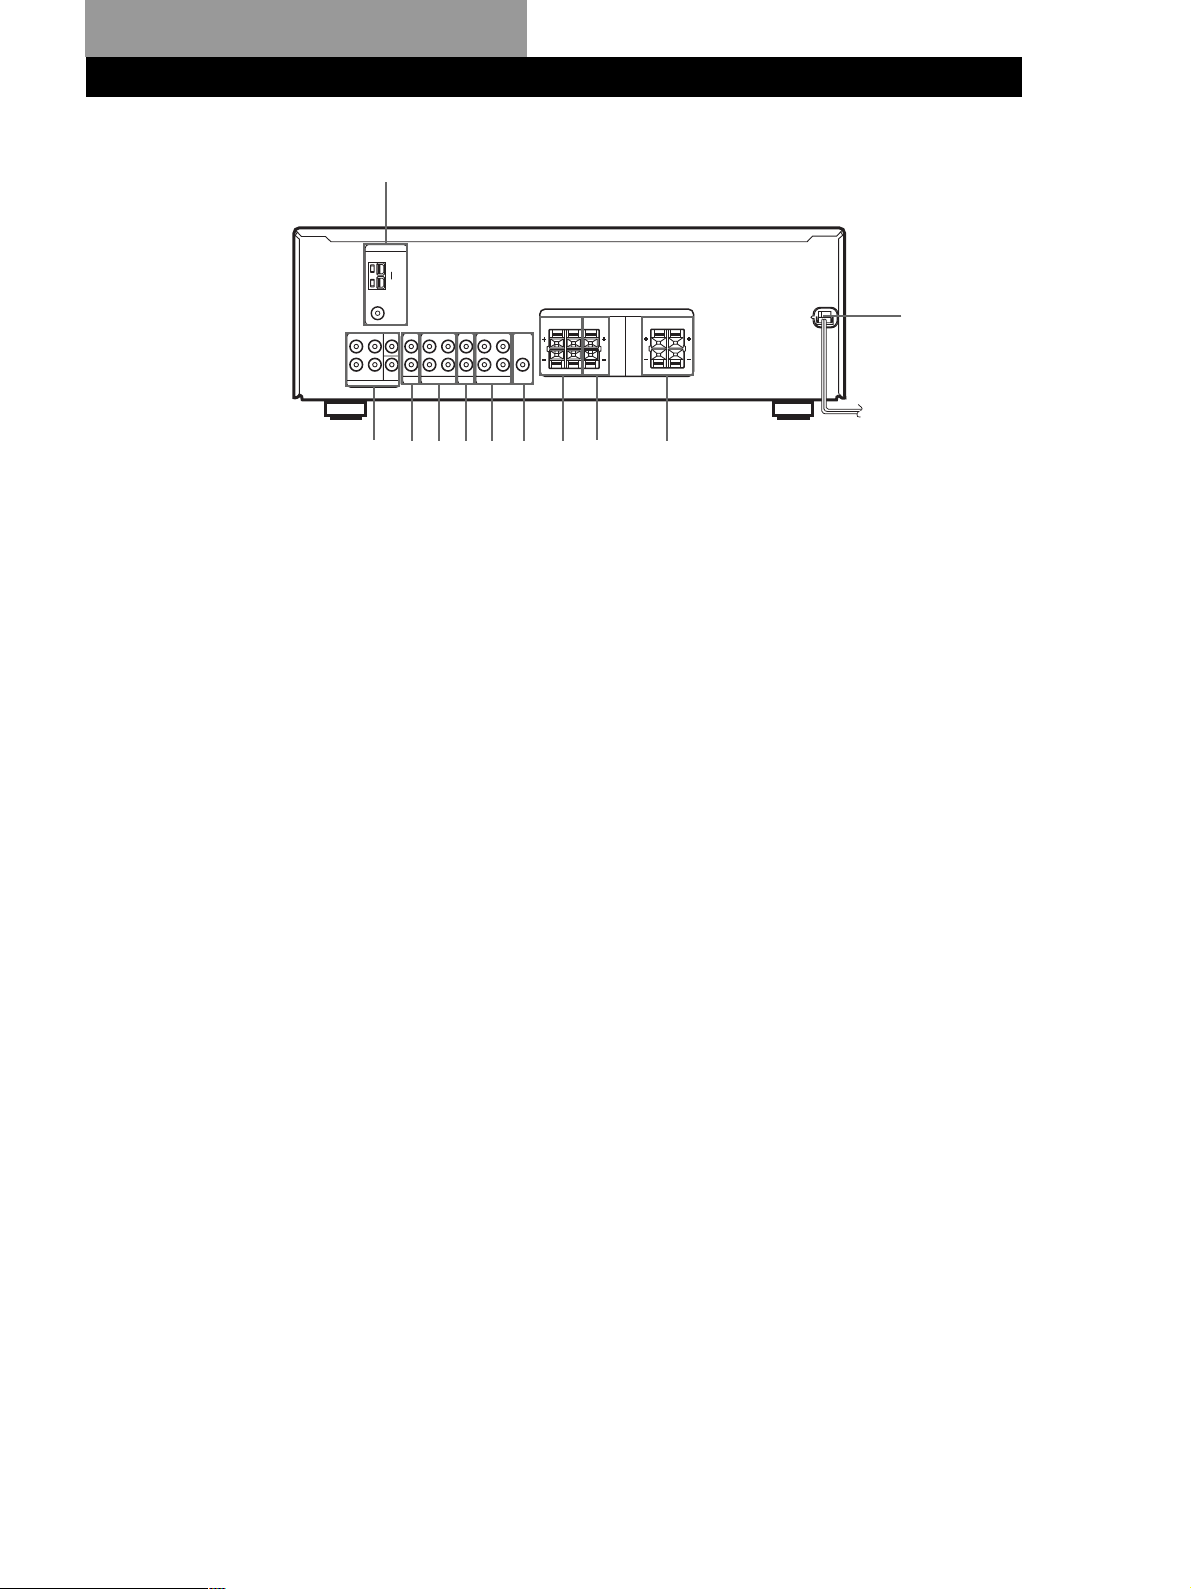
Rear Panel Descriptions
1
qa
1 ANTENNA (AM/FM)
2 DVD/MULTI CH
3 CD
4 MD/TAPE
2
3
456 7
5 TV/SAT
6 VIDEO
7 SUB WOOFER
8 SPEAKERS SURROUND
9 q;
8
9 SPEAKERS CENTER
q; SPEAKERS FRONT
qa Mains lead
25
GB
Page 26

Remote Button Descriptions
You can use the remote to operate the components in your system. The table below shows buttons not described on
previous pages and buttons with names different from buttons on the main unit.
Remote Button
AV
?/1
0-9
>10
ENTER
-/- -
./>
m/M
n
N
Operates
TV/VCR/
CD player/
DVD player/
MD deck/
VCD player/
LD player/
DAT deck
Receiver
CD player/
MD deck/
VCD player/
LD player/
DAT deck
TV/VCR/SAT
CD player/
MD deck/
Tape deck/
VCD player/
LD player
TV/VCR/SAT/
Tape deck/
LD player/
VCD player/
MD deck/
DAT deck
TV
CD player/
MD deck/
DVD player/
LD player/
VCD player/
Tape deck/
VCR/
DAT deck
CD player/
DVD player/
VCD player
MD deck/
Tape deck/
VCR/
LD player/
DAT deck
Tape deck
CD player/
MD deck/Tape
deck/VCR/
DVD player/
VCD player/
LD player/
DAT deck
Function
Turns the audio and video
components on or off.
Use with “SHIFT” button
to select tuner preset
station numeric input
during DIRECT TUNING
or MEMORY mode.
Selects track numbers.
0 selects track 10.
Selects channel numbers.
Selects track numbers over
10.
After selecting a channel,
disc or track using the
numeric buttons, press to
enter the value.
Selects the channel entry
mode, either one or two
digit.
Skips tracks.
Searches tracks (forward
or backward).
Fastforwards or rewinds.
Starts play on the reverse
side.
Starts play.
Remote Button
X
x
POSITION*
SWAP*
DISC
SUB CH +/–*
D. SKIP/CH/
PRESET +/–
P IN P*
JUMP
WIDE
ANT TV/VTR
TV/VIDEO
* Only for Sony TVs with the picture-in-picture function.
Operates
CD player/
MD deck/Tape
deck/VCR/
DVD player/
VCD player/
LD player/
DAT deck
CD player/
MD deck/Tape
deck/VCR/
DVD player/
VCD player/
LD player/
DAT deck
TV
TV
CD player
TV
Receiver
TV/VCR/SAT
CD player
TV
TV
TV
VCR
TV/VCR
Function
Pauses play or record.
(Also starts recording with
components in record
standby).
Stops play.
Changes the position of
the small picture.
Swaps the small and the
large picture.
Select discs (Mega
storage CD player only).
Select preset channels for
small picture.
Scans and selects preset
stations.
Selects preset channels.
Skips discs (CD player
with multi-disc changer
only).
Activates the picture-inpicture function.
Toggles between the
previous and the current
channels.
Selects the wide-picture
mode.
Selects output signal
from the antenna terminal:
TV signal or VCR
programme.
Selects input signal: TV
input or video input.
26
GB
Page 27

Remote Button Descriptions
Remote Button
MENU </>
MENU +/–
MENU
F/f/G/g
ENTER
RETURN
TITLE
Operates
Receiver
Receiver
DVD player
DVD player
DVD player
DVD player
DVD player
Function
Selects a menu item.
Makes adjustment or
change the setting.
Displays DVD menu.
Selects a menu item.
Enters the selection.
Returns to the previous
menu or exits the menu.
Displays DVD title.
Notes
• Some Sony equipment cannot be controlled by this remote
as shown in the table above.
• Some functions explained in this section may not work
depending on the model of the receiver.
• The above explanation is intended to serve as an example
only. Therefore, depending on the component the above
operation may not be possible or may operate differently
than described.
• The VIDEO 1, VIDEO 2, VIDEO 3, PHONO, AUX, A.F.D.
and MULTI CH/2CH DIRECT functions are not available
for set operation.
27
GB
Page 28
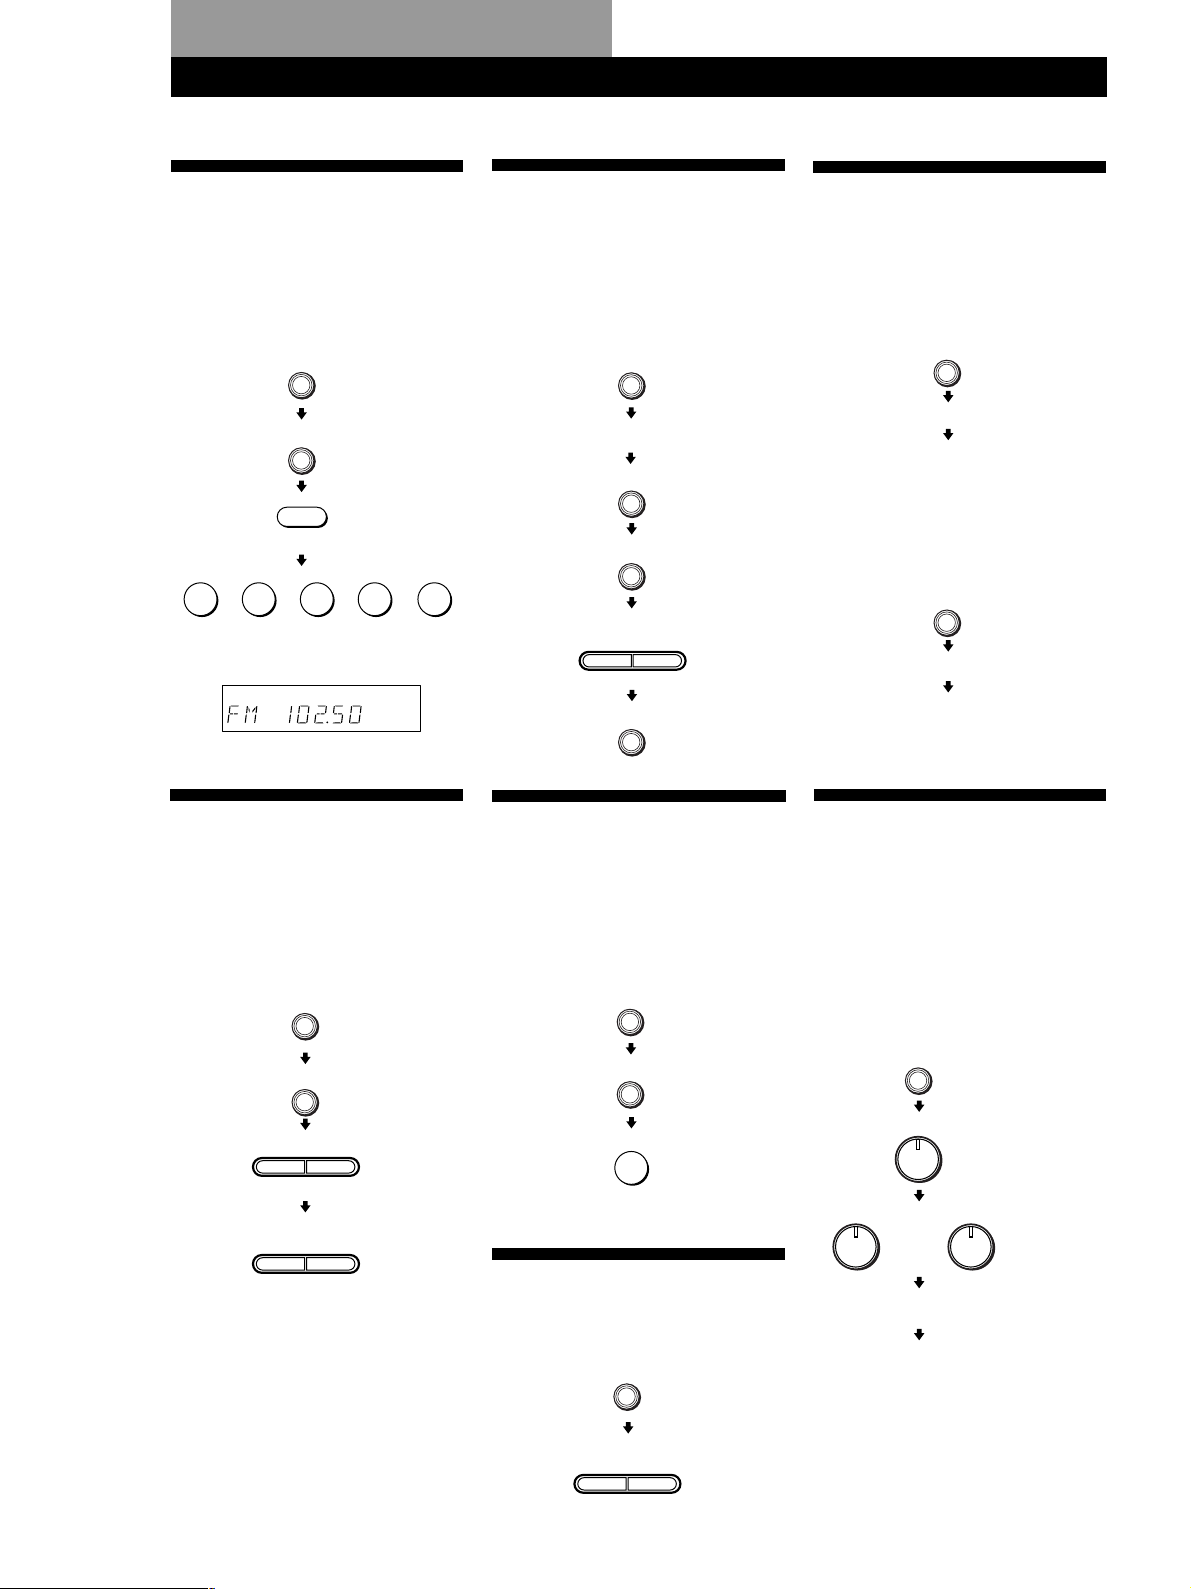
Quick Reference Guide
Receiving Broadcasts
(direct tuning)
Example: Receiving FM
102.50 MHz
TUNER
FM/AM
Select FM.
D. TUNING
02501
Display
(on remote)
(on remote)
MHz
Presetting Radio
Stations
Example: Presetting a
station as A7
TUNER
Tune in the station you want.
MEMORY
SHIFT
PRESET/
–
PTY SELECT
MEMORY
Select A.
+
Select A7.
Selecting a
Component
Example 1:Playing a CD
CD
Turn on the CD player.
Start playing.
Example 2:Watching a video
tape
VIDEO
Turn on the VCR.
Start playing.
Scanning Radio
Stations
Example: Scanning FM
(automatic tuning)
stations
TUNER
–
–
FM/AM
TUNING
TUNING
Select FM.
+
To continue
scanning.
+
Receiving Preset
Stations
Example: Receiving the
station number A7
TUNER
SHIFT
Select A.
7
(on remote)
Scanning Preset
Stations
TUNER
Using Pre-programmed
Sound Fields
Example: Watching the
video tape of a
Dolby Surroundencoded movie
VIDEO
SOUND FIELD
ON/
OFF
SOUND FIELD
–
MODE
Turn on the VCR.
Start playing.
+
MODE
Select PRO
LOGIC.
28
GB
PRESET/
–
PTY SELECT
+
Page 29

Préparatifs
AVERTISSEMENT
Afin d’éviter tout risque
d’incendie ou
d’électrocution, éviter
d’exposer l’appareil à la
pluie ou à l’humidité.
Afin d’écarter tout risque
d’électrocution, garder le coffret fermé.
Ne confier l’entretien de l’appareil qu’à
un personnel qualifié.
N’installez pas l’appareil dans un
espace confiné comme dans une
bibliothèque ou un meuble encastré.
Ne pas jeter les piles.
Les déposer aux
endroits prévus à cet
effet.
Précautions
Sécurité
• Si un solide ou un liquide tombait
dans le coffret, débranchez l’amplituner et faites-le vérifier par un
technicien qualifié avant de le
remettre en service.
• Afin d’éviter tout risque d’incendie,
ne recouvrez pas la ventilation du
récepteur par des journaux, des
serviettes, des rideaux, etc. Et ne
placez pas de bougies allumées sur le
récepteur.
• Afin d’éviter tout risque d’incendie et
d’électrocution, ne placez pas de vase
sur le récepteur.
Sources d’alimentation
• Avant de mettre en service l’amplituner, vérifiez que la tension de
fonctionnement correspond à celle du
courant secteur local. La tension de
fonctionnement est indiquée sur la
plaque signalétique à l’arrière de
l’ampli-tuner.
• L’ampli-tuner n’est pas déconnecté de
la source d’alimentation (secteur) tant
qu’il est branché sur une prise
murale, même si vous le mettez hors
tension.
• Si vous ne comptez pas utiliser
l’ampli-tuner pendant un certain
temps, débranchez-le de la prise
murale. Pour débrancher le cordon,
tirez sur la fiche et jamais sur le
cordon proprement dit.
• Si le cordon d’alimentation secteur
doit être remplacé, adressez-vous à
un technicien qualifié uniquement.
• L'interrupteur d'alimentation se
trouve sur le panneau avant.
Installation
• Installez l’ampli-tuner dans un
endroit bien ventilé pour éviter tout
risque de surchauffe interne et
prolonger la durée de vie des
composants.
• N’installez pas l’ampli-tuner près
d’une source de chaleur, dans un
endroit en plein soleil, poussiéreux
ou exposé à des chocs mécaniques.
• Ne posez rien sur le coffret qui puisse
bloquer les orifices de ventilation et
provoquer un mauvais
fonctionnement.
• Bien que le récepteur chauffe en cours
de fonctionnement, il ne s’agit pas
d’un dysfonctionnement de
l’appareil. Si vous utilisez ce
récepteur de façon continue à un
niveau de volume élevé, la
température des parois supérieures,
latérales et inférieures augmente
considérablement. Evitez de toucher
les parois pour ne pas vous brûler.
Fonctionnement
• Avant de raccorder d’autres
appareils, mettez l’ampli-tuner hors
tension et débranchez-le.
Nettoyage
• Nettoyez le coffret, le panneau et les
commandes avec un chiffon doux
légèrement imprégné d’une solution
détergente douce. N’utilisez pas de
tampon abrasif, poudre à récurer ou
solvant, comme l’alcool ou la benzine.
En cas de question ou de problème
concernant l’ampli-tuner, consultez
le revendeur Sony le plus proche.
FR
2
Page 30

Préparatifs
Au sujet de ce
manuel
Les instructions contenues dans ce
manuel concernent le modèle
STR-DE375. Vérifiez le numéro de
votre modèle en regardant dans le
coin inférieur droit du panneau
avant.
Conventions
• Ce mode d’emploi décrit le
fonctionnement avec les commandes
de l’ampli-tuner. Vous pouvez
également utiliser les commandes de
la télécommande qui ont un nom
identique ou similaire à celles de
l’ampli-tuner.
• Vous trouverez un “Guide de
référence rapide” à la page 28.
• La section “Nomenclature de la
télécommande” (page 26) fournit un
aperçu des touches de commande à
distance.
• Les symboles suivants sont utilisés
dans ce manuel:
Indique que vous pouvez utiliser
la télécommande pour effectuer
cette opération.
Donne des conseils
supplémentaires pour faciliter
l’utilisation.
Cet ampli-tuner intègre un décodeur
Dolby Pro Logic Surround.
Fabriqué sous licence de Dolby
Laboratories.
DOLBY, PRO LOGIC, et le symbole
double-D ; sont des marques de
Dolby Laboratories.
TABLE DES MA TIÈRES
Préparatifs
Déballage 4
Description des raccordements 4
Raccordement d’antennes 5
Raccordement de composants audio 5
Raccordement de composants vidéo 6
Raccordement d’enceintes 7
Raccordement au courant secteur 8
Avant la mise en service de l’ampli-tuner 9
Mémorisation automatique des stations FM par ordre alphabétique
(“Auto-betical”) 9
Fonctionnement de l’ampli-tuner
Sélection d’un composant 10
Réception radio 12
Préréglage des stations de radio 13
Utilisation du système RDS (Radio Data System) 14
Enregistrement 16
Utilisation du programmateur d’extinction 16
Ecoute du son spatial
Sélection d’un champ sonore 17
Pour mieux profiter du son spatial Dolby Pro Logic 18
Informations supplémentaires
Guide de dépannage 21
Spécifications 22
Glossaire 23
Index 24
GB
FR
NL
SE
Nomenclature du panneau arrière 25
Nomenclature de la télécommande 26
Guide de référence rapide 28
FR
3
Page 31

Préparatifs
Préparatifs
Préparatifs
Déballage
Vérifiez si les accessoires suivants se trouvent dans
l’emballage.
• Antenne fil FM (1)
• Antenne cadre AM (1)
• Télécommande (1)
• Piles de format AA (R6) (2)
Mise en place des piles dans la
télécommande
Insérez deux piles de format AA (R6) en faisant
correspondre les bornes + et – avec le schéma dans le
logement. Pour utiliser la télécommande, dirigez-la
vers le détecteur infrarouge g sur l’ampli-tuner.
]
}
}
]
Description des raccordements
Vous pouvez raccorder les composants audio/vidéo
suivants à l’ampli-tuner. Selon les composants que
vous voulez raccorder, reportez-vous aux pages
indiquées pour les démarches à suivre. Pour plus de
détails sur les différentes prises de l’ampli-tuner,
reportez-vous à “Nomenclature du panneau arrière”
page 25.
Lecteur DVD/
décodeur Dolby
Digital
Raccordement
d‘antennes (5)
Antenne FM/AM
Enceinte
avant
(droite)
Raccordement
d‘enceintes
(7)
Enceinte
avant
(gauche)
Raccordement de
composants video
(6)
Syntoniseur de
téléviseur
SAT (Récepteur
satellite)
Magnétoscope
Quand remplacer les piles
Dans des conditions d’utilisation normales, les piles
durent environ six mois. Quand vous ne pouvez plus
contrôler l’ampli-tuner avec la télécommande,
remplacez les piles par des neuves.
Remarques
• Ne laissez pas la télécommande dans un endroit
extrêmement chaud ou humide.
• N’insérez pas une pile neuve avec une pile usagée.
• N’exposez pas le détecteur infrarouge aux rayons directs
du soleil ou à un dispositif d’éclairage car cela pourrait
provoquer un mauvais fonctionnement.
• Si vous prévoyez de ne pas utiliser la télécommande
pendant longtemps, enlevez les piles pour éviter tout
dommage dû à une fuite d’électrolyte et à la corrosion.
Caisson
de grave
amplifié
Enceinte
Surround
(droite)
Enceinte
Surround
(gauche)
Lecteur CD
Platine à
MD/cassette
Raccordement de
composants audio (5)
Enceinte
centrale
Avant de commencer
• Mettez tous les composants hors tension avant
d’effectuer les connexions.
• Effectuez toutes les connexions avant de brancher le
cordon d’alimentation secteur.
• Enfoncez les fiches correctement pour éviter un
bourdonnement et du bruit.
• Lors du raccordement d’un cordon audio, faites
correspondre les broches codées par couleur aux
prises sur les composants: blanc (audio, gauche) à
blanc et rouge (audio, droit) à rouge.
FR
4
Page 32

Raccordement d’antennes
Aperçu
Préparatifs
Si la réception AM est de mauvaise qualité
Raccordez un fil isolé de 6 à 15 mètres (non fourni) à la
borne d’antenne AM en plus de l’antenne cadre AM.
Essayez de dérouler le fil à l’extérieur et de le conserver
à l’horizontale.
Ce paragraphe explique comment raccorder des
antennes AM et FM à l’mpli-tuner. Si vous voulez
écouter la radio via l’ampli-tuner, effectuez ces
connexions en premier lieu, puis passez aux pages
suivantes. L’illustration ci-dessous indique
l’emplacement des bornes sur l’ampli-tuner.
ANTENNA
De quelles antennes avez-vous besoin?
• Antenne fil FM (fournie)
(1)
• Antenne cadre AM
(fournie) (1)
Raccordements
Antenne cadre AM
Ampli-tuner
ANTENNA
AM
Après le
raccordement,
essayez de conserver
l'antenne fil à
l'horizontale.
Raccordement du fil de terre
Si vous raccordez l’ampli-tuner à une antenne
extérieure, mettez-le à la terre, comme indiqué sur
l’illustration de gauche, par mesure de protection
contre la foudre. Afin d’éviter tout risque d’explosion,
ne raccordez pas le fil de terre à un tuyau de gaz.
Que faire ensuite?
Si vous voulez raccorder d’autres composants, passez au
paragraphe suivant. Si vous comptez utiliser l’ampli-tuner
uniquement pour écouter la radio, allez directement à
“Raccordement d’enceintes” pages 7.
Raccordement de composants
audio
Aperçu
Ce paragraphe explique comment raccorder des
composants audio à l’ampli-tuner. Si vous souhaitez
utiliser l’ampli-tuner comme amplificateur, effectuez
ces connexions. L’illustration ci-dessous indique
l’emplacement des prises.
Antenne fil FM
FM
Ω
75
COAXIAL
Si la réception FM est de mauvaise qualité
Raccordez un câble coaxial de 75-ohms (non fourni)
pour raccorder l’ampli-tuner à une antenne FM
extérieure, comme indiqué ci-dessous.
Ampli-tuner
ANTENNA
Fil de terre
(non fourni)
A la terre
AM
Antenne extérieure FM
FM
Ω
75
COAXIAL
MD/TAPE
CD
De quels cordons avez-vous besoin?
Vous avez besoin de cordons audio (non fournis) (1 pour le
lecteur CD et 2 pour la platine MD ou le lecteur de cassette).
Blanc (gauche)Blanc (gauche)
Rouge (droit)
Rouge (droit)
(continuer page suivante)
FR
5
Page 33

Préparatifs
Raccordements
La flèche l indique le sens du signal.
Lecteur CD
Ampli-tuner
L
R
IN
CD
Lecteur CD
OUTPUT
LINE
L
R
Platine MD ou Platine à cassette
Platine MD ou
Platine à cassette
OUTPUT
Ampli-tuner
IN
OUT
MD/TAPE
L
R
LINE
INPUT
LINE
L
R
Que faire ensuite?
Passez à la section suivante pour raccorder des composants
vidéo afin d’exploiter le son spatial pendant que vous
regardez/écoutez des émissions de télévision ou des
enregistrements vidéo.
Raccordements
La flèche l indique le sens du signal.
Vous pouvez écouter le son du magnétoscope ou du
téléviseur/récepteur satellite en raccordant le signal
audio du magnétoscope ou du téléviseur/récepteur
satellite à l'amplificateur.
TV/SAT
Syntoniseur de téléviseur
Ampli-tuner
Magnétoscope
Ampli-tuner
AUDIO OUT
AUDIO IN
TV/SAT
VIDEO
L
R
AUDIO IN
ou Récepteur satellite
AUDIO
OUTPUT
L
R
L
R
Magnétoscope
R
AUDIO
AUDIO
OUTPUT INPUT
L
Raccordement de composants
vidéo
Aperçu
Ce paragraphe explique comment raccorder des
composants vidéo à l’ampli-tuner. L’illustration cidessous indique l’emplacement des prises.
TV/SAT
DVD/MULTI CH
De quels cordons avez-vous besoin?
• Câbles audio/vidéo (non fournis) (1 pour chaque
syntoniseur de télévision ou Récepteur satellite; 2 pour le
magnétoscope)
VIDEO
Utilisez les touches de fonction (TV/SAT, CD, MD/
TAPE, ou TUNER) pour sélectionner le signal VIDEO
AUDIO OUT. Vous pouvez enregistrer ce signal audio
en raccordant un appareil enregistreur tel qu’une
platine à cassette (à la prise VIDEO AUDIO OUT).
Lecteur DVD/décodeur Dolby Digital
De quels cordons avez-vous besoin?
• Cordons audio (non fournis) (1 pour les prises DVD/
MULTI CH FRONT et SURROUND)
Blanc (G)
Rouge (D)
Blanc (G)
Rouge (D)
• Cordons audio monophoniques (non fournis) (1 pour
les prises DVD/MULTI CH CENTER et SUB
WOOFER)
Noir Noir
Blanc (gauche)Blanc (gauche)
Rouge (droit)
FR
6
Rouge (droit)
Page 34

Préparatifs
Le son Dolby Digital décodé peut être reproduit par
les enceintes raccordées à l’ampli-tuner
Si vous avez un lecteur DVD ou un décodeur Dolby
Digital avec une sortie 5.1 CH, vous pouvez amplifier
une piste son décodée Dolby Digital avec les
raccordements suivants.
Ampli-tuner
L
R
FRONT SURROUND
DVD/MULTI CH
CENTER
SUB
WOOFER
Le lecteur DVD
PRE OUT
SURROUND
CENTER
SUB
WOOFER
FRONT
Remarque
• Si vous avez un lecteur DVD avec une sortie analogique
2 CH, connectez-le à une autre prise.
Que faire ensuite?
Passez au paragraphe suivant pour le raccordement des enceintes.
Raccordement d’enceintes
Aperçu
Ce paragraphe explique comment raccorder des
enceintes à l’ampli-tuner. Vous devez raccorder des
enceintes avant (gauche et droite), mais vous n'êtes pas
obligé de raccorder des enceintes centrale et enceinte
surround. Raccordez des enceintes centrale et enceinte
surround pour accentuer l’effet spatial et un caisson de
grave amplifié pour accentuer la réponse dans les
basses fréquences. L’illustration ci-dessous indique
l’emplacement des bornes sur l’ampli-tuner.
SPEAKERS SURROUND
SPEAKERS FRONT
Pour obtenir un effet spatial optimal, installez les
enceintes comme illustré ci-dessous.
Enceinte surround
60 - 90 cm
45°
De quels cordons avez-vous besoin?
Vous avez besoin de cordons d’enceintes (non fournis) (1
pour chaque enceinte).
(+)(+)
(–)
(–)
Dénudez environ 15 mm de gaine à chaque extrémité du
cordon. Veillez à faire correspondre les cordons d’enceintes
aux bornes des composants: + à + et – à –. Si les cordons sont
inversés, le son risque de présenter de la distorsion et de
manquer de graves.
Raccordements
Enceintes avant
Enceinte avant
(droite)
Ampli-tuner
SPEAKERS
FRONT
L
R
Enceintes centrale et enceinte surround
Enceinte
surround
(droite)
Ampli-tuner
SPEAKERS
SURROUND
CENTER
L
R
Enceinte avant
(gauche)
Enceinte
centrale
Enceinte
surround
(gauche)
SUB WOOFER
SPEAKERS CENTER
(continuer page suivante)
FR
7
Page 35

Préparatifs
–
Pour éviter de court-circuiter les enceintes
Court-circuiter les enceintes peut endommager l’amplituner. Pour éviter que cela ne se produise, prenez les
précautions suivantes lors de la connexion des
enceintes. Vérifiez que l’extrémité dénudée de chaque
cordon d’enceinte ne touche aucune autre prise
d’enceinte ou une autre extrémité dénudée d’un autre
cordon d’enceinte.
Exemples de cordons d’enceinte mal installés:
S
P
E
A
K
E
R
S
F
R
O
N
T
R
L
+
–
L’extrémité dénudée du cordon d’enceinte touche une
autre prise d’enceinte.
SPEAKERS
FRONT
R
L
+
Caisson de grave amplifié
Ampli-tuner
AUDIO OUT
SUB
WOOFER
Caisson de grave amplifié
INPUT
Remarque
Ne raccordez aucun autre composant.
Si votre moniteur de téléviseur utilise des enceintes
séparées
Vous pouvez raccorder l’une d’entre elles aux bornes
SPEAKERS CENTER pour pouvoir exploiter le son
Dolby Pro Logic Surround (voir page 18).
Que faire ensuite?
Pour terminer l’installation, passez à la section
“Raccordement au courant secteur” sur cette page.
Les extrémités dénudées de plusieurs cordons d’enceinte
se touchent parce qu’une partie trop importante
d’isolant a été retirée.
Après avoir connecté tous les appareils, les enceintes et
le cordon d'alimentation secteur, sortez une tonalité de
test, de test pour vérifier que toutes les enceintes sont
connectées correctement. Pour savoir comment sortir
une tonalité de test, référez-vous à “Réglage du volume
des enceintes” à la page 19.
Si vous avez connecté des enceintes surround, appuyez
sur la touche DVD/MULTI CH et désactivez le champ
sonore sur l’ampli-tuner avant de diffuser la tonalité de
test individuellement par les enceintes surround
gauche et droite.
Si aucun son n’est entendu d’une enceinte lors de la
sortie de la tonalité de test, ou si la tonalité de test est
sortie d’une enceinte qui ne correspond pas au nom
affiché sur l’ampli-tuner, les enceintes sont peut-être
court-circuitées. Si cela se produit, vérifiez de nouveau
la connexion des enceintes.
Raccordement au courant
secteur
Branchement du cordon d’alimentation
secteur
Branchez le cordon d’alimentation secteur de l’amplituner et des composants audio/vidéo sur une prise
murale.
,
à une prise murale
Que faire ensuite?
Avant de commencer à utiliser l’ampli-tuner, passez au
paragraphe suivant pour vérifier que toutes les commandes
sont correctement réglées.
FR
8
Page 36

Préparatifs
Avant la mise en service de
l’ampli-tuner
La première fois que vous utilisez l’ampli-tuner, ou si
vous voulez supprimer tous les préréglages effectués,
annulez la mémoire de l’ampli-tuner en procédant de
la façon suivante.
?/1 (alimentation)
DIMMER
1 Eteignez l’ampli-tuner.
2 Appuyez sur ?/1 (alimentation) pendant plus de
4 secondes.
“INITIAL” apparaît sur l’afficheur et les
paramètres suivants sont réinitialisés ou supprimés:
• Tous les préréglages par défaut des stations sont
rétablis.
• Tous les préréglages par défaut des champs
sonores sont rétablis.
• Tous les noms d’index (des stations préréglées et
des sources de programme) sont supprimés.
• Tous les réglages effectués avec la touche SET UP
sont réinitialisés aux réglages par défaut.
• Le champ sonore mémorisé pour chaque source
de programme et station préréglée est supprimé.
Mettez l’ampli-tuner sous tension et vérifiez
l'indicateur suivant.
• Appuyez sur MUTING si MUTING apparaît sur
l’afficheur.
• Appuyez sur DIMMER pour régler l’écran
d’affichage à l’un des quatre niveaux de luminosité.
MUTING
Mémorisation automatique
des stations FM par ordre
alphabétique (“Auto-betical”)
Avec la fonction “Auto-betical Select”, vous pouvez
mémoriser automatiquement jusqu’à 30 stations FM et
FM RDS dans l’ordre alphabétique, sans redondance.
En outre, la fonction “Auto-betical select” mémorise
uniquement les stations qui ont un signal clair. Si vous
voulez mémoriser les stations FM ou AM (PO) une par
une, reportez-vous à “Préréglage des stations de
radio”, à la page 13.
L’ampli-tuner mémorise d’abord les stations FM RDS,
dans l’ordre alphabétique, selon leurs noms, puis les
stations FM ordinaires dans l’ordre de la fréquence.
(Pour plus de détails sur le RDS, voir page 14.)
1 Appuyez sur ?/1 (alimentation) pour mettre
l’ampli-tuner hors tension.
2 Tenez la touche MEMORY enfoncée et appuyez
sur ?/1 (alimentation) pour mettre l’ampli-tuner
sous tension.
“AUTOBETICAL SELECT” apparaît et l’amplituner balaie et mémorise toutes les stations FM et
FM RDS diffusées dans la région.
“FINISH” apparaît quand l’ampli-tuner a fini de
mémoriser les stations FM et FM RDS.
Pour changer un code de présélection pour une autre
station
Voir “Préréglage des stations de radio” à la page 13.
Pour arrêter la fonction Auto-betical select avant que
toutes les stations ne soient mémorisées
Appuyez sur ?/1 (alimentation) pour mettre l’ampli-tuner
hors tension.
Les stations déjà mémorisées sont décalées vers l’arrière
(vers C0) et risquent d’être effacées, en fonction du
nombre de stations mémorisées par la fonction Autobetical select.
Remarques
• Si vous déménagez, répétez ces opérations pour
mémoriser de nouvelles stations.
• Pour plus de détails sur la syntonisation des stations
préréglées, voir page 13.
• Lorsque l’indication “FINISH” apparaît, toutes les
mémoires de présélection précédentes sont effacées. Si
nécessaire, présélectionnez à nouveau des stations AM.
FR
9
Page 37

Fonctionnement de l’ampli-tuner
Fonctionnement de l’ampli-tuner
10
(alimentation)
FR
Sélection d’un composant
Pour écouter ou regarder un composant raccordé, vous
devez d’abord sélectionner la fonction sur l’amplituner ou avec la télécommande.
Avant tout, vérifiez que:
• Vous avez raccordé tous les composants
correctement, comme indiqué aux pages 5 à 8.
TREBLE
+/–
Touches de
fonction
BASS
+/–
Appuyez sur
VIDEO
TV/SAT
DVD/MULTI CH
MD/TAPE
CD
TUNER
MASTER
VOLUME
MUTING
?/1
MENU </>
LEVEL
MENU
+/–
1 Appuyez sur ?/1 (alimentation) pour mettre
l’ampli-tuner sous tension.
2 Appuyez sur une touche de fonction pour
sélectionner un composant:
Pour écouter ou regarder
Des cassettes vidéo
Des programmes de télévision
ou le récepteur satellite
Le lecteur DVD/décodeur
Dolby Dogital
Des minidisques (MD) ou des
cassettes audio
Des disques compacts (CD)
Des émissions de radio
3 Mettez le composant sous tension, par exemple le
lecteur CD, et démarrez la lecture.
Pour accorder des stations de radio sur l’amplituner, reportez-vous à “Réception radio” page 12.
4 Tournez la commande MASTER VOLUME pour
régler le volume.
Chaque fois que vous tournez la commande
MASTER VOLUME, l’affichage change comme suit :
VOL MIN y VOL 1 y … y VOL 30 y
VOL MAX
Pour régler le volume du haut-parleur du téléviseur
Utilisez la commande de réglage du volume du téléviseur.
Pour éviter d’endommager les haut-parleurs
Assurez-vous que vous avez baissé le volume avant de
mettre l’ampli-tuner hors tension. Lorsque vous mettez
l’ampli-tuner sous tension, le volume reste au niveau
sur lequel il était réglé lorsque vous l’avez mis hors
tension.
Pour
Couper le son
Régler la balance
Régler les timbres
Vous devez
Appuyez sur MUTING. Appuyez
une nouvelle fois sur la touche ou
augmentez le volume pour restaurer
le son.
1 Appuyer plusieurs fois de suite
sur la touche LEVEL ou MAIN
MENU de la télécommande
jusqu’à ce que l’indicateur LEVEL
s’allume.
2 Appuyer plusieurs fois de suite sur
MENU < ou > jusqu’à ce que
“BALANCE” apparaisse dans la
fenêtre d’affichage.
3 Appuyer sur MENU + ou – pour
ajuster la balance gauche/droite.
Appuyer sur BASS +/– et TREBLE
+/– pour régler le niveau de tonalité.
Vous pouvez sélectionner
-6 dB à +6 dB comme niveau de
timbre par incréments de 2 dB.
Pour écouter avec un casque
Raccordez le casque à la prise PHONES. Aucun son
n’est émis par les haut-parleurs.
Pour regarder et écouter des programmes
vidéo
Quand vous regardez et écoutez la télévision ou un
programme vidéo, nous vous conseillons d’écouter le
son par l’ampli-tuner plutôt que par les haut-parleurs
du téléviseur. Ainsi, vous pourrez profiter du son
spatial, comme le Dolby Pro Logic Surround, et utiliser
la télécommande de l’ampli-tuner pour contrôler le son.
Désactivez d’abord les haut-parleurs du téléviseur pour
pouvoir écouter le son spatial fourni par l’ampli-tuner.
Pour regarder et écouter un programme de télévision,
allumez le téléviseur, le syntoniseur de téléviseur et l’amplituner, puis appuyez sur la touche TV/SAT de l’ampli-tuner.
Pour regarder une cassette vidéo, effectuez les opérations
suivantes:
1 Appuyez sur VIDEO pour sélectionner le
magnétoscope.
2 Allumez le téléviseur et réglez l’entrée vidéo du
téléviseur en fonction du composant utilisé.
3 Allumez le magnétoscope et démarrez la lecture.
Utilisation de la télécommande
La télécommande vous permet de contrôler l’amplituner et les composants Sony raccordés.
?/1
Touches de
fonction
Page 38

Fonctionnement de l’ampli-tuner
1
Appuyez sur une des touches de fonction pour
sélectionner le composant que vous voulez utiliser.
Le tableau suivant indique le réglage usine des
touches de fonction de la télécommande.
Pour écouter ou regarder
Des émissions de radio
Des disques compacts (CD)
Des minidisques (MD) ou
des cassettes audio
Des programmes de
télévision ou le récepteur
satellite
Des cassettes vidéo VHS
(mode VTR-3)
Le lecteur DVD/
Décodeur Dolby Dogital
avec MULTI CH OUTPUT
* Les fonctions VIDEO 1, VIDEO 2, VIDEO 3, PHONO
et MD/TAPE sont des opérations à deux touches.
Pour sélectionner la fonction ci-dessus, appuyez
simultanément sur FN SHIFT (changement de
fonction) et sur la touche de fonction souhaitée.
Par exemple, appuyez sur FN SHIFT et CD/SACD
pour sélectionner la fonction MD/TAPE.
Appuyez sur
TUNER
CD/SACD
MD/TAPE et FN SHIFT*
(INITIAL-MD MODE)
TV/SAT
(INITIAL-TV MODE)
VIDEO
DVD/LD
(INITIAL-DVD MODE)
Si vous voulez changer le réglage par défaut
d’une touche, passez à la section suivante.
L’ampli-tuner et le composant sélectionné se
mettent sous tension.
Si le composant ne se met pas sous tension
Appuyez sur l’interrupteur d’alimentation sur le composant.
2 Démarrez la lecture.
Pour plus de détails, voir “Nomenclature de la
télécommande” page 26.
Changement des réglages par défaut
d’une touche de fonction
Si les réglages par défaut des touches FUNCTION ne
correspondent pas aux composants que vous utilisez,
vous pouvez les changer. Par exemple, si vous avez un
lecteur MD et une platine cassette mais que vous
n’avez pas de lecteur CD, vous pouvez affecter la
touche CD/SACD à votre platine cassette.
Notez que les réglages des fonctions TUNER et
FN SHIFT (VIDEO 1, VIDEO 2, VIDEO 3, PHONO et
MD/TAPE) ne peuvent pas être modifiés.
AV ?/1
?/1
Touches de
fonction
Touches
numériques
> 10
.
ENTER
MASTER VOL –
Les touches suivantes sont assignées pour sélectionner
les fonctions:
Pour utiliser
Le lecteur CD
La platine DAT
La platine MD
La platine à cassette A
La platine à cassette B
Le lecteur LD
Le magnétoscope (mode de
télécommande VTR 1*)
Le magnétoscope (mode de
télécommande VTR 2*)
Le magnétoscope (mode de
télécommande VTR 3*)
Le téléviseur
DSS (Digital Satellite System)
DVD
La platine VCD
* Les magnétoscopes Sony utilisent les modes de
télécommande VTR 1, 2 et 3 qui correspondent aux
systèmes Beta, 8 mm et VHS.
Appuyez sur
1
2
3
4
5
6
7
8
9
0
> 10
ENTER
.
Vous pouvez maintenant utiliser la touche CD/
SACD pour commander la platine cassette.
1 Tenez enfoncée la touche de fonction dont vous
voulez changer la fonction (par exemple, CD/
SACD).
2 Appuyez sur la touche correspondante de
l’appareil que vous désirez assigner à la touche de
fonction (par exemple, 4 - la platine à cassette).
Pour remettre une touche à sa valeur par défaut
Répétez les opérations ci-dessus.
Pour remettre toutes les touches de fonction à leur
valeur par défaut
Appuyez sur ?/1, AV ?/1 et MASTER VOL – en même
temps.
11
FR
Page 39

Fonctionnement de l’ampli-tuner
Réception radio
Pour recevoir d’autres stations
Répétez les étapes 3 à 5.
Vous pouvez entrer directement la fréquence d’une
station à l’aide des touches numériques de la
télécommande (accord direct). Si vous ne connaissez
pas la fréquence de la station, reportez-vous à
“Recherche d’une station par balayage (accord
automatique)”.
Avant de commencer, vérifiez que:
• Vous avez raccordé une antenne FM/AM à l’amplituner comme indiqué à la page 5.
?/1
(alimentation)
FM/AMFM MODE
MASTER VOLUMETUNING +/–
TUNER
Touches
numériques
D. TUNING
Si l’indicateur STEREO reste éteint
Appuyez sur FM MODE pendant la réception d’une
émission FM stéréo.
Si une émission FM stéréo présente des distorsions
L’indicateur STEREO clignote. Appuyez sur FM MODE
pour passer en mode monaural (MONO). L’effet stéréo
est annulé mais la distorsion est réduite. Pour revenir en
mode stéréo, appuyez de nouveau sur cette touche.
Si vous ne parvenez pas à accorder une station et
que les numéros entrés clignotent
Vérifiez si vous avez entré la fréquence correcte. Sinon,
appuyez sur D. TUNING et entrez de nouveau la
fréquence de la télécommande. Si les numéros
continuent de clignoter, cette fréquence n’est pas
utilisée dans la région.
Pour regarder des programmes de télévision FM
simultanés
Veillez à accorder le programme simultané sur le
téléviseur (ou magnétoscope) et sur l’ampli-tuner.
Si vous avez entré une fréquence qui n’est pas
couverte par l’intervalle d’accord
La valeur entrée est automatiquement arrondie à la
fréquence supérieure ou inférieure la plus proche.
Les intervalles d’accord direct sont:
FM: intervalles de 50 kHz
AM: intervalles de 9 kHz
12
Recherche d’une station par balayage
1 Appuyez sur ?/1 (alimentation) pour mettre
l’ampli-tuner sous tension.
2 Appuyez sur TUNER.
La dernière station reçue est accordée.
(accord automatique)
Si vous ne connaissez pas la fréquence de la station que
vous voulez écouter, l’ampli-tuner peut balayer toutes
les stations recevables pour la retrouver.
1 Appuyez sur TUNER.
3 Appuyez sur FM/AM pour sélectionner des
stations FM ou AM.
La dernière station reçue est accordée.
2 Appuyez sur FM/AM pour sélectionner FM ou
4 Appuyez sur D. TUNING de la télécommande.
5 Appuyez sur les touches numériques de la
télécommande pour entrer la fréquence.
Exemple 1: FM 102.50 MHz Exemple 2: AM 1350 kHz
02501
35001
6 Si vous choisissez une station AM, réglez
l’antenne cadre AM pour améliorer la réception.
FR
AM.
3 Appuyez sur TUNING + ou –.
Appuyez sur la touche + pour aller vers les
fréquences supérieures et sur la touche – pour
aller vers les fréquences inférieures. Quand une
extrémité de la gamme est atteinte, le balayage se
poursuit automatiquement à partir de l’autre
extrémité. Chaque fois que l’ampli-tuner trouve
une station, le balayage s’arrête. Pour poursuivre
le balayage, appuyez de nouveau sur la touche.
Page 40

Préréglage des stations de
radio
Vous pouvez prérégler les stations que vous écoutez le
plus souvent sur l’ampli-tuner afin de ne pas avoir à
les accorder chaque fois. Vous pouvez mémoriser
jusqu’à 30 stations FM ou AM sur l’ampli-tuner. Vous
pouvez mémoriser les stations sur des numéros de
préréglage composés d’une lettre (A, B ou C) et d’un
chiffre (0 à 9), comme par exemple A1, B6 ou C9.
PRESET/PTY SELECT +/–
DISPLAY
MEMORY SHIFT ENTER TUNER
MENU </> NAME
MENU +/–
Fonctionnement de l’ampli-tuner
Accord des stations préréglées (accord
préréglé)
Vous pouvez écouter immédiatement une station en
entrant son numéro de préréglage. Si vous ne savez
plus sur quel numéro de préréglage se trouve la
station, vous pouvez balayer les stations préréglées.
1 Appuyez sur TUNER.
La dernière station reçue est accordée.
2 Appuyez sur SHIFT pour sélectionner une lettre
(A, B ou C), puis appuyez sur une touche numérique
de la télécommande.
Par exemple, pour accorder la station mémorisée
sur le numéro de préréglage A7, sélectionnez A et
appuyez sur la touche 7.
Vous pouvez balayer les stations préréglées
Appuyez d’abord sur TUNER, puis sur PRESET/PTY
SELECT + ou – pour sélectionner la station souhaitée.
Chaque fois que vous appuyez sur ces touches, les
numéros de préréglage changent dans l’ordre suivant:
t A1 y A2 y… y A0 y B1 y B2 y … y B0 T
1 Appuyez sur TUNER.
La dernière station reçue est accordée.
2 Accordez la station souhaitée.
Pour plus de détails sur la façon d’accorder une
station, reportez-vous à “Réception radio” à la
page précédente.
3 Appuyez sur MEMORY.
“MEMORY” apparaît pendant quelques secondes.
Effectuez les étapes 4 à 6 avant que “MEMORY”
ne disparaisse.
4 Appuyez sur SHIFT pour sélectionner une lettre
(A, B ou C). Chaque fois que vous appuyez sur la
touche SHIFT, la lettre “A”, “B” ou “C” apparaît
sur l’affichage.
Si “MEMORY” disparaît, recommencez à partir de
l’étape 3.
5 Appuyez sur PRESET/PTY SELECT +/– ou
TUNING +/– pour sélectionner un numéro.
6 Appuyez une nouvelle fois sur MEMORY pour
mémoriser la station.
7 Répétez les étapes 2 à 6 pour prérégler d’autres
stations.
Pour remplacer une station préréglée
Préréglez une nouvelle station sur le même numéro de
préréglage.
Remarque
Si le cordon d’alimentation secteur reste débranché pendant
une semaine environ, les stations sont effacées de la
mémoire et vous devez les prérégler à nouveau.
t C0 y … y C2 y C1 T
Attribution d’un nom aux stations préréglées
Vous pouvez sauvegarder des noms (noms d’index),
de 8 caractères de longueur maximum, pour vos
stations de présélection (excepté les stations FM RDS).
Une fois que vous avez attribué un nom à une station,
il apparaît sur l’affichage à la place de la fréquence
quand vous accordez cette station.
Les caractères que vous pouvez choisir pour créer un
nom incluent des lettres, des chiffres et des symboles.
1 Sélectionnez la station préréglée à laquelle vous
voulez attribuer un nom.
2 Appuyez sur NAME.
Le curseur clignote sur l’affichage.
3 Utilisez la touche MENU + ou – pour sélectionner
un caractère.
4 Appuyez sur la touche MENU </> pour amener le
curseur sur la position du caractère suivant.
5 Répétez les étapes 3 et 4 pour sélectionner 8
caractères maximum.
6 Appuyez sur ENTER pour mémoriser les noms.
En cas d’erreur
Appuyez plusieurs fois sur MENU </> jusqu’à ce que le
caractère à modifier clignote sur l’affichage, puis
sélectionnez un autre caractère avec la touche MENU + ou –.
Remarques
• Vous pouvez également introduire un nom de 8 caractères
maximum pour la source programme. Sélectionnez la
source programme voulue et répétez les étapes 2 à 6.
• Pour effacer le nom de la source programme, appuyez sur
NAME et appuyez ensuite sur la même touche de source
programme. Appuyez sur ENTER pour effacer le nom
(excepté TUNER).
13
FR
Page 41

Fonctionnement de l’ampli-tuner
Utilisation du système RDS
(Radio Data System)
Description du système RDS
Le RDS (Radio Data System) est un service de
radiodiffusion qui permet aux stations de diffuser des
informations supplémentaires parallèlement au signal
radio normal. Ce récepteur vous propose deux
fonctions RDS très pratiques : “Affichage des
informations RDS”, et “Recherche de station par type
de programme”. Le service RDS est disponible
uniquement sur les stations FM*.
Remarques
• En cas d’annonces urgentes provenant d’autorités
gouvernementales, “ALARM” clignote sur l’affichage.
• Quand le message comprend 9 caractères ou plus, les
caractères défilent sur l’affichage.
• Les messages suivants peuvent apparaître si une station
ne diffuse pas de service RDS particulier:
“NO PTY” (la station ne diffuse pas le type de programme
choisi).
“NO TEXT” (la station ne diffuse pas de texte).
“NO TIME” (l’heure n’est pas disponible).
• Certains messages peuvent être incomplets, selon la
méthode adoptée par la station pour diffuser les messages.
Recherche de stations RDS par type de
programme (PTY)
Remarque
Le RDS peut ne pas fonctionner correctement si la
transmission de la station RDS accordée est de mauvaise
qualité ou si le signal est trop faible.
* Toutes les stations FM n’offrent pas de service RDS et
toutes les stations RDS ne diffusent pas les mêmes
services. En cas de doute, vérifiez quels services RDS sont
diffusés dans votre région.
Réception des émissions RDS
Sélectionnez simplement une station de la gamme FM.
Lorsque vous syntonisez une station qui fournit des
services RDS, le nom de la station apparaît dans la
fenêtre d’affichage.
Affichage des informations RDS
Appuyez sur DISPLAY. Chaque fois que vous appuyez
sur DISPLAY, l’affichage indique les informations
suivantes dans l’ordre.
Information affichée
Nom de la station**
Fréquency**
Type de programme
Radiotexte
Horloge (cycle de 24
heures)
Mode Champ sonore**
Vous pouvez:
Localiser chaque station par son nom
(ex. WDR) au lieu de la fréquence.
Localiser chaque station par la
fréquence.
Localiser un type de programme en
cours de diffusion. (Voir page 15
pour les types de programmes que
vous pouvez choisir.)
Afficher les messages diffusés par les
stations RDS.
Afficher l’heure courante.
Affiche le mode de champ sonore en
cours.
Vous pouvez rechercher une station en sélectionnant
un type de programme. L’ampli-tuner accorde les
stations RDS préréglées qui diffusent le type de
programme choisi.
1 Appuyez sur PTY pour afficher le type PTY en
cours. Appuyez sur PRESET/PTY SELECT + ou –
jusqu’à ce que le type de programme voulu
apparaisse sur l’affichage.
Reportez-vous au tableau suivant pour connaître
les types de programme disponibles.
2 Appuyez sur PTY pendant que le type de
programme est affiché.
Le tuner commence à rechercher les stations RDS
qui diffusent le type de programme (“SEARCH”
et le type de programme apparaissent
alternativement). Lorsque l’ampli-tuner trouve le
programme souhaité, il arrête la recherche. Le
numéro de préréglage de la station qui diffuse
actuellement le programme clignote et l’amplituner reçoit la station.
Remarque
“NO PTY” apparaît si le type de programme choisi n’est pas
diffusé et le tuner revient à la station précédente.
14
** Ces informations apparaissent également pour les stations
qui n’offrent pas le service RDS.
FR
Page 42

Fonctionnement de l’ampli-tuner
Vous pouvez choisir les types de programme suivants:
Type de
Ce que vous entendez
Programme
NONE
NEWS
AFFAIRS
INFO
SPORT
EDUCATE
DRAMA
CULTURE
SCIENCE
VARIED
POP M
ROCK M
EASY M
LIGHT M
CLASSICS
OTHER M
WEATHER
FINANCE
CHILDREN
SOCIAL
RELIGION
PHONE IN
TRAVEL
LEISURE
Tout programme non défini ci-dessous.
Actualités.
Programme thématique basé sur les
actualités.
Programmes pour les consommateurs et
des conseils professionnels (p.ex. des
conseils médicaux)
Programmes sportifs.
Programmes éducatifs, tels que
“Comment faire?” et conseils.
Pièces radiophoniques et feuilletons.
Programmes culturels régionaux et
nationaux, tels que religion, langues, et
problèmes sociaux.
Programmes de sciences naturelles..
Divers types de programmes, comme les
interviews de personnages célèbres, les
jeux radiophoniques et comédies.
Musique pop.
Musique rock.
Musique de variété.
Musique classique pour grand public,
oeuvres instrumentales, vocales et
chorales.
Diffusion de musique classique, comme
les concerts, musique de chambre, opéras,
etc.
Genres musicaux qui n’entrent dans
aucune des catégories ci-dessus tels que le
rhythm & blues et le reggae.
Emissions météorologiques.
Emissions boursières, commerciales, etc.
Emissions de divertissement et éducatives
pour la jeunesse.
Emissions de sociologie, histoire,
géographie, psychologie et de société.
Emissions religieuses.
Débats en direct par téléphone ou en
public.
Emissions de voyages, destinations
touristiques, idées et offres de voyages.
Emissions récréatives impliquant la
participation des auditeurs.
Type de
Programme
JAZZ
COUNTRY
NATION M
OLDIES
FOLK M
DOCUMENT
Ce que vous entendez
Musique polyphonique, syncopée.
Emissions musicales sur l’Amérique
latine.
Musique populaire locale ou nationale.
Musique “Golden age”.
Musique puisant ses racines dans la
culture musicale d’un pays.
Emission sur des questions factuelles.
15
FR
Page 43

Fonctionnement de l’ampli-tuner
Enregistrement
1 Appuyez sur TV/SAT pour sélectionner la source
de programme.
Vous pouvez réaliser facilement des enregistrements
entre les différents composants raccordés à l’amplituner. Il n’est pas nécessaire de raccorder directement
les composants de lecture et d’enregistrement, car une
fois que vous avez sélectionné la source de programme
sur l’ampli-tuner, vous pouvez procéder à
l’enregistrement ou au montage comme si vous
utilisiez les commandes de chaque composant.
Avant de commencer, vérifiez que vous avez raccordé
correctement tous les composants.
Touches de fonction
Composant de lecture
(source de programme)
l: Sens du signal audio
Composant d’enregistrement
(Platine MD, Platine à cassette,
magnétoscope)
Enregistrement sur un minidisque ou une
cassette audio
Vous pouvez enregistrer sur un minidisque ou une
cassette audio avec l’ampli-tuner. Consultez le mode
d’emploi de la platine MD ou de la platine à cassette si
nécessaire.
1 Appuyez sur une des touches de fonction pour
sélectionner la source de programme.
2 Préparez l’appareil à la lecture. Par exemple,
mettez le téléviseur et le syntoniseur de télévision
sous tension.
3 Introduisez une cassette vierge dans le
magnétoscope en vue de l’enregistrement.
4 Démarrez l’enregistrement sur le magnétoscope.
Vous pouvez remplacer le signal audio pendant le
montage d’une cassette vidéo
A l’endroit où vous voulez ajouter un son différent,
appuyez sur une autre touche de fonction (CD, par
exemple) et démarrez la lecture. Le son de l’appareil
sélectionné est enregistré au-dessus du signal audio
original.
Pour reprendre l’enregistrement du son original,
appuyez sur la touche de fonction TV/SAT.
Remarque
Vous ne pouvez pas enregistrer le signal audio en mode
DVD/MULTI CH.
Utilisation du programmateur
d’extinction
Vous pouvez régler l’ampli-tuner pour qu’il se mette
automatiquement hors tension à l’heure que vous
programmez.
SLEEP
16
2 Réglez le composant pour la lecture.
Par exemple, insérez un CD dans le lecteur CD.
3 Insérez une cassette vierge ou un disque dans la
platine d’enregistrement et réglez le niveau
d’enregistrement, si nécessaire.
4 Démarrez l’enregistrement sur la platine, puis la
lecture sur le composant.
Enregistrement sur une cassette vidéo
Vous pouvez enregistrer au départ d’un téléviseur ou
récepteur satellite à l’aide de l’ampli-tuner. Vous
pouvez également ajouter un signal audio provenant
de différentes sources audio lors du montage d’une
cassette vidéo. Pour plus d’informations, consultez le
mode d’emploi de votre magnétoscope.
FR
Appuyez sur SLEEP de la télécommande pendant que
l’appareil est sous tension. Chaque fois que vous appuyez
sur SLEEP, l’heure change selon la séquence suivante.
t 2-00-00 t 1-30-00 t 1-00-00 t 0-30-00 t OFF
L’affichage s’assombrit après que vous avez spécifié l’heure.
Vous pouvez vérifier la durée restante avant la mise
hors tension de l’ampli-tuner
Appuyez sur SLEEP de la télécommande. La durée
restante apparaît dans l’affichage.
Page 44

Ecoute du son spatial
Sélection d’un champ sonore
Ecoute du son spatial
* “DOLBY PL” apparaît sur l’affichage.
** Avec DVD/MULTI CH uniquement.
Vous pouvez exploiter les atouts du son spatial en
sélectionnant simplement l’un des champs sonores
préprogrammés en fonction du type de musique que
vous souhaitez écouter.
MAIN
MENU
MENU
SOUND FIELD
MODE +/–
MENU +/–
+/–
SURR
SOUND FIELD
ON/OFF
SOUND FIELD
MODE +/–
1 Appuyez sur SOUND FIELD ON/OFF pour
activer le champ sonore.
L’indicateur de champ sonore s’allume.
2 Appuyez plusieurs fois de suite sur SOUND
FIELD MODE +/– jusqu’à ce que le champ sonore
voulu apparaisse dans la fenêtre d’affichage.
Sélectionnez le champ sonore approprié comme suit:
MODE
Type
CINEMA
VIRTUAL
MUSIC
(Champ sonore)
PRO LOGIC*
C STUDIO
(Cinéma Studio)
DOLBY V
V SURR**
HALL
Effets
Décode les émissions
codées dans le mode
Dolby Surround.
Reproduit les
caractéristiques sonores
d’un cinéma. Excellent
pour regarder des films
ordinaires.
Utilisez des haut-parleurs
frontaux pour créer des
effets de son spatial.
Utilisez des haut-parleurs
frontaux et un haut
parleur central pour créer
des effets de son spatial.
Reproduit l’acoustique
d'une salle de concert
rectangulaire. Excellent
pour restituer des sons
doux.
Si vous utilisez la télécommande
Chaque fois que vous appuyez sur SOUND FIELD
MODE +/–, les champs sonores changent comme suit:
Lorsque vous sélectionnez la source de programme
t PRO LOGIC* y C STUDIO T
t HALL y DOLBY V T
Avec DVD/MULTI CH
C STUDIO y V SURR
* “DOLBY PL” apparaît sur l’affichage.
Pour désactiver le champ sonore
Appuyez sur SOUND FIELD ON/OFF ou 2CH/OFF
de la télécommande.
L’ampli-tuner mémorise le dernier champ sonore
sélectionné pour chaque source de programme
(Liaison de champ sonore)
Chaque fois que vous sélectionnez une source de
programme, le dernier champ sonore appliqué à cette
source est automatiquement réutilisé. Par exemple, si
vous écoutez un CD avec le champ sonore HALL,
changez de source de programme et revenez au CD,
HALL sera à nouveau appliqué au CD. Dans le cas de la
radio, les champs sonores sont mémorisés séparément
pour la gamme AM ou FM et pour toutes les stations
préréglées.
Vous pouvez reconnaître un programme enregistré
en Dolby Surround grâce à l’indication sur
l’emballage
Cependant, certains disques vidéo et laser sont
enregistrés en Dolby Surround même si ce n’est pas
indiqué sur l’emballage.
(continuer page suivante)
17
FR
Page 45

Ecoute du son spatial
SOUND FIELD
MODE +/–
TEST TONE
MAIN
MENU
MENU
+/–
MENU </>
Réglage du niveau de l’effet
(tous les champs sonores sauf PRO LOGIC)
Vous pouvez rendre le son spatial plus évident en
augmentant le niveau de l’effet. La commande de
réglage du niveau de l’effet vous permet d’ajuster
l’effet sur six niveaux différents (1-6).
1 Reproduisez une source de programme.
Pour mieux profiter du son
spatial Dolby Pro Logic
Afin d’obtenir le meilleur son spatial Dolby Pro Logic
possible, sélectionnez d’abord le mode de canal central
en fonction des enceintes utilisées. Ensuite, réglez le
volume et le temps de retard de chaque enceinte.
2 Appuyez sur SURR.
Le niveau d’effet (“EFFECT 1” … “EFFECT 6”)
apparaît dans l’affichage.
3 Appuyez sur MENU +/– pour sélectionner le
niveau de votre choix.
Si vous utilisez la télécommande
Appuyez plusieurs fois de suite sur la touche MAIN
MENU de la télécommande jusqu’à ce que l’indicateur
SURR s’allume. Chaque fois que vous appuyez sur
MENU +/–, le niveau de l’effet change comme suit:
EFFECT 1 y EFFECT 2 y … y EFFECT 6
Remarque
Avec certaines sources de lecture, le changement du niveau
d’effet n’est pas toujours accompagné d’un changement
important de l’effet spatial.
Pour pouvoir effectuer les réglages suivants, vous avez
besoin de deux enceintes supplémentaires et/ou d’une
enceinte centrale.
SET UP
MENU </> MENU +/–
SOUND FIELD
MODE +/–
LEVEL
SOUND FIELD
ON/OFF
18
Sélection du mode de canal central
Vous avez le choix entre quatre modes de canal central:
PHANTOM, NORMAL, WIDE et 3 STEREO. Chaque
mode correspond à une configuration d’enceintes
différente. Sélectionnez le mode le mieux adapté à la
configuration de vos enceintes.
1 Appuyez sur SOUND FIELD ON/OFF pour
activer le champ sonore.
2 Appuyez plusieurs fois sur SOUND FIELD
MODE +/– pour sélectionner un champ sonore
Dolby Surround (PRO LOGIC ou C STUDIO).
3 Appuyez sur SET UP.
4 Appuyez plusieurs fois de suite sur MENU < ou >
FR
jusqu’à ce que l’indication “CTR MODE”
apparaisse dans la fenêtre d’affichage.
Page 46

Ecoute du son spatial
5 Appuyez plusieurs fois de suite sur MENU +/–
jusqu’à ce que le mode de canal central voulu
apparaisse dans la fenêtre d’affichage.
Sélectionnez le mode de canal central en fonction
des indications du tableau suivant:
Si vous avez
Des enceintes
avant et enceinte
surround et une
petite enceinte
centrale
Des enceintes
avant et centrale
mais pas d’enceintes
surround
Des enceintes
avant et enceinte
surround mais
pas d’enceinte
centrale
Des enceintes
avant et enceinte
surround
et une grande
enceinte centrale
Sélectionnez
NORMAL
3 STEREO
(3 Channel Logic)
PHANTOM
WIDE
Pour que
Le son des graves du
canal central soit
fourni par les
enceintes avant (car
une petite enceinte ne
peut pas produire
assez de graves).
Le son du canal
surround soit fourni
par les enceintes
avant.
Le son du canal
central soit fourni par
les enceintes avant.
Le canal central
reproduit intégralement
la totalité du spectre
audio.
Réglage du volume des enceintes
La tonalité d’essai permet de régler le volume de toutes
les enceintes sur le même niveau. (Si toutes les
enceintes ont la même puissance, il n’est pas nécessaire
de régler le volume.)
L’utilisation des touches de la télécommande vous
permet de tester la connexion du haut-parleur et de
régler le niveau du volume depuis votre position
d’écoute.
1 Appuyez sur SOUND FIELD ON/OFF pour
activer le champ sonore.
Appuyez de façon répétée sur SOUND FIELD
MODE +/– pour sélectionner “DOLBY PL”.
2 Appuyez sur la touche TEST TONE de la
télécommande.
La tonalité d’essai est fournie par chaque enceinte
l’une après l’autre.
3 Réglez le niveau du volume de façon à ce que le
volume de la tonalité de test diffusée par les hautparleurs soit identique lorsque vous vous trouvez
à votre position d’écoute principale.
• Appuyez sur MENU < ou > pour sélectionner
“CTR xxdB” ou “SURR xxdB”.
• Appuyez sur MENU +/– pour régler le niveau.
4 Appuyez sur la touche TEST TONE de la
télécommande pour arrêter la tonalité d’essai.
Vous pouvez régler toutes les enceintes
simultanément
Réglez la commande MASTER VOL sur la
télécommande ou MASTER VOLUME sur l’ampli-tuner.
Vous pouvez également régler le niveau de volume
avec les commandes de l’ampli-tuner
Après avoir appuyé sur la touche TEST TONE de
la télécommande:
• Appuyez plusieurs fois de suite sur la touche MENU
< ou > pour sélectionner “CTR xxdB”.
Appuyez sur MENU +/– pour régler le niveau du
haut-parleur central.
• Appuyez plusieurs fois de suite sur la touche MENU
< ou > pour sélectionner “SURR xxdB”.
Appuyez sur MENU +/– pour régler le niveau du
haut-parleur enceinte surround.
Vous pouvez sélectionner –15 dB à +10 dB comme
niveau de volume par incréments de 1 dB.
Vous pouvez régler le niveau de volume du hautparleur d’extrêmes graves
• Appuyez plusieurs fois de suite sur la touche LEVEL
ou MAIN MENU de la télécommande jusqu’à ce que
l’indicateur LEVEL s’allume.
• Appuyez plusieurs fois de suite sur la touche MENU
< ou > pour sélectionner “SW xxdB”.
• Appuyez sur MENU +/– pour régler le niveau.
Vous pouvez sélectionner –15 dB à +10 dB comme
niveau de volume par incréments de 1 dB.
Vous pouvez augmenter le niveau de sortie des
enceintes enceinte surround
La plage de réglage des enceintes surround est comprise
entre –15 et +10, mais vous pouvez la décaler de 5
niveaux (–10 à +15).
• Appuyez sur SET UP.
• Appuyez sur la touche MENU < ou > jusqu’à ce que
l’indication “SURR SET UP” apparaît dans la fenêtre
d’affichage.
• Appuyez plusieurs fois de suite sur MENU +/–
jusqu’à ce que l’indication “NORMAL” apparaisse
dans la fenêtre d’affichage.
Sur l’affichage, le niveau des enceintes surround ne sort
pas de la plage –15 à +10, cependant vous pouvez
entendre la différence de niveau de sortie.
Pour réinitialiser la plage de réglage du niveau enceinte
surround, répétez cette opération pour que “GAIN
LOW” soit affiché.
Vous pouvez remettre tous les réglages de champ
sonore aux valeurs initiales
• Eteignez l’ampli-tuner.
• Maintenez la touche SOUND FIELD ON/OFF
enfoncée, puis appuyez sur 1/u (alimentation).
«SF CLR» apparaît sur l’afficheur.
Tous les réglages de champ sonore seront supprimés et
le champ sonore sera désactivé.
(continuer page suivante)
19
FR
Page 47

Ecoute du son spatial
Réglage du temps de retard (champ
sonore PRO LOGIC uniquement)
Vous pouvez rendre l’effet spatial plus efficace en
retardant la sortie des enceintes surround (temps de
retard). Vous avez le choix entre trois temps de retard,
S (15 mS), M (20 mS) et L (30 mS). Par exemple, si les
enceintes surround se trouvent dans une grande pièce
ou loin de la position d’écoute, réglez un temps de
retard plus court.
1 Démarrez la lecture d’une source de programme
enregistrée en Dolby Surround.
2 Appuyez sur SURR.
Le temps de retard actuel est indiqué sur
l’afficheur.
3 Appuyez sur MENU +/– pour sélectionner le
niveau que vous préférez, par exemple “DELAY
S”, “DELAY M” ou “DELAY L”.
Paramètres réglables pour chaque champ sonore lorsque vous sélectionnez la source
programme
Champ sonore
Hors service
En service
Type
––
CINEMA
VIRTUAL
MUSIC
MODE
––
PRO LOGIC
C STUDIO
DOLBY V
HALL
Paramètres
DELAY EFFECT SURROUND CENTER SUB WOOFER
r
r r
r ra) r
rr
r r r
a)
r
b)
r
b)
r
Sortie du signal de test
Pas de son
Selon le mode de canal central
(voir page 18)
Pas de son
Alternativement des enceintes
avant et enceinte surround
Paramètres réglables pour chaque champ sonore lors de l’utilisation de DVD/MULTI CH
Champ sonore
Hors service
En service
Type
––
CINEMA
VIRTUAL
MODE
––
C STUDIO
V SURR
Paramètres
DELAY EFFECT SURROUND CENTER SUB WOOFER
r r r
rr rr
r rr
Sortie du signal de test
Dans l’ordre suivant:
avant (G), central, avant (D),
enceinte surround (D), enceinte
surround (G))
Dans l’ordre suivant: avant (G),
central, avant (D)
20
a) Réglable seulement quand le mode de canal central est réglé sur
PHANTOM, NORMAL ou WIDE (voir page 18).
b) Réglable seulement quand le mode de canal central est réglé sur
3 STEREO, NORMAL ou WIDE (voir page 18)
FR
Remarque
Pour régler le volume des enceintes avec le signal de test
comme décrit à la page 19, sélectionnez le champ sonore
PRO LOGIC. La sortie du signal de test avec tous les autres
champs sonores est utilisée pour vérifier si les enceintes
fournissent ou non le son.
Page 48

Informations supplémentaires
Guide de dépannage
Si vous rencontrez des difficultés lors de l’utilisation de
l’ampli-tuner, consultez ce guide de dépannage pour
essayer de résoudre le problème. Toutefois, si le
problème persiste, consultez un revendeur Sony.
Pas de son ou son extrêmement faible.
, Vérifiez si les enceintes et les composants sont
correctement raccordés.
, Vérifiez si vous avez sélectionné le bon
composant sur l’ampli-tuner.
, Appuyez sur MUTING si MUTING apparaît
sur l’afficheur.
, Le dispositif de protection de l’ampli-tuner
s’est déclenché à cause d’un court-circuit
(“PROTECT” clignote). Mettez l’ampli-tuner
hors tension, éliminez la cause du court-circuit,
puis remettez l’ampli-tuner sous tension.
Les sons des canaux gauche et droit sont déséquilibrés
ou inversés.
, Vérifiez si les enceintes et les composants sont
correctement raccordés.
, Réglez la balance (voir page 10).
Bourdonnement ou parasites importants.
, Vérifiez si les enceintes et les composants sont
correctement raccordés.
, Assurez-vous que les cordons de
raccordement ne sont pas à proximité d’un
transformateur ou moteur et qu’ils se
trouvent à au moins 3 mètres d’un téléviseur
ou d’une lampe fluorescente.
, Eloignez le téléviseur des composants audio.
, Vérifiez que vous avez raccordé un fil de terre
à la borne de terre de l’antenne.
, Les fiches et les prises sont sales. Essuyez-les
avec un chiffon légèrement imprégné
d’alcool.
Le RDS ne fonctionne pas.
, Vérifiez que vous avez accordé une station
FM.
, Sélectionnez une station FM avec un signal
plus puissant.
Les informations ne sont pas affichées ou sont
inappropriées.
, Renseignez-vous auprès de l’émetteur pour
savoir si la station en question diffuse le service
RDS, ou si le service est momentanément
suspendu.
Informations supplémentaires
Le nom de la station n’apparaît pas sur l’affichage.
, Appuyez sur DISPLAY jusqu’à ce que le nom
de la station apparaisse.
Impossible d’accorder des stations de radio.
, Vérifiez que les antennes sont correctement
raccordées. Réglez les antennes et raccordez
une antenne extérieure si nécessaire.
, Le signal des stations est trop faible (lors de
l’accord automatique).
Utilisez l’accord direct.
, Vous n’avez pas préréglé de stations ou elles
ont été effacées (lors de l’accord de stations
préréglées). Préréglez des stations (voir page
13).
Pas de son ou son très faible en provenance des
enceintes surround.
, Sélectionnez le mode de canal central
approprié (voir page 18).
, Réglez le volume des enceintes correctement
(voir page 19).
, Vérifiez que le mode spatial du champ sonore
est activé.
Aucun son ne sort de l’enceinte centrale.
, Sélectionnez le mode de canal central
approprié (voir page 18).
, Réglez le volume des enceintes correctement
(voir page 19).
Impossible d’obtenir l’effet spatial.
, Vérifiez que l’effet spatial est activé.
Impossible d’enregistrer.
, Vérifiez si les composants sont correctement
raccordés.
, Vous ne pouvez pas enregistrer le signal
audio d’une source de programme raccordée
aux prises DVD/MULTI CH.
La télécommande ne fonctionne pas.
, Dirigez la télécommande vers le détecteur
infrarouge g sur l’ampli-tuner.
, Enlevez tout obstacle éventuel entre la
télécommande et l’ampli-tuner.
, Si les piles de la télécommande sont faibles,
remplacez-les par des neuves.
, Vérifiez que vous avez sélectionné la fonction
appropriée sur la télécommande.
21
FR
Page 49

Informations supplémentaires
Spécifications
Section amplificateur
Puissance de
sortie nominale
en mode stéréo
Puissance de
sortie de
référence
Réponse en
fréquence
Entrées
CD,
DVD/
MULTI CH,
MD/TAPE,
TV/SAT,
VIDEO
(DIN 1 kHz, 4 ohms)
50 W + 50 W
(DIN 1 kHz, 4 ohms)
Avant: 50 W/canal
Centre: 50 W
Enceinte Surround: 50 W/
canal
TV/SAT, CD, MD/TAPE,
VIDEO, DVD/MULTI
CH: 10 Hz - 50 kHz dB
Sensibilité
150 mV
Impédance
kilohms
50
+0.5
–2
S/B
85 dB
Sorties
Sourdine
TONE
MD/TAPE OUT:
Tension: 150 mV,
Impédance: 10 kilohms
VIDEO AUDIO OUT:
Tension: 150 mV,
Impédance: 10 kilohms
SUB WOOFER:
Tension: 2 V
Impédance: 1 kilohms
PHONES:
Coupure complète du son
±6 dB à 100 Hz et 10 kHz
Accepte
des casques de haute et
basse impédance
Section syntoniseur
Tuner FM stéréo, FM/AM superhétérodyne
Section syntoniseur FM
Plage d’accord
Bornes d’antenne
Fréquence
intermédiaire
Sensibilité
Sensibilité
utilisable
87,5 - 108,0 MHz
75
ohms, asymétrique
10,7 MHz
Mono: 18,3 dBf,
2.2 µV/75 ohms
Stéréo
: 38,3 dBf,
22.5 µV/75 ohms
11,2 dBf,
1 µV /75 ohms (IHF)
Section tuner AM
Plage d’accord
Antenne
Fréquence
intermédiaire
Sensibilité
utilisable
S/B
Distorsion
harmonique
Sélectivité
Généralités
Système
Alimentation
Consommation
électrique
Dimensions
531 - 1602 kHz
Antenne cadre
450 kHz
50 dB/m (à 999 kHz)
54 dB (à 50 mV/m)
0,5 % (50 mV/m, 400 Hz)
35 dB
Section tuner:
synthétiseur
numérique PLL
verrouillé au quartz
Section préamplificateur:
Egaliseur type NF à
faible bruit
Section amplificateur de
puissance: Purement
complémentaire SEPP
CA 230 V, 50/60 Hz
160 W
Mode veille : 0,5 W
430 x 145 x 298 mm
S/B
Distorsion
harmonique à
1 kHz
Séparation
Réponse en
fréquence
Sélectivité
Mono: 76 dB
Stéréo
: 70 dB
Mono: 0,3 %
Stéréo
: 0,5 %
45 dB à 1 kHz
30 Hz - 15 kHz dB
60 dB à 400 kHz
+0.5
–2
Poids (approx.)
Accessoires
fournis
Les spécifications indiquées sont mesurées
à 230 V CA, 50 Hz.
La conception et les spécifications sont
modifiables sans préavis.
5,6 kg
Voir page 4
22
FR
Page 50

Informations supplémentaires
Glossaire
Mode de Canal Central
Ce réglage des enceintes accentue l’effet
spatial Dolby Pro Logic. Pour obtenir le
meilleur effet spatial possible, choisissez un
des quatres modes suivants selon la
configuration des enceintes.
• Mode NORMAL
Choisissez le mode NORMAL si vous
utilisez des enceintes avant et surround
avec une petite enceinte centrale. Etant
donné qu’une petite enceinte ne peut pas
reproduire suffisamment de graves, le son
des graves du canal central est fourni par
les enceintes avant.
Enceinte
centrale
Enceinte
Surround
(droite)
Enceinte
Surround
(droite)
Enceinte
avant
(droite)
Enceinte
Surround
(droite)
Enceinte
avant
(gauche)
Enceinte
avant
(droite)
Enceinte
avant
(gauche)
Enceinte
Surround
(gauche)
• Mode WIDE
Choisissez le mode WIDE si vous utilisez
des enceintes avant et enceinte surround
avec une grande enceinte centrale. Le
mode WIDE permet de profiter pleinement
du son spatial Dolby.
Enceinte
centrale
Enceinte
avant
(gauche)
Enceinte
Surround
(gauche)
• Mode PHANTOM
Choisissez le mode PHANTOM si vous
avez des enceintes avant et surround mais
pas d’enceinte centrale. Le son du canal
central est fourni par les enceintes avant.
Enceinte
avant
(gauche)
Enceinte
Surround
(gauche)
• Mode 3 STEREO
Choisissez le mode 3 STEREO si vous avez
des enceintes avant et centrale mais pas
d’enceintes surround. Le son du canal
surround est fourni par les enceintes
avant, ce qui permet de profiter un peu du
son spatial même sans enceintes surround.
Enceinte
centrale
Enceinte
avant
(gauche)
Enceinte
avant
(droite)
Temps de retard
C’est le temps qui s’écoule entre la sortie du
son spatial des enceintes avant et des
enceintes surround. En réglant le temps de
retard des enceintes surround, vous pouvez
obtenir un effet de présence. Réglez un temps
de retard plus long si les enceintes surround
se trouvent dans une petite pièce ou à
proximité de la position d’écoute et réglez un
temps de retard plus court si les enceintes
surround se trouvent dans une grande pièce
ou loin de la position d’écoute.
Accord direct
Cette méthode permet d’entrer directement la
fréquence de la station avec les touches
numériques de la télécommande. Utilisez
cette méthode quand vous connaissez la
fréquence de la station.
Dolby Pro Logic Surround
C’est une méthode de décodage du son Dolby
Surround. Le Dolby Pro Logic Surround
produit un son à quatre voies à partir d’un
son à deux voies. Comparé à l'ancien système
Dolby Surround, le Dolby Pro Logic
Surround restitue de façon plus naturelle le
panoramique gauche-droite et localise plus
précisément les sons. Pour pouvoir profiter
pleinement du Dolby Pro Logic Surround,
vous devez avoir deux enceintes surround et
une enceinte centrale. Les enceintes surround
fournissent un son monophonique.
DVD/MULTI CH
Ces prises sont utilisées pour l’entrée de
signaux audio multivoies, vous permettant
ainsi de profiter d’un son surround 5,1 voies.
Utilisez ces prises pour raccorder un
décodeur Dolby Digital, un lecteur DVD avec
un décodeur Dolby Digital intégré ou un
récepteur TV satellite.
Station préréglée
C’est une station de radio mémorisée dans la
mémoire de l’ampli-tuner. Une fois que vous
avez préréglé une station, il n’est plus
nécessaire de l’accorder. Chaque station a un
numéro de préréglage, ce qui permet de les
retrouver rapidement.
son spatial
Le son spatial comprend trois éléments: le
son direct, le son immédiatement réfléchi
(premières réflexions) et le son réverbéré
(réverbération). Ces trois éléments sont
affectés par l’acoustique de la pièce. La
combinaison de ces trois éléments permet de
recréer l’environnement sonore d’une salle de
concert.
• Types de son
Premières réflexions
Son direct
Réverbération
• Evolution du son des enceintes
surround
Son Direct
Niveau
Temps des premières
réflexions
Premières
réflexions
Réverbération
Temps
Tonalité d’essai
Ce signal émis par l’ampli-tuner permet de
régler le volume des enceintes. La tonalité
d’essai fonctionne comme suit:
• Dans un système avec une enceinte
centrale (modes NORMAL/WIDE/3
STEREO)
La tonalité sort par l’enceinte avant
gauche, l’enceinte centrale, l’enceinte avant
droite, puis les enceintes surround.
Enceinte
avant gauche
NORMAL/WIDE
Enceinte
centrale
3 STEREO
Enceintes surround
(gauche et
droite)
Enceinte
avant droite
• Dans un système sans enceinte centrale
(mode PHANTOM)
La tonalité d’essai sort par les enceintes
avant et surround alternativement.
Enceintes avant (gauche et droite)
PHANTOM
Enceintes surround
(gauche et
droite)
23
FR
Page 51

Index
A
Accord automatique 12
Accord direct 12, 23
Accord préréglé 13
Accord Voir réception radio
Affichage 14
Attribution d’un nom aux
stations préréglées 13
Auto-betical select 9
B
Balayage
des stations de radio 13
des stations préréglées 13
C
Caractères 13
Connexions Voir
Raccordements
Copie Voir enregistrement
D
Déballage 4
Dolby Pro Logic
son spatial 18, 23
mode de canal central 18,
23
E, F
Enceintes
installation 7
raccordement 7
Enregistrement
sur une cassette 16
G, H, I, J, K, L
Guide de dépannage 21
Guide de référence rapide 28
M
Mémorisation des stations Voir
préréglage
Mode de canal central 18, 23
mode NORMAL 19, 23
mode PHANTOM 19, 23
mode 3 STEREO 19, 23
mode WIDE 19, 23
Montage Voir Enregistrement
N, O
Niveau de l’effet 18
P, Q
Panneau arrière 5 – 8, 25
Pour regarder et écouter des
programmes vidéo 10
Préréglage des stations de
radio 13
Programmateur d’extinction
16
PTY 14
R
Raccordements
antennes 5
aperçu 4
composants audio 5
composants vidéo 6
cordon d’alimentation
secteur 8
enceintes 7
RDS 14
Réception
avec l’accord direct 12
à l’aide des stations
préréglées 13
Réglage
du niveau de l’effet 18
du temps de retard 20
du volume 10
du volume des enceintes 19
S
Sélection d’une source de
programme 10
avec la télécommande 10,
11
Son spatial 17, 23
Station préréglée 13
T, U, V, W, X, Y, Z
Temps de retard 20, 23
Tonalité d’essai 19
Touches de la
télécommande 10, 16, 26
24
FR
Page 52

Nomenclature du panneau arrière
1
qa
1 ANTENNA (AM/FM)
2 DVD/MULTI CH
3 CD
4 MD/TAPE
2
3
456 7
5 TV/SAT
6 VIDEO
7 SUB WOOFER
8 SPEAKERS SURROUND
9 q;
8
9 SPEAKERS CENTER
q; SPEAKERS FRONT
qa Cordon d’alimentation secteur
25
FR
Page 53

Nomenclature de la télécommande
Vous pouvez utiliser la télécommande pour commander les composants de votre système. Le tableau ci-dessous
indique les touches qui ne sont décrites dans les pages précédentes et des touches portant un nom différent sur
l’appareil principal.
26
Commande
AV
?/1
0-9
>10
ENTER
-/- -
./>
m/M
n
FR
Contrôle
Le téléviseur/
magnétoscope/
Le lecteur CD/
Le lecteur DVD/
platine MD/
platine VCD/
Le lecteur LD/
platine DAT
L’ampli-tuner
Le lecteur CD/
platine MD/
platine VCD/
le lecteur LD/
platine DAT
Le téléviseur/
magnétoscope/
SAT
Le lecteur CD/
platine à
cassette/
platine MD/
platine VCD/
le lecteur LD
Le téléviseur/
magnétoscope/
SAT/platine à
cassette/
le lecteur LD/
platine VCD/
platine MD/
platine DAT
Le téléviseur
Le lecteur CD/
platine MD/
le lecteur DVD/
le lecteur LD/
platine VCD/
platine à
cassette/
magnétoscope/
platine DAT
Le lecteur CD/
Le lecteur DVD/
platine VCD
La platine à
cassette/
platine MD/
magnétoscope/
le lecteur LD/
platine DAT
La platine à
cassette
Fonction
Mise sous ou hors tension.
Utiliser la touche “SHIFT”
pour sélectionner l’entrée
numérique de la station
présélectionnée sur le
syntoniseur en mode
DIRECT TUNING ou
MEMORY.
Sélection des numéros de
plage. 0 sert pour 10.
Sélection des numéros de
canal.
Sélection des numéros de
plage supérieurs à 10.
Après avoir sélectionné un
canal, un disque ou une
plage à l’aide des touches
numériques, appuyez pour
entrer la valeur.
Sélection du mode d’entrée
de canal, soit un ou deux
chiffres.
Saut de plages.
Recherche de plages (avant
ou arrière).
Avance rapide ou
rebobinage.
Début de la lecture sur la
face arrière
Commande
N
X
x
POSITION*
SWAP*
DISC
SUB CH +/–*
D. SKIP/CH/
Contrôle
Le lecteur CD/
platine à cassette/
platine MD/
magnétoscope/
Le lecteur DVD/
platine VCD/
le lecteur LD/
platine DAT
Le lecteur CD
platine à cassette/
platine MD/
magnétoscope/
Le lecteur DVD/
platine VCD/
le lecteur LD/
platine DAT
Le lecteur CD/
platine à
cassette/
platine MD/
magnétoscope/
Le lecteur DVD/
platine VCD/
le lecteur LD/
platine DAT
Le téléviseur
Le téléviseur
Le lecteur CD
Le téléviseur
L’ampli-tuner
PRESET +/–
Le téléviseur
magnétoscope/SAT
Le lecteur CD
P IN P*
JUMP
WIDE
ANT TV/VTR
TV/VIDEO
Le téléviseur
Le téléviseur
Le téléviseur
Le magnétoscope
Le téléviseur/
magnétoscope
* Uniquement pour les téléviseurs Sony équipés de la
fonction image dans l’image.
Fonction
Début de la lecture.
Pause de lecture ou
d’enregistrement.
(Egalement pour démarrer
l’enregistrement sur les
composants en attente
d’enregistrement.)
Arrêt de la lecture.
Changement de position de
l’image incrustée.
Inversion de l’image incrustée
et de l’image principale.
Sélection de disques
(Lecteur CD avec changeur
multi-disques uniquement).
Sélectionne les canaux
présélectionnés pour la
petite image.
Balayage et sélection des
stations préréglées.
Sélection des canaux préréglés.
Saut de disques (lecteur CD
avec changeur multi-disques
uniquement).
Activation de la fonction
image dans l’image.
Permute le canal en cours et
le canal précédent.
Sélectionne le mode d’image
élargie.
Sélection du signal de sortie
de la borne d’antenne: signal
du téléviseur ou du
magnétoscope.
Sélection du signal d’entrée:
entrée TV ou entrée vidéo.
Page 54

Nomenclature de la télécommande
Commande
MENU </>
MENU +/–
MENU
F/f/G/g
ENTER
RETURN
TITLE
Contrôle
L’ampli-tuner
L’ampli-tuner
Le lecteur DVD
Le lecteur DVD
Le lecteur DVD
Le lecteur DVD
Le lecteur DVD
Fonction
Sélectionne un élément de
menu.
Permet d’effectuer un
ajustement ou de modifier le
réglage.
Affiche le menu DVD.
Sélectionne un élément de
menu.
Entre la sélection.
Revient au menu précédent
ou referme le menu.
Affiche le titre du DVD.
Remarque
• Certains téléviseurs Sony ne peuvent pas être pilotés par
la télécommande de la manière indiquée ci-dessus.
• Certaines fonctions décrites dans cette section peuvent ne
pas fonctionner selon le modèle du récepteur.
• L’explication ci-dessus n’est donnée qu’à titre indicatif.
Par conséquent, selon le composant, l’opération ci-dessus
peut ne pas être possible ou peut fonctionner
différemment.
• Les fonctions VIDEO 1, VIDEO 2, VIDEO 3, PHONO,
AUX, A.F.D. et MULTI CH/2CH DIRECT ne sont pas
disponibles pour l’opération de réglage.
27
FR
Page 55

Guide de référence rapide
Réception radio
(accord direct)
Exemple: Réception de la
fréquence FM
102,50 MHz
TUNER
FM/AM
D. TUNING
02501
Affichage
Sélectionnez
FM
(de la
télécommande)
(de la télécommande)
MHz
Préréglage des
stations de radio
Exemple: Préréglage d’une
station sur le
numéro A7
TUNER
Accordez la station souhaitée
MEMORY
SHIFT
Sélectionnez A
PRESET/
–
PTY SELECT
MEMORY
+
Sélectionnez A7.
Sélection d’un
composant
Exemple 1: Lecture d’un CD
CD
Mettez sous tension le lecteur CD
Démarrez la lecteur
Exemple 2: Pour regarder
une cassette
vidéo
VIDEO
Mettez sous tension le magnétoscope
Démarrez la lecture
Balayage des
stations de radio
(accord automatique)
Exemple: Balayage des
stations FM
TUNER
–
–
FM/AM
TUNING
TUNING
Sélectionnez
FM
+
Pour continuer le
balayage
+
Réception des
stations préréglées
Exemple: Réception de la
station A7
TUNER
SHIFT
Sélectionnez A
(de la
7
télécommande)
Balayage des
stations préréglées
TUNER
Utilisation des
champs sonores
préréglés
Exemple: Pour regarder la
cassette vidéo d’un
film codé au
surround Dolby
VIDEO
SOUND FIELD
ON/
OFF
SOUND FIELD
–
MODE
Mettez sous tension le magnétoscope
Démarrez la lecture
+
MODE
Sélectionnez
PRO LOGIC
28
PRESET/
–
PTY SELECT
FR
+
Page 56

Voorbereidingen
WAARSCHUWING
Stel het apparaat niet
bloot aan regen of vocht,
om gevaar voor brand of
een elektrische schok te
voorkomen.
Open nooit de behuizing, om gevaar
voor elektrische schokken te vermijden.
Laat reparaties aan de erkende
vakhandel over.
Plaats het apparaat niet in een gesloten
ruimte, zoals een boekenrek of
ingebouwde kast.
Gooi de batterij niet
weg, maar lever hem in
als KCA.
V oorzorgsmaatregelen
Veiligheid
• Mocht er vloeistof of een voorwerp in
het apparaat terechtkomen, trek dan
de stekker uit het stopkontakt en laat
het apparaat eerst nakijken door een
deskundige, alvorens het weer in
gebruik te nemen.
• Om brand te voorkomen mogen de
verluchtingsopeningen van de
receiver niet worden afgedekt met
kranten, tafelkleedjes, gordijnen, enz..
Plaats geen brandende kaarsen op het
toestel.
• Plaats evenmin vazen op de receiver
om brand of elektrocutie te
voorkomen.
Stroomvoorziening
• Kontroleer voor het aansluiten van
het apparaat eerst of de
bedrijfsspanning ervan wel
overeenkomt met de plaatselijke
netspanning. De bedrijfsspanning
staat aangegeven op het naamplaatje
aan de onderzijde van het apparaat.
• Zolang het netsnoer op het
stopkontakt is aangesloten, blijft er
spanning op het apparaat staan, zelfs
nadat het apparaat is uitgeschakeld.
• Trek de stekker van het netsnoer uit
het stopkontakt wanneer u denkt het
apparaat geruime tijd niet te zullen
gebruiken. Om de aansluiting op het
stopkontakt te verbreken, mag u
uitsluitend aan de stekker trekken;
trek nooit aan het snoer.
• Indien het netsnoer vervangen moet
worden, mag dit alleen uitgevoerd
worden door een erkend
onderhoudscentrum.
• De aan/uit-schakelaar bevindt zich
aan de voorkant van het apparaat.
Opstelling
• Zet het apparaat op een goed
geventileerde plaats, met rondom
vrije luchtdoorstroming, om
oververhitting van de inwendige
onderdelen te voorkomen, in het
belang van een langdurige
betrouwbare werking.
• Plaats het apparaat niet in de buurt
van een warmtebron of in direkt
zonlicht. Vermijd tevens plaatsen met
veel stof, vocht en mechanische
trillingen of schokken.
• Zet niets bovenop het apparaat. De
ventilatie-openingen aan de
bovenzijde mogen niet geblokkeerd
worden, in het belang van een juist
funktioneren van het apparaat en een
langere levensduur van de
componenten.
• De receiver warmt op terwijl hij in
werking is. Dat is normaal en wijst
niet op een defect. Wanneer deze
receiver langdurig met hoog volume
werkt, kan de bovenkant, zijkant en
onderkant van de behuizing sterk
opwarmen. Raak de behuizing niet
aan om verbranding te voorkomen.
Bediening
• Zorg ervoor dat de stekkers van de
netsnoeren van de apparatuur niet in
het stopkontakt zitten, alvorens de
aansluitingen te maken. Sluit de
netsnoeren pas als allerlaatste aan.
Reiniging
• Gebruik voor het reinigen van de
ombouw, het voorpaneel en de
bedieningsorganen een zachte doek,
licht bevochtigd met wat milde
vloeibare zeep. Gebruik geen
schuurspons, schuurmiddelen of
vluchtige stoffen zoals spiritus of
benzine.
Mocht u na het doorlezen van de
gebruiksaanwijzing nog vragen over
of problemen met het apparaat
hebben, aarzel dan niet kontakt op
te nemen met de dichtstbijzijnde
Sony handelaar.
NL
2
Page 57

Voorbereidingen
Omtrent deze
handleiding
Deze gebruiksaanwijzing geldt voor
model STR-DE375. Controleer uw
modelnummer in de rechter
benedenhoek van het voorpaneel.
Ter verduidelijking
• Alle aanwijzingen in de tekst
beschrijven de bediening met de
toetsen op de tuner/versterker zelf. U
kunt voor de bediening echter ook de
toetsen van de afstandsbediening
xgebruiken die dezelfde of
soortgelijke namen dragen als de
bedieningsorganen op het apparaat.
• Een “Beknopt bedieningsoverzicht”
treft u aan op bladzijde 28.
• Onder “Beschrijving van de
afstandsbediening” op pagina 26
vindt u een overzicht van de toetsen
op de afstandsbediening.
• Op een aantal plaatsen in deze
gebruiksaanwijzing zult u de
onderstaande symbolen aantreffen:
Dit symbool verschijnt bij funkties
die tevens via de
afstandsbediening beschikbaar
zijn.
Dit symbool vestigt uw aandacht
op handige tips, die de bediening
vergemakkelijken.
Deze tuner/versterker is uitgerust met
een Dolby Pro Logic Surround decoder.
Geproduceerd onder licentle van: Dolby
Laboratories.
“DOLBY”, “PRO LOGIC” en het
dubbele-D symbool ; zijn
handelsmerken van Dolby Laboratories
INHOUDSOPGAVE
Voorbereidingen
Uitpakken 4
Aansluit-overzicht 4
Aansluiten van de antennes 5
Aansluiten van audio-apparatuur 5
Aansluiten van video-apparatuur 6
Aansluiten van luidsprekers 7
Aansluiten van de stroomvoorziening 8
Alvorens u de tuner/versterker in gebruik neemt 9
Automatisch vastleggen van FM zenders in alfabetische volgorde
(“Auto-betical” voorinstelling) 9
Tuner/versterker bedieningsfunkties
Kiezen van audio/video-apparatuur 10
Radio-ontvangst 12
Voorinstellen van radiozenders 13
Gebruik van het Radio Data Systeem (RDS) 14
Opnemen 16
Gebruik van de Sleep Timer 16
Gebruik van de akoestiekfunkties
Kiezen van een akoestiek-instelling 17
Optimaal benutten van Dolby Pro Logic Surround geluid 18
Aanvullende informatie
Verhelpen van storingen 21
Technische gegevens 22
Verklarende woordenlijst 23
Index 24
.
GB
FR
NL
SE
Beschrijving van het achterpaneel 25
Beschrijving van de afstandsbediening 26
Beknopt bedieningsoverzicht 28
NL
3
Page 58

Voorbereidingen
Voorbereidingen
Uitpakken
Kontroleer of het onderstaande bijgeleverd toebehoren
inderdaad in de verpakking van de tuner/versterker
aanwezig is:
• FM draadantenne (1)
• AM kaderantenne (1)
• Afstandsbediening (1)
• R6 (AA-formaat) batterijen (2)
Aanbrengen van batterijen in de
afstandsbediening
Plaats de twee AA-formaat R6 batterijen in de
afstandsbediening, met de juiste polariteit van (+) en
(–) zoals is aangegeven in het batterijvak. Voor gebruik
van de afstandsbediening richt u deze op de g
afstandsbedieningssensor voorop de tuner/versterker.
]
}
}
]
Aansluit-overzicht
Op dit apparaat kunt u de volgende antennes en videoen audio-apparatuur aansluiten. Volg voor het
aansluiten de aanwijzingen op de tussen haakjes
aangegeven bladzijden. Zie voor de plaats en de
benaming van de aansluitingen de “Beschrijving van
het achterpaneel” op bladzijde 25.
DVD-speler/
Dolby Digitaldecoder
Aansluiten van de
antennes (5)
AM/FM antenne
Voor-
luidspreker
(R)
Aansluiten
van
luidspreker
(7)
Voor-
luidspreker
(L)
Aansluiten van
video-apparatuur
(6)
TV-
afstemeenheid
SAT
(satellietontvanger)
Videorecorder
Wanneer u de batterijen dient te vervangen
Bij normaal gebruik zal een stel batterijen ongeveer een
half jaar meegaan. Als de tuner/versterker niet meer
naar behoren op de afstandsbediening reageert, is het
tijd beide batterijen door nieuwe te vervangen.
Opmerkingen
• Leg de afstandsbediening niet op een al te warme of
vochtige plaats.
• Gebruik geen oude en nieuwe batterij naast elkaar.
• Let op dat de afstandsbedieningssensor van de tuner/
versterker niet wordt blootgesteld aan rechtstreekse
zonnestraling of fel lamplicht, anders zal de
afstandsbediening niet naar behoren funktioneren.
• Wanneer u denkt de afstandsbediening geruime tijd niet
te gebruiken, is het beter de batterijen eruit te verwijderen,
om eventuele beschadiging door batterijlekkage en
corrosie te voorkomen.
Surroundluidspreker
(L)
CD speler
MD-Deck/
cassettedeck
Aansluiten van
video-apparatuur (5)
Midden-
luidspreker
Aktieve
woofer
Surroundluidspreker
(R)
Vóór het aansluiten
• Schakel eerst alle betrokken apparatuur uit, alvorens
u begint met het aansluiten ervan.
• Sluit de netsnoeren van de apparatuur pas op het
stopkontakt aan nadat alle andere aansluitingen in
orde zijn.
• Steek alle stekkers stevig in de aansluitbussen, om
gebrom en andere bijgeluiden te voorkomen.
• Zorg bij het aansluiten van de audio snoeren dat u
links en rechts niet verwisselt: de witte stekkers op
de witte stekkerbussen (voor het linker kanaal) en de
rode stekkers op de rode stekkerbussen (voor het
rechter kanaal).
NL
4
Page 59

Aansluiten van de antennes
Overzicht
Hieronder wordt beschreven hoe u de bijgeleverde AM
en FM antennes op de tuner aansluit. Als u deze tuner
wilt gebruiken voor radio-ontvangst, maak dan eerst
de hieronder beschreven aansluitingen en ga dan door
naar de volgende bladzijden. Zie voor de plaats van de
antenne-aansluitingen de onderstaande afbeelding.
ANTENNA
Benodigdheden
Voorbereidingen
In gebieden met een problematische AM-ontvangst
In gebieden met slechte ontvangst kan het nodig zijn
naast de AM kaderantenne een (niet bijgeleverde)
geïsoleerde draadantenne van 6 tot 15 meter lang aan te
sluiten. Span de geïsoleerde draad zo mogelijk
buitenshuis en horizontaal op.
Aansluiten van een aardleiding
Als u de tuner/versterker aansluit op een
buitenantenne, dient deze geaard te worden zoals in de
afbeelding links, ter bescherming tegen blikseminslag.
Sluit de aardingsdraad nooit aan op een gasleiding;
gezien de kans op een gasexplosie is dit uiterst
gevaarlijk.
Wat is de volgende stap?
Als u tevens andere apparatuur wilt aansluiten, lees dan
verder in de volgende paragraaf. Als u de tuner echter slechts
wilt gebruiken voor radio-ontvangst, ga dan door naar
“Aansluiten van luidsprekers” op blz. 7.
• FM draadantenne
(bijgeleverd) (1)
• AM kaderantenne
(bijgeleverd) (1)
Aansluitingen
Na het aansluiten
AM
kaderantenne
Tuner/
versterker
ANTENNA
In gebieden met een problematische FM-ontvangst
Sluit via een 75-ohm coaxiaalkabel (niet bijgeleverd) een
FM buitenantenne aan op de tuner/versterker, zoals
hieronder aangegeven.
Tuner/
versterker
ANTENNA
van de draadantenne dient u
deze zo
horizontaal
AM
mogelijk te
plaatsen.
FM draadantenne
FM
Ω
75
COAXIAL
Aansluiten van audioapparatuur
Overzicht
Hieronder wordt beschreven hoe u geluidsapparatuur
op de tuner/versterker aansluit. Als u dit apparaat wilt
gebruiken als versterker, maak dan eerst de hieronder
beschreven aansluitingen. Zie voor de plaats van de
stekkerbussen de onderstaande afbeelding.
MD/TAPE
CD
Benodigdheden
Audiosnoeren (niet bijgeleverd) (1 per CD-speler, 2 per
minidisc-recorder of cassettedeck)
Wit (L)
Rood (R)
Wit (L)
Rood (R)
Aardleiding
(niet bijgeleverd)
Naar een aardpunt
AM
FM buitenantenne
FM
Ω
75
COAXIAL
(wordt vervolgd)
NL
5
Page 60

Voorbereidingen
Aansluitingen
De pijl l geeft de richting van de signaalstroom aan.
CD-speler
Tuner/versterker
L
R
IN
CD
CD-speler
OUTPUT
LINE
L
R
Minidisc-recorder of cassettedeck
Minidisc-recorder
of cassettedeckTuner/versterker
OUTPUT
INPUT
LINE
LINE
OUT
MD/TAPE
L
R
IN
L
R
Wat is de volgende stap?
Aansluitingen
De pijl l geeft de richting van de signaalstroom aan.
U kunt het geluid van een videorecorder of TV/SAT
beluisteren door het audiosignaal van de
videorecorder of TV/SAT in de tuner/versterker in te
voeren.
TV/SAT
Tuner/versterker
Videorecorder
Tuner/versterker
AUDIO OUT
AUDIO IN
VIDEO
TV/SAT
AUDIO IN
TV-afstemeenheid of
Satellietontvanger
L
R
Videorecorder
L
R
L
R
AUDIO
OUTPUT
AUDIO
AUDIO
OUTPUT INPUT
L
R
Ga naar het volgende hoofdstuk voor de aansluiting van
videocomponenten en de weergave van surround sound bij
het bekijken/beluisteren van TV-programma’s of
videocassettes.
Aansluiten van videoapparatuur
Overzicht
Hieronder wordt beschreven hoe u video-apparatuur
op de tuner/versterker kunt aansluiten.
Zie voor de plaats van de stekkerbussen de
onderstaande afbeelding.
TV/SAT
DVD/MULTI CH
VIDEO
Gebruik de funktiekeuzetoetsen (TV/SAT, CD, MD/
TAPE, of TUNER) om in te stellen op het VIDEO
AUDIO OUT signaal. U kunt dit geluidssignaal
opnemen door een opname-apparaat zoals een
cassettedeck aan te sluiten (op de VIDEO AUDIO OUT
stekkerbus).
DVD-speler/Dolby Digital-decoder
Benodigdheden
• Audio-aansluitsnoeren (niet bijgeleverd) (1 voor de
DVD/MULTI CH FRONT en SURROUND
aansluitingen)
Wit (L)Wit (L)
Rood (R)Rood (R)
• Mono-aansluitsnoeren (niet bijgeleverd) (1 voor de
DVD/MULTI CH CENTER en SUB WOOFER
aansluitingen)
Zwart Zwart
Benodigdheden
• Audio/videokabels (niet meegeleverd)(1 voor een TVafstemeenheid of Satellietontvanger; 2 voor een
videorecorder)
Wit (L)Wit (L)
Rood (R)Rood (R)
NL
6
Page 61

Voorbereidingen
U kunt gedecodeerde Dolby Digital-geluidssporen
weergeven via de luidsprekers aangesloten op de tuner/
versterker.
Indien u beschikt over een DVD-speler of een Dolby
Digital decoder met 5.1 CH uitgang, kunt u een
gedecodeerde Dolby Digital soundtrack versterken met
de volgende aansluitingen.
Tuner/versterker
CENTER
L
R
DVD/MULTI CH
SUB
WOOFER
FRONT SURROUND
DVD-Speler
PRE OUT
CENTER
SUB
WOOFER
SURROUND
FRONT
Opmerking
Indien u beschikt over een DVD-speler met 2CH analoge
uitgang, verbindt u die met een andere functie-aansluiting.
Wat is de volgende stap?
Lees verder in de volgende paragraaf voor het aansluiten van
de luidsprekers.
Voor een zo treffend mogelijk akoestisch effekt stelt u
de luidsprekers op zoals in onderstaande afbeelding is
aangegeven.
Surroundluidspreker
60 - 90 cm
45°
Benodigdheden
Luidsprekersnoeren (niet bijgeleverd) (1 per luidspreker)
(+)(+)
(–)
Strip ongeveer 15 mm van de uiteinden van het snoer. Let
goed op dat het luidsprekersnoer met de juiste polariteit (+
en –) wordt aangesloten. Als u bij één van de luidsprekers
de + en – polen verwisselt, zal het geluid vervormd klinken
en de lage tonen zullen niet goed doorkomen.
(–)
Aansluiten van luidsprekers
Overzicht
Hieronder wordt beschreven hoe u uw luidsprekers op
de tuner/versterker kunt aansluiten. Hoewel
voorluidsprekers (linker en rechter) vereist zijn, is
gebruik van midden- en Surroundluidspreker niet
strikt noodzakelijk. Door toevoeging van midden- en
Surroundluidspreker aan uw installatie echter, zult u
van geluid met akoestiek-effekten kunnen genieten.
Aansluiting van een aktieve woofer zal het lagetonenbereik verruimen. Zie voor de exakte plaats van de
aansluitingen de onderstaande afbeelding.
SPEAKERS SURROUND
SUB WOOFER
SPEAKERS FRONT
SPEAKERS CENTER
Aansluitingen
Voorluidsprekers
Voorluidspreker
(R)
Surround- en middenluidsprekers
Surround-
luidspreker
(R)
Tuner/versterker
SPEAKERS
FRONT
L
R
Tuner/versterker
SPEAKERS
SURROUNDLRCENTER
Voorluidspreker
Midden-
luidspreker
(L)
Surround-
luidspreker
(L)
(wordt vervolgd)
NL
7
Page 62

Voorbereidingen
–
Vermijd kortsluiting van de luidsprekers
De tuner/versterker wordt mogelijk beschadigd indien
de luidsprekers kortsluiting maken. Let op de
volgende voorzorgen bij het verbinden van de
luidsprekers zodat kortsluiting wordt voorkomen.
Controleer bij het aansluiten dat de ontblote uiteinden
van ieder luidsprekersnoer beslist geen contact maken
met een andere stekkerbus of een ander
luidsprekersnoer.
Voorbeelden van een foute aansluiting van een
luidsprekersnoer:
SPEAKERS
FRONT
R
L
+
–
Het ontblote uiteinde maakt contact met een andere
luidspreker-stekkerbus.
SPEAKERS
FRONT
R
L
Aktieve woofer
Tuner/versterker
AUDIO OUT
SUB
WOOFER
Aktieve woofer
INPUT
Opmerking
Niet aansluiten op een andere component.
IAls uw TV-monitor gebruik maakt van afzonderlijke
luidsprekers
Kunt u een ervan aansluiten op de SPEAKERS CENTER
aansluitingen voor gebruik met Dolby Pro Logic
Surround geluid (zie pagina 18).
Wat is de volgende stap?
Ga naar “Aansluiten van de stroomvoorziening” op deze
pagina om uw systeem aan te vullen.
Aansluiten van de
+
De ontblote uiteinden raken elkaar aan omdat er te veel
isolatie is verwijderd.
Controleer na het aansluiten van alle componenten, de
luidsprekers en het netsnoer of de luidsprekers juist
werken. Geef hiervoor de testtoon via iedere
luidspreker weer. Zie “Instellen van het volume van de
luidsprekers” op blz. 19 voor details.
Indien u Surroundluidspreker heeft aangesloten, moet
u op de DVD/MULTI CH toets drukken en het
geluidsveld van de tuner/versterker uitschakelen
voordat u de weergave van de testtoon start zodat de
testtoon afzonderlijk via de linker- en rechter
Surroundluidspreker wordt weergegeven.
Indien u geen geluid via een luidspreker hoort bij
weergave van de testtoon, of een testtoon via een
andere luidspreker dan de luidspreker waarvan de
naam op het uitleesvenster van de tuner/versterker
wordt getoond, maken de luidsprekers kortsluiting. U
moet in dat geval de aansluitingen van de luidsprekers
nogmaals controleren.
stroomvoorziening
Aansluiten van het netsnoer
Sluit het netsnoer van deze tuner/versterker en van
uw audio/video-apparatuur aan op een stopkontakt.
naar een stopkontakt
Wat is de volgende stap?
Lees alvorens de installatie in gebruik te nemen de volgende
paragraaf door, om ervan verzekerd te zijn dat alle toetsen en
schakelaars juist staan ingesteld.
,
NL
8
Page 63

Voorbereidingen
Alvorens u de tuner/versterker
in gebruik neemt
Voor het eerste gebruik van de tuner/versterker of als
u eerder gemaakte instellingen wilt wissen, volgt u de
onderstaande aanwijzingen.
?/1 (aan/uit)
DIMMER
1 Schakel de tuner/versterker uit.
2 Hou ?/1 (aan/uit) langer dan 4 seconden
ingedrukt.
De aanduiding “INITIAL” verschijnt in het
uitleesvenster en dan zijn de onderstaande
instellingen gewist of in de oorspronkelijke
uitgangsstand teruggesteld:
• Alle voorkeurzenders zijn teruggesteld op de
fabrieksinstellingen.
• Alle klankbeeld-parameters zijn teruggesteld op
de fabrieksinstelligen.
• Alle vastgelegde namen (van voorkeurzenders en
beeld/geluidsbronnen) zijn gewist.
• Alle instellingen gemaakt met de SET UP toets
zijn teruggesteld op de fabrieksinstellingen.
• Alle klankbeelden die waren vastgelegd voor
voorkeurzenders en beeld/geluidsbronnen zijn
gewist.
Zet de tuner/versterker aan en controleer de volgende
indicator.
• Druk op MUTING wanneer MUTING verschijnt in
het uitleesvenster.
• Druk herhaaldelijk op DIMMER om de
displayverlichting te regelen (4 standen).
MUTING
Automatisch vastleggen van
FM zenders in alfabetische
volgorde (“Auto-betical”
voorinstelling)
Met de “Auto-betical” voorinstelling kunt u maximaal
30 FM radiozenders en RDS informatie-zenders in het
afstemgeheugen van de tuner/versterker vastleggen,
in alfabetische volgorde. Alleen de best doorkomende
zenders worden door de “Auto-betical” voorinstelling
gekozen. Als u de FM of AM (middengolf en langegolf)
zenders zelf wilt kiezen, om deze één voor één vast te
leggen, volg dan de aanwijzingen onder “Voorinstellen
van radiozenders” op blz. 13.
De FM RDS informatiezenders worden eerst
vastgelegd, in alfabetische volgorde van hun officiële
zendernaam, gevolgd door de gewone FM
radiozenders, in volgorde van afstemfrekwentie. (Zie
voor nadere bijzonderheden over de RDS
informatiefunkties blz. 14).
1 Druk op de ?/1 (aan/uit) schakelaar om de
tuner/versterker uit te schakelen.
2 Druk op de MEMORY toets en houd deze
ingedrukt, en druk daarbij op de ?/1 (aan/uit)
schakelaar om het apparaat weer in te schakelen.
De aanduiding “AUTOBETICAL SELECT”
verschijnt en de tuner/versterker gaat dan op
zoek naar alle plaatselijk te ontvangen FM en FM
RDS zenders en legt deze in het afstemgeheugen
vast.
Wanneer de tuner/versterker het vastleggen van
de FM en FM RDS zenders voltooid heeft,
verschijnt de aanduiding “FINISH” in het
uitleesvenster.
Een vooringestelde code omprogrammeren voor een
andere zender
Zie “Voorinstellen van radiozenders” op pagina 13.
Onderbreken van de “Auto-betical” voorinstelling
voordat alle zenders zijn vastgelegd
Druk op de ?/1 (aan/uit) schakelaar om de tuner/
versterker uit te schakelen.
De radiozenders die reeds waren vastgelegd,
verschuiven nu naar de “hogere” nummers (naar C0) en
kunnen uit het afstemgeheugen worden gewist,
afhankelijk van het aantal zenders dat wordt gekozen
door de “Auto-betical” voorinstelling.
Opmerkingen
• Als u verhuist naar een andere streek, kan het nodig zijn
deze procedure opnieuw uit te voeren, om de best te
ontvangen zenders in uw nieuwe woongebied vast te
leggen.
• Voor meer details over het afstemmen op
voorinstelzenders, zie pagina 13.
• Wanneer “FINISH” verschijnt, zijn alle vorige
voorinstelgeheugens gewist. Programmeer opnieuw AMzenders indien nodig.
NL
9
Page 64

Tuner/versterker bedieningsfunkties
?/1
Tuner/versterker bedieningsfunkties
Kiezen van audio/videoapparatuur
Voor het luisteren of kijken naar de weergave van
aangesloten apparatuur, dient u eerst met de
afstandsbediening of op de tuner/versterker het
gewenste apparaat in te stellen.
Voordat u begint dient u te zorgen dat:
• de apparatuur zorgvuldig op de juiste wijze is
aangesloten, zoals beschreven op bladzijden 5 t/m 8.
?/1
(aan/uit)
MENU </>
MENU
+/–
1 Druk op de ?/1 (aan/uit) schakelaar om de
tuner/versterker in te schakelen.
2 Kies het gewenste apparaat door indrukken van
een van de funktiekeuzetoetsen:
Voor TV-kijken of luisteren naar
Videocassettes
TV-programma's of
Satellietontvanger
DVD-speler/Dolby Digital-
decoder
Minidiscs (MD) of Audiocassettes
Compact discs (CD)
Radio-uitzendingen
3 Schakel het gekozen apparaat, bijvoorbeeld de
CD-speler, in en start het afspelen.
Om op deze tuner/versterker op radiozenders af
te stemmen, wordt verwezen naar “Radioontvangst” op bladzijde 12.
4 Stel de geluidssterkte naar wens in met de
MASTER VOLUME regelaar.
Telkens wanneer u aan MASTER VOLUME
draait, verandert het uitleesvenster als volgt:
VOL MIN y VOL 1 y … y VOL 30 y
VOL MAX
Funktiekeuzetoetsen
LEVEL
+/–
BASS
+/–
TREBLE
MASTER
VOLUME
MUTING
Drukt u op
VIDEO
TV/SAT
DVD/MULTI CH
MD/TAPE
CD
TUNER
Voor
Dempen van het geluid
Bijregelen van de balans
Bijregelen van de
klankkleur
Doet u het volgende
Druk op MUTING. Druk
nogmaals of zet het volume
hoger om het geluid te
herstellen.
1 Druk herhaaldelijk op
LEVEL of MAIN MENU
op de afstandsbediening tot
de LEVEL indicator oplicht.
2 Druk herhaaldelijk op
MENU < of > tot
“BALANCE” verschijnt in
het uitleesvenster.
3 Druk op MENU + of – om de
links
/rechts-balans te regelen.
Druk op BASS +/– en TREBLE
+/– om het klankniveau te
regelen. De toonregeling is
instelbaar van –6 dB tot +6 dB
in stapjes van 2 dB tegelijk.
Voor luisteren via de hoofdtelefoon
Sluit de hoofdtelefoon aan op PHONES. Er komt geen
geluid uit de luidsprekers.
Kijken/luisteren naar videoprogramma's
Wanneer u naar TV-uitzendingen of videoprogramma’s
kijkt, wordt aanbevolen het geluid via de tuner/
versterker in plaats van via de TV-luidsprekers te laten
klinken. Dit stelt u in staat de voordelen van de
akoestiek-effekten van de tuner/versterker te benutten,
zoals Dolby Pro Logic Surround, en biedt u de
mogelijkheid de afstandsbediening van de tuner/
versterker te gebruiken voor het regelen van het geluid.
Schakel de TV-luidsprekers uit voordat u begint, zodat u
kunt genieten van het akoestiek-geluid van uw tuner/
versterker.
Voor het kijken/luisteren naar TV-uitzendingen, schakelt
u zowel het TV-toestel, de TV-afstemeenheid, als de tuner/
versterker in en drukt u op de TV/SAT toets van de tuner/
versterker.
Voor het bekijken van videoprogramma’s, gaat u als volgt
te werk:
1 Druk op VIDEO om de videorecorder te kiezen.
2 Schakel de TV in en kies de video-stand voor het
ingangssignaal van de videorecorder.
3 Zet de videorecorder aan en start de weergave.
Gebruik van de afstandsbediening
Met de afstandsbediening kunt u de tuner en de hierop
aangesloten Sony apparatuur op afstand bedienen.
10
Het volume van de TV-luidspreker regelen
Gebruik de volumeregelaar van de TV.
Funktiekeuzetoetsen
Voorkom beschadiging van de luidsprekers
Zorg ervoor dat u het volume dicht zet alvorens de tuner/
versterker af te zetten. Bij het afzetten van de tuner/
NL
versterker blijft de volume-instelling immers behouden.
Page 65

Tuner/versterker bedieningsfunkties
1
Druk op een van de Funktiekeuzetoetsen om de audioof videocomponent te kiezen die u wilt gebruiken.
De Funktiekeuzetoetsen op de afstandsbediening staan
bij aflevering als volgt ingesteld:
Voor TV-kijken of
Drukt u op
luisteren naar
Radioprogramma's
Compact discs (CD)
Minidiscs (MD) of
Audiocassettes
TV-programma's of
Satellietontvanger
VHS videocassettes
(bedieningsstand VTR-3)
DVD-speler/
Dolby Digital decoder
met MULTI CH OUTPUT
* De VIDEO 1, VIDEO 2, VIDEO 3, PHONO en MD/
TAPE functie werkt met 2 toetsen. Om een
bovenvermelde functie te kiezen, drukt u
tegelijkertijd op FN SHIFT (function shift) en de
gewenste functietoets.
Druk bijvoorbeeld op FN SHIFT en CD/SACD om
de MD/TAPE functie te kiezen.
TUNER
CD/SACD
MD/TAPE et FN SHIFT*
(INITIAL-MD MODE)
TV/SAT
(INITIAL-TV MODE)
VIDEO
DVD/LD
(INITIAL-DVD MODE)
Om de fabrieksinstelling van een toets te wijzigen,
zie het volgende hoofdstuk.
De tuner/versterker en het gekozen apparaat
worden ingeschakeld.
Als de gekozen audio- of videocomponent niet
wordt ingeschakeld
Druk op de aan/uit-schakelaar van het betreffende
apparaat.
2 Start de weergave.
Voor nadere bijzonderheden wordt verwezen
naar “Beschrijving van de afstandsbediening” op
bladzijde 26.
Veranderen van de toewijzingen van
een funktiekeuzetoets
Als de toewijzingen van de FUNCTION toetsen
(hierboven) zoals deze in de fabriek zijn ingesteld, niet
overeenstemmen met die van uw apparatuur, is het
mogelijk om deze instellingen aan te passen. Indien u
bijvoorbeeld beschikt over een MD-speler en een
cassettedeck, en niet over een CD-speler, kunt u de
CD/SACD-toets toekennen aan uw cassettedeck.
AV ?/1
?/1
Funktiekeuzetoetsen
Nummertoetsen
> 10
.
ENTER
MASTER VOL –
De volgende cijfertoetsen zijn bedoeld om de functies
te selecteren:
Bedienen
CD-speler
DAT deck
Minidisc-recorder
Cassettedeck A
Cassettedeck B
Laserdisc-speler
Videorecorder (bedieningsstand VTR 1*)
Videorecorder (bedieningsstand VTR 2*)
Videorecorder (bedieningsstand VTR 3*)
TV-toestel
DSS (Digital Satellite System)
DVD
VCD-speler
* Sony videorecorders worden bediend in een VTR 1, 2 of
3 stand. Deze bedieningsstanden komen overeen met
resp. Beta, 8mm en VHS.
Drukt u op
1
2
3
4
5
6
7
8
9
0
> 10
ENTER
.
Nu kan het cassettedeck worden bediend met de
CD/SACD-toets.
Merk op dat de instellingen van de TUNER en
FN SHIFT functies (VIDEO 1, VIDEO 2, VIDEO 3,
PHONO en MD/TAPE) niet kan worden gewijzigd.
1 Houd de Funktiekeuzetoetsen waarvan u de
toewijzing wilt veranderen, ingedrukt
(bijvoorbeeld CD/SACD).
2 Druk op de betreffende toets van de component
die u aan de functietoets wilt toekennen
(bijvoorbeeld 4 - Cassettedeck).
Een toets in de fabrieksinstelling zetten
Voer de bovenstaande procedure opnieuw uit.
Alle functietoetsen in de fabrieksinstelling zetten
Druk tegelijk op ?/1, AV ?/1 en MASTER VOL –.
11
NL
Page 66

Tuner/versterker bedieningsfunkties
Radio-ontvangst
Op deze tuner kunt u de frekwentie van een
radiozender direkt invoeren met behulp van de
nummertoetsen van de afstandsbediening (direkte
afstemming). Zie ook “Automatisch doorlopen van
radiozenders (automatische afstemming)”.
Alvorens u begint, let op dat u:
• een FM/AM antenne op de tuner heeft aangesloten
zoals beschreven op bladzijde 5.
?/1 (aan/uit)
FM/AMFM MODE
MASTER VOLUMETUNING +/–
TUNER
Nummertoetsen
D. TUNING
Voor ontvangst van andere radiozenders
Herhaal de stappen 3 t/m 5.
Als de STEREO indikator gedoofd blijft
Druk bij ontvangst van een FM stereo-uitzending op de
FM MODE toets.
Als een FM stereo-uitzending met veel storing
doorkomt
De STEREO indikator knippert. Druk op de FM MODE
toets om op MONO in te stellen. Het stereo effekt zal nu
verloren gaan, maar het geluid zal minder vervormd
klinken. Om weer terug te schakelen naar stereo
ontvangst drukt u nogmaals op deze toets.
Als u niet op de zender kunt afstemmen en de
ingevoerde cijfers knipperen
Kontroleer of u wel de juiste afstemfrekwentie hebt
ingevoerd. Is er sprake van een vergissing, druk dan
weer op de D. TUNING toets en voer de juiste
frekwentie in van de afstandsbediening. Knipperen de
cijfers nu nog en wordt er geen radiozender ontvangen,
dan is de gekozen afstemfrekwentie in uw woongebied
niet in gebruik.
Kijken naar TV-programma’s waarvan het geluid
gelijktijdig via FM wordt uitgezonden
Zorg dat u zowel op de TV (of de videorecorder) als op
de tuner op de TV-uitzending afstemt.
Als u voor de frekwentie een getal invoert dat niet
deelbaar is door het geldende afsteminterval
In dat geval wordt het door u gekozen getal
automatisch afgerond naar de dichtstbijzijnde waarde
die wel deelbaar is door het afsteminterval.
Afstemintervallen voor direkte afstemming:
FM: 50 kHz interval
AM: 9 kHz interval
12
1 Druk op de ?/1 (aan/uit) toets om de tuner in te
schakelen.
2 Druk op de TUNER toets.
Er wordt afgestemd op de laatst ontvangen
radiozender.
3 Druk op FM/AM om FM of AM zenders te
kiezen.
4 Druk op de D. TUNING toets van de
afstandsbediening.
Automatisch doorlopen van radiozenders
(automatische afstemming)
Als u de afstemfrekwentie van de gewenste zender niet
weet, kunt u de tuner alle zenders die in uw gebied te
ontvangen zijn, laten doorlopen tot u de gewenste
zender vindt.
1 Druk op de TUNER toets.
De tuner stemt af op de laatst ontvangen zender.
2 Druk op FM/AM om FM of AM te kiezen.
3 Druk op de TUNING + of – toets.
5 Druk op de nummertoetsen van de
afstandsbediening om de frekwentie in te voeren.
Voorbeeld 1: FM 102,50 MHz Voorbeeld 2: AM 1350 MHz
02501
35001
6 Bij het afstemmen op AM zenders verstelt u de
richting van de kaderantenne voor de beste
NL
ontvangst.
Druk op de + toets voor een zender met een
hogere frekwentie; op de – toets voor een zender
met een lagere frekwentie. Wanneer het einde van
een afstemband wordt bereikt, springt de tuner
automatisch naar de andere kant van de band.
Zodra een zender doorkomt, stopt de
automatische afstemming. Om dan verder te
zoeken, drukt u de toets nogmaals in.
Page 67

Voorinstellen van radiozender s
Tuner/versterker bedieningsfunkties
Afstemmen op vooringestelde zenders
(geheugen-afstemming)
U zult waarschijnlijk uw favoriete radiozenders in het
geheugen van de tuner willen vastleggen zodat u
hierop snel kunt afstemmen. In het tuner-geheugen
kunnen in totaal 30 FM or AM zenders worden
opgeslagen. De zenders legt u vast onder een code
bestaande uit een letter (A, B of C) en een cijfer (0 t/m
9). Zo kunt u bijvoorbeeld een zender vastleggen onder
code A1, B6 of C9, etc.
PRESET/PTY SELECT +/–
DISPLAY
MEMORY SHIFT ENTER TUNER
MENU </> NAME
MENU +/–
1 Druk op de TUNER toets.
Er wordt afgestemd op de laatst ontvangen
radiozender.
2 Stem op de zender af die u in het geheugen wilt
vastleggen.
Op deze en de vorige bladzijde onder “Radioontvangst” staat beschreven hoe u op zenders
kunt afstemmen.
3 Druk op de MEMORY toets.
De aanduiding “MEMORY” verschijnt enige
sekonden lang in het uitleesvenster. Zorg dat u de
stappen 4 t/m 6 uitvoert voordat de “MEMORY”
aanduiding dooft.
4 Druk op de SHIFT toets om een letter (A, B of C)
te kiezen.
Iedere keer dat u op de SHIFT toets drukt
verschijnt een letter, “A”, “B” of “C”, in het
uitleesvenster.
Als de “MEMORY” aanduiding dooft, begint u
opnieuw vanaf stap 3.
5 Druk op de PRESET/PTY SELECT +/– of TUNING
+/– toets om een zendernummer te kiezen.
6 Druk nogmaals op de MEMORY toets om de
ontvangen radiozender in het geheugen vast te
leggen.
7 Herhaal de stappen 2 t/m 6 voor het voorinstellen
van andere radiozenders.
Een vooringestelde zender wijzigen
Leg de nieuwe zender onder de code vast en de eerder
vastgelegde zender wordt gewist.
Opmerking
Als de stroomvoorziening van de tuner langer dan ongeveer
een week wordt verbroken (stekker uit het stopkontakt),
zullen de vooringestelde zenders uit het geheugen gewist
worden. In dat geval dient u de zenders opnieuw vast te
leggen.
U kunt direkt op een radiozender afstemmen door
invoeren van de bijbehorende code. Als u niet weet
welke zenders onder de codes zijn vastgelegd, kunt u
de tuner alle vooringestelde zenders laten doorlopen.
1 Druk op de TUNER toets.
Er wordt afgestemd op de laatst ontvangen zender.
2
Druk op de SHIFT toets om een letter (A, B of C) te
kiezen, en druk vervolgens op een nummertoets
van de afstandsbediening
Om bijvoorbeeld af te stemmen op
voorinstelzender A7 kiest u A en drukt u
vervolgens op 7.
Automatisch doorlopen van de vooringestelde
zenders
Druk eerst op de TUNER toets en dan op de PRESET/
PTY SELECT + of – toets om de gewenste zender te
kiezen. Iedere keer dat u op de betreffende toets drukt,
veranderen de codes als volgt:
t A1 y A2 y… y A0 y B1 y B2 y … y B0 T
t C0 y … y C2 y C1 T
.
Naamgeving van vooringestelde zenders
U kunt namen (indexnamen) van maximum 8 tekens
lang opslaan voor uw voorkeuzezenders (behalve FM
RDS-zenders). Wanneer de naam eenmaal in het
geheugen is vastgelegd, verschijnt in het uitleesvenster
de zendernaam in plaats van de frekwentie telkens
wanneer u op de betreffende zender afstemt.
De lettertekens die u kunt gebruiken, omvatten letters,
cijfers en symbolen.
1
Stem af op de zender die u van een naam wilt voorzien.
2 Druk op de NAME toets.
De cursor knippert in het uitleesvenster.
3 Gebruik de MENU + of – toets om de gewenste
letter of het cijfer in te voeren.
4 Druk op de MENU </> toets om de cursor een
positie naar rechts op te schuiven voor de
volgende letter.
5 Herhaal de stappen 3 en 4 tot maximaal 8 letters/
cijfers zijn ingevoerd.
6 Druk op ENTER om de namen te slaan.
Indien u een vergissing maakt
Druk enkele malen op de MENU </> toets tot de letter of
het cijfer dat u wilt veranderen in het uitleesvenster begint te
knipperen. Voer dan het juiste letterteken in met de MENU +
of – toets.
Opmerkingen
• U kunt ook een naam van maximum 8 tekens invoeren als
weergavebron. Kies de gewenste weergavebron en herhaal
de stappen 2 tot 6.
• Om de naam van een programmabron te wissen, drukt u
op NAME en vervolgens op dezelfde
programmabrontoets. Druk op ENTER om de naam te
wissen (behalve TUNER).
13
NL
Page 68

Tuner/versterker bedieningsfunkties
Gebruik van het Radio Data
Systeem (RDS)
Welke mogelijkheden biedt het RDS
informatiesysteem?
RDS (Radio Data Systeem) is een radioinformatiesysteem waarmee radiozenders naast de
gewone radio-uitzending allerlei nuttige informatie
kunnen uitzenden. Deze receiver heeft twee handige
RDS-functies: RDS informatie in het uitleesvenster; en
keuze van radiozenders aan de hand van het soort
programma dat ze uitzenden. RDS is alleen
beschikbaar voor FM zenders.*
Opmerking
De RDS informatie zal niet altijd goed te ontvangen zijn, als
de zender waarop u hebt afgestemd niet goed doorkomt of
als de signaalsterkte onvoldoende is.
* Niet alle FM radiozenders geven RDS informatie door, en
de zenders die dit wel doen bieden niet alle dezelfde
soorten informatie. Voor nadere bijzonderheden omtrent
de in uw woongebied beschikbare RDS informatie kunt u
het best kontakt opnemen met de plaatselijk aktieve
radiozenders.
Ontvangst van RDS uitzendingen
Kies eenvoudigweg een radiozender uit de FM band.
Bij afstemming op een zender die RDS informatie
uitzendt, verschijnt de zendernaam in het
uitleesvenster.
Aangeven van RDS informatie in het
uitleesvenster
Druk op de DISPLAY toets. Iedere keer dat u op de
DISPLAY toets drukt, verspringen de aanduidingen in
het uitleesvenster stap voor stap, om de volgende
informatie aan te geven.
Aangegeven
informatie
Zendernaam**
Afstemfrekwentie**
Programmatype
Radiotekst
Juiste tijd (24-uurs
cyclus)
Hiermee kunt u:
De zender aan de hand van de
zendernaam (bijv. WDR) in plaats van
via de frekwentie opzoeken.
De zender aan de hand van de
frekwentie opzoeken.
Een bepaald programmatype opsporen.
(Zie bladzijde 15 voor de
programmatypes waaruit u kunt kiezen.)
De tekstberichten aangeven die door de
RDS zender worden uitgezonden.
De huidige tijd aangeven.
Opmerkingen
• Als er een speciale mededeling of waarschuwingsbericht
van overheidswege doorkomt, zal in het uitleesvenster de
aanduiding “ALARM” gaan knipperen.
• Als een aanduiding uit 9 of meer letters bestaat, zal de
tekst over het scherm lopen.
• De volgende aanduidingen kunnen verschijnen als een
zender een bepaald type RDS informatie niet uitzendt:
“NO PTY” (er wordt geen programmatype-informatie
uitgezonden);
“NO TEXT” (er wordt geen radiotekst uitgezonden);
“NO TIME” (de juiste tijd wordt niet uitgezonden).
• Afhankelijk van de methode die door de radiozender
wordt gebruikt om de tekst door te sturen, is het mogelijk
dat bepaalde tekstboodschappen onvolledig zijn.
Opzoeken van een radiozender aan de hand
van het programmatype (PTY)
U kunt een radiozender van uw keuze opzoeken door
in te stellen op het gewenste programmatype. De tuner
stemt dan af op een uitzending van het gekozen type,
verzorgd door een van de RDS zenders die zijn
vastgelegd in het afstemgeheugen van de tuner.
1 Druk op PTY om het huidige PTY type weer te
geven. Druk op PRESET/PTY SELECT + of – tot
het gewenste programmatype in het
uitleesvenster verschijnt. Hieronder vindt u een
overzicht van de beschikbare programmatypes.
2 Druk op de PTY toets terwijl het programmatype
in het uitleesvenster wordt aangegeven.
De tuner doorloopt dan de vooringestelde RDS
radiozenders op zoek naar het gekozen soort
programma. (De aanduiding “SEARCH” en het
programmatype verschijnen afwisselend in het
uitleesvenster.) Wanneer de tuner/versterker een
programma van het door u gekozen type vindt,
stopt het apparaat met zoeken. Dan knippert het
voorinstelnummer van de radiozender die het
gekozen soort programma uitzendt, en
vervolgens schakelt de tuner/versterker over op
ontvangst en weergave van de betreffende
uitzending.
Opmerking
De aanduiding “NO PTY” verschijnt wanneer het door u
gekozen programmatype niet wordt uitgezonden; de tuner
keert dan terug naar de oorspronkelijke zender.
14
Geluidsveldstand**
** Deze informatie wordt look aangegeven voor FM
radiozenders die geen RDS informatie uitzenden.
NL
Toont de huidige geluidsveldstand.
Page 69

Tuner/versterker bedieningsfunkties
U heeft de keuze uit de volgende programmatypes:
Programmatype
NONE
NEWS
AFFAIRS
INFO
SPORT
EDUCATE
DRAMA
CULTURE
SCIENCE
VARIED
POP M
ROCK M
EASY M
LIGHT M
CLASSICS
OTHER M
WEATHER
FINANCE
CHILDREN
SOCIAL
RELIGION
PHONE IN
TRAVEL
LEISURE
U luistert naar
Ieder type uitzending dat niet onder een
van de volgende categorieën valt.
Nieuwsberichten.
Aktualiteitenprogramma’s over
onderwerpen die recentelijk in het nieuws
zijn.
Uitzendingen over consumentenzaken,
medisch advies, weersinformatie, etc.
Sportuitzendingen.
Educatieve programma’s en uitzendingen
met advies op verschillende gebieden.
Hoorspelen en radioseries.
Radio-uitzendingen over nationale of
regionale culturele aangelegenheden,
zoals religie, taal en sociale vraagstukken.
Programma’s over natuurwetenschappen
en technologie.
Gevarieerd amusement, zoals interviews
met bekende persoonlijkheden,
quizprogramma's en komedies.
Populaire muziek.
Rockmuziek.
Easy listening ("middle of the road"
muziek).
Lichte klassieke muziek, zowel
instrumentaal als vokaal.
Uitvoeringen van klassieke muziek door
grote orkesten, kamermuziek, opera, enz.
Muziek die in geen enkele van de
bovenstaande categorieën thuishoort,
zoals bijvoorbeeld rhythm & blues en
reggae.
Weerberichten.
Beursberichten en financieel-economische
programma's.
Jongerenprogramma's.
Programma's over sociologie,
geschiedenis, aardrijkskunde,
psychologie, en
maatschappijwetenschappen.
Programma's over religieuze
aangelegenheden.
Meningsuiting via telefoon of
panelgesprekken.
Informatieprogramma's over reizen.
Vrijetijdsprogramma's waar luisteraars
aan kunnen deelnemen.
Programmatype
JAZZ
COUNTRY
NATION M
OLDIES
FOLK M
DOCUMENT
U luistert naar
Polyfonische, gesyncopeerde muziek.
Muziek uit het zuiden van de VS.
Hedendaagse populaire muziek uit land
of streek.
"Golden age" muziek.
Muziek die stamt uit de muziekcultuur
van een bepaald land.
Duidingsprogramma's.
15
NL
Page 70

Tuner/versterker bedieningsfunkties
Opnemen
1 Druk op TV/SAT om de programmabron te
selecteren.
Deze tuner/versterker maakt opnemen naar en van
apparatuur die hierop is aangesloten bijzonder
eenvoudig. U hoeft de audio/video-apparatuur voor
weergave en opname niet direkt op elkaar aan te
sluiten: als eenmaal een weergavebron op de tuner/
versterker is gekozen, is maken en monteren van
opnamen mogelijk op dezelfde wijze als u zou doen
met gebruik van de bedieningsorganen op elk
apparaat.
Kontroleer, alvorens u begint, of alle apparatuur naar
behoren is aangesloten.
Funktiekeuzetoetsen
Apparaat voor
weergave
(weergavebron)
l: Audio-signaalstroom
Opname-apparaat
(Minidisc-recorder,
cassettedeck,
videorecorder)
2 Zet de betreffende apparatuur klaar voor
weergave. Bijvoorbeeld de TV en TVafstemeenheid aanzetten.
3 Breng een onbespeelde videocassette in de
videorecorder voor opname.
4 Begin met opnemen op de videorecorder.
U kunt bij het monteren van een videocassette
geluid vervangen
Op het punt waar u een ander geluid wilt beginnen
toevoegen, drukt u op een andere funktietoets
(bijvoorbeeld voor de CD) en begint de weergave. Het
geluid van de geselecteerde apparatuur zal over het
oorspronkelijke geluid worden opgenomen.
Om weer verder te gaan met opname van het
oorspronkelijke geluid, drukt u op de TV/SAT
funktietoets.
Opmerking
U kunt geen audio signaal opnemen in de DVD/MULTI CH
stand.
16
Opnemen op een minidisc of audiocassette
Via deze tuner/versterker kunt u muziek op een
minidisc of geluidscassette opnemen. Raadpleeg de
gebruiksaanwijzing van uw minidisc-recorder of
cassettedeck voor nadere bijzonderheden.
1 Druk op een van de funktiekeuzetoetsen om de
gewenste weergavebron te kiezen.
Gebruik van de Sleep Timer
U kunt de tuner/versterker instellen om automatisch
uit te schakelen op een opgegeven tijdstip.
SLEEP
2 Maak het gekozen apparaat gereed voor
weergave.
Voor de CD-speler bijvoorbeeld, plaatst u een
compact disc.
3 Steek een onbespeelde minidisc of cassette in het
cassettedeck voor opname en stel zonodig het
opnameniveau in.
4 Start het opnemen op het opnamedeck en start het
afspelen van de weergavebron.
Opnemen op videocassette
Met behulp van de tuner/versterker kunt u opnemen
van een TV of Satellietontvanger. U kunt bij het
monteren van een videocassette ook geluid afkomstig
uit diverse audiobronnen toevoegen. Raadpleeg indien
NL
nodig de handleiding van uw videorecorder.
Druk op SLEEP van de afstandsbediening terwijl het toestel
aan staat. Telkens wanneer u op SLEEP drukt, verandert de
tijd zoals hieronder aangegeven.
t 2-00-00 t 1-30-00 t 1-00-00 t 0-30-00 t OFF
Het uitleesvenster dimt nadat u het tijdstip heeft opgegeven.
U kunt nagaan hoeveel tijd er nog rest voordat de
tuner/versterker zal uitschakelen
Druk op SLEEP van de afstandsbediening.
De resterende tijd verschijnt dan in het uitleesvenster.
Page 71

Gebruik van de akoestiekfunkties
Gebruik van de akoestiekfunkties
Kiezen van een akoestiekinstelling
U kunt genieten van surround sound door gewoon een
voorgeprogrammeerde akoestiek-instelling te kiezen
afhankelijk van de muziek die u wenst te beluisteren.
MAIN
MENU
MENU
SOUND FIELD
MODE +/–
MENU +/–
+/–
SURR
SOUND FIELD
ON/OFF
SOUND FIELD
MODE +/–
Type
MUSIC
* De aanduiding “DOLBY PL” verschijnt in het
uitleesvenster.
** Alleen bij grebruik van DVD/MULTI CH.
MODE (klankbeeld)
HALL
Effecten
Geeft de akoestiek van
een gewone
rechthoekige
concertzaal. Ideaal voor
zachtere akoestische
muziek.
Bij gebruik van de afstandsbediening
Bij elke druk op SOUND FIELD MODE +/– verandert
de akoestiek-instelling als volgt:
Bij het kiezen van de weergavebron
t PRO LOGIC* y C STUDIO T
t HALL y DOLBY V T
Bij gebruik van DVD/MULTI CH
C STUDIO y V SURR
* De aanduiding “DOLBY PL” verschijnt in het
uitleesvenster.
1 Druk op SOUND FIELD ON/OFF om de
akoestiek-instelling aan te schakelen.
De geluidsveldindicator licht op.
2 Druk herhaaldelijk op SOUND FIELD MODE +/–
tot de gewenste akoestiek-instelling verschijnt in
het uitleesvenster. Kies de akoestiek-instelling als
volgt:
Type
CINEMA
VIRTUAL
MODE (klankbeeld)
PRO LOGIC*
C STUDIO
(Cinema Studio)
DOLBY V
V SURR**
Effecten
Decodeert programma’s
opgenomen in Dolby
Surround.
Geeft de akoestiek van
een bioscoopzaal. Goed
voor alle soorten
speelfilms.
Gebruik de
voorluidsprekers om
surround sound
effecten te creëren.
Gebruik de
voorluidsprekers en de
middenluidspreker om
surround sound
effecten te creëren.
De akoestiek-instelling uitschakelen
Druk op de SOUND FIELD ON/OFF toets of 2CH/OFF op
de afstandsbediening.
De tuner/versterker “onthoudt” voor elke
geluidsbron het laatst gekozen klankbeeld
(Geheugen-klankbeeld)
Wanneer u een bepaalde geluidsbron kiest, wordt
automatisch het laatst daarvoor gebruikte klankbeeld
ingeschakeld. Als u bijvoorbeeld een CD beluistert met
het HALL klankbeeld en dan overchakelt op een andere
geluidsbron, dan zal bij terugschakelen naar CDweergave automatisch het HALL klankbeeld weer
gelden. In het geheugen van de tuner worden de
klankbeelden voor de AM en FM afstemband en voor
alle voorkeurzenders afzonderlijk onthouden.
Op de verpakking kunt u meestal zien of het geluid
is opgenomen met Dolby Surround codering
Sommige videocassettes of laserdiscs kunnen wel zijn
opgenomen met Dolby Surround geluid, ook al staat dit
niet op de verpakking aangegeven.
(wordt vervolgd)
17
NL
Page 72

Gebruik van de akoestiekfunkties
SOUND FIELD
MODE +/–
TEST TONE
MAIN
MENU
MENU
+/–
MENU </>
Instellen van het effectniveau (alle
klankbeelden behalve PRO LOGIC)
Desgewenst kunt u het akoestiekeffekt meer
geprononceerd maken, door verhogen van het EFFECT
niveau. Met deze instelling kunt u de “aanwezigheid”
van het akoestiekeffekt in zes stappen (1-6) naar wens
bijregelen.
1 Start de weergave van de geluidsbron.
2 Druk op SURR.
Het effektniveau (“EFFECT 1” … “EFFECT 6”)
wordt weergegeven in het uitleesvenster.
3 Druk op MENU +/– om het gewenste niveau te
kiezen.
Bij gebruik van de afstandsbediening
Druk herhaaldelijk op MAIN MENU op de
afstandsbediening tot de SURR indicator oplicht. Bij elke
druk op MENU +/– verandert het effectniveau als volgt:
Optimaal benutten van Dolby
Pro Logic Surround geluid
Om het Dolby Pro Logic Surround geluid zo goed
mogelijk tot zijn recht te laten komen, dient u eerst de
CENTER MODE instelling te kiezen die het beste past
bij uw luidspreker-opstelling. Vervolgens stelt u de
geluidssterkte en de vertragingstijd van elke
luidspreker af.
Let op dat u tenminste over één extra paar luidsprekers
dient te beschikken voor het maken van de
onderstaande instellingen.
SET UP
SOUND FIELD
MODE +/–
LEVEL
EFFECT 1 y EFFECT 2 y … y EFFECT 6
Opmerking
Wijzigen van het effectniveau kan onder bepaalde
omstandigheden en met bepaalde geluidsbronnen wel eens
weinig verschil maken.
MENU </> MENU +/–
SOUND FIELD
ON/OFF
Kiezen van de CENTER MODE instelling
Deze tuner/versterker biedt u de keuze uit vier
verschillende CENTER MODE instellingen:
“Phantom”, “Normal”, “Wide” en “3 STEREO”. Elke
instelling is voor een bepaalde luidspreker-opstelling
ontworpen. Kies de CENTER MODE instelling die het
beste past bij uw luidspreker-opstelling:
1 Druk op SOUND FIELD ON/OFF om de
akoestiek-instelling aan te schakelen.
18
2 Druk herhaaldelijk op de SOUND FIELD MODE
+/– toets om het Dolby rondom-akoestiekeffekt
(PRO LOGIC of C STUDIO akoestiek) te kiezen.
3 Druk op SET UP.
4 Druk herhaaldelijk op MENU < of > tot “CTR
MODE” verschijnt in het uitleesvenster.
NL
Page 73

Gebruik van de akoestiekfunkties
5
Druk herhaaldelijk op MENU +/– tot de gewenste
center mode verschijnt in het uitleesvenster. Kies
de CENTER MODE instelling als volgt:
Als u beschikt
Kiest u
Zodat
over
Voor- en
Surroundluidspreker,
en een kleine
middenluidspreker
Voor- en
middenluidsprekers,
maar geen
Surroundluidspreker
Voor- en
Surroundluidspreker,
maar geen
middenluidspreker
Voor- en
Surroundluidspreker,
en een grote
middenluidspreker
NORMAL
3 STEREO
(3 Channel Logic)
PHANTOM
WIDE
Het basgeluid van het
middenkanaal via de
voorluidsprekers
wordt weergegeven
(omdat een kleine
middenluidspreker
onvoldoende
basgeluid kan
produceren).
Het geluid van het
Surroundluidspreker
kanaal via de
voorluidsprekers
wordt weergegeven.
Het geluid van het
middenkanaal via de
voorluidsprekers
wordt weergegeven.
Het middenkanaal
het hele
geluidsspectrum
weergeeft.
Afstellen van de geluidssterkte van de
luidsprekers
Met behulp van de testtoon-funktie kunt u de
geluidssterkte van uw luidsprekers op hetzelfde
niveau afstellen. (Als al uw luidsprekers reeds
hetzelfde geluidsvolume te horen geven, is afstellen
niet noodzakelijk.)
Met de toetsen op de afstandsbediening kunt u de
luidsprekeraansluiting testen en het volumeniveau
bijstellen vanuit uw luisterpositie.
1 Druk op de SOUND FIELD ON/OFF toets om de
klankbeeldfunctie in te schakelen.
Druk enkele malen op de SOUND FIELD MODE
+/– toets om in te stellen op het “DOLBY PL”
klankbeeld.
Alle luidsprekers kunnen tegelijkertijd afgesteld
worden
Hiervoor gebruikt u de MASTER VOLUME regelaar op
de tuner/versterker of MASTER VOL toets op de
afstandsbediening.
Het geluidsniveau van de luidsprekers kan ook
afgesteld worden met de toetsen op de tuner/
versterker
Nadat u op TEST TONE op de afstandsbediening hebt
gedrukt:
• Druk herhaaldelijk op MENU < of > om
“CTR xxdB” te kiezen.
Druk op MENU +/– om het niveau van de
middenluidspreker te regelen.
• Druk op herhaaldelijk op MENU < of > om
“SURR xxdB” te kiezen.
Druk op MENU +/– om het niveau van de
Surroundluidspreker
De geluidssterkte is instelbaar van –15 dB tot +10 dB in
stapjes van 1 dB tegelijk.
te regelen.
U kunt het volume van de subwoofer regelen
• Druk herhaaldelijk op LEVEL of MAIN MENU op de
afstandsbediening tot de LEVEL indicator oplicht.
• Druk herhaaldelijk op MENU < of > om “SW xxdB”
te kiezen.
• Druk op MENU +/– om het niveau te regelen.
De geluidssterkte is instelbaar van –15 dB tot +10 dB in
stapjes van 1 dB tegelijk.
Het uitgangsniveau van de Surroundluidspreker kan
verhoogd worden
Het instelbereik van de Surroundluidspreker loopt van
–15 tot +10, maar het is mogelijk om dit bereik met 5
niveaus (–10 tot +15) te verschuiven.
• Druk op SET UP.
• Druk herhaaldelijk op MENU < of > tot “SURR SET
UP” verschijnt in het uitleesvenster.
• Druk herhaaldelijk op MENU +/– tot “NORMAL”
verschijnt in het uitleesvenster.
De waarden voor het uitgangsniveau van de
achterluidsprekers die in het uitleesvenster worden
aangegeven, blijven tussen –15 en +10 staan, maar in het
daadwerkelijke uitgangsniveau zult u verschil horen.
2 Druk op de TEST TONE toets van de
afstandsbediening.
De testtoon is achtereenvolgens via elk van de
luidsprekers hoorbaar.
3 Regel het volume zodat het testtoonvolume van
elke luidspreker identiek klinkt in de
luisterpositie.
• Druk op MENU < of > om “CTR xxdB” of
“SURR xxdB” te kiezen.
• Druk op MENU +/– om het niveau te regelen.
4 Druk op de TEST TONE toets van de
afstandsbediening om de testtoon uit te
schakelen.
Om het instelbereik van de Surroundluidspreker terug
te stellen, herhaalt u deze procedure tot de aanduiding
“GAIN LOW” in het uitleesvenster verschijnt.
U kunt alle geluidsvelden terugstellen
• Zet de tuner/versterker af.
• Hou SOUND FIELD ON/OFF ingedrukt en
vervolgens op ?/1 (aan/uit). “SF CLR” verschijnt in
het uitleesvenster.
Alle geluidsveldinstellingen worden gewist en afgezet.
(wordt vervolgd)
19
NL
Page 74

Gebruik van de akoestiekfunkties
Instellen van de vertragingstijd (alleen vor
het PRO LOGIC klankbleed)
Het akoestiek-geluid kan effektiever gemaakt worden
door het geluid dat via de Surroundluidspreker klinkt
te vertragen (vertragingstijd). U heeft de keuze uit drie
verschillende vertragingstijden, S (15 mS), M (20 mS)
en L (30 mS). Bijvoorbeeld voor een ruime kamer of
wanneer de Surroundluidspreker ver van de
luisterpositie vandaan staan opgesteld, maakt u de
vertragingstijd korter.
1 Start de weergave van een videobron die met
Dolby Surround akoestiek is opgenomen.
2 Druk op SURR.
De oorspronkelijke of laatst gekozen
vertragingstijd wordt aangegeven.
3 Druk op MENU +/– om het gewenste niveau te
kiezen, bijvoorbeeld “DELAY S”, “DELAY M” or
“DELAY L”.
Instelbare parameters voor elke akoestiek-instelling bij het kiezen van een programmabron
Klankbeelden-weergave
Uitgeschakeld
Ingeschaked
Type
––
CINEMA
VIRTUAL
MUSIC
MODE
––
PRO LOGIC
C STUDIO
DOLBY V
HALL
Parameters
DELAY EFFECT
rr
SURROUND
rra)r
rr
rr r
CENTER SUB WOOFER
a)
r
r
b)
b)
r
r
Testtoon-weergave
Geen geluid
Afhankelijk van de
middenkanaal-aanpassing (zie
blz. 18)
Geen geluid
Beurtelings via de voor-en
Surroundluidspreker
Instelbare parameters voor elk klankbeeld bij gebruik van DVD/MULTI CH
Klankbeelden-weergave
Uitgeschakeld
Ingeschaked
Type
––
CINEMA
VIRTUAL
MODE
––
C STUDIO
V SURR
DELAY EFFECT
rrr r
rrr
Parameters
SURROUND
CENTER SUB WOOFER
rr r
Testtoon-weergave
In onderstaande volgorde:
linksvoor, midden, rechtsvoor,
rechts Surroundluidspreker,
links Surroundluidspreker
In onderstaande volgorde:
linksvoor, midden, rechtsvoor
20
a) Alleen instelbaar wanneer de middenkanaal-aanpassing is
ingesteld op PHANTOM, NORMAL of WIDE (zie blz.18).
b) Alleen instelbaar wanneer de middenkanaal-aanpassing is
ingesteld op 3 STEREO, NORMAL of WIDE (zie blz.18).
NL
Opmerking
Om de geluidssterkte van de diverse luidsprekers af te
stellen met behulp van de testtoon, zoals beschreven op
blz.19, kiest u het PRO LOGIC klankbeeld. Bij alle andere
klankbeelden dient de testtoon alleen om te controleren of de
diverse luidspekers al dan niet geluid weergeven.
Page 75

Aanvullende informatie
Verhelpen van storingen
Als u een van de volgende problemen ondervindt bij
de bediening van de tuner, kunt u deze lijst van
kontrolepunten doorlopen om aan de hand hiervan het
probleem te verhelpen. Mocht het probleem
onopgelost blijven, neemt u dan a.u.b. kontakt op met
uw dichtstbijzijnde Sony handelaar.
Er klinkt geen geluid of de geluidssterkte blijft te gering.
, Kontroleer of de luidsprekers en audio/
videocomponenten goed zijn aangesloten.
, Kontroleer of op de tuner/versterker het
juiste apparaat is gekozen.
, Druk op MUTING wanneer MUTING
verschijnt in het uitleesvenster.
, Er is kortsluiting opgetreden, waardoor het
beveiligingscircuit is ingeschakeld (de
aanduiding “PROTECT” knippert). Schakel
de tuner uit, los het probleem dat kortsluiting
veroorzaakt op en schakel het apparaat dan
weer in.
Geluid van links en rechts is verwisseld.
, Kontroleer of de luidsprekers en audio/
video-componenten goed zijn aangesloten.
, Bijregelen van de balans (zie blz. 10)
Er klinkt een hinderlijke bromtoon of andere storende
achtergrondgeluiden.
, Kontroleer of de luidsprekers en audio/
video-componenten goed zijn aangesloten.
, Houd de aansluitsnoeren uit de buurt van een
transformator of motor en tenminste 3 meter
van een TV-toestel of TL-verlichting.
, Plaats de geluidsinstallatie niet te dicht in de
buurt van een ingeschakelde TV.
, Sluit een aardingsdraad aan op de de
antenne-aardaansluiting.
, De stekkers en aansluitbussen zijn vuil.
Reinig de stekkers en aansluitbussen met een
doekje, licht bevochtigd met wat alkohol.
De RDS werkt niet.
, Kontroleer of wel op een FM zender is
afgestemd.
, Stem af op een beter doorkomende FM zender.
De gewenste aanduidingen of informatie verschijnen niet
in het uitleesvenster.
, Neem kontakt op met de radiozender en
informeer of deze wel of geen RDS signalen
uitzendt. Het kan voorkomen dat de RDS
dienstverlening tijdelijk buiten werking is.
Aanvullende informatie
De zendernaam verschijnt niet in het uitleesvenster.
, Druk op de DISPLAY toets tot de
zendernaam verschijnt.
Afstemmen op bepaalde zenders lukt niet.
, Kontroleer of de antennes goed zijn
aangesloten. Verstel zonodig de stand van de
antennes en sluit een buitenantenne aan.
, Mogelijk is de signaalsterkte te gering om
door de antenne van de tuner opgepikt te
worden (bij gebruik van de automatische
afstemming). Gebruik de direkte afstemming.
, Er zijn geen zenders in het afstemgeheugen
vastgelegd, of de vooringestelde zenders zijn
gewist (bij geheugen-afstemming). Leg de
zenders in het geheugen vast (zie blz. 13).
Uit de surroundluidsprekers klinkt geen geluid of de
geluidssterkte blijft te gering.
, Kies de CENTER MODE instelling die past bij
uw luidspreker-opstelling (zie blz. 18).
, Stel de geluidssterkte van de luidsprekers op
het juiste niveau af (zie blz. 19).
, Let op dat de akoestiekfunktie is
ingeschakeld.
Er komt geen geluid uit de middenluidspreker.
, Kies de CENTER MODE instelling die past bij
uw luidspreker-opstelling (zie blz. 18).
, Stel de geluidssterkte van de luidsprekers op
het juiste niveau af (zie blz. 19).
Het geluid wordt niet met akoestiek-effekt
weergegeven.
, Kontroleer of de akoestiekfunktie wel is
ingeschakeld.
Opnemen is niet mogelijk.
, Controleer of de apparatuur correct is
aangesloten.
, U kunt geen geluid opnemen van een
programmabron die is aangesloten op de
DVD/MULTI CH aansluitingen.
De afstandsbediening werkt niet.
, Richt de afstandsbediening recht op de
afstandsbedieningssensor g van de tuner/
versterker.
, Er bevindt zich een obstakel tussen het
apparaat en de kop van de afstandsbediening.
, Vervang beide batterijen in de
afstandsbediening door nieuwe.
, Kontroleer of u de juiste funktie voor
bediening van het gewenste apparaat op de
afstandsbediening heeft gekozen.
21
NL
Page 76

Aanvullende informatie
T echnische gegevens
Versterker-gedeelte
Nominaal
uitgangsvermogen in
Stereo Mode
Referentieuitgangsvermogen
Frekwentiekarakteristiek
Ingangen
CD,
DVD/
MULTI CH,
MD/TAPE,
TV/SAT,
VIDEO
(DIN, bij 1 kHz, 4 ohm)
50 W + 50 W
(DIN, bij 1 kHz, 4 ohm)
Voorluidsprekers:
50 W/ch
Middenluidspreker:
50 W
Surroundluidspreker:
50 W/ch
TV/SAT, CD, MD/TAPE,
VIDEO , DVD/MULTI CH:
10 Hz - 50 kHz dB
Gevoeligheid
150 mV
Impedantie
kOhm
ruisverhouding
50
+0,5
–2
Signaal/
85 dB
Uitgangen
Demping
TONE
MD/TAPE OUT:
Uitgangsspanning:
150 mV
Uitgangsimpedantie:
10 kOhm
VIDEO AUDIO OUT:
Uitgangsspanning:
150 mV
Uitgangsimpedantie:
10 kOhm
SUB WOOFER:
Uitgangsspanning: 2 V
Uitgangsimpedantie:
1 kOhm
PHONES: Voor het
aansluiten van hoogen laagohmige
hoofdtelefoons
Volledige geluiddemping
±6 dB bij 100 Hz en
10 kHz
Tuner-gedeelte
FM Stereo, FM/AM superheterodyne
afstemming
FM tuner-gedeelte
Afstembereik
Antenneaansluitingen
Tussenfrequentie
87,5 - 108,0 MHz
75 ohm, asymmetrisch
10,7 MHz
AM tuner-gedeelte
Afstembereik
Antenne
Tussenfrequentie
Bruikbare
gevoeligheid
Signaal/
ruisverhouding
Harmonische
vervorming
Selektiviteit
531 - 1602 kHz
Kaderantenne
450 kHz
50 dB/m (bij 999 kHz)
54 dB (bij 50 mV/m)
0,5% (50 mV/m,
35 dB
Algemeen
Afstemsysteem
Voeding
Stroomverbruik
Tuner-gedeelte: PLL
Voorversterker-gedeelte:
Eindversterker-gedeelte:
230 V wisselstroom,
160 W
Wachtstand: 0,5 W
400 kHz)
kwartsgekoppeld
digitaal
synthesizersysteem
Lage-ruis NF type
equalizer-versterker
Zuiver
komplementaire SEPP
50/60 Hz
Gevoeligheid
Bruikbare
gevoeligheid
Signaal/
ruisverhouding
Harmonische
vervorming bij
1 kHz
Scheiding
Frekwentiebereik
Selektiviteit
Mono: 18,3 dBf,
2,2 µV/75 ohm
Stereo: 38,3 dBf,
22,5 µV/75 ohm
11,2 dBf,
1 µV/75 ohm (IHF)
Mono: 76 dB
Stereo: 70 dB
Mono: 0,3 %
Stereo: 0,5 %
45 dB bij 1 kHz
30 Hz - 15 kHz dB
60 dB bij 400 kHz
+0,5
–2
Afmetingen
Gewicht
Bijgeleverd
toebehoren
De vermelde technische gegevens zijn
gemeten bij 230 V AC, 50 Hz.
Wijzigingen zonder kennisgeving in
ontwerp en technische gegevens
voorbehouden.
Ca. 430 x 145 x 298 mm
5,6 kg
zie blz. 4
22
NL
Page 77

Aanvullende informatie
Verklarende
woordenlijst
CENTER MODE
Instelling voor luidspreker-opstelling om het
Dolby Pro Logic Surround geluid optimaal tot
zijn recht te laten komen. Voor een zo fraai
mogelijke akoestiek, kiest u één van de
volgende vier CENTER MODE instellingen,
afhankelijk van de opstelling van uw
luidsprekers.
• NORMAL instelling
Kies de NORMAL instelling als u beschikt
over voor- en surroundluidspreker en een
kleine middenluidspreker. Aangezien een
kleine middenluidspreker onvoldoende
basgeluid kan produceren, wordt het
basgeluid van het middenkanaal via de
voorluidsprekers weergegeven.
Voorluidspreker
Surroundluidspreker
• WIDE instelling
Kies de WIDE instelling als u beschikt over
voor- en surroundluidspreker en een grote
middenluidspreker. Met de WIDE
instelling kunt u het Dolby Surround
geluid optimaal benutten.
Voorluidspreker
Surroundluidspreker
• PHANTOM instelling
Kies de PHANTOM instelling als u
beschikt over voor- en
surroundluidspreker, maar niet over een
middenluidspreker. Het geluid van het
middenkanaal wordt via de
voorluidsprekers weergegeven.
Voorluidspreker
Surroundluidspreker
Middenluidspreker
(L)
(L)
Middenluidspreker
(L)
(L)
(L)
(L)
Voorluidspreker
(R)
Surroundluidspreker
(R)
Voorluidspreker
(R)
Surroundluidspreker
(R)
Voorluidspreker
(R)
Surroundluidspreker
(R)
• 3 STEREO instelling
Kies de 3 STEREO instelling als u beschikt
over voor- en middenluidsprekers, maar
niet over surroundluidspreker. Het geluid
van het surroundkanaal wordt via de
voorluidsprekers weergegeven, zodat u
enige mate van akoestiek kunt verkrijgen
zonder surroundluidspreker te gebruiken.
Voorluidspreker
Middenluidspreker
(L)
Voorluidspreker
(R)
Vertragingstijd
De vertragingstijd is het tijdsverschil tussen de
akoestiek-weergave van de voorluidsprekers en
die van de surroundluidspreker. Door de
vertragingstijd van de surroundluidspreker in
te stellen, kunt u de sfeer van verschillende
luisterruimtes nabootsen. Als u uw
surroundluidspreker in een kleine kamer of
dicht in de buurt van uw luisterpositie heeft
opgesteld, maakt u de vertragingstijd langer.
Voor een ruime kamer of wanneer de
surroundluidspreker ver van de luisterpositie
vandaan staan opgesteld, maakt u de
vertragingstijd korter.
Direkte afstemming
Deze afstemmethode stelt u in staat de
afstemfrekwentie van een zender direkt in te
voeren met behulp van de nummertoetsen
van de afstandsbediening. Gebruik deze
wijze van afstemming als u de frekwentie van
de gewenste zender weet.
Dolby Pro Logic Surround
Een van de decodeersystemen voor Dolby
Surround geluid, waarmee een twee-kanaals
geluidsspoor wordt omgezet in vier
gescheiden kanalen. Vergeleken met het
eerdere Dolby Surround systeem, zorgt de
Dolby Pro Logic Surround voor een meer
natuurlijk klankbeeld met vloeiender
verlopende bewegingen en precieser
gelokaliseerd geluid. Om de voordelen van
Dolby Pro Logic Surround optimaal te horen,
heeft u een paar surroundluidspreker en een
middenluidspreker noding. De
surroundluidspreker gaven het geluid in
mono weer.
DVD/MULTI CH
Deze aansluitingen dienen om
meerkanaalsaudiosignalen in te voeren, zodat
u kunt genieten van 5.1-kanaals surround
sound. Gebruik deze aansluitingen voor het
aansluiten van een Dolby Digital decoder,
een DVD-speler met ingebouwde Dolby
Digital decoder of een TV-satellietontvanger.
Vooringestelde radiozenders
Dit zijn zenders die onder een letter-pluscijfer code in het afstemgeheugen van de
tuner zijn vastgelegd. Wanneer een zender
eenmaal is vooringesteld worden tijdrovende
bedieningshandelingen voor afstemming
overbodig. U kunt snel op de vooringestelde
zender afstemmen door eenvoudigweg de
toegewezen code in te voeren.
Akoestisch rondom-geluid
Dit geluid bestaat uit drie
geluidscomponenten: rechtstreeks geluid,
vroeg weerkaatst geluid en een nagalm. De
akoestiek van de ruimte waarin u zich
bevindt, beïnvloedt de wijze waarop deze
drie geluidscomponenten te horen zijn. De
tuner/versterker kombineert deze
geluidscomponenten op een dusdanige
manier dat diverse luisteromgevingen, zoals
bijvoorbeeld een concertzaal, kunnen worden
nagebootst.
• Zaal-geluidscomponenten
Vroege weerkaatsingen
Rechtstreeks
geluid
Nagalm
• Overgang van het geluid van de
surroundluidspreker
Rechtstreeks geluid
Niveau
Vroege weerkaatsingstijd
Vroege
weerkaatsingen
Nagalm
Tijd
Testtoon
Het geluidssignaal dat de tuner te horen geeft
aan de hand waarvan u de geluidssterkte van
de luidsprekers kunt afstellen. De testtoon is
als volgt via elk van de luidsprekers te horen:
• Bij een geluidsinstallatie met een
middenluidspreker (NORMAL/WIDE/
3 STEREO instellingen)
De testtoon wordt achtereenvolgens
weergegeven via de linker
voorluidspreker, de middenluidspreker,
de rechter voorluidspreker en de
surroundluidspreker.
Voor (L)
NORMAL/WIDE
Midden
3 STEREO
Surround-
luidspreker
Voor (R)
(L, R)
• Bij een geluidsinstallatie zonder
middenluidspreker (PHANTOM
instelling)
De testtoon wordt afwisselend via de vooren surroundluidsprekers weergegeven.
Voor (L, R)
PHANTOM
Surround-
luidspreker
(L, R)
23
NL
Page 78

Index
A
Aansluiten: Zie Aansluitingen
Aansluiten van audio-
apparatuur 5
Aansluitingen
antennes 5
audio-apparatuur 5
luidsprekers 7
netsnoer 8
overzicht 4
video-apparatuur 6
Achterpaneel 5–8, 25
Afstandsbedieningstoetsen 10,
16, 26
Afstemming: Zie Radio-
ontvangst
Akoestiek 18, 23
Antenne-aansluitingen 5
Auto-betical voorinstelling 9
Automatische afstemming 12
B
Beknopt bedieningsoverzicht
28
C
CENTER MODE instelling
18, 23
NORMAL instelling 19, 23
PHANTOM instelling
19, 23
3 STEREO instelling 19, 23
WIDE instelling 19, 23
D
Direkte afstemming 12, 23
Dolby Pro Logic
Surround 18, 23
CENTER MODE instelling
19, 23
Doorlopen van
radiozenders 13
vooringestelde zenders 13
E, F
Effectniveau 18
G, H
Geheugen-afstemming 13
I, J
Instellen
effectniveau 18
geluidsniveau 10
luidspreker-geluidssterkte 19
vertragingstijd 20
K
Kiezen van een weergavebron
10
met de afstandsbediening
10
Kijken/luisteren naar
videoprogramma’s 10
Kopiëren: Zie Opnemen
L
Letters/cijfers 13
Luidsprekers
aansluiting 7
opstelling 7
M
Monteren van opnamen: Zie
Opnemen
N
Naamgeving van
vooringestelde zenders 13
NORMAL instelling 19, 23
O
Opnemen
op audiocassette 16
P, Q
PHANTOM instelling 19, 23
PTY 14
R, S
Radio-ontvangst
direkte afstemming 12
vooringestelde radiozenders
13
RDS 14
Sleep Timer 16
T
Testtoon 19
3 STEREO instelling 19, 23
U
Uitleesvenster 14
Uitpakken 4
V
Vastleggen van radiozenders:
Zie voorinstellen van
radiozenders
Verhelpen van storingen 21
Vertragingstijd 20, 23
Video-apparatuur aansluiten 6
Vooringestelde zenders 23
Voorinstellen van
radiozenders 13
W, X, Y, Z
WIDE instelling 19, 23
24
NL
Page 79

Beschrijving van het achterpaneel
1
qa
1 Antenne-aansluitingen
[ANTENNA (FM/AM)]
2 DVD/MULTI CH
3 CD-speler aansluiting (CD)
4 Minidisc-recorder/cassettedeck
aansluiting (MD/TAPE)
5 TV/satellietontvanger
aansluiting (TV/SAT)
2
3
456 7
6 Videorecorder-aansluiting
(VIDEO)
7 SUB WOOFER
8 Aansluiting voor akoestiek-
Surroundluidspreker
(SPEAKERS SURROUND)
8
9 q;
9 Aansluiting voor akoestiek-
middenluidspreker (SPEAKERS
CENTER)
q; Voorluidspreker-aansluitingen
(SPEAKERS FRONT)
qa Netsnoer
25
NL
Page 80

Beschrijving van de afstandsbediening
De systeemcomponenten kunnen worden bediend met de afstandsbediening. Hieronder vindt u een overzicht van
de toetsen die niet op de vorige pagina’s beschreven staan en toetsen met andere namen dan die op het hoofdtoestel.
Toets
AV
?/1
0-9
>10
ENTER
-/- -
./>
m/M
n
Voor
bediening van
TV/VCR/
CD-speler/
DVD-speler/
minidisc-recorder/
VCD-speler/
laserdisc-speler/
DAT deck
Tuner/versterker
CD-speler/
minidisc-recorder/
VCD-speler/
laserdisc-speler/
DAT deck
TV/videorecorder/
SAT
CD-speler/
cassettedeck/
minidisc-recorder/
VCD-speler/
laserdisc-speler
TV/
videorecorder/
SAT/cassettedeck/
laserdisc-speler/
VCD-speler/
minidisc-recorder/
DAT deck
TV
CD-speler/minidiscrecorder/DVDspeler/laserdiscspeler/VCD-speler/
cassettedeck/
videorecorder/
DAT deck
CD-speler/
DVD-speler/
VCD-speler
cassettedeck/
minidisc-recorder/
videorecorder/
laserdisc-speler/
DAT deck
Cassettedeck
Funktie
In/uitschakelen van de
stroom.
Gebruik de “SHIFT” toets
om het
voorinstelzendernummer
te kiezen tijdens DIRECT
TUNING of MEMORY
mode.
Kiezen van muziekstuknummers. Met 0 kiest u
muziekstuknummer 10.
Kiezen van
kanaalnummers.
Kiezen van muziekstuknummers boven de 10.
Druk hierop om de
waarde in te voeren na het
kiezen van een kanaal, disc
of muziekstuk.
Om met de
nummertoetsen
kanaalnummers te kunnen
kiezen, bestaande uit één
of twee cijfers.
Overslaan van
muziekstukken.
Zoeken van
muziekstukken
(voorwaarts of
terugwaarts).
Vooruitspoelen of
terugspoelen.
Starten van de weergave
van de achterkant van de
cassette.
Toets
Voor
Funktie
bediening van
N
X
x
POSITION*
SWAP*
DISC
SUB CH
+/–*
D.SKIP/CH/
PRESET
P IN P*
JUMP
WIDE
ANT TV/
VTR
TV/
VIDEO
* Uitsluitend voor Sony TV’s voorzien van de beeld-in-beeld
funktie.
CD-speler/
cassettedeck/
minidisc-recorder/
videorecorder/
DVD-speler/VCDspeler/laserdiscspeler/DAT deck
CD-speler/
cassettedeck/
minidisc-recorder/
videorecorder/
DVD-speler/VCDspeler/laserdiscspeler/DAT deck
CD-speler/
cassettedeck/
minidisc-recorder/
videorecorder/
DVD speler/VCDspeler/laserdiscspeler/DAT deck
TV
TV
CD-speler
TV
Tuner/versterker
+/–
TV/VCR/SAT
CD-speler
TV
TV
TV
Videorecorder
TV/videorecorder
Starten van de weergave.
Tijdelijk onderbreken van
de weergave of opname.
(Ook voor het starten van
de opname van
apparatuur die in de
opname-pauzestand staat.)
Stoppen van de weergave.
Veranderen van de plaats
van het inzetbeeld.
Verwisselen van het
inzetbeeld en het gewone
beeld.
Discs kiezen. (Enkel Mega
Storage-CD-speler.)
Om voorinstelkanalen
voor het kleine beeld te
kiezen.
Doorlopen en kiezen van
vooringestelde zenders.
Kiezen van kanalen.
Overslaan van compact
discs (alleen voor een CDspeler met een multi-disc
wisselaar).
In werking stellen van de
beeld-in-beeld funktie.
Schakelt om tussen vorige
en huidige kanalen.
Kiest de breedbeeldstand.
Kiezen van het
uitgangssignaal van de
antenne-aansluiting: TVsignaal of
videoprogramma.
Kiezen van het
ingangssignaal: TV-signaal
of videoprogramma.
26
NL
Page 81

Beschrijving van de afstandsbediening
Toets
Voor
Funktie
bediening van
MENU </> Tuner/versterker Om een menu item te kiezen.
MENU +/– Tuner/versterker Om instellingen te verrichten of
MENU DVD speler Om het DVD menu te tonen.
F/f/G/g DVD speler Om een menu item te kiezen.
ENTER DVD speler Om de selectie in te voeren.
RETURN DVD speler Om terug te keren naar het
TITLE DVD speler Om de DVD titel te tonen.
te wijzigen.
vorige menu of het menu te
verlaten.
Opmerkingen
• Bepaalde Sony apparatuur is niet geschikt voor deze
afstandsbediening en zal niet reageren op de
bovengenoemde bedieningstoetsen.
• Sommige functies die in dit hoofdstuk uitgelegd staan
werken niet met bepaalde receivermodellen.
• De bovenstaande uitleg is louter bedoeld als voorbeeld.
Sommige componenten werken dan ook niet of worden
anders bediend dan hierboven beschreven.
• Bij de instelling zijn de functies VIDEO 1, VIDEO 2,
VIDEO 3, PHONO, AUX, A.F.D. en MULTI CH/
2CH DIRECT niet beschikbaar.
27
NL
Page 82

Beknopt bedieningsoverzicht
Radio-ontvangst
(direkte afstemming)
Voorbeeld:Afstemmen op
FM 102,50 MHz
TUNER
FM/AM
Stel in op FM.
D. TUNING
02501
(van de afstandsbediening)
Uitleesvenster
(van de
afstandsbediening)
MHz
Voorinstellen van
radiozenders
Voorbeeld:Voorinstellen van
een zender onder
code A7
TUNER
Stem af op de gewenste zender.
MEMORY
SHIFT
Kies A.
PRESET/
–
PTY SELECT
MEMORY
+
Kies A7.
Kiezen van audio/
video-apparatuur
Voorbeeld 1: Afspelen van een
compact disc
CD
Schakel de CD-speler in.
Start de weergave.
Voorbeeld 2: Bekijken van een
videocassette
VIDEO
Schakel de videorecorder in.
Start de weergave.
Doorlopen van
radiozenders
(automatische afstemming)
Voorbeeld:Doorlopen van
FM zenders
TUNER
FM/AM
Stel in op FM.
–
–
TUNING
TUNING
+
Om verder te
zoeken.
+
Afstemmen op
vooringestelde
zenders
Voorbeeld: Afstemmen op de
zender vastgelegd
onder A7
TUNER
SHIFT
Kies A.
(van de
7
afstandsbediening)
Doorlopen van
vooringestelde
zenders
TUNER
Gebruik van
voorgeprogr ammeerde
akoestiekinstellingen
Voorbeeld: Bekijken van een
videocassette van
een met Dolby
Surround akoestiek
opgenomen film
VIDEO
SOUND FIELD
ON/
OFF
SOUND FIELD
–
MODE
Zet de videorecorder aan.
+
MODE
Stel in op
PRO LOGIC.
28
Start de weergave.
PRESET/
–
PTY SELECT
NL
+
Page 83

Förberedelser
VARNING!
Utsätt inte receivern för
regn och fukt för att undvika
riskerna för brand och/eller
elektriska stötar.
Öppna inte höljet. Det kan resultera i
risk för elektriska stötar. Överlåt allt
reparations- och underhållsarbete till
fackkunniga tekniker.
Placera enheten på en plats med god
ventilation. Placera den inte i bokhyllan
eller i ett skåp.
Kasta inte batterier
tillsammans med
vanliga sopor. Se till att
de omhändertas som
miljöfarligt avfall.
Att observera
Angående säkerhet
• Dra ut stickkontakten ur nätuttaget,
om du skulle råka tappa ett föremål
eller spilla vätska i mottagaren. Låt en
fackkunnig reparatör besiktiga
mottagaren innan den tas i bruk igen.
• Se upp så att inte ventilationshålen
blockeras av tidningar, bordsdukar,
gardiner eller liknande. Om inte
ventilationen fungerar
tillfredsställande finns risk för brand.
Ställ inte heller tända ljus på
mottagaren.
• Placera inte blomvaser ovanpå
enheten eftersom de utgör en
potentiell risk för brand eller
elskador.
Angående strömförsörjning
• Kontrollera innan mottagaren tas i
bruk att märkspänningen stämmer
överens med lokal nätspänning.
Märkspänningen anges på
namnplåten på baksidan.
• Nätströmtillförseln kopplas inte ur så
länge stickkontakten sitter i ett
nätuttag, inte ens när strömmen till
mottagaren slås av.
• Dra ut stickkontakten ur nätuttaget,
när mottagaren inte ska användas
under en längre tidsperiod. Dra i
stickkontakten, aldrig i själva kabeln,
för att koppla ur nätkabeln.
• Nätkabeln får endast bytas ut av en
verkstad som Sonys representant
godkänt.
• Strömbrytaren finns på framsidan.
Angående anslutningarna
• Allra första steget före anslutningar:
slå av strömmen och koppla ur
nätkabeln från nätuttaget.
Angående rengöring
• Torka mottagaren och reglagen med
en mjuk trasa, som fuktats i mild
diskmedelslösning. Använd varken
slipande rengöringsmedel eller starka
rengöringsvätskor, som t. ex.
spritlösningar och bensin.
Rådfråga affären där mottagaren
köptes, eller Sonys representant, när
du råkar ut för svårigheter, eller vill
ställa frågor som inte besvaras i
denna bruksanvisning.
Angående placering
• Placera mottagaren på en plats med
tillräcklig ventilation för att undvika
överhettning och för att förlänga
mottagarens livslängd.
• Placera inte mottagaren på en plats,
där den utsätts för värme, solsken,
damm och/eller mekaniska stötar.
• Placera ingenting ovanpå mottagaren.
Det kan blockera
ventilationsöppningarna, vilket
resulterar i fel.
• Mottagaren blir varm under drift; det
är inget fel. Om du använder
mottagaren under en längre tid på
hög volym kan temperaturen på
ovansidan, sidorna och undersidan
stiga drastiskt. Se upp så att du inte
bränner dig på chassit.
SE
2
Page 84

Förberedelser
Angående denna
bruksanvisning
Instruktionerna i den här
handledningen gäller modell STRDE375. Se efter vilken modell du har
genom att kontrollera numret, som står
längst nere till vänster på enhetens
framsida.
Praktisk vägledning
• Anvisningarna i denna
bruksanvisning beskriver
tillvägagångssättet när reglagen på
mottagaren används. Knapparna,
som har liknande namn och de som
märkts på samma sätt som reglagen
på mottagaren, på medföljande
fjärrkontroll kan också användas för
att fjärrstyra mottagaren.
• En Snabbguide finns på sid. 28.
• På sidan 26, under “Beskrivning på
knapparna på fjärrkontrollen“, finns
en översikt över fjärrknapparna.
• Följande vägledning används i denna
bruksanvisning:
anger att fjärrkontrollen i detta fall
kan användas för mottagarens
fjärrstyrning.
anger råd och fingervisningar som
underlättar tillvägagångssättet.
INNEHÅLL
Förberedelser
Uppackning 4
Översikt över anslutningarna 4
Anslutning av antenner 5
Anslutningarna till ljudkällor 5
Anslutningarna till videokällor 6
Högtalaranslutningarna 7
Nätanslutning 8
Innan mottagaren tas i bruk 9
Automatisk lagring av FM-stationer i alfabetisk följd i minnet
(AUTOBETICAL SELECT) 9
Tillvägagångssättet
Val av önskad källa 10
Radiomottagning 12
Lagring av stationer i ett stationsförval 13
Hur datastyrd utsändning i radio RDS (Radio Data System)
tillämpas 14
Inspelning 16
Använda insomningstimern 16
Ljudåtergivning med simulerad akustik
Val av önskat ljudfält 17
Optimal ljudkvalitet vid ljudåtergivning med Dolbys akustik 18
GB
FR
NL
SE
Den här mottagaren är utrustad med
avkodarkretsar för Dolby Pro Logic
Surround.
Tillverkas under licens av Dolby
Laboratories.
DOLBY, PRO LOGIC och dubbel Dkännetecknet ; är Dolby Laboratories
varumärken.
Övright
Felsökning 21
Tekniska data 22
Ordlista 23
Alfabetiskt register 24
Beskrivning på baksida 25
Beskrivning på knapparna på fjärrkontrollen 26
Snabbguide 28
SE
3
Page 85

Förberedelser
Förberedelser
Uppackning
Kontrollera att de följande tillbehören levererats med
denna mottagare:
• FM-trådantenn (1)
• AM-ramantenn (1)
• fjärrkontroll (1)
• batterier R6 (storlek AA) (2)
Batteriernas isättning i fjärrkontrollen
Sätt två R6-batterier (storlek AA) i batterifacket med
polerna + och – vända åt korrekt håll enligt
märkningarna i batterifacket. Rikta fjärrkontrollen mot
fjärrstyrningsgivaren
på mottagaren.
g
]
}
]
}
Översikt över anslutningarna
De följande ljud/videokällorna kan anslutas till denna
mottagare för deras styrning via mottagaren. Följ
anvisningarna på de angivna sidorna för att ansluta de
önskade källorna till mottagaren. Vi hänvisar till
rubriken “Beskrivning av baksida” av sid. 25 angående
de olika in/utgångarna på mottagaren.
DVD-spelare/
Dolby Digitaldekoder
Anslutning av
antenner (5)
AM/FM-antenn
Främre
högtalare
(höger)
Högtalaranslutningarna
(7)
Främre
högtalare
(vänster)
Anslutningarna till
videokällor (6)
Tv-kanalväljare
SAT
(Satellitmottagare)
Video
När ska batterierna bytas ut?
Vid normalt bruk beräknas batteriernas livslängd till ca.
sex månader. Byt ut batterierna mot nya batterier när
fjärrkontrollen inte längre kan användas för
mottagarens fjärrstyrning.
OBS!
• Lämna inte fjärrkontrollen liggande på en plats, där den
utsätts för värme eller fukt.
• Byt aldrig ut endast ett batteri. De båda batterierna måste
bytas ut på en och samma gång.
• Utsätt inte fjärrstyrningsgivaren för solsken eller lampljus.
Det kan resultera i fel vid fjärrstyrning.
• Ta ur batterierna, när fjärrkontrollen inte ska användas
under en längre tidsperiod, för att undvika skador på
grund av batteriläckage och korrosion.
Surroundhögtalare
(L)
CD-spelare
MD-spelare/
kassettdäck
Anslutningarna till
ljudkällor (5)
Mellersta
högtalare
Bashögtalare
förstärkarsteg
Surroundhögtalare
(R)
med
Innan anslutningarna utförs
• Kontrollera innan anslutningarna utförs att
strömbrytarna på samtliga källor står i frånslagna
lägen.
• Anslut nätkabeln först efter att samtliga andra
anslutningar gjorts.
• Skjut in kontakterna så långt det går för att undvika
brum och störningar.
• Var noga med att ansluta ljud kablarna så att de
färgade kontakterna ansluts till de färgade in/
utgångarna på korrekt sätt: vit (vänster ljudkanal) till
vit och röd (höger ljudkanal) till röd.
SE
4
Page 86

Anslutning av antenner
Översikt
Detta kapitel beskriver anslutning av AM- och FMantenner till mottagaren. Utför först de följande
anslutningarna för att kunna lyssna på radio. Gå
därefter till de följande sidorna. Vi hänvisar till den
nedanstående illustrationen angående antennintagens
placering.
Förberedelser
När det uppstår störningar vid AM-mottagning
Anslut en 6 till 15 m lång, avskärmad kabel (tillval) till
antennintaget AM ANTENNA, utöver AMramantennen. Dra kabeln utomhus i horisontell riktning.
Anslutning av jordledning
Om du ansluter receivern till en utomhusantenn, skall
du jorda apparaten för att skydda den mot blixtnedslag
på det sätt som bilden i vänster kolumn visar. För att
förhindra en gasexplosion, skall du inte ansluta
jordledningen till en gasledning.
ANTENNA
Vilka antenner krävs det?
• FM-trådantenn
(medföljer) (1)
Anslutningarna
AM-ramantenn
• AM-ramantenn
Mottagare
ANTENNA
AM
(medföljer) (1)
Dra
trådantennen
rakt i horisontell
riktning efter
dess anslutning.
Det nästa steget?
Gå över till nästa kapitel för att ansluta önskade källor till
mottagaren. Gå över till kapitlet “Högtalaranslutningarna”
på sid. 7 när mottagaren endast ska användas för
radiomottagning.
Anslutningarna till ljudkällor
Översikt
Detta kapitel beskriver anslutning av ljudkällor till
mottagaren. Avsluta först anslutningarna enligt
nedanstående när mottagaren också ska användas som
en förstärkare. Vi hänvisar till nedanstående illustration
som visar var de olika anslutningarna är placerade.
MD/TAPE
CD
FM-trådantenn
FM
Ω
75
COAXIAL
När det uppstår störningar vid FM-mottagning
Använd en 75-ohms koaxialkabel (medföljer inte) för att
ansluta receivern till en FM utomhusantenn på det sätt
som visas här nedan.
Mottagare
ANTENNA
AM
Jordledning
(medföljer
inte)
Till jord
FM utomhusantenn
FM
Ω
75
COAXIAL
Vilka kablar krävs det?
Ljudkablar (tillval) (en var för anslutning av CD-spelare, två
var för anslutning av MD-spelare och kassettdäck).
Vit (V)
Röd (H)
Vit (V)
Röd (H)
(forts.)
SE
5
Page 87

Förberedelser
Anslutningarna
Pilen l anger signalflödet.
CD-spelare
Mottagare
IN
CD
L
R
CD-spelare
OUTPUT
LINE
L
R
MD-spelare eller kassettdäck
Mottagare
IN
OUT
MD/TAPE
MD-spelare eller kassettdäck
OUTPUT
INPUT
LINE
LINE
L
R
L
R
Det nästa steget?
Gå till nästa sektion för att ansluta videokomponenter som
gör att du kan få surroundljud när du tittar/lyssnar på ett
TV-program eller videoband.
Anslutningarna till videokällor
Anslutningarna
Pilen l anger signalflödet.
Du kan lyssna på ljudet från videon eller TV/SAT:n
genom att ansluta ljudsignalen från videon eller TV/
SAT:n till mottagaren.
TV/SAT
Mottagare
L
R
AUDIO IN
TV/SAT
Video
Mottagare Video
L
R
AUDIO IN
AUDIO OUT
VIDEO
Använd funktionsknapparna (TV/SAT, CD, MD/TAPE,
eller TUNER) för att välja VIDEO AUDIO OUT-signal.
Du kan spela in ljudsignalen genom att ansluta en
inspelningskomponent, t ex ett kassettdäck (till VIDEO
AUDIO OUT-uttaget).
TV-kanalväljare/
Satellitmottagare
L
R
AUDIO
OUTPUT
AUDIO
AUDIO
OUTPUT INPUT
L
R
Översikt
Detta kapitel beskriver anslutning av videokällor till
mottagaren. Vi hänvisar till nedanstående illustration
som visar var de olika anslutningarna är placerade.
TV/SAT
DVD/MULTI CH
Vilka kablar krävs det?
• Ljud/videokabel (medföljer ej) (1 för varje TV-tuner eller
Satellitmottagare; 2 för videospelaren)
Vit (V)
Röd (H)
VIDEO
Vit (V)
Röd (H)
DVD-spelare/Dolby Digital-dekoder
Vilka kablar krävs det?
• Audioledningar (medföljer inte) (En stycken för
uttagen DVD/MULTI CH FRONT och SURROUND)
Vit (V)
Röd (H)
Vit (V)
Röd (R)
• Monoaudioledningar (medföljer inte) (En stycken för
uttagen DVD/MULTI CH CENTER och SUB
WOOFER)
Svart
Svart
SE
6
Page 88

Förberedelser
Du kan spela upp avkodade Dolby Digital-ljudspår i
högtalarna som är anslutna till mottagare.
Om du har en DVD-spelare, eller en Dolby Digitaldekoder med 5.1 kanalers (5.1 CH) utgång, kan du
förstärka ett avkodat Dolby Digital-ljudspår med
följande anslutningar.
Mottagare
L
R
FRONT SURROUND
DVD/MULTI CH
CENTER
SUB
WOOFER
DVD-spelare
PRE OUT
SURROUND
CENTER
SUB
WOOFER
FRONT
OBS!
Om du har en DVD-spelare med 2 kanalers (2 CH) analog
utgång, ansluter du den till en annan funktionskontakt.
Det nästa steget?
Gå över till nästa kapitel för att kunna ansluta högtalarna.
Placera högtalarna enligt nedanstående illustration för
optimal ljudkvalitet vid ljudåtergivning med
simulerad akustik:
Surroundhögtalare
Från 60 till 90 cm
45°
Vilka kablar krävs det?
Högtalarkablar (tillval) (en per varje högtalare)
(+)(+)
(–)
(–)
Tvinna de blottade kabeländarna, ca. 15 mm långa. Anslut
högtalarkablarna på korrekt sätt: + till + och – till –. Om
anslutningarna kastas om, resulterar det i basförlust.
Anslutningarna
Högtalaranslutningarna
Översikt
Detta kapitel beskriver anslutning av högtalare till
mottagaren. Ett par (vänster och höger) främre
högtalare måste anslutas. Utöver detta är det möjligt
att ansluta en mellersta och ett par Surroundhögtalare
till mottagaren. Anslutning av mellersta och
Surroundhögtalare sörjer för förstklassig
ljudåtergivning med simulerad akustik.
Basåtergivningen förbättras efter anslutning av en
bashögtalare med inbyggt förstärkarsteg. Vi hänvisar
till nedanstående illustration angående
högtalaruttagens placering.
SPEAKERS SURROUND
SUB WOOFER
SPEAKERS FRONT
SPEAKERS CENTER
Främre högtalare
Främre högtalare
högtalare (höger)
Mottagare
SPEAKERS
FRONT
L
R
Surroundhögtalare och mellersta högtalare
Surroundhögtalare
högtalare
(höger)
Mottagare
SPEAKERS
SURROUNDLRCENTER
Mellersta
högtalare
Främre högtalare
högtalare (vänster)
Surroundhögtalare
högtalare
(vänster)
(forts.)
SE
7
Page 89

Förberedelser
–
Att undvika kortslutning av högtalarna
Kortslutning av högtalarna kan orsaka skador på
mottagaren. Följ noga anvisningarna nedan vid
anslutning av högtalarna för att förhindra detta.
Kontrollera att de blottade ändarna på
högtalarkablarna inte vidrör ett annat högtalaruttag
eller den blottade ändan på en annan högtalarkabel.
Exempel på problem med högtalarkabeln:
S
P
E
A
K
E
R
S
F
R
O
N
T
R
L
+
–
Blottad högtalarkabel vidrör ett annat högtalaruttag.
SPEAKERS
FRONT
R
L
+
Bashögtalare med inbyggt förstärkarsteg
Mottagare
AUDIO OUT
SUB
WOOFER
Lågbashögtalare
med inbyggt förstärkarsteg
INPUT
OBS!
Anslut inga andra källor.
Om TV-monitorn använder separata högtalare
Anslut en av högtalarna till SPEAKERS CENTERuttagen för användning med Dolby Logic Surround-ljud
(se sid 18).
Det nästa steget?
Gå till kapitlet “Nätanslutningar” på den här sidan för att
avsluta anslutningarna.
Nätanslutning
Blottade högtalarkablar vidrör varandra p.g.a. att alltför
mycket av isoleringen rivits av.
Efter anslutning av samtliga komponenter, högtalare
och nätkabel ska du använda en testton kontrollera att
alla högtalarna är anslutna på rätt sätt. Se “Justering av
högtalarvolym” på sidan 19 för mer information om
hur du använder testtonen.
När Surroundhögtalare har anslutits ska du trycka på
tangenten DVD/MULTI CH och stänga av ljudfältet på
mottagaren innan du använder testtonen, så att den
sänds separat från Surroundhögtalare vänster och
höger högtalare.
Om ingen testton kan höras från en högtalare, eller om
en testton hörs från en annan högtalare än den som
visas i högtalarens teckenfönster, kan det hända att
högtalaren blivit kortsluten. Kontrollera
högtalaransluitningarna på nytt om detta inträffar.
Anslutning av nätkabel
Anslut nätkablarna från denna mottagare och de
anslutna ljud/videokällorna till lämpliga nätuttag.
till ett nätuttag
,
Det nästa steget?
Gå över till nästa kapitel innan mottagaren tas i bruk för att
kontrollera att reglagen står i korrekta lägen.
SE
8
Page 90

Förberedelser
Innan mottagaren tas i bruk
Gör på följande sätt innan du börjar använda receivern
för första gången eller om du vill radera receiverns
minne.
?/1 (power)
DIMMER
1 Stäng av receivern.
2 Tryck på ?/1 (power) i mer än 4 sekunder.
“INITIAL” tänds på displayen och samtliga detaljer
inklusive följande återställs eller raderas:
• Samtliga snabbvalsstationer återställs till sina
fabriksinatällningar.
• Samtliga ljudfältsparametrar återställs till sina
fabriksinställningar.
• Alla namn (för snabbvalsstationer och
programkällor) raderas.
• Samtliga justeringar gjorda med SET UP-knappen
återställs till sina fabriksinställningar.
• Det ljudfält som har minneslagrats för varje
programkälla och snabbvalsstation raderas.
Slå på mottagaren och kontrollera följande indikator.
• Tryck på MUTING om MUTING visas i
teckenfönstret.
• Tryck på DIMMER för att ställa in belysningen i
teckenfönstret. Det finns fyra olika
belysningsnivåer.
MUTING
Automatisk lagring av FMstationer i alfabetisk följd i
minnet (AUTOBETICAL SELECT)
Tack vare stationsförvalsautomatiken AUTOBETICAL
SELECT är det möjligt att automatiskt lagra upp till 30
FM-stationer, bl. a. FM-stationerna som sänder
koderna för RDS-tjänster, i alfabetisk följd i ett
stationsförval. Utöver detta, lagras endast stationerna
med de högsta signalstyrkorna i detta slags
stationsförval. Vi hänvisar till “Lagring av stationer i
ett stationsförval” på sid. 13 angående manuell lagring
av FM- och/eller AM (MV)-stationer i ett
stationsförval.
FM-stationerna, som sänder koder för
programinformation, sorteras i alfabetisk ordning
enligt deras namn. De övriga FM-stationerna ordnas i
frekvensföljd (vi hänvisar till sid. 14 angående RDSmottagning).
1 Tryck på strömbrytaren ?/1 (power) för att slå av
mottagaren.
2 Håll MEMORY intryckt och tryck på
strömbrytaren ?/1 (power) för att slå på
mottagaren.
AUTOBETICAL SELECT visas i teckenfönstret.
Mottagaren börjar söka FM efter stationer och
lagrar alla FM-stationer, som kan tas emot i
området ifråga, också de som sänder koderna för
RDS-tjänster, i ett stationsförval.
FINISH visas i teckenfönstret efter att samtliga
FM-stationer, som påträffats, har lagrats i det
automatiska stationsförvalet.
Ändra en förinställd kod till en annan kanal
Se “Förinställa radiokanaler” på sidan 13.
Hur stationernas automatiska lagring i minnet avbryts
Tryck på strömbrytaren ?/1 (power) för att slå av
strömmen.
Under pågående, automatisk lagring av FM-stationer i
ett stationsförval tilldelas de stationer, som tidigare på
något annat sätt lagrats i stationsförvalet, nya, högre
förvalskoder (mot C0). Det kan då hända att vissa
stationer raderas ur minnet, beroende på det antal
stationer som lagras i det automatiska stationsförvalet.
OBS!
• Observera efter flyttning att stationerna, som kan tas emot
i det nya bostadsområdet, måste lagras i ett nytt,
automatiskt stationsförval.
• För information om hur du ställer in de förinställda
kanalerna, se sidan 13.
• När väl FINISH visas kommer alla de tidigare förinställda
minnena att raderas. Förinställ AM-kanalerna igen om det
är nödvändigt.
SE
9
Page 91

Tillvägagångssättet
Tillvägagångssättet
10
Val av önskad källa
Lämplig väljare för val av ljud/videokällor på
mottagaren eller fjärrkontrollen måste tryckas in för
ljud/bildåtergivning från önskad, ansluten källa.
Kontrollera först det följande:
• att samtliga anslutningar gjorts ordentligt på korrekt
sätt enligt anvisningarna på sid. 5 - 8.
?/1
(power)
MENU </>
LEVEL
Väljare för
ljud/video-källor
MASTER
VOLUME
Att
undertrycka ljudet
styra volymbalansen
styra bas- och
diskantåtergivningen
Följ nedanstående anvisningar
Press MUTING. Tryck en gång till
eller återställ ljudet genom att
vrida upp volymen.
1 Tryck på LEVEL eller MAIN
MENU på fjärrkontrollen flera
gånger tills indikatorn LEVEL
tänds.
2 Tryck på MENU < eller > flera
gånger tills “BALANCE” visas i
teckenfönstret.
3 Justera balansen åt höger eller
vänster genom att trycka på
MENU + eller –.
Tryck på BASS +/– och TREBLE
+/– för att justera nivån på tonen.
Du kan välja en nivå från –6 dB till
+6 dB i steg på 2 dB.
Ljudåtergivning via anslutna hörlurar
BASS
MENU
+/–
TREBLE
+/–
MUTING
+/–
1 Tryck på strömbrytaren ?/1 (power) för att slå på
mottagaren.
Anslut hörlurarna till PHONES-kontakten. Då hörs
ingenting från högtalarna.
Ljud/bildåtergivning från ansluten video
Vid tittande på tv- eller videoprogram rekommenderar
vi ljudåtergivning via mottagaren, istället för via tv:ns
2 Tryck på lämplig väljare för ljud/videokällor för
att välja önskad källa:
Ljud- eller bildåtergivning
Videoband
Tv-program eller
Satellitmottagare
DVD-spelare/Dolby Digital
decoder
MD-musik eller kassettband
CD-musik
Radioprogram
Tryck på
VIDEO
TV/SAT
DVD/MULTI CH
MD/TAPE
CD
TUNER
högtalare. Detta möjliggör ljudåtergivning till exempel
med Dolbys akustik Pro Logic samtidigt som
fjärrkontrollen kan användas för att fjärrstyra
ljudåtergivningen. Koppla ur ljudåtergivning via tv:ns
högtalare för att kunna njuta av ljudåtergivning med
Dolbys akustik via mottagaren.
Tv-mottagning/ljudåtergivning: slå på tv:n, tvkanalväljaren och mottagaren. Tryck på väljaren TV/SAT på
mottagaren.
Ljud/bildåtergivning från ansluten video: följ
nedanstående anvisningar:
1 Välj VCR genom att trycka på VIDEO.
3 lå på vald källa, t. ex. ansluten CD-spelare. Sätt
igång ljud/bildåtergivningen.
Vi hänvisar till kapitlet “Radiomottagning” på
sid. 12 angående stationsinställning.
4 Vrid på MASTER VOLUME för att höja volymen
till önskad nivå.
Varje gång du vrider på MASTER VOLUME
ändras visningen i teckenfönstret enligt följande:
VOL MIN y VOL 1 y … y VOL 30 y
VOL MAX
Ställa in volymen på TV:ns högtalare
Använd TV:ns volymkontroll.
Så här undviker du att skada högtalarna
Vrid ner volymen innan du stänger av mottagaren. När
du slår på den igen står volymen likadant som när du
SE
stängde av den.
2 Slå på tv:n och välj lämplig videoingång, till
vilken vald video anslutits.
3 Slå på videobandspelaren och starta
uppspelningen.
Fjärrstyrning med fjärrkontroll
Fjärrkontrollen kan användas för fjärrstyrning av
denna mottagare och de anslutna källor som tillverkats
av Sony.
?/1
Väljare för
ljud/videokällor
Page 92

Tillvägagångssättet
1 Tryck på en av funktionsknapparna för att välja
den komponent som du vill använda.
Funktionsknapparna på fjärrkontrollen är
fabriksinställda enligt följande.
Ljud-eller bildåtergivning
Radioprogram
CD-musik
MD-musik/kassettband
Tv-program eller
Satellitmottagare
Program på VHSvideoband (läget VTR-3)
DVD-spelare/Dolby Digitaldekoder med MULTI CH
OUTPUT
* Funktionerna VIDEO 1, VIDEO 2, VIDEO 3, PHONO
och MD/TAPE är 2-tangentusfunktioner. För att
välja någon av ovanstående funktioner trycker du på
FN SHIFT (funktionsbyte) och önskad
funktionstangent på samma gång.
Exempel: För att välja funktionen MD/TAPE trycker
du på FN SHIFT och CD/SACD.
Tryck på
TUNER
CD/SACD
MD/TAPE och FN SHIFT*
(INITIAL-MD MODE)
TV/SAT
(INITIAL-TV MODE)
VIDEO
DVD/LD
(INITIAL-DVD MODE)
Om du vill ändra knappens fabriksinställning se
följande stycke.
Såväl mottagaren som den valda källan slås på.
När strömmen inte slås på till vald källa
Tryck i så fall på strömbrytaren på vald källa.
2 Sätt igång ljud/bildåtergivningen.
Vi hänvisar till rubriken “Beskrivning av
knapparna på fjärrkontrollen” på sid. 26
angående detaljer.
Ändring av en viss källa som tilldelats
en viss väljare för ljud/videokällor
När de förvalda ljud/videokällor, som tilldelats
väljarna för ljud/videokällor FUNCTION, inte
matchar de existerande, anslutna källorna, är det
möjligt att ändra dem. Om du t.ex. har en MD-spelare
och ett kassettdäck, men ingen CD-spelare, kan du
göra så att du kan använda knappen CD/SACD för
kassettdäcket.
Tänk på att inställningarna för TUNER- och FN SHIFTfunktionerna (VIDEO 1, VIDEO 2, VIDEO 3, PHONO
och MD/TAPE) inte kan ändras.
1 Håll den väljare för ljud/video-källor, vars källa
ska ändras (som t. ex. CD/SACD), intryckt.
2 Tryck på den knapp som motsvarar den
komponent som du vill tilldela
funktionstangenten (som t.ex. 4 - Kassettdäck).
AV ?/1
?/1
Väljare för
ljud/video-
Direktväljare
> 10
.
källor
ENTER
MASTER VOL –
Du kan använda följande sifferknappar för att välja de
olika funktionerna:
För att styra
CD-spelare
DAT-däck
MD-spelare
Kassettdäck A
Kassettdäck B
Laserskivspelare
Video (fjärrstyrningsläge VTR 1*)
Video (fjärrstyrningsläge VTR 2*)
Video (fjärrstyrningsläge VTR 3*)
TV
DSS (Digital Satellite System)
DVD
VCD-spelare
* Valet av fjärrstyrningsläget VTR 1, 2 eller 3 måste göras
för att kunna fjärrstyra Sonys anslutna Beta-video, 8
mm:s video eller VHS-video.
Tryck på
1
2
3
4
5
6
7
8
9
0
> 10
ENTER
.
Nu kan du kontrollera kassettdäcket med
knappen CD/SACD.
Återställa en knapp till fabriksinställningen
Följ de ovanstående anvisningarna.
Återställa alla knapparna till fabriksinställningarna
Tryck samtidigt på ?/1, AV ?/1 och MASTER VOL –.
11
SE
Page 93

Tillvägagångssättet
Radiomottagning
På denna mottagare är det möjligt att direktvälja
önskad station genom att trycka på lämpliga
direktväljare på fjärrkontrollen (direktval av stationer).
Vi hänvisar till rubriken “Automatisk stationssökning”
(stationssökningsautomatik) när du inte känner till
frekvensen på önskad station.
Kontrollera det följande före stationsinställning:
• Har FM- och AM-antennerna anslutits till
mottagaren enligt anvisningarna på sid. 5.
Direktval av nästa station
Följ igen anvisningarna från och med punkt 3 till och med
punkt 5.
När indikatorn STEREO Inte tänds
Tryck på FM MODE under pågående FMstereomottagning.
När det uppstår störningar vid FM-mottagning,
blinkar indikatorn STEREO. Tryck på FM MODE för att
gå över till enkanalig mottagning (MONO). Ljudet
återges inte längre i stereo, men störningarna reduceras.
Tryck på nytt på denna väljare för att återgå till
stereomottagning.
?/1 (power)
FM/AMFM MODE
MASTER VOLUMETUNING +/–
TUNER
Direktväljare
D. TUNING
1 Tryck på strömbrytaren ?/1 (power) för att slå på
mottagaren.
När direktvalet av önskad station misslyckas
samtidigt som de inmatade siffrorna blinkar
Kontrollera att korrekt frekvens matats in. Tryck igen
på D. TUNING och mata in siffrorna på nytt på
fjärrkontrollen, om så inte var fallet. När de inmatade
siffrorna börjar blinka igen, anger det att denna
frekvens inte kan tas emot i området där mottagaren
används.
Samsändning på FM och i tv
Kontrollera att korrekt kanal för programmet, som
sänds i både radio och tv, ställts in på tv (eller video)
och att korrekt stationsfrekvens ställts in på mottagaren.
Efter inmatning av en frekvens som inte täcks av
stationssökningssteget
Avrundas den inmatade frekvensen automatiskt uppåt
eller nedåt till närmast frekvens som täcks av
stationssökningssteget.
Stationssökningsstegen vid direktval:
FM: 50 kHz:s steg
AM: 9 kHz:s steg
Automatisk stationssökning
(stationssökningsautomatik)
12
2 Tryck på väljaren TUNER.
Stationen, som senast ställdes in, ställs in igen.
3 Tryck på FM/AM för att välja FM-eller AM-
stationer.
4 Tryck på D. TUNING på fjärrkontrollen.
5 Tryck på lämpliga direktväljare på fjärrkontrollen
för att mata in önskad frekvens:
t. ex. 1: 102, 50 MHz på FM t. e. 2: 1350kHz på AM
02501
35001
6 Vid inställning av AM-stationer måste AM-
ramantennen riktas tills mottagningskvaliteten
blir optimal.
SE
Utnyttja automatisk stationssökning, när du inte
känner till frekvensen på önskad station, för att söka
vald våglängd efter önskad station.
1 Tryck på väljaren TUNER.
Stationen, som senast ställdes in, ställs in på nytt.
2 Tryck på FM/AM för att välja FM eller AM.
3 Tryck på TUNING + eller –.
Tryck på + för att söka efter en station vars
frekvens är högre än den som visas i
teckenfönstret och på – för att söka efter en station
med lägre frekvens. Efter att den högsta eller
lägsta frekvensen på vald våglängd ställts in,
fortsätter stationssökningen på nytt från den
lägsta eller högsta frekvensen på vald våglängd.
Stationssökningen avbryts varje gång en station
ställts in. Tryck en gång till på TUNING + eller –
för att fortsätta stationssökningen.
Page 94

Lagring av stationer i ett
stationsförval
Det är möjligt att lagra önskade stationer i ett stationsförval för att inte varje gång behöva ställa in dem
manuellt. Upp till 30 FM- och AM-stationer kan lagras
i ett stationsförval. Stationerna lagras i minnet under
förvalskoder som består av en bokstav (A, B eller C)
och en siffra (från 0 till 9): som t. ex. A1, B6 eller C9.
PRESET/PTY SELECT +/–
DISPLAY
MEMORY SHIFT ENTER TUNER
1 Tryck på väljaren TUNER.
Stationen, som senast ställdes in, ställs in på nytt.
2 Ställ in önskad station.
Vi hänvisar till rubriken Radiomottagning på
föregående sida angående stationsinställning.
3 Tryck på MEMORY.
MEMORY visas i några sekunder i teckenfönstret.
Åtgärderna enligt punkterna 4 till 6 måste utföras
innan MEMORY hinner slockna.
4 Tryck lämpligt antal gånger på SHIFT för att välja
önskad bokstav (A, B eller C).
Med vart tryck på SHIFT visas A, B eller C i
teckenfönstret.
Börja om från och med punkt 3 om MEMORY skulle
slockna.
5 Tryck på PRESET/PTY SELECT +/– eller
TUNING +/– för att välja önskat
snabbvalsnummer.
MENU </> NAME
MENU +/–
Tillvägagångssättet
Förvalsstationers snabbval (snabbval)
En förvalsstation kan direktväljas genom att mata in
dess förvalskod. Utnyttja förvalsstationers
snabbsökning när du glömt vilka stationer som
lagrades i minnet på vilka direktväljare.
1 Tryck på väljaren TUNER.
Stationen, som senast ställdes in, ställs in igen.
2 Tryck lämpligt antal gånger på SHIFT för att välja
bokstaven (A, B eller C) i förvalskoden på
fjärrkontrollen.
Om du till exempel vill ställa in den station som har
förvalskoden A7 väljer du A och trycker sedan på 7.
Val av önskad förvalsstation genom att utnyttja
förvalsstationers snabbsökning
Tryck först på väljaren TUNER och därefter på PRESET/
PTY SELECT + eller – för att välja önskad förvalsstation.
Med vart tryck på endera väljaren ändras förvalskoderna
enligt följande:
t A1 y A2 y… y A0 y B1 y B2 y … y B0 T
t C0 y … y C2 y C1 T
Lagring i minnet av namn på
förvalsstationer
Du kan lagra namn (indexnamn) med högst 8 tecken
för de olika förinställda stationerna (utom på FMsändare som sänder koder för datastyrd utsändning i
radio RDS). Namnen kan bestå av upp till åtta tecken.
Efter lagring i minnet av ett namn på en viss
förvalsstation visas namnet i teckenfönstret, istället för
frekvensen, efter att den stationen ställts in.
Tecknen, som används vid lagring i minnet av namn
på förvalsstationer, kan vara bokstäver, siffror eller
specialtecken.
1 Ställ in den förvalsstation som ska namnges.
2 Tryck på NAME.
En blinkande markör visas i teckenfönstret.
3 Tryck lämpligt antal gånger på MENU + eller –
för att välja önskat tecken.
4 Tryck på MENU </> för att flytta markören till
läget för val av nästa tecken.
6 Tryck en gång till på MEMORY för att lagra
stationen.
7 Följ igen anvisningarna från och med punkt 2 till
och med punkt 6 för att lagra de resterande
stationerna i minnet.
Lagring av en ny station i minnet på en direktväljare som
redan använts
Lagra önskad station i minnet på samma direktväljare.
OBS!
Observera att hela stationsförvalet raderas ur minnet om det
tar omkring en vecka innan nätkabeln ansluts på nytt efter
att den kopplats ur. I detta fall måste stationerna igen lagras
i ett stationsförval.
5 Följ igen anvisningarna enligt ovanstående
punkter 3 och 4 för att mata in upp till åtta tecken.
6 Tryck på ENTER för att lagra namnen.
Efter inmatning av fel tecken
Tryck gång på gång på MENU </> tills tecknet, som ska
ändras, börjar blinka i teckenfönstret. Tryck därefter lämpligt
antal gånger på MENU + eller – för att välja korrekt tecken.
OBS!
• Du kan också mata in ett namn bestående av 8 tecken för
programkällan. Välj önskad programkälla och upprepa
steg 2 till och med 6.
• För att radera programkällans namn trycker du på NAME
och sedan på samma programkällas knapp. Tryck på
ENTER för att radera namnet (Fungerar inte för TUNER).
13
SE
Page 95

Tillvägagångssättet
Hur datastyrd utsändning i
radio RDS (Radio Data System)
tillämpas
Vad kan göras med hjälp av datastyrd
utsändning i radio?
Datastyrd utsändning i radio RDS är en
informationstjänst som gör det möjligt för stationerna
att sända olika slags informationer tillsammans med
normala radiovågor. Den här receivern är utrustad
med två RDS-funktioner, som gör användandet
bekvämt och enkelt: programinformation för visning i
klartext av det som tas emot, och sökning efter önskat
program enligt programtyp. Endast stationerna på FM*
sänder koderna för datastyrd utsändning i radio RDS.
OBS!
Det kan hända att RDS-informationen inte kan tas emot när
stationen, som ställts in, inte sänder RDS-koder eller när den
stationens signalstyrka är låg.
* Alla stationer på FM sänder inte RDS-koder eller så sänder
stationerna koder för olika slags RDS-tjänster. Kontakta de
lokala sändarna för att ta reda på vilka RDS-tjänster som
kan tas emot i området där mottagaren används.
RDS-mottagning
Välj önskad station på FM.
När du ställer in en kanal som erbjuder RDS-tjänster
visas kanalens namn i teckenfönstret.
Visning av RDS-informationer i
teckenfönstret
Tryck på DISPLAY. Med vart tryck på DISPLAY
ändras visningssättet enligt följande:
OBS!
• ALARM blinkar i teckenfönstret för att ange pågående
sändning av ett katastrofmeddelande från myndigheter.
• När ett meddelande består av nio eller fler tecken, rullas
meddelandet fram i teckenfönstret.
• Följande meddelanden visas i teckenfönstret när sändaren
ifråga inte sänder koderna för en viss RDS-tjänst:
NO PTY (koderna för önskad programtyp sänds inte)
NO TEXT (koderna för radiotext sänds inte)
NO TIME (koderna för tid och datum sänds inte)
• Beroende på den metod som radiostationen använder för
att sända texten kan det hända att vissa textmeddelanden
inte är fullständiga.
Sökning efter önskat program enligt
programtyp
Det är möjligt att söka efter en station, som sänder ett
visst slags program, genom att välja önskad
programtyp. Mottagaren ställer in förvalsstationerna
som sänder program enligt vald programtyp.
1 Tryck på PTY för att visa aktuell PTY-typ. Tryck
på PRESET/PTY SELECT + eller – tills önskad
programtyp visas i teckenfönstret.
Vi hänvisar till tabellen på nästa sida angående de
programtyper som kan väljas.
2 Tryck lämpligt antal gånger på PTY under tiden
då namnet på vald programtyp visas i
teckenfönstret.
Mottagaren söker igenom förvalsstationerna för
att hitta en station som sänder ett program enligt
vald programtyp ("SEARCH" och namnet på
programtypen visas växelvis i teckenfönstret).
Sökningen avbryts så fort mottagaren påträffat en
sändare, som sänder ett program enligt vald
programtyp. Förvalskoden på den sändaren
blinkar i teckenfönstret, varefter den sändaren
ställs in.
14
Det som visas
Stationsnamn**
Frekvens**
Programtyp
Radiotext
Tid (24-timmars
tidsangivelse) och datum
Ljudfältsläge**
** Dessa informationer visas också efter inställning av en
station som inte sänder koder för RDS-tjänster, namnet
SE
endast efter att namn på förvalsstationer lagrats i minnet.
Vad som kan göras:
stationsinställning enligt
stationsnamn (som t. ex. WDR),
istället för frekvens
stationsinställning med hjälp av
stationfrekvens
sökning efter ett visst program
enlight programtyp (Vi hänvisar
till sid. 15 angående detaljer.)
visning av textmeddelanden
sändaren ifråga sänder
kontroll av gällande tid
Visar aktuellt ljudfältsläge.
OBS!
NO PTY visas i teckenfönstret när inte någon förvalsstation
sänder ett program enligt vald programtyp och den
ursprungliga stationen ställs in igen.
Page 96

Tillvägagångssättet
Följande programtyper kan väljas:
Programtyp
NONE
NEWS
AFFAIRS
INFO
SPORT
EDUCATE
DRAMA
CULTURE
SCIENCE
VARIED
POP M
ROCK M
EASY M
LIGHT M
CLASSICS
OTHER M
WEATHER
FINANCE
CHILDREN
SOCIAL
RELIGION
PHONE IN
TRAVEL
LEISURE
Programinnehåll
Samtliga program som inte kan
klassificeras enligt nedanstående.
Nyheter.
Aktuella nyheter som utvidgar
nyhetsområdet.
Program om ekonomiska frågor,
läkarvård, väderleksprognoser o.s.v.
Sportprogram.
Undervisande program som t. ex. Gör det
själv ...., råd och tips.
Radiopjäser och serier.
Nationella eller lokala kulturprogram,
som t. ex. om religion, språk och
samhällsfrågor.
Naturvetenskapliga och tekniska
program.
Kändisintervjuer, frågelekar och
komedier.
Populärmusik.
Rockmusik.
Lättare underhållningsmusik (middle of
the road music).
Klassisk musik, som t. ex. instrumental
musik, musik med vokalist och körmusik.
Orkestermusik, kammarmusik, opera
o.s.v.
Musik som inte kan klassificeras enligt
någon ovanstående musikkategori, som
t. ex. rytmisk musik & blues och reggae.
Väderleksrapporter.
Börsrapporter, handels- och
ekonominyheter.
Underhållnings- och intresseprogram för
unga lyssnare.
Program om sociologi, historia, geografi,
psykologi och samhället.
Tankar om tro och livsåskådning.
Debattprogram.
Program om paketresor, resmål.
Fritidsprogram som lyssnarna kan delta i.
Programtyp
JAZZ
COUNTRY
NATION M
OLDIES
FOLK M
DOCUMENT
Programinnehåll
Polyfonisk & synkoperad musik.
Sånger med ursprung i sydamerikanska
staterna.
Aktuell populärmusik i landet eller
området.
”Golden age”-musik.
Musik med rötter i en viss nations kultur.
Dokumentärprogram.
15
SE
Page 97

Tillvägagångssättet
Inspelning
Reglagen på denna mottagare underlättar inspelning
av önskad ljud/bildåtergivning på anslutet däck eller
ansluten video. Direktanslutning mellan källor för
ljud/bildåtergivning och däck/video för inspelning
krävs inte: efter val av önskad ljud/videokälla på
mottagaren är det möjligt att spela in eller redigera
band på samma sätt som när de respektive reglagen på
vald källa och däcket/videon för inspelning används.
Kontrollera före inspelningsstart att samtliga ljud/
bildkällor anslutits på korrekt sätt:
Väljare för ljud/videokällor
1 Tryck på TV/SAT för att välja programkälla.
2 Ställ in komponenten i inspelningsläget. Slå till
exempel på TVn och TV-mottagaren.
3 Sätt i ett tomt videoband för inspelning i
videospelaren.
4 Börja inspelningen på videospelaren.
Du kan spela över ljudet när du redigerar
videobandet
Vid den punkt som du vill börja lägga till olika ljud
trycker du på en annan funktionsknapp (till exempel
CD) och börjar uppspelningen. Ljudet från den valda
komponenten spelar över orginalljudet.
Om du vill återta orginalinspelningen trycker du på
TV/SAT-funktionsknappen.
OBS!
Du kan inte spela in ljud signalen i DVD/MULTI CH läget .
Källa för ljud/
bildåtergivning
l: ljudsignalflöde
Däck/video för
inspelning (MD-spelare,
kassettdäck, video)
Inspelning på en MD-skiva eller ett
kassettband
Inspelning på en MD-skiva eller ett kassettband kan
göras via denna mottagare. Vi hänvisar till MDspelarens eller kassettdäckets bruksanvisning
angående ytterligare information.
1 Tryck på lämplig väljare för ljud/videokällor för
att välja önskad källa för ljudåtergivning.
2 Gör vald källa klar för ljudåtergivningsstart, som
t. ex. lägg en CD-skiva i CD-spelaren.
3 Sätt i kassetten för inspelning i däcket eller MD-
skivan för inspelning i MD-spelaren. Styr vid
behov ut inspelningsnivån.
4 Sätt igång inspelningen på däcket eller MD-
spelaren. Starta därefter ljudåtergivningen.
Spela in på videoband
Du kan spela in från en TV eller från en
Satellitmottagare med hjälp av mottagaren. Det går
också att lägga till ljud från en mängd olika ljudkällor
när videobandet redigeras. Se videospelarens
bruksanvisning för ytterligare information.
Använda insomningstimern
Du kan ställa in mottagare så att den stängs av
automatiskt vid önskad tid.
SLEEP
Tryck på SLEEP på fjärrkontrollen när strömmen är på. Varje
gång du trycker på SLEEP ändras tiden enligt nedan.
t 2-00-00 t 1-30-00 t 1-00-00 t 0-30-00 t OFF
Teckenfönstret lyser svagt efter det att du har angett tiden.
Du kan kontrollera återstående tid innan mottagare
stängs av
Tryck på SLEEP på fjärrkontrollen. Den återstående
tiden visas.
16
SE
Page 98

Ljudåtergivning med simulerad akustik
Ljudåtergivning med simulerad akustik
Val av önskat ljudfält
Du kan använda surroundljud genom att helt enkelt
välja en av de förprogrammerade ljudfälten beroende
av vilken typ av musik du vill lyssna på.
Fjärrstyrning med fjärrkontrollen
Varje gång du trycker på SOUND FIELD MODE +/–
ändras ljudfältet enligt:
När du väljer programkälla
t PRO LOGIC* y C STUDIO T
MAIN
MENU
MENU
SOUND FIELD
MODE +/–
MENU +/–
+/–
SURR
SOUND FIELD
ON/OFF
SOUND FIELD
MODE +/–
1 Tryck på SOUND FIELD ON/OFF för att aktivera
ljudfältet.
Ljudfältsindikatorn tänds.
2 Tryck på SOUND FIELD MODE +/– flera gånger
tills ljudfältet du vill ha visas i teckenfönstret.
Välj passande ljudfält enligt följande:
Typ
CINEMA
VIRTUAL
MUSIC
MODE (Sound field)
PRO LOGIC*
C STUDIO
(Cinema Studio)
DOLBY V
V SURR**
HALL
för att
Avkodar program som
kodats med Dolby
Surround.
Återge ljudmiljön i en
biosalog. Utmärkt när
du tittar på vanliga
filmer.
Använda de främre
högtalarna för att skapa
surroundljud.
Använda de främre
högtalarna och
mitthögtalarna för att
skapa surroundljud.
Återge akustiken i en
rektangulär konsertsal.
Utmärkt för mjuka
akustikljud.
t HALL y DOLBY V T
När au använder DVD/MULTI CH
C STUDIO y V SURR
* DOLBY PL visas i teckenfönstret.
Avaktivera ljudfältet
Tryck på SOUND FIELD ON/OFF eller 2CH/OFF på
fjärrkontrollen.
Receivern minneslagrar det senaste ljudfält som har
valts för varje enskild programkälla (Sound Field
Link)
Varje gång du väljer en programkälla, återkommer
automatiskt det ljudfält som senast användes för denna
programkälla. Om du t.ex. lyssnar på CD-skivor med
HALL som ljudfält, byter till en annan programkälla
och därefter återgår till CD-spelaren, återkommer
ljudfältet automatiskt. När det gäller tunern
minneslagras ljudfälten separat för AM-eller FM-bandet
samt för samtliga snabbvalsstationer.
Ljudkällorna, som kodats med Dolbys simulerade
akustik, har märkts med DOLBY SURROUND
Ljudet på vissa videoband och laserskivor kan ha
kodats med Dolby Surround, trots att det inte anges på
videokassetten eller skivfodralet.
* DOLBY PL visas i teckenfönstret.
** Bara när au använder DVD/MULTI CH.
(forts.)
17
SE
Page 99

Ljudåtergivning med simulerad akustik
SOUND FIELD
MODE +/–
TEST TONE
MAIN
MENU
MENU
+/–
MENU </>
Styrning av effektnivå (alla ljudfält utom
PRO LOGIC)
Genom att höja effektnivån, är det möjligt att göra den
simulerade akustiken ännu mer framträdande. Känslan
av närvaro i ljudfältet kan styras till någon av sex olika
nivåer (EFFECT 1-6).
1 Starta önskad ljudåtergivning.
2 Tryck på SURR.
Effektnivå (”EFFECT 1”…”EFFECT 6”) visas i
teckenfönstret.
3 Välj önskad nivå genom att trycka på MENU +/–.
järrstyrning med fjärrkontrollen
Tryck på MAIN MENU på fjärrkontrollen flera gånger
tills indikatorn SURR tänds. Varje gång du trycker på
MENU +/– ändras nivån på effekten enligt:
Optimal ljudkvalitet vid
ljudåtergivning med Dolbys
akustik
För att sörja för bästa möjliga ljudkvalitet vid
ljudåtergivning med Dolbys akustik, måste
avkodarläget för Dolbys avkodare Pro Logic väljas
enligt de till mottagaren anslutna högtalarna. Styr
därefter volymen i ljudet via varje högtalare till samma
nivå och välj önskad fördröjningstid.
Observera att minst ett par extra högtalare och/eller en
mellersta högtalare måste anslutas till mottagaren för
att göra de följande inställningarna.
SET UP
SOUND FIELD
MODE +/–
LEVEL
EFFECT 1 y EFFECT 2 y … y EFFECT 6
OBS!
Det kan hända att akustikeffekten i viss slags ljudåtergivning
inte påverkas nämnvärt vid ändring av effektnivån.
MENU </> MENU +/–
SOUND FIELD
ON/OFF
Val av avkodarläge
Det är möjligt att välja mellan tre olika avkodarlägen:
PHANTOM, NORMAL, WIDE och 3 STEREO. Lägena
väljs enligt antalet anslutna högtalare. Välj det läge
som passar den högtalaranläggning som anslutits till
mottagaren.
18
1 Tryck på SOUND FIELD ON/OFF för att aktivera
ljudfältet.
2 Tryck lämpligt antal gånger på SOUND FIELD
MODE +/– för att välja önskat ljudfält (PRO
LOGIC eller C STUDIO) för ljudåtergivning med
Dolbys simulerade akustik.
3 Tryck på SET UP.
4 Tryck på MENU < eller > flera gånger tills “CTR
MODE” visas i teckenfönstret.
SE
Page 100

Ljudåtergivning med simulerad akustik
5 Tryck på MENU +/– flera gånger tills det
mittläge du vill ha visas i teckenfönstret. Välj
lämpligt avkodarläge enligt nedanstående tabell:
Antalet
anslutna
högtalare
Främre och
Surroundhögtalare
samt en
mellersta
högtalare med
låg kapacitet
Främre och
mellersta
högtalare, inga
Surroundhögtalare
Främre och
Surroundhögtalare,
ingen mellersta
högtalare
Främre och
Surroundhögtalare
samt en
mellersta
högtalare med
hög kapacitet
Välj
NORMAL
3 STEREO
(3 Channel Logic)
PHANTOM
WIDE
Så att
Basen via den
mellersta kanalen
sänds ut via de
främre högtalarna (på
grund av att den
mellersta högtalaren
har för låg kapacitet
för basåtergivning).
ljudet via de
Surroundhögtalare
kanalerna sänds ut
via de främre
högtalarna.
ljudet via den
mellersta kanalen
sänds ut via de
främre högtalarna.
Mittkanalen återger
fullständigt hela
ljudspektrat.
Styrning av volymnivå i ljudet via de alla anslutna
högtalarna på en och samma gång
Tryck på knapparna MASTER VOL på fjärrkontrollen
eller vrid på MASTER VOLUME på mottagaren.
Reglagen på mottagaren kan också användas för
styrning av volymnivå
När du har tryckt på TEST TONE på fjärrkontrollen:
• Välj “CTR xxdB” genom att trycka på MENU
< eller > flera gånger.
Justera mitthögtalarens nivå med hjälp av MENU +/–.
• Välj “SURR xxdB” genom att trycka på MENU
< eller > flera gånger.
Justera Surroundhögtalare med hjälp av MENU +/–.
Du kan välja en ljudnivå från –15 dB till +10 dB i steg på
1 dB.
Du kan ställa in subwooferns ljudvolym
• Tryck på LEVEL eller MAIN MENU på
fjärrkontrollen flera gånger tills indikatorn LEVEL
tänds.
• Välj “SW xxdB” genom att trycka på MENU < eller >
flera gånger.
• Justera nivån med hjälp av MENU +/–.
Du kan välja en ljudnivå från –15 dB till +10 dB i steg på
1 dB.
Styrning av volymbalans i ljudet via de
anslutna högtalarna
Med hjälp av testtonen är det möjligt att styra volymen
i ljudet via varje högtalare till samma volymnivå.
(Styrning av volymnivå krävs inte när prestandan hos
varje ansluten högtalare är densamma.)
När knapparna på fjärrkontrollen används är det
möjligt att testa högtalaranslutningen och styra
volymbalansen från lyssningsläget.
1 Tryck in SOUND FIELD ON/OFF-knappen för att
aktivera ljudfältsfunktionen.
Tryck in SOUND FIELD MODE +/– -knappen
upprepade gånger för att välja “DOLBY PL”funktionen”.
2 Tryck på TEST TONE på fjärrkontrollen.
Testtonen återges i följd via de anslutna
högtalarna.
3 Ställ in ljudnivån så att testtonens hörs lika starkt
från alla högtalarna när du befinner dig i den
position du brukar lyssna från.
• Välj “CTR xxdB” eller “SURR xxdB” genom att
trycka på MENU < eller >.
• Justera nivån med hjälp av MENU +/– .
Utnivån i ljudet via Surroundhögtalare kan höjas
Räckvidden vid styrning av nivå i ljudet via
Surroundhögtalare har förvalts till nivåområdet från –
15 till +10, men räckvidden kan förskjutas uppåt med
fem nivåer (från –10 till +15).
• Tryck på SET UP.
• Tryck på MENU < eller > flera gånger tills “SURR
SET UP” visas i teckenfönstret.
• Tryck på MENU +/– flera gånger tills “NORMAL”
visas i teckenfönstret.
Räckvidden, som visas i teckenfönstret, är fortfarande
från –15 till +10, men det är möjligt att höra en skillnad i
utnivå för ljudet som återges via Surroundhögtalare .
Återgång till förvald räckvidd: följ igen de ovanstående
anvisningarna och vänta tills “GAIN LOW” visas i
teckenfönstret.
Du kan återge alla ljudfälten sina ursprungliga
inställningar
• Stäng av mottagaren.
• Håll SOUND FIELD ON/OFF nedtryckt och tryck
sedan på ?/1 (power). ”SF CLR” visas i
teckenfönstret.
Alla ljudfältsinställningar raderas och ljudfälten
avaktiveras.
4 Tryck på TEST TONE på fjärrkontrollen för att
koppla ur testtonen.
(forts.)
19
SE
 Loading...