

Sony SRS-U10 annexe
A
B
C
Active Speaker System
Operating Instructions
Manual de instrucciones
SRS-U10
© 2006 Sony Corporation Printed in China
Front
INPUT 1
to INPUT 2 jack
to DC IN 6 V jack
To LINE OUT or to
headphones jack
(stereo mini jack)
RK-G136 connecting cord
(optional)
Portable audio
player, etc.
PC, etc.
to wall outlet
AC power adaptor (supplied)
2-888-389-12(1)
Rear
CD/MD player, etc.
English
Before operating the unit, please read this manual thoroughly and
retain it for future reference.
WARNING
To reduce the risk of fire or electric shock, do not
expose this apparatus to rain or moisture.
To reduce the risk of electrical shock, do not open the cabinet.
Refer servicing to qualified personnel only.
To reduce the risk of fire, do not cover the ventilation of the
apparatus with newspapers, tablecloths, curtains, etc. And do not
place lighted candles on the apparatus.
To reduce the risk of fire or electric shock, do not place objects
filled with liquids, such as vases, on the apparatus.
Do not install the appliance in a confined space, such as a
bookcase or built-in cabinet.
CAUTION
You are cautioned that any changes or modification not expressly
approved in this manual could void your authority to operate this
equipment.
Precautions
On safety
• Before operating the system, be sure that the operating voltage
of the system is identical with that of your local power supply.
Where purchased Operating voltage
U.S.A. 120 V AC, 60 Hz
Other countries 100 – 240 V AC, 50/60 Hz
• Use only the supplied AC power adaptor .
• After operating the system with the AC power adaptor,
disconnect the AC power adaptor from the wall outlet if the
system is not to be used for an extended period of time. The
POWER switch does not turn the AC power adaptor off.
On placement
• Do not set the speakers in an inclined position.
• Do not leave the system in a location near heat sources, or in a
place subject to direct sunlight, excessive dust, moisture, rain or
mechanical shock.
On cleaning
Do not use alcohol, benzine, or thinner to clean the cabinet.
On operation
• Do not open the cabinet. Refer servicing to qualified personnel
only.
• Should any solid object or liquid fall into the system, have the
system checked by qualified personnel before operating it any
further.
• Although this system is magnetically shielded, do not leave
recorded tapes, watches, personal credit cards, or floppy disks
with magnetic coding in front of the system for an extended
period of time.
If the TV picture or monitor display is
magnetically distorted
Although this system is magnetically shielded, there may be cases
that the picture on some TV sets/personal computer sets may
become magnetically distorted. In such a case, turn off the power
of the TV set/personal computer set once, and after 15 to 30
minutes turn it on again. For the personal computer set, take the
appropriate measures such as data storage before turning it off.
When there seems to be no improvement, locate the system
further away from the TV set/personal computer set. Furthermore,
be sure not to place objects in which magnets are attached or used
near the TV set/personal computer set, such as audio racks, TV
stands, toys etc. These may cause magnetic distortion to the
picture due to their interaction with the system.
If you have any questions or problems concerning your speaker
system, please consult your nearest Sony dealer.
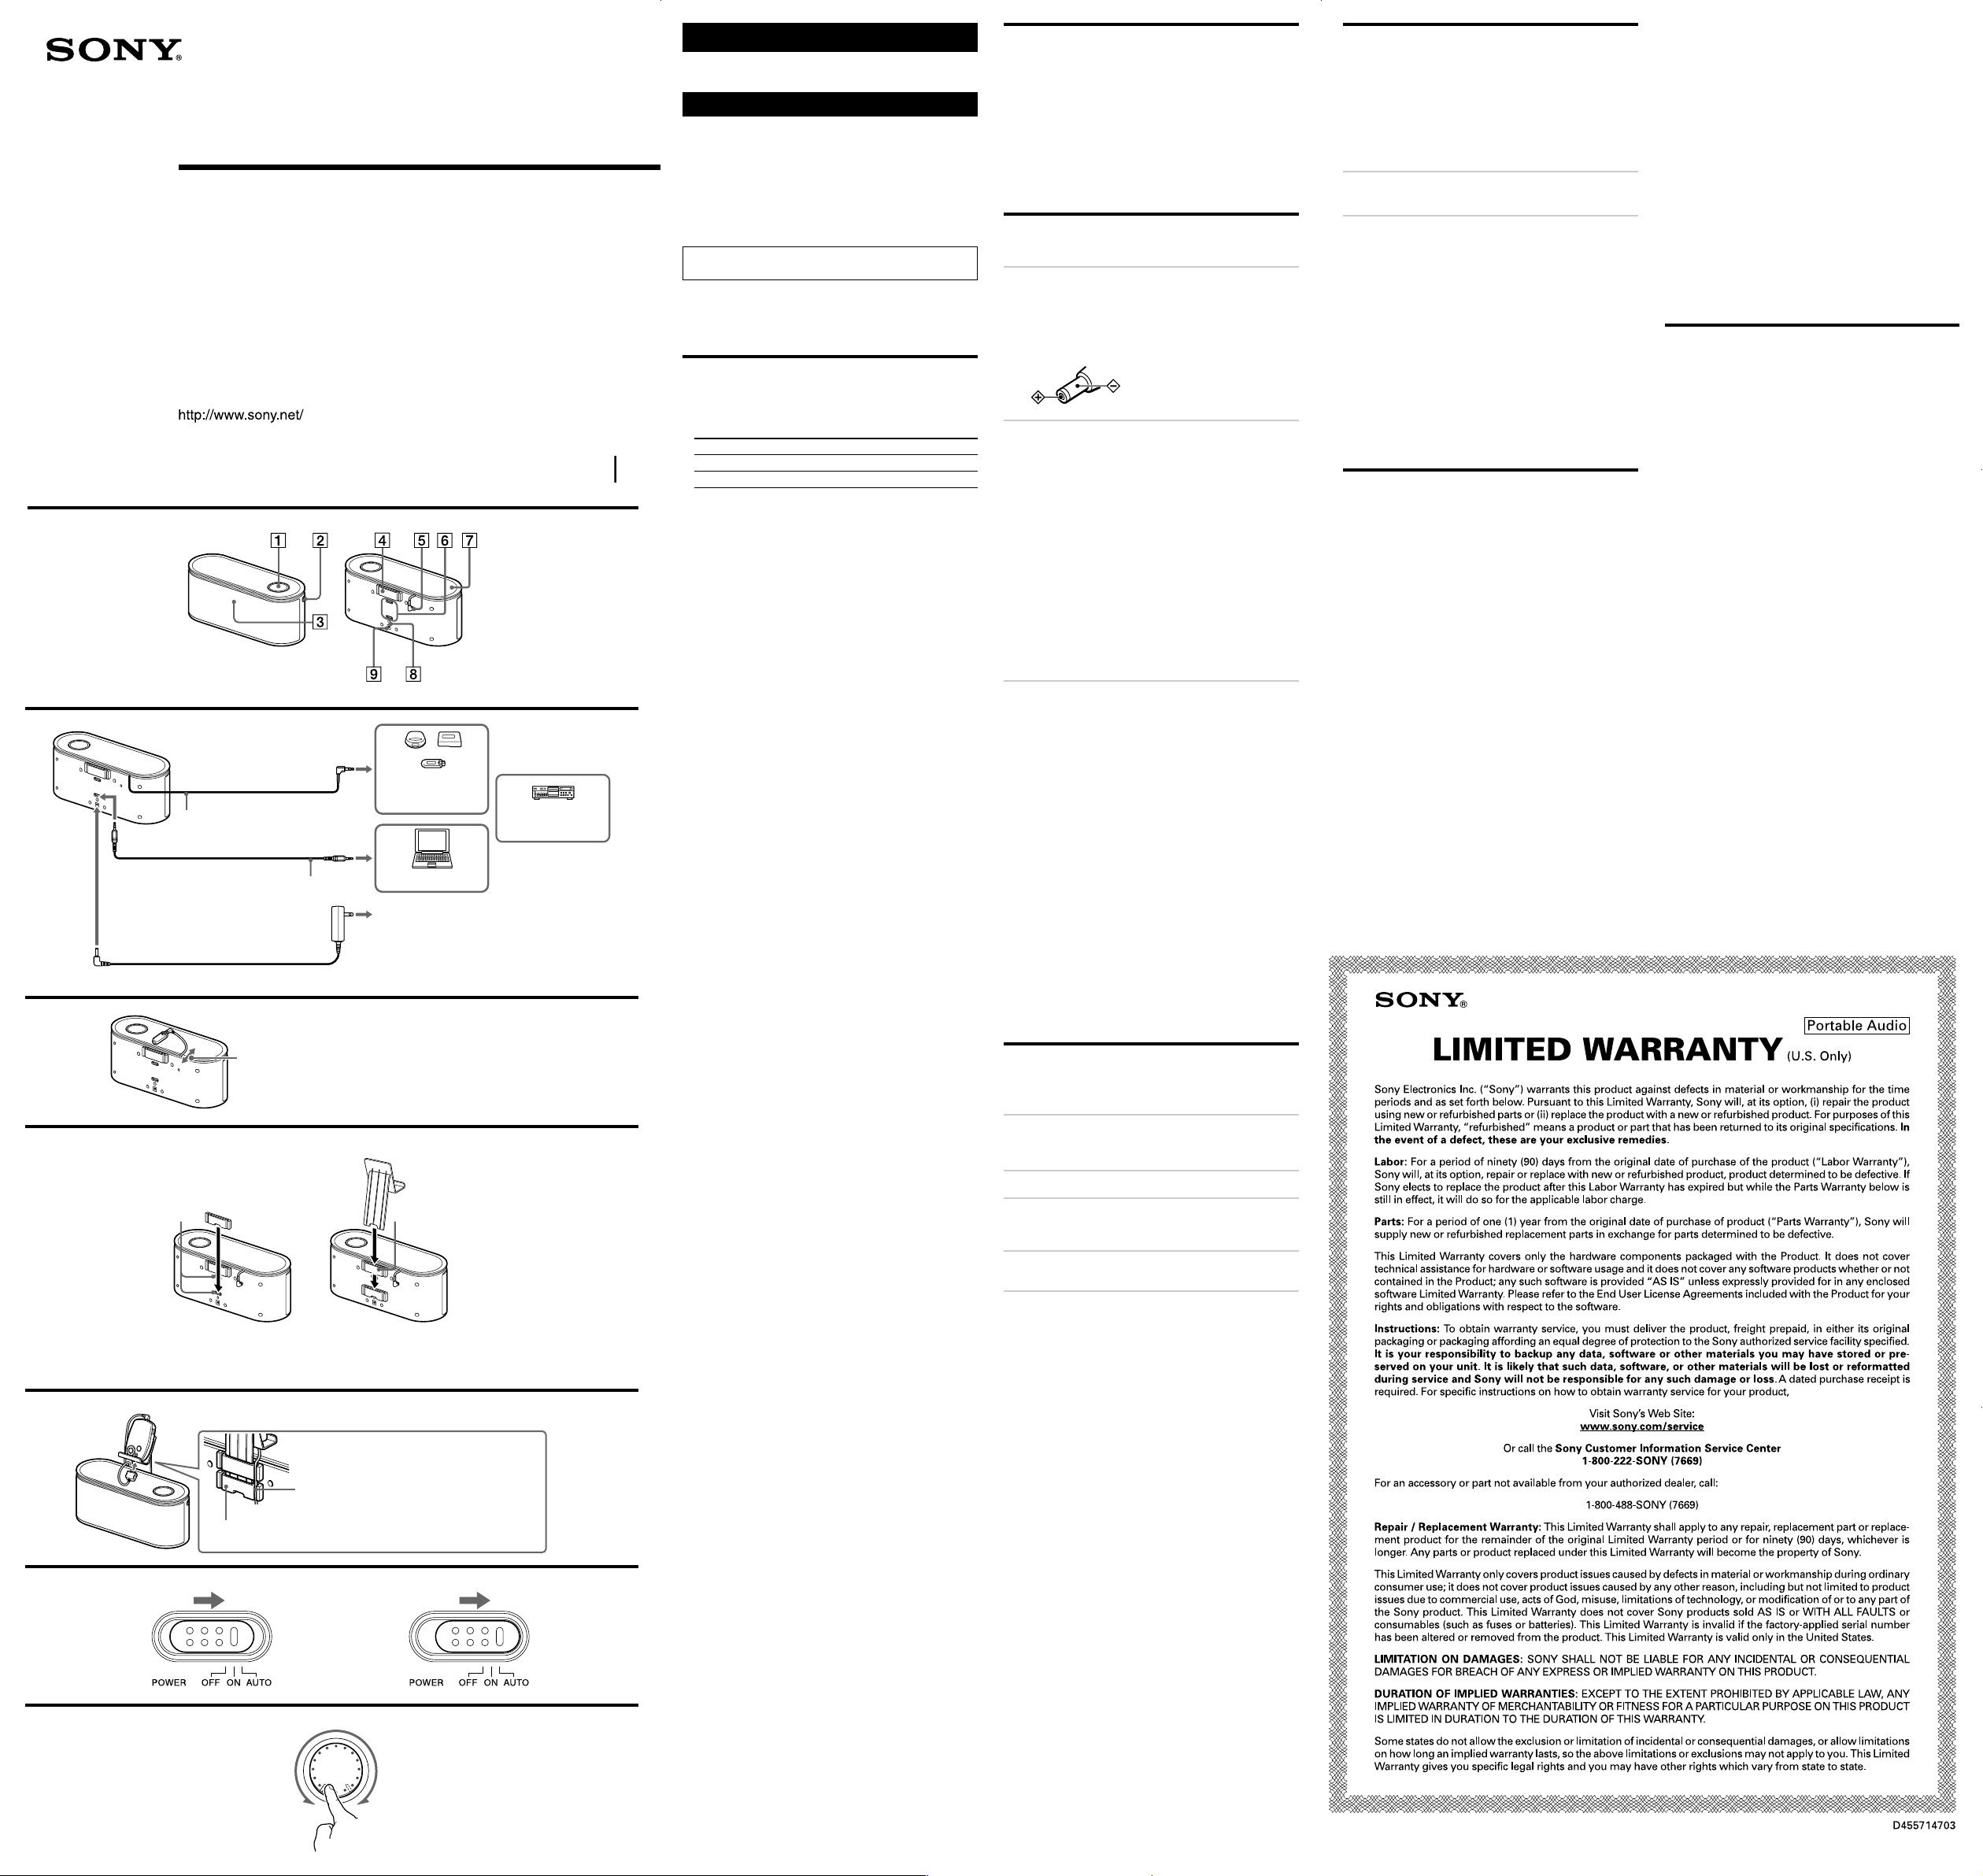
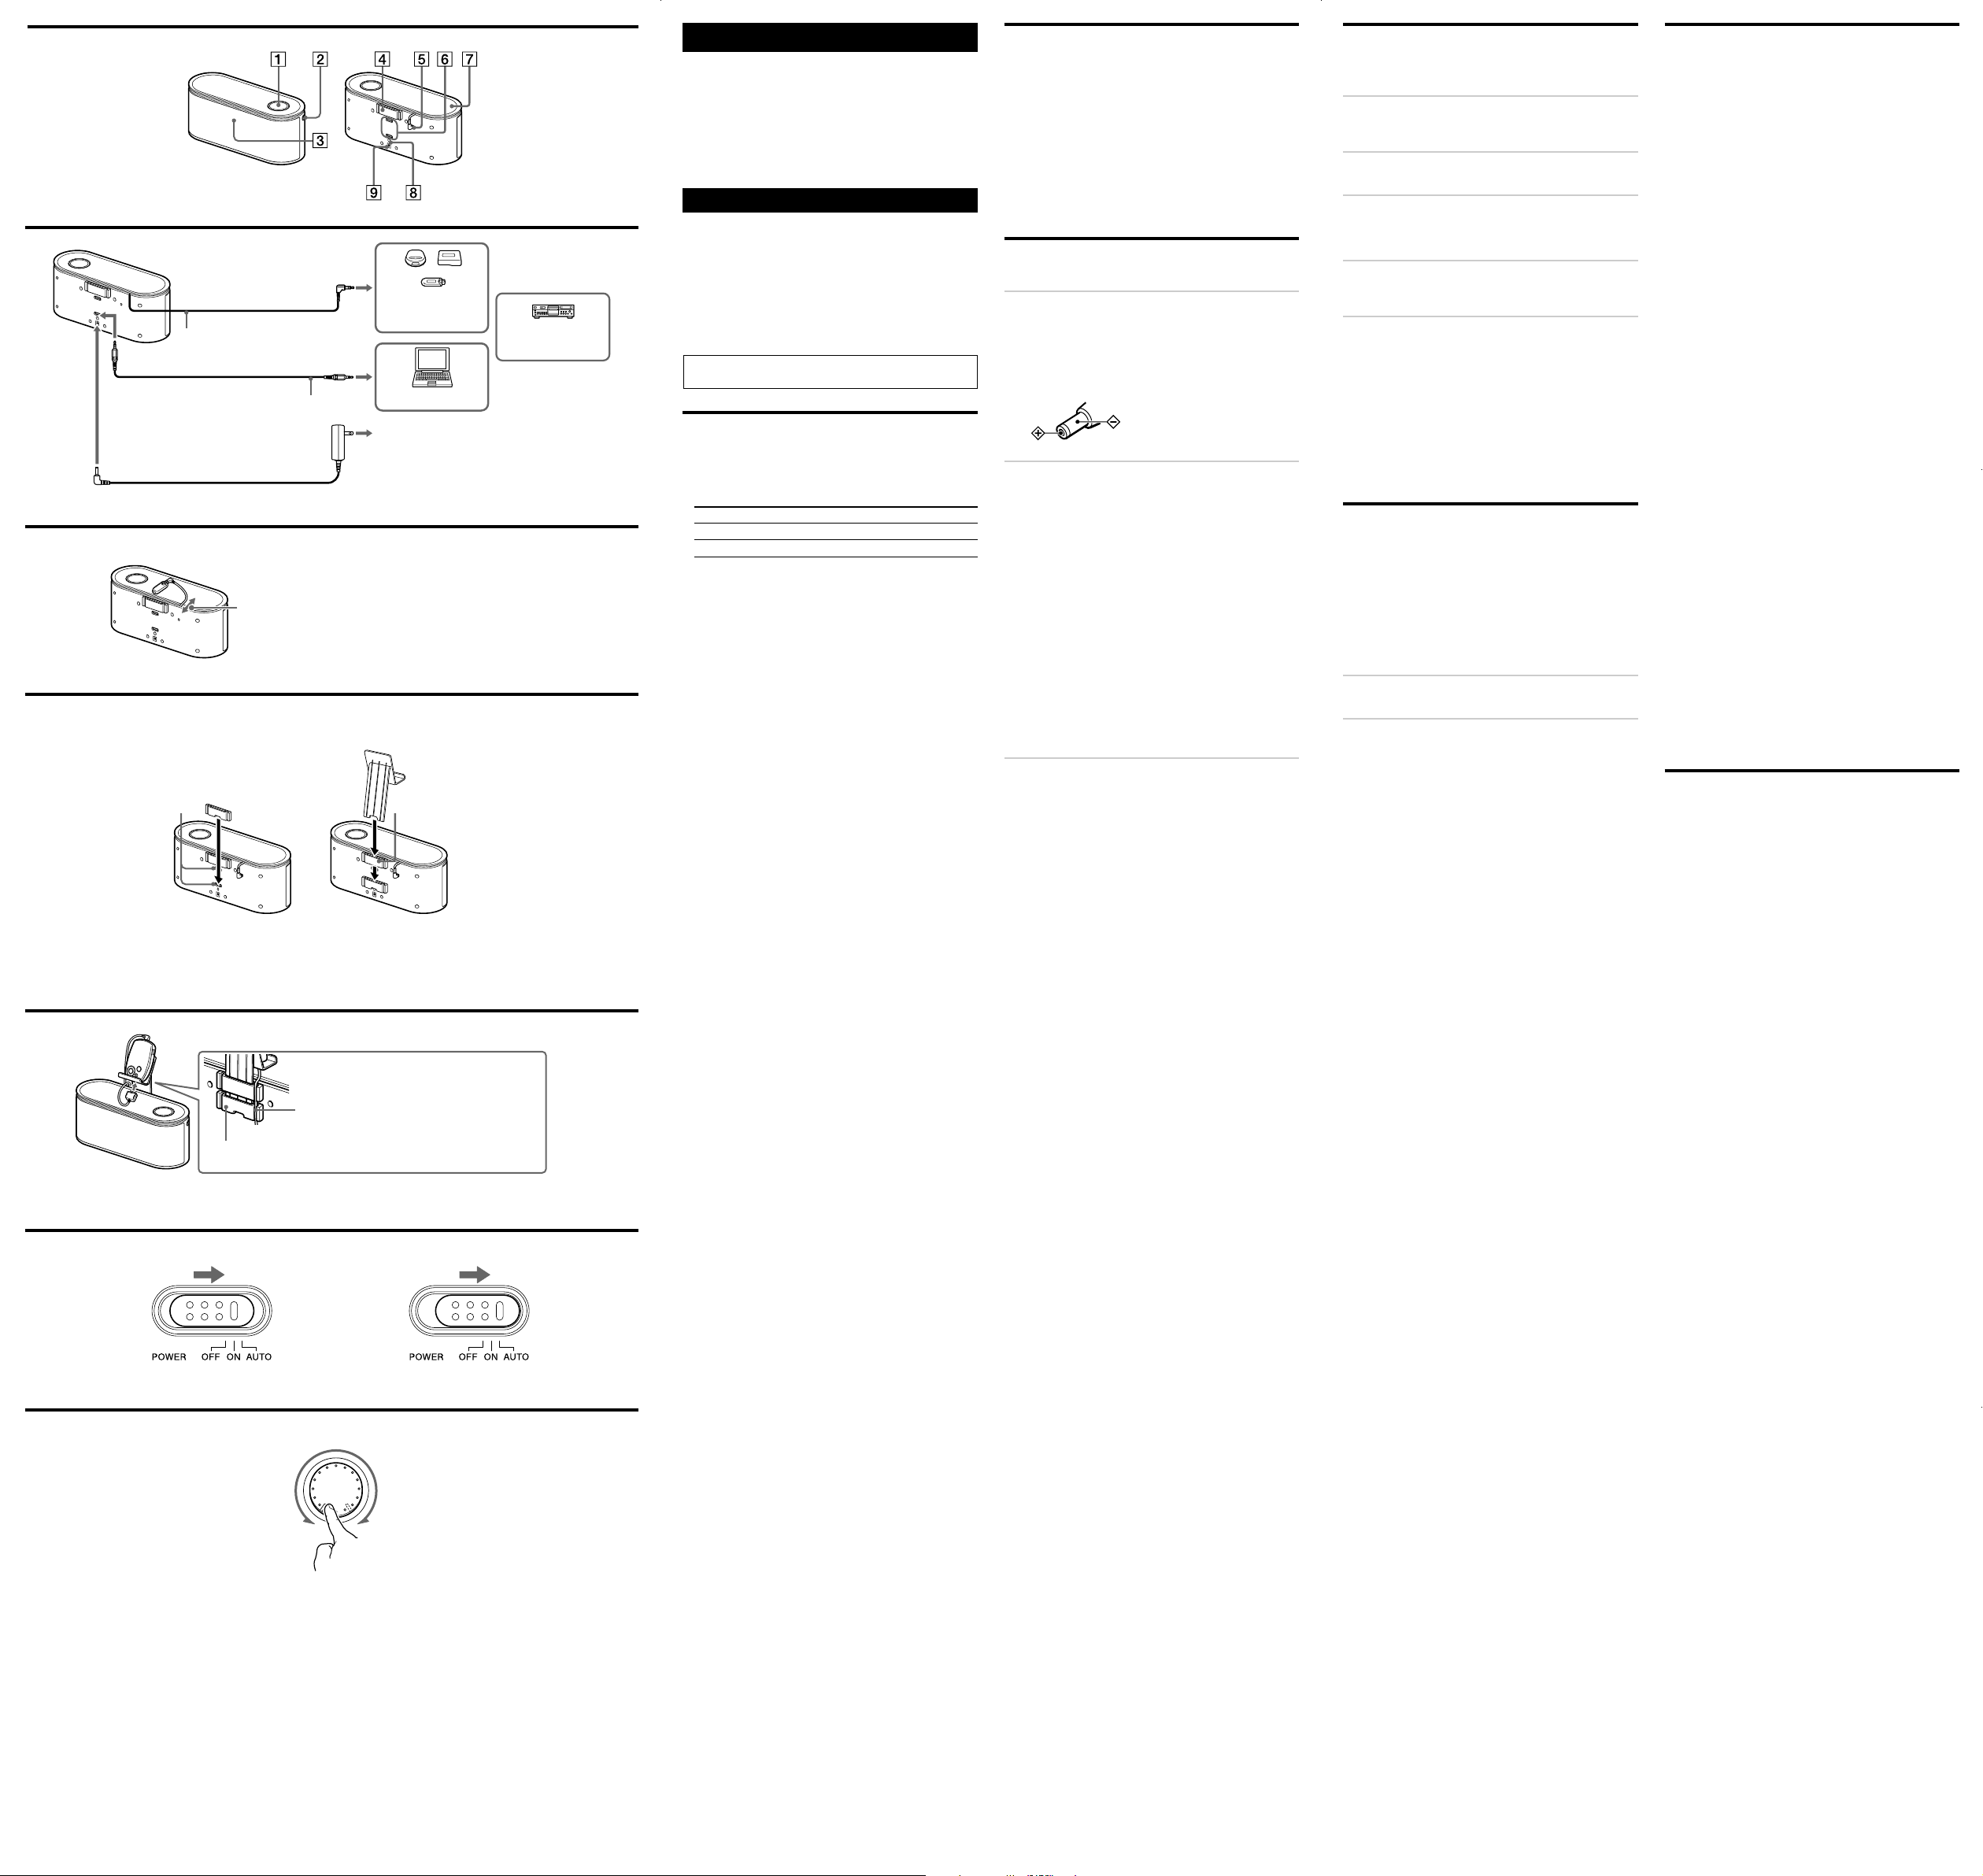
Identifying parts (see fig. A)
1 VOLUME control
2 POWER switch
3 Power indicator
4 Stand holder
5 INPUT 1
Connecting cord with stereo-mini plug
6 Stand cover holes
7 Tray
8 INPUT 2
9 DC IN 6 V jack
Connect the supplied AC power adaptor.
Hooking up the speakers
(see fig. B)
1 Connect the AC power adaptor to the
system.
Note on the AC power adaptor
Use only the supplied AC power adaptor. Do not use any
other AC power adaptor to avoid damaging the speakers.
Polarity of the plug
2 Connect the speaker to the source device.
When the system is connected to the monaural
jack of the source device
The sound may not come through the right side. In such a
case, use the optional* plug adaptor PC-236MS.
To connect to a stereo phone-type headphones
jack
Use the optional plug adaptor PC-234S, or optional
connecting cord RK-G138.*
* The above optional accessories are not provided in some areas.
z Hint
The tray of this system uses soft material. You can install a
portable player connected to INPUT 1 on the tray. The cord
length can be adjusted manually (~ approx.30 cm). (See fig.
C.) Note that the Auto Power function may not work
correctly if equipment that generates microwaves, such as a
mobile phone, is installed on the tray.
When using your portable player on the
stand (see fig. D)
Attach the supplied stand as shown in the illustration. This is
useful, for example, when watching a portable video player.
You can adjust the level of the stand by changing the position of
the stand cover.
Notes
• Because light, such as direct sunlight, is refracted when it
passes through the stand, and may focus in one place (as it
would by a lens), it may cause a fire to occur at the focused
point. Please keep the stand in a place not subject to a source of
light when unattended.
• If you operate a portable player with the player installed on the
stand, this unit may fall backwards. Be sure to operate the
portable player by holding it on your hand.
• Some portable players may not be installable on the supplied
stand due to their shape.
When installing your portable audio player
on the stand while the cable supplied with
the player is connected (see fig. E)
The supplied stand has a hole for connecting a cable. Attach the
stand cover in the upper position to install the portable audio
player on the stand with a cable connected to the player. The
connected cable can be tidily routed along the groove.
Turning the speaker on/off
automatically
– Auto Power On/Off function
You can set the system to turn on automatically when an audio
signal is input from a source device. When the system is turned
on, the power indicator lights up.
If no signal is input for about 90 seconds or more*, the system
turns off automatically and the power indicator goes off.
* Automatic-off time may vary according to how the speaker is used.
1 Set the POWER switch to AUTO. (See fig.
F-2.)
Notes
• If the input signal level is too low, the system will not turn on
automatically.
• If a device that generates microwaves, such as a mobile phone,
is nearby, the system may be turned on unintentionally by the
device.
• If a mobile phone is connected to the system, the system may
be turned on unintentionally by noise or an incoming call.
When connecting a mobile phone, turn on/off the system
manually by the POWER switch.
• The system may not turn off automatically because of received
noise, depending on the source device.
• If no device is connected to INPUT 1, the system may not turn
off automatically, or it may turn on unintentionally.
• The beginning of the input signal may not be heard, depending
on the input signal level.
• When leaving the system unattended, set the POWER switch to
OFF to prevent malfunction.
Troubleshooting
Should you have a problem with your speaker system, check the
following list and take the suggested measures. If the problem
persists, consult your nearest Sony dealer.
No sound
• Check that both this unit and the source device are turned on.
• Turn up the volume of the unit.
• Turn up the volume of the source device as high as possible to
the extent that sound is not distorted. For details on volume
adjustment, refer to the operating instructions supplied with the
device.
• Make sure all the connections have been correctly made.
Low sound level
• Turn up the volume of the source device as high as possible to
the extent that sound is not distorted. For details on volume
adjustment, refer to the operating instructions supplied with the
device.
• Turn up the volume of the unit.
Distorted sound
• Turn down the volume of the source device to the point where
the sound is no longer distorted. For details on volume
adjustment, refer to the operating instructions supplied with the
device.
• If the source device has a bass boosts function, set it to off.
• Turn down the volume of the unit.
There is hum or noise in the speaker output.
• Make sure all the connections have been correctly made.
• Make sure none of the audio devices are positioned too close to
the TV set.
The brightness of the power indicator is
unstable.
The brightness of the power indicator may become unstable when
the volume is turned up. This is not malfunction.
The system will not turn on automatically
when the Auto Power On/Off function is on.
When connected to the headphones jack, turn up the volume of the
source device. When connected to the LINE OUT jack, set the
POWER switch to ON.
The system will not turn off automatically
when the Auto Power On/Off function is on.
• Connect a device to INPUT 1.
• Re-position the system.
• Move the source device away from the system.
• Move the system away from devices that generate strong
microwaves, such as mobile phones.
Specifications
Speaker section
Speaker system 48 mm, Full range, magnetically
Enclosure type Bass reflex
Impedance 4 Ω
Rated input power 1.8 W
Maximum input power 3.6 W
Amplifier section
Maximum output 1.8 W + 1.8 W (1 kHz, 4 Ω)
Bass Boost MEGA BASS
Input Connecting cord with stereo-mini plug
Input impedance 4.7 kΩ (at 1 kHz)
General
Power DC 6 V (supplied AC power adaptor)
Dimensions (w/h/d) Approx. 270 × 105 × 110 mm
Mass Approx. 700 g (1 lb. 9 oz.), including
Supplied accessories
Stand cover (1)
Stand (1)
AC power adaptor (1)
Operating Instructions (1)
Optional accessories
Connecting cord RK-G136, RK-G138
Plug adaptor PC-234S, PC-236MS
The above optional accessories are not provided in some areas.
Design and specifications are subject to change without notice.
This warranty is valid only in the United States.
shielded
(30 cm) × 1
Stereo mini jack × 1
3
/4 × 4 1/4 × 4 3/8 in)
(10
stand cover
The cord length can be adjusted manually by pulling/retracting.
D
Stand cover
Stand cover holes
Attach the stand cover to the stand cover hole
securely until it locks into position.
E
Stand
Stand holder
Insert the stand into the stand holder, and push into the
stand cover fully to secure it.
Route the connected cable along the groove.
Listening to the sound
First, turn down the volume on this unit. When connecting the
speakers to the headphone output, turn down the volume of the
connected device.
1 Set the POWER switch to ON. (See fig. F-
1.)
The power indicator lights up.
2 Start playing on the source device.
3 Adjust the volume.
Set the volume of the source device to moderate level, and
turn the VOLUME control on this unit.
4 Set the POWER switch to OFF after using.
The power indicator goes off.
Notes
• If connecting the speaker to a device with a built-in radio or
tuner, radio broadcasting cannot be received or sensitivity may
be reduced significantly.
• If the source device has a bass boost function or equalizer
function, set them to off. If these functions are on, sound may
be distorted.
• If the source device’s headphone output has a line switch, better
sound will be heard if it is set to on. See the operating
instructions of the source device.
• If both the device connected to INPUT 1 and the device
connected to INPUT 2 are played at the same time, both sounds
can be heard.
(See fig. G. )
F
G
Attach the stand cover in the upper position.
12
M
X
I
N
A
M
V
O
E
L
U
M
A
Parte frontal
B
a la toma INPUT 2
a la toma DC IN 6 V
A la toma LINE OUT o la toma de
auriculares (minitoma estéreo)
INPUT 1
Cable de conexión RK-G136
(opcional)
C
La longitud del cable se puede ajustar manualmente tirando o
retrayéndolo.
D
Orificios de la
cubierta del soporte
Coloque correctamente la cubierta del soporte en
los orificios de ésta hasta que quede encajada.
Cubierta del soporte
E
Coloque la cubierta del soporte en la posición superior.
F
Parte posterior
Reproductor de
audio portátil, etc.
Reproductor de
CD/MD, etc.
Computadora, etc
a la toma de corriente de pared
Adaptador de alimentación de ca
(suministrado)
Soporte
Enganche del soporte
Introduzca el soporte en el enganche del soporte y, a
continuación, insértelo en la cubierta del soporte.
Coloque el cable conectado en la ranura.
Español
Antes de utilizar la unidad, lea este manual atentamente y
consérvelo para consultarlo en el futuro.
Para los clientes de México
Sistema de altavoces activo
POR FAVOR LEA DETALLADAMENTE ESTE MANUAL DE
INSTRUCCIONES ANTES DE CONECTAR Y OPERAR ESTE
EQUIPO.
RECUERDE QUE UN MAL USO DE SU APARATO PODRÍA
ANULAR LA GARANTÍA.
ADVERTENCIA
Para reducir el riesgo de incendios o electrocución, no
exponga el dispositivo a la lluvia ni a la humedad.
Para evitar descargas eléctricas, no abra la unidad. En caso de
avería, solicite los servicios de personal cualificado.
Para reducir el riesgo de incendio, no cubra los orificios de
ventilación del dispositivo con periódicos, manteles, cortinas, etc.
y no ponga velas encendidas encima del dispositivo.
Para reducir el riesgo de incendio o sacudida eléctrica, no ponga
objetos que contengan líquido, tal como floreros, encima del
dispositivo
.
No instale el dispositivo en un espacio cerrado, como una
estantería para libros o un armario empotrado.
Precauciones
Seguridad
• Antes de utilizar el sistema, asegúrese de que el voltaje de
funcionamiento del sistema es idéntico al de la fuente de
alimentación local.
Lugar de adquisición Voltaje de funcionamiento
EE. UU. ca de 120 V, 60 Hz
Otros países ca de 100 a 240 V, 50/60 Hz
•
Utilice únicamente el adaptador de alimentación de ca suministrado.
• Después de utilizar el sistema con el adaptador de alimentación
de ca, desconecte el adaptador de la toma de corriente de pared
si el sistema no se va a usar durante un período de tiempo
prolongado. El interruptor POWER no desactiva el adaptador
de alimentación de ca.
Colocación
• No coloque los altavoces en posición inclinada.
• No deje el sistema cerca de fuentes de calor, ni en lugares
expuestos a la luz solar directa, polvo excesivo, humedad,
lluvia o golpes.
Limpieza
No utilice alcohol, bencina ni disolvente para limpiar la unidad.
Funcionamiento
• No abra la unidad. Solicite asistencia técnica únicamente a
personal cualificado.
• Si se introduce algún objeto sólido o líquido en el sistema, haga
que lo revise personal cualificado antes de volver a utilizarlo.
• Aunque este sistema está protegido magnéticamente, no deje
cintas grabadas, relojes, tarjetas de crédito ni disquetes que
utilicen codificación magnética delante de éste durante un
período prolongado de tiempo.
Si la imagen del televisor o la pantalla del monitor
aparece distorsionada debido al magnetismo
Aunque este sistema está protegido magnéticamente, en algunos
casos la imagen de algunos televisores o computadoras personales
puede distorsionarse debido al magnetismo. Si esto ocurre, apague
el televisor o la computadora y vuelva a encenderlo transcurridos
de 15 a 30 minutos. En el caso de la computadora personal, tome
medidas adecuadas, como guardar los datos antes de apagarla.
Si no se produce ninguna mejora, aleje el sistema del televisor o
computadora
imanes cerca del televisor o
mesas de televisores, juguetes, etc., ya que pueden ocasionar una
distorsión magnética de la imagen debido a la interacción con el
sistema.
Si tiene alguna pregunta o problema relacionado con el sistema de
altavoces, consulte con el distribuidor Sony más cercano.
. Asimismo, no coloque objetos que contengan o usen
la computadora
, como soportes de audio,
de la
Identificación de los
componentes
1 Control VOLUME
2 Interruptor POWER
3 Indicador de alimentación
4 Enganche del soporte
5 INPUT 1
Cable de conexión con miniclavija estéreo
6 Orificios de la cubierta del soporte
7 Bandeja
8 INPUT 2
9 Toma DC IN 6 V
Conecte el adaptador de alimentación de ca suministrado.
(consulte la fig. A)
Conexión de los altavoces
(consulte la fig. B)
1 Conecte el adaptador de alimentación de ca
al sistema.
Nota acerca del adaptador de alimentación de ca
Utilice únicamente el adaptador de alimentación de ca
suministrado. No utilice ningún otro adaptador de
alimentación de ca para evitar dañar los altavoces.
Polaridad de la clavija
2 Conecte el altavoz al dispositivo fuente.
Cuando se conecta el sistema a la toma monoaural
del dispositivo fuente
Es posible que el sonido no se emita por el canal derecho. En
tal caso, utilice el adaptador de clavija opcional* PC-236MS.
Para conectar a una toma de auriculares
estereofónicos
Utilice el adaptador de clavija PC-234S opcional o el cable
de conexión RK-G138 opcional.*
* Los accesorios opcionales mencionados anteriormente no se
suministran en algunas áreas.
z Sugerencia
La bandeja de este sistema ha sido fabricada en un material
suave. Es posible instalar un reproductor portátil conectado
a la toma INPUT 1 en la bandeja
manualmente la longitud del cable (~ aprox. 30 cm).
(Consulte la figura C.) Es posible que la función de
desconexión automática no funcione correctamente si en la
bandeja se instala un equipo que genere microondas como,
por ejemplo, un teléfono móvil.
Utilización del reproductor portátil con el
soporte (consulte la fig. D)
Coloque el soporte suministrado tal y como se muestra en la
ilustración. Le será muy útil, por ejemplo, cuando visualice un
reproductor de vídeo portátil.
Es posible ajustar el nivel del soporte modificando la posición de
la cubierta del mismo.
Notas
• Puesto que la luz como, por ejemplo, la luz solar directa, se
refleja cuando pasa a través del soporte, es posible que enfoque
hacia un lugar en concreto (como sucedería con una lente) y
provoque un incendio. No deje el soporte en un lugar cercano a
una fuente de luz mientras no pueda vigilarlo.
• Si utiliza un reproductor portátil con el reproductor instalado en
el soporte, es posible que la unidad se caiga hacia atrás.
Asegúrese de sujetarlo bien con las manos al utilizarlo.
• Es posible que algunos reproductores portátiles no se puedan
instalar en el soporte suministrado debido a su forma.
Instalación del reproductor de audio
portátil en el soporte con el cable
suministrado conectado (consulte la fig. E)
El soporte suministrado cuenta con un orificio para conectar el cable.
Coloque la cubierta del soporte en la posición superior para instalar
el reproductor de audio portátil con un cable conectado al mismo.
Coloque el cable conectado en la ranura para que no quede suelto.
, así como ajustar
Audición del sonido
En primer lugar, baje el volumen de la unidad. Cuando conecte los
altavoces a la salida de auriculares, baje el volumen del
dispositivo fuente.
1 Ajuste el interruptor POWER en ON.
(Consulte la fig.
El indicador de alimentación se enciende.
F-1. )
2 Inicie la reproducción en el dispositivo
fuente.
3 Ajuste el volumen.
Ajuste el volumen del dispositivo fuente a un nivel
moderado y gire el control VOLUME de esta unidad.
(Consulte la fig. G. )
4 Cuando termine de utilizar la unidad, ajuste
el interruptor POWER en OFF.
El indicador de alimentación se apaga.
Notas
• Si conecta el altavoz a un dispositivo con radio o sintonizador
incorporado, es posible que la recepción o sensibilidad de las
emisoras se vea reducida de forma significativa.
• Si el dispositivo fuente tiene funciones de potenciación de
graves o del ecualizador, desactívelas. Si están activadas, el
sonido podría distorsionarse.
• Si la salida de los auriculares del dispositivo fuente tiene un
interruptor de línea, actívelo para que se emita un sonido mejor.
Consulte el manual de instrucciones del dispositivo fuente.
• Si se reproduce al mismo tiempo desde el dispositivo conectado
a la toma INPUT 1 y desde el dispositivo conectado a la toma
INPUT 2, se escucharán ambos sonidos a la vez.
Encendido o apagado
automático de los altavoces
– Función de encendido/apagado automático
Es posible ajustar el sistema para que se encienda automáticamente
cuando reciba una señal de audio de un dispositivo fuente. Al
encender el sistema, el indicador de alimentación se ilumina.
Si no se recibe ninguna señal durante 90 segundos
aproximadamente*, el sistema se apaga automáticamente y el
indicador de alimentación se desactiva.
* El tiempo de apagado automático varía en función de las condiciones
de uso.
1 Ajuste el interruptor POWER en AUTO.
(Consulte la fig. F-2.)
Notas
• Si el nivel de la señal de entrada es demasiado bajo, el sistema
no se encenderá automáticamente.
• Si un dispositivo que genera microondas, como un teléfono
móvil, se encuentra cerca, el sistema podría encenderse
automáticamente.
• Si un teléfono móvil se encuentra conectado al sistema, éste
ultimo podría encenderse automáticamente a causa del ruido o
de una llamada entrante. Si conecta un teléfono móvil, encienda
o apague el sistema manualmente mediante el interruptor
POWER.
• En función del dispositivo fuente, es posible que el sistema no
se apague automáticamente debido al ruido recibido.
• Si no se ha conectado ningún dispositivo a la toma INPUT 1, es
posible que el sistema no se apague automáticamente o que se
encienda inesperadamente.
• En función del nivel de la señal de entrada, es posible que no se
escuche el inicio de ésta.
• Cuando deje el sistema sin supervisión, ajuste el interruptor
POWER en OFF para evitar fallos de funcionamiento.
Solución de problemas
Si experimenta algún problema con el sistema de altavoces,
compruebe la lista siguiente y tome las medidas que se sugieren. Si
el problema persiste, consulte con el distribuidor Sony más cercano.
No hay sonido
• Compruebe que tanto la unidad como el dispositivo fuente están
encendidos.
• Suba el volumen de la unidad.
• Suba el volumen del dispositivo fuente al máximo posible sin
que se produzca una distorsión del sonido. Para obtener más
información del ajuste del volumen, consulte el manual de
instrucciones suministrado con el dispositivo conectado.
• Asegúrese de que todas las conexiones se han realizado
correctamente.
El nivel de sonido es bajo
• Suba el volumen del dispositivo fuente al máximo posible sin
que se produzca una distorsión del sonido. Para obtener más
información del ajuste del volumen, consulte el manual de
instrucciones suministrado con el dispositivo conectado.
• Suba el volumen de la unidad.
El sonido aparece distorsionado
• Baje el volumen del dispositivo fuente hasta que el sonido ya
no aparezca distorsionado. Para obtener más información del
ajuste del volumen, consulte el manual de instrucciones
suministrado con el dispositivo conectado.
• Si el dispositivo fuente tiene la función de potenciador de
graves, desactívela.
• Baje el volumen de la unidad.
Se escucha un zumbido o ruido en la salida
del altavoz.
• Asegúrese de que todas las conexiones se han realizado
correctamente.
• Compruebe que ninguno de los dispositivos de audio se
encuentra demasiado cerca del televisor.
El brillo del indicador de alimentación es
inestable.
Es posible que el brillo del indicador de alimentación se vuelva
inestable al subir el volumen. No se trata de un fallo de funcionamiento.
El sistema no se enciende automáticamente
cuando la función de encendido/apagado
automático está activada.
Si se conecta a la toma de auriculares, suba el volumen del
dispositivo fuente. Si el sistema está conectado a la toma LINE
OUT, ajuste el interruptor POWER en ON.
El sistema no se apaga automáticamente
cuando la función de encendido/apagado
automático está activada.
• Conecte un dispositivo a la toma INPUT 1.
• Reubique el sistema.
• Aleje el dispositivo fuente del sistema.
• Aleje el sistema de dispositivos que generen microondas
potentes, como los teléfonos móviles.
Especificaciones
Sección del altavoz
Sistema de altavoces 48 mm, gama completa, protegido
Tipo cerrado Reflejo de graves
Impedancia 4 Ω
Potencia nominal de entrada 1,8 W
Potencia máxima de entrada 3,6 W
Sección del amplificador
Potencia maxima de salida 1,8 W + 1,8 W (1 kHz, 4 Ω)
Potenciación de graves MEGA BASS
Entrada Cable de conexión con miniclavija
Impedancia de entrada 4,7 kΩ (a 1 kHz)
Generales
Alimentación cc de 6 V (adaptador de alimentación de
Dimensiones (an/al/pr) Aprox. 270 × 105 × 110 mm
Peso Aprox. 700 g, incluyendo la cubierta del
Accesorios suministrados
Cubierta del soporte (1)
Soporte (1)
Adaptador de alimentación de ca (1)
Manual de instrucciones (1)
Accesorios opcionales
Cable de conexión RK-G136, RK-G138
Adaptador de clavija PC-234S, PC-236MS
Los accesorios opcionales mencionados anteriormente no se
suministran en algunas áreas.
El diseño y las especificaciones están sujetos a cambios sin previo aviso.
magnéticamente
estéreo (30 cm) × 1
Miniclavija estéreo × 1
ca suministrado)
soporte
G
12
M
X
I
N
A
M
V
O
E
L
U
M
 Loading...