

Sony SRMASTER SR-PC4,SRMASTER SRPC-5 Operation Manual

MEMORY DATA TRANSFER UNIT
SRPC-5
SR-PC4
OPERATION MANUAL [English]
1st Edition

Before operating the unit, please read this manual
thoroughly and retain it for future reference.
For SRPC-5
Important Safety Instructions
• Read these instructions.
• Keep these instructions.
• Heed all warnings.
• Follow all instructions.
• Do not use this apparatus near water.
• Clean only with dry cloth.
• Do not block any ventilation openings.
Install in accordance with the manufacturer’s
instructions.
• Do not install near any heat sources such as radiators,
heat registers, stoves, or other apparatus (including
amplifiers) that produce heat.
• Do not defeat the safety purpose of the polarized or
grounding-type plug. A polarized plug has two blades
with one wider than the other. A grounding-type plug
has two blades and a third grounding prong. The wide
blade or the third prong are provided for your safety. If
the provided plug does not fit into your outlet, consult an
electrician for replacement of the obsolete outlet.
• Protect the power cord from being walked on or pinched
particularly at plugs, convenience receptacles, and the
point where they exit from the apparatus.
• Only use attachments/accessories specified by the
manufacturer.
• Use only with the cart, stand, tripod, bracket,
or table specified by the manufacturer, or sold
with the apparatus.
When a cart is used, use caution when moving
the cart/apparatus combination to avoid injury from tipover.
• Unplug this apparatus during lightning storms or when
unused for long periods of time.
• Refer all servicing to qualified service personnel.
Servicing is required when the apparatus has been
damaged in any way, such as power-supply cord or plug
is damaged, liquid has been spilled or objects have fallen
into the apparatus, the apparatus has been exposed to
rain or moisture, does not operate normally, or has been
dropped.
WARNING
To reduce the risk of fire or electric shock,
do not expose this apparatus to rain or
moisture.
To avoid electrical shock, do not open the
cabinet. Refer servicing to qualified
personnel only.
THIS APPARATUS MUST BE EARTHED.
This apparatus is provided with a main switch on the rear
panel.
Install this apparatus so that user can access the main
switch easily.
To completely turn off the power, turn off the main power
switch on the rear panel.
WARNING:
Using this unit at a voltage other than 120 V may require
the use of a different line cord or attachment plug, or both.
To reduce the risk of fire or electric shock, refer servicing
to qualified service personnel.
This symbol is intended to alert the user to
the presence of uninsulated “dangerous
voltage” within the product’s enclosure
that may be of sufficient magnitude to
constitute a risk of electric shock to
persons.
This symbol is intended to alert the user to
the presence of important operating and
maintenance (servicing) instructions in
the literature accompanying the
appliance.
Attention-when the product is installed in Rack:
1. Prevention against overloading of branch circuit
When this product is installed in a rack and is supplied
power from an outlet on the rack, please make sure that
the rack does not overload the supply circuit.
2. Providing protective earth
When this product is installed in a rack and is supplied
power from an outlet on the rack, please confirm that
the outlet is provided with a suitable protective earth
connection.
3. Internal air ambient temperature of the rack
When this product is installed in a rack, please make
sure that the internal air ambient temperature of the
rack is within the specified limit of this product.
2

4. Prevention against achieving hazardous condition
due to uneven mechanical loading
When this product is installed in a rack, please make
sure that the rack does not achieve hazardous condition
due to uneven mechanical loading.
5. Install the equipment while taking the operating
temperature of the equipment into consideration
For the operating temperature of the equipment, refer to
the specifications of the Operation Manual.
6. When performing the installation, keep the
following space away from walls in order to obtain
proper exhaust and radiation of heat.
Right, Left : 4 cm (1.6 inches) or more
Rear : 10 cm (4 inches) or more
When installing the installation space must be secured in
consideration of the ventilation and service operation.
• Do not block the ventilation slots at the left side and right
side panels, and vents of the fans.
• Leave a space around the unit for ventilation.
• Leave more than 40 cm of space in the rear of the unit to
secure the operation area.
When the unit is installed on the desk or the like, leave at
least 4 cm of space in the left and right sides.
Leaving 40 cm or more of space above the unit is
recommended for service operation.
WARNING: THIS WARNING IS APPLICABLE
FOR USA ONLY.
If used in USA, use the UL LISTED power
cord specified below.
DO NOT USE ANY OTHER POWER
CORD.
Plug Cap Parallel blade with ground pin
(NEMA 5-15P Configuration)
Cord Type SJT, three 16 or 18 AWG
wires
Length Minimum 1.5 m (4 ft .11 in.),
Less than 2.5 m (8 ft .3 in.)
Rating Minimum 10A, 125V
Using this unit at a voltage other than 120V
may require the use of a different line cord
or attachment plug, or both. To reduce the
risk of fire or electric shock, refer servicing
to qualified service personnel.
WARNING: THIS WARNING IS APPLICABLE
FOR OTHER COUNTRIES.
1. Use the approved Power Cord (3-core mains lead) /
Appliance Connector / Plug with earthing-contacts that
conforms to the safety regulations of each country if
applicable.
2. Use the Power Cord (3-core mains lead) / Appliance
Connector / Plug conforming to the proper ratings
(Voltage, Ampere).
If you have questions on the use of the above Power Cord /
Appliance Connector / Plug, please consult a qualified
service personnel.
CAUTION
The apparatus shall not be exposed to dripping or
splashing. No objects filled with liquids, such as vases,
shall be placed on the apparatus.
Do not install the appliance in a confined space, such as
book case or built-in cabinet.
CAUTION
The unit is not disconnected from the AC power source
(mains) as long as it is connected to the wall outlet, even if
the unit itself has been turned off.
For kundene i Norge
Dette utstyret kan kobles til et IT-strømfordelingssystem.
Apparatet må tilkoples jordet stikkontakt
Suomessa asuville asiakkaille
Laite on liitettävä suojamaadoituskoskettimilla
varustettuun pistorasiaan
För kunderna i Sverige
Apparaten skall anslutas till jordat uttag
For the customers in the U.S.A.
This equipment has been tested and found to comply with
the limits for a Class A digital device, pursuant to Part 15
of the FCC Rules. These limits are designed to provide
reasonable protection against harmful interference when
the equipment is operated in a commercial environment.
This equipment generates, uses, and can radiate radio
frequency energy and, if not installed and used in
accordance with the instruction manual, may cause
harmful interference to radio communications. Operation
of this equipment in a residential area is likely to cause
harmful interference in which case the user will be
required to correct the interference at his own expense.
You are cautioned that any changes or modifications not
expressly approved in this manual could void your
authority to operate this equipment.
All interface cables used to connect peripherals must be
shielded in order to comply with the limits for a digital
device pursuant to Subpart B of Part 15 of FCC Rules.
This device complies with Part 15 of the FCC Rules.
Operation is subject to the following two conditions: (1)
this device may not cause harmful interference, and (2) this
device must accept any interference received, including
interference that may cause undesired operation.
For the customers in Canada
This Class A digital apparatus complies with Canadian
ICES-003.
For the customers in Europe
This product with the CE marking complies with the EMC
Directive issued by the Commission of the European
Community.
3

Compliance with this directive implies conformity to the
following European standards:
• EN55103-1: Electromagnetic Interference(Emission)
• EN55103-2: Electromagnetic Susceptibility(Immunity)
This product is intended for use in the following
Electromagnetic Environment: E4 (controlled EMC
environment, ex. TV studio).
For the customers in Europe
The manufacturer of this product is Sony Corporation, 17-1 Konan, Minato-ku, Tokyo, Japan.
The Authorized Representative for EMC and product
safety is Sony Deutschland GmbH, Hedelfinger Strasse
61, 70327 Stuttgart, Germany. For any service or
guarantee matters please refer to the addresses given in
separate service or guarantee documents.
This apparatus shall not be used in the residential area.
For the customers in Europe, Australia and New
Zealand
WARNING
This is a Class A product. In a domestic environment, this
product may cause radio interference in which case the
user may be required to take adequate measures.
For the customers in Taiwan only
For SR-PC4
WARNING
To reduce the risk of fire or electric shock,
do not expose this apparatus to rain or
moisture.
To avoid electrical shock, do not open the
cabinet. Refer servicing to qualified
personnel only.
WARNING
This unit has no power switch.
When installing the unit, incorporate a readily accessible
disconnect device in the fixed wiring, or connect the power
plug to an easily accessible socket-outlet near the unit. If
a fault should occur during operation of the unit, operate
the disconnect device to switch the power supply off, or
disconnect the power plug.
WARNING: THIS WARNING IS APPLICABLE
FOR USA ONLY.
If used in USA, use the UL LISTED power
cord specified below.
DO NOT USE ANY OTHER POWER
CORD.
Plug Cap Parallel blade
(NEMA 1-15P Configuration)
Cord Type NISPT-2 or SPT-2,
two 16 or 18 AWG wires
Length Minimum 1.5 m (4 ft .11 in.),
Less than 2.5 m (8 ft .3 in.)
Rating Minimum 7 A, 125 V
Using this unit at a voltage other than 120V
may require the use of a different line cord
or attachment plug, or both. To reduce the
risk of fire or electric shock, refer servicing
to qualified service personnel.
WARNING: THIS WARNING IS APPLICABLE
FOR OTHER COUNTRIES.
1. Use the approved Power Cord (2-core mains lead) /
Appliance Connector / Plug that conforms to the safety
regulations of each country if applicable.
2. Use the Power Cord (2-core mains lead) / Appliance
Connector / Plug conforming to the proper ratings
(Voltage, Ampere).
If you have questions on the use of the above Power Cord /
Appliance Connector / Plug, please consult a qualified
service personnel.
IMPORTANT
The nameplate is located on the bottom.
4

For the customers in the U.S.A.
This equipment has been tested and found to comply with
the limits for a Class A digital device, pursuant to Part 15
of the FCC Rules. These limits are designed to provide
reasonable protection against harmful interference when
the equipment is operated in a commercial environment.
This equipment generates, uses, and can radiate radio
frequency energy and, if not installed and used in
accordance with the instruction manual, may cause
harmful interference to radio communications. Operation
of this equipment in a residential area is likely to cause
harmful interference in which case the user will be
required to correct the interference at his own expense.
You are cautioned that any changes or modifications not
expressly approved in this manual could void your
authority to operate this equipment.
All interface cables used to connect peripherals must be
shielded in order to comply with the limits for a digital
device pursuant to Subpart B of Part 15 of FCC Rules.
This device complies with Part 15 of the FCC Rules.
Operation is subject to the following two conditions: (1)
this device may not cause harmful interference, and (2) this
device must accept any interference received, including
interference that may cause undesired operation.
For the customers in Canada
This Class A digital apparatus complies with Canadian
ICES-003.
For the customers in Europe, Australia and New
Zealand
WARNING
This is a Class A product. In a domestic environment, this
product may cause radio interference in which case the
user may be required to take adequate measures.
For the customers in Europe
The manufacturer of this product is Sony Corporation, 17-1 Konan, Minato-ku, Tokyo, 108-0075 Japan.
The Authorized Representative for EMC and product
safety is Sony Deutschland GmbH, Hedelfinger Strasse
61, 70327 Stuttgart, Germany.
This apparatus shall not be used in the residential area.
For the customers in Taiwan only
5

Table of Contents
Overview................................................................................ 7
Features ................................................................................... 7
System Configuration Example .............................................. 7
Names and Functions of Parts ............................................9
Front ........................................................................................ 9
Rear ....................................................................................... 10
Setup.................................................................................... 11
Setup Flow ............................................................................ 11
Preparation ............................................................................ 11
Shared File Server Settings ................................................... 11
Displaying the Web Application Screen ............................... 11
Network Settings................................................................... 12
Mounting the File Server ...................................................... 12
Proxy Settings ....................................................................... 13
Saving and Recalling GUI Configuration Data .................... 15
Configuring the Monitor Output Signal................................ 15
Lookup Table (LUT) Settings............................................... 16
Color Control Function for the Monitor Output ................... 16
Basic Operations................................................................ 17
Web Application Screen ....................................................... 17
Displaying Video Data.......................................................... 17
Importing Files ...................................................................... 18
Other Operations ................................................................ 21
Viewing SRMemory Card Information ................................ 21
Viewing File Server Data...................................................... 21
Displaying the Web Client IP Addresses .............................. 21
Managing Log Files .............................................................. 21
Automatic Execution Using a Job File.................................. 22
Specifications ..................................................................... 23
SRPC-5.................................................................................. 23
SR-PC4.................................................................................. 24
Appendix ............................................................................. 24
Error/Warning Messages....................................................... 24
Salvaging SRMemory Cards for which File Content
was Lost ....................................................................... 25
List of Keyboard Shortcuts ................................................... 25
Supported Formats ................................................................ 26
LUT File Formats Applicable to This Board ........................ 26
MPEG-4 Visual Patent Portfolio License ............................. 27
Job File Samples ................................................................... 28
6
Table of Contents

Overview
The SRPC-5 or SR-PC4 (herein referred to as the “unit”)
is a data transfer unit used for displaying and transferring
materials recorded on an SRMemory card.
Using the unit, you can view materials recorded on an
SRMemory card on a master monitor, or transfer recorded
materials on an SRMemory card to a server or non-linear
editing equipment.
Operations can be performed via a web browser on a PC or
workstation. These operations include clip playback/
pausing, clip list display, and metadata confirmation/
editing.
Features
View video recorded on SRMemory cards
The unit is equipped with an HD-SDI connector that
allows you to view video recorded on an SRMemory card
on a master monitor.
[PC5] The HD-SDI connector also supports 3G-SDI dual
link, allowing display of a wide range of formats.
Transfer data recorded on SRMemory
cards
Material recorded on an SRMemory card can be
transferred to a server or non-linear editing equipment via
Gigabit Ethernet.
Marks for model-specific functions
This manual uses the following markers to indicate
functions that are specific to the SRPC-5 or SR-PC4.
[PC5] : SRPC-5
[PC4] : SR-PC4
10 Gigabit Ethernet and eSATA support
By installing a commercially available 10GbE network
interface card into the PCIe expansion slot on the rear of
the unit, even faster data transfer is possible via 10 Gigabit
Ethernet.
By installing a commercially available eSATA card into
the PCIe expansion slot, you can transfer data to external
HDDs, etc.
For details on recommended third-party products, contact
your local Sony representative.
System Configuration Example
The following are examples of network system configurations in which data is transferred between a shared file server
using the unit.
For the SRPC-5
Shared file server
Switching hub
Web client
SRPC-5
HD monitor
Overview
7
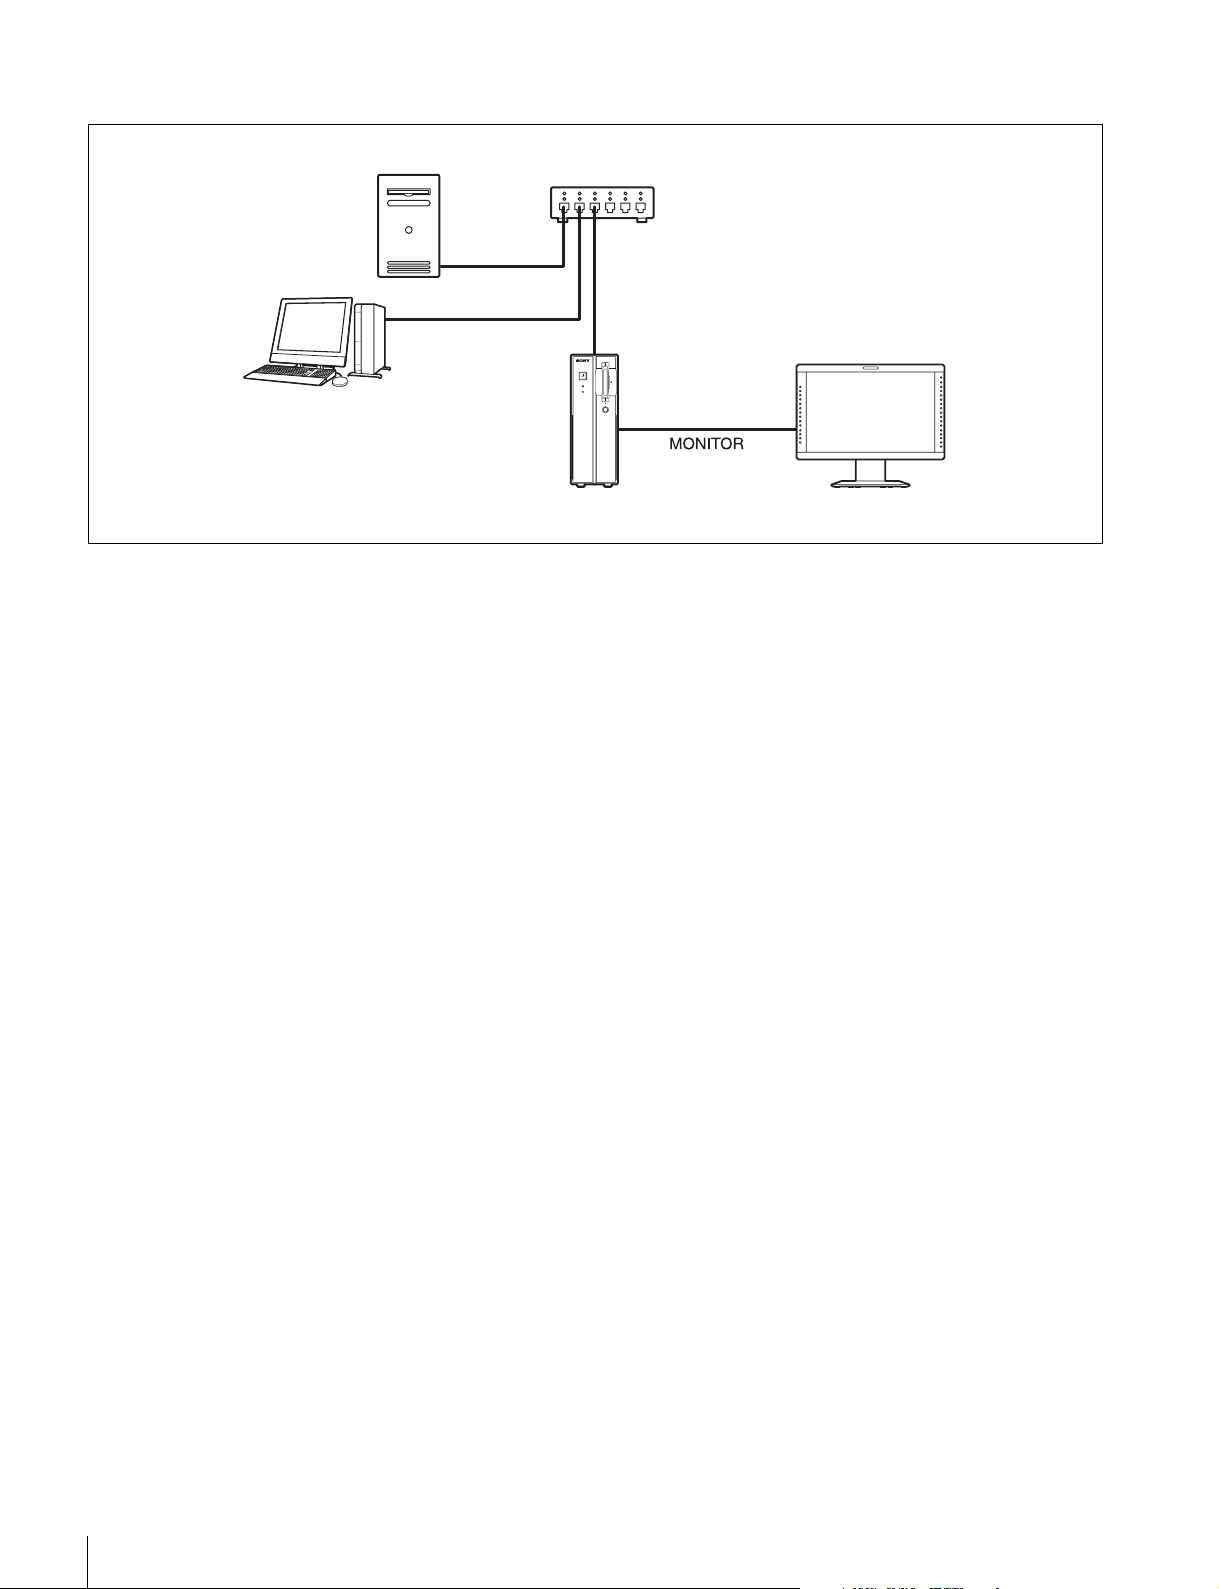
For the SR-PC4
Web client
Shared file server
Switching hub
SR-PC4
HD monitor
8
Overview
Names and Functions of Parts
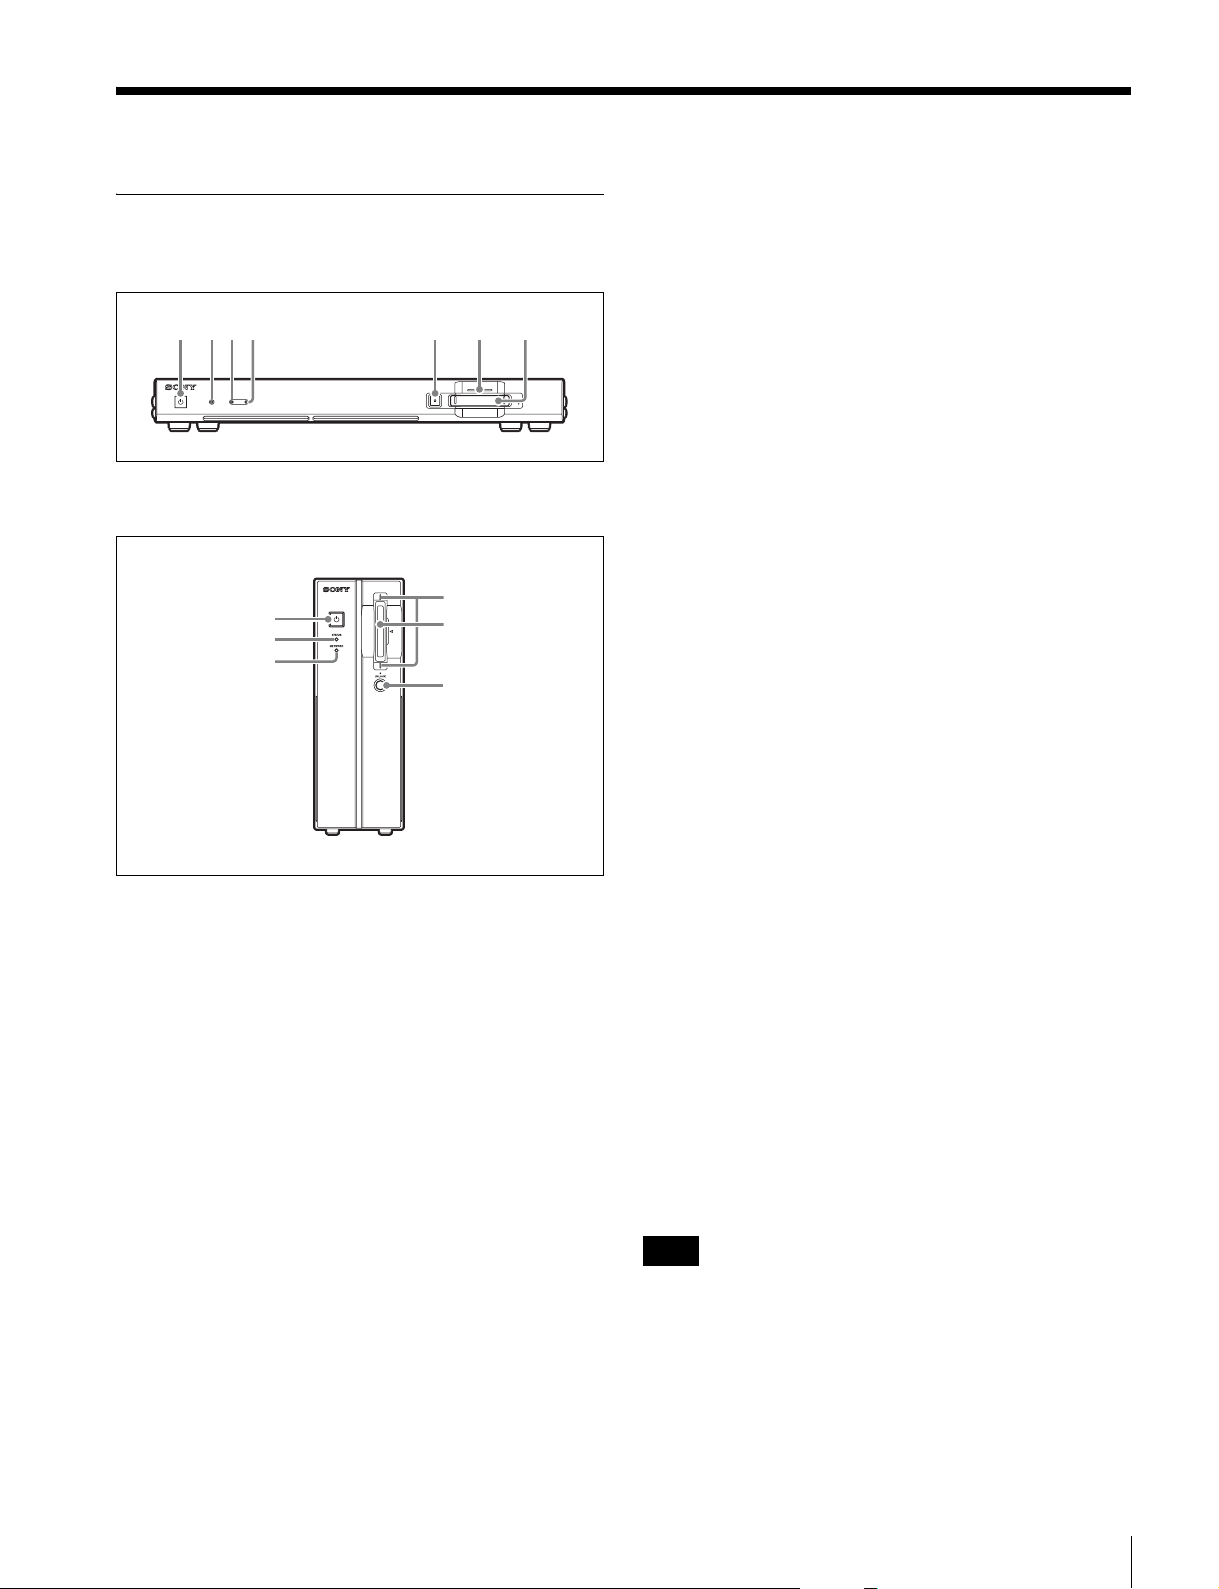
Front
SRPC-5
1234 5 6 7
SR-PC4
6
1
2
4
a On/standby button
[PC5] When the main power switch on the rear of the unit
is turned on, this turns on the unit or sets it to standby
mode.
[PC4] Turns the unit on/off.
The button will light or blink based on the operating status
of the unit.
Lit red: The unit is in standby mode.
Blinking green: The unit is starting up.
Lit green: The unit is turned on.
Blinking green: If the button blinks green after startup,
the unit may be malfunctioning.
Blinking red: [PC4] If the button is blinking red before
the unit is turned on, the power supply voltage may be
incorrect.
If the button blinks green after startup or blinks red, stop
operation and contact your local Sony representative.
b STATUS indicator
Displays the status of the unit.
Lit green: Operating normally.
Blinking green: The unit is starting up.
Lit yellow: A warning has occurred.
7
8
Lit red: An error has occurred.
Blinking blue: The unit is starting up in default IP
address mode (see page 12).
c [PC5] VTR indicator
This is not used in this version.
d NETWORK indicator
Displays the communication status between the unit and
the server.
Off: The server is not mounted.
Lit green: The server is mounted.
Blinking green: Data is being transferred.
e [PC5] Eject button
Press this to eject the SRMemory card.
f SRMemory indicator
Displays the status of the SRMemory card inserted in the
slot.
Off: The SRMemory card is logically detached from the
unit.
Lit blue: The SRMemory card is connected to the unit and
available for use.
Lit green: Data is being read from the SRMemory card.
Blinking blue
attached to or detached from the unit.
Blinking green
signals, such as file name changes, is being written.
Blinking purple
is being performed from the menu.
Blinking red
performed in response to an error.
Fast blinking red
1)
: The SRMemory card is logically being
1)
: Data other than audio and video
1)
: Files are being deleted or formatting
1)
: Salvaging or formatting is being
1)
: A problem was detected while
processing the SRMemory card. Eject or salvage the
card or perform the appropriate operation as instructed
by the message that appears.
1) Blinking LED: Blinks at 1-second interval.
Fast blinking LED: Blinks at 1/4-second interval.
g SRMemory slot
Insert the SRMemory card here.
Note
[PC4] Be sure to insert the SRMemory card all the way into
the slot. The card may not lock into place if it is not
inserted completely.
h [PC4] UNLOCK button
Unlocks the SRMemory slot.
Press this button to unlock the slot before removing an
SRMemory card.
Names and Functions of Parts
9
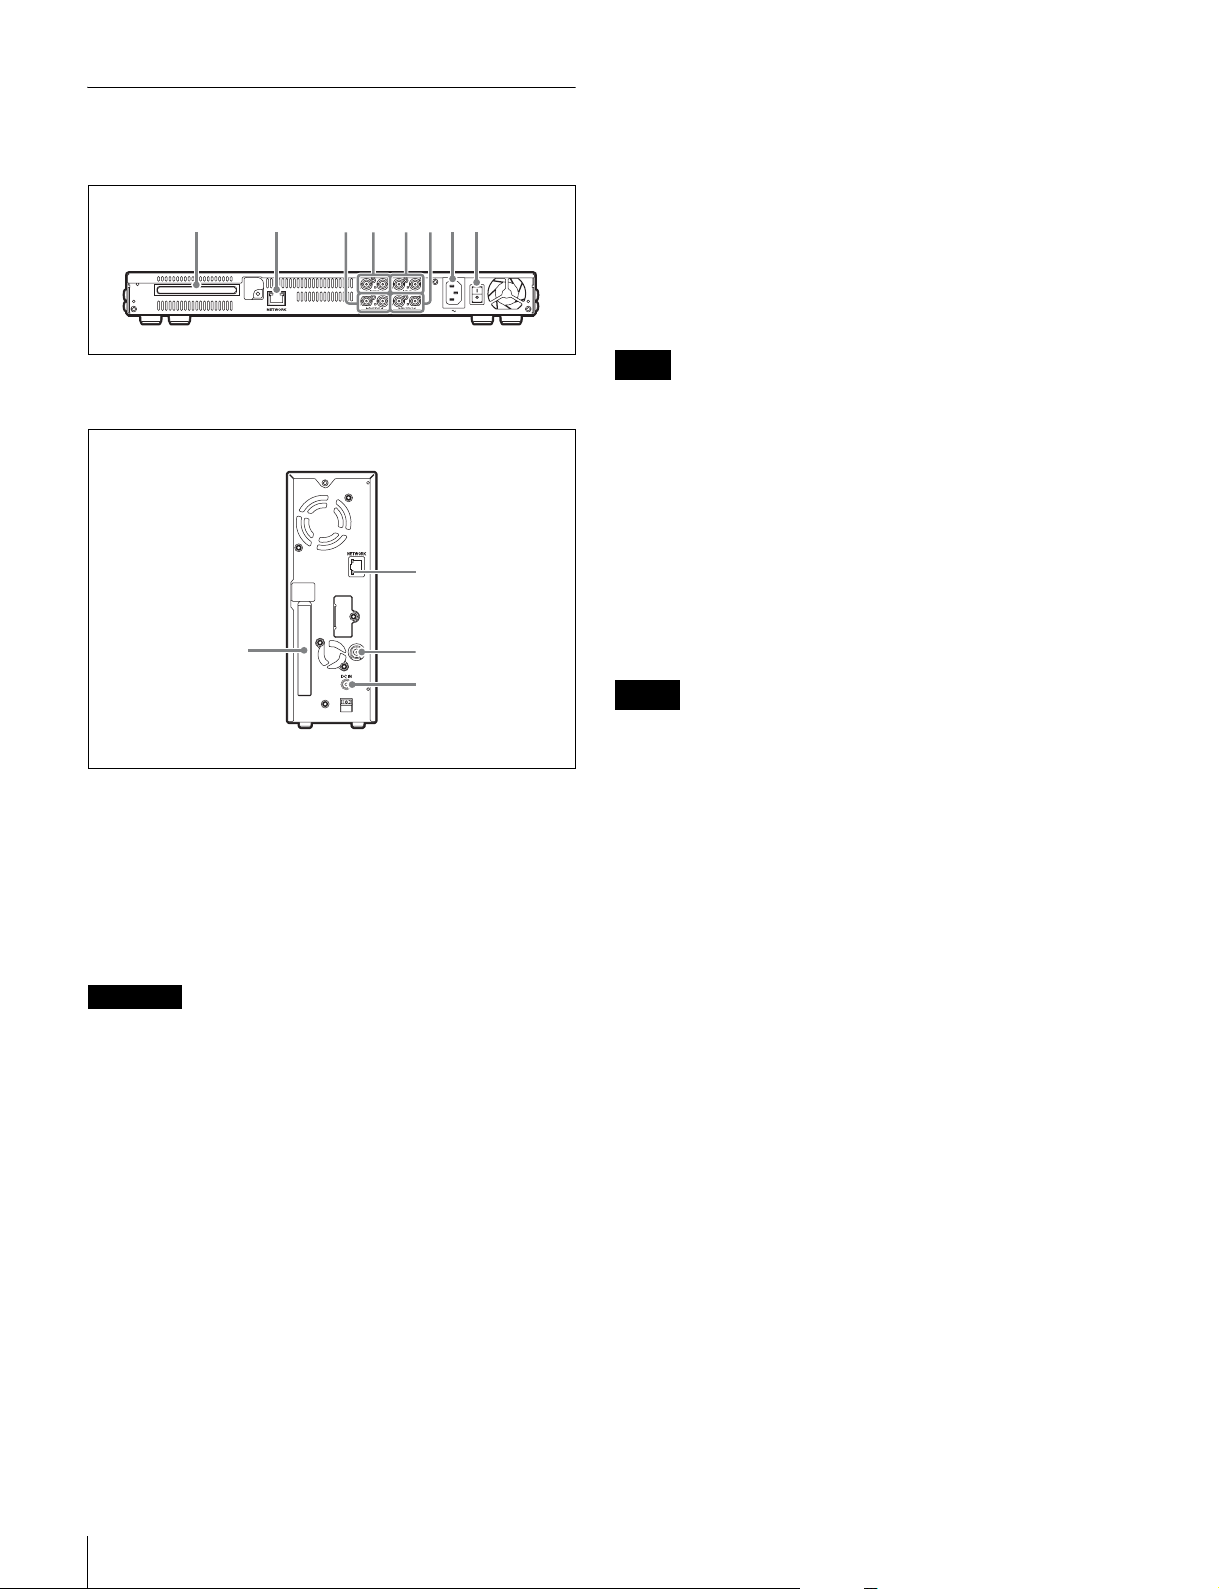
Rear
SRPC-5
12345678
g [PC5] AC IN connector
Connect the power cord here for connection to a power
outlet.
h [PC5] Main power switch
Use this to turn the power supply on/off. During regular
use of the unit, leave the main power switch in the on
position, and use the on/standby button on the front of the
unit to switch between operational mode and standby
mode.
Note
SR-PC4
2
1
9
0
a PCIe expansion slot
You can install a commercially available 10GbE card or
eSATA card here.
b NETWORK connector
Connect a network cable here to enable file transfer to the
file server and control of the unit from a web client.
Always make sure that the unit is in standby mode before
setting the main power switch to the off position to turn off
the power.
i [PC4] MONITOR connector
HD SDI signals are output from here for connection to an
HD monitor.
j [PC4] DC IN connector
Connect the supplied AC adapter here and connect it to a
power outlet.
Notes
• Do not use AC adapters other than the one supplied.
• Before disconnecting the AC adapter, always turn off the
unit using the on/standby button on the front panel of the
unit.
CAUTION
• For safety, do not connect the connector for peripheral
device wiring that might have excessive voltage to this
port. Follow the instructions for this port.
• When you connect the NETWORK cable of the unit to
peripheral device, use a shielded-type cable to prevent
malfunction due to radiation noise.
c [PC5] VTR I/F OUTPUT connector
Used for future expansion. This is not used in this version.
d [PC5] VTR I/F INTPUT connector
Used for future expansion. This is not used in this version.
e [PC5] AUX INPUT connector
Used for future expansion. This is not used in this version.
f [PC5] AUX OUTPUT connector
HD SDI signals are output from here for connection to an
HD monitor.
10
Names and Functions of Parts
 Loading...