

Sony SRG-120DU User Manual

HD Color
C-187-100-11 (1)
Video Camera
Operating Instructions
Before operating the unit, please read this manual thoroughly
and retain it for future reference.
SRG-120DU
© 2015 Sony Corporation

Table of Contents
Overview
Features .......................................................3
How to Use This Operating Instructions... 3
System Configuration.................................4
Operating a Camera Using the Supplied
Infrared Remote Commander.............4
Operating a Camera Using the IP Remote
Controller ........................................4
Operating Multiple Cameras Using the IP
Remote Controller ............................5
Operating Multiple Cameras Using Multiple
IP Remote Controllers.......................6
Precautions for Preventing Access to the
Camera by an Unintended
Third Party.............................................7
Appendix
Message List..............................................18
Troubleshooting........................................19
Menu Configuration ..................................21
Preset Items...............................................23
License.......................................................24
Adjusting and Setting with Menus
About On-Screen Menus ............................8
Main Menu...............................................8
Setting Menus...........................................8
Control Button Display Section ..................8
EXPOSURE Menu........................................9
WHITE BALANCE Menu............................10
PICTURE Menu ..........................................11
PAN TILT ZOOM Menu..............................11
SYSTEM Menu ...........................................12
STATUS Menu............................................13
Operation Using the Supplied
Infrared Remote Commander
Pan/Tilt and Zoom Operation ...................14
Panning and Tilting .................................14
Zooming ................................................15
Operating Multiple Cameras with the
Infrared Remote Commander...........15
Adjusting the Camera ...............................15
Focusing on a Subject..............................15
Shooting with Back Lighting....................15
Storing the Camera Settings in Memory
— the Presetting Feature...................16
2

Overview
How to Use This Operating Instructions
Features
• The 1/2.8 type Exmor CMOS camera (utilising
approximately 2 million valid pixels) allows for highdefinition shooting with superior picture quality.
• 12x optical zoom with wide-range
71-degree horizontal angle zoom lens.
• By adopting its wide and dynamic range functions, you
can see the optimised shooting image which
incorporates bright and dark subjects at the same time.
• Adopts the industry standard RS-232 interface of
VISCA camera protocol in external communication.
Long distance remote operation available using RS-
232.
• High-speed and low-noise pan/tilt functions support a
variety of purposes.
• You can use the infrared remote commander to set the
camera and also to select panning, tilting and zooming
from the setting menu.
• You can store up to 16 kinds of camera direction and
camera status into the camera.
• You can use the LAN cable for external
communication. This will make system construction
easier.
• The camera can be set for a variety of HD video formats
and has a USB3.0 video output terminal.
This Operating Instructions explains how to operate the
HD Color Video Camera from a computer via a network
and from a remote controller (not supplied).
The Operating Instructions is designed to be read on the
computer display.
This section gives tips on making the most of the
Operating Instructions. Read it before you operate the
camera.
Jumping to a related page
When you read the Operating Instructions on the
computer display, you can click on a sentence to jump to
a related page.
Printing the Operating Instructions
Depending on your system, certain displays or
illustrations in the Operating Instructions, when printed
out, may differ from those that appear on your screen.
Remote Controller
You can operate and set the camera by using the supplied
infrared remote commander or the IP Remote Controller
(RM-IP10) (optional accessory).
Installation Manual (printed matter)
The supplied Installation Manual describes the names and
functions of parts and controls of the camera, connection
examples, and how to set up the camera. Be sure to read
the Installation Manual before hand.
3

System Configuration
This unit has various system configuration capabilities using optional products. This section describes typical system
examples with the required components and the main usage of each system.
Operating a Camera Using the Supplied Infrared Remote Commander
What you can do with this system
To operate the camera readily from a short distance.
System configuration
Computer
Infrared Remote
Commander (supplied)
Video signal
Signal flow
Operating a Camera Using the IP Remote Controller
What you can do with this system
To perform pan/tilt and zoom operations using the joystick of the IP remote controller, and to perform the Preset operation
using the button.
An application software that supports this unit is needed.
For details about the application software, consult your Sony dealer.
System configuration
Computer
IP Remote Controller (not supplied)
Video signal
Remote Control (VISCA) signal
Signal flow
Note
Select the MODE selector of IP remote controller to position 0 (automatically selected) when using a combination of this
unit and IP remote controller. For details, refer to the Operating Instructions of IP remote controller.
4

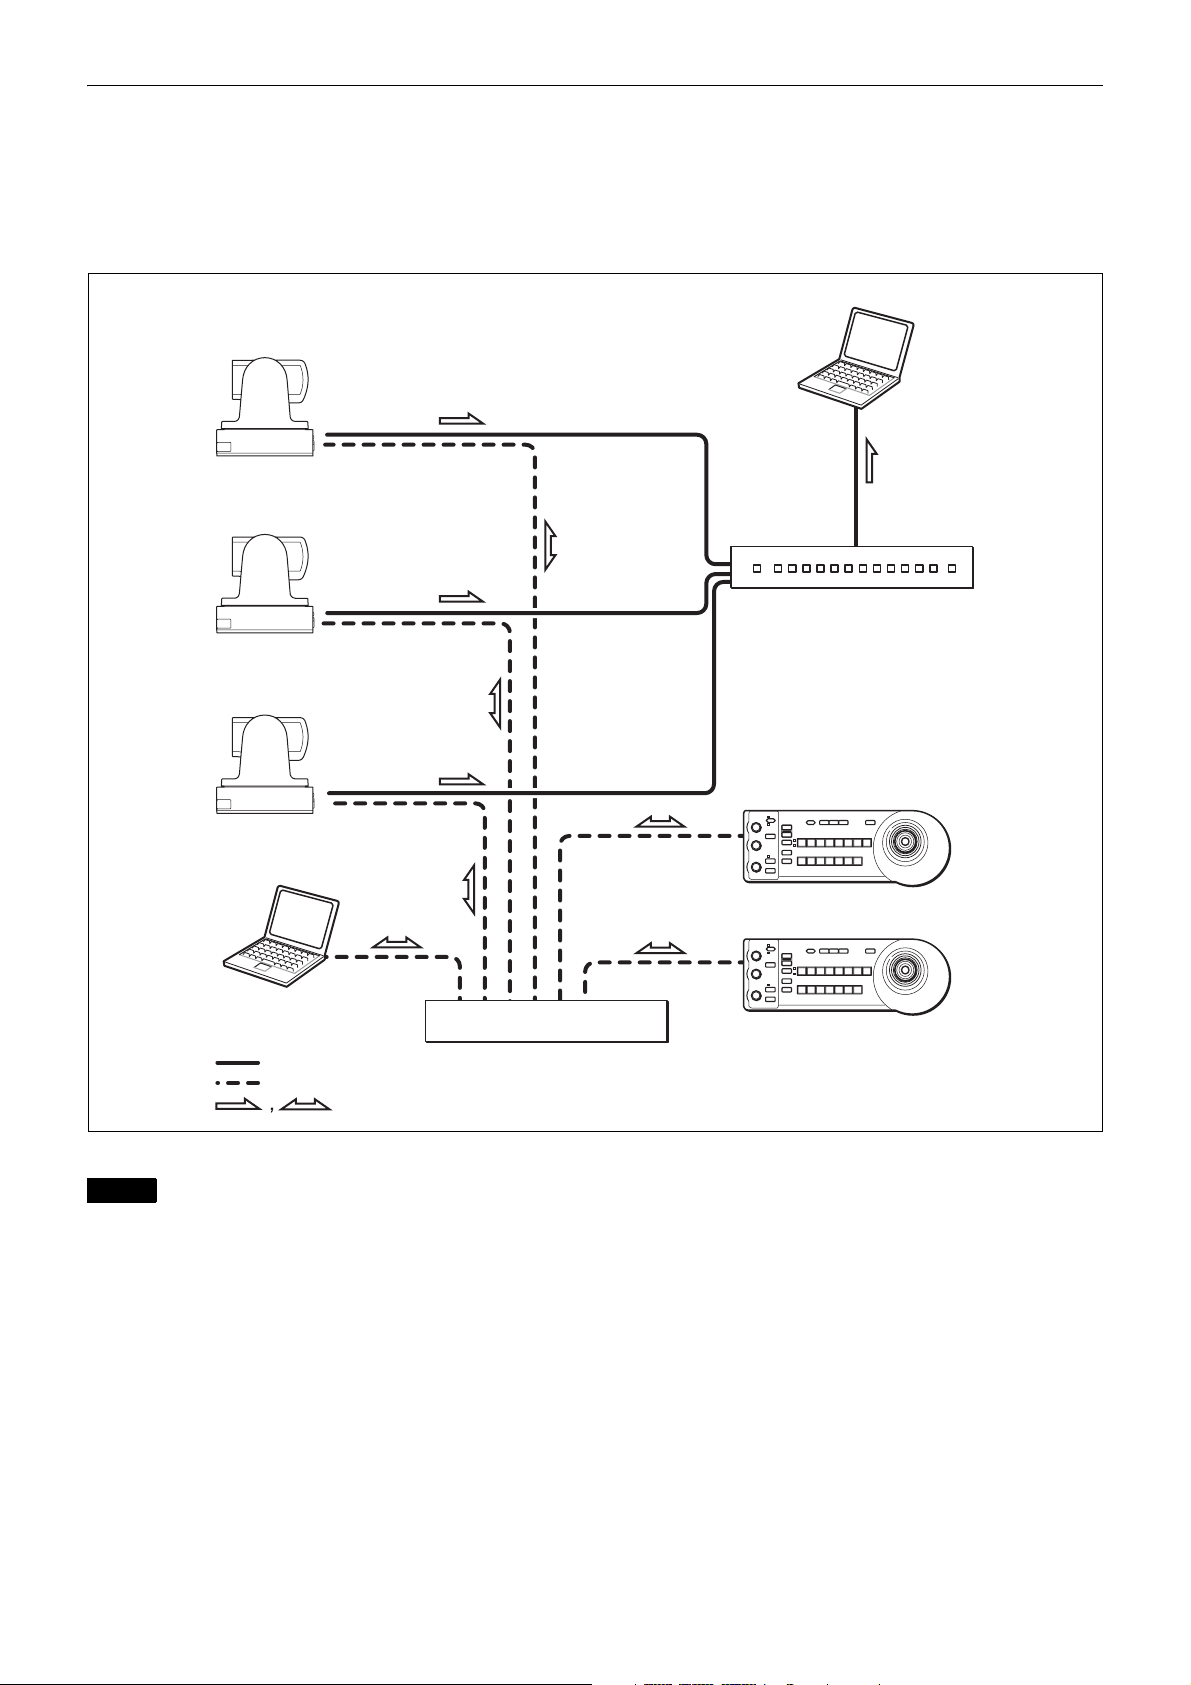
Operating Multiple Cameras Using the IP Remote Controller
What you can do with this system
You can operate up to 7 cameras with daisy chain connection using the IP remote controller (not supplied).
System Configuration
Computer
USB3.0 hub
IP Remote Controller (not supplied)
Video signal
Remote control (VISCA) signal
Signal flow
,
Notes
• Only RS-232 connection is available for VISCA CONTROL.
• You need to match the communication speed between the camera and the IP remote controller.
• Only one camera at a time can be displayed on the computer.
• You cannot use the RS-232 connections when using the LAN connection.
• The specified frame rate may not be output when communicating via a USB3.0 hub.
5
Operating Multiple Cameras Using Multiple IP Remote Controllers
What you can do with this system
• You can connect up to 112 cameras and five IP remote controllers.
• The joystick of the IP remote controller allows comfortable pan/tilt and zoom operations.
System configuration
Computer
USB3.0 hub
IP Remote Controller (not supplied)
Computer for the setting
Video signal
Remote control (LAN) signal
Signal flow
Notes
Switching hub
IP Remote Controller (not supplied)
• You cannot use the RS-232 connections when using the LAN connection.
• The specified frame rate may not be output when communicating via a USB3.0 hub.
6

Precautions for Preventing Access to the Camera by an Unintended Third Party
The camera may be accessed by an unintended third party
on the network (LAN or VISCA), depending on the usage
environment. If the camera is accessed by an unintended
third party, there may be undesired effects such as
operations or settings that may interfere with viewing.
The camera can be fraudulently accessed in a network
environment where a device is connected or connectable
to the network without the administrator’s permission, or
a PC or other network device connected to the network
can be used without any permission. If the computer to
check USB images is connected to a network, there may
be a risk of information leaks, obstructed viewing due to
infection by a virus, or other risks. Connect to these
environments at your own risk.
7
Adjusting and Setting with Menus
About On-Screen Menus
You can change various settings, such as shooting
conditions and system setup of the camera, while
observing menus displayed on a connected computer
screen.
To display the menu and images on the computer screen,
dedicated software (SRGViewer) is needed.
This section explains how to read the on-screen menus
before starting menu operations.
For the overall menu configurations, see “Menu
Configuration” (page 21).
Note
You cannot perform pan/tilt operations while the menu is
displayed.
Setting Menus
The setting menu selected on the main menu is displayed.
a Setting menu
The name of the setting menu currently selected is
displayed here.
b Selected item
Selects a setting item.
The selected item is shown by the cursor.
Move the cursor up or down by pressing the V or v
button on the infrared remote commander.
Main Menu
To display the main menu, press the DATA SCREEN
button on the supplied infrared remote commander.
a Selected item
Selects a setting menu.
The selected item is shown by the cursor. The cursor
moves up or down by pressing the V or v button on the
infrared remote commander.
b Menu items
To display a setting menu, select one using the V or v
button on the infrared remote commander and press
the HOME button on the infrared remote commander.
c Setting items
The setting items for this setting menu are displayed.
Select the setting item using the V or v button on the
infrared remote commander.
d Set value
The currently set values are displayed.
To change a set value, use the B or b button on the
infrared remote commander.
For the default value of each setting item, see “Menu
Configuration” (page 21).
Control Button Display Section
Names of buttons displayed on the monitor are different
from buttons on the infrared remote commander to be
used.
Use the proper buttons on the infrared remote
commander, referring to the following pictures.
Main menu
8
 Loading...