

Sony SNC-DH240T, SNC-ZM551-R, SNC-XM637, SNC-XM631, SNC-XM632 User Manual
...
A-EAK-100-15 (1)
Network Camera
Application Guide
1.5
Before operating the unit, please read this manual thoroughly
and retain it for future reference.
© 2012 Sony Corporation

Table of Contents
Overview
Using the SNC toolbox .......................................... 3
Starting SNC toolbox ......................................... 3
How to use SNC toolbox .................................... 3
Searching devices ............................................... 5
Assigning an IP address ..................................... 5
Using the Network settings ................................ 7
Registering in My device ................................... 8
Changing the Device list display method ........... 9
Setting SNC toolbox options ............................ 10
Using Privacy Masking — Masking a Camera
Image .............................................................. 11
Using Panorama Creator — Creating a Panorama
Image .............................................................. 13
Using the Custom Homepage — Setting the
customized homepage .................................... 14
Creating and Uploading the Voice alert file ..... 15
Using the Firmware Upgrade ........................... 18
Using CGI Sending .......................................... 19
Using the Schedule Task .................................. 19
Configuring the device setting ......................... 21
Device restart and initialization ....................... 21
Installing SNC toolbox ..................................... 21
Using the SNC audio upload tool ....................... 22
Installing SNC audio upload tool ..................... 22
Connecting the Camera to the Computer ......... 23
How to use the SNC audio upload tool ............ 23
Configuring Windows Firewall .......................... 27
When using Windows Vista ............................. 27
When using Windows 7 ................................... 28
When using Windows 8 ................................... 30
2
Table of Contents
Overview
This instruction manual is for application software, such
as the SNC toolbox.
Note
Some function described in this manual may not be
displayed, depending on the function of the connected
camera.
Using the SNC toolbox
Explains the functions in SNC toolbox.
To install SNC toolbox, see “Installing SNC toolbox” on
page 21.
Notes
• SNC toolbox may not operate correctly if you use a
personal firewall or antivirus software in your
computer. In this case, disable the software.
• If you are using Windows XP Service Pack 2 or later,
Windows Vista, Windows 7 or Windows 8, disable
Windows Firewall. Otherwise SNC toolbox will not
operate correctly. To set Windows Firewall see:
“Configuring Windows Firewall” in “When using
Windows Vista” on page 27, or “Configuring
Windows Firewall” in “When using Windows 7” on
page 28, or “Configuring Windows Firewall” in
“When using Windows 8” on page 30.
• The model on sale in China does not support the SSL
function.
• To perform SSL communication with a camera,
configure the settings of SNC toolbox.
To configure the settings when registering in My
device, see “Registering in My device” on page 8.
To configure the settings for each device, see “Modify
Device Entry” in “How to use SNC toolbox” on
page 3.
To configure the settings for multiple devices at the
same time, see “Network tab” in “Setting SNC
toolbox options” on page 11.
Starting SNC toolbox
toolbox from the application list displayed on the Apps
screen.
SNC toolbox starts.
The main screen appears. SNC toolbox detects device(s)
connected to the local network and displays the list.
When you are using Windows Vista, message “User
Account Control – An unidentified program wants
access to your computer” may appear. In this case, click
Allow.
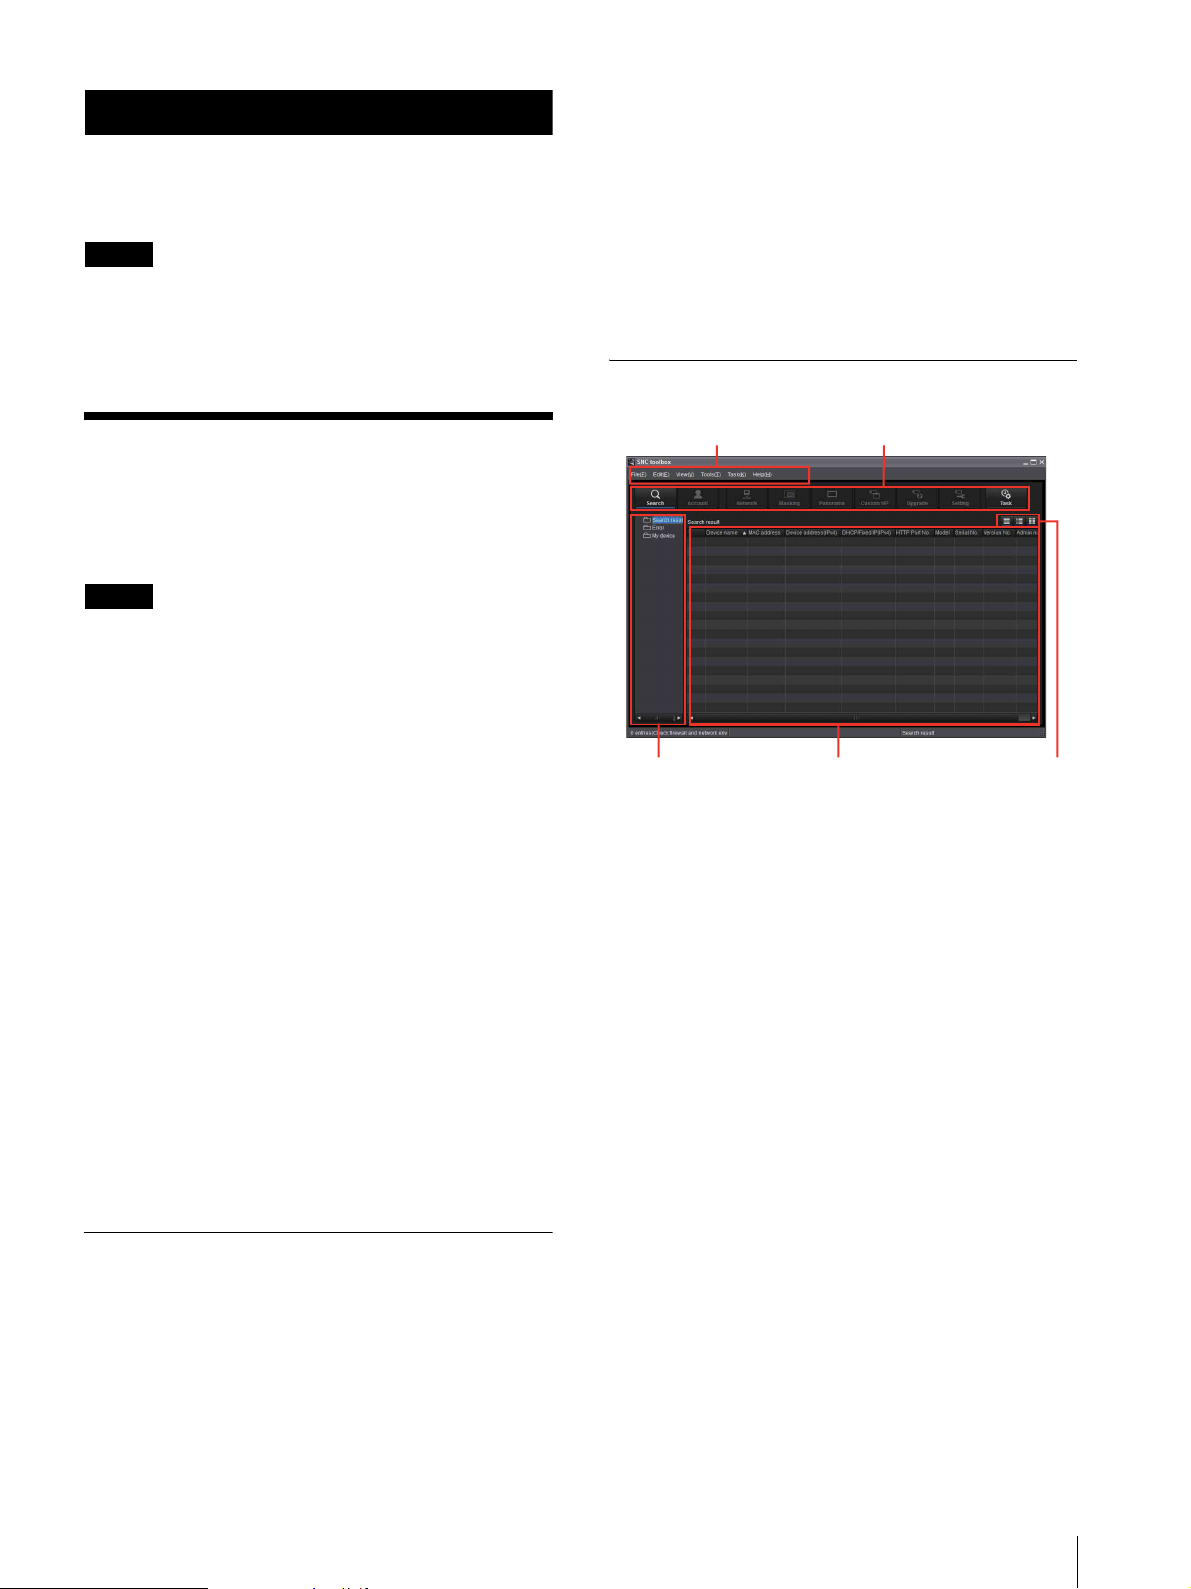
How to use SNC toolbox
Menu bar Function buttons
Device tree display
Device list
Menu bar
All functions can be selected from here.
File (F) menu
Import: Reads the Device list file (CSV format).
Export: Outputs the Device list in a CSV format file.
Close: Exits SNC toolbox.
Edit (E) menu
Cut: Cuts off a device or folder.
Copy: Copies a device or folder.
Paste: Pastes a device or folder.
Select All: Selects all devices in the Device list.
Add Folder: Creates a folder.
Add Device Entry: Manually registers a device.
Modify Device Entry: Edits the device information.
Remove: Removes a device from a folder.
Delete: Deletes a device or folder.
View button
If you are using Windows XP, Windows Vista or
Windows 7, select All Programs from Windows Start
menu, then select SNC toolbox and SNC toolbox in
sequence.
If you are using Windows 8, right-click the mouse on the
Start screen, then select All apps from the application
bar displayed at the bottom of the screen. Select SNC
View (V) menu
Status Bar: Switches show/hide of status at the bottom
of the screen.
Normal: Displays detailed information on a device.
Snapshot small: Displays detailed information on a
device with a small thumbnail.
Using the SNC toolbox
3

Snapshot large: Lists devices with large thumbnails.
Column Setting: Displays the setting screen for the
items to display on the list.
Function buttons
Function buttons are used for updating lists and
displaying dialog.
Tools (T) m enu
Search: Searches again for devices.
Enabling the Search external network device(s)
function allows you to search in a wider range.
To configure the function, click Option under Tools,
then select Search Setting in the Network tab.
Device Account: Displays the management screen for
user names and passwords related to the device.
Network Setting: Displays the screen for modifying the
address settings for the selected device.
Device Setting: Displays the settings screen for the
selected device.
Privacy Masking: Displays the Privacy Masking
screen.
Panorama Creator: Displays the Panorama Creator
screen.
Custom Homepage: Displays the Custom Homepage
screen.
Voice alert file:
Create: Displays the Create Voice alert file screen.
Upload: Displays the Uploading Voice alert file
screen.
Firmware Upgrade: Displays the Firmware Upgrade
screen.
CGI Sending: Displays the CGI Sending screen.
Initialize Device:
Reboot: Restarts the device.
Factory default: Initializes the device to factory
default.
Backup setting data: Backs up setting data on a
computer.
Restore setting: Restore the backup setting data to
the device.
Device Homepage: Connects to the device.
Device Log:
System Log: Obtains system log for the device.
Access Log: Obtains access log for the device.
Device Log download: Downloads logs for the device.
Tool Log: Obtains SNC toolbox log.
Option: Displays the screen for modifying SNC toolbox
settings.
Search
Updates the Device list in the search result.
Account
Sets the administrator for each device.
Network
Displays the Network Setting dialog.
Masking
Displays the Privacy Masking dialog.
Panorama
Displays the Panorama Creator dialog.
Upgrade
Updates the device firmware.
Custom HP
Displays the Custom Homepage dialog.
Setting
Displays the settings screen for the device.
Task
Displays the Task List dialog.
Device tree view
This function allows you to customize folders. The
registration details of My device can be displayed in tree
format.
Search result folder
Selecting this folder displays devices in the network
segment that had been searched for when the system is
launched or with the Search function in the device list.
The search result can be displayed for maximum 1,024
cameras.
Task (K) menu
Task Lis t : Displays the Task list screen.
Add Task: Displays the Task Wizard screen.
Modify Task: Displays the Task editing screen.
Delete Task: Deletes task.
Help (H) menu
Tips: Displays tips for the SNC toolbox.
Vers ion : Displays SNC toolbox version information.
4
Using the SNC toolbox
Error folder
When this folder is selected, devices registered in My
device folder that can not be connected are displayed in
the Device list.
Also, if a registered device is not found on the network,
it will also be registered in this folder.
My device folder
When this folder is selected, devices in the Search result
folder or registered manually are displayed in the Device
list.

Device list
Devices registered in the folder selected at Device tree
view are displayed in a list.
Device name
Displays individual device names.
Status (Only for Error folder and My device
folder)
You can check the current connection status.
MAC address
You can check the MAC address of the device.
Device address
You can check the IP address of the device.
Port No., HTTP Port No.
You can check the port number of the device.
Searching devices
Clicking Search enables you to detect network devices
connected to the network. In the initial status, it detects
devices on the same network segment. However after
configuring search settings, it is able to search devices
even outside the network segments.
For details on Search settings, see “Setting SNC toolbox
options – Network tab – Search Setting” (page 11).
SNC toolbox automatically searches devices on a
regular basis. You can determine the status of the search
function from the Search button.
Searching
Searches devices on the network on a regular basis and
updates the device list automatically. Click to stop
searching.
DHCP/Fixed IP
Displays whether the IP address of the selected device is
DHCP or fixed IP.
Client certificate
Displays the name of the client certificate used for SSL
function.
Model
Displays the model name.
Serial No.
Displays the serial number.
Version No.
Displays the version of firmware.
Admin name
Displays the administrator user name.
IP Address of NIC (Search result folder only)
Displays the IP address of the NIC (Network Interface
Card) detected.
Tips
• A camera with which SSL communication has been
performed will show on the left side of its IP
address.
• The model on sale in China does not support the SSL
function.
View button
You can change the display format of the Device list
(page 9) .
Stop Searching
Searching stopped. Click to resume searching.
To expand search range
Configure the search settings.
1
Click Option under To ol s.
2
Click the Network tab.
3
Place a check on Search external network
device(s) in Search Setting.
To search in a wider range, set the greater value in TTL.
Tip
If the device is not detected even with the correct search
settings, see “Note” in “Setting SNC toolbox options –
Network tab – Search Setting” (page 11).
Assigning an IP address
To connect the device via network, you need to assign a
new IP address to the device when you install it for the
first time.
Clicking Network after selecting a device to configure
network settings with from the device list, the Network
setting dialog will be displayed. This dialog is
configured with two types of tabs, Basic Setting and
IPv6 Setting.
Using the SNC toolbox
5

Basic Setting tab (when a single device is
selected from the device list)
Basic Setting tab (when multiple devices are
selected from the device list)
You can configure the network information (IPv4) of the
single device selected in the device list.
Device list: Displays devices for IPv4. After selecting
and setting a device to configure, the device list will
be updated automatically.
Obtain IP address automatically: Sets DHCP mode to
on.
Use the following IP address: Sets the DHCP mode off.
When this is set, specify the IP address, subnet mask,
default gateway to specify the fixed address. You can
also add a check to “After getting response of ping,
the IP will be skipped” to determine whether the
specified IP address is already in use or not.
Obtain DNS server address automatically: Sets DNS
mode to on.
Use the following DNS server address: Sets DNS
mode to off. When this is set, specify the preference
DNS server address and alternative DNS server
address.
HTTP port No.: Normally, 80 should be selected.
When setting a value other than 80, select the textbox
and enter a port number.
You can configure network information (IPv4) for
multiple devices selected in the device list.
Based on the selected multiple devices, the following
points are different from the Basic Setting tab when a
single device is selected.
Use the following IP address: Sets the DHCP mode off,
then specifying the start and end IP addresses
enables you to configure sequential IP addresses.
Network address: Displayed when multiple devices are
selected from the device list and multiple network
addresses exist. Selecting the network address where
the device you want to configure exists enables you
to configure collectively.
IPv6 Setting tab (when a single device is
selected from the device list)
6
Using the SNC toolbox
You can configure the network information (IPv6) of a
single device selected in the device list.
Device list: Displays devices for IPv6. After selecting
and setting a device to configure, the device list will
be updated automatically.
IPv6: Enables you to switch IPv6 modes.
Obtain IP address automatically: Sets DHCP mode to
on.
Use the following IP address: Sets DHCP mode to off.
When this is set, specify an IP address, prefix, default
gateway to specify the fixed address. You can also
add a check to “After getting response of ping, the IP
will be skipped” to determine whether the specified
IP address is already in use or not.
Obtain DNS server address automatically: Sets DNS
mode to on.
Use the following DNS server address: Sets DNS
mode to off. When this is set, specify a preference
DNS server address and alternative DNS server
address.
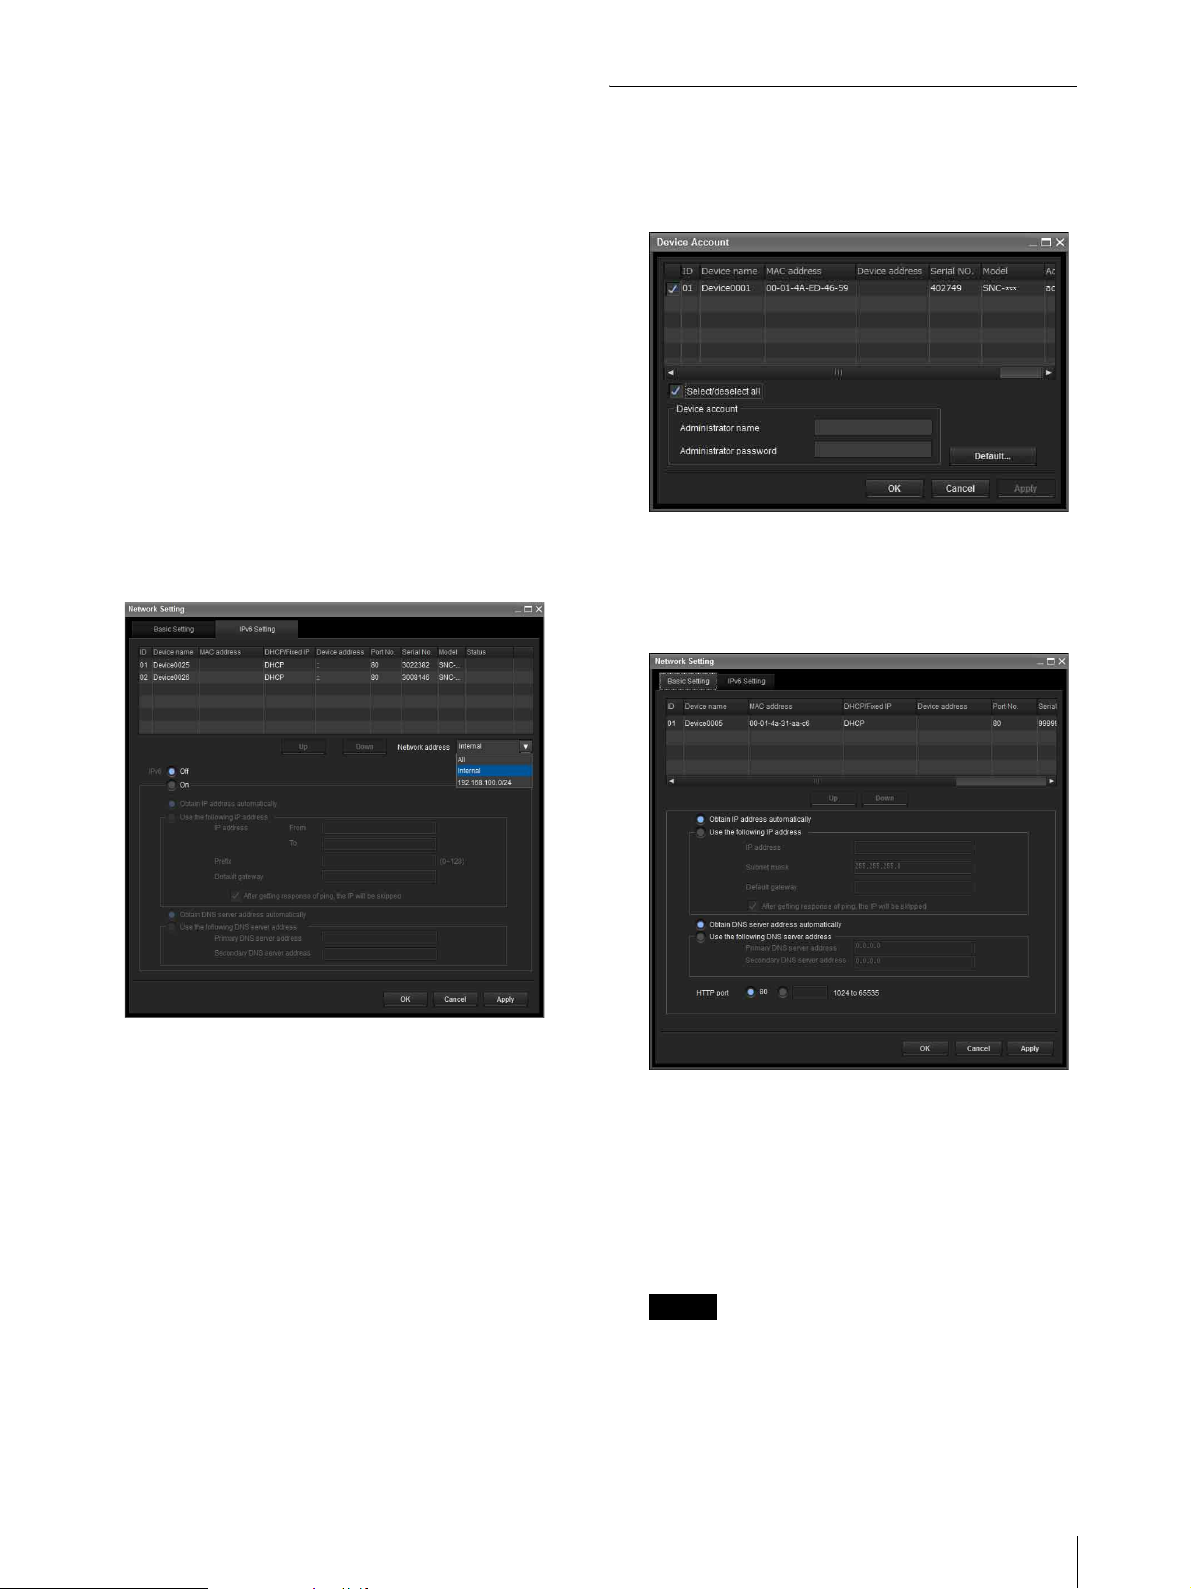
Using the Network settings
1
Select a device you want to assign an IP address to
from the list and click Network.
The account settings screen is displayed.
IPv6 Setting tab (when multiple devices are
selected from a device list)
You can configure network information (IPv6) for
multiple devices selected from the Device list.
Based on the multiple devices selected, the following
points are different from the Basic Setting tab when a
single device is selected.
Use the following IP address: Sets the DHCP mode off,
then specifying the start and end IP addresses
enables you to configure sequential IP addresses.
Network address: Displayed when multiple devices are
selected from a device list and when multiple
network addresses exist. Selecting the network
address where the device you want to configure
exists enables you to configure collectively.
2
Register the name and password of the
administrator and click OK.
The factory settings for both items are “admin”.
The Network Setting screen is displayed.
3
Set the IP address.
To obtain the IP address automatically from a
DHCP server:
Select Obtain IP address automatically.
The IP address, Subnet mask and Default gateway
are assigned automatically.
Note
When you select Obtain IP address
automatically, make sure that the DHCP server is
operating on the network.
Using the SNC toolbox
7

To specify the IP address manually:
Select Use the following IP address, and type the
IP address, Subnet mask and Default gateway in the
relevant boxes.
4
Set the DNS server address.
To obtain the DNS server addresses
automatically:
Select Obtain DNS server address automatically.
To specify the DNS server addresses manually:
Select Use the following DNS server address, and
type the Primary DNS server address and
Secondary DNS server address in the relevant
boxes.
5
Set the HTTP port No.
Normally, select 80 for the HTTP port No. To use
another port number, type a port number between
1024 and 65535 in the text box.
Note
Registering in My device
The device tree has three folders by default: Search
result, Error and My device.
The Search result folder and Error folder are fixed, so
you cannot edit the content or rename the folder.
The My device folder can be renamed, and you can add,
delete and move folders.
Search result folder
Displays devices detected by search.
Error folder
Displays devices that are not connected.
My device folder
You can sort and manage devices using any folder.
Adding a folder
1
Select the parent folder to which you want to add a
folder.
When using a port number other than 80, check
with the network administrator first.
6
Confirm that all items are correctly set, then click
OK.
If Setting OK is displayed, the IP address is
correctly assigned.
7
When setting is finished, to access the device
directly, double-click the device name in the list.
The viewer screen of the network device is
displayed on the Web browser.
Note
If the IP address is not set correctly, the viewer does not
appear after step 7. There is a possibility that the device
cannot be searched for. In that case, try to set the IP
address again.
2
Right click the mouse and select Add Folder from
the displayed menu.
A folder is added. Enter a folder name of your
choice.
Registering a device
To register a device, follow the procedure below:
• Registering by Add Device Entry dialog
• Registering by drag & drop
• Registering by copy & paste
Registering by Add Device Entry dialog
1
Select the folder to register the device.
2
Right click the mouse and select Add Device Entry
from the displayed menu.
8
Using the SNC toolbox
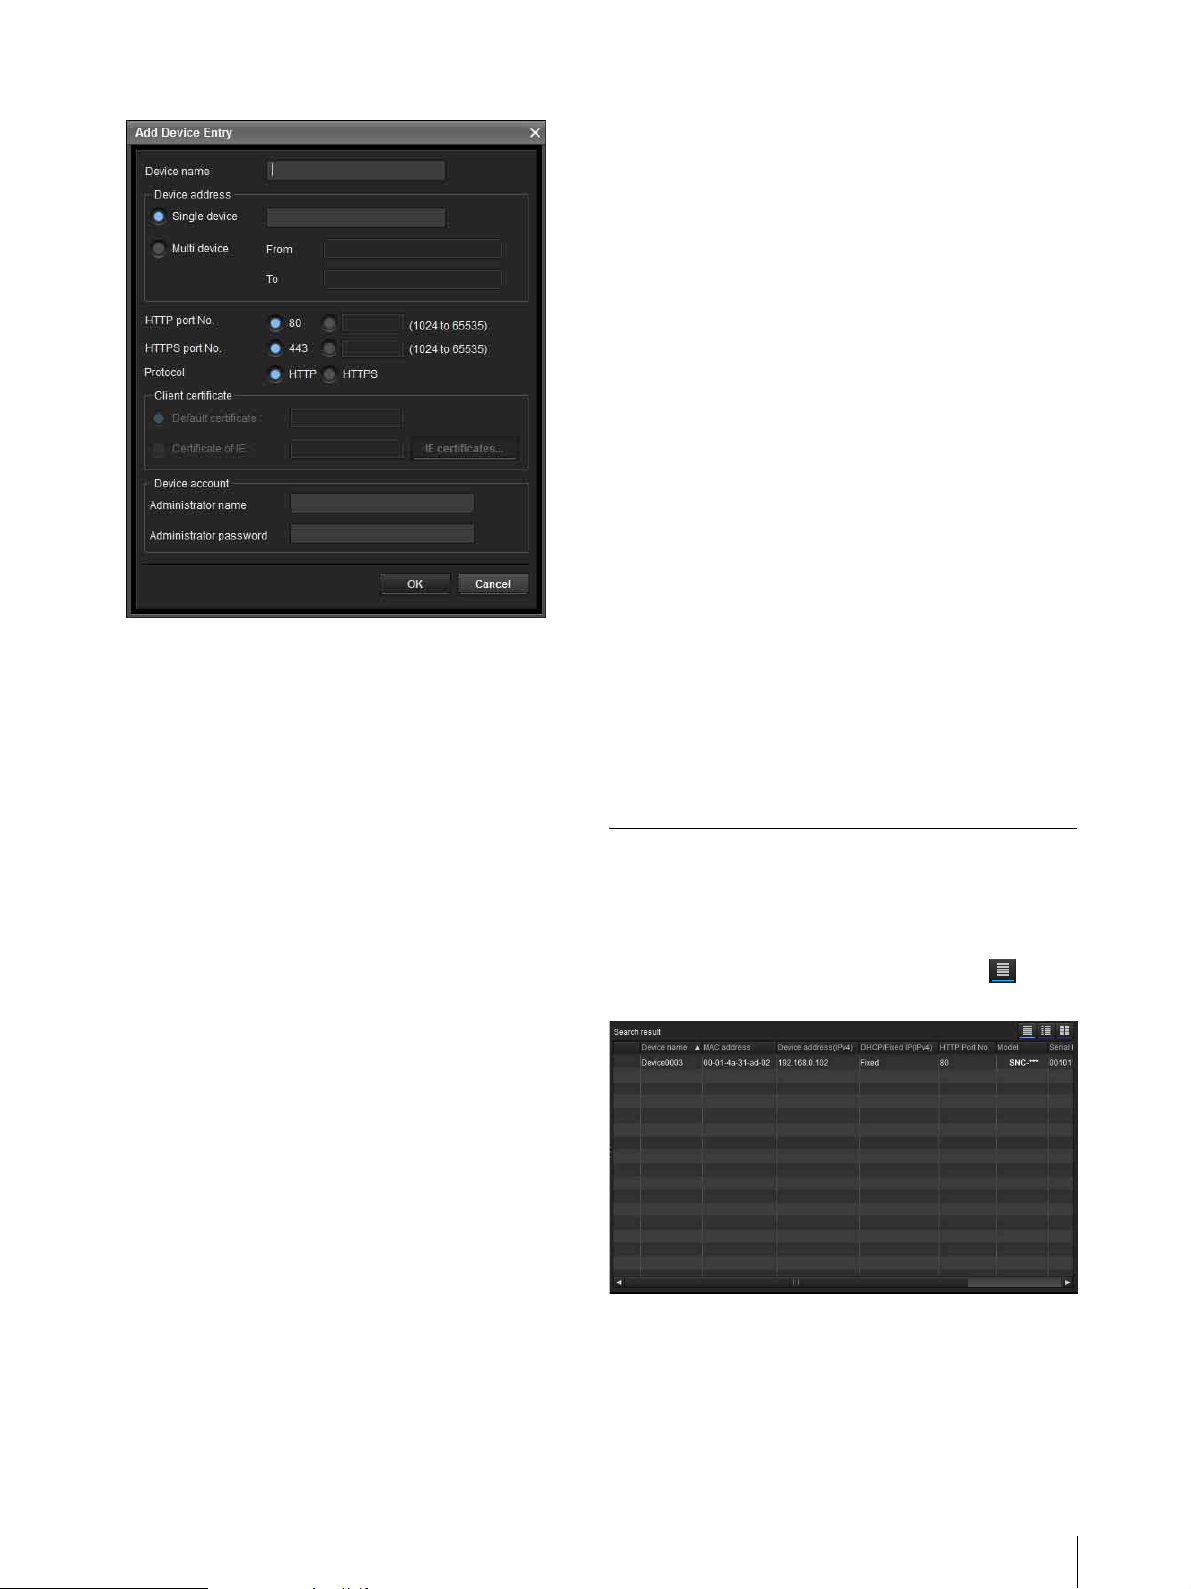
The Add Device Entry dialog appears.
3
Enter the following items:
Device name: Enter a device name of your choice.
Device address: Enter the address of the device to
register. Normally, select Single device. If there is
more than one camera in the specified IP address
range then select Multi device.
HTTP port No.: Normally, 80 should be selected.
When setting a value other than 80, select the
textbox and enter a port number.
HTTPS port No.: Normally select 443. When
setting a value other than 443, select the textbox
and enter a port number.
Protocol: Select communication protocol HTTP
or HTTPS.
Client certificate: Set when using the client
authentication of the SSL function.
Activates when HTTPS is selected.
Default certificate: Select Default client
certificate of the Network tab from Option in
the Tools menu.
Certificate of IE: Press the IE certificates...
button, then select the certificate registered in
the Internet Explorer.
Device account: Enter the user name and password
of the administrator who will access the device in
the Administrator name field and Administrator
password field, respectively.
Registering by copy & paste
Select a device from the Device list in the Search result
folder and right click the mouse. Select Copy from the
displayed menu (or select Copy from the Edit menu).
Next, select the folder to register in and right click the
mouse. Select Paste from the displayed menu.
Renaming the device/folder
Select the folder or device to rename and right click the
mouse. Select Rename from the displayed menu. The
device/folder name is highlighted. Enter the new name.
Deleting a device/folder
Select the device/folder to be deleted from the Device
list or Device tree and right click the mouse. Select
Delete from the displayed menu (or select Delete from
the Edit menu).
Moving a device/folder
You can move a device/folder by following either of the
methods below:
• Select a device/folder from the Device list or Device
tree and drag & drop in the folder to move it to, which
will move the device/folder.
• Select a device/folder from the Device list or Device
tree and right click the mouse. Select Cut from the
displayed menu (or select Cut from the Edit menu).
Next, select the folder to move to and select Paste.
Changing the Device list display method
Details display
Select Normal from the View menu or click to set
to the details display.
4
Click OK to finish registration.
Registering by drag & drop
To add a device, select a device from the Device list in
the Search result folder, and drag & drop to the folder to
register it in.
Using the SNC toolbox
9
Details display with thumbnails
Select Snapshot(S) from the View menu or click to
set to the details display with thumbnails.
Display with large thumbnails
Select Snapshot(L) from the View menu or click to
set to display with large thumbnails.
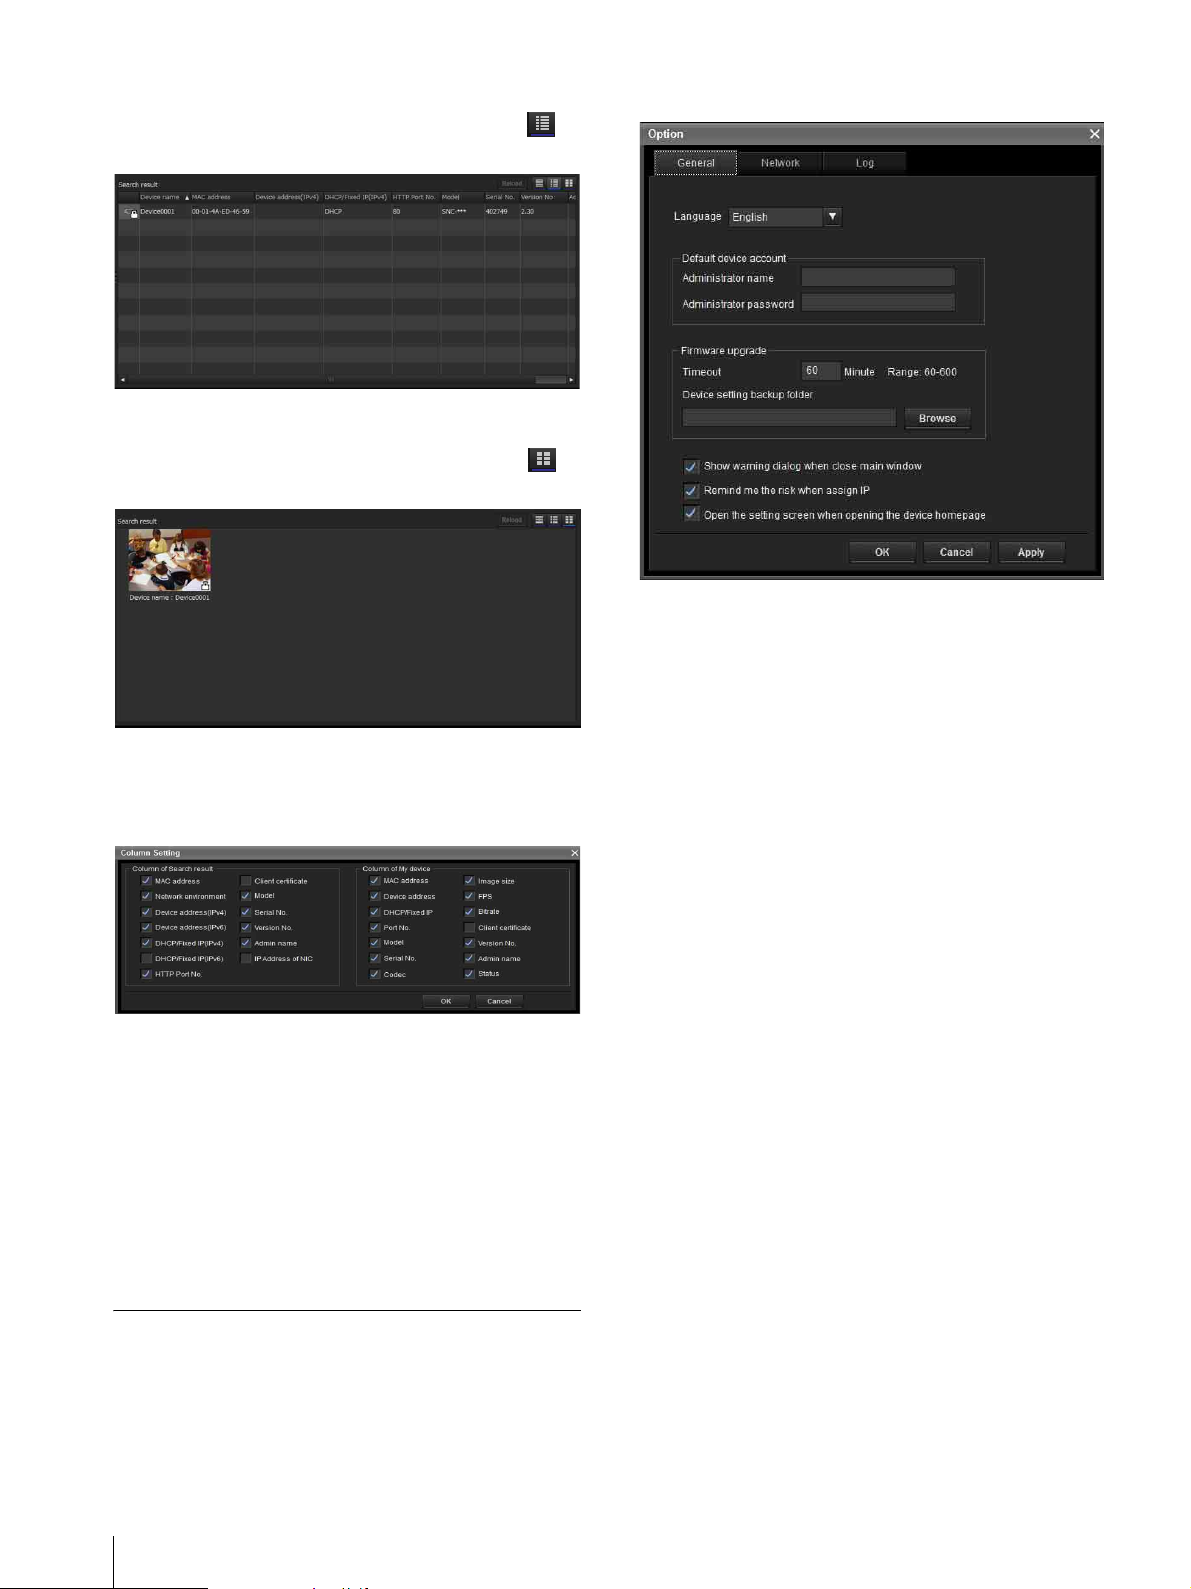
General tab
Language
Set language.
Modifying the items to show on list
Select Column setting from the View menu to display
the “Column Setting” dialog.
Check the items you want to display and remove the
checks from items you want to hide.
Click OK after making the changes. The new setting is
reflected on the list and the display returns to the main
screen.
Updating thumbnail images
To display the thumbnail, select the camera of the
thumbnail you wish to update and click Reload to
display the current camera image as the thumbnail.
Default device account
Set the initial values of user name and password for the
administrator accessing the device for each device.
Firmware Upgrade
Make settings related to firmware upgrades.
Timeout: Configure the Timeout of the device when an
upgrade is performed.
Device setting backup folder: Set the backup folder for
the setting file when an upgrade is performed. Click
Browse to display the folder selection dialog and
specify the folder in which to save the file.
Show warning dialog when close main window:
Select to display the warning message.
Remind me the risk when assign IP: Select to display
the warning message.
Open the setting screen when opening the device
homepage: Select to open the setting screen directly.
Setting SNC toolbox options
Select Option from the Tools menu to display the
“Option” dialog. This dialog consists of three tabs:
General, Network and Log.
10
Using the SNC toolbox
 Loading...