

Page 1
3-863-913-11 (1)
Network Camera
SNC-M1/M1W/M3/M3W
Quick Start Guide Network Configuration Using a Router
The Quick Start Guide briefly explains the connections and settings of the camera for viewing the
camera image via Internet when connecting to the network using a router.
For the installation and operations of the camera, please refer to the Installation Manual and the
User's Guide in the supplied CD-ROM.
Flowchart of preparations
Quick Start Guide (this document) Installation Manual User’s Guide
Check the supplied accessories
and system reguirements.
Connect the
camera.
Set up the
camera.
Install the
camera.
Use the
camera.
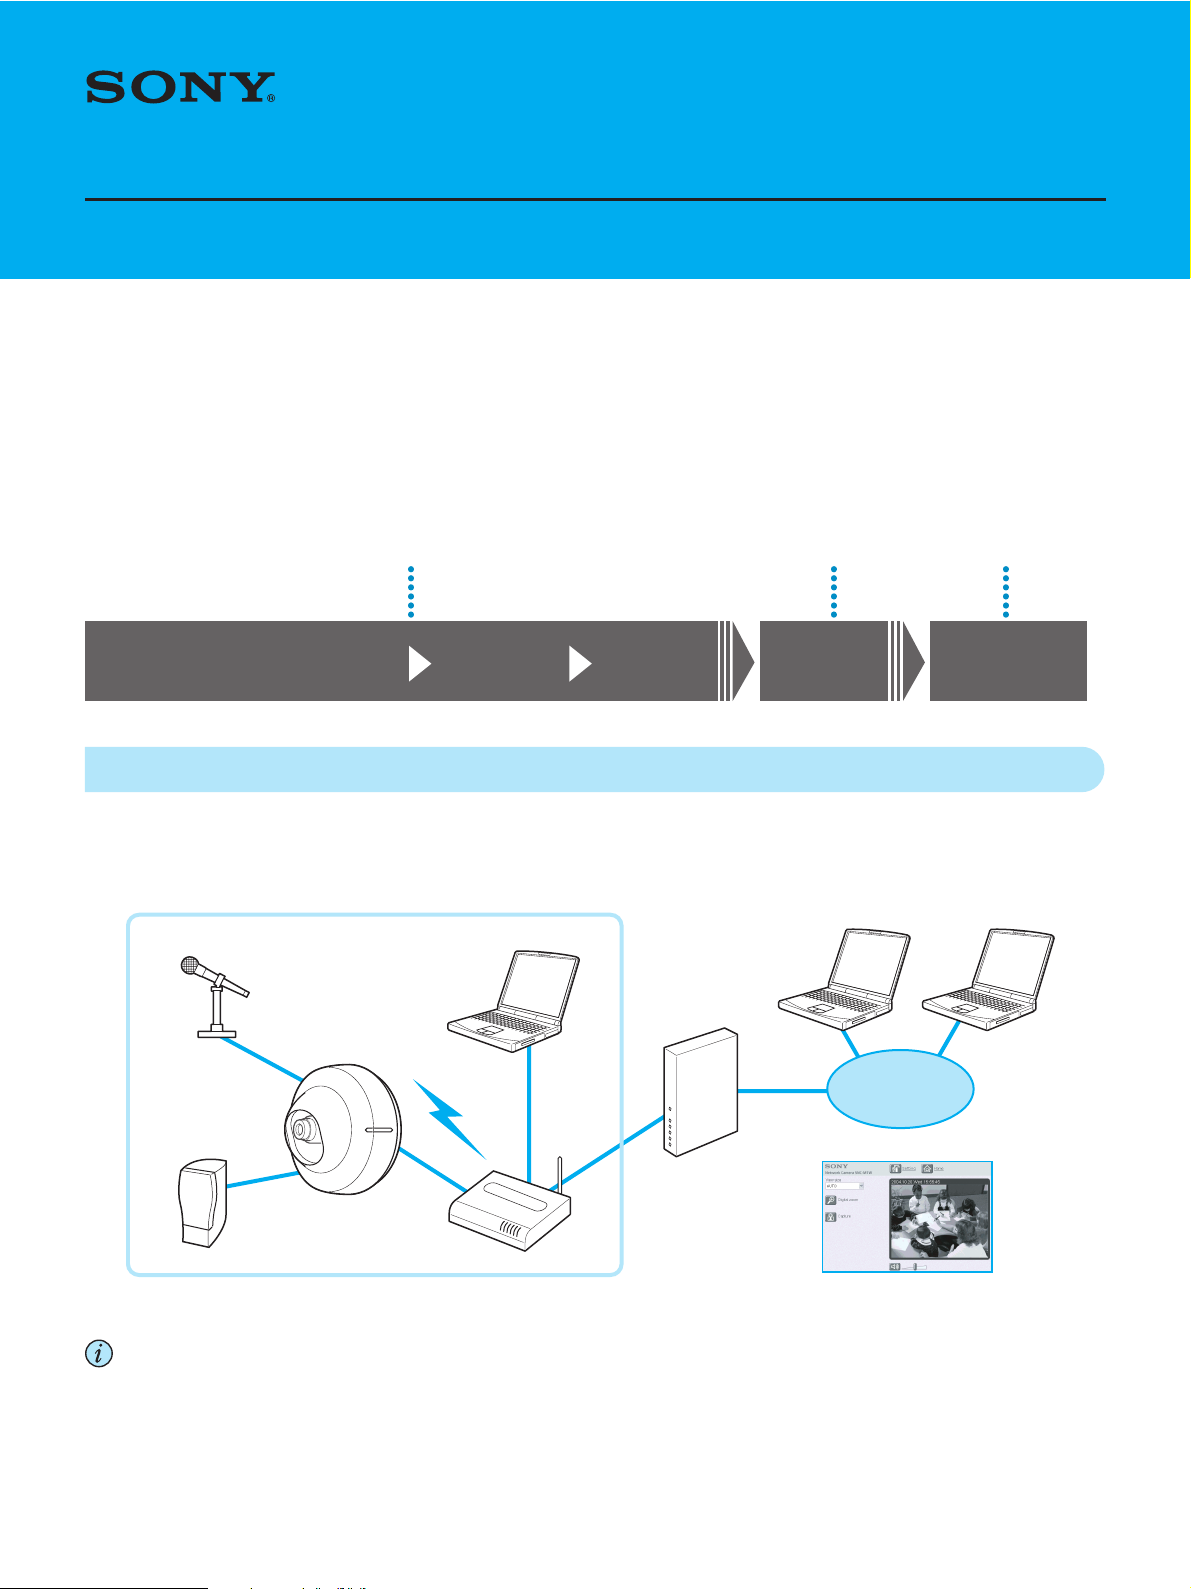
System Configuration
You can monitor the image of the camera via LAN and Internet.
LAN
Microphone
Network Camera
SNC-M1/M1W
SNC-M3/M3W
Speaker
* Wireless LAN connection is available only for the SNC-M1W and SNC-M3W.
or
Router
Computer
Wireless*
Modem
Computer
Internet
Web browser
Computer
Notes
• For viewing the camera image via Internet, the global IP address provided by ISP is required.
• The SNC-M1/M1W/M3/M3W network cameras do not support PPPoE. Use a router compliant with PPPoE if you use ISP with PPPoE
connection.
© 2004 Sony Corporation
Page 2
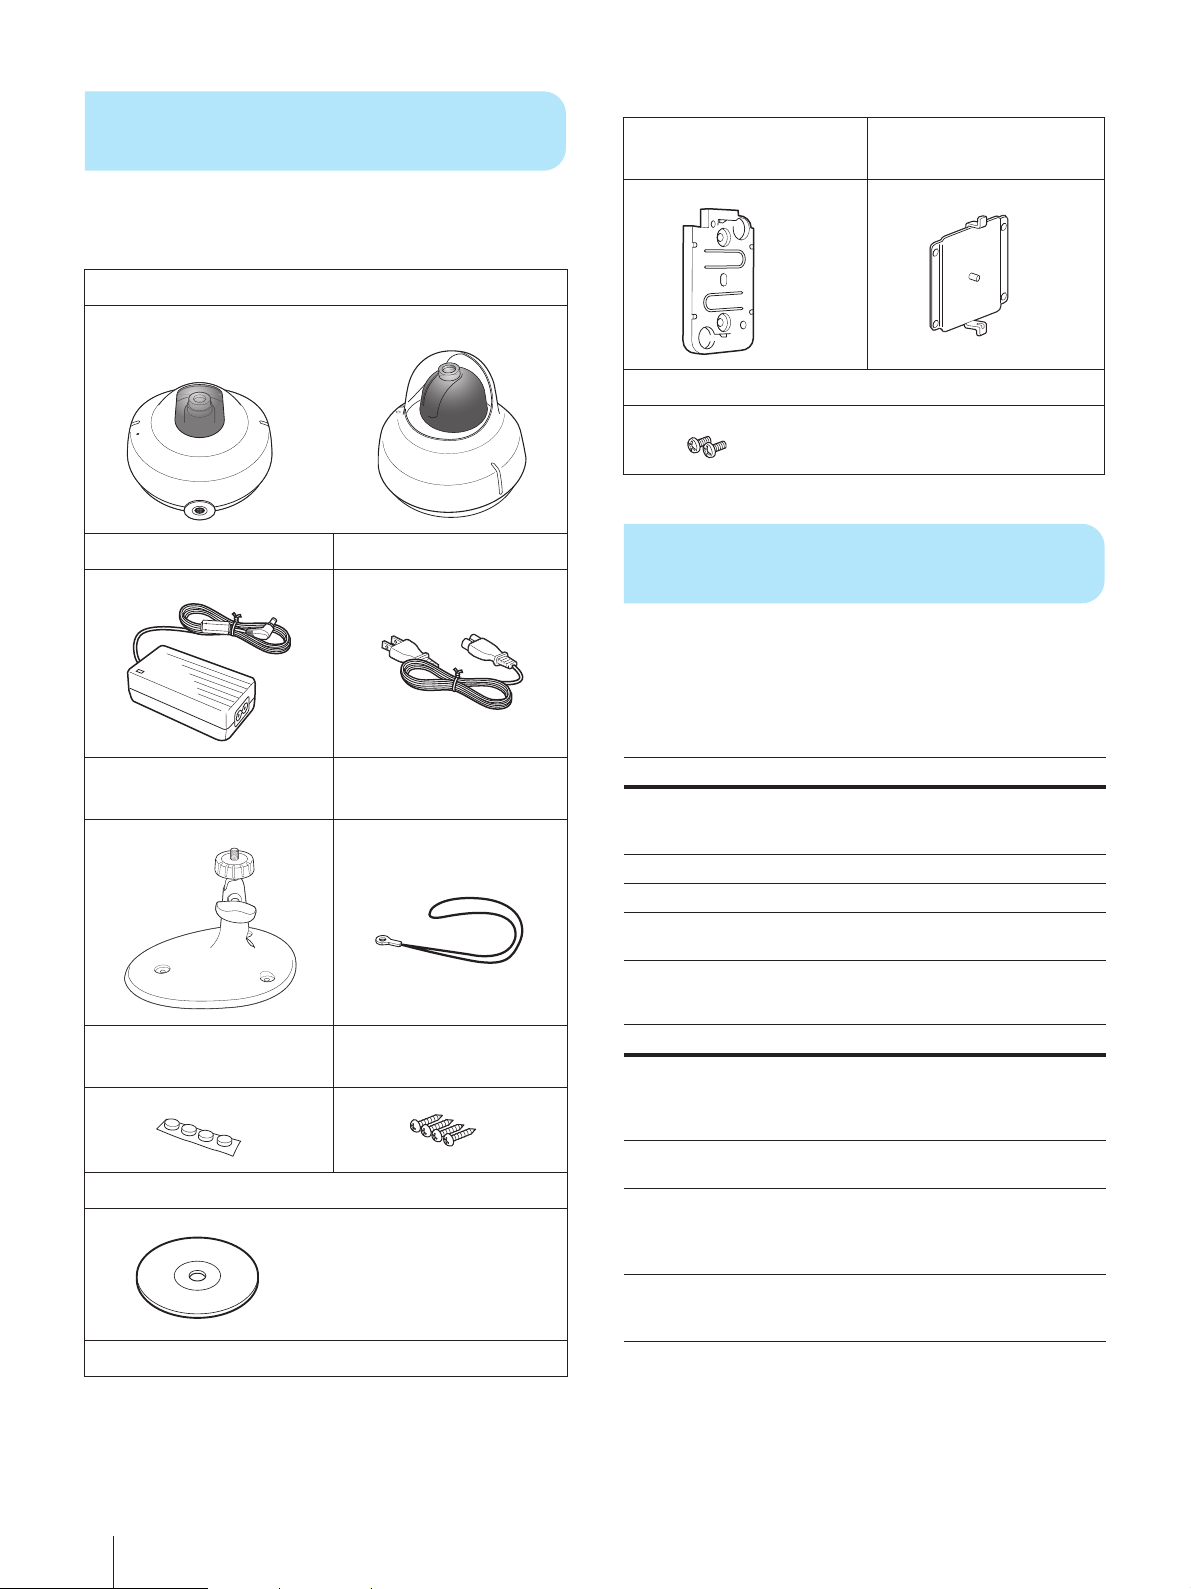
1 Check the Camera and Supplied
Accessories
Before using, check that the camera and all the supplied
accessories are included in the package.
z Network camera (1)
SNC-M3/M3W only
z Wall-mounting holder
(1)
z Wall-mounting
bracket (1)
SNC-M1/M1W
z
AC power adaptor (1)
z Stand (1) z Drop-prevention
SNC-M3/M3W
or
z Power cord (1)
strap (1)
z +PSW screws (3 × 8) (2)
2 Check the Specifications of the
Computer
The following are the system requirements for the
computer to view the image of the camera and to run the
program of the supplied CD-ROM.
System requirements for using the camera
Item Specifications
Processor Pentium III, 1 GHz or higher
(Pentium 4, 2 GHz or
higher recommended)
RAM 256 MB or more
OS Windows 2000/XP
Web browser Internet Explorer Ver. 5.5 or
Ver. 6.0
System requirements for using the CD-ROM
z Rubber foot (4) z Tapping screws
(4 × 20) (4)
z CD-ROM (User’s Guide and programs) (1)
z Installation Manual (1)
Check the Camera and Supplied Accessories / Check the Specifications of the Computer
2
Item Specifications
Computer PC with Intel Pentium CPU
Monitor Monitor supporting resolution
OS Microsoft Windows Millennium
Acrobat Reader (for
displaying the User's Guide)
• Microsoft, Windows, Internet Explorer and MS-DOS are
registered trademarks of Microsoft Corporation in the United
States and/or other countries.
• Intel and Pentium are registered trademarks of Intel
Corporation or its subsidiaries in the United States and other
countries.
Installed memory: 64 MB or
more
CD-ROM drive: × 8 or faster
of 800 × 600 or higher
Edition, Windows 2000 Service
Pack 2, Windows XP
Professional or Home Edition
Adobe Acrobat Reader Version
4.0 or later, or Adobe Reader
Version 6.0 or later
Page 3
• Adobe, Acrobat and Acrobat Reader are trademarks of Adobe
Systems Incorporated in the United States and/or other
countries.
• All other company and product names are trademarks or
registered trademarks of the respective companies or their
respective makers.
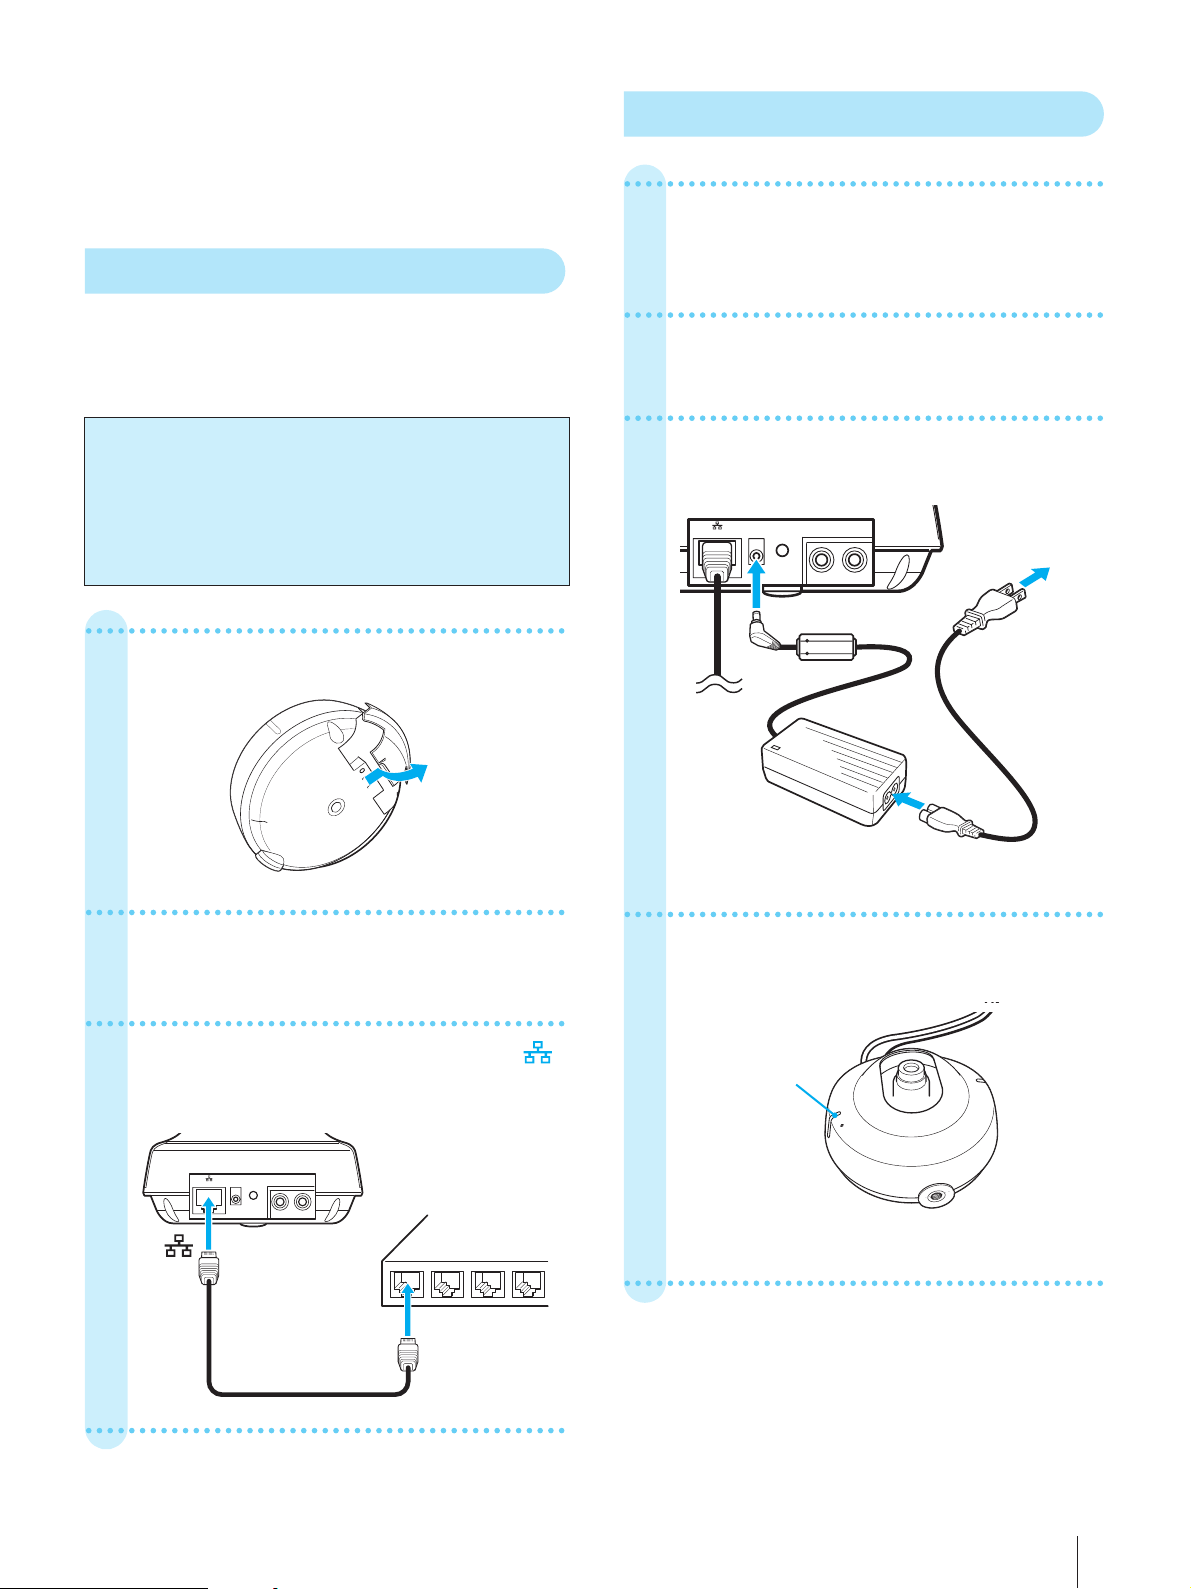
3 Connect the Camera to the Router
4 Turn on the Power of the Camera
1
Insert the DC plug of the supplied AC
power adaptor into the DC IN 5V jack
on the camera.
To make the network setting on the camera, connect the
camera to the router using a commercially available
network cable. The setting of the camera should be
performed using the computer connected to the router.
Notes
• Before setting, turn on the power of the router and
computer and connect them to the Internet.
• Use a commercially available category 5, straight network
cable.
• The illustrations used in this guide show the SNC-M1
network camera.
1
Remove the cap of the camera.
2
Connect the power cord to the AC
power adaptor.
3
Plug the power cord to a wall outlet.
Camera
!
1 to DC IN 5V
AC power adaptor
(supplied)
5m
2 to a wall outlet
3 to the adaptor
Power cord
(supplied)
2
Connect the network cable to the LAN
jack on the router.
3
Connect the network cable to the
(network) port on the camera.
Camera
!
5m
to
Network cable
(straight)
Router
to LAN
(10BASE-T/
100BASE-TX)
4
Check that the POWER indicator
flashes, then stays lit.
POWER indicator
The camera is now turned on.
After connection, place back the cap of the camera.
Connect the Camera to the Router / Turn on the Power of the Camera
3
Page 4

5 Install the IP Setup Program from
the CD-ROM
This section explains how to install the IP Setup Program
from the CD-ROM supplied with the camera. The IP Setup
Program is required for detecting the camera.
The other supplied programs can be installed in the same
procedures.
Utility programs stored in the CD-ROM
The following utility programs are stored in the supplied
CD-ROM.
4
Click “Next.”
Click.
Program Function
IP Setup Program Allows detection and set up of Sony
SNC Audio upload tool Allows output of the sound picked up
Easy recording software
An easy-recording software program, “Network Camera
Recorder,” is available for the SNC-M1/M1W/M3/M3W
network cameras.
"Network Camera Recorder" allows manual or scheduled
recordings of camera images and the sound picked up by the
microphone built in the camera.
For more information on “Network Camera Recorder,” access
URL: (for customers in Europe)
http://www.sonybiz.net/software/m-series
1
Insert the CD-ROM disc into the CD-
network cameras in the network.
by the microphone connected to the
computer from the speaker built in
the SNC-M1/M1W/M3/M3W network
camera.
ROM drive of your computer.
5
Read the Software License Agreement
carefully and click “Yes” to accept the
agreement.
Click.
6
Select the destination folder in which
to install the program and click “Next.”
The default setting is “C:\…\SONY\IP Setup
Program.”
2
Click the “IP Setup” icon of IP Setup
Program.
Click.
3
Click “Open.”
The IP Setup Program starts and Welcome dialog
appears.
Note
If you click “Save this program to disk,” you cannot install
correctly.
In this case, delete the downloaded file, and click the “IP
Setup” icon again.
Install the IP Setup Program from the CD-ROM
4
1 The
destination
folder is
displayed.
2 Click.
Page 5

7
Enter or select the name of the folder
in which to install the program, then
click “Next.”
The default setting is “IP Setup Program.”
1Enter the
2Click.
folder name.
1
Start the IP Setup Program.
Select “Program” from the “Start” menu of
Windows, then select “IP Setup Program.”
The IP Setup Program runs and displays all the
cameras connected to the network in the camera
list.
2
Click on the camera in which you want
to assign an IP address.
When multiple cameras are connected to the
same network, check the model name and serial
number on the rear of the camera.
The program is installed. After the installation,
“Setup Complete” dialog is displayed.
8
Click “Finish.”
Click.
The IP Setup Program installation is completed.
6 Set up the Camera
To connect the camera to a network, you need to assign a
new IP address to the camera. This section explains how
to assign an IP address to the camera using the installed
IP Setup Program and how to configure other network
settings.
Notes
• For viewing the camera image via Internet, the global IP
address provided by ISP is required.
• This section explains the usual settings using “Obtain an IP
address automatically” or “Use the following IP address,”
“Obtain DNS server address automatically” and “HTTP port
No. 80.” If you need other settings, refer to the User’s Guide
stored in the supplied CD-ROM.
Click on the camera to assign an IP address.
The network settings for the selected camera are
displayed.
3
Click on “Obtain an IP address
automatically.”
By selecting “Obtain an IP address automatically,”
the IP address is automatically assigned by the
DHCP server. The “Subnet mask” and “Default
gateway” are also assigned.
Select this.
Subnet mask is
displayed.
IP address is displayed.
Default gateway
is displayed.
Set up the Camera
5
Page 6

To assign a static IP address
Click on “Use the following IP address” and enter
the IP address, subnet mask and default gateway.
4
Click on “Obtain DNS server address
automatically.”
By selecting “Obtain DNS server address
automatically,” the DNS server addresses are
automatically assigned.
Select this.
5
Click on “80” on “HTTP port No.”
DNS server addresses are displayed.
Select this.
8
Click “OK.”
“Setting OK” is displayed.
The network setting of the camera is completed.
Note
To exit the IP Setup Program, click on the upper right
corner.
Click.
7 Set Port Forwarding on the Router
To view the camera image via Internet, you need to set
port forwarding on the router. Skip this setting when you
do not use the router.
6
Type “admin” in both the
“Administrator name” and
“Administrator password” boxes.
The default settings of both items are “admin.”
You can change the administrator name and
password later using the “User setting” menu.
Type “admin.”
7
Record the set IP address in the
Type “admin.”
following space.
You need to enter the IP address when you set
the router*.
1
Perform the port forwarding setting on
the router.
For details, refer to the operation manual supplied
with the router.
2
Check the global IP address for WAN
on the router and record it in the
following space.
You need to enter the global IP address when you
access the camera via Internet.
Global IP address
Note
The name of the function “port forwarding” may be different
depending on the router.
IP address
* To view the camera image via Internet, you need to set
port forwarding on the router. See “Set Port Forwarding
on the Router”.
Set Port Forwarding on the Router
6
Page 7

8 Monitor the Image of the Camera
You can monitor the image of the camera using Internet
Explorer as the Web browser.
3
Click “Enter.”
Note
This section uses illustrations of the Welcome page of
Network Camera SNC-M1W.
Accessing from Internet Explorer
1
Start Internet Explorer.
2
Type the IP address in the URL box of
Internet Explorer.
To view the image via LAN:
Enter the IP address recorded in step 7 on page
6.
To view the image via Internet:
Enter the global IP address of the router recorded
in step 2 of “Set Port Forwarding on the Router”
on page 6.
Type the IP address.
Click.
The image shot by the camera is displayed in the
main viewer.
When you access the main viewer of the camera for
the first time
When you click “Enter” on the welcome page, “Security
warning” is displayed.
When you click "Yes" to install the ActiveX control and the
main viewer is displayed.
The welcome page of the camera is displayed.
Note
For checking your network configuration, see “System
Configuration” on page 1.
Click.
Note
If the welcome page is not displayed correctly, check the
security level setting of the Internet Explorer. For details, refer
to the User’s Guide stored in the supplied CD-ROM.
Monitor the Image of the Camera
7
Page 8

Setting for Wireless Network (SNC-M1W/M3W only)
4
Click “Network.”
To use the camera in a wireless network via an access
point, set as follows.
Use the network cable for connection when you assign a
new IP address to the SNC-M1W/M3W wireless network
camera.
1
Display the welcome page of the
camera following the procedure of
“Monitor the Image of the Camera” on
page 7.
2
Click “Setting.”
Click.
Click.
The “Network setting” menu appears.
5
Click the “Wireless network” tab.
6
Set the items for the wireless network.
1 Infrastructure
2 SSID
3 WEP key
data
4 OK
3
Type the user name and password for
the administrator, then click “OK.”
The default settings of both items are “admin.”
Type the user name.
Type the password.
Click.
The “Administrator” menu is displayed.
a Select “Infrastructure” on “Type.”
b Enter the “SSID” to match the setting on the
access point.
c Enter the “WEP key data” to match the
settings on the access point.
d Click “OK.”
7
Turn off the power of the camera.
8
Remove the network cable from the
camera.
9
Turn on the power of the camera
without connecting the network cable.
The Wireless setting is now enabled.
Sony Corporation
 Loading...