

Sony SnapLab UP-CR15L Using Manual
Printed in Japan
Digital Photo Printer
4-198-691-01 (1)
ご使用になる前に ________________ JP
Before Using This Printer __________ GB
Avant d’utiliser cette imprimante ___ FR
Vor Verwendung dieses Druckers __ DE
Prima di usare la stampante _______ IT
Antes de utilizar la impresora ______ ES
_ GR
Bu Yazıcıyı Kullanmadan Önce ______ TR
UP-CR15L
お買い上げいただきありがとうございます。
電気製品は安全のための注意事項を守らないと、
火災や人身事故になることがあります。
このご使用になる前にには、事故を防ぐための重要な注意事項と製品の取り扱いかたを示して
います。このご使用になる前にをよくお読みのうえ、製品を安全にお使いください。お読みに
なったあとは、いつでも見られるところに必ず保管してください。
© 2010 Sony Corporation
日本語
安全のために
ソニー製品は安全に充分配慮して設計されています。しかし、電気製品は、まち
がった使いかたをすると、火災や感電などにより死亡や大けがなど人身事故につ
ながることがあり、危険です。
事故を防ぐために次のことを必ずお守りください。
安全のための注意事項を守る
4 〜 6 ページの注意事項をよくお読みください。
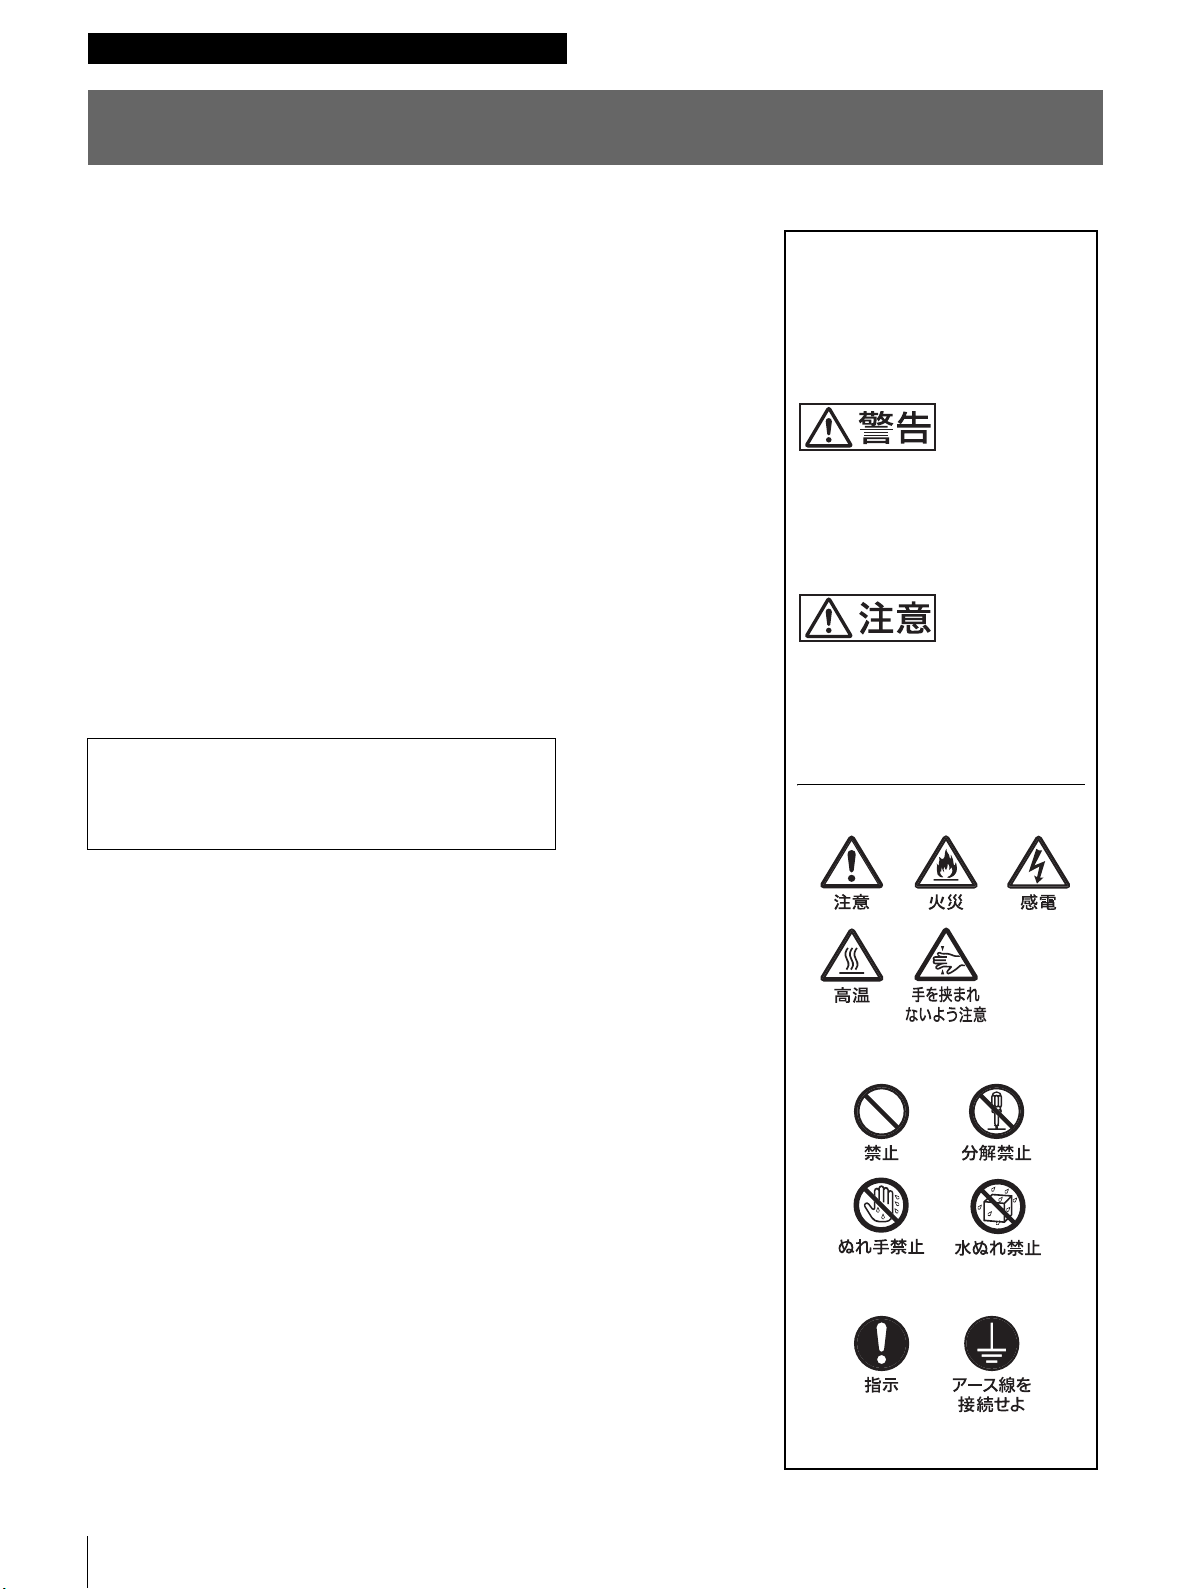
警告表示の意味
取扱説明書および製品では、次の
ような表示をしています。表示の
内容をよく理解してから本文をお
読みください。
定期点検をする
長期間、安全にお使いいただくために、定期点検をすることをおすすめします。
点検の内容や費用については、お買い上げ店またはソニーのサービス窓口にご相
談ください。
故障したら使わない
すぐに、お買い上げ店またはソニーのサービス窓口にご連絡ください。
万一、異常が起きたら
• 煙が出たら
• 異常な音、においがしたら
• 内部に水、異物が入ったら
• 製品を落としたり、キャビネットを破損したときは
m
a スタンバイ状態にする。
b 電源コードや接続コードを抜く。
c お買い上げ店またはソニーのサービス窓口に連絡する。
この表示の注意事項を守らないと、
火災や感電などにより死亡や大け
がなど人身事故につながることが
あります。
この表示の注意事項を守らないと、
感電やその他の事故によりけがを
したり周辺の物品に損害を与えた
りすることがあります。
注意を促す記号
行為を禁止する記号
行為を指示する記号
2

目次
警告.............................................................................. 4
注意.............................................................................. 5
CD-ROM マニュアルの使いかた ....................................... 7
準備............................................................................ 7
取扱説明書を読むには............................................... 7
こんなことができます........................................................ 8
最新の情報について ........................................................... 9
設置する.............................................................................. 9
電源コードを接続する............................................... 9
プリント紙・インクリボンを取り付ける ......................... 10
プリント紙・インクリボンの取り扱いについて ..... 10
プリント紙・インクリボンを取り付ける ................ 10
ペーパートレイを取り付ける .................................. 13
起動と終了........................................................................ 14
起動.......................................................................... 14
終了.......................................................................... 14
管理画面を表示する ......................................................... 15
仕様................................................................................... 16
目次
JP
3
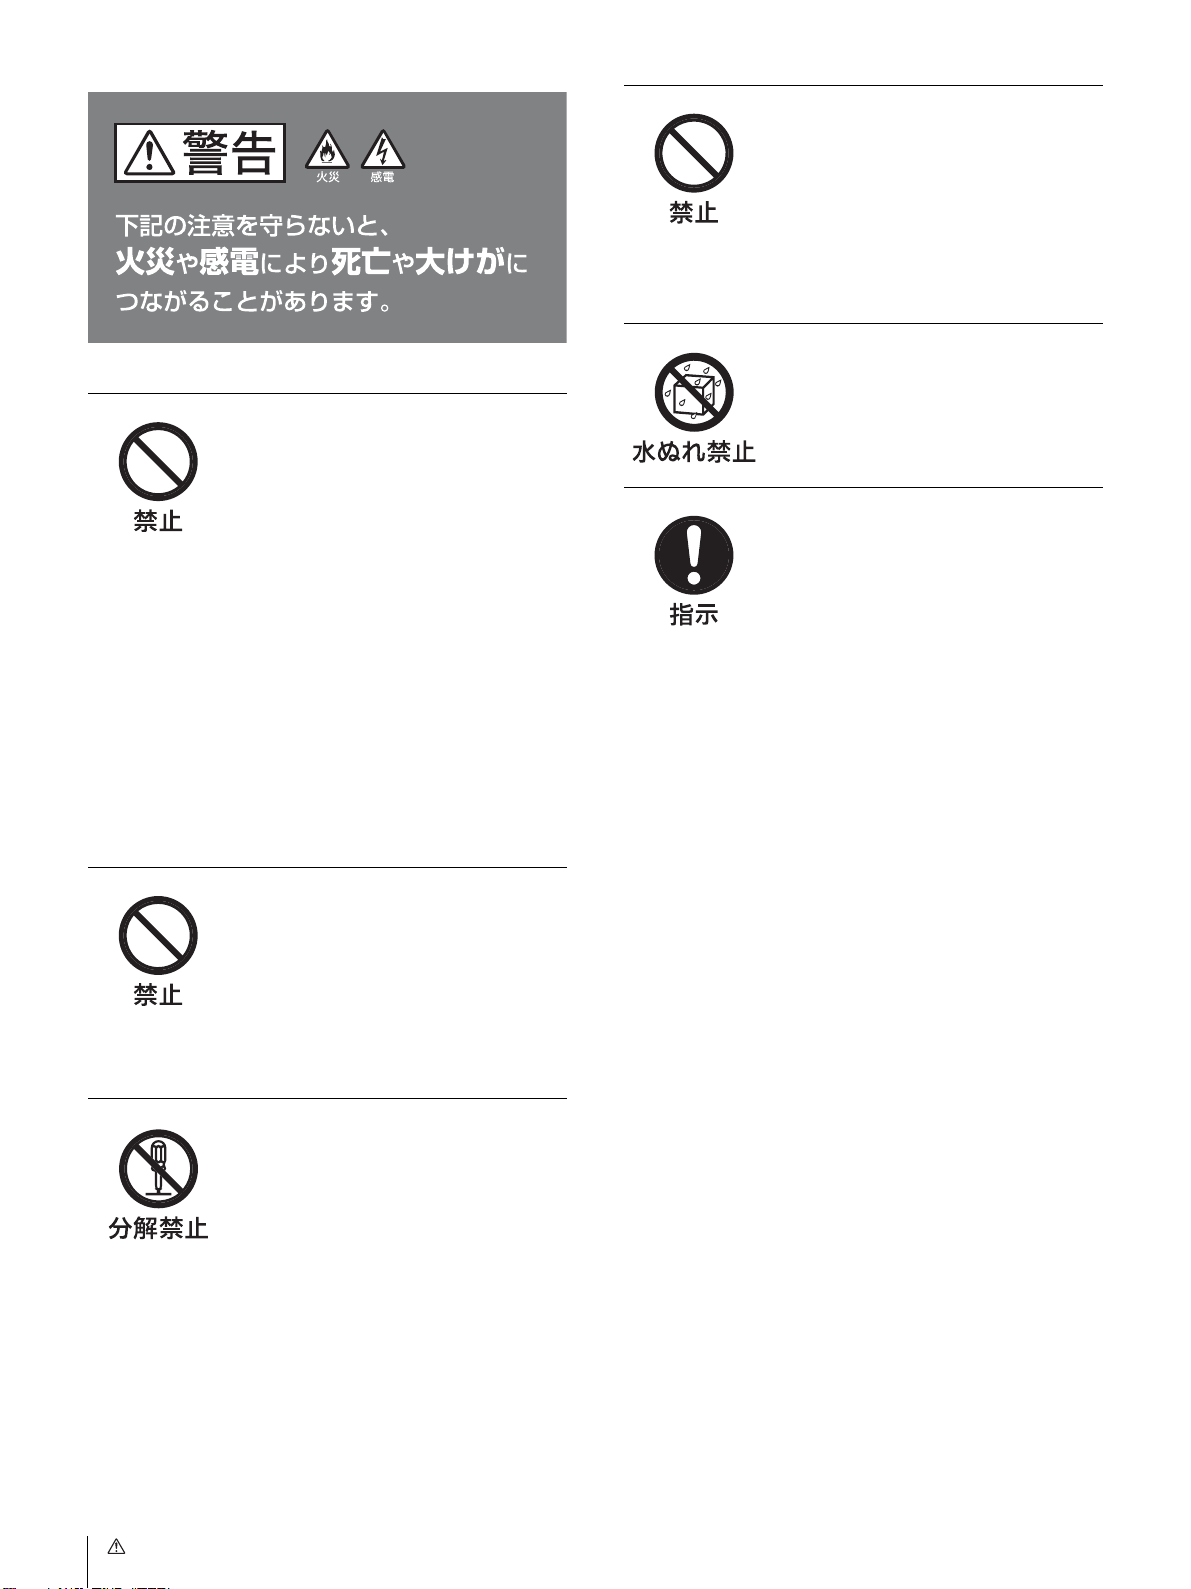
警告
油煙、湯気、湿気、ほこりの
多い場所では設置・使用しない
上記のような場所に設置すると火災や感
電の原因となります。
取扱説明書に記されている使用条件以外
の環境での使用は、火災や感電の原因と
なります。
水にぬれる場所で使用しない
水ぬれすると、漏電による感電発火の原
電源コードを傷つけない
電源コードを傷つけると、火災や感電の
原因となることがあります。
• 設置時に、製品と壁やラック、棚など
の間に、はさみ込まない。
• 電源コードを加工したり、傷つけたり
しない。
• 重いものをのせたり、引っ張ったりし
ない。
• 熱器具に近づけたり、加熱したりしな
い。
• 電源コードを抜くときは、必ずプラグ
をもって抜く。
万一、電源コードが傷んだら、お買い上
げ店またはソニーのサービス窓口に
交換をご依頼ください。
因となることがあります。
表示された電源電圧で使用す
る
製品の表示と異なる電源電圧で使用する
と、火災や感電の原因となります。
内部に水や異物を入れない
水や異物が入ると火災や感電の原因とな
ることがあります。
万一、水や異物が入ったときは、すぐに
電源を切り、電源コードや接続コードを
抜いて、お買い上げ店またはソニーの
サービス窓口にご相談ください。
分解や改造をしない
分解や改造をすると、火災や感電、けが
の原因となることがあります。
内部の点検や修理は、お買い上げ店また
はソニーのサービス窓口にご依頼くださ
い。
4
警告
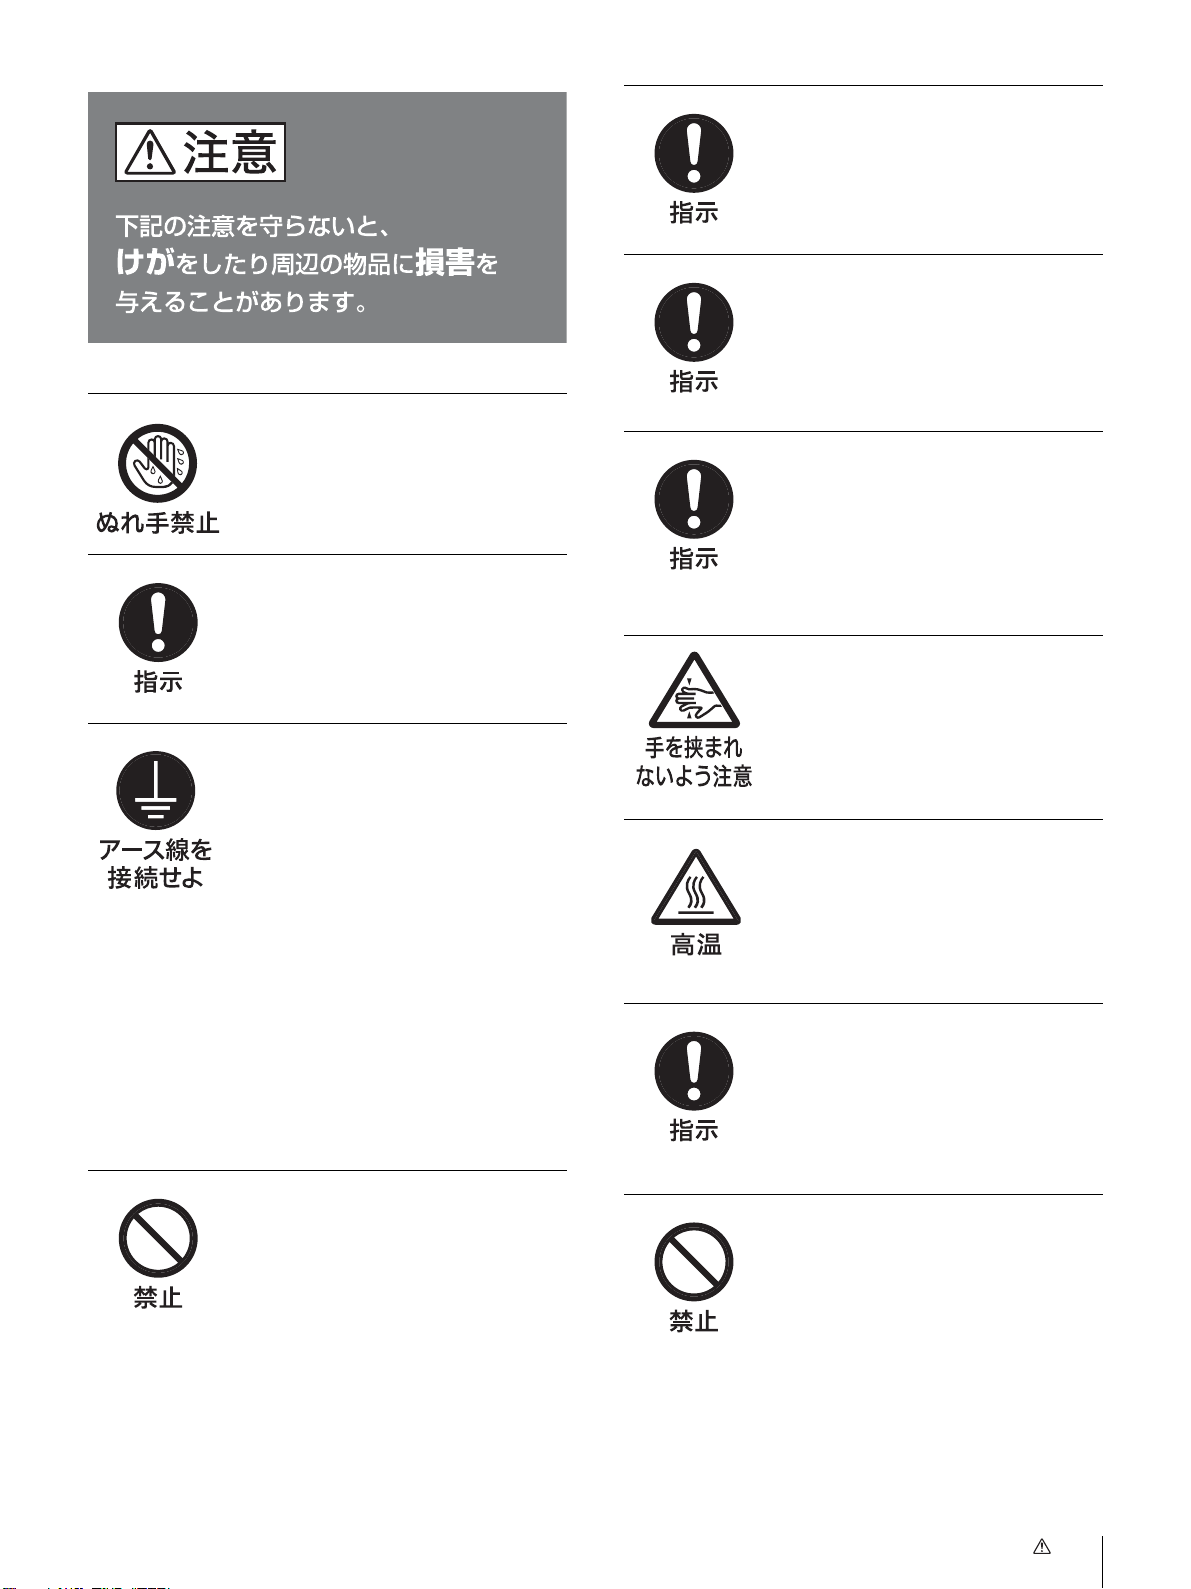
注意
お手入れの際は、電源を切る
電源を接続したままお手入れをすると、
感電の原因となることがあります。
コード類は正しく配置する
電源コードや接続ケーブルは、足に引っ
かけると本機の落下や転倒などによりけ
がの原因となることがあります。
充分注意して接続・配置してください。
ぬれた手で電源プラグをさわ
らない
ぬれた手で電源プラグを抜き差しする
と、感電の原因となることがあります。
付属の電源コードを使用する
付属の電源コードを使わないと、火災や
感電の原因となることがあります。
安全アースを接続する
安全アースを接続しないと、感電の原因
となることがあります。
次の方法でアースを接続してください。
• 電源コンセントが 3 極の場合
付属の電源コードを使用することで安
全アースが接続されます。
• 電源コンセントが 2 極の場合
付属の 3 極 t2 極変換プラグを使用
し、変換プラグから出ている緑色の
アース線を建物に備えられているアー
ス端子に接続してください。
安全アースを取りつけることができない
場合は、お買い上げ店またはソニーの
サービス窓口にご相談ください。
移動時にはコード類をはずす
電源コードや接続コードは、足に引っか
けると本機の落下などによりけがの原因
となることがあります。
移動時には、コード類をはずしてくださ
い。
表示パネルを閉めるときに指
を挟まないように注意する
表示パネルを閉めるときは、表示パネル
と本体の間に指を挟まれないように注意
してください。
インクリボンの装着口の内部
に手を入れない
中にあるサーマルヘッドが熱くなってい
る場合があり、やけどの原因となること
があります。
電源コードのプラグおよびコ
ネクターは突き当たるまで差
し込む
真っ直ぐに突き当たるまで差し込まない
と、火災や感電の原因となります。
製品の上に乗らない、重いも
のを乗せない
倒れたり、落ちたり、壊れたりして、け
がの原因となることがあります。
プリント紙排出口をのぞかな
い
プリント紙排出口からプリントされたプ
リント紙が排出されますので、のぞきこ
むと失明やけがの原因となることがあり
ます。
プリント紙の排出口はのぞかないでくだ
さい。
注意
5
通気孔をふさがない
通気孔をふさぐと内部に熱がこもり、火
災や故障の原因となることがあります。
風通しをよくするために次の項目をお守
りください。
• 壁から 10cm 以上離して設置する。
• 密閉された狭い場所に押し込めない。
• 毛足の長い敷物(じゅうたんや布団な
ど)の上に設置しない。
• 布などで包まない。
• あお向けや横倒し、逆さまにしない。
不安定な場所に設置しない
ぐらついた台の上や傾いたところに設置
すると、倒れたり落ちたりしてけがの原
因となることがあります。また、設置・
取り付け場所の強度を充分にお確かめく
ださい。
プリント紙は縦置きにする
横に置くと回転して落下し、けがの原因
となることがあります。
表示パネルに無理な力をかけ
ない
表示パネルのガラスが割れて、けがの原
因になることがあります。
排紙トレイは、人通りの妨げ
になる場所には設置しない
設置された排紙トレイが通路に飛び出し
ていると、通行人がぶつかってけがをす
るおそれがあります。
6
注意

CD-ROM マニュアルの
使いかた
付属の CD-ROM には UP-CR15L の取扱説明書が記録され
ています。
この取扱説明書は PDF(PortableDocumentFormat) ファイ
ルで作成されています。
準備
付属の CD-ROM に収納されているオペレーションマニュア
ルを使用するためには、以下のソフトウェアがコンピュー
ターにインストールされている必要があります。
• AdobeReader6.0以上
メモ
AdobeReader がインストールされていない場合は、下記
URL よりダウンロードできます。
http://www.adobe.com/jp/
窓口のご案内(付属)にあるソニーのご相談窓口にご依頼
ください(有料)。
Adobe および AdobeReader は、AdobeSystemsIncorporated(アド
ビシステムズ社)の商標です。
取扱説明書を読むには
CD-ROM に収納されている取扱説明書を読むには、次のよ
うにします。
1
CD-ROM を、CD-ROM ドライブに入れます。
2
InstructionsForUse フォルダ内の、読みたい言語の取
扱説明書を選択します。
メモ
• ほかの説明書をお読みになる場合は、CD-ROM に収納さ
れている Readme ファイルで説明書の収納先フォルダを
確認してください。
• AdobeReader のバージョンによって、ファイルが正しく
表示されないことがあります。正しく表示されない場合
は、「準備」の項の URL より最新のソフトウェアをダウ
ンロードしてください。
ご注意
CD-ROM が破損または紛失したため、新しい CD-ROM を
ご希望の場合は、お買い上げ店、または業務用製品ご相談
CD-ROM マニュアルの使いかた
7

こんなことができます
本機は、デジタルカメラなどで撮影した画像データをメモ
リーカードから読み込んで手軽にプリントできます。
本機には次の特長があります。
多彩なプリントサービス
通常のプリントに加え、分割写真やフレームつきプリント、
インデックスプリントができます。
また、トリミングや色の調整など、撮影した画像を編集し
てプリントできます。
オーダー番号やファイル名を透かし状にプリントでき、プ
リントの仕分けが容易になります。
送した場合も、メモリーカードから読み込んでプリントす
る場合と同様の多彩なプリントサービスが利用できます。
別売りのワイヤレスアダプター
作なしに、ワイヤレス機能を搭載したデジタルカメラから
画像を転送してプリントすることができます。
なお、この機能を使う場合は拡張コンパクトフラッシュが
必要です。
1) ご使用になれる BluetoothUSB アダプターについては、「仕様」
の「別売り品」(17 ページ)をご覧ください。なお、ご使用の
国・地域によっては、販売しておりません。お買い上げ店、ま
たはお近くのソニーサービス窓口にご相談ください。
2) サイレックステクノロジー社製 SX-WSG1 が必要です。ご使用の
国・地域によっては販売しておりません。お買い上げ店、また
はお近くのソニーサービス窓口にご相談ください。
対応するデジタルカメラや本機の詳細情報については、
UP-CR15L のサポートページ(http://www.sony.co.jp/snaplab)
をご覧ください。
2)
を使用すると、本機の操
選べる操作モード
本機を使用する用途に合わせて、フル機能モード、簡易
モード、イベントモードの 3 つの操作モードが選べます。
各種のメモリーカードに対応
デジタルカメラ用の主要な記憶メディアである、メモリー
スティックや xD- ピクチャーカード、SD カード、マル
チメディアカード、コンパクトフラッシュに対応していま
す。
また、USB メモリーにも対応しています。
高速で高画質なプリント
新開発の昇華熱転写方式のプリントエンジンにより、保存
性に優れた美しい画像がすばやくプリントできます。
タッチパネルで簡単操作
8 インチタッチパネル式ディスプレイを採用し、画面に触
れるだけで簡単に操作できます。
オリジナルデータでカスタマイズ
ロゴや文字などの透かしプリント
ロゴや文字などお好みのデザインを拡張コンパクトフラッ
シュに入れてセットしておくと、そのデザインを写真上に
透かしのように入れてプリントすることができます
(ウォーターマーク)。
パソコンからプリント
付属の USB ケーブルを使って本機とパソコンを接続すると、
パソコンから送ったデータを本機でプリントできます。
1) パソコンと本機を接続する前に、付属のプリンタードライバー
をインストールする必要があります。プリンタードライバーの
最新情報については UP-CR15L のサポートページ(http://
www.sony.co.jp/snaplab)をご覧ください。
1)
一体型のコンパクトなボディ
ディスプレイとプリンターが一体になったコンパクトなボ
ディなので、店頭のカウンターなど、限られたスペースに
も設置できます。
また、ディスプレイは操作スタイルに合わせて 7 段階に角
度を調整できます。
プロモーション用の画像やフレームデータの入ったメモ
リーカード(拡張コンパクトフラッシュ)を拡張スロット
にセットしておけば、待機時に広告を表示したり、フレー
ムを合成したプリントができます。
タにはオリジナルの画像が使えます。
1) 市販のコンパクトフラッシュが必要です。
1)
広告やフレームデー
ワイヤレス機器を使って簡単にプリント
別売りの BluetoothUSB アダプター1)を使用すると、携帯
電話などの Bluetooth 対応機器からワイヤレスで画像を転
送してプリントできます。Bluetooth 通信を使って画像を転
こんなことができます
8
最新の情報について
設置する
最新の情報については、UP-CR15L のサポートページ
(http://www.sony.co.jp/snaplab)をご覧ください。
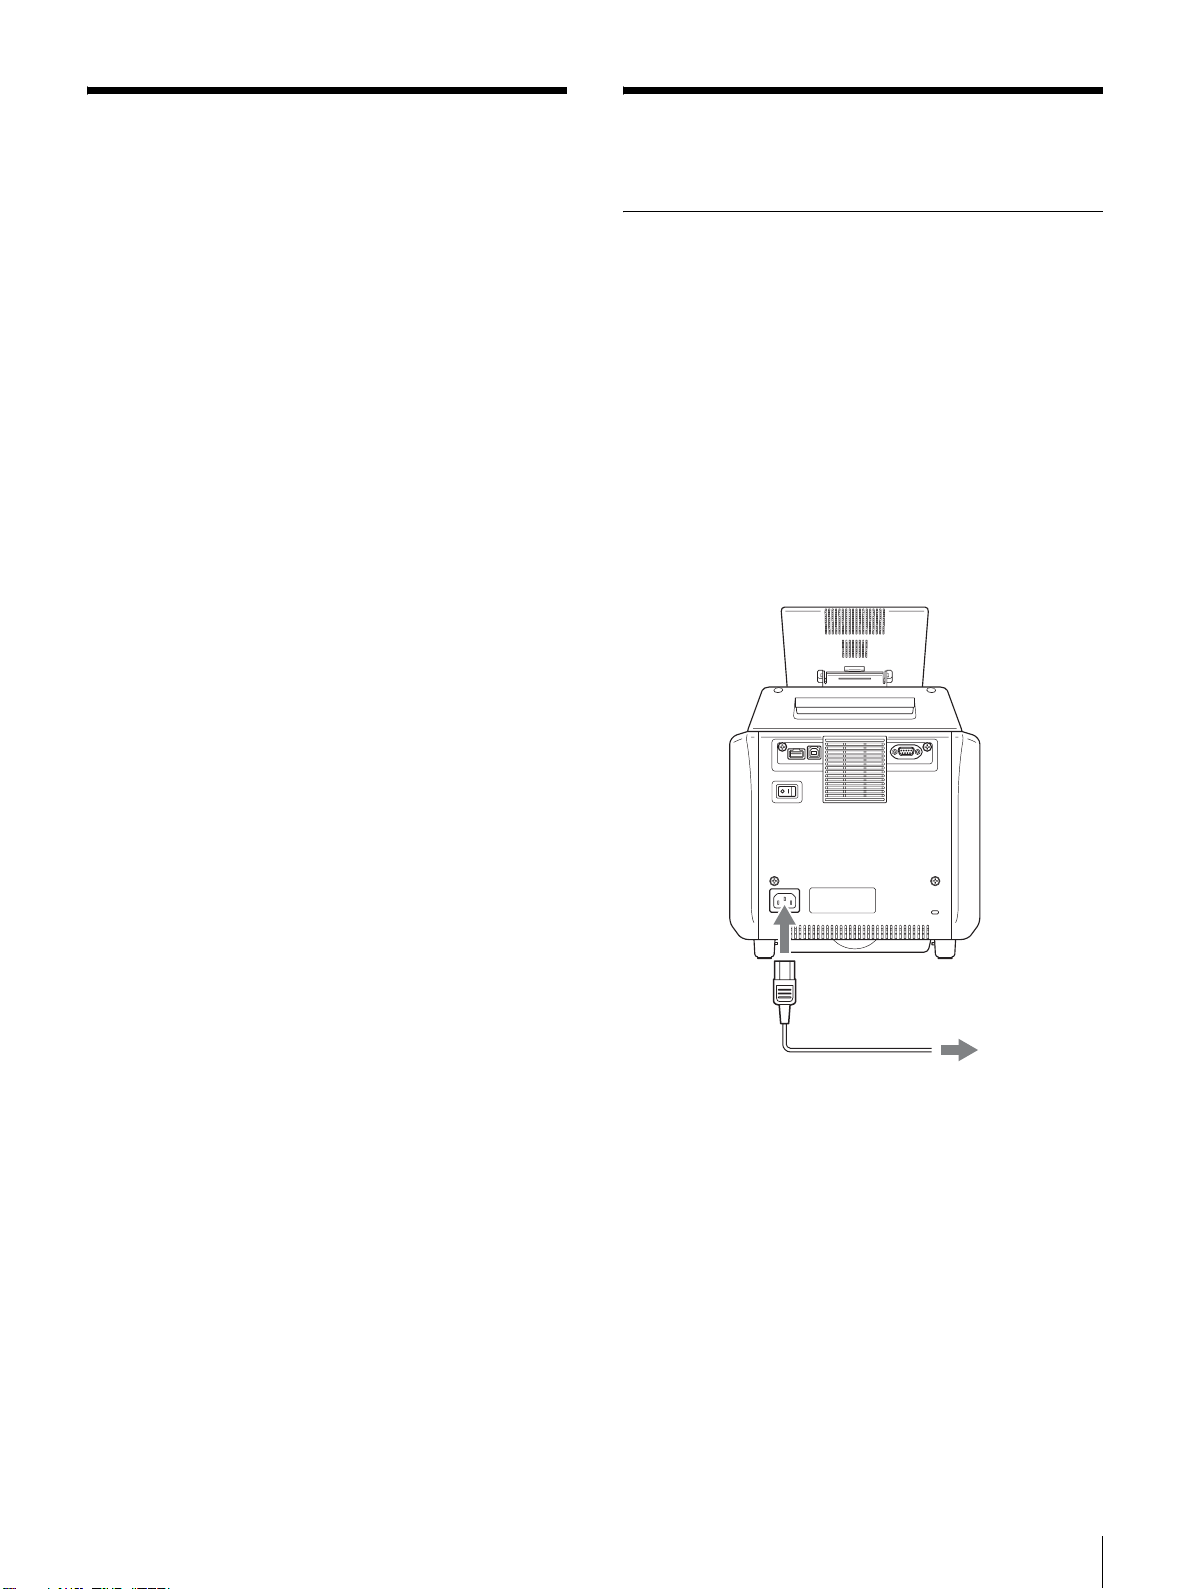
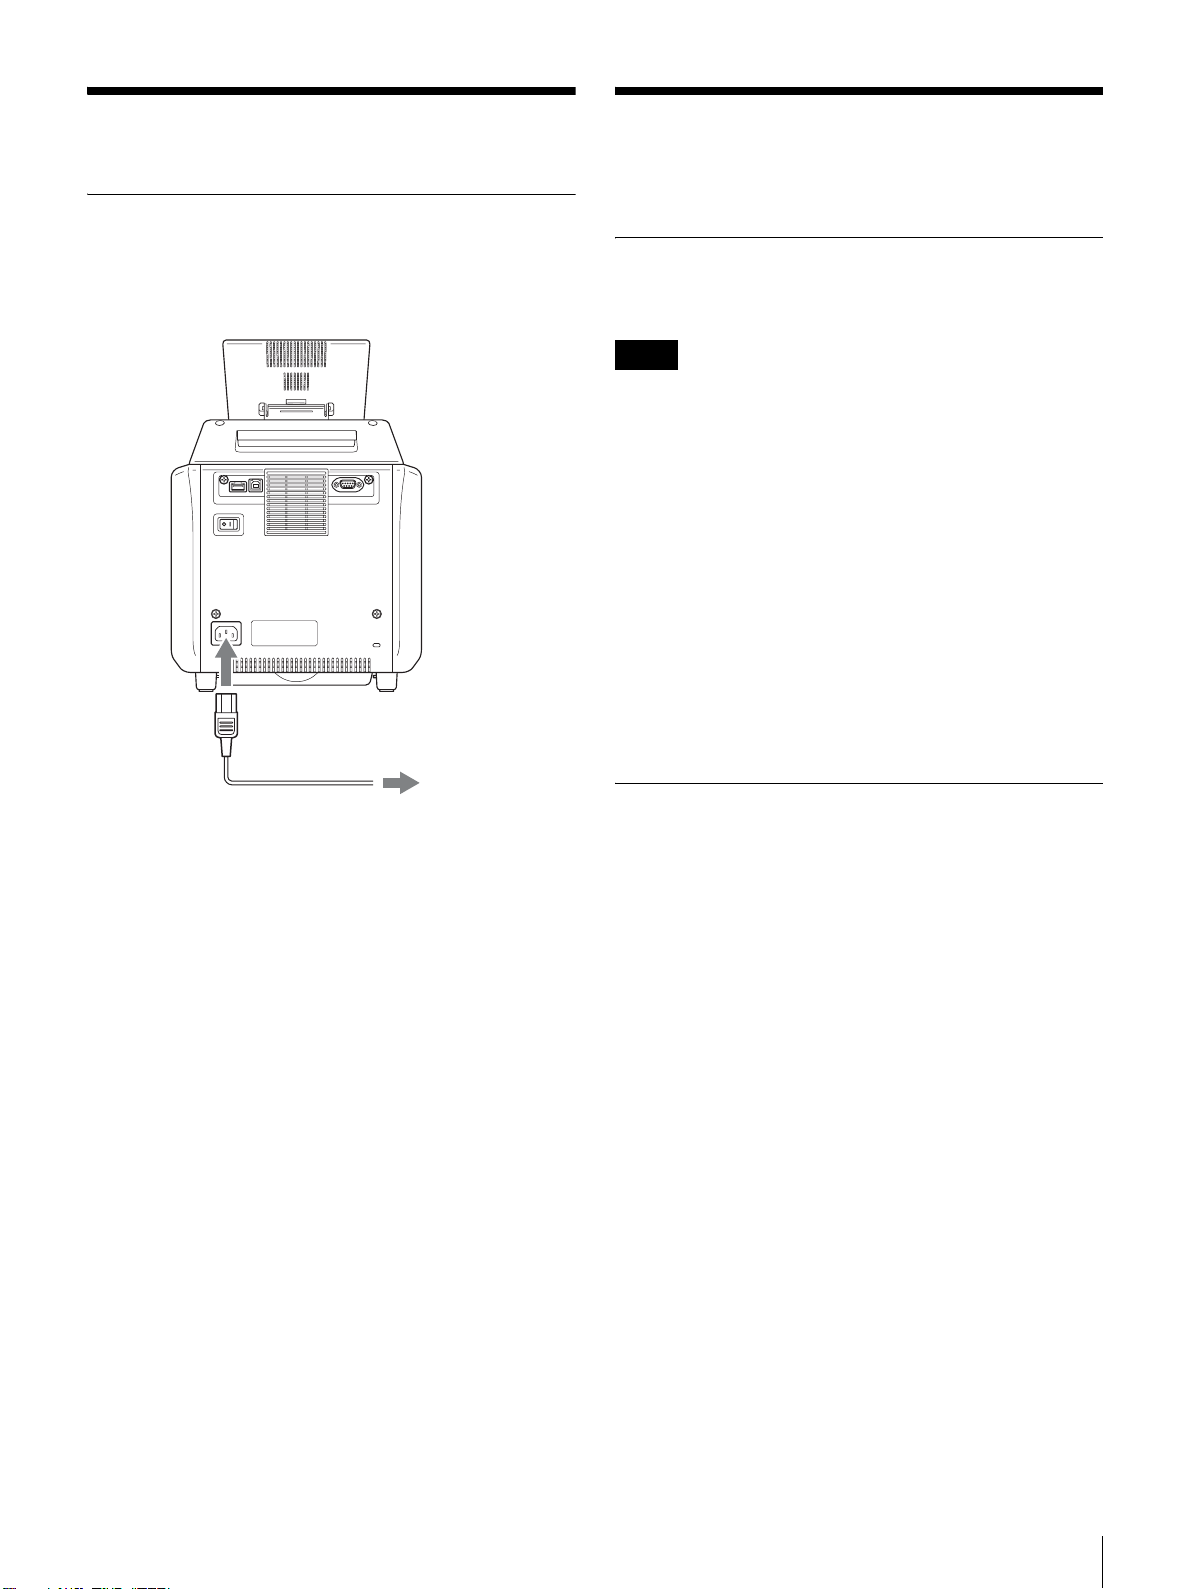
電源コードを接続する
付属の電源コードの電源プラグを本機の〜 ACIN 端子に接
続し、もう一方をコンセントに差し込みます。
コンセントが 2 芯の場合は、コンセント側の電源プラグに
付属の 3 極→ 2 極変換プラグを装着してください。このと
き、変換プラグに付いている緑色のアース線を必ず建物の
アース端子に接続してください。
3 極→ 2 極変換プラグをご使用になる場合のご注意
アースの接続は、必ず電源プラグをコンセントへ接続する
前に行ってください。アースの接続をはずす場合は、必ず
電源プラグを電源コンセントから抜いてから行ってくださ
い。
電源コード(付属)
コンセント
最新の情報について/設置する
9
プリント紙・インクリボ
ンを取り付ける
プリント紙・インクリボンの取り扱い
について
ご注意
• プリントパックにはインクリボンが 2 個、プリント紙が 2
巻入っています。インクリボンとプリント紙は同じ箱に
入っているものを必ずセットでお使いください。
• インクリボンとプリント紙は余分に巻いてあります。イ
ンクリボンとプリント紙が余っていても、必ず新しいイ
ンクリボンとプリント紙をセットで取り付けてください。
余ったプリント紙を使うと故障の原因となります。
• プリント紙のサイズに合ったインクリボンをセットでお
使いください。異なる組み合わせでお使いになると、正
常なプリント結果が得られないだけでなく、紙づまりや
故障の原因になります。
• プリント紙のプリント面やインクリボンのインクには触
らないでください。プリント面やインクに指紋やほこり
が付着すると、きれいにプリントできないことがありま
す。
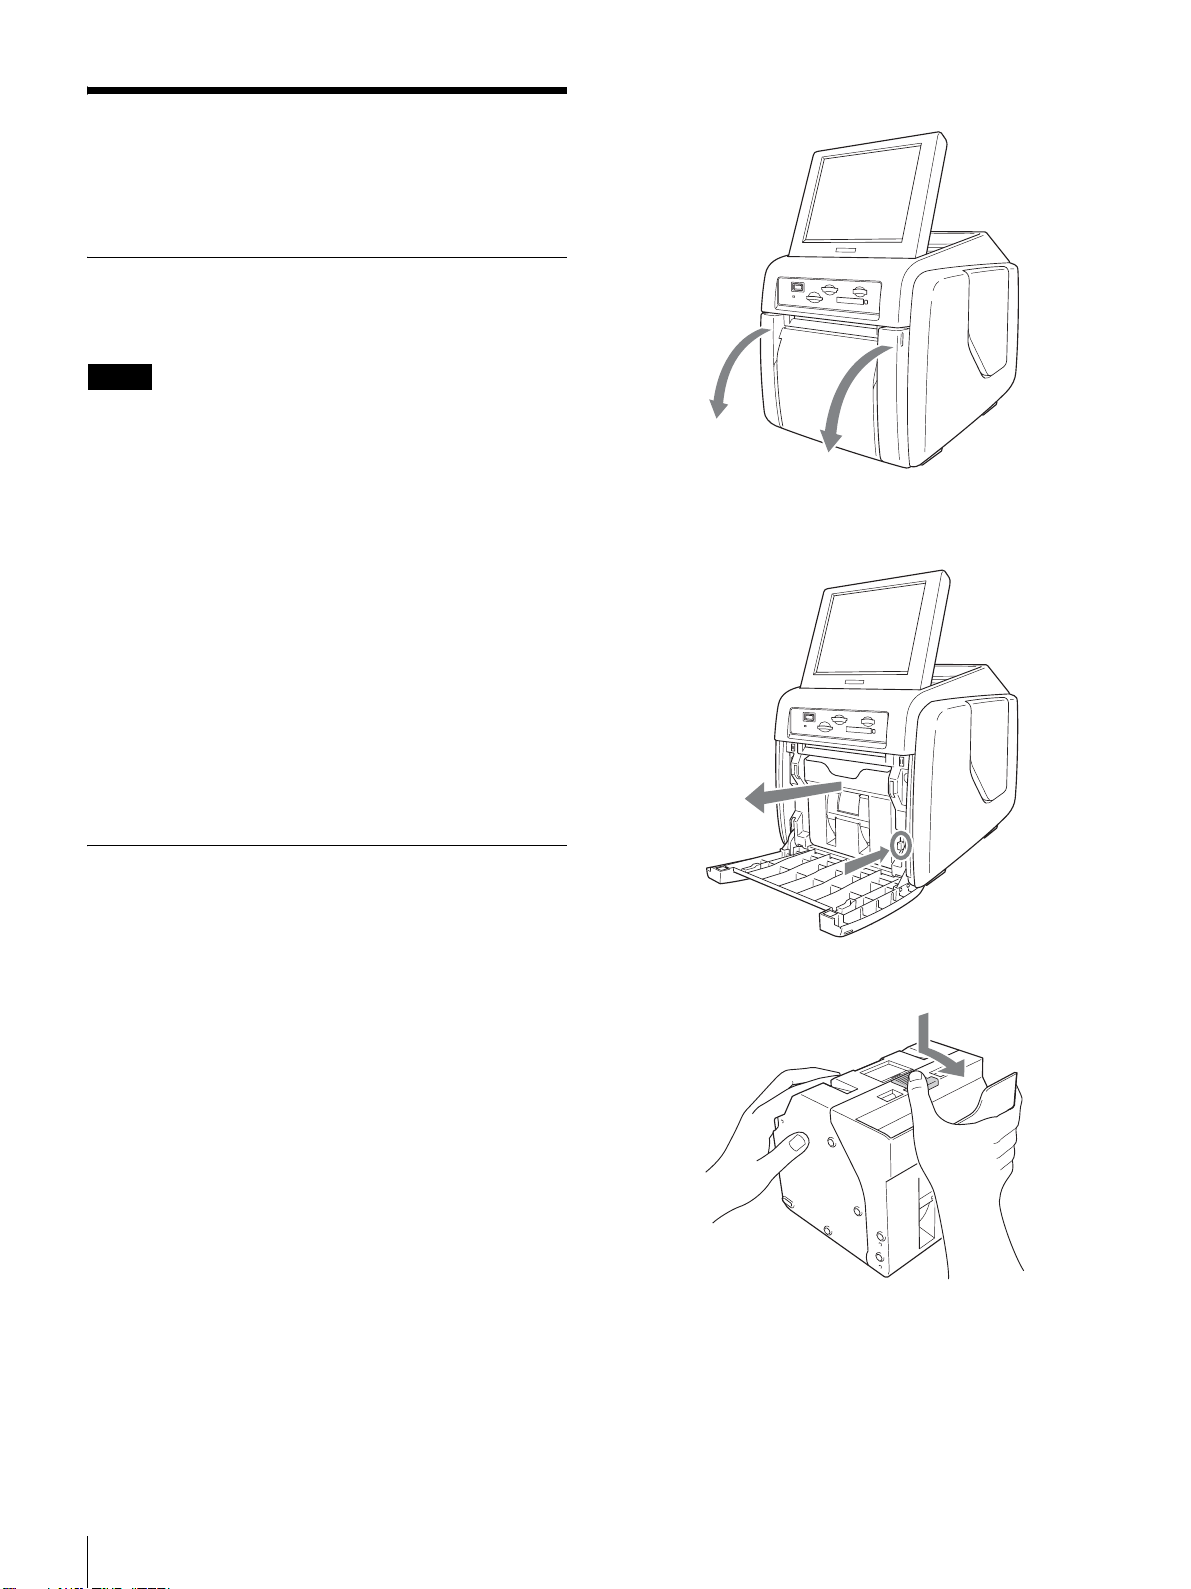
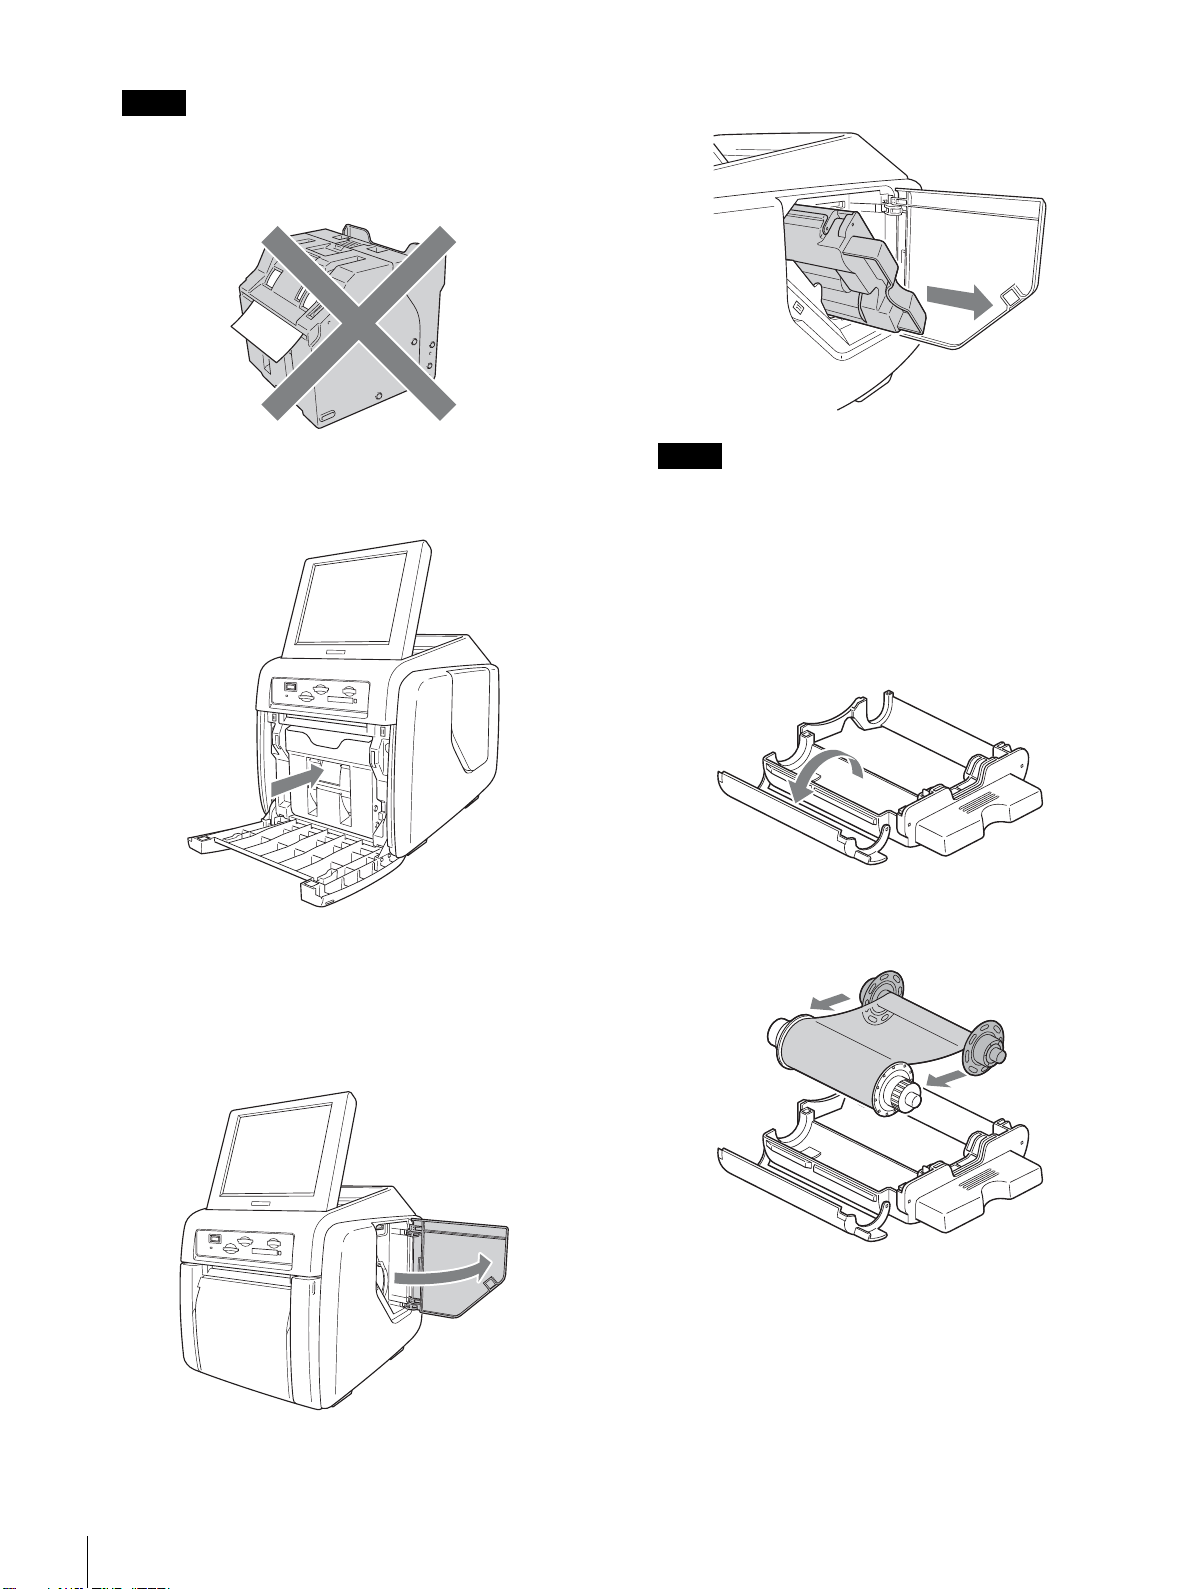
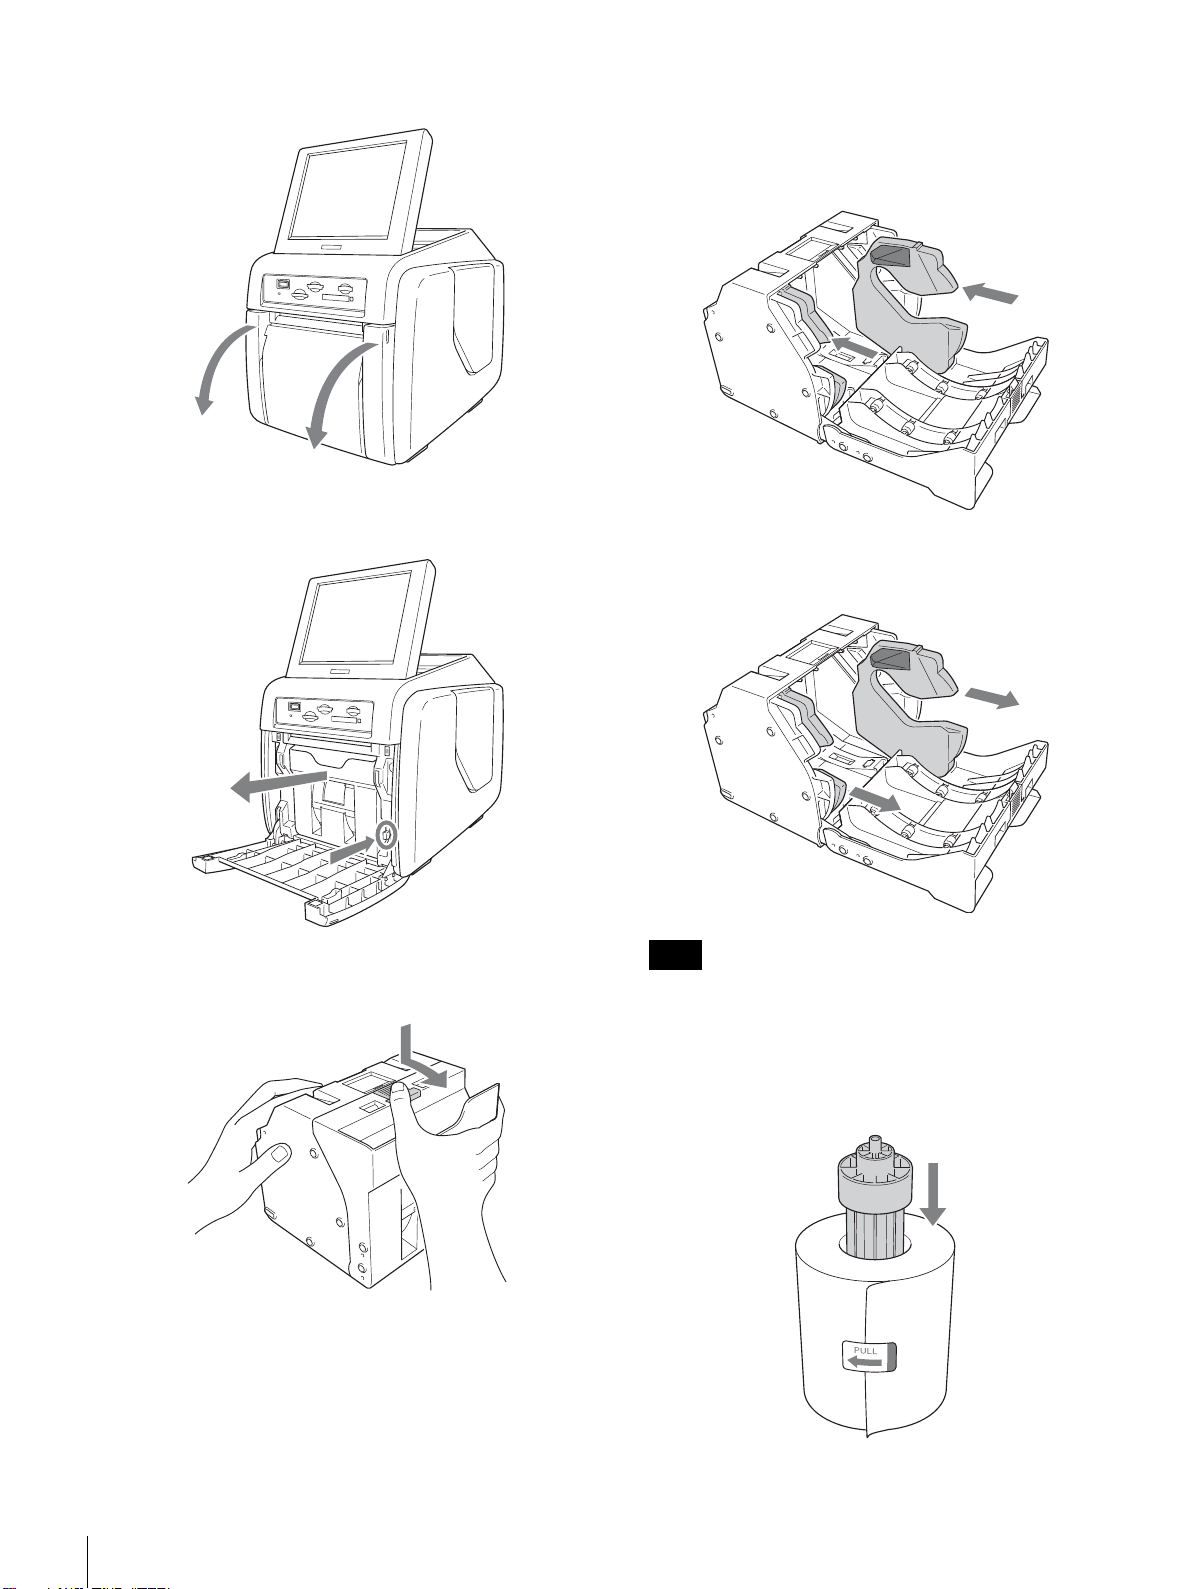
1
フロントドアを開ける。
2
ペーパーホルダー取り出しボタンを押し、ペーパーホ
ルダーを引き出す。
プリント紙・インクリボンを取り付け
る
初めてプリンターをお使いになる場合は、まずプリント紙
およびインクリボンを取り付けてください。
ペーパーホルダーにアダプターを取り付け
る
プリント紙の紙幅は、プリントパックによって異なります。
2UPC-C54 シリーズおよび 2UPC-C58 シリーズを使用する
場合は、ペーパーホルダーにアダプターを取り付けて、幅
を調整します。
3
上部のボタンを押して、ペーパーホルダーを開ける。
プリント紙・インクリボンを取り付ける
10
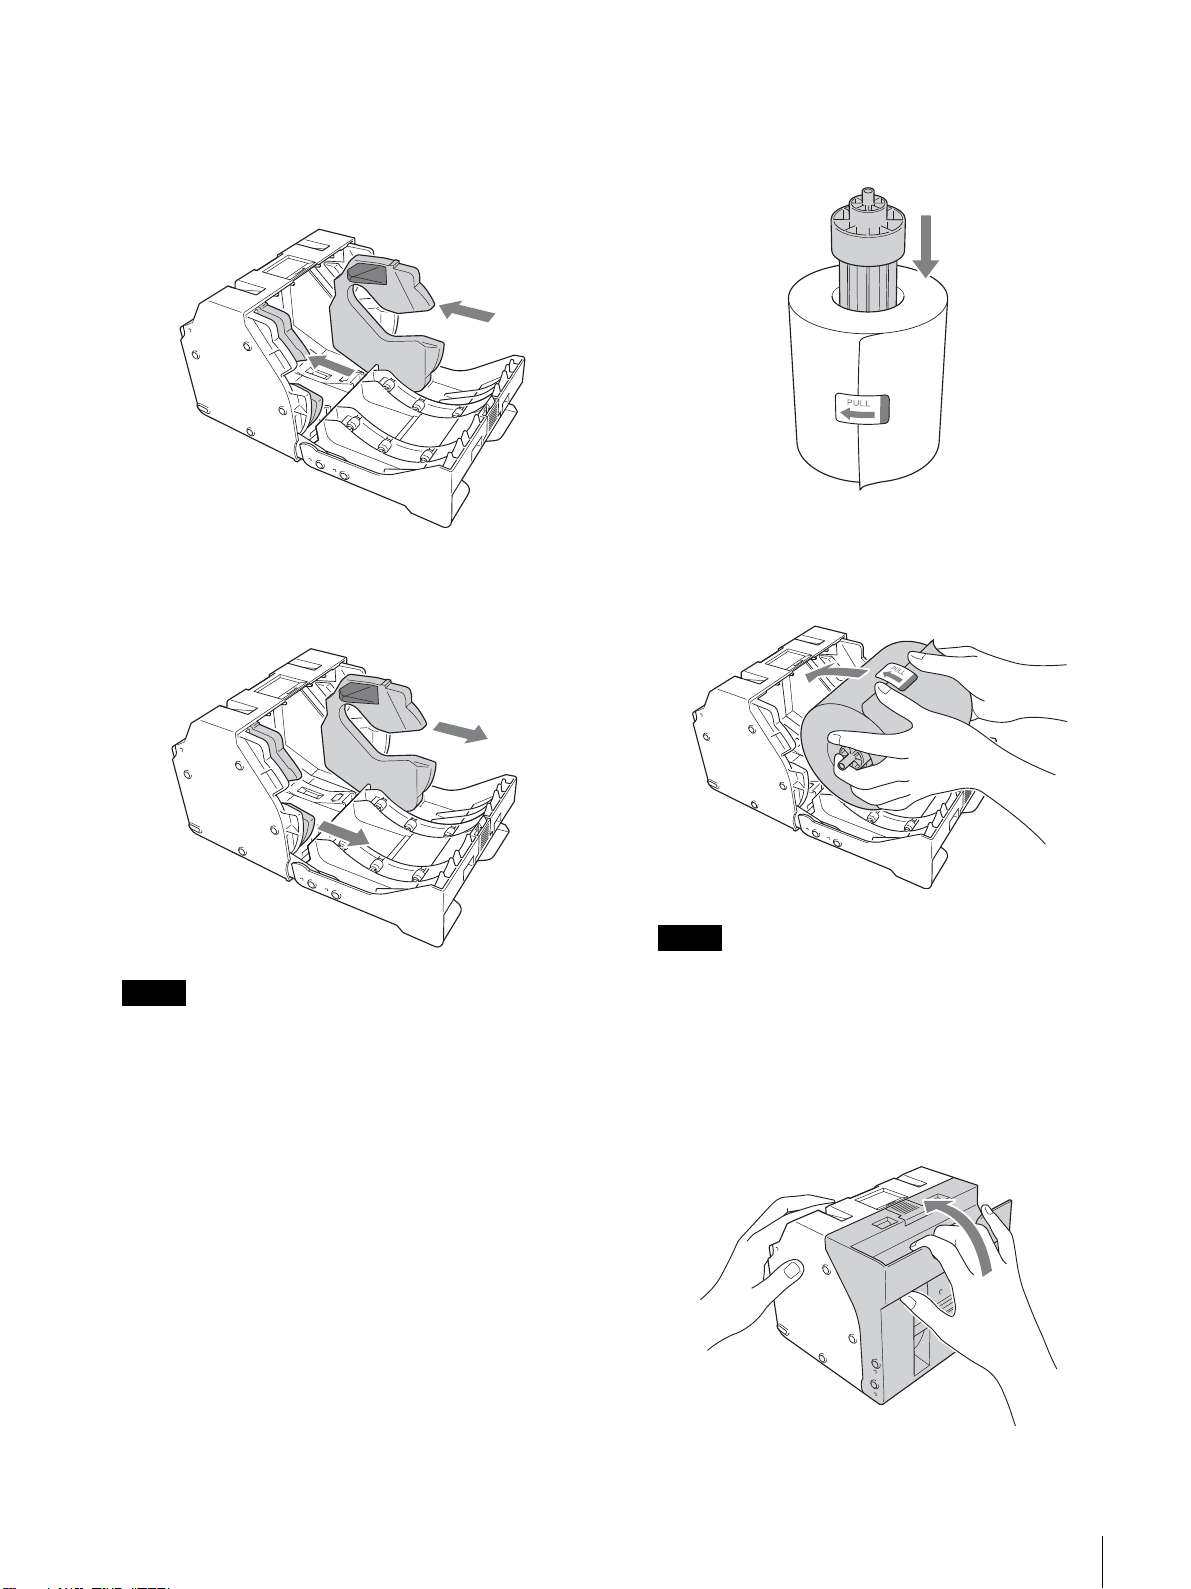
4
ペーパーホルダーの幅を調節する。
プリント紙を取り付ける
2UPC-C54 シリーズおよび 2UPC-C58 シリーズを
使用する場合
ペーパーホルダーに左右のアダプターを取り付けます。
2UPC-C53 シリーズおよび 2UPC-C55 シリーズを
使用する場合
ペーパーホルダーからアダプターを取りはずします。
1
プリント紙にペーパーコアを差し込む。
2
プリント紙をペーパーホルダーに入れる。
プリント紙の中央にあるシールの矢印が奥を向くよう
に入れます。
ご注意
アダプターはなくさないように保管してください。
ご注意
プリント紙を取り付けるときは、ペーパーホルダーの
ふたを完全に開いてください。完全に開いていないと、
故障の原因となることがあります。
3
プリント紙の中央についているシールをはがす。
4
ペーパーホルダーを閉める。
プリント紙・インクリボンを取り付ける
11
ご注意
ペーパーホルダーを閉じた際に、プリント紙の先端が
ペーパーホルダーの排出口から出ないように注意して
ください。
2
インクリボンホルダーを取り出す。
5
ペーパーホルダーを本機の中に戻す。
カチッと音がするまで、押し込んでください。
6
フロントドアを閉める。
インクリボンを取り付ける
ご注意
インクリボンホルダーを取り出した後に、開口部へ手
を入れないでください。内部の突起や可動部に触れる
と、けがや故障の原因となるおそれがあります。また、
プリント直後はサーマルヘッドが高温になっており、
触れるとやけどの原因となることがあります。
3
インクリボンホルダーのカバーを開ける。
4
インクリボンの白のスプールを黒のスプールから引き
抜く。
1
サイドドアを開ける。
プリント紙・インクリボンを取り付ける
12
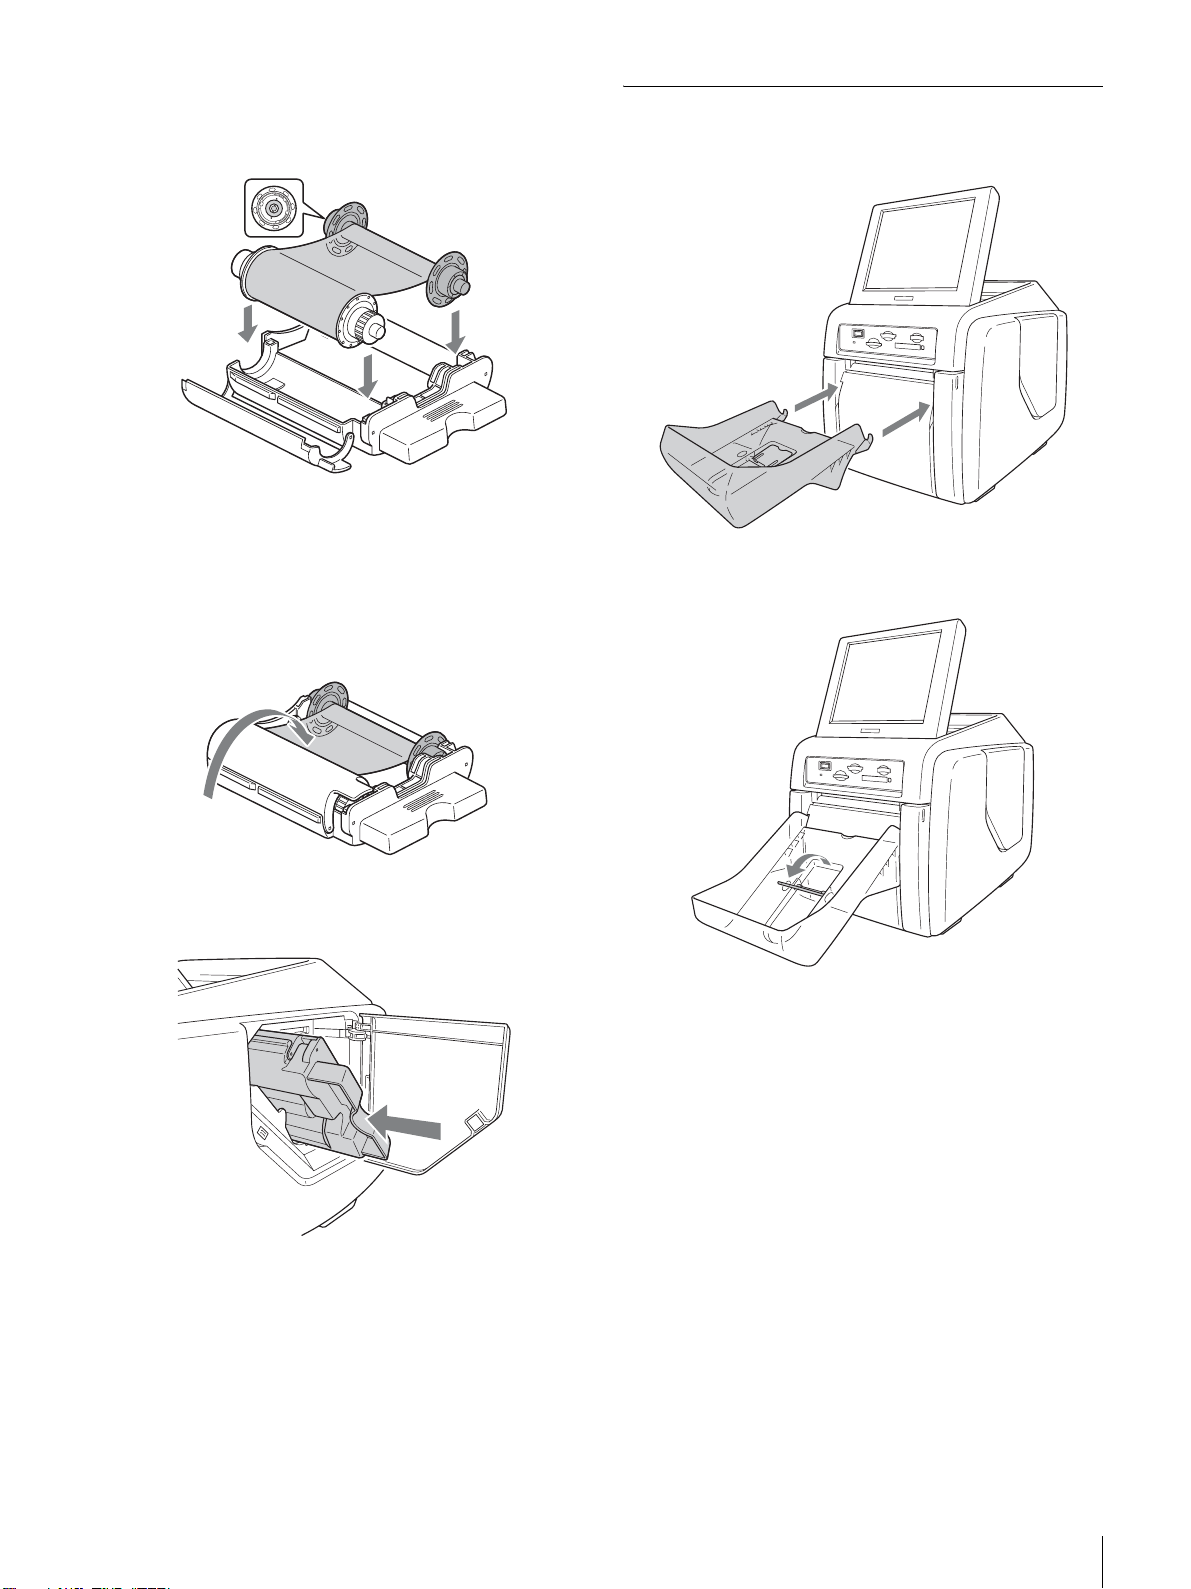
5
リボンがゆるまないように巻きほどき、インクリボン
ホルダーに取り付ける。
IC 基板
図のように白のスプールを手前側に、黒のスプールを
奥側に取り付けてください。黒いスプールの IC 基板の
ある側は、カチッと音がするまで押し込んでください。
6
インクリボンホルダーのカバーを、カチッと音がする
までしっかりと閉める。
ペーパートレイを取り付ける
付属のペーパートレイを取り付けます。
プリント画のサイズが小さい場合は、排紙ストッパーを立
てて使用します。
7
インクリボンホルダーを装着口に差し込み、取っ手のく
ぼんだ部分(矢印の箇所)を押して、奥まで挿入する。
8
サイドドアを閉める。
排紙ストッパーを立てる。
プリント紙・インクリボンを取り付ける
13

起動と終了
起動
1
本機前面のスロットにメモリーカードが挿入されてい
ないことを確認し、POWER スイッチを ON にする。
終了
1
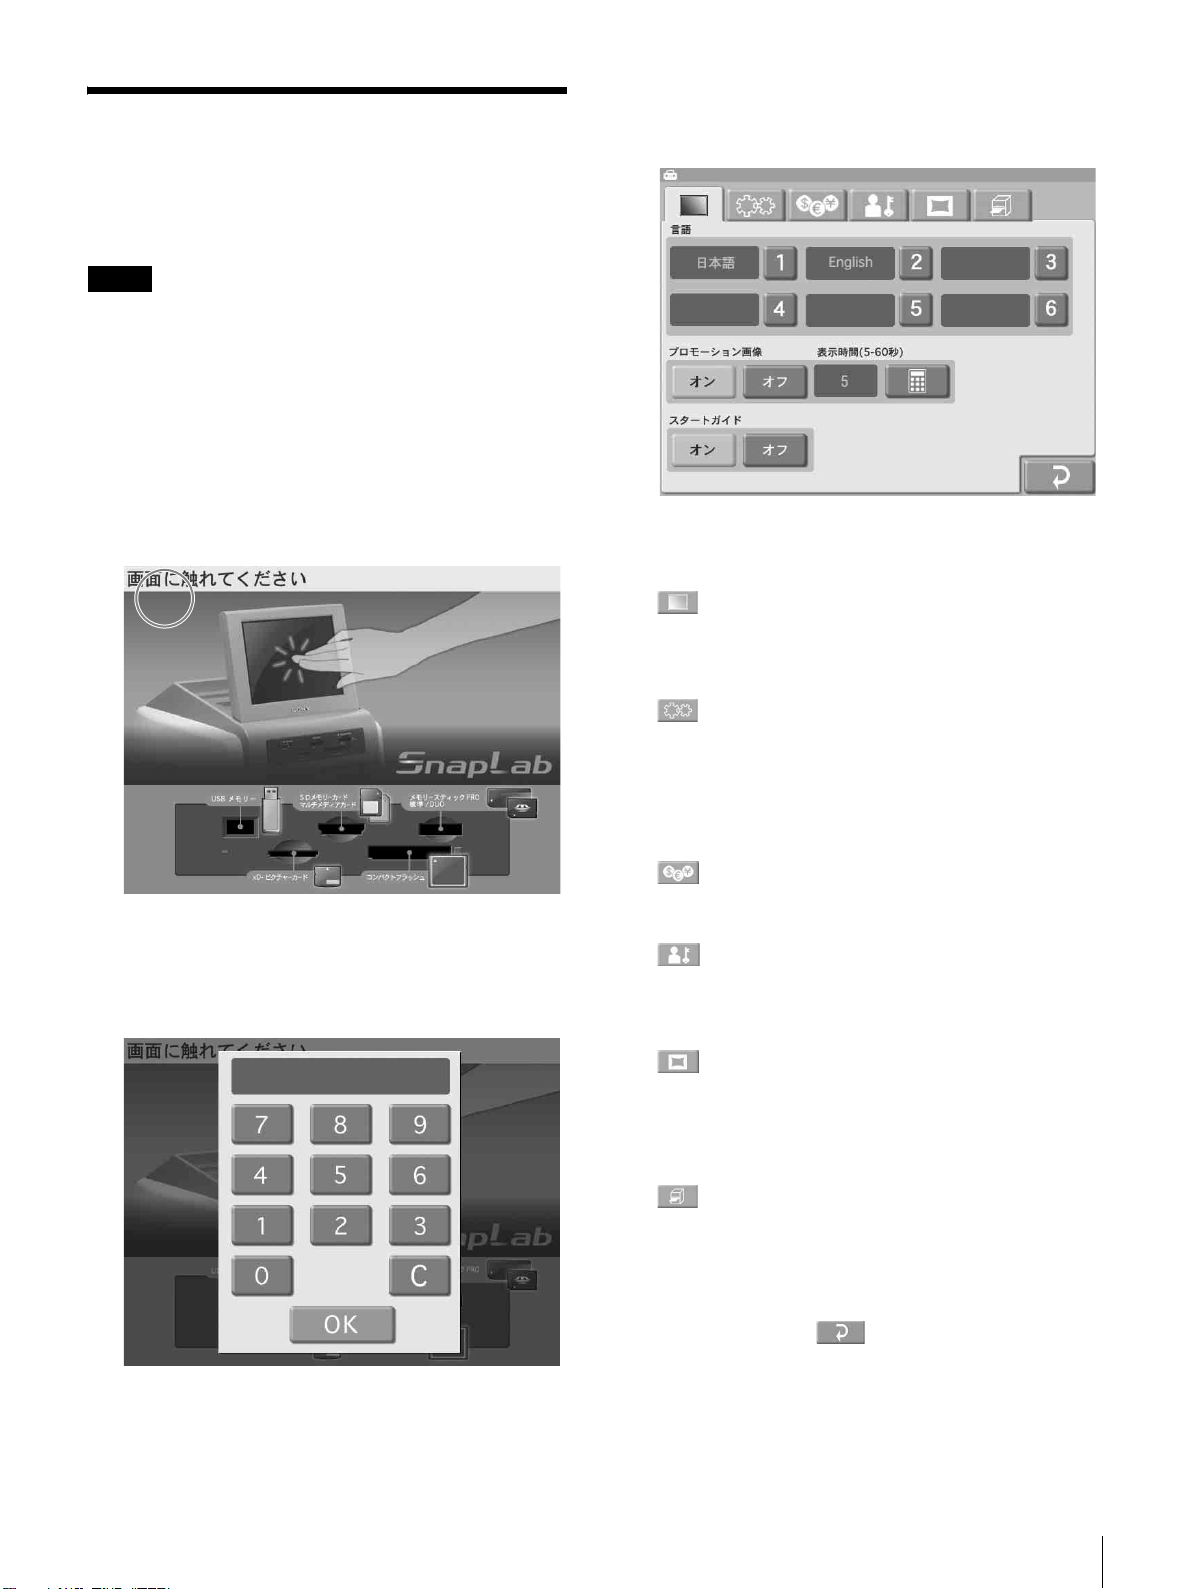
操作中の場合は操作を終了させ、スタートガイド画面
を表示させる。
本機が起動し、スタートガイド画面が表示されます。
プリント紙・インクリボンが無い場合は、次の画面が表示
されます。
2
本機前面のスロットにメモリーカードが挿入されてい
ないことを確認し、POWER スイッチを OFF にする。
ご注意
本機の電源を切った後再び電源を入れる場合は、5 秒以上
経過してから電源を入れてください。
14
起動と終了
3
[OK]ボタンにタッチする。
管理画面を表示する
管理画面は次の手順で表示します。
ご注意
• 管理画面で本機の設定を行うには、管理者パスワードの
入力が必要です。出荷時には、「9999」が管理者パスワー
ドとして設定されています。
• 本機前面のスロットにメモリーカードが挿入されている
と、管理画面を表示できません。メモリーカードを抜い
てから、再度操作してください。
1
スタートガイド画面で、画面の左上隅に 2 回続けてタッ
チする。
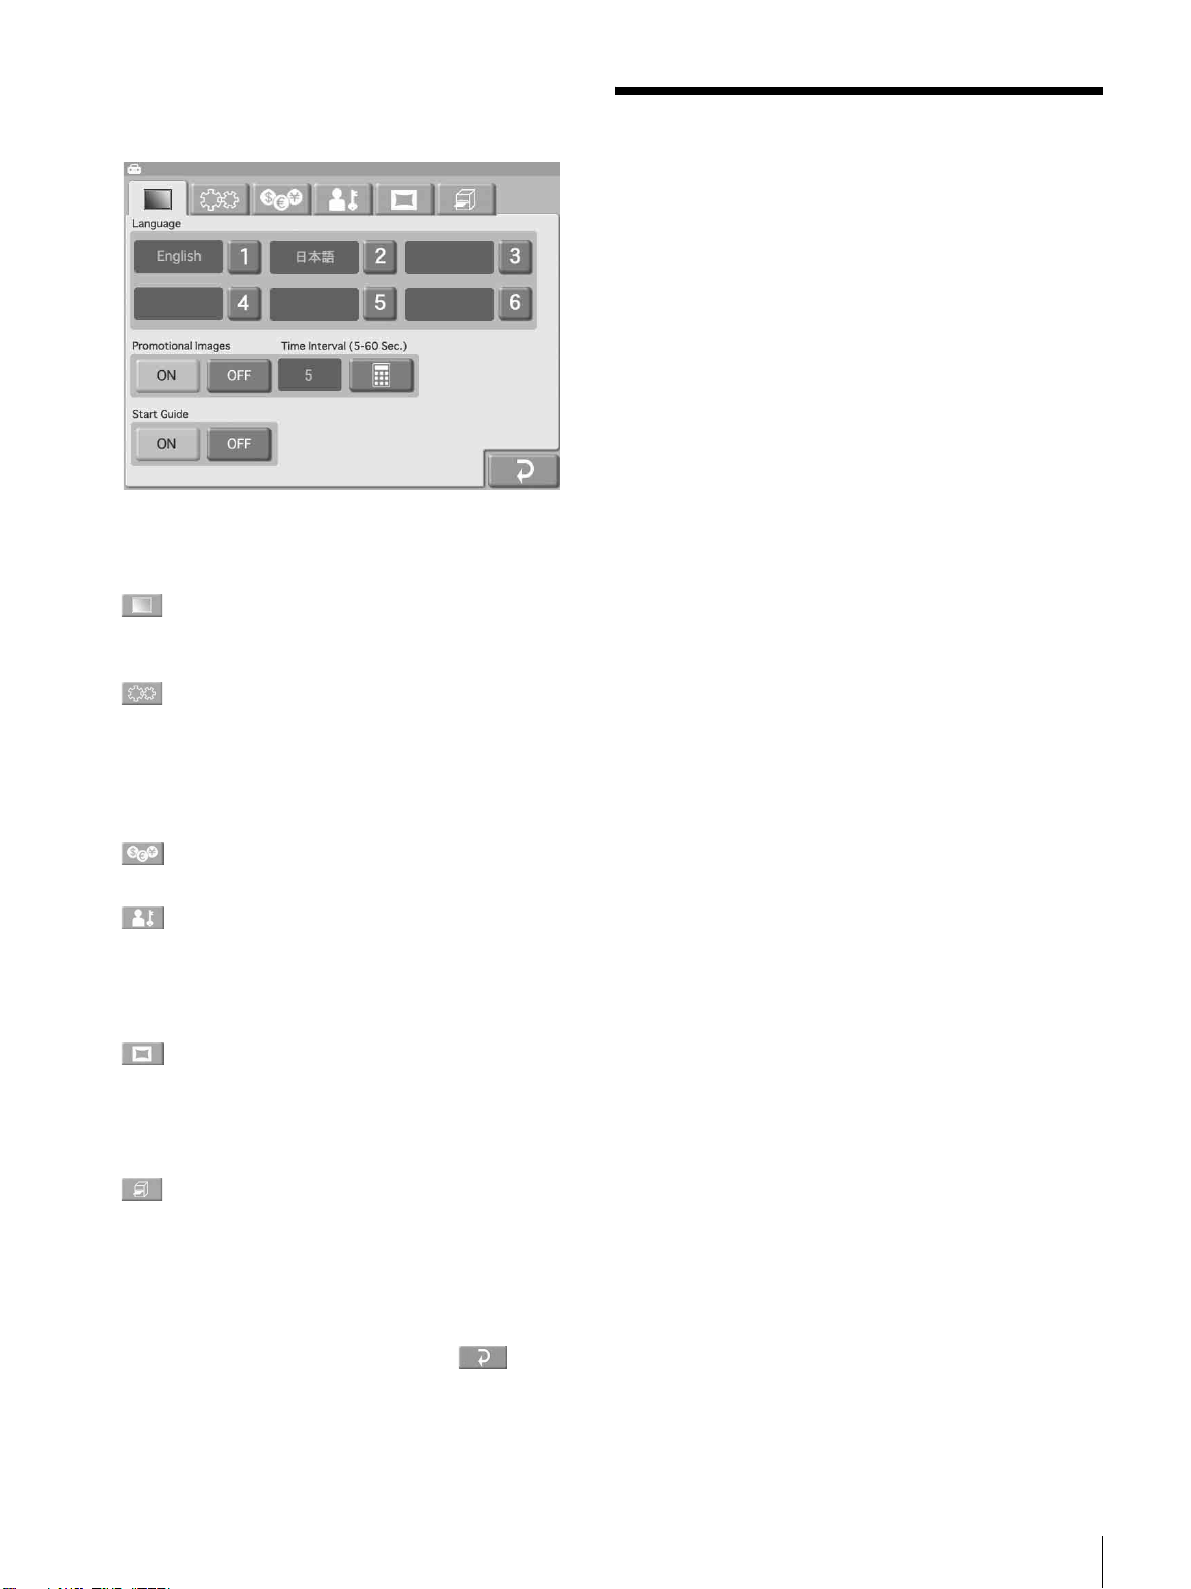
管理画面が表示されます。
この画面で各タブにタッチして画面を選択し、設定を
行います。
(画面表示)タブ
画面に表示する言語の選択やスクリーンセーバーの設
定を行います。
(システム)タブ
操作モードの選択や時計の設定、パソコンとの接続の
設定などを行います。
また、サーマルヘッドのクリーニングやタッチパネル
の調整も、このタブから行います。
パスワード入力画面が表示されます。
2
画面上のテンキーを使って、管理者パスワードを入力
する。
(料金)タブ
使用する通貨や料金について設定します。
(管理)タブ
プリントの上限枚数やパスワードを設定します。
また、プリント履歴やシステム履歴を表示します。
(テンプレート)タブ
フレームつきプリントのテンプレートなどのデータを
拡張コンパクトフラッシュへコピーします。
また、画像と合成するテキストを入力します。
(プリンターの設定)タブ
オーダー番号やファイル名のプリント、およびカット
モードについて設定します。
また、プリンターの画質調整を行います。
4
設定が終了したら、 ボタンにタッチします。
管理画面を表示する
15

仕様
電源 AC100V50/60Hz
消費電流 最大 3.0A
動作温度 5°C〜35°C
動作湿度 20%〜80%(結露なきこと)
最大外形寸法 約 275×300×380mm
(最大突起含まず)
(幅/高さ/奥行き)
質量 約 11kg(本体のみ)
プリント方式 昇華熱転写型
プリント解像度 300dpi
プリント階調 YMC 各色 8bit(256 階調)処理
プリントサイズ 2UPC-C53 シリーズ:
89 × 127mm± 2mm(L サイズ)
2UPC-C54 シリーズ:
102 × 152mm± 2mm(KG(はがき)
サイズ)
2UPC-C55 シリーズ:
127 × 178mm± 2mm(2L サイズ)
127 × 127mm± 2mm(13 × 13cm
サイズ)
89 × 127mm± 2mm(L サイズ)
2UPC-C58 シリーズ:
102 × 203mm± 2mm(10 × 20cm
サイズ)
102 × 178mm± 2mm(HV(ハイビ
ジョン)サイズ)
102 × 152mm± 2mm(KG(はがき)
サイズ)2)
102 × 102mm± 2mm(10 × 10cm
サイズ)
1)プリンタードライバー使用時のみ印刷できます。
2)プリンタードライバー使用時は印刷できません。
プリント画素数 2UPC-C53 シリーズ:
1,100 × 1,536 ドット(L サイズ)
2UPC-C54 シリーズ:
1,248 × 1,848 ドット(KG(はがき)
サイズ)
2UPC-C55 シリーズ:
1,536 × 2,148 ドット(2L サイズ)
1,536 × 1,548 ドット(13 × 13cm サイ
ズ)1)
1,100 × 1,536 ドット(L サイズ)
2UPC-C58 シリーズ:
1,248 × 2,448 ドット(10 × 20cm サイ
ズ)
1)
1,248 × 2,148 ドット(10 × 18cm サイ
ズ)
1,248 × 1,848 ドット(KG(はがき)
サイズ)
1,248 × 1,248 ドット(10 × 10cm サイ
ズ)
(ただし、左右上下各およそ 2mm はプリ
ントされません)
1)プリンタードライバー使用時のみ印刷できます。
2)プリンタードライバー使用時は印刷できません。
プリント時間(光沢)
2UPC-C53 シリーズ:
約 14 秒(L サイズ)
2UPC-C54 シリーズ:
約 18 秒(KG(はがき)サイズ)
2UPC-C55 シリーズ:
約 20 秒(2L サイズ)
2UPC-C58 シリーズ:
約 21 秒(10 × 20cm サイズ)
(ご使用になる条件によっては、プリント
時間が異なる場合があります。)
プリント時間(マット)
2UPC-C53 シリーズ:
約 18 秒(L サイズ)
2UPC-C54 シリーズ:
約 24 秒(KG(はがき)サイズ)
2UPC-C55 シリーズ:
約 27 秒(2L サイズ)
2UPC-C58 シリーズ:
約 29 秒(10 × 20cm サイズ)
(ご使用になる条件によっては、プリント
時間が異なる場合があります。)
入力端子 ACIN(電源入力用)
制御端子 RS-232C(外部制御用、D-Sub9 ピン)(1)
USB ポート(デバイス)
Hi-SpeedUSB(USB2.0 準拠)
USB ポート(ホスト)
USB メモリー用(2)
(フロント 1、リア 1)
メモリーカードスロット
メモリースティック用(1)
SD カード用(1)
(SDXC には対応していません)
コンパクトフラッシュ用(2)
(マイクロドライブには対応していませ
ん。1 か所は拡張用スロットで、サイ
ドドアの内側にあります)
xD- ピクチャーカード用(1)
対応画像フォーマット
JPEG:JFIF4:4:4,4:2:2,4:2:0(ベースライ
ン JPEG)
2)
16
仕様

Exif2.2.1 準拠
DCF2.0 準拠
(プログレッシブ JPEG およびグレース
ケール(8bit)JPEG には対応していま
せん)
TIFF:Exif2.2.1 準拠(RGB 非圧縮)
BMP:24 ビット Windows 形式
(各フォーマットのバージョンによって
は、対応していないことがあります)
最大ピクセル数 JPEG:横 8,000×縦 6,000 ピクセルまたは
縦 8,000 ×横 6,000 ピクセル
TIFF:横 8,000×縦 6,000 ピクセルまたは
縦 8,000 ×横 6,000 ピクセル
BMP:横 8,000×縦 6,000 ピクセルまたは
縦 8,000 ×横 6,000 ピクセル
最大ファイル数 各メディア 9999 ファイル
液晶ディスプレイ
8 インチ TFT カラー液晶タッチスクリー
ンディスプレイ
640 × 480 ドット、RGB
付属品 ペーパートレイ(1)
ペーパーホルダー(1)
アダプター(左右各 1)
ペーパーコア(1)
電源コード(1)
USB ケーブル(1-790-081-71(Sony))(1)
クリーニングカートリッジ(1)
インクリボンホルダー(1)
3 極→ 2 極変換プラグ(1)
CD-ROM(1)
ソフトウェアライセンス契約書(1)
ご使用になる前に(1)
保証書(1)
本機の仕様および外観は、改良のため予告なく変更するこ
とがありますが、ご了承ください。
本機は「高調波電流規格 JISC61000-3-2 適合品」です。
この装置は、クラス B 情報技術装置です。この装置は、
家庭環境で使用することを目的としていますが、この装
置がラジオやテレビジョン受信機に近接して使用される
と、受信障害を引き起こすことがあります。
取扱説明書に従って正しい取り扱いをして下さい。
VCCI-B
• お使いになる前に、必ず動作確認を行ってください。
本機や付属のソフトウエア、記録メディア、外部スト
レージなどを使用中、万一これらの不具合により正常
に動作しなかった場合のプリント結果や記録データの
補償については、ご容赦ください。
• 故障その他に伴う営業上の機会損失等は保証期間中お
よび保証期間経過後にかかわらず、補償はいたしかね
ますのでご了承ください。
• 本機の液晶パネルは有効画素 99.99% 以上の非常に精密
度の高い技術で作られていますが、画面上に黒い点が
現れたり(画素欠け)、常時点灯している輝点(赤、
青、緑など)や滅点がある場合があります。また、液
晶パネルの特性上、長期間ご使用の間に画素欠けが生
じることもあります。これらの現象は故障ではありま
せんので、ご了承の上本機をお使いください。
注意
付属の電源コードは本機の専用品です。
他の機器には使用できません。
別売り品
使用リボンカートリッジ/プリント紙
ラミネートカラープリントパック
2UPC-C53 シリーズ
2UPC-C54 シリーズ
2UPC-C55 シリーズ
2UPC-C58 シリーズ
BluetoothUSB アダプター
DPPA-BT1
1)ご使用の国・地域によっては、販売しておりません。お買い上
げ店、またはお近くのソニーサービス窓口にご相談ください。
2)本機の Bluetooth 通信機能は DPPA-BT1 との組み合わせでのみ
使用することができます。他の BluetoothUSB アダプターはご
使用になれません。
1)2)
仕様
17

English
Owner’s Record
The model and serial numbers are located at the rear.
Record these number in the space provided below.
Refer to these numbers whenever you call upon your Sony
dealer regarding this product.
Model No. ____________________
Serial No. ____________________
WARNING
To reduce the risk of fire or electric shock, do not
expose this apparatus to rain or moisture.
To avoid electrical shock, do not open the
cabinet. Refer servicing to qualified personnel
only.
THIS APPARATUS MUST BE EARTHED.
To disconnect the main power, unplug the AC IN
connector.
If you have any questions about this product, you may call;
Sony Customer Information Service Center 1-800-2227669 or http://www.sony.com/
Declaration of Conformity
Trade Name :SONY
Model :UP-CR15L
Responsible Party :Sony Electronics Inc.
Address :16530 Via Esprillo, San Diego,
CA 92127 U.S.A.
Telephone Number: 858-942-2230
This device complies with part 15 of the FCC Rules.
Operation is subject to the following two conditions:
(1) this device may not cause harmful interference, and
(2) this device must accept any interference received,
including interference that may cause undesired
operation.
For the customers in Canada
This Class B digital apparatus complies with Canadian
ICES-003.
For the customers in the U.S.A.
This equipment has been tested and found to comply with
the limits for a Class B digital device, pursuant to Part 15
of the FCC Rules. These limits are designed to provide
reasonable protection against harmful interference in a
residential installation. This equipment generates, uses,
and can radiate radio frequency energy and, if not installed
and used in accordance with the instructions, may cause
harmful interference to radio communications. However,
there is no guarantee that interference will not occur in a
particular installation. If this equipment does cause
harmful interference to radio or television reception,
which can be determined by turning the equipment off and
on, the user is encouraged to try to correct the interference
by one or more of the following measures:
• Reorient or relocate the receiving antenna.
• Increase the separation between the equipment and
receiver.
• Connect the equipment into an outlet on a circuit
different from that to which the receiver is connected.
• Consult the dealer or an experienced radio/TV
technician for help.
You are cautioned that any changes or modifications not
expressly approved in this manual could void your
authority to operate this equipment.
All interface cables used to connect peripherals must be
shielded in order to comply with the limits for a digital
device pursuant to Subpart B of Part 15 of FCC Rules.
Warning on power connection
Use a proper power cord for your local power supply.
1. Use the approved Power Cord (3-core mains lead)/
Appliance Connector/Plug with earthing-contacts that
conforms to the safety regulations of each country if
applicable.
2. Use the Power Cord (3-core mains lead)/Appliance
Connector/Plug conforming to the proper ratings
(Voltage, Ampere).
If you have questions on the use of the above Power Cord/
Appliance Connector/Plug, please consult a qualified
service personnel.
For the customers in Europe
The manufacturer of this product is Sony Corporation, 17-1 Konan, Minato-ku, Tokyo, Japan.
The Authorized Representative for EMC and product
safety is Sony Deutschland GmbH, Hedelfinger Strasse
61, 70327 Stuttgart, Germany.
For any service or guarantee matters, please refer to the
addresses given in separate service or guarantee
documents.
For kundene i Norge
Dette utstyret kan kobles til et IT-strømfordelingssystem.
18
For the customers in the USA
Lamp in this product contains mercury. Disposal of these
materials may be regulated due to environmental
considerations. For disposal or recycling information,
please contact your local authorities or the
Telecommunications Industry Association
(www.eiae.org).
For the State of California, USA only
Perchlorate Material - special handling may apply, See
www.dtsc.ca.gov/hazardouswaste/perchlorate
Perchlorate Material: Lithium battery contains
perchlorate.
For the customers in Taiwan only
19
GB

Table of Contents
Using the CD-ROM Manual.......................21
Preparations ................................................... 21
Reading the CD-ROM Manual...................... 21
What This Product Can Do.......................21
Information Updates .................................22
Installation .................................................23
Connecting the Power Cord........................... 23
Loading Paper Roll and Ink Ribbon.........23
Handling the paper roll and ink ribbon.......... 23
Loading the Paper Roll and Ink Ribbon........ 23
Attaching the Paper Tray............................... 26
Startup and Shutdown..............................27
Startup............................................................ 27
Shutdown....................................................... 28
Displaying the Administration Screen ....28
Specifications............................................29
20
Table of Contents

Using the CD-ROM
What This Product Can
Manual
The supplied CD-ROM includes manuals for this printer.
The copies of these manuals are created in pdf (Portable
Document Format).
Preparations
One of the following programs must be installed on your
computer in order to use the operation manuals contained
on the CD-ROM disc.
• Adobe Reader Version 6.0 or higher
Memo
If Adobe Reader is not installed, you can download it from
the following URL:
http://www.adobe.com/
Adobe and Adobe Reader are trademarks of Adobe Systems
Incorporated in the United States and/or other countries.
Reading the CD-ROM Manual
To read the manual on the CD-ROM, proceed as follows.
Do
This unit reads image data stored on a memory card and
allows quick and easy printing of photos taken with a
digital camera or other device.
The product has the following features.
Versatile print services
Besides regular photo printout, the unit can produce split
image prints, prints with borders, and index prints. It also
allows the user to edit images before printing with
functions such as trimming and color adjustment.
Order numbers and file names can be printed as a
watermark, making print sorting easy.
Selectable operation modes
To fit the specific purpose for which the unit is used, Full
mode, Quick Print mode, and Event mode can be selected.
Support for a wide range of memory cards
All major memory card formats used in digital cameras are
supported: “Memory Stick,” xD-Picture Card, SD Card,
MultiMediaCard, and CompactFlash card.
The unit also supports USB memory.
1
Insert the CD-ROM disc in your CD-ROM drive.
The manuals are saved in the Instructions For Use
folder.
2
Select and click the manual that you want to read.
Memos
• Open the Readme file on the CD-ROM to confirm the
storage folders for any other manuals you want to read.
• The files may not be displayed properly, depending on
the version of Adobe Reader. In such a case, install the
latest version you can download from the URL
mentioned in “Preparations” above.
Note
If you lose the CD-ROM disc or you cannot read it for
some reason, you can purchase a new CD-ROM disc.
Contact your nearest Sony service representative.
High-speed high-quality printing
Using a newly developed print engine that features a
dyesublimation thermal transfer technology, it is possible
to print images of lasting beauty at high speed.
Easy operation by touch panel
A 8-inch touch panel display is used, allowing for easy
operation with just a touch of the screen.
Customizable with original data
By inserting a memory card (expansion CompactFlash
card) carrying promotional images and border data into the
expansion slot, screen savers can be displayed and photos
can be combined with borders for printing.
images can be used for the advertisement and border data.
1) A commercially available CompactFlash card is required.
1)
Original
Using the CD-ROM Manual / What This Product Can Do
21

Printing from wireless devices
Using an optional Bluetooth USB adaptor1), you can
wirelessly send images from Bluetooth-compatible
devices such as mobile phones and print. The versatile
print services available when printing from a memory card
are also available when sending images via Bluetooth
communication.
Using an optional wireless adapter
2)
, you can send images
from a digital camera with wireless functions and print the
images without touching the unit.
An expansion CompactFlash card is necessary to use this
function.
1) For more on compatible Bluetooth USB adaptors, see “Optional
accessories” on page 30 of “Specifications.” The adaptor may not be
commercially available depending on your country or region. Consult
your local Sony dealer.
2) A Silex Technologies SX-WSG1 is required. This device may not be
commercially available depending on your country or region. Consult
your local Sony dealer.
For information on supported digital cameras and further details on this
unit, please visit the UP-CR15L support page at http://www.sony.net/
snaplab.
Printing watermarks for logos and text
By storing logos, text, and other custom designs on an
expansion CompactFlash card and installing the card, you
can print the designs onto photos as watermarks.
Information Updates
For the latest information, please visit the UP-CR15L
support page at http://www.sony.net/snaplab.
Printing from computers
By connecting the unit to a computer using the supplied
USB cable, data sent from the computer can be printed on
the unit.
1) The supplied printer driver must be installed on the computer before
1)
connecting it to the unit. For the latest information on the printer driver,
please visit the UP-CR15L support page at http://www.sony.net/snaplab.
Compact, integrated body
The display and printer are housed in a single enclosure
which does not take up much space and easily fits on a
shop counter or similar.
In addition, the screen angle can be adjusted to seven
different settings to fit operation conditions.
22
Information Updates
Installation
Connecting the Power Cord
Loading Paper Roll and
Ink Ribbon
Connect the power cord to the ~ AC IN connector on the
back of the unit, and then connect the plug to a power
outlet.
Power cord (not supplied)
Power outlet
Handling the paper roll and ink
ribbon
Notes
• The print pack contains two ink ribbons and two paper
rolls. Be sure to use the ink ribbon and paper roll in the
same carton as a set.
• The ink ribbon and paper roll are not meant to be used up
completely. Even if there is some ink ribbon and paper
remaining, be sure to load a new ink ribbon and paper
roll as a set. Using leftover paper may result in
malfunction.
• Make sure to use a matching paper roll and ink ribbon
set. Using an unmatched combination will not only
prevent you from obtaining normal print results but may
cause a paper jam or a malfunction.
• Do not touch the printing surface of the paper roll or the
ink on the ink ribbon. Fingerprints and other pollutants
can lead to reduced print quality.
Loading the Paper Roll and Ink
Ribbon
When using the printer for the first time, you must first
load a paper roll and ink ribbon.
Attaching adaptors to paper holder
Paper roll widths vary according to the print pack. When
using the 2UPC-C54 series or 2UPC-C58 series print pack,
attach an adaptor to the paper holder to compensate for the
width difference.
Installation / Loading Paper Roll and Ink Ribbon
23
1
Open the front door.
2
Press the paper holder release button and pull the paper
holder out.
4
Adjust the width of the paper holder.
When using the print pack 2UPC-C54 series or
2UPC-C58 series
Attach adaptors to both ends of the paper holder.
When using the print pack 2UPC-C53 series or
2UPC-C55 series
Remove the adaptors from the paper holder.
3
Press the latch on top of the paper holder and open the
holder.
Note
Store the adaptors in a safe place so as not to lose them.
Loading the paper roll
1
Insert the paper core into the paper roll.
24
Loading Paper Roll and Ink Ribbon

2
Insert the paper roll into the paper holder.
5
Return the paper holder into the unit.
The arrow on the label in the center of the paper roll
must point inwards.
Note
When installing the paper roll, make sure the paper
holder is completely open. Otherwise a malfunction
may occur.
3
Remove the label in the center of the paper roll.
4
Close the paper holder.
Insert the paper holder until you hear a sharp click.
6
Close the front door.
Loading the ink ribbon
1
Open the side door.
Note
When closing the paper holder, take care that the
leading edge of the paper roll does not stick out of the
paper feed opening.
2
Remove the ink ribbon holder.
Loading Paper Roll and Ink Ribbon
25

Note
After removing the ink ribbon holder, do not insert
your hand into the opening in the unit. Touching the
protrusions or movable parts inside the unit may result
in bodily injury or malfunction of the unit. In
particular, touching the thermal head when it is hot
immediately after printing may result in burns.
3
Open the ink ribbon holder cover.
4
Detach the white spool of the ink ribbon from the black
spool.
6
Close the ink ribbon holder cover until it snaps into
place.
7
Insert the ink ribbon holder into the compartment, and
push the indented area of the handle (indicated by the
arrow) until the holder is completely inserted.
5
Gently unravel the ribbon without loosening it, and
place it in the ink ribbon holder.
IC chip
Place the white spool in the front holder and the black
spool in the rear holder as shown. Be sure to press
down on the side of the black spool in which the IC
chip is embedded until it snaps into place.
8
Close the side door.
Attaching the Paper Tray
Attach the supplied paper tray.
Raise the paper eject stopper when printout size is small.
26
Loading Paper Roll and Ink Ribbon

Raise the eject paper stopper.
Startup and Shutdown
Startup
1
Verify that no memory card is inserted in any of the
front-side memory card slots of the unit. Then turn on
the POWER switch.
The unit starts up, and the start guide screen appears.
If the ink ribbon or paper roll is empty, the following
screen appears.
Startup and Shutdown
27

Shutdown
1
Complete any pending operations, and then bring up
the start guide screen.
Displaying the
Administration Screen
Proceed as follows to display the administration screen.
Notes
• Before you can make settings on the administration
screen, you must enter the administrator password. In the
factory default condition, the administrator password is
set to “9999.”
• If a memory card is inserted in any of the front-side
memory card slots of the unit, the administration screen
does not come up. Remove any memory cards first, and
then repeat the procedure.
1
At the Start Guide display, touch the top left corner of
the screen twice in succession.
2
Verify that no memory card is inserted in any of the
front-side memory card slots of the unit. Then turn off
the POWER switch.
Note
After turning off the unit, wait at least 5 seconds before
turning it on again.
The password entry screen appears.
2
Enter the administrator password using the numeric
keypad.
28
Displaying the Administration Screen
3
Touch the [OK] button.
The administration screen appears.
By touching one of the tabs at the top of this screen,
you can select the respective category to make
settings.
(Screens) tab
Lets you select the language display and configure
settings such as those for the screen saver.
(System) tab
Let’s you select the operation mode, set the clock, and
configure settings such as those for connecting the unit
to a computer.
You can also perform thermal head cleaning and touch
panel adjustment from this tab.
(Pricing) tab
Lets you set the currency to use and the price of prints.
(Administration) tab
Lets you limit the number of prints per order and make
password settings.
The print logs and system logs can also be displayed
from this tab.
(Template) tab
Lets you copy data such as templates for border prints
onto an expansion CompactFlash card.
You can also enter the text that will be added to images
from this tab.
(Printer settings) tab
Lets you configure settings such as those for printing
by order number or file name, as well as cutting mode
settings.
You can also perform print quality adjustment from
this tab.
4
When the setting is complete, touch the button.
Specifications
Power requirements
100 to 240 V AC, 50/60 Hz
Input current 3.0 to 1.3 A max.
Operating temperature range
5 to 35°C
Operating humidity range
20 to 80% (no condensation)
External dimensions
Approx. 275 × 300 × 380 mm (WHD)
7
(10
/8 × 11 7/8 × 14 15/16 inches)
(excluding the maximum projecting
parts)
Mass Approx. 11 kg (24 lb 4 oz) (printer only)
Printing method Dye sublimation thermal transfer
Resolution 300 dpi
Gradations 8 bits (256 levels) each for Yellow,
Magenta, Cyan
Picture size 2UPC-C53 series:
89 × 127 mm ±2 mm (3.5 × 5 inches
3
±
/32 inches)
2UPC-C54 series:
102 × 152 mm ±2 mm (4 × 6 inches
3
±
/32 inches)
2UPC-C55 series:
127 × 178 mm ±2 mm (5 × 7 inches
3
±
/32 inches)
127 × 127 mm ±2 mm (5 × 5 inches
3
±
/32 inches)1)
89 × 127 mm ±2 mm (3.5 × 5 inches
3
±
/32 inches)
2UPC-C58 series:
102 × 203 mm ±2 mm (4 × 8 inches
3
±
/32 inches)
102 × 178 mm ±2 mm (4 × 7 inches
3
±
/32 inches)
102 × 152 mm ±2 mm (4 × 6 inches
3
±
/32 inches)2)
102 × 102 mm ±2 mm (4 × 4 inches
3
±
/32 inches)
1) Printable only when using the printer driver.
2) Not printable when using the printer driver.
Printable pixels 2UPC-C53 series:
1,100 × 1,536 dots (3.5 × 5 inches)
2UPC-C54 series:
1,248 × 1,848 dots (4 × 6 inches)
2UPC-C55 series:
1,536 × 2,148 dots (5 × 7 inches)
1,536 × 1,548 dots (5 × 5 inches)
1,100 × 1,536 dots (3.5 × 5 inches)
2UPC-C58 series:
1,248 × 2,448 dots (4 × 8 inches)
1,248 × 2,148 dots (4 × 7 inches)
1,248 × 1,848 dots (4 × 6 inches)
1)
2)
Specifications
29

1,248 × 1,248 dots (4 × 4 inches)
(The top and bottom and right and left
portions will not be printed by about 2
mm)
1) Printable only when using the printer driver.
2) Not printable when using the printer driver.
Printing time (glossy)
2UPC-C53 series:
Approx. 14 sec. (3.5 × 5 inches)
2UPC-C54 series:
Approx. 18 sec. (4 × 6 inches)
2UPC-C55 series:
Approx. 20 sec. (5 × 7 inches)
2UPC-C58 series:
Approx. 21 sec. (4 × 8 inches)
(Printing time may vary depending on the
conditions of use.)
Printing time (matte)
2UPC-C53 series:
Approx. 18 sec. (3.5 × 5 inches)
2UPC-C54 series:
Approx. 24 sec. (4 × 6 inches)
2UPC-C55 series:
Approx. 27 sec. (5 × 7 inches)
2UPC-C58 series:
Approx. 29 sec. (4 × 8 inches)
(Printing time may vary depending on the
conditions of use.)
Input connector AC IN (for power)
Control connector
RS-232C (External control interface,
D-SUB 9-pin connector) (1)
USB function port
Hi-Speed USB (USB2.0)
USB host port for the USB memory (2)
(front ×1, rear ×1)
Memory card slots
“Memory Stick” interface slot (1)
SD Card interface slot (1)
(SDXC not supported)
CompactFlash card interface slot (2)
(Microdrive is not supported. One of the
two slots is used as expansion slot
located inside the side door.)
xD-Picture Card interface slot (1)
Compatible image file formats
JPEG: JFIF 4:4:4, 4:2:2, 4:2:0 (baseline
JPEG)
Exif 2.2.1 compatible
DCF 2.0 compatible
(progressive JPEG and 8-bit grayscale
JPEG not supported)
TIFF: Exif 2.2.1 compatible (TIFF-RGB
non compressed)
BMP: 24 bit Windows format
(Some versions of the file formats may
not be compatible)
Maximum number of pixels to be handled
JPEG: 8,000(H) × 6,000(V) or
8,000(V) × 6,000(H)
TIFF: 8,000(H) × 6,000(V) or
8,000(V) × 6,000(H)
BMP: 8,000(H) × 6,000(V) or
8,000(V) × 6,000(H)
Maximum number of files to be handled
9,999 files for a memory card
LCD display 8 inch touch sensitive TFT color display
640 × 480 pixels, RGB
Accessories supplied
Paper Tray (1)
Paper Holder (1)
Paper Core (1)
Adaptor (left, 1)
Adaptor (right, 1)
Cleaning Cartridge (1)
Ink Ribbon Holder (1)
USB Cable (1-790-081-71 (Sony)) (1)
CD-ROM (1)
Software License Agreement (1)
Before Using this Printer (1)
Warranty Card (1)
Optional accessories
Self-Laminating Color Printing Pack
2UPC-C53 series
2UPC-C54 series
2UPC-C55 series
2UPC-C58 series
Bluetooth USB adaptor
DPPA-BT1
1) May not be commercially available depending on your country or region.
Consult your local Sony dealer.
2) The Bluetooth communication function for this unit can only be used with
DPPA-BT1 adaptors. All other Bluetooth USB adaptors are not supported.
Design and specifications are subject to change without
notice.
1) 2)
30
Specifications
 Loading...