

Page 1
2-666-582-11 (1)
Digital Photo Printer
Operating Instructions GB
Mode d’emploi FR
Manual de instrucciones ES
UP-CR10L
© 2005 Sony Corporation
Page 2

English
Owner's Record
The model and serial numbers are located at the rear.
Record these number in the space provided below.
Refer to these numbers whenever you call upon your Sony
dealer regarding this product.
Model No. ____________________
Serial No. ____________________
WARNING
To reduce the risk of fire or electric shock, do not
expose this apparatus to rain or moisture.
To avoid electrical shock, do not open the
cabinet. Refer servicing to qualified personnel
only.
THIS APPARATUS MUST BE EARTHED.
This unit has no power switch.
When installing the unit, incorporate a readily accessible
disconnect device in the fixed wiring, or connect the power
cord to an easily accessible socket-outlet near the unit.
If a fault should occur during operation of the unit, operate
the disconnect device to switch the power supply off, or
disconnect the power cord.
The shielded interface cable recommended in this manual
must be used with this equipment in order to comply with
the limits for a digital device pursuant to Subpart B of Part
15 of FCC Rules.
If you have any questions about this product, you may call;
Sony Customer Information Service Center 1-800-2227669 or http://www.sony.com/
Declaration of Conformity
Trade Name : SONY
Model : UP-CR10L
Responsible Party : Sony Electronics Inc.
Address : 16450 W. Bernardo Dr., San
Diego, CA 92127 U.S.A.
Telephone Number: 858-942-2230
For the customers in the U.S.A.
This equipment has been tested and found to comply with
the limits for a Class B digital device, pursuant to Part 15
of the FCC Rules. These limits are designed to provide
reasonable protection against harmful interference in a
residential installation. This equipment generates, uses,
and can radiate radio frequency energy and, if not installed
and used in accordance with the instructions, may cause
harmful interference to radio communications. However,
there is no guarantee that interference will not occur in a
particular installation. If this equipment does cause
harmful interference to radio or television reception,
which can be determined by turning the equipment off and
on, the user is encouraged to try to correct the interference
by one or more of the following measures:
• Reorient or relocate the receiving antenna.
• Increase the separation between the equipment and
receiver.
• Connect the equipment into an outlet on a circuit
different from that to which the receiver is connected.
• Consult the dealer or an experienced radio/TV
technician for help.
You are cautioned that any changes or modifications not
expressly approved in this manual could void your
authority to operate this equipment.
2
Page 3
Table of Contents
Chapter 1 Outline
What This Product Can Do .............................................................5
Supplied Documentation ................................................................6
Chapter 2
Preparations
Chapter 3 Setup
Supplied Accessories .....................................................................7
Controls and Functions ..................................................................8
Front ...................................................................................................... 8
Rear ....................................................................................................... 9
Installation......................................................................................10
Connecting the Power Cord ................................................................ 10
Adjusting the Display Angle ............................................................... 10
Loading Paper Roll and Ribbon Cartridge .......................................... 10
Attaching the Paper Tray..................................................................... 16
Preparing an Expansion CompactFlash Card...................................... 17
Startup and Shutdown ..................................................................18
Startup ................................................................................................. 18
Shutdown............................................................................................. 19
GB
Setup Procedure ............................................................................20
Setting Items ..................................................................................21
System Tab .......................................................................................... 21
Screens Tab ......................................................................................... 22
Template Tab....................................................................................... 23
Text Input Screen ................................................................................ 23
Print Tab .............................................................................................. 24
Print Color Tab.................................................................................... 24
Pricing Tab .......................................................................................... 25
Administration Tab.............................................................................. 26
Table of Contents
3
Page 4

Chapter 4 Operation
Operation Outline ..........................................................................28
Print Types .......................................................................................... 28
Operation Flow.................................................................................... 29
Setting Memory Cards...................................................................30
Using a “Memory Stick” ..................................................................... 30
Using a CompactFlash Card................................................................ 30
Using a SmartMedia Card ................................................................... 31
Using a SD Card/MultiMediaCard...................................................... 31
Using a xD-Picture Card ..................................................................... 32
Selecting Images for Printing .......................................................32
Verifying Order Contents and Entering a Password ........................... 34
Using Index Print ...........................................................................35
Using Split Image Print .................................................................36
Using Border Print......................................................................... 39
Printing All Images on a Memory Card........................................ 42
Image Editing .................................................................................43
Specifying the Layout (Crop & Rotate) .............................................. 43
Adjusting the Image Quality ............................................................... 44
Printing in Sepia or Black and White.................................................. 45
Compensating for the Red Eye Effect................................................. 45
Adding the Date .............................................................................46
Printing From DPOF Settings .......................................................47
Printing From a Computer ............................................................47
Installing the Printer Driver................................................................. 47
Connection to a Computer................................................................... 48
Appendix
4
Table of Contents
Precautions ....................................................................................49
Supported Memory Cards and File Formats ............................... 50
Notes on Using Memory Cards ........................................................... 50
Cleaning..........................................................................................53
Troubleshooting ............................................................................54
Ribbon Cartridge and Paper .........................................................55
Specifications ................................................................................55
Page 5

Outline
What This Product Can
Do
This device reads image data from memory cards used by
devices such as digital cameras and prints out photos of
superb quality. It also prints out data sent from a computer.
The product has the following features.
Versatile print services
Besides regular photo printout, the unit can produce split
image prints, prints with borders, and index prints. It also
allows the user to edit images before printing with
functions such as trimming and color adjustment.
Order numbers can be printed as a watermark, making
print sorting easy.
Chapter
Customizable with original data
By inserting a memory card carrying promotional images
and border data into the expansion slot, screen savers can
be displayed and photos can be combined with borders for
printing.
and border data.
Compact, integrated body
The display and printer are housed in a single enclosure
which does not take up much space and easily fits on a
shop counter or similar.
In addition, the screen angle can be adjusted to eight
different settings to fit operation conditions.
*) A commercially available CompactFlash card or
*)
Original images can be used for the screen saver
Microdrive is required.
Chapter 1 Outline
Selectable operation modes
To fit the environment where the unit is used, Full mode,
Quick Print mode, and Event mode can be selected.
Support for a wide range of memory cards
All major memory card formats used in digital cameras are
supported: “Memory Stick”, xD-Picture Card, SD Card,
MultiMediaCard, CompactFlash card, Microdrive, and
SmartMedia card.
High-speed high-quality printing
Using a newly developed print engine that features a
dyesublimation thermal transfer technology, it is possible
to print images of lasting beauty at high speed.
Easy operation by touch panel
An 8-inch touch panel display is used, allowing for easy
operation with just a touch of the screen.
Also, by incorporating a paper roll and ribbon cartridge
system, replacement of the paper and ribbon is a snap.
What This Product Can Do
5
Page 6

Supplied Documentation
The product comes with the following documentation.
Chapter 1 Outline
Instruction Manual (this document)
The Instruction Manual is aimed at owners of the product
and contains detailed information about the following
topics:
• Installation
•Setup
• Printing image data stored on memory cards
• Troubleshooting
Basic Operation Guide (PDF)
The Basic Operation Guide file contains simple
instructions and information about the topics listed below.
You should print out parts of this file as necessary and post
them near the product for user guidance.
• How to print photos in Full mode (aimed at customers)
• How to print photos in Quick Print mode (aimed at
customers)
• Maintenance (aimed at shop personnel)
• xD-Picture Card is a trademark of Fuji Photo Film Co.,
Ltd.
• Other product names are the registered trademarks or
trademarks of their respective manufacturers.
Printer Driver Installation Guide
The Printer Driver Installation Guide explains how to
install and use the printer driver for the unit on a computer.
Adobe Photoshop Plug-in Module User's
Guide
The Adobe Photoshop Plug-in Module User's Guide
explains how to install the Photoshop plug-in and how to
use Photoshop to create templates for prints with borders.
Trademarks
The following words are trademarks of their respective
owners.
• “Memory Stick”, “MagicGate Memory Stick”,
“Memory Stick Duo”, “Memory Stick PRO”, and
“Memory Stick PRO Duo” are trademarks of Sony
Corporation.
• CompactFlash is a trademark of SanDisk Corporation.
• SmartMedia is a registered trademark of Toshiba
Corporation.
• MultiMediaCard is a trademark of Infineon
Technologies AG.
• Microdrive is a registered trademark of Hitachi Global
Storage Technologies.
• miniSD is a trademark of SD Card Association.
• Adobe and Photoshop are either registered trademarks or
trademarks of Adobe Systems Incorporated in the
United States and/or other countries.
6
Supplied Documentation
Page 7
Preparations
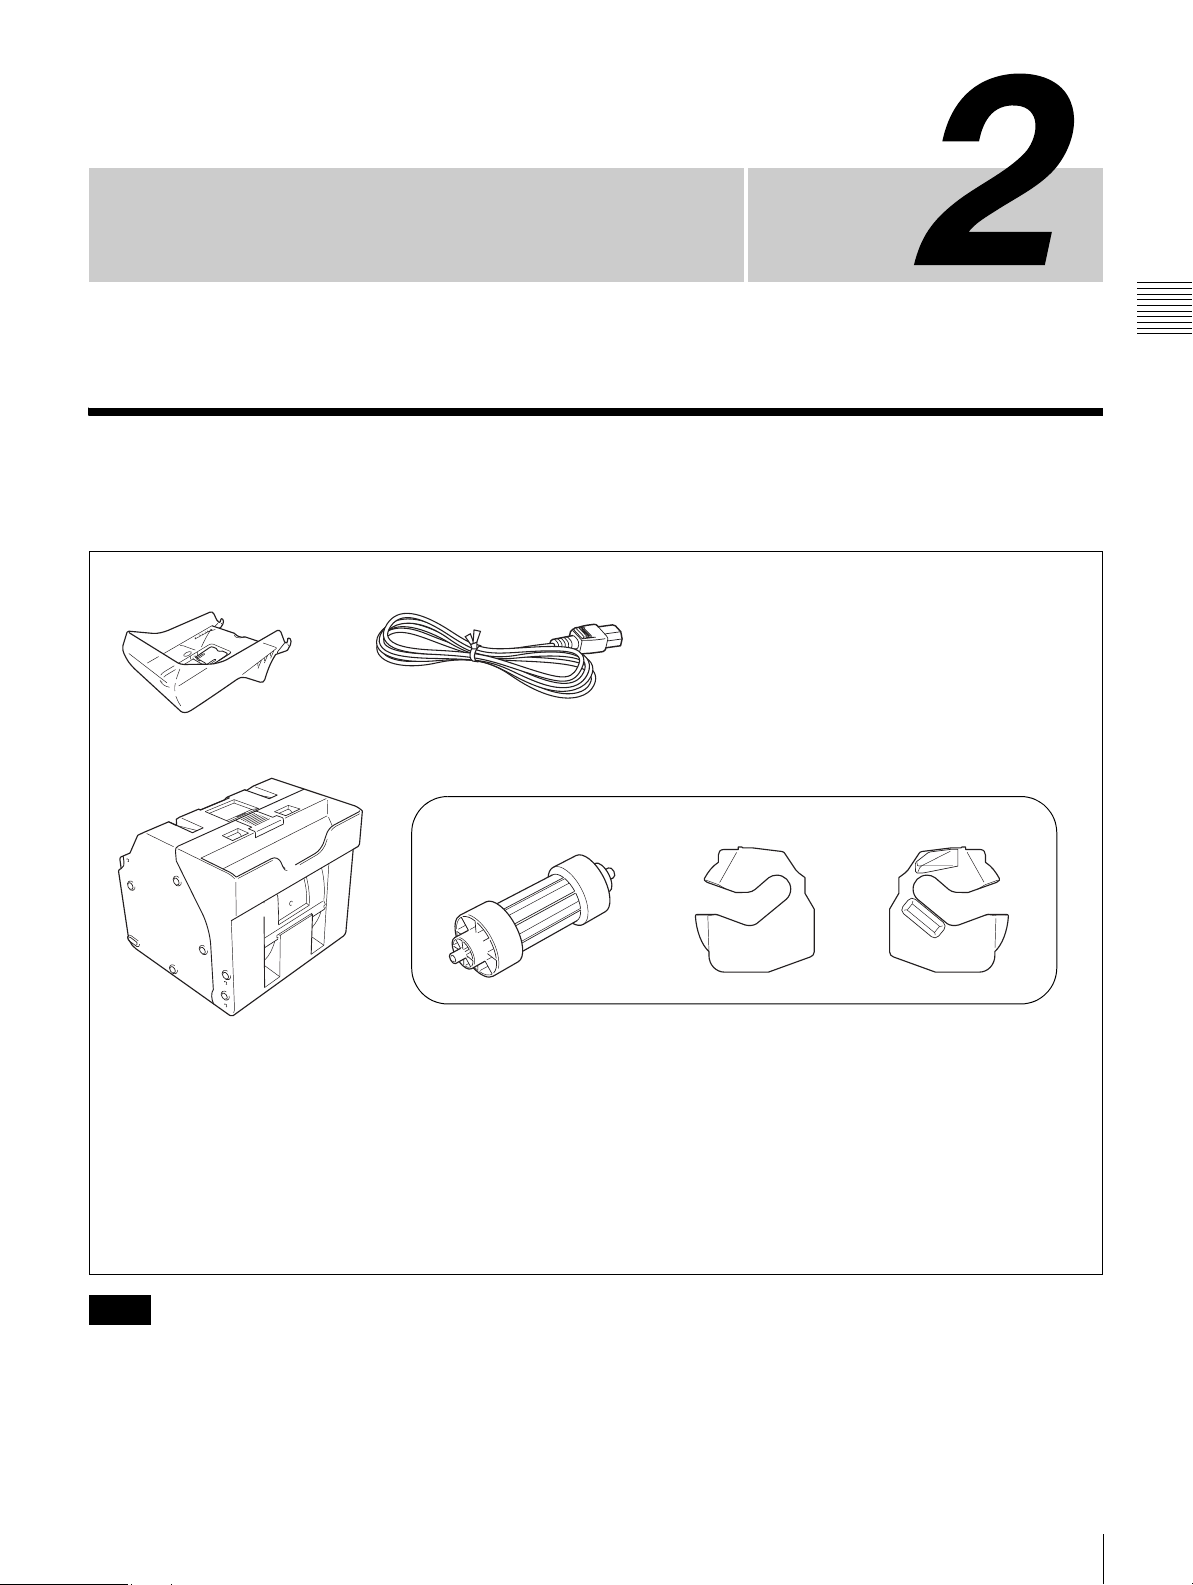
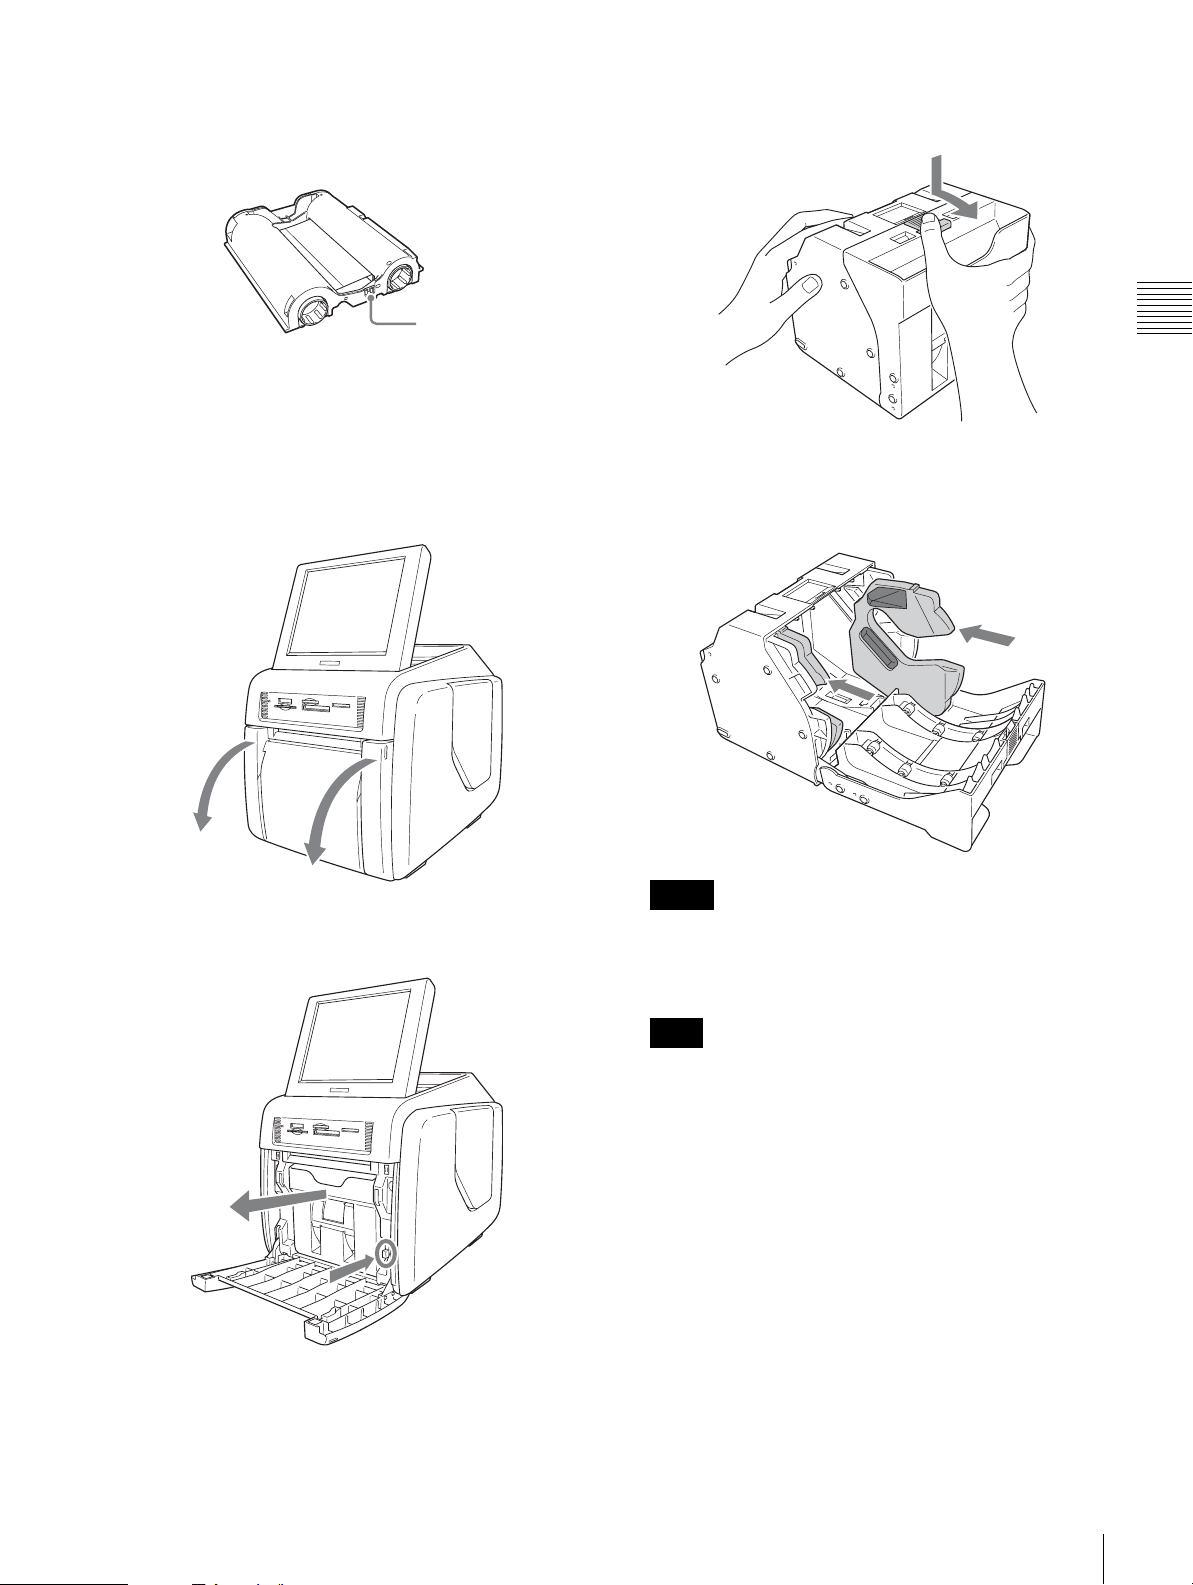
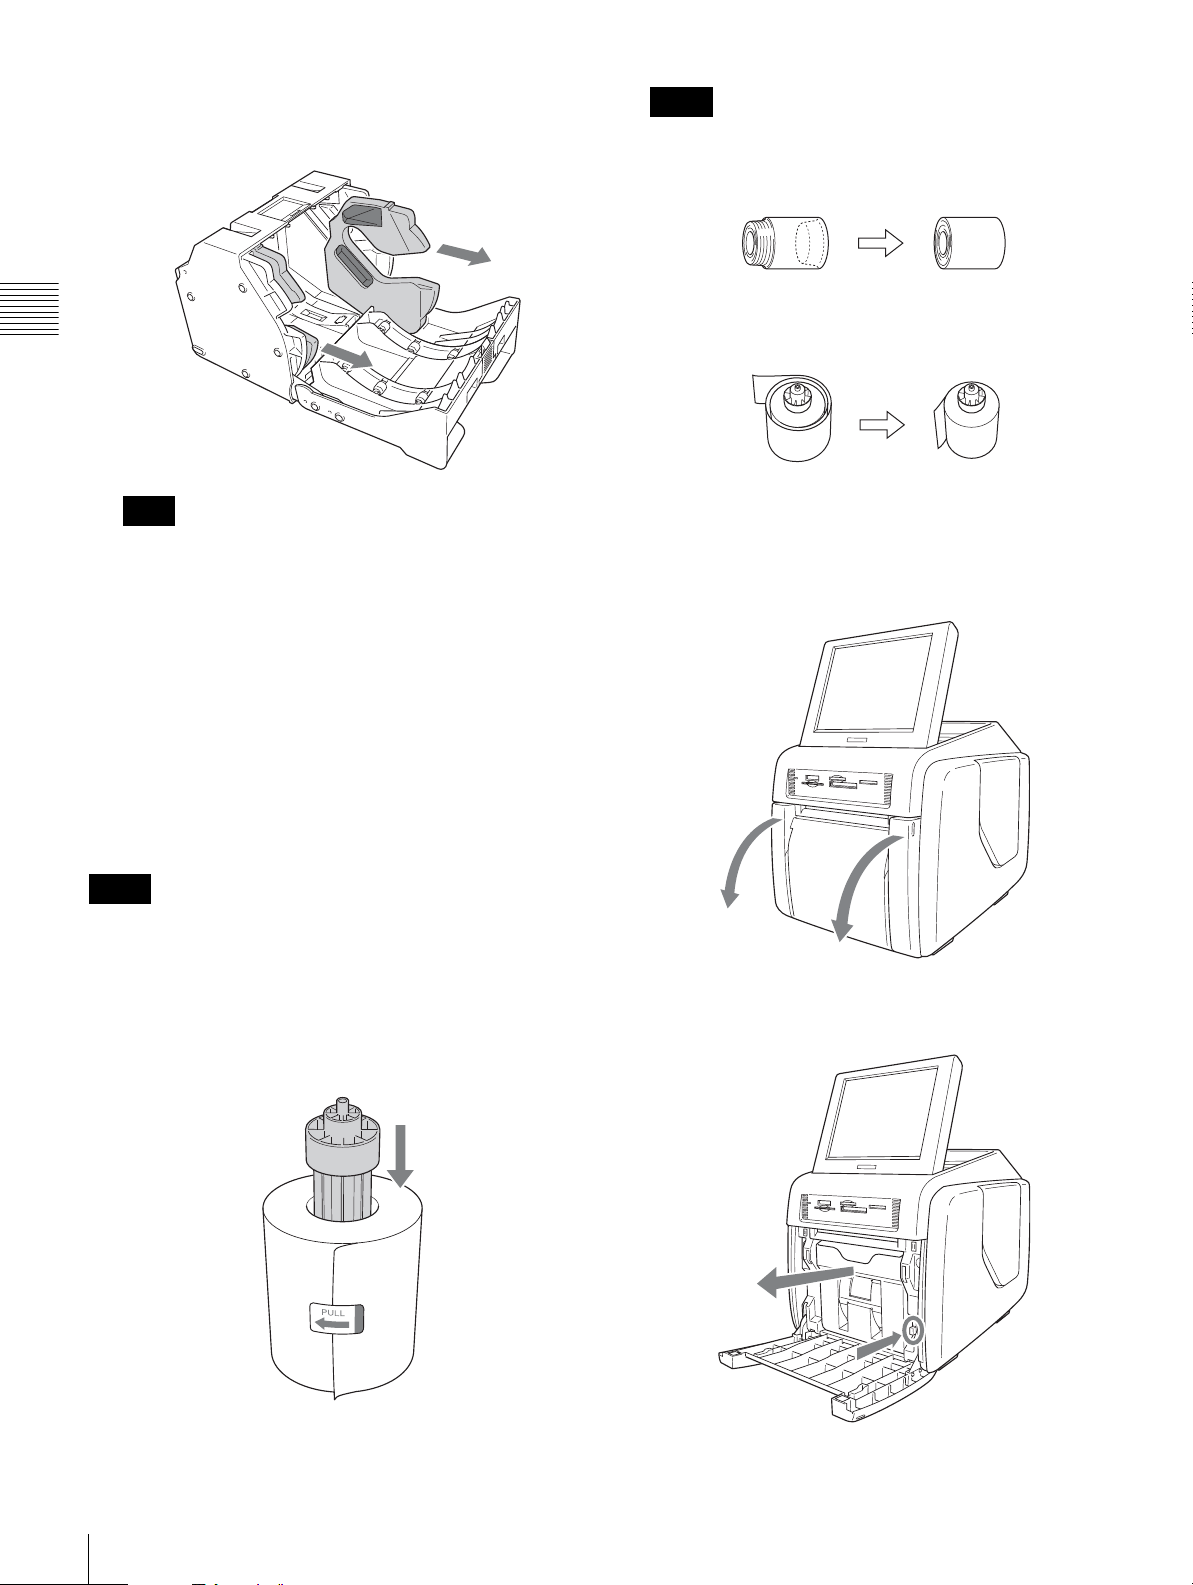
Supplied Accessories
Make certain you have received the following accessories:
Chapter
Chapter 2
Preparations
Paper Tray (1)
Paper Holder
Cleaning Cartridge (1)
Ferrite Core (1)
CD-ROM (1)
Service and Customer Support Information (1)
Operating Instructions (1)
Software License Agreement (1)
Warranty Card (1)
∗1)
∗2)
Power Cord (1)
These accessories are stored in the paper holder.
Paper Core (1) Adaptor (left,1) Adaptor (right,1)
∗1) The paper holder is stored in the printer. Be sure to remove the paper
holder from the inside of the printer before turning the power on.
∗2) For information on use, refer to the operating instructions supplied with
the cleaning cartridge.
Notes
• When taking the unit out of the carton box, be careful not
to hurt your back.
• The packaging materials are needed when transporting
the unit, so we suggest you keep them.
• Before transporting the unit, remove the ribbon cartridge
and paper roll from the unit.
Supplied Accessories
7
Page 8

Controls and Functions
Front
Chapter 2
Preparations
1
2
34 5
67
0
a Display
Shows the operation screen. Because the display is a touch
screen, the user simply touches the field for the desired
operation. The angle of the display can be adjusted for best
viewing.
b Access indicator
Lights when a memory card is inserted a slot, and flashes
when a memory card is being accessed.
c “Memory Stick” slot (page 30)
Holds a “Memory Stick” with stored image data.
d xD-Picture Card slot (page 32)
Holds an xD-Picutre Card with stored image data.
e SD Card/MultiMediaCard slot (page 31)
Holds an SD Card or MultiMediaCard with stored image
data.
f SmartMedia card slot (page 31)
Holds a SmartMedia card with stored image data.
qsqa98
Note
To avoid loss of image data or damage to the main unit,
never attempt to insert a “Memory Stick”, SmartMedia
card, SD Card, or MultiMediaCard into a CompactFlach
type adapter set in the CompactFlach slot.
h Eject slot
The printed photo emerges from this slot.
i Paper tray (page 16)
Printed photos are collected in this tray.
j Paper eject stopper (page 17)
When using the print pack 2UPC-C13, this stopper should
be raised.
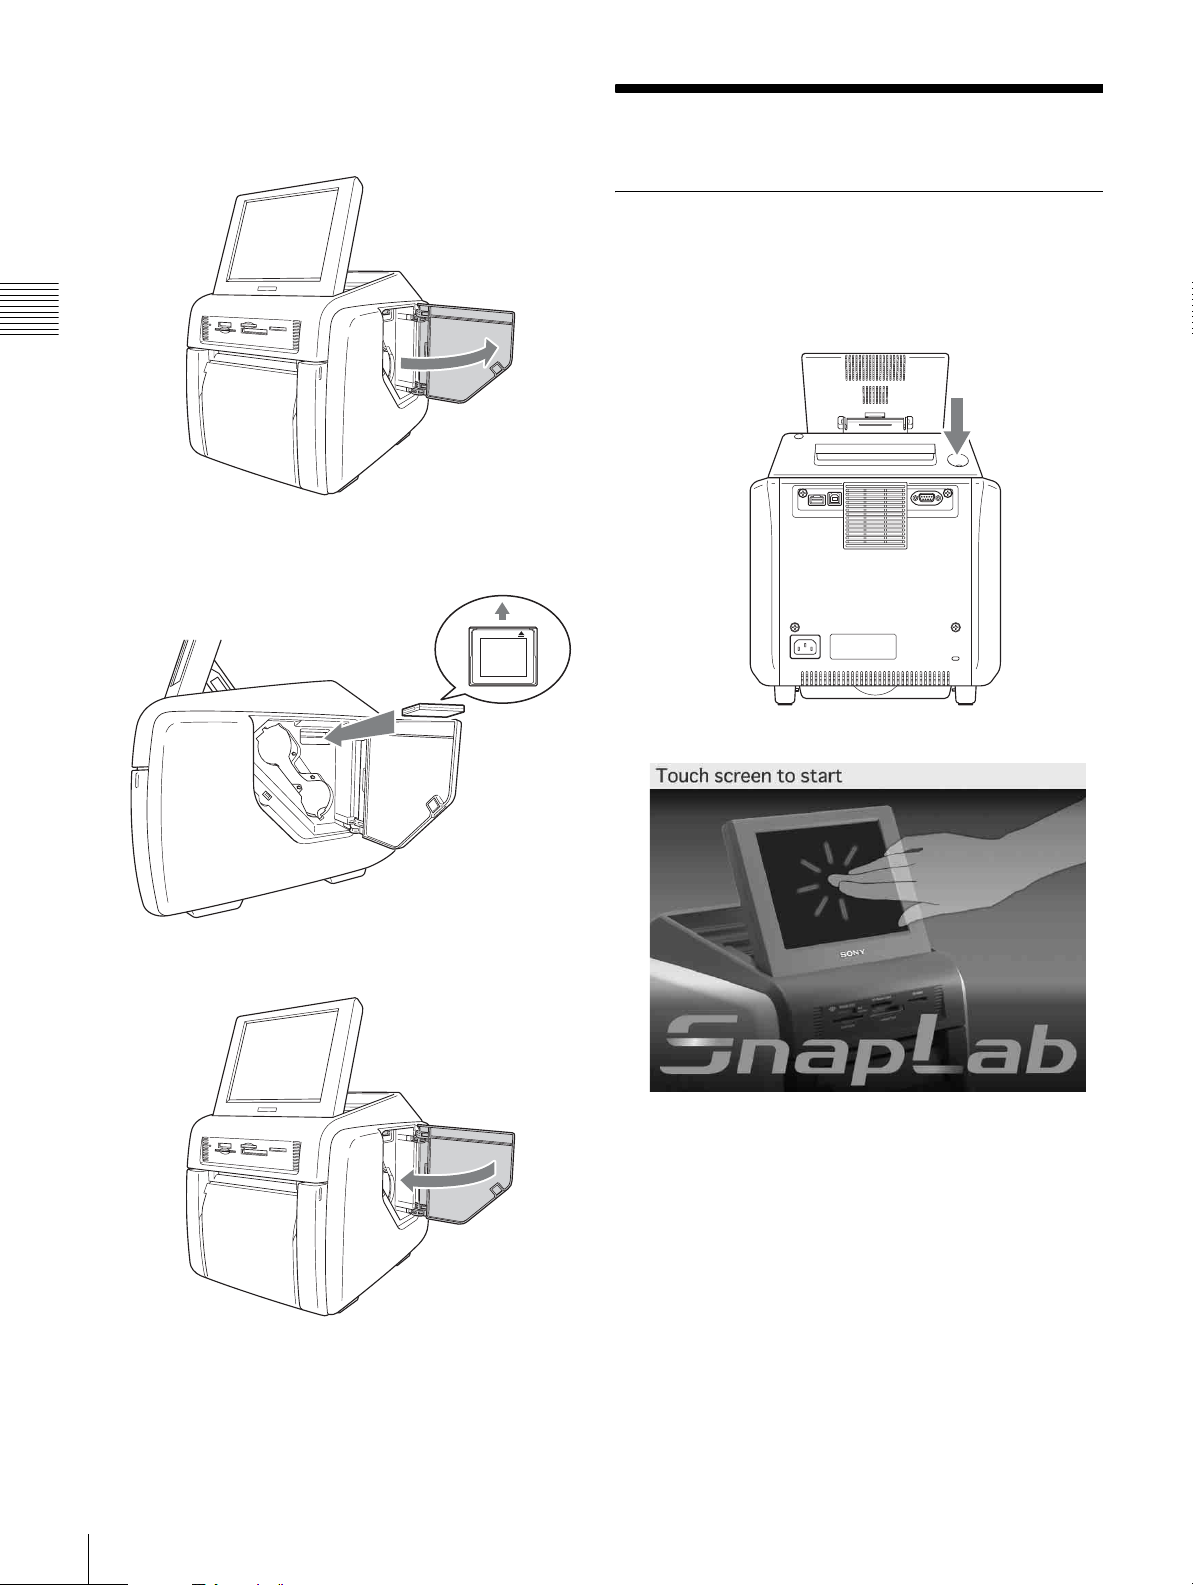
k Front door (page 12)
Open this door to change the paper roll.
g CompactFlash card slot (page 30)
Holds a CompactFlash card with stored image data.
8
Controls and Functions
Page 9
Front door open
Rear
4
5
AB
A Paper holder (page 12)
The paper roll is inserted here.
The white areas between printouts are cut off and
collected in the top portion of the paper holder.
B Paper holder release button (page 12)
Press this button to remove the paper holder.
l Side door (page 14)
Open this door for replacing the ribbon cartridge and
inserting the expansion CompactFlash card.
Side door open
B
A
1
6
2
7
3
a USB port (host)
Allows connection of a USB device.
You can connect a commercially available card reader or
USB flash memory device to this port and use it to read
*1)*2)*3)
data.
b USB port (device) (page 48)
Use a commercially available USB cable to connect the
unit to a computer.
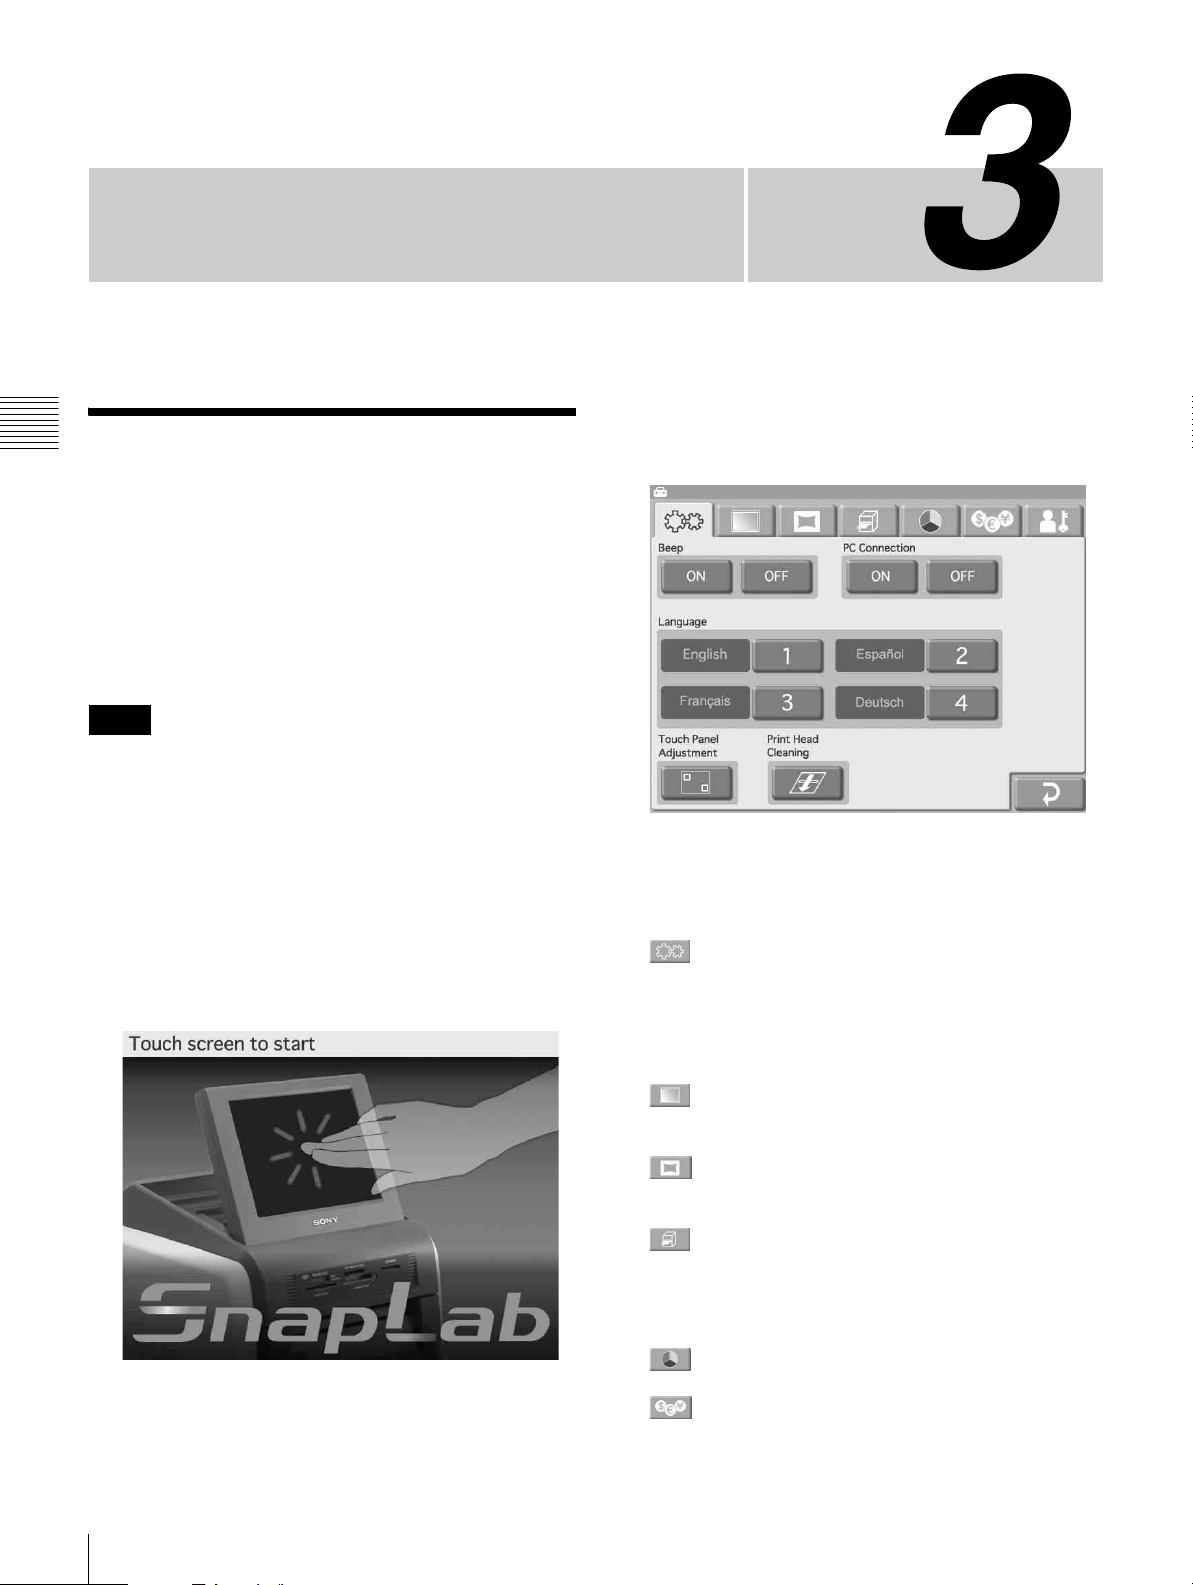
c ~ AC IN (Power Source) Connector (page 10)
Connect the supplied power cord here.
d Display stand
Use this stand to adjust the angle of the display.
*2)
Chapter 2
Preparations
A Ribbon cartridge access opening (page 14)
Mount the ribbon cartridge here.
B Expansion CompactFlash card slot (page 17)
When using border print, promotional images display,
text input, or print spool, insert the expansion
CompactFlash card here.
e On/Standby button
Press this button to turn on power to the unit. Press it again
to enter the standby mode.
f RS-232C interface
Serves for future expansion. Currently not used.
g Air vent
Features a built-in filter for the thermal head cooling fan.
*1) Correct operation with every card reader and USB
flash memory device is not guaranteed.
*2) Operation is not guaranteed when connected by a USB
hub.
*3) PictBridge is not supported.
Controls and Functions
9
Page 10
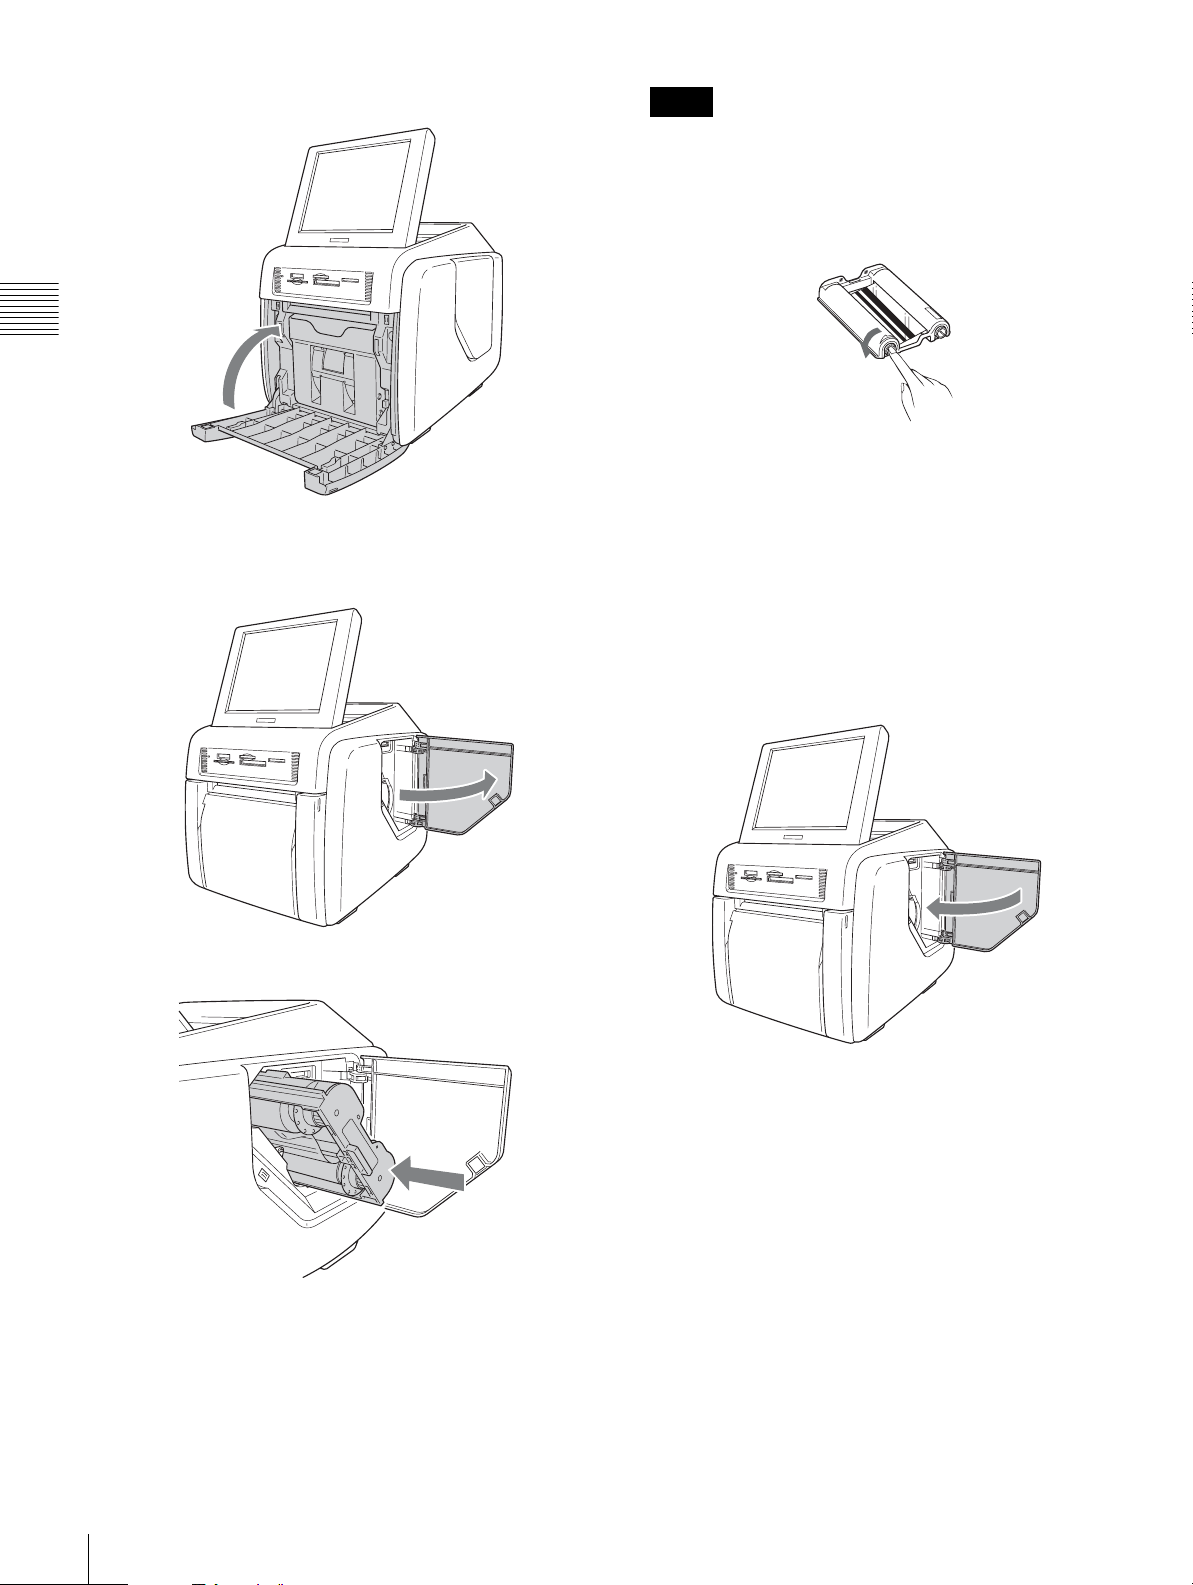
Installation
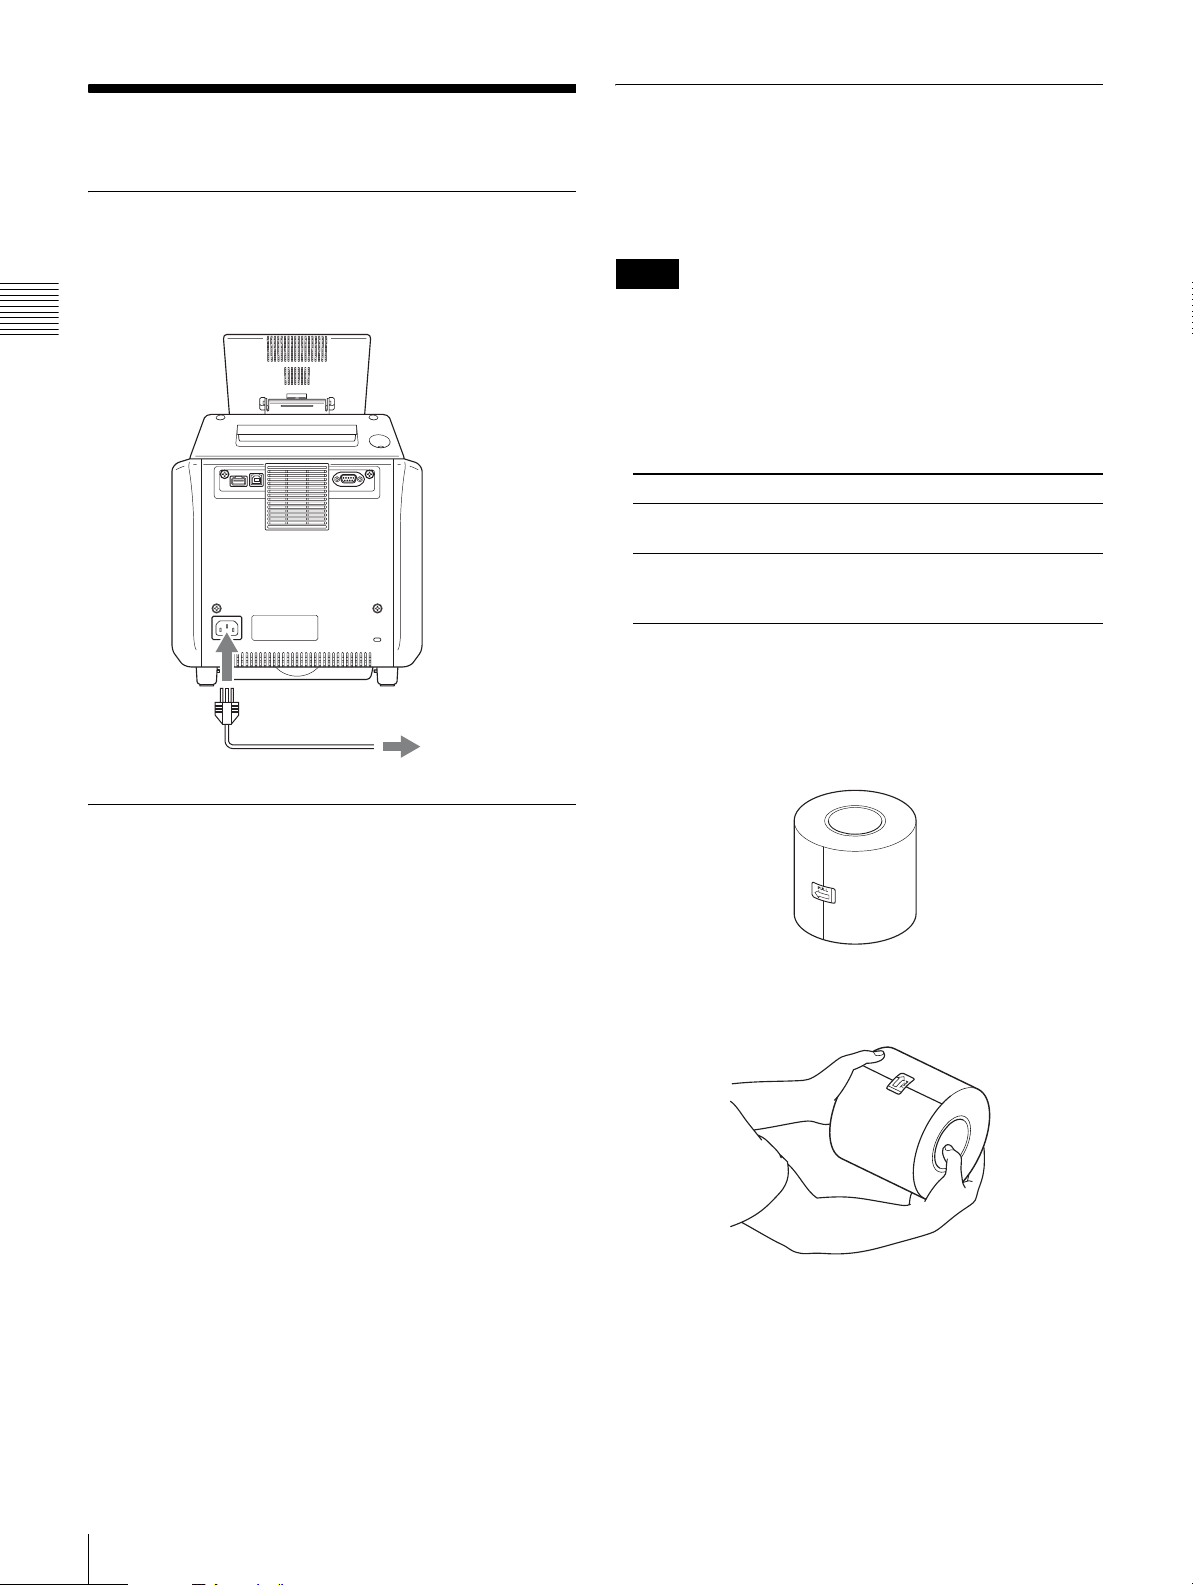
Connecting the Power Cord
Loading Paper Roll and Ribbon
Cartridge
Handling the paper roll and ribbon
cartridge
Connect the supplied power cord to the ~ AC IN connector
on the back of the unit, and then connect the plug to a
power outlet.
Chapter 2
Preparations
Power cord (supplied)
Power outlet
Adjusting the Display Angle
Notes
• The print pack contains two ribbon cartridges and two
paper rolls. Be sure to use the ribbon cartridge and paper
roll in the same carton as a set. (See “Ribbon Cartridge
and Paper” on page 55.)
• The number of sheets that can be printed depends on the
print pack type. The table below lists the image count for
one ribbon cartridge and paper roll set.
Print pack 2UPC-C13 2UPC-C14 2UPC-C15
Number of
sheets
Print size 3.5 × 5 inches
300 (sheets) 200 (sheets) 172 (sheets)
(89 × 127
mm)
4 × 6 inches
(102 × 152
mm)
5 × 7 inches
(127 × 178
mm)
• Do not replace the ribbon cartridge and paper roll before
they are used up. Otherwise the above number of sheets
may not be achieved.
• Place the paper roll vertically. If you place the paper roll
horizontally, the paper roll may roll around and fall. This
may cause an injury.
The display angle can be adjusted to make the display
more easily viewable. Eight settings are available for angle
adjustment.
When storing the unit, pull the display forward until
completely upright and then push it backward until
horizontal.
• Hold the paper roll with both hands so that you do not
drop it, because it is heavy. Dropping may result in an
injury.
Hold the paper roll with both hands.
10
Installation
Page 11
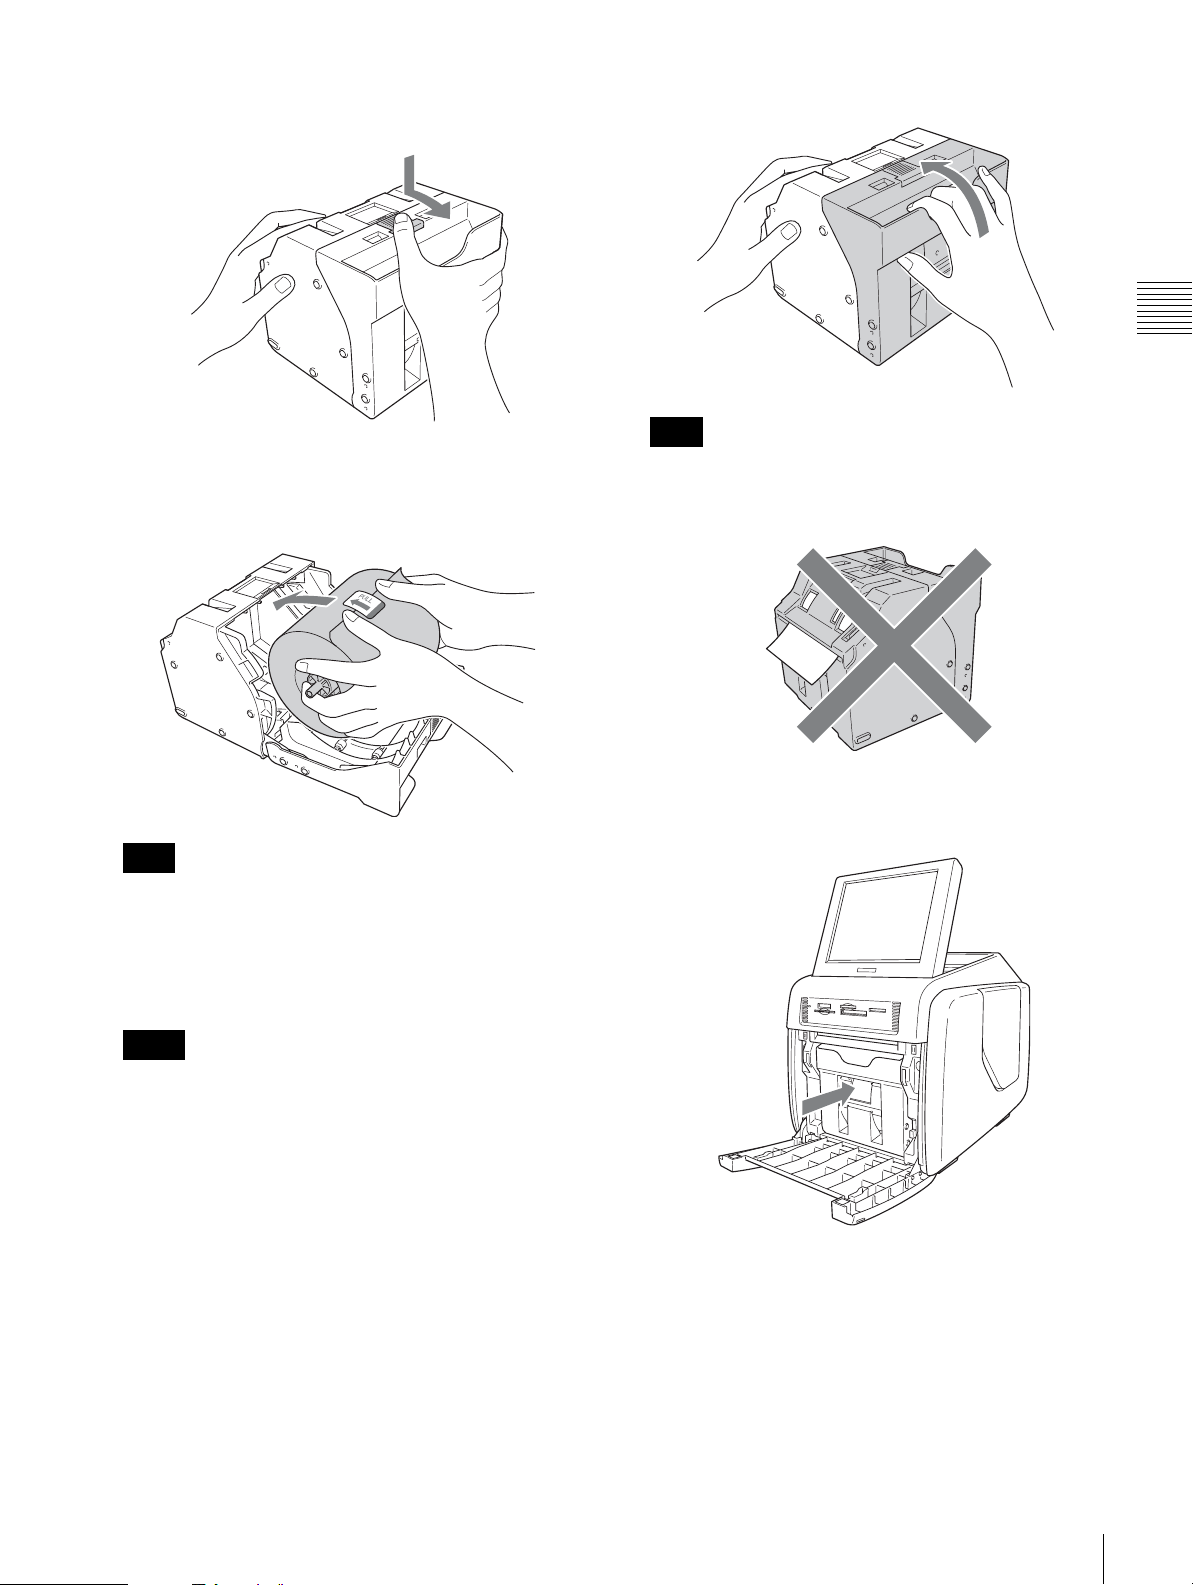
• An IC board is incorporated in the ribbon cartridge. Do
not touch the terminal of the IC board with anything,
including your fingers or metallic objects. Also, do not
strike, bend, or drop the IC board.
3
Press the latch on top of the paper holder and open the
holder.
IC board
Attaching adaptors to paper holder
Paper roll widths vary according to the print pack. When
using the 2UPC-C14 print pack, attach an adaptor to the
paper holder to compensate for the width difference.
1
Open the front door.
2
Press the paper holder release button and pull the paper
holder out.
4
Adjust the width of the paper holder.
When using the print pack 2UPC-C14
Attach adaptors to both ends of the paper holder.
Memo
Make sure the color of the label on the upper part of the
adaptors matches the color of the label on the paper
holder.
Chapter 2
Preparations
Note
Insert the adaptors firmly and completely into the
paper holder.
Installation
11
Page 12
When using the print pack 2UPC-C13 or
2UPC-C15
Remove the adaptors from the paper holder.
Chapter 2
Preparations
Note
Store the adaptors in a safe place so as not to lose them.
Loading the paper roll and ribbon
cartridge
When using the printer for the first time, you must first
load a paper roll and ribbon cartridge. When using the
2UPC-C14, adaptors must be installed in the paper holder,
as described in the section “Attaching adaptors to paper
holder” on page 11.
For information on how to remove a spent paper roll and
ribbon cartridge, see the section “Removing the paper roll
and ribbon cartridge” on page 15.
Notes
• If the edges of the paper roll are uneven, make sure
to even them out before installing the paper roll.
Otherwise a malfunction may occur.
• If the paper is wound loosely around the core, make
sure to wind it tightly before installing the paper roll.
Otherwise a malfunction may occur.
• Do not grasp the paper too tightly or strike it against
a hard object, because the paper may tear or crease,
effecting the print quality.
2
Open the front door.
Notes
• Always use a designated print pack.
• Always replace the paper roll and ribbon cartridge
together as a set.
Loading the paper roll
1
Insert the paper core into the paper roll.
3
Press the paper holder release button and pull the paper
holder out.
12
Installation
Page 13
4
Press the latch on top of the paper holder and open the
holder.
7
Close the paper holder.
Chapter 2
5
Insert the paper roll into the paper holder.
The arrow on the label in the center of the paper roll
must point inwards.
Note
When installing the paper roll, make sure the paper
holder is completely open. Otherwise a malfunction
may occur.
6
Remove the label in the center of the paper roll.
Note
When closing the paper holder, take care that the
leading edge of the paper roll does not stick out of the
paper feed opening.
8
Return the paper holder into the unit.
Insert the paper holder until you hear a sharp click.
Preparations
Notes
• Make sure to fully remove all labels from the paper
roll. If labels remain inside the printer, operation
problems may occur.
• After inserting the paper roll, do not touch the
printing surface (the inner surface of the rolled
paper). Fingerprints, sweat, creases etc. can lead to
reduced print quality.
• Insert the paper roll firmly and completely into the
paper holder.
Installation
13
Page 14
9
Close the front door.
Chapter 2
Preparations
Loading the ribbon cartridge
1
Open the side door.
Notes
• If it is difficult to insert the ribbon cartridge, remove
it and try inserting it again. Reduce the ribbon slack
by turning the cartridge spool in the direction of the
arrow only if the ribbon cartridge cannot be inserted
due to slack in the ribbon.
• Do not rewind the ribbon cartridge for reuse in
printing. Printing will not be performed properly,
and it may cause a malfunction to occur.
• Do not try to replace the ribbon cartridge while
printing is in progress.
• Immediately after printing, the thermal head inside
the unit will be hot. When loading a cartridge, do not
insert your hand into the ribbon cartridge access
opening, to prevent the risk of burns.
2
Insert the ribbon cartridge completely.
3
Close the side door.
Notes on storage
• Avoid placing where subject to:
– high temperatures
– high humidity or dust
– direct sunlight
• After opening the bag, use the ribbon cartridge and the
paper as soon as possible.
• When storing after partial use, put the ribbon and the
paper back in their bags.
14
Installation
Page 15
Notes
3
Remove any paper remnants from the paper holder.
• There is extra paper on the paper roll. When the ribbon
cartridge is finished, remove the remainder of the paper
roll and install a new ribbon cartridge and paper roll.
• Make sure to use a matching paper roll and ribbon
cartridge set. Using an unmatched combination will not
only prevent you from obtaining normal print results but
may cause a paper jam or a malfunction.
• Do not touch the printing surface of the paper roll or the
ink on the ribbon cartridge. Fingerprints and other
pollutants can lead to reduced print quality.
Removing the paper roll and ribbon
cartridge
Removing the paper roll
1
Open the front door.
4
Press the latch on top of the paper holder and open the
holder.
5
Remove the paper roll.
Chapter 2
Preparations
2
Press the paper holder release button and pull the paper
holder out.
6
Pull out the paper core from the paper roll.
Note
You will need to reuse the paper core. Be careful not
to misplace it.
Installation
15
Page 16
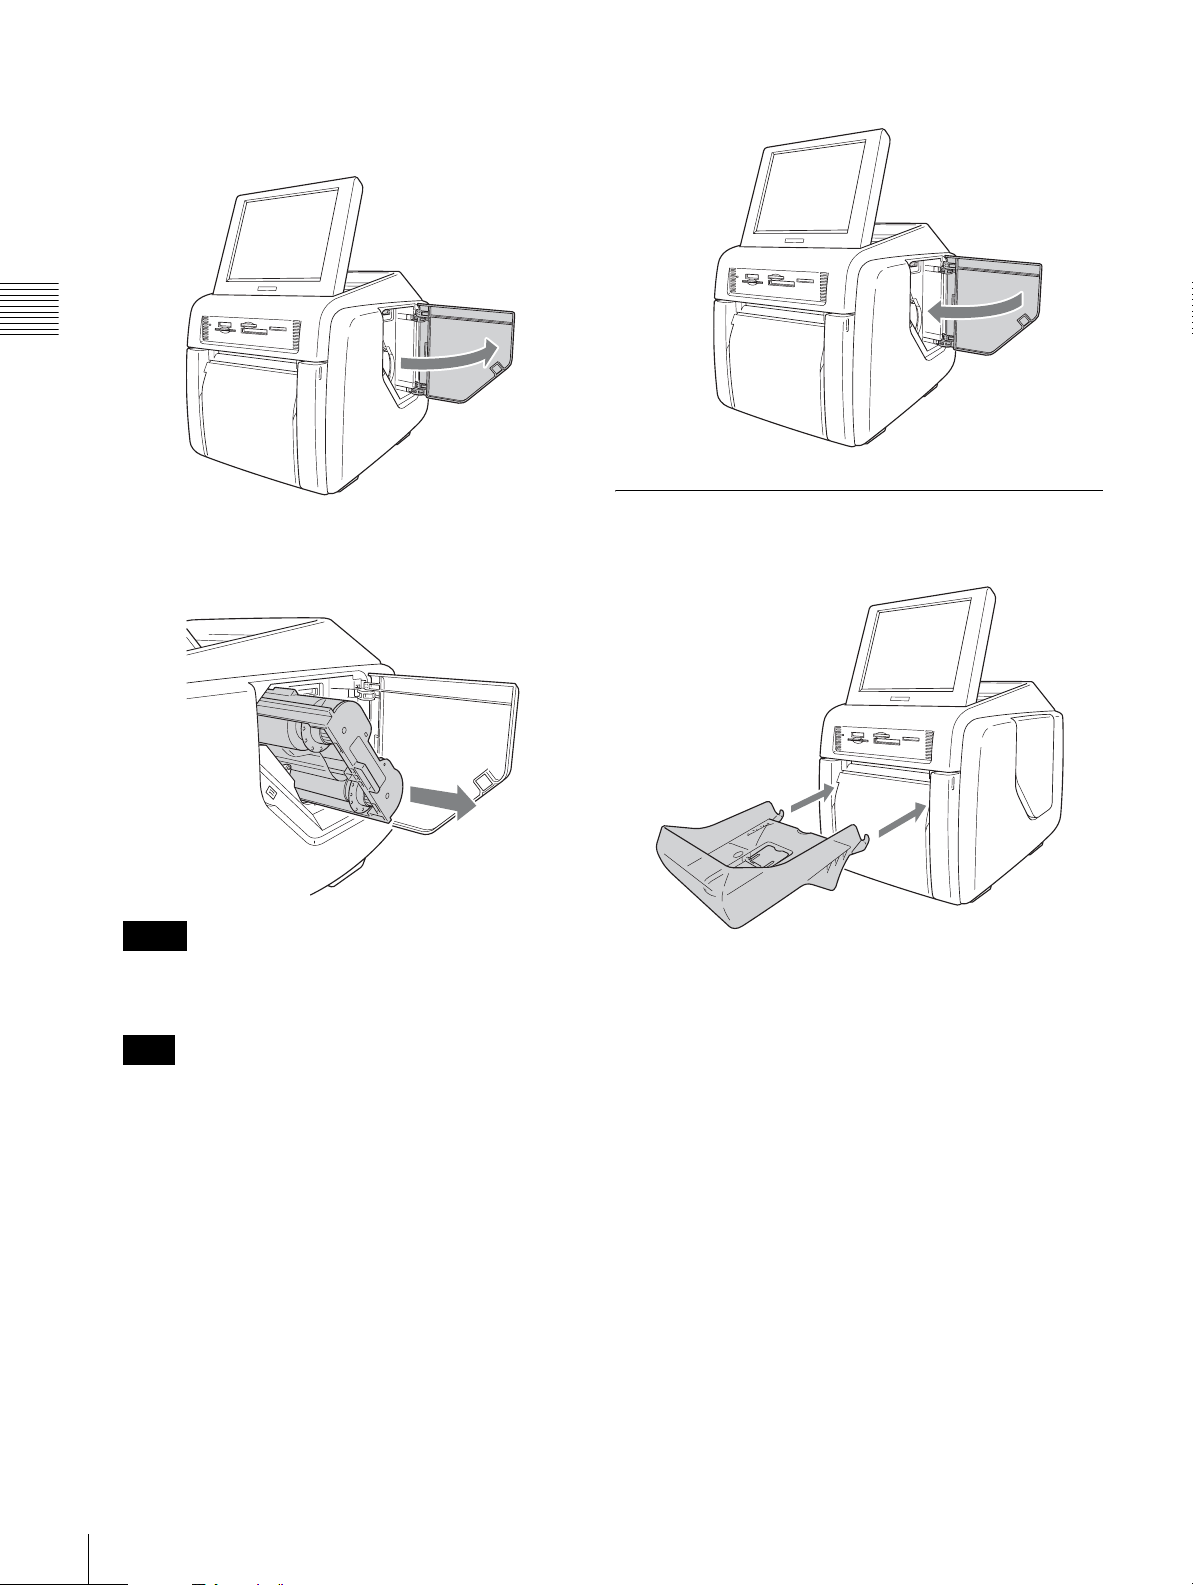
Removing the ribbon cartridge
1
Open the side door.
Chapter 2
Preparations
3
Close the side door.
2
Pull back the latch on the ribbon cartridge to release
the lock, and then grasp the ribbon cartridge and
remove it.
Memo
If the ink ribbon breaks, you can reconnect it with a
piece of tape and use the remaining ribbon.
Note
Immediately after printing, the thermal head inside the
unit will be hot. When removing a cartridge, do not
insert your hand into the ribbon cartridge access
opening, to prevent the risk of burns.
Attaching the Paper Tray
Attach the supplied paper tray.
16
Installation
Page 17
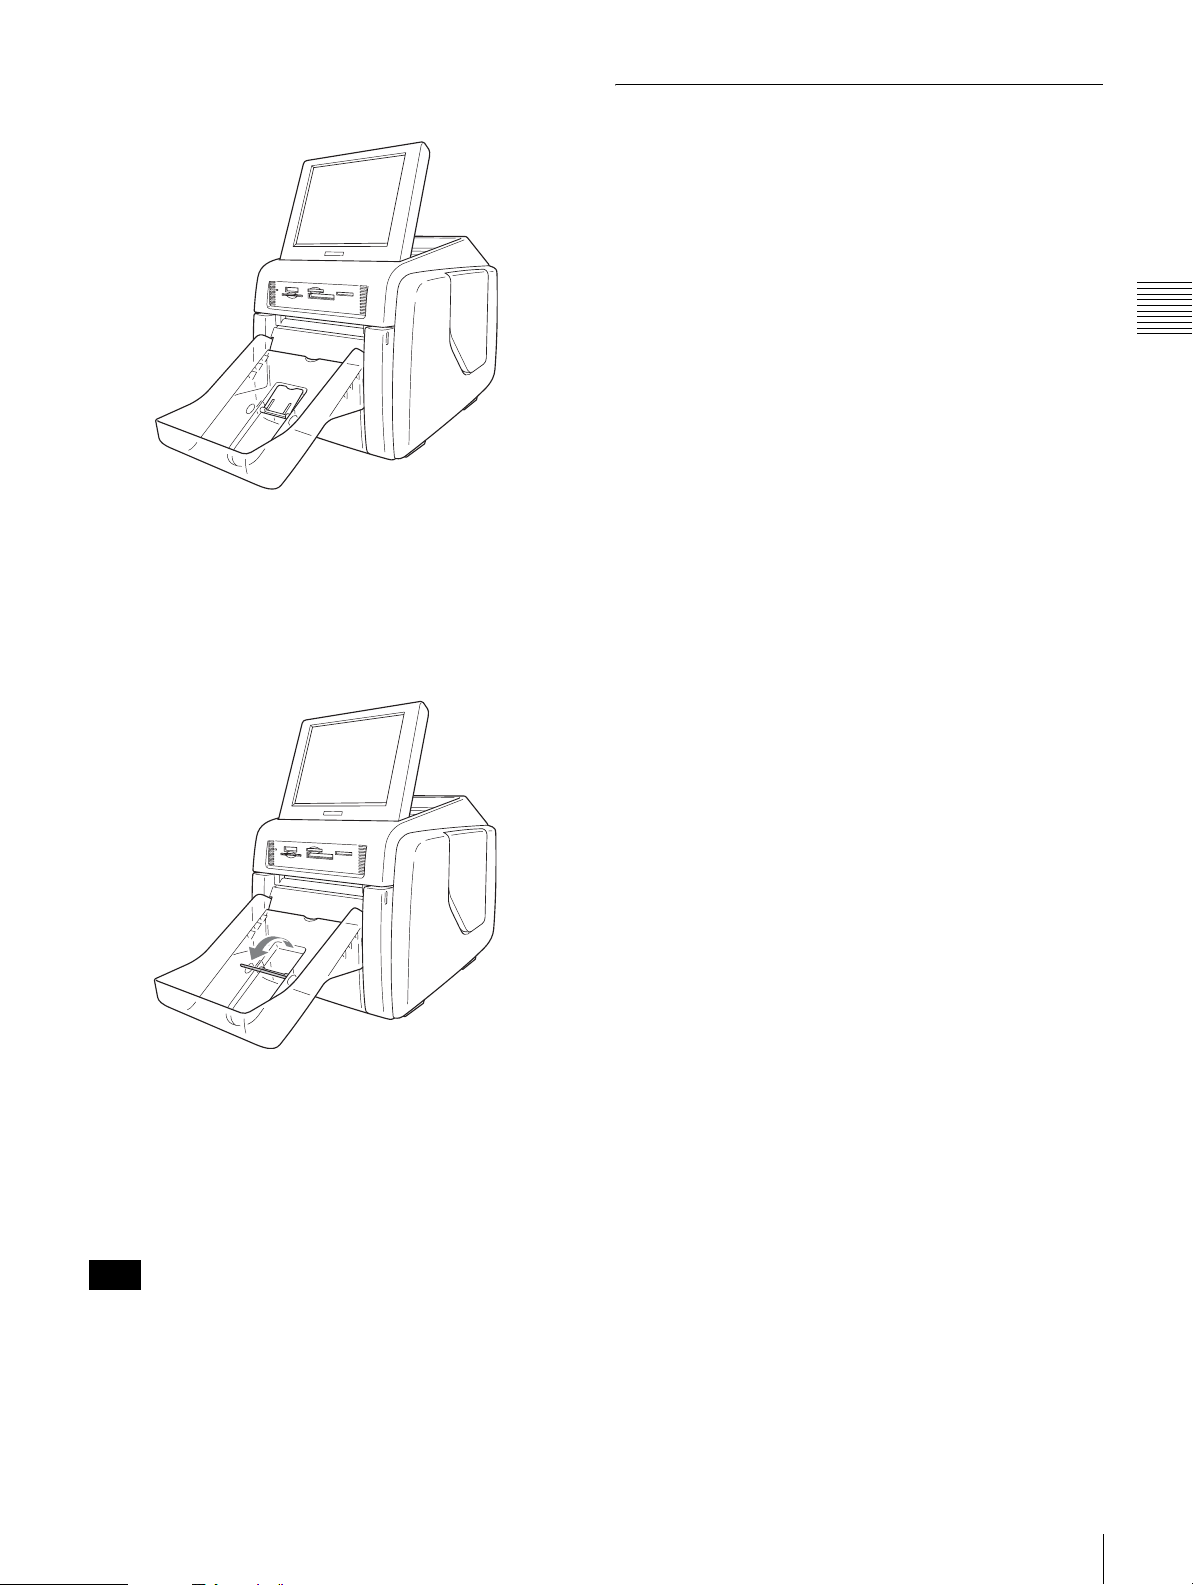
When using the print pack 2UPC-C14 or 2UPCC15
About 100 sheets of printouts can be left on this paper tray.
However, the number of printouts which can be
accumulated on the paper tray changes according to the
environment condition where the printer is used or the
printed image. Remove the printed sheets accumulated on
the paper tray as soon as possible.
When using the printing pack 2UPC-C13
Preparing an Expansion
CompactFlash Card
For using the following functions, an expansion
CompactFlash card is required:
• Border print
• Promotional images display
•Text input
• System logs and print logs export
To create the expansion CompactFlash card, a
commercially available CompactFlash card is used.
The CompactFlash card can be a Type I, Type II, or
Microdrive.
We recommend using a CompactFlash card with at least
512 MB of free space.
Creating the expansion CompactFlash card
The supplied CD-ROM contains sample templates for
border prints and sample promotional images. You can
create an expansion CompactFlash card by copying this
data onto a CompactFlash card with your computer. If your
computer cannot use CompactFlash cards, you can copy
the data to another type of memory card temporarily and
then copy it to a CompactFlash card with the unit.
1
Insert the CompactFlash card into the computer.
Chapter 2
Preparations
Raise the eject paper stopper.
About 100 sheets of printouts can be left on this paper tray.
However, the number of printouts which can be
accumulated on the paper tray changes according to the
environment condition where the printer is used or the
printed image. Remove the printed sheets accumulated on
the paper tray as soon as possible.
Note
Do not touch the printouts until they have been ejected
from the printer. If a printout gets stuck in the eject slot,
remove it from the slot immediately.
2
Copy the promotional images.
Create the folder “\Sony\UPCR\” in the root folder of
the CompactFlash card, and copy the entire folder
“\Sony\UPCR\Promotion” into it from the supplied
CD-ROM.
3
Copy the border print templates.
The templates are stored in the folder
“\Sony\UPCR\Template” on the supplied CD-ROM.
The folder is divided into subfolders for each print size
(3×5, 4×6, and 5×7). Create the folder
“\Sony\UPCR\Template” in the root folder of the
CompactFlash card, and copy the entire folder for each
desired print size into it.
A CompactFlash card with at least 512 MB of free
space is required to copy all the data stored on the CDROM.
If you have copied the CD-ROM data to a memory card
other than a CompactFlash card, you will need to use the
unit to copy it from that memory card to a CompactFlash
card.
For details on copying the data, see “Template Tab” on
page 23.
To remove the paper tray
Grasp the bottom of the paper tray, lift it up while keeping
it horizontal, and pull it out.
Installation
17
Page 18
Inserting the expansion CompactFlash card
Chapter 2
Preparations
1
Open the side door.
2
Insert the expansion CompactFlash card that you have
created into the expansion CompactFlash card slot.
Startup and Shutdown
Startup
1
Verify that no memory card is inserted in any of the
front-side memory card slots of the unit. Then press
the on/standby button.
3
Close the side door.
The unit starts up, and the following screen appears.
For details on subsequent steps, see the section
“Operation” on page 28.
18
Startup and Shutdown
Page 19

Shutdown
1
Complete any pending operations, and then bring up
the following screen.
2
Verify that no memory card is inserted in any of the
front-side memory card slots of the unit. Then press
the on/standby button to turn the unit off.
Chapter 2
Preparations
Startup and Shutdown
19
Page 20
Setup
Chapter 3 Setup
Setup Procedure
Before the unit can be used, you must first make various
settings. This includes selecting the language and
currency, selecting the service mode, and setting up
passwords. These settings are made from the
administration screen. You can also use the administration
screen later to change settings and to adjust the unit.
To bring up the administration screen, proceed as follows.
Notes
• Before you can make settings on the administration
screen, you must enter the administrator password. In the
factory default condition, the administrator password is
set to “9999”.
• If a memory card is inserted in any of the front-side
memory card slots of the unit, the administration screen
does not come up. Remove any memory cards first, and
then repeat the procedure.
1
At the Start Guide display, touch the top left corner of
the screen twice in succession.
The password entry screen appears.
2
Enter the password using the numeric keypad.
Chapter
3
Touch the [OK] button.
The administration screen appears.
By touching one of the tabs at the top of this screen,
you can select the respective category to make
settings. For details on each category, see the section
“Setting Items” on page 21.
(System) tab
Lets you select the language to be used by the system,
the beep ON/OFF setting, and the computer
connection function.
The touch panel adjustment can also be performed
from this tab.
(Screens) tab
Lets you select the operation mode and the
promotional images function.
(Template) tab
Lets you load and delete templates and enter text to be
added to images.
(Print) tab
Lets you select the order numbering format and the
date format.
The print position adjustment can also be performed
from this tab.
(Print color) tab
Lets you adjust the print quality.
(Pricing) tab
Lets you set the currency to use and the price of prints.
20
Setup Procedure
Page 21
(Administration) tab
Lets you limit the number of prints per order and make
password settings.
The print logs and system logs can also by displayed
from this tab.
4
When the setting is complete, touch the button.
Setting Items
System Tab
Chapter 3 Setup
Beep
Determines whether a beep sound is heard when
performing an operation step or when an error has
occurred.
PC Connection
Determines whether the unit can be controlled from a
computer. When set to [OFF], the unit cannot be controlled
from a computer even if connected via a USB cable.
Language
Selects the language to be used for operation screens and
messages. Up to four languages can be selected. When
multiple languages are selected, the user can select the
language when placing an order.
The administration screen uses the language selected as
[1].
1
Touch one of the buttons [1] - [4].
A list of languages appears.
2
Touch the language you want to use and touch the
[OK] button.
To cancel a setting, touch [(Off)].
Note
When only one language was selected, the language
selection screen does not appear when placing an order.
Setting Items
21
Page 22
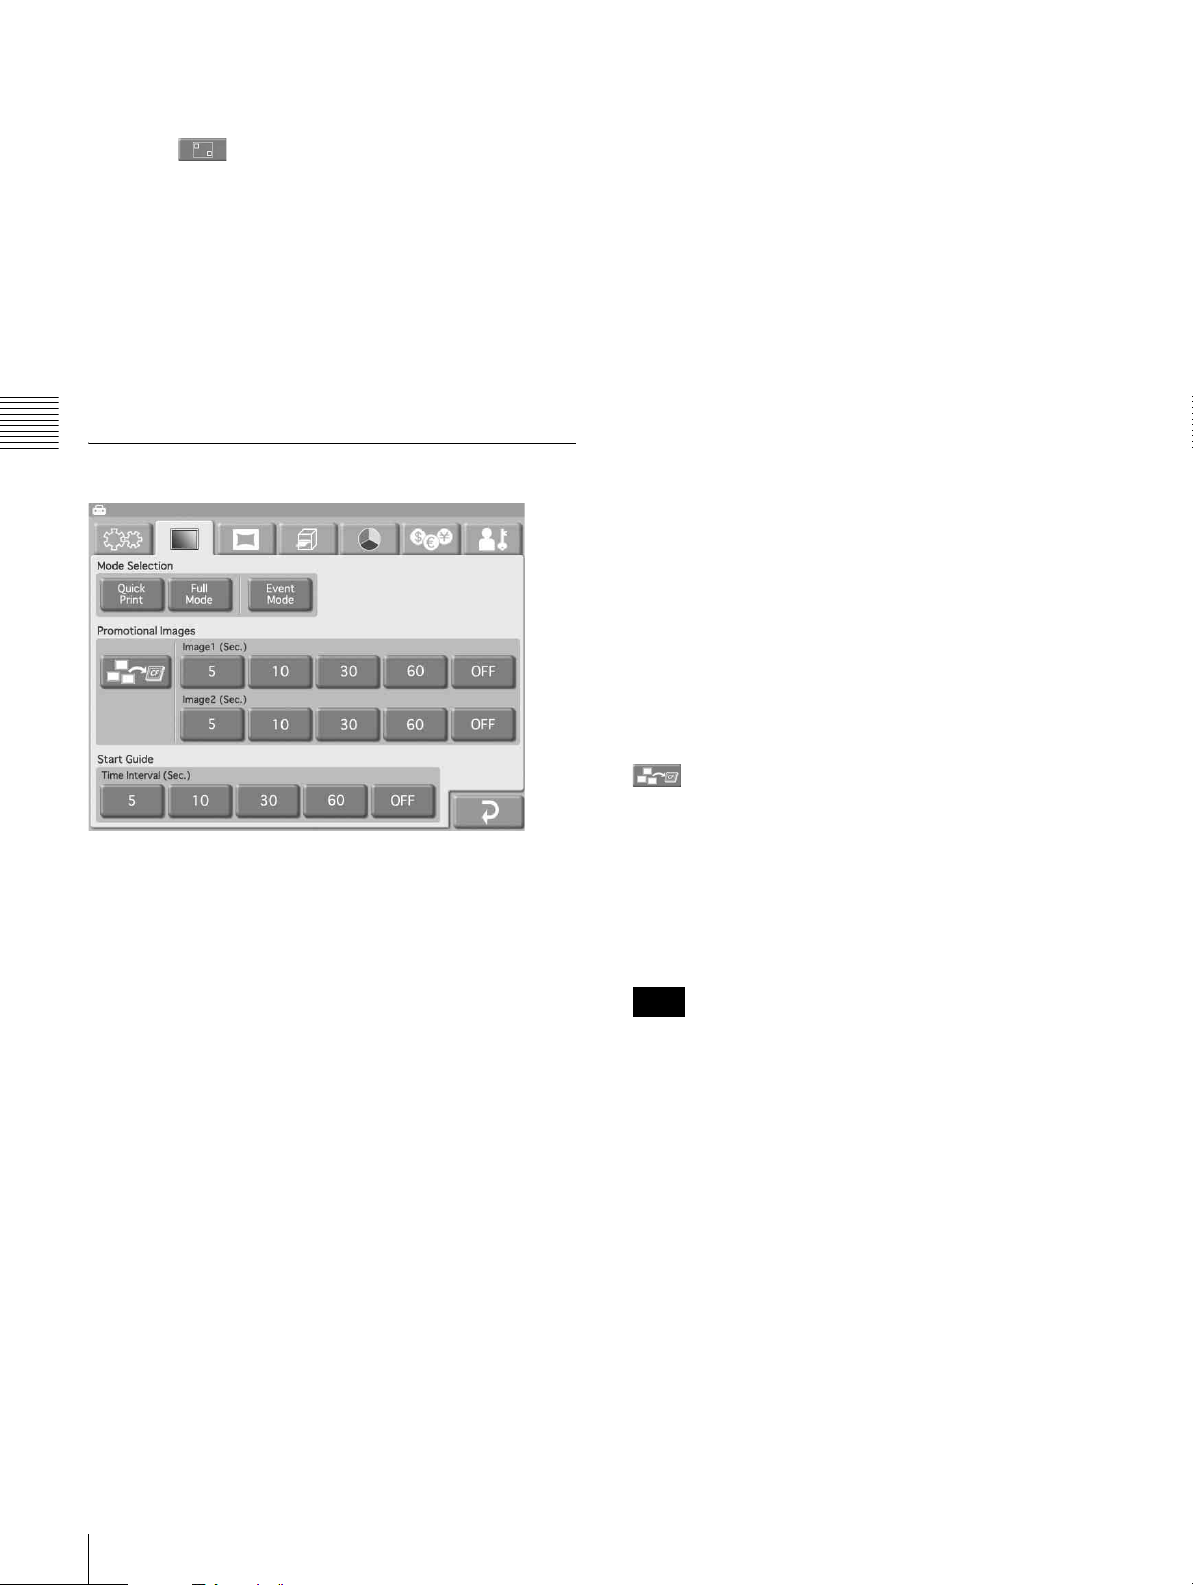
Touch Panel Adjustment
This allows you to calibrate the touch panel.
Touch the button, and then touch the box that
appears on the screen. When you touch the box, a new box
appears in a different location. Touch each of the boxes in
order. When no more boxes appear, the touch panel
adjustment is complete.
• Event Mode
This mode is designed for providing free access to
printing functions, for example at a party, wedding
reception, or similar. The mode is also suitable for use by
shop employees rather than customers.
No password entry or price confirmation are required
before starting to print.
Print Head Cleaning
This allows you to clean the inside of the printer.
For details, refer to the operating instructions for the
supplied cleaning cartridge.
Chapter 3 Setup
Screens Tab
Mode Selection
You can select either Quick Print mode, Full mode, or
Event mode.
•Quick Print
This mode limits the number of options that are available
to the customer. It is best suited to allow easy and quick
printing of photos.
The customer can select whether to print only selected
images from the memory card or all images on the
memory card. Image editing is not possible.
You can require the input of a password before printing
is carried out.
•Full Mode
In this mode, the customer can access the full range of
functions provided by the unit. In addition to normal
printing, this includes Split Image print, Index Print, and
Border Print. Image editing is also possible.
You can require the input of a password before printing
is carried out.
Promotional Images
Allows you to set the promotional images. Up to two
images can be specified for display during standby in Full
mode or Quick Print mode. In the default condition, the
Start Guide is used as standby screen. When one or two
images have been specified, these are shown alternately
with the Start Guide.
To use the promotional image function, an expansion
CompactFlash card is required. For information on the
expansion CompactFlash card, see the section “Preparing
an Expansion CompactFlash Card” on page 17.
You may create your own promotional image using
commercially available photo editing software.
Promotional image specifications
• Image size: 640 (W) × 480 (H) pixels
• File format: 24-bit Windows BMP
• File name: Image 1 = promo1.bmp, Image 2 =
promo2.bmp
• (Import promotional image)
This button lets you import a promotional image from
memory card inserted front-side memory card slot.
If an error message appears, check the following likely
causes.
– The expansion CompactFlash card has insufficient
free space.
– The file selected for copying does not meet the
promotional image specifications.
Note
If there are promotional images already stored on the
expansion CompactFlash card, they will be overwritten.
Be careful when performing this procedure, because
even read-only files will be forcibly overwritten.
• Image 1, Image 2
Selects the time period for which the promotional image
is displayed. When the time has elapsed, the unit
automatically switches to the next image. When [OFF] is
selected, the promotional image is not shown.
It is not possible to set Image 1, Image 2, and Start Guide
all to [OFF] at the same time.
22
Setting Items
Page 23
Start Guide
Selects the time period for which the Start Guide is
displayed. When the time has elapsed, the unit
automatically switches to the promotional image. When
[OFF] is selected, the Start Guide is not shown.
It is not possible to set Image 1, Image 2, and Start Guide
all to [OFF] at the same time.
• (Delete All)
Deletes all template data stored on the expansion
CompactFlash card.
Note
Be careful when performing this procedure, because
even if the existing templates are read-only files, they
will be forcibly deleted.
Template Tab
This lets you load and delete templates for border print and
enter text to be generated.
To use the Template tab, an expansion CompactFlash card
is required. For information on the expansion
CompactFlash card, see the section “Preparing an
Expansion CompactFlash Card” on page 17.
Templates are created using the Adobe Photoshop plug-in
that is contained on the supplied CD-ROM. For details, see
the documentation of the Adobe Photoshop plug-in.
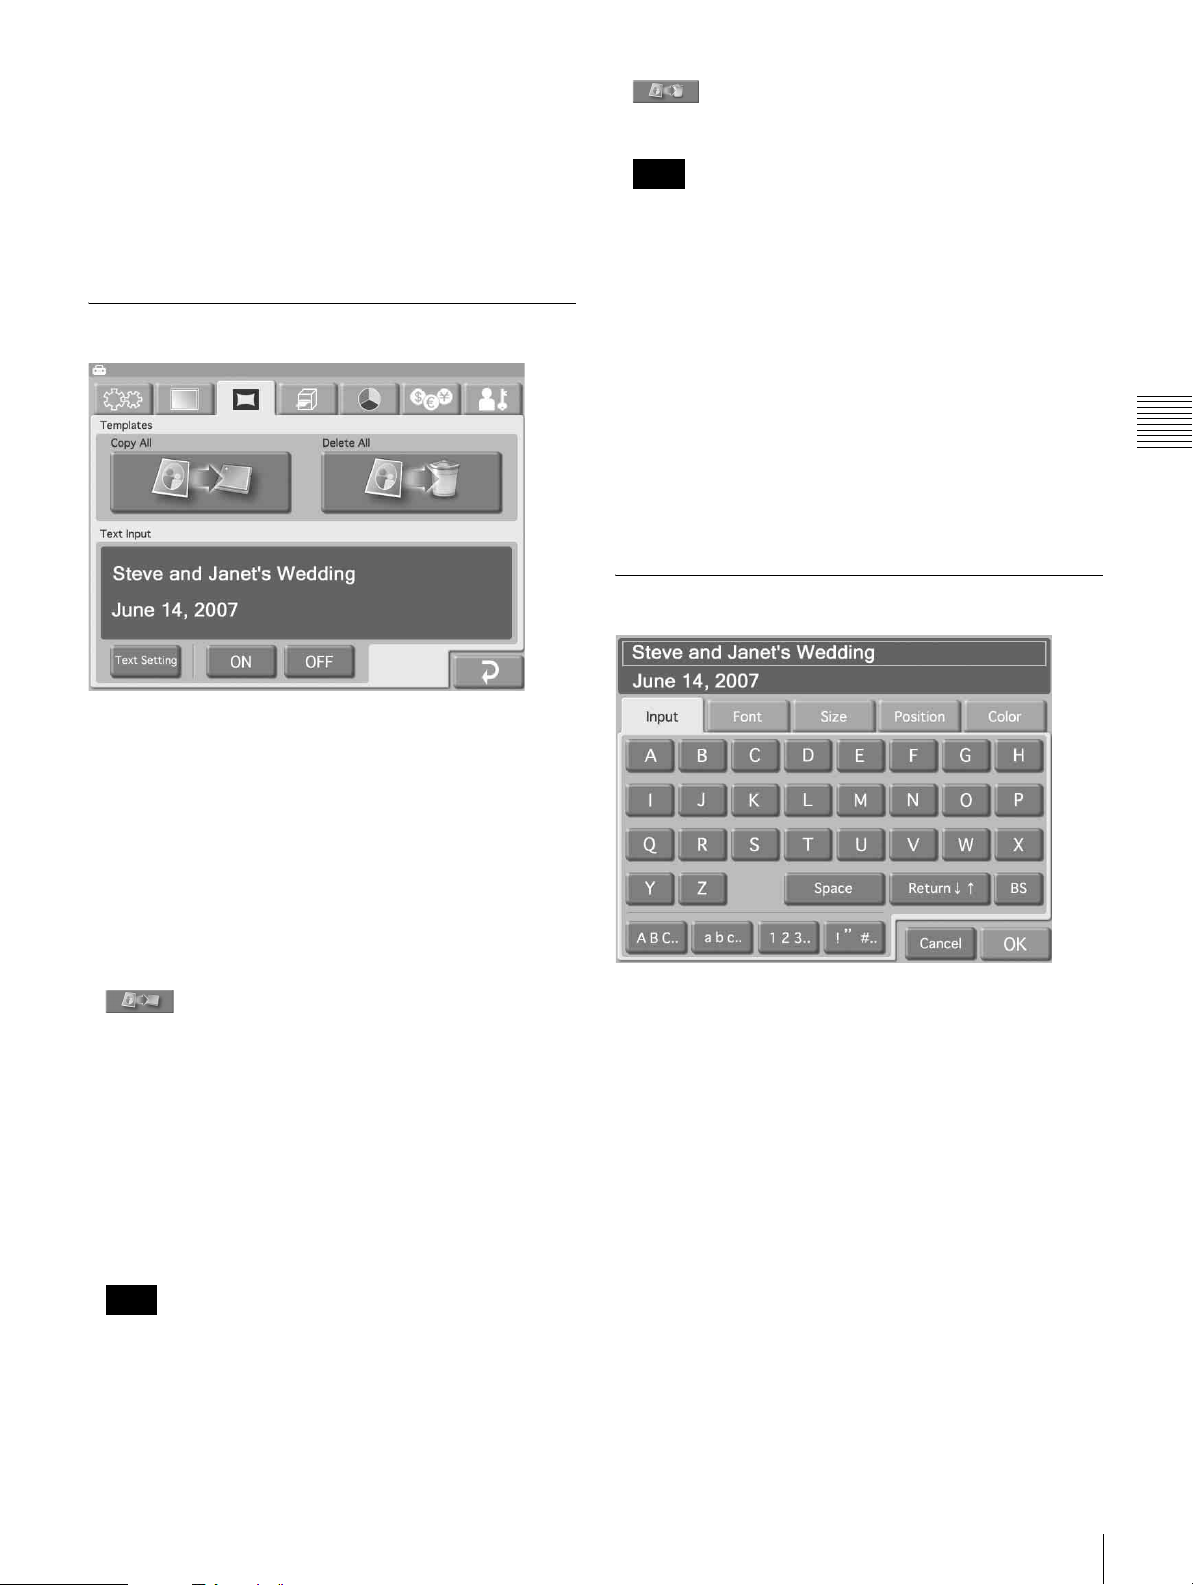
Text Input
You can enter text for addition to images. When [Print] or
[Border Print] is performed, the entered text is printed
along with the image. Alphanumeric characters and
symbols can be used to create text.
To enter text, touch the [Text Setting] button to bring up
the text input screen. For information on how to use this
screen, see the section “Text Input Screen” below.
To use the entered text, select [ON].
Text Input Screen
Chapter 3 Setup
Templates
• (Copy All)
Copies all template data stored on a memory card
inserted front-side memory card slot to the expansion
CompactFlash card.
Touch the button and then follow the instructions that
appear.
If an error message appears, check the following likely
causes.
– The expansion CompactFlash card has insufficient
free space.
– The file selected for copying does not meet the
promotional image specifications.
Note
If there are templates with the same name stored on the
expansion CompactFlash card, they will be overwritten.
Be careful when performing this procedure, because
even read-only files will be forcibly overwritten.
[Input] tab
Touch the keys shown on the screen to enter text. Up to 2
lines containing a total of 128 alphanumeric characters can
be entered. To make a correction, touch the [BS]
(Backspace) button. If you keep touching the button, the
entire line where the cursor is located will be erased.
[Font] tab
Lets you select the font to be used.
[Size] tab
Use the [+] and [-] buttons to control the text size. The size
setting range is 8 - 72 points, in 2-point steps.
Setting Items
23
Page 24
[Position] tab
Lets you specify where in the image the text should be
placed.
[Color] tab
Lets you specify the text color.
Note
Print position adjustment
If the print is not properly centered on the paper, you can
adjust the position in the X (horizontal) and Y (vertical)
direction. The adjustment range is ±2 mm in each
direction.
Depending on the number of characters and text size
selected, it may not be possible to print the entire text in
some cases.
Chapter 3 Setup
Print Tab
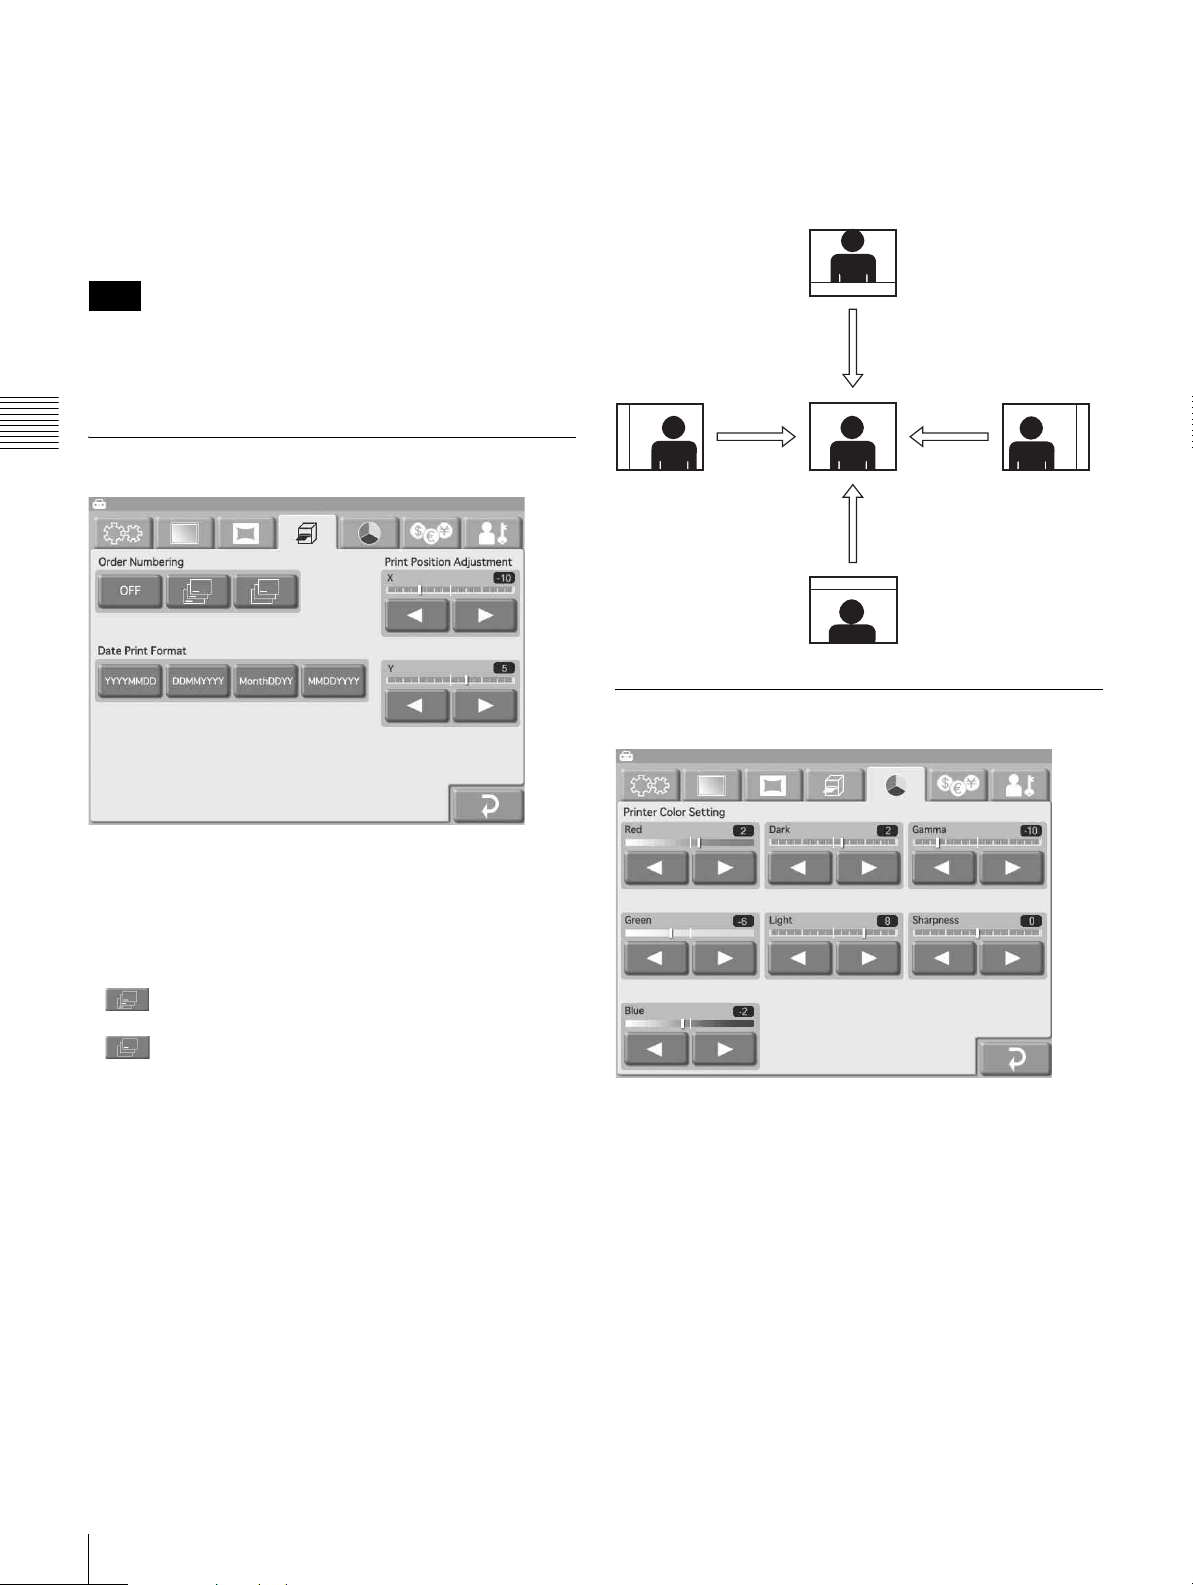
Order Numbering
Select one of the following settings related to including the
order number on the prints.
•OFF
No order number is printed.
• (Print all)
The order number is printed on all photos.
• (Print first only)
The order number is printed on the first image of each
order. If you print multiple copies of the first image, the
order number is printed on each copy.
The order number is printed as a watermark on the edge of
the photo.
Decrease
the Y value
Increase
the X value
Decrease
the X value
Increase
the Y value
Print Color Tab
Various settings related to print color and quality can be
made here. Each item is set with the [b] and [B] buttons.
The setting range is ±16 in steps of 2.
Date Print Format
Specifies the format that is used when including the date in
the printout.
• YYYYMMDD (Example: 2005/10/30)
• DDMMYYYY (Example: 30/10/2005)
• MonthDDYY (Example: Oct/30/05)
• MMDDYYYY (Example: 10/30/2005)
24
Setting Items
Red, Green, Blue
Adjusts the color component of the respective color.
Dark, Light
Adjusts gradation in dark and light sections.
Gamma
Adjusts the halftone density.
Page 25

Sharpness
Adjusts the outline sharpness of the image.
Pricing Tab
Price Indication
Specifies whether the price is shown on the image
selection and preview screens.
On-screen
abbreviation
SEK
SGD
THB
TRL
USD
HKD
KRW
MXN
BRL
COP
VEB
XCD
ARS
CLP
PEN
PA B
ECS
JMD
UYU
Currency
Swedish Krona
Singapore Dollar
Thai Baht
Turkish Lira
US Dollar
Hong Kong Dollar
South Korean Won
Mexican Peso
Brazilian Real
Colombian Peso
Venezuelan Bolivar
East Carribbean Dollar
Argentinian Peso
Chilean Peso
Peruvian Nuevo Sol
Panama Balboa
Ecuador Sucre
Jamaican Dollar
Uruguayan Peso
Chapter 3 Setup
Currency
Selects the currency to use when calculating the price for
an order.
When you touch the button, a list of currencies such
as indicated below appears. Touch the currency to use, and
touch the [OK] button. If you select [(blank)], the currency
is not shown.
On-screen
abbreviation
AUD
CAD
CHF
DKK
EUR
GBP
GRD
ILS
YEN
NOK
NT
NZD
PHP
RMB
Rs
RUB
Currency
Australian Dollar
Canadian Dollar
Swiss Franc
Danish Kroner
Euro
British Pound
Greek Drachma
Israeli Shekel
Japanese Yen
Norwegian Kroner
Taiwan New Dollar
New Zealand Dollar
Philippine Peso
Chinese Yuan
Indian Rupee
Russian Ruble
Pricing
• 3×5", 4×6", 5×7"
Lets you set the price per print for each size.
Touch the button. Using the numeric keypad that
appears, enter the value. Then touch the [OK] button.
The price setting range is 0 - 9999 (0 - 99.99 depending
on currency).
Additional Price
• Index Print, Border Print, Split Image
Lets you set the additional cost for the respective print
function. The sum of the per-print price and the
additional price becomes the final price.
Touch the button. Using the numeric keypad that
appears, enter the value. Then touch the [OK] button.
The price setting range is 0 - 9999 (0 - 99.99 depending
on currency).
Setting Items
25
Page 26
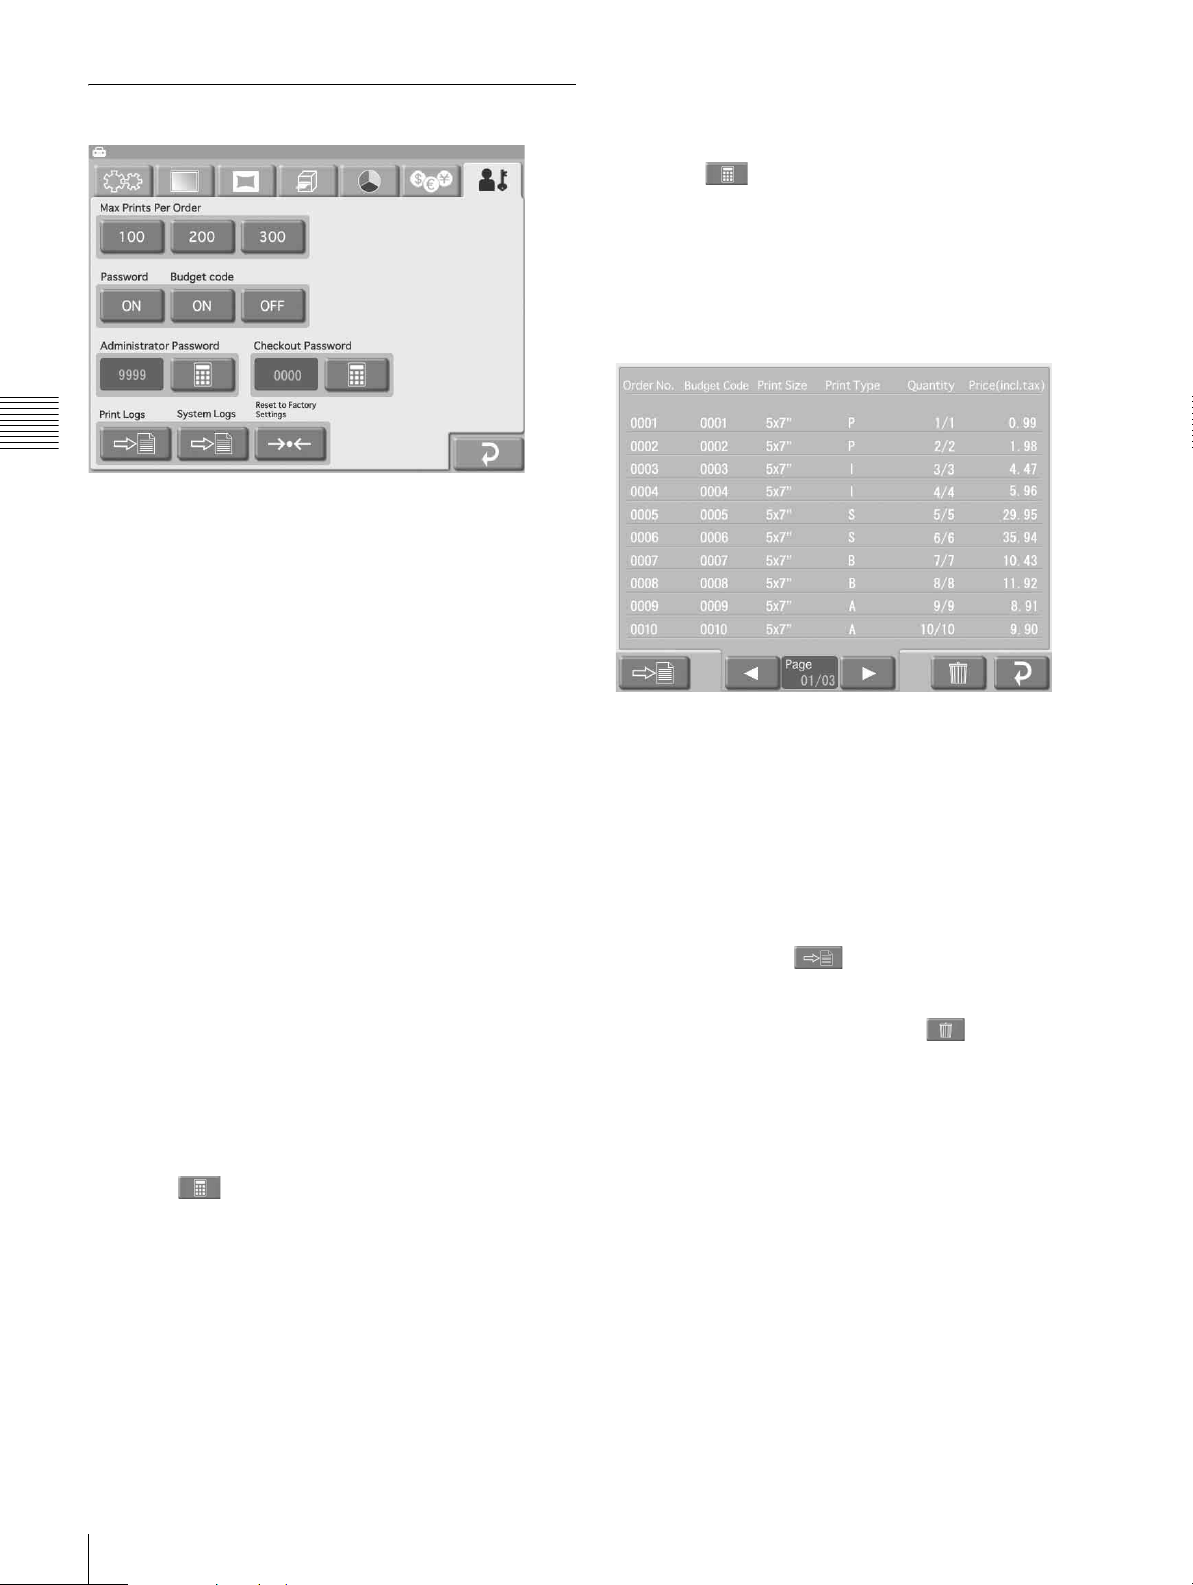
Administration Tab
Chapter 3 Setup
Max Prints Per Order
Sets the maximum number of prints that can be handled as
one order. Available settings are 100, 200, or 300 prints.
Also, the maximum number of prints for a single image is
99 prints.
Checkout Password
Allows you to set the password to be input when starting
to print.
Touch the button. Using the numeric keypad that
appears, specify a password (a 4-digit number). Then
touch the [OK] button.
Print Logs
Displays the print history of the unit, with one entry for
each order.
Password
Allows you to set whether a password must be entered
before printing starts. When set to [ON], a password is
required in Full mode and Quick Print mode before
printing can begin.
Budget code
Determines whether a budget code must be input when
printing.
When this is set to [ON], the unit requests input of a budget
code before printing in Full mode and Quick Print mode.
The entered code is output in the print logs. For example,
you could assign different budget codes to different
departments, allowing you to manage actual print counts
per department. A budget code is a number up to 4 digit.
Administrator Password
Allows you to set the password for the administration
screen.
Touch the button. Using the numeric keypad that
appears, specify a password (a 4-digit number). Then
touch the [OK] button.
The administrator password can also be used as the
password that must be entered for printing to start.
Each entry comprises the following items.
•Order Number
• Budget Code
•Print Size
• Print Type (P: Print, I: Index Print, S: Split Image Print,
B: Border Print, A: Print All)
• Quantity
• Price (incl. tax)
The print log information can be exported to the expansion
CompactFlash card.
To do this, touch the button. The print log data are
exported in CSV format. The exported CSV file also
contains the budget code.
To clear the print log data, touch the button.
26
Setting Items
Page 27
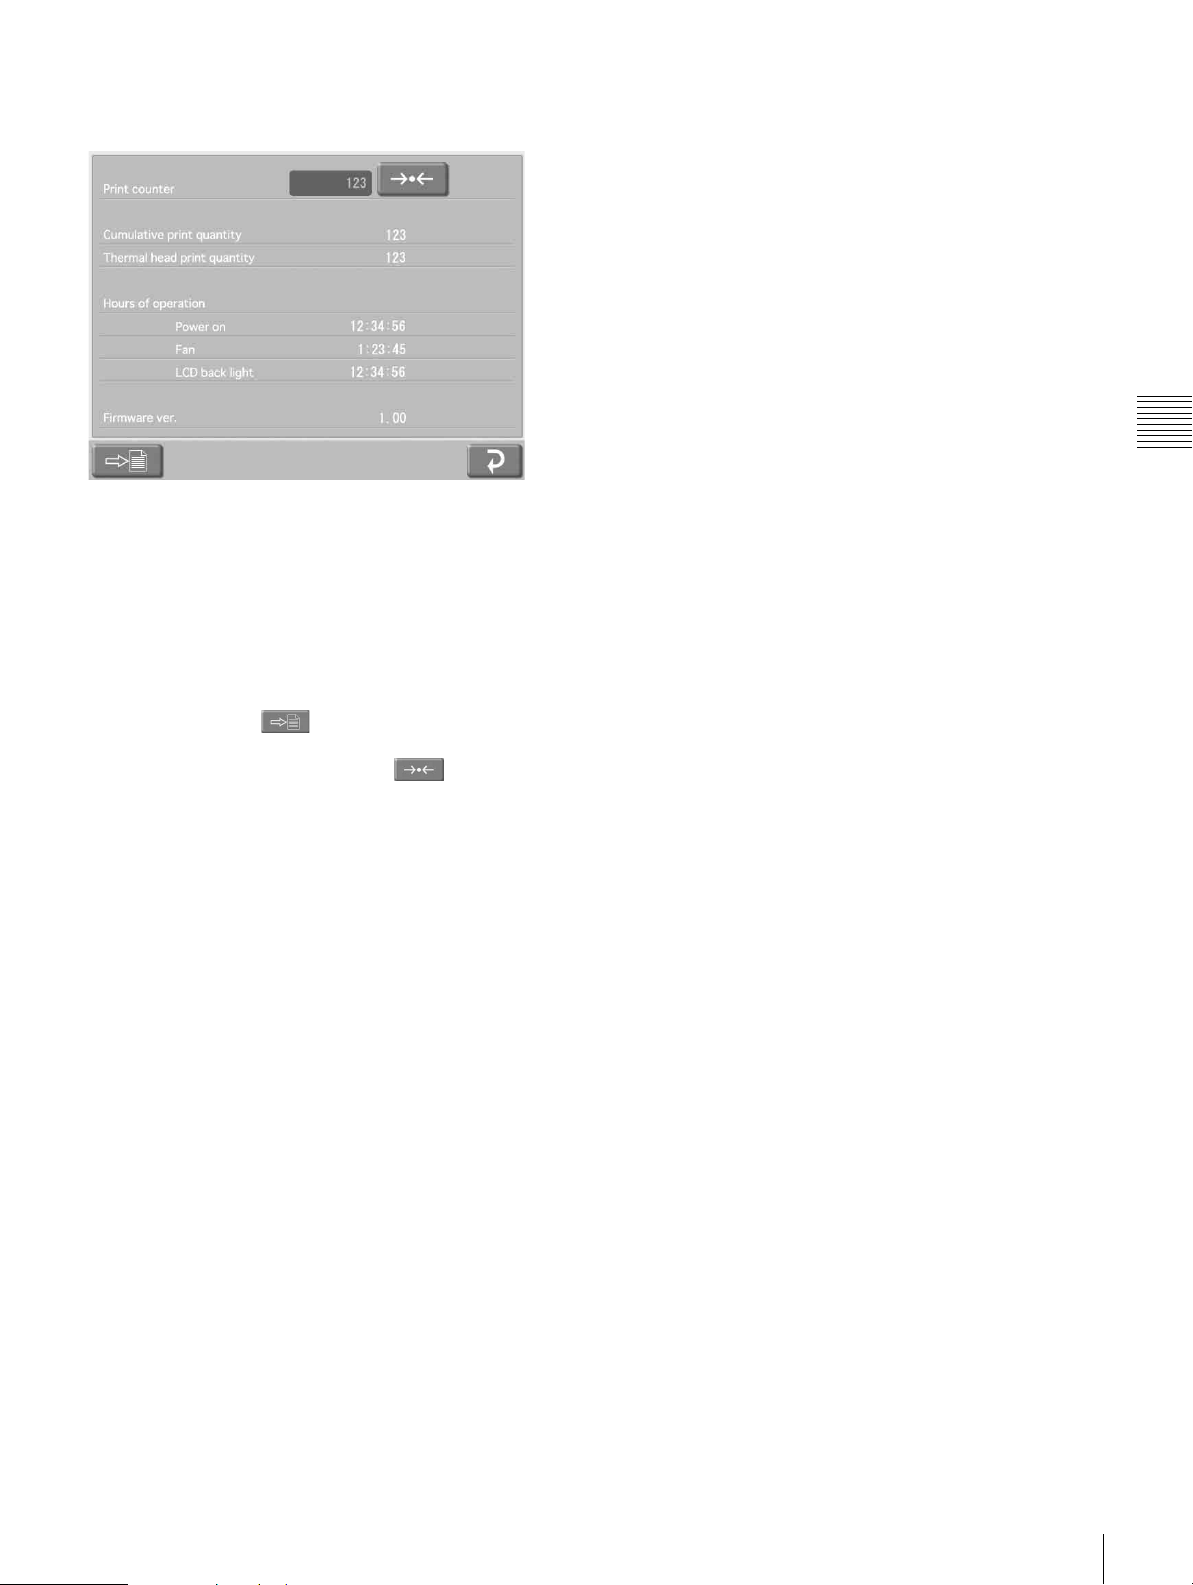
System Logs
Displays the operation history of the system.
The following items are shown.
•Print counter
• Cumulative print quantity
• Thermal head print quantity
• Hours of operation (power-on time, fan operation time,
LCD backlight operation time)
• Firmware version
The system log information can be exported to the
expansion CompactFlash card.
To do this, touch the button. The system log data are
exported in CSV format.
To reset the print counter, touch the button.
Chapter 3 Setup
Reset to Factory Settings
Returns the unit to the factory default settings.
Setting Items
27
Page 28

Operation
Operation Outline
Print Types
Chapter 4 Operation
The unit can print photos taken with a digital camera in
several different ways, as listed below.
Print
Select desired images from the contents of the memory
card, specify the number of copies, and print.
This function is available in all operation modes.
Index Print
All images on the memory card are printed as thumbnails.
This is convenient to check memory card contents and
visually sort through a large number of images when
selecting images for printing.
This function is available in Full mode and Event mode.
Chapter
Split Image
This lets you print several images on a single sheet.
Splitting into prescribed-size images such as for passport
photos is also possible.
This function is available in Full mode and Event mode.
Border Print
You can select from a variety of border designs to be
printed around the image.
This function is available in Full mode and Event mode.
Print All Images
This lets you print all images on the memory card in one
go. There is no need to select images.
This function is available in Quick Print mode.
28
Operation Outline
Page 29
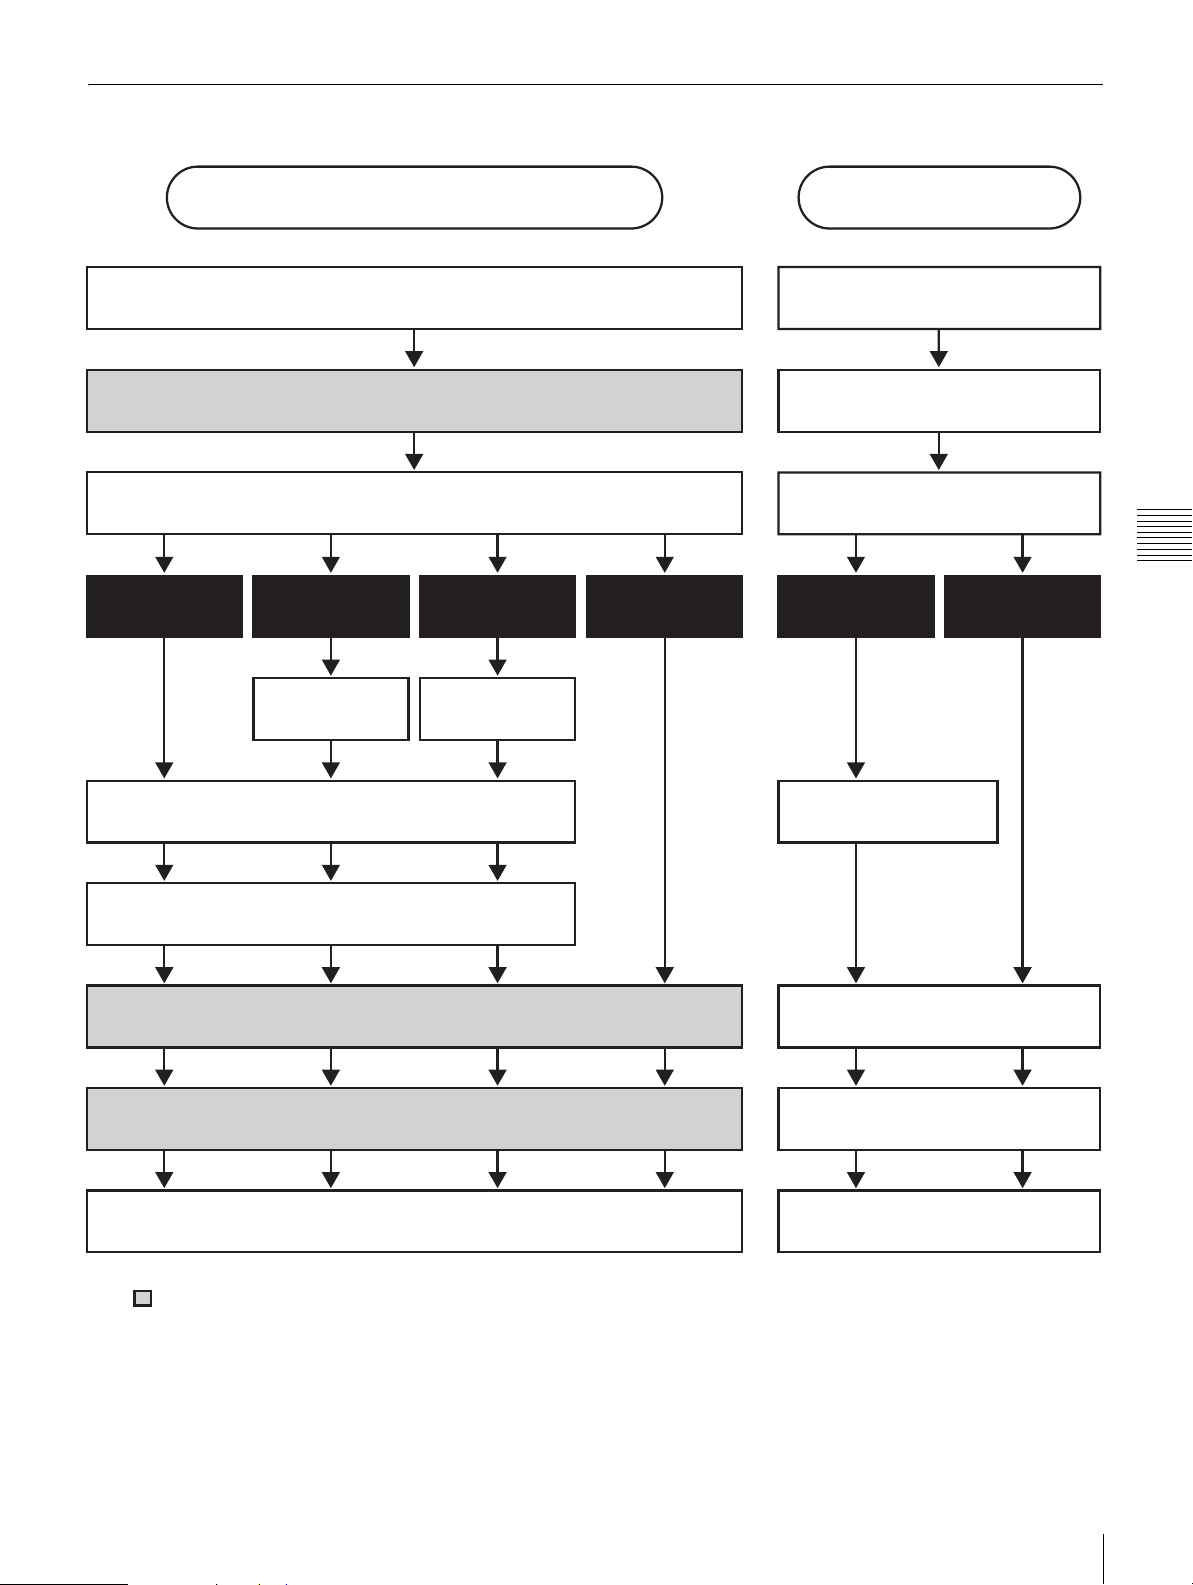
Operation Flow
Full mode/Event mode
Insert memory card
Select language *
Select print type
Print Border Print Split Image Index Print
Select border Select layout
Quick Print mode
Insert memory card
Select language *
Select print type
Chapter 4 Operation
Print Print All Images
Select image/number of copies
Edit (if required)
Verify order
Enter password *
Print
: Not required in Event mode.
: Not required depending on settings.
*
Select image/
number of copies
Verify order
Enter password *
Print
Operation Outline
29
Page 30
Setting Memory Cards
A variety of memory cards, listed below, can be set in the
drives and slots on the user interface panel to read image
data stored on these memory cards.
•“Memory Stick”
• CompactFlash cards
• SmartMedia cards
•SD Cards
• MultiMediaCards
• xD-Picture Cards
Notes
• Be sure to back up all image data stored on memory
cards before using it with this unit.
• Multiple memory cards cannot be inserted and used at
the same time.
Chapter 4 Operation
• To avoid loss of image data or damage to the main unit,
never attempt to insert a “Memory Stick”, SmartMedia
card, SD Card, or MultiMediaCard into a CompactFlash
type adapter set in the CompactFlash slot.
Removing the “Memory Stick”
When you see a message that prompts you to remove the
“Memory Stick”, first push the “Memory Stick” until you
hear a click 1, then pull it out 2.
1
2
Note
To prevent losing valuable data or damaging the “Memory
Stick”, never remove the “Memory Stick” from the slot
until the message prompts you to remove it.
Using a “Memory Stick”
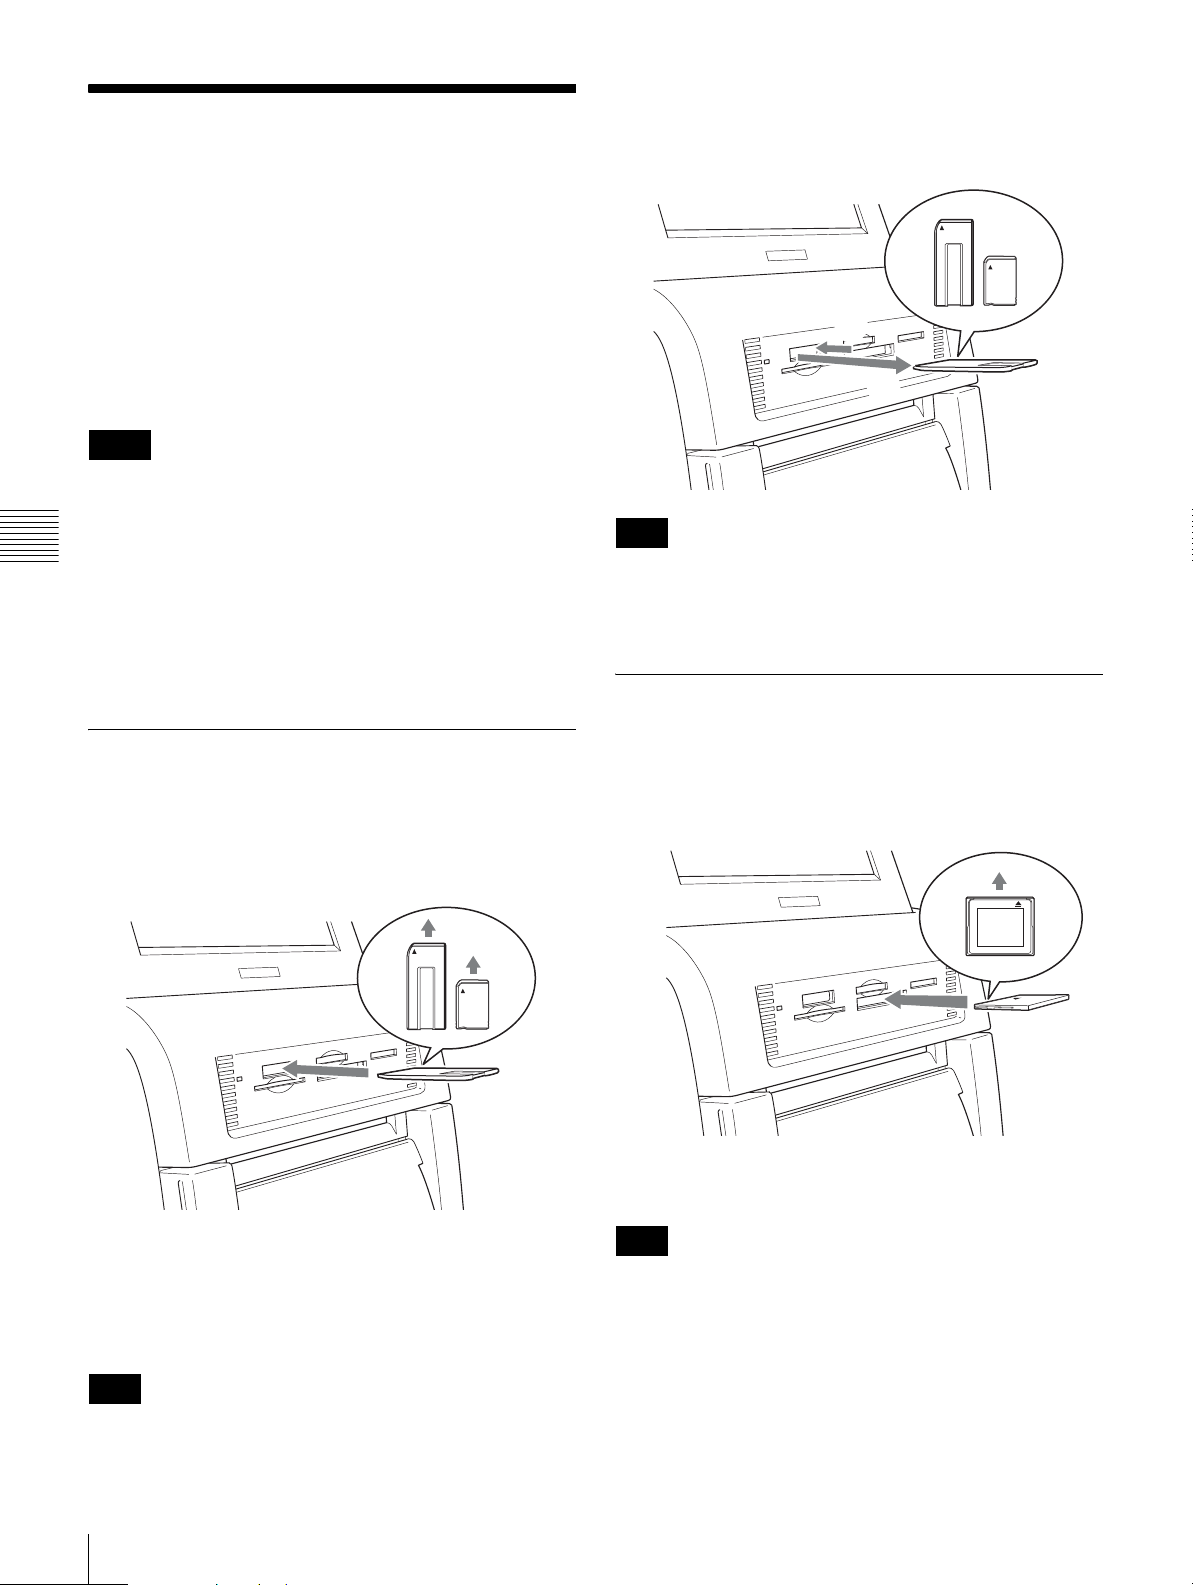
Inserting the “Memory Stick”
With the v mark on the “Memory Stick” facing up and
forward, completely insert the “Memory Stick” into the
slot.
When you insert the “Memory Stick” into the unit, it is
automatically detected.
A “Memory Stick Duo” can also be used without an
adapter. As with a “Memory Stick”, insert it with the side
that has the v mark facing upward.
Using a CompactFlash Card
Inserting the CompactFlash card
With the v mark on the CompactFlash card facing up and
forward, completely insert the CompactFlash card into the
slot.
When you insert the CompactFlash card into the unit, it is
automatically detected.
Note
Before inserting the CompactFlash card, make sure that it
is oriented correctly. Inserting the card in the wrong
direction may damage the internal contacts, which can lead
to malfunctions.
Note
Do not use a “Memory Stick Duo” adapter, as this may
cause a malfunction.
30
Setting Memory Cards
Page 31

Removing the CompactFlash card
When you see a message that prompts you to remove the
CompactFlash card, pull the it straight out.
Note
To prevent losing valuable data or damaging the
CompactFlash card, never remove the CompactFlash card
from the slot until the message prompts you to remove it.
Using a SmartMedia Card
Inserting the SmartMedia card
With the terminals on the SmartMedia card facing up,
completely insert the card into the slot.
Using a SD Card/MultiMediaCard
Inserting the SD Card or MultiMediaCard
With the notch on the SD Card or MultiMediaCard away
from you and to the right, completely insert the card into
the slot.
When you insert the SmartMedia card into the unit, it is
automatically detected.
Removing the SmartMedia card
When you see a message that prompts you to remove the
SmartMedia card, first push the SmartMedia card until you
hear a click, then pull it out.
Note
To prevent losing valuable data or damaging the
SmartMedia card, never remove the SmartMedia card
from the slot until the message prompts you to remove it.
When you insert the SD Card or MultiMediaCard into the
unit, it is automatically detected.
Removing the SD Card or MultiMediaCard
When you see a message that prompts you to remove the
SD Card or MultiMediaCard, first push the SD Card or
MultiMediaCard until you hear a click, then pull it out.
Notes
• To prevent losing valuable data or damaging the SD
Card or MultiMediaCard, never remove the card from
the slot until the message prompts you to remove it.
• When using a miniSD Card, always use a designated
miniSD Card adapter. There is a risk that you will not be
able to eject the miniSD Card if you insert it into the card
slot without an adapter.
Chapter 4 Operation
Setting Memory Cards
31
Page 32

Using a xD-Picture Card
Inserting the xD-Picture Card
With the v mark on the xD-Picture Card facing up and
forward, completely insert the xD-Picture Card into the
slot.
Chapter 4 Operation
When you insert the xD-Picture Card into the unit, it is
automatically detected.
Removing the xD-Picture Card
When you see a message that prompts you to remove the
xD-Picture Card, first push the xD-Picture Card until you
hear a click, then pull it out.
Selecting Images for
Printing
The procedure for selecting images from the inserted
memory card is described below.
This procedure can be carried out in any operation mode.
1
Touch any place on the screen.
The language selection screen appears.
Note
To prevent losing valuable data or damaging the xDPicture Card, never remove the xD-Picture Card from the
slot until the message prompts you to remove it.
Memo
When using Event mode, and when only one language
was selected at the administration screen, the language
selection screen does not appear. Instead, the Main
Menu appears. In this case, proceed to step 3.
2
Touch the language you want to use.
Precautions about using the unit are shown. Read these
carefully and then touch the [OK] button.
32
Selecting Images for Printing
Page 33

Memo Memo
The following buttons are available in the screens that
follow. Touch the buttons when required.
• [Start Over]: Returns to the start screen in step 1.
• [Main Menu]: Returns to the Main Menu screen in
step 4.
• [Help]: Displays the help screen for a description
about procedures that apply to the current screen.
3
Insert the memory card into the respective slot on the
front side of the unit.
When the memory card is recognized, the Main Menu
appears.
4
Touch [Print].
Touching the [Add Date] button on this screen will
cause the shooting date to be printed on each photo.
For details, see the section “Adding the Date” on page
46.
Notes
• Images in a format not supported by the unit and
images that are broken (corrupted file data) are
indicated by the following icon.
• Images where one side (vertical or horizontal) is less
than 480 pixels are shown as small thumbnails.
Because of their lower resolution, such images may
not print at high quality.
6
Specify the number of copies (quantity) to print.
Use the [+] and [–] buttons to specify the quantity.
Chapter 4 Operation
A list display of images contained on the memory card
appears.
5
Touch the images that you want to print.
To deselect an image, touch the image once more.
To select all images, touch the [Select All] button.
If there are more images than fit on one list display
screen, the [b] and [B] buttons can be used to move
among screens.
The quantity specified for an image is shown at the top
right corner of the thumbnail.
To specify the individual quantities, touch the
thumbnail of the image with the quantity you want to
change, and then touch the [+] or [–] button.
If the [Select All] button has been selected, the
quantity set with the [+] and [–] buttons will apply to
all images.
Memo
If the digital camera with which the photos were taken
supports DPOF, the images to print and the quantity
for each image can already be specified at the camera.
For details, see the section “Printing From DPOF
Settings” on page 47.
Selecting Images for Printing
33
Page 34

If you wish to print without editing the images,
proceed to step 9. To perform editing, proceed to step
7.
In Quick Print mode, image editing is not possible.
7
To enlarge the selected image, touch the button.
9
Touch the [Print] button.
The order contents are shown.
Chapter 4 Operation
The preview screen appears.
8
To edit an image, touch the [Edit] button.
Memo
In Event mode, the order contents are not shown and
printing starts directly.
Verifying Order Contents and
Entering a Password
1
Verify that the print quantity, pricing, and other items
are correct. Then touch the [Print Start] button.
The edit menu appears. This menu gives access to the
Crop & Rotate, Color Adjustment, Red Eye
Reduction, and Sepia/Black&White functions.
For details on editing, see the section “Image Editing”
on page 43.
34
Selecting Images for Printing
The numeric keypad appears in the right part of the
screen.
Memo
If password (or budget code) input was disabled at the
administration screen, printing starts immediately
when the [Print Start] button is touched.
Page 35

2
Enter the password and touch the [OK] button.
Use the numeric keypad on the screen to enter the 4digit password. This can be either the checkout
password or the administrator password.
Memo
If budget code input was selected at the administration
screen, enter the budget code instead of the password,
and then touch the [OK] button.
The printing process starts. When all necessary data
have been read from the memory card, a message
about removing the memory card appears. Remove the
memory card from the memory card slot.
Note
Do not remove the memory card before this message
is shown. Otherwise data on the memory card may be
erased or corrupted. Removing and inserting an
expansion CompactFlash card during printing may
also cause improper printout.
Using Index Print
This function prints out all images on a memory card in
reduced size to provide an index of the contents.
The maximum number of images printed on a single sheet
is as follows.
• 3×5": 30 images
• 4×6": 35 images
• 5×7": 56 images
This function is available in Full mode and Event mode.
1
Touch any place on the screen.
The language selection screen appears.
Memo
When using Event mode, and when only one language
was selected at the administration screen, the language
selection screen does not appear. Instead, the Main
Menu appears. In this case, proceed to step 3.
Chapter 4 Operation
2
Touch the language you want to use.
Precautions about using the unit are shown. Read these
carefully and then touch the [OK] button.
Using Index Print
35
Page 36

3
Insert the memory card into the respective slot on the
front side of the unit.
When the memory card is recognized, the Main Menu
appears.
4
Touch [Index Print].
Chapter 4 Operation
The order contents are shown.
Using Split Image Print
This function lets you print several images on a single
sheet. Splitting into prescribed-size images such as
passport photos is also possible.
This function is available in Full mode and Event mode.
1
Touch any place on the screen.
Memo
In Event mode, the order contents are not shown and
printing starts directly.
5
Verify the order contents and enter the password.
For details on this operation, see “Verifying Order
Contents and Entering a Password” on page 34.
The language selection screen appears.
Memo
When using Event mode, and when only one language
was selected at the administration screen, the language
selection screen does not appear. Instead, the Main
Menu appears. In this case, proceed to step 3.
2
Touch the language you want to use.
36
Using Split Image Print
Precautions about using the unit are shown. Read these
carefully and then touch the [OK] button.
Page 37

3
Insert the memory card into the respective slot on the
front side of the unit.
When the memory card is recognized, the Main Menu
appears.
4
Touch [Split Image].
The split image layout selection screen appears.
5
Select the layout by touching it, and then touch the
[OK] button.
6
Touch the frame you want to assign the image to.
A list of images stored on the memory card is shown.
7
Select the image by touching it, and then touch the
[OK] button.
Chapter 4 Operation
To print passport type photos, select a suitable layout.
Frames that are marked with the same letter on screen
will contain the same image.
The preview screen appears.
The preview screen appears again.
To assign multiple images, repeat steps 6 and 7 for the
desired number of images.
To change an image that you have already selected,
touch that image again and then touch the [Image
Selection] button. You can then select a new image.
Using Split Image Print
37
Page 38

8
Specify the number of copies (quantity) to print.
Use the [+] and [-] buttons to specify the quantity.
If you wish to print without editing the images,
proceed to step 10. To perform editing, proceed to step
Chapter 4 Operation
9.
9
To edit an image, select it and then touch the [Edit]
button.
10
Touch the [Print] button.
The order contents are shown.
Memo
In Event mode, the order contents are not shown and
printing starts directly.
11
Verify the order contents and enter the password.
The edit menu appears. This menu gives access to the
Crop & Rotate, Color Adjustment, Red Eye
Reduction, and Sepia/Black&White functions.
For details on this operation, see “Verifying Order
Contents and Entering a Password” on page 34.
For details on editing, see the section “Image Editing”
on page 43.
38
Using Split Image Print
Page 39

Using Border Print
When printing images stored on the memory card, you can
select from a variety of border designs to be printed around
the image, and you can also enter text to be printed.
This function is available in Full mode and Event mode.
To use this function, the expansion CompactFlash card
must be inserted.
You can load new border designs and enter text characters
from the administration screen. For details, see the section
“Template Tab” on page 23.
1
Touch any place on the screen.
2
Touch the language you want to use.
Precautions about using the unit are shown. Read these
carefully and then touch the [OK] button.
3
Insert the memory card into the respective slot on the
front side of the unit.
When the memory card is recognized, the Main Menu
appears.
Chapter 4 Operation
The language selection screen appears.
Memo
When using Event mode, and when only one language
was selected at the administration screen, the language
selection screen does not appear. Instead, the Main
Menu appears. In this case, proceed to step 3.
4
Touch [Border Print].
The border selection screen appears.
Using Border Print
39
Page 40

5
Select the desired border by touching it, and then touch
the [OK] button.
7
Specify the number of copies (quantity) to print.
Use the [+] and [–] buttons to specify the quantity.
If you wish to enlarge the selected border, touch the
button.
Chapter 4 Operation
A list of images stored on the memory card is shown.
6
Select the image to be printed by touching it.
To deselect an image that you have selected, touch that
image again. To select all images, touch the [Select
All] button.
If there are more images than fit on one list display
screen, the [b] and [B] buttons can be used to move
among screens.
If the [Select All] button has been selected, the
quantity set with the [+] and [–] buttons will apply to
all images.
The quantity specified for an image is shown at the top
right corner of the thumbnail.
If you wish to print without editing the images,
proceed to step 10. To perform editing, proceed to step
8.
In Quick Print mode, image editing is not possible.
8
To enlarge the selected image, Touch the button.
The preview screen appears.
40
Using Border Print
Page 41

9
To edit an image, touch the [Edit] button.
The edit menu appears. This menu gives access to the
Crop & Rotate, Color Adjustment, Red Eye
Reduction, and Sepia/Black&White functions.
Memo
In Event mode, the order contents are not shown and
printing starts directly.
11
Verify the order contents and enter the password.
For details on this operation, see “Verifying Order
Contents and Entering a Password” on page 34.
Chapter 4 Operation
For details on editing, see the section “Image Editing”
on page 43.
10
Touch the [Print] button.
The order contents are shown.
Using Border Print
41
Page 42

Printing All Images on a
Memory Card
This function lets you print all images stored on a memory
card in one operation, producing one print per image.
The function is available in Quick Print mode.
1
Touch any place on the screen.
Chapter 4 Operation
3
Insert the memory card into the respective slot on the
front side of the unit.
When the memory card is recognized, the Main Menu
appears.
4
Touch [Print All Images].
The order contents are shown.
5
Verify the order contents and enter the password.
The language selection screen appears.
Memo
When only one language was selected at the
administration screen, the language selection screen
does not appear. Instead, the Main Menu appears. In
this case, proceed to step 3.
2
Touch the language you want to use.
For details on this operation, see “Verifying Order
Contents and Entering a Password” on page 34.
If the number of images on the memory card is higher than
the maximum allowable number of prints per order, the
image list screen will appear after the Main Menu, with the
number of images corresponding to the maximum number
being selected. You can then proceed to print these images,
or change the image selection.
Precautions about using the unit are shown. Read these
carefully and then touch the [OK] button.
42
Printing All Images on a Memory Card
Page 43

Image Editing
Specifying the Layout (Crop &
Rotate)
The Edit Menu gives access to the following functions:
•Crop & Rotate (page 43)
• Color Adjustment (page 44)
• Sepia/Black&White printing (page 45)
• Red Eye Reduction (page 45)
The steps for image editing are described below.
1
Touch the [Edit] button.
The Edit Menu appears.
2
Touch the item you want to edit.
This function allows you to trim the image or rotate it,
thereby changing the composition of the image.
To crop the image
You can perform cropping by zooming the image in and
out, and by shifting the position of the zoomed portion.
1
On the Edit Menu, touch [Crop & Rotate].
The following screen appears.
Chapter 4 Operation
The respective editing screen appears. For details on
operation steps, see the later sections.
3
When finished editing, touch the [OK] button on the
respective editing screen.
The original screen reappears.
An edited image is indicated by a pencil symbol in the list
display.
To remove editing effects
You can return a temporarily edited image to its original
unedited state.
1
Select an edited image on the image list screen, and
touch the [Edit] button.
The Edit Menu appears.
2
Touch the [Reset] button.
A confirmation message appears. Touch the [Yes]
button.
The editing effects for the selected image are removed,
and the Edit Menu reappears.
2
Use the and buttons to adjust the size of the
image.
3
Use the arrow buttons to adjust the position of the
image.
4
Repeat steps 2 and 3 to obtain the correct printing
image.
5
When the composition of the image is as desired,
touch the [OK] button.
The original screen reappears.
Image Editing
43
Page 44

To rotate the image
You can rotate the image in steps of 90 degrees.
1
On the Edit Menu, touch [Crop & Rotate].
The following screen appears.
Chapter 4 Operation
2
Touch the button.
Each time you touch the button, the image is rotated by
90 degrees in the clockwise direction.
Adjusting the Image Quality
The following items can be adjusted.
•Brightness
•Tint
• Saturation
• Sharpness
1
On the Edit Menu, touch [Color Adjustment].
The following screen appears.
3
When the orientation of the image is as desired, touch
the [OK] button.
The original screen reappears.
2
Use the [b] and [B] buttons to adjust the setting of the
respective items.
Each item can be adjusted in ±8 steps.
To cancel the adjustment, touch the [Cancel] button.
3
When the image adjustment is complete, touch the
[OK] button.
The original screen reappears.
44
Image Editing
Page 45

Printing in Sepia or Black and White
Compensating for the Red Eye
You can set the image color to sepia or black and white for
printing.
1
On the Edit Menu, touch [Sepia/B&W].
The following screen appears.
2
Touch either [Sepia] or [B&W].
To cancel the setting, touch the same button once
more.
Effect
On photos taken with a flash, the so-called red eye effect
can sometimes be a problem. This function makes the
effect less noticeable.
Note
If cropping or rotation is performed after red eye reduction,
the corrections for red eye are canceled.
Make sure to perform red eye reduction after cropping or
rotation.
1
On the Edit Menu, touch [Red Eye Reduction].
The following screen appears. The compensation
frame is located in the center of the image.
Chapter 4 Operation
3
Touch the [OK] button.
The original screen reappears.
2
Use the arrow buttons to move the compensation
frame to the eye position.
3
Use the and buttons to adjust the size of the
compensation frame, so that the eye is fully within the
frame.
Image Editing
45
Page 46

4
Touch the button.
The compensation function is carried out.
The result is shown in the small image at the bottom of
the screen.
To cancel the compensation function, touch the
button.
Perform red eye reduction on one eye at a time.
Note
With some images, the compensation function may
not be entirely successful.
5
Touch the [OK] button.
The original screen reappears.
Also when red eye reduction was carried out, the results
will not be reflected on the preview screen. However, the
Chapter 4 Operation
symbol under the preview image indicates that the
function was used.
Adding the Date
You can add the date when an image was shot to the
printout.
This function is available when [Print] or [Border Print]
was selected from the Main Menu.
For this function to work, the image data must conform to
the Exif 2.0 or later specification.
1
On the list display of images, touch the [Add Date]
button.
The date is added to all images that are printed.
To cancel the setting, touch the [Add Date] button
once more.
The format in which the date information is printed can be
changed at the administration screen. For details, see the
section “Print Tab” on page 24.
46
Adding the Date
Page 47

Printing From DPOF
Settings
If a digital camera that supports DPOF was used, the
images to print and the quantity for each image can also be
specified at the camera.
When image and quantity selection was made at the
camera and such a memory card is then inserted into the
slot of this unit, the selection data generated by the digital
camera are automatically read by the unit. By using these
data, printing can be carried out quickly and easily.
If the number of images selected at the digital camera is
higher than the maximum allowable number of prints per
order, the image list screen will appear, with the number of
images corresponding to the maximum number being
selected. You can then proceed to print these images, or
change the image selection.
This function is active when [Print] or [Print All Images]
is selected at the Main Menu.
Printing From a Computer
When a commercially available USB cable is used to
connect the unit to a computer, data sent from the
computer can be printed out using this unit.
When the USB cable is plugged in, the indication “PC
MODE” is shown on the display of the unit. In this
condition, the touch panel is inactive.
To print from a computer, you need to access the [System]
tab on the administration screen and set [PC Connection]
to [ON].
Installing the Printer Driver
If the unit is to be controlled from a computer, you must
install the supplied printer driver on the computer before
connecting the unit to the computer for the first time. For
details on installation, refer to the installation guide and the
Readme file on the supplied CD-ROM.
Chapter 4 Operation
Memo
DPOF (Digital Print Order Format) is a standard that
enables automatic printing of images taken with a digital
camera. Digital cameras supporting this standard write
information about image selection and print quantity onto
the memory card. This information can then be used by
DPOF compatible photo printers to enable quick and easy
printing.
Note
Available functions and operation steps for specifying
DPOF information depend on the digital camera model.
For details, refer to the documentation of your camera.
Note
The supplied printer driver does not support printing via a
network.
Printing From DPOF Settings / Printing From a Computer
47
Page 48

Connection to a Computer
To control the unit from a computer, you must connect the
unit to the computer using a commercially available USB
cable. Plug the USB cable into the USB port (device) on
the rear of the unit.
When making the connection, you should also consult the
documentation of the computer.
Chapter 4 Operation
USB cable
Computer
Note
If the connection is made via a USB hub, correct operation
is not assured.
Attaching a ferrite core to a USB cable
Before connecting a USB cable (not supplied) to the
printer, you should attach a supplied ferrite core to its cable
for noise prevention. To conform to radiation standards,
attach the supplied ferrite core to the USB cable of your
device as described below.
1
Release two stoppers on the ferrite core to open it.
2
Slip the USB cable through the ferrite core and
position it at the base of the USB connector to the
printer.
3
Close the ferrite core until you hear a click.
Note
When the ferrite core cannot be secure because the USB
cable is thin, secure it using a tape.
48
Printing From a Computer
Page 49

Appendix
Precautions
Safety
• Operate the printer using the power source specified in
“Specifications” on page 55.
• Be careful not to damage the power cord by placing or
dropping heavy objects on it; it is dangerous to use the
unit with a damaged power cord.
• If you do not intend to use the unit for a long time,
disconnect the power cord.
• Unplug the power cord by grasping the plug, not the cord
itself.
• Do not disassemble the unit. There is a danger of electric
shock from the internal parts.
• Be careful not to spill water or other liquids on the unit,
or to allow combustible or metallic material to enter the
cabinet. If used with foreign matter in the cabinet, the
unit is liable to fail, or present a risk of fire or electric
shock.
• If the unit malfunctions or if a foreign body falls into the
cabinet, disconnect the power immediately and consult
your Sony service facility or your Sony dealer.
• To store a half-used printing pack, replace it in its
original packing and reseal the package. If possible, keep
the sealed printing pack in a cool, dark location. To
subsequently use the printing pack, place it, in its sealed
package, in a warm room for several hours. Doing so
prevents condensation from forming when the printing
pack is removed from its package.
Installation
• Install the unit on a level surface. Do not install the unit
on a slant or on its side. Doing so could damage the unit.
• Do not jar or drop the unit.
• Do not install the unit in any location that is subject to:
– instability
– excessive dust
– extremely high or low temperatures
– vibration
– high humidity
– direct sunlight
• Do not block the ventilation holes on the unit. Doing so
could result in damage.
On transporting the printer
Do not transport the printer with the supplied accessories,
ribbon cartridge and paper roll attached. Doing so may
cause a malfunction. It is recommended that you store the
ribbon cartridge and paper roll in the package they came in
after you remove them.
On condensation
• If the printer is subjected to wide and sudden changes in
temperature, such as when it is moved from a cold room
to a warm room or when it is left in a room with a heater
that tends to produce quantities of moisture,
condensation may form inside the printer. In such cases
the printer will probably not work properly, and may
even develop a fault if you persist in using it. If moisture
condensation forms, turn off the power and leave the
printer standing for at least one hour.
• If the printing pack is subjected to wide and sudden
changes in temperature, condensation may form on the
ribbon cartridge or paper inside. This will cause the
printer to malfunction. Also if the printing pack is used
in this state, spots are likely to appear on the printout.
Appendix
Precautions
49
Page 50

Supported Memory Cards
LOCK LOCK
and File Formats
Supported memory cards
This unit supports the following types of memory cards.
•“Memory Stick”
•“Memory Stick PRO”
• “Memory Stick Duo”
• SmartMedia card
• CompactFlash card
•SD Card
• MultiMediaCard
• xD-Picture Card
material recorded with this unit is not protected by
MagicGate.
In addition, you can also use “Memory Stick Duo” or
“Memory Stick PRO” with your unit.
Write-protecting “Memory Stick” data
In order to protect important data from accidental erasure,
the “Memory Stick” has a write-protect switch. When the
switch is in the left-hand position, data can be written to or
deleted from the “Memory Stick”, and the “Memory
Stick” can be initialized. When the switch is in the righthand position, data in the “Memory Stick” can be read, but
cannot be written. When inserting a “Memory Stick” into
this unit in order to read data, slide the write-protect switch
to the protected state.
Supported file formats
The unit supports the following file formats. The
maximum data size that can be read by the unit is 6,400 ×
4,800 pixels.
•JPEG
Appendix
JFIF 4:4:4, 4:2:2, 4:2:0 (baseline JPEG)
Exif 2.2.1 compliant
DCF 2.0 compliant
•TIFF
Exif 2.2.1 compliant (RGB non-compressed)
•BMP
24-bit Windows format
(Some format versions may not be supported.)
Up to eight levels are supported for directories on a
memory card, and up to 9,999 files can be handled with a
single operation.
Notes on Using Memory Cards
Note
Sony bears no responsibility for damage to your memory
card or data while using this unit.
“Memory Stick” types
“Memory Stick” is a removable, compact data storage card
that can be used with digital still cameras and personal
computers. Still images stored in a “Memory Stick” can be
easily displayed, overwritten or deleted.
“Memory Stick” comes in two types: general purpose
“Memory Stick” and “Memory Stick” using the
MagicGate encryption technology to protect copyrighted
material, referred to as “MagicGate Memory Stick”. This
unit supports both types of “Memory Stick”. However,
because this unit does not support the MagicGate standard,
Contacts
Label area
Note
The write-protect switch position and shape varies
depending on your type of “Memory Stick”.
Write-protect switch
Not writeprotected
Writeprotected
Reinitializing (formatting) “Memory Stick”
Before using your “Memory Stick” for the first time, make
sure that you use your digital camera to format it.
Formatting the “Memory Stick” with a device other than
your digital camera may make data on the “Memory Stick”
unreadable for the system.
Notes on using “Memory Stick”
• To use a “Memory Stick” insert it directly into the
“Memory Stick” slot of the system. Do not insert the
“Memory Stick” into a CompactFlash type adapter, as
this may accidentally delete the data on the “Memory
Stick”.
• Do not remove the “Memory Stick” while reading or
writing data.
• Data may be corrupted in the following cases.
– When the “Memory Stick” is removed or the system is
turned off during read or write operation
– When the “Memory Stick” is used in locations subject
to static electricity or electrical noise
• Do not strike, bend, or drop the “Memory Stick”.
• Do not attempt to disassemble or modify the “Memory
Stick”.
50
Supported Memory Cards and File Formats
Page 51

• Do not get the “Memory Stick” wet.
• Avoid storing or using the “Memory Stick” under the
following conditions:
– In a hot location, such as inside a car or outside on a
very hot day.
– In direct sunlight.
– In a humid location or where corrosion occurs easily.
• Do not touch the “Memory Stick” contacts with
anything, including your finger and metallic objects.
• Do not affix anything other than the supplied label to the
“Memory Stick” labeling position.
• Affix the supplied label so that it does not stick out
beyond the labeling position.
• Carry and store the “Memory Stick” in its case.
Notes on using “Memory Stick Duo”
• Use a sharp object such as a ballpoint pen to move the
“Memory Stick Duo” write-protect switch.
• Some “Memory Stick Duo” are not equipped with a
write-protect switch. When using a “Memory Stick
Duo” without a write-protect switch, be careful not to
edit or erase data by mistake.
Write-protect sticker
Write-protect area
• When a sticker is applied in the write-protect area, the
SmartMedia card cannot be used to store photographs
taken with a digital camera.
• To make it possible to write data to the card again,
simply remove the write-protect sticker.
• Do not attempt to reuse a sticker once you have peeled it
off. Doing so could damage the unit.
CompactFlash card
The card can only be set in the slot in one direction. If the
card does not slide into the slot smoothly, do not try to
force it in. Instead, make sure that the card is oriented
correctly, with the v mark pointing towards the slot.
Notes on using “Memory Stick PRO”
This system does not support the access control security
function.
SmartMedia card
The parts of a SmartMedia card are shown below.
Contacts
Write-protect area
Index area
For details, either visit the SSFDC forum Web site or refer
to the user’s manual accompanying your card.
http://www.ssfdc.or.jp
Write-protecting SmartMedia card data
In order to protect important data from accidental erasure,
a SmartMedia card can be write-protected to prevent data
from being written.
To do so, apply a write-protect sticker at the location
shown in the figure (the write-protect area).
Direction of insertion
v mark
For details, refer to the user’s manual accompanying your
card.
SD Card
The parts of an SD Card are shown below.
Write-protect swith Contacts
For details, either visit the SD Card Association Web site
or refer to the user’s guide accompanying your card.
http://www.sdcard.org/
Appendix
Write-protecting SD Card data
In order to protect important data from accidental erasure,
an SD Card can be write-protected to prevent data from
being written.
Supported Memory Cards and File Formats
51
Page 52

To do so, slide the write-protect switch as shown in the
figure.
Write-protect switch
Not writeprotected
Writeprotected
When it is write-protected, the SD Card cannot be used to
store photographs taken with a digital camera.
MultiMediaCard
The card can only be set in the slot in one direction. If the
card does not slide into the slot smoothly, do not try to
force it in. Instead, make sure that the card is oriented
correctly.
Always orient the card as show below.
Appendix
Direction of insertion
Notch
For details, refer to the user’s guide accompanying your
card.
xD-Picture Card
The card can only be set in the slot in one direction. If the
card does not slide into the slot smoothly, do not try to
force it in. Instead, make sure that the card is oriented
correctly, with the v mark pointing towards the slot.
v mark
Direction of insertion
For details, refer to the user's manual accompanying your
card.
Notes on using memory cards
Note
The following apply to all memory cards except “Memory
Stick”.
For details about ““Memory Stick” types” on page 50.
• Before using any memory card, be sure to carefully read
its user manual.
• When you purchase a memory card, you must first
initialize it with a digital camera. If you initialize the
memory card with a personal computer or any device
other than a digital camera, this unit may not be able to
read the image data stored on the memory card.
• Do not attempt to use any memory card that is not
specified for use with this unit. Doing so could damage
this unit.
• Do not strike, bend, or drop the memory card.
• Do not attempt to disassemble or modify the memory
card.
• Do not get the memory card wet.
• Because the memory card is vulnerable to humidity, we
recommend that such memory card not be used under
humid conditions.
• Avoid storing or using memory card under the following
conditions:
– In a hot location, such as inside a car or outside on a
very hot day.
– In direct sunlight.
– In a humid location or where corrosion occurs easily.
– In a location where the memory card could be exposed
to electrostatic discharge or electronic noise.
• Do not touch the contacts on a SmartMedia card,
CompactFlash card, SD Card, or MultiMediaCard with
your hands or bare metal.
• Always keep the memory card in its case when carrying
or storing it.
• When using a SmartMedia card, SD Card, or
MultiMediaCard, insert the memory card directly into
the corresponding slot. Do not insert a SmartMedia card
or other memory cards into the CompactFlash type
adapter. Doing so could cause the image data stored in
the card to be deleted or damaged.
• Always make sure that the memory card is oriented
correctly before inserting it in the appropriate slot of the
unit. Inserting any memory card in the wrong direction
may damage the unit and/or memory card and cause
malfunctions.
• Do not remove the memory card or turn off this unit
while data is being read or written to the memory card.
Doing so could cause the data that is being recorded to
be deleted or damaged.
52
Supported Memory Cards and File Formats
Page 53

Cleaning
Before cleaning the unit, be sure to set it to standby with
the on/standby button and disconnect the power cord.
When the cabinet becomes dirty
If the cabinet is extremely dirty, soak a clean cloth in
water, or a solution of water and a neutral detergent, wring
out the cloth, and then wipe the surface of the cabinet.
Next, wipe clean with a clean, dry cloth.
To avoid damaging the surfaces of the unit, never use
thinner, benzene, alcohol, or any other type of organic
solvent to clean the unit.
When the display becomes dirty
When the display has become considerably dirty, wipe it
clean with a dry cloth or with a clean cloth soaked in water
and thoroughly wrung out. Do not use even a mild
detergent, as it can damage the surface of the display.
Never touch or strike the surface of the display with a hard
object.
When cleaning the inside of the printer
When cleaning the print head, use the supplied cleaning
cartridge. For details, refer to the operating instructions
supplied with the cleaning cartridge.
To clean the printer roller, use a soft cloth moistened with
cleaning alcohol to gently wipe the roller while turning it.
Appendix
When the filter for the cooling fan
becomes dirty
When the filter for the thermal head cooling fan has
become considerably dirty, remove it and rinse off the dirt
with water. Do not scrub the filter mesh with a brush or
other cleaning tool.
Cleaning
53
Page 54

Troubleshooting
Before sending the unit out for servicing, check the items
listed below. If you still cannot solve the problem, contact
your Sony Authorized Dealer.
Symptom Cause/Remedy
Cannot load paper roll. Are you trying to load 2UPC-C13,
C15 while adaptors are mounted
in the paper holder?
tRemove the adaptors and then
load the paper roll (page 11).
Paper roll was loaded,
but “no paper” message
appears.
Ribbon cartridge was
loaded, but “no ribbon
cartridge” message
appears.
Out of paper message
appears, but there is
still paper in the unit.
Appendix
There is a white margin
on the printed image.
Power does not switch
on.
The unit does not
switch to standby.
Display not on or
difficult to see.
Paper roll may not have been
loaded correctly.
tEnsure that paper roll is loaded
correctly (page 12).
Ribbon may not have been loaded
correctly.
tEnsure that ribbon is loaded
correctly (page 14).
This is not a defect. Some spare
paper will be left over.
tRemove the leftover paper and
load a new ribbon cartridge and
paper roll (page 12).
The print position may not be
correct.
tAdjust the print position (page
24).
The power cord may not be
connected.
tMake sure that the power cord
is connected (page 10).
The on/standby button may not
have been pressed correctly.
tMake sure that the on/standby
button has been fully
depressed (page 18).
The unit may still be doing
processing.
tWait a few moments for the unit
to stop processing.
An abnormal condition may have
caused the unit to stop
responding.
tDisconnect the power cord
from the power outlet. Then
reconnect the power cord, and
press the on/standby button.
Depending on the display angle,
the display may not be visible or
may be difficult to see.
tThe display angle can be
adjusted. Adjust the angle of
the display to improve the
display appearance (page 8).
Symptom Cause/Remedy
Image data cannot be
read.
A mounted memory card does not
contain any data.
tInsert a memory card that
contains image data.
Data has been recorded on a
memory card in a format that the
unit does not recognize.
tBe sure to store image data in
a format that the unit can
recognize (page 50).
The memory card may not be
properly inserted.
tMake sure that the memory
card is fully inserted (page 30).
The memory card may not be
inserted in the correct direction.
tSet the memory card in the
direction shown on the
operation screen.
54
Troubleshooting
Page 55

Ribbon Cartridge and
Paper
Each printing pack contains two sets of the ribbon
cartridge and paper roll combination.
Be sure to use the ribbon cartridge and the paper roll in the
carton as a set.
2UPC-C13 series Self-Laminating Color Printing
Pack
Contains color ribbon cartridge and paper.
Ribbon cartridge for printing: 2 rolls
3.5 × 5 inches print paper: 2 rolls
2UPC-C14 series Self-Laminating Color Printing
Pack
Contains color ribbon cartridge and paper.
Ribbon cartridge for printing: 2 rolls
4 × 6 inches print paper: 2 rolls
2UPC-C15 series Self-Laminating Color Printing
Pack
Contains color ribbon cartridge and paper.
Ribbon cartridge for printing: 2 rolls
5 × 7 inches print paper: 2 rolls
Printing capacity
Each printing pack contains two sets of the ribbon
cartridge and paper combination. One set of the ribbon
cartridge and paper allows you to print the following
number of sheets.
Print pack 2UPC-C13 2UPC-C14 2UPC-C15
Number of
sheets
Print size 3.5 × 5 inches
Notes
• However the number of sheets that can be printed may
not be guaranteed if you replace the ribbon cartridge and
paper before the ribbon cartridge and paper run out.
• Always use a designated print pack.
300 (sheets) 200 (sheets) 172 (sheets)
(89 × 127
mm)
4 × 6 inches
(102 × 152
mm)
5 × 7 inches
(127 × 178
mm)
Specifications
Power requirements
100 to 240 V AC, 50/60 Hz
Input current 3.0 to 1.3 A max.
Operating temperature range
5 to 35°C
Operating humidity range
20 to 80%
External dimensions
Approx. 275 × 300 × 380 mm (WHD)
7
/8 × 11 7/8 × 14 15/16 inches)
(10
(excluding the maximum projecting
parts)
Mass Approx. 11 kg (24 lb 4 oz) (printer only)
Printing system Dye sublimation thermal transfer
Thermal head 11.8 dot/mm (300 dpi)
Gradations 256 levels (8 bits) each for yellow,
magenta and cyan
Picture size 2UPC-C13: 89 × 127 mm (3.5 × 5 inches)
2UPC-C14: 102 × 152 mm (4 × 6 inches)
2UPC-C15: 127 × 178 mm (5 × 7 inches)
Printable pixels 2UPC-C13: 1,100 × 1,536 dots
2UPC-C14: 1,248 × 1,848 dots
2UPC-C15: 1,536 × 2,148 dots
(The top and bottom and right and left
portions will not be printed by about 2
mm)
Printing time 2UPC-C13: Approx. 13 sec.
2UPC-C14: Approx. 16 sec.
2UPC-C15: Approx. 17 sec.
Input connector AC IN (for power)
Control connector
RS-232C (External control interface,
D-SUB 9-pin connector) (1)
USB function port
Hi-Speed USB (USB2.0)
USB host port for the USB flash memory
Memory card slots
“Memory Stick” interface slot (1)
SD Card interface slot (1)
CompactFlash card interface slot (2)
(One of the two slots is used as expansion
slot located inside the side door.)
SmartMedia card interface slot (1)
xD-Picture Card interface slot (1)
Appendix
Ribbon Cartridge and Paper / Specifications
55
Page 56

Compatible image file formats
JPEG: JFIF 4:4:4, 4:2:2, 4:2:0 (baseline
JPEG)
Exif 2.2.1 compatible
DCF 2.0 compatible
TIFF: Exif 2.2.1 compatible (TIFF-RGB
non compressed)
BMP: 24 bit Windows format
(Some versions of the file formats may
not be compatible)
Maximum number of pixels to be handled
JPEG:6,400(H) × 4,800(V)
TIFF:6,400(H) × 4,800(V)
BMP:6,400(H) × 4,800(V)
Maximum number of files to be handled
9,999 files for a memory card
LCD display 8 inch touch sensitive TFT color display
640 × 480 pixels, RGB
Accessories supplied
Paper Tray (1)
Paper Holder (1)
Paper Core (1)
Adaptor (left, 1)
Adaptor (right, 1)
Appendix
Power Cord (1)
Cleaning Cartridge (1)
Ferrite Core (1)
CD-ROM (1)
Software License Agreement (1)
Operating Instructions (1)
Warranty Card (1)
Service and Customer Support Info. (1)
Optional accessories
Self-Laminating Color Printing Pack
2UPC-C13
2UPC-C14
2UPC-C15
Design and specifications are subject to change without
notice.
56
Specifications
Page 57

57
Page 58

Français
AVERTISSEMENT
Afin de réduire les risques d’incendie ou
d’électrocution, ne pas exposer cet appareil à la
pluie ou à l’humidité.
Pour prévenir tout risque d’électrocution, ne pas
ouvrir le boîtier. Confier l’entretien de cet appareil
exclusivement à un personnel qualifié.
CET APPAREIL DOIT ETRE RELIE A LA TERRE.
Cet appareil n’est pas équipé d’un interrupteur
d’alimentation.
Lors de son installation, incorporez un dispositif de
coupure facile d’accès dans le câblage fixe ou branchez le
cordon d’alimentation sur un prise murale située près de
l’appareil et facilement accessible.
En cas d’anomalie pendant le fonctionnement de
l’appareil, actionnez le dispositif de coupure pour couper
l’alimentation électrique ou débranchez le cordon
d’alimentation.
2
Page 59

Table des matières
Chapitre 1 Résumé
Utilité de cet appareil.......................................................................5
Documentation fournie ...................................................................6
Chapitre 2
Préparations
Accessoires fournis ........................................................................7
Commandes et fonctions................................................................8
Installation......................................................................................10
Marche et arrêt ...............................................................................18
Chapitre 3 Configuration
Avant ..................................................................................................... 8
Arrière ................................................................................................... 9
Raccorder le cordon d’alimentation .................................................... 10
Réglage de l’angle de l’écran .............................................................. 10
Chargement du rouleau de papier et de la cartouche de ruban............ 10
Attacher le bac à papier ....................................................................... 16
Préparation d’une carte d’extension CompactFlash............................ 17
Marche................................................................................................. 18
Arrêt..................................................................................................... 19
FR
Procédure de configuration..........................................................20
Eléments de réglage......................................................................21
Onglet Système.................................................................................... 21
Onglet Ecrans ...................................................................................... 22
Onglet Modèle..................................................................................... 23
Ecran de saisie de texte ....................................................................... 23
Onglet Impression ............................................................................... 24
Onglet Couleur Impression ................................................................. 24
Onglet Tarifs........................................................................................ 25
Onglet Administration......................................................................... 26
Table des matières
3
Page 60

Chapitre 4 Fonctionnement
Résumé du fonctionnement .........................................................28
Types de tirages................................................................................... 28
Ordre des opérations............................................................................ 29
Installation de cartes mémoire .....................................................30
Utilisation d’un « Memory Stick »...................................................... 30
Utilisation d’une carte CompactFlash ................................................. 30
Utilisation d’une carte SmartMedia .................................................... 31
Utilisation d’une carte SD/MultiMediaCard ....................................... 31
Utilisation d’une carte xD-Picture....................................................... 32
Sélection d’images à imprimer.....................................................32
Vérification du contenu de la commande et saisie du mot de passe ... 35
Utilisation du tirage index............................................................. 36
Utilisation d’image divisée............................................................37
Utilisation du tirage cadre.............................................................39
Imprimer toutes les images d’une carte mémoire ......................42
Modification d’images ...................................................................43
Déterminer la disposition (Rogner et pivoter)..................................... 44
Réglage de la qualité de l’image ......................................................... 45
Impression en sépia ou monochrome .................................................. 45
Réduction des yeux rouges.................................................................. 46
Ajouter la date................................................................................47
Impression à partir de réglages DPOF ........................................47
Impression à partir d’un ordinateur .............................................48
Installation du pilote d’imprimante ..................................................... 48
Raccordement à un ordinateur............................................................. 48
Annexe
4
Table des matières
Précautions ....................................................................................49
Cartes mémoire et formats de fichiers pris en charge............... 50
Remarques sur l’utilisation des cartes mémoire.................................. 50
Nettoyage .......................................................................................53
Résolution des problèmes techniques........................................ 54
Cartouche de ruban et papier.......................................................55
Caractéristiques techniques.........................................................56
Page 61

Résumé
Utilité de cet appareil
Cet appareil lit les données d’images de cartes mémoire
utilisées avec des appareils tels que des appareils
numériques et imprime des photos d’une qualité
magnifique. Il imprime aussi les données envoyées par un
ordinateur. L’appareil présente les caractéristiques
suivantes.
Services d’imprimerie versatiles
Outre les photos ordinaires, l’appareil peut imprimer des
images divisées, des tirages cadre et des tirages index. Il
permet aussi à l’utilisateur de modifier des images avant
l’impression grâce aux fonctions de coupe et de réglage de
couleur.
Il est possible d’imprimer des numéros d’impression en
filigrane, ce qui facilite le triage.
Choix de modes d’opération
Pour correspondre à l’environnement dans lequel
l’appareil est utilisé, il est possible de choisir entre le mode
complet, le mode d’impression rapide et le mode
événement.
Chapitre
Opération facile à l’aide d’un panneau
tactile
L’utilisation d’un écran tactile de 8 pouces facilite
l’opération à l’aide d’un simple contact.
Et l’intégration d’un système de rouleau de papier et de
cartouche de ruban facilite grandement le remplacement
du papier et du ruban.
Personnalisation avec des données
originales
En introduisant une carte mémoire contenant des images
promotionnelles et des données de cadre dans
l’emplacement à cet effet, il est possible d’afficher des
économiseurs d’écran et de combiner des photos et des
cadres pour l’impression.
images originales pour l’économiseur d’écran et les
données de cadre.
Conception compacte et tout-en-un :
L’écran et l’imprimante sont contenus dans un châssis
unique qui n’est pas encombrant et se place facilement sur
un comptoir ou dans un endroit similaire.
En outre, il est possible de régler l’angle de l’écran sur 8
positions disponibles pour correspondre aux conditions de
travail.
*)
Il est possible d’utiliser des
Chapitre 1 Résumé
Prise en charge d’une gamme étendue de
cartes mémoire
Prise en charge des formats principaux de cartes mémoire
utilisées dans les appareils numériques : « Memory Stick »,
Carte xD-Picture, Carte SD, Carte MultiMediaCard, Carte
CompactFlash, Microdrive et SmartMedia.
Impression à grande vitesse et de haute
qualité
Grâce à un nouveau moteur d’imprimerie doté d’une
technologie de transfert thermique par sublimation, il est
possible d’imprimer à grande vitesse des images d’une
beauté durable.
*) Il est nécessaire de se procurer une carte CompactFlash
ou Microdrive, disponibles dans le commerce.
Utilité de cet appareil
5
Page 62

Documentation fournie
Cet appareil est fourni avec la documentation suivante.
Chapitre 1 Résumé
Mode d’emploi (ce document)
Le mode d’emploi est destiné aux utilisateurs de l’appareil
et contient des informations détaillées sur les sujets
suivants :
• Installation
• Configuration
• Imprimer des images stockées sur cartes mémoire
• Résolution des problèmes techniques
Guide d’opérations de base (PDF)
Le guide d’opérations de base contient des instructions et
informations simples sur les sujets suivants. Il vous est
recommandé d’imprimer des parties de ce fichier si
nécessaire et de les placer près de l’appareil pour vous
assister à l’utilisation.
• Comment imprimer en mode complet (destiné aux
clients)
• Comment imprimer en mode d’impression rapide
(destiné aux clients)
• Entretien (destiné au personnel de magasin)
• Microdrive est une marque commerciale déposée de
Hitachi Global Storage Technologies.
• miniSD est une marque commerciale de SD Card
Association.
• Adobe et Photoshop sont soit des marques commerciales
déposées ou des marques commerciales de Adobe
Systems Incorporated aux Etats-Unis et/ou dans d’autres
pays.
• xD-Picture Card est une marque commerciale de Fuji
Photo Film Co., Ltd.
• Les autres noms de produits sont des marques
commerciales déposées ou des marques commerciales
de leurs fabricants respectifs.
Guide d’installation du pilote de
l’imprimante
Le guide d’installation du pilote de l’imprimante explique
comment installer et utiliser le pilote de l’imprimante sur
un ordinateur.
Mode d’emploi du plug-in Adobe
Photoshop
Le mode d’emploi du plug-in Adobe Photoshop explique
comment installer le plug-in Photoshop et comment
l’utiliser pour créer des modèles d’impressions avec
cadres.
Marques commerciales
Les mots suivants sont des marques commerciales de leurs
propriétaires respectifs.
• « Memory Stick », « MagicGate Memory Stick »,
« Memory Stick Duo », « Memory Stick PRO » et
« Memory Stick PRO Duo » sont des marques
commerciales de Sony Corporation.
• CompactFlash est une marque commerciale de SanDisk
Corporation.
• SmartMedia est une marque commerciale déposée de
Toshiba Corporation.
• MultiMediaCard est une marque commerciale de
Infineon Technologies AG.
6
Documentation fournie
Page 63

Préparations
Accessoires fournis
Vérifiez que vous avez bien reçu les accessoires suivants :
Chapitre
Chapitre 2
Préparations
Bac à papier (1)
Porte-papier
Cartouche de nettoyage (1)
Tore de ferrite (1)
CD-ROM (1)
Information de service et de support technique (1)
Mode d’emploi (1)
Licence du logiciel (1)
Carte de garantie (1)
∗1)
∗2)
Cordon d’alimentation (1)
Ces accessoires sont rangés dans le porte-papier.
Mandrin (1) Adaptateur (gauche, 1) Adaptateur (droit, 1)
∗1) Le porte-papier est rangé dans l’imprimante. Veillez à retirer le porte-papier
de l’intérieur de l’imprimante avant de mettre l’appareil sous tension.
∗2) Pour les informations sur l’utilisation, consultez le mode d’emploi fourni avec
la cartouche de nettoyage.
Remarques
• Lors du déballage de l’appareil, faites attention à votre
dos.
• Les matériaux d’emballage vous seront nécessaires lors
du transport de l’appareil, donc il vous est recommandé
de les garder.
• Avant de transporter l’appareil, retirez la cartouche de
ruban et le rouleau de papier de l’appareil.
Accessoires fournis
7
Page 64

Commandes et fonctions
Avant
Chapitre 2
Préparations
1
2
34 5
67
0
a Ecran
Affiche l’écran d’opération. Comme l’écran est tactile,
l’utilisateur touche simplement le champ correspondant à
l’opération souhaitée. Il est possible d’ajuster l’angle de
l’écran pour mieux voir.
b Indicateur d’accès
S’allume quand une carte mémoire est introduite, et
clignote lors de l’accès à une carte mémoire.
c Emplacement pour « Memory Stick » (page 30)
Pour placer un « Memory Stick » contenant des données
d’images.
d Emplacement pour carte xD-Picture (page 30)
Pour placer une carte xD-Picture contenant des données
d’images.
e Emplacement pour carte SD /MultiMediaCard
(page 31)
Pour placer une carte SD ou MultiMediaCard contenant
des données d’images.
qsqa98
Remarque
Pour éviter toute perte de données d’images ou tout
endommagement de l’appareil principal, n’essayez jamais
d’introduire un « Memory Stick », une carte SmartMedia,
une carte SD ou une carte MultiMediaCard dans un
adaptateur type CompactFlash inséré dans l’emplacement
CompactFlash.
h Fente de sortie
La photo imprimée sort par cette fente.
i Bac à papier (page 16)
Les photos imprimées sont collectées dans ce bac.
j Dispositif de blocage du papier (page 17)
Lors de l’utilisation du pack d’impression 2UPC-C13, ce
dispositif doit être levé.
k Portière avant (page 12)
Ouvrez cette portière pour remplacer le rouleau de papier.
f Emplacement pour carte SmartMedia (page 31)
Pour placer une carte SmartMedia contenant des données
d’images.
g Emplacement pour carte CompactFlash (page 30)
Pour placer une carte CompactFlash contenant des
données d’images.
8
Commandes et fonctions
Page 65

Portière avant ouverte
Arrière
4
5
AB
APorte-papier (page 12)
Le rouleau de papier est introduit ici.
Les zones blanches entre les pages imprimées sont
coupées et recueillies dans la partie supérieure du
porte-papier.
BBouton de relâche du porte-papier (page 12)
Appuyez sur ce bouton pour retirer le porte-papier.
l Portière latérale (page 14)
Ouvrez cette portière pour remplacer la cartouche de ruban
et pour introduire la carte d’extension CompactFlash.
Portière latérale ouverte
B
A
1
6
2
7
3
a Port USB (hôte)
Permet le raccord d’un dispositif USB.
Vous pouvez raccorder à ce port un lecteur de carte ou un
dispositif de mémoire flash USB disponibles dans le
commerce et les utiliser pour la lecture de données.
b Port USB (dispositif) (page 48)
Utilisez un câble USB disponible dans le commerce pour
raccorder l’appareil à un ordinateur.
c Connecteur ~ AC IN (Source d’alimentation) (page
10)
Raccordez ici le cordon d’alimentation fourni.
d Support d’écran
Utilisez ce support pour ajuster l’angle de l’écran.
*2)
*1)*2)*3)
Chapitre 2
Préparations
AOuverture d’accès à la cartouche de ruban (page
14)
Placez ici la cartouche de ruban.
BEmplacement pour carte d’extension
CompactFlash (page 17)
Lors du tirage cadre, de l’affichage d’images
promotionnelles, de la saisie de texte ou de la
désynchronisation de l’impression, introduisez ici la
carte d’extension CompactFlash.
e Bouton Marche/Veille
Appuyez sur ce bouton pour mettre l’appareil sous tension.
Appuyez à nouveau pour le mettre en veille.
f Interface RS-232C
Pour une expansion future. Actuellement pas en
utilisation.
g Fente d’aération
Doté d’un filtre intégré pour le ventilateur de la tête
thermique.
*1) Nous ne garantissons pas le fonctionnement correct de
tous les lecteurs de cartes et de tous les dispositifs
mémoire flash USB.
*2) Le fonctionnement n’est pas garanti si le raccord est
fait via un multiport USB.
*3) PictBridge n’est pas pris en charge.
Commandes et fonctions
9
Page 66

Installation
Raccorder le cordon d’alimentation
Chargement du rouleau de papier et
de la cartouche de ruban
Manipulation du rouleau de papier et de la
cartouche de ruban
Raccordez le cordon d’alimentation fourni au connecteur ~
AC IN à l’arrière de l’appareil, puis branchez-le sur une
prise secteur.
Chapitre 2
Préparations
Cordon d’alimentation (fourni)
Prise secteur
Réglage de l’angle de l’écran
Remarques
• Le pack d’impression contient deux cartouches de ruban
et deux rouleaux de papier. Veillez à utiliser la cartouche
de ruban et le rouleau de papier du même set. (Voir
« Cartouche de ruban et papier » à la page 55.)
• La quantité possible de pages imprimables dépend du
type de pack d’impression. Le tableau suivant montre le
nombre d’images pour un set de cartouche de ruban et de
rouleau de papier.
Pack
d’impression
Nombre de
pages
Format
d’impression
2UPC-C13 2UPC-C14 2UPC-C15
300 (pages) 200 (pages) 172 (pages)
89 × 127 mm102 × 152 mm127 × 178
mm
• Ne remplacez pas la cartouche de ruban et le rouleau de
papier avant leur épuisement. Sinon, le nombre de pages
ci-dessus ne sera pas atteint.
• Placez le rouleau de papier verticalement. Si vous le
placez horizontalement, le rouleau de papier peut rouler
et tomber. Ceci peut provoquer une blessure.
Vous pouvez régler l’angle de l’écran pour le rendre plus
facile à regarder. Vous disposez pour cela de huit positions
différentes.
Lors du rangement de l’appareil, tirez l’écran vers l’avant
jusqu’à une position verticale puis repoussez-le pour
atteindre une position horizontale.
• Tenez le rouleau de papier avec vos deux mains, de
manière à ne pas le laisser tomber car il est lourd. Le
laisser tomber pourrait provoquer une blessure.
Tenez le rouleau de papier avec vos deux mains.
10
Installation
Page 67

• Une carte IC est contenue dans la cartouche de ruban. Ne
touchez en aucun cas la borne de la carte IC, même avec
vos doigts ou des objets métalliques. Ne frappez pas, ne
pliez pas et le laissez pas tomber la carte IC.
3
Appuyez sur le verrou en haut du porte-papier et
ouvrez-le.
Carte IC
Attacher les adaptateurs au porte-papier
La largeur des rouleaux à papier dépend des packs
d’impression. Si vous utilisez le pack d’impression 2UPCC14, attachez un adaptateur au porte-papier pour
compenser la différence de largeur.
1
Ouvrez la portière avant.
4
Réglez la largeur du porte-papier.
Si vous utilisez le pack d’impression 2UPCC14
Attachez des adaptateurs des deux côtés du portepapier.
Chapitre 2
Préparations
2
Appuyez sur le bouton de relâche du porte-papier et
retirez-le.
Mémo
Vérifiez que la couleur de l’étiquette du haut des
adaptateurs est la même que celle de l’étiquette du
porte-papier.
Remarque
Placez les adaptateurs fermement et complètement
dans le porte-papier.
Installation
11
Page 68

Si vous utilisez le pack d’impression 2UPCC13 ou 2UPC-C15
Retirez les adaptateurs du porte-papier.
Chapitre 2
Préparations
Remarque
Rangez les adaptateurs dans un endroit sans risque,
pour ne pas les perdre.
Chargement du rouleau de papier et de la
cartouche de ruban
Lors de la première utilisation de l’imprimante, vous devez
d’abord charger le rouleau de papier et la cartouche de
ruban. Si vous utilisez le 2UPC-C14, vous devez installer
les adaptateurs dans le porte-papier, comme décrit dans la
section « Attacher les adaptateurs au porte-papier » à la
page 11.
Pour savoir comment retirer un rouleau de papier et une
cartouche de ruban épuisés, voir la section « Retrait du
rouleau de papier et de la cartouche de ruban » à la page
15.
Remarques
• Si les bords du rouleau de papier sont irréguliers,
égalisez-les avant de l’installer. Sinon un mauvais
fonctionnement pourrait arriver.
• Si le papier est peu serré autour du mandrin, vérifiez
à bien le serrer avant d’installer le rouleau de papier.
Sinon un mauvais fonctionnement pourrait arriver.
• Ne saisissez pas le papier trop fermement et ne le
frappez pas contre un objet dur, car il pourrait se
déchirer ou se froisser, ce qui réduirait la qualité
d’impression.
2
Ouvrez la portière avant.
Remarques
• Utilisez toujours un pack d’impression indiqué.
• Remplacez toujours le rouleau de papier et la cartouche
de ruban ensemble.
Chargement du rouleau de papier
1
Placez le mandrin dans le rouleau de papier.
3
Appuyez sur le bouton de relâche du porte-papier et
retirez-le.
12
Installation
Page 69

4
Appuyez sur le verrou en haut du porte-papier et
ouvrez-le.
7
Fermez le porte-papier.
Chapitre 2
5
Placez le rouleau de papier dans le porte-papier.
La flèche de l’étiquette au centre du rouleau de papier
doit être dirigée vers l’intérieur.
Remarque
Lors de l’installation du rouleau de papier, vérifiez à
bien ouvrir le porte-papier. Sinon un mauvais
fonctionnement pourrait arriver.
6
Retirez l’étiquette au centre du rouleau de papier.
Remarque
En fermant le porte-papier, vérifiez bien que le bout
d’engagement du rouleau de papier ne dépasse pas
l’ouverture de l’alimentation de papier.
8
Replacez le porte-papier dans l’appareil.
Introduisez le porte-papier jusqu’au déclic.
Préparations
Remarques
• Vérifiez à bien retirer toutes les étiquettes du rouleau
de papier. Si des étiquettes restent dans
l’imprimante, des problèmes de fonctionnement
peuvent arriver.
• Après l’introduction du rouleau de papier, ne
touchez pas la surface d’impression (la surface
intérieure du papier enroulé). Les empreintes
digitales, la transpiration etc. peuvent réduire la
qualité de l’impression.
• Placez le rouleau de papier fermement et
complètement dans le porte-papier.
Installation
13
Page 70

9
Fermez la portière avant.
Chapitre 2
Préparations
Chargement de la cartouche de ruban
1
Ouvrez la portière latérale.
Remarques
• Si vous avez des difficultés en introduisant la
cartouche de ruban, retirez-la et essayez à nouveau
de l’introduire. Diminuez le jeu du ruban en tournant
la bobine de la cartouche dans le sens de la flèche,
uniquement s’il vous empêche d’introduire la
cartouche de ruban.
• Ne rembobinez pas la cartouche de ruban pour une
réutilisation. L’impression ne serait pas bonne, et
cela pourrait provoquer un mauvais fonctionnement.
• Ne tentez pas de remplacer la cartouche de ruban en
cours d’impression.
• Immédiatement après l’impression, la tête
thermique à l’intérieur de l’appareil sera chaude.
Pour éviter toute brûlure, n’introduisez pas votre
main dans l’ouverture d’accès à la cartouche de
ruban lors du chargement d’une cartouche.
2
Introduisez complètement la cartouche de ruban.
3
Fermez la portière latérale.
Remarques sur le rangement
• Evitez le rangement dans les endroits sujets à :
– de hautes températures
– un haut degré d’humidité ou de la poussière
– la lumière directe du soleil
• Après l’ouverture de l’emballage, utilisez la cartouche
de ruban et le papier dès que possible.
• En cas de rangement après utilisation partielle, replacez
le ruban et le papier dans leurs emballages.
14
Installation
Page 71

Remarques
3
Retirez les restes de papier du porte-papier.
• Le rouleau de papier contient du papier supplémentaire.
Lorsque la cartouche de ruban est terminée, retirez ce qui
reste du papier et installez un nouveau set de cartouche
de ruban et de rouleau de papier.
• Vérifiez que le rouleau de papier et la cartouche de ruban
correspondent. Si vous utilisez une combinaison qui ne
correspond pas, les résultats d’impression ne seront pas
normaux et vous provoquerez un bourrage du papier ou
un mauvais fonctionnement.
• Ne touchez pas la surface d’impression du rouleau de
papier ou l’encre sur la cartouche de ruban. Les
empreintes digitales et autres polluants peuvent réduire
la qualité de l’impression.
Retrait du rouleau de papier et de la
cartouche de ruban
Retrait du rouleau de papier
1
Ouvrez la portière avant.
4
Appuyez sur le verrou en haut du porte-papier et
ouvrez-le.
5
Retirez le rouleau de papier.
Chapitre 2
Préparations
2
Appuyez sur le bouton de relâche du porte-papier et
retirez-le.
6
Retirez le mandrin du rouleau de papier.
Remarque
Vous devrez réutiliser le mandrin. Veillez à ne pas le
perdre.
Installation
15
Page 72

Retrait de la cartouche de ruban
1
Ouvrez la portière latérale.
Chapitre 2
Préparations
3
Fermez la portière latérale.
2
Tirez sur le verrou de la cartouche de ruban pour
l’ouvrir, puis saisissez la cartouche et retirez-la.
Mémo
Si le ruban se déchire, vous pouvez le recoller avec du
papier collant et utiliser le reste du ruban.
Remarque
Immédiatement après l’impression, la tête thermique à
l’intérieur de l’appareil sera chaude. Pour éviter toute
brûlure, n’introduisez pas votre main dans l’ouverture
d’accès à la cartouche de ruban lors du retrait d’une
cartouche.
Attacher le bac à papier
Attachez le bac à papier fourni.
16
Installation
Page 73

Si vous utilisez le pack d’impression 2UPC-C14
ou 2UPC-C15
Préparation d’une carte d’extension
CompactFlash
Une carte d’extension CompactFlash est nécessaire pour
les fonctions suivantes :
• Le tirage cadre
• L’affichage d’images promotionnelles
• La saisie de texte
• L’export de journaux système et d’impression
Pour la création d’une carte d’extension CompactFlash,
utilisez une carte CompactFlash disponible dans le
commerce.
Il peut s’agir d’une carte CompactFlash de type I, II ou
Microdrive.
Nous vous recommandons d’utiliser une carte
CompactFlash avec un espace libre d’au moins 512 Mo.
Chapitre 2
Préparations
Vous pouvez laisser environ 100 pages imprimées dans ce
bac. Cependant, le nombre de pages imprimées qui
peuvent rester dans le bac dépend de l’environnement où
l’imprimante est utilisée ou de l’image imprimée. Retirez
dès que possible les pages imprimées accumulées dans le
bac.
Si vous utilisez le pack d’impression 2UPC-C13
Levez le dispositif de blocage du papier.
Vous pouvez laisser environ 100 pages imprimées dans ce
bac. Cependant, le nombre de pages imprimées qui
peuvent rester dans le bac dépend de l’environnement où
l’imprimante est utilisée ou de l’image imprimée. Retirez
dès que possible les pages imprimées accumulées dans le
bac.
Création d’une carte d’extension CompactFlash
Le CD-ROM fourni contient des modèles pour les tirages
cadre et des échantillons d’images promotionnelles. Vous
pouvez créer une carte d’extension CompactFlash en
copiant ces données sur une carte CompactFlash avec
votre ordinateur. Si votre ordinateur ne peut utiliser les
cartes CompactFlash, vous pouvez copier temporairement
les données sur un autre type de carte mémoire, puis les
copier sur une carte CompactFlash avec l’appareil.
1
Introduisez la carte CompactFlash dans l’ordinateur.
2
Copiez les images promotionnelles.
Créez le dossier « \Sony\UPCR\ » dans le dossier
racine de la carte CompactFlash et copiez-y le dossier
entier « \Sony\UPCR\Promotion » du CD-ROM
fourni.
3
Copiez les modèles de tirage cadre.
Les modèles sont stockés dans le dossier
« \Sony\UPCR\Template » du CD-ROM fourni. Le
dossier est divisé en sous-dossiers pour chaque format
d’impression (3×5, 4×6 et 5×7). Créez le dossier
« \Sony\UPCR\Template » dans le dossier racine de la
carte CompactFlash et copiez-y le dossier entier de
chaque format d’impression.
Vous avez besoin d’une carte CompactFlash avec un
espace libre d’au moins 512 Mo pour copier toutes les
données stockées sur le CD-ROM.
Remarque
Ne touchez pas les pages imprimées avant leur sortie
complète de l’imprimante. Si une page est bloquée dans la
fente de sortie, retirez-la immédiatement de la fente.
Pour retirer le bac à papier
Saisissez-le par le bas, soulevez-le en le maintenant à
l’horizontale, et retirez-le.
Si vous avez copié les données du CD-ROM sur une carte
mémoire autre qu’une carte CompactFlash, vous devrez
utiliser l’appareil pour copier les données de cette carte sur
une carte CompactFlash.
Pour les détails sur la copie de données, voir « Onglet
Modèle » à la page 23.
Installation
17
Page 74

Introduction d’une carte d’extension
CompactFlash
1
Ouvrez la portière latérale.
Chapitre 2
Préparations
2
Introduisez la carte d’extension CompactFlash que
vous avez créée dans l’emplacement à cet effet.
Marche et arrêt
Marche
1
Vérifiez qu’aucune carte mémoire n’est placée dans un
des emplacements situés à l’avant de l’appareil.
Appuyez ensuite sur le bouton Marche/Veille
3
Fermez la portière latérale.
L’appareil se met en marche et le message suivant
s’affiche.
Pour les détails sur les étapes suivantes, voir la section
« Fonctionnement » à la page 28.
18
Marche et arrêt
Page 75

Arrêt
1
Terminez toutes les opérations en cours, puis accédez
à l’écran suivant.
2
Vérifiez qu’aucune carte mémoire n’est placée dans un
des emplacements situés à l’avant de l’appareil. Puis
appuyez sur le bouton Marche/Veille pour mettre
l’appareil hors tension.
Chapitre 2
Préparations
Marche et arrêt
19
Page 76

Configuration
Chapitre 3 Configuration
Procédure de
configuration
Avant d’utiliser cet appareil, vous devez procéder à
certains réglages. Ceux-ci comprennent la sélection de la
langue et des monnaies, la sélection du mode de service et
le réglage des mots de passe. Ces réglages se font à partir
de l’écran Administration. Vous pouvez aussi utiliser plus
tard l’écran Administration pour modifier les réglages et
ajuster l’appareil.
Pour accéder à l’écran Administration, procédez de la
manière suivante.
Chapitre
L’écran de saisie du mot de passe s’affiche.
Remarques
• Avant d’effectuer des réglages sur l’écran
Administration, vous devez saisir le mot de passe
administrateur. Le réglage par défaut en sortie d’usine
pour le mot de passe administrateur est « 9999 ».
• Si une carte mémoire est placée dans un des
emplacements à l’avant de l’appareil, l’écran
Administration ne s’affiche pas. Retirez d’abord toute
carte mémoire, puis répétez la procédure.
1
Lors de l’affichage du guide de démarrage, touchez la
partie supérieure gauche de l’écran deux fois
successivement.
2
Saisissez le mot de passe à l’aide du clavier
numérique.
3
Touchez le bouton [OK].
L’écran Administration s’affiche.
En touchant un des onglets en haut de cet écran, vous
pouvez sélectionner la catégorie qui convient aux
réglages à effectuer. Pour les détails sur chaque
catégorie, voir la section « Eléments de réglage » à la
page 21.
20
Procédure de configuration
Page 77

Onglet (Système)
Vous permet de sélectionner la langue du système, le
réglage de Marche/Arrêt du bip sonore et la fonction
de connexion de l’ordinateur.
Cet onglet vous permet aussi d’effectuer le réglage du
panneau tactile.
Onglet (Ecrans)
Vous permet de sélectionner le mode d’opération et la
fonction d’images promotionnelles.
Onglet (Modèle)
Vous permet de charger et d’effacer des modèles ou de
saisir du texte à ajouter aux images.
Onglet (Impression)
Vous permet de sélectionner le format de
numérotation de commande et le format de date.
Cet onglet vous permet aussi d’effectuer le réglage de
position d’impression.
Onglet (Couleur Impression)
Vous permet de régler la qualité d’impression.
Onglet (Tarifs)
Vous permet de régler les monnaies à utiliser et le prix
des impressions.
Onglet (Administration)
Vous permet de limiter le nombre d’impressions par
commande et de faire des réglages de mot de passe.
Cet onglet vous permet aussi d’accéder aux journaux
d’impression et de système.
4
Quand ce réglage est terminé, touchez le bouton .
Eléments de réglage
Onglet Système
Chapitre 3 Configuration
Bip sonore
Pour choisir si un bip sonore est entendu lors d’une
opération ou quand une erreur est survenue.
Connexion PC
Pour choisir de contrôler ou non l’appareil à partir d’un
ordinateur. Quand il est réglé sur [NON], l’appareil ne peut
être contrôlé à partir d’un ordinateur, même s’il est
raccordé par câble USB.
Langue
Pour sélectionner la langue à utiliser pour les écrans
d’opération et les messages. Vous pouvez sélectionner
jusqu’à quatre langues. Si plusieurs langues sont
sélectionnées, l’utilisateur peut sélectionner la langue lors
de la commande.
L’écran Administration utilise la langue sélectionnée
comme [1].
1
Touchez un des boutons [1] - [4].
Une liste de langues s’affiche.
2
Touchez la langue souhaitée et touchez le bouton
[OK].
Pour annuler un réglage, touchez [(Non)].
Remarque
Si vous n’avez sélectionné qu’une langue, l’écran de
sélection de langue ne s’affiche pas lors de la commande.
Eléments de réglage
21
Page 78

Réglage du panneau tactile
Ceci vous permet de calibrer le panneau tactile.
Touchez le bouton , puis touchez la boîte qui
s’affiche à l’écran. Lorsque vous touchez la boîte, une
nouvelle boîte s’affiche dans un autre endroit. Touchez
chacune des boîtes dans l’ordre. Quand aucune boîte
n’apparaît, le réglage du panneau tactile est terminé.
• Mode événement
Ce mode est destiné à fournir l’accès gratuit aux
fonctions d’impression, par exemple lors d’une fête,
d’un mariage ou similaire. Ce mode convient aussi à
l’utilisation par des employés de magasins plutôt que par
des clients.
Aucun mot de passe ni aucune confirmation de prix n’est
nécessaire avant l’impression.
Nettoyage de la tête d’impression
Ce procédé vous permet de nettoyer la tête thermique à
l’intérieur de l’imprimante.
Pour les détails, consultez le mode d’emploi avec la
cartouche de nettoyage fournie.
Chapitre 3 Configuration
Onglet Ecrans
Sélection mode
Vous pouvez sélectionner le mode impression rapide, le
mode complet ou le mode événement.
• Impression rapide
Ce mode limite le nombre d’options disponibles au
client. Il convient à l’impression facile et rapide de
photos.
Le client peut sélectionner d’imprimer uniquement une
sélection d’images d’une carte mémoire, ou toutes les
images. La modification d’images n’est pas possible.
Vous pouvez demander la saisie d’un mot de passe avant
l’impression.
•Mode complet
Avec ce mode, le client peut accéder à toutes les
fonctions fournies par l’appareil. Outre l’impression
normale, ces fonctions comprennent l’image divisée, le
tirage index et le tirage cadre. La modification d’images
est aussi possible.
Vous pouvez demander la saisie d’un mot de passe avant
l’impression.
Images promotionnelles
Vous permet de régler les images promotionnelles. Vous
pouvez déterminer jusqu’à deux images pour l’affichage
de veille en mode complet ou en mode d’impression
rapide. Par défaut, le guide de démarrage est utilisé comme
écran de veille. Si vous avez déterminé une ou deux
images, elles s’affichent en alternance avec le guide de
démarrage.
Une carte d’extension CompactFlash est nécessaire pour la
fonction d’image promotionnelle : Pour l’information sur
la carte d’extension CompactFlash, voir la section
« Préparation d’une carte d’extension CompactFlash » à
la page 17.
Vous pouvez créer votre propre image promotionnelle à
l’aide d’un logiciel d’édition de photographie disponible
dans le commerce.
Spécifications d’image promotionnelle
• Taille de l’image : 640 (L) × 480 (H) pixels
• Format de fichier : 24-bit Windows BMP
• Nom de fichier : Image 1 = promo1.bmp, Image 2 =
promo2.bmp
• (Importer l’image promotionnelle)
Ce bouton vous permet d’importer une image
promotionnelle d’une carte mémoire introduite dans
l’emplacement à cet effet à l’avant de l’appareil.
Si un message d’erreur s’affiche, vérifiez les raisons
possibles suivantes.
– La carte d’extension CompactFlash n’a pas assez
d’espace libre.
– Le fichier sélectionné pour la copie ne répond pas aux
spécifications d’image promotionnelle.
Remarque
Si d’autres images promotionnelles sont déjà stockées
sur la carte d’extension CompactFlash, elles seront
effacées. Prenez garde lors de cette procédure, car même
les fichiers pour lecture seule seront effacés.
• Image 1, Image 2
Pour sélectionner l’intervalle de temps pendant lequel
l’image promotionnelle est affichée. Quand l’intervalle
est passé, l’appareil passe automatiquement à l’image
suivante. Si [NON] est sélectionné, l’image
promotionnelle ne s’affiche pas.
Il n’est pas possible de régler Image 1, Image 2 et le
guide de démarrage sur [NON] en même temps.
22
Eléments de réglage
Page 79

Guide de démarrage
Pour sélectionner l’intervalle de temps pendant lequel le
guide de démarrage est affiché. Quand l’intervalle est
passé, l’appareil passe automatiquement à l’image
promotionnelle. Si [NON] est sélectionné, le guide de
démarrage ne s’affiche pas.
Il n’est pas possible de régler Image 1, Image 2 et le guide
de démarrage sur [NON] en même temps.
Onglet Modèle
• (Supprimer tout)
Supprime tous les modèles stockés sur la carte
d’extension CompactFlash.
Remarque
Prenez garde lors de cette procédure, car même les
fichiers pour lecture seule seront effacés.
Text Input
Vous pouvez saisir du texte à ajouter aux images. Si vous
activez [Tirage] ou [Tirage cadre], le texte saisi est
imprimé avec l’image. Vous pouvez utiliser des caractères
alphanumériques et des symboles pour créer du texte.
Pour saisir du texte, touchez le bouton [Text Setting] pour
accéder à l’écran de saisie de texte. Pour savoir comment
utiliser cet écran, voir la section « Ecran de saisie de
texte » ci-dessous.
Pour utiliser le texte saisi, sélectionnez [OUI].
Ecran de saisie de texte
Chapitre 3 Configuration
Ceci vous permet de charger ou d’effacer des modèles
pour tirage cadre et de saisir du texte.
Une carte d’extension CompactFlash est nécessaire pour
utiliser l’onglet Modèle : Pour l’information sur la carte
d’extension CompactFlash, voir la section « Préparation
d’une carte d’extension CompactFlash » à la page 17.
Les modèles sont créés avec le plug-in Adobe Photoshop,
qui est inclus sur le CD-ROM fourni. Pour les détails, voir
la documentation du plug-in Adobe Photoshop.
Modèles
• (Copier tout)
Copie tous les modèles d’une carte mémoire introduite
dans l’emplacement à cet effet sur une carte d’extension
CompactFlash.
Touchez le bouton puis suivez les instructions qui
s’affichent.
Si un message d’erreur s’affiche, vérifiez les raisons
possibles suivantes.
– La carte d’extension CompactFlash n’a pas assez
d’espace libre.
– Le fichier sélectionné pour la copie ne répond pas aux
spécifications d’image promotionnelle.
Remarque
Si d’autres modèles avec le même nom sont déjà stockés
sur la carte d’extension CompactFlash, ils seront effacés.
Prenez garde lors de cette procédure, car même les
fichiers pour lecture seule seront effacés.
Onglet [Input]
Touchez les boutons affichés à l’écran pour saisir du texte.
Vous pouvez saisir jusqu’à 2 lignes contenant un total de
128 caractères alphanumériques. Pour effectuer une
correction, touchez le bouton [BS] (Effacement arrière). Si
vous continuez de toucher le bouton, la ligne entière où est
placé le curseur sera effacée.
Onglet [Font]
Vous permet de sélectionner les polices à utiliser.
Onglet [Size]
Utilisez les boutons [+] et [–] pour contrôler la taille des
caractères. L’étendue de la taille va de 8 à 72 points, par
incréments de 2 points.
Eléments de réglage
23
Page 80

Onglet [Position]
Vous permet de déterminer la position du texte dans
l’image.
Onglet [Color]
Vous permet de déterminer la couleur du texte.
Remarque
Réglage position impression
Si l’impression n’est pas correctement centrée sur le
papier, vous pouvez ajuster la position dans la direction X
(horizontale) et Y (verticale). L’étendue d’ajustement va
jusqu’à ± 2 mm dans chaque direction.
Selon le nombre et la taille des caractères sélectionnés, il
peut arriver que vous ne puissiez pas imprimer tout le
texte.
Chapitre 3 Configuration
Onglet Impression
Ordre numérotation
Sélectionnez un des réglages suivants relatifs à l’inclusion
de la numérotation lors de l’impression.
• NON
Aucune numérotation n’est imprimée.
• (Sur tous tirages)
La numérotation est imprimée sur toutes les photos.
• (Sur premier tirage seul)
La numérotation est imprimée sur la première page de
chaque commande. Si vous imprimez plusieurs copies
de la première image, la numérotation est imprimée sur
chaque copie.
La numérotation est imprimée en filigrane au bord de la
photo.
Réduction de
la valeur Y
Augmentation
de la valeur X
Réduction de
la valeur X
Augmentation
de la valeur Y
Onglet Couleur Impression
Vous pouvez effectuer ici certains réglages relatifs à la
couleur et à la qualité de l’impression. Chaque élément est
réglé à l’aide des boutons [b] et [B]. L’étendue de réglage
est de ±16 par incréments de 2.
Format impression date
Détermine le format utilisé lors de l’impression de la date.
• AAAAMMJJ (Exemple : 2005/10/30)
• JJMMAAAA (Exemple : 30/10/2005)
• MoisJJAA (Exemple : Oct/30/05)
• MMJJAAAA (Exemple : 10/30/2005)
24
Eléments de réglage
Rouge, Vert, Bleu
Règle la composition de couleur des couleurs respectives.
Foncé, Clair
Règle le degré de sections en foncé et en clair.
Gamma
Règle la densité de demi-teinte.
Page 81

Netteté
Règle la netteté du contour de l’image.
Onglet Tarifs
Indication prix
Détermine si le prix est affiché sur les écrans de sélection
et de prévisualisation d’images.
Abréviation sur
écran
SEK
SGD
THB
TRL
USD
HKD
KRW
MXN
BRL
COP
VEB
XCD
ARS
CLP
PEN
PA B
ECS
JMD
UYU
Monnaie
Couronne suédoise
Dollar de Singapour
Baht thaïlandais
Lire turque
Dollar américain
Dollar de Hong Kong
Won sud-coréen
Peso mexicain
Réal brésilien
Peso colombien
Bolivar vénézuélien
Dollar des Caraïbes de l’est
Peso argentin
Peso chilien
Nuevo Sol péruvien
Balboa de Panama
Sucre équatorien
Dollar jamaïquain
Peso uruguayen
Chapitre 3 Configuration
Devise
Détermine la devise à utiliser lors du calcul du prix d’une
commande.
Quand vous touchez le bouton , une liste de devises
comme ci-dessous s’affiche. Touchez la devise souhaitée
et touchez le bouton [OK]. Si vous sélectionnez [(vide)], la
devise ne s’affiche pas.
Abréviation sur
écran
AUD
CAD
CHF
DKK
EUR
GBP
GRD
ILS
YEN
NOK
NT
NZD
PHP
RMB
Rs
RUB
Monnaie
Dollar australien
Dollar canadien
Franc suisse
Couronne danoise
Euro
Livre Sterling
Drachme grecque
Shekel israélien
Yen japonais
Couronne norvégienne
Dollar nouveau de Taiwan
Dollar néo-zélandais
Peso des Philippines
Yuan chinois
Roupie indienne
Rouble russe
Tari fs
• 9×13, 10×15, 13×18
Vous permet d’établir le prix par tirage pour chaque
format.
Touchez le bouton . A l’aide du clavier numérique
qui s’affiche, saisissez la valeur. Puis touchez le bouton
[OK]. L’étendue des tarifs va de 0 à 9999 (0 à 99,99
selon la monnaie).
Prix additionnel
• Tirage index, Tirage cadre, Image divisée
Vous permet de régler le coût additionnel pour la
fonction d’impression respective. Le total du prix par
tirage et du prix additionnel devient le prix final.
Touchez le bouton . A l’aide du clavier numérique
qui s’affiche, saisissez la valeur. Puis touchez le bouton
[OK]. L’étendue des tarifs va de 0 à 9999 (0 à 99,99
selon la monnaie).
Eléments de réglage
25
Page 82

Onglet Administration
Chapitre 3 Configuration
Tirages max par commande
Règle le nombre maximal de tirages pris en charge dans
une commande. Les réglages disponibles sont 100, 200 ou
300 tirages.
De même, le nombre maximal de tirages pour une seule
image est 99.
Vérification mot de passe
Vous permet de régler le mot de passe à saisir au début de
l’impression.
Touchez le bouton . A l’aide du clavier numérique qui
s’affiche, saisissez un mot de passe (un numéro de 4
chiffres). Puis touchez le bouton [OK].
Impression journaux
Affiche l’historique d’impression de l’appareil, avec une
entrée par commande.
Mot de passe
Vous permet de demander la saisie d’un mot de passe
avant l’impression. Si le réglage est [OUI], un mot de
passe est nécessaire avant l’impression en mode complet et
en mode d’impression rapide.
Code budget
Détermine si la saisie d’un code budget est nécessaire pour
l’impression.
Si le réglage est [OUI], l’appareil demande la saisie d’un
code budget avant l’impression en mode complet et en
mode d’impression rapide. Le code saisi apparaît dans les
journaux d’impression. Par exemple, vous pourriez donner
des codes particuliers à différents départements, ce qui
vous permettrait de gérer les compteurs de tirages de
chaque département. Un code budget est un numéro de 1 à
4 chiffres.
Mot de passe administrateur
Vous permet de régler le mot de passe pour l’écran
Administration.
Touchez le bouton . A l’aide du clavier numérique qui
s’affiche, saisissez un mot de passe (un numéro de 4
chiffres). Puis touchez le bouton [OK].
Vous pouvez aussi utiliser le mot de passe administrateur
comme mot de passe nécessaire avant une impression.
Chaque entrée contient les éléments suivants.
• Commande No.
• Code budget
•Format tirage
• Type tirage (P : Imprimer, I : Tirage index, S : Image
divisée, B : Tirage cadre, A : Imprimer tout)
• Quantité
• Prix (taxes comp.)
Vous pouvez exporter l’information de journaux
d’impression vers la carte d’extension CompactFlash.
Pour ce faire, touchez le bouton . Les données de
journaux d’impression sont exportées en format CSV. Le
fichier CSV exporté contient aussi le code budget.
Pour effacer les données de journaux d’impression,
touchez le bouton .
26
Eléments de réglage
Page 83

Journaux système
Affiche l’historique d’opération du système.
Les éléments suivants sont affichés.
• Compteur tirages
• Total quantité tirages
• Quantité tirages tête thermique
• Heures de fonctionnement (heure de mise sous tension,
fonctionnement du ventilateur et du rétroéclairage LCD)
• Version microprogramme
Vous pouvez exporter l’information de journaux système
vers la carte d’extension CompactFlash.
Pour ce faire, touchez le bouton . Les données de
journaux système sont exportées en format CSV.
Pour réinitialiser le compteur tirages, touchez le bouton
.
Chapitre 3 Configuration
Réinitialisation réglages usine
Restaure l’appareil aux réglages d’usine par défaut.
Eléments de réglage
27
Page 84

Fonctionnement
Résumé du
fonctionnement
Chapitre 4 Fonctionnement
Types de tirages
L’appareil peut imprimer des photos prises avec un
appareil numérique de plusieurs manières différentes,
comme dans la liste qui suit.
Impression
Sélectionnez les images souhaitées dans le contenu d’une
carte mémoire, déterminez le nombre de copies et
imprimez.
Cette fonction est disponible dans tous les modes
d’opération.
Chapitre
Imprimer toutes images
Ceci vous permet d’imprimer toutes les images de la carte
mémoire en une fois. La sélection d’images n’est pas
nécessaire.
Cette fonction est disponible en mode d’impression rapide.
Tirage index
Toutes les images de la carte mémoire sont imprimées en
miniatures. Ceci convient à la vérification du contenu
d’une carte mémoire et au triage visuel d’un grand nombre
d’images lors de la sélection d’images à imprimer.
Cette fonction est disponible en mode complet et en mode
événement.
Image divisée
Ceci vous permet d’imprimer plusieurs images sur une
seule page. La division en images de format prescrit, tel
que le format passeport, est aussi disponible.
Cette fonction est disponible en mode complet et en mode
événement.
Tirage cadre
Vous pouvez choisir parmi des modèles de cadres à
imprimer autour de l’image.
Cette fonction est disponible en mode complet et en mode
événement.
28
Résumé du fonctionnement
Page 85

Ordre des opérations
Mode complet/Mode événement
Introduisez la carte mémoire
Sélectionnez la langue *
Sélectionnez le type de tirage
Imprimer Tirage cadre Image divisée Tirage index
Sélectionnez le
cadre
Sélectionnez la
disposition
Mode d’impression rapide
Introduisez la carte mémoire
Sélectionnez la langue *
Sélectionnez le type de tirage
Imprimer
Imprimer toutes
images
Chapitre 4 Fonctionnement
Sélectionnez l’image/le nombre de copies
Modifiez (si nécessaire)
Vérifiez la commande
Saisissez le mot de passe *
Imprimer
: Pas nécessaire en mode événement.
: Pas nécessaire avec certains réglages.
*
Sélectionnez l’image/
le nombre de copies
Vérifiez la commande
Saisissez le mot de passe *
Imprimer
Résumé du fonctionnement
29
Page 86

Installation de cartes
mémoire
Vous pouvez placer plusieurs types de cartes mémoire,
comme dans la liste ci-dessous, dans les lecteurs et
emplacements sur l’interface d’utilisateur, pour lire les
images stockées sur ces cartes mémoire.
•« Memory Stick »
• Cartes CompactFlash
• Cartes SmartMedia
•Cartes SD
• Cartes MultiMediaCard
• Cartes xD-Picture
Remarque
N’utilisez pas d’adaptateur pour « Memory Stick Duo »,
cela pourrait provoquer un mauvais fonctionnement.
Retrait du « Memory Stick »
Quand vous voyez un message qui vous demande de retirer
le « Memory Stick », poussez d’abord dessus jusqu’au
déclic 1, puis retirez-le 2.
1
Remarques
• Veillez à bien sauvegarder toutes les images de la carte
Chapitre 4 Fonctionnement
mémoire avant de l’utiliser avec cet appareil.
• Il n’est pas possible d’introduire et d’utiliser plusieurs
cartes mémoire en même temps.
• Pour éviter toute perte de données d’images ou tout
endommagement de l’appareil principal, n’essayez
jamais d’introduire un « Memory Stick », une carte
SmartMedia, une carte SD ou une carte MultiMediaCard
dans un adaptateur type CompactFlash inséré dans
l’emplacement CompactFlash.
Utilisation d’un « Memory Stick »
Introduction d’un « Memory Stick »
Avec la marque v du « Memory Stick » pointée vers le
haut et vers l’avant, introduisez complètement le
« Memory Stick » dans son emplacement.
2
Remarque
Pour éviter de perdre des données précieuses ou
d’endommager le « Memory Stick », ne retirez jamais le
« Memory Stick » de son emplacement avant que le
message ne vous le demande.
Utilisation d’une carte
CompactFlash
Introduction de la carte CompactFlash
Avec la marque v de la carte CompactFlash pointée vers
le haut et vers l’avant, introduisez complètement la carte
CompactFlash dans son emplacement.
Lorsque vous introduisez le « Memory Stick » dans
l’appareil, il est automatiquement détecté.
Vous pouvez aussi utiliser un « Memory Stick Duo » sans
adaptateur. Tout comme avec le « Memory Stick »,
introduisez-le avec la marque v pointée vers le haut.
30
Installation de cartes mémoire
Lorsque vous introduisez la carte CompactFlash dans
l’appareil, elle est automatiquement détectée.
Page 87

Remarque
Avant d’introduire la carte CompactFlash, vérifiez qu’elle
est bien orientée. Si vous introduisez la carte dans le
mauvais sens, les contacts internes peuvent être
endommagés, ce qui peut provoquer un mauvais
fonctionnement.
Retrait de la carte CompactFlash
Quand vous voyez un message qui vous demande de retirer
la carte CompactFlash, retirez-la tout de suite.
Remarque
Pour éviter de perdre des données précieuses ou
d’endommager la carte CompactFlash, ne retirez jamais la
carte CompactFlash de son emplacement avant que le
message ne vous le demande.
Utilisation d’une carte SmartMedia
Utilisation d’une carte SD/
MultiMediaCard
Introduction de la carte SD ou
MultiMediaCard
Avec l’entaille de la carte SD ou MultiMediaCard éloignée
de vous et vers la droite, introduisez complètement la carte
dans son emplacement.
Chapitre 4 Fonctionnement
Introduction de la carte SmartMedia
Introduisez complètement la carte SmartMedia dans son
emplacement avec ses bornes pointées vers le haut.
Lorsque vous introduisez la carte SmartMedia dans
l’appareil, elle est automatiquement détectée.
Retrait de la carte SmartMedia
Quand vous voyez un message qui vous demande de retirer
la carte SmartMedia, poussez d’abord dessus jusqu’au
déclic, puis retirez-la.
Lorsque vous introduisez la carte SD ou MultiMediaCard
dans l’appareil, elle est automatiquement détectée.
Retrait de la carte SD ou MultiMediaCard
Quand vous voyez un message qui vous demande de retirer
la carte SD ou MultiMediaCard, poussez d’abord dessus
jusqu’au déclic, puis retirez-la.
Remarques
• Pour éviter de perdre des données précieuses ou
d’endommager la carte SD ou MultiMediaCard, ne
retirez jamais la carte de son emplacement avant que le
message ne vous le demande.
• Si vous utilisez une carte miniSD, utilisez toujours un
adaptateur de carte miniSD indiqué. Vous risquez de ne
pas pouvoir éjecter la carte miniSD si vous l’introduisez
dans son emplacement sans adaptateur.
Remarque
Pour éviter de perdre des données précieuses ou
d’endommager la carte SmartMedia, ne retirez jamais la
carte SmartMedia de son emplacement avant que le
message ne vous le demande.
Installation de cartes mémoire
31
Page 88

Utilisation d’une carte xD-Picture
Introduction de la carte xD-Picture
Avec la marque v de la carte xD-Picture pointée vers le
haut et vers l’avant, introduisez complètement la carte xDPicture dans son emplacement.
Chapitre 4 Fonctionnement
Lorsque vous introduisez la carte xD-Picture dans
l’appareil, elle est automatiquement détectée.
Retrait de la carte xD-Picture
Quand vous voyez un message qui vous demande de retirer
la carte xD-Picture, poussez d’abord dessus jusqu’au
déclic, puis retirez-la.
Sélection d’images à
imprimer
Suivez la procédure ci-dessous pour sélectionner des
images de la carte mémoire introduite.
Vous pouvez suivre cette procédure dans tous les modes
d’opération.
1
Touchez l’écran n’importe où.
L’écran de sélection de langue s’affiche.
Remarque
Pour éviter de perdre des données précieuses ou
d’endommager la carte xD-Picture, ne retirez jamais la
carte xD-Picture de son emplacement avant que le message
ne vous le demande.
Mémo
Si vous utilisez le mode événement, et si une seule
langue a été sélectionnée à l’écran Administration,
l’écran de sélection de langue ne s’affiche pas. Au lieu
de lui, le menu principal s’affiche. Dans ce cas, passez
à l’étape 3.
2
Touchez la langue souhaitée.
32
Sélection d’images à imprimer
Des précautions d’utilisation de l’appareil sont
affichées. Lisez-les attentivement puis touchez le
bouton [OK].
Page 89

Mémo
Les boutons suivants sont disponibles dans les écrans
suivants. Touchez les boutons qui conviennent.
• [Réinitialiser] : Retourne à l’écran de départ de
l’étape 1.
• [Menu principal] : Retourne au menu principal de
l’étape 4.
• [Aide] : Affichage de l’écran d’aide pour une
description des procédures qui s’appliquent à l’écran
en cours.
3
Introduisez la carte mémoire dans l’emplacement
approprié à l’avant de l’appareil.
Quand la carte est détectée, le menu principal
s’affiche.
4
Touchez [Tirage]
Si les images ne sont pas toutes affichables sur un seul
écran, vous pouvez utiliser les boutons [b] et [B] pour
passer d’un écran à un autre.
Mémo
Si vous touchez le bouton [Ajouter date] sur cet écran,
la date de prise de chaque photo sera imprimée.
Pour les détails, voir la section « Ajouter la date » à la
page 47.
Remarques
• Les images qui ne sont pas prises en charge par
l’appareil et les images brisées (fichiers corrompus)
sont indiquées par l’icône suivante.
Chapitre 4 Fonctionnement
• Les images dont un côté (vertical ou horizontal) est
inférieur à 480 pixels sont affichées en miniature. A
cause de leur résolution moindre, l’impression de
telles images peut ne pas être de haute qualité
Une liste des images stockées sur la carte mémoire
s’affiche.
5
Touchez les images à imprimer.
Pour désélectionner une image, touchez-la à nouveau.
Pour sélectionner toutes les images, touchez le bouton
[Tout sélectionner].
6
Déterminez le nombre de copies (quantité) à imprimer.
Utilisez les boutons [+] et [–] pour déterminer la
quantité.
La quantité déterminée d’une image est indiquée dans
le coin supérieur droit de la miniature.
Pour déterminer les quantités individuelles, touchez la
miniature de l’image avec la quantité à changer, puis
touchez les boutons [+] ou [–].
Si vous avez sélectionné le bouton [Tout sélectionner],
la quantité déterminée par les boutons [+] et [–] sera
appliquée à toutes les images.
Sélection d’images à imprimer
33
Page 90

Mémo
Si l’appareil numérique avec lequel les photos ont été
prises prend en charge DPOF, les images à imprimer
et la quantité pour chaque image peuvent être
déterminées par cet appareil. Pour les détails, voir la
section « Impression à partir de réglages DPOF » à la
page 47.
Si vous voulez imprimer les images sans les modifier,
passez à l’étape 9. Pour la modification, passez à
l’étape 7.
En mode d’impression rapide, la modification d’image
n’est pas possible.
7
Pour agrandir l’image sélectionnée, touchez le bouton
.
Chapitre 4 Fonctionnement
Pour les détails sur la modification, voir la section
« Modification d’images » à la page 43.
9
Touchez le bouton [Imprimer].
L’écran de prévisualisation s’affiche.
8
Pour modifier une image, touchez le bouton [Editer].
Le menu Editer s’affiche. Ce menu donne accès aux
fonctions Rogner et pivoter, Réglage couleur,
Réduction des yeux rouges et Sépia/Monochrome.
Le contenu de la commande s’affiche.
Mémo
En mode événement, le contenu de la commande ne
s’affiche pas et l’impression démarre directement.
34
Sélection d’images à imprimer
Page 91

Vérification du contenu de la
commande et saisie du mot de
passe
1
Vérifiez que la quantité de tirages, le prix et les autres
éléments sont corrects. Puis touchez le bouton
[Démarrer impression].
Le clavier numérique s’affiche dans la partie droite de
l’écran.
2
Saisissez le mot de passe et touchez le bouton [OK].
Utilisez le clavier numérique sur l’écran pour saisir le
mot de passe de 4 chiffres. Ceci peut être la
vérification mot de passe ou le mot de passe
administrateur.
Mémo
Si vous avez sélectionné la saisie de code budget à
l’écran Administration, saisissez le code budget au
lieu du mot de passe, puis touchez le bouton [OK].
Chapitre 4 Fonctionnement
Mémo
Si l’entrée du mot de passe (ou du code budget) a été
désactivée à l’écran Administration, l’impression
démarre dès que le bouton [Démarrer impression] est
touché.
L’impression démarre. Quand les données nécessaires
de la carte mémoire ont été lues, un message qui vous
demande de la retirer s’affiche. Retirez la carte
mémoire de son emplacement.
Remarque
Ne retirez pas la carte mémoire avant que le message
ne s’affiche. Sinon, les données de la carte mémoire
peuvent être effacées ou corrompues. Le retrait ou
l’introduction d’une carte d’extension CompactFlash
pendant l’impression peut provoquer une impression
incorrecte.
Sélection d’images à imprimer
35
Page 92

Utilisation du tirage index
Cette fonction permet d’imprimer toutes les images d’une
carte mémoire en taille réduite pour fournir un index du
contenu de la carte.
Le nombre maximum d’images imprimées sur une seule
page est comme suit.
• 3×5 pouces : 30 images
• 4×6 pouces : 35 images
• 5×7 pouces : 56 images
Cette fonction est disponible en mode complet et en mode
événement.
1
Touchez l’écran n’importe où.
Chapitre 4 Fonctionnement
2
Touchez la langue souhaitée.
Des précautions d’utilisation de l’appareil sont
affichées. Lisez-les attentivement puis touchez le
bouton [OK].
3
Introduisez la carte mémoire dans l’emplacement
approprié à l’avant de l’appareil.
Quand la carte est détectée, le menu principal
s’affiche.
L’écran de sélection de langue s’affiche.
Mémo
Si vous utilisez le mode événement, et si une seule
langue a été sélectionnée à l’écran Administration,
l’écran de sélection de langue ne s’affiche pas. Au lieu
de lui, le menu principal s’affiche. Dans ce cas, passez
à l’étape 3.
4
Touchez [Tirage index].
Le contenu de la commande s’affiche.
Mémo
En mode événement, le contenu de la commande ne
s’affiche pas et l’impression démarre directement.
5
Vérifiez le contenu de la commande et saisissez le mot
de passe.
36
Utilisation du tirage index
Pour les détails sur cette opération, voir « Vérification
du contenu de la commande et saisie du mot de passe »
à la page 35.
Page 93

Utilisation d’image
divisée
Cette fonction vous permet d’imprimer plusieurs images
sur une seule page. La division en images de format
prescrit, tel que le format passeport, est aussi disponible.
Cette fonction est disponible en mode complet et en mode
événement.
1
Touchez l’écran n’importe où.
3
Introduisez la carte mémoire dans l’emplacement
approprié à l’avant de l’appareil.
Quand la carte est détectée, le menu principal
s’affiche.
4
Touchez [Image divisée].
L’écran de sélection de disposition d’image divisée
s’affiche.
Chapitre 4 Fonctionnement
L’écran de sélection de langue s’affiche.
Mémo
Si vous utilisez le mode événement, et si une seule
langue a été sélectionnée à l’écran Administration,
l’écran de sélection de langue ne s’affiche pas. Au lieu
de lui, le menu principal s’affiche. Dans ce cas, passez
à l’étape 3.
2
Touchez la langue souhaitée.
5
Sélectionnez la disposition en la touchant, et touchez
le bouton [OK].
Pour imprimer des photos de type passeport,
sélectionnez la disposition appropriée. Des cadres
indiqués par la même lettre à l’écran contiendront la
même image.
L’écran de prévisualisation s’affiche.
Des précautions d’utilisation de l’appareil sont
affichées. Lisez-les attentivement puis touchez le
bouton [OK].
Utilisation d’image divisée
37
Page 94

6
Touchez le cadre à attribuer à l’image.
Une liste des images stockées sur la carte mémoire
s’affiche.
7
Chapitre 4 Fonctionnement
Sélectionnez l’image en la touchant, et touchez le
bouton [OK].
8
Déterminez le nombre de copies (quantité) à imprimer.
Utilisez les boutons [+] et [–] pour déterminer la
quantité.
Si vous voulez imprimer les images sans les modifier,
passez à l’étape 10. Pour la modification, passez à
l’étape 9.
9
Pour modifier une image, sélectionnez-la et touchez le
bouton [Editer]
L’écran de prévisualisation s’affiche à nouveau.
Pour déterminer plusieurs images, répétez les étapes 6
et 7 pour le nombre souhaité d’images.
Pour changer une image déjà sélectionnée, touchez à
nouveau cette image puis touchez le bouton [Sélection
image]. Vous pouvez alors sélectionner une nouvelle
image.
38
Utilisation d’image divisée
Le menu Editer s’affiche. Ce menu donne accès aux
fonctions Rogner et pivoter, Réglage couleur,
Réduction des yeux rouges et Sépia/Monochrome.
Page 95

Pour les détails sur la modification, voir la section
« Modification d’images » à la page 43.
10
Touchez le bouton [Imprimer].
Utilisation du tirage cadre
Quand vous imprimez des images stockées sur la carte
mémoire, vous pouvez choisir parmi des modèles de cadre
à imprimer autour de l’image, et vous pouvez aussi saisir
du texte à imprimer.
Cette fonction est disponible en mode complet et en mode
événement.
Pour utiliser cette fonction, la carte d’extension
CompactFlash doit être introduite.
Vous pouvez charger de nouveaux modèles de cadres et
saisir des caractères à partir de l’écran Administration.
Pour les détails, voir la section « Onglet Modèle » à la
page 23.
1
Touchez l’écran n’importe où.
Le contenu de la commande s’affiche.
Mémo
En mode événement, le contenu de la commande ne
s’affiche pas et l’impression démarre directement.
11
Vérifiez le contenu de la commande et saisissez le mot
de passe.
Pour les détails sur cette opération, voir « Vérification
du contenu de la commande et saisie du mot de passe »
à la page 35.
Chapitre 4 Fonctionnement
L’écran de sélection de langue s’affiche.
Mémo
Si vous utilisez le mode événement, et si une seule
langue a été sélectionnée à l’écran Administration,
l’écran de sélection de langue ne s’affiche pas. Au lieu
de lui, le menu principal s’affiche. Dans ce cas, passez
à l’étape 3.
Utilisation du tirage cadre
39
Page 96

2
Touchez la langue souhaitée.
Des précautions d’utilisation de l’appareil sont
affichées. Lisez-les attentivement puis touchez le
bouton [OK].
Chapitre 4 Fonctionnement
3
Introduisez la carte mémoire dans l’emplacement
approprié à l’avant de l’appareil.
5
Sélectionnez le cadre souhaité en le touchant, et
touchez le bouton [OK].
Si vous voulez agrandir le cadre sélectionné, touchez
le bouton .
Une liste des images stockées sur la carte mémoire
s’affiche.
Quand la carte est détectée, le menu principal
s’affiche.
4
Touchez [Tirage cadre].
L’écran de sélection de cadre s’affiche.
6
Sélectionnez l’image à imprimer en la touchant.
Pour désélectionner une image, touchez-la à nouveau.
Pour sélectionner toutes les images, touchez le bouton
[Tout sélectionner].
Si les images ne sont pas toutes affichables sur un seul
écran, vous pouvez utiliser les boutons [b] et [B] pour
passer d’un écran à un autre.
40
Utilisation du tirage cadre
Page 97

7
Déterminez le nombre de copies (quantité) à imprimer.
Utilisez les boutons [+] et [–] pour déterminer la
quantité.
Si vous avez sélectionné le bouton [Tout sélectionner],
la quantité déterminée par les boutons [+] et [–] sera
appliquée à toutes les images.
La quantité déterminée d’une image est indiquée dans
le coin supérieur droit de la miniature.
9
Pour modifier une image, touchez le bouton [Editer].
Le menu Editer s’affiche. Ce menu donne accès aux
fonctions Rogner et pivoter, Réglage couleur,
Réduction des yeux rouges et Sépia/Monochrome.
Chapitre 4 Fonctionnement
Si vous voulez imprimer les images sans les modifier,
passez à l’étape 10. Pour la modification, passez à
l’étape 8.
En mode d’impression rapide, la modification d’image
n’est pas possible.
8
Pour agrandir l’image sélectionnée, touchez le bouton
.
L’écran de prévisualisation s’affiche.
Pour les détails sur la modification, voir la section
« Modification d’images » à la page 43.
10
Touchez le bouton [Imprimer].
Le contenu de la commande s’affiche.
Utilisation du tirage cadre
41
Page 98

Mémo
En mode événement, le contenu de la commande ne
s’affiche pas et l’impression démarre directement.
11
Vérifiez le contenu de la commande et saisissez le mot
de passe.
Imprimer toutes les
images d’une carte
mémoire
Pour les détails sur cette opération, voir « Vérification
du contenu de la commande et saisie du mot de passe »
à la page 35.
Chapitre 4 Fonctionnement
Cette fonction vous permet d’imprimer toutes les images
stockées sur une carte mémoire en une seule opération, en
produisant un tirage par image.
Cette fonction est disponible en mode d’impression rapide.
1
Touchez l’écran n’importe où.
L’écran de sélection de langue s’affiche.
Mémo
Si une seule langue a été sélectionnée à l’écran
Administration, l’écran de sélection de langue ne
s’affiche pas. Au lieu de lui, le menu principal
s’affiche. Dans ce cas, passez à l’étape 3.
2
Touchez la langue souhaitée.
Des précautions d’utilisation de l’appareil sont
affichées. Lisez-les attentivement puis touchez le
bouton [OK].
42
Imprimer toutes les images d’une carte mémoire
Page 99

3
Introduisez la carte mémoire dans l’emplacement
approprié à l’avant de l’appareil.
Quand la carte est détectée, le menu principal
s’affiche.
4
Touchez [Imprimer toutes images].
Le contenu de la commande s’affiche.
5
Vérifiez le contenu de la commande et saisissez le mot
de passe.
Modification d’images
Le menu Editer donne accès aux fonctions suivantes :
• Rogner et pivoter (page 44)
• Réglages couleur (page 45)
• Sépia/Monochrome (page 45)
• Réduction des yeux rouges (page 46)
Les étapes de modification d’images sont décrites cidessous.
1
Touchez le bouton [Editer].
Le menu Editer s’affiche.
2
Touchez l’élément à modifier.
Chapitre 4 Fonctionnement
Pour les détails sur cette opération, voir « Vérification
du contenu de la commande et saisie du mot de passe »
à la page 35.
Si le nombre maximum d’images de la carte mémoire est
supérieur au nombre maximum de tirages permis pour une
commande, la liste d’images s’affiche après le menu
principal, avec un nombre correspondant au nombre
maximum sélectionné. Vous pouvez alors imprimer ces
images, ou changer la sélection.
L’écran de modification respectif s’affiche. Pour les
détails sur les étapes de l’opération, voir les sections
suivantes.
3
Lorsque la modification est terminée, touchez le
bouton [OK] sur l’écran de modification respectif.
L’écran original s’affiche à nouveau.
Une image modifiée est indiquée par le symbole d’un
crayon dans la liste.
Pour supprimer les effets de modification
Vous pouvez revenir à une image modifiée
temporairement ou à son état d’origine.
1
Sélectionnez une image modifiée sur la liste, et
touchez le bouton [Editer].
Le menu Editer s’affiche.
2
Touchez le bouton [Réinitialiser].
Un message de confirmation s’affiche. Touchez le
bouton [Oui].
Les effets de modification de l’image sélectionnée
sont supprimés, et le menu Editer s’affiche à nouveau.
Modification d’images
43
Page 100

Déterminer la disposition (Rogner et
pivoter)
Pour faire pivoter l’image
Vous pouvez faire pivoter l’image par incréments de 90
degrés.
Cette fonction vous permet de couper l’image ou de la faire
pivoter, en altérant ainsi sa composition.
Pour rogner l’image
Vous pouvez effectuer une coupe en zoomant sur l’image
et en déplaçant la position de la portion agrandie.
1
Sur le menu Editer, touchez [Rogner & pivoter].
L’écran suivant s’affiche.
Chapitre 4 Fonctionnement
1
Sur le menu Editer, touchez [Rogner & pivoter].
L’écran suivant s’affiche.
2
Touchez le bouton .
Chaque fois que vous touchez le bouton, l’image
pivote de 90 degrés dans le sens des aiguilles d’une
montre.
2
Utilisez les boutons et pour régler la taille de
l’image.
3
Utilisez les boutons fléchés pour régler la position de
l’image.
4
Répétez les étapes 2 et 3 pour obtenir l’image correcte
à imprimer.
5
Quand la composition de l’image est celle que vous
souhaitez, touchez le bouton [OK].
3
Quand l’orientation de l’image est celle que vous
souhaitez, touchez le bouton [OK].
L’écran original s’affiche à nouveau.
44
Modification d’images
L’écran original s’affiche à nouveau.
 Loading...