

Page 1

3-757-865-21 (1)
Wcieo Cassette
Recorder
Operating Instructions
YUS
SLV-420
SLV-420 PX
Page 2
WARNING
To prevent fire or shock hazard, do not expose the unit to rain or moisture.
CAUTION
Risk of Et-ECTRC SHOCK
00 NOTOPEN
CAUTION : TO REDUCE THE RISK OF ELECTRIC SHOCK.
DO NOT REMOVE COVER (OR BACK),
NO USER-SERVICEABLE PARTS INSIDE.
REFER servicing TO QUALIRED SERVICE PERSONNEL
This symbol is intended to alert the user to the
presence of uninsulated "dangerous voltage"
within the product's enclosure that may be of
sufficient magnitude to constitute a risk of
electric shodi to persons.
This symbol is intended to alert the user to the
presence of important operating and
mainten£uice (servicing) instructions in the
literature accompanying the appliance.
CAUTION
To prevent electric shock, do not use this polarized AC plug with
an extension cord, receptacle or other outlet unless the blades can
be fully inserted to prevent blade exposure.
Precautions
Safety
♦ Operate the unit only on 120V AC, 60 Hz (SLV-420 ortfy).
* If anything falls into the cabinet, unplug the urut and láve it
dieckfid by qualified personnel before operating it any further.
♦ One blade of the plug is wider than the other for the purpose of
safety and will fit into the power outlet only one way. If you are
unable to insert the plug fully into the outlet, contact your Sony
dealer.
♦ Unplug the unit from the wall outlet if you do not intend to use
it for an extended ¡jeriod of time. To disconnect the cord, pull it
out by the plug, never by the cord.
• Keep the unit and cassettes away from equipment with strong
magnets, such as miaowave ovens or large loudspeakers.
• Do not place heavy objects on the unit.
• if the urut is brought directly from a cold to a warm location,
moisture may condense inside the VCR and cause damage to the
video head and tape. When you first install the unit, or when
you move it from a cold to a warm location, wait for about one
hour before operating the unit
Information
For customers in the USA
This equipment has been tested and found to comply with the
limits fora Class B digital device, pursuant to Part 15 of the FCC
Rules. These limits are designed to provide reasonable protection
against harmful interference in a residential installation. This
equipment generates, uses, and can radiate radio frequency energy
and, if not installed and used in accordance with the instnictions,
may cause harmful interference to radio communications.
However, there is no guarantee that interference will not occur in a
particular instahatian. If this equipment does cause harmful
interference to radio or television reception, which can be
determined by turning the equipment off and orv the user is
encouraged to try to correct the interference by one or more of the
following measures*
• Reorient or relocate the receiving antenna,
• Increase the separation between the equipment and receiver.
• Connect the equipment into an outlet on a circuit different fiom
that to which the receiver is connected.
• Consult the dealer or an experienced radlo/TV technician for
help.
You are cautioned that any dianges or modifications not expressly
approved in this manual could void your authority to operate this
equipment.
Caution
Television programs, films, video tapes and other materials may be
copyrighted. Unauthorized recording of such material may be
contrary to the provisions of the copyright laws^ Also, use of this
recorder with cable television transmission may require
authorization &om the cable television transmission and/or
program owner.
Notice to customers vi^o have
purchased this product outside the USA
(SLV^OPXonfy)
Plug adaptor
The plug supplied with your VCR differs from the one that is
showm in the Operating Instructions, Attach the supplied adaptor
onto the phig so that it will fit your power outlet
Installing
• Allow adequate air circulation to prevent internal heat buildup.
• Do not place the imit on surfaces (rugs, blankets, etc.) or near
materials (curtains, draperies) that may block, the venblabon
slots.
• Do not install the unit near heat sources such as radiators or air
ducts, or in a place subject to direct sunlight, excessive dust,
mechanical vibration or shock.
• Do not install the unit in an inclined position. It is designed to be
operated in a horizontal position only.
2 I Introduction
Power supply
The unit operates on a power supply of 110 to 240 V AC, 50/60 Hi,
and not only on 120 V AC, 60 Hz as indicated in the Operating
Instructions.
Owner's record
The model number is located at the rear and front of the unit and
the serial number on the top. Record these numbers in the spaces
provided below. Refer to them whenever you call upon your Sony
dealer regarding this product.
Model No. Serial No.
Page 3

Table of contents
Welcome!
Getting Started
4 Step 1: Unpacking
5 Step 2: Setting up the remote commander
6 Step 3: Hookups
19 Step 4: Setting the clock
20 Presetting channels
23 Setting up cable box control
26 Setting up VCR Plus+
Basic Operations
28 Playing a tape
30 Recording TV programs
33 Recording TV programs using the timer
36 Recording TV programs using VCR Plus+
38 Checking/changing/cancelling timer settings
Additional Operations
40 Playing/searching at various speeds
41 Adjusting the picture
42 Editing with another VCR
Additional Information
44 General setup information
45 Troubleshooting
47 Specifications
Index to parts and controls
48
Index
50
back
Quick reference to using the VCR
œver
Introduction
Page 4

Welcome!
Step 1: Unpacking
Thank you for purchasing the Sony Video Cassette Recorder (УСЮ.
Here are some of the features you'U enjoy with your VCR:
• VCR Plus+* system that lets you quickly and easily preset the VCR to
record programs
• Cable box control that allows your VCR to control channel selection
on most brands of cable boxes
• ON SCREEN HELP messages that warn you of having attempted an
incorrect operation.
• VCR Pliis+ and PliisCode are trademarks of Gemstar Development Corp. VCR Plus+
system is manufactured under license from Gemstar Development Coqx>ration.
Check that you have the following items:
• Remote commander
« Plug adaptor
(SLV-420 PXonly)
• Cable Mouse (cable box
controller)
• 75-ohm coaxial cable with
F-type connectors
• AC power cord
4 I Getting Started
Page 5
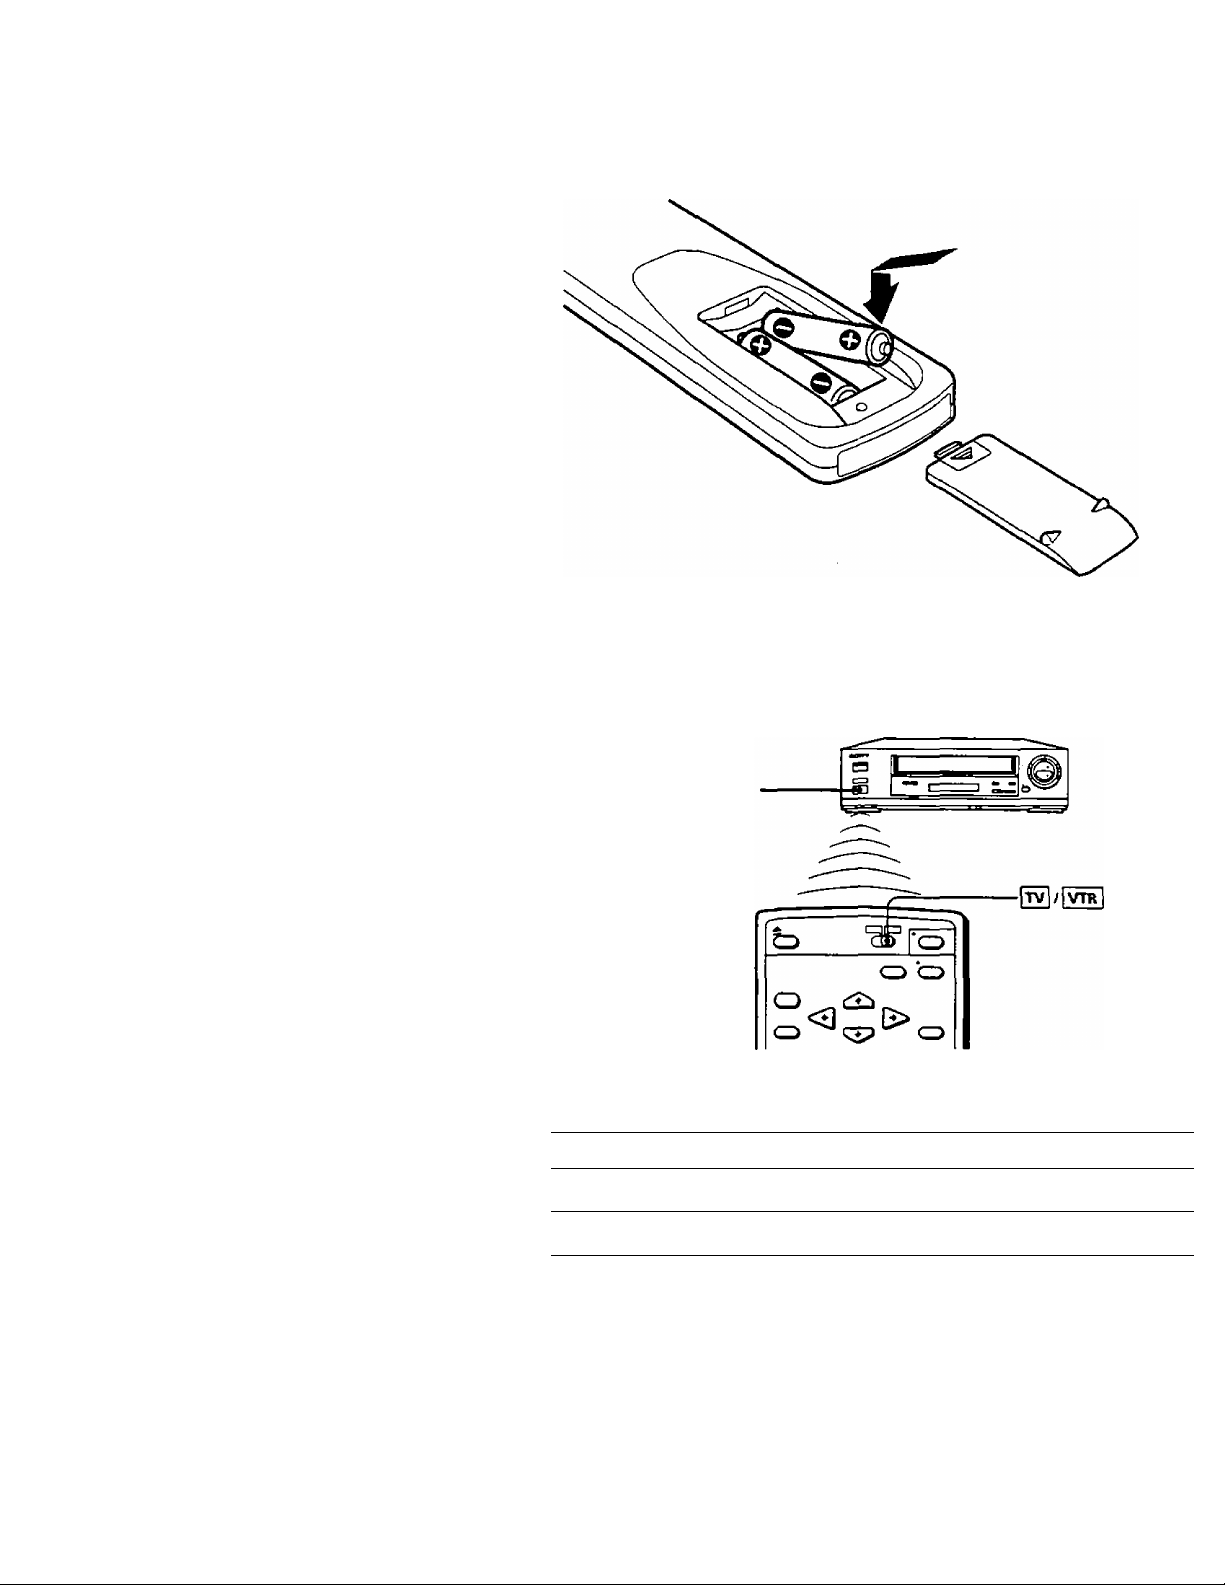
step 2: Setting up the
remote commander
Notes
• With normal use, the
batteries should last for
approximately three to six
months.
• If you do not use the remote
commander for an extended
period of time, remove the
batteries to avoid possible
damage from battery
leakage.
• E>o not use a new battery
with an old one.
• Do not use different types of
batteries.
Inserting the batteries
Insert two si2e AA (R6) batteries by matching the + and - on the
batteries to the diagram inside the battery compartment.
Using the remote commander
You can use this remote commander to operate this VCR and a Sony
TV. Buttons on the remote commander marked with a dot (•) can be
used to operate your TV.
Remote sensor
To operate Set|TV|/rVTR|to
the VCR VTR and point at the remote sensor on the VCR
a Sony TV
TV and point at the remote sensor on the TV
Getting Started | 5
Page 6

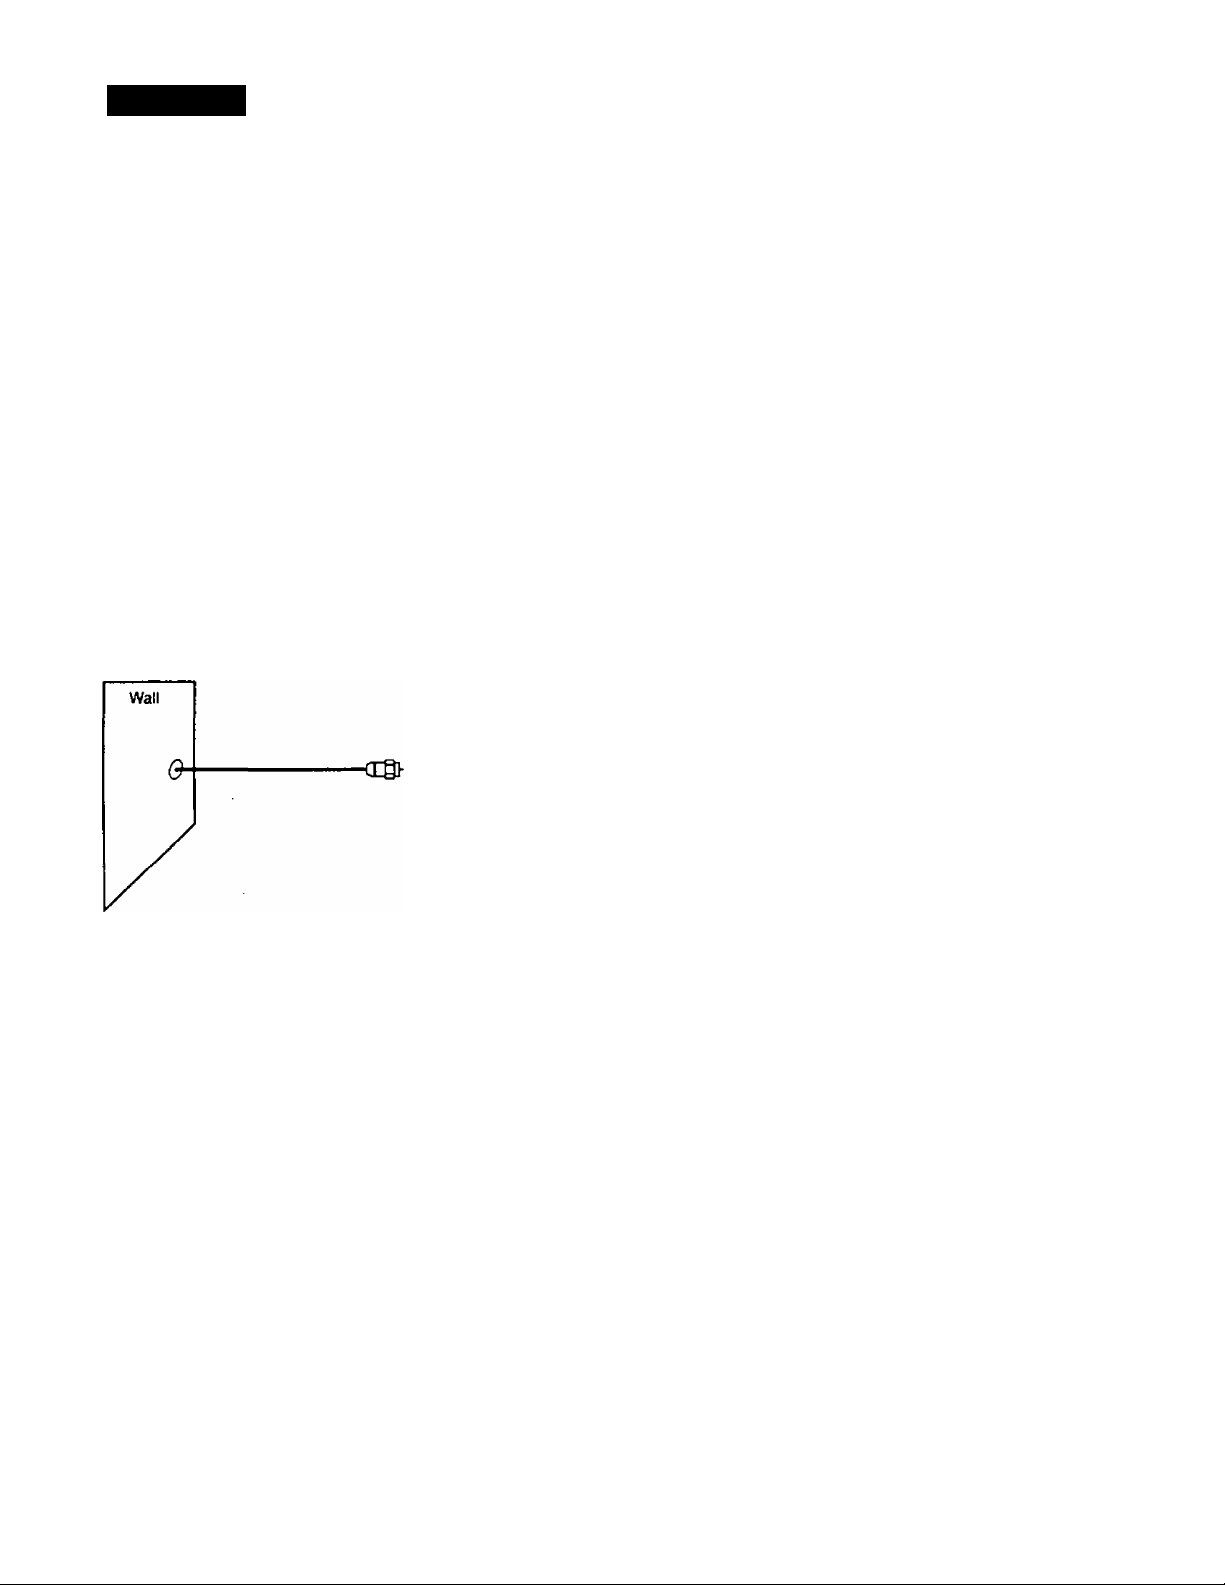
Step3: Hookups
Selecting the best hookup option
Before you can use your VCR for the first time/ you need to connect it to
your TV and set it up to receive programs for viewing and recording.
This section explains how to hook up and set up your VCR so that you
can start enjoying it right away. There are, however, many types of TVs
available and many ways in which your TV can be hooked up. For
these reasons, this manual describes several ways your VCR can be
connected.
To hook up your VCR so that it works best for you, first scan through
the table below. Then use the accompanying diagrams and procedures
on the following pages to set up your VCR.
Caution
Connections between the
VCR's VHF/UHF connector
and the antenna terminals of
the TV receiver should be
made only as shown in the
following instructions. Failure
to do so may result in
operation that violates the
regulations of the Federal
Communications Comrrussion
regarding the use and
operation of RF devices. Never
cormect the output of the VCR
to an antenna or make
simultaneous (parallel)
antenna and VCR cormections
at the anterma terminals of
your receiver.
If you have
Stereo TV that has audio/video
inputs
Cable box that is compatible with
the VCR's cable box control
feature
Cable box with many scrambled
channels
Cable box with only a few
scrambled channels
Cable box with only a few
scrambled channels, using an
A/B switdi
No box
Antenna only, no cable TV
Use
Audio/video (A/V) hookup,
then follow one of the h(X)kups
below.
Hcxjkup 1
Hookup 2
Hookups
Hookups Page 16
Hookups
Hookup 4
Refer to
Page?
Pages
Page 10
Page 12
Page 12
Page 14
After you've completed the connections, follow the instructions for
setup including VCR Hus-t- setup. During setup, if you need more
details of the procedure described, page numbers are provided where
you can find complete, step-by-step instructions.
After you've completed the setup, you're ready to use your VCR.
Procedures differ depending on the hookup you used- For an overview,
refer to "Quick reference to using the V(^R" on the back cover.
Note to CATV system
installer
This reminder is provided to
(all the CATV system
mstaller's attention to Article
820-40 of the NEC that
provides guidelines for proper
grounding and, in particular,
specifies that the cable ground
shall be cormected to the
grounding system of the
building, as dose to the point
of cable entry as practical.
Getting Started
Before you get started
• Turn off the power to all equipment.
• Do not connect the AC power cords until all of the connections are
completed,
• Be sure you make connections firmly. Loose connections may cause
picture distortioa
• If your TV doesn't match any of the examples provided, see your
nearest Sony dealer or qualified technician.
Page 7
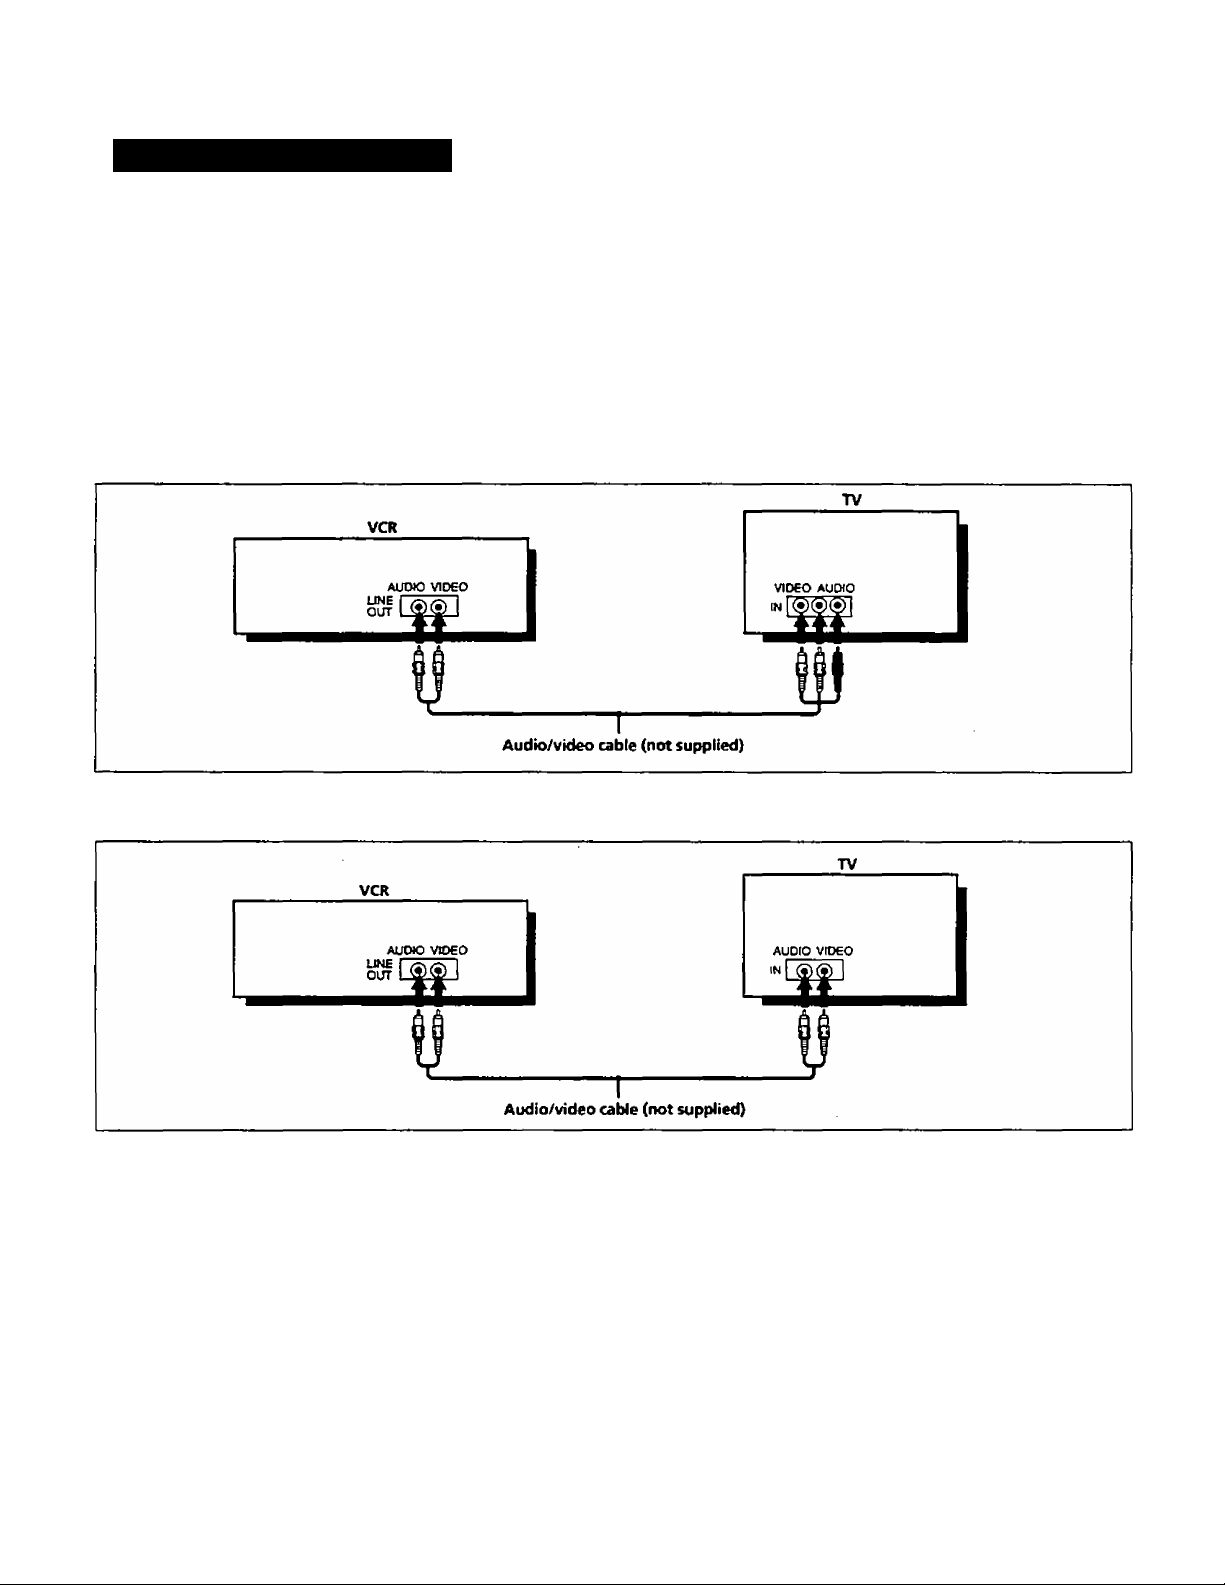
Audio/video (AA/) hookup
A Use this hookup if your TV has stereo jacks
If your TV has audio/video (A/V) input jacks, you will get a better
picture and sound if you hook up your VCR using these coimections. If
your TV doesn't have A/V inputs, see the following pages for antenna
or cable hookups.
If you're planning to use your VCR only to play back pictures and
movies, you're finished setting up the VCR after you've made these
connections. If you want to record off-air or off your cable TV system,
complete these connections first, and then go to the following pages for
antenna or cable hookups.
B Use this hookup if your TV doesn't have stereo jacks
Page 8
Hookup 1
Using cable box
control
This hookup is recommended for most cable systems with cable boxes.
It allows the VCR's cable box control feature to control the channel on
the cable box, simplifying the recording process. You should use this
hookup if you have a cable box, especially if your cable system
scrambles all or most charmels. A list of compatible cable boxes is on
page 24.
Background
This VCR can record virtually any unscrambled cable channel. Some
cable systems scramble specific channels, usually premium or pay-perview channels. This hookup lets you record scrambled channels, by
using the VCR's cable box control feature to select the channel on the
cable box.
What you can and can't do with this hookup
VWiatyou can do
• Record any charmel by selecting the chaimel directly with your VCR
• Select channels on the cable box using the VCR's remote commander
What you can't do
• Record with the cable box turned off
• Record one channel while watching another channel
3 I Getting Started
Page 9

Hookup 1: VCR setup
Hookup 1; VCR Plu5+ channel setup
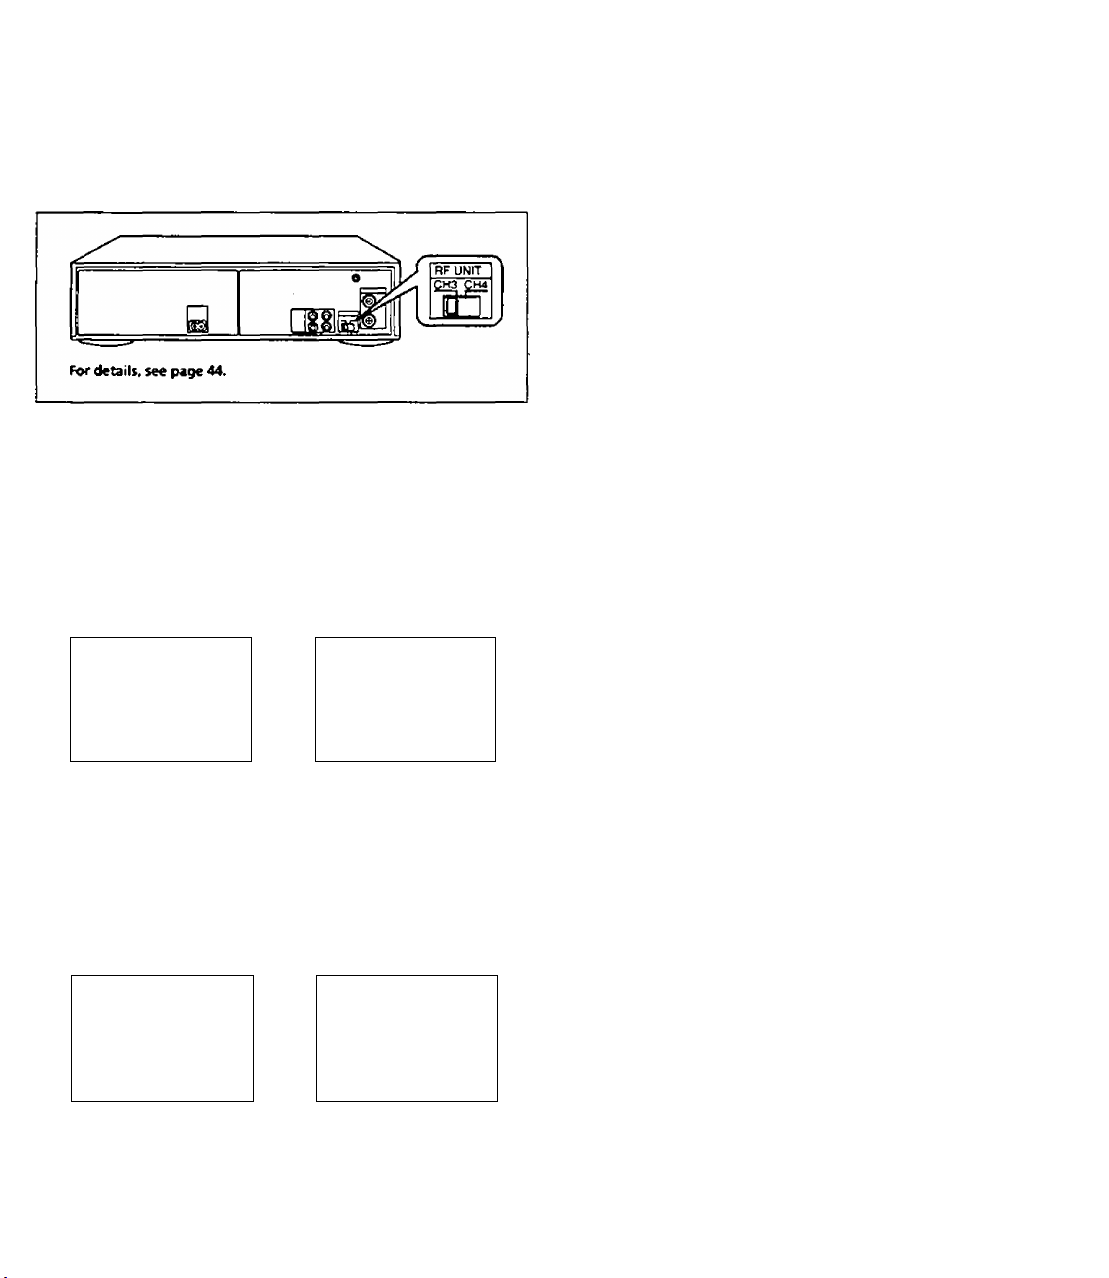
1 Set the RF UNIT switch to CH 3 or CH 4, whichever
channel is not used in your area. If both are used, set
the switch to either channel.
If you made A/V connections (from page 7), you can
skip this step.
2 Turn on your cable box.
3 Set CABLE BOX CONTROL to ON:
Press MENU and select
CABLE BOX CONTROL
NCNU CABLE BOX CONTROL
TWER SET/CMECK
TUNER PRESET
SET VCR Pka . CHANNELS
»CABLE BOX CONTROL
CLOCK SET
Enter your cable box code Select ;
YOOR CABLE ^J^OOOE NO YOUR CABLE BOX OUTPUT CH
~>y\
ENTER YOUR CABLE BOX
CODE NO USINO G9 KEY5
REFER TO T>C OFERATING
UANUAL FOfl TME C00£
TMEN PUSH EXECUTÉ
Select ON and press
EXECUTE.
•ON OFF
USE TO select
PUSH EXECUTE FOR FIRST
TIME SETUP
PUSH MENU TO OOrr
CH2
• CH3
CH4
UNEtUNE IN ON WCR)
USE F A TO safer CAiBf
BOX CH. THEN PUSH EXECUTE
1 Rnd the VCR Plus+ Channel Listing in your program
guide. For details on the VCR PIus+ Channel Listing,
see page 26.
2 If the channels in the program guide are different
from the channels that you actually use on your TV,
set the chzinnels that eire different as follows:
Press MENU and select
SET VCR Plus+
CHANNELS.
U£NU
TWER SETOfECX
TUNER PRESET
SET VCR PVn. CHANNELS
NCABU BOX CONTROL
CLOCK SET
Enter the program guide
channel, then the channel
you use on your TV.
SET VCR Ptu». CHANNELS
— GIADE CH TV CH
PUSH 0« KEVS TO SET
PROGRAM GUIDE CH
OR.RUSH EXECUTE TO SEE
VCR PktH CHANNEL UST
------------
Program guide channel
Your actual TV channel —
4
For details, see page 27.
You are now ready to use your VCR
A Quick reference (back cover) to operations is
provided on the back cover to help you quickly enjoy
the basic functions. These procedures differ slightly
depending on the hookup used. Make a note of which
hookup you used (Hookup 1) so that you can always
follow the correct instructions.
Press EXECUTE.
For details, see page 23.
Getting Started
Page 10
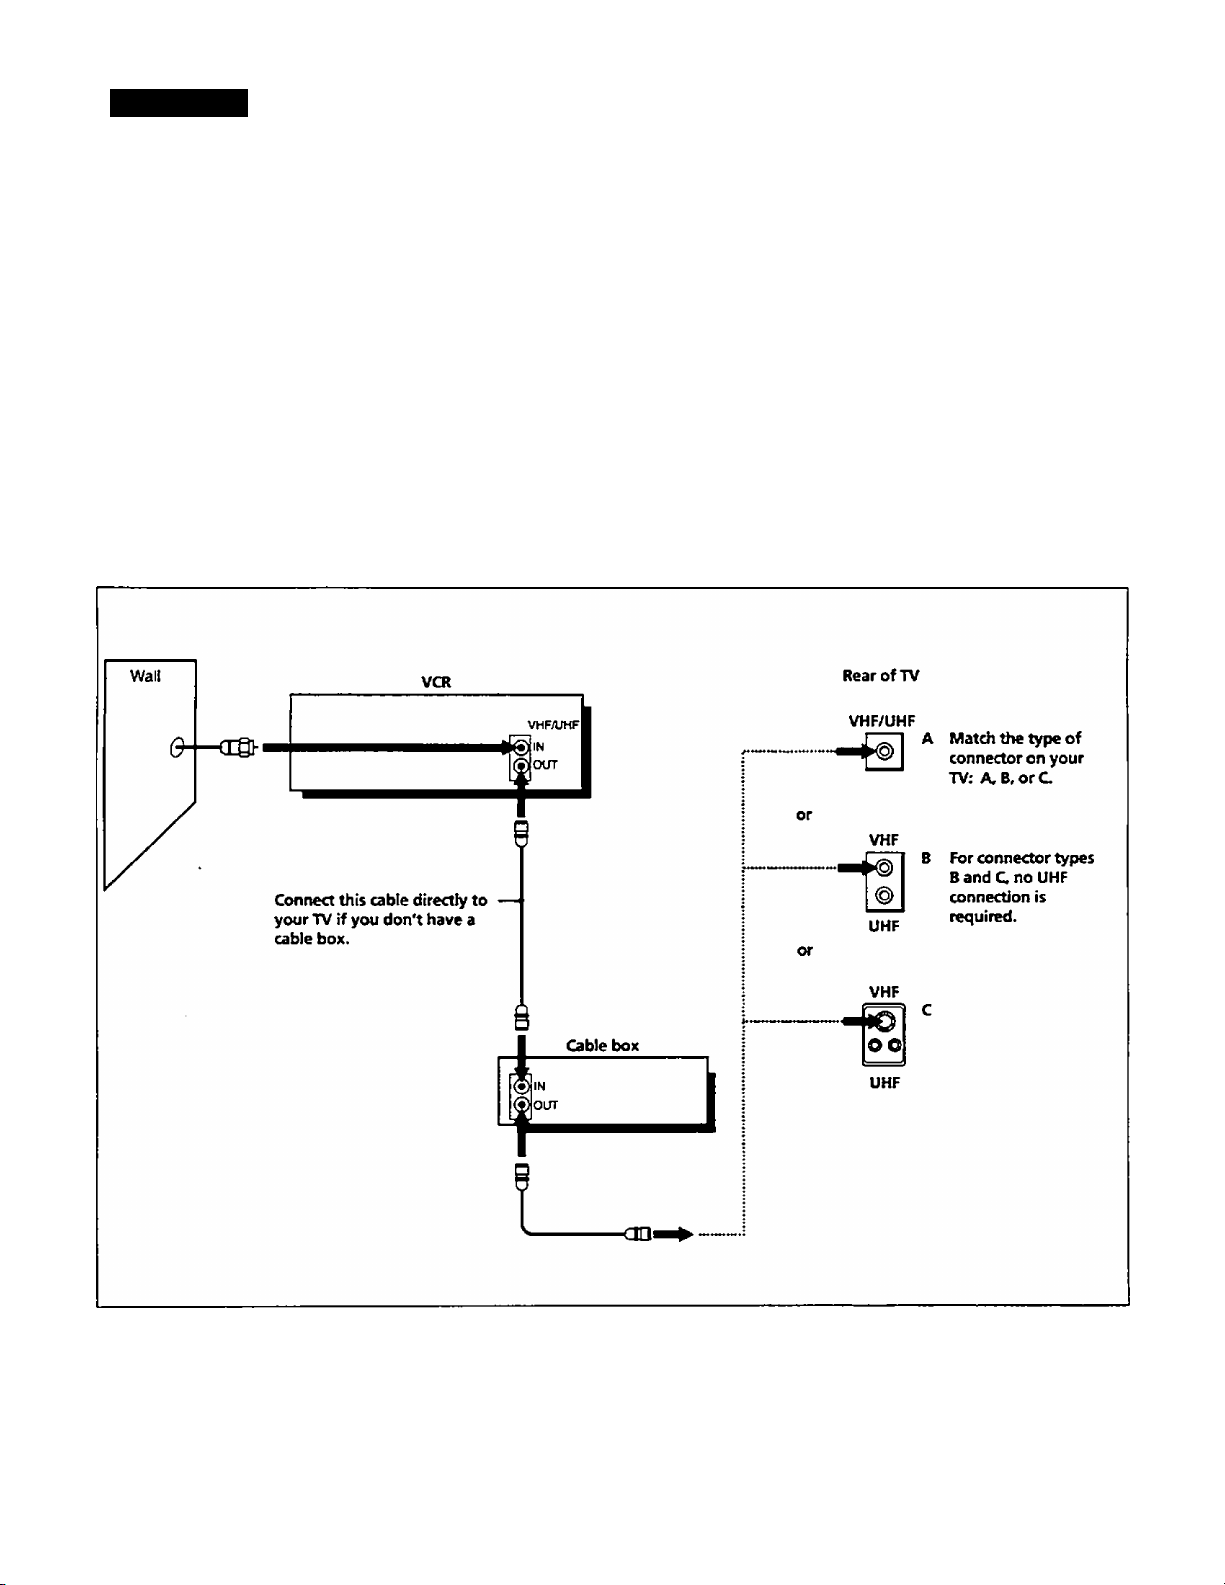
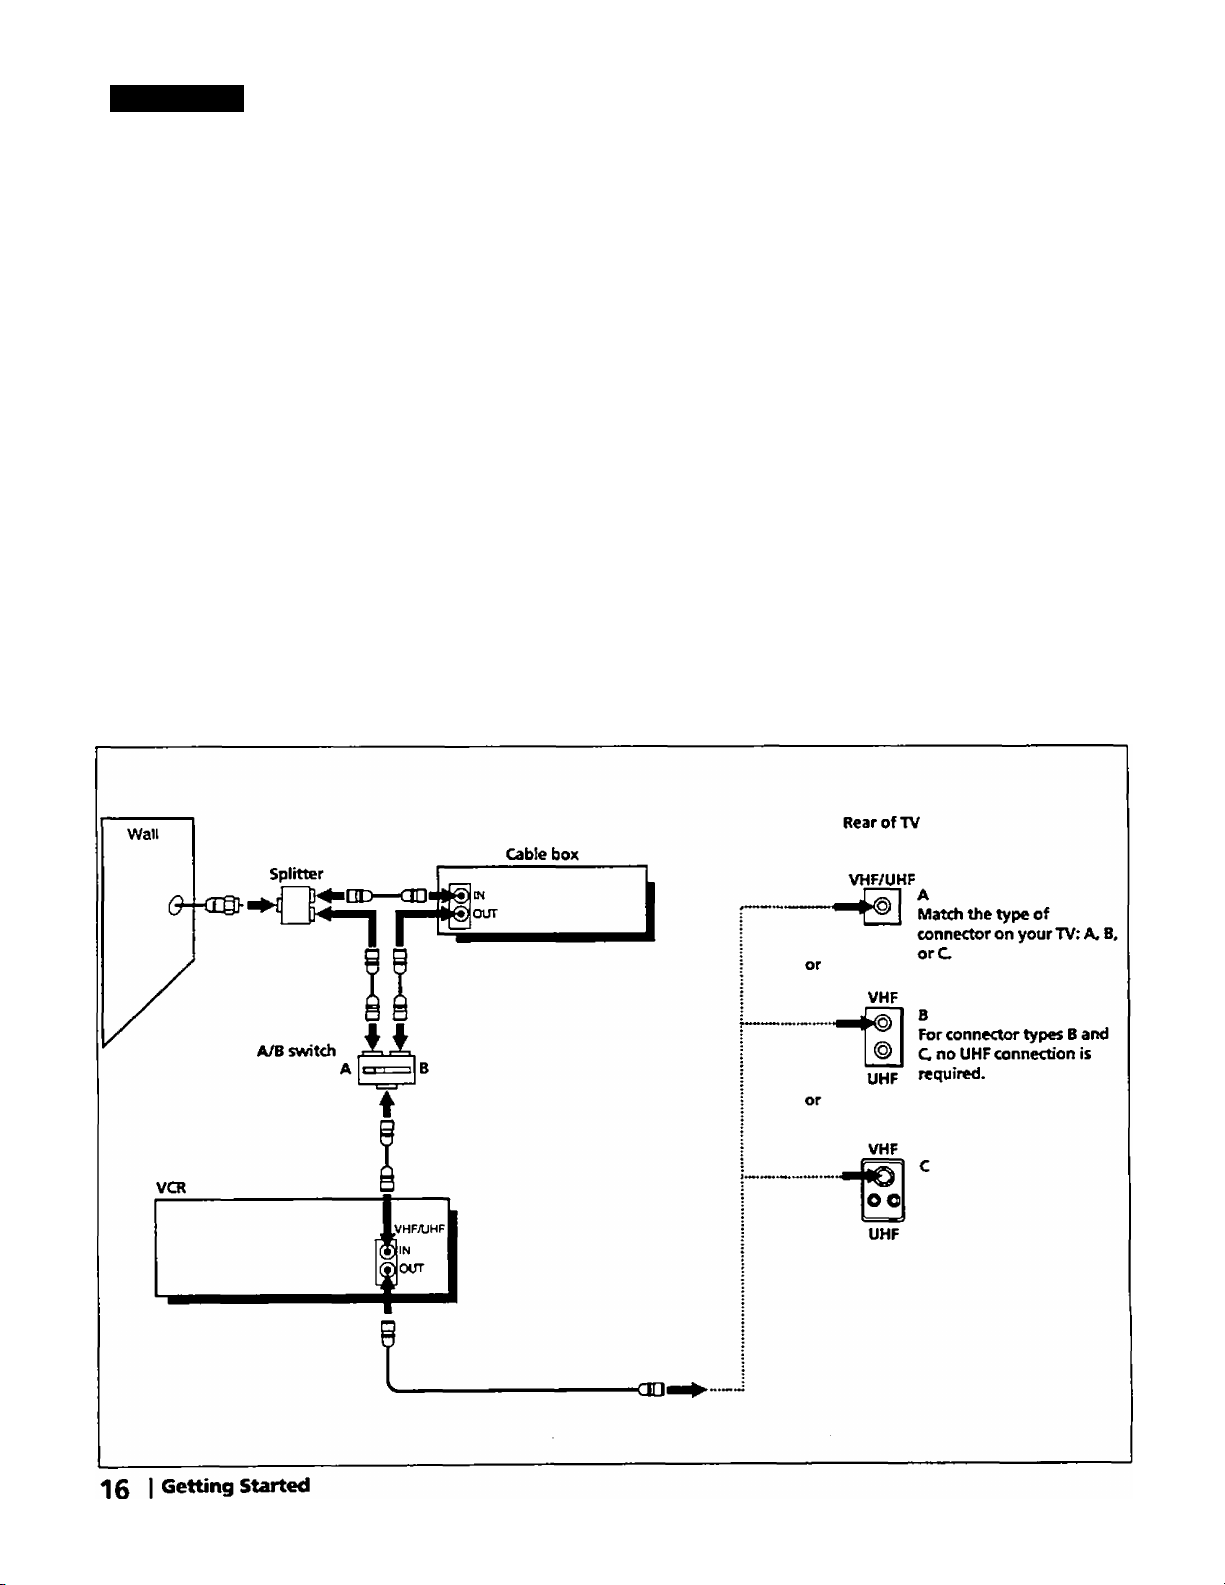
Hookup 2
Cable box with many
scrambled channels
Use this hookup if your cable company cannot supply a cable box that is
compatible with the VCR's cable box control feature, and your cable
system scrambles all, or most channels.
Background
This VCR can record virtually any unscrambled cable channel. Some
cable systems scramble specific channels, usually premium or pay-perview channels. Although this hookup lets you record these scrambled
channels, you must use the cable box rather than the VCR to select
channels.
What you can and can't do with this hookup
IVhaf you can cfo
• Record any channel by selecting the channel on the cable box
IVhatyou can't cfo
• Record with the cable box turned off
• Record one channel while watching another channel
• Record by selecting channels directly with the VCR
VCR
IVHF/UHF
5 IN
iOLTT
Cable box
<30i
or
or
Rear of TV
VHF/UHF
-a
VHF
UHF
VHF
oo
UHF
A Matdi the type of
connector on your
TV: A.B,orC
B For connector types
B and C no UHF
connection is
required.
^ Q I Getting Started
Page 11
Hookup 2; VCR setup
Hookup 2: VCR Plus+ channel setup
1 Set the RF UNIT switch to CH 3 or CH A, whichever
channel is not used in your area. If both are used^ set
the switch to either channel.
If you made A/V connections (from page 1), you can
skip this step.
2 Turn on your cable box.
3 SetNORM/CATVtoNORM:
Press MENU and select
TUNER PRESET.
MENU
TIMER SET/CMECK ► NORMiCATV
► TUNER PRESET ALfTO PRESET
SET VCR PUst CRA>MELS MANUAL SET •ADD
CABLE BOX CONTROL
CLOCK SET
For details, see pa9e 20.
Set NORM/CATV to NORM
and press EXECUTE.
TUNER PRESET CM3
AFT
Fine tunno
•NORM CATV
ERASE
OFF
•ON
1 Find the VCR Plus+ Channel Listing in your program
guide. For details on the VCR Plus+ Channel Listing,
see page 26.
2 Enter all the channels you want to record and the
cable box output channel (usuciUy 2,3, or 4):
Press MENU and select
SET VCR Plu5+ CHANNELS.
MENU
TIMER SETACHECK
TUNER PRESET
► SET VC« Pub . CHANNELS
CABLE BOX CONTROL
CLOCK SET
For details, see page 27.
You are now ready to use your VCR
A (^uick reference (back cover) to operations is
provided on the back cover to help you quickly enjoy
the basic functions. These procedures differ slightly
depending on the hookup used. Make a note of which
hookup you used (Hookup 2) so that you can always
follow the correct instructions.
Enter the program guide
channel, then the cable
box output channel.
SET VCR PUB. CHANNELS
— omoe CH
PUSH M KEYS TO SET
PROGRAM GUIDE CH
ORPUSH EXECUTE TO SEE
VC« Pvo. CHAI«£L Li$T
TV CM-
2
Program guide channel
Your cable box channel—
Press EXECUTE.
4 Preset the channels into the VCR:
Press MENU and select
TUNER PRESET.
MENU
TWER SCTX>iECK NORM/CATV HgORM CATV
► Tuner preset ► AUTO PRESET
SET VCR PXB. CHAM«LS
CABLE BOX OONTTtOL
CLOCK SET
For details, see page 20.
Press AUTO PRESET and
press EXECUTE.
TUNER PRESET CM3
MANUAL SET «ADD ERASE
AFT .ON OFF
FINE TUNOiC ,
^ i i i ^
— PLEASE WA(T —
^ ^ ^
Page 12
Hookup 3
Cable box with only a
few scrambled
channels
or
No cable box
Use this hookup if you do not have a cable box. Also use this hookup if
your cable company cannot supply a cable box that is compatible with
the VCR's cable box control feature, and your cable system scrambles
only a few channels.
Background
This VCR can record virtually any unscrambled cable charmel. Some
cable systems scramble specific channels, usually premium or pay-perview channels. You v/ill not be able to record scrambled charmels with
this hookup.
What you can and can't do with this hookup
What you can do
• Record 2my unscrambled cheumel
What you can't do
• Record scrambled channels that require a cable box
'12 I Getting Started
Page 13

Hookup 3: VCR setup
1 Set the RF UNIT switch to CH 3 or CH 4^ whichever
channel is not used in your area. If both are used^ set
the switch to either channel.
If you made A/V connections (from page 1), you can
skip this step.
Hookup 3: VCR Plu&t- channel setup
1 Find the VCR Plus+ Ch2innel Listing in your program
guide. For details on the VCR Plus+ Channel listing,
see page 26.
2 If the channels in the program guide are different
from the channels that you actually use on your TV,
set the channels that are different as follows:
2 SetNORM/CATVtoCATV:
Press MENU and select
TUNER PRESET.
mCR SCT/CWECK
»■ TIMER PRESET
SET VCR Pm*. CHANNELS
CABLE BOX COKTTXX
CLOCK SET
For details, see page 20.
Preset the channels into the VCR:
Set NORM/CATV to CATV
and press EXECUTE.
TUNER PRESET
»noruk:atv
AUTO PRESET
MANUAL SET
AFT
FINE TUNMO
CHS
NORM
• CATV
• ADO ERASE
• ON
OFF
Press MENU and
SET VCR Plus+ CHANNELS.
Enter the program guide
channel, then the channel
you use on your TV.
MENU
1»<EH STTiCMECK
tuner preset
»SET VCR Pm*. CHANNELS
CABLE BOX CONTROL
CLOCK SET
SET VCR Hu». CMA»MELS
— GUIDE CH TV CH
PUSH KEYS TO SET
PROGRAM GLnOE CM
OR. PUSH EXECUTE TO SEE
VCR Pin*, channel LtST
-----------
Program guide channel
Your actual TV channel •
4
For details, see page 27.
You are now ready to use your VCR
A Quick reference (back cover) to operations is
provided on the back cover to help you quickly enjoy
the basic functions. These procedures differ slightly
depending on the hookup used. Make a note of which
hookup you used (Hookup 3) so that you can always
follow the correct instructions.
Press EXECUTE.
Press MENU and select
TUNER PRESET.
MENU
TIMER SETCMECK NOflMCATV NORM «CATV
► tuner preset
SET VCR PXn . CHANNELS MANUAL SET
CABLE BOX CONTROL • AFT • ON OFF
CLOCK SET FINE TUNOJG
For details, see page 20.
Select AUTO PRESET
and press EXECUTE.
TUNER PRESET
► AUTO PRESET
—- please war ——
_______
•ADD ERASE
F X
CM3
______
Getting Started | t3
Page 14
Hookup 4
have cable TV).
Antenna hookup
A Use this hookup if you're using:
• VHF/UHF antenna (you get channels 2-13 and channels 14 and higher)
• UHF-only antenna (you get channels 14 and higher)
• separate VHF and UHF antennas
Rear of TV
VHF/UHF
connector on your
TV: A, B,orC
B Use this hookup if you're using a VHFonly antenna (you get channels 2-13 only)
or
or
if you cannot connect your antenna cable to the VCR directly
If your antenna cable is a flat cable (300-ohm twin lead cable)^ attach an
external antenna connector (not supplied) so that you can connect the
cable to the VHF/UHF IN jack. If you have separate cables for VHF and
UHF antennas, you may use a U/V band mixer (not supplied). For
details, see page 44.
Rear of TV
VHF/UHF
--®
VHF
UHF
VHF
04
UHF
Match the type of
connector on your
TV: A.B,orC
B For connector types
B and C, no UHF
connection is
required.
^4 I Getting started
Page 15

Hookup 4; VCR setup
Hookup 4: VCR Plus-t- channel setup
1 Set the RF UNIT switch to CH 3 or CH 4, whichever
channel is not used in your area. If both are used^ set
the switch to either channel.
If you made A/V connections (from page 7), you can
skip this step.
2 SetNORM/CATVtoNORM:
Press MENU and select
TUNER PRESET.
MENU
TlPi*£R SET/CHECK
► TUNER PRESET
SFT VCR PVic . CHANNELS
CABLE BOX CONTROL
CLOCK SCr
Set NORM^CATV to NORM
and press EXECUTE.
TUNER PRESET CH3
► NORM/CATV • NORM CATV
ALfTO PRESET
MANUAL SET
AFT
FINE TUNTNG
•ADD
ERASE
•ON OFF
1 Hnd the VCR Plus+ Channel Listing in your program
guide. For details on the VCR Plus+ Channel listing,
see page 26.
2 If the channels in the program guide are different
from the channels that you actually use on your TV,
set the cheinnels that are different as follows:
Press MENU and select
SET VCR Plus+ CHANNELS.
MENU
TIMER SETACMECK
TUNER PRESET
► SET VCR PV». OWWELS
CABLE BOX CONTROL
CLOCK SET
Enter the program guide
channel, then the channel
you use on your TV.
SET VCR Pxit. channels
-Guoe CH TV CH—
25 - A«
PUSH (« KEYS TO SET
PROGRAM GUIDE CH
Oa PUSH EXECUTE TO SEE
VCR PX». CHANNEL UST
Program guide chanitel
Your actual TV channel -
♦
For details, see page 27.
You are now ready to use your VCR
Press EXECUTE.
For details, see page 20.
3 Preset the channels into the VCR:
Press MENU and selea
TUNER PRESET.
MENU TUNER PRESET CH3
Timer setaocck
► TUNER PRESET
SET VCR Plm. channels
CABLE BOX CONTROL
CLOCK SET
For detailt, see page 20.
Select AUTO PRESET
and press EXECUTE.
NORUtlATV •norm CATV
► ALfTO PRESET
manual set
AFT
FINE TLININa
----
PLEASE
_______
--Г T
fc A
•ADO ERASE
• ON OFF
wxn —
T ^_________
A Quick reference (back cover) to operations is
provided on the back cover to help you quickly enjoy
the basic functions. These procedures differ slightly
depending on the hookup used. Make a note of which
hookup you used (Hookup 4) so that you can always
follow the correct instructions.
Getting Started
15
Page 16
Hookup 5
Cable box with only a
few scrambled
channels, using an A/B
switch
By using an A/B switch (not supplied), this hookup allows you to
record both scrambled and unscrambled channels conveniently. With
the A/B switch set to position “"A," you can record unscrambled
channels by selecting channels directly wdth the VCR. You only use
position "B" and the cable box to record a scrambled channel.
Background
This VCZR can record virtually any unscrambled cable channel. Some
cable systems scramble specific channels, usually premium or pay-per-
view channels. This hookup lets you record both unscrambled and
scrambled channels.
What you can and can't do with this hookup
Vffhat you can do
• Record any unscrambled channel by selecting the channel directly
with your VCR (the A/B switch is set to "A")
• Record any scrambled channel by selecting the channel on the cable
box the (the A/B switch is set to "B")
What you can't do
• Record one channel while watching another channel
Page 17

Hookup 5: VCR setup
Hookup S: VCR Plus-h channel setup
1 Set the RF UNIT switch to CH 3 or CH 4^ whichever
channel is not used in your area. If both are used^ set
the switch to either channel.
If you made A/V connections (from page 1), you can
skip this step.
2 Set the A/B switch to "A.*"'
3 SetNORM/CATVtoCATV;
Press MENU and select
TUNER PRESET.
MENU
TWEfl Srr/CMEC*C
► tuner preset
SET VCR Pku* Channels
CABLE BOX CONTROL
CLOO SET
For details, see page 20.
Set NORM/CATV to CATV
and press EXECUTE.
TUNER PRESET CH2
► normicatv
AUTO PRESET
MANUAL SET •ADO ERASE
AFT
FV{E TWNQ
•CATV
NORM
*ON 0*T
1 Bnd the VCR Plus-i- Channel Listing in your program
guide. For details on the VCR Plus+ Channel listing,
see page 26.
2 For unscrambled channels, if the channels in the
program guide are different from the channels that
you actually use on your TV, set the channels that are
different as follows:
Press MENU and select
SET VCR Plus+
CHANNELS.
MENU
TWER SFTCHECX
TUNER PRESET
SET VCR PXzs. CHANNELS
► CABLE BOX CONTROL
CLOCK SET
For details, see page 27.
Enter the program guide
channel, then the channel
you use on your TV.
SET VCR PiMt CKAM«LS
PUSH 0-9 KEYS TO SET
program GUIDE CH
OR PUSH execute to see
VCR PX»t CMAr#4EL LIST
Program guide channel
Your actual TV channel —
Press EXECUTE,
3 For scrambled channels, enter all the scrambled
channels you want to record and the cable box output
channel (usually 2,3, or 4):
ID
CS
3
I
4 Press the channels into the VCR.
Press MENU and select
TUNER PRESET.
MENU
TWER SETCHECK
► tuner PRESET
SET VCR Plui. channels
CABLE BOX CONTROL
CLOCK SET
For details, see page 20.
Select AUTO PRESET
and press EXECUTE.
TUNER PRESET CM3
NORM/CATV
► AUTO PRESET
AWNUAL SET •ADD ERASE
AFT •ON OFT
FINE TUN»jQ
-----
NORM >CATV
PLEASE WAG
t ^
à ^
--------
T ^_________
5 Preset the cable box output channel (usually 2,3, or 4):
Enter the cable box output
Press MENU and select
TUNER PRESET.
MENU
TIMER SET/CHECK
► TUNER PRESET
SET VCR Plutt channels
CABLE BOX CONTROL
CLOCK SET
channel.
Set MANUAL SET to ADD
TUNER PRESET
NORAVCATV
AUTO PRESET
► manual set •ADO
AFT
FWE TUNWG
NORM »CATV
ERASE
•ON OFF
CH3
Press MENU artd select
SET VCR Plus-f^
CHANNELS.
MENU
TIMER SET«M£CK
TUNER PRESET
► SET VCR Rw* CHANNELS
CABLE BOX CONTROL
CLOCK SET
For details, see page 27.
Enter the Program guide
channel, then the cable
box output chanrtel.
SET VCR PAN. CHANNELS
-GUIDE CH
25
PUSH M KEYS TO SET
PROGRAM QUOe CH
OR PUSH EXECUTE TO SEE
VCR Plu». CHAMVEL UST
Program guide channel
Your cable box channel -
Mr
Press EXECUTE.
For details, see page 21.
Getting Started | ^ 7
Page 18

Hookup 5
1 WM aa c aiwifv icdwjf ywwi
Cable box with only a few
scrambled channels, using an
A/B switch (continued)
To play a tape
1 Set the TV to channel 3 or 4 (or to video input, if you naade A/V
connections.)
2 Insert a tape and press O- PLAY.
To record an unscrambled channel
1 Set the A/B switch to "A."
2 Press VCR Plus+ on the remote commander.
3 Enter the program's PlusCode number.
4 Press ONCE, DAILY, or WEEKLY.
5 Insert a tape.
6 Press POWER to rum off the VCR.
To record a scrambled channel
1 Set the A/B switch to ''B."
2 Turn on the cable box.
3 Set the cable box to the channel you want to record.
4 Press VCR PIus+ on the remote commander.
5 Enter the program's PlusCode number.
6 Press ONŒ, DAILY, or WEEKLY.
7 Insert a tape.
8 Press POWER to turn off the VCR.
9 Leave the cable box on.
To watch TV
1 Turn off your VCR, or press the VCR's TV/VTR button imtil the VTR
indicator in the display window goes off.
2 Set the A/B switch to "B."
3 Turn on your cable box.
4 Set the TV to the cable box output channel (usually 2,3, or 4).
5 Set the cable box to the channel you want to watch.
^ 3 I Getting Started
Page 19

step 4: Setting the
clock
Set the time and date to use the timer feature for recording programs.
1 Press MENU.
The main MENU appears on the TV
screen.
MENU
► TIMER SETiCMECK
TUNER PRESET
SET VCR Pvn . CHANNELS
CABLE BOX CONTROL
CLOCK SET
ID
O
o
S
3*
X
o o
O O O CD
O 'CD CD *e>
o o
O O 0(00,
-MENU
■ CURSOR
•EXECUTE
Press the CURSOR buttons
to move the cursor (P) to CLOCK
SET, then press EXECUTE.
The CLOCK SET menu appears on the TV
screen and the month flashes.
Set the month using the CURSOR
{<^!^) buttons.
Press CURSOR [> so that the day
flashes and set the day using the
CURSOR (/ ^ ) buttons.
The day of the week is set automatically.
Press CURSOR so that the year
flashes and set the year using the
CURSOR buttons.
CLOCK SET
.. U*-!\
994 SAT 12; 00 AM
^T^
C^OCKSET
-^¿-/1994 PRI12:00AM
.aJi M994
7/t-M994.~ FRI 12;00AM
FRI 12.00AM
A
SONY
V.
Note
• The menu disappears
automatically if you don't
proceed for more than a few
minutes.
Press CURSOR O so that the hour
flashes and set the hour using the
CURSOR ( / ^ ) buttons.
Press CURSOR D> so that the
minutes flash and set the minutes
using the CURSOR
buttons.
8 Press EXECUTE to start the dock.
CLOCK SET
Tit /1994
Clock SET
7M /1994
FRI—3
Getting Started | ^ 9
Page 20

Presetting channels
(Skip this section if you are using cable box control.)
MENU
CURSOR
EXECUTE
AlUO V \ji ICCCiVlXig VAX! iOA LAICIS A. WAAA 4CAAiA A*X
to 69 and unscrambled CATV channels 1 to 125. First, we recommend
that you preset the receivable channels in your area using automatic
presetting. Then, if there eire any unwanted channels, disable them
manually. If you have decided which channels you wish to preset, set
them directly using manual presetting.
Before you start...
• Turn on the VCR and the TV.
• Set the TV to the VCR channel (channel 3 or 4). If your TV is
connected to the VCR using A/V connections, set the TV to video
input.
• Press TV/VTR to display the VTR indicator in the VCR^s display
window.
• Press INPUT SELECT so that a channel number appears in the VCR's
display window.
Presetting all receivable channels automatically
1 Press MENU.
The main MENU appears on the TV
screen.
Press the CURSOR buttons
to move the cursor (P) to TUNER
PRESET, then press EXECUTE.
The TUNER PRESET menu appears on
the TV screen.
Press the CURSOR buttons
to move the cursor (P) to NORM/
CATV.
Select NORM or CATV using the CURSOR (O / O) buttons:
• To preset cable TV channels, select
CATV.
• To preset VHF and UHF channels,
select NORM.
MENU
TMER SETK^fECK
► TUNER PRESET
SET VCR Pu. CKAJSNELS
OSLE tOX CONTROt.
OjOCX set
TUNER PRESET
NORUCATV
AUTO PRESET
► MANUAL SET
ATT
FME TUNINO
TUNER PRESET CH2
► KtORMCATV
AUTO PRESET
MANUAL SET
AFT
FWE TUNINO
CH2
CATV
•NORM
•ADO ERASE
•ON OFF
•NORM CATV
•ADO ERASE
OFF
•ON
Page 21

Press the CURSOR buttons
to move the cursor (^) to AUTO
PRESET, then press EXECUTE.
AH receivable channels are preset in
numerical sequence. When no more
receivable channels can be found,
presetting stops and the picture from the
lowest numbered channel is displayed on
the TV screen.
Presetting/disabling channels manually
TUNER PRESET
PAinO PRESET
uw«jal set >aoo erase
AFT .ON OFF
FINE TUNWC .
— PLEASE WAXT —
______
^ T
_______________
CM2
CO.TV
o
S;
MENU
CURSOR
EXECUTE
Number
buttons.
ENTER
CH+/-
Display the TUNER PRESET menu.
For instructions, follow steps 1 and 2 in
^Tresetting all receivable channels
automatically."
Select the channel to preset or disable:
• To preset a channel, enter the channel
number by pressing the number
buttons then ENTER.
• To disable a chaimel, sdect the channel
number by pressing CH +/-.
Set MANUAL SET to ADD or ERASE,
using the CURSOR
buttons:
• To preset a channel, select ADD.
• To disable a channel, select ERASE.
Repeat steps 2 and 3 to preset or disable channels as required, then press EXECUTE.
TUNER PRESET
NORMCATV
AUTO PRESET
»MANUAL SET
AFT
FINE TUNMG
TUNER PRESET CMS
NOflWCATV
AUTO PRESET
»MANUAL SET
AFT
FINE TUMNO
TUNER PRESET
NORWCATV
AUTO PRESET
»MANUAL SET
AFT
FME TUMNO
CM2
•NORM CATV
• AOO ERASE
OFF
•ON
.NORM CATV
•AOO ERASE
OFF
•ON
CMS
•NOMA
CATV
•ADO ERASE
OFF
•ON
Getting Started | 21
Page 22

Presetting channels
(continued)
Cable TV channel assignment
Cable TV systems use letters or numerals to designate channels. This
VCR is designed to correspond with standard cable systems. The chart
below shows the channel numbers on this VCR and the corresponding
cable TV chaimels. Note that the channel number assignment shown in
the chart may not correspond to the channel number used by your local
cable company. Check with your local cable TV company for more
information on the available channels.
MENU
CURSOR
EXECUTE
A-8
21
22 23
H
36
V
w W+1
m 125
W+83 W+84
1 2
I
2
24 25
J
37
38 53
W+2
3 12
3
12
26
L M
K
W+S7W+58 A-5
13 14
13 A
27 28
N O
94
15 16 17
29
95
96 97 98
A-i A-3
B C D
30 31
P
Q
Number on this VCR |
Cable TV channel
IS 19 20
E F
G
S T
34 35
U
32 33
99 100 101
A-1 W+59W+60
If the picture is not clear
Normally, the Auto Fine Tuning (AFT) function automatically tunes in
channels clearly. If, however, the picture of a channel is not dear, you
may also use the manual tuning function.
Display the TUNER PRESET menu.
For instructions, follow steps 1 and 2 in
"Tresetting all receivable channels
automatically."
TUNER PRESET
NOftWCATV
AUTO PRESET
»MANUAL SET
APT
FWE TUN)W
•NOAM CATV
■ AOOERASE
0*T
.ON
R
A-2
CHi
Number
buttons,
ENTER
Select the channel you want to finetune by pressing the number buttons
and then ENTER.
Press the CURSOR buttons to
move the cursor (P-) to HNE TUNING.
The fine tuning meter appears.
Press the CURSOR «I/O) buttons to
get a clearer picture, then press
EXECUTE.
Note that the AFT setting switches to OFF.
TUNER PRESET
N0RWCA7V
AUTO PRESET
»manual set *A00 ERASE
AFT
FINE TUMNO
TUNER PRESET CNS
NORUCATV •NORM
AUTO PRESET
MANUAL Srr •AOO
AFT
»FINE TUMNO
TUNER PRESET CHS
NORMOATV
AUTO PRESET
MANUAL SET
ATT
»FINE TUNING
.NORM
.ON OFF
• ON OFF
•norm CATV
•AOO ERASE
ON »OFT
CHS
CATV
CATV
ERASE
-
■ 1
Page 23

Setting upcable box control
I OUT mcluaes a caDle box control feature which allows the VCR to
control most brands of cable boxes via the Cable Mouse. With cable box
control, the VCR controls channels on the cable box for timer recording.
You can also use the VCR's remote commander to change channels on
the cable box whenever the cable box is turned on. To use cable box
control, you need to connect the Cable Mouse (page 8) and set the code
number and output channel.
MENU
CURSOR
EXECUTE
Number
buttons
This VCR is programmed with codes necessary to control channel
selection on most brands of cable boxes at the time this VCR was
manufactured. It is possible that new cable boxes may be introduced
that cannot be controlled with this VCR's Cable Mouse. If you have a
cable box that is incompatible with this VCR, contact your cable
operator — they may be able to provide you with a compatible cable
box.
1 Press MENU.
The main MENU appears on the TV
screen.
Press the CURSOR ( ) buttons
to move the cursor (P) to CABLE
MENU
► TIMER SET/CWECK
TUNER PRESCT
SET VCR PM* CHU^NELS
CABLE BOX CONTROL
CLOCK SET
CABLE BOX CONTROL
•ON OPP
BOX CONTROU then press EXECUfE.
The CABLE BOX CONTROL menu
appears.
Press the CURSOR (<3 f O) buttons to select ON, then press EXECUTE.
USE ► -► TD SELECT
PUSH EXECUTE FOR FIRST
TTME SETUP
PUSH MENU TO OUT
YOUR CABLE BOX COM NO
ENTER YOUR CABLE BOX
COM NO USING 0-9 KEYS
REFER TO THE OPERATING
MANUAL FOR THE COM
THEN PLISH EXECUTE
%*✓
Enter the cable box code number
by pressing the number buttons,
then press EXECUTE.
Find your cable box code number from
the chart on the following page.
5 Select the output channel for cable
box using the CURSOR (^/^)
buttons, then press EXECUTE.
YOUR CABLE BOX OUTPUT CM
cm
• CMJ
CM4
LME (LINE IN ON VCR]
USE • * TO SELECT CABLE
BOX CM then push execute
Getting started | 23
Page 24

Setting up cable box control
(continued)
\jomfNmoi« cao№ ooxes ana meir coae numoers
Try using the Primary Use No. first, if it doesn't work the Secondary
No. may.
Cable box
brand
Drake
Eastern 20
Gemini 28
Hamlin/Regal 14,15,43
Jerrold/GI
Macom 26,37
Magnavox 36
Oak
Panasonic 12,13
Philips 22 21,23,24
Honeer
RCA
tR axle no.
Primary
use
1,2,3,4
17,18
8,9 Viewstar
IR code no.
Secondary
use
38
16,44
10,11,30,31,32
19
25
Cable box
brand
Regency
Scientific
Atlanta
Texscan 27
Tocom
Toshiba
Unika
United Cable 3
United
Satellite
Video Tech 39
Videoway
Zenith
IRcode rx).
Primary
use
20
5,6
10,11
7
IR code no.
Secondary
use
3S
41
42
40
22,23
33,34
The VCR contains 44 cable box code numbers (1 to 44). If your cable
box is not listed above, you may try one of the other codes.
Page 25

Tips for rformal viewing
• Place the Cable Mouse so that it hangs out over the cable box front.
• Position the cable box away from the VCR.
• Do not place the cable box on top of the VCR.
• Point the remote commander at the VCR, not at the cable box.
• Tap the buttons lightly; do not hold them pressed down.
?
I
i
Note
• Tap the buttons on the
remote commander lightly.
Do not hold the buttons
down.
To check the cable box control setting
1 Press CH+/-on the remote commander. Does the channel indicator
on the cable box change? (Point the remote commander at the VCR,
not at the cable box.)
2 Press alllO number buttons (0 to 9) on the remote commander. Does
the charmel indicator on the cable box change?
If the answer to both 1 and 2 is "yes," you have made the correct setting.
If you cannot get your VCR to control the cable box
✓ Check the position of the Cable Mouse.
/ Place the cable box and VCR away from each other. Do not place the
cable box on top of the VCR.
Try the setup again making sure to use the correct control code. If the
cable box still does not respond you can try other codes.
If your cable box still does not operate with the Cable Mouse, contact
your cable company to see if they can provide you with a compatible
cable box.
Page 26

Setting up VCR Pius+
Example of '’PiusCode*
/S;30 EMOVIE-MusicaI(2hrs.) 1330441
□ SPORT - Golf {1hr 25min.) 42060
Eaa-WS9974
^6:30 HEinDRAMA-Comedy(2hrs.) 17390
DSCIENCE AND TECHNOLOGY
(Ihr. ISmin.) 73457
Example of 'Channel Line-up Chart'
PlusCode
VCR Plus+ is a feature in Sony VCRs that simplifies the task of
programming the VCR to make timer recordings.
How VCR Plus<f works
Whenever you want to record a TV program, all you need to do is look
up the program's "PlusCode," a number assigned to each program
that's published in the TV section of most newspapers, cable TV listings,
and even TV GUIDE magazine. Then, just enter the PlusCode of the
program you want and the VCR is automatically programmed to record
that show. It's that simple. With VCR Plus+, you no longer have to go
through a lengthy and often repetitive procedure when you set start and
stop times, channel numbers, and dates. All this information is
automatically sent to your VCR when you enter the program's
PlusCode.
How to set up your VCR
Setting up your VCR involves coordinating the TV channel number (the
number you turn to on your TV or VCR to watch a program) with the
guide channel (the number that's assigned to that channel in your
program guide). To get the guide channel numbers, find the "Channel
Line-up Chart" in the program guide for your area that features VCR
PlusCodes. It usually looks like the example to the left.
For each channel your VCR receives, use the Channel Line-up Chart to
check that the chaimel numbers match. For example, if HBO is listed in
the Channel Line-up Chart on channel 33, and your VCR receives HBO
on channel 15, you need to coordinate these numbers using the
following procedure. For channels in which the numbers are the same
(for example, if your VCR receives HBO on channel 33, and the guide
channel number is 33), you can skip this procedure.
Page 27

MENU
CURSOR
EXECUTE
1 Press MENU.
The main MENU appears on the TV
screen.
MENU
TIMER SETOCCK
TUWER PREStT
SET VCR P%a * CHWiELS
CABLE BOX CONTROL
CLOCK SFT
Number
buttons,
ENTER
Press the CURSOR (/ cp) buttons
to nrwve the cursor (P^) to SET VCR
PIUS4- CHANNELS, then press
EXECUTE.
The SET VCR Plus+ CHANNELS menu
appears and the GUIDE CH column
flashes.
Enter the channel number assigned
in the program guide and press
ENTER.
The TV CH column flashes.
If you made Hookup 1, 3, or 4,
enter the actual number on your
TV (and VCR) and press ENTER.
If you made Hookiq> 2, enter the
cable output channel (usually 2,
3, or 4) and press ENTER.
If you made Hookup 5, enter the
actual number on your TV (and
VCR) for an unscrambled channel
and press ENTER. For a scrambled
channel, enter the cable output
channel (usually 2, 3, or 4) and
press ENTER.
SET vCR PW channels
ouiot^ TV CH
KEYS TO SET
PROGftAM OUlOE CH
OR. PUSH EXECUTE TO SEE
VCR Plus. CHANNEL LtST
SET VCR PXia. CHANNELS
CUOE CH T\io«
IS • “25.^
PUSH ft-# KEYS L SET
your tv CH
TVCN PUSH ENTER
SET VCR PXi*. CHANNELS
CUIOE CH TV CM
PUSH KEYS TO SET
PROGRAM GUIDE CH
OR. PUSH EXECl/TE TO SEE
VCR PVi». CHANNEL UST
Repeat steps 3 and 4 for each
channel whose numbers don't
match.
When you have set all channels,
press EXECUTE to confirm your
channel settings.
When you've finished, press MENU
to exit.
VCR Pkf»« CHANNEL UST
PACE 1
GLROE TV GUIDE
11 • S5 13
18 * 36 20 8
21 * 11 39 15
M • »
» • A«
use «--»TO CHANGE PAGE
PUSH LENU TO OUfT
Getting Started | 27
3« IIS
AS 13
TV
14
Page 28

Basic Operations
Playing atape
n
CID i
L —
-T
___
This section shows you how to play back a video tape.
1 Turn on your TV and tune in to the
VCR:
• If the TV is connected to the VCR using
the audio/video cable, set the TV to
video input
• If the TV is connected to the VCR using
only the antenna cable, set the TV to
the channel for the VCR.
r'
2 Insert a tape.
The VCR turns on automatically. The tape
starts playing automabcaJly if its safety
tab has been removed.
REJECT
II PAUSE
O-PLAY
■ STOP
DUAL MODE
SHUTTLE
ring
3 Press PLAY to start pla^ng.
When the tape reaches the end, the VCR
automatically rewinds it to the beginning.
(The power remains on.)
Additional tasks
To
Slop play
Pause play It PAUSE
Resume play after pause
Search-forward
Search backward Turn the DMS ring to 9 during playback
Fast-forward the tape
Revrind the tape
Eject the tape REJECT
Press
■ STOP
IIPAUSEorP=-PLAY
Turn the DUAL MODE SHUTTLE CDMS) ring
to S during playback
Turn the DMS ring to ►► during stop
Turn the DMS ring to during stop
• For further infonnalion on
searching and playback
functions, see 'Tlaying/
searching at various speeds"
on page 40.
Note
• Tapes recorded in LP mode
can be played back on this
VCR, while playback in
modes other than normal
forward speed is not
guaranteed.
28 I Basic Operations
Page 29

Notes
• When you insert a tape with
a short tape length such as T20, T'30 or a non-standard
commerciaUy available tape,
the remaining tape length
may not be correct.
• The display will not appear
during still mode or slowmotion playback.
Displaying the remaining tape length and time
counter
Press DISPLAY to turn the display on or off.
Notes
• When a tape is reinserted,
the counter returns to
"OHOOMOOS."
• The counter will not work on
tape portions with no
recording.
The white bar represents the
approximate lerigth of tape remainir>g.
Time counter
Using the time counter
At the point on a tape that you want to find later, press COUNTER
RESET tp reset the counter to "0H(X)M00S." When you rewind or
advance the tape to this point, refer to the counter.
Basic Operations | ^
Page 30

Recording TV
programs
This section shows you how to record TV programs in the most basic
way: manual recording. With manual recording, you start the VCR
recording when the program begins, then stop it when the program
ends. The VCR also provides the following ways of recording.
• Manually start recording, then stop it automatically—^TRecordmg
using the quick timer" (page 31)
• Automatically start and stop recording—"Recording TV programs
using the timer'^ (page 33)
• Automatically start and stop recording just by entering the "Plus
Code"—"Recording TV programs using VCR Plus+" (page 36)
Turn on your TV and tune ¡n to the
vat
• If the TV is connected to the VCR
using the audio/video cable, set the
TV to video input.
• If the TV is connected to the VCR
using only the antenna cable, set the
TV to the channel for the VCR.
When using a cable box, turn it on.
Insert a tape with its safety tab in
place.
Note
• If you insert a tape with its
safety tab removed^ the VCR
starts playing. To record on
this tap>e, cover the tab hole.
rip
• To select charmels, you can
also use the number buttons
on the remote commander.
Enter the desired channel
number using the number
buttons, then press ENTER.
Press INPUT SELECT until a channel
number appears in the VCR s
display window.
—
VTR
_______
-
Select the desired channel by pressing CH +/-.
VTR
Select the tape speed, SP or EP, by pressing TAPE SPEED.
See ^To select tape speeds" on the next
page.
f SP
k
VTR
6 Start recording by pressing #REC .
When the tape reaches the end, the VCR
automatically rewinds it to the beginning.
1
J
TT»
f C
t (
,c)
Page 31

Tips
• To cut out an unwanted
scene while recording, press
11 PAUSE, turn the DUAL
MODE SHUTTLE ring
on the VCR to rewind the
tape to the beginning of the
unwanted scene, then press
11 PAUSE to resume
recording.
• The display appears on the
TV screen indicating
information about the tape,
but the information will not
be recorded on the tape.
• Ifyoudon't want to watch
TV while recording, you can
turn off the TV. When using
a cable box, make sure to
leave it on.
Note
• If you've inserted a tape with
its safety tab removed, the
VCR ejects it when you press
• REC.
To stop recording
Press ■ STOP.
To select tape speeds
When recording, select either SP or EP. EP provides recording time
three times as long as SP. However, SP provides better picture quality.
You can mix SP and EP on the same tape. When playing back, the VCR
automatically detects the tape speed. See the table below for the
maximum recording/playback time in each speed.
Tape type
T-160
T-120
T-30
Maximum recordingfplaybadc time
SP
2 hrs. 40 min.
2 his.
Ihr.
30 min. 1 hr. 30 min.
EP
8 hrs.
6 hrs.
3hrs.
Recording using the quick tinner
The quick timer enables you to record for a specified period of time in
intervals of 30 minutes. Once you specify the recording time, the VCR
autonaatically stops recording. Before you begin, check that the clock is
set correctly.
Press QUICK TIMER until the desired duration appears in the display
window. The TIMER REC indicator on the VCR lights up. Each press
increases the recording duration in increments of 30 minutes as shown
below.
0:00 -► 0:30 -► 1 ;00
---------
► 8:30 -► 9:00
1
The recording duration decreases minute by minute to 0:00, then the
VCR turns off automatically.
To stop recording
Press ■ STOP,
To extend the recording duration while recording
Press QUICK TIMER until the desired duration appears in the display
window.
Basic Operations | 31
Page 32

Recording TV programs
(continued)
Watching a TV program while recording another
You can watch a TV program and record another at the same time.
1 Press TV/VTR to turn off the VTR indicator in the display window.
2 If the TV is connected to the VCR using the audio/video cable, set the
TV to TV input
If the TV is connected to the VCR using only the antenna cable, skip
this step.
3 Select the desired channel on the TV.
Saving a recording
Video tapes have a safety tab to protect against accidental recording. To
prevent accidental erasure of a recording, break off the safety tab with a
screwdriver or other tool. A tape with its safety tab removed ejects if
you try to record on it.
To record on a tape with its safety tab removed, cover the tab hole with
adhesive tape.
Adhesive tape
32 I Basic Operatiorts
Page 33

Recording TV programs using the timer
POWER
MENU
CURSOR
EXECUTE
This section shows you how to let the VCR automatically start and stop
recording TV programs- You can preset up to eight programs within a
one month time frame. If VCR PIus+ is available in your area, see the
section "Recording TV programs using VCR Plus+" on page 36 for
easier timer recording.
Before you start...
• Check that the clock is set correctly.
• Insert a tape with its safety tab in place. Make sure the tape is longer
than the total recording time.
• Turn on your TV and tune in to the VCR.
When using a cable box, turn it on.
Press MENU and select TIMER SET/
CHECK.
STTJCMECX
DATE START STOP
If the dock needs to be set,^TLEASE SET
THE CLOCK" appears on the screen and
the VCR automatically enters the dock
setting mode.
Set the date to start recording:
1 PressCURSOR O.
Make sure toda/s date is flashing. If it
isn't, reset the dock to the correct time.
2 Press CURSOR ^ to set the month
and date.
The day of the week is set
automatically.
To record the same program every day or
the same day once a week, see 'Daily/
weekly recording" on page 35.
Set the time to start recording:
1 Press CURSOR D> to flash the hour
imder "START," then press the
CURSOR (^ ) buttons to set the
hour.
2 Press CURSOR G> to flash the minutes
under "START," then press the
CURSOR (^) buttons to set the
minutes.
tiuehsttcheck
ST/WT STOP
■ ^
TWCR SCT/CHEOC
7i 10
OATT STOP
7M0 OlH ^^<3^ •
W * * . .
(continued)
Basic Operations | 33
Page 34

Recording TV programs using
the timer (continued)
Press CURSOR , then set the
time to stop recording in the same
way.
TIME1ISCTOCCK 7/4 um
tWTl STAin STQf^ CX
7i tOM • OOHJ»^VW . • »
Tips
• To set the channel, you can
also use the CH+/- or
number buttons.
• To record a video source
from the LINE IN jacks,
press INPUT SELECT to
display "L" in the “CH"
p>osition.
rip
• To set the recording tape
speed, you can also use
TAPE SPEED.
Tip
• To change or correct a
setting before confirming it,
press CURSOR ^ to flash
the item you want to change
and reset it
Press CURSOR [>«then press the
CURSOR (c2::i / ) buttons to select
the channel you want to record.
Only the channels preset in the VCR will
appear. When using a cable box, the cable
box channels appear.
Press CURSOR O, then press the
CURSOR () buttons to select
the tape speed, SP or EP.
See 'To select tape speeds" on page 31.
To confirm your program, press CURSOR O.
All the settings stop flashing and the
cursor (►) appears in the leftmost column.
To preset another timer setting, move the
cursor to the next line using CURSOR ^
and repeat steps 2 to 7.
8 After making the desired timer
settings, press EXECUTE.
TtuCR SfTOCCX TH UO)
DAIi STAm iTO^
7/ to&n » OOMII. ssr
T»eRse7iOcoc 7 t4
QATI STAin
./* * * * *
w .. * * * *
* / * * •: * *
. /.. *; * *
* /■ *. * * *
TaACn srrx>ccx 7/4 HOi
OATH STAKT STO^ CH
»-7/ 10SLH •. OOKM SS7W 3* E7
--------
STD^
HOM
::
Press POWER to turn off the VCR.
The TIMER indicator on the VCR
lights up and the VCR stands by for
recording. When using a cable box, leave
it on.
The VCR automatically turns on and
starts recording at the preset start time,
and turns off at the preset stop time.
To stop recording
Press ■ STOP.
Page 35

To use the VCR while recording
You can do the following tasks during timer recording.
To
Reset the counter to "0H00MCK)S"
Display tape information on the TV
screen
Check the timer settings
Watch another TV program
Press
COUNTER RESET
DISPLAY
MENU and select TIMER SET/CHECK
TV/VTR (See "Watching a TV program
while recording another" on page 32.)
Using the VCR before timer recording begins
Press POWER to turn on the VCR. The TIMER indicator on the
VCR goes off and the VCR is ready for use.
After using the VCR, turn off the VCR again to turn on the TIMER
indicator on the VCR. When using a cable box, leave it on. Remember to
turn off the VCR before the time you've set the VCR to start recording,
or the timer setting will be cancelled.
Daily/weekly recording
T
the current date
I
SUN-SAT
I
MON-SAT
MON-FRI
I
EVERY SAT
EVERY MON
I
EVERY SUN
I
1 month later
(cycles backward)
Daily/weekly recording
Daily recording records the same program every day of the week;
weekly recording records the same program on the same day, every
week.
When you set the date to start recording in step 2 of ''Recording TV
programs using the timer," press CURSOR until the desired day
appears. Each time you press the button, the indication changes as
shown on the left.
Basic Operations | 35
Page 36

Recording TV
programs using VCR
PÌUS+
POWER
TIMER
CLEAR
VCRPIUS4ONCE
WEEKLY
DAILY
TAPE
SPEED
Number
buttons
This section shows you another way of timer recording: recording using
VCR Plus+. This allows you to record TV programs more easily. Just
enter the program's ^TlusCode", and the VCR will automatically record
the program. You can preset up to eight programs within a one month
time frame.
Before you start...
• Check that the dock is set correctly.
• Insert a tape with its safety tab in place. Make sure the tape is longer
than the total recording time.
• Turn on your TV and tune in to the VCR.
When using a cable box, turn it on.
Press VCR Plus-p.
If the dock needs to be set, 'TLEASE SET
THE CLCXZK" appears on the screen and
the VCR automatically enters the dock
setting mode.
Enter the desired program's PiusCode using the number buttons.
If you make a mistake, press TIMER
CLEAR and enter the PiusCode again.
vcn Pm.
PLUSCOOC T«>c socco
t
.............
1 (SPI
ENTER РП0С1ШГЗ PCUSOOOC
VSINC 0-9 KEYS
TO OiANCE TAPC SPEED.
PUSH TAPE SPECO
VCR PM.
PLUSCOOC TAPE SPEED
«3!
.........
1 [SPl
APTCR ENTCPNG PLUSCOOC.
PUSH 0NCCDAA.Y.
OB WEIW.Y
IF YOU UAKC A hUSTAKE,
PUSH CLEAR
Notes
• You cannot set VCR Plus+in
the following cases:
- When the VCR is tiumed
off.
- While recording using the
timer or quick timer.
• The tuner will not accept
settings in the following
cases:
- When you select DAILY
for a Saturday and Sunday
program.
- When you select DAILY or
WEEKLY for a program
more than seven days
ahead.
- When you enter the
PiusCode of a program
that has already ended.
Select the tape speed, SP or EP, by
vCR Pm*
pressing TAPE SPEED.
AFTER EHTERWO РШЭОООС,
PUSH ONCCDAJLY,
ОЙ WEEKLY
IF YOU UAKC A MISTAKE,
PUSH CLEAR
4 Press ONCE, DAILY or WEEKLY
according to the following:
To record the program
Only once
Monday to Friday at the same scheduled time DAILY
Every week at the same scheduled time
The recording information appears on the
TV screen: date, program start and stop
times, chaimel number and tape speed.
Check that the information is correct.
To preset another timer setting, repeat
steps 1 to 4.
VCR Pm.
DATE START STOP CH
UnO№ SOOPU IDOOPH 3> SP
TO Srr TIMER PUSH POWER
TO CANCO-PuSH Clear
PLUSCOOC ТАРЕ SPEED
(«ZST-.-l tSPI
Press
ONCE
WEEKLY
PLUSCOOC TAPE SPCCO
tA»ST---] tSPi
RCCOFSwa TIME
Page 37

Press POWER to turn off the VCR.
The TIMER indicator on the VCR
lights up and the VCR stands by for
recording. When using a cable box, leave
it on.
The VCR automatically turns on, records
the program and turns off.
To stop recording
Press ■ STOP.
To use the VCR while recording
You can do the following tasks while recording using VCR Plus+.
To Press
Reset the counter to "OHOOMOOS" COUNTER RESET
Display tape information on the
TV screen
Check the timer settings
Watch another TV program
DISPLAY
MENU and select TIMER SET/CHECK
TV/VTR (See ^Watching a TV program
while recording another^' on page 32.)
Using the VCR before recording begins
Press POWER to turn off the VCR, The TTMER indicator on the
VCR goes off and the VCR is ready for use.
After using the VCR, turn off the VCR again to turn on the TIMER
indicator on the VCR When using a cable box, leave it on.
Remember to reset the VCR to stand by for recording before the time
you^ve set the VCR to start recording, or the timer «tting will be
cancelled.
Basic Operations | 37
Page 38

Checking/changing/
1 rus secnon snows you now to cnecK, cnange ana cancel tne timer
settings after you've stored them in the VCR.
cancelling timer
settings
Before you start...
• Turn on your TV and tune in to the VCR.
1 Press POWER to turn on the VCR.
The TIMER REC indicator on the VCR
goes off.
Press MENU and select TIMER SET/ CHECK.
Check the timer settings:
• If you do not want to change or cancel
the settings, press EXECUTE, then turn
off the VCR to return to recording
standby.
• If you want to change or cancel the
settings, press the CURSOR (¿2^ / ^)
buttons to move the cursor (►) to the
setting you want to change or cancel.
TWERSiT/CXCX
DATE ST«rr STOP
P4/ f4 SLK 7: OOMa. COW
3/ 13 ||. 90PV It: 1 3ni
< SIT 1. OOAU 3. OOW
IWtT
TUtCRSmCH№< 4rl4 rut
DATS STAirr STOP CH
4J 34 &J4 7: OOfWt COM tv
SM 3 Ftt 9: SOM 11. 1 5 hi SO V
HHQi * III 1: OOm 3. OOUf L2 9
CNOh ftp U: SSPM. 30PI 117V
tk;
CH
a w
so E?
L2 9
mi
Change or cancel the timer setting:
• To change the setting, press the CURSOR
(<3 / buttons to flash the item you
want to change, and reset it using the
CURSOR (^ ^) buttons. Then, press
CURSOR (2> to move the cursor to the
leftmost column.
• To cancel the setting, press TIMER CLEAR.
Press EXECUTE.
The VCR returns to the original screen. When
there are any other timer settings left in the
TIMER SET/CHECK menu, turn off the VCR
to return to recording standby.
To check the timer settings during timer recording
Press MENU and select TIMER SET/ CHECK. After checking, press
EXECUTE to turn off the display.
Page 39

When the timer settings overlap
The VCR will not record overlapping programs. If any of your timer
settings overlap, change the settings.
Case 1
Program 1 ^
OiSted first) 10:00 10:50
Program 2
(listed next)
Will be cleared 11 30
Case 2
Program 1
10«0 10:50
Program 2
Case 3
Will be cut off
Program 1 lo.'OO
Program 2,0:45
20 seconds
will not be
recorded
=>
11:40
11:30
Case f; tf you preset two programs to start recorrffng at the same
time...
The program listed first in the TIMER SET/CHECK menu has
priority over the other program. The timer setting of the lower
priority program will be erased from the TIMER SET/CHECK
menu when the first program begins recording.
C^e2; If you preset program 2 to start recording at the same hme
you preset program 1 to finish recording...
The last 20 seconds of program 1 will not be recorded because
the VCR will enter recording pause for program 2 before
program 1 is finished.
Case3: If you preset program 2 to start recording before program 1
is finished recording...
Program 2 will start recording before program 1 has finished.
12M
Bask Operations 39
Page 40

Additional Operations
Playing/searching at
various speeds
You can play back a tape at various speeds: high-speed, slov^r motion,
frame by frame and so on. These options are also useful for searching
for a specific point during playback. The sound is muted during these
operations.
To resume
Playback options Operation
normal
playback
SLOW +/SKIP
FRAME
II PAUSE
®/e
SEARCH
O'PLAY
DUAL MODE
SHUTTLE
ring
Playing at various speeds:
One-fifth the normal speed
Twice the normal speed
High speed
Fast-forwarding/ Rewinding During stop, turn the DUAL
Viewing the picture during
fast-forward or rewind
Locking in a high-speed
picture
Locking in a slow-motion
picture
During playback or pause, turn
the DUAL MODE SHUTTLE
ring right or left to:
1/5
X2
® or ©
MODE SHUTTLE ring to
►► or to and release.
During fast-forward, turn the
DUAL MODE SHUTTLE ring
to During rewind, turn the
ring to
During playback or pause,
press © SEARCH or 9
SEARCH. To change direction,
press -^11 FRAME (backward)
or FRAME (forward).
During playback or pause,
press !► SLOW +/-. Youcan
increase the playback speed
with the + button and decrease
the speed with the - button. To
change direction, press ◄!!
FRAME (backward) or !!►
FRAME (forward).
Release the ring.
Press PLAY.
To return to the
previous mode,
release the ring.
Press O-PLAY.
Press C>-PLAY.
“ Adjust the picture using the
T/A
TRACKING
NORMAL/SLOW STILL
ADJUST buttons if:
- Streaks appear while
playing in slow mobon.
- Bands appear on the top
or bottom while pausing.
- The picture shakes while
pausing.
Note
• Tapes recorded in LP mode
can be played back on this
VCR, while playback in
modes other than normal
forward speed is not
guaranteed.
40 I Additional Operations
Playing frame by ftame
Skipping a scene
Rewind and restart play
During pause, press (!►
FRAME to advance the picture
one frame or -^11 FRAME to
reverse the picture one frame.
During playback, press SKIP.
Press'mg once skips about 30
seconds.
During stop, press I>- PLAY
on the VCR while holding the
DUAL MODE SHUTTLE ring
on the VCR at the position.
Presses PLAY.
The VCR
automatically
resumes normal
playback.
Page 41

Adjusting the picture
The VCR automatically adjusts the picture for the best possible
playback or recording. If, however, you find the automatic adjustment
unsatisfactory, you can adjust the picture manually.
o o o
o o o
O O O o c3
\C D ¿ CD
OD <
CD O
O o CD *0
TRACKING
AUTO/MANUAU
T/A
NORMAU
SLOW
Adjusting the traddng
Though the VCR automatically adjusts the tracking when playing a tape
(the AUTO TRACKING indicator flashes in the display window, then
lights steadily), distortion may occur if the tape was recorded in poor
condition. If so, manually adjust the tracking condition.
Press the ▼/A TRACKING NORMAL/SLOW buttons to display the
tracking meter. The distortion should disappear as you press one of the
two buttons. If you cannot get a dear picture with manual adjustment,
press TRACKING AUTO/MANUAL to return to automatic adjustment.
MOftMAL TRACKim
Tracking meter
SONY
Note
• Auto tracking adjustment is
not possible for tapes
recorded in LP mode.
Additional Operations I 41
Page 42

Editing with another
VCR
This section shows you how to edit to or from another VCR or
camcorder. You can make a copy of a tape using this VCR for recon
or playback.
How to hook up to record on this VCR
This VCR (Recorder)
TV
X_
U№ IN
other VCR (Player)
rip
• Make sure you connect the
plugs to jacks of the same
color.
Note
• When connecting the VCRs,
do not simultaneously
connect the LINE IN and
LINE OUT jacks on your
VCR. A humming noise may
occur if you do this.
Signal flow
Audio/video cable (not supplied)
How to hook up to record to another VCR
This VCR (Mayer) TV
Signal flow
Audio/video cable (not supplied)
42 I Additional Operations
Page 43

Tips
• To release the VCRs from
pavise, vise the II PAUSE
buttons on the VCRs so that
you can edit more precisely.
• To cut out unwanted scenes
while editing, press II
PAUSE on this VCR when
an unwanted scene begins.
When it ends, press II
PAUSE again to resume
recording (Assemble
Editing).
Operation (when recording on this VCR)
Before you start editing
• Press INPUT SELECT to display "L" in the display window.
• Press TAPE SPEED on the remote commander to select the recording
tape speed (SP/EP).
• REC
1 Insert a source tape with its safety
tab removed into the other
(playback) VCR. Search for the
point to start playback and set it to
playback pause.
2 Insert a tape into this (recording)
VCR. Search for the point to start
recording and press II PAUSE.
3 Press • REC on this VCR artd set it
to recording pause.
4 To start editing, press the II PAUSE
buttons on both VCRs to release
the VCRs from pause.
For best results, press the pause button on
the other VCR just before pressing 11
PAUSE on this VCR-
To stop editing
Press the ■ STOP buttons on both VCRs.
Page 44

Additional Information
General setup
information
TV
Setting the RF unit
When connecting the VCR to the TV using only the antenna cable, you
must set the RF UNIT switch on the rear of the VCR so that the TV can
receive the correct signal from the VCR
If you connect the VCR to the TV using the supplied audio/video cable,
you can skip this step.
1 Set the RF UNIT sxvitch on the rear of the VCR to CHS or CH4,
whichever channel is not used in your area. If both are used, set the
switch to either channel.
2 Press POWER to turn on the VCR.
3 Press TV/ VTR to turn on the VTR indicator in the VCR's display
window.
POWER TVAmt
EAC-32 Antenna connector (not supplied)
CHANNEL W-
4 Press CHANNEL +/- to display a channel number in the dispby
window. Select an active channel number in your area.
5 Turn on your TV and set it to the channel you selected in step 1
(channel 3 or 4).
The selected TV channel broadcast appears on the TV screen. If the
channels change when you press CHANNEL +/-, you have made the
correct setting.
Whenever you use the VCR, set the TV to the channel selected in step
1.
Attaching the external antenna connector
When using a 300-ohm twin lead cable for VHF/UHF antenna, use the
EAC-32 anterma connector (not supplied) to connect the antenna to the
VCR
1 Loosen the screws on the emtenna connector.
2 Wind the twin leads around the screws on the antenna connector.
3 Retighten the screws.
7S-ohm coaxial cable •
/\y\ I Additional Information
EAC-66
UHF/VHF band
separator/mixer
(not supplied)
Attaching an UHFA/HF band mixer
When using both 75-ohm coaxial cable and 300-ohm twin lead cable for
VHF/UHF antenna, use the EAC-66 UHF/VHF band separator/mixer
(not supplied) to connect the antenna to the VCR.
1 Loosen the screws on the mixer.
2 Wind the twin leads around the screws on the mixer.
3 Retighten the screws.
4 Connect the 75-ohm coaxial cable to the mixer.
Page 45

Troubleshooting
Power
Clock
Playback
Symptom
The POWER switch does not
function.
The power is turned on but the
VCR does not operate.
The dock has stopped and —"
lights in the display window.
The playback picture does not
appear on the TV screen.
The picture is not clear.
The picture rolls vertically
during picture search.
Remedy
• Connect the AC power cord securely.
Moisture condensation occurs. Turn the power off, unplug the AC
power cord and leave the VCR to dry for over an hour.
The dock stops if the VCR is discormected from the wall outlet for
more than th^ hours. Reset the dock (and timer).
• Make sure the TV is set to the channel for the VCR. If you are using a
monitor, set it to video input
• Adjust the tracking with the TRACKING NORMAL/SLOW buttons.
• The video heads are dirty (see below). Qean the video heads using the
Sony T-25CL video head cleaning cassette. If this deaning cassette is
not available in your area, have the heads deaned at your nearest Sony
service facility (a standard service charge will be required.) Do not use
a commerdally available wet-type deaning cassette, as it may damage
the video heads.
• The video heads may have to be replaced. Consult your local Sony
dealer for more information.
Adjust the vertical hold control on the TV or monitor.
The picture has ik> sound. • The tape is defective. Use a new tape.
Symptoms caused by contaminated video heads
« Normal picture * Rough picture • Undear picture
initial
(continued)
No picture (or
black & white
screen appears)
terminal
Page 46

Troubleshooting
(continued)
Recording
Timer recording
Symptom
A TV program does not appear on
the TV screen.
TV reception is poor.
The tape ejects when you press
• REC
Nothing happens when you press
• REC
The timer does not operate.
Remedy
• Make sure the TV is set to the channel for the VCR. If you are using a
monitor, set it to video input.
• Adjust the TV antenna.
• Check that the safety lab has not been removed.
• Make sure the tape has been wound to the beginning.
• Select the correct source with the INPUT SELECT button. Select a
channel number when recording TV programs; select "L" when
recording from other equipment.
• Check that the dock is set
• Make sure a tape has been inserted.
• Check that the safety tab has not been removed.
• Make sure the tape has been wound to the beginning.
• Make sure a program has been set for timer recording.
• Make sure your timer settings have not already passed the current
time.
• Check that the cable box is turned on.
• TTie dock stops if the VCR is disconnected from the wall outlet for
more than three hours. Reset the clock and timer.
• When you lise cable box control, make sure the CABLE BOX
CONTROL option is set to ON.
Others
A tape cannot be inserted.
The remote commander does not
function.
The channels on the VCR cannot be
changed.
The tracking indicator does not
appear on the screen.
The VCR needs to be deaned.
• Check that a tape isn't already in the tape compartment
• Make sure you are pointing the remote commander at the remote
sensor on the VCR-
• Replace all the batteries in the remote commander with new ones if
they are weak.
• Make sure the CABLE BOX CONTROL option is set to OFF.
• The recording condition of the tape is very poor and tracking cannot
be adjusted.
• Qean the cabinet, panel and controls with a dry, soft doth, or a soft
doth slightly moistened with a mild detergent solution. Do not use
any type of solvent such as alcohol or benzine.
If you have any questior»s or problems concerning your unit, please
consult your nearest Sony dMler.
46 I Additional Information
Page 47

Specifications
System
Format
VHS NTSC standard
Timer section
Qock
Quartz locked
Video recording system
Rotary two-head helical scanning
FM system
Video signal
NTSC color, EIA standards
Tape speed
SP: 3335 mm/s (1 3/8 inches/s)
EP: 11.11 mm/s (7/16 inches/s)
LP: 16.67 mm/s (11/16 inches/s),
playback only
MajtinfMm recordingfplaybacfc time
8 hrs. in EP mode (withT-160
tape)
Fast-forward and rewind time
Approx. 4 min. 30 sec (with T-120
tape)
Tuner section
Channel coverage
VHF2tol3
UHFMto69
CATV A-8 to A-1, A to W, W+1 to
W+S4
Antenna
75-ohm antenna terminal for
VHF/UHF
Inputs and outputs
LINE tN
VIDEO IN, phono jack (1)
Input signal: 1 Vp-p, 75 ohms,
unbalanced, sync negative
AUDIO IN, phono jack (1)
Input level: -75 dBs (0 dBs =
0.775 Vnns)
Input impedance; more than
47kilohms
UNEOUT
VIDEO OUT, phono jack (1)
Output signal: 1 Vp-p, 75 ohms,
unbalanced, sync negative
AUDIO OUT, phono jack (2)
Standard output: -73 dBs
Load impedance; 47 kilohms
Output impedance: less than 10
kilohms
Timer indication
12-hour cycle
Timer setting
Only for recording 8 programs in
one month at max.
Power back-up
BuiU-in self-chargjng capacitor
Back-up duration: up to three
hours at one time
General
Power requirements
120 V AC, 60 Hz ipr SLV-420)
no V to 240 V AC, 50/60 Hz
(/nrSLV-420?X)
Power consumption
19 W (max.)
Operating temperature
5“C to WC (4rF to 104‘T)
Storage temperature
-2(7’C to 60'’C (-4”F to 14i7’F)
Dimensions
Approx. 355 X 100 X 368 mm
(w/h/d)
Approx. (14 X 4 X 4 Vi inches)
induding projecting parts and
controls
Weight
Approx. 43 kg (9 lb 15 oz)
Supplied accessories
Remote commander (1)
Size AA (R6) batteries (2)
73ohm coaxial cable with F-type
connectors (1)
AC power cord (1)
Cable Mouse (cable box contrc41er) (1)
Plug adaptor (1) (SLV-420 PX only)
Design and spedñcations.are subject to
change without notice.
CABLE BOX CONTROL
Mini jack (1)
Additional Information { 47
Page 48

Index to parts and
controls
Refer to the pages indicated in ( ) for details.
Front panel
Display window
ISPLMPi
1
I<i<3 no> M>[
eeiree
8881
m POWER switch/indicator
[U TV/VTR button
[3] INPUT SELECT button (43)
[4] Tape compartment
\5\ QUICK TIMER button
# REC (recording) button (43)
[7] O PLAY button
[E DUAL MODE SHUTTLE ring
[E TIMER indicator (34)
53 REC (recording) indicator
101 ■ STOP button (43)
M II PAUSE button (43)
M CHANNEL buttons
M REJECT button
m Remote sensor (5)
m VTR indicator (32)
fE Tape speed indicators (30)
[E AUTO TRACKING indicator (41)
[4] Tape operation indicators
fSl Line/channel indicator (30)
[E Timecounter/cIock(19,29)
[E Tape indicator
Rear panel
48 I Additional Infoimation
[Tl AC IN connector
m LINE IN AUDIO/VIDEO jacks (42)
[E LINE OUT AUDIO/VIDEO jacks (7,42)
[4] RF UNIT switch (44)
[E CABLE BOX CONTROL jack (8)
E VHF/UHF connectors (8,10,12,14,16)
Page 49

Remote commander
[T] ± EJECT button (28)
01 TAPE SPEED button (30)
Menu operation buttons
MENU button
CURSOR buttons
( / <3 / O )
EXECUTE button
COUNTER RESET button
(29)
[4] Channel niunber buttons <md
ENTER button
[U TRACKING buttons (41)
▼/A NORMAL SLOW
(STILL ADJUST) buttons
AUTO/MANUAL button
[FI Tape transport buttons (40)
!► SLOW buttons
FRAME buttons
SKIP button
[7] ®/® SEARCH buttons
(40)
01 QUICK TIMER button (31)
02 DISPLAY button (29)
01 INPUT SELECT button (43)
01 VOL (volume) button
CH (channel) button (30)
0] # REC (recording) button
(30)
M II PAUSE button (28)
M DUAL MODE SHUTTLE ring
(28.40)
U O PLAY button (28.40)
ID ■ STOP button (28)
M rfvl/fVi^remote
control switch (5)
[m POWER switch
02 HMER CLEAR button (36.38)
01 TV/VTR button (32)
03 VCR Plus+ buttons (26.36)
VCR Plus+ button
ONCE button
DAILY button
WEEKLY button
Additional Infonmation | 49
Page 50

Index
A,B
Accessories supplied 4
Adjusting
picture 22
tracking 41
AFT CAuto Fine Tuning) 22
Antenna hookup 14
Audio/video (A/V) hookup 7
Recording 30
saving 32
using VCR Plus+ 36
while watching another program
32
Safety tab 32
Seardung
at various speeds 40
SP mode 31
Cable hookup 6
Cable Box Control
cable box code number chart
24
setting 23
Cable TV channel assignment 22
Cancelling timer settings 38
Changing timer settings 38
Channel line-up chart 26
Qeaning the video heads 45
Qock setting 19
Connecting
cable TV 6
external antenna connector 44
UHF/VHF band mixer 44
Counter 29
Disabling channels 21
Dubbing. See Editing.
E, F, G, H, I, J, K
Editing 42
assemble editing 43
EP mode 31
U M, N, O
IP mode 28,40
T,u
Timer recording 33
canceUing timer settings 38
changing timer settings 38
checking timer settings 38
daily/weekly recording 35
overlapping timer settings 39
using VCR Plus+ 36
Tracking adjustment See Adjusting
V, W, X, Y, 2
VCRP1US+
channel setup 26
recording 36
Picture adjustment. See Adjusting
Pbyback 28
at various speeds 40
frame-by-frame 40
skip 40
slow motion 40
Presetting channels 20
Quick timer 31
50 I Additional Information
Page 51

O
uick reference to using the VCR
Hookup 1 Hookup 2
To play a tape
1 Set the TV to channel 3 or
4 (or to video input, if
you made A/V
connections.)
2 Insert a tape and press
To record a program
1 Turn on the cable box.
2 Press VCR Plus+ on the
remote commander.
3 Enter the program's
PlusCode number.
4 Press ONCE, DAILY, or
WEEKLY.
5 Insert a tape.
6 Press POWER to turn off
the VCR.
7 Leave the cable box on.
To watch TV
1 Turn off your VCR, or
press the VCR's TV/VTR
button until the VTR
indicator in the display
window goes off.
2 Turn on your cable box.
3 Set the TV to the cable
box output chaimel
(usually 2,3, or 4).
4 Set the cable box to the
channel you want to
watch.
To play a tape
1 Set the TV to channel 3 or
4 (or to video input, if
you made A/V
connections.)
2 Insert a tape and press
DUPLAY.
To record a program
1 Turn on the cable box
2 Set the cable box to the
channel you want to
record.
3 Press VCR Pius+on the
remote commander.
4 Enter the program's
PlusCode number.
5 Press ONCE, DAILY, or
WEEKLY.
6 Insert a tape.
7 Press POWER to turn off
the VCR.
8 Leave the cable box on.
To watch TV
1 Turn off your VCR, or
press the VCR's TV/VTR
button until the VTR
indicator in the display
window goes off.
2 Turn on your cable box
3 Set the TV to the cable
box output channel
(usually 2,3, or 4).
4 Set the cable box to the
channel you want to
watch.
Hookup 3 Hookup 4
To play a tape
1 If you made A/V
connections, set the TV to
video input.
If you didn't use A/V
hookup:
• Turn on the cable box
• Set the cable box to
channel 3 or 4.
• Set the TV to the output
channel of the cable box
(usually 2,3 or 4).
2 Insert a tape and press
>-PLAY.
To record a program
1 Press VCR Plus+ on the
remote commander.
2 Enter the program's
PlusCode number.
3 Press ONCE, DAILY, or
WEEKLY.
4 Insert a tape.
5 Press POWER to turn off
the VCR.
To watch TV
1 Turn off your VCR, or
press the VCR's TV/VTR
button imtil the VTR
indicator in the display
window goes off.
2 Select the channel with
your cable box (if you
have one) or with your
TV.
To play a tape
1 Set the TV to channel 3 or
4 (or to video input, if
you made A/V
connections.)
2 Insert a tape and press
[>• PLAY. If there's no
picture on your TV, press
the VCR's TV/VTR
button until the VTR
indicator comes on in the
display window.
To record a program
1 Press VCR Plus+ on the
remote commander.
2 Enter the program's
PlusCode number,
3 Press ONCE, DAILY, or
WEEKLY.
4 Insert a tape.
5 Press POWER to turn off
the VCR.
To watch TV
1 Turn off the VCR, or
press the VCR's TV/VTR
button until the VTR
indicator in the display
window goes off.
2 Set the TV to the chaimel
you want to watch.
If you have any questions about this product, you may cal): Sony Customer Information Center 1-600-222-SONY (7669) Sony Corporation
or write to; Sony Customer Information Center Sony Drive, Mail Drop #T1 -11. Park Ridge. NJ 07656 Printed in Malaysia
 Loading...