

Sony SH800 User Manual

January 11,2018
1
Sony SH800 Cell Sorter
SSFF
NEW
ACCOUNTS MUST BE ADDED on BEFORE THE CHIP IS SCANNED
Currently the 70, 100 and 130 µm chips are in use
Notes:
• Make sure to draw all your gates and name everything before you record your data. Once you have recorded data
you cannot draw new gates. You may copy and paste regions to new tubes.
• For sort targeting with real cells
o Set the number of events to sort higher than needed
o Test placement of sorted cell by initiating SORT
o Pause and look at deposition
o It will only do one sort per tube, so if you need to do multiple tests you do not want to reach desired # of events or
it will insist on a new tube being created
1. Start up
NOTE: The upper lid on the cytometer has pneumatic lifters, so attempting to open this with the air line
vented will create an error. The air to the cytometer should be restored before attempting to load a chip, or to
look at filters. The air line
Check the LCD display for pressure reading before opening the chip loader flap door.
1. Decontaminate and clean all surfaces of the collection chamber. And clean sort collection device if desired.
2. No Cavicide should be used on the plates. A 70% EtOH wipe daily should be sufficient. The lower
portion of the sort chamber can be wiped with a small amount of Cavicide.
i. For the 70µm chip
o Microbubbles are always a greater problem for the 70um than other nozzles and may be contribute
to the instability. In the AM, the air line vent should be closed and the vent valve on the tank turned to
reseat the seal.
o This nozzle is VERY sensitive and side streams will not form if the plates are not clean and dry
o IF sheath pressure issue occurs, check the lid of the sheath tank.

January 11,2018
2
ii. For the 130µm chip
o You must have a filled sheath tank
o Stream appears very unstable with low sheath fluid volumes. Instability has been noted when tank is less than
50% full so make sure to Top it 0ff !
o De-bubble the filter
4. Turn pressure on before continuing on to any other steps.
5. Power up the SH800. The display screen will show the active levels of fluids.
6. Disconnect the airline in from the sheath tank. Release pressure using pressure relief ring. Fill sheath tank to below
the upper weld line. The pressure release ring on top of the tank should not be left pointing up, place it in the groove
on the top of relief valve.
7. Empty the waste tank at the sink, wear the face shield while emptying. Add bleach to the tank to the bleach line
indicated on the bottom of the carboy before replacing.
8. *Once the system has been setup, you cannot empty the waste or fill sheath without putting the machine in
“standby” mode. Doing so without putting the machine in standby mode will turn the stream off and the chip will
have to be re-calibrated. Directions for putting the machine in standby are located on page 6*
9. Fill water Sterile Di tank in the left panel on the sorter with sterile water located on shelf to the right above machine
or above the hall sink shelves to the left. When the water tank has been filled, the filter must be de-bubbled through
the software. You will need to open the side access panel and vent the filter into a paper towel.
10. Log into windows using FACS User account (no password).
11. Once the SH800 has gone to standby, start the SH800 software.
12. Log in with your user name and password. If it does not ask you to scan the chip, log out and log in as “facs user.”
13. Turn on aerosol management system if you are sorting a BSL-2 sample.
14. Fill out the Biohazard form on clipboard identifying the type of hazard and clean up procedure.
2. Automated Alignment and Sort Setup (20 minutes)
1. On log in you are prompted to scan and load the new chip – Chips are good for 24h and the previous
day’s chip can be reused if <24h has passed. If continuing use on the current chip, simply open the
instrument front and reload the current chip once it is ejected. Load/ exchange the chip following the
onscreen instructions. Write date and time on the package if using a new chip. Put the old chip in the
previous day’s package and put in box with used chips.
i. To load a chip – feed the chip until the soft stop then gently push into seat.
ii. Select only the 488nm blue laser for initial calibration.
iii. Select filter configuration for 405nm violet laser check box(this is our system not your application
setting).
iv. Follow prompts on screen check sample line for back flush
v. Run the sheath filter de-bubble option available on the bottom of the screen during start up.
vi. Run the sample line clean if this is the first sort of the day, this runs both the bleach 12ml and DI
water 12ml.
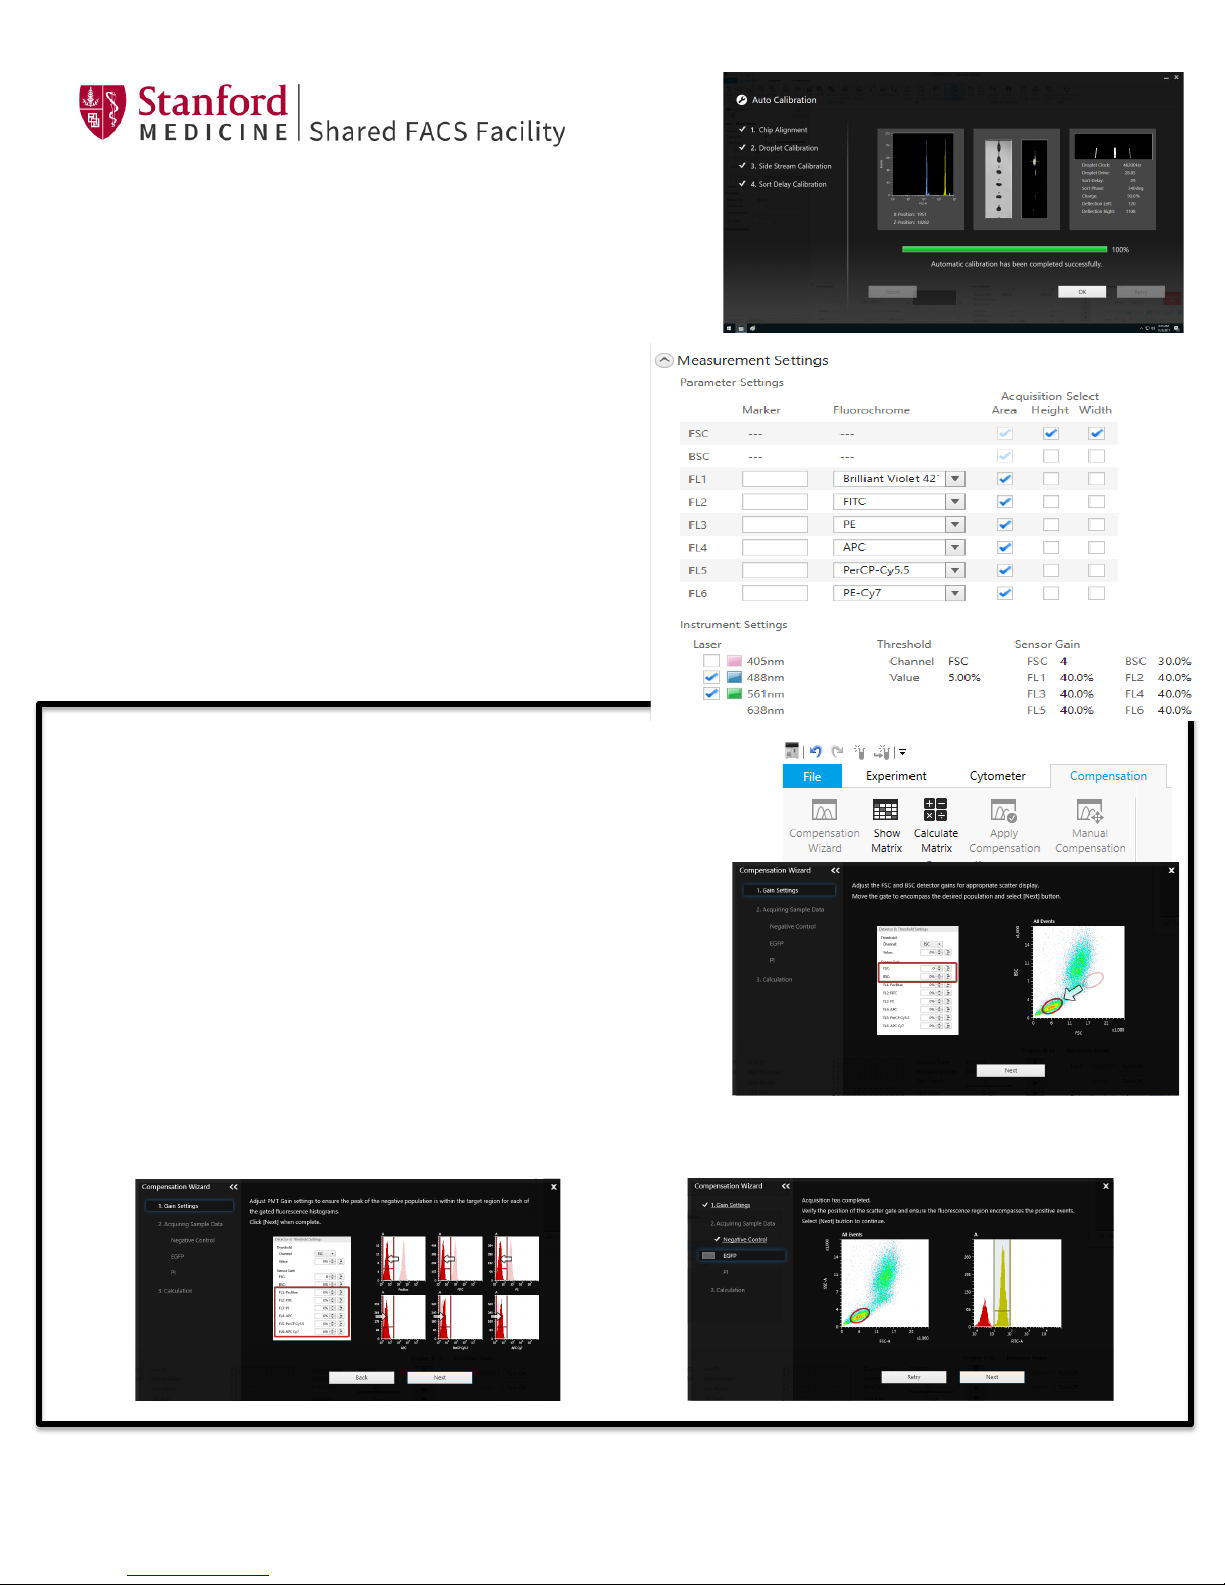
2. Run autocalibration–initial calibration needs only the blue laser selected.
i. When prompted, load the calibration beads. The bottle is located in the small fridge to the left of the
sink. Mix the vial gently and dispense 8 drops into a 5ml FACS tube (can be polystyrene or
polypropylene). Make sure the tube goes to the bottom of the tube holder.
ii. Step one of the calibration aligns the chip, finds the target fluorescent sensitivity this takes approximately 5
minutes. Step 2 fine tunes stream profile, side streams and drop charge.
iii. If autocalibration fails, do a sheath filter de-bubble
January 11,2018
3
iv. If this does not resolve issue, check the optical filters, sheath
tank seal, check front cytometer pane for liquid levels.
3. If you fill the di water bottle you will need to de-bubble the di
water filter using the option in the software.
4. Sorting Setup
1. ALL SAMPLES, INCLUDING COMPS, MUST BE
FILTERED
2. Select the experiment you would like to use, or the SSFF
QC Template
3. On the upper right, change the experiment name.
4. Fill in other information for your experiment.
5. Check or uncheck the fluorescent parameters that are
needed, and name the parameters if you wish.
6. Turn on/off lasers for your experiment. Be sure that the
488nm laser is on. The violet laser decreases the life of
the chip. Only turn it on if needed.
7. Click Create New Experiment in the lower right of the
monitor.
When running a compensation matrix
1. There are 2 methods for compensation available the wizard and manual
2. Choose to start compensation wizard if you are sorting with multiple
fluorochromes and have prepared single color controls.
3. Click OK to continue
4. Follow the wizard’s instructions and run the negative control, and
adjust the instrument settings in detector/threshold settings FSC
and BSC to get population on scale. Briefly load a fully stained
sample at this point (do not record it) and verify that none of the
positive populations are off scale. If they are, lower the PMT
value to get them back on scale.
5. Then record negative and adjust the gate such that it is around the
negative population.
6. Positive sample using these adjusted settings.
7. Acquire single-stained controls, then set compensation as directed.
8. Click Close then Finish to end the Wizard.
 Loading...