

Page 1
SED-E1
4-541-088-12(1)
CHARGE indicator
Start Here
Startup Guide
Developer Edition
SmartEyeglass
SED-E1
4-541-088-12(1)
For use by developers in testing and creation of applications for
SmartEyeglass platform.
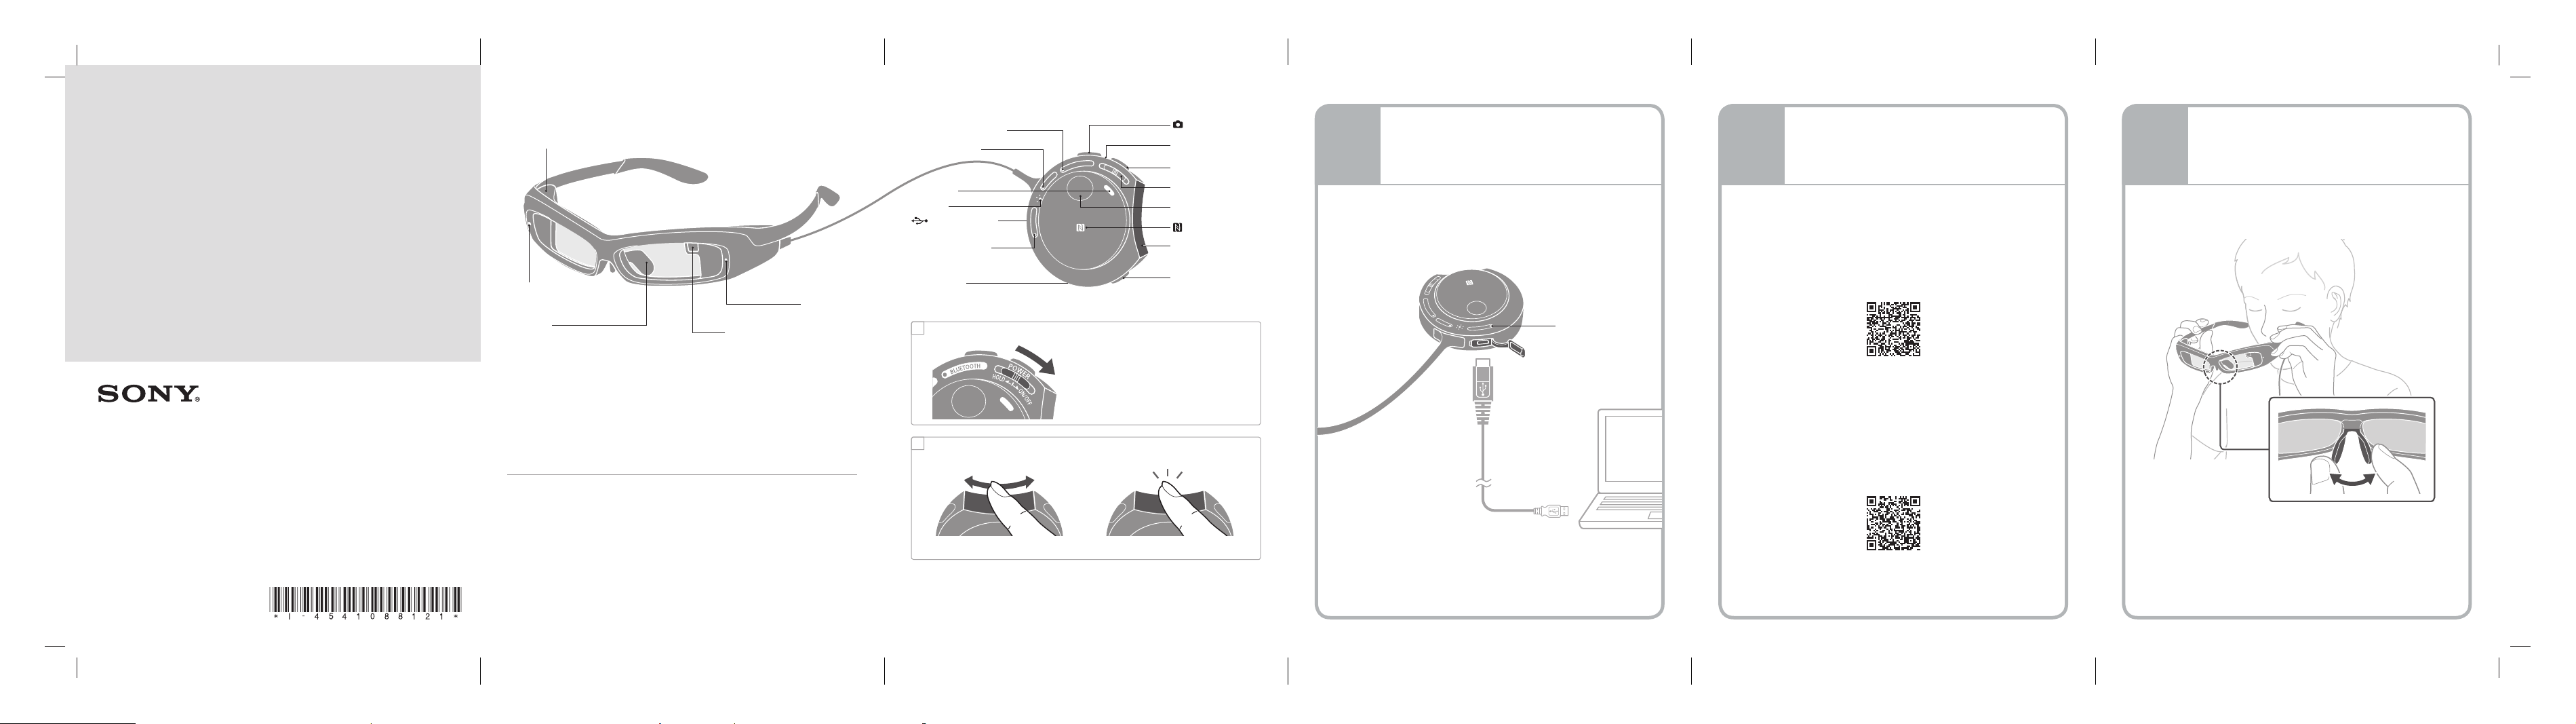
Eyewear Controller
Camera indicator
Camera
Accelerometer, Gyroscope,
Electronic compass
Nose pad
Brightness sensor
(CAMERA) button
BACK button
POWER switch
Touch sensor
Rotary clip
Noise suppression
sub microphone
(N mark)
TALK button
Microphone
BLUETOOTH indicator
CHARGE indicator
Micro USB port
WLAN indicator
Strap hole
Speaker
Slide and hold the POWER switch to ON/
OFF for 4 seconds or more.
When only sliding the switch without
holding it, the image display turns on /
off.
To turn on/off the power
To operate the touch sensor
B
A
Supplied items
• Micro USB cable
• Carrying case
• Dark filter
• Camera cover sheet
• Nose pad (small)
• Warranty
• Startup Guide (this document)
• Reference Guide
Swipe from side to side.
Switches the item on the display.
Tap
Selects/enters the item.
Connect the controller to a computer with the supplied
micro USB cable to charge the built-in lithium-ion battery.
The CHARGE indicator lights up in orange during charging
and turns off when the charging completes.
Tip
It takes about 2 hours to completely charge a fully-discharged
battery.
Scan the 2 codes below, and install two applications into
your smartphone. Use a smartphone with Android™ 4.4 or
later.
Install “Smart Connect”.
https://play.google.com/store/apps/details?id=com.
sonyericsson.extras.liveware
If “Smart Connect” is already installed, update it to the
latest version.
After installing “Smart Connect”, select [Open] on the
“Smart Connect” screen in Google Play to start “Smart
Connect”.
Install “SmartEyeglass”.
https://play.google.com/store/apps/details?id=com.
sony.smarteyeglass
STEP
Installing the Applications
into a Smartphone
2
STEP
Charging the Battery
1
STEP
Wearing/Adjusting the
Eyewear
3
Wear the eyewear. If the eyewear does not fit, adjust the
angle or width of nose pad.
Tips
• If the eyewear does not fit by adjusting the nose pad, replace it
with the supplied nose pad (small). For details on how to replace
the nose pad, refer to the Help Guide.
• We recommend that you attach the controller to your clothing, etc.,
using the rotary clip.
• You cannot put on the eyewear while wearing glasses.
Page 2
SED-E1
4-541-088-12(1)
©2015 Sony Corporation Printed in Japan
Using the Camera of Eyewear
The setting is now complete. To take an image with the camera follow
the instructions below.
Turn on the wireless LAN feature of your smartphone.
Swipe the touch sensor to select the [
camera] screen, and tap
the touch sensor.
A frame appears, and the eyewear is connected with your
smartphone via wireless LAN (the camera indicator lights up in red).
Move your head to center the frame over the subject.
Press the
button on the controller to shoot an image.
The shot image appears on the eyewear for about 3 seconds.
To continue shooting, press the button.
Shot images are saved in the smartphone.
Enjoying Features Other than the
Camera
Installing applications to your smartphone can enhance your
enjoyment of eyewear. You can access your smartphone without
operating it. For example, you can view received email or Twitter
messages on eyewear, and check your messages or schedule by
speaking your query.
Follow the steps below to install additional applications into a
smartphone.
Select the connection notification for “SmartEyeglass” in the
notification bar (status bar) at the top of the smartphone display.
Select “Applications” and select an application you want to install.
Follow the on-screen instructions.
For details on how to use additional applications, refer to “Help Guide”
(instruction manual).
About Help Guide
“Help Guide” is the instruction manual provided on
the Internet.
It provides up-to-date information on how to use
the device, how to make settings on the device/
smartphone, and safety precautions.
Visit the following site with your smartphone or
computer.
http://rd1.sony.net/help/sed/sede1/h_uce/
Please read “Reference Guide” for your continued safety.
Q & A
Unable to charge the battery.
• Disconnect the micro USB cable, then reconnect it.
Unable to turn the power on.
• The battery is low. Charge the rechargeable battery.
Unable to connect a smartphone to the device by using the NFC
function.
• Touch
(N mark) on the rear of the controller to (N mark) on
the rear of the smartphone carefully and hold it in position.
• Check that the NFC function of the smartphone is on. For more
details, see the instruction manual of the smartphone.
• Unlock the sleep function and screen lock of the smartphone.
• If the above methods do not resolve the problem, try steps in
“Connecting by not using the NFC function.”
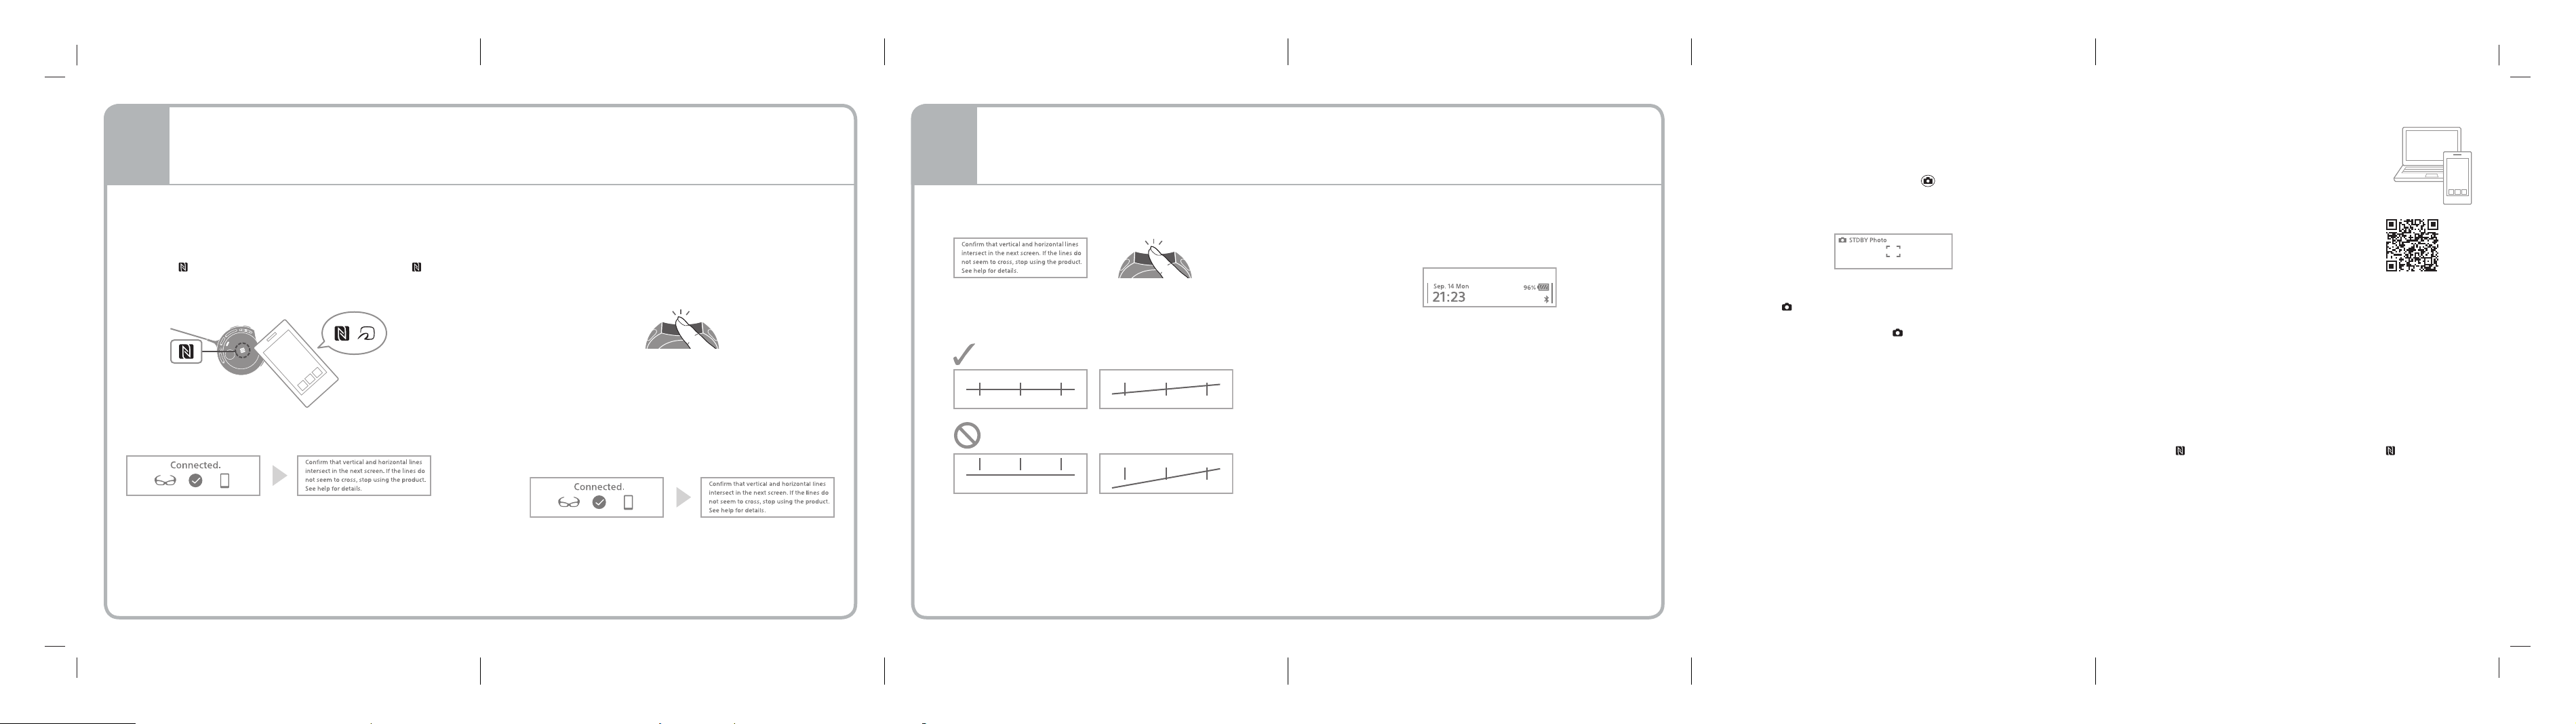
Connecting by using the NFC function
Unlock the sleep function and screen lock of the
smartphone.
Check that the NFC function of the smartphone is on.
Touch
(N mark) on the rear part of the controller to
(N mark) on the rear of the smartphone and hold it until
[SONY] appears on the eyewear.
When the connection is successful, the following display
appears on the eyewear.
Connection completion
(displayed for about 5 seconds)
Tap the touch sensor while the following message is
displayed.
Check that the three vertical lines and horizontal line
intersect.
If any vertical line does not intersect with the horizontal
line, adjust the angle or width of the nose pad.
If the vertical and horizontal lines still do not intersect,
request repair from service representative. Consult a
contact shown on the supplied warranty.
STEP
Connecting the Device and Smartphone with the Bluetooth
Function
4
STEP
Confirming Screen Alignment
5
Connecting by not using the NFC function
Slide and hold the POWER switch of the controller to the
ON/OFF direction for 4 seconds or more to turn the
device on.
Tap the touch sensor when [Touch the smartphone you
want to connect with to the device.] appears on the
eyewear.
Turn on the Bluetooth setting of the smartphone and
select “SmartEyeglass” from the available device list.
Confirm that the passkey displayed is the same on the
eyewear and smartphone. Tap the touch sensor on the
controller, then select “Pairing” on the smartphone.
When the connection is successful, the following display
appears on the eyewear.
Connection completion
(displayed for about 5 seconds)
Tap the touch sensor after you have confirmed that the
screen alignment is appropriate.
When the current time (Home screen) appears, the
setting is complete.
Current time
(Home screen)
Tip
NFC (Near Field Communication) is a technology enabling short-range wireless communication between various devices, such as smartphones and IC tags. Thanks to
the NFC function, data communication - for example, Bluetooth pairing - can be achieved easily by simply touching NFC-compatible devices together (i.e., at the
N-Mark symbol or location designated on each device).
 Loading...