

Sony SDX-S300C, SDX-S310C Operator's Manual

SDX-S300C/S310C
AIT Drive Unit
3-864-729-11(1)
Operator’s Guide
Mode d’emploi
––––––––––––– page 2
–––––––––––––––– page 19
Bedienungsanleitung
Guía del Usuario
–––––––––––––– Página 55
–––––––– Seite 37

Safety Regulations
Owner’s Record
The model and serial numbers are located on the bottom. Record the serial
number in the space provided below.
Refer to them whenever you call upon your dealer regarding this product.
Model No. Serial No.
Information
WARNING
To prevent fire or shock hazard, do not expose the
unit to rain or moisture.
To avoid electrical shock, do not open the cabinet.
Refer servicing to qualified personnel only.
For the customers in the U.S.A
You are cautioned that any changes or modifications not expressly approved
in this manual could void your authority to operate this equipment.
WARNING
Note: This equipment has been tested and found to comply with the limits
for a Class B digital device, pursuant to Part 15 of the FCC Rules. These
limits are designed to provide reasonable protection against harmful
interference in a residential installation. This equipment generates, uses and
can radiate radio frequency energy and, if not installed and used in
accordance with the instructions, may cause harmful interference to radio
communications. However, there is no guarantee that interference will not
occur in a particular installation. If this equipment does cause harmful
interference to radio or television reception, which can be determined by
turning the equipment off and on, the user is encouraged to try to correct the
interference by one or more of the following measures:
• Reorient or relocate the receiving antenna
• Increase the separation between the equipment and receiver.
• Connect the equipment into an outlet on a circuit different from that to
which the receiver is connected.
• Consult the dealer or an experienced radio/TV technician for help.
This device requires shielded interface cables to comply with FCC emission
limits.
2

Table of Contents
Part1
Introduction
Part 2
Preparation
Part 3
Operation
Part 4
Care and
Maintenance
About AIT Drives ............................................................................... 5
Features....................................................................................................5
Usable Cartridges ....................................................................................5
System Components ................................................................................ 5
Part Name and Functions................................................................. 6
Front panel............................................................................................... 6
Rear Panel................................................................................................8
Supplied Items................................................................................... 9
Interconnections ............................................................................. 10
SCSI ID Setting ................................................................................ 11
How to use the AIT Drive .....................................................................12
Cartridge Removal.................................................................................13
Taking Care of the Drive................................................................. 14
Safety Considerations ............................................................................14
Avoiding Damage..................................................................................14
Other precautions...................................................................................15
Taking Care of Cartridges .............................................................. 16
Use Precautions .....................................................................................16
Storage Precautions ...............................................................................16
Head Cleaning ................................................................................. 17
How to Clean .........................................................................................17
English
Appendix
Trade Name: SONY
Model No.: SDX-S310C
Responsible Party: Sony Electronics Inc.
Address: 1 Sony Drive, Park Ridge, NJ. 07656 USA
Telephone No.: 201-930-6970
This device complies with Part 15 of the FCC Rules. Operation is subject to the following two conditions:
(1) This device may not cause harmful interference, and
(2) This device must accept any interference received, including interference that may cause undesired operation.
Specifications.................................................................................. 18
Declaration of Conformity
Table of Contents 3

How to Use this Manual
This Guide describes AIT Drive model SDX-S300C/S310C, and how to take
care of it. Please read it carefully before using the drive, and keep it handy for
future reference.
The Guide consists of four parts, plus the specifications. Refer to the parts
that relate your use of each part.
Part 1 describes the features of the drive, its system components, and the
name and function of each part.
Part 2 describes the necessary connections between the drive and the host
computer and other SCSI peripheral devices, functions of the drive and how
to set the SCSI ID. Read this part if you are installing the drive.
Part 3 describes how to use the drive, including how to turn it on, and how
to install and remove cartridges. Read this part if you are going to operate the
drive.
Part 4 describes how to take care of the drive and cartridges, and how to
clean the drive heads. Read this part before using the drive.
Appendix
Provides the major specifications of the SDX-S300C/S310C.
4

Part 1 Introduction
About AIT Drives
The SDX-S300C and S310C are external AIT drive units that use the same
size media as 8-mm video cartridges.
Features
The SDX-S300C/S310C AIT Drives have the following features:
• The Advanced Intelligent Tape format provides a huge data storage capacity
on AIT cartridges (25GB without data compression). A ‘Read after Write’
function and three-level error correction code guarantee high data
reliability.
• This model includes a data compression function which allows storing even
more data.
• While reading, the SDX-S300C and S310C automatically detect whether
data has been stored with compression, and decompress the data if
necessary.
• Wide SCSI interface. (SDX-S300C)
• Differential Wide SCSI interface. (SDX-S310C)
Usable Cartridges
The drive uses AIT cartridges.
Caution
Regular 8-mm video tape cartridges look very similar, but are subject to an
entirely different specification, and cannot be used. Inserting a regular 8-mm
video tape will cause it to be rejected automatically.
System Components
The SDX-S300C and S310C connect to the host computer via a Wide SCSI
interface.
Host Computer
Wide SCSI(16 bit)
SDX-S300C/310C
(this device)
N 68p cable
Wide SCSI Peripheral Devices (up to 15 devices)
Part 1 Introduction
5
Part Name and Functions
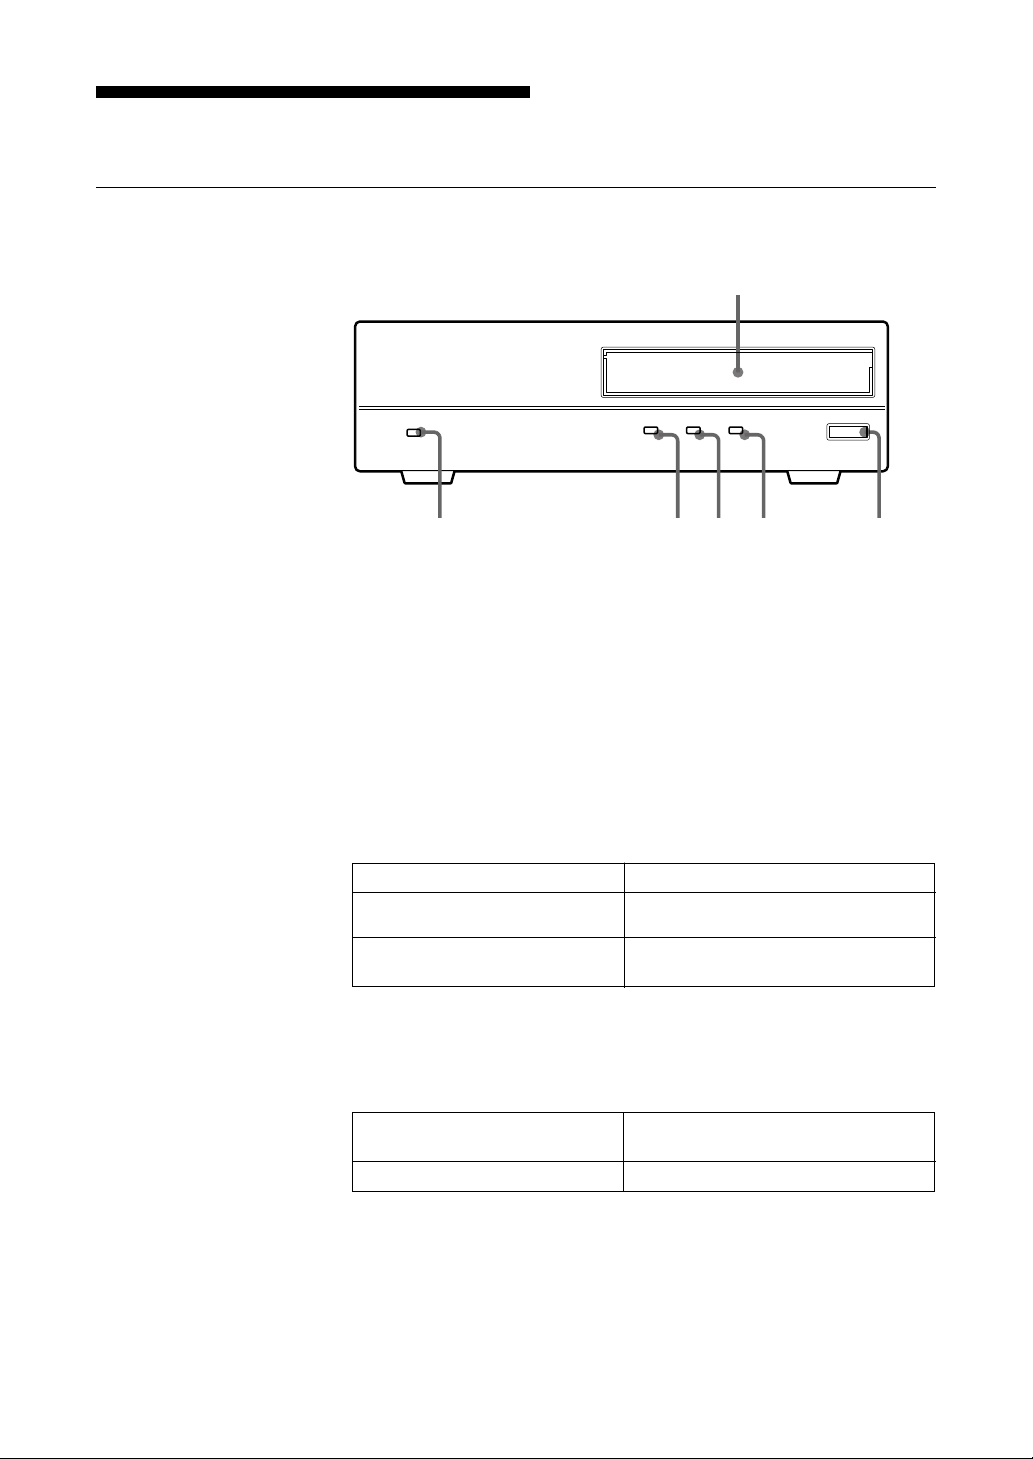
Front panel
1
POWER
1
Data Cartridge Receptacle
BUSY TAPE STATUS
Insert an AIT data cartridge here. See page 12 for information on
inserting and removing data cartridges.
2 EJECT Button
Push to remove a data cartridge from the drive.
3 STATUS Indicator
Lights when an inserted cartridge is write-protected. This indicator also
lights under the following conditions:
Drive needs cleaning repeated long-on, short-off blinking.
End of Tape during cleaning repeated blinking (same on-off
Drive Malfunctioning repeated short-on (once or twice),
interval).
long-off blinking.
4 TAPE Indicator
When a AIT cartridge is installed, this indicator lights. This also lights
under the following conditions:
EJECT
23456
6
Part 1 Introduction
Inserting and removing a
cartridge
repeated blinking (same on-off
interval)
alternating long-short blinkingCartridge deteriorated

5 BUSY Indicator
Lights when data is being transferred through the SCSI interface. This
indicator also blinks (with the same on-off interval) while the drive is
reading or writing normally.
6 POWER Indicator
Lights while the drive is on.
Part 1 Introduction
7

Rear Panel
1
Power Switch
1
SCSI CONNECTOR
SCSI ID
0
AC IN
FG
Press to turn the device on or off.
2 AC IN Connector
Connect the supplied power cable here.
3 Cooling Fan
4 FRAME GND (Ground) Terminal
Connect the ground terminals of other devices to the drive’s frame
ground.
5 Rotary Selector Switch
Selects the SCSI ID for the drive.
23456
8
Part 1 Introduction
6 Wide SCSI Connector
Connects to the SCSI bus connector of the host computer or another
SCSI peripheral with a Wide SCSI cable.

Part 2 Preparation
After you confirm that you have all of the required accessories for your
installation, connect the drive to the host computer, and select the SCSI ID
with the rotary switch on the rear panel.
Supplied Items
When you first open the box, make sure it contains the following items.
Contact your supplier if anything is missing or broken.
• AIT Drive Unit
• Power Cable
• This Guide
• Four rubber feet (for operating the drive in the upright position)
Part 2 Preparation
9
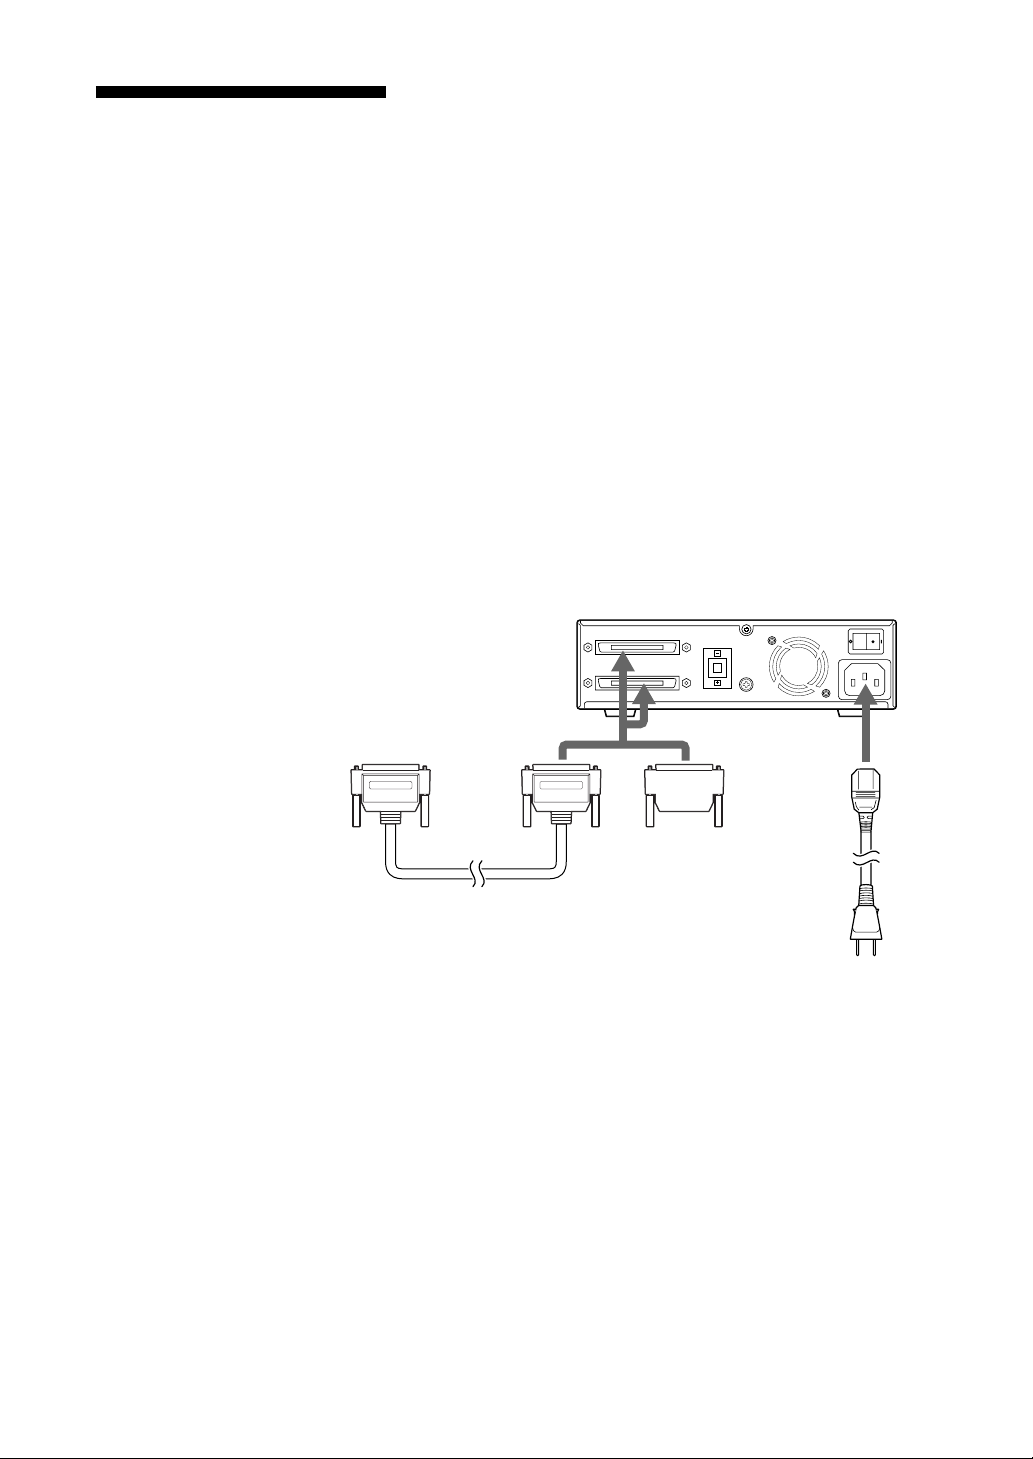
Interconnections
0
SCSI ID
SCSI CONNECTOR
AC IN
FG
Up to fifteen Wide SCSI peripherals can be connected to the host computer
through the SCSI bus.
Use a regular Wide SCSI cable for connection. The drive uses a 68-pin halfpitch connector.
Precautions
• Switch off the host computer and peripherals before connecting the Wide
SCSI cable.
• Make sure the Wide SCSI connectors are pressed tightly together.
• If the drive is the last (or only) device on the Wide SCSI bus, be sure to
connect a SCSI bus terminator to the unused SCSI connector.
Use a single ended terminator for SDX-S300C or a differential terminator
for SDX-S310C.
Use of the wrong terminator may cause damage.
• The total length of the SCSI cable(s) between the host computer and the last
device on the SCSI bus should be less than 3 meters (SDX-S300C) or 25
meters (SDX-S310C).
10
Part 2 Preparation
Terminator
AC Power

SCSI ID Setting
The SCSI ID is set by the rotary switch on the rear panel. Press the + or –
buttons to change the selected SCSI ID.
As shipped from the factory, the SCSI ID is set to 0. Press the switch buttons,
if necessary, to select the SCSI ID number you require. SCSI IDs above 9 are
displayed as A to F (hexadecimal). Usually 7 is reserved for the host adapter
ID, and should not be selected for other devices.
Precautions
• The SCSI ID must be of each device must be different (unique) from the
IDs of other peripherals on the SCSI bus.
• As shipped from the factory, SCSI parity is enabled and Term power is ON.
The internal terminator is disabled, so make sure a terminator is connected
to the end of the SCSI bus before use.
• Before changing the SCSI ID setting, be sure to turn off the power with the
POWER switch on the rear panel.
Part 2 Preparation
11

Part 3 Operation
This section describes how to use the AIT drive, and how to handle data
cartridges.
How to use the AIT Drive
1 Turn on the POWER switch on the real panel.
The POWER indicator should light, and the STATUS, BUSY and TAPE
indicators should blink as the self-test is performed.
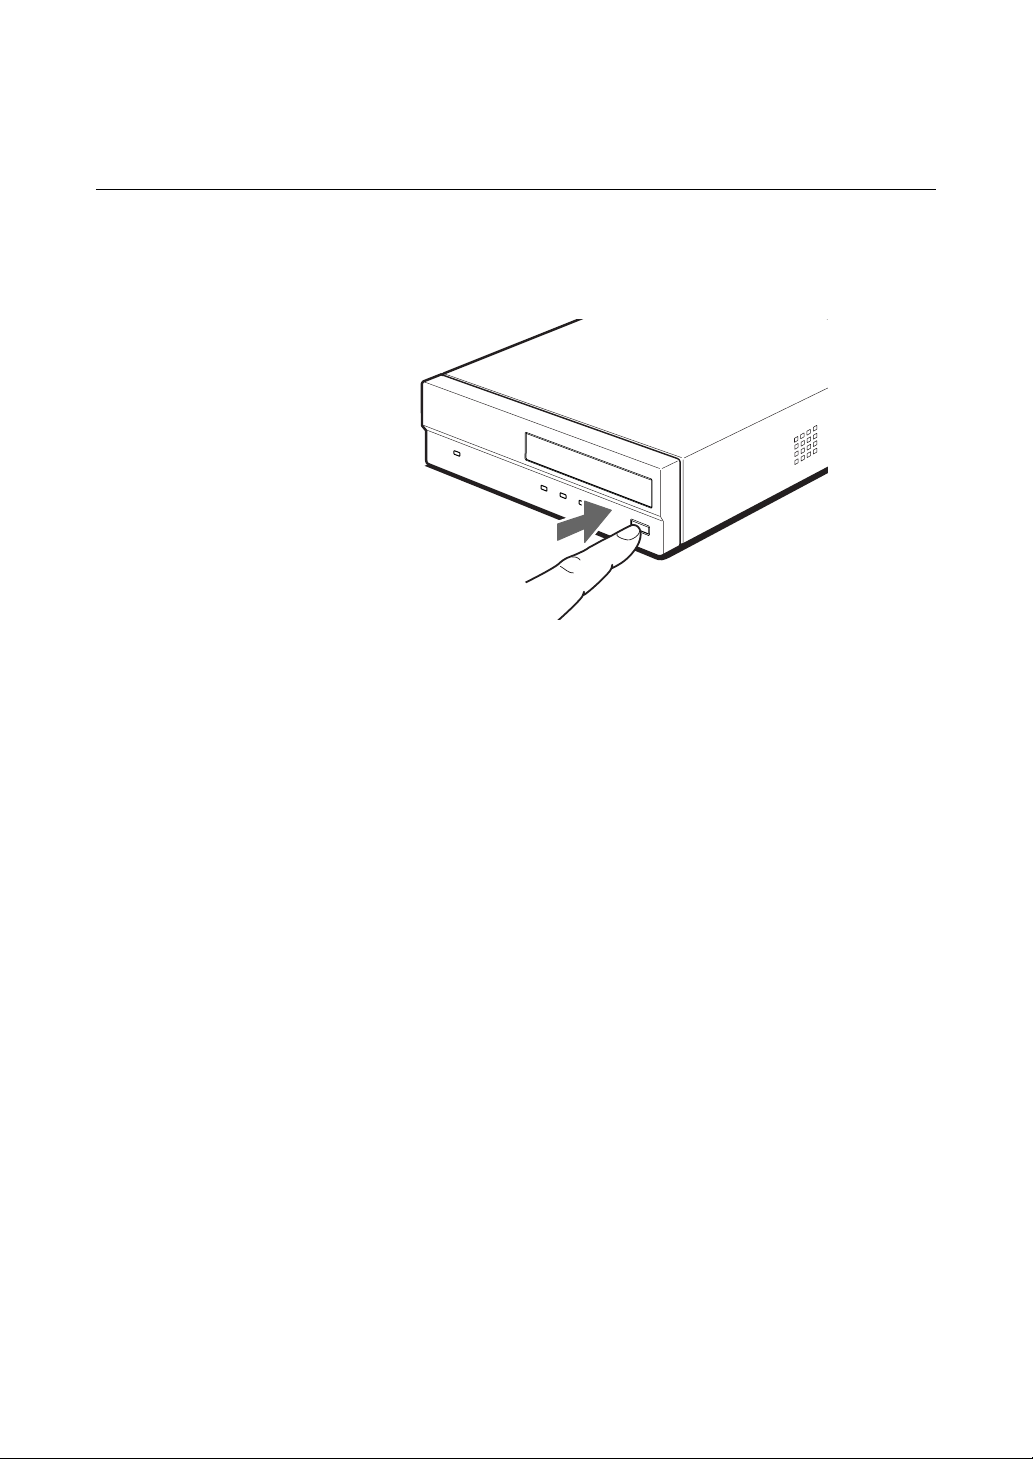
2 When the three indicators stop blinking, you can insert an AIT data
cartridge as shown below.
The TAPE indicator will blink, and if the cartridge is write-protected, the
STATUS indicator lights.
P
O
W
E
R
B
U
S
Y
T
A
P
E
S
T
A
T
U
S
E
J
E
C
T
3 Computer software controls the reading and writing of tapes.
While reading or writing, the BUSY indicator blinks.
12
Part 3 Operation
Cartridge Removal
Press the EJECT button.
The AIT cartridge is ejected automatically.
P
O
W
E
R
B
U
S
Y
T
A
P
E
S
T
A
T
U
S
E
J
E
C
T
Caution
Do not push the EJECT button while the BUSY indicator is blinking: to do so
could destroy data on the tape.
Part 3 Operation
13

Part 4 Care and Maintenance
Taking Care of the Drive
Safety Considerations
■ Power
• Be sure to use 100–120 / 200–240 V AC.
• Avoid plugging into the same outlet as high-current equipment like copiers
or shredders.
■ Power Cable Precautions
• Do not crush the cable or place heavy items on it. If the cable insulation
appears worn or broken, do not use the cable.
• Always unplug the cable by holding the plug: never pull the cable itself, as
it will break.
• If the drive is not being used for a long time, unplug the cable from the
outlet.
Avoiding Damage
■ Avoid shock and vibration
Intense shock, such as from dropping the drive, will damage it.
■ Environmental considerations
Do not store or use the drive in locations subject to:
• high humidity
• excessive dust
• high temperature
• intense vibration
• direct sunlight
• sudden changes in temperature
■ Proper ventilation
Avoid covering the ventilation hole on the side. If the hole is covered and the
internal temperature rises too high, the drive can malfunction. If you
absolutely must operate the drive in the upright position with the ventilation
hole facing downwards, mount the supplied rubber feet equivalent spacers on
the case, and locate the drive where air can circulate freely around the case.
14
Part 4 Care and Maintenance

■ Avoid sudden changes in temperature
If the drive is moved from a cool place to a warm place, or if the room
temperature suddenly rises, moisture may condense inside the case. After a
sudden change in temperature, wait at least one hour before turning the drive
on. If the drive is turned on with condensation inside, and a cartridge is
installed, the drive or the tape can be damaged. If you suspect such a
condition might occur, remove the cartridge immediately.
The evaporation of internal moisture can be hastened by leaving the drive
turned on without a cartridge installed.
■ Abnormal occurrences
If the drive behaves abnormally, immediately unplug it from the wall outlet
and contact your supplier for assistance.
Other precautions
■ Electromagnetic interference (EMI)
The drive utilizes high frequency electronic circuits which could cause noise
in radio or television receivers, or audio equipment. If this occurs, try
increasing the distance between the devices.
■ Cabinet cleaning
Wipe the cabinet with a soft dry cloth. For heavy dirt, wipe with a soft cloth
moistened with a gentle liquid soap, then wipe again with a soft dry cloth. Do
not use alcohol, paint thinner, bug sprays or other volatile solvents, as they
can damage the finish.
Part 4 Care and Maintenance
15
Taking Care of Cartridges
Use Precautions
• Avoid heavy vibration and dropping.
• The lid on the insertion edge of the cartridge is opened automatically when
it is inserted into the drive. Do not open the lid by hand, as touching the tape
may damage it.
• The cartridge was carefully aligned during assembly at the factory. Please
do not try to open it or take it apart.
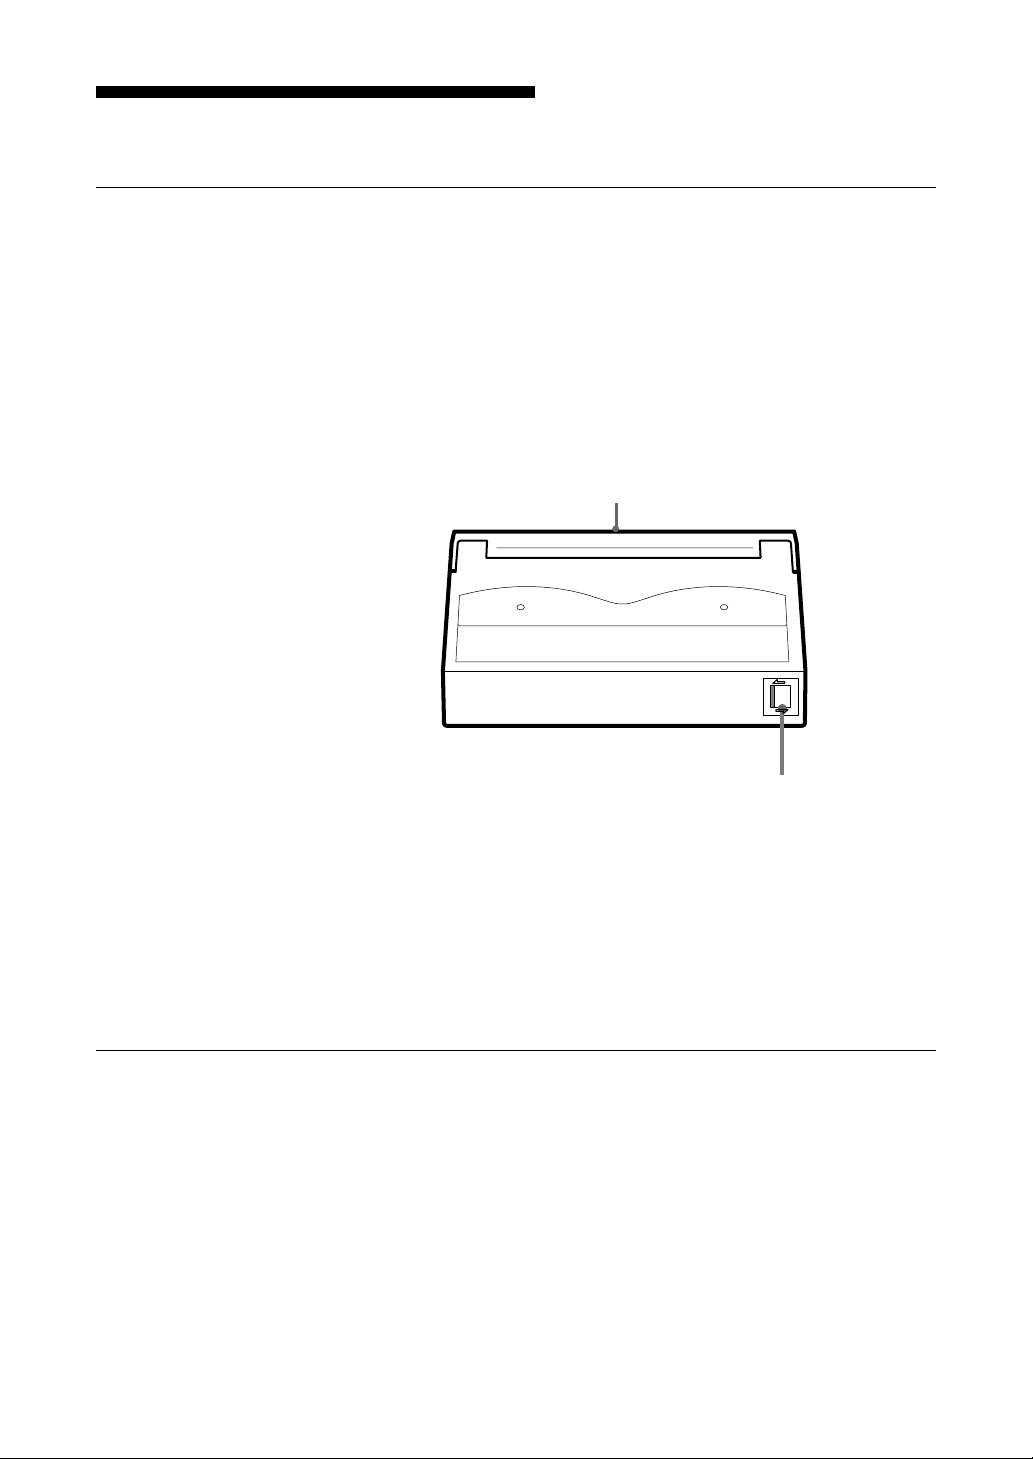
• The write-protect switch on the front edge of the cartridge prevents the tape
from being written to or accidentally erased. If you do not need to write to
the tape, move this switch to the write-protect position.
lid
• In case of a sudden change in temperature, condensation may interfere with
• Avoid unnecessary insertion and removal of cartridges if you do not need to
• When finished using the drive, remove the cartridge.
Storage Precautions
• Keep cartridges in their cases when not in the drive.
• Avoid storing cartridges in dusty places, in direct sunlight, near heaters or
• Do not place cartridges on the dashboard or in a storage tray in a car.
Push the switch to the left to enable writing and erasure. ?
Push the switch to the right to protect the tape
from writing or accidental erasure. /
reading and writing to a tape.
write or read a tape.
air conditioners, or in humid locations.
16
Part 4 Care and Maintenance

Head Cleaning
To keep the AIT drive in top condition, clean the head as needed. using the
proper head cleaning cartridge (sold separately). When the head needs
cleaning, the STATUS indicator blinks (page 6).
How to Clean
1 Turn on the power.
2 After the STATUS, BUSY and TAPE indicators have stopped flashing,
After head cleaning finishes, the cleaning tape ejects automatically.
insert the head cleaning cartridge into the data cartridge receptacle.
Head cleaning starts automatically.
Part 4 Care and Maintenance
17

Appendix
Specifications
■ Performance
Storage Capacity
Approx. 25 Gbytes
(uncompressed)
Approx. 50 Gbytes
(with 2x compression)
(using proper AIT tape)
Bit Error Rate
Less than 10
Data Transfer Speed (tape)
3 Mbytes/s uncompressed,
6 Mbytes/s compressed
Burst Data Transfer Speed (SCSI)
20 Mbytes/s (max.)
Initialize Time
less than 5 seconds
Load Time less than 35 seconds
Unload Time less than 35 seconds
Rewind Time
less than 90 seconds
–17
■ Operating Environment
Operating
Temperature 5 to 35 °C
Humidity 30 to 80 %
(non-condensating)
Non-Operating
Temperature –40 to 70 °C
(–40 °F to 158 °F)
Humidity 10 to 90 %
Specifications may be subject to change, in the
interest of technological improvement, without
notice or obligation.
■ Power Supply & Miscellaneous
Power Supply
100–120 V/200–240 V AC,
50/60 Hz
Current Consumption
0.5 A/0.3A (max.)
Case Dimensions
189 × 58 × 262 mm (W × H × D)
Weight 2.3 kg
Accessories Power Cable (1)
User’s Guide (1)
Rubber feet (4)
18
Appendix

Régles de sécurité
AVERTISSEMENT
Afin d’eviter tout risque d’incendie ou d’électrocution,
ne pas exposer cet appareil à la pluie ou à l’humidité.
Afin d’écarter tout risque d’électrocution, garder le
coffret fermé. Ne confier l’entretien de l’appareil qu à
un personnel qualifié.
Français
Table of Contents 19

Table des matières
Chapitre 1
Introduction
Chapitre 2
Préparatifs
Chapitre 3
Fonctionnement
Chapitre 4
Manipulation et
entretien
A propos des lecteurs AIT.............................................................. 22
Caractéristiques .....................................................................................22
Cassettes utilisables ...............................................................................22
Composants du système ........................................................................23
Nomenclature et fonctions............................................................. 24
Panneau avant ........................................................................................24
Panneau arrière ...................................................................................... 26
Articles fournis................................................................................ 27
Interconnexions .............................................................................. 28
Réglage SCSI ID .............................................................................. 29
Utilisation du lecteur AIT......................................................................30
Retrait de la cassette .............................................................................. 31
Manipulation du lecteur.................................................................. 32
Conditions de sécurité ...........................................................................32
Eviter de l’endommager ........................................................................32
Autres précautions .................................................................................33
Manipulation des cassettes ........................................................... 34
Précautions d’utilisation ........................................................................ 34
Précautions de rangement...................................................................... 34
Nettoyage de tête ............................................................................ 35
Nettoyage...............................................................................................35
Appendice
20 Table of Contents
Spécifications.................................................................................. 36

Comment utiliser ce mode d’emploi
Ce mode d’emploi décrit le modèle SDX-S300/S310C du lecteur AIT et sa
manipulation. Prière de lire attentivement ce mode d’emploi avant d’utiliser
le lecteur et le garder à portée de main pour toute référence ultérieure.
Ce guide consiste en quatre chapitres plus les spécifications. Se reporter au
chapitre correspondant à chaque utilisation.
Chapitre 1 décrit les caractéristiques du lecteur, les composants de son
système et le nom e la fonction de chaque pièce.
Chapitre 2 décrit les connexions nécessaires entre le lecteur et l’ordinateur
central et d’autres périphériques SCSI, les fonctions du lecteur et le réglage le
SCSI ID. Lisez ce chapitre si vous installez le lecteur.
Chapitre 3 décrit l’utilisation du lecteur, y compris sa mise sous tension
ainsi que l’installation et le retrait des cassettes. Lisez ce chapitre si vous
commencez à faire fonctionner le lecteur.
Chapitre 4 décrit comment manipuler le lecteur et les cassettes et comment
nettoyer les têtes d’impression. Lisez ce chapitre avant d’utiliser le lecteur.
Annexe
Donne les principales spécifications du SDX-S300C/S310C.
21

Chapitre 1 Introduction
A propos des lecteurs AIT
Les SDX-S300C et S310C sont des lecteurs AIT externes qui utilisent le
même format de média que les cassettes vidéo 8 mm.
Caractéristiques
Les lecteurs AIT SDX-S300C/S310C possèdent les caractéristiques
suivantes:
• Le format AIT (Advanced Intelligent Tape) procure une énorme capacité
d’enregistrement sur des cassettes AIT (25 Giga-octets sans compression de
données). Une fonction “Lecture après Ecriture” et un code de correction
d’erreur à trois niveaux garantissent une grande fiabilité des données.
• Ce modèle comporte une fonction de compression de données qui permet de
mémoriser encore plus de données.
• Pendant la lecture, les SDX-S300C et S310C détectent automatiquement si
les données ont été enregistrées avec la compression et les décompressent si
nécessaire.
• Une interface SCSI large (SDX-S300C)
• Une interface SCSI différentielle large (SDX-S310C)
Cassettes utilisables
Le lecteur utilise des cassettes AIT.
Précaution
Les cassettes vidéo 8 mm normales ressemblent aux cassettes AIT mais ont
des spécifications complètement différentes et ne peuvent pas être utilisées.
Si une cassette vidéo 8 mm est insérée dans le lecteur, elle est
automatiquement éjectée.
22
Chapitre 1 Introduction

Composants du système
Les SDX-S300C et S310C se raccordent à l’ordinateur central via une
interface SCSI large.
Ordinateur central
(SCSI large de 16 bits)
N Câble 68P
SDX-S300C/S310C
(cet appareil)
Périphériques SCSI large (jusqu’à 15 périphériques)
Chapitre 1 Introduction
23
 Loading...