

Page 1

AIT Drive
User’s Guide
4-658-215-03(1)
SDX-420 Series
SDX-520 Series
2000 Sony Corporation
Page 2

This document contains proprietary
information which is protected by
copyright.
All rights reserved. No part of this
document may be photocopied,
reproduced or translated to another
language without prior written consent
of Sony.
The information contained in this
document is subject to change without
notice.
SONY MAKES NO WARRANTY
OF ANY KIND WITH REGARD TO
THIS DOCUMENT.
Sony shall not be liable for error
contained herein, indirect, special,
incidental or consequential damages in
connection with the furnishing,
performance or use of this document.
VORSICHT
Diese Ausrüstung erfüllt die
Europäischen EMC-Bestimmungen für
die Verwendung in folgender /
folgenden Umgebung(en):
• Wohngegenden
• Gewerbegebiete
• Leichtindustriegebiete
(Diese Ausrüstung erfüllt die
Bestimmungen der Norm EN55022,
Klasse B.)
Contents
Introduction .......................................4
Product Features........................4
Precautions ................................5
Installation .........................................6
Jumper Setting...........................6
Option Switches (DIP Switch) ..7
Mounting Holes........................8
Remodeling from 5.25" Model
to 3.5" Model .......................10
Orientation...............................10
Operation .........................................11
Location of 3 LEDs ................. 11
LED Indication for
Drive Status .........................12
Drive Operation.......................13
Emergency Tape Removal
Procedure .............................14
Interface Implementation.................17
Supported ATA Commands ....17
Supported ATAPI Packet
Commands ........................... 17
Specification ....................................18
Product Specifications.............18
Third Party Support Contacts
(In the USA) ...............................20
Sony Contacts .................................. 22
2
Page 3

SDX-420/SDX-520 Tape Drive
The Sony SDX-420/SDX-520 series drive is a high capacity data storage
device using Advanced Intelligent tape (AIT) technology. The SDX-420
series/SDX-520 series drive achieves high data reliability through ReadAfter-Write, an additional level of Error Correction Code, and other
features.
The Sony SDX-420 series/SDX-520 series drive stores data on tape using a
standard format called AIT (Advanced Intelligent Tape) and ALDC
formats.
3
Page 4

Introduction
Product Features
SDX-420 series SDX-520 series
Data Capacity
Transfer Rate
(sustained)
* Assuming a 2.6 : 1 compression ratio.
(The compression ratio varies according to the type of data.)
• Supported Format : AIT-1 (SDX-420 series)
• Burst Transfer Rate 66 MB/s Ultra DMA (mode 4)
• Large 10 MB Buffer Memory
• 3.5” Standard Height, 5.25” Half Height
• ATA/ATAPI-5 Interface
• Support Fixed Record Length Only
• Frame Rewrite Function
• Three levels of Error Correction Code (ECC)
• High Speed search (120 times normal Read/Write speed)
• Random Read, Append Write
35 GB uncompressed 50 GB uncompressed
(with AIT-1 230 m tape) (with AIT-2 230 m tape)
91 GB compressed* 130 GB compressed*
(with AIT-1 230 m tape) (with AIT-2 230 m tape)
4 MB/s uncompressed 6 MB/s uncompressed
: AIT-1, AIT-2 (SDX-520 series)
4
Page 5

Precautions
Installation
Avoid placing the drive in a location subject to:
– high humidity
– high temperature
– mechanical shock and vibration
– direct sunlight
Operation
• Do not move the drive while it is operating. It may cause malfunction.
• Avoid exposing the drive to sudden changes from a low to high in
temperature. This may cause water condensation to collect inside the
drive. If the ambient temperature should suddenly rise while the drive is
turned on , wait at least one hour before turning on the drive. If you
attempt to operate the drive immediately after a sudden increase in
temperature, a malfunction may occur.
• Turning off the power to the drive while it is writing to tape may cause
the tape to become unreadable. All previously negotiated parameters will
be lost, whenever power to the drive is cycled.
Transportation
• Keep the original packing materials to facilitate transportation of the
drive.
• Always remove the tape before moving the drive. After removing the
drive from the computer, repack the drive into its original packing.
5
Page 6
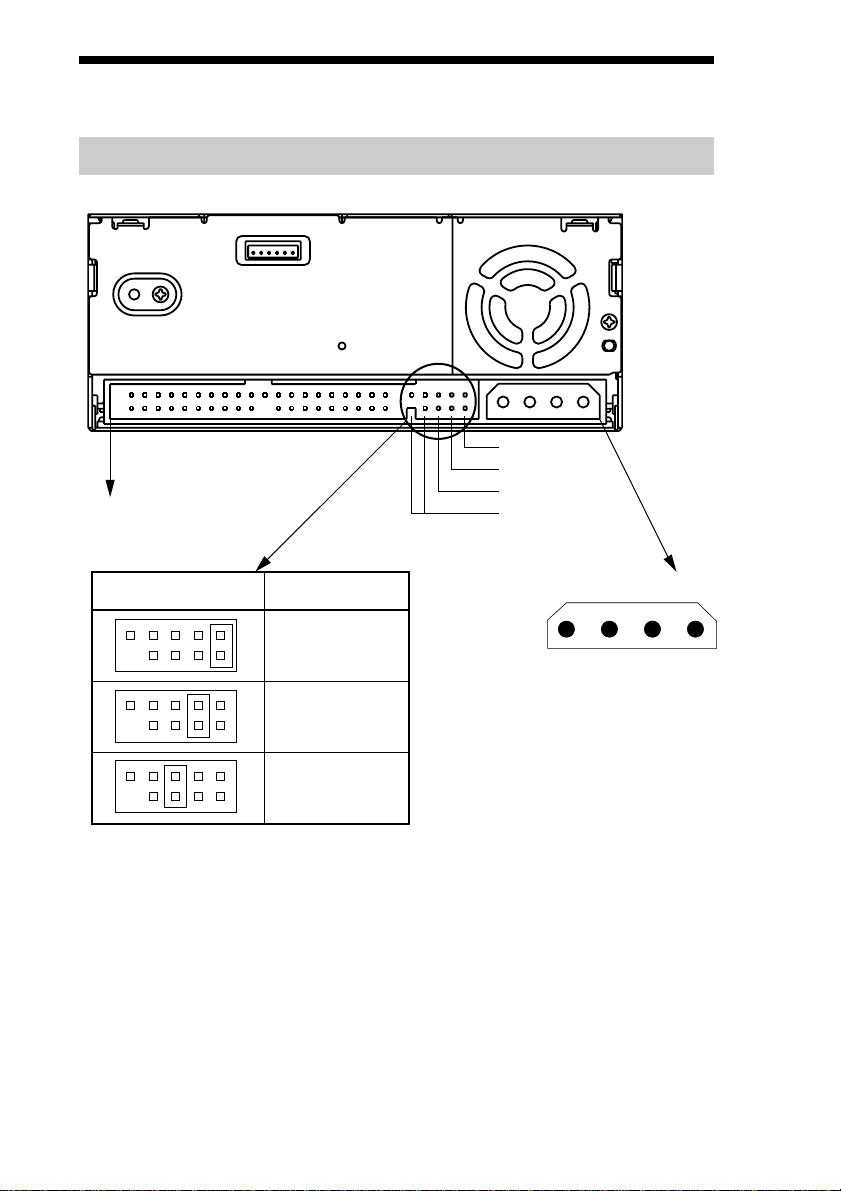
Installation
Jumper Setting
IDE Interface Connector
Master
Slave
Cable Select
No Connection
Jumpers Drive Setting
Master
Slave
Cable Select
Power Connector
4 3 2 1
5V GND GND 12V
6
Page 7
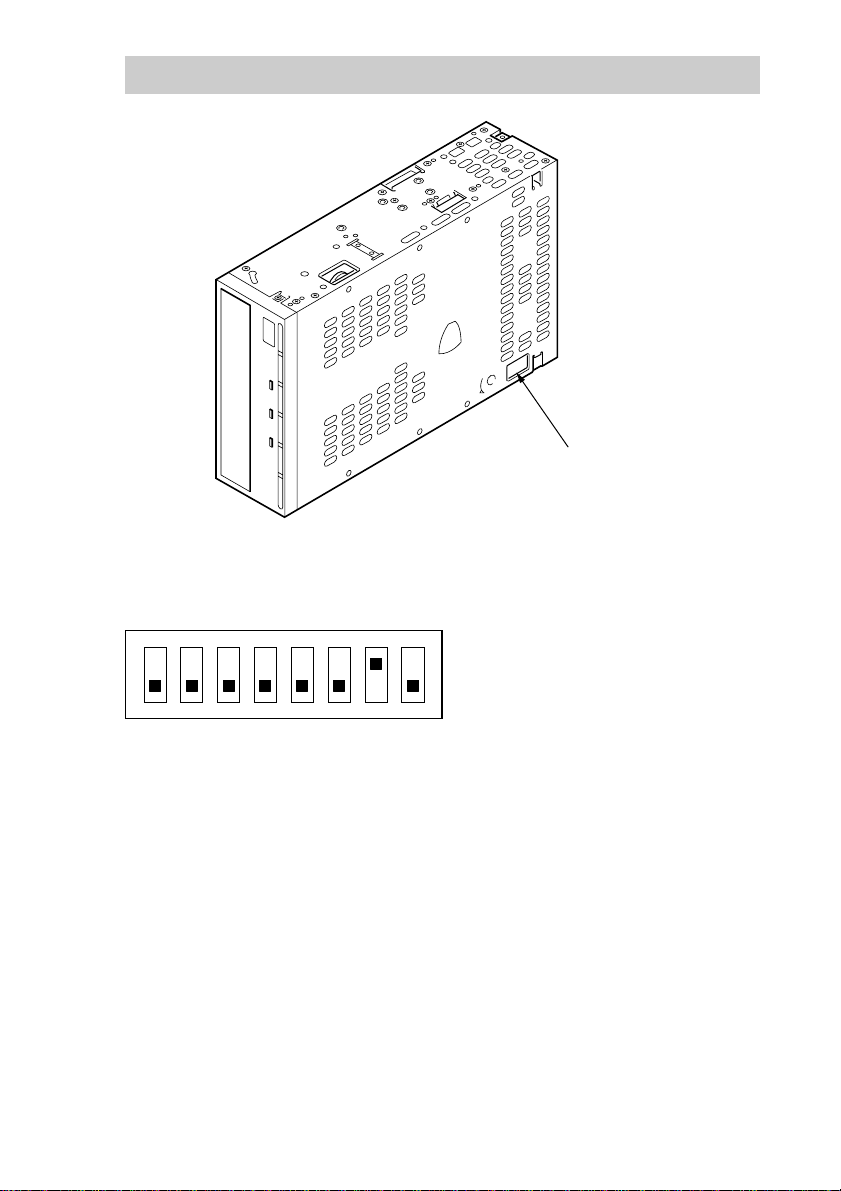
Option Switches (DIP Switch)
DIP Switch Positions
DIP Switch
ON
12345678
1 Reserved (OFF)
2 Reserved (OFF)
3 Reserved (OFF)
4 Reserved (OFF)
5 Reserved (OFF)
6 Reserved (OFF)
7 DC Control (1) (ON)
8 DC Control (2) (OFF)
Data Compression Control DIP switch
Data compression can be selected by DIP switches. Data compression is
enabled while position 7 [DC Control (1)] is ON. Control by host can be
disabled when position 8 [DC Control (2)] is ON.
7
Page 8

Mounting Holes
For 3.5" Standard Height (SDX-420C, SDX-520C)
95.5 mm (3.76 in)
155.0±0.5 mm (6.10±0.02 in) 7.6±0.5 mm (0.30±0.02 in)
94.0±0.3 mm (3.70±0.01 in)
101.6±0.5 mm (4.00±0.02 in)
7.0±0.5 mm (0.28±0.02 in)
5.53±0.5 mm
(0.218±0.02 in)
3-M3 (depth
2.5 mm (0.10 in) max.)
6-M3 (depth
2.5 mm (0.10 in) max.)
70.0±0.3 mm
(2.76±0.01 in)
42.0±0.3 mm
(1.65±0.01 in)
31.0±0.3 mm
(1.22±0.01 in)
90.0±0.3 mm (3.54±0.01 in)
21.0±0.3 mm
(0.83±0.01 in)
8.45 mm (0.333 in)
60.0±0.3 mm (2.36±0.01 in)
5.0±0.3 mm
(0.20±0.01 in)
41.2±0.5 mm
(1.62±0.02 in)
7.4±0.5 mm
(0.29±0.02 in)
8
Page 9
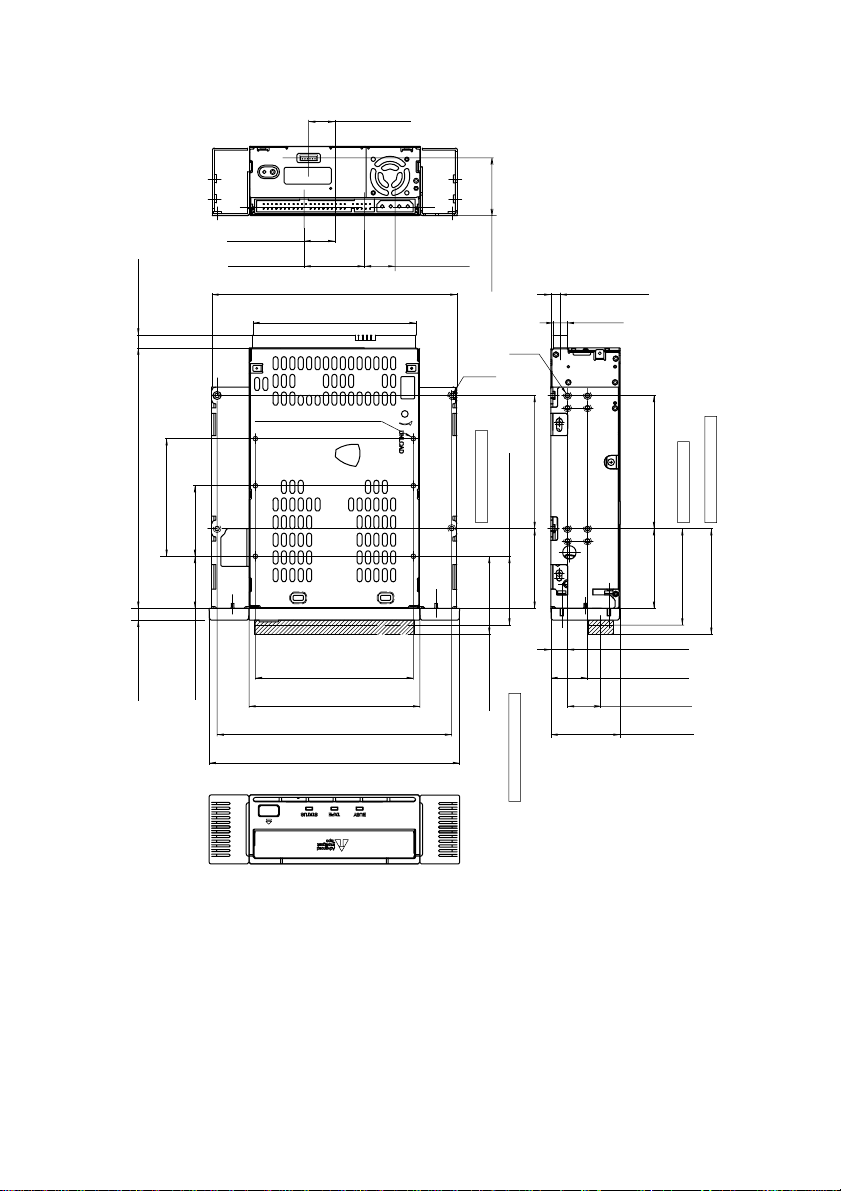
For 5.25" Half Height (SDX-420C/R, SDX-520C/R)
15.6±0.5 mm
(0.61±0.02 in)
18.4±0.5 mm
7.6±0.5 mm
(0.3±0.02 in)
(0.72±0.02 in)
35.9±0.5 mm
(1.41±0.02 in)
6-M3 (depth 2.5 mm max.)
(depth 0.10 in max.)
146±0.5 mm
(5.75±0.02 in)
95.5 mm
(3.76 in)
18.2±0.5 mm
(0.72±0.02 in)
4-M3
34.3±0.5 mm
(1.35±0.02 in)
4-M3
5.53±0.5 mm
(0.218±0.02 in)
8.45 mm
(0.333 in)
(6.1±0.02 in)
155.0±0.5 mm
7±0.5 mm
(0.28±0.02 in)
70.0±0.3 mm
(2.76±0.01 in)
42.0±0.3 mm
(1.65±0.01 in)
31.0±0.3 mm
(1.22±0.01 in)
94.0±0.3 mm
(3.7±0.01 in)
101.6±0.5 mm
(4±0.02 in)
139.6±0.5 mm
(5.5±0.02 in)
149.0±0.5 mm
(5.87±0.02 in)
79.2±0.3 mm
Cassette in ON point
41.0±1.0 mm
(1.61±0.04 in)
47.5±0.3 mm
46.5±1.5 mm
(1.83±0.06 in)
The cartridge eject distance
(3.12±0.01 in)
(1.87±0.01 in)
79.2±0.3 mm
(3.12±0.01 in)
47.5±0.3 mm
(1.87±0.01 in)
9.9±0.5 mm
(0.39±0.02 in)
21.8±0.5 mm
(0.86±0.02 in)
19.7±0.5 mm
(0.78±0.02 in)
41.2±0.5 mm
(1.62±0.02 in)
The cartridge eject distance
Cassette in ON point
57.5±1 mm
(2.26±0.04 in)
63.0±1.5 mm
(2.48±0.06 in)
9
Page 10
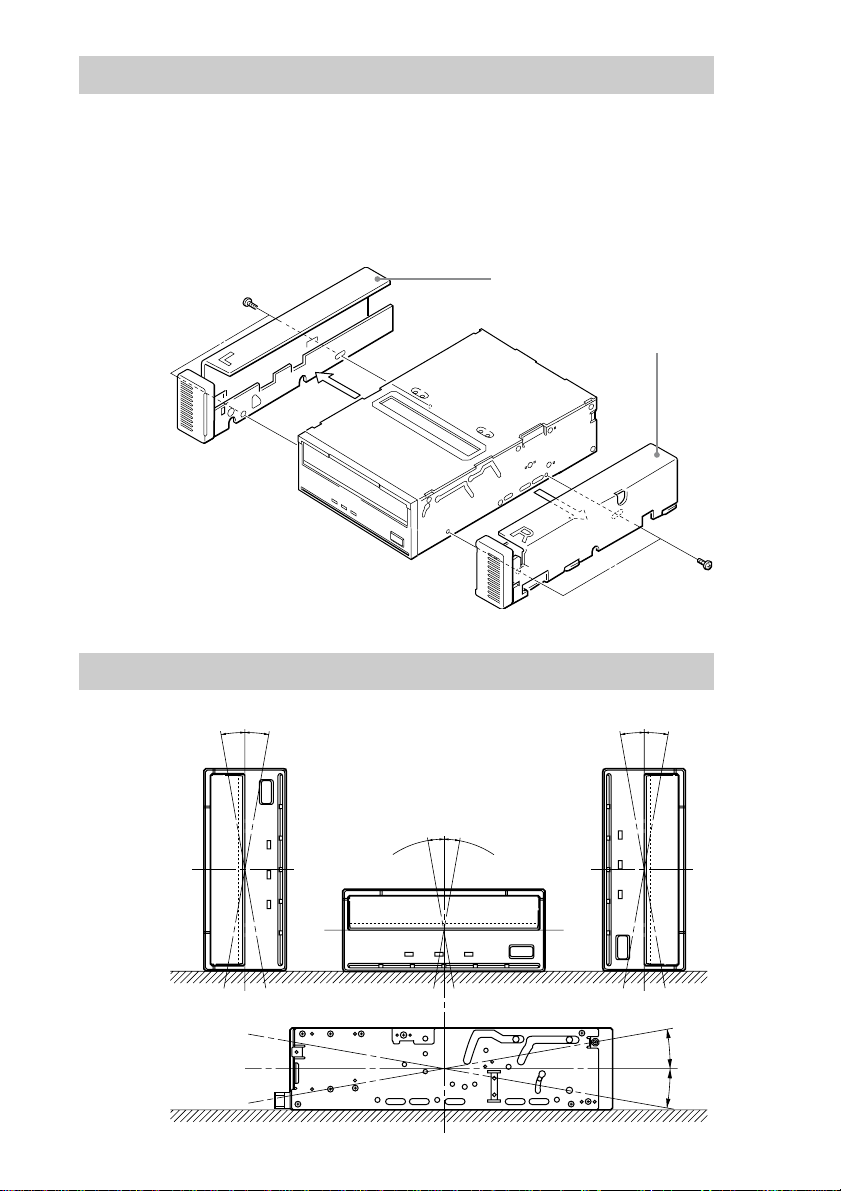
Remodeling from 5.25" Model to 3.5" Model
You can remodel the SDX-420C/R and the SDX-520C/R (5.25" model) to
the SDX-420C and the SDX-520C (3.5" model) yourself.
1 Remove the 2 screws for each side rail.
2 Take the side rail off.
Side Rail (L)
Side Rail (R)
Orientation
10
10°
10° 10° 10°
10°
10°
10°
10°
Page 11
Operation
Location of 3 LEDs
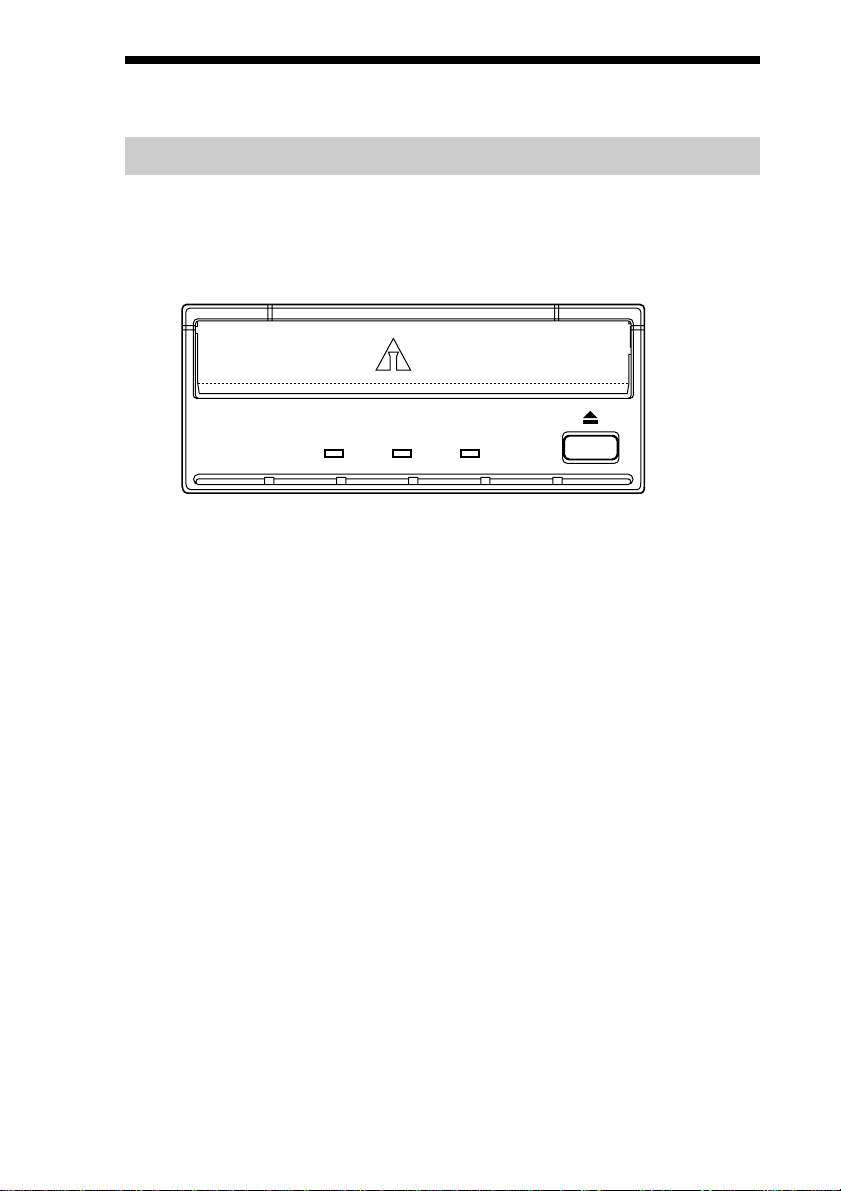
There are three LED indications (BUSY,TAPE and STATUS) and an
EJECT button on the front panel of the unit.
Front Panel (for 3.5" Standard Height)
Advanced
Intelligent
Tap e
BUSY TAPE STATUS
11
Page 12
LED Indication for Drive Status
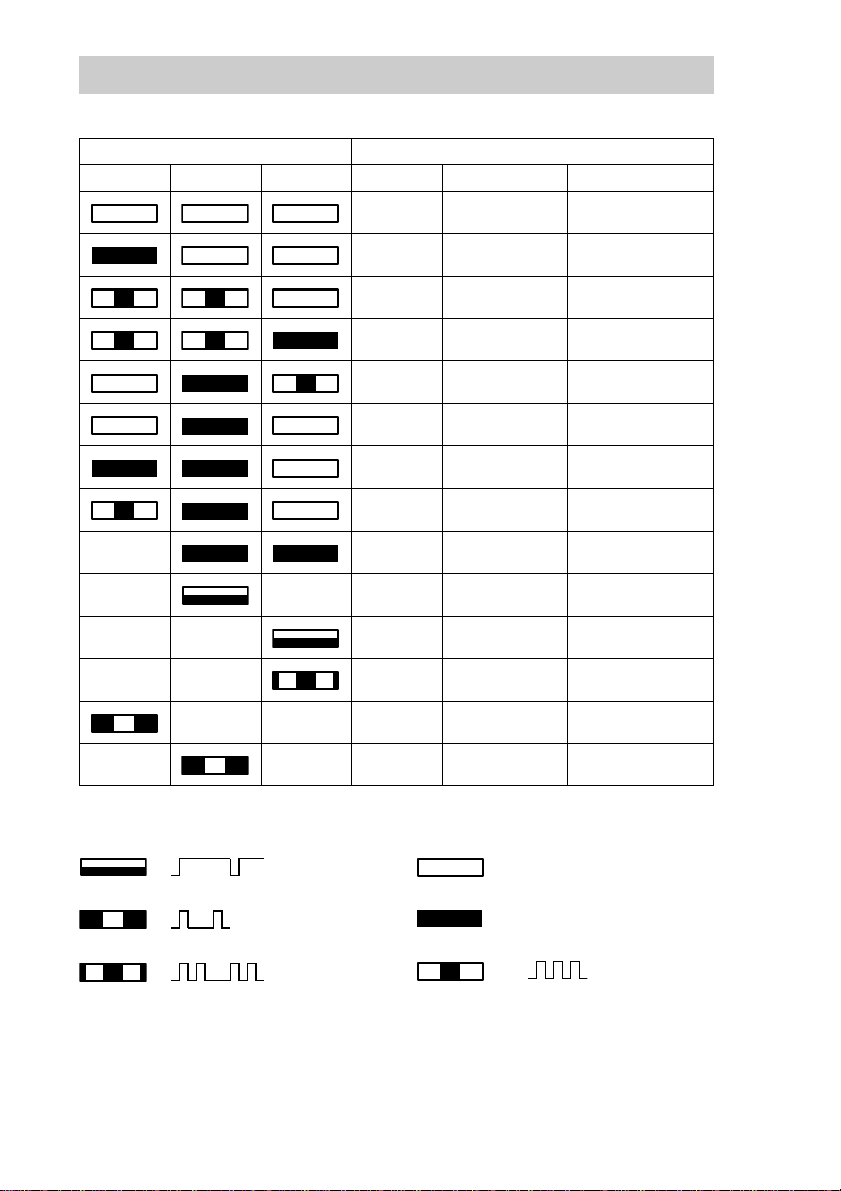
The LED indicators are defined as follows.
LED State
BUSY TAPE STATUS Activity Cartridge Other
None None None
IDE None None
Drive
Drive
None Loaded
None Loaded None
IDE Loaded None
IDE/Drive Loaded None
Independent ✽ Loaded Write Protected
Independent Independent ✽ Loaded Error Rate Warning
✽✽ ✽✽Cleaning Request
✽✽ ✽✽Self test Failure
✽✽✽ ✽Waiting for Reset
✽ ✽✽ ✽Waiting for Eject
1 pulse (3.5 sec on / 0.5 sec off)
1 pulse (0.25 sec on)
Loading/Unloading
Loading/Unloading
off
on
None
Write Protected
Cleaning Tape at EOM
✽ : Not defined.
12
2 pulses (0.25 sec on/0.5 sec off)
1 pulse (0.25 sec on / 0.25 sec off)
Page 13
Drive Operation
Loading a Tape
Insert a cassette into the slot on the front panel with the arrow on the
cassette pointing towards the drive. As the cassette is inserted, the drive
takes it and automatically loads it into drive mechanism.
Unloading a Tape
The cassette can be removed from the SDX-420/SDX-520 either in
response to a ATAPI Packet Unload Command, or by pressing the eject
bottom.
By pressing Eject button, the tape goes to BOT, the drive unthreads it, and
ejects the cassette from the slot.
Write-protecting a Tape
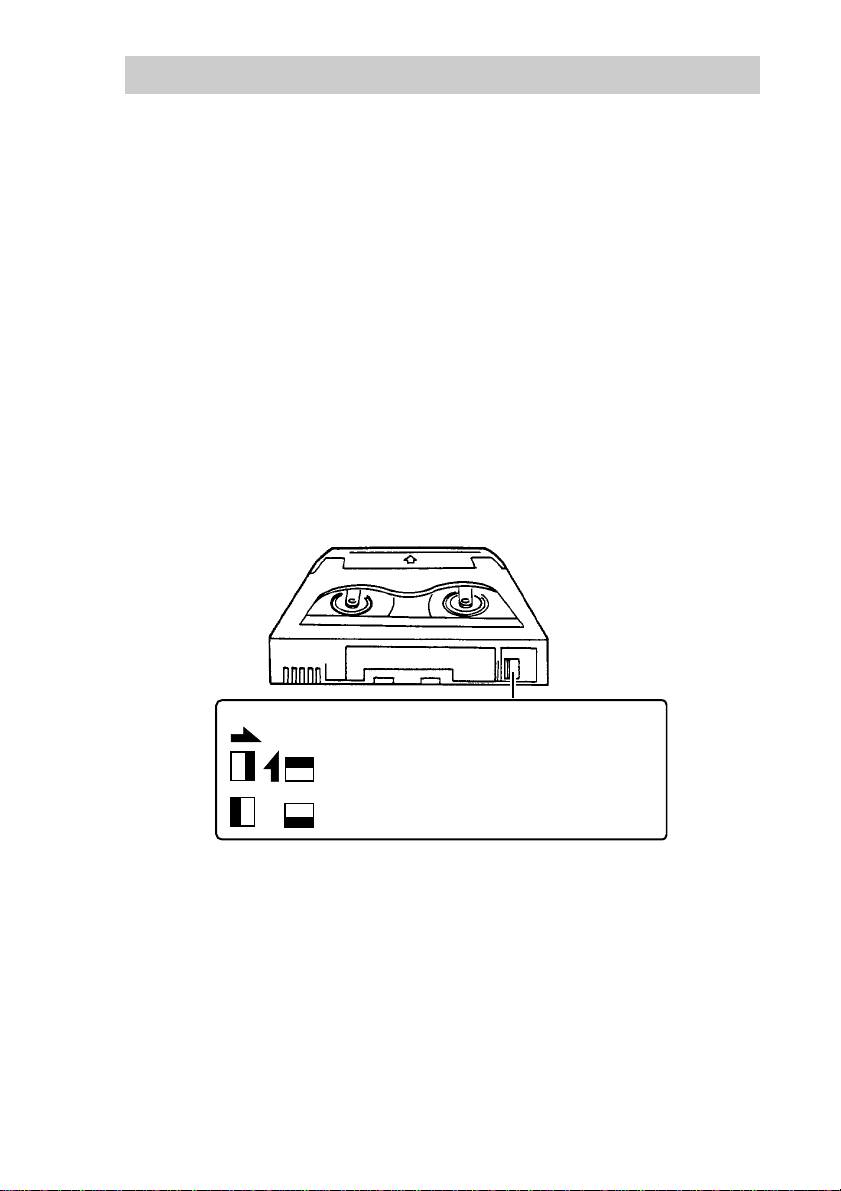
Cassettes can be write-protected by sliding the tab on the back of the
cassette. In this state, data can be read from the tape but not written onto it.
AIT-1 AIT-2
Using your fingernail, push the switch in the
direction of the arrow to protect the tape from
writing or accidental erasure.
Return the switch to its original position to
re-enable writing.
Using a Cleaning Cassette
In case of SDX-420 series/SDX-520 series, a cleaning function is built into
the drive and hence the use of a c leaning cartridge is not needed. If
however the drive experiences excessive errors, the use of a cleaning
cartridge is recommended.
13
Page 14

Emergency Tape Removal Procedure
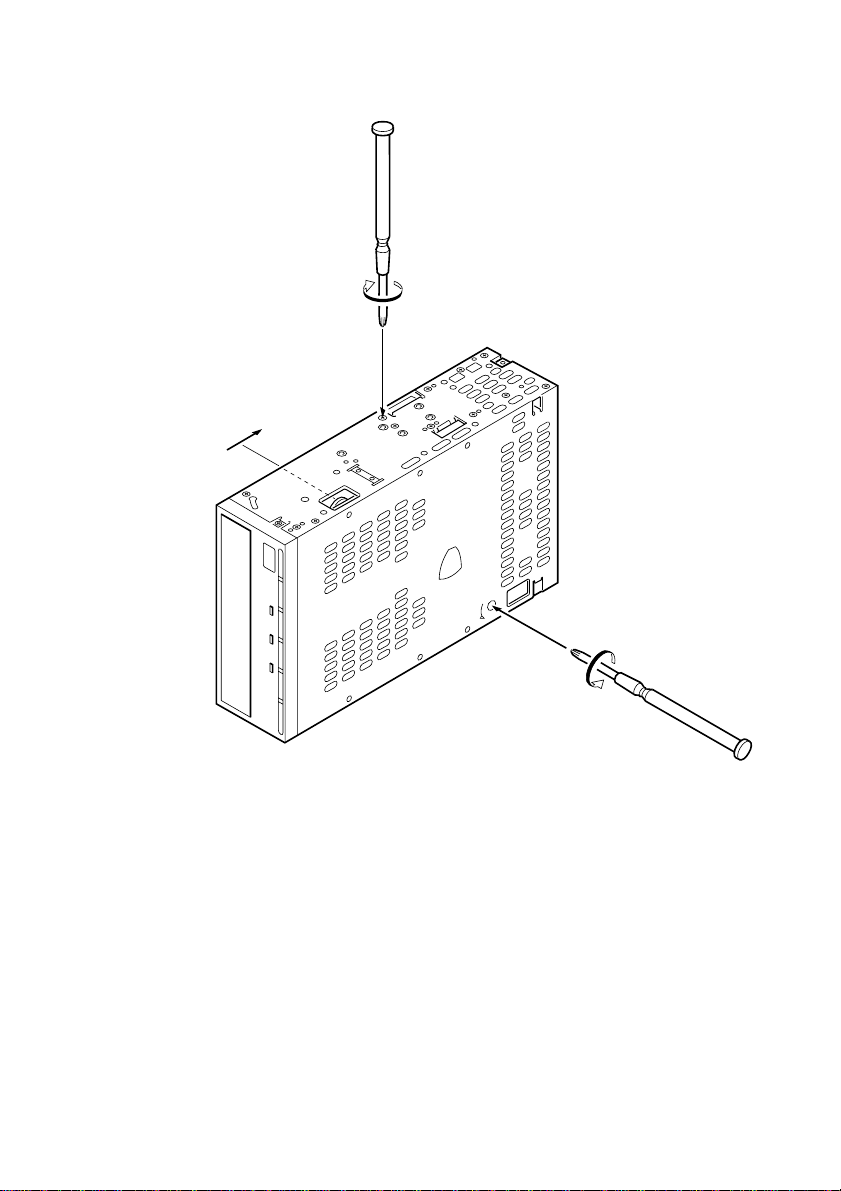
1 Remove the drive from the chassis or enclosure to allow
access to the bottom and right side of the drive.
2 Remove the drive’s top cover.
3 Locate the small opening in the bottom of the drive and
insert the tip of a precision screwdriver so that the Threading
motor shaft can be rotated.
4 Rotate the motor shaft counterclockwise to bring the
threading mechanism back to the initial position. (Refer to
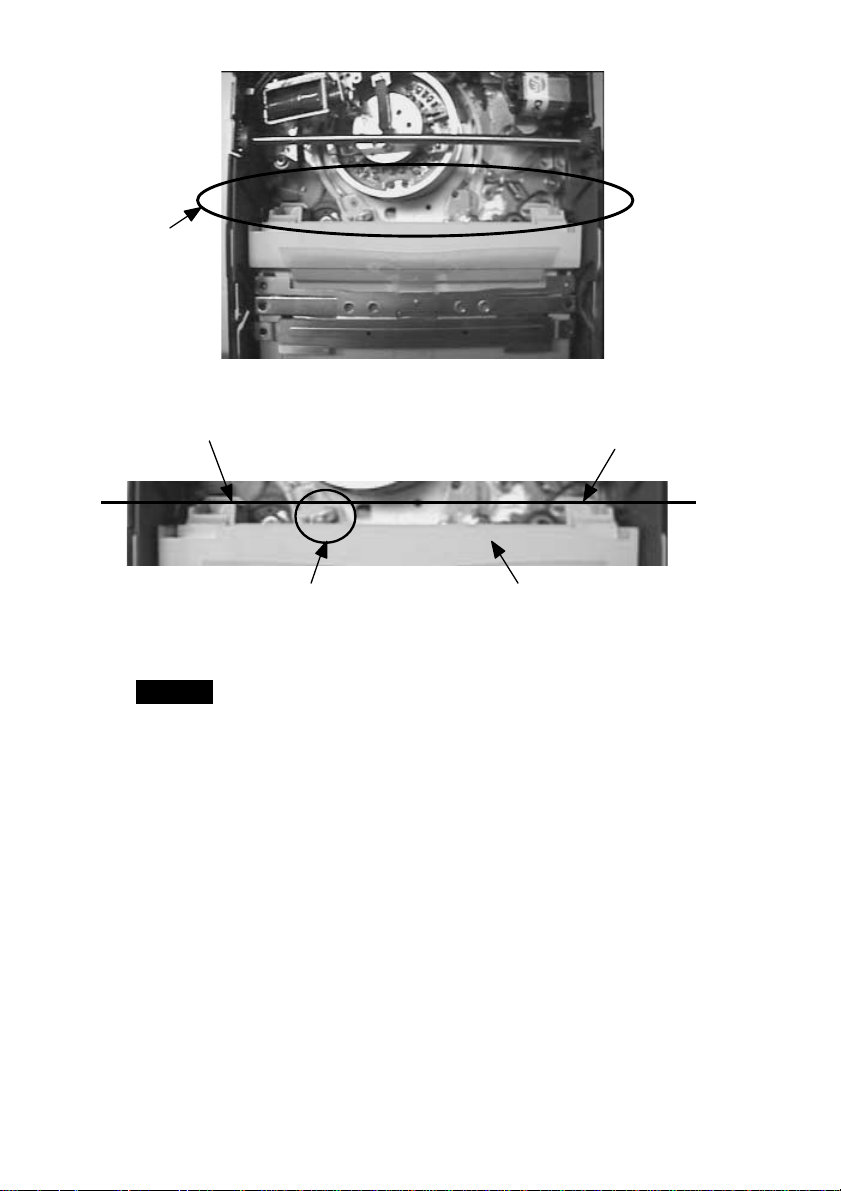
the photo-1 on page 16.)
5 Before manual eject procedure, tape slack must be removed
in order to prevent tape damage. Press and rotate the gear
mechanism located on the right side of the drive clockwise to
tighten the tape.
6 After the tape slack has been removed, turn the screw
located on the right side of the drive clockwise by a precision
screwdriver until the tape cartridge is lifted out of the drive
mechanism and is ejected.
14
Page 15
7 Return the drive to Sony for repair.
3. Cassette Compartment Motor
2. Reel Motor
1. Loading Motor
15
Page 16
A
tape guide surfa ce
tape guide surfa ce
C
B
Photo-1: The Initial Position of the Threading Mechanism
Caution
Stop rotating the motor shaft immediately, when the guide B (see detail A of Photo-1)
gets to the area below the line C-C (This line is defined by 2 circular tape guide surfaces
of the cartridge). Otherwise the gear of the drive can be damaged.
detail A
Cartridge
C
16
Page 17

Interface Implementation
Supported ATA Commands
ATA commands supported:
– ATAPI SOFT RESET (0x08)
– EXECUTE DRIVE DIAGNOSTIC (0x90)
– ATAPI PACKET COMMAND (0xA0)
– ATAPI IDENTIFY DEVICE (0xA1)
– STANDBY IMMEDIATE (0xE0)
– IDLE IMMEDIATE (0xE1)
– CHECK POWER MODE (0xE5)
– SLEEP (0xE6)
– SET FEATURE (0xEF)
Supported ATAPI Packet Commands
Mandatory ATAPI command set:
Supporting most of all SCSI commands in SDX-400C/SDX-500C
– ERASE
– INQUIRY
– LOAD/UNLOAD
– LOCATE
– LOG SELECT
– LOG SENSE
– MODE SELECT
– MODE SENSE
– READ
– READ POSITION
– REQUEST SENSE
– REWIND
– SPACE
– TEST UNIT READY
– WRITE
– WRITE FILEMARK
– WRITE BUFFER
17
Page 18
Specification
Product Specifications
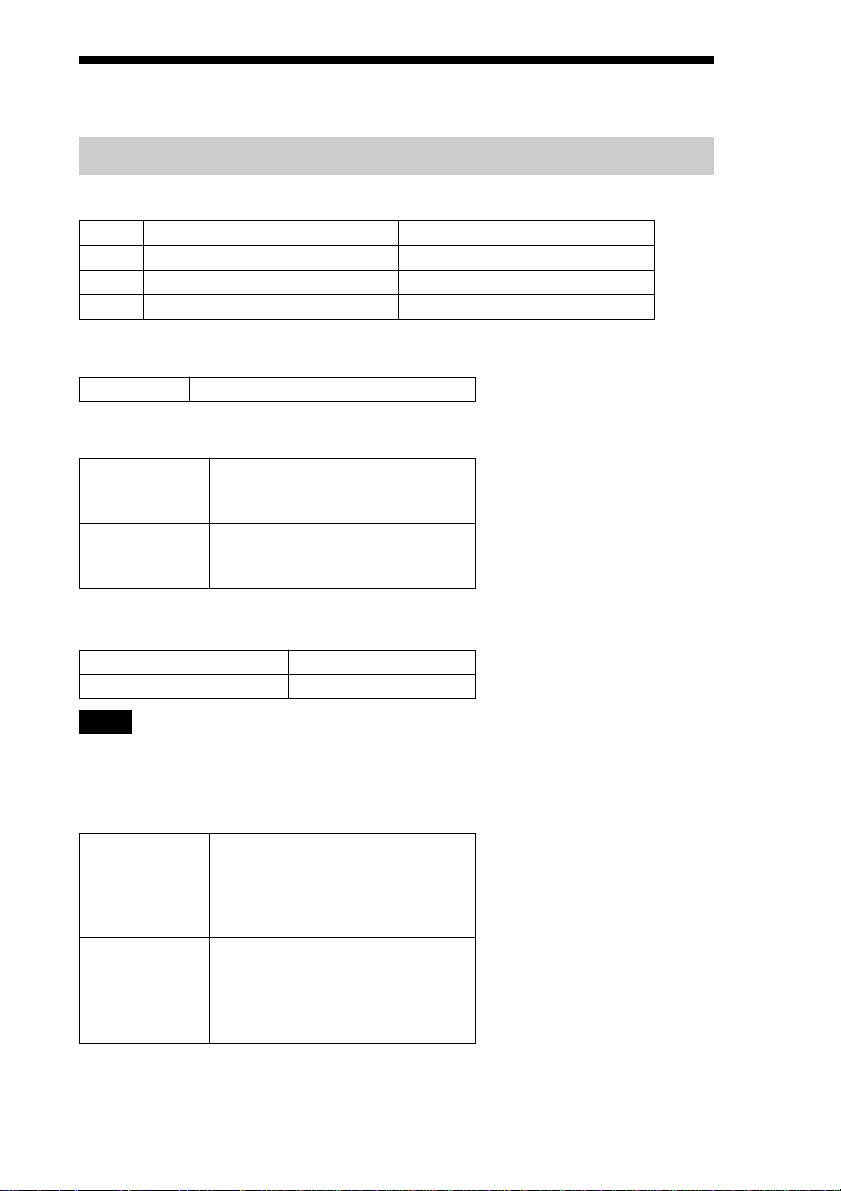
Dimensions
SDX-420C, SDX-520C SDX-420C/R, SDX-520C/R
Height 41.2 mm (1.62 in) 41.2 mm (1.62 in)
Width 101.6 mm (4.0 in) 146.0 mm (5.75 in)
Depth 155.0 mm (6.1 in) 155.0 mm (6.1 in)
Altitude
Operating 0 to 10,000 feet
Vibration
Operating Swept Sine 5 to 500 Hz
Non-Operating Swept Sine 5 to 500 Hz
Acoustic Noise (A) curve weight
Streaming Write/Read 35 db (A)
Insert/Eject 60 db (A)
*0.25 G Peak 1 Octave/min.
3 axes, 3 directions
*0.5 G Peak 1 Octave/min.
3 axes, 3 directions
Note
The sound-meter on (A) scale is located 1m in front of
the center of the drive front panel.
Shock
Operating No Data Loss
Non-Operating No Device Damage
Half Sine
5 G Peak 3 ms
3 axes, 3 directions
*Interval 10 seconds
Half Sine
90 G Peak 3 ms
(30 G Peak 11 ms)
3 axes, 3 directions
18
Page 19
Temperature and Humidity Range
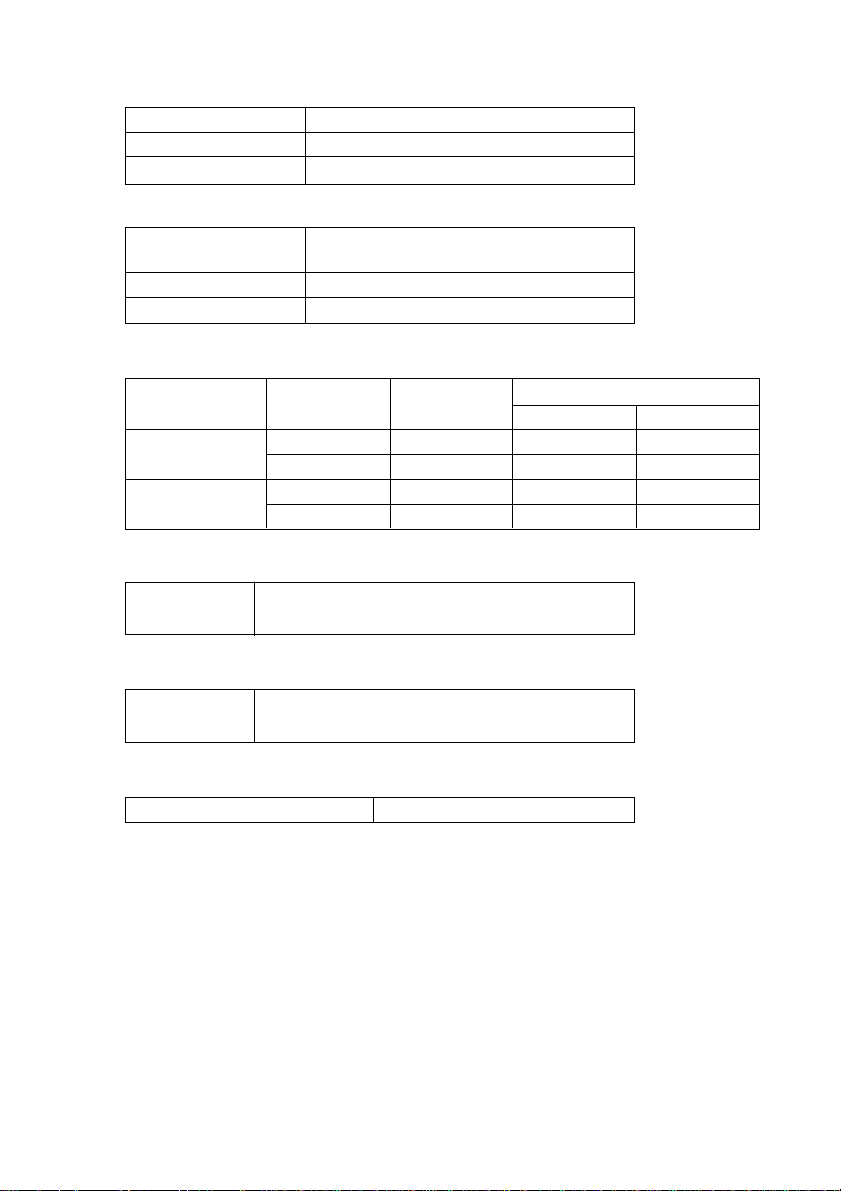
Temperature
Operating 5 ˚C to 40 ˚C (∆T<10 ˚C/h)
Non-Operating (mech.) – 40 ˚C to 70 ˚C (∆T<20 ˚C/h)
Non-Operating (tape) – 40 ˚C to 45 ˚C (∆T<20 ˚C/h)
Humidity
Operating 20 to 80% RH, non-condensing
Maximum wet bulb temperature = 26 ˚C
Non-Operating (mech.) 5 to 95% RH (∆T<30%/h)
Non-Operating (tape) 20 to 80% RH (∆T<30%/h)
Power Requirements
Model Voltage Max Ripple
SDX-420 series
SDX-520 series
5 V +/– 5 % 100 mVp-p 1.4 A 2.5 A
12 V +/– 10 % 150 mVp-p 0.45 A 1.2 A
5 V +/– 5 % 100 mVp-p 1.5 A 2.5 A
12 V +/– 10 % 150 mVp-p 0.45 A 1.2 A
Suspended Particulate
Operating
Less than 150 microgram/m
Based Sampling period 24 hours
3
Current
Typical Maximum
ESD
Discharge < 15 kV: No operation failure
Voltage < 20 kV: No drive damage
Air-cooling Requirement
Surrounding temperature < 40 ˚C
Clean air flow is recommended to minimize the possibility of data loss.
19
Page 20
Third Party Support Contacts (In the USA)
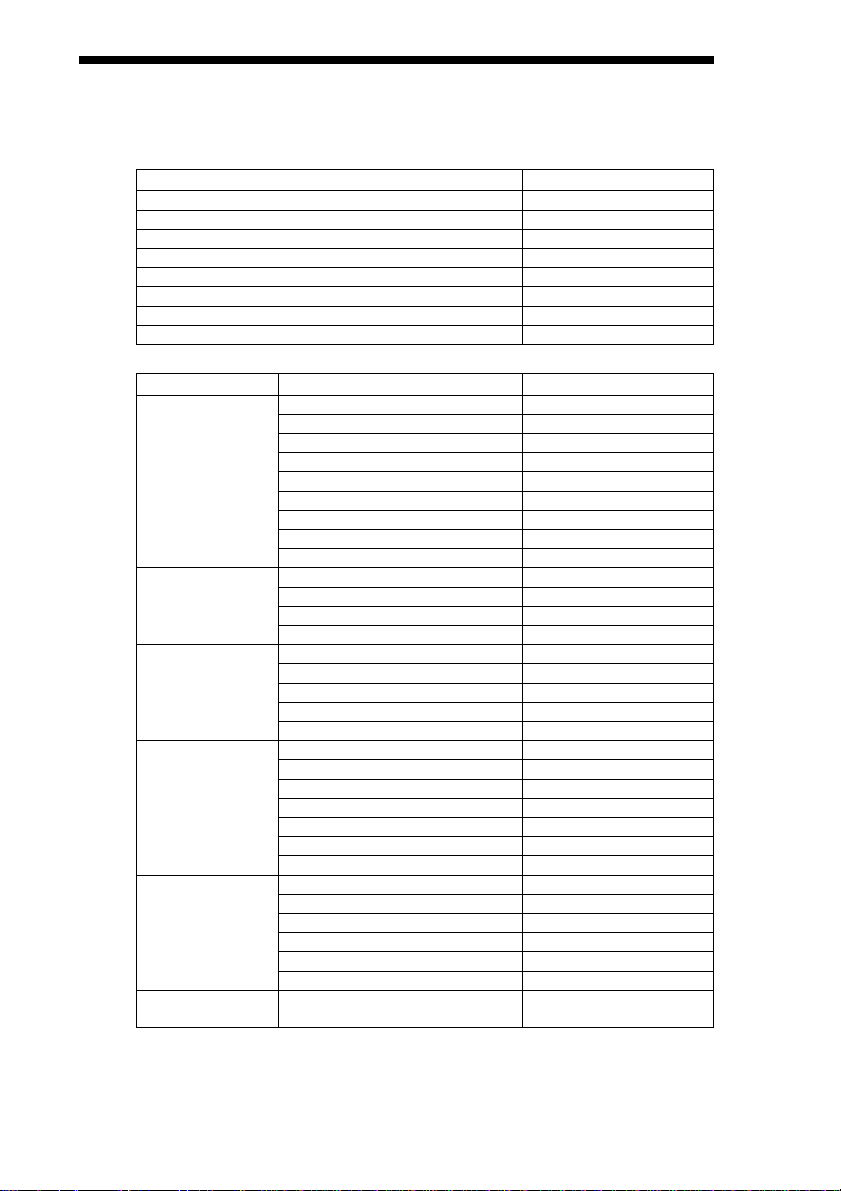
Host Adapter Vendors Phone Numbers
Adaptec 408-945-8600
ATTO 716-691-1999
Bus Logic 408-492-9090
DPT 407-830-5522
Future Domain 714-253-0400
Initio 408-988-1919
Qlogic 714-438-2200
Ultera Systems Inc. 714-367-8800
Operating Systems
DOS Arcada 407-333-7500
Macintosh Cheyenne 516-484-5110
OS/2 Cheyenne 516-484-5110
Windows Arcada 407-333-7500
Windows NT Arcada 407-333-7500
Windows NT Microsoft 206-882-8080
Advanced Server
Backup Software Vendors Phone Numbers
Cheyenne 516-484-5110
Columbia Data Products 407-869-6700
Corel 613-728-8200
NovaStor 805-579-6700
Palindrome 708-505-3300
ST. Bernard Sofware 619-676-2277
Sytron 508-898-0100
Tapedisk 715-235-3388
Corel 613-728-8200
Dantz 510-253-3000
NovaStor 805-579-6700
Corel 613-728-8200
IBM 800-426-3333
NovaStor 805-579-6700
Sytron 407-333-7500
Cheyenne 516-484-5110
Corel 613-728-8200
Creata 909-595-8811
NovaStor 805-579-6700
ST. Bernard Software 619-676-2277
Sytron 508-898-0100
Cheyenne 516-484-5110
Creata 909-595-8811
Microsoft 206-882-8080
NovaStor 805-579-6700
Avail Systems 303-444-4018
* All phone numbers listed are in the USA.
Add the country code (1) prior to those numbers when calling from
outside the USA.
20
Page 21
Operating Systems
Windows 95 NovaStor 805-579-6700
DEC Unix Cheyenne 516-484-5110
SUN Unic Legato 415-812-6000
Solaris Unix Cheyenne 516-484-3150
SCO Unix Cheyenne 516-484-3150
NCR Unix NovaStor 818-707-9900
HP Unix Cheyenne 516-484-3150
AIX Unix Cheyenne 516-484-3150
Interactive Unix Sun Soft 310-348-8649
SGI Unix Software Moguls 612-933-8790
Novell UNIXware Novell 801-263-3500
Novell NLM Arcada 407-263-3500
Banyan Performance Tech 210-979-2110
Lantastic NovaStor 818-707-9900
Amiga Moonlighter 407-384-9484
RS6000 Legato 415-812-6000
Backup Software Vendors Phone Numbers
NovaStor 612-933-8790
Software Moguls 612-933-8790
Work Station Solutions 603-880-0080
NovaStor 818-707-9900
Software Moguls 612-933-8790
Sun Soft 310-348-8649
Work Station Solutions 603-880-0080
Legato 415-812-6000
NovaStor 818-707-9900
Software Moguls 612-933-8790
Sun Soft 310-348-8649
Work Station Solutions 603-880-0080
Legato 415-812-6000
Software Moguls 612-933-8790
Work Station Solutions 603-880-0080
Work Station Solutions 603-880-0080
NovaStor 818-707-9900
Work Station Solutions 603-880-0080
Legato 415-812-6000
NovaStor 818-707-9900
Software Moguls 612-933-8790
Work Station Solutions 603-880-0080
Work Station Solutions 603-880-0080
Avail Systems 303-444-4018
Cheyenne 516-484-3150
Columbia Data Products 407-682-0265
Creata 909-595-8811
Legato 415-812-6000
NovaStor 818-707-9900
Novell 801-419-5544
Palindrome 708-505-3300
Performance Tech 210-979-2110
ST. Bernard Software 619-676-2277
Symantec 310-449-4156
Sytron 508-898-0100
NovaStor 818-707-9900
Software Moguls 612-933-8790
21
Page 22

Sony Contacts
For further information, please contact:
Sony Electronics Inc., Technical Support
3300 Zanker Road San Jose, CA95134, 1940. USA
TEL: (1) 800-801-7927
URL: http://sony.storagesupport.com/
E-mail: [email protected]
Sony Corporation
Electronic Devices Marketing Group, Product Marketing Div.
Computer Peripherals Dept. Tape Streamer Section
Osaki Gate City East Tower, 1-11-1, Osaki
Shinagawa-ku, Tokyo, 141-0032 Japan
TEL: (81) 3-5435-3486 FAX: (81) 3-5435-3565
Sony of Canada Ltd., AV/IT Marketing Group
Computer Peripherals Product Marketing
115 Gordon Baker Road Toronto, Ontario, M2H 3R6 Canada
TEL: (416) 499-1414 or (1) 800-961-7669
FAX: (416) 499-8541
Sony Computer Peripherals & Compornents Europe
URL: http://www.sonyisstorage.com/
Electronics Devices Marketing (Singapore)
(A division company of Sony Electronics (S) Pte. Ltd.)
Enterprise Storage Solutions Dept.
2 International Business Park, #01-10 Tower One,
The Strategy, Singapore 609930
TEL:65-6544-8000 FAX:65-6544-7390
Sony Corporation of Hong Kong Ltd.
Computer Peripheral Sales & Marketing Division
Electronic Devices Marketing Hong Kong
45/F, The Lee Gardens, 33 Hysan Avenue, Causeway Bay, Hong Kong
TEL: (852) 2909-1008 FAX: (852) 2909-2001
Sony Corporation of Hong Kong Ltd. Beijing Rep. Office
Computer Peripheral Div.
Full Link Plaza Tower A 11/F., No.18 Chaoyangmenwai Ave., Beijing
100020 P.R.C.
TEL:86-10-6588-0558 FAX:86-10-6588-0855
URL: http://www.sony.com.cn
22
Page 23

Sony Corporation of Hong Kong Ltd. Shanghai Rep. Office
44F., HSBC Tower, 101 Yin Cheng East Road, Pudong, New Area,
Shanghai, P.R.C. Postcode 200120
TEL: 86-21-6841-3222 FAX: 86-21-6841-0280
Sony Brasil Ltda.
Rua Inocéncio Tobias, 125-BlocoA, CEP01144-000, São Paulo -SP-Brasil
TEL: (55) 11-3824-6586 to 6598 FAX: (55) 11-3611-9064
URL: http://www.sonybrasil.com
Sony Australia Ltd., Information Technology Products Division
P.O. Box 377, NSW 1670, Australia
TEL: 1800-226-429 FAX: (61) 2-9870-8564 A.C.N. 001 215 354
URL: http://www.sony.com.au/home.asp
E-mail: [email protected]
Sony Chile Ltda
Av. Kennedy 8017, Las Condes, Santiago, Chile
TEL: (02) 210-6000 FAX: (02) 210-5417
Sony Taiwan Limited
Optical Devices Storage Dept. Data Storage Section
5F, 145 Changchun Road, Taipei 104, Taiwan
TEL: 886-2-2522-7920 FAX: 886-2-2522-2153
Sony Korea Corporation EDMK CP Sales & Marketing Team
34F, ASEM Tower, World Trade Center, 159-1, Samsung-Dong,
Kangnam-Ku, Seoul, 135-798, Korea
TEL: 82-2-6001-4249 FAX: 82-2-6001-4115
URL: http://www.sony.co.kr/cp/
Sony Gulf FZE Computer Display & Peripheral Div.
P.O.BOX 16871, Jebel Ali, Dubai, U.A.E.
TEL: 971-4-8815488 or 8816912 FAX: 971-4-8817210 or 8816259
Sony Marketing of Japan
Business Solution Dept. Server Solution Marketing Section
URL: http://www.sony.co.jp/STORAGE
23
Page 24

Printed in Japan
 Loading...