

Sony SDM-X95, SDM-X75 User Manual
TFT LCD カラー
コンピューター
ディスプレイ
取扱説明書
お買い上げいただきありがとうございます。
2-633-895-07(1)
電気製品は安全のための注意事項を守らないと、
火災や人身事故になることがあります。
この取扱説明書には、事故を防ぐための重要な注意事項と製品
の取り扱いかたを示しています。この取扱説明書と別冊の「安
全のために」をよくお読みのうえ、製品を安全にお使いくださ
い。お読みになったあとは、いつでも見られるところに必ず保
管してください。
SDM-X75
SDM-X95
© 2005 Sony Corporation
この装置は、情報処理装置等電波障害自主規制協議会(VCCI)
の基準に基づくクラス B 情報技術装置です。この装置は、家庭
環境で使用することを目的としていますが、この装置がラジオ
やテレビジョン受信機に近接して使用されると、受信障害を引
き起こすことがあります。
取扱説明書に従って正しい取り扱いをしてください。
当社は国際エネルギースタープログラムの
参加事業者として、本製品が国際エネルギー
スタープログラムの基準に適合していると
判断します。
本製品は社団法人電子情報技術産業協会が定めた「表示装置の
静電気および低周波電磁界」に関するガイドラインに適合して
おります。
This monitor complies with the
TCO'99 guidelines.
(for the black model)
This monitor complies with the
TCO'03 guidelines.
(for the silver model)
2
目次
使用上のご注意 . . . . . . . . . . . . . . . . . . . . . . . . . . . . . . . . . . . . . . . . . . . . 4
ディスプレイの型名を確認する . . . . . . . . . . . . . . . . . . . . . . . . . . . . . . 5
各部の名前とはたらき . . . . . . . . . . . . . . . . . . . . . . . . . . . . . . . . . . . . . . 5
接続と設定 . . . . . . . . . . . . . . . . . . . . . . . . . . . . . . . . . . . . . . 6
準備 1:スタンドを組み立てる . . . . . . . . . . . . . . . . . . . . . . . . . . . . . . 6
準備 2:ビデオ信号ケーブルをつなぐ . . . . . . . . . . . . . . . . . . . . . . . . 7
準備 3:USB マウスと USB キーボードなどをつなぐ
(USB 端子があるモデルのみ) . . . . . . . . . . . . . . . . . . . . . . . 8
準備 4:オーディオ接続コードをつなぐ . . . . . . . . . . . . . . . . . . . . . . 9
準備 5:電源コードをつなぐ . . . . . . . . . . . . . . . . . . . . . . . . . . . . . . .10
準備 6:コード類をまとめて端子カバーを閉める . . . . . . . . . . . . .10
準備 7:電源を入れる . . . . . . . . . . . . . . . . . . . . . . . . . . . . . . . . . . . . .10
準備 8:ディスプレイの向きと高さを変える . . . . . . . . . . . . . . . . .11
入力を切り換えるには (INPUT1/INPUT2) . . . . . . . . . . . . . . . . .12
調整する . . . . . . . . . . . . . . . . . . . . . . . . . . . . . . . . . . . . . . 12
メニュー操作のしかた . . . . . . . . . . . . . . . . . . . . . . . . . . . . . . . . . . . . .12
メニュー一覧 . . . . . . . . . . . . . . . . . . . . . . . . . . . . . . . . . . . . . . . . . . . . .13
画質調整メニュー . . . . . . . . . . . . . . . . . . . . . . . . . . . . . . . . . . . . . .13
画調整メニュー(アナログ RGB 信号のみ) . . . . . . . . . . . . . . . .14
メニュー位置メニュー . . . . . . . . . . . . . . . . . . . . . . . . . . . . . . . . . .14
自動入力センサーメニュー . . . . . . . . . . . . . . . . . . . . . . . . . . . . . .15
LANGUAGE メニュー . . . . . . . . . . . . . . . . . . . . . . . . . . . . . . . . . .15
0 リセットメニュー(お買い上げ時の設定に戻す) . . . . . . . . . . .15
メニューロック . . . . . . . . . . . . . . . . . . . . . . . . . . . . . . . . . . . . . . .15
・Macintoshは、Apple Computer,
Inc. の米国およびその他の国にお
ける登録商標です。
・Windows
Corporation の米国およびその他
の国における登録商標です。
・ IBM PC/AT と VGA は、IBM
Corporation の登録商標です。
・ VESA と DDC
Electronics Standards
Association の商標です。
・ENERGY STAR
環境保護局の商標です。
・ Adobe、Acrobat は Adobe
Systems Incorporated (アドビ
システムズ社)の商標です。
・ この取扱説明書に表記されている
上記以外の製品名は、それぞれの
会社の商標または登録商標です。
・ この取扱説明書では、「
については一部表記を省略してい
ます。
®
は、米国 Microsoft
™
は、Video
®
マークは、米国
®
」と「™」
機能 . . . . . . . . . . . . . . . . . . . . . . . . . . . . . . . . . . . . . . . . . . 16
音量を調節する . . . . . . . . . . . . . . . . . . . . . . . . . . . . . . . . . . . . . . . . . . .16
省電力機能(パワーセーブ機能) . . . . . . . . . . . . . . . . . . . . . . . . . . . .16
節電しながら使う(ECO モード) . . . . . . . . . . . . . . . . . . . . . . . . . . .16
自動輝度調整機能(ライトセンサー) . . . . . . . . . . . . . . . . . . . . . . . .16
自動画質調整機能(アナログ RGB 信号のみ) . . . . . . . . . . . . . . . . .17
KVM 機能(Keyboard-Video-Mouse 機能) . . . . . . . . . . . . . . . . .17
故障かな?と思ったら . . . . . . . . . . . . . . . . . . . . . . . . . . . . 18
表示メッセージについて . . . . . . . . . . . . . . . . . . . . . . . . . . . . . . . . . . .18
本機の症状と対処のしかた . . . . . . . . . . . . . . . . . . . . . . . . . . . . . . . . .19
保証書とアフターサービス . . . . . . . . . . . . . . . . . . . . . . . . 21
保証書 . . . . . . . . . . . . . . . . . . . . . . . . . . . . . . . . . . . . . . . . . . . . . . . . . . .21
アフターサービスについて . . . . . . . . . . . . . . . . . . . . . . . . . . . . . . . . .21
主な仕様 . . . . . . . . . . . . . . . . . . . . . . . . . . . . . . . . . . . . . . 22
TCO’99 Eco-document (for the black model) . . . . . . . . . . . . . . . . . . . . i
TCO’03 Eco-document (for the silver model) . . . . . . . . . . . . . . . . . . . ii
http://www.sony.co.jp/
3
使用上のご注意
電源について
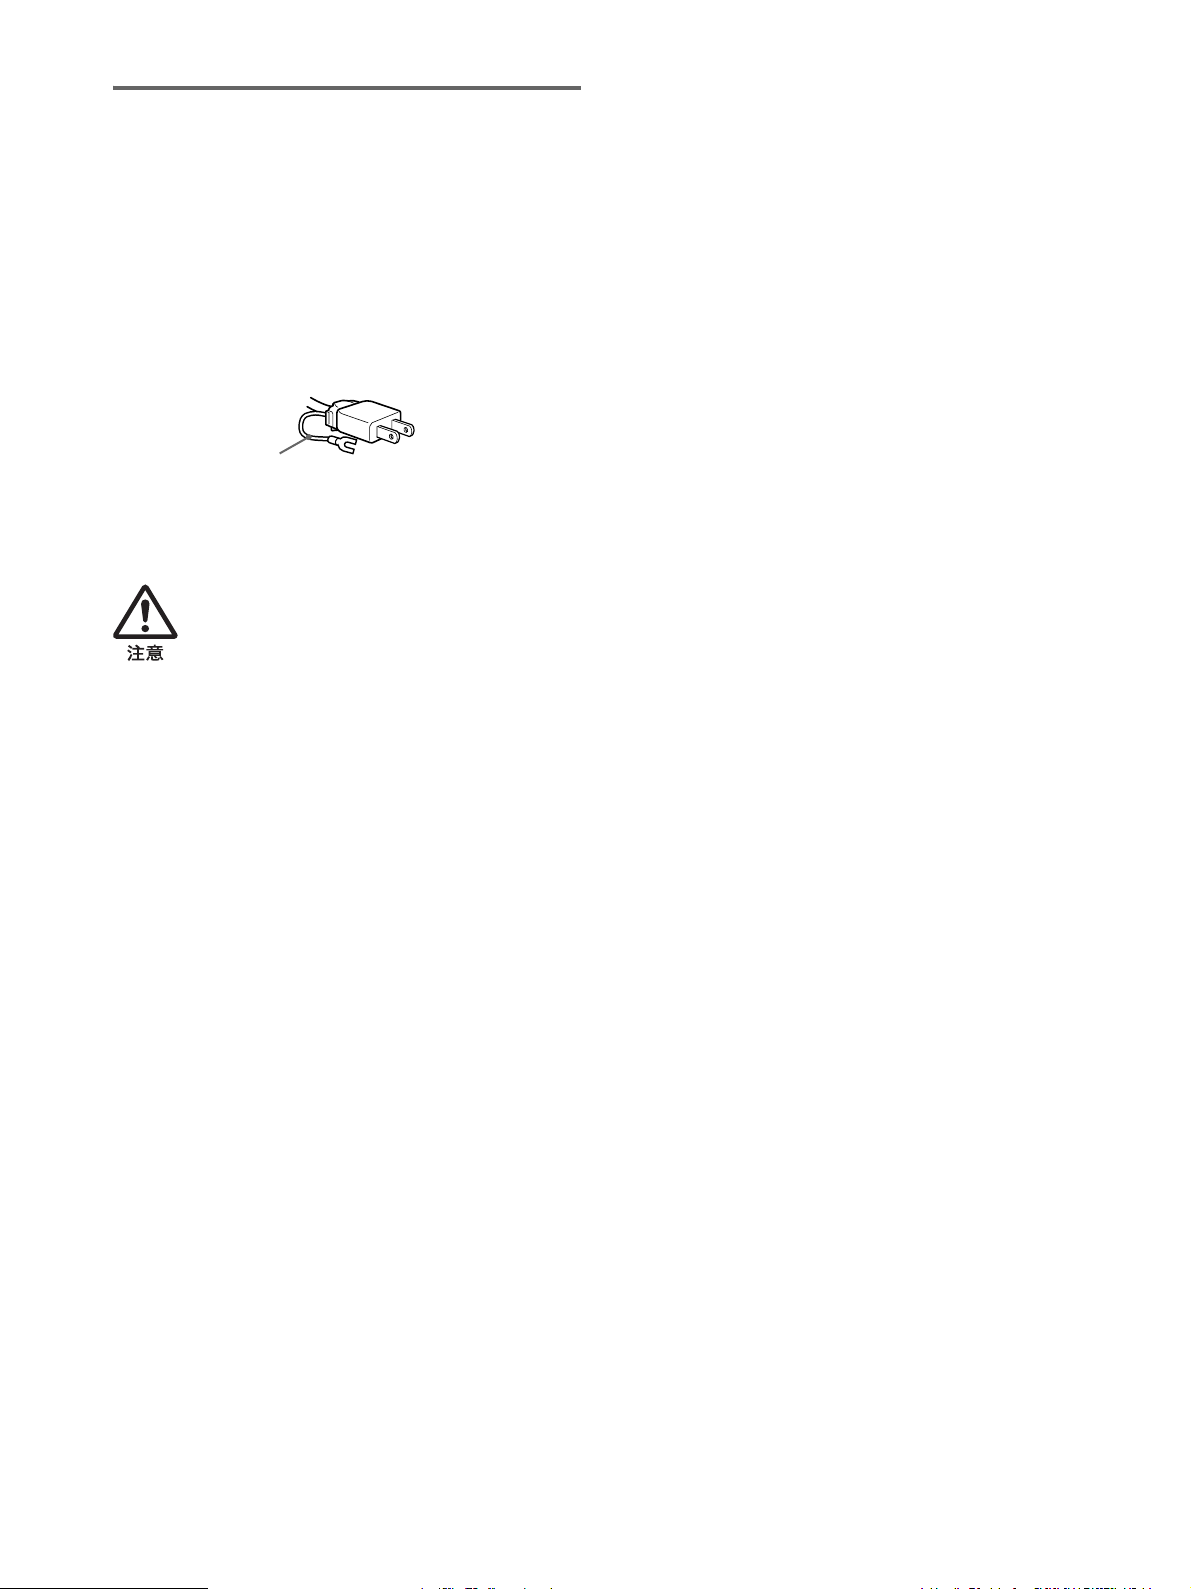
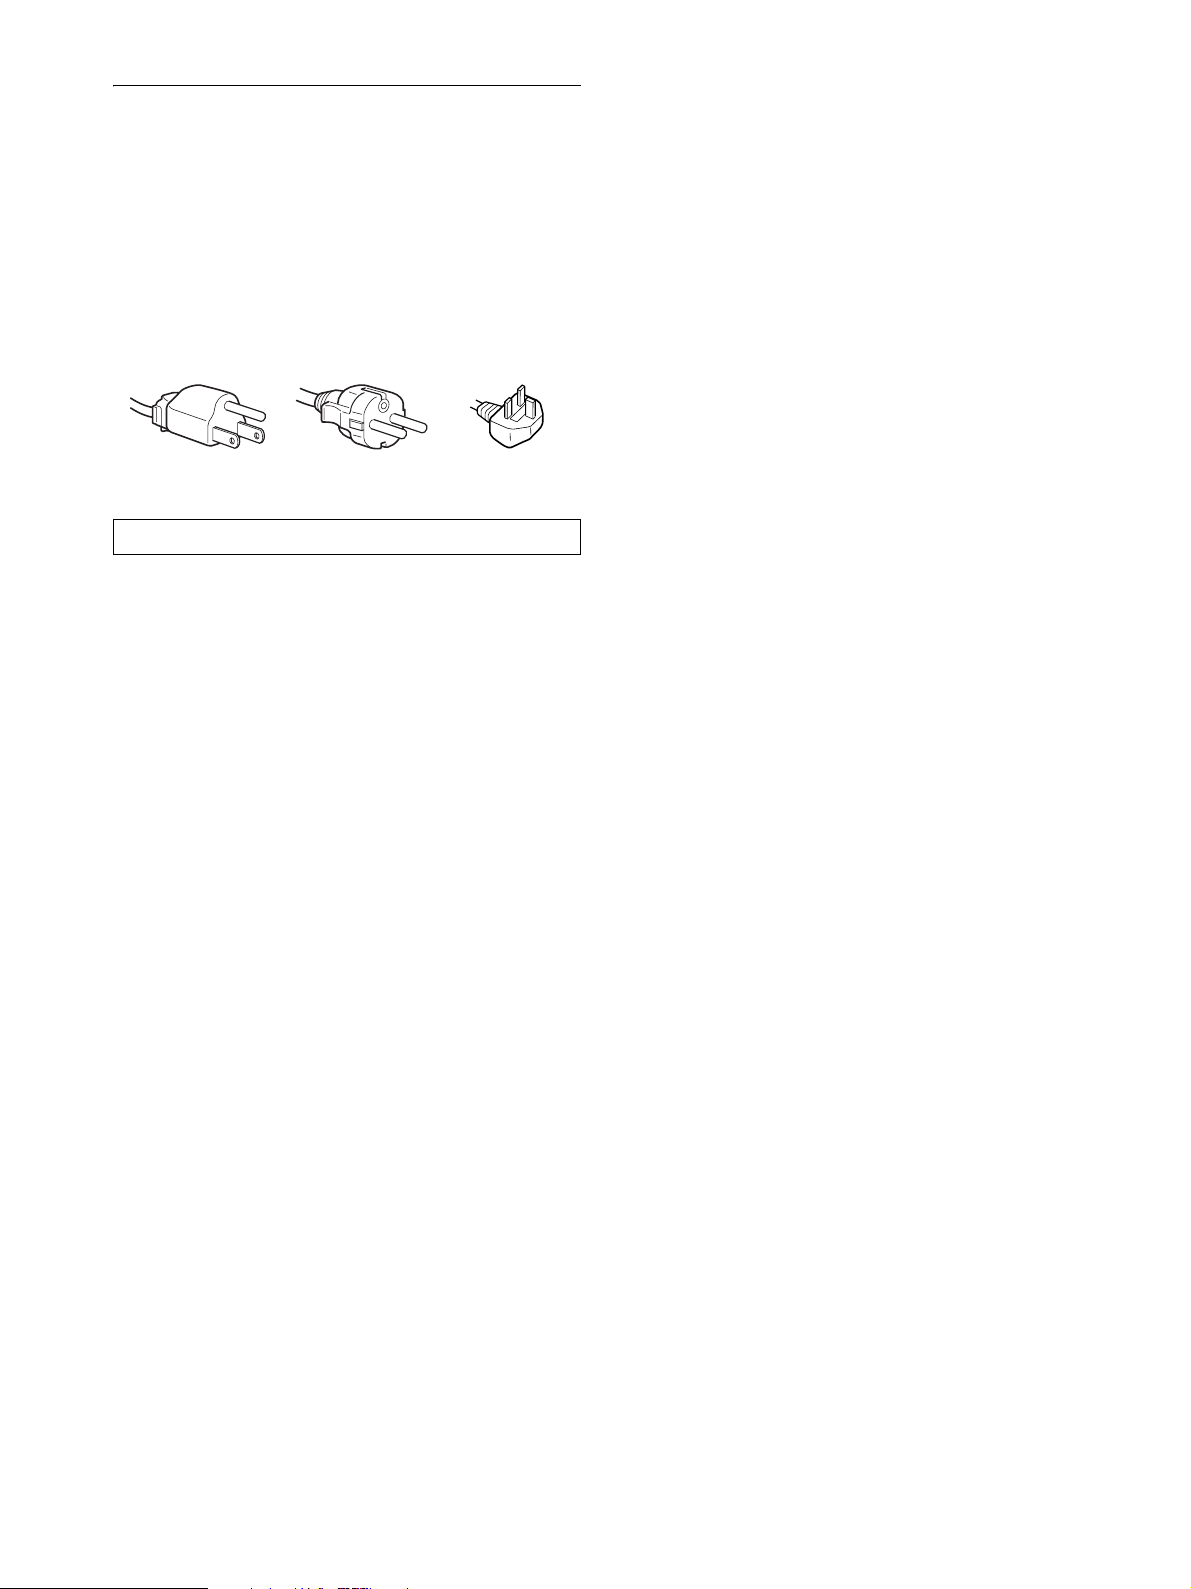
付属の電源コードをお使いください。別売りの電源コード
をお使いになる場合は、下図のプラグ形状例を参考にして
ください。
安全のため、電源コードにはアース線がついています。電
源コンセントにプラグを差し込む前に、必ずアース接続を
行ってください。電源コードを抜くときは、先にプラグを
抜いてからアース線をはずしてください。
プラグ形状例
AC100V 用
アース線
アースキャップおよびケーブルキャップは幼児の手
の届かないところへ保管する
お子様が誤って飲むと、窒息死するおそれがあ
ります。
万一誤って飲み込まれた場合は、ただちに医師
に相談してください。
特に小さいお子様にはご注意ください。
使用・設置場所について
次のような場所での使用・設置はおやめください。
・ 異常に高温になる場所
炎天下や夏場の窓を閉め切った自動車内はとくに高温に
なり、放置すると変形したり、故障したりすることがあ
ります。
・ 直射日光のあたる場所、熱器具の近くなど、温度の高い
場所
変形したり、故障したりすることがあります。
・ 振動の多い場所
・ 強力な磁気のある場所
・ 砂地、砂浜などの砂ぼこりの多い場所
海辺や砂地、あるいは砂ぼこりが起こる場所などでは、
砂がかからないようにしてください。故障の原因になる
ばかりか、修理できなくなることがあります。
背面上部の通風孔は熱くなりますので触らないようにご
注意ください。
・ 寒いところでご使用になると、画像が尾を引いて見えた
り、画面が暗く見えたりすることがありますが、故障で
はありません。温度が上がると元に戻ります。
・ 静止画を継続的に表示した場合、残像を生じることがあ
りますが、時間の経過とともに元に戻ります。
・ 使用中に画面やキャビネットがあたたかくなることがあ
りますが、故障ではありません。
液晶ディスプレイパネルについて
本機の液晶ディスプレイパネルは非常に精密度の高い技
術でつくられていますが、黒い点が現れたり、赤と青、緑
の点が消えないことがあります。また、見る角度によって
すじ状の色むらや明るさのムラが見える場合があります。
これらは、液晶ディスプレイの構造によるもので、故障で
はありません。
これらの点をご了承のうえ、本機をお使いください。
お手入れについて
・ お手入れをする前に、必ず電源プラグをコンセントから
抜いてください。
・ 液晶の画面は特殊加工がされていますので、なるべく画
面に触れないようにしてください。また画面の汚れをふ
きとるときは、乾いた柔らかい布でふきとってください。
・ アルコール、シンナー、ベンジンなどは使わないでくだ
さい。変質したり、塗装がはげたりすることがあります。
・ 化学ぞうきんをご使用の際は、その注意書きに従ってく
ださい。
・ 殺虫剤のような揮発性のものをかけたり、ゴムやビニー
ル製品に長時間接触させると、変質したり、塗装がはげ
たりすることがあります。
搬送するときは
・ 本機を運ぶときは、本機に接続されているケーブル等を
すべてはずし、高さ調整スタンドをお使いの際は、液晶
ディスプレイを一番上まで上げてから、画面を傷つけな
いよう注意し、液晶ディスプレイの両側をしっかりと
持ってください。落としたりするとけがや故障の原因と
なることがあります。
・ 修理や引っ越しなどで本機を運ぶ場合は、お買い上げ時
に本機が入っていた箱と、クッション材を使ってくださ
い。高さ調整スタンドをお使いの際は、ストッパーピンで
液晶ディスプレイを固定してください。
液晶画面について
・ 液晶画面を太陽に向けたままにすると、液晶画面を傷め
てしまいます。窓際や室外に置くときなどはご注意くだ
さい。
・ 液晶画面を強く押したり、ひっかいたり、上にものを置
いたりしないでください。画面にムラが出たり、液晶パ
ネルの故障の原因になります。
廃棄するときは
・ 一般の廃棄物と一緒にしないでください。
ごみ廃棄場で処分されるごみの中にディスプレイを捨て
ないでください。
・ 本機の蛍光管の中には水銀が含まれています。廃棄の際
は、地方自治体の条例または規則に従ってください。
4
ディスプレイの型名を確認する
マークが付いている内容は、モデルにより異なります。詳し
くは「主な仕様」(22 ページ)でご確認ください。
はじめに、ディスプレイの型名を確認してください。
型名は、ディスプレイの後面の ID ラベルに記されていま
す(例:SDM-X75F のように記載されています)。
お使いのディスプレイによって、機能やメニューの一部が
使用できないことがありますのでご注意ください。
各部の名前とはたらき
使いかたについての詳しい説明は( )内のページをご覧
ください。
イラストは一例です。
お使いのディスプレイとは異なることがあります。
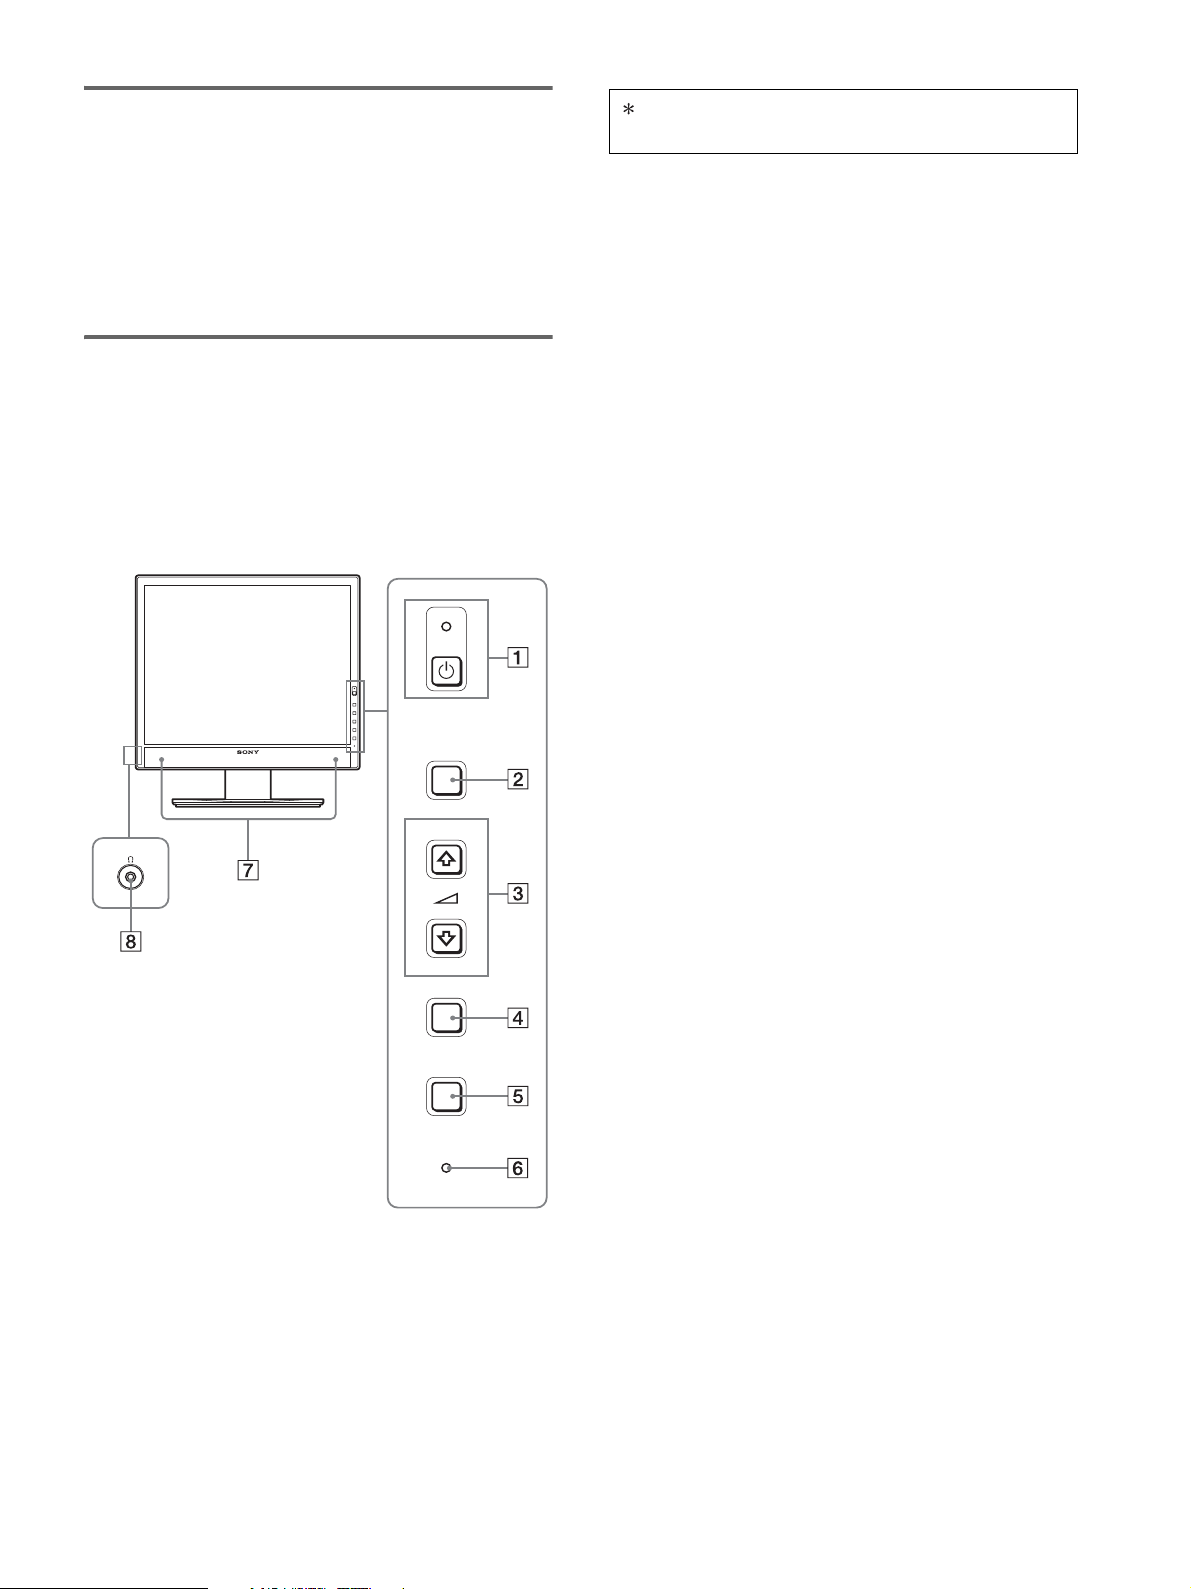
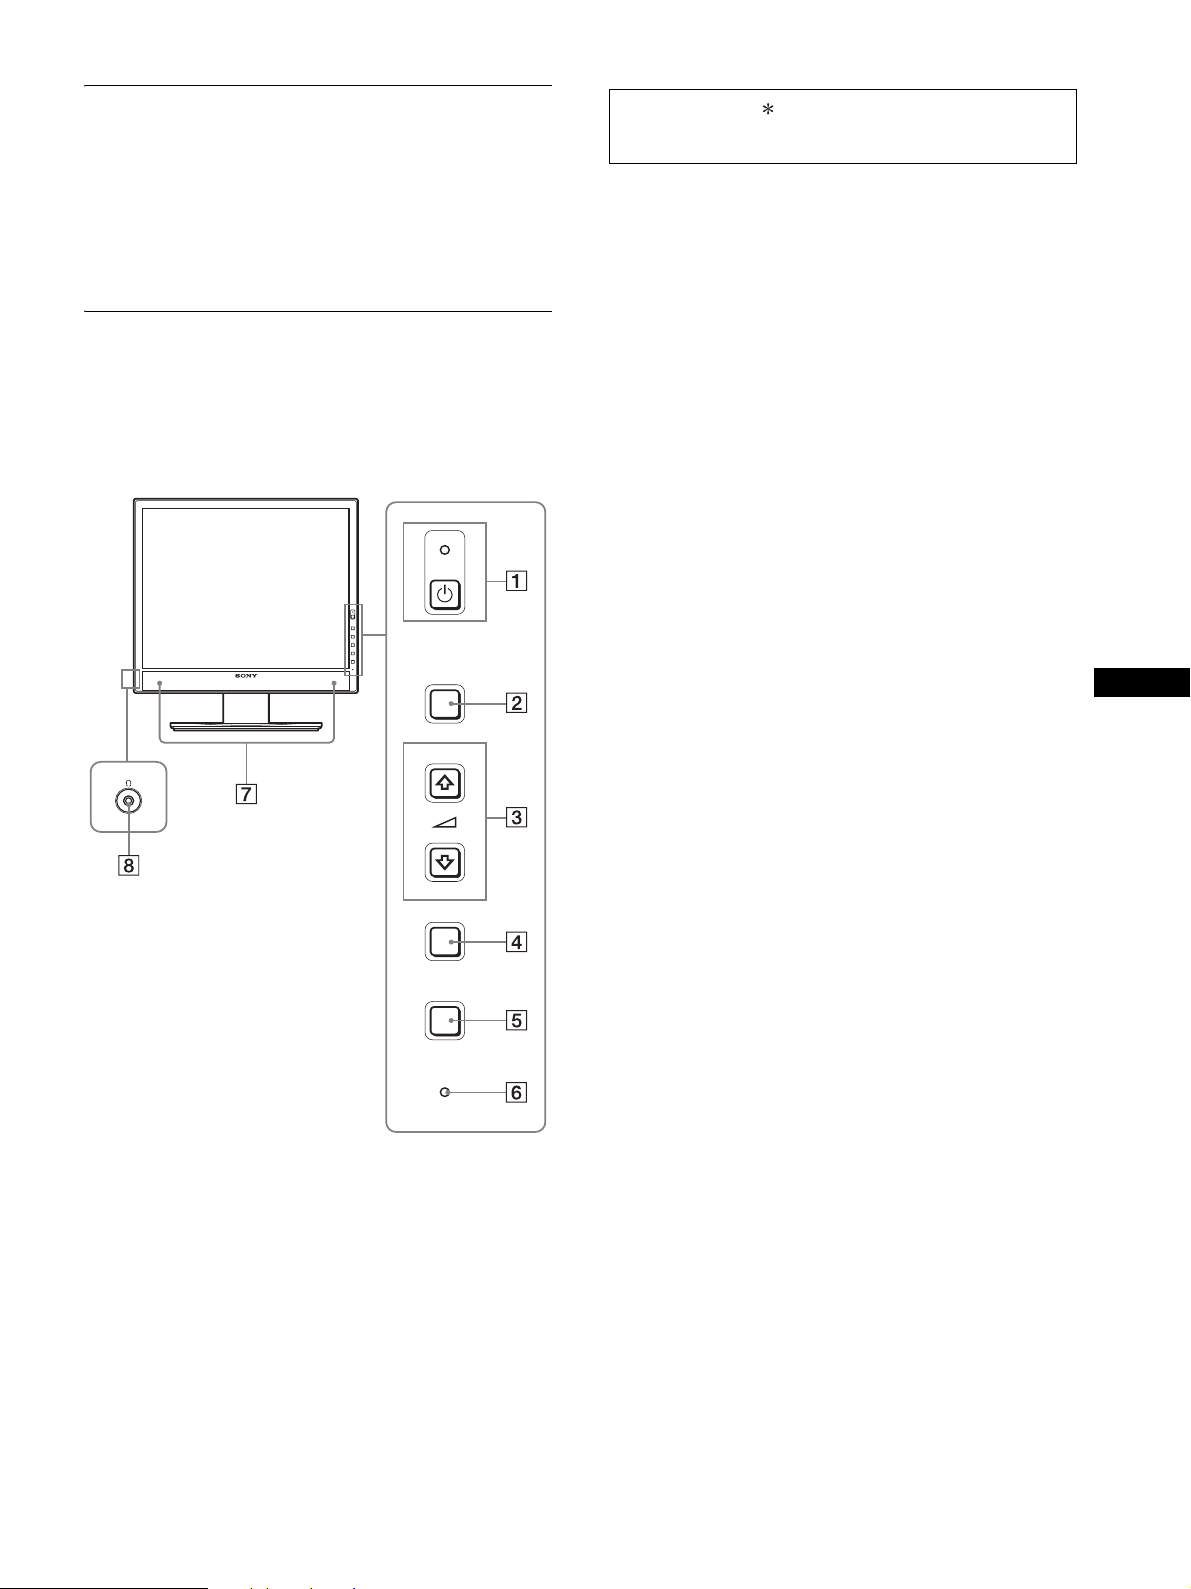
ディスプレイ前面
MENU
A 1(電源)スイッチと 1(電源)ランプ(10、16
ページ)
1
(電源)ランプが赤色に点灯しているときに押すと、
ディスプレイの電源が入ります。もう一度押すと、ディ
スプレイの電源が切れます。
1(電源)ランプが消灯しているときは、9 の MAIN
POWER(主電源) スイッチで主電源を入れてください。
B MENU (メニュー)ボタン(12 ページ)
メニュー画面を出すときや、消すときに押します。
C m/M および 2(音量調節)ボタン(12 ページ)
メニュー画面でメニューや項目を選んだり、調整した
りするときに使います。
また、スピーカーの音量を調節します。
D OK ボタン(12 ページ)
3 の m/M ボタンで選んだメニューや項目、調整値を決
定するときに押します。
INPUT(11 ページ)
また、メニュー画面が表示されていないときに押すと、
本機に入力される信号を切り換えて、見たいコン
ピュータを選ぶことができます。
INPUT
OK
ECO
E ECO ボタン (17 ページ)
節電するときに押します。
また、メニュー画面が表示されていないとき、このボ
タンを 3 秒以上押し続けると画質を自動的に調整する
ことができます(ワンタッチオートアジャスト機能)。
(ただしアナログ RGB 信号のみ)
F ライトセンサー(17 ページ)
周囲の明るさを検知するためのセンサーです。セン
サーをおおわないようにしてください。
G ステレオスピーカー(9、16 ページ)
音声を出力します。
H ヘッドホン端子(9、16 ページ)
ヘッドホンをつなぎます。
5
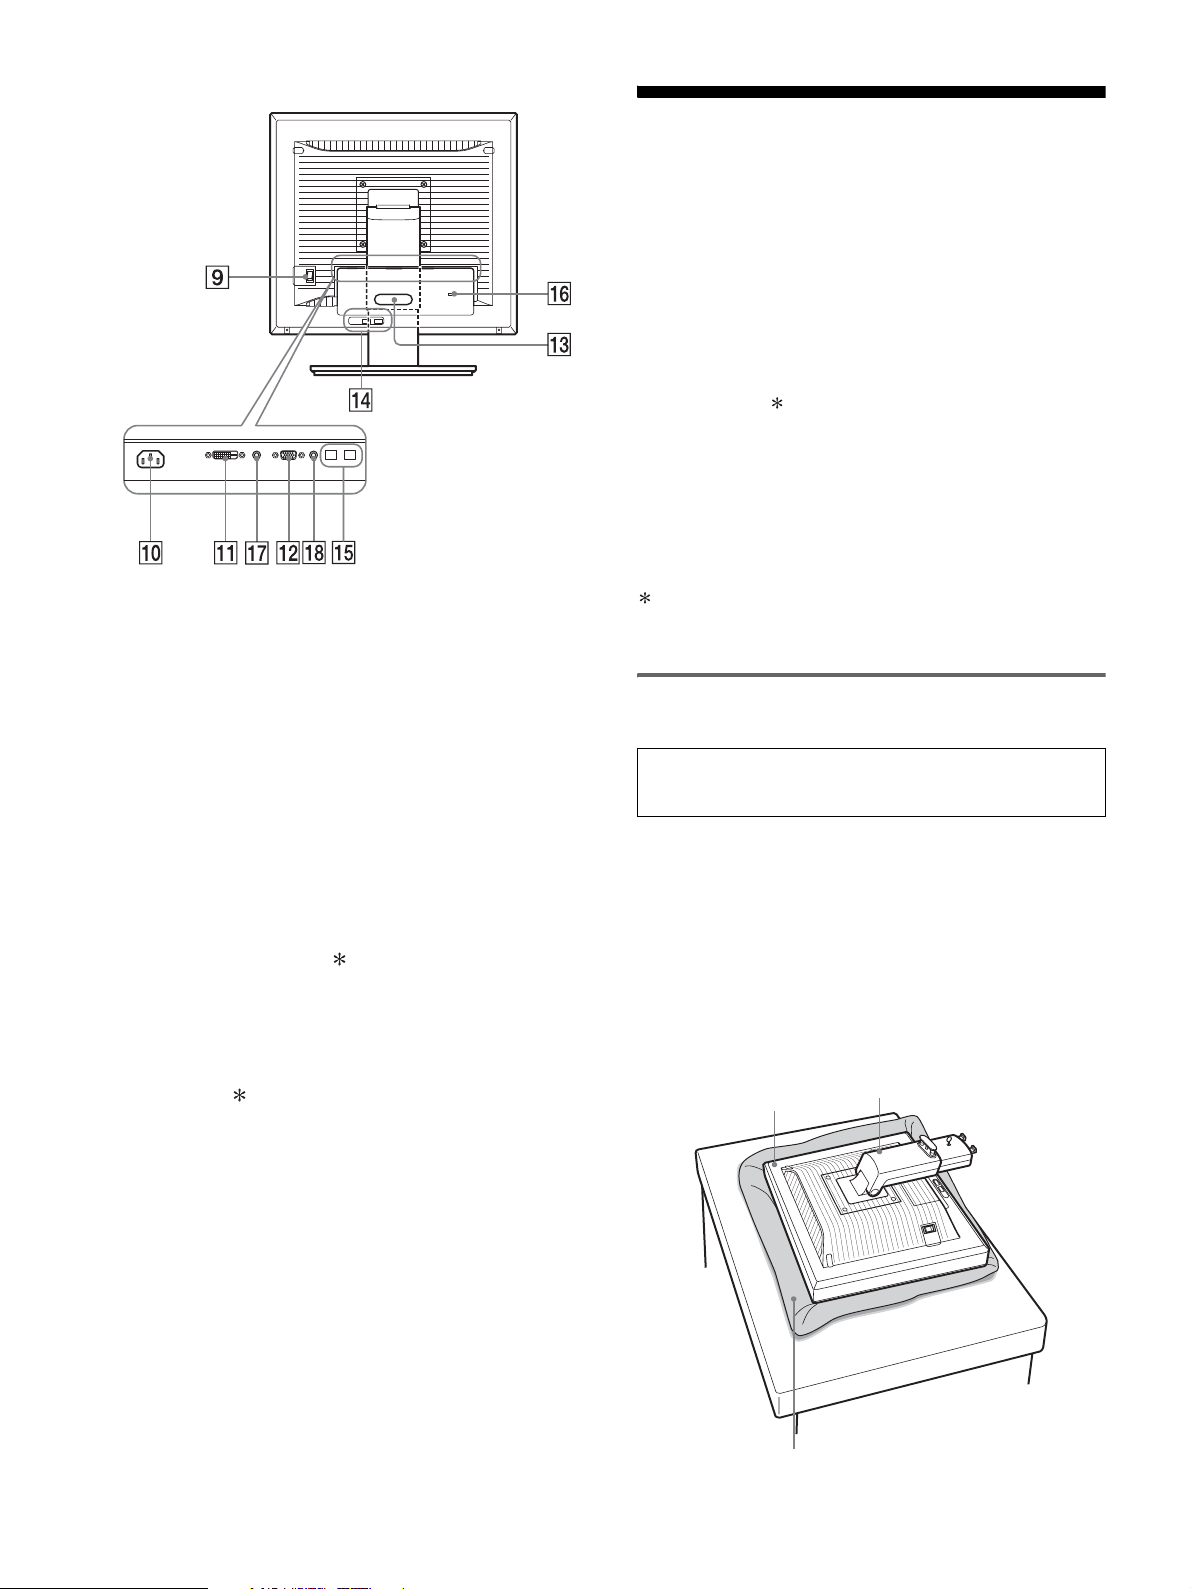
ディスプレイ後面
接続と設定
本機をお使いになる前に、下記のものがそろっていること
をご確認ください。
・ 液晶ディスプレイ
・ 電源コード
・ スタンドベース
・ HD15-HD15 ビデオ信号ケーブル(アナログ RGB)
・ DVI-D ビデオ信号ケーブル(デジタル RGB)
・ オーディオ接続コード(ステレオミニプラグ)
・ USB ケーブル
・ CD-ROM(Windows/Macintosh ユーティリティ / 取
扱説明書など)
・ 保証書
・ クイックセットアップガイド
・ 安全のために
・ ソニーご相談窓口のご案内
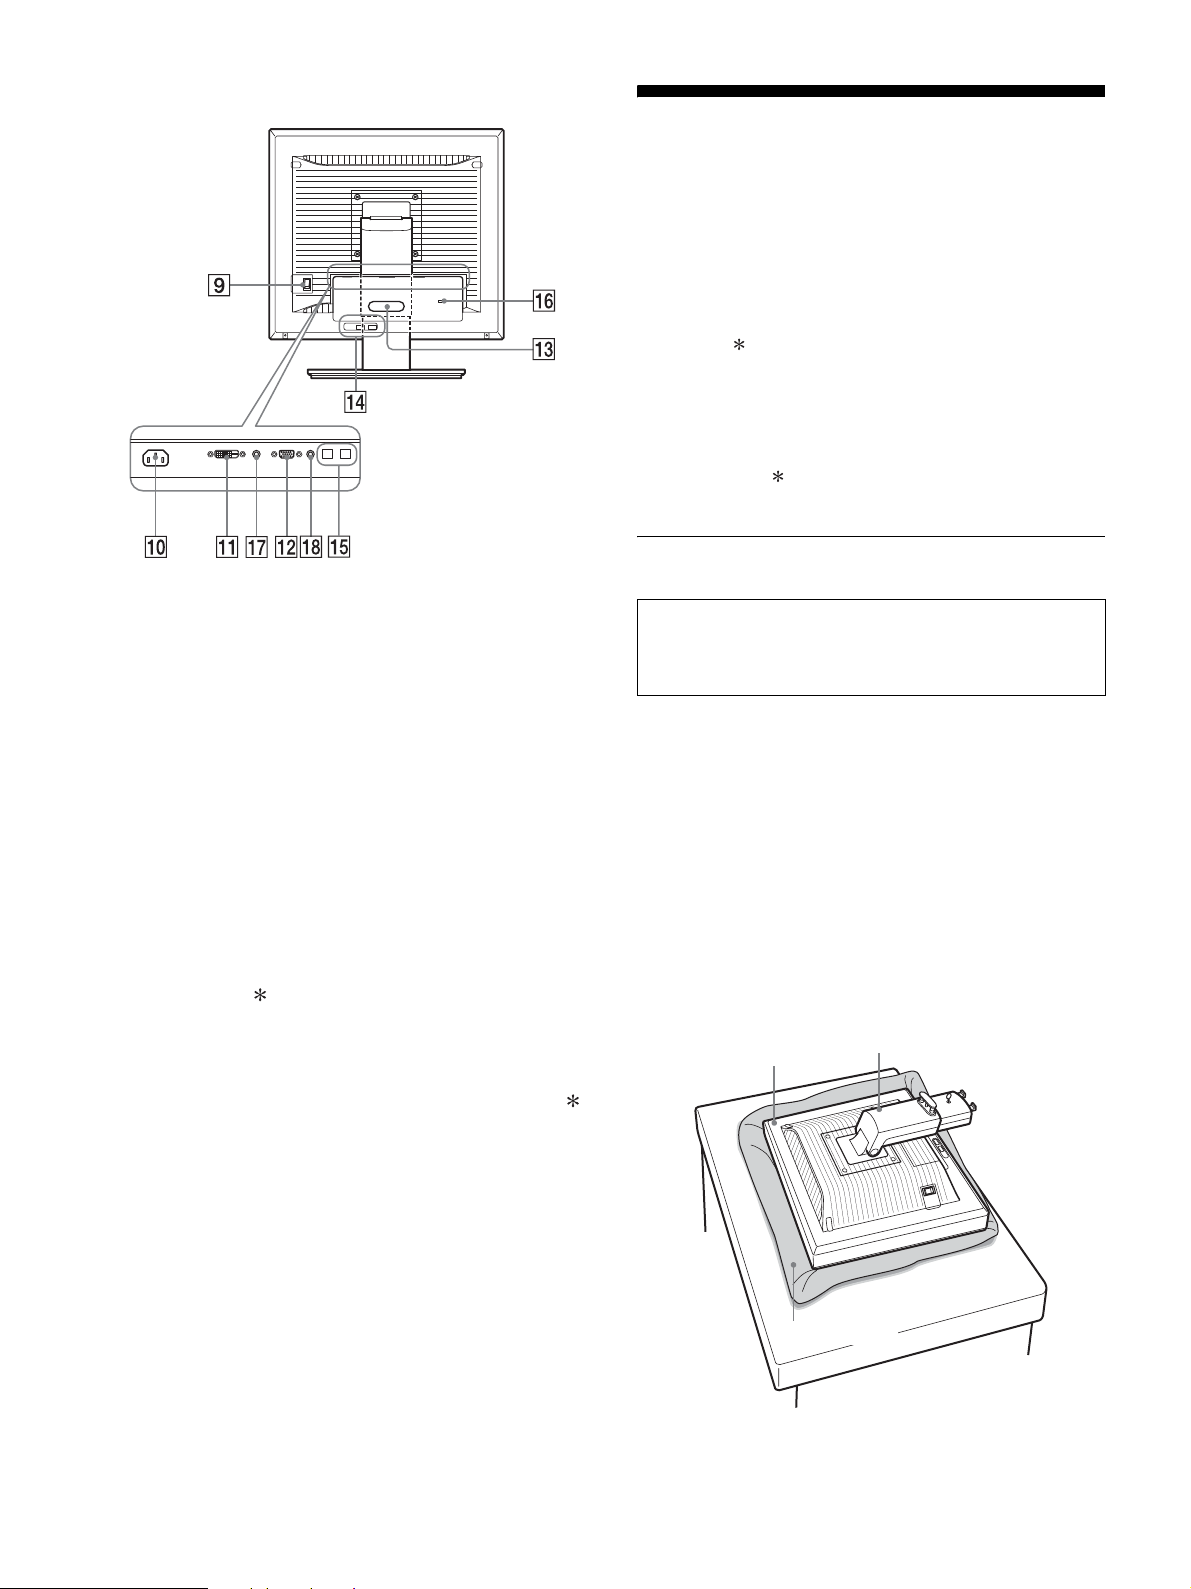
I MAIN POWER(主電源)スイッチ(10 ページ)
ディスプレイの主電源を入 / 切します。
J 電源入力端子(9 ページ)
電源コードをつなぎます。
K DVI-D 入力端子(デジタル RGB)(8 ページ)
DVI Rev. 1.0 準拠のデジタル RGB 信号を入力します。
L HD15(RGB)入力端子(アナログRGB)(8ページ)
アナログ RGB の映像信号(0.700 Vp-p、正極性)と
同期信号を入力します。
M コード留め(9 ページ)
ケーブルやコード類をまとめます。
N USB ダウンストリーム端子(8 ページ)(USB 端
子があるモデルのみ)
USB マウスと USB キーボードを本機につなぐことに
より、2 台までのコンピュータを本機で入力を切り換え
ながら使うことができます。
O USB アップストリーム端子(USB 端子があるモ
デルのみ)
USB ケーブルをコンピュータと本機につなぎます。
P 盗難防止用ロック
キーケーブルロックなど、市販の盗難防止用ケーブル
をつなぐことができます。
盗難防止用ケーブルについての連絡先は、日本ポラデ
ジタル(株)営業部です。
Q INPUT1 用音声入力端子
INPUT1 に接続されたコンピュータ、または他のオー
ディオ機器の音声出力端子につないで、音声信号を入
力します。
R INPUT2 用音声入力端子
INPUT2 に接続されたコンピュータ、または他のオー
ディオ機器の音声出力端子につないで、音声信号を入
力します。
マークが付いている内容は、モデルにより異なります。
詳しくは「主な仕様」(22 ページ)でご確認ください。
準備 1:スタンドを組み立てる
本機を机などに置いたり、立てたりするときは、液晶画面を強
く押さないでください。画面の色むらや液晶パネルの故障の原
因になります。
x 付属のスタンドを使うとき
1 箱を開けてスタンドベースを取り出す。
2 部品を確認する。
・ スタンドベース(裏にネジがついています。)
3 机などの上に柔らかいマットなどを敷く。
直に本機を置くと、ディスプレイの液晶画面や本体を
傷つけるおそれがあります。
4 ディスプレイ本体を箱から取り出し、マットなどの上
にディスプレイの下端と机の端をそろえて置く。
ディスプレイ
柔らかいマットなど
スタンド
6

5 スタンドのツメをスタンドベースの穴に引っかけて、
スタンドベースを取り付ける。1
スタンドベースの裏側にあるネジのハンドルを持ち上
げて、しっかり締める。2
ネジがしっかり締まっていることを確かめて、ハンド
ルを倒す。
1 スタンドベース
2 ネジ
準備 2:ビデオ信号ケーブルを
つなぐ
本機とコンピュータの電源を切った状態でつないでく
ださい。
ご注意
・ ビデオ信号ケーブルのピンに、直接手を触れないでくださ
い。
・ ビデオ信号ケーブルのピンが曲がることを防ぐため端子の
向きをご確認ください。
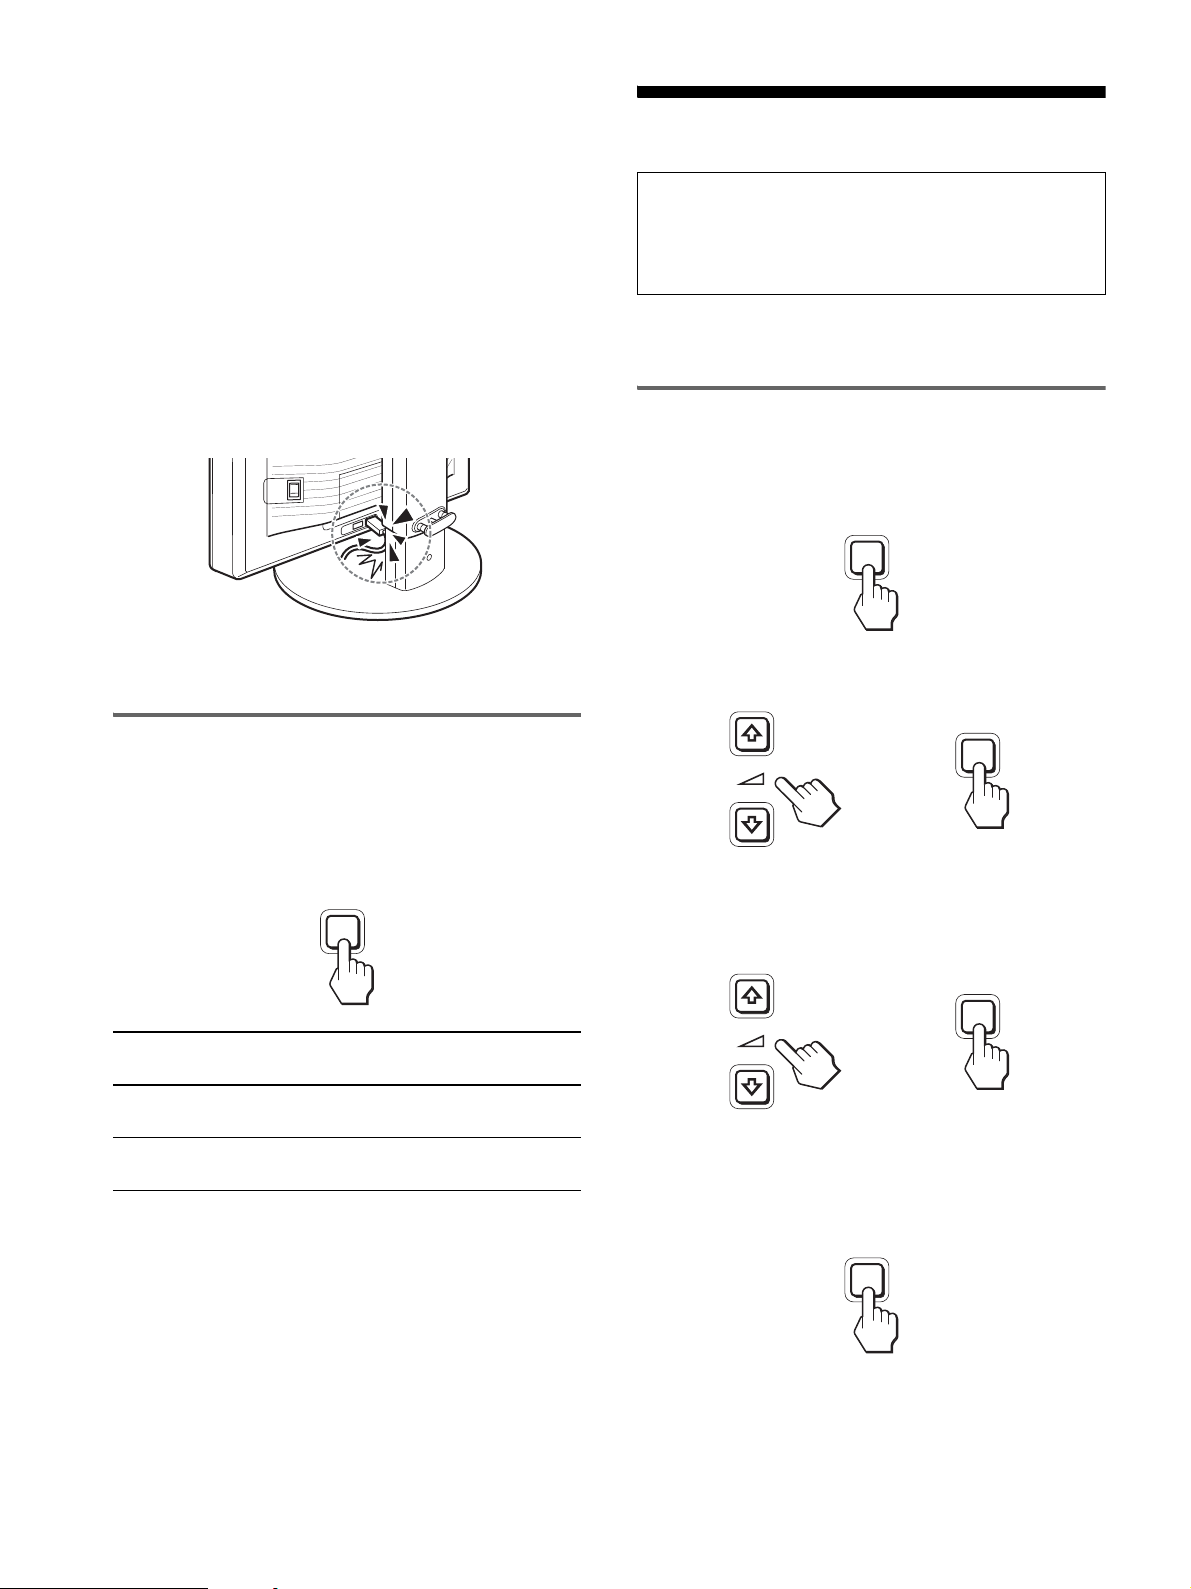
1 端子カバーを引き下げる。
6
本機を立ててから、ストッパーピンを抜く。
ストッパー
ピン
ご注意
横にしたままストッパーピンを抜かないでください。
スタンドが勢いよく引き伸ばされ、本機が身体に当たったり落下
したりして、けがや故障の原因となることがあります。
x VESA スタンドを使うとき
VESA 対応
ネジ(4 本)
端子カバー
2 ディスプレイを上に傾ける。
さらにディスプレイの位置を上に移動させる。
ディスプレイ本体についているスタンドを外すことによ
り、市販の VESA スタンドを取り付けることができます。
7

3 本機にビデオ信号ケーブルをつなぐ。
x HD15 出力端子(アナログ RGB)のあるコン
ピュータをつなぐ
コンピュータを本機のHD15 入力端子(アナログ RGB)
に、付属の HD15-HD15 ビデオ入力信号ケーブル(ア
ナログ RGB)でつなぐ。
準備 3:USB マウスと USB
キーボードなどをつなぐ(USB
端子があるモデルのみ)
USB マウスと USB キーボードなどを本機につなぐことに
より、2 台までのコンピュータを本機で入力を切り換えな
がら使うことができます(KVM 機能)。
詳しくは、「KVM 機能」(17 ページ)をご覧ください。
USB マウスと USB キーボードを本機で使わない場合は、
準備 4 へ進んでください。
1 付属の USB ケーブルで本機とコンピュータをつなぐ。
2 本機に USB マウスと USB キーボードなどをつなぐ。
HD15 入力端子
コンピュータの HD15 出力端子
(アナログ RGB)へ
HD15-HD15 ビデオ信号ケーブル
(アナログ RGB)(付属)
(アナログ RGB)へ
x DVI 出力端子(デジタル RGB)のあるコン
ピュータをつなぐ
コンピュータを本機のDVI-D 入力端子(デジタル RGB)
に、付属の DVI-D ビデオ信号ケーブル(デジタル RGB)
でつなぐ。
DVI-D 入力端子
コンピュータの
DVI 出力端子
(デジタル RGB)へ
(デジタル RGB)へ
Macintosh をお使いのときは
USB ダウンストリーム端子に、パワーボタンのある
Macintosh 用キーボードをつなぐと、キーボードのパ
ワーボタンが働きません。このときは、Macintosh 本
体のパワーボタンで電源を入れるか、コンピュータに
直にキーボードをつないで電源を入れた後、USB ダウ
ンストリーム端子につないでください。
ご注意
・ 本機のUSB端子はWindows2000 / Windows XP Professional/
Windows XP Home edition / Macintosh に対応しています。
・ すでにお使いのコンピュータに USB マウスと USB キーボード
がつながっているときは、いったん取りはずしてください。
・ この方法で使用できるのは、コンピュータおよび OS が USB に
対応しているときのみです。詳しくは、コンピュータまたは OS
の取扱説明書をご覧ください。
DVI-D ビデオ信号ケーブル(デジタル RGB)(付属)
8
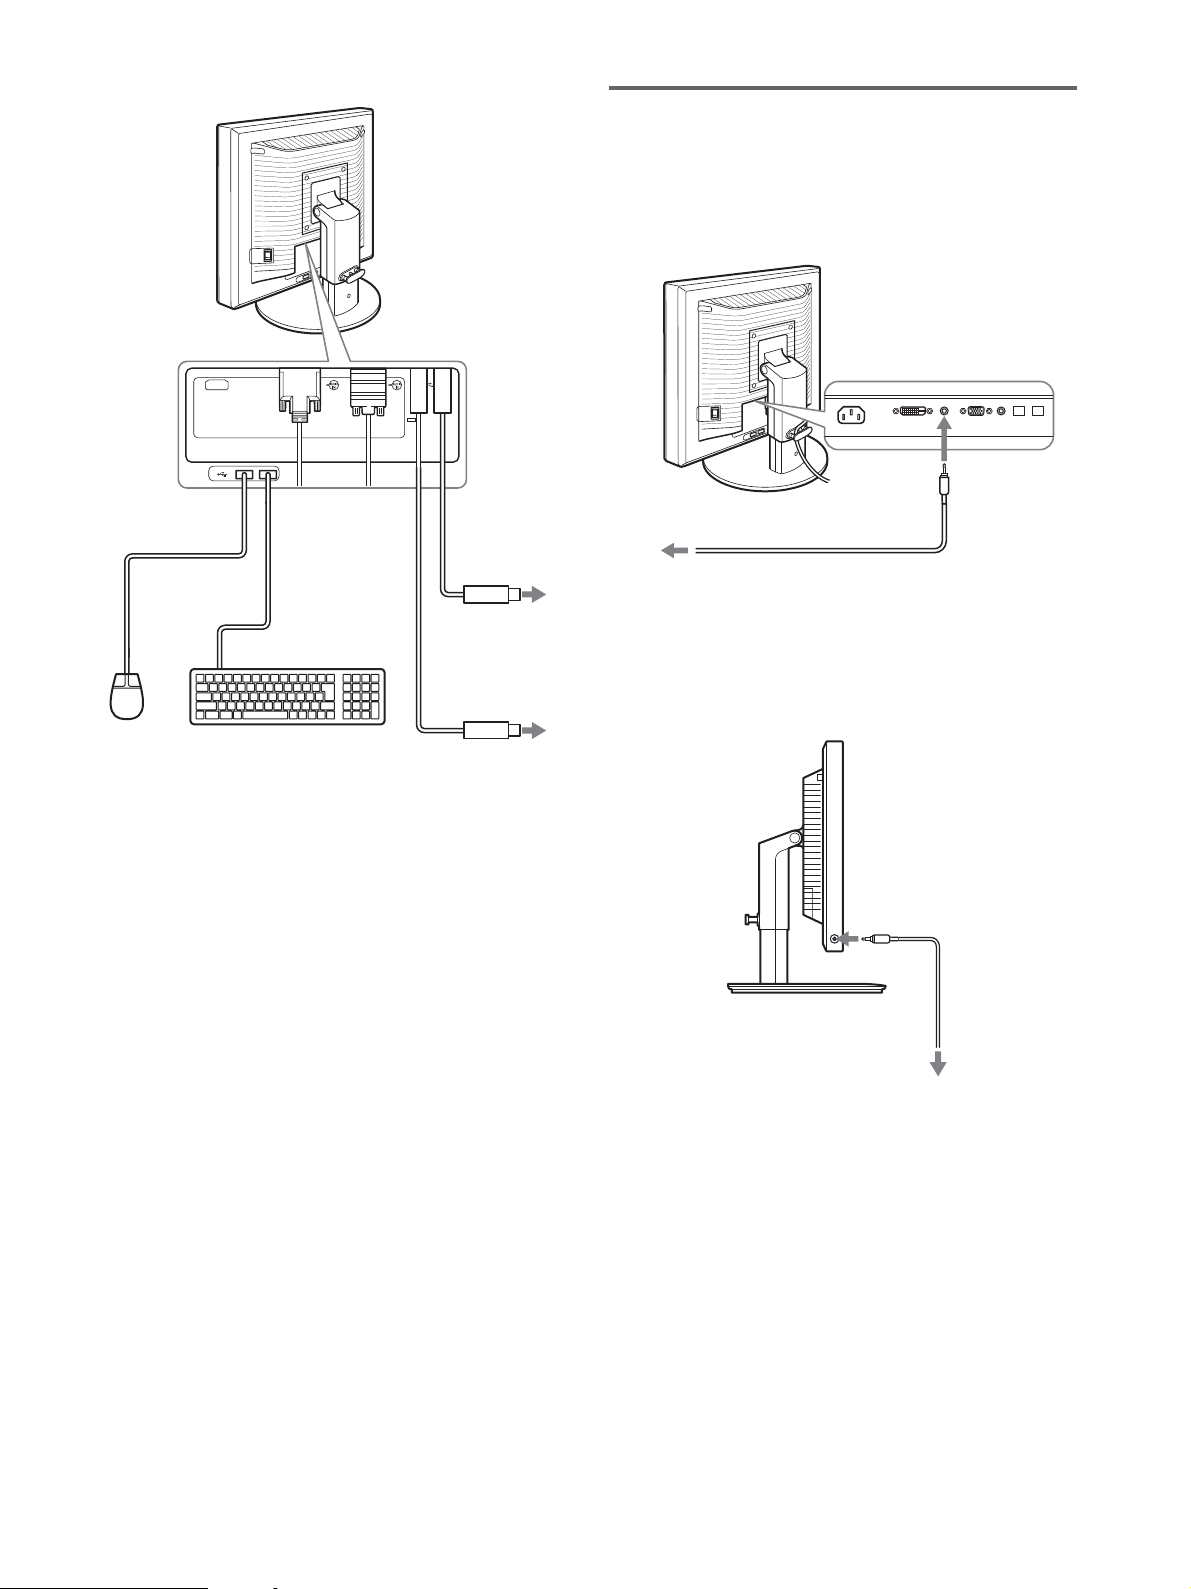
準備 4:オーディオ接続コード
をつなぐ
コンピュータまたはオーディオ機器と本機の音声入力端
子を、付属のオーディオ接続コードでつなぐ。
2
USB マウス
2
USB キーボード
AC IN DVI-D HD1512
USB ケーブル
(付属)
1
コンピュータの
USB 端子へ
USB ケーブル(付属)
21
1
コンピュータの
USB 端子へ
コンピュータまたは
その他のオーディオ
機器の音声出力端子
へ
オーディオ接続コード
(付属)
音声入力端子へ
x ヘッドホンで音声を聞くときは
本機のヘッドホン端子に、オーディオジャックを突き当
たるまで差し込む。
ヘッドホン端子へ
オーディオケーブル
(別売り)
本機の音声入力端子と音声出力端子の接続を完了するこ
とで、音声出力を切り換えることができます。
また、本機のステレオスピーカーから音声を聞けます。詳
しくは、「音量を調節する」(16 ページ)をご覧ください。
9
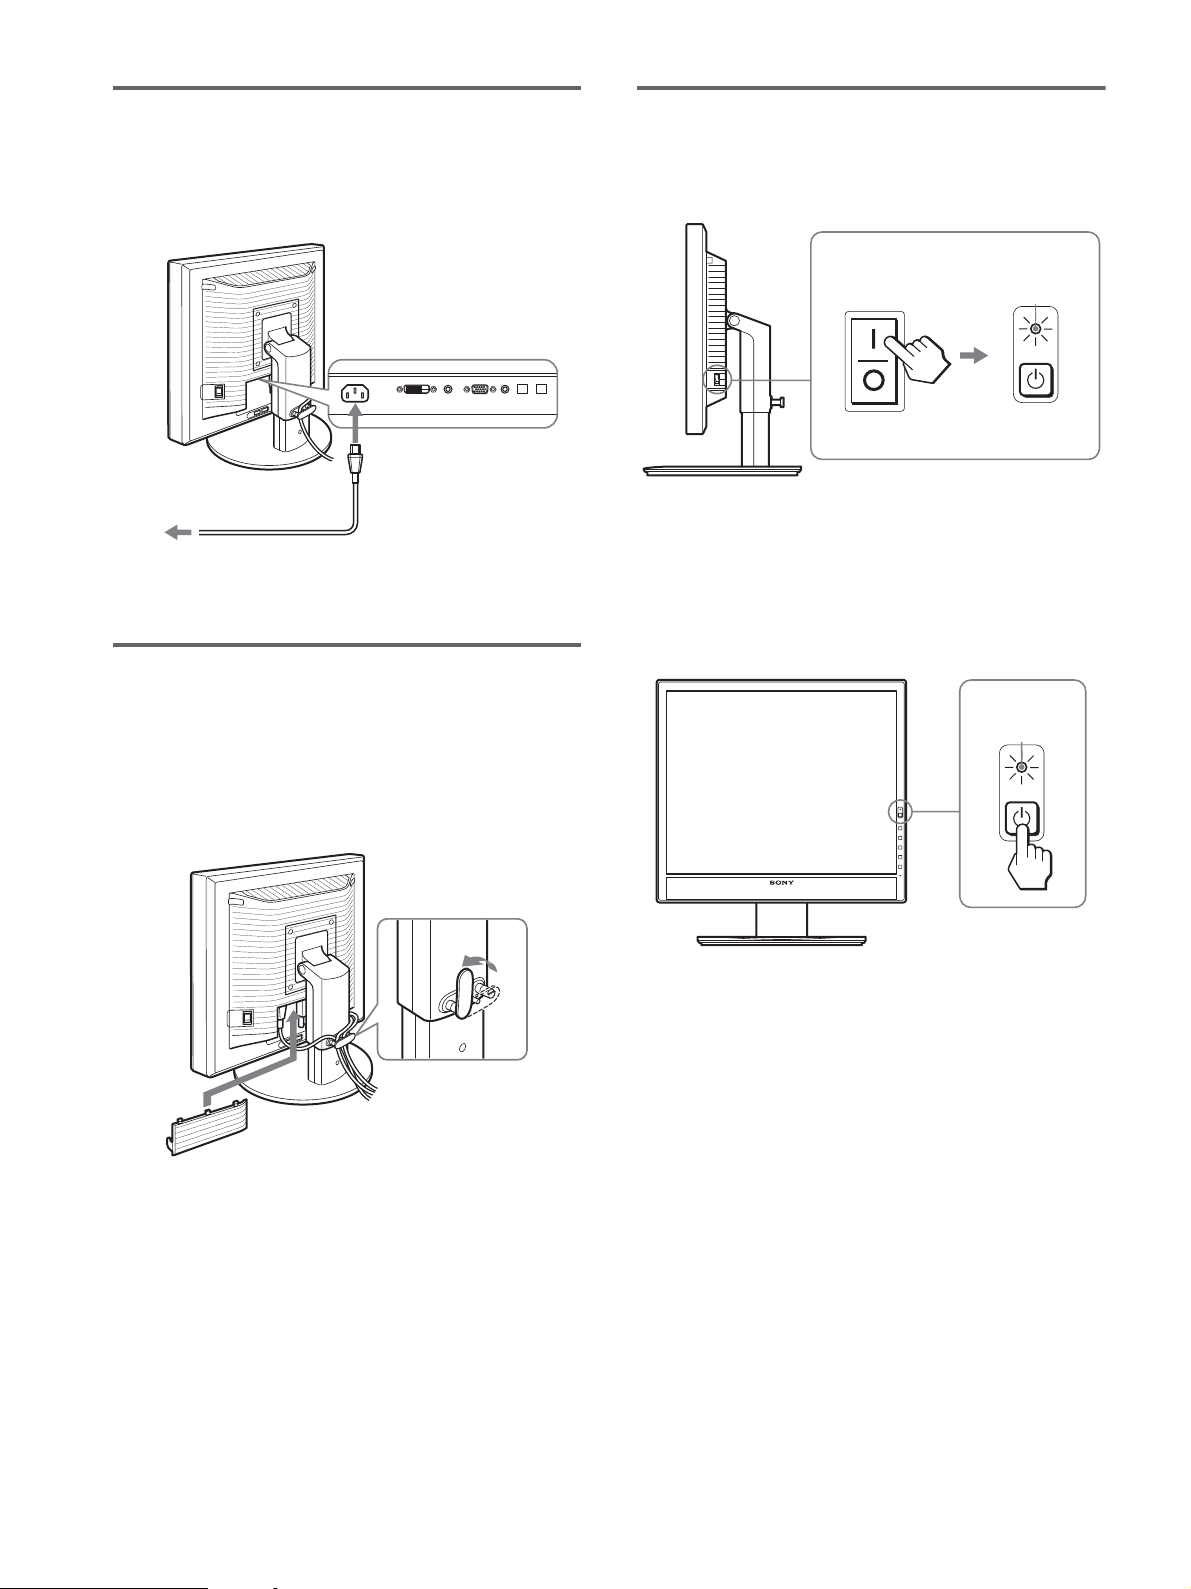
準備 5:電源コードをつなぐ
準備 7:電源を入れる
1 本機に電源コードを突き当たるまで差し込む。
2 電源コンセントへ突き当たるまで差し込む。
電源入力端子へ 1
電源コンセントへ
2
電源コード(付属)
準備 6:コード類をまとめて端
子カバーを閉める
1 1(電源)ランプが赤色に点灯することを確認する。な
お、お買い上げ時の状態では、[ 側に設定されています。
MAIN POWER
ご注意
本機右側面の MAIN POWER(主電源)スイッチがお買い上げ時
に [ 側になっていない場合は、スイッチを [ 側に押して 1(電源)
ランプが赤色に点灯することを確認してください。
2 本機正面右側の 1(電源)スイッチを押す。
1(電源)ランプが緑色に点灯します。
赤く点灯
緑に点灯
1 図のようにコードとケーブルをケーブルホルダーに通
す。
2 端子カバーを閉める。
ご注意
コード類は、長さに余裕を持たせて、たるむようにまとめてくだ
さい。画面の向きを変えたときに、コード類が引っ張られると、
はずれたり、断線の故障の原因となることがあります。
3 コンピュータの電源を入れる。
10

本機の電源を入れても画面に画像が出ないときは
・ ビデオ信号ケーブルや電源コードを正しくつないでいる
か確認する。
・「NO INPUT SIGNAL」と表示されているとき
-コンピュータが省電力状態になっている。キーボードの
キーのどれかを押してみるか、マウスを動かしてみる。
-OK ボタンを押して、入力切り換えが正しいか確認す
る(11 ページ)。
・「CABLE DISCONNECTED」と表示されているとき
-ビデオ信号ケーブルを正しくつないでいるか確認する。
-OK ボタンを押して、入力切り換えが正しいか確認す
る(11 ページ)。
・「OUT OF RANGE」と表示されているとき
本機をつなぐ前につないでいたディスプレイがあるとき
は、そのディスプレイにつなぎ換えて、画像が出るか確
認する。
画像が出たら、コンピュータで以下の範囲に設定する。
アナログ RGB デジタル RGB
水平周波数 28 ~ 80 kHz 28 ~ 64 kHz
垂直周波数 48 ~ 75 Hz 60 Hz
解像度 1280 × 1024 以下
詳しくは、「本機の症状と対処のしかた」(19 ページ)を
ご覧ください。
準備 8:ディスプレイの向きと
高さを変える
下図の範囲でディスプレイの向きを変えられます。
ディスプレイ両側を持ち、ディスプレイの向きを調整す
る。
約5° 約20°
モニタ用のドライバは不要です
本機はプラグ & プレイ機能(DDC)を搭載しており、Windows
のプラグ & プレイ機能によりモニタの情報が自動的に認識されま
す。このため、モニタ用の特別なドライバは通常不要です。本機
とコンピュータをはじめて起動したとき、設定用のウィザードが
表示される場合は、その手順に従ってください。プラグ & プレイ
モニタが自動的に選ばれて、使える状態になります。
これで自動的に垂直周波数は 60 Hz になります。
本機ではちらつきは目立ちませんので、このままの垂直周波数で
お使いいただけます。垂直周波数を上げる必要はありません。
約175°
約175°
下図の範囲でディスプレイの高さを変えられます。
ディスプレイ両側を持ち、ディスプレイの高さを調整す
る。
約110 mm
11
ディスプレイをより快適にお使いいただくために
机や椅子の高さに合わせて、ディスプレイが反射しない見
やすい角度に調整してください。
ご注意
・ ディスプレイの向きを調整するときは、ディスプレイやケーブ
ル類および USB 周辺機器を周りのものにぶつけないよう、静か
に動かしてください。
・ ディスプレイの高さを調整するときは、ディスプレイの下にも
のを置かないでください。誤ってぶつけると破損することがあ
ります。
・ USB 機器または USB の周辺機器を取り付けた場合、スタンド
に当たらないように注意してください。大きさによっては、ディ
スプレイの向きや高さを変えると破損することがあります。
(USB 端子があるモデルのみ)
入力を切り換えるには
(INPUT1/INPUT2)
調整する
調整を始める前に
本機とコンピュータをつなぎ、両方の電源を入れ、30
分以上経過してから調整してください。最適な調整がで
きます。
メニューを使って、いろいろな調整や設定ができます。
メニュー操作のしかた
1 メニュー画面を出す。
MENU ボタンを押して、メニュー画面を出す。
MENU
2 調整したいメニューや項目を選ぶ。
m/Mボタンを押して選び、OKボタンを押して決定する。
INPUT
OK
,
OK ボタンを押す。
押すたびに、下表のように入力が切り換わります。
INPUT
OK
画面表示
(左上に約 5 秒表示)
入力 1:DVI-D INPUT1 用 DVI-D 入力端子
入力 2:HD15 INPUT2 用 HD15 入力端子
以下につないだ入力に
切り換わります。
(デジタル RGB)
(アナログ RGB)
3 調整する。
m/M ボタンを押して調整し、OK ボタンを押す。
OK ボタンを押すと、調整値が設定されて前の画面に戻
ります。
INPUT
OK
,
4 メニューを消す。
MENU ボタン押すと、メニュー画面が消える。
ボタンを押さなくても、調整後、約 45 秒たつと自動的
に消えます。
MENU
x お買い上げ時の状態に戻す
リセット画面を使います。詳しくは、0(リセット) ( 15
ページ)をご覧ください。
12
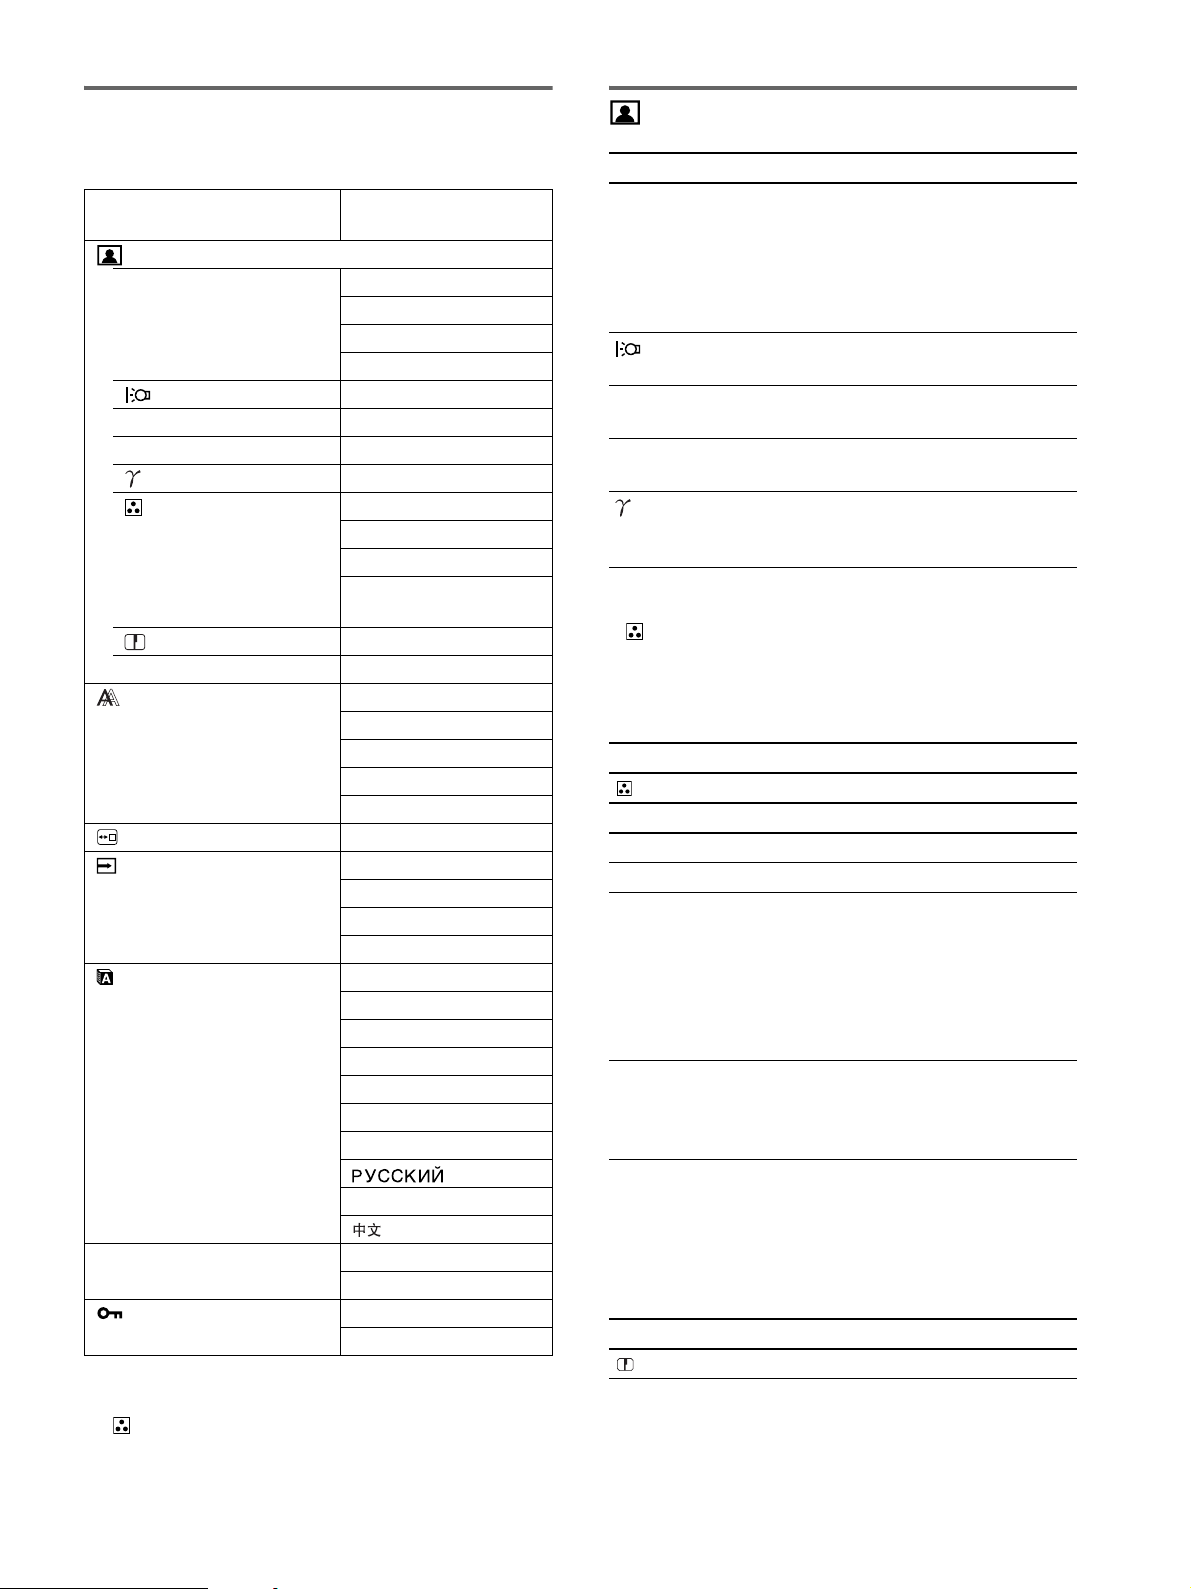
メニュー一覧
画質調整メニュー
●のついたものは、そのモデルで使うことができる機能です。
SDM-X75F/X95F
SDM-X75K/X95K
画質調整メニュー
MODE (ECO モード) HIGH
MIDDLE
LOW
1)
AUTO
バックライト輝度 ●
6 コントラスト ●
8 ブライトネス ●
ガンマ ●
1)
1) 2)
2)
2)
色温度 9300K
6500K
2)
sRGB
ユーザー(ゲインとバ
イアス)
シャープネス ●
0 モードリセット
●
画調整メニュー オート
フェーズ
ピッチ
水平位置
垂直位置
メニュー位置メニュー ●
自動入力センサー
メニュー
オン
入力 1
入力 2
オフ
LANGUAGE メニュー ENGLISH
FRANÇAIS
DEUTSCH
ESPAÑOL
ITALIANO
NEDERLANDS
SVENSKA
日本語
0 リセットメニュー OK
キャンセル
メニューロックメニュー オン
オフ
1)
ECO モードが「AUTO」に設定されているときは、バックラ
イト輝度、コントラストは調整できません。
2)
(色温度)で sRGB が選択されているときは、コントラスト、
ブライトネスおよびガンマは調整できません。
メニュー項目 M ボタンを押す m ボタンを押す
MODE ECO モードを設定します。
HIGH
MIDDLE
LOW
画面の明るさを HIGH、MIDDLE、
LOW、AUTO から選べ、消費電力を節
約できます。さらに、入力ごとに異な
るモードを設定できます。
AUTO
バックライ
ト輝度
6 コントラスト 画像の明暗の差が
8ブライトネス 画像(黒レベル)
画面が明るくなり
ます。
強くなります。
が明るくなります。
画面が暗くなりま
す。
画像の明暗の差が
弱くなります。
画像(黒レベル)
が暗くなります。
ガンマ 機能
画像の色合いを、オリジナル画像の色
合いに近づけられます。
ご注意
・ (色温度)で sRGB が選択されているときは、コントラスト、
ブライトネスおよびガンマは調整できません。
・ ECO モードが「AUTO」に設定されているときは、バックライ
ト輝度、コントラストは調整できません。
メニュー項目
色温度
選択項目 機能
9300K 青みがかかった白色
6500K 赤みがかかった白色
sRGB
1)
「sRGB」を選ぶと、色合いは sRGB カ
ラー設定に調整されます。(sRGB カ
ラー設定は、業界標準のコンピュータ
機器用色空間プロトコルです。)
「sRGB」を選んだ場合、お使いのコン
ピュータも sRGB プロファイルにして
ください。
ユーザー 画面の明るい部分(ゲイン:白レベル)
と暗い部分(バイアス:黒レベル)を
微調整できます。また、調整した値は
記憶されます。
1)
つないでいるコンピュータやその他の機器が sRGB に対応して
いないときは、sRGB カラー設定に調整されません。
「sRGB」を選ぶと、コントラスト、ブライトネス、ガンマは調
整できません。
ECO モードが「AUTO」に設定されていると、「sRGB」は選べ
ません。
メニュー項目 m/M ボタンを押す
シャープネス 画像の輪郭の鋭さを調整します。
13
x 手動で鮮明さや画像の位置を調整し直す
メニュー項目
0 モードリセット
選択項目 機能
OK バックライト輝度、コントラスト、ブ
ライトネス、ガンマ、色温度および
シャープネスをお買い上げ時の設定に
戻します。
キャンセル
画調整メニュー(アナログ
リセットが実行されないまま、メニュー
画面に戻ります。
RGB 信号のみ)
x 自動画質調整機能
本機は、信号を受信したときに、自動的に画像の位置と鮮
明さ(フェーズ / ピッチ)を調整して、最適な画像を表示
します(17 ページ)。
ご注意
自動画質調整機能が働いている間は、1(電源)スイッチ以外は
操作できません。
自動画質調整機能で完全に調整されていないと感じたと
きは
現在入力中の信号に合わせて再度自動で調整し直せます
(下記のオート)。
文字や画像が鮮明でないとき、画像が真ん中に出ないとき
に調整します。この調整は、コンピュータがディスプレイ
の HD15 入力端子(アナログ RGB)に接続されていると
きに有効です。
1 解像度をコンピュータ側で1280×1024に設定する。
2 CD-ROM を入れる。
3 CD-ROM を起動して、テストパターンを表示する。
Windows の場合
CD-ROM が自動で起動したとき
1 地域とモデルを選んで、「ディスプレイアジャストメン
トツール(Utility)」をクリックする。
2「Adjust」をクリックし、解像度を確認して「Next」を
クリックする。
ピッチ、フェーズ、水平位置・垂直位置の順にテストパ
ターンが出ます。
CD-ROM が自動で起動しないとき
1 マイ・コンピュータを開き、CD-ROM アイコンを右ク
リックして「エクスプローラ」から CD-ROM を開く。
2 [Utility] を開いて、[Windows] を選ぶ。
3 [Win_Utility.exe] を起動する。
テストパターンが出ます。
Macintosh の場合
1 [Utility] を開き、[Mac] を選ぶ。
2 [Mac_Utility.exe] を起動する。
テストパターンが出ます。
さらに微調整したいときは
手動で、鮮明さ(フェーズ / ピッチ)や位置(水平位置 /
垂直位置)を調整し直せます。
「オート」や「フェーズ / ピッチ」、「水平位置 / 垂直位置」
で設定した調整値は記憶されて、同じ信号が入力される
と、記憶した調整値になります。
コンピュータをつなぎ換えるなどで入力信号を変えたと
きには、もう一度調整が必要になることがあります。
メニュー項目 機能
オート フェーズ、ピッチ、水平位置、垂直位
置の設定を、現在入力されている信号
に最適な調整値にして、その調整値を
記憶します。
メニュー項目 m/M ボタンを押す
フェーズ 横縞を最少になるように調整します。
ピッチ 縦縞を最少になるように調整します。
水平位置 テストパターンの外周の枠が全部、画
垂直位置
メニュー位置メニュー
メニュー項目 m/M ボタンを押す
メニュー位置 メニューの表示位置を変えられます。
面に入るように調整します。
9 か所があらかじめ設定されています。
14
自動入力センサーメニュー
メニューロック
デジタル入力のあるモデルでは、入力信号の有無を検知し
て、自動的に入力を切り換えることができます。
メニュー項目 機能
オン 選んでいる入力端子への入力信号がな
いときや、OK ボタンで入力信号がな
い入力端子を選んだときは、画面に表
示メッセージが出て(18 ページ)、他
の入力端子への入力信号があるかを自
動的に確認し、入力を自動的に切り換
えます。
入力が切り換わると、切り換わった入
力が画面の左上に表示されます。
入力信号がない場合は、本機は省電力
状態になります。
入力 1 電源を入れたときに、入力 1 または入
入力 2
オフ 入力は自動的に切り替わりません。
力 2 が優先的に表示されます(自動入
力センサーは働きません)。
OK ボタンを押して、入力を切り換え
てください。
メニュー項目 機能
オン 1(電源)スイッチ以外の操作は、
「 」マークが出て操作できなくなり
ます。
オフ 「オン」を解除するときに選びます。
「オン」のときに MENU ボタンを押す
と、 (メニューロック)が自動的に選
択されます。
LANGUAGE メニュー
メニュー項目 m/M ボタンを押す
ENGLISH
FRANÇAIS
DEUTSCH
ESPAÑOL
ITALIANO
NEDERLANDS
SVENSKA
日本語
英語
フランス語
ドイツ語
スペイン語
イタリア語
オランダ語
スウェーデン語
ロシア語
中国語
0 リセットメニュー(お買い上
げ時の設定に戻す)
メニュー項目 機能
OK すべての調整値をお買い上げ時の設定に
戻します。ただし、(LANGUAGE メ
ニュー)の設定はリセットされません。
キャンセル リセットが実行されないまま、メニュー
画面に戻ります。
15
機能
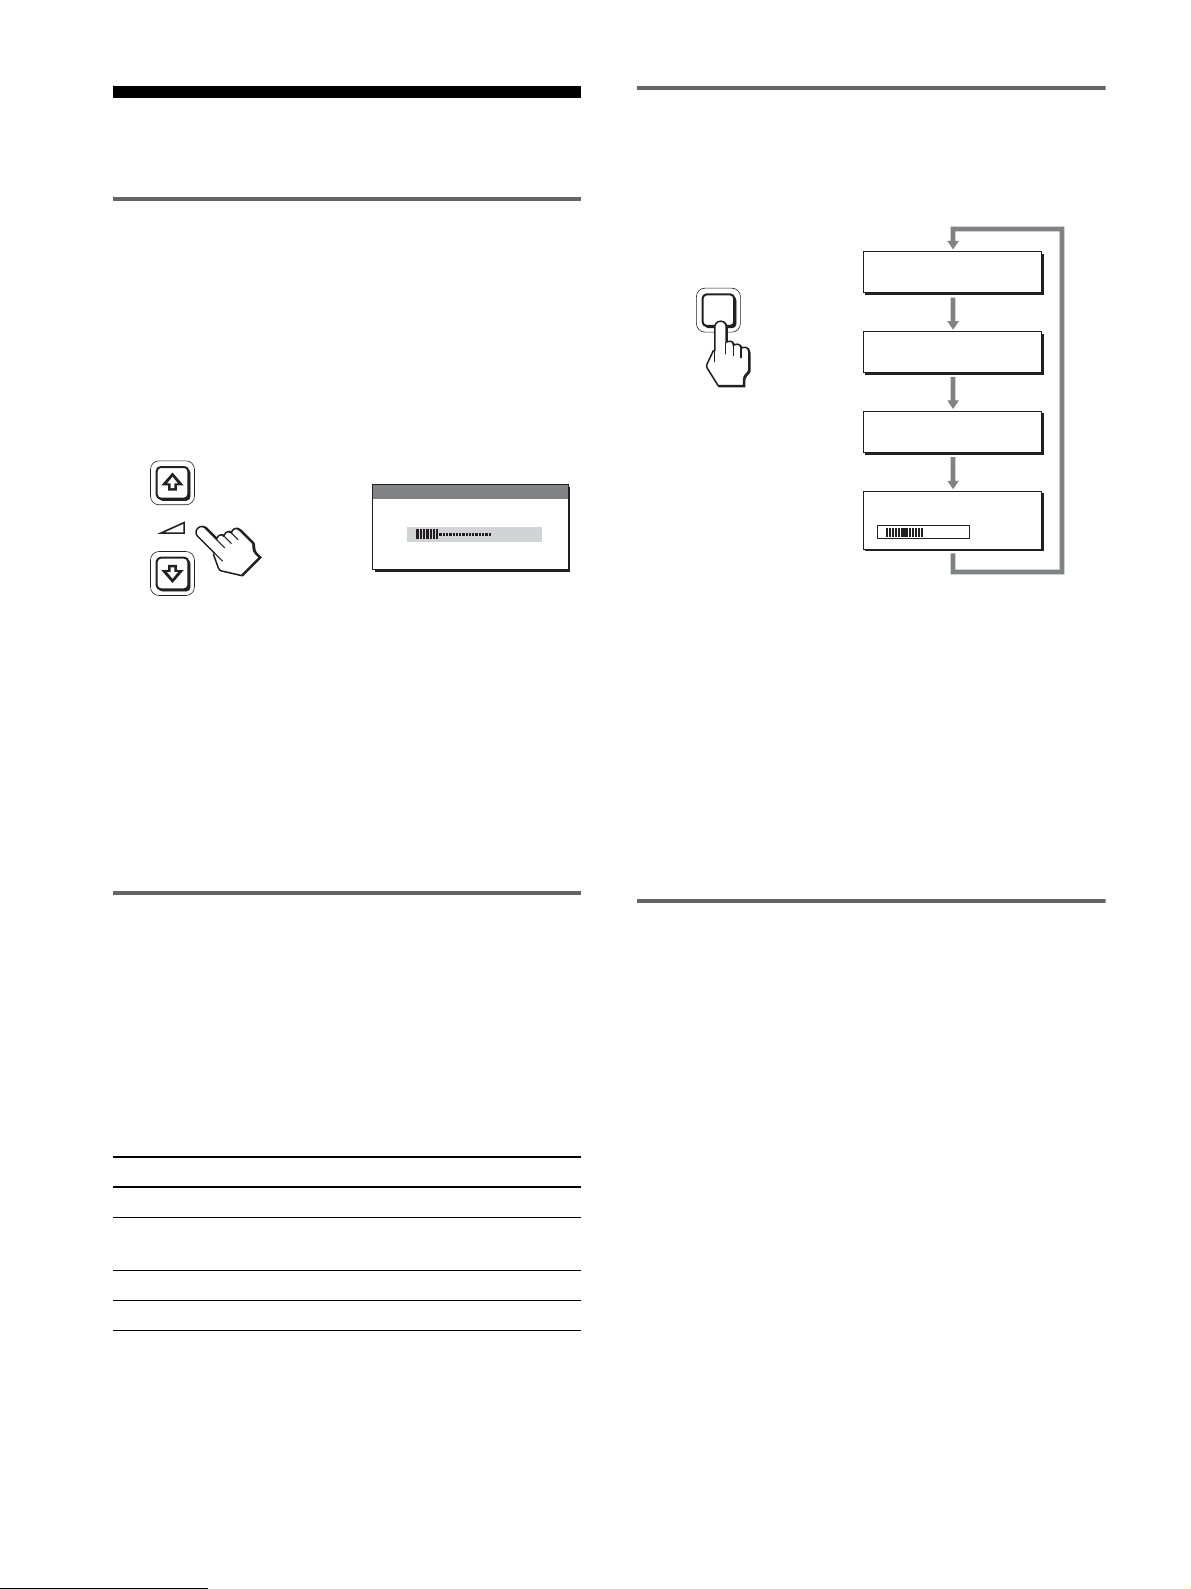
音量を調節する
本機の音声入力端子につないだコンピュータや他のオー
ディオ機器の音声を、本機のスピーカーやヘッドホンで楽
しめます。
メニュー画面とは別の音量画面で、音量を調節します。
節電しながら使う(ECO モード)
本機前面にある ECO ボタンをくり返し押すと、画面の明
るさが変わります。
:
ECO
,
ECO HIGH
:
ECO MIDDLE
1 メニュー画面が出ていないときに、m/M ボタンを押す。
音量
,
2 m/M ボタンを押して音量を調節する。
約 5 秒後に、自動的に調節画面は消えます。
ご注意
・ メニュー画面を表示しているときは、音量は調節できま
せん。
・ 本機が省電力状態になると、スピーカーおよびヘッドホ
ンからの音声は聞こえなくなります。
30
省電力機能(パワーセーブ機能)
本機は、VESA、NUTEK および ENERGY STAR のパワー
セービングガイドラインに対応しています。アナログ入力
では DPMS(Display Power Management Standard)、デ
ジタル入力では DMPM (DVI Digital Monitor Power
Management) に対応しているコンピュータやグラフィッ
クボードにつなぐと、操作をしていないときは自動的に次
のような省電力状態になります。
本機の状態 1(電源)ランプ
通常動作時 緑点灯
アクティブオフ
(ディープスリープ)
1(電源):切 赤点灯
主電源:切 消灯
1)
コンピュータが省電力状態になると、信号が入力されなくなる
ため、アクティブオフ状態になる前に「NO INPUT SIGNAL」
と表示が出ます。約 5 秒後、本機も省電力状態になります。
「ディープ ス リ ープ」は、EPA(Environmental Protection
Agency)の定めた待機時の消費電力抑制状態です。
1)
オレンジ点灯
:
ECO LOW
:
ECO AUTO
50
各設定が表示されて、画面の明るさが変わります。表示は
約 5 秒後に消えます。
HIGH → MIDDLE → LOW の順番に画面の明るさが落ち、
消費電力を節約できます。
お買い上げ時の状態では、画面の明るさは「HIGH」に設
定されています。
自動輝度調整機能
(ライトセンサー)
本機には、周囲の明るさに応じて画面の明るさを自動調整
する機能があります。本機前面の ECO ボタン、または
MENU の画質調整メニューで、ECO モードを「AUTO」
にすることにより、画面の明るさを自動的に最適な状態に
調整します。お買い上げ時の状態では、画面の明るさは
「HIGH」に設定されています。さらに、本機前面の ECO
ボタンから、ECO モードを「AUTO」に設定したときに表
示される調節バーを m/M ボタンで変更することにより、お
好みに応じた自動調整のレベル(明るめ、暗めなど)を調
整可能範囲内において設定することができます。
16
自動画質調整機能
(アナログ RGB 信号のみ)
本機は、信号を受信したときに、自動的に画像の位
置と鮮明さ(フェーズ / ピッチ)を調整して、最適
な画像を表示します。
お買い上げ時に設定されている表示モード
本機には、入力信号に合わせて最適な画質で表示できるよ
うに、代表的な表示モードがお買い上げ時に設定されてい
ます。信号が表示モードと同じであれば、自動的にあらか
じめ設定された最適な調整値で表示されます。
表示モード以外の信号のときは
下記の周波数の間であれば、信号を初めて受信したときに
自動画質調整機能が働いて、きれいな画像を表示します。
水平周波数: 28 ~ 80 kHz
垂直周波数: 48 ~ 75 Hz
信号を初めて受信したときには、画面表示までに通常より
時間がかかることがありますが、この調整値は自動的に本
機に記憶され、次からは表示モードの信号と同様に動作す
るようになります。
・ 本機の USB 端子は、USB Full-Speed (Max 12 Mbps)
に対応しています。
ご注意
・ INPUT/OK ボタンを押しても、すぐにコンピュータが切り換わ
らない場合があります。
・ 最新の USB ドライバをインストールして使用してください。古
いドライバのままでは、USB機器が動作しないことがあります。
・ USB ハブを使用するときは、自動入力センサーメニューでオフ
に設定してください。
手動でフェーズやピッチ、画像の位置を調整したと
きは
入力信号によって自動調整機能だけでは完全に調整でき
ないときは、手動で調整できます(15 ページ)。手動で調
整すると、すべての表示モードにおいて、手動で調整した
調整値がユーザーモードとして記憶され、同じ信号が入力
されるたびに、その調整値が選ばれるようになります。
ご注意
自動画質調整機能が働いている間は、1(電源)スイッチ以外は
操作できません。
KVM 機能
(Keyboard-Video-Mouse 機能)
USB マウスと USB キーボードを本機につなぐこと
により、2 台までのコンピュータを INPUT/OK ボ
タン(8 ページ)で切り換えながら使うことができ
ます。
USB 端子について
・ 本機の USB 端子には、USB マウスと USB キーボード
をつなぐことを推奨します。それ以外の機器を本機につ
ないでも、正しく動作しない場合があります。また、
Bluetooth 対応の機器は、正しく動作しないことがあり
ます。
17

故障かな?と思ったら
お買い上げ店などにご相談いただく前に、次の事項をご確
認ください。
表示メッセージについて
入力信号が正しくないときは、画面に次のような表示メッ
セージが出ます。この場合は、「本機の症状と対処のしか
た」(19 ページ)に従ってください。
「NO INPUT SIGNAL」 と表示されている場合
現在選んでいる入力端子の入力信号がありません。
自動入力センサー(15 ページ)がオンに設定されている
ときは、他の入力端子からの入力信号をさがし、自動的に
入力を切り換えます。
例:
「OUT OF RANGE」 と表示されている場合
入力信号の周波数が、本機の仕様に合っていません。以下
を確認してください。
詳しくは、「本機の症状と対処のしかた」(19 ページ)を
ご覧ください。
xxx.x kHz / xxx Hz と表示されている場合
水平または垂直周波数が、本機の仕様に合っていませ
ん。
数字の部分に現在入力されている信号の水平 / 垂直周
波数が表示されます。
例:
RESOLUTION > 1280 × 1024 と表示されている場合
解像度が、本機の仕様(1280 × 1024 以下)に合って
いません。
例:
入力信号が見つからないときは、
「GO TO POWER SAVE」
というメッセージが表示されてから約 5 秒後に省電力
状態に入ります。
「CABLE DISCONNECTED」 と表示されている場合
現在選んでいる入力端子のビデオ信号ケーブルがはずれ
ています。
自動入力センサー(15 ページ)がオンに設定されている
ときは、他の入力端子からの入力信号をさがし、自動的に
入力を切り換えます。
例:
入力信号が見つからないときは、
「GO TO POWER SAVE」
というメッセージが表示されてから約45秒後に省電力
状態に入ります。
18
本機の症状と対処のしかた
本機以外(コンピュータなど)が原因の場合は、接続機器の取扱説明書をご覧ください。
こんなときは 原因と対処のしかた
画像が出ない。
1(電源)ランプが点灯していな
い。または、1(電源)スイッチ
を押しても 1(電源)ランプが
点灯しない。
1(電源)ランプが赤色またはオ
レンジ色に点灯している。
「CABLE DISCONNECTED」と
いう警告表示が出ている。
「NO INPUT SIGNAL」という警
告表示が出ている。または 1(電
源)ランプがオレンジ色に点灯し
ている。
「OUT OF RANGE」という警告
表示が出ている(18 ページ)。
Windows を使用している。 ・ 本機をつなぐ前につないでいたディスプレイがあるときは、そのディスプレイに
Macintosh とつないでいる。 ・ 必要に応じて市販のアダプタをお使いください。アダプタは、先にコンピュータ
画像が乱れる、ゆれる、ちらつく。 ・ ピッチとフェーズを調整する(アナログ RGB 信号のみ)(15 ページ)。
・ 電源コードをつなぎ直す。
・ 主電源を入れる(10 ページ)
・ 1(電源)スイッチで電源を入れる。
・ ビデオ信号ケーブルを正しくつなぐ(7 ページ)。
・ ビデオ信号ケーブルのピンが曲がっている。まっすぐに直すか、別のケーブルを
使う。
・ 入力切り換えが正しいか確認する(11 ページ)。
・ 付属品ではないビデオ信号ケーブルを使っている。付属品ではないビデオ信号
ケーブルを使っていると、「CABLE DISCONNECTED」と表示が出ることがあ
ります。故障ではありません。
・ ビデオ信号ケーブルを正しくつなぐ(7 ページ)。
・ ビデオ信号ケーブルのピンが曲がっている。まっすぐに直すか、別のケーブルを
使う。
・ 入力切り換えが正しいか確認する(11 ページ)。
x本機以外(コンピュータなど)が原因の場合
・ コンピュータが省電力状態になっている。キーボードのキーのどれかを押してみ
るか、マウスを動かしてみる。
・ コンピュータのグラフィックボードが正しくバススロットに差し込まれているか
確認する。
・ コンピュータの電源を入れる。
・ コンピュータを再起動する。
x本機以外(コンピュータなど)が原因の場合
・ 入力信号の周波数が、本機の仕様に合っていない。本機をつなぐ前につないでい
たディスプレイがあるときは、そのディスプレイにつなぎ換えて、画像が出るか
確認する。画像が出たら、コンピュータで以下の範囲に設定する。
水平周波数:28 ~ 80 kHz(アナログ RGB)、28 ~ 64 kHz(デジタル RGB)
垂直周波数:48 ~ 75 Hz(アナログ RGB)、60 Hz(デジタル RGB)
解像度:1280 × 1024 以下
つなぎ換えて、画像が出るか確認する。画像が出たら、以下を行う。Windows
のデバイス選択画面で製造元に SONY を選び、本機の型名を選ぶ。本機の型名
が表示されないときは、「プラグ アンド プレイ」を選ぶ。
に差し込んでから、ビデオ信号ケーブルにつなぎます。
・ 離れたところにある他の電源につないでみる。
x本機以外(コンピュータなど)が原因の場合
・ コンピュータのグラフィックボードで、本機が正しく設定されているかを確認する。
・ 入力信号のグラフィックモード(VESA、Macintosh19" カラーなど)と周波数
が、本機で使用できる範囲かを確認する。ただし本機で使用できる範囲でも、グ
ラフィックボードによっては同期パルス幅が合わないため、きれいに画像を映せ
ないことがあります。
・ 本機はインターレース信号には対応していません。プログレッシブ信号になるよ
うに設定してください。
・ コンピュータのリフレッシュレート(垂直周波数)を、最適な画面になるように
設定する。
19

こんなときは 原因と対処のしかた
画像がくっきりしていない。 ・ コントラストやブライトネスを調整する(14 ページ)。
・ ピッチとフェーズを調整する(アナログ RGB 信号のみ)(15 ページ)。
x本機以外(コンピュータなど)が原因の場合
・ コンピュータで解像度を 1280 × 1024 に設定する。
画像が二重、三重になる。 ・ ビデオ信号ケーブルの延長コードやスイッチャーボックスの使用をやめる。
・ 接続ケーブルを端子にしっかりと差し込む。
画像の位置がずれている、または画
像の大きさが正しくない。(アナログ
RGB 信号のみ)
・ ピッチとフェーズを調整する(15 ページ)。
・ 画像の位置を調整する(15 ページ)。入力信号やグラフィックボードによって
は、画像が画面全体に広がらないことがあります。
画像が小さい。 x本機以外(コンピュータなど)が原因の場合
・ コンピュータで解像度を 1280 × 1024 に設定する。
画像が暗い。 ・ バックライトを調整する(14 ページ)。
・ ブライトネスを調整する(14 ページ)。
・ ガンマを調整する(14 ページ)。
・ 電源を入れたあと、画面が明るくなるまでしばらく時間がかかります。
・ ECO ボタンを押した後は、ECO モードの設定によっては、画面が暗くなること
もあります。
画面に波模様や縦縞が出る。 ・ ピッチとフェーズを調整する(アナログ RGB 信号のみ)(15 ページ)。
色むらがある。 ・ ピッチとフェーズを調整する(アナログ RGB 信号のみ)(15 ページ)。
白色が白く見えない。 ・ 色温度を調整する(14 ページ)。
本機のボタンが働かない。
・「メニューロック」が「オン」になっている。「オフ」にする(16 ページ)。
( マークが画面に出る)
USB ケーブルでつないだ機器が動作
しない。
・ USB ケーブル(付属)を正しくつないでいるか確認する(8 ページ)。
・ 主電源スイッチおよび 1(電源)スイッチを押して、本機の電源を入れる。
xコンピュータなど本機につないでいる機器が原因の場合
・ つないでいる機器の電源が入っているか確認する。
・ 最新の USB ドライバをコンピュータにインストールし直す。詳しくは、つない
だ機器のメーカーにお問い合わせください。
・ キーボードやマウスでコンピュータを操作できないときは、キーボードやマウス
をコンピュータに直接つなぎ、コンピュータを再起動してから USB 接続の設定
をする。その後、本機につなぎ直す。本機の USB 端子を経由してコンピュータ、
キーボード、マウスをつなぐと、最初にコンピュータを起動したときに、コン
ピュータをマウスやキーボードから操作できないことがあります。
しばらくすると、ディスプレイの電
源が切れてしまう。
メニュー画面上の解像度表示が正し
くない。
主電源を切っても、1(電源)ラン
プがしばらく点灯している。
xコンピュータなど本機につないでいる機器が原因の場合
・ コンピュータの省電力設定をオフにする。
・ グラフィックボードの設定によっては、メニュー画面上の解像度表示とコン
ピュータでの設定が一致しないことがあります。
・ 主電源が入っていて 1(電源)スイッチを押していない状態、または省電力状態
のときに、MAIN POWER(主電源)スイッチを切ると、1(電源)ランプがす
ぐに消灯しない場合があります。故障ではありません。
本機の情報(インフォメーション)を表示する
信号を入力しているときに、INFORMATION 画面が出る
まで MENU ボタンを 5 秒以上押したままにする。
もう一度、MENU ボタンを押すと消えます。
例:
MENU
INFORMATION
MODEL : SDM-X75F
SER. NO : 1234567
MANUFACTURED : 2005-52
機種名
製造番号
製造年と週
本機の安全規格上の型名は SDM-X75 /X95 ですが、販
売上の型名および取扱説明書での型名は SDM-X75F/
X95F/X75K/X95K となります。
故障のときは、お買い上げ店またはソニーサービス窓口にご連絡く
ださい。また、お問い合わせのときは次のことをお知らせください。
・ 型名:
・ 製造番号:
・ 故障の状態:できるだけ詳しく
・ 購入年月日:
・ つないでいるコンピュータ、およびグラフィックボードの仕様
と名前:
・ 入力信号の種類(アナログ RGB/ デジタル RGB):
20

ご相談になるときは次のことをお知らせください。
保証書とアフターサー
ビス
保証書
・ この製品は保証書が添付されていますので、お買い上げ
の際、お買い上げ店でお受け取りください。
・ 所定事項の記入および記載内容をお確かめのうえ、大切
に保存してください。
・ 保証期間は、お買い上げ日より 3 年間です。
アフターサービスについて
調子が悪いときはまずチェックを
b「故障かな?と思ったら」の項を参考にして、故障かどう
かをお調べください。
それでも具合が悪いときはサービス窓口へ
型名:ディスプレイが梱包されていた箱や本体後面の IDラ
ベルをご覧になり、お使いのディスプレイの型名をご確認
ください。
製造番号:
故障の状態:できるだけ詳しく
購入年月日:
お買い上げ店
TEL.
お近くのサービスステーション
TEL.
This display is designed for use in Japan only and
cannot be used in any other country.
b お買い上げ店、または添付の「ソニーご相談窓口のご案
内」にある、お近くのソニーサービス窓口にご相談くだ
さい。
保証期間中の修理は
b 保証書の記載内容に基づいて修理させていただきます。
くわしくは保証書をご覧ください。
保証期間経過後の修理は
b 修理によって機能が維持できる場合は、ご要望により有
料で修理させていただきます。
部品の保有期間について
当社では、コンピュータディスプレイの補修用性能部品
(製品の機能を維持するために必要な部品)を、製造打ち
切り後 8 年間保有しています。この部品保有期間を修理可
能の期間とさせていただきます。
保有期間が経過した後も、故障箇所によっては、修理可能
の場合がありますので、お買い上げ店か、サービス窓口に
ご相談ください。
21
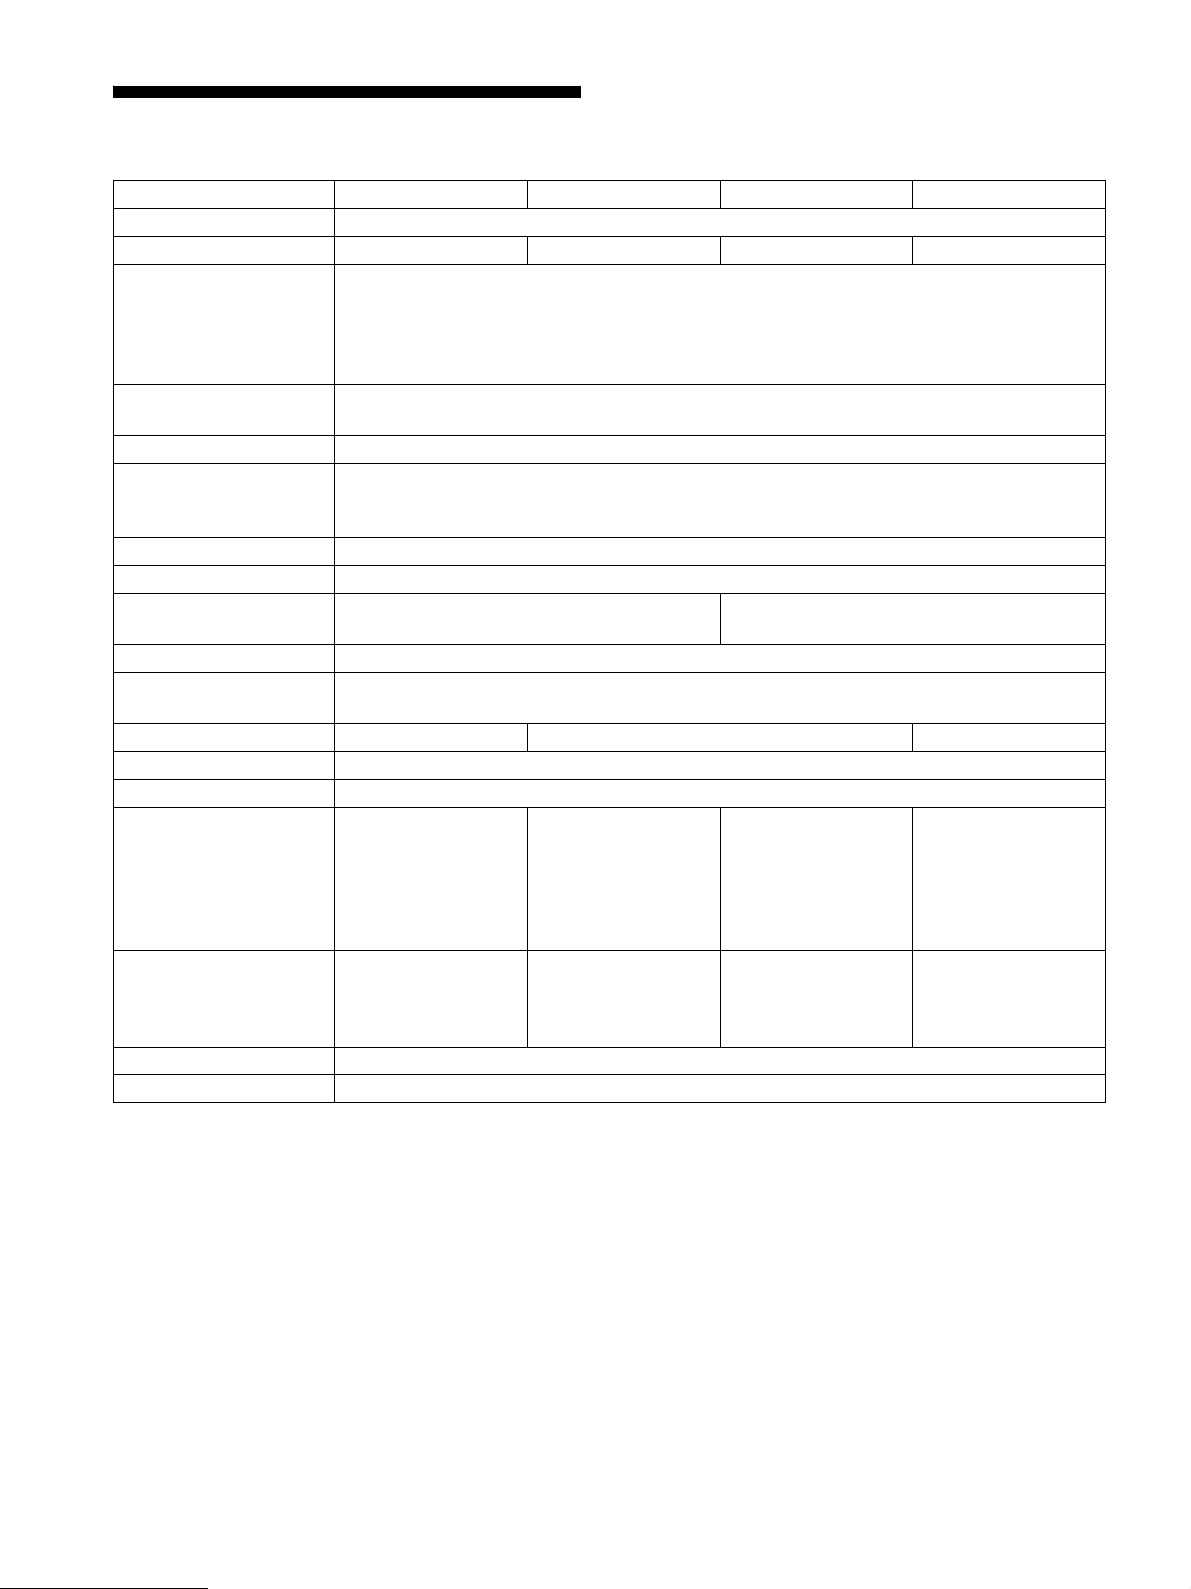
主な仕様
型名 SDM-X75F SDM-X95F SDM-X75K SDM-X95K
LCD パネル a-Si TFT アクティブマトリックス
画面サイズ 17 インチ(43 cm) 19 インチ(48 cm) 17 インチ(43 cm) 19 インチ(48 cm)
入力信号フォーマット RGB 動作周波数
水平:28 ~ 80 kHz(アナログ RGB)
28 ~ 64 kHz(デジタル RGB)
垂直:48 ~ 75 Hz(アナログ RGB)
60 Hz(デジタル RGB)
解像度 水平:最大 1280 ドット
垂直:最大 1024 ライン
入力信号の種類 デジタル×1 アナログ×1
入力信号レベル アナログ RGB 信号:0.7 Vp-p、75 Ω、正極性
同期信号:TTL レベル、2.2 kΩ、極性自由
デジタル RGB(DVI)信号: TMDS(Single link)
音声入力 ステレオミニジャック、0.5 Vrms、47kΩ
スピーカー出力 1W × 2
USB 端子
ヘッドホン端子 ×1
電源 AC100 ~ 240 V/50-60 Hz
消費電力量 最大 45 W 最大 50 W 最大 55 W
動作温度 5 ~ 35 ℃
スタンドの種類 高さ調整スタンド
最大外形寸法
(幅 / 高さ / 奥行き)
質量 約 7.6 kg
プラグ & プレイ機能 DDC2B
付属品 6 ページをご覧ください。
1)
推奨周波数タイミング
・ 水平同期幅率:水平周波数のタイミングの合計の 4.8% 以上、
または 0.8 mµs のどちらか大きい方
・ 水平ブランキング幅:2.5 µs以上
・ 垂直ブランキング幅:450 µs以上
約 369 × 393.5 -
503.5 × 253 mm
( スタンド付 )
約 369 × 337 ×
66 mm
( スタンドなし )
( スタンド付 )
約 4.4 kg
( スタンドなし )
–
最大 1.0 A
約 414 × 409.5 -
519.5 × 277.5 mm
( スタンド付 )
約 414 × 370 ×
69 mm
( スタンドなし )
約 8.9 kg
( スタンド付 )
約 5.4 kg
( スタンドなし )
1)
USB Full-Speed (Max12 Mbps)
A ポート× 2、B ポート× 2、
約 369 × 393.5 -
503.5 × 253 mm
( スタンド付 )
約 369 × 337 ×
66 mm
( スタンドなし )
約 7.6 kg
( スタンド付 )
約 4.4 kg
( スタンドなし )
約 414 × 409.5 -
519.5 × 277.5 mm
( スタンド付 )
約 414 × 370 ×
( スタンドなし )
( スタンド付 )
( スタンドなし )
69 mm
約 8.9 kg
約 5.4 kg
本機の使用および外観は、改良のため予告なく変更するこ
とがありますが、ご了承ください。
22

TCO’99 Eco-document (for the black
model)
x Congratulations!
You have just purchased a TCO’99 approved and labelled product! Your
choice has provided you with a product developed for professional use.
Your purchase has also contributed to reducing the burden on the
environment and also to the further development of environmentally
adapted electronics products.
x Why do we have environmentally labelled com-
puters?
In many countries, environmental labelling has become an established
method for encouraging the adaptation of goods and services to the
environment. The main problem, as far as computers and other electronics
equipment are concerned, is that environmentally harmful substances are
used both in the products and during their manufacture. Since it is not so
far possible to satisfactorily recycle the majority of electronics equipment,
most of these potentially damaging substances sooner or later enter nature.
There are also other characteristics of a computer, such as energy
consumption levels, that are important from the viewpoints of both the
work (internal) and natural (external) environments. Since all methods of
electricity generation have a negative effect on the environment (e.g.
acidic and climate-influencing emissions, radioactive waste), it is vital to
save energy. Electronics equipment in offices is often left running
continuously and thereby consumes a lot of energy.
x What does labelling involve?
This product meets the requirements for the TCO’99 scheme which
provides for international and environmental labelling of personal
computers. The labelling scheme was developed as a joint effort by the
TCO (The Swedish Confederation of Professional Employees), Svenska
Naturskyddsforeningen (The Swedish Society for Nature Conservation)
and Statens Energimyndighet (The Swedish National Energy
Administration).
Approval requirements cover a wide range of issues: environment,
ergonomics, usability, emission of electric and magnetic fields, energy
consumption and electrical and fire safety.
The environmental demands impose restrictions on the presence and use
of heavy metals, brominated and chlorinated flame retardants, CFCs
(freons) and chlorinated solvents, among other things. The product must
be prepared for recycling and the manufacturer is obliged to have an
environmental policy which must be adhered to in each country where the
company implements its operational policy.
Labelled products must meet strict environmental demands, for example,
in respect of the reduction of electric and magnetic fields, physical and
visual ergonomics and good usability.
Below you will find a brief summary of the environmental requirements
met by this product. The complete environmental criteria document may
be ordered from:
TCO Development
SE-114 94 Stockholm, Sweden
Fax: +46 8 782 92 07
Email (Internet): development@tco.se
Current information regarding TCO’99 approved and labelled
products may also be obtained via the Internet, using the address:
http://www.tco-info.com/
x Environmental requirements
Flame retardants
Flame retardants are present in printed circuit boards, cables, wires,
casings and housings. Their purpose is to prevent, or at least to delay the
spread of fire. Up to 30% of the plastic in a computer casing can consist
of flame retardant substances. Most flame retardants contain bromine or
chloride, and those flame retardants are chemically related to another
group of environmental toxins, PCBs. Both the flame retardants
containing bromine or chloride and the PCBs are suspected of giving rise
to severe health effects, including reproductive damage in fish-eating
birds and mammals, due to the bio-accumulative* processes. Flame
retardants have been found in human blood and researchers fear that
disturbances in foetus development may occur.
The relevant TCO’99 demand requires that plastic components weighing
more than 25 grams must not contain flame retardants with organically
bound bromine or chlorine. Flame retardants are allowed in the printed
circuit boards since no substitutes are available.
Cadmium**
Cadmium is present in rechargeable batteries and in the colour-generating
layers of certain computer displays. Cadmium damages the nervous
system and is toxic in high doses. The relevant TCO’99 requirement states
that batteries, the colour-generating layers of display screens and the
electrical or electronics components must not contain any cadmium.
Mercury**
Mercury is sometimes found in batteries, relays and switches. It damages
the nervous system and is toxic in high doses. The relevant TCO’99
requirement states that batteries may not contain any mercury. It also
demands that mercury is not present in any of the electrical or electronics
components associated with the labelled unit.
CFCs (freons)
The relevant TCO’99 requirement states that neither CFCs nor HCFCs
may be used during the manufacture and assembly of the product. CFCs
(freons) are sometimes used for washing printed circuit boards. CFCs
break down ozone and thereby damage the ozone layer in the stratosphere,
causing increased reception on earth of ultraviolet light with e.g. increased
risks of skin cancer (malignant melanoma) as a consequence.
Lead**
Lead can be found in picture tubes, display screens, solders and
capacitors. Lead damages the nervous system and in higher doses, causes
lead poisoning. The relevant TCO’99 requirement permits the inclusion of
lead since no replacement has yet been developed.
* Bio-accumulative is defined as substances which accumulate within
living organisms.
** Lead, Cadmium and Mercury are heavy metals which are Bio-
accumulative.
The energy requirements include a demand that the computer and/or
display, after a certain period of inactivity, shall reduce its power
consumption to a lower level in one or more stages. The length of time to
reactivate the computer shall be reasonable for the user.
i

TCO’03 Eco-document (for the silver
model)
x Congratulations!
The display you have just purchased carries the TCO’03
Displays label. This means that your display is designed,
manufactured and tested according to some of the strictest
quality and environmental requirements in the world. This
makes for a high performance product, designed with the
user in focus that also minimizes the impact on our natural
environment.
x Ergonomics
• Good visual ergonomics and image quality in order to
improve the working environment for the user and to
reduce sight and strain problems. Important parameters
are luminance, contrast, resolution, reflectance, colour
rendition and image stability.
x Energy
• Energy-saving mode after a certain time – beneficial
both for the user and the environment
• Electrical safety
x Emissions
• Electromagnetic fields
• Noise emissions
x Ecology
• The product must be prepared for recycling and the
manufacturer must have a certified environmental
management system such as EMAS or ISO 14 001
• Restrictions on
- chlorinated and brominated flame retardants and
polymers
- heavy metals such as cadmium, mercury and lead.
involved in influencing the development of IT equipment
in a more user-friendly direction. Our labelling system
started with displays in 1992 and is now requested by users
and IT-manufacturers all over the world.
For more information, please visit
www.tcodevelopment.com
Recycling Information
x Customer in Europe
The collection and recycling of this product has been planned
according to your country’s relevant legislation. To ensure that
this product will be collected and recycled in way that minimizes
the impact on the environment, please do the following:
1. If you purchased this product for private use, contact your
municipality or the waste collection system and bring the
product to this collection point / have the product be picked up
by the waste collection system. Alternatively, your retailer
might take back this if you purchase new equivalent equipment;
please check with your retailer whether he will take back this
product before bringing it. For information on your country’s
recycling arrangements, please contact the Sony representation
in your country (contact details at: www.sony-europe.com).
Further details on specific recycling systems can be found at the
following addresses:
- Belgium: www.recupel.be
- Netherlands: www.nvmp.nl (consumer electronics)
www.ictmilieu.nl (IT equipment)
- Norway: www.elretur.no
- Sweden: www.el-kretsen.se
- Switzerland: www.swico.ch
2. If you use this product professionally, check the product’s
delivery contract for take back / recycling arrangements and
follow the procedures described therein. Alternatively, follow
the procedures described under point 1.
x Customer in USA
We Sony as a member of EIA recommends to visit URL below
http://www.eiae.org/
x Customer in Asia
http://www.sony.co.jp/SonyInfo/Environment/recycle/3R.html
The requirements included in this label have been
developed by TCO Development in co-operation with
scientists, experts, users as well as manufacturers all over
the world. Since the end of the 1980s TCO has been
ii

2-633-895-07(1)
TFT LCD Color
Computer Display
SDM-X75
SDM-X95
© 2005 Sony Corporation

Owner’s Record
The model and serial numbers are located at the rear of the unit.
Record these numbers in the spaces provided below. Refer to them
whenever you call upon your dealer regarding this product.
Model No.
Serial No.
WARNING
To reduce the risk of fire or electric shock, do not
expose this apparatus to rain or moisture.
Dangerously high voltages are present inside the
unit. Do not open the cabinet. Refer servicing to
qualified personnel only.
FCC Notice
This equipment has been tested and found to comply with the limits
for a Class B digital device, pursuant to Part 15 of the FCC Rules.
These limits are designed to provide reasonable protection against
harmful interference in a residential installation. This equipment
generates, uses, and can radiate radio frequency energy and, if not
installed and used in accordance with the instructions, may cause
harmful interference to radio communications. However, there is no
guarantee that interference will not occur in a particular installation.
If this equipment does cause harmful interference to radio or
television reception, which can be determined by turning the
equipment off and on, the user is encouraged to try to correct the
interference by one or more of the following measures:
– Reorient or relocate the receiving antenna.
– Increase the separation between the equipment and receiver.
– Connect the equipment into an outlet on a circuit different from
that to which the receiver is connected.
– Consult the dealer or an experienced radio/TV technician for help.
You are cautioned that any changes or modifications not expressly
approved in this manual could void your authority to operate this
equipment.
NOTICE
This notice is applicable for USA/Canada only.
If shipped to USA/Canada, install only a UL LISTED/CSA
LABELLED power supply cord meeting the following
specifications:
SPECIFICATIONS
Plug Type Nema-Plug 5-15p
Cord Type SVT or SJT, minimum 3 × 18 AWG
Length Maximum 15 feet
Rating Minimum 7 A, 125 V
NOTICE
Cette notice s’applique aux Etats-Unis et au Canada
uniquement.
Si cet appareil est export* aux Etats-Unis ou au Canada, utiliser
le cordon d’alimentation portant la mention UL LISTED/CSA
LABELLED et remplissant les conditions suivantes:
SPECIFICATIONS
Type de fiche Fiche Nema 5-15 broches
Cordon Type SVT ou SJT, minimum 3 × 18 AWG
Longueur Maximum 15 pieds
Tension Minimum 7 A, 125 V
As an
ENERGY STAR Partner, Sony
Corporation has determined that this product
meets the
energy efficiency.
ENERGY STAR guidelines for
IMPORTANTE
Para prevenir cualquier mal funcionamiento y evitar daños, por
favor, lea detalladamente este manual de instrucciones antes
de conectar y operar este equipo.
If you have any questions about this product, you may call;
Sony Customer Information Services Center 1-800-222-7669
or http://www.sony.com/
Declaration of Conformity
Trade Name : SONY
Model : SDM-X75 /X95
Note : means any number or alphanumeric
character.
Responsible Party : Sony Electronics Inc.
Address : 16530 Via Esprillo, San Diego, CA
92127 U.S.A.
Telephone Number : 858-942-2230
This device complies with part 15 of the FCC rules. Operation is
subject to the following two conditions: (1) This device may not
cause harmful interference, and (2) this device must accept any
interference received, including interference that may cause
undesired operation.
Be sure to confirm the carton that came with your display. The ID
label of your display model is located at the rear of the display.
This monitor complies with the
TCO’99 guidelines.
(for the black model)
This monitor complies with the
TCO’03 guidelines.
(for the silver model)
2

Table of Contents
py
Precautions. . . . . . . . . . . . . . . . . . . . . . . . . . . . . . . . . . . . . . . . . . . . 4
Checking the model name of the display . . . . . . . . . . . . . . . . . . . . . 5
Identifying parts and controls . . . . . . . . . . . . . . . . . . . . . . . . . . . . . . 5
Setup . . . . . . . . . . . . . . . . . . . . . . . . . . . . . . . . . . . . . . . . . .6
Setup 1: Assemble the stand . . . . . . . . . . . . . . . . . . . . . . . . . . . . . . 6
Setup 2: Connect the video signal cables . . . . . . . . . . . . . . . . . . . . 7
Setup 3: Connect the USB mouse or the USB keyboard or other
devices (USB port-equipped models only) . . . . . . . . . . . . 8
Setup 4: Connect the audio cords . . . . . . . . . . . . . . . . . . . . . . . . . . 9
Setup 5: Connect the power cord . . . . . . . . . . . . . . . . . . . . . . . . . 10
Setup 6: Secure the cords and close the connector cover . . . . . . 10
Setup 7: Turn on the display and computer . . . . . . . . . . . . . . . . . . 10
Setup 8: Adjust the tilt and height . . . . . . . . . . . . . . . . . . . . . . . . . 11
Selecting the input signal (INPUT1/INPUT2) . . . . . . . . . . . . . . . . . 12
Customizing Your Display . . . . . . . . . . . . . . . . . . . . . . .13
• Macintosh is a trademark licensed to
Apple Computer, Inc., registered in the
U.S.A. and other countries.
• Windows
Microsoft Corporation in the United
States and other countries.
• IBM PC/AT and VGA are registered
trademarks of IBM Corporation of the
U.S.A.
•VESA and DDC
Video Electronics Standards
Association.
•
ENERGY STAR is a U.S. registered
mark.
• Adobe and Acrobat are trademarks of
Adobe Systems Incorporated.
• All other product names mentioned
herein may be the trademarks or
registered trademarks of their respective
companies.
•Furthermore, “™” and “®” are not
mentioned in each case in this manual.
®
is registered trademarks of
™
are trademarks of the
Navigating the menu. . . . . . . . . . . . . . . . . . . . . . . . . . . . . . . . . . . . 13
Menu options list. . . . . . . . . . . . . . . . . . . . . . . . . . . . . . . . . . . . . . . 14
PICTURE ADJUST menu . . . . . . . . . . . . . . . . . . . . . . . . . . . . . 14
SCREEN menu (analog RGB signal only) . . . . . . . . . . . . . . . . 15
MENU POSITION menu . . . . . . . . . . . . . . . . . . . . . . . . . . . . . . 15
INPUT SENSING menu . . . . . . . . . . . . . . . . . . . . . . . . . . . . . . . 15
LANGUAGE menu . . . . . . . . . . . . . . . . . . . . . . . . . . . . . . . . . . . 16
0 RESET menu (reset to the default setting) . . . . . . . . . . . . . . . . 16
MENU LOCK menu . . . . . . . . . . . . . . . . . . . . . . . . . . . . . . . . . 16
Technical Features . . . . . . . . . . . . . . . . . . . . . . . . . . . . .16
Controlling the volume . . . . . . . . . . . . . . . . . . . . . . . . . . . . . . . . . . 16
Power saving function. . . . . . . . . . . . . . . . . . . . . . . . . . . . . . . . . . . 16
Reducing the power consumption (ECO mode) . . . . . . . . . . . . . . . 17
Automatic brightness adjustment function (light sensor) . . . . . . . . 17
Automatic picture quality adjustment function (analog RGB signal
only) . . . . . . . . . . . . . . . . . . . . . . . . . . . . . . . . . . . . . . . . . . . . . . . . 17
KVM function (Keyboard-Video-Mouse function) . . . . . . . . . . . . . . 17
Troubleshooting. . . . . . . . . . . . . . . . . . . . . . . . . . . . . . . .18
On-screen messages . . . . . . . . . . . . . . . . . . . . . . . . . . . . . . . . . . . 18
Trouble symptoms and remedies . . . . . . . . . . . . . . . . . . . . . . . . . . 19
GB
Specifications. . . . . . . . . . . . . . . . . . . . . . . . . . . . . . . . . .22
TCO’99 Eco-document (for the black model) . . . . . . . . . . . . . . . . . . .i
TCO’03 Eco-document (for the silver model) . . . . . . . . . . . . . . . . . . ii
http://www.sony.net/
3
py
Precautions
Warning on power connections
• Use the supplied power cord. If you use a different power cord,
be sure that it is compatible with your local power supply.
For the customers in the U.S.A.
If you do not use the appropriate cord, this display will not
conform to mandatory FCC standards.
For the customers in the UK
If you use the display in the UK, be sure to use the appropriate
UK power cord.
Example of plug types
for 100 to 120 V AC for 200 to 240 V AC for 240 V AC only
The equipment should be installed near an easily accessible outlet.
Installation
Do not install or leave the display:
• In places subject to extreme temperatures, for example near a
radiator, heating vent, or in direct sunlight. Subjecting the
display to extreme temperatures, such as in an automobile
parked in direct sunlight or near a heating vent, could cause
deformations of the casing or malfunctions.
• In places subject to mechanical vibration or shock.
• Near any equipment that generates a strong magnetic field,
such as a TV or various other household appliances.
• In places subject to inordinate amounts of dust, dirt, or sand, for
example near an open window or an outdoor exit. If setting up
temporarily in an outdoor environment, be sure to take
adequate precautions against airborne dust and dirt. Otherwise
irreparable malfunctions could occur.
Be careful not to touch the air vents on the upper rear of the
display, since they become heated.
Handling the LCD screen
• Do not leave the LCD screen facing the sun as it can damage
the LCD screen. Take care when you place the display by a
window.
• Do not push on or scratch the LCD screen. Do not place a heavy
object on the LCD screen. This may cause the screen to lose
uniformity or cause LCD panel malfunctions.
• If the display is used in a cold place, a residual image may
appear on the screen. This is not a malfunction. The screen
returns to normal as the temperature rises to a normal operating
level.
• If a still picture is displayed for a long time, a residual image
may appear for a while. The residual image will eventually
disappear.
• The LCD panel becomes warm during operation. This is not a
malfunction.
Note on the LCD (Liquid Crystal Display)
Please note that the LCD screen is made with highprecision technology. However, black points or bright
points of light (red, blue, or green) may appear
constantly on the LCD screen, and irregular colored
stripes or brightness may appear on the LCD screen.
This is not malfunction.
(Effective dots: more than 99.99%)
Maintenance
• Be sure to unplug the power cord from the power outlet before
cleaning your display.
• Clean the LCD screen with a soft cloth. If you use a glass
cleaning liquid, do not use any type of cleaner containing an
anti-static solution or similar additive as this may scratch the
LCD screen’s coating.
• Clean the cabinet, panel, and controls with a soft cloth lightly
moistened with a mild detergent solution. Do not use any type
of abrasive pad, scouring powder, or solvent, such as alcohol or
benzine.
• Do not rub, touch, or tap the surface of the screen with sharp or
abrasive items such as a ballpoint pen or screwdriver. This type
of contact may result in a scratched picture tube.
• Note that material deterioration or LCD screen coating
degradation may occur if the display is exposed to volatile
solvents such as insecticide, or if prolonged contact is
maintained with rubber or vinyl materials.
Transportation
• Disconnect all the cables from the display. If you use a height
adjustable stand adjust its height to the highest position and
hold both sides of the LCD display securely. Be careful not to
scratch the screen when transporting. If you drop the display,
you may injured or the display may be damaged.
• When you transport this display for repair or shipment, use the
original carton and packing materials.
• Replace the stopper pin for the height adjustable stand to fix the
stand during the transportation.
Disposal of the display
• Do not dispose of this display with general
household waste.
• The fluorescent tube used in this display contains
mercury. Disposal of this display must be carried out
in accordance to the regulations of your local
sanitation authority.
For customers in the United States
This product contains mercury. Disposal of this product may be
regulated if sold in the United States. For disposal or recycling
information, please contact your local authorities or the
Electronics Industries Alliance (http://www.eiae.org).
4
py
Checking the model name of the
display
The contents with mark for specifications vary
depending on the models. For details, see “Specifications”
(page 22).
Check the model name of the display first.
The model name is located at the rear of the display (Example:
SDM-X75F).
You cannot use some of the functions or menu options for
certain display models.
Identifying parts and controls
See the pages in parentheses for further details.
The illustration only shows one of all the models that are available
for this display.
Front of the display
MENU
1 1 (Power) switch and 1 (power) indicator
(pages 10, 16)
This switch turns the display on when 1 (power) indicator is
red. To turn the display off, press this switch again.
If the 1 (power) indicator fails to light, press the MAIN
POWER switch (9).
2 MENU button (page 12)
This button turns the menu screen on and off.
3 m/M and 2 (volume control) buttons (page 12)
These buttons are used to select the menu items and make
adjustments.
4 OK button (page 12)
This button activates the selected menu item and adjustments
made using the m/M buttons (3).
INPUT (page 11)
These buttons switch the video input signal between INPUT1
and INPUT2 when two computers are connected to the
display. (Only available when menu is turned off.)
5 ECO button (page 16)
This button is used to reduce the power consumption.
When the menu screen is not displayed, you can also
automatically adjust the picture quality for the current input
signal while keeping pressing this button for more than 3
seconds (One touch Auto adjust). (analog RGB signal only)
GB
INPUT
OK
ECO
6 Light sensor (page 16)
This sensor measures the brightness of the area surrounding
the display. Be sure not to cover the sensor with paper, etc.
7 Stereo speakers (pages 9, 16)
These speakers output audio signals as sound.
8 Headphone jack (pages 9, 16)
This jack outputs audio signals to your headphones.
5
py
Rear of the display
Setup
Before using your display, check that the following items are
included in your carton:
• LCD display
•Power cord
• Stand Base
• HD15-HD15 video signal cable (analog RGB)
• DVI-D video signal cable (digital RGB)
• Audio cord (stereo miniplug)
• USB cable
• CD-ROM (utility software for Windows/Macintosh, Operating
Instructions, etc.)
• Warranty card
• Quick Setup Guide
The contents with mark for specifications vary depending on
the models. For details, see “Specifications” (page 22).
Setup 1:Assemble the stand
9 MAIN POWER switch (page 10)
This switch is to turn the MAIN POWER button of the display
on and off.
0 AC IN connector (page 9)
This connector connects the power cord (supplied).
qa DVI-D input connector (digital RGB) (page 8)
This connector inputs digital RGB video signals that comply
with DVI Rev.1.0.
qs HD15 input connector (analog RGB) (page 8)
This connector inputs analog RGB video signals (0.700 Vp-p,
positive) and sync signals.
qd Cable holder (page 9)
This part secures cables and cords to the display.
qf USB downstream port (page 8) (USB port-equipped
models only)
Connecting the USB mouse and USB keyboard to the display,
you can connect up to two computers to the display switching
the input back and forth.
qg
USB upstream port (USB port-equipped models only)
Connect the USB cable to your computer and display.
qh Security lock hole
The Kensington Micro Saver Security System should be used
for the security lock hole.
Micro Saver Security System is a trademark of Kensington.
Do not press the LCD screen when placing or raising
the display straight on a desk or a like.
It may affect the uniformity of the screen or damage
the LCD display.
x When using supplied stand
1 Open the carton and take out the stand base.
2 Confirm the supplied items.
• With a screw attached to the bottom of Stand Base.
3 Put a soft mat or a like on a desk or a like.
You may damage the LCD screen and the display itself, if
putting the display directly on the desk.
4 Take the display out from the carton and then place
the frame of the laid display along the edge of the
desk.
Display
Stand
qj Audio Jack for INPUT1
This jack inputs audio signals when connected to the audio
output jack of a computer or other audio equipment connected
to INPUT1.
q, Audio Jack for INPUT2
This jack inputs audio signals when connected to the audio
output jack of a computer or other equipment connected to
INPUT2.
Soft mat or a like
6
 Loading...