

Sony SDM-V76D Service Manual
17" LCD Color Monitor SDM-V76D
Service
Service
Service
Horizontal Frequency
28-80 kHz
TABLE OF CONTENTS
Description Page Description Page
Table Of Contents.......……..............................…........1
Revision List.…........................................……......2
Important Safety Notice.……..................……......3
1.Precaution……………..............................………........4
2.Specification…………….…………………………….......7
2.1 Product Specification..…………...............……...........7
2.2.Interface Description..........................…...........8
2.3.Factory Present Mode…..............……...............9
2.4 Panel Specification...........................…............9
3. OSD Operation…………….............……………..........11
3.1.Generalization………............………..…................11
3.2.Key Control………………………...........................11
3.3.Common Adjustment………….................................13
3.4.Navigating The Menu.....……...…………..................13
3.5. Adjustment Steps Of Main Menu.....……………......14
3.6. Adjustment Of Service OSD..………….................25
http://www.wjel.net
4 Disassembly Flow Chart……………… ...........27
4.1.Disassembly Steps…………………......….......27
4.2 Wiring Diagram………..………..…………..….......31
4.3 Monitor Exploded View.... ..………...................….....32
5. Circuit Block Diagram…………...................................33
5.1.Main Board…………..…………………………………33
5.2.Power Board……………………..............................34
6.Trouble Shooting…….…………………..............35
7.Schematic…………………………………..….40
7.1 Main Board........….…....................................40
7.2 Power Board....……......…..............................45
8. PCB Layout..………….......................................47
8.1.Main Board………........................................47
8.2.Power Board…........…….............................49
9.EDID Content……..................…......................51
10.BOM List…..............………………....................52
SAFETY NOTICE
ANY PERSON ATTEMPTING TO SERVICE THIS CHASSIS MUST FAMILIARIZE HIMSELF WITH THE
CHASSIS AND BE AWARE OF THE NECESSARY SAFETY PRECAUTIONS TO BE USED WHEN SERVICING
ELECTRONIC EQUIPMENT CONTAINING HIGH VOLTAGES.
CAUTION: USE A SEPARATE ISOLATION TRANSFOMER FOR THIS UNIT WHEN SERVICING
1
17" LCD Color Monitor SDM-V76D
Revision List
Revision Date Revision History TPV Model
A00 Jul.-14-06 First Version Release T786KMCDKS5SNP
http://www.wjel.net
2

17" LCD Color Monitor SDM-V76D
Important Safety Notice
Proper service and repair is important to the safe, reliable operation of all SONY Company Equipment. The service
procedures recommended by SONY and described in this service manual are effective methods of performing
service operations. Some of these service operations require the use of tools specially designed for the purpose.
The special tools should be used when and as recommended.
It is important to note that this manual contains various CAUTIO NS and NOTICES which should be carefully read in
order to minimize the risk of personal injury to service personnel. The possibility exists that improper service
methods may damage the equipment. It is also important to understand that these CAUTIONS and NOTICES ARE
NOT EXHAUSTIVE. SONY could not possibly know, evaluate and advise the service trade of all conceivable ways
in which service might be done or of the possible hazardous consequences of each way. Consequently, SONY has
not undertaken any such broad evaluation. Acco rdingl y, a servicer who uses a service procedure or tool which is not
recommended by SONY must first satisfy himself thoroughly that neither his safety nor the safe operation of the
equipment will be jeopardized by the service method selected.
Hereafter throughout this manual, SONY Company will be referred to as SONY.
WARNING
Use of substitute replacement parts, which do not have the same, specifie d safet y charact erist ics may create sho ck,
fire, or other hazards.
Under no circumstances should the original design be modified or altered without written permission from SONY.
SONY assumes no liability, express or implied, arising out of any unauthorized modification of design.
Servicer assumes all liability.
FOR PRODUCTS CONTAINING LASER:
DANGER-Invisible laser radiations when open AVOID DIRECT EXPOSURE TO BEAM.
CAUTION-Use of controls or adjustments or performance of procedures other than those specified herein may
result in hazardous radiation exposure.
CAUTION -The use of optical instruments with this product will increase eye hazard.
TO ENSURE THE CONTINUED RELIABILITY OF THIS PRODUCT, USE ONLY ORIGINAL MANUFACTURER'S
REPLACEMENT PARTS, WHICH ARE LISTED WITH THEIR PART NUMBERS IN THE PARTS LIST SECTION OF
THIS SERVICE MANUAL.
Take care during handling the LCD module with backlight unit
-Must mount the module using mounting holes arranged in four corners.
-Do not press on the panel, edge of the frame strongly or electric shock as this will result in damage to the screen.
-Do not scratch or press on the panel with any sharp objects, such as pencil or pen as this may result in damage to
the panel.
-Protect the module from the ESD as it may damage the electronic circuit (C-MOS).
-Make certain that treatment person’s body is grounded through wristband.
-Do not leave the module in high temperature and in areas of high humidity for a long time.
-Avoid contact with water as it may a short circuit within the module.
-If the surface of panel becomes dirty, please wipe it off with a soft material. (Cleaning with a dirty or rough cloth may
http://www.wjel.net
damage the panel.)
3
17" LCD Color Monitor SDM-V76D
Precaution
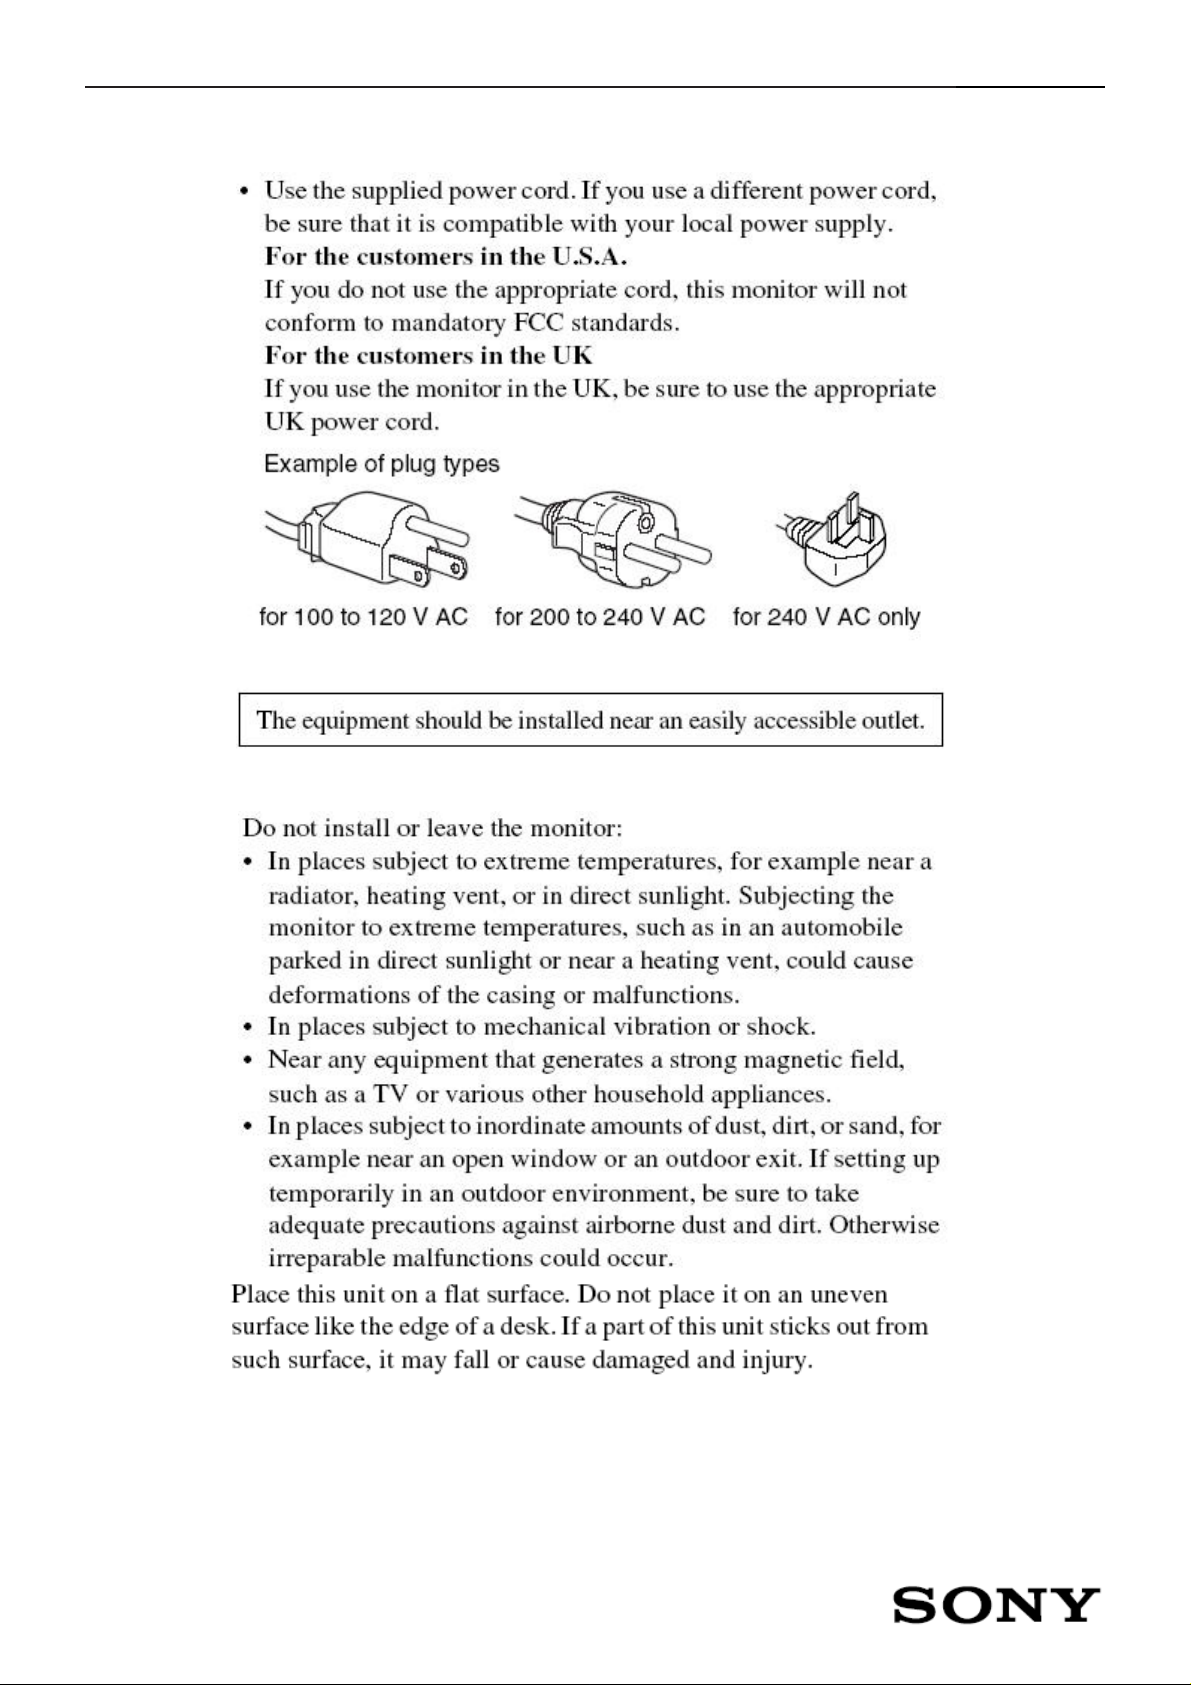
Warning on power connections
Installation
http://www.wjel.net
4
17" LCD Color Monitor SDM-V76D
Handing the LCD screen
Maintenance
http://www.wjel.net
T ransportation
Installation on a wall or a mounting arm
5
17" LCD Color Monitor SDM-V76D
Disposal Of The Display
http://www.wjel.net
6

17" LCD Color Monitor SDM-V76D
2. Specification
2.1 Product Specification
Driving system TFT LCD
Size 17.0"
Type M170E5-L09
Pixel pitch 0.294mm(H) x 0.294mm(V)
Viewing angle 150(H) 130(V)
LCD Panel
Luminance 300 cd/m2 (typ)
Pixel Arrangement R.G.B Vertical St ripe
Contrast Ratio 500:1 (typ)
Response time 8ms (typ)
Display colors 16.2 million Colors
Max dimension
R G B Analog 0.7Vp-p, 75, positive
Horizontal: 337.92mm
Vertical: 270.34mm
SYNC signal
Input signals
Power consumption
Power supply AC voltage
Operating condition
Dimensions (width / height / depth) 382x403.2x193.2mm
Digital RGB signal TMDS
Horizontal frequency 28kHz–80kHz (Analog), 28KHz-64KHz(Digital)
Vertical rate 56-75Hz (Analog), 60Hz(Digital)
Recommend resolution 1280 x 1024
Normal operation
Active off (deep sleep)
Power off
Temperature 5-35°C
Humidity 10-80%
Altitude 0-4000m
TTL level, 2.2 KΩ
≤38W
≤1W
≤1W
100~240VAC,50~60Hz
http://www.wjel.net
7
17" LCD Color Monitor SDM-V76D
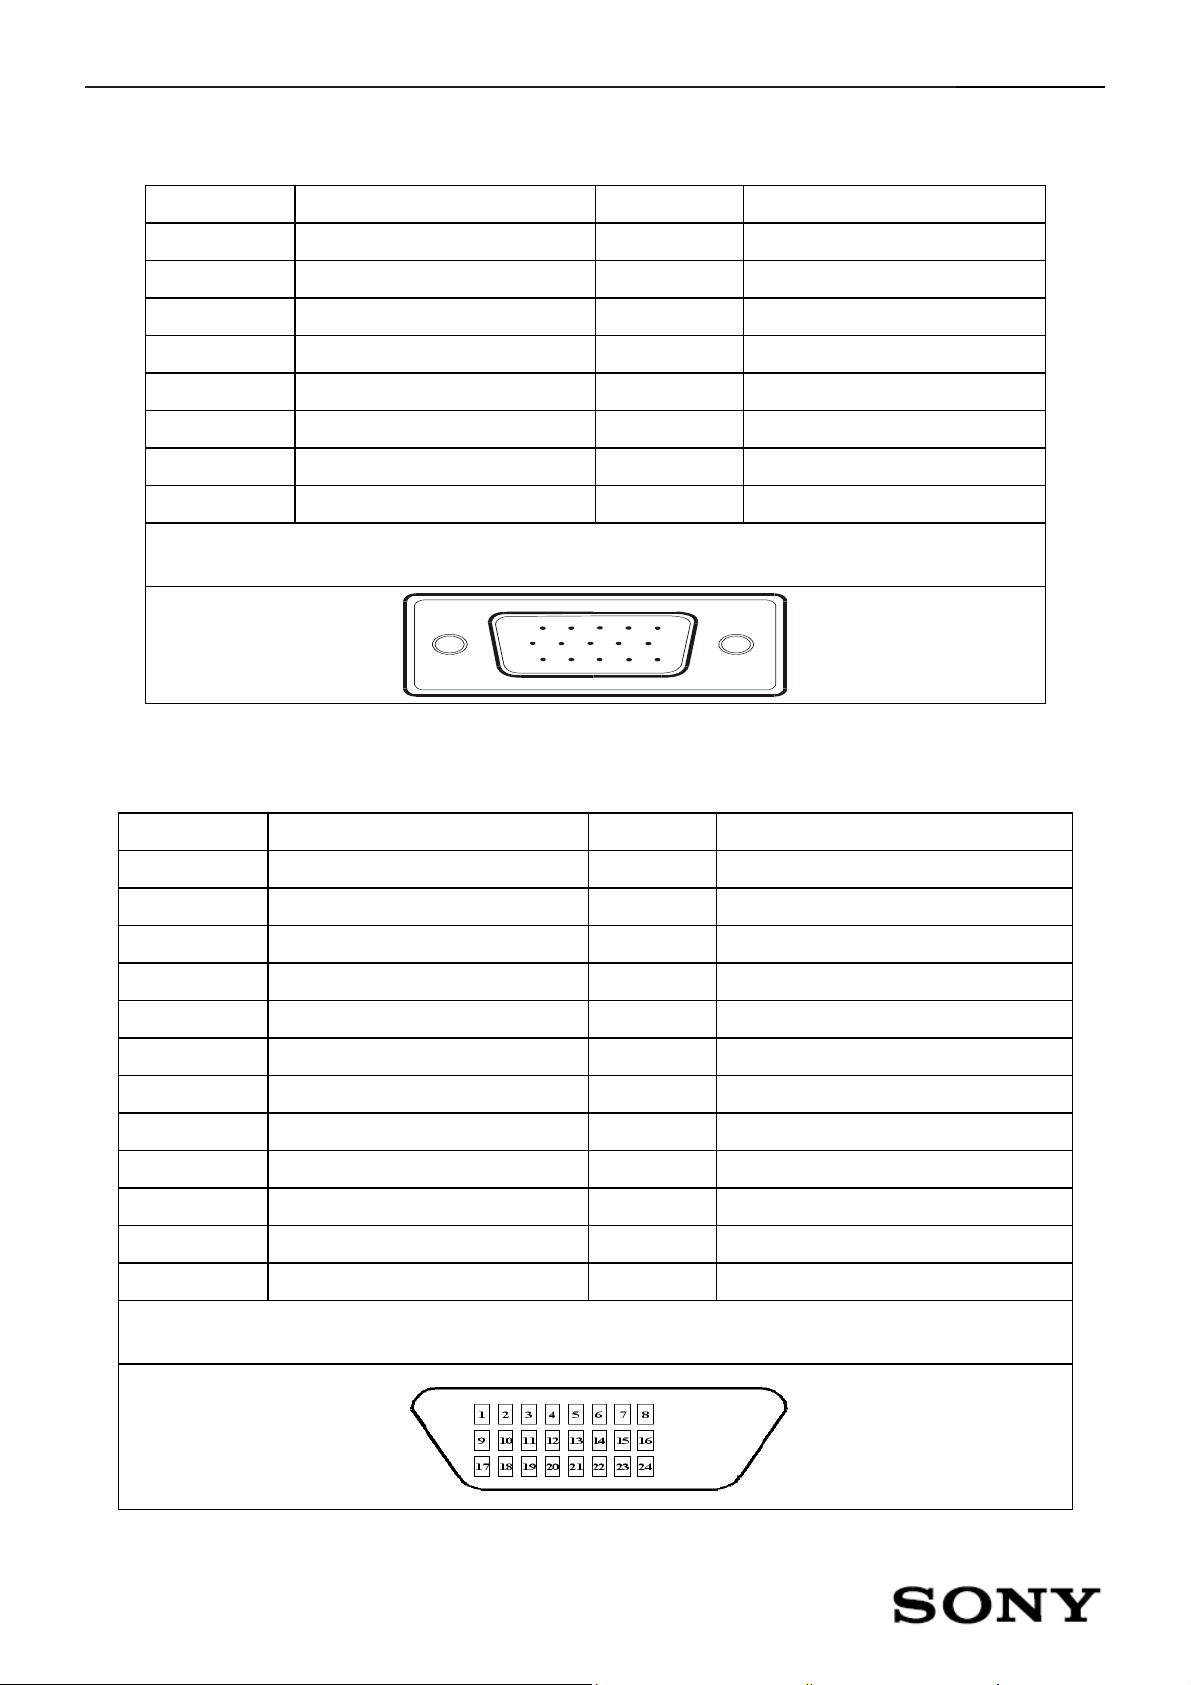
2.2 Interface Description
Analog connector
NO. Description NO. Description
1. Red Video 9. +5V
2. Green Video 10. Detect Cable
3. Blue Video 11. NC
4. GND 12. SDA
5. Sensor for PC 13. Horizontal Sync
6. Red GND 14. Vertical Sync
7. Green GND 15. SCL
8. Blue GND
VGA Connector layout
15
6
11 15
10
Digital connector
NO. Description NO. Description
1. TMDS Data 2- 13. No Connect
2. TMDS Data 2+ 14. +5V
3. TMDS Data 2 Shield 15. Sense of connection PC
4. No Connect 16. Hot Plug Detect
5. No Connect 17. TMDS Data 0-
6. DDC Clock 18. TMDS Data 0+
7. DDC Data 19. TMDS Data 0 Shield
8. No Connect 20. No Connect
9. TMDS Data1- 21. No Connect
10. TMDS Data 1+ 22. TMDS Clock Shield
11. TMDS Data 1 Shield 23. TMDS Clock +
12. No Connect 24. TMDS Clock -
http://www.wjel.net
DVI Connector layout
8

17" LCD Color Monitor SDM-V76D
2.3 Factory Preset Mode
Resolution Frequency (KHz) Vertical (Hz)
720 × 400 31.500 70.156
640 × 480 31.469 59.940
640 × 480 35 66.667
640 × 480 37.500 75
720 × 480 35.162 59.901
800 × 600 35.156 56.250
800 × 600 37.879 60.317
800 × 600 48.077 72.188
800 × 600 46.875 75
832 × 624 49.725 74.553
1024 × 768 48.363 60.004
1024 × 768 53.946 66.110
1024 × 768 56.476 70.069
1024 × 768 60.023 75.029
Clock (MHZ)
28.350
25.175
30.240
31.500
31.505
36
40
50
49.500
57.285
65
71.640
75
78.750
1024 × 768 60.241 74.927
1152 × 864 67.500 75
1152 × 870 68.681 75.062
1152 × 900 61.795 65.950
1152 × 900 71.732 76.068
1280 × 960 60 60
1280 × 1024 63.981 60.020
1280 × 1024 79.976 75.025
2.4 Panel Specification
2.4.1 General Specification
http://www.wjel.net
80
108
100
92.940
105.590
108
108.00
135.00
9
17" LCD Color Monitor SDM-V76D
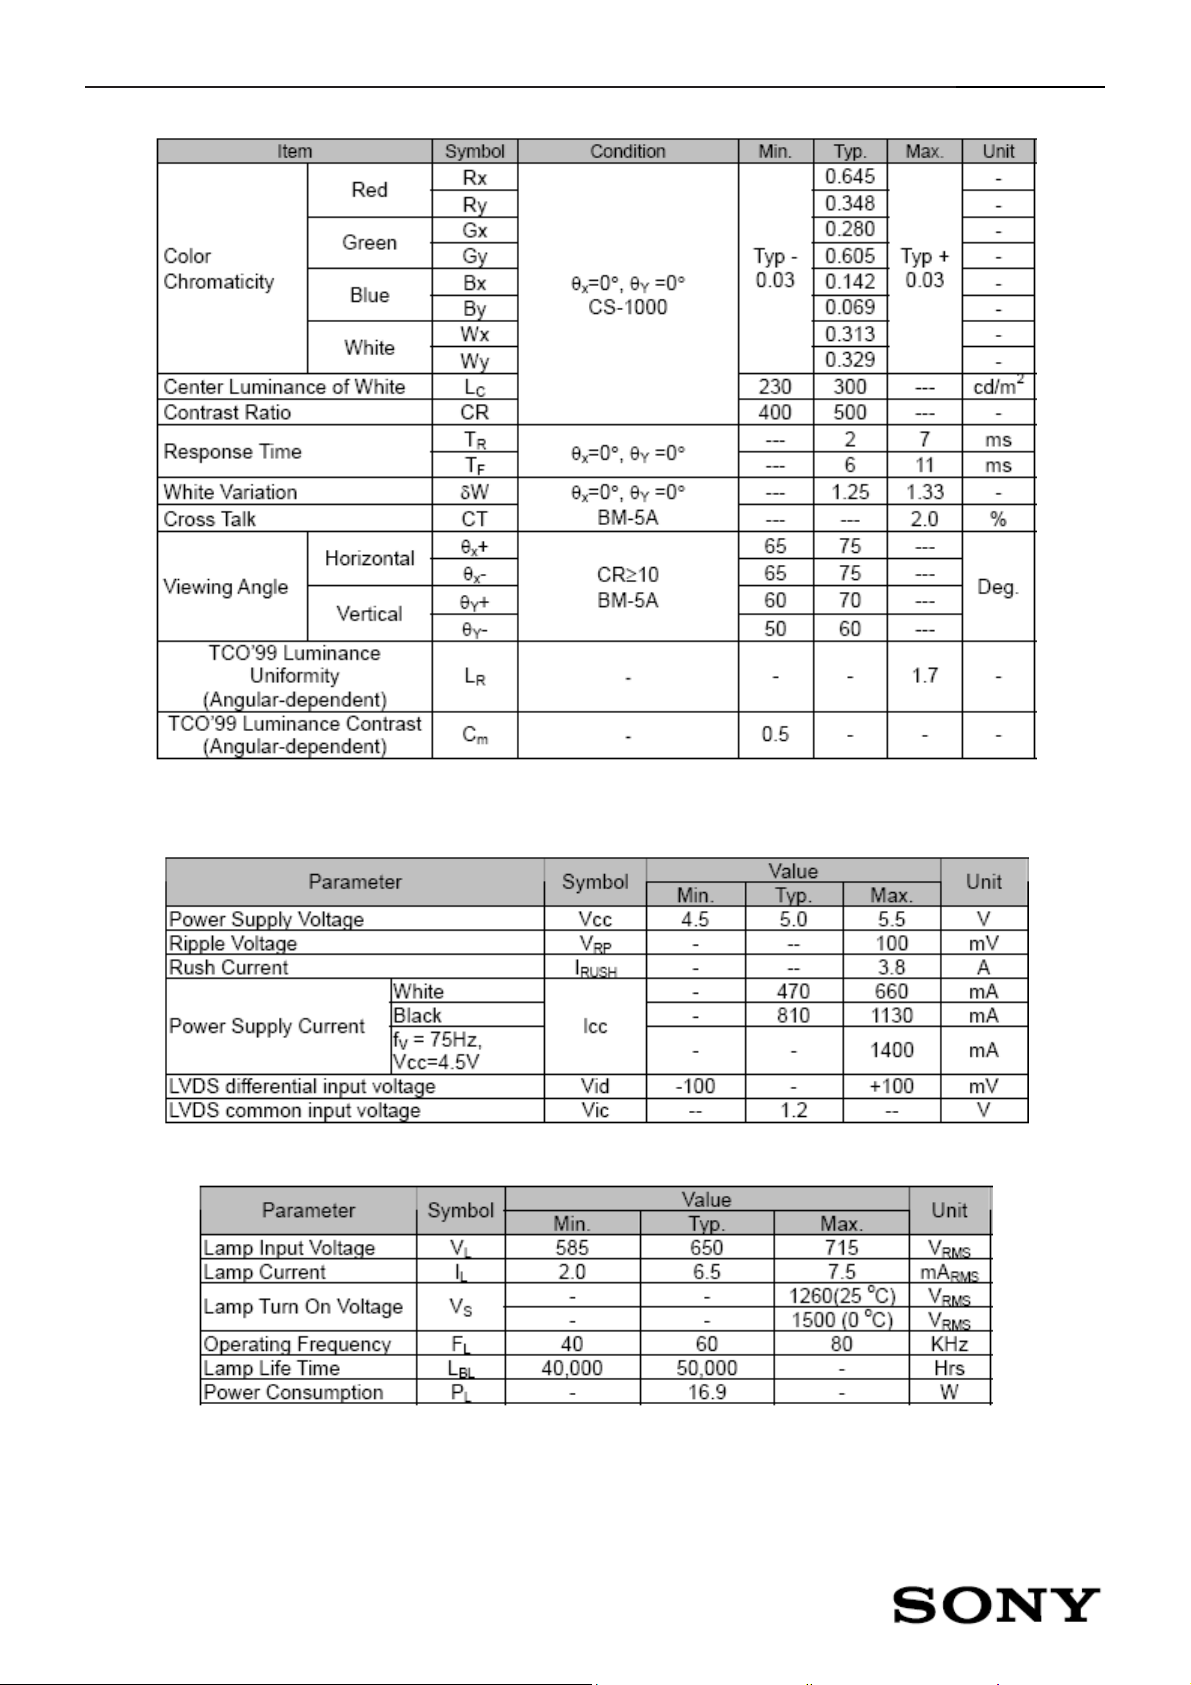
2.4.2 Optical Characteristics
2.4.3 Electrical Characteristics
TFT-LCD
Backlight
http://www.wjel.net
10

17" LCD Color Monitor SDM-V76D
3. OSD Operation
3.1 Generalization
Press the power button to turn the monitor on or off. The control buttons are located at the right side of the
monitor. By changing these settings, the picture can be adjusted to your personal preferences.
The power cord should be connected.
-
Connect the video cable from the monitor to the video card.
-
Press the power button to turn on the monitor, the power indicator will light up.
-
3.2 Key Control
Front of the display
Power Switch and indicator: To turn the display on or off, press the Power Switch. The power indicator
lights up in green when the display is turned on, and lights up in orange when the monitor is in power saving mode.
http://www.wjel.net
Menu Button: This button displays or close the main menu.
Button: These buttons are used to select the menu items and make adjustments.
OK Button: This button selects the item or executes the settings in the menu.
Input button (SDM-S76D/ SDM-S96D/ SDM-V76D/ SDM-V96D/ SDM-S76F/ SDM-S96F only): this button switches
the video input signal between INPUT 1 and INPUT 2 when two computers are connected to the display.
11
17" LCD Color Monitor SDM-V76D
ECO button: This button is used to reduce the power consumption.
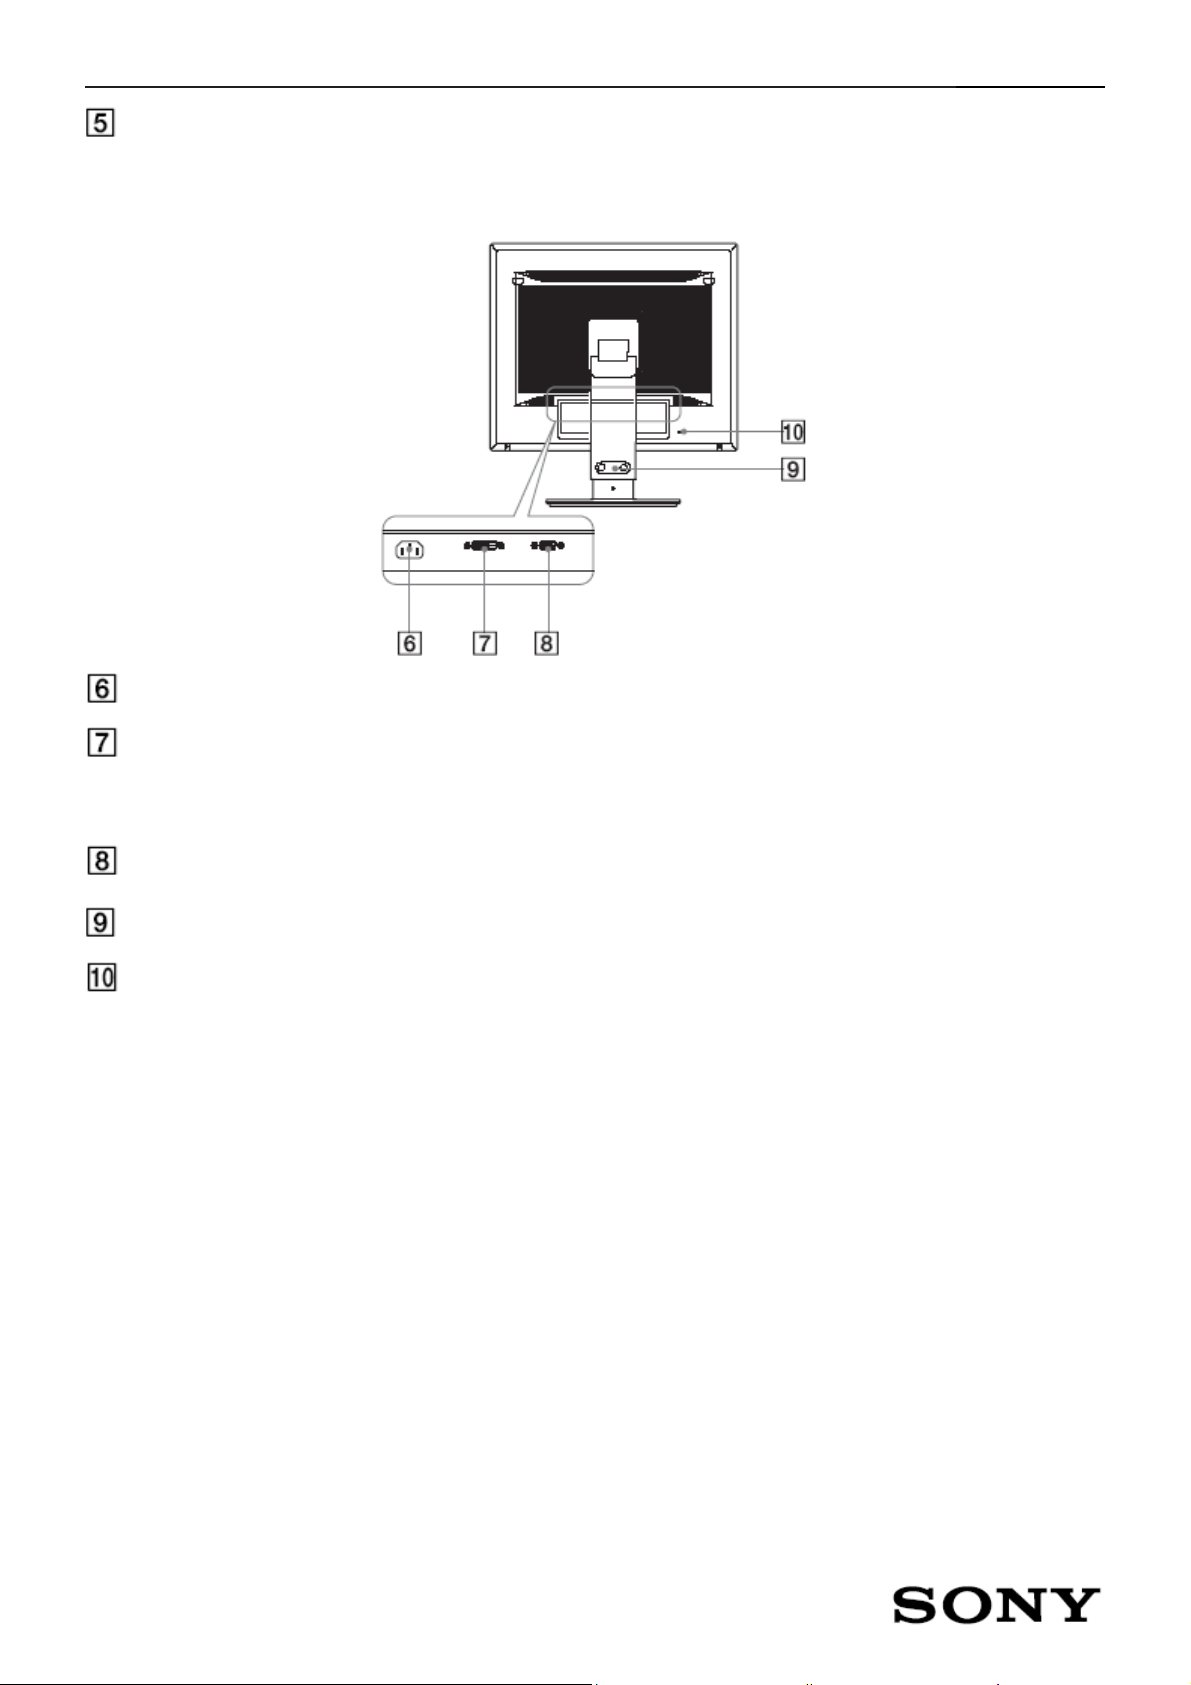
Rear of the display
AC IN connector: connect the power cord.
DVI-D input connector (SDM-S76D/ SDM-S96D/ SDM-V76D/ SDM-V96D/ SDM-S76F/ SDM-S96F only): the
connector inputs digital RGB video signals that comply with DVI Rev.1.0.
HD15 input connector: this connector inputs analog RGB video signals (0.7 Vp-p, positive) and SYNC signals.
Cable holder (SDM-S76F/SDM-S96F only): this part secures cables and cords to the display.
Security lock hole: the security lock hole should be applied with the Kensington Micro Save Security System.
Micro Save Security System is a trademark of Kensington.
http://www.wjel.net
12

17" LCD Color Monitor SDM-V76D
A
3.3 Common adjustment
NO Icon Tag Description
1
2
3
4
5
6
7
8
9
10
γ
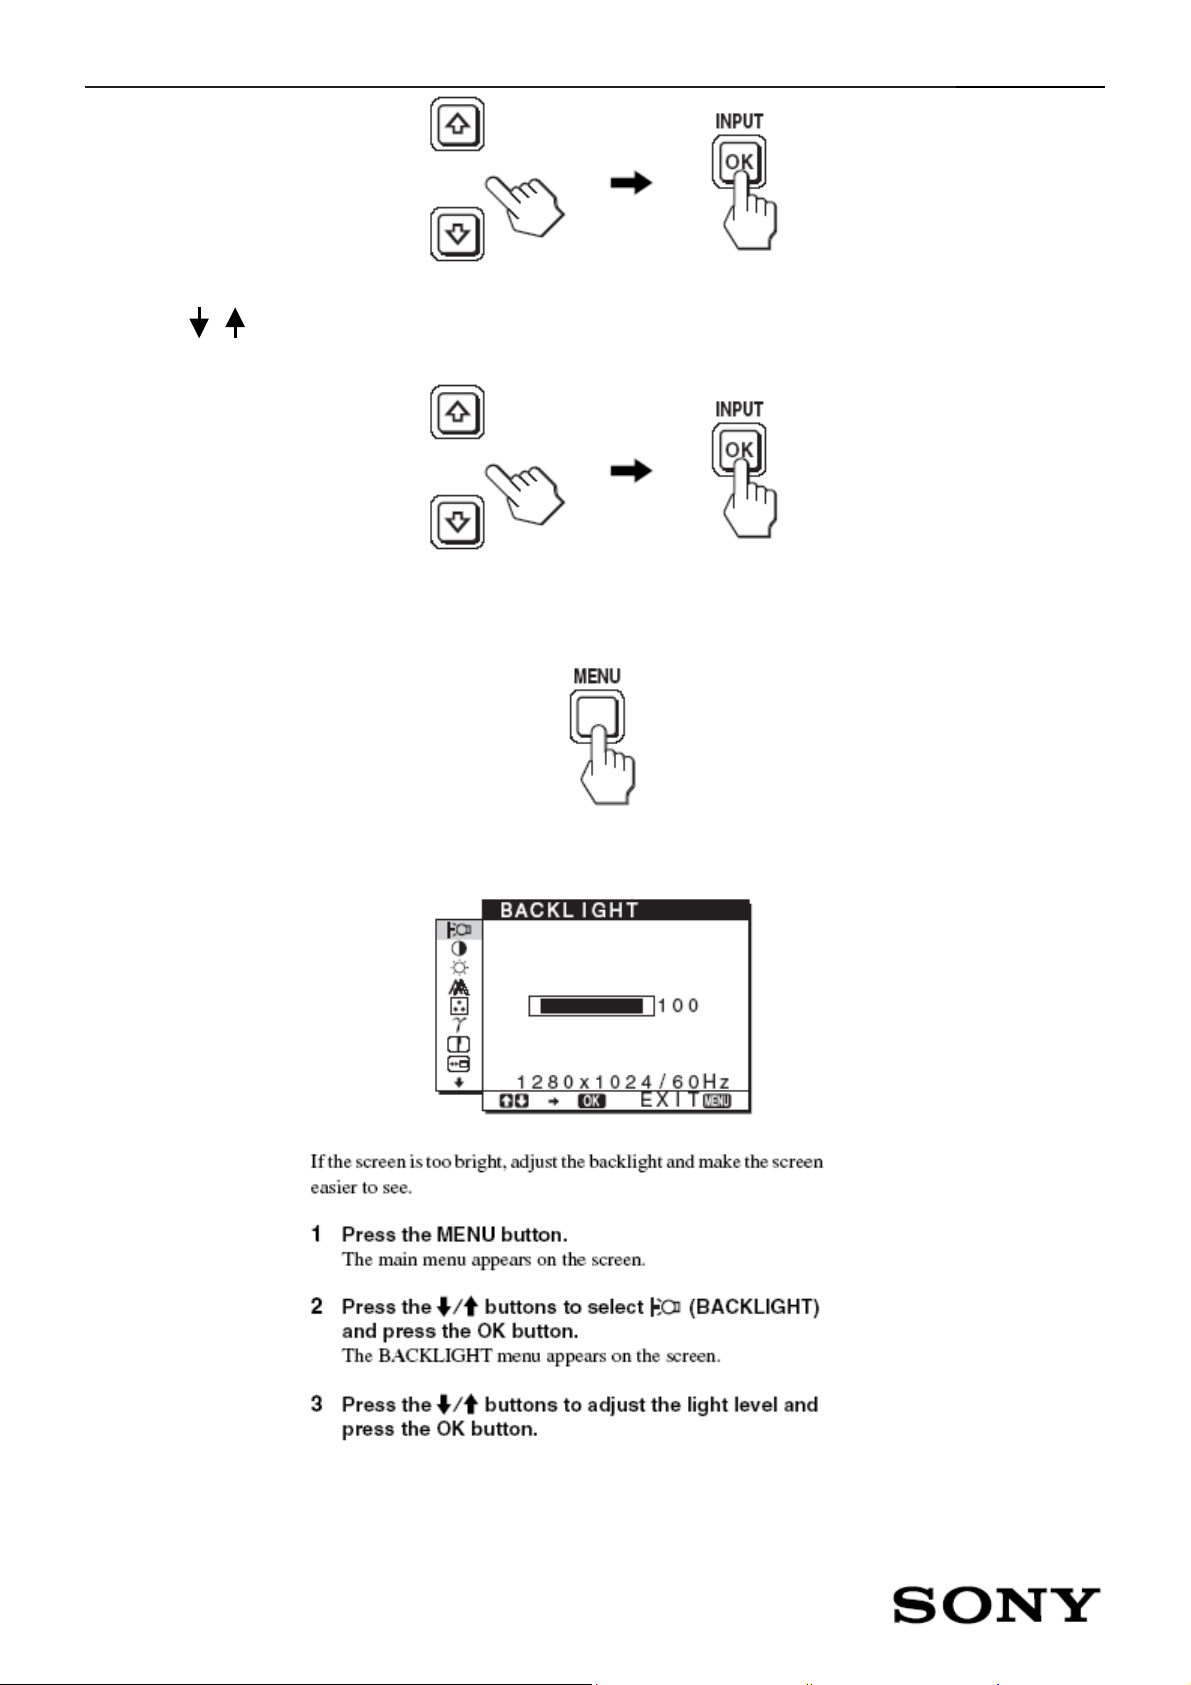
Backlight Adjust the brightness of the backlight
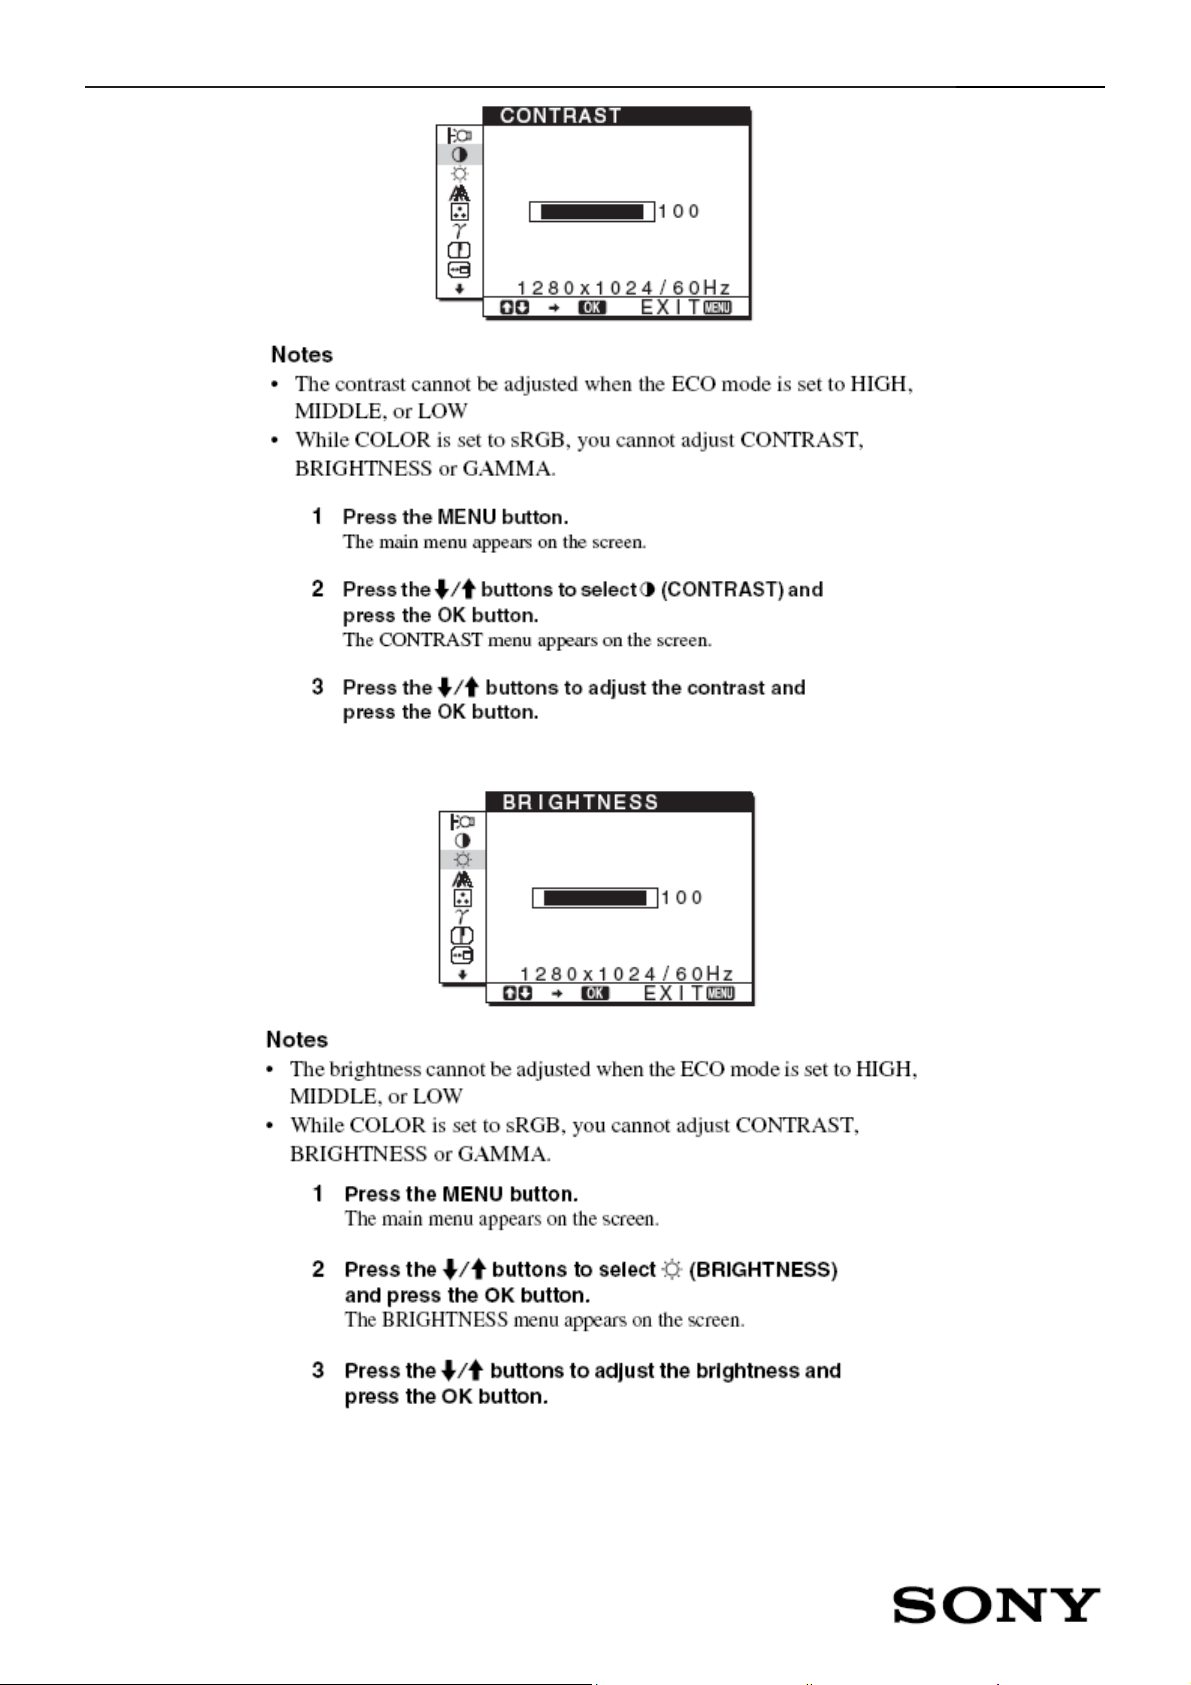
Contrast Adjust the picture contrast
Brightness Adjust the picture brightness (black level)
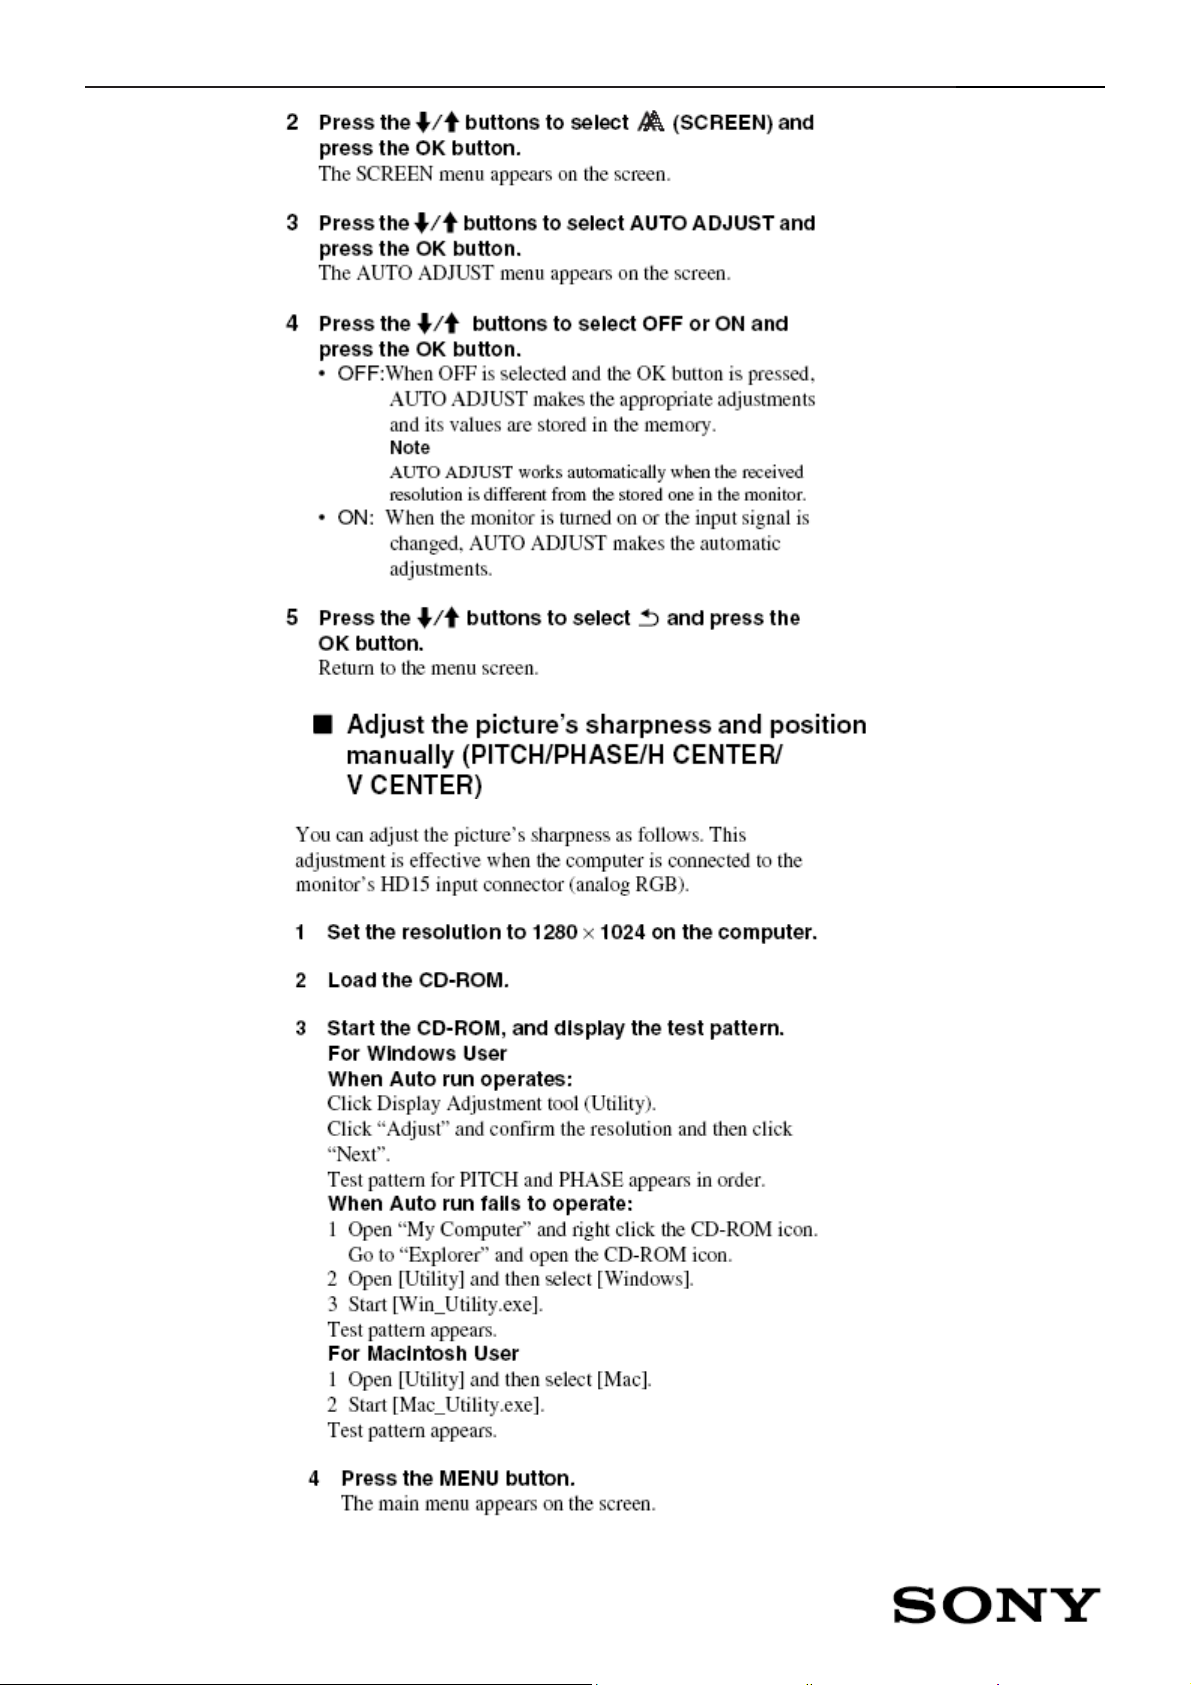
Screen Adjust the picture’s sharpness or its centering
Color Adjust the color temperature of the picture
Gamma Change the picture’s color shade settings
Sharpness Adjust to sharpen the edge of images
Menu position Change the on screen menu position
Automatically detects an input signal to an input terminal, and changes
Input Sensing
Language Chance the language used on menus or messages
the input automatically before the monitor goes into the power saving
mode.
11
12
Reset Reset the adjustments to the default settings
Lock the control of buttons to prevent accidental adjustments or
Menu lock
resetting
3.4 Navigating The Menu
1. Display the main menu.
Press the MENU button to display the main menu on your screen.
http://www.wjel.net
2. Select the menu you to adjust
Press the / buttons to display the desired menu. Press the OK button to select the menu item.
13
17" LCD Color Monitor SDM-V76D
3. Adjust the menu
Press the / buttons to make the adjustment, then press the OK button. When you press the OK button, the
setting is stored, then the display returns to the previous menu.
4. Close the menu
Press the MENU button once to return to normal viewing. If no bu ttons a re pres sed, the men u close s auto matically
after about 45 seconds.
3.5 Adjustment Steps Of Main Menu
1. Adjusting the backlight (BACKLIGHT)
http://www.wjel.net
2. Adjusting the contrast (CONTRAST)
14
17" LCD Color Monitor SDM-V76D
3. Adjusting the black level of an image (BRIGHTNESS)
http://www.wjel.net
15

17" LCD Color Monitor SDM-V76D
Adjusting to the desired brightness
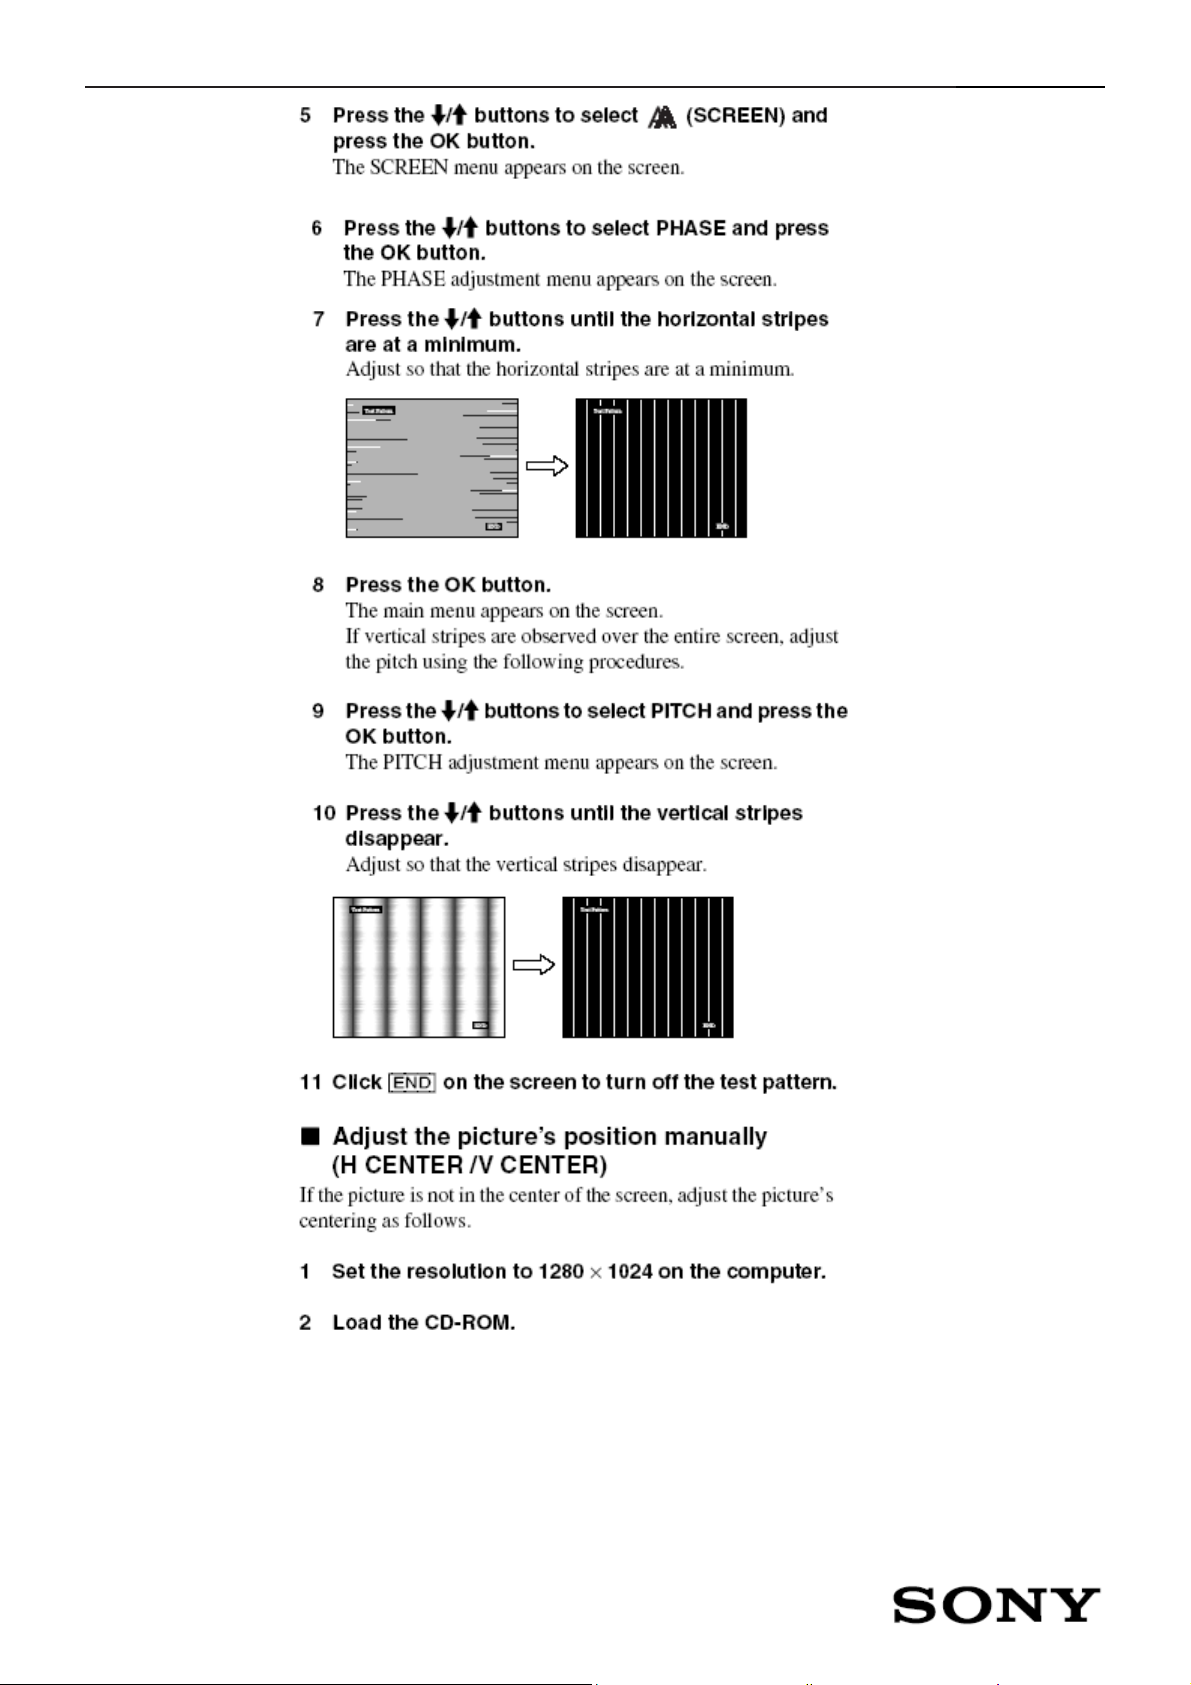
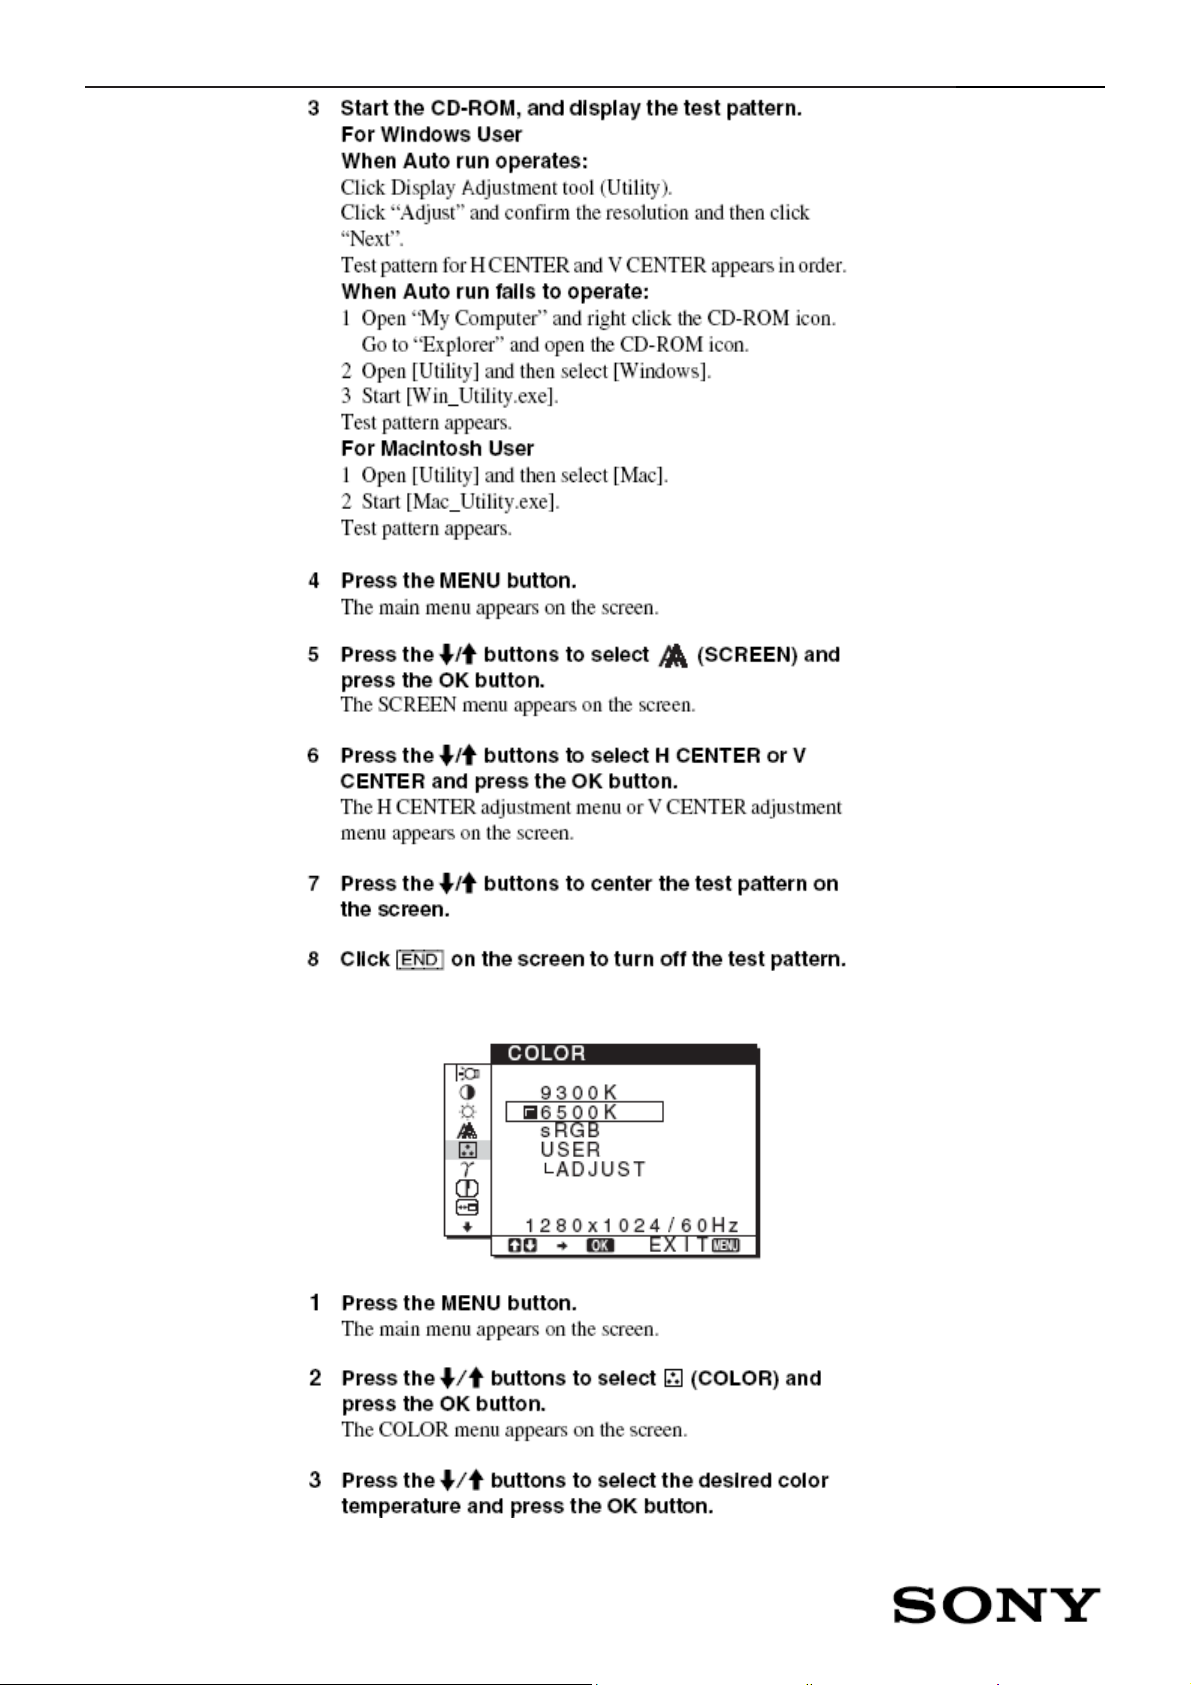
4. Adjusting the picture’s sharpness and centering (SCREEN)
(Analog RGB signal only)
http://www.wjel.net
16
17" LCD Color Monitor SDM-V76D
http://www.wjel.net
17
17" LCD Color Monitor SDM-V76D
http://www.wjel.net
18
17" LCD Color Monitor SDM-V76D
5. Adjusting the color temperature (COLOR)
http://www.wjel.net
19

17" LCD Color Monitor SDM-V76D
6. Fine tuning the color temperature (USER ADJUSTMENT)
6. Changing the gamma setting (GAMMA)
http://www.wjel.net
20
17" LCD Color Monitor SDM-V76D
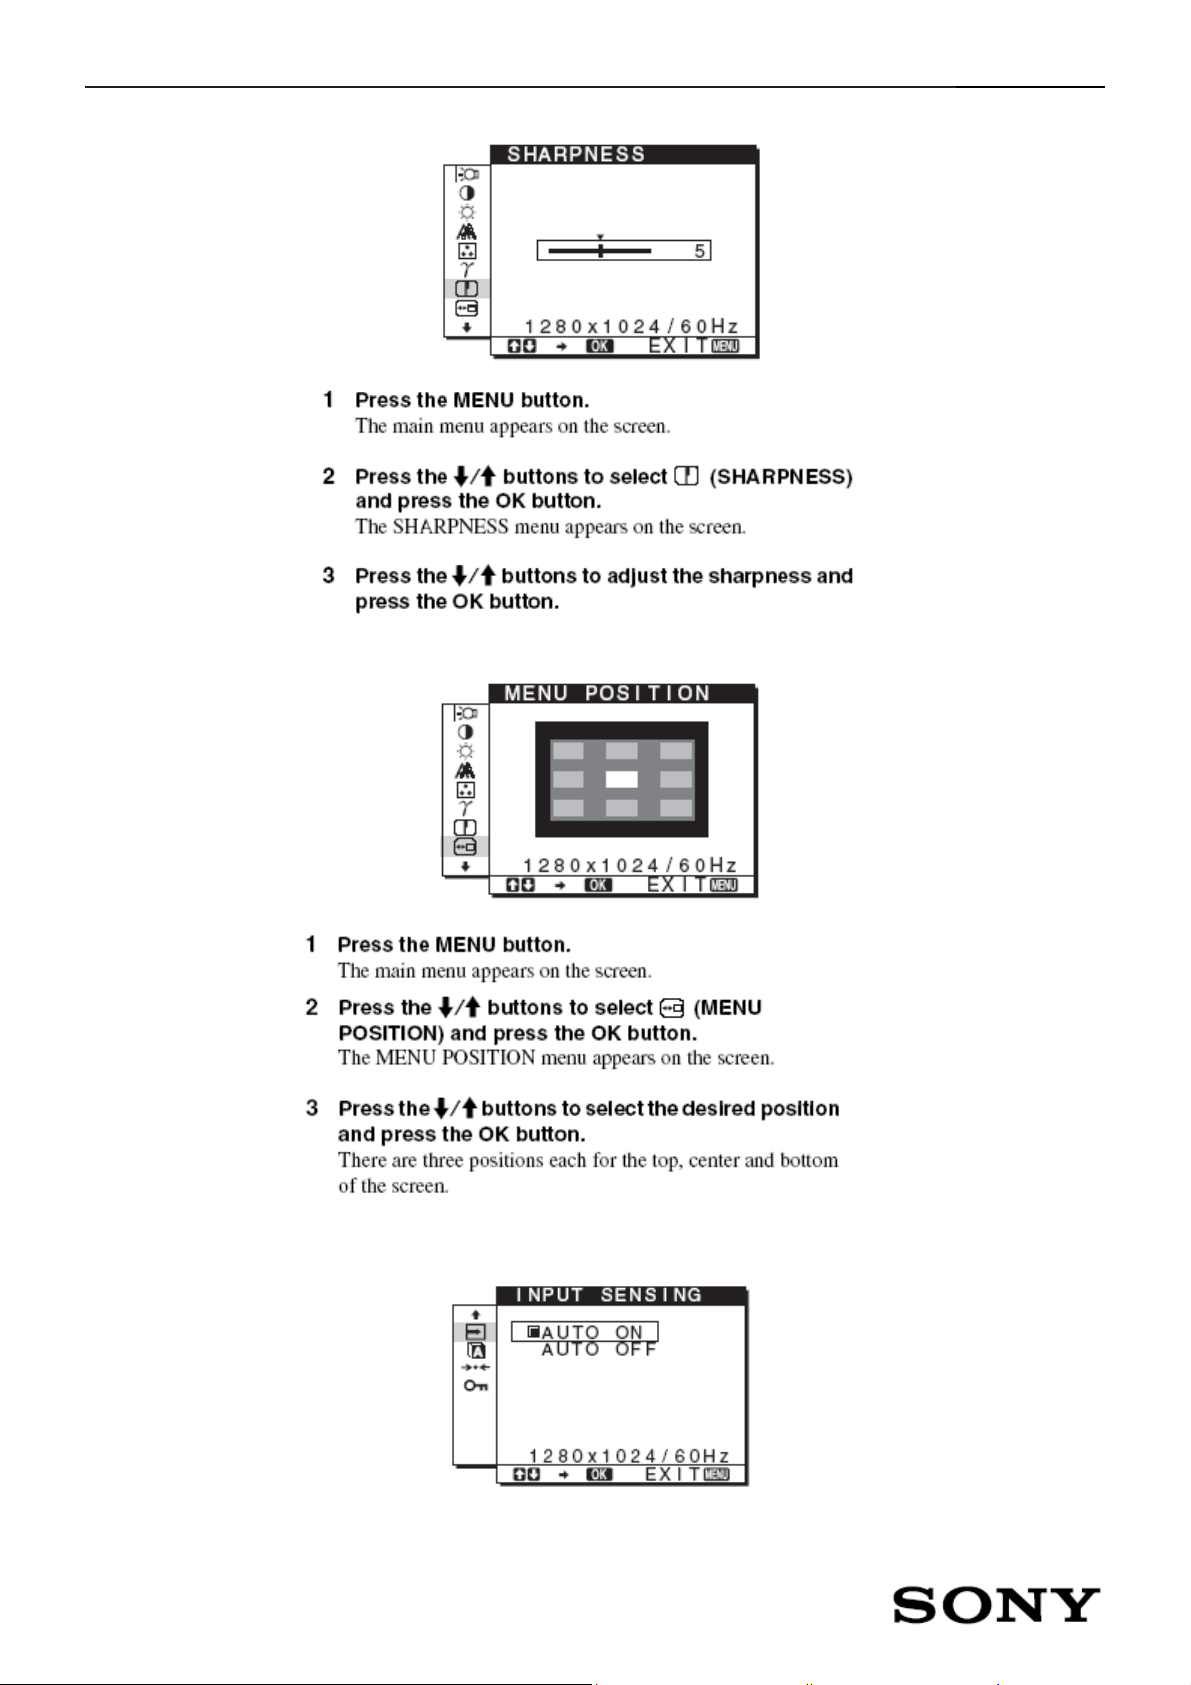
Adjusting the sharpness (SHARPNESS)
7. Changing the menu’s position (MENU POSITION)
8. Changing the input automatically(INPUT SENSING)
http://www.wjel.net
21
 Loading...