

Sony SDM-HS93 User Manual
4-094-159-04 (1)
TFT LCD
カラー
コンピューター
ディスプレイ
取扱説明書
お買い上げいただきありがとうございます。
電気製品は安全のための注意事項を守らないと、
火災や人身事故になることがあります。
この取扱説明書には、事故を防ぐための重要な注意事項と製品
の取り扱いかたを示しています。この取扱説明書と別冊の「安
全のために」をよくお読みのうえ、製品を安全にお使いくださ
い。お読みになったあとは、いつでも見られるところに必ず保
管してください。
SDM-HS53
SDM-HS73
SDM-HS93
2003 Sony Corporation
この装置は、情報処理装置等電波障害自主規制協議会
(
置は、家庭環境で使用することを目的としていますが、この
装置がラジオやテレビジョン受信機に近接して使用される
と、受信障害を引き起こすことがあります。
取扱説明書に従って正しい取り扱いをしてください。
本製品は社団法人電子情報技術産業協会が定めた「表示装置
の静電気および低周波電磁界」に関するガイドラインに適合
しております。
)の基準に基づくクラスB情報技術装置です。この装
VCCI
当社は国際エネルギースター
プログラムの参加事業者とし
て、本製品が国際エネルギース
タープログラムの基準に適合
していると判断します。
2
目次
ご愛用者カード登録と
オンラインアンケート
ご協力のお願い
ソニーでは、ご愛用者カードの登
録およびオンラインアンケートの
ためのホームページを用意してい
ます。
ホームページ
http://www.sony.co.jp/cs/
オンラインアンケートにご回答い
ただいたお客様のご意見・ご感想
は、より一層使いやすい製品をつ
くり出すために活用させていただ
きます。
ぜひ、ご愛用者カードへの登録と
オンラインアンケートへのご協力
をお願いいたします。
ご注意:ブラウザのバージョンに
よっては、うまく表示できない場
合があります。その場合は、ブラ
ウザのバージョンアップなどを
行ってください。
使用上のご注意 .............................................................................
各部の名前とはたらき...................................................................
接続と設定.....................................................................................
手順1:コンピュータにつなぐ .......................................................
手順2:電源コードをつなぐ...........................................................
手順3:コード類をまとめてバックカバーを閉める.......................
手順4:電源を入れる......................................................................
ディスプレイの向きを変える........................................................
調整する ......................................................................................
お好みの明るさに調整する .........................................................
メニュー操作のしかた.................................................................
バックライトの明るさを調整する(バックライト輝度)..............
コントラストを調整する(コントラスト)....................................
ブライトネス(画面の黒レベル)を調整する(ブライトネス).......
画像を調整する(画調整).............................................................
色温度を調整する(色温度).........................................................
ガンマ設定を変更する(ガンマ)..................................................
メニューの表示位置を変える(メニュー位置)............................
メニュー言語を変える(
その他の調整をする ....................................................................
LANGUAGE
)......................................
4
5
7
7
8
8
9
9
10
10
10
11
11
11
12
13
13
14
14
14
• Macintoshは、Apple Computer,
の米国およびその他の国におけ
Inc.
る登録商標です。
• Windows
Microsoft Corporation
びその他の国における登録商標で
す。
• IBM PC/ATとVGAは、IBM
Corporation
• VESAとDDC
Electronics Standards Association
の商標です。
• Adobe、AcrobatはAdobe
Systems Incorporated
ステムズ社)の商標です。
• ENERGY STAR
環境保護局の商標です。
この取扱説明書に表記されている上
•
記以外の製品名は、それぞれの会社
の商標または登録商標です。
この取扱説明書では、「」と「」に
•
ついては一部表記を省略していま
す。
http://www.sony.co.jp/
と
MS-DOS
の登録商標です。
は、
Video
マークは、米国
は、米国
の米国およ
(アドビシ
機能解説 ......................................................................................
省電力機能(パワーセーブ機能)..................................................
節電しながら使う( モード)....................................................
自動画質調整機能........................................................................
故障かな?と思ったら.................................................................
表示メッセージについて .............................................................
本機の症状と対処のしかた .........................................................
自己診断表示機能........................................................................
保証書とアフターサービス .........................................................
15
15
15
15
16
16
17
19
19
本機の仕様についてくわしくは、別冊の「クイックセットアップガ
イド」をご覧ください。
3
使用上のご注意
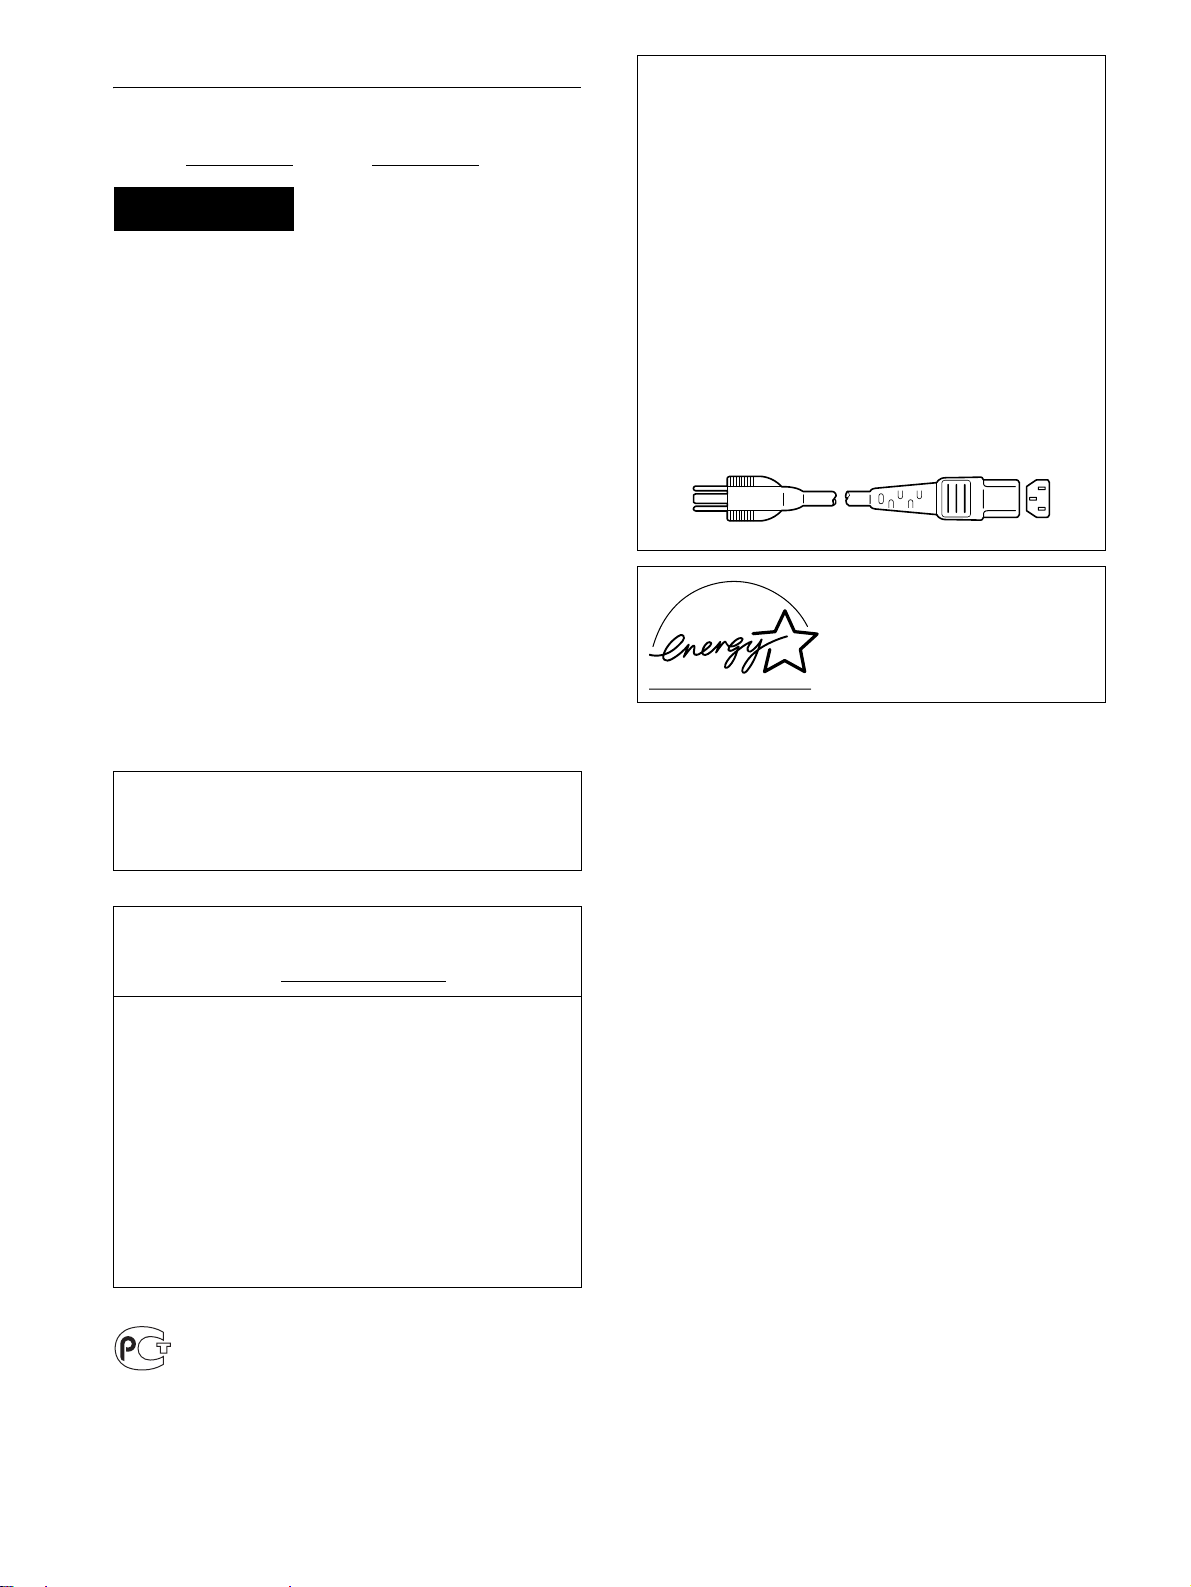
電源について
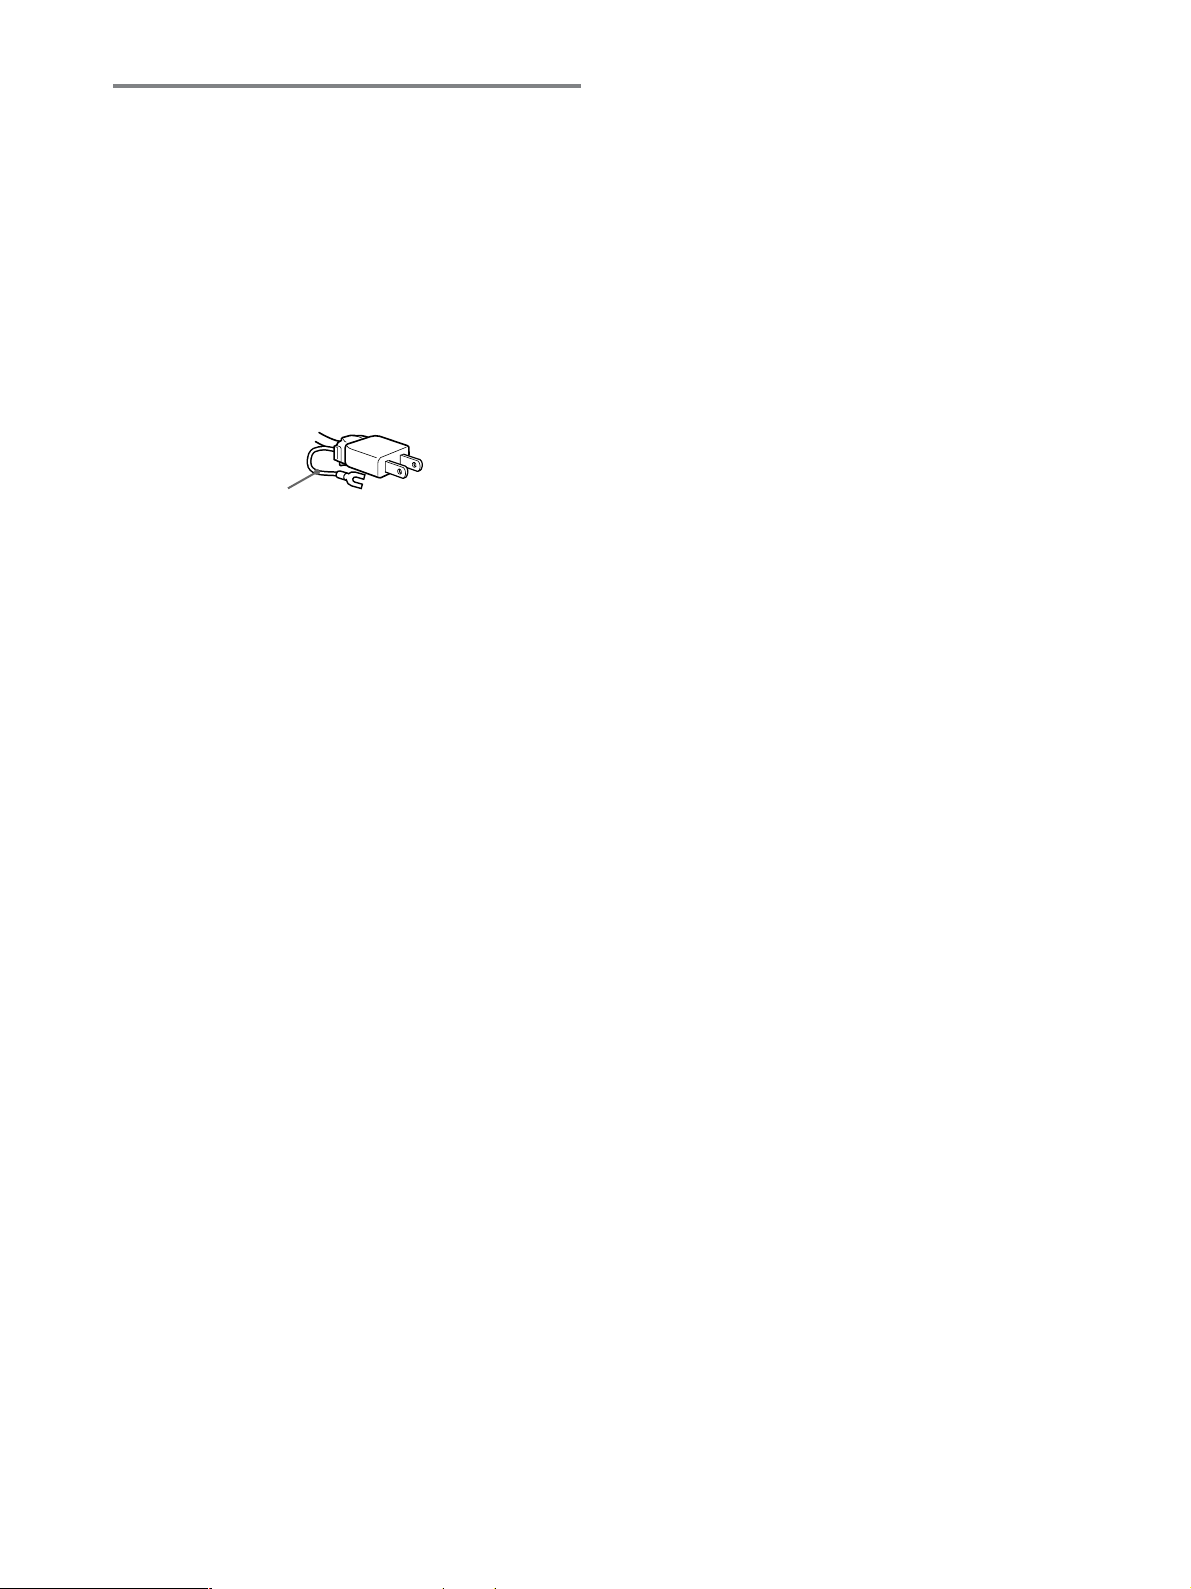
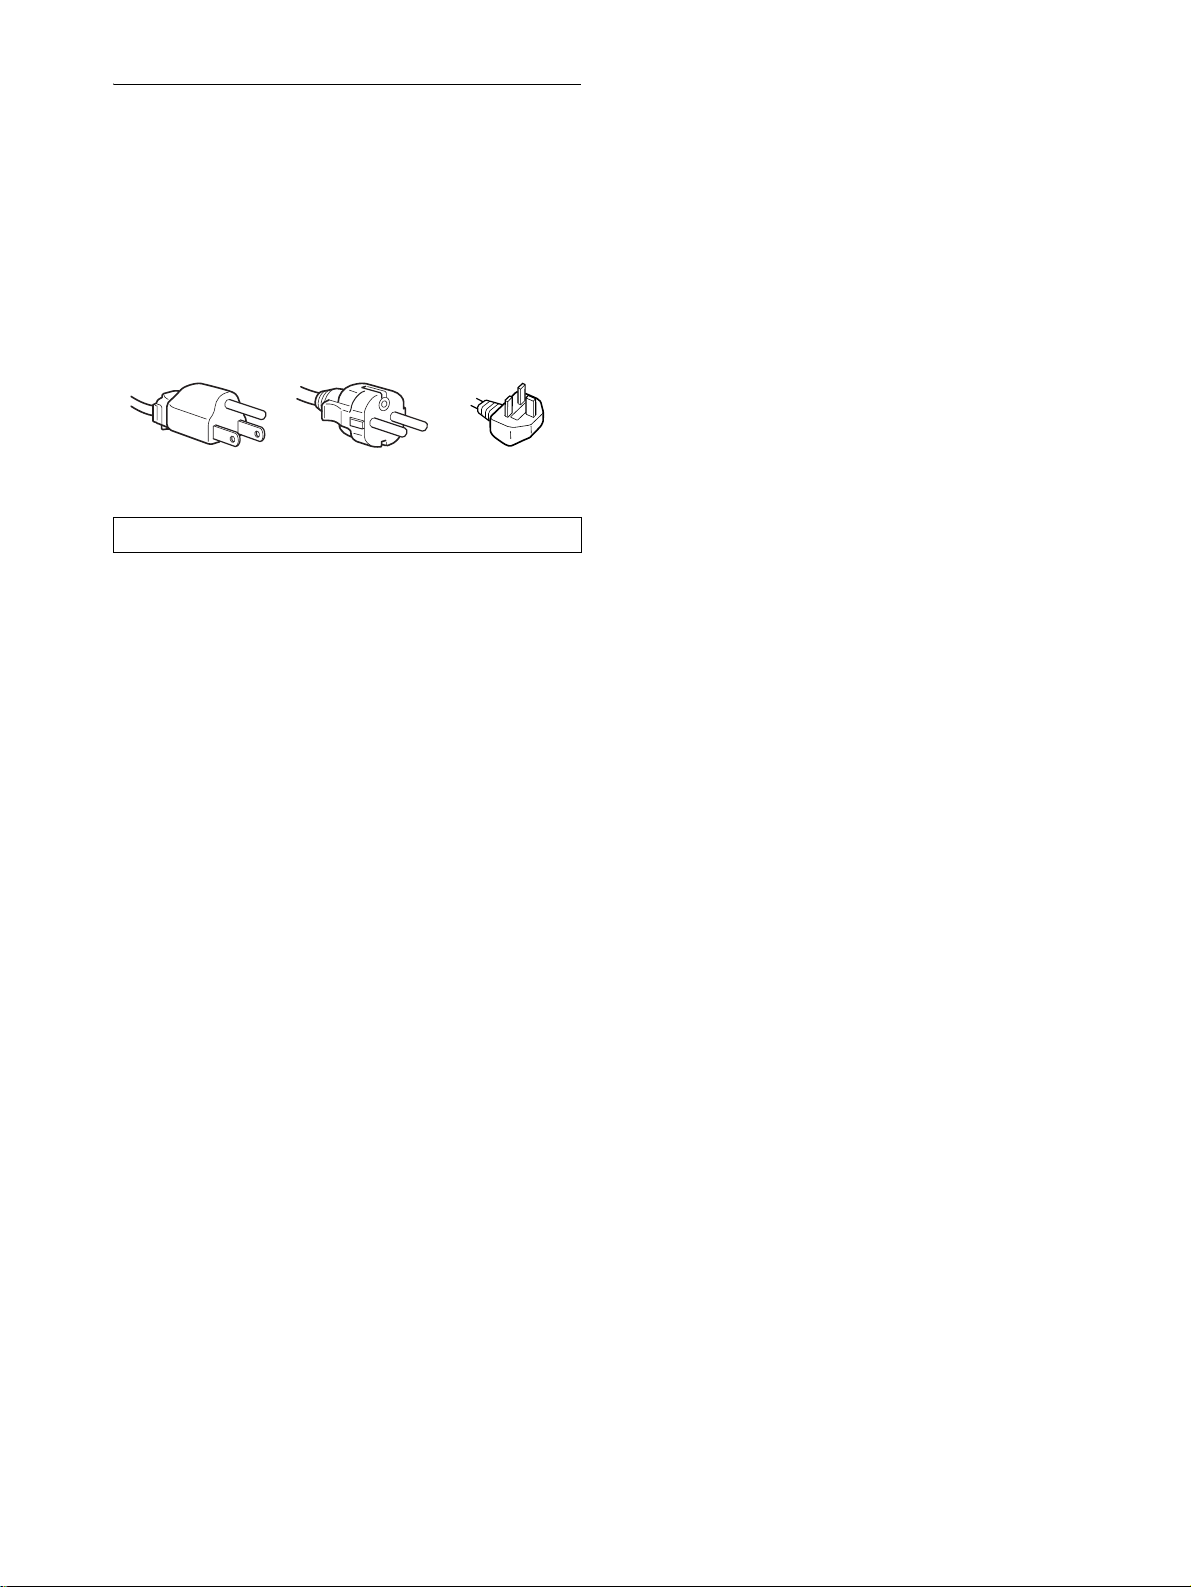
付属の電源コードをお使いください。別売りの電源コード
をお使いになる場合は、下図のプラグ形状例を参考にして
ください。
安全のため、電源コードにはアース線がついています。電
源コンセントにプラグを差し込む前に、必ずアース接続を
行ってください。電源コードを抜くときは、先にプラグを
抜いてからアース線をはずしてください。
プラグ形状例
アース線
AC100V
使用・設置場所について
次のような場所での使用・設置はおやめください。
異常に高温になる場所
•
炎天下や夏場の窓を閉め切った自動車内はとくに高温に
なり、放置すると変形したり、故障したりすることがあ
ります。
直射日光のあたる場所、熱器具の近くなど、温度の高い
•
場所
変形したり、故障したりすることがあります。
振動の多い場所
•
強力な磁気のある場所
•
砂地、砂浜などの砂ぼこりの多い場所
•
海辺や砂地、あるいは砂ぼこりが起こる場所などでは、
砂がかからないようにしてください。故障の原因になる
ばかりか、修理できなくなることがあります。
用
液晶ディスプレイパネルについて
本機の液晶ディスプレイパネルは非常に精密度の高い技術
でつくられていますが、黒い点が現れたり、赤と青、緑の
点が消えないことがあります。また、見る角度によってす
じ状の色むらや明るさのムラが見える場合があります。
これらは、液晶ディスプレイの構造によるもので、故障で
はありません。
これらの点をご了承のうえ、本機をお使いください。
お手入れについて
お手入れをする前に、必ず電源プラグをコンセントから
•
抜いてください。
液晶の画面は特殊加工がされていますので、なるべく画面
•
にふれないようにしてください。また画面の汚れをふきと
るときは、乾いた柔らかい布でふきとってください。
アルコール、シンナー、ベンジンなどは使わないでくださ
•
い。変質したり、塗装がはげたりすることがあります。
化学ぞうきんをご使用の際は、その注意書きに従ってく
•
ださい。
殺虫剤のような揮発性のものをかけたり、ゴムやビニー
•
ル製品に長時間接触させると、変質したり、塗装がはげ
たりすることがあります。
搬送するときは
本機を運ぶときは、本機に接続されているケーブル等を
•
すべてはずし、ディスプレイスタンドの支柱部と基部を
両手でしっかりと持ってください。落としたりするとけ
がや故障の原因となることがあります。
修理や引っ越しなどで本機を運ぶ場合は、お買い上げ時に
•
本機が入っていた箱と、クッション材を使ってください。
液晶画面について
液晶画面を太陽に向けたままにすると、液晶画面を傷め
•
てしまいます。窓際や室外に置くときなどはご注意くだ
さい。
液晶画面を強く押したり、ひっかいたり、上にものを置
•
いたりしないでください。画面にムラが出たり、液晶パ
ネルの故障の原因になります。
寒い所でご使用になると、画像が尾を引いて見えたり、
•
画面が暗く見えたりすることがありますが、故障ではあ
りません。温度が上がると元に戻ります。
静止画を継続的に表示した場合、残像を生じることがあ
•
りますが、時間の経過とともに元に戻ります。
使用中に画面やキャビネットがあたたかくなることがあ
•
りますが、故障ではありません。
廃棄するときは
一般の廃棄物と一緒にしないでください。
•
ごみ廃棄場で処分されるごみの中にディスプレイを捨て
ないでください。
本機の蛍光管の中には水銀が含まれています。廃棄の際
•
は、地方自治体の条例または規則に従ってください。
4
各部の名前とはたらき
使いかたについてのくわしい説明は( )内のページをご覧
ください。
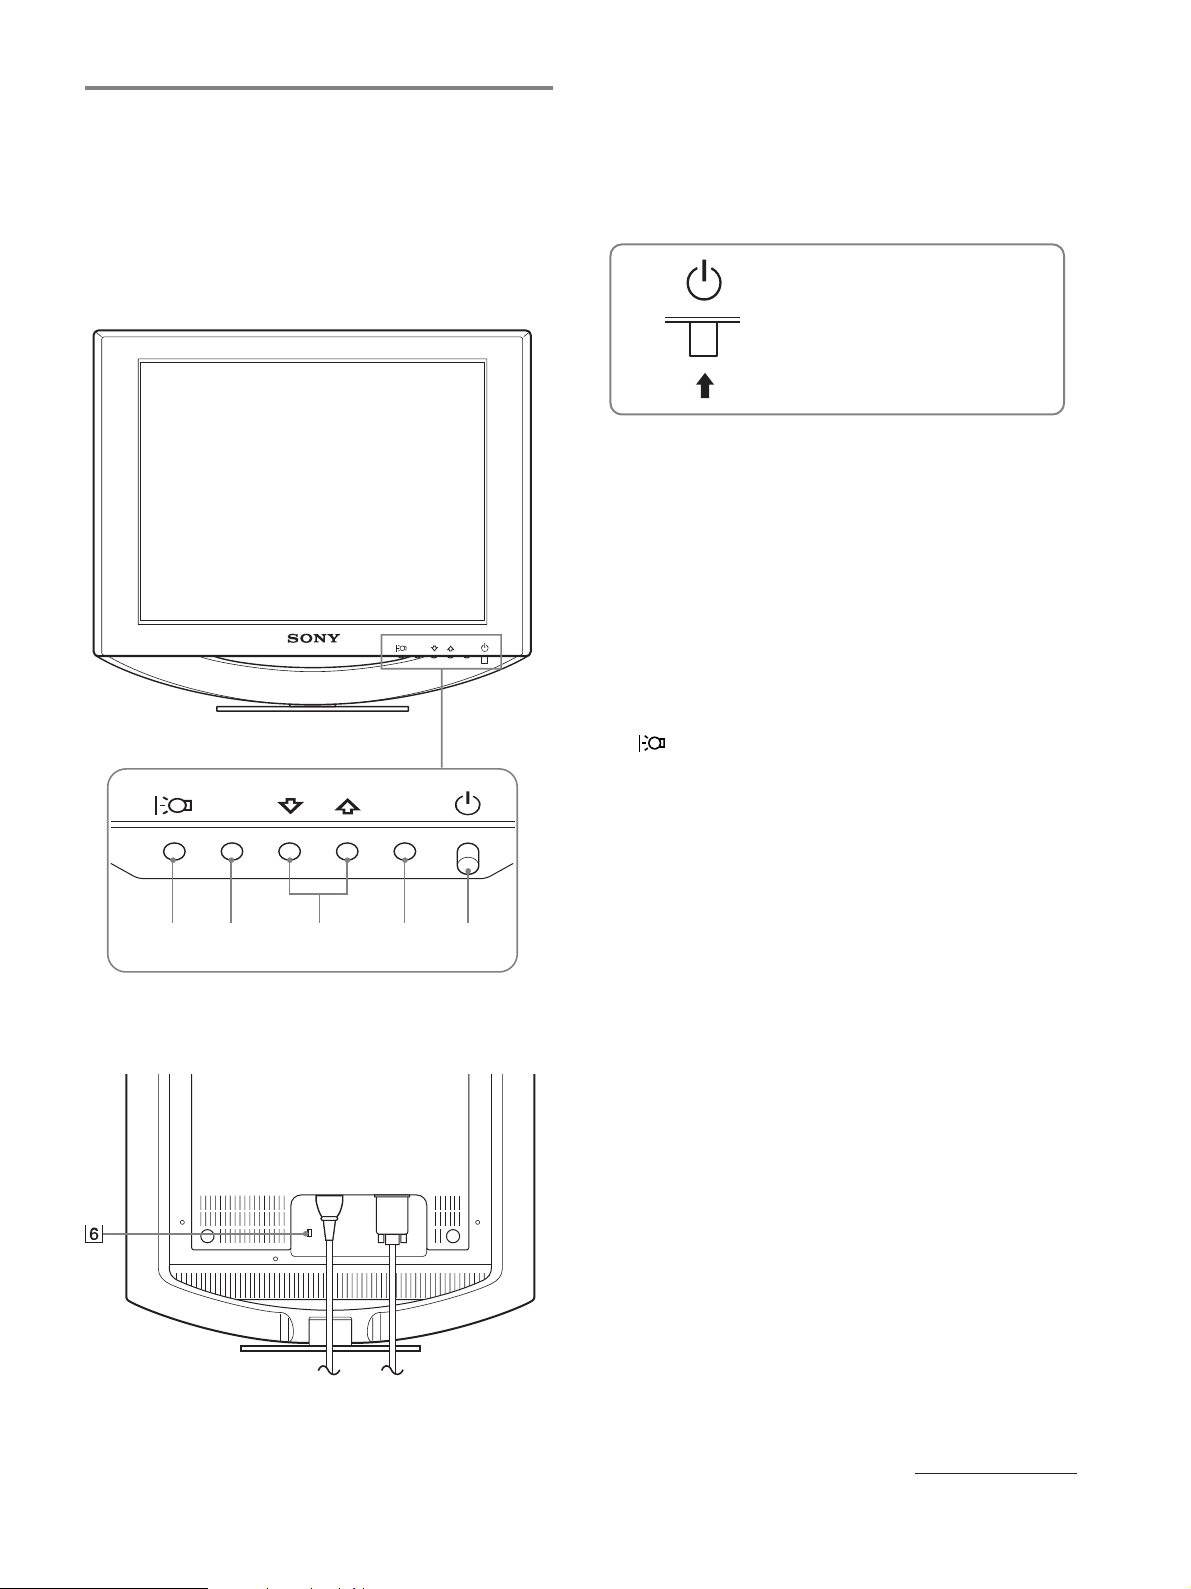
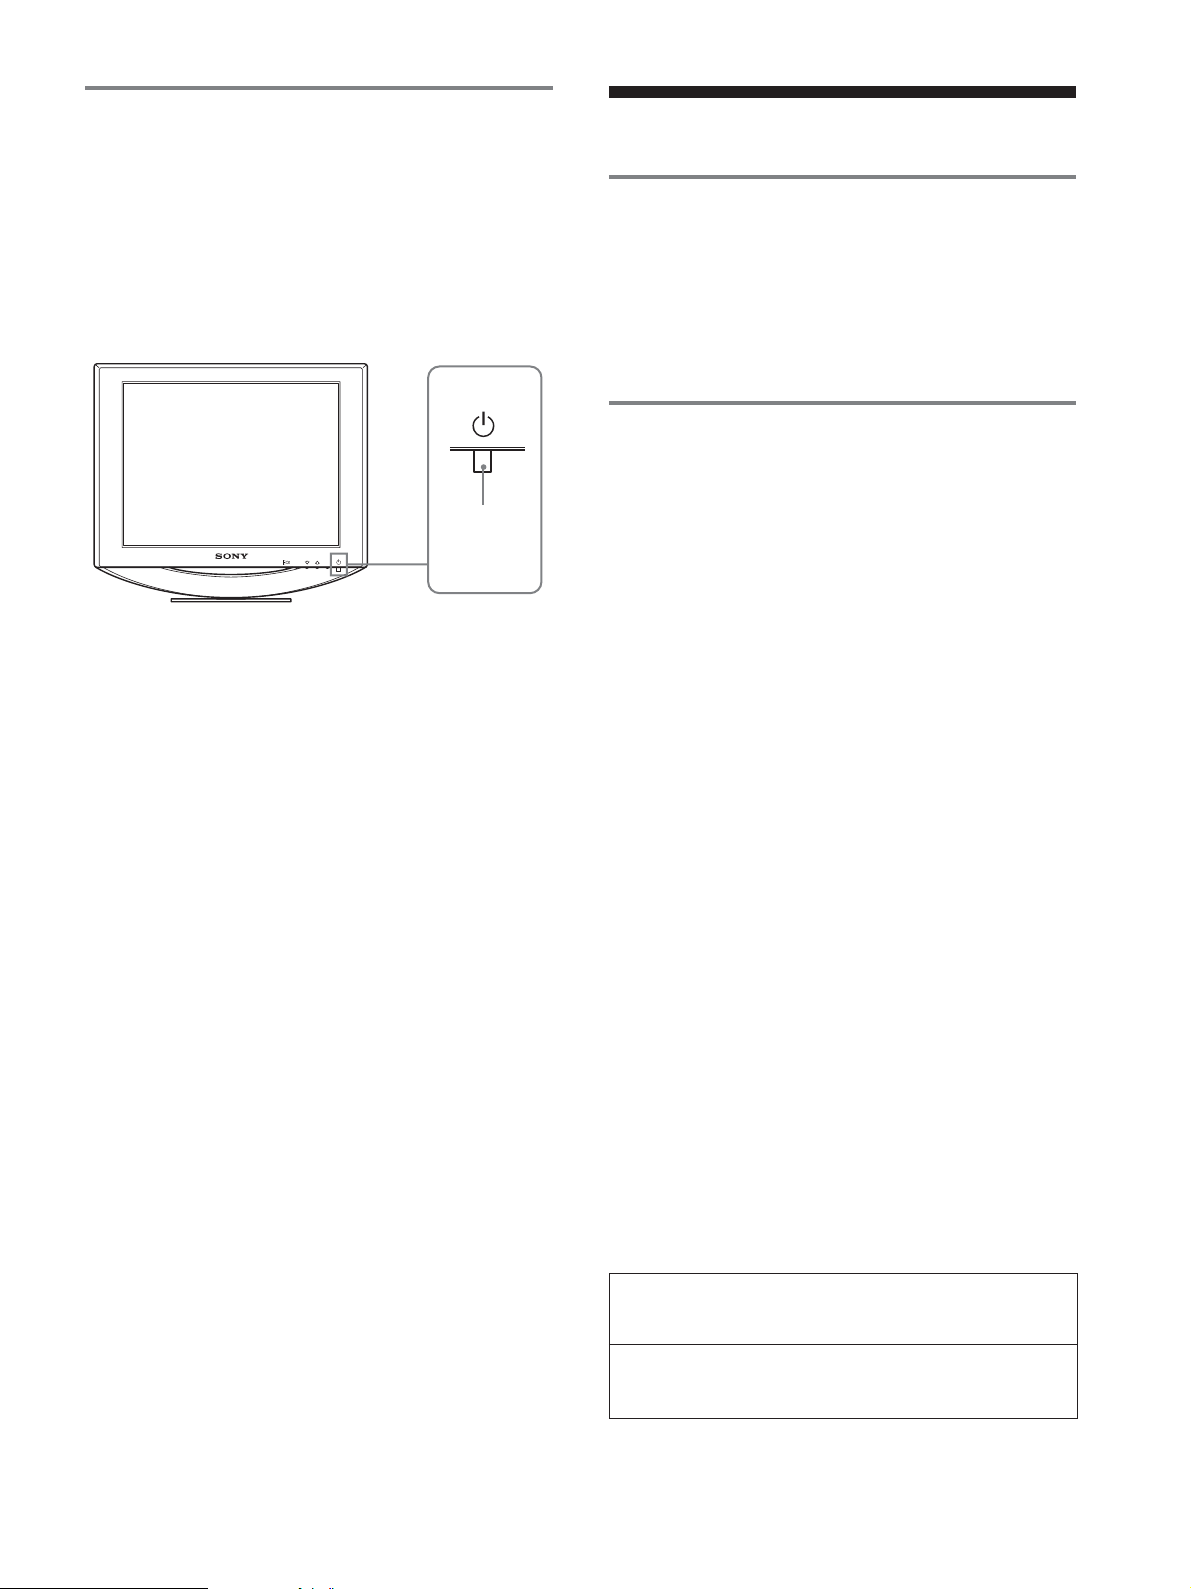
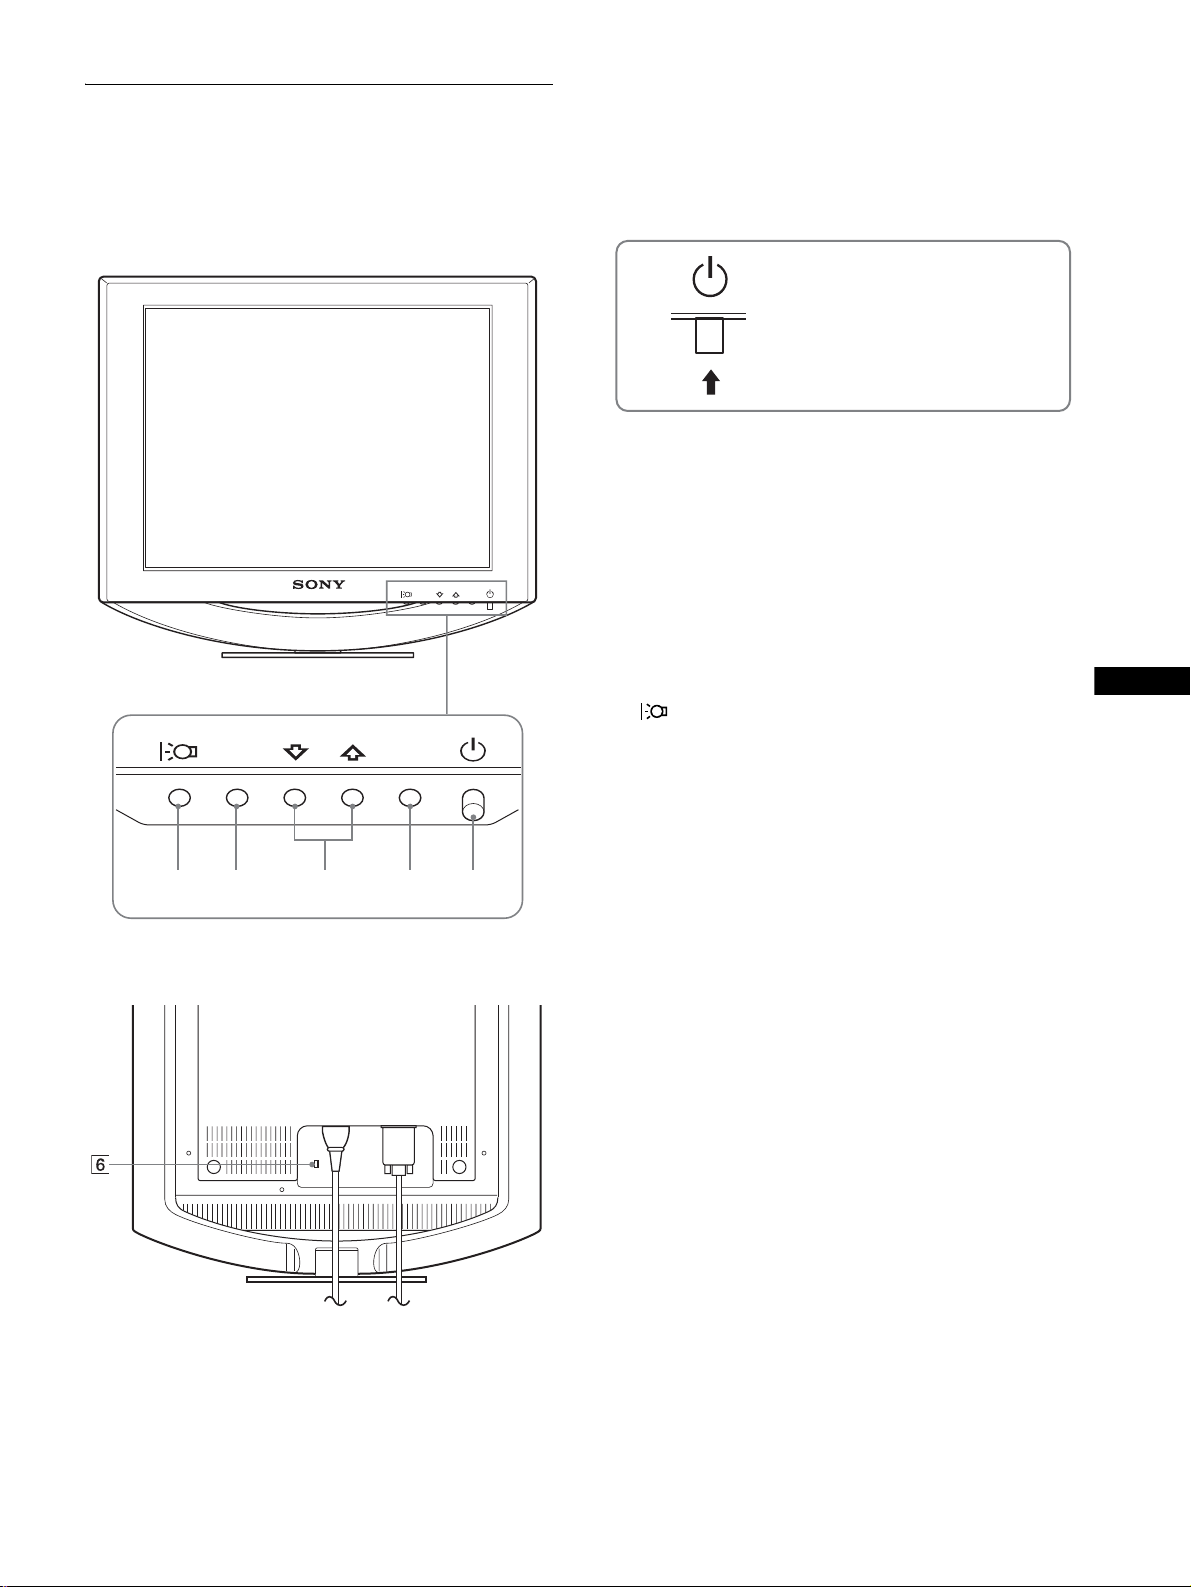
1(電源)スイッチおよび各操作ボタンは、前面右下に配置
されています。
液晶ディスプレイ前面
1 1(電源)スイッチとランプ(9、15、19ページ)
1(電源)スイッチを上に押して、ディスプレイの電源
を入/切します。
電源が入るとランプが緑色に点灯します。
省電力状態のときは、オレンジ色に点灯します。
上に押して、ディスプレイの
電源を入/切します。
OK
OK
MENU
12345
MENU
2
MENU
メニュー画面を出すときまたは、終了するときに押しま
す。
3 M
メニュー項目を選んだり、調整したりするときに使いま
す。
4
OK
メニュー画面で選択/調整した項目を決定するときに押
します。
5
画面の明るさを切り換えるときに押します。
(メニュー)ボタン(10、11ページ)
mボタン(11ページ)
/
ボタン(11ページ)
ボタン (10ページ)
6 盗難防止用ロック
キーケーブルロックなど、市販の盗難防止用ケーブルを
つなぐことができます。
盗難防止用ケーブルについての連絡先は、日本ポラデ
ジタル(株)営業部です。
ディスプレイスタンド後面
次のページへつづく
5
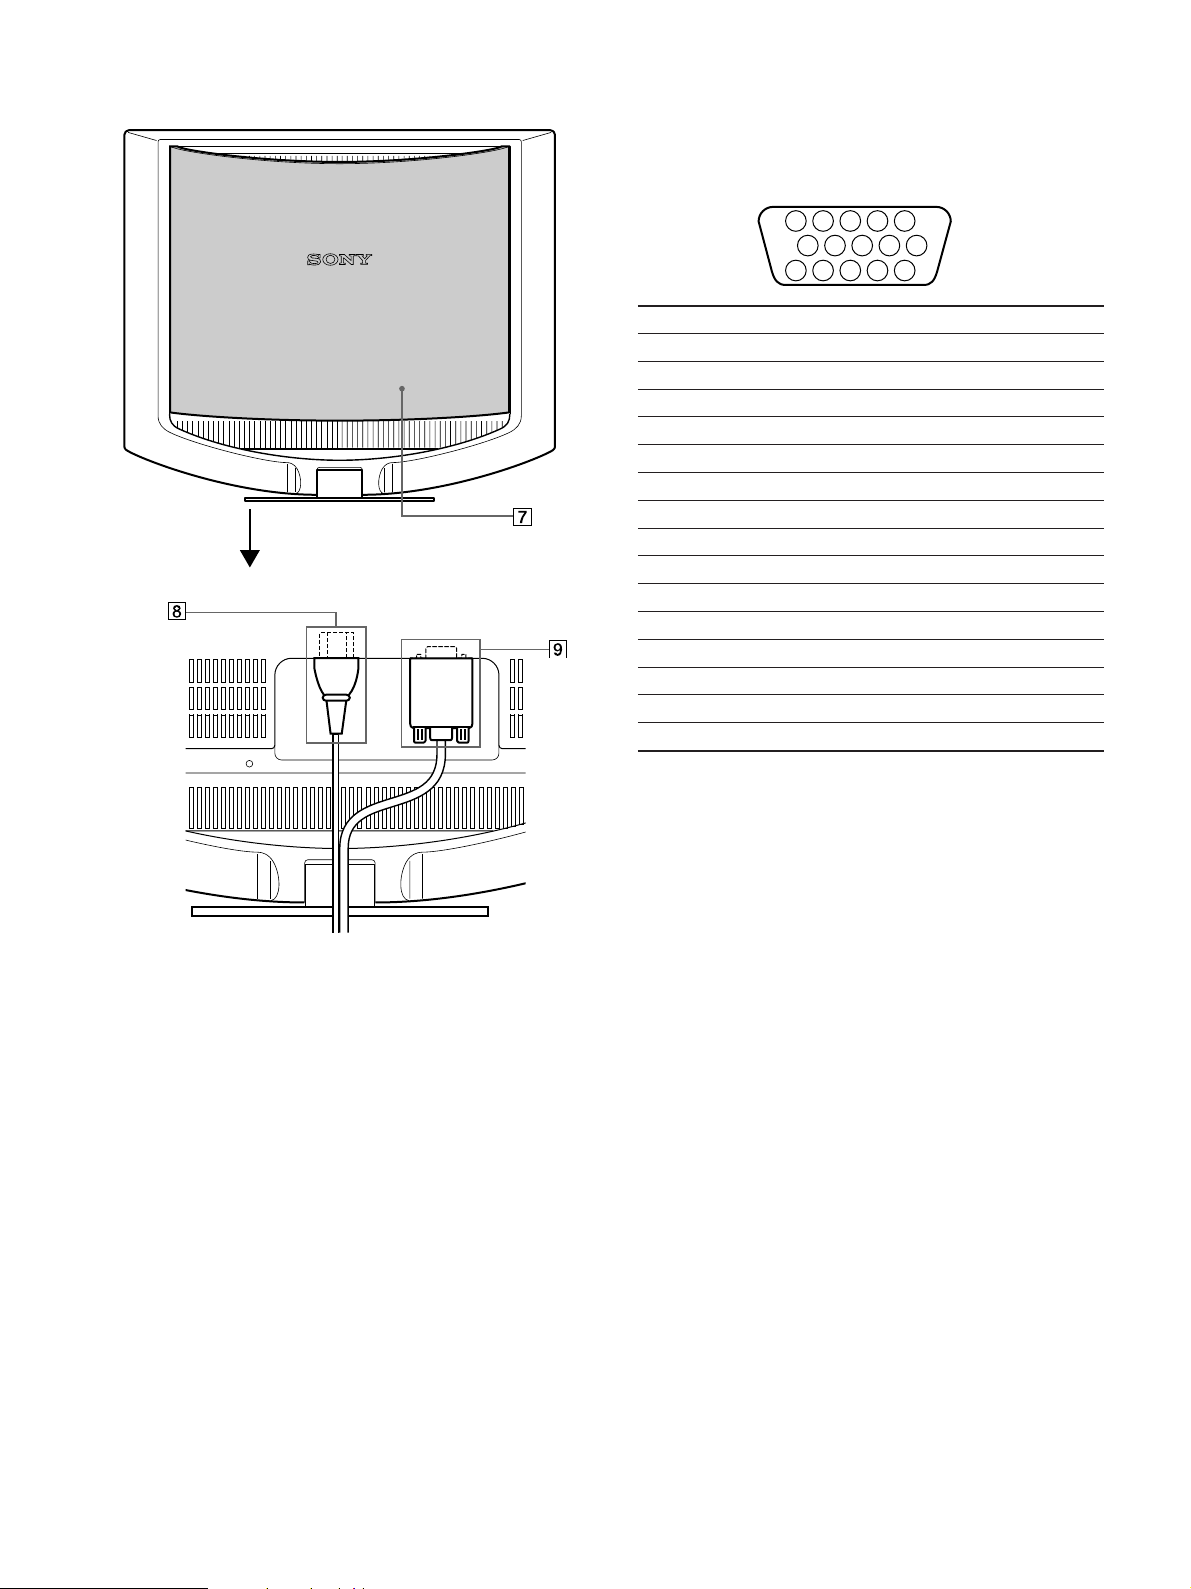
液晶ディスプレイ後面
9
HD15(RGB
の映像信号(
RGB
力します。
)入力端子 (
0.7 Vp-p
INPUT)(7
、正極性)と同期信号を入
ページ)
バックカバーを開ける
5 4 3 2
ピン番号 信号名
1R
2G
3B
4ID
5 DDC
6R
7G
8B
9 DDC + 5V
10
11 ID
12
13
14
15
*
VESA
(赤)
(緑)
(青)
(アース)
アース *
(赤)アース
(緑)アース
(青)アース
*
アース
(アース)
データライン(
水平同期
垂直同期
クロックライン(
による
Display Data Channel(DDC
SDA
SCL
1
678910
1112131415
)*
)*
)規格
後面イラストは
SDM-HS53
を使っています。
7 バックカバー(8ページ)
ケーブルやコードをはずすときに、このカバーを開けま
す。
8 電源入力端子(8ページ)
電源コードをつなぎます。
6
■
Macintosh
コンピュータにつなぐ
接続と設定
本機をお使いになる前に、下記のものがそろっていること
をご確認ください。
液晶ディスプレイ
•
電源コード
•
• HD15-HD15
コードストラップ
•
•Utility/Instruction Manual CD-ROM(Windows/
Macintosh
保証書
•
クイックセットアップガイド
•
安全のために
•
ソニーご相談窓口のご案内
•
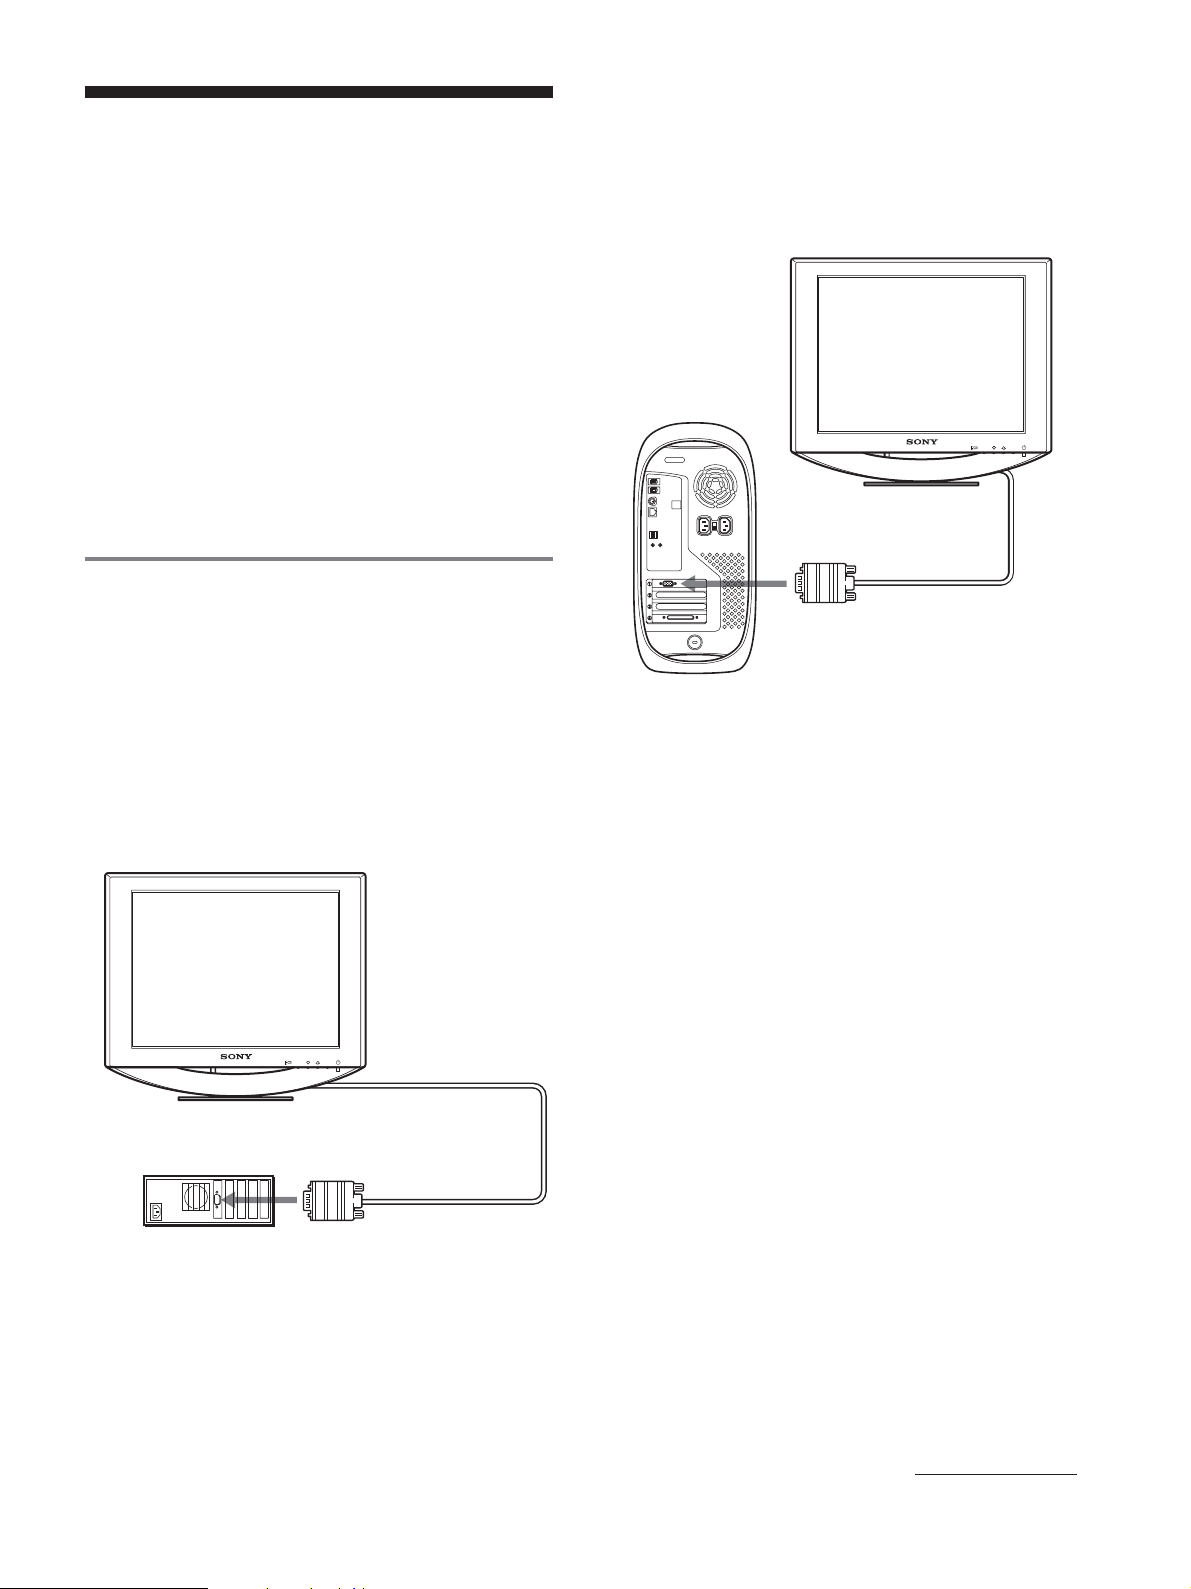
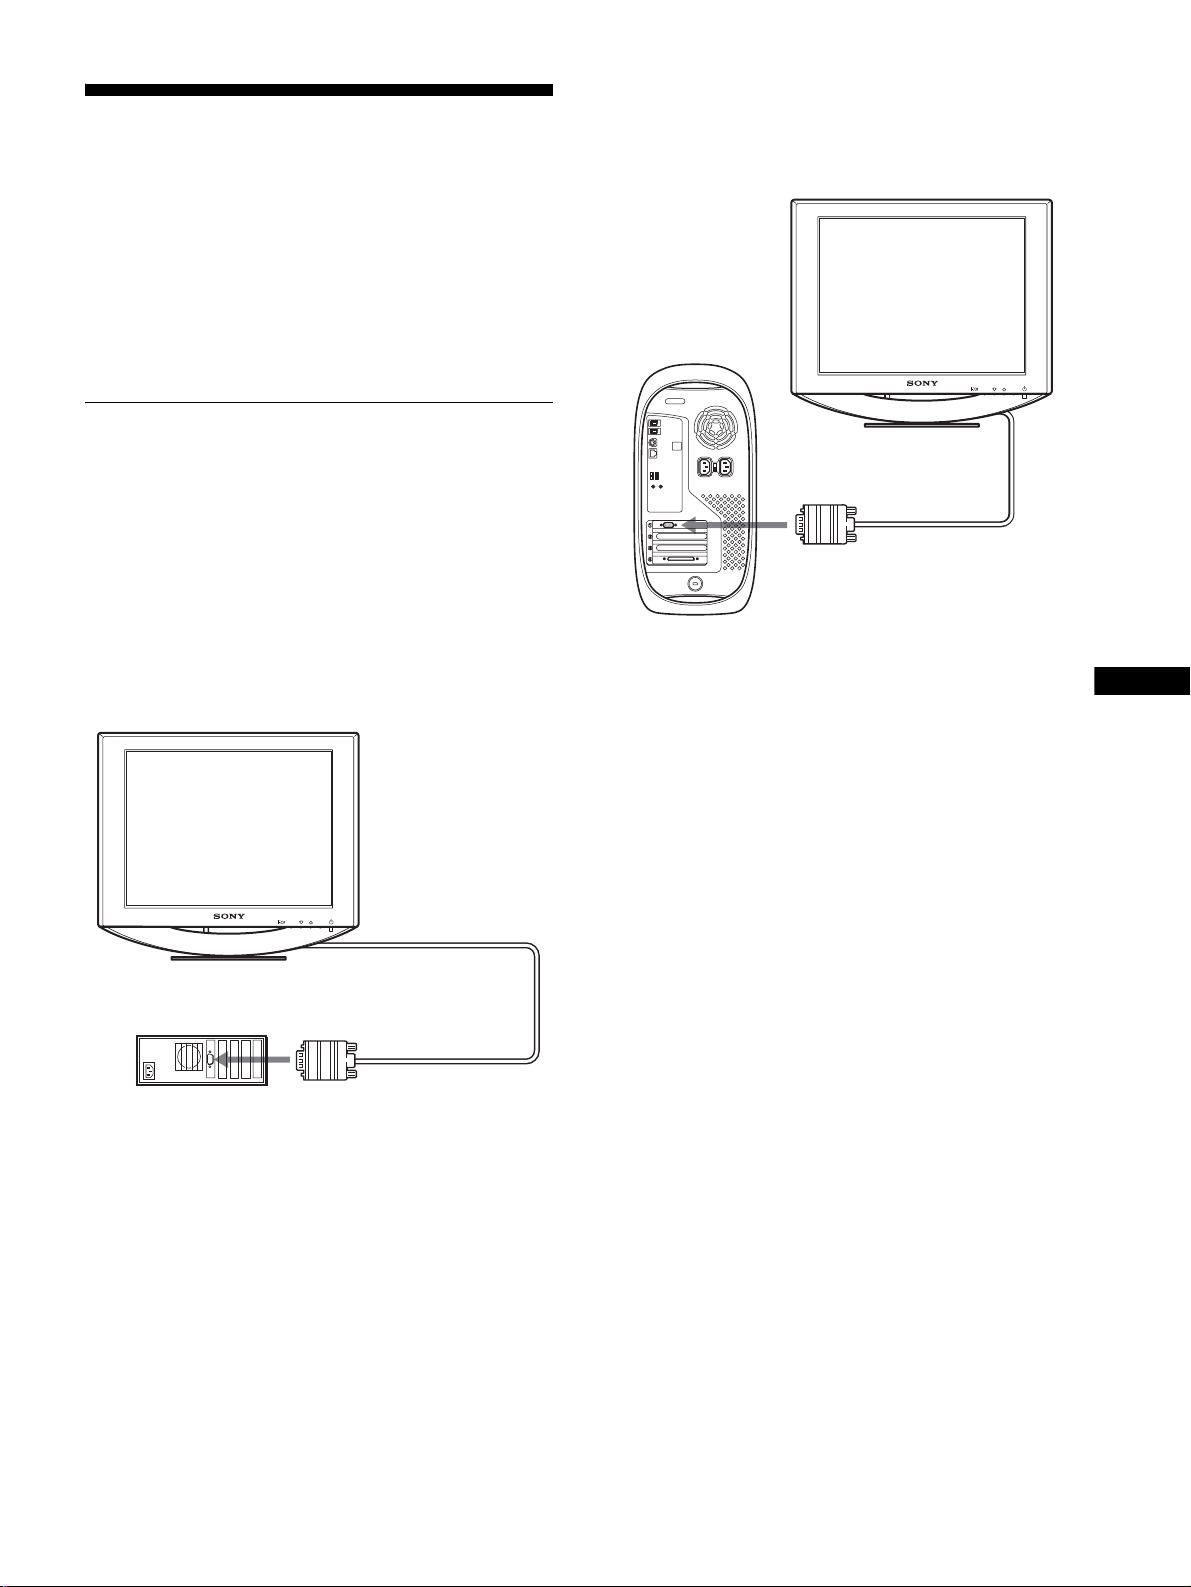
手順1:コンピュータにつなぐ
本機とコンピュータの電源を切った状態でつないでくださ
い。
ご注意
ビデオ信号ケーブルのピンに、直接手を触れないでください。
•
ビデオ信号ケーブルのピンが曲がることを防ぐため
•
向きをご確認ください。
ビデオ信号ケーブル
ユーティリティ/取扱説明書)
HD15
端子の
本機を
Macintosh
じて
Macintosh
オ信号ケーブルをつなぐ前に、
ピュータにつないでください。
コンピュータにつなぐときは、必要に応
アダプタ(市販)をお使いください。ビデ
Macintosh
コンピュータ
ビデオ出力へ
Macintosh
HD15-HD15
ビデオ信号ケーブル
(付属)
アダプタをコン
MENU
OK
■
IBM PC/AT
IBM PC/AT
または互換機
コンピュータまたは互換機につなぐ
MENU
OK
ビデオ出力へ
HD15-HD15
コンピュータ
ビデオ信号ケーブル
(付属)
次のページへつづく
7
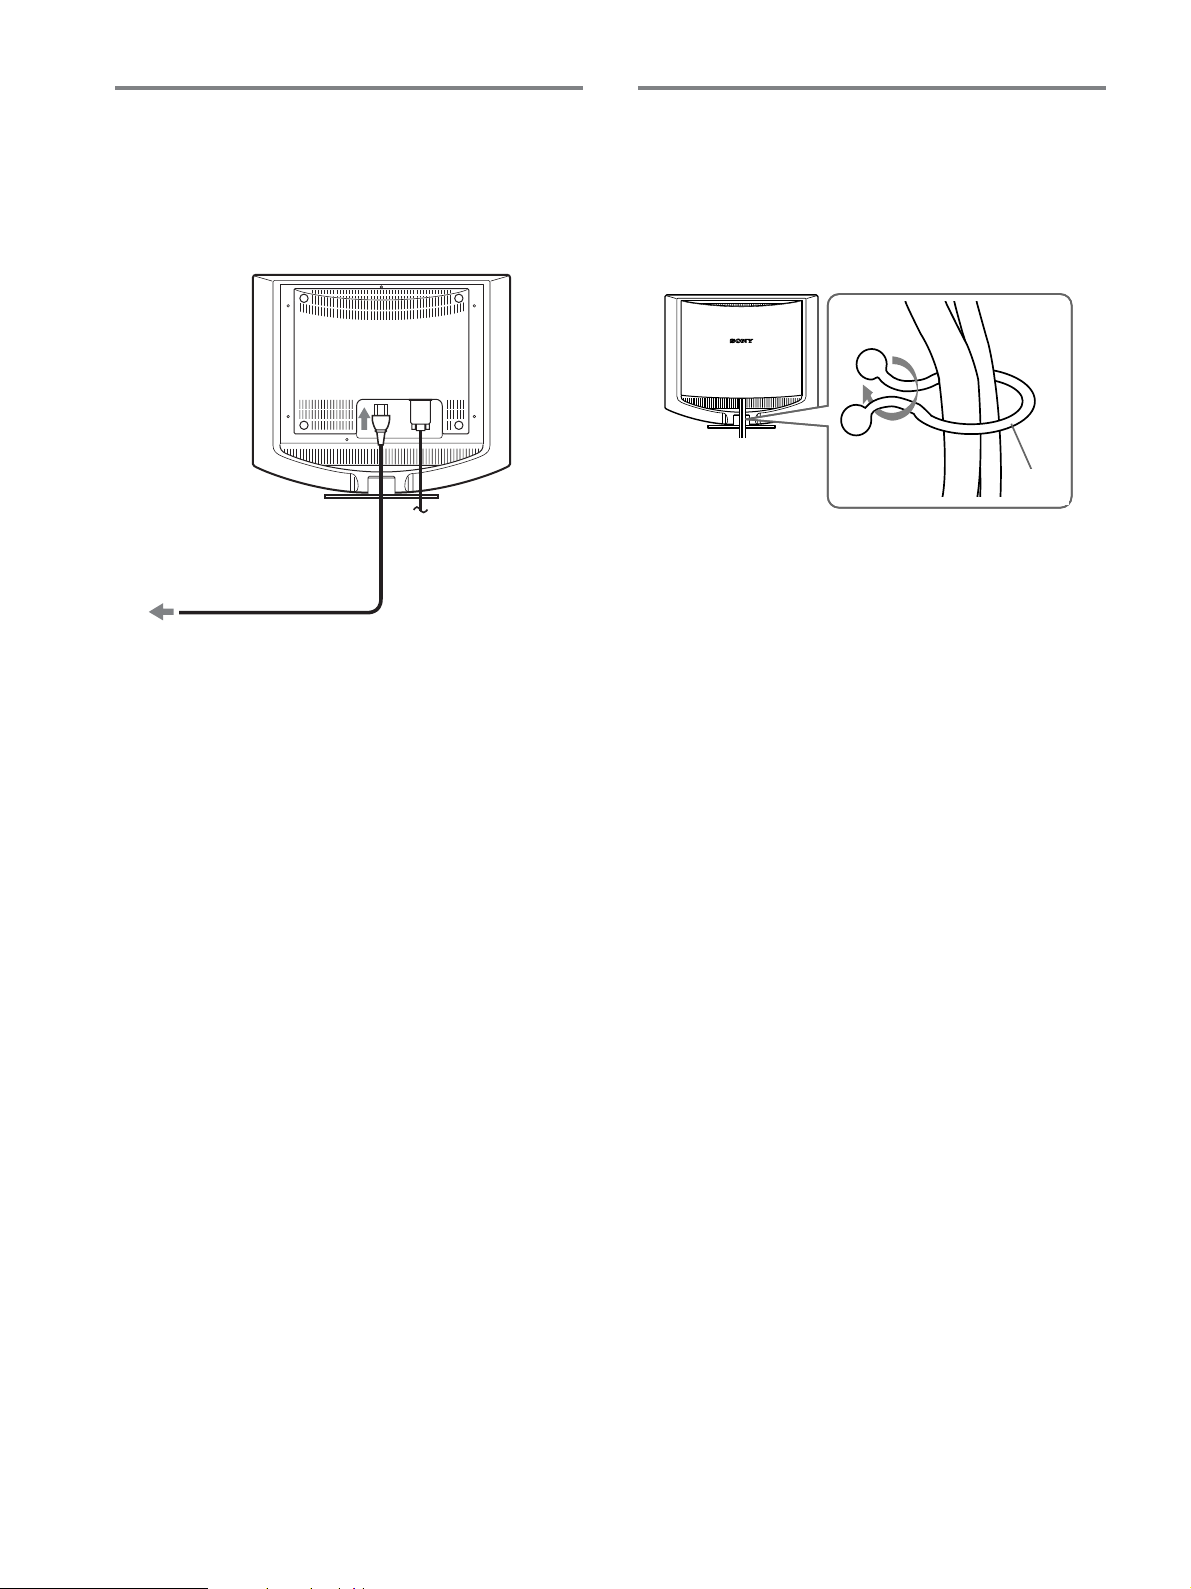
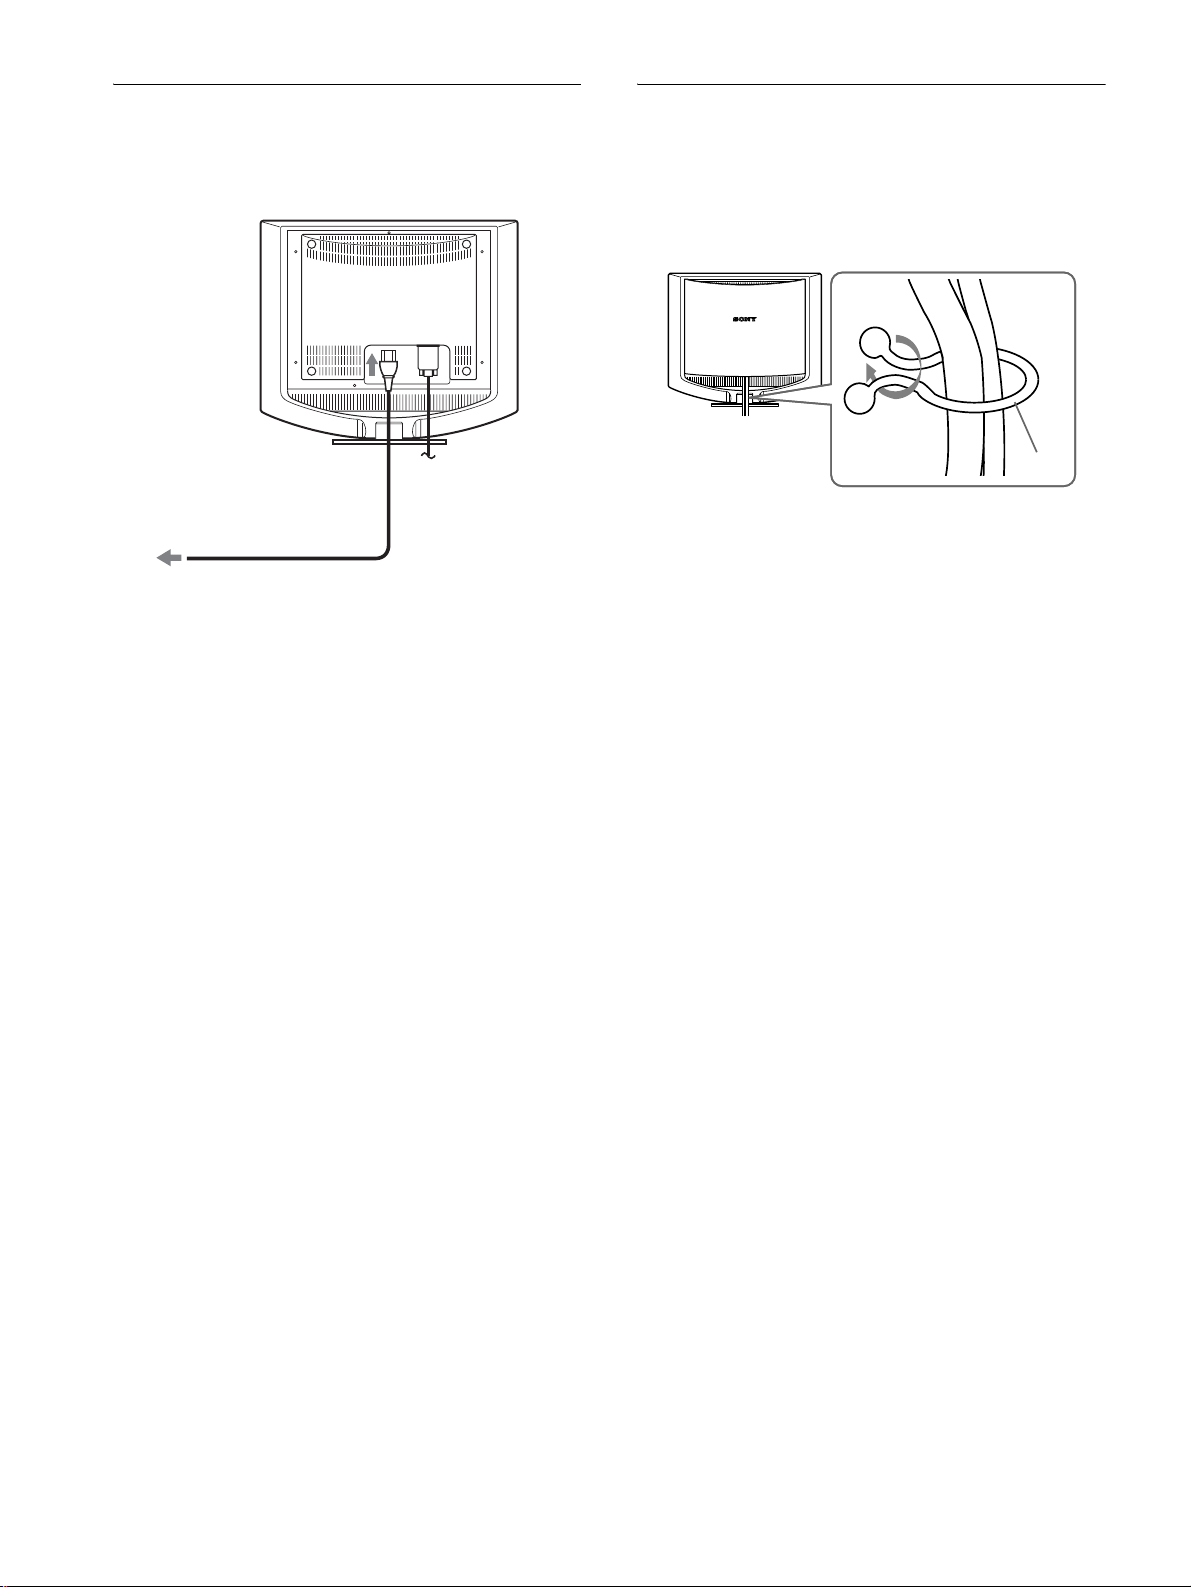
手順2:電源コードをつなぐ
手順3:コード類をまとめて
本機とコンピュータの電源を切った状態でつないでくださ
い。本機に電源コードをつないでから、電源コンセントへ
差し込みます。
電源入力端子へ
電源コンセントへ
電源コード(付属)
後面イラストは
でも同じようにしてください。
HS93
SDM-HS53
を使っていますが、
SDM-HS73/
バックカバーを閉める
コード類を束ねる。
1
付属のコードストラップを使って、コード類をまとめて
ください。
コード
ストラップ
後面イラストは
HS73/HS93
バックカバーを閉める。
2
SDM-HS53
でも同じようにしてください。
を使っていますが、
SDM-
8
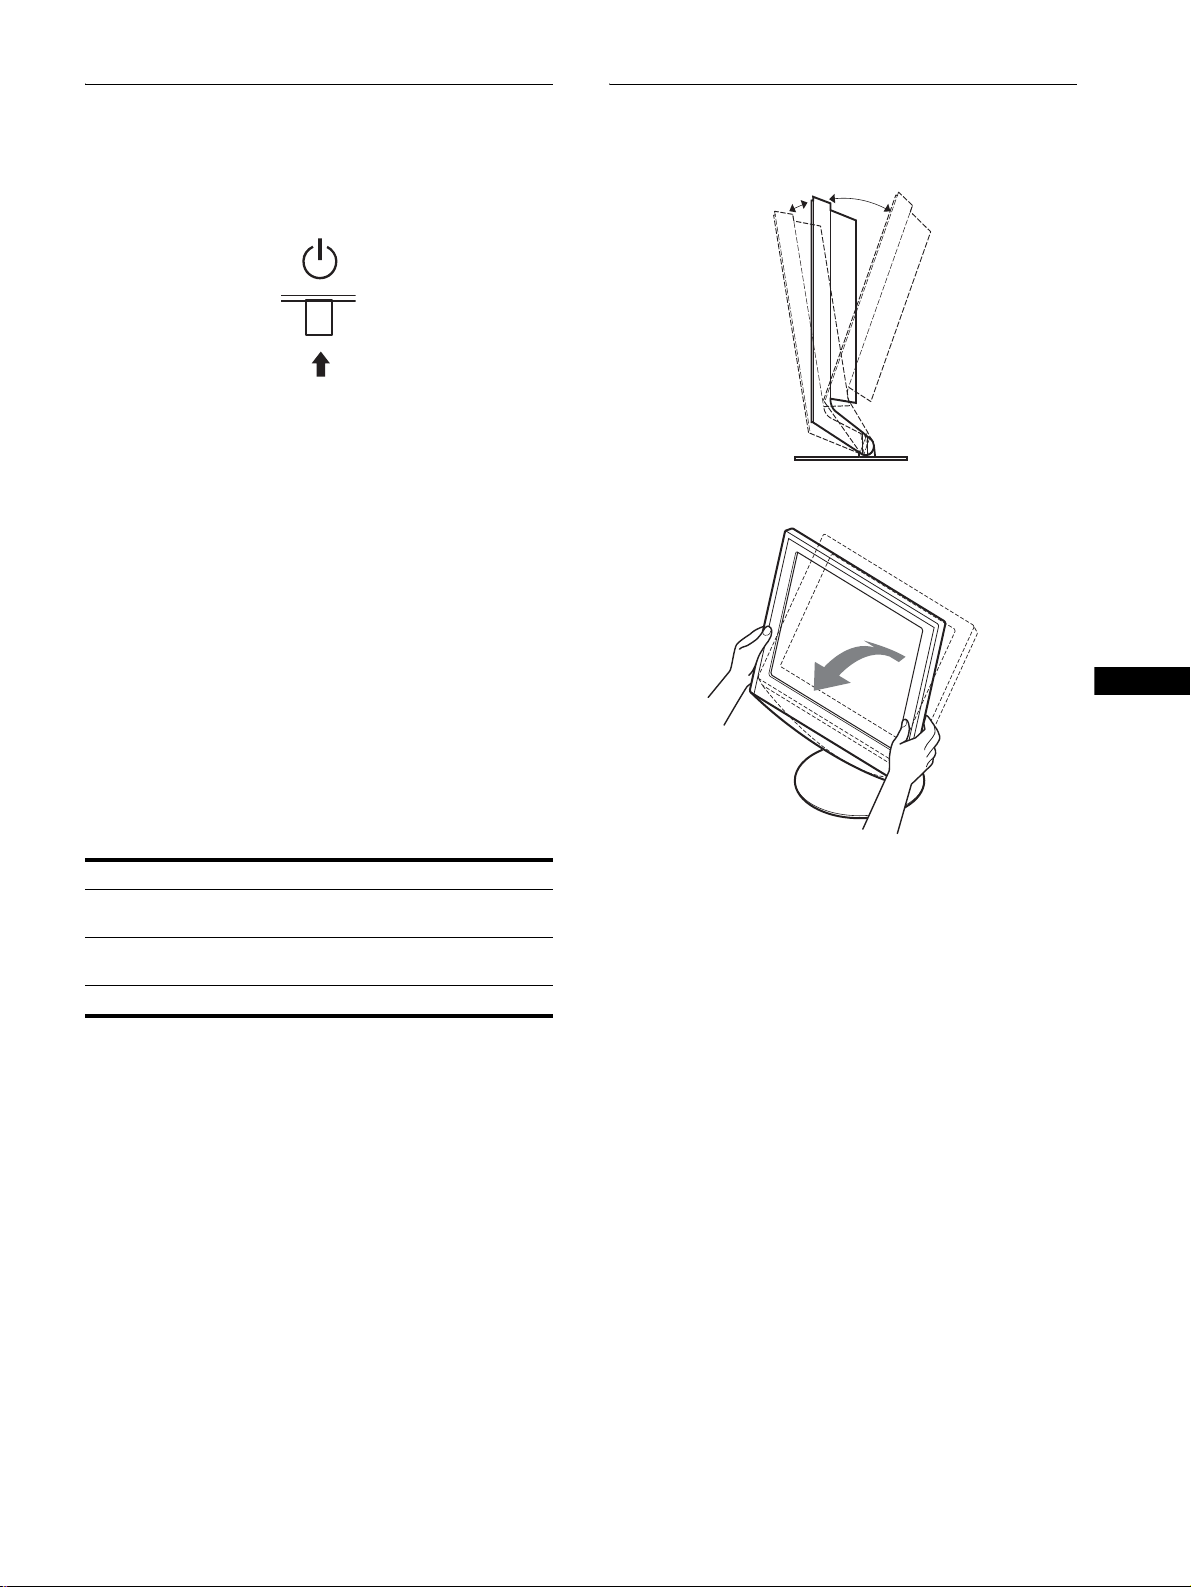
手順4:電源を入れる
ディスプレイの向きを変える
1(電源)スイッチを上に押す。
1
本機の1(電源)ランプが緑色に点灯します。
コンピュータの電源を入れる。
2
これで、本機を使用できる状態になりました。必要に応じ
て、次ページからの設定や調整などを行ってください。
本機の電源を入れても画面に画像が出ないときは
ビデオ信号ケーブルなどが正しく接続されているか確認
•
する。
•「NO INPUT SIGNAL
コンピュータが省電力状態になっている。キーボードの
キーのどれかを押してみるか、マウスを動かしてみる。
」と表示されているとき
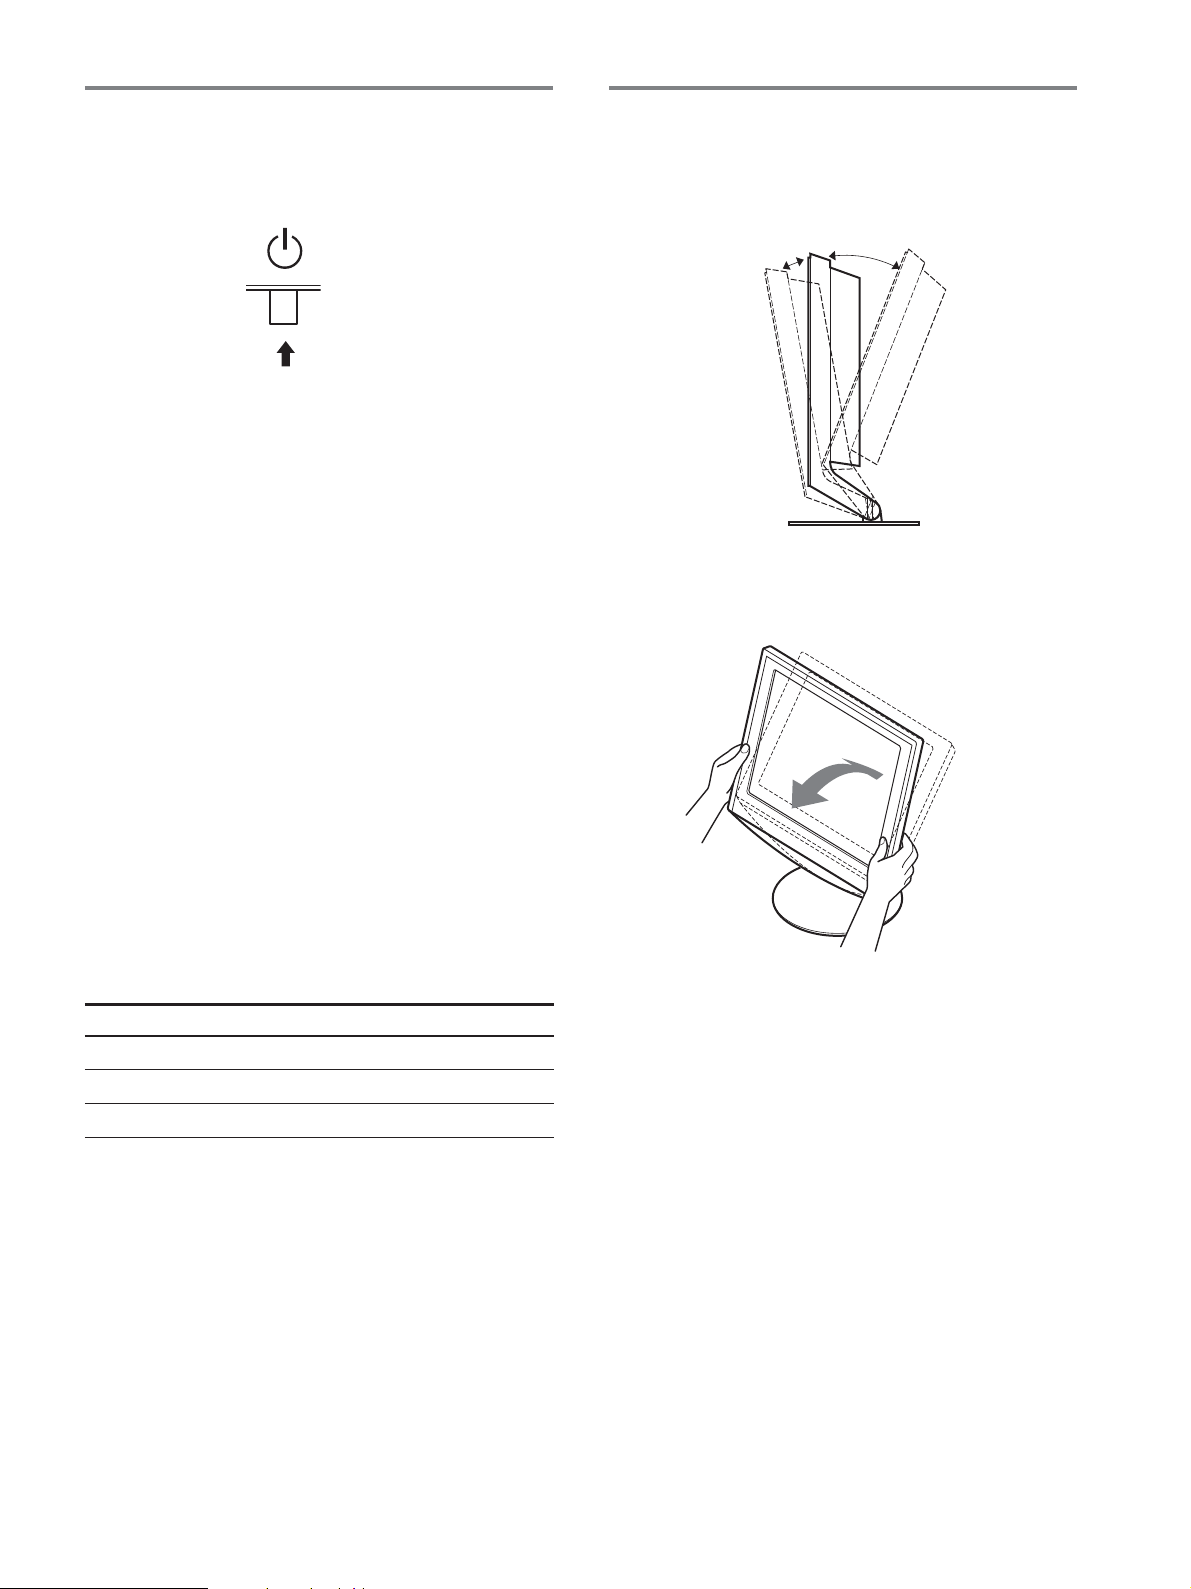
本機にはディスプレイスタンドがついているので、下図の
範囲で画面の向きを変えられます。
約
°
約
°
5
画面両側の下部を持ち、画面の向きを調整してください。
20
•「CABLE DISCONNECTED
ビデオ信号ケーブルが正しく接続されているか確認す
る。
•「OUT OF SCAN RANGE
本機をつなぐ前につないでいたディスプレイがあるとき
は、そのディスプレイにつなぎ換えて、画像が出るか確
認する。
画像が出たら、コンピュータで以下の範囲に設定する。
SDM-HS53
水平周波数
垂直周波数
解 像 度
くわしくは、「本機の症状と対処のしかた」(17ページ)を
ご覧ください。
モニタ用のドライバは不要です
本機はプラグ&プレイ機能(
ラグ&プレイ機能によりモニタの情報が自動的に認識されます。こ
のため、モニタ用の特別なドライバは通常不要です。本機とコン
ピュータをはじめて起動したとき、設定用のウィザードが表示され
る場合は、その手順に従ってください。プラグ&プレイモニタが自
動的に選ばれて、使用できる状態になります。
28〜61 kHz
〜
48
75 Hz
×
1024
768
DDC
」と表示されているとき
」と表示されているとき
SDM-HS73/HS93
28〜80 kHz
〜
75 Hz
48
以下
)を搭載しており、
1280
×
1024
Windows
以下
のプ
ディスプレイをより快適にお使いいただくために
本機の画面は、お使いになる方に合わせて見やすい角度に
調整できるように設計されています。
お使いになる机や椅子の高さに合わせて、画面が反射しな
い角度に調整してお使いください。
これで自動的に垂直周波数は
本機ではちらつきは目立ちませんので、このままの垂直周波数でお
使いいただけます。垂直周波数を上げる必要はありません。
60 Hz
になります。
9
調整する
調整を始める前に
本機とコンピュータを接続し、両方の電源を入れてく
ださい。電源を入れて、30分以上経過してから調整す
ると、最適な調整ができます。
メニューを使って、いろいろな調整や設定ができます。
お好みの明るさに調整する
ボタンを押すと、押すたびに以下の順で画面の明るさが
切り換わります。
HIGHtMIDDLEtLOW
「
す。
「ユーザー」を選ぶと、メニューの「バックライト輝度」を
選んだときと同じように、M/mボタンを押してバックライ
トの明るさを調整できます。
「ユーザー」に設定しているときにだけ、メニューの「バッ
クライト輝度」、「コントラスト」、「ブライトネス」の調整が
できます(11ページ)。
「
」から「
HIGH
」を選ぶと、消費電力が抑えられます(15ページ)。
LOW
LOW
tユーザーt
」になるにつれて画面が暗くなりま
HIGH
…
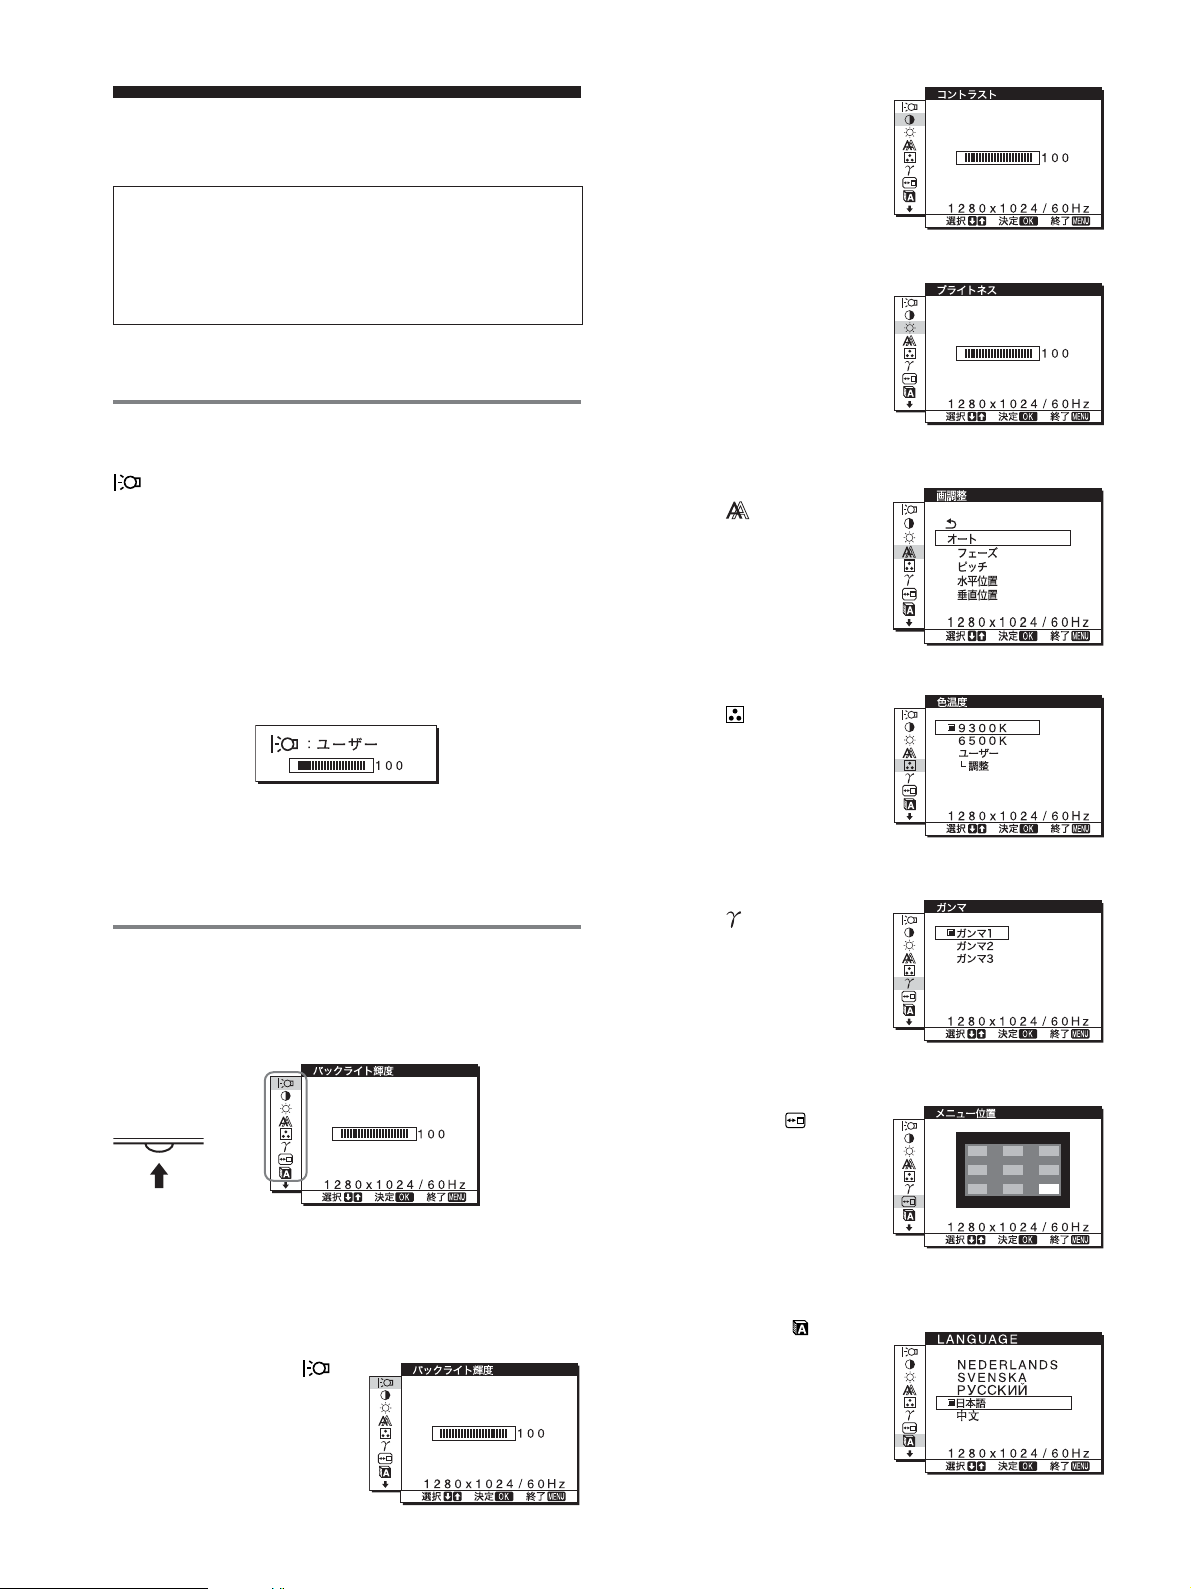
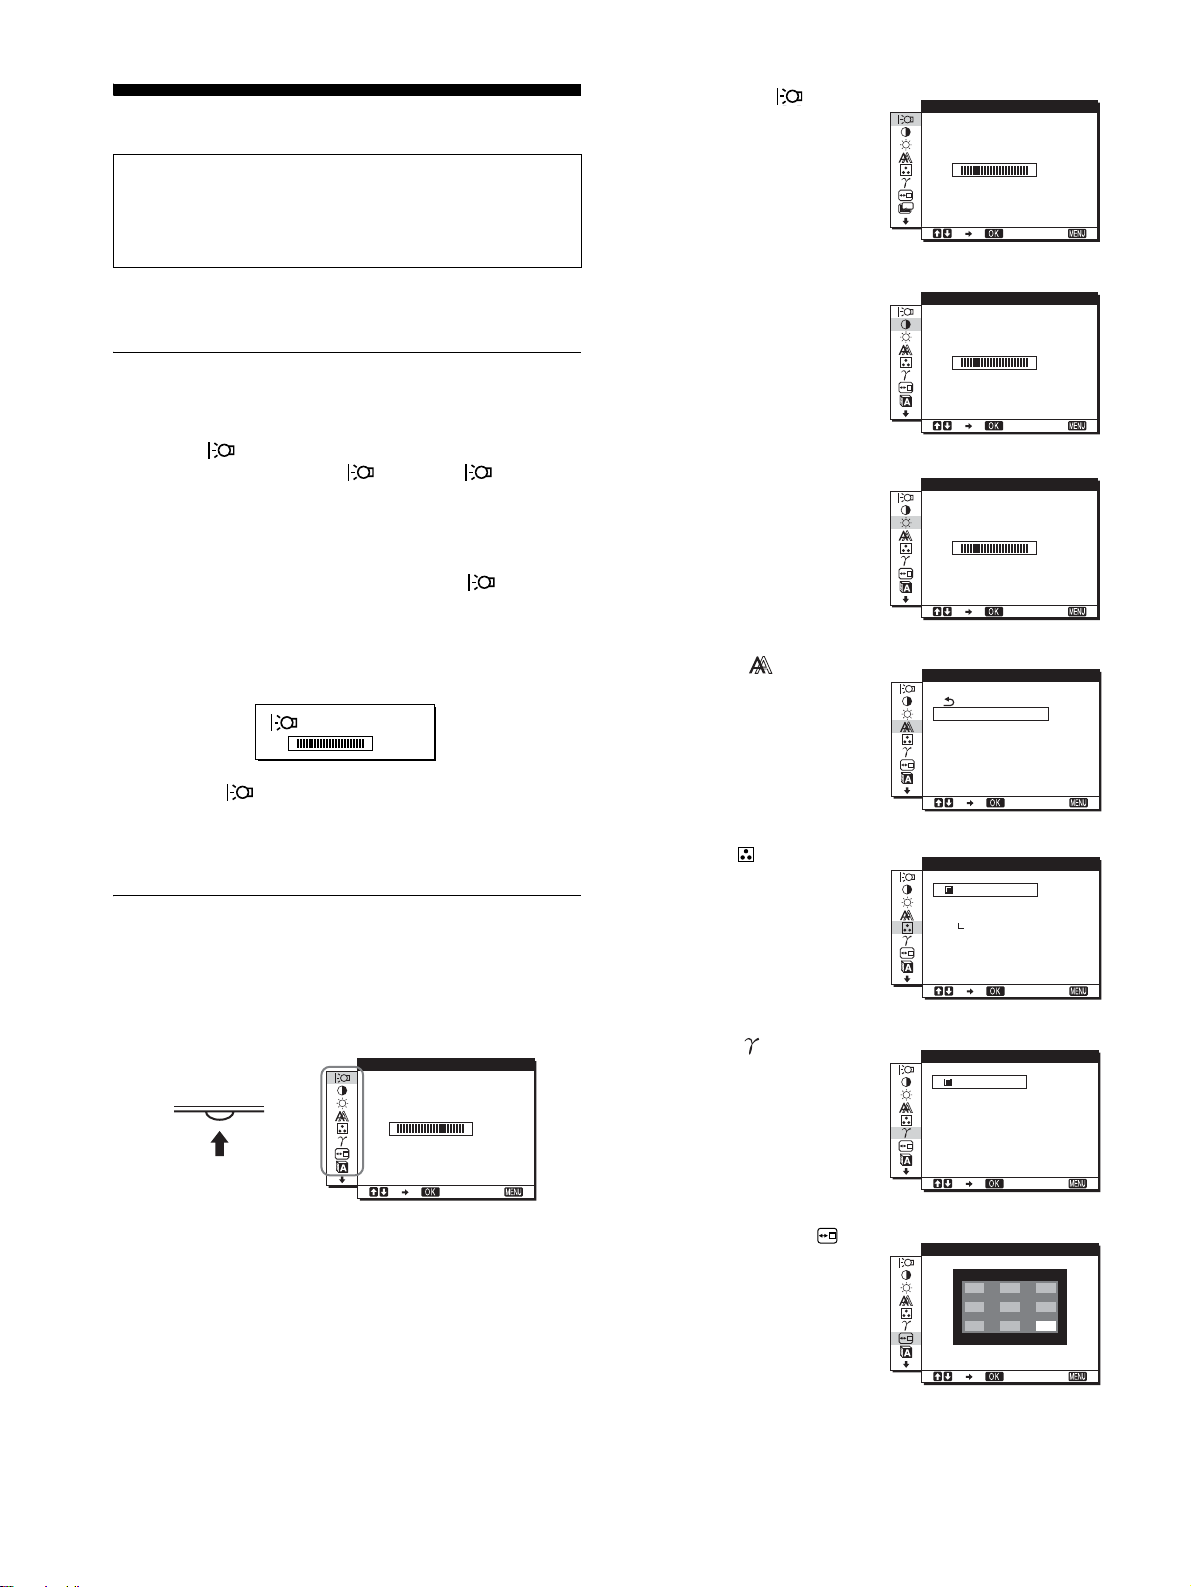
2 コントラスト6
(11ページ)
画像の明暗の差(コントラ
スト)を調整します。
3 ブライトネス8
(11ページ)
画像の明るさ(黒レベル)
を調整します。
4 画調整 (12ページ)
画像の鮮明さ(フェーズ
ピッチ)や位置(水平/垂直
位置)を調整します。
5 色温度 (13ページ)
画像の白色の度合いを調整
します。
/
メニュー操作のしかた
ボタンを押して、メニュー画面を出します。
MENU
ボタンの使いかたは、次のページをご覧ください。
MENU
MENU
,
M/mボタンとOKボタンで、上のイラストにあるマークを選
ぶと、以下の1〜9のメニューが出ます。9のマークは、
mを押し続けると表示されます。M/mボタンとOKボタンの
使いかたは、次のページをご覧ください。
1 バックライト輝度
(11ページ)
画面が明るすぎると感じる
ときに調整して、画面を見
やすくします。
6 ガンマ (13ページ)
画像の色合いを、オリジナ
ル画像の色合いに近付けら
れます。
7 メニュー位置
(14ページ)
メニュー画面に隠れた部分
を見るときなどに、メ
ニューの表示位置を変えら
れます。
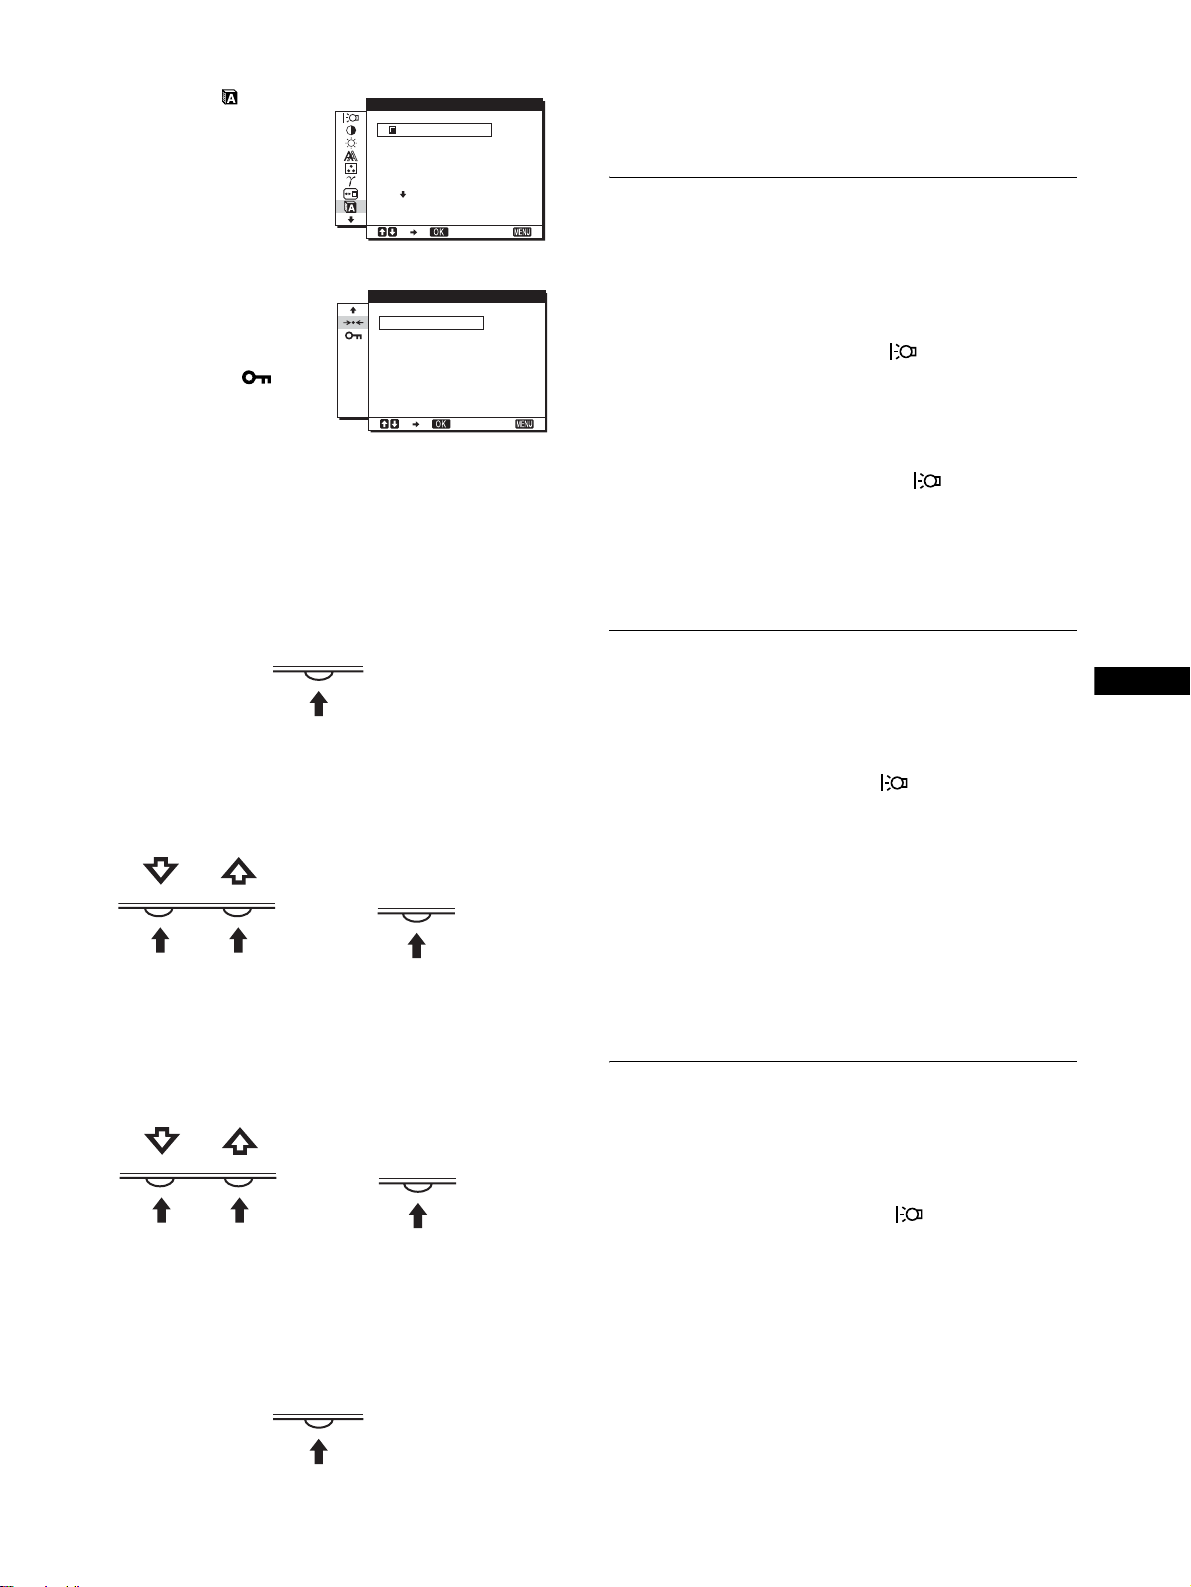
8
LANGUAGE
(14ページ)
本機のメニュー、メッセー
ジなどの表示言語を変更で
きます。
10
9 その他(14ページ)
以下のメニュー項目を設定
します。
リセット0
•
メニューロック
•
バックライトの明るさを調整す
(バックライト輝度)
る
画面が明るすぎると感じるときに調整して、画面を見やす
くします。
■
MENU
の使いかた
メニュー画面を出す。
1
MENU
ボタンとM/mボタン、OKボタン
ボタンを押して、メニュー画面を出す。
MENU
調整したいメニューや項目を選ぶ。
2
M/mボタンを押して選び、OKボタンを押して決定す
る。
OK
,
調整する。
3
M/mボタンを押して調整し、OKボタンを押す。
ボタンを押すと、調整値が設定されて前の画面に戻
OK
ります。
ご注意
モードを「
とき(10ページ)は調整できません。
1 MENU
メニュー画面が出ます。
mボタンを押して「 (バックライト輝度)」を選び、
2M/
ボタンを押す。
OK
バックライト輝度画面が出ます。
mボタンを押して、希望の明るさに調整し、OKボタ
3M/
ンを押す。
」または「
HIGH
ボタンを押す。
MIDDLE
」、「
」に設定している
LOW
コントラストを調整する(コント
ラスト)
画像の明暗の差(コントラスト)を調整します。
ご注意
モードを「
とき(10ページ)は調整できません。
1 MENU
メニュー画面が出ます。
mボタンを押して「6(コントラスト)」を選び、OKボ
2M/
タンを押す。
コントラスト画面が出ます。
」または「
HIGH
ボタンを押す。
MIDDLE
」、「
」に設定している
LOW
OK
,
メニューを消す。
4
ボタン押すと、メニュー画面が消える。
MENU
ボタンを押さなくても、調整後、約30秒たつと自動的
に消えます。
MENU
■元の状態に戻す
リセット画面を使います。くわしくは、14ページをご覧く
ださい。
mボタンを押して、コントラストを調整し、OKボタ
3M/
ンを押す。
ブライトネス(画面の黒レベル)
を調整する
画像の明るさ(黒レベル)を調整します。
ご注意
モードを「
とき(10ページ)は調整できません。
1 MENU
メニュー画面が出ます。
2M/
タンを押す。
ブライトネス画面が出ます。
3M/
す。
ボタンを押す。
mボタンを押して「8(ブライトネス)」を選び、OKボ
mボタンを押して、明るさを調整し、OKボタンを押
(ブライトネス)
」または「
HIGH
MIDDLE
」、「
」に設定している
LOW
11
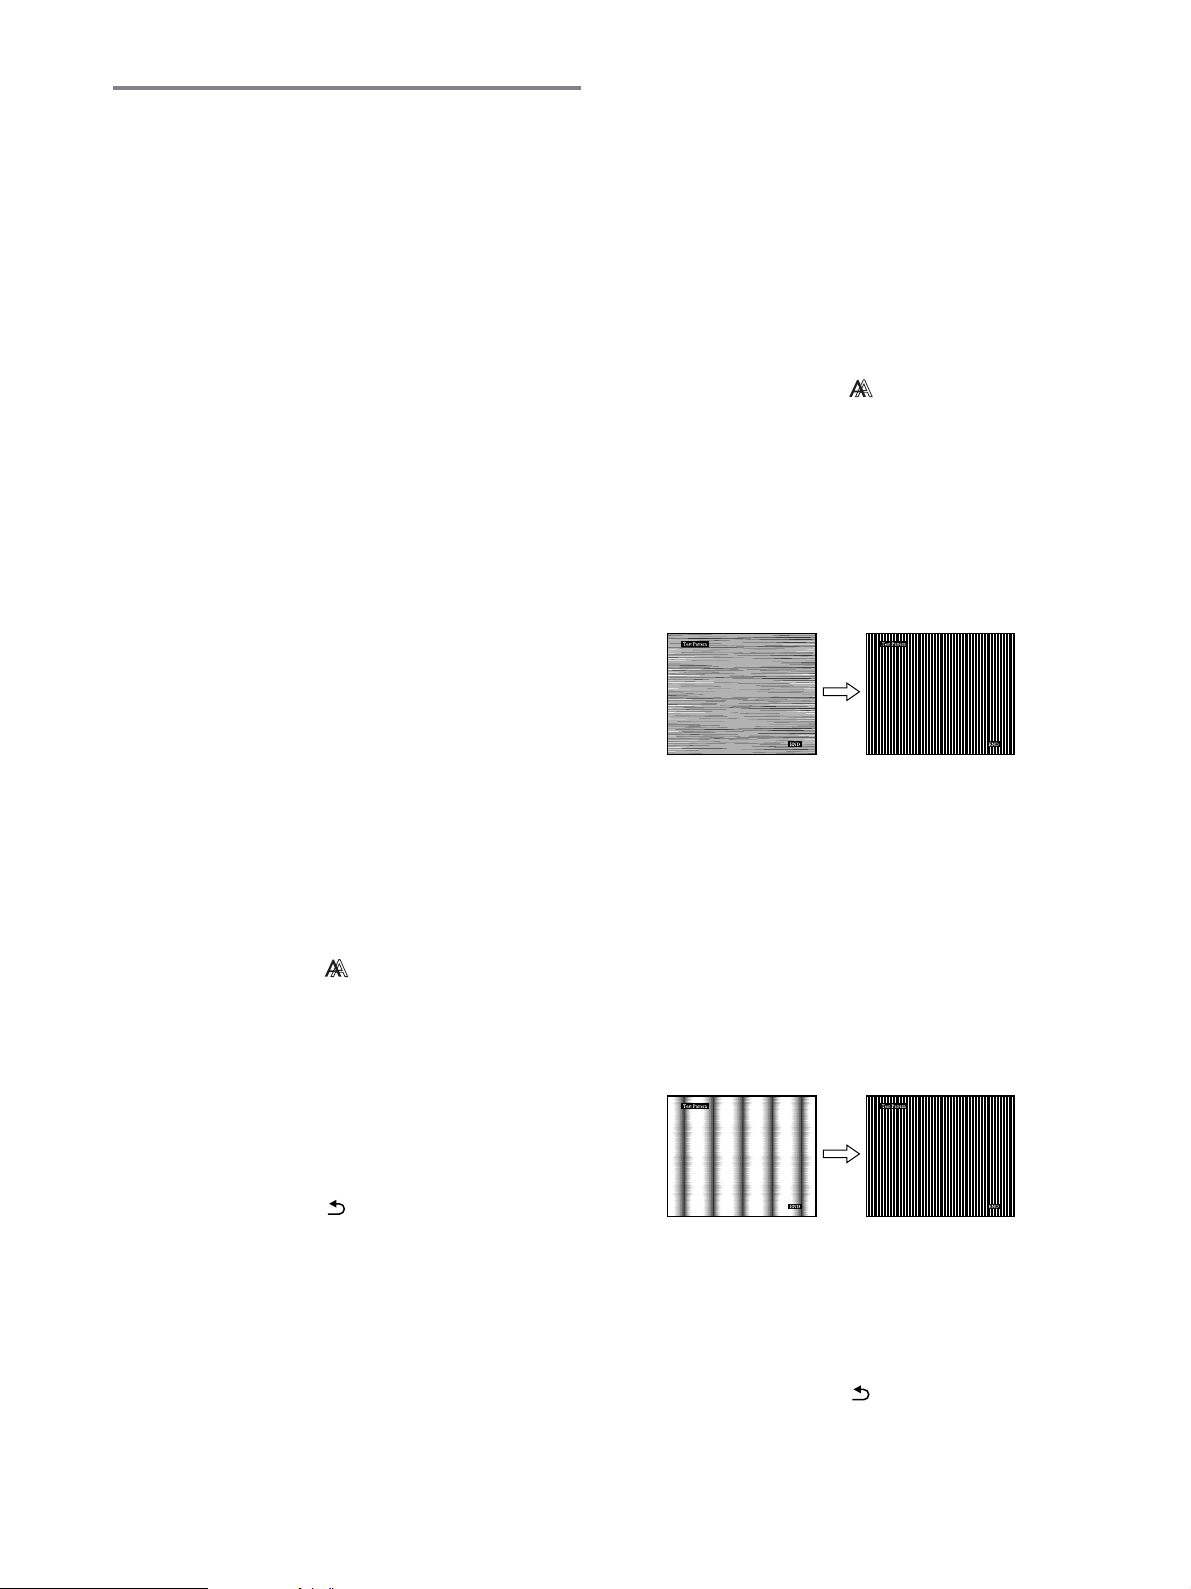
画像を調整する(画調整)
■自動画質調整機能
本機は、信号を受信したときに、自動的に画像の位
置と鮮明さ(フェーズ/ピッチ)を調整して、最適な画
像を表示します(15ページ)。
ユーティリティディスクを起動して、テストパターンを
3
表示する。
Windows
[Utility],[Windows]/[Win Utility.exe]
でクリックする。
Macintosh
[Utility],[Mac]/[Mac Utility]
クする。
の場合
の順にマウス
の場合
の順にマウスでクリッ
ご注意
自動画質調整機能が働いている間は、1(電源)スイッチ以外は操作
できません。
自動画質調整機能で完全に調整されていないと感じたとき
は
現在入力中の信号に合わせて再度自動で調整し直せます
(下記のオート)。
それでも、さらに調整したいときは
手動で、鮮明さ(フェーズ/ピッチ)や位置(水平位置/垂直
位置)を調整し直せます。
「オート」や「フェーズ/ピッチ」、「水平位置/垂直位置」で設
定した調整値は記憶されて、同じ信号が入力されると、記
憶した調整値になります。
コンピュータをつなぎ換えるなどで入力信号を変えたとき
には、もう一度調整が必要になることがあります。
■現在入力中の信号に合わせて自動で調整し直す
(オート)
1 MENU
メニュー画面が出ます。
2M/
を押す。
画調整画面が出ます。
3M/
す。
フェーズ、ピッチ、水平位置、垂直位置の設定を、現在
入力されている信号に最適な調整値にして、その調整値
を記憶します。
ボタンを押す。
mボタンを押して、「 (画調整)」を選び、OKボタン
mボタンを押して、「オート」を選び、OKボタンを押
4MENU
メニュー画面が出ます。
5M/
を押す。
画調整画面が出ます。
6M/
押す。
フェーズ画面が出ます。
7M/
テストパターンの横縞が最少になるように調整します。
8OK
画調整画面に戻ります。
画面全体にまだ縦縞が見られるときは、続いてピッチ調
整を行います。
9M/
す。
ピッチ画面が出ます。
10M/
テストパターンの大きな縦縞がなくなるように調整しま
す。
ボタンを押す。
mボタンを押して、「 (画調整)」を選び、OKボタン
mボタンを押して、「フェーズ」を選び、OKボタンを
mボタンで、横縞が最少になるように調整する。
ボタンを押す。
mボタンを押して、「ピッチ」を選び、OKボタンを押
mボタンで、縦縞がなくなるように調整する。
mボタンを押して、「 」を選び、OKボタンを押す。
4M/
メニュー画面に戻ります。
■さらに手動で鮮明さを調整し直す
(フェーズ/ピッチ)
文字や画像が鮮明でないときに調整します。
解像度をコンピュータ側で
1
1280×1024(SDM-HS73/HS93
ユーティリティディスクを入れる。
2
1024×768(SDM-HS53
)に設定する。
12
)、
画面上の[END]をマウスでクリックして、テストパター
11
ンを消す。
ボタンを押す。
12 OK
画調整画面に戻ります。
mボタンを押して、「 」を選び、OKボタンを押す。
13M/
メニュー画面に戻ります。
■さらに手動で画像の位置を調整し直す
(水平位置/垂直位置)
画像が画面のまん中に出ないときに調整します。
ユーティリティディスクを入れる。
1
ユーティリティディスクを起動して、テストパターンを
2
表示する。
Windows
[Utility],[Windows]/[Win Utility.exe]
でクリックする。
Macintosh
[Utility],[Mac]/[Mac Utility]
クする。
3 MENU
メニュー画面が出ます。
mボタンを押して、「 (画調整)」を選び、OKボタン
4M/
を押す。
画調整画面が出ます。
mボタンを押して、「水平位置」または「垂直位置」を選
5M/
び、OKボタンを押す。
水平位置画面または垂直位置画面が出ます。
mボタンを押して、テストパターンの外周の枠が全
6M/
部、画面に入るように調整する。
画面上の[END]をマウスでクリックして、テストパター
7
ンを消す。
8OK
画調整画面に戻ります。
mボタンを押して、「 」を選び、OKボタンを押す。
9M/
メニュー画面に戻ります。
の場合
の順にマウス
の場合
の順にマウスでクリッ
ボタンを押す。
ボタンを押す。
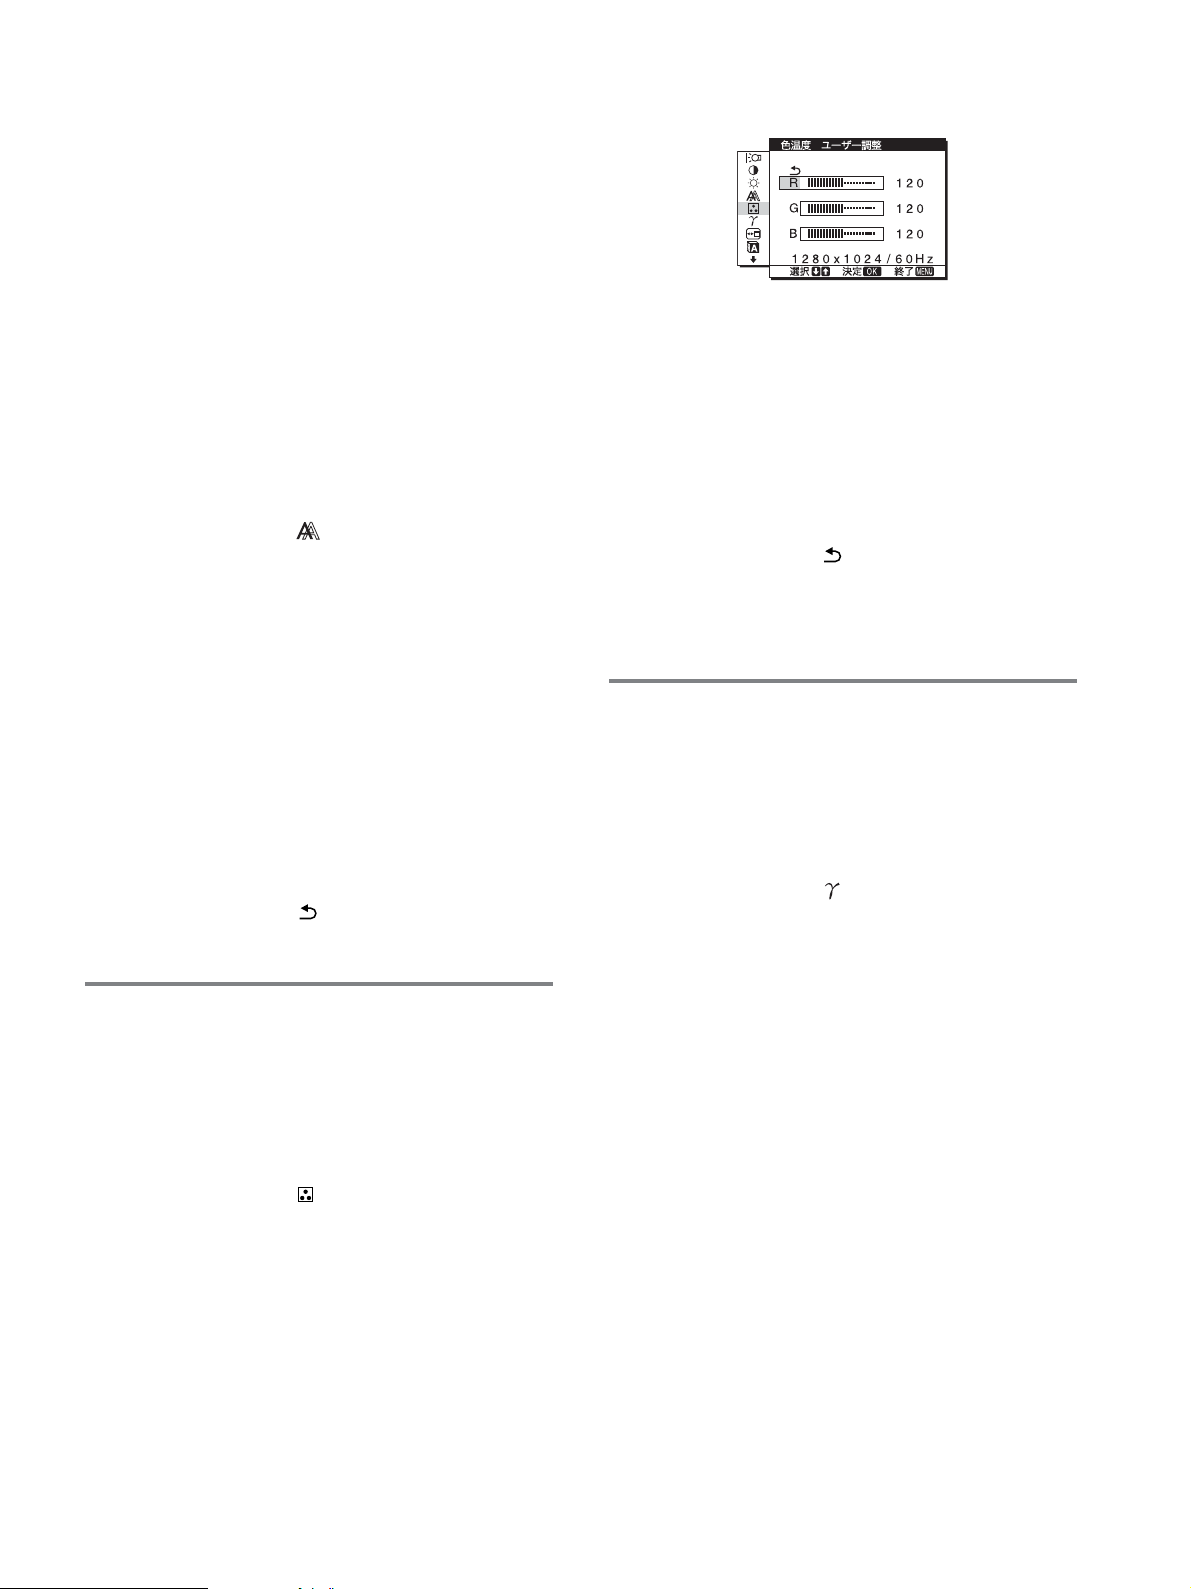
色温度をさらに微調整するときは(ユーザー調整)
mボタンを押して、「調整」を選び、OKボタンを押
1M/
す。
ユーザー調整画面が出ます。
mボタンで「R」(
2M/
んでOKボタンを押し、M/mボタンで調整した後、
ボタンを押す。
「G」(
Green
色温度を変えるため、Gは固定されています。
mボタンを押して、「 」を選び、OKボタンを押す。
3M/
新しい調整値が「ユーザー」として設定され、「ユー
ザー」を選ぶたびに同じ調整値が選ばれます。
メニュー画面に戻ります。
:緑)が基準となって、RやBを増減して
:赤)または「B」(
Red
Blue
:青)を選
OK
ガンマ設定を変更する(ガンマ)
画像の色合いを、オリジナル画像の色合いに近付けられま
す。
1 MENU
メニュー画面が出ます。
2M/
を押す。
ガンマ画面が出ます。
ボタンを押す。
mボタンを押して、「 (ガンマ)」を選び、OKボタン
色温度を調整する(色温度)
画像の白色の度合いを、あらかじめ設定された中から選べ
ます。また、必要に応じて、微調整もできます。
1 MENU
メニュー画面が出ます。
2M/
を押す。
色温度画面が出ます。
3M/
9300K
かった白色から赤みがかった白色へと変わります。
ボタンを押す。
mボタンを押して、「 (色温度)」を選び、OKボタン
mボタンを押して色温度を選び、OKボタンを押す。
(お買い上げ時)から
にすると、青みが
6500K
mボタンを押して、希望の設定を選び、OKボタンを
3M/
押す。
13
メニューの表示位置を変える
その他の調整をする
(メニュー位置)
メニュー画面に隠れた部分を見るときなどに、メニューの
表示位置を変えられます。
1 MENU
メニュー画面が出ます。
2M/
ボタンを押す。
メニュー位置画面が出ます。
3M/
す。
画面上部3か所、画面中央3か所、画面下部3か所があら
かじめ設定されています。
ボタンを押す。
mボタンを押して、「 (メニュー位置)」を選び、
mボタンを押して希望の位置を選び、OKボタンを押
メニュー言語を変える
(
LANGUAGE
本機のメニュー、メッセージなどの表示言語を変更できま
す。
1 MENU
メニュー画面が出ます。
2M/
ボタンを押す。
ボタンを押す。
mボタンを押して、「 (
LANGUAGE
mボタンを押して、言語を選び、OKボタンを押す。
3M/
ENGLISH:英語
•
FRANÇAIS:フランス語
•
DEUTSCH:ドイツ語
•
ESPAÑOL:スペイン語
•
ITALIANO:イタリア語
•
NEDERLANDS:オランダ語
•
SVENSKA:スウェーデン語
•
•
日本語
•
:中国語
•
)
LANGUAGE
画面が表示されます。
:ロシア語
)」を選び、
OK
OK
以下のメニュー項目を設定、調整します。
リセット0
•
メニューロック
•
1MENU
メニュー画面が出ます。
調整したいメニュー項目のマークが出るまでmボタン
2
を押し続ける。
3M/
OK
各項目は以下のように設定、調整します。
ボタンを押す。
mボタンを押して、設定、調整したい項目を選び、
ボタンを押す。
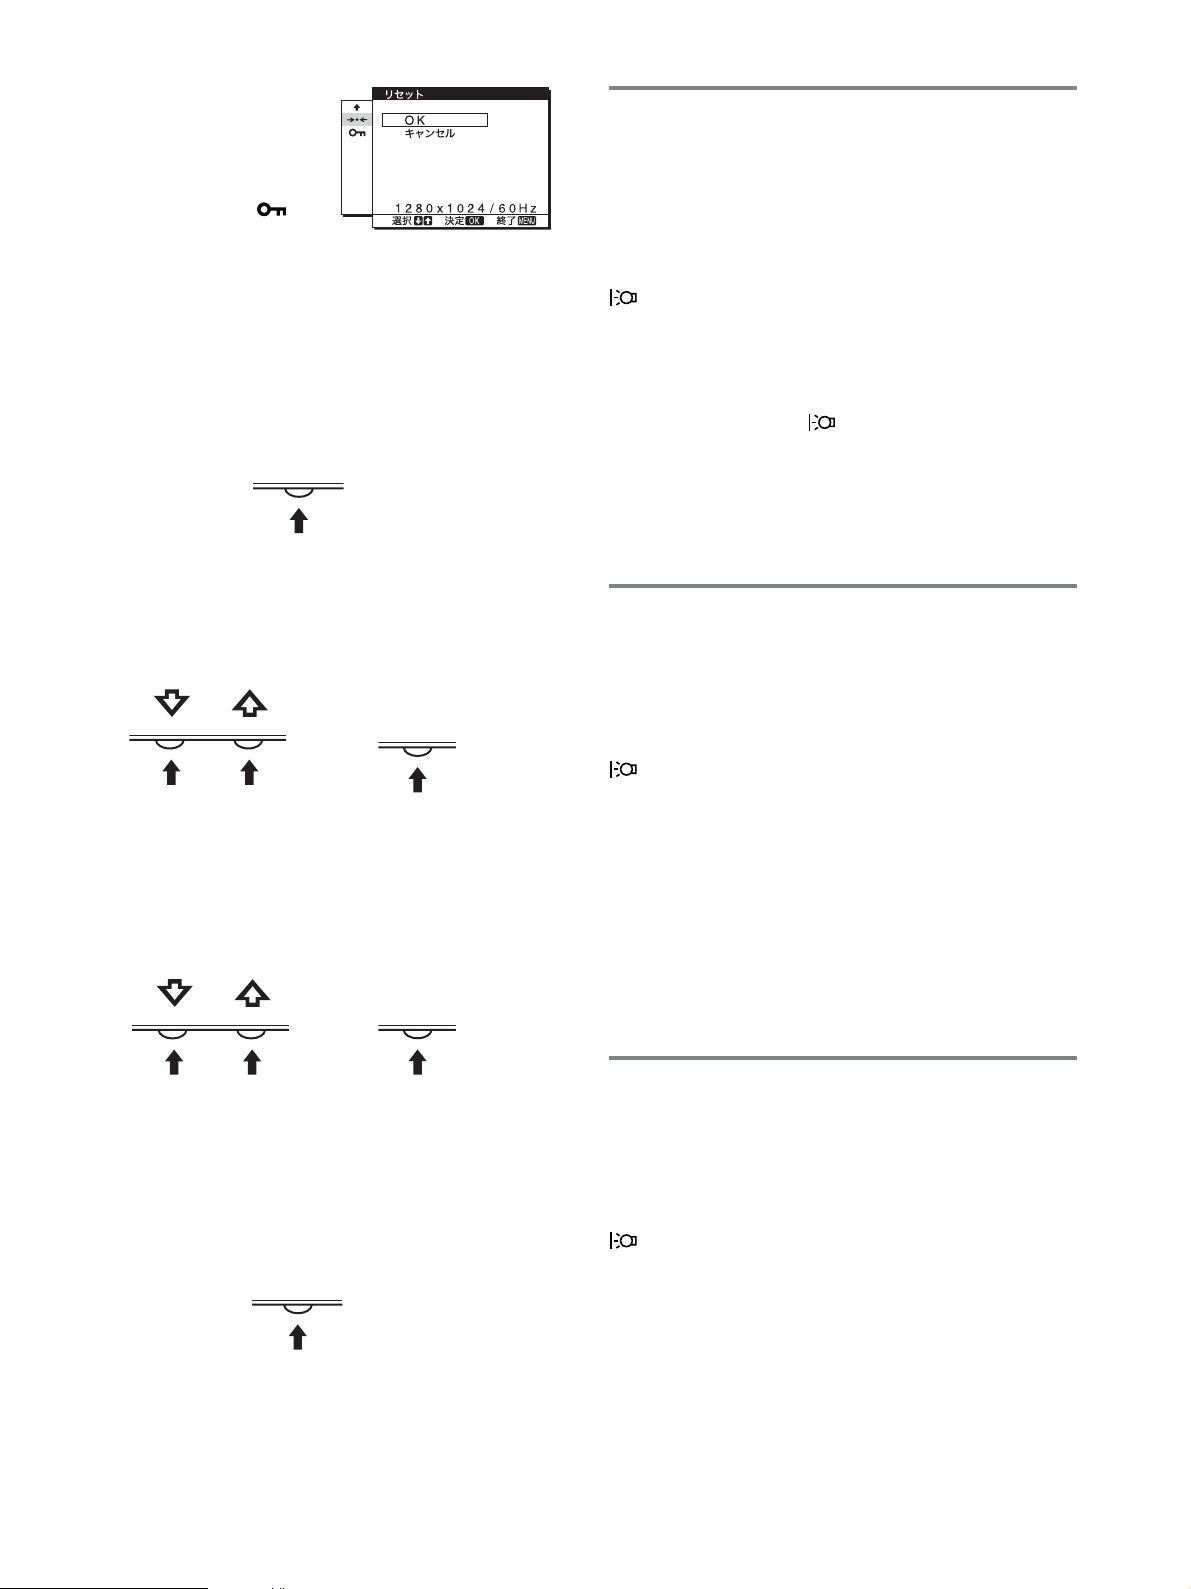
■お買い上げ時の設定に戻す(リセット)
調整した設定を、お買い上げ時の設定に戻します。
mボタンを押して、「0(リセット)」を選び、OKボタ
1M/
ンを押す。
リセット画面が表示されます。
mボタンを押して、希望の設定を選び、OKボタンを
2M/
押す。
: すべての調整値をお買い上げ時の設定に戻し
• OK
ます。ただし、「 (
リセットされません。
キャンセル:リセットが実行されないまま、メニュー
•
画面に戻ります。
LANGUAGE
)」の設定は
■調整値を変えられないようにする(メニューロッ
ク)
本機の調整や設定を変えられないように、ボタン操作を
ロックできます。
mボタンを押して、「 (メニューロック)」を選び、
1M/
ボタンを押す。
OK
メニューロック画面が出ます。
mボタンを押して、「オン」または「オフ」を選び、
2M/
ボタンを押す。
オン:1(電源)スイッチ以外の操作は、「 」マー
•
クが出て操作できなくなります。
オフ:「オン」を解除するときに選びます。「オン」の
•
ときもこの操作は行えます。
OK
14
機能解説
省電力機能(パワーセーブ機能)
本機は、
セービングガイドラインに対応しています。
(
Display Power Management Signaling
いるコンピュータやグラフィックボードにつなぐと、操作
をしていないときは自動的に次のような省電力状態になり
ます。
SDM-HS53
本機の状態
通常動作時
アクティブオフ*
(ディープスリープ)
1(電源):切
SDM-HS73
本機の状態
通常動作時
アクティブオフ*
(ディープスリープ)
1(電源):切
SDM-HS93
本機の状態
通常動作時
アクティブオフ*
(ディープスリープ)
1(電源):切
* コンピュータが省電力状態になると、信号が入力されなくなる
** 「ディープスリープ」は、
VESA、NUTEK
ため、アクティブオフ状態になる前に「
と表示が出ます。約5秒後、本機も省電力状態になります。
Agency
)の定めた待機時の消費電力抑制状態です。
および
消費電力
25 W
1 W
**
1 W
消費電力
45 W
(最大)
1 W
**
(最大)
1 W
消費電力
50 W
(最大)
1 W
**
(最大)
1 W
EPA(Environmental Protection
NERGY STAR
E
(最大)
(最大)
(最大)
(最大)
(最大)
1(電源)ランプ
緑点灯
オレンジ点灯
消灯
1(電源)ランプ
緑点灯
オレンジ点灯
消灯
1(電源)ランプ
緑点灯
オレンジ点灯
消灯
NO INPUT SIGNAL
のパワー
DPMS
)に対応して
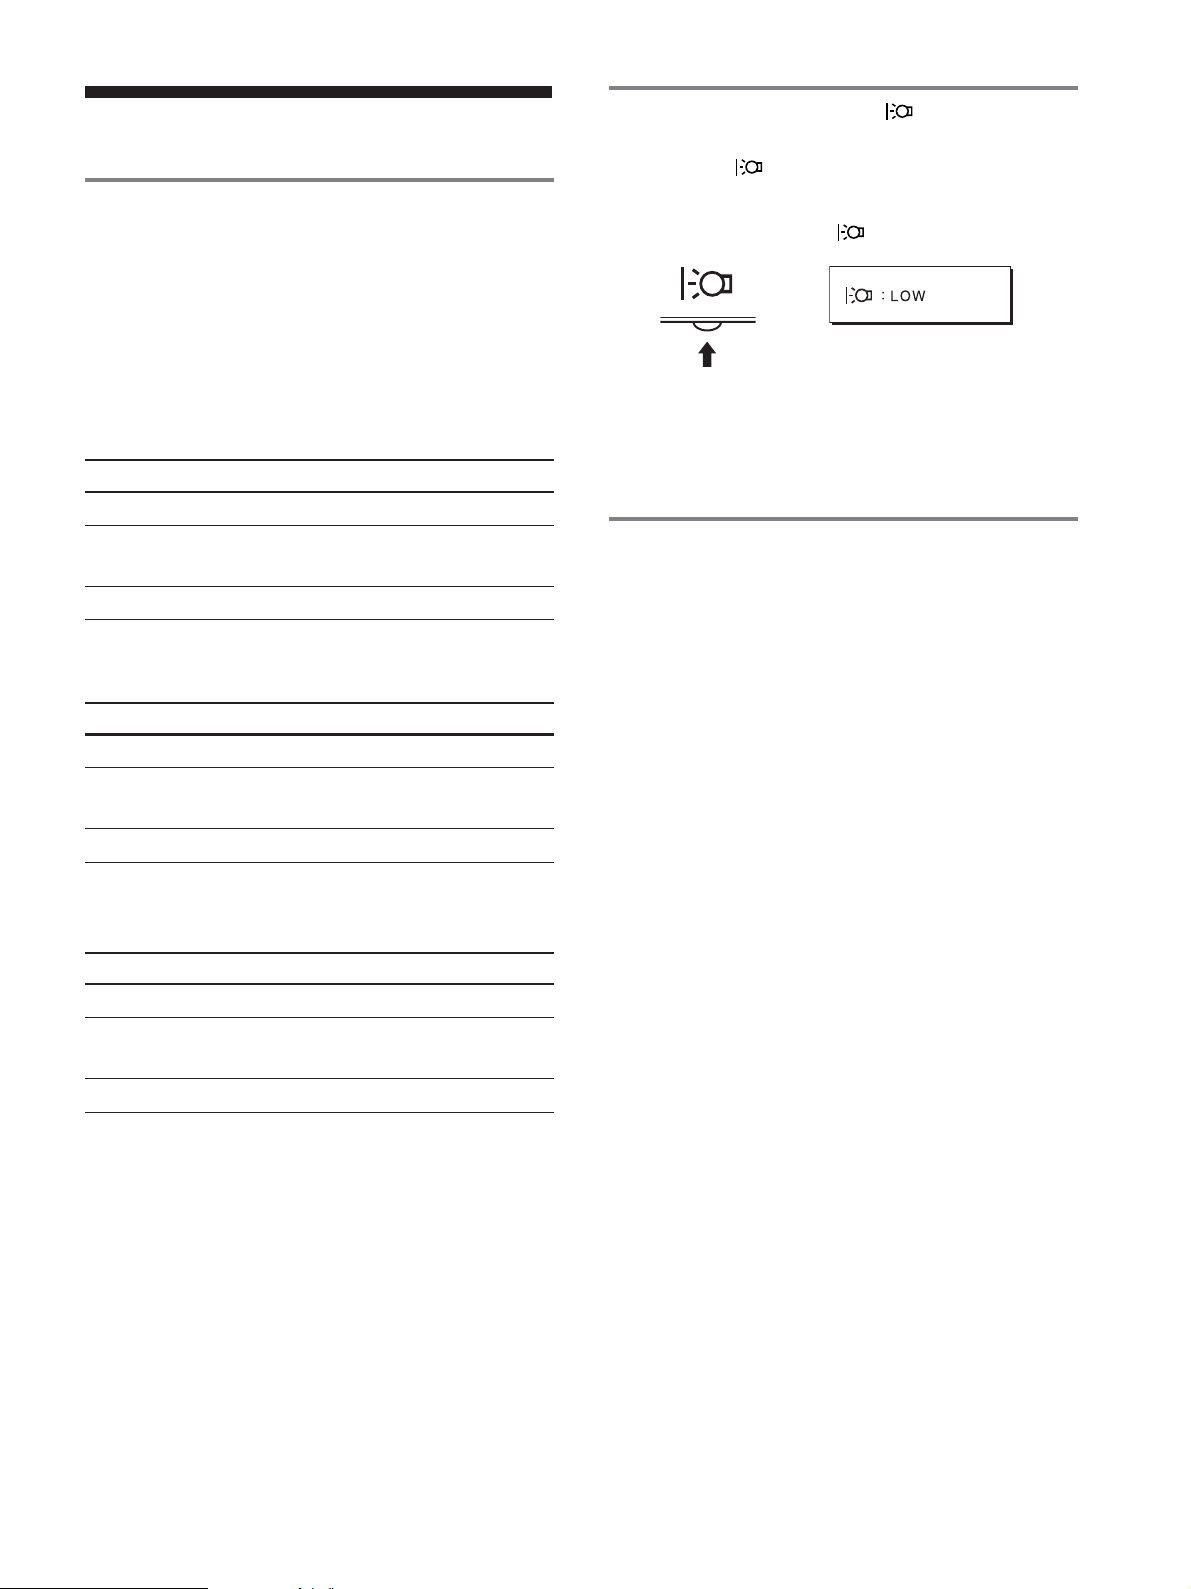
節電しながら使う( モード)
本機前面にある ボタンを押して「
消費電力を節約できます。
「
」と表示されるまで、 ボタンを何度か押す。
LOW
,
「
「
」と表示されて、バックライト輝度が落ちます。
LOW
」表示は約5秒後に消えます。
LOW
」に設定すると、
LOW
自動画質調整機能
本機では、入力信号に合わせて最適な画質で表示できるよ
うに、代表的な表示モードがお買い上げ時に設定されてい
ます。
また、設定されている表示モード以外の信号に対しても、
水平周波数28〜
(
SDM-HS73/HS93
ば、信号をはじめて受信したときに自動画質調整機能が働
いて、自動的に画像の位置とフェーズ、ピッチが調整さ
れ、きれいな画像を表示します。
このため、設定されている表示モード以外の信号をはじめ
て受信したときには、画面表示までに通常より時間がかか
ることがあります。この調整値は、自動的に本機に設定さ
れますので、次からは表示モードの信号と同様に動作する
ようになります。
また、上記のすべての表示モードは、ユーザーが微調整を
したときには、自動的に調整値がユーザーモードとして設
定されます。同じ信号が入力されるたびに、その調整値が
選ばれるようになります。
ご注意
自動画質調整機能が働いている間は、1(電源)スイッチ以外は操作
」
できません。
61 kHz(SDM-HS53)、28〜80 kHz
)、垂直周波数48〜
75 Hz
の間であれ
15
故障かな?と思ったら
お買い上げ店などにご相談いただく前に、次の事項をご確
認ください。
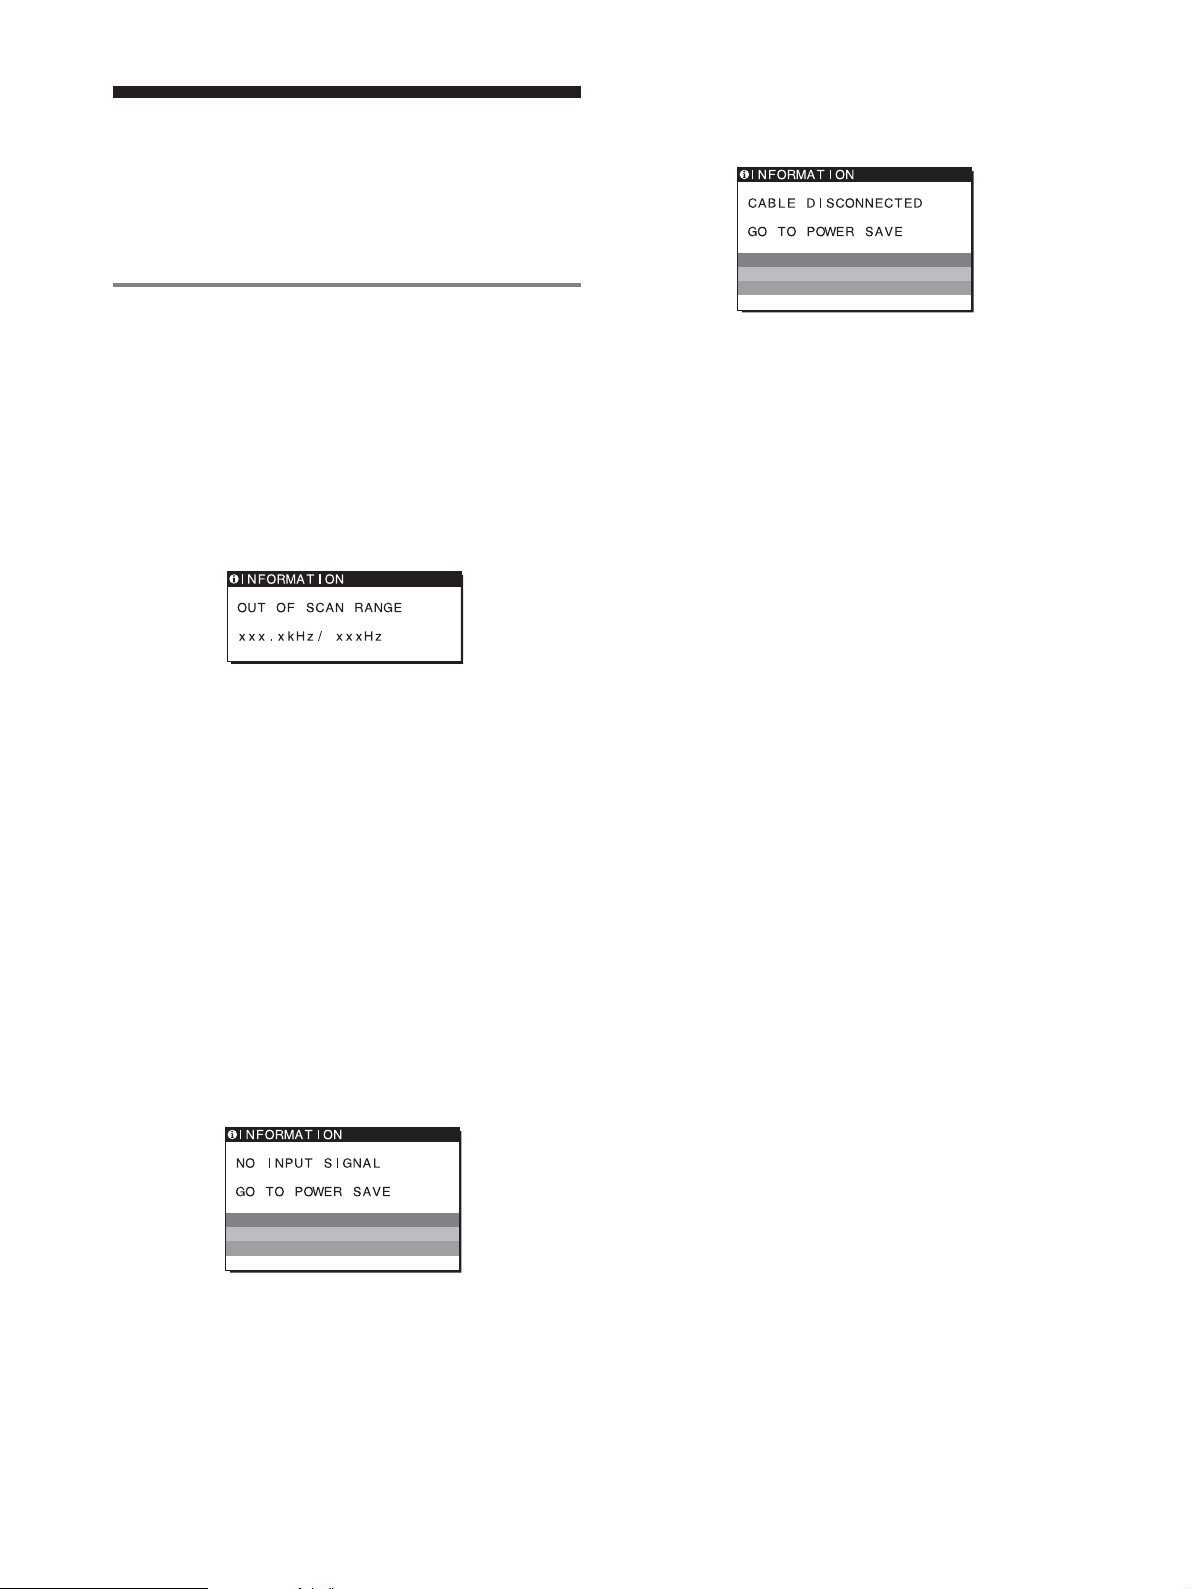
表示メッセージについて
CABLE DISCONNECTED
ビデオ信号ケーブルがはずれています。
と表示されている場合
入力信号が正しくないときは、画面に次のような表示メッ
セージが出ます。この場合は、次ページの「本機の症 状と
対処のしかた」に従ってください。
OUT OF SCAN RANGE
入力信号の周波数が、本機の仕様に合っていません。以下
を確認してください。
xxx.x kHz / xxx Hz
水平または垂直周波数が、本機の仕様に合っていま
せん。
数字の部分に現在入力されている信号の水平/垂直周波
数が表示されます。
RESOLUTION > 1024 × 768
(
SDM-HS53
解像度が、本機の仕様に合っていません。
)
と表示されている場合
と表示されている場合
と表示されている場合
GO TO POWER SAVE
このメッセージが表示されてから約5秒後に省電力状態
に入ります。
RESOLUTION > 1280
(
SDM-HS73/HS93
解像度が、本機の仕様に合っていません。
NO INPUT SIGNAL
ビデオ入力端子からの入力信号がありません。
×
)
と表示されている場合
と表示されている場合
1024
GO TO POWER SAVE
このメッセージが表示されてから約5秒後に省電力状態
に入ります。
16

本機の症状と対処のしかた
コンピュータなど本機に接続している機器が原因の場合は、接続機器の取扱説明書をご覧ください。
下記のように対処しても正常にならない場合は、「自己診断表示機能」をご覧ください(19ページ)。
こんなときは 原因と対処のしかた
画像が出ない。
電源コードをつなぎ直す。
1(電源)ランプが点灯して
いない。または、1(電源)
スイッチを押しても1(電
源)ランプが点灯しない。
1(電源)ランプが緑色に点
灯、またはオレンジ色で点
滅している。
「
CABLE
DISCONNECTED
う警告表示が出ている。
「
NO INPUT SIGNAL
いう警告表示が出ている。
または、1(電源)ランプが
オレンジ色に点灯、または
緑色とオレンジ色に点滅し
ている。
」とい
•
1(電源)スイッチを入れる。
•
自己診断表示機能で確認する(19ページ)。
•
ビデオ信号ケーブルを正しくつなぐ(7ページ)。
•
ビデオ信号ケーブルのピンが曲がっている。まっすぐに直すか、別のケーブルを使う。
•
付属品ではないビデオ信号ケーブルを使っている。付属品ではないビデオ信号ケーブルを使っている
•
と、省電力状態になる前に「
ません。
ビデオ信号ケーブルを正しくつなぐ(7ページ)。
•
」と
ビデオ信号ケーブルのピンが曲がっている。まっすぐに直すか、別のケーブルを使う。
•
■本機以外(コンピュータなど)が原因の場合
コンピュータが省電力状態になっている。キーボードのキーのどれかを押してみるか、マウスを動かし
•
てみる。
コンピュータのグラフィックボードが正しくバススロットに差し込まれているか確認する。
•
コンピュータの電源を入れる。
•
コンピュータを再起動する。
•
CABLE DISCONNECTED
」と表示が出ることがあります。故障ではあり
「
OUT OF SCAN
RANGE
が出ている。
Windows
ディスプレイをつなぎ換え
たとき
Macintosh
る。
」という警告表示
を使用していて
とつないでい
■本機以外(コンピュータなど)が原因の場合
入力信号の周波数が、本機の仕様に合っていない。本機をつなぐ前につないでいたディスプレイがある
•
ときは、そのディスプレイにつなぎ換えて、画像が出るか確認する。画像が出たら、コンピュータで以
下の範囲に設定する。
水平周波数:28〜
垂直周波数:48〜
本機をつなぐ前につないでいたディスプレイがあるときは、そのディスプレイにつなぎ換えて、画像が
•
出るか確認する。画像が出たら、
(
SDM-HS53
グ アンド プレイ」を選ぶ。
市販の
•
Macintosh
つなぐ(7ページ)。
61 kHz(SDM-HS53
75 Hz
または
SDM-HS73
アダプタを使っているときは、
)
、28〜
Windows
または
SDM-HS93
80 kHz(SDM-HS73/HS93
のデバイス選択画面で製造元に
)を選ぶ。本機の型名が表示されないときは、「プラ
Macintosh
アダプタとビデオ信号ケーブルを正しく
)
を選び、本機の型名
SONY
次のページへつづく
17
こんなときは 原因と対処のしかた
ピッチとフェーズを調整する(12ページ)。
画像が乱れる、ゆれる、ちらつ
く。
画像がくっきりしていない。
画像が二重、三重になる。
画像の位置がずれている、また
は画像の大きさが正しくない。
•
離れたところにある他の電源につないでみる。
•
■本機以外(コンピュータなど)が原因の場合
コンピュータのグラフィックボードで、本機が正しく設定されているかを確認する。
•
入力信号のグラフィックモード(
•
囲かを確認する。ただし本機で使用できる範囲でも、グラフィックボードによっては同期パルス幅が合
わないため、きれいに画像を映せないことがあります。
コンピュータのリフレッシュレート(垂直周波数)を、最適な画面になるように設定する。
•
コントラストやブライトネスを調整する(11ページ)。
•
ピッチとフェーズを調整する(12ページ)。
•
■本機以外(コンピュータなど)が原因の場合
コンピュータで解像度を
•
)に設定する。
HS93
ビデオ信号ケーブルの延長コードやインプットセレクタの使用をやめる。
•
接続ケーブルを端子にしっかりと差し込む。
•
ピッチとフェーズを調整する(12ページ)。
•
画像の位置を調整する(13ページ)。入力信号やグラフィックボードによっては、画像が画面全体に広
•
がらないことがあります。
”
VESA、Macintosh19
カラーなど)と周波数が、本機で使用できる範
XGA(1024 × 768)(SDM-HS53)、SXGA(1280 × 1024)(SDM-HS73/
画像が小さい。
画像が暗い。
画面に波模様や縦縞が出る。
色むらがある。
白色が白く見えない。
本機のボタンが働かない。
( マークが画面に出る)
■本機以外(コンピュータなど)が原因の場合
コンピュータの解像度を画面の解像度と同じにする。
•
ブライトネスを調整する(11ページ)。
•
バックライトを調整する(11ページ)。
•
画面の明るさを調整する(10ページ)
•
電源を入れたあと、画面が明るくなるまでしばらく時間がかかります。
•
ピッチとフェーズを調整する(12ページ)。
•
ピッチとフェーズを調整する(12ページ)。
•
色温度を調整する(13ページ)。
•
メニューロック機能が「オン」になっている。「オフ」にする(14ページ)。
•
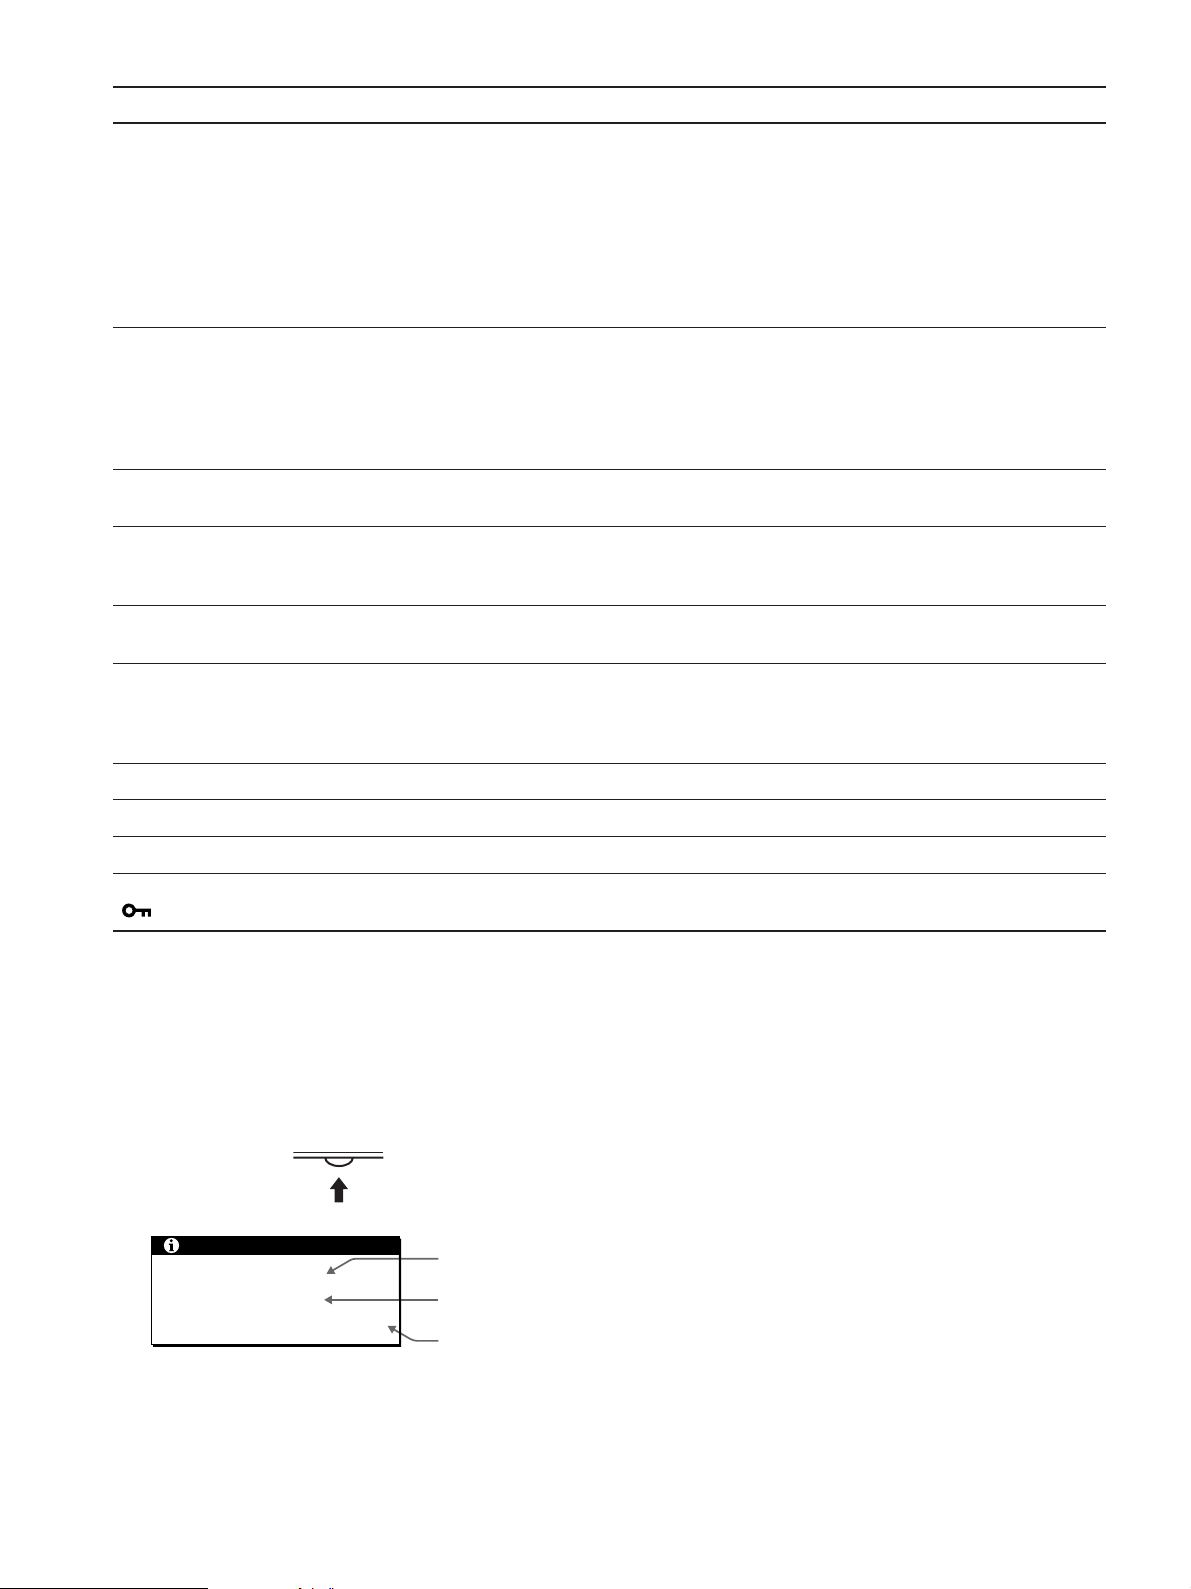
本機の情報(インフォメーション)を表示する
信号を入力しているときに、
まで
MENU
もう一度、
ボタンを5秒以上押したままにする。
ボタンを押すと消えます。
MENU
INFORMATION
MENU
例:
INFORMATION
MODEL : SDM-HS53
SER NO : 1234567
MANUFACTURED : 2003-52
機種名
製造番号
製造年と週
画面が出る
故障のときは、お買い上げ店またはソニーサービス窓口にご連絡く
ださい。また、お問い合わせのときは次のことをお知らせくださ
い。
型名:
•
•
•
•
•
SDM-HS53
製造番号:
故障の状態:できるだけくわしく
購入年月日:
接続しているコンピュータ、およびグラフィックボードの仕様と
名称:
または
SDM-HS73
または
SDM-HS93
18
自己診断表示機能
本機には自己診断表示機能がついています。本機またはコ
ンピュータに異常が起きたときには、画像が消えて、1(電
源)ランプが緑色に点灯するか、オレンジ色に点滅します。
1(電源)ランプがオレンジ色に点灯しているときは、コン
ピュータが省電力状態になっています。キーボードのキー
のどれかを押してみるか、マウスを動かしてみてくださ
い。
1(電源)
MENU
OK
ランプ
保証書とアフターサービス
保証書
この製品は保証書が添付されていますので、お買い上げ
•
の際、お買い上げ店でお受け取りください。
所定事項の記入および記載内容をお確かめのうえ、大切
•
に保存してください。
保証期間は、お買い上げ日より3年間です。
•
アフターサービスについて
調子が悪いときはまずチェックを
b「故障かな?と思ったら」の項を参考にして、故障かど
うかをお調べください。
それでも具合が悪いときはサービス窓口へ
b お買い上げ店、または添付の「ソニーご相談窓口のご案
内」にある、お近くのソニーサービス窓口にご相談くだ
さい。
画像が消えて、1(電源)ランプが緑色に点灯してい
るとき
1(電源)スイッチを押して電源を切り、ビデオ信号ケー
1
ブルを抜く。
1(電源)スイッチを押して、本機の電源を入れ直す。
2
本のカラーバー(白、赤、緑、青)が出れば、本機は正常
4
な状態です。ビデオ信号ケーブルをつなぎ直して、コン
ピュータの状態を確認してください。
カラーバーが出ないときは、本機が故障している可能性が
あります。お買い上げ店またはソニーサービス窓口にご相
談ください。
画像が消えて、1(電源)ランプがオレンジ色に点滅
しているとき
1(電源)スイッチを押して、本機の電源を入れ直す。
1(電源)ランプが緑色に点灯すれば、本機は正常な状態で
す。
1(電源)ランプが点滅したままのときは、本機が故障して
いる可能性があります。お買い上げ店またはソニーサービ
ス窓口にご相談ください。お問い合わせのときは、本機の
型名と製造番号、接続しているコンピュータとグラフィッ
クボードの仕様および名称をお知らせください。
保証期間中の修理は
b 保証書の記載内容に基づいて修理させていただきます。
くわしくは保証書をご覧ください。
保証期間経過後の修理は
b 修理によって機能が維持できる場合は、ご要望により有
料で修理させていただきます。
部品の保有期間について
当社では、コンピュータディスプレイの補修用性能部品
(製品の機能を維持するために必要な部品)を、製造打ち切
り後8年間保有しています。この部品保有期間を修理可能の
期間とさせていただきます。
保有期間が経過した後も、故障箇所によっては、修理可能
の場合がありますので、お買い上げ店か、サービス窓口に
ご相談ください。
ご相談になるときは次のことをお知らせください。
型名:
SDM-HS53
製造番号:
故障の状態:できるだけくわしく
購入年月日:
お買い上げ店
または
SDM-HS73
または
SDM-HS93
TEL.
お近くのサービスステーション
TEL.
This display is designed for use in Japan only and
cannot be used in any other country.
19

4-094-159-04(1)
TFT LCD Color
Computer Display
SDM-HS53
SDM-HS73
SDM-HS93
© 2003 Sony Corporation
Owner’s Record
The model and serial numbers are located at the rear of the unit.
Record these numbers in the spaces provided below. Refer to them
whenever you call upon your dealer regarding this product.
Model No.
Serial No.
WARNING
To prevent fire or shock hazard, do not expos e the
unit to rain or moisture.
Dangerously high voltages are present inside the
unit. Do not open the cabinet. Refer servicing to
qualified personnel only.
FCC Notice
This equipment has been tested and found to comply with the limits
for a Class B digital device, pursuant to Part 15 of the FCC Rules.
These limits are designed to provide reasonable protection against
harmful interference in a residential installation. This equipment
generates, uses, and can radiate radio frequency energy and, if not
installed and used in accordance with the instructions, may cause
harmful interference to radio communications. However, there is no
guarantee that interference will not occur in a particular installation.
If this equipment does cause harmful interference to radio or
television reception, which can be determined by turning the
equipment off and on, the user is encouraged to try to correct the
interference by one or more of the following measures:
– Reorient or relocate the receiving antenna.
– Increase the separation between the equipment and receiver.
– Connect the equipment into an outlet on a circuit different from
that to which the receiver is connected.
– Consult the dealer or an ex perienced r adio/TV te chnician for help.
You are cautioned that any changes or modifications not expressly
approved in this manual could void your authority to operate this
equipment.
NOTICE
This notice is applicable for USA/Canada only.
If shipped to USA/Canada, install only a UL LISTED/CSA
LABELLED power supply cord meeting the following
specifications:
SPECIFICATIONS
Plug Type Nema-Plug 5-15p
Cord Type SVT or SJT, minimum 3 × 18 AWG
Length Maximum 15 feet
Rating Minimum 7 A, 125 V
NOTICE
Cette notice s’applique aux Etats-Unis et au Canada
uniquement.
Si cet appareil est exporté aux Etats-Unis ou au Canada, utiliser
le cordon d’alimentation portant la mention UL LISTED/CSA
LABELLED et remplissant les conditions suivantes:
SPECIFICATIONS
Type de fiche Fiche Nema 5-15 broches
Cordon Type SVT ou SJT, minimum 3 × 18 AWG
Longueur Maximum 15 pieds
Tension Minimum 7 A, 125 V
ENERGY STAR Partner, Sony
As an
Corporation has determined that this
product meets the
guidelines for energy efficiency.
ENERGY STAR
IMPORTANTE
Para prevenir cualquier mal funcionamiento y evitar daños, por
favor, lea detalladamente este manual de instrucciones antes
de conectar y operar este equipo.
If you have any questions about this product, you may call;
Sony Customer Information Services Center
1-800-222-7669 or http://www.sony.com/
Declaration of Conformity
Trade Name: SONY
Model: SDM-HS53/HS73/HS93
Responsible Party: Sony Electronics Inc.
Address: 16450 W. Bernardo Dr,
Telephone Number: 858-942-2230
This device complies with part 15 of the FCC rules. Operation is
subject to the following two conditions: (1) This device may not
cause harmful interference, and (2) this device must accept any
interference received, including interference that may cause
undesired operation.
San Diego, CA 92127 U.S.A.
BZ
03
2
Table of Contents
• Macintosh is a trademark licensed to
Apple Computer, Inc., registered in the
U.S.A. and other countries.
• Windows
trademarks of M ic roso ft C orp o rat ion i n
the United States an d o ther countries.
• IBM PC/AT and VGA are registered
trademarks of IBM Corporation of the
U.S.A.
• VESA and DDC
Video Electronics Standards
Association.
ENERGY STAR is a U.S. registered
•
mark.
• Adobe and Acrobat are trademar ks of
Adobe Systems Incorporated.
• Al l other product names mentioned
herein may be the trademarks or
registered trademarks of thei r respecti ve
companies.
• F urthermore, “” and “” are not
mentioned in each case in this manual.
and MS-DOS are registered
are trademarks of the
Precautions. . . . . . . . . . . . . . . . . . . . . . . . . . . . . . . . . . . . . . . . . . . .4
Identifying parts and controls . . . . . . . . . . . . . . . . . . . . . . . . . . . . . . 5
Setup. . . . . . . . . . . . . . . . . . . . . . . . . . . . . . . . . . . . . . . . . .7
Step 1: Connect the display to your computer . . . . . . . . . . . . . . . . . 7
Step 2: Connect the power cord. . . . . . . . . . . . . . . . . . . . . . . . . . . . 8
Step 3: Secure the cords and close the back cover. . . . . . . . . . . . .8
Step 4: Turn on the monitor and computer . . . . . . . . . . . . . . . . . . . 9
Adjusting the tilt . . . . . . . . . . . . . . . . . . . . . . . . . . . . . . . . . . . . . . . .9
Customizing Your Monitor . . . . . . . . . . . . . . . . . . . . . . .10
Adjusting to the desired brightness. . . . . . . . . . . . . . . . . . . . . . . . . 10
Navigating the menu. . . . . . . . . . . . . . . . . . . . . . . . . . . . . . . . . . . .10
Adjusting the backlight (BACKLIGHT) . . . . . . . . . . . . . . . . . . . . . . 11
Adjusting the contrast (CONTRAST) . . . . . . . . . . . . . . . . . . . . . . . 11
Adjusting the black level of an image (BRIGHTNESS). . . . . . . . . . 11
Adjusting the picture’s sharpness and centering (SCREEN) . . . . . 12
Adjusting the color temperature (COLOR) . . . . . . . . . . . . . . . . . . . 13
Changing the gamma setting (GAMMA). . . . . . . . . . . . . . . . . . . . .14
Changing the menu’s position (MENU POSITION) . . . . . . . . . . . . 14
Selecting the on-screen menu language (LANGUAGE). . . . . . . . . 14
Additional settings. . . . . . . . . . . . . . . . . . . . . . . . . . . . . . . . . . . . . . 14
Technical Features . . . . . . . . . . . . . . . . . . . . . . . . . . . . .15
Power saving function. . . . . . . . . . . . . . . . . . . . . . . . . . . . . . . . . . . 15
Reducing the power consumption ( mode) . . . . . . . . . . . . . . . . 15
Automatic picture quality adjustment function . . . . . . . . . . . . . . . .15
Troubleshooting. . . . . . . . . . . . . . . . . . . . . . . . . . . . . . . .16
On-screen messages . . . . . . . . . . . . . . . . . . . . . . . . . . . . . . . . . . . 16
Trouble symptoms and remedies . . . . . . . . . . . . . . . . . . . . . . . . . . 17
Self-diagnosis function . . . . . . . . . . . . . . . . . . . . . . . . . . . . . . . . . . 19
For details on the specifications o f the SDM-HS53/HS 73/
HS93, refer to the supplementary document “Quick
Setup Guide.”
GB
http://www.sony.net/
3
Precautions
Warning on power connections
• Use the supplied power cord. If you use a different power cord,
be sure that it is compatible with your local power supply.
For the customers in the U.S.A.
If you do not use the appropriate cord, this monitor will not
conform to mandatory FCC standards.
For the customers in the UK
If you use the monitor in the UK, be sure to use the appropriate
UK power cord.
Example of plug types
for 100 to 120 V AC for 200 to 240 V AC for 240 V AC only
The equipment should be installed near an easily accessible outlet.
Installation
Do not install or leave the monitor:
• In places subject t o extreme temperatures, for example near a
radiator, heating ve nt, or in direc t su nlight. Subjecting the
monitor to extreme temperatures, such as in an automobile
parked in direct sunlight or near a heating vent, could cause
deformations of the casing or malfunctions.
• In places subject to mechanical vibration or shock.
• Near any equipment that generates a strong magnetic field,
such as a TV or various other household appliances.
• In places subject to inordinate amounts of dust, dirt, or sand, for
example near an open window or an outdoor exit. If setting up
temporarily in an outdoor environ me n t, be sur e to take
adequate precautions against airborne dust and dirt. Otherwise
irreparable malfu nctions could occur.
Handling the LCD screen
• Do not leave the LCD screen facing the sun as it can damage
the LCD screen. Take care when you place the monitor by a
window.
• Do not push on or scratch the LCD screen. Do not place a heavy
object on the LCD screen. This may cause th e screen to lose
uniformity or cause LCD panel malfunctions.
• If the monitor is used in a col d place, a residual image may
appear on the screen. This is not a malfunction. The screen
returns to normal as the temperature rises to a normal operating
level.
• If a still picture is displ ayed for a long time, a residual image
may appear for a while. The residual image will eventually
disappear.
• The LCD panel becomes warm during operation. This is not a
malfunction.
Note on the LCD (Liquid Crystal Display)
Please note that the LCD screen is made with highprecision technology. However, black points or bright
points of light (red, blue, or green) may appear
constantly on the LCD screen, and irregular colored
stripes or brightness may appear on the LCD screen.
This is not malfunction.
(Effective dots: more than 99.99%)
Maintenance
• Be sure to unplug the power cord from the power outlet before
cleaning your mon itor.
• Clean the LCD screen with a soft cloth. If you use a glass
cleaning liquid, do not use any type of cleaner contai ning an
anti-static solution or similar additive as this may scratch the
LCD screen’s coating.
• Clean the cabinet, panel, and controls with a soft cloth lightly
moistened with a mil d detergent solution. Do not use any type
of abrasive pad, scouring powder, or solvent, such as alcohol or
benzine.
• Do not rub, touch, or tap the surface of the screen with sharp or
abrasive items such as a ballpoint pen or screwdriver. This type
of contact may result in a scratched picture tube.
• Note that material deterioration or LCD screen coating
degradation may occur if the monitor is exposed to volatile
solvents such as insecticide, or if prolonged co ntact is
maintained with rubber or vinyl materials.
Transportation
• Disconnect all cables from the monitor and grasp the support
and base sections of the display stand firmly with both hands
when transporti ng. If you d rop the mo nitor, yo u may be in jured
or the monitor m a y be damaged.
• When you transport this monitor for repair or shipment, use the
original carton and packing materials.
Disposal of the monitor
• Do not dispose of this monitor with general
household waste.
• The fluorescent tube used in this monitor contains
mercury. Disposal of this mon itor must be carried out
in accordance to the regulations of your local
sanitation authority.
4
Identifying parts and controls
See the pages in parentheses for further details.
The 1 (power) switch and the control buttons are on the lower
right part of the front of the monitor.
Front of the LCD display
MENU
OK
OK
MENU
1 1 (Power) switch and indicator (pages 9, 15, 19)
To turn the displ ay on or off, press the 1 (power) switch
upward.
The power indicator lights up in green when the display is
turned on, and lights up in orange when the monitor is in
power saving mode.
Press upward to turn the display on or off.
2 MENU button (pages 10, 11)
This button displays or closes the main menu.
3 M/m buttons (page 11)
These buttons functio n as the M/m buttons when selecti ng the
menu items and making adjust m e nt s .
4 OK button (page 11)
This button selects the item or executes the settings in the
menu.
5 button (page 10)
This button is used to change the brightness of the screen.
6 Security Lock Hole
The security lock hole should be app lied with t he Kensingt on
Micro Saver Security System.
Micro Saver Security System is a tra demark of Kensington.
GB
Rear of the display stand
12345
(continued)
5
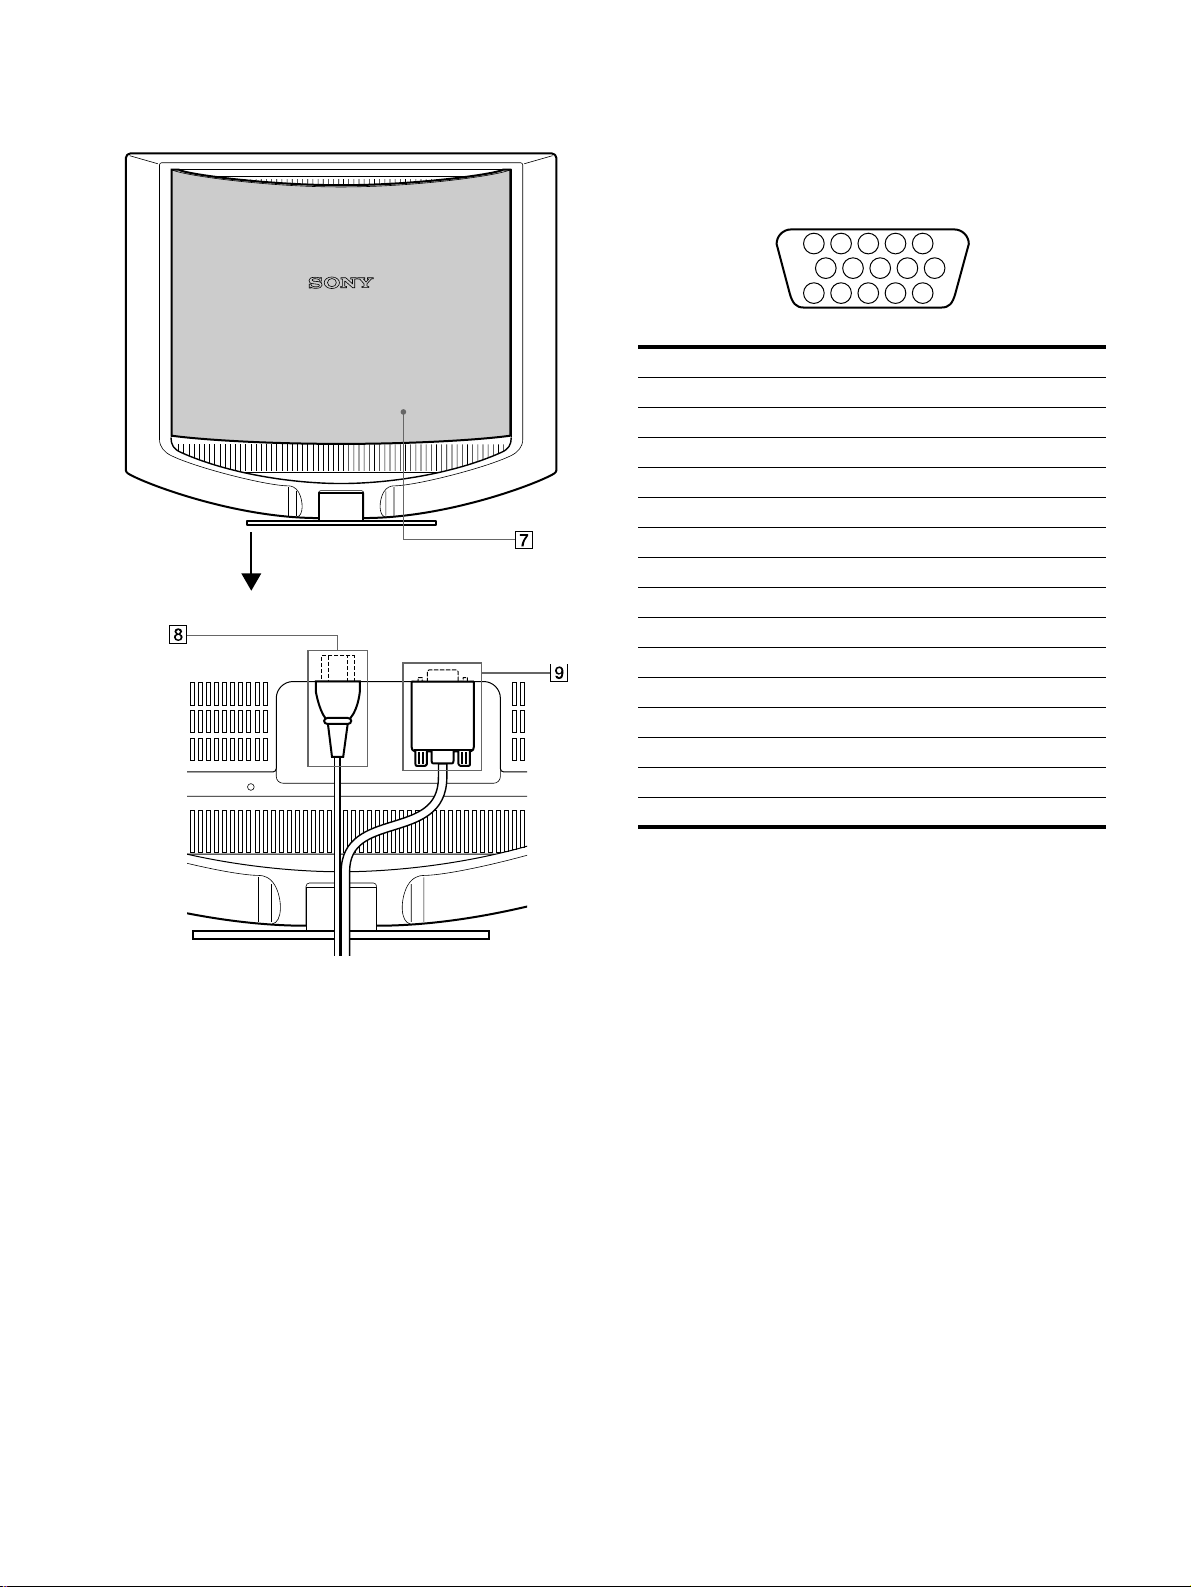
Rear of the LCD display
8 AC IN connector (page 8)
Connect the power cord (supplied ).
9 HD15 (RGB) input connector (page 7)
This connector inputs RGB video signals (0.7 Vp-p, positive)
and SYNC signals.
Open the back cover.
5 4 3 2
1
678910
1112131415
Pin No. Signal
1Red
2Green
3Blue
4 ID (Ground)
5 DDC Ground*
6 Red Ground
7 Green Ground
8 Blue Ground
9 DDC + 5V*
10 Ground
11 ID (Ground)
12 Bi-Directional Data (SDA )*
13 H. Sync
14 V. Sync
15 Data Clock (SCL)*
The illustration of the back of the monitor show here is the
SDM-HS53.
7 Back cover (page 8)
Open this cover when you connect/disconnect cables or cords.
* DDC (Display Data Channel) is a standard of VESA.
6
Setup
Before using your monitor, check that the following items are
included in your carton:
•LCD display
• Power cord
• HD15-HD15 vide o signal cable
•Cord strap
• Utility/Instruction Manual CD-ROM (utility software for
Windows/Macintosh, Operating Instructions)
• Warranty card
• Quick Setup Guide
Step 1:Connect the display to your
computer
Turn off the monitor and computer before co nnecting.
x Connecting to a Macintosh co m puter
When connecting this monitor to a Macintosh computer, use the
Macintosh adapter (not supplied) if necessary. Connect the
Macintosh adapter to the computer before connecting the cable.
MENU
OK
Notes
• Do not touch the pins of the video signal cable connector as this might
bend the pins.
• Check the alignment of the HD15 connector to prevent bending the pins
of the video signal cable connector.
x Connecting to an IBM PC/AT or compatible
computer
MENU
OK
to video output
HD15-HD15 video
IBM PC/AT or
compatible computer
signal cable (supplied)
Macintosh computer
to video output
HD15-HD15 video
signal cable (supplied)
GB
(continued)
7
Step 2:Connect the power cord
Step 3:Secure the cords and close
With the monitor and computer switched off, first connect the
power cord to the monitor, then connect it to a power outlet.
to AC IN
to a power outlet
power cord (supplied)
The illustration of the back of the monitor show here is that
of the SDM-HS53.
The same applies for the SDM-HS73/HS93 model.
the back cover
1 Bundle the cables and cords.
Using the supplied cord strap, bundle the cab les and cords.
Cord
strap
The illustration of the back of the monitor show here is
that of the SDM-HS53.
The same applies for the SDM-HS73/HS93 model.
2 Close the back cover.
8
Step 4:Turn on the monitor and
Adjusting the tilt
computer
1 Press the 1 (power) switch upward.
The 1 (power) indicator of the monitor lights up in green.
2 Turn on the computer.
The installation of your monitor is compl ete. If necessary, use the
monitor’s controls to adjust the picture.
If no picture appears on your screen
• Check that the power cord and the video signal cable are
properly co nnected.
• If NO INPUT SIGNAL appears on the screen:
The computer is in the power savin g mode. Try pressing any
key on the keyboard or moving the mouse.
• If CABLE DISCONNECTED appears on the screen:
Check that the video signa l cable is properly connected.
This display can be adjusted within the angles shown below.
Approx. 5°
Grasp the lower sides of the LCD panel, then adjust screen tilt.
Approx. 20°
GB
• If OUT OF SCAN RANGE appears on the screen:
Reconnect the old monitor. Then adju st th e computer’s
graphics board within the following ranges.
SDM-HS53 SDM-HS73/HS93
Horizontal
frequency
Vertical
frequency
Resolution 1024 × 768 or less 1280 × 1024 or less
For more information about the on-screen messages, see “Trouble
symptoms and remedies” on page 17.
No need for specific drivers
The monitor complies with the “DDC” Plug & Play standard and
automatically detec ts all the monitor’s informati on. No specific driver
needs to be installed to the computer.
The first time you turn on your computer after connecting the monitor, the
setup Wizard may appear on the screen. In this case, follow the on-screen
instructions. The Plug & Play monitor is automatically selected so that
you can use this monitor.
The vertical frequency turns to 60 Hz.
Since flickers are unobtrusive on the monitor, you can use it as it is. You
do not need to set the vertical frequency to any particular high value.
28–61 kHz 28–80 kHz
48–75 Hz 48–75 Hz
To use the display comfortably
This display is designed so that you c an set it up a t a comfor table
viewing angle. Adjust the viewing angle of your display
according to the height of the desk and chair, and so that light is
not reflected from the screen to your eyes.
9
Customizing Your Monitor
Before making adjustments
Connect the monitor and the co mputer, and turn them on.
Wait for at least 30 minutes before making adjustments for the
best result.
1 BACKLIGHT
(page 11)
Select the BACKLIGHT
menu to adjust the brightn ess
of the backlight.
ZZ...
BACKL GHTI
1280 1024 60Hzx
100
/
EX I T
You can make numerous adj ustments to your monitor using the
on-screen menu.
Adjusting to the desired
brightness
Pressing the button, you can change the brightness of the
screen. Each time you pre s s the button, the mode
changes as follows.
t MIDDLE t LOW t USER t HIGH
HIGH
The brightness of the screen will decrease as the mode
setting changes from HIGH to LOW.
If you select USER, you can adjust the ba cklight level by pressin g
the M/m buttons, the same as when you select BAC KLIGHT
using the menu.
:
USER
100
Only while the mode is set to USER, are the BACKLIGHT,
CONTRAST, and BRIGHTNESS items of the menu available
(page 11).
If you select LOW, the power consumption is reduced (page 15).
Navigating the menu
Press the MENU butto n to display th e main menu on your scr een.
See page 11 for more information on using the MENU button.
2 CONTRAST 6 (page 11)
Select the CONTRAST
menu to adjust the picture
contrast.
3 BRIGHTNESS 8
(page 11)
Select the BRIGHTNESS
menu to adjust the picture
brightness (black level).
4 SCREEN (page 12)
Select the SCREEN menu to
adjust the picture’s sharpness
(phase/pitch) or its centering
(horizontal/vertical
position).
5 COLOR (page 13)
Select the COLOR menu to
adjust the color temperature
of the picture. This adjusts
the tone of the screen.
CONTRAST
1280 1024 60Hzx
BR GHTNESSI
1280 1024 60Hzx
SCREEN
AUTO
PHASE
P I TCH
H CENTER
V CENTER
1280 1024 60Hzx /
COLOR
9300K
6500K
USER
ADJ UST
1280 1024 60Hzx /
100
/
EX I T
100
/
EX I T
EX I T
EX I T
MENU
,
BACKL GHTI
1280 1024 60Hzx
100
/
EX I T
Use the M/m and OK buttons to select the icons in the above main
menu illustration. The following 1~9 menu appears. Keep
pressing m to scroll d own until th e icon s in me nu 9 appea r. Se e
page 11 for more information on using the M/m and OK buttons.
10
6 GAMMA (page 14)
Select the GAMMA menu to
change the picture’s color
shade setting.
7 MENU POSITION
(page 14)
Select the MENU
POSITION to change the onscreen menu position.
GAMMA
GAMMA 1
GAMMA 2
GAMMA 3
1280 1024 60Hzx /
MENU POS T ONII
1280 1024 60Hzx /
EX I T
EX I T
8 LANGUAGE (page 14)
Select LANGUAGE to
change the language used on
menus or messages.
LANGUAGE
ENGL I SH
FRANÇA I S
DEUTSCH
ESPAÑOL
I TAL I ANO
1280 1024 60Hzx /
EX I T
x Resetting the adjustments
You can reset the adjustments using th e RESET menu. See
page 14 for more information on resetting the adjustments.
Adjusting the backlight
(BACKLIGHT)
9 Other menus (page 14)
Set the following menu
items.
• RESET 0
•MENU LOCK
RESET
OK
CANCEL
1280 1024 60Hzx /
EX I T
x Using the MENU, M/m, and OK buttons
1 Display the main menu.
Press the MENU button to display the main menu on your
screen.
MENU
2 Select the menu you want to adjust.
Press the M/m buttons to display the de si re d m e nu . Pr e s s th e
OK button to select the menu item.
OK
,
If the screen is too bright, adjust the backlig ht and make the screen
easier to see.
Note
The backlight cannot be adjusted when the mode is set to HIGH,
MIDDLE, or LOW (p age 10).
1 Press the MENU button.
The main menu appears on th e screen.
2 Press the M/m buttons to select (BACKLIGHT)
and press the OK button.
The BACKLIGHT menu appears on the s creen.
3 Press the M/m buttons to adjust the light level and
press the OK button.
Adjusting the contrast
(CONTRAST)
Adjust the picture contrast.
Note
The contrast cannot be adjusted when the mode is set to HIGH,
MIDDLE, or LOW (p age 10).
1 Press the MENU button.
The main menu appears on th e screen.
2 Press the M/m buttons to select 6 (CONTRAST) and
press the OK button.
The CONTRAST menu appears on the screen.
GB
3 Adjust the menu.
Press the M/m buttons to make the adjust ment, the n press t he
OK button.
When you press the OK butto n, the setting is stored, then the
display returns to the previous menu.
OK
,
4 Close the menu.
Press the MENU button once to return to normal viewing. If
no buttons are pressed, the menu closes automatically after
about 30 seconds.
MENU
3 Press the M/m buttons to adjust the contrast and
press the OK button.
Adjusting the black level of an
image (BRIGHTNESS)
Adjust the picture brightness (black level).
Note
The brightness cannot be adjusted when the mode is set to HIGH,
MIDDLE, or LOW (p age 10).
1 Press the MENU button.
The main menu appears on th e screen.
2 Press the M/m buttons to select 8 (BRIGHTNESS)
and press the OK button.
The BRIGHTNESS menu appears on th e screen.
3 Press the M/m buttons to adjust the brightness and
press the OK button.
11
 Loading...