

Page 1

2-583-748-01(1)
TFT LCD Color
Computer Display
Quick Setup Guide
Guide de configuration rapide
Guía de instalación rápida
US
FR
ES
DO NOT RETURN TO PLACE OF PURCHASE
NE PAS RETOURNER AU MAGASIN
If you believe the product purchased in the U.S. is
defective, call Sony for assistance or Advance Exchange.
For assistance in the U.S. call: 1-866-357-SONY (7669)
For assistance in Canada call: 1-800-961-SONY (7669)
Si vous croyez que le produit acheté aux E.-U. est defectueux, communiquer
avec Sony pour obtenir de l’aide ou un remplacement.
Pour obtenir de l’aide aux E.-U., composer le : 1-866-357-SONY (7669)
Pour obtenir de l’aide au Canada, composer le :1-800-961-SONY (7669)
Si usted compró este producto en E.E.U.U. y necesita asistencia,
no regrese el producto comuniquese al 1-866-357-SONY (7669).
http://www.sony.com/displays/support
SDM-HS75P/SDM-HS95P
© 2004 Sony Corporation
Page 2

Owner’s Record
The model and serial numbers are located at
the rear of the unit. Record these numbers in
the spaces provided below. Refer to them
whenever you call upon your dealer
regarding this product.
Model No.
Se ria l No .
WARNING
To prevent fire or shock hazard,
do not expose the unit to rain or
moisture.
Dangerously high voltages are
present inside the unit. Do not
open the cabinet. Refer servicing
to qualified personnel only.
Precautions
Warning on power connections
• Use the supplied power cord. If you use a
different power cord, be sure that it is
compatible with your local power supply.
For the customers in the U.S.A.
If you do not use the appropriate cord, this
monitor will not conform to mandatory
FCC standards.
For the customers in the UK
If you use the monitor in the UK, be sure
to use the appropriate UK power cord.
Example of plug types
for 100 to 120 V AC for 200 to 240 V AC
Installation
Do not install or leave the monitor:
• In places subject to extreme temperatures,
for example near a radiator, heating vent,
or in direct sunlight. Subjecting the
monitor to extreme temperatures, such as
in an automobile parked in direct sunlight
or near a heating vent, could cause
deformations of the casing or
malfunctions.
• In places subject to mechanical vibration
or shock.
• Near any equipment that generates a
strong magnetic field, such as a TV or
various other household appliances.
• In places subject to inordinate amounts of
dust, dirt, or sand, for example near an
open window or an outdoor exit. If setting
up temporarily in an outdoor
environment, be sure to take adequate
precautions against airborne dust and dirt.
Otherwise irreparable malfunctions could
occur.
Place this unit on a flat surface. Do not place
it on an uneven surface like the edge of a
desk. If a part of this unit sticks out from
such surface, it may fall or cause damaged
and injury.
Note on the LCD (Liquid Crystal
Display)
Please note that the LCD screen is made
with high-precision technology. However,
black points or bright points of light (red,
blue, or green) may appear constantly on the
LCD screen, and irregular colored stripes or
brightness may appear on the LCD screen.
This is not malfunction.
(Effective dots: more than 99.99%)
for 240 V AC only
The equipment should be installed near an
easily accessible outlet.
2 (US)
For customers in the United
States
This product contains mercury. Disposal of this
product may be regulated if sold in the United
States. For disposal or recycling information,
please contact your local authorities or the
Electronics Industries Alliance
(http://www.eiae.org).
Page 3
To view the Operating
Instructions on the CD-
Setup
ROM
Note
To view the Operating Instructions on the
CD-ROM, Macromedia Shockwave
Player and Adobe Acrobat Reader
(version 6.0 or later) must be installed on
your computer. The “installs” folder on
the CD-ROM contains the installation
programs for them.
If you want to install those programs,
open the “My Computer” and right-click
on the CD-ROM drive, then select
“Explore” and open the “installs”
folder.(for Windows only)
If you are using a Macintosh
computer:
Double-click on th e CD-ROM icon to open the
window, then double-click on the
“MONITOR” icon
To view the Operating
Instructions
The Operating Instructions files are included in
the supplied CD-ROM. Load the supplied CDROM into the CD-ROM drive of your computer.
After a while, the introductory page of the CDROM will open automatically.
If the introductory page does not appear
automatically, open the Operating Instruction file
directly. (for Windows only)
1 Open the “My Computer.”
2 Right-click the “CD-ROM” drive, and select
“Explore.”
3 Open the “manuals” folder.
4 Open the “HS” folder.
5Select and open the “HS_75_95_P_**.pdf.”
(“**” in the file name stands for the language in
which each PDF file is written. For example,
HS_75_95_P_GB.pdf is written in British
English.)
To exit from the CD-ROM
Click “EXIT/CD-ROM.”
.
Unpacking
Make sure your carton contains everything
listed below.
•LCD display
• Power cord
• HD15-HD15 video signal cable (analog
RGB)
• DVI-D video signal cable (digital RGB)
•Cord strap
• CD-ROM (utility software for Windows/
Macintosh, Operating Instructions, etc.)
• Warranty card
• This Quick Setup Guide
Connecting your
monitor
Connect your monitor to a computer or other
equipment.
• Turn off the monitor, computer, and
any other equipment before
connecting them.
• Do not touch the pins of the video
signal cable plug.
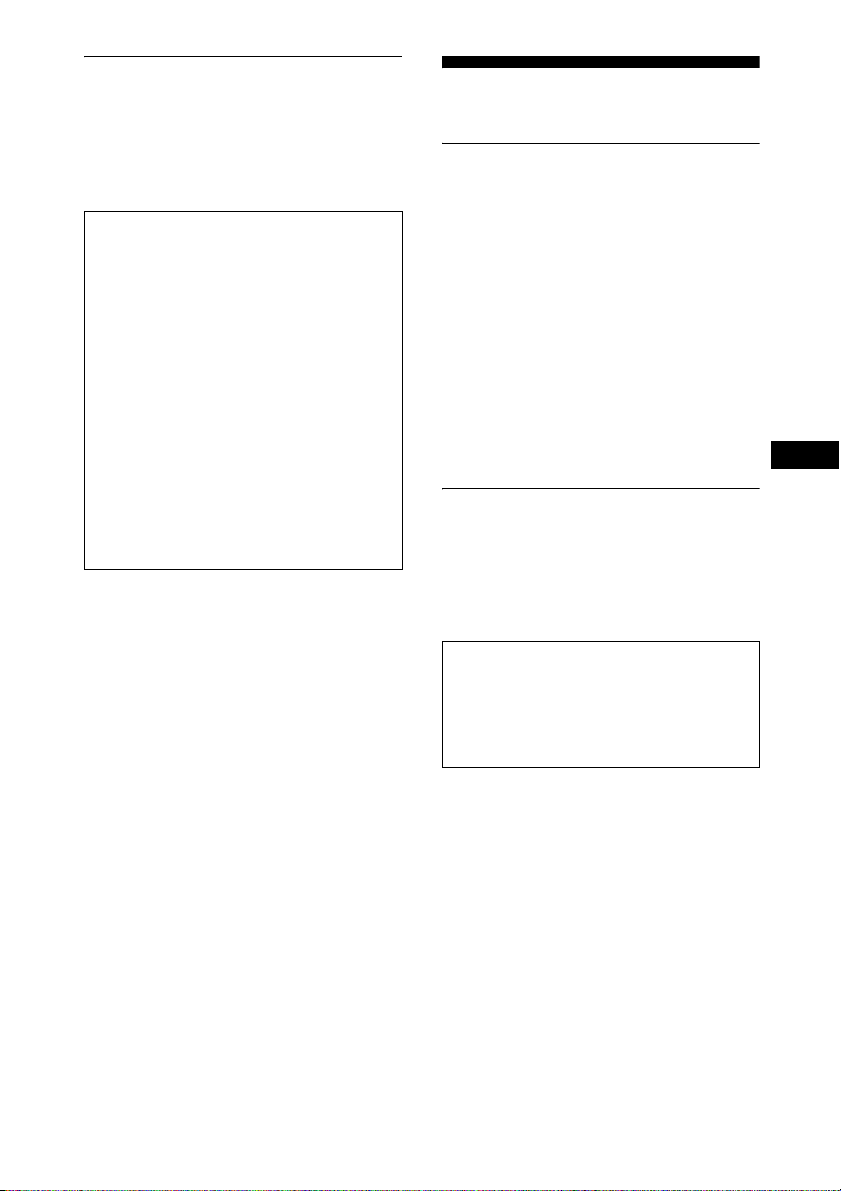
1 Open the stand.
2 Remove the back cover.
3 Connect your monitor to a
computer.
Connecting a Macintosh computer
Connect the supplied video signal cable to a
video output connector on the computer. If
necessary, use an adapter (not supplied).
Connect the adapter to the computer before
connecting the video signal cable.
US
3 (US)
Page 4
4 Connect the supplied power cord
to the monitor’s AC IN connector.
5 Connect the power cord to a
power outlet.
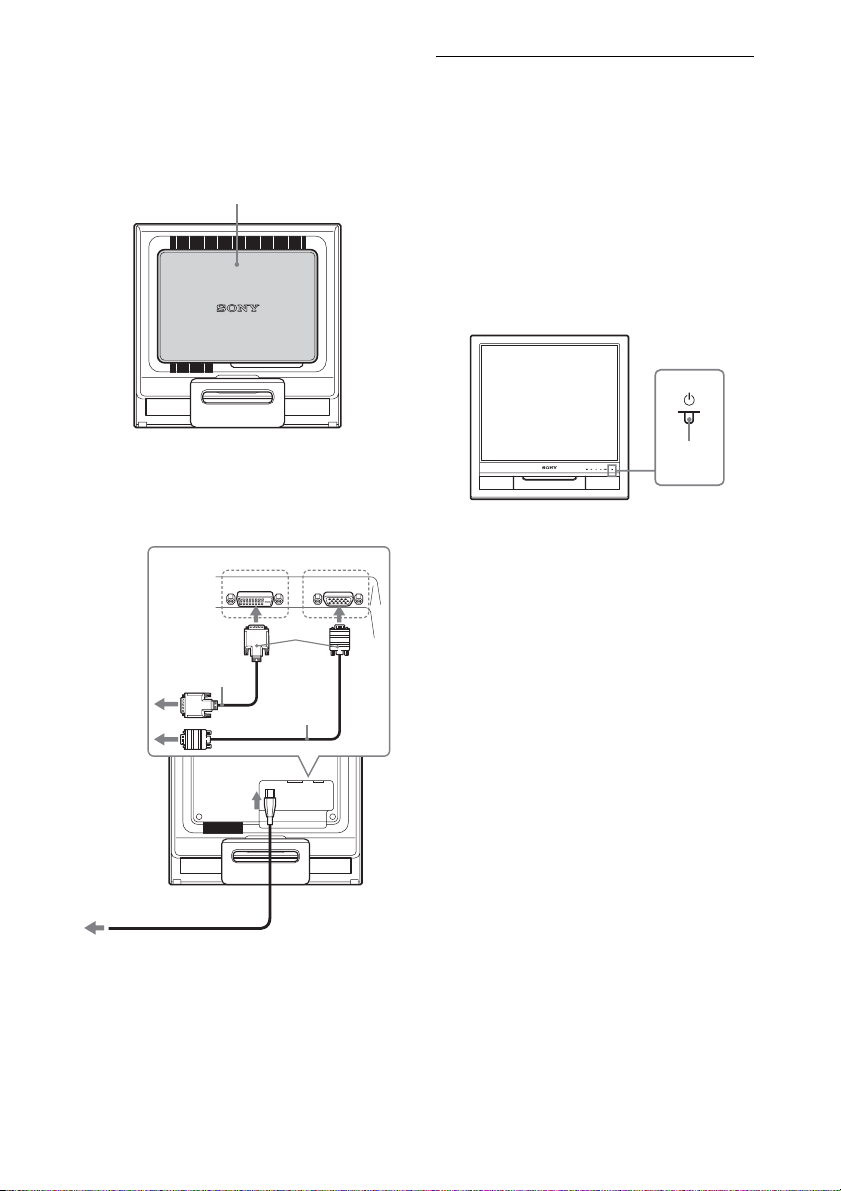
Turning on the monitor
and computer
Turn on your monitor first, then a computer.
back cover
2
to the DVI-D input
connector (digital RGB)
DVI-D video
signal cable
(supplied)
to AC IN
to the HD15 input
connector (analog RGB)
INPUT 1 INPUT 2
DVI- D
HD-15
3
HD15-HD15
video signal
cable
(supplied)
1 Press upward the 1 (power)
switch on the front right of the
monitor.
The 1 (power) indicator lights up in
green.
lights in
green
2 Turn on the computer.
4
to power outlet
5
Note
For details on securing the cords, refer to the
Operating Instructions on the CD-ROM.
4 (US)
power cord
(supplied)
Page 5

Troubleshooting
Trouble symptoms and remedies (If no picture
appears on the screen)
If no picture appears on the screen, check the following table for possible solutions. If you are
experiencing difficulties not listed below, refer to the Operating Instructions on the supplied
CD-ROM. For problems caused by a computer or other equipment, refer to the user’s manuals
supplied with the respective items.
Symptom Check these items
If the 1 (power)
indicator is not lit, or
if the 1 (power)
indicator will not
light up when the 1
(power) switch is
pressed,
If CABLE
DISCONNECTED
appears on the
screen,
If NO INPUT
SIGNAL appears on
the screen, or the 1
(power) indicator is
orange,
• Check that the power cord is properly connected.
• Check that the video signal cable is properly connected and
all plugs are firmly seated in their sockets (page 3 (US)).
• Check that the video input connector’s pins are not bent or
pushed in.
• A non-supplied video signal cable is connected. If you
connect a non-supplied video signal cable, CABLE
DISCONNECTED may appear on the screen before entering
the power saving mode. This is not a malfunction.
• Check that the video signal cable is properly connected and
all plugs are firmly seated in their sockets (page 3 (US)).
• Check that the video input connector’s pins are not bent or
pushed in.
x Problems caused by a computer or other
equipment connected, and not caused by the
monitor
• The computer is in the power saving mode. Try pressing any
key on the keyboard or moving the mouse.
• Check that your graphics board is installed properly.
• Check that the computer’s power is on.
• Restart the computer.
US
5 (US)
Page 6

Symptom Check these items
If OUT OF RANGE
appears on the
screen,
x Problems caused by a computer or other
equipment connected, and not caused by the
monitor
• Check that the video frequency range is within that specified
for the monitor. If you replaced an old monitor with this
monitor, reconnect the old monitor and adjust the computer’s
graphics board within the following ranges:
Horizontal: 28–80 kHz (analog RGB), 28–64 kHz (digital
RGB)
Vertical: 48–75 Hz (analog RGB), 60 Hz (digital RGB)
Resolution: 1280
If you are using
Windows and
replaced an old
monitor with this
monitor,
• If you replaced an old monitor with this monitor, reconnect
the old monitor and do the following. Select “SONY” from
the “Manufacturers” list and select “SDM-HS75P” or
“SDM-HS95P” from the “Models” list in the Windows
device selection screen. If the model name of this monitor
does not appear in the “Models” list, try “Plug & Play.”
× 1024 or less
Displaying this
monitor’s information
While the monitor is receiving a video
signal, press and hold the MENU
button for more than 5 seconds until
the information box appears.
Press the MENU button again to make the
box disappear.
MENU
Example
INFORMATION
MODEL : SDM-HS75P
SER . NO : 1234567
MANUFACTURED : 2004-52
1Model name
2Serial number
3Week and year of manufacture
If any problem persists, call your authorized
Sony dealer and give the following
information:
1
2
3
• Model name: SDM-HS75P or SDMHS95P
• Serial number
• Detailed description of the problem
• Date of purchase
• Name and specifications of your computer
and graphics board
6 (US)
Page 7

Specifications
LCD panel Panel type: a-Si TFT Active Matrix
Picture size:
SDM-HS75P: 17.0 inch
SDM-HS95P: 19.0 inch
Input signal format
Resolution Horizontal: Max.1280 dots
Input signal levels
Power requirements
Power consumption
Operating temperature
Dimensions (width/height/depth)
Mass SDM-HS75P: Approx. 5 kg
Plug & Play DDC2B
Included itemsSee “Setup.”
RGB operating frequency*
Horizontal:
28–80 kHz (analog RGB)
28–64 kHz (digital RGB)
Ve rt i ca l :
48–75 Hz (analog RGB)
60 Hz (digital RGB)
Vertical: Max.1024 lines
Analog RGB video signal:
0.7 Vp-p, 75 Ω, positive
SYNC signal:
TTL level, 2.2 kΩ,
positive or negative
(Separate horizontal and
vertical)
Digital RGB (DVI) signal: TMDS
(Single link)
100–240 V, 50–60 Hz, Max. 1.0 A
SDM-HS75P: Max. 45 W
SDM-HS95P: Max. 60 W
5–35°C
Display (upright):
SDM-HS75P
Approx. 388 × 382.5 × 139.2
mm
1
/4 × 15 × 5 1/2 inches)
(15
SDM-HS95P
Approx. 435 × 418 × 146 mm
1
/8 × 16 1/2 × 5 3/4 inches)
(17
3
(11 lb.
(13 lb. 3
/8 oz.)
5
/8 oz.)
SDM-HS95P: Approx. 6 kg
• Horizontal sync width duty should be more
than 4.8% of total horizontal time or 0.8
µsec, whichever is larger.
• Horizontal blanking width should be more
than 2.5 µsec.
• Vertical blanking width should be more than
450 µsec.
Design and specifications are subject to change
without notice.
US
* Recommended horizontal and vertical timing
condition
7 (US)
Page 8

AVERTISSEMENT
Pour prévenir tout risque
d’incendie ou d’électrocution,
n’exposez jamais l’appareil à la
pluie ou à l’humidité.
Des tensions extrêmement
élevées sont présentes à
l’intérieur de l’appareil. N’ouvrez
jamais le boîtier de l’appareil.
Confiez l’entretien à un
technicien qualifié uniquement.
Précautions
Avertissement sur les
raccordements d’alimentation
• Utilisez le cordon d’alimentation fourni.
Si vous utilisez un cordon d’alimentation
différent, assurez-vous qu’il est
compatible avec la tension secteur locale.
Pour les clients aux Etats-Unis
Si vous n’utilisez pas le cordon approprié,
ce moniteur ne sera pas conforme aux
normes FCC obligatoires.
Pour les clients au Royaume-uni
Si vous utilisez le moniteur au Royaumeuni, veuillez utiliser le cordon
d’alimentation adapté aux prises utilisées
au Royaume-uni.
Exemples de types de fiches
pour 100 à 120 V CA
pour 240 V CA uniquement
L’appareil doit être installé à proximité
’
une prise de courant facile d’accès.
d
pour 200 à 240 V CA
Installation
N’installez pas et ne laissez pas le moniteur :
• A des endroits exposés à des températures
extrêmes, par exemple à proximité d’un
radiateur, d’un conduit de chauffage ou
exposés aux rayons directs du soleil.
L’exposition du moniteur à des
températures extrêmes, comme dans
l’habitacle d’un véhicule garé en plein
soleil ou à proximité d’un conduit de
chauffage risque d’entraîner des
déformations du boîtier ou des problèmes
de fonctionnement.
• A des endroits soumis à des vibrations
mécaniques ou à des chocs.
• A proximité d’appareils générant de
puissants champs magnétiques, comme
un téléviseur ou d’autres appareils
électroménagers.
• A des endroits soumis à des quantités
inhabituelles de poussière, de saletés ou
de sable, par exemple à côté d’une fenêtre
ouverte ou d’une porte donnant sur
l’extérieur. En cas d’installation
temporaire à l’extérieur, veillez à prendre
les précautions requises contre la
poussière et les saletés en suspension dans
l’air, faute de quoi des dommages
irréparables risquent de se produire.
Posez cet appareil sur une surface plane. Ne
le placez pas sur une surface instable,
notamment sur le bord d’une table. Si une
partie de l’appareil déborde d’une telle
surface, il risque de tomber et de provoquer
des dégâts ou des blessures.
Remarque sur l’écran à cristaux
liquides (LCD - Liquid Crystal
Display)
Veuillez noter que l’écran LCD est issu
d’une technologie de haute précision.
Toutefois, il est possible que des points noirs
ou des points brillants de lumière (rouge,
bleu ou vert) apparaissent en permanence
sur l’écran LCD, ainsi que des bandes de
couleurs irrégulières ou une certaine
luminosité. Il ne s’agit pas d’un
dysfonctionnement.
(Points effectifs : supérieurs à 99,99%)
2 (FR)
Page 9

Pour lire le mode
d’emploi sur le CD-ROM
Installation
Remarque
Pour pouvoir lire le mode d’emploi figurant
sur le CD-ROM, vous devez installer
Macromedia Shockwave Player et Adobe
Acrobat Reader (version 6.0 ou plus récente)
sur votre ordinateur. Le dossier « installs » du
CD-ROM contient les programmes
d’installation de ces logiciels.
Si vous souhaitez installer ces
programmes, ouvrez le « Poste de
travail » et cliquez avec le bouton droit
de la souris sur le lecteur de CD-ROM,
sélectionnez ensuite « Explore », puis
ouvrez le dossier « installs ». (Pour
Windows uniquement)
Si vous utilisez un ordinateur
Macintosh :
Double-cliquez sur l’icône du CD-ROM pour
ouvrir la fenêtre, puis double-cliquez sur
l’icône « MONITOR ».
Pour afficher le mode d’emploi
Les fichiers du Mode d’emploi sont inclus sur le
CD-ROM fourni. Chargez ce dernier dans le
lecteur de CD-ROM de votre ordinateur. Après
quelques instants, la page d’accueil du CD-ROM
s’ouvre automatiquement.
Si cette page n’apparaît pas automatiquement,
ouvrez directement le fichier du Mode d’emploi.
(Pour Windows uniquement)
1Ouvrez « Poste de travail ».
2Cliquez sur le lecteur « CD-ROM » avec le
bouton droit de la souris, puis sélectionnez
« Explore ».
3Ouvrez le dossier « manuals ».
4Ouvrez le dossier « HS ».
5Sélectionnez et ouvrez le fichier
« HS_75_95_P_FR.pdf ».
Pour quitter le CD-ROM
Cliquez sur « EXIT/CD-ROM ».
Déballage
Assurez-vous que votre emballage contient
tous les éléments énumérés ci-dessous.
• Ecran LCD
• Cordon d’alimentation
• Câble de signal vidéo HD15-HD15 (RVB
analogique)
• Câble de signal vidéo DVI-D (RVB
numérique)
•Sangle
• CD-ROM (logiciel utilitaire pour
Windows et Macintosh, mode d’emploi,
etc.)
• Carte de garantie
• Le présent guide de configuration rapide
Branchement du
moniteur
Raccordez votre moniteur à un ordinateur ou
à un autre appareil.
• Eteignez le moniteur, l’ordinateur et
tout autre appareil avant d’effectuer
le raccordement.
• Ne touchez pas les broches de la
fiche du câble de signal vidéo.
1 Dépliez le support.
2 Retirez le panneau arrière.
3 Raccordez votre moniteur à un
ordinateur.
Raccordement à un ordinateur
Macintosh
Raccordez le câble de signal vidéo fourni à un
connecteur de sortie vidéo sur l’ordinateur. Si
nécessaire, utilisez un adaptateur (non
fourni). Raccordez l’adaptateur à l’ordinateur
avant de raccorder le câble de signal vidéo.
FR
3 (FR)
Page 10

4 Raccordez le cordon
d’alimentation fourni au
connecteur AC IN du moniteur.
5 Raccordez le cordon
d’alimentation secteur à une prise
secteur.
Panneau arrière
2
Remarque
Pour de plus amples informations sur la fixation
des cordons, reportez-vous au mode d’emploi sur
le CD-ROM.
Mise sous tension du
moniteur et de
l’ordinateur
Mettez d’abord votre moniteur sous tension,
puis l’ordinateur.
1 Appuyez sur le commutateur 1
(alimentation) situé à droite de la
face avant du moniteur.
Le voyant d’alimentation 1 s’allume en
vert.
vers le connecteur
d’entrée DVI-D (RVB
numérique)
vers une
prise secteur
5
4 (FR)
vers le connecteur
d’entrée HD15 (R VB
analogique)
INPUT 1 INPUT 2
DVI- D
Câble de
signal vidéo
DVI-D (fourni)
vers AC IN
Câble de
signal vidéo
HD15-HD15
(fourni)
4
Cordon d’alimentation
(fourni)
3
HD-15
s’allume
en vert
2 Mettez l’ordinateur sous tension.
Page 11

Dépannage
Problèmes et solutions (si aucune image
n’apparaît à l’écran)
Si aucune image n’apparaît à l’écran, recherchez une solution possible dans le tableau suivant.
Si vous rencontrez des problèmes qui ne sont pas abordés ci-dessous, reportez-vous au mode
d’emploi sur le CD-ROM fourni. Si les problèmes sont causés par l’ordinateur ou un autre
appareil, reportez-vous au mode d’emploi fourni avec l’appareil concerné.
Problème Vérifiez les points suivants
Si le voyant
d’alimentation 1
n’est pas allumé ou
si le voyant
d’alimentation 1 ne
s’allume pas lorsque
vous appuyez sur le
commutateur
d’alimentation 1 ,
Si CABLE NON
CONNECTÉ
apparaît sur l’écran,
Si l’indication PAS
D’ENTREE VIDEO
apparaît sur l’écran
ou si l’indicateur 1
(alimentation) est
allumé en orange,
• Vérifiez que le cordon d’alimentation est correctement
raccordé.
• Vérifiez que le câble de signal vidéo est correctement
raccordé et que toutes les fiches sont correctement branchées
dans leur prise (page 3 (FR)).
• Vérifiez que les broches du connecteur d’entrée vidéo ne sont
pas pliées ou enfoncées.
• Un câble de signal vidéo non fourni est raccordé. Si vous
raccordez un câble de signal vidéo non fourni, l’indication
CABLE NON CONNECTÉ peut apparaître sur l’écran avant
le passage en mode d’économie d’énergie. Il ne s’agit pas
d’un problème de fonctionnement.
• Vérifiez que le câble de signal vidéo est correctement
raccordé et que toutes les fiches sont correctement branchées
dans leur prise (page 3 (FR)).
• Vérifiez que les broches du connecteur d’entrée vidéo ne sont
pas pliées ou enfoncées.
x Problèmes causés par un ordinateur ou un autre
appareil raccordé et non par le moniteur
• L’ordinateur est en mode d’économie d’énergie. Appuyez sur
une touche quelconque du clavier ou déplacez la souris.
• Vérifiez que votre carte graphique est correctement installée.
• Vérifiez que l’alimentation de l’ordinateur est activée.
• Redémarrez l’ordinateur.
FR
5 (FR)
Page 12

Problème Vérifiez les points suivants
Si HORS PLAGE
FRÉQUENCES
apparaît à l’écran,
Si vous utilisez
Windows et que vous
remplacez un ancien
moniteur par celuici,
x Problèmes causés par un ordinateur ou un autre
appareil raccordé et non par le moniteur
• Vérifiez que la plage de fréquence vidéo est comprise dans la
plage spécifiée pour le moniteur. Si vous avez remplacé un
ancien moniteur par ce moniteur, rebranchez l’ancien, puis
ajustez la carte graphique de l’ordinateur dans les plages
suivantes :
Horizontale : 28–80 kHz (RVB analogique), 28–64 kHz
(RVB numérique)
Verticale : 48–75 Hz (RVB analogique), 60 Hz (RVB
numérique)
Résolution : 1280 × 1024 ou moins
• Si vous avez remplacé votre ancien moniteur par ce moniteur,
rebranchez l’ancien moniteur et suivez la procédure suivante.
Sélectionnez « SONY » dans la liste « Fabricants » et
sélectionnez « SDM-HS75P » ou « SDM-HS95P » dans la
liste « Modèles » dans l’écran de sélection de périphériques
Windows. Si le nom du modèle ne se trouve pas dans la liste
« Modèles », essayez « Plug & Play ».
Affichage des
informations du
moniteur
Lorsque le moniteur reçoit un signal
vidéo, appuyez sur la touche MENU et
maintenez-la enfoncée pendant plus
de 5 secondes jusqu’à ce que la boîte
de dialogue d’informations s’affiche.
Appuyez de nouveau sur la touche MENU
pour faire disparaître la boîte de dialogue.
MENU
Exemple
INFORMATIONS
MODEL : SDM-HS75P
SER. NO : 1234567
MANUFACTURED : 2004-52
1Désignation
2Numéro de série
3Semaine et année de fabrication
1
2
3
Si le problème persiste, contactez votre
revendeur Sony agréé et fournissez-lui les
informations suivantes :
• Désignation : SDM-HS75P ou SDMHS95P
• Numéro de série
• Description détaillée du problème
• Date d’achat
• Nom et spécifications de votre ordinateur
et de votre carte graphique
6 (FR)
Page 13

Spécifications
Panneau LCD
Type de panneau : a-Si TFT à
matrice active
Taille de l’image :
SDM-HS75P:
17,0 pouces (43 cm)
SDM-HS95P:
19,0 pouces (48 cm)
Format du signal d’entrée
Fréquence opérationnelle RVB*
Horizontale :
28–80 kHz (RVB analogique)
28–64 kHz (RVB numérique)
Verticale :
48–75 Hz (RVB analogique)
60 Hz (RVB numérique)
Résolution Horizontale : Max.1280 points
Verticale : Max.1024 lignes
Niveaux des signaux d’entrée
Signal vidéo RVB analogique :
0,7 Vp-p, 75 Ω, positif
Signal SYNC :
Niveau TTL, 2,2 kΩ, positif ou
négatif
(horizontal et vertical
séparément)
Signal RVB numérique (DVI) :
TMDS (lien simple)
Puissance de raccordement
100–240 V, 50–60 Hz, Max. 1,0 A
Consommation électrique
SDM-HS75P: Max. 45 W
SDM-HS95P: Max. 60 W
Température de fonctionnement 5–35°C
Dimensions (largeur/hauteur/profondeur)
Ecran (verticalement) :
SDM-HS75P
Approx. 388 × 382.5 × 139.2
mm
SDM-HS95P
Approx. 435 × 418 × 146 mm
Masse SDM-HS75P: Approx. 5 kg
SDM-HS95P: Approx. 6 kg
Plug & Play DDC2B
Pièces comprises
Voir « Installation ».
* Condition de synchronisation horizontale et
verticale recommandée
• La largeur de synchronisation horizontale
doit être supérieure de plus de 4,8% à la
durée horizontale totale ou 0,8 µs, suivant la
plus grande valeur.
• La largeur de suppression horizontale doit
être supérieure à 2,5 µs.
• La largeur de suppression verticale doit être
supérieure à 450 µs.
La conception et les spécifications sont sujettes à
modifications sans préavis.
FR
7 (FR)
Page 14

ADVERTENCIA
Para evitar el riesgo de incendios o
de electrocución, no exponga la
unidad a la lluvia ni a la humedad.
La tensión existente dentro de la
unidad es muy elevada y puede
resultar peligrosa. No abra el aparato.
Solicite asistencia técnica
únicamente a personal cualificado.
Precauciones
Advertencia sobre la conexión de
la alimentación
• Utilice el cable de alimentación
suministrado. En caso de utilizar un cable
de alimentación distinto, asegúrese de que
sea compatible con el suministro eléctrico
local.
Para los clientes en los EE.UU.
Si no utiliza el cable adecuado, este
monitor no cumplirá con las normas
obligatorias de la FCC.
Para los clientes en el Reino Unido
Si utiliza el monitor en el Reino Unido,
asegúrese de utilizar el cable de
alimentación adecuado para este país.
Ejemplo de tipos de enchufe
para ca de 100 a
120 V
sólo para ca de
240 V
para ca de 200 a
240 V
Instalación
No instale ni deje el monitor:
• En lugares expuestos a temperaturas
extremas, por ejemplo cerca de un
radiador, una salida de aire caliente o bajo
la luz solar directa. Si lo expone a
temperatura extremas, como en un
automóvil bajo la luz solar directa o cerca
de una salida de aire caliente, pueden
producirse deformaciones del exterior o
fallos de funcionamiento.
• En lugares expuestos a vibraciones
mecánicas o golpes.
• Cerca de equipos que generan un campo
magnético intenso, como un televisor o
demás electrodomésticos.
• En lugares expuestos a grandes cantidades
de polvo, suciedad o arena, como cerca de
una ventana abierta o de una salida al
exterior. Si lo coloca temporalmente en el
exterior, asegúrese de tomar las
precauciones adecuadas contra el polvo y
la suciedad, ya que de lo contrario podrían
producirse fallos irreparables en el
funcionamiento.
Coloque la unidad sobre una superficie
plana. No la coloque sobre una superficie
irregular como, por ejemplo, la esquina de
una mesa. Si parte de la unidad sobresaliera,
podría caerse o causar daños.
Nota sobre la pantalla LCD
(Pantalla de cristal líquido)
Tenga en cuenta que la pantalla LCD está
fabricada con tecnología de alta precisión.
No obstante, pueden aparecer de forma
constante en la misma puntos negros o
brillantes de luz (rojos, azules o verdes) y
ocasionalmente brillos o rayas de color
irregular. Esto no es un fallo de
funcionamiento.
(Puntos efectivos: más del 99,99%)
El equipo debe instalarse cerca de una toma
de corriente de fácil acceso.
2 (ES)
Page 15

Visualizar el manual de
instrucciones del CD-
Instalación
ROM
Nota
Para ver el manual de instrucciones del CDROM, Macromedia Shockwave Player y
Adobe Acrobat Reader (versión 6.0 o
posterior) deben estar instalados en su PC. La
carpeta “installs” del CD-ROM contiene los
programas de instalación de los mismos.
desea instalar dichos programas, abra el
icono “Mi PC” y haga clic con el botón
derecho en la unidad de CD-ROM, a
continuación, seleccione “Explorar” y
abra la carpeta “installs”. (sólo para
Windows)
Si utiliza un Macintosh:
Haga doble clic en el icono del CD-ROM para
abrir la ventana y, a continuación, haga doble
clic en el icono “MONITOR”.
Para visualizar el manual de
instrucciones
Los archivos del Manual de instrucciones se
incluyen en el CD-R OM suministrado. Introduzca
el CD-ROM suministrado en la unidad de CDROM del ordenador. Transcurridos unos
segundos, se abrirá automáticamente la página de
introducción del CD-ROM.
Si la página de introducción no aparece
automáticamente, abra el archivo del Manual de
instrucciones directamente. (sólo para Windows)
1Abra “Mi PC”.
2Haga clic con el botón derecho en la unidad de
“CD-ROM” y, a continuación, seleccione
“Explorar”.
3Abra la carpeta “manuals”.
4Abra la carpeta “HS”.
5Seleccione y abra “HS_75_95_P_ES.pdf”.
Para salir del CD-ROM
Haga clic en “EXIT/CD-ROM”.
Si
Desembalaje
Asegúrese de que los siguientes artículos se
incluyen en la caja.
• Pantalla LCD
• Cable de alimentación
• Cable de señal de vídeo HD15-HD15
(RGB analógico)
• Cable de señal de vídeo DVI-D (RGB
digital)
• Clip de cables
• CD-ROM (software de utilidades para
Windows/Macintosh, manual de
instrucciones, etc.)
• Tarjeta de garantía
• Esta Guía de instalación rápida
Conexión del monitor
Conecte el monitor a un ordenador o a otro
equipo.
• Apague el monitor, el ordenador y
cualquier otro equipo antes de
conectarlos.
• No toque los terminales del conector
del cable de señal de vídeo.
1 Abra el soporte.
2 Retire la cubierta posterior.
3 Conecte el monitor al ordenador.
Conexión de un ordenador Macintosh
Conecte el cable de señal de vídeo
suministrado a un conector de salida de vídeo
del ordenador. En caso necesario, utilice un
adaptador (no suministrado) y conéctelo al
ordenador antes de conectar el cable de señal
de vídeo.
ES
3 (ES)
Page 16

4 Conecte el cable de alimentación
suministrado al conector AC IN
del monitor.
Encender el monitor y
el ordenador
5 Conecte el cable de alimentación
a la toma de corriente.
cubierta
posterior
2
al conector de entrada
DVI-D (RGB digital)
cable de señal
de vídeo
DVI-D
(suministrado)
al conector de entrada
HD15 (RGB analógico)
INPUT 1 INPUT 2
DVI- D
HD-15
3
cable de
señal de
vídeo
HD15-HD15
(suministrado)
Primero, encienda el monitor y, a
continuación, el ordenador.
1 Pulse el interruptor 1
(alimentación) situado en la parte
frontal derecha del monitor.
El indicador 1 (alimentación) se
ilumina en verde.
se ilumina
en verde
2 Encienda el ordenador.
a AC IN
4
a la toma de corriente
cable de
alimentación
5
(suministrado)
Nota
Para obtener más información acerca de cómo
conectar los cables, consulte el manual de
instrucciones del CD-ROM.
4 (ES)
Page 17

Resolución de problemas
Problemas y soluciones (Si no aparece ninguna
imagen en la pantalla)
Si no aparece ninguna imagen en la pantalla, compruebe la tabla siguiente para obtener posibles
soluciones. Si el problema no aparece en la lista, consulte el manual de instrucciones en el CDROM suministrado. Para aquellos problemas causados por el ordenador u otro equipo, consulte
los manuales de usuario suministrados con los artículos correspondientes.
Problema Compruebe lo siguiente
Si el indicador 1
(alimentación) no
está encendido o si
1 no se enciende al
pulsar el interruptor
1 (alimentación),
Si CABLE
DESCONECTADO
aparece en la
pantalla,
Si NO SEÑAL
aparece en la
pantalla, o el
indicador 1
(alimentación) está
en naranja,
• Compruebe que el cable de alimentación está conectado
correctamente.
• Compruebe que el cable de señal de vídeo esté conectado
correctamente y que todos los enchufes estén colocados en
sus receptáculos (página 3 (ES)).
• Compruebe que los terminales del conector de entrada de
vídeo no estén doblados o hundidos.
• Se ha conectado un cable de señal de vídeo no suministrado.
En tal caso, es posible que la indicación CABLE
DESCONECTADO aparezca en la pantalla antes de pasar al
modo de ahorro de energía. No se trata de un fallo en el
funcionamiento.
• Compruebe que el cable de señal de vídeo esté conectado
correctamente y que todos los enchufes estén colocados en
sus receptáculos (página 3 (ES)).
• Compruebe que los terminales del conector de entrada de
vídeo no estén doblados o hundidos.
x Problemas causados por un ordenador u otro
equipo conectado, y no por el monitor
• El ordenador se encuentra en el modo de ahorro de energía.
Intente pulsar cualquier tecla del teclado o mover el ratón.
• Compruebe que la tarjeta gráfica esté instalada
correctamente.
• Compruebe que el ordenador esté encendido.
• Reinicie el ordenador.
ES
5 (ES)
Page 18

Problema Compruebe lo siguiente
Si FUERA DEL
ALCANCE aparece
en la pantalla,
Si utiliza Windows y
ha sustituido un
monitor antiguo por
éste,
x Problemas causados por un ordenador u otro
equipo conectado, y no por el monitor
• Compruebe que el rango de frecuencia de vídeo se encuentre
dentro del rango especificado para el monitor. Si ha sustituido
un monitor antiguo por éste, vuelva a conectar el antiguo y
ajuste la tarjeta gráfica del ordenador a los siguientes valores:
Horizontal: 28–80 kHz (RGB analógico), 28–64 kHz (RGB
digital)
Vertical: 48–75 Hz (RGB analógico), 60 Hz (RGB digital)
Resolución: 1 280 × 1 024 o inferior
• Si ha sustituido un monitor antiguo por éste, vuelva a
conectar el monitor antiguo y realice los pasos siguientes.
Seleccione “SONY” en la lista “Fabricantes” y seleccione
“SDM-HS75P” o “SDM-HS95P” en la lista “Modelos” de la
pantalla de selección de dispositivos de Windows. Si el
nombre de modelo de este monitor no aparece en la lista
“Modelos”, inténtelo con “Plug & Play”.
Visualización de la
información del
monitor
Mientras el monitor recibe una señal
de vídeo, mantenga pulsado el botón
MENU durante más de 5 segundos
hasta que aparezca el cuadro de
información.
Pulse el botón MENU de nuevo para cerrar
el cuadro.
MENU
Ejemplo
INFORMACIÓN
MODEL : SDM-HS75P
SER. NO : 1234567
MANUFACTURED : 2004-52
1Nombre del modelo
2Número de serie
3Semana y año de fabricación
1
2
3
Si el problema persiste, llame a su
distribuidor Sony autorizado y
proporciónele la siguiente información:
• Nombre del modelo: SDM-HS75P o
SDM-HS95P
• Número de serie
• Descripción detallada del problema
• Fecha de compra
• Nombre y especificaciones del ordenador
y la tarjeta gráfica
6 (ES)
Page 19

Especificaciones
Panel LCD Tipo de panel: Matriz activa a-Si
TFT
Tamaño de imagen:
SDM-HS75P:
43,18 cm (17,0 pulgadas)
SDM-HS95P:
48,26 cm (19,0 pulgadas)
Formato de la señal de entrada
Frecuencia de funcionamiento
RVA*
Horizontal:
28–80 kHz (RGB analógico)
28–64 kHz (RGB digital)
Ve rt i ca l :
48–75 Hz (RGB analógico)
60 Hz (RGB digital)
Resolución Horizontal: Máx. 1 280 puntos
Vertical: Máx. 1 024 líneas
Niveles de señal de entrada
Señal de vídeo RGB analógica:
0,7 Vp-p, 75 Ω, positiva
Señal SYNC:
Nivel TTL, 2,2 kΩ, positiva o
negativa
(Horizontal y vertical
independiente)
Señal RGB (DVI) digital: TMDS
(enlace único)
Requisitos de alimentación
100–240 V, 50–60 Hz, Máx. 1,0 A
Consumo de energía
SDM-HS75P: Máx. 45 W
SDM-HS95P: Máx. 60 W
Temperatura de funcionamiento 5–35°C
Dimensiones (ancho/alto/profundidad)
Pantalla (vertical):
SDM-HS75P
Aprox. 388 × 382.5 × 139.2 mm
SDM-HS95P
Aprox. 435 × 418 × 146 mm
Peso SDM-HS75P: Aprox. 5 kg
SDM-HS95P: Aprox. 6 kg
Plug & Play DDC2B
Elementos que se incluyen
Consulte “Instalación”.
total horizontal o 0,8 µseg, según el que sea
mayor.
• La anchura de supresión horizontal debe ser
superior a 2,5 µseg.
• La anchura de supresión vertical debe ser
superior a 450 µseg.
Diseño y especificaciones sujetos a cambios sin
previo aviso.
REFERENCIA DE
TERMINOLOGIA
AC IN (entrada de ca)
CD-ROM (disco compacto de memoria de
sólo lectura)
COMPUTER (computador)
DDC (Display Data Channel, Canal de
datos)
DISPLAY (monitor)
DVI-D (el interfaz visual digital para digital)
LCD (pantalla de cristal líquido)
MENU (Menú)
PC (computadora personal)
RGB (Rojo, verde, azul)
RVA (volt ampere reactivo)
SYNC (Sincronizada)
TFT (transistor de película fina)
TMDS (señal diferencial minimizada de
transición)
TTL (lógica de transistor a transistor)
ES
* Condición de sincronización horizontal y
vertical recomendada
• La anchura de sincronización horizontal de
empleo debe ser superior al 4,8% del tiempo
7 (ES)
Page 20

Sony Corporation Printed in Korea
 Loading...