

Sony SDM-HS73 QUICK START

4-094-158-01(2)
TFT LCD Color
Computer Display
Quick Setup Guide
Setup . . . . . . . . . . . . . . . . . . . . . . . . . . . . . . . . . . . . . . . . . . . . 2 (US)
Troubleshooting / Specifications . . . . . . . . . . . . . . . . . . . . . . . 4 (US)
Guide de configuration rapide
Installation . . . . . . . . . . . . . . . . . . . . . . . . . . . . . . . . . . . . . . . . 2 (FR)
Dépannage / Spécifications . . . . . . . . . . . . . . . . . . . . . . . . . . 4 (FR)
Guía de instalación rápida
Instalación . . . . . . . . . . . . . . . . . . . . . . . . . . . . . . . . . . . . . . . . 2 (ES)
Resolución de problemas / Especificaciones . . . . . . . . . . . . . 4 (ES)
. . . . . . . . . . . . . . . . . . . . . . . . . . . . . . . . . . . . . . . . . . . . . 2 (CS)
. . . . . . . . . . . . . . . . . . . . . . . . . . . . . . . . . . . . 4 (CS)
US
FR
ES
CS
SDM-HS53
SDM-HS73
SDM-HS93
© 2003 Sony Corporation

WARNING
To prevent fire or shock hazard, do not ex pose the
unit to rain or moisture.
Dangerously high voltages are present inside the
unit. Do not open the cabinet. Refer servicing to
qualified personnel only.
To view the Operating Instructions
on the CD-ROM
Notes
• To vi ew the Operating Instructions on the CD -ROM , Adobe Acrobat
Reader (later than version 4. 0) ne eds to be installed on your comput er.
• Mo re information on the comma nds, features, and tools of A dobe
Acrobat Reader is avai la ble from the Reader’s onli ne H e lp.
Precautions
Warning on power connections
• Use the supplied power cord. If you use a different power cord,
be sure that it is compatible with your local power supply.
For the customers in the U.S.A.
If you do not use the appropriate cord, this monitor will not
conform to mandatory FCC standards.
For the customers in the UK
If you use the monitor in the UK, be sure to use the appropriate
UK power cord.
Example of plug types
for 100 to 120 V AC for 200 to 240 V AC for 240 V AC only
The equipment should be installed near an easily accessible outlet.
Installation
Do not install or leave the monitor:
• In places subject to extreme temperatures, for example near a
radiator, heating ve nt, or in direct sunlight. Su bje c tin g the
monitor to extreme temperatures, such as in an automobile
parked in direct sun light or near a heatin g vent, could cause
deformations of the casing or malfunctions.
• In places subject to mechanical vibration or shock.
• Near any equipment that generates a strong magnetic field,
such as a TV or various other household appliances.
• In places subject to inordinate amounts of dust, dirt, or sand, for
example near an open window or an outdoor exit. If setting up
temporarily in an outdoor environ me n t, be sur e to take
adequate precautions against airborne dust and dirt. Otherwise
irreparable malfu nctions could occur.
Note on the LCD (Liquid Crystal Display)
Please note that the LCD screen is made with high-precision
technology. However, black points or bright points of light (red,
blue, or green) may appear constantly on the LCD screen, and
irregular colored st r ipes or brightness may ap pear on the LCD
screen. This is not malfunction.
(Effective dots: more than 99.99%)
For Windows
Load the supplied CD-ROM into the CD-ROM driv e of your
computer. After a while, the window of the CD-ROM will open
automatically. Double-click on “Manual.pdf” in the window. The
Operating Instruction files will open.
Note
Depending on a computer you are using, the window of the CD-ROM may
not open automati ca ll y. In this case, double-cli ck on the icon of the CDROM to open the window of t he CD-ROM.
For Macintosh
Load the supplied CD-ROM into the CD-ROM driv e of your
computer. The icon of the CD-ROM will appear on the desktop.
Double-click the icon to open the window of the CD-ROM and
double-click on “Manual.pdf” in the window. The Operating
Instruction files will open.
Note
If you are using Mac OS X, activate the Adobe Acrobat Reader first,
then double-click on “Manual.pdf” in the window.
If you cannot open the Operating Instruction files
Adobe Acrobat Reader may not be installed on your computer.
You can download it for free from the Adobe Web site.
Setup
Unpacking
Make sure your carton contains everything listed below.
•LCD display
• Power cord
• HD15-HD15 video signal cable
•Cord strap
• Utility/Instruction Manual CD-ROM (utility software for
Windows/Macintos h, Operating Instructions)
• Warranty card
• This Quick Set up Guide
Connecting your monitor
Connect your monitor to a computer or other equipment.
2 (US)
• Turn off the monitor, computer, and any other
equipment before connecting them.
• Do not touch the pins of the vide o signal cable plug.
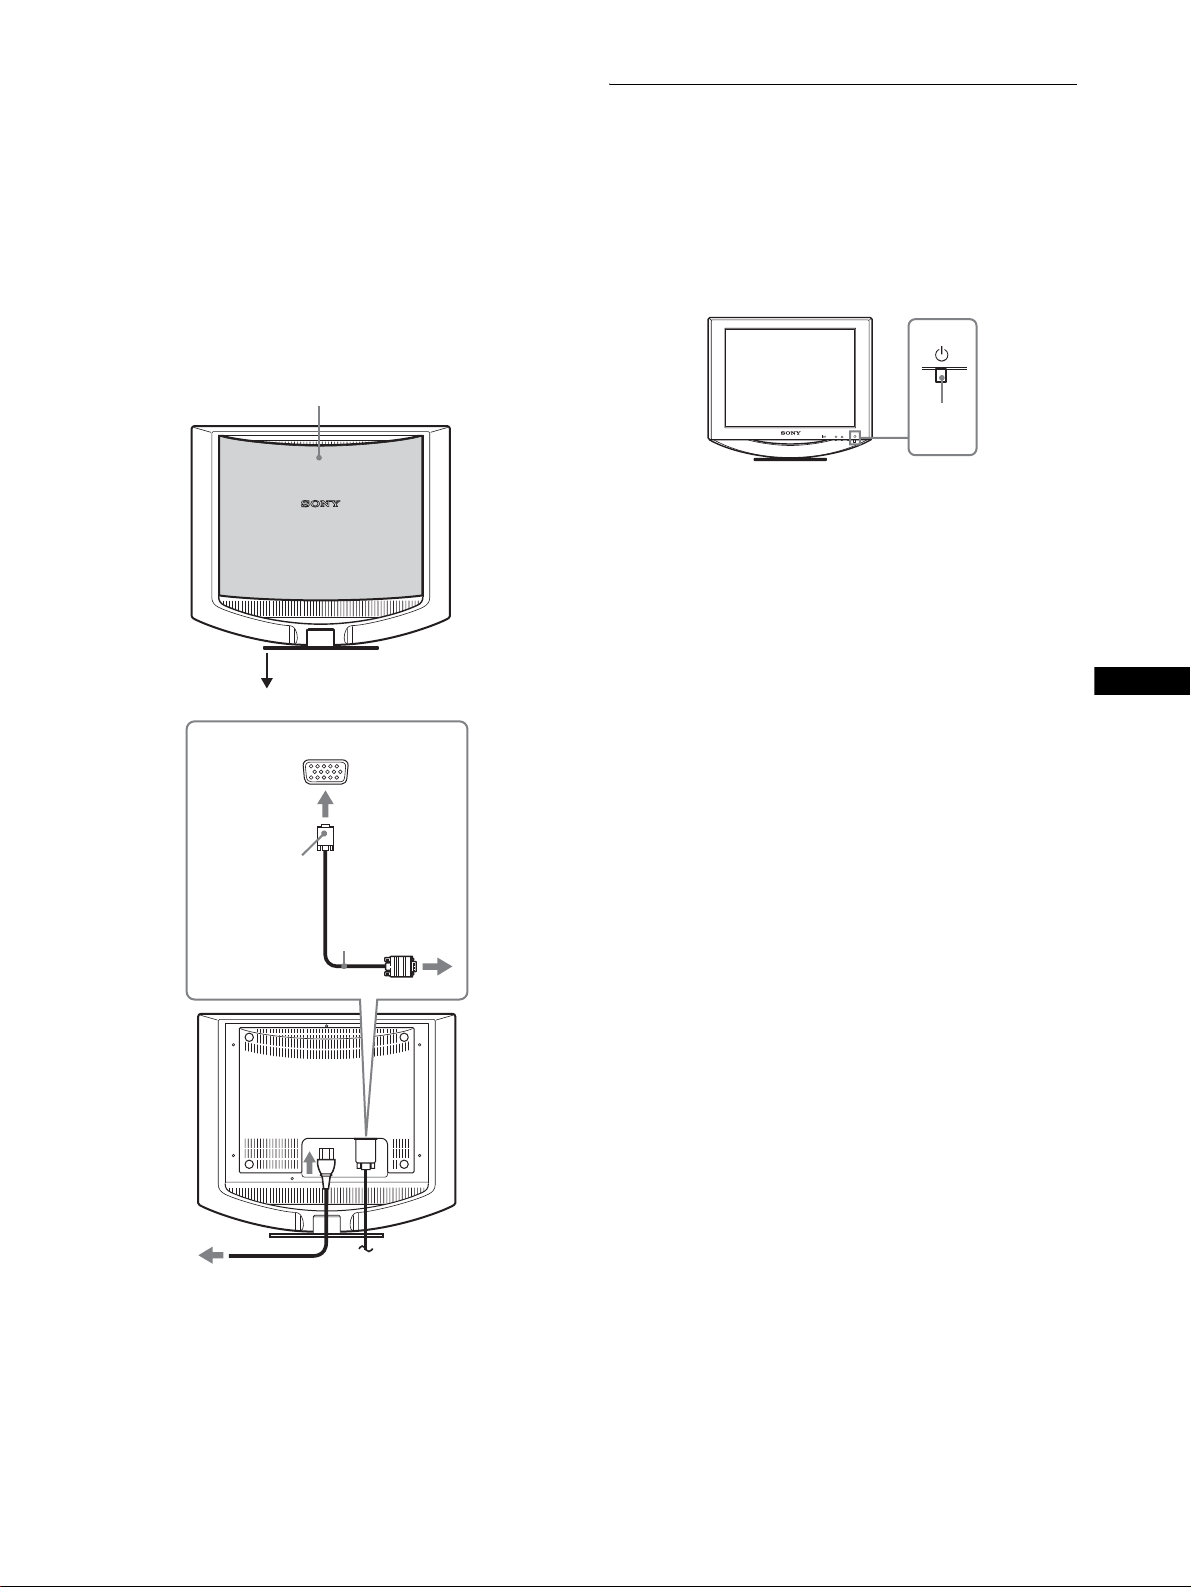
1 Remove the back cover.
2 Connect your monitor to a computer.
Connecting a Macintosh computer
Connect the supplie d vid eo signal cable to a video outpu t co nnector
on the computer. If necessary, use an adapter (not supplied). Connect
the adapter to the computer before connecting the video signal cable.
3 Connect the supplied power cord to the monitor’s
AC IN connector.
4 Connect the power cord to a power outlet.
Turning on the monitor and
computer
Turn on your monitor first, then a computer.
1 Press upward the 1 (power) switch on the front
right of the monitor.
The 1 (power) indicator lights up in gr een.
1
back cover
2
HD15-HD15
video signal
cable (supplied)
to the HD15
(RGB) input
connector
2 Turn on the computer.
lights in
MENU
OK
green
US
3
to AC IN
to power outlet
4
The illustration of the back of the monitor show here is that
of the SDM-HS53.
The same applies for the SDM-HS73/HS93 model.
Note
For details on securing the cords, refer to the Operating Instructions on the
CD-ROM.
power cord
(supplied)
3 (US)

Troubleshooting
Trouble symptoms and remedies (If no picture appears on the screen)
If no picture appears on the screen, check the following table for possible solutions. Then, if the problem persi sts, use the self-diagnosis
function (page 5 (US)). If you are experiencing difficulties not listed below, refer to the Operating Instructions on the supplied CD-ROM.
For problems caused by a computer or other equipment, refer to the user’s manuals supplied with the respective items.
Symptom Check these items
If the 1 (power) indicator is not lit,
or if the 1 (power) indica tor will not
light up when the 1 (power) switch
is pressed,
If the 1 (power) indicator is green
or flashing orange,
If CABLE DISCONNECTED
appears on the screen,
If NO INPUT SIGNAL appears on
the screen, or the 1 (power)
indicator is either orange or
alternating between green and
orange,
If OUT OF SCAN RANGE appears
on the screen,
If you are using Windows and
replaced an old monitor with this
monitor,
• Check that the power cord is properly connected.
• Check that the 1 (power) switch is in the “on” position.
• Use the self-diagnosis function (page 5 (US)).
• Check that the video sig nal cable is properly connected and all plugs are firmly seated in
their sockets (page 2 (US)).
• Check that the video input connector’s pins are not bent or pushed in.
• A non-supplied video signal cable is connected. If you connect a non-suppl ied video
signal cable, CABLE DISCONNECTED may appear on the screen before entering the
power saving mode. This is not a malfunction.
• Check that the video sig nal cable is properly connected and all plugs are firmly seated in
their sockets (page 2 (US)).
• Check that the video input connector’s pins are not bent or pushed in.
x Problems caused by a computer or other equipment connected, and not
caused by the monitor
• The computer is in the power saving mode. Try pressing any key on the keyboard or
moving the mouse.
• Check that your graphics board is installed proper ly.
• Check that the computer’s power is on.
• Restart the computer.
x Problems caused by a computer or other equipment connected, and not
caused by the monitor
• Check that the video frequency range is within that specified for the monitor. If you
replaced an old monitor with this monitor, reconnect the old monitor and adjust the
computer’s graphics board within the following ranges:
Horizontal: 28 – 61 kHz (SDM-HS53), 28 – 80 kHz (SDM-HS73/HS93)
Vertical: 48 – 75 Hz
• If you replaced an old monitor with this monitor, reconnect the old monitor and do the
following. Select “SONY” from the “Manufacturers” list and select “SDM-HS53,”
“SDM-HS73” or “SDM-HS93” from the “Models” list in the Windows device selection
screen. If the model name of thi s monitor doe s not appea r in the “Mode ls” list, try “Plug &
Play.”
4 (US)
Self-diagnosis function
This monitor is equipped with a self-diag nosis function. If there is
a problem with your monitor or compute r(s), the screen will go
blank and the 1 (power) indicator will either light up in green or
flash orange. If the function tells you the monitor may have a
potential failure, consult your authorized Sony dealer.
If the picture disappears from the screen and the
1 (power) indicator is green
1 Turn off the 1 (power) switch and disconnect the
video signal cables from the monitor.
2 Turn the monitor on by pressing the 1 (power)
switch.
If all four color bars appear (white, red, green, blue), the monitor
is working properly. Reconnect the video input cables and check
the condition of your computer(s).
If the color bars do not appear, th ere is a potent ial monitor failu re.
If the picture disappears from the screen and the
1 (power) indicator is flashing orange
Press the 1 (power) switch twice to turn the monitor off
and then on.
If the 1 (power) indicator ligh ts up green, the moni tor is working
properly.
If the 1 (power) indicator is still flashing, there is a potential
monitor failure.
Displaying this monitor’s
information
While the monitor is rece iving a video signal , press and
hold the MENU button for more than 5 secon ds until the
information box appears.
Press the MENU button again to make the box disappear.
MENU
Example
INFORMATION
MODEL : SDM-HS53
SER NO : 1234567
MANUFACTURED : 2003-52
If any problem persists, call your authorized Sony dealer and give
the following information:
• Model name: SD M-HS53 or SDM-HS73 or SDM-HS93
• Serial number
• Detailed description of the problem
• Date of purchase
• Name and specifications of your computer and graphics board
Model name
Serial number
Week and year
of manufacture
Specifications
SDM-HS53
LCD panel Panel type: a-S i TFT Ac tive Matrix
Input signal format
Resolution Horizontal: Max.1024 dot s
Input signal levels
Power requirements
Power consumption Max. 25 W
Operating tempera tu re 5 – 35°C
Dimensions (width/height/depth)
Mass Approx. 3.8 kg (8 lb. 6 oz.)
Plug & Play DDC2B
Included items See “Setup.”
SDM-HS73/HS93
LCD panel Panel type: a-S i TFT Ac tive Matrix
Input signal format
Resolution Horizontal: Max.1280 dot s
Input signal levels
Power requirements
Power consumption
Operating tempera tu re 5 – 35°C
Dimensions (width/height/depth)
Mass Approx. 5.9 kg (13 lb. 0 oz.) (SDM-HS73)
Plug & Play DDC2B
Included items See “Setup.”
* Recommended horizontal and vertical timing condition
• Horiz ont al sync width duty should be more tha n 4. 8% of total
horizontal time or 0.8 µs, whichever is larger.
• Horiz ont al blanking width should be more tha n 2. 5 µse c.
• Vertical blanking width should be more th an 450 µsec.
Design and specifications are subject to change without notice.
Picture size : 15.0 inch
RGB operating frequency*
Horizontal: 28 – 61 kHz
Vertical: 48 – 75 Hz
Vert ical: Max.768 lines
RGB video signal
0.7 Vp-p, 75 Ω, positive
SYNC signal
TTL level, 2.2 kΩ,
positive or negative
(Separate horizontal and vertical)
100 – 240 V, 50 – 60 Hz,
Max. 0.6 A
Display (upright):
Approx. 390 × 342 × 185 mm
3
/8 × 13 1/2 × 7 3/8 inches)
(15
Picture size: 17 .0 inch (SDM-HS73)
Picture size: 19 .0 inch (SDM-HS93)
RGB operating frequency*
Horizontal: 28 – 80 kHz
Vertical: 48 – 75 Hz
Vertic al : Ma x. 1024 lines
RGB video signal
0.7 Vp-p, 75 Ω, positive
SYNC signal
TTL level, 2.2 kΩ,
positive or negative
(Separate horizontal and vertical)
100 – 240 V, 50 – 60 Hz, Max. 1. 0 A
Max. 45 W (SDM-HS73)
Max. 50 W (SDM-HS93)
Display (upright):
Approx. 441 × 404 × 216 mm
3
/8 × 16 × 8 5/8 inches) (SDM-HS73)
(17
Approx. 480 × 440 × 260 mm
(19 × 17
Approx. 6.7 kg (14 lb. 12 oz.) (SDM-HS93)
3
/8 × 10 1/4 inches) (SDM-HS93)
US
5 (US)

AVERTISSEMENT
Pour prévenir tout risque d’incendie ou
d’électrocution, n’exposez jamais l’appareil à la
pluie ou à l’humidité.
Des tensions extrêmement élevées sont
présentes à l’intérieur de l’appareil. N’ouvrez
jamais le boîtier de l’appareil. Confiez l’entretien à
un technicien qualifié uniquement.
Précautions
Avertissement sur les raccordements
d’alimentation
• Utilisez le cordon d’alimentation fourni. Si vous utilisez un
cordon d’alimentation différent, assurez-vous qu’il est
compatible avec la tension secteur locale.
Pour les clients aux Etats-Unis
Si vous n’utilisez pas le cordon appro p rié , ce m onite u r ne sera
pas conforme aux normes FCC obligatoires.
Pour les clients au Royaume-uni
Si vous utilisez le moniteur au Royaume-uni, veuill ez utiliser le
cordon d’alimentation ada pt é au x p rise s utilisées au Royaumeuni.
Exemples de types de fiches
Remarque sur l’écran à cristaux liquides (LCD Liquid Crystal Display)
Veuillez noter que l’écran LCD est issu d’une technologie de
haute précision. Toutefois, il est possible que des points noirs ou
des points brillants de lumière (rouge, bleu ou vert) apparaissent
en permanence sur l’écran LCD, ainsi que des bandes de couleurs
irrégulières ou une certaine luminosité. Il ne s’agit pas d’un
dysfonctionnement.
(Points effectifs : supérieurs à 99,99%)
Pour lire le mode d’emploi sur le
CD-ROM
Remarques
• Pour pouvoir lire le mode d’emploi sur le CD-ROM, vous devez installer
Adobe Acrobat Reader (version plus récente que 4.0) sur votre ordinateur.
• Vous tro uve re z de plu s am ples inform ations sur les commandes, les
caractéris tiques et l es outil s d’Adobe Acrobat Reader s ur l’aide en ligne
Acrobat Reader.
Pour Windows
Insérez le CD-ROM fourni dans le lecteur de CD-ROM de votre
ordinateur. La fenêtre du CD-ROM s’affiche automatiquement
après quelque s secondes . Double-cliq uez sur « Manual.pdf » dans
la fenêtre. Les fichiers du mode d’emploi s’ouvrent.
Remarque
En fonction de l’ordin at eu r uti li s é, la fenêtre du CD-ROM peut ne pa s
s’ouvrir automatiquement. Dans ce cas, double-cliquez sur l’icône du CDROM pour ouvrir la fenêtre du CD- RO M.
pour 100 à 120 V
CA
L’appareil doit être installé à proximité d’une prise de courant
facile d’accès.
pour 200 à 240 V CApour 240 V CA
uniquement
Installation
N’installez pas et ne laissez pas le moniteur :
• A des endroi ts exposés à des températu r es extrêmes, par
exemple à proximité d’un radiateur, d’un conduit de chauffage
ou exposés aux rayons directs du soleil. L’exposition du
moniteur à des températures extrêmes, comme dans l’habitacle
d’un véhicule garé en plein soleil ou à proximité d’un conduit
de chauffage r isque d’entraîner des déformations du boîtier ou
des problèmes de fonct ionnement.
• A des endroits soumis à des vibrations mécaniques ou à des
chocs.
• A proximité d’a ppareils générant de puissants champs
magnétiques, comme un téléviseur ou d’autres appareils
électroménagers.
• A des endroits soumis à des quantités inhabituelles de
poussière, de saletés ou de sable, par exemple à côté d’une
fenêtre ouverte ou d’ une porte donnant sur l’extérieur. En cas
d’installation temporaire à l’extérieur, veillez à prendre les
précautions requises contre la poussière et les saletés en
suspension dans l’air, faute de quoi des dommages irréparables
risquent de se produire.
Pour Macintosh
Insérez le CD-ROM fourni dans le lecteur de CD-ROM de votre
ordinateur. L’icône du CD-ROM s’affiche sur le bureau. Doublecliquez sur l’icône pour ouvrir la fenêtre du CD-ROM et doublecliquez sur « Manual.pdf » dans la fenêtre. Les fichier s du mode
d’emploi s’ouvrent.
Remarque
Si vous utilisez Mac OS X, commencez par ouvrir Adobe Acrobat
Reader, puis double-cliquez sur « Manual.pdf » dans la fenêtre.
Si vous n’arrivez pas à ouvrir les fichiers du mode
d’emploi
Il est possible que Adobe Acrobat Reader ne soit pas installé sur
votre ordinateur.
Vous pouvez le télécharger gratuitement à partir du site Web
Adobe.
Installation
Déballage
Assurez-vous que votre emballage co ntient tous les éléments
énumérés ci-dessous.
• Ecran LCD
• Cordon d’alimentation
• Câble de signal vidéo HD15-HD15
•Sangle
• CD-ROM d’utilitaire et m ode d ’emplo i (log iciel utilita ire pou r
Windows et Macintosh, mode d’emploi)
• Carte de garantie
• Le présent gu ide de configuration rapide
2 (FR)
 Loading...