

Page 1
User's Guide
Mode d'emploi
Guía del usuario
SCPH-90001
Before using this product, carefully read the supplied documentation.
Avant d'utiliser ce produit, lisez attentivement la documentation fournie.
Antes de utilizar este producto, lea detenidamente la documentación suministrada.
US
FR
ES
01-UG1
Page 2

About the PlayStation®2 console documentation
The PlayStation
• Quick Reference / Safety and Support
A manual that is included in the package with the console. It contains information on
setting up and performing basic operations on the console, as well as safety and
troubleshooting information.
• User's Guide (this document)
This document (in PDF format) is accessed from a PC through the Internet and
contains information on performing advanced operations on the console, technical
specifications and other information. You can download this document from the
support page on the Sony Computer Entertainment Web site
(http://www.us.playstation.com/Support/PS2).
®2 console documentation includes the following:
Table of contents
Preparation
Getting started................................................................................3
Part names......................................................................................3
Connecting to a TV........................................................................4
Connecting digital audio equipment .............................................. 6
Connecting the controller...............................................................6
Connecting the AC power cord......................................................7
Turning the console on and off ......................................................8
Games
Playing a game...............................................................................9
Using memory cards.................................................................... 12
DVDs
Watching a DVD..........................................................................16
Using the playback modes............................................................20
Adjusting DVD player settings ....................................................22
Main menu
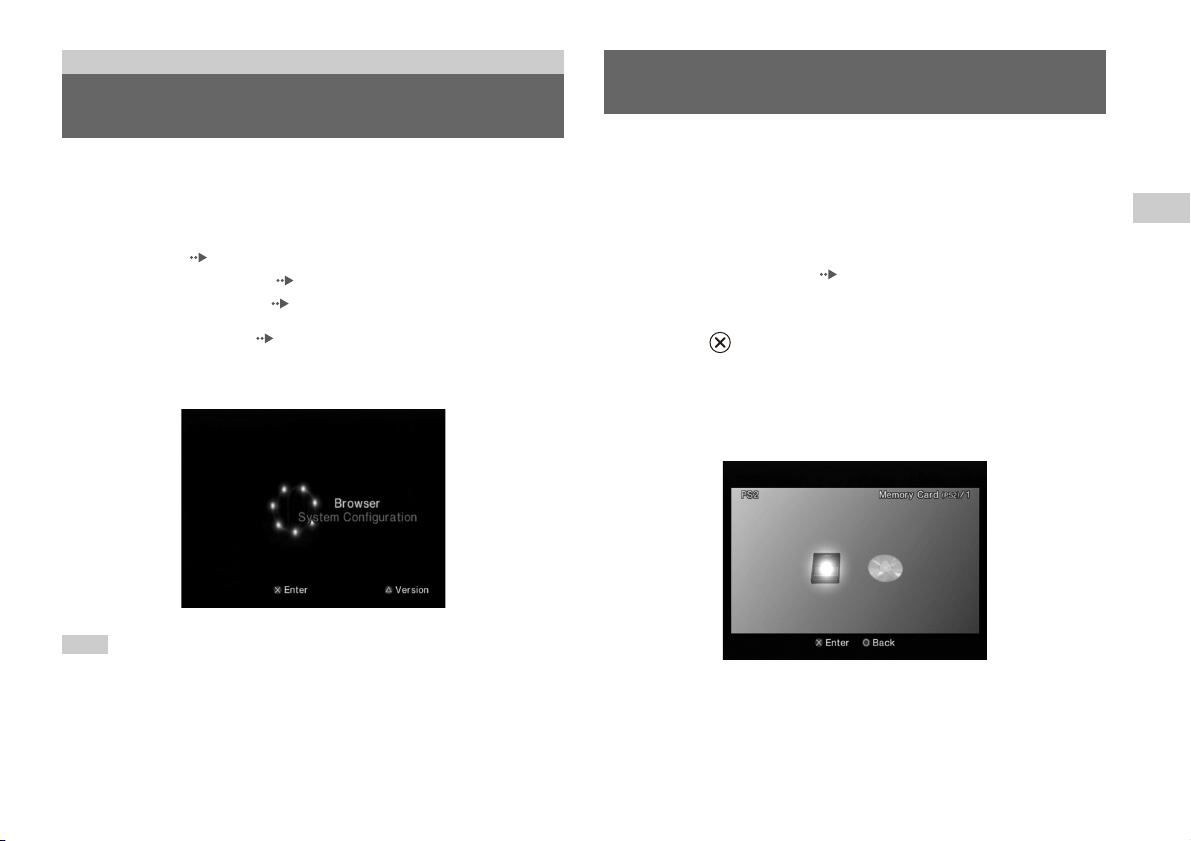
Displaying the main menu............................................................29
Using the Browser screen.............................................................29
Using the System Configuration menu ........................................30
Using the Version Information screen..........................................33
Networking
Networking...................................................................................36
Additional information
Specifications ...............................................................................39
Audio CDs
Table of contents
2
Playing an audio CD....................................................................14
Page 3
Preparation
Getting started
Positioning the console
Set the console in a horizontal position only.
MEMORY CARD MEMORY CARD
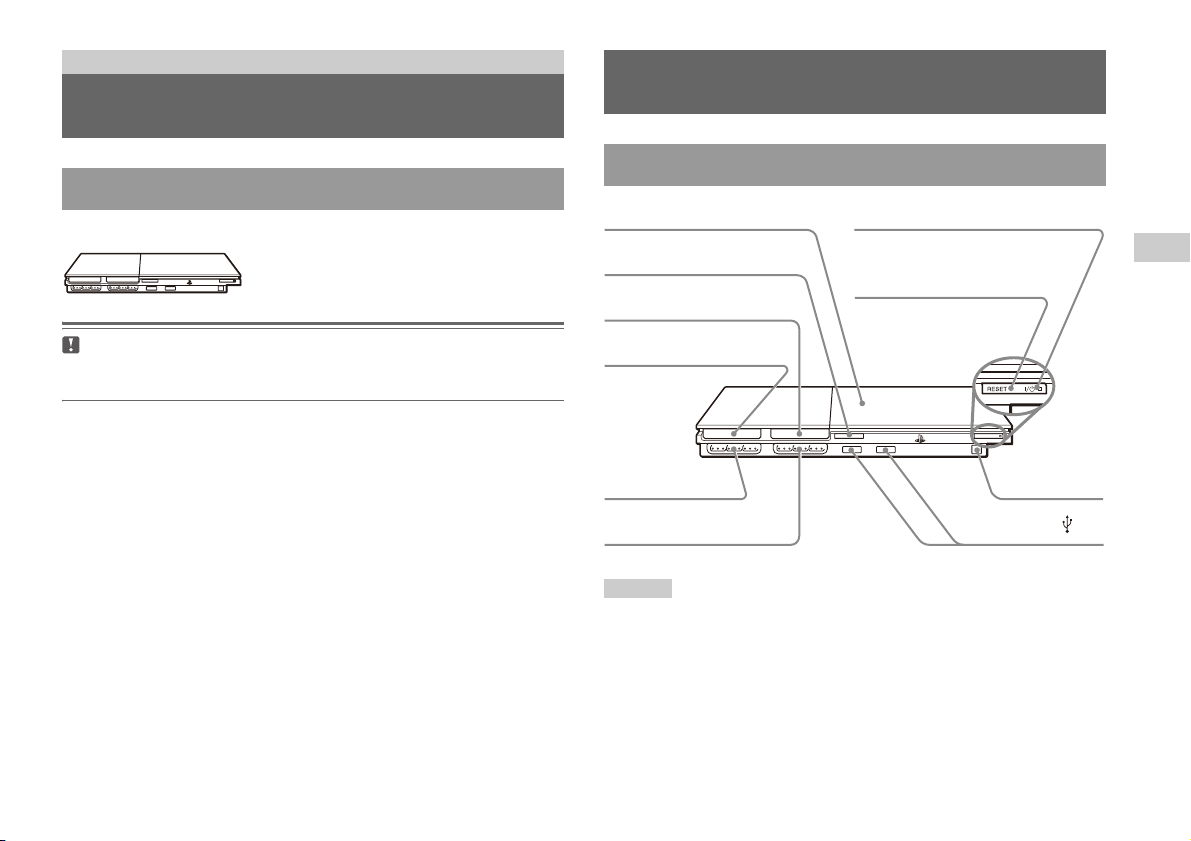
Part names
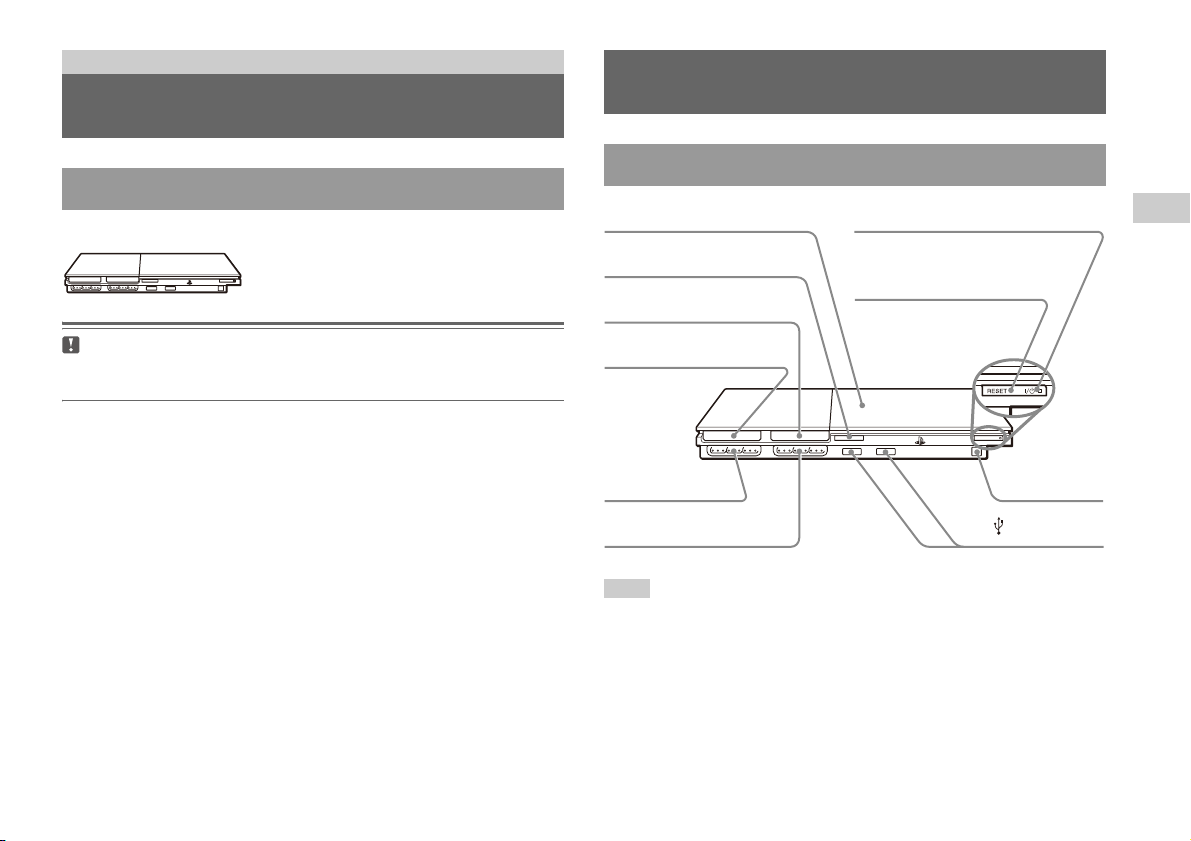
PlayStation®2 console front
Disc cover
A (open) button
MEMORY CARD slot 2
]/1 (on/standby) indicator
]/1 (on/standby)/RESET button
US
Preparation
Caution
Do not place the console in locations where it may be exposed to magnetic
fields, such as those produced by magnets or loudspeakers.
MEMORY CARD slot 1
MEMORY CARD MEMORY CARD
Controller port 1
Controller port 2
Hint
You can connect various USB devices to the PlayStation®2 console, but not all are
compatible. Refer to the instructions supplied with the USB device for more
information.
IR receiver
USB connector
Getting started
3
Page 4
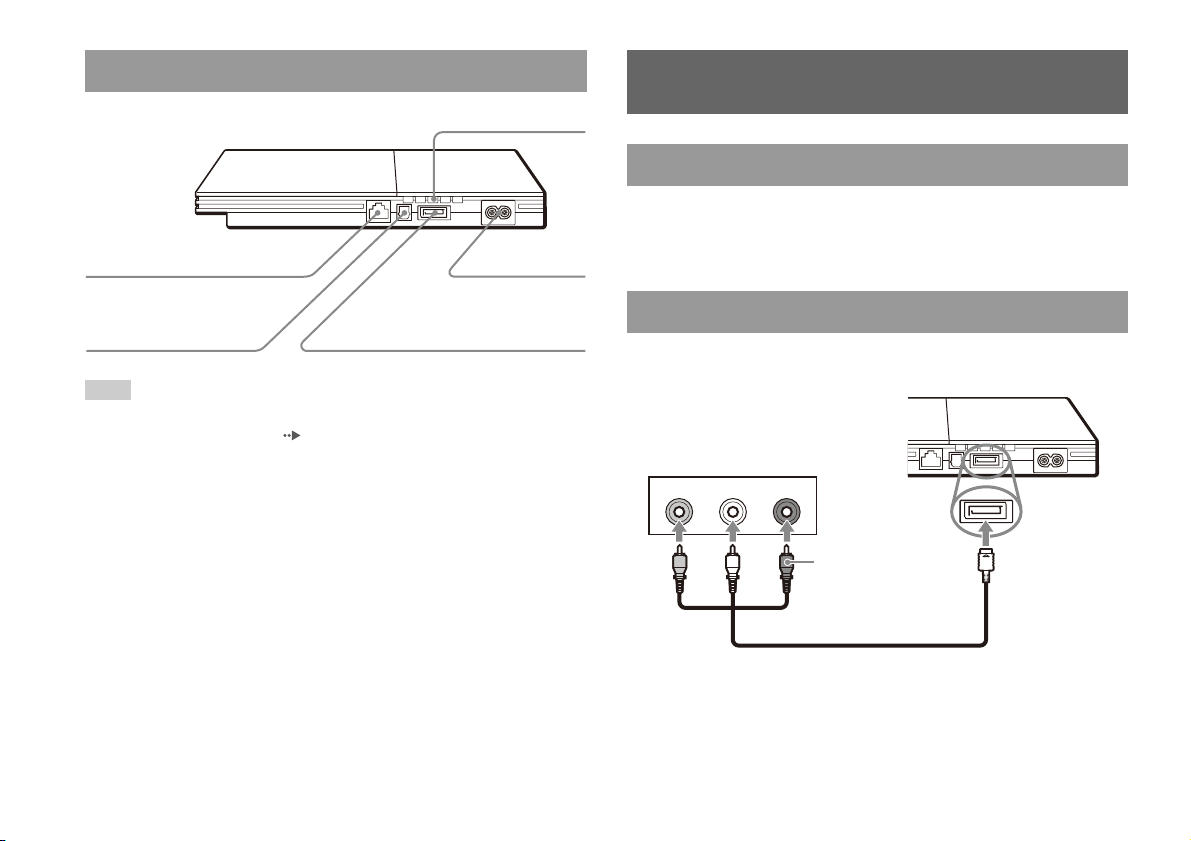
PlayStation®2 console rear
NETWORK connector
Rear vent
~AC IN connector
Connecting to a TV
Before connecting
• Do not plug the AC power cord for the console into an electrical outlet
until you have made all other connections.
• Check that the TV is turned off.
DIGITAL OUT (OPTICAL)
connector
Hint
For part names of the analog controller (DUALSHOCK®2), see "Using the analog
controller (DUALSHOCK
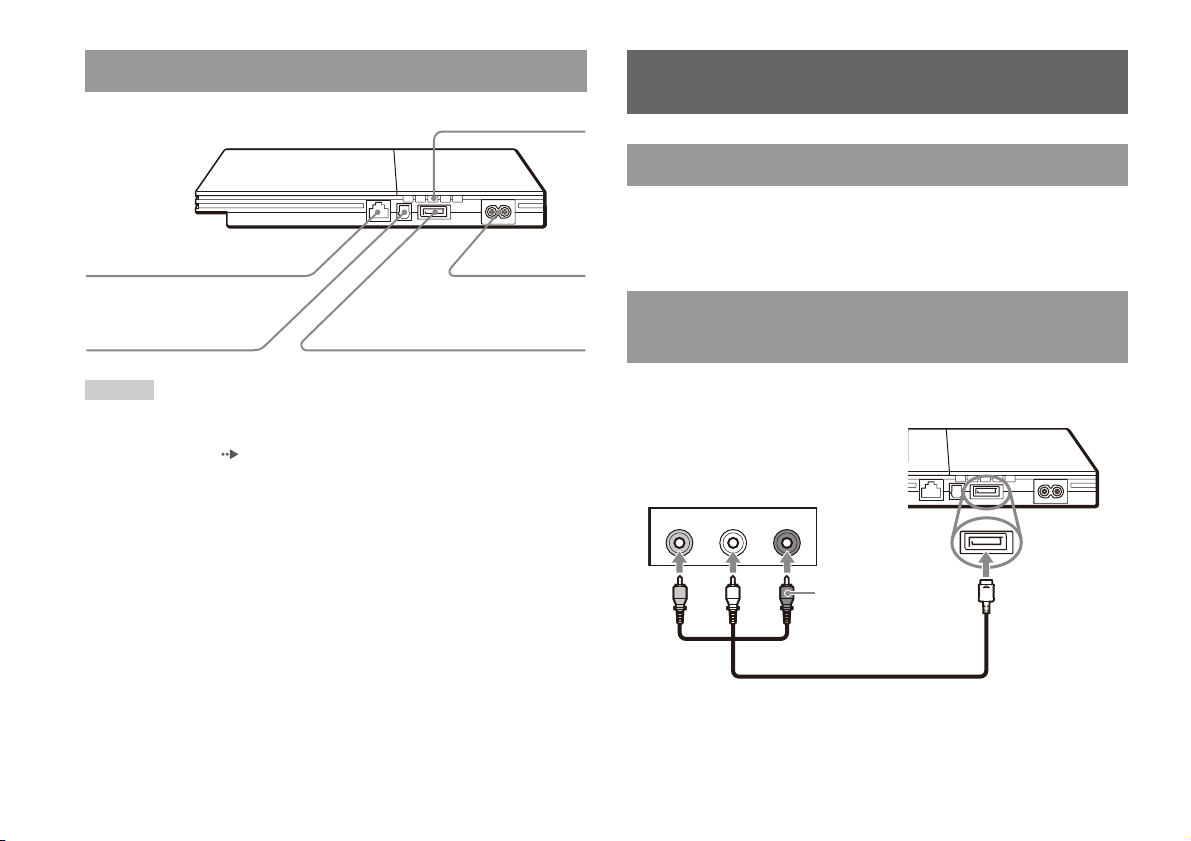
Connecting to a TV
4
®2)" ( page 11).
AV MULTI OUT connector
Connecting to a TV using the supplied AV cable
Connect the console to the TV as shown below.
Console rear
Audio and video inputs of the TV
L-AUDIO-RVIDEO
White RedYellow
Do not use when
connecting to a
monaural TV.
AV cable
To the AV MULTI
OUT connector
Page 5
Caution
If you display a still im age on a plasma or projection* TV screen for an extended
period of time, "ghosting" may occur. This is a characteristic of these types of
TVs. Static, non-moving images, such as console setting menus, DVD menus or
paused images, may leave a faint image permanently on the TV screen if left on
for an extended time. Refer to the instructions supplied with your TV for details.
* Except those of LCD screen types
Hint
When playing a DVD, connect the console to the TV directly. If the video signal
from the console is coming through a VCR to the TV, copy protection on some
DVDs may affect picture quality.
When using a cable other than the supplied AV
cable
Picture quality varies depending on the type of cable used. Use the
information below to determine the best connection method.
If you use a cable other than the supplied AV cable, refer to the instructions
supplied with the cable.
TV Cable type
A TV with S VIDEO inputs S VIDEO cable (SCPH-10480 U)
A TV without video inputs RFU adaptor (SCPH-10071)
A TV with component video
input connectors
Component AV cable (SCPH-10490 U)
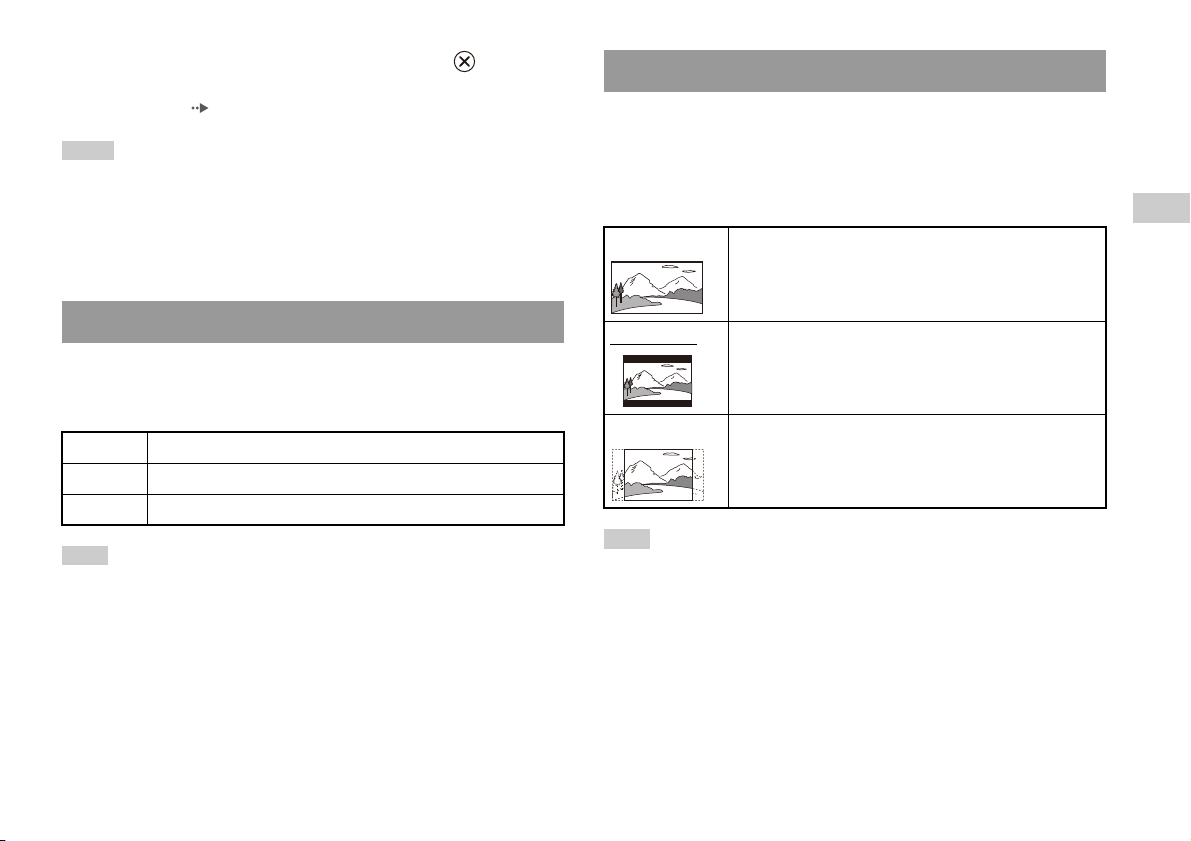
Picture quality scale
x RFU adaptor x AV cable (supplied) x S VIDEO cable x Component AV cable
This scale is intended only as a reference. Depending on the product or
condition of your TV, the picture quality may be different.
High quality
Hints
• To use progressive scan, you must have a TV and software that support prog ressive
scan (480p) and you must connect using the appropriate type of cable*. You must
also check that the console settings are correct. For details, see "Progressive" in
"Setting TV display options" ( page 24).
* The component AV cable (sold separately) is compatible with progressive scan.
• This product is compatible for use with component video inputs (Y C
but cannot be used with input s in HDTV format (Y P
supplied with your TV for details.
• For TV connection methods not listed in this manual, contact SCEA Consumer
Services via our Web site at http://www.us.playstation.com or call 1-800-345-
7669.
B P R). Refe r to the instructions
B/PB CR/PR),
US
Preparation
Connecting to a TV
5
Page 6
Connecting digital audio
MEMORY CARD
equipment
By using a commercially available optical digital cable to connect digital
audio equipment, you can enjoy surround sound with the effect of being in
a movie theater or a concert hall. When connecting the console to audio
equipment with digital connectors, refer to the instructions supplied with
the device to be connected.
Console rear
Connected device
DIGITAL IN
OPTICAL
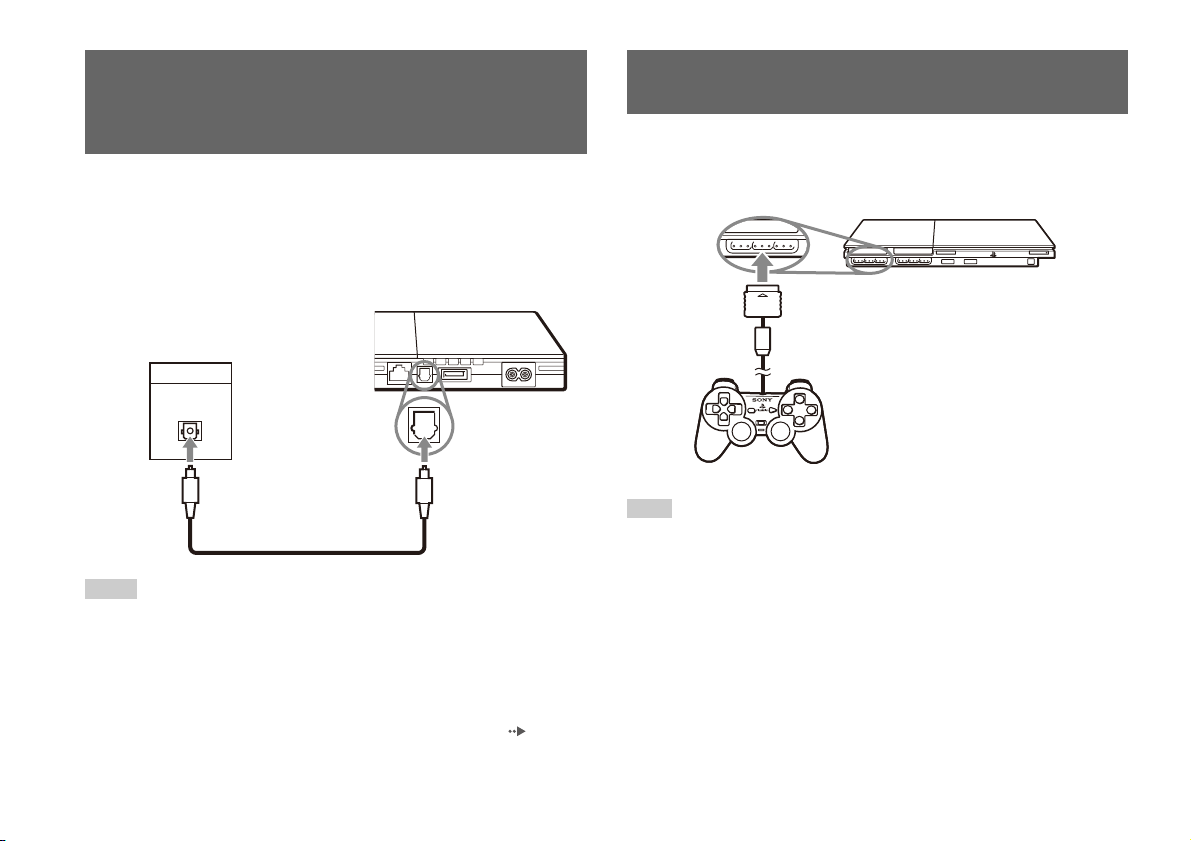
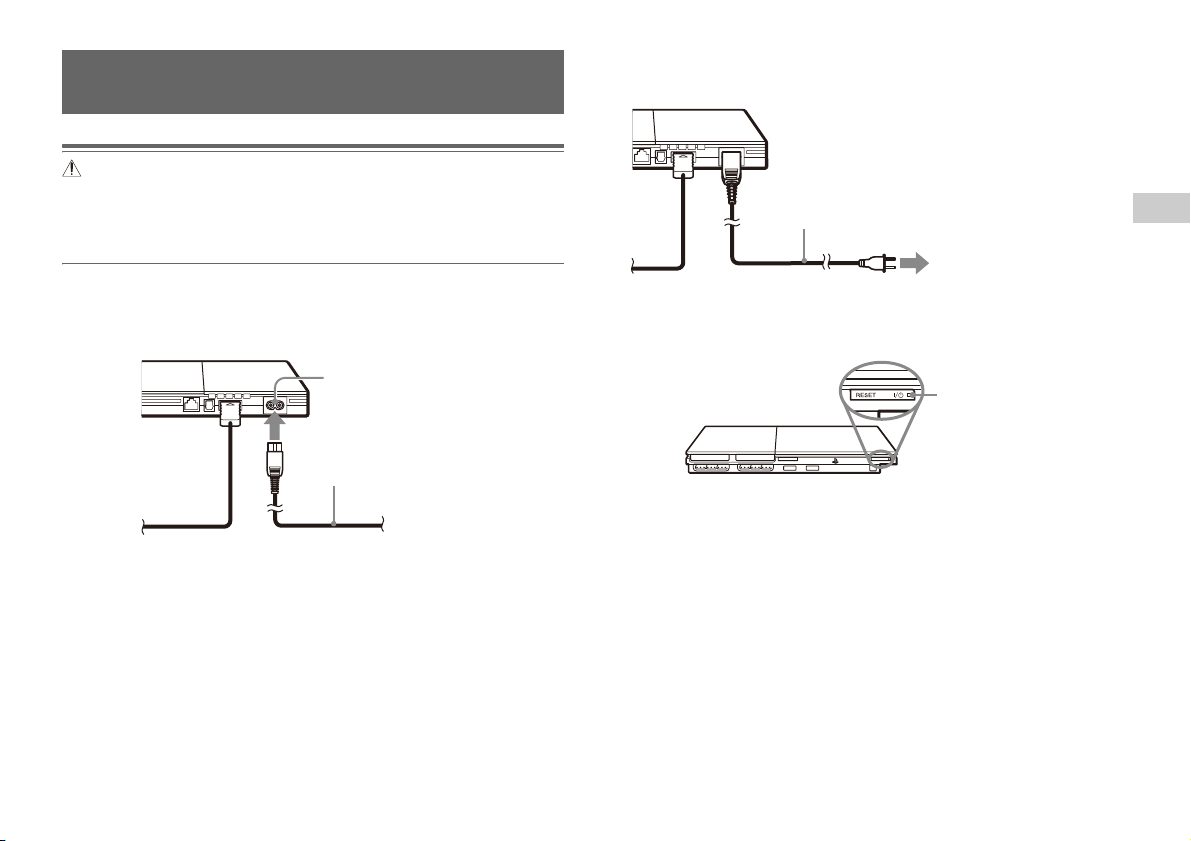
Connecting the controller
1 Insert the analog controller (DUALSHOCK®2) into a controller
port of the console.
Console front
MEMORY CARD MEMORY CARD
Analog controller
(DUALSHOCK
®2)
Commercially available optical
digital cable
Hints
• If you connect the console to audio equipment using an optical digital cable, it may
affect the audio output of some PlayStation
no sound is produced. If this happens, use a cable such as the supplied AV cable
and connect it to the console's AV MULTI OUT connector. Do not use an optical
digital cable.
• After connect ing digital audio equipment, set "Digital Out (Optical)" to "On " in the
System Configuration menu. For details, see "Digital Out (Optical)" ( page 31).
Connecting digital audio equipment
6
Hint
Some software titles designate a specific controller port to be used. Refer to the
instructions supplied with the software for details.
®2 format software with the result that
Page 7
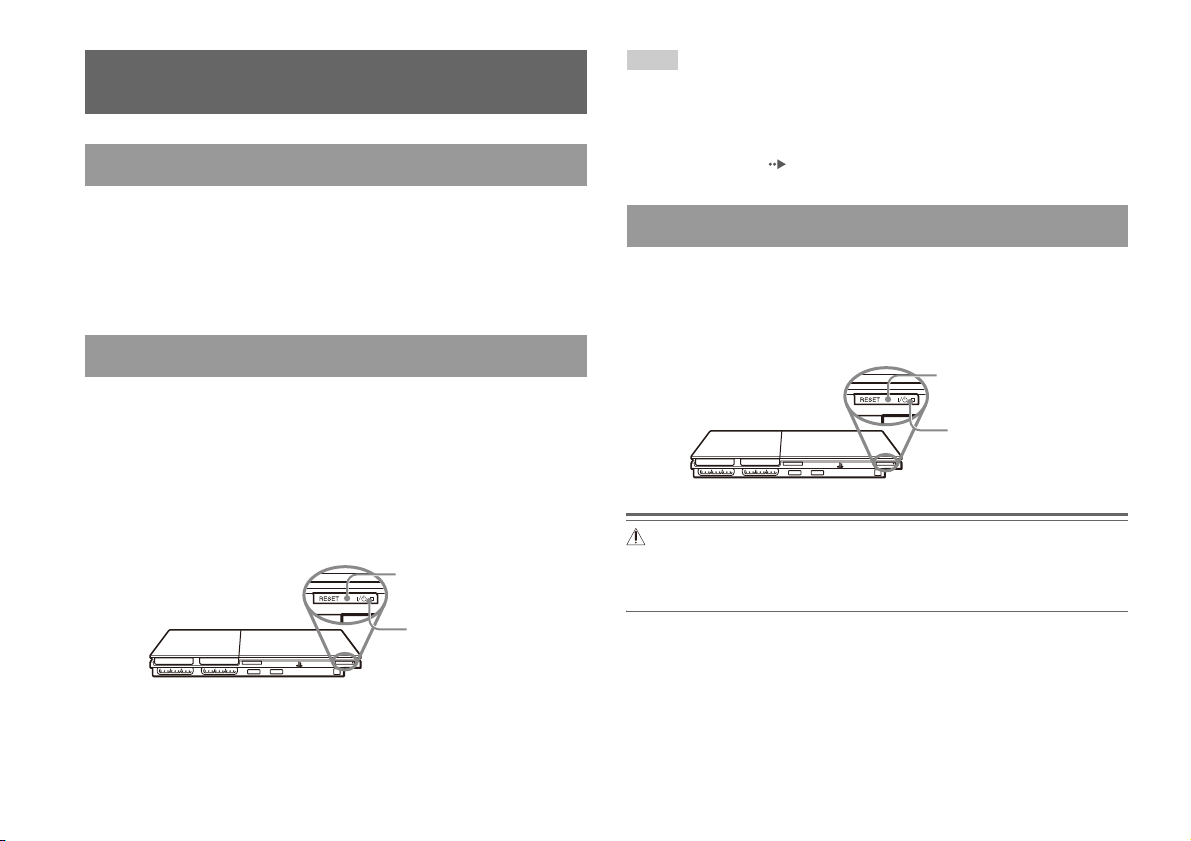
Connecting the AC power cord
Warnings
• The socket-outlet shall be installed near the equipment and shall be easily
accessible.
• Do not plug the AC power cord for the console into an electrical outlet until
you have made all other connections.
1 Connect the AC power cord to the ~ AC IN connector on the
console rear.
Console rear
~AC IN connector
2 Plug the AC power cord into the electrical outlet.
Console rear
AC power cord
To the electrical outlet
The =/1 (on/standby) indicator on the console front will light up in red
to indicate that the console is in standby mode.
]/1 indicator
Console front
US
Preparation
AC power cord
MEMORY CARD MEMORY CARD
Connecting the AC power cord
7
Page 8
Turning the console on and off
Before turning on the console
Do not turn on the console until you have finished these steps. Refer to the
instructions supplied with your TV for details.
• Turn on the TV.
• Change your TV setting to display output from the line to which the
console is connected.
Turning on the console
1 Check that the =/1 (on/standby) indicator on the console
front is lit up in red.
2 Press the =/1 (on/standby)/RESET button on the console
front.
The =/1 indicator on the console front will turn green and output from
the console will be displayed on the TV.
=/1/RESET button
Console front
MEMORY CARD MEMORY CARD
=/1 indicator
Hints
• The first time you turn on the console after purchase, screens for setting
"Language", "Time Zone" and "Daylight Savings Time (Summer Time)" will be
displayed. Follow the on-screen instructions to complete the settings.
• If you connect the console to a wide screen TV, set "Screen Size" in the System
Configuration menu ( page 31).
Turning off the console
1 Press and hold the =/1/RESET button on the console front for
at least one second.
The =/1 indicator will turn red to indicate that the console has entered
standby mode.
=/1/RESET button
Console front
MEMORY CARD MEMORY CARD
Warning
The power is not completely turned off when the console is in standby mode. If
you do not plan to use the console for an extended period of time, unplug the
AC power cord from the electrical outlet.
=/1 indicator
Turning the console on and off
8
Page 9
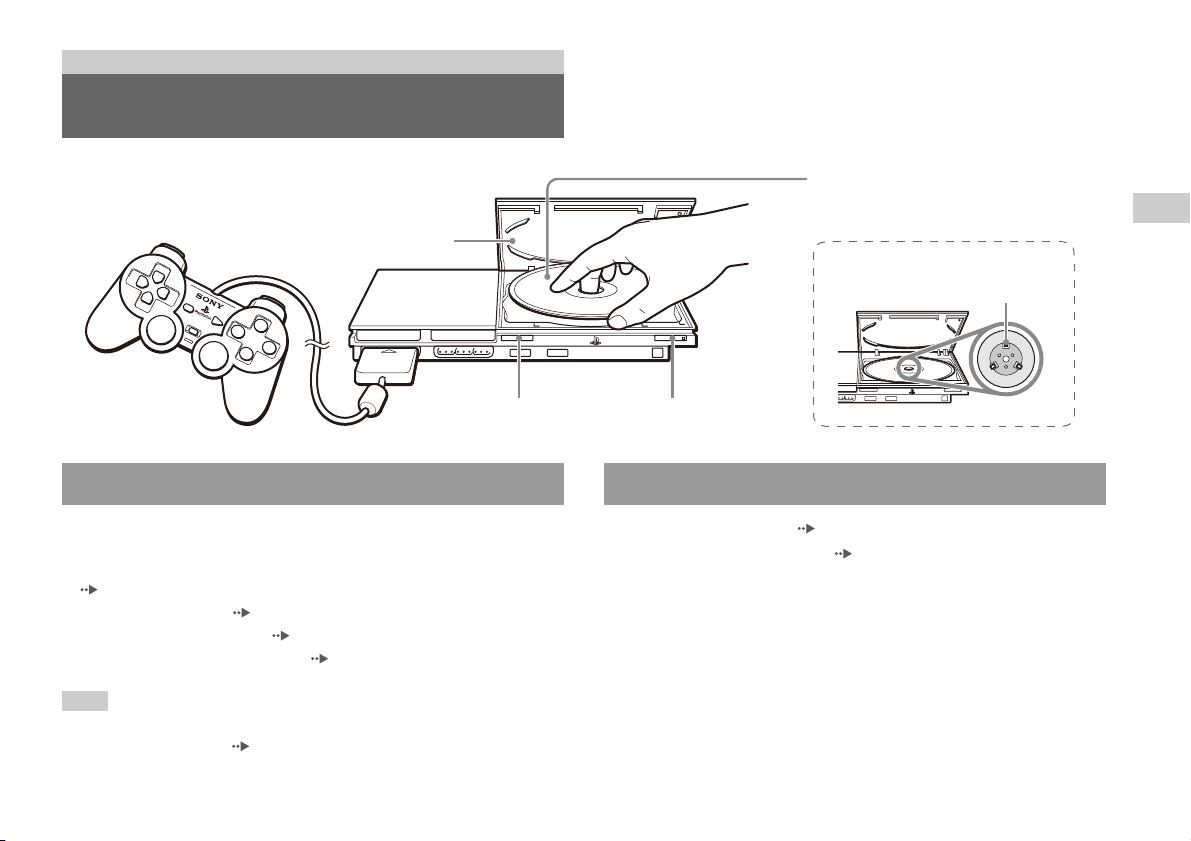
Games
Playing a game
Disc cover
MEMORY CARD MEMORY CARD
=/1/RESET buttonA (open) button
Before playing a game Starting a game
Place the disc in the console with the label
side facing up.
Place the disc so that all three tabs
are above the disc's surface.
US
Games
Check that the connections to the TV and audio equipment are correct and
that the precautions have been met.
• "Precautions" in the Quick Reference / Safety and Support manual
(page2)
• "Connecting to a TV" ( page 4)
• "Connecting the controller" ( page 6)
• "Connecting the AC power cord" ( page 7)
Hint
To play online games, you first need to connect to and set up a network. See
"Connecting to a network" ( page 36) for details.
1 Turn on the console ( page 8).
The main menu is displayed ( page 29).
2 Press the A (open) button on the console front.
The disc cover opens.
3 Place the disc in the console.
Set the disc in the disc holder with the label side facing up.
Playing a game
9
Page 10
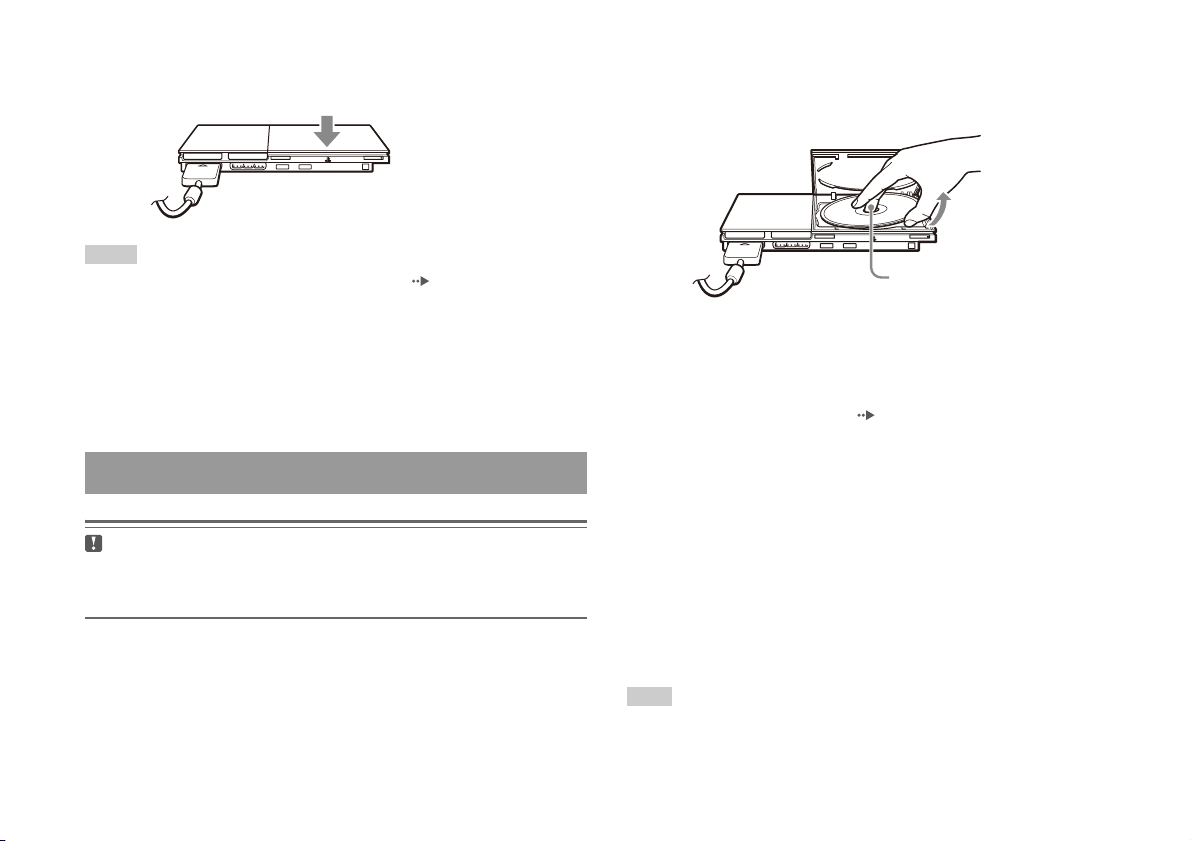
4 Close the disc cover.
After the disc cover is closed, the game will start.
MEMORY CARD MEMORY CARD
Hints
• You can also start a game from the Browser screen ( page 29).
• If you turn on the console after inserting a disc, the game will start automatically.
2 Remove the disc.
Hold down the black center part of the disc holder, and then lift the
disc by the edges.
MEMORY CARD MEMORY CARD
Press the black center part of
the disc holder.
Playing a game
10
To reset a game
Press the \/1 (on/standby)/RESET button on the console front. Do not
accidentally press the @/1/RESET button while playing a game, as doing
so will cause the game to reset.
Ending a game
Caution
When removing a disc, check that the disc has stopped completely . Do not touch
the disc if it is spinning, as doing so may cause injury, damage to the disc or
console malfunction.
1 Press the A button on the console front.
3 Close the disc cover.
4 Press the =/1/RESET button.
The main menu is displayed ( page 29).
Changing game discs
1 Open the disc cover and remove the disc.
When removing a disc, hold down the black center part of the disc
holder and then lift the disc by the edges.
2 Insert a new disc.
3 Close the disc cover and reset the console.
The new game will start.
Hint
You do not need to turn off the console when changing games.
Page 11

Using the analog controller (DUALSHOCK®2)
The analog controller (DUALSHOCK®2) is equipped with a pressuresensitive button function. It also has a vibration function.
Part names
SELECT button
L2 button
L1 button
Directional
buttons
Right analog stick/ R3 button*
Mode indicator
ANALOG mode button
* The left and right analog sticks, or the L3 and R3 buttons, function only in analog
mode (indicator: red).
* The L3 and R3 buttons function when the analog sticks are pressed.
Left analog stick/ L3 button*
Hint
Before using the analog controller
(DUALSHOCK
rotate the left and right analog sticks once with your
thumbs. Do not twist the analog sticks, but rotate as if
drawing a circle as shown in the diagram.
®2), with the console turned on,
START button
R2 button
R1 button
button
button
button
button
About mode switching
The ANALOG mode button can be used to switch between two modes.
Switch to the appropriate mode for use. Note, however, that some software
titles make this adjustment automatically.
Digital mode
(indicator: off)
Analog mode
(indicator: red)
Hints
• When using the analog controller in digital mode, the left and right analog sticks
do not function. Also, the pressure-sensitive button function is turned off.
• Depending on the software, you may not be able to switch modes even if you press
the ANALOG mode button.
When using in analog mode
• When playing a PlayStation®2 format software title, the left and right
analog sticks/L3 and R3 buttons are active and all buttons except
SELECT, START, L3 and R3 have pressure-sensitive button function.
• When playing a PlayStation
® format software title, the left and right
analog sticks are active.
Hint
Depending on the software, the buttons for use in analog mode may be limited. Refer
to the instructions supplied with the software for details.
US
Games
Playing a game
11
Page 12
About the vibration function
The vibration function can be set to ON or OFF in the software options
menu.
Using memory cards
Hints
• Before using the vibration function, read "Notes on safety when using the analog
controller (DUALSHOCK
manual ( page 2).
• Depending on the software, the vibration function may be set to "On"
automatically.
• When the analog controller (DUALSHOCK
off or unplug the controller from the console. The vibration may cause the
controller to unexpectedly move or fall.
®2)" in the Quick Reference / Safety and Support
®2) is not being used, turn the console
About using the analog controller (DUALSHOCK®)
(SCPH-110 U)
You can use the analog controller (DUALSHOCK®) (SCPH-110 U) with
the PlayStation
may be different from those of the analog controller (DUALSHOCK
Only the left and right analog sticks can be used in analog mode.
®2 console, but the functions of the buttons in analog mode
®2).
You can save and load game data using a memory card (sold separately).
You can also delete game data or copy game data from one memory card
to another.
About memory card types
There are two types of memory cards. Select a memory card suitable for
the software in use.
Memory card type Compatible software Amount of memory
Memory card (8MB) (for
PlayStation
10020 U)
Memory card
(SCPH-1020 U)*
* This product is no
®2) (SCPH-
longer manufactured.
PlayStation
software
PlayStation
software
MagicGate™ is a term of copyright protection technology developed by
Sony Corporation.
®2 format
® format
Approx. 8 MB
15 memory blocks
(approx. 120 KB)
Using memory cards
12
Page 13
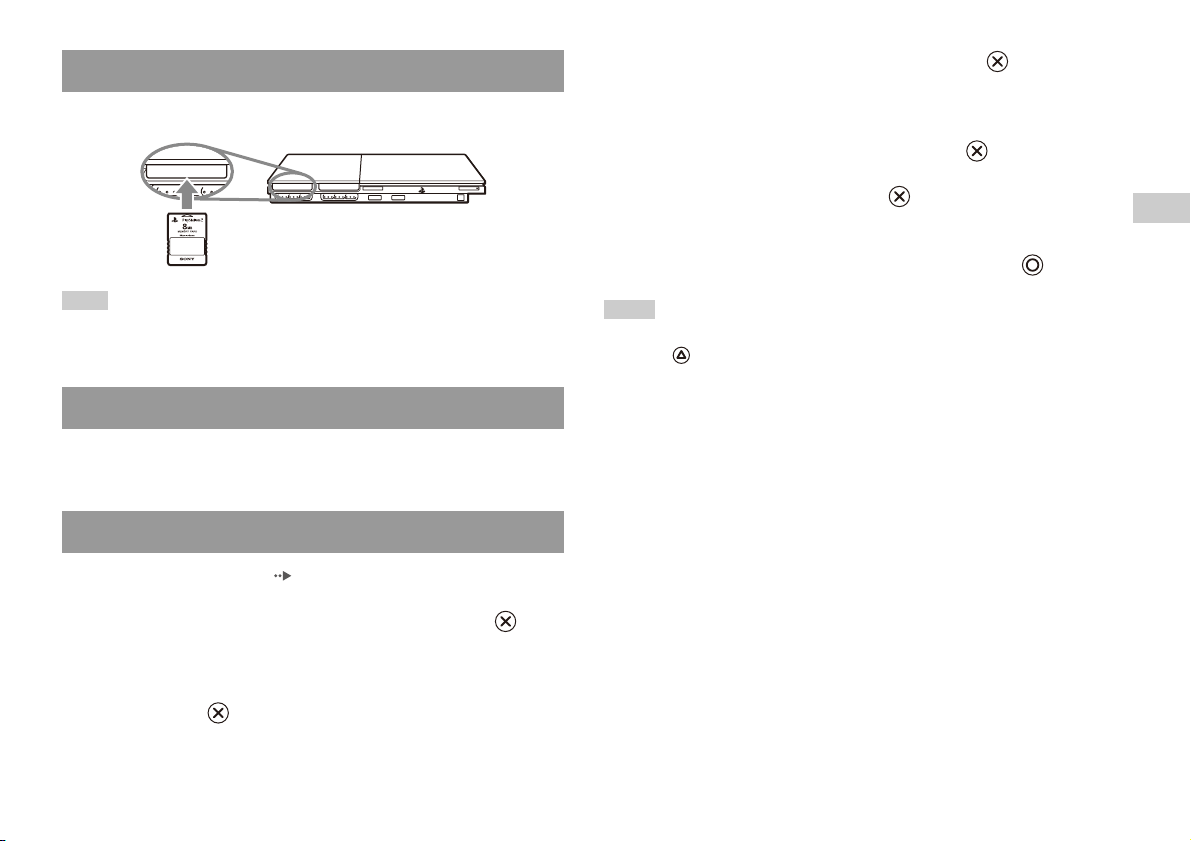
Inserting a memory card
MEMORY CARD
Insert the memory card into a memory card slot on the console front.
Console front
MEMORY CARD MEMORY CARD
3 Select "Copy" or "Delete", and then press the button.
When copying game data, check that two memory cards are inserted
in the console. If you have selected "Delete", skip to step 5.
4 Select the destination, and then press the button.
5 Select "Yes", and then press the button.
While copying or deleting data, do not remove the memory cards.
6 When copying or deleting is completed, press the button.
US
Games
Hint
Some software titles designate a specific memory card slot to use. Refer to the
instructions supplied with the software for details.
Saving or loading game data
Depending on the software, the procedure for saving or loading may vary.
Refer to the instructions supplied with the software for details.
Copying or deleting game data
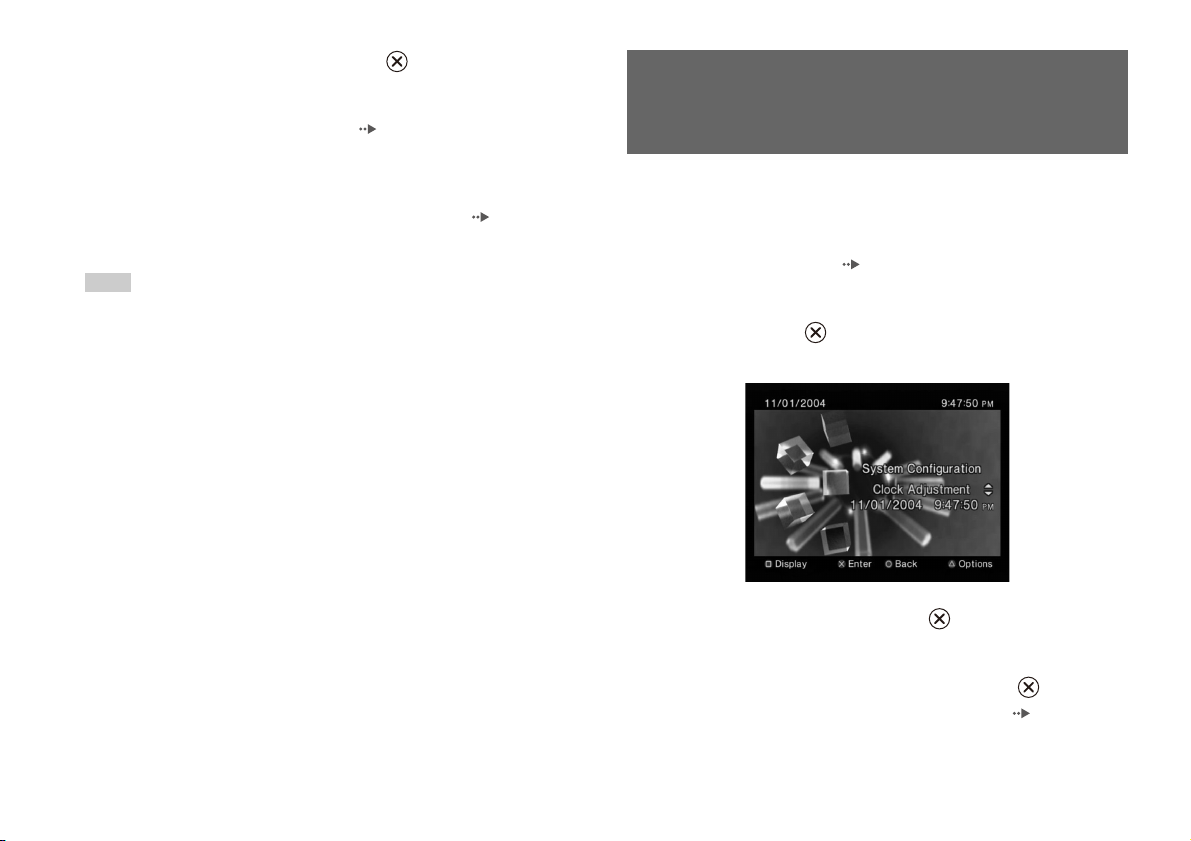
1 At the Browser screen ( page 29), use the directional
buttons to select the icon for the memory card you want to
use for copying or deleting data and then press the
button.
2 Select the icon for the data you want to copy or delete, and
then press the button.
Hints
• To view information about a game data item, select the icon for the data and then
press the button to check the details.
• Compatibility between software and memory cards:
– You cannot save or copy PlayStation
(SCPH-1020 U).
– You cannot save PlayStation
PlayStation
memory card (SCPH-1020 U) to a memory card (8MB) (for PlayStation
storage purposes. Note that such game data cannot be loaded directly from a
memory card (8MB) (for PlayStation
®2). You can, however, copy PlayStation® format game data from a
®2 format software to a memory card
® format game data to a memory card (8MB) (for
®2) for
®2).
Using memory cards
13
Page 14
Audio CDs
Operating the CD player during playback
Playing an audio CD
Playing a CD
1 Turn on the console and insert the disc ( page 9).
Follow steps 1 to 4 of "Starting a game".
The track numbers are displayed.
2 Using the directional buttons, select the track number you
want to play and then press the button.
Playback begins.
Hints
• If you turn on the console after inserting a disc, the track numbers are displayed
automatically.
• You can also start playback from the Browser screen ( page 29).
Caution
To play an audio CD recorded in DTS format, you must connect a device with
a DTS decoder to the DIGITAL OUT (OPTICAL) connector ( page 6). Note
that an extremely loud noise may be emitted if the device does not have a DTS
decoder or if it is connected to the AV MULTI OUT connector.
Using the directional buttons, select the icon for the desired track and then
press the button.
Icon (button*) Function
. (L1 button) Go to the beginning of the current or previous track
m (L2 button) Fast reverse
M (R2 button) Fast forward
> (R1 button) Go to the beginning of the next track
N (START button) Start playback
X (START button) Pause playback
x (SELECT button) Stop playback
* You can operate directly by pressing the analog controller (DUALSHOCK®2)
buttons shown in parentheses.
Hint
You can also use the DVD remote control (for PlayStation®2) (sold separately).
Playing an audio CD
14
Page 15
Ending audio CD playback
1 Using the directional buttons, select x and then press the
button.
Playback stops. Press the A (open) button on the console front to
remove the disc.
Playing in various modes
You can set for "Play Mode" and "Repeat".
Play Mode Normal Plays tracks as recorded on the CD
Program Plays tracks in a specified order
Shuffle Plays tracks in a random order
Repeat Off Does not play the CD repeatedly
All Plays all tracks repeatedly
1 Plays a track repeatedly
1 At the Browser screen ( page 29), use the directional
buttons to select the audio CD icon and then press the
button.
The Play Options screen is displayed.
3 Select the desired setting, and then press the button.
If you select "Program", the screen for specifying track order will be
displayed. Select the tracks you want to play.
4 Press the button.
The Browser screen is displayed.
5 Select the audio CD icon, and then press the button.
The track numbers are displayed, and the setting option is shown in the
lower left of the screen.
6 Select the desired track, and then press the button.
Playback begins.
Hints
• You can also access the Play Options screen from the screen displaying the tracks
by selecting the Audio CD icon in the upper left corner of the screen and pressing
the button.
• You can set "Play Mode" and "Repeat" at the same time.
US
Audio CDs
2 Select "Play Mode" or "Repeat", and then press the
button.
Playing an audio CD
15
Page 16
DVDs
Using the Control Panel
Watching a DVD
You can operate the DVD player using the following methods.
• Using the on-screen Control Panel
• Operating directly using the analog controller (DUALSHOCK
• Using the DVD remote control (for PlayStation
The following instructions assume use of the Control Panel to operate the
DVD player. Some operations may be different depending on the method
used.
Hints
• For details about the features available on a DVD, refer to the instructions supplied
with the DVD.
• In rare instances, certain DVDs may not operate properly with the PlayStation
console. This is primarily due to variations in the manufacturing process or
software encoding of the DVD-Video software. If you experience problems, try
restarting your DVD. If problems persist, call the publisher of the DVD or contact
SCEA Consumer Services via our Web site at http://www.us.playstation.com or
call 1-800-345-7669.
®2) (sold separately)
®2)
®2
1 Start playback of the DVD ( page 18).
2 Press the SELECT button.
The Control Panel is displayed. If you press the SELECT button again,
the display will change its position on the screen.
3 Using the directional buttons, select an icon and then press
the button.
Hint
To turn off the Control Panel, press the SELECT button (once or twice), or press the
button.
Control Panel item list
You can access the following options in the Control Panel.
Icon Function
Menu Displays the DVD-Video menu
Watching a DVD
16
Top Menu Displays the DVD-Video menu
Page 17
Icon Function
O
0~9
Return
Audio Options
Angle Options
Subtitle Options
Go To
Setup
Time Display
Help
Go to Chapter
./> Previous/Next
/Search
/Slow
Returns to the previously selected screen
within the DVD's menu
Displays and changes audio options on
DVDs with multiple audio tracks
Displays and changes viewing angles on
DVDs recorded with multi-angle options
Displays and changes subtitle options on
DVDs with subtitle options
Skips to the selected title, chapter or the
specified time, and starts playback
( page 18)
Displays and changes options for
language, picture quality, Parental Control
level, audio, etc. ( page 22)
Displays the current title or chapter
number, the elapsed time, etc.
( page 19)
Displays the direct button functions of the
analog controller (DUALSHOCK
Used to enter the number of a chapter you
want to play ( page 18)
Returns/skips to the beginning of the
current, previous or next chapter
Fast reverses/forwards playback
( page 19)
Changes to playback/reverse playback in
slow-motion
®2)
Icon Function
N
X
x
Play Starts playback
Pause Pauses playback
Stop Stops playback ( page 18)
A-B Repeat
Shuffle Play
Program Play
Repeat Play
Original/Play List
Clear
Specifies a scene for playback, and starts
playback of the scene that has been set
( page 21)
Begins playback of titles or chapters in a
random order ( page 21)
Begins playback of titles or chapters in a
programmed sequence ( page 20)
Selects repeated playback of all the titles
on the disc, or one title or one chapter
( page 21)
For DVD-RW discs (VR mode), selects
Original or Play List content to play
( page 20)
Clears selected numbers or playback
modes ( page 22)
Hints
• You can use " " to check the options that can be accessed directly using the
buttons of the analog controller. To access the options directly using the controller,
you must clear the Control Panel from the screen.
• Depending on the playback mode, some options may not be available or cannot be
adjusted.
US
DVDs
Watching a DVD
17
Page 18
Playing a DVD
Selecting a specific scene for playback
1 Turn on the console and insert a disc ( page 9).
Follow steps 1 to 4 of "Starting a game". Playback begins.
Hints
• If you turn on the console after inserting a disc, playback will begin automatically.
• You can also start playback from the Browser screen ( page 29).
Ending DVD playback x
1 During playback, select x in the Control Panel ( page 16)
and then press the button.
Playback stops. Press the A (open) button on the console front, and
then remove the disc.
Playing a DVD from the last stopping point
(Resume Play)
1 During playback, select x in the Control Panel ( page 16)
and then press the button.
2 Select N, and then press the button.
Playback begins from the point where you stopped the disc in step 1.
To clear Resume Play
After step 1, select x and then press the button.
Selecting a scene by chapter number
1 During playback, select the desired chapter number in the
Control Panel ( page 16) and then press the button.
Playback of the selected chapter begins. If you want to play a chapter
with a single digit number (i.e. 1-9), enter a leading zero. For example,
enter as "01".
Selecting a scene by title number, chapter number or by
specifying the time
1 During playback, select in the Control Panel
( page 16) and then press the button.
2 Select an item, and then press the button.
Title Specifies the title number
Chapter Specifies the chapter number
C XX:XX:XX
(or T XX:XX:XX)
Specifies the elapsed time for the chapter (or title)
3 Select the numbers for the desired scene, and then press the
button.
Playback of the selected chapter begins.
Watching a DVD
18
Page 19
Finding a particular point on a DVD (Search) Displaying playback information
You can display information such as the current title number or elapsed
You can search either forwards or backwards to quickly locate a particular
point on a DVD.
1 During playback, select or in the Control Panel
( page 16) and then press and hold the button.
Search speed changes as shown below when you press either the up or
down directional button while holding down the button.
• Search 3
• Search 2
• Search 1
•Slow
2 Release the button when you reach the point you are
searching for.
Playback returns to normal speed.
Hint
To use the analog controller for Search during playback, press and hold down the L2
or R2 button to begin searching. Use the directional buttons to change speeds.
Release the L2 or R2 button when you reach the point you are searching for.
time.
1 During playback, select in the Control Panel
( page 16) and then press the button.
The display changes as shown below each time you press the
button.
Title X Chapter X Title number and chapter number
Title X Chapter X C XX:XX:XX Elapsed time of current chapter
Title X Chapter X C - XX:XX:XX Remaining time of current chapter
Title X Chapter X T XX:XX:XX Elapsed time of current title
Title X Chapter X T - XX:XX:XX Remaining time of current title
(Off)
US
DVDs
Watching a DVD
19
Page 20
Selecting Original or Play List for DVD-RW
playback
Using the playback modes
When using a DVD-RW disc (VR mode), you can select the type of titles
you want to play.
1 With playback stopped, select in the Control Panel
( page 16) and then press the button.
Original and Play List will be selected in turn each time you press the
button.
Original Plays content in the originally recorded sequence
Play List Plays edited content. Play List is the default setting.
Hints
• Slow-motion play in reverse is not available for DVD-RW discs (VR mode).
• You cannot use this function with Resume Play. Clear Resume Play ( page 18)
before selecting this feature.
Using the various playback modes, you can play titles or chapters in the
order you want or repeat playback of a specific scene. There are four
playback modes:
• Program Play ( page 20)
• Shuffle Play ( page 21)
• Repeat Play ( page 21)
• A-B Repeat ( page 21)
The following instructions assume use of the Control Panel ( page 16)
to operate the DVD player.
Hints
• You can play combinations of Program Play, Shuffle Play, and Repeat Play. Note,
however, that some Shuffle Play or Repeat Play options may not be available
depending on the combination.
• The PlayStation
®2 console plays disc content as recorded in the DVD software.
Program Play
You can create programs to play titles and chapters in any order.
1 During playback, select in the Control Panel
( page 16) and then press the button.
2 Select a program number, and then press the button.
If no programs have been set, the only option will be "1. Title".
Using the playback modes
20
3 Select the title number, and then press the button.
Page 21
4 Select the chapter number, and then press the button.
To play all the chapters, select "All". Repeat steps 2 to 4 to set other
titles or chapters.
Repeat Play
You can set this option to play titles or chapters repeatedly.
5 Press the START button.
Program Play begins.
Hint
The setting will not be cleared after Program Play finishes.
Shuffle Play
You can set this option for random playback of all titles or chapters
recorded on a disc. Playback order will be different each time Shuffle Play
is used.
1 Select in the Control Panel ( page 16), and then
press the button.
The display changes as shown below each time you press the
button.
Title Shuffle Plays titles in random order
Chapter Shuffle Plays chapters in random order
Shuffle Off Clears Shuffle Play
2 Select N, and then press the button.
1 Select in the Control Panel ( page 16), and then
press the button.
The display changes as shown below each time you press the
button.
Disc Repeat Repeats playback of all titles
Title Repeat Repeats playback of one title
Chapter Repeat Repeats playback of one chapter
Repeat Off Clears Repeat Play
2 Select N, and then press the button.
A-B Repeat
You can set a specific scene to be played repeatedly.
1 During playback, select in the Control Panel
( page 16) and then press the button at the point you
want to start repeated playback.
The starting point (point A) is set.
2 Press the button at the point you want to end repeated
playback.
The ending point (point B) is set, and repeated playback of the section
from A to B begins.
US
DVDs
Using the playback modes
21
Page 22
Clearing playback modes
Clears playback modes to allow normal playback.
Adjusting DVD player settings
1 Select in the Control Panel ( page 16), and then
press the button.
A message stating, "Play mode contents cleared", is displayed and the
console returns to normal playback.
Hint
If multiple playback modes have been set in a combination, all playback modes are
cleared.
You can change the initial settings, adjust the picture and sound and set
various other output options using the Setup display. You can also select a
language for subtitles and menus, restrict playback by children and set
other options.
Hints
• Some DVDs do not support all settings. The PlayStation®2 console plays disc
content as recorded in the DVD software. If the DVD does not support the features
listed, you will not be able to change the settings.
• The following options are not available during playback or Resume Play. Clear
Resume Play ( page 18) before changing these settings.
– "Menu", "Audio" and "Subtitles" in Language Setup
– "TV Type" and "Progressive" in Screen Setup
– "Parental Control" in Custom Setup
– "DTS" and "Audio Track Auto Select Mode" in Audio Setup
You can change DVD player settings using the following procedure:
1 Select in the Control Panel ( page 16), and then press
the button.
The Setup icon bar is displayed.
2 Select the icon for the setting you want to change, and then
press the button.
The current setting for each item is displayed.
3 Select the desired item, and then press the button.
The menu option becomes active and can be selected.
Adjusting DVD player settings
22
Page 23
4 Select the desired setting, and then press the button.
The setting of the item is completed. For details, see the instructions
for each item ( pages 23 to 28).
Hints
• The default setting for each menu item is underlined in the explanations below.
• To return to the Control Panel after making settings, press the SELECT button.
• Settings are saved when you do any of the following:
– Stop playback (including stopping Resume Play)
– Open the disc cover
Setting TV display options
In the Screen Setup menu, you can set the screen size (aspect ratio) and
other options that affect picture quality.
TV Type
You can set the aspect ratio to match the screen of the connected TV.
16:9 Select this option when using a widescreen TV or a standard
TV with special 16:9/widescreen functionality.
US
DVDs
Setting language options
In "Language Setup" you can choose the language for the DVD's menu,
audio and subtitles. Note that if you select a language that is not recorded
on the DVD, one of the recorded languages is selected automatically.
Menu Selects the language for the DVD's menu
Audio Selects the language for the DVD's audio track
Subtitles Selects the language for the DVD's subtitles
Hint
If you select "Audio Follow" for subtitles, the subtitle language will automatically be
set to match the language selected for the DVD's audio track.
4:3 Letter Box
4:3 PAN SCAN Select this option when using a standard TV. This setting
Hint
When you set "Progressive" to "On", "TV Type" is automatically set to "16:9".
Select this option when using a standard TV. This setting
displays a wide picture with margins on the upper and lower
portions of the screen.
displays a picture adjusted to the height of the screen, cutting
off portions at left and right that do not fit.
Adjusting DVD player settings
23
Page 24

DNR (Digital Noise Reduction)
You can use this setting to help reduce roughness in the on-screen image
and produce a cleaner picture.
Off
DNR1 Increases picture quality
DNR2 Increases picture quality (maximum)
DNR is not used.
Hints
• "DNR2" is more effective for reducing image roughness than "DNR1", but in some
cases an afterimage may appear. If this occurs, select "Off".
• The DNR function may produce limited results on some DVDs.
• When you set "Progressive " to "On", "DNR" is automatically turned off and c annot
be turned on.
Outline Sharpening
You can sharpen or soften the outline of the on-screen image. The higher
the value, the sharper the outline. Normally, select "0".
•-2 •-1 •0
•+1 •+2
Hint
Depending on the DVD, Outline Sharpening may produce limited results.
Display
During playback, you can display playback status information in the top
right corner of the screen for a few seconds.
On
Off Playback status information is not displayed.
Playback status information is displayed for a few seconds.
Progressive
You can display an image in which the picture updates all the lines in one
pass. In most cases, this results in a clearer, flicker-free image. This feature
is available only if your TV, AV cable* and software support progressive
scan (480p).
* The component AV cable (sold separately) is compatible with progressive scan.
On Select this option when the console is connected to a TV that supports
Off
progressive scan (480p).
Select this option when the console is connected to a standard TV.
Hints
• If picture quality is reduced or no image is displayed, set "Progressive" to "Off"
when the console is connected to a TV without the necessary equipment. If you
accidentally set this option to "On" for such a TV, picture quality may be reduced
or the picture may not be displayed. To clear the setting, follow these steps:
Check that you have a DVD in the console.
1
Press the _/1/RESET button on the console front.
2
Then press and hold down the START button of the analog controller
(DUALSHOCK
The "Progressive" setting is returned to "Off", allowing the DVD-Video to
be displayed as normal. You can also cancel this setting using the "Clear
Progressive Setting" ( page 34) option in the Version Information
screen.
• DVDs can contain video-based and film-based material, which use different frame
rates. When playing video-based material using progressive scan, some images
may appear unnatural. If this occurs, set "Progressive" to "Off" and view in
standard interlace mode.
• When you set "Progressive" to "On", "TV Type" ( page 23) is automatically set
to "16:9".
• DVD-RW disc (VR mode) content can only be vi ewed in standa rd interlace format.
The "Progressive" option is not available when playing such content.
®2) in controller port 1 until the DVD picture is displayed.
Adjusting DVD player settings
24
Page 25
Setting viewer options
In "Custom Setup" you can set a Parental Control level and adjust other
playback features.
2 Select a number, and then press the button.
Repeat step 2 to enter a four-digit password. If you want to clear a
number, press the button. When registering a password, you are
required to enter it again for confirmation.
Pause mode
You can use this option to set the picture status when playback is paused.
Auto A picture with moving elements is displayed without jitter. Normally
select this position.
Frame A picture without moving elements can be displayed at high resolution.
Parental Control
In some regions, the viewing of some DVD content may be restricted
based on viewer age or other factors. You can use the Parental Control
feature to restrict the level of content that may be viewed through your
console.
Hint
Settings are saved when you do any of the following:
– Stop playback (including stopping Resume Play)
– Open the disc cover
Setting Parental Control
1 Select "Parental Control", and then press the button.
The screen for registering a password is displayed. If a password has
already been registered, the screen for confirming the password is
displayed.
3 Select "Region", and then press the button.
The list of region options is displayed.
4 Select the region to base the Parental Control level on, and
then press the button.
The default region is "USA". If you select "Other", see "Region code
list" ( page 26).
5 Select "Level", and then press the button.
The list of level options is displayed.
6 Select a restriction level, and then press the button.
The lower the value, the stricter the restriction.
To clear Parental Control
With DVD playback stopped, go to step 6 in "Setting Parental Control" and
set "Level" to "Off".
US
DVDs
Adjusting DVD player settings
25
Page 26

Region code list
To enter a Parental Control region code, select "Other" in step 4 of "Setting
Parental Control" ( page 25). Use the directional buttons to select the
first letter, and then press the right directional button. Then select the next
letter and press the button.
Region Code Region Code
Austria AT Malaysia MY
Belgium BE Netherlands NL
Canada CA Norway NO
China CN Philippines PH
Denmark DK Russia RU
Finland FI Singapore SG
France FR Spain ES
Germany DE Sweden SE
Hong Kong HK Switzerland CH
Indonesia ID Taiwan TW
Italy IT Thailand TH
Japan JP United Kingdom GB
Korea KR
Hint
The default region is "USA".
Changing your password
In step 2 of "Setting Parental Control" ( page 25), complete the
following steps:
1 Using the directional buttons, select "Change Password" and
then press the button.
The screen for changing the password is displayed.
2 Select a number, and then press the button.
Repeat step 2 to enter a four-digit password. You are required to enter
it again for confirmation.
Temporary override of Parental Control restrictions
1 Start playback of the DVD ( page 18).
You will be prompted to temporarily change the Parental Control level
to allow playback. This usually occurs immediately at disc start-up but
may also occur at different times depending on the DVD.
2 Using the directional buttons, select "Yes" and then press the
button.
The screen for entering the password is displayed.
3 Select a number, and then press the button.
Repeat step 3 to enter the four-digit password. After entering the
password, playback will begin again. When DVD playback is stopped,
the Parental Control level returns to the original setting.
Hints
• If you forget your password, see the Quick Reference / Safety and Support manual
(page2).
• If you do not set a password, you cannot change the Parental Control settings.
Adjusting DVD player settings
26
Page 27
• Some DVDs with the Parental Control feature do not allow use of playback modes
( pages 20 to 22).
Dolby Digital
This option sets Dolby Digital as the output signal for the DIGITAL OUT
(OPTICAL) connector.
Setting sound options
Audio Digital Out
You can switch the method of outputting the audio signal when you
connect the following audio devices to the DIGITAL OUT (OPTICAL)
connector.
Caution
When the console is connected to an audio device without a Dolby Digital or
DTS decoder, set "Dolby Digital" and "DTS" to "Off". If you set these options
to "On" without the necessary decoder, you may have no sound or an extremely
loud noise may be emitted.
Digital Out (Optical)
This option sets the type of output for the DIGITAL OUT (OPTICAL)
connector.
On Select this option when you want sound (audio signal) to be output
through the DIGITAL OUT (OPTICAL) connector.
Settings for "Dolby Digital" and "DTS" are displayed.
Off Select this option when you do not want sound to be output through the
DIGITAL OUT (OPTICAL) connector.
Settings for "Dolby Digital" and "DTS" are not displayed.
On Select this option when the console is connected to an audio device
Off
with a built-in Dolby Digital decoder.
Select this option when the console is connected to an audio device
without a built-in Dolby Digital decoder.
DTS
This option sets DTS as the output signal for the DIGITAL OUT
(OPTICAL) connector.
On Select this option when the console is connected to an audio device
Off
with a built-in DTS decoder.
Select this option when the console is connected to an audio device
without a built-in DTS decoder.
Audio Track Auto Select Mode
This setting gives priority to the audio track that contains the highest
number of channels when you play a DVD on which multiple audio
formats (PCM, Dolby Digital or DTS) are recorded. If PCM, Dolby Digital
and DTS have the same number of channels, the console selects PCM,
Dolby Digital and DTS audio tracks in that order.
On Priority given
Off
No priority given
US
DVDs
Adjusting DVD player settings
27
Page 28
Hints
• If you set "DTS" to "Off" in "Audio Digital Out" ( page 27), the DTS audio
track is not played.
• Depending on the DVD, the audio channel with priority may be predetermined. In
this case, the audio track will be selected based on the DVD's order of priority.
DVD Volume
You can set this option if the audio output level of the DVD is low. You
can set this only when "Digital Out (Optical)" is set to "Off" in "Audio
Digital Out" ( page 27).
+2 Turns up the volume (maximum)
+1 Turns up the volume
Standard
Normally select this option.
Caution
If you set this option to "+1" or "+2", the sound may become distorted. If this
happens, change the setting to "Standard". Also note that if you set the volume
too high, it may harm your hearing or damage the speakers.
Adjusting DVD player settings
28
Page 29
Main menu
Displaying the main menu
From the main menu, you can access information and change various
settings. You can also move to the following screens from the main menu.
The main menu is displayed when you turn on the console without a disc
inserted.
• Browser screen ( page 29)
• System Configuration menu ( page 30)
• Version Information screen ( page 33)
1 Turn on the console ( page 8).
The main menu is displayed. Note that it may take some time for the
main menu to be displayed.
Using the Browser screen
You can do the following from the Browser screen:
• Copy or delete game data saved on a memory card
• Start a game
• Start playback of an audio CD
• Start playback of a DVD
1 Display the main menu ( page 29).
2 Using the directional buttons, select "Browser" and then
press the button.
The Browser screen is displayed.
3 Insert a disc or memory card.
The icon for the inserted item is displayed in the Browser screen.
\
US
Main menu
Hint
If you turn on the console with a disc inserted, the main menu will not be displayed.
To display the main menu, press the A button on the console front and remove the
disc. Then press the _/1/RESET button to reset the console.
Displaying the main menu
29
Page 30
4 Select an icon, and then press the button.
• When you select the memory card icon, icons for data saved on the
memory card are displayed. To copy or delete game save data, see
"Copying or deleting game data" ( page 13).
• If you select the icon for a PlayStation
software disc, the game will start.
• When you select the icon for an audio CD, the tracks contained on
the CD are displayed. See "Playing an audio CD" ( page 14).
• If you select the icon for a DVD, playback of the DVD will begin.
Hint
The message "There is no data" is displayed on the Browser screen when no memory
card or disc is inserted in the console.
®2 or PlayStation® format
Using the System Configuration
menu
From the System Configuration menu, you can change settings for
numerous options including language or time display, and audio or video
output method.
1 Display the main menu ( page 29).
2 Using the directional buttons, select "System Configuration"
and then press the button.
The System Configuration menu is displayed.
3 Select an item, and then press the button.
The menu option becomes active and can be selected.
Using the System Configuration menu
30
4 Select the desired setting, and then press the button.
For details, see the instructions for each menu item ( pages 31 to
32).
Page 31
Hints
• The default setting for each menu item is underlined in the explanations below.
• Changes to each setting are saved and remain in effect even after you turn off or
reset the console.
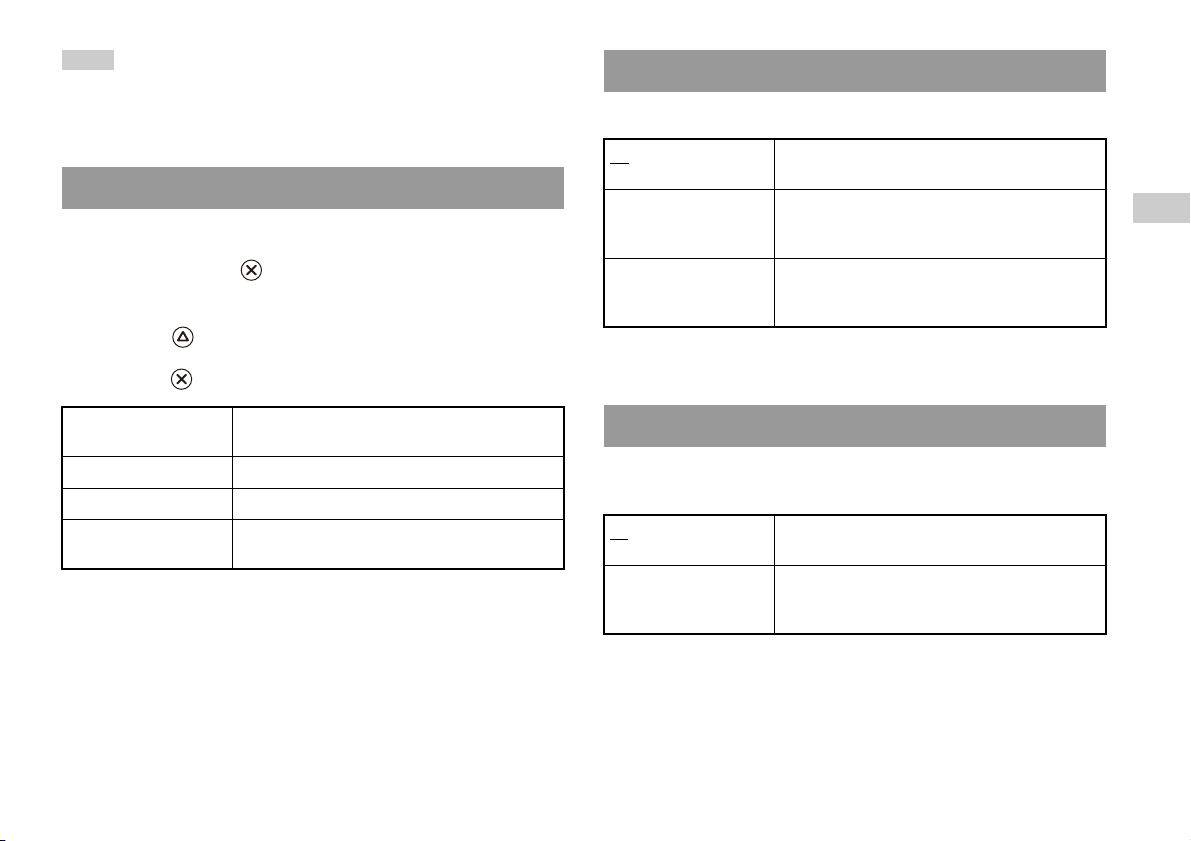
Clock Adjustment
You can set the date and time. Use the directional buttons to set "Year",
"Month", "Day", "Hour", "Minute" and "Second". The setting goes into
effect when you press the button.
Optional settings
If you press the button at the "Clock Adjustment" screen, you can set
options such as "Date Format" or "Time Format". Use the directional
buttons and the button to make each setting.
Screen Size
You can set the display mode for the TV.
4:3 Select this option when using a standard TV with the
console.
Full* Select this option when using a standard TV with the
console. The black margins on the upper and lower
portions of the screen are cut off.
16:9 Select this option when using a wide screen TV or a
standard TV with special 16:9/wide screen
functionality.
* "Full" display mode is compatible with the System Configuration menu, Browser
screen and audio CD screen.
US
Main menu
Time Format Sets the system clock to either 12-hour or 24-hour
clock display
Date Format Sets the display order of year, month and day
Time Zone Sets the time zone
Daylight Savings Time Sets Standard or Daylight Savings (Summer Time).
Normally select "Standard".
Digital Out (Optical)
You can set whether to output the signal through the DIGITAL OUT
(OPTICAL) connector.
On Select this option when you want to output signal
through the DIGITAL OUT (OPTICAL) connector.
Off Select this option when you do not want to output
signal through the DIGITAL OUT (OPTICAL)
connector.
Using the System Configuration menu
31
Page 32
Component Video Out
When using the component AV cable (sold separately), you must set the
mode to match the input jacks on your TV.
Y Cb/ Pb Cr/ Pr Select this option when connecting the console to
component video input connectors.
RGB Select this option when connecting the console to
RGB input connectors.
Hint
The following limitations apply when using the DVD remote control with the option
set to "Gameplay Function On":
– Depending on the software, some remote control buttons may not work properly.
– The buttons of the DVD remote control will not work when two or more buttons
are pressed at the same time.
– Some software titles may stop operating properly when a controller is removed
from controller port 1. If this happens, set to "Gameplay Function Off".
– Some unlicensed 3rd party peripherals may not work. Note that the use of such
peripherals is not recommended and will void your warranty.
Hint
The "RGB" setting is only for PlayStation®2 and PlayStation® format software.
When you watch a DVD, the mode automatically switches to "Y Cb/ Pb Cr/ Pr".
Remote Control
You can set this option when using the DVD remote control (for
PlayStation
Gameplay Function On Select this option when operating PlayStation®2 or
Gameplay Function Off Select this option when not operating PlayStation
Using the System Configuration menu
32
®2) (sold separately).
PlayStation
control.
or PlayStation
remote control.
® format software with the DVD remote
® format software with the DVD
®2
Language
You can use this option to select the language displayed on the main menu,
Browser screen, System Configuration menu, and Version Information
screen.
English Displays messages in English
French Displays messages in French
Spanish Displays messages in Spanish
German Displays messages in German
Italian Displays messages in Italian
Dutch Displays messages in Dutch
Portuguese Displays messages in Portuguese
Page 33

Using the Version Information
3 Select the desired setting, and then press the button.
For details, see the instructions for each item ( pages 33 to 35).
screen
You can check version information for various console components by
selecting this option. You can also change optional settings for some items.
1 At the main menu ( page 29), press the button.
The Version Information screen is displayed.
Optional settings
Optional settings are available for "Console", "PlayStation® Driver" and
"DVD Player". "DVD Player" can be set only if the DVD player's
"Progressive" option is set to "On".
1 Using the directional buttons, select an item and then press
the button.
The current setting for the item is displayed.
Hint
The default setting for each menu item is underlined in the explanations below.
Console
The PlayStation®2 console automatically adjusts its internal settings for
optimal playback. When "Diagnosis" is set to "On", the console makes
additional adjustments that may allow discs that were previously
unplayable to be played.
Diagnosis
Off Diagnosis is turned off.
On Diagnosis is turned on.
Hint
The "Diagnosis" setting will automatically return to the default setting in the
following cases:
– When playback of PlayStation
begins
– When the console is reset
– When the console is turned off
®2 or PlayStation® format software or a DVD
US
Main menu
2 Select an item, and then press the button.
The available options are displayed.
Using the Version Information screen
33
Page 34

PlayStation® Driver
DVD Player
You can set the PlayStation® Driver program to optimize performance of
PlayStation
Hint
The settings will automatically return to the default settings in the following case:
– When the console is turned off
Disc Speed
Standard Loads discs at normal speed
Fast Loads discs at high speed
Hint
Set to "Standard" in the following cases:
– When fast loading does not produce improved results
– When using software that is not compatible with fast loading
Texture Mapping
Standard
Smooth Displays with reduced roughness in on-screen images
Hint
Set to "Standard" in the following cases:
– When smooth texture mapping does not produce improved results
– If the picture does not display properly when set to "Smooth"
® format software.
Displays as normal
If you set "Progressive" to "On" when the console is connected to a TV
without the necessary equipment, the picture quality may be reduced or the
picture may not be displayed. You can clear the "Progressive" setting by
following the procedure below.
Remove the DVD before clearing the setting.
Clear Progressive Setting
No Leaves the "Progressive" setting on
Yes Clears the "Progressive" setting
1 Display the Version Information screen.
2 Using the directional buttons, select "DVD Player" and then
press the button.
The "Clear Progressive Setting" option is displayed.
3 Press the button.
4 Select "Yes", and then press the button.
5 Press the button twice.
The display returns to the main menu.
6 Press the A (open) button on the console front, and place a
DVD in the console.
Using the Version Information screen
34
Page 35

7 Close the disc cover.
Playback begins.
Hint
The setting will not be cleared if 1) you do not start a DVD after step 4 or 2) you reset
or turn off the console before step 6.
US
Main menu
Using the Version Information screen
35
Page 36

Networking
Connecting to a network
Networking
You can enjoy online games by connecting the PlayStation®2 console to a
network.
Hints
• Games that require use of the internal hard disk drive (for PlayStation®2) are not
compatible with this console. Contact SCEA Consumer Services via our Web site
at http://www.us.playstation.com or call 1-800-345-7669.
• There is no need to purchase the network adaptor (for PlayStation
separately). This console has a built-in network connector to allow connection to a
broadband network.
Items you will need
To connect to a network and to create network settings, you will need the
following:
• A network adaptor compatible PlayStation
• Broadband Internet service
• A commercially available Ethernet cable
• A memory card (8MB) (for PlayStation
Hints
• Ethernet cables can be of either straight-thru or crossover types. In most cases, a
straight-thru type cable can be used to connect a PlayStation
network. Depending on the network device being used, a crossover type cable may
be required. For details, refer to the instructions supplied with the network device.
• Some titles may not require a memory card (8MB) (for PlayStation
online content.
®2 game
®2) (sold separately)
®2) (sold
®2 console to a
®2) to access
This model of the PlayStation®2 console supports broadband connection.
See "Connecting with an Ethernet cable" ( page 37) for basic setup
instructions.
Warning
Do not plug the AC power cord for the console into an electrical outlet until you
have made all other connections.
36
Networking
Page 37

Connecting with an Ethernet cable
You can connect the console directly to a broadband network using an
Ethernet cable. Refer to the instructions supplied with the network device
for details.
Setup configurations will vary depending on the type of Internet service in
use. Additional network equipment (sold separately) may be required
depending on the network setup. Refer to your Internet service provider or
instructions supplied with the network equipment for details. For
additional information, contact SCEA Consumer Services via our Web site
at http://www.us.playstation.com or call 1-800-345-7669.
1 Insert the Ethernet cable into the network connector on the
console rear.
Console rear
Commercially available Ethernet cable
2 Connect the Ethernet cable to the network device.
The connection method will vary depending on the network device.
Refer to the instructions supplied with the network device for details.
Warning
Do not connect Ethernet cables or telephone cords of the following types to the
network connector. If you connect the wrong type of cable, too much electrical
current may pass through the connector, causing a malfunction, excessive heat
or fire in the connector:
- Ethernet cables not appropriate for use with a 10Base-T/100Base-TX network
- Standard residential telephone lines
- Any ISDN (digital) compatible phone or data line
- PBX phone lines
- Other "unknown" types of telephone lines
Creating a network configuration
After you have connected the console to a network, you will need to create
and save a network configuration. This can be done using PlayStation
format software compatible with the network adaptor (for PlayStation
Refer to the instructions supplied with the software.
Hint
Depending on the type of Internet service used, you may need to provide your MAC
address. You can find the MAC address for your console listed in the Version
Information screen ( page 33).
®2
®2).
US
Networking
Networking
37
Page 38

Playing online games
You can play PlayStation®2 online games that are compatible with the
network adaptor (for PlayStation
with the software for details.
Hints
• Parents are encouraged to monitor children in online gaming to ensure safe and
responsible Internet usage.
• To quit an online game, follow the on-screen instructions or the instructions
supplied with the software.
• If you cannot find instructions, you can quit by pressing the \/1/RESET button.
The \/1 indicator will turn red when the console has entered standby mode.
• If you are not able to quit using the method above, you can force the software to
quit by pressing and holding down the \/1/RESET button until the \/1 indicator
turns red.
®2). Refer to the information supplied
38
Networking
Page 39

Additional information
Specifications
Design and specifications are subject to change without notice.
General
Power requirements 120 V AC, 60 Hz
Power consumption (approx.) 35 W
Console dimensions (approx.) 230 × 28 × 152 mm / 9 × 1 × 6 in (w/h/d)
Console mass (approx.) 720 g / 1.6 lbs
Signal format NTSC
Operating temperature 5°C to 35°C / 41°F to 95°F
About national export control
This product may fall within the scope of national export control
legislation. You must comply fully with the requirements of such
legislation and of all other applicable laws of any jurisdiction in relation to
this product.
About access control
This product incorporates access control technology. Use of software not
specifically designed for this product (excluding DVD-Videos and audio
CDs) and copies of software designed for this product are prevented by
access control. Unauthorized transfer, delivery, display, export, import, or
transmission of programs, devices, or the product modified with programs
or devices, to defeat the purpose of this access control feature is or may be
prohibited by law.
US
Additional information
Inputs/outputs on the console
front
Inputs/outputs on the console
rear
Controller port (2)
MEMORY CARD slot (2)
USB connector (2)
NETWORK connector
~AC IN connector
AV MULTI OUT connector
DIGITAL OUT (OPTICAL) connector
Supplied accessories
See the Quick Reference / Safety and Support manual ( page 2)
Specifications
39
Page 40

À propos de la documentation de la console PlayStation®2
La documentation de la console PlayStation®2 comprend ce qui suit :
• Aide-mémoire / Sécurité et support technique
Un manuel livré avec la console. Il présente des informations sur l'installation de la
console et l'exécution d'opérations élémentaires, ainsi que des renseignements sur la
sécurité et le dépannage.
• Le Mode d'emploi (ce document)
Ce document (au format PDF) peut être visualisé sur un ordinateur par le biais
d'Internet et contient des informations sur l'exécution d'opérations avancées sur la
console, les caractéristiques techniques et autres. Vous pouvez télécharger ce document
sur la page d'assistance du site Web de Sony Computer Entertainment à l'adresse
(http://www.us.playstation.com/Support/PS2).
Table des matières
Préparation
Démarrage rapide.........................................................................41
Noms des composants.................................................................. 41
Raccordement à un téléviseur ...................................................... 42
Raccordement d'équipements audio numériques.........................44
Branchement de la manette..........................................................45
Raccordement du cordon d'alimentation...................................... 45
Mise sous tension et hors
tension de la console.............................................................. 46
Jeux
Comment jouer............................................................................. 48
Utilisation des memory cards (cartes mémoire) ..........................51
CD audio
Lecture d'un CD audio..................................................................54
DVD
Lecture d'un DVD ........................................................................56
Utilisation des modes de lecture...................................................60
Paramètres et réglages du lecteur DVD........................................62
Menu principal
Affichage du menu principal........................................................69
Utilisation de l'écran navigateur ...................................................69
Utilisation du menu Configuration du Système ...........................70
Utilisation de l'écran d'informations sur la version ......................73
Connexion au réseau
Connexion à un réseau .................................................................76
Informations supplémentaires
Spécifications ...............................................................................79
Table des matières
40
Page 41
Préparation
Démarrage rapide
Installation de la console
Placez la console uniquement en position horizontale.
MEMORY CARD MEMORY CARD
Attention
N'installez pas la console à un endroit où elle pourrait être exposée à des champs
magnétiques tels que ceux produits par des aimants ou des haut-parleurs.
Noms des composants
Console PlayStation®2 Avant
Couvercle du compartiment à disque
Bouton A (ouvrir)
Fente pour MEMORY CARD
(carte mémoire) N°2
Fente pour MEMORY CARD
(carte mémoire) N°1
MEMORY CARD MEMORY CARD
Port de manette N°1
Indicateur ]/1 (marche/veille)
Bouton ]/1 (marche/veille)/RESET
Récepteur
infrarouge
FR
Préparation
Port de manette N°2
Conseil
Vous pouvez connecter divers périphériques USB à la console PlayStation®2, mais
ils ne sont pas tous compatibles. Pour en savoir davantage, reportez-vous aux
instructions fournies avec le périphérique USB.
Connecteur USB
Démarrage rapide
41
Page 42
Console PlayStation®2 Arrière
Connecteur NETWORK
(réseau)
Grille d'aération arrière
Prise ~AC IN
Raccordement à un téléviseur
Avant la connexion
• Ne branchez pas le cordon d'alimentation de la console sur une prise
électrique avant d'avoir effectué tous les autres raccordements.
• Vérifiez que le téléviseur est éteint.
Connecteur DIGITA L OUT
(OPTICAL)
Conseil
Pour connaître les noms des composants de la manette analogique
(DUALSHOCK
(DUALSHOCK
Raccordement à un téléviseur
42
Connecteur AV MULTI OUT
(sortie AV multiple)
®2), reportez-vous à la section "Utilisation de la manette analogique
®2)" ( page 50).
Raccordement à un téléviseur à l'aide du câble
AV fourni
Connectez la console au téléviseur de la manière illustrée ci-dessous.
Arrière de la console
Entrées audio et vidéo du téléviseur
L-AUDIO-RVIDEO
Blanc RougeJaune
Ne pas utiliser en cas de
raccordement à un
téléviseur
monophonique.
Câble AV
Vers le connecteur
AV MULTI OUT
(sortie AV multiple)
Page 43
Attention
Si vous une image fixe est affichée pendant trop longtemps sur un téléviseur à
écran plasma ou à projection*, des "ombres" risquent d'apparaître. Il s'agit d'une
caractéristique de ces types de téléviseurs. Si vous laissez une image fixe
affichée pendant trop longtemps (par exemple, un menu de paramètres de la
console, un menu DVD ou une image en pause), un effet d'image rémanente
risque de se produire sur l'écran. Pour plus de détails, reportez-vous aux
instructions qui accompagnent votre téléviseur.
* à l'exception des écrans de type LCD
Conseil
Lors de la lecture d'un DVD, connectez la console directement au téléviseur. Si le
signal vidéo de la console passe par un magnétoscope vers le téléviseur, la protection
contre la copie de certains DVD pourrait affecter la qualité des images.
Utilisation d'un câble AV autre que celui fourni
La qualité de l'image varie selon le type de câble utilisé. Reportez-vous aux
informations ci-dessous pour déterminer la méthode de connexion la
mieux adaptée.
Si vous utilisez un câble autre que celui fourni, reportez-vous aux
instructions qui l'accompagnent.
Téléviseur Type de câble
Téléviseur équipé d'entrées
S VIDEO
Un téléviseur sans entrées
vidéo
Téléviseur équipé de
connecteurs d'entrée vidéo
composant
Câble S VIDEO (SCPH-10480 U)
Adaptateur RFU (SCPH-10071)
Câble AV composant (SCPH-10490 U)
Échelle de qualité de l'image
x Adaptateur RFU x Câble AV (fourni) x Câble S VIDEO x Câble AV composant
Cette échelle est fournie uniquement à titre de référence. La qualité de
l'image peut varier selon le produit ou l'état de votre téléviseur.
Qualité élevée
Conseils
• Pour utiliser le bala yage progressif, vous devez disposer d'un télé viseur compatible
et d'un logiciel avec ce type de balayage (480p) et connecter votre console en
utilisant le type de câble approprié*. Vous devez également vérifier que les
paramètres de la console sont corrects. Pour plus de détails, reportez-vous au
paragraphe "Balayage progressif", à la section "Réglage du mode d'affichage du
téléviseur" ( page 64).
* Le câble AV composant (vendu séparément) est compatible avec le balayage
progressif.
• Ce produit est compatible pour une utilisation avec des entrées vidéo (Y C
R/PR), mais ne peux pas être utilisé avec des entrées sous format HDTV (Y PB
C
R). Pour plus de détails, reportez-vous aux instructions fournies avec votre
P
téléviseur.
• Pour les méthodes de connexion du téléviseur qui ne sont pas incluses dans ce
manuel, contactez le service d’aide aux consommateurs de SCEA via notre site
Web à l’adresse http://www.us.playstation.com ou composez le 1-800-345-7669.
B/PB,
FR
Préparation
Raccordement à un téléviseur
43
Page 44

Raccordement d'équipements
audio numériques
A l'aide d'un câble numérique optique commercialisé pour connecter
l'équipement audio numérique, vous pouvez profiter du son
ambiophonique qui reproduit la qualité acoustique d'un cinéma ou d'une
salle de concert. Si vous raccordez la console à un équipement audio à
l'aide de connecteurs numériques, reportez-vous aux instructions qui
accompagnent le périphérique à connecter.
Arrière de la console
Périphérique connecté
DIGITAL IN
OPTICAL
Câble numérique optique
commercialisé
Conseils
• Si vous raccordez la console à un équipement audio à l'aide d'un câble numérique
optique, cela peut affecter la sortie audio de certains logiciels au format
PlayStation
câble tel que le câble AV fourni et connectez-le au connecteur AV MULTI OUT
(sortie AV multiple) de la console. N'utilisez pas de câble numérique optique.
®2, et empêcher la production du son. Si cela se produit, utilisez un
• Une fois l'équipement audio numérique raccordé, réglez le paramètre "DIGITAL
OUT (OPTICAL)" sur "Activé" dans le menu C onfiguration du Système. Pour plus
de détails, reportez-vous à la section "DIGITAL OUT (OPTICAL)"
( page 71).
Raccordement d'équipements audio numériques
44
Page 45

Branchement de la manette
MEMORY CARD
1 Insérez la manette analogique (DUALSHOCK®2) dans un port
de manette de la console.
Avant de la console
MEMORY CARD MEMORY CARD
Manette analogiqu e
(DUALSHOCK
®2)
Raccordement du cordon
d'alimentation
Avertissements
• La sortie de la prise de courant doit être installée près de l'équipement et doit
être facile d'accès.
• Ne branchez pas le cordon d'a limentation de la console sur une prise électrique
avant d'avoir effectué tous les autres raccordements.
1 Branchez le cordon d'alimentation à la prise AC IN ~ située à
l'arrière de la console.
Arrière de la console
Prise ~AC IN
FR
Préparation
Conseil
Certains titres de logiciel spécifient l'utilisation d'u n port de manette particulier. P our
plus de détails, reportez-vous aux instructions qui accompagnent le logiciel.
Cordon d'alimentation
Branchement de la manette
45
Page 46

2 Branchez le cordon d'alimentation sur la prise électrique.
Arrière de la console
Mise sous tension et hors
tension de la console
Cordon d'alimentation
L'indicateur =/1 (marche/veille) situé à l'avant de la console s'allume
en rouge pour indiquer que la console est en mode de veille.
Avant de la console
MEMORY CARD MEMORY CARD
Mise sous tension et hors tension de la console
46
Vers la prise électrique
Indicateur ]/1
Avant de mettre la console sous tension
Ne mettez pas la console sous tension avant d'avoir exécuté cette
procédure. Pour plus de détails, reportez-vous aux instructions qui
accompagnent votre téléviseur.
• Mettez le téléviseur sous tension.
• Modifiez le réglage du téléviseur pour afficher la sortie de la ligne à
laquelle la console est raccordée.
Mise sous tension de la console
1 Vérifiez que l'indicateur =/1 (marche/veille) situé à l'avant
de la console est allumé en rouge.
2 Appuyez sur le bouton =/1 (marche/veille)/RESET situé à
l'avant de la console.
L'indicateur =/1 situé à l'avant de la console devient vert et la sortie de
la console s'affiche sur le téléviseur.
Bouton =/1/RESET
Avant de la console
MEMORY CARD MEMORY CARD
Indicateur =/1
Page 47

Conseils
• Lors de la première mise sous tension depuis l'achat de la console, les écrans des
paramètres "Langue", "Fuseaux horaires" et "heure avancée (heure d'été)"
s'affichent. Suivez les instructions qui s'affichent pour achever la définition des
réglages.
• Si vous raccordez la console à un téléviseur grand écran, réglez "Taille de
l'écran" dans le menu Configuration du Système ( page 71).
Mise hors tension de la console
1 Maintenez enfoncé le bouton =/1/RESET situé à l'avant de la
console pendant au moins une seconde.
L'indicateur =/1 devient rouge pour indiquer que la console est passée
en mode de veille.
Bouton =/1/RESET
Avant de la console
MEMORY CARD MEMORY CARD
Avertissement
Lorsque la console est en mode de veille, elle n'est pas complètement hors
tension. Si vous envisagez de ne pas utiliser la console pendant une période
prolongée, débranchez le cordon d'alimentation de la prise électrique.
Indicateur =/1
Mise sous tension et hors tension de la console
FR
Préparation
47
Page 48
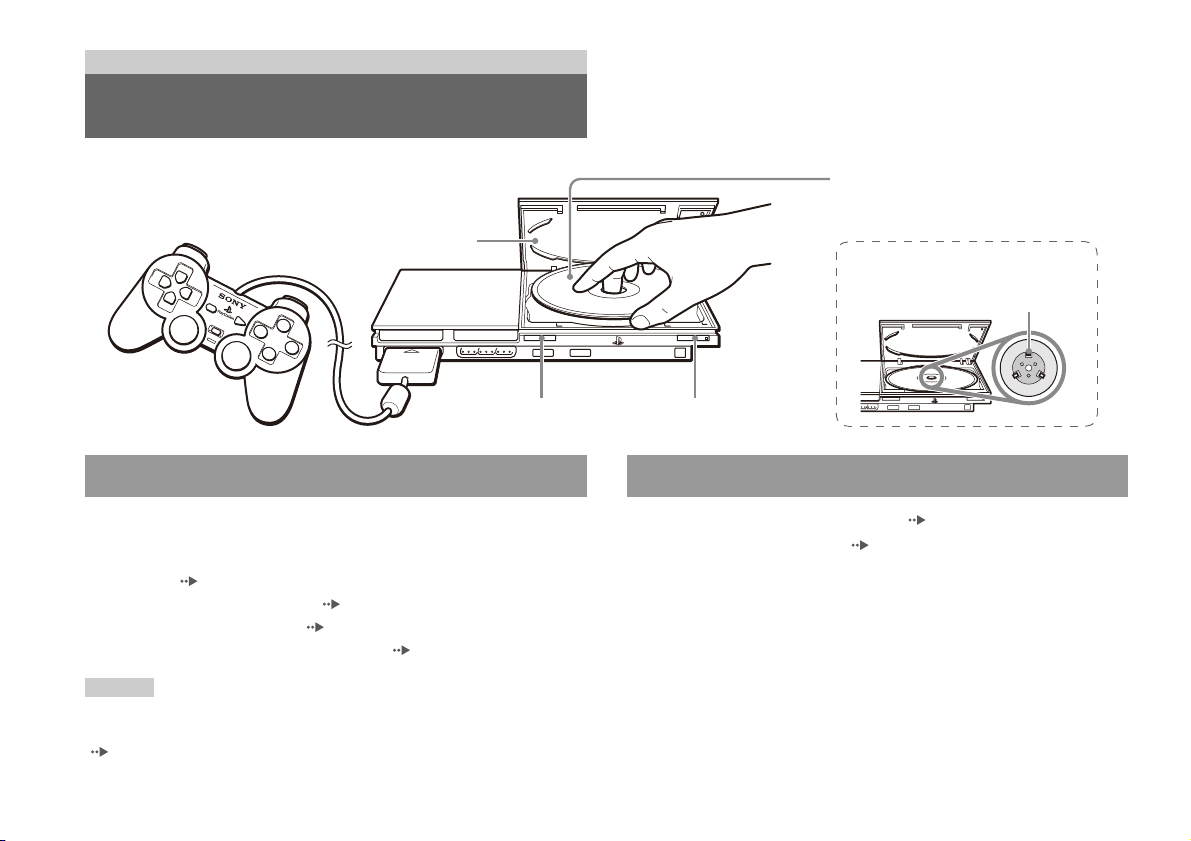
Jeux
Comment jouer
Couvercle du compartiment à disque
MEMORY CARD MEMORY CARD
Bouton =/1/RESETBouton A (ouvrir)
Avant de jouer Démarrage d'un jeu
Insérez le disque dans la console, l'étiquette
orientée vers le haut.
Positionnez le disque de sorte que
l'ensemble des trois pattes se trouve
au-dessus de la surface du disque.
Comment jouer
48
Vérifiez que les raccordements au téléviseur et à l'équipement audio sont
corrects et que toutes les précautions ont été prises.
• "Précautions" dans le manuel Aide-mémoire / Sécurité et support
technique" ( page 40)
• "Raccordement à un téléviseur" ( page 42)
• "Branchement de la manette" ( page 45)
• "Raccordement du cordon d'alimentation" ( page 45)
Conseil
Pour jouer à des jeux en ligne, vous devez d'abord vous connecter à un réseau et le
configurer. Pour plus de détails, reportez-vous à la section "Connexion à un réseau"
( page 76).
1 Mettez la console sous tension ( page 46).
Le menu principal s'affiche ( page 69).
2 Appuyez sur le bouton A (ouvrir) situé à l'avant de la console.
Le couvercle du compartiment à disque s'ouvre.
3 Insérez le disque dans la console.
Placez le disque sur le plateau, étiquette orientée vers le haut.
Page 49

4 Refermez le couvercle du compartiment à disque.
Une fois le couvercle du compartiment à disque fermé, le jeu démarre.
MEMORY CARD MEMORY CARD
2 Retirez le disque.
Maintenez abaissée la partie centrale noire du plateau, puis soulevez le
disque par ses bords.
Conseils
• Vous pouvez également lancer un jeu à partir de l'écran navigateur ( page 69).
• Si vous mettez la console sous tension après avoir inséré un disque, le jeu démarre
automatiquement.
Pour réinitialiser un jeu
Appuyez sur le bouton \/1 (marche/veille)/RESET situé à l'avant de la
console. N'appuyez pas par inadvertance sur le bouton @/1/RESET
pendant que vous jouez, car cela entraînerait la réinitialisation du jeu.
Arrêt d'un jeu
Attention
Lorsque vous retirez un disque, vérifiez qu'il est complètement arrêté. Ne
touchez pas le disque s'il tourne encore, car vous risqueriez de vous blesser,
d'endommager le disque ou d'entraîner une défaillance de la console.
1 Appuyez sur le bouton A situé à l'avant de la console.
MEMORY CARD MEMORY CARD
Appuyez sur la partie
centrale noire du plateau.
3 Refermez le couvercle du compartiment à disque.
4 Appuyez sur le bouton =/1/RESET.
Le menu principal s'affiche ( page 69).
Changement de disque de jeu
1 Ouvrez le couvercle du compartiment à disque et retirez le
disque.
Lorsque vous retirez un disque, maintenez abaissée la partie centrale
noire du plateau, puis soulevez le disque par ses bords.
2 Insérez un nouveau disque.
3 Refermez le couvercle du compartiment à disque et
réinitialisez la console.
Le nouveau jeu démarre.
Conseil
Il n'est pas nécessaire de mettre la console hors tension lorsque vous souhaitez
changer de jeu.
Comment jouer
FR
Jeux
49
Page 50
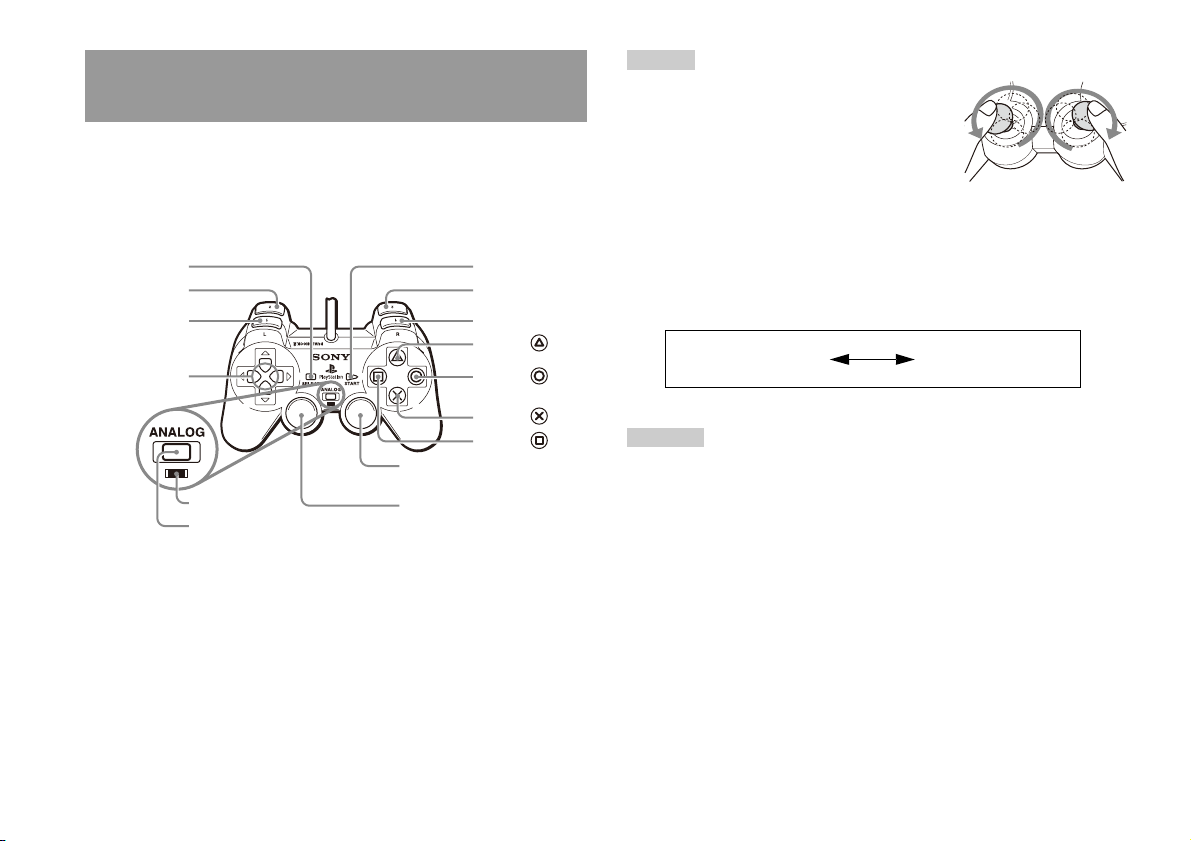
Utilisation de la manette analogique
(DUALSHOCK®2)
La manette analogique (DUALSHOCK®2) est dotée d'une fonction de
bouton sensible à la pression. Elle propose également une fonction de
vibration.
Conseil
Après avoir mis la console sous tension et avant
d'utiliser la manette analogique (DUALSHOCK
pivotez les manches analogiques gauche et droit une
fois à l'aide de vos pouces. Pour ceci, ne tordez pas les
manches analogiques, mais faites-les pivoter comme
si vous dessiniez un cercle (voir l'illustration).
®2),
Comment jouer
50
Noms des composants
Touche SELECT
(de sélection)
Touche L2
Touche L1
Touches
directionnelles
Manche analogique droit/
Indicateur de
mode
Touche de mode ANALOG
(analogique)
* Les manches analogiques gauche et droit, ou les touches L3 et R3, fonctionnent
uniquement en mode analogique (indicateur : rouge).
* Les touches L3 et R3 fonctionnent lorsque l'utilisateur appuie sur les manches
analogiques.
Touche R3*
Manche analogique gauche/
Touche L3*
Touche START (de
mise en marche)
Touche R2
Touche R1
Touche
Touche
Touche
Touche
À propos du changement de mode
La touche de mode ANALOG (analogique) peut être utilisée pour passer
d'un mode à l'autre. Elle permet de basculer vers le mode approprié.
Remarquez cependant que certains titres de logiciel effectuent ce réglage
automatiquement.
Mode numérique
(indicateur : éteint)
Mode analogique
(indicateur : rouge)
Conseils
• Lorsque vous utilisez la manette analogique en mode numérique, les manches
analogiques gauche et droit ne fonctionnent pas. En outre, la fonction de bouton
sensible à la pression est désactivée.
• Selon le logiciel, il se peut que vous ne puissiez pas changer de mode, même si
vous appuyez sur la touche de mode ANALOG (analogique).
Utilisation en mode analogique
• Lorsque vous jouez un titre de logiciel au format PlayStation®2, les
manches analogiques droit et gauche/boutons L3 et R3 sont actifs et
toutes les touches sauf START (de mise en marche), SELECT (de
sélection), L3 et R3 ont une fonction de bouton sensible à la pression.
• Lorsque vous jouez un titre de logiciel au format PlayStation
®, les
manches analogiques droit et gauche sont actifs.
Page 51

Conseil
Selon le logiciel, les touches disponibles en mode analogique peuvent être limitées.
Pour plus de détails, reportez-vous aux instructions qui accompagnent le logiciel.
À propos de la fonction de vibration
Il est possible de régler la fonction de vibration sur "Activé(e)" ou
"Désactivé(e)" à l'aide du menu d'options logiciel.
Conseils
• Avant d'utiliser la fonction de vibration, veuillez lire la section "Remarques sur la
sécurité lors de l'utilisation de la manette analogique (DUALSHOCK
manuel Aide-mémoire / Sécurité et support technique ( page 40).
• Selon le logiciel, il se peut que la fonction de vibration soit réglée autom atiquement
sur "Activé(e)".
• Lorsque la manette analogique (DUALSHOCK
console hors tension ou débranchez la manette de la console. La vibration peut
entraîner un mouvement inattendu de la manette ou une chute de celle-ci.
®2) n'est pas utilisée, mettez la
®2)" du
Utilisation des memory cards
(cartes mémoire)
Vous pouvez sauvegarder et charger des données de jeu à l'aide d'une
memory card (carte mémoire) (vendue séparément). Il est également
possible de supprimer des données de jeu ou de copier des données de jeu
d'une memory card (carte mémoire) vers une autre.
À propos des types de memory card (carte
mémoire)
Il existe deux types de memory cards (cartes mémoire). Sélectionnez une
memory card (carte mémoire) adaptée au logiciel utilisé.
FR
Jeux
À propos de l'utilisation de la manette
analogique (DUALSHOCK®) (SCPH-110 U)
Vous pouvez utiliser la manette analogique (DUALSHOCK®) (SCPH-110
U) avec la console PlayStation
analogique peuvent être différentes de celles de la manette analogique
(DUALSHOCK®2). Seuls les manches analogiques gauche et droit
peuvent être utilisés en mode analogique.
®2, mais les fonctions des touches en mode
Type de memory card
(carte mémoire)
Memory card (carte mémoire)
(8 MB) (pour PlayStation
(SCPH-10020 U)
Memory card (carte mémoire)
(SCPH-1020 U)*
* Ce produit n’est plus en
production.
Logiciel compatible Quantité de mémoire
Logiciel au format
®2)
PlayStation®2
Logiciel au format
PlayStation
®
Environ 8 MB
15 blocs mémoire
(environ 120 KB)
MagicGate™ est un terme qui désigne une technologie de protection de
droits d’auteurs développée par Sony Corporation.
Utilisation des memory cards (cartes mémoire)
51
Page 52

Insertion d'une memory card (carte mémoire)
MEMORY CARD
Sauvegarde ou chargement de données de jeu
Insérez la memory card (carte mémoire) dans une fente pour MEMORY
CARD (carte mémoire) située à l'avant de la console.
Avant de la console
MEMORY CARD MEMORY CARD
Conseil
Certains titres de logiciel spécifient l'utilisation d'une fente pour MEMORY CARD
(carte mémoire) particulière. Pour plus de détails, reportez-vous aux instructions qui
accompagnent le logiciel.
La procédure de sauvegarde ou de chargement peut varier selon le logiciel.
Pour plus de détails, reportez-vous aux instructions qui accompagnent le
logiciel.
Copie ou suppression de données de jeu
1 Sur l'écran navigateur ( page 69), utilisez les touches
directionnelles pour sélectionner l'icône de la memory card
(carte mémoire) que vous désirez utiliser pour copier ou
supprimer les données, puis appuyez sur la touche .
2 Sélectionnez l'icône des données que vous souhaitez copier
ou supprimer, puis appuyez sur la touche .
3 Sélectionnez "Copier" ou "Supprimer", puis appuyez sur la
touche .
Lorsque vous copiez des données de jeu, vérifiez que deux memory
cards (cartes mémoire) sont insérées dans la console. Si vous avez
sélectionné "Supprimer", passez à l'étape 5.
4 Sélectionnez la destination, puis appuyez sur la touche .
5 Sélectionnez "Oui", puis appuyez sur la touche .
Lors de la copie ou de la suppression de données, ne retirez pas les
memory cards (cartes mémoire).
Utilisation des memory cards (cartes mémoire)
52
6 Une fois la copie ou la suppression terminée, appuyez sur la
touche .
Page 53

Conseils
• Pour afficher des informations sur un élément de données de jeu, sélectionnez
l'icône correspondant à ces données, puis appuyez sur la touche pour vérifier
les détails.
• Compatibilité entre les logiciels et les memory cards (cartes mémoire) :
– Vous ne pouvez pas sauvegarder ou copier un logiciel au format PlayStation
sur une memory card (carte mémoire) (SCPH-1020 U).
– Vous ne pouvez pas sauvegarder des données de jeu au format PlayStation
une memory card (carte mémoire) (8 MB) (pour PlayStation
vous pouvez copier des données de jeu au format PlayStation
®2). Cependant,
® d'une memory
card (carte mémoire) (SCPH-1020 U) vers une memory card (carte mémoire)
(8 MB) (pour PlayStation
®2) à des fins de stockage. Remarquez que de telles
données de jeu ne peuvent pas être chargées directement à partir d'une memory
card (carte mémoire) (8 MB) (pour PlayStation
®2).
®2
® sur
FR
Jeux
Utilisation des memory cards (cartes mémoire)
53
Page 54

CD audio
Utilisation du lecteur CD pendant la lecture
Lecture d'un CD audio
Lecture d'un CD
1 Mettez la console sous tension et insérez le disque
( page 48).
Suivez les étapes 1 à 4 de la section "Démarrage d'un jeu".
Les numéros de plages s'affichent.
2 À l'aide des touches directionnelles, sélectionnez le numéro
de plage à lire, puis appuyez sur la touche .
La lecture démarre.
Conseils
• Si vous mettez la console sous tension après avoir inséré un disque, les numéros de
plages s'affichent automatiquement.
• Vous pouvez également lancer la lecture à partir de l'écran navigateur
( page 69).
Attention
Pour lire un CD audio enregistré au format DTS, vous devez raccorder un
périphérique équipé d'un décodeur DTS au connecteur DIGITAL OUT
(OPTICAL) ( page 44). Remarquez qu'un bruit extrêmement fort peut être
émis si le périphérique ne dispose pas de décodeur DTS ou s'il est raccordé au
connecteur AV MULTI OUT (sortie AV multiple).
À l'aide des touches directionnelles, sélectionnez l'icône de la plage
désirée, puis appuyez sur la touche .
Icône (touche*) Fonction
. (touche L1) Accéder au début de la plage en cours ou à la plage
m (touche L2) Rembobiner rapidement
M (touche R2) Avancer rapidement
> (touche R1) Accéder au début de la plage suivante
N (touche START) Démarrer la lecture
X (touche START) Suspendre la lecture
x (touche
SELECT)
* Vous pouvez utiliser directement le lecteur en appuyant sur les touches de la
manette analogique (DUALSHOCK
Conseil
Vous pouvez utiliser directement le lecteur en appuyant sur les touches de la manette
analogique (DUALSHOCK
précédente
Arrêter la lecture
®2) indiquées entre parenthèses.
®2) indiquées entre parenthèses.
Lecture d'un CD audio
54
Page 55
Arrêt de la lecture d'un CD audio
1 À l'aide des touches directionnelles, sélectionnez x, puis
appuyez sur la touche .
La lecture s'arrête. Appuyez sur le bouton A (ouvrir) situé à l'avant de
la console pour retirer le disque.
3 Sélectionnez le paramètre désiré, puis appuyez sur la touche
.
Si vous sélectionnez "Programme", l'écran de spécification de l'ordre
des plages s'affiche. Sélectionnez les plages à lire.
4 Appuyez sur la touche .
L'écran navigateur s'affiche.
Lecture dans différents modes
Vous pouvez sélectionner "Mode de Lecture" ou "Mode Répétition".
Mode de
Lecture
Mode
Répétition
Lecture
Continue
Programme Lit les plages dans un ordre spécifié
Lecture
Aléatoire
Désactivé(e) Ne lit pas le CD de manière répétée
Tout Lit toutes les plages de manière répétée
1 Lit une plage de manière répétée
Lit les plages comme elles sont enregistrées sur
le CD
Lit les plages dans un ordre aléatoire
1 Sur l'écran navigateur ( page 69), utilisez les touches
directionnelles pour sélectionner l'icône du CD audio, puis
appuyez sur la touche .
L'écran Options de Lecture s'affiche.
2 Sélectionnez "Mode de Lecture" ou "Mode Répétition", puis
appuyez sur la touche .
5 Sélectionnez l'icône du CD audio, puis appuyez sur la touche
.
Les numéros de plages s'affichent et l'option apparaît dans la partie
inférieure gauche de l'écran.
6 Sélectionnez la plage désirée, puis appuyez sur la touche .
La lecture démarre.
Conseils
• Vous pouvez également accéder à l'écran Options de Lecture à partir de l'écran
indiquant les plages en appuyant sur l'icône CD audio dans le coin supérieur
gauche de l'écran et en appuyant sur la touche .
• Vous pouvez sélectionner simultanément "Mode de Lecture" et "Mode
Répétition".
Lecture d'un CD audio
FR
CD audio
55
Page 56

DVD
Utilisation du Panneau de commandes
Lecture d'un DVD
Vous pouvez utiliser le lecteur DVD à l'aide des méthodes suivantes.
• Utilisation du Panneau de commandes affiché
• Fonctionnement direct à l'aide de la manette analogique
(DUALSHOCK
• Utilisation de la télécommande DVD (pour PlayStation
séparément)
Les instructions suivantes supposent l'utilisation du Panneau de
commandes pour contrôler le lecteur DVD. Certaines opérations peuvent
être différentes selon la méthode employée.
Conseils
• Pour plus de détails sur les fonctions disponibles sur un DVD, reportez-vous aux
instructions fournies avec le DVD.
• Dans de rare cas, certains DVD peuvent ne pas fonctionner correctement avec la
console PlayStation
fabrication ou de codage du logiciel vidéo du DVD. Si vous rencontrez des
problèmes, essayez de redémarrer votre DVD. Si les problèmes persistent, appelez
l'éditeur du DVD ou contactez le service d’aide aux consommateurs de SCEA via
notre site Web à l’adresse http://www.us.playstation.com ou composez le 1-800345-7669.
®2)
®2) (vendue
®2. Cela est généralement dû à des variations du processus de
1 Lancez la lecture du DVD ( page 58).
2 Appuyez sur la touche SELECT (de sélection).
Le Panneau de commandes s'affiche. Si vous appuyez à nouveau sur
la touche SELECT (de sélection), l'affichage change de position à
l'écran.
3 À l'aide des touches directionnelles, sélectionnez une icône,
puis appuyez sur la touche .
Conseil
Pour désactiver le Panneau de commandes, appuyez à une ou deux reprises sur la
touche SELECT (de sélection), ou appuyez sur la touche .
Liste des paramètres du Panneau de commandes
Vous pouvez accéder aux options suivantes dans le Panneau de
commandes.
Icône Fonction
Lecture d'un DVD
56
Menu Affiche le menu des disques DVD vidéo
Page 57

Icône Fonction
Menu principal Affiche le menu des disques DVD vidéo
O
0~9
Retour
Choix audio
Choix d'angle de
caméra
Choix des soustitres
Atteindre
Réglages
Affichage du
temps
Aide
Aller au chapitre
Permet de revenir à l'écran sélectionné
précédemment au sein du menu du DVD
Affiche et permet de changer les options
audio de DVD comportant plusieurs
plages audio
Affiche et permet de changer les angles de
caméra de DVD enregistrés sous plusieurs
angles
Affiche et permet de changer les options de
sous-titres de DVD avec sous-titres
Permet de passer au titre ou au chapitre
sélectionné, ou encore au temps spécifié, et
de démarrer la lecture ( page 58)
Affiche et permet de changer les options de
langue, de qualité d'image, de niveau de
Contrôle parental, du son, etc.
( page 62)
Affiche le numéro du titre ou du chapitre
en cours, le temps écoulé, etc.
( page 59)
Affiche la liste des fonctions associées aux
touches d'accès direct de la manette
analogique (DUALSHOCK
Permet d'entrer le numéro du chapitre que
vous souhaitez lire ( page 58)
®2)
Icône Fonction
./> Précédent/Suivant
/ Recherche Lecture retour/avance rapide ( page 59)
/Ralenti
N
X
x
Lecture Démarre la lecture
Pause Suspend la lecture
Arrêt Arrête la lecture ( page 58)
Lecture répétée
A-B
Lecture aléatoire
Lecture
programmée
Lecture répétée
Original/Play List
Effacement
Permet de revenir au début du chapitre en
cours ou précédent, ou de passer au début
du chapitre suivant.
Permet de passer à la lecture ou à la lecture
retour au ralenti
Spécifie une scène pour lecture et démarre
la lecture de la scène spécifiée
( page 62)
Démarre la lecture de titres ou de chapitres
dans un ordre aléatoire ( page 61)
Démarre la lecture de titres ou de chapitres
dans un ordre programmé ( page 60)
Sélectionne la lecture répétée de tous les
titres sur le disque, ou d'un seul titre ou
chapitre ( page 61)
Pour des disques DVD-RW (en mode VR),
permet de sélectionner le contenu Original
ou Play List pour la lecture ( page 60)
Efface les numéros ou les modes de lecture
sélectionnés ( page 62)
FR
DVD
Lecture d'un DVD
57
Page 58

Conseils
• Vous pouvez utiliser " " pour vérifier les options accessibles directement à l'aide
des touches de la manette analogique. Pour accéder directement aux options à
l'aide de la manette, vous devez faire disparaître le Panneau de commandes de
l'écran.
• Selon le mode de lecture, il se peut que certaines options ne soient pas disponibles
ou ne puissent pas être réglées.
Lecture d'un DVD
1 Mettez la console sous tension et insérez un disque
( page 48).
Suivez les étapes 1 à 4 de la section "Démarrage d'un jeu". La lecture
démarre.
Reprise de la lecture depuis le point où vous avez
arrêté le DVD (Reprise de lecture)
1 Pendant la lecture, sélectionnez x dans le Panneau de
commandes ( page 56), puis appuyez sur la touche .
2 Sélectionnez N, puis appuyez sur la touche .
La lecture reprend depuis le point où vous avez arrêté le disque à
l'étape 1.
Pour désactiver Reprise de lecture
Après l'étape 1, sélectionnez x, puis appuyez sur la touche .
Conseils
• Si vous mettez la console sous tension après avoir inséré un disque, la lecture
• Vous pouvez également lancer la lecture à partir de l'écran navigateur
1 Pendant la lecture, sélectionnez x dans le Panneau de
Lecture d'un DVD
58
démarre automatiquement.
( page 69).
Arrêt de la lecture d'un DVD x
commandes ( page 56), puis appuyez sur la touche .
La lecture s'arrête. Appuyez sur le bouton A (ouvrir) situé à l'avant de
la console, puis retirez le disque.
Sélection d'une scène particulière pour la
lecture
Sélection d'une scène par numéro de chapitre
1 Pendant la lecture, sélectionnez le numéro du chapitre
souhaité dans le Panneau de commandes ( page 56), puis
appuyez sur la touche .
La lecture du chapitre sélectionné démarre. Si vous souhaitez lire un
chapitre portant un numéro à un chiffre (1 à 9), entrez le zéro à gauche.
Par exemple, entrez "01".
Sélection d'une scène par numéro de titre ou de chapitre,
ou encore en spécifiant le temps
1 Pendant la lecture, sélectionnez dans le Panneau de
commandes ( page 56), puis appuyez sur la touche .
Page 59
2 Sélectionnez une option, puis appuyez sur la touche .
Titre Spécifie le numéro du titre
Chapitre Spécifie le numéro du chapitre
C XX:XX:XX
(ou T XX:XX:XX)
Spécifie le temps écoulé du chapitre (ou du titre)
3 Sélectionnez les numéros de la scène souhaitée, puis
appuyez sur la touche .
La lecture du chapitre sélectionné démarre.
Recherche d'un point particulier sur un DVD
(Recherche)
Vous pouvez rechercher soit en avant, soit en arrière pour localiser
rapidement un point particulier sur un DVD.
1 Pendant la lecture, sélectionnez ou dans le Panneau
de commandes ( page 56), puis maintenez la touche
enfoncée.
Lorsque vous appuyez sur la touche directionnelle haut ou bas pendant
que vous maintenez en même temps la touche enfoncée, la vitesse
de recherche change tel qu'illustré ci-dessous.
• Recherche 3
• Recherche 2
• Recherche 1
• Ralenti
2 Relâchez la touche quand vous avez trouvé le point que
vous cherchez.
La lecture revient à la vitesse normale.
Conseil
Pour utiliser la manette analogique afin d'effectuer une recherche pendant la lecture,
maintenez la touche L2 ou R2 enfoncée afin de lancer la recherche. Utilisez les
touches directionnelles pour modifier la vitesse. Relâchez la touche L2 ou R2 quand
vous avez trouvé le point que vous cherchez.
Affichage des informations de lecture
Vous pouvez afficher des informations, telles que le numéro du titre en
cours ou le temps écoulé.
1 Pendant la lecture, sélectionnez dans le Panneau de
commandes ( page 56), puis appuyez sur la touche .
A chaque fois que vous appuyez sur la touche , l'écran change tel
qu'illustré ci-dessous.
Titre X Chapitre X Numéro du titre et numéro du chapitre
Titre X Chapitre X C XX:XX:XX Temps écoulé du chapitre en cours
Titre X Chapitre X C - XX:XX:XX Temps restant du chapitre en cours
Titre X Chapitre X T XX:XX:XX Temps écoulé du titre en cours
Titre X Chapitre X T - XX:XX:XX Temps restant du titre en cours
(Désactivé(e))
FR
DVD
Lecture d'un DVD
59
Page 60

Sélection du contenu Original ou Play List pour la
lecture d'un DVD-RW
Utilisation des modes de lecture
Si vous utilisez un disque DVD-RW (en mode VR), vous pouvez
sélectionner le type de titres que vous souhaitez lire.
1 Une fois la lecture arrêtée, sélectionnez dans le
Panneau de commandes ( page 56), puis appuyez sur la
touche .
Vous pouvez basculer entre les options Original et Play List en
appuyant sur la touche .
Original Lit le contenu dans l'ordre d'enregistrement initial
Play List Lit le contenu modifié. Play List est le paramètre par
défaut.
Conseils
• La lecture au ralenti en arrière n'est pas disponible sur les disques DVD-RW (mode
VR).
• Vous ne pouvez pas utiliser cette fonction avec la fonction Reprise de lecture.
Désactivez Reprise de lecture ( page 58) avant de sélectionner cette fonction.
A l'aide des différents modes de lecture, vous pouvez lire des titres ou des
chapitres dans l'ordre souhaité ou répéter la lecture d'une scène
particulière. Il existe quatre modes de lecture :
• Lecture programmée ( page 60)
• Lecture aléatoire ( page 61)
• Lecture répétée ( page 61)
• Lecture répétée A-B ( page 62)
Les instructions suivantes supposent l'utilisation du Panneau de
commandes ( page 56) pour contrôler le lecteur DVD.
Conseils
• Vous pouvez combiner les modes Lecture programmée, Lecture aléatoire et
Lecture répétée. Il se peut cependant que certaines options de Lecture aléatoire et
de Lecture répétée ne soient pas disponibles selon la combinaison choisie.
• La console PlayStation
logiciel du DVD.
®2 lit le contenu du disque tel qu'il a été enregistré le
Lecture programmée
Vous pouvez créer des programmes de lecture de titres et de chapitres dans
n'importe quel ordre.
1 Pendant la lecture, sélectionnez dans le Panneau de
commandes ( page 56), puis appuyez sur la touche .
Utilisation des modes de lecture
60
Page 61

2 Sélectionnez un numéro de programme, puis appuyez sur la
touche .
Si aucun programme n'est défini, la seule option disponible est
"1. Titre".
Sélection aléatoire des titres Lecture de titres en ordre aléatoire
Sélection aléatoire des chapitres Lecture de chapitres en ordre aléatoire
Sélection aléatoire désactivée Désactive le mode Lecture aléatoire
3 Sélectionnez le numéro de titre, puis appuyez sur la touche
.
4 Sélectionnez le numéro de chapitre, puis appuyez sur la
touche .
Pour lire tous les chapitres, sélectionnez "Tout". Répétez les étapes 2
à 4 pour définir d'autres titres ou chapitres.
5 Appuyez sur la touche START.
La lecture programmée commence.
Conseil
Le réglage ne sera pas effacé une fois la Lecture programmée terminée.
Lecture aléatoire
Vous pouvez sélectionner cette option pour obtenir une lecture aléatoire de
tous les titres ou chapitres enregistrés sur un disque. L'ordre de lecture sera
différent à chaque sélection du mode Lecture aléatoire.
1 Sélectionnez dans le Panneau de commandes
( page 56), puis appuyez sur la touche .
A chaque fois que vous appuyez sur la touche , l'écran change tel
qu'illustré ci-dessous.
2 Sélectionnez N, puis appuyez sur la touche .
Lecture répétée
Vous pouvez définir cette option pour lire des titres ou chapitres de
manière répétée.
1 Sélectionnez dans le Panneau de commandes
( page 56), puis appuyez sur la touche .
À chaque fois que vous appuyez sur la touche , l'écran change tel
qu'illustré ci-dessous.
Répétition du disque Lecture répétée de tous les titres
Répétition du titre Lecture répétée d'un titre
Répétition d'un chapitre Lecture répétée d'un chapitre
Répétition désactivée Désactive le mode Lecture répétée
2 Sélectionnez N, puis appuyez sur la touche .
FR
DVD
Utilisation des modes de lecture
61
Page 62
Lecture répétée A-B
Vous pouvez définir une scène particulière à lire de manière répétée.
1 Pendant la lecture, sélectionnez dans le Panneau de
commandes ( page 56), puis appuyez sur la touche au
point auquel vous souhaitez démarrer la lecture répétée.
Le point de début (point A) est enregistré.
2 Appuyez sur la touche au point auquel vous souhaitez finir
la lecture répétée.
Le point de fin (point B) est enregistré et la lecture répétée du passage
de A à B commence.
Désactivation des modes de lecture
Désactive les modes de lecture pour reprendre une lecture normale.
1 Sélectionnez dans le Panneau de commandes
( page 56), puis appuyez sur la touche .
Le message "Contenu du mode de lecture effacé" s'affiche et la
console revient à une lecture normale.
Conseil
Si vous avez défini une combinaison de plusieurs modes de lecture, ils sont tous
désactivés.
Paramètres et réglages du
lecteur DVD
Vous pouvez modifier les réglages initiaux, ajuster l'image et le son et
configurer d'autres options en utilisant l'affichage de configuration. Vous
pouvez aussi choisir une langue pour les sous-titres et les menus,
restreindre le visionnage des enfants et configurer d'autres options.
Conseils
• Certains DVD ne prennent pas en charge tous les paramètres. La console
PlayStation
DVD. Si le DVD ne prend pas en charge les fonctions répertoriées, vous ne pouvez
pas modifier les paramètres.
• Les options suivantes ne sont pas disponibles pendant la lecture ou la fonction
Reprise de lecture. Désactivez Reprise de lecture ( page 58) avant de modifier
ces paramètres.
– "Menu", "Audio" et "Sous-titres" dans Sélection de la langue
– "Type TV" et "Balayage progressif" dans Réglage de l'écran
– "Contrôle parental" dans Réglage personnalisé
– "DTS" et "Sélection automatique de plage audio" dans Réglage audio
Vous pouvez modifier les paramètres du lecteur DVD de la manière
suivante :
1 Sélectionnez dans le Panneau de commandes
®2 lit le contenu du disque tel qu'il a été enregistré dans le logiciel du
( page 56), puis appuyez sur la touche .
La barre d'icônes Configurer s'affiche.
Paramètres et réglages du lecteur DVD
62
Page 63
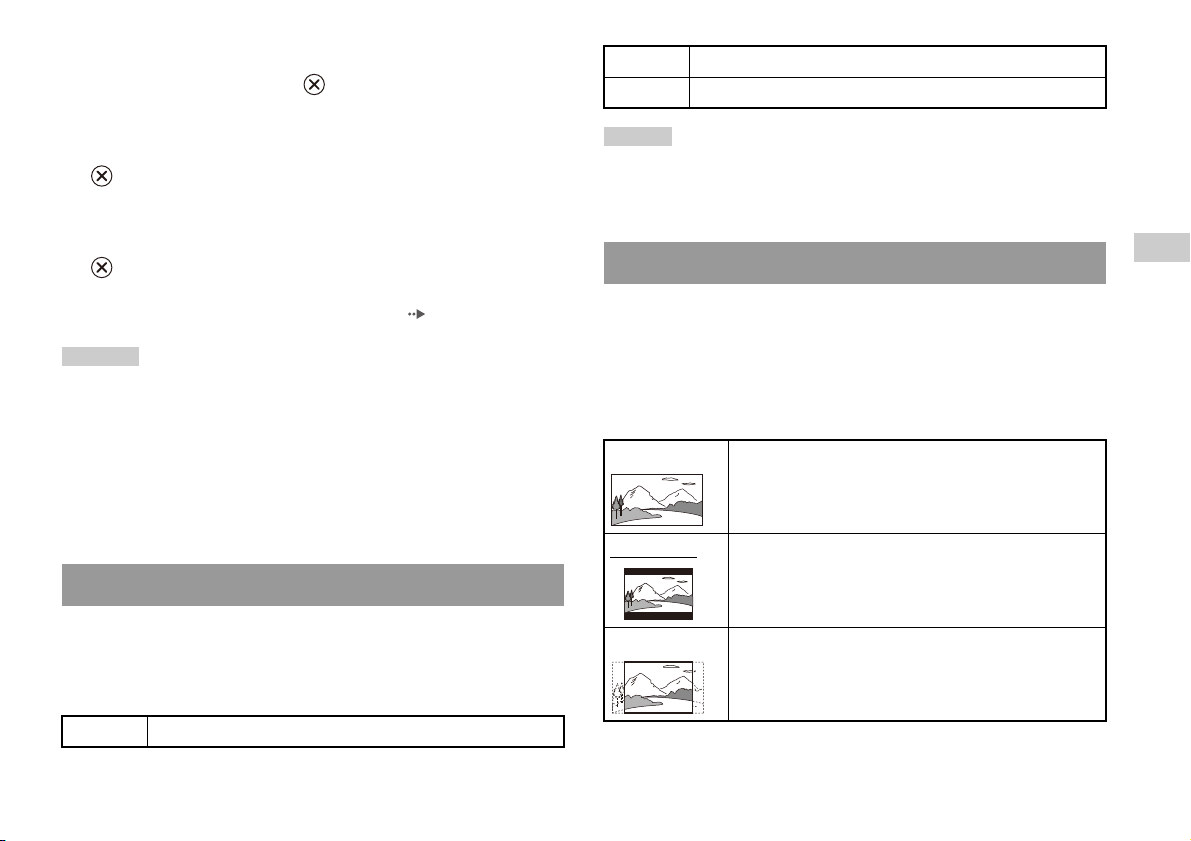
2 Sélectionnez l'icône correspondant au paramètre à modifier,
puis appuyez sur la touche .
La valeur actuelle de chaque option s'affiche.
3 Sélectionnez le paramètre désiré, puis appuyez sur la touche
.
L'option de menu devient active et peut être sélectionnée.
Audio Permet de sélectionner la langue de la bande son du DVD
Sous-titres Permet de sélectionner la langue des sous-titres du DVD
Conseil
Si vous sélectionnez "Idem audio" pour les sous-titres, la langue de ceux-ci sera
automatiquement définie pour correspondre à la langue sélectionnée pour la bande
son du DVD.
4 Sélectionnez le paramètre désiré, puis appuyez sur la touche
.
La valeur du paramètre est définie. Pour plus de détails, reportez-vous
aux instructions relatives à chaque paramètre ( pages 63 à 68).
Conseils
• Le paramètre par défaut de chaque menu a été souligné dans les explications cidessous.
• Pour revenir au Panneau de commandes une fois les paramètres définis, appuyez
sur la touche SELECT.
• Les paramètres sont sauvegardés lorsque vous effectuez une des opérations
suivantes :
– Arrêt de la lecture (y compris l'arrêt de la fonction Reprise de lecture)
– Ouverture du couvercle du compartiment à disque
Sélection de la langue
Dans "Sélection de la langue", vous pouvez choisir la langue du menu du
DVD, de la bande son et des sous-titres. Remarquez que si vous
sélectionnez une langue qui n'est pas enregistrée sur le DVD, une des
langues enregistrées est sélectionnée automatiquement.
Menu Permet de sélectionner la langue du menu du DVD
Réglage du mode d'affichage du téléviseur
Dans le menu Réglage de l'écran, vous pouvez définir la taille de l'écran
(rapport d'aspect) et d'autres options qui affectent la qualité de l'image.
Type TV
Vous pouvez définir le rapport d'aspect afin qu'il corresponde à l'écran du
téléviseur raccordé.
16:9 Sélectionnez cette option si vous utilisez un téléviseur grand
4:3 Letter Box
4:3 PAN SCAN Sélectionnez cette option si vous utilisez un téléviseur
écran ou un téléviseur standard offrant une fonctionnalité
16:9/grand écran.
Sélectionnez cette option si vous utilisez un téléviseur
standard. Cette option affiche les images larges avec des
bandes en haut et en bas de l'écran.
standard. Cette option affiche les images élargies en fonction
de la hauteur de l'écran, les parties gauche et droite qui ne
s'adaptent pas à l'écran étant coupées.
Paramètres et réglages du lecteur DVD
FR
DVD
63
Page 64

Conseil
Lorsque "Balayage progressif" est réglé sur "Activé", "Type TV" est
automatiquement réglé sur "16:9".
Affichage
Pendant la lecture, vous pouvez afficher le statut de lecture dans le coin
supérieur droit de l'écran pendant quelques secondes.
DNR (Digital Noise Reduction, réduction du bruit
numérique)
Ce paramètre peut vous aider à réduire les irrégularités affichées à l'écran
et à obtenir une image plus claire.
Désactivé(e)
DNR1 Augmente la qualité de l'image
DNR2 Augmente la qualité de l'image (maximum)
La réduction DNR n'est pas utilisée.
Conseils
• "DNR2" est plus efficace pour réduire les irrégularités de l'image que "DNR1",
mais dans certains cas, ce paramètre risque de produire une i mage rémanente. Dans
ce cas, sélectionnez "Désactivé(e)".
• La fonction DNR peut produire des résultats limités sur certains DVD.
• Lorsque "Balayage progressif" est réglé sur "Activé(e)", "DNR" est
automatiquement désactivé et ne peut pas être activé.
Précision des contours
Vous pouvez accentuer ou atténuer les contours de l'image affichée. Plus
la valeur est élevée, plus les contours sont accentués. En règle générale,
sélectionnez "0".
•-2 •-1 •0
•+1 •+2
Conseil
Selon le DVD, il se peut que le paramètre Précision des contours produise des
résultats limités.
Activé(e) Le statut de lecture s'affiche pendant quelques secondes.
Désactivé(e) Le statut de lecture ne s'affiche pas.
Balayage progressif
Vous pouvez afficher une image dans laquelle toutes les lignes sont mises
à jour en un seul passage. Dans la plupart des cas, cela produit une image
plus claire et sans sautillement. Cette fonction n'est disponible que si votre
téléviseur, le câble AV* et le logiciel prennent en charge le balayage
progressif (480p).
* Le câble AV composant (vendu séparément) est compatible avec le balayage
progressif.
Activé Sélectionnez cette option lorsque la console est raccordée à un
Désactivé
téléviseur prenant en charge le balayage progressif (480p).
Sélectionnez cette option si la console est raccordée à un téléviseur
standard.
Conseils
• Si la qualité de l'image est réduite ou si aucune image ne s'affiche, réglez "Balayage
progressif" sur "Désactivé" alors que la console est connectée à un téléviseur qui
ne dispose pas de l'équipement nécessaire. Si vous réglez accidentellement cette
option sur "Activé" pour un tel téléviseur, la qualité de l'image peut être réduite ou
l'image risque de ne pas s'afficher. Pour désactiver ce paramètre, procédez de la
manière suivante :
Paramètres et réglages du lecteur DVD
64
Page 65

Vérifiez qu'un DVD est inséré dans la console.
1
Appuyez sur le bouton _/1/RESET situé à l'avant de la console.
2
Ensuite, maintenez enfoncée la touche START de la manette
analogique (DUALSHOCK
que l'image du DVD s'affiche. Le paramètre "Balayage progressif" a de
nouveau la valeur "Désactivé", afin de permettre un affichage normal de
la vidéo du DVD. Vous pouvez également annuler ce paramètre à l'aide
de l'option "Désactiver Balayage Progressif" ( page 74) de l'écran
d'informations sur la version.
• Les DVD peuvent contenir des données de type vidéo et de type film utilisant des
vitesses d'images différentes. Lors de la lecture de données de type vidéo utilisant
le balayage progressif, certaines images vidéo peuvent paraître non naturelles.
Dans ce cas, réglez "Balayage progressif" sur "Désactivé" et visionnez le DVD en
mode entrelacé standard.
• Lorsque "Balayage progressif" est réglé sur "Activé", "Type TV" ( page 63) est
automatiquement réglé sur "16:9".
• Le contenu du disque DVD-RW (mode VR) ne peut être visionné qu'au format
entrelacé standard. L'option "Balayage progressif" n'est pas disponible lors de la
lecture d'un tel contenu.
®2) dans le port de manette N°1 jusqu'à ce
Définition des options de l'afficheur
Le paramètre "Réglage personnalisé" vous permet de régler un niveau de
"Contrôle parental" et d'ajuster d'autres paramètres de lecture.
Mode de pause
Vous pouvez utiliser cette option pour définir l'état de l'image lorsque la
lecture est suspendue.
Image Une image contenant des sujets immobiles peut être affichée en haute
résolution.
Contrôle parental
Dans certaines régions, le visionnage du contenu de certains DVD peut
être restreint selon l'âge de l'utilisateur ou d'autres facteurs. Vous pouvez
utiliser la fonction Contrôle parental pour restreindre le niveau du contenu
qui pourra être lu sur votre console.
Conseil
Les paramètres sont sauvegardés lorsque vous effectuez une des opérations
suivantes :
– Arrêt de la lecture (y compris l'arrêt de la fonction Reprise de lecture)
– Ouverture du couvercle du compartiment à disque
Réglages du Contrôle parental
1 Sélectionnez "Contrôle parental", puis appuyez sur la touche
.
L'écran d'enregistrement d'un code d'accès s'affiche. Si vous avez déjà
entré un code d'accès, l'écran de confirmation s'affiche.
2 Sélectionnez un numéro, puis appuyez sur la touche .
Répétez l'étape 2 pour saisir un code d'accès à quatre chiffres. Si vous
souhaitez effacer un chiffre, appuyez sur la touche . Lorsque vous
spécifiez un code d'accès, vous devez le saisir à nouveau pour
confirmation.
FR
DVD
Auto Une image contenant des sujets en mouvement est affichée sans
sautillement. En règle générale, sélectionnez cette position.
3 Sélectionnez "Région", puis appuyez sur la touche .
La liste des codes de région s'affiche.
Paramètres et réglages du lecteur DVD
65
Page 66
4 Sélectionnez la région sur laquelle seront basés les niveaux
de Contrôle parental, puis appuyez sur la touche .
La région par défaut est "USA". Si vous sélectionnez "Autres",
reportez-vous à la section "Liste des codes de région" ( page 66).
5 Sélectionnez "Niveau", puis appuyez sur la touche .
La liste des options de niveau s'affiche.
6 Sélectionnez un niveau de restriction, puis appuyez sur la
touche .
Plus la valeur est faible, plus la restriction est stricte.
Pour désactiver le Contrôle parental
Une fois la lecture du DVD arrêtée, passez à l'étape 6 de la section
"Réglages du Contrôle parental" et réglez "Niveau" sur "Désactivé(e)".
Liste des codes de région
Si vous souhaitez entrer un code de région pour le Contrôle parental,
sélectionnez "Autres" à l'étape 4 de la section "Réglages du Contrôle
parental" ( page 65). Utilisez les touches directionnelles pour
sélectionner la première lettre, puis appuyez sur la touche directionnelle
droite. Ensuite, sélectionnez la deuxième lettre et appuyez sur la touche
.
Région Code Région Code
Allemagne DE Japon JP
Autriche AT Malaisie MY
Belgique BE Norvège NO
Canada CA Pays-Bas NL
Chine CN Philippines PH
Corée KR Royaume-Uni GB
Danemark DK Russie RU
Espagne ES Singapour SG
Finlande FI Suède SE
France FR Suisse CH
Hong-Kong HK Taiwan TW
Indonésie ID Thaïlande TH
Italie IT
Paramètres et réglages du lecteur DVD
66
Conseil
La région par défaut est "USA".
Page 67
Changement de votre code d'accès
A l'étape 2 de la section "Réglages du Contrôle parental" ( page 65),
exécutez les étapes suivantes :
1 A l'aide des touches directionnelles, sélectionnez "Changer
le code d'accès", puis appuyez sur la touche .
L'écran de changement du code d'accès s'affiche.
• Si vous ne définissez pas de code d'accès, vous ne pouvez pas modifier les
paramètres du Contrôle parental.
• Certains DVD proposant la fonction de Contrôle parental n'autorisent pas
l'utilisation des modes de lecture ( pages 60 à 62).
Réglage du son
2 Sélectionnez un numéro, puis appuyez sur la touche .
Répétez l'étape 2 pour saisir un code d'accès à quatre chiffres. Vous
êtes invité à le spécifier à nouveau pour confirmation.
Annulation temporaire des restrictions de Contrôle parental
1 Lancez la lecture du DVD ( page 58).
Vous serez invité à modifier temporairement le niveau de Contrôle
parental pour autoriser la lecture. Cela se produit généralement
immédiatement au démarrage du disque, mais peut également survenir
à différents moments, selon le DVD.
2 À l'aide des touches directionnelles, sélectionnez "Oui", puis
appuyez sur la touche .
L'écran de saisie du code d'accès s'affiche.
3 Sélectionnez un numéro, puis appuyez sur la touche .
Répétez l'étape 3 pour saisir le code d'accès à quatre chiffres. Une fois
le code d'accès entré, la lecture recommence. Lorsque vous arrêtez la
lecture du DVD, le niveau du Contrôle parental est rétabli au niveau
préalablement choisi.
Conseils
• Si vous avez oublié votre code d'accès, consultez le manuel Aide-mémoire /
Sécurité et support technique ( page 40).
Sortie audio numérique
Vous pouvez changer le mode de sortie des signaux audio lorsque vous
raccordez les appareils suivants au connecteur DIGITAL OUT
(OPTICAL).
Attention
Si la console est connectée à un appareil audio dépourvu de décodeur Dolby
Digital ou DTS, réglez "Dolby Digital" et "DTS" sur "Désactivé(e)". Si vous
réglez ces options sur "Activé(e)" sans disposer du décodeur nécessaire, il se
peut que la console n'émette aucun son ou un bruit très fort.
DIGITAL OUT (OPTICAL)
Cette option définit le type de sortie du connecteur DIGITAL OUT
(OPTICAL).
Activé(e) Sélectionnez cette opt ion si vous souhaitez que le son (s ignal audio)
soit émis via le connecteur DIGITAL OUT (OPTICAL).
Les paramètres de "Dolby Digital" et "DTS" s'affichent.
Désactivé(e) Sélectionnez cette option si vous ne souhaitez pas que le son soit
émis via le connecteur DIGITAL OUT (OPTICAL).
Les paramètres de "Dolby Digital" et "DTS" ne s'affichent pas.
Paramètres et réglages du lecteur DVD
FR
DVD
67
Page 68

Dolby Digital
Sélectionnez cette option pour émettre les signaux Dolby Digital via le
connecteur DIGITAL OUT (OPTICAL).
Activé(e) Sélectionnez cette option si la console est raccordée à un appareil
Désactivé(e)
audio équipé d'un décodeur Dolby Digital intégré.
Sélectionnez cette option si la console est raccordée à un appareil
audio dépourvu de décodeur Dolby Digital intégré.
DTS
Sélectionnez cette option pour émettre les signaux DTS via le connecteur
DIGITAL OUT (OPTICAL).
Activé(e) Sélectionnez cette option si la console est raccordée à un appareil
Désactivé(e)
audio équipé d'un décodeur DTS intégré.
Sélectionnez cette option si la console est raccordée à un appareil
audio dépourvu de décodeur DTS intégré.
Sélection automatique de plage audio
Ce paramètre accorde la priorité à la bande sonore contenant le plus grand
nombre de canaux lorsque vous lisez un DVD sur lequel plusieurs formats
audio (format PCM, Dolby Digital ou DTS) sont enregistrés. Si les formats
PCM, DTS et Dolby Digital possèdent le même nombre de canaux, la
console sélectionne les bandes sonores PCM, Dolby Digital et DTS dans
cet ordre.
Conseils
• Si vous réglez "DTS" sur "Désactivé(e)" dans "Sortie audio numérique"
( page 68), la bande sonore DTS n'est pas lue par la console.
• Selon le DVD, le canal audio ayant la priorité peut être prédéterminé. Dans ce cas,
la bande sonore sera sélectionnée en se basant sur l'ordre de priorité du DVD.
Volume du DVD
Vous pouvez définir cette option si le niveau de sortie audio du DVD est
bas. Cette option n'est disponible que si "DIGITAL OUT (OPTICAL)" est
réglé sur "Désactivé(e)" dans "Sortie audio numérique" ( page 67).
+2 Augmente le volume (maximum)
+1 Augmente le volume
Normal
En règle générale, sélectionnez cette option.
Attention
Si vous réglez cette option sur "+1" ou "+2", le son risque d'être déformé. Dans
ce cas, sélectionnez "Normal". Remarquez également que si vous réglez le
volume trop fort, cela risque d'endommager les haut-parleurs ou votre ouïe.
Activé(e) Priorité accordée
Désactivé(e)
Paramètres et réglages du lecteur DVD
68
Aucune priorité accordée
Page 69

Menu principal
Affichage du menu principal
A partir du menu principal, vous pouvez accéder à des informations et
modifier divers paramètres. Il permet également d'accéder aux écrans
suivants. Le menu principal s'affiche lorsque vous mettez la console sous
tension sans avoir inséré de disque.
• Écran navigateur ( page 69)
• Menu configuration du système ( page 70)
• Écran d'informations sur la version ( page 73)
Utilisation de l'écran navigateur
L'écran navigateur vous permet de réaliser les opérations suivantes :
• Copie ou suppression de données de jeu sauvegardées sur une memory
card (carte mémoire)
• Démarrage d'un jeu
• Lancement de la lecture d'un CD audio
• Lancement de la lecture d'un DVD
1 Affichez le menu principal ( page 69).
FR
Menu principal
1 Mettez la console sous tension ( page 46).
Le menu principal s'affiche. Remarquez que l'affichage du menu
principal peut prendre un certain temps.
Conseil
Si vous mettez la consol e sous tensio n alors qu'un disque est inséré, le menu pri ncipal
ne s'affiche pas. Pour afficher le menu principal, appuyez sur le bouton A situé à
l'avant de la console et retirez le disque. Appuyez ensuite sur le bouton
_/1/RESET pour réinitialiser la console.
2 À l'aide des touches directionnelles, sélectionnez
"Navigateur", puis appuyez sur la touche .
L'écran navigateur s'affiche.
3 Insérez un disque ou une memory card (carte mémoire).
L'icône de l'élément inséré s'affiche dans l'écran navigateur.
\
Affichage du menu principal
69
Page 70

4 Sélectionnez une icône, puis appuyez sur la touche .
• Lorsque vous sélectionnez une icône de memory card (carte
mémoire), les icônes des données sauvegardées sur celle-ci
s'affichent. Pour copier ou supprimer des données de jeu
sauvegardées, reportez-vous à la section “Copie ou suppression de
données de jeu” ( page 52).
• Si vous sélectionnez l'icône d'un disque de logiciel au format
PlayStation
• Si vous sélectionnez l'icône d'un CD audio, les plages contenues sur
le CD s'affichent. Reportez-vous à la section “Lecture d'un CD
audio” ( page 54).
• Si vous sélectionnez l'icône d'un DVD, la lecture du DVD démarre.
Conseil
Le message "Aucune donnée" s'affiche sur l'écran navigateur si aucune memory card
(carte mémoire) ou aucun disque ne sont insérés dans la console.
®2 ou PlayStation®, le jeu démarre.
Utilisation du menu
Configuration du Système
A partir du menu Configuration du Système, vous pouvez modifier les
paramètres de nombreuses options, telles que la langue ou l'affichage de
l'heure, ainsi que le mode de sortie audio ou vidéo.
1 Affichez le menu principal ( page 69).
2 À l'aide des touches directionnelles, sélectionnez
"Configuration du Système", puis appuyez sur la touche .
Le menu Configuration du Système s'affiche.
3 Sélectionnez une option, puis appuyez sur la touche .
L'option de menu devient active et peut être sélectionnée.
Utilisation du menu Configuration du Système
70
Page 71

4 Sélectionnez le paramètre désiré, puis appuyez sur la touche
.
Pour plus de détails, reportez-vous aux instructions relatives à chaque
option de menu ( pages 71 à 72).
Type d'heure Spécifie l'utilisation de l'heure d'hiver (heure standard)
ou de l'heure d'été. En règle générale, sélectionnez
"Standard".
Conseils
• Le paramètre par défaut de chaque menu a été souligné dans les explications cidessous.
• Les modifications apportées à chaque paramètre sont enregistrées et restent en
vigueur même après la mise hors tension ou la réinitialisation de la console.
Configuration de l'heure
Vous pouvez régler la date et l'heure. Utilisez les touches directionnelles
pour régler l'"Année", le "Mois", le "Jour", l'"Heure", les "Minutes" et les
"Secondes". Ce paramètre entre en vigueur lorsque vous appuyez sur la
touche .
Réglages facultatifs
Si vous appuyez sur la touche lorsque l'écran "Configuration de
l'heure" est affiché, vous pouvez définir des options telles que "Affichage
de la date" ou "Affichage de l'heure". Utilisez les touches directionnelles
et la touche pour définir chaque paramètre.
Affichage de l'heure Configure l'horloge système pour utiliser le format à
12 heures ou à 24 heures
Affichage de la date Définit l'ordre d'affichage de l'année, du mois et du jour
Fuseaux horaires Définit le fuseau horaire
Taille de l'écran
Vous pouvez régler le mode d'affichage du téléviseur.
4:3 Sélectionnez cette option si vous raccordez la console
à un téléviseur standard.
Plein écran* Sélectionnez cette option si vous raccordez la console
à un téléviseur standard. Les bandes noires situées en
bas et en haut de l'écran sont alors coupées.
16:9 Sélectionn ez cette option si vous utilisez un tél éviseur
grand écran ou un téléviseur standard offrant une
fonctionnalité 16:9/écran large.
* Le mode d'affichage "Plein écran" est compatible avec le menu Configuration du
Système, l'écran navigateur et l'écran CD audio.
DIGITAL OUT (OPTICAL)
Vous pouvez choisir d'émettre les signaux DTS via le connecteur
DIGITAL OUT (OPTICAL).
Activé Sélectionnez cette option si vous souhaitez que les
signaux audio soient émis via le connecteur DIGITAL
OUT (OPTICAL).
Désactivé Sélectionnez cette option si v ous ne souhaitez pas que
les signaux audio soient émis via le connecteur
DIGITAL OUT (OPTICAL).
FR
Menu principal
Utilisation du menu Configuration du Système
71
Page 72

Sortie vidéo
Si vous utilisez le câble AV composant (vendu séparément), vous devez
définir le mode pour qu'il corresponde aux prises d'entrée de votre
téléviseur.
Y Cb/ Pb Cr/ Pr Sélectionnez cette option si vous raccordez la console
RGB Sélectionnez cette option si vous raccordez la console
aux connecteurs d'entrée vidéo composant.
aux connecteurs d'entrée RGB.
Conseil
Le paramètre "RGB" n'est disponible que pour les logiciels au format PlayStation®2
et PlayStation
à "Y Cb/ Pb Cr/ Pr".
®. Lorsque vous lisez un DVD vidéo, le mode passe automatiquement
Télécommande
Vous pouvez définir cette option lorsque vous utilisez la télécommande
DVD (pour PlayStation
Fonction Jeu Activée Sélectionnez cette option lorsque vous souhaitez faire
Fonction Jeu Désactivée Sélectionnez cette option lorsque vous ne souhaitez
®2) (vendue séparément).
fonctionner des logiciels au format PlayStation
PlayStation
pas faire fonctionner des logiciels au format
PlayStation
télécommande DVD.
® à l'aide de la télécommande DVD.
®2 ou PlayStation® à l'aide de la
®2 ou
Conseil
Les restrictions suivantes s'appliquent en utilisant la télécommande de DVD avec le
paramètre d'option "Fonction Jeu Activée" :
– Selon le logiciel, il se peut que certaines touches de la télécommande ne
fonctionnent pas correctement.
– La télécommande DVD ne fonctionne pas si vous appuyez sur plusieurs touches
simultanément.
– Certains titres de logiciel risquent de ne pas fonctionner correctement si la
manette est débranchée du port de manette N°1. Si cela se produit, sélectionnez
l'option "Fonction Jeu Désactivée".
– Certains périphériques de tiers sans licences peuvent ne pas fonctionner.
Veuillez noter qu'il n'est pas recommandé d'utiliser de tels périphériques et que
cela annulera votre garantie.
Langue
Cette option permet de sélectionner la langue d'affichage du menu
principal, de l'écran navigateur, du menu Configuration du Système et de
l'écran d'informations sur la version.
Anglais Affiche les messages en anglais
Français Affiche les messages en français
Espagnol Affiche les messages en espagnol
Allemand Affiche les messages en allemand
Italien Affiche les messages en italien
Néerlandais Affiche les messages en néerlandais
Portugais Affiche les messages en portugais
Utilisation du menu Configuration du Système
72
Page 73

Utilisation de l'écran
2 Sélectionnez une option, puis appuyez sur la touche .
Les options disponibles s'affichent.
d'informations sur la version
Vous pouvez vérifier les informations sur la version de différents
composants de la console en sélectionnant cette option. Il est également
possible de modifier des paramètres facultatifs pour certains éléments.
1 Lorsque le menu principal est affiché ( page 69), appuyez
sur la touche .
L'écran d'informations sur la version s'affiche.
Réglages facultatifs
Vous pouvez définir des réglages facultatifs pour les paramètres
"Console", "Lecteur PlayStation
peut être défini que si l'option "Balayage progressif" du lecteur DVD est
réglée sur "Activé(e)".
1 À l'aide des touches directionnelles, sélectionnez une
option, puis appuyez sur la touche .
La valeur actuelle de chaque option s'affiche.
®" et "Lecteur DVD". "Lecteur DVD" ne
3 Sélectionnez le paramètre désiré, puis appuyez sur la touche
.
Pour plus de détails, reportez-vous aux instructions relatives à chaque
paramètre ( pages 73 à 75).
Conseil
Le paramètre par défaut de chaque menu a été souligné dans les explications cidessous.
Console
La console PlayStation®2 règle automatiquement ses configurations
internes pour obtenir une lecture optimale. Si "Diagnostic" est réglé sur
"Activé", la console effectue des réglages supplémentaires qui peuvent
permettre de lire des disques précédemment illisibles.
Diagnostic
Désactivé La fonction Diagnostic est désactivée.
Activé La fonction Diagnostic est activée.
Conseil
Le paramètre "Diagnostic" redevient automatiquement le paramètre par défaut dans
les cas suivants :
– Lors de la lecture d'un logiciel au format PlayStation
lorsqu'un DVD démarre
– Lorsque la console est réinitialisée
– Lorsque la console est mise hors tension
®2 ou PlayStation® ou
FR
Menu principal
Utilisation de l'écran d'informations sur la version
73
Page 74
Lecteur PlayStation®
Vous pouvez régler le programme Lecteur PlayStation® pour optimiser les
performances d'un logiciel au format PlayStation
Conseil
Les paramètres par défaut sont automatiquement rétablis dans le cas suivant :
– Lorsque la console est mise hors tension
Vitesse du Disque
Normale Charge les disques à vitesse normale
Rapide Charge les disques à grande vitesse
Conseil
Réglez cette option sur "Normale" dans les cas suivants :
– Lorsque le chargement rapide ne produit aucune amélioration des résultats
– Lorsque vous utilisez un logiciel non compatible avec le chargement rapide
Textures
®.
Conseil
Réglez cette option sur "Standard" dans les cas suivants :
– Lorsqu'une texture lisse ne produit aucune amélioration des résultats
– Si l'image ne s'affiche pas correctement alors que l'option "Lisse" est
sélectionnée
Lecteur DVD
Si vous réglez "Balayage progressif" sur "Activé" lorsque la console est
raccordée à un téléviseur qui ne dispose pas de l'équipement nécessaire, la
qualité de l'image peut être réduite ou il se peut que l'image ne s'affiche
pas. Vous pouvez désactiver le paramètre "Balayage progressif" de la
manière suivante.
Retirez le DVD avant de désactiver ce paramètre.
Désactiver Balayage Progressif
Non Laisse le paramètre "Balayage progressif" activé
Oui Désactive le paramètre "Balayage progressif"
Standard
Lisse Réduit les irrégularités des images affichées
Utilisation de l'écran d'informations sur la version
74
Affiche une texture normale
1 Affichez l'écran d'informations sur la version.
2 À l'aide des touches directionnelles, sélectionnez "Lecteur
DVD", puis appuyez sur la touche .
L'option "Désactiver Balayage Progressif" s'affiche.
3 Appuyez sur la touche .
4 Sélectionnez "Oui", puis appuyez sur la touche .
Page 75

5 Appuyez à deux reprises sur la touche .
L'écran revient au menu principal.
6 Appuyez sur le bouton A (ouvrir) situé à l'avant de la console
et insérez un DVD dans la console.
7 Refermez le couvercle du compartiment à disque.
La lecture démarre.
Conseil
Le paramètre ne sera pas désactivé si 1) vous ne démarrez pas la lecture d'un DVD
après l'étape 4 ou si 2) vous réinitialisez ou mettez hors tension la console avant
l'étape 6.
FR
Menu principal
Utilisation de l'écran d'informations sur la version
75
Page 76

Connexion au réseau
Connexion à un réseau
Vous pouvez jouer à des jeux en ligne en connectant la console
PlayStation
Conseils
• Les jeux qui exigent un disque dur interne (pour PlayStation®2) ne sont pas
compatibles avec cette console. Contactez le service d’aide aux consommateurs de
SCEA via notre site Web à l’adresse http://www.us.playstation.com ou composez
le 1-800-345-7669.
• Il n'y a aucun besoin d'acheter un adaptateur réseau (pour
séparément). Cette console possède un connecteur réseau intégré pour une
connexion réseau à large bande.
Éléments nécessaires
Pour une connexion au réseau et pour créer une configuration de réseau,
vous devez disposer des éléments suivants :
• Un jeu PlayStation
• Un service Internet à large bande
• Un câble Ethernet en vente dans le commerce
• Une memory card (carte mémoire) (8MB) (pour PlayStation
séparément)
®2 à un réseau.
PlayStation®2) (vendu
®2 compatible avec un adapatateur réseau
®2) (vendue
Conseils
• Les câbles Ethernet peuvent être soit de type direct ou de type relais. Dans la
plupart des cas, vous pouvez utiliser un câble de type direct pour connecter une
console PlayStation
peut-être un type relais. Reportez-vous aux instructions fournies avec le
périphérique de réseau pour les détails.
• Certains titres n'exigent peut-être pas de memory card (carte mémoire) (8 MB)
(pour PlayStation
®2 à un réseau. Selon le périphérique de réseau utilisé, il faut
®2) pour accéder au contenu en ligne.
Connexion à un réseau
Ce modèle de console PlayStation®2 convient pour les connexions à large
bande. Reportez-vous à la section "Connexion avec un câble Ethernet" (
page 77) pour les instructions de configuration de base.
Avertissement
Ne branchez pas le cordon d'alimentation de la console sur une prise électrique
avant d'avoir effectué tous les autres raccordements.
Connexion à un réseau
76
Page 77
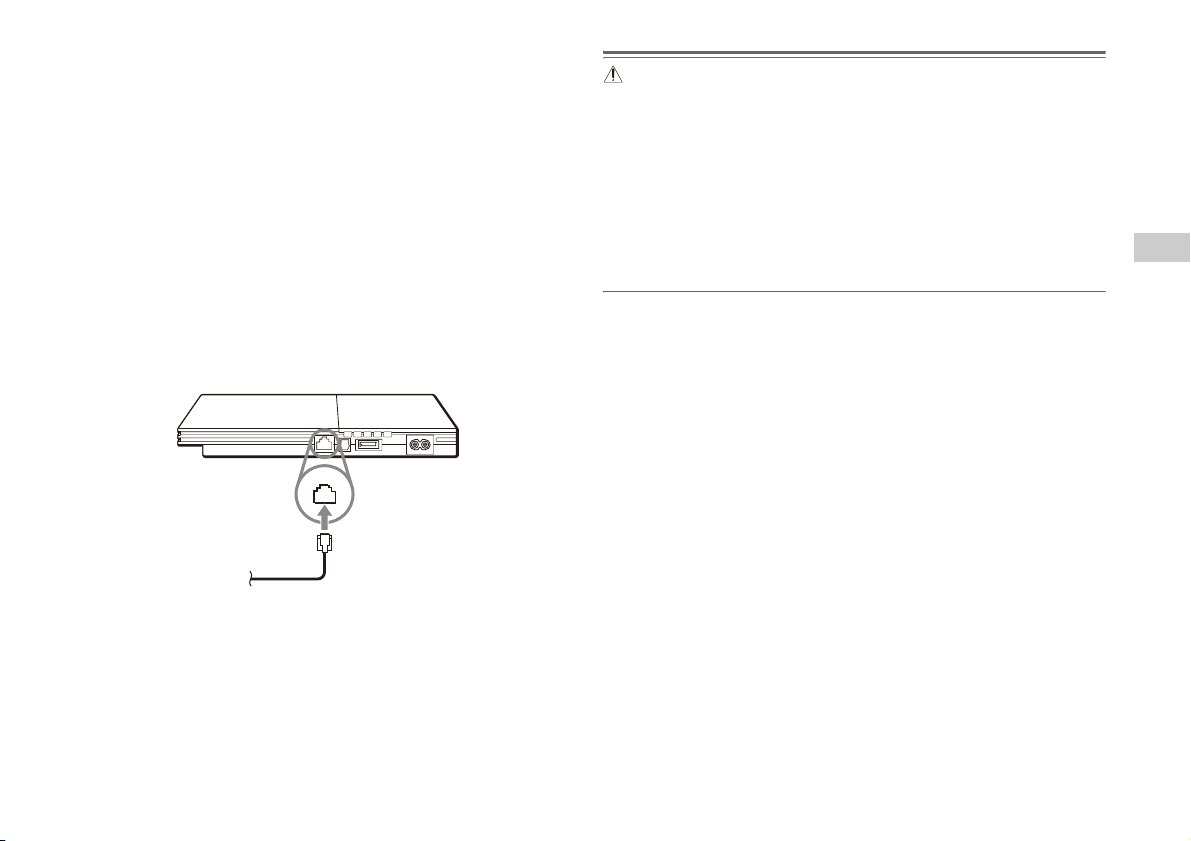
Connexion avec un câble Ethernet
Vous pouvez raccorder la console directement à un réseau à large bande
avec un câble Ethernet. Pour plus de détails, reportez-vous aux instructions
fournies avec votre périphérique réseau.
Les configurations d'installation peuvent varier selon le type de service
Internet utilisé. Vous devrez peut-être vous procurer d'autre équipement
réseau (vendu séparément) selon la configuration du réseau. Reportezvous à votre fournisseur de service Internet ou aux instructions fournies
avec l'équipement réseau pour plus de détails. Pour plus d'information,
contactez le service d’aide aux consommateurs de SCEA via notre site
Web à l’adresse http://www.us.playstation.com ou composez le 1-800345-7669.
1 Insérez le câble Ethernet dans le connecteur NETWORK
(réseau) à l'arrière de la console.
Arrière de la console
Câble Ethernet
commercialisé
2 Connectez le câble Ethernet au périphérique réseau.
La méthode de connexion variera selon le périphérique réseau. Pour
plus de détails, reportez-vous aux instructions fournies avec votre
périphérique réseau.
Avertissement
Ne raccordez pas les câbles Ethernet ou les cordons téléphoniques des types
suivants au connecteur NETWORK (réseau). Si vous utilisez le mauvais type de
câble, trop de courant électrique passera dans le connecteur menant à une
défaillance, une surchauffe ou un incendie dans le connecteur.
- Les câbles Ethernet non appropriés pour l'utilisation avec un réseau 10/10
Base-T/100Base-TX.
- Lignes téléphoniques résidentielles normales
- Toute ligne de données ou téléphonique compatible RNIS (numérique)
- Lignes téléphoniques PBX
- Autres types "inconnus" de lignes téléphoniques
FR
Connexion au réseau
Connexion à un réseau
77
Page 78

Création d'une configuration réseau Jeux en ligne
Lorsque vous avez raccordé la console à un réseau, vous devez créer et
enregistrer une configuration réseau. Pour ce faire, vous pouvez utiliser un
logiciel format PlayStation
PlayStation
®2). Veuillez vous reporter aux instructions fournies avec le
®2 compatible avec l'adaptateur réseau (pour
logiciel.
Conseil
Selon le type de service Internet utilisé, il se peut que vous deviez spécifier votre
adresse MAC. Vous trouverez l'adresse MAC de votre console sur l'écran
d'informations sur la version ( page 73).
Vous pouvez jouer aux jeux en ligne PlayStation®2 compatibles à
l'adaptateur réseau (pour PlayStation
®2). Pour plus de détails, reportez-
vous aux informations fournies avec le logiciel.
Conseils
• On encourage les parents à surveiller les jeux en ligne des enfants pour assurer une
utilisation responsable et sécuritaire d'Internet.
• Pour quitter un jeu en ligne, suivez les instructions à l'écran ou celles fournies avec
le logiciel.
• Si vous ne pouvez pas trouver les instructions, vous pouvez quitter en appuyant sur
le bouton \/1 RESET. L'indicateur \/1 deviendra rouge lorsque la console passe
en mode de veille.
• Si vous ne pouvez pas quitter le logiciel à l'aide de la procédure ci-dessus, vous
pouvez forcer le logiciel à fermer en appuyant sur le bouton \/1 RESET pendant
plusieurs secondes jusqu'à ce que l'indicateur \/1 s'allume en rouge.
Connexion à un réseau
78
Page 79

Informations supplémentaires
Spécifications
Conception et spécifications sujettes à modification sans préavis.
Généralités
Alimentation 120 V AC, 60 Hz
Consommation électrique
(approx.)
Dimensions de la console
(approx.)
Masse de la console (approx.) 720 g / 1,6 lbs
Format des signaux NTSC
Température de
fonctionnement
35 W
230 × 28 × 152 mm / 9 × 1 × 6 pouces (l/h/p)
5 °C à 35 °C / 41 °F à 95 °F
Accessoires fournis
Consultez le manuel Aide-mémoire / Sécurité et support technique
(page40)
À propos du contrôle des exportations nationales
Ce produit peut être soumis à la législation nationale de contrôle des
exportations. Vous devez vous conformer entièrement aux exigences de
cette législation ou de toute autre loi applicable de toute juridiction en
relation avec ce produit.
Contrôle d'accès
Ce produit incorpore une technologie de contrôle d'accès. L'utilisation d'un
logiciel non conçu spécifiquement pour ce produit (excluant les
DVD-vidéos et CD audios) et des copies de logiciels conçus pour ce
produit est interdite par contrôle d'accès. Tout transfert, livraison,
affichage, exportation, importation ou transmission non autorisés de
programmes, périphériques ou toute modification du produit par des
programmes ou périphériques pour contourner la fonction de contrôle
d'accès est ou peut être interdit par la loi.
FR
Informations supplémentaires
Entrées/sorties à l'avant de la
console
Entrées/sorties à l'arrière de la
console
Port de manette (2)
Fente pour MEMORY CARD (carte mémoire)
(2)
Connecteur USB (2)
Connecteur NETWORK (réseau)
Prise ~AC IN
Connecteur AV MULTI OUT (sortie AV
multiple)
Connecteur DIGITAL OUT (OPTICAL)
Spécifications
79
Page 80

Acerca de la documentación de la consola PlayStation®2
La documentación de la consola PlayStation
• Referencia rápida / Seguridad y soporte técnico
Un manual incluido con la consola. Contiene información sobre cómo instalar y
realizar operaciones básicas en la consola, como también información de seguridad y
solución de problemas.
• Guía del usuario (Este documento)
Este documento (en formato PDF) se encuentra disponible desde una PC a través de
Internet y contiene información para realizar operaciones avanzadas en la consola,
especificaciones técnicas y otra información.
Puede descargar este documento desde la página de soporte del sitio Web de Sony
Computer Entertainment (http://www.us.playstation.com/Support/PS2).
®2 incluye lo siguiente:
Índice
Preparación
Introducción.................................................................................81
Denominación de las piezas......................................................... 81
Conexión a un televisor ............................................................... 82
Conexión de un equipo de audio digital ...................................... 84
Conexión del control....................................................................84
Conexión del cable de alimentación AC...................................... 85
Encendido y apagado de la consola .............................................86
Juegos
Cómo jugar a un juego.................................................................87
Uso de memory cards (tarjetas de memoria) ............................... 90
DVD
Reproducción de un DVD ............................................................94
Uso de los modos de reproducción...............................................98
Ajuste de la configuración del reproductor de DVD..................100
Menú principal
Visualización del menú principal...............................................107
Uso de la pantalla Navegador.....................................................107
Uso del menú Configuración del Sistema..................................108
Uso de la pantalla Versión..........................................................111
Redes
Redes ..........................................................................................114
Información adicional
Especificaciones.........................................................................117
80
CD audio
Reproducción de un CD audio..................................................... 92
Índice
Page 81
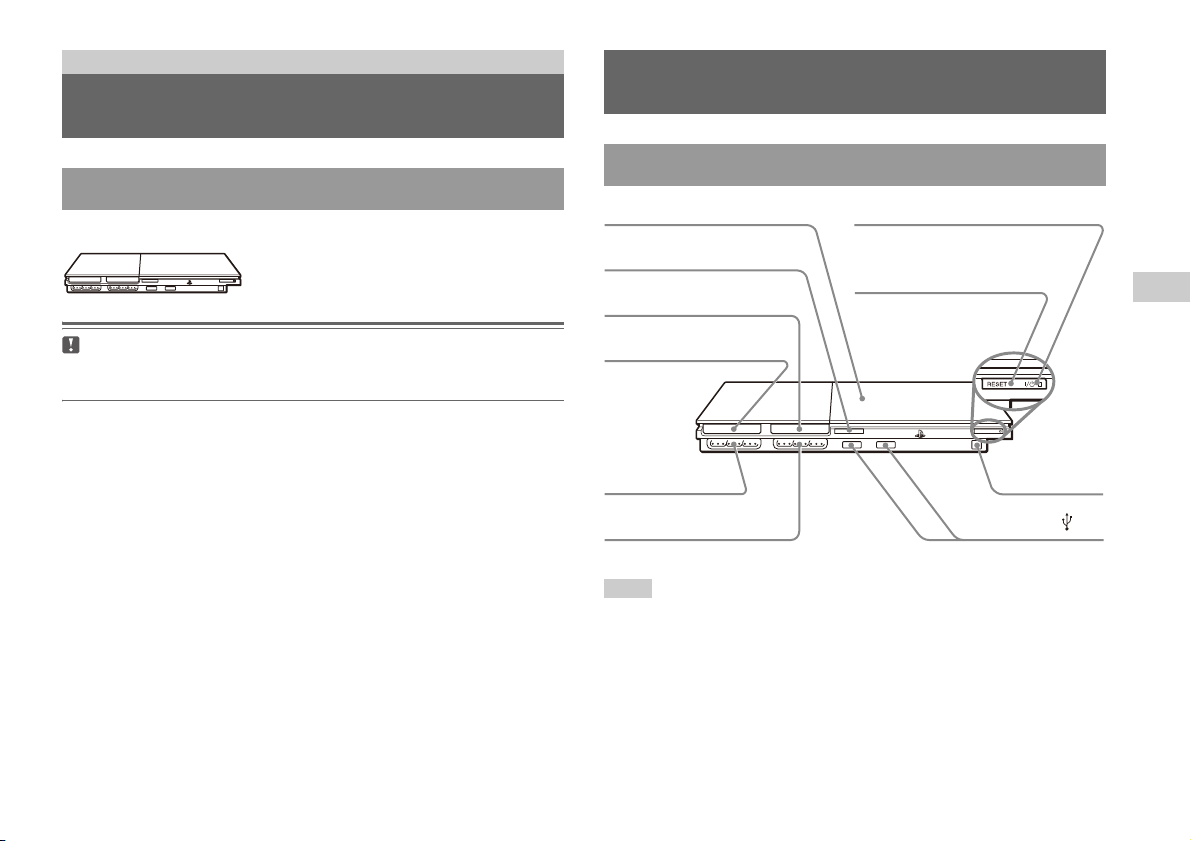
Preparación
1
Introducción
Colocación de la consola
Coloque la consola sólo en la posición horizontal.
MEMORY CARD MEMORY CARD
Precaución
No coloque la consola en lugares en los que pueda verse expuesta a campos
magnéticos, como los producidos por imanes o altavoces.
Denominación de las piezas
Parte frontal de la consola PlayStation®2
Cubierta del disco
Botón A (abrir)
Ranura para MEMORY CARD
(tarjeta de memoria) 2
Ranura para MEMORY
CARD (tarjeta de memoria) 1
MEMORY CARD MEMORY CARD
Puerto de control 1
Puerto de control 2
Indicador ]/
Botón ]/1 (encendido/espera)/
RESET (reinicio)
Nota
Puede conectar varios dispositivos USB a la consola PlayStation®2, pero no todos
son compatibles. Consulte las instrucciones suministradas con el dispositivo USB
para obtener más información.
(encendido/espera)
Receptor
infrarrojo
Conector USB
ES
Preparación
Introducción
81
Page 82

Parte trasera de la consola PlayStation®2
Rejilla de ventilación trasera
Conector de red
NETWORK
Conector ~AC IN
Conexión a un televisor
Antes de realizar la conexión
• No enchufe el cable de alimentación AC de la consola en una toma de
corriente eléctrica hasta que no haya realizado el resto de las conexiones.
• Compruebe que el televisor está apagado.
Conector AV MULTI OUT
Nota
Para conocer la denominación de los componentes del control analógico
(DUALSHOCK
(DUALSHOCK
Conexión a un televisor
82
Conector DIGITAL OUT
(OPTICAL)
®2), consulte la sección "Uso del control analógico
®2)" ( página 89).
Conexión a un televisor mediante el cable AV
suministrado
Conecte la consola al televisor de la forma que se indica a continuación.
Parte trasera de la consola
Entradas de audio y vídeo del televisor
L-AUDIO-RVIDEO
Blanco
RojoAmarillo
No utilice esta clavija
cuando conecte la
consola a un televisor
monofónico.
Cable AV
Al conector AV
MULTI OUT
Page 83

Precaución
Si visualiza una imagen fija en la pantalla de un televisor de plasma o
proyección* durante un período de tiempo prolongado, se puede producir una
"imagen eco". Ésta es una característica de este tipo de televisores. Las
imágenes estáticas, sin movimiento, como los menús de ajuste de la consola, los
menús de DVD o las imágenes pausadas, pueden dejar una imagen débil de
forma permanente en la pantalla del televisor si se dejan fijas durante mucho
tiempo. Consulte las instrucciones suministradas con su televisor para obtener
información detallada.
* Excepto los televisores de pantalla LCD
Nota
Al reproducir un DVD, conecte la consola directamente al televisor. Si la señal de
vídeo de la consola se transmite a través de un VCR al televisor, es posible que la
protección contra copias en algunos DVD afecte la calidad de la imagen.
Al usar un cable distinto del Cable AV
suministrado
La calidad de la imagen varía según el tipo de cable utilizado. Utilice la
siguiente información para determinar el mejor método de conexión.
Si utiliza un cable distinto del Cable AV suministrado, consulte las
instrucciones que acompañan al cable.
Televisor Tipo de cable
Un televisor con entradas S VIDEO Cable S VIDEO (SCPH-10480 U)
Un televisor sin entradas de vídeo Adaptador RFU (SCPH-10071)
Un televisor con conectores de entrada
de vídeo en componentes
Cable AV por componentes
(SCPH-10490 U)
Escala de calidad de la imagen
x Adaptador RFU x Cable AV (suministrado) x Cable S VIDEO x Cable AV por componentes
Esta escala sirve sólo de referencia. La calidad de la imagen puede variar
según el producto o el estado de su televisor.
Alta calidad
Notas
• Para utilizar el barrido progresivo, debe disponer de un televisor y software que
admita el barrido prog resivo (480 p) y debe realizar la conexión con el tipo de cable
adecuado*. También debe comprobar que los ajustes de la consola sean correctos.
Para obtener información detallada, consulte "Modo progresivo" en "Ajuste de las
opciones de visualización del televisor" ( página 102).
* El cable AV por componentes (vendido por separado) es compatible con el
barrido progresivo.
• Este producto es compatible con el uso de entradas de vídeo de componentes
(Y C
B/PB CR/PR), pero no se puede usar con entradas en formato HDTV (Y PB
R). Consulte las instrucciones suministradas con el televisor para obtener detalles.
P
• Para obtener información sobre métodos de conexión a un televisor que no
aparecen en este manual, póngase en contacto con el Servicio de atención al cliente
de SCEA a través de nuestro sitio Web http://www.us.playstation.com o llame al
1-800-345-7669.
ES
Preparación
Conexión a un televisor
83
Page 84

Conexión de un equipo de audio
MEMORY CARD
digital
Mediante un cable digital óptico disponible en el mercado para conectar el
equipo de audio digital, puede disfrutar de sonido surround como si
estuviera en una sala de cine o de conciertos. Para conectar la consola al
equipo de audio con conectores digitales, consulte las instrucciones que
acompañan al dispositivo que va a conectar.
Parte trasera de la consola
Dispositivo conectado
DIGITAL IN
OPTICAL
Conexión del control
1 Inserte el control analógico (DUALSHOCK®2) en un puerto de
control de la consola.
Parte frontal de la consola
MEMORY CARD MEMORY CARD
Control analógico
(DUALSHOCK
®2)
Cable digital óptico disponible
en el mercado
Notas
• La conexión de la consola a un equipo de audio mediante un cable digital óptico
puede afectar a la salida de audio de determinados títulos de software de formato
PlayStation
un cable como el cable AV suministrado y conéctelo al conector AV MULTI OUT
de la consola. No utilice ningún cable digital óptico.
• Tras conectar el equipo de audio digital, ajuste "DIGITAL OUT (OPTICAL)" en
"Activado" en el menú Configuración del Sistema. Para obtener información
detallada, consulte "DIGITAL OUT (OPTICAL)" ( página 109).
Conexión de un equipo de audio digital
84
®2 y es posible que no se emita ningún sonido. Si ocurre esto, utilice
Nota
Algunos títulos de software recomiendan el uso de un puerto de control específico.
Consulte las instrucciones que acompañan al software para obtener información
detallada.
Page 85

Conexión del cable de
alimentación AC
Advertencias
• La toma de corriente debe estar instalada cerca de los aparatos y debe ser
accesible.
• No enchufe el cable de alimentación AC de la consola en una toma de
corriente eléctrica hasta que no haya realizado el resto de las conexiones.
1 Conecte el cable de alimentación AC al conector ~ AC IN en
la parte trasera de la consola.
Parte trasera de la consola
Conector ~AC IN
2 Enchufe el cable de alimentación AC a la toma de corriente
eléctrica.
Parte trasera de la consola
Cable de alimentación AC
A la toma de corriente eléctrica
ES
Preparación
El indicador =/1 (encendido/espera) de la parte frontal de la consola
se iluminará en rojo para indicar que la consola se encuentra en el
modo de espera.
Indicador ]/1
Parte frontal de la consola
Cable de alimentación AC
MEMORY CARD MEMORY CARD
Conexión del cable de alimentación AC
85
Page 86

Encendido y apagado de la
consola
Antes de encender la consola
No encienda la consola hasta que no haya completado estos pasos.
Consulte las instrucciones suministradas con su televisor para obtener
información detallada.
• Encienda el televisor.
• Cambie el ajuste del televisor para visualizar la salida de la línea a la que
está conectada la consola.
Notas
• La primera vez que encienda la consola después de comprarla, aparecerán varias
pantallas en las que podrá ajustar el "Idioma", la "Zona horaria" y el "Horario de
verano". Siga las instrucciones en pantalla para completar los ajustes.
• Si conecta la consola a un televisor panorámico, ajuste la opción "Tamaño de la
Pantalla" en el menú Configuración del Sistema ( página 109).
Apagado de la consola
1 Pulse y mantenga pulsado el botón =/1/RESET (reinicio) de la
parte frontal de la consola durante por lo menos un segundo.
El indicador =/1 se iluminará en rojo para indicar que la consola ha
entrado en el modo de espera.
Botón =/1/RESET (reinicio)
Encendido de la consola
1 Compruebe que el indicador =/1 (encendido/espera) de la
parte frontal de la consola está encendido en rojo.
2 Pulse el botón =/1 (encendido/espera)/RESET (reinicio) de la
parte frontal de la consola.
El indicador =/1 de la parte frontal de la consola se iluminará en verde
y la salida de la consola se mostrará en el televisor.
Parte frontal de la consola
MEMORY CARD MEMORY CARD
Encendido y apagado de la consola
86
Botón =/1/RESET (reinicio)
Indicador =/1
Parte frontal de la consola
MEMORY CARD MEMORY CARD
Advertencia
La consola no está totalmente apagada cuando se encuentra en el modo de
espera. Si no tiene pensado utilizar la consola durante un período de tiempo
prolongado, desenchufe el cable de alimentación AC de la toma de corriente
eléctrica.
Indicador =/1
Page 87

Juegos
Cómo jugar a un juego
Cubierta del disco
MEMORY CARD MEMORY CARD
Botón =/1/RESET (reinicio)Botón A (abrir)
Antes de jugar a un juego Inicio del juego
Inserte el disco en la consola con la cara de
la etiqueta hacia arriba.
Coloque el disco de modo que las tres
etiquetas queden en la parte superior.
ES
Juegos
Compruebe que las conexiones con el televisor y el equipo de audio son
correctas y que se han seguido todas las precauciones.
• "Precauciones" en el manual Referencia rápida / Seguridad y soporte
técnico ( página 80)
• "Conexión a un televisor" ( página 82)
• "Conexión del control" ( página 84)
• "Conexión del cable de alimentación AC" ( página 85)
Nota
Para jugar en línea, debe conectarse primero a una red y configurarla. Consulte
"Conexión a una red" ( página 114) para obtener información detallada.
1 Encienda la consola ( página 86).
Aparecerá el menú principal ( página 107).
2 Pulse el botón A (abrir) situado en la parte frontal de la
consola.
Se abrirá la cubierta del disco.
3 Coloque el disco en la consola.
Coloque el disco en el soporte correspondiente con la cara de la
etiqueta hacia arriba.
Cómo jugar a un juego
87
Page 88

4 Cierre la cubierta del disco.
Tras cerrar la cubierta del disco, el juego se iniciará.
MEMORY CARD MEMORY CARD
Notas
• También puede iniciar un juego desde la pantalla Navegador ( página 107).
• Si enciende la consola después de insertar un disco, el juego se iniciará
automáticamente.
Para reiniciar un juego
Pulse el botón \/1 (encendido/espera)/RESET (reinicio) de la parte frontal
de la consola. Tenga cuidado de no pulsar el botón @/1/RESET (reinicio)
accidentalmente mientras juega, ya que el juego se reiniciará.
2 Extraiga el disco.
Presione la parte negra central del soporte del disco y levante el disco
por los bordes.
MEMORY CARD MEMORY CARD
Presione la parte negra
central del soporte del disco.
3 Cierre la cubierta del disco.
4 Pulse el botón =/1/RESET (reinicio).
Aparecerá el menú principal ( página 107).
Cambio de juego
Finalización del juego
Precaución
Antes de extraer un disco, compruebe que éste se ha detenido por completo. No
toque el disco si éste está girando, ya que podría ocasionarle alguna lesión,
dañar el disco o provocar fallos en la consola.
1 Pulse el botón A de la parte frontal de la consola.
Cómo jugar a un juego
88
1 Abra la cubierta del disco y extraiga el disco.
Para extraer un disco, presione la parte negra central del soporte del
disco y levante el disco por los bordes.
2 Inserte un disco nuevo.
3 Cierre la cubierta del disco y reinicie la consola.
El nuevo juego se iniciará.
Nota
No es necesario apagar la consola para cambiar de juego.
Page 89
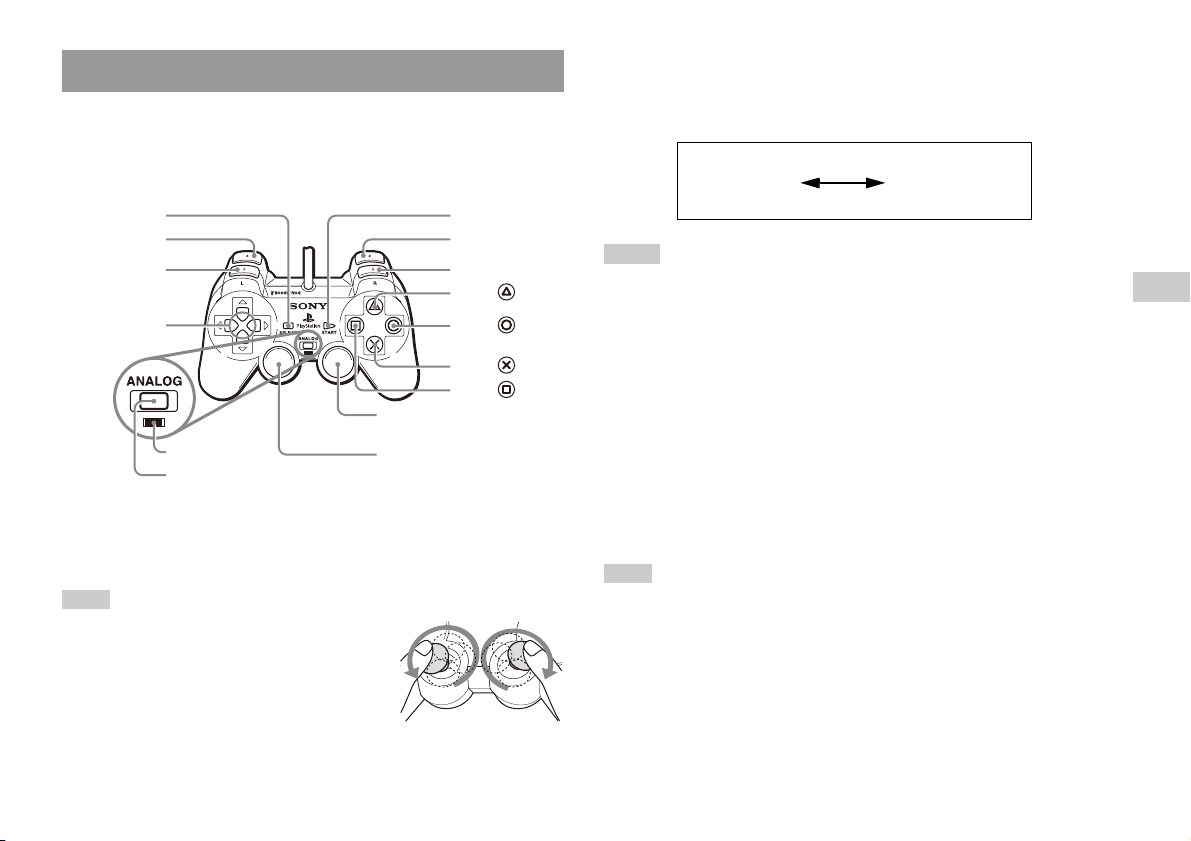
Uso del control analógico (DUALSHOCK®2)
El control analógico (DUALSHOCK®2) está equipado con una función de
botón sensible a la presión. También presenta una función de vibración.
Denominación de las piezas
Botón SELECT
(selección)
Botón L2
Botón L1
Botones de
dirección
Joystick analógico derecho/
Indicador de
modo
Botón modo ANALOG
(analógico)
* Los joysticks analógico izquierdo y derecho, o los botones L3 y R3, sólo
funcionan en el modo analógico (indicador: rojo).
* Los botones L3 y R3 se activan al pulsar los joysticks analógicos.
Botón R3*
Joystick analógico
izquierdo/Botón L3*
Nota
Antes de utilizar el control analógico
(DUALSHOCK
girar una vez los joysticks analógicos izquierdo y
derecho con los pulgares. No retuerza los joysticks,
sino hágalos girar como si dibujara un círculo, tal y
como se muestra en el diagrama.
®2), con la consola encendida, haga
Botón START
(inicio)
Botón R2
Botón R1
Botón
Botón
Botón
Botón
Acerca del cambio de modo
El botón modo ANALOG (analógico) permite alternar entre los dos
modos. Cambie al modo que desee. No obstante, debe tener en cuenta que
algunos títulos de juego pueden realizar este ajuste automáticamente.
Modo digital
(indicador:
apagado)
Modo analógico
(indicador: rojo).
Notas
• Cuando utilice el control analógico en el modo digital, los joysticks analógicos
izquierdo y derecho no funcionarán. Asimismo, se desactivará la función de botón
sensible a la presión.
• Dependiendo del software, es posible que no pueda cambiar de modo aunque pulse
el botón modo ANALOG (analógico).
Al utilizar el modo analógico
• Al jugar un título de software de formato PlayStation®2, los joysticks
analógicos izquierdo y derecho/botones L3 y R3 están activos y todos los
botones cuentan con la función de botón sensible a presión salvo los
botones SELECT (seleccionar), START (inicio), L3 y R3.
• Al jugar un título de software de formato PlayStation
®, los joysticks
analógicos izquierdo y derecho están activos.
Nota
Según el software, los botones que se pueden utilizar en el modo analógico pueden
estar limitados. Consulte las instrucciones que acompañan al software para obtener
información detallada.
ES
Juegos
Cómo jugar a un juego
89
Page 90
Acerca de la función de vibración
La función de vibración puede ajustarse en "Activada" o "Desactivada" en
el menú de opciones del software.
Notas
• Antes de usar la función de vibración, lea la sección "Notas sobre seguridad al
utilizar el control analógico (DUALSHOCK
Seguridad y soporte técnico ( página 80).
• Dependiendo del software, la función de vibración puede estar ajustada
automáticamente en "Activada".
• Cuando no utilice el control analógico (DUALSHOCK
desconecte el control. La vibración puede hacer que el control se mueva o se caiga
de forma inesperada.
®2)" en el manual Referencia rápida /
®2), apague la consola o
Uso de memory cards (tarjetas de
memoria)
Puede guardar y cargar datos de juego utilizando una memory card (tarjeta
de memoria) (vendida por separado). También puede borrar datos de juego
o copiar datos de juego de una memory card (tarjeta de memoria) a otra.
Acerca de los tipos de memory card (tarjeta de
memoria)
Acerca del uso del control analógico
(DUALSHOCK®) (SCPH-110 U)
Puede usar el control analógico (DUALSHOCK®) (SCPH-110 U) con la
consola PlayStation
analógico pueden ser distintas de las del control analógico
(DUALSHOCK®2). En el modo analógico sólo se pueden utilizar los
joysticks analógicos izquierdo y derecho.
Uso de memory cards (tarjetas de memoria)
90
®2, pero las funciones de los botones en el modo
Existen dos tipos de memory card (tarjeta de memoria). Seleccione una
memory card (tarjeta de memoria) adecuada para el software que está
utilizando.
Tipo de memory card (tarjeta
de memoria)
Memory card (tarjeta de
memoria) (8MB) (para
PlayStation
Memory card (tarjeta de
memoria) (SCPH-1020 U)*
* Este producto ya no se fabrica.
®2) (SCPH-10020 U)
Software
compatible
Software de formato
PlayStation
Software de formato
PlayStation
®2
®
Cantidad de memoria
Aprox. 8 MB
15 bloques de memoria
(aprox. 120 KB)
MagicGate™ es una tecnología de protección de los derechos de autor,
desarrollada por Sony Corporation.
Page 91
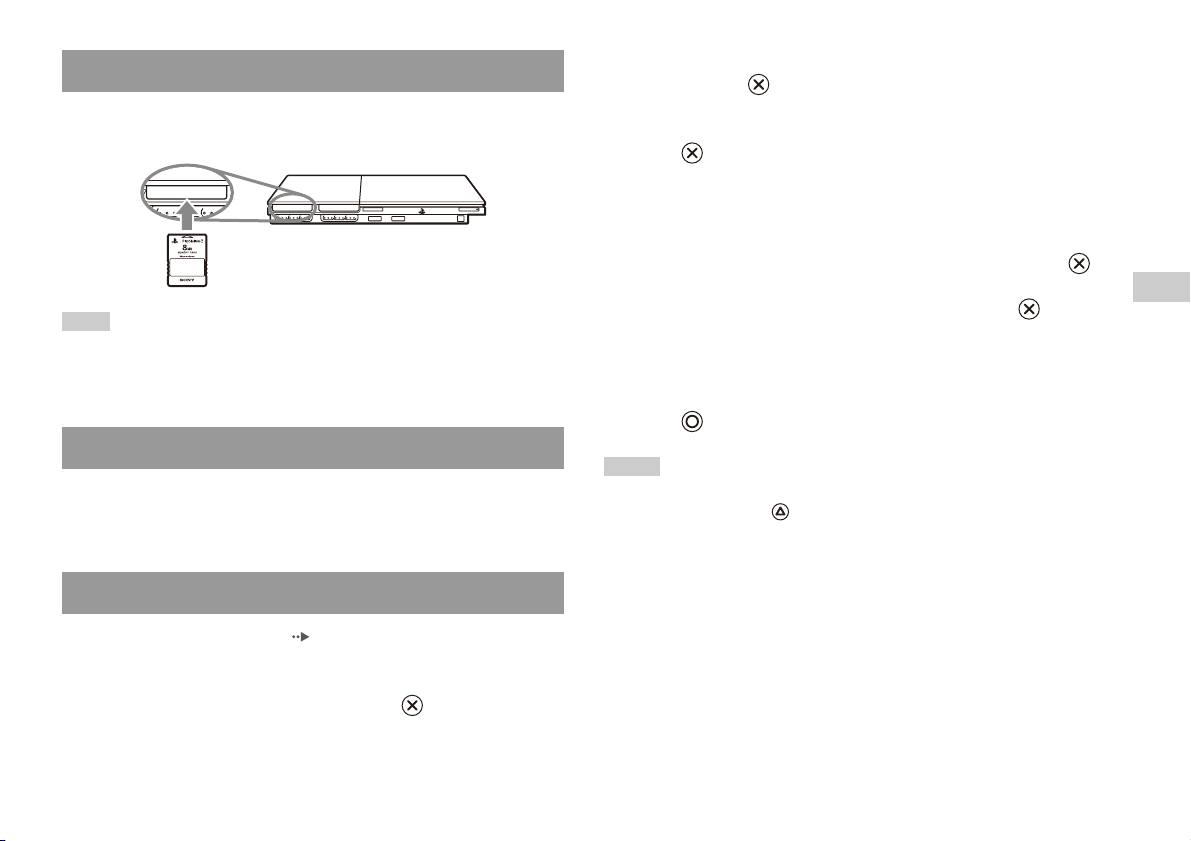
Inserción de la memory card (tarjeta de memoria)
MEMORY CARD
Inserte la memory card (tarjeta de memoria) en una ranura para MEMORY
CARD (tarjeta de memoria) de la parte frontal de la consola.
Parte frontal de la consola
MEMORY CARD MEMORY CARD
Nota
Algunos títulos de software requieren el uso de una ranura para MEMORY CARD
(tarjeta de memoria) específica. Consulte las instrucciones que acompañan al
software para obtener información detallada.
Cómo guardar o cargar datos de juego
Según el software, el procedimiento para guardar o cargar datos puede
variar. Consulte las instrucciones que acompañan al software para obtener
información detallada.
Cómo copiar o borrar datos de juego
1 En la pantalla Navegador ( página 107), utilice los botones
de dirección para seleccionar el icono de la memory card
(tarjeta de memoria) que desea utilizar para copiar o borrar
datos y, a continuación, pulse el botón .
2 Seleccione el icono de los datos que desea copiar o borrar y
pulse el botón .
3 Seleccione "Copiar" o "Eliminar" y, a continuación, pulse el
botón .
Cuando copie datos del juego, compruebe que hay dos memory cards
(tarjetas de memoria) insertadas en la consola. Si ha seleccionado
"Eliminar", avance hasta el paso 5.
4 Seleccione el destino y, a continuación, pulse el botón .
5 Seleccione "Sí" y, a continuación, pulse el botón .
Mientras se copian o se borran los datos, no extraiga la memory card
(tarjeta de memoria).
6 Una vez completado el proceso de copia o borrado, pulse el
botón .
Notas
• Para ver información sobre un elemento de datos de juego, seleccione el icono de
los datos y pulse el botón para consultar los detalles.
• Compatibilidad entre software y memory cards (tarjetas de memoria):
– No se puede guardar o c opiar software de formato PlayStation
card (tarjeta de memoria) (SCPH-1020 U).
– No se pueden guardar datos de juego de formato PlayStation
card (tarjeta de memoria) (8MB) (para PlayStation
pueden copiar datos de juego de formato PlayStation
(tarjeta de memoria) (SCPH-1020 U) en una memory card (tarjeta de memoria)
(8MB) (para PlayStation
datos de juego no se pueden cargar directamente desde una memory card (tarjeta
de memoria) (8MB) (para PlayStation
®2) con fines de almacenamiento. Recuerde que estos
®2).
®2). Sin embargo, sí se
®2 en una memory
® en una memory
® de una memory card
ES
Juegos
Uso de memory cards (tarjetas de memoria)
91
Page 92

CD audio
Reproducción de un CD audio
Reproducción de un CD
1 Encienda la consola e inserte el disco ( página 87).
Siga los pasos 1 a 4 de la sección "Inicio del juego".
Se muestran los números de pista.
2 Utilice los botones de dirección para seleccionar el número
de pista que desea reproducir y, a continuación, pulse el
botón .
Se inicia la reproducción.
Notas
• Si enciende la consola después de insertar un disco, los números de pista se
mostrarán automáticamente.
• También puede iniciar la reproducción desde la pantalla Navegador
( página 107).
Utilización del reproductor de CD durante la
reproducción
Utilice los botones de dirección para seleccionar el icono de la pista que
desea reproducir y, a continuación, pulse el botón .
Icono (botón*) Función
. (botón L1) Ir al principio de la pista actual o anterior
m (botón L2) Retroceso rápido
M (botón R2) Avance rápido
> (botón R1) Ir al principio de la pista siguiente
N (botón START
(inicio))
X (botón START
(inicio))
x (botón SELECT
(selección))
* Puede activar las opciones directamente pulsando los botones del control
analógico (DUALSHOCK
Iniciar la reproducción
Pausar la reproducción
Detener la reproducción
®2) que se muestran en paréntesis.
Precaución
Para reproducir un CD audio grabado en formato DTS, debe conectar un
dispositivo con un decodificador DTS al conector DIGITAL OUT (OPTICAL)
( página 84). Tenga en cuenta que es posible que se emita un ruido
extremadamente fuerte si el dispositivo no tiene un decodificador DTS o si está
conectado al conector AV MULTI OUT.
Reproducción de un CD audio
92
Nota
También puede utilizar el control remoto de DVD (para PlayStation®2) (vendido por
separado).
Page 93
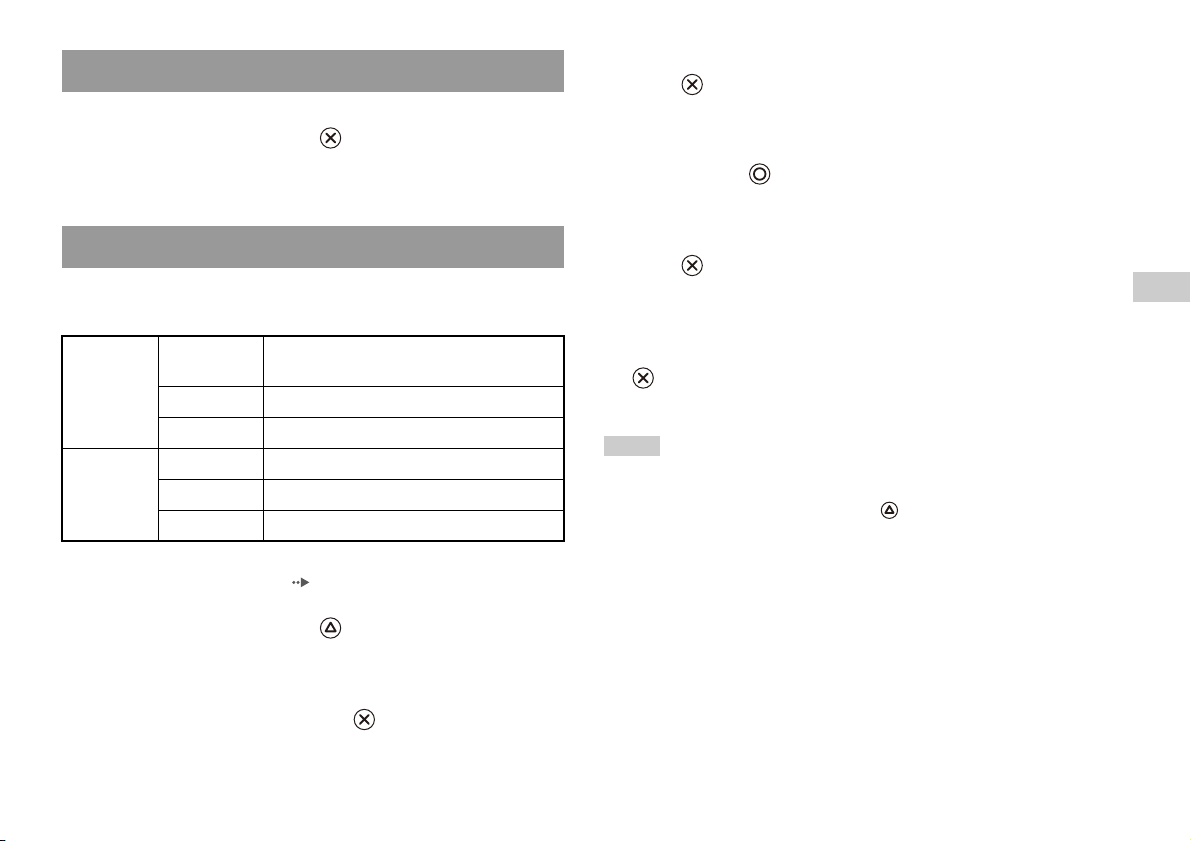
Finalización de la reproducción de un CD audio
1 Utilice los botones de dirección para seleccionar x y, a
continuación, pulse el botón .
La reproducción se detiene. Pulse el botón A (abrir) situado en la parte
frontal de la consola para extraer el disco.
3 Seleccione el ajuste deseado y, a continuación, pulse el
botón .
Si selecciona "Programada", se mostrará la pantalla para especificar el
orden de las pistas. Seleccione las pistas que desea reproducir.
4 Pulse el botón .
Aparecerá la pantalla Navegador.
Reproducción en diversos modos
Puede ajustar las opciones "Modo de Reproducción" y "Modo de
Repetición".
Modo de
Reproducción
Modo de
Repetición
Normal Reproduce las pistas tal y como están grabadas
en el CD
Programada Reproduce las pistas en un orden específico
Aleatoria Reproduce las pistas en orden aleatorio
Desactivado No reproduce el CD varias veces
Todas Reproduce todas las pistas repetidamente
1 Reproduce una pista repetidamente
1 En la pantalla Navegador ( página 107), utilice los botones
de dirección para seleccionar el icono del CD audio y, a
continuación, pulse el botón .
Se muestra la pantalla Opciones de Reproducción.
2 Seleccione "Modo de Reproducción" o "Modo de Repetición"
y, a continuación, pulse el botón .
5 Seleccione el icono del CD audio y, a continuación, pulse el
botón .
Se muestran los números de pista y la opción de ajuste aparece en la
parte inferior izquierda de la pantalla.
6 Seleccione la pista deseada y, a continuación, pulse el botón
.
Se inicia la reproducción.
Notas
• También puede acceder a la pantalla Opciones de Reproducción desde la pantalla
que muestra las pistas seleccionando el icono CD audio en la esquina superior
izquierda de la pantalla y pulsando el botón .
• Puede ajustar las opciones "Modo de Reproducción" y "Modo de Repetición" al
mismo tiempo.
Reproducción de un CD audio
ES
CD audio
93
Page 94
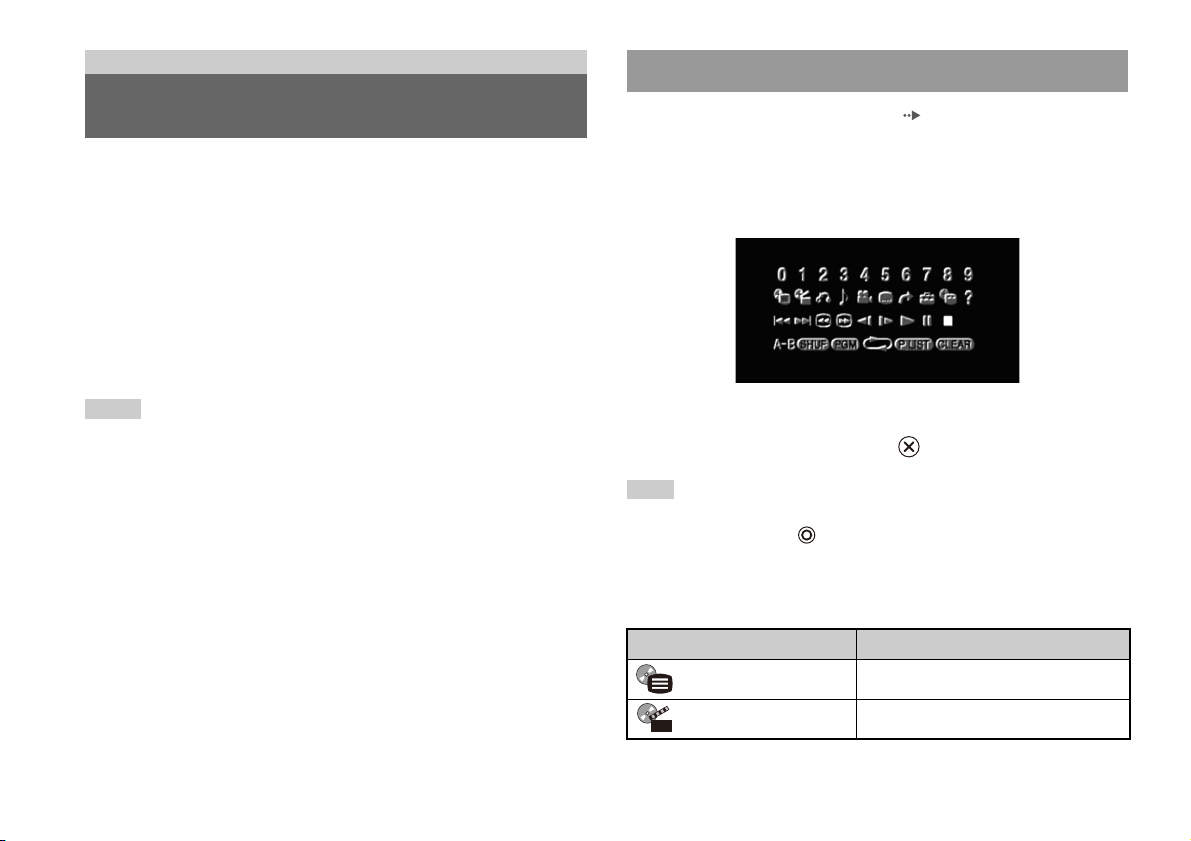
DVD
Uso del Panel de control
Reproducción de un DVD
Puede utilizar el reproductor de DVD mediante uno de los siguientes
métodos.
• Mediante el Panel de control que aparece en la pantalla
• Mediante el control analógico (DUALSHOCK
• Mediante el control remoto de DVD (para PlayStation
separado)
En las siguientes instrucciones se asume el uso del Panel de control para
utilizar el reproductor de DVD. Algunas operaciones pueden ser distintas
según el método utilizado.
Notas
• Para obtener información detallada sobre las características disponibles en un
DVD, consulte las instrucciones que acompañan a dicho DVD.
• En algunos casos, es posible que ciertos DVD no funcionen correctamente con la
consola PlayStation
fabricación o a la codificación del software del vídeo DVD. Si tiene problemas,
pruebe a reiniciar el DVD. Si los problemas persisten, póngase en contacto con el
editor del DVD o póngase en contacto con el Servicio de atención al cliente de
SCEA a través de nuestro sitio Web http://www.us.playstation.com o llame al 1800-345-7669.
®2. Esto se debe principalmente a variaciones en el proceso de
®2)
®2) (vendido por
1 Inicie la reproducción del DVD ( página 96).
2 Pulse el botón SELECT (selección).
Aparecerá el Panel de control. Si vuelve a pulsar el botón SELECT
(selección), se cambiará la posición de la presentación en la pantalla.
3 Utilice los botones de dirección para seleccionar un icono y,
a continuación, pulse el botón .
Nota
Para desactivar el Panel de control, pulse el botón SELECT (selección) (una o dos
veces) o bien pulse el botón .
Lista de elementos del Panel de control
Desde el Panel de control puede acceder a las siguientes opciones.
Icono Función
Menú Muestra el menú del vídeo DVD
Reproducción de un DVD
94
Menú de títulos Muestra el menú del vídeo DVD
Page 95
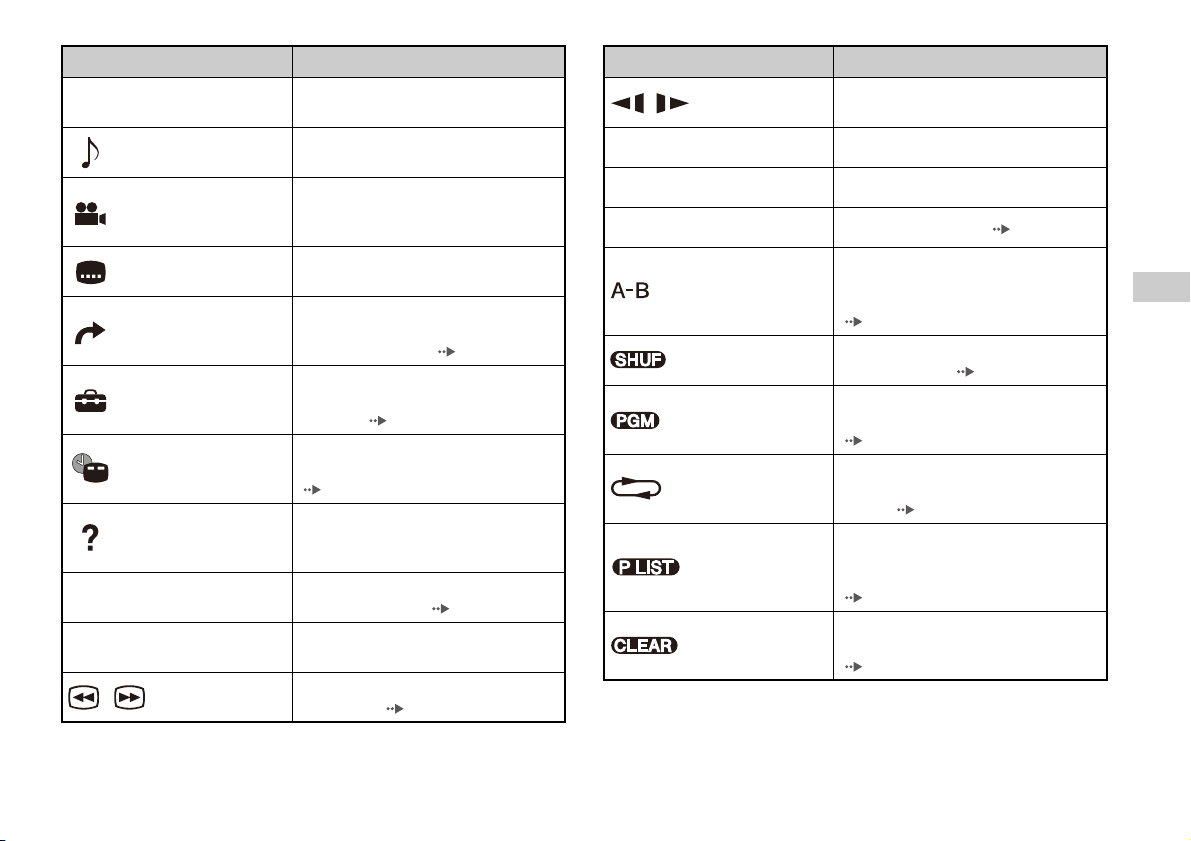
Icono Función
O
0~9
./>
/ Búsqueda
Volver
Opciones de audio
Opciones de
ángulo
Opciones de
subtítulos
Ir a
Ajustar
Presentación del
tiempo
Ayuda
Ir al capítulo
Anterior/
Siguiente
Vuelve a la pantalla seleccionada
anteriormente dentro del menú del DVD
Muestra y cambia las opciones de audio en
los DVD con múltiples pistas de audio
Muestra y cambia los ángulos de visión en
DVD grabados con opciones de múltiples
ángulos
Muestra y cambia las opciones de subtítulos
en DVD con opciones de subtítulos
Permite avanzar al título o capítulo
seleccionado, o al tiempo especificado, e
inicia la reproducción ( página 96)
Muestra y cambia las opciones de idioma,
calidad de imagen, nivel de Control Paterno,
audio, etc. ( página 100)
Muestra el número del título o capítulo
actual, el tiempo transcurrido, etc.
(página97)
Muestra las funciones de los botones de
acceso directo del control analógico
(DUALSHOCK
Permite introducir el número del capítulo
que desee reproducir ( página 96)
Regresa/avanza hasta el principio del
capítulo actual, anterior o siguiente
Retrocede/avanza rápidamente la
reproducción ( página 97)
®2)
Icono Función
/ Cámara lenta
N
X
x
Reproducir Inicia la reproducción
Pausa Hace una pausa en la reproducción
Parar Detiene la reproducción ( página 96)
Repetición A-B
Reproducción
Aleatoria
Reproducción
Programada
Reproducción
Repetida
Original/Play List
Borrar
Cambia a la reproducción/reproducción
hacia atrás a cámara lenta
Especifica una escena para su reproducción
e inicia la reproducción en el punto de la
escena que se ha establecido
(página100)
Inicia la reproducción de títulos o capítulos
en orden aleatorio ( página 99)
Inicia la reproducción de títulos o capítulos
en una secuencia programada
(página98)
Selecciona la reproducción repetida de
todos los títulos del disco, o de un título o
capítulo ( página 99)
Para discos DVD-RW (modo VR),
selecciona el contenido de Original o el de
la lista Play List que desea reproducir
(página98)
Borra los números o cancela los modos de
reproducción seleccionados
( página 100)
ES
DVD
Reproducción de un DVD
95
Page 96

Notas
• Puede usar " " para consultar las opciones a las que puede acceder directamente
pulsando los botones del control analógico. Para acceder a las opciones
directamente mediante el control, debe cerrar el Panel de control para que
desaparezca de la pantalla.
• Según el modo de reproducción, es posible que algunas opciones no estén
disponibles o no se puedan ajustar.
Reproducción de un DVD
1 Encienda la consola e inserte un disco ( página 87).
Siga los pasos 1 a 4 de la sección "Inicio del juego". Se inicia la
reproducción.
Reproducción de un DVD desde el último punto
de detención (Reanudación de la reproducción)
1 Durante la reproducción, seleccione x en el Panel de control
( página 94) y, a continuación, pulse el botón .
2 Seleccione N y, a continuación, pulse el botón .
Se inicia la reproducción desde el punto en el que detuvo el disco en el
paso 1.
Para cancelar la Reanudación de la reproducción
Tras el paso 1, seleccione x y, a continuación, pulse el botón .
Notas
• Si enciende la consola después de insertar un disco, la reproducción se iniciará
automáticamente.
• También puede iniciar la reproducción desde la pantalla Navegador
( página 107).
Finalización de la reproducción de un DVD x
1 Durante la reproducción, seleccione x en el Panel de control
( página 94) y, a continuación, pulse el botón .
La reproducción se detiene. Pulse el botón A (abrir) situado en la parte
frontal de la consola y, a continuación, extraiga el disco.
Reproducción de un DVD
96
Selección de una escena específica para la
reproducción
Selección de una escena por el número de capítulo
1 Durante la reproducción, seleccione el número de capítulo
que desee en el Panel de control ( página 94) y, a
continuación, pulse el botón .
Se inicia la reproducción del capítulo seleccionado. Si desea
reproducir un capítulo con un número de un solo dígito (es decir, 1-9),
introduzca un cero delante. Por ejemplo, introduzca "01".
Selección de una escena por el número de título, el número
de capítulo o especificando el tiempo
1 Durante la reproducción, seleccione en el Panel de
control ( página 94) y, a continuación, pulse el botón .
Page 97

2 Seleccione un elemento y pulse el botón .
Título Especifica el número de título
Capítulo Especifica el número de capítulo
C XX:XX:XX
(o T XX:XX:XX)
Especifica el tiempo transcurrido del capítulo
(o título)
3 Seleccione los números de la escena deseada y, a
continuación, pulse el botón .
Se inicia la reproducción del capítulo seleccionado.
2 Suelte el botón cuando llegue al punto que está
buscando.
La reproducción vuelve a la velocidad normal.
Nota
Para utilizar el control analógico para la Búsqueda durante la reproducción, pulse y
mantenga pulsado el botón L2 o R2 para iniciar la búsqueda. Utilice los botones de
dirección para cambiar la velocidad. Suelte el botón L2 o R2 cuando llegue al punto
que está buscando.
Visualización de la información de reproducción
ES
DVD
Búsqueda de un punto concreto en un DVD
(Búsqueda)
Puede buscar hacia delante o hacia atrás para localizar rápidamente un
punto concreto en un DVD.
1 Durante la reproducción, seleccione o en el Panel de
control ( página 94) y, a continuación, pulse y mantenga
pulsado el botón .
La velocidad de búsqueda cambia de la forma que se indica a
continuación cuando se pulsa el botón de dirección hacia arriba o hacia
abajo mientras se mantiene pulsado el botón .
• Búsqueda 3
• Búsqueda 2
• Búsqueda 1
• Cámara lenta
Puede visualizar información como el número de título actual o el tiempo
transcurrido.
1 Durante la reproducción, seleccione en el Panel de
control ( página 94) y, a continuación, pulse el botón .
La presentación cambia de la forma que se indica a continuación cada
vez que se pulsa el botón .
Título X Capítulo X Número de título y número de capítulo
Título X Capítulo X C XX:XX:XX Tiempo transcurrido del capítulo actual
Título X Capítulo X C - XX:XX:XX Tiempo restante del capítulo actual
Título X Capítulo X T XX:XX:XX Tiempo transcurrido del título actual
Título X Capítulo X T - XX:XX:XX Tiempo restante del título actual
(Desactivada)
Reproducción de un DVD
97
Page 98

Selección de Original o Play List para la
reproducción de DVD-RW
Cuando utilice un disco DVD-RW (modo VR), puede seleccionar el tipo
de títulos que desea reproducir.
1 Cuando la reproducción se haya detenido, seleccione
en el Panel de control ( página 94) y, a
continuación, pulse el botón .
Cada vez que pulse el botón , se seleccionará Original y Play List
de forma alternativa.
Original Reproduce el contenido en la secuencia grabada
originalmente
Play List Reproduce contenido editado. Play List es la opción
predeterminada.
Uso de los modos de
reproducción
Mediante los distintos modos de reproducción, puede reproducir títulos o
capítulos en el orden que desee o repetir la reproducción de una escena
específica. Existen cuatro modos de reproducción:
• Reproducción Programada ( página 98)
• Reproducción Aleatoria ( página 99)
• Reproducción Repetida ( página 99)
• Repetición A-B ( página 100)
En las siguientes instrucciones se asume el uso del Panel de control
( página 94) para utilizar el reproductor de DVD.
Notas
• La reproducción a cámara lenta hacia atrás no está disponible para discos DVDRW (modo VR).
• No se puede usar esta función con la función de Reanudación de la reproducción.
Cancele la función de Reanudación de la reproducción ( página 96) antes de
seleccionar esta función.
Uso de los modos de reproducción
98
Notas
• Puede combinar las opciones de Reproducción Programada, Aleatoria y Repetida.
Sin embargo, puede que algunas opciones de Reproducción Aleatoria o Repetida
no estén disponibles según la combinación.
• La consola PlayStation
en el software DVD.
®2 reproduce el contenido del disco tal y como fue grabado
Reproducción Programada
Puede crear programas para reproducir títulos o capítulos en cualquier
orden.
1 Durante la reproducción, seleccione en el Panel de
control ( página 94) y, a continuación, pulse el botón .
Page 99

2 Seleccione un número de programa y, a continuación, pulse
el botón .
Si no se ha determinado ningún programa, la única opción será "1.
Título".
3 Seleccione el número de título y, a continuación, pulse el
botón .
4 Seleccione el número de capítulo y, a continuación, pulse el
botón .
Para reproducir todos los capítulos, seleccione "Todo". Repita los
pasos 2 a 4 para ajustar otros títulos o capítulos.
5 Pulse el botón START (inicio).
Se inicia la Reproducción Programada.
Nota
El ajuste no se borrará tras finalizar la Reproducción Programada.
Selección aleatoria de títulos Reproduce los títulos en orden aleatorio
Selección aleatoria de
capítulos
Selección aleatoria desactivada Cancela la Reproducción Aleatoria
Reproduce los capítulos en orden aleatorio
2 Seleccione N y, a continuación, pulse el botón .
Reproducción Repetida
Puede ajustar esta opción para que reproduzca títulos o capítulos
repetidamente.
1 Seleccione en el Panel de control ( página 94) y, a
continuación, pulse el botón .
La presentación cambia de la forma que se indica a continuación cada
vez que se pulsa el botón .
ES
DVD
Reproducción Aleatoria
Puede ajustar esta opción para que se reproduzcan aleatoriamente todos los
títulos o capítulos grabados en un disco. El orden de reproducción
cambiará cada vez que se utilice la Reproducción Aleatoria.
1 Seleccione en el Panel de control ( página 94) y, a
continuación, pulse el botón .
La presentación cambia de la forma que se indica a continuación cada
vez que se pulsa el botón .
Repetir disco Repite la reproducción de todos los títulos
Repetir título Repite la reproducción de un título
Repetir capítulo Repite la reproducción de un capítulo
Repetición desactivada Cancela la Reproducción Repetida
2 Seleccione N y, a continuación, pulse el botón .
Uso de los modos de reproducción
99
Page 100
Repetición A-B
Puede determinar una escena específica para que se reproduzca
repetidamente.
Ajuste de la configuración del
reproductor de DVD
1 Durante la reproducción, seleccione en el Panel de
control ( página 94) y, a continuación, pulse el botón
en el punto en el que desea iniciar la reproducción repetida.
Se establece el punto de partida (punto A).
2 Pulse el botón en el punto en el que desea finalizar la
reproducción repetida.
Se establece el punto de finalización (punto B), y se inicia la
reproducción repetida de la sección comprendida entre el punto A y el
punto B.
Desactivación de los modos de reproducción
Desactiva los modos de reproducción para permitir la reproducción
normal.
1 Seleccione en el Panel de control ( página 94) y,
a continuación, pulse el botón .
Aparecerá el mensaje "Se han borrado los contenidos del modo de
reproducción" y la consola volverá a la reproducción normal.
Nota
Si se han combinado varios modos de reproducción, se desactivarán todos los modos
de reproducción.
Puede cambiar los ajustes iniciales, ajustar la imagen y el sonido y ajustar
otras opciones de salida por medio de la pantalla Ajustar. También puede
seleccionar un idioma para los subtítulos y menús, prohibir la reproducción
por parte de niños y ajustar otras opciones.
Notas
• Algunos DVD no admiten todos los ajustes. La consola PlayStation®2 reproduce
el contenido del disco tal y como fue grabado en el software DVD. Si el DVD no
admite las funciones enumeradas, no podrá cambiar la configuración.
• Las siguientes opciones no están disponibles durante la reproducción o la
Reanudación de la reproducción. Cancele la Reanudación de la reproducción
( página 96) antes de modificar estas opciones.
– "Menú", "Audio" y "Subtítulos" en Selección de idioma
– "Formato TV" y "Modo progresivo" en Ajuste de la pantalla
– "Control paterno" en Ajuste personalizado
– "DTS" y "Modo Automático de Selección de Pistas" en Audio
Puede cambiar la configuración del reproductor de DVD mediante el
siguiente procedimiento:
1 Seleccione en el Panel de control ( página 94) y, a
continuación, pulse el botón .
Se muestra la barra de iconos Ajustar.
2 Seleccione el icono de la opción que desee modificar y, a
continuación, pulse el botón .
Se muestra el ajuste actual de cada elemento.
Ajuste de la configuración del reproductor de DVD
100
 Loading...