

Page 1
Remote
Commander
3-865-783-16(1)
Operating Instructions
Mode d’emploi
GB
FR
RM-TP501E
1998 by Sony Corporation
Page 2

Precautions
About This Manual
CAUTION (Lithium battery)
Danger of explosion if battery is incorrectly
replaced. Replace only with the same or equivalent
type recommended by the manufacturer. Discard
used batteries according to the manufacturer’s
instructions.
On operation
Before connecting other components, be sure to turn off and
unplug the amplifier.
On cleaning
Clean the cabinet, panel and controls with a soft cloth slightly
moistened with a mild detergent solution. Do not use any type of
abrasive pad, scouring powder or solvent such as alcohol or
benzine.
If you have any question or problem concerning your
remote commander, please consult your nearest Sony
dealer.
• The following icon is used in this manual:
z Indicates hints and tips for making the task easier.
GB
2
Page 3

TABLE OF CONTENTS
Preparations 4
Compatible Components and Functions 4
Preparing the Commander 5
Screen Hierarchy 8
Location of Parts and Basic
Operations 9
Front panel 9
Rear panel 10
Operation 11
Basic Operations 11
Example: Operating a CD Player 13
Example: Recording from CD to MD 14
Selecting Sound Fields 15
Adjusting Sound Fields 17
Adjusting the Commander’s Operating
Environment 19
GB
Additional information 23
Precautions during use 23
Troubleshooting 24
Specifications 25
Index 25
GB
3
Page 4

Preparations
Compatible Components and Functions
This chapter describes how to prepare
the remote commander for operation.
Be sure to read this section before
operating.
This unit is a remote control system that utilizes infrared
rays to control an amplifier and AV components
connected to the amplifier.
Compatible Components
This unit can be used to operate Sony AV components as
well as AV components manufactured by other
manufacturers. Set up is necessary in order to operate
components manufactured by other companies (see page
19).
Note
Depending on the component, control may not be possible using
this unit.
Functions
This unit is a bidirectional remote commander. Not only
does it transmit infrared rays for operation of the
amplifier, it can also receive infrared rays emitted by the
amplifier to display characters and other information
supplied by other components connected to the amplifier
with a CONTROL A1 cord.
GB
4
Page 5
Preparing the Commander
Please be sure to carry out the procedures described in
“Setting up the commander” on page 6 after inserting the
batteries.
Inserting batteries into the commander
Insert the four size-AA (LR6) alkaline batteries (for
commander operation) and lithium battery (for
preservation of the commander’s internal memory).
1 Remove the battery compartment cover.
Push in the direction
of arrow
2 Insert the alkaline batteries.
Size-AA alkaline batteries
4 Close the battery compartment cover.
Preparations
After inserting the batteries, touching the touch panel
turns on the light and displays the touch panel (LCD)
adjustment screen. Follow the procedure on the next
page for touch panel adjustment and initial
communication.
]
}
Always insert the negative (–) pole
side of batteries first
}
]
]
}
}
]
3 Insert the lithium battery.
After wiping the lithium battery thoroughly with a
dry cloth, insert it into the compartment with the
positive (+) pole side facing up.
Coin shaped lithium
battery CR2032
Positive (+) pole side up
Notes
• The LCD lights up when touched.
• VOL +/–, MUTING and SLEEP can be used even when the
LCD is not lit.
• If the commander is not used for approx. 10 seconds, the LCD
turns off automatically (Auto Off function).
GB
5
Page 6

Preparing the Commander
Preparations
Setting up the commander
Please be sure to carry out the following 1 to 5 procedures
for preparation of the commander.
The commander’s panel is touch sensitive and can be
operated by simply touching it.
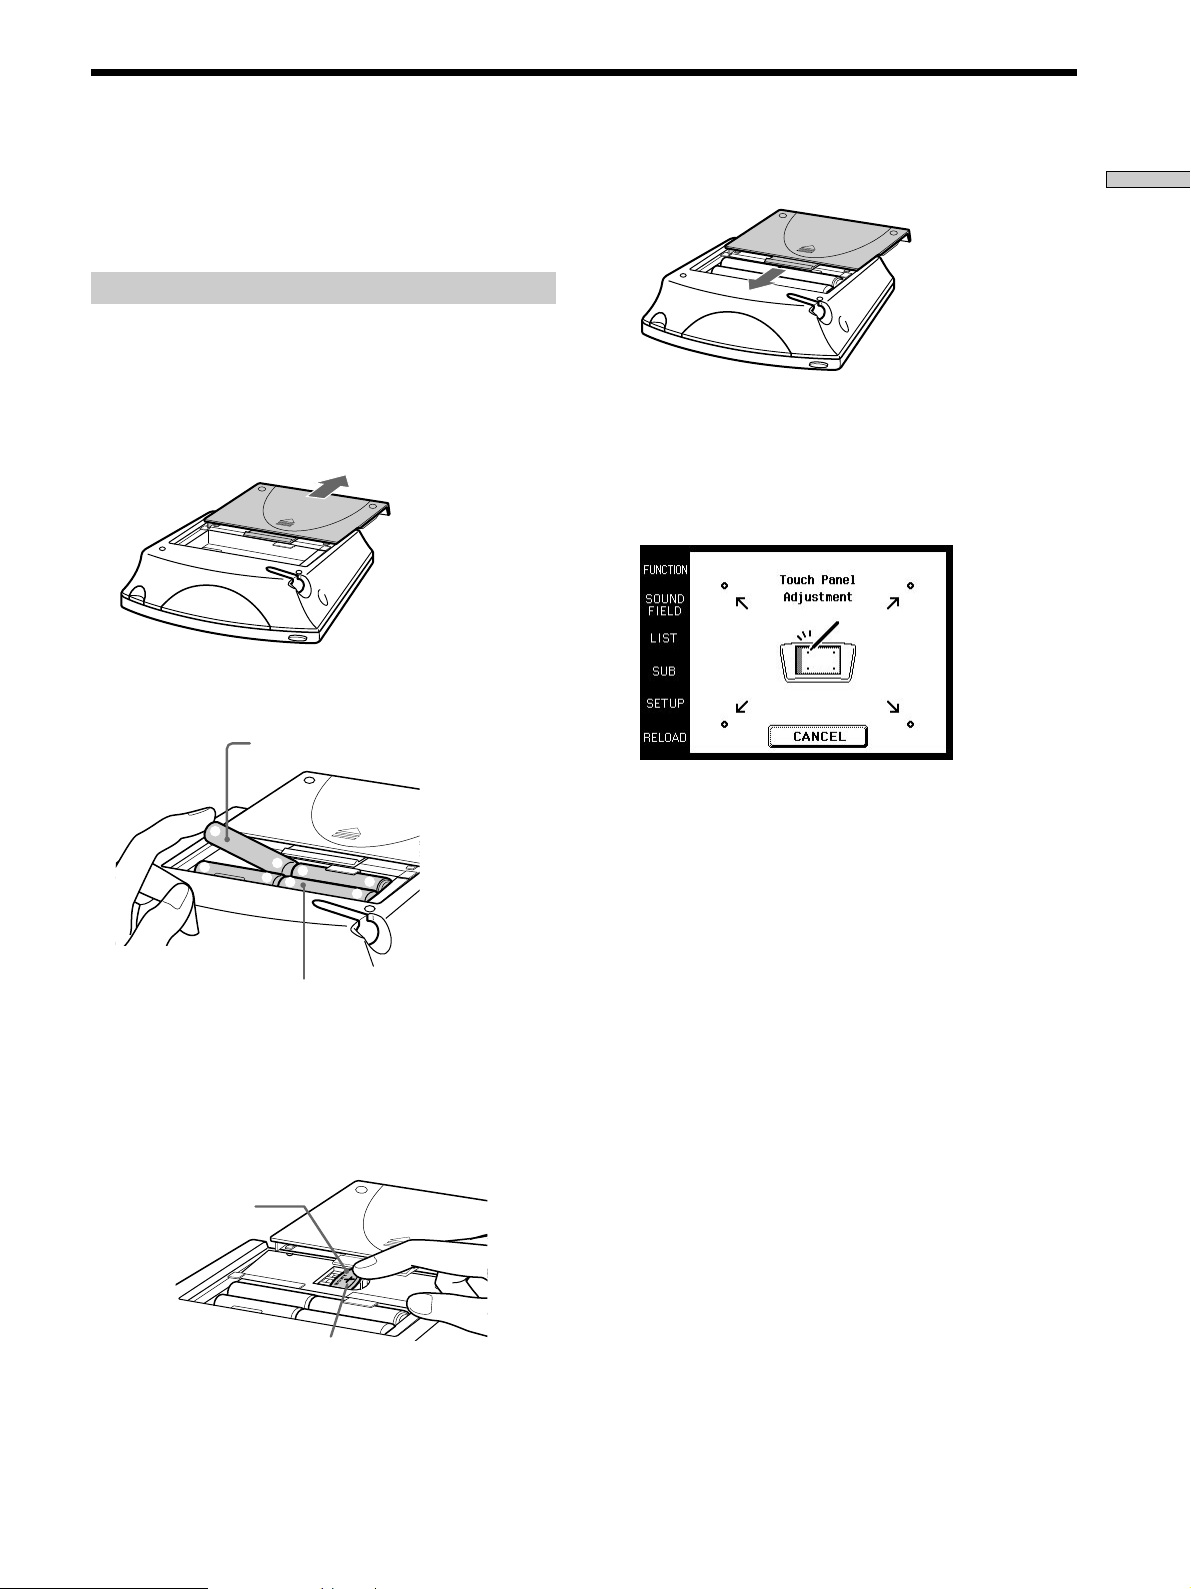
1 Remove the touch pen.
Touch panel adjustment
3 Adjust the position of the touch panel’s LCD.
Touch the center of each of the 4 dots with the touch
pen. When all 4 dots have been touched “Adjusted”
appears, a buzzer sounds, and the initial
communication screen appears.
When returning the touch pen, always slide it in tip
first.
Pen holder
Remove by sliding out
Touch the 4 dots with the touch pen.
Caution
Use only the touch pen provided with this unit or the soft tip
of your finger to operate the touch panel. Using a
commercially available writing utensils may damage the
panel and make correct operation impossible. If the tip of the
touch pen is damaged, or the touch pen is lost, please consult
your nearest Sony dealer.
2 Turn CONTRAST to adjust brightness of the LCD.
CONTRAST control
Caution
Touch panel adjustment must be carried out for proper panel
operation. If used without adjustment, the ”Touch Panel
Adjustment” screen appears each time the LCD lights up.
Initial communication
4 Press U on the amplifier to turn on the amplifier.
5 Point the commander’s transmitter/receiver section
toward the amplifier, and touch OK.
Once initial communication with the amplifier has
been established, the commander is ready to operate
the amplifier.
GB
6
Page 7
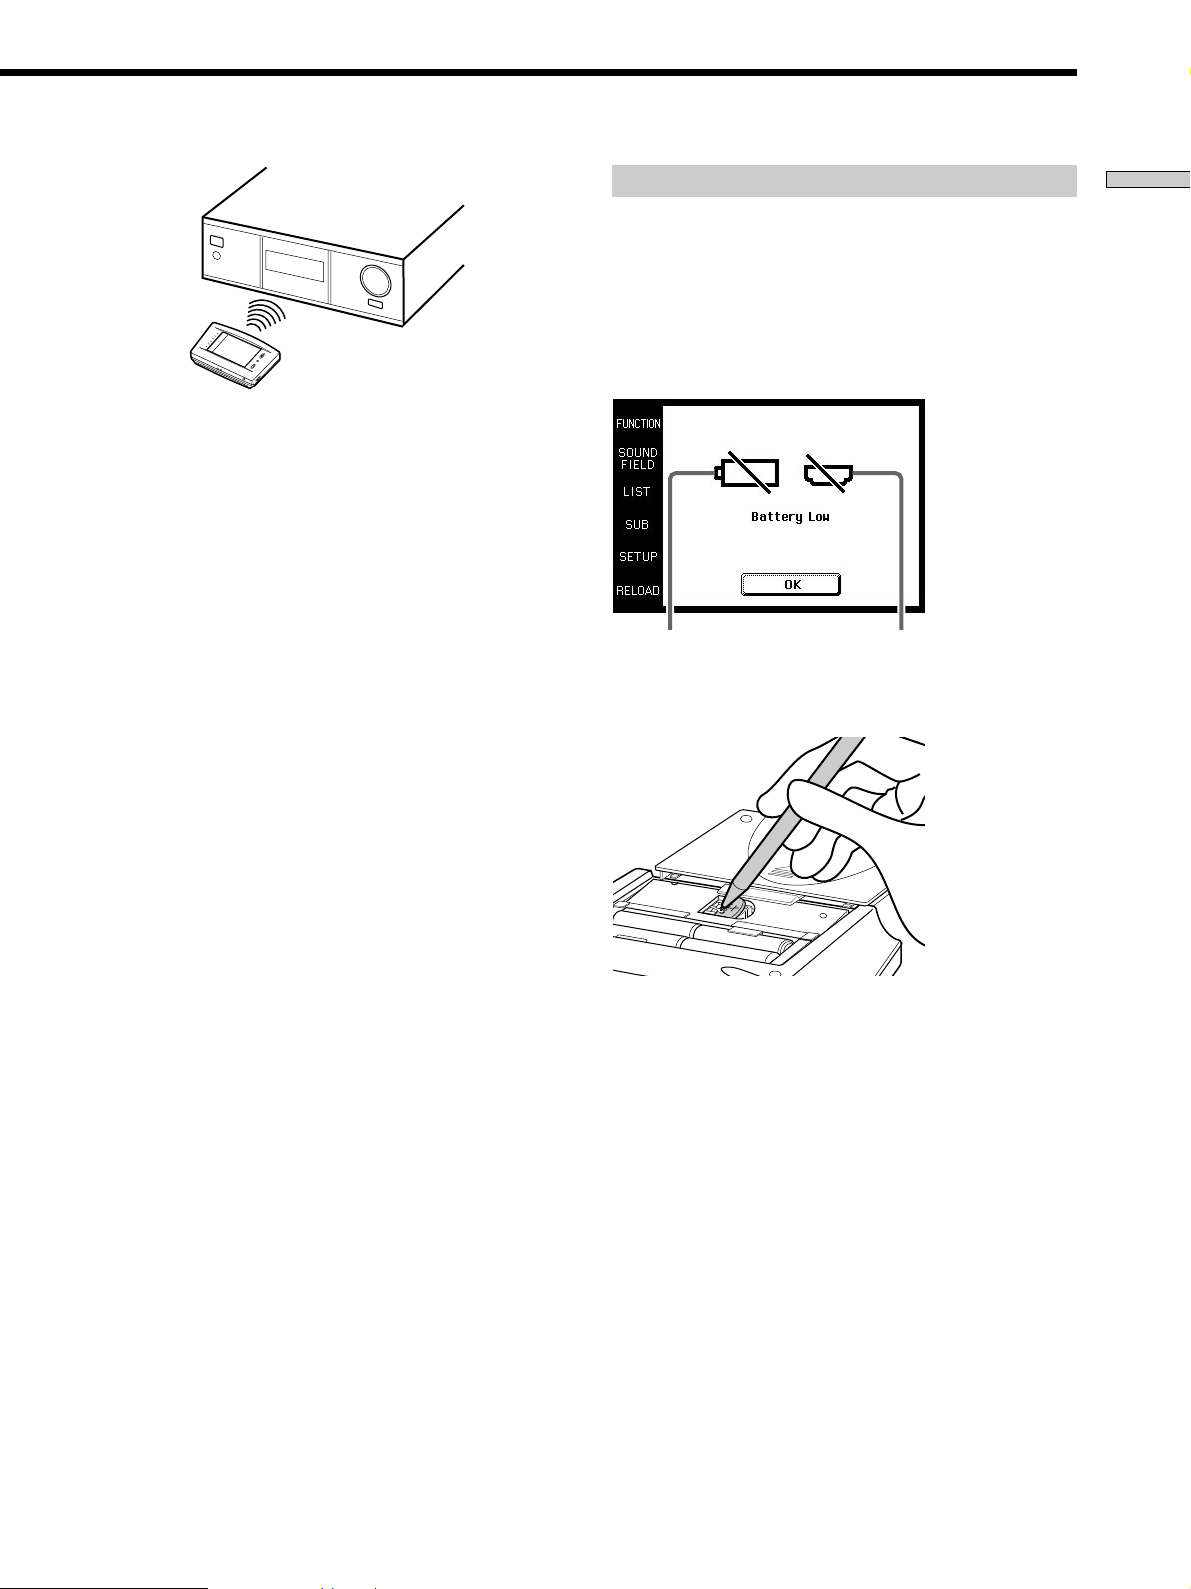
1 m ~ 2 m
Note
• To ensure good communication conditions, carry out initial
setup from directly in front of, and close to the amplifier.
• Do not move the unit during initial setup.
If a communication error occurs during setup
An error message will be displayed.
• Touching OK will return to the step 5 setup screen.
• Touching SKIP goes to the regular screen without
carrying out initial setup. Although operation is
possible in this condition, functions not included on the
amplifier will be displayed, and some buttons will not
be operable. Also, the initial setup screen will appear
each time the touch panel is turned on.
When replacing the batteries
To ensure preservation of the commander’s internal
memory when replacing batteries, be sure to observe the
following cautions.
When to replace batteries
When the batteries become weak, a warning sounds and a
message is displayed. Replace batteries as instructed by
the message.
Replace alkaline
batteries.
How to remove the lithium battery
Replace lithium
battery.
Preparations
Note
The commander receives and displays data transmitted from the
amplifier. Communication errors may occur if the commander’s
transmitter/receiver section is not directed properly toward the
amplifier.
Be sure to point the commander’s transmitter/receiver section
towards the amplifier.
Notes
• Disc titles and song titles downloaded from the CD changer are
memorized in the commander. The lithium battery is used for
preservation of this memory. If the unit is used with an
exhausted battery, the settings memorized in the commander
will be erased. Please replace the battery as soon as the message
appears.
• Replace the alkaline batteries with new batteries as soon as
their charge is exhausted. If the unit is used with exhausted
batteries, exhaustion of the lithium battery used to maintain
memory will be quickened and the memorized settings may be
erased.
• The life span of batteries may be shortened depending on the
conditions in which the commander is used.
• If the alkaline batteries and lithium battery become exhausted
at the same time, replace the alkaline batteries first. Replacing
the lithium battery first will erase the data memorized in the
commander.
• When replacing the alkaline batteries, always replace all 4
batteries with new ones.
• After replacing batteries, be sure to carry out touch panel
adjustment (page 6).
GB
7
Page 8
Screen Hierarchy
Preparations
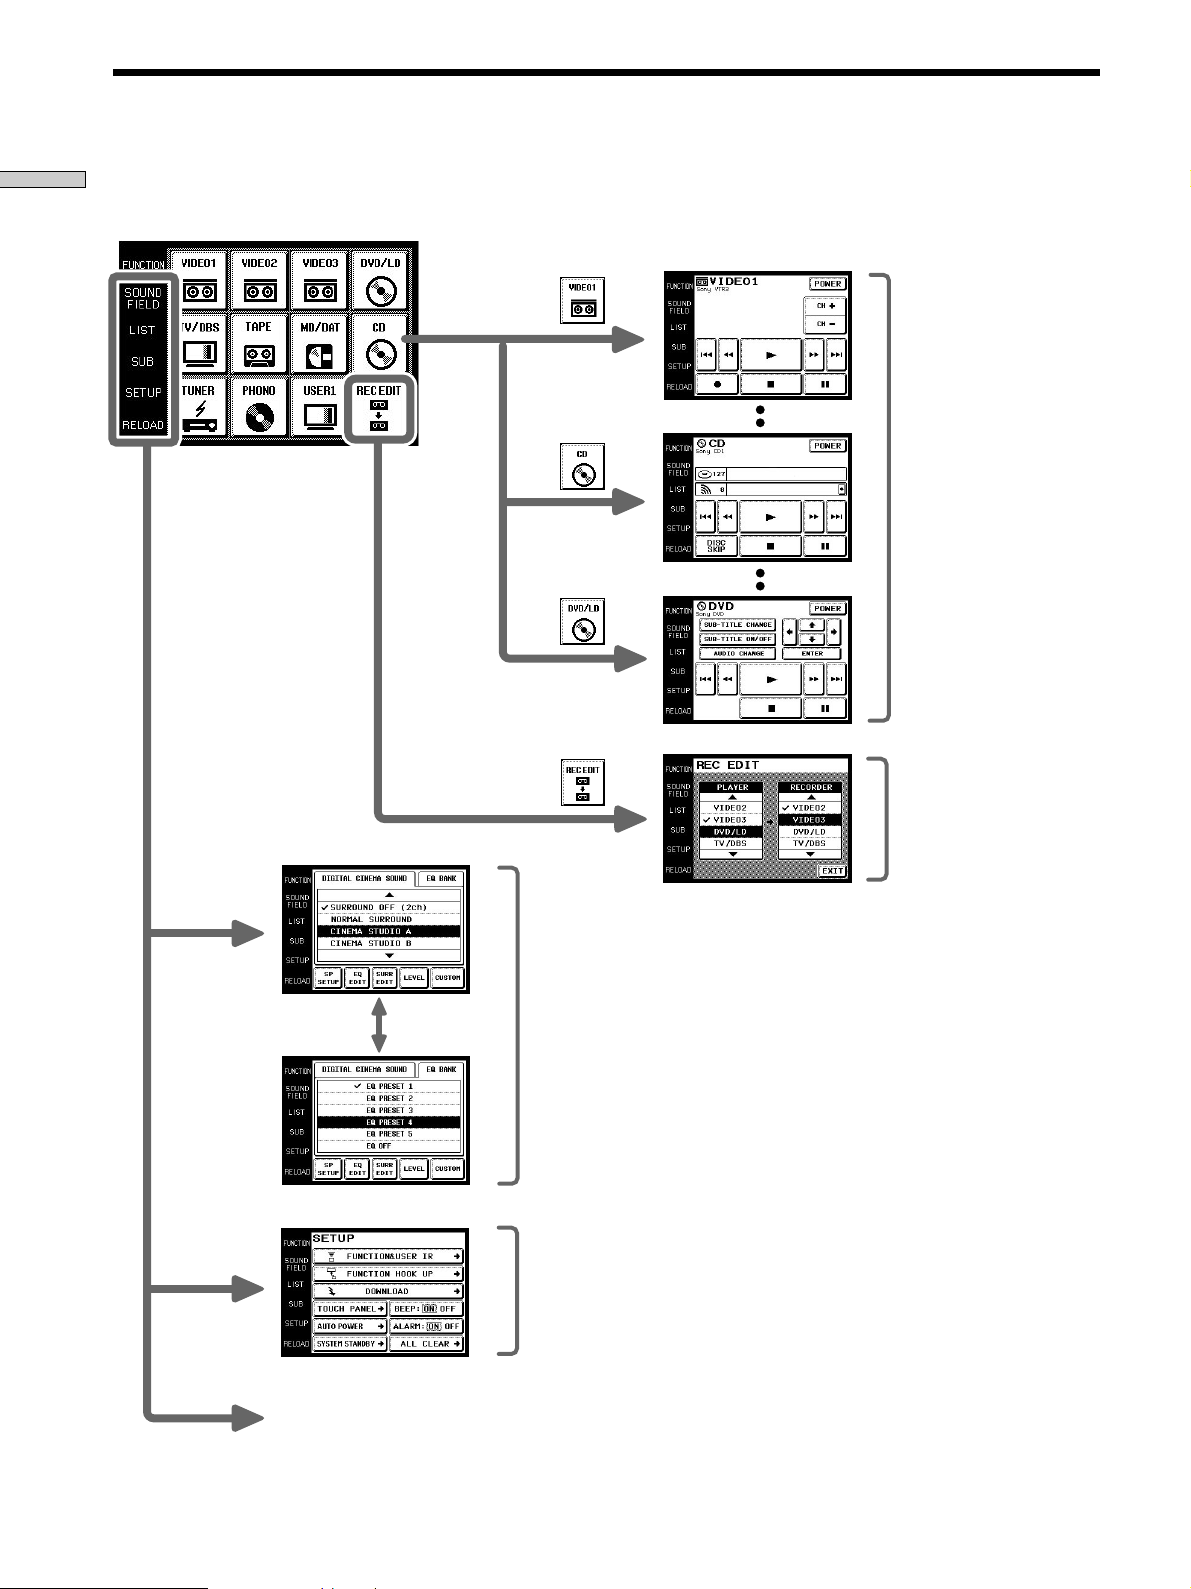
The following diagram shows the basic composition of this unit’s screen hierarchy.
FUNCTION screen
Normally, the
FUNCTION
screen is
displayed.
To display a
different screen,
touch the left side
of the LCD.
Screens for selection and
operation of components
connected to the amplifier.
SOUND FIELD screen
SETUP screen
RELOAD...
Touch when the song titles of
a CD or MD being played
back are not displayed
correctly or when all the
soundfield parameters are
grayed out.
Screen for selection and
adjustment of the sound fields
and equalizer (see page 16~20).
Screen for setting up the
operation environment and
control of components made by
other manufacturers (page 20).
Screen for recording audio
and video from one
component to another (see
page 14).
GB
8
Page 9
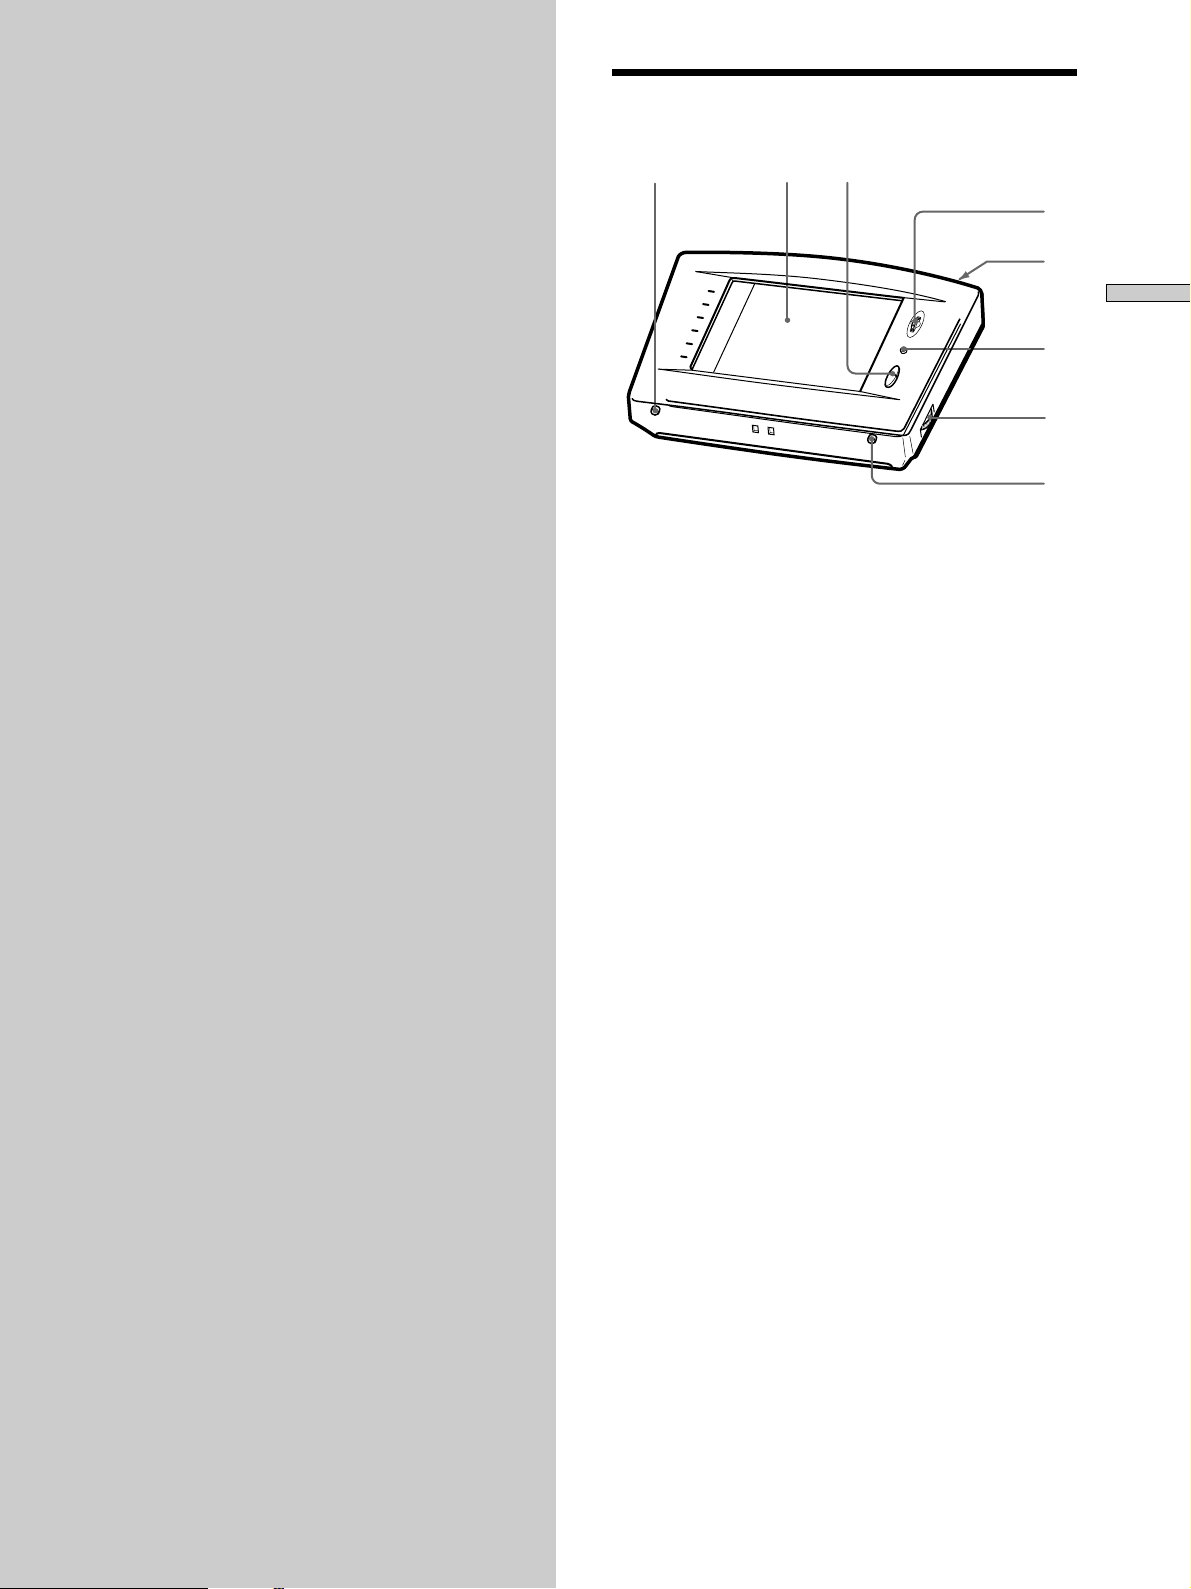
Location of
Front panel
Parts and Basic
Operations
This chapter provides information
about the locations and functions of
the buttons and controls on this unit.
1
1 BACK LIGHT/COMMANDER OFF
Press to turn the backlight on or off. Hold down for
about 2 seconds to turn the LCD off. When the LCD is
off, press to turn on the LCD and backlight.
• To prolong use of the batteries, if there are no commands
entered in the touch panel for 10 seconds, the LCD
automatically turns off.
• To view the LCD display without turning on the backlight,
touch the touch panel when both the backlight and LCD
are off.
23
4
5
Location of Parts and Basic Operations
6
7
8
2 Touch panel
Touch to operate. The commander turns on
automatically.
3 VOL +/– buttons
Use to adjust the volume of the amplifier.
4 JOG DIAL control
Rotate to scroll through items in a list (etc.).
Push to select the highlighted item.
5 SYSTEM/STANDBY button
Normally used to turn off all Sony components. Can
also be used to turn the amplifier on or off depending
on the settings made in the SETUP screen (see page
22).
6 MUTING button
Use to mute the sound of the amplifier.
7 CONTRAST control
Use to adjust the contrast of the LCD.
8 SLEEP button
Use to operate the amplifier’s sleep function. The
sleep settings appear in the amplifier’s display, not the
commander’s LCD.
GB
9
Page 10

Rear panel
1
Location of Parts and Basic Operations
5
1 Transmitter/receiver section
Transmits and receives infrared signals to and from
the amplifier.
2 Battery cover
3 Touch pen
4 SYSTEM/STANDBY button
Normally used to turn off all Sony components. Can
also be used to turn the amplifier on or off depending
on the settings made in the SETUP screen (see page
22).
2
3
4
5 Touch pen holder
Pull out and insert touch pen when not in use.
10
GB
Page 11
Operation
Basic Operations
This chapter explains how to operate
the amplifier and connected audio/
video components.
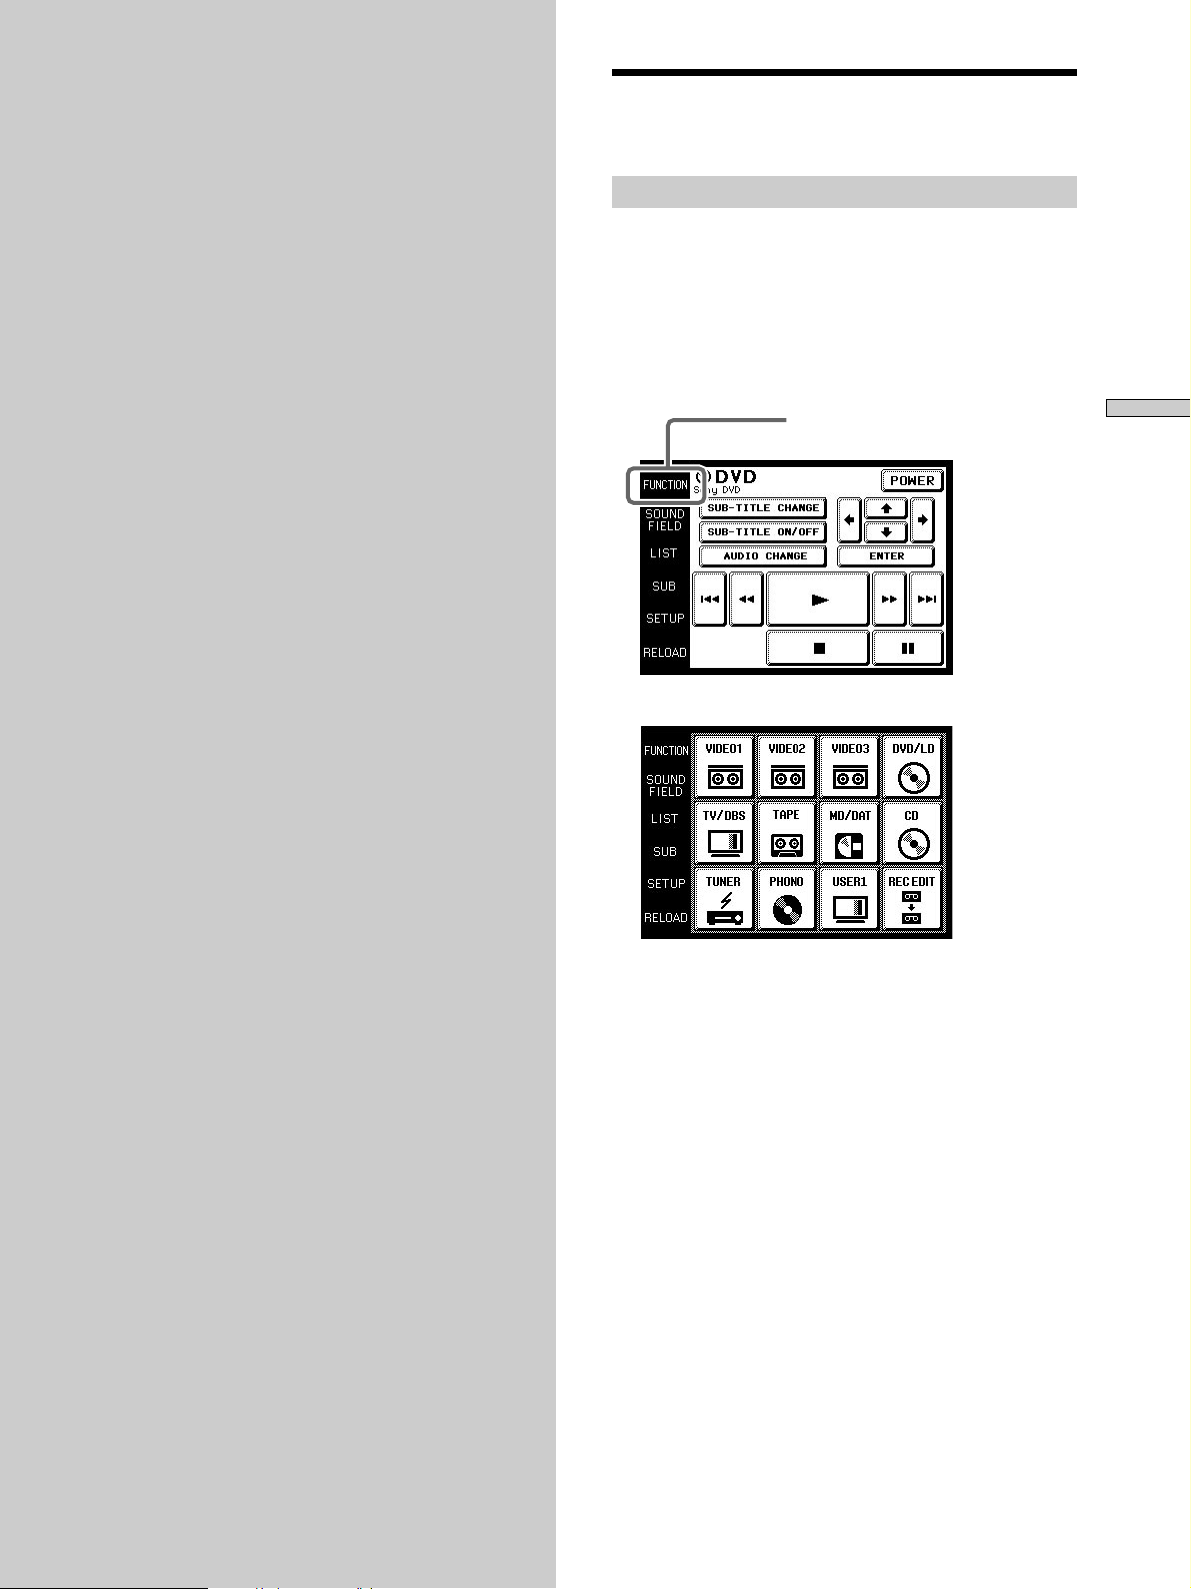
Displaying the FUNCTION screen
To operate components connected to the amplifier, first
display the FUNCTION screen, then select the component
you wish to operate (CD, MD etc.).
Normally, the FUNCTION screen is displayed. If it is not
displayed, touch FUNCTION to display it.
Touch FUNCTION in the LCD.
FUNCTION
The FUNCTION screen appears.
Operation
Composition of the FUNCTION screen is shown on the
next page.
z
You can change the functions displayed in the FUNCTION
screen
You can set all functions, except REC EDIT, to be displayed, or
not, using the FUNCTION HOOK UP screen (see page 21).
11
GB
Page 12

Basic Operations
The following diagram shows the composition of the FUNCTION screen hierarchy.
The types of icons that can be displayed on the FUNCTION screen can be set using FUNCTION HOOK UP in the SETUP
screen. (For details on FUNCTION HOOK UP, see page 21.)
Operation
FUNCTION screen hierarchy
12
GB
Page 13

Example: Operating a CD Player
This section describes how to operate a CD player
connected to the amplifier. Other components can also be
operated in the same way.
For details concerning CD player operation, please refer
to your CD player’s operating instructions.
The screens used in the following example are the screens
that appear when using a SONY CD changer with a
CONTROL A1 terminal.
1 Touch FUNCTION.
The FUNCTION screen appears.
2 Touch .
The amplifier’s function switches to CD and the CD
screen appears.
Selected maker and
category (see page 20).
Disc title*
To operate other functions
Touch SUB. Another set of buttons are displayed and
ready for use.
Operation
To view the list
Touch LIST to view the disc titles in a Sony CD changer (5,
50, 200 CD) or the song/disc titles in a Sony MD deck
connected by a CONTROL A1 cord. In this case of a Sony
CD changer, the information must be downloaded from
the receiver (see page 21 for details).
The LIST screen can only be displayed when the
FUNCTION is set to CD or DAT/MD.
Song title*
• Long titles can be read by touching the scroll icon ( ) to
scroll along the title.
* Only displayed when a Sony CD changer (5/50/200 CDs) is
connected to the amplifier by a CONTROL A1 cord.
3 Touch ( to start playback.
z
When the song number or song title is not displayed
correctly
Point the commander toward the amplifier and touch RELOAD.
• Touch the disc number to start playing that disc. appears on
the disc being played.
• Use the JOG DIAL or touch 4 or $ to scroll up or down the list.
• Touch NUMBER to sort in numerical order or touch TITLE to
sort in alphabetical order.
• Touch FUNCTION to return to the FUNCTION screen at any
time.
13
GB
Page 14

Example: Recording from CD to MD
This section describes how record audio from a CD to an
MD as an example of recording audio/video.
Other operations
Recording from an LD to a video deck is basically the same
procedure. For details on the buttons used in recording, refer to
the operating instructions supplied with the amplifier and other
components.
1 Touch FUNCTION.
Operation
2 Touch .
4 Touch to select the recorder component (MD/DAT
in this example).
When MD/DAT is touched, the REC EDIT operation
screen appears.
The FUNCTION screen appears.
The REC EDIT screen appears.
5 Touching r in RECORDER: MD/DAT, then touch (
in PLAYER: CD.
Starts playback from the CD player
3 Touch to select the player component (CD in this
example).
Because CD is not displayed, use the JOG DIAL or
touch $ to scroll downward through the list. If you
scroll to far, touch 4 to scroll back up.
PLAYER
Touching 4 moves list up
Touching $ moves list down
When PLAYER is selected, the amplifier’s function
automatically switches to the PLAYER component.
Starts recording on the MD deck.
Recording starts.
The FUNCTION screen returns once the recording
finishes.
To stop recording at any time
Although recording stops automatically in the above
example, recording can also be stopped at any time by
touching p in RECORDER.
To stop the recording procedure at any time
Touch FUNCTION to display the FUNCTION screen.
During steps 2 to 3, touching EXIT will also stop the
recording procedure.
14
GB
Page 15

Selecting Sound Fields
These sections describe how to select and make
adjustments to the sound fields.
For details concerning sound fields, please refer to the
operating instructions supplied with the amplifier.
Displaying the SOUND FIELD screen
Touch SOUND FIELD.
SOUND FIELD
The SOUND FIELD screen appears.
SOUND FIELD screen hierarchy
Operation
CUSTOM
LEVEL
The SOUND FIELD screen hierarchy is shown on the
right.
SURR EDIT
EQ EDIT
SP SETUP
15
GB
Page 16
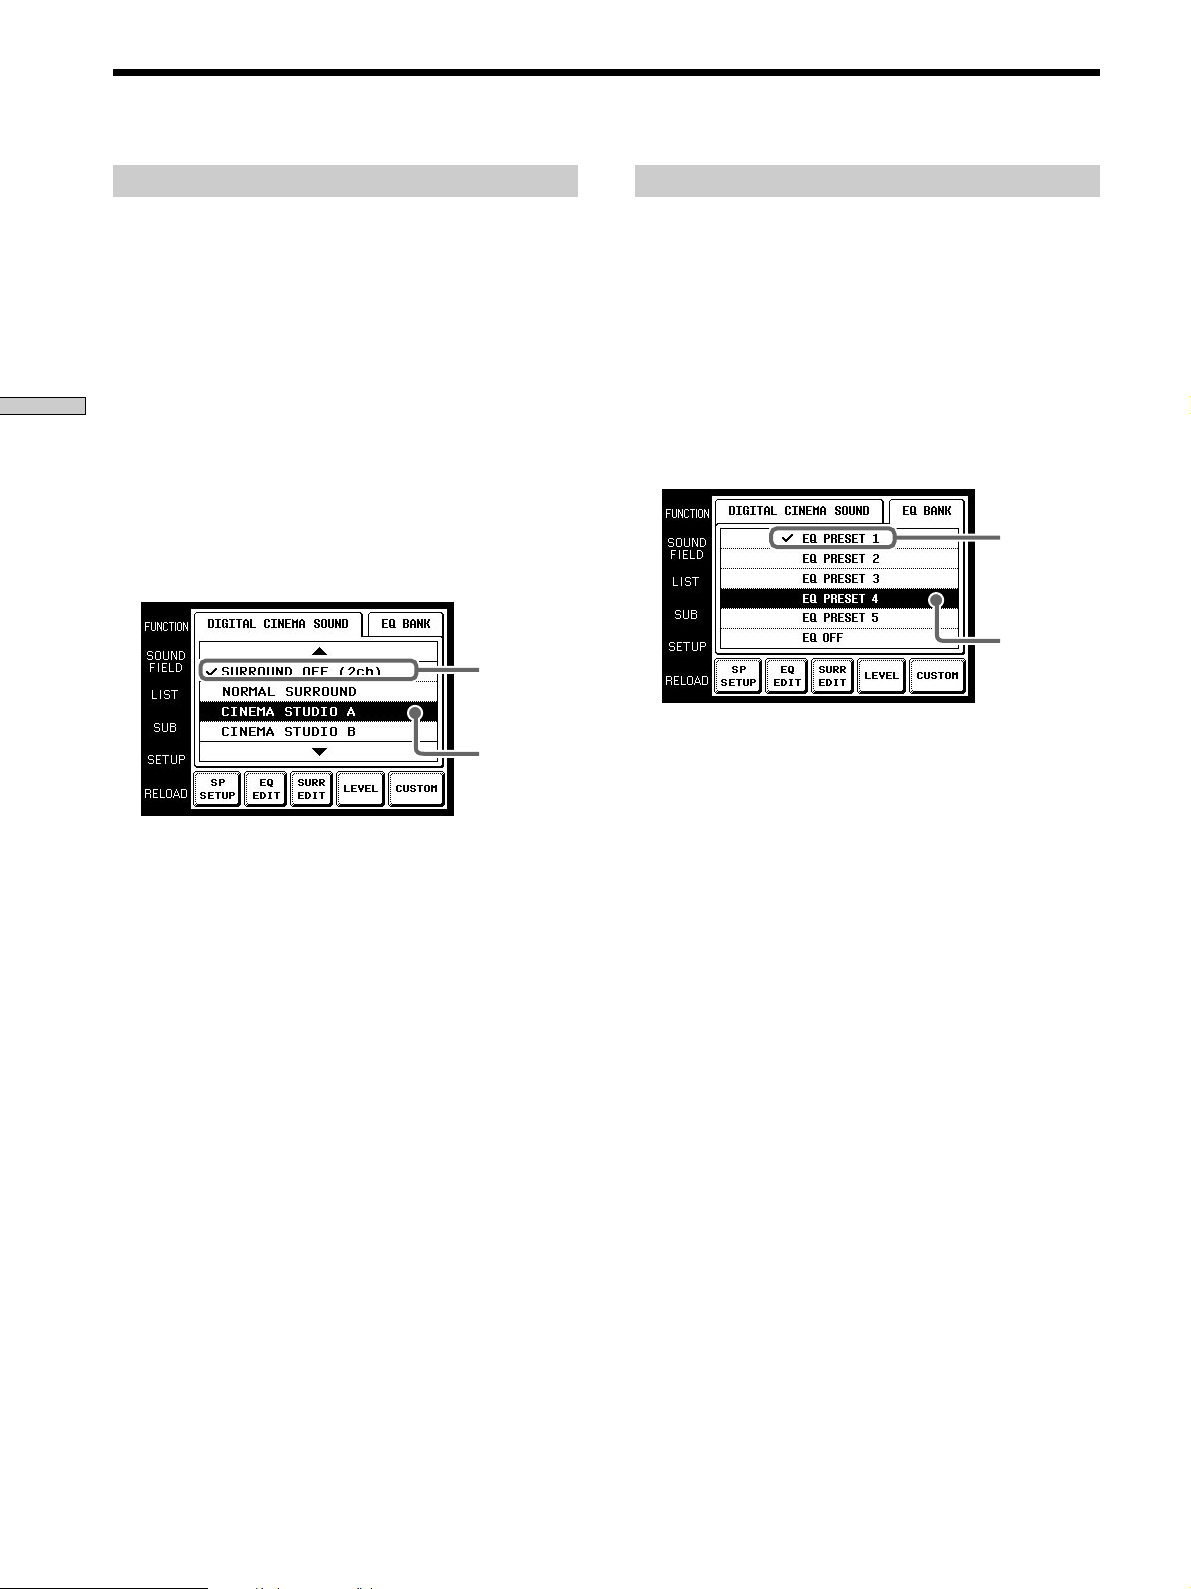
Selecting Sound Fields
For details concerning which sound fields can be selected,
please refer to the amplifier’s operating instructions.
1 Touch SOUND FIELD.
2 Touch DIGITAL CINEMA SOUND.
Operation
3 Use JOG DIAL or touch 4 or $ to scroll through the
4 Push JOG DIAL to select the highlighted sound field
Selecting the sound field
The SOUND FIELD screen appears.
The DIGITAL CINEMA SOUND screen appears.
list.
or touch the sound field you desire.
A check (✔) will appear next to the selected sound
field, and the sound field will change.
Selected
sound field
Cursor
Selecting the equalizer
1 Touch SOUND FIELD.
The SOUND FIELD screen appears.
2 Touch EQ BANK.
The EQ BANK screen appears.
3 Touch one of the equalizer presets (EQ PRESET
1~5).
Touch EQ OFF to turn the amplifier’s equalizer off.
A check (✔) will appear next to the selected equalizer,
and the equalizer settings will change.
Selected
equalizer
Cursor
Note
If EQ OFF is selected, EQUALIZER screen settings cannot be
changed.
16
GB
Page 17

Adjusting Sound Fields
Set up the SOUND FIELD screen menus to fully enjoy the
surround sound created by the sound fields.
Set speaker configuration, size and distance from the main
listening position on the SP SETUP screen.
On the EQ EDIT screen, adjust the frequency bands of
front, center and rear speakers of the equalizer preset (EQ
PRESET 1-5) that you selected on the EQ BANK screen.
Adjust various aspects of individual sound fields on the
SURROUND screen. The settings are stored individually
for each sound field.
Adjust the output level of each speaker and perform a
variety of other adjustments to control the sound mix on
the LEVEL screen.
CUSTOM allows you to customize other operations that
the amplifier performs. For details on what can be
adjusted, refer to the operating instructions supplied with
the amplifier.
To adjust the speaker settings
1 Touch SP SETUP on the SOUND FIELD screen.
The SP SETUP screen appears.
To adjust the frequency bands
1 Touch EQ EDIT on the SOUND FIELD screen.
The EQUALIZER screen of the equalizer preset
selected in the EQ BANK screen appears.
If EQ OFF is selected in the EQ BANK screen,
EQUALIZER screen items are all grayed out, and edit
functions cannot be performed.
2 Use JOG DIAL or touch 4 or $ to scroll through the
list.
3 Push JOG DIAL to select an item or touch the item
you want to adjust.
Output speaker
BASS: low range
MID: mid range
TREBLE: high range
GAIN: gain adjustment
FREQUENCY: frequency
adjustment
RANGE: range adjustment
Operation
2 Use JOG DIAL or touch 4 or $ to scroll through the
list.
3 Push JOG DIAL to select a parameter or touch the
parameter you want to adjust.
4 Touch or to adjust to the desired
setting.
5 Repeat steps 2 through 4 when there is more than
one parameter that you wish to adjust.
6 Touch EXIT when speaker setup is finished.
Notes
• Items that cannot be adjusted due to the current speaker
settings or sound field mode are grayed out.
• If the alarm sounds, or all items appear to be grayed out, touch
RELOAD.
4 Touch or to adjust to the desired
value.
5 Repeat steps 2 through 4 when there is more than
one item that you wish to adjust.
6 Touch EXIT when adjustment is finished.
Notes
• Items that cannot be adjusted due to the current speaker
settings or sound field mode are grayed out.
• If the alarm sounds, or all items appear to be grayed out, touch
RELOAD.
17
GB
Page 18

Adjusting Sound Fields
1 Touch SURR EDIT on the SOUND FIELD screen.
Operation
2 Use JOG DIAL or touch 4 or $ to scroll through the
3 Push JOG DIAL to select an item or touch the
4 Touch or to adjust to the desired
5 Repeat steps 2 through 4 when there is more than
6 Touch EXIT when adjustment is finished.
Notes
• Items that cannot be adjusted due to the current speaker
• If the alarm sounds, or all items appear to be grayed out, touch
To adjust the surround parameters
The SURROUND screen appears.
list.
aspect you want to adjust.
value.
SURROUND EFFECT: Higher values increase the
“presence” of the surround effect.
WALL TYPE: Use to simulate different sonic
environments.
REVERB TIME: Use to control the spacing of the early
reflections to simulate a larger or smaller room.
Tone quality adjustments: Use these parameters to
adjust the overall sound quality of the selected
sound field.
one aspect that you wish to adjust.
settings or sound field mode are grayed out.
RELOAD.
To adjust the speaker levels
1 Touch LEVEL on the SOUND FIELD screen.
The LEVEL screen appears.
2 Use JOG DIAL or touch 4 or $ to scroll through the
list.
3 Push JOG DIAL to select an item or touch the item
you want to adjust.
4 Touch or to adjust.
5 Repeat steps 2 through 4 when there is more than
one item that you wish to adjust.
6 Touch EXIT when adjustment is finished.
To adjust the speaker balance
Use TEST TONE to listen to the levels output from each speaker.
AUTO outputs the test tone to each speaker in order. You can also
select individual speakers to output the test tone. Adjust your
speaker levels so that the test tone is output at the same level
from all speakers.
Notes
• Items that cannot be adjusted due to the current speaker
settings or sound field mode are grayed out.
• If the alarm sounds, or all items appear to be grayed out, touch
RELOAD.
18
GB
Page 19

Adjusting the Commander’s Operating Environment
To customize other amplifier operations
1 Touch CUSTOM on the SOUND FIELD screen.
The CUSTOMIZE screen appears.
2 Use JOG DIAL or touch 4 or $ to scroll through the
list.
3 Push JOG DIAL to select an item or touch the item
you want to set.
4 Touch or to adjust settings.
5 Repeat steps 2 through 4 when there is more than
one item that you wish to adjust.
The following explanations allow you to adjust various
setting and customize the commander’s operating
environment.
Displaying the SETUP screen
To adjust the operating environment, first display the
SETUP screen.
Touch SETUP.
SETUP
The SETUP screen appears.
Operation
6 Touch EXIT when adjustment is finished.
Notes
• Items that cannot be adjusted due to the current speaker
settings or sound field mode are grayed out.
• If the alarm sounds, or all items appear to be grayed out, touch
RELOAD.
19
GB
Page 20

Adjusting the Commander’s Operating Environment
The following procedure lets you setup the component
commander to operate the components connected to the
amplifier.
When carrying out this operation, make sure that the amplifier’s
power is on, and be sure to point the commander’s transmitter/
receiver section toward the amplifier.
1 Touch SETUP.
Operation
2 Touch FUNCTION&USER IR.
3 Select the function that you wish to register (Ex:
Registering the connected component
The SETUP screen appears.
The FUNCTION&USER IR screen appears.
VCR).
To display other items, use the JOG DIAL or touch 4
or $ to scroll through the list.
The FUNCTION&USER IR:CATEGORY screen
appears.
4 Select the type of component connected (Ex: Sony
VTR1).
To display other items, use the JOG DIAL or touch 4
or $ to scroll through the list.
The FUNCTION&USER IR:MAKER CODE screen
appears.
5 Touch the remote controller mode of the connected
component.
The component selected in steps 4 to 5 will be
registered at the function selected in step 3, and the
SETUP screen will reappear. A long beep sound is
emitted to indicate that registration was successful.
Operation is now possible from the FUNCTION
screen.
If a series of short beeps is emitted, redo the
registration procedure. If this occurs, make sure the
amplifier is turned on and that the commander is
pointing toward the amplifier during operation.
To stop registration at any time
Touch EXIT during step 2 or touch CANCEL during steps 3 to 5.
20
Notes
• All icons may not be displayed when registering components
made by certain manufacturers.
• Some icons may not function even though they are displayed
when registering components made by certain manufacturers.
GB
Page 21

FUNCTION screen setup
Up to 11 components can be displayed on the FUNCTION
screen. Only connected components will appear on the
FUNCTION screen.
1 Touch SETUP.
The SETUP screen will appear.
2 Touch FUNCTION HOOK UP.
The FUNCTION HOOK UP screen will appear.
2 Touch DOWNLOAD.
The DOWNLOAD screen will appear.
Operation
3 Touch to select the data you wish to download and
press:
FUNCTION NAME: Names of connected components.
TUNER PRESET NAME: Broadcast station names etc.,
memorized in amplifier.
CD MEMO: CD song titles or disc titles etc., from a
Sony CD changer (5/50/200 CD) connected to the
amplifier with CONTROL A1 cable.
3 Select the function not to be displayed and touch
NO.
To display other items, use the JOG DIAL or touch 4
or $ to scroll through the list.
The selected component is set to not appear and the
SETUP screen appears.
To display the components set not to display
Touch YES instead of NO is step 3.
z
Components that have been registered (see page 20) are set
to “YES” automatically.
Downloading amplifier data
Various types of data can be downloaded from the
amplifier.
When carrying out this operation, make sure that the amplifier’s
power is on, and be sure to point the commander’s transmitter/
receiver section toward the amplifier. Also, operate the
commander at a distance of about 1~2 meters from the
amplifier.
1 Touch SETUP.
The SETUP screen will appear.
Downloading starts, and the progress is displayed.
During this time, please leave the commander’s
transmitter/receiver section pointed toward the
amplifier.
When you touch CANCEL, the data downloaded
before you touched CANCEL will be saved.
When downloading has finished, the DOWNLOAD
screen returns. A long beep sound will be emitted if
downloading has been carried out properly.
If a series of short beeps is emitted, please redo the
download procedure. If this occurs, make sure the
amplifier is turned on and that the commander is
pointing toward the amplifier during operation.
4 Repeat step 3 when downloading other data.
5 Touch EXIT.
Download finishes and the SETUP screen appears.
21
GB
Page 22

Adjusting the Commander’s Operating Environment
Operation
p Adjusting the position of the touch panel
(LCD)
Adjust the position of the LCD when it shifts from the
normal operating position.
1 Touch TOUCH PANEL on the SETUP screen.
2 Touch the center of each of the 4 dots.
Other setup
The TOUCH PANEL ADJUSTMENT screen appears.
(For details, see “Touch panel adjustment” on page 6.)
“Adjusted” appears in a short while and long beep is
emitted.
p Setting the operation sound on or off
A beep can be set to sound or not sound when the touch
panel is touched.
Touch ON (sound) or OFF (no sound) in BEEP:ON
OFF in the SETUP screen.
p Setting the warning alarm on or off
A warning alarm can be set to sound or not sound when a
communication error has occurred.
Touch ON (sound) or OFF (no sound) in ALARM:ON
OFF in the SETUP screen.
p Returning settings to their factory preset
settings
Use this function to erase all memorized settings and
return them to their factory presets.
Please note that once erased, settings can not be returned.
When carrying out this operation, make sure that the amplifier’s
power is on, and be sure to point the commander’s transmitter/
receiver section toward the amplifier.
1 Touch ALL CLEAR on the SETUP screen.
p Setting the AUTO POWER function
ON: When a video function (DVD, etc.) is selected, the
commander sends numerous codes to the
appropriate Sony AV components. At this time, the
TV automatically switches to VIDEO 1 input mode.*
Example) When you select DVD, the following
occurs.
1 The amplifier switches to DVD player operation
mode.
2 The TV turns on.
3 The DVD player turns on.
4 The TV automatically selects VIDEO 1 input.
OFF: When a function is selected, the commander code
applies only to amplifier operation.
* Switching to VIDEO 1 input may not be automatic on all Sony
TVs. This is because some TVs cannot receive remote control
codes immediately after being turned on.
p Changing the function of the SYSTEM/STANDBY
button
ALL OFF: Switches power of all Sony AV components
off.
ON/OFF: Switches only the amplifier on or off.
2 Touch OK.
22
GB
Page 23

Additional
Precautions during use
information
On installment
Do not drop the commander or subject it to strong
vibration as this could cause damage.
On the touch pen
Use only the touch pen provided with this unit or the soft
tip of your finger to operate the touch panel. Using a
commercially available writing utensils may damage the
panel and make correct operation impossible. If the tip of
the touch pen is damaged, or the touch pen is lost, please
consult your nearest Sony dealer.
On handling
The touch panel (display section) is made of glass.
Twisting the touch panel, dropping the unit, placing your
elbow (etc.) on it, or placing heavy objects on top of it,
may break the touch panel and cause bodily harm due to
glass fragments.
On cleaning
Clean the cabinet, panel and controls with a soft cloth
slightly moistened with a mild detergent solution. Do not
use solvent such as thinner, benzine, or alcohol as these
will damage the surface of the commander.
Additional information
23
GB
Page 24

Troubleshooting
If you experience any of the following difficulties while
using the commander, use this troubleshooting guide to
help you remedy the problem. Should any problem
persist, consult your nearest Sony dealer.
Operation cannot be done with the commander.
/ Check that the amplifier and components are
connected correctly.
/ The commander and amplifier are too far apart.
/ Make sure that there are no objects between the
commander and amplifier.
/ Make sure that the amplifier’s power is turned on.
/ The commander’s transmitter/receiver section is
not pointed at the amplifier.
/ The commander’s batteries are exhausted. Replace
Additional information
with new alkaline batteries (see page 7).
/ There is an invertor system florescent light near the
commander or amplifier. Please place away from
the florescent light.
/ Make sure you have selected the correct function
on the remote.
/ When you operate a programmed non-Sony
component, the remote may not function properly
depending on the make and model of the
component.
The amplifier’s functions and modes do not
correlate with the displays on the commander.
/ Initial communication setup has not been done.
Use after first carrying out initial communication
setup (see page 6).
/ The commander was not pointed at the amplifier
when it was turned on. Touch RELOAD, and
download component data (see page 8).
/ Select the correct function using the commander.
LCD does not appear.
/ The LCD is not turned on. Touch the touch panel.
/ Contrast is too light or too dark.
Use the CONTRAST control to adjust the contrast
of the LCD (see page 6).
When a CD player, tape deck, or MD deck is
connected to the amplifier via S-LINK CONTROL
A1 jacks, Auto Function does not work properly.
/ Reprogram the remote (see page 19).
24
GB
Page 25

Specifications
Index
Operating system
Liquid crystal touch
panel
Liquid crystal size
3.8 inches
(256 x 200 dots)
Liquid crystal type
Reflection system
(Monochrome type)
Touch panel Resistant membrane
system
Analog type
Power requirements
For operation: DC 6V
(T ype AA alkaline
batteries)
For memory
preservation:
DC 3V
(CR2032 lithium
battery)
A, B
Battery 5, 7
C
CD player 13
D
Downloading amplifier data 19
E, F, G
Front panel 9
FUNCTION Screen 11, 12
setup 20
H, I, J, K, L, M, N, O
Operating components
CD player 13
Recording 14
P, Q, R
Rear panel 10
Recording 14
Registering the connected
component 20
Additional information
Maximum external dimensions
(width x height x depth, including
projecting parts and controls)
160 x 111 x 46 mm
Mass 290 g (Main unit only
including touch pen)
Design and specifications are subject
to change without notice.
S, T, U, V, W, X, Y, Z
Setup
commander 6
environment 19~22
FUNCTION screen 20
SETUP screen 19
SOUND FIELD 15~19
25
GB
Page 26

Remote
Commander
3-865-783-26(1)
Bedienungsanleitung
Manual de instrucciones
Gebruiksaanwijzing
DE
ES
NL
RM-TP501E
1998 by Sony Corporation
Page 27

Précautions
A propos de ce manuel
ATTENTION (pile au lithium)
Danger d’explosion si la pile n’est pas remplacée de
la façon indiquée.Remplacer seulement la pile par
une pile du même type ou d’un type équivalent à
celui conseillé par le fabricant. Mettre les piles usées
au rebut conformément aux instructions du
fabricant.
Fonctionnement
Avant de raccorder d’autres appareils, veillez à éteindre et à
débrancher l’amplificateur.
Nettoyage
Nettoyez le coffret, le panneau et les commandes avec un chiffon
doux légèrement imprégné d’une solution détergente neutre.
N’utilisez pas de tampon abrasif, poudre à récurer ni solvant,
comme l’alcool ou la benzine.
Pour toute question ou difficulté concernant
l’amplificateur, consultez votre revendeur Sony.
• L’icône suivante est utilisée dans ce manuel:
z Indique des conseils et suggestions pouvant faciliter
une opération.
FR
2
Page 28

TABLE DES MATIÈRES
Préparatifs 4
Appareils et fonctions compatibles 4
Préparation de la télécommande 5
Hiérarchie des écrans 8
Nomenclature et opérations
élémentaires 9
Panneau avant 9
Panneau arrière 10
Fonctionnement 11
Opérations élémentaires 11
Exemple: Exploitation d’un lecteur CD 13
Exemple: Enregistrement d’un CD sur un MD 14
Sélection des champs sonores 15
Réglage des champs sonores 17
Réglage des conditions de fonctionnement de la
télécommande 19
FR
Informations complémentaires 23
Précautions d’utilisation 23
En cas de panne 24
Spécifications 25
Index 25
FR
3
Page 29

Préparatifs
Appareils et fonctions compatibles
Ce chapitre indique comment
préparer la télécommande pour que
vous puissiez vous en servir avec vos
appareils.
Veuillez le lire attentivement avant
d’utiliser la télécommande.
Ce système de télécommande utilise les rayons
infrarouges pour la commande à distance d’un
amplificateur et des appareils audio vidéo raccordés à
l’amplificateur.
Appareils compatibles
Cette télécommande peut être utilisée pour la commande
à distance des appareils audio vidéo Sony ou d’une autre
marque. Pour piloter les appareils d’une autre marque un
réglage initial sera toutefois nécessaire (voir page 19).
Remarque
Il se peut que la télécommande ne puisse pas être utilisée avec
certains appareils.
Fonctions
Cette télécommande est bidirectionnelle. Non seulement
elle transmet des signaux infrarouges à l’amplificateur
mais elle peut en recevoir de l’amplificateur, ce qui
permet d’afficher les caractères et les informations fournis
par les appareils reliés à l’amplificateur à l’aide d’un câble
CONTROL A1.
FR
4
Page 30

Préparation de la télécommande
Effectuez les opérations décrites à la page 6 dans “Réglage
de la télécommande” après avoir inséré les piles.
Insertion des piles dans la télécommande
Insérez quatre piles alcalines de format AA (LR6) (pour le
fonctionnement de la télécommande proprement dite) et
une pile au lithium (pour la sauvegarde de la mémoire
interne de la télécommande).
1 Enlevez le couvercle du logement des piles.
Poussez dans le sens
de la flèche
2 Insérez les piles alcalines.
Piles alcalines de taille AA
4 Fermez le couvercle du logement des piles.
Préparatifs
Après avoir inséré les piles, il suffit de toucher le
panneau tactile pour l’allumer et faire apparaître
l’écran de réglage du panneau tactile (LCD). Suivez les
instructions de la page suivante pour le réglage du
panneau tactile et la communication initiale.
]
}
Insérez toujours le pôle négatif des
piles (–) en premier
}
]
]
}
}
]
3 Insérez la pile au lithium.
Après avoir bien essuyé la pile au lithium avec un
chiffon sec, insérez-la dans le logement avec la face
positive (+) tournée vers le haut.
Pile au lithium
plate CR2032
Pôle positif (+) dirigé vers
le haut
Remarques
• L’écran LCD s’éclaire lorsque vous le touchez.
• VOL+/–, MUTING et SLEEP peuvent être utilisés même
lorsque l’écran LCD n’est pas éclairé.
• Si vous n’utilisez pas la télécommande pendant environ 10
secondes, l’écran LCD s’éteindra automatiquement (Extinction
automatique).
FR
5
Page 31

Préparation de la télécommande
Préparatifs
Réglage de la télécommande
Veillez à effectuer les opérations 1 à 5 suivantes pour que
la télécommande fonctionne.
Le panneau de la télécommande est sensible au toucher et
il suffit de le toucher pour effectuer une opération.
1 Retirez le crayon tactile.
Réglage du panneau tactile
3 Ajustez la position de l’écran LCD du panneau
tactile.
Touchez le centre de chacun des 4 points avec le
crayon tactile. Quand vous avez touché les quatre
points “Adjusted” apparaît, un avertisseur retentit et
l’écran de communication initial apparaît.
Lorsque vous rangez le crayon tactile, insérez-le par la
pointe.
Porte-crayon tactile
Faites glisser pour enlever
Touchez les 4 points avec le crayon
tactile.
Attention
Touchez le panneau seulement avec le crayon tactile fourni
avec la télécommande ou avec le bout du doigt. L’utilisation
d’un autre ustensile, par exemple un crayon ou un stylo, peut
endommager le panneau et perturber le fonctionnement de la
télécommande. Consultez votre revendeur Sony si l’extrémité
du crayon tactile est endommagée ou si vous avez perdu
votre crayon tactile.
2 Tournez CONTRAST pour ajuster la luminosité de
l’écran LCD.
Commande CONTRAST
Attention
Le réglage du panneau tactile doit être effectué pour que le
panneau fonctionne correctement. Si vous l’utilisez sans
l’avoir ajusté, l’écran “Touch Panel Adjustment” apparaîtra
chaque fois que l’écran LCD s’éclairera.
Communication initiale
4 Appuyez sur U de l’amplificateur pour mettre
l’amplificateur sous tension.
5 Dirigez la section émettrice/réceptrice de la
télécommande vers l’afficheur de l’amplificateur et
touchez OK.
Lorsque la communication avec l’amplificateur a été
établie, la télécommande est prête pour la commande
à distance de l’amplificateur.
FR
6
Page 32

1 m ~ 2 m
Remarque
• Effectuez le réglage initial devant et tout près de
l’amplificateur. Les conditions de communication seront
meilleures.
• Ne bougez pas la télécommande pendant le réglage initial.
Si une erreur de communication se produit
pendant le réglage
Un message d’erreur apparaîtra.
• Pour revenir à l’écran de réglage de l’étape 5, touchez
OK.
• Pour passer à l’écran normal sans réglage initial,
touchez SKIP. Bien que la télécommande fonctionne
sans réglage initial, certaines fonctions absentes sur
l’amplificateur apparaîtront et certaines touches seront
inutilisables. En outre, l’écran de réglage initial
apparaîtra chaque fois que le panneau tactile sera
allumé.
Remplacement des piles
Pour préserver la mémoire interne de la télécommande
lors du remplacement des piles, veuillez prendre les
précautions suivantes.
Quand remplacer les piles
Lorsque les piles sont faibles, un avertisseur retentit et un
message s’affiche. Remplacez les piles comme indiqué par
le message.
Remplacez les piles
alcalines.
Retrait de la pile au lithium
Remplacer la pile
au lithium.
Préparatifs
Remarque
La télécommande reçoit et affiche les données transmises par
l’amplificateur. Des erreurs de communication peuvent se
produire si la section émettrice/réceptrice n’est pas dirigée
correctement vers l’amplificateur.
Veillez à diriger la section émettrice/réceptrice de la
télécommande vers l’amplificateur.
Remarques
• Les titres des disques et des morceaux importés du changeur
CD sont mémorisés dans la télécommande. La pile au lithium a
pour but de préserver cette mémoire. Si la télécommande est
utilisée avec une pile au lithium usée, les réglages mémorisés
dans la télécommande s’effaceront. Veuillez remplacer la pile
au lithium dès que le message apparaît.
• Remplacez les piles alcalines par des neuves dès qu’elles sont
épuisées. Si la télécommande est utilisée quand les piles
alcalines sont vides, la pile au lithium utilisée pour la
sauvegarde de la mémoire s’épuisera plus rapidement et les
réglages mémorisés risquent de s’effacer.
• L’autonomie des piles est plus ou moins longue selon les
conditions d’utilisation de la télécommande.
• Si les piles alcalines et la pile au lithium s’épuisent en même
temps, remplacez d’abord les piles alcalines. Si vous remplacez
d’abord la pile au lithium, les données mémorisées dans la
télécommande s’effaceront.
• Remplacez toujours les 4 piles alcalines par des neuves.
• Après avoir remplacé les piles, n’oubliez de régler la panneau
tactile (page 6).
FR
7
Page 33

Hiérarchie des écrans
Préparatifs
Le schéma suivant montre la composition de base de la hiérarchie des écrans.
Ecran FUNCTION
Normalement,
l’écran
FUNCTION
apparaît en
premier.
Pour afficher un
autre écran,
touchez le côté
gauche de l’écran
LCD.
Ecrans de sélection et
d’exploitation des appareils
raccordés à l’amplificateur.
Ecran SOUND FIELD
Ecran SETUP
Ecran de sélection et de réglage
des champs sonores et de
l’égaliseur (voir pages 16~20).
Ecran de réglage des conditions
de fonctionnement et de
contrôle des appareils d’une
autre marque (page 20).
Ecran pour
l’enregistrement audio et
vidéo d’un appareil à
l’autre (voir page 14).
RELOAD...
FR
8
Touchez ce paramètre quand
les titres des morceaux du CD
ou MD en cours de lecture ne
sont pas exacts ou lorsque
tous les paramètres de champ
sonore apparaissent en gris.
Page 34

Nomenclature
Panneau avant
et opérations
élémentair es
Ce chapitre fournit des informations
concernant l’emplacement et les
fonctions des touches et commandes
de la télécommande.
1
1 BACK LIGHT/COMMANDER OFF
Sert à allumer et éteindre le rétroéclairage. Appuyez
plus de 2 secondes pour éteindre l’écran LCD. Quand
l’écran LCD est éteint, appuyez sur cette touche pour
allumer l’écran LCD et le rétroéclairage.
• Pour prolonger la durée de vie des piles, l’écran LCD
s’éteint automatiquement si aucune commande n’est
transmise pendant 10 secondes.
• Pour voir l’écran LCD sans activer le rétroéclairage,
touchez le panneau tactile lorsque le rétroéclairage et
l’écran LCD sont éteints.
23
4
5
Nomenclature et opérations élémentaires
6
7
8
2 Panneau tactile
Touchez-le pour effectuer les diverses opérations. La
télécommande s’allume automatiquement.
3 Touches VOL +/–
Servent à régler le volume de l’amplificateur.
4 Molette JOG DIAL
Sert à faire défiler les options d’une liste (etc.).
Appuyez dessus pour sélectionner l’option surlignée.
5 Touche SYSTEM/STANDBY
Sert normalement à mettre hors tension tous les
appareils Sony, mais peut aussi servir à mettre
l’amplificateur sous ou hors tension selon les réglages
effectués sur l’écran SETUP (voir page 22).
6 Touche MUTING
Sert à couper le son de l’amplificateur.
7 Molette de réglage du contraste
Sert à ajuster le contraste de l’écran LCD.
8 Touche SLEEP
Sert à activer la minuterie d’arrêt de l’amplificateur.
Les réglages de la minuterie apparaissent sur
l’afficheur de l’amplificateur mais pas sur l’écran LCD
de la télécommande.
FR
9
Page 35

Panneau arrière
Nomenclature et opérations élémentaires
1
5
1 Section émettrice/réceptrice
Transmet à l’amplificateur et reçoit de l’amplificateur
les signaux infrarouges.
2 Couvercle du logement des piles
3 Crayon tactile
4 Touche SYSTEM/STANDBY
Sert normalement à mettre hors tension tous les
appareils Sony, mais peut aussi servir à mettre
l’amplificateur sous ou hors tension selon les réglages
effectués sur l’écran SETUP (voir page 22).
2
3
4
5 Porte-crayon tactile
Tirez et insérez le crayon tactile quand vous ne
l’utilisez pas.
10
FR
Page 36

Fonctionnement
Opérations élémentaires
Ce chapitre explique comment faire
fonctionner l’amplificateur et les
appareils audio/vidéo qui lui sont
raccordés.
Affichage de l’écran FUNCTION
Pour piloter les appareils raccordés à l’amplificateur,
affichez d’abord l’écran FUNCTION, puis sélectionnez
l’appareil que vous souhaitez utiliser (lecteur CD, MD,
etc.).
Normalement, l’écran FUNCTION apparaît en premier.
S’il n’est pas affiché, il suffit de toucher FUNCTION pour
le faire apparaître.
Fonctionnement
Touchez FUNCTION sur l’écran LCD.
FUNCTION
L’écran FUNCTION apparaît.
La composition de l’écran FUNCTION est indiquée à la
page suivante.
z
Vous pouvez changer les fonctions affichées sur l’écran
FUNCTION
Vous pouvez sélectionner d’afficher ou non toutes les fonctions,
sauf REC EDIT, en utilisant l’écran FUNCTION HOOK UP (voir
page 21).
11
FR
Page 37

Opérations élémentaires
Hiérarchie de l’écran FUNCTION
Le schéma suivant montre la composition de la hiérarchie de l’écran FUNCTION.
Vous pouvez sélectionner les types d’icônes apparaissant sur l’écran FUNCTION à l’aide de FUNCTION HOOK UP de
l’écran SETUP. (Pour les détails sur FUNCTION HOOK UP, voir page 21.)
Fonctionnement
12
FR
Page 38

Exemple: Exploitation d’un lecteur CD
Cette section décrit comment faire fonctionner un lecteur
CD raccordé à l’amplificateur. Les opérations sont
similaires pour les autres appareils.
Pour plus de détails sur l’exploitation d’un lecteur CD,
reportez-vous au mode d’emploi du lecteur CD.
Les écrans illustrés dans les exemples suivants sont les
écrans qui apparaissent quand vous utilisez un changeur
CD SONY avec prise CONTROL A1.
1 Touchez FUNCTION.
L’écran FUNCTION apparaît.
2 Touchez .
L’amplificateur se règle sur le lecteur CD et l’écran CD
apparaît sur la télécommande.
Marque et catégorie
sélectionnées (voir page 20).
Titre de disque*
Pour utiliser les autres fonctions
Touchez SUB. Un autre tableau de boutons apparaît.
Fonctionnement
Pour afficher la liste de titres
Touchez LIST pour voir les titres des disques du changeur
Sony (5, 50, 200 CD) ou les titres des morceaux/disques
de la platine MD Sony raccordé par un câble CONTROL
A1. Dans le cas d’un changeur CD Sony, ces informations
doivent être importées au préalable de l’ampli-tuner (voir
page 21 pour les détails).
L’écran LIST ne peut être affiché que lorsque FUNCTION
est réglé sur CD ou DAT/MD.
Titre de
morceau*
• Pour faire défiler les titres très longs, il suffit de toucher
l’icône de défilement .
* Cet écran n’apparaît que lorsqu’un changeur CD Sony (5/50/200
CD) est relié à l’amplificateur à l’aide d’un câble CONTROL A1.
3 Touchez ( pour commencer la lecture.
z
Si le numéro ou le titre du morceau n’est pas exact
Dirigez la télécommande vers l’amplificateur et touchez
RELOAD.
• Touchez un numéro de disque pour écouter le disque.
apparaît sur le disque en cours de lecture.
• Utilisez la molette JOG DIAL ou touchez 4 ou $ pour faire
défiler vers le haut ou le bas les options de la liste.
• Touchez NUMBER pour classer les disques par ordre
numérique ou TITLE pour les classer par ordre
alphabétique.
• Touchez FUNCTION pour revenir à l’écran FUNCTION
quand vous voulez.
13
FR
Page 39

Exemple: Enregistrement d’un CD sur un MD
Cette section décrit comment enregistrer un CD sur un
MD, à titre d’exemple d’enregistrement audio/vidéo.
Autres opérations
Pour l’enregistrement d’un LD sur une platine vidéo, la marche à
suivre est identique. Pour de plus amples détails sur les boutons
utilisés pour l’enregistrement, reportez-vous au mode d’emploi
fourni avec l’amplificateur et les autres appareils.
1 Touchez FUNCTION.
Fonctionnement
L’écran FUNCTION apparaît.
2 Touchez .
L’écran REC EDIT apparaît.
4 Touchez l’écran pour sélectionner l’enregistreur
(dans notre exemple, MD/DAT).
Quand vous touchez MD/DAT, l’écran d’exploitation
REC EDIT apparaît.
5 Touchez r dans RECORDER: MD/DAT, puis touchez
( dans PLAYER: CD.
La lecture commence sur le lecteur CD.
3 Touchez l’écran pour sélectionner le lecteur (dans
notre cas CD).
Comme CD ne figure pas sur la liste, utilisez la
molette JOG DIAL ou le bouton $ pour faire défiler les
options de la liste vers le bas. Si vous allez trop loin,
revenez en arrière en touchant 4.
PLAYER
Touchez 4 pour aller vers le haut
Touchez $ pour aller vers le bas
Quand PLAYER est sélectionné, la fonction de
l’amplificateur se règle automatiquement sur le
lecteur.
L’enregistrement commence sur la platine MD.
L’enregistrement commence.
L’écran FUNCTION réapparaît quand
l’enregistrement est terminé.
Pour arrêter l’enregistrement en cours
Bien que l’enregistrement s’arrête automatiquement
quand il est terminé, comme indiqué ci-dessus, il peut
aussi être interrompu à volonté. Il suffit de toucher p
dans RECORDER.
Pour arrêter la procédure d’enregistrement
Touchez FUNCTION pour afficher l’écran FUNCTION.
Aux étapes 2 à 3, il suffit de toucher EXIT pour arrêter la
procédure.
14
FR
Page 40

Sélection des champs sonores
Cette section décrit comment sélectionner des champs
sonores et les régler, si nécessaire.
Pour de plus amples détails sur les champs sonores,
reportez-vous au mode d’emploi fourni avec
l’amplificateur.
Affichage de l’écran SOUND FIELD
Touchez SOUND FIELD.
SOUND FIELD
L’écran SOUND FIELD apparaît.
Hiérarchie de l’écran SOUND FIELD
Fonctionnement
CUSTOM
LEVEL
La hiérarchie de l’écran SOUND FIELD est indiquée à
droite.
SURR EDIT
EQ EDIT
SP SETUP
15
FR
Page 41

Sélection des champs sonores
Sélection d’un champ sonore
Pour les détails sur les champs sonores disponibles,
reportez-vous au mode d’emploi de l’amplificateur.
1 Touchez SOUND FIELD.
L’écran SOUND FIELD apparaît.
2 Touchez DIGITAL CINEMA SOUND.
L’écran DIGITAL CINEMA SOUND apparaît.
Fonctionnement
3 Utilisez la molette JOG DIAL ou touchez 4 ou $
pour faire défiler la liste.
4 Appuyez sur la molette JOG DIAL pour sélectionner
le champ sonore surligné ou touchez le champ
sonore souhaité.
Une coche (✔) apparaît à côté du champ sonore
sélectionné. Le champ sonore change.
Champ sonore
sélectionné
Sélection de l’égaliseur
1 Touchez SOUND FIELD.
L’écran SOUND FIELD apparaît.
2 Touchez EQ BANK.
L’écran EQ BANK apparaît.
3 Touchez un des préréglages de l’égaliseur (EQ
PRESET 1-5).
Touchez EQ OFF pour désactiver le préréglage
d’égaliseur de l’amplificateur.
Une coche (✔) apparaît à côté du préréglage
d’égaliseur sélectionné et les courbes d’égalisation
changent.
Préréglage
d’égaliseur
sélectionné
Curseur
Curseur
Remarque
Si EQ OFF est sélectionné, les réglages de l’écran EQUALIZER ne
pourront pas être changés.
16
FR
Page 42

Réglage des champs sonores
Faites les réglages nécessaires sur les menus d’écran
SOUND FIELD pour bénéficier d’un son surround
optimal.
Indiquez la configuration de vos enceintes, leur taille et
leur distance de la position d’écoute principale sur l’écran
de réglage des enceintes SP SETUP.
Sur l’écran EQ EDIT, ajustez les bandes de fréquences des
enceintes avant, centrale et arrière pour le préréglage
d’égaliseur (EQ PRESET 1-5) que vous avez choisi sur
l’écran EQ BANK.
Ajustez ensuite les différentes caractéristiques des champs
sonores sur l’écran SURROUND. Les réglages sont
mémorisés individuellement pour chaque champ sonore.
Réglez le niveau de sortie de chaque enceinte et effectuez
d’autres réglages pour contrôler le mixage du son sur
l’écran LEVEL.
Finalement, personnalisez d’autres fonctions de
l’amplificateur sur l’écran CUSTOM. Pour les détails sur
les réglages possibles, reportez-vous au mode d’emploi
fourni avec l’amplificateur.
Pour ajuster les réglages d’enceintes
1 Touchez SP SETUP sur l’écran SOUND FIELD.
L’écran SP SETUP apparaît.
Pour régler les bandes de fréquences
1 Touchez EQ EDIT sur l’écran SOUND FIELD.
L’écran EQUALIZER du préréglage d’égaliseur
sélectionné sur l’écran EQ BANK apparaît.
Si EQ OFF est sélectionné sur l’écran EQ BANK, les
paramètres de l’écran EQUALIZER apparaîtront en
gris et les fonctions d’édition ne pourront pas être
utilisées.
2 Utilisez la molette JOG DIAL ou touchez 4 ou $
pour faire défiler la liste.
3 Appuyez sur la molette JOG DIAL pour sélectionner
un paramètre ou touchez le paramètre que vous
voulez régler.
Enceinte en service
BASS: Grave
MID: Médium
TREBLE: Aigu
GAIN: Réglage du gain
FREQUENCY: Réglage de la
fréquence
RANGE: Réglage de la plage
Fonctionnement
2 Utilisez la molette JOG DIAL ou touchez 4 et $
pour faire défiler la liste.
3 Appuyez sur la molette JOG DIAL pour sélectionner
un paramètre ou touchez le paramètre que vous
voulez ajuster.
4 Touchez ou pour ajuster le réglage
souhaité.
5 Répétez les opérations 2 à 4 si vous voulez ajuster
plus d’un paramètre.
6 Touchez EXIT lorsque le réglage d’enceinte est
terminé.
Remarques
• Les paramètres qui ne peuvent pas être ajustés pour les
réglages d’enceintes actuels ou le mode de champ sonore
sélectionné apparaissent en gris.
• Si l’avertisseur retentit ou si tous les paramètres apparaissent
en gris, touchez RELOAD.
4 Touchez ou pour ajuster la valeur
souhaitée.
5 Répétez les étapes 2 à 4 si vous voulez régler plus
d’un paramètre.
6 Touchez EXIT quand le réglage est terminé.
Remarques
• Les paramètres qui ne peuvent pas être ajustés à cause des
réglages actuels des enceintes ou du mode de champ sonore
sélectionné apparaissent en gris.
• Si un avertisseur retentit, ou si toutes les options apparaissent
en gris, touchez RELOAD.
17
FR
Page 43

Réglage des champs sonores
Pour régler les paramètres surround
1 Touchez SURR EDIT sur l’écran SOUND FIELD.
L’écran SURROUND apparaît.
Fonctionnement
2 Utilisez la molette JOG DIAL ou touchez 4 ou $
pour faire défiler la liste.
3 Appuyez sur la molette JOG DIAL pour sélectionner
un paramètre ou touchez le paramètre que vous
voulez régler.
4 Touchez ou pour régler la valeur
souhaitée.
SURROUND FFECT: La “présence” de l’effet surround
augmente proportionnellement à la valeur.
WALL TYPE: Sert à simuler un autre environnement
acoustique.
REVERB TIME: Sert à contrôler l’espacement des
premières réflexions pour simuler une pièce plus
grande ou plus petite.
Réglages de la qualité sonore: Ces paramètres
servent à ajuster la qualité générale du son du
champ sonore sélectionné.
5 Répétez les opérations 2 à 4 si vous voulez régler
plus d’une caractéristique.
6 Touchez EXIT quand le réglage est terminé.
Remarques
• Les paramètres qui ne peuvent pas être ajustés à cause des
réglages actuels des enceintes ou du mode de champ sonore
sélectionné apparaissent en gris.
• Si un avertisseur retentit, ou si toutes les options apparaissent
en gris, touchez RELOAD.
Pour régler le volume des enceintes
1 Touchez LEVEL sur l’écran SOUND FIELD.
L’écran LEVEL apparaît.
2 Utilisez la molette JOG DIAL ou touchez 4 ou $
pour faire défiler la liste.
3 Appuyez sur la molette JOG DIAL pour sélectionner
un paramètre ou touchez le paramètre que vous
voulez régler.
4 Touchez ou pour régler la valeur
souhaitée.
5 Répétez les opérations 2 à 4 si vous voulez régler
plus d’un paramètre.
6 Touchez EXIT quand le réglage est terminé.
Pour régler la balance des enceintes
Pour contrôler le niveau de sortie du son de chaque enceinte,
utilisez TEST TONE.
Le signal de test sort de chaque enceinte dans l’ordre si l’option
AUTO est sélectionnée. Vous pouvez aussi sélectionner les
enceintes devant fournir le signal de test. Ajustez le niveau des
enceintes de sorte que le signal de test soit au même niveau sur
toutes les enceintes.
Remarques
• Les paramètres qui ne peuvent pas être ajustés à cause des
réglages actuels des enceintes ou du mode de champ sonore
sélectionné apparaissent en gris.
• Si un avertisseur retentit, ou si toutes les options apparaissent
en gris, touchez RELOAD.
18
FR
Page 44

Réglage des conditions de
fonctionnement de la
Pour personnaliser les opérations sur
l’amplificateur
1 Touchez CUSTOM sur l’écran SOUND FIELD.
L’écran CUSTOMIZE apparaît.
2 Utilisez la molette JOG DIAL ou touchez 4 ou $
pour faire défiler la liste.
3 Appuyez sur la molette JOG DIAL pour sélectionner
un paramètre ou touchez le paramètre que vous
voulez régler.
4 Touchez ou pour régler la valeur
souhaitée.
télécommande
Les explications suivantes vous permettront de changer
divers réglages et de personnaliser les conditions de
fonctionnement de la télécommande.
Affichage de l’écran SETUP
Pour régler les conditions de fonctionnement, affichez
d’abord l’écran SETUP.
Touchez SETUP.
SETUP
Fonctionnement
5 Répétez les opérations 2 à 4 si vous voulez régler
plus d’un paramètre.
6 Touchez EXIT quand le réglage est terminé.
Remarques
• Les paramètres qui ne peuvent pas être ajustés à cause des
réglages actuels des enceintes ou du mode de champ sonore
sélectionné apparaissent en gris.
• Si un avertisseur retentit, ou si toutes les options apparaissent
en gris, touchez RELOAD.
L’écran SETUP apparaît.
19
FR
Page 45

Réglage des conditions de fonctionnement de la télécommande
Affectation des appareils raccordés
La procédure suivante sert à prérégler la télécommande
pour l’exploitation des appareils raccordés à
l’amplificateur.
Avant d’effectuer ces opérations, n’oubliez pas de mettre
l’amplificateur sous tension et de diriger la section émettrice/
réceptrice de la télécommande vers l’afficheur de l’amplificateur.
1 Touchez SETUP.
Fonctionnement
L’écran SETUP apparaît.
2 Touchez FUNCTION&USER IR.
L’écran FUNCTION&USER IR apparaît.
3 Sélectionnez la fonction que vous voulez
enregistrer (par ex. VCR).
Pour afficher d’autres options, utilisez la molette JOG
DIAL ou touchez 4 ou $ pour faire défiler les options
de la liste.
L’écran FUNCTION&USER IR:CATEGORY apparaît.
4 Sélectionnez le type d’appareil raccordé (par ex.
VTR1 Sony).
Pour afficher d’autres options, utilisez la molette JOG
DIAL ou touchez 4 ou $ pour faire défiler les options
de la liste.
L’écran FUNCTION&USER IR:MAKER CODE
apparaît.
5 Touchez le mode de commande à distance de
l’appareil raccordé.
L’appareil sélectionné aux étapes 4 et 5 est affecté à la
fonction sélectionnée à l’étape 3, puis l’écran SETUP
réapparaît. Un long bip signale que l’appareil a bien
été enregistré.
Maintenant vous pouvez faire fonctionner cet appareil
depuis l’écran FUNCTION.
Si une série de bips retentit, recommencez toute la
procédure. Assurez-vous auparavant que
l’amplificateur est sous tension et que la
télécommande est bien dirigée vers l’amplificateur
durant l’opération.
20
Pour arrêter l’opération en cours
Touchez EXIT à l’étape 2 ou touchez CANCEL aux étapes 3 à 5.
Remarques
• Toutes les icônes n’apparaîtront pas lors de l’affectation
d’appareils de certaines marques.
• Certaines icônes peuvent ne pas fonctionner bien qu’elles
soient affichées lors de l’affectation d’appareils de certaines
marques.
FR
Page 46

Réglage de l’écran FUNCTION
Un maximum de 11 appareils peuvent être indiqués sur
l’écran FUNCTION. Seuls les appareils raccordés à
l’amplificateur apparaîtront sur cet écran.
1 Touchez SETUP.
L’écran SETUP apparaît.
2 Touchez FUNCTION HOOK UP.
L’écran FUNCTION HOOK UP apparaît.
2 Touchez DOWNLOAD.
L’écran DOWNLOAD apparaît.
Fonctionnement
3 Touchez l’écran pour sélectionner les données que
vous voulez importer et appuyez sur:
FUNCTION NAME: Noms des appareils raccordés
TUNER PRESET NAME: Noms des stations radio, etc.
mémorisées dans l’amplificateur.
CD MEMO: Titres des morceaux ou titres des disques,
etc. d’un changeur CD Sony (5/50/200 CD) raccordé
à l’amplificateur par un câble CONTROL A1.
3 Sélectionnez la fonction qui n’a pas besoin d’être
affichée et touchez NO.
Pour afficher d’autres options, utilisez la molette JOG
DIAL ou touchez 4 ou $ pour faire défiler les options
de la liste.
L’appareil sélectionné est réglé pour ne pas apparaître
sur l’écran SETUP.
Pour réafficher les appareils qui ont été masqués sur la liste
Touchez YES au lieu de NO à l’étape 3.
z
Les appareils qui ont été affectés (voir page 20) se règlent
automatiquement sur “YES”.
Importation des données de
l’amplificateur
Différents types de données peuvent être importées de
l’amplificateur.
Avant d’effectuer ces opérations, n’oubliez pas de mettre
l’amplificateur sous tension et de diriger la section émettrice/
réceptrice de la télécommande vers l’amplificateur. Utilisez aussi
la télécommande à environ 1 à 2 mètres de l’amplificateur.
1 Touchez SETUP.
L’écran SETUP apparaît.
L’importation des données commence et une barre de
progression apparaît.
Pendant l’importation, laissez la section émettrice/
réceptrice de la télécommande dirigée vers
l’amplificateur.
Quand vous touchez CANCEL, les données importées
avant que vous avez touché CANCEL sont sauvegardées.
Quand l’importation est terminée, l’écran
DOWNLOAD réapparaît. Un long bip signale que
l’importation est terminée.
Si une série de bips retentit, recommencez toute la
procédure. Assurez-vous auparavant que
l’amplificateur est sous tension et que la
télécommande est bien dirigée vers l’amplificateur
durant l’opération.
4 Répétez l’étape 3 pour importer d’autres données.
5 Touchez EXIT.
L’opération est terminée et l’écran SETUP apparaît.
21
FR
Page 47

Réglage des conditions de fonctionnement de la télécommande
Autre réglage
Fonctionnement
p Réglage de la position du panneau tactile
(LCD)
Ajustez la position de l’écran LCD s’il n’est pas bien centré.
1 Touchez TOUCH PANEL sur l’écran SETUP.
L’écran TOUCH PANEL ADJUSTMENT apparaît.
2 Touchez le centre de chacun des 4 points.
(Pour les détails, voir “Réglage du panneau tactile” à
la page 6.)
“Adjusted” apparaît un moment et un long bip est émis.
p Réglage de la fonction AUTO POWER
ON : Lorsqu’une fonction vidéo (DVD, etc.) est
sélectionnée, la télécommande envoie un certain
nombre de codes aux appareils AV Sony appropriés.
A ce moment, le téléviseur se règle
automatiquement sur le mode d’entrée VIDEO 1.
Exemple) Lorsque vous sélectionnez DVD, les
appareils se comportent de la façon suivante.
1 L’amplificateur se règle sur le mode de
fonctionnement du lecteur DVD.
2 Le téléviseur s’allume.
3 Le lecteur DVD s’allume.
4 Le téléviseur sélectionne automatiquement
l’entrée VIDEO 1.
OFF : Lorsqu’une fonction est sélectionnée, la code de
commande ne met que l’amplificateur en état de
fonctionnement.
p Changement de fonction du bouton SYSTEM/
STANDBY
ALL OFF: Mise hors tension de tous les appareils
audio/vidéo Sony.
ON/OFF: Mise sous et hors tension de l’amplificateur
seulement.
p Mise en ou hors service du son de
fonctionnement
Vous pouvez mettre en ou hors service le bip qui est
audible quand vous touchez le panneau tactile.
Touchez ON (bip) ou OFF (sans bip) dans BEEP:ON
OFF sur l’écran SETUP.
p Mise en ou hors service de l’avertisseur
Vous pouvez mettre en ou hors service l’avertisseur qui
est audible quand une erreur de communication a lieu.
Touchez ON (avertisseur) ou OFF (sans avertisseur)
dans ALARM:ON OFF sur l’écran SETUP.
p Rétablissement des réglages usine
Utilisez cette fonction pour annuler tous les réglages
effectués et rétablir les réglages usine.
Notez qu’une fois effacés, vos préréglages personnels ne
pourront pas être rétablis.
Avant d’effectuer cette opération, n’oubliez pas de mettre
l’amplificateur sous tension et de diriger la section émettrice/
réceptrice de la télécommande vers l’amplificateur.
1 Touchez ALL CLEAR sur l’écran SETUP.
2 Touchez OK.
* La commutation sur l’entrée VIDEO 1 peut ne pas s’effectuer
automatiquement sur certains téléviseurs Sony. En effet, ces
téléviseurs ne peuvent pas recevoir de codes de commande
immédiatement après leur mise sous tension.
FR
22
Page 48

Informations
Précautions d’utilisation
complémentaires
Télécommande
Ne laissez pas tomber la télécommande et ne la
soumettez-pas à de fortes vibrations, car elle risque d’être
endommagée.
Crayon tactile
Utilisez seulement le crayon tactile fourni avec la
télécommande ou le bout du doigt pour toucher le
panneau. L’utilisation de tout autre ustensile d’écriture,
par exemple un crayon ou un stylo, peut endommager le
panneau et perturber le fonctionnement de la
télécommande.
Consultez votre revendeur Sony si l’extrémité du crayon
tactile est endommagée ou si vous avez perdu votre
crayon tactile.
Informations complémentaires
Panneau tactile
Le panneau tactile (section d’affichage) est en verre. Ne
tordez pas le panneau tactile et ne mettez pas les coudes
ni des objets lourds dessus, car il pourrait se briser et les
fragments de verre causer des blessures.
Nettoyage de la télécommande
Nettoyez le coffret, le panneau et les commandes avec un
chiffon doux légèrement imprégné d’une solution
détergente neutre. N’utilisez pas de diluant, de benzine ni
d’alcool, car ils pourraient abîmer la surface de la
télécommande.
23
FR
Page 49

En cas de panne
Informations complémentaires
Si un des problèmes suivants se présente quand vous
utilisez la télécommande, référez-vous à ce guide pour le
résoudre. Si le problème persiste, consultez votre
revendeur Sony.
Impossible de faire fonctionner les appareils avec
la télécommande.
/ Vérifiez si les appareils et l’amplificateur sont
raccordés correctement.
/ La télécommande et l’amplificateur sont trop
éloignés.
/ Vérifiez si un objet ne se trouve pas entre la
télécommande et l’amplificateur.
/ Vérifiez si l’amplificateur est sous tension.
/ La section émettrice/réceptrice de la
télécommande n’est pas dirigée vers
l’amplificateur.
/ Les piles de la télécommande sont épuisées.
Remplacez-les toutes par des piles alcalines neuves
(voir page 7).
/ Une lampe fluorescente à onduleur se trouve près
de la télécommande ou de l’amplificateur. Eloignez
la télécommande de cette lampe.
/ Vérifiez si vous avez sélectionné la fonction
appropriée sur la télécommande.
/ Lorsque vous faites fonctionner un appareil d’une
autre marque que Sony qui n’a pas été programmé,
la télécommande peut ne pas fonctionner
correctement. Cela dépend de la marque et du
modèle.
Quand un lecteur CD, une platine à cassette ou
une platine MD est raccordé à l’amplificateur par
les prises S-LINK CONTROL A1, la commande
automatique ne fonctionne pas correctement.
/ Reprogrammez la télécommande (voir page 19).
Les fonctions et les modes de l’amplificateur ne
correspondent pas aux affichages de la
télécommande.
/ Vous n’avez pas effectué le réglage initial de
communication.
Utilisez la télécommande après avoir effectué le
réglage initial (voir page 6).
/ La télécommande n’était pas dirigée vers
l’amplificateur quand elle a été mise sous tension.
Touchez RELOAD et importez les données de
l’appareil (voir page 8).
/ Sélectionnez la fonction appropriée à l’aide de la
télécommande.
L’écran LCD n’apparaît pas.
/ L’écran LCD n’est pas allumé. Touchez le panneau
tactile.
/ Le contraste est trop clair ou trop sombre.
Utilisez la molette CONTRAST pour ajuster le
contraste de l’écran LCD (voir page 6).
24
FR
Page 50

Spécifications
Index
Système de fonctionnement
Panneau tactile à
cristaux liquides
Taille de l’écran à cristaux liquides
3,8 pouces
(256 x 200 points)
Type de cristaux liquides
Système à réflexion
(type monochrome)
Panneau tactile
Système à membrane
résistante
Type analogique
Alimentation Fonctionnement :
CC 6 V (piles
alcalines de
type AA)
Sauvegarde de la
mémoire : CC 3 V
(pile au lithium
CR2032)
Dimensions maximales extérieures
(largeur x hauteur x profondeur, parties
saillantes et commandes comprises)
160 x 111 x 46 mm
Poids 290 g (télécommande et
crayon tactile)
La conception et les spécifications
peuvent être modifiées sans préavis.
A, B
Affectation des appareils
raccordés 20
C, D
Champs sonores 15~19
E, F, G, H
Ecran FUNCTION 11, 12
réglage 20
Exploitation des appareils
raccordés
lecteur CD 13
enregistrement 14
Enregistrement 14
I, J, K
Importation des données de
l’amplificateur 19
L, M, N, O
Lecteur CD 13
P, Q
Panneau avant 9
Panneau arrière 10
Piles 5, 7
R
Réglage
de la télécommande 6
des conditions de
fonctionnement 19~22
de l’écran FUNCTION 20
de l’écran SETUP 19
Informations complémentaires
S, T, U, V, W, X, Y, Z
SOUND FIELD 15~19
25
FR
Page 51

Informations complémentaires
26
FR
Page 52

Informations complémentaires
27
FR
Page 53

Informations complémentaires
FR
Sony Corporation Printed in Japan
28
 Loading...