

Page 1
4-236-327-11(2)
Remote
Commander
Operating Instructions
Owner’s Record
The model and serial numbers are located on the rear panel. Record the serial number
in the space provided below. Refer to them whenever you call upon your Sony dealer
regarding this product.
Model No. Serial No.
RM-PP505
© 2001 Sony Corporation
Page 2

Precautions
About this manual
On safety
Should any solid object or liquid fall into the cabinet,
unplug the receiver and have it checked by qualified
personnel before operating it any further.
On operation
Before connecting other components, be sure to turn
off and unplug the receiver.
On cleaning
Clean the cabinet, panel and controls with a soft cloth
slightly moistened with a mild detergent solution. Do
not use any type of abrasive pad, scouring powder or
solvent such as alcohol or benzine.
If you have any question or problem
concerning your remote, please consult your
nearest Sony dealer.
The instructions in this manual are for model
RM-PP505. Check your model number by
looking at the lower right corner of the front
side.
2
Page 3
Before you use your
remote
Table of Contents
Check that you received the following item
with the remote:
R6 (size-AA) batteries (2)
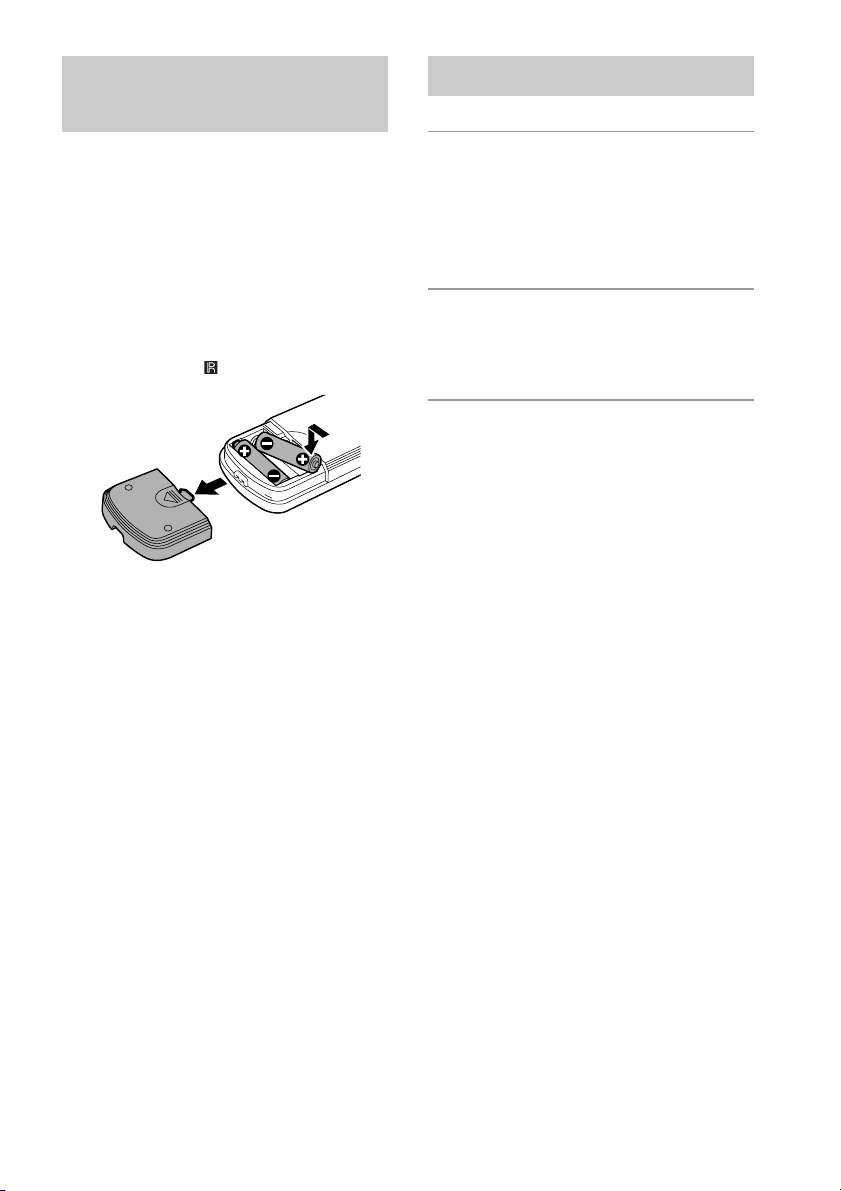
Inserting batteries into the
remote
Insert two R6 (size-AA) batteries with the +
and – properly oriented in the battery
compartment. When using the remote, point it
at the remote sensor
Tip
Under normal conditions, the batteries should last for
about 6 months. When the remote no longer operates
the receiver, replace both batteries with new ones.
Notes
• Do not leave the remote in an extremely hot or
humid place.
• Do not use a new battery with an old one.
• Do not expose the remote sensor of the receiver to
direct sunlight or lighting apparatuses. Doing so
may cause a malfunction.
• If you don’t use the remote for an extended period
of time, remove the batteries to avoid possible
damage from battery leakage and corrosion.
on the receiver.
Location of Parts and Basic
Remote Operations
Parts description ....................................4
Table of buttons that you can use to
control each component ..................9
Advanced Remote Operations
Programming the remote ..................... 10
Selecting the mode of the remote ........ 13
Additional Information
Troubleshooting...................................14
Specifications ...................................... 14
3
Page 4
Location of Parts and Basic Remote Operations
This chapter provides information on the
location of buttons and how to use them to
perform basic operations.
However, some functions explained in this
section may not work depending on the model
of the receiver.
For the functions of the receiver you purchased,
refer to the Operating Instructions supplied
with the receiver.
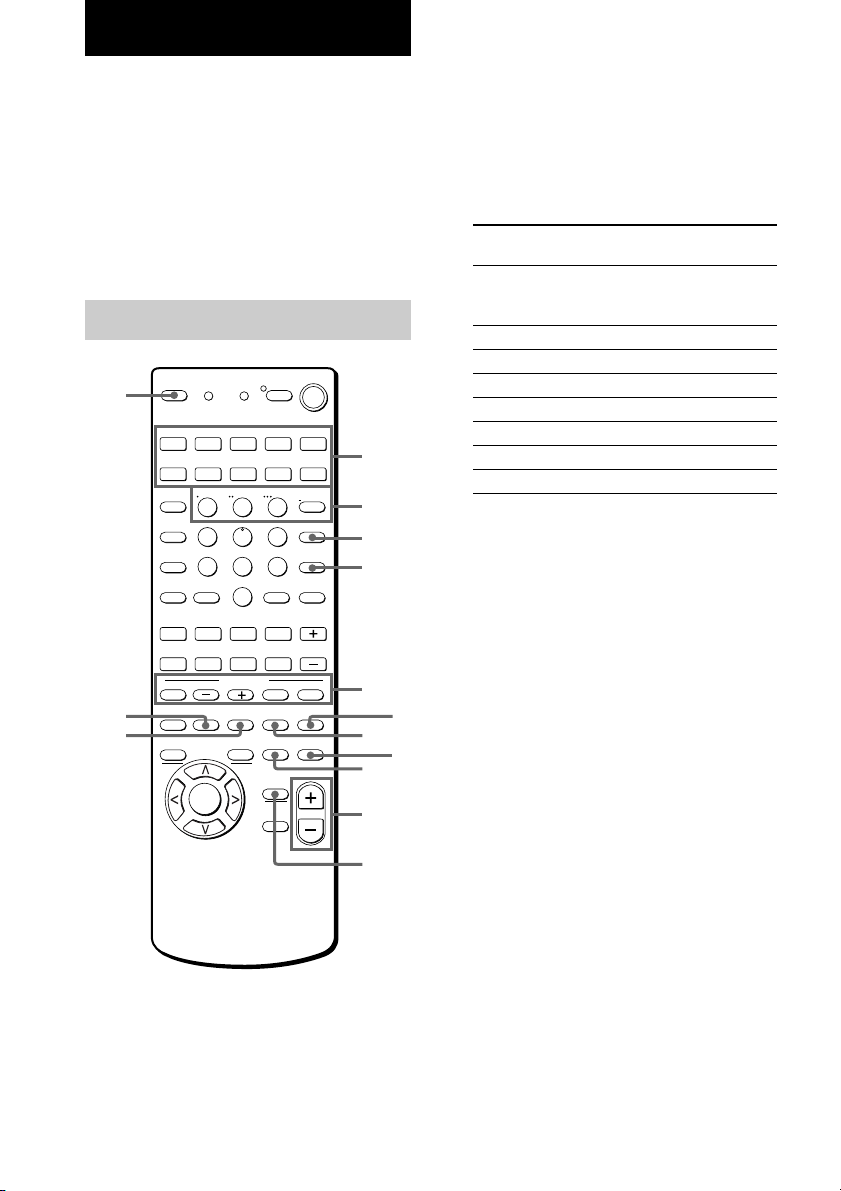
Parts description
? / 1
AV
? / 1
qf
qd
qs
SLEEP
VIDEO 1 VIDEO 2 VIDEO 3 DVD/LD TV/SAT
AUX
MD/TAPE CD/SACD TUNER PHONO
AV1 AV2 3RD
MONITOR
TV/VIDEO
SEARCH
MODE
WIDE
CLEAR
– /– –
D.TUNING
– SUB CH +
– VOL +
nN
O
A.F.D.
AV
DISPLAY
TITLE/
GUIDE
ENTER/
1
4
7
SHIFT
>10
/11 /10 /12
MODE
TEST
TONE
EXEC
USE MODE
2
5
8
0
POSITION SWAP
.Mm
MUTING
X
SOUND FIELD
NIGHT
MODE
AV
MENU
SYSTEM
STANDBY
3
6
9
ENTER
>
P IN P
x
2CH
EQ/
TONE
ON
SCREEN
MAIN
MENU
EXIT/
RETURN
2ND ROOM
(SOURCE)
INPUT MODE
AUDIO
SPLIT
ANT
TV/VTR
DISC
JUMP
D. SKIP/
CH/PRESET
PRESET
MULTI/2CH
A. DIRECT
MUTING
MASTER
VOL
1
2
3
4
5
6
7
8
9
0
1 Function buttons
Press one of the buttons to select the
component you want to use. When you
press a button, the receiver turns on. The
components are factory assigned to the
buttons as follows. When you want to
assign other components, program the
remote following the steps on page 10.
Button(s) Assigned
component(s)
VIDEO1 VCR (VTR mode 3)
VIDEO2 VCR (VTR mode 1)
VIDEO3 VCR (VTR mode 2)
DVD/LD DVD player
TV/SAT TV tuner
AUX —
MD/TAPE MD deck
CD/SACD CD player
TUNER Built-in tuner
PHONO Turntable
See the table on page 9 for information on
the buttons that you can use to control each
component.
Note that the function buttons are factoryset as described in the table above. If you
want to change the factory setting of the
buttons to match your particular
components, do the procedure
“Programming the remote” on page 10.
qa
4
Page 5

2 Remote mode buttons
Press to select the mode of the remote (page
13).
3 INPUT MODE button
Press to select the input mode.
4 AUDIO SPLIT button
Press to assign the audio input for each
function.
5 SOUND FIELD buttons
A.F.D. button
Press to set the receiver to automatically
select the appropriate sound field for the
input signal.
This button can be used only with receivers
that have digital inputs.
MODE +/– button
Press to select sound fields.
2CH button
Press to turn the sound field off and listen to
2 channel stereo sound.
Multi channnel source is also downmixed to
a 2 channel stereo sound.
PRESET button
Press to select CINEMA STUDIO A, B, or
C, etc.
6 MULTI/2CH A. DIRECT button
Press to select the multi channel input
sources.
7 EQ/TONE button
Press to turn the tone effect on or off.
Note that if you have adjusted the tone
using the MAIN MENU button and cursor
buttons, the adjusted tone will be produced
whenever you turn on the tone effect.
8 MUTING button
Press to mute the sound.
9 ON SCREEN button
Press to display the menus of the receiver
on the TV screen.
0 MASTER VOLUME +/– buttons
Press to adjust the volume level of all
speakers at the same time.
qa MAIN MENU button
Press to select the cursor mode of the
receiver (LEVEL, SURROUND, or EQ).
qs NIGHT MODE button
Press to select NIGHT MODE.
qd TEST TONE button
Press to output a test tone.
qf SLEEP button
Press repeatedly to activate the sleep
function and the duration which the receiver
turns off automatically.
continued
Location of Parts and Basic Remote Operations
5
Page 6

Parts description (continued)
? / 1
AV
? / 1
wl
SLEEP
wk
VIDEO 1 VIDEO 2 VIDEO 3 DVD/LD TV/SAT
AUX
MD/TAPE CD/SACD TUNER PHONO
AV1 AV2 3RD
MONITOR
TV/VIDEO
SEARCH
wj
wh
wg
wf
wd
ws
wa
MODE
WIDE
CLEAR
– /– –
D.TUNING
– SUB CH +
– VOL +
nN
O
A.F.D.
AV
DISPLAY
TITLE/
GUIDE
ENTER/
1
4
7
SHIFT
>10
/11 /10 /12
MODE
TEST
TONE
EXEC
USE MODE
2
5
8
0
POSITION SWAP
.Mm
MUTING
X
SOUND FIELD
NIGHT
MODE
AV
MENU
SYSTEM
STANDBY
3
6
9
ENTER
>
P IN P
x
2CH
EQ/
TONE
ON
SCREEN
MAIN
MENU
EXIT/
RETURN
2ND ROOM
(SOURCE)
INPUT MODE
AUDIO
SPLIT
ANT
TV/VTR
DISC
JUMP
D. SKIP/
CH/PRESET
PRESET
MULTI/2CH
A. DIRECT
MUTING
MASTER
VOL
qg
qh
qj
qk
ql
w;
qg AV ?/1 switch
Press to turn the selected audio and video
components under the function button, on or
off.
If you press the ?/1 switch at the same
time, it will turn off the main component
and other Sony audio/video components
(SYSTEM STANDBY).
Note
The function of the AV ?/1 switch changes
automatically each time you press the function
buttons (1). Depending on the component, the
above operation may not be be possible or may
operate differently than described.
qh ANT TV/VTR / DISC button*
Press repeatedly to select the signal to be
output from the antenna terminal of the
VCR (TV signal or video signal). With a
CD player, press to select discs (mega
storage CD player only).
qj ENTER button
Press to enter the selection.
qk D.SKIP/CH/PRESET +/– buttons*
If you selected tuner:
Press to scan and select preset stations.
If you selected TV, VCR, or SAT:
Press to select preset channels.
If you selected CD player:
Press to skip discs (CD player with multidisc changer only).
ql AV MENU button
Press to display the menus of the VCR,
satellite tuner, or DVD.
w; EXIT/RETURN button
After pressing the MAIN MENU, AV
MENU, or TITLE GUIDE button, press to
return to the previous menu or exit the
menu.
* The function of these buttons switch automatically
each time you press the function buttons (1). The
above explanation is intended to serve as an
example only. Therefore, depending on the
component, the above operation may not be
possible or may operate differently than described.
6
Page 7

wa Cursor buttons (U/u/I/i), ENTER/
EXEC button
After pressing the MAIN MENU, AV
MENU, or TITLE/GUIDE button, use the
cursor buttons to make specific settings,
then press the ENTER/EXEC button to
enter the selection.
ws TITLE/GUIDE button*
Press to display DVD titles or guide menus.
wd AV DISPLAY button
Press to select the information displayed on
the TV screen.
wf Operation buttons*
The following table describes the
component operated by each button and the
function of the buttons. See the table on
page 10 for information on the buttons that
you can use to control each component.
Button(s)
./>
m/M
n
N
X
x
Function
Skips tracks.
Fast forwards or rewinds.
Searches tracks in the forward or
backward direction.
Starts play on the reverse side of
the cassette.
Starts play. (Starts play on the
front side of the cassette.)
Pauses play or recording or starts
recording when the component is
in recording standby.
Stops play.
wg SHIFT / >10 button*
If you selected tuner:
Press repeatedly to select a memory page
for presetting radio stations or tuning to
preset stations.
If you selected VCR, TV, LD player, tape
deck, MD deck, or CD player:
Press before inputting a channel or track
number of eleven or higher.
wh CLEAR / -/-- / D.TUNING button*
If you selected DVD player:
Press if you made a mistake when you press
the numeric buttons.
If you selected TV or VCR:
Press to select the channel entry mode,
either one or two digit.
wj SEARCH MODE button
Press to select the search mode of DVD
player.
wk Indicator*
Lights up whenever any button on the
remote is pressed.
wl USE MODE button
Use to program the remote.
* The function of these buttons switch automatically
each time you press the function buttons (1). The
above explanation is intended to serve as an
example only. Therefore, depending on the
component, the above operation may not be
possible or may operate differently than described.
Location of Parts and Basic Remote Operations
continued
7
Page 8

Parts description (continued)
TV operation
After pressing the MONITOR button, the
button lights up and you can use the following
buttons to operate TV.
? / 1
AV
? / 1
SLEEP
VIDEO 1 VIDEO 2 VIDEO 3 DVD/LD TV/SAT
AUX
MD/TAPE CD/SACD TUNER PHONO
AV1 AV2 3RD
MONITOR
r;
TV/VIDEO
el
SEARCH
ek
ej
eh
MODE
WIDE
CLEAR
– /– –
D.TUNING
– SUB CH +
– VOL +
nN
O
A.F.D.
AV
DISPLAY
TITLE/
GUIDE
ENTER/
1
4
7
SHIFT
>10
/11 /10 /12
MODE
TEST
TONE
EXEC
USE MODE
2
5
8
0
POSITION SWAP
.Mm
MUTING
X
SOUND FIELD
NIGHT
MODE
AV
MENU
SYSTEM
STANDBY
3
6
9
ENTER
>
P IN P
x
2CH
EQ/
TONE
ON
SCREEN
MAIN
MENU
EXIT/
RETURN
2ND ROOM
(SOURCE)
INPUT MODE
AUDIO
SPLIT
ANT
TV/VTR
DISC
JUMP
D. SKIP/
CH/PRESET
PRESET
MULTI/2CH
A. DIRECT
MUTING
MASTER
VOL
e;
ea
es
ef
ed
eg
e; Numeric buttons (1 to 0)*
Press to select channel numbers.
ea JUMP button
Press to toggle between the previous and the
current channels.
es POSITION button
Press to change the position of the small
picture**.
ed SWAP button
Press to swap the small and large
pictures**.
ef P IN P button
Press to activate the picture-in-picture
function**.
eg MUTING button
Press to mute the sound.
eh VOLUME +/– buttons
Press to adjust the volume of TV.
ej SUB CH +/– buttons
Press to change the sub channel selection.
ek WIDE button
Press to switch the TV to the wide mode.
el TV/VIDEO button
Press to select the TV input signal.
r; MONITOR button
Press to active TV control buttons. The
button lights up. Press again to restore
original category.
* The function of these buttons switch automatically
each time you press the function buttons (1). The
above explanation is intended to serve as an
example only. Therefore, depending on the
component, the above operation may not be
possible or may operate differently than described.
**Only with Sony TVs with the picture-in-picture
function.
8
Page 9

Table of buttons that you can use to control each component
Component CD DAT MD Tape LD VCR TV
player deck deck deck player
(A and B)
Button(s)
AV ?/1 zzz zzzzzz
Numeric buttons zzzzzzzzzz
SHIFT >10 z zzzzz z
nz
VOL – z
O (Return) zzz
N zzzzzz zz
VOL + z
X zzzzzz zz
MUTING z
x zzzzzz zz
./> z z z z** zz zz
m/M zzzzzz zz
SUB CH +/– z
D.SKIP z* zz z*
CH/PRESET +/– zzz
ANT TV/VTR z
DISC z* z
CLEAR z
-/-- D.TUNING zz
AV MENU zzz
TITLE/GUIDE zz
Cursor buttons zzz
ENTER/EXEC zzz
EXIT/RETURN zz zzz
AV DISPLAY zzzzzz
TV/VIDEO z
SEARCH MODE z
Satellite Video
tuner/ CD
Cable box player
DVD
player
Location of Parts and Basic Remote Operations
* With a multi-disc changer only.
** B deck only.
9
Page 10

Advanced Remote Operations
This chapter describes how to change the
factory setting of a function button and how to
set the remote to control non-Sony
components.
Programming the remote
You can program the remote to control nonSony components by changing the code. Once
the control signals have been memorized, you
can use those components as part of your
system.
Furthermore, you can also program the remote
for Sony components that the remote is unable
to control. Note that the remote can only
control components that accept infrared
wireless control signals.
Note
When you assign a component to the MONITOR
button, you can operate the programmed component
without changing the function of the receiver.
1 Press AV ?/1 while pressing down USE
MODE.
The indicator lights.
2 Press the function button (including
MONITOR) for the component you want
to control.
For example, if you are going to control a
CD player, press CD.
3 Press the numeric buttons to enter the
numeric code (or one of the codes if
more than one code exists)
corresponding to the component and
the maker of the component you want
to control.
See the tables on pages 11 and 12 for
information on the numeric code(s)
corresponding to the component and the
maker of the component (the first digit and
the last two digits of the numeric code
correspond to the category and the maker’s
code respectively.)
4 Press ENTER.
Once the numeric code has been verified,
the indicator slowly flashes twice and the
remote automatically exits the programming
mode.
5 Repeat steps 1 to 4 to control other
components.
To cancel programming
Press USE MODE during any step. The remote
automatically exits the programming mode.
Tips
• If programming is unsuccessful, check the
following:
– If the indicator does not light up in step 1, the
batteries are weak. Replace both batteries.
– If the indicator flashes 4 times in quick
succession while entering the numeric code, an
error has occurred. Start again from step 1.
• To activate the function after programming, press
the programmed button to activate the function you
want.
Notes
• The indicator turns off while a valid button is
pressed.
• In step 2, if several function buttons are pressed,
only the last pressed button is valid.
• In step 3, if a function button is pressed, the new
function is selected and the programming procedure
returns to the beginning of step 3.
• For the numeric codes, only the first three numbers
entered are valid.
To clear the memory of the remote
To clear all programmed and learned signals,
do the following to reset the remote to factory
settings.
Press ?/1, AV ?/1 and MASTER VOL – at
the same time.
The indicator flashes 3 times, then goes off.
10
Page 11

The numeric codes
corresponding to the
component and the maker of
the component
Use the numeric codes in the tables below to
control non-Sony conponents and also Sony
components that the remote is normally unable
to control. Since the remote signal that a
component accepts differs depending on the
model and year of the component, more than
one numeric code may be assigned to a
component. If you fail to program your remote
using one of the codes, try using other codes.
Notes
• The numeric codes are based on the latest
information available for each brand. There is a
chance, however, that your component will not
respond to some or all of the codes.
• All of the functions on this remote may not be
available when used with your particular
component.
To control a CD player
Maker Code(s)
SONY 101, 102, 103
DENON 104, 123
JVC 105, 106, 107
KENWOOD 108, 109, 110
MAGNAVOX 111, 116
MARANTZ 116
ONKYO 112, 113, 114
PANASONIC 115
PHILIPS 116
PIONEER 117
TECHNICS 115, 118, 119
YAMAHA 120, 121, 122
To control a DAT deck
Maker Code(s)
SONY 203
PIONEER 219
To control an MD deck
Maker Code(s)
SONY 301
DENON 302
JVC 303
KENWOOD 304
To control a tape deck
Maker Code(s)
SONY 201, 202
DENON 204, 205
KENWOOD 206, 207, 208, 209
NAKAMICHI 210
PANASONIC 216
PHILIPS 211, 212
PIONEER 213, 214
TECHNICS 215, 216
YAMAHA 217, 218
To control an LD player
Maker Code(s)
SONY 601, 602, 603
PIONEER 606
To control a video CD player
Maker Code(s)
SONY 605
Advanced Remote Operations
continued
11
Page 12

Programming the remote (continued)
To control a VCR
Maker Code(s)
SONY 701, 702, 703, 704, 705, 706
AIWA 710, 750, 757, 758
AKAI 707, 708, 709, 759
BLAUPUNKT 740
EMERSON 711, 712, 713, 714, 715,
716, 750
FISHER 717, 718, 719, 720
GENERAL ELECTRIC 721, 722, 730
GOLDSTAR 723, 753
GRUNDIG 724
HITACHI 722, 725, 729, 741
ITT/NOKIA 717
JVC 726, 727, 728, 736
MAGNAVOX 730, 731, 738
MITSUBISHI/MGA 732, 733, 734, 735
NEC 736
PANASONIC 729, 730, 737, 738, 739, 740
PHILIPS 729, 730, 731
PIONEER 729
RCA/PROSCAN 722, 729, 730, 731, 741, 747
SAMSUNG 742, 743, 744, 745
SANYO 717, 720, 746
SHARP 748, 749
TELEFUNKEN 751, 752
TOSHIBA 747, 755, 756
ZENITH 754
To control a DVD player
Maker Code(s)
SONY 401
PANASONIC 402, 406
PHILIPS 407
PIONEER 403
TOSHIBA 404
DENON 405
To control a TV
Maker Code(s)
SONY 501
DAEWOO 504, 505, 506, 507, 515, 544
FISHER 508
GOLDSTAR 503, 511, 512, 515, 534, 544
GRUNDIG 517, 534
HITACHI 513, 514, 515, 544
ITT/NOKIA 521, 522
JVC 516
MAGNAVOX 503, 518, 544
MITSUBISHI/MGA 503, 519, 544
NEC 503, 520, 544
PANASONIC 509, 524
PHILIPS 515, 518
PIONEER 509, 525, 526, 540
RCA/PROSCAN 510, 527, 528, 529, 544
SAMSUNG 503, 515, 531, 532, 533,
534, 544
SANYO 508, 545
SHARP 535
TELEFUNKEN 523, 536, 537, 538
THOMSON 530, 537, 539
TOSHIBA 535, 540, 541
ZENITH 542, 543
To control a satellite tuner or cable
box
Maker Code(s)
SONY 801, 802, 803
JERROLD/G.I. 806, 807, 808, 809, 810,
811, 812, 813, 814
PANASONIC 818
RCA 804, 805
S. ATLANTA 815, 816, 817
12
Page 13

Selecting the mode of the remote
Set the remote mode using the USE MODE
button (wl) and the remote mode buttons (2).
Selecting the command mode
You can switch the command mode (AV1 or
AV2) of the remote. If the command mode of
the receiver and the remote is different, you
cannot use the remote to operate the receiver.
Press 1 (AV1) (or 2 (AV2)) while pressing
down USE MODE.
The indicator lights once (twice for AV2), then
the command mode switches.
Setting to the 2nd room mode.
You can use the remote to select the function
for the 2nd room (2nd room mode). You can
use the function buttons only for the 2nd room.
Press 2ND ROOM while pressing down
USE MODE.
The indicator lights for a while, then the mode
switches to the 2nd room mode.
Tips
• If you press a function button while pressing down
2ND ROOM, you can select the function for the
2nd room even though the mode is not set to the
2nd room mode.
• If you press 2ND ROOM only, you can output the
source signal of the current function of the receiver
to the amplifier in the 2nd room.
Setting to the 3rd room mode.
You can use the remote to select the function
for the 3rd room and adjust the volume in the
3rd room (3rd room mode). During 3rd room
mode, you can adjust the volume of speakers in
another room when you set the receiver to
output the sound using SPEAKER terminals.
You can use the function buttons and
MASTER VOL +/– buttons only.
Press 3 (3RD) while pressing down USE
MODE.
The indicator lights 3 times, then the mode
switches to the 3rd room mode.
To check the mode of the remote
Press USE MDOE. You can check the remote
by the indicator.
Mode Indicator lights
AV1 once
AV2 twice
2nd room once (for a while)
3rd room 3 times
Advanced Remote Operations
13
Page 14

Additional Information
Troubleshooting
If you experience any of the following
difficulties while using the receiver, use this
troubleshooting guide to help you remedy the
problem. Should any problem persist, consult
your nearest Sony dealer.
The remote does not function.
• Check the mode of the remote (page 13).
• Point the remote at the remote sensor on the
receiver.
• Remove any obstacles in the path between the
remote and the receiver.
• Replace both batteries in the remote with new
ones, if they are weak.
• Make sure you select the correct function on the
remote.
Specifications
General
Remote control system
Infrared control
Power requirements 3 V DC with two R6
(size-AA) batteries
Dimensions 210 x 68 x 25 mm
Mass (approx.) 150 g excluding batteries
Design and specifications are subject to change
without notice.
14
Page 15

Advanced Remote Operations
15
Page 16

Sony Corporation Printed in Malaysia
16
 Loading...