

Page 1
2-186-506-12(1)
Video Cassette Recorder/
DVD Recorder
Operating Instructions
RDR-VX500
For customers in the U.S.A
Owner’s Record
The model and serial numbers are located at the rear of the unit.
Record the serial number in the space provided below. Refer to them
whenever you call upon your Sony dealer regarding this product.
Model No. RDR-VX500
Serial No.______________
© 2004 Sony Corporation
For Customers in Canada
If this prod uct is not work ing pro perly, please c all 1- 877-602- 2008 f or
Peace of Mind Warranty Replacement service.
For other product related questions please contact our Customer
Information Service Centre at 1-877-899-7669 or write to us at:
Customer Information Service 115 Gordon Baker Road, Toronto,
Ontario, M2H 3R6
Page 2
WARNING
To prevent fire or shock hazard,
do not expose the unit to rain or
moisture.
To avoid electrical shock, do not
open the cabinet. Refer servicing
to qualified personnel only.
The AC power cord must be
changed only at a qualified
service shop only.
This applia n ce is classifi ed as a
CLASS 1 LASER product. The
CLASS 1 LASER PRODUCT
MARKING is located on the rear
exterior.
CAUTION
The use of optical instruments with this
product will increase eye hazard. As
the laser beam used in this VCR-DVD
recorder is harmful to eyes, do not
attempt to disassemble the cabinet.
Refer servicing to qualified personnel
only.
This symbol is intended
to alert the user to the
presence of uninsulated
“dangerous voltage”
enclosure that may be of sufficient
magnitude to constitute a risk of
electric shock to persons.
instructions in the literature
accompanying the appliance.
within the product’s
This symbol is intended
to alert the user to the
presence of important
operating and
maintenance (servicing)
CAUTION
TO PREVENT ELECTRIC SHO CK ,
MATCH WIDE BLADE OF PLUG
TO WIDE SLOT, FULLY INSERT.
CAUTION
You are cautioned that any change or
modifications not expressly approved
in this manual could void your
authority to operate this equipment.
Note
This equipment has been tested and
found to comply with the limits for a
Class B digital device, pursuant to Part
15 of the FCC Rules. These limits are
designed to provide reasonable
protection against harmful interference
in a residential installation. This
equipment generates, uses, and can
radiate radio frequency energy and, if
not installed and used in accordance
with the instructions, may cause
harmful interference to radio
communications. However, there is no
guarantee that interference will not
occur in a particular installation. If this
equipment does cause harmful
interference to radio or television
reception, which can be determined by
turning the equipment off and on, the
user is encouraged to try to correct the
interference by one or more of the
following measures:
– Reorient or relocate the receiving
antenna.
– Increase the separation between the
equipment and receiver.
– Connect the equipment into an outlet
on a circuit different from that to
which the receiver is connected.
– Consult the dealer or an experienced
radio/TV technician for help.
VCR Plus+ and PlusCode are
registered trademarks of Gemstar
Development Corporation. The VCR
Plus+ system is manufactured under
license from Gemstar Development
Corporation.
2
Page 3

Precautions
On safety
Should any solid object or liquid fall
into the cabinet, unplug the recorder
and have it checked by qualified
personnel before operating it any
further.
On power sources
• Operate the recorder only on
120 V AC, 60 Hz.
• The recorder is not disconnected
from the AC power source as l ong
as it is connected to the wall outlet,
even if the recorder it self has bee n
turned off.
• If you are not going to use the
recorder for a long time, be sure to
disconnect the recorder from the
wall outlet. To disconnect the AC
power cord, grasp the plug itself;
never pull the cord.
On placement
• Place the recor der in a location
with adequate ventilation to
prevent heat build-up in the
recorder.
• If the recorder is brought direct ly
from a cold to a warm lo ca tion,
moisture may condense inside the
recorder and cause damage to the
video head, tape, and the optical
block. When you first install the
recorder, or when you move it
from a cold to a warm lo ca tion,
wait for about three hours before
operating the recorder.
• Do not place the recorder on a soft
surface su ch as a rug that mi g ht
block the ventilation holes.
• Do not place the recorder in a
confined space such as a bookshelf
or similar unit.
• Do not place the recorder in a
location near heat sources, or in a
place subject to direct sunlight,
excessive dust, or mechanical
shock.
• Do not place the recorder in an
inclined position. It is designed to
be operated in a horizontal
position only.
• Keep the recorder, discs, and
cassettes away from equipment
with strong magnets , suc h a s
microwave ovens, or large
loudspeakers.
• Do not place heavy objects on the
recorder.
• To prevent fire or shock hazard, do
not place objects filled with
liquids, such as vases, on the
apparatus.
On recording
• Contents of the recording cannot
be compensated for if the
recording or playback is not made
due to a malfunction of the
recorder, disc, etc.
• Make trial recordings before
making the actual recording.
Copyrights
• Television programs, films, video
tapes, discs, and other mate r ials
may be copyrighted. Unauthorized
recording of such material may be
contrary to the provisions of the
copyright laws. Also, use of this
recorder with ca b le te levision
transmission may require
authorization from the cable
television transmitter and/or
program owner.
• This product incorporates
copyright protection technology
that is protected by U.S. patents
and other intellectual property
rights. Use of this copyright
protection technology must be
authorized by Macrovision, and is
intended for home and other
limited viewing uses only unless
otherwise authorized by
Macrovision. Reverse engineering
or disassembly is prohibited.
Hookups and Settings __________
Basic Operation _______________
DVD Recording________________
Playing Discs _________________
VCR Recording ________________
Playing VHS Tapes _____________
DVD Editing __________________
Dubbing (TAPE y DV D)________
DV Dubbing (DV t DVD) _______
Settings and Adjustments _______
Additional Information__________
3
Page 4
Copy guard function
Since the recorder has a copy guard
function, programs received through
an external tuner (not supplied) may
contain copy protection signals
(copy guard function) and as such
may not be recordable, depending
on the type of signal.
IMPORTANT NOTICE
Caution: This recorder is capable
of holding a still video image or
on-screen display image on your
television screen indefinitely. If
you leave the still video image or
on-screen display image displayed
on your TV for an extended period
of time you risk permanent
damage to your television scre e n.
Plasma display panels and
projection televisions are
especially susceptible to this.
If you have any questions or
problems concerning your recorder,
please consult your nearest Sony
dealer.
IMPORTANT SA FETY
INSTRUCTIONS
1 Read these instructions.
2 Keep these instruction s.
3 Heed all warnings.
4 Follow all instruc tions.
5 Do not use this apparatus near
water.
6 Clean only with dry cloth.
7 Do not block any ventilation
openings. Install in accordance
with the manufacturer’s
instructions.
8 Do not install near any heat
sources such as radiators, heat
registers, stoves, or other
apparatus (including amplifiers)
that produce heat.
9 Do not defeat the safety purpose
of the polarized or groundingtype plug. A polarized plug has
two blades with one wider than
the other. A grounding type plug
has two blades and a third
grounding prong. The wide
blade or the third prong are
provided for your safety. If the
provided plug does not fit into
your outlet, consult an
electrician for replacement of
the obsolete outlet.
10 Protect the p ower cord from
being walked on or pinched
particularly at plugs,
convenience receptacl es, and the
point where they exit from the
apparatus.
11 Only use attachments/
accessories speci fied by the
manufacturer.
12 Use only with the cart, stand,
tripod, bracket, o r table specified
by the manufacturer, or sold
with the apparatus. When a cart
is used, use caution when
moving the cart/appar at us
combination to av oid injury
from tip-over.
13 Unplug this apparatus during
lightning storms or when unused
for long periods of time.
14 Refer all servicing to qua lified
service personnel. Servic ing is
required when the apparatus has
been damaged in any way, such
as power-supply cord or plug is
damaged, liquid has been spilled
or objects have fallen into the
apparatus, the apparatus has
been exposed to rain or
moisture, does not operate
normally, or has been dropped.
4
Page 5
About this manual
• Instructions in this manua l
describe the controls on the
remote. You can also use the
controls on the recorder if they
have the same or similar names as
those on the remote.
• The on-screen display illustrations
used in this ma nual may not match
the graphics displayed on your TV
screen.
• The explanations regarding di sc s
in this manual ref er to discs
created on this recorder. The
explana ti ons do not ap pl y t o di sc s
that are created on oth er reco rder s
and played back on this recorder.
Icon Meaning
+
RW
-
RWVR
-
RW
+
-
DVD
Video
R
R
Functions available for DVD+RWs
Functions available for DVD-RWs in VR (Video
Recording) mode
Function s a va il ab le f or DVD -R Ws i n vi de o mo de
Functions available for DVD+Rs
Functions available for DVD-Rs
Functions available for DVD VIDEOs
Functions available for VIDEO CDs, Super
VCD
VCDs or CD-Rs/CD-RWs in video CD format or
Super VCD format
CD
DATA CD
Functions available for music CDs or CD-Rs/CDRWs in music CD format
Functions available for DATA CDs (CD-Rs/CDRWs containing MP3
* audio tracks or JPEG files)
Functions available for VHS VIDEOs
* MP3 (MPEG1 Audio Layer 3) is a standard format defined by ISO/MPEG
which compresses audio data.
5
Page 6

Table of Contents
WARNING . . . . . . . . . . . . . . . . . . . . . . . . . . . . . . . . . . . . . . . . . . . . . . . . . . . . . . . . . . .2
Precautions . . . . . . . . . . . . . . . . . . . . . . . . . . . . . . . . . . . . . . . . . . . . . . . . . . . . . . . . . .3
Ways to Use Your Video Cassette Recorder/DVD Recorder . . . . . . . . . . . . . . . . . . . .8
Quick Guide to DVD Disc Types . . . . . . . . . . . . . . . . . . . . . . . . . . . . . . . . . . . . . . . . .10
Recordable and playable VHS tapes . . . . . . . . . . . . . . . . . . . . . . . . . . . . . . . . . . . . .14
Hookups an d Settings . . . . . . . . . . . . . . . . . . . . . . . . . . . . . . . . . . . . . 15
Hooking Up the Recorder . . . . . . . . . . . . . . . . . . . . . . . . . . . . . . . . . . . . . . . . . . . . . .15
Step 1: Unpacking . . . . . . . . . . . . . . . . . . . . . . . . . . . . . . . . . . . . . . . . . . . . . . . . . . . .15
Step 2: Connecting the Antenna Cable . . . . . . . . . . . . . . . . . . . . . . . . . . . . . . . . . . . .15
Step 3: Connecting to Your TV . . . . . . . . . . . . . . . . . . . . . . . . . . . . . . . . . . . . . . . . . .18
Step 4: Connecting to Your AV/Amplifier (Receiver). . . . . . . . . . . . . . . . . . . . . . . . . .23
Step 5: Connecting the Power Cord . . . . . . . . . . . . . . . . . . . . . . . . . . . . . . . . . . . . . .26
Step 6: Preparing the Remote . . . . . . . . . . . . . . . . . . . . . . . . . . . . . . . . . . . . . . . . . . .26
Step 7: Easy Setup . . . . . . . . . . . . . . . . . . . . . . . . . . . . . . . . . . . . . . . . . . . . . . . . . . .30
Setting Up the VCR Plus+® System . . . . . . . . . . . . . . . . . . . . . . . . . . . . . . . . . . . . . .32
Connecting Another VCR or Similar Device . . . . . . . . . . . . . . . . . . . . . . . . . . . . . . . .34
Basic Opera tion . . . . . . . . . . . . . . . . . . . . . . . . . . . . . . . . . . . . . . . . . 37
Playing a DVD Disc or VHS Tape . . . . . . . . . . . . . . . . . . . . . . . . . . . . . . . . . . . . . . . .37
Recording a Program to a DVD Disc . . . . . . . . . . . . . . . . . . . . . . . . . . . . . . . . . . . . .38
Recording a Program to a VHS Tape . . . . . . . . . . . . . . . . . . . . . . . . . . . . . . . . . . . . .39
Using the On-Screen Menus . . . . . . . . . . . . . . . . . . . . . . . . . . . . . . . . . . . . . . . . . . . .40
Using the Title List . . . . . . . . . . . . . . . . . . . . . . . . . . . . . . . . . . . . . . . . . . . . . . . . . . .42
Using the DVD Disc Setting Displays . . . . . . . . . . . . . . . . . . . . . . . . . . . . . . . . . . . . .43
Checking the Play Information and Playing Time . . . . . . . . . . . . . . . . . . . . . . . . . . . . 45
Changing the Name of a Recorded Program (Title Input) . . . . . . . . . . . . . . . . . . . . .46
DVD Recording . . . . . . . . . . . . . . . . . . . . . . . . . . . . . . . . . . . . . . . . . . 47
Before Recording . . . . . . . . . . . . . . . . . . . . . . . . . . . . . . . . . . . . . . . . . . . . . . . . . . . .47
DVD Recording without the Timer . . . . . . . . . . . . . . . . . . . . . . . . . . . . . . . . . . . . . . .48
DVD Timer Recording (Standard/VCR Plus+) . . . . . . . . . . . . . . . . . . . . . . . . . . . . . .50
Recording from Connected Equipment with a Timer (Synchro Rec) . . . . . . . . . . . . .53
Checking/Changing/Canceling DVD Timer Settings (Timer List) . . . . . . . . . . . . . . . . 55
Recording from Connected Equipment without a Timer . . . . . . . . . . . . . . . . . . . . . . .56
Playing Discs . . . . . . . . . . . . . . . . . . . . . . . . . . . . . . . . . . . . . . . . . . . 57
Playing . . . . . . . . . . . . . . . . . . . . . . . . . . . . . . . . . . . . . . . . . . . . . . . . . . . . . . . . . . . .57
Searching for a Title/Chapter/Track, etc. . . . . . . . . . . . . . . . . . . . . . . . . . . . . . . . . . .62
Playing MP3 Audio Tracks . . . . . . . . . . . . . . . . . . . . . . . . . . . . . . . . . . . . . . . . . . . . .63
Playing JPEG Image Files . . . . . . . . . . . . . . . . . . . . . . . . . . . . . . . . . . . . . . . . . . . . .64
6
Page 7

VCR Recording . . . . . . . . . . . . . . . . . . . . . . . . . . . . . . . . . . . . . . . . . . 67
Before Recording . . . . . . . . . . . . . . . . . . . . . . . . . . . . . . . . . . . . . . . . . . . . . . . . . . . .67
VCR Recording without the Timer . . . . . . . . . . . . . . . . . . . . . . . . . . . . . . . . . . . . . . . 67
VCR Timer Recording (Standard/VCR Plus+) . . . . . . . . . . . . . . . . . . . . . . . . . . . . . . 69
Recording from Connected Equipment with a Timer (Synchro Rec) . . . . . . . . . . . . .72
Checking/Changing/Canceling VCR Timer Settings (Timer List) . . . . . . . . . . . . . . . . 74
Recording from Connected Equipment without a Timer . . . . . . . . . . . . . . . . . . . . . . . 75
Playing VHS Tapes . . . . . . . . . . . . . . . . . . . . . . . . . . . . . . . . . . . . . . . 76
Playing . . . . . . . . . . . . . . . . . . . . . . . . . . . . . . . . . . . . . . . . . . . . . . . . . . . . . . . . . . . .76
Searching Using Various Functions . . . . . . . . . . . . . . . . . . . . . . . . . . . . . . . . . . . . . .79
Selecting the sound during playback . . . . . . . . . . . . . . . . . . . . . . . . . . . . . . . . . . . . . 80
DVD Editing . . . . . . . . . . . . . . . . . . . . . . . . . . . . . . . . . . . . . . . . . . . . 81
Before Editing . . . . . . . . . . . . . . . . . . . . . . . . . . . . . . . . . . . . . . . . . . . . . . . . . . . . . . .81
Editing a Title . . . . . . . . . . . . . . . . . . . . . . . . . . . . . . . . . . . . . . . . . . . . . . . . . . . . . . . 82
Creating a Playlist . . . . . . . . . . . . . . . . . . . . . . . . . . . . . . . . . . . . . . . . . . . . . . . . . . . . 84
Editing a Playlist . . . . . . . . . . . . . . . . . . . . . . . . . . . . . . . . . . . . . . . . . . . . . . . . . . . . . 86
Dubbing (TAPE y DVD) . . . . . . . . . . . . . . . . . . . . . . . . . . . . . . . . . . . 89
Dubbing from a Video to a DVD . . . . . . . . . . . . . . . . . . . . . . . . . . . . . . . . . . . . . . . . .89
Dubbing from a DVD to a Video . . . . . . . . . . . . . . . . . . . . . . . . . . . . . . . . . . . . . . . . .91
DV Dubbing (DV t DVD) . . . . . . . . . . . . . . . . . . . . . . . . . . . . . . . . . . . 93
Before DV Dubbing . . . . . . . . . . . . . . . . . . . . . . . . . . . . . . . . . . . . . . . . . . . . . . . . . . . 93
Connecting a Digital Video Camera to the DV IN Jack . . . . . . . . . . . . . . . . . . . . . . .93
Dubbing from a DV Format Tape to a DVD . . . . . . . . . . . . . . . . . . . . . . . . . . . . . . . . 94
Settings an d Adjustment s . . . . . . . . . . . . . . . . . . . . . . . . . . . . . . . . . . . 96
Using the Setup Displays . . . . . . . . . . . . . . . . . . . . . . . . . . . . . . . . . . . . . . . . . . . . . . 96
Antenna Reception Setting (Tuner Preset) . . . . . . . . . . . . . . . . . . . . . . . . . . . . . . . . . 97
Clock Setting (Clock Set) . . . . . . . . . . . . . . . . . . . . . . . . . . . . . . . . . . . . . . . . . . . . . . 99
Video Settings (Video) . . . . . . . . . . . . . . . . . . . . . . . . . . . . . . . . . . . . . . . . . . . . . . . 100
Audio Settings (Audio) . . . . . . . . . . . . . . . . . . . . . . . . . . . . . . . . . . . . . . . . . . . . . . .102
Recording and VCR Settings (Features) . . . . . . . . . . . . . . . . . . . . . . . . . . . . . . . . .104
Language, Parental Control Settings/Factory Settings (Options) . . . . . . . . . . . . . . . 105
Easy Setup (Resetting the Recorder) . . . . . . . . . . . . . . . . . . . . . . . . . . . . . . . . . . . .107
Additional Information . . . . . . . . . . . . . . . . . . . . . . . . . . . . . . . . . . . . 108
Troubleshooting . . . . . . . . . . . . . . . . . . . . . . . . . . . . . . . . . . . . . . . . . . . . . . . . . . . . 108
Notes About This Recorder . . . . . . . . . . . . . . . . . . . . . . . . . . . . . . . . . . . . . . . . . . .113
Specifications . . . . . . . . . . . . . . . . . . . . . . . . . . . . . . . . . . . . . . . . . . . . . . . . . . . . . . 114
About i.LINK . . . . . . . . . . . . . . . . . . . . . . . . . . . . . . . . . . . . . . . . . . . . . . . . . . . . . . . 115
Guide to Parts and Controls . . . . . . . . . . . . . . . . . . . . . . . . . . . . . . . . . . . . . . . . . . . 117
Glossary . . . . . . . . . . . . . . . . . . . . . . . . . . . . . . . . . . . . . . . . . . . . . . . . . . . . . . . . . . 122
DVD Audio/Subtitle Language . . . . . . . . . . . . . . . . . . . . . . . . . . . . . . . . . . . . . . . . . 123
Index . . . . . . . . . . . . . . . . . . . . . . . . . . . . . . . . . . . . . . . . . . . . . . . . . . . . . . . . . . . . .124
7
Page 8
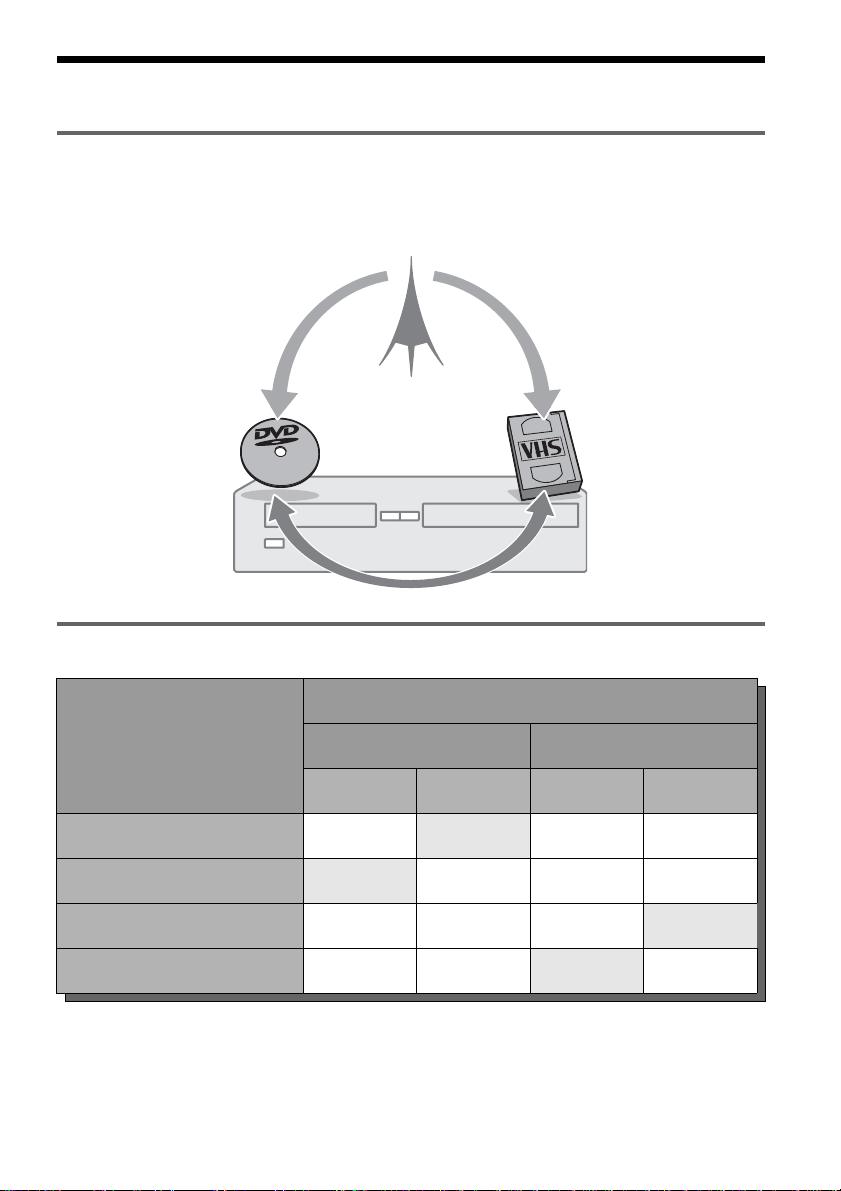
Ways to Use Your Video Cassette Recorder/DVD Recorder
What is a Video Cassette Recorder/DVD Recorder?
, This is a DVD recorder with built-in VHS video deck. It allows recording to DVD+RWs,
DVD+Rs, DVD-RWs, DVD-Rs, and VHS tapes. In addition, you can also enjoy playback and
editing of DVD discs and VHS tapes.
Operation restrictions
Possible simultaneous operations
Current operation
Playback Recording Playback Recording
Playing a VHS tape — No Yes
Recording on a VHS tape No — Yes Yes
Playing a DVD disc Yes
Recording on a DVD disc Yes Yes No —
*1
When pressing DVD, VHS tape playback stops.
*2
When pressing VIDEO, DVD playback stops.
VHS DVD
*2
Yes
*2
— No
*1
8
Yes
*1
Page 9
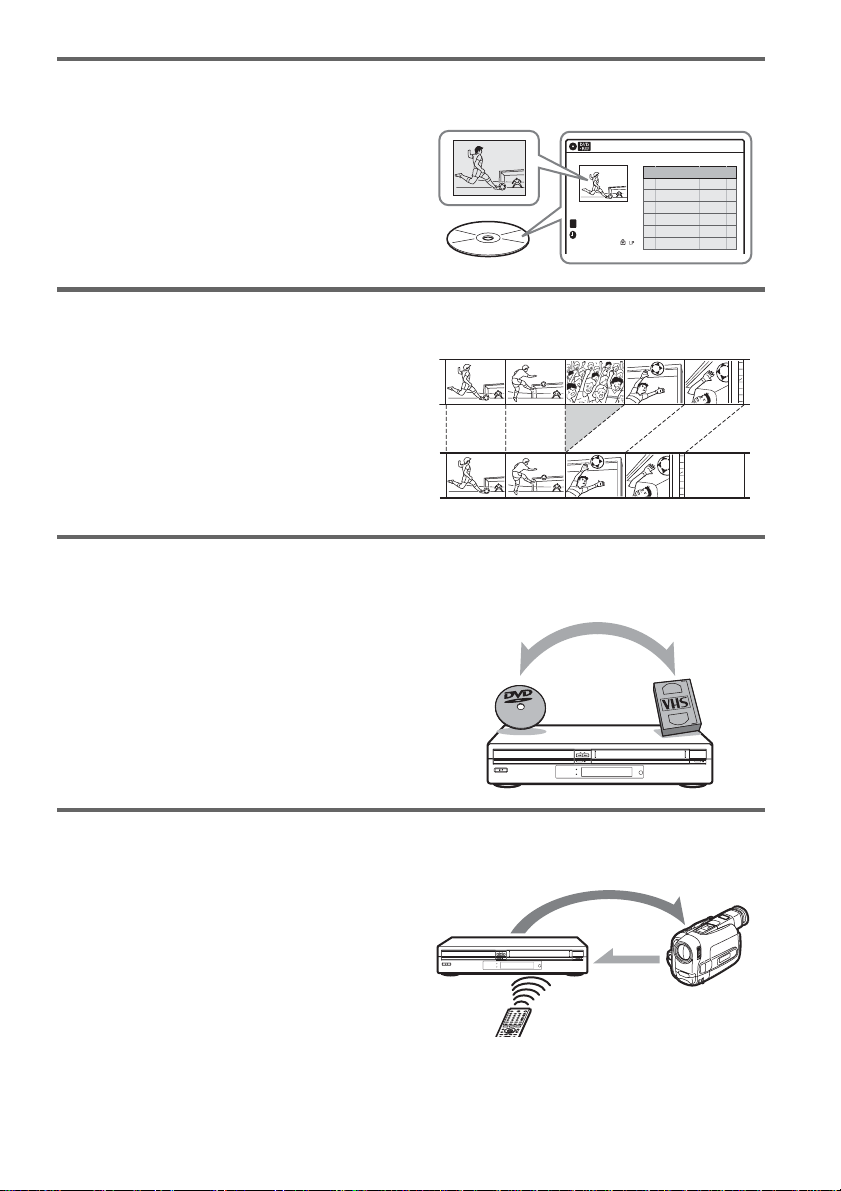
Quick access to recorded titles – Title List
, Display the Title List to see all of the title s
on the disc, including the recording date,
channel, recording mode, recording time
and movie thumbnail im age (page 42).
Creating your own program – Playlist
, Record a program on a DVD-RW (VR
mode), then erase, move and add scenes at
will to create your own, original program
(page 84).
One touch button dubbing from VCR to DVD
, This recorder lets you dub from VHS tape
to DVD and from DVD to VHS tape with a
single deck (page 89).
* Note that when playing back and recording a DVD or
VHS tape that includes a copy protect signal, the copy
protect function will prevent norma l r e cording.
Title List
Title List(Original) 10:10 AM
No. Title Length Edit
01 CH 23 >01:29:03
02 CH 66 >00:31:23
03 CH 95 >01:59:00
T
CH 23
Nov/16/2004
08:00 PM
Original
Playlist
Dubbing
04 CH 97 >00:58:56
Simple dubbing of DV tapes – DV Edit
, Connect your digital video camera to the
DV IN jack and simply dub the entire
contents or just selected scenes to a DVD
disc (page 93).
A list of recordable and playable DVD discs is on page 10.
Control
Dubbing
9
Page 10

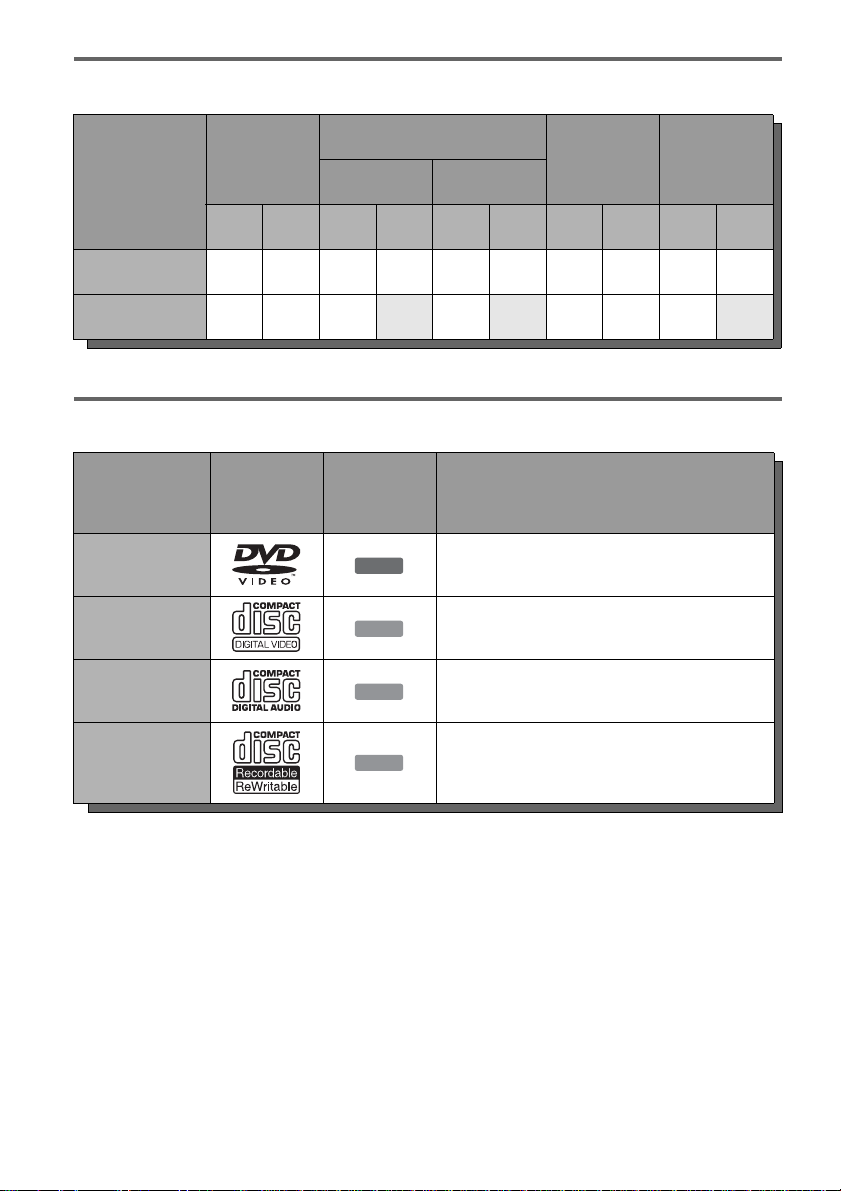
Quick Guide to DV D Disc Types
Recordable and playable discs
Type
DVD+RW
Disc
Logo
VR
mode
Icon used
in this
manual
+
RW
-
RWVR
Formatting
(new discs)
Automatically
formatted
Format in VR mode*2
(page 43)
DVDRW
DVD+R
DVD-R
Video
mode
-
RW
+
R
-
R
Video
Format in Video
mode
Automatically
formatted
Automatically
formatted
Usable disc versions (as of June 2004)
• 4x-speed or slower DVD+RWs
• 2x-speed or slower DVD-RWs (Ver.1.1, Ver.1.1
with CPRM
*1
)
• 4x-speed or slower DVD-RWs (Ver.1.2, Ver.1.2
with CPRM)
• 8x-speed or slower DVD+Rs
• 8x-speed or slower DVD-Rs (Ver.2.0)
Compatibility with other
DVD players (finalizing)
Playable on DVD+RW
compatible players
(automatically finalized)
Playable only on VR mode
compatible players (finalization
unnecessary) (page 44)
Playable on most DVD players
*2
(page 43)
(finalization necessary )
(page 44)
Playable on DVD+R compatible
players (finalization necess ary)
(page 44)
Playable on most DVD players
(finalization necessary )
(page 44)
“DVD+RW,” “DVD-RW,” “DVD+R,” and “DVD-R,”
are trademarks.
*1
CPRM (Content Protection for Recordable Media) is
a coding technology that protects co pyr ights for
images.
*2
Unused DVD-RWs are formatted in VR mode
automatically.
*3
Erasing titles only frees up di sc space i f you erase t he
last title.
*4
Erasing titles does not free up disc space.
10
Page 11

Recording Features Editing Features
Rewrite
(page 48)
Auto
Chapter
(page 104)
Yes Yes Yes Yes Yes
Manual
Chapter
(page 84)
Change
title name
(page 82)
Erase title
(page 82)
*3
A-B Erase
(page 83)
No No
Yes Yes Yes Yes Yes Yes Yes
Yes Yes No Yes Yes
No Yes No Yes Yes
No Yes No Yes Yes
*3
*4
*4
No No
No No
No No
Discs that cannot be re corded on
• DVD-RWs (Ver.1.0)
• DVD+RWs that are not 2.4x-speed compatible
• Double layer discs
• 8 cm discs
Playlist
(page 84)
,continued
11
Page 12
12 cm/8 cm discs
DVD-RW
DVD+RW
Operation
12 cm 8 cm 12 cm 8 cm 12 cm 8 cm 12 cm 8 cm 12 cm 8 cm
Playback Yes — Yes Yes Yes Yes Yes — Yes Yes
Recording Yes — Yes No Yes No Yes — Yes No
VR mode Video mode
DVD+R DVD-R
Playable discs
Type Disc Logo
DVD VIDEO
VIDEO CD
CD
DATA CD
* A logical format of files and folders on DATA-CDs,
defined by ISO (International Standard Organi zation).
Icon used
in this
manual
DVD
VCD
CD
DATA CD
Discs that cannot be played
• CD -Rs/CD-RW s, ot her than those recorded in
music CD format, MP3 or JPEG format, or
Video CD format
• Data part of CD-Extras
• DVD-ROMs
• DVD Audio discs
• DVD-RAMs
• HD layer on Super Audio CDs
Characteristics
Discs such as movies that can be purc hased or
rented
VIDEO CDs or CD-Rs/CD-RWs in VIDEO CD/
Super VIDEO CD format (wit h PBC function)
Music CDs or CD-Rs/CD-RWs in music CD
format that can be purc ha s ed
CD-Rs/CD-RWs created on a PC or similar
device in music format, or MP3 or JPEG for ma t
that conforms to ISO 9660* Level 1/Level 2
• DVD VIDEOs with a different region code
(see page 13)
• A disc recorded in a color system other than
NTSC, such as PAL o r SECAM
z Hint
This DVD recorder can play 8 cm CDs and 8 cm DVDs
as well.
12
Page 13
Note on playback operations of DVD VIDEOs/
VIDEO CDs
Some playback operations of DVD VIDEOs/
VIDEO CDs may be intentionally set by software
producers. Since this recorder plays DVD
VIDEOs/VIDEO CDs according to the disc
contents the sof tware producers designed, some
playback features may not be available. Also, see
the instructions supplied with the DVD VIDEOs/
VIDEO CDs.
Region code (DVD VIDEO only )
Your recorder has a region code printed on the rear
of the unit and will only play DVD VIDEOs
(playback only) labeled with identical region
codes. This system is us ed to protect copyrig ht s .
DVD VIDEOs labeled will also play on this
ALL
recorder.
If you try to play any other DVD VIDEO, the
message “Pleas e check the Regional code of this
disc.” will appear on the TV scre en. Depend ing on
the DVD VIDEO, no region code indication may
be labeled even though playing the DVD VIDEO
is prohibited by area r estrictions.
RDR-VX500
NO.
X
Notes
• Some DVD+RWs/DVD+Rs, DVD-RWs/DVD-Rs, or
CD-RWs/CD-Rs cannot be played on this recorder due
to the recording quality or physical c ondi tion of the
disc, or the characteristics of the recording device and
authoring software. The disc will not pla y if it ha s not
been correctly final ized. For m ore in formati on, s ee t he
operating instructions for the recording device.
• You cannot mix VR mode and Video mode on the same
DVD-RW. To change the disc’s format, reformat the
disc (page 43). Note that the disc’s contents will be
erased after reformatting.
• You cannot shorten the time requ ire d for rec or ding
even with high-speed discs. Also, you cannot record on
the disc if the disc is not 1x speed compa tible.
• It is recommended that you use discs with “For Video”
printed on their packaging.
• You cannot add new recordings to DVD-Rs or DVDRWs (Video mode) that contain recordings made on
other DVD equipment.
• In some cases, you may not be able to add new
recordings to DVD+RWs that contain recordings made
on other DVD equipment. If you do add a new
recording, note that this recorder will rewrite t he DVD
menu.
• If the disc contains PC data unrecognizable by this
recorder, the data may be erased.
Region code
Music discs encoded with copyright protection
technologies
This product is designed to playback discs th at
conform to the Compact Disc (CD) standard.
Recently, various music disc s encoded with
copyright prote ct i on t echnologies are bei ng
marketed by so me record companies. Please be
aware that among those discs, there are some that
do not confor m to the CD sta ndard and may n ot be
playable by this pro duct.
13
Page 14
Recordable an d playable VHS tapes
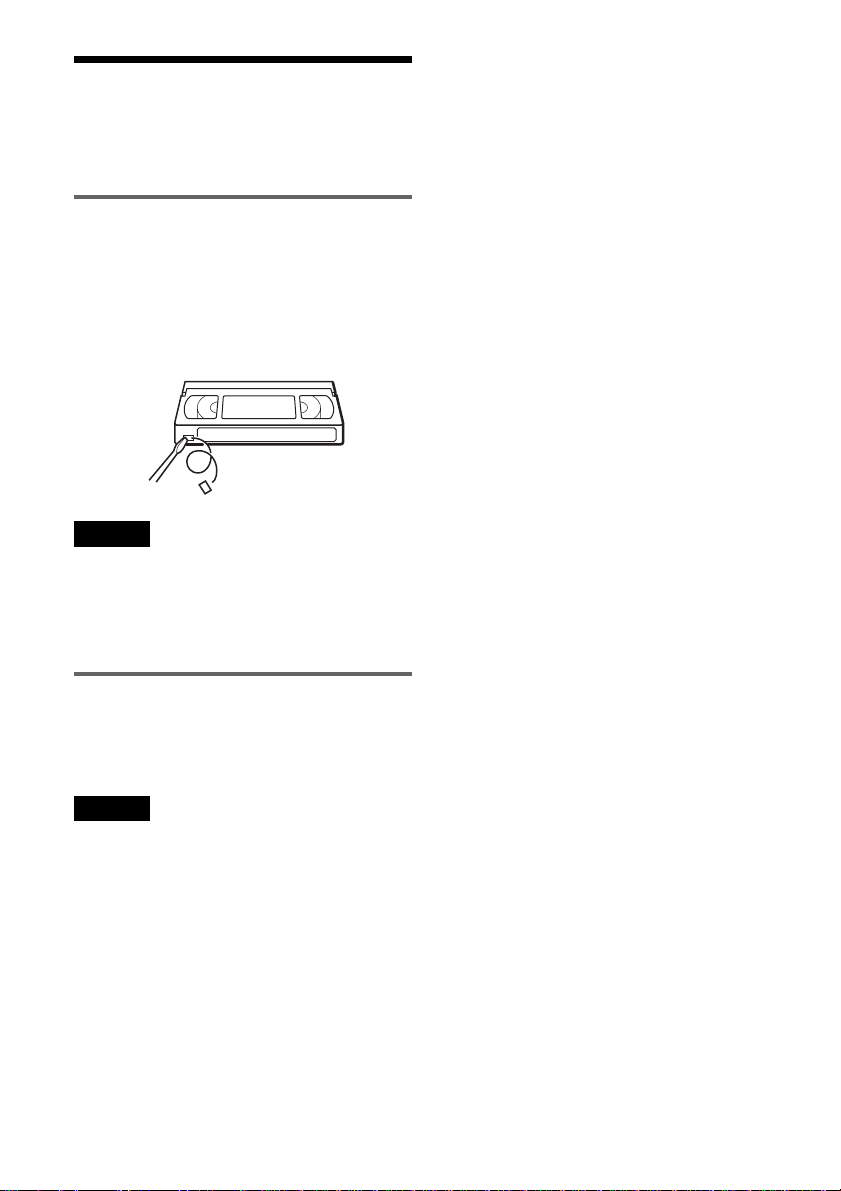
This VCR uses the VHS s ystem.
Recording
This VCR records using the V HS system.
z Hint
If you do not want recorded contents to be erased, break
off the erasure preven t io n tab. To record again on a tape
that has had the erasure prevention tab re moved, cover
the hole with cellophane tape, etc.
Safety tab
Notes
• This VCR cannot record using the S-VHS syste m.
• Tapes recorded in E P (3
played back on standard mode only VHS decks.
• Noise may appear in the i mage wh en tap es rec orded in
×) mode by this VCR are played back on other
EP (3
VHS decks with 3
×) mode by this VCR cannot be
× mode.
Playback
The VCR automatically identifies the recording
system and recording mode (SP (standard) or EP
(3
×)) of recorded tapes during playback.
Notes
• You cannot play back foreign video software that uses
non-NTSC color TV systems (PAL, SECAM).
• When playing back tapes recorded using the S-VHS
system, the playback imag e may be disturbed.
14
Page 15

Hookups and Settings
Hooking Up the Recorder
Follow steps 1 to 7 to hook up and adjust th e
settings of the recorder.
Notes
• Plug cords securely to prevent unwanted noise.
• Refer to the instructions supplied with the components
to be connected.
• Be sure to disconnect the power cord of each
component before connecting.
Step 2: Connecting the
Antenna Cable
Select one of the following antenna hookups. Do
not connect the power cord until you reach
“Connecting the Power Cord” on page 26 .
If you have Hookup
Cable box or satellite receiver with a
video/audio output
Cable box with an antenna output
only
Cable without cab l e box , or ante nn a
only (no cable TV)
A (page16)
B (page 17)
C (page 17)
Hookups and Settings
Step 1: Unpacking
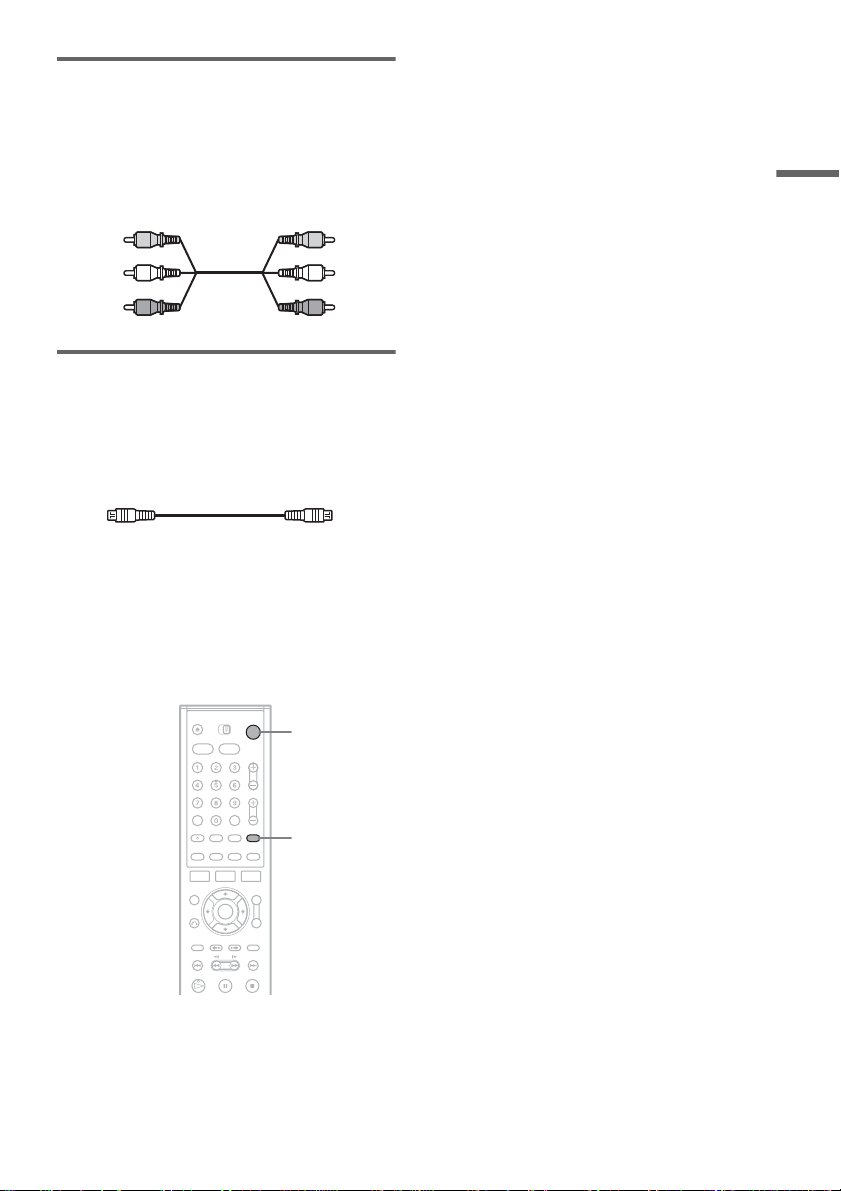
Check that you have the following items:
• Audio/video cord
(pinplug × 3 y pinplug × 3) (1)
• Antenna cable (1)
• Remote commander (remote) (1)
• Size AA (R6) batteries (2)
Note to CATV system installer (in US A)
This reminder is provided to call the CATV
system installer’s attention to Article 820- 40 of
the NEC that provides gui delines for proper
grounding and, in particular, specifies that the
cable ground shall be connected to the grounding
system of the buildi ng, as close to the point of
cable entry as pract i cal.
Notes
• If your antenna is a flat cable (300-ohm twin lead
cable), use an external ante nna co n ne ctor (not
supplied) to connect the an ten n a to th e reco rd er.
• If you have separate cables for VHF and UHF
antennas, use a UHF/VHF band mixer (not supplied) to
connect the antenna to the recorder.
,continued
15
Page 16
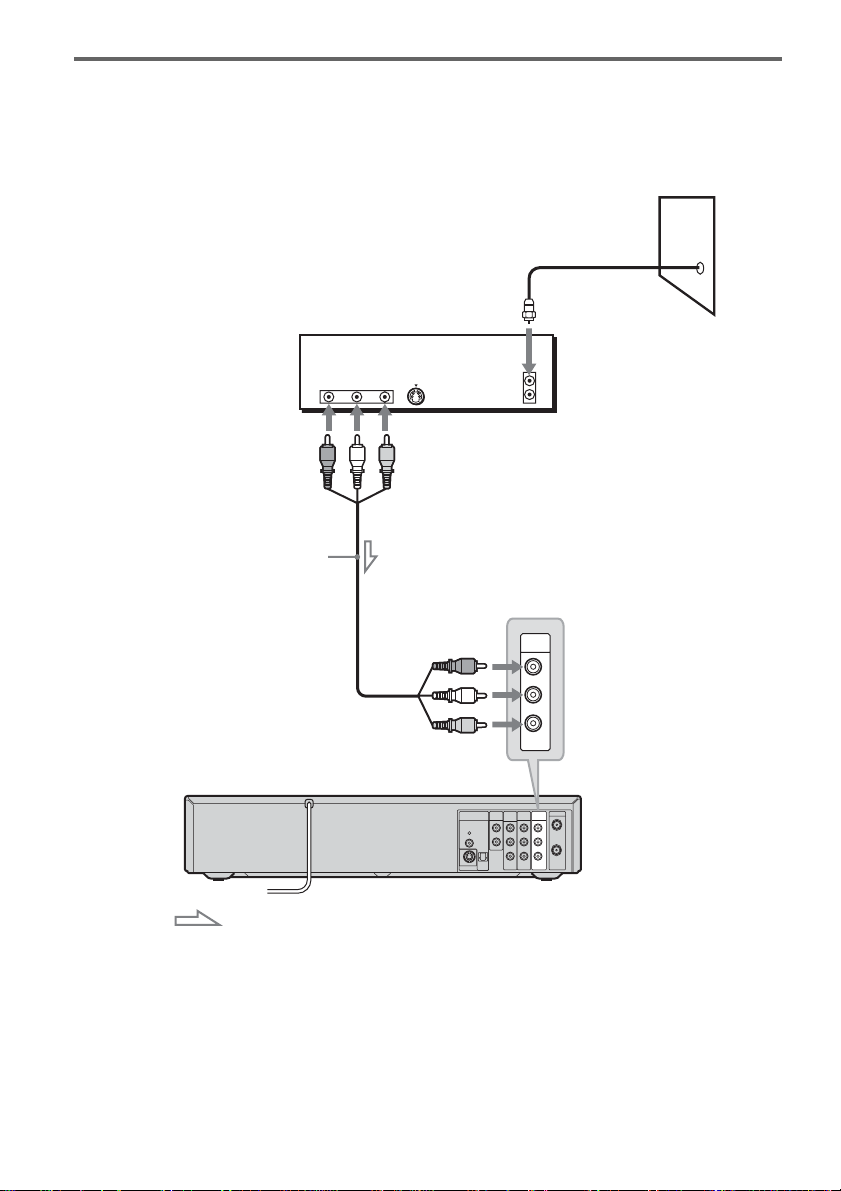
A: Cable box or satellite receiver with a video/audio output
With this hookup, you can record any channel on the cable box or satellite receiver. Be sure that the
satellite receiver or cable box is turned on.
To watch cable or satellite programs, you need to match the channel on the recorder (L1) to the input jack
connected to the cable box or satellite receiver (LINE 1 IN).
Wall
Cable box/satellite receiver
AUDIO
VIDEO
OUT
OUT
Audio/video cord
(supplied)
RL
S VIDEO
ANT IN
TO TV
LINE 1 IN
AUDIO
R
L
16
VCR-DVD recorder
: Signal flow
to LINE 1 IN
DIGITAL
DOLBY DIGITAL
S VIDEO OUT
VIDEO
VHF/UHF
COMPONENT
AUDIO OUT
AUDIO
OUT
LINE 1 IN
LINE OUT
VIDEO OUT
P
P
Y
B
R
AUDIO AUDIO
VIDEO VIDEO
IN
R
L
OUT
R
PCM/DTS/
L
COAXIAL
OPTICAL
Page 17
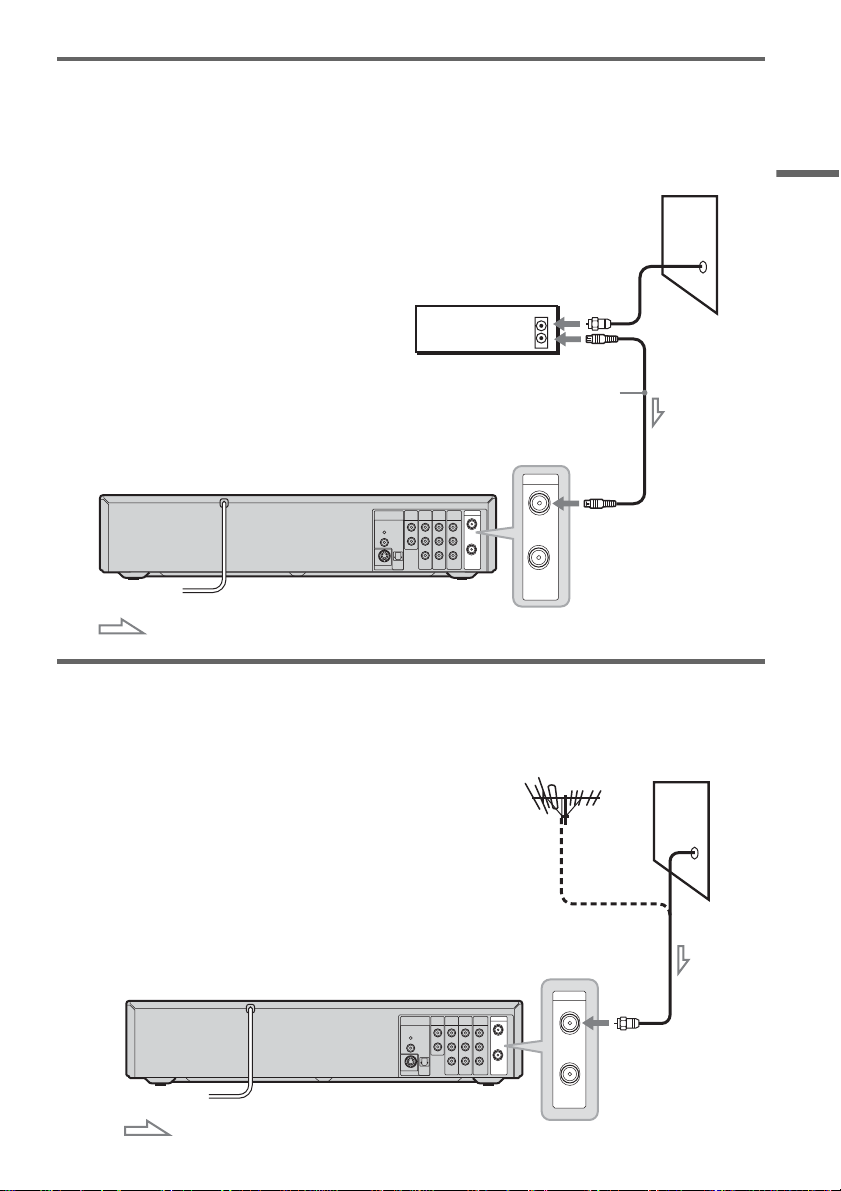
B: Cable box with an antenna output only
With this hookup, you can record any channel on the satellite receiver or cable box. Be sure that the
satellite receiver or cable box is turned on.
To watch cable programs, you need to match the channel on the recorder (2ch, 3ch or 4ch) to the antenna
output channel on the cable box (2ch, 3ch or 4ch).
Wall
Cable box
ANT IN
TO TV
Antenna cable (supplied)
Hookups and Settings
VCR-DVD recorder
DOLBY DIGITAL
COAXIAL
OPTICAL
S VIDEO OUT
R
AUDIO AUDIO
B
P
L
L
P
R
VIDEO VIDEO
VHF/UHF
COMPONENT
AUDIO OUT
DIGITAL
AUDIO
OUT
LINE 1 IN
LINE OUT
VIDEO OUT
R
Y
PCM/DTS/
VHF/UHF
IN
IN
OUT
to VHF/UHF IN
OUT
: Signal flow
C: Cable without cable box, or antenna only (no cable TV)
Use this hookup if yo u w atch cable channels w ithout a cable box. Also use this hookup if you are using
a VHF/UHF antenna or separate VH F and UHF antennas.
With this hookup , you can record any channel by selecting the channel on the reco rder.
Wall
VCR-DVD recorder
DOLBY DIGITAL
COAXIAL
OPTICAL
S VIDEO OUT
R
AUDIO AUDIO
B
P
L
L
P
R
VIDEO VIDEO
VHF/UHF
COMPONENT
AUDIO OUT
DIGITAL
AUDIO
OUT
LINE 1 IN
LINE OUT
VIDEO OUT
R
Y
PCM/DTS/
VHF/UHF
IN
OUT
IN
to VHF/UHF IN
OUT
: Signal flow
17
Page 18
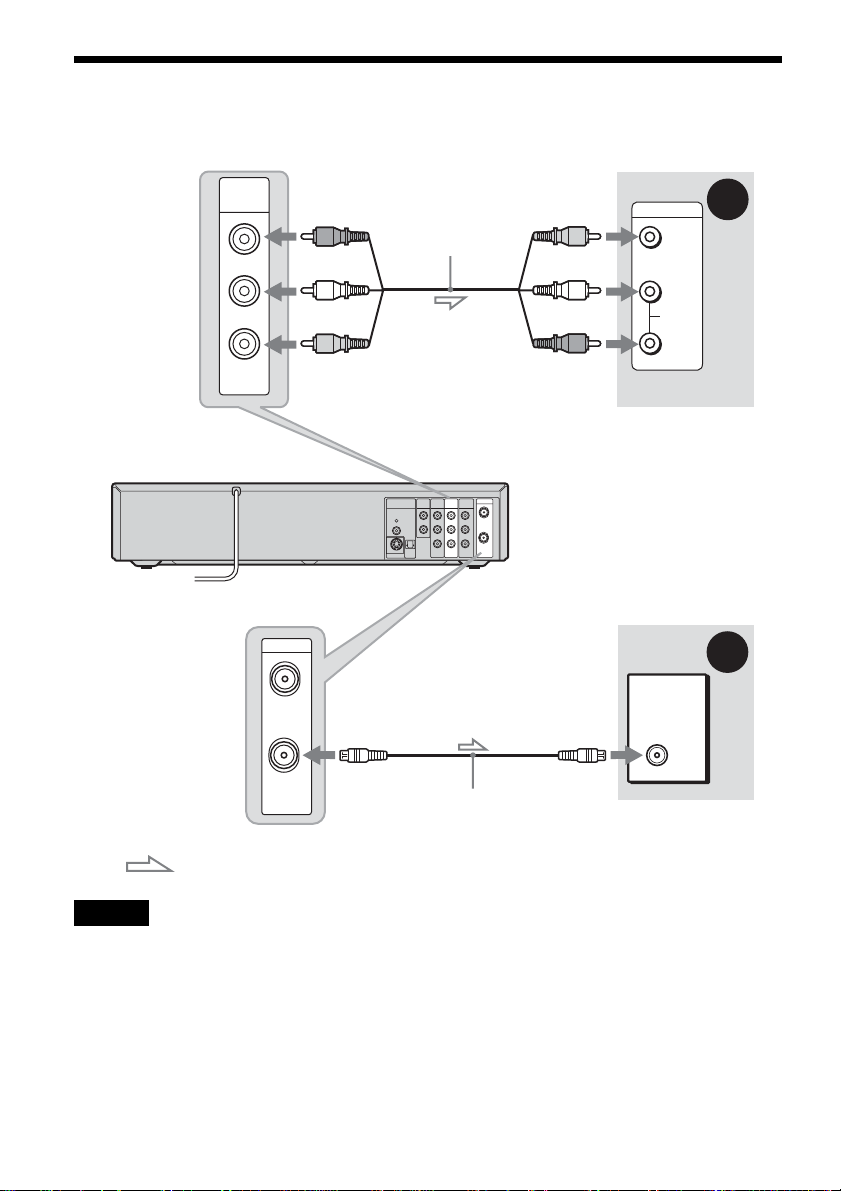
Step 3: Connecting to Your TV
Select one of the following patterns A or B, accordi ng to the in p ut jack on your TV.
VCR-DVD recorder
LINE OUT
AUDIO
VIDEO
(red)
(white)
(yellow)
to LINE OUT (AUDIO L/R)
VHF/UHF
IN
OUT
Audio/video cord
(supplied)
COMPONENT
AUDIO OUT
DIGITAL
AUDIO
OUT
VIDEO OUT
R
Y
PCM/DTS/
DOLBY DIGITAL
B
P
L
COAXIAL
OPTICAL
P
R
S VIDEO OUT
LINE OUT
AUDIO AUDIO
VIDEO VIDEO
(yellow)
INPUT
A
VIDEO
(white)
L
(red)
AUDIO
R
TV or projector
VHF/UHF
LINE 1 IN
IN
R
L
OUT
B
TV
Antenna cable
(supplied)
: Signal flow
Note
Do not connect more than one type of video c or d bet wee n the recorder and your TV at the same time .
18
Page 19
A Connecting to audio/video input
jacks
If your TV, monitor, projector, or other equipment
has audio/video (A/V) input ja cks, you will get
better pict ure and sound if you connect the
recorder using t hi s connection.
Hookups and Settings
Yellow
White (L)
Red (R)
Yellow
White (L)
Red (R)
B Connecting to an antenna input
jack
If your TV does not have audio/video (A/V) input
jack, connec t t he recorder to a TV using an
antenna cable.
Setting the RF Output channel
When connecting the recorder to the TV using
only the antenna ca bl e, you must set the RF
Output channel in the “Tuner Preset” so that th e
TV can receive the correct signal from the
recorder.
"/1
TV/VIDEO
1 Press "/1 to turn on the recorder.
2 Press TV/VIDEO repeatedly until “TV”
disappears from the front panel display.
3 Turn on your TV and se t it to the channe l 3.
When using channel 4 to receive the recorder
signal, see “3, 4 C h O ut” on page 98.
,continued
19
Page 20
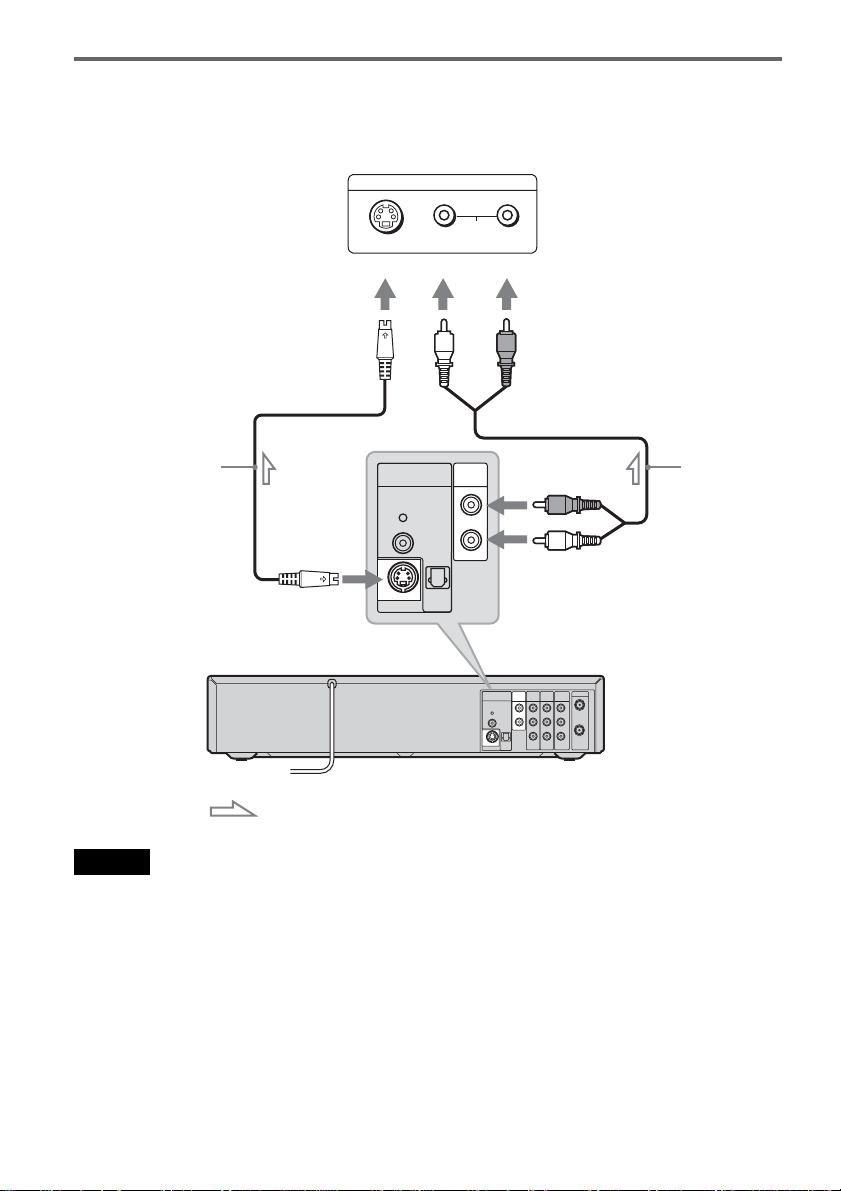
If your TV has an S video input jack
Connect an S video cord (not supplied). You will enjoy high quality images.
Make audio connections using the AUDIO OUT L/R jacks when yo u connect the recorder using this
connection.
INPUT
S video cord
(not supplied)
VCR-DVD recorder
to S VIDEO OUT
DIGITAL
PCM/DTS/
DOLBY DIGITAL
S VIDEO OUT
AUDIO
COAXIAL
AUDIO
LRS VIDEO
(white) (red)
AUDIO OUT
OUT
R
L
OPTICAL
DIGITAL
AUDIO
OUT
PCM/DTS/
DOLBY DIGITAL
COAXIAL
OPTICAL
S VIDEO OUT
TV or projector
(red)
(white)
to AUDIO OUT L/R
VHF/UHF
COMPONENT
AUDIO OUT
LINE 1 IN
LINE OUT
VIDEO OUT
R
L
IN
Y
R
AUDIO AUDIO
B
P
L
OUT
P
R
VIDEO VIDEO
Audio cord
(not supplied)
: Signal flow
Notes
• Do not connect more than one type of vid eo cor d be twe en the recorder and your TV at the same time.
• When recording a DVD, the DVD video signal is output to the S VIDEO OUT even if you switch the output to
VIDEO.
20
Page 21
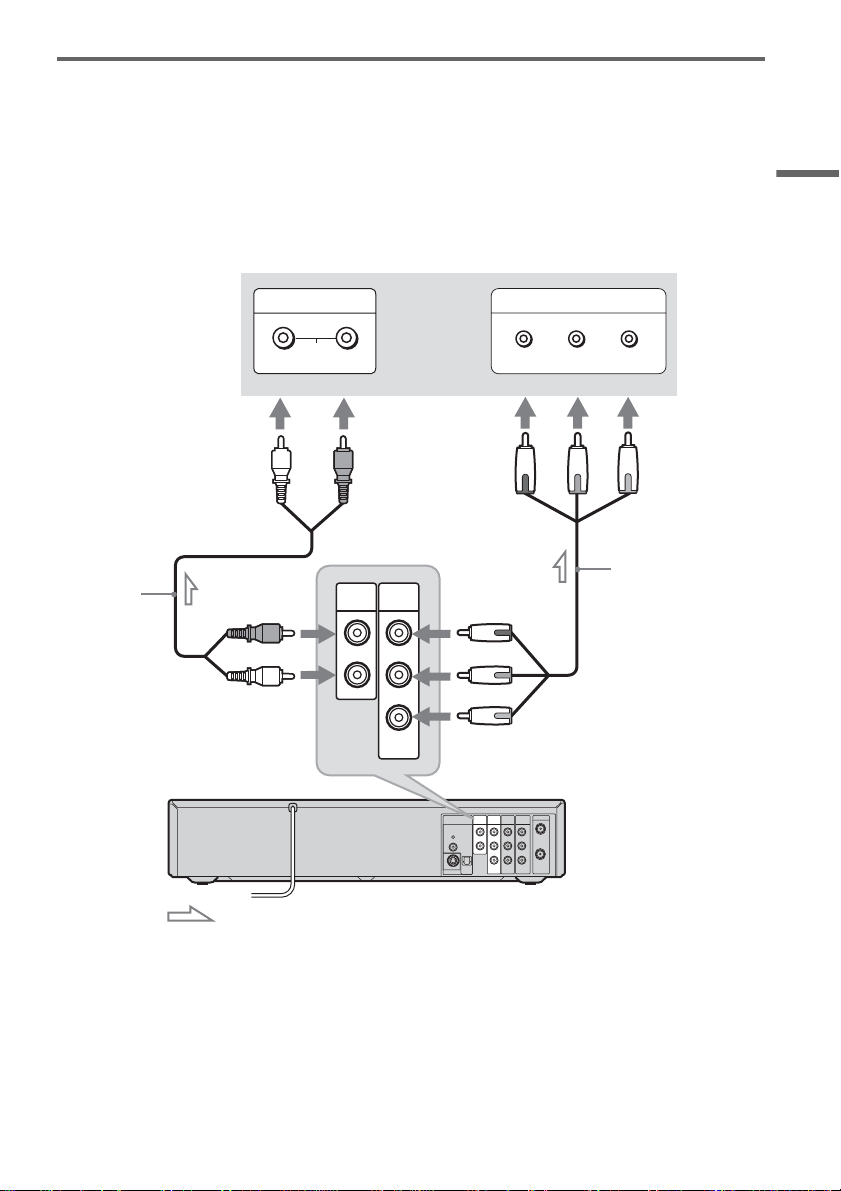
If your TV has component video input jacks
Connect the COMPO N EN T VIDEO OUT jacks using a component video cord (not supplied) or three
video cords (not supplied) of the same kind and length. You will enjoy accurate color reproduction and
high quality images .
If your TV accepts pr ogressive 480p for m at signals, you must use this connection a nd t hen set
“Progressive” of “V ideo” to “On” in the “Setup” display (page 101). The PROG RESSIVE indicator
lights up when th e recorder output s pr ogressive signa ls.
Make audio connections using the AUDIO OUT L/R jacks when you connect the recorder using this
connection.
Hookups and Settings
Audio cord
(not suppli ed)
(white) (red)
(red)
(white)
to AUDIO OUT L/R
VCR-DVD recorder
INPUT
AUDIO
LR
AUDIO OUT
R
L
TV or projector
COMPONENT
VIDEO OUT
COMPONENT VIDEO IN
Y
(green) (blue) (red)
(green)
Y
(blue)
PB
PR
(red)
to COMPONENT VIDEO OUT
COMPONENT
DIGITAL
AUDIO
OUT
AUDIO OUT
LINE 1 IN
LINE OUT
VIDEO OUT
R
Y
PCM/DTS/
DOLBY DIGITAL
COAXIAL
OPTICAL
S VIDEO OUT
R
AUDIO AUDIO
B
P
L
L
P
R
VIDEO VIDEO
P
B
P
R
Component video cord
(not supplied)
VHF/UHF
IN
OUT
: Signal flow
When playing “wide screen” images
Some recorded images may not fit your TV screen. To change the aspect ratio, see page 100.
z Hint
Video signal can also be output from the COMPONENT VIDEO OUT jack when playing a VHS tape.
,continued
21
Page 22

Notes
• Consumers should note that not all high definition television sets are fully compatible with this product and may cause
artifacts to be displayed in the pic ture . In the case of 480 progressive scan picture problems, it is recommended that
the user switch the connection to the ‘standard definition’ output. If th ere are ques tions regarding our TV set
compatibility with this model 480p DVD recorder, please contact our customer service center.
• When recording a DVD, the DVD video signal is output to the COMPONENT VIDEO OUT even if you switch the
output to VIDEO.
22
Page 23
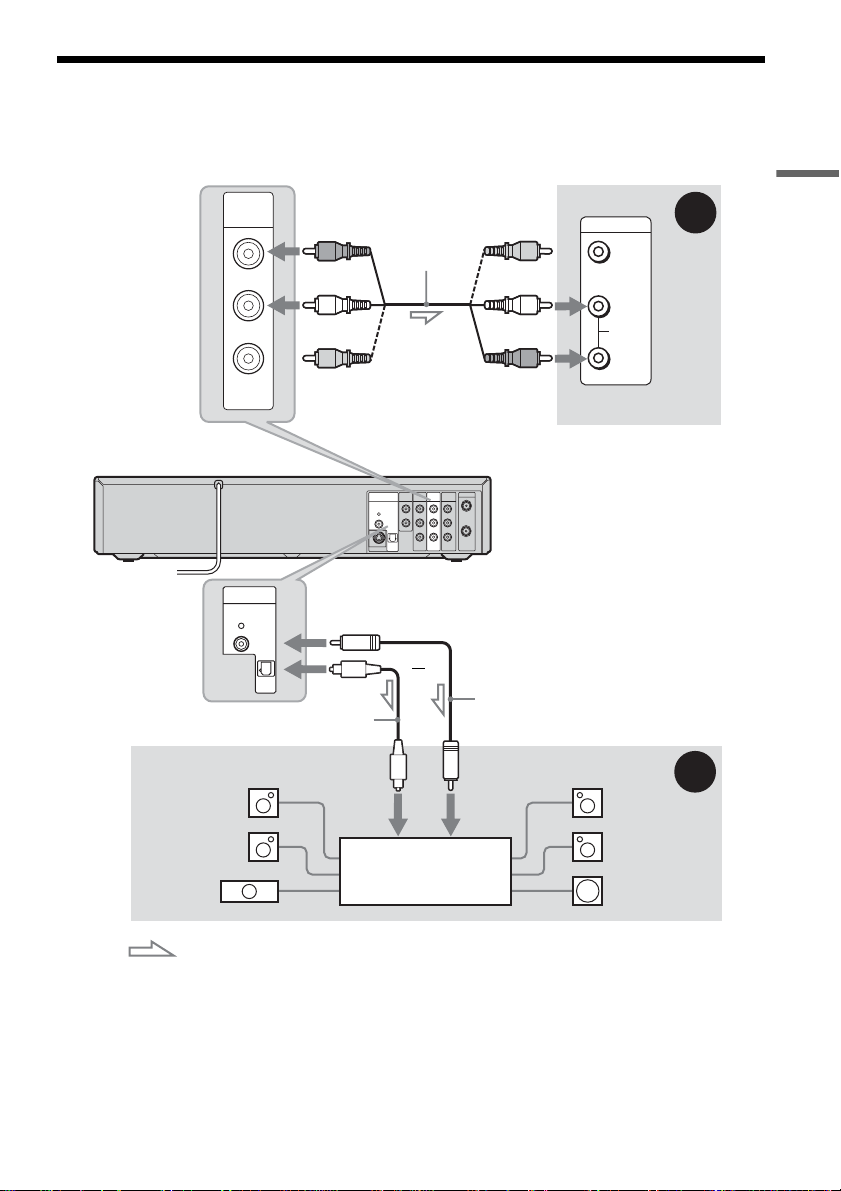
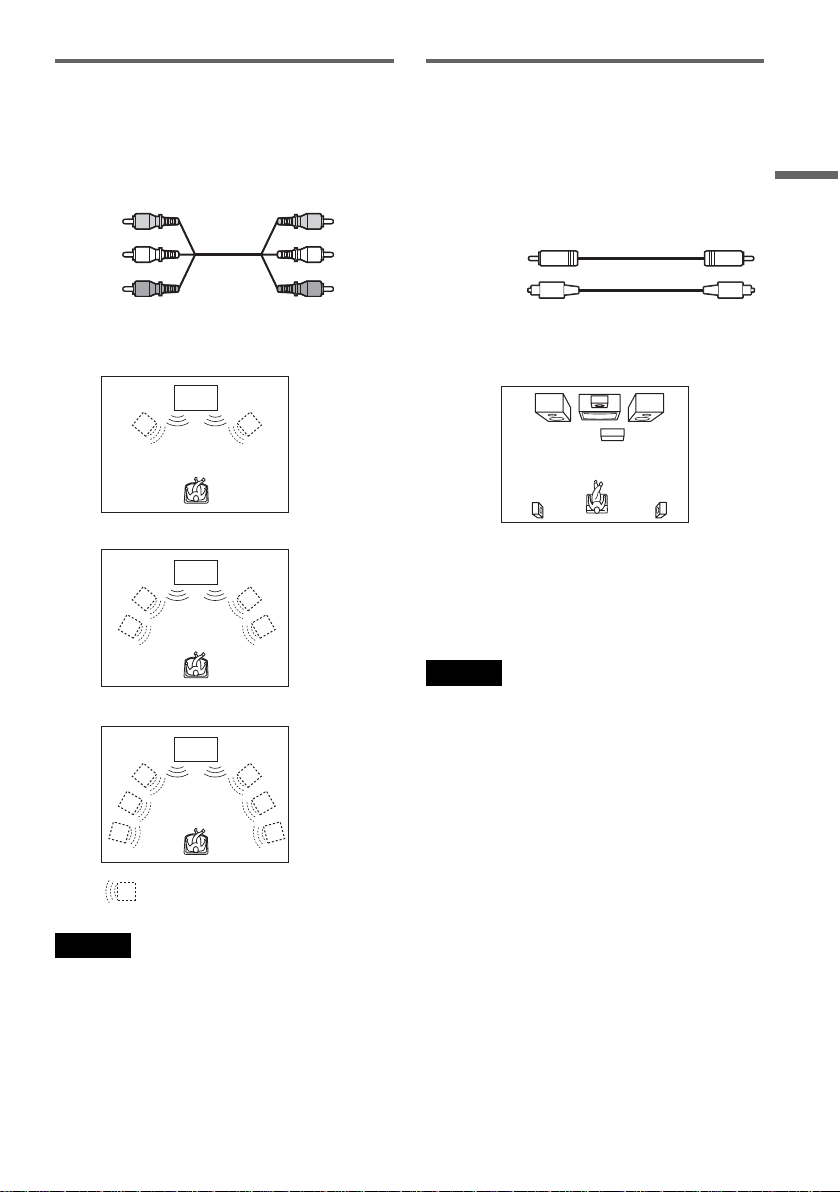
Step 4: Connecting to Your AV/Amplifier (Receiver)
Select one of the f ollowi ng pat terns A or B, according to the input j ack on your AV amplifier (r eceiver).
This will enable you to listen to DVD audio tracks through your AV amplifier (receiver).
VCR-DVD recorder
LINE OUT
AUDIO
VIDEO
DIGITAL
AUDIO
OUT
PCM/DTS/
DOLBY DIGITAL
COAXIAL
OPTICAL
(red)
Audio/video cord
(supplied)
(white)
(yellow)*
to LINE OUT (AUDIO L/R)
COMPONENT
AUDIO OUT
DIGITAL
AUDIO
OUT
LINE 1 IN
LINE OUT
VIDEO OUT
R
Y
PCM/DTS/
DOLBY DIGITAL
COAXIAL
OPTICAL
S VIDEO OUT
to DIGITAL AUDIO OUT
(COAXIAL or OPTICAL)
R
AUDIO AUDIO
B
P
L
L
P
R
VIDEO VIDEO
or
VHF/UHF
IN
OUT
(yellow)
(white)
(red)
INPUT
VIDEO
L
AUDIO
R
AV amplifier (receiver)
A
Hookups and Settings
Coaxial digital cord
Optical digital cord (not supplied)
[Speakers]
to optical
digital input
Rear (L)
Front (L)
(not supplied)
to coaxial
digital input
[Speakers]
Rear (R)
Front (R)
AV amplifier (receiver)
Center
with a decoder
Subwoofer
: Signal flow
* The yellow plug is used for video signals (page 18).
z Hints
• For correct speaker location, see the ope rati ng instructions supplied with the conne ct ed com pone nt s.
• Digital audio signal can also be output when playing a VHS tape.
B
,continued
23
Page 24

Notes
• Do not connect your TV’s audio output jacks to the LINE IN (AUDIO L/R) jacks at the same time. This will cause
unwanted noise to come from your TV’s speakers.
• When recording a DVD, the DVD audio signal is output to the DIGITAL AUDIO OUT even if you switch the output
to VIDEO.
24
Page 25
A Connecting to audio L/R input
jacks
This connection wil l us e your TV’s or stereo
amplifier’s (receiver’s) two speakers for sound.
Connect using the audio/video cord (supplied).
Yellow
White (L)
Red (R)
Yellow
White (L)
Red (R)
B Connecting to a digital audio
input jack
If your AV amplifier (receiver) has a Dolby
Digital or DTS
*2
decoder and a digital input jack,
use this c o nnection .
Connect using a coaxial or optical digital cord (not
supplied).
Coaxial cord
Optical cord
*1
Hookups and Settings
• S urround effect (pa ge 60)
Surround1
TV
Surround2
TV
Surround3
TV
: Virtual speaker
Note
Do not connect your TV’s audio output jacks to the LINE
IN (AUDIO L/R) jacks at the same time. This will cause
unwanted noise to come from your TV’s spea ke rs .
• Surround effect
Dolby Digital (5.1ch), DTS (5.1ch)
*1
Manufactured under license from Dolby Laboratories.
“Dolby,” “Pro Logic,” and the double-D symbol are
trademarks of Dolby Laboratories.
*2
“DTS” and “DTS Digital Out” are trademarks of
Digital Theater Systems, Inc.
Notes
• After you have completed the connection, make the
appropriate settings under “ Audio Connection Setup”
in Easy Setup (page 30). Otherwise, no sound or a loud
noise will come from your speakers .
• The surround sound effects of this record er cannot be
used when you connect using a coaxial or op ti cal
digital cord.
• This recorder does not support Linear PCM playback
with 2 channels or more.
• When outputting the sound of a DVD-RW (VR Mode)
disc recorded in two languages from the DIGITAL
AUDIO OUT jack, the sound cannot be switched with
the AUDIO button.
25
Page 26
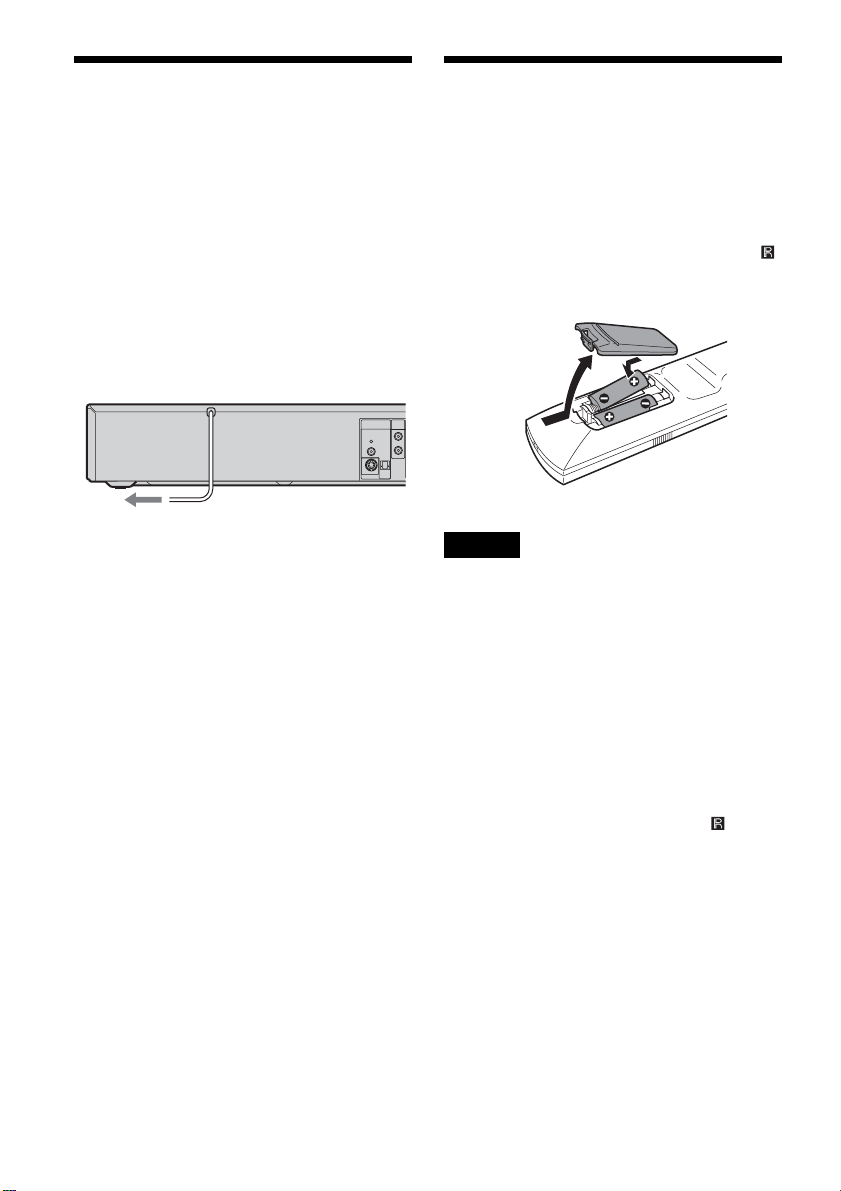
Step 5: Connecting the
Step 6: Preparing the
Power Cord
Plug the recorder and TV power cords into an AC
outlet. After you connect the power co rd, you
must wait for a short while before
operating the recorder. You can operate the
recorder only after the fro nt panel display lights up
and the recorder enters standby mo de.
If you connect addi ti onal equipment to thi s
recorder (page 34), be sure to connect the power
cord only after all connections are complete.
AUDIO OUT
DIGITAL
AUDIO
OUT
R
PCM/DTS/
DOLBY DIGITAL
L
COAXIAL
OPTICAL
S VIDEO OUT
to AC outlet
Remote
You can control the recorder using the supplied
remote. Insert two size AA (R6) batterie s by
matching the 3 and # ends on the batteries to the
markings insi de the battery comp artment. When
using the remote, point it at the remote sens or
on the recorder.
Notes
• If the supplied remote interferes your other Sony DVD
Player/Video Cassette Recorder o r Video Casse tte
Recorder/DVD Recorder, change the command mode
number f o r t h is r ecorder (page 29).
• Use the ba tteries corr ec tly to avoid po ss ible leakag e
and corrosion. Do not touch the liquid with bare hands
should leakage occur. Observe the followi ng:
– Do not use a new batte r y with an old battery, or
batteries of different manufacturers.
– Do not a tte mpt to recharge the ba tteries.
– If you do not intend to use the remote for an extended
period of time, remove the batteries.
– If batt ery leakage occurs, wipe out any liquid inside
the battery compartment, and insert new batteries.
• Do not expose the remote se nsor ( ma r ke d on the
front panel) to strong light, such as direct sunlight or
lighting apparatus. The recorder may not respond to the
remote.
• With normal use, the ba tteries shoul d last about thre e to
six months.
• Do not leave the r e mote in an extremely hot or hu mid
place.
• Do not drop any foreign object into the remote casing,
particularly when replacing the batteries.
26
Page 27

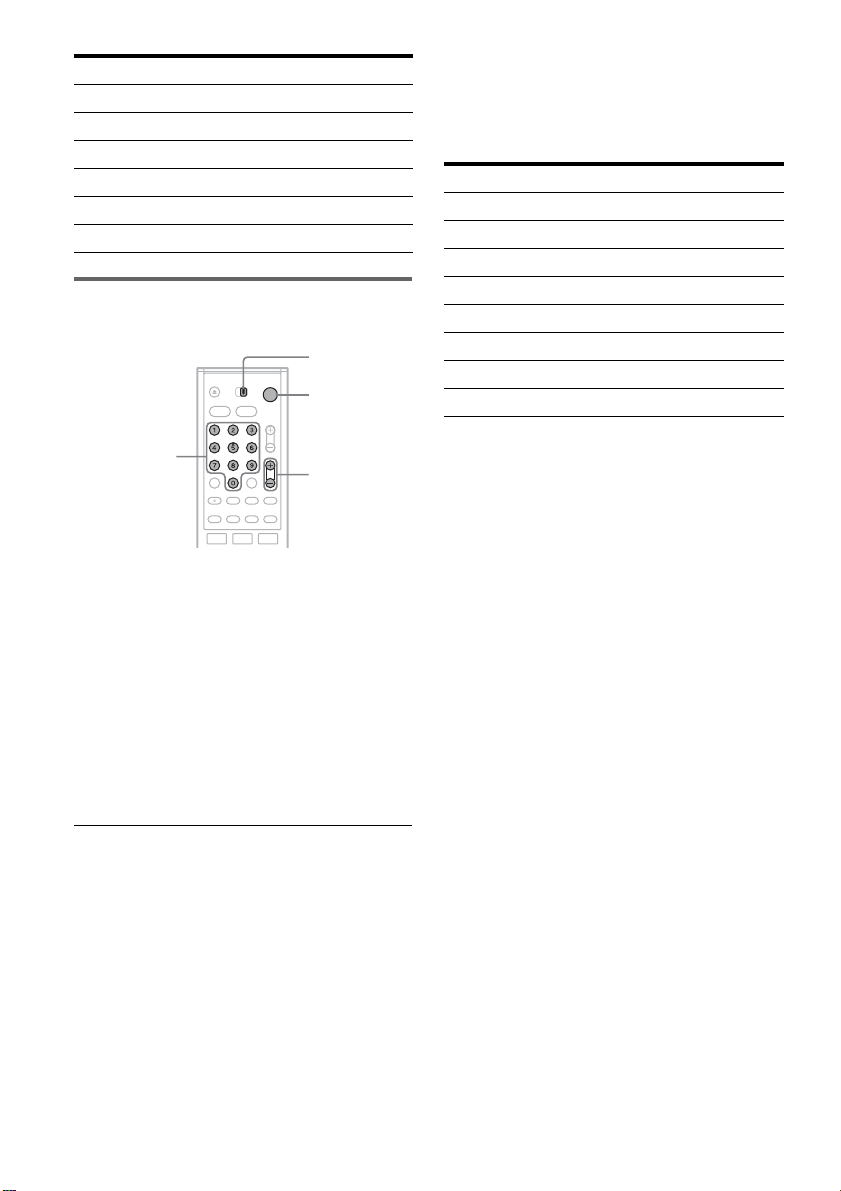
Controlling TVs with the remote
You can adjust th e remote control’s signal to
control your TV .
If you connected the recorder to an AV am plifier
(receiver), you can also use the supplied remote to
control the AV amplifier’s (receiver’s) volume.
Notes
• Depending on the connected unit, you may not be able
to control your TV or AV amplifier (receiver) with
some or all of the buttons below.
• If you enter a new code number, the code number
previously entered will be erased.
• When you replace the batteries of the remote, the code
number may be reset to th e de f ault setting. Set the
appropriate code number again.
TV/DVD·VIDEO
switch
"/1
Number
buttons,
SET
CH +/–
VOL +/–
TV/VIDEO
1 Slide the TV/DVD·VIDEO switch to TV.
2 Hold down "/1.
3 Enter your TV’s man ufacturer code (see
below) using the number buttons.
4 Release "/1.
When the TV/DVD·VIDEO switch is set to
TV, the remote performs the following:
Press To
"/1 Turn your TV on or off
VOL +/– Adjust the volume of
CH +/– Select the channel on
TV/VIDEO Switch your TV’s input
Number buttons and
SET
your TV
your TV
source
Select the channel on
your TV
Code numbers of controllable TVs
If more than one c ode number is listed, tr y
entering them one at a time until you fin d th e one
that works with your TV.
Manufacturer Code number
Sony 01 (default)
Akai 04
AOC 04
Centurion 12
Coronado 03
Curtis-Mathes 12, 14
Daewoo 04, 22
Daytron 03, 12
Fisher 11
General Electric 04, 06, 10
Hitachi 02, 03, 04
J.C.Penney 04, 10, 12
JVC 09
KMC 03
LG/Gold Star 03, 04, 17
Magnavox 03, 04, 08, 12, 21
Marantz 04, 13
MGA/Mitsubishi 04, 12, 13, 17
NEC 04, 12
Panasonic 06, 19
Philco 02, 03, 04, 08
Philips 08, 21
Pioneer 06, 16
Portland 03
Proscan 10
Quasar 06, 18
Radio Shack 05, 10, 14
RCA 04, 10
Sampo 12
Samsung 03, 04, 12, 20
Sanyo 11, 14
Scott 12
Sears 07, 10, 11
Sharp 03, 05, 18
,continued
Hookups and Settings
27
Page 28
Manufacturer Code number
Sylvania 08, 12
Teknika 03, 08, 14
Toshiba 07, 18
Wards 03, 04, 12
Yorx 12
Zenith 14, 15
Controlling the volume of your AV
amplifier (receiver) with the remote
TV/DVD·VIDEO
switch
"/1
Number
buttons
VOL +/–
1 Slide the TV/DVD·VIDEO switch to
DVD·VIDEO.
2 Hold down "/1, and en ter the
manufacture r code (see the table below)
for your AV amplifier (receiver) using the
number buttons.
3 Release "/1.
The VOL +/– buttons control the AV
amplifier’s volume.
If you want to control th e TV’s volume, slide
the TV/DVD·VIDEO switch to TV.
Code numbers of co ntrollable AV amplifiers
(receivers)
If more than one code number is listed, try
entering them one at a time until you fin d t he one
that works with your AV amplifier (receiver).
Manufacturer Code number
Sony 78, 79, 80, 91
Denon 84, 85, 86
Kenwood 92, 93
Onkyo 81, 82, 83
Pioneer 99
Sansui 87
Technics 97, 98
Yamaha 94, 95, 96
z Hint
If you want to control the TV’s volume even when the
TV/DVD·VIDEO switch is set to DVD·VIDEO, repeat
the steps above and enter the code num ber 90 ( de faul t) .
28
Page 29
If you have a Sony DVD Player/Video
Cassette Recorder or Video
Cassette Recorder/DVD Recorder
If the supplied remote interferes with your other
Sony DVD Player/Video Cassette Recorder or
Video Cassette Recorder/DVD Recorder, set the
command mode number for this recorder and the
supplied remote to one that differs from the other
Sony DVD Player/Video Cassette Recorder or
Video Cassette Recorder/DVD Recorder.
The default command mode setting for this
recorder and the supplied remote is DVD
COMBO3.
SYSTEM
MENU
O RETURN
M/m,
ENTER
3 Select “Options,” an d pr e s s ENT E R .
Options
Title List
Timer
Edit
Disc Setting
Setup
Language
Parental
Front Display
Command Mode
Factory Setting
10:10 AM
: Auto
: Mode3
4 Select “Command Mode,” and press
ENTER.
Options
Title List
Timer
Edit
Disc Setting
Setup
Language
Parental
Front Display
Command Mode
Factory Setting
: Auto
: DVD1 No
Mode1
Mode2
Mode3
10:10 AM
5 Select the command mode (“Mode1,”
“Mode2,” or “Mo de3 ”), and pre ss E NTE R.
6 Slide the COMMAND MODE switch on the
remote so it matches the mode you
selected abo v e.
Hookups and Settings
COMMAND
MODE switch
1 Press SYSTEM MENU.
The System Menu a ppears.
2 Select “Setup,” and press ENTER.
Setup
Title List
Timer
Edit
Disc Setting
Setup
Tuner Preset
Clock Set
Video
Audio
Features
Options
Easy Setup
10:10 AM
To return to the previous display
Press O RETURN.
29
Page 30
Step 7: Easy Setup
Follow the steps below to make the minimum
number of basic adjustments for usi n g the
recorder. If you do not complete Easy Setup, it
will appear each time you turn on your recorder.
Settings are made in the following order.
OSD Language Setup
m
Clock Setup
m
Tuner and Channel Setup
m
TV Type Setup
m
Audio Connection Setup
m
Finished!
"/1
M/m/,,
ENTER
O RETURN
1 Turn on the TV.
2 Press "/1.
The recorder turn s on.
3 Switch the input selector on your TV so that
the signal from the recorder appears on
your TV screen.
When connecting the recorder to the TV using
only the antenn a cable, see “Setting the RF
Output channel” on page 19.
“Initial setting necessary to operate the DVD
recorder will be m ade. You can change the m
later using Setup. ” appears.
• If this message does not appear, select “Easy
Setup” in the “Setup” display to run Easy
Setup (page 107).
4 Press ENTER .
The setup display for selecting the language
used in the on-screen display app ear s.
Easy Setup
Select the screen language.
English
Français
Español
5 Select a language, and press ENTER.
The setup display for clock setting appears.
Easy Setup
Select a method for setting the clock.
If you select "Auto", this recorder will look
for a time signal when you turn it off.
Auto
Manual
30
Page 31

6 Select “Auto,” and pr e s s ENT E R .
The recorder wil l aut omatically sear ch for a
channel that carries a time signal when you
turn off the recorder after finishing Easy
Setup.
• If broadcasters in your area are not yet
sending time signals, select “Manual,” and
press ENTER. Press M/m to set the month
and press ,. Set the day, year, hour,
minutes, and AM/PM in the sa me way . Th e
day of the week is set automatically.
7 Select whethe r or not you have a cable
connection.
Easy Setup
Select the way in which you will receive
channels.
Antenna
Cable
If you use an antenna onl y (no cable TV),
select “Antenna.”
If you use a cable connection without a cable
box, select “Cabl e.”
8 Press ENTER.
The Tuner Preset function automatically starts
searching for all of th e receivable chann el s
and presets them.
Easy Setup
Searching for receivable channels. 25
Please wait.
9 Select the setting that matches your TV
type.
Easy Setup
Select your TV screen type.
16 : 9
4 : 3 Letter Box
4 : 3 Pan Scan
“4:3 Letter Box”: For standard TVs.
Displays “wid e s creen” pictures with bands
on the upper and lower sections of the screen.
“4:3 Pan Scan”: For standard TVs.
Automatically displays “wid e screen”
pictures on the ent ir e screen and cuts of f t he
sections that do not fit.
“16:9”: For wide -scree n TVs or stan dard TVs
with a wide screen mode.
For details, see “Video Settings (Video)” on
page 100.
10
Press ENTER.
The setup disp lay for selecting th e type of
Dolby Digital signal appears.
Easy Setup
Dolby Digital
D-PCM
Dolby Digital
10:10 AM
10:10 AM
Hookups and Settings
To set the channels manually, see page 98.
After the Tuner Preset is finished, the setup
display for selecting the aspect ratio of the
connected TV appe ar s.
11
Select the type of Dol by Digital signal you
want to send to your amplifier (receiver).
If your AV amplifier (receiver) has a Dolby
Digital decoder, select “Dolb y D igital.”
Otherwise, select “D-PCM.”
12
Press ENTER.
The setup disp lay for selecting th e type of
DTS signal appe ars.
Easy Setup
DTS
On
Off
10:10 AM
,continued
31
Page 32

13
Select whether or not you want to send a
DTS signal to your amplifier (receiver),
and press ENTER.
If your AV ampli fie r (receiver) has a DT S
decoder, sel ect “ On.” Ot herwi se, select “Off .”
14
Press ENTER when “F inish” appears.
Easy Setup is finished. All connections and
setup operations ar e complete.
Easy Setup
Easy Setup is finished.
Finish
10:10 AM
To return to the previous disp lay
Press O RETURN.
z Hint
If you want to run Easy Setup again, select “Easy Setup”
in the “Setup” display (page 107).
Note
To record TV programs using the timer, you must set the
clock accurately.
Setting Up the VC R Pl us +® System
Setting up your rec order i nvolves c oordina ting th e
TV channel number (the number you t urn to on
your TV or recorder to watch a program) with the
guide channel (the number that’s assigned to that
channel in your TV pr ogram guide).
To find the guide channel numbers , lo ok at the
“Channel Line-up Chart” in the program guide for
your area that features VCR PlusCode numbers.
Use the Channel Lin e- up Chart to coordinate the
guide channel number with the TV channel
number . F or example, if HBO is listed in the
Channel Line-up Ch ar t a s channel 33, and the
recorder receives HBO on channel 5, coordinate
these numbers u sin g the following proc edure.
SYSTEM
MENU
O RETURN
M/m/</,,
ENTER
32
1 Press SYSTEM MENU while the recorder is
stopped.
Title List(Original)
Title List
Timer
Edit
Disc Setting
Setup
Press ENTER :
Title Menu for DVD Title List.
10:10 AM
Page 33

2 Select “Setup,” and press ENTER.
Setup
Title List
Timer
Edit
Disc Setting
Setup
Tuner Preset
Clock Set
Video
Audio
Features
Options
Easy Setup
10:10 AM
6 Enter the TV channel number using M/m.
Tuner Preset
Title list
Antenna/Cable TV
Guide Channel Setup
Auto Preset
List
Timer
Channel Add/Delete
[ Guide CH ]
Edit
3,4 Ch Out
[ TV CH ]
Guide Channel Setup
Setting
Enter actual receiving channel
Setup
33 34 35 36 37 38
5 34 35 36 37 38
10:10 AM
: Cable TV
: 3CH
Hookups and Settings
3 Select “Tuner Preset,” and press ENTER.
4 Select “Guide Channel Setup,” and press
ENTER.
The upper row shows VCR Plus+ guide
channels assign ed in the program gui de and
the lower row shows TV channels or cable
box or satellite re ceiver out put channels.
Tuner Preset
Title list
Antenna/Cable TV
Guide Channel Setup
Auto Preset
List
Timer
Channel Add/Delete
[ Guide CH ]
Edit
3,4 Ch Out
[ TV CH ]
Guide Channel Setup
Setting
Enter actual receiving channel
Setup
1 2 3 4 5 6
1 2 3 4 5 6
10:10 AM
: Cable TV
: 3CH
5 Select the channel number that do es not
match the guide channel using </,.
Tuner Preset
Title list
Antenna/Cable TV
Guide Channel Setup
Auto Preset
List
Timer
Channel Add/Delete
[ Guide CH ]
Edit
3,4 Ch Out
[ TV CH ]
Guide Channel Setup
Setting
Enter actual receiving channel
Setup
33 34 35 36 37 38
33 34 35 36 37 38
10:10 AM
: Cable TV
: 3CH
If you made Hookup A (page 16) or Hookup
C (page 17) ente r t he actual channel nu m ber
on your TV (and the recorder).
If you made Hookup B (page 17) enter the
cable box output channel (Usually 2ch, 3ch, or
4ch). See the instructions supplied with your
cable box to confirm the cable box’s ou tput
channel.
7 Repeat steps 5 an d 6 for each guide
channel number that does not match the TV
channel number.
8 Press SYSTEM MENU to exit the menu.
To return to the previous display
Press O RETURN.
33
Page 34

Connecting Another VCR or Similar Device
After disconnecting the recorder ’s power cord from an AC outlet, connect o ther VCR or similar recording
device to the LINE IN jacks of this recorder.
See also the instruction manual supplied with the connected equipment.
To record on t his recorder, see “Recording from Connected Equipmen t w ith a Timer (Synchro Rec)” on
page 53 and page 72. Connect the equipment to the LINE 1 IN jacks of the recorder to record using the
Synchro Rec function .
Connecting to the LINE 2 IN jacks on the front panel
Connect other VCR or similar device to the LINE 2 IN jacks of this recorder. If the equipment has an
S video jack, you can use an S video cord instead of an audio/video cord.
You can connect a second DVD player and record DVDs.
Other VCR, etc.
S video cord
(not supplied)
S VIDEO
OUTPUT
VIDEO
S VIDEO
VIDEO
AUDIO
LR
Audio/video cord
(not supplied)
LINE 2 IN
L AUDIO R
(MONO)
DV IN
to LINE 2 IN
VCR-DVD recorder
: Signal flow
Note
You cannot record DVD video that contains a copy guard signal played back by another DVD player to a disc in this
recorder.
34
Page 35

Connecting to the LINE 1 IN jacks
You can connect a se cond VCR or similar de vi ce.
Other VCR, etc.
LINE OUTPUT
AUDIO
RL
Audio/video cord
(not supplied)
VIDEO
LINE 1 IN
AUDIO
Hookups and Settings
R
L
to LINE 1 IN
VIDEO
VCR-DVD recorder
VHF/UHF
COMPONENT
AUDIO OUT
DIGITAL
AUDIO
OUT
LINE 1 IN
LINE OUT
VIDEO OUT
P
P
Y
B
R
AUDIO AUDIO
VIDEO VIDEO
IN
R
L
OUT
R
PCM/DTS/
DOLBY DIGITAL
L
COAXIAL
OPTICAL
S VIDEO OUT
: Signal flow
z Hint
When the connected equipment o utputs only monaural sound, use audio cables that distribute monaural sounds to left/
right channels (not supplie d) .
,continued
35
Page 36

Notes
• Do not connect the yellow LINE IN (VIDEO) jack when using an S video cor d.
• Do not connect the output jack of this recorder to another equipment’s input jack with the other equipment’s output
jack connected to the input jack of this recorder. Noise (feedback) may result.
• Pictures containing copy protec ti on signals that prohibit any copying ca nnot be recor de d.
• If you pass the recorder signals via the VCR, you ma y not rec ei ve a clear ima ge on your TV sc ree n.
VCRVCR-DVD recorder TV
Be sure to connect your VCR to the VCR-DVD recorder and your TV in the order shown below. To watch video tapes,
watch the tapes through a second Lin e inp ut on your TV.
LINE 1 IN
VCR VCR-DVD recorder TV
LINE 2 IN
• If you disconnect the recorder’s power cord, you will not be able to view the signals from the connected VCR.
• Do not connect more than one type of vid eo cor d be twe en the recorder and your TV at the same time.
36
Page 37

Basic Operation
Playing a DVD Disc or VHS Tape
5 Press Z OPEN/CLOSE, and place a disc on
the disc tray.
Playing a DVD disc
+
RW
-
RWVR
Z OPEN/
CLOSE
DVD
-
RW
Video
+
R
-
DVD
R
TV/DVD·VIDEO
switch
"/1
x STOPH PLAY
1 Turn on the TV.
2 Press "/1.
The recorder tu rns on.
3 Switch the input selecto r on your TV so that
the signal from the recorder appears on the
TV screen.
When connecting the recorder to the TV using
only the antenna cable, see “Sett ing the RF
Output channel” on page 19.
4 Slide the TV/DVD·VIDEO switch to
DVD·VIDEO, then press DVD to control the
DVD recorder.
With the playback side facing down
6 Press Z OPEN/CLOSE to close the disc
tray.
Wait until “LOAD” disappears from the front
panel display.
Playback starts automatically depending on
the disc.
7 Press H PLAY.
To stop playback
Press x STOP.
Playing a VHS tape
TV/DVD·VIDEO
switch
"/1
VIDEO
H PLAY
x STOP
Basic Operation
,continued
37
Page 38

1 Turn on the TV.
2 Press "/1.
The recorder tu rns on.
3 Switch the input selector on your TV so that
the signal from the recorder appears on the
TV screen.
When connecting the record er to the TV using
only the antenna cable, see “Setting th e R F
Output channel” on page 19.
4 Slide the TV/DVD·VIDEO switch to
DVD·VIDEO, then press VIDEO to control
the VCR.
5 Insert a tape.
The VCR starts playing automatically if you
insert a tape with its safety tab removed.
6 Press H PLAY.
To stop playbac k
Press x STOP.
Recording a Program to a DVD Disc
+
-
RWVR-RW
RW
The following explains how to record a current
TV program to a DVD disc.
Z OPEN/
CLOSE
DVD
z REC
REC MODE
Video
+
R
-
R
TV/DVD·VIDEO
switch
"/1
CH +/–
INPUT
SELECT
x STOP
38
1 Turn on the TV.
2 Press "/1.
The recorder turn s on.
3 Switch the input selector on your TV so that
the signal from the recorder appears on the
TV screen.
When connecting the recorder to the TV using
only the antenn a cable, see “Setting the RF
Output channel” on page 19.
4 Slide the TV/DVD·VIDEO switch to
DVD·VIDEO, then press DVD to contr ol the
DVD recorder.
Page 39

5 Press Z OPEN/CLOSE, and place a
recordable disc on the disc tray.
With the playback side facing down
6 Press Z OPEN/CLOSE to close the disc
tray.
Wait until “LOAD” disappears fro m the front
panel display.
Unused DVD-RWs are formatted in VR mode
automatically.
To format in Video mod e, see pag e 43.
7 Press CH +/– or INPUT SELECT to select the
channel or in put source yo u want to re cord.
8 Press REC MODE repeatedly to select the
recording mode.
Each time you press the button, the display
changes on the TV screen as follows:
HQ SP LP EPHSP SLP
Recording a Program to a VHS Tape
TV/DVD·VIDEO
switch
"/1
VIDEO
CH +/–
INPUT
SELECT
z REC
REC MODE
x STOP
Basic Operation
For more details about the recording mode,
see page 47.
9 Press z REC.
“REC” appears in the front panel display and
recording starts.
Recording conti nues until you stop th e
recording or the disc is full.
To stop recording
Press x STOP.
Note that it may take a few seconds for the
recorder to stop recording.
z Hint
This recorder can reco rd on vario us discs . Select t he disc
type according to your needs (page 10).
1 Turn on the TV.
2 Press "/1.
The recorder turn s on.
3 Switch the input selector on your TV so th at
the signal from the recorder appears on the
TV screen.
When connecting the recorder to the TV using
only the antenn a cable, see “Setting the RF
Output channe l” on pa ge 19.
4 Slide the TV/DVD·VIDEO switch to
DVD·VIDEO, then press VIDEO to control
the VCR.
5 Insert a tape with its safety tab in place.
6 Press CH +/– or INP UT SELECT to sele ct the
channel or input s ource you want to record.
,continued
39
Page 40

7 Press REC MODE repeatedly to select the
tape speed, “SP” or “EP.”
“EP” (Extended Play) provides recording
time three times as long as “SP” (Standard
Play). However, “SP” produces better picture
and audio quality.
8 Press z REC.
“REC” appears in the front panel di sp la y a nd
recording start s .
Recording contin ues until you stop the
recording or the t ape reaches the e nd.
To stop recording
Press x STOP.
Using the On-Screen Menus
+
-
RW
VCD
RWVR-RW
CD
Video
DATA CD
This section introduces the System Menu, TOOLS
menu, and sub-menu. By using these displays, you
can perform most of the recorder’s operations.
-
+
R
DVD
R
SYSTEM
MENU
O RETURN
TOOLS
M/m,
ENTER
System Menu
The System Menu appears when you press
SYSTEM MENU, and provides entries to all of
the recorder’s main functions, such as timer
recording and se t u p.
Select an option by pressing M/m and ENTER.
Title List(Original)
Title List
Timer
Edit
Disc Setting
Setup
A “Title List” (page 42):
Press ENTER to display the “Title List”
menu, which shows recorded titles on the d isc.
10:10 AM
40
Page 41

B “Timer” (pages 50, 69):
Allows you to set a new timer recording
setting.
You can also disp la y t h e Ti m er List menu,
which allows you to check, change, or cancel
timer settings.
C “Edit” (page 81):
Allows you to create and edit a Playlist
(DVD-RW in VR mode only), record a DV
format tape onto a disc, dub from a DVD disc
to a VHS tape and dub f rom a VHS tape to a
DVD disc.
D “Disc Setting” (page 43):
Allows you to format or finalize a DVD.
E “Setup” (page 96):
Turns on the “Set up” display, which al lows
you to set up the recorder to suit your
preferences.
Sub-menu
The sub-menu appears when you select an item
from a list menu (e.g. a title from the Title List
menu), and press ENTER. The sub-menu displays
options applicable only to the selected item. The
displayed option s di f fer depending on the
situation and disc t ype.
Select an option by pr es sing M/m and ENTER.
Example: The Title List menu
T
CH 23
Nov/16/2004
08:00 PM
Title List(Original)
No. Title Length Edit
01 CH 23 >01:29:03
02 CH 66 >00:31:23
03 CH 95 >01:59:00
04 CH 97 >00:58:56
10:10 AM
Play
Erase
Protect
Title Name
A·B Erase
Basic Operation
Selectable options
The options that can be selected differ according
to the media.
In addition, the opti ons that can be selected also
differ accordin g t o the operating mode and the
disc condition.
Example: When a disc or a VHS tape is in stop
mode.
Type Selectable optio ns
+
RW
-
RWVR
-
RW
Video
-
R
+
R
*
**
DVD
VCD
CD
DATA CD
* Un fi na liz ed disc only
Notes
• The System Menu is not displayed when recording
DVD and dubbing a VHS tape to a disc.
• When the System Menu is displaye d, DVD and
VIDEO buttons are not available.
Options for the selected item
TOOLS
The TOOLS menu appears when you press
TOOLS, and dis play s opti ons. You can sear ch for
a title/chapter/track, check the playing and
remaining time, or change audio and repeat
settings. The displayed options differ depending
on the media type.
Select the option by pressing M/m and ENTER.
Example: When y ou press TOOLS while a
DVD-RW (VR mode) is playing.
Title 1/4
T
1/1
Chapter
C
Time
00:00:25
ENG Dolby 5.1 (1/3)
Audio
Repeat
OFF
00:01:30
Remain
Adjust Enter
ENTER
To return to the previous display
Press O RETURN.
Note
The TOOLS menu may not be displayed during DVD
recording.
41
Page 42

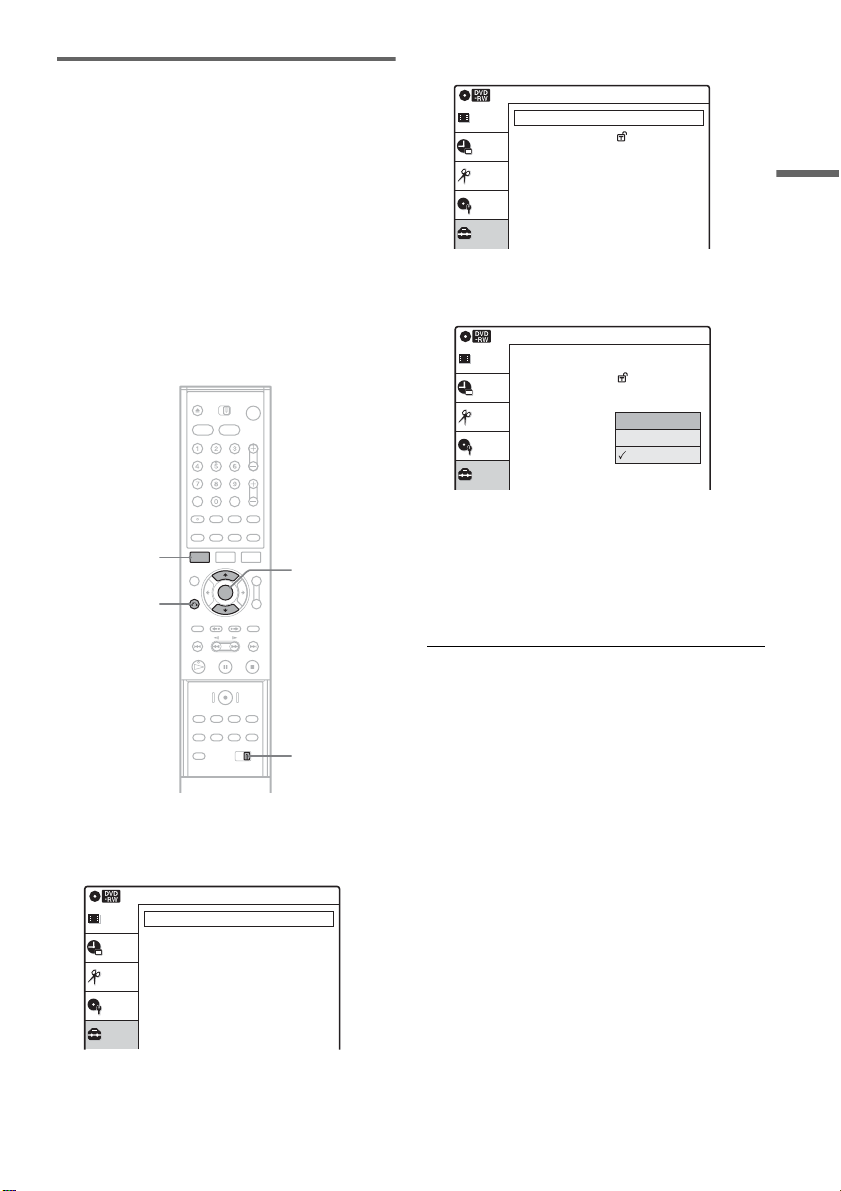
Using the Title List
1
+
-
RW
RWVR-RW
Video
The titles of programs recorded on a disc are
displayed in the Title List.
Z OPEN/
CLOSE
DVD
ORIGINAL/
PLAYLIST
TOP MENU
-
+
R
R
TITLE LIST
MENU
1 Press DVD to control the DVD recorder.
2 Press Z OPEN/CLOSE, and place a disc on
the disc tray.
Example: DVD-RW in VR mode
2
3
T
CH
23
Nov/16/2004
08:00 PM
Title List(Original)
No. Title Length Edit
01 CH 23 >01:29:03
02 CH 66 >00:31:23
03 CH 95 >01:59:00
04 CH 97 >00:58:56
10:10 AM
4
3
A Title type (DVD-RW in VR mode only):
Displays the title type, “Title List(Original)”
or “Playlist.”
B Movie thumbnail image
C Title information:
Displays the title number, title name,
recording dat e, and recording mode.
“ ” indicates the protected title.
D Clock
About the Title List for DVD-RWs (VR mo de )
You can switch the Title List to show Original or
Playlist.
While the Title List menu is turned on, press
ORIGINAL/PLAYLIST repeatedly to select
either “Title List(Original)” or “Playlist.”
For details, see “Edit options for DVD-RWs (VR
mode)” on page 81.
With the recording side facing down
3 Press Z OPEN/CLOSE to close the disc
tray.
Wait until “LOAD” disappears fr om the front
panel display.
4 Press TITLE LIST.
42
To turn off the Title List
Press TITLE LIST.
Notes
• The Title List does not appear for DV D-RW (Vide o
mode), DVD+R, or DVD-R that have been finalized.
To view a title, press TOP MENU or MENU (page 57).
• The Title List may not appear for discs created on other
DVD recorders.
• Letters that cannot be displaye d are replaced with an
“*.”
• When playback of the Title List m ovie thumbnail
image for the se le cted title finishes, the thumbnai l
image display stops at the last image of the movie
thumbnail image.
Page 43

Using the DVD Disc Setting Displays
+
-
RW
RWVR-RW
Video
With the “Di s c Setting” display, you can perfor m
operations such as formatting an d fi nalizing
(page 44).
-
+
R
R
4 Press SYSTEM MENU while the recorde r is
in stop mode.
Title List(Original)
Title List
Timer
Edit
Disc Setting
Setup
Press ENTER :
Title Menu for DVD Title List.
10:10 AM
Basic Operation
Z OPEN/
CLOSE
DVD
SYSTEM
MENU
O RETURN
M/m/</,,
ENTER
1 Press DVD to control the DVD recorder.
2 Press Z OPEN/CLOSE, and place a disc on
the disc tray.
With the recording side facing down
3 Press Z OPEN/CLOSE to close the disc
tray.
Wait until “LOAD” disappea rs from th e front
panel display.
5 Select “Disc S etting,” and pres s ENTER.
The “Disc Set ting” displa y appears.
1
2
3
4
5
Disc Setting
Title List
Disc Name :
Disc Protect : Not Protected
Timer
Disc Format : VR Mode
Disc Finalize : Unfinalized
Edit
Erase All Titles
Disc Setting
Setup
10:10 AM
6 Select an option, and pre ss ENT ER.
A “Disc Name”:
Labels a disc. Enter the disc name in the
“Disc Name” display (page 46).
B “Disc Protect” (DVD-RW in VR mode
only):
Protects all titles on the disc. To cancel
the protection, select “Not protected.”
C “Disc Format” (DVD-RW/DVD+RW
only):
Erases all contents of the disc to make a
blank disc. For DVD-RWs, select a
recording format (“VR Mode” or “Video
Mode”) according to your needs.
D “Disc Finalize”:
Finalizes a disc (page 44).
E “Erase All Titles” (DVD-RW/
DVD+RW only):
Erases all titles on the disc (except the
protected titles) and Playlists cre ated with
protected titles.
To return to the pr evious display
Press O RETURN.
,
continued
43
Page 44

z Hints
• You can set protection for individual titles (page 82).
• By reformatting, you can change the recor ding format
on DVD-RWs, or record again on DVD-RWs (Video
mode) that have been finali zed .
Note
You can enter up to 32 characters for a disc name. The
disc name may not appear when the disc is played on
other DVD equipment.
Finalizing a disc (preparing a disc
for playback on other equipment)
-
+
-
RWVR-RW
RW
Finalizing is nece ssary when you play discs
recorded with t his recorder on oth e r DVD
equipment.
When you finalize a DVD+RW, DVD-RW
(Video mode), DVD+R, or DVD-R, a DVD menu
will be automatically created, which can be
displayed on other DVD equipment.
Before finalizing, check the differences between
the disc types in the table below.
Video
+
R
R
1 Follow steps 1 to 6 of “Using the DVD Disc
Setting Displays” on page 43 to select
“Disc Finalize” in the “Disc Setting”
display.
The display for confirmation appears.
Do you want to finalize this disc ?
Finalize Unfinalize
2 Select “Finalize,” and press EN TER.
The display for confirmation appears again.
3 Select “OK,” and press ENTER.
The recorder starts finalizing the disc.
To unfinalize a DVD-RW (VR mo de )
If you cannot record or edit on a DVD-RW (VR
mode) that has been finalized with other DVD
equipment (a message appears), unfinalize the
disc by selecting “Unfinalize” in step 2 above.
Differences between the disc types
+
-
RWVR
-
RW
Discs are automatically finalized when
RW
stopped recording. If you want to record
on it again, reformat the disc (pa ge 43).
However, after reformatting the disc, all
recorded contents will be erased.
Finalizing is unnecessary when playing a
disc on VR format compatible equipment.
Even if your other DVD equipment is
VR format compatible, you may need to
finalize the disc, especially if the
recording time is short. After finalizing,
you cannot edit or record on the disc. If
you want to edit or record on it again,
unfinalize or reformat the disc (page 43).
However, after reformatting the disc, all
recorded contents will be erased.
Finalizing is necessary when playing on
Video
any equipment other tha n th is recorder.
After finalizing, you cannot edit or
record on the disc. If you want to edit or
record on it again, unfinalize or reformat
the disc (page 43). However, after
reformatting the disc, al l re corded
contents will b e erased.
Finalizing is necessary when playing on
+
R
any equipment other tha n th is recorder.
-
R
After finalizing, you cannot edit or
record on the disc.
z Hint
You can check whether the disc has been finali zed or not.
If you cannot select “Finalize” in step 2 above, the disc
has already been finalized.
Notes
• Depending on the condition of the disc, recording, or
the DVD equipment, discs may not play eve n if the
discs are finalized.
• The recorder may not be able to finaliz e the d isc if it
was recorded on another recorder.
44
Page 45

Checking the Play Information and Playing Time
+
-
RW
VCD
RWVR-RW
CD
Video
DATA CD
You can check the pl aying time and rem ai ni n g
time of the current title, chapter, or track.
Press DISPLAY.
The information dis pl ay appears.
The display disappears after a short time.
Play
1:23:45
HQ
Rem 16:15
Original
-
+
R
R
TIME/TEXTDISPLAY
Stop
0:30:00
SP
Rem 01:30
CH 110
DVD
◆VHS
F Play mode
G Time counter
H Recording mode
I Remaining time
J Current channel
K Date and time
Note
The information display may not be displayed during
DVD recording.
Checking the playing/remaining
time
You can view the playing or time information
displayed on the T V screen and the front panel
display.
Press TIME/TEXT repeatedly.
The displays diffe r depending on the med ia ty pe
or playing status.
◆Front panel display
Example: When playing a DVD
Playing time of the current title
Current title number and current chapter
number
Clock
Basic Operation
Mon Nov 01. 2004 10:10 AM
◆DVD
A Play mode
B Playing time
C Recording mo de
D Remaining time
E Current channel*
* Title type (Original or Playlist) for DVD-RW in VR
mode
qa
Example: When playing a CD
Playing time of the current track
m
Current track number
m
Clock
Example: When playing a VHS tape
Playing time
m
Remaining time
m
Clock
45
Page 46

Changing the Name of a Recorded Program (Title Input)
+
-
RW
RWVR-RW
Video
You can label a title, disc , or progra m by enteri ng
characters. You can enter up to 32 characters for a
title or disc name, but the actual number of
characters displayed in the menus such as the Title
List will vary. When the display for entering
characters app ears, follow the ste ps below.
O RETURN
-
+
R
R
M/m/</,,
ENTER
2 Repeat step 1 to enter the remaining
characters.
Input row
Disc Name
Kids
_
A B C D E
F G H I J
K L M N O
P Q R S T
U V W X Y
Z
Backspace Space Delete Clear Finish
a b c d e
f g h i j
k l m n o
p q r s t
u v w x y
z
10:10 AM
1 2 3 4 5
6 7 8 9 0
- _ + = •
@ # $
!
~
%^& ( )
To erase a charac t er, move the cursor to t h e
right of the character at the input row. Select
“Backspace” an d pr ess ENTER.
To erase the character at the position of the
cursor, select “Delete” and press ENTER.
To insert a char acter, move the cursor to the
right of the point where you want to insert the
character. Select the character and press
ENTER.
To erase all of the ch aracters, selec t “Clear”
and press ENTER.
3 Select “Finish,” and pre ss ENTER.
To cancel the se tt i ng, press O RETURN.
1 Select the char acter you want to enter
using M/m/</,, and pre ss ENTER.
The selected character appears at th e t op of
the display.
Example: Disc Name
Disc Name
K
_
A B C D E
F G H I J
K L M N O
P Q R S T
U V W X Y
Z
Backspace Space Delete Clear Finish
You can only enter characters and symbols
that are displayed.
To insert a space, se l ect “Space.”
46
a b c d e
f g h i j
k l m n o
p q r s t
u v w x y
z
1 2 3 4 5
6 7 8 9 0
- _ + = •
!
~
%^& ( )
10:10 AM
@ # $
Page 47

DVD Recording
Before Recording
Before you start recording…
• This recorder can record on various discs. Select
the disc type according to your needs (page 10).
• Check that the disc has enough availab l e space
for the recording (page50). For DVD-RWs, you
can free up disc space by erasing titles (page 82).
z Hint
Timer recordings will start regardless of whether or not
the recorder is turned on. You cannot turn of f the
recorder during a timer recording. The recorder
automatically turns off after the timer recording finishes.
Recording mode Recording time
(minute)
HQ (High qual i ty) 60
HSP R 90
SP (Standard mode) 120
LP r 180
EP r 240
SLP (Long duration) 360
Note
Situations below may cause slight inaccuracies with the
recording time .
– Recording a program with poor reception, or a program
or video source of low picture quality
– Recording on a disc that has already been edited
– Recor d ing only a still picture or just sound
DVD Recording
Notes
• This recorder records at x1 speed.
• This recorder shares a single tuner for both the DVD
recorder and the VCR. You cannot record different
programs to a DVD and a VHS tape at the same time.
Recording mode
Like the SP or EP recording m ode of VCRs, this
recorder has six different recording modes.
Select a recording mode according to the time and
picture quality yo u need. For example, if picture
quality is your top priorit y, select the High Quality
mode (HQ). If recording time is your priority,
Super Long Play mode (SLP) can be a pos si ble
choice. Note that the recording t ime in the
following table is an approximate guide.
Press REC MOD E repeatedly to swi t ch t h e
recording modes.
I want to record with the
best possible picture
quality, so I’ll select HQ.
Recording a stereo/SAP program
The recorder can receive and rec ord stereo/SAP
programs.
Stereo programs
When a stereo program is received, the
“STEREO” indicator light s up in the fr ont panel
display. If there is noi se in the stereo program,
press AUDIO repeatedly until the “MONO”
indicator disappears from the TV scr een. The
sound will be recorded in monaural but with less
noise.
SAP (Second Audio Program)
When a SAP (Second Audio Program) is received,
the “SAP” indicator lights up in the front panel
display. To record only SAP sound, set “Tuner
Audio” of “Audio” to “SAP” in the “Setup”
display (page102).
,continued
47
Page 48

Unrecordable pictures
Pictures with cop y protection cannot b e recorded
on this recorder.
Copy contr ol
signals
Copy-Free
Copy-Once
Copy-Never None
* The recor de d disc can be played only on CPRM
compatible equipm en t.
Recording stops when a copy guard sig nal is detected.
Recordable discs
+
-
RWVR-RW
RW
-
+
-
RWVR
Ver.1.1 with CPRM*
Ver.1.2 with CPRM*
R
R
Video
DVD Recording without the Timer
+
RW
-
RWVR-RW
Z OPEN/
CLOSE
DVD
DISPLAY
Video
+
R
-
R
TV/DVD·VIDEO
switch
VIDEO
CH +/–
INPUT
SELECT
TV/VIDEO
H PLAY
REC MODE
X PAUSE
x STOP
z REC
1 Press DVD to control the DVD recorder.
2 Press Z OPEN/CLOSE, an d place a
recordable disc on the disc tr ay.
With the recording side facing down
3 Press Z OPEN/CLOSE to close the disc
tray.
Wait until “LOAD” disappears from the fr ont
panel displ ay.
Unused DVD-RWs are formatted in VR mode
automatically.
To format in Vi deo mode, see page 43.
4 Press CH +/– or INPUT SELECT to select the
channel or input source you want to record.
48
Page 49

5 Press REC MODE repeatedly to select the
recording mode.
Each time you press the button, the display
changes on the TV screen as follows:
HQ SP LP EPHSP SLP
For more details about the recording mode,
see page 47.
6 Press z REC.
Recording start s.
Recording conti nues until you stop th e
recording or the disc is full.
Recording using the Quick Timer
(One-touch Timer Recording)
You can set the recorder to record in 30 minute
increments.
1 Press DVD to control the DVD recorder.
2 Press z REC repeatedly to set the
duration.
Each press advances the time in 30 minute
increments. The maximum duration is six
hours.
0:30 1:00 5:30 6:00
(normal
recording)
DVD Recording
To stop recording
Press x STOP.
Note that it may take a few seconds for the
recorder to stop recording.
To pause recording
Press X PAUSE.
To restart recording, press X PAUSE agai n.
To watch another TV program while recording
1 Slide the TV/DVD·VIDEO switch to TV.
2 Press TV/VIDEO to switch to the TV’s
antenna input.
3 Select anot her channel on the TV.
To watch a VHS tape while recording
Press VIDEO to control the VCR, insert a tape,
then press H PLAY.
“OTR” (One-touc h Timer Re cording) and the
remaining recording time a re d ispla yed in the
front panel display while recording.
The time counter decreases minu te by minute
to 0:00, then the rec order stops record i ng
(power turns off).
To cancel the Quick Timer
Press z REC repeatedly until the counter appears
in the front panel display. The recorder returns to
normal reco rding mode.
To stop recording.
Press x STOP twice.
z Hint
If you do not want to watch TV while recording, you can
turn off the TV. When using a cable box or sa te llite
receiver, make sure to leave it on.
Notes
• After pressing z REC, it may take a short while to
start recording.
• You cannot change the recording mode while
recording or during recording pause.
• If there is a power failure, the program you are
recording may be erased.
• You cannot change the channel or inpu t sour c e of the
recorder using CH +/– or INPUT SELECT while
recording another TV program.
,continued
49
Page 50

Checking the disc status while
recording
You can check th e recording info rmation such as
recording time or disc type.
Press DISPLAY during recording.
The recording i nf ormation appears.
Record
0:00:03
HQ
Rem 02:28
CH 1
A Disc type
B Recording status
C Recording time
D Recording mode
E Remaining recording time
F Current channel
Press DISPLAY repeatedly to turn off the display.
DVD Timer Recording (Standard/VC R Pl us+)
+
-
RW
RWVR-RW
Video
You can set the timer for a total of 12 programs
together with DVD Timer Recording and VCR
Timer Recording, up to one month in ad vance.
There are two methods to set the timer: the
standard method a nd V C R Plus+ method.
• Standard: Set the date, time, and channel of th e
program manually.
• VCR Plus+: Enter the PlusCod e nu m be r
designated for eac h TV program (pag e 52).
Note
Do not operate your cable box or satellit e re ceiver just
before or during a timer recording. This may prevent the
accurate recording of a program.
Setting the timer manually
(Standard)
Z OPEN/
CLOSE
DVD
-
+
R
R
Creating chapters in a title
The recorder will automatically divide a recording
(a title) into chapte rs by inserti ng chapter marks at
5 or 15 minute inter val s during recording. Select
the interval, “5 Mi n” (default) or “15 Min” in
“DVD Auto Chap ter” of “ Features ” in the “Setup”
display (page 104).
To cancel “DVD Auto Chapter” setting, select
“Off.”
z Hint
You can create chapters manually when playing
DVD+RWs or DVD-RWs (VR mode). For details, see
page 84.
50
SYSTEM
MENU
[TIMER]
M/m/</,,
ENTER
x STOP
Page 51

1 Press DVD to control the DVD recorder.
12 3 4 56
2 Press Z OPEN/CLOSE, and place a
recordable disc on the disc tray.
With the recording side facing down
3 Press Z OPEN/CLOSE to close the disc
tray.
Wait until “LOAD” disappears fro m the front
panel display.
Unused DVD-RWs are formatted in VR mode
automatically.
To format in Video mod e, see pag e 43.
4 Press [TIMER].
Timer – Standard
No Rec To Date Start End Source Mode Edit
No.1
01 DVD 06/14 09:00PM 10:00PM CH8 LP
02 DVD 06/14 09:15PM 09:45PM CH1 LP
RecTo Date Start Stop CH Mode
03 --- --/-- --:-- --:-- ---- ---
DVD
11/30 02 40 03 0505 CH 100 SP
--- --/-- --:-- --:-- ---- ---04
--- --/-- --:-- --:-- ---- ---05
VCR Plus+
--- --/-- --:-- --:-- ---- ---06
: PM
:
PM
If the Timer programming (VCR Plus+) menu
appears, press < to switch the display to
“Standard.”
5 Select an item using </, and adjust
using M/m.
A “RecTo”:
Select “DVD.”
B “Date”:
Sets the date using M.
To record the same program every day or
the same day ever y w eek, press m.
The item changes as follows:
Today y Mon-Fr i (Monday to Friday)
y Sun (every Sunday) y Mon (every
Monday) y … y Sat (every Saturday)
y 1 month later y … y Tod ay
C “Start”:
Sets the start time.
D “Stop”:
Sets the stop time.
10:10 AM
E “CH”:
Selects the channel or input source.
F “Mode”:
Selects the recording mode (page 47).
To use the Rec Mode Adjust function,
select “Auto.” For details, see “To use the
Rec Mode Adjust function” on page 52.
If you make a mistake, select the item and
change the setting.
6 Press ENTER.
The Timer List menu (page 55) appears. The
c indicator lights up in the front panel
display, and the recorder is ready to start
recording. If the c indicator flashes in the
front panel display, check that a recor dable
disc is inserted and that there is enough disc
space for the recording.
There is no need to turn off the recorder before
the timer recording starts.
If the timer settings overlap, the message
“These timer settings overlap.” appears. To
confirm, change, or cancel timer recording,
see “Checking/C hanging/Canceling DVD
Timer Settings (Ti m er List)” on page 55.
7 Press SYSTEM MENU to exit the menu.
To stop recording
Press x STOP twice.
Note that it may take a few seconds for the
recorder to stop recording.
If the timer settings overlap
The program that starts first has priority and the
second program starts record ing only after t he first
program has f in ished. If the programs start at the
same time, the program listed firs t in the menu has
priority.
7:00 8:00 9:00 10:00
Program 1
Program 2
will be cut off
7:00 8:00 9:00 10:00
Program 1
Program 2
will be cut off
,continued
DVD Recording
51
Page 52

To confirm, ch a nge, o r ca ncel timer rec or ding
See “Checking/Changing/Canceling DVD Timer
Settings (Timer List)” on page 55.
To use the Rec Mode Adjust func tion
When you are recording a program in the Auto
mode and there is not enough available disc space
for the recording, the rec o rder automatically
adjust the record i ng m ode to enable the en tire
program to be recorded.
z Hints
• You can play the recorded program by selecting the
program title in th e T itle List menu.
• When the start time and the channel or input source to
be recorded are the same but the “RecTo” setting
differs, the program is recorded to both the DVD disc
and the VHS tape.
• You can also display the Timer programming menu as
follows:
1 Press SYSTEM MENU.
The System Menu appears.
2 Select “Timer,” and press ENTER.
3 Select “Timer – S ta ndard,” and press ENTER.
Notes
• To record a cable or satellite program, turn on the cable
box or satellite receiver and sel ect the program you
want to record. Leav e the cable box or satell ite receiv er
turned on until the recorder finish es recording.
• Even if the timer is set, timer recordings cannot be
made while recording a program that has priority.
• Before the timer recording starts, “TIMER REC”
flashes in the front panel display.
• Even if a timer recording is started in the condition with
the recorder power on, the recorder power is
automatically tur ned off when the timer recording
finishes.
• If you attempt to make a timer reco rd ing of a copy
protected broadcast, a black sc ree n is r e cord e d.
Recording TV programs using the
VCR Plus+ system
The VCR Plus+ system is a feature that simplifies
setting the timer. Just enter the PlusCode number
listed in the TV program guide. The date, time,
and channel of that program are set automatically.
Before you start, check that the TV and guide
channels are correctly set in “Guid e C hannel
Setup” of “Tuner Preset” in the “Setup ” di splay
(page 98).
DVD
Number
buttons
CLEAR
VCR Plus+
SYSTEM
MENU
M/m/</,,
ENTER
x STOP
1 Press DVD to control the DVD recorder.
2 Insert a recordable disc.
3 Press VCR Pl us+.
Timer – VCR Plus+
Title List
Set VCR Plus+ Code number. [0~9]
Timer
Edit
Disc Setting
Setup
Standard
10:10 AM
52
If the Timer programming (Standard) menu
appears, press < to switch the display to
“VCR Plus+.”
4 Press the number buttons to enter the
PlusCode number.
If you make a mistake, press CLEAR and reenter the correct number.
Page 53

5 Press ENTER.
The date, start and s to p ti m es, channel, and
recording mode appe ar.
The c indicator lights up in the front panel
display, and the recorder is ready to start
recording. If the c indicator flashes in the
front panel di splay, check th at a recordable
disc is inserted.
Timer – Standard
No Rec To Date Start End Source Mode Edit
No.1
01 DVD 06/14 09:00PM 10:00PM CH8 LP
02 DVD 06/14 09:15PM 09:45PM CH1 LP
RecTo Date Start Stop CH Mode
03 --- --/-- --:-- --:-- ---- ---
DVD
11/15 9 00 11 00 CH 83 LP
--- --/-- --:-- --:-- ---- ---04
--- --/-- --:-- --:-- ---- ---05
VCR Plus+
--- --/-- --:-- --:-- ---- ---06
: PM
:
10:10 AM
PM
6 Select “RecTo” usin g </, and select
“DVD” using M/m, and press ENTER.
If you want to change other settings, press </
, to select the item and press M/m to change
the setting.
7 Press SYSTEM MENU to exit the menu.
Recording fr om Connected Equipment with a Timer (Synchro Rec)
+
-
RW
RWVR-RW
Video
You can set the recorder to automatically record
programs from connected equipm ent that has a
timer function (such as a satel lite tuner). Connect
the equipment to the LINE 1 IN jacks of the
recorder (page35).
When the connected equipment tu rn s on, the
recorder start s record ing a prog ram from t he LINE
1 IN jacks.
DVD
-
+
R
R
DVD Recording
To stop recording
Press x STOP twice.
Note that it may take a few seconds for the
recorder to stop recording.
If the timer settings overlap
See page 51.
To confirm, change, or cancel ti m er recording
See “Checking/Changing/Canceling DVD Timer
Settings (Timer L is t )” on page 55.
z Hint
You can also display the Timer programm ing menu as
follows:
1 Press SYSTEM MENU.
The System Menu appears.
2 Select “Timer,” and press ENTER.
3 Select “Timer – VC R Plus+, ” and pr ess ENTER .
Notes
• When the PlusCode number is incorr ect, “Inv al id
code” appears on the TV screen.
• Before the timer recording starts, “TIMER REC”
flashes in the f r o nt panel display.
• Even if a timer rec o r di ng is s ta r te d in the co n di ti on with
the recorder power on, the recorder power is automatically
turned off when the timer recording finishes.
• If you attempt to make a timer recording of a copy
protected broadcast, a black scr een is recorded.
SYSTEM
MENU
M/m,
ENTER
x STOP
REC MODE
SYNCHRO
REC
1 Press DVD to control the DVD recorder.
2 Insert a recordable disc.
3 Select the l ine input audio.
Set “Line Audio Input” of “Audio” to
“Stereo” or “Main/Sub” in the “Set up”
display (page 103).
,
continued
53
Page 54

4 Press REC MODE repeatedly to select the
recording mode.
Each time you press the button, the display
changes on the TV screen as follows :
HQ SP LP EPHSP SLP
For more details about the recording mode,
see page 47.
5 Press SYSTEM MENU whil e the rec order is
in stop mode.
6 Select “Setup,” and press ENTER.
7 Select “Features,” and press ENTER.
The “Features” setup appears.
8 Select “Synchro Recording,” and press
ENTER.
9 Select “to DVD,” and press ENTER.
10
Press SYSTEM MENU to exit the menu.
11
Set the timer on the connec ted eq uipment
to the time of the program you want to
record, and turn it off.
12
Press SYNCHRO REC.
The SYNCHRO REC indicator lights up on
the front panel. The recorder is ready to start
Synchro-Recording.
The recorder aut o matically start s r ecording
when it receives an input signal from the
connected equipm ent. The recorder st ops
recording whe n the connected equipment
turns off.
To stop recording
Press x STOP twice.
Notes
• The recorder starts reco rd ing only after detecting the
video signal from the connected equi pment. The
beginning of the program may not be rec ord e d
regardless of whether or not the re corder’s power is on
or off.
• During Synchro-Recording, other operations such as
normal recording cannot be done.
• To use the connected equipment whil e th e reco rd er is
standing by for Synchro-Recording, cancel SynchroRecording by pressing SYNCHRO REC. Be sure to
turn off the connected equipme nt and press
SYNCHRO REC to reset Synchro-Recording before
the timer recording starts.
• The Synchro Rec function does not work with some
tuners. For details, see the tuner’s operating
instructions.
• While the recorder is standing by for SynchroRecording, the Auto Clock Set function (page 99) does
not work.
• To use the Synchro Rec function, you must first set the
recorder’s clock correctly.
• When the recorder’s power is on, the recorder enters
the Synchro-Recording standby mode after a SynchroRecording has finished.
• Even if a Synchro-Recording is started in the condition
with the recorder power on, the recorder power is
automatically turned off wh en the Synchro-Recording
finishes.
• If you attempt to make a Synchro-Recording of a copy
protected broadcast, a blac k screen is recorded.
• When the recorder’s clock is not set correctly, the
Synchro-Recording st arts approximately 2 minutes
after the set time .
If the timer settings of a Synchro-Recording
and another timer recording overlap
Regardless of whether or not the program i s a
Synchro Rec program, the pr ogram that sta rts first
has priority. The recorder sw itc he s to start
recording the second program around 10 seconds
after the first pr ogram has finis h ed.
To cancel Synchro Rec function
Press SYNCHRO REC. The SYNCHRO REC
indicator on the recorder turns off.
If you press SYNCH RO REC during SynchroRecording, the Synchro-Recording stops, the
SYNCHRO REC indicator turns off and the
recorder’s power turns off.
54
7:00 8:00 9:00 10:00
Program 1
Program 2
will be cut off
Page 55

Checking/Changing/ Canceling DVD Timer Settings (Tim er Li st )
+
-
-
RWVR
RW
RW
Video
You can check, change, or cancel timer settings
using the Timer List menu.
SYSTEM
MENU
O RETURN
+
R
-
R
M/m/</,,
ENTER
4 Select the timer setting you want to check/
change/cancel, and press ENTER.
The sub-menu appears.
Timer List
No RecTo Date Start Stop CH Mode Edit
01 DVD 11/17 09:00PM 10:00PM CH8
DVD 11/28 09:15PM 09:45PM CH1
02 Del
03 --- --/-- --:-- --:-- ---- ---
--- --/-- --:-- --:-- ---- ---04
--- --/-- --:-- --:-- ---- ---05
--- --/-- --:-- --:-- ---- ---06
10:10 AM
Edit
5 Select one of t he options, and press
ENTER.
“Edit”: Changes the timer setting. Select an
item using </, and adjust using M/m.
Press ENTER.
Timer – Standard
No Rec To Date Start End Source Mode Edit
No.1
01 DVD 06/14 09:00PM 10:00PM CH8 LP
02 DVD 06/14 09:15PM 09:45PM CH1 LP
RecTo Date Start Stop CH Mode
03 --- --/-- --:-- --:-- ---- ---
DVD
11/17 09 15 09 45 CH1 LP
--- --/-- --:-- --:-- ---- ---04
--- --/-- --:-- --:-- ---- ---05
VCR Plus+
--- --/-- --:-- --:-- ---- ---06
: PM
:
10:10 AM
PM
DVD Recording
1 Press SYSTEM MENU.
The System Menu a ppears.
2 Select “Timer, ” and press ENTER.
3 Select “Timer List,” and press ENTER.
Timer List
No RecTo Date Start Stop CH Mode Edit
01 DVD 11/17 09:00PM 10:00PM CH8 LP
02 DVD 11/28 09:15PM 09:45PM CH1 LP
03 --- --/-- --:-- --:-- ---- ---
--- --/-- --:-- --:-- ---- ---04
--- --/-- --:-- --:-- ---- ---05
--- --/-- --:-- --:-- ---- ---06
Timer information displays the recording
date, time, recording mode, etc.
10:10 AM
“Del”: Eras es t he t imer sett ing. Pr ess E NTER.
Timer List
No Rec To Date Start End Source Mode Edit
01 DVD 06/14 09:00PM 10:00PM CH8 LP
02 DVD 06/14 09:15PM 09:45PM CH1 LP
03 --- --/-- --:-- --:-- ---- ---
--- --/-- --:-- --:-- ---- ---04
--- --/-- --:-- --:-- ---- ---05
--- --/-- --:-- --:-- ---- ---06
No.1
Do you want to erase “No.01”?
OK Cancel
10:10 AM
To turn off the Timer List
Press O RETURN.
Note
Even if the timer is set, timer recordings cannot be made
while recording a program that has prior ity.
55
Page 56

Recording from Connected Equipment with ou t a Time r
4 Press REC MODE repeatedly to select the
recording mode.
Each time you pr ess the button, t he display
changes on the TV screen as follows:
+
-
RWVR-RW
RW
You can record from a connected VCR or similar
device. To connect other VCR or similar device,
see “Connecting Another VCR or Similar Device”
on page 34.
Use the DV IN jack on the front panel if the
equipment has a DV output jack (i.LINK j ack).
DVD
REC MODE
Video
-
+
R
R
INPUT
SELECT
x STOP
z REC
1 Press DVD to control the DVD recorder.
2 Insert a recordable disc.
3 Press INPUT SELECT to select an input
source according t o t he connection you
made.
The front panel display changes as follows:
HQ SP LP EPHSP SLP
For more details about the recording mode,
see page 47.
5 Select the line input audio.
Set “Line Audio Input” of “Audio” to
“Stereo” or “Ma in/Sub” in the “Setup”
display (page103).
6 Insert the source tape into the connected
equipment and set to playback pause.
7 At the same time, press z REC on this
recorder and the paus e or pla y butto n on
the connected equipment.
Recording starts.
To stop recordi ng, press x STOP on this
recorder.
If you connect a digital vi deo camera with a DV
IN jack
See “Dubbing from a DV Format Tape to a DVD”
on page 94 for an explanation of how to record
from the DV IN jack.
Notes
• When recording a video game image, the screen may not
be clear.
Any program that contains a Copy-Never copy guard
•
signal cannot be recorded. The recorder automatically
stops recording after a few seconds.
56
program position
LINE2 DVLINE1
Page 57

Playing Discs
Playing
+
-
RWVR-RW
RW
VCD
CD
Z OPEN/
CLOSE
DVD
Number
buttons
TITLE LIST
Video
DATA CD
3 Press Z OPEN/CLOSE to close the disc
tray.
If you inserted a DVD VIDEO, VIDEO CD,
CD, or DATA CD, press
H PLAY. Playback
starts.
Playback starts automatically depending on
-
+
R
DVD
R
the disc.
4 Press TITLE LIST.
For details about the Title List, s ee “Using the
Title List” on page 42.
Example: DVD-RW (VR mode)
M/m,
ENTER
T
CH 23
Nov/16/2004
08:00 PM
Title List(Original)
No. Title Length Edit
01 CH 23 >01:29:03
02 CH 66 >00:31:23
03 CH 95 >01:59:00
04 CH 97 >00:58:56
10:10 AM
Playing Discs
TOP MENU
H PLAY
"/1 x
MENU
m/M
x STOP
REPEAT
1 Press DVD to control the DVD recorder.
2 Press Z OPEN/CLOSE, and place a disc on
the disc tray.
With the playback side facing down
5 Select the title, and press ENTER.
The sub-menu appears.
6 Select “Play,” and pre ss E NT ER.
Playback starts from the selected title on the
disc.
To use the DVD’ s Menu
When you play a DVD VIDEO, or a finalized
DVD+RW, DVD-RW (Video mode), DVD+R, or
DVD-R, you can di splay the disc’s m enu by
pressing TOP MENU or MENU.
To play VIDEO CDs with PBC functions
PBC (Playback Control) allows you to play
VIDEO CDs interactively using the menu on your
TV screen.
When you start playi ng a V I D EO CD with PBC
functions, the menu appears.
Select an item using the n umber buttons a nd press
ENTER. Then follow the instructions in the menu
(press H PLAY when “Press SELECT”
appears).
To cancel PBC Playback
Press MENU re peatedly until “M enu: Off”
appears.
To stop playback
Press x STOP.
,continued
57
Page 58

To resume playback from the point where you
stopped the disc (Resume Play)
When you press H PLAY again after you stop
the disc, the recorder resum es playback from t h e
point where you pressed x STOP.
To start from the beginning, press x STOP twice,
and press H PLAY.
The point where you st opped playing is cle ar ed
when:
–you open the disc tr ay.
–you play anothe r t itle.
–you switch the Title List menu to Original or
Playlist (DVD-RW in VR mode only).
–you edit the title after stopping playback.
–y ou turn off the recorder.
–you make a recordi ng.
To repeat a specific portion (Repeat A-B Play)
(DVD and VIDEO CD (with PBC function off)
only)
1 During playback, press REPEAT.
2 Select “A” using M/m.
3 Press ENTER at the starting point (point A) of
the portion to be played repeatedly.
“A-” lights up .
4 Continue playing or press m/M to locate
the ending point (point B), then press ENTER.
Repeat A-B Play starts.
To lock the recorder (Child Lock)
You can lock all of the buttons on the recorder so
that the settings ar e not canceled by mistake.
When the recorder is turned on, hold down "/1 on
the recorder until “CHILD LOCK” appears in the
front panel di splay. The rec order turns off a nd the
indicator remains lit if there is a timer setting.
The recorder will not work except for timer
recordings.
To unlock the recorder, hold down "/1 on the
recorder until “CHILD LOCK” disappea rs from
the front panel dis pl ay. The recorder is unl ocked
and turns on.
To stop timer recording while the recorder is
locked, press x tw ice. The record ing stops an d the
recorder is unlocked.
Notes
• When playing back a disc recorded by other equipment
on this recorder, be sure to f ina lize the disc with the
equipment used to record it.
• For details on the operati on r es tr ic ti ons, se e page 8.
• The recorder will be unlocked when:
– You stop timer recording by pressing x.
– You ins ert a ta pe .
– The AC power cord is disconnected or power supply
stops.
To play restric ted DVDs (Parent al Control)
If you play a restricted DVD, the message “Your
selection exceeds the rating limit for this player.
Override the limit?” appears on your TV screen.
1 Select “OK” and press ENTER.
The display for enter i ng your password
appears.
2 Enter your four digit password using the
number buttons.
The recorder starts playback.
To register or change the password, see “Parental
(DVD VIDEO onl y) ” on page 105.
58
Page 59

Playback options
Z OPEN/CLOSE
AUDIO
SUBTITLE
M/m/</,,
ENTER
INSTANT REPLAY/
INSTANT ADVANCE
. PREV/NEXT >
H PLAY
SHUFFLE
Buttons Operations Discs
Z OPEN/CLOSE Stops play and opens the disc tray. All di scs
SURROUND
TOOLS
ZOOM
ANGLE
X PAUSE
REPEAT
Playing Discs
AUDIO Selects one of the audio tracks recorded on the disc
when pressed repeatedly.
Selects the audio source.
DVD
Selects stereo or monaural aud io tracks.
VCD
SUBTITLE Selects a subtitle language when pressed repeatedly.
ANGLE Selects an angle when pressed repeatedly.
If various angles (multi-angles) for a sc ene are
recorded on the disc, “ ” appears in the front panel
display.
ZOOM Zooms into a scene during playback or still mode
when pressed repeatedly.
Magnification changes as follows:
normal magnification t ×2 t ×4 t normal
magnification
The zoom function may not work depending on the
DVD.
To zoom in a JPEG image, see page 65.
DVD
DVD
DVD
DVD
VCD
VCD
,continued
.
59
Page 60

Buttons Operations Discs
SURROUND Selects one of the effects when pressed repeatedly.
“Off”: No surround effect
“Surround1”: Creates one set of virtual surround
speakers.
“Surround2”: Creates two sets of virt ua l surround
speakers.
“Surround3”: Creates three sets of virtual surround
speakers.
Effective when you use two separate front speakers.
INSTANT
REPLAY/
INSTANT
ADVANCE
. PREV/
NEXT >
• Replays the scene/briefly fast forwards the scene
when pressed in continuous pl ay mode.
• Goes to the previous/next frame when pressed in
pause mode.
• Goes to the beginning of the current/ ne xt t it le/
chapter/scene/track and sta r ts playback when
pressed during playback.
• Goes to the beginning of the previous title/chapter/
scene/track when . PREV is pressed within 3
seconds after starting a title/chapter/scene/track.
(fast reverse/fast
forward)
Fast reverses/fast forwards the disc when pressed
during playback.
Search speed changes as follows:
fast reverse fast forward
FR1 T t FF1
(slow)
*1
T T t t FF2
FR2
FR3*2 T T T t t t FF3
Plays in slow motion when pressed in pause mode.
The playback speed changes as follows:
*1
*2
reverse slow motion forward slow motion
T t
T T t t
T T T t t t
+
-
RWVR-RW
RW
-
+
R
R
CD
+
-
RWVR-RW
RW
-
+
R
R
All discs
All discs
*1
FR2 and FF2 are not
available for MP3.
*2
FR3 and FF3 are only
available for DVDs
and VIDEO CDs.
+
-
RWVR-RW
RW
-
+
VCD
* Pl ay back di rec ti on
R
only
R
*
Video
DVD
Video
DVD
Video
DVD
X PAUSE Pauses playback.
If you pause playback for more than 5 min ut es,
playback starts automatically.
SHUFFLE Plays in random order when pressed during playback. *
60
All discs
VCD
CD
DATA CD
* with PBC function off
Page 61

Buttons Operations Discs
REPEAT Selects the item to be rep eated using M/m.
When playing a DVD
• Chapter: repeats the current chapter.
• Title: repeat s th e current titl e o n a disc.
• A-B (Repeat A-B Play): repeats a specific portion
(page 58).
When playing a VIDEO CD (with P B C function off)
• Track: repeats the current track.
• Disc: repeats all of the tracks.
• A-B (Repeat A-B Play): repeats a specific portion
(page 58).
When playi ng a CD
• Track: repeats the current track.
• Disc: repeats all of the tracks.
When playing a DATA CD (MP3 audio)
• File: repeats the current track.
• Folder: repeats the cur rent album.
To cancel Repeat Pl ay, press REPEAT, and sel e ct
“Off.”
To resume normal pla yba ck, press H PLAY.
To playback quickly with sound (Scan Audio)
(DVD with Dolby Digital sound tracks only)
Set “Scan Audio” of “Audio” to “On” in the
“Setup” display (page 103).
You can then play qu i ckl y with dialog or sound
during FF1 fa st-forward of a D VD disc with
Dolby Digital sound t ra cks.
z Hint
You can select the audio/subtitle se ttings and the angle
using the TV screen. Press TOOLS during playback ,
select “Audio,” “Subtitle ,” o r “Angle” using M/m, then
select the setting or angle using </,. Then press
ENTER.
Notes on playing DTS sound tracks on a CD
When play in g D TS-encoded CDs, exces sive noise will
be heard from the analog stereo jacks. To avoid possible
damage to the audio system, the consumer should take
proper precautions when the an al o g stereo jacks of the
recorder are connected to an amplification system. To
enjoy DTS Digital Surround™ playback, an external 5.1channel decoder system must be connected to the digital
jack of the recorder.
Notes on playing DVDs with a DTS sound track
DTS audio signals are output only through the DIGITAL
AUDIO OUT (COAXIAL or OPTICAL) jack.
When you play a DVD with DTS sound tracks, set
“Digital Out” – “DTS” to “On” of “Audio” in the “Set up”
display (page 102).
Notes
• Shuffle play will stop when all the tracks are played
back.
• You cannot repeat play in the following cases:
– while in shuffle play
– VIDEO CDs with PBC function on.
• When the playback signal does not contain a signal for
the surround speakers, the surround effects will be
difficult to hear.
• When you select one of the surround mode s, turn off
the surround settings of the connected TV or amplifier
(receiver).
• Make sure that your listening position is between and
at an equal distance from your speakers, and that the
speakers are located in similar surroundings.
+
-
-
RWVR
RW
+
R
*
VCD
CD
DATA CD
* with PB C func tion off
RW
-
DVD
R
Video
Playing Discs
61
Page 62

Searching for a Title/ Chapter/Track, etc.
+
-
RWVR-RW
RW
VCD
You can search a DVD by title or chapter , and
VIDEO CD by track or scene. As titl es and tra cks
are assigned individual numbers on the disc, select
the title or track by entering its number. You can
also search for a scene using the time code.
Video
-
+
R
DVD
R
Setting and selecting a favorite
scene (Bookmark)
+
-
RWVR-RW
RW
You can have the recorder store specific portions
of the disc in memor y an d p lay t hem imme diate ly
whenever you wa nt (Bookmark ). U p t o 10
bookmarks per di sc.
Video
-
+
R
DVD
R
Number
buttons
TOOLS
M/m/</,,
ENTER
1 Press TOOLS during playback.
The TOOLS menu ap pears.
2 Select a search method.
“Title” (for DVDs)
“Chapter” (for DVDs)
“Track” (for VIDEO CDs with PBC function
off)
“Time” (for DVDs/VIDEO CDs): Searches
for a starting point by entering the time code.
3
Press
</,
to select the number of the
title, chapter, track , etc., you want, or press
the number buttons to enter the time code.
For example: Tim e
To find a scene at 2 hours, 10 minutes, and 20
seconds, enter “21020.”
If you make a mistake, wait a bit until the
display returns to th e el apsed playing tim e
display, then select another numbe r.
4 Press ENTER.
The recorder starts playback from the selected
number.
CLEAR
</,,
ENTER
SEARCH
MARKER
You can play back f ro m the bookmarked scene.
During playbac k, pr ess SEARCH, and sele ct the
bookmark using </,, then press ENTER.
To set a bookmark
During playba ck , pr es s MARKE R wh en yo u fi nd
a scene to be bookmarked.
To reset the bookmark
During playbac k, pr ess SEARCH, and sele ct the
bookmark you wa nt to r eset using, then press </
,, then press CLEAR.
Note
When you eject the disc, the bookmark information is
cleared.
Note
Depending on the disc, you cannot use the TOOLS menu
to search for a title, chapter, track, or start from a point by
entering the time code.
62
Page 63

Playing MP3 Audio Tr ac ks
DATA CD
You can play MP3 au di o t ra cks on DATA CDs
(CD-Rs/CD-RWs).
4 Select the desired directory, then press
ENTER.
5 Select the desired track, the n press
ENTER.
The selected tr ack starts playing.
When a track or album is being played, the
title is shown in a box.
DVD
M/m,
O RETURN
TOP MENU
ENTER
x STOP
REPEAT
1 Press DVD to control the DVD recorder.
2 Place a DATA CD on the disc tray.
When you load a DATA CD which contains
MP3 audio tracks an d JPEG image files, the
display for selecting a media type appears.
10:10 AM
Music
Press ENTER :
Photo
Music Menu for this CD
If you load a DATA CD which contains only
MP3 audio files , the MP3 display appe ars.
Then you can skip step 3.
3 Select “Music,” then press ENTER.
To stop play
Press x STOP.
To play repeatedly
Press REPEAT repeatedly during playback.
Off: does not play repeatedly.
File: repeats the current track.
Folder: repeats the current album.
To return to the previous display
Press O RETURN.
To return to the display for selecting a media
type
Press x STOP, then press TOP MENU.
About MP3 audio tracks
MP3 is audio compression technology t h a t
satisfies certain ISO/MPEG regulations.
You can play back DATA CDs (CD-Rs/CD-RWs)
recorded in MP3 (MPE G1 Audio Layer 3) format.
However, the discs must be recorded according to
ISO9660 Level 1, Level 2 or Joliet format for the
recorder to recognize the tracks. You can also play
discs recorded in Multi Session.
See the instructions supplied with the CD-R/CDRW drives and the recording software (not
supplied) for details on the recording format.
Note on Multi Session discs
If MP3 audio tra cks are recorded in t he first
session, the recorder will also play MP3 audio
tracks in other ses si ons. If audio tracks in Music
CD format are recorded in the first session, only
the first session will be played back.
z Hints
• Since a disc with many trees takes longer to start
playback, it is recommen de d t ha t you cr eat e albums
with no more than two trees.
• When playback of all the MP3 audio tracks within the
album finishes, the recorder stops.
Playing Discs
,continued
63
Page 64

Notes
• The recorder may not be able to play some DATA CDs
created in the Packet Write format.
• The recorder will play any data with the extension
“.MP3,” even if they are not in MP3 format. Playing
this data may generate a loud noi se which coul d
damage your speaker system.
• The recorder does not conform to audio tracks in
MP3PRO format.
• The recorder can recognize up to 499 MP3 files within
a single folder. The recorder may not recognize some
discs depending on the recording device used for
recording or the disc condition .
• The recorder can play MP3 audio t racks recorded in the
following sampling frequenci e s: 32 kHz, 44.1 kHz,
48 kHz.
• ID3 tags cannot be displayed.
• Only alphabet and numbers can be used for album or
track names. Anything else is dis pla ye d as an aste r isk.
Playing JPEG Image Files
DATA CD
You can play JPEG image files on DATA CDs
(CD-Rs/CD-RWs).
DVD
TOOLS
O RETURN
TOP MENU
H PLAY
M/m/</,,
ENTER
./>
x STOP
1 Press DVD to control the DVD recorder.
2 Place a DATA CD on the disc tray.
When you load a DATA CD which contains
MP3 audio track s and JPEG image files , the
display for selecting a media type appears.
10:10 AM
Music
Press ENTER :
Photo
Music Menu for this CD
If you load a DATA CD which cont ai ns only
JPEG files, the screen shown in step 3
appears. Skip to step 4.
64
Page 65

3 Select “Photo,” then press ENTER.
Directory information
Photo
\\abc\defg
Page 1 / 2
10:10 AM
Slide Show
4 Press ./> to select the next/
previous album p age, then pres s M/m/</
, to select an im age.
To display the selected image
1 Press ENTER.
The selected imag e is di splayed over the
entire screen.
2 To display the next/previous image, press
./>.
To play the Slid e show
1 Press H PLAY.
You can also play the Sl ide show using
the menu on the selected image.
For details, see “To enjoy t he Slide show”
on page 65.
2 Press </, to select th e desire d playin g
speed on the “Slide Show Speed” menu,
then press ENTER.
Slide show start s fro m th e sel ected im age.
To zoom in an imag e
1 Press M/m/</, to select an image in the
“Index” display, then press ENTER.
2 Press </, to select “ ,” then press
ENTER.
3 Press ENTER repeatedly to change the
magnification. Each time you press ENTER,
the magnificat ion changes as show n below.
2× t 4× t 2× t normal magnification
To enjoy the Slide show
1 Press M/m/</, to select an image in the
“Index” display, then press ENTER.
2 Press </, to select “ ,” then press
ENTER.
The “Slide Show Speed” menu appea rs .
“”: Slow
“”: Normal
“”: Fast
3 Press </, to select the d esi red p lay spee d,
then press ENTER.
Slide show sta rt s.
To turn on/off the menu in the single image
display
Press TOOLS to turn off the menu.
To return to the previous display
Press O RETURN.
To return to the display for selecting a media
type
Press x STOP, then press TOP MENU.
Playing Discs
To rotate the selected image
1 Press M/m/</, to sel ect an image in the
“Index” display , then press ENTER.
2 Press </, to select “ ,” then press
ENTER.
Each time yo u pr es s EN TER , t he i ma ge t urn s
clockwise by 90°.
Notes
• Slide show can play in only one direction.
• You cannot rotate or zoom in the image during Slide
show.
If you select “ ” in the rotated image d isplay ,
•
the images in the “
Index” display will not be rotated.
,continued
65
Page 66

About JPEG image files
You can play JPEG im age files on CD-R s or C D RWs. However, the discs must be recorded
according to ISO9660 level 1 or level 2 for the
player to recognize the files.
You can also play dis cs reco rded in Multi Sess ion.
See the instructio ns o f the CD-R/RW device or
recording software (not supplied) for details on the
recording f ormat.
To play a Multi Session CD
This player can play Multi Session CDs when an
JPEG image file is located in the first session.
Any subseque nt JPEG i mage f iles, re corded i n the
later sessions, can also be played back. When
audio tracks and im ages in music CD format or
video CD format are recorded in the first session,
only the first se ss ion will be played ba ck.
z Hint
If you add numbers (01, 02, 03, etc.) to the front of the
file names, the files will be played in that order.
Notes
• The system can play the extension “.JPG” or “.JPEG.”
• Some CD-Rs or CD-RWs cannot be pla yed on this
system depending on file forma t.
• If you add the extension “.JPG” or “.JPEG” to data not
in JPEG format, “Unsupported Format” wil l app ear.
• Depending on the disc or the size of im ag e file s,
playback may take some time to start.
• The recorder can recognize up to 999 JPEG files within
a single folder. The recorder may not recognize some
discs depending on the recording device used for
recording or the disc condition .
• Progressive and lossless compression JPEG image files
are not supported.
• The image size tha t c an be displayed is limited. You
can display the following images;
width 32 – 7,680 pixels by height 32 – 8,192 pixels .
66
Page 67

VCR Recording
Before Recording
VCR Recording without the Timer
Before you start recording…
Check th a t the tape is longer than the recording
time.
z Hint
Timer recordings will start regardless of whether or not
the recorder is turned on. You cannot turn of f the
recorder during a timer recording. The recorder
automatically turns off after the timer recording finishes.
Note
This recorder shares a single tuner for both the DVD
recorder and the VCR. You cannot record differen t
programs to a DVD and a VHS tape at the same time.
Recording a stereo/SAP program
The recorder can receive and record stereo/SAP
programs.
Stereo program s
When a stereo program is received, the
“STEREO” indicator lights up in the front panel
display. If there is noise in the stereo program,
press AUDIO repeatedly until the “MONO”
indicator disappears from the TV sc r een. The
sound will be recorded in monaural but wi t h le ss
noise.
SAP (Second Audio Program)
When a SAP (Second Audio Program) is received,
the “SAP” indicator lights up in the front panel
display. To record onl y SA P sound, set “Tuner
Audio” of “Audio” to “S A P” in the “Setup”
display (page 102).
TV/DVD·VIDEO
switch
DVD
DISPLAY
H PLAY
REC MODE
VIDEO
CH +/–
SET
TV/VIDEO
INPUT
SELECT
X PAUSE
x STOP
z REC
1 Press VIDEO to control the VCR.
2 Insert a tape with its safety tab in place.
3 Press CH +/– or INPUT SELECT to select
the channel or input source you want to
record.
4 Press REC MODE repeatedly to select the
tape speed, “ SP” or “EP.”
“EP” (Extended Play) provides recording
time three times as long as “SP” (Standard
Play). Howeve r, “SP” pr oduc es bet ter pic ture
and audio quality.
5 Press z REC.
“REC” appears in the front panel display and
recording starts.
VCR Recording
,continued
67
Page 68

To stop recording
Press x STOP.
To pause recordin g
Press X PAUSE.
To restart recording, press X PAUSE again.
If you pause recording for mo re than 5 minutes,
recording stops automatically.
To watch another TV program while recording
1 Slide the TV/DVD·VIDEO switch to TV.
2 Pres s T V/VIDEO to switc h to the TV’s
antenna input.
3 Select another channel on the TV .
Recording using the Quick Timer
(One-touch Timer Recording)
You can set the recorder to record in 30 minute
increments.
1 Press VIDEO to control the VCR.
2 Press z REC repeatedly to set the
duration.
Each press advances the time in 30 minute
increments. The maximum duration is six
hours.
0:30 1:00 5:30 6:00
(normal
recording)
To watch a DVD while recording
Press DVD to control the DVD recorder, insert a
disc, then press H PLAY.
To save a recording
To prevent accidental erasure, break off the safety
tab as illustrated. To record on the tape again,
cover the tab hole with adhesive tape.
Safety tab
z Hints
• To select a channel, you can use the numbe r buttons.
Enter the channel number, and press SET.
• You can select a video source from the LINE 1 IN or
LINE 2 IN jacks using the INPUT SELECT button.
• The display appears on the TV screen indicating
information about the tape, but the information will not
be recorded on the tape.
• If you do not want to watch TV while recording, you
can turn off the TV. When using a cable box, make sure
to leave it on.
Notes
• You cannot change the channel or input source of the
recorder using CH +/– or INPUT SELECT while
recording another TV program.
• If you insert a tape with its safety tab removed, the tape
is ejected when you press z REC.
“OTR” (One-touc h Timer Reco rding ) and the
remaining recording time a re d isplay ed in t he
front panel display while recording.
The time counter decrease s minute by minute
to 0:00, then the recorder stops recording
(power turns off).
To cancel the Qui ck Timer
Press z REC repeatedly until the counte r appears
in the front panel display. The recorder retur ns to
normal reco rding mode.
To stop recording
Press x STO P twice.
z Hint
If you do not want to watch TV while recording, you can
turn off the TV. When using a cable box or satellite
receiver, make sur e to leave it on.
Notes
• You cannot change the re cording mode while
recording.
• You cannot watch a TV program while recording
another TV program.
68
Page 69

Checking the remaining time
Press DISPLAY.
Stop
0:30:00
SP
Rem 01:30
CH 110
A Play mode
B Time counter
C Recording mo de
D Remaining time
E Current channel
To check the remaining time of a tape, set “VCR
Function” – “Tape Length” of “Features” i n th e
“Setup” display correctly (pag e 104).
Maximum recording time
Tape Length SP EP
T-120 2 hrs 6 hrs
T-160 2 hrs 40 mins 8 hrs
T-180 3 hrs 9 hrs
VCR Timer Recording (Standard/VCR Plus+)
You can set the timer for a total of 12 programs
together with DVD Timer Recording and VCR
Timer Recording, up to one month in advance.
There are two methods to set the timer: the
standard method and VCR Plus+ method.
• Standard: Set the date, time, and channel of the
program manually.
• VCR Plus+: Enter the PlusCode num be r
designated for eac h TV program (page 71 ).
Note
Do not operate your cable box or satel lit e receiver just
before or during a timer recording. This may prevent the
accurate recording of a program.
Setting the timer manually
(Standard)
VIDEO
VCR Recording
Notes
• The remaining tape length m ay no t be indic a te d
accurately for short tapes such as T-20 or T-30, or tapes
recorded in LP mode.
• It may take up to one minute for th e VCR to calculate
and display the remaining tape len gth a f te r you press
DISPLAY.
SYSTEM
MENU
[TIMER]
M/m/</,,
ENTER
x STOP
,continued
69
Page 70

1 Press VIDEO to control the VCR.
2 Insert a tape with its safety tab in place.
3 Press [TIMER].
Timer – Standard
No Rec To Date Start End Source Mode Edit
No.1
01 DVD 06/14 09:00PM 10:00PM CH8 LP
02 DVD 06/14 09:15PM 09:45PM CH1 LP
RecTo Date Start Stop CH Mode
03 --- --/-- --:-- --:-- ---- ---
DVD
11/30 02 40 03 0505 CH 100 SP
--- --/-- --:-- --:-- ---- ---04
--- --/-- --:-- --:-- ---- ---05
VCR Plus+
--- --/-- --:-- --:-- ---- ---06
: PM
:
12 3 4 56
If the Timer programming (VCR Plus+) menu
appears, press < to switch t h e display to
“Standard.”
10:10 AM
PM
4 Select an item using </, and adjust
using M/m.
A “RecTo”:
Select “VCR.”
B “Date”:
Sets the date using M.
To record the same program every day or
the same day every week, press m.
The item changes as follows:
Today y Mon-Fri (Monday to Friday)
y Sun (every Sunday) y Mon (every
Monday) y … y Sat (every Saturday)
y 1 month later y … y Today
C “Start”:
Sets the start time.
D “Stop”:
Sets the stop time.
E “CH”:
Selects the chann el or input source.
F “Mode”:
Selects the recording mode; “SP” or
“EP.” To use the Auto Tape Speed
function, select “Auto.” For details, see
“To use the Auto Tape Speed function”
on page 71.
If you make a mistake, select the item and
change the setting.
5 Press ENTER .
The Timer List men u ( page 74) appears. Th e
c indicator lights up in the front panel
display, and the recorder is ready to start
recording. If the c indicator flashes in the
front panel display, check that a tape with its
safety tab in place is inserted.
If the timer settings overlap, a message
appears. To confirm, change, or cancel timer
recording, see “Checkin g/ Changing/
Canceling VCR Timer Settings (Timer List)”
on page 74.
6 Press SYSTEM MENU to exit the menu.
To stop recording
Press x STOP twi ce.
If the timer settings overlap
The program that starts first has priority and the
second program starts recording only after the first
program has finished. If the programs start at the
same time, the program listed first in the menu has
priority.
7:00 8:00 9:00 10:00
Program 1
Program 2
will be cut off
7:00 8:00 9:00 10:00
Program 1
Program 2
70
will be cut off
To confirm, change, or cancel timer recording
See “Checking/Changing/Canceli ng VCR Timer
Settings (Timer List)” on page 74.
Page 71

To use the Auto Tape Speed function
When you are reco rding a program in th e A uto
mode and the remain ing tape becomes sh orter than
the recording time, the tape s peed is automa tically
changed to EP mode. Note that some noise will
appear on the picture when the tape speed is
changed. If you want to keep the tape speed, select
“SP.” To operate this function, set “VCR
Function” – “Tape Le ngt h” of “Features” in the
“Setup” display correctly (page 104).
z Hints
• When the start time and the channel or input source to
be recorded are the same but the “RecTo” setting
differs, the program is record ed to both th e DVD disc
and the VHS tape.
• You can also display the Timer programming menu as
follows:
1 Press SYSTEM MENU.
The System Menu appears.
2 Select “Timer,” and press ENTER.
3 Select “Timer – Standard,” and press ENTER.
Notes
• To record a cable or sa tellite program, turn on the cable
box or satellite receiver and select the program you
want to record. Leav e the cable box or satell ite receiv er
turned on until the recorder finishes record in g .
• Even if the timer is set , ti mer recordings cann ot be
made while recording a program tha t ha s pr ior i ty.
• You cannot record on a tape with its safety tab
removed.
• Before the timer recording starts, “TIMER REC”
flashes in the f r o nt panel display.
• Even if a timer recording is started in the condition with
the recorder power on, the recorder power is
automatically turned off when the timer recording
finishes.
Recording TV programs using the
VCR Plus+ system
The VCR Plus+ system is a featur e that simp lifies
setting the timer. Just enter the PlusCode number
listed in the TV program guide. The date, time,
and channel of th at progr am are se t automat icall y.
Before you start, check that the TV and guide
channels are correctly set in “Guide Channel
Setup” of “Tune r Pr eset” in the “Setup” d is play
(page 98).
VIDEO
Number
buttons
CLEAR
VCR Plus+
SYSTEM
MENU
M/m/</,,
ENTER
x STOP
1 Press VIDEO to control the VCR.
2 Insert a tape with its safety tab in place.
3 Press VCR Plus +.
Timer – VCR Plus+
Title List
Set VCR Plus+ Code number. [0~9]
Timer
Edit
Disc Setting
Setup
Standard
10:10 AM
VCR Recording
If the Timer programming (Standard) menu
appears, pres s < to switch the display to
“VCR Plus+.”
4 Press the number buttons to enter the
PlusCode number.
If you make a mistake, press CLEAR and reenter the correct number.
,
continued
71
Page 72

5 Press ENTER.
The date, start and stop times, channel , and
recording mode appear.
The c indicator lights up in the front panel
display, and the recorder is ready to start
recording. If the c indicator flas h e s in the
front panel display, check that a tape with its
safety tab in place is inserted.
Timer
Timer – Standard
No Rec To Date Start End Source Mode Edit
No.1
01 DVD 06/14 09:00PM 10:00PM CH8 LP
02 DVD 06/14 09:15PM 09:45PM CH1 LP
RecTo Date Start Stop CH Mode
03 --- --/-- --:-- --:-- ---- ---
DVD
11/15 09 00 11 00 CH83 LP
--- --/-- --:-- --:-- ---- ---04
--- --/-- --:-- --:-- ---- ---05
VCR Plus+
--- --/-- --:-- --:-- ---- ---06
: PM
:
10:10 AM
PM
6 Select “RecTo” using </, and select
“VCR” using M/m, and press ENTER.
If you want to change other settings, press </
, to select the item and press M/m to change
the setting.
7 Press SYSTEM MENU to exit the menu.
Recording from Connected Equipment with a Timer (Synchro Rec)
You can set the recorder to automatically record
programs from connected equipment that has a
timer function (such as a satellite tuner). Connect
the equipment to the LINE 1 IN jacks of the
recorder (page35).
When the connec t ed equipment turns on , th e
recorder starts re cording a prog ram from the LINE
1 IN jacks.
VIDEO
To stop recording
Press x STOP twice.
If the timer settings overlap
See page 70.
To confirm, change, or cancel timer recording
See “Checking/Changing/Canceling V CR Ti m er
Settings (Timer List)” on page 74.
z Hint
You can also display the Timer programming menu as
follows:
1 Press SYSTEM MENU.
The System Menu appears.
2 Select “Timer,” and press ENTER .
3 Select “Timer – V C R Plus+,” and press ENTER.
Notes
• When the PlusCode number is incorrec t, “Inva li d
code” appears on the TV screen.
• Before the timer recording starts, “TIMER REC”
flashes in the front panel display.
• You cannot record on a tape with its safety tab
removed.
• Even if a timer recording is started in the condition with
the recorder power on, the recorder power is
automatically tur ned off when the timer recording
finishes.
72
SYSTEM
MENU
REC MODE
M/m,
ENTER
x STOP
SYNCHRO
REC
1 Press VIDEO to control the VCR.
2 Insert a tape with its safety tab in place.
3 Press REC MODE repeatedly to select the
tape speed, “SP” or “EP.”
“EP” (Extended Play) provides recording
time three times as long as “SP” (Standard
Play). However, “SP” pr oduc es bett er pic ture
and audio qual i t y.
Page 73

4 Press SYSTEM MENU whi le the r ecorder is
in stop mode.
5 Select “Setup ,” and press ENTER.
6 Select “Features,” and press ENTER.
The “Features” setup appears.
7 Select “Synchro Recording,” and press
ENTER.
8 Select “to Video,” and press ENTER.
9 Press SYSTEM MENU to exit the menu.
10
Set the timer on the connected equipment
to the time of the program you want to
record, and turn it off.
11
Press SYNCHRO REC.
The SYNCHRO REC in di cator lights up on
the front panel. The recorder is ready to start
Synchro-Recording.
The recorder automatically starts recording
when it receives an input signal from the
connected equipment. The recorder stops
recording when t he connected equipment
turns off.
To stop recording
Press x STOP twice.
To cancel Synchro R ec function
Press SYNCHRO REC. The SYNCHRO REC
indicator on the record er turns off.
If you press SYNCHRO REC during SynchroRecording, the Sy nchro-Recording stops, the
SYNCHRO REC indica tor turns off and the
recorder’s power turns off.
Notes
• The recorder starts recording only after detecting the
video signal from the connected equ ipment. The
beginning of the program may not be recorde d
regardless of whether or not the recorder’s power is on
or off.
• During Synchro-Recording, other operations such as
normal recording cannot be done.
• To use the connected equipment while the recorder is
standing by for Synchro-Recording, canc e l Synch ro Recording by pressing SYNCHRO REC. Be sure to
turn off the connected equipment a nd pr e ss
SYNCHRO REC to reset Synchro-Recording before
the timer recording starts.
• The Synchro Rec function does not work with some
tuners. For details, see the tuner’s operating
instructions.
• While the recorder is standing by for Synchr oRecording, the Auto Clock Set function (page 99) does
not work.
• To use the Synchro Rec function, you must first set the
recorder’s clock correctly .
• When the recorder’s power is on, th e reco rd er enters
the Synchro-Recording standby mode after a SynchroRecording has finished.
• You cannot record on a tape with its safety ta b
removed.
• Even if a Synchro-Recording is started in the condition
with the recorder power on, the recorder power is
automatically turned off when the Synchro-Recording
finishes.
• When the recorder’s clock is not set correctly, the
Synchro-Recording start s ap pr oxim a tely 2 minutes
after the set time.
If the timer settings of a Synchro-Recording
and another timer recording overlap
Regardless of whe ther or not the program is a
Synchro Rec program , the pr ogram th at star ts firs t
has priority and the second program starts
recording only after t he fi rst pro gram has fini shed.
VCR Recording
Program 1
Program 2
7:00 8:00 9:00 10:00
will be cut off
73
Page 74

Checking/Changing/ Canceling VCR Timer Settings (Timer List)
You can check, change, or cancel timer settings
using the Timer List m e nu.
SYSTEM
MENU
O RETURN
M/m/</,,
ENTER
4 Select the timer setting you want to check/
change/cancel, and press ENTER.
The sub-menu appears.
Timer List
No RecTo Date Start Stop CH Mode Edit
01 VCR 11/17 09:00PM 10:00PM CH8
02 VCR 11/28 09:15PM 09:45PM CH1
03 --- --/-- --:-- --:-- ---- ---
--- --/-- --:-- --:-- ---- ---04
--- --/-- --:-- --:-- ---- ---05
--- --/-- --:-- --:-- ---- ---06
10:10 AM
Edit
Del
5 Select one of the options, and press
ENTER.
“Edit”: Changes the timer setting. Select an
item using </, and adjust using M/m.
Press ENTER.
Timer – Standard
No Rec To Date Start End Source Mode Edit
No.1
01 DVD 06/14 09:00PM 10:00PM CH8 LP
02 DVD 06/14 09:15PM 09:45PM CH1 LP
RecTo Date Start Stop CH Mode
03 --- --/-- --:-- --:-- ---- ---
VCR
11/17 09 15 09 45 CH1 LP
--- --/-- --:-- --:-- ---- ---04
--- --/-- --:-- --:-- ---- ---05
VCR Plus+
--- --/-- --:-- --:-- ---- ---06
: PM
:
10:10 AM
PM
1 Press SYSTEM MENU.
The System Menu a ppears.
2 Select “Timer,” and press ENTER.
3 Select “Timer List,” and press ENTER.
Timer List
No RecTo Date Start Stop CH Mode Edit
01 VCR 11/17 09:00PM 10:00PM CH8 LP
02 VCR 11/28 09:15PM 09:45PM CH1 LP
03 --- --/-- --:-- --:-- ---- ---
--- --/-- --:-- --:-- ---- ---04
--- --/-- --:-- --:-- ---- ---05
--- --/-- --:-- --:-- ---- ---06
Timer information displays the recording
date, time, recording mode, etc.
74
10:10 AM
“Del”: Erases the timer setting. Press ENTER.
Timer List
No Rec To Date Start End Source Mode Edit
01 DVD 06/14 09:00PM 10:00PM CH8 LP
02 DVD 06/14 09:15PM 09:45PM CH1 LP
03 --- --/-- --:-- --:-- ---- ---
--- --/-- --:-- --:-- ---- ---04
--- --/-- --:-- --:-- ---- ---05
--- --/-- --:-- --:-- ---- ---06
No.1
Do you want to erase “No.01”?
OK Cancel
10:10 AM
To turn off the Timer List
Press O RETURN.
z Hint
While recording, you cannot modify the timer setting for
the current recording.
Note
Even if the timer is set, timer recordings cannot be made
while recording a program th at has priority.
Page 75

Recording from Connected Equipment without a Timer
You can record from a connected VCR or similar
device. To connect other VCR or similar device,
see “Connecting Another VCR or Similar Device”
on page 34.
VIDEO
4 Press REC MODE repeatedly to select the
tape speed, “ SP” or “EP.”
“EP” (Extended Play) provides recording
time three times as long as “SP” (Standard
Play). Howeve r, “SP” pr oduc es bet ter pic ture
and audio quality.
5 Insert the source tape into the connected
equipment and set to playback pause.
6 At the same time, press z REC on this
recorder and the pause or play button on
the connected equipment.
Recordin g s t arts.
To stop reco rding, press x STOP on this
recorder.
INPUT
SELECT
x STOP
REC MODE
z REC
1 Press VIDEO to control the VCR.
2 Insert a tape with its safety tab in place.
3 Press INPUT SELECT to select an input
source accordin g to the connection you
made.
The front panel display changes as follows:
program position
LINE2LINE1
Notes
• When recording a video game image, the screen may
not be clear.
• You cannot record on a tape with its safe ty ta b
removed.
VCR Recording
75
Page 76

Playing VHS Tapes
Playing
Z OPEN/
CLOSE
CLEAR
DISPLAY
"/1
VIDEO
TRACKING +/–
To stop playback
Press x STOP.
To eject the tape
Press Z OPEN/CLOSE.
To turn off the power w hile rewin ding (R ewind
Shut Off)
Press "/1 while the tape is rewinding. The power
will turn off but the tape will keep rewin ding until
it reaches the end.
To use the time counter
Press CLEAR at the point on the tape that you
want to find later. The counter in the front panel
display resets to “0:00:00.” To search for the
counter 0:00:00 point automatically, see
“Searching for the counter 0:00:00 point” on
page 79.
To display the counter on the TV screen, press
DISPLAY.
H PLAY
x STOP
1 Press VIDEO to control the VCR.
2 Insert a tape.
The VCR starts playing automatically if you
insert a tape with its safety tab removed.
3 Press H PLAY.
The display window shows the playback time.
When the tape reaches the en d, it will rewi nd
automatically.
Notes
• Tapes recorded in LP mode on other VCRs can be
played back on this VCR but the picture quality cannot
be guaranteed.
• The counter resets to “0 :00:00” whenever a tape is
reinserted.
• The counter stops counting when it comes to a portion
with no recording.
• When 10 hours have passed , the co unter in the front
panel display returns to “0:00:00” and the count starts
over again.
• When playback does not start even if you insert a tape
with its safety tab removed, set “VCR Func tion” –
“Auto Play” of “Features” to “On” in the “Setup”
display (page 104).
• Stop disc playback whil e playing back a video.
• The VCR can also play S-VHS tapes. The VCR will
automatically id entify the type of tape inser te d in the
VCR (either VHS or S-VHS). When S-VHS tapes are
played in the VCR, the enhanced resolution will not be
visible on screen; there ma y al so be pic tur e distortion
while playing the S-VHS tape in slow motion or while
utilizing other special playback modes. The VCR will
not record in S-VHS mode on an S-VHS tape.
• For details on the operati on r es tr ic ti ons, se e page 8.
76
Page 77

Adjusting the picture (tracking)
Although the VCR automatically adjusts the
tracking w hen playin g a tape, dis tortion may occur
if the recording is in poor condition. In this case,
manually adjust the tracking.
Press TRACKING +/– to adjust the picture.
The tracking meter appears.
Press TRACKING +/– repeatedly until the
distortion disappears.
Tracking
Tracking meter
To resume automatic tracking adjustment
Press TRACKING + and TRACKING – at the
same time.
Or, eject the tape and reinsert it.
Playing VHS Tapes
,continued
77
Page 78

Playback option
Buttons Operations
H PLAY
INSTANT REPLAY/
INSTANT ADVANCE
. PREV/NEXT >
X PAUSE
(fast reverse/fast
forward)
When you press and hold down the but to n duri ng fast reverse/fast forward, you can
view the picture.
• Plays at high speed when briefly pressed during playback.
When you press and hold down th e button during playback, playi ng at high speed
continues until you releas e the butt on.
Plays in slow motion when pressed in pause mode.
(slow)
• Fast reverses/fast forwards when pressed duri ng stop.
INSTANT
ADVANCE
INSTANT
• Plays frame by frame when pr essed in pause mo de.
• Fast forwards the current scene for 30 seconds when pressed during playback.
Replays the previous scene when pressed during playback.
*2
REPLAY
. PREV/
NEXT >
Fast reverses/fast forwards when pressed during playback.
Search speed changes as follows:
–×7 y –×5 y –×3 y STILL y SLOW y PLAY y ×2 y ×3 y ×5 y ×7
X PAUSE Pauses playbac k .
If you pause playback for more than 5 minutes, playback starts automatically.
*1
You can pres s INSTANT ADVANCE up to 4 time. T his allo ws you to fast fo rward u p to 2 minutes in total .
*2
For 10 seconds in SP or LP mode/for 15 seconds in EP mode
To resume normal play back, press H PLAY.
Notes
• The sound is muted during playba ck at var ious speeds.
• The picture may show noise when pla ying at high speed in reverse.
78
*1
Page 79

Searching Usin g Various Functions
The VCR automatically marks the tape with an
index signal at the point where eac h recording
begins.
You can easily find a specific point using various
search functions.
Note
You cannot use these search functions during DVD
recording.
VIDEO
TOOLS
M/m,
ENTER
H PLAY
3 Select “Go To Zero,” and press ENTER.
The VCR start s searching and aut om atically
stops at the 0:00: 00 point.
Go to Zero
0:00:00
Searching for a blank space of the
tape
The VCR auto m at ic ally searches for the
beginning of a bl ank space. You can easily fin d a
point you can start recording from.
1 Press VIDEO to control the VCR.
2 Press TOOLS.
The TOOLS menu appears.
Go To Zero
End Search
Forward Intro Scan
Reverse Intro Scan
ENTER
Move
Enter
Playing VHS Tapes
Searching for the counter 0:00:00
point
To mark a point on the t ape that you want to find
later, reset the tape counter to “0:00:00.”
The VCR automatically fast-forwards or rewinds
to the 0:00:00 point on the tape counter.
1 Press VIDEO to control the VCR.
2 Press TOOLS.
The TOOLS menu ap pears.
Go To Zero
End Search
Forward Intro Scan
Reverse Intro Scan
ENTER
Move
Enter
3 Select “End Search,” and pres s ENTER.
The VCR start s searching and aut om atically
stops at the beginning of a blank spac e. If no
blank space is found, the VCR reaches the
end.
End search
0:00:13
Note
The VCR may be unable to recognize the end of a blank
space depending on the length of that blank space.
,continued
79
Page 80

Searching using the index function
(Scan and Play)
The VCR automatically marks the tape with an
index signal at the point where each recording
begins. Use these si gnals as reference s t o find a
specific reco rding.
1 Press VIDEO to control the VCR.
2 Press TOOLS.
The TOOLS menu ap pears.
Go To Zero
End Search
Forward Intro Scan
Reverse Intro Scan
ENTER
Enter
Move
Selecting the sound during playback
AUDIO
Press AUDIO repeatedly during playback.
To list en to On-screen
display
Front panel
display
3 Select “Forward Intro Scan” to scan
ahead, or “Reverse Intro Scan” to sca n
backwards.
The VCR searches and then plays back for
about five seco nds.
Scan and play
–0:00:01
4 Press H PLAY to view that program.
If you do not press H PLAY, the VCR
automatically searches for the next index
mark, or until it reaches the end of the tape.
Note
Once in recording mode, if the VCR is put in pause and
then released to start the recording, no index mark will be
inserted. An index mark will be inserted if the channel is
changed while VCR is put in pause.
Stereo Hi-Fi STEREO
Left channel Left STEREO
Right channel Right ST EREO
Monaural
sound on the
normal audio
track
Mono No indicator
How sound is recor ded on a video tape
The VCR records sound onto two separate trac ks.
Hi-fi audio is recorded onto the ma in track along
with the picture. Monaural sound is recorded onto
the normal audio track along the edge of the tape.
Normal audio track
Hi-fi audio track
(main track)
Monaural sound
Stereo sound
(left/right channels)
Notes
• To play a tape in stereo, you must use the A/V
connections.
• When you play a tape recorded in monaural, the sound
is heard in monaural regardless of the AUDIO setting.
80
Page 81

DVD Editing
Edit options for DVD-RWs (VR mode)
-
RWVR
Before Editing
This recorder offers various edi t options for
various disc types. Before you edit, check the disc
type in the front panel display, and select the
option available for your disc (pag e 10).
Note
You may lose the edited contents if you remove the disc
or a timer recording sta rts while editing.
Edit options for DVD+RWs/DVD-RWs
(Video mode)/DVD+Rs/DVD-Rs
+
-
RW
RW
Video
You can perform simple edits. Since Vi deo mode
titles are actual recordings on the disc, you cannot
undo any edits you make. The edit functions
available for Video mode titles are:
–Setting protecti on against erasure (page 82).
–Labeling a titl e (page 82).
–Erasing a title (page 82).
Notes
• Once the disc is finalized, you cannot edit or record on
the disc (except for DVD+RWs).
• If a message appears and indicates that the disc’s
control information is full, erase unnecessary titles.
-
+
R
R
You can enjoy advanced edit functions. First you
have two options for a DVD-RW (VR mode):
editing either the original recording (called the
“original”), or th e playback informat i on created
from the original (called a “Playlist”). Since each
is different in nature and offers diffe r e nt merits,
read the following and select the one that better
suits your needs.
To edit original titles
Edits made to the original titles are final. If you
plan to retain an unaltered original recording,
create and edit a Playlist (se e below). The edit
functions avai la bl e for original titles ar e:
–Labeling a title (page 82).
–Setting protection against erasure (page 82).
–Erasing a title (page 82).
–Erasing a section of a title (A-B Erase) (page 83).
To create and edit Playlist titles
A Playlist is a group of Playli st titl es create d fro m
the original title for editing purposes. When you
create a Playlist, only the control information
necessary for playback, such as the playback
order, is stored on the dis c. Since the o riginal title s
are left unaltered, Playlist titles can be re-edited.
Example: You have recorded the final few
matches of a soccer tournament on a DVD-RW
(VR mode). You want to create a digest with the
goal scenes and ot her highlig hts, but you also want
to keep the original recording.
DVD Editing
In this case, you can compile highlight scenes as a
Playlist title. Y ou can even rearrange the scene
order within the Playlist titl e (“Creating a P laylist”
on page 84).
,continued
81
Page 82

The advanced edit functions available for Playlist
titles are:
–Labeling a title (page 82).
–Erasing a title (page 82).
–Editing a Playlist scene (page 86).
z Hint
You can display the disc’s Playlist titles in the Title List
(Playlist), or the original titles in the Title List (Original).
To switch the two Title Lists, press TITLE LIST, and
press ORIGINAL/PLAYLIST.
Notes
• You cannot protect Playlist titles.
• If a message appears and indicat es tha t the disc ’ s
control informat ion is full, erase unnece ssary titles.
Editing a Titl e
+
-
RW
RWVR-RW
Video
This section explains t he basic edit functions . Note
that editing is irreversible. To edit a DVD-RW
(VR mode) without changing the original
recordings, cr eate a Playlist title (page 84).
Note
When editing a DVD+R, DVD-R, or DVD-RW (Video
mode), finish all editing befor e fina l iz ing the disc. You
cannot edit a finalized disc.
DVD
TITLE LIST
ORIGINAL/
PLAYLIST
-
+
R
R
M/m,
ENTER
82
./>
H PLAY
x STOP
X PAUSE
CHAPTER
MARK
MARK ERASE
1 Press DVD to control the DVD recorder.
2 Press TITLE LIST.
When editing a DVD-RW in VR mode, press
ORIGINAL/PLAYLIST to switch the “Title
List(Origina l) , ” if necessary.
3 Select a title, and press ENTER.
The sub-menu appears.
Page 83

4 Select an option, and press ENTER.
You can make the following edits to the title.
“Erase”: Erases the selected title. Select “OK”
when asked for confirmation.
“Protect”: Protects the ti tle. Select “On” when
the Protecti on display appears. “ ” appears
next to the protected t it l e. To cancel the
protection, select “Off.”
“Title Name”: Allows you to enter or re -ent er
a title name (page 46).
“A-B Erase” : Erases a section of the title ( see
below).
z Hint
You can label or re-label DVDs (page 43).
Note
You cannot protect Playlist titles.
Erasing a section of a title
(A-B Erase)
-
RWVR
You can select a section (scene) in a title and erase
it. Note that erasing scenes in a title cannot be
undone.
1 Press DVD to control the DVD recorder.
2 Press TITLE LIST.
Press ORIGINAL/PLAYLIST to switch the
“Title List(Original),” if necessary.
3 Select a title, and press ENTER.
The sub-menu ap pears.
4 Select “A-B Erase ,” an d pr e s s ENTER.
The display for setting points A and B
appears.
“Start” is selected.
A-B Erase
CH 6
T
Nov/16/2004 08:00 PM
Start 00:00:00
00:00:07
End 00:00:00
10:10 AM
Title No.01
Start
End
Erase
Finish
5 Press ENTER at the starting point of the
portion to be erased (point A).
You can use H PLAY, ,
./>, x STOP and X PAUSE to find
the point of the porti on to be erased.
“End” is selected.
A-B Erase
CH 6
T
Nov/16/2004 08:00 PM
Start 00:00:10
00:00:10
End 00:00:00
10:10 AM
Title No.01
Start
End
Erase
Finish
6 Press ENTER at the ending point of the
portion to be erased (point B).
“Erase” is selected .
7 Select “Erase,” an d press ENTER.
The display asks for confirmation.
8 Select “OK,” and pr ess ENTER.
The scene is erased. To continue, repeat from
step 5. To finish, select “Finish.”
z Hint
A chapter mark is inserted after t he scene was erased. The
chapter mark divide s the title into separate chapters on
either side of the mark.
Notes
• Images or sound may be momentarily interrupted at the
point where you erase a section of a title.
• Sections shorter than five seconds m ay not be e ras ed.
• The start and end points of a title may be different from
what you have set.
• The total playing time of the title does not change even
if a scene was erased.
DVD Editing
,continued
83
Page 84

Creating chapters manually
-
+
You can manually insert a chapter mark at any
point you like during playback.
Press CHAPTER MARK at the point where you
want to divide the title into chapters.
Each time you press the button, “Marking mark...”
appears on the sc reen and the scene s before and
after of the mark become separate chapters.
RW
RWVR
Making mark...VR
Creating a Playlist
-
RWVR
You can add a section of the title to the Playlist
title as one scene wi thout changing the actual
recordings. A Pl aylist title can contain up to 99
scenes.
For details, see “Edit options for DVD-RWs (VR
mode)” on page 81.
Note
If you erase an original title used in a Playlist, that Playlist
is also erased.
DVD
To erase chapter marks
You can combine tw o chapters by erasing the
chapter mark during playback.
During playbac k, press MARK ERASE.
The current chap ter combines with t he previous
chapter.
Notes
• If a message appears and indicat es that no more chapter
marks can be added, you may not be able to record or
edit.
• You cannot add or eras e the chapter marks of t h e titles
of protected discs or protected tit les.
SYSTEM
MENU
ORIGINAL/
PLAYLIST
./>
H PLAY
TITLE LIST
M/m,
ENTER
x STOP
X PAUSE
1 Press DVD to control the DVD recorder.
2 Press SYSTEM MENU while the recorder is
stopped.
Title List(Original)
Title List
Timer
Edit
Disc Setting
Setup
Press ENTER :
Title Menu for DVD Title List.
10:10 AM
84
Page 85

3 Select “Edit,” and pr e ss EN T ER .
Edit
Title List
Timer
Edit
Disc Setting
Setup
Create Playlist
Edit Playlist
DV Edit
Dubbing
10:10 AM
4 Select “Create Playlist,” and press ENTER.
“Start” is selected.
Playlist No. 01
T
---/--/---- --:--
Create Playlist
Start 00:00:00
00:00:07
End 00:00:00
10:10 AM
Scene No.01
Start
End
Make
Finish
To play the Playlist title
1 Press TITLE LIST .
2 Press ORIGINAL/PLAYLIST to switch to the
“Playlist.”
3 Select a Playlist title, and press ENTER.
The sub-menu ap pears.
4 Select “Play,” and press ENTER .
z Hint
When a Playlist title is created, the start and end points
will become chapter marks, and each sc en e wil l beco me
a chapter.
Notes
• The picture may pau se wh en th e edit ed s cene is pl ayed.
• The start and end points of a title may be different from
what you have set.
5 Press ENTER at the starting point.
You can use H PLAY, ,
./>, x STOP and X PAUSE to find
the point.
“End” is selected.
Playlist No. 01
T
---/--/---- --:--
Create Playlist
Start 00:00:10
00:00:10
End 00:00:00
10:10 AM
Scene No.01
Start
End
Make
Finish
6 Press ENTER at the ending point.
“Make” is selected.
To reset the start or end point, select “Start” or
“End” and repeat step 5 or 6.
7 Press ENTER.
The selected section is captured as a scene. To
continue, repeat the steps above.
8 When you finish capturing scenes, select
“Finish” and press ENTER.
DVD Editing
85
Page 86

Editing a Playlist
-
RWVR
You can edit a scen e of the Playlist titles.
4 Select “Edit Playlist,” and press ENTER.
The display for selecting Playlist titles
appears.
Playlist
No. Title Length Edit
01 CH 32 >00:05:04
02 CH 96 >00:00:51
10:10 AM
DVD
SYSTEM
MENU
O RETURN
./>
H PLAY
M/m/</,,
ENTER
x STOP
X PAUSE
1 Press DVD to control the DVD recorder.
2 Press SYSTEM MENU while the recorder is
stopped.
Title List(Original)
Title List
Timer
Edit
Disc Setting
Setup
Press ENTER :
Title Menu for DVD Title List.
10:10 AM
3 Select “Edit,” and pr e s s ENT E R .
Edit
Title List
Timer
Edit
Disc Setting
Setup
Create Playlist
Edit Playlist
DV Edit
Dubbing
10:10 AM
T
CH 32
Nov/27/2004
03:25 PM
5 Select a Playlist title, and press ENTER.
The sub-menu appears.
6 Select an option, and press ENT ER .
You can make the following edits to the title.
“Erase”: Erases th e selected Playlist titl e.
Select “OK” when asked for confirmation.
“Title Name”: Allows you to enter or r e-enter
a Playlist title name (page 46).
“Edit Scene”: Allows you to re-edit without
changing the actual recordings (see below).
“Title List”: Switches to the “Title
List(Original).”
7 Select “Edit Scene,” and pre ss ENTER.
Edit Scene
03 00:04:2002 00:00:1001 00:00:34
The Scene List menu appears with all of the
selected scenes.
“Modify”: Allows you to change the start and
end point of the selected scene. See
“Modifying a scen e (Modify)” on p age 87.
“Move”: Changes the scene orde r. See
“Moving a scene (M ove )” on page 87.
“Add”: Allows yo u to add mor e scenes be fore
the selected scene. See “Adding a scene
(Add)” on page 88.
“Erase”: Erases the scene. The select io n i s
canceled. See “Erasing a scene (Erase)” on
page 88.
10:10 AM
Playlist No.01Scene No.1 / 1
Play
Modify
Move
Add
Erase
86
Page 87

Modifying a scene (Modify)
-
RWVR
You can change the start and end point of t he
selected scene.
1 After step 7 of “Editing a Playlist” on
page 86, select a scene, and press ENTER.
2 Select “Modify ,” and press ENTER.
“Start” is selected.
Modify
Playlist No. 01
T
Nov/27/2004 03:25 PM
Start 00:00:00
00:00:07
End 00:00:00
10:10 AM
Scene No.01
Start
End
Change
Cancel
3 Press ENTER at the starting point.
You can use H PLAY, ,
./>, x STOP and X PAUSE to find
the point.
“End” is selected.
Modify
Playlist No. 01
T
Nov/27/2004 03:25 PM
Start 00:00:10
00:00:10
End 00:00:00
10:10 AM
Scene No.01
Start
End
Change
Cancel
4 Press ENTER at the ending point.
“Change” is selected.
To reset the start or end point, select “Start” or
“End” and repeat step 3 or 4.
5 Press ENTER.
The display returns to “Edit Scene” display.
The re-selected section is captured as a scene.
To modify other scenes, press O RETURN,
and repeat from ste p 1.
To turn off the display
Press SYSTEM MENU.
Note
The start and end point of a s cen e may be different from
what you have set.
Moving a scene (Move)
-
RWVR
You can change the scene order within the Playlist
title.
1 After step 7 of “Editing a Playlist” on
page 86, select a scene, and press ENTER.
2 Select “Move,” an d press ENTER.
Edit Scene
03 00:04:2002 00:00:1001 00:00:34
10:10 AM
Playlist No.01Scene No. 2 / 3
Play
Modify
Move
Add
Erase
3 Select a new locat ion using </,.
4 Press ENTER.
The selected sc ene mo ve s t o the n ew l oc ati on .
To move other scene s pr ess O RETURN,
and repeat from step 1.
Edit Scene
01 00:00:34
02 00:04:20
To turn off the display
Press SYSTEM MENU.
03 00:00:10
10:10 AM
Playlist No.01Scene No. 3 / 3
Play
Modify
Move
Add
Erase
DVD Editing
To cancel modifyi ng
Select “Cancel,” and press ENTER.
,continued
87
Page 88

Adding a scene (Add)
-
RWVR
You can add a scene before the selected scene.
1 After step 7 of “Editing a Playlist” on
page 86, select a scene, and press ENTER.
2 Select “Add,” an d press ENTER.
“Start” is selected.
Add
Playlist No. 01
T
Nov/27/2004 03:25 PM
Start 00:00:00
00:00:07
End 00:00:00
10:10 AM
Scene No.01
Start
End
Add
Cancel
3 Press ENTER at the starting point.
You can use H PLAY, ,
./>, x STOP and X PAUSE to find
the point.
“End” is selected.
Add
Playlist No. 01
T
Nov/27/2004 03:25 PM
Start 00:00:10
00:00:10
End 00:00:00
10:10 AM
Scene No.01
Start
End
Add
Cancel
To turn off the display
Press SYSTEM MENU.
Note
The start and end point of a scene may be different from
what you have set.
Erasing a scene (Erase)
-
RWVR
You can erase a select ed scene.
1 After step 7 of “Editing a Playlist” on
page 86, select a scene, and press ENTE R.
2 Select “Era se,” and press ENTER .
The display asks for confirmation.
3 Select “OK, ” and press ENTER.
The selected scene is erased.
To erase other scenes, press O RETURN,
and repeat from step 1.
To turn off the display
Press SYSTEM MENU.
4 Press ENTER at the ending point.
“Add” is selected .
To reset the start or end point, select “Start” or
“End” and repeat step 3 or 4.
5 Press ENTER.
The display returns to “Edit Scene” display.
The selected section is captured as a scene and
added before the selected scene .
To add other scenes, press O RETURN, and
repeat from step 1.
To cancel adding
Select “Cancel,” and press ENTER.
88
Page 89

Dubbing (TAPE y DVD)
Dubbing from a Vi deo to a DVD
+
RW
-
RWVR-RW
Video
-
+
R
R
Using the T VIDEO button on the
recorder
1 Insert a recordable disc.
2 Insert a source tape.
3 Press T VIDEO on the reco rde r .
Dubbing starts.
You can record (dub) VHS tape video and audio to
a disc. The audio switching and audio settings
must be made for both the VHS tape and the disc.
DVD
AUDIO
SYSTEM
MENU
H PLAY
REC MODE
T VIDEO
VIDEO
M/m,
ENTER
X PAUSE
x STOP
Using the TV screen
1 Insert a recordable disc.
2 Insert a source tape.
3 Press DVD to control the DVD recorder.
4 Press SYSTEM MENU w hile the record er is
stopped.
Title List(Original)
Title List
Timer
Edit
Disc Setting
Setup
Press ENTER :
Title Menu for DVD Title List.
10:10 AM
5 Select “Edit,” and press ENTER.
Edit
Title List
Timer
Edit
Disc Setting
Setup
Create Playlist
Edit Playlist
DV Edit
Dubbing
10:10 AM
Dubbing (TAPE y DVD)
6 Select “Dubbing,” and press ENTER.
Edit
Title List
Timer
Edit
Disc Setting
Setup
Create Playlist
Edit Playlist
DV Edit
Dubbing
10:10 AM
Video --> DVD
DVD --> Video
,continued
89
Page 90

7 Select “Video t DVD,” and pres s ENTER .
The display for con fi r m at i on appears.
8 Select “OK,” and press ENTER.
Dubbing starts.
To select the recording mode
Press DVD to control the DVD recorder, then
press REC MOD E repeatedly.
Each time you press the button, the display
changes on the TV screen as follows:
HQ SP LP EPHSP SLP
For more details about the recording mode, see
page 47.
To select the sound
1 After ste p 2 above, press VID EO to control
the VCR.
2 Press H PLAY.
3 Press AUDIO repeatedl y to select the soun d
you want.
For details, see pag e 80.
4 Press X PAUSE.
5 Follow the instructions ab ove from step 3.
Notes
• Dubbing is not possible in the fo llowing cases.
– When a non -rec or da ble DV D is set.
– When using VHS software with copy guard
functions.
• Dubbing stops in the following cases.
– When the VHS tape is played back to the end and
stops.
– When the VHS deck or the DVD deck is stopped.
– When the disc remaining time runs out.
• The System menu, TOOLS menu, and infor mati on
display are not displayed durin g dubbing.
• Copyrights
– Recordings made from VHS tapes and other
copyrighted material are solely for individual
enjoyment, and other unauthorized use is prohibited
under copyright law.
– Unauthorized editing of copyrighted material is
prohibited under copyright law.
To stop dubbing
Press x STOP.
Note that it may take a few seconds for the
recorder to stop dubbing.
To play discs recorded with this recorder on
other DVD equi pment
Finalize the disc. For details, see page 44.
z Hints
• A black screen is recorded at the end of the dubbed disc,
but this is not a malfunction. When dubbing stops, there
may be some time difference between the tape and the
disc. In this case, a black (no signal) screen is recorded.
• You can switch the playback tape audio while dubbing.
• When dubbing a VHS tape to a disc, the VHS tape
counter value may differ slightly from the DVD
recording time.
• The audio output is the VHS playback a udio.
90
Page 91

Dubbing from a DVD to a Video
+
-
-
RWVR
RW
RW
Video
You can record (dub) DVD video and audio to a
VHS tape. However, note that when you record
copy-protect ed software to a tap e, th e video may
appear disrupte d w hen you play back the tap e.
DVD
AUDIO
SUBTITLE
SYSTEM
MENU
TOP MENU
REC MODE
DVD t
-
+
R
DVD
R
VIDEO
TITLE LIST
M/m,
ENTER
X PAUSE
x STOP
Using the DVD t button on the
recorder
1 Insert a tape with its safety tab in place.
2 Insert a source disc.
3 Press DVD to control the DVD recorder.
4 Press TOP MENU or TITLE LIST, and select
a title.
5 Start playing, an d press x STOP or
X PAUSE.
6 Press DVD t on the recorder.
Dubbing starts.
Using the TV screen
1 Insert a tape with its safety tab in place.
2 Insert a source disc.
3 Press DVD to control the DVD recorder.
4 Press TOP MENU or TITLE LIST, and select
a title.
5 Start playing, an d press x STOP or
X PAUSE.
6 Press SYSTEM MENU.
Title List(Original)
Title List
Timer
Edit
Disc Setting
Setup
Press ENTER :
Title Menu for DVD Title List.
10:10 AM
Dubbing (TAPE y DVD)
7 Select “Edit,” and press ENTER.
Edit
Title List
Timer
Edit
Disc Setting
Setup
Create Playlist
Edit Playlist
DV Edit
Dubbing
10:10 AM
,continued
91
Page 92

8 Select “Dubbing,” and press ENTER.
Edit
Title List
Timer
Edit
Disc Setting
Setup
Create Playlist
Edit Playlist
DV Edit
Dubbing
10:10 AM
Video --> DVD
DVD --> Video
9 Select “DVD t Vide o,” and p ress ENTER .
The display for con fi r m at i on appears.
10
Select “OK,” and press ENTER.
Dubbing starts.
The disc’s menu may appear depending on the
disc when playba ck of a disc finishes. In this
case, press x STOP to stop dubbi ng,
otherwise the disc’s menu is recorded until t he
tape reaches its end.
To select the tape speed
Press VIDEO to control the VCR, then press REC
MODE repeated l y to select “SP” or “EP.”
“EP” (Extended Pl ay) provides recording time
three times as long as “SP” (Standard Play).
However, “SP” pro duces better picture and audio
quality.
Notes
• Dubbing is not possible when “Video” of “Progressive”
is set to “On” in the “Setup” displa y.
• Dubbing stops in the following cases.
– When the D VD is playe d ba ck to the end and stops.
– When the DVD deck or the VHS deck is stopped.
– Whe n the ta pe re ma ining time runs out.
• The System menu, TOOLS menu, and infor mati on
display are not displayed durin g dubbing.
• Copyrights
– Recor dings made from discs and other copyrighted
material are solely for individual enjoyment, and
other unauthorized use is prohibited under copyright
law.
– Unauthorized editing of copyrighted material is
prohibited under copyright law.
To select the sound or language
After step 5 above, press AUDIO repeatedly to
select the sound you want, or press SU BTI TLE
repeatedly to select the language yo u w ant. For
details, see page 59.
To stop dubbing
Press x STOP.
Note that it may take a few seconds for the
recorder to stop dubbing.
z Hints
• You can switch the playback DVD audio while
dubbing.
• The brightness of the playback video may differ from
that during normal DVD playback.
• The DVD playback time may differ slightly from the
VHS tape counter value.
• The audio being played back (main audio, sub audio,
etc.) is the dubbed audio.
92
Page 93

DV Dubbing (DV t DVD)
Before DV Dubbing
This secti on expl ai ns du b bing wi th a di gi t al vi deo
camera via th e D V IN jack on the front panel. If
you want to dub by way of the LINE IN jacks, see
“Recording from Connected Equipment with a
Timer (Synchro Rec)” on page 53.
To record from the DV IN jack
The DV IN jack on this recorder conforms to the
i.LINK standard. You can connect any other
equipment that ha s an i.LINK (DV) jack , a nd
record digital si gnals.
Follow the instructions in “Connecting a Digital
Video Camera to the DV IN Jack,” and then move
on to the section on dubbing. For mo re
information about i.LINK, see “About i.LINK” on
page 115.
z Hint
If you plan to do additional editing on a disc after the
initial dub, use the DV IN jack and record on a DVD-RW
(VR mode).
Note
When selecting DV input, lines appear on the screen.
This is not a malfunction. Connect a digital video camera
and display an image. These lines disappears.
Connecting a Digital Video Camera to the DV IN Jack
You can connect a digital video c amera to the DV
IN jack on the recorder to record or edit from a DV
format tape. Operation is straightforward bec au se
the recorder will fast fo rwa rd an d re win d th e tap e
for you – you do not need to operate your digi ta l
video camera. D o th e following to start us in g t he
“DV Edit” functions of this recorder.
See the instruction manual supplied with the
digital video camera as well before connect ing.
Notes
• The DV IN jack is for input only. It will not output
signals.
• You cannot use the DV IN jack when:
– your di git al vide o cam era doe s not wor k with this
recorder. Connect th e camera to th e LINE IN jack an d
follow the instructions of “Recor ding from
Connected Equipment without a Time r” on page 56.
– the input signal is not in DVC-SD form a t. Do not
connect a MICRO MV format digital video camera
even if it has an i.LINK jack.
– the images on the tape contain c opy protec tion
signals, which limit rec o r ding.
• 16:9 images are recorded in 4:3 size.
DV Dubbing (DV t DVD)
VCR-DVD recorder
DV
DV IN
Digital video camera
To DV IN
: Signal flow
i.LINK cable
(not supplied)
DV output
93
Page 94

Dubbing from a DV Format Tape to a DVD
+
-
RW
RWVR-RW
Video
You can record a DV format tape onto a disc. The
recorder controls the digital video camera. You
can fast forward, re wind, play in slo w motion, and
stop the tape to select the scenes using the
recorder’s remote control .
◆How chapters ar e created
The recorder div i des the title in either 5 or 15minute intervals, according to the setting in “DVD
Auto Chapter” in “Features” setup (page 104).
Z OPEN/
CLOSE
DVD
-
+
R
R
CH +/–
3 Press Z OPEN/CLOSE to close the disc
tray.
Wait until “LOAD” disappears fr om the fr ont
panel display.
Unused DVD-RWs are formatted in VR mode
automatically.
To format in Vi deo mode, see page 43.
4 Insert the source DV format tape into your
digital video camera.
For the recorder to reco rd or ed it, your di gi tal
video camera m us t be set to video playba ck
mode.
5 Press INPUT SELECT repeatedly to select
“DV.”
6 Press REC M ODE repeatedly to select the
recording mode.
Each time you pre ss the button, the disp la y
changes on the TV screen as follows:
HQ SP LP EPHSP SLP
INPUT
SELECT
SYSTEM
MENU
O RETURN
REC MODE
M/m,
ENTER
1 Press DVD to control the DVD recorder.
2 Press Z OPEN/CLOSE, and place a
recordable disc on the disc tray.
With the recording side facing down
For more d etails about the recording mode,
see page 47.
7 Press SYSTEM MENU while the recorder is
stopped.
Title List(Original)
Title List
Timer
Edit
Disc Setting
Setup
Press ENTER :
Title Menu for DVD Title List.
10:10 AM
8 Select “Set up,” and press ENTER.
Setup
Title List
Timer
Edit
Disc Setting
Setup
Tuner Preset
Clock Set
Video
Audio
Features
Options
Easy Setup
10:10 AM
94
Page 95

9 Select “Audio ,” and press ENTER.
Audio
Title list
Tuner Audio
Digital Out
Timer
Downmix
Edit
Audio DRC
Scan Audio
Disc Setting
DV Audio Input
Line Audio Input
Setup
10
Select “DV Audio Input,” and press ENTER.
Audio
Title list
Tuner Audio
Digital Out
Timer
Downmix
Edit
Audio DRC
Scan Audio
Disc Setting
DV Audio Input
Line Audio Input
Setup
“Stereo 1”: Re co rds original so und only.
Normally select this when dubbing a DV
format tape.
“Stereo 2”: Re cords additional audio only.
Select “Stereo 2” if you have added a seco nd
audio channel when recording with your
digital video camer a.
11
Select “Stereo 1” or “Stereo 2,” and press
ENTER.
12
Press O RETURN twice.
13
Select “Edit,” and pr e ss ENTER.
Edit
Title List
Create Playlist
Edit Playlist
Timer
DV Edit
Edit
Dubbing
Disc Setting
Setup
: Main
: Normal
: Standard
: On
: Stereo 1
: Stereo
: Main
: Normal
: Standard
: On
:
Stereo 1
:
Stereo 2
10:10 AM
10:10 AM
10:10 AM
14
Select “DV Edit,” and press ENTER.
The display for recording and “DV Tap e
Mode” appear.
If “DV Tape Mode” does not appear, check
the connection to y our di gital video camera.
DV Tape Mode
15
Select z on th e TV screen, and press
ENTER.
Starts recordin g the tape contents.
You can use m, x, X, y, H, M, and z
on the TV screen to search the point you want
to start recording.
To stop during recording
Select x on the TV screen, and press ENTER.
Note that it may take a few seconds for the
recorder to stop recording.
To turn off the display for recording
Press INPUT SELECT or CH +/–.
Notes
• If you want to play the disc on other DVD equipment,
finalize the disc (page 44).
• You cannot connect more than one pie c e of digi ta l
video equipment to the recorder.
• You cannot control the recorder using another device or
another recorder of the same model.
• You cannot record date, time, or the contents of the
cassette memo ry on to the disc.
• If you record from a DV format tape with a sound track
that is recorded in multiple sampling frequencies
(48 kHz, 44.1 kHz, or 32 kHz), no sound or an
unnatural sound will be output when playing back the
sampling frequency switch point on the disc.
• The recorded picture may be momen tarily affected if
the picture size of the so urce image ch anges, or if th ere
is nothing recorded on the ta pe .
• Noise may occur when you switch the audio sampling
mode (48 kHz/16 bits t 32 kHz/12 bits).
• 16:9 images are recorded in 4:3 size.
DV Dubbing (DV t DVD)
95
Page 96

Settings and Adjustments
Using the Setup Di sp l ays
By using the setup displays, you can make various
adjustments to items such as picture and sound, as
well as select a language for the subtitles.
The setup display s ar e used in the followin g w ay.
2 Select “Setup,” and press ENTER.
The “Setup” di splay appears.
Setup
Title List
Timer
Edit
Disc Setting
Setup
Tuner Preset
Clock Set
Video
Audio
Features
Options
Easy Setup
10:10 AM
Note
Playback settings stored in the disc take priority over the
setup display settings, and not all of the functions
described may work.
SYSTEM
MENU
M/m,
ENTER
1 Press SYSTEM MENU whil e the rec order is
in stop mode.
Title List(Original)
Title List
Timer
Edit
Disc Setting
Setup
Press ENTER :
Title Menu for DVD Title List.
10:10 AM
3 Select “Tuner Preset,” “Clock Set,”
“Video,” “Audio, ” “Features,” “Options ,”
or “Easy Setup,” and press ENTER.
The selected setup display appears.
Example: “Video” setup
Video
Title list
Timer
Edit
Disc Setting
Setup
TV Type
Black Level
Picture Control
Progressive
10:10 AM
: 4:3 Pan Scan
: On
: Standard
: Off
4 Select the item you want to set up, and
press ENTER.
Available options for the item appear.
Example: “TV Type ”
Video
Title list
Timer
Edit
Disc Setting
Setup
TV Type
Black Level
Picture Control
Progressive
: 4:3 Letter Box
16:9
4:3 Letter Box
: On
4:3 Pan Scan
: Composite
: Off
10:10 AM
96
Page 97

Some items display a dialog box that provides
further detailed settings.
Example: The foll ow i ng dialog box appears
when “Parental” in “Options” setup is
selected.
Enter Password
Title list
Timer
Edit
Disc Setting
Setup
Enter the password.
10:10 AM
In this case, see “Parental” in “Language,
Parental Control Settings/Factory Settings
(Options)” on page 105.
5 Select an option, and press ENTER.
The currently selected option is displayed
next to the setup ite m .
Example: when “16:9” is set.
Video
Title list
TV Type
Black Level
Timer
Picture Control
Edit
Progressive
Disc Setting
Setup
To turn off the display
Press SYSTEM MENU.
10:10 AM
: 16:9
: On
: Standard
: Off
Antenna Reception Setting (Tuner Preset)
The “Tuner Preset” setup helps you to make tuner,
setting for the recorder.
Select “Tuner Pre set” in the “Setup” di splay. To
use the display, see “Using the Setup Displays” on
page 96.
Setup
Title List
Tuner Preset
Clock Set
Timer
Video
Edit
Audio
Features
Disc Setting
Options
Setup
Easy Setup
Note
You cannot presets channels for the connected cable box
or satellite rece ive r.
Auto Preset
Automatically presets the receivable channels.
The recorder can receive VHF channels 2 to 13,
UHF channels 14 to 69, and unscrambled CATV
channels 1 to 125. Fi rst, we recommend tha t y ou
preset the receivable channels in your area using
automatic pr esetting method s.
1 Follow steps 1 to 3 of “Using the Setup
Displays” on page 96 to select “Tuner Preset”
in the “Setup” display.
2 Select “A nt enna/Cable,” and pr ess ENTER.
Tuner Preset
Title list
Antenna/Cable
Auto Preset
Timer
Manual Set
Edit
3,4 Ch Out
Guide Channel Setup
Disc Setting
Setup
: 4:3 Letter Box
Antenna
Cable
: On
: 3CH
10:10 AM
10:10 AM
Settings and Adjustments
“Antenna”: Presets VHF and UHF ch annels.
“Cable”: Presets cable TV channels.
3 Select an option, and press ENTER.
,continued
97
Page 98

Select “Auto Preset ,” and press ENTER.
4
All receivable ch annels are preset in
numerical sequ ence.
Auto Preset
Title list
Searching for receivable channels: 3
Timer
Edit
Scanning... Please wait.
Disc Setting
Setup
Stop
10:10 AM
7%
Manual Set
Presets or disables channels manuall y.
If some channe ls co uld not be set using the Auto
Preset or Easy Setup function, you can set them
manually.
1 Follow st eps 1 to 3 of “Using the Setup
Displays” on page 96 to select “Tuner Preset”
in the “Setup” display.
2 Select “An te nna/Cable,” and press EN TER .
Tuner Preset
Title list
Antenna/Cable
Auto Preset
Timer
Manual Set
Edit
3,4 Ch Out
Guide Channel Setup
Disc Setting
Setup
“Antenna”: Presets VHF and UHF cha nnels.
“Cable”: Preset s cable TV channels.
: 4:3 Letter Box
Antenna
Cable
: On
: 3CH
10:10 AM
3 Select an option, and press ENT ER .
4 Select “Manual Set,” and pres s EN TER.
5 Select the channel you want to preset/disable
using M/m or CH +/–, and p re ss E NTER.
Manual Set
Title list
Timer
Edit
Disc Setting
Setup
Select a channel:
Add Erase
10:10 AM
69
6 Select “Add” or “Erase” using </,, and
press ENTER.
7 To pr es et or disable another channel, repeat
steps 5 and 6.
3, 4 Ch Out
Set the RF output ch annel so that the TV ca n
receive the correct signal from the record er .
For details, see page 19.
1 Follow steps 1 to 3 of “Using the Setup
Displays” on page 96 to select “Tuner Preset”
in the “Setup” display.
2 Selec t “ 3, 4 C h O ut , ” and press ENTER.
Tuner Preset
Title list
Antenna/Cable
Auto Preset
Timer
Manual Set
Edit
3,4 Ch Out
Guide Channel Setup
Disc Setting
Setup
“3CH”: when using channel 3 to receive the
recorder signal.
“4CH”: when using channel 4 to receive the
recorder signal.
: Cable
: 3 CH
10:10 AM
3CH
4CH
3 Select “3CH” or “4CH,” and press ENTER.
The confirmation messages will be displayed
for a while.
Guide Channel Setup
Sets up the guid e channel numbe r assigned t o each
channel.
You need to set this correctly to make timer
recordi n gs with th e VCR Plus+ functio n . For
details, see page 32.
98
Page 99

Clock Setting (Clock Set)
The “Clock Set” setup helps you to make clock
setting for the recorder.
Select “Clock Set” in the “Setup” display. To use
the display, see “Using the Setup Displays” on
page 96.
Auto (Auto Clock Set)
Turns on the Auto Clock Set function when a channel
in your local area broadc asts a time signal.
1 Follow steps 1 to 3 of “Using the Setup
Displays” on page 96 to select “Clock Set” in
the “Setup” di splay.
2 Select “Au t o, ” and press ENTER.
Auto
Title list
Clock Set CH
Time Zone
Timer
Daylight Saving
Edit
Disc Setting
Setup
3 Select “Clock Set CH,” “Time Zone,” or
“Daylight Saving” and press ENTER.
4 Adjust these settings by pressing M/m and
ENTER.
◆ Cloc k Set CH
Select a channel that carries a time signal
using M/m.
Use this option if you k now of a channel that
carries a time signal. Most PBS member
stations broadcast a time signal. For the fastest
response select your local PBS station. Leave
the setting at “Auto” to have the recorder
automatically search for a channel that carries
a time signal.
Clock Set CH
Title list
Timer
Edit
Disc Setting
Setup
Select a channel:
10:10 AM
: Auto
: Auto
: Auto
10:10 AM
Auto
◆ Time Zone
Select the time zone for your area, or select
“Auto” to have the recorder automat icall y set
your time zone.
The options are:
Auto y Atlantic y Eastern y Central
y Mountain y Pacific y Alaska y
Hawaii y Auto
◆ Daylight Saving
Select “On” or “Off ” (standard t ime), or select
“Auto” to have the recorder automat icall y set
the daylight saving time.
Manual
If the Auto Clock Set function did not set the clock
correctly for your local area, set the clock
manually.
1 Follow steps 1 to 3 of “Using the Setup
Displays” on page 96 to select “Clock Set” in
the “Setup” display.
2 Select “Manual,” and press ENTER .
Clock Set
Title list
Timer
Edit
Disc Setting
Setup
Month Day Year
01
01 2004 THU
Hour Min
AM/PM
00 AM12 :
10:10 AM
3 Press M/m to set the month, and press ,.
Set the day, year, hour, minutes, and AM/PM
in sequence. Pr ess </, to select the item to
be set, then pre ss M/m to set the nu mbers. The
day of the week is set automatically.
4 Press ENTER to start the clock.
z Hint
To change the numbers in step 3, press < to return to the
item to be changed, and select the numbers by pressing
M/m.
Settings and Adjustments
99
Page 100

Video Settings (Video)
Video settings will adjust items related to the
image, such as size and color.
Choose the settings according to the type of TV,
tuner, or decoder connected to the recorder.
16:9
4:3 Letter Box
1 Press SYSTEM MENU whil e the rec order is
in stop mode.
2 Select “Setup,” and press ENTER.
3 Select “Video,” and press ENTER.
The “Video” setup appears with the following
options. The defaul t settings are underlined.
Video
Title list
TV Type
Black Level
Timer
Picture Control
Edit
Progressive
Disc Setting
Setup
TV Type
Selects the aspect rat i o of th e connected TV (4:3
standard or wide ).
16:9 Select this when connecting to a
wide-screen TV or TV with a
wide mode function.
4:3 Letter
Box
Select this when connecting to a
4:3 screen TV. Displays a wide
picture with bands on the upper
and lower portions of the screen.
10:10 AM
: 4:3 Pan Scan
: Off
: Standard
: Off
4:3 Pan Scan
Note
Depending on the disc, “4:3 Letter Box” may be selected
automatically instead of “4:3 Pan Scan” or vice versa.
Black Level
Selects the black level (setup level) for the video
signals output from the LINE OUT jacks
(page 18).
This setting is not effective when the
PROGRESSIVE indicator lights up in the front
panel and the record er output s progr essive signal s.
On Raises the sta nda rd bl ack level.
Select this when the pict ure
appears too dark.
Off Sets the black level of the output
signal to the standard level.
Normally, select this.
100
4:3 Pan
Scan
Select this when connecting to a
4:3 screen TV. Automatically
displays a wide picture on t he
entire screen an d cuts off the
portions that do not fit.
 Loading...