

Page 1
3-874-363-41(1)
DVD Recorder
Operating Instructions
RDR-HX780/HX980
© 2008 Sony Corporation
Page 2
WARNING
To reduce the risk of fire or
electric shock, do not expose this
apparatus to rain or moisture.
To avoid electrical shock, do not
open the cabinet. Refer servicing
to qualified personnel only.
The power cord (mains lead) must
be changed only at a qualified
service shop.
Batteries or batteries installed
apparatus shall not be exposed to
excessive heat such as sunshine,
fire or the like.
CAUTION
The use of optical instruments
with this product will increase eye
hazard. As the laser beam used in
this DVD recorder is harmful to
eyes, do not attempt to
disassemble the cabinet.
Refer servicing to qualified
personnel only.
This label is located on the laser
protective housing inside the
enclosure.
Precautions
• This unit operates on 220 –
240 V AC, 50/60 Hz. Check that
the unit’s operating voltage is
identical with your local power
supply.
• To prevent fire or shock hazard,
do not place objects filled with
liquids, such as vases, on the
apparatus.
• Install this system so that the
power cord (mains lead) can be
unplugged from the wall socket
immediately in the event of
trouble.
Disposal of Old Electrical
& Electronic Equipment
This symbol is applicable only in
the European Union and other
European countries with separate
collection systems.
Precautions
This equipment has been tested
and found to comply with the
limits set out in the EMC
Directive using a connection
cable shorter than 3 metres.
On safety
Should any solid object or
liquid fall into the cabinet,
unplug the recorder and have it
checked by qualified personnel
before operating it any further.
About the hard disk drive
The hard disk has a high storage
density, which enables long
recording durations and quick
access to the written data.
However, it can easily be
damaged by shock, vibration or
dust, and should be kept away
from magnets. To avoid losing
important data, observe the
following precautions.
• Do not apply a strong shock to
the recorder.
• Do not place the recorder in a
location subject to mechanical
vibrations or in an unstable
location.
• Do not place the recorder on
top of a hot surface, such as a
VCR or amplifier (receiver).
2
Page 3

• Do not use the recorder in a
place subject to extreme
changes in temperature
(temperature gradient less
than 10 °C/hour).
• Do not move the recorder
with its AC power cord
(mains lead) connected.
• Do not disconnect the AC
power cord (mains lead) while
the power is on.
• When disconnecting the AC
power cord (mains lead), turn
off the power and make sure
that the hard disk drive is not
operating (the clock is
displayed in the front panel
display for at least 30 seconds
and all recording or dubbing
has stopped).
• Do not move the recorder for
one minute after you have
unplugged the AC power cord
(mains lead).
• Do not attempt to replace or
upgrade the hard disk by
yourself, as this may result in
malfunction.
If the hard disk drive should
malfunction, you cannot
recover lost data. The hard disk
drive is only a temporary
storage space.
About repairing the hard
disk drive
• The contents of the hard disk
drive may be checked in case
of repair or inspection during
a malfunction or
modification. However, the
contents will not be backed up
or saved by Sony.
• If the hard disk needs to be
formatted or replaced, it will
be done at the discretion of
Sony. All contents of the hard
disk drive will be erased,
including contents that violate
copyright laws.
On power sources
• The recorder is not
disconnected from the AC
power source (mains) as long
as it is connected to the wall
outlet, even if the recorder
itself has been turned off.
• If you are not going to use the
recorder for a long time, be
sure to disconnect the
recorder from the wall outlet.
To disconnect the AC power
cord (mains lead), grasp the
plug itself; never pull the
cord.
On placement
• Place the recorder in a location
with adequate ventilation to
prevent heat build-up in the
recorder.
• Do not place the recorder on a
soft surface such as a rug that
might block the ventilation
holes.
• Do not place the recorder in a
confined space such as a
bookshelf or similar unit.
• Do not place the recorder in a
location near heat sources, or
in a place subject to direct
sunlight, excessive dust, or
mechanical shock.
• Do not place the recorder in
an inclined position. It is
designed to be operated in a
horizontal position only.
• Keep the recorder and discs
away from equipment with
strong magnets, such as
microwave ovens, or large
loudspeakers.
• Do not place heavy objects on
the recorder.
On recording
Make trial recordings before
making the actual recording.
,continued
3
Page 4

On compensation for lost
recordings
Sony is not liable and will not
compensate for any lost
recordings or relevant losses,
including when recordings are
not made due to reasons
including recorder failure, or
when the contents of a
recording are lost or dam aged as
a result of recorder failure or
repair undertaken to the
recorder. Sony will not restore,
recover, or replicate the
recorded contents under any
circumstances.
Copyrights
• Television programmes,
films, video tapes, discs, and
other materials may be
copyrighted. Unauthorized
recording of such material
may be contrary to the
provisions of the copyright
laws. Also, use of this
recorder with cable television
transmission may require
authorization from the cable
television transmitter and/or
programme owner.
• This product incorporates
copyright protection
technology that is protected
by U.S. patents and other
intellectual property rights.
Use of this copyright
protection technology m ust be
authorized by Macrovision,
and is intended for home and
other limited viewing uses
only unless otherwise
authorized by Macrovision.
Reverse engineering or
disassembly is prohibited.
• This Product includes
FontAvenue
by NEC corporation.
FontAvenue is a registered
trademark of NEC
corporation.
• “ ” and x-Application are
trademarks of Sony
Corporation.
®
fonts licenced
Copy guard function
Since the recorder has a copy
guard function, programmes
received through an external
tuner (not supplied) may
contain copy protection signals
(copy guard function) and as
such may not be recordable,
depending on the type of signal.
IMPORTANT NOTICE
Caution: This recorder is
capable of holding a still
video image or on-screen
display image on your
television screen
indefinitely. If you leave the
still video image or onscreen display image
displayed on your TV for an
extended period of time you
risk permanent damage to
your television screen.
Plasma display panels and
projection televisions are
especially susceptible to this.
If you have any questions or
problems concerning your
recorder, please consult your
nearest Sony dealer.
About this manual
Check your model name
The instructions in this
manual are for 2 models:
RDR-HX780 and RDRHX980. Check your model
name by looking at the front
panel of the recorder.
4
Page 5

• In this manual, the internal
hard disk drive is written as
“HDD,” and “disc” is used as
a general reference for the
HDD, DVDs, or CDs unless
otherwise specified by the text
or illustrations.
• Icons, such as , listed
at the top of each explanation
indicate what kind of media
can be used with the function
being explained. For details,
see “Recordable and Playable
Discs” on page 121.
• Instructions in this manual
describe the controls on the
remote. You can also use the
controls on the recorder if
they have the same or similar
names as those on the remote.
• The on-screen display
illustrations used in this
manual may not match the
graphics displayed on your
TV screen.
• Oceanian models are used for
illustration purposes.
• The explanations regarding
DVDs in this manual refer to
DVDs created on this
recorder. The explanations do
not apply to DVDs that are
created on other recorders and
played back on this recorder.
DVD
5
Page 6

Table of Contents
WARNING . . . . . . . . . . . . . . . . . . . . . . . . . . . . . . . . . . . . . . . . . . . . . . . . . .2
Precautions . . . . . . . . . . . . . . . . . . . . . . . . . . . . . . . . . . . . . . . . . . . . . . . . .2
Guide to Parts and Controls . . . . . . . . . . . . . . . . . . . . . . . . . . . . . . . . . . . .10
Hookups and Settings . . . . . . . . . . . . . . . . . . . . . . . . . . . . . . . .15
Hooking Up the Recorder . . . . . . . . . . . . . . . . . . . . . . . . . . . . . . . . . . . . . .15
Step 1: Connecting the Aerial Cable . . . . . . . . . . . . . . . . . . . . . . . . . . . . .16
Step 2: Connecting the Video Cords/HDMI Cord . . . . . . . . . . . . . . . . . . . . 17
About the “Control for HDMI” functions for ‘BRAVIA’ Sync
(for HDMI connections only) . . . . . . . . . . . . . . . . . . . . . . . . . . . . . . 19
Step 3: Connecting the Audio Cords/HDMI Cord . . . . . . . . . . . . . . . . . . . . 20
Step 4: Connecting the AC power cord (Mains Lead) . . . . . . . . . . . . . . . . 21
Step 5: Preparing the Remote . . . . . . . . . . . . . . . . . . . . . . . . . . . . . . . . . . 22
Controlling TVs with the remote . . . . . . . . . . . . . . . . . . . . . . . . . . . . . .22
If you have a Sony DVD player or more than one Sony DVD
recorder. . . . . . . . . . . . . . . . . . . . . . . . . . . . . . . . . . . . . . . . . . . . . .23
Changing programme positions of the recorder using the remote . . . . 23
Step 6: Easy Setup . . . . . . . . . . . . . . . . . . . . . . . . . . . . . . . . . . . . . . . . . .24
Connecting a VCR or Similar Device . . . . . . . . . . . . . . . . . . . . . . . . . . . . .26
Connecting to the LINE 1 IN jacks . . . . . . . . . . . . . . . . . . . . . . . . . . . .26
Connecting to the LINE 2 IN jacks on the front panel . . . . . . . . . . . . . .27
Connecting to a Satellite or Digital Tuner . . . . . . . . . . . . . . . . . . . . . . . . . .28
Seven Basic Operations — Getting to Know Your DVD Recorder
1. Inserting a Disc . . . . . . . . . . . . . . . . . . . . . . . . . . . . . . . . . . . . . . . . . . .29
2. Recording a Programme . . . . . . . . . . . . . . . . . . . . . . . . . . . . . . . . . . . . 29
Checking the disc status while recording . . . . . . . . . . . . . . . . . . . . . . . 30
3. Playing the Recorded Programme (Title List) . . . . . . . . . . . . . . . . . . . . 31
Displaying the playing time and play information . . . . . . . . . . . . . . . . .33
4. Changing the Name of a Recorded Programme . . . . . . . . . . . . . . . . . . 34
5. Labelling and Protecting a Disc . . . . . . . . . . . . . . . . . . . . . . . . . . . . . . . 35
Labelling a disc . . . . . . . . . . . . . . . . . . . . . . . . . . . . . . . . . . . . . . . . . . .35
Protecting a disc . . . . . . . . . . . . . . . . . . . . . . . . . . . . . . . . . . . . . . . . . .36
6. Playing the Disc on Other DVD Equipment (Finalise) . . . . . . . . . . . . . .37
Unfinalising a disc . . . . . . . . . . . . . . . . . . . . . . . . . . . . . . . . . . . . . . . . .38
7. Reformatting a Disc . . . . . . . . . . . . . . . . . . . . . . . . . . . . . . . . . . . . . . . . 39
Recording . . . . . . . . . . . . . . . . . . . . . . . . . . . . . . . . . . . . . . . . 41
Timer Recording . . . . . . . . . . . . . . . . . . . . . . . . . . . . . . . . . . . . . . . . . . . . . 41
Using the Quick Timer function. . . . . . . . . . . . . . . . . . . . . . . . . . . . . . .43
Recording stereo and bilingual programmes . . . . . . . . . . . . . . . . . . . .43
Creating chapters in a title . . . . . . . . . . . . . . . . . . . . . . . . . . . . . . . . . .43
Checking/Changing/Cancelling Timer Settings (Timer List) . . . . . . . . . . . . 44
Recording from Connected Equipment . . . . . . . . . . . . . . . . . . . . . . . . . . . 45
Recording from connected equipment with a timer (Synchro Rec.) . . . 45
Recording from connected equipment without a timer . . . . . . . . . . . . .46
6
Page 7

Playback . . . . . . . . . . . . . . . . . . . . . . . . . . . . . . . . . . . . . . . . 47
Playing . . . . . . . . . . . . . . . . . . . . . . . . . . . . . . . . . . . . . . . . . . . . . . . . . . . .47
Playback options. . . . . . . . . . . . . . . . . . . . . . . . . . . . . . . . . . . . . . . . . . 49
Playing a specific portion repeatedly (A-B Repeat). . . . . . . . . . . . . . . . 51
Playing repeatedly (Repeat) . . . . . . . . . . . . . . . . . . . . . . . . . . . . . . . . . 51
Creating your own programme (Programme) . . . . . . . . . . . . . . . . . . . .52
Advanced Playback Functions . . . . . . . . . . . . . . . . . . . . . . . . . . . . . . . . . .53
Playing from the beginning of the programme you are recording
(Chase Play) . . . . . . . . . . . . . . . . . . . . . . . . . . . . . . . . . . . . . . . . . . 53
Playing a previous recording while making another
(Simultaneous Rec and Play) . . . . . . . . . . . . . . . . . . . . . . . . . . . . .53
Searching for a Time/Title/Chapter/Track, etc. . . . . . . . . . . . . . . . . . . . . . 54
Erasing and Editing . . . . . . . . . . . . . . . . . . . . . . . . . . . . . . . . .55
Before Editing . . . . . . . . . . . . . . . . . . . . . . . . . . . . . . . . . . . . . . . . . . . . . . .55
Erasing and Editing a Title . . . . . . . . . . . . . . . . . . . . . . . . . . . . . . . . . . . . .56
Editing multiple titles (Multi-Mode) . . . . . . . . . . . . . . . . . . . . . . . . . . . . 56
Erasing a section of a title (A-B Erase) . . . . . . . . . . . . . . . . . . . . . . . . .57
Dividing a title (Divide) . . . . . . . . . . . . . . . . . . . . . . . . . . . . . . . . . . . . . 57
Erasing and Editing a Chapter . . . . . . . . . . . . . . . . . . . . . . . . . . . . . . . . . . 58
Dividing a chapter (Divide) . . . . . . . . . . . . . . . . . . . . . . . . . . . . . . . . . . 59
Erasing a chapter (Erase). . . . . . . . . . . . . . . . . . . . . . . . . . . . . . . . . . . 59
Combining multiple chapters (Combine). . . . . . . . . . . . . . . . . . . . . . . . 59
Creating and Editing a Playlist . . . . . . . . . . . . . . . . . . . . . . . . . . . . . . . . . . 60
Moving a Playlist title (Move) . . . . . . . . . . . . . . . . . . . . . . . . . . . . . . . . 60
Combining multiple Playlist titles (Combine). . . . . . . . . . . . . . . . . . . . . 60
Dividing a Playlist title (Divide) . . . . . . . . . . . . . . . . . . . . . . . . . . . . . . . 60
Moving a chapter (Move) . . . . . . . . . . . . . . . . . . . . . . . . . . . . . . . . . . .61
Dubbing (HDD y DVD) . . . . . . . . . . . . . . . . . . . . . . . . . . . . . . 62
Before Dubbing . . . . . . . . . . . . . . . . . . . . . . . . . . . . . . . . . . . . . . . . . . . . . 62
HDD/DVD Dubbing . . . . . . . . . . . . . . . . . . . . . . . . . . . . . . . . . . . . . . . . . . 63
Dubbing Using Dubbing List . . . . . . . . . . . . . . . . . . . . . . . . . . . . . . . . . . . .63
Making a Backup Disc (DVD Backup) . . . . . . . . . . . . . . . . . . . . . . . . . . . .66
HDD Camcorder Dubbing . . . . . . . . . . . . . . . . . . . . . . . . . . . . .67
Before HDD Camcorder Dubbing . . . . . . . . . . . . . . . . . . . . . . . . . . . . . . . .67
Preparing for HDD camcorder dubbing. . . . . . . . . . . . . . . . . . . . . . . . .68
One-Touch Dubbing from HDD Camcorder (ONE-TOUCH DUB) . . . . . . . 69
Dubbing from HDD Camcorder Using the On-Screen Display
(HDD-Cam Dubbing) . . . . . . . . . . . . . . . . . . . . . . . . . . . . . . . . . . . . . .69
DV Camcorder Dubbing . . . . . . . . . . . . . . . . . . . . . . . . . . . . . .71
Before DV Camcorder Dubbing . . . . . . . . . . . . . . . . . . . . . . . . . . . . . . . . .71
Preparing for DV camcorder dubbing . . . . . . . . . . . . . . . . . . . . . . . . . .71
Dubbing an Entire DV Format Tape (DV One-Touch Dubbing) . . . . . . . . . 73
Dubbing Selected Scenes (DV Manual Dubbing) . . . . . . . . . . . . . . . . . . .73
Playing from a DV Camcorder . . . . . . . . . . . . . . . . . . . . . . . . . . . . . . . . . .74
,continued
7
Page 8

Music Jukebox . . . . . . . . . . . . . . . . . . . . . . . . . . . . . . . . . . . .75
About Jukebox . . . . . . . . . . . . . . . . . . . . . . . . . . . . . . . . . . . . . . . . . . . . . .75
Preparing for Using Jukebox . . . . . . . . . . . . . . . . . . . . . . . . . . . . . . . . . . .75
Connecting the USB device . . . . . . . . . . . . . . . . . . . . . . . . . . . . . . . . .75
Copying tracks or albums (USB t HDD). . . . . . . . . . . . . . . . . . . . . . .75
Copying audio tracks (DISC t HDD) . . . . . . . . . . . . . . . . . . . . . . . . .76
Copying tracks or albums on the HDD (HDD y HDD) . . . . . . . . . . . . 76
Playing Audio Tracks Using Jukebox/USB Device . . . . . . . . . . . . . . . . . . 77
Adding audio tracks to a Playlist (HDD only) . . . . . . . . . . . . . . . . . . . .78
Playback options. . . . . . . . . . . . . . . . . . . . . . . . . . . . . . . . . . . . . . . . . . 78
Playing repeatedly (Repeat) . . . . . . . . . . . . . . . . . . . . . . . . . . . . . . . . . 78
Creating your own programme (Programme) (USB device only) . . . . . 79
Managing Audio Tracks on the Music Jukebox (HDD only) . . . . . . . . . . . . 80
Photo Album . . . . . . . . . . . . . . . . . . . . . . . . . . . . . . . . . . . . . . 81
About the “Photo Album” Function . . . . . . . . . . . . . . . . . . . . . . . . . . . . . . .81
Preparing for Using the “Photo Album” Function . . . . . . . . . . . . . . . . . . . . 81
Connecting the USB device . . . . . . . . . . . . . . . . . . . . . . . . . . . . . . . . .81
Copying JPEG image files to the HDD (DISC/USB t HDD). . . . . . . . 81
Copying all JPEG image files from the connected USB device
(USB t DVD-RW/DVD-R) . . . . . . . . . . . . . . . . . . . . . . . . . . . . . . . 82
Copying JPEG image files or albums on the HDD (HDD y HDD) . . . 83
Copying JPEG image albums to a disc
(HDD t DVD-RW/DVD-R) . . . . . . . . . . . . . . . . . . . . . . . . . . . . . .83
Copying JPEG image files to a disc (HDD t DVD-RW/DVD-R) . . . . .84
Using the “Photo Album” List . . . . . . . . . . . . . . . . . . . . . . . . . . . . . . . . . . .85
Playing a slideshow. . . . . . . . . . . . . . . . . . . . . . . . . . . . . . . . . . . . . . . .87
Creating a Slideshow with Your Favourite Music and Graphic Effects
(x-Pict Story) (HDD only) . . . . . . . . . . . . . . . . . . . . . . . . . . . . . . . . . . . 88
Managing JPEG Image Files on the HDD . . . . . . . . . . . . . . . . . . . . . . . . . 90
Printing JPEG Image Files . . . . . . . . . . . . . . . . . . . . . . . . . . . . . . . . . . . . . 91
Settings and Adjustments . . . . . . . . . . . . . . . . . . . . . . . . . . . . .93
Adjusting Picture Quality . . . . . . . . . . . . . . . . . . . . . . . . . . . . . . . . . . . . . .93
Using the Setup Menus . . . . . . . . . . . . . . . . . . . . . . . . . . . . . . . . . . . . . . . 96
Disc Settings (Disc Setup) . . . . . . . . . . . . . . . . . . . . . . . . . . . . . . . . . . . . . 96
Recorder Settings (Basic) . . . . . . . . . . . . . . . . . . . . . . . . . . . . . . . . . . . . .97
Aerial Reception Settings (Tuner) . . . . . . . . . . . . . . . . . . . . . . . . . . . . . . .99
Video Settings (Video In/Out) . . . . . . . . . . . . . . . . . . . . . . . . . . . . . . . . . .103
Audio Input Settings (Audio In) . . . . . . . . . . . . . . . . . . . . . . . . . . . . . . . .104
Audio Output Settings (Audio Out) . . . . . . . . . . . . . . . . . . . . . . . . . . . . . .105
Language Settings (Language) . . . . . . . . . . . . . . . . . . . . . . . . . . . . . . . .106
Recording Settings (Recording) . . . . . . . . . . . . . . . . . . . . . . . . . . . . . . . .107
Playback Settings (Playback) . . . . . . . . . . . . . . . . . . . . . . . . . . . . . . . . . .109
HDMI Settings (HDMI Output) . . . . . . . . . . . . . . . . . . . . . . . . . . . . . . . . . 111
Other Settings (Options) . . . . . . . . . . . . . . . . . . . . . . . . . . . . . . . . . . . . . 112
Other Settings (Options 2) . . . . . . . . . . . . . . . . . . . . . . . . . . . . . . . . . . . . 113
8
Page 9

Additional Information . . . . . . . . . . . . . . . . . . . . . . . . . . . . . . 114
Troubleshooting . . . . . . . . . . . . . . . . . . . . . . . . . . . . . . . . . . . . . . . . . . . .114
Resetting the Recorder . . . . . . . . . . . . . . . . . . . . . . . . . . . . . . . . . . . . . .120
Recordable and Playable Discs . . . . . . . . . . . . . . . . . . . . . . . . . . . . . . . . 121
Playable Discs . . . . . . . . . . . . . . . . . . . . . . . . . . . . . . . . . . . . . . . . . . . . . 123
About Recording/Dubbing Mode . . . . . . . . . . . . . . . . . . . . . . . . . . . . . . .124
Language Code List . . . . . . . . . . . . . . . . . . . . . . . . . . . . . . . . . . . . . . . . .128
Country/Area Code . . . . . . . . . . . . . . . . . . . . . . . . . . . . . . . . . . . . . . . . .128
Notes About This Recorder . . . . . . . . . . . . . . . . . . . . . . . . . . . . . . . . . . .129
Notes on MP3 Audio Tracks, JPEG Image Files, DivX Video Files, and
i.Link . . . . . . . . . . . . . . . . . . . . . . . . . . . . . . . . . . . . . . . . . . . . . . . . . . 130
Specifications . . . . . . . . . . . . . . . . . . . . . . . . . . . . . . . . . . . . . . . . . . . . . . 132
Index . . . . . . . . . . . . . . . . . . . . . . . . . . . . . . . . . . . . . . . . . . . . . . . . . . . .133
9
Page 10
Guide to Parts and Controls
For more information, see the pages in parentheses.
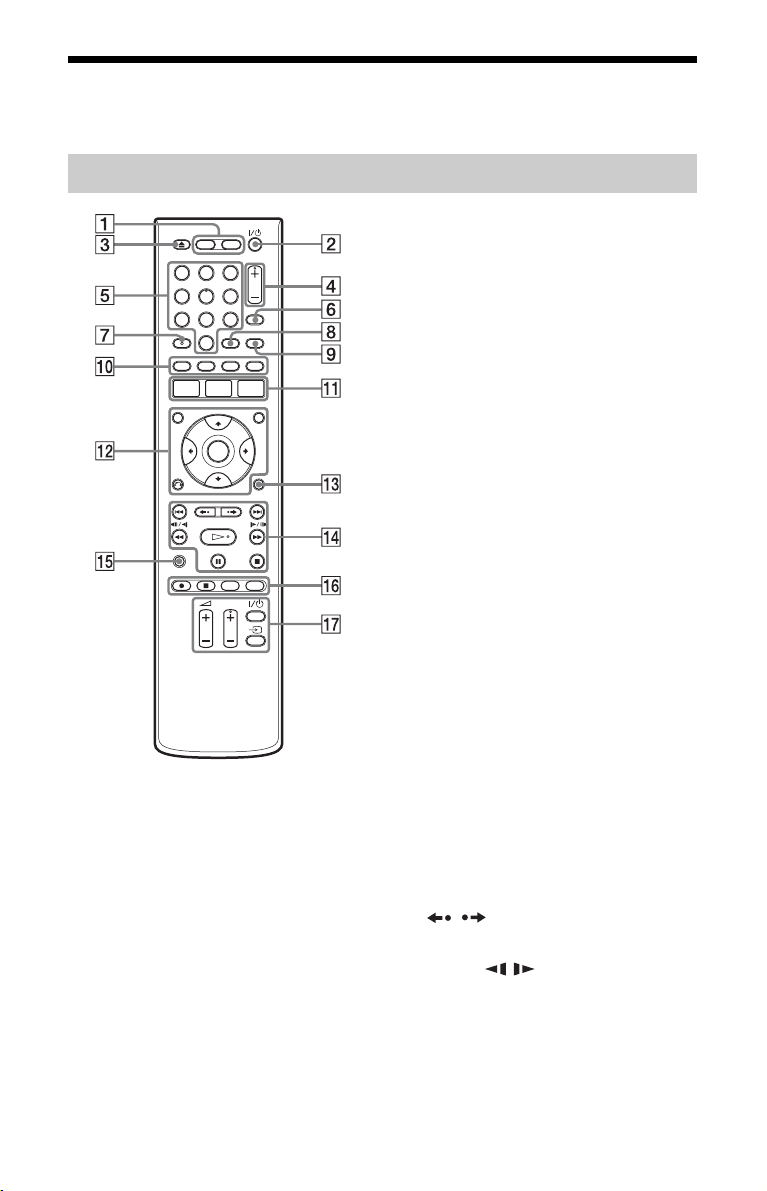
Remote
1 2 3
4 5 6
7 8 9
0
A HDD (29)
Records to or plays titles on HDD.
DVD (29)
Records to or plays titles on DVD.
B [/1 (on/standby) (24)
Turns the recorder on or off.
C Z (open/close) (29)
Opens or closes the disc tray.
D PROG (programme) +/– (29)
The + button has a tactile dot*.
E Number buttons (54)
The number 5 button has a tactile dot*.
F INPUT (input select) (45)
Selects an input source.
10
G AUDIO (49)
The AUDIO button has a tactile dot*.
H CLEAR (34, 51, 52)
I TV/DVD
This button is not available.
J SUBTITLE (49)
Selects a subtitle language.
ANGLE (49, 87)
Changes the angles or rotates an image
during slideshow.
PLAY MODE (51, 54)
ZOOM (87)
Zooms an image during a slideshow.
K SYSTEM MENU (93)
TITLE LIST (31, 47, 56)
TIMER (41)
L TOP MENU (47)
MENU (47)
Displays the disc’s menu.
</M/m/,/ENTER (24)
Selects a desired item.
O RETURN (24)
M DISPLAY
Displays the playing status or disc
information.
(33)
N ./> (previous/next) (49,
78)
/ (instant replay/instant
advance) (49)
mc / CM (search/
slow/freeze frame) (49, 78)
H (play) (47, 87)
X (pause) (30, 49, 78, 87)
x (stop) (47, 77, 87)
The H button has a tactile dot*.
Page 11

O TV PAUSE
This button is not available.
P z REC (29)
x REC STOP (29)
HDD/DVD DUB (63)
Starts dubbing the current playing title
or cancels the dubbing.
REC MODE (29)
Selects the recording mode.
Q TV [/1 (on/standby) (22)
TV t (input select) (22)
2 (volume) +/– (22)
TV
TV PROG (programme) +/– (22)
The + button has a tactile dot*.
* Use the tactile dot as a reference when operating
the recorder.
,continued
11
Page 12
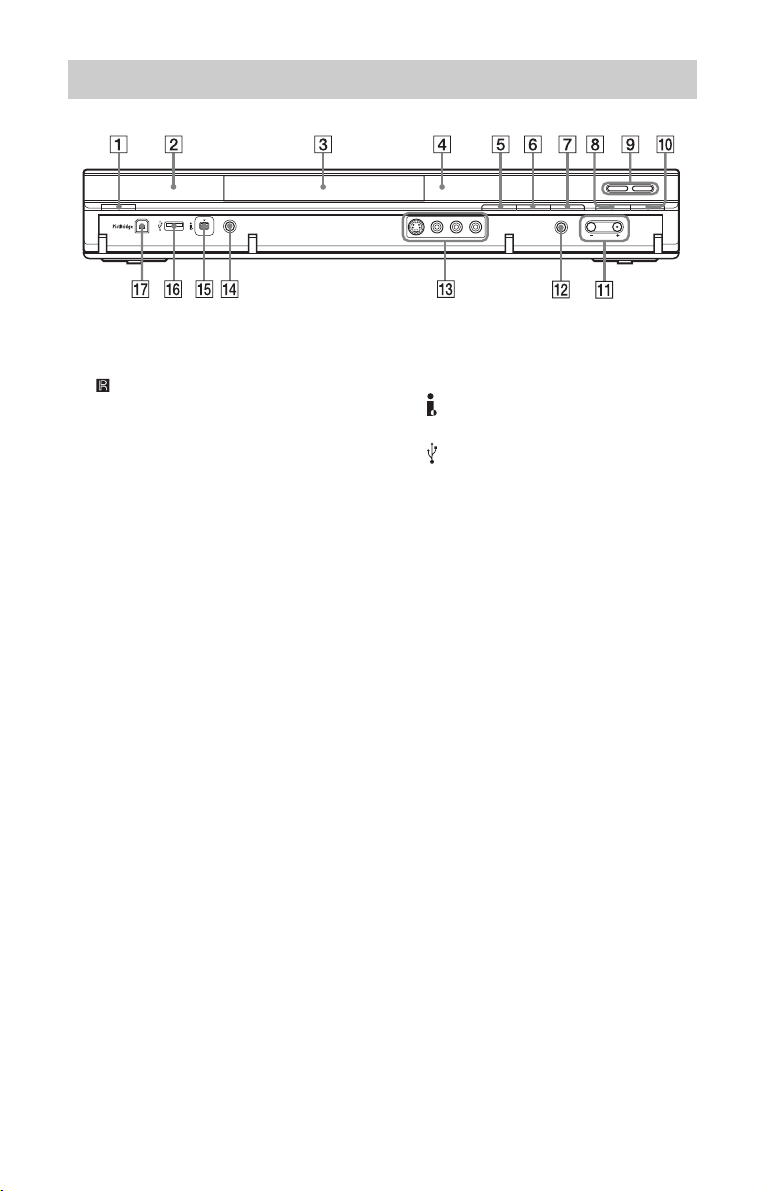
Front panel
A [/1 (on/standby) (24)
Turns the recorder on or off.
B (remote sensor) (22)
C Disc tray (29)
D Front panel display (13)
E Z (open/close) (29)
Opens or closes the disc tray.
F N (play) (47, 87)
The N button has a tactile dot*.
G x (stop) (47, 77, 87)
H z REC (29)
I HDD (29)
Records to or plays titles on HDD. The
HDD indicator lights up when the HDD
is selected.
DVD (29)
Records to or plays titles on DVD. The
DVD indicator lights up when the DVD
is selected.
J x REC STOP (29)
K PROGRAM +/– (29)
The + button has a tactile dot*.
L INPUT (input select) (45)
Selects an input source.
M LINE 2 IN (S VIDEO/VIDEO/
L(MONO) AUDIO R) jacks (27)
Connect a VCR or similar recording
device to these jacks.
N ONE-TOUCH DUB (69, 73)
Starts dubbing from a connected digital
video camera.
O DV IN jack (71)
Connect a DV camcorder to this jack.
P USB jack (type A) (75, 81)
Connect a USB device to this jack.
Q PictBridge USB jack (type B)
(91)
Connect a PictBridge-compatible
printer to this jack.
* Use the tactile dot as a reference when operating
the recorder.
To lock the recorder (Child Lock)
You can lock all of the buttons on the
recorder so that the settings are not cancelled
by mistake.
When the recorder is turned off, hold down
x (stop) on the recorder until “LOCKED”
appears in the front panel display. The
recorder does not work except for timer
recordings and Synchro-Recording while
the Child Lock is set.
To unlock the recorder, hold down x (stop)
on the recorder until “UNLOCKED”
appears in the front panel display.
12
Page 13
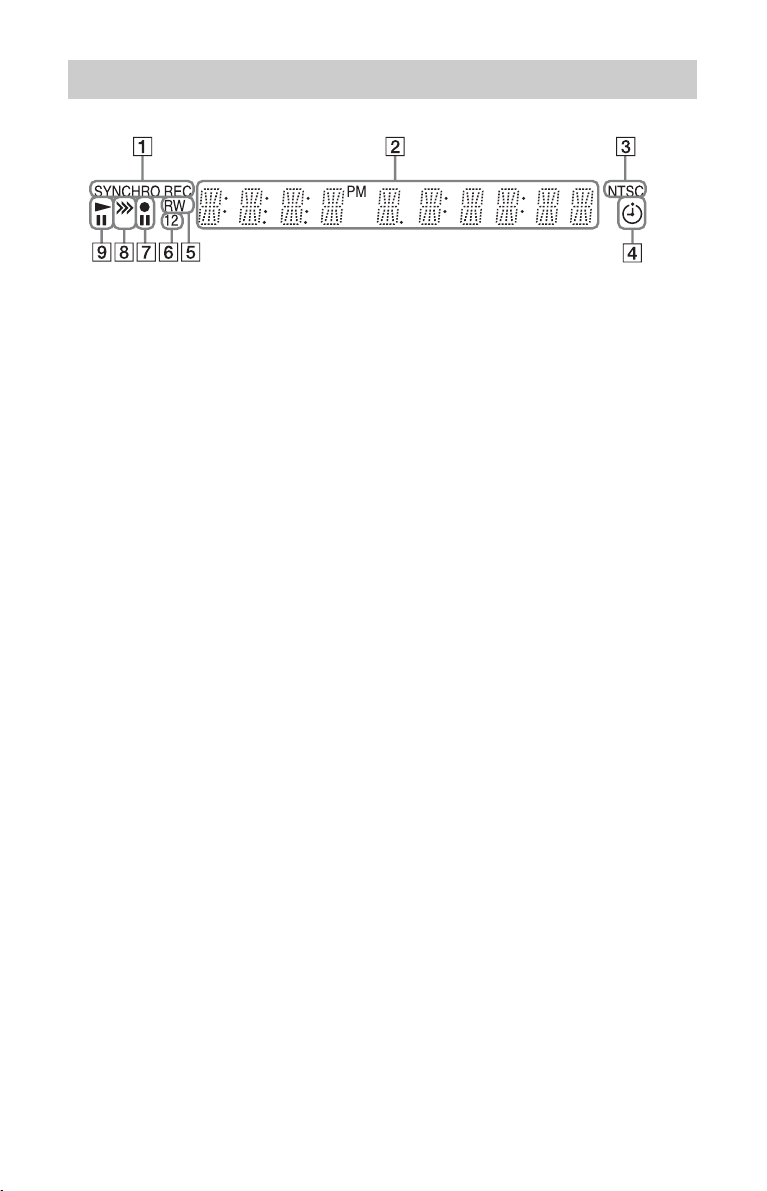
Front panel display
A SYNCHRO REC indicator (45)
Lights up when the recorder is set to
stand by for Synchro-Recording.
B Displays the following:
• Playing time
• Current title/chapter/track/index
number
• Recording time/recording mode
•Clock
• Programme position
C NTSC indicator (98, 103)
Lights up when NTSC colour system is
selected.
D Timer indicator (41)
Lights up when the timer for recording
is set.
E Disc type
Lights up when a recordable DVD-R or
DVD-RW disc is loaded.
F Command Mode indicator (112)
Displays the Command Mode of the
remote.
When the Command Mode for the
recorder is set to “3 (Default setting),”
either “1” or “2” does not appear.
G Recording status
H Dubbing direction indicator
I Playing status
,continued
13
Page 14
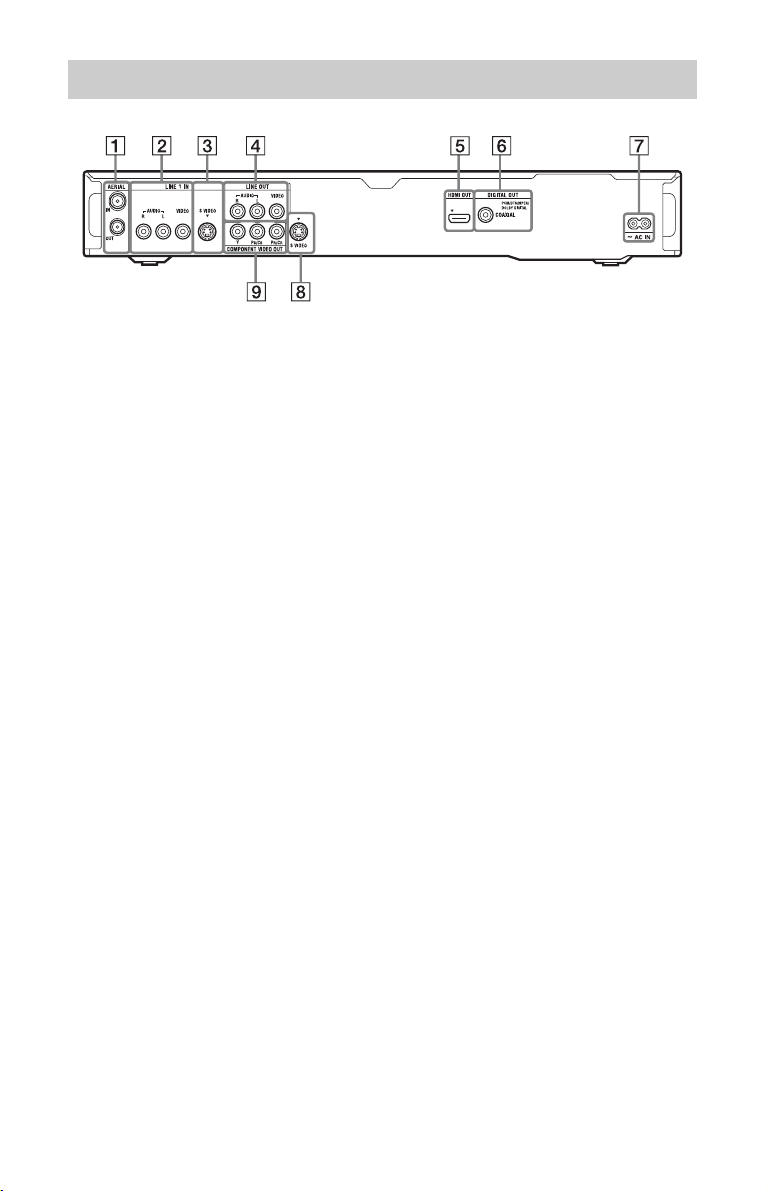
Rear panel
A AERIAL IN/OUT jacks (16)
B LINE 1 IN (R-AUDIO-L/VIDEO)
jacks (26)
C LINE 1 IN (S VIDEO) jack (26)
D LINE OUT (R-AUDIO-L/VIDEO)
jacks (17, 20)
E HDMI OUT (high-definition
multimedia interface out) jack
(17, 20)
F DIGITAL OUT (COAXIAL) jack
(20)
G AC IN terminal (21)
H LINE OUT (S VIDEO) jack (17)
I COMPONENT VIDEO OUT
B/CB, PR/CR) jacks (17)
(Y, P
14
Page 15

Hookups and Settings
Hooking Up the Recorder
Follow steps 1 through 6 to hook up and adjust the settings of the recorder. Do not connect
the AC power cord (mains lead) until you reach “Step 4: Connecting the AC power cord
(Mains Lead)” on page 21.
b Notes
• See “Specifications” (page 132) for a list of supplied accessories.
• Plug in cords securely to prevent unwanted noise.
• Refer to the instructions supplied with the components to be connected.
• You cannot connect this recorder to a TV that does not have a video input jack.
• Be sure to disconnect the AC power cord (mains lead) of each component before connecting.
Hookups and Settings
15
Page 16
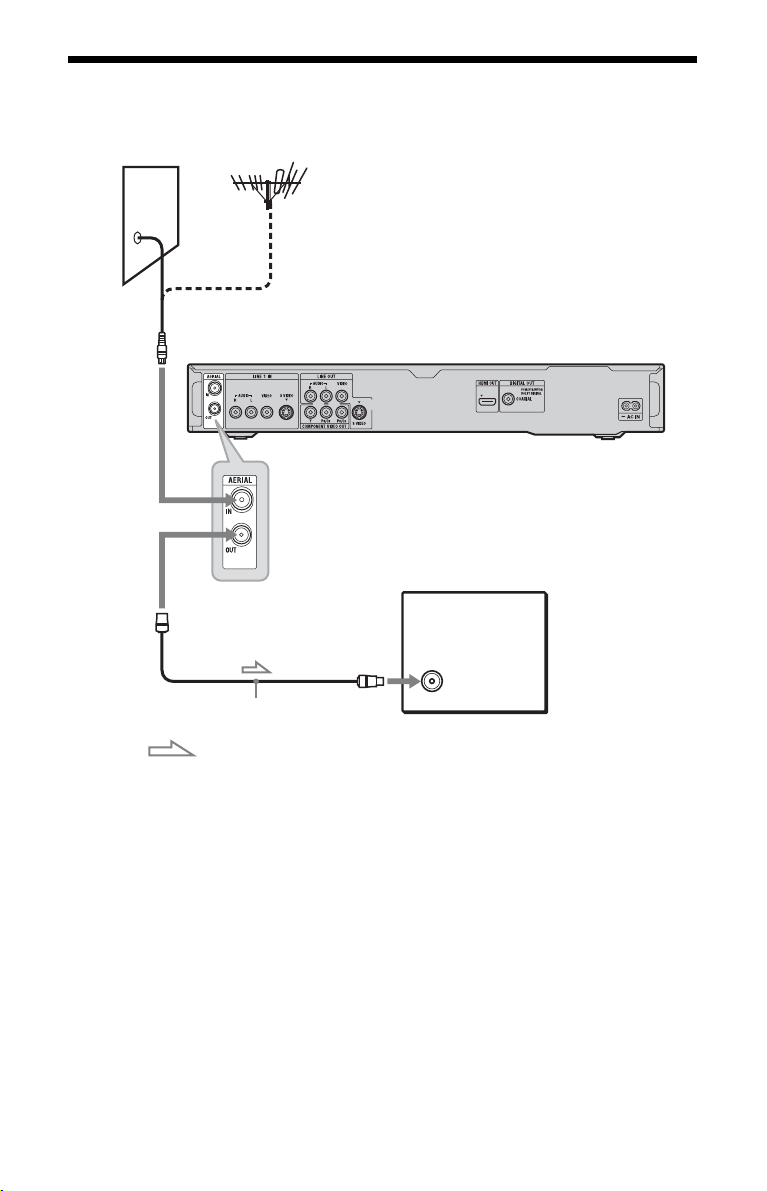
Step 1: Connecting the Aerial Cable
Connect the aerial cable by following the steps below.
Wall
to AERIAL IN
DVD recorder
to AERIAL OUT
to aerial input
Aerial cable (supplied)
: Signal flow
TV
1 Disconnect the aerial cable from your TV, and connect it to AERIAL IN on the rear
panel of the recorder.
2 Connect AERIAL OUT of the recorder to the aerial input of your TV using the supplied
aerial cable.
16
Page 17
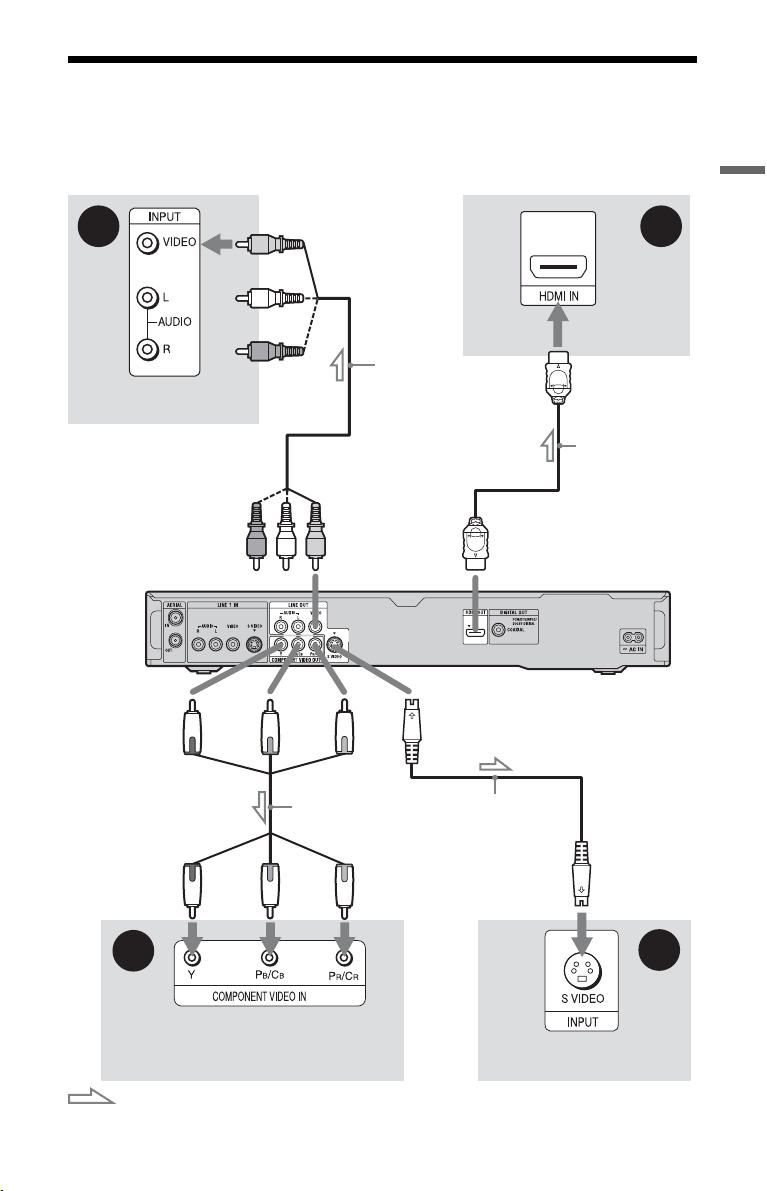
Step 2: Connecting the Video Cords/HDMI Cord
Select one of the following patterns, A through D, according to the input jack on your TV
monitor, projector, or audio component such as an AV amplifier (receiver). This will enable
you to view pictures.
Hookups and Settings
A
TV, projector, or audio
component
(green)
to COMPONENT
VIDEO OUT
Audio/video
cord
(supplied)
to LINE OUT (VIDEO)
(yellow)
(red)(blue)
Component video cord
(not supplied)
to LINE OUT
(S VIDEO)
S-video cord
(not supplied)
to HDMI OUT
D
TV, projector, or
audio component
HDMI cord
(not supplied)
DVD recorder
(green)
C
TV, projector, or audio
component
: Signal flow
(red)(blue)
B
TV, projector, or audio
component
,continued
17
Page 18
A Video input jack
You will enjoy standard quality images.
B S VIDEO input jack
You will enjoy high quality images.
C Component video input jacks (Y, PB/
B, PR/CR)
C
You will enjoy accurate colour reproduction
and high quality images.
If your TV accepts progressive 525p/625p
format signals, use this connection and set
“Progressive” to “Compatible” in the “Easy
Setup” setup (page 24). Then set
“Component Video Out” to “Progressive” in
the “Video In/Out” setup to send progressive
video signals. For details, see “Component
Video Out” on page 103.
D HDMI input jack
Use a certified HDMI cord (not supplied) to
enjoy high quality digital picture and sound
through the HDMI OUT jack.
When connecting a Sony TV that is
compatible with the “Control for HDMI”
function, see page 19.
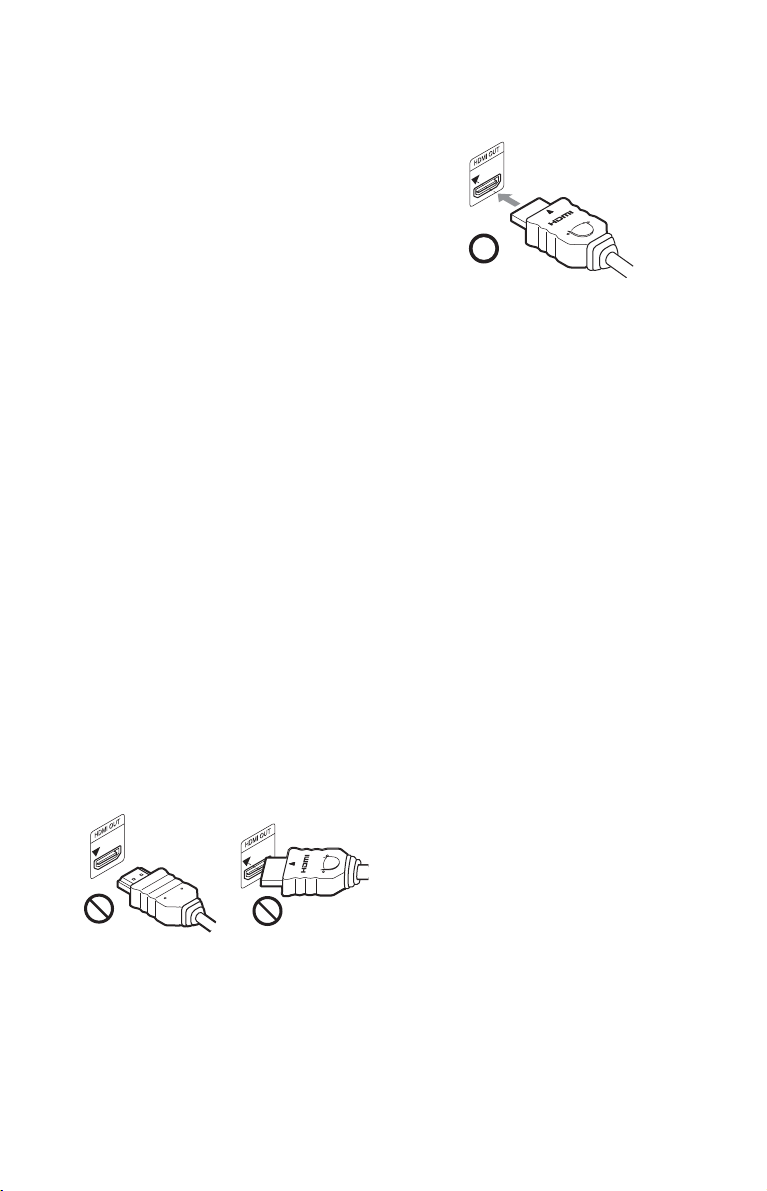
When connecting to the HDMI jack
Follow the steps below. Improper handling
may damage the HDMI jack and the
connector.
1 Carefully align the HDMI jack on the
rear of the recorder and the HDMI
connector by checking their shapes.
Make sure the connector is not upside
down or tilted.
2 Insert the HDMI connector straight into
the HDMI jack.
Do not bend or apply pressure to the
HDMI connector.
b Notes
• Be sure to disconnect the HDMI cord when
moving the recorder.
• Do not apply too much pressure to the cabinet
wall, if you place the recorder on the cabinet
with the HDMI cord connected. It may damage
the HDMI jack or the HDMI cord.
• Do not twist the HDMI connector while
connecting to or disconnecting from the HDMI
jack to avoid damaging the HDMI jack and
connector.
When playing “wide screen” images
Some recorded images may not fit your TV
screen. To change the picture size, see
page 109.
If you are connecting to a VCR
Connect your VCR to the LINE IN jacks on
the recorder (page 26).
b Notes
• Do not connect more than one type of video cord
between the recorder and your TV at the same
time.
• You cannot connect the HDMI OUT jack
(connection D) to DVI jacks that are not HDCP
compliant (e.g., DVI jacks on PC displays).
• Component video and RGB signals are not
output when using the HDMI connection.
18
down
* This DVD recorder incorporates High-
Definition Multimedia Interface (HDMI™)
technology.
Not straightConnector is upside
HDMI, the HDMI logo and High-Definition
Multimedia Interface are trademarks or
registered trademarks of HDMI Licensing LLC.
Page 19

About the “Control for HDMI” functions for ‘BRAVIA’ Sync (for HDMI connections only)
By connecting Sony components that are
compatible with the “Control for HDMI”
function with an HDMI cord (not supplied),
operation is simplified as below:
• One-Touch Play (page 48)
• System Power-Off
When you turn the TV off using the power
button on the TV’s remote, the recorder
and components compatible with the
“Control for HDMI” function turn off
automatically. However, the recorder does
not turn off while recording or dubbing
even if you turn off the TV.
• ‘BRAVIA’ Sync display
You can control the recorder by pressing
the SYNC MENU button on the TV’s
remote.
b Notes
• Depending on the connected component, the
“Control for HDMI” function may not work.
Refer to the operating instructions supplied with
the component.
• You can use the ‘BRAVIA’ Sync display feature
only when the connected TV has the SYNC
MENU button. For details on ‘BRAVIA’ Sync,
refer to the operating instructions supplied with
the TV.
• To use the ‘BRAVIA’ Sync features, set
“Control for HDMI” to “On” (default) in the
“HDMI Output” setup (page 112).
Hookups and Settings
19
Page 20
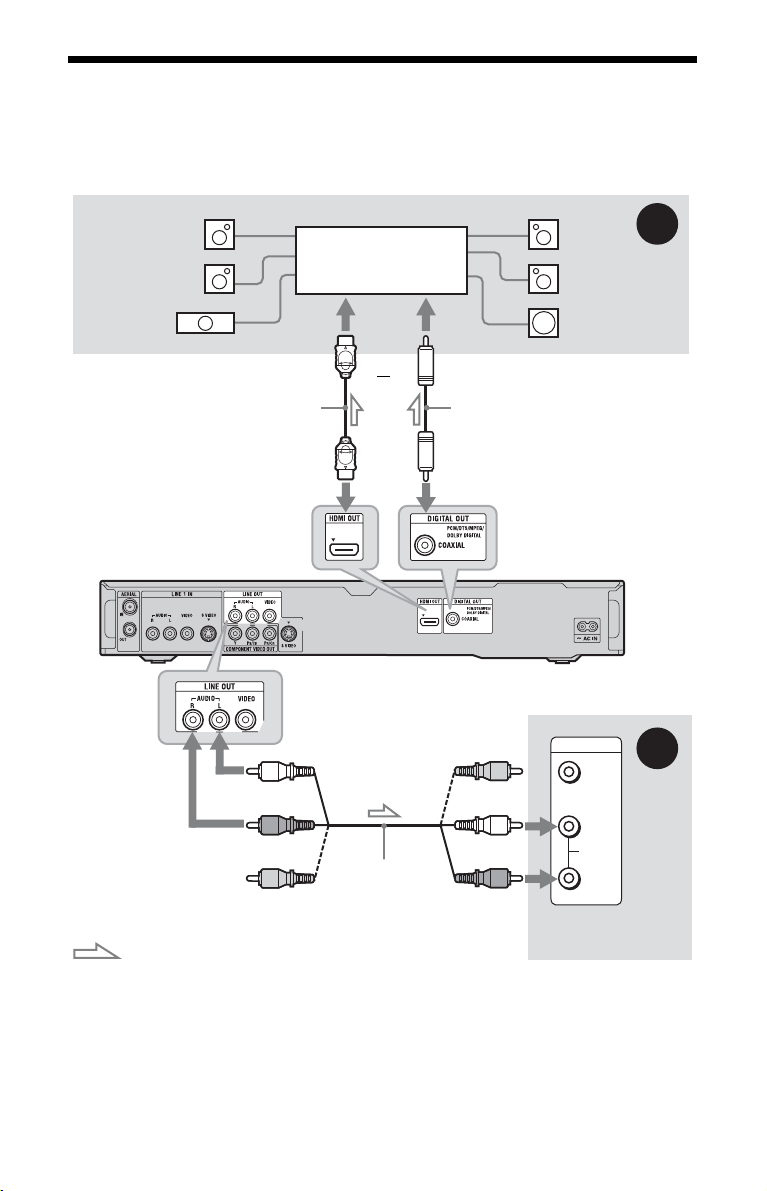
Step 3: Connecting the Audio Cords/HDMI Cord
Select one of the following patterns, A or B, according to the input jack on your TV monitor,
projector, or audio component such as an AV amplifier (receiver). This will enable you to
listen to sound.
[Speakers]
Rear (L)
Front (L)
Audio component with
a decoder
[Speakers]
Rear (R)
Front (R)
A
Centre
HDMI cord
(not supplied)
to HDMI OUT
to LINE OUT (R-AUDIO-L)
(white)
(red)
Audio/video cord
(yellow)*
: Signal flow
* The yellow plug is used for video signals (page 17).
(supplied)
Subwoofer
or
to coaxial/HDMI digital input
Coaxial digital cord
(not supplied)
to DIGITAL OUT (COAXIAL)
DVD recorder
INPUT
VIDEO
(yellow)
(white)
(red)
L
AUDIO
R
TV, projector, or
audio component
B
A Digital audio input jack
If your audio component has a Dolby*1
Digital, DTS
*2
, or MPEG audio decoder and
a digital input jack, use this connection. You
can enjoy Dolby Digital (5.1ch), DTS
(5.1ch), and MPEG audio (5.1ch) surround
effects.
20
If you connect a Sony audio component that
is compatible with the “Control for HDMI”
function, refer to the operating instructions
supplied with the audio component.
Page 21
B Audio L/R (left/right) input jacks
This connection will use your TV’s or audio
component’s two speakers for sound.
z Hint
For correct speaker location, refer to the operating
instructions supplied with the connected
components.
b Notes
• Do not connect your TV’s audio output jacks to
the LINE IN (R-AUDIO-L) jacks at the same
time. This will cause unwanted noise to come
from your TV’s speakers.
• With connection B, do not connect the LINE IN
(R-AUDIO-L) and LINE OUT (R-AUDIO-L)
jacks to your TV’s audio ou tput jacks at the same
time. This will cause unwanted noise to come
from your TV’s speakers.
• With connection A, after you have completed
the connection, make the appropriate settings in
the “Audio Out” setu p (page 105). Oth erwise, no
sound or a loud noise will come from your
speakers.
• When you connect the recorder to an audio
component using an HDMI cord, you will need
to do one of the following:
– Connect the audio component to the TV with
the HDMI cord, or
– Connect the recorder to the TV with a video
cord other than HDMI cord (component video
cord, S-video cord, or audio/video cord).
*1
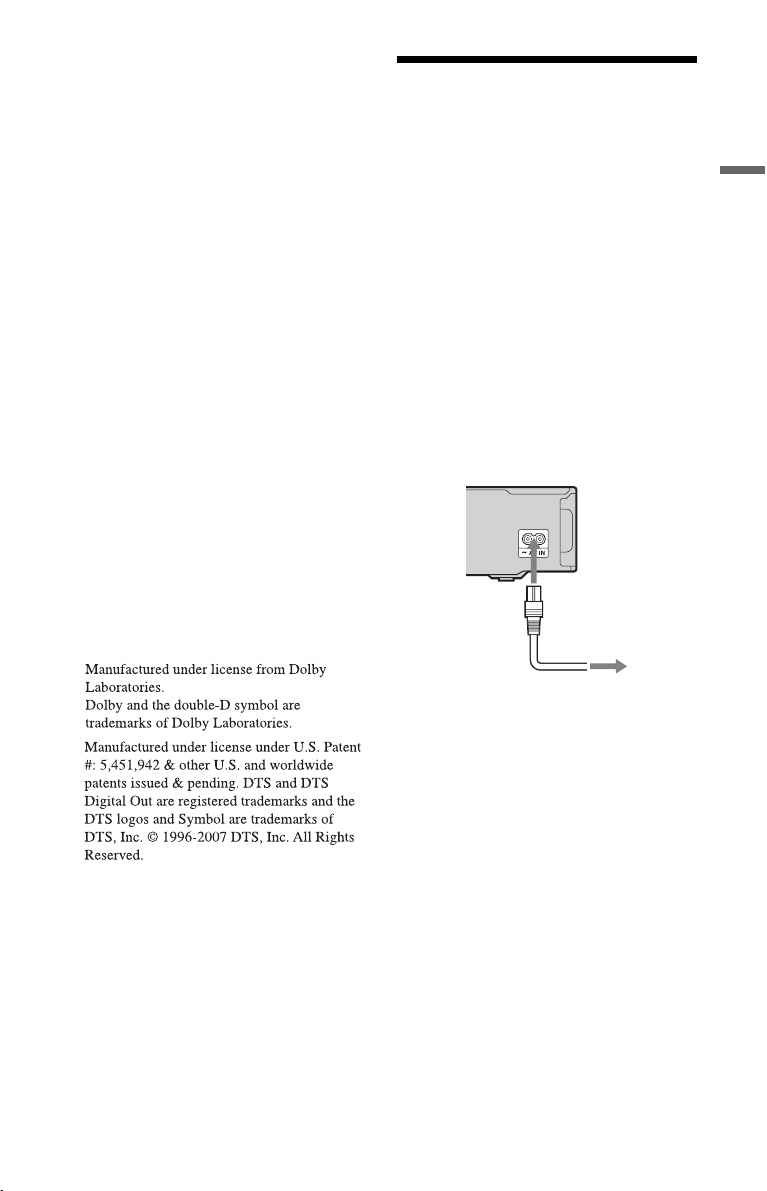
Step 4: Connecting the AC power cord (Mains Lead)
Connect the supplied AC power cord (mains
lead) to the AC IN terminal of the recorder.
Then plug the recorder and TV mains leads
(AC power cords) into the mains. After you
connect the AC power cord (mains lead),
you must wait for a short while before
operating the recorder. You can operate
the recorder once the front panel display
lights up and the recorder enters standby
mode.
If you connect additional equipment to this
recorder (page 26), be sure to connect the
AC power cord (mains lead) after all
connections are complete.
to AC IN
1
2
to mains
Hookups and Settings
*2
21
Page 22
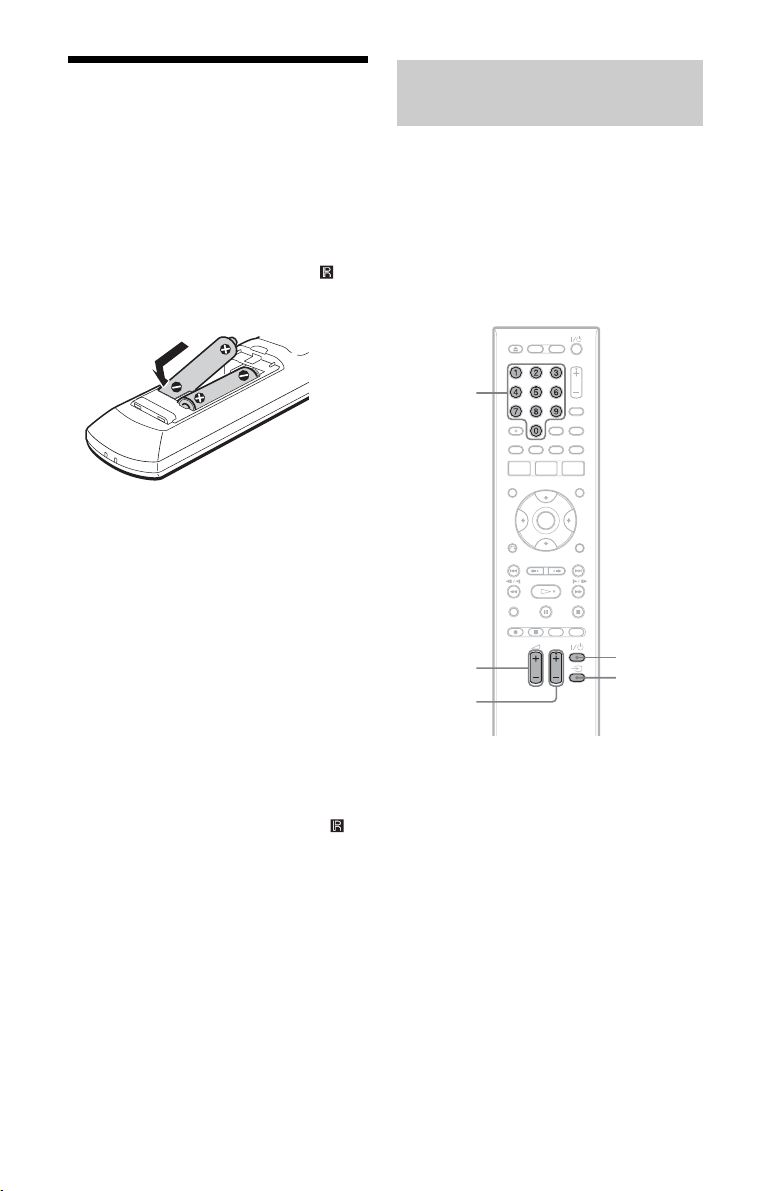
Step 5: Preparing the Remote
You can control the recorder using the
supplied remote. Insert two R6 (size AA)
batteries by matching the 3 and # ends on
the batteries to the markings inside the
battery compartment. When using the
remote, point it at the remote sensor on
the recorder.
b Notes
• If the supplied remote interferes with your other
Sony DVD recorder or player, change the
command mode number for this recorder
(page 23).
• Use the batteries correctly to avoid possible
leakage and corrosion. Should leakage occur, do
not touch the liquid with bare hands. Observe the
following:
– Do no t use a new battery with an old battery, or
batteries of different manufacturers.
– Do not attempt to recharge the batteries.
– If you do not intend to use the remote for an
extended period of time, remove the batteries.
– If battery leakage occurs, wipe out any liquid
inside the battery compartment, and insert new
batteries.
• Do not expose the remote sensor (marked on
the front panel) to strong light, such as direct
sunlight or a lighting apparatus. The recorder
may not respond to the remote.
• When you replace the b atteries of the remote, the
code number and Command Mode may be reset
to the default setting. Set the appropriate code
number and Command Mode again.
Controlling TVs with the remote
You can adjust the remote’s signal to control
your TV.
b Notes
• Depending on the connected unit, you may not
be able to control y our TV with some or all of the
buttons below.
• If you enter a new code number, the code
number previously entered will be erased.
Number
buttons
TV 2 +/–
TV PROG
+/–
TV [/1
TV t
1 Hold down TV [/1 located at the
bottom of the remote.
Do not press the [/1 button at the top of
the remote.
2 With TV [/1 pressed down, enter the
TV’s manufacturer code using the
number buttons.
For instance, to enter “09,” press “0”
then “9.” After you enter the last
number, release the TV [/1 button.
22
Page 23
Code numbers of controllable TVs
If more than one code number is listed,
try entering them one at a time until you
find the one that works with your TV.
Manufacturer Code number
Sony 01 (default)
Hitachi 24
JVC 33
LG/Goldstar 76
Panasonic 17, 49
Philips 06, 08, 72
Samsung 71
Sharp 29
Toshiba 38
The remote performs the following:
Buttons Operations
TV [/1 Turns your TV on or
TV 2 (volume)
+/–
TV PROG +/– Selects the
TV t (input
select)
off.
Adjusts the volume
of your TV.
programme position
on your TV.
Switches your TV’s
input source.
If you have a Sony DVD player or more than one Sony DVD recorder
If the supplied remote interferes with your
other Sony DVD recorder or player, set the
command mode number for this recorder
and the supplied remote to one that differs
from the other Sony DVD recorder or player
after you have completed “Step 6: Easy
Setup.”
The default command mode setting for this
recorder and the supplied remote is “3
(Default setting).”
You can check the current Command Mode
in the front panel display. For details, see
page 112.
The default command mode setting for this
recorder and the supplied remote is “3
(Default setting).”
The remote does not function if different
command modes are set for the recorder
and remote. Set the same command mode.
Changing programme positions of the recorder using the remote
You can change programme positions of the
recorder using the number buttons.
Example: for channel 50
Press “5,” “0,” then press ENTER.
Hookups and Settings
23
Page 24

Step 6: Easy Setup
Make the basic adjustments by following the
on-screen instructions in “Easy Setup.”
Be careful not to disconnect the cables or
exit the “Easy Setup” function during this
procedure.
[/1
</M/m/,,
O
RETURN
ENTER
TV [/1
1 Turn on the recorder and your TV.
Then switch the input selector on your
TV so that the signal from the
recorder appears on your TV screen.
The “Language” display appears.
• If the “Language” display does not
appear, select “Easy Setup” in the
“Basic” setup from “Initial Setup” in
the System Menu (page 98).
2 Select a language for the on-screen
displays using </M/m/,, and
press ENTER.
The initial settings message appears.
3 Select “Start” using M/m, and press
ENTER.
Follow the on-screen instructions to
make the following settings.
Auto Channel Setting
• Select “Auto Scan.” Then select your
country/region using </,, and
press ENTER. The programme
position order will be set according to
the country/region you select.
• To skip this setting, select “Do not
set.”
To set the programme positions
manually, see page 99.
Clock Setting
The “Auto” function cannot be used in
your area.
• Select “Manual” to set the clock
manually. The “Manual Clock
Setting” display appears.
1 Select the time zone for your area
or GMT (Greenwich Mean Time)
using </,, and press m.
2 Select “On” using </, if you
are now on summer time, and
press ENTER.
3 Set the day, month, year, hour and
minutes using </M/m/,, and
press ENTER to start the clock.
z Hint
You can select the clock and date display. Set
“Display” of “Clock Setting” in the “Basic”
setup (page 97).
TV Type (page 109)
• If you have a widescreen TV, select
“Wide (16:9).”
• If you have a standard TV, select
“Standard (4:3).” This will determine
how “widescreen” images are
displayed on your TV.
Progressive
When you connect a progressive format
TV to this recorder using the
COMPONENT VIDEO OUT jacks,
select “Compatible.”
HDD caution messages
Read the HDD caution messages, and
press ENTER.
4 Select “Finish Setup” using M/m,
and press ENTER.
“Easy Setup” is completed.
24
Page 25

To return to the previous step
Press O RETURN.
z Hint
If you want to run “Easy Setup” again, select
“Easy Setup” in the “Basic” setup from “Initial
Setup” in the System Menu (page 98).
Hookups and Settings
25
Page 26
Connecting a VCR or Similar Device
After disconnecting the recorder’s AC power cord (mains lead) from the mains, connect a
VCR or similar recording device to the LINE IN jacks of this recorder.
Use the DV IN jack on the front panel if the equipment has a DV output jack (i.LINK jack)
(page 71).
For details, refer to the instruction manual supplied with the connected equipment.
To record on this recorder, see “Recording from Connected Equipment” on page 45.
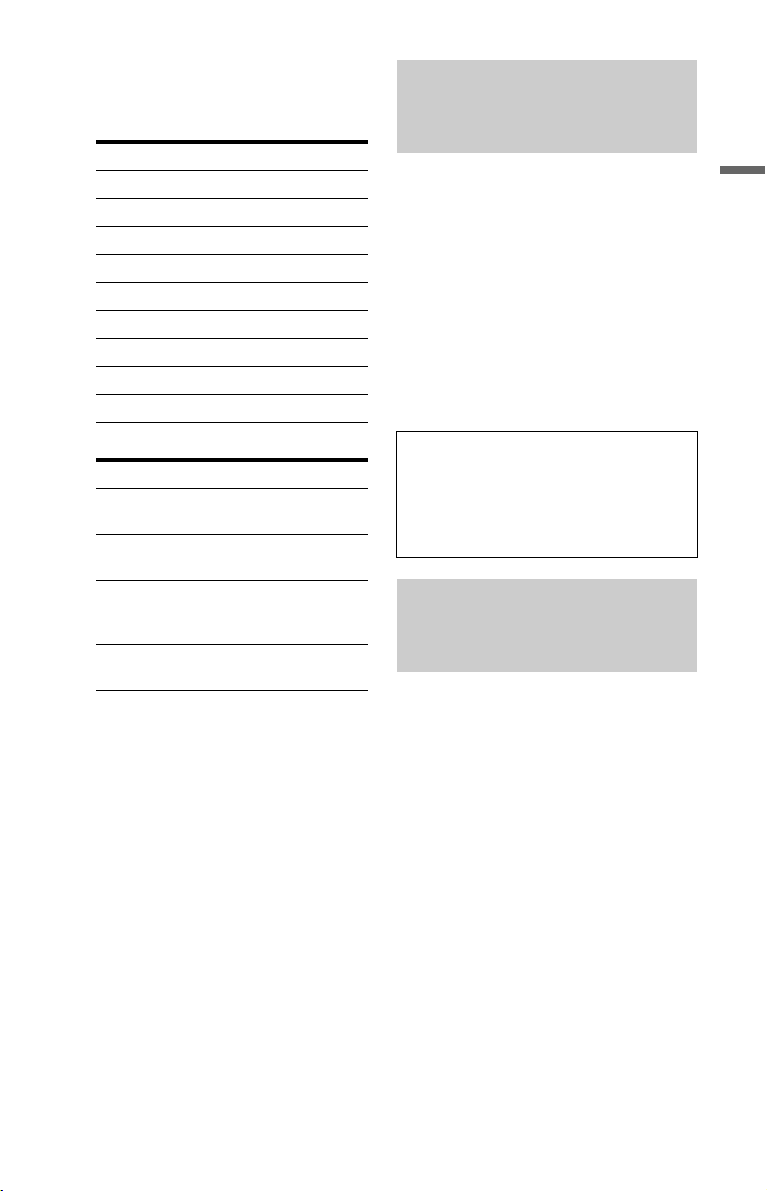
Connecting to the LINE 1 IN jacks
Connect a VCR or similar recording device to the LINE 1 IN jacks of this recorder.
RL
Audio/video cord
(not supplied)
: Signal flow
AUDI O
OUTPUT
VIDEO
VCR, etc.
S VIDEO
S-video cord
(not supplied)
to LINE 1 IN
DVD recorder
26
Page 27
b Notes
• Pictures containing copy protection signals that prohibit any copying cannot be recorded.
• If you pass the recorder signals through a VCR, you may not receive a clear image on your TV screen.
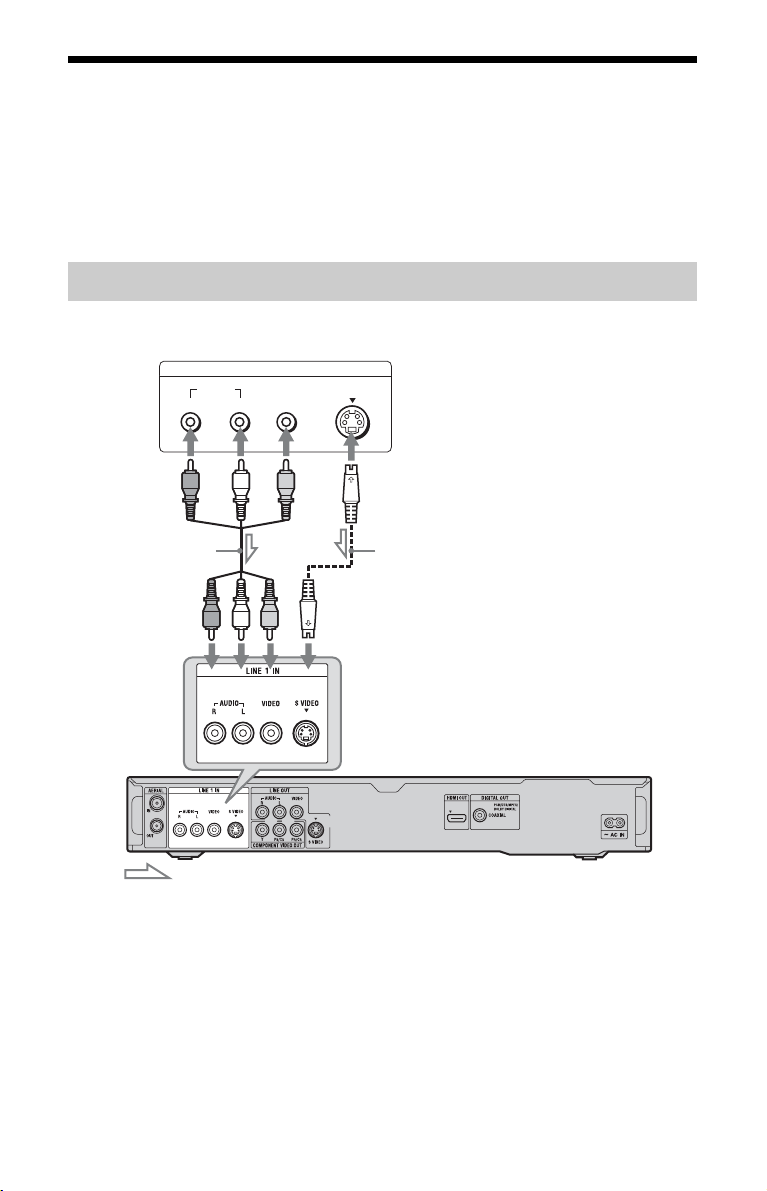
VCRDVD recorder TV
Be sure to connect your VCR to the DVD recorder and to your TV in the order shown below. To watch
video tapes, watch the tapes through a second line input on your TV.
Line input 1
VCR TV
DVD recorder
Line input 2
• If you disconnect the recorder’s AC power cord (mains lead), you will not be able to view the signals
from the connected VCR.
Connecting to the LINE 2 IN jacks on the front panel
Connect a VCR or similar recording device to the LINE 2 IN jacks of this recorder. If the
equipment has an S-video jack, you can use an S-video cord instead of an audio/video cord.
VCR, etc.
S VIDEO
OUTPUT
VIDEO
AUDIO
LR
Hookups and Settings
S-video cord
(not supplied)
to LINE 2 IN
: Signal flow
Audio/video cord
(not supplied)
DVD recorder
z Hint
When the connected equipment outputs only monaural sound, connect to only the L(MONO) and VIDEO
input jacks on the front of the recorder. Do not connect the R input jack.
b Notes
• Do not connect the yellow LINE IN (VIDEO) jack when using an S-video cord.
• Do not connect the output jack of this recorder to another equipment’s input jack with the other
equipment’s output jack connected to the input jack of this recorder. This may cause noise (feedback).
• Do not connect more than one type of video cord between the recorder and your TV at the same time.
27
Page 28
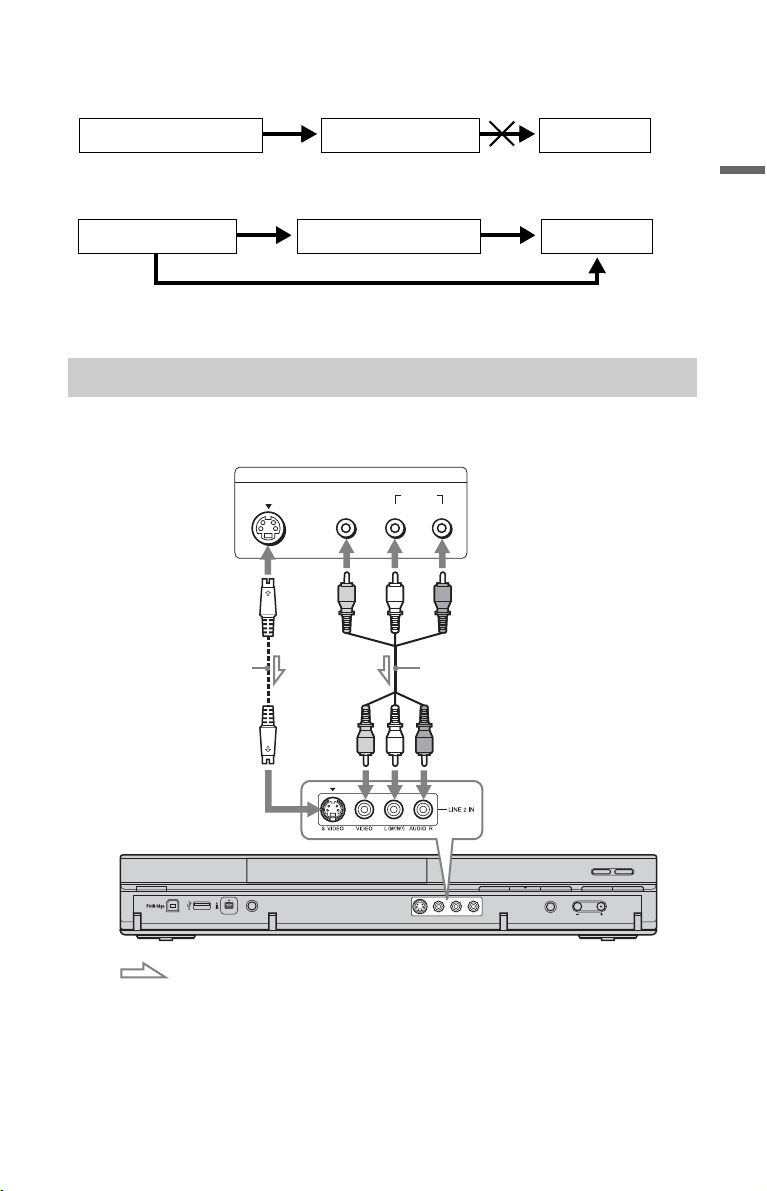
Connecting to a Satellite or Digital Tuner
Connect a satellite or digital tuner to this recorder using the LINE 1 IN jacks. Disconnect the
recorder’s AC power cord (mains lead) from the mains when connecting the tuner.
To use the Synchro Rec function, see below.
TV
Audio/video cord
(supplied)
to LINE OUT
to LINE 1 IN
INPUT
AUDIO
VIDEO
L
R
DVD recorder
Audio/video cord
(not supplied)
: Signal flow
If you want to use the Synchro Rec
function
This connection is necessary to use the
Synchro-Recording function. See
“Recording from connected equipment with
a timer (Synchro Rec.)” on page 45.
28
Satellite tuner, etc.
VIDEO
L
R
AUDIO
OUTPUT
b Notes
• Synchro-Recording does not work with some
tuners. For details, refer to the tuner’s operating
instructions.
• If you disconnect the recorder’s AC power cord
(mains lead), you will not be able to view the
signals from the connected tuner.
Page 29
Seven Basic Operations
— Getting to Know Your DVD Recorder
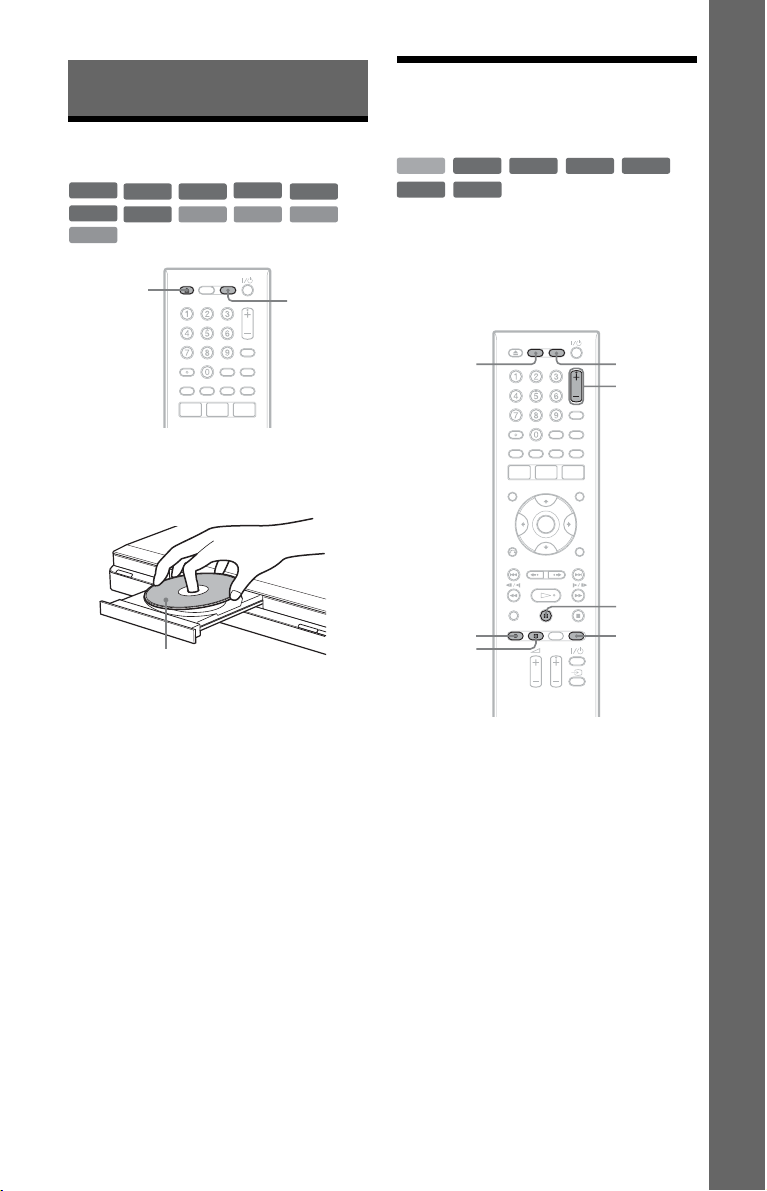
1. Inserting a Disc
+
RW
-
R
Video
DATA CD
Z (open/
close)
-
RWVR-RW
DVD
VCD CD
Video
+
-
R
RVR
DATA DVD
DVD
1 Press DVD.
2 Press Z (open/close), and place a
disc on the disc tray.
Recording/playing side facing down
2. Recording a
Programme
+
-
HDD
-
RVR-R
RW
Video
RWVR-RW
This section introduces the basic operation
to record a current TV programme to the
hard disk (HDD) or to a disc (DVD). For an
explanation of how to make timer
recordings, see page 41.
HDD DVD
z REC
x REC
STOP
Video
+
R
PROG +/–
X
REC MODE
Seven Basic Operations — Getting to Know Your DVD Recorder
3 Press Z (open/close) to close the
disc tray.
Wait until “LOAD” disappears from the
front panel display.
Unused DVDs are formatted
automatically.
• For DVD-RW discs
DVD-RWs are formatted in the
recording format (VR mode or Video
mode) set by “Format DVD-RW” of
“Basic” in the “Disc Setup” setup
(page 96).
• For DVD-R discs
DVD-Rs are automatically formatted
in Video mode. To format an unused
DVD-R in VR mode, format the disc
in the “Format” setup (page 39)
before you make a recording.
If the disc is recordable on this recorder,
you can manually re-format the disc to
make a blank disc (page 39).
1 Press HDD or DVD.
If you want to record to a DVD, insert a
recordable DVD.
2 Press PROG +/– to select the
programme position or input source
you want to record.
,continued
29
Page 30
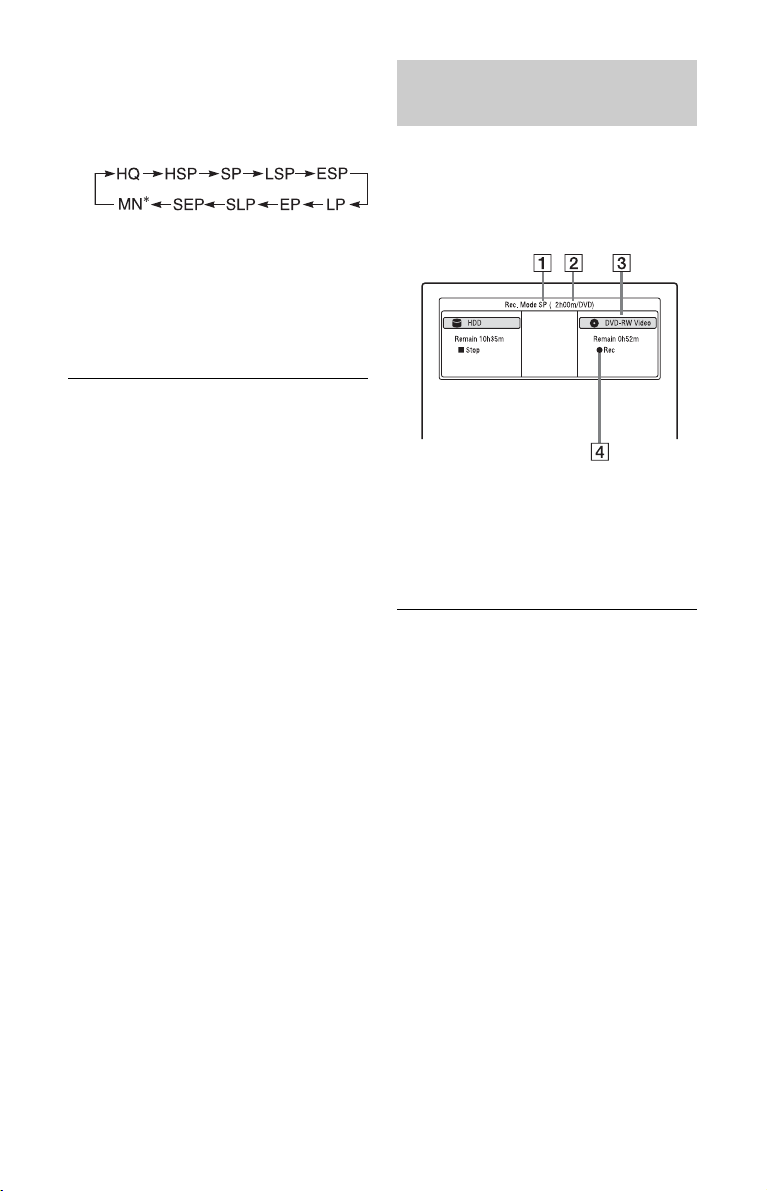
3 Press REC MODE repeatedly to select
the recording mode.
Each time you press the button, the
display on the TV screen changes as
follows:
* Available when “Manual Rec. Mode” is set
to “On (go to setup)” in the “Recording”
setup (page 107).
For more details about the recording
mode, see page 124.
4 Press z REC.
Recording starts.
To stop recording
Press x REC STOP.
To pause recording
Press X.
To resume recording, press X again.
To watch another TV programme while
recording
Set your TV to the TV input using the
TV t button (page 22).
b Notes
• If you press the [/1 button while recording, the
recorder stops recording and turns off.
• After pressing the z REC button, it may take a
short while to start recording.
• It may take a short while for recorder to stop or
pause recording.
• You cannot change the recording mode while
recording.
• Programmes are recorded in the original aspect
ratio when recording to the HDD (when “HDD
Recording Format” is set to “Video Mode Off”
in the “Recording” setup (page 108))/DVDRWs/DVD-Rs (VR mode).
• When recording to DVD-R DLs (Video mode),
the title is divided when the layer switches.
• If there is a power failure, the programme you
are recording may be erased.
Checking the disc status while recording
You can check the recording information
such as recording time or disc type.
Press DISPLAY during recording.
The recording information appears.
A Recording mode
B Recording time
C Disc type/format
D Recording status
To turn off the display
Press DISPLAY repeatedly.
30
Page 31

3. Playing the Recorded
Programme (Title List)
+
-
HDD
-
RVR-R
To play a recorded title, select the title from
the Title List.
RW
Video
RWVR-RW
Video
+
R
A Disc type:
Displays the media type, HDD or DVD.
B Total number of titles
C Sub-menu:
Press , to display the sub-menu.
The sub-menu displays options
applicable only to the selected item. The
displayed options differ depending upon
the model, situation, and disc type.
Seven Basic Operations — Getting to Know Your DVD Recorder
HDD
TITLE LIST
DVD
</M/m/,,
ENTER
1 Press HDD or DVD.
If you select DVD, insert a DVD (see “1.
Inserting a Disc” on page 29).
Playback starts automatically depending
on the disc.
2 Press TITLE LIST.
Example: 4-Title List for HDD
Sub-menu
D Scroll bar:
Appears when all of the titles do not fit
on the list. To view the hidden titles,
press M/m.
E Title information:
“Recording”: Indicates that the title is
currently being recorded.
: Indicates a protected title.
“NEW”: Indicates that the title is newly
recorded (not played back) (HDD only).
: Press DISPLAY to display
“ .” “ ” indicates titles
containing “Copy-Once” copy
protection signals (HDD only)
(page 127).
: Indicates that the title is recorded
using the Update function.
Genre icons: Indicates the title’s genre
(HDD only).
: Indicates a bilingual programme
(HDD only).
F Remaining time of the current disc in
the current recording mode (example:
SP mode)
3 Select a title using M/m, and press
ENTER.
Playback starts from the selected title.
,continued
31
Page 32

To stop playback
Press x (stop).
To scroll the list display by page (Page
mode)
Press ./> while the Title List is
displayed. Each time you press ./>,
the Title List changes to the previous/next
page of titles.
About the Title List for DVD-RWs/DVD-Rs
(VR mode)
You can switch the Title List to show
Original or Playlist titles.
1 Press < while the Title List is
displayed.
2 Select “Play List” using M/m, and press
ENTER.
3 Select “Original” or “Play List” using
M/m, and press ENTER.
To change the title order for HDD (Sort
Titles)
1 Press < while the Title List is
displayed.
2 Select “Sort Titles” using M/m, and
press ENTER.
3 Select the item using M/m, and press
ENTER.
Order Sorted
By Date In order of when the titles
were recorded. The title
that is recorded most
recently is listed at the
top.
Unseen Title In order of when the titles
were recorded. The title
that is recorded most
recently and has not been
played is listed at the top.
By Title In alphabetical order.
By Number In order of recorded title
number.
To search for a title by genre (HDD only)
1 Press < while the Title List is
displayed.
2 Select “Genre” using M/m, and press
ENTER.
3 Select a genre using M/m, and press
ENTER.
To change a title thumbnail picture
(Thumbnail)
After recording, the first scene of the
recording (the title) is automatically set as
the thumbnail picture.
You can select a favourite scene for the
thumbnail picture shown in the Title List.
1 Press TITLE LIST.
For DVD-RWs/DVD-Rs (VR mode),
switch the Title List to show Original or
Playlist titles, if necessary.
2 Select a title using M/m, and press ,.
The sub-menu appears.
3 Select “Edit” using M/m, and press
ENTER.
4 Select “Set Thumbnail” using M/m, and
press ENTER.
The display for setting the thumbnail
point appears and the title starts to play.
5 While watching the playback picture,
press H, X, cm/MC
or PLAY MODE to select the scene you
want to set for a thumbnail picture, and
press X.
Playback pauses.
6 Select “OK” using M/m, and press
ENTER.
The scene is set for the title’s thumbnail
picture.
To return to the Title List, press
O RETURN.
To change the thumbnail preview mode
(Set Preview) (HDD only)
You can select “Quick Preview” or
“Normal” for the thumbnail preview mode
in the Title List. Set “Set Preview” in the
“Options” setup (page 113).
32
Page 33

To switch to the 8 Title List
1 Press < while the Title List is
displayed.
2 Select “Title View” using M/m, and
press ENTER.
3 Select “8 Titles” using M/m, and press
ENTER.
Detailed information, including the
resumption time, for the selected title is
shown below the list.
To turn off the Title List
Press TITLE LIST.
b Notes
• The title names may not appear for DVDs
created on other DVD recorders.
• It may take a few seconds for the thumbnail
pictures to be displayed.
• After editing, the title thumbnail picture may
change to the first scene of the recording (title).
• After dubbing, the title thumbnail picture set on
the source recording is cancelled.
• When the Title List does not appear by pressing
the TITLE LIST button, the DVD has no Title
List. In this case, try pressing the TOP MENU
button to display the DVD’s menu.
Displaying the playing time and play information
+
-
-
RW
R
Video
RWVR-RW
DVD
VCD
HDD
-
RVR
DATA DVD
DATA CD
You can check the playing time of the
current title, chapter, track, or disc. Also,
you can check the disc name recorded on the
DVD/CD.
Press DISPLAY repeatedly.
The displays differ depending on the disc
type or playing status.
In stop mode
Example: DVD-RW in VR mode
During playback
Example: DVD-R in Video mode
Video
+
CD
R
Seven Basic Operations — Getting to Know Your DVD Recorder
A Playing status
B Shows that the Resume Play is
available (page 48).
C Current selected recording mode
(maximum DVD recording time)
(page 124)
D Remaining time
,continued
33
Page 34

E Station name and programme position
number
F Audio setting for the current
programme
G Recording restrictions for the current
programme
H Disc information
I Title type (Original or Playlist) for
DVD-RW/DVD-R in VR mode
J Disc type/format (page 121)
Displays the finalised disc in Video
mode as “DVD-VIDEO.”
K Title number-Chapter number
(page 54)
L Playing time
M Multi-angles indicator (page 49)
N Copy-protected indicator (page 127)
O Data transfer bar and rate
To turn off the display
Press DISPLAY repeatedly.
z Hints
• When “On Screen Display” is set to “On”
(default) in the “Options” setup (page 112),
information automatically appears on the screen
when the recorder is operated.
• To increase disc space, see “To open up disc
space” (page 55).
4. Changing the Name of a Recorded Programme
+
-
-
RW
R
RWVR-RW
Video
HDD
-
RVR
You can label a DVD, title, or programme by
entering characters. You can enter up to 64
characters for a title recorded in the HDD/
DVD-RW/DVD-R (VR mode), 40
characters for a title recorded in the
DVD+RW/DVD-RW (Video mode)/
DVD+R/DVD-R (Video mode), but the
actual number of characters displayed in the
menus such as the Title List will vary. The
steps below explain how to change the name
of the recorded programme.
TITLE LIST
.
m
Video
+
R
</M/m/,,
ENTER
>
M
x
b Note
Playing time of MP3 audio tracks may not be
displayed correctly.
34
1 Press TITLE LIST.
2 Select a title using M/m, and press
,.
The sub-menu appears.
3 Select “Edit” using M/m, and press
ENTER.
Page 35

4 Select “Title Name” using M/m, and
press ENTER.
The display for entering characters
appears.
The current name is displayed at the
input row.
Input row
5. Labelling and Protecting a Disc
You can execute options effective for the
entire disc in the “Disc Setup” setup.
Seven Basic Operations — Getting to Know Your DVD Recorder
SYSTEM
MENU
5 Move the cursor to the point where
you want to insert the character using
m/M.
To erase all of the characters, press and
hold CLEAR for 2 seconds or more.
6 Select “Upper case” or “Lower case”
using ./>.
The characters for the selected type are
displayed.
7 Press </M/m/, to select the
character you want to enter, and
press ENTER.
The selected character appears at the
input row.
To insert a space, press X (or select
“Space,” and press ENTER).
8 Repeat steps 6 and 7 to enter the
remaining characters.
To erase a character, move the cursor to
the character at the input row, and press
CLEAR (or select “Clear,” and press
ENTER).
To insert a character, move the cursor to
the right of the point where you want to
insert the character. Then select the
character, and press ENTER.
To erase all of the characters, press and
hold CLEAR for 2 seconds or more.
9 Press x (or select “OK,” and press
ENTER).
To cancel the setting, press
O RETURN.
</M/m/,,
ENTER
Labelling a disc
+
-
RW
R
Video
-
RWVR-RW
Video
+
-
RVR
R
1 Insert a disc.
See “1. Inserting a Disc” on page 29.
2 Press SYSTEM MENU.
The System Menu appears.
3 Select “Disc Setup,” and press
ENTER.
,continued
35
Page 36

4 Select “Basic,” and press ENTER.
4 Select “Basic,” and press ENTER.
5 Select “Input Disc Name,” and press
ENTER.
6 Select “Next Screen,” and press
ENTER.
Enter the disc name (page 34).
You can enter up to 64 characters for a
DVD-RW/DVD-R (VR mode) disc
name, and 40 characters for a
DVD+RW/DVD-RW (Video mode)/
DVD+R/DVD-R (Video mode) disc
name.
b Note
The disc name may not appear when the disc is
played on other DVD equipment.
Protecting a disc
RWVR
-
RVR
-
1 Insert a disc.
See “1. Inserting a Disc” on page 29.
2 Press SYSTEM MENU.
The System Menu appears.
3 Select “Disc Setup,” and press
ENTER.
5 Select “Protect Disc,” and press
ENTER.
6 Select “On,” and press ENTER.
7 Press SYSTEM MENU to exit.
To cancel the protection
Select “Off” in step 6.
z Hint
You can set protection for individual titles
(page 56).
36
Page 37

6. Playing the Disc on
Other DVD Equipment
(Finalise)
+
-
RWVR-RW
RW
-
R
Video
Finalising is necessary when you play discs
recorded with this recorder on other DVD
equipment.
When you finalise a DVD+RW, DVD-RW
(Video mode), DVD+R, or DVD-R (Video
mode), a DVD menu will be automatically
created, which can be displayed on other
DVD equipment.
Before finalising, check the differences
between the disc types in the table below.
Differences between disc types
Discs are automatically finalised
+
RW
when removed from the recorder.
However, you may need to finalise
the disc for certain DVD
equipment, or if the recording time
is short. You can edit or record on
the disc even after finalising.
Finalising is unnecessary when
-
RWVR
playing a disc on VR format
compatible equipment.
Even if your other DVD equipment
is VR format compatible, you may
need to finalise the disc, especially
if the recording time is short. You
can edit or record on the disc even
after finalising.
-
Finalising is necessary when
RW
Video
playing on any equipment other
than this recorder.
After finalising, you cannot edit or
record on the disc. If you want to
record on it again, unfinalise
(page 38) or reformat the disc
(page 39). However, if you
reformat the disc, all recorded
contents will be erased.
Video
+
-
RVR
R
Finalising is necessary. The disc
-
RVR
can be played only on equipment
that supports DVD-R in VR mode.
You can edit or record on the disc
even after finalising (except DVDR DL in VR mode).
Finalising is necessary when
+
R
playing on any equipment other
-
R
Video
than this recorder.
After finalising, you cannot edit or
record on the disc.
SYSTEM
MENU
</M/m/,,
ENTER
1 Insert a disc.
See “1. Inserting a Disc” on page 29.
2 Press SYSTEM MENU.
The System Menu appears.
3 Select “Disc Setup,” and press
ENTER.
4 Select “Finalise,” and press ENTER.
Seven Basic Operations — Getting to Know Your DVD Recorder
,continued
37
Page 38

5 Select “Finalise,” and press ENTER.
6 Select “Next Screen,” and press
ENTER.
For DVD-RW/DVD-R (VR mode), the
recorder starts finalising the disc. Go to
step 9.
7 (DVD+RW/DVD-RW (Video mode)/
DVD+R/DVD-R (Video mode) only)
Select a title menu style, and press
ENTER.
The menu appears in the selected title
menu style when the “top menu” (or
“menu” for a DVD+RW/DVD+R) is
selected on the DVD equipment.
8 (DVD+RW/DVD-RW (Video mode)/
DVD+R/DVD-R (Video mode) only)
Select “Yes,” and press ENTER.
The recorder starts finalising the disc.
9 Press SYSTEM MENU to exit.
z Hint
You can check whether the disc has been finalised
or not. Press DISPLAY after step 1 (page 33).
b Notes
• Depending on the condition of the disc,
recording, or the DVD equipment, discs may not
play even if the discs are finalised.
• The recorder may not be able to finalise the disc
if it was recorded on another recorder.
• Inserting an unfinalised disc into other DVD
equipment may damage the recorded contents.
• When using a DVD+RW, you can edit or record
on the disc even after finalising. However, the
title menu will not be displayed. Finalise the disc
again to display the title menu.
Unfinalising a disc
-
RWVR-RW
For DVD-RWs (Video mode)
DVD-RWs (Video mode) that have been
finalised to prohibit additional recording or
editing can be unfinalised to allow further
recording or editing.
For DVD-RWs (VR mode)
If you cannot record or edit on a DVD-RW
(VR mode) that has been finalised with other
DVD equipment, unfinalise the disc.
b Note
The recorder is not able to unfinalise DVD-RWs
(Video mode) that have been finalised on another
recorder.
Video
1 Insert a disc.
See “1. Inserting a Disc” on page 29.
2 Press SYSTEM MENU.
The System Menu appears.
3 Select “Disc Setup,” and press
ENTER.
4 Select “Finalise,” and press ENTER.
38
Page 39

5 Select “Unfinalise,” and press
ENTER.
7. Reformatting a Disc
6 Select “Start,” and press ENTER.
The recorder starts unfinalising the disc.
Unfinalising may take several minutes.
+
-
RWVR-RW
RW
New discs are automatically formatted when
inserted. If necessary, you can manually reformat a DVD+RW, DVD-RW, or DVD-R
disc to make a blank disc. For DVD-RWs or
DVD-Rs, you can select a recording format
(VR mode or Video mode) according to your
needs.
SYSTEM
MENU
Video
-
RVR-R
Video
</M/m/,,
ENTER
1 Insert a disc.
See “1. Inserting a Disc” on page 29.
2 Press SYSTEM MENU.
The System Menu appears.
3 Select “Disc Setup,” and press
ENTER.
Seven Basic Operations — Getting to Know Your DVD Recorder
,continued
39
Page 40

4 Select “Format,” and press ENTER.
5 Select an item, and press ENTER.
“VR Mode”: Formats DVD-RWs/DVDRs in VR mode.
“Video Mode”: Formats DVD-RWs/
DVD-Rs in Video mode.
“Format DVD+RW”: Formats
DVD+RWs.
6 Select “Start,” and press ENTER.
All contents on the disc are erased.
z Hint
By reformatting, you can change the recording
format on DVD-RWs, or record again on DVDRWs that have been finalised.
b Note
You cannot reformat recorded DVD-Rs.
40
Page 41

Recording
Timer Recording
1 Press TIMER.
The “Timer List” display appears.
HDD
-
RVR
+
-
RW
R
Video
-
RWVR-RW
Video
+
R
You can set the timer for a total of 32
programmes, up to 30 days in advance.
Set the date, time, and programme position
of the programme manually.
Before you start recording…
• Check that the disc has enough available
space for the recording (page 33). For the
HDD, DVD+RWs, and DVD-RWs, you
can free up disc space by erasing titles
(page 55).
• Adjust the recording picture quality if
necessary (page 93).
TIMER
</M/m/,,
ENTER
z REC
x REC
STOP
2 Select the “New Input” row, and
press ENTER.
3 Select an item using </, and
adjust using M/m. Then press
ENTER.
The adjustable items are listed below.
“Pr/CH”: Sets the programme position.
“Date”: Sets the date (up to 30 days
later). Select a recording pattern by
pressing
for the same daily or weekly
programmes.
“Start”: Sets the start time.
“Stop”: Sets the stop time.
“Extend”: Sets duration when a timer
recording is in progress. If the
programme set to be recorded daily or
weekly is extended, the manually
extended time set here will be added to
the subsequent timer recording times.
• If you make a mistake, select the item
M repeatedly to set the timer
and change the setting.
Recording
,continued
41
Page 42

4 Select “OK,” and press ENTER.
The “Timer List” display appears
(page 44).
The timer recording indicator lights up
on the front panel display and the
recorder is ready to start recording.
Unlike a VCR, there is no need to turn
off the recorder before the timer
recording starts.
• To record a satellite programme, turn
on the satellite tuner and select the
satellite programme you want to
record. Leave the satellite tuner turned
on until the recorder finishes
recording. If you connect equipment
with a timer function, you can use the
Synchro Rec function (page 45).
To enter a title name
Select “Set Title Name” in step 3 above, and
press ENTER (page 34).
Rec. Mode Adjust
If there is not enough available disc space fo r
the recording, the recorder automatically
adjusts the recording mode to enable the
entire programme to be recorded. Set “Rec.
Mode Adjust” to “On” in the “Recording”
setup (page 107).
z Hint
When you select “AUTO” for the recording mode,
the recorder automatically maximises the
recording quality for the space available on the
inserted disc (if recording to DVD), or to fit on to
a blank DVD disc (if recording to HDD).
To stop recording during timer recording
Press x REC STOP.
Note that it may take a few seconds for the
recorder to stop recording.
On-screen instructions may appear after
pressing x REC STOP. In this case, follow
the on-screen instructions.
To make the detailed settings
1 Select “Set Details” in step 3 above, and
press ENTER.
2 Select an item using M/m and set using
</,.
“Record to”: Sets the recording
destination. If there is not enough
available DVD disc space for the
recording, the recorder automatically
records the programme to the HDD even
if you select “DVD” (Recovery
Recording).
“Recording Mode”: Sets the recording
mode (page 124).
“Update”: Sets the recorder
automatically replacing the previous
timer recording with the new one.
“Genre”: Sets the genre.
“Bilingual Recording”: Sets the sound
to be recorded (page 104).
“HDD Recording Format”: Sets the
recording format of HDD (page 108).
b Notes
• If a message indicating that the HDD is full
appears on the screen, change the recording
destination to “DVD,” or make available space
for the recording (page 56).
• Check that the clock is correctly set before
setting the timer recording. If not, the timer
recording cannot be made.
• Even if the timer is set for the same daily or
weekly programme, the timer recording cannot
be made if it overlaps with a programme that has
priority. “Overlap” will appear next to the
overlapped setting in the Timer List. Check the
priority order of the settings (page 44).
• Even if the timer is set, timer recordings cannot
be made while recording a programme that has
priority.
• The “Rec. Mode Adjust” function only works
with a timer recording. It does not function with
Quick Timer or Synchro Rec.
42
Page 43

Using the Quick Timer function
You can set the recorder to record in 30minute increments.
Press z REC repeatedly to set the
duration.
Each press advances the time in 30-minute
increments. The maximum duration is six
hours.
(normal recording)
The time counter decreases minute by
minute to 0:00, then the recorder stops
recording (the power turns off).
To cancel the Quick Timer
Press z REC repeatedly until “0:00”
appears in the front panel display. The
recorder returns to normal recording mode.
To stop recording, press x REC STOP.
Before recording starts, set “Bilingual
Recording” to “A/L” (default) or “B/R” in
the “Audio In” setup (page 104).
About HDD Recording format, see
page 108.
ZWEITON (German stereo) system
When a stereo-based programme is
received, “Stereo” appears.
When a bilingual ZWEITON-based
programme is received, “L,” “R,” or “L+R”
appears.
NICAM system
To record a NICAM programme, be sure to
set “NICAM Select” to “NICAM” (default)
in the “Audio In” setup. If the sound is not
clear when listening to NICAM broadcasts,
set “NICAM Select” to “Standard”
(page 104).
Creating chapters in a title
Recording
b Note
If you turn off the recorder during recording,
recording is stopped.
Recording stereo and bilingual programmes
The recorder automatically receives and
records stereo and bilingual programmes
based on the ZWEITON system or the
NICAM system.
The HDD (when “HDD Recording Format”
is set to “Video Mode Off” in the
“Recording” setup (page 108)) and a DVDRW (VR mode) or DVD-R (VR mode) can
record both main and sub sounds. You can
switch between main and sub when playing
the disc.
The HDD (when “HDD Recording Format”
is set to “Video Mode On” in the
“Recording” setup (page 108)) and a
DVD+RW, DVD+R, DVD-RW (Video
mode), or DVD-R (Video mode) can record
only one sound track (main or sub) at a time.
The recorder can automatically divide a
recording (a title) into chapters by inserting
chapter marks. To select chapter mark
intervals or disable this function, see “Auto
Chapter (HDD/VR),” “Auto Chapter
(Video),” or “Auto Chapter (DVD+R/
+RW)” in the “Recording” setup (page 108).
When recording to the HDD, a DVD-R (VR
mode) or a DVD-RW (VR mode), you can
edit chapter marks (page 58).
43
Page 44

Checking/Changing/ Cancelling Timer Settings (Timer List)
+
-
-
RW
R
RWVR-RW
Video
HDD
-
RVR
You can check, change, or cancel timer
settings using the Timer List.
Video
+
R
1 Press TIMER.
The “Timer List” display appears.
When all of the timer settings are not
visible on the display, press M/m to view
the hidden timer settings.
2 Select the timer setting you want to
check/change/cancel, and press ,.
The sub-menu appears.
3 Select an option, and press ENTER.
“Modify”:
Changes the timer setting.
Select an item using </, and adjust
using M/m. Select “OK,” and press
ENTER.
When the timer settings overlap
• The programme that starts first has priority
and the entire programme is recorded.
• After finishing the previous recording, the
other recording starts with several tens-ofsecond’s delay (when the end-time of one
recording and the start-time of another are
the same).
• When the recordings start at the same time,
only one of them will be recorded. Cancel
the timer setting for the programme that
you are not going to record.
z Hint
You can move to the first row/bottom row of the
Timer List using ./> while the list is
displayed.
b Note
Even if the timer is set, timer recordings cannot be
made while recording a programme that has
priority.
44
“Erase”:
Erases the timer setting. Select “Yes,”
and press ENTER.
“Skip Once”:
Cancels the daily or weekly recordings
only once. After cancelling the timer
setting, “Skip Once” appears next to the
timer setting in the Timer List.
To change or cancel the setting, repeat
steps 2 and 3 above.
Page 45

Recording from Connected Equipment
To cancel Synchro Rec before recording
starts
Press [/1.
The SYNCHRO REC indicator in the front
panel display turns off.
Recording from connected equipment with a timer (Synchro Rec.)
HDD
You can set the recorder to automatically
record programmes from connected
equipment that has a timer function (such as
a satellite tuner). Connect the equipment to
the LINE 1 IN jacks of the recorder
(page 28).
When the connected equipment turns on, the
recorder starts recording a programme from
the LINE 1 IN jacks.
The recording destination is HDD only.
1 Press REC MODE repeatedly to select
the recording mode.
For details about recording mode, see
page 124.
2 Select the desired audio signal when
recording a bilingual programme.
Set “External Audio” to “Bilingual” and
“Bilingual Recording” to “A/L” or “B/
R” in the “Audio In” setup (page 104).
For details about the bilingual
recording, see page 43.
3 Set the timer on the connected
equipment to the time of the
programme you want to record, and
turn it off.
4 Press down x REC STOP on the
recorder for more than 3 seconds.
The SYNCHRO REC indicator lights up
in the front panel display and the
recorder turns off. The recorder is ready
to start Synchro-Recording.
You can also set the recorder to stand by
for Synchro-Recording by setting
“Synchro Rec.” of “Timer Recording”
to “Yes” from the System Menu.
To cancel Synchro Rec during recording
Press down z REC for more than 3 seconds.
The Synchro Rec is cancelled, and the
recording continues.
To stop recording
Press x REC STOP. Then select “Yes” in
the confirmation display, and press ENTER.
b Notes
• The recorder starts recording only after detecting
a video signal from the connected equipment.
The beginning of the programme may not be
recorded.
• The Synchro Rec function does not work with
some tuners. For details, refer to the tuner’s
operating instructions.
• To use the Synchro Rec function, you must first
set the recorder’s clock correctly.
If the timer settings of a SynchroRecording and another timer recording
overlap
Timer recordings always have priority. The
Synchro-Recording starts only after the
timer recording has finished.
Timer
recording
SynchroRecording
will be cut off
Recording
,continued
45
Page 46

Recording from connected equipment without a timer
+
-
-
RW
R
RWVR-RW
Video
HDD
-
RVR
You can record from a connected VCR or
similar device. To connect a VCR or similar
device, see “Connecting a VCR or Similar
Device” on page 26.
Video
+
R
1 Press HDD or DVD.
If you select DVD, insert a recordable
DVD (see “1. Inserting a Disc” on
page 29).
2 Press INPUT to select an input source
according to the connection you
made.
The front panel display changes as
follows:
programme position
5 Insert the source tape into the
connected equipment and set to
playback pause.
6 Press z REC.
This recorder starts recording.
7 Press the pause (or play) button on
the connected equipment to cancel
the playback pause status.
The connected equipment starts
playback and the playback image is
recorded by this recorder.
To stop recording, press x REC STOP
on this recorder.
If you connect a DV camcorder with a DV
IN jack
See “DV Camcorder Dubbing” on page 71.
If you connect an HDD camcorder with a
USB jack
See “HDD Camcorder Dubbing” on
page 67.
3 Select the desired audio signal when
recording a bilingual programme to
the HDD or DVD+RWs/DVD+Rs/
DVD-RWs/DVD-Rs (Video mode).
Set “External Audio” to “Bilingual” and
“Bilingual Recording” to “A/L” or “B/
R” in the “Audio In” setup (page 104).
4 Press REC MODE repeatedly to select
the recording mode.
For details about the recording mode,
see page 124.
b Notes
• When recording a video game image, the screen
may not be clear.
• Any programme that contains a Copy-Never
copy guard signal cannot be recorded.
• When “Bilingual Recording” is set to “A/L” or
“B/R” in step 3, you cannot select the sound
when playing in the following cases.
– When recording to the HDD (“HDD
Recording Format” is set to “Video Mode Off”
in the “Recording” setup (page 108))/DVDRW/DVD-R (VR mode) in PCM mode.
– When recording to the HDD (“HDD
Recording Format” is set to “Video Mode On”
in the “Recording” setup (page 108))/
DVD+RW/DVD+R/DVD-RW/DVD-R
(Video mode).
46
Page 47

Playback
3 Select a title using M/m, and press
ENTER.
Playback starts from the selected title.
Playing
+
-
-
RW
R
Video
RWVR-RW
DVD
HDD
-
RVR
DATA DVDCDDATA CD
HDD DVD
AUDIO
SUBTITLE
ANGLE
/
.
VCD
Video
PLAY
MODE
TITLE LIST
</M/m/,,
ENTER
>
H/X/x
1 Press HDD or DVD.
• If you select DVD, insert a disc (see
“1. Inserting a Disc” on page 29).
• If you insert a DVD VIDEO, VIDEO
CD, DATA DVD or DATA CD, press
H. Playback starts.
2 Press TITLE LIST.
If the Title List is already displayed, skip
this step.
Example: HDD
z Hint
+
R
You can also use the H button in step 3 to start
playback.
b Note
When any video titles are recorded on a DATA
DVD, the MP3 audio tracks on that DATA DVD
cannot be played.
Playback
To use the DVD’s Menu
When you play a DVD VIDEO, or a
finalised DVD+RW, DVD-RW (Video
mode), DVD+R, or DVD-R (Video mode),
you can display the disc’s menu by pressing
TOP MENU or MENU.
b Note
The H button is not available in the disc’s menu.
To play VIDEO CDs/Super VIDEO CDs with
PBC functions
PBC (Playback Control) allows you to play
VIDEO CDs/Super VIDEO CDs
interactively using the menu on your TV
screen.
When you start playing a VIDEO CD/Super
VIDEO CD with PBC functions, the menu
appears.
Select an item using the number buttons, and
press ENTER. Then, follow the instructions
in the menu (press H when “Press
SELECT” appears).
b Note
Some playback options such as search, repeat play
or programme play cannot be played with PBC
function. To play with playback options, start
playback without PBC functions using the Title
List.
,continued
47
Page 48

To play DivX video files or audio tracks in
a disc containing both file types
1 Press < while the Title List (DVD/CD)
is displayed.
2 Select “Data Format” using M/m, and
press ENTER.
3 Select “CD,” “MP3” or “DivX” using
M/m, and press ENTER.
4 Return to the Title List, then select an
album, title or track, and press ENTER
or
H.
To stop playback
Press x.
To resume playback from the point where
you stopped (Resume Play)
When you press H again after you stop
playback, the recorder resumes playback
from the point where you pressed x.
To start from the beginning, press x again,
and press H. Playback starts from the
beginning of the title/track/scene.
b Notes
• Resume Play is not available for Super VIDEO
CDs.
• The point where you stopped playing is cleared
from memory when:
– you open the disc tray (except HDD).
– you play another title (except HDD).
– you start playback using the Title List (except
HDD).
– you edit the title after stopping playback.
– you change the settings on the recorder.
– you make a recording (except HDD).
– you disconnect the AC power cord (mains
lead).
To play restricted DVDs (Parental
Control)
If you play a restricted DVD, the display for
entering your password appears on your TV
screen.
Enter your four-digit password using the
number buttons, and press ENTER.
The recorder starts playback.
To register or change the password, see
“Parental Control (DVD VIDEO only)” on
page 109.
One-Touch Play (for HDMI connection
only)
Press H. With one touch of the H button,
the recorder and your TV automatically turn
on and the TV’s input is switched to the
recorder. Playback starts automatically.
b Notes
• When using the HDMI connection, there may be
a delay, before the playback picture appears on
the TV screen, and the beginning portion of the
playback picture may not be displayed.
• To use the One-Touch Play function, set
“Control for HDMI” to “On” (default) in the
“HDMI Output” setup (page 112).
48
Page 49

Playback options
To check the position of the buttons below, see the illustration on page 47.
Buttons
Operations
ANGLE Changes the angles for a scene when pressed during playback.
DVD
When the disc has various angles (multi-angles) recorded,
“ ” appears on the screen.
To switch the angle mark indicator to off, set “Angle Indicator”
to “Off” in the “Playback” setup (page 110).
AUDIO Selects one of the audio tracks recorded on the disc when pressed
HDD
DVD
DATA DVD
-
RWVR
VCD
DATA CD
-
CD
RVR
repeatedly in normal playback mode.
DVD
DATA DVD
-
RWVR
HDD
VCD CD
*1
DATA DVD*2DATA CD
*1
DATA CD
-
RVR
: Selects the language.
: Selects the main or sub sound.
*2
: Selects stereo or
monaural audio tracks.
*1
DivX video file only
*2
MP3 audio track only
SUBTITLE
DVD
DATA DVD*DATA CD
* DivX video file only
/ (instant replay/
instant advance)
-
+
RWVR
HDD
-
RW
-
DATA CD
* DivX video file only
RW
-
+
Video
R
R
Video
DVD
DATA DVD
*
RVR
Selects a subtitle language when pressed repeatedly.
*
Each time you press , replays the scene for the following
duration.
5 seconds t 15 seconds t 30 seconds t 1minute t
2 minutes t 3 minutes t 5 minutes t 10 minutes t
20 minutes t advances the time in 10-minute increments t
2 hours
*
Each time you press , briefly fast forwards the current scene
for the following duration.
30 seconds t 1minute t 1 minute 30 seconds t 2minutes
t 3minutes t 5minutes t 10 minutes t 20 minutes t
advances the time in 10-minute increments t 2hours
Playback
. (previous)/
> (next)
Goes to the beginning of the previous/next title/chapter/scene/
track when pressed during playback.
Goes to the beginning of the first title/track when pressed in stop
mode.
,continued
49
Page 50

Buttons
(fast reverse/fast forward)
Operations
Fast reverses/fast forwards the disc when pressed during
playback.
Search speed changes as follows:
mFR2 T T t t MFF2
mFR3
mFR4*3 T T T T t t t t MFF4
When you press and hold the button, fast forward/fast reverse
continues at the selected speed until you release the button.
*1
When you press m once during playback, you can play Reverse
play (not available for VIDEO CDs/Super VIDEO CDs/DivX
video files/audio tracks).
*2
When you press M once during playback, you can play quickly
with sound (Scan Audio) (not available for VIDEO CDs/Super
VIDEO CDs).
*3
Not available for VIDEO CDs/Super VIDEO CDs/audio tracks.
To resume normal playback, press H.
(slow, freeze frame)
+
HDD
-
RW
-
DATA DVD
*1
*2
RW
+
Video
R
R
Video
DVD
*1*2
DATA CD
Playback direction only
DivX video file only
-
RWVR
-
RVR
VCD
*1*2
Plays in slow motion when pressed for more than one second in
pause mode.
Plays one frame at a time when pressed briefly in pause mode.
To resume normal playback, press H.
*1
X (pause) Pauses playback.
To resume normal playback, press H.
fast reverse fast forward
*1
mFR1
T t MFF1
*3
T T T t t t MFF3
*2
*3
*3
b Notes
• Angles and subtitles cannot be changed with
titles recorded on this recorder.
• JPEG image files made with a DVD camcorder
can only be played as a slideshow. For video
files containing JPEG image files and movies,
the recorder can play movie parts only.
Notes on playing DVDs with a DTS sound
track
DTS audio signals are output only through the
DIGITAL OUT (COAXIAL) jack.
When you play a DVD with DTS sound tracks, set
“DTS Output” to “On” in the “Audio Out” setup
(page 105).
50
Notes on playing DTS sound tracks on a
CD
• When playing DTS-encoded CDs, excessive
noise will be heard from the LINE OUT (RAUDIO-L) jacks. To avoid possible damage to
the audio system, the user should take proper
precautions when the LINE OUT (R-AUDIO-L)
jacks of the recorder are connected to an
amplification system. To enjoy DTS Digital
Surround™ playback, an external DTS decoder
must be connected to the DIGITAL OUT jack of
the recorder.
• Set the sound to “Stereo” using the AUDIO
button when you play DTS sound tracks on a CD
(page 49).
Page 51

Playing a specific portion repeatedly (A-B Repeat)
1 Press PLAY MODE during playback.
For audio tracks on a CD, press ,
while the Title List is displayed, and
select “Play Mode.”
The “Play Mode” menu appears.
2 Select “A-B Repeat,” and press
ENTER.
“Set point A” is selected.
3 While monitoring the sound, press
ENTER at the starting point (point A)
of the portion to be played
repeatedly.
“Set point B” is selected.
4 Continue playing to locate the ending
point (point B), and press ENTER.
A-B Repeat starts.
To cancel A-B Repeat
Press CLEAR. Or, set “A-B Repeat” to
“Off” in the “Play Mode” menu.
b Notes
• Wh en playing an HDD/DVD VIDEO/DVD-RW
(Video mode)/DVD-R (Video mode), set the
start and stop points within the same title.
• “A-B Repeat” is not available for MP3 audio
tracks.
Playing repeatedly (Repeat)
You can repeatedly play all the titles/tracks/
files or a single title/chapter/track on the
HDD, a disc or an album.
1 Press PLAY MODE during playback.
For audio tracks on a DATA DVD/
DATA CD/CD, press , while the Title
List is displayed, and select “Play
Mode.”
The “Play Mode” menu appears.
2 Select “Repeat,” and press ENTER.
3 Select an item to be repeated using
M/m.
“Repeat Title” (for HDD/DVDs/DATA
*1
DVDs
/DATA CDs*1): repeats the
current title.
“Repeat Chapter” (for HDD/DVDs):
repeats the current chapter.
“Repeat Track” (for VIDEO CDs
CDs/DATA DVDs/DATA CDs):
repeats the current track.
“Repeat Programme”: repeats the
current programme (page 52).
“Repeat Disc” (for VIDEO CDs
DVD-RWs/DVD-Rs (VR mode)/CDs/
DATA DVDs/DATA CDs): repeats the
entire disc.
“Repeat Album” (for DATA DVDs
DATA CDs
album.
*1
DivX video file only
*2
Available only when playing without PBC
functions
*3
Audio tracks only
*3
): repeats the current
*2
/
*2
/
*3
4 Press ENTER.
Repeat play starts.
To cancel Repeat play
Press CLEAR. Or, set “Repeat” to “Repeat
Off” in the “Play Mode” menu.
Playback
/
b Note
You can select “Repeat Programme” only during
Programme play.
,continued
51
Page 52

Creating your own programme (Programme)
Video
DATA CD
-
R
Video
VCD
CD
-
RW
HDD
*2 *2
DATA DVD
*1
finalised disc only
*2
MP3 audio tracks only
You can play the contents of the HDD or a
disc in the order you want by arranging the
order of the titles/chapters/albums/tracks on
the HDD or disc to create your own
programme. You can make a programme of
up to 24 chapters/tracks, etc.
*1*1
1 Press PLAY MODE during playback.
For audio tracks on a DATA DVD/
DATA CD/CD, press , while the Title
List is displayed, and select “Play
Mode.”
The “Play Mode” menu appears.
2 Select “Programme,” and press
ENTER.
3 Select “Input/Edit Programme,” and
press ENTER.
The “Input/Edit Programme” display
differs depending upon the disc type.
Example: DVD
6 To programme other chapters or
tracks, press </M/m/, to select a
step number, and repeat steps 4 and
5.
7 Press H.
Programme play starts.
To stop Programme play
Press x (stop).
To cancel Programme play
Press CLEAR during playback. Or, set
“Programme” to “Cancel Programme Play”
in the “Play Mode” menu.
To erase the programme
Press CLEAR in stop mode. Or, set
“Programme” to “Erase Programme List” in
the “Play Mode” menu.
z Hints
• The programme you made remains after
Programme play finishes. To play the same
programme again, set “Programme” to “Start
Programme Play” in the “Play Mode” menu.
However, the programme is cleared after you
remove the disc or press [/1.
• You can repeat Programme play. During
Programme play, set “Repeat” to “Repeat
Programme” in the “Play Mode” menu
(page 51).
4 Select a title or album (example: Title
01) using M/m, and press ,.
5 Select a chapter or track (example:
Chapter 001) using M/m, and press
ENTER.
The chapter or track is programmed.
If you make a mistake, select the step
number (example: 01.) using </M/m,
and press CLEAR.
52
Page 53

Advanced Playback Functions
Playing from the beginning of the programme you are recording (Chase Play)
HDD
“Chase Play” allows you to view the
recorded part of a programme on the HDD
while the recording is being made. You do
not need to wait until the recording finishes.
Press H while recording.
Playback starts from the beginning of the
programme you are recording.
When you fast forward to the point that you
are recording, “Chase Play” returns to
normal playback.
Playing a previous recording while making another (Simultaneous Rec and Play)
You can also play a DVD VIDEO, VIDEO
CD, Super VIDEO CD, DATA DVD, or
DATA CD while recording on the HDD.
Example: Play another title on the HDD
while recording to the HDD.
1 While recording, press TITLE LIST to
display the HDD Title List.
2 Select the title you want to play, and
press ENTER.
Playback starts from the selected title.
Example: Play a DVD while recording to
the HDD.
1 While recording, press DVD and insert
the DVD into the recorder.
2 Press TITLE LIST to display the DVD
Title List.
3 Select the title you want to play, and
press ENTER.
Playback starts from the selected title.
b Note
You cannot play a DVD, DivX video or VIDEO
CD recorded in the NTSC colour system while
recording on the HDD in the PAL/SECAM colour
system.
Playback
+
-
HDD
-
RVR-R
DATA CD
“Simultaneous Rec and Play” allows you to
view a previously recorded programme
while recording programmes. Playback
continues even if a timer recording starts.
Use this function as follows:
• While recording to the HDD:
Play another title on the HDD.
Play a previously recorded programme on
a DVD by pressing the DVD button.
• While recording to a DVD:
Play a previously recorded programme on
the HDD by pressing the HDD button.
RW
Video
RWVR-RW
DVD
VCD
Video
+
R
DATA DVD
53
Page 54

Searching for a Time/ Title/Chapter/Track, etc.
z Hint
You can search for a title/track/chapter by entering
the title/track/chapter number using the number
buttons during playback.
+
-
-
RW
R
Video
RWVR-RW
DVD
VCD
HDD
-
RVR
*
DATA CD
* DivX video file only
You can search a disc by title, chapter, scene
or track. As titles and tracks are assigned
individual numbers, select the title or track
by entering its number. You can also search
for a scene using the time code.
Video
+
R
DATA DVD
*
1 Press PLAY MODE during playback.
The “Play Mode” menu appears.
2 Select “Search Mode,” and press
ENTER.
3 Select a search method, and press
ENTER.
“Time Search” (for HDD/DVDs/DATA
*1
DVDs
/DATA CDs*1/VIDEO
*2*3
CDs
): Searches for a starting point
by entering the time code.
“Title Search” (for HDD/DVDs/DATA
*1
DVDs
/DATA CDs*1)
“Chapter Search” (for HDD/DVDs)
“Track Search” (for VIDEO CDs
*1
DivX video file only
*2
Except Super VIDEO CDs
*3
Available only when playing without PBC
functions
The display for entering the number
appears.
*3
)
4 Press the number buttons to select
the number of the title, chapter, time
code, etc., you want.
For example: Time Search
To find a scene at 2 hours, 10 minutes,
and 20 seconds, enter “21020.”
If you make a mistake, select another
number.
5 Press ENTER.
Playback starts from the selected
number.
54
Page 55

Erasing and Editing
Before Editing
This recorder offers various edit options for
various disc types.
b Notes
• You may lose the edited contents if you remove
the disc or a timer recording starts while editing.
• DVD discs created by DVD camcorders cannot
be edited on this recorder.
• If a message appears and indicates that the disc’s
control information is full, erase or edit
unnecessary titles.
• The remaining disc space displayed on the
screen may differ from the actual remaining disc
space.
• When editing a DVD+R or DVD-R, finish all
editing before finalising the disc. You cannot
edit a finalised disc.
To open up disc space
To open up disc space on a DVD+RW or
DVD-RW (Video mode), erase the title with
the largest number in the title list.
Largest title number
To switch between the Playlist and
Original Title List (DVD-RW/DVD-R in VR
mode only)
You can display the Playlist titles in the Title
List (Playlist), or the Original titles in the
Title List (Original).
1 Press < while the Title List is
displayed.
2 Select “Play List” using M/m, and press
ENTER.
3 Select “Original” or “Play List” using
M/m, and press ENTER.
About editing accuracy
When editing the titles recorded on the
HDD, you can select the type of editing.
“Video Mode Compatible Editing”:
Recommended if you are going to dub the
titles to DVD-RWs/DVD-Rs (Video mode)
or DVD+RWs/DVD+Rs afterward by Highspeed dubbing. The editing points and
chapter marks may be slightly different from
those you selected.
“Frame Accurate Editing”:
Recommended when you want to edit titles
precisely. However, the editing points may
be slightly different from the point you
selected when you dub the titles by Highspeed dubbing.
Erasing and Editing
To open up disc space on the HDD or a
DVD-RW (VR mode), you can erase any
title.
See “Erasing and Editing a Title” on
page 56.
For DVD-Rs and DVD+Rs, the available
disc space does not increase even if you
erase titles.
55
Page 56

Erasing and Editing a
“Create”: Creates a Playlist (page 60).
“Undo”: Undoes the last edit you made.
Title
+
-
HDD
-
RVR-R
This section explains the basic edit
functions. Note that editing is irreversible.
To edit DVD-RWs/DVD-Rs (VR mode)
without changing the original recordings,
create a Playlist title (page 60).
RW
Video
RWVR-RW
Video
+
R
1 Press TITLE LIST.
For DVD-RWs/DVD-Rs in VR mode,
switch the Title List (Original or
Playlist), if necessary.
2 Select a title, and press ,.
The sub-menu appears.
3 Select an option, and press ENTER.
You can make the following edits to the
title.
“Erase”: Erases the selected title. Select
“Yes” when asked for confirmation.
“Edit”: Allows you to make the
following edits.
• “Title Name”: Allows you to enter or
re-enter a title name (page 34).
• “Set Thumbnail”: Changes the title’s
thumbnail picture that appears in the
Title List (page 32).
• “A-B Erase”: Erases a section of the
title (page 57).
• “Divide”: Divides a title into two titles
(page 57).
• “Chapter Edit”: Edits chapters in a title
(page 58).
• “Set Genre”: Assigns a genre to a title.
• “Protect”: Protects the title. “ ”
appears next to the protected title.
• “Move”: Changes the title’s playing
order (page 60).
• “Combine”: Combines two titles into
one (page 60).
“Genre Name”: Allows you to enter a
genre name (up to 12 characters)
(page 34).
“Multi-Mode”: Allows you to select and
edit multiple titles at one time (page 56).
z Hint
You can label or re-label DVDs (page 35).
Editing multiple titles (MultiMode)
HDD
You can select and edit up to 24 titles at one
time.
1 Press TITLE LIST.
2 Press ,.
The sub-menu appears.
3 Select “Multi-Mode,” and press
ENTER.
The display for selecting titles to be
edited appears.
4 Select a title, and press ENTER.
A check mark appears in the check box.
To clear the check mark, press ENTER
again.
5 Repeat step 4 to select all of the titles
you want to edit.
6 When you finish selecting titles,
press ,.
The sub-menu appears.
7 Select an option, and press ENTER.
“Erase”: Erases the selected titles.
“Protect”: Protects the titles. “ ”
appears next to the protected title.
“Unprotected”: Unprotects the titles.
“Change Genre”: Changes the genre of
the titles.
56
Page 57

z Hint
You can exit “Multi-Mode” by pressing , and
selecting “Single-Mode” while selecting titles.
Erasing a section of a title (A-B Erase)
-
HDD
You can select a section (scene) in a title and
erase it. Note that erasing scenes in a title
cannot be undone.
RWVR
-
RVR
1 After step 2 of “Erasing and Editing a
Title,” select “Edit,” and press
ENTER.
2 Select “A-B Erase,” and press
ENTER.
For the HDD, select a type of editing,
and press ENTER. For details, see
page 55.
The display for setting point A appears.
The title starts to play.
3 Select point A using m/M or H,
and press X
• To return to the beginning of the title,
press X and then press ..
.
4 Select “From,” and press ENTER.
The position of point A is displayed.
5 Press H.
6 Select point B using m/M or H,
and press X.
7 Select “To,” and press ENTER.
The position of point B is displayed.
8 Select “Yes,” and press ENTER.
The scene is erased.
To cancel “A-B Erase”
Press O RETURN. The Title List appears.
z Hint
A chapter mark is inserted after the scene is erased.
The chapter mark divides the title into separate
chapters on either side of the mark.
b Notes
• Images or sound may be momentarily
interrupted at the point where you erase a section
of a title.
• Sections shorter than five seconds may not be
erased.
Dividing a title (Divide)
**
-
RWVR
HDD
If you want to dub a long title to a disc but do
not want to reduce the picture quality, divide
the title into two shorter titles. Note that
dividing a title cannot be undone.
* Only playlist titles can be divided for DVD-
RWs/DVD-Rs in VR mode.
-
RVR
1 After step 2 of “Erasing and Editing a
Title,” select “Edit,” and press
ENTER.
2 Select “Divide,” and press ENTER.
For the HDD, select a type of editing,
and press ENTER. For details, see
page 55.
The display for setting the dividing
point appears.
The title starts to play.
3 Select the dividing point using m/
M or H, and press X.
• To return to the beginning of the title,
press X and then press ..
Erasing and Editing
,continued
57
Page 58

4 Press ENTER.
For the HDD, the display asks for
confirmation.
5 Select “Yes,” and press ENTER (HDD
only).
The title is divided into two.
Erasing and Editing a Chapter
-
HDD
You can edit individual chapters within a
title. To edit DVD-RWs/DVD-Rs (VR
mode) without changing the original
recordings, create a Playlist (page 60).
RWVR
-
RVR
1 Press TITLE LIST.
For DVD-RWs/DVD-Rs in VR mode,
switch the Title List (Original or
Playlist), if necessary.
2 Select a title containing the chapter
you want to edit, and press ,.
The sub-menu appears.
3 Select “Edit,” and press ENTER.
4 Select “Chapter Edit,” and press
ENTER.
For the HDD, select a type of editing,
and press ENTER. For details, see
page 55.
5 Select an option, and press ENTER.
You can make the following edits to the
chapter.
“Divide”: Divides a chapter into two
(page 59).
“Erase/Move”
• “Erase”: Erases the selected chapter
(page 59).
• “Move” (for Playlist titles on DVDRWs/DVD-Rs in VR mode): Changes
the chapter’s playing order (page 61).
“Combine”: Combines two chapters
into one (page 59).
58
Page 59

Dividing a chapter (Divide)
1 After step 4 of “Erasing and Editing a
Chapter,” select “Divide.”
2 Select a chapter using </,.
3 Select the dividing point using m/
M or H, and press X.
• To return to the beginning of the
chapter, press X and then press ..
4 Press ENTER.
The chapter is divided into two.
Erasing a chapter (Erase)
1 After step 4 of “Erasing and Editing a
Chapter,” select “Erase.”
Combining multiple chapters (Combine)
1 After step 4 of “Erasing and Editing a
Chapter,” select “Combine.”
Erasing and Editing
2 Move the combining bar using </
,, and press ENTER.
The two adjacent chapters of the
combining bar are combined.
b Note
Chapters cannot be combined if they are
automatically created from an HDD camcorder
dubbing.
2 Select a chapter using </,, and
press ENTER.
3 (For a Playlist chapter only)
Select “Erase,” and press ENTER.
The display asks for confirmation.
4 Select “Yes,” and press ENTER.
The chapter is erased.
59
Page 60

Creating and Editing a Playlist
4 Select “Move,” and press ENTER.
RWVR
-
RVR
-
Playlist edit allows you to edit or re-edit
without changing the actual recordings. You
can create up to 99 Playlist titles.
b Note
Playlist titles containing titles recorded with the
“Copy-Once” copy protection signal cannot be
dubbed or moved (page 127).
1 Press TITLE LIST, and switch to the
Playlist.
For details on switching to the Playlist,
see page 55.
2 Press ,.
The sub-menu appears.
3 Select “Create,” and press ENTER.
The original titles in the Title List
appear.
4 Select an original title to add to the
Playlist, and press ENTER.
The selected title is added to the Playlist.
5 Repeat steps 3 and 4 to select all of
the titles you want to add to the
Playlist.
5 Select a new location for the title
using M/m, and press ENTER.
The title moves to the new location.
• To move more titles, repeat from step
2.
Combining multiple Playlist titles (Combine)
1 Press TITLE LIST, and switch to the
Playlist.
For details on switching to the Playlist,
see page 55.
2 Select a Playlist title, and press ,.
The sub-menu appears.
3 Select “Edit,” and press ENTER.
4 Select “Combine,” and press ENTER.
Moving a Playlist title (Move)
1 Press TITLE LIST, and switch to the
Playlist.
For details on switching to the Playlist,
see page 55.
2 Select a Playlist title, and press ,.
The sub-menu appears.
3 Select “Edit,” and press ENTER.
60
5 Select a title you want to combine,
and press ENTER.
6 Select “Yes,” and press ENTER.
The titles are combined.
Dividing a Playlist title (Divide)
You can divide a Playlist title. For
instructions, see page 57.
Page 61

Moving a chapter (Move)
1 Press TITLE LIST, and switch to the
Playlist.
For details on switching to the Playlist,
see page 55.
2 Select a Playlist title containing the
chapter you want to edit, and press
,.
The sub-menu appears.
3 Select “Edit,” and press ENTER.
4 Select “Chapter Edit,” and press
ENTER.
5 Select “Erase/Move.”
6 Select a chapter using </,, and
press ENTER.
7 Select “Move,” and press ENTER.
8 Select a new location for the chapter
using </,, and press ENTER.
The chapter moves to the new location.
Erasing and Editing
61
Page 62

Dubbing (HDD y DVD)
Before Dubbing
In this section, “dubbing” refers to “copying
a recorded title on the internal hard disk
drive (HDD) to another disc, or vice versa.”
You can dub a playing title using the HDD/
DVD DUB button (see “HDD/DVD
Dubbing” on page 63) or you can select to
dub multiple titles all at once (see “Dubbing
Using Dubbing List” on page 63). You can
also dub an entire DVD disc to make a
backup copy (see “Making a Backup Disc
(DVD Backup)” on page 66).
Before you start, read the following
precautions, which are common to all
dubbing methods.
Before you start…
• You cannot record both the main and sub
sound on the HDD (when “HDD
Recording Format” is set to “Video Mode
On” in the “Recording” setup),
DVD+RWs, DVD-RWs (Video mode),
DVD+Rs, or DVD-Rs (Video mode). For
bilingual programmes, set “Bilingual
Recording” to either “A/L” (default) or “B/
R” in the “Audio In” setup (page 104).
About HDD Recording format, see
page 108.
• A title name in the dubbing source is
dubbed. However, only up to 40 characters
of a title name are dubbed when dubbing
from the HDD to a DVD+RW/DVD-RW
(Video mode)/DVD+R/DVD-R (Video
mode).
• The chapter marks in the dubbing source
are dubbed. The position of chapter marks
may be slightly changed from the original.
However, the chapter marks in the dubbing
source are not retained in the dubbed title
when dubbing to a DVD-RW/DVD-R
(Video mode), DVD+RW, or DVD+R at
normal speed. The chapter marks are
automatically inserted according to the
“Auto Chapter (Video)” and “Auto
Chapter (DVD+R/+RW)” settings in the
“Recording” setup (page 108).
• The “Set Thumbnail” setting in the
dubbing source is dubbed as a thumbnail
picture marker (except when dubbing from
a DVD+RW/DVD-RW (Video mode)/
DVD+R/DVD-R (Video mode)). The
position of thumbnail picture markers may
be slightly changed from the original.
z Hint
When you dub a Playlist title, it is recorded as an
Original title.
b Notes
• You cannot make a recording while dubbing.
• Before playing a dubbed disc on other DVD
equipment, finalise the disc (page 37, 64).
• You cannot dub from DVD VIDEOs to the
HDD.
• Titles containing mixed aspect ratios cannot be
dubbed to a DVD+RW/DVD+R/DVD-RW/
DVD-R (Video mode) using the HDD/DVD
DUB button.
• Titles over 8 hours cannot be dubbed to singlelayer DVD+RWs/DVD+Rs.
• Low resolution (SEP through LP modes) 16:9
size titles cannot be dubbed to a DVD+RW/
DVD+R/DVD-RW/DVD-R (Video mode).
• Titles recorded in Dolby Digital 5.1 ch audio are
down-converted to 2-channel audio when
dubbed at normal speed (“Real time” dubbing).
• About the “Move” function, see page 127.
62
Page 63

HDD/DVD Dubbing
Dubbing Using Dubbing
+
-
HDD
-
RVR-R
You can dub a single title by pressing the
HDD/DVD DUB button during playback.
You can also dub from finalised DVD-RWs/
DVD-Rs (Video mode) to the HDD.
RW
Video
RWVR-RW
Video
+
R
1 Start playback of a title.
For playing a title, see “Playing” on
page 47.
2 Press HDD/DVD DUB.
The recorder starts dubbing the current
playing title from the beginning.
The recorder turns off automatically
when you do not use the recorder for
more than 20 minutes after the dubbing
has finished.
To cancel dubbing
Press and hold HDD/DVD DUB for more
than one second.
When dubbing is stopped partway, no part of
the title will be moved to the dubbing target.
However, note that this will decrease the free
space for DVD+Rs/DVD-Rs.
About dubbing mode
Titles on the HDD are dubbed to a disc at
high speed (“High-Speed” dubbing).
Titles on a disc are dubbed to the HDD at
normal speed (“Real time” dubbing).
List
+
-
-
RW
R
RWVR-RW
Video
HDD
-
RVR
You can select the titles you want to dub
using Dubbing List. You can also edit titles
before dubbing without changing the
original titles.
Video
+
R
1 Press SYSTEM MENU.
The System Menu appears.
2 Select “Dubbing,” and press ENTER.
3 Select a dubbing direction, and press
ENTER.
To dub titles from the HDD to a disc,
select “HDD -> DVD.”
To dub titles from a disc to the HDD,
select “DVD/CD -> HDD.”
4 Select “Create New Dubbing List,”
and press ENTER.
The Dubbing List appears.
• If you have previously saved a
Dubbing List and want to resume
editing it, select “Use Previous
Dubbing List,” and go to step 7.
Dubbing (HDD y DVD)
For the minimum required time for “HighSpeed” dubbing, see page 127.
To convert the recording mode (only
when dubbing from a disc to the HDD)
Before step 1, press REC MODE to select
the recording mode.
b Note
You cannot use the HDD/DVD DUB button in the
following cases. Dub the title using Dubbing List
(page 63).
– When dubbing the title recorded in MN6 mode
or longer duration mode to a DVD+RW/
DVD+R.
– Wh en dubbing the title recorded in HQ+ mode to
a DVD.
A Direction of dubbing
B Total number of titles to be
dubbed
,continued
63
Page 64

C Dubbing step number
Display 1: Select a title you want to
dub (the “Select Titles” display).
Display 2: Edit a title (the “Title
Edit” display).
Display 3: Confirm the settings and
start dubbing (the “Start Dubbing”
display).
D Total size of the selected titles and
available space on the disc to be
dubbed (approximate)
E Selected title’s thumbnail picture
5 Select a title, and press ENTER.
The selected title changes colour.
When you select “HDD -> DVD” in step
3, you can change the title order or
search for a title by genre (see “3.
Playing the Recorded Programme (Title
List)” on page 31).
6 Repeat step 5 to select all of the titles
in the order you want to dub.
7 Select “Next” using ,, and press
ENTER.
The “Title Edit” display appears.
For details about editing, see “To edit
titles on the Dubbing List” on page 65.
8 Select “Next” using ,, and press
ENTER.
The “Start Dubbing” display appears.
9 Select an option using M/m, and
press ENTER.
The options differ depending on the
dubbing direction or disc type.
“Recording Mode”: Changes the
dubbing mode of all selected titles at a
time using M/m (page 124).
“Input Disc Name”: Changes the disc
name (page 34).
“Finalise”: Select “Yes” to finalise a
disc automatically after dubbing (DVDRW/DVD-R (Video mode), or
DVD+R).
10
Select “Start Dubbing,” and press
ENTER.
When you set “Finalise” to “Yes” in step
9, select the title menu style, and press
ENTER.
The recorder turns off automatically
when you do not use the recorder for
more than 20 minutes after the dubbing
has finished.
To cancel dubbing
Press and hold HDD/DVD DUB for more
than one second.
When dubbing (Move) is stopped partway,
no part of the title will be moved to the
dubbing target. However, note that this will
decrease the free space for DVD+Rs/DVDRs.
64
About dubbing mode
“ ” appears next to the title that can be
dubbed at high speed (“High-Speed”
dubbing) in the “Title Edit” display. The
following titles are dubbed at normal speed
(“Real time” dubbing).
– Titles containing both main and sub
sounds (except DVD-RWs/DVD-Rs (VR
mode)).
– Titles recorded in mixed picture size (4:3
and 16:9, etc.) (except for DVD-RWs/
DVD-Rs (VR mode)).
– Titles recorded on DVD+RWs/DVD-RWs
(Video mode)/DVD+R/DVD-R (Video
mode).
For the minimum required time for “HighSpeed” dubbing, see page 127.
Page 65

To edit titles on the Dubbing List
1 Follow steps 1 to 7 of “Dubbing Using
Dubbing List” on page 63.
The “Title Edit” display appears.
2 Select a title you want to edit, and press
ENTER.
The sub-menu appears.
3 Select an option, and press ENTER.
The options differ depending on the
dubbing direction or disc type.
“Erase”: Erases the selected title.
“Title Name”: Names or renames a title
(page 34).
“A-B Erase”: Erases the section of the
title (page 57).
“Move”: Changes the order of titles
(page 60).
“Preview”: Allows you to check the
content of a title.
“Divide”: Divides a title into two titles
(page 57).
“Combine”: Combines two titles
(page 60).
“Chapter Edit”: Edits chapters
(page 58).
“Set Thumbnail”: Changes the title’s
thumbnail frame that appears in the Title
List (page 32).
“Recording Mode”: Sets the picture
quality of the dubbing.
“Bilingual”: Sets how a bilingual audio
programme is dubbed.
“Cancel”: Exits the sub-menu.
4 Repeat steps 2 and 3 to edit all of the
titles.
5 Go to step 8 of “Dubbing Using
Dubbing List” on page 63 to dub edited
titles.
b Notes
• The Dubbing List you created remains after
dubbing. To edit the existing Dubbing List,
select “Use Previous Dubbing List” in step 4.
The Dubbing List is cleared when:
– you change “Input Line System” setting in the
“Basic” setup (page 98).
– you reset the recorder (page 120).
– you open the disc tray (except when dubbing
from the HDD).
– you edit the titles on a disc (except when
dubbing from the HDD).
– yo u switch the Title List to Origi nal or Playlist
(when dubbing from DVD-RWs/DVD-Rs in
VR mode only).
– you finalise the disc.
• The “seams” that are left over from editing may
remain on the disc after dubbing to DVD+RWs/
DVD-RWs (Video mode)/DVD+Rs/DVD-Rs
(Video mode).
• Finalisation is cancelled if a timer recording
starts, even if you set “Finalise” to “Yes” in step
9.
Dubbing (HDD y DVD)
65
Page 66

Making a Backup Disc (DVD Backup)
+
-
RW
RW
You can dub all of the contents on a finalised
DVD+RW/DVD+R or finalised DVD-RW/
DVD-R (Video mode) to another recordable
DVD+RW/DVD-RW or unused DVD+R/
DVD-R via the HDD as a backup copy.
b Note
Backup discs of unfinalised discs cannot be made.
Video
+
-
R
Video
R
1 Press SYSTEM MENU.
The System Menu appears.
2 Select “Dubbing,” and press ENTER.
3 Select “DVD Backup,” and press
ENTER.
4 Select “Start new DVD Backup,” and
press ENTER.
• If you have previously dubbed backup
data to the HDD, select “Resume
writing data,” and go to step 7.
5 Insert the DVD you are going to make
a backup of.
6 Select “Start,” and press ENTER.
The recorder starts dubbing all of the
contents on a DVD to the HDD.
7 Press Z (open/close), and replace
the DVD with a recordable DVD+RW/
DVD-RW or an unused DVD+R/DVDR.
To make a backup disc of DVD+RWs/
DVD+Rs, insert a recordable
DVD+RW or unused DVD+R.
To make a backup disc of DVD-RWs/
DVD-Rs, insert a recordable DVD-RW
or unused DVD-R.
8 Select “Start,” and press ENTER.
The recorder starts “High-Speed”
dubbing the contents that were dubbed
to the HDD in step 6.
9 Select “Cancel,” and press ENTER.
The disc is automatically finalised.
• To make another backup disc, replace
discs, select “Start,” and press
ENTER.
10
Select “Yes” or “No,” and press
ENTER.
To erase the backup data on the HDD,
select “Yes.”
To make another backup disc later,
select “No.”
The recorder turns off automatically
when you do not use the recorder for
more than 20 minutes after the dubbing
has finished.
To display the dubbing information
Press DISPLAY while dubbing.
To cancel DVD backup during dubbing
Press and hold HDD/DVD DUB for more
than one second.
To erase backup data on the HDD
1 Select “Erase back-up data” in step 4,
and press ENTER.
The display asks for confirmation.
2 Select “Yes,” and press ENTER.
b Notes
• When dubbing to a DVD+R/DVD-R is stopped
partway in step 8, you cannot play or record on
the disc. However, a DVD+RW/DVD-RW can
be used again after it is reformatted.
• You cannot make a backup disc of DVD+R DLs/
DVD-R DLs.
• You may not use the “DVD Backup” function
depending on the recording quality or physical
condition of the disc, or characteristics of the
recording device and authoring software.
66
Page 67

HDD Camcorder Dubbing
Before HDD Camcorder Dubbing
You can dub the contents of a Sony HDD
camcorder to the hard disk drive of the
recorder via the USB jack on the front panel.
Methods to dub from the HDD camcorder
include:
• One-Touch Dubbing (Incremental
Dubbing)
• Dubbing using the on-screen display
(Incremental Dubbing/Full Dubbing)
Follow the instructions in “Preparing for
HDD camcorder dubbing,” and then move
on to the section on dubbing.
z Hints
• If you want to dub by way of the LINE IN jacks,
see “Recording from Connected Equipment” on
page 45.
• If you want to record the contents of the HDD
camcorder on a DVD, dub them to the HDD of
the recorder first, and then edit the title on the
HDD and dub it to a DVD.
• Parts finished dubbing remain on the recorder
when the HDD space of the recorder becomes
full or you stop dubbing partway.
• Dolby Digital 5.1 ch audio recorded in the HDD
camcorder can be dubbed to the recorder in the
same format, without down-conversion.
b Notes
• No timer recordings or other operations are
available when dubbing from the HDD
camcorder.
• The supported device is Sony HDD SD
(standard definition) camcorder released in or
before April 2008.
• The recorder does not support the AVCHD
format (HD (high definition) image quality).
You can dub MPEG-2 format images (SD
(standard definition) images) only.
• When the HDD camcorder contains still images
and moving images, only moving images can be
dubbed to the recorder.
• Playlist made with the HDD camcorder cannot
be dubbed to the recorder.
• You cannot set the recording mode for HDD
camcorder dubbing.
• When dubbing from the HDD camcorder, the
recorder recognises and uses the shooting date
and time information of the HDD camcorder. If
the HDD camcorder’s clock is incorrect, the
recorder may not dub the contents properly. Set
the HDD camcorder’s clock correctly before
shooting.
• Images of the HDD camcorder are not displayed
when dubbing.
• You cannot record date, time, or the contents of
the HDD camcorder memory onto the recorder.
• If you dub the contents recorded in high quality
mode in the HDD camcorder to the recorder, it
may take longer to finish dubbing than the
recording.
• Set the recorder and HDD camcorder to the same
colour system.
How titles and chapters are created
In each dubbing operation, the contents
dubbed to the recorder are divided into titles
by the shooting date. If the date has been
changed to the next day during one shooting
session, the shot image is included in the title
of the date when the shooting session started.
The title is divided into chapters. Each
shooting session on the HDD camcorder
becomes a chapter.
z Hint
The title n ames are automatically l abelled as “USB
*** (start time of the first shooting session).”
b Note
The dubbed contents are divided into titles in the
following cases, even if they were all recorded in
the same day:
– When the total recording time exceeds 12 hours.
– When the total number of scenes exceeds 99.
HDD Camcorder Dubbing
,continued
67
Page 68

Preparing for HDD camcorder dubbing
Connect an HDD camcorder to the USB jack
on the recorder.
Refer as well to the instruction manual
supplied with the HDD camcorder before
connecting.
1 Turn on your HDD camcorder and the
recorder.
2 Connect your HDD camcorder to the
USB jack on the front panel.
DVD recorder
to USB jack
USB cable
(not supplied)
b Notes
• Connect the HDD camcorder directly to the
recorder.
• Do not disconnect the USB cable while dubbing.
• When signal input to the USB jack (type A) on
the front panel or recorder operation cannot be
performed correctly when using an HDD
camcorder, connect the HDD camcorder to the
LINE IN jacks and follow the instructions of
“Recording from Connected Equipment” on
page 45.
• The recorder can recognise and store the
shooting date and time information of up to 10
HDD camcorders. If you connect 11 or more
HDD camcorders, one-touch dubbing and
“Incremental Dubbing” cannot be made
properly.
USB output
HDD camcorder
: Signal flow
3 Set your HDD camcorder to the USB
connection mode (example:
“ COMPUTER” or “ USB
CONNECT”).
For details, refer to the operating
instructions supplied with the HDD
camcorder.
To restart the connected USB device
Select “Restart USB Device” of “USB” in
the “Options 2” setup (page 113).
68
Page 69

One-Touch Dubbing from
Dubbing from HDD
HDD Camcorder (ONETOUCH DUB)
HDD
You can dub contents of your HDD
camcorder onto the HDD of the recorder
with a single press of the ONE-TOUCH
DUB button on the recorder.
When dubbing from the HDD camcorder for
the first time, all of the contents are dubbed
to the recorder. The next time, only newly
shot sessions that have not been dubbed yet
are dubbed to the recorder.
Follow steps 1 to 3 of “Preparing for HDD
camcorder dubbing” on page 68, and
press ONE-TOUCH DUB on the recorder.
The recorder starts dubbing the contents on
the HDD camcorder to the HDD Title List of
the recorder.
The recorder turns off automatically if you
do not use the recorder for more than
20 minutes after the dubbing has finished.
To stop during dubbing
Press x REC STOP.
Note that it may take a few seconds for the
recorder to stop dubbing.
b Notes
• The one-touch dubbing button on the HDD
camcorder does not function with the recorder.
• In One-Touch Dubbing, the contents that have
already been dubbed to the recorder cannot be
dubbed again, even after you erase them from
the recorder. To dub the same contents to the
recorder again, dub the entire contents of the
HDD camcorder (see “Dubbing from HDD
Camcorder Using the On-Screen Display (HDDCam Dubbing)” on page 69).
• Data about the dubbed contents are all cleared
when you reset the recorder (page 120).
• If the USB jack and the DV IN jack on the
recorder are both connected to a compatible
digital video camera, One-Touch Dubbing is
performed via the USB jack.
Camcorder Using the On-
Screen Display (HDD-
Cam Dubbing)
HDD
You can dub the contents of your HDD
camcorder onto the HDD of the recorder
using the on-screen display.
Methods to dub from the HDD camcorder
include:
• Incremental Dubbing
The recorder automatically detects the
contents recorded on the connected HDD
camcorder, and starts dubbing from the
contents following the last dubbed
contents if there are contents that have
already been dubbed.
• Full Dubbing
The recorder dubs all contents of the HDD
camcorder, including the contents that
have already been dubbed to the recorder.
1 Follow steps 1 to 3 of “Preparing for
HDD camcorder dubbing” on
page 68.
2 Press SYSTEM MENU.
The System Menu appears.
3 Select “HDD-Cam/DV,” and press
ENTER.
4 Select “HDD-Cam Dubbing,” and
press ENTER.
5 Select “Incremental Dubbing” or
“Full Dubbing,” and press ENTER.
To dub newly shot contents only, select
“Incremental Dubbing.”
To dub all contents of the HDD
camcorder, select “Full Dubbing.”
The display asks for confirmation.
HDD Camcorder Dubbing
,continued
69
Page 70

6 Select “Yes,” and press ENTER.
The recorder starts dubbing the contents
on the HDD camcorder to the HDD Title
List of the recorder.
The recorder turns off automatically if
you do not use the recorder for more
than 20 minutes after the dubbing has
finished.
To stop dubbing
Press x REC STOP. Or, select “Exit” in
step 6, and press ENTER.
b Note
With “Incremental Dubbing,” the contents that
have already been dubbed to the recorder are not
dubbed again, even after you erase them from the
recorder. You can dub only newly shot contents.
70
Page 71

DV Camcorder Dubbing
z Hint
If you plan to do additional editing on a disc after
the initial dub, use the DV IN jack and record on a
DVD-RW/DVD-R (VR mode) or HDD.
Before DV Camcorder Dubbing
This section explains dubbing with a DV
camcorder and playing the contents of a DV
camcorder via the DV IN jack on the front
panel. If you want to dub by way of the
LINE IN jacks, see “Recording from
Connected Equipment” on page 45.
The DV IN jack on this recorder conforms to
the i.LINK standard.
Follow the instructions in “Preparing for DV
camcorder dubbing,” and then move on to
the section on dubbing. For more
information about i.LINK, see “About
i.LINK” on page 131.
How chapters are created
The contents dubbed to the HDD or DVD
become a single title. This title is divided
into chapters. When dubbing to the HDD or
a DVD-RW/DVD-R (VR mode) and when
“Auto Chapter (HDD/VR)” is set to “On” in
the “Recording” setup (page 108), each
shooting session on the tape becomes a
chapter on the disc. For other discs, the
recorder divides the title into chapters
according to the “Auto Chapter (Video)” or
“Auto Chapter (DVD+R/+RW)” setting in
the “Recording” setup (page 108).
b Notes
• You cannot make a recording while DV
camcorder dubbing.
• The DV IN jack is for input only. It will not
output signals.
• You cannot use the DV IN jack when:
– signal input to the DV IN jack on the front
panel or recorder operation cannot be
performed correctly when using a digital video
camera (see “About i.LINK” on page 131).
Connect the camera to the LINE IN jacks and
follow the instructions of “Recording from
Connected Equipment” on page 45.
– the input signal is not in DVC-SD format. Do
not connect a MICRO MV format digi tal video
camera even if it has an i.LINK jack.
– the images on the tape contain copy protection
signals, which limit recording.
• If you want to play DVDs dubbed from a DV
camcorder on other DVD equipment, fina lise the
disc (page 37).
• Set the recorder and DV camcorder to the same
colour system (page 98).
Hookups
DVD recorder
to DV IN
DV Camcorder Dubbing
Preparing for DV camcorder dubbing
You can connect a DV camcorder to the DV
IN jack on the recorder to record or edit from
a DV/Digital8 format tape. Operation is
straightforward because the recorder will
fast forward and rewind the tape for you –
you do not need to operate your DV
camcorder.
Refer as well to the instruction manual
supplied with the DV camcorder before
connecting.
i.LINK cable
(not supplied)
: Signal flow
DV output
DV camcorder
,continued
71
Page 72

1 Press HDD or DVD to select the
recording destination.
If you select DVD, insert a disc (see “1.
Inserting a Disc” on page 29).
2 Insert the source DV/Digital8 format
tape into your DV camcorder.
For the recorder to record or edit, your
DV camcorder must be set to video
playback mode.
3 Press REC MODE on the remote
repeatedly to select the recording
mode.
The recording mode changes as follows:
For details about the recording mode,
see page 124. Note that you cannot
select further manual recording mode
options.
4 Set the “External Audio” setting in
the “Audio In” setup (page 104).
5 Set the “DV Input” setting in the
“Audio In” setup (page 104).
You are ready to start dubbing. Select
one of the dubbing methods on the
following pages.
To playback DV/Digital8 format tape
You can check the contents of DV/Digital8
format tape before dubbing. For details, see
“Playing from a DV Camcorder” on
page 74.
b Notes
• You cannot connect more than one piece of
digital video equipment to the recorder.
• You cannot control the recorder using another
device or another recorder of the same model.
• You cannot record date, time, or the contents of
the cassette memory onto the disc.
• If you record from a DV/Digital8 format tape
that is recorded in multiple sound tracks, such as
a tape with multiple sampling frequencies
(48 kHz, 44.1 kHz, or 32 kHz), no sound or an
unnatural sound will be output when playing
back the sampling frequency switch point on the
disc.
• In order to use this recorder’s “Auto Chapter”
setting (page 71), be sure to correctly set the
clock on your DV camcorder before shooting.
• The recorded picture may be momentarily
affected or the start and end points of a title may
be different from what you have set if the source
DV/Digital8 format tape is in any of the
following conditions. In this case, connect your
digital video camera to the LINE IN jacks and
follow the instructions of “Recording from
Connected Equipment” (page 45).
– There is a blank space in the recorded portion
of the tape.
– The tape’s time code is not sequential.
– If the picture size or the recording mode on the
tape being dubbed changes.
• A blank or black coloured screen will be dubbed
when the recorder is set to a different colour
system from the DV tape contents’ system. Set
“Input Line System” in the “Basic” setup to the
same colour system as the DV tape contents’
system (page 98).
72
Page 73

Dubbing an Entire DV
Dubbing Selected
Format Tape (DV OneTouch Dubbing)
+
-
-
RW
R
Video
RWVR-RW
HDD
-
RVR
You can record the entire contents of a DV/
Digital8 format tape onto a disc with a single
press of the ONE-TOUCH DUB button on
the recorder. The recorder controls the DV
camcorder for the whole process, and
completes the recording.
Follow steps 1 to 5 of “Preparing for DV
camcorder dubbing” on page 71, and
press ONE-TOUCH DUB on the recorder.
The recorder rewinds the tape and then starts
recording the tape contents.
After the recording is finished, the recorder
rewinds the tape in the DV camcorder, and
finalises the recorded disc (except DVDRW/DVD-R (VR mode)) automatically.
To stop during recording
Press and hold x REC STOP for more than
3 seconds.
Note that it may take a few seconds for the
recorder to stop recording.
b Notes
• When a blank space between the recordings on
the tape continues for more than two minutes,
DV One-Touch Dubbing ends automatically.
• The recorder will pause recording when there is
a blank space or an image containing copy
protection signals on the tape. The recorder will
resume recording automatically when receiving
a recordable signal.
• Finalisation is cancelled if a timer recording
starts (except for DVD-RW/DVD-R (VR
mode)).
• DV One-Touch Dubbing ends automatically
when there are images containing copy
protection signals at the beginning of the tape.
• When connecting digital video cameras to both
DV IN jack and USB jack, pressing the ONETOUCH DUB button starts dubbing from the
HDD camcorder. Disconnect the HDD
camcorder from the USB jack to dub from the
DV camcorder.
Video
+
R
Scenes (DV Manual
Dubbing)
+
-
HDD
-
-
RVR
You can select and dub scenes while playing
a DV/Digital8 format tape.
RW
R
RWVR-RW
Video
Video
+
R
1 Follow steps 1 to 5 of “Preparing for
DV camcorder dubbing” on page 71.
2 Press SYSTEM MENU.
The System Menu appears.
3 Select “HDD-Cam/DV,” and press
ENTER.
4 Select “DV Manual Dubbing,” and
press ENTER.
5 Select the recording destination,
“Record to Hard Disk Drive” or
“Record to DVD,” and press ENTER.
6 Press H.
The scene starts to play.
7 Find the point on the DV/Digital8
format tape that you want to start
dubbing from using m/M or c/
C, and press X.
8 Select “Start Rec.,” and press
ENTER.
The recorder starts dubbing.
9 Select “Pause Rec,” and press
ENTER.
The recorder pauses dubbing.
10
Repeat steps 6 to 9 to dub more
scenes.
11
Select “Stop Rec,” and press ENTER.
The selected scenes are dubbed as a
single title.
To exit “DV Manual Dubbing”
Press SYSTEM MENU.
DV Camcorder Dubbing
,continued
73
Page 74

z Hint
You can turn off the dubbing menu by pressing the
DISPLAY button during dubbing. Press the
DISPLAY button again to display the dubbing
menu.
Playing from a DV
Camcorder
b Note
You cannot set a scene to be shorter than one
second.
1 Connect your DV camcorder to the DV
IN jack on the front panel.
2 Press SYSTEM MENU.
The System Menu appears.
3 Select “HDD-Cam/DV,” and press
ENTER.
4 Select “DV Playback,” and press
ENTER.
5 Start playback on the DV camcorder.
Images from the DV camcorder appear
on your TV screen.
To cancel playback
Press SYSTEM MENU.
z Hint
You can dub the playing tape contents. During
playback, press HDD or DVD to select the
dubbing destination, and press z REC. To stop
dubbing, press x REC STOP.
74
Page 75

Music Jukebox
About Jukebox
There are two methods to use Jukebox:
connecting the USB device or copying audio
tracks to the HDD.
When using Jukebox, you can do following:
• Store audio tracks on the HDD.
• Play audio tracks using various play
modes.
• Label tracks, albums, or artists.
• Create a Playlist.
Notes on copying
• You cannot copy audio tracks on the HDD to
discs or USB devices.
• Some audio tracks may not be copied depending
on the file size.
• An artist name, album name, and MP3 audio
track name are copied, and albums and MP3
tracks are stored in each artist folder. However,
albums and MP3 audio tracks are stored in the
“Unknown” folder when their artist name cannot
be copied.
• Audio tracks from a CD are stored in the artist
folder labelled “Unknown.” Names are
automatically labelled; “A_* ****_F_*****” for
album, “A_*****_F_*****_T_*****” for
audio tracks.
• When copying is stopped partway, tracks that
have finished copying before you stop will
remain copied onto the HDD as an album.
You can check which albums have been copied
in the Music Jukebox list (page 77).
• No other operations are available when copying
audio tracks.
• W hile copying audio tracks, timer recordings a re
unavailable. If the timer is set during copying,
the recorder starts the timer recording after
copying is finished.
• Copy-protected CDs cannot be copied to the
HDD.
Preparing for Using
Jukebox
Connect a USB device to the USB jack on
the recorder, or copy audio tracks from the
connected USB device or CDs/DATA CDs/
DATA DVDs to the HDD.
Connecting the USB device
You can connect a USB device to the USB
jack on the recorder to listen to the MP3
audio tracks or copy to the HDD. Refer to
the operating instructions supplied with the
USB device before connecting.
DVD recorder
to USB jack
USB device
b Note
Some USB devices may not work with this
recorder.
Copying tracks or albums (USB t HDD)
You can copy up to 99 albums or 999 audio
tracks on the USB device to the HDD.
1 Connect the USB device to the USB
jack on the recorder (page 75).
2 Press SYSTEM MENU.
The System Menu appears.
3 Select “Music Jukebox,” and press
ENTER.
4 Select “Listen to Music from USB
Device,” and press ENTER.
The “Music Jukebox (USB)” appears.
5 Select an album to copy using M/m,
and press ,.
The sub-menu appears.
Music Jukebox
,continued
75
Page 76

6 Select “Edit” using M/m, and press
ENTER.
7 Select an item using M/m, and press
ENTER.
To copy all albums, select “Copy all to
HDD.”
To copy the selected albums, select
“Copy to HDD.”
The display asks for confirmation.
8 Select “Yes” using </,, and
press ENTER.
The albums are copied to the HDD.
• To copy more albums, repeat from
step 5.
To cancel copying
Press ENTER.
Copying audio tracks (DISC t HDD)
1 Insert a disc that you are going to
copy to the HDD.
2 Press SYSTEM MENU.
The System Menu appears.
3 Select “Dubbing,” and press ENTER.
4 Select “DVD/CD -> HDD” using M/m,
and press ENTER.
The copying starts.
To cancel copying
Press ENTER.
b Note
Before copying, select “CD” or “MP3” under
“Data Format” in the Title List (DVD/CD)
(page 48).
Copying tracks or albums on the HDD (HDD y HDD)
1 Press SYSTEM MENU.
The System Menu appears.
2 Select “Music Jukebox,” and press
ENTER.
3 Select “Listen to Music / Edit,” and
press ENTER.
The “Music Jukebox (HDD)” appears.
4 Select an artist using M/m, and press
ENTER.
5 Select an album using M/m, and
press ENTER.
If you want to copy the album, press ,
instead of ENTER, then go to step 7.
6 Select a track to copy using M/m, and
press ,.
The sub-menu appears.
7 Select “Edit” using M/m, and press
ENTER.
8 Select “Copy Album” or “Copy
Track” using M/m, and press ENTER.
9 Select a copy destination (an artist or
album) using M/m, and press ENTER.
The display asks for confirmation.
10
Select “Yes” using </,, and
press ENTER.
The albums or tracks are copied to the
HDD.
• To copy more tracks or albums, repeat
from step 4.
To cancel copying
Press ENTER.
76
Page 77

Playing Audio Tracks Using Jukebox/USB Device
1 Press SYSTEM MENU.
The System Menu appears.
2 Select “Music Jukebox,” and press
ENTER.
3 Select “Listen to Music / Edit” or
“Listen to Music from USB Device,”
and press ENTER.
To listen to the audio tracks on the
HDD, select “Listen to Music / Edit.”
To listen to the MP3 audio tracks from
the connected USB device, select
“Listen to Music from USB Device.”
The Music Jukebox list appears.
4 Select an artist, album, or track, and
press H.
(HDD only) To display an album list,
select an artist using M/m, and press
ENTER.
To display a track list, select an album
using M/m, and press ENTER.
Playback starts.
To stop playback
Press x (stop).
To return to the previous display
Press O RETURN. If you cannot return to
the artist list or album list using
O RETURN, see “To change the display
mode (Original list only)” on page 77.
To scroll the list display by page (Page
mode)
Press SUBTITLE (previous)/ANGLE (next)
while the Music Jukebox list is displayed.
Each time you press SUBTITLE (previous)/
ANGLE (next), the Music Jukebox list
changes to the previous/next page of the list.
To change the play information (HDD
only)
Press DISPLAY repeatedly.
Each time you press the button, information
below the artist/album/track list is changed.
About the Playlist and Original list (HDD
only)
You can switch the “Music Jukebox (HDD)”
to show tracks in Original list or Playlist.
1 Press < while the “Music Jukebox
(HDD)” is displayed.
2 Select “Play List” using M/m, and press
ENTER.
3 Select an item using M/m, and press
ENTER.
Item Display
Original Tracks in the Original list.
Play List 1
Play List 2
Play List 3
Play List 4
Favourites Tracks in order of
To change the display mode (Original list
only)
Tracks in each Playlist.
playback frequency. The
track that is most often
played is listed at the top.
1 Press < while the “Music Jukebox
(HDD)” is displayed.
2 Select “Display Mode” using M/m, and
press ENTER.
3 Select an item using M/m, and press
ENTER.
Item Display
Artist (HDD
only)
Album Album list appears.
Track Track list appears.
Artist list appears.
Music Jukebox
,continued
77
Page 78

Adding audio tracks to a Playlist (HDD only)
You can add audio tracks on the HDD to the
Playlist. You can add up to 25 audio tracks
to each Playlist.
1 After step 2 of “Playing Audio Tracks
Using Jukebox/USB Device,” select
“Listen to Music / Edit,” and press
ENTER.
Switch the display to the Original list
(page 77).
2 Select a track to add to the Playlist,
and press ,.
The sub-menu appears.
3 Select “Add to Play List,” and press
ENTER.
4 Select a Playlist, and press ENTER.
The track is added to the selected
Playlist.
5 Repeat steps 2 to 4 to select all of the
tracks you want to add to the Playlist.
• To check the Playlist tracks, switch to
the Playlist.
Playback options
Buttons Operations
./>
(previous/
next)
m/M
(fast
reverse/
fast
forward)
Goes to the next or previous
track when pressed during
playback.
Fast reverses/fast forwards the
disc when pressed during
playback.
Search speed changes as
follows:
fast reverse fast forward
m
FR1 Tt M
m
FR2 T Tt t M
When you press and hold the
button, fast forward/fast
reverse continues at the
selected speed until you
release the button.
To resume normal playback,
press H.
FF1
FF2
Buttons Operations
X (pause) Pauses playback.
To resume normal playback,
press H.
Playing repeatedly (Repeat)
You can repeatedly play tracks or a single
track.
1 Press , during playback.
If you are playing tracks on the HDD, go
to step 3.
2 (USB device only) Select “Play
Mode” using M/m, and press ENTER.
The “Play Mode” menu appears.
3 Select “Repeat” using M/m, and
press ENTER.
4 Select an item using M/m.
“Repeat Artist” (HDD only): repeats
tracks of the current artist.
“Repeat Album”: repeats the current
album.
“Repeat Track”: repeats the current
track.
“Repeat Play List” (HDD only): repeats
the current Playlist.
“Repeat Programme” (USB device
only): repeats the current programme
(page 79).
5 Press ENTER.
Repeat play starts.
To cancel Repeat play
Set “Repeat” to “Repeat Off” in step 4.
b Note
You can select “Repeat Programme” only during
Programme play.
78
Page 79

Creating your own programme (Programme) (USB device only)
You can play the contents of the connected
USB device in the order you want by
arranging the order of the tracks on the
connected USB device to create your own
programme. You can make a programme of
up to 24 tracks.
1 Press , while the “Music Jukebox
(USB)” is displayed.
2 Select “Play Mode” using M/m, and
press ENTER.
The “Play Mode” menu appears.
3 Select “Programme,” and press
ENTER.
4 Select “Input/Edit Programme,” and
press ENTER.
5 Select an album (example: Album 01)
using M/m, and press ,.
To cancel Programme play
Set “Programme” to “Cancel Programme
Play” in the “Play Mode” menu during
playback.
To erase the programme
Set “Programme” to “Erase Programme
List” in the “Play Mode” menu.
z Hints
• The programme you made remains after
Programme play finishes. To play the same
programme again, set “Programme” to “Start
Programme Play” in the “Play Mode” menu.
However, the programme is cleared after you
press [/1.
• You can repeat Programme play. During
Programme play, set “Repeat” to “Repeat
Programme” in the “Play Mode” menu
(page 78).
Music Jukebox
6 Select a track (example: Track 001)
using M/m, and press ENTER.
The track is programmed.
If you make a mistake, select the step
number (example: 01.) using </M/m,
and press CLEAR.
7 To programme other tracks, press
</M/m/, to select a step number,
and repeat steps 5 and 6.
8 Press H.
Programme play starts.
To stop Programme play
Press x (stop).
79
Page 80

Managing Audio Tracks on the Music Jukebox (HDD only)
You can erase or label artists/albums/tracks
on the HDD.
1 Press SYSTEM MENU.
The System Menu appears.
2 Select “Music Jukebox,” and press
ENTER.
3 Select “Listen to Music / Edit,” and
press ENTER.
The “Music Jukebox (HDD)” appears.
4 Select an artist, album, or track, and
press ,.
To display an album list, select an artist
using M/m, and press ENTER.
To display a track list, select an album
using M/m, and press ENTER.
5 Select an option, and press ENTER.
“Erase”: Erases the selected artist/
album/track. Select “Yes” when asked
for confirmation.
“Edit”: Allows you to make the
following edits.
• “Artist Name”: Allows you to enter or
re-enter an artist name (page 34).
• “Album Name”: Allows you to enter
or re-enter an album name (page 34).
• “Track Name”: Allows you to enter or
re-enter a track name (page 34).
• “Copy Album”: Allows you to copy an
album (page 76).
• “Copy Track”: Allows you to copy a
track (page 76).
“Repeat”: Repeats playback of artist/
album/track (page 78).
“Add to Play List”: Allows you to add
tracks to a Playlist (page 78).
“Play List Name”: Allows you to enter
or re-enter a Playlist name (up to 12
characters) (page 34).
b Note
You cannot edit audio tracks on the connected
USB device.
80
Page 81

Photo Album
About the “Photo Album” Function
The “Photo Album” function enables you to
do following.
• Store JPEG image files on the HDD.
• View JPEG image files on the HDD,
DATA DVDs (DVD-RWs/DVD-Rs)/
DATA CDs, or connected USB device.
• Edit JPEG image files.
• Print JPEG image files.
• Copy JPEG image files and slideshow to
DVD-RWs/DVD-Rs.
• Create a slideshow with your favourite
music and graphic effects (x-Pict Story).
Preparing for Using the “Photo Album” Function
Connect a USB device to the USB jack on
the recorder, or copy JPEG image files from
DATA CDs/DATA DVDs or the connected
USB device to the HDD.
Connecting the USB device
You can connect a USB device (digital still
camera, Memory card reader, and USB
memory) to the USB jack on the recorder to
view JPEG image files or copy to the HDD.
Refer to the operating instructions supplied
with the USB device before connecting.
DVD recorder
to USB jack
Photo Album
USB cable (not supplied)
USB output
Digital still camera
: Signal flow
b Note
Some USB devices may not work with this
recorder.
Copying JPEG image files to the HDD (DISC/USB t HDD)
1 Insert a disc that you are going to
copy to the HDD or connect the USB
device to the USB jack on the
recorder.
2 Press SYSTEM MENU.
The System Menu appears.
,continued
81
Page 82

3 Select “Photo Album,” and press
ENTER.
The “Photo Album” menu appears.
4 Select the item, and press ENTER.
To copy from DATA CDs/DATA
DVDs (DVD-RWs/DVD-Rs), select
“View Photos on a DVD/CD.”
To copy from the connected USB
device, select “View Photos on a USB
Device.”
The “Photo Album” list appears.
Example: DVD/CD
5 Select an album or JPEG image file
using M/m, and press ,.
The sub-menu appears.
6 Select “Multi-Mode” using M/m, and
press ENTER.
• To copy all the albums and JPEG
image files, select “Copy all to HDD,”
and go to step 11.
• To copy the album or file selected in
step 5 only, select “Copy to HDD,”
and go to step 11.
7 Select an album or JPEG image file,
and press ENTER.
A check mark appears in the check box
by the selected item.
• To clear the check mark, press ENTER
again.
• To clear all check marks, press , to
select “Single-Mode” from the submenu.
8 Repeat step 7 to select all of the
albums or JPEG image files you want
to copy.
9 Press ,.
The sub-menu appears.
10
Select “Copy to HDD,” and press
ENTER.
The display asks for confirmation.
11
Select “Yes,” and press ENTER.
• To cancel, select “No.”
Copying all JPEG image files from the connected USB device (USB t DVD-RW/ DVD-R)
1 Connect the USB device to the USB
jack on the recorder.
2 Insert a blank DVD-RW/DVD-R (Video
mode).
3 Press SYSTEM MENU.
The System Menu appears.
4 Select “Photo Album,” and press
ENTER.
The “Photo Album” menu appears.
5 Select “Copy Photos from a Digital
Camera,” and press ENTER.
The display asks for confirmation.
6 Select “Yes,” and press ENTER.
• To cancel, select “No.”
z Hint
See “7. Reformatting a Disc” (page 39) to format
DVD-RWs/DVD-Rs in Video mode.
b Notes
• During copying, other operations cannot be
performed.
• While copying JPEG image files, timer
recordings are unavailable. If the timer is set
during copying, the recorder starts the timer
recording after copying is finished.
82
Page 83

Copying JPEG image files or albums on the HDD (HDD y HDD)
1 Press SYSTEM MENU.
The System Menu appears.
2 Select “Photo Album,” and press
ENTER.
The “Photo Album” menu appears.
3 Select “View/Edit Photos on the
HDD,” and press ENTER.
The “Photo Album” list appears.
4 Select an album using M/m.
To copy the selected album, go to step 6.
To copy a JPEG image file, go to step 5.
5 Press ENTER, and select a JPEG
image file using M/m.
6 Press ,.
The sub-menu appears.
7 Select “Multi-Mode” using M/m, and
press ENTER.
• To copy the selected album, select
“Copy Album Contents” in “Album
Options,” and go to step 12.
• To copy the selected files, select
“Copy” in “File Options,” and go to
step 12.
8 Select an album or JPEG image file,
and press ENTER.
A check mark appears in the check box
by the selected item.
• To clear the check mark, press ENTER
again.
• To clear all check marks, press , to
select “Single-Mode” from the submenu.
9 Repeat step 8 to select all of the
albums or JPEG image files you want
to copy.
10
Press ,.
The sub-menu appears.
11
Select “Copy,” and press ENTER.
12
Select the destination album using
M/m, and press ENTER.
The display asks for confirmation.
13
Select “Yes,” and press ENTER.
• To cancel, select “No.”
b Note
Albums or JPEG image files are not copied to the
HDD in the following cases.
– when the HDD disc space is insufficient for
copying.
– when there are already the maximum number of
files and/or albums on the HDD.
Copying JPEG image albums to a disc (HDD t DVD-RW/ DVD-R)
You can copy the edited JPEG image albums
to a DVD-RW/DVD-R (Video mode).
A slideshow is also recorded to the disc as a
video file. You can play the slideshow on
other DVD equipment that may not be
compatible with the playback of JPEG
image files.
1 Insert a DVD-RW/DVD-R (in Video
mode).
2 Press SYSTEM MENU.
The System Menu appears.
3 Select “Photo Album,” and press
ENTER.
The “Photo Album” menu appears.
4 Select “View/Edit Photos on the
HDD,” and press ENTER.
The “Photo Album” list appears.
5 Select an album using M/m, and
press ,.
The sub-menu appears.
6 Select “Multi-Mode,” and press
ENTER.
To copy the album selected in step 5
only, go to step 10.
7 Select an album, and press ENTER.
A check mark appears in the check box
by the selected item.
• To clear the check mark, press ENTER
again.
• To clear all check marks, press , to
select “Single-Mode” from the submenu.
,continued
Photo Album
83
Page 84

8 Repeat step 7 to select all of the
albums you want to copy.
9 Press ,.
The sub-menu appears.
10
Select “Copy to DVD,” and press
ENTER.
The display asks for confirmation.
11
Select “Yes,” and press ENTER.
The selected JPEG image albums are
copied in the “PICTURE” folder on the
disc.
The JPEG image album names are
automatically labelled as
“***ALBUM.”
If you want to play the disc on other
DVD equipment, finalise the disc
(page 37).
• To cancel, select “No.”
z Hints
• See “7. Reformatting a Disc” (page 39) to format
DVD-RWs/DVD-Rs in Video mode.
• See the “Photo Album” list to check which
albums have been copied (page 85).
b Notes
• You may not be able to play the slideshow
depending on DVD equipment.
• You cannot copy JPEG image files to a
recordable DVD which has been recorded using
other recorders/devices.
• DATA DVDs finalised on this recorder may not
be able to play on other equipment.
• You can record up to 99 slideshows to a disc.
• When copying an album containing more than
99 JPEG image files to a disc, slideshows will be
created with every 99 JPEG image files and
recorded to a disc.
• For DVDs, the available disc space does not
increase even if you erase slideshows.
Copying JPEG image files to a disc (HDD t DVD-RW/DVD-R)
You can copy the edited JPEG image files to
a DVD-RW/DVD-R (Video mode).
A slideshow is also recorded to the disc as a
video file. You can play the slideshow on
other DVD equipment that may not be
compatible with the playback of JPEG
image files.
1 Follow steps 1 to 4 of “Copying JPEG
image albums to a disc
(HDD t DVD-RW/DVD-R)” on
page 83.
The “Photo Album” list appears.
2 Select an album using M/m, and
press ENTER.
The photo list appears.
3 Select a JPEG image file using M/m,
and press ,.
The sub-menu appears.
4 Select “Multi-Mode,” and press
ENTER.
To copy the JPEG image file selected in
step 3 only, go to step 8.
5 Select a JPEG image file, and press
ENTER.
A check mark appears in the check box
by the selected item.
• To clear the check mark, press ENTER
again.
• To clear all check marks, press , to
select “Single-Mode” from the submenu.
6 Repeat step 5 to select all of the JPEG
image files you want to copy.
7 Press ,.
The sub-menu appears.
8 Select “Copy to DVD,” and press
ENTER.
The display asks for confirmation.
84
Page 85

9 Select “Yes,” and press ENTER.
The selected JPEG image files are
copied in the “PICTURE” folder on the
disc.
The JPEG image file names are
automatically labelled as “PHOT****.”
If you want to play the disc on other
DVD equipment, finalise the disc
(page 37).
• To cancel, select “No.”
To select a JPEG image file from a
different album
1 Switch to the album list in step 5.
For instructions, see “To switch
between the album list and JPEG image
file list” on page 87.
2 Select an album using M/m, and press
<.
3 Switch to the JPEG image file list.
For instructions, see “To switch
between the album list and JPEG image
file list” on page 87.
4 Select a JPEG image file using M/m, and
press ENTER.
z Hints
• See “7. Reformatting a Disc” (page 39) to format
DVD-RWs/DVD-Rs in Video mode.
• See the “Photo Album” list to check which JPEG
image files have been copied (page 85).
b Notes
• You may not be able to play the slideshow
depending on DVD equipment.
• You cannot copy JPEG image files to a
recordable DVD which has been recorded using
other recorders/devices.
• DATA DVDs finalised on this recorder may not
be able to play on other equipment.
• You can record up to 99 slideshows to a disc.
• For DVDs, the available disc space does not
increase even if you erase slideshows.
Using the “Photo Album” List
You can play JPEG image files on the HDD,
DATA DVDs/DATA CDs, or connected
USB device using the “Photo Album” list.
1 Press SYSTEM MENU.
The System Menu appears.
2 Select “Photo Album,” and press
ENTER.
The “Photo Album” menu appears.
3 Select the item, and press ENTER.
To play JPEG image files on the HDD,
select “View/Edit Photos on the HDD.”
To play JPEG image files on DATA
CDs/DATA DVDs, select “View Photos
on a DVD/CD.”
To play JPEG image files on the
connected USB device, select “View
Photos on a USB Device.”
The “Photo Album” list appears.
4 Select an album using M/m, and
press ENTER.
To show the 4-Photo List or 1-Photo
List, press < to select “Title View,”
and press ENTER, then select “4
Photos” or “1 Photo” using M/m, and
press ENTER.
Photo Album
,continued
85
Page 86

12-Photo List (Example: HDD)
A Album name
B Album size
C Sub-menu:
Press , to display the sub-menu.
The sub-menu displays options
applicable only to the selected item. The
displayed options differ depending upon
the model, situation, and disc type.
For details about the sub-menu options,
see “Managing JPEG Image Files on the
HDD” on page 90.
4-Photo List
1-Photo List
m
m
Sub-menu
D Scroll bar:
Appears when all of the JPEG image
files do not fit on the list. To view the
hidden JPEG image files, press M/m.
E Album and JPEG image file
information:
Displays the image, JPEG image file
number, recording date and time, JPEG
image file name, and JPEG image file
size. “ ” appears for protected JPEG
image files.
F Remaining space on the HDD
To scroll the list display by page (Page
mode)
Press ./> while the “Photo Album”
list is displayed. Each time you press .
>, the “Photo Album” list changes to the
previous/next page of albums/JPEG image
files.
/
86
Page 87

To switch between the album list and
JPEG image file list
1 Press < while the “Photo Album” list
is displayed.
2 Select “Display Mode” using M/m, and
press ENTER.
3 Select “File” or “Album” using M/m,
and press ENTER.
z Hints
• You can switch the thumbnail picture on the
album list among the JPEG image files in the
selected album by pressing m/M.
• You can switch to the previous or next album by
pressing m/M on the JPEG image file list.
To turn off the “Photo Album” list
Press SYSTEM MENU.
To display the detailed information
1 Select a JPEG image file, and press ,.
2 Select “Detai led Information,” and press
ENTER.
The detailed information for the selected
JPEG image file appears.
To reload the files or folders
When a disc or the connected USB device
contains 1,000 or more files and/or 100 or
more folders, select “Read next” in the
“Photo Album” list, and press ENTER to
view unloaded files or folders.
It may take a few minutes to load files or
folders.
b Note
The thumbnail for a file that cannot be playable on
the recorder is displayed as “ .”
Playing a slideshow
1 Follow steps 1 to 4 of “Using the
“Photo Album” List.”
The “Photo Album” list appears.
Switch between the album list and JPEG
image file list, if necessary.
2 Select an album or JPEG image file
using M/m, and press H.
The slideshow starts.
z Hint
You can start a slideshow by selecting “Start
Slideshow” from the sub-menu.
b Notes
• Depending on the aspect ratio, some pictures
may be displayed with black bands at top and
bottom, or left and right.
• Large picture files may take a few seconds to
display. This is not a malfunction.
To stop a slideshow
Press x (stop) or O RETURN.
To pause a slideshow
Press X (pause).
To view the previous/next image during a
slideshow
Press ./>.
To zoom an image
Press ZOOM repeatedly during a slideshow.
Each time you press ZOOM, the
magnification changes as shown below.
2× t 4× t normal magnification
You can move the area you want to zoom
using </M/m/,.
Photo Album
To rotate an image
Press ANGLE repeatedly during a
slideshow.
Each time you press ANGLE, the image
turns clockwise by 90°.
,continued
87
Page 88

To play a slideshow with the sound (HDD
only)
You can enjoy a slideshow while listening to
the sound stored in the HDD. First prepare
Music Playlists by adding audio tracks using
Jukebox (see “Adding audio tracks to a
Playlist (HDD only)” on page 78).
1 Select “View/Edit Photos on the HDD”
in step 3 of “Using the “Photo Album”
List” on page 85.
The “Photo Album” list appears.
Switch between the album list and JPEG
image file list, if necessary.
2 Select an album or JPEG image file
using M/m, and press ,.
3 Select “Start Audio Slideshow,” and
press ENTER.
4 Select the desired Music Playlist or
“Favourites” using </,.
5 Select “Start,” and press ENTER.
The slideshow and the playback from
the first track of the selected Music
Playlist start.
b Notes
• While playing a slideshow with the sound, you
cannot do the following:
– Zoom, rotate, skip or pause an image.
– Display information on the screen by pressing
DISPLAY.
• If there is no audio track in the selected Music
Playlist, the slideshow is played back with no
sound.
Creating a Slideshow with Your Favourite Music and Graphic Effects (x-Pict Story) (HDD only)
You can easily create and play your own
slideshow with your favourite music in
Music Playlist and graphic effects using the
JPEG image files on the HDD (x-Pict Story).
First prepare Music Playlists by adding
audio tracks using Jukebox (see “Adding
audio tracks to a Playlist (HDD only)” on
page 78). The created x-Pict Story is
automatically stored in the Title List (HDD)
and you can copy it onto a recordable disc.
1 Press SYSTEM MENU.
The System Menu appears.
2 Select “Photo Album,” and press
ENTER.
The “Photo Album” menu appears.
3 Select “View/Edit Photos on the
HDD,” and press ENTER.
The “Photo Album (HDD)” list appears.
4 Select an album, and press ,.
The sub-menu appears.
5 Select “Create x-Pict Story” using M/
m, and press ENTER.
88
Page 89

6 Select a graphic effect and a Music
Playlist using </M/m/,.
• “Theme”: Select a theme. The
recorder adds graphic effects
according to the theme you set from
the following:
“Happy moments (1)”: with simple
graphic effects
“Happy moments (2)”: with simple
graphic effects rapidly changing
“Nostalgic memories”: in
monochrome
“Sweetest recollections”: with moving
graphic effects
“Blissful life”: with moving graphic
effects rapidly changing
“Normal”: no graphic effects
• “Play List”: Select the desired Music
Playlist or “Favourites.” For an
explanation of how to make a Music
Playlist, see “Adding audio tracks to a
Playlist (HDD only)” on page 78.
7 Select “Next,” and press ENTER.
The copyright message appears on the
screen.
8 Select “Yes” using </,, and
press ENTER.
The x-Pict Story is saved as a video file
in the Title List on the HDD.
The title names are automatically
labelled as “x-Pict_Story ***” using the
name of the selected album folder.
To stop creating x-Pict Story
Press and hold x REC STOP for more than
3 seconds.
z Hints
• The order of audio tracks in the created x-Pict
Story is followed by that of Music Playlist. If
you want to change its order, change the order of
Music Playlist before creating an x-Pict Story.
• If the selected fo lder has no name, the title names
are automatica lly labelled with the date when th e
x-Pict Story was created.
• An x-Pict Story is created in the HQ mode.
• To edit x-Pict Story titles, see “Erasing and
Editing” on page 55.
b Notes
• You cannot make a recording while creating an
x-Pict Story.
• If there is no JPEG image file in the selected
folder, you cannot create an x-Pict Story.
• If there is no audio track in the selected Music
Playlist, the x-Pict Story is created with no
sound.
• The selected Music Playlist may not be played
back to the end depending on the number of
JPEG image files.
• If the HDD is full, a warning message appears
and you cannot create an x-Pict Story.
• While creating an x-Pict Story, you cannot do
the following:
– Zoom, rotate, skip or pause an image.
– Display information on the screen by pressing
DISPLAY.
• The order of graphic effects changes at random
every time you crea te an x-Pict Story in the same
theme.
• Do not disconnect or connect the USB cable or
i.LINK cable while creating an x-Pict Story.
This may cause the x-Pict Story to be created
incorrectly.
• The graphic effect may not show a smooth
motion or not appear correctly on the created xPict Story depending on conditions, such as size
of the image files.
To play an x-Pict Story
You can play a created x-Pict Story from the
Title List on the HDD.
For details, see “3. Playing the Recorded
Programme (Title List)” on page 31.
To dub an x-Pict Story
You can dub a created x-Pict Story to DVDs.
For details, see “Dubbing (HDD y DVD)”
on page 62. If you want to play the disc on
other DVD equipment, finalise the disc
(page 37).
Photo Album
89
Page 90

Managing JPEG Image Files on the HDD
1 Press SYSTEM MENU.
The System Menu appears.
2 Select “Photo Album,” and press
ENTER.
The “Photo Album” menu appears.
3 Select “View/Edit Photos on the
HDD,” and press ENTER.
The “Photo Album (HDD)” list appears.
4 Select an album or JPEG image file,
and press ,.
The sub-menu appears.
5 Select an option, and press ENTER.
You can make the following edits to the
album/JPEG image file.
“Start Slideshow”: Starts a slideshow
(page 87).
“Copy to DVD”: Copies the selected
album or JPEG image file to a DVD
(page 83).
“Multi-Mode”: Selects multiple albums
or JPEG image files to edit.
“Copy all to HDD”: Copies all the
albums and JPEG image files to the
HDD (page 81).
“Copy to HDD”: Copies the selected
album or JPEG image file to the HDD
(page 81).
“File Options”
• “Erase”: Erases the selected JPEG
image file.
• “Copy”: Copies the selected JPEG
image file (page 83).
• “Rename File”: Changes the selected
JPEG image file name (page 34).
• “Protect”: Protects the selected JPEG
image file. Select again to cancel the
protection.
90
“Start Audio Slideshow” (HDD only):
Starts a slideshow with the sound
(page 88).
“Create x-Pict Story”: Creates a new xPict Story (page 88).
“New Album”: Creates a new album.
“Album Options”
• “Erase Album”: Erases the selected
album.
• “Copy Album Contents”: Copies all
JPEG image files in the selected album
to the HDD (page 83).
• “Rename Album”: Changes the
selected album name (page 34).
• “Protect Album Contents”: Protects all
JPEG image files in the selected
album.
• “Cancel Protection”: Cancels
protection of all JPEG image files in
the selected album.
“Print”: Prints the selected JPEG image
file (page 91).
“Detailed Information”: Displays the
detailed information for the selected
JPEG image file (page 87).
“Single-Mode”: Cancels “Multi-Mode.”
Page 91

Printing JPEG Image Files
You can print JPEG image files on the HDD,
DATA DVDs/DATA CDs, or connected
USB device by connecting a PictBridgecompatible printer to the USB jack on the
recorder.
Refer to the instructions supplied with the
printer.
1 Connect a PictBridge-compatible
printer to the USB jack on the
recorder.
DVD recorder
to USB jack
PictBridge-compatible
printer
2 Connect the USB device to the USB
jack on the recorder.
When printing JPEG image files on the
HDD or DATA DVDs/DATA CDs,
skip this step.
3 Press SYSTEM MENU.
The System Menu appears.
4 Select “Photo Album,” and press
ENTER.
The “Photo Album” menu appears.
5 Select the item, and press ENTER.
To print JPEG image files on the HDD,
select “View/Edit Photos on the HDD.”
To print JPEG image files on a DATA
DVD/DATA CD, select “View Photos
on a DVD/CD.”
To print JPEG image files from the
connected USB device, select “View
Photos on a USB Device.”
The “Photo Album” list appears.
6 Select an album, and press ENTER.
7 Select a file using M/m, and press
,.
The sub-menu appears.
8 Select the item, and press ENTER.
To print two or more files, select “MultiMode.”
To print the file selected in step 7 only,
go to step 12.
9 Select a file, and press ENTER.
A check mark appears in the check box
by the selected item.
• To clear the check mark, press ENTER
again.
• To clear all check marks, select
“Single-Mode.”
10
Repeat step 9 to select all files you
want to print.
11
Press ,.
The sub-menu appears.
12
Select “Print,” and press ENTER.
The display asks for confirmation.
13
Select “Start,” and press ENTER.
You can set the paper size and layout.
Refer to the operating instructions
supplied with the printer.
Photo Album
,continued
91
Page 92

To cancel printing
Press ENTER.
To display the connected printer
Select “Confirm Printer” of “USB” in the
“Options 2” setup (page 113).
To restart the connected USB device
Select “Restart USB Device” of “USB” in
the “Options 2” setup (page 113).
z Hint
Printing options, such as paper size or layout,
differ depending on th e printer. For details, refer to
the instructions supplied with the printer.
92
Page 93

For playback
Settings and Adjustments
Adjusting Picture Quality
+
-
-
RW
R
Video
RWVR-RW
DVD
VCD
HDD
-
RVR
*
DATA CD
* DivX video file only
You can adjust the picture quality from the
connected equipment, such as a TV or VCR,
and also the picture quality of broadcasts
that the recorder can receive by selecting a
preset setting. You can also adjust the
picture quality by changing detailed settings,
and store up to three settings in the memory.
Video
+
R
DATA DVD
*
1 Press SYSTEM MENU in stop mode.
For adjusting playback picture quality,
press SYSTEM MENU during
playback.
The System Menu appears.
2 Select “Picture Adjustment,” and
press ENTER.
3 Select a preset setting using </,,
and press ENTER.
For recording
Tuner TV broadcast
VCR Video cassettes
DTV Digital broadcast
Dynamic Produces a bold
Standard Displays a standard
Professional Displays an original
Memory1/
Memory2/
Memory3
To check the detailed settings for the
selected preset, press DISPLAY.
dynamic picture by
increasing the picture
contrast and the
colour intensity.
picture.
picture.
Your own settings. To
create your own
settings, see “To create
your own setting” on
page 93.
4 Press SYSTEM MENU to exit.
To create your own setting
1 Select “Memory1,” “Memory2,” or
“Memory3” in step 3.
2 Select “Detailed Settings,” and press
ENTER.
The display for adjusting detailed
settings appears.
3 Select an item using M/m, and adjust
settings using </,.
For explanation of each setting, see the
tables below.
4 Press SYSTEM MENU to exit.
The setting is automatically stored as the
setting you selected in step 1.
Settings and Adjustments
Memory1/
Memory2/
Memory3
Your own settings. To
create your own settings,
see “To create your own
setting” on page 93.
,continued
93
Page 94

Setting options for recording picture
quality
For details about each setting, see the
explanation of the display.
Prog.
Motion
Cinema Converts the progressive
3-D Y/C Adjusts the brightness/colour
YNR
(luminance
noise
reduction)
CNR
(chroma
noise
reduction)
Detail
Adjusts the progressive video
signal when “Component
Video Out” is set to
“Progressive” (page 103) or
when using the HDMI
connection.
Select “Motion” for a picture,
including subjects that move
dynamically.
Select “Still” for a picture
with little movement.
video signal to match the type
of DVD software that you are
watching when “Component
Video Out” is set to
“Progressive” (page 103) or
when using the HDMI
connection.
Select “Auto” to detect the
software type (Film-based or
Video-based) automatically
and select the appropriate
conversion mode. Normally
select this position.
Select “Off” to fix the
conversion mode to the mode
for Video-based software.
separation for the video
signals.
Select “Motion” for a picture,
including subjects that move
dynamically.
Select “Still” for a picture
with little movement.
Reduces noise contained in
the luminance element of the
video signal.
Reduces noise contained in
the chroma element of the
video signal.
Adjusts the sharpness of
images outlines.
White
Enhancer
Black
Enhancer
Black
Level
Hue Adjusts the colour balance.
Chroma
Level
Adjusts the intensity of white.
Adjusts the intensity of black.
Selects the black level (setup
level) for the NTSC video
signals.
Select “ON” to set the black
level of the input signals to the
standard level. Normally,
select “OFF” position.
Makes the colours deeper or
lighter.
Setting options for playback picture
quality
For details about each setting, see the
explanation of the display.
Prog.
Motion
Cinema Converts the progressive
Adjusts the progressive video
signal when “Component
Video Out” is set to
“Progressive” (page 103) or
when “Screen Resolution” is
set to other than “720 x 576i”
(or “720 x 480i”) (page 111).
Select “Motion” for a picture,
including subjects that move
dynamically.
Select “Still” for a picture
with little movement.
video signal to match the type
of DVD software that you are
watching when “Component
Video Out” is set to
“Progressive” (page 103) or
when “Screen Resolution” is
set to other than “720 x 576i”
(or “720 x 480i”) (page 111).
Select “Auto1” to
automatically detect the
software type (Film-based or
Video-based) and select the
appropriate conversion mode.
Normally select this position.
If the picture appears
unnatural, select “Auto2,”
“On,” or “Off.”
White AGC Turns on for automatic white
level adjustment.
94
Page 95

YNR
(luminance
noise
reduction)
BNR (block
noise
reduction)
MNR
(mosquito
noise
reduction)
Reduces noise contained in
the luminance element of the
video signal.
Reduces “block noise” or
mosaic-like patterns in the
picture.
Reduces the faint noise
appearing around the outlines
of the images. The noise
reduction effects are
automatically adjusted within
each setting range according
to the video bit rate and other
factors.
b Notes
• If the outlines of the images on your screen
become blurred, set “BNR” and/or “MNR” to
“Off.”
• Depen ding on the disc or the scene being played,
the above BNR or MNR effects may be hard to
discern. Also, these functions may not work with
some screen sizes.
• The following settings are not available for the
signals output from the HDMI jack.
– “Sharpness”
– “White Enhancer”
– “Black Enhancer”
– “Black Level”
– “Gamma Correction”
–“Hue”
– “Chroma Level”
Sharpness Sharpens the outlines of the
images.
Detail
Adjusts the sharpness of
images outlines.
White
Adjusts the intensity of white.
Enhancer
Black
Adjusts the intensity of black.
Enhancer
Black
Level
Selects the black level (setup
level) for the video signals.
Select “ON” to raise the black
level. Select this when the
picture appears too dark.
Select “OFF” to set the black
level of the input signals to the
standard level. Normally,
select this position.
Gamma
Adjusts how dark areas look.
Correction
Hue Adjusts the colour balance.
Chroma
Level
Makes the colours deeper or
lighter.
Settings and Adjustments
95
Page 96

Using the Setup Menus
Disc Settings (Disc
You can change the settings of the recorder,
such as picture quality settings, audio
settings, etc.
1 Press SYSTEM MENU while the
recorder is in stop mode.
2 Select “Disc Setup” or “Initial
Setup” using M/m, and press ENTER.
3 Select the desired setup item using
M/m, then press ENTER.
See the explanations in the following
sections.
The default settings are underlined.
Setup)
You can adjust DVD related settings.
Basic
Input Disc Name
You can label a disc.
For details, see page 35.
Protect Disc
You can protect a disc against erasure.
For details, see page 36.
Format DVD-RW (DVD-RW only)
The recorder automatically starts formatting
in VR mode or Video mode, whichever is
selected below, when a new, unformatted
DVD-RW is inserted.
VR Mode Automatically formats the
Video
Mode
Format
disc in VR mode.
Automatically formats the
disc in Video mode.
96
You can manually re-format a DVD+RW,
DVD-RW, or DVD-R disc to make a blank
disc.
For details, see page 39.
Finalise
Finalises a disc to play it on other DVD
equipment.
For details, see page 37.
Page 97

Optimise HDD
As you record, erase and edit recordings
repeatedly, the HDD file system gradually
becomes fragmented. To ‘clean up’ all the
fragmented files, optimise the HDD
periodically. When the HDD needs
optimising, a message recommending
optimisation will appear automatically.
To cancel optimisation, press ENTER. The
HDD will be partly optimised.
b Notes
• It will take about eight hours to optimise the
HDD. During optimisation, other operations,
such as recording or playback, cannot be
performed.
• You cannot optimise the HDD when the HDD
disc space is insufficient for optimising. Erase
titles to open up disc space (page 56).
Format HDD.
You can format the HDD and resolve the
problem when the hard disk error occurred.
“Format HDD.” can be selected only when
the hard disk needs formatting. Note that all
of the recorded content on the HDD will be
erased.
Recorder Settings (Basic)
You can make clock and other recorderrelated settings.
Clock Setting
Auto (Auto Clock Set)
This function cannot be used in your area.
Manual (Manual Clock Set)
Set the clock manually.
1 Press </, to select the time zone for
your area or GMT (Greenwich Mean
Time), and press m.
2 Select “On” using </, if you are now
on summer time, and press ENTER.
3 Set the day, month, year, hour, and
minutes using </M/m/,, and press
ENTER to start the clock.
To change the numbers, press < to
return to the item to be changed, and
press M/m.
Display
Selects the clock and date display.
1 Select the display type using M/m.
2 Select the format using </,.
,continued
Settings and Adjustments
97
Page 98

Input Line System
Selects the colour system when recording
from the connected equipment.
NTSC Records in NTSC or PAL-60
PAL/
SECAM
colour system.
Records in PAL or SECAM
colour system.
b Notes
• When picture noise appears after you change the
“Input Line System” setting, change the “Input
Colour System” setting (page 103). If picture
noise still appears, hold down x (stop) on the
recorder, and press INPUT on the recorder.
• When you change the “Input Line System”
setting, the Dubbing List is erased.
Power Save
Selects whether this recorder is in power
save mode when the power is turned off
(standby).
HELP Setting
On Displays Help information for
GUI displays.
Off Does not set to HELP setting
mode.
Easy Setup (Resetting the
Recorder)
Select this to run the “Easy Setup”
programme.
Follow the instructions for “Easy Setup”
(page 24) from step 2.
On No antenna input signals are
Off
output when the recorder is in
standby.
Does not set to power save
mode. Normally, select this
setting.
b Note
Power Save mode does not function in the
following case, even when “Power Save” is set to
“On.”
– Synchro-Recording is set.
98
Page 99

Aerial Reception Settings (Tuner)
You can make tuner and programme
position settings for the recorder.
Auto Channel Setting
You can preset programme positions
automatically.
Select your country/region using </,,
and press ENTER.
The programme position order will be set
according to the country/region you set.
If any programme positions are unused or
contain unwanted channels, you can disable
them (page 99).
1 Select your country/region using </
,, and press ENTER.
Programme position
2 Press PROG +/– to select the
programme position.
3 Select the item you want to change using
M/m, and change the settings using </
,, then press ENTER.
• To preset anothe r programme position,
repeat from step 2.
Manual CH Setting
Presets programme positions manually.
If some programme positions could not be
set using the “Easy Setup” function, you can
set them manually.
If there is no sound or if the picture is
distorted, the wrong tuner system may have
been preset during “Easy Setup.” Set the
correct tuner system manually in the steps
below.
Skip
On Select this when the
programme position is unused
or contains unwanted
programme positions.
The selected position will be
skipped when you press
PROG +/–.
Off Does not skip the selected
programme position.
Settings and Adjustments
,continued
99
Page 100

CH System
Select the region to get the best broadcast
reception.
Western
Euro
ID & NZ • New Zealand (VHF)
AU • Australia
Eastern
Euro
CN Do not select this.
UK & IE • Hong Kong
US Do not select this.
• Malaysia, Singapore,
Thailand
•Middle East
• Australia
• New Zealand (UHF)
Do not select this.
• South Africa
Channel
Press </, repeatedly until the
programme position you want is displayed.
• To select a cable or satellite programme
position, press </, until the
programme position you want is displayed.
Receivable channels
TV system Channel coverage
BG
• Malaysia,
Singapore,
Thailand
•Middle East
• Australia,
New Zealand
I
• South Africa
I or M/N
• Hong Kong
E2 – E12 VHF
Italian A – H VHF
AS0 – AS12 VHF
NZ1 – NZ11 VHF
E21 – E69 UHF
AS28 – AS69 UHF
S1 – S20 CATV
S21 – S41 HYPER
S01 – S05 CATV
Ireland A – J VHF
South Africa 4 – 11,
13 VHF
B21 – B69 UHF
S1 – S20 CATV
S21 – S41 HYPER
S01 – S05 CATV
Ireland A – J VHF
South Africa 4 – 11,
13 VHF
B21 – B69 UHF
S1 – S20 CATV
S21 – S41 HYPER
S01 – S05 CATV
100
For customers in Australia and New
Zealand
• Australia
Channel Set number Channel
1AS1
2AS2
3AS3
4AS4
5AS5
 Loading...