

Sony RDRGX-300 Service manual
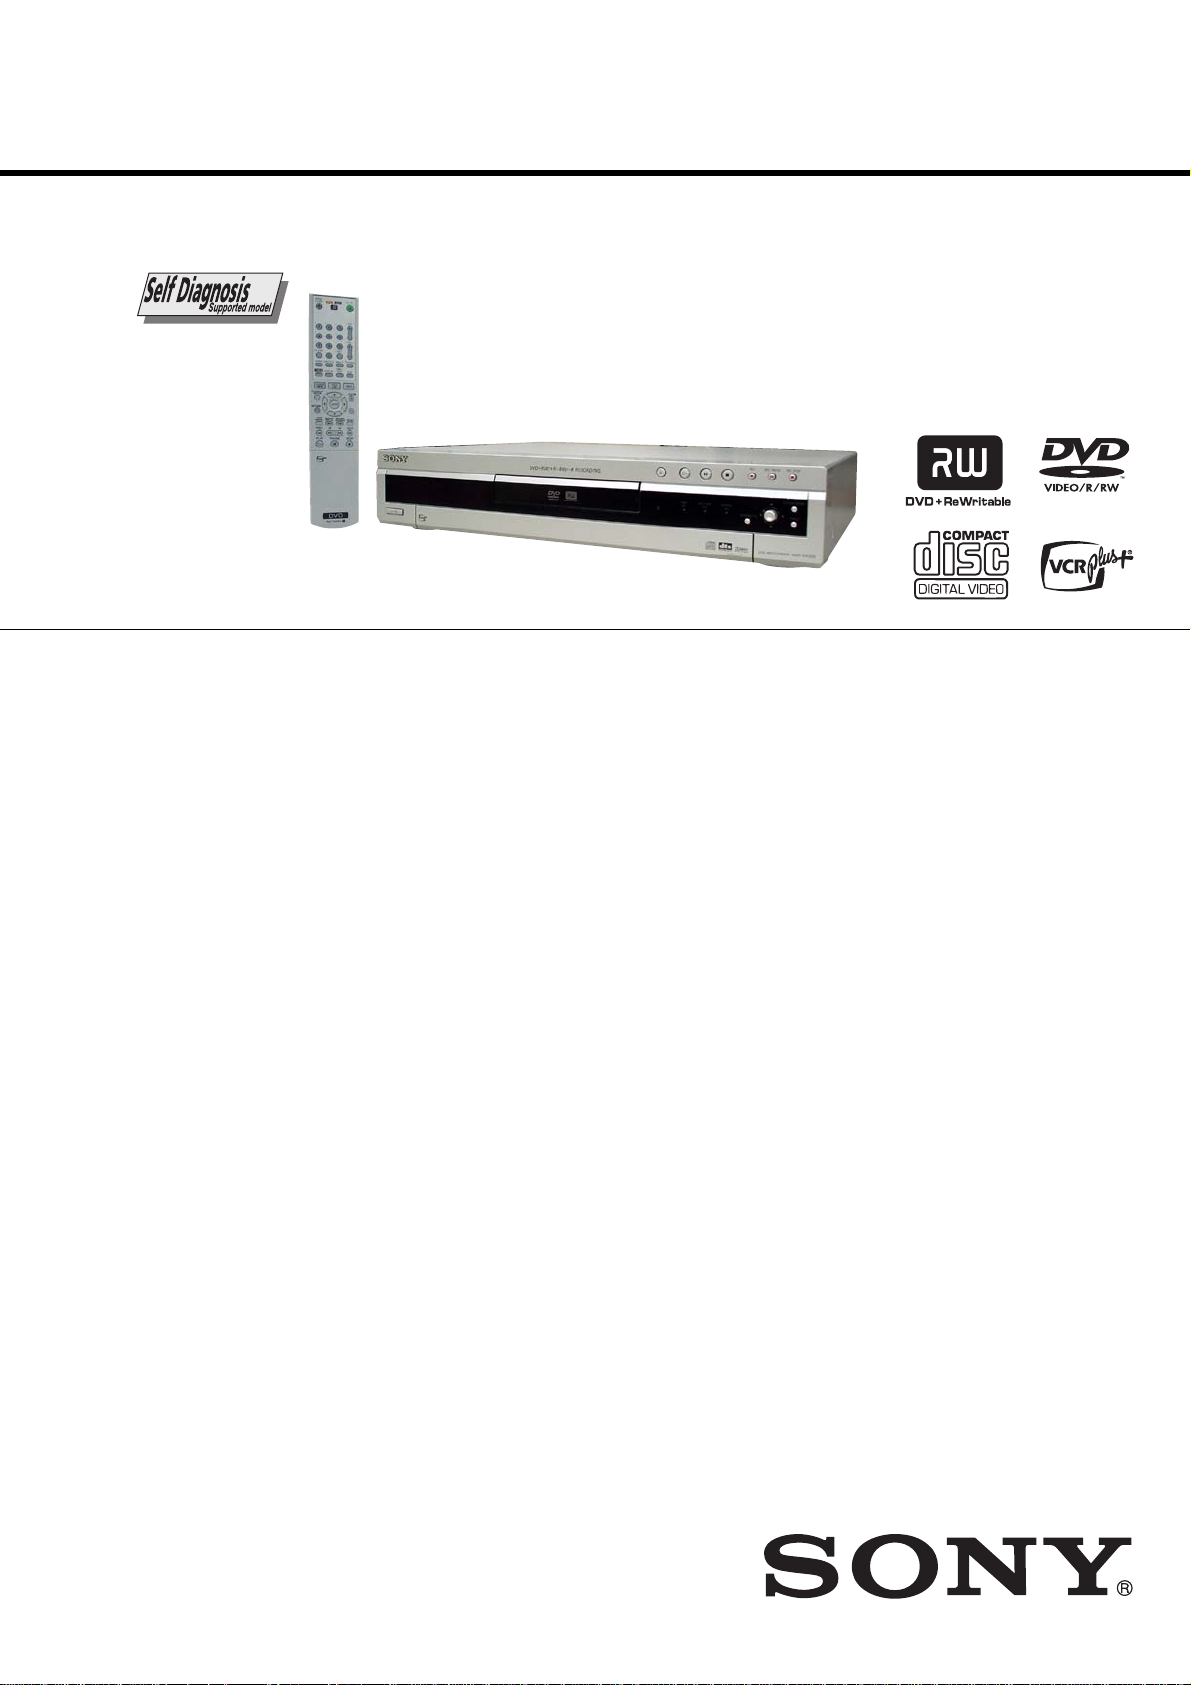
RDR-GX300
RMT-D205A
SERVICE MANUAL
SPECIFICATIONS
System
Laser: Semiconductor laser
Channel coverag e:
NTSC
VHF: 2 to 13/UHF: 14 to 69/CATV: A-8 to
A-1, A to W, W+1 to W+84
Video reception: Frequency synthesizer
system
Audio reception: Split carrier system
Antenna: 75-ohm antenna terminal for VHF/
UHF
Timer: Clock: Quartz locked/Time r indication:
12-hour cycle (digital)/Pow er back-up
duration: 1 hour
Video recording format: MPEG Video
Audio recording format/applicable bit rate:
Dolby Digital/2 ch, 256 kbps
When you play PCM sound tracks with a 96 kHz
sampling frequency, the output signals from the
DIGITAL OUT (OPTICAL or COAXIAL) jack
are converted to 48 k H z sampling frequency.
Outputs
(Jack name: Jack type/output level/output
impedance)
LINE OUT 1/2
(AUDIO): Phono jack/2 Vrms/10 kilohms
(VIDEO): Phono jack/1.0 Vp-p
(S VIDEO): 4-pin mini DIN/Y:1.0 Vp-p, C:
0.286 Vp-p
DIGITAL OUT (OPTICAL):
Optical output jack/–18 dBm (wave leng th:
660 nm)
DIGITAL OUT (COAXIAL):
Phono jack/0.5 Vp-p/75 ohms
COMPONENT VIDEO OUT (Y, P
Phono jack/Y: 1.0 Vp-p/P
interlace*=0.648 Vp- p, progressive or
interlace**=0. 7 Vp-p
* “Y/Pb/Pr Out Black Le vel” is “On”
** “Y/Pb/Pr Out Black Level” is “Off”
SET TOP BOX CONTROL:
Mini jack
B
, PR:
B
, PR):
US Model
Canadian Model
General
Power requirements: 120 V AC, 60 Hz
Power consumption: 37 W
Dimensions (approx.): 430 × 85 × 345 mm
Mass (approx.): 4.8 kg (10.58 lb)
Operating temperature: 5 ºC t o 35 ºC
Operating humidity: 25 % to 80 %
Supplied accessories:
Specifications and design are subject to change
without notice.
3
/8 × 13 5/8 in.) (width/height/depth)
(17 × 3
incl. projecting parts
(41 ºF to 95 ºF)
Audio/video cord (1)
Power cord (1)
Antenna cable (1)
Set top box controller (1)
Remote commander (remote) (1)
Size AA(R6) batteries (2)
Inputs
(Jack name: Jack type/input level/input
impedance)
LINE IN 1/2/3
(AUDIO): Phono jack/2 Vrms/more than 22
kilohms
(VIDEO): Phono jack/1.0 Vp-p
(S VIDEO): 4-pin mini DIN/Y:1.0 Vp-p, C:
0.286 Vp-p
DVD RECORDER

WARNING!!
WHEN SERVICING, DO NOT APPROACH THE LASER EXIT WITH
THE EYE TOO CLOSELY. IN CASE IT IS NECESSARY TO
CONFIRM LASER BEAM EMISSION, BE SURE TO OBSERVE
FROM A DISTANCE OF MORE THAN 25 cm FROM THE SURFACE
OF THE OBJECTIVE LENS ON THE OPTICAL PICK-UP BLOCK.
CAUTION:
The use of optical instrument with this product will increase eye
hazard.
CAUTION
Use of controls or adjustments or performance of procedures
other than those specified herein may result in hazardous radiation
exposure.
SAFETY-RELATED COMPONENT WARNING!!
COMPONENTS IDENTIFIED BY MARK 0 OR DOTTED LINE WITH
MARK 0 ON THE SCHEMATIC DIAGRAMS AND IN THE PARTS
LIST ARE CRITICAL TO SAFE OPERATION. REPLACE THESE
COMPONENTS WITH SONY PARTS WHOSE PART NUMBERS
APPEAR AS SHOWN IN THIS MANUAL OR IN SUPPLEMENTS
PUBLISHED BY SONY.
Unleaded solder
Boards requiring use of unleaded solder are printed with the leadfree mark (LF) indicating the solder contains no lead.
(Caution: Some printed circuit boards may not come printed with
the lead free mark due to their particular size.)
: LEAD FREE MARK
Unleaded solder has the following characteristics.
• Unleaded solder melts at a temperature about 40°C higher than
ordinary solder.
Ordinary soldering irons can be used but the iron tip has to be
applied to the solder joint for a slightly longer time.
Soldering irons using a temperature regulator should be set to
about 350°C.
Caution: The printed pattern (copper foil) may peel away if the
heated tip is applied for too long, so be careful!
• Strong viscosity
Unleaded solder is more viscous (sticky, less prone to flow) than
ordinary solder so use caution not to let solder bridges occur such
as on IC pins, etc.
• Usable with ordinary solder
It is best to use only unleaded solder but unleaded solder may
also be added to ordinary solder.
SAFETY CHECK-OUT
After correcting the original service problem, perform the following
safety checks before releasing the set to the customer.
1. Check the area of your repair for unsoldered or poorly-soldered
connections. Check the entire board surface for solder splashes
and bridges.
2. Check the interboard wiring to ensure that no wires are
"pinched" or contact high-wattage resistors.
3. Look for unauthorized replacement parts, particularly
transistors, that were installed during a previous repair . Point
them out to the customer and recommend their replacement.
4. Look for parts which, through functioning, show obvious signs
of deterioration. Point them out to the customer and
recommend their replacement.
5. Check the B+ voltage to see it is at the values specified.
6. Flexible Circuit Board Repairing
• Keep the temperature of the soldering iron around 270˚C
during repairing.
• Do not touch the soldering iron on the same conductor of the
circuit board (within 3 times).
• Be careful not to apply force on the conductor when soldering
or unsoldering.
— 2 —

TABLE OF CONTENTS
SERVICE NOTE
1. DISK REMOVAL PROCEDURE IF THE TRAY
CANNOT BE EJECTED (FORCED EJECTION) ············ 5
1. GENERAL
WARNING ············································································1-1
Precautions·············································································1-1
Ways to Use Your DVD Recorder··········································1-1
Quick Guide to Disc Types ····················································1-2
Hookups and Settings ································································1-3
Hooking Up the Recorder ······················································1-3
Step 1: Unpacking ·································································1-3
Step 2: Connecting the Antenna Cable and Set Top Box
Controller ···············································································1-3
Step 3: Connecting the Video Cords ······································1-4
Step 4: Connecting the Audio Cords ·····································1-4
Step 5: Connecting the Power Cord·······································1-5
Step 6: Preparing the Remote ················································1-5
Step 7: Easy Setup ·································································1-5
Setting Up the VCR Plus ® System ······································1-6
Connecting a VCR or Similar Device····································1-7
Guide to Displays ······································································1-7
Using the On-Screen Menus ··················································1-7
Using the Title List ································································ 1-8
Using the “Disc Info” Screen (disc settings) ························· 1-8
Checking the Play Information and Playing Time·················1-9
How to Enter Characters························································1-9
Recording ················································································ 1-10
Before Recording·································································1-10
Timer Recording (Standard/VCR Plus+)·····························1-10
Checking/Changing/Canceling Timer Settings (Timer List)···
Recording Without the Timer ··············································1-11
Recording From a VCR or Similar Device ··························1-12
Playback ·················································································· 1-12
Playing ·················································································1-12
Chasing Playback/Simultaneous Rec and Play····················1-14
Searching for a Title/Chapter/Track, etc. ·····························1-14
Playing MP3 Audio Tracks ··················································1-14
Editing ·····················································································1-15
Before Editing······································································ 1-15
Editing a Title ······································································1-15
Creating and Editing a Playlist ············································1-16
Settings and Adjustments ························································1-17
Using the Setup Displays·····················································1-17
Antenna Reception and Language Settings (Settings)·········1-17
Video Settings (Video) ·························································1-18
Audio Settings (Audio)························································1-19
Recording and Parental Control Settings (Features) ··········· 1-19
Disc and Remote Control Settings/Factory Settings
(Options) ··············································································1-20
Easy Setup (Resetting the Recorder) ··································· 1-20
Additional Information ····························································1-20
Troubleshooting ···································································1-20
Self-diagnosis Function (When letters/numbers appear in the
display) ················································································1-21
Notes About This Recorder ·················································1-21
Specifications······································································· 1-22
Guide to Parts and Controls ·················································1-22
Glossary ··············································································· 1-23
Language Code List ·····························································1-23
Cable Box/Satellite Receiver Brand Code··························· 1-24
1-11
2. DISASSEMBLY
2-1. UPPER CASE ·································································2-2
2-2. RD-50 BOARD ·······························································2-3
2-3. D.C. FAN·········································································2-4
2-4. POWER BLOCK·····························································2-4
2-5. TRAY COVER ASSEMBLY ··········································2-5
2-6. DVD DRIVE ···································································2-6
2-7. FRONT PANEL SECTION ·············································2-7
2-8. DOOR·············································································· 2-7
2-9. FR-216 BOARD, FL-141 BOARD ·································2-8
2-10. REAR PANEL ·································································2-8
2-11. AV-84 BOARD ································································2-9
2-12. CIRCUIT BOARDS LOCATION ·································2-10
3. BLOCK DIAGRAMS
3-1. OVERALL BLOCK DIAGRAM (1/2) ···························3-1
3-2. OVERALL BLOCK DIAGRAM (2/2) ···························3-3
3-3. POWER BLOCK DIAGRAM (1/3)································3-5
3-4. POWER BLOCK DIAGRAM (2/3)································3-7
3-5. POWER BLOCK DIAGRAM (3/3)································3-9
4. SCHEMATIC DIAGRAMS
4-1. FRAME SCHEMATIC DIAGRAM································4-1
4-2. SCHEMATIC DIAGRAMS ············································4-3
WAVEFORMS ································································4-4
• AV-84 (1/8) (POWER)
SCHEMATIC DIAGRAM ······························4-7
• AV-84 (2/8) (AUDIO IN)
SCHEMATIC DIAGRAM ······························4-9
• AV-84 (3/8) (AUDIO OUT)
SCHEMATIC DIAGRAM ····························4-11
• AV-84 (4/8) (TUNER)
SCHEMATIC DIAGRAM ····························4-13
• AV-84 (5/8) (SYSTEM CONTROL)
SCHEMATIC DIAGRAM ····························4-15
• AV-84 (6/8) (VIDEO IN)
SCHEMATIC DIAGRAM ····························4-17
• AV-84 (7/8) (VIDEO OUT)
SCHEMATIC DIAGRAM ····························4-19
• AV-84 (8/8) (STB CONTROL)
SCHEMATIC DIAGRAM ····························4-21
• CN-220 (RELAY)
SCHEMATIC DIAGRAM ····························4-23
• FL-141 (DV/LINE 2 IN/FL DRIVER)
SCHEMATIC DIAGRAM ····························4-25
• FR-216 (LED DRIVE, FUNCTION KEY)
SCHEMATIC DIAGRAM ····························4-27
• RD-50 (1/19) (CONNECTOR)
SCHEMATIC DIAGRAM ····························4-29
• RD-50 (2/19) (VIDEO DECODER)
SCHEMATIC DIAGRAM ····························4-31
• RD-50 (3/19) (AV GLUE)
SCHEMATIC DIAGRAM ····························4-33
• RD-50 (4/19) (AV ENCODER)
SCHEMATIC DIAGRAM ····························4-35
• RD-50 (5/19) (MR PROCESS)
SCHEMATIC DIAGRAM ····························4-37
• RD-50 (6/19) (AV DECODER)
SCHEMATIC DIAGRAM ····························4-39
• RD-50 (7/19) (SDRAM)
SCHEMATIC DIAGRAM ····························4-41
• RD-50 (8/19) (NAZCA)
SCHEMATIC DIAGRAM ····························4-43
• RD-50 (9/19) (SDRAM)
SCHEMATIC DIAGRAM ····························4-45
• RD-50 (10/19) (AUDY, DAC)
SCHEMATIC DIAGRAM ····························4-47
• RD-50 (11/19) (JTAG)
SCHEMATIC DIAGRAM ····························4-49
• RD-50 (12/19) (SH)
SCHEMATIC DIAGRAM ····························4-51
— 3 —

• RD-50 (13/19) (SDRAM, NAND FLASH)
SCHEMATIC DIAGRAM ····························4-53
• RD-50 (14/19) (SWA/UNSW BUFFER-1)
SCHEMATIC DIAGRAM ····························4-55
• RD-50 (15/19) (SWA/UNSW BUFFER-2)
SCHEMATIC DIAGRAM ····························4-57
• RD-50 (16/19) (FLASH ROM)
SCHEMATIC DIAGRAM ····························4-59
• RD-50 (17/19) (GPS3 (HOST GLUE))
SCHEMATIC DIAGRAM ····························4-61
• RD-50 (18/19) (PLL)
SCHEMATIC DIAGRAM ····························4-63
• RD-50 (19/19) (POWER)
SCHEMATIC DIAGRAM ····························4-65
5. IC PIN FUNCTION DESCRIPTION
5-1. IT CONTROL IC (IC603: N603H2MC-511FPUO (AV-84
BOARD)) ········································································5-1
6. SERVICE MODE
6-1. Checking Item ·································································6-1
6-2. Screen Transition in the Service Mode····························6-2
6-3. Service Mode Menu Items and Description ····················6-3
6-4. Device Check Menu (1/2) ···············································6-3
6-5. Device Check Menu (2/2) ···············································6-3
6-6. Path Check Menu (1/2)····················································6-4
6-7. Path Check Menu (2/2)····················································6-4
6-8. Hard Disk Check Menu ···················································6-4
6-9. Device AUTO Check Screen Transition··························6-5
6-10. Device Individual Check, Screen Transition ··················· 6-5
6-11. Path Individual Check (Pasted Screen Check (visual check)
and data check (digital video data auto-check) )
Screen Transition·····························································6-6
6-12. Path Individual Check (Audio output Confirmation)
Screen Transition·····························································6-6
7. ADJUSTMENT
1. Videl Levl Adjustment (RD-046 Board) ·························7-1
2. Component Video Output Level Adjustment ··················7-1
3. S-Video Output S-Y Check ·············································7-1
4. S-Video Output S-C Level Check ···································7-2
5. Component Video Output Y Check ································· 7-2
6. Component Video Output B-Y Chec ······························· 7-2
7. Component Video Output R-Y Check ····························· 7-2
8. REPAIR PARTS LIST
8-1. EXPLODED VIEWS
8-1-1.OVERALL SECTION·····················································8-1
8-1-2.DVD DRIVE ···································································8-2
8-1-3.CHASSIS BLOCK ·························································· 8-3
8-2. ELECTRICAL PARTS LIST ·········································· 8-4
— 4 —

SERVICE NOTE
1. DISK REMOVAL PROCEDURE IF THE TRAY CANNOT BE EJECTED (FORCED EJECTION)
1. Remove the upper case.
2. Remove the RD-50 board, RD bracket.
3. Insert the stiff wire in the hole and eject the tray.
Tr ay
The hole
Fig. 1
The stiff wire
Fig. 2
NOTES DURING THE FORCED EJECTION
1. If the forced ejection is executed while a blank disc media (DVD±RW, ±R) exists on the tray
• Insert a DVD-ROM (DVD test disc, DVD software available on the market, or the like) in the tray and then close the tray.
Note1: If you close the tray while it is empty, ejection of the tray becomes impossible.
Note2: If you close the tray with a CD disc inserted in it, the CD can be ejected. However, if you close the tray while it is empty, there can be a case that
ejection of the tray becomes impossible.
Note3: Even if you replace the DVD drive unit while the tray remains under the state as described above, the situation cannot be improved.
2. If the tray cannot be ejected while the disc is not inserted
• Execute the forced ejection.
• Insert a DVD-ROM (DVD test disc, DVD software available on the market, or the like) on the tray and try to close the tray.
(There are cases that it recovers the trouble.)
3. Contents of forcedly ejected blank disc media (DVD±RW , ±R) can be damaged. (There can be a case that initialization is also impossible.)
— 5 —

MEMO
— 6 —

SECTION 1
GENERAL
RDR-GX300
This section is extracted from instruction manual.
(RDR-GX300 : 2-024-212-11 (1))
WARNING
To prevent fire or shock hazard,
do not expose the unit to rain or
moisture.
To avoid electrical shock, do not
open the cabinet. Refer se rvicing
to qualified person nel only.
The AC power cord mus t be
changed only at a qualifi ed
service shop only.
CAUTION
The use of optical instruments with this
product will increase eye hazard. As
the laser beam used in this DVD
recorder is harmful to eyes, do not
attempt to disassemble the cabinet.
Refer servicing to qualified personnel
only.
This symbol is intended
to alert the user to the
presence of uninsulated
“dangerous voltage”
within the product’s
enclosure that may be of sufficient
magnitude to constitute a risk of
electric shock to persons.
This symbol is intended
to alert the user to the
presence of important
operating and
maintenance (servicing)
instructions in the literature
accompanying the appliance.
CAUTION
TO PREVENT ELECTRIC SHOCK,
MATCH WIDE BLADE OF PLUG
TO WIDE SLOT, FULLY INSERT.
2
For customers in the U.S.A
Owner’s Record
The model and serial numbers are located at
the rear of the unit.
Record the serial number in the space
provided below. Refer to them
whenever you call upon your Sony dealer
regarding this product.
Model No. RDR-GX300
Serial No.______________
CAUTION
You are cautioned that any change or
modifications not expressly approved
in this manual could void your
authority to operate this equipment.
Note
This equipment has been tested and
found to comply with the limits for a
Class B digital device, pursuant to Part
15 of the FCC Rules. These limits are
designed to provide reasonable
protection against harmful interference
in a residential installation. This
equipment generates, uses, and can
radiate radio frequency energy and, if
not installed and used in accordance
with the instructions, may cause
harmful interference to radio
communications. However, there is no
guarantee that interference will not
occur in a particular installation. If this
equipment does cause harmful
interference to radio or television
reception, which can be determined by
turning the equipment off and on, the
user is encouraged to try to correct the
interference by one or more of the
following measures:
– Reorient or relocate the receiving
antenna.
– Increase the separation between the
equipment and receiver.
– Connect the equipment into an outlet
on a circuit different from that to
which the receiver is connected.
– Consult the dealer or an experienced
radio/TV technician for help.
VCR Plus+ and PlusCode are
registered trademarks of Gemstar
Development Corporation. The VCR
Plus+ system is manufactured under
license from Gemstar Development
Corporation.
Precautions
This equipment has been tested and
found to comply with the limits set
out in the EMC Directive using a
connection cable shorter than 3
meters.
On safety
Should any solid object or liquid fall
into the cabinet, unplug the recorder
and have it checked by qualified
personnel before operating it any
further.
On power sources
• The recorder is not disconn ecte d
from the AC power source as long
as it is connected to the wall outlet,
even if the recorder itself has been
turned off.
• If you are not going to use the
recorder for a long time, be sure to
disconnect the recorder from the
wall outlet. To disconnect the AC
power cord, grasp the plug itself;
never pull the cord.
On placement
• Place the recorder in a location
with adequate ventilation to
prevent heat build-up in the
recorder.
• Do not place the recorder on a soft
surface such as a rug that might
block the ventilation holes.
• Do not place the recorder in a
confined space such as a bookshelf
or similar unit.
• Do not place the recorder in a
location near heat sources, or in a
place subject to direct sunlight,
excessive dust, or mechanical
shock.
• Do not place the recorder in an
inclined position. It is designed to
be operated in a horizontal
position only.
• Keep the recorder and discs away
from equipment with strong
magnets, such as microwave
ovens, or large loudspeakers.
• Do not place heavy objects on the
recorder.
• To prevent fire or shock hazard, do
not place objects filled with
liquids, such as vases, on the
apparatus.
On recording
• Contents of the recording cannot
be compensated for if the
recording or playback is not made
due to a malfunction of the
recorder, disc, etc.
• Make trial recordings before
making the actual recording.
Copyrights
• Television programs, films, video
tapes, discs, and other materials
may be copyrighted. Unauthorized
recording of such material may be
contrary to the provisions of the
copyright laws. Also, use of this
recorder with cable television
transmission may require
authorization from the cable
television transmitter and/or
program owner.
• This product incorporates
copyright protection technology
that is protected by U.S. patents
and other intellectual property
rights. Use of this copyright
protection technology must be
authorized by Macrovision, and is
intended for home and other
limited viewing uses only unless
otherwise authorized by
Macrovision. Reverse engineering
or disassembly is prohibited.
Copy guard function
Since the recorder has a copy guard
function, programs received through
an external tuner (not supplied) may
contain copy protection signals
(copy guard function) and as such
may not be recordable, depending
on the type of signal.
IMPORTANT NOTICE
Caution: This recorder is capable
of holding a still video image or
on-screen display image on your
television screen indefinitely. If
you leave the still video image or
on-screen display image displayed
on your TV for an extended period
of time you risk permanent damage
to your television screen. Plasma
display panels and projection
televisions are especially
susceptible to this.
If you have any questions or
problems concerning your recorder,
please consult your nearest Sony
dealer.
IMPORTANT SAFETY
INSTRUCTIONS
1 R e ad these instructions.
2 Keep these instructions.
3 Heed all warnings.
4 Fo ll ow all instructions.
5 Do not use this apparatus near
water.
6 Cle a n only wit h dr y cl oth.
7 Do not bloc k a ny ven tilation
openings. Install in accordance
with the manufacturer’s
instructions.
8 Do not install near any heat
sources such as radiators, heat
registers, stoves, or other
apparatus (including amplifiers)
that produce heat.
9 Do not defeat the safety purpose
of the polarized or groundingtype plug. A polarized plug has
two blades with one wider than
the other. A grounding type plug
has two blades and a third
grounding prong. The wide
blade or the third prong are
provided for your safety. If the
provided plug does not fit into
your outlet, consult an
electrician for replacement of
the obsolete outlet.
10 Protect the power cord from
being walked on or pinched
particularly at plugs,
convenience receptacles, and the
point where they exit from the
apparatus.
11 Only use attachments/
accessories specified by the
manufacturer.
12 Use only with the cart, stand,
tripod, bracket, or table specified
by the manufacturer, or sold
with the apparatus. When a cart
is used, use caution when
moving the cart/apparatus
combination to avoid injury
from tip-over.
13 Unplug this apparatus during
lightning storms or when unused
for long periods of time.
14 Re f e r a ll serv ic ing to qualified
service personnel. Servicing is
required when the apparatus has
been damaged in any way, such
as power-supply cord or plug is
damaged, liquid has been spilled
or objects have fallen into the
apparatus, the apparatus has
been exposed to rain or
moisture, does not operate
normally, or has been dropped.
About this manual
• Instructions in this manual
describe the controls on the
remote. You can also use the
controls on the recorder if they
have the same or similar names as
those on the remote.
• The on-screen display illustrations
used in this manual may not match
the graphics displayed on your TV
screen.
• The explanations regarding discs
in this manual refer to discs
created on this recorder. The
explanations do not apply to discs
that are created on other recorders
and played back on this recorder.
3
Ways to Use Your DVD Recorder
Remote cable box or satellite receiver control – Set top box control
, Connect the supplied set top box controller
to have the recorder change the channel of
your cable box or satellite receiver du ring a
timer recording (page 14).
103
Quick access to recorded titles – Title List
, Display the Title List to see all of the titles
on the disc, including recording date,
channel, recording mode and thumbnail
image (page 32). The recorder will
automatically take program label
information from the XDS (Extended Data
Service)* and display it as the title name
(page 32).
* not av ailable in some areas.
Title List
Play the beginning of a title while it is being recorded – Chasing Playback
, If you are using a DVD-RW (VR mode),
you can watch a program from the
beginning while it is being recorded
(page 57).
Recording
TITLE LIST
ORIGINAL
1 2ch 1:00PM - 2:00PM
Sort
Date
Wed 9/15 1:00PM( 1H00M)SP
Title
2 5ch 8:00PM - 9:00PM
Number
Fri 9/17 8:00PM( 1H00M)SLP
3 12ch 9:00AM - 9:30AM
Sat 9/25 9:00AM( 0H30M)EP
4 3ch 8:00PM - 8:30PM
Sat 9/25 8:00PM( 0H30M)SLP
The game isn’t over
yet, but I’ll start
watching it from the
beginning now.
CH 103!
My Movies
1.5/4.7GB
2ch
5ch
12ch
3ch
Watching one title while recording another – Simultaneous Rec and Play
, If you are using a DVD-RW (VR mode),
you can watch a previously recorded
program while recording another program
on the same disc (page 57).
Recording
I think I’ll watch
yesterday’s golf game
now, even though I
am recording a movie.
Creating your own program – Playlist
, Record a program on a DVD-RW (VR
mode), then delete, move and add scenes at
will to create your own, original program
(page 65).
Original
Playlist
Dynamic surround sound – TVS
, Enjoy virtual surround sound effects from
just your TV’s speakers with the TV Virtual
Surround settings when playing a DVD
VIDEO with multichannel audio tracks
such as Dolby Digital (5.1ch) (page 53).
A list of recordable and playable discs is on page 8.
6
7
1-1

Quick Guide to Disc Types
Recordable and playable discs
Icon
used in
VR
mode
Video
mode
1
Disc
Logo
)
this
manual
+
RW
-
RW
-
RW
+
R
-
R
VR
Video
Type
DVD+RW
DVDRW
DVD+R
DVD-R
Usable disc versions (as of May 2004)
• 4x-speed or slower DVD+RWs
• 2x-speed or slower DVD-RWs (Ver.1.1, Ver.1.1
with CPRM*
• 8x-speed or slower DVD+Rs
• 8x-speed or slower DVD-Rs (Ver.2.0)
8
Formatting
(new discs)
Automatically
formatted
Format in VR
mode
(page 35)
Format in
Video mode
(page 35)
Automatically
formatted
Automatically
formatted
Compatibility with
other DVD players
(finalizing)
Playable on DVD+RW
compatible players
(automatically finalized)
Playable only on VR mode
compatible players
(finalization unnecessary)
Playable on most DVD
players (finalization
necessary) (page 36)
Playable on DVD+R
compatible players (finalization
necessary) (page 36)
Playable on most DVD
players (finalization
necessary) (page 36)
“DVD+RW,” “DVD-RW,” “DVD+R,” and “DVD-R,”
are trademarks.
*1
CPRM (Content Protection for Recordable Media) is
a coding technology that protects copyrights for
images.
*2
Only if the recording mode is SP, HSP, or HQ, and
“Rec Screen Size” is set to “16:9.”
*3
Erasing titles does not free up disc space.
Recording Features Editing Features
Auto
Manual
Record
Rewrite
Chapter
(page 78)
Yes
Yes
Yes
Yes
Yes
Chapter
(page 65)
No
Yes
No
No
No
(page 41)
Yes
Yes
Yes
No
No
Discs that cannot be recorded on
• 4x-speed compatible DVD-RWs (Ver. 1.2/4x)
• DVD-RWs (Ver. 1.0)
• DVD+RWs that are not 2.4x-speed compatible
• Dual layer discs
• 8 cm discs
16:9 sizes
(page 48)
No
Yes
Yes *
No
Yes *
2
2
Change
title name
(page 62)
Yes
Yes
Yes
Yes
Yes
Delete title
(page 63)
Yes
Yes
Yes
Yes *
Yes *
3
3
A-B Erase
(page 63)
Yes
Yes
No
No
No
Playlist
(page 65)
No
Yes
No
No
No
,
continued
9
Playable discs
Icon
Disc
Type Characteristics
DVD VIDEO
VIDEO CD
CD
DATA CD
Discs that cannot be played
• All CD-ROMs (including PHOTO CDs)
• CD-Rs/CD-RWs, ot her than those recorded in
music CD format, MP3 form at , or V i deo CD
format
• Data part of CD-Extras
• DVD-ROMs
• DVD Audio discs
• DVD-RAMs
• HD layer on Super Audio CDs
• DVD VIDEOs with a different region code (see
below)
• A disc recorded in a color system other than
NTSC, such as PAL or SECAM
Logo
used in
this
manual
Discs such as movies that can be purchased or rented
DVD
VIDEO CDs or CD-Rs/CD-RWs in
VCD
VIDEO CD/Super VIDEO CD format
Music CDs or CD-Rs/CD-RWs in music CD format
CD
that can be purchased
CD-ROMs/CD-Rs/CD-RWs created on a PC or
DATA C D
similar device in music format containing MP3
audio tracks
z Hint
This DVD recorder can play 8 cm CDs and 8 cm DVDs
as well.
Note on playback operatio ns of DVD VIDEOs/
VIDEO CDs
Some playback operations of DVD VIDEOs/
VIDEO CDs may be intentionally set by software
producers. Since this recorder plays DVD
VIDEOs/VIDEO CDs according to the disc
contents the software producers designed, some
playback features may not be available. Also, see
the instructions supplied with the DVD VIDEOs/
VIDEO CDs.
Region code (DVD VIDEO only)
Your recorder has a region code printed on the rear
of the unit and will only play DVD VIDEOs
(playback only) labeled with identical region
codes. This system is used to protect copyrights.
DVD VIDEOs labeled will also play on this
recorder.
If you try to play any other DVD VIDEO, the
message “Playback prohibited by region code.”
will appear on the TV screen. Depending on the
DVD VIDEO, no region code indication may be
labeled even though playing the DVD VIDEO is
prohibited by area restrictions.
Music discs encoded with copyri ght protection
technologies
This product is designed to playba ck discs that
conform to the Compact Disc (CD) standard.
Recently, various musi c discs encoded with
copyright protection techn ol ogi es are being
marketed by some record companies. Please be
aware that among those discs, there are some that
do not conform to the CD sta ndard and may not be
playable by this product.
ALL
X
Region code
RDR–XXXX
00V 00Hz
NO.
00W
0-000-000-00
Notes
• You cannot mix VR mode and Video mode on the same
DVD-RW. To change the disc’s format, reformat the
disc (page 35). Note that the disc’s contents will be
erased after reformatting.
• You cannot shorten the time requir e d for r ecor ding
even with high-speed discs. Also, you cannot record on
the disc if the disc is not 1x speed compatible.
• It is recommended that you use discs with “For Video”
printed on their packaging.
• You cannot add new recordings to DVD-Rs or DVDRWs (Video mode) that contain recordings made on
other DVD equipment.
• In some cases, you may not be able to add new
recordings to DVD+RWs that contain recordings made
on other DVD equipment. If you do add a new
recording, note that this recorder will rewrite the DVD
menu.
• If the disc contains PC data unrecognizable by this
recorder, the data may be erased.
• Some DVD+RWs/DVD+Rs, DVD-RWs/DVD-Rs, or
CD-RWs/CD-Rs cannot be played on this recorder due
to the recording quality or physical condition of the
disc, or the characteristics of the recording device and
authoring software. The disc will not play if it has not
been correctly finalized. For mo re info rmation , see the
operating instructions for the recording device.
10
11
1-2

Hookups and Settings
Hooking Up the Recorder
Follow steps 1 to 7 to hook up and adjust the
settings of the recorder .
Notes
• Plug cords securely to prevent unwanted noise.
• Refer to the instructions supplied with the components
to be connected.
• You cannot connect this recorder to a TV that does not
have a video input jack.
• Be sure to disconnect the power cord of each
component before connecting.
Step 1: Unpacking
Check that you have the following items:
• Audio/video cord (pinplug u 3 y pinplug u 3)
(1)
• Power cord (1)
• Antenna cable (1)
• Remote commander (remote) (1)
• Set top box controller (1)
• Size AA (R6) batteries (2)
Step 2: Connecting the
Antenna Cable and Set Top
Box Controller
Select one of the following antenna hookups. Do
not connect the power cord unt il you reach “Step
5: Connecting the Power Cord” (page 20).
If you have Hookup
Cable box with a video/audio output
or a satellite receiver
Cable box with an antenna outp ut
only
Cable without cable box, or antenna
only (no cable TV)
A (page 13)
B (page 15)
C (page 14)
Using the cable box/satellite
receiver control function
The cable box/satellite receiver contro l function
can be used with hookup A or B. It allows the
recorder to control a cable box or satellite receiver
via the supplied set top box controller. The
recorder controls channel s on the cable box or
satellite receiver for timer record ing. You can also
use the recorder’s remote control to chan ge
channels on the cable box/sa tellite receiver
whenever the cable box/satellite receiver is turned
on, even if the recorder is turned off.
To use the cable box/satellite receiver control
function, you need to connect the set top box
controller and set the cod e nu m ber and output
channel (page 23). After setting up the cable box/
satellite receiver control, check that the recorder
can correctly control th e cable box or satellite
receiver (page26).
Note to CATV system installer (in USA)
This reminder is provided to call the CATV
system installer’s attention to Article 820- 40 of
the NEC that provides guidelines for proper
grounding and, in particular, specifies that the
cable ground shall be connected to the grounding
system of the building, as close to t he point of
cable entry as practical.
Notes
• If your antenna is a flat cable (30 0- ohm twin lead
cable), use an external antenna connector (not
supplied) to connect the antenna to the recorder.
• If you have separate cables for VHF and UHF
antennas, use a UHF/VHF band mixer (not supplied) to
connect the antenna to the recorder.
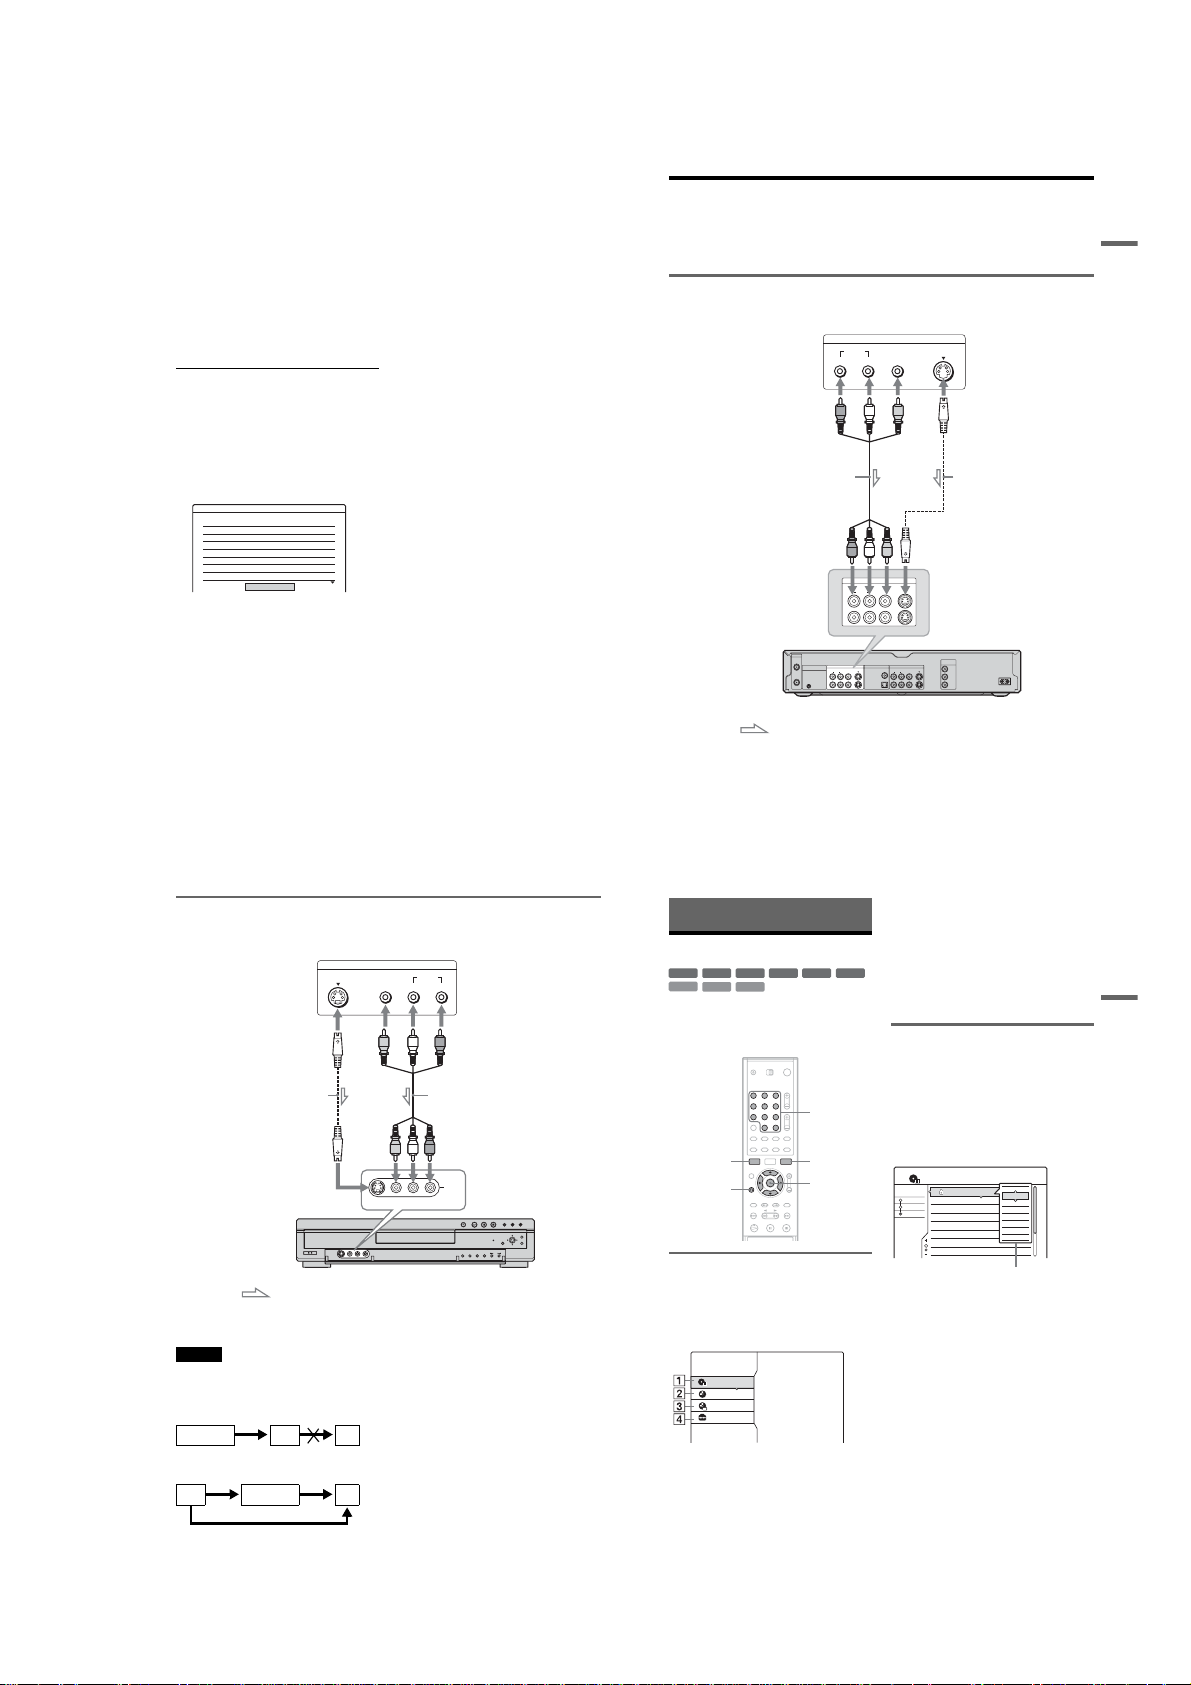
A: Cable box or satellite receiver with a video/audio output
With this hookup, you can recor d any channel on the cable box or satelli te receiver. Be sure that the
satellite receiver or cable box is turned on.
To watch cable or satellite programs, you need to match the channel on the recorder (L1 or L3) to the
input jack connected to the cable box or satellite receiver (LINE IN 1 or 3 ).
to SET TOP BOX
CONTROL
z Hints
• If your cable box or satellite receiver has an S-video jack, you can use an S-video cord (not supplied) instead of the
audio/video cord.
• If you connect an S-video cord to the LINE IN 1 jack, set “Line1 Input” in Video Setup to “S VIDEO” (page 75). If
you connect an S-video cord to the LINE IN 3 jack, set “Line3 Input” in Video Setup to “S VIDEO” (page 74).
Place the set top box controller
near the remote sensor on the
cable box/satellite receiver.
Audio/video
cord (supplied)
SET TOP BOX
CONTROL
to LINE IN
1 or 3
VHF/UHF
IN
SET TOP BOX
CONTROL
OUT
: Signal flow
Set top box
controller
(page 12)
RL
1
3
LINE IN DIGITAL OUT
VIDEO
AUDIORL
1
3
AUDIO
OUT
LINE IN
AUDIORL
S VIDEO
PCM/DTS/
DOLBY DIGITAL
VIDEO
OUT
VIDEO
1
COAXIAL
2
OPTICAL
Cable box/
satellite receiver
S VIDEO
S-video cord (not
supplied)
S VIDEO
LINE OUT
S VIDEO
VIDEO
AUDIORL
ANT IN
TO TV
COMPONENT
VIDEO OUT
Y
B
P
PR
Antenna cable
(supplied)
to antenna input
~
AC IN
DVD recorder
Wall
TV
Hookups and Settings
12
B: Cable box with an antenna output only
With this hookup, you can record any channel on the satellite receiv er or cable box. Be sure that the
satellite receiver or cable box is turned on.
To watch cable programs, you need to match the channel on the recorder (2ch, 3ch, or 4ch) to the antenna
output channel on the cable box (2ch, 3ch, or 4ch).
Wall
Set top box
controller
Antenna cable
(supplied)
to VHF/UHF OUT
to VHF/UHF IN
: Signal flow
VHF/UHF
VHF/UHF
IN
IN
OUT
OUT
Cable box
ANT IN
TO TV
VHF/UHF
IN
SET TOP BOX
OUT
to antenna
input
CONTROL
SET TOP BOX
CONTROL
AUDIORL
1
3
LINE IN DIGITAL OUT
S VIDEO
VIDEO
TV
(supplied)
to SET TOP
BOX
CONTROL
1
COAXIAL
PCM/DTS/
DOLBY DIGITAL
2
OPTICAL
Place the set top box controller
near the remote sensor on the
cable box/satellite receiver.
COMPONENT
VIDEO OUT
LINE OUT
Y
S VIDEO
VIDEO
AUDIORL
B
P
P
R
DVD recorder
~ AC IN
continued
,
C: Cable without cable box, or antenna only (no cable TV)
Use this hookup if you watch cable channels without a cable box. Also use this hookup if you are using
a VHF/UHF antenna or separat e VHF and UHF antennas.
With this hookup, you can record any channel by selecting the ch annel on the recorder.
Wall
to VHF/UHF IN
VHF/UHF
IN
OUT
to VHF/UHF OUT
Antenna cable (supplied)
: Signal flow
VHF/UHF
IN
SET TOP BOX
CONTROL
OUT
to antenna input
AUDIORL
1
3
LINE IN DIGITAL OUT
S VIDEO
VIDEO
LINE OUT
VIDEO
AUDIORL
1
COAXIAL
PCM/DTS/
DOLBY DIGITAL
2
OPTICAL
TV
DVD recorder
COMPONENT
VIDEO OUT
Y
S VIDEO
B
P
P
R
~ AC IN
13
Hookups and Settings
14
15
1-3

Step 3: Connecting the Video Cords
Select one of the following patter ns A through C, according to the input jack on your TV monitor,
projector, or AV amplifier (receiver). This will enable you to view pictures. Audio connections are
explained in “Step 4: Connecting t he Audio Cords” (page 18).
A
INPUT
VIDEO
L
AUDIO
R
TV, projector, or AV
amplifier (receiver)
to LINE OUT (VIDEO) 1 or 2
VHF/UHF
IN
OUT
Audio/video
cord (supplied)
SET TOP BOX
LINE IN DIGITAL OUT
CONTROL
S VIDEO
VIDEO
AUDIORL
1
PCM/DTS/
DOLBY DIGITAL
3
(yellow)
AUDIORL
1
COAXIAL
2
OPTICAL
(red) (blue)
S-video cord
(not supplied)
to LINE OUT (S VIDEO) 1 or 2
COMPONENT
VIDEO OUT
LINE OUT
Y
S VIDEO
VIDEO
P
B
PR
Component video
cord (not supplied)
(green)
TV, projector, or AV
amplifier (receiver)
DVD recorder
~
AC IN
to COMPONENT
VIDEO OUT
TV, projector, or AV
amplifier (receiver)
: Signal flow
Note
Do not connect more than one type of video cord between the recorder and your T V at the sa me time.
INPUT
S VIDEO
COMPONENT
VIDEO IN
Y
P
B
P
R
B
C
(green)
(blue)
(red)
A
Connecting to a video input jack
Connect the yellow plug of the audio /v id eo cord
(supplied) to the yellow (video) jack. You will
enjoy standard quality images.
Note that you cannot use the PROGRESSIVE
button with this connection.
Yellow
White (L)
Red (R)
B
Connecting to an S VIDEO input
Yellow
White (L)
Red (R)
jack
Connect an S-video cord (not supplied). You will
enjoy high quality images.
Note that you cannot use the PROGRESSIVE
button with this connection.
C
Connecting to component video
input jacks (Y, P
Connect the COMPONENT VIDEO OUT jacks
using a component video cord (not supplied) or
three video cords (not supplied) of the same kind
and length. You will enjoy accurate color
reproduction and high quality images.
If your TV accepts progress iv e 480p format
signals, you must use this conne ction and then
press PROGRESSIVE on the remote to send
progressive video signals. For details, see “Using
the PROGRESSIVE button ” (page 17).
Green
Blue
Red
When playing “wide screen” i mages
Some recorded images may not fit your TV
screen. To change the aspect ratio, see page 74.
If you are connecting to a VCR
Connect your VCR to the LINE IN (VIDEO) jack
on the recorder (page 29).
B
, PR)
Green
Blue
Red
Using the PROGRESSIVE button
By using the PROGRESSIVE b ut to n on the
remote, you can select the signal format in which
the recorder outputs vi deo signals: Interlace or
Progressive.
Connect the recorder using the COMPONENT
VIDEO OUT jacks (pattern C above), and press
PROGRESSIVE repeatedly. “PROGRESSIVE”
appears in the front panel display when the
recorder outputs progres si ve signals.
◆Progressive
Select this when:
–your TV accepts progres si ve signals, and,
–the TV is connected to the CO MPONENT
VIDEO OUT jacks.
Note that the pictures will no t be cl ear or no
picture will appear if you select progressive signal
output when either of the above conditions is not
met.
◆Interlace
Set to this position when:
–your TV does not accept progressiv e si gnals, or,
–your TV is connected to jacks other than the
COMPONENT VIDEO OUT jacks (LINE OUT
(VIDEO) or S VIDEO).
z Hint
When you select progressive signal output, you can finetune the signal according to the type of software you are
watching (page 75).
Note
Consumers should note that not all high definition
television sets are fully compatible with this product and
may cause artifacts to be displaye d in th e picture. In the
case of 480 progre ssive scan picture prob lems, it is
recommended that the user switch the connection to the
‘standard definition’ output. If there are que st ions
regarding our TV set compatibility with this model 480p
DVD recorder, please contact our customer service
center.
Hookups and Settings
16
Step 4: Connecting the Audio Cords
Select one of the foll owin g p at ter ns A or B, according to the input jack on your TV monitor, projec tor,
or AV amplifier (receiv er).
This will enable you to listen to sound.
INPUT
LINE OUT
S VIDEO
VIDEO
(yellow)
(white)
(red)
COMPONENT
VIDEO OUT
Y
B
P
P
R
DVD recorder
Coaxial digital cord
(not supplied)
to coaxial
digital input
VIDEO
L
AUDIO
R
TV, projector, or AV
amplifier (receiver)
~ AC IN
[Speakers]
B
Rear (R)
Front (R)
Subwoofer
(red)
(white)
(yellow)*
LINE OUT
S VIDEO
VIDEO
AUDIORL
1
2
VHF/UHF
IN
SET TOP BOX
LINE IN DIGITAL OUT
CONTROL
VIDEO
AUDIORL
1
OUT
3
COAXIAL
OPTICAL
to DIGITAL OUT (COAXIAL or
OPTICAL)
PCM/DTS/
DOLBY DIGITAL
DIGITAL OUT
Optical digital cord (not supp lied)
[Speakers]
Rear (L)
to optical
digital input
Front (L)
Center
Audio/video
cord (supplied)
to LINE OUT (R-AUDIO-L) 1 or 2
S VIDEO
AUDIORL
1
COAXIAL
PCM/DTS/
DOLBY DIGITAL
2
OPTICAL
or
AV amplifier (receiver)
with a decoder
17
A Connecting to audio L/R input
jacks
This connection will use your TV’s or stereo
amplifier’s (receiver’s) two speakers for sound.
Connect using the audio/video cord ( su ppl i ed).
A
Yellow
White (L)
Red (R)
• Surround effect (page 53)
TV: Dynamic, Wide, Night
Stereo amplifier (receiver): Standard, Night
Note
Do not connect your TV’s audio output jacks to the LINE
IN (AUDIO L/R) jacks at the same time. This will cause
unwanted noise to come from your TV’s speakers.
B Connecting to a digital audio
input jack
If your AV amplifier (receiver) has a Dolby*1
Digital or DTS*
use this connection.
Connect using a coaxial or optical digital cord (not
supplied).
Yellow
White (L)
Coaxial cord
Red (R)
Optical cord
• Surround effect
Dolby Digital (5.1ch), DTS (5.1ch)
*1
*2
• After you have completed the connection, make the
• The surround sound effects of this recorder cannot be
2
decoder and a digital input jack,
Manufactured under license from Dolby laboratorie s.
“Dolby,” “Pro Logic,” and the double-D symbol are
trademarks of Dolby Laboratories.
“DTS” and “DTS Digital Out” are trademarks of
Digital Theater Systems, Inc.
Notes
appropriate settings under “Audio Connection” in Easy
Setup (page 23). Otherwise , no so und or a lou d noise
will come from your speakers.
used with this connection.
Hookups and Settings
: Signal flow
* The yellow plug is used for vide o signals (page 17).
z Hint
For correct speaker location, see the operating instructions supplied with the connected components.
Note
Do not connect your TV’s audio output jacks to the LINE IN (AUDIO L/R) jacks at the same time. This will cause
unwanted noise to come from your TV’s speakers.
18
19
1-4

Step 5: Connecting the
Power Cord
Connect the supplied power cord t o th e A C I N
terminal of the recorder. Then p lu g t he recorder
and TV power cords into an AC outlet. After you
connect the power cord, yo u m u s t wait for a
short while before operating the recorder. You
can operate the recorder only after the front panel
display lights up and the record er enters standby
mode.
If you connect additional equi pm ent to this
recorder (page 29), be sure to co nnect the power
cord only after all connections are complete.
~
AC IN
1
to AC IN
2
to AC outlet
20
Step 6: Preparing the
Remote
You can control the recorder using the supplied
remote. Insert two size AA (R6) batteries by
matching the 3 and # ends on the batteries to the
markings inside the batter y compartment. When
using the remote, point it at the remote sensor
on the recorder.
Notes
• If the supplied remote interferes your other Sony DVD
recorder or player, change the command mode number
for this recorder (page22).
• Use the batteries correctly to avoid possible leakage
and corrosion. Do not touch the liquid with bare hands
should leakage occur. Observe the following:
– Do not use a new battery with an old batter y, or
batteries of different manufacturers.
– Do not attempt to recharge the batteries.
– If you do not intend to use the remote for an extended
period of time, remove the batteries.
– If battery leakage occur s, wipe out a ny liquid inside
the battery compartment, and insert n ew batteries.
• Do not expose the remote se nsor (ma r ke d on the
front panel) to strong light, such as direct sunlight or
lighting apparatus. The recorder may not respond to the
remote.
Controlling TVs with the remote
You can adjust the remote control’s signal to
control your TV.
If you connected the recorder to an AV amplifier
(receiver), you can also use the supplied remote to
control the AV amplifier’s (receiver’s) volume.
Notes
• Depending on the connected unit, you may not be able
to control your TV or AV amplifier (receiver) with
some or all of the buttons below.
• If you enter a new code number, the code number
previously entered will be erased.
• When you replace the batteries of the remote, the code
number may be reset to the default sett ing. Set the
appropriate code number again.
Number
buttons, SET
1 2 3
4 5 6
7 8 9
TV/DVD
switch
"/1
CH +/–
VOL +/–
0
TV/VIDEO
1 Slide the TV/DVD switch to TV.
2 Hold down [/1.
3 Enter your TV’s manufacturer co de (see
“Code numbers of controllable TVs”
below) using the number buttons.
4 Release [/1.
When the TV/DVD switch is set to TV, the
remote performs the following:
[/1 Turns your TV on or off
VOL +/– Adjusts the volume of your
CH +/– Selects the channel on your
TV/VIDEO Switches your TV’s input
Number buttons and
SET
TV
TV
source
Selects the channel on your
TV
Code numbers of controllable TV s
If more than one code number is li s te d , try
entering them one at a time until you find the one
that works with your TV.
Manufacturer Code number
Sony 01 (default)
Akai 04
AOC 04
Centurion 12
Coronado 03
Curtis-Mathes 12, 14
Daewoo 04, 22
Daytron 03, 12
Fisher 11
General Electric 04, 06, 10
Gold Star/LG 03, 04, 17
Hitachi 02, 03, 04
J.C.Penney 04, 10, 12
JVC 09
KMC 03
Magnavox 03, 04, 08, 12, 21
Marantz 04, 13
MGA/Mitsubishi 04, 12, 13, 17
NEC 04, 12
Panasonic 06, 19
Philco 02, 03, 04, 08
Philips 08, 21
Pioneer 06, 16
Portland 03
Proscan 10
Quasar 06, 18
Radio Shack 05, 10, 14
RCA 04, 10
Sampo 12
Samsung 03, 04, 12, 20
Sanyo 11, 14
Scott 12
Sears 07, 10, 11
Sharp 03, 05, 18
,
continued
Hookups and Settings
21
Manufacturer Code number
Sylvania 08, 12
Teknika 03, 08, 14
Toshiba 07, 18
Wards 03, 04, 12
Yorx 12
Zenith 14, 15
Controlling the volume of your AV
amplifier (receiver) with the remote
TV/DVD
switch
"/1
Number
buttons, SET
1 2 3
4 5 6
7 8 9
VOL +/–
0
1 Slide the TV/DVD switch to DVD.
2 Hold down [/1, and enter the
manufacturer code (see the table below)
for your AV amplifier (receiver) using the
number buttons.
3 Release [/1.
The VOL +/– buttons control the A V
amplifier’s volume.
If you want to control the TV’s volume, slide
the TV/DVD switch to TV.
z Hint
If you want to control the TV’s vol ume ev en when th e
TV/DVD switch is set to DVD, repeat the steps above
and enter the code number 90 (default).
Code numbers of controllabl e AV amplifiers
(receivers)
If more than one code number is listed, try
entering them one at a time until you find the one
that works with your AV amplifier (receiver).
Manufacturer Code number
Sony 78, 79, 80, 91
Denon 84, 85, 86
Kenwood 92, 93
Onkyo 81, 82, 83
Pioneer 99
Sansui 87
Technics 97, 98
Yamaha 94, 95, 96
If you have a Sony DVD player or
more than one Sony DVD recorder
If the supplied remote interferes with your other
Sony DVD recorder or player, set the command
mode number for this recorder and the supplied
remote to one that differs from the other Son y
DVD recorder or player.
The default command mode setting for this
recorder and the supplied remote is DVD3.
1 2 3
4 5 6
7 8 9
0
SYSTEM
MENU
O RETURN
M/m,
ENTER
COMMAND
MODE
1 Press SYSTEM MENU.
The System Menu appears.
2 Select “SETUP,” and press ENTER.
SETUP
Settings
Tuner Preset
Video
Set VCR Plus+ Channels
Audio
Clock
Features
Set Top Box Control
Options
Language
Easy Setup
3 Select “Options,” and press ENTER.
SETUP
Settings
Video
Audio
Features
Options
Easy Setup
4 Select “Command Mode,” and press
ENTER.
Settings
Video
Audio
Features
Options
Easy Setup
5 Select the Command mode (DVD1, DVD2,
or DVD3), and press ENTE R.
6 Slide the COMMAND MODE switch on the
remote so it matches the mo de you
selected above.
To return to the previous step
Press O RETURN.
SETUP
Format DVD :
Dimmer :
Auto Display :
Command Mode :
Factory Setup
Format DVD :
Dimmer :
Auto Display :
Command Mode :
Factory Setup
VR
Normal
On
DVD3
VR
Normal
On
DVD3
DVD1
DVD2
DVD3
Step 7: Easy Setup
Follow the steps below to make the minimum
number of basic adjustments for using the
recorder. If you do not complet e Eas y Setup, it
will appear each time you turn on your recorder.
Settings are made in the foll owing order.
OSD Language Setup
m
Clock Setup
m
Cable Box/Sat. Control Setup
m
Tuner and Channel Setup
m
TV Type Setup
m
Audio Connection Setup
m
Finished!
"/1
Number
buttons
O RETURN
1 2 3
4 5 6
7 8 9
CH +/–
0
</M/m/,,
ENTER
1 Turn on the TV.
2 Press [/1.
The recorder turns on.
Hookups and Settings
,
22
continued
23
1-5

3 Switch the input sele ctor on your TV so that
the signal from the rec order appears on
your TV screen.
“Initial settings necessary to operate the DVD
recorder will be made. You can change them
later using Setup. Before you start, check that
you have made all necessary connections.”
appears.
• If this message does not app ear, select “Easy
Setup” from “SETUP” in the System Menu
to run Easy Setup. For details, see “Settings
and Adjustments” on page 69.
4 Press ENTER.
The Setup Display for selecting the l anguage
used in the on-screen display appears.
Language 1/6
EASY SETUP
Select the screen Language.
English
Français
Español
5 Select a language, and pre ss ENTER.
The Setup Display for clock setting appears.
EASY SETUP
Auto
Manual
Clock 2/6
Select a method for setting the clock.
If you select "Auto", this recorder will look for a
time signal when you turn it off.
6 Select “Manual,” and press ENTER.
Press M/m to set the month and press ,. Set
the day, year, hour, and minutes in the same
way. The day of the week is set automati cally.
If you used antenna hookup C (page 15), you
can select “Auto.” The recorder will
automatically search for a channel that carries
a time signal when you turn off the recorder
after finishing Easy Setup.
Once the clock is set, the Setup Display for
cable box/satellite receiver control appears.
Set Top Box Control 3/6
EASY SETUP
Do you want to control your set top box
with this recorder?
(Changes to the current setting will erase all timer settings.)
Yes
No
7 Set the cable box/satellite receiver
control, and press ENTER.
If you want to use the cable box/satellite
receiver control (page14), select “Yes.”
If you do not have a cable box, select “No,”
then go to step 11.
8 Enter the brand code of your cable box/
satellite receiver.
See “Cable Box/Satellite Receiver Brand
Code” (page 96).
Use M/m to select the number and </, to
move the cursor.
Set Top Box Control 3/6
EASY SETUP
Enter the brand code of your set top box.
- - - -
9 Press ENTER.
Set Top Box Control 3/6
EASY SETUP
Select input line or Set Top Box's output channel.
Line1
Line2
Line3
Ch2
Ch3
Ch4
10Select the cable box output chan nel.
If you connect your cable box or satellite
receiver to the recorder’s audio/video input
(page 13), select “Line1,” “Line2,” or
“Line3,” then go to step 13.
If you connect the satellite receiver or cable
box to the recorder’s antenna i nput (page14),
select “Ch2,” ‘Ch3,” or “Ch4” and press
ENTER, then go to step 13. See the
instructions supplied with your cable box to
confirm the cable box’s antenna output
channel.
11Select whether or not you ha ve a cable
connection.
Tuner Preset 4/6
EASY SETUP
Select the way in which you will receive channels.
Antenna
Cable
If you use an antenna only (no cable TV ) ,
select “Antenna.”
If you use a cable connection without a ca bl e
box, select “Cable.”
12Press ENTER.
The Tuner Preset function automatically starts
searching for all of the receivable channels
and presets them.
EASY SETUP
EASY SETUP
16 : 9
4 : 3 Letter Box
4 : 3 Pan Scan
Tuner Preset 4/6
Ch45
TV Type 5/6
Searching for receivable channels.
Please wait.
To set the channels manually, see page71.
After the Tuner Preset is finished, the Setup
Display for selecting the aspect ratio of the
connected TV appears.
13Select the setting that matches your TV
type.
Select your TV screen type.
“4:3 Letter Box”: For standard TVs.
Displays “wide screen” pictu res with bands
on the upper and lower sections of the screen.
“4:3 Pan Scan”: For standard TVs.
Automatically displays “wide screen”
pictures on the entire scree n and cuts off the
sections that do not fit.
“16:9”: For wide-screen TVs or standard TVs
with a wide screen mode.
For details, see “TV type” on page 74.
14Press ENTER.
The Setup Display for selecting the type of
jack used to connect to your amplifier
(receiver) appears.
EASY SETUP
Yes :
Yes :
No
EASY SETUP
D-PCM
Dolby Digital
Audio Connection 6/6
LINE OUT(R-AUDIO-L)
DIGITAL OUT
Audio Connection 6/6
Is this recorder connected to an amplifier (receiver)?
Select the type of jack you are using.
15Select the type of jack (if any) you are
using to connect to an amplifier (receiver),
and press ENTER.
If you did not connect an AV amplifie r
(receiver), select “No,” then go to step 19.
If you connected an AV amplifier (receiver)
using just an audio cord, select “Yes: LINE
OUT (R-AUDIO- L ),” then go to step 19.
If you connected an AV amplifier (receiver)
using either a digital optical or coaxial cord,
select “Yes: DIGITAL OUT.”
16Select the type of Dolby Digital signal you
wish to send to your amplifier (receiver).
Dolby Digital
If your AV amplifier (receiver) has a Do lb y
Digital decoder, select “Do lby Digital.”
Otherwise, select “D-PCM.”
Hookups and Settings
24
17Press ENTER.
The Setup Display for the DTS signal appears.
Audio Connection 6/6
EASY SETUP
DTS
On
Off
18Select whether or not you wish to send a
DTS signal to your amplifier (receiver),
and press ENTER.
If your AV amplifier (recei ver) has a DTS
decoder, select “On.” Otherwise, select “Off.”
19Press ENTER when “Finish” appears.
Easy Setup is finished. All connections and
setup operations are complete.
If you use the cable box/satellite receiver
control, check that the control works correctly
(see below).
EASY SETUP
Easy Setup is finished.
Finish
To return to the previous step
Press O RETURN.
z Hint
If you want to run Easy Setup again, select “Easy Setup”
in the Setup Display (page 81).
Notes
• If there are only a few channels in your area that carry
time signals, setting the clock automa ti cally may take
up to about 20 minutes after the recorder tur ns of f . If
nothing happens even after you wait about 20 minutes,
set the clock manually in “Clock” of “Settings”
(page 72).
• To record TV programs using the timer, you must set
the clock accurately.
• If you use an S-video cord to connect your cable box or
satellite receiver, set “Line1 Input” or “Line3 Input” in
Video Setup to “S Video” (page 75).
26
Checking the cable box/satellite
receiver control setting
1 Point the remote at the recor der (not at the
cable box/satellite receiver.)
2 Press CH +/– and check th at the channel
changes on the cable box/satellite receiver
window.
3 Press the number but tons and check that
the channel changes on the cab le box/
satellite receiver window.
To fix the set top box controller to your cable
box/satellite receiver
Once you have confirmed that the set top box
controller controls your cable box or satellite
receiver, fix it in place.
1 Remove the backing on the double-sided tape.
2 Attach it so that the cable mouse is di rectly
above the remote control sensor on your cable
box/satellite receiver.
If you cannot get the recorder to control your
cable box/satellite receiver
Check the settings at “Set Top Box Control” in
Settings Setup (page 73).
Check the connection and posi tion of the cable
mouse (page 13).
If your cable box or satellite receiver still does not
operate with this recorder, contact your cable
company to see if they can provide you with a
compatible cable box or satellite receiver.
Setting Up the VCR Plus®
System
Setting up your r ecorder involv es coordi nating t he
TV channel number (the number you t ur n t o on
your TV or recorder to watch a prog ra m) wit h the
guide channel (the number that’s assigned to that
channel in your TV program gui de).
To find the guide channel numbers, l ook at the
“Channel Line-up Chart” in the program guide for
your area that features VCR PlusCode numbers.
Use the Channel Line-up Chart to co or di nate the
guide channel number with the TV c hannel
number. For example, if HBO is listed in the
Channel Line-up Chart as channel 33, and the
recorder receives HBO on c h annel 5, coordinate
these numbers using the following procedure.
SYSTEM
MENU
SYSTEM MENU
TITLE LIST
TIMER
TIMER LIST
SETUP
1 2 3
4 5 6
7 8 9
0
</M/m/,,
ENTER
Number
buttons, SET
O RETURN
1 Press SYSTEM MENU while the recorder is
stopped.
2 Select “SETUP,” and press ENTER.
,
continued
SETUP
Settings
Tuner Preset
Video
Set VCR Plus+ Channels
Audio
Clock
Features
Set Top Box Control
Options
Language
Easy Setup
3 Select “Settings,” and press ENTER.
4 Select “Set VCR Plus + Channels,” and
press ENTER.
Settings - Set VCR Plus+ Channels
Guide CH TV CH
- -
5 Select “Guide CH – TV CH,” and press
ENTER.
Settings - Set VCR Plus+ Channels
Guide CH TV CH
- -
6 Enter the guide channe l number assigned
in the program guide us ing the number
buttons, and press SET.
Settings - Set VCR Plus+ Channels
Guide CH TV CH
33
7 Enter the TV channel number using the
number buttons, and pres s SET.
Settings - Set VCR Plus+ Channels
Guide CH TV CH
33
Channel list
- - ----
- - ----
- - ----
- -
----
- -
- -
- -
33
- -
5
,
continued
25
Hookups and Settings
27
1-6
If you connected a cable box or sa te lli te
receiver to the recorder and set “Set Top Box
Control” to “On,” enter the TV channel
number on your cable box.
If you connected a cable box and set “Set Top
Box Control” to “Off,” enter the cable box
output channel (Usually 2ch, 3ch, or 4ch). See
the instructions supplied with your cable box
to confirm the cable box’s output channel.
8 Repeat steps 5 to 7 for each guide channel
number that does not match the TV channel
number.
9 Press SYSTEM MENU repea tedly to exit the
menu.
To return to the previous step
Press O RETURN.
To check the channel settings
When displaying the “Set VCR Plus+ Channels”
menu, select “Channel List,” t hen press ENTER.
The display lists the channels for which the guide
channel number does not match th e TV channel
number.
Settings - VCR Plus+ Channel List
Guide CH TV CH
2
-
21
4
-
32
6
-
9
10
-
121
11
-
13
25
-
36
28
-
2
Close
To go to the next page, press m.
To return to the previous page, press M.
Guide CH TV CH
45
-
53
-
- -
-
- -
-
- -
-
- -
-
- -
-
Page1
18
5
- -
- -
- -
- -
- -
Connecting a VCR or Similar Device
After disconnecting the recorder’s power cord from an AC outlet, connect a VCR or similar recording
device to the LINE IN jacks of this recorder.
See also the instruction manual supplied with the connected equipment.
To record on this recorder, see “Recording From a VCR or Similar Device” (page 49).
Connecting to the LINE IN 1 or 3 jacks
If the equipment has an S-video ja ck, you can use an S-video cord instea d of an audio/video cord.
Audio/video cord
(not supplied)
to LINE IN 1 or 3
VHF/UHF
IN
SET TOP BOX
OUT
: Signal flow
CONTROL
VCR, etc.
1
3
AUDIO
RL
LINE IN
AUDIORL
1
3
LINE IN DIGITAL OUT
S VIDEO
VIDEO
AUDIORL
COAXIAL
PCM/DTS/
DOLBY DIGITAL
OPTICAL
LINE OUTPUT
VIDEO
S VIDEO
VIDEO
LINE OUT
AUDIORL
1
2
S Video
S-video cord
(not supplied)
DVD recorder
COMPONENT
VIDEO OUT
Y
S VIDEO
VIDEO
B
P
PR
~
AC IN
Hookups and Settings
28
Connecting to the LINE 2 IN jacks on the front panel
Connect a VCR or similar recording device to the LINE 2 IN jacks of this recorder. If the equipment h as
an S-video jack, you can use an S-video cord instead of an audio/video cord.
z Hint
When the connected equipment outputs only monaura l sound, use audio cables that distribute monaural sounds to left/
right channels (not supplied).
Notes
• Do not connect the yellow LINE IN (VIDEO) jack when using an S-video cord.
• Do not connect the output jack of this recorde r to anot he r equi pme nt’s input jack with the other equipment’s output
jack connected to the input jack of this recorder. Noise (feedback) may result.
• Pictures containing copy prot ection signals that prohibit any copying cannot be recorded.
• If you pass the recorder signals via the VCR, you ma y not receive a clear image on your TV screen.
Be sure to connect your VCR to the DVD recorder and your TV in the order shown below. To watch videotapes, watch
the tapes through a second Line input on your TV.
VCR DVD recorder TV
• If you disconnect the recorder’s power cord, you will not be able to view the signals from the connected VCR.
• Do not connect more than one type of video cor d be twe en the reco rd er a nd your TV at the same time.
30
VCR, etc.
S VIDEO
S-video
cord (not
supplied)
to LINE 2 IN
: Signal flow
VCRDVD recorder TV
LINE IN 1
OUTPUT
VIDEO
S VIDEO VIDEO
LINE IN 2
AUDIO
LR
Audio/video cord
(not supplied)
LINE 2 IN
L
(MONO)
AUDIO R
DVD recorder
Guide to Displays
Using the On-Screen Menus
+
-
-
RW
VR
CD
SYSTEM
MENU
RWVideo
DATA CD
RW
VCD
This section introduces the System Menu, TOOLS
menu, and sub-menu. By using these displays, you
can perform most of the recorder’s operations.
O RETURN
System Menu
The System Menu appears when you press
SYSTEM MENU, and provides entries to all of
the recorder’s main functions, such as timer
recording and setup.
Select an option by pressing M/m and ENTER.
SYSTEM MENU
TITLE LIST
TIMER
TIMER LIST
SETUP
A TITLE LIST (page 32):
Turns on the Title List menu, wh ic h shows
recorded titles on the disc.
1 2 3
4 5 6
7 8 9
-
+
0
DVD
R
R
Number
buttons, SET
TOOLS
</M/m/,,
ENTER
,
continued
B TIMER (page 41):
Allows you to set a new timer recording
setting.
C TIMER LIST (page 44):
Turns on the Timer List menu, which allows
you to check, change, or can cel ti mer setti ngs.
D SETUP (page 69):
Turns on the Setup Display, which allows you
to set up the recorder to suit your preferences.
Sub-menu
The sub-menu appears when you select an item
from a list menu (e.g. a title from the Title List
menu), and press ENTER. The sub-menu displays
options applicable only to the selected item. The
displayed options differ dependi ng on the
situation and disc type.
Select an option by pressing M/m and ENTER.
Example: The Title List menu
My Movies
TITLE LIST
1 2ch 1:00PM - 2:00PM
Sort
Date
2 5ch 8:00PM - 9:00PM
Title
3 12ch 9:00AM - 9:30AM
Number
4 3ch 8:00PM - 8:30PM
5 25ch 8:00PM - 8:30PM
6 L2 9:00PM - 9:30PM
7 8ch 9:00PM - 9:30PM
8 125ch 10:00AM - 10:30AM
Options for the selected item
ORIGINAL
Close
Wed
Play
Fri
Play Beginning
Sat
Erase
Protect Title
Sat
Title Name
Fri
Set Thumbnail
Tue
A-B Erase
Tue
Thu
1.5/4.7GB
9/15
9/17
9/25
9/25
10/15
10/19
10/26
10/28
,
continued
29
Guide to Displays
31
1-7

TOOLS
The TOOLS menu appears when you press
TOOLS, and displays options applicable to the
entire disc (e.g. disc protection), recorder (e.g.
audio settings during recording), or multiple items
on a list menu (e.g. erasing multiple titles). The
displayed options differ depending on the
situation and disc type.
Select the opti on by pressing M/m and ENTER.
Example 1: When you press TOOLS while the
Title List menu is turned on.
My Movies
Close
Sort
Date
Disc Info.
Title
Erase Titles
Number
Playlist
Create Playlist
TOOLS
TITLE LIST
ORIGINAL
1 2ch 1:00PM - 2:00PM
2 5ch 8:00PM - 9:00PM
3 12ch 9:00AM - 9:30AM
4 3ch 8:00PM - 8:30PM
5 25ch 8:00PM - 8:30PM
6 L2 9:00PM - 9:30PM
7 8ch 9:00PM - 9:30PM
8 125ch 10:00AM - 10:30AM
1.5/4.7GB
9/15
Wed
9/17
Fri
9/25
Sat
9/25
Sat
10/15
Fri
10/19
Tue
10/26
Tue
10/28
Thu
Options for the disc or menu
Example 2: When you press TOOLS while a
DVD-RW (VR mode) is playing.
Close
Stop
Disc Info.
Erase Title
Protect Title
TOOLS
Options for the disc or picture
To return to the previous display
Press O RETURN.
32
Using the Title List
+
-
-
RW
VR
Z OPEN/
CLOSE
RW
RW
The titles of programs recor ded on a disc are
displayed in the Title List.
TITLE LIST
CURSOR
MODE
1
Press Z OPEN/CLOSE, and place a disc on
the disc tray.
With the recording side facing down
2
Press Z OPEN/CLOSE to close the disc
tray.
Wait until “LOAD” disappears from the front
panel display.
3
Press TITLE LIST.
To show the list in greater detail (z oom), press
ZOOM+.
Video
1 2 3
4 5 6
7 8 9
-R+
R
0
TOOLS
</M/m/,,
ENTER
ZOOM +/–
Standard Title List (Example: DVD-RW in VR
mode)
My Movies
Sort
Date
Title
Number
TITLE LIST
ORIGINAL
1 2ch 1:00PM - 2:00PM
2 5ch 8:00PM - 9:00PM
3 12ch 9:00AM - 9:30AM
4 3ch 8:00PM - 8:30PM
5 25ch 8:00PM - 8:30PM
6 L2 9:00PM - 9:30PM
7 8ch 9:00PM - 9:30PM
8 125ch 10:00AM - 10:30AM
1.5/4.7GB
9/15
Wed
9/17
Fri
9/25
Sat
9/25
Sat
10/15
Fri
10/19
Tue
10/26
Tue
10/28
Thu
m
“Zoomed” Title List
My Movies
1 2ch 1:00PM - 2:00PM
Wed 9/15 1:00PM( 1H00M)SP
2 5ch 8:00PM - 9:00PM
Fri 9/17 8:00PM( 1H00M)SLP
3 12ch 9:00AM - 9:30AM
Sat 9/25 9:00AM( 0H30M)EP
4 3ch 8:00PM - 8:30PM
Sat 9/25 8:00PM( 0H30M)SLP
1.5/4.7GB
12ch
2ch
5ch
3ch
TITLE LIST
ORIGINAL
Sort
Date
Title
Number
A Title type (DVD-RW in VR mode only):
Displays the title type, Original or Playlist.
B Sort buttons:
Sorts the title order (see below).
C Zooming indicator:
Shows the current zoom stat us .
D Disc name (page 35)
E Disc space (remainder/total)
F Title information:
Displays the title number, title name, and
recording date.
“z” (red) indicates that the title is currently
being recorded.
“” indicates the protected title.
G Scroll bar:
Appears when all of the titles do not fit on the
list. To view the hidden titles, press M/m.
H Title’s thumbnail picture
To scroll the list display by page (Page mode)
Press CURSOR MODE while the list display is
turned on. The display enters Page mode. Each
time you press M/m, the entire Title List changes
to the next/previous page of t itles.
To return to the Cursor mode, press CURSOR
MODE again.
About the Title List for DVD-RWs (VR mode)
You can switch the Title List to show Original or
Playlist.
While the Title List menu is turned on, press
TOOLS and select either “Original” or “Playlist,”
and press ENTER. “PLAYLIST” appears on the
front panel display when “Playlist” is selected.
For details, see “Edit options for DVD-RWs (VR
mode)” (page 61).
To change the title order (Sort)
Press < while the Title List menu i s tur ned on to
move the cursor to the Sort column. Press M/m to
select the item, and press ENTER.
Order Sorted
Date in order o f when the titles were
recorded. The title that is re corded
most recently is listed at the top.
Title in alphabetical order.
Number in order of recorded title number.
To change a title thumbnail picture
(Thumbnail) (DVD-RW in VR mode only)
You can select a favorite scene for the thumbnail
picture shown in the Title List menu.
1
Press TITLE LIST while a disc is in the
recorder, and press ZOOM + .
2
Select a title whose thumbnail picture you
want to change, and press ENTE R.
3
Select “Set Thumbnail” from the sub-menu,
and press ENTER.
The selected title starts to play in the
background.
4
While watching the playback picture, press
H PLAY, X PAUSE, or m/M to select
the scene you want to set for a thumbnail
picture, and press ENTER.
The scene is set for the title’s thumbnail
picture.
To turn off the Title List
Press TITLE LIST.
,
continued
Guide to Displays
33
z Hint
After recording, the first scene of t he recording (t he title)
is automatically set as the thumbnail picture.
Notes
• The Title List may not appear for discs created on other
DVD recorders.
• Letters that cannot be displayed are r eplaced with an
“*”.
• Title thumbnail pictures are disp la ye d only on this
recorder.
• It may take a few seconds for the thumbnail pictures to
be displayed.
• After editing, the title thumbnail picture may change to
the first scene of the recording (title).
Using the “Disc Info”
Screen (disc settings)
+
-
-
RW
VR
RW
With the Disc Information displa y, you ca n check
the disc type and remaining disc space. Also, you
can perform operations such as formatting and
finalizing (page 35).
1
RW
Z OPEN/
CLOSE
Press Z OPEN/CLOSE, and place a disc on
the disc tray.
With the recording side facing down
2
Press Z OPEN/CLOSE to close the disc
tray.
Wait until “LOAD” disappears from the front
panel display.
3
Press TOOLS.
The TOOLS menu appears.
4
Select “Disc Info.,” and press ENTER.
Items in the display differ depe ndi ng on the
disc type or recording fo rm at.
Video
1 2 3
4 5 6
7 8 9
-
+
R
R
0
TOOLS
</M/m/,,
ENTER
Example: DVD-RW (VR mode)
Disc Information
DiscName Movie
Media DVD-RW Format VR
Title no. Original 3 / Playlist 2
Protected Not Protected
Date 9/15/2003 ~ 10/28/2003
HQ : 0H30M
HSP : 0H45M
LP : 1H30M
EP : 2H00M
Remainder
SP : 1H00M
SLP : 3H00M
2. 3 / 4. 7GB
Close
Disc Name
Protect Disc
Finalize
Erase All
Format
A “Disc Name”
B “Media”: Disc type
C “Format”: Recording format type (DVD-
RW only)
D “Title no.”: Total number of titles
E “Protected”: Indicates whether protection is
set (DVD-RW in VR mode only)
F “Date”: Dates of when the oldest and the
most recent titles were recorded
G “Continuous Rem. Time”/“Remainder”
(approximate)
• The longest continuous recording time in
each of the recordin g m o des
• Disc space bar
• Remaining disc space/to tal disc space
H Disc setting buttons (page 35)
•“Disc Name”
•“Protect Disc”
•“Finalize”/“Unfinalize”
•“Erase All”
•“Format”
Available settings differ dep ending on the disc
type.
z Hint
For DVD-RWs (Video mode) and DVD+RWs, you can
check free space and title location on the disc using the
Disc Map display (page 64) .
Note
On this model, 1 GB (read “gigabyte”) is equivalent to 1
billion bytes. The larger the number, the larger the disc
space.
Labeling, protecting, or formatting
a disc
-
VR
HQ : 0H30M
LP : 1H30M
-
RWVideo
HSP : 0H45M
EP : 2H00M
+
R
SP : 1H00M
SLP : 3H00M
2. 3 / 4. 7GB
R
Close
Disc Name
Protect Disc
Finalize
Erase All
Format
+
-
RW
RW
You can execute options effective for the entire
disc using the Disc Information display.
1 Press TOOLS while the disc is in the
recorder.
The TOOLS menu appears.
2 Select “Disc Info.,” and press ENTER.
Example: When the inserted disc is a DVDRW (VR mode).
Disc Information
DiscName
Media DVD-RW Format VR
Title no. Original 3 / Playlist 2
Protected Not Protected
Date 9/15/2003 ~ 10/28/2003
Remainder
3 Select an option, and press ENTER.
“Disc Name”: Labels a disc. Enter the disc
name in the “Input Disc Name” display
(page 39).
“Protect Disc” (DVD-RW in VR mode only):
Protects all titles on the disc. To cancel the
protection, select “Don’t Protect.”
“Erase All” (DVD-RW/DVD+RW only):
Erases all titles on the disc (except the
protected titles).
“Format” (DVD-RW/DVD+RW only):
Erases all contents of the disc to make a bl ank
disc. For DVD-RWs, select a recording
format (VR or Video) according to your
needs.
z Hints
• You can set protection for individua l ti tle s ( page 62).
• By reformatting, you can change the recording f or mat
on DVD-RWs, or record again on DVD-RWs (Video
mode) that have been finalized.
Note
You can enter up to 64 characters for a disc name. The
disc name may not appear when the disc is played on
other DVD equipment.
Guide to Displays
,
34
continued
35
1-8
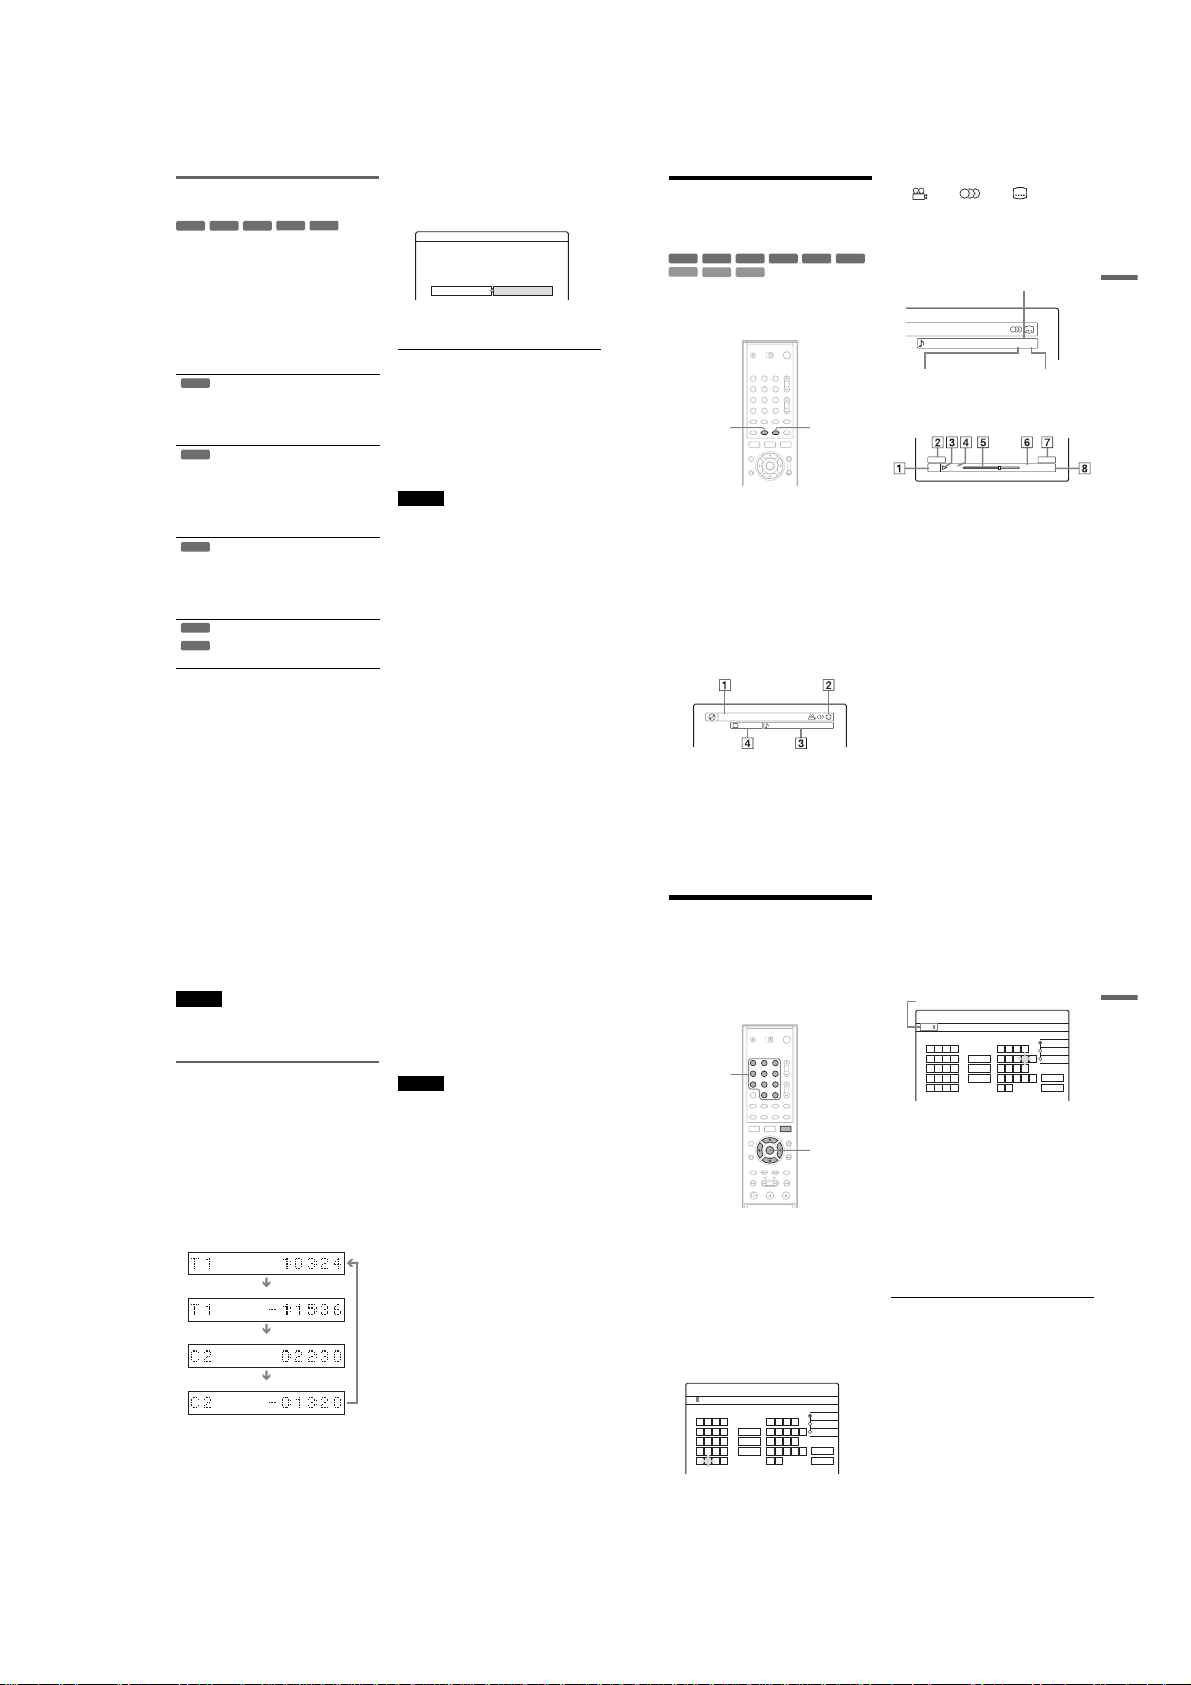
Finalizing a disc (preparing a disc
for playback on other equipment)
+
-
-
RW
VR
RW
Finalizing is necessary when you play discs
recorded with this recorder on other DVD
equipment.
When you finalize a DVD+RW, DVD-RW
(Video mode), DVD+R, or DVD-R, a DVD menu
will be automatically created, which can be
displayed on other DVD equipment.
Before finalizing, check the dif f erences between
the disc types in the table below.
RW
Differences between the disc t ypes
Discs are automatical ly finalized when
+
RW
removed from the recorder. However,
you may need to finalize the disc for
certain DVD equipment, or if the
recording time is short. You can edit or
record on the disc even after finalizing.
Finalizing is unnecessary when playi ng
-
RW
VR
a disc on VR format compatible
equipment.
Even if your other DVD equipment is
VR format compatible, you may need to
finalize the disc, especial ly if the
recording time is short. You can edit or
record on the disc even after finalizing.
Finalizing is necessary when playing on
-
RW
Video
any equipment other than this recorder.
After finalizing, you cannot edit or
record on the disc. If you want to record
on it again, reformat the disc (page 35).
However, all recorded contents w il l be
erased.
Finalizing is necessary when playing on
+
R
any equipment other than this recorder.
-
R
After finalizing, you cannot edit or
record on the disc.
1 Press TOOLS while the disc is in the
recorder.
The TOOLS menu appears.
2 Select “Disc Info.,” and press ENTER.
The Disc Information display appears.
-R+
Video
R
36
3 Select “Finalize,” and press ENTER.
The display shows the approximate time
required for finalizing and asks for
confirmation.
Finalize
About xx min is needed for finalizing this disc.
Cannot cancel finalizing during transaction.
Do you want to finalize?
OK Cancel
4 Select “OK,” and press ENTER.
The recorder starts finalizing the disc.
To unfinalize a DVD-RW (VR mode)
If you cannot record or edit on a DVD-RW (VR
mode) that has been finalized with other DVD
equipment (a message appears), unfinalize the
disc by selecting “Unfinalize” in step 3 above.
z Hint
You can check whether the disc has been finalized or not.
If you cannot select “Finalize” in step 3 above, the disc
has already been finalized.
Notes
• Depending on the condition of the disc, recording, or
the DVD equipment, discs may not play even if the
discs are finalized.
• The recorder may not be able to finalize the disc if it
was recorded on another recorder.
Checking the Play
Information and Playing
Time
+
-
-
RW
VR
RW
VCD
You can check the playing time and remaining
time of the current title, chapter, or track. Also,
you can check the disc name recorded on the disc.
Press DISPLAY repe atedly.
Each time you press the button, the display
changes as follows:
Title/track information (Display 1)
m
Play mode/time information (Display 2)
m
(Display off)
The displays differ depending on t he disc type or
playing status.
◆Display 1
Example: When playing a DVD VI D EO
A Title number/name
RW
CD
DATA CD
Title 1
(Track number for CDs/VIDEO CDs without
PBC, scene number for VIDEO CDs with
PBC, track number/name for DA TA CDs)
Video
1 2 3
4 5 6
7 8 9
-
+
0
1 : English DolbyDigital 2/0Angle3(5)
DVD
R
R
TIME/TEXTDISPLAY
B Available functions for DVD VIDEOs
( angle/ audio/ subtitle, etc.)
C The current selected function or audio
setting (appears only tempor ar i l y)
D The current selected ang le
Example: Dolby Digital 5.1 ch
Rear (L/R)
1 : English DolbyDigital 3/2.1
Front (L/R) + Center
◆Display 2
Example: When playing a DVD-RW (VR mode)
Original
DVD-RW
VR
LFE (Low Frequency
Effect)
Movies
0:00:45
T1SP
A Disc type*2/format (page 8)
B Title type (Original or Playlist) (page 61)
C Play mode
D Recording mode (page 40)
E Playing status bar*
F Title number (chapter number*1) (page 58)
(Track number for CDs/VIDEO CDs without
PBC, scene number for VIDEO CDs with
PBC, track number (album number*
DATA CDs)
G CD text (album name) appears when text is
recorded on a CD.
H Playing time (remaining time*
*1Displayed when you press TIME/TEXT repeatedly.
2
Displays Super VCDs as “SVCD”, DATA CDs as
*
“CD”.
3
Does not appear with VCDs, or DATA CDs.
*
3
1
) for
1
)
,
continued
Guide to Displays
37
z Hints
• If “DTS” is set to “Off” in Audio Setup, the DTS track
selection option will not appear on the screen even if
the disc contains DTS tracks (page 77).
• When “Auto Display” is set to “On” (default) in
Options Setup (page 80), playback information
automatically appears when the recorder is turned on,
etc.
Notes
• The recorder can only display the first level of a CD’s
text, such as the disc name.
• The letters or symbols that cannot be displ ay ed are
replaced with “*.”
Checking the playing/remaining
time
You can view the playing or time information
displayed on the TV screen and the front panel
display.
Press TIME/TEXT repeatedly.
The displays differ depending on the disc type or
playing status.
◆Front panel display
Example: When playing a DVD
Playing time and number of the current title
Remaining time of the current title
Playing time and number of the current chapter
Remaining time of the current chapter
38
Example: When playing a CD
Track playing time and the current track/index
number
m
Remaining time of the current track
m
Playing time of the disc
m
Remaining time of the disc
m
CD text (when available)
Notes
• The recorder can only disp la y the firs t level of a CD’s
text, such as the disc name.
• The letters or symbols tha t c annot be displayed are
replaced with “*.”
• Playing time of MP3 audio tracks may not be displayed
correctly.
How to Enter Characters
You can label a titl e, dis c, or pr ogr am by en te ri ng
characters. You can ente r up to 64 char acte rs for a
title or disc name, but the actual number of
characters displayed in the menus such as the Title
List will vary. Whe n the display for enteri ng
characters appears, follo w t he steps below.
Number
buttons, SET
1 Press </M/m/, to move the cursor to
the right of the screen and select “A”
(upper-case), “a” (lower-case), or
“Symbol,” and press ENTER.
The characters of the selected type are
displayed.
2 Press </M/m/, to select the character
you want to enter, and press ENTER.
The selected character appears at the top of
the display.
Example: Input Title Name
Input Title Name
1
2
3
4
5
The type of characters will change according
to the language you select in Eas y Setup.
Some languages allow you to enter an accent
mark.
1 2 3
4 5 6
7 8 9
0
</M/m/,,
ENTER
K
,. - 1
Back
BA C 2
Clear All
ED F 3
HG I 4
Space
KJ L5
"A"
NM O 6
6
"a"
QP R S
7
Symbol
UT V 8
8
Cancel
XW Y Z79
9
Finish
0
0
To enter a letter with an accen t mark, sel ect an
accent followed by the letter.
Example: Select “ ` ” and then “a” to enter “à.”
To insert a space, select “Space.”
3 Repeat steps 1 and 2 to enter the
remaining characters.
Input row
Input Title Name
Kids
,. - 1
1
Back
BA C 2
2
Clear All
ED F 3
3
4
HG I 4
Space
KJ L5
5
To erase a character, move the cursor to the
right of the characte r at the input row. Select
“Back” and press ENTER.
To insert a character, move the cursor to the
right of the point where you want to insert the
character. Select the charac ter and press
ENTER.
To erase all of the characters, select “Clear
All” and press ENTER.
"A"
NM O 6
6
"a"
QP R S
7
Symbol
UT V 8
8
Cancel
9
XW Y Z79
Finish
0
0
4 Select “Finish,” and press ENTER.
To cancel the setting, select “Cancel.”
To use the number buttons
You can also use the number butt ons to enter
characters.
1 In step 2 above, press the number butt ons
repeatedly to select a character.
Example:
Press the number 3 button once to e nt er “D.”
Press the number 3 button thre e times t o enter
“F.”
2 Press SET and sele ct t h e next character.
3 Select “Finish” and press ENTER.
Guide to Displays
39
1-9
Recording
Before Recording
Before you start recording…
• This recorder can record on various discs. Select
the disc type accordin g to your needs (page 8).
• Check that the disc has enou gh available space
for the recording (page34). For DVD+RWs and
DVD-RWs, you can free up disc space by
erasing titles (page 64).
• Adjust the recording picture quality and picture
size if necessary (page 48).
z Hint
Timer recording s wi ll be mad e re gard less whe the r or not
the recorder is turned on. You can turn off the recorder
without affecting the recording even after recording
starts.
Recording mode
Like the SP or LP recording mode of VCRs, this
recorder has six differe nt recording modes.
Select a recording mode according to the time and
picture quality you need. For ex am ple, if picture
quality is your top prio rity, select the High Qualit y
mode (HQ). If recording time is your priority,
Super Long Play mode (SLP) can be a possible
choice. Note that the recording time in the
following table is an approxim ate guide.
Press REC MODE repeatedly to switch the
recording modes.
I want to record with the
best possible picture
quality, so I’ll select HQ.
Recording mode Recording time
(minute)
HQ (High quality) 60
HSP R 90
SP (Standard mode) 120
LP r 180
EP r 240
SLP (Long duration) 360
Note
Situations below may cause slight inaccuracies with the
recording time.
– Recording a program with poor reception, or a program
or video source of low picture quality
– Recording on a disc that has already been edited
– Recording only a still picture or just sound
Recording a stereo/SAP program
The recorder can receive and record stereo/SAP
programs.
Stereo programs
When a stereo program is re ceived, the
“STEREO” indicator lights up on the fr ont panel
display. If there is noise in the stereo program, set
“Auto Stereo” in Audio Setup to “Off” (page 76).
The sound will be recorded in monaural but with
less noise.
SAP (Second Audio Program)
When a SAP (Second Audio Program) is received,
the “SAP” indicator lights up on the front panel
display. To record only SAP sound, set “Tuner
Audio” in Audio Setup to “SAP” (page 76).
z Hint
You can select the audio (main or SAP) while recording
bilingual programs using the AUDIO button. This does
not affect the recorded sound.
Unrecordable pictures
Pictures with copy protection c annot be recorded
on this recorder.
When the recorder receives a copy guard signal,
the recorder continues to re cord but only a blank,
grey colored screen w il l be r e corded.
Copy control
signals
Copy-Free
Copy-Once Ver.1.1 with
Copy-Never None (a blank screen is
* The recorded disc can be pl ayed only on CPRM
compatible equipment.
Recordable discs
+
-
RW
VR
RW
-
+
R
R
-
RW
VR
CPRM*
recorded)
-
Timer Recording (Standard/
VCR Plus+)
RW
Video
+
-
-
RW
VR
RW
[TIMER]
Video
1 2 3
4 5 6
7 8 9
0
RW
You can set the timer for a total of 30 programs, up
to one month in advance.
There are two methods to set t he timer: the
standard method and VCR Plus+ method.
• Standard: Set the date, time, and c hannel of the
program manually.
• VCR Plus+: Enter the PlusCode number
designated for each TV program (page 43).
Note
Do not operate your cable box or satellite receiver jus t
before or during a timer recording. This may prevent the
accurate recording of a program.
Setting the timer manually
(Standard)
Z OPEN/
CLOSE
-
+
R
R
Recording
TOOLS
</M/m/,,
ENTER
x REC
STOP
40
1 Press Z OPEN/CLOSE, and place a
recordable disc on t he disc tray.
With the recording side facing down
2 Press Z OPEN/CLOSE to close the disc
tray.
Wait until “LOAD” disappears from the front
panel display.
Unused DVDs are formatted automatically.
3 Press [TIMER].
Timer - Standard
Set the timer manually.
Start CH
Date
Toda y
::
VCR Plus+
If the Timer programming (VCR Plus+) menu
appears, press < to switch the d isplay to
“Standard.”
4 Select an item using </, and adjust
using M/m.
“Date”: Sets the date.
The item changes as follows.
Today y Tomorrow y …… y Tue 10/
28 (1 month later) y Sun (every Sunday)
y …… y Sat (every Saturday) y
Mon-Fri (Monday to Friday) y Mon-Sat
(Monday to Saturday) y Sun-Sat (Sunday to
Saturday) y Today
“Start”: Sets the start time.
“Stop”: Sets the stop time.
“CH”: Selects the channel or input source.
◆When using the cable box/sa tellite box
control
Turn on the cable box or satel lite re ceiver and
enter the channel number.
Example: When selecting 215ch
Select 2 and press , for the next digit. Select
1 and press ,. Then select 5.
ModeStop
,
continued
41
“Mode”: Selects the recording mode
(page 40).
If you make a mistake, select the item and
change the setting.
5 Select “OK,” and press ENTER.
The Timer List menu (page 44) appears. The
TIMER REC indicator lights up o n th e front
panel and the recorder is ready to start
recording.
Unlike a VCR, there is no need to turn off the
recorder before the timer recording starts.
To stop recording during timer recording
Open the remote’s cover and press x REC STOP.
Note that it may take a few seconds for the
recorder to stop recording.
OK
Cancel
Rec Mode Adjust
If there is not enough available disc space for the
recording, the recorder automatically adjusts the
recording mode to enable the entire program to be
recorded. This function is normally set to “On.”
To cancel this function, press TOOLS while the
Timer List is displayed. Select “Rec Mode
Adjust” and press ENTER. Select “Off” and press
ENTER.
If the timer settings overlap
Overlapped timer settings are shown as follows.
Timer
These timer settings overlap. Do you want to continue?
Mon-Sat 10:00AM - 10:30AM 25ch SP
Fri 10/29 9:00AM - 10:15AM 3ch SLP
Cancel
OK
To store the setting as shown, select “OK.” The
program at the top of the list has priority over the
rest of the programs.
To cancel the overlapped timer setting, select
“Cancel.”
To confirm, change, or cancel timer recording
See “Checking/Changing/Canceling Timer
Settings (Timer List)” (page 44).
To extend the recording dura tion time while
recording
1 Press TOOLS during recording.
The TOOLS menu appears.
2 Select “Extend Rec Time,” and press ENTER.
Extend Rec. Time
Set the timer extend function.
Tue 9/28 10:00AM - 11:30AM 3ch SP
Extend Time
Off
3 Press M/m to select the duration time.
You can set the duration in increments of 10
minutes, for a maximum of 60 minutes.
OK
Cancel
4 Select “OK,” and press ENTER.
z Hint
You can play the recorded program by selecting the
program title in the Title List menu.
Notes
• If “The disc is full or nearly full” appears on the screen,
change the disc, or make available space for the
recording (DVD+RW/DVD-RW only) (page 64).
• To record a cable or satellite pro gr am without using
cable box/satellite box control, turn on the cable box or
satellite receiver and select the program you want to
record. Leave the cable box or satellite receiver turned
on until the recorder finishes recording.
• Even if the timer is set for the sa me daily or weekly
program, the timer recording cannot be made if it
overlaps with a program that has priority. The mark
will appear next to the overlapped setting in the Timer
List. Check the priority order of the settings (page 44).
• Even if the timer is set, timer recordings cannot be
made while recording a program that has priority.
• The Rec Mode Adjust function only works with a timer
recording. It does not function with Quick Timer
(page 47).
Recording TV programs using the
VCR Plus+ system
The VCR Plus+ system is a feature that simpli fies
setting the timer. Just enter the PlusCode number
listed in the TV program guide. The date, time,
and channel of that progr am are set automat icall y.
Before you start, check that the TV and guide
channels are correctly set in “Set VCR Plus+
Channels” in “Settings” (page 71).
1 2 3
CLEAR
[TIMER]
4 5 6
7 8 9
Number
buttons, SET
0
</M/m/,,
ENTER
x REC
STOP
1 Insert a recordable disc.
2 Press [TIMER].
Timer - VCR Plus+
Set the timer by entering the PlusCode.
PlusCode
Standard
If the Timer programming (Standard) menu
appears, press < to switch the display to
“VCR Plus+.”
3 Press the number buttons to enter the
PlusCode number, and pr ess SET.
If you make a mistake, press CLEAR and reenter the correct numb er .
OK
Cancel
Recording
,
42
continued
43
1-10

4 Select “OK,” and press ENTER.
The date, start and stop times, channel, and
recording mode appear.
Timer - VCR Plus+
Is the following timer setting correct? To modify,
adjust each item or re-enter the PlusCode.
Date
Start CH ModeStop
::
Mon 6/28 AM AM
10 00 11 30
If you want to change the setting, pr ess </
, to select the item and press M/m to change
the setting.
To re-enter the PlusCode number, select
“Change.”
5 Select “OK,” and press ENTER.
The TIMER REC indicator lights up on the
front panel, and the recorder is ready to start
recording.
To stop recording during timer recording
Open the remote’s cover and press x REC STOP.
Note that it may take a few seconds for the
recorder to stop recording.
If the timer settings overlap
See page 41.
To extend the recording duration time while
recording
See page 41.
To confirm, change, or cancel timer recording
See “Checking/Changing/C anceling Timer
Settings (Timer List)” (page 44).
z Hint
The Rec Mode Adjust func tion also w orks with t his timer
method (page 41).
107 HQ
Change
OK
Cancel
Checking/Changing/
Canceling Timer Settings
(Timer List)
+
-
-
RW
VR
RW
You can check, change, or can cel timer settings
using the Timer List menu.
1 Press SYSTEM MENU.
RW
SYSTEM
MENU
O RETURN
The System Menu appears.
Video
1 2 3
4 5 6
7 8 9
-
+
R
R
0
</M/m/,,
ENTER
2 Select “TIMER LIST,” and press ENTER.
TIMER LIST
Mon 10/25 8:30PM - 9:30PM 4ch
Mon-Sat 10:00AM - 10:30AM 25ch
Fri 10/29
9:00AM - 10:15AM 3ch
Sat 10/30 4:00PM - 5:00PM 125ch
Timer information displays the recording
date, time, recording mode, etc.
“
❐
”: Indicates that the setting is overlapped
by another setting.
“
” (green): Indicates that the setting is fully
a
recordable.
“
” (red): Indicates the setting currently
z
being recorded.
“
” (grey): Indicates that the setting cannot
z
be recorded in the selected recording mode.
3 Select the timer setting you want to check/
change/cancel, and press E NTER.
The sub-menu appears.
10:30 PM
HQ
SP
SLP
SLP
4 Select one of the options, and press
ENTER.
“Modify”: Changes the timer setting. Select
an item using </, and adjust using M/m.
Select “OK” and press ENTER.
Modify
Modify the timer setting.
Date
Start CH ModeStop
::
Mon-Sat PM PM
10 00 10 15
“Erase”: Erases the timer setting. Select “OK”
and press ENTER.
Erase
Are you sure you want to erase this timer setting?
Mon-Sat 10:00AM - 10:30AM 25ch SP
OK Cancel
“Check Overlap”: Checks for ov er la pped
settings.
The timer setting set most recently is listed at
the top and has priority over the other settings.
You may not be able to record a program of
lower priority.
Check Overlap
These timer settings overlap.
Mon-Sat 10:00AM - 10:30AM 25ch SP
Fri 10/29 9:00AM - 10:15AM 3ch SLP
Change Close
To change the priority of a program, press </
, to select “Change.” For details, see
“Changing the priority of overlapped
settings” (page 46).
Select “Close” to return to the Timer List.
To change or cancel the setting, repeat steps 3
and 4 above.
25 SP
OK
Cancel
To turn off the Timer List
Press O RETURN.
z Hint
While recording, you cannot modify the timer setting for
the current recording, but you can extend the recording
duration of the recording time (page 41).
Notes
• Even if the timer is set, timer recordi ngs c annot be
made while recording a program that has priority.
• Even if the timer is set for the same daily or weekly
program, the timer recording cannot be made if it
overlaps with a program that has priority. “” will
appear next to the overlapped setting in the Timer List.
Check the priority order of the settings.
Recording
44
Changing the priority of overlapped
settings
If the timer settings overlap, the program that was
set last has priority and will be recorded. A timer
recording of lower priority may be canceled, start
from the middle or stop midway through the
program.
You can change the priority of a program if
necessary.
When the timer settings overlap
The program set last has prior ity.
Example: You set the timer in order of A, B, and
C (setting C has first priority)
7:00
A
9:00 11:00
Actual recording
ABC
7:00 9:00 10:30
If you give setting B priority over setting C, all of
program B will be recorded and program C is
recorded only after program B has ended.
ABC
7:00 9:00 11:00
If the end time of one recordin g and the start
time of another are the same
The end of program A will be cut.
7:00 9:00 10:00
A
B
10:30
will be cut off
C
B
1 Press SYSTEM MENU.
The System Menu appears.
2 Select “TIMER LIST,” and press ENTER.
TIMER LIST
Mon 10/25 8:30PM - 9:30PM 4ch
Mon-Sat 10:00AM - 10:30AM 25ch
9:00AM - 10:15AM 3ch
Fri 10/29
Sat 10/30 4:00PM - 5:00PM 125ch
3 Select an overlapped t imer setting, and
press ENTER.
indicates that the timer setting is
overlapped by another timer setting.
10:30 PM
HQ
SP
SLP
SLP
4 Select “Check Overlap,” and press ENTER.
Check Overlap
These timer settings overlap.
Mon-Sat 10:00AM - 10:30AM 25ch SP
Fri 10/29 9:00AM - 10:15AM 3ch SLP
Change Close
5 Select “Change,” and press ENTER.
Change priority
Fri 10/29 9:00AM - 10:15AM 3ch SLP
Where do you want to move this timer setting?
Mon-Sat 10:00AM - 10:30AM 25ch SP
6 Press M/m to change the timer setting’s
priority, and press ENTER .
The setting moves to its new location in the
list. A timer setting higher up in the list has
higher priority.
To return to the Time r L ist, select “Cancel.”
z Hint
You can change the priority of a timer setting while
recording.
Cancel
Recording Without the
Timer
+
-
-
RW
VR
RW
1
2 Press CH +/– to selec t the channel or input
3 Press REC MODE repeatedly to select the
4 Press z REC.
RWVideo
z REC
REC MODE
Insert a recordable disc.
source you want to record.
recording mode.
Each time you press the button, the display
changes on the TV screen as fo l l ow s:
HQ SP LP EPHSP SLP
For more details about the recording mode,
see page 40.
Recording starts.
Recording continues until yo u stop the
recording or the disc is full.
1 2 3
4 5 6
7 8 9
-
+
R
R
CH +/–
0
TV/VIDEO
</M/m/,,
ENTER
X REC
PAUSE
x REC
STOP
,
continued
To stop recording
Press x REC STOP located beneath the remote
control cover. Note that it may take a few seco nds
for recording to stop.
To pause recording
Press X REC PAUSE located beneath the remote
control cover. To restart recording, press the
button again.
To watch another TV program while recording
Set your TV to the TV input using the TV/VIDEO
button.
Using the Quick Timer function
You can set the recorder to record in 30 minute
increments.
Press z REC repeatedly to set the duration.
Each press advances the time in 30minute
increments. The maximum duration is six hours.
0:30 1:00 5:30 6:00
The time counter decreases minute by minute to
0:00, then the record er stops recording (powe r
does not turn off). Even if you turn off the recorder
during recording, the record er co ntinue s to recor d
until the time counter runs out.
To cancel the Quick Timer
Press z REC repea tedl y unt il the c ount er appe ars
in the front panel display. The recorder returns to
normal recording m ode.
z Hint
If you do not want to watch TV while recording, you can
turn off the TV. When using a cable box, make sure to
leave it on.
Notes
• After pressing z REC, it may take a short while to start
recording.
• You cannot change the recording mode while
recording or during recording pause.
• If there is a power failure, the program you are
recording may be erased.
• You cannot watch a TV program while recording
another TV program.
(normal
recording)
45
Recording
,
46
continued
47
1-11
Adjusting the recording picture
quality and size
You can adjust the recording picture quality and
picture size.
1 2 3
4 5 6
7 8 9
DISPLAY
1 Before recording starts, press TOOLS and
select “Rec Settings.” Then press ENTER.
Rec. Settings
Select the item you want to change.
2 Select the item you want to adjust, and
press ENTER.
The adjustment display appea rs.
0
Rec Mode :
DVD Rec. Picture Size :
Rec NR :
Rec Video Equalizer
TOOLS
</M/m/,,
ENTER
SP
4 : 3
Off
Example: Rec NR
Rec NR
Off 1 2 3
“Rec Mode”: Selects the recording mode for
the desired recording time and picture quality.
For more information, see “Recording mode”
(page 40).
“DVD Rec. Picture Size”: Sets the picture size
of the program to be recorded.
• 4:3 (default): Sets the picture size to 4:3.
• 16:9: Sets the picture size to 16:9 (w i de
mode).
48
This function works with DVD-Rs and DVDRWs (Video mode) when the recording mode
is set to HQ, HSP, or SP. For all other
recording modes, the screen size is fixed at
“4:3.”
For DVD-RWs (VR mode), t he ac tual pictu re
size is recorded regardless of the setting. For
example, if a 16:9 size picture i s receiv ed, the
disc records the picture as 16:9 even if “Rec
Screen Size” is set to “4:3.”
For DVD+RWs/DVD+Rs, the screen size is
fixed at “4:3.”
“Rec NR” (noise reduction): Reduces noise
contained in the video s ignal.
“Rec Video Equalizer”: Adj usts th e pictur e in
greater detail.
Press M/m to select the item you want to
adjust, then press ENTER.
• Contrast: Changes the contr ast.
• Brightness: Changes the overall brightness.
• Color: Makes the colors deep er o r li ghter.
• Hue: changes the color balance.
3
Adjust the setting using </M/m/,,
and press ENTER.
The default setting is underlined.
“Rec NR”: (weak) Off
“Rec Video Equalizer”:
• Contrast: (weak) –3 ~ 0
• Brightness: (dark) –3 ~ 0
• Color: (light) –3 ~ 0
• Hue: (red) –3 ~ 0
Repeat steps 2 and 3 to adjust any other items.
Notes
• If one program contains two picture sizes, the selected
size is recorded. However, if the 16:9 signal cannot be
recorded as 16:9, it is recorded as 4:3.
• When playing a 16:9 size picture recorded as 4:3, the
image is fixed to 4:3 letter box regardless of the setting
in “TV Type” of Video Setup (page 74).
• Remnants of images may appear on your screen when
using “Rec NR.”
1 ~ 3 (strong)
~ 3 (strong)
~ 3 (bright)
~ 3 (deep)
~ 3 (green)
Checking the disc status while
recording
You can check the recordin g i nformation such as
recording time or disc type.
Press DISPLAY twice during recording.
The recording information appears.
DVD-RW
VIDEO
1:23:45SP
A Disc type/format
B Recording status
C Recording mode
D Recording time
Press DISPLAY to turn off the display.
Creating chapters in a title
The recorder will automatically divide a recording
(a title) into chapters by inse rting chapte r marks at
6 or 15 minute intervals during recording. Select
the interval, “6Min” (default) or “15Min” in
“Auto Chapter” of Features Setu p (page 78).
z Hint
You can create chapters manually when playing DVDRWs (VR mode). For details, see page 65.
Recording From a VCR or
Similar Device
+
-
-
RW
VR
REC MODE
INPUT
SELECT
RW
RW
You can record from a connected VCR or si milar
device. To connect a VCR or similar device, see
“Connecting a VCR or Similar Device” (page 29).
Video
1 2 3
4 5 6
7 8 9
-
+
R
R
0
TOOLS
M/m, ENTER
X REC
PAUSE
x REC
STOP
1 Insert a recordable disc.
2 Press INPUT SELECT to select an input
source according to the connection you
made.
The front panel display cha nges as follows:
*
Channel
number
* Does not appear when “Se t Top Box Control” is
set to “On.”
3 Press REC MODE repeated ly to select the
recording mode.
The recording mode changes as follows:
HQ SP LP EPHSP SLP
L2L1 L3
,
continued
Recording
49
4 Press TOOLS and select “Li ne Audio
Input.” Then press ENTER.
“Main/Sub”: Records the two different sou nd
tracks on DVD-RWs (VR mode). You can
select either sound track when playing back
the disc.
“Stereo” (default): Records stereo sound only.
Select this for dis c s other than DVD-R Ws
(VR mode).
5 Press X REC PAUSE to set this recorder to
record pause.
6 Insert the source t ape into the connected
equipment and set to play back pause.
7 At the same time, press X REC PAUSE on
this recorder and the pause or play button
on the connected equipmen t.
Recording starts.
To stop recording, press x REC STOP on this
recorder.
z Hint
You can adjust the settings for the recording picture
before recording. See “Adjusting the recording picture
quality and size” (page 48).
Notes
• When recording a video game image, the scr een m ay
not be clear.
• Any program that contains a Copy-Never copy guard
signal cannot be recorded. The recorder continues to
record, but a blank screen will be recorded.
Playback
Playing
+
-
-
RW
VR
RW
VCD
O RETURN
1 Press Z OPEN/CLOSE, and place a disc on
2 Press Z OPEN/CLOSE to close the dis c
RWVideo
CD
DATA CD
Z OPEN/
CLOSE
Number
buttons
TITLE LIST
TOP MENU
m/M
H PLAY
the disc tray.
With the playback side facing down
tray.
If you inserted a DVD VIDEO, VIDEO CD,
CD, or DATA CD, press H PLAY. Playback
starts.
1 2 3
4 5 6
7 8 9
-
+
0
DVD
R
R
"/1
TOOLS
</M/m/,,
ENTER
MENU
x STOP
X PAUSE
3 Press TITLE LIST.
For details about the Title List, see “Using the
Title List” (page32).
Example: DVD-RW (VR mode)
My Movies
x STOP.
1.5/4.7GB
9/15
Wed
9/17
Fri
9/25
Sat
9/25
Sat
10/15
Fri
10/19
Tue
10/26
Tue
10/28
Thu
TITLE LIST
ORIGINAL
1 2ch 1:00PM - 2:00PM
Sort
Date
2 5ch 8:00PM - 9:00PM
Title
3 12ch 9:00AM - 9:30AM
Number
4 3ch 8:00PM - 8:30PM
5 25ch 8:00PM - 8:30PM
6 L2 9:00PM - 9:30PM
7 8ch 9:00PM - 9:30PM
8 125ch 10:00AM - 10:30AM
4 Select the title, and press ENTER.
The sub-menu appears.
5 Select “Play,” and press ENTER.
Playback starts from the selected title on the
disc.
To use the DVD’s Menu
When you play a DVD VIDEO, or a finalized
DVD+RW, DVD-RW (Video mode), DVD+R, or
DVD-R, you can display the di sc’s menu by
pressing TOP MENU or MENU.
To play VIDEO CDs with PBC functions
PBC (Playback Control) allows you to play
VIDEO CDs interactively using the menu on your
TV screen.
When you start playing a VIDEO CD with PBC
functions, the menu appears.
Select an item using t he number butt ons an d pres s
ENTER. Then follow the instructions in the menu
(press
H PLAY when “Press SELECT” appears).
The PBC function of Super VCDs does not work
with this recorder. Super VCDs are played in
continuous play mode only.
To stop playback
Press x STOP.
To resume playback from the point where you
stopped the disc (Resume Play)
When you press H PLAY again after you stop
the disc, the recorder resumes playback from the
point where you pressed
To start from the beginning, press TOOLS, select
“Play Beginning” and press ENTER. Playback
starts from the beginning of the title/track/scene.
Playback
,
50
continued
51
1-12

The point where you stopped play in g i s cl eared
when:
–you open the disc tray.
–you play another title.
–you switch the Title List menu to Original or
Playlist (DVD-RW in VR mode only).
–you edit the title after stopping playback.
–you change the settings on the recorder.
–you turn off the recorder (VIDEO CD/CD/
DATA CD only).
–you make a recording (except for DVD-RWs in
VR mode).
To play restricted DVDs (Parental Control)
If you play a restricted DVD, the message “Do
you want temporarily change parental control to
*?” appears on your TV screen.
1
Select “OK” and press ENTER.
The display for entering your password
appears.
2
Enter your four digit password using the
number buttons.
3
Press ENTER to select “OK.”
The recorder starts playba ck.
To register or change the password, see “Parental
Control (DVD VIDEO only)” (page 78).
To lock the disc tray (Child Lock)
You can lock the disc tray to prevent children from
ejecting the disc.
When the recorder is in standby mode, press
O RETURN, ENTER, and then {/1 on the
remote.
The recorder turns on and “LOCKED” appears on
the front panel display. The Z OPEN/CLOSE
button does not work while the Ch ild Lock is set.
To unlock the disc tray, press O RETURN,
ENTER, and then {/1 on the remote again when
the recorder is in standby mode.
z Hints
• You can also use the H PLAY button in step 4
(page 51) to start playback.
• Even if a timer recording starts dur ing playback,
neither the recording nor playback will stop (DVD-
RWs (VR mode) only). See page 57.
• Even if you select “Factory Setup” in Options S et up
(page 80) , the Child Lock remains set.
Playback options
Z OPEN/CLOSE
1 2 3
4 5 6
7 8 9
AUDIO
SUBTITLE
INSTANT REPLAY/
INSTANT ADVANCE
./> PREV/NEXT
H PLAY
PROGRESSIVE
0
Buttons Operations Discs
Z OPEN/CLOSE Stops play and opens the disc tray. All discs
AUDIO Selects one of the audio tracks recorded on the disc
when pressed repeatedly.
Selects the languag e.
DVD
-
RW
VR
Selects the main or secondar y audio p rogram
(SAP).
CD VCD
audio tracks.
Selects stereo or monaural
DATA CD
SUBTITLE Selects a subtitle language when pressed repeatedly.
ANGLE Selects an angle when pressed repeatedly.
If various angles (multi-angle s ) for a sc ene are
recorded on the disc, “” appears in the front panel
display.
ANGLE
SUR
m / M
X PAUSE
-
RW
CD
DVD
DVD
Playback
VR
DVD
VCD
DATA CD
52
Buttons Operations Discs
SUR (surround) Selects one of the TVS effects when pressed
PROGRESSIVE Switches the type of video output signal to interlace or
INSTANT
REPLAY/
INSTANT
ADVANCE
. PREV/
> NEXT
(fast reverse/fast
forward)
(slow, freeze frame)
X PAUSE Pauses playback. All discs
To resume normal playback, press H PLAY.
repeatedly.
TVS* (TV Virtual Surround) lets you enjoy virtual
surround sound effects created from the front left and
right speakers. The selected setting is displayed in the
front panel display for a few seconds.
“TVS OFF”: No surround effect
“TVS DYNAMIC”: Creates one set of virtual rear
speakers.
“TVS WIDE”: Creates five sets of virtual rear
speakers.
“TVS NIGHT”: Creates five sets of virtual rear
speakers. Effective at low volume.
“TVS STANDARD”: Creates three sets of virtual rear
speakers. Effective when you use two separa te front
speakers.
progressive format (page 17).
Replays the scene/briefly fast forwards the scene.
Goes to the beginning of the previous/next title/
chapter/scene/track.
Fast reverses/fast forwards the disc when pressed
during playback.
Search speed changes as fo ll ow s:
fast reverse fast forward
FR1 T t FF1
FR2 T T t t FF2
FR3* T T T t t t FF3*
When you press and hold the button, fast forward/fast
reverse continues at the selected speed until you
release the button.
Plays in slow motion when pressed for more than one
second in pause mode.
Plays one frame at a time when pressed briefly in
pause mode.
DVD
* TVS was developed
by Sony to produce
home surround sound
with just a stereo TV.
This only works with
multichannel Dolby
Digital soundtracks.
-
+
VCD
+
-
RW
VR
RW
+
RW
+
RWVideo
-
R
DVD
R
-
-
RW
VR
RWVideo
-
DVD
R
R
All discs
All discs
* FR3 and FF3 are only
available for DVDs.
+
-
-
RW
VR
RW
+
VCD
* Playback dire ction
RWVideo
-
DVD
R
R
*
only
Notes
• To enjoy the TVS function, set “Digital Output” to
“On” and “Dolby Digital” to “D-PCM” in Audio
Setup.
• When the playback signal does not contain a signal for
the rear speakers, the surround effects will be di fficult
to hear.
• When you select one of the surround mode s, tu rn off
the surround settings of the connected TV or amplifier
(receiver).
• Make sure that your listening position is between and
at an equal distance from your speakers, and that the
speakers are located in similar surroundings.
• The TVS function cannot be used with discs recorded
on this recorder. Angles and subtitles also cannot be
changed.
Notes on playing DTS sound tracks on a CD
When playing DTS-encoded CDs, excessive noise will
be heard from the analog stereo jacks. To avoid poss ible
damage to the audio system, the consumer should tak e
proper precautions when the analog stereo jacks of the
recorder are connected to an amplification system. To
enjoy DTS Digital Surround™ playback, an external 5.1channel decoder system must be connect ed to t he di gital
jack of the recorder.
Notes on playing DV Ds with a DTS sound track
DTS audio signals are output only through the DIGITAL
OUT (COAXIAL or OPTICAL) jack.
When you play a DVD with DTS sound tracks, set
“DTS” to “On” in Audio Setup (page 77).
,
Adjusting the picture quality
+
-
-
RW
VR
RW
VCD
1 Press TOOLS during playba ck.
2 Select “Video Settin gs,” and press
3 Select an item, and press ENTER.
RWVideo
The TOOLS menu appears.
ENTER.
Video Settings
Select the item you want to change.
Y NR :
C NR :
BNR :
DVE :
PB Video Equalizer
The adjustment display appears.
“Y NR” (luminance noise reduction):
Reduces noise contained in the luminance
element of the video signal.
“C NR” (chroma noise reduction): Red uces
noise contained in the color element of the
video signal.
“BNR” (block noise reduc t ion): Reduces
“block noise” or mosaic like patterns in the
picture.
“DVE” (digital video enhanc er): Sharp ens the
outlines of the images.
“PB Video Equalizer” (Playback video
equalizer): Adjusts the picture in greater
detail.
Select an item and press ENTER.
• Contrast: changes the contrast.
• Brightness: changes the ove ra ll br ig htness.
• Color: makes the colors deeper or lig hter.
• Hue: changes the color bala nce.
-
+
R
R
2
2
2
Off
continued
DVD
53
Playback
,
54
continued
55
1-13
4 Press </, to adjust the setting, and
press ENTER.
The default settings are underlined.
“
Y NR”: (weak) Off 1 2 3 (strong)
“
C NR”: (weak) Off 1 2 3 (strong)
“
BNR”: (weak) Off 1 2 3 (strong)
“
DVE”*: (weak) Off 1 2 3 (strong)
“
PB Video Equalizer
• Contrast: (weak) –3 ~ 0 ~ 3 (strong)
• Brightness: (dark) –3 ~ 0
• Color: (light) –3 ~ 0
• Hue: (red) –3 ~ 0
Repeat steps 3 and 4 to adjust any other items.
* “1” softens the outlines of the images. “2”
enhances the outlines and “3” enhanc es them more
than “2.”
Notes
• If the outlines of the images on your scree n be come
blurred, set “BNR” to “Off.”
• Depending on the disc or the scene being played, the
above BNR, Y NR, or C NR effects may be hard to
discern. And, these functions may not work with some
screen sizes.
• When playing a disc recorded in SLP recording mode,
the BNR setting may have little effect.
• When using the DVE function, noise found in the disc
may become more apparent. In this case, it is
recommended that you use the BNR function with the
DVE function. If the condition still does not improve,
set the DVE level to “1” or “Off.”
”:
~ 3 (bright)
~ 3 (deep)
~ 3 (green)
56
Adjusting the sound quality
+
-
-
RW
VR
RW
VCD
1 Press TOOLS during play back.
2 Select “Audio Settings,” and press
3 Select an item, and press ENTER.
4 Press </M/m/, to select the option,
Note
There may be little effect by changing the Audio Filter
depending on the disc or playback environment.
RW
CD
The TOOLS menu appears.
ENTER.
“Surround (TVS)” (DVD VIDEO only):
Selects one of the surround m odes. For more
information, see “Playback options”
(page 53).
“Audio Filter” (all discs): Selects the digital
filter to reduce noise above 22.05 kHz (Fs* is
44.1 kHz), 24 kHz (Fs is 48 kHz), or 48 kHz
(Fs is above 96 kHz).
• Sharp (default): Provides a w ide frequency
range and spatial feeling.
• Slow: Provides smooth and warm sound.
* Sampling frequency of aud io source
This function only adjusts the output signals
from the LINE OUT (AUDIO L/R) 1/2 jacks.
and press ENTER.
-
+
Video
DVD
R
R
Chasing Playback/
Simultaneous Rec and Play
-
RW
VR
“Chasing Playback” allows you to view the
beginning of a program while it is being recorded.
“Simultaneous Rec and Play” allows you to view
a previously recorded program while recording
another on the same disc.
1 2 3
4 5 6
7 8 9
0
TITLE LIST
TOOLS
M/m,
ENTER
Playing from the beginning of the
program you are recording
You can view the recorded part of a program while
the recording is being made. You do not need to
wait until the recording finishes.
1 Press TOOLS while recording.
The TOOLS menu appears.
2 Select “Chasing Playback,” and press
ENTER.
Playback starts from th e beginning of the
program you are recordin g.
When you fast forward to the point that you
are recording, Chasing Playback returns to
normal playback.
Notes
• This function does not work when recording:
– on a 1x-speed DVD-RW.
– in the HQ or HSP recording mode.
• The picture on your TV screen freezes for a few
seconds when you fast-forward/fast-reverse or Instant
Replay/Advance the recording.
Playing a previous recording while
making another
You can play a previously recorded program while
recording another on the same disc. Playback
continues even if the recording is a timer
recording.
1 While recording, press TITLE LIST.
The Title List menu appears.
2 Select the title you wa nt to play, and press
ENTER.
The sub-menu appears.
3 Select “Play”, and press ENTER.
Playback starts from the selected title.
Notes
• This function does not work when recording:
– on a 1x-speed DVD-RW.
– in the HQ or HSP recording mode.
• The picture on your TV screen freezes for a few
seconds when you fast-forward/fast-reverse or instant
replay/instant advance the recording.
• When playing a title recorded in the HQ or HSP
recording mode, picture noise may appear depending
upon the condition of the recording.
Playback
57
Searching for a Title/
Chapter/Track, etc.
+
-
-
RW
VR
RW
VCD
You can search a DVD by title or chapter, and
VIDEO CD/CD/DATA-CD by track or scene. As
titles and tracks are as si g ned individual numbers
on the disc, select the title or trac k by entering its
number. You can also search for a scene using the
time code.
Number
buttons, SET
1 Press TOOLS during playback.
2 Select a search method, and pres s ENTER.
RWVideo
CD
DATA CD
CLEAR
The TOOLS menu appears.
“Title Search” (for DVDs)
“Chapter Search” (for DVDs)
“Track Search” (for CDs/DATA CDs)
“Search” (for VIDEO CDs)
“Album Search” (for DATA CDs)
“Time Search” (for DVDs): Searches for a
starting point by entering the time code.
The display for entering the number appears.
Example: Title Search
The number in parentheses indicates the total
number of titles, tracks, etc.
58
1 2 3
4 5 6
7 8 9
-
+
R
R
0
TOOLS
M/m,
ENTER
Title : -- (21)
3 Press the number butto ns to select the
number of the title, chapter, track, time
code, etc., you want.
For example: Time Search
DVD
To find a scene at 2 hours, 10 minutes, and 20
seconds, enter “21020.”
If you make a mistake, press CLEAR to
cancel the number, then select another
number.
4 Press SET.
The recorder starts play back from the selec ted
number.
Playing MP3 Audio Tracks
DATA CD
You can play MP3 audio tracks on DA TA CD s
(CD-ROMs/CD-Rs/CD-RWs).
1 2 3
4 5 6
7 8 9
0
H PLAY
1 Insert a DATA CD on the disc tray.
2 Press H PLAY.
Playback starts from the first MP3 audio track
on the disc. Note that the play ba ck or de r may
be different from the edite d order. See
“Playback order of MP3 audio tr acks.”
About MP3 audio tracks
MP3 is audio compression t echnology that
satisfies certain ISO/MPEG regulations.
You can play back DATA CDs (CD-ROMs/CDRs/CD-RWs) recorded in MP3 (MPEG1 Audio
Layer 3) format. However, the discs must be
recorded according to ISO9660 Level 1, Level 2
or Joliet format for th e recorder to recognize the
tracks. You can also play discs recorded in Multi
Session.
See the instructions supplied with the CD-R/CDRW drives and the reco rding software (not
supplied) for details on the recording forma t.
Note on Multi Session discs
If MP3 audio tracks are recorded in the fi rst
session, the recorder will also play MP3 audio
tracks in other sessions. If audio tracks in Music
CD format are recorded in the first session, o nl y
the first session will be played back.
Playback order of MP3 audio tr acks
Albums containing MP3 audi o tr ac ks play in the
following order.
A t B t C t D t F t G. Albums that
do not contain tracks (such as album E) are
skipped.
Tree 1 Tree 2 Tree 3 Tree 4 Tree 5
ROOT
Album
MP3 audio track
When you insert a DATA CD and pres s
H PLAY, the numbered tracks are played
sequentially, from 1 thro ugh 7. Any subalbums/tracks contained within a currently
selected album take priority over the next album in
the same tree. (Example: C contains D so 4 is
played before 5.)
z Hints
• You can view the disc information while playing MP3
audio tracks (page 38) .
• If you add numbers (01, 02, 03, etc.) to the front of the
track names when you store the tracks in a disc, the
tracks will be played in that order.
• Since a disc with many trees takes longer to start
playback, it is recommended that you create albums
with no more than two trees.
,
continued
Playback
59
1-14

Notes
• Depending on the software you use to create the DATA
CD, the playback order may differ from the above
illustration.
• Proceeding to the next or another album may take some
time.
• The recorder may not be able to play some DATA CDs
created in the Packet Write format.
• The recorder will play any data with the extension
“.MP3,” even if they are not in MP3 format. Playing
this data may generate a loud noise which could
damage your speaker system.
• The recorder does not conform to audio tr ac ks in
MP3PRO format.
• The playback order above may not be applic able if
there are more than a total of 999 albums and tracks in
the DATA CD.
• The recorder can recognize up to 499 album s (the
recorder will count just albums, including albums that
do not contain MP3 audio tracks). The recorder will not
play any albums beyond the first 499 albums. Of the
first 499 albums, the recorder will play no more tha n a
combined total of 999 albums and tracks.
• The recorder can play MP3 audio tracks recorded in the
following sampling frequencies: 32 kHz, 44.1 kHz,
48 kHz.
• ID3 tags cannot be displayed.
• Only alphabet and numbers can be used for album or
track names. Anything else is displayed as an asterisk .
Editing
Before Editing
This recorder offers variou s ed it options for
various disc types. Before you edit, check the disc
type in the front panel display, and select the
option available for your dis c (page 8).
Note
You may lose the edited contents if you remove the disc
or a timer recording starts while e d iting.
Edit options for DVD+RWs/DVD-RWs
(Video mode)/DVD+Rs/DVD-Rs
+
-
RW
RW
You can perform simple edits. Si nce Video mode
titles are actual recordings on the disc, you cannot
undo any edits you make. The edit functions
available for Video mode titles are:
–Setting protection aga i ns t er asure (page 62).
–Labeling a title (pag e 62).
–Erasing a title (page 62).
–Erasing multiple titles (page 63).
–Erasing a section of a title (A-B Erase)
(DVD+RWs only) (page 63).
–Erasing titles to ope n up disc space (Disc Map)
(DVD-RWs in Video mode and DVD+RWs
only) (page 64).
Notes
• Once the disc is finalized, you cannot edit or record on
the disc (except for DVD-RWs (VR mode) and
DVD+RWs).
• You cannot create a Playlist (see below).
• If a message appears and indicates that the disc’s
control information is full, erase unnecessary titles.
-R+
Video
R
Edit options for DVD-RWs (VR mode)
-
RW
VR
You can enjoy advanced edit functions. First you
have two options for a DVD-RW (VR mode):
editing either the original recording (called the
“original”), or the playback information cre at ed
from the original (called a “Playlist”). Since each
is different in natu re and offers differen t m erits,
read the following and select the one that better
suits your needs.
To edit original titles
Edits made to the original titles are final. If you
plan to retain an unaltered original recording,
create and edit a Playlis t ( see below). The edit
functions available for original titles are:
–Labeling a title (page62).
–Setting protection against erasure (page 62).
–Erasing a title (page 62).
–Erasing multiple titles (page 6 3).
–Erasing a section of a title (A-B Erase) (page 63).
To create and edit Playlist titles
A Playlist is a group of Playlist titles crea ted from
the original title for editing purposes. When you
create a Playlist, only th e control information
necessary for playback, such as the playback
order, is stored on the disc. Si nce the origin al title s
are left unaltered, Playlist titles can be re-edited.
Example: You have recorded the final few
matches of a soccer tournament on a DVD-RW
(VR mode). You want to create a digest with the
goal scenes and other high lights, but you also want
to keep the original recording.
In this case, you can compile highlight scenes as a
Playlist title. You can even rearrange the scene
order within the Playlist title (“Creat in g and
Editing a Playlist” on page 65).
Editing
60
The advanced edit functions available for Playlist
titles are:
–Labeling a title (page 62).
–Erasing a title (page62).
–Erasing multiple titles (page 63).
–Erasing a section of a title (A-B Erase) (page 63).
–Rearranging the title order (page 67).
–Dividing a title into multiple titles (page67).
–Combining multiple titles into one title
(page 68).
z Hint
You can display the disc’s Playlist titles in th e Title List
(Playlist), or the original titles in the Title List (Original).
To switch the two Title Lists, press TOOLS while a Title
List is displayed, and select “Original” or “Playlist.”
Notes
• The Playlist title calls up data from the original titles for
playback. When an original title is use d for a Playlist
title, the original title cannot be erased.
• You cannot protect Playlist titles.
• If a message appears and indicat es tha t the disc’s
control information is full, eras e unnecessary titles.
62
Editing a Title
+
-
-
RW
VR
RW
This section explai ns the basic e dit functio ns. Note
that editing is irreversible. To edit a DVD-RW
(VR mode) without changing the original
recordings, create a Play list title (page 84).
When editing a DVD+R, DVD-R, or DVD-RW (Video
mode), finish all editing before finalizing the disc. You
cannot edit a finalized disc.
1 Press TITLE LIST.
2 Select a title, and press ENTER.
3 Select an option, and press ENTER.
RWVideo
Note
m/M
CHAPTER
MARK
When editing a DVD-RW in VR mode, press
TOOLS and select “Original” or “Playlist”
from the TOOLS menu to switch the Title
Lists, if necessary.
The sub-menu appears.
You can make the following edits to the title.
“Erase”: Erases the selected title. Select “OK”
when asked for confirmation. When the title is
protected, the display asks for confirmation.
To erase, select “Change,” and when the
Protection display appears, select “Off.”
1 2 3
4 5 6
7 8 9
-
R+R
0
TITLE LIST
TOOLS
</M/m/,,
ENTER
CHAPTER
ERASE
“Protect Title”: Protects the title. Select “On”
when the Protection display appears. “”
appears next to the protected ti tle. To cancel
the protection, select “Off.”
“Title Name”: Allows you to enter or re-enter
a title name (page 39).
“Set Thumbnail”: Changes the title’s
thumbnail picture that appears in the Title List
(page 32).
“A-B Erase”: Erases a section of the title (see
below).
z Hints
• You can erase multiple titles at one time (page 63), or
erase all of the titles on the disc at once (page 35).
• You can label or re-label DVDs (page 35).
Note
You cannot protect Playlist titles.
Erasing a section of a title
(A-B Erase)
+
-
RW
VR
RW
You can select a section (scene) in a title and erase
it. Note that erasing scenes in a title cannot be
undone.
1 After step 2 of “Editing a Title,” select
“A-B Erase” and press ENTER.
The display for setting point A appears.
A-B Erase (Set point A)
When the title is protected, the display asks for
confirmation. To continue, select “Change,”
and when the protection display appears,
select “Off.”
2 Select point A by pressing m/M, and
press ENTER.
The display for setting point B appears.
Playback point
2 5ch 8:00PM - 9:00PM
A 0:12:34
–– –– –
B : :
,
continued
A-B Erase (Set point B)
3 Select point B by press ing m/M, and
press ENTER.
The display asks for confirmation. To reset
either point A or B, select “Change A” or
“Change B,” and go to step 2 or 3.
4 Select “OK,” and press ENTER.
The scene is erased, and the di splay asks
whether to erase another scene. To continue,
select “Yes,” and repeat from step 2. To finish,
select “No.”
z Hint
A chapter mark is inserted after the scene was erased. The
chapter mark divides the title into separ ate chapters on
either side of the mark.
Notes
• Images or sound may be momentarily interrupted at the
point where you erase a section of a title.
• Sections shorter than five seconds may not be e ras ed .
• For DVD+RWs, the erased section may be slightly
different from the points you selected.
A
2 5ch 8:00PM - 9:00PM
A 0:12:34
B 0:23:45
Erasing multiple titles (Erase Titles)
+
-
-
RW
VR
RW
You can select and erase two or more titles at one
time using the TOOLS menu.
1 Press TITLE LIST to turn on the Title List
2 Select “Erase Titles,” and press ENTER.
RWVideo
menu, and press TOOLS.
The TOOLS menu appears.
The display for selecting titles to be erased
appears.
-
R+R
,
continued
61
Editing
63
1-15
3 Select a title, and press ENTER.
A check mark appears in the check box next to
the selected title. To clear the check mark,
press ENTER again. To clear all of check
marks, select “Reset All.”
Erase Titles
Select the titles to erase.
1 2ch 1:00PM - 2:00PM
2 5ch 8:00PM - 9:00PM
3 12ch 9:00AM - 9:30AM
4 3ch 8:00PM - 8:30PM
5 25ch 8:00PM - 8:30PM
• When the title is protected, the display asks
for confirmation. To continue, select
“Change,” and when the protection display
appears, select “Off.” To cancel, select
“Close.”
4 Repeat step 3 to select all of the titles you
want to erase.
5 When you finish selecting titles, select
“OK,” and press ENTER.
The list of the titles to be erased appears for
confirmation. To change the selection, select
“Change,” and repeat from st ep 3.
6 Select “OK,” and press ENTER.
The titles are erased.
OK
9/15
Cancel
9/17
9/25
9/25
Reset All
10/15
Erasing titles to open up disc space
(Disc Map)
+
-
RW
Video
RW
When recording on a DVD+RW or DVD-RW
(Video mode), the recorder searches for the largest
open space and records there. Befo re you st a rt,
check the disc stat us by us ing Dis c Map, an d erase
titles to create a space large enough for the
recording.
1 Insert a disc and press TITLE LIST.
2 Press TOOLS and select “Disc Map,” and
press ENTER.
The Disc Map appears. To check the open
space, select the space by pressing </,.
Disc Map
Empty Title
HQ: 0H30M
HSP: 0H45M
SP: 1H00M
EP: 2H00M
SLP: 3H00M
Cancel
Selected open space
2.3GB
LP : 1H30M
Erase
• When
b
or B appears on either side of the
screen, you can scroll sidewa ys by pressing
<
/,.
3 Select a title by pre ssing </,, and
press ENTER.
The display for selecting titles to be erased
appears. To cancel the selectio n, press
ENTER again.
Disc Map
2 5ch 8:00PM - 9:00PM
Fri 9/17 8:00PM( 1H00M) SP 0.6GB
Erase Cancel
Selected title
• When the title is protected, the di splay asks
for confirmation. To continue, select
“Change,” and when the protectio n di splay
appears, select “Off.” To cancel, select
“Close.”
4 Repeat step 3 w hen erasing more titles.
5 Select “Erase,” and press ENTER.
The display asks for confirma tio n. To change
the selection, select “Change.”
6 Select “OK,” and press ENTE R.
The selected titles are erased, freeing up disc
space.
Creating chapters manually
-
RW
VR
You can manually insert a chapter mark at any
point you like during playback or recording.
1 Press CHAPTER M ARK at the point where
you want to divide the title into chapters.
Each time you press the button, “Marking...”
appears on the screen and the scenes to the left
and right of the mark become separate
chapters.
Marking...
To erase chapter marks
You can combine two chapters by erasing the
chapter mark during playback.
Press
./>
while displaying the chapter containing the
chapter mark you want to erase, press CHAPTER
ERASE.
The current chapter combin es w it h t he previous
chapter.
If a message appears and indicates that no more chapter
marks can be added, you may not be able to record or edit.
to search for a chapter number , and
Note
Creating and Editing a
Playlist
-
RW
VR
Playlist edit allows you to edit or re-edit without
changing the actual recordings. A Playlist title can
contain up to 50 scenes.
For details, see “Edit options for DVD-RWs (VR
mode)” (page 61).
Note
Once you create a Playlist title from origi na l titles, you
will be unable to erase or edit the origi nal titles.
1 2 3
4 5 6
7 8 9
0
TITLE LIST
TOOLS
</M/m/,,
m/M
H PLAY
1 Press TITLE LIST to turn on the Title List
menu, and press TOOLS.
The TOOLS menu appears.
2 Select “Create Playlist,” and press ENTER.
The display for selecting titles appears.
ENTER
Editing
64
3 Select the title you want to include in the
Playlist title, and press ENTER.
A check mark appears in the check box next to
the selected title. To clear the check mark,
press ENTER again. To select all of the titles,
select “Select All.”
Create Playlist
Select the titles you want to capture.
Original
1 2ch 1:00PM - 2:00PM
2 5ch 8:00PM - 9:00PM
3 12ch 9:00AM - 9:30AM
4 3ch 8:00PM - 8:30PM
5 25ch 8:00PM - 8:30PM
6 L2 9:00PM - 9:30PM
4 Repeat step 3 to add more titles.
To go to the next page of titles, press m. To
clear all of the check marks, select “Reset
All.”
5 Select “OK,” and press ENTER.
The list of selected titles appears. To add
another title, select “Add Title.”
Create Playlist - Selected Titles
Select a title to start capturing.
1 2ch 1:00PM - 2:00PM
2 5ch 8:00PM - 9:00PM
6 Select one of the titles, and press ENTER.
The sub-menu appears.
“Capture”: Adds a section of the title to the
Playlist title as one scene.
“Capture All”: Adds the entire title to the
Playlist title as one scene. After capturing the
title, select “Scene List” and go to step 12.
“Check Scenes”: Allows you t o check the
captured scene.
7 Select “Capture,” and press ENTER.
The display for setting the start poin t (IN)
appears. The title starts to play in the
background.
Capture (Set IN point) 2 5ch 8:00PM - 9:00PM
9/15
9/17
9/25
9/25
10/15
10/19
Scene List
9/15
9/17
Add Title
IN
0:10:26
OUT - : - - : - -
66
Cancel
Select All
Reset All
Cancel
,
continued
65
8 Select the IN poi nt by pressing m/M,
and press ENTER.
The display for setting the end point (OUT)
appears, and the title continues to play in the
background.
OK
Capture (Set OUT point)IN2 5ch 8:00PM - 9:00PM
IN
0:10:26
OUT 0:23:45
9 Select the OUT po int by pressing m/M,
and press ENTER.
The display asks for confirmation. To re set the
IN or OUT point, select “Change IN” or
“Change OUT” and repeat step 8 or 9. To view
the selected scene, sel ect “Preview.”
10Select “OK,” and ENTER.
The selected section is captured as a scene,
and the display asks whether you want to
continue. To continue, select “More,” and
repeat the steps above. To ca pt ure a scene
from another title, select “New Title.”
11When you finish capturing scenes, select
“No More” and press ENTER.
The Scene List menu appears with all of the
selected scenes.
Total duration of
the selected scene
Scene List Total 0:33:28 Scenes 2
1
2
12Select the scene you want to edi t, and
press ENTER.
The sub-menu appears.
“Move”: Changes the scene order.
“Erase”: Erases the scene. The sel ection is
canceled.
“Preview”: Displays thumbnail pictur es of the
scenes.
“Change IN”: Allows you to change the IN
point, and repeat from ste p 8.
5ch 8:00PM - 9:00PM
0:10:26 - 0:23:45
5ch 8:00PM - 9:00PM
0:25:00 - 0:45:08
Total number of scenes
OK
Quit
Add
Preview
“Change OUT”: Allows you to change the
OUT point, and repeat from step 9.
To add more scenes, select “Add” and go to
step 6. To preview all of the captured sc enes in
the listed order, select “Preview.”
13When you finish editi ng the Scene List,
select “OK,” and press ENTER.
The display for entering the title name
appears. To enter a new name, select “Enter”
(see page 39).
14Select “OK” to use the default name, and
press ENTER.
To play the Playlist title
Press TOOLS while the Title List menu is turned
on. Then, select “Playlist” and press ENTER.
When the Title List (Playlist ) menu appears , select
a title and press
z Hint
When a Playlist title is created, the IN and OUT points
will become chapter marks, and each scene will become
a chapter.
The picture may pause when the edited scene is played.
H PLAY.
Note
Moving a Playlist title (Move Title)
-
RW
VR
You can change the Playlist title order within the
Title List (Playlist).
1 Press TITLE LIST to turn on the Title List
(Playlist) menu.
If the Title List (Original) menu appears, pres s
TOOLS and select “Playlist.”
2 Select “Number” in the “Sort” column,
and press ENTER.
The titles are sorted in order of title number.
3 Select a title, and press ENTER.
The sub-menu appears.
4 Select “Move Title,” an d press ENTER.
Move
1 2ch 1:00PM - 2:00PM
Where do you want to move this title?
2 5ch 8:00AM - 9:00AM
5 Select a new location for the title by
pressing M/m and press ENTER.
The title moves to the new location.
Dividing a Playlist title (Divide Title)
-
RW
VR
1 Press TITLE LIST to turn on the Title List
(Playlist) menu .
If the Title List (Original) menu appears, press
TOOLS and select “Playlist.”
2 Select a title, and press ENTER.
The sub-menu appears.
3 Select “Divide Title,” and press ENTER.
The display for setting the dividing point
appears. The title starts to play in the
background.
Divide
4 Select the dividing poin t by pressing
m/M, and press ENTER.
The display asks for confirmation. To change
the dividing point, select “Change.”
5 Select “OK,” and press ENTER.
The display for entering the title name
appears. To use the same title name as before,
select “No.”
6 Select “Yes,” and press ENTER to ente r a
new name.
Follow the explanations on page 39. After you
enter a new name, the title is divide d i n two.
9/15
Wed
Fri
9/17
1 2ch 1:00PM - 2:00PM
Cancel
0:12:34
,
continued
Editing
67
1-16

Combining multiple Playlist titles
(Combine Titles)
-
RW
VR
1 Press TITLE LIST to tu rn on the Title List
(Playlist) menu.
If the Title List (Original) menu appears, press
TOOLS and select “Playlist.”
2 Press TOOLS to select “Combine Titles,”
and press ENTER.
The display for selecting titles appears.
3 Select a title, and press ENTER.
A number indicating the order in which you
selected the title appears. To c anc el the
selection, press ENT E R ag ain.
Combine
Select the titles to combine.
1 2ch 1:00PM - 2:00PM
1
2 5ch 8:00PM - 9:00PM
3 2ch 1:00PM - 2:00PM
4 2ch 1:00PM - 2:00PM
4 Repeat step 3 to select all of the titles you
want to combine.
To cancel all of the selections, select “Reset
All.”
5 Select “OK,” and press ENTER.
The list of titles to be combined appears. To
change the selection, select “Change” and go
to step 3.
Combine
Combine the titles in the following order.
1
1 2ch 1:00PM - 2:00PM
2
2 2ch 1:00PM - 2:00PM
3
3 2ch 1:00PM - 2:00PM
OK Change Cancel
6 Select “OK,” and press ENTER.
The display for selecting a title name from
among the selected titles appears. To enter a
new name, select “Enter Text,” and follow the
explanations on page 39.
7 Select a name, and press ENTE R.
The titles are combined.
9/15
Cancel
9/17
9/28
10/ 5
Reset All
68
Settings and Adjustments
Using the Setup Displays
By using the Setup Displays, you can m a ke
various adjustments to items such as picture and
sound, as well as select a langua ge for the
subtitles.
The Setup Displays are us ed in t he fol lowin g way.
Note
Playback settings stored in the disc take priority over the
Setup Display settings, and not all of the functions
described may work.
SYSTEM
MENU
SYSTEM MENU
TITLE LIST
TIMER
TIMER LIST
SETUP
1 2 3
4 5 6
7 8 9
0
</M/m/,,
ENTER
OK
1 Press SYSTEM MENU while the recorder is
in stop mode.
The System Menu appears.
9/15
9/28
10/ 5
2 Select “SETUP,” and press ENTER.
The Setup Display appears.
SETUP
Settings
Tuner Preset
Video
Set VCR Plus+ Channels
Audio
Clock
Features
Set Top Box Control
Options
Language
Easy Setup
3 Select “Settings,” “Video,” “Audio,”
“Features,” “Options,” or “Easy Setup,”
and press ENTER.
The selected Setup Display appears.
Example: “Video” setup
SETUP
Settings
Video
Audio
Features
Options
Easy Setup
4 Select the item you want to set up, and
press ENTER.
Available options for the item appear.
Example: “TV Type”
SETUP
Settings
Video
Audio
Features
Options
Easy Setup
Some items display a dialog box that provides
further detailed settings.
Example: The following dial og box appears
when “Parental Control” in Features Setup is
selected.
Features - Parental Control
Enter your password.
In this case, see “Parental Control” in
“Recording and Parental Control Settings
(Features)” (page 78).
TV Type :
Pause Mode :
Y/Pb/Pr Out Black Level
Progressive Mode :
Screen Saver :
Line1 Input :
Line3 Input :
TV Type :
Pause Mode :
Y/Pb/Pr Out Black Level
Progressive Mode :
Screen Saver :
Line1 Input :
Line3 Input :
4 : 3 Letter Box
Auto
Off
:
Auto
On
Video
Video
4 : 3 Letter Box
16 : 9
Auto
4 : 3 Letter Box
Off
:
4 : 3 Pan Scan
Auto
On
Video
Video
OK
Cancel
,
continued
Settings and Adjustments
69
5 Select an option, and pre ss ENTER.
The currently selected optio n is di splayed
next to the setup item.
Example: when “16:9” is set.
SETUP
Settings
Video
Audio
Features
Options
Easy Setup
To turn off the display
Press SYSTEM MENU repeate dl y.
TV Type :
Pause Mode :
Y/Pb/Pr Out Black Level
Progressive Mode :
Screen Saver :
Line1 Input :
Line3 Input :
16 : 9
Auto
Off
:
Auto
On
Video
Video
70
Antenna Reception and
Language Settings
(Settings)
The Settings Setup helps you to make tuner, clock,
and language settings for the recorder.
Select “Settings” in the Setup Display. To use the
display, see “Using the Setup Displays” (page 69).
SETUP
Settings
Tuner Preset
Video
Set VCR Plus+ Channels
Audio
Clock
Features
Set Top Box Control
Options
Language
Easy Setup
Tuner Preset
Notes
• You cannot presets channels f or the conne c ted c abl e
box or satellite receiver.
• You cannot select “Tuner Preset” when you set “Set
Top Box Control” to “On.”
Auto Preset
Automatically presets the receivable channels.
The recorder can receive VH F channels 2 to 13,
UHF channels 14 to 69, and unscrambled CATV
channels 1 to 125. First, we recomm end that you
preset the receivable channels in your area using
automatic presetting methods.
1 Follow steps 1 to 3 of “Using the Setup
Displays” (pag e69) to select “Settings” in the
Setup Display.
2 Select “Tuner Pres et ,” and press ENTER.
Settings - Tuner Preset Ch1
Antenna / Cable :
Auto Preset
Manual Set :
AFT :
Cable
Add
On
3 Select “Antenna/Cable,” and press ENTER.
Settings - Tuner Preset Ch1
Antenna / Cable :
Auto Preset
Manual Set :
AFT :
“Cable”: Presets cable TV channe l s.
“Antenna”: Presets VHF and UHF channels.
Cable
Antenna
Cable
Add
On
4 Select an option, and press ENTER.
5 Select “Auto Preset,” and press ENTER.
All receivable channels are pr eset in
numerical sequence.
Settings - Tuner Preset - Auto Preset
Searching for receivable channels.
Please Wait.
Manual Set
Presets or disables channels m anually.
If some channels could not be set using the Auto
Preset or Easy Setup function, you can set them
manually.
1 Follow steps 1 to 3 of “Using the Setup
Displays” (page 69) to select “Settings” in the
Setup Display.
Ch 23
2 Select “Tuner Preset,” and press ENTER.
Settings - Tuner Preset Ch1
Antenna / Cable :
Auto Preset
Manual Set :
AFT :
Cable
Add
On
3 Select “Antenna/Cable,” and press ENTER.
Settings - Tuner Preset Ch1
Antenna / Cable :
Auto Preset
Manual Set :
AFT :
“Cable”: Presets cable TV channe l s.
“Antenna”: Presets VHF and UHF channels.
Cable
Antenna
Cable
Add
On
4 Select the channel you want to preset us in g
the number buttons and the SET but to n.
To disable a channel, select the channel using
CH +/–.
Channel to be preset/disabled
Settings - Tuner Preset Ch34
Antenna / Cable :
Auto Preset
Manual Set :
AFT :
5 Select “Manual Set,” and press ENTER.
“Add”: Presets the channel.
“Erase”: Disables the channel.
6 Select “Add” to preset the channel, and press
ENTER.
Cable
Add
Add
On
Erase
7 Select “AFT” and press ENTER.
Settings - Tuner Preset Ch34
Antenna / Cable :
Auto Preset
Manual Set :
AFT :
“On”: Turns on the Auto Fine Tuning
function. Normally, select this.
“Off”: Allows you to adjust the picture
manually.
8 Select “On” to turn on AFT, and press
ENTER.
To preset or disable anothe r channel, repeat
from step 3.
• If the Auto Fine Tuning function does not
work effectively, select “Off” in step 7 and
press ENTER. When the fine tu ni ng bar
appears, press </, to obtain a clearer
picture, and press ENTER.
Fine Tuning
9 To preset or disable another chan nel, repeat
steps 4 to 8.
Cable
Add
On
On
Off
Ch34
Set VCR Plus+ Channels
Sets up the guide channel number assigned to each
channel.
You need to set this correctly t o m ake timer
recordings with the VCR Plus+ function. For
details, see page 27.
,
continued
Settings and Adjustments
71
1-17

Clock
Auto (Auto Clock Set)
Turns on the Auto Clock Set function when a channel
in your local area broadcasts a time signal.
1 Follow steps 1 to 3 of “Using the Setup
Displays” (page 69) to select “Settings” in the
Setup Display.
2 Select “Clock,” and press ENTER.
3 Select “Auto,” and press ENTER.
Settings - Clock - Auto Clock Set
Full Auto :
Clock Set CH :
Time Zone :
Daylight Saving :
4 Select “Full Auto,” and press ENTER.
“Yes”: Automatically sets your time zone and
Daylight Saving Time (if applic able).
“No”: Allows you to adjust your time zone
and Daylight Saving Time manually, without
turning off the Auto Clock Set function.
5 Select “Yes,” and press ENTER.
The recorder automatical l y sets the clock by
searching for a channel that carries a time
signal and sets your time zone and Daylight
Saving Time (if applicable).
• If the clock does not activa t e, your clock
setting is incorrect. After repea ting steps 1 to
4 above, select “No” i n st ep 5 and press
ENTER. Then select “Clock Set CH,”
“Time Zone,” or “Daylight Saving ” and
press ENTER. Adjust these settings by
pressing M/m and ENTER.
◆ Clock Set CH
Select a channel that carries a ti m e s ignal
using the number buttons.
Use this option if you know of a channel th at
carries a time signal. Most PBS member
stations broadcast a time signal. F or the fastest
response select your local PBS station. Leave
the setting at “--” to have the recorder
automatically search for a channel that carries
a time signal. To return to “- -,” enter “0.”
Settings - Clock - Auto Clock Set
Full Auto :
Clock Set CH :
Time Zone :
Daylight Saving :
Yes
No
– –
– –
Auto
Auto
◆ Time Zone
Select the time zone for your area, or select
“Auto” to have the recorder automatically set
your time zone.
The options are:
Auto y Atlantic y Eastern y Central
y Mountain y Pacific y Alaska y
Hawaii y Auto
◆ Daylight Saving
Select “On” or “Off” (standard time), or select
“Auto” to have the recorder automatically set
the daylight saving time.
z Hint
If you set “Full Auto” to “Yes,” the Auto Clock Set
function is activated whenever the recorder is turned off.
Note
If “Set Top Box Control” is set to “On,” the channel on
the cable box or satellite receiver changes when the
recorder searches for a channel that carries a time signal
and sets your time zone.
Manual (Manual Clock Se t)
If the Auto Clock Set function did not set the clock
correctly for your local area, set the clock
manually.
1
Follow steps 1 to 3 of “Using the Setup
Displays” (pag e69) to select “Settings” in the
Setup Display.
2
Select “Clock,” and press ENTER.
3
Select “Manual,” and press ENTER.
Settings - Clock - Present Time
Set the time and date manually.
4
Press M/m to set the month, and press ,.
Set the day, year, hour, and minutes in
sequence. Press </, to select the item to be
set, then press M/m to set the numbers. The
day of the week is set automatically.
5
Press ENTER to start the clock.
z Hint
To change the numbers in step 4, press < to retur n to the
item to be changed, and select the numbers by pressing
M/m.
2004//
112:Thu 00 AM1
Set Top Box Control
You can control your cable box/satellite receiver
using the supplied set top box cont roller. See
“Step 7: Easy Setup” for detai ls .
Set Top Box Control
On Turns on the cable box/satellite
receiver control function. See
“Using the cable box/satelli te
receiver control function”
(page 12).
Turns off the cable box/satellite
Off
receiver control function. Select
this if you do not want to use the
supplied set top box controller.
When “Set Top Box Control” is set to “On,” you
can make the following settings. Note that when
you change “Set Top Box Control” to “On” or
“Off,” all of the timer recording settings will be
canceled.
◆Brand Code
See “Cable Box/Satellite Receiver Brand Code”
(page 96) for the brand code for your cable box or
satellite receiver, and enter the code using the
number buttons and ENTER.
◆Connection
Selects the connect ion you use d for your ca ble box
or satellite recei ver. When the cable box or
satellite receiver is connected to the recorder’s
LINE IN jacks, select the connection from
“Line1,” “Line2,” or “Line3.” When the cable box
or satellite receiver is connected to the recorder’s
VHF/UHF IN jack, select the output channel,
“Ch2,” “Ch3,” or “Ch4.”
◆Ch. digit lock
Allows you to select whether to fix the digits for
your cable box or satellite receive r.
Select this when your cable box or
Off
satellite receiver only accepts a
three or more digit channel
number. Normally select this.
Lock to
Select this only when your cable
two digits
box or satellite receiver only
accepts a two digit channel
number.
◆Mode for SET button
Select “Mode1” or “Mode 2” if your cable box or
satellite receiver requires pressing an ENTER
button or a SET button etc., after entering the
channel number. If “Mode 1” does not work, try
“Mode 2.” If your cable box or satellite receiver
does not respond to either setting, contact the
manufacturer of the cable box or satellit e rece iver.
Off No code is sent when SET is
pressed. Normally select this.
Mode 1 Sends the channel number you
entered.
Mode 2 Sends the channel number you
entered.
Language
OSD (On-Screen Display)
Switches the display language on the screen.
DVD Menu (DVD VIDEO only)
Switches the language for the DVD menu.
Audio (DVD VIDEO onl y)
Switches the language of the sound track.
When you select “Original,” the language given
priority in the disc is selected.
Subtitle (DVD VIDEO only)
Switches the language of the subtitles recorded on
the disc.
When you select “Audio Follow,” the subtitle
language changes according to the language you
selected for the sound track.
z Hint
If you select “Others” in “DVD Menu,” “Subtitle,” or
“Audio,” select and enter a language code from
“Language Code List” (page 95) using the number
buttons.
Note
If you select a language in “DVD Menu,” “Subtitle,” or
“Audio” that is not recorded on the DVD VIDEO, one of
the recorded languages will be automatically selected.
Settings and Adjustments
72
Video Settings (Video)
Video settings will adjust items related to the
image, such as size and color.
Choose the settings according to the type of TV,
tuner, or decoder connected to the DVD re corder.
1 Press SYSTEM MENU while the recorder is
in stop mode.
2 Select “SETUP,” and press ENTER.
3 Select “Video,” and press ENTER.
The Video Setup appears with the following
options. The default settings are underlined.
SETUP
Settings
Video
Audio
Features
Options
Easy Setup
TV Type
Selects the aspect ratio of the connected TV (4:3
standard or wide).
16:9 Select this when connecting to a
4:3 Letter
Box
4:3 Pan
Scan
4 : 3 Letter Box
TV Type :
Auto
Pause Mode :
Y/Pb/Pr Out Black Level
:
Off
Progressive Mode :
Auto
Screen Saver :
On
Line1 Input :
Video
Line3 Input :
Video
wide-screen TV or TV with a
wide mode function.
Select this when connecting t o a
4:3 screen TV. Displays a wide
picture with bands on the upper
and lower portions of the screen.
Select this when connecting t o a
4:3 screen TV. Automatically
displays a wide picture on the
entire screen and cuts off the
portions that do not fit.
16:9
4:3 Letter Box
4:3 Pan Scan
Note
Depending on the disc, “4:3 Letter Box” may be selected
automatically instead of “4:3 Pan Scan” or vice versa.
Pause Mode (DVDs only)
Selects the picture quality in pause mode.
Auto The picture, including subjects
Frame The picture, including subjects
Y/Pb/Pr Out Black Level
Selects the black level (setup level) for the video
signals output from the COMPONENT VIDEO
OUT jacks (page 17).
This setting is not effective when the
PROGRESSIVE indicator lights up on the front
panel and the recorder output s progres sive si gnals.
On Raises the standard black level.
Off
that move dynamically, is ou tput
with no jitter. Normally select this
position.
that do not move dynamically, is
output in high resolution.
Select this when the picture
appears too dark.
Sets the black level of the output
signal to the standard level.
Normally, select this.
Progressive Mode
DVD software can be divided into two types : film
based software and video bas ed software. Video
based software is derived from TV, such as
dramas and sit-coms, and displays images at 30
frames/60 fields per second. Film based software
is derived from film and disp l ays images at 24
frames per second. Some DVD software cont ains
both Video and Film.
In order for these images to ap pear natural on your
screen when output in PROGRESSIVE mode, the
progressive video signal ne eds to be converted to
match the type of DVD softw ar e that you are
watching.
You can fine-tune the progressive 480p video
signals that are output w hen you press
PROGRESSIVE (“PROGRESSIVE” lights up).
Note that you must connect to a progressive
format TV using the COMPONENT VIDEO OUT
jacks (page 17).
Auto Automatically detects the
Video Fixes the conversion mode to the
Screen Saver
The screen saver image appears when you do not
use the recorder for more than 10 minutes while
the power is turned on. The screen saver image
helps prevent your display device from becoming
damaged (ghosting).
On
software type (Film-based or
Video-based) and sel e cts the
appropriate conversion mode.
Normally select this position.
mode for Video-ba s ed software.
Turns on the screen saver
function.
Off Turns off the function.
Line1 Input
Selects a method of inputting video signals for the
LINE IN 1 jack on the rear panel of th e recorder.
Video
Inputs video signals.
S Video Inputs S video signals.
Line3 Input
Selects the method of inputti ng video signals for
the LINE IN 3 jack on the rear panel of the
recorder. The pictures will not be clear if this
setting does not match the type of video input
signal.
Video Inputs video signals.
S Video Inputs S-video signals.
73
Settings and Adjustments
74
75
1-18
Audio Settings (Audio)
The Audio Setup allows you to adju st t he sound
according to the playback and connection
conditions.
1 Press SYSTEM MENU while the recorder is
in stop mode.
2 Select “SETUP,” and press ENTER.
3 Select “Audio,” and press ENTER.
The Audio Setup appears with the following
options. The default settings are underlined.
SETUP
Settings
Video
Audio
Features
Options
Easy Setup
Auto Stereo
This function is effective only when “Tuner
Audio” is set to “Main.”
On Receives stereo programs.
Off Select this to reduce noise.
Tuner Audio
Selects the sound to be recorded.
Main
SAP Records onl y th e SAP
Note
If no SAP sound is received, the main sound is recorded
regardless of the setting.
On
Auto Stereo :
Main
Tuner Audio :
Off
Audio ATT :
Standard
Audio DRC :
Dolby Surround
Downmix :
On
Digital Out :
D-PCM
Dolby Digital :
Off
DTS :
Normally select this.
The sound changes to
monaural.
Records only the main
sound.
(Second Audio Program)
sound.
Audio ATT (attenuation)
If the playback sound is distorted, set this item to
“On.” The recorder reduces the audio output level.
This function affects the output of the following
jacks:
– LINE OUT (AUDIO L/R) 1/2 jacks
On Select this when the
playback sound from the
speakers is distorted.
Normally select this
Off
position.
Audio DRC (Dynamic Rang e Control) (DVDs
only)
Makes the sound clear when the volume is turned
down when playing a DVD that conforms to
“Audio DRC.” This affects the output from the
following jacks:
– LINE OUT (AUDIO L/R) 1/2 jacks
– DIGITAL OUT (OPTICAL or COAXIAL) jack
only when “Dolby Digital” is set to “D-PCM”
(page 77).
Normally select this
Standard
position.
TV Mode Makes low sounds clear
even if you turn the volume
down.
Wide
Gives you the feeling of
Range
being at a live performance.
Downmix (DVDs only)
Switches the method for mixing down to two
channels when you play a DVD which has rear
sound elements (channels) or is recorded in Dolby
Digital format. For details on the rear signal
components, see “Checking the Play Information
and Playing Time” (page 3 7). This function
affects the output of the following jacks:
– LINE OUT (AUDIO L/R) 1/2 jacks
– DIGITAL OUT (OPTICAL or COAXIAL) jack
when “Dolby Digital” is set to “D-PCM”
(page 77).
Dolby
Surround
Normal Multi-channel audio sign al s
Digital Out
Selects if audio signals are output vi a t he
DIGITAL OUT (OPTICAL or COAXIAL) jacks.
On
Off The influence of th e digital
◆To set the digital output signal
The following setup items switch the method of
outputting audio signals when you connect a
component such as an amplifier (receiver) with a
digital input jack.
For connection details, see “Connecting th e Audio
Cords” (page 18).
Select “Dolby Digital” and “DTS” after setting
“Digital Out” to “On.”
Normally select this
position.
Multi-channel audio signals
are output to two channels
for enjoying surround
sounds.
are downmixed to two
channels for use with your
stereo.
Normally select this
position. When you select
“On,” see “To set the digital
output signal” for further
settings.
circuit upon the analog
circuit is minimal.
SETUP
Settings
Auto Stereo :
Video
Tuner Audio :
Audio
Audio ATT :
Features
Audio DRC :
Options
Downmix :
Digital Out :
Easy Setup
Dolby Digital :
DTS :
On
Main
Off
Standard
Dolby Surround
On
D-PCM
Off
If you connect a component that does not accept
the selected audio signal, a loud noise (or no
sound) will come out from the speakers, and may
affect your ears or cause speaker damage.
• Dolby Digital (DVDs only)
Selects the type of Dolby Digit al si gnal.
D-PCM Select this when the recorder
Dolby
Digital
• DTS (DVD VIDEO only)
Selects whether or not to output DTS signals.
On Select this when the recorder
Off
is connected to an audio
component lacking a built- in
Dolby Digital decoder. You
can select whether the
signals conform to Dolby
Surround (Pro Logic) or not
by making adjustments to
the “Downmix” item in
Audio Setup (page 76).
Select this when the recorder
is connected to an audio
component with a bu ilt-in
Dolby Digital decoder.
is connected to an audio
component with a bu ilt-in
DTS decoder.
Select this when the recorder
is connected to an audio
component without a built-in
DTS decoder.
Settings and Adjustments
76
Recording and Parental
Control Settings (Features)
The Features Setup allows you to adjust recording
and parental control settin gs.
1 Press SYSTEM MENU while the recorder is
in stop mode.
2 Select “SETUP,” and press ENTER.
3 Select “Features,” and press ENTER.
The Features Setup appears with t he
following options. The default settings are
underlined.
SETUP
Settings
Video
Audio
Features
Options
Easy Setup
Auto Chapter
Automatically divides a recording (a title) into
chapters by inserting chapter markings at a
specified interval. The markings are inserted while
the recording is being made.
Off No chapter mark is inserted.
6Min
15Min Inserts chapter marks at
Note
Depending upon the size of the recording being made, the
actual interval may vary from the interval selected in
“Auto Chapter.” The selected interval should only be
used as an approximation to create chapters.
6 Min
Auto Chapter :
Parental Control
Inserts chapter marks at
approximately 6 minute
intervals.
approximately 15 minute
intervals.
Parental Control (DVD VIDEO only)
Playback of some DVD VIDEOs can be limited
according to a predetermin ed level, such a s the age
of the users. Scenes may be blocked or replaced
with different scenes.
1 After step 3 above, select “Parental Control,”
and press ENTER.
• If you have not entered a password, the
display for registering a new pa ssword
appears.
Features - Parental Control
Enter a new password.
• When you have already registered a
password, the display for enteri ng the
password appears.
Features - Parental Control
Enter your password.
2 Enter your four-digit password using the
number buttons, then select “OK” and press
ENTER.
Features - Parental Control
Level :
Standard :
Password
3 Select “Standard,” and press , or ENTER.
The selection items for “Standard” are
displayed.
Features - Parental Control
Level :
Standard :
Password
OK
Cancel
OK
Cancel
Off
USA
Off
Others
USA
Others
4 Select a geographic area as the playback
limitation level, and press ENTER.
The area is selected.
When you select “Others,” press the number
buttons to select and en te r an ar ea code in the
table (see below). Then select “OK” and press
ENTER.
5 Select “Level,” and press ENTER.
The selection items for “Level” are disp la yed.
Features - Parental Control
Level :
Standard :
Password
Off
Off
Others
8
7
6
5
4
The lower the value, the stricter the limitation.
6 Select the level, and press ENTER.
The Parental Control setting is complete.
• To cancel the Parental Control setting for the
disc, set “Level” to “Off” in step 6.
• To change the password, select “Password”
in step 3, and press ENTER. When th e
display for registering a password appears,
enter a new four-digit pass w ord using the
number buttons, then select “OK” and press
ENTER.
Notes
• If you forget your password, you will have to reset it by
selecting “Parental Control” under “Factory Setup” in
Options Setup (page 80).
• When you play discs which do not have the Pare nta l
Control function, playback cannot be limit ed on this
recorder.
• Depending on the disc, you may be asked to change the
Parental Control level whil e playing the disc. In this
case, enter your password, then change the level.
◆Area code
Standard Code number
Argentina 2044
Australia 2047
Austria 2046
Belgium 2057
Brazil 2070
Canada 2079
Chile 2090
China 2092
Denmark 2115
Finland 2165
France 2174
Germany 2109
India 2248
Indonesia 2238
Italy 2254
Japan 2276
Korea 2304
Malaysia 2363
Mexico 2362
Netherlands 2376
New Zealand 2390
Norway 2379
Pakistan 2427
Philippines 2424
Portugal 2436
Russia 2489
Singapore 2501
Spain 2149
Sweden 2499
Switzerland 2086
Thailand 2528
United Kingdom 2184
77
Settings and Adjustments
78
79
1-19
Disc and Remote Control
Settings/Factory Settings
(Options)
The Options Setup allows you to set up other
operational settings.
1 Press SYSTEM MENU while the recorder is
in stop mode.
2 Select “SETUP,” and press ENTER.
3 Select “Options,” and press ENT ER.
The Options Setup appears with the following
options. The default settings are underlined.
SETUP
Settings
Video
Audio
Features
Options
Easy Setup
Format DVD (DVD-RW only)
The recorder automat ically starts formatting in
VR mode or Video mode, whiche ver is selected
below, when a new, unformatted DVD-RW is
inserted.
VR Automatically formats the
Video Automatically formats the
Dimmer
Adjusts the lighting of the front panel display.
Normal
Power
Save
VR
Format DVD :
Normal
Dimmer :
On
Auto Display :
DVD3
Command Mode :
Factory Setup
disc in VR mode.
disc in Video mode.
Bright lighting.
Low lighting. Turns off the
lighting when the power is
off.
Auto Display
On Automatically displays
Off Displays information only
Command Mode
Changes the Command Mo de of the recorder if
other DVD equipment is assigned the same
Command Mode. Be sure to match the Command
Mode switch on the remote to the setting made
here. For details, see “If you have a Sony DVD
player or more than one Sony DVD recorder” on
page 22.
DVD1 Select this if the default
DVD2 Select this if the default
DVD3
Factory Setup
Allows you to select the setup settings by group,
and return them to their default settings. Not e that
all of your previous settings wi ll be lost.
1
2
3
4
information on the screen
when the recorder is turned
on, etc.
when DISPLAY is pressed.
Command Mode conflicts
with other DVD equipment.
Command Mode conflicts
with other DVD equipment.
The default Command Mode
of the recorder.
After step 3 above, select “Factory Setup,”
and press , or ENTER.
The display for select i ng a group of settings
appears.
Select the group of settings you want to return
to default from “Settings,” “Video,” “Audio,”
“Features,” “Options,” “Parental Control,”
and “All,” and press , or ENTE R.
Select “Start,” and press ENTER.
The selected settings return to their default
settings.
Press ENTER when “Finish” appears.
Easy Setup
(Resetting the Recorder)
Select this to run the Easy Setup program.
1 Press SYSTEM MENU while the recorder is
in stop mode.
2 Select “SETUP,” and press ENTER.
3 Select “Easy Setup,” and press ENTER.
SETUP
Settings
Easy Setup
Video
Audio
Features
Options
Easy Setup
4 Press ENTER.
5 Select “Start,” and press ENTER.
6 Follow the instructions for Easy Setup
(page 23) from step 5.
Settings and Adjustments
80
Additional Information
Troubleshooting
If you experience any of the following difficulties
while using the recorder, use this troubleshooting
guide to help remedy the problem bef or e
requesting repairs. Should any problem persist,
consult your nearest Sony dealer.
Power
The power does not turn on.
, Check that the AC power cord is connected
securely.
Picture
There is no picture.
, Re-connect all connecting cords securely.
, The connecting cords are damaged.
, Check the connection to your TV (page 12).
, Switch the input selector on your TV (such as to
“VCR”) so that the signal from the recorder
appears on the TV screen.
Picture noise appears.
, If the picture output signal from your recorder
passes through your VCR to get to your TV, or if
you are connected to a combination TV/VIDEO
player, the copy-protection sign al applied to
some DVD programs could affect picture
quality. If you still experience th is probl em even
when you connect your recorder directly to your
TV, try connecting your recorder to your TV’s
S VIDEO input.
, You have set the recorder to progressive format
(the PROGRESSIVE indicator lights up) even
though your TV cannot accept the progressive
signal. In this case, press PROGRESSIVE until
the progressive indicator turns off.
, Even if your TV is compatible with progressive
format (480p) signals, the image may be affected
when you set the recorder to progressive format.
In this case, press PROGRESSIVE so that the
PROGRESSIVE indicator turns off and the
recorder is set to normal (interlace ) format.
TV program reception does not fill the screen.
, Set the channel manually in “Tune r Preset” in
Settings Setup (page70).
, Select the correct source using the INPUT
SELECT button, or select a channel of any TV
program using the CH +/– buttons.
TV program pictures are distorted.
, Reorient the TV antenna.
, Adjust the picture (see the TV’s instruction
manual).
, Place the recorder and TV farther apart.
, Place the TV and any bunched antenna cables
farther apart.
, The RF cable is connected to the VH F /U HF
OUT jack on the recorder. Connect the cable to
the VHF/UHF IN jack.
The channel on the cable box/satellite receiver
has been changed.
, The set top box controller is connected and “Set
Top Box Control” is set to “On.” Check the “Set
Top Box Control” settings in Settings Setup
(page 73).
TV channels cannot be chang ed.
, The channel is disabled (page 71).
, A timer recording started, which changed the
channels.
The picture from equipment connected to the
recorder’s input jack does not appear on the
screen.
, If the equipment is connected to the LINE IN 1
jack, select “L1” in the front panel display by
pressing CH +/– or INPUT SELECT.
If the equipment is connected to the LINE 2 IN
jacks, select “L2” in the front panel display by
pressing CH +/– or INPUT SELECT.
If the equipment is connected to the LINE IN3
jack, select “L3” in the front panel display by
pressing CH +/– or INPUT SELECT.
, When an S video cable is connec ted to the
recorder’s LINE IN 1 or LINE IN 3 jack, set
“Line1 Input” or “Line3 Input” in Video Setup to
“S Video” (page 75).
The playback picture or TV program from the
equipment connected thr ough the recorder is
distorted.
, If the playback picture output from a DVD
player, VCR, or tuner goes through your recorder
before reaching your TV, the copy-protection
signal applied to some programs could affec t
picture quality. Disconnect the pl ayback
equipment in question and connect it directly to
your TV.
The picture does not fill t he screen.
, Set “TV Type” in Video Setup in accordance
with the aspect ratio of your TV (page 74).
The picture does not fill the sc reen, even
though the aspect ratio is set in “TV Type” in
Video Setup.
, The aspect ratio of the disc is fixed on your DVD.
Sound
There is no sound.
, Re-connect all conn ections securely.
, The connecting cord is damaged.
, The input source setting on the amplifier or the
connection to the amplifie r is incorrect.
, The recorder is in reverse play, fast-forward,
slow motion, or pause mode.
, If the audio signal does not come through the
DIGITAL OUT (OPTICAL or COAXIAL)
jacks, check the Audio Setup settings (page 76).
Sound distortion occurs.
, Set “Audio ATT” in Audio Setup to “On”
(page 76).
Sound is noisy.
, When playing a CD with DTS sound tracks,
noise will come from the LINE OUT (AUDIO
L/R) 1/2 jacks (page 55).
The sound volume is low
, The sound volume is low on some DVDs.
The sound volume may improve if you set
“Audio DRC” in Audio Setup to “TV Mode”
(page 76).
, Set “Audio ATT” in Audio Setup to “Off”
(page 76).
An alternate audio track can not be recorded or
played.
, Second Audio Program (SAP) is not available
for all programs. The progr am you ar e record ing
does not have a second audio program.
, You have set “Tuner Audio” in Audio Settings to
“Main” (page 76). Select “SAP” to record
alternate audio programs.
, When recording from conn ected equipment, set
“Line Audio Input” in TOOLS menu to “Main/
Sub” (page 49).
, If you have connected an AV amplifier to the
DIGITAL OUT (OPTICAL or COAXIAL) jack
and want to change the audio track for a DVDRW (VR mode) during playback, set “Dolby
Digital” in Audio Setup to “D-PCM” (page 77).
Playback
The disc does not play.
, The disc is upside down. Insert the disc with the
labeled side facing up.
, The disc is not correctly inserted.
, Moisture has condensed inside the recorder.
Remove the disc and leave the recor der turned on
for about half an hour until the m o i s ture
evaporates.
, If the disc was recor ded on an oth er re co rde r, th e
recorder cannot play the disc if it was not
finalized (page36).
The disc does not start playba ck from the
beginning.
, Resume play was activated (page 51).
, You have inserted a disc whose Title menu or
DVD menu automatically appears on the TV
screen when it is first inserted. Use the menu to
start playback.
The recorder starts playing the disc
automatically.
, The DVD VIDEO features an auto playback
function.
Playback stops automatica lly.
, If the disc has an auto pause signal, the recorder
stops playback at the auto pause signal.
81
Additional Infor mation
,
82
continued
83
1-20

Some functions such as Stop, Se arch, or Slowmotion Play cannot be performed.
, Depending on the disc, you may not be able to do
some of the operations above. See the instruction
manual supplied with the disc.
The language for the sound t rack cannot be
changed.
, Multilingual tracks are not recorded on the d is c
being played.
, The DVD VIDEO prohibits the changing of the
language for the sound track.
, Try changing the language using the DVD
VIDEO’s menu.
The subtitle language cannot be changed or
turned off.
, Multilingual subtitl es are not recorded on the
DVD VIDEO.
, The DVD VIDEO prohibits changing of the
subtitles.
, Try changing the subtitle using the DVD
VIDEO’s menu.
, The subtitles cannot be changed for the titles
recorded on this recorder.
The angles cannot be changed.
, Multi-angles are not recorded on the DVD
VIDEO being played.
, You are trying to ch ange the angles wh en “”
does not appear on the TV screen (page 53).
, The DVD VIDEO prohibits changing angles.
, Try changing the angle using the DVD VIDEO’s
menu.
, The angles cannot be changed for the titles
recorded on this recorder.
The MP3 audio track does not play .
, The MP3 audio track is not re cor ded in a form at
that the recorder can play (page 59).
Recording/Timer recording/Editing
The channel cannot be changed from the
channel you are recording.
, Set the TV’s input source to “TV.”
Recording does not start imm ediately after you
press z REC.
, Operate the recorder only after “LOAD”,
“FORMAT,” or “INFOWRITE” disappears
from the front panel display.
Nothing was recorded even tho ugh you set the
timer setting correctly.
, There was a power failure during recording.
, The recorder’s internal clock stopped due to a
power failure that lasted for more than 1 hour.
Reset the clock (page 72).
, The channel was disabled after the timer
recording was set. (See “Manual Set” on
page 71.)
, Disconnect the AC power cord from the AC
outlet, and connect it again.
, The program contains copy protection signals
that restrict copying.
, The timer setting overlapped another setting that
was set later or has priority (page 46).
, There is no DVD inside the recorder.
, There is not enough disc space for the recording.
, The set top box was turned off.
, The set top box controller was incorrect ly
connected (page 13).
, The settings in “Set Top Box Control” in Settings
Setup have been changed (page 73).
Recording does not stop immediately after you
press x REC STOP.
, It will take a few seconds for the recorder to input
disc data before recording can stop.
Recording does not stop after you press x
STOP.
, Open the remote’s cover and press x REC
STOP.
Timer recording is not complete or did not start
from the beginning.
, There was a power failure during recording. If
the power recovers when there is a timer
recording, the recorder resumes record ing.
Should the power failure continue for more than
1 hour, reset the clock (page 72).
, The timer setting overlapped another setting that
was set later or has priority (page 46).
, Disc space was not enough.
Contents previously recorded were erased.
, Data that has been recorded on a DVD with a PC
will be erased from the dis c w hen the disc is
inserted.
Display
The clock has stopped.
, Set the clock again (page 72).
, The clock stopped due to a power failure that
lasted for more than 1 hour. Reset the cl oc k
(page 72).
The TIMER REC indicator is flashing.
, The disc does not have enough space.
, Insert a recordable disc inside the recorder.
The recording mode indi cation is incorrect.
, When the recording or dubbing is less than three
minutes, the recording mode indication may be
displayed incorrectly. The actual recordi ng itse lf
is correctly made in the selected recording mode.
The clock does not appear in the f ront panel
display.
, “Dimmer” in Options Setup is set to “Power
Save” (page 80).
Remote control
The remote does not function .
, Batteries are weak.
, The remote is too far from the recorder.
, The remote’s manufacturer code retu rne d to the
default setting when you replaced the batteries.
Reset the code (page20).
, Turn on the recorder.
, The remote is not pointed at the remote sensor on
the recorder.
, Different command modes are set for the
recorder and remote. Set the same command
mode (page 22).
, Set the TV/DVD switch to DVD (page 21).
Other Sony equipment responds to the remote.
, The same command mode is set for both the
equipment and recorder. Set a different
command mode for the recorder (page 22).
Others
The recorder does not opera te properly.
, Restart the recorder. Press down "/1 on t he
recorder for more than ten second s un ti l
“WELCOME” appears in the fr ont pane l displ ay.
, When static electricity, etc., causes the recorder
to operate abnormally, turn off the recorder and
wait until the clock appears i n the front panel
display. Then, unplug the recorder and after
leaving it off for a while, plug it in again.
Five numbers or letters are dis played on the
front panel display.
, The self-diagnosis function was activated (see
the table on page 86).
The disc tray does not open after you press Z
OPEN/CLOSE.
, It may take a few seconds for the disc tray to
open after you have recorded or edited a disc.
This is because the recorder is adding disc data to
the disc.
The disc tray does not open and “TRAY
LOCKED” appears on the front panel display.
, Contact your Sony dealer or local authorized
Sony service facility.
Additional Infor mation
84
“RECOVERY” appears in the front panel
display.
, The recorder’s recovery function was activated
when the recorder was turned on because the
power was turned off or failed during recording.
Leave the recorder on until “RECOVERY”
disappears from the front panel display.
“FAN ERROR” appears in the front panel
display.
, Check that the v ent on the rear of the reco rder is
not blocked. Then, turn off the recor de r , wa it
until the clock appears in the front panel display,
and disconnect the AC power cord. Lea ve the
recorder off for a while, then re-connec t t h e
power cord, and press "/1 on the recorder.
The disc tray does not open and yo u cannot
remove the disc after you p ress Z OPEN/
CLOSE.
, Turn off the recorder, Once the clock appears in
the front panel display, disconnect the AC power
cord. Connect it again while pressing down A on
the recorder, and release the button when the disc
tray opens. Then, keep [/
pressed for about ten seconds until
“WELCOME” appears in the front panel display.
“LOCKED” appears in the front panel display.
, The disc tray is locked. Cance l the Child Lock
(page 52).
1 on the recorder
Self-diagnosis Function
(When letters/numbers
appear in the display)
When the self-diagnosis function is activated to
prevent the recorder from malfunctioning, a fivecharacter service number (e.g., C 13 50) with a
combination of a letter and fo ur numbers appears
on the front panel display. In this case, check the
following table.
First three
characters of the
service number
C 13 The disc is dirty.
C 31 The disc is not inserted
E XX
(xx is a number)
Cause and/or
corrective action
, Clean the disc with a
soft cloth.
correctly.
, Re-insert the disc
correctly.
To prevent a malfunction,
the recorder has
performed the selfdiagnosis function.
, Contact your neares t
Sony dealer or local
authorized Sony
service facility and
give the fivecharacter service
number.
Example: E 61 10
Notes About This Recorder
On operation
• If the recorder is brought directly from a cold to
a warm location, or is placed in a very damp
room, moisture may condense on the lenses
inside the recorder. Should this occur, the
recorder may not operate prop er ly . In t hi s case,
remove the disc and leave the recorder turned on
for about half an hour until the moisture
evaporates.
• When you move the recorder, take out any discs.
If you don’t, the disc may be damaged.
On adjusting volume
• Do not turn up the volume while listening to a
section with very low level inputs or no audio
signals. If you do, the sp eak ers ma y be d amage d
when a peak level section is play ed.
On cleaning
Clean the cabinet, panel, and controls with a soft
cloth slightly moistened with a mild detergent
solution. Do not use any type of abrasive pad,
scouring powder or solvent such as alcohol or
benzine.
On cleaning discs
Do not use a commercially available cleaning
disc. It may cause a malfunction.
Notes about the discs
• To keep the disc clean, handle the disc by its
edge. Do not touch the surface. Dust,
fingerprints, or scrat c hes on the disc may cause
it to malfunction.
,
continued
• After playing, store the dis c i n i ts case.
• Clean the disc with a cleaning cloth. Wipe the
disc from the center out.
• Do not use solvents such as benzine, thinner,
commercially available cleaners, or anti-static
spray intended for vinyl LPs.
• Do not use the following discs.
–A disc that has a non-standard shape (e.g.,
card, heart).
–A disc with a label or stic ker on it.
–A disc that has celloph ane tape or sticker
adhesive on it.
85
Additional Infor mation
• Do not expose the disc to direct sunlight or heat
sources such as hot air ducts, or leave it in a car
parked in direct sunlight as the te mperatu re may
rise considerably inside the car.
86
87
1-21

Specifications
System
Laser: Semiconductor laser
Channel coverage:
NTSC
VHF: 2 to 13/UHF: 14 to 69/CATV: A-8 to
A-1, A to W, W+1 to W+84
Video reception: Frequency synthesizer
system
Audio reception: Split carrier system
Antenna: 75-ohm antenna terminal for VHF/
UHF
Timer: Clock: Quartz locked/Timer indication:
12-hour cycle (digital)/Power back-up
duration: 1 hour
Video recording format: MPE G Video
Audio recording format/applicable bit rate:
Dolby Digital/2 ch, 256 kbps
When you play PCM sound trac ks w it h a 96 kHz
sampling frequency, the output signals from the
DIGITAL OUT (OPTICAL or COAXIAL) jack
are converted to 48 kHz sampli ng frequency.
Inputs
(Jack name: Jack type/input level/input
impedance)
LINE IN 1/2/3
(AUDIO): Phono jack/2 Vrms/more than 22
kilohms
(VIDEO): Phono jack/1.0 Vp-p
(S VIDEO): 4-pin mini DIN/Y:1.0 Vp-p, C:
0.286 Vp-p
Outputs
(Jack name: Jack type/output level/output
impedance)
LINE OUT 1/2
(AUDIO): Phono jack/2 Vrms/10 kilohms
(VIDEO): Phono jack/1.0 Vp-p
(S VIDEO): 4-pin mini DIN/Y:1.0 Vp-p, C:
0.286 Vp-p
DIGITAL OUT (OPTICAL):
Optical output jack/–18 dBm (wave length:
660 nm)
DIGITAL OUT (COAXIAL):
Phono jack/0.5 Vp-p/75 ohms
COMPONENT VIDEO OUT (Y, P
Phono jack/Y: 1.0 Vp-p/P
interlace*=0.648 Vp-p, prog ressive or
interlace**=0.7 Vp-p
* “Y/Pb/Pr Out Black Level” is “On”
** “Y/Pb/Pr Out Black Level” is “Off”
SET TOP BOX CONTROL:
Mini jack
General
Power requirements: 120 V AC, 60 Hz
Power consumption: 37 W
Dimensions (approx.): 430 u 85 u 345 mm
3
/8 u 13 5/8 in.) (width/height/depth)
(17 u 3
incl. projecting parts
Mass (approx.): 4.8 kg (10.58 lb)
Operating temperature: 5 ºC to 35 ºC
(41 ºF to 95 ºF)
Operating humidity: 25 % to 80 %
Supplied accessories:
Audio/video cord (1)
Power cord (1)
Antenna cable (1)
Set top box controller (1)
Remote commander (remote) (1)
Size AA(R6) batteries (2)
Specifications and design are subject to ch an g e
without notice.
B
, PR:
B
, PR):
Guide to Parts and Controls
For more information, see the pages in parentheses.
Front panel
Buttons on the recorder have the same function as the buttons on the remote if they have the same or
similar names.
A @/1 (on/standby) button (23)
B Front panel display (38, 92)
C Disc tray (41)
D (remote sensor) (20)
E TIMER REC indicator (41)
F A (open/close) button (41)
G H (play) button (51)
X (pause) button (51)
x (stop) button (51)
H z REC button (47)
X REC PAUSE button (47)
x REC STOP button (47)
I SYSTEM MENU button (31)
TOOLS button (32)
J </M/m/,/ENTER button (31)
K O RETURN button (32)
L ./> (previous/next) buttons (53)
M CHANNEL +/– buttons (47)
N INPUT SELECT button
(47, 49, 71)
O REC MODE button (40)
P LINE 2 IN (S VIDEO/VIDEO/AUDIO L/
R) jacks (30)
Additional Infor mation
88
Remote
Buttons on the remote have the same function as
the buttons on the recorder if they have the same
or similar names. Buttons with an orange dot next
to them can be used with your TV when the TV/
DVD switch is set to TV.
1 2 3
4 5 6
7 8 9
0
A TV/DVD switch (21)
B Z OPEN/CLOSE button (41)
C Number buttons (21 , 4 3)*
SET button (21, 43)
The number 5 button has a tact ile dot.
D CLEAR button (43)
E AUDIO button (53)*
SUBTITLE button (53)
ANGLE button (53)
F [TIMER] button (41, 43)
G SYSTEM MENU button (31)
TITLE LIST button (32, 51, 62)
TOOLS button (32)
H CURSOR MODE button (3 2)
I O RETURN button (32)
J TOP MENU button (51)
K . PREV (previous)/> NEXT
buttons (53)
L z REC button (47)
X REC PAUSE button (47)
x REC STOP button (47)
M REC MODE button (40)
N PROGRESSIVE button (17)
O [/1 (on/standby) button (23)
P CH (channel) +/– buttons (21)
The + button has a tactile dot.
Q VOL (volume) +/– buttons (21)
R TV/VIDEO button (21)
S DISPLAY button (37, 49)
TIME/TEXT button (38)
T SUR (surround) button (53)
U </M/m/,/ENTER button (31)
V ZOOM +/– buttons (32)
W INSTANT REPLAY/ INSTANT
ADVANCE buttons (53)
X MENU button (51 )
Y m / M (search) buttons (53)
Z H PLAY button* (51)
The button has a tactile dot.
X PAUSE button (51)
x STOP button (51)
wj CHAPTER MARK/ERASE buttons (65)
wk INPUT SELECT button (49, 71)
wl COMMAND MODE switch (DVD 1,2,3)
(22)
* Use the tactile dot as a reference when operating the
recorder.
,
continued
89
Additional Infor mation
,
90
continued
91
1-22
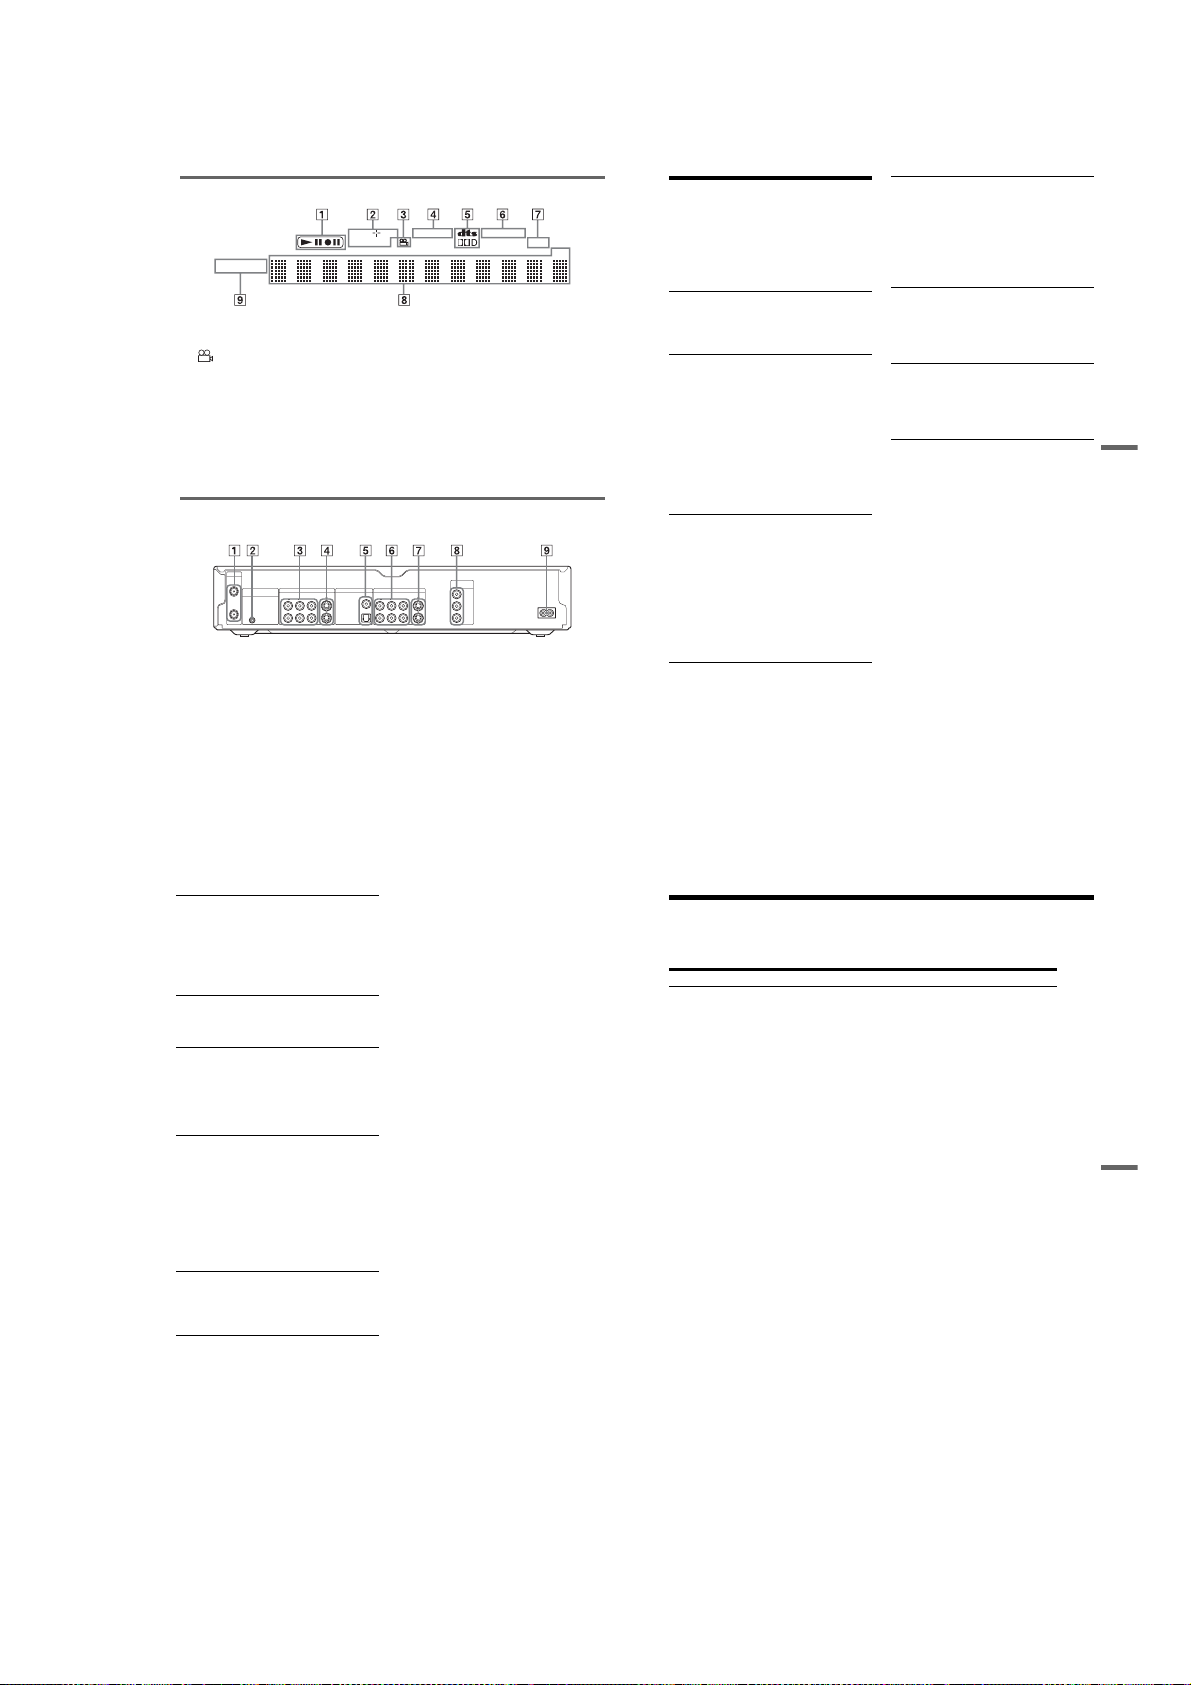
Front panel display
DVD RW
VCD VR
PROGRESSIVE
A Playing/recording status
B Disc type*/recording format
C (angle) indicator (53)
D PLAYLIST indicator (32)
E Audio signal in dicators (37)
F STEREO indicator (40)
z Hint
You can turn off the front panel display when the recorder is turned off by setting “Dimmer” to “Power Save” in Options
Setup (page 80).
PLAYLIST
G SAP (Second Audio Program) indicator
(40)
H Displays the following (38):
• Playing time /remaining time
• Current title/chapter/track/index number
• Recording time/recording mode
• Clock
• Channel
* Displays DATA CDs as “CD.”
STEREO
SAP
CH
I PROGRESSIVE indicator
Rear panel
VHF/UHF
IN
SET TOP BOX
LINE IN DIGITAL OUT
CONTROL
OUT
1
3
AUDIORL
S VIDEO
VIDEO
COAXIAL
PCM/DTS/
DOLBY DIGITAL
OPTICAL
A VHF/UHF IN/OUT jacks (12)
B SET TOP BOX CONTROL jack (13, 14)
C LINE IN (AUDIO L/R/VIDEO) 1/3 jacks
(29)
D LINE IN (S VIDEO) 1/3 jacks (29)
E DIGITAL OUT (COAXIAL/OPTICAL)
jacks (19)
AUDIORL
1
2
COMPONENT
VIDEO OUT
LINE OUT
VIDEO
F LINE OUT (AUDIO L/R/VIDEO) 1/2
Y
S VIDEO
P
B
P
R
jacks (16, 18, 19)
~
AC IN
G LINE OUT (S VIDEO) 1/2 jacks (17)
H COMPONENT VIDEO OUT (Y, P
jacks (17)
I AC IN terminal (20)
B, PR)
Glossary
Chapter (page 58)
Sections of a picture or a music fe at ur e that are
smaller than titles. A title is composed of several
chapters. Dependin g on t he di sc , no ch ap te rs m ay
be recorded.
Copy protection signals (page 40)
Copy restriction set by copyright owners, etc.
These signals are included in some software or TV
programs and restrict recording on this recorder.
Dolby Digital (p age 77)
Digital audio compression technology developed
by Dolby Laboratories. This technology conforms
to multi-channel surround sound. The rear channel
is stereo and there is a discr ete s ubwoofe r ch annel
in this format. Dolby Digital provides the same
discrete channels of high quality digital audio
found in “Dolby Digital” theater surround sound
systems. Good channel separation is realized
because all of the channel data is recorded
discretely, and little deterior at ion occurs because
all channel data processing is digital.
DTS (page 77)
Digital audio compression technology by Digital
Theater Systems, Inc. Thi s t echnology conforms
to multi-channel surround sound. The rear channel
is stereo and there is a discr ete s ubwoofe r ch annel
in this format. DTS provides the same discrete
channels of high quality digital a udi o.
Good channel separation is realized because all of
the channel data is recorded discretely, and little
deterioration occurs because all channel data
processing is digital.
DVD+RW (page 8)
A DVD+RW (read “plus RW”) is a recordable and
rewritable disc. DVD+RWs use a recording
format that is comparable to the DVD VIDEO
format.
DVD-RW (page 8)
A DVD-RW is a recordable and rewritable disc
that is the same size as a DVD VIDEO. The DVDRW has two different modes: VR mode and Video
mode. DVDs created in Vide o m o de have the
same format as a DVD VIDEO, while discs
created in VR (Video Recording) mode allow the
contents to be programmed or ed ited.
DVD+R (page 8)
A DVD+R (read “plus R”) is a recordable dis c that
is the same size as a DVD VIDEO. Contents can
be recorded only once to a DVD+R, and will have
the same format as a DVD VIDEO.
DVD-R (page 8)
A DVD-R is a recordable disc tha t is the same size
as a DVD VIDEO. Contents can be recorded only
once to a DVD-R, and will have the same format
as a DVD VIDEO.
DVD VIDEO (page 8)
A disc that contains up to eight hou rs of moving
pictures on a disc the same diam et er as a CD.
The data capacity of a single -layer and singlesided DVD is 4.7 GB (Giga Byte), which is 7
times that of a CD. The data capacity of a doublelayer and single-sided DVD is 8.5 GB, a singlelayer and double-sided D VD is 9.4 GB, and
double-layer and double-sided DVD is 17 GB.
The picture data uses the MPEG 2 format, which
is a worldwide standard of digital compression
technology. The picture data is com pressed to
about 1/40 (average) of its original size. The DVD
also uses a variable rate coding technology that
changes the data to be alloca te d according to the
status of the picture. Audio information is
recorded in a multi-channe l format, such as Do lby
Digital, allowing you to enjo y a m ore real audio
presence.
Furthermore, various advanced functions such as
the multi-angle, multilingual, and Parental
Control functions are provi ded on the DVD.
Additional Infor mation
92
Interlace format (page 17)
Interlace format shows eve ry other line of an
image as a single “field” and is the standard
method for displaying images on television. The
even number field shows the even numbered lines
of an image, and the odd numbered field shows the
odd numbered lines of an image.
Original (page 61)
Titles actually recorded on a DVD-RW (VR
mode). Erasing original titles frees up disc space.
Playlist (page 61)
Playback information created from the actual
recordings on a DVD-RW (VR mode). A Playlist
leaves the original titles as the y ar e, and contains
only the information need ed to control playback.
A Playlist title takes up very little disc space.
Progressive format (page 17)
Compared to the Inte rlace format that alter n at ely
shows every other line of an image (field ) to create
one frame, the Progressive format shows the entire
image at once as a single frame . T his means that
while the Interlace format can show 3 0 frame s/ 60
fields in one second, the Prog ressive format can
show 60 frames in one second. The overall picture
quality increases and still images, text, and
horizontal lines appear sh arper.
Title (page 58)
The longest section of a picture or music feature
on a DVD, movie, etc., in video software, or the
entire album in audio software.
Track (page 58)
Sections of a music feature on a CD (the length of
a song).
Language Code List
For details, see page 73.
The language spellings conform to the ISO 639: 1988 (E/F) standard.
Code Language Code Language Code Language Code Language
1027 Afar
1028 Abkhazian
1032 Afrikaans
1039 Amharic
1044 Arabic
1045 Assamese
1051 Aymara
1052 Azerbaijani
1053 Bashkir
1057 Byelorussian
1059 Bulgarian
1060 Bihari
1061 Bislama
1066 Bengali;
Bangla
1067 Tibetan
1070 Breton
1079 Catalan
1093 Corsican
1097 Czech
1103 Welsh
1105 Danish
1109 German
1130 Bhutani
1142 Greek
1144 English
1145 Esperanto
1149 Spanish
1150 Estonian
1151 Basque
1157 Persian
1165 Finnish
1166 Fiji
1171 Faroese
1174 French
1181 Frisian
1183 Irish
1186 Scots Gaelic
1194 Galician
1196 Guarani
1203 Gujarati
1209 Hausa
1217 Hindi
1226 Croatian
1229 Hungarian
1233 Armenian
1235 Interlingua
1239 Interlingue
1245 Inupiak
1248 Indonesian
1253 Icelandic
1254 Italian
1257 Hebrew
1261 Japanese
1269 Yiddish
1283 Javanese
1287 Georgian
1297 Kazakh
1298 Greenlandic
1299 Cambodian
1300 Kannada
1301 Korean
1305 Kashmiri
1307 Kurdish
1311 Kirghiz
1313 Latin
1326 Lingala
1327 Laothian
1332 Lithuanian
1334 Latvian;
Lettish
1345 Malagasy
1347 Maori
1349 Macedonian
1350 Malayalam
1352 Mongolian
1353 Moldavian
1356 Marathi
1357 Malay
1358 Maltese
1363 Burmese
1365 Nauru
1369 Nepali
1376 Dutch
1379 Norwegian
1393 Occitan
1403 (Afan)Oromo
1408 Oriya
1417 Punjabi
1428 Polish
1435 Pashto;
Pushto
1436 Portuguese
1463 Quechua
1481 Rhaeto-
Romance
1482 Kirundi
1483 Romanian
1489 Russian
1491 Kinyarwanda
1495 Sanskrit
1498 Sindhi
1501 Sangho
1502 Serbo-
Croatian
1503 Singhalese
1505 Slovak
1506 Slovenian
1507 Samoan
1508 Shona
1509 Somali
1511 Albanian
1512 Serbian
1513 Siswati
1514 Sesotho
1515 Sundanese
1516 Swedish
1517 Swahili
1521 Tamil
1525 Telugu
1527 Tajik
1528 Thai
1529 Tigrinya
1531 Turkmen
1532 Tagalog
1534 Setswana
1535 Tonga
1538 Turkish
1539 Tsonga
1540 Tatar
1543 Twi
1557 Ukrainian
1564 Urdu
1572 Uzbek
1581 Vietnamese
1587 Volapük
1613 Wolof
1632 Xhosa
1665 Yoruba
1684 Chinese
1697 Zulu
1703 Not specified
,
continued
93
Additional Infor mation
94
95
1-23

Cable Box/Satellite
Receiver Brand Code
If more than one code number is listed, try
entering them one at a time until you find the one
that works with your cable box/satellite receiver.
Cable box brand Code number
3M 0033
ABC 0003, 0011, 0017, 0008,
Accuphase 0003, 0013, 0047, 0001,
Acorn 1102, 023 7
Action 0237
Active 02 37, 1102
Aim 0015
Allegro 0315, 0153
Amark 0008, 0277, 0144, 0056
American 0060
Americast 0899
Antronix 0207, 0022
Anvision 0211, 0111
Apache 0770
Arbatron 0014, 0011, 0003, 0476
Archer 0153, 0022, 0207, 0039,
ASE 1080
Auna 1269
BBT 0267
BCC 0276
Belcor 00 56, 0022
Bell & Howell 0014
Bell Atlantic 0641
Bell South 0899
Bestlink 0303
Betavue 0022
British Telecom 0003
BVS 0641
96
0014, 0001, 0013, 0206,
0047, 0237, 0033
0011, 0017, 0014, 0206
0797, 0237, 0260
Cable box brand Code number
Cable Healthcare 0769, 0058
Cable Star 0056
Cabletenna 0022, 0039
Cableview 0022
Century 0153, 0618, 0008, 0315
Citation 0017
Citizen 0153, 0315, 0078, 0242
Clearmaster 0883
ClearMax 0883, 1247
Colour Voice 0031, 0025
Comband 0233, 0232
Comtec 0274
Comtronics 0060, 0040
Comtronics Eagle 0040, 0060
Contec 0019
Coolmax 0883
Curtis Mathes 0015, 0242
Dae Ryung Eagle 0008
Daeryung 0008, 0877, 0477, 0277,
Diamond 0035
Digeo 1476
Digi 0637
Director 0476
Dumont 0637
Eagle Comtronics 0060, 0028
Eastern 0002, 0274, 0418
Electricord 0078
Emerson 0797, 0303, 0015, 0014
Everquest 0040, 0015
Focus 0400
Fosgate 0276
Funai 0248, 0019
FutureVision 0649
Garrard 0153
Gateway 0764
GC Electronics 0207, 0056, 0330, 0016,
1877
0040, 0077, 0030
Cable box brand Code number
GE 0 232, 0233, 0144, 0021
Gemini 0015, 0070, 0057, 0242,
General Instrument 0476, 0011, 0014, 0098,
GHZ 0078
Gibraltar 0003
Global 1327
GMI 0069 , 00 57, 0015, 0797
GoldStar 0144, 0040
Goodmind 0770, 0797
Gradiente 1136
Hamlin 0020, 0009, 0034, 0259,
Healthway Interactive 0058, 1020, 1015, 0769
Hitachi 0011, 0154, 0009, 0008,
Houston Tracker 0011
Hwalin 0303
IBM 0670
IEEC 1018
Interbuy 0274
Jasco 0315, 0153, 0015
Jebsee 0014, 0400
Jerrold 0003, 0014, 0276, 0011,
Kuang Yu 0024
Leon 0069, 0015
LG 0 040, 0144
Linsay 0440
Macom 0033
Maestro 0812
Magnavox 0797, 0027, 0032, 0334,
Millennium 0618, 0153
Memorex 0000
Mitsubishi 0003
0014, 0797, 0013, 0400
0810, 0024, 0003, 0015,
0276
0015, 0273, 0206
0003, 0033, 0014, 0255
0012, 0020, 0024, 0015,
0047, 0098, 0476, 0031,
0029, 0111, 0032, 0054,
0810, 0028
0069
Cable box brand Code number
Motorola 0476, 0276, 1476, 0810,
Movie Time 0156, 0078, 0063, 0203
MS 0069, 0015, 1018, 0303
MultiVision 0012
Myrio 1117
NET 0274
Next Level 0764, 1316, 1315, 1314
Nexus 0770
Northcoast 0671, 0314
Nova Vision 0277, 0008
Novabeam 0277
Novaplex 0618, 0277, 0017, 0008
NSC 0156, 0070, 0203, 0063,
Oak 0019, 0303, 0248, 0017
Omega 0015
Omniview 0371
Optimus 0021
Pace 0237
Pacific Bell 0843
Panasonic 0107, 0021, 0144, 0008,
Panther 0637
Paragon 0000, 0525, 0008
Penney 0637, 0000
Philips 0025, 0031, 0290, 0027,
Pioneer 0144, 0023, 0533, 1877,
Popular Mechanics 0400
Prelude 0770
Prism 0012, 0013, 0059
Protelcon 0786
Pulsar 0000, 0040
Quasar 0000
1376, 1254, 0400, 1106
0400, 0012, 0618, 0022,
0637, 0010, 0044
0124, 0307, 0000, 0040
0030, 0153, 0060, 0242,
0028, 0334, 0211, 0029,
0259, 0307, 0652, 0013,
0069, 0649, 0255, 0305,
0032, 0111, 0317
0877, 0260
,
continued
Additional Infor mation
97
Cable box brand Code number
Quest 0144, 0020
R Line 0040
RadioShack 0883, 0015, 0315, 0303,
Rampage 0255
Ranger 1247
RCA 0021, 0060, 0797, 0047,
Realistic 0207, 0153
Recoton 0153, 0400
Regal 0259, 0020, 0273, 0279,
Regency 0002, 0020, 0682
Rembrandt 0070, 0153, 0040, 0022,
RK 0304, 0479
Runco 0000
Samsung 0040, 0144, 0023, 0003,
Sasktel 1737
Scientific Atlanta 0008, 0277, 0017, 0006,
Seam 0510
Sears 0510
Sejin 1265
Sigma 0019
Signal 0040, 0015, 0011, 0035
Signature 0011
SkyCable 0112
Skygiant 1091
SL Marx 0040
Sony 1006, 1506, 1606
Spectradyne 0769, 0058
Spectravision 0058
Sprucer 0021, 0307, 0010, 0144
Standard Components 0203, 0096, 0155
Starcom 0003, 0015, 0047, 0014,
0797
1256, 0843
0276
0011
0070, 0000
0237, 0025, 0477, 0207,
0877, 0003, 0012, 0000,
0021, 1877
0098, 0305
98
Cable box brand Code number
Stargate 0015, 0040, 0770, 0865,
Starquest 0015
StarSight 0542, 0422
Stealth 0274
Stellar One 0807
Storm 1018, 0637
Suena Madritel 1230
Supercable 0276
Supermax 0883
Sylvania 0001
Tandy 0258
Tatung 0097
Teac 1018
Technics 0029
Teknika 0146
Teleavia 0040
TeleCaption 0221
Teleview 0063, 0040
Texscan 0001, 0096, 0010
TFC 0310
Thomson 1256
Timeless 0418, 0274, 0040
Tocom 0012, 0013, 0029, 0019,
Torx 0003
Toshiba 0000
Trans PX 030 3, 0276, 0153, 0315
Trinity 1248
Tristar 0883
TS 0255, 0024, 1018, 0003,
Tusa 0015
TV COMM 0035, 0019
TV Guide 1476
TV86 0063, 0040
Uniden 0022
Unika 0207, 0153, 0022
0797, 0305, 0014
0059, 0017
0303
Cable box brand Code number
United Cable 0003, 0014, 0011, 0276
Universal 0191, 0078, 0207, 0056,
US Electronics 0276, 0008, 0003, 0017
V2 0883
Videoway 0250, 0000
VideoWorks 0124
Vidtech 0244
Viewmaster 0883, 0770
Viewstar 0258, 0289, 0060, 00 63,
Vision 0883
Visionetics 1264
Vortex View 0883
WaveMaster 0565
Wiso 0078
Zenith 0000, 0525, 0054, 0017,
Zentek 0400
0022, 0039, 0153, 0077,
0322, 0315
0211, 0027, 0111, 0030,
0121
0039, 0153, 0060, 0315,
0191, 0899
Satellite receiver
brand
AlphaStar 0772
Atlantic Telephone 1333
Bell ExpressVu 0775
Century 0856
Chaparral 0216
Crossdigital 1109
DirecTV 0749, 0566, 0392, 1749,
Dish Network System 0775, 1005, 1170
Dishpro 0775, 1005
Echostar 0775, 1170, 1005
Expressvu 0775
Galaxis 0863
GE 0566
General Instrument 0361, 0869, 0627
GOI 0775
Gradiente 0856
Hitachi 0819, 0749
Houston Tracker 0775
HTS 0775
Hughes Network Systems 0749, 1749, 1442, 1142
Humax 1176, 1359, 1048, 0863,
Innova 0099
Jerrold 0361, 0036, 0627
JVC 0775, 1170
Magnavox 0722, 0724
McIntosh 0869
Memorex 0724
Mitsubishi 0749
Motorola 0869
NEC 1270
Netsat 0099
Next Level 0869
Optimus 0724
Panasonic 0247, 0701
Code number
0099, 1109, 1076, 1442,
1856, 0247, 1142, 1639,
0724, 0639, 0819
0283
,
continued
Additional Infor mation
99
1-24
 Loading...