

Page 1
4-267-070-51(1)
IC Recorder
Operating Instructions
ICD-PX312/PX312F
Getting Started
Basic Operations
Other Recording Operations
Other Playback Operations
Editing Files
Listening to the FM Radio
About the Menu Function
Utilizing Your Computer
Additional Information
Troubleshooting
Page 2

• The recorded music is limited to private use only.
Use of the music beyond this limit requires
permission of the copyright holders.
• Sony is not responsible for incomplete recording/
downloading or damaged data due to problems of
the IC recorder or computer.
• Depending on the types of the text and characters,
the text shown on the IC recorder may not be
displayed properly on device. This is due to:
– The capacity of the connected IC recorder.
– The IC recorder is not functioning normally.
– Content information is written in the language
or the character that is not supported by the IC
recorder.
Notice for users
All rights reserved. This manual or the software
described herein, in whole or in part, may not be
reproduced, translated or reduced to any machine
readable form without prior written approval from
Sony Corporation.
IN NO EVENT SHALL SONY CORPORATION BE
LIABLE FOR ANY INCIDENTAL,
CONSEQUENTIAL OR SPECIAL DAMAGES,
WHETHER BASED ON TORT, CONTRACT, OR
OTHERWISE, ARISING OUT OF OR IN
CONNECTION WITH THIS MANUAL, THE
SOFTWARE OR OTHER INFORMATION
CONTAINED HEREIN OR THE USE THEREOF.
Sony Corporation reserves the right to make any
modification to this manual or the information
contained herein at any time without notice.
The software described herein may also be governed
by the terms of a separate user license agreement.
• This software is for Windows and cannot be used
for Macintosh.
• The supplied connecting cable is for the IC recorder
ICD-PX312/PX312F. You cannot connect other IC
recorders.
GB
2
Page 3

What you record is for personal
enjoyment and use only. Copyright laws
prohibit other forms of use without the
permission of the copyright holders.
The use of Memory Stick™ media for
recording copyright-protected graphics or
other data is limited to the restrictions
specified under applicable copyright
laws. Any use beyond those restriction is
prohibited.
This product supports “Memory Stick
Micro™ (M2™)” media. “M2™” is an
abbreviated form of “Memory Stick
Micro™.” Hereinafter, “M2™” is used in
this document.
Trademarks
• Microsoft, Windows, Windows Vista and Windows
Media are registered trademarks or trademarks of
Microsoft Corporation in the United States and/or
other countries.
• Macintosh and Mac OS are trademarks of Apple
Inc., registered in the USA and other countries.
• Pentium is a registered trademark of Intel
Corporation.
• MPEG Layer-3 audio coding technology and
patents licensed from Fraunhofer IIS and Thomson.
• microSD and microSDHC logos are trademarks of
SD-3C, LLC.
• “Memory Stick Micro,” “M2” and are
trademarks or registered trademarks of Sony
Corporation.
• “MagicGate” is a trademark of Sony Corporation.
• Nuance, the Nuance logo, Dragon, Dragon
NaturallySpeaking, and RealSpeak are trademarks
and/or registered trademarks of Nuance
Communications Inc., and/or its affiliates in the
United States and/or other countries.
All other trademarks and registered trademarks are
trademarks or registered trademarks of their
respective holders. Furthermore, “ ™ ” and “
not mentioned in each case in this manual.
The “Sound Organizer” uses software modules as
shown below:
Windows Media Format Runtime
®
” are
GB
3
Page 4

Table of Contents
Getting Started
Step 1: Checking the Contents of the
Package .....................................................7
Index to parts and controls ...................8
Preventing unintentional operations
(HOLD) ..............................................10
Step 2: Preparing a Power Source ..........11
When to replace the batteries .............12
Step 3: Turning the IC Recorder On .......13
Turning the power on .........................13
Turning the power off .........................13
Step 4: Setting the Clock ........................14
Step 5: Setting the Language to Be
Used in the Display Window .................. 16
Basic Operations
Recording .......................................18
Listening .........................................23
Erasing ............................................28
Other Recording Operations
Changing the Recording Settings ........... 30
Selecting a recording scene for
each situation ......................................30
Adding a recording to a previously
recorded file ........................................33
GB
4
Adding an overwrite recording
during playback ..................................35
Starting to record automatically in
response to sound
– the VOR function .............................37
Recording on a Memory Card .................39
Recording via Other Devices ..................43
Recording with an external
microphone .........................................43
Recording from other equipment ........45
Operation during Recording ....................47
Monitoring the recording ....................47
Other Playback Operations
Changing the Playback Settings ..............48
Convenient playback methods ............48
Reducing noise in the playback
sound and making the human voice
clearer – the noise cut function ...........49
Adjusting the playback speed
– the DPC (Digital Pitch Control)
function ...............................................50
Selecting the playback mode ..............52
Playing Back a File at a Desired
Time with an Alarm ................................55
Playback via Other Devices ....................58
Recording with other equipment ........58
Page 5

Editing Files
Arranging Files in a Folder .....................59
Moving a file to a different folder ......59
Copying a file to the other memory ....60
Erasing all files in a folder ..................62
Using a Track Mark ................................63
Adding a track mark ...........................63
Erasing a track mark ...........................64
Erasing all the track marks in the
selected file at one time ......................65
Dividing a File ........................................67
Dividing a file at the current
position ...............................................67
Dividing a file at all the track mark
positions ..............................................68
Protecting a File ......................................71
Listening to the FM Radio (for
ICD-PX312F only)
Tuning in an FM Radio Station ..............73
Tuning in a radio station by
scanning frequencies ..........................73
Tuning in a preset radio station ..........74
Recording FM broadcasts ...................75
Presetting FM Radio Stations .................76
Presetting FM radio stations
automatically ......................................76
Presetting FM radio stations
manually .............................................77
Erasing preset FM radio stations ........77
Changing the FM Radio Reception
Settings ....................................................79
Switching the receiver sensitivity of
the FM radio .......................................79
Switching the scanning sensitivity ......80
Switching the FM radio output
between speaker and headphones .......81
About the Menu Function
Making Settings for the Menu ................82
Menu Settings .........................................84
Utilizing Your Computer
Using the IC Recorder with Your
Computer .................................................96
Connecting the IC recorder to your
computer .............................................96
Structure of folders and files ...............97
Disconnecting the IC recorder
from your computer ..........................101
Copying Files from the IC Recorder to
Your Computer .....................................103
Copying MP3 Files from Your
Computer to the IC Recorder and
Playing Them Back ...............................104
Copying an MP3 file from your
computer to the IC recorder
(drag and drop) .................................104
Playing back MP3 files copied
from your computer using the
IC recorder ........................................104
GB
5
Page 6

Using the IC Recorder as USB
Memory .................................................106
Using the Supplied Sound Organizer
Software ................................................107
What you can do using Sound
Organizer ..........................................107
System requirements for your
computer ...........................................108
Installing Sound Organizer ...............109
The Sound Organizer window ..........111
Additional Information
Using a USB AC Adaptor .....................112
Disconnecting the IC recorder from
the AC outlet .....................................112
Precautions ............................................114
Specifications ........................................117
System requirements ........................117
Design and specifications .................118
Battery life ........................................121
Troubleshooting
Troubleshooting ....................................122
Message List .........................................131
System Limitations ...............................136
Display Window Guide ........................137
Index .....................................................142
GB
6
Page 7
Getting Started
Step 1: Checking the Contents of the Package
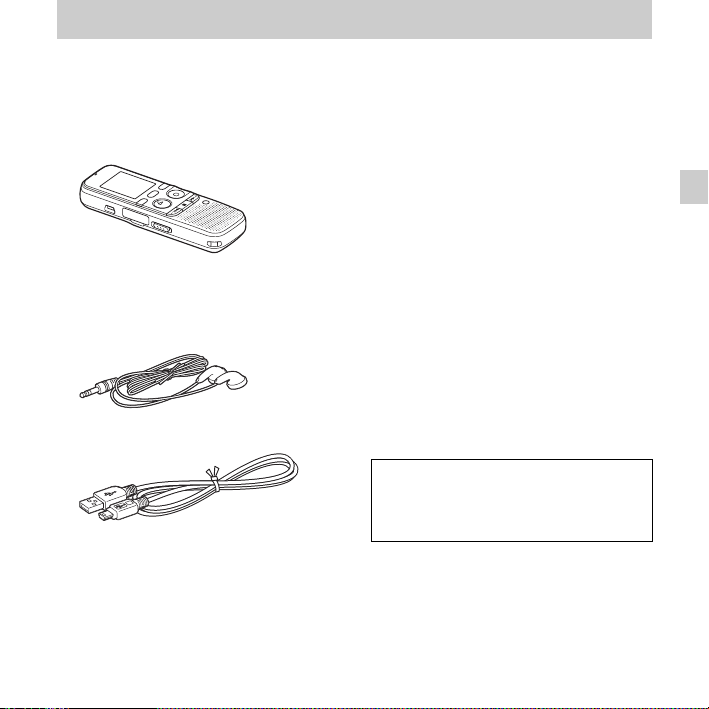
IC Recorder (1)
Remove the film on the display window
before you use the IC recorder.
Stereo headphones (1)
(for ICD-PX312F only)
USB connecting cable (1)
To connect the IC recorder to a computer,
make sure to use the supplied USB
connecting cable.
LR03 (size AAA) alkaline batteries
(2)
P Note
When you charge batteries, purchase
NH-AAA-B2KN rechargeable batteries (not
supplied).
Application software, Sound
Organizer (CD-ROM) (1)
Application software, Dragon
NaturallySpeaking (DVD-ROM)*
Operating Instructions
The operating instructions are stored as PDF
files in the built-in memory of the IC
recorder.
* The application software, Dragon
NaturallySpeaking (DVD-ROM) is supplied
with some models in some regions only.
You are cautioned that any changes or
modifications not expressly approved in this
manual could void your authority to operate
this equipment.
Getting Started
GB
7
Page 8
Index to parts and controls
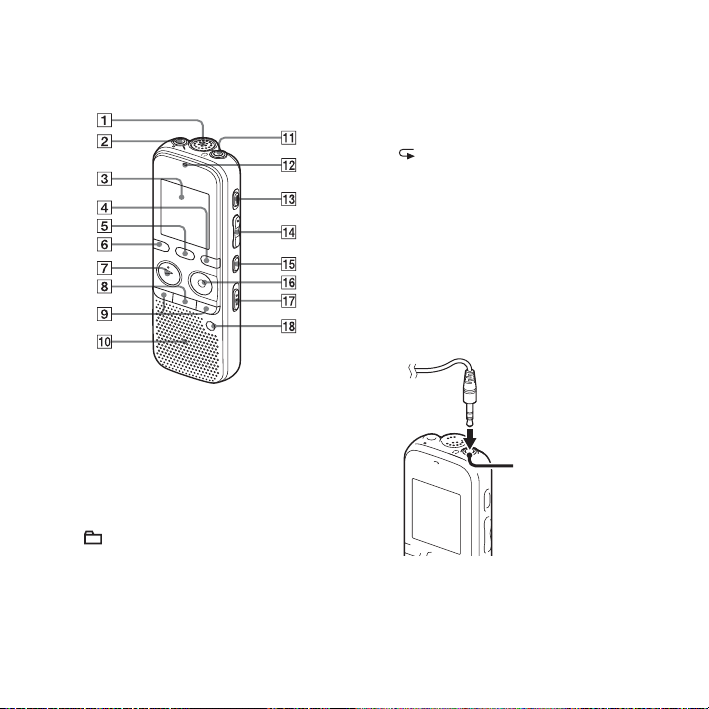
Front
K i (headphone) jack*
2
L Operation indicator
M ERASE button
N VOL (volume) –/+*
1
button
O (repeat) A-B button
P
z REC/PAUSE button
Q NOISE CUT switch
R T-MARK (track mark) button
1
*
These buttons and the jack have a tactile
dot. Use it as a reference point for
operations, or to identify each terminal.
2
*
Connect the headphones to the
i (headphone) jack. When noise is heard,
clean the plug of the headphones.
A Built-in microphone
B m (microphone) jack*
C Display window
D DISP/MENU button
E SCENE button
F (folder) button
G
N PLAY/STOP•ENTER*
H
x (stop) button
I –
. (review/fast backward), >+
(cue/fast forward) buttons
J Speaker
GB
8
1
1
button
i (headphone)
jack
Page 9
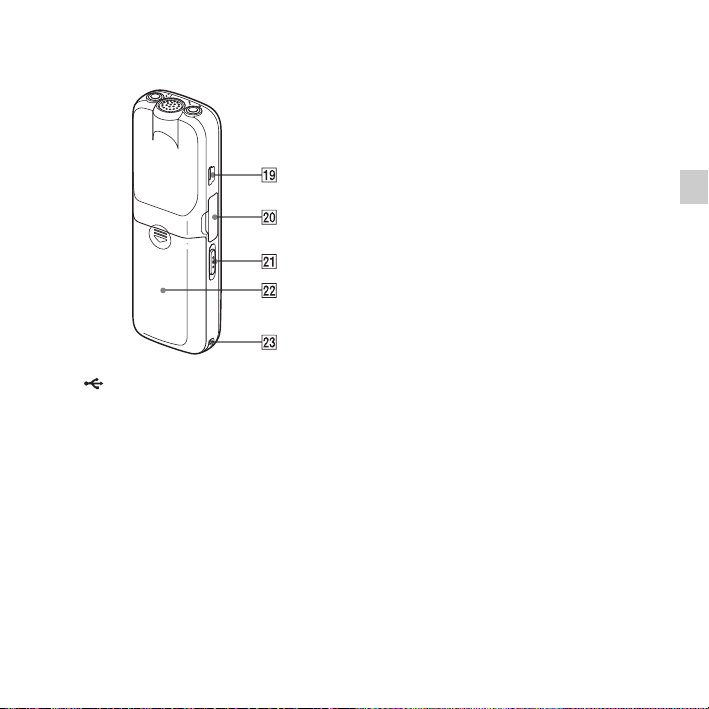
Rear
S (USB) connector
T M2™/microSD memory card slot
U HOLD•POWER ON/OFF switch
V Battery compartment
W Strap hole (A strap is not supplied.)
Getting Started
GB
9
Page 10

Preventing unintentional
operations (HOLD)
You can disable all the buttons (HOLD) in
order to prevent unintentional operations
when you carry the IC recorder, etc.
To put the IC recorder in the
HOLD status
Slide the HOLD•POWER ON/OFF switch
in the direction of “HOLD.”
“HOLD” will appear for approximately 3
seconds, indicating that all the button
operations are disabled.
“HOLD” appears if you press any button
when the HOLD function is activated.
To release the IC recorder from
the HOLD status
Slide the HOLD•POWER ON/OFF switch
towards the center.
P Note
When the HOLD function is activated during
recording, all the button operations are
disabled. To stop recording, cancel the HOLD
function first.
Tip
z
Even if the HOLD function is activated, you
can stop the alarm playback by pressing any
button. (You cannot stop normal playback.)
10
GB
Page 11
Step 2: Preparing a Power Source
Remove the film on the display window
before you use the IC recorder.
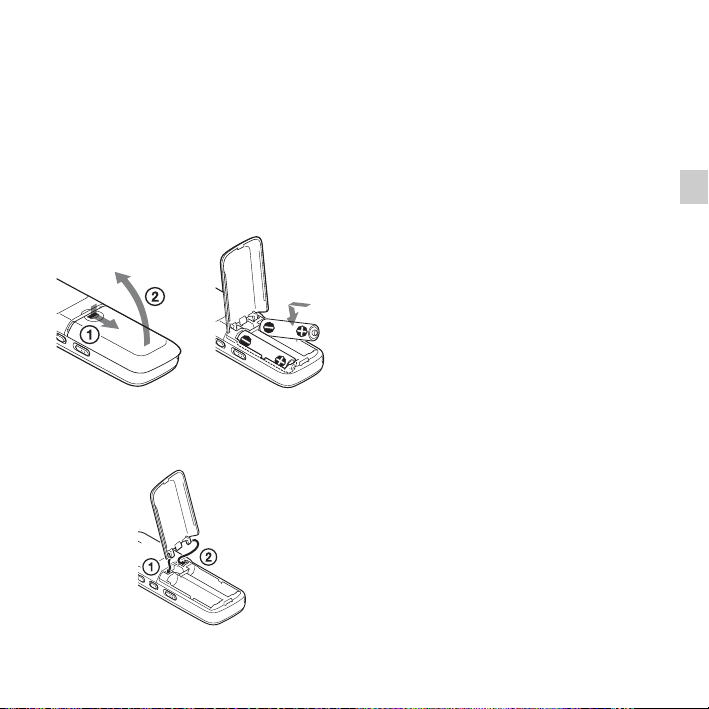
Slide and lift the battery compartment lid,
insert LR03 (size AAA) alkaline batteries
with correct polarity, and close the lid.
If the battery compartment lid is
accidentally detached, attach it as
illustrated.
The clock setting window appears and the
year section flashes when you insert
batteries for the first time, or when you
insert batteries after the IC recorder has
been without batteries for a certain period
of time. See “Step 4: Setting the Clock” on
page 14 to set the date and time.
z Tips
• When replacing the batteries, files recorded
or alarm settings are not erased even when
you remove the batteries.
• When replacing the batteries, the clock
continues moving for about 1 minute after
you remove the batteries.
• You can use two NH-AAA-B2KN
rechargeable batteries (not supplied).
P Notes
• Do not use manganese batteries for this IC
recorder.
• When replacing the batteries, be sure to
replace both batteries with new ones.
• Do not charge dry batteries. You cannot
charge the supplied LR03 (size AAA)
alkaline batteries.
• When you are not going to use the IC
recorder for a long time, remove the batteries
to prevent damage from battery leakage and
corrosion.
11
Getting Started
GB
Page 12

When to replace the batteries
The battery indicator in the display window
shows the battery condition.
Battery remain indicator
: “Low Battery Level” appears.
Replace the old batteries with new
ones.
m
: “Low Battery” appears and the IC
recorder will stop operation.
12
GB
Page 13

Step 3: Turning the IC Recorder On
Turning the power on
Slide the HOLD•POWER ON/OFF switch
in the direction of “POWER ON/OFF” for
more than 1 second. The IC recorder is
turned on, and the “Accessing...” animation
is displayed.
Turning the power off
Slide the HOLD•POWER ON/OFF switch
in the direction of “POWER ON/OFF” for
more than 2 seconds, and “Power Off” is
displayed.
The IC recorder turns off within a few
seconds.
z Tips
• When you are not going to use the IC
recorder for a long time, we recommend to
turn off the IC recorder.
• When the IC recorder is in the stop mode,
and you leave the IC recorder without
attempting an operation for a certain length
of time, the auto power off function will take
effect. (The length of time before auto power
off is set to “10min” when you purchase the
IC recorder.) You can select the length of
time before auto power off takes effect in the
menu (page 94).
13
Getting Started
GB
Page 14
Step 4: Setting the Clock
N
PLAY/
STOP•ENTER
DISP/MENU
x
–., >+
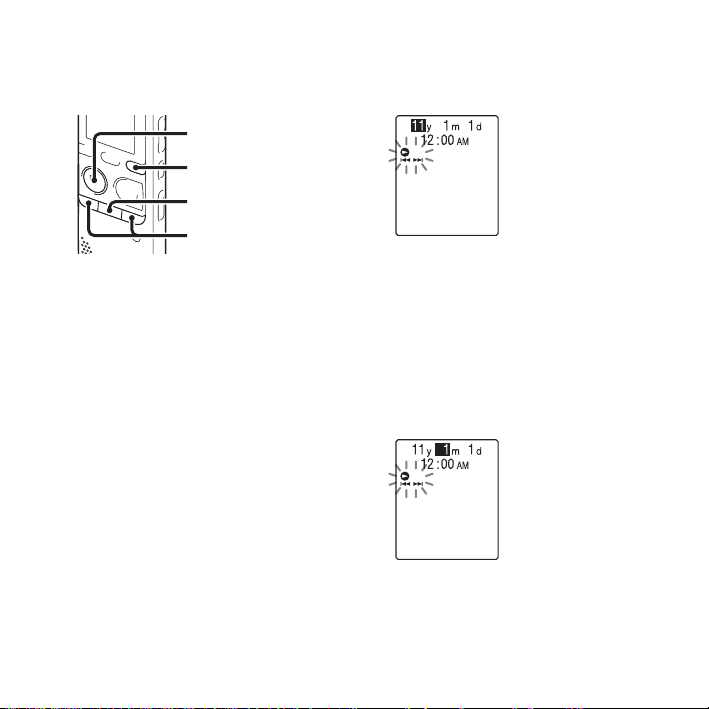
You need to set the clock to use the alarm
function or record the date and time.
When you insert batteries for the first time,
or when you insert batteries after the IC
recorder has been without batteries for
more than 1 minute, “Set Date&Time”
appears, and then the clock setting window
appears.
Set the clock as follows:
1 Set the year.
Press –
. or >+ to set the year, and
then press
Select the last two digits of the year.
N PLAY/STOP•ENTER.
When you press
STOP•ENTER, the cursor moves to the
month section.
N PLAY/
2 Set the month, day, hour, and minute in
sequence in the same way.
Press –
. or >+ to select the desired
figures, and then press
STOP•ENTER.
When you set the minute, the
“Executing...” animation is displayed,
and then the stop mode window appears.
N PLAY/
14
GB
Page 15
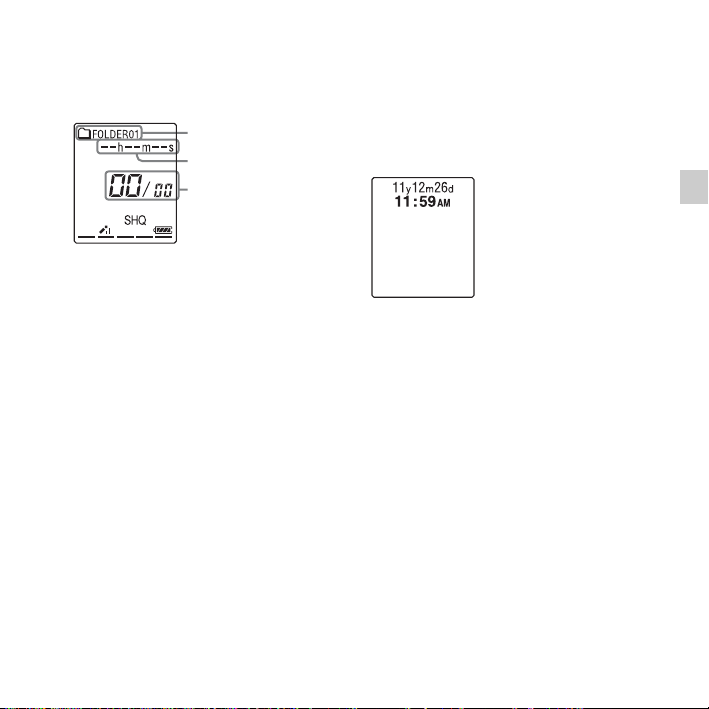
When you use the IC recorder for the
first time or when no file is recorded, the
following window may be displayed.
Current folder
Elapsed time
Current file number/
the total number of
files in the folder
P Notes
• If you do not press N PLAY/
STOP•ENTER within 1 minute of entering
the clock setting data, the clock setting mode
is canceled and the stop mode window will
be displayed.
• When any button not intended for use in
setting the clock is pressed during the clock
setting mode, the clock setting is canceled.
To set the clock, use the menu.
To set the clock using the menu
While the IC recorder is in the stop mode,
you can set the clock using the menu.
Press and hold DISP/MENU to enter the
menu mode. Then select “Detail Menu,”
then “Date&Time” to set the clock
(page 93).
To display the current date and
time
While the IC recorder is in the stop mode,
x (stop) to display the current date
press
and time for about 3 seconds.
Getting Started
15
GB
Page 16

Step 5: Setting the Language to Be Used in the Display Window
N
PLAY/
STOP•ENTER
DISP/MENU
x
–., >+
3 Press –. or >+ to select
You can select the language to be used for
messages, menus, etc. from 3 languages.
1 Press and hold DISP/MENU to enter the
menu mode.
The menu mode window will be
displayed.
“Language,” and then press
STOP•ENTER.
N PLAY/
2 Press –. or >+ to select “Detail
Menu,” and then press
STOP•ENTER.
GB
16
N PLAY/
4 Press –. or >+ to select the
language that you want to use, and then
N PLAY/STOP•ENTER.
press
Page 17

You can select the following languages.
English, Español (Spanish), Français
(French)
5 Press x (stop) to exit the menu mode.
Getting Started
17
GB
Page 18
Basic Operations
Recording
P Notes
• Before making a recording, be sure to check the battery indicator (page 12).
• Noise may be recorded if an object, such as your finger, etc., accidentally rubs or scratches the IC
recorder during recording.
z
Tip
Before you start recording, we recommend you make a trial recording first, or monitor the
recording (page 47).
Starting to record
1 Slide the HOLD•POWER ON/OFF switch towards the
center to release the IC recorder from the HOLD status
(page 10).
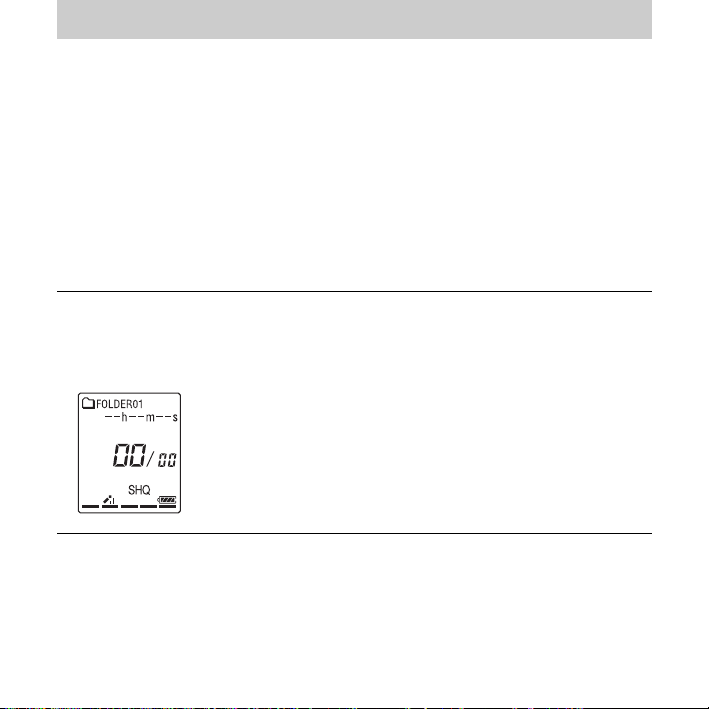
The stop mode window appears.
2 Select the folder in which you want to record files
(page 24).
18
GB
Page 19
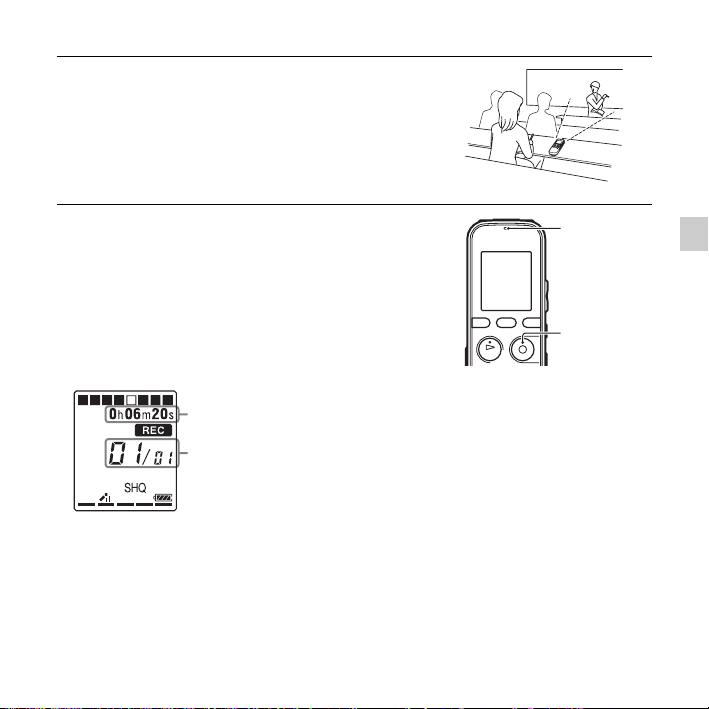
3 Place the IC recorder so that the built-in microphone
face the direction of the source to be recorded.
4 Press z REC/PAUSE in the stop mode.
The operation indicator flashes in orange, and then
lights up in red. (When “LED” is set to “OFF” in the
menu (page 93), the indicator does not light.)
You do not need to press and hold
while recording.
The new file will be automatically recorded after the
last recorded file.
Elapsed time of the current recording
File number of the f ile being recorded/
the total number of re corded files in the
folder
zTip
You can switch the elapsed time display to remaining time,
or another display by pressing DISP/MENU (page 27).
z REC/PAUSE
Operation
indicator
z REC/
PAUSE
19
Basic Operations
GB
Page 20
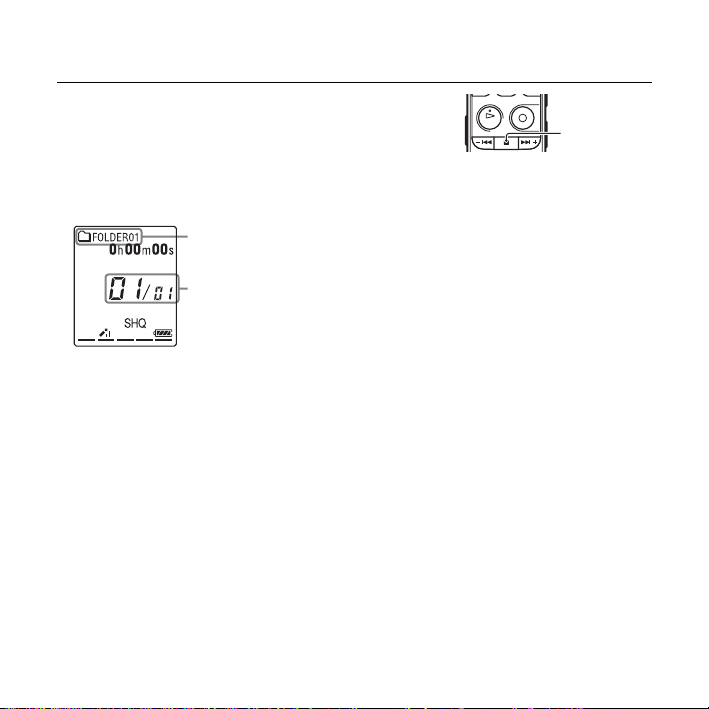
To stop recording
1 Press x (stop).
The “Accessing...” animation appears and the IC
recorder stops at the beginning of the current recording
file.
You can locate the recorded file using its folder name
and file number for playback later.
The folder containing the recorded file
The number of the recorded file
representing how early the file was
recorded in a folder.
Note while accessing
The IC recorder is recording data and storing it on the memory media when the
“Accessing...” animation appears in the display window or the operation indicator flashes in
orange. While the IC recorder is accessing data, do not remove the batteries or connect or
disconnect the USB AC adaptor (not supplied). Doing so may damage the data.
x
20
GB
Page 21

Other operations
pause recording* Press z REC/PAUSE. During recording pause, the operation indicator
release pause and
resume recording
review the current
recording instantly
review during
recording
* One hour after you pause recording, recording pause is automatically released and the IC recorder
enters the stop mode.
z Tips
• Files recorded using this IC recorder will be recorded as MP3 files.
• You can record up to 199 files in each folder.
• You can make new folders or erase unwanted folders using the supplied Sound Organizer
software (page 107).
flashes in red and “PAUSE” begins to flash in the display window.
Press
z REC/PAUSE again. Recording resumes from that point. (To stop
recording after pausing recording, press
N PLAY/STOP•ENTER. Recording stops and playback starts from
Press
the beginning of the file just recorded.
Press and hold
and you can search backwards while listening to fast playback sound. After
you release
–. during recording or recording pause. Recording stops
–., playback starts from that point.
x (stop).)
Remaining memory indicator
During recording, the remaining memory indicator decreases one by one. When the
remaining time of recording reaches 10 minutes, the last one of the indicator flashes. When
the remaining time reaches 1 minute, the display will be changed automatically to the
remaining time display, and the remaining recording time display will also flash. To continue
recording, first erase some of the files.
Basic Operations
21
GB
Page 22
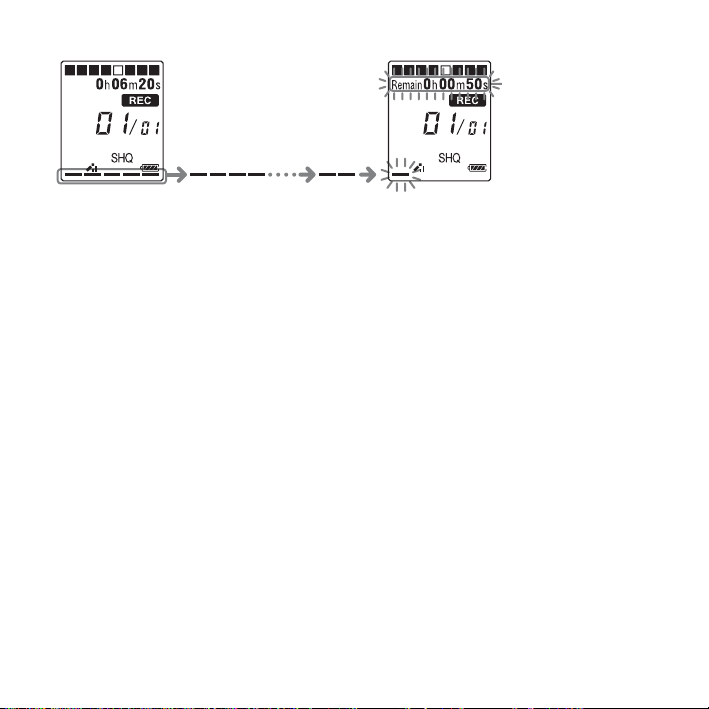
The remaining time
Flashing
To record according to each recording situation (scene selection)
According to various recording scene, you can change the recording items, such as REC
Mode (page 91), Mic Sensitivity (page 91), etc., to the recommended settings in bulk. For
details on scene selection, see page 30.
22
GB
Page 23
Listening
Starting playback
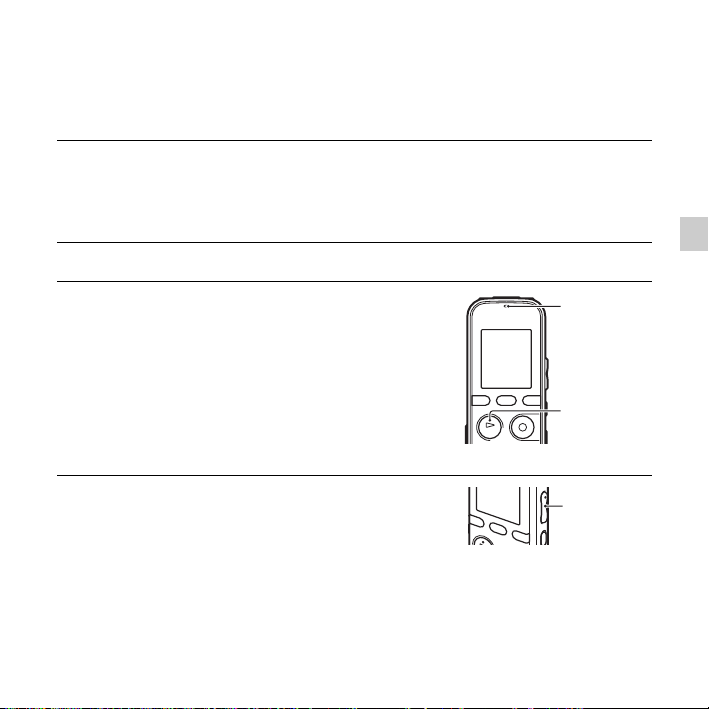
1 Slide the HOLD•POWER ON/OFF switch towards the
center to release the IC recorder from the HOLD status
(page 10).
The stop mode window appears.
2 Select the file you want to play (page 24).
Basic Operations
3 Press N PLAY/STOP•ENTER.
Playback will start soon, and the operation indicator
will light in green. (When “LED” is set to “OFF” in the
menu (page 93), the indicator does not light.)
4 Press VOL –/+ to adjust the volume.
Operation
indicator
N
PLAY/
STOP•ENTER
VOL –/+
23
GB
Page 24
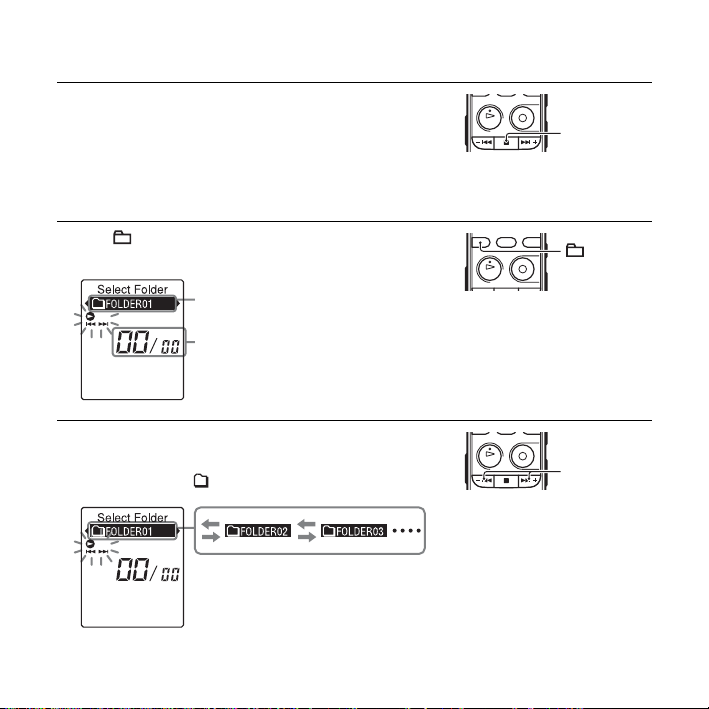
To stop playback
1 Press x (stop).
To select a folder and file
1 Press (folder) to display the folder selection
window.
Current folder
Current file number/the total
number of files in the folder
2 Press –. or >+ to select a folder.
When you purchase the IC recorder, there are 5 folders
already available ( FOLDER01-05).
x
–., >+
24
GB
Page 25

3 Press N PLAY/STOP•ENTER.
4 Press –. or >+ to select a file.
Press
>+ to select a file with a larger number.
Press –
. to select a file with a smaller number.
N
PLAY/
STOP•ENTER
–., >+
Basic Operations
25
GB
Page 26

Other operations
stop at the current position
(Playback Pause function)
go back to the beginning of
the current file
go back to previous files Press –. repeatedly. (During the stop mode, keep the button
skip to the next file Press
skip to the succeeding files Press >+ repeatedly. (During the stop mode, keep the button
*1When a track mark is set, the IC recorder goes backward or forward to the track mark before or after
the current point (page 63).
2
*
These operations are for when “Easy Search” is set to “OFF” (page 48).
3
*
In the continuous searching mode, the IC recorder does not locate track marks.
Press N PLAY/STOP•ENTER. To resume playback from that point,
N PLAY/STOP•ENTER again.
press
Press
–. once.*
pressed to go back the files continuously.*
>+ once.*
pressed to skip the files continuously.*
1*2
1*2
3
)
3
)
26
GB
Page 27
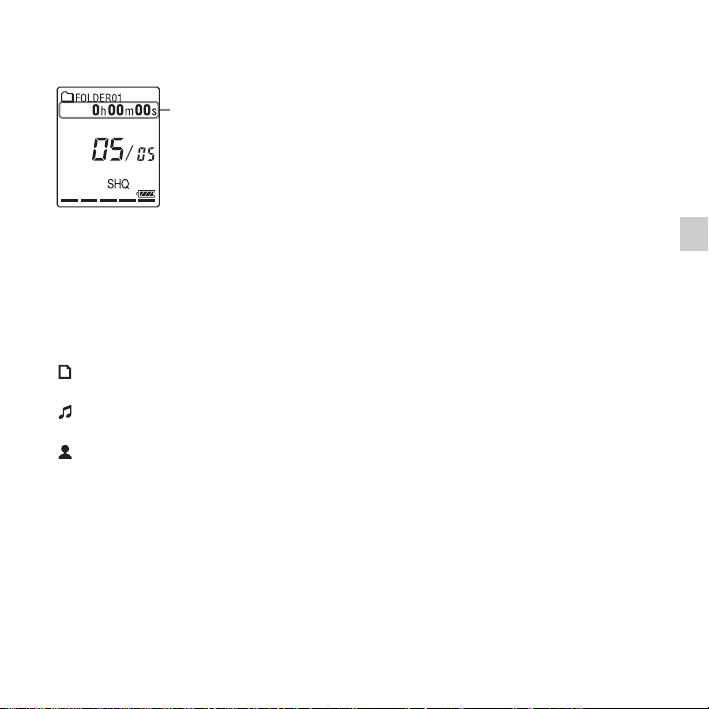
About the display
File information
Press DISP/MENU briefly to switch and check the file information.
A file recorded using the IC recorder is displayed as follows.
Elapsed time: The elapsed playback time of one file
Remaining time: The maximum recording time during recording
The remaining playback time of one file (in the stop mode or playback
mode)
Recording date/time: Date/time recorded
: File name (in the stop mode or playback mode): Date_file number (e.g. 110101_001 or
FM_110101_001)
: Title (in the stop mode or playback mode): Date_file number (e.g. 110101_001 or
FM_110101_001)
: Artist name (in the playback mode): Artist name (e.g. My Recording)
27
Basic Operations
GB
Page 28

Erasing
P Note
Once a recording has been erased, you cannot retrieve it.
Selecting a file and erasing it
1 Slide the HOLD•POWER ON/OFF switch towards the
center to release the IC recorder from the HOLD status
(page 10).
The stop mode window appears.
2 Select the file you want to erase when the IC recorder is
in the stop or playback mode (page 24).
3 Press ERASE.
“Erase?” is displayed and the specified file is played
back for confirmation.
4 Press –. or >+ to select “YES.”
ERASE
–., >+
28
GB
Page 29
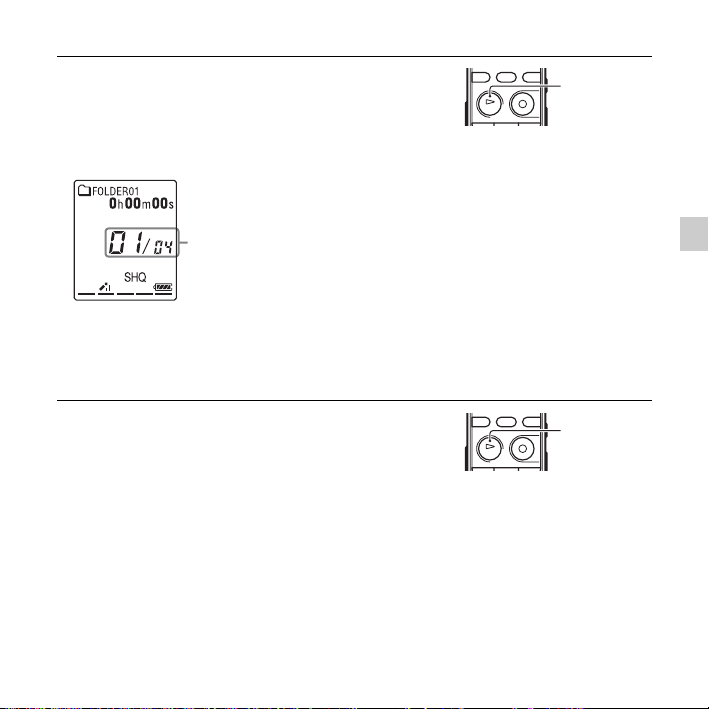
5 Press N PLAY/STOP•ENTER.
The “Erasing...” animation appears in the display
window and the selected file will be erased.
When a file is erased, the remaining files will advance
so that there will be no space between files.
N
PLAY/
STOP•ENTER
The 1st file has been erased and the
following files have had their numbers
reduced by 1.
The total number of files in the folder is
reduced from 05 to 04.
To cancel erasing
1 Select “NO” in step 4 of “Selecting a file and erasing
it,” and then press
N PLAY/STOP•ENTER.
N
PLAY/
STOP•ENTER
To erase another file
Proceed with steps 2 through 5 in “Selecting a file and erasing it.”
To erase a part of a file
Divide the file into two files first (page 67), and then proceed with steps 3 through 5 in
“Selecting a file and erasing it” after selecting the file you want to erase.
29
Basic Operations
GB
Page 30
Other Recording Operations
Changing the Recording Settings
Selecting a recording scene for each situation
SCENE
N PLAY/
STOP•ENTER
–., >+
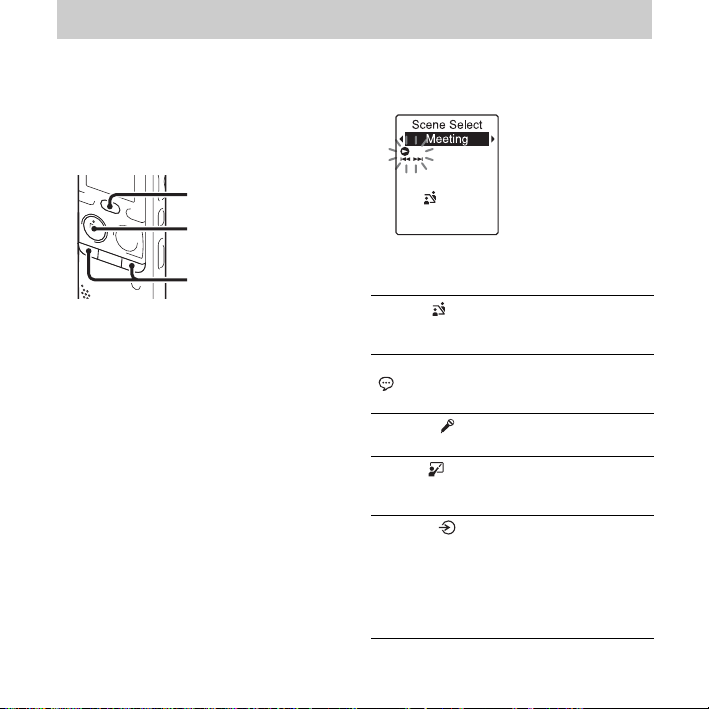
According to various recording scene, you
can change the items for recording, such as
REC Mode (page 91), Mic Sensitivity
(page 91), etc., to the recommended
settings in bulk.
1 Press SCENE in the stop mode.
The Scene Select window will be
displayed.
2 Press –. or >+ to select a scene
you want, and then press
STOP•ENTER.
N PLAY/
The indicator corresponding to the
selected scene is displayed.
Meeting ()
Voice Notes
()
Interview
Lecture
Audio IN ()
To record in a variety of
situations, such as recording
in a conference room.
To record dictation with a
microphone in front of your
mouth.
To record human voice at a
()
distance of 1 to 2 meters.
To record a wide range of
()
sound, such as a lecture in a
classroom or a chorus lesson.
To record from external
equipment, such as a portable
CD/MD player or a tape
recorder, connected to the IC
recorder via an audio output
connector (stereo mini-jack).
Also used for dubbing.
30
GB
Page 31
P Notes
• You cannot set a scene during recording.
• When 60 seconds have passed without any
operation after the Scene Select window
appeared, the stop mode window will be
displayed.
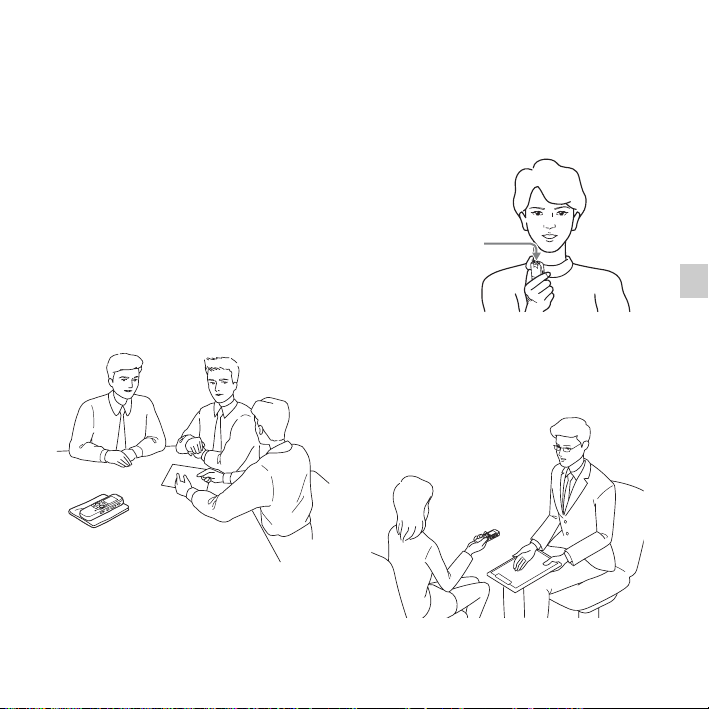
Tips for better recording
There are ways of making better recordings
other than using scene selection.
Recording at a meeting
By placing the IC recorder on a stand or a
handkerchief substituting for a stand, you
can record with clear, low-noise sound,
without vibration noise from the desk.
Recording a voice note
By placing the IC recorder close to one side
of your mouth, you can prevent breathing
on the built-in microphone, and record with
clear sound.
Built-in
microphone
Recording an interview
Place the IC recorder so that the built-in
microphone face the interviewee.
Other Recording Operations
31
GB
Page 32

Recording a music performance
By attaching a tripod (not supplied) or
placing the IC recorder on a stand or table,
you can adjust the angle of the IC recorder
and the built-in microphone more precisely.
When recording a chorus or piano
performance, for example, place the IC
recorder on a table approximately 2 to 3
meters from the performer(s). Set up the IC
recorder with the display window facing up,
and with the built-in microphone pointing
towards the sound source.
Scene Select settings
For details on the menu items and settings,
see pages 86 through 92.
32
Meeting
()
VOR OFF OFF OFF
REC Mode 192kbps
Mic
Sensitivity
LCF(Low
Cut)
Select
Input
GB
(MONO)
(SHQ)
Medium
()
ON ON ON
MIC IN MIC IN MIC IN
Voice Notes
()
128kbps
(MONO)
(HQ)
Low
()
Interview
()
192kbps
(MONO)
(SHQ)
Medium
()
Page 33
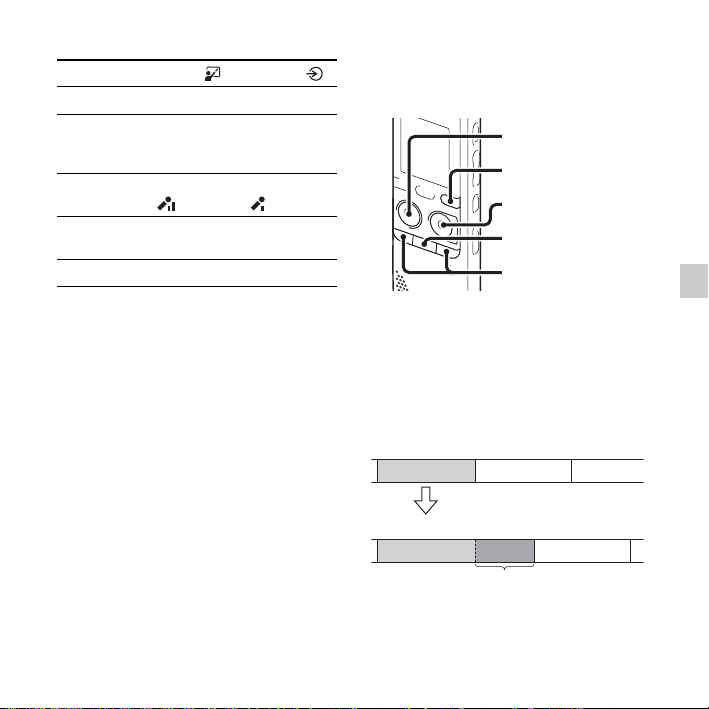
Lecture ( ) Audio IN ( )
VOR OFF OFF
REC Mode 192kbps
Mic
Sensitivity
LCF(Low
Cut)
Select Input MIC IN Audio IN
(MONO)
(SHQ)
Medium
()
OFF OFF
192kbps
(MONO)
(SHQ)
Low
()
P Note
You cannot modify the Scene Select settings.
If you want to change the setting items, such as
REC Mode (page 91), Mic Sensitivity
(page 91), etc., for recording situations, use the
menu to change each item of recording
settings.
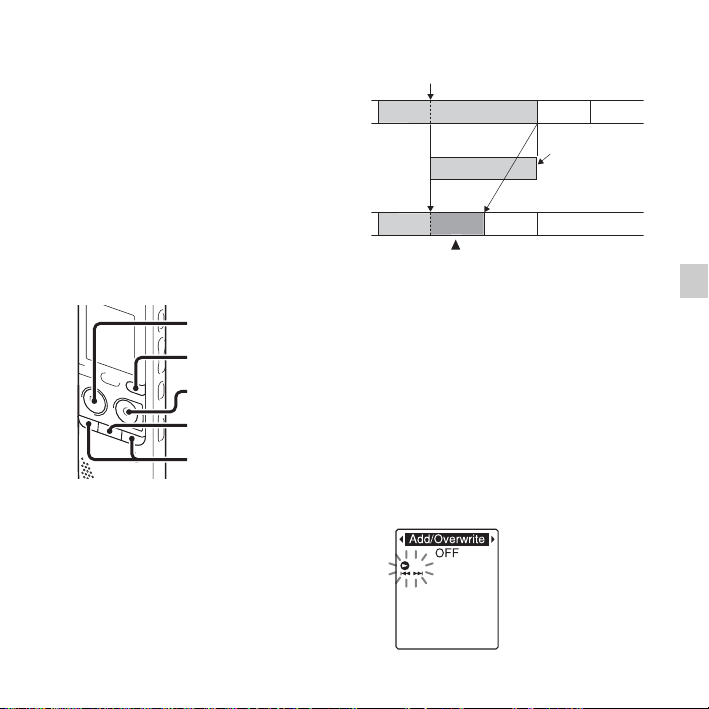
Adding a recording to a previously recorded file
N PLAY/
STOP•ENTER
DISP/MENU
z REC/PAUSE
x
–., >+
When “Add/Overwrite” in the menu is set
to “Add,” you can add a recording to the
file being played back. The added recording
will be placed after the current file, and will
be counted as a part of the file.
During playback of file 3
File 3 File 4
After adding a recording
File 3 File 4
Added recording
Select the file to which you want to add a
recording first.
Other Recording Operations
33
GB
Page 34

1 Press and hold DISP/MENU in the stop
mode to enter the menu mode.
The menu mode window will be
displayed.
4 Press x (stop) to exit the menu mode.
2 Press –. or >+ to select “Add/
Overwrite,” and then press
STOP•ENTER.
3 Press –. or >+ to select “Add,”
and then press
STOP•ENTER.
“Add/Overwrite” is set to “OFF” when
you purchase the IC recorder.
GB
34
N PLAY/
N PLAY/
5 When the file to be added is played back,
z REC/PAUSE.
press
“Add REC?” will be displayed.
For details on playback, see page 23.
6 While “Add REC?” is displayed, press
z REC/PAUSE.
The operation indicator will turn red.
Then recording starts.
7 Press x (stop) to stop recording.
Recording is added to
the current file. The file
number and the total
number of files in the
folder remain
unchanged.
P Notes
• You cannot add a recording when the file has
reached the maximum size limit (500 MB).
Page 35
• You cannot add a recording to an MP3 file
that was not recorded using the IC recorder.
Moreover, when you edit files using the
supplied Sound Organizer software, adding a
recording to the files may not be possible.
• The REC Mode of an additional recording is
the same as the added file.
• If 10 minutes have passed after step 5, you
must start the procedure again from step 5.
Adding an overwrite recording during playback
N PLAY/
STOP•ENTER
DISP/MENU
z REC/PAUSE
x
–., >+
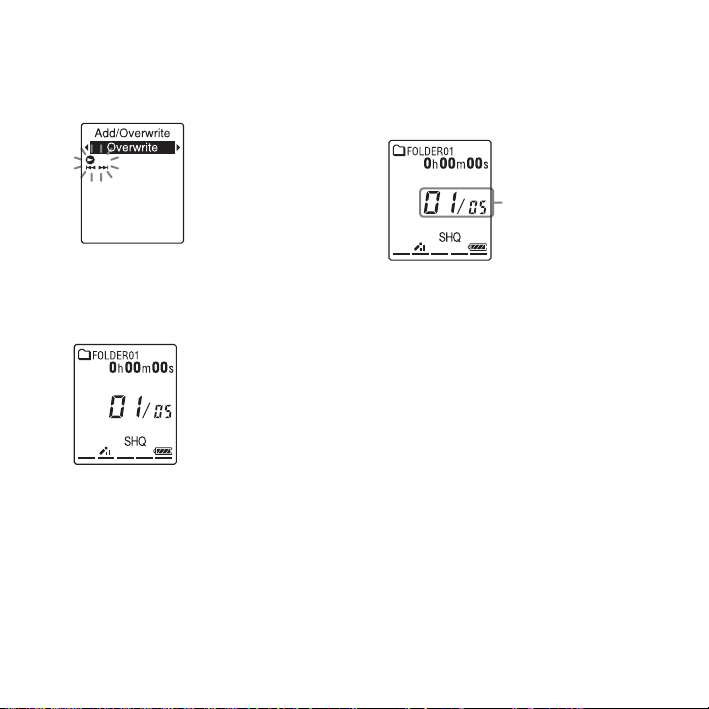
When “Add/Overwrite” in the menu is set
to “Overwrite,” you can add an overwrite
recording after a selected point in a
recorded file. The part of the file after the
selected point is erased.
The starting point of an overwrite recording
File 2
File 2 File 3 File 4
Added overwrite recording in File 2
File 3 File 4
The erased part
of File 2
Select the file to which you want to add an
overwrite recording first.
1 Press and hold DISP/MENU in the stop
mode to enter the menu mode.
The menu mode window will be
displayed.
2 Press –. or >+ to select “Add/
Overwrite,” and then press
STOP•ENTER.
N PLAY/
Other Recording Operations
35
GB
Page 36
3 Press –. or >+ to select
“Overwrite,” and then press
STOP•ENTER.
N PLAY/
The operation indicator will turn red.
Then recording starts.
7 Press x (stop) to stop recording.
Recording overwrites
the current file. The file
number and the total
number of files in the
folder remain
unchanged.
“Add/Overwrite” is set to “OFF” when
you purchase the IC recorder.
4 Press x (stop) to exit the menu mode.
5 When the file to be added is played back,
z REC/PAUSE at the position
press
where you want to overwrite the file.
“Overwrite REC?” will be displayed.
For details on playback, see page 23.
6 While “Overwrite REC?” is displayed,
z REC/PAUSE.
press
GB
36
P Notes
• You cannot add an overwrite recording to an
MP3 file when the file has reached the
maximum size limit (500 MB). However,
you can add an overwrite recording to a file,
even if the file has reached the maximum
size limit, when the beginning of the point to
the overwritten has not reached the
maximum size limit.
• You cannot add an overwrite recording to an
MP3 file which was not recorded using the
IC recorder. Moreover, when you edit files
using the supplied Sound Organizer
software, adding an overwrite recording to
the files may not be possible.
• The REC Mode of an additional overwrite
recording is the same as the added file.
• If 10 minutes have passed after step 5, you
must start the procedure again from step 5.
Page 37
Starting to record
automatically in response to
sound – the VOR function
N PLAY/
STOP•ENTER
DISP/MENU
z REC/PAUSE
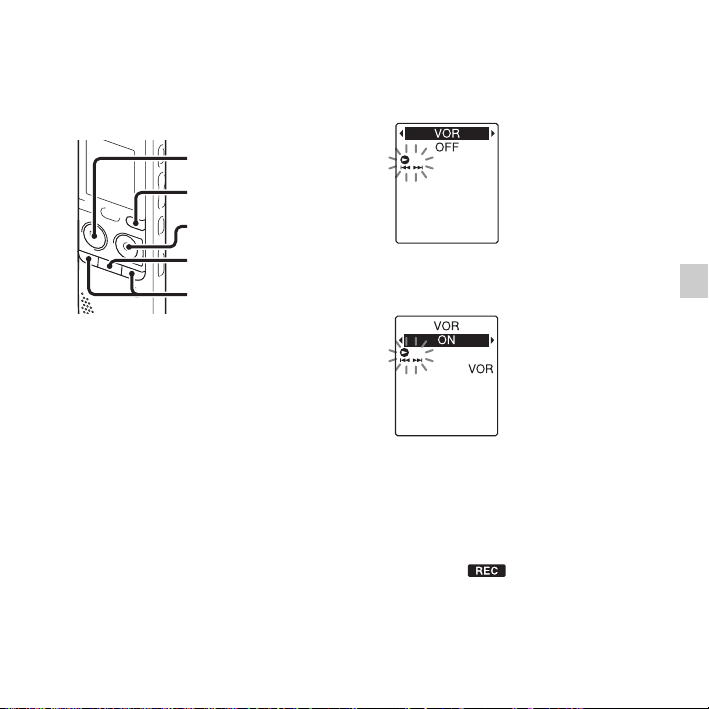
2 Press –. or >+ to select “VOR,”
and then press
STOP•ENTER.
N PLAY/
x
–., >+
You can set the VOR (Voice Operated
Recording) function to “ON,” to make the
IC recorder start recording when the IC
recorder detects sound, and pause when no
sound is heard, eliminating recording
during soundless periods.
1 Press and hold DISP/MENU in the stop
or recording mode to enter the menu
mode.
The menu mode window will be
displayed.
3 Press –. or >+ to select “ON,” and
then press
“VOR” is set to “OFF” when you
purchase the IC recorder.
N PLAY/STOP•ENTER.
4 Press x (stop) to exit the menu mode.
5 Press z REC/PAUSE.
“VOR” and “ ” appear in the display
window.
37
Other Recording Operations
GB
Page 38
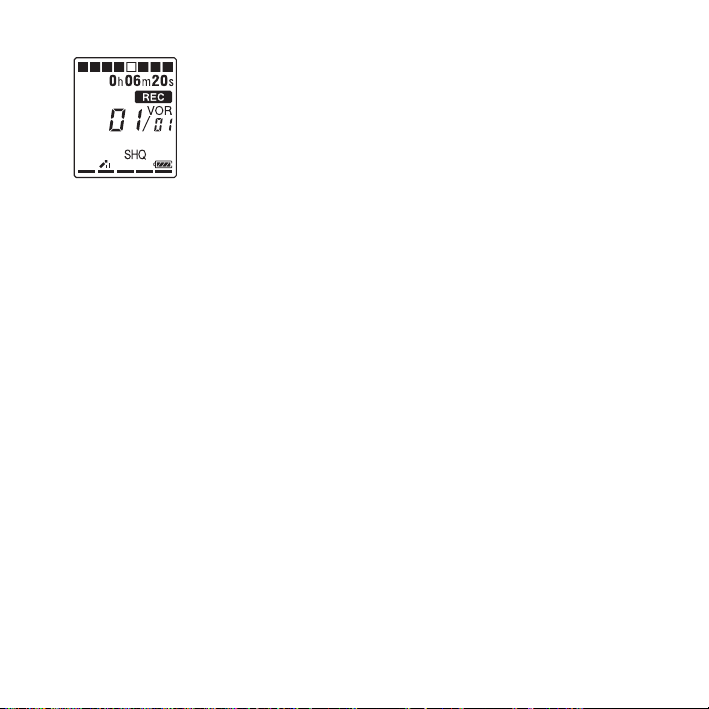
The recording pauses when no sound is
detected and “PAUSE” flashes. When the
IC recorder detects sound again, the
recording starts again.
To cancel the VOR function
Set “VOR” to “OFF” in step 3.
P Notes
• The VOR function is affected by the sound
around you. Set “Mic Sensitivity” in the
menu (page 91) according to the recording
conditions. If recording is not satisfactory
after you have changed the “Mic Sensitivity”
setting, or for an important recording, set
“VOR” to “OFF” in the menu.
• During the FM recording (page 75), the
VOR function does not work.
GB
38
Page 39
Recording on a Memory Card
N PLAY/STOP•ENTER
DISP/MENU
z REC/PAUSE
x
–., >+
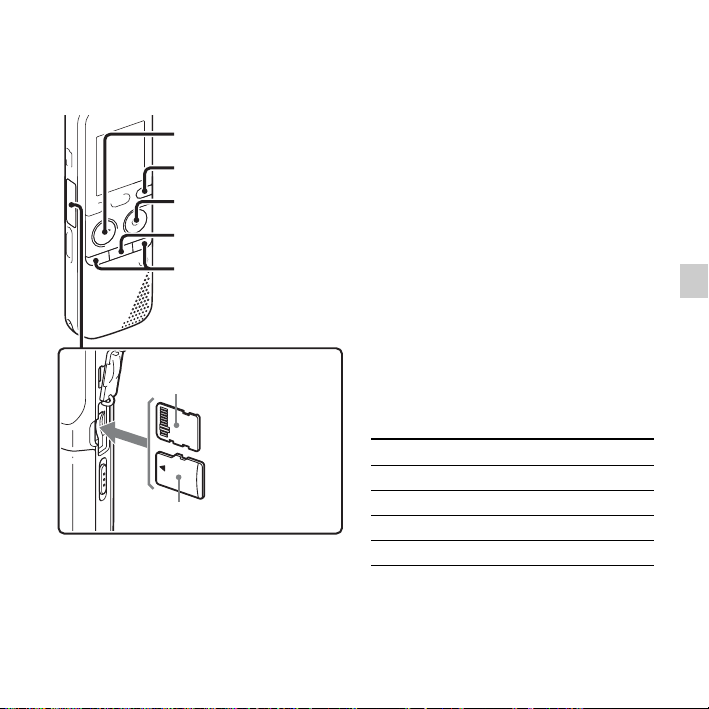
Insert M2™ with the terminal side
facing toward you.*
* When you are
inserting a memory
card with the back side
of the IC recorder
facing toward you.
Insert microSD card with the label
side facing toward you.*
In addition to the built-in memory, you can
record files on a memory card.
About compatible memory cards
Memory cards that you can use with the IC
recorder are as follows:
• Memory Stick Micro™ (M2™) media:
Up to 16 GB is supported.
• microSD card: A microSD (FAT16) card
smaller than 2 GB and a microSDHC
(FAT32) card from 4 GB to 32 GB are
supported.
A memory card of 64 MB or less is not
supported.
The microSD/microSDHC cards that have
been tested according to our standards are
as follows.
microSD/microSDHC cards
Supplier 2 GB 4 GB 8 GB 16 GB 32 GB
SONY
Toshiba
Panasonic
SanDisk
aaa
aaaa
aaaa
aaaa a
a: Operation tested
–: Operation not tested
As of January 2011
——
—
—
39
Other Recording Operations
GB
Page 40

For ICD-PX312/PX312F, the operational tests
performed were using memory cards available
as of January 2011.
For the latest information about the memory
cards that have been tested, please access the
support home page for the IC recorder:
http://www.sony-latin.com/index.crp
In this manual, M2™ and microSD cards are
generally referred to as a “memory card.”
The M2™/microSD card slot is referred to as
the “memory card slot.”
Due to the file system specifications of the
IC recorder, you can record and play back a
file smaller than 500 MB using a memory
card.
You can record up to 4,074 files on an
M2™ media.
P Note
Operations of all types of compatible memory
cards are not guaranteed.
To insert a memory card
Before recording, be sure to copy all the
data stored on the memory card to your
computer and format the memory card on
the IC recorder (page 95) so it contains no
data.
1 Open the cover of the memory card slot
in the stop mode.
GB
40
2 Insert an M2™ or microSD card, in the
direction shown in the illustration on
page 39, securely to the end of the slot
until it clicks into place. Then close the
cover.
To remove a memory card
Push the memory card into the slot. When it
pops out, remove it from the memory card
slot.
Structure of folders and files
5 folders are created in a memory card in
addition to those in the built-in memory.
The structure of folders and files is
somewhat different from that of the built-in
memory (page 99).
P Notes
• Do not insert or remove a memory card
during recording/playback/formatting.
Doing so may cause a malfunction of the IC
recorder.
• Do not remove a memory card while the
“Accessing...” animation appears in the
display window. Doing so may damage the
data.
• If a memory card is not recognized, remove
it and then insert it into the IC recorder
again.
• Close the cover of the memory card slot
firmly. Also, do not insert any liquid, metal,
flammable or any object other than a
Page 41
memory card into the slot. Doing so may
cause fire, electric shock, or malfunctions.
To switch the IC recorder
destination to the memory card
1 Press and hold DISP/MENU in the stop
mode to enter the menu mode.
The menu mode window will be
displayed.
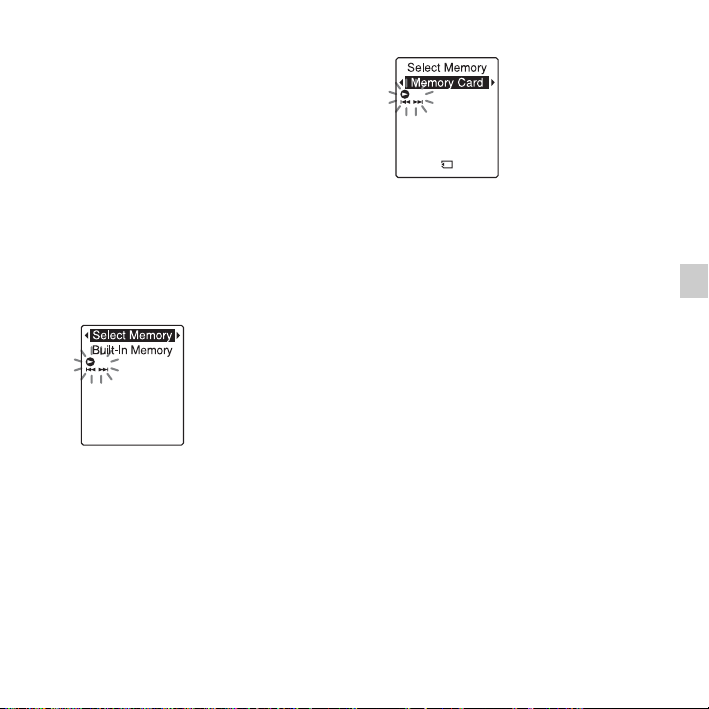
2 Press –. or >+ to select “Select
Memory,” and then press
STOP•ENTER.
N PLAY/
3 Press –. or >+ to select “Memory
Card,” and then press
STOP•ENTER.
N PLAY/
“Select Memory” is set to “Built-In
Memory” when you purchase the IC
recorder.
If the memory card has already been
formatted, proceed to step 7.
4 When the memory card is not formatted,
. or >+ to select “Detail
press –
Menu,” and then press
STOP•ENTER.
N PLAY/
5 Press –. or >+ to select “Format,”
and then press
STOP•ENTER.
“Erase All Data?” will be displayed.
N PLAY/
6 Press –. or >+ to select “YES,”
and then press
STOP•ENTER.
N PLAY/
Other Recording Operations
41
GB
Page 42
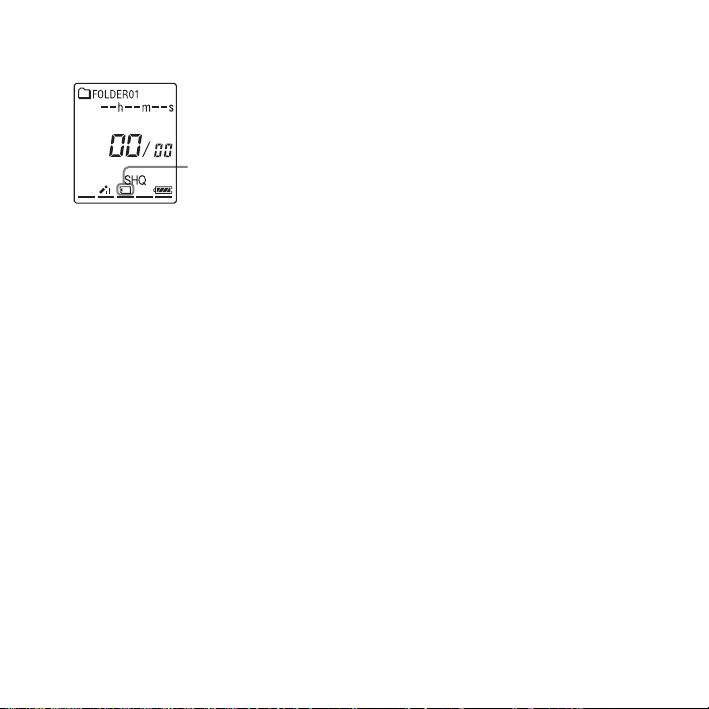
7 Press x (stop) to exit the menu mode.
Memory card indicator
is displayed.
To use the built-in memory
Select “Built-In Memory” in step 3.
To start recording
Select the folder and then press z REC/
PAUSE. For details on recording, see
page 18.
42
GB
Page 43
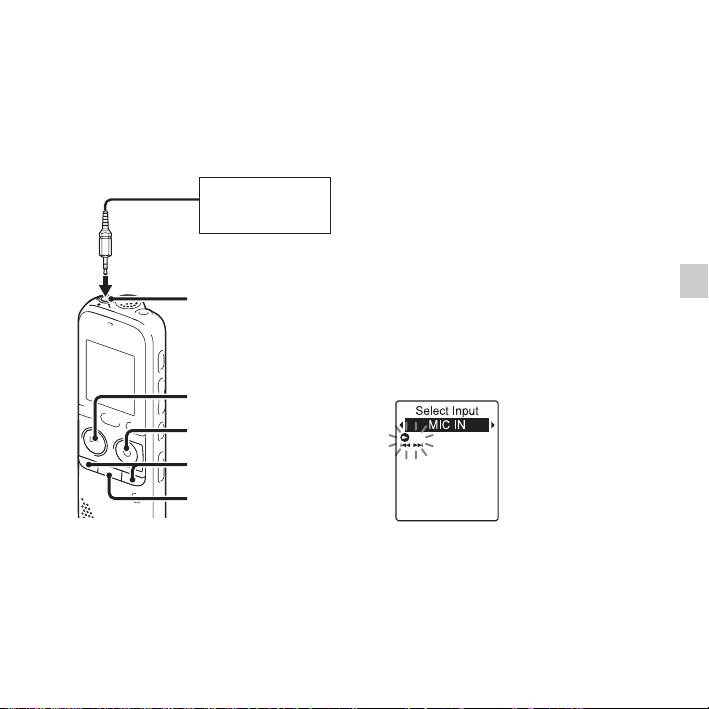
Recording via Other Devices
Recording with an external microphone
External
microphone
(not supplied)
m (microphone)
jack
N PLAY/
STOP•ENTER
z REC/PAUSE
–., >+
x
When you connect a stereo microphone
(not supplied) to the IC recorder and the
recording mode is set to “SHQ” or “HQ”
mode, you can record sound in stereo.
You can play back the sound in stereo using
the stereo headphones.
1 Connect an external microphone (not
supplied) to the m (microphone) jack
when the IC recorder is in the stop mode.
“Select Input” appears in the display
window.
If “Select Input” is not displayed, set it in
the menu (page 92).
2 Press –. or >+ t o sele ct “MIC IN,”
and then press
STOP•ENTER.
“Select Input” is set to “MIC IN” when
you purchase the IC recorder.
N PLAY/
3 Press x (stop) to exit the menu mode.
43
Other Recording Operations
GB
Page 44

4 Press z REC/PAUSE to start recording.
The built-in microphone is automatically
cut off, and the IC recorder starts
recording sounds from the external
microphone.
If the input level is not strong enough,
adjust the “Mic Sensitivity” setting on
the IC recorder (page 91).
When a plug in power type microphone
is connected, power is automatically
supplied to the microphone from the IC
recorder.
5 Press x (stop) to stop recording.
z Recommended microphones
You can use the Sony ECM-CS10,
ECM-CZ10, ECM-DS70P, ECM-DS30P
electret condenser microphone (not supplied).
To record sound from a
telephone or a cell phone
You can use the ECM-TL1 headphone-type
electret condenser microphone (not
supplied) to record sound from a telephone
or a cell phone.
For details on how to make the connection,
refer to the operating instructions supplied
with the ECM-TL1 microphone.
P Notes
• After you have made the connection, check
the sound quality of the conversation and the
recording level before you start recording.
• If the beep of the telephone or a dial tone is
recorded, the conversation may be recorded
with lower level of sound. In this case, start
recording after the conversation has started.
• The VOR function (page 37) may not work,
depending on the kind of telephone or the
line condition.
• We assume no responsibility whatsoever for
any inconvenience, even if you cannot
record a conversation using the IC recorder.
44
GB
Page 45
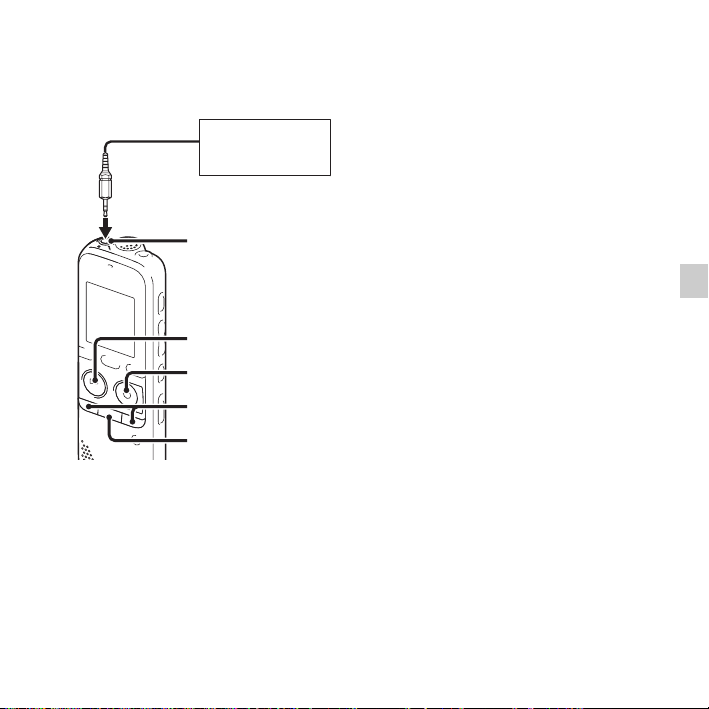
Recording from other equipment
CD player, etc.
m (microphone)
jack
N PLAY/
STOP•ENTER
z REC/PAUSE
–., >+
x
You can make music files without using the
computer by recording sound from other
equipment connected to the IC recorder.
When you select “Audio IN” in the “Scene
Select” menu, the settings suitable for
recording from other equipment are already
selected. For details on setting, see page 30.
z Tips
• Before you start recording, we recommend
you make a trial recording first, or monitor
the recording (page 47).
• If the input level is not strong enough,
connect the headphone jack (minijack,
stereo) of other equipment to the
m (microphone) jack of the IC recorder and
adjust the volume level on the piece of
equipment connected to the IC recorder.
1 Connect other equipment to the IC
recorder when the IC recorder is in the
stop mode.
Connect the audio output connector
(stereo mini-plug) of other equipment to
the m (microphone) jack of the IC
recorder using an audio connecting cable
(page 119).
“Select Input” appears in the display
window.
If “Select Input” is not displayed, set it in
the menu (page 92).
Other Recording Operations
45
GB
Page 46
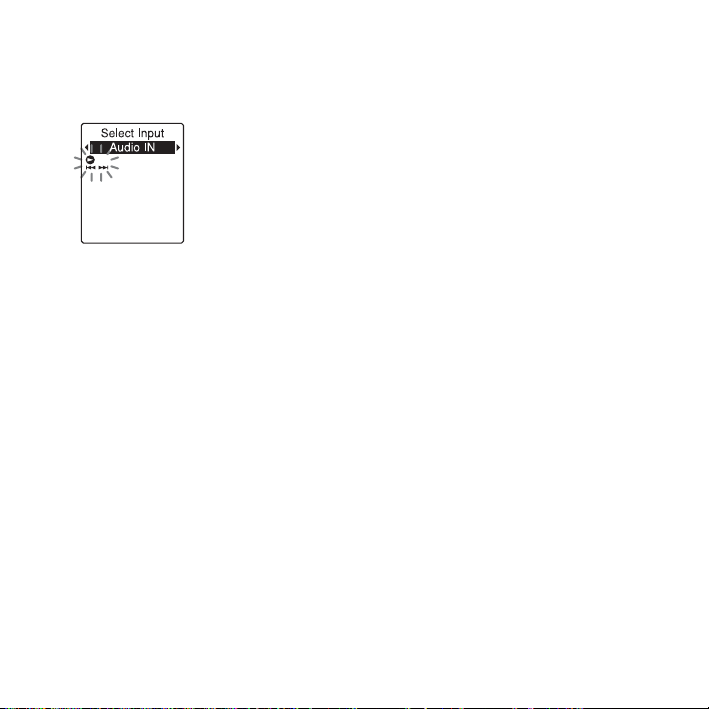
2 Press –. or >+ to select “Audio
IN,” and then press
STOP•ENTER.
“Select Input” is set to “MIC IN” when
you purchase the IC recorder.
N PLAY/
3 Press x (stop) to exit the menu mode.
4 Press z REC/PAUSE to start recording.
The built-in microphone is automatically
cut off and the IC recorder starts
recording sounds from the connected
equipment.
5 Start playback on the piece of equipment
connected to the IC recorder.
6 Press x (stop) to stop recording.
P Note
When audio output of an external device
connected to the IC recorder is monaural and
the recording mode is set to
“192kbps(MONO)” (SHQ) or
“128kbps(MONO)” (HQ), sounds are
GB
46
recorded only in one channel. In this case, set
the recording mode to “48kbps(MONO)” (SP)
or “8kbps(MONO)” (LP) in the menu
(page 91).
Page 47
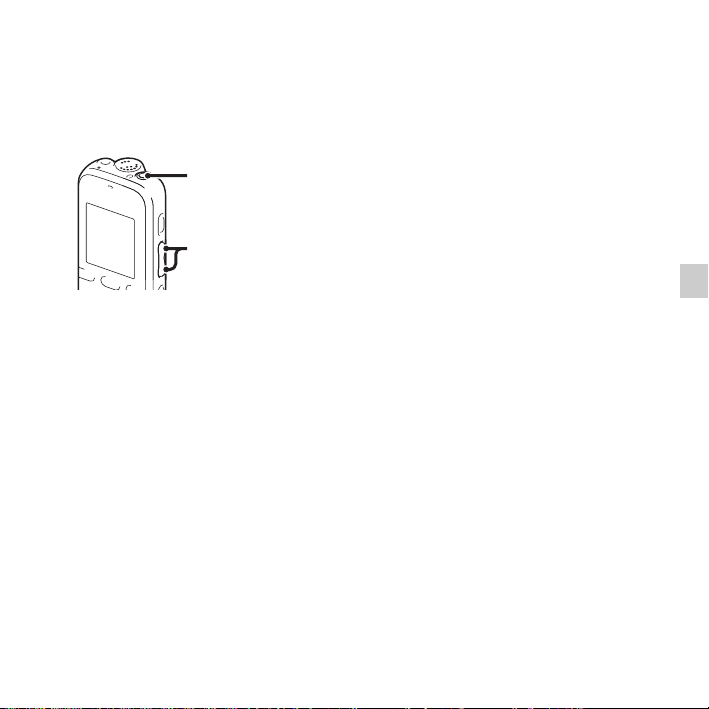
Operation during Recording
Monitoring the recording
i (headphone) jack
VOL –/+
If you connect the headphones to the
i (headphone) jack, you can monitor the
recording. You can adjust the monitoring
volume by pressing VOL –/+, but the
recording level is fixed.
P Note
When the cord of the headphones touches the
IC recorder while you are monitoring the
recording, the IC recorder may record a
rustling noise. The rustling noise can be
reduced by holding the cord away from the IC
recorder.
Other Recording Operations
47
GB
Page 48

Other Playback Operations
Changing the Playback Settings
Convenient playback methods
Listening with better sound
quality
• To listen with headphones:
Connect the headphones to the
i (headphone) jack. The built-in speaker
will be automatically disconnected.
• To listen from an external speaker:
Connect an active or passive speaker to
the i (headphone) jack.
Quickly locating the point you
wish to start playback (easy
search)
When “Easy Search” is set to “ON”
(page 87) in the menu, you can quickly
locate the point at which you wish to start
playback by pressing –
repeatedly during playback.
You can go back approx. 3 seconds by
pressing –
seconds by pressing
function is useful for locating a desired
point in a long recording.
GB
48
. once, or advance approx. 10
. or >+
>+ once. This
Searching forward/backward
during playback (cue/review)
• To search forward (cue):
Press and hold
release it at the point you wish to resume
playback.
• To search backward (review):
Press and hold –
release it at the point you wish to resume
playback.
The IC recorder searches at slow speed with
playback sound. This is useful to check one
word forward or back. Then, if you press
and hold the button, the IC recorder starts to
search at higher speed.
z When files are played back to the
end of the last file
• When you play back or fast play back to the
end of the last file, “FILE END” lights up for
approx. 5 seconds.
• When “FILE END” and the operation
indicator go off, the IC recorder will stop at
the beginning of the last file.
• If you press and hold
END” is lit, the files are played back rapidly,
and normal playback will start at the point
you release the button.
>+ during playback and
. during playback and
–. while “FILE
Page 49

• If the last file is long and you wish to start
playback at a later part of the file, press and
hold >+ to go to the end of the file, and
then press
go back to the desired point.
• For files other than the last one, go to the
beginning of the next file and play backward
to the desired point.
–. while “FILE END” is lit to
Reducing noise in the
playback sound and making
the human voice clearer –
the noise cut function
N PLAY/
STOP•ENTER
x
DISP/MENU
When you slide the NOISE CUT switch to
“ON” in the playback mode, ambient noise
other than the human voice is reduced. A
file is played back with clear sound quality
because the noise of all frequency bands
including a human voice is reduced.
P Notes
• The effect of the noise cut function may be
different depending on the condition of the
recorded voice.
• When you are using the built-in speaker, the
noise cut function does not work.
• When you are listening to the FM radio, the
noise cut function does not work.
To set the noise cut level
1 Press and hold DISP/MENU in the stop
or playback mode to enter the menu
mode.
The menu mode window will be
displayed.
Other Playback Operations
–., >+
2 Press –. or >+ to select “Detail
Menu,” and then press
STOP•ENTER.
N PLAY/
49
GB
Page 50
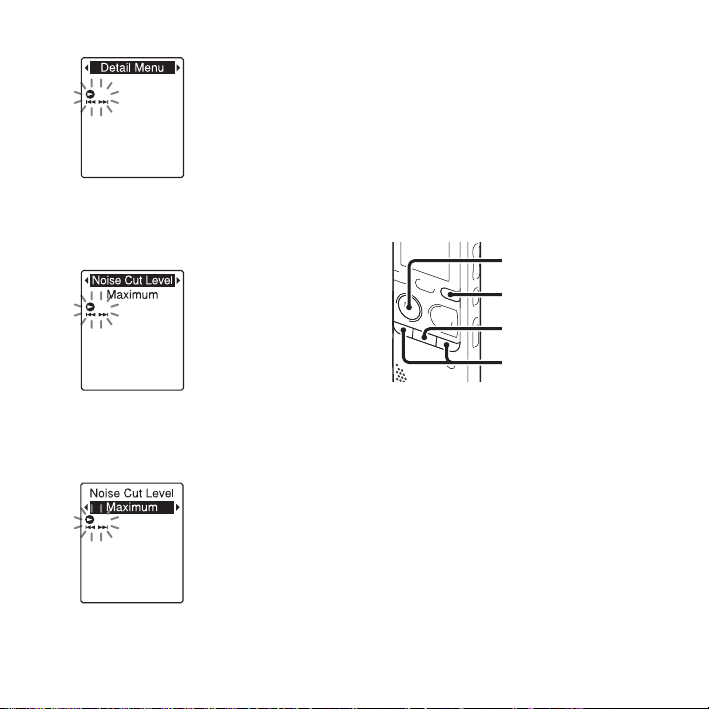
3 Press –. or >+ to select “Noise Cut
Level,” and then press
STOP•ENTER.
N PLAY/
5 Press x (stop) to exit the menu mode.
To cancel the noise cut function
Slide the NOISE CUT switch to “OFF.”
Adjusting the playback
speed – the DPC (Digital
Pitch Control) function
N
PLAY/
STOP•ENTER
DISP/MENU
x
–., >+
4 Press –. or >+ to select
“Maximum” or “Medium,” and then
N PLAY/STOP•ENTER.
press
“Noise Cut Level” is set to “Maximum”
when you purchase the IC recorder.
GB
50
You can adjust the playback speed in a
range from 0.50 times to 2.00 times. The
file is played back in natural tones by
means of a digital processing function.
1 Press and hold DISP/MENU in the stop
or playback mode to enter the menu
mode.
The menu mode window will be
displayed.
Page 51
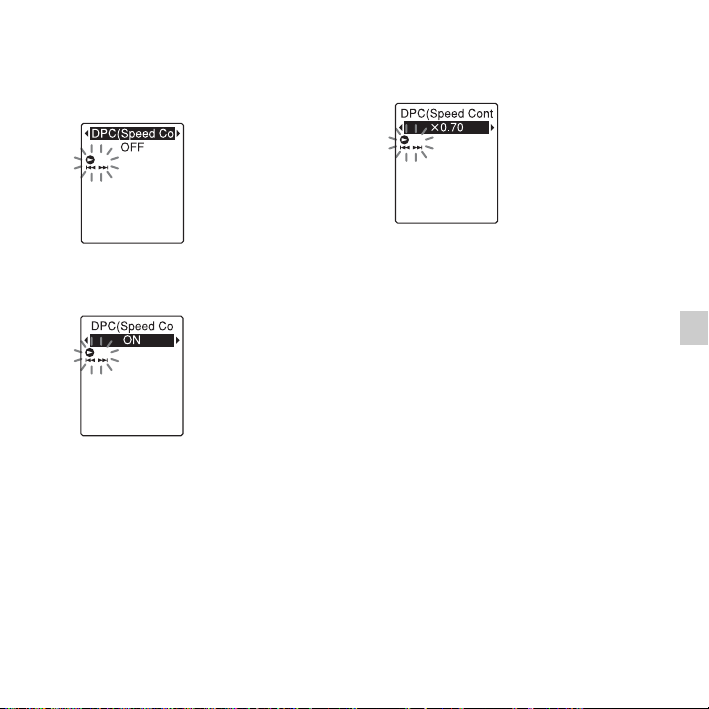
2 Press –. or >+ to select
“DPC(Speed Control),” and then press
N PLAY/STOP•ENTER.
3 Press –. or >+ to select “ON,” and
then press
N PLAY/STOP•ENTER.
4 Press –. or >+ to adjust the
playback speed.
.: Decreases the speed by 0.05 times
–
each time this button is pressed (from
×0.50 to ×1.00).
>+: Increases the speed by 0.10 times
each time this button is pressed (from
×1.00 to ×2.00).
When you press and hold each button,
you can change the speed continuously.
The playback speed is set to “×0.70”
when you purchase the IC recorder.
To resume normal playback
speed
Select “OFF” in step 3.
P Note
The noise cut function (page 49) does not
work if you set “
“ON.”
DPC(Speed Control)” to
Other Playback Operations
51
GB
Page 52
Selecting the playback mode
N PLAY/
STOP•ENTER
DISP/MENU
A-B
x
–., >+
You can use the menu or operate buttons to
select the playback mode according to the
playback situations.
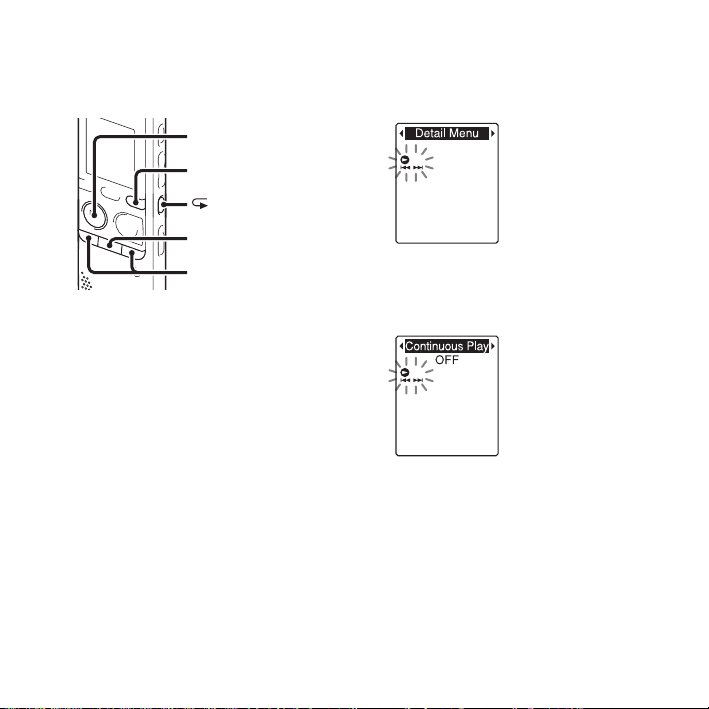
To play back all files in a folder
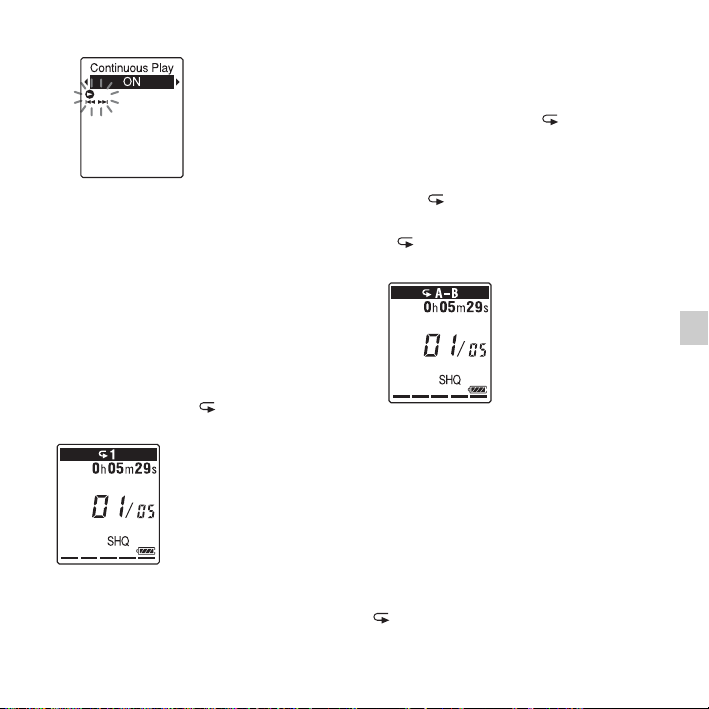
continuously – the continuous
play
2 Press –. or >+ to select “Detail
Menu,” and then press
STOP•ENTER.
N PLAY/
3 Press –. or >+ to select
“Continuous Play,” and then press
N PLAY/STOP•ENTER.
1 Press and hold DISP/MENU in the stop
or playback mode to enter the menu
mode.
The menu mode window will be
displayed.
GB
52
4 Press –. or >+ to select “ON,” and
then press
N PLAY/STOP•ENTER.
Page 53
To play back a specified section
repeatedly – A-B repeat
1 During playback, press (repeat) A-B
to specify the starting point A.
“A-B B?” is displayed.
“Continuous Play” is set to “OFF” when
you purchase the IC recorder.
5 Press x (stop) to exit the menu mode.
To resume normal playback
mode – the single file play
Select “OFF” in step 4.
To play back a file repeatedly
During playback, press and hold N PLAY/
STOP•ENTER until “ 1” appears. The
selected file will be played back repeatedly.
To resume normal playback, press
N PLAY/STOP•ENTER again.
2 Press (repeat) A-B again to specify
the finishing point B.
“ A-B” is displayed and the specified
section is played back repeatedly.
To resume normal playback:
N PLAY/STOP•ENTER.
Press
To stop A-B repeat playback:
x (stop).
Press
To change the segment specified for A-B
repeat playback:
During A-B repeat playback, press
(repeat) A-B again to specify a new
53
Other Playback Operations
GB
Page 54

starting point A. Then specify a new
finishing point B, as in step 2.
P Note
You cannot set the points A and B near the
beginning or the end of a file, and around track
marks.
54
GB
Page 55
Playing Back a File at a Desired Time with an Alarm
N
PLAY/
STOP•ENTER
DISP/MENU
x
–., >+
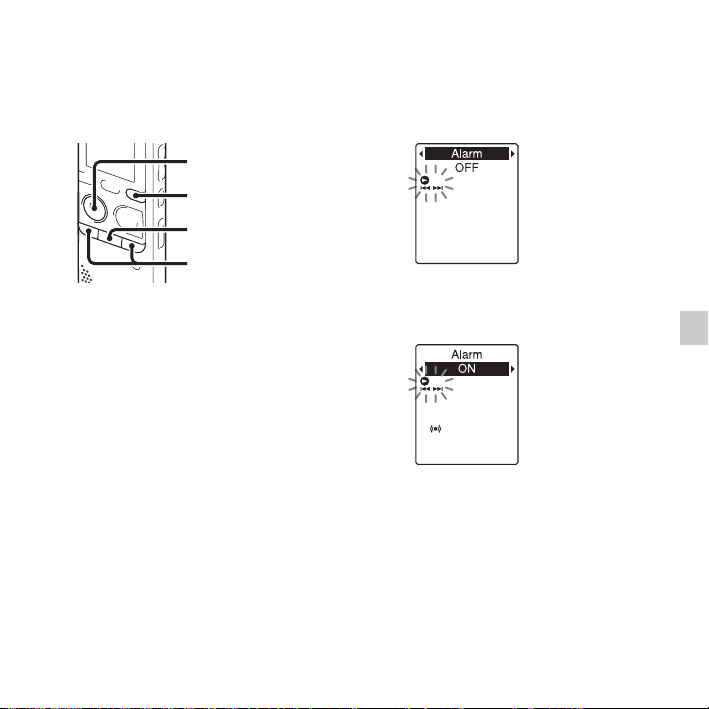
3 Press –. or >+ to select “ON,”
You can sound an alarm and start playback
of a selected file at a desired time. You can
have a file played back on a specified date,
once every week, or at the same time every
day. You can set an alarm for a file.
1 Select the file you want to play back with
an alarm.
2 Enter the alarm setting mode.
1 Press and hold DISP/MENU in the
stop mode to enter the menu mode.
The menu mode window will be
displayed.
2 Press –. or >+ to select
“Alarm,” and then press
STOP•ENTER.
N PLAY/
and then press
STOP•ENTER.
“Alarm” is set to “OFF” when you
purchase the IC recorder.
3 Set the alarm date and time.
1 Press –. or >+ to select “Date,”
a day of the week, or “Daily,” and
then press
N PLAY/
N PLAY/STOP•ENTER.
55
Other Playback Operations
GB
Page 56
2 When you select “Date”:
Set the year, month, day, hour, and
minute in sequence, as described in
“Step 4: Setting the Clock” on page 14.
When you select a day of the week
or “Daily”:
Press
–. or >+
and then press
STOP•ENTER, press
to set the minute, and then press
N
PLAY/STOP•ENTER.
to set the hour,
N
PLAY/
–. or >+
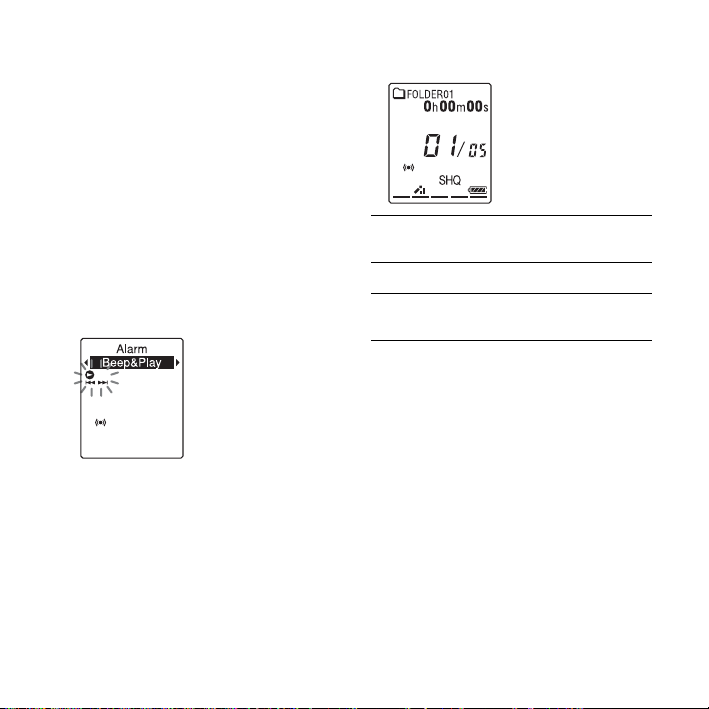
4 Press –. or >+ to select a favorite
alarm pattern, and then press
STOP•ENTER.
The alarm pattern is set to “Beep&Play”
when you purchase the IC recorder.
The “Executing...” animation is
displayed.
N PLAY/
5 Press x (stop) to exit the menu mode.
Beep&Play The selected file will be played
Beep Only the alarm will sound.
Play Only the selected file will be
To change the alarm setting
Select the file you want to change its alarm
setting, and then follow steps 2 through 5.
To cancel the alarm setting
Follow steps 1 and 2. In step 2-3 select
“OFF” and press
STOP•ENTER. The alarm will be canceled
and the alarm indicator will disappear from
the display window.
back after the alarm.
played back.
N PLAY/
56
GB
Page 57
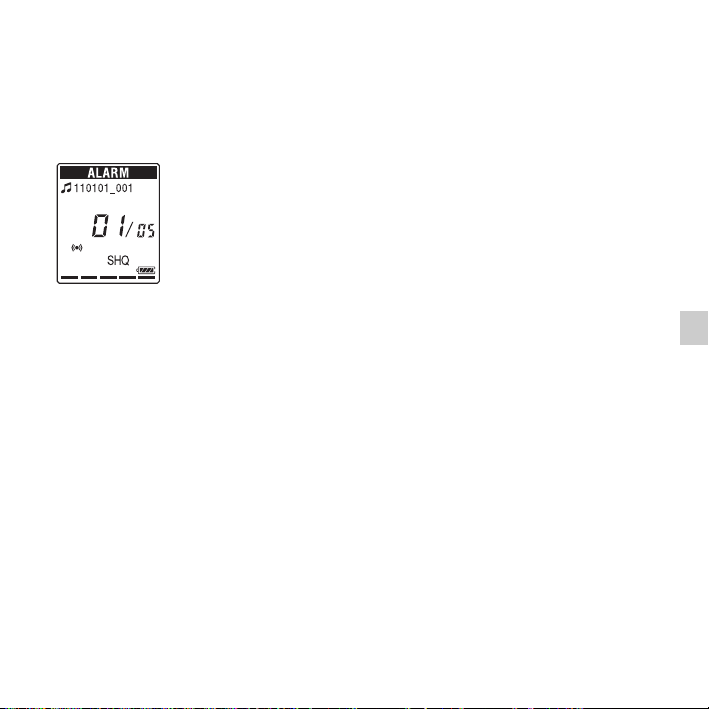
When the set date and time comes
At the set time, “ALARM” is displayed in
the display window and the alarm and the
selected file will be played back using the
selected alarm pattern.
When the playback ends, the IC recorder
will stop automatically. (When the alarm
pattern is set to “Beep&Play” or “Play,” the
IC recorder will stop at the beginning of the
selected file.)
To stop the alarm playback
Press any button other than VOL –/+ while
the alarm sound is heard. If the HOLD
function is activated, you can stop the alarm
playback by pressing any button.
P Notes
• You can set only one alarm each one file.
• When the clock has not been set or no files
are recorded, you cannot set the alarm.
• The alarm sounds even if you set “Beep” to
OFF” in the menu (page 94).
“
• If the alarm time comes while the IC
recorder is accessing data, etc., the alarm
may be canceled automatically.
• If more than one alarm time comes, only the
first file will be played back with an alarm.
• If you divide a file you have set an alarm for,
the alarm setting remains on only the first
part of the divided file.
• If you erase a file in which you have set an
alarm, that alarm will be also canceled.
• You cannot set alarm in podcast files.
• You cannot set an alarm in the files stored on
a memory card.
Other Playback Operations
57
GB
Page 58

Playback via Other Devices
Recording with other equipment
Tape recorder,
mini disc recorder,
etc.
i (headphone)
jack
N PLAY/
STOP•ENTER
x
You can record the sound of the IC recorder
with other equipment.
Before you start recording, we recommend
you make a trial recording first.
GB
58
1 Connect the i (headphone) jack of the
IC recorder to the external input terminal
of other equipment using an audio
connecting cable (page 119).
2 Press N PLAY/STOP•ENTER to start
playback and at the same time set the
connected equipment to the recording
mode.
A file from the IC recorder will be
recorded on the equipment connected.
3 Press x (stop) on the IC recorder and the
connected equipment at the same time to
stop recording.
z Tip
If the volume of the recorded sound is not
strong enough, adjust the playback sound of
the IC recorder (page 23).
Page 59
Editing Files
Arranging Files in a Folder
Moving a file to a different folder
N
PLAY/
STOP•ENTER
DISP/MENU
x
–., >+
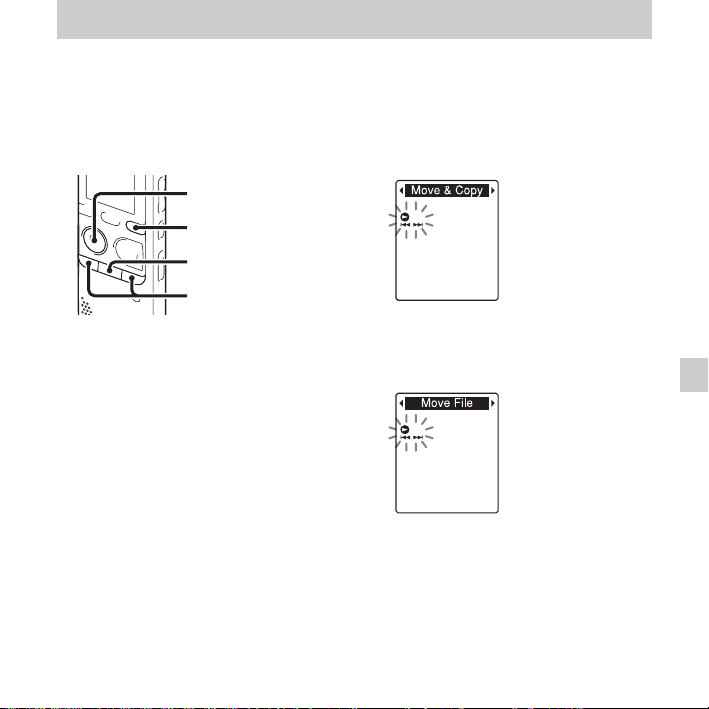
1 Select the file you want to move.
2 Press and hold DISP/MENU in the stop
mode to enter the menu mode.
The menu mode window will be
displayed.
3 Press –. or >+ to select “Move &
Copy,” and then press
STOP•ENTER.
N PLAY/
4 Press –. or >+ to select “Move
File,” and then press
STOP•ENTER.
N PLAY/
59
Editing Files
GB
Page 60
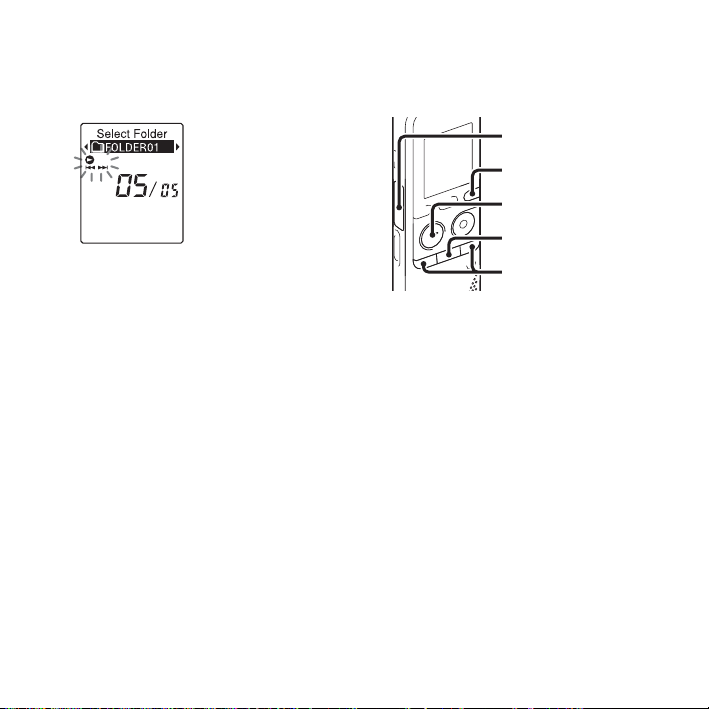
5 Press –. or >+ to select the folder
that you want to move the file into, and
then press
The “Moving File...” animation is
displayed and the file is moved to the last
position in the destination folder.
When you move a file to another folder,
the original file in the previous folder
will be erased.
N PLAY/STOP•ENTER.
6 Press x (stop) to exit the menu mode.
To cancel moving the file
Press x (stop) before step 5.
P Notes
• You cannot move podcast files.
• You cannot move protected files (page 71).
• You cannot move files to the other memory
media.
Copying a file to the other memory
Memory card slot
DISP/MENU
N PLAY/
STOP•ENTER
x
–., >+
You can copy files between the built-in
memory and a memory card, which is
useful in saving a backup. Before starting
the operation, insert a memory card to be
used for copying into the memory card slot.
1 Select the file you want to copy.
When you want to copy a file from a
memory card to the built-in memory, set
the source memory media to “Memory
Card” (page 41).
2 Press and hold DISP/MENU in the stop
mode to enter the menu mode.
The menu mode window will be
displayed.
60
GB
Page 61
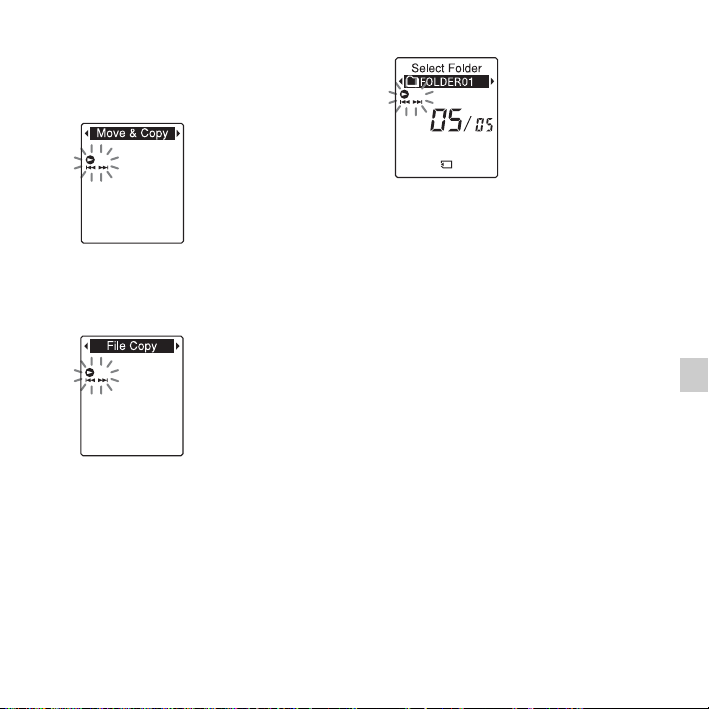
3 Press –. or >+ to select “Move &
Copy,” and then press
STOP•ENTER.
N PLAY/
4 Press –. or >+ to select “File
Copy,” and then press
STOP•ENTER.
“Copy to Memory Card” or “Copy to
Built-In Memory” appears and the folder
selection window is displayed.
N PLAY/
5 Press –. or >+ to select the folder
that you want to copy the file into, and
then press
N PLAY/STOP•ENTER.
The “Copying...” animation appears and
the file is copied as the last file in the
destination folder. A file will be copied
with the identical file name.
6 Press x (stop) to exit the menu mode.
To cancel the copy operation
Press x (stop) before step 5.
To cancel the copy operation
during copying
While the “Copying...” animation is
displayed in step 5, press
P Notes
• Before starting to copy the target file, make
sure to check the battery indicator (page 12).
If the batteries are weak, you may not be
able to copy files.
• If the remaining memory capacity of the
destination memory media is insufficient,
you may not be able to copy files.
• You cannot copy the podcast files.
x (stop).
Editing Files
61
GB
Page 62
• Do not remove or insert a memory card, or
turn off the IC recorder while copying. Files
may be damaged.
Erasing all files in a folder
N
PLAY/
STOP•ENTER
DISP/MENU
x
–., >+
P Note
If the selected folder contains a protected file
(page 71), you cannot erase the protected file
in that folder.
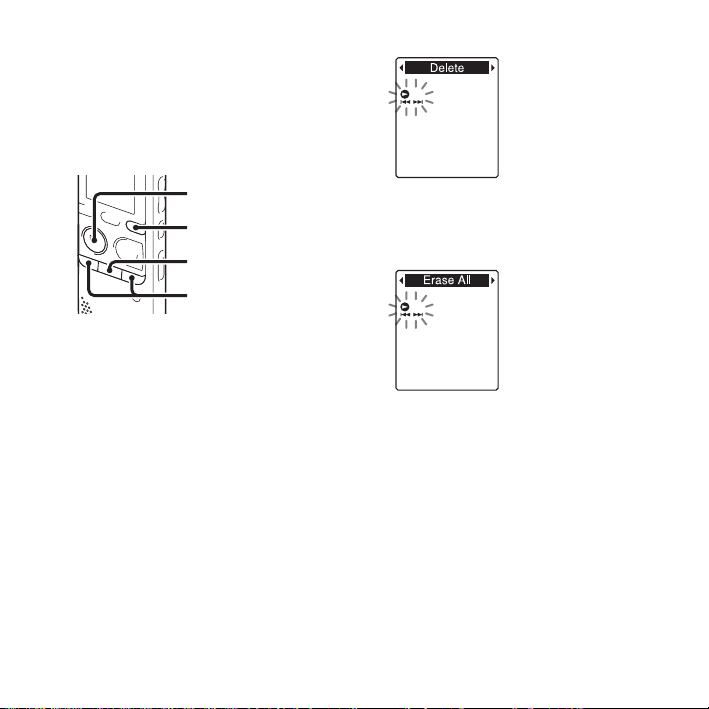
1 Select the folder containing the files you
want to erase when the IC recorder is in
the stop mode.
2 Press and hold DISP/MENU to enter the
menu mode.
The menu mode window will be
displayed.
3
Press –. or >+ to select “Delete,”
and then press
GB
62
N
PLAY/STOP•ENTER.
4 Press –. or >+ to select “Erase
All,” and then press
STOP•ENTER.
“Erase All?” will be displayed.
5
Press –. or >+ to select “YES,” and
then press
The “Erasing...” animation appears in the
display window and all files in the
selected folder will be erased.
N
N PLAY/
PLAY/STOP•ENTER.
6 Press x (stop) to exit the menu mode.
To cancel erasing
Select “NO” in step 5, and then press
N PLAY/STOP•ENTER.
Page 63

Using a Track Mark
Adding a track mark
N PLAY/
STOP•ENTER
–., >+
T-MARK
You can add a track mark at a point at
which you would like to divide a file later
or locate during playback. You can add a
maximum of 98 track marks to each file.
During recording, playing back, or
recording pausing, press T-MARK at the
position you want to add a track mark.
The (track mark) indicator flashes, and a
track mark is added.
P Notes
• You can add a track mark only to files
recorded using the IC recorder. However,
when you edit files using the supplied Sound
Organizer software, adding a track mark to
the files may not be possible.
• You cannot add a track mark at a point
within 0.5 seconds from another track mark.
• You cannot add a track mark at the very
beginning or at the very end of the file.
• If there are already 98 track marks in a file,
you cannot add any more track marks.
• When a track mark is added during
playback, the playback stops.
To locate a track mark and
starting playback at the track
mark
Press –. or >+ in the stop mode.
When the (track mark) indicator flashes
once, press
N PLAY/STOP•ENTER.
63
Editing Files
GB
Page 64
Erasing a track mark
N
PLAY/
STOP•ENTER
DISP/MENU
x
–., >+
1 Stop at a position after the track mark
you want to erase.
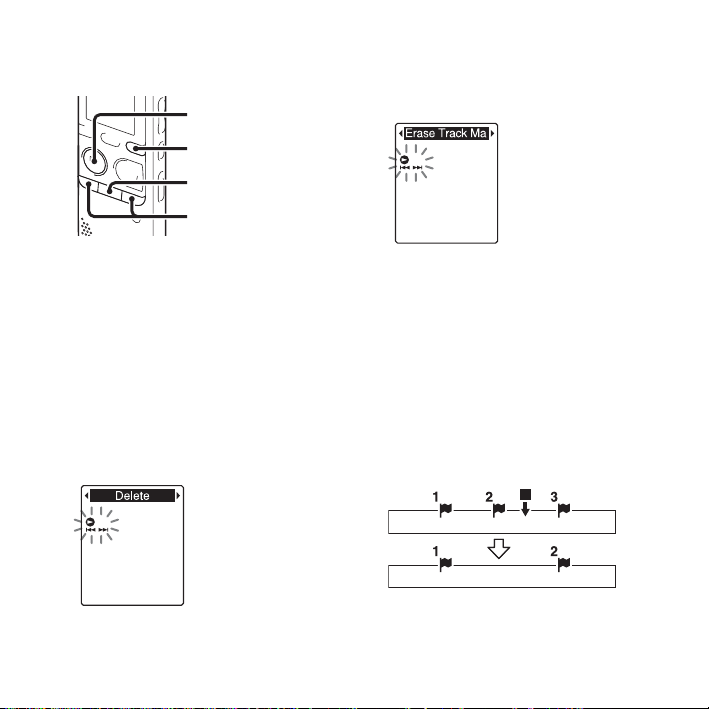
4 Press –. or >+ to select “Erase
Track Mark,” and then press
STOP•ENTER.
“Erase Track Mark?” is displayed and
the track mark indicator and the track
mark number to be erased will flash.
N PLAY/
2 Press and hold DISP/MENU in the stop
mode to enter the menu mode.
The menu mode window will be
displayed.
3
Press –. or >+ to select “Delete,”
N
PLAY/STOP•ENTER.
64
GB
and then press
5 Press –. or >+ to select “YES,”
and then press
STOP•ENTER.
The “Erasing...” animation appears in the
display window and the selected track
mark will be erased.
The track mark just before the stop position
will be erased.
N PLAY/
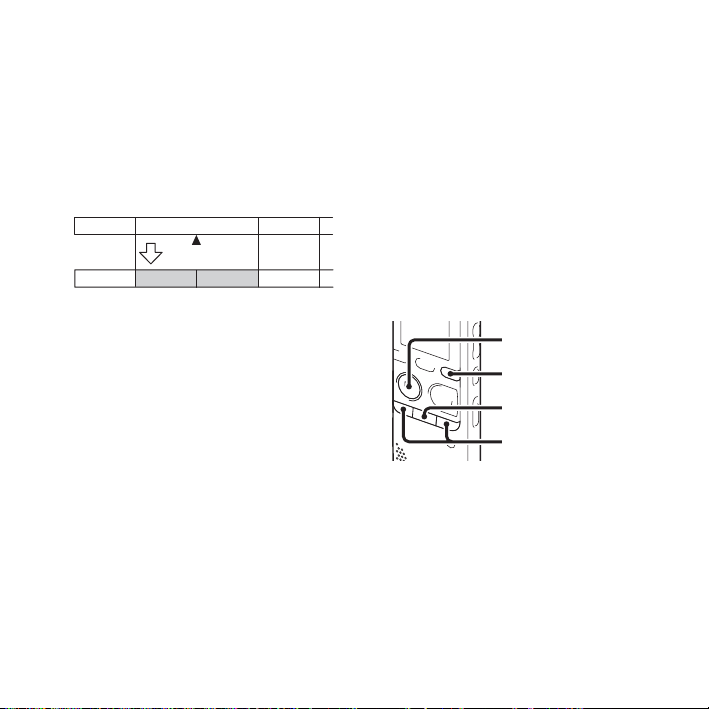
Stop position
Erase track
mark
Page 65
6 Press x (stop) to exit the menu mode.
To cancel erasing
Select “NO” in step 5, and then press
N PLAY/STOP•ENTER.
Erasing all the track marks in the selected file at one time
N
PLAY/
STOP•ENTER
DISP/MENU
x
–., >+
1 Select a file from which you want to
erase the track marks.
2 Press and hold DISP/MENU in the stop
mode to enter the menu mode.
The menu mode window will be
displayed.
3
Press –. or >+ to select “Delete,”
and then press
N
PLAY/STOP•ENTER.
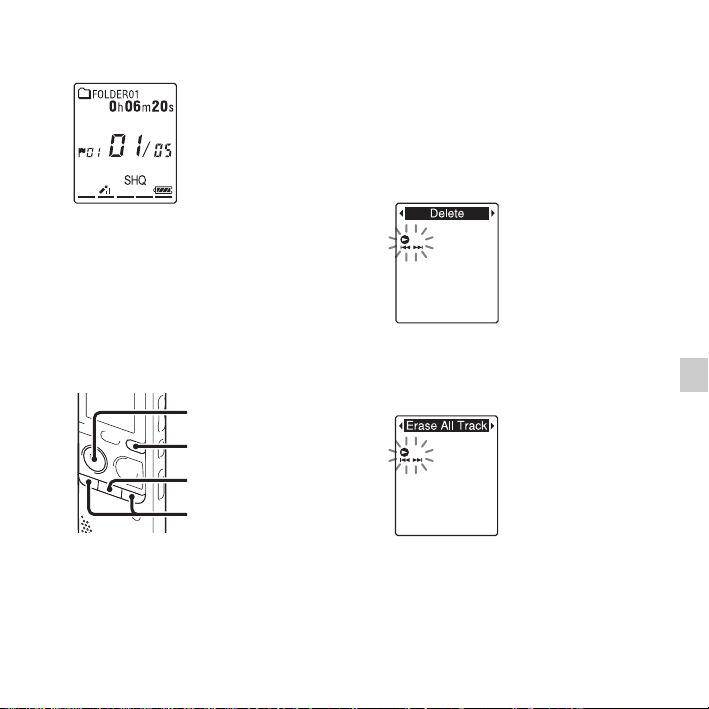
4 Press –. or >+ to select “Erase All
Track Marks,” and then press
STOP•ENTER.
“Erase All Track Marks?” will be
displayed.
N PLAY/
Editing Files
65
GB
Page 66

5 Press –. or >+ to select “YES,”
and then press
STOP•ENTER.
The “Erasing...” animation appears in the
display window and all the track marks
will be erased at one time.
N PLAY/
6 Press x (stop) to exit the menu mode.
To cancel erasing
Select “NO” in step 5, and then press
N PLAY/STOP•ENTER.
66
GB
Page 67
Dividing a File
Dividing a file at the current position
N
PLAY/
STOP•ENTER
DISP/MENU
x
–., >+
You can divide a file in the stop mode, so
that the file is divided into two parts and a
new file number is added to the newer part
of the divided file. By dividing a file, you
can easily find the point from which you
want to play back when you make a long
recording such as at a meeting. You can
divide a file until the total number of files in
the folder reaches the maximum number
allowed.
1 Stop the file at the position where you
want to divide a file.
2 Press and hold DISP/MENU in the stop
mode to enter the menu mode.
The menu mode window will be
displayed.
3
Press –. or >+ to select “Divide,”
N
and then press
PLAY/STOP•ENTER.
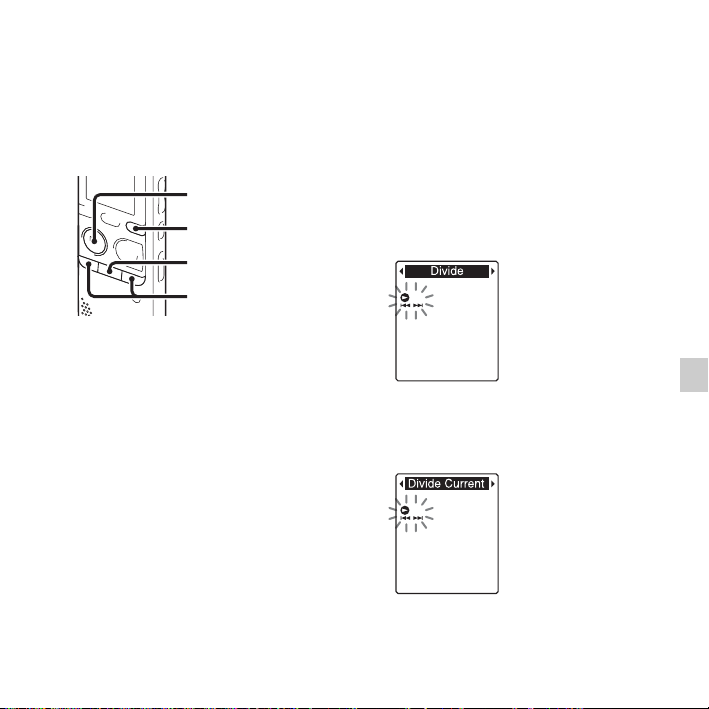
4 Press –. or >+ to select “Divide
Current Position,” and then press
N PLAY/STOP•ENTER.
“Divide?” will be displayed.
67
Editing Files
GB
Page 68
5 Press –. or >+ to select “YES,”
and then press
STOP•ENTER.
The “Dividing...” animation appears, and
the divided files will be suffixed with a
sequential number (“_1” for the original
file, and “_2” for the new file).
File 1 File 2 File 3
File 1 File 2_1 File 3File 2_2
A suffix made up of a sequential number is
added to each of the divided files.
N PLAY/
A file is divided.
6 Press x (stop) to exit the menu mode.
P Notes
• You need a certain amount of free space in
the memory media to divide a file.
• When you divide a file with a title and artist
name, the newer part has the same title and
artist name.
• You cannot divide files other than those
recorded using the IC recorder (e.g., a file
transferred from a computer). Moreover,
when you edit files using the supplied Sound
Organizer software, dividing files may not
be possible.
• Once a file is divided, you cannot return it to
the original status again.
• If you divide a file at the position within 0.5
seconds from a track mark, the track mark
will be erased.
• Because of the system limitations, you
cannot divide a file at the very beginning or
at the very end of the file.
To cancel dividing
Select “NO” in step 5, and then press
N PLAY/STOP•ENTER.
Dividing a file at all the track mark positions
N
PLAY/
STOP•ENTER
DISP/MENU
x
–., >+
1 Select the file you want to divide.
2 Press and hold DISP/MENU in the stop
mode to enter the menu mode.
The menu mode window will be
displayed.
68
GB
Page 69
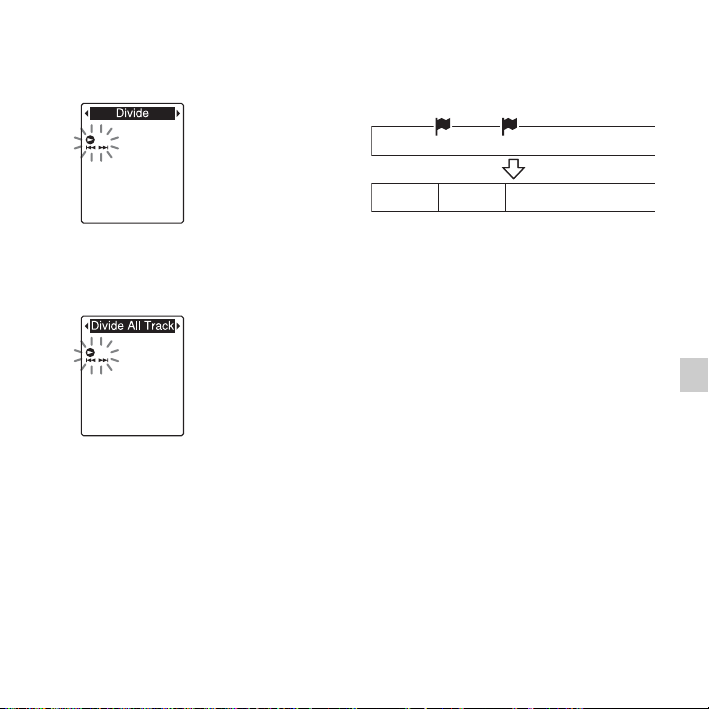
3
Press –. or >+ to select “Divide,”
and then press
N
PLAY/STOP•ENTER.
4 Press –. or >+ to select “Divide
All Track Marks,” and then press
N PLAY/STOP•ENTER.
“Divide All Track Marks?” will be
displayed.
5 Press –. or >+ to select “YES,”
and then press
STOP•ENTER.
The “Dividing...” animation appears, and
the file is divided at all the track mark
N PLAY/
positions. All the existing track marks in
the files will be erased.
File 1
A file is divided.
File 1_01 File 1_02 File 1_03
A suffix made up of a sequential number is
added to each of the divided files.
6 Press x (stop) to exit the menu mode.
To cancel dividing
Select “NO” in step 5, and then press
N PLAY/STOP•ENTER.
z Tip
To cancel division during the operation at all
the remaining track marks, press
The files that have been divided before the
cancellation remain divided.
P Notes
• You need a certain amount of free space in
the memory media to divide a file.
• When you divide a file with a title and artist
name, the newer part has the same title and
artist name.
• You cannot divide files other than those
recorded using the IC recorder (e.g., a file
transferred from a computer). Moreover,
when you edit files using the supplied Sound
x (stop).
69
Editing Files
GB
Page 70

Organizer software, dividing files may not
be possible.
• Once a file is divided, you cannot return it to
the original status again.
70
GB
Page 71
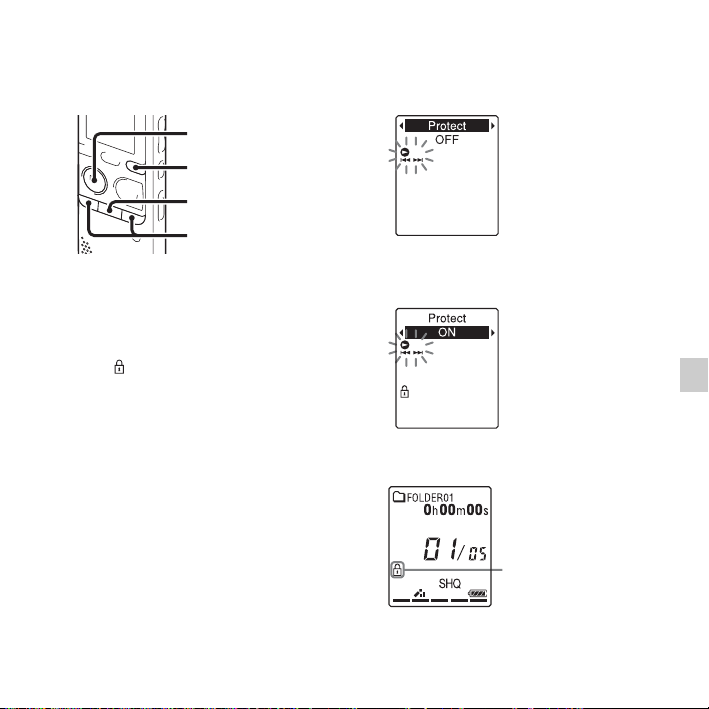
Protecting a File
N
PLAY/
STOP•ENTER
DISP/MENU
x
–., >+
To prevent a file from being accidentally
erased or edited, you can protect an
important file. A protected file is marked
with the (protect) indicator and is
regarded as a read-only file you cannot
erase or edit.
1 Display the file which you want to
protect.
2 Press and hold DISP/MENU in the stop
mode to enter the menu mode.
The menu mode window will be
displayed.
3 Press –. or >+ to select “Protect,”
and then press
STOP•ENTER.
N PLAY/
4 Press –. or >+ to select “ON,” and
then press
N PLAY/STOP•ENTER.
5 Press x (stop) to exit the menu mode.
Protect mark
Editing Files
71
GB
Page 72

To release protection
Select the protected file, and then follow
steps 2 through 5.
In this case, select “OFF” in step 4, and
then press
P Note
You cannot set protection to the podcast files.
N PLAY/STOP•ENTER.
72
GB
Page 73
Listening to the FM Radio
Listening to the FM Radio (for ICD-PX312F only)
Tuning in an FM Radio Station
Tuning in a radio station by scanning frequencies
N
PLAY/
STOP•ENTER
DISP/MENU
x
–., >+
The headphone cord of the headphones is
an FM antenna, therefore, connect the
headphones to the i (headphone) jack
when listening to the FM radio.
P Note
During FM reception, the DPC function and
noise cut function do not work.
1 Press and hold DISP/MENU in the stop
mode to enter the menu mode.
The menu mode window will be
displayed.
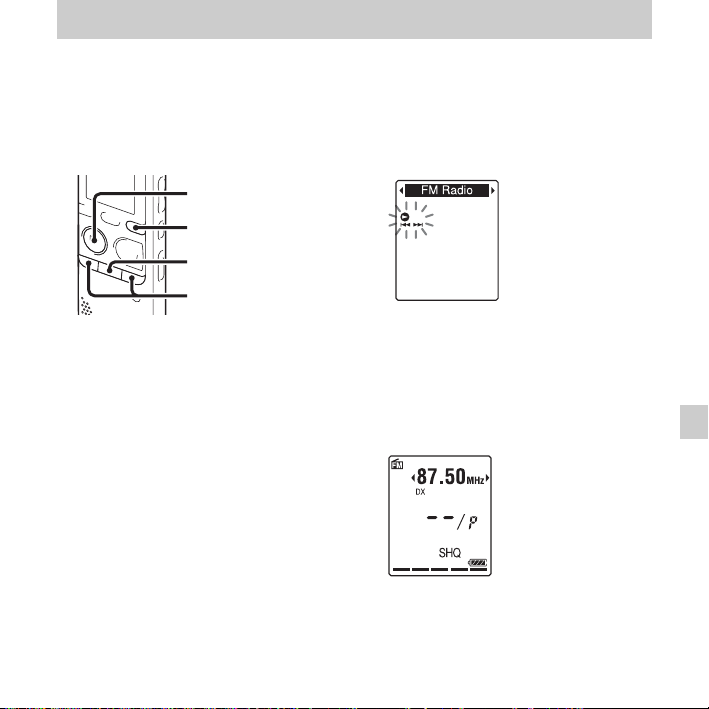
2 Press –. or >+ to select “FM
Radio,” and then press
STOP•ENTER.
The IC recorder enters the FM radio
mode.
N PLAY/
3 Press DISP/MENU briefly to move the
b, B) to both sides of the
cursors (
frequency display on the upper line in the
display window.
The IC recorder is now ready for tuning
in a station by scanning frequencies.
73
Listening to the FM Radio
GB
Page 74
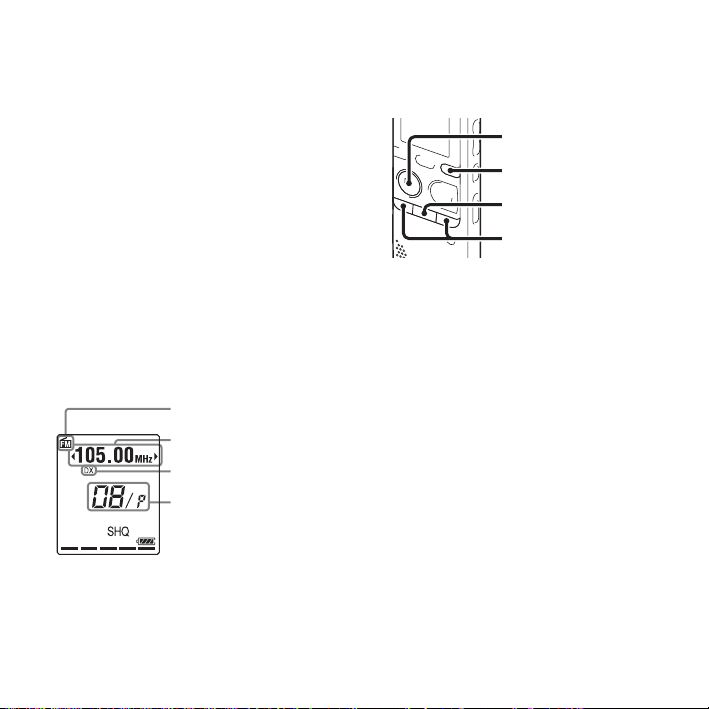
4 Press –. or >+ repeatedly to tune
in a station.
5 Press x (stop) to turn the FM radio off.
To scan radio frequencies
automatically
In step 4, press and hold –. or >+
until the frequency digits begin to change in
the display window. The IC recorder
automatically scans the radio frequencies
and stops when it finds a clear station.
If you cannot tune in a station, press –
>+ repeatedly to change the frequency
or
step by step.
Display when listening to the FM
radio
FM indicator
Radio frequency
Receiver sensitivity
Preset number
.
Tuning in a preset radio station
N
PLAY/
STOP•ENTER
DISP/MENU
x
–., >+
When you have already preset FM radio
stations (page 76), you can tune in a station
by selecting a preset number.
1 Press and hold DISP/MENU in the stop
mode to enter the menu mode.
The menu mode window will be
displayed.
74
GB
Page 75
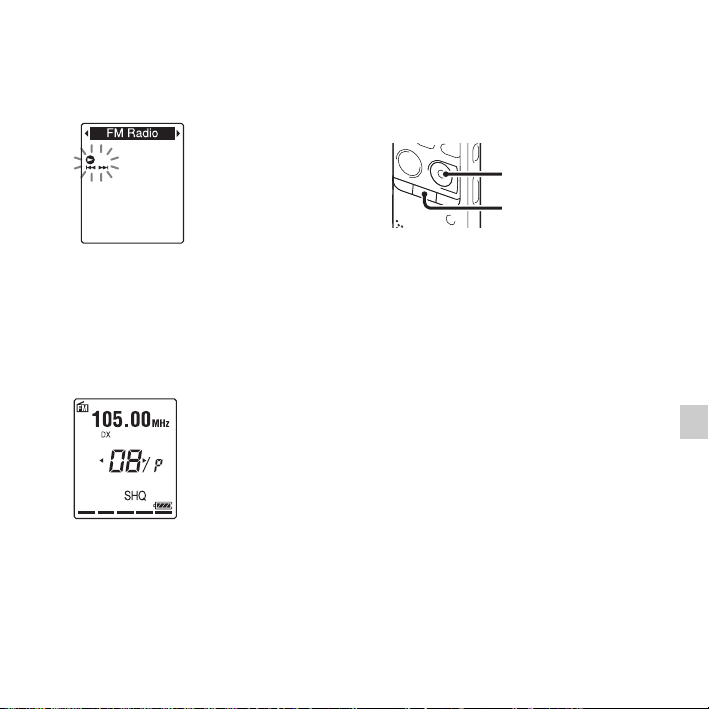
2 Press –. or >+ to select “FM
Radio,” and then press
STOP•ENTER.
N PLAY/
5 Press x (stop) to turn the FM radio off.
Recording FM broadcasts
z REC/PAUSE
x
The IC recorder enters the FM radio
mode.
3 Press DISP/MENU briefly to move the
b, B) to both sides of the preset
cursors (
number display on the lower line in the
window.
The IC recorder is now ready for tuning
in a radio station by selecting a preset
number.
4 Press –. or >+ repeatedly until the
preset (P) number you want is displayed.
1 Tune in the station you want to record.
2 Press z REC/PAUSE to start recording.
3 Press x (stop) to stop recording.
P Notes
• While the FM radio is activated, you cannot
change memory media or select a folder.
Before starting FM radio recording, select
the memory media and folder you want to
use to record the FM broadcast in advance.
• During FM recording, the “Mic Sensitivity”
(page 91), “VOR” (page 37), and “LCF(Low
Cut)” (page 92) settings are disabled.
75
Listening to the FM Radio
GB
Page 76
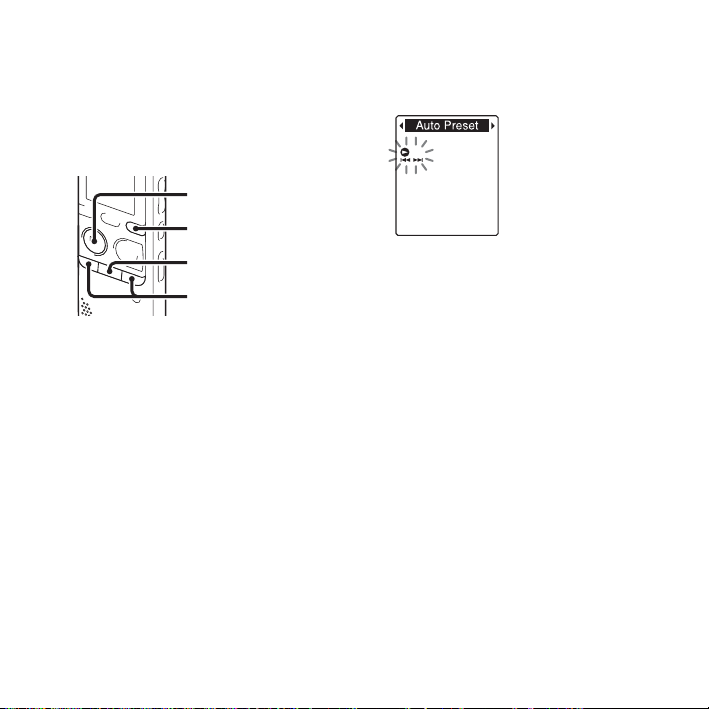
Presetting FM Radio Stations
Presetting FM radio stations automatically
N
PLAY/
STOP•ENTER
DISP/MENU
x
–., >+
You can automatically tune in radio stations
and then register them with preset numbers.
You can preset up to 30 FM radio stations
automatically using the preset menu.
1 Press and hold DISP/MENU during FM
reception to enter the menu mode.
The menu mode window will be
displayed.
2 Press –. or >+ to select “Auto
Preset,” and then press
STOP•ENTER.
N PLAY/
“Auto Preset?” will be displayed.
3
Press –. or >+ to select “YES,” and
then press
The IC recorder automatically scans for
available radio frequencies and the
stations will be stored in memory from
the lower frequencies to the higher ones.
While presetting FM radio stations
automatically, the preset number ready to
be assigned flashes.
To stop the automatic presetting
Press x (stop). The preset numbers stored
until you press the
in memory.
N
PLAY/STOP•ENTER.
x (stop) button remain
76
GB
Page 77
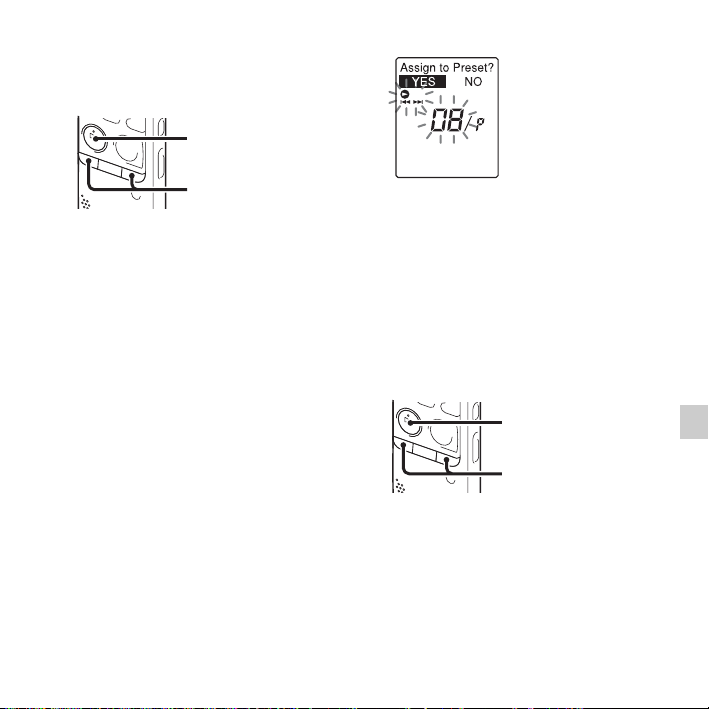
Presetting FM radio stations manually
N PLAY/
STOP•ENTER
–., >+
You can store an unregistered FM radio
station on a preset number. You can preset
up to 30 FM radio stations.
1 Follow steps 1 through 4 of “Tuning in a
radio station by scanning frequencies” on
page 73 and tune in the station you want
to preset. When the station is not a preset
station, “ - -/P” is displayed. You can
register it with a new preset number.
2 Press N PLAY/STOP•ENTER.
The preset number and “Assign to
Preset?” will be displayed.
3
Press –. or >+ to select “YES,” and
then press
N
PLAY/STOP•ENTER.
The station will be stored in memory on
the preset number.
P Note
If 10 seconds have passed after “Assign to
Preset?” appears
canceled.
, the setting operations are
Erasing preset FM radio stations
N PLAY/
STOP•ENTER
–., >+
1 Follow steps 1 through 4 of “Tuning in a
preset radio station” on page 74 and tune
in the station to display the preset
number you want to erase.
Listening to the FM Radio
77
GB
Page 78

2 Press N PLAY/STOP•ENTER.
The preset number and “Erase Preset?”
will be displayed.
3 Press
–. or >+
and then press
STOP•ENTER.
The preset number will be changed to
“--/P.”
to select “YES,”
N PLAY/
78
GB
Page 79
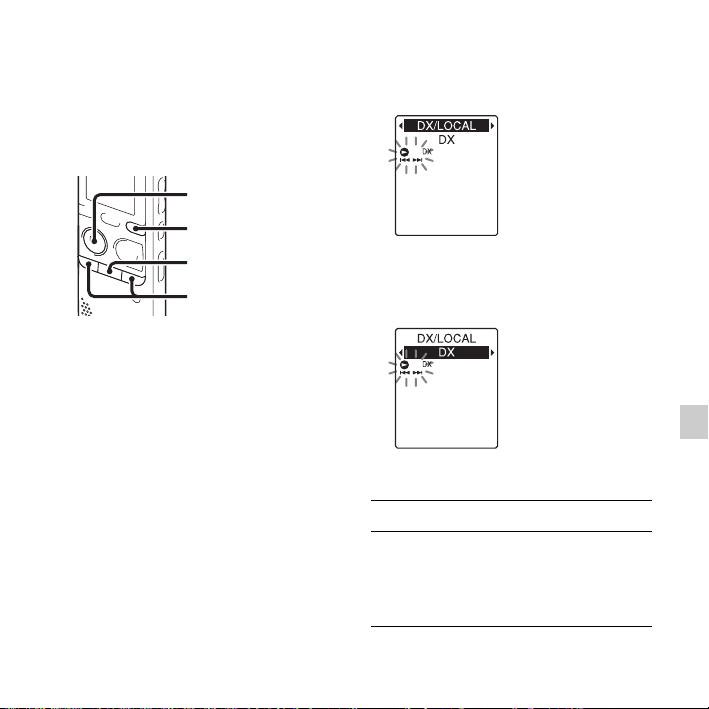
Changing the FM Radio Reception Settings
Switching the receiver sensitivity of the FM radio
N
PLAY/
STOP•ENTER
DISP/MENU
x
–., >+
You can set the receiver sensitivity when
listening to the FM radio.
1 Press and hold DISP/MENU during FM
reception to enter the menu mode.
The menu mode window will be
displayed.
2 Press –. or >+ to select “DX/
LOCAL,” and then press
STOP•ENTER.
N PLAY/
3 Press –. or >+ to select “DX” or
“LOCAL,” and then press
STOP•ENTER.
N PLAY/
4 Press x (stop) to exit the menu mode.
DX Normally, select this setting.
LOCAL When there is interference or
collapsing caused by a intense
electric field around the transmitting
antenna of the broadcasting station,
etc., select this setting.
79
Listening to the FM Radio
GB
Page 80
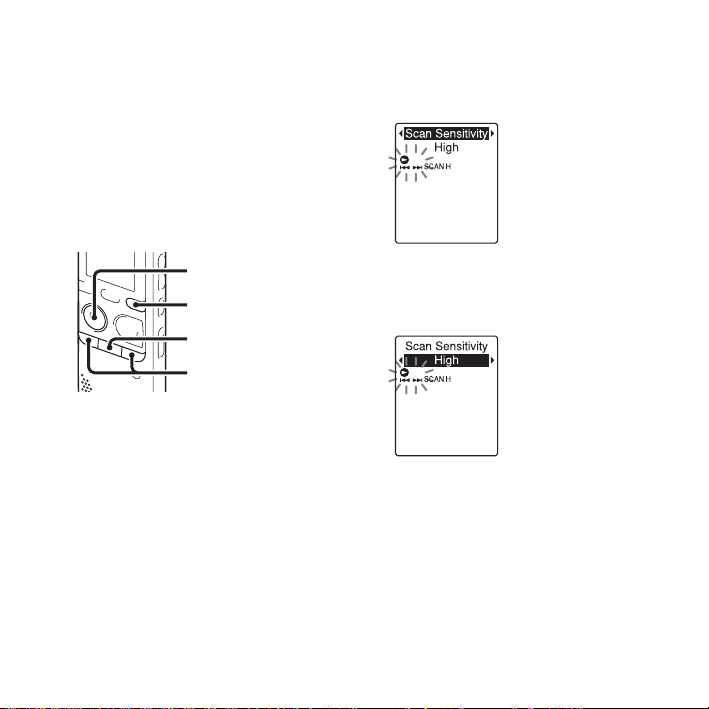
“DX/LOCAL” is set to “DX” when you
purchase the IC recorder.
P Note
Select “DX” when the IC recorder reception
status is not good due to a weak signal.
Switching the scanning sensitivity
N
PLAY/
STOP•ENTER
DISP/MENU
x
–., >+
You can set the scanning sensitivity when
presetting FM radio stations.
1 Press and hold DISP/MENU during FM
reception to enter the menu mode.
The menu mode window will be
displayed.
2
Press –. or >+ to select “Scan
Sensitivity,” and then press
STOP•ENTER.
3
Press –. or >+ to select “High” or
“Low,” and then press
STOP•ENTER.
The scanning sensitivity is set to “High”
when you purchase the IC recorder.
N
N
PLAY/
PLAY/
4 Press x (stop) to exit the menu mode.
80
GB
Page 81
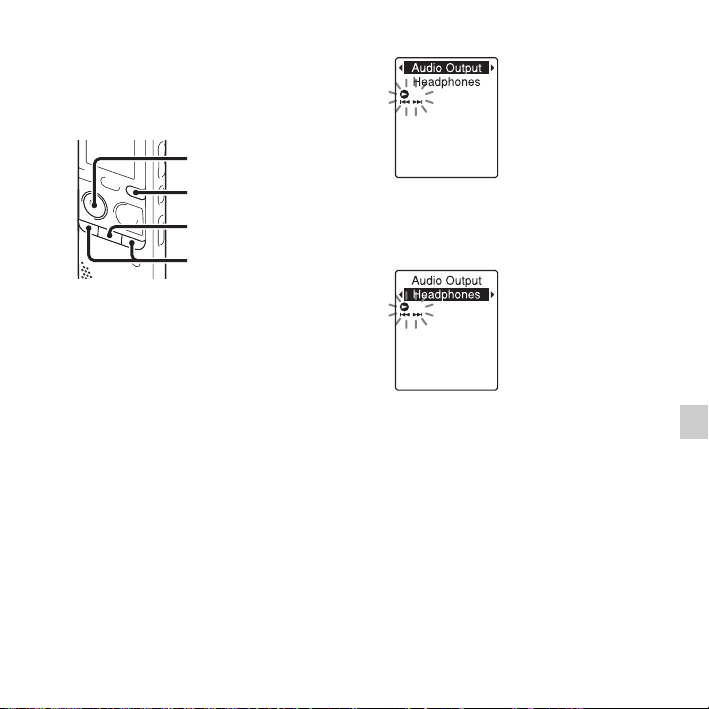
Switching the FM radio output between speaker and headphones
N
PLAY/
STOP•ENTER
DISP/MENU
x
–., >+
During FM reception or FM recording, you
can switch between the sound from the
speaker and the sound from the headphones
using the menu.
1 Press and hold DISP/MENU during FM
reception to enter the menu mode.
The menu mode window will be
displayed.
2 Press –. or >+ to select “Audio
Output,” and then press
STOP•ENTER.
N PLAY/
3 Press –. or >+ to select
“Headphones” or “Speaker,” and then
N PLAY/STOP•ENTER.
press
The FM radio output is set to
“Headphones” when you purchase the IC
recorder.
4 Press x (stop) to exit the menu mode.
Listening to the FM Radio
81
GB
Page 82
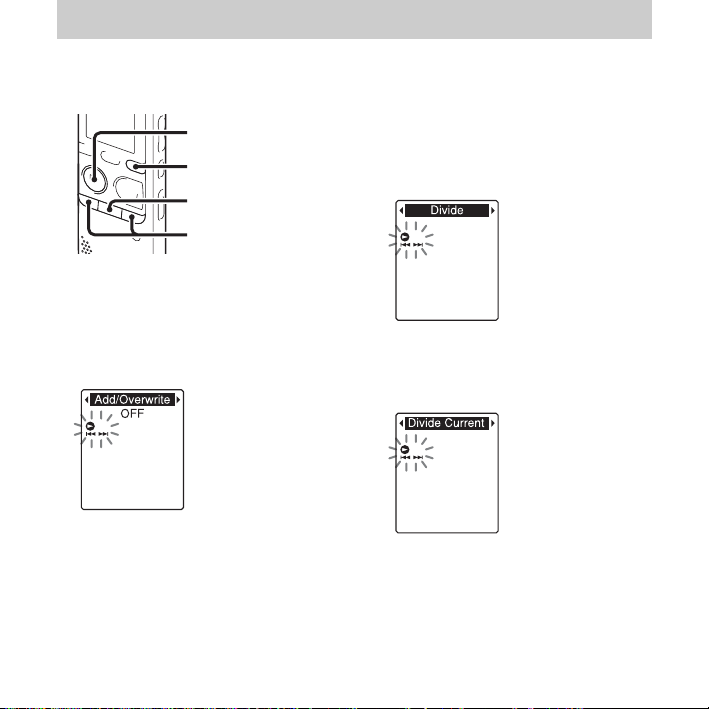
About the Menu Function
Making Settings for the Menu
N
PLAY/
STOP•ENTER
DISP/MENU
x
–., >+
1 Press and hold DISP/MENU to enter the
menu mode.
The menu mode window will be
displayed.
2 Press –. or >+ to select the menu
item for which you want to make setting,
and then press
STOP•ENTER.
When you select “Divide,” “Move &
Copy,” “Delete,” or “Detail Menu,”
GB
82
N PLAY/
3 Press –. or >+ to select the setting
4 Press –. or >+ to make the setting,
5 Press x (stop) to exit the menu mode.
. or >+ to select their sub
press –
menu item for which you want to make
setting, and then press
STOP•ENTER.
you want to set, and then press
N PLAY/STOP•ENTER.
and then press
STOP•ENTER.
N PLAY/
N PLAY/
Page 83

P Note
If you do not press any button for 60 seconds,
the menu mode is automatically canceled and
the window will return to the normal display.
To return to the previous window
During menu operations, press DISP/
MENU.
When the selection screen of the sub menu
screen is displayed after you select
“Divide,” “Move & Copy,” “Delete,” or
“Detail Menu,” press –
select “[Back],” and then press
. or >+ to
N PLAY/
STOP•ENTER to return to the main menu
window.
To exit the menu mode
Press x (stop).
About the Menu Function
83
GB
Page 84

Menu Settings
Menu items Operation mode
Add/Overwrite
VOR
DPC(Speed Control)
Easy Search
Alarm
Protect
Divide
Divide Current Position
Divide All Track Marks
[Back]
Move & Copy
Move File
File Copy
[Back]
Delete
Erase Track Mark
Erase All Track Marks
Erase All
[Back]
a
: the setting can be made /—: the setting cannot be made)
(
Stop mode Playback
mode
a
a
aa
aa
a
a
a
a
a
a
a
a
a
a
a
a
a
a
a
————
—
————
————
————
————
————
————
————
————
————
————
————
————
————
————
————
Recording
mode
* For ICD-PX312F only
GB
84
FM radio
reception
mode*
a
———
———
FM radio
recording
mode*
——
Page 85

Menu items Operation mode
(
a
: the setting can be made /—: the setting cannot be made)
Select Memory
FM Radio*
Auto Preset*
DX/LOCAL*
Scan Sensitivity*
Audio Outp ut*
Detail Menu
REC Mode
Mic Sensitivity
LCF(Low Cut)
Select Input
Continuo us Play
Noise Cut Level
LED
Language
Date&Time
Time Display
Beep
Auto Power Off
Format
[Back]
Stop mode Playback
mode
a
a
———
———
———
———
aaaa
a
a
a
a
aa
aa
a
a
a
a
a
a
a
aaa
Recording
mode
————
————
——
—
—
————
————
————
————
————
————
————
————
a
a
———
———
* For ICD-PX312F only
FM radio
reception
mode*
FM radio
recording
mode*
a
aa
a
aa
a
——
——
——
—
—
—
—
About the Menu Function
85
GB
Page 86

Menu items Settings (*: Initial setting) See page
Add/Overwrite
Allows you to add a recording to a previously recorded file
33, 35
or an overwrite recording during playback.
Add:
You can add a recording.
Overwrite:
You can overwrite a recording.
OFF*:
You cannot add or overwrite a recording.
VOR
Sets the VOR (Voice Operated Recording) function.
ON:
Recording starts when the IC recorder detects sound and
37
pauses when no sound is heard, eliminating recording
during soundless periods. The VOR function is activated
z REC/PAUSE is pressed.
when
OFF*:
The VOR function does not work.
P Note
During FM recording (page 75), the VOR function does not
work (for ICD-PX312F only).
DPC(Speed Control)
Sets the DPC (Digital Pitch Control) function.
ON:
50
You can adjust the playback speed in a range from 0.50
times to 2.00 times.
OFF*:
The DPC function is canceled.
86
GB
Page 87

Menu items Settings (*: Initial setting) See page
Easy Search
Sets the easy search function.
48
ON:
You can go forward for about 10 seconds by pressing
>+ and go back for about 3 seconds by pressing
–.. This function is useful when attempting to locate
desired point in a long recording.
OFF*:
The easy search function does not work. When you press
>+ or –., a file will be moved forward or
backward.
Alarm
Sets the alarm.
55
ON:
The alarm function is effective. Set the date, time or day
of the week or choose daily for playback, and set the
following alarm pattern.
Beep&Play: The selected file is played back after the
alarm sounds.
Beep: Only the alarm sounds.
Play: Only the selected file is played back.
OFF*:
The alarm function is canceled.
Protect
Protects the selected file to prevent the file from being
71
erased, divided, or being moved.
ON:
The protect function is activated.
OFF*:
The protect function is canceled.
About the Menu Function
87
GB
Page 88

Menu items Settings (*: Initial setting) See page
Divide Divide Current
Position
Divides a file into two.
YES:
A file will be divided into two.
NO:
67
Division is not executed.
Divide All Track
Marks
Divides a file at all the track mark positions.
YES:
The track mark division is executed.
68
NO:
The track mark division is not executed.
Move &
Move File
Copy
File Copy
Moves the selected file to the selected folder.
Before attempting to move a file, select the file to be moved,
and then go to the menu window.
Copies the selected file from the built-in memory to the
desired folder on a memory card, or from a memory card to
59
60
the desired folder on the built-in memory.
Before attempting to copy a file, select the file to be copied
and then go to the menu window.
Delete Erase Track
Mark
Erases the track mark just before the current position.
YES:
The track mark will be erased.
NO:
64
The track mark will not be erased.
Erase All Track
Marks
Erases all the track marks of the selected file.
YES:
All the track marks will be erased.
NO:
65
All the track marks will not be erased.
88
GB
Page 89
Menu items Settings (*: Initial setting) See page
Delete Erase All
Erases all files in the selected folder.
62
Press (folder) to display the folder selection window
before erasing the files and select a folder from which all
files are to be erased, and then go to the menu window.
YES:
All files in the selected folder will be erased.
NO:
All files will not be erased.
Select Memory
Selects the memory media on which you want to store a file, or
which contains the file you want to play, edit, or copy.
Built-In Memory*:
41
The built-in memory of the IC recorder is selected.
Memory Card:
The memory card inserted in the memory card slot is
selected.
P Note
When no memory card is currently inserted in the IC
recorder, the built-in memory is automatically selected.
FM Radio
The IC recorder enters the FM radio mode. 73
(for ICD-PX312F only)
Auto Preset
(for ICD-PX312F only)
Scans automatically for available frequencies. The stations
will be stored in memory.
YES:
76
The automatic presetting is activated.
NO:
The automatic presetting is canceled.
About the Menu Function
89
GB
Page 90

Menu items Settings (*: Initial setting) See page
DX/LOCAL
(for ICD-PX312F only)
Sets the receiver sensitivity when listening to the FM radio.
DX*:
Normally, select this setting.
LOCAL:
79
When there is interference or collapsing caused by a
intense electric field around the transmitting antenna of
the broadcasting station, etc., select this setting.
P Note
Select “DX” when the IC recorder reception status is not
good due to a weak signal.
Scan Sensitivity
(for ICD-PX312F only)
Sets the scanning sensitivity when presetting FM radio
stations.
High*:
The scanning sensitivity is set to high.
80
Low:
The scanning sensitivity is set to low.
Audio Output
(for ICD-PX312F only)
During FM reception or recording, switches between the
sound from the speaker and the sound from the headphones.
81
Headphones*:
The sound comes out from the headphones.
Speaker:
The sound comes out from the speaker(s).
90
GB
Page 91
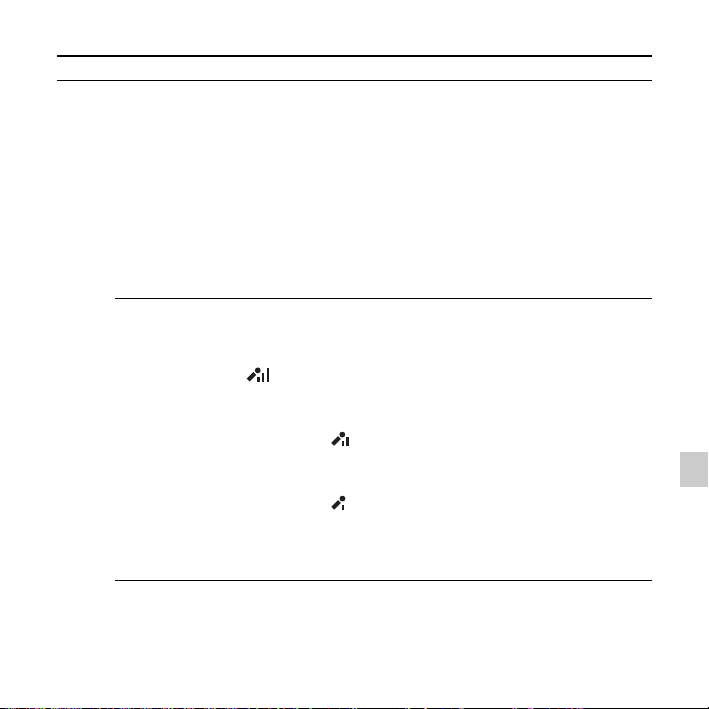
Menu items Settings (*: Initial setting) See page
Detail
REC Mode
Menu
Sets the recording mode including sound quality.
192kbps(MONO)*:
Super high-quality monaural recording mode (displayed
as “SHQ” in the window)
–
128kbps(MONO):
High-quality monaural recording mode (displayed as
“HQ” in the window)
48kbps(MONO):
Standard play monaural recording mode (displayed as
“SP” in the window)
8kbps(MONO):
Long play monaural recording mode (displayed as “LP”
in the window)
Mic Sensitivity
Sets the microphone sensitivity.
High:
–
To record a sound far away from the IC recorder or a low
sound, such as recording in a spacious room (displayed as
“ ” in the window).
Medium*:
To record the sound of a normal conversation or meeting,
such as recording in a meeting space or during interview
(displayed as “ ” in the window).
Low:
To record dictation with a microphone in front of your
mouth, a sound near the IC recorder, or a loud sound
(displayed as “ ” in the window).
P Note
During FM recording (page 75), the Mic Sensitivity setting
is disabled (for ICD-PX312F only).
About the Menu Function
91
GB
Page 92

Menu items Settings (*: Initial setting) See page
Detail
Menu
LCF(Low Cut)
Sets the LCF (Low Cut Filter) function to cut a low
frequency to reduce the roaring noise from wind; therefore
you can record a file more clearly.
ON:
–
The LCF function is activated.
OFF*:
The LCF function is canceled.
P Note
During FM recording (page 75), the LCF function does not
work (for ICD-PX312F only).
Select Input
Selects the external input to be recorded that is connected to
m (microphone) jack.
the
MIC IN*:
Select when you record files using an external
43, 45
microphone.
Audio IN:
Select when you record using other equipment.
Continuous Play
Sets the continuous playback mode.
52
ON:
Files in one folder are played back continuously.
OFF*:
A file is played back and the IC recorder stops at the
beginning of the next file.
Noise Cut Level
Sets the noise cut level to use when the IC recorder plays a
file back which is recorded with the noise cut function.
Maximum*:
49
The noise cut level will be more intense.
Medium:
The noise cut level will be weakened. Select when you
cannot catch the sound easily by setting “Noise Cut
Level” to “Maximum.”
92
GB
Page 93

Menu items Settings (*: Initial setting) See page
Detail
Menu
LED
Turns the operation indicator on or off during operation.
ON*:
During accessing to the memory, recording or playback,
the indicator lights or flashes.
–
OFF:
The indicator does not light or flash, even during
operation.
P Note
When the IC recorder is connected to a computer, the
operation indicator lights or flashes even if “LED” is set to
“OFF.”
Language
Date&Time
Sets the language to be used for messages, menus, folder
names, file names, etc.
English*, Español (Spanish), Français (French)
Sets the clock to use the alarm function or record the date
and time.
1Press and hold
Select “Detail Menu,” then “Date&Time.”
2Press –
“Manual,” and then press
Auto(Synchronizing)*:
When the IC recorder is connected to a computer that is
DISP/MENU to enter the menu mode.
. or >+ to select “Auto(Synchronizing)” or
N PLAY/STOP•ENTER.
16
14
running the Sound Organizer software, the clock will
be automatically adjusted according to that computer.
Manual:
Sets the clock by setting year, month, day, hour, and
minute in sequence.
3When you select “Manual,” press –
. or >+ to set
the year, month, day, hour, and minute in sequence, and
then press
Select the last two digits of the year when you set the
N PLAY/STOP•ENTER.
year. When you set the minute, the “Executing...”
animation is displayed.
About the Menu Function
93
GB
Page 94

Menu items Settings (*: Initial setting) See page
Detail
Time Display
Menu
Sets the clock display.
12-Hour*:
12:00AM = midnight, 12:00PM = noon
24-Hour:
–
0:00 = midnight, 12:00 = noon
Beep
Sets whether a beep will be heard or not.
ON*:
A beep will sound to indicate that an operation has been
–
accepted or an error has occurred.
OFF:
No beep sound will be heard.
P Note
The alarm sounds even if you set “Beep” to “OFF” in the
menu.
Auto Power Off
If the IC recorder is on and left for the period you have set,
–
the IC recorder turns off automatically.
5min:
The IC recorder will be turned off after approx. 5 minutes.
10min*:
The IC recorder will be turned off after approx. 10
minutes.
30min:
The IC recorder will be turned off after approx. 30
minutes.
60min:
The IC recorder will be turned off after approx. 60
minutes.
OFF:
The IC recorder will not be turned off automatically.
94
GB
Page 95

Menu items Settings (*: Initial setting) See page
Detail
Menu
Format
Formats the memory media currently selected (the built-in
memory or the memory card), erasing all the data in the
memory and resetting the folder structure to its default
status.
–
YES:
The “Formatting...” animation appears and the memory
media will be formatted.
NO:
The memory media will not be formatted.
P Notes
• Use the IC recorder formatting function to format the
memory media.
• Switch the memory media to the one to be formatted
before you start the format operation (page 41).
• When you format the memory media, all the data which
you have stored on the IC recorder will be erased. Once the
memory media has been erased, you cannot retrieve the
data that was erased.
• When you format the built-in memory, the operating
instructions stored in the built-in memory will also be
erased. To get another copy of the operating instructions,
please visit the Sony support home page:
http://www.sony-latin.com/index.crp
About the Menu Function
95
GB
Page 96

Utilizing Your Computer
Using the IC Recorder with Your Computer
When the IC recorder is connected to your
computer, you can transfer data between
them.
Copying files from the IC
recorder to your computer to
store them (page 103)
Copying MP3 files from your
computer to the IC recorder to
play them back (page 104)
Using the IC recorder as USB
memory (page 106)
You can store image data or text data stored
on the computer temporarily in the IC
recorder.
Managing and editing files using
the Sound Organizer software
(page 107)
The supplied Sound Organizer software
allows you to transfer the files that you
have recorded using the IC recorder to your
computer to manage and edit them. You can
also transfer MP3 files and podcast files
stored on your computer to the IC recorder.
GB
96
System requirements for your
computer
For details on the system requirements for
your computer, see page 108, 117.
P Note
While the IC recorder is connected with your
computer, the IC recorder operations and FM
reception are disabled.
Connecting the IC recorder to your computer
Computer
To USB port of
your computer
IC recorder
To (USB)
connector
USB connecting
cable
Page 97

To exchange files between the IC recorder
and your computer, connect the IC recorder
to your computer.
1 Connect the (USB) connector of the
IC recorder with the USB port of your
running computer with the supplied USB
connecting cable inserted into the
connectors securely until each plug stops
to the end.
2 Make sure the IC recorder has been
recognized properly.
On the Windows screen; open “My
Computer” or “Computer,” and make
sure that “IC RECORDER” or
“MEMORY CARD” has been
recognized.
On the Macintosh screen; make sure that
an “IC RECORDER” or “MEMORY
CARD” drive is displayed on the
desktop.
The IC recorder is recognized by the
computer as soon as the connection is
made. While the IC recorder is connected to
the computer, “Connecting” is displayed in
the display window of the IC recorder.
P Notes
• If you connect more than two USB devices
to your computer, normal operation will not
be guaranteed.
• Use of this IC recorder with a USB hub or a
USB connecting cable other than the
supplied cable is not guaranteed.
• A malfunction may occur depending on the
USB devices connected at the same time.
• Before connecting the IC recorder to your
computer, check that the batteries are
inserted in the IC recorder.
• It is recommended that you disconnect the
IC recorder from the computer when you are
not using the IC recorder connected to the
computer.
Structure of folders and files
The folders and files are displayed on the
computer screen as shown.
On a Windows screen using Explorer, and
on a Macintosh screen using Finder, folders
and files can be displayed by opening “IC
RECORDER” or “MEMORY CARD.”
Utilizing Your Computer
97
GB
Page 98
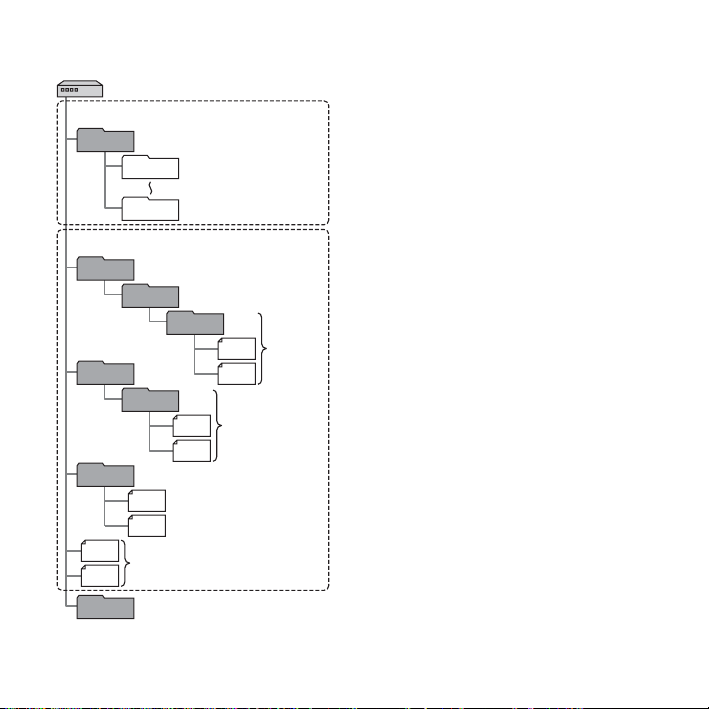
Built-in memory
“IC RECORDER”
VOICE*
MUSIC
PODCASTS
Conversation
MP3
MP3
Instructions
GB
98
Folder for files recorded
using the IC recorder
1
FOLDER01
FOLDER05
Folder transferred from
your computer
POP
J-POP*
2
NEWS*
MP3
MP3
2
*
MP3
MP3
4
*
5
*
2
MP3
MP3
3
*
*1When a file is transferred directly under the
VOICE folder, the IC recorder recognizes
and handles it as a file transferred from the
computer. When you transfer a file from
your computer to the IC recorder, put the
file in the folders under the VOICE folder.
2
*
The name of a folder in which MP3 files are
stored will be displayed on the IC recorder
as it is, so it is convenient if you put an
easy-to-remember name on the folder in
advance.
Folders shown in the illustration are
examples of folder names.
3
*
The IC recorder can recognize up to 8 levels
of folders transferred to the IC recorder.
*4If you transfer MP3 files separately, they
3
*
are classified as being in “No Folder.”
5
The operating instructions of the IC
*
recorder are stored in the “Instructions”
folder directly under the “IC RECORDER”
folder.
z
Tips
• The title or artist name, etc., registered in the
MP3 files, can be displayed on the IC
recorder. It is useful if you input the ID3 tag
information using the software you use to
make the MP3 files on your computer.
• If no title, or artist name has been registered,
“No Data” will be displayed in the display
window of the IC recorder.
When connecting the IC recorder with your
computer after the destination memory
Page 99
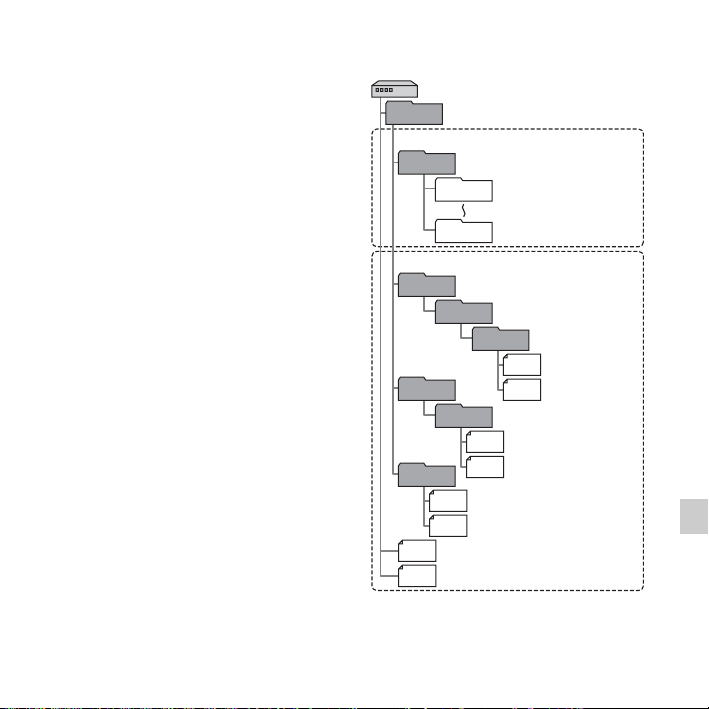
media has been set to “Memory Card”
(page 41), the structure of folders is
different from that when the destination
memory media is set to “Built-In Memory.”
Memory Stick Micro™ (M2™)
“MEMORY CARD”
MSSONY
Folder for files recorded
VOICE
MUSIC
PODCASTS
Conversation
MP3
MP3
using the IC recorder
FOLDER01
FOLDER05
Folder transferred from
your computer
POP
J-POP
MP3
MP3
NEWS
MP3
MP3
MP3
MP3
Utilizing Your Computer
99
GB
Page 100
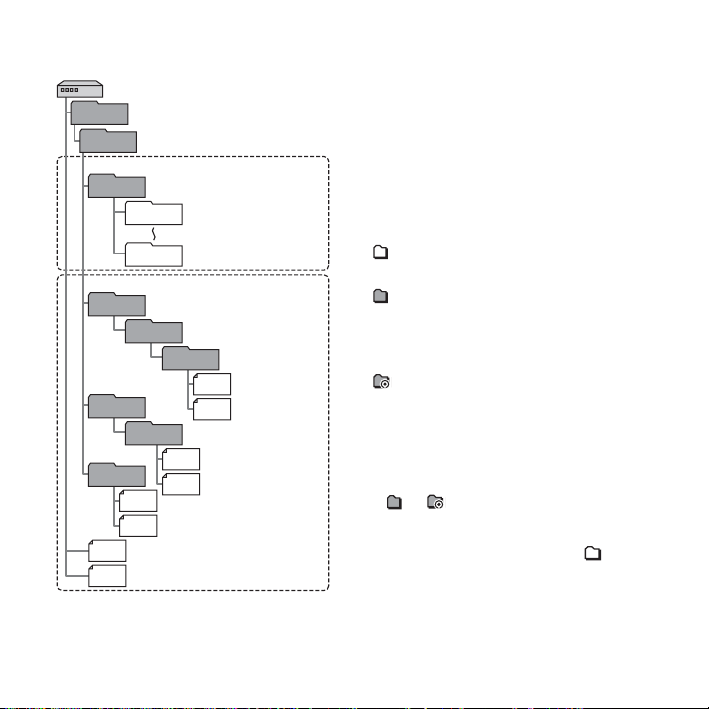
microSD card Structure of folders displayed in
“MEMORY CARD”
PRIVATE
Sony
VOICE
FOLDER01
FOLDER05
MUSIC
POP
PODCASTS
NEWS
Conversa tion
MP3
MP3
MP3
MP3
Folder for files recorded
using the IC recorder
Folder transferred from
your computer
J-POP
MP3
MP3
MP3
MP3
the display window of the IC
recorder
The display of the structure of the folders
seen in the display window of the IC
recorder is different from that seen on the
display of a computer.
The folder indicators in the display window
of the IC recorder are as follows:
: Folder for files recorded using the
IC recorder
: Folder transferred from a computer
(They are displayed when MP3 files
have been transferred from a
computer.)
: Folder for podcast files transferred
from a computer (These folders are
displayed when podcast files have
been transferred from a computer.)
P Note
If or folders have no files that can be
played back using the IC recorder, those
folders will not be displayed in the display
window of the IC recorder. Even if folders
have no files inside, however, those folders
can be displayed.
100
GB
 Loading...