

Page 1
Instruction Manual
Руководство по эксплуатации
SCPH-75008
Before using this product, carefully read this manual and retain it for future reference.
Перед началом эксплуатации внимательно прочитайте данное руководство и сохраните его для дальнейшего использования.
GB
RU
2-650-066-52(1)
Page 2

WARNING
To reduce the risk of fire or electric shock, do not expose this
apparatus to rain or moisture.
To prevent fire or shock hazard, do not place a container filled
with liquids on top of the console.
To avoid electrical shock, do not open the cabinet. Refer
servicing to qualified personnel only.
Caution
Use of controls or adjustments or performance of procedures
other than those specified herein may result in hazardous
radiation exposure.
The use of optical instruments with this product will increase
eye hazard.
CLASS 1 LASER PRODUCT
LUOKAN 1 LASERLAITE
KLASS 1 LASERAPPARAT
watching TV or playing video games, including DVD videos or games played on the
PlayStation®2 console. Players who have not had any seizures may nonetheless have
an undetected epileptic condition. Consult your physician before operating the
PlayStation®2 console if you have an epileptic condition or experience any of the
following symptoms while watching TV programmes or playing video games:
altered vision, muscle twitching, other involuntary movements, loss of awareness of
your surroundings, mental confusion, and/or convulsions.
Some PlayStation® or PlayStation®2 format software titles may perform differently
on this console than they do on previous PlayStation®2 or PlayStation® consoles, or
may not perform properly on this console. For more information, visit our Web site
at www.playstation.com
2
This appliance is classified as a CLASS 1 LASER product under IEC60825-1: 2001.
Read carefully before operating your
PlayStation®2 console
A few people may experience epileptic seizures when viewing flashing lights or
patterns in our daily environment. These persons may experience seizures while
WARNIN G
Page 3

Table of contents
WARNING .................................................................................... 2
Precautions ..................................................................................... 4
Preparation
Getting started ................................................................................ 7
Part names ...................................................................................... 8
Connecting to a TV........................................................................ 9
Connecting digital audio equipment ............................................ 12
Connecting the controller............................................................. 12
Connecting the AC adaptor and AC power cord .........................13
Turning the console on and off .................................................... 14
Games
Playing a game ............................................................................. 15
Using Memory Cards ................................................................... 18
Audio CDs
Playing an audio CD .................................................................... 20
DVDs
Watching a DVD.......................................................................... 22
Using the playback modes ........................................................... 26
Adjusting DVD player settings.................................................... 28
Main menu
Displaying the main menu............................................................35
Using the Browser screen .............................................................35
Using the System Configuration menu.........................................36
Using the Version Information screen..........................................39
Networking
Connecting to a network...............................................................42
Creating network settings .............................................................44
Additional information
Compatible software.....................................................................45
Accessories ...................................................................................46
GUARANTEE..............................................................................47
Specifications ...............................................................................47
Troubleshooting............................................................................49
GB
Table of contents
3
Page 4

Precautions
This product has been designed with the highest concern for safety. However, any
electrical device, if used improperly, has the potential for causing fire, electrical
shock or personal injury. To help ensure accident-free operation, follow these
guidelines:
• Observe all warnings, precautions and instructions.
• Stop use and unplug the AC power cord from the electrical outlet immediately if
the device functions in an abnormal manner or produces unusual sounds or smells.
• Contact the appropriate PlayStation® customer service helpline which can be
found within every PlayStation® and PlayStation®2 format software manual if the
device does not operate properly.
Safety
• Do not remove the console exterior or disassemble the console. The laser beam
emitted from the lens of this unit may be harmful to the eyes.
• Do not use the console near water.
• Keep the console and all connecting cords and cables out of the reach of children.
• Do not touch the plug of the AC power cord with wet hands.
• Do not touch the console or connected accessories during an electrical storm.
• Do not touch the console or AC adaptor for extended periods of time while the
console is turned on as extended contact may cause low-temperature burns.
• Do not place the console and connected accessories on the floor or in a place where
they may cause persons walking by to trip or stumble.
• Adjust the settings of the DVD player according to the instructions provided before
playing a DVD. If the settings are not correct, a loud sound may be emitted,
possibly injuring your ears or damaging the speakers.
• Do not touch a disc while it is spinning as personal injury or damage to the disc
may result.
• Do not close the disc cover in a way that could pinch your hand or fingers as
personal injury or damage to the console may result.
Health
• Stop using the console immediately if you experience any of the following
symptoms. If the condition persists, consult a doctor.
– Lightheadedness, nausea, or a sensation similar to motion sickness
– Tired, uncomfortable or aching hands or arms
– Tired, dry or aching eyes
• When operating the unit, play in a well-lit room and keep a safe distance from the
TV screen.
• Avoid prolonged use of the console. Take a break of about 15 minutes during every
hour of play.
• Do not use the console when you are tired or short of sleep.
• Listening to sound continuously for a long time with a high volume may adversely
affect the ears. Be careful especially when using headphones. Adjust the volume
so that surrounding sounds can be heard.
4
Precautions
Page 5

Use and handling
• Do not throw or drop the console or accessories, or expose them to strong physical
shock.
• Do not place the console or accessories on surfaces that are unstable, tilted or
subject to vibration.
• Do not expose the console or accessories to high temperatures, high humidity or
direct sunlight (use in an environment where temperatures range from 5 °C to
35 °C).
• Do not place the console or accessories in locations subject to sudden temperature
change (for example, changes of 10 °C per hour or more).
• Do not leave the console or accessories in a car with its windows closed
(particularly in summer).
• Do not place the console in locations of poor ventilation such as small, enclosed
areas, directly against a wall or on a thick carpet or bedding.
• Do not expose the console to dust, smoke or steam. This can cause the console to
malfunction.
• Do not allow liquid or small particles to get into the console.
• Do not put any objects on the console.
• Do not touch, or insert foreign objects into the connectors of the console or
accessories.
• Do not place the console close to magnetic fields produced by magnets or
loudspeakers.
• Do not set the console other than in the vertical or horizontal position. When
placing in the vertical position, use the Vertical Stand (for PlayStation®2) (sold
separately) that is compatible with this console. Also, do not change the position
while the console is turned on.
AC adaptor and AC power cord use
• To help ensure safe operation, regularly inspect the AC adaptor and AC power
cord. If damaged, stop use immediately and contact the appropriate PlayStation®
customer service helpline which can be found within every PlayStation® and
PlayStation®2 format software manual.
• Do not use a power cord other than the supplied AC adaptor and AC power cord.
• Check that there is no dust or lint on the power plug before inserting into an
electrical outlet. If the plug becomes dirty, wipe it off with a dry cloth before
connecting.
• Unplug the AC power cord from the electrical outlet before cleaning or moving the
console, or when you do not intend to use the console for an extended period of
time.
When disconnecting, grasp the power cord by the plug and pull straight out of the
electrical socket. Never pull by the cord and do not pull out at an angle.
• Do not connect the AC adaptor and/or AC power cord to a voltage transformer or
inverter.
Notes on safety when using the Analog Controller
(DUALSHOCK®2)*
• Stop using the console immediately if you begin to feel tired or if you experience
discomfort or pain in your hands or arms while operating the Analog Controller
(DUALSHOCK®2). If the condition persists, consult a doctor.
• The Analog Controller (DUALSHOCK®2) is intended for use with the hands only.
Do not bring it into contact with your head, face or the bones of any other part of
the body.
• The vibration function of the Analog Controller (DUALSHOCK®2) can aggravate
injuries. Do not use the vibration function if you have any ailment or injury to the
bones, joints or muscles of your hands or arms. Note that some PlayStation®2 and
PlayStation® format software titles set the vibration function to "On" by default. In
most cases, the vibration function can be set to "Off" in the options menu of the
software. Do not play such titles using the Analog Controller (DUALSHOCK®2)
unless you have set the vibration function to "Off".
• Avoid prolonged use of the Analog Controller (DUALSHOCK®2). Take a break
at about 30-minute intervals.
* These notes also apply to other controllers.
GB
Precautions
5
Page 6

Connecting with a network cable
Do not connect network cables or telephone cords of the following types to the
network connector:
• Standard residential telephone lines
• Network cables not appropriate for use with a 10Base-T/100Base-TX network
• Any ISDN (digital) compatible phone or data line
• PBX phone lines
• Other "unknown" types of telephone lines
Disc handling
• Do not touch the disc surface when handling a disc; hold it by the edges.
• Do not stick paper or tape onto discs and do not write on discs.
• Fingerprints, dust, dirt or scratches on the disc can distort the picture or reduce
sound quality. Always handle carefully and make sure discs are clean before use.
• Do not leave discs near a heat source, in direct sunlight or in high humidity.
• Store discs in their cases when not in use.
• Clean discs using a soft cloth, lightly wiping from the centre outwards.
Do not use solvents such as benzine, commercially available cleaners not intended
for CDs or anti-static spray intended for vinyl LPs.
• Do not leave a disc in the console when moving or changing the position of the
console.
• Do not use irregularly shaped discs (for example, heart- or star-shaped discs) or
damaged, re-shaped or repaired discs.
Never disassemble the console or supplied accessories
Use the PlayStation®2 console and accessories according to the instructions in this
manual. No authorisation for the analysis or modification of the console, or the
analysis and use of its circuit configurations, is provided. There are no userserviceable components inside the PlayStation®2 console. Disassembling the
console will void the guarantee. Additionally, there is a risk of exposure to laser
radiation as well as to electrical shock hazards.
When connecting the console to a plasma or projection* TV
Do not leave a still image on the TV screen for an extended period of time, as this
may leave a faint image permanently on the screen.
* Except LCD screen types.
Moisture condensation
If the console or disc is brought directly from a cold location to a warm one, moisture
may condense on the lens inside the console or on the disc. Should this occur, the
console may not operate properly. In this case, remove the disc and turn off and
unplug the console. Do not put the disc back in until the moisture evaporates (this
may take several hours). If the console still does not operate properly, contact the
appropriate PlayStation® customer service helpline which can be found within every
PlayStation® and PlayStation®2 format software manual.
Cleaning
• For safety reasons, before cleaning the console or connected accessories, 1) turn
off the console, 2) disconnect the power plug for the console from the electrical
outlet, and 3) remove the network cable from the network connector.
• When cleaning the console, use a soft, dry cloth. Do not use paint thinner, solvents,
other chemicals or a chemically-treated dust cloth to clean the product.
• When dust accumulates in the console vents, remove the dust with a low-powered
vacuum cleaner.
• Do not touch the lens located inside the disc cover. To help protect the lens from
dust, keep the disc cover closed except when inserting or removing discs.
Exterior protection
To help prevent damage to the painted parts, follow the precautions below:
• Do not spill liquids such as alcohol, benzine, paint thinner or other chemicals on
the product.
• Do not place any rubber, vinyl or plastic items on the painted surfaces for an
extended period of time.
6
Precautions
Page 7

Preparation
Positioning the console
Getting started
Checking the package contents
Check that you have all of the following items. If any items are missing,
contact the appropriate PlayStation
be found within every PlayStation
manual.
s PlayStation®2 console...1 s Analog Controller
s AC adaptor...1
® customer service helpline which can
® and PlayStation®2 format software
(DUALSHOCK
s AV Cable (integrated
audio/video)...1
s AC power cord...1s Euro-AV connector plug...1
®2)...1
You can place the console in either the horizontal or vertical position.
Horizontal position
Set the console horizontally.
Vertical position
When setting the console in the vertical
position, use the SCPH-70110 E Vertical
Stand (for PlayStation
Note
Some Vertical Stands (for PlayStation®2) cannot be used with this model of the
PlayStation®2 console ( page 46). Choose the SCPH-70110 E when purchasing a
Vertical Stand.
®2) (sold separately).
GB
Preparation
Preparation
s Instruction Manual...1
Getting started
7
Page 8

Caution
RESET
Do not place the console in locations where it may be exposed to the following
conditions:
• Places subject to excessive cigarette smoke or dust. Cigarette smoke residue
or dust build-up on the internal components, such as the lens, may cause the
console to malfunction.
• Places subject to extreme temperatures, in direct sunlight, near a heat source,
or in a car with its windows closed (particularly in summer). These conditions
may warp the exterior of the console or cause the console to malfunction.
• Places close to magnetic fields, such as those produced by magnets or
loudspeakers.
• Places subject to vibration.
Part names
PlayStation®2 console front
Disc cover
A (open) button
MEMORY CARD slot 2
]/1 (on/standby) indicator
]/1 (on/standby)/RESET button
8
Part names
MEMORY CARD slot 1
Controller port 1
Controller port 2
* The " " product family logo can be rotated to match the horizontal or vertical
positioning of the console.
" " product family logo*
IR receiver
Front vent
USB connector
Note
You can connect USB devices that are compatible with the PlayStation®2 console.
Note, however, that not all USB-compatible products work with the PlayStation®2
console. Refer to the instructions supplied with the device to be connected for more
information.
Page 9

PlayStation®2 console rear
Connecting to a TV
Rear vent
Before connecting
! DC IN 8.5V
NETWORK connector
DIGITAL OUT
(OPTICAL) connector
Note
For part names of the Analog Controller (DUALSHOCK®2), see "Using the Analog
Controller (DUALSHOCK®2)" ( page 17).
AV MULTI OUT connector
connector
• Do not plug the AC power cord for the console into the electrical outlet
until you have made all other connections.
• Check that the TV is turned off.
Connecting to a TV using the supplied AV Cable
Connect the console to the TV as shown below.
Console rear
Audio and video inputs of the TV
VIDEO L-AUDIO-R
White RedYellow
AV Cable (integrated audio/video)
Do not use when
connecting to a
monaural TV.
To the AV MULTI
OUT connector
GB
Preparation
Preparation
Connecting to a TV
9
Page 10

Caution
If you display a still image on a plasma or projection* TV screen for an extended
period of time, "ghosting" may occur. This is a characteristic of these types of
TVs. Static, non-moving images, such as console setting menus, DVD menus or
paused images, may leave a faint image permanently on the TV screen if left on
for an extended time. Refer to the instructions supplied with your TV for details.
* except those of LCD screen types
Note
The console can be connected to a VCR or an integrated TV/VCR. Note, however,
that if you play a DVD with copy-protection encryption, picture quality may be
reduced.
Connecting to a TV with a Euro-AV connector
using the Euro-AV connector plug
Connect your PlayStation®2 console to the Euro-AV connector (SCART)
on the TV using the Euro-AV connector plug and AV Cable (integrated
audio/video), making sure you match the colour-coded plugs of the AV
Cable to the matching jacks of the connector plug.
Console rear
Euro-AV
connector plug
To AV MULTI
To Euro-AV
connector
AV Cable (integrated audio/video)
After connecting
Set your TV to the appropriate video input mode. Refer to the Instruction
Manual of your TV.
OUT connector
Connecting to a TV
10
Page 11

When using cables sold separately
Picture quality differs depending on the type of cable used. Use the
information below to determine the best connection method.
If you use a cable sold separately, refer to the instructions supplied with the
cable.
TV Cable type
A TV with S VIDEO inputs S VIDEO Cable (SCPH-10060 E)
A TV without video inputs RFU Adaptor (SCPH-10072 C)
A TV with Euro-AV (SCART)
connector
A TV with component video
input connectors
Euro-AV Cable (SCPH-10142)
Component AV Cable (for PlayStation®2)
(SCPH-10100 E)
Notes
• The DVD player's progressive scan mode is only available when playing a disc
recorded in NTSC format, and viewed on a TV that supports progressive scan
(480p).
• You cannot connect the console to a TV with component video inputs that are
exclusively for HDTV use (Y PB PR). Refer to the instructions supplied with your
TV for details.
GB
Preparation
Preparation
Picture quality scale
x AV Cable (supplied) x S VIDEO Cable x Component AV Cable
x RFU Adaptor
This scale is intended only as a reference. Depending on the product or
condition of your TV, the picture quality may be different.
When using the Euro-AV Cable, picture quality may vary depending on your
TV's AV connection.
For optimum picture quality, connect your Euro-AV cable to an RGBcompatible socket on your TV. Refer to the instructions supplied with your TV
for details.
High quality
Connecting to a TV
11
Page 12
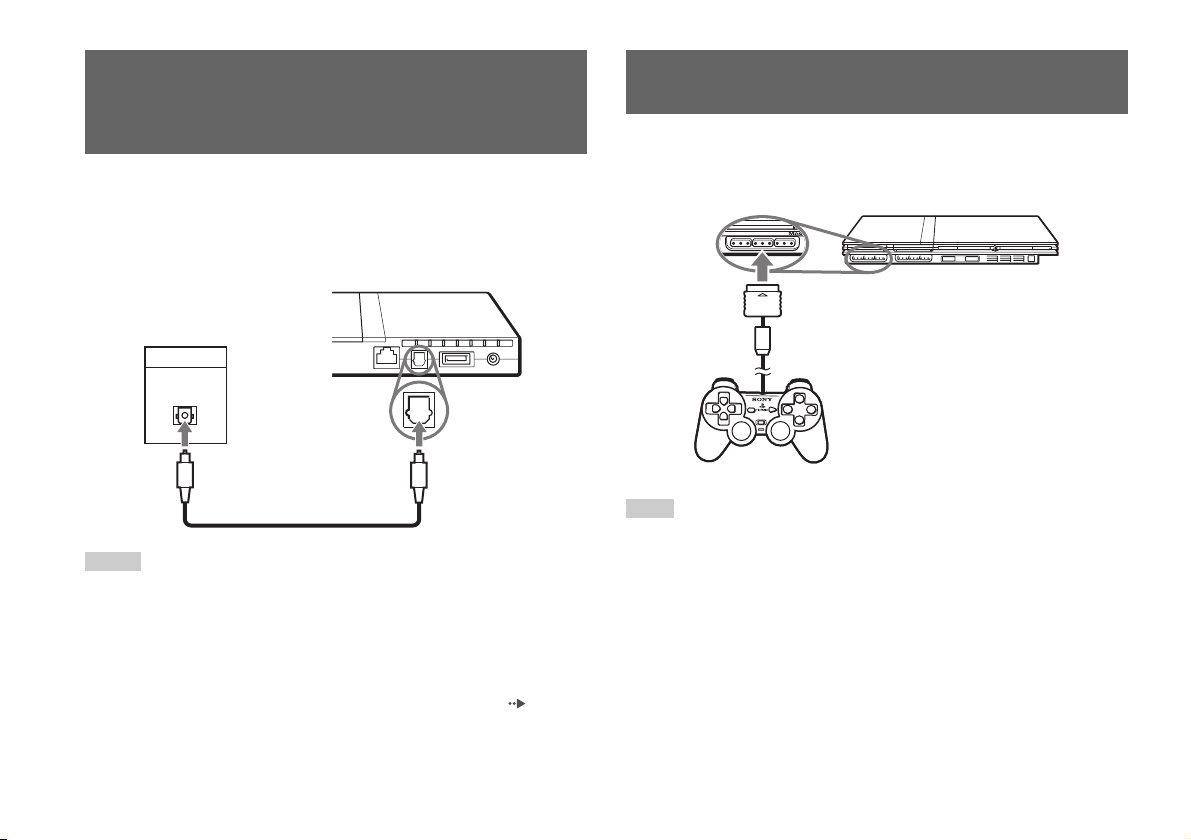
Connecting digital audio
MEMORY CARD
equipment
By using a commercially available optical digital cable, you can enjoy
surround sound with the effect of being in a movie theatre or a concert hall.
When connecting the console to audio equipment with digital connectors,
refer to the instructions supplied with the device to be connected.
Console rear
Connected device
DIGITAL IN
OPTICAL
Connecting the controller
1 Insert the Analog Controller (DUALSHOCK®2) into a controller
port of the console.
Console front
Notes
• If you connect the console to audio equipment using an optical digital cable, it may
affect the audio output of some PlayStation®2 format software with the result that
no sound is produced. If this happens, use a cable such as the supplied AV Cable
(integrated audio/video) and connect it to the console's AV MULTI OUT
connector. Do not use an optical digital cable.
• After connecting digital audio equipment, set "Digital Out (Optical)" to "On" in the
System Configuration menu. For details, see "Digital Out (Optical)" ( page 37).
Connecting digital audio equipment
12
Commercially available optical
digital cable
Analog Controller
(DUALSHOCK
Note
Some software titles designate a specific controller port to be used. Refer to the
instructions supplied with the software for details.
®2)
Page 13

Connecting the AC adaptor and
RESET
AC power cord
3 Plug the AC power cord into the electrical outlet.
Console rear
Warnings
• The socket-outlet shall be installed near the equipment and shall be easily
accessible.
• Do not plug the AC power cord for the console into the electrical outlet until you
have made all other connections.
1 Connect the AC power cord to the AC adaptor.
AC adaptor
AC power cord
2 Plug the connector of the AC adaptor into the ! DC IN 8.5V
connector on the console rear.
Console rear
! DC IN 8.5V connector
AC adaptor
AC power cord
The =/1 (on/standby) indicator on the console front will light up in red
to indicate that the console is in standby mode.
Console front
Connecting the AC adaptor and AC power cord
To the electrical outlet
Some regions and countries may
use a different electrical outlet
plug from the one illustrated.
]/1 indicator
GB
Preparation
Preparation
13
Page 14

Turning the console on and off
RESET
RESET
Before turning on the console
Do not turn on the console until you have finished these steps. Refer to the
instructions supplied with your TV for details.
• Turn on the TV.
• Change your TV setting to display output from the line to which the
console is connected.
Turning on the console
1 Check that the =/1 (on/standby) indicator on the console
front is lit up in red.
2 Press the =/1 (on/standby)/RESET button on the console
front.
The =/1 indicator on the console front will turn green and output from
the console will be displayed on the TV.
=/1/RESET button
Console front
=/1 indicator
Notes
• The first time you turn on the console after purchase, screens for setting
"Language", "Time Zone" and "Daylight Savings Time (Summer Time)" will be
displayed. Follow the on-screen instructions to complete the settings.
• If you connect the console to a wide-screen TV, set "Screen Size" in the System
Configuration menu ( page 37).
Turning off the console
1 Press and hold the =/1/RESET button on the console front for
more than a second.
The =/1 indicator will turn red to indicate that the console has entered
standby mode.
=/1/RESET button
Console front
Warning
The power is not completely turned off when the console is in standby mode. If
you do not plan to use the console for an extended period of time, unplug the
AC power cord from the electrical outlet.
=/1 indicator
Turning the console on and off
14
Page 15

Games
Playing a game
Disc cover
=/1/RESET buttonA (open) button
Before playing a game Starting a game
Place the disc in the console with the label
side facing up.
Place the disc so that all three tabs
are above the disc's surface.
GB
Games
Check that the connections to the TV and audio equipment are correct and
that the precautions have been met.
• "Precautions" ( page 4)
• "Connecting to a TV" ( page 9)
• "Connecting the controller" ( page 12)
• "Connecting the AC adaptor and AC power cord" ( page 13)
Note
To play online games, you first need to connect to and set up a network. See
"Connecting to a network" ( page 42) for details.
1 Turn on the console ( page 14).
The main menu is displayed ( page 35).
2 Press the A (open) button on the console front.
The disc cover opens.
3 Place the disc in the console.
Set the disc in the disc holder with the label side facing up.
Playing a game
15
Page 16
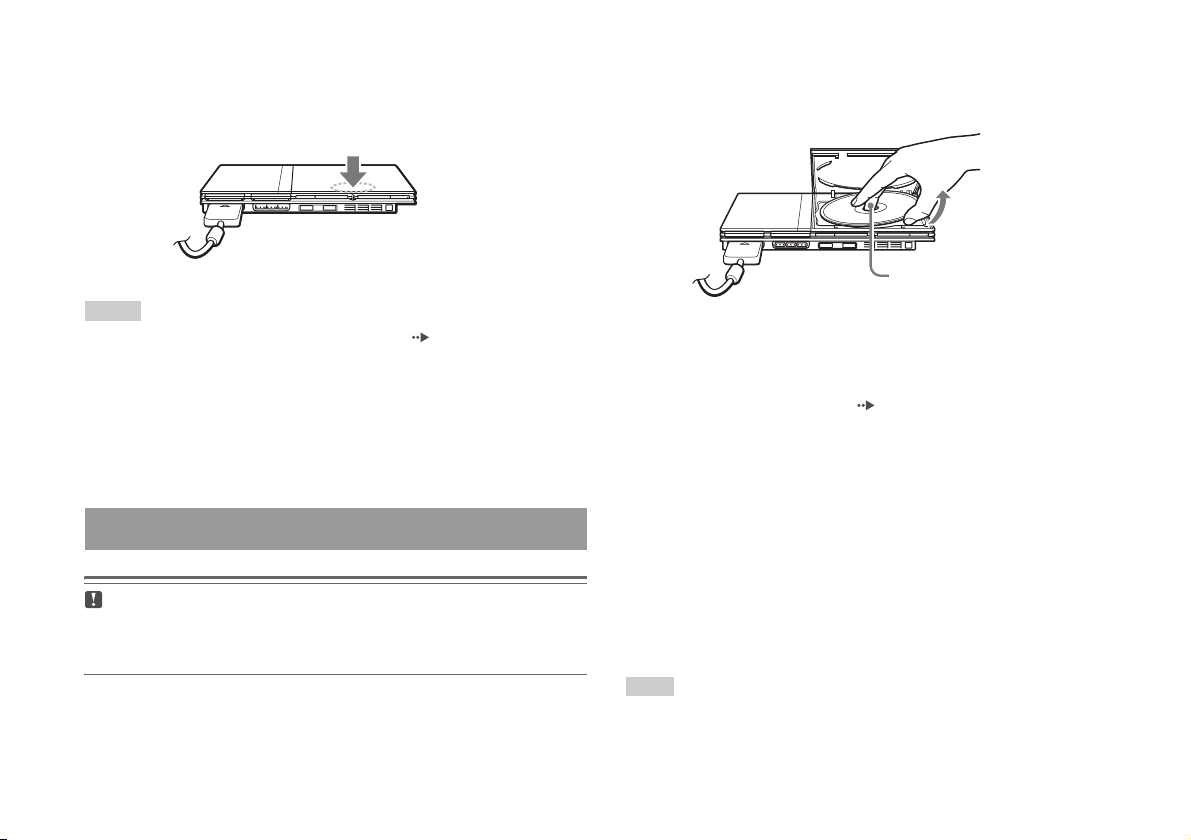
4 Close the disc cover.
Push the middle of the disc cover. After the disc cover is closed, the
game will start.
Push the middle of the disc cover.
Notes
• You can also start a game from the Browser screen ( page 35).
• If you turn on the console after inserting a disc, the game will start automatically.
To reset a game
Press the \/1 (on/standby)/RESET button on the console front. Do not
accidentally press the @/1/RESET button while playing a game, as doing
so will cause the game to reset.
Ending a game
Caution
When removing a disc, check that the disc has stopped completely. Do not touch
the disc if it is spinning, as doing so may cause injury, damage to the disc or
console malfunction.
1 Press the A button on the console front.
2 Remove the disc.
Hold down the black centre part of the console, and then lift the disc
by the edges.
Press the black centre part
of the disc holder.
3 Close the disc cover.
4 Press the =/1/RESET button.
The main menu is displayed ( page 35).
Changing game discs
1 Open the disc cover and remove the disc.
When removing a disc from the console, hold down the black centre
part of the disc holder and then lift the disc by the edges.
2 Insert a disc.
3 Close the disc cover and reset the console.
The new game will start.
Note
You do not need to turn off the console when changing games.
Playing a game
16
Page 17
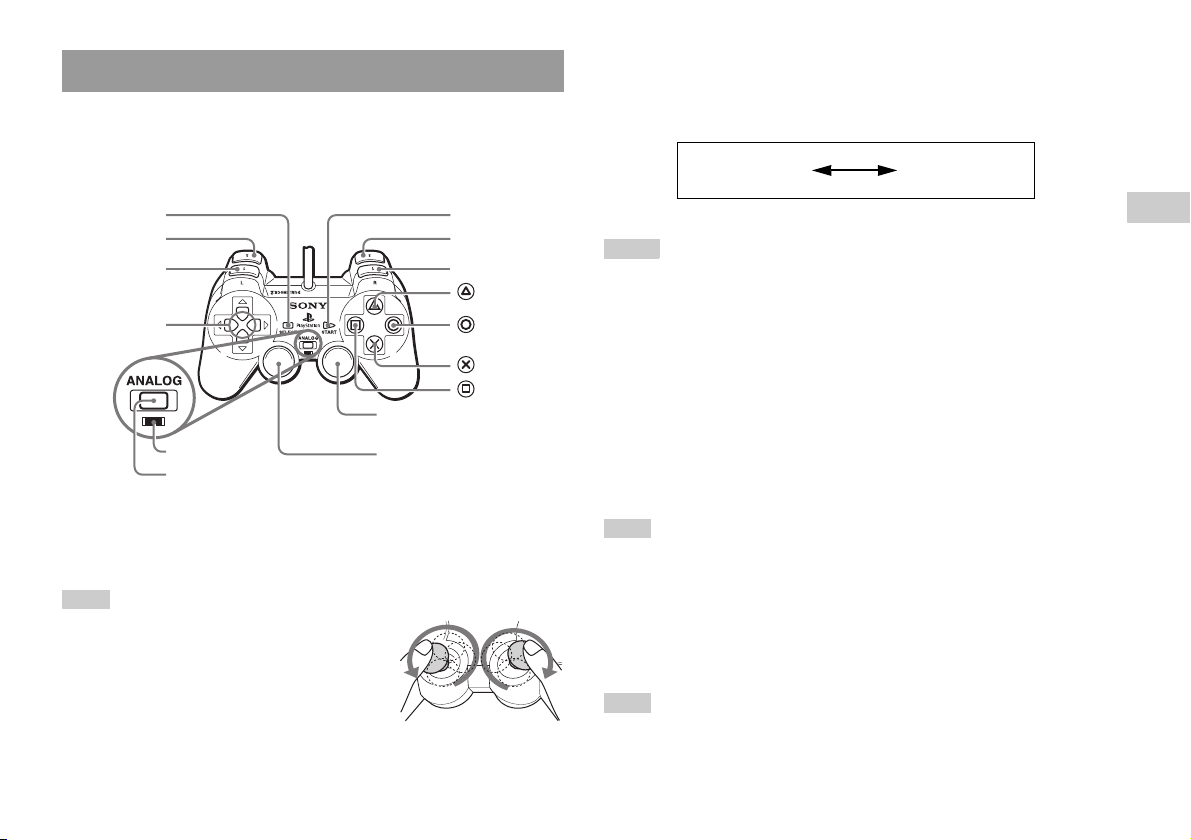
Using the Analog Controller (DUALSHOCK®2)
The Analog Controller (DUALSHOCK®2) is equipped with a pressuresensitive button function. It also has a vibration function.
Part names
SELECT button
L2 button
L1 button
Directional
buttons
Right analog stick/ R3 button*
Mode indicator
ANALOG mode button
* The left and right analog sticks, or the L3 and R3 buttons, function only in analog
mode (indicator: red).
* The L3 and R3 buttons function when the analog sticks are pressed.
Left analog stick/ L3 button*
Note
Before using the Analog Controller
(DUALSHOCK®2), with the console turned on,
rotate the left and right analog sticks once with your
thumbs before starting a game. Do not twist the
analog sticks, but rotate as if drawing a circle as
shown in the diagram.
START button
R2 button
R1 button
button
button
button
button
About mode switching
The ANALOG mode button can be used to switch between two modes.
Switch to the appropriate mode for use. Note, however, that some software
titles make this adjustment automatically.
Digital mode
(indicator: off)
Analog mode
(indicator: red)
Notes
• When using the Analog Controller in digital mode, the left and right analog sticks
do not function. Also, the pressure-sensitive button function is turned off.
• Depending on the software, you may not be able to switch modes even if you press
the ANALOG mode button.
About analog controls
• When playing a PlayStation®2 format software title, you can use all
buttons in analog mode except for the START, SELECT, L3 and R3
buttons.
• When playing a PlayStation
® format software title, only the left and right
analog sticks can be used in analog mode.
Note
Depending on the software, the buttons for use in analog mode may be limited. Refer
to the instructions supplied with the software for details.
About the vibration function
The vibration function can be set to ON or OFF in the software options
menu.
Note
Depending on the software, the vibration function may be set to "On" automatically.
GB
Games
Playing a game
17
Page 18

About using the Analog Controller (DUALSHOCK®)
(SCPH-110 E)
Using Memory Cards
You can use the Analog Controller (DUALSHOCK®) (SCPH-110 E) with
the PlayStation
may be different from those of the Analog Controller (DUALSHOCK
®2 console, but the functions of the buttons in analog mode
®2).
Only the left and right analog sticks can be used in analog mode.
Note
Not all PlayStation®2 format software titles support the use of the Analog Controller
(DUALSHOCK®) (SCPH-110 E). The Analog Controller (DUALSHOCK®2)
should be used in such cases.
You can save and load game data using a Memory Card. You can also
delete game data or copy game data from one Memory Card to another.
About Memory Card types
There are two types of Memory Cards. Select a Memory Card suitable for
the software in use.
Memory Card type Compatible software Amount of memory
Memory Card (8MB)
(for PlayStation®2)
(SCPH-10020 E)
Memory Card
(SCPH-1020 E)
Note
The Memory Card (8MB) (for PlayStation®2) uses "MagicGate", a technology that
helps protect copyrighted content through data encryption and hardware
authentication.
by Sony Group.
bearing the "MagicGate" trademark.
PlayStation®2 format
software
PlayStation® format
software
Approx. 8 MB
15 memory blocks
(approx. 120 KB)
is a term of copyright protection technology developed
does not guarantee compatibility with other products
Using Memory Cards
18
Page 19

Inserting a Memory Card
MEMORY CARD
Insert the Memory Card into a MEMORY CARD slot on the console front.
Console front
3 Select "Copy" or "Delete", and then press the button.
When copying game data, check that two Memory Cards are inserted
in the console. If you have selected "Delete", skip to step 5.
4 Select the destination, and then press the button.
Note
Some software titles designate a specific MEMORY CARD slot to use. Refer to the
instructions supplied with the software for details.
Saving or loading game data
Depending on the software, the procedure for saving or loading may vary.
Refer to the instructions supplied with the software for details.
Copying or deleting game data
1 At the Browser screen ( page 35), use the directional
buttons to select the icon for the Memory Card you want to
use for copying or deleting data and then press the
button.
2 Select the icon for the data you want to copy or delete, and
then press the button.
5 Select "Yes", and then press the button.
While copying or deleting data, do not remove the Memory Cards.
6 When copying or deleting is completed, press the button.
Notes
• To view information about a game data item, select the icon for the data and then
press the button to check the details.
• Compatibility between software and Memory Cards:
– You cannot save or copy PlayStation®2 format software to a Memory Card
(SCPH-1020 E).
– You cannot save PlayStation® format game data to a Memory Card (8MB) (for
PlayStation®2). You can, however, copy PlayStation® format game data from a
Memory Card (SCPH-1020 E) to a Memory Card (8MB) (for PlayStation®2) for
storage purposes. Note that such game data cannot be loaded directly from a
Memory Card (8MB) (for PlayStation®2).
GB
Games
Using Memory Cards
19
Page 20

Audio CDs
Operating the CD player during playback
Playing an audio CD
Playing a CD
1 Turn on the console and insert the disc ( page 15).
Follow steps 1 to 4 of "Starting a game".
The track numbers are displayed.
2 Using the directional buttons, select the track number you
want to play and then press the button.
Playback begins.
Notes
• If you turn on the console after inserting a disc, the track numbers are displayed
automatically.
• You can also start playback from the Browser screen ( page 35).
Caution
To play an audio CD recorded in DTS format, you must connect a device with
a DTS decoder to the DIGITAL OUT (OPTICAL) connector ( page 12).
Note that an extremely loud noise may be emitted if the device does not have a
DTS decoder or if it is connected to the AV MULTI OUT connector.
Using the directional buttons, select the icon for the desired track and then
press the button.
Icon (button*) Function
. (L1 button) Go to the beginning of the current or previous track
m (L2 button) Fast reverse
M (R2 button) Fast forward
> (R1 button) Go to the beginning of the next track
N (START button) Start playback
X (START button) Pause playback
x (SELECT button) Stop playback
* You can operate directly by pressing the buttons of the Analog Controller
(DUALSHOCK®2).
Note
You can also use the DVD Remote Control (for PlayStation®2) (sold separately).
Ending audio CD playback
1 Using the directional buttons, select x and then press the
button.
Playback stops. Press the A (open) button on the console front to
remove the disc.
Playing an audio CD
20
Page 21

Playing in various modes
You can set for "Play Mode" and "Repeat".
5 Select the audio CD icon, and then press the button.
The track numbers are displayed, and the setting option is shown in the
lower left of the screen.
Play Mode Normal Plays tracks as recorded on the CD
Program Plays tracks in a specified order
Shuffle Plays tracks in a random order
Repeat Off Does not play the CD repeatedly
All Plays all tracks repeatedly
1 Plays a track repeatedly
1 At the Browser screen ( page 35), use the directional
buttons to select the audio CD icon and then press the
button.
The Play Options screen is displayed.
2 Select "Play Mode" or "Repeat", and then press the
button.
3 Select the desired setting, and then press the button.
If you select "Program", the screen for specifying track order will be
displayed. Select the tracks you want to play.
4 Press the button.
The Browser screen is displayed.
6 Select the desired track, and then press the button.
Playback begins.
Notes
• You can also access the Play Options screen from the screen displaying the tracks
by selecting the Audio CD icon in the upper left corner of the screen and pressing
the button.
• You can set "Play Mode" and "Repeat" at the same time.
GB
Audio CDs
Playing an audio CD
21
Page 22

DVDs
Using the Control Panel
Watching a DVD
You can operate the DVD player using the following methods.
• Using the on-screen Control Panel
• Operating directly using the Analog Controller (DUALSHOCK
• Using the DVD Remote Control (for PlayStation
The following instructions assume use of the Control Panel to operate the
DVD player. Some operations may be different depending on the method
used.
Notes
• For details about playing a DVD, refer to the instructions supplied with the DVD.
• The PlayStation®2 console plays disc content as recorded in the DVD software.
Note that not all features are available on all DVDs.
®2) (sold separately)
®2)
1 Start playback of the DVD ( page 24).
2 Press the SELECT button.
The Control Panel is displayed. If you press the SELECT button again,
the display will change its position on the screen.
3 Using the directional buttons, select an icon and then press
the button.
Note
To turn off the Control Panel, press the SELECT button (once or twice), or press the
button.
Control Panel item list
You can access the following options in the Control Panel.
Icon Function
Menu Displays the DVD-Video menu
Watching a DVD
22
Top Menu Displays the DVD-Video menu
Page 23

Icon Function
O
0~9
Return
Audio Options
Angle Options
Subtitle Options
Go To
Setup
Time Display
Help
Go to Chapter
./> Previous/Next
/Search
/Slow
Returns to the previously selected screen
within the DVD's menu
Displays and changes audio options on
DVDs with multiple audio tracks
Displays and changes viewing angles on
DVDs recorded with multi-angle options
Displays and changes subtitle options on
DVDs with subtitle options
Skips to the selected title, chapter or the
specified time, and starts playback
( page 24)
Displays and changes options for
language, picture quality, Parental Control
level, audio, etc. ( page 28)
Displays the current title or chapter
number, the elapsed time, etc.
( page 25)
Displays the direct button functions of the
Analog Controller (DUALSHOCK
Used to enter the number of a chapter you
want to play ( page 24)
Returns/skips to the beginning of the
current, previous or next chapter
Fast reverses/forwards playback on the
screen to help you find a particular scene
( page 25)
Changes to playback/reverse playback in
slow-motion
®2)
Icon Function
N
X
x
Play Starts playback
Pause Pauses playback
Stop Stops playback ( page 24)
A-B Repeat
Shuffle Play
Program Play
Repeat Play
Original/Play List
Clear
Specifies a scene for playback, and starts
playback of the scene that has been set
( page 27)
Begins playback of titles or chapters in a
random order ( page 27)
Begins playback of titles or chapters in a
programmed sequence ( page 26)
Selects repeated playback of all the titles
on the disc, or one title or one chapter
( page 27)
For DVD-RW discs (VR mode), selects
Original or Play List content to play
( page 26)
Clears selected numbers or playback
modes ( page 28)
Notes
• You can use " " to check the options that can be accessed directly using the
buttons of the Analog Controller. To access the options directly using the
controller, you must clear the Control Panel from the screen.
• Depending on the playback mode, some options may not be available or cannot be
adjusted.
GB
DVDs
Watching a DVD
23
Page 24

Playing a DVD
Selecting a specific scene for playback
1 Turn on the console and insert a disc ( page 15).
Follow steps 1 to 4 of "Starting a game". Playback begins.
Notes
• If you turn on the console after inserting a disc, playback will begin automatically.
• You can also start playback from the Browser screen ( page 35).
Ending DVD playback x
1 During playback, select x in the Control Panel ( page 22)
and then press the button.
Playback stops. Press the A (open) button on the console front, and
then remove the disc.
Playing a DVD from the last stopping point
(Resume Play)
1 During playback, select x in the Control Panel ( page 22)
and then press the button.
2 Select N, and then press the button.
Playback begins from the point where you stopped the disc in step 1.
To clear Resume Play
After step 1, select x and then press the button.
Selecting a scene by chapter number
1 During playback, select the desired chapter number in the
Control Panel ( page 22) and then press the button.
Playback of the selected chapter begins. If you want to play a chapter
with a single digit number (i.e. 1-9), enter a leading zero. For example,
enter as "01".
Selecting a scene by title number, chapter number or by
specifying the time
1 During playback, select in the Control Panel
( page 22) and then press the button.
2 Select an item, and then press the button.
Title Specifies the title number
Chapter Specifies the chapter number
C XX:XX:XX
(or T XX:XX:XX)
Specifies the elapsed time for the chapter (or title)
3 Select the numbers for the desired scene, and then press the
button.
Playback of the selected chapter begins.
Watching a DVD
24
Page 25

Finding a particular point on a DVD (Search) Displaying playback information
You can display information such as the current title number or elapsed
You can search either forwards or backwards to quickly locate a particular
point on a DVD.
1 During playback, select or in the Control Panel
( page 22) and then press and hold the button.
Search speed changes as shown below when you press either the up or
down directional button while holding down the button.
• Search 3
• Search 2
• Search 1
•Slow
2 Release the button when you reach the point you are
searching for.
Playback returns to normal speed.
Note
To use the Analog Controller to Search during playback, press and hold down the L2
or R2 button to begin searching. Use the directional buttons to change speeds.
Release the L2 or R2 button when you reach the point you are searching for.
time.
1 During playback, select in the Control Panel
( page 22) and then press the button.
The display changes as shown below each time you press the
button.
Title X Chapter X Title number and chapter number
Title X Chapter X C XX:XX:XX Elapsed time of current chapter
Title X Chapter X C - XX:XX:XX Remaining time of current chapter
Title X Chapter X T XX:XX:XX Elapsed time of current title
Title X Chapter X T - XX:XX:XX Remaining time of current title
(Off)
GB
DVDs
Watching a DVD
25
Page 26

Selecting Original or Play List for DVD-RW
playback
Using the playback modes
When using a DVD-RW disc (VR mode), you can select the type of titles
you want to play.
1 With playback stopped, select in the Control Panel
( page 22) and then press the button.
Original and Play List will be selected in turn each time you press the
button.
Original Plays content in the originally recorded sequence
Play List Plays edited content. Play List is the default setting.
Notes
• Slow-motion play in reverse is not available for DVD-RW discs (VR mode).
• You cannot use this function with Resume Play. Clear Resume Play ( page 24)
before selecting this feature.
Using the various playback modes, you can play titles or chapters in the
order you want or repeat playback of a specific scene. There are four
playback modes:
• Program Play ( page 26)
• Shuffle Play ( page 27)
• Repeat Play ( page 27)
• A-B Repeat ( page 27)
The following instructions assume use of the Control Panel ( page 22)
to operate the DVD player.
Notes
• You can play combinations of Program Play, Shuffle Play, and Repeat Play. Note,
however, that some Shuffle Play or Repeat Play options may not be available
depending on the combination.
• The PlayStation®2 console plays disc content as recorded in the DVD software.
Program Play
You can create programmes to play titles and chapters in any order.
1 During playback, select in the Control Panel
( page 22) and then press the button.
2 Select a programme number, and then press the button.
If no programmes have been set, the only option will be "1. Title".
Using the playback modes
26
3 Select the title number, and then press the button.
Page 27

4 Select the chapter number, and then press the button.
To play all the chapters, select "All". Repeat steps 2 to 4 to set other
titles or chapters.
Repeat Play
You can set this option to play titles or chapters repeatedly.
5 Press the START button.
Program Play begins.
Note
The setting will not be cleared after Program Play finishes.
Shuffle Play
You can set this option for random playback of all titles or chapters
recorded on a disc. Playback order will be different each time Shuffle Play
is used.
1 Select in the Control Panel ( page 22), and then
press the button.
The display changes as shown below each time you press the
button.
Title Shuffle Plays titles in random order
Chapter Shuffle Plays chapters in random order
Shuffle Off Clears Shuffle Play
2 Select N, and then press the button.
1 Select in the Control Panel ( page 22), and then
press the button.
The display changes as shown below each time you press the
button.
Disc Repeat Repeats playback of all titles
Title Repeat Repeats playback of one title
Chapter Repeat Repeats playback of one chapter
Repeat Off Clears Repeat Play
2 Select N, and then press the button.
A-B Repeat
You can set a specific scene to be played repeatedly.
1 During playback, select in the Control Panel
( page 22) and then press the button at the point you
want to start repeated playback.
The starting point (point A) is set.
2 Press the button at the point you want to end repeated
playback.
The ending point (point B) is set, and repeated playback of the section
from A to B begins.
GB
DVDs
Using the playback modes
27
Page 28
Clearing playback modes
Clears playback modes to allow normal playback.
Adjusting DVD player settings
1 Select in the Control Panel ( page 22), and then
press the button.
A message stating, "Play mode contents cleared", is displayed and the
console returns to normal playback.
Note
If multiple playback modes have been set in a combination, all playback modes are
cleared.
You can use the Control Panel to adjust DVD player settings, such as the
language for subtitles, audio language, and Parental Control level.
Notes
• Some DVDs do not support all settings. The PlayStation®2 console plays disc
content as recorded in the DVD software. If the DVD does not support the features
listed, you will not be able to change the settings.
• The following options are not available during playback or Resume Play
( page 24). Clear Resume Play before changing these settings.
– "Menu", "Audio" and "Subtitles" in Language Setup
– "TV Type" and "Progressive" in Screen Setup
– "Parental Control" in Custom Setup
– "DTS" and "Audio Track Auto Select Mode" in Audio Setup
You can change DVD player settings using the following procedure:
1 Select in the Control Panel ( page 22), and then press
the button.
The Setup icon bar is displayed.
2 Select the icon for the setting you want to change, and then
press the button.
The current setting for each item is displayed.
3 Select the desired item, and then press the button.
The menu option becomes active and can be selected.
Adjusting DVD player settings
28
Page 29

4 Select the desired setting, and then press the button.
The setting of the item is completed. For details, see the instructions
for each item ( pages 29 to 34).
Notes
• The default setting for each menu item is underlined in the explanations below.
• To return to the Control Panel after making settings, press the SELECT button.
• Settings are saved when you do any of the following:
– Stop playback (including stopping Resume Play)
– Open the disc cover
Setting TV display options
In the Screen Setup menu, you can set the screen size (aspect ratio) and
other options that affect picture quality.
TV Type
You can set the aspect ratio to match the screen of the connected TV.
16:9 Select this option when using a wide-screen TV or a standard
TV with special 16:9/wide-screen functionality.
GB
DVDs
Setting language options
In "Language Setup" you can choose the language for the DVD's menu,
audio and subtitles. Note that if you select a language that is not recorded
on the DVD, one of the recorded languages is selected automatically.
Menu Selects the language for the DVD's menu
Audio Selects the language for the DVD's audio track
Subtitles Selects the language for the DVD's subtitles
Note
If you select "Audio Follow" for subtitles, the subtitle language will automatically be
set to match the language selected for the DVD's audio track.
4:3 Letter Box Select this option when using a standard TV. This setting
displays a wide picture with margins on the upper and lower
portions of the screen.
4:3 PAN SCAN Select this option when using a standard TV. This setting
displays a picture adjusted to the height of the screen, cutting
off portions at left and right that do not fit.
Note
When you set "Progressive" to "On", "TV Type" is automatically set to "16:9".
Adjusting DVD player settings
29
Page 30

DNR (Digital Noise Reduction)
You can use this setting to help reduce roughness in the on-screen image
and produce a cleaner picture.
Off DNR is not used.
DNR1 Increases picture quality
DNR2 Increases picture quality (maximum)
Notes
• "DNR2" is more effective for reducing image roughness than "DNR1", but in some
cases an afterimage may appear. If this occurs, select "Off".
• The DNR function may produce limited results on some DVDs.
• When you set "Progressive" to "On", "DNR" is automatically turned off and cannot
be turned on.
Outline Sharpening
You can sharpen or soften the outline of the on-screen image. The higher
the value, the sharper the outline. Normally, select "0".
•-2 •-1 •0 •+1 •+2
Note
Depending on the DVD, Outline Sharpening may produce limited results.
Display
During playback, you can display playback status information in the top
right corner of the screen for a few seconds.
On Playback status information is displayed for a few seconds.
Off Playback status information is not displayed.
Progressive
You can display an image in which the picture updates all the lines in one
pass. In most cases, this results in a clearer, flicker-free image. This feature
is available only if your TV and AV Cable* support progressive scan
(480p).
* The Component AV Cable (for PlayStation®2) (sold separately) is compatible
with progressive scan.
On Select this option when the console is connected to a TV that supports
Off Select this option when the console is connected to a standard TV.
* The DVD player's progressive scan mode is only available when playing a disc
progressive scan (480p).*
recorded in NTSC format, and viewed on a TV that supports progressive scan
(480p).
Notes
• If picture quality is reduced or no image is displayed, set "Progressive" to "Off"
when the console is connected to a TV without the necessary equipment. If you
accidentally set this option to "On" for such a TV, picture quality may be reduced
or the picture may not be displayed. To clear the setting, follow these steps:
Check that you have a DVD in the console.
1
Press the \/1 (on/standby)/RESET button on the console front.
2
Then press and hold down the START button of the Analog Controller
(DUALSHOCK®2) in controller port 1 until the DVD picture is displayed.
The "Progressive" setting is returned to "Off", allowing the DVD-Video to
be displayed as normal. You can also cancel this setting using the "Clear
Progressive Setting" ( page 40) option in the Version Information
screen.
• DVDs can contain video-based and film-based material, which use different frame
rates. When playing video-based material using progressive scan, some images
may appear unnatural. If this occurs, set "Progressive" to "Off" and view in
standard interlace mode.
• When you set "Progressive" to "On", "TV Type" ( page 29) is automatically set
to "16:9".
Adjusting DVD player settings
30
Page 31

• DVD-RW disc (VR mode) content can only be viewed in standard interlace format.
The "Progressive" option is not available when playing such content.
3 Select "Region".
The list of region options is displayed.
Setting viewer options
Pause mode
You can use this option to set the picture status when playback is paused.
Auto A picture with moving elements is displayed without jitter. Normally
select this position.
Frame A picture without moving elements can be displayed at high resolution.
Parental Control
In some regions, the viewing of some DVD content may be restricted
based on viewer age or other factors. You can use the Parental Control
feature to restrict the level of content that may be viewed through your
console.
The lower the value, the stricter the restriction.
Setting Parental Control
1 Select "Parental Control", and then press the button.
The screen for registering a password is displayed. If a password has
already been registered, the screen for confirming the password is
displayed.
2 Select a number, and then press the button.
Repeat step 2 to enter a four-digit password. If you want to clear a
number, press the button. When registering a password, you are
required to enter it again for confirmation.
4 Select the region to base the Parental Control level on, and
then press the button.
If you select "Other", see "Region code list" ( page 32).
5 Select "Level", and then press the button.
The list of level options is displayed.
6 Select a restriction level, and then press the button.
To clear Parental Control
With DVD playback stopped, go to step 6 in "Setting Parental Control" and
set "Level" to "Off".
GB
DVDs
Adjusting DVD player settings
31
Page 32

Region code list
To enter a Parental Control region code, select "Other" in step 4 of "Setting
Parental Control" ( page 31). Use the directional buttons to select the
first letter, and then press the right directional button. Then select the next
letter and press the button.
2 Select a number, and then press the button.
Repeat step 2 to enter a four-digit password. You are required to enter
it again for confirmation.
Playing a disc restricted by Parental Control
Region Code Region Code
Austria AT Malta MT
Belgium BE Netherlands NL
Czech Republic CZ Norway NO
Denmark DK Poland PL
Finland FI Portugal PT
France FR Russia RU
Germany DE Slovakia SK
Greece GR Spain ES
Ireland IE Sweden SE
Israel IL Switzerland CH
Italy IT Turkey TR
Luxembourg LU United Kingdom GB
Changing your password
In step 2 of "Setting Parental Control" ( page 31), complete the
following steps:
1 Using the directional buttons, select "Change Password" and
then press the button.
The screen for changing the password is displayed.
1 Start playback of the DVD ( page 24).
You will be prompted to temporarily change the Parental Control level
to allow playback. This usually occurs immediately at disc start-up but
may also occur at different times depending on the DVD.
2 Using the directional buttons, select "Yes" and then press the
button.
The screen for entering the password is displayed.
3 Select a number, and then press the button.
Repeat step 3 to enter the four-digit password. After entering the
password, playback will begin again. When DVD playback is stopped,
the Parental Control level returns to the original setting.
Notes
• If you forget your password, see "Troubleshooting" ( page 51).
• If you do not set a password, you cannot change the Parental Control settings.
• Some DVDs with the Parental Control feature do not allow use of playback modes
( pages 26 to 27).
Adjusting DVD player settings
32
Page 33

Setting sound options
Audio Digital Out
You can switch the method of outputting the audio signal when you
connect the following audio devices to the DIGITAL OUT (OPTICAL)
connector.
Caution
When the console is connected to an audio device without a Dolby Digital, DTS
or MPEG decoder, set "Dolby Digital", "DTS" and "MPEG" to "Off". If you set
these options to "On" without the necessary decoder, you may have no sound or
an extremely loud noise may be emitted.
Digital Out (Optical)
This option sets the type of output for the DIGITAL OUT (OPTICAL)
connector.
Dolby Digital
This option sets Dolby Digital as the output signal for the DIGITAL OUT
(OPTICAL) connector.
On Select this option when the console is connected to an audio device
with a built-in Dolby Digital decoder.
Off Select this option when the console is connected to an audio device
without a built-in Dolby Digital decoder.
DTS
This option sets DTS as the output signal for the DIGITAL OUT
(OPTICAL) connector.
On Select this option when the console is connected to an audio device
with a built-in DTS decoder.
Off Select this option when the console is connected to an audio device
without a built-in DTS decoder.
GB
DVDs
On Select this option when you want sound (audio signal) to be output
through the DIGITAL OUT (OPTICAL) connector.
Settings for "Dolby Digital", "DTS" and "MPEG" are displayed.
Off Select this option when you do not want sound to be output through the
DIGITAL OUT (OPTICAL) connector.
Settings for "Dolby Digital", "DTS" and "MPEG" are not displayed.
MPEG
This option sets MPEG AUDIO as the output signal for the DIGITAL
OUT (OPTICAL) connector.
On Select this option when the console is connected to an audio device
with a built-in MPEG decoder.
Off Select this option when the console is connected to an audio device
without a built-in MPEG decoder.
Adjusting DVD player settings
33
Page 34

Audio Track Auto Select Mode
This setting gives priority to the audio track that contains the highest
number of channels when you play a DVD on which multiple audio
formats (PCM, Dolby Digital, DTS or MPEG) are recorded. If PCM,
Dolby Digital, DTS and MPEG have the same number of channels, the
console selects PCM, Dolby Digital, DTS and MPEG audio tracks in that
order.
On Priority given
Off No priority given
Notes
• If you set "DTS" to "Off" in "Audio Digital Out" ( page 33), the DTS audio
track is not played.
• Depending on the DVD, the audio channel with priority may be predetermined. In
this case, the audio track will be selected based on the DVD's order of priority.
DVD Volume
You can set this option if the audio output level of the DVD is low. You
can set this only when "Digital Out (Optical)" is set to "Off" in "Audio
Digital Out" ( page 33).
+2 Turns up the volume (maximum)
+1 Turns up the volume
Standard Normally select this option.
Caution
If you set this option to "+1" or "+2", the sound may become distorted. If this
happens, change the setting to "Standard". Also note that if you set the volume
too high, it may harm your hearing or damage the speakers.
Adjusting DVD player settings
34
Page 35

Main menu
Displaying the main menu
From the main menu, you can access information and change various
settings. You can also move to the following screens from the main menu.
The main menu is displayed when you turn on the console without a disc
inserted.
• Browser screen ( page 35)
• System Configuration menu ( page 36)
• Version Information screen ( page 39)
1 Turn on the console ( page 14).
The main menu is displayed. Note that it may take some time for the
main menu to be displayed.
Using the Browser screen
You can do the following from the Browser screen:
• Copy or delete game data saved on a Memory Card
•Start a game
• Start playback of an audio CD
• Start playback of a DVD
1 Display the main menu ( page 35).
2 Using the directional buttons, select "Browser" and then
press the button.
The Browser screen is displayed.
3 Insert a disc or Memory Card.
The icon for the inserted item is displayed on the Browser screen.
\
GB
Main menu
Note
If you turn on the console with a disc inserted, the main menu will not be displayed.
To display the main menu, press the A (open) button on the console front and
remove the disc. Then press the =/1 (on/standby)/RESET button to reset the console.
Displaying the main menu
35
Page 36

4 Select an icon, and then press the button.
• When you select the Memory Card icon, icons for data saved on the
Memory Card are displayed. To copy or delete saved game data, see
"Copying or deleting game data" ( page 19).
• If you select the icon for a PlayStation
software disc, the game will start.
• When you select the icon for an audio CD disc, the tracks contained
on the CD are displayed. See "Playing an audio CD" ( page 20).
• If you select the icon for a DVD disc, playback of the DVD will
begin.
®2 or PlayStation® format
Using the System Configuration
menu
From the System Configuration menu, you can change settings for
numerous options including language or time display, and audio or video
output method.
1 Display the main menu ( page 35).
Note
The message "There is no data" is displayed on the Browser sc reen when no Memory
Card or disc is inserted in the console.
Using the System Configuration menu
36
2 Using the directional buttons, select "System Configuration"
and then press the button.
The System Configuration menu is displayed.
3 Select an item, and then press the button.
The menu option becomes active and can be selected.
4 Select the desired setting, and then press the button.
For details, see the instructions for each menu item ( pages 37 to
38).
Page 37

Notes
• The default setting for each menu item is underlined in the explanations below.
• Changes to each setting are saved and remain in effect even after you turn off or
reset the console.
Clock Adjustment
You can set the date and time. Use the directional buttons to set "Year",
"Month", "Day", "Hour", "Minute" and "Second". The setting goes into
effect when you press the button.
Optional settings
If you press the button at the "Clock Adjustment" screen, you can set
options such as "Date Format" or "Time Format". Use the directional
buttons and the button to make each setting.
Screen Size
You can set the display mode for the TV.
4:3 Select this option when using a standard TV with the
console.
Full* Select this option when using a standard TV with the
console. The black margins on the upper and lower
portions of the screen are cut off.
16:9 Select this option when using a wide-screen TV or a
standard TV with special 16:9/wide-screen
functionality.
* "Full" display mode is compatible with the System Configuration menu, Browser
screen and audio CD screen.
GB
Main menu
Time Format Sets the system clock to either 12-hour or 24-hour
clock display
Date Format Sets the display order of year, month and day
Time Zone Sets the time zone
Daylight Savings Time Sets Standard or Daylight Savings (Summer Time).
Normally select "Standard".
Digital Out (Optical)
You can set whether to output the signal through the DIGITAL OUT
(OPTICAL) connector.
On Select this option when you want to output signal
through the DIGITAL OUT (OPTICAL) connector.
Off Select this option when you do not want to output
signal through the DIGITAL OUT (OPTICAL)
connector.
Using the System Configuration menu
37
Page 38

Component Video Out
When using the Component AV Cable (for PlayStation®2) (sold
separately), you must set the mode to match the input jacks on your TV.
Y Cb/Pb Cr/Pr Select this option when connecting the console to
component video input connectors.
RGB Select this option when connecting the console to
RGB input connectors.
Note
The "RGB" setting is only for PlayStation®2 and PlayStation® format software.
When you watch a DVD, the mode automatically switches to "Y Cb/Pb Cr/Pr".
Note
The following limitations apply when the DVD Remote Control is set to "Gameplay
Function On":
– Depending on the software, some remote control buttons may not work properly.
– The buttons of the DVD Remote Control will not work when two or more
buttons are pressed at the same time.
– Some software titles may stop operating properly when a controller is removed
from controller port 1. If this happens, set to "Gameplay Function Off".
Language
You can use this option to select the language displayed on the main menu,
Browser screen, System Configuration menu, and Version Information
screen.
Remote Control
You can set this option when using the DVD Remote Control (for
PlayStation
Gameplay Function On Select this option when operating PlayStation®2 or
Gameplay Function Off Select this option when not operating PlayStation®2
Using the System Configuration menu
38
®2) (sold separately).
English Displays messages in English
Russian Displays messages in Russian
PlayStation® format software with the DVD Remote
Control.
or PlayStation® format software with the DVD
Remote Control.
Page 39

Using the Version Information
3 Select the desired setting, and then press the button.
For details, see the instructions for each item ( pages 39 to 41).
screen
You can check version information for various console components by
selecting this option. You can also change optional settings for some items.
1 At the main menu ( page 35), press the button.
The Version Information screen is displayed.
Optional settings
Optional settings are available for "Console", "PlayStation® Driver" and
"DVD Player". "DVD Player" can be set only if the DVD player's
"Progressive" option is set to "On".
1 Using the directional buttons, select an item and then press
the button.
The current setting for the item is displayed.
Note
The default setting for each menu item is underlined in the explanations below.
Console
The PlayStation®2 console automatically adjusts its internal settings for
optimal playback. When "Diagnosis" is set to "On", the console makes
additional adjustments.
Diagnosis
Off Diagnosis is turned off.
On Diagnosis is turned on.
Note
The "Diagnosis" setting will automatically return to the default setting in the
following cases:
– When playback of PlayStation®2 or PlayStation® format software or a DVD
begins
– When the console is reset
– When the console is turned off
GB
Main menu
2 Select an item, and then press the button.
The available options are displayed.
Using the Version Information screen
39
Page 40

PlayStation® Driver
DVD Player
You can set the PlayStation® Driver programme to optimise performance
of PlayStation
Note
The settings will automatically return to the default settings in the following case:
– When the console is turned off
Disc Speed
Standard Loads discs at normal speed
Fast Loads discs at high speed
Note
Set to "Standard" in the following cases:
– When fast loading does not produce improved results
– When using a software title that is not compatible with fast loading
Texture Mapping
Standard Displays as normal
Smooth Displays with reduced roughness in on-screen images
Note
Set to "Standard" in the following cases:
– When smooth texture mapping does not produce improved results
– If the picture does not display properly when set to "Smooth"
® format software.
If you set "Progressive" to "On" when the console is connected to a TV
without the necessary equipment, the picture quality may be reduced or the
picture may not be displayed. You can clear the "Progressive" setting by
following the procedure below.
Remove the DVD before clearing the setting.
Clear Progressive Setting
No Leaves the "Progressive" setting on
Yes Clears the "Progressive" setting
1 Display the Version Information screen.
2 Using the directional buttons, select "DVD Player" and then
press the button.
The "Clear Progressive Setting" option is displayed.
3 Press the button.
4 Select "Yes", and then press the button.
5 Press the button twice.
The display returns to the main menu.
6 Press the A (open) button on the console front, and place a
DVD in the console.
Using the Version Information screen
40
Page 41

7 Close the disc cover.
Playback begins.
Note
The setting will not be cleared if 1) you do not start a DVD after step 4 or 2) you reset
or turn off the console before step 6.
GB
Main menu
Using the Version Information screen
41
Page 42

Networking
Connecting with a network cable
Connecting to a network
Please be aware that Network Gaming is not supported in all countries
at the time of going to print.
You can enjoy online games by connecting the PlayStation®2 console to a
broadband network. To play all online games, you will need the following:
• A Network Access Disc (supplied separately)
• A Memory Card (8MB) (for PlayStation
• A service contract with a Broadband Internet Service Provider (sold
separately)
• An Ethernet Cable (sold separately)
• An External Network Device such as a Broadband enabled digital set-top
box, a cable modem, an ADSL modem or a router (sold separately)
Notes
• You cannot play online games with this console using a dial-up or ISDN
connection.
• USB connectivity from the External Network Device to the USB connector is not
supported.
• There are two types of network cables: straight-through cable and crossover cable.
Ensure that you use the correct type of cable when connecting your PlayStation®2
console to your Broadband Internet connection. Refer to the Instruction Manual
supplied with the network device, or your Broadband Internet Service Provider for
details.
®2) (sold separately)
You can connect the console to a network using an Ethernet network cable
connected to the NETWORK connector on the console rear. You can
connect to a 100 Base-TX or 10 Base-T network. Refer to the instructions
supplied with the network device for details.
Basic network setup
Network line
This will vary depending on the
type of broadband service in your
home.
Commercially
available network cable
Note
When connecting the console and a PC to the network, a network device such as a
router or a hub may be required. Refer to the instructions supplied with the network
device for details.
Network equipment
The type of equipment used will also
vary depending on the type of
service.
Broadband modem, router etc.
PC
For more information on network setup, visit www.playstation.com
Connecting to a network
42
Page 43

Connecting the console
Warning
Do not plug the AC power cord for the console into the electrical outlet until you
have made all other connections.
1 Connect the Ethernet network cable to the NETWORK
connector on the console rear.
Console rear
Commercially available network cable
2 Insert the connector on the network cable to the network
device.
The connection method will vary depending on the network device.
Refer to the instructions supplied with the network device for details.
Warning
Do not connect network cables or telephone cords of the following types to the
network connector; too much electrical current may pass through the connector,
causing a malfunction, excessive heat or fire in the connector:
- Standard residential telephone lines
- Network cables not appropriate for use with a 10Base-T/100Base-TX network
- Any ISDN (digital) compatible phone or data line
- PBX phone lines
- Other "unknown" types of telephone lines
GB
Networking
Connecting to a network
43
Page 44

Creating network settings
After you have connected a network cable to the console, you will need to
create and save network settings. To do this you need a Network Access
Disc supplied by registering your PlayStation
your PlayStation
or by visiting www.ps2registration.com
®2 console by completing the Registration Card enclosed
Items you will need
To create a network setting, you will need the following items:
• A Memory Card (8MB) (for PlayStation
• Login and network setup information provided by your Broadband
Internet Service Provider
Note
Depending on the type of Internet service used, you may need to provide your
Broadband Internet Service Provider with your MAC Address. You can find the
MAC Address for your console listed in the Version Information screen
( page 39).
®2 console. You can register
®2) (sold separately)
Creating network settings
44
Page 45

Additional information
Compatible software
You can play discs of the following types on the PlayStation®2 console:
Disc type Disc logo
PlayStation®2 format DVD-ROM
[12 cm, Silver]
PlayStation®2 format CD-ROM
[12 cm, Blue]
PlayStation® format CD-ROM
[12 cm, Black]
Audio CD
[12 cm, 8 cm]
DVD-Video*
[12 cm, 8 cm]
DVD-RW (VR mode)
[12 cm, 8 cm]
* Throughout this manual, the term "DVD-Video" is used to refer to DVD-R,
DVD-RW (Video mode), DVD+R and DVD+RW discs.
" ", PlayStation®2 logo and
designation
" ", PlayStation®2 logo and
designation
PlayStation® logo and
designation
The "DVD VIDEO" logo is a
trademark.
The "DVD-RW" logo is a
trademark.
About DVD-Videos
• The console can only play discs recorded for the PAL broadcast standard.
You cannot play discs recorded for other broadcast standards (such as
NTSC) on this console (unless the NTSC disc displays the "ALL" label
and an NTSC compatible TV is used).
• DVD-Videos are assigned a number (region code) for the geographic
region in which the disc can be played. This console can only play discs
marked with region code "5" or "ALL".
ALL
About DVD-R, DVD-RW, DVD+R and DVD+RW discs
• Some discs may not be playable due to scratches, dust or problems
encountered during recording.
• Only discs that have been "finalised" can be played.
• Sections of video recorded on CPRM (Content Protection for Recordable
Media)-compatible DVD-RW discs or on CPRM-compatible DVD-R
discs using the "copy-once" capability cannot be played on this console.
Music discs encoded with copyright protection
technologies
The audio CD playback feature of this product is designed to conform
to the Compact Disc (CD) standard. Recently, some record companies
have started marketing music discs encoded with copyright protection
technologies. Some of these music discs do not conform to the CD
standard and may not be playable on this product.
GB
Additional information
About PlayStation®2 format CD-ROM and DVD-ROM, and
PlayStation
® format CD-ROM discs
The console can only play discs with the designation.
Discs marked with , or
cannot be played.
About DualDiscs
A DualDisc is a two sided disc product which contains DVD recorded
material on one side and digital audio material on the other side. However,
since the audio material side does not conform to the Compact Disc (CD)
standard, playback on this product is not guaranteed.
Compatible software
45
Page 46

Accessories
About the DVD Remote Control (for
PlayStation®2)
Optional accessories are available for this model of PlayStation®2 console.
When using optional accessories, be sure to purchase those that are
compatible with your PlayStation
PlayStation
PlayStation
www.playstation.com for details on the accessories that can be used with
this model.
® customer service helpline which can be found within every
® and PlayStation®2 format software manual or visit
®2 console. Contact the appropriate
Accessories not compatible with this model of
PlayStation®2 console
The following accessories are not
PlayStation
Model number Product name
SCPH-1070 E Multitap
SCPH-10090 E Multitap (for PlayStation®2)
SCPH-10040 E Vertical Stand (for PlayStation®2)
SCPH-10110 E Horizontal Stand (for PlayStation®2)
- Product that use the S400 i.LINK connector
i.LINK and i.LINK logo " " are trademarks.
®2 console:
compatible with this model of
• This model of the PlayStation®2 console features a built-in IR Receiver.
When operating with a DVD Remote Control (for PlayStation
separately), do not insert an IR Receiver (for PlayStation
controller port of the console.
• When purchasing a DVD Remote Control for use with this console,
choose one that does not include a separate IR Receiver Unit.
• You cannot open or close the disc cover using the DVD Remote Control.
®2) (sold
®2) into a
About Multitaps
Only the Multitap (for PlayStation
can be used with this console. Do not connect Multitap products with other
model numbers to the console as this may result in damage to the console.
* You can use this product with both PlayStation®2 and PlayStation® format
software titles.
®2) (SCPH-70120 E)* (sold separately)
46
Accessories
Page 47

GUARANTEE Specifications
Refer to the Guarantee Card supplied with this Product.
Sony Computer Entertainment Europe
30 Golden Square, London
W1F 9LD UK
General
Power requirements ! DC IN 8.5V
Electrical current consumption
(approx.)
Console dimensions (approx.) 230 × 28 × 152 mm (w/h/d)
Console mass (approx.) 900 g
Signal format PAL
Operating temperature 5 °C to 35 °C
Inputs/outputs on the console
front
Inputs/outputs on the console
rear
5.3 A
Controller port (2)
MEMORY CARD slot (2)
USB connector (2)
NETWORK connector
! DC IN 8.5V connector
AV MULTI OUT connector
DIGITAL OUT (OPTICAL) connector
GB
Additional information
GUARANTEE
47
Page 48

AC adaptor
Power requirements 100-240 V AC, 50/60 Hz
Voltage/electrical current
output (approx.)
Adaptor dimensions (approx.) 60 × 28 × 124 mm (w/h/d)
Adaptor mass (approx.) 350 g
8.5 V, 5.65 A
Supplied accessories
page 7
About national export control
This product may fall within the scope of national export control
legislation. You must comply fully with the requirements of such
legislation and of all other applicable laws of any jurisdiction in relation to
this product.
About copy protection
Attempted copying of DVD's played on this device, may be prevented or
restricted by copy protection technology contained on the DVD.
Attempted recording or copying of DVD's for private use by the removal
or circumvention of copy protection technology may be prohibited under
applicable law.
Specifications
48
Design and specifications are subject to change without notice.
Copyrights
This product incorporates copyright protection technology that is protected
by method claims of certain U.S. patents and other intellectual property
rights owned by Macrovision Corporation and other rights owners. Use of
this copyright protection technology must be authorized by Macrovision
Corporation, and is intended for home and other limited viewing uses only
unless otherwise authorized by Macrovision Corporation. Reverse
engineering or disassembly is prohibited.
This product is manufactured under license from Dolby Laboratories.
"Dolby" and the double-D symbol are trademarks of Dolby Laboratories.
Confidential unpublished works. ©1992-1997 Dolby Laboratories. All
rights reserved.
"DTS" and "DTS Digital Out" are trademarks of Digital Theater Systems,
Inc.
About access control
This product incorporates access control technology. Use of software not
specifically designed for this product (excluding DVD-Videos and audio
CDs) and copies of software designed for this product are prevented by
access control. Unauthorized transfer, delivery, display, export, import, or
transmission of programs, devices, or the product modified with programs
or devices, to defeat the purpose of this access control feature is or may be
prohibited by law.
Page 49

Troubleshooting
Go through this section if you experience difficulty in operating the
PlayStation
service line at the number listed on your guarantee card for assistance.
Check the following items first:
• The console is turned on.
• The AC power cord is connected properly to the electrical outlet.
• The cables are correctly and securely connected.
Check also for the TV or monitor and other connected devices.
Picture
There is no picture on the TV screen.
, Check whether the =/1 (on/standby) indicator on the console front is lit in red. If
, Switch the input mode of the TV (or VCR) as appropriate for the connector in
, Try using another compatible AV Cable. There may be a problem with the AV
, Set "Component Video Out" to "Y Cb/Pb Cr/Pr" in the System Configuration
, Check that the inserted disc can be played with the PlayStation®2 console
®2 console. Should any problem persist, call the PlayStation®
it is red, press the =/1 (on/standby)/RESET button to turn on the console (the
=/1 indicator will turn green).
use on the console.
Cable in use.
menu ( page 38) when connecting the console to the component AV inputs on
a TV. Use the supplied AV Cable (integrated audio/video) to make the setting,
and then connect to the TV using the Component AV Cable (for PlayStation®2)
(sold separately).
( page 45).
Picture noise appears on the TV screen.
, Check that the disc is clean and does not have any scratches. If the disc is dirty,
clean it ( page 6).
, If you move the console from a cold to a warm location, allow the console to
adjust to room temperature before use.
, If moisture condensation occurs, remove the disc and do not use the console for
several hours until the condensation evaporates ( page 6).
, For some output connectors on a TV, the component video output setting needs
to be set. Check that the correct settings have been made ( page 38).
, Some PlayStation® format software titles may not perform properly on the
PlayStation®2 console. For more information, call the PlayStation® service line
at the number listed on your guarantee card for assistance.
, Some TVs may experience a bouncing effect in their pictures when using the
PlayStation®2 console. If this happens, connect the console to another TV.
"The disc could not be read" is displayed on the screen.
, Check that the disc is placed in the console with the label side facing up
( page 15).
, Check that the disc is clean and does not have any scratches. If the disc is dirty,
clean it ( page 6).
There is no picture or picture noise appears when playing a DVD.
, When playing a DVD, connect the console to the TV directly ( page 10). If
the video signal from the console is coming through a VCR to the TV, copy
protection on some DVDs may affect picture quality.
, If the console is connected to a TV or cable* that does not support progressive
scan (480p), no image will be displayed when you set "Progressive" to "On" in
the Control Panel. Clear the "Progressive" setting ( pages 30, 40). If picture
noise appears when using a TV that supports progressive scan (480p), also clear
the "Progressive" setting.
* The Component AV Cable (for PlayStation®2) (sold separately) is compatible
with progressive scan.
, A DVD-R or DVD-RW disc that is not finalised cannot be played on the
PlayStation®2 console.
, Content of a video re corded on CPRM-compatible DVD-R or CPRM-compatible
DVD-RW discs cannot be played on the PlayStation®2 console.
GB
Additional information
Troubleshooting
49
Page 50

, See also "There is no picture on the TV screen" and "Picture noise
appears on the TV screen".
The aspect ratio does not change even when playing the DVD with the
aspect ratio setting adjusted and/or playing 16:9 pictures of a DVD.
, Depending on the DVD, the aspect ratio cannot be changed.
, Check that the console is connected to the TV directly. If there is a selector or
receiver (AV amplifier) connected between the console and TV, depending on
the type of device connected, the aspect ratio cannot be changed.
, Depending on the TV, the aspect ratio cannot be changed.
The size of the video image and the TV screen do not match.
, Set the aspect ratio to match your TV screen ( page 29). If changing the
setting does not work, try adjusting the aspect ratio of your TV. Refer to the
instructions supplied with your TV for details.
Sound
There is no sound.
, Switch the input mode of the TV (or VCR) as appropriate for the connector in
use on the console.
, Check that the TV volume is not set to "mute". Also check that the TV volume
level is set properly.
, If the console is connected to an audio device, check the settings on the
connected device. Refer to the instructions supplied with the device for details.
, Try using another compatible AV Cable ( page 9). There may be a problem
with the AV Cable in use.
, Some PlayStation®2 format software titles do not support audio output from the
DIGITAL OUT (OPTICAL) connector. Connect the console to the audio device
using an analog AV Cable, such as the supplied AV Cable (integrated audio/
video) ( page 9).
Sound quality is poor.
, Check that the disc is clean and does not have any scratches. If the disc is dirty,
clean it ( page 6).
, If you move the console from a cold to a warm location, allow the console to
adjust to room temperature before use.
, If moisture condensation occurs, remove the disc and do not use the console for
several hours until the condensation evaporates ( page 6).
, Some PlayStation® format software titles may not perform properly on the
PlayStation®2 console. For more information, contact the appropriate
PlayStation® customer service helpline which can be found within every
PlayStation® and PlayStation®2 format software manual.
There is no sound or the sound quality from the digital audio equipment
is poor.
, Check that the disc is clean and does not have any scratches. If the disc is dirty,
clean it ( page 6).
, Set "Digital Out (Optical)" to "On" in the System Configuration menu
( page 37).
, If playing a DTS audio track using an audio device with a built-in DTS decoder,
check that the settings are correct ( pages 33, 37). If the console is connected
to an audio device without a built-in DTS decoder, select tracks other than DTS
audio tracks to play.
, Some PlayStation®2 format software titles do not support audio output from the
DIGITAL OUT (OPTICAL) connector. Connect the console to the audio device
using an analog AV Cable, such as the supplied AV Cable (integrated audio/
video) ( page 9).
, See also "There is no sound" and "Sound quality is poor".
Surround effect is not present when playing a DVD with a Dolby Digital
audio track.
, Check that the console is connected to an audio device with a built-in Dolby
Digital decoder using an optical digital cable.
, Check that the settings of the audio device are correct. Refer to the instructions
supplied with the device for details.
, Set "Dolby Digital" to "On" in "Audio Digital Out" ( page 33).
Troubleshooting
50
Page 51

, For some DVDs with a Dolby Digital audio track, the output signal may not
comprise the entire 5.1 channel range.
Operation
The controller does not function.
, If the software title is compatible only with the Analog Controller
(DUALSHOCK®2), it will not work properly with the Analog Controller
(DUALSHOCK®). Use a controller that is appropriate for the software title.
Refer to the instructions supplied with the software for details.
, Check that the controller is set to the appropriate mode for the software. Refer to
the instructions supplied with the software for details.
, Try using another controller that is compatible with the PlayStation®2 console.
There may be a problem with the controller in use.
The console does not recognise the Memory Card. Data cannot be
saved or copied to the Memory Card.
, Check that the Memory Card is compatible with the software in use
( page 18).
, Check that the Memory Card is inserted securely ( page 19).
, Check that you are saving the data correctly. Refer to the instructions supplied
with the software for details.
, Data cannot be saved if there is not enough free space on the Memory Card.
, Try using another Memory Card. There may be a problem with the Memory Card
in use.
Data saved on a Memory Card is corrupted.
, While saving, loading, copying or deleting data, do not attempt any of the
following. Doing so may damage the data.
• Do not remove the Memory Card or the controller.
• Do not open the disc cover.
• Do not reset the console.
• Do not turn off the console.
, Corrupted data can be deleted in the Browser menu ( page 19).
The console does not function properly.
, Static electricity and other similar occurrences may affect the console's
operation. Turn off the console and unplug it from the electrical outlet. Then,
replug and turn on the console by pressing the @/1/RESET button.
The @/1 indicator flashes in red and the console does not work.
, Do not use the console until the flashing stops. Placing the console in an
extremely hot location or blocking the console's vents raises the internal
temperature of the console, thereby preventing proper operation.
The console makes noise or shakes.
, Because PlayStation®2 format software titles load at a higher speed than
PlayStation® format software titles, the noise or vibration may be greater.
The DVD does not play.
, Check that the DVD has the correct region code. Also check that the broadcast
signal of the disc is compatible with the console ( page 45).
, The Parental Control feature may be set on the disc. Follow the on-screen
instructions and temporarily raise the level of Parental Control ( page 32).
You forget your password.
, You can clear the password using the following procedure:
1 Start a DVD, and then stop playback.
Clear Resume Play ( page 24). Use a DVD without the Parental Control
feature.
2 At the Control Panel, select and then press the button
(page22).
3 Select "Parental Control", and then press the button.
The screen to enter a password is displayed. If the screen to register a
password is displayed, no password had been registered before. In this case,
register a new password.
4 Press the SELECT button.
The screen to clear the password is displayed.
GB
Additional information
Troubleshooting
51
Page 52

Enter the number "7444".
5
The registered password is cleared, and the screen for registering a password
is displayed. Enter a new password ( page 31).
Some functions are not available.
, Depending on the DVD, some functions may not be available:
• Stop, Search, Slow, Program Play, Shuffle Play or Repeat Play may be
prohibited.
• The audio language cannot be changed on discs that do not have multiple audio
tracks. Also, there are DVDs that do not allow the audio language to be
changed.
• If multilingual subtitles are not recorded on the DVD, you cannot change the
language for the subtitles. It may not be possible to change the subtitle
language or turn the subtitles off.
• If multiple angles are not re corded on the DVD, you cannot change the viewing
angles. Changing the viewing angles may be prohibited.
• You can only select when playing a DVD-RW disc (VR mode).
Check whether a DVD-RW disc (VR mode) is inserted in the console.
Some DVD settings cannot be changed.
, Some settings cannot be changed during playback or Resume P lay ( page 28).
Stop playback completely or clear Resume Play ( page 24) before attempting
to adjust the settings.
Network
Connection to the network cannot be established.
, Check that the network settings are correct. Refer to the instructions supplied
with the software or the information from your Internet service provider and
adjust the setting accordingly.
, The network is busy. Wait a few minutes, and then try to access the network
again.
, Check that the network cable is properly connected ( page 43).
, Check that you are using the correct type of network cable ( page 43).
, Check that the network settings or connections of the network device are correct.
Refer to the instructions supplied with the network device for details.
Troubleshooting
52
Page 53

GB
Additional information
Troubleshooting
53
Page 54

ПPEДУПPEЖДEHИE
Чтобы снизить риск возгорания и поражения
электрическим током, берегите телевизор от дождя и
влаги.
Для пpeдотвpaщeния возгоpaния или поpaжeния
элeктpичecким током нe cтaвьтe нa конcоль eмкоcти,
нaполнeнныe жидкоcтями.
Bо избeжaниe поpaжeния элeктpичecким током нe
откpывaйтe коpпyc aппapaтa. Для peмонтa обpaщaйтecь
только к квaлифициpовaнномy cпeциaлиcтy.
Пpeдyпpeждeниe
Использование, регулировка или обслуживание изделия
способами, не упомянутыми в данном руководстве, может
привести к воздействию опасного излучения.
Иcпользовaниe оптичecкиx пpибоpов c дaнным издeлиeм
являeтcя пpичиной повышeнной опacноcти для зpeния.
CLASS 1 LASER PRODUCT
LUOKAN 1 LASERLAITE
KLASS 1 LASERAPPARAT
Bнимaтeльно пpочтитe пepeд иcпользовaниeм
конcоли PlayStation®2
Heкотоpыe люди могyт быть подвepжeны эпилeптичecким пpипaдкaм,
когдa видят мигaющиe огни или цвeтовыe пятнa в обычной жизни. Эти
люди могyт быть подвepжeны пpипaдкaм пpи пpоcмотpe тeлeвизоpa или
игpe в видeоигpы, в том чиcлe пpи пpоcмотpe диcков DVD-видeо или во
вpeмя игpы нa конcоли PlayStation®2. Oднaко игpоки, нe подвepжeнныe
пpипaдкaм, могyт тaкжe иcпытывaть cкpытыe эпилeптичecкиe
cоcтояния. Пpeждe чeм иcпользовaть конcоль PlayStation®2, обpaтитecь
к вpaчy, ecли вы подвepжeны эпилeптичecким пpиcтyпaм или
иcпытывaeтe любыe из cлeдyющиx cимптомов пpи пpоcмотpe
тeлeвизионныx пpогpaмм или пpи игpe в видeоигpы: измeнeниe зpeния,
подepгивaниe мышц, дpyгиe peфлeктивныe cоcтояния, потepя контaктa c
окpyжaющeй cpeдой, помyтнeниe cознaния и/или конвyльcии.
Некоторое программное обеспечение формата PlayStation® или
PlayStation®2 на этой консоли может работать иначе, нежели на
консолях предыдущих версий PlayStation®2 и PlayStation®, или работать
некорректно. Для получения более подробной информации посетите
наш сайт: www.playstation.com
Изделие относится к 1 КЛАССУ ЛАЗЕРОВ согласно IEC60825-1: 2001.
ПPEДУПPEЖДEHИE
54
Page 55

Содержание
ПPEДУПPEЖДEHИE........................................................... 54
Меры предосторожности....................................................... 56
Подготовительные операции
Начало работы......................................................................... 59
Названия компонентов........................................................... 60
Подсоединение к телевизору ................................................ 61
Подсоединение цифрового аудиооборудования ............... 64
Подключение контроллера................................................... 65
Подсоединение адаптера AC (переменного тока)
и шнура питания AC (переменного тока).................... 65
Включение и выключение консоли .................................... 67
Игры
Игры ........................................................................................... 68
Использование MEMORY CARD (карт памяти) ............ 72
Аудио CD
Воспроизведение аудио CD................................................... 74
Диски DVD
Воспроизведение DVD-видео............................................... 76
Использование режимов воспроизведения........................ 81
Нaстройкa установок DVD проигрывателя ...................... 83
Главное меню
Вызов главного меню .............................................................90
Использование экрана браузера...........................................90
Использование меню Конфигурация системы..................91
Использование экрана Информация о версии ..................94
Работа в сети
Подключение к сети................................................................97
Сетевые настройки..................................................................99
Дополнительная информация
Совместимое программное обеспечение ..........................100
Аксессуары..............................................................................101
ГАРАНТИЯ ............................................................................102
Технические характеристики ..............................................103
Устранение неисправностей ................................................105
RU
Содержание
55
Page 56

Меры предосторожности
При разработке данного изделия учтены все требования к обеспечению
полной безопасности пользователя. Однако любой электрический
прибор при неправильном использовании является потенциальным
источником возгорания, поражения электрическим током или травмы.
Для обеспечения безопасной работы изделия следуйте данной
инструкции.
• Ознакомьтесь со всеми предупреждениями, мерами предосторожности
и инструкциями.
• Немедленно прекратите использование и отключите шнур питания AC
(переменного тока) от электрической сети, если Вы заметили, что
изделие не работает должным образом, издает необычные звуки или
запахи.
• Если консоль работает неправильно, обратитесь в соответствующую
службу технической поддержки PlayStation®, адреса которой можно
найти в каждом руководстве по программному обеспечению формата
PlayStation® и PlayStation®2.
Безопасность
• Не снимайте внешние панели консоли и не разбирайте консоль.
Лазерный луч, генерируемый данн ым изделием, может быть опасен для
зрения.
• Не используйте консоль вблизи водоемов.
• Храните консоль, соединительные шнуры и кабели вне досягаемости
маленьких детей.
• Не касайтесь мокрыми руками штепселя шнура питания AC
(переменного тока).
• Не касайтесь консоли и подсоединенных к ней дополнительных
устройств во время грозы.
• Избегайте длительного контакта с включенной консолью или
адаптером AC (переменного тока), это может привести к
низкотемпературным ожогам.
• Не устанавливайте консоль и дополнительные устройства на полу или
в местах, где о них можно споткнуться.
• Перед началом использования проигрывателя DVD произведите его
необходимую настройку в соответствии с прилагаемыми к нему
инструкциями. Если настройки проведены неправильно,
проигрыватель может издать громкий звук, который может
травмировать Ваш слух или повредить наушники.
• Не касайтесь руками диска в момент вращения, это может стать
причиной травмы или повреждения диска.
• Закрывая крышку диска, соблюдайте осторожность, чтобы рука или
пальцы не попали под крышку - это может стать причиной травмы или
повреждения консоли.
Здоровье
Немедленно прекратите использование консоли, если у Вас появились
какие-либо из следующих симптомов. Если такое состояние не проходит,
обратитесь к врачу.
– Головокружение, тошнота или ощущение, аналогичное укачиванию
– Усталость, дискомфорт или боль в руках
– Усталость, сухость или резь в глазах
• Используйте изделие в хорошо освещенной комнате и сохраняйте
безопасное расстояние от телевизионного экрана.
• С тарайтесь не использовать консоль чересчур долго. Через каждый ча с
игры устраивайте 15-минутный перерыв.
• Не пользуйтесь консолью, если чувствуете усталость или не выспались.
• Продолжительное воздействие громкого звука может негативно
повлиять на Ваш слух. Будьте особенно осторожны, используя
наушники. Отрегулируйте громкость так, чтобы были слышны и
окружающие звуки.
Использование и управление
• Не бросайте и не роняйте консоль или дополнительные устройства к
ней и не подвергайте их механическому воздействию.
• Не устанавливайте консоль и дополнительные устройства на
неустойчивые, наклонные или вибрирующие поверхности.
• Не подвергайте консоль воздействию высоких температур, высокой
влажности или прямых солнечных лучей (используйте изделие при
температуре от 5 °C до 35 °C).
• Не располагайте консоль и дополнительные устройства в местах,
подверженных резким изменени ям температуры (например, изменения
температуры в течение часа на 10 °C и более).
Меры предосторожности
56
Page 57

• Не оставляйте консоль или дополнительные устройства в машине с
закрытыми окнами (особенно в летнее время).
• Не устанавливайте консоль в местах с недостаточным доступом
воздуха, например, в маленьких закрытых пространствах, вплотную к
стене, на толстом ковре или на постели.
• Не подвергайте консоль воздействию сигаретного дыма или пыли или
пара. Это может привести к неисправности консоли.
• Не допускайте попадания внутрь консоли жидкости или мелких частиц.
• Ничего не кладите на поверхность консоли.
• Не касайтесь разъемов консоли или дополнительных устройств, не
вставляйте в них инородные предметы.
• Не располагайте консоль вблизи магнитных полей, создаваемых
магнитами или громкоговорителями.
• Устанавливайте консоль только в вертикальном или горизонтальном
положении. Устанавливая консоль в вертикальном положении,
используйте совместимую с ней вертикальную подставку (для
PlayStation®2) (продается отдельно). Не меняйте положения консоли в
момент ее работы.
Использование адаптера AC (переменного тока) и
шнура питания AC (переменного тока)
• С целью обеспечения безопасности работы изделия, регулярно
проверяйте адаптер AC (переменного тока) и шнур питания AC
(переменного тока). При обнаружении повреждения немедленно
прекратите его использование и обратитесь в соответствующую
службу технической поддержки PlayStation®, адреса которой можно
найти в каждом руководстве по программному обеспечению формата
PlayStation® и PlayStation®2.
• Используйте адаптер AC (переменного тока) и шнур питания AC
(переменного тока) только из комплекта поставки.
• Прежде чем вставить штепсель электропитания в розетку, убедитесь,
что на штепселе нет пыли и волокон. Есл и штепсель загрязнился, перед
включением протрите его сухой тканью.
• Перед очисткой или перемещением консоли, или если Вы не намерены
использовать ее в ближайшее время, извлеките шнур питания AC
(переменного тока) из розетки.
Вынимая шнур питания из розетки, держитесь за его штепсель и тяните
его прямо. Запрещается тянуть за шнур и вытаскивать штепсель под
углом к розетке.
• Не подсоединяйте адаптер AC (переменного тока) и/или шнур питания
AC (переменного тока) к трансформатору напряжения или
преобразователю.
Примечания по технике безопасности при
использовании аналогового контроллера
(DUALSHOCK
• Немедленно прекратите пользоваться консолью, если почувствуете
усталость или начнете испытывать дискомфорт или боль в кистях или
других частях рук при использовании Аналогового контроллера
(DUALSHOCK®2). Если такое состояние не проходит, обратитесь к
врачу.
• Аналоговый контроллер (DUALSHOCK®2) предназначен к
использованию только руками. Не прижимайте его к голове, лицу или
другим участкам тела.
• Вибрирующее воздействие Аналогового контроллера
(DUALSHOCK®2) может причинить травму. Не используй те функцию
вибрации, если у вас есть заболевание или повреждения костей,
суставов или мышц кистей или рук. Обратите внимание, что некоторые
диски программного обеспечения формата PlayStation®2 и PlayStation®
включают функцию вибрации по умолчанию. В большинстве случаев
функцию вибрации можно отключить в меню параметров
программного обеспечения. Для проигрывания таких дисков
пользуйтесь Аналоговым контроллером (DUALSHOCK®2) только с
отключенной функцией вибрации.
• Избегайте длительного использования Аналогового контроллера
(DUALSHOCK®2). Устраивайте перерывы примерно через каждые
30 минут.
* Данные примечания также относятся и к другим контроллерам.
®2)*
Подключение с помощью сетевого кабеля
Не подсоединяйте к сетевому разъему сетевые кабели и телефонные
шнуры следующих типов:
• Стандартные домашние телефонные линии
• Сетевые кабели, не предназначенные для использования в сети 10BaseT/100Base-TX
RU
Меры предосторожности
57
Page 58

• Любая телефонная линия или канал передачи данных, совместимые с
ISDN (цифровая)
• Телефонные линии мини-АТС
• Другие “незнакомые” типы телефонных линий
Обращение с дисками
• При обращении с дисками не прикасайтесь к их поверхности; держите
их за края.
• Не приклеивайте на диски бумагу или скотч, не делайте на дисках
надписей.
• Отпечатки пальцев, пыль, грязь или царапины на диске могут привести
к искажению изображения или ухудшению качества звука.
Обращайтесь с дисками аккуратно, а перед использованием убедитесь,
что диски чистые.
• Не оставляйте диски рядом с источниками тепла, под воздействием
прямых солнечных лучей или высокой влажности.
• Когда диски не используются, храните их в коробках.
• Чистить диски следует мягкой тканью, по направлению от центра к
краям. Не используйте растворители, например, бензин, доступные в
продаже чистящие средства, не предназначенные для компакт-дисков,
или антистатические аэрозоли, предназначенные для виниловых
пластинок.
• Не оставляйте диск в консоли, когда передвигаете ее или меняете ее
положение.
• Не используйте диски неправильной ф ормы (например, в форме сердца
или звезды), поврежденные диски, диски с измененной формой или
диски, подвергавшиеся ремонту.
Запрещается разбирать консоль и прилагаемые
дополнительные устройства
Используйте консоль PlayStation®2 и дополнительные устройства в
соответствии с инструкциями в данном руководстве. Не разрешен анализ
или изменение модификации консоли, а также анализ и использование
конфигурации ее схем. Внутри консоли PlayStation®2 отсутствуют
компоненты, обслуживание которых может выполнить пользователь. В
случае разборки консоли гарантия на нее будет аннулирована. Кроме
того, существует опасность подвергнуться воздействию (лазерного)
излучения, а также поражению электрическим током.
При подключении консоли к плазменному или
проекционному* телевизору.
Не оставляйте на долгое время статическое изображение на экране
телевизора, так как от него может остаться след на экране.
* За исключением ЖК-экранов.
Конденсация влаги
Если консоль или диск переносятся с холода в теплое помещение, то на
линзе внутри консоли или на диске может сконденсироваться влага. Это
может привести к неправильной работе консоли. В этом случае
извлеките диск, выключите консоль и извлеките штепсель из розетки.
Не вставляйте диск, пока влага не испарится (это может занять
несколько часов). Если консоль по-прежнему работает неправильно,
обратитесь в соответствующую службу технической поддержки
PlayStation®, адреса которой можно найти в каждом руководстве по
программному обеспечению формата PlayStation® и PlayStation®2.
Очистка
• В целях безопасности перед началом очистки консоли или
подсоединенных к ней дополнительных устройств 1) отключите
консоль, 2) извлеките штепсель консоли из электрической розетки и
3) отсоедините сетевой кабель от сетевого разъема.
• Для чистки консоли пользуйтесь мягкой сухой тканью. Не используйте
для чистки устройства растворители, разбавители, другие химические
вещества или салфетки с специальной пропиткой.
• Если на вентиляционных отверстиях консоли скопилась пыль, удалите
ее с помощью маломощного пылесоса.
• Не касайтесь линз под крышкой диска. Чтобы линзы не запылились,
держите крышку диска закрытой, за исключением случаев, когда Вы
вставляете или извлекаете диск.
Защита от внешних повреждений
Во избежание повреждения окрашенных частей необходимо соблюдать
следующие меры предосторожности:
• Не проливайте на устройство такие жидкости, как спирт, бензол,
растворитель, и прочие химические вещества.
• Не оставляйте на длительное время резиновые, виниловые или
пластиковые предметы на окрашенных поверхностях устройства.
Меры предосторожности
58
Page 59

Подготовительные операции
Установка консоли
Начало работы
Проверка содержимого упаковки
Проверьте наличие следующих предметов. Если какие-либо из
предметов отсутствуют, обращайтесь в соответствующую
службу техническое поддержки PlayStation
находятся в каждом руководстве по программному обеспечению
формата PlayStation
s Консоль PlayStation®2...1 s Аналоговый контроллер
s Адаптер АС
(переменного тока)…1
s Соединительный разъем
Euro-AV (аудио/видео)…1
® и PlayStation®2.
(DUALSHOCK
s Кабель AV
(интегрированный аудио/
видео)…1
s Шнур питания АС
(переменного тока)…1
®, адреса которой
®2)...1
Консоль можно установить в горизонтальном или вертикальном
положении.
Горизонтальное положение
Установите консоль горизонтально.
Вертикальное положение
При установке консоли в вертикальное
положение используйте SCPH-70110 E –
вертикальную подставку (для
PlayStation
Примечание
Некоторые вертикальные подставки (для PlayStation®2) не могут быть
использованы с этой моделью консоли PlayStation®2 ( стр. 101).
Приобретая вертикальную подставку, выбирайте модель SCPH-70110E.
®2) (продается отдельно).
RU
Подготовительные операции
s Руководство по эксплуатации…1
Начало работы
59
Page 60

Предупреждение
RESET
1
Не устанавливайте консоль в местах, где возможно возникновение
следующих условий:
• Густой сигаретный дым или пыль. Сигаретный дым или пыль,
оседающие на внутренних компонентах, например, линзе, могут
стать причиной неисправности консоли.
• Слишком высокая или низкая температура, прямой солнечный
свет, источники тепла или автомобиль, в котором закрыты окна
(особенно летом). Это может привес ти к повреждению корпуса или
стать причиной неисправности консоли.
• Магнитные поля – например, созданные магнитами или
громкоговорителями.
• Вибрация.
Названия компонентов
Передняя панель консоли PlayStation®2
Крышка диска
Кнопка A (открывание)
гнездо MEMORY CARD 2
гнездо MEMORY CARD 1
Порт контроллера 1
Порт контроллера 2
индикатор ]/
Кнопка ]/1 RESET(вкл./
готовность/перезапуск)
Логотип семейства
изделий “ ”*
* Ло готип семейства изделий “ ” можно поворачивать в соответс твии
с горизонтальным или вертикальным положением консоли.
Примечание
Существует возможность подключения USB-устройств, совместимых с
консолью PlayStation®2. Не все USB-совместимые изделия работают с
консолью PlayStation
®2. Дополнительную информацию см. также в
руководстве пользователя подключаемого изделия.
(вкл./готовность)
Инфракрасн
ый приемник
Переднее
вентиляционное
отверстие
Разъем USB
Названия компонентов
60
Page 61

Задняя панель консоли PlayStation®2
Заднее вентиляционное отверстие
Подсоединение к телевизору
Перед подключением
!
Разъем
DC IN 8,5V
(входа
Разъем NETWORK (сети)
Разъем DIGITAL OUT
(OPTICAL) (цифрового
оптического выхода)
Примечание
Названия компонентов Аналогового контроллера (DUALSHOCK®2)
см. в разделе “Использование Аналогового контроллера
(DUALSHOCK®2)” ( стр. 70).
Разъем AV MULTI OUT
(аудио/видео мульти-выхода)
постоянного
тока 8,5 В)
• Не включайте шнур питания АС (переменного тока) консоли
в электрическую розетку до тех пор, пока не произведете все
необходимые подсоединения.
• Убедитесь в том, что телевизор выключен.
Подсоединение к телевизору используя
прилагаемый Кабель AV (интегрированный
аудио/видео)
Подсоедините консоль к телевизору, как показано ниже.
Задняя панель консоли
Аудио- и видеовходы телевизора
VIDEO L-AUDIO-R
Желтое
Белое
Красное
Кабель AV (интегрированный аудио/видео)
Не используйте при
подсоединении к
монофоническому
телевизору.
К разъему AV
MULTI OUT
(аудио/видео
мульти-выхода)
RU
Подготовительные операции
Подсоединение к телевизору
61
Page 62

Предупреждение
При продолжительном отображении одного кадра на плазменном
или проекционном* телеэкране может возникнуть ореол. Это
особенность указанных типов телевизоров. При отображении в
течение длительного времени статичных, неподвижных
изображений – например, меню настроек консоли, меню DVD или
изображений в режиме паузы, они могут оставлять на экране
телевизора остаточное изображение. Для получения более
подробной информации см. инструкцию по эксплуатации,
прилагаемую к телевизору.
* кроме телевизоров с жидкокристаллическим экраном
Примечание
Консоль можно подсоединить к видеомагнитофону или видеодвойке.
Обратите внимание, что при воспроизведении DVD с защитой от
копирования качество изображения может ухудшиться.
Подсоединение к телевизору с разъемом
Euro-AV (аудио/видео) с помощью
Соединительного разъема Euro-AV (аудио/
видео)
Подсоедините консоль PlayStation®2 к разъему Euro-AV (аудио/
видео) (SCART) телевизора с помощью Соединительного
разъема Euro-AV (аудио/видео) и Кабеля AV
(интегрированного аудио/видео), совместив цветные штекеры
Кабеля AV с гнездами соответствующего цвета на
Соединительном разъеме.
Задняя панель консоли
Соединительный
разъем Euro-AV
(аудио/видео)
К разъему EuroAV (аудио/видео)
Кабель AV (интегрированный аудио/видео)
К разъему AV
MULTI OUT
(аудио/видео
мульти-выхода)
Подсоединение к телевизору
62
После подсоединения
Установите для телевизора правильный режим видеовхода. См.
руководство по эксплуатации телевизора.
Page 63

Использование кабелей, продаваемых
отдельно
Шкала качества изображения
Высокое
качество
Качество изображения зависит от типа используемого кабеля.
Используйте приведенную ниже информацию для определения
оптимального способа подсоединения.
При использовании кабеля, продаваемого отдельно, изучите
прилагаемые к нему инструкции.
Телевизор Тип кабеля
Телевизор с входным
разъемом S VIDEO
(S видео)
Aдaптep RFU SCPH-10072 C
Телевизор с разъемом
Euro-AV (аудио/видео)
(SCART)
Телевизор с
компонентным разъемом
видеовходов
Кабель S VIDEO (S видео)
(SCPH-10060 E)
Кабель Euro-AV (аудио/видео)
(SCPH-10142)
Компонентный кабель AV (аудио/видео)
(для PlayStation®2) (SCPH-10100 E)
x Кабель AV
(прилагается)
x Адаптер RFU
Данная шкала приведена только для справки. Качество изображения
может разниться в зависимости от изделия или состояния телевизора.
При использовании кабеля Euro-AV качество изображений может
различаться в зависимости от соединения AV телевизора.
Для оптимального качества изображения подключите кабель Euro-AV
(аудио/видео) к гнезду, поддерживающему сигнал RGB на телевизоре.
Подробности см. в инструкции по эксплуатации, прилагаемой к
телевизору.
x Кабель S VIDEO
(S видео)
x Компонентный кабель AV
(аудио/видео)
Примечания
• Режим прогрессивного сканирования проигрывателя DVD доступен
только при воспроизведении дисков, записанных в формате NTSC и
воспроизведенных на экране телевизора, поддерживающего
прогрессивное сканирование (480р).
• Невозможно подсоединить консоль к телевизору с компонентными
видеовходами, предназначенными исключительно для использования с
HDTV (Y PB PR). Для получения более подробной информации см.
инструкцию по эксплуатации, прилагаемую к телевизору.
RU
Подготовительные операции
Подсоединение к телевизору
63
Page 64

Подсоединение цифрового
аудиооборудования
Используя продающийся отдельно цифровой оптический
кабель, можно воспроизводить звук с эффектами,
аналогичными прослушиванию в кинотеатре или концертном
зале. При подключении консоли к аудиооборудованию с
цифровыми разъемами следуйте инструкциям, прилагаемым к
подключаемому устройству.
Задняя панель консоли
Подключаемое устройство
DIGITAL IN
OPTICAL
Отдельно продающийся
оптический цифровой кабель
Примечания
• При подключении консоли к аудиооборудованию с помощью
оптического цифрового кабеля может отсутствовать звук при
использовании некоторых форматов программного обеспечения
PlayStation®2. В таком случае используйте прилагаемый кабель AV
(интегрированный аудио/видео) и подсоедините его к разъему консоли
AV MULTI OUT (аудио/видео мульти-выхода). Не используйте
оптический цифровой кабель.
• После подсоединения цифрового аудиооборудования установите для
параметра “DIGITAL OUT (OPTICAL) (цифровой оптический
выход)” значение “Вкл.” в меню Конфигурация системы. Подробнее
см. “DIGITAL OUT (OPTICAL) (цифровой оптический выход)”
( стр. 93).
Подсоединение цифрового аудиооборудования
64
Page 65

Подключение контроллера
MEMORY CARD
1 Вставьте Аналоговый контроллер (DUALSHOCK®2) в порт
контроллера на консоли.
Передняя панель консоли
Подсоединение адаптера AC
(переменного тока) и шнура
питания AC (переменного тока)
Аналоговый контроллер
(DUALSHOCK
Примечание
Некоторые приложения требуют использования конкретного порта
контроллера. Для получения более подробной информации см.
инструкцию по эксплуатации, прилагаемую к программному
обеспечению.
®2)
Предупреждения
• Электрическая розетка должна быть расположена рядом с
оборудованием в легкодоступном месте.
• Не включайте шнур питания АС (переменного тока) консоли в
электрическую розетку до тех пор, пока не произведете все
необходимые подсоединения.
1 Подсоедините шнур питания АС (переменного тока) к
адаптеру АС (переменного тока).
Адаптер АС (переменного тока)
Шнур питания АС (переменного тока)
Подключение контроллера
RU
Подготовительные операции
65
Page 66

2 Подключите разъем адаптера AC (переменного тока) к
RESET
разъему
задней стороне консоли.
! DC IN 8,5V (вход постоянного тока 8,5 В) на
Задняя панель консоли
Разъем
! DC IN 8,5V
(входа постоянного тока 8,5 В)
Адаптер АС (переменного тока)
3 Подключите шнур питания АС (переменного тока) к
розетке электропитания.
Задняя панель консоли
Шнур питания АС (переменного тока)
К розетке электропитания
В некоторых странах и регионах
для подключения к электросети
используются вилки, отличные от
изображенной на иллюстрации.
Индикатор =/1 (вкл./готовность) на передней панели
консоли загорится красным цветом, показывая, что консоль
находится в режиме ожидания.
Передняя панель
консоли
Индикатор ]/1
Подсоединение адаптера AC (переменного тока) и шнура питания AC (переменного тока)
66
Page 67

Включение и выключение
RESET
RESET
консоли
Перед включением консоли
Не включайте консоль, пока не выполнили следующие
действия. Для получения более подробной информации см.
инструкцию по эксплуатации, прилагаемую к телевизору.
• Включите телевизор.
• Переключите телевизор на отображение сигналов от входа, к
которому подключена консоль.
Включение консоли
1 Проверьте, чтобы индикатор =/1 (вкл./готовность) на
передней панели консоли горел красным цветом.
Примечания
• При первом включении консоли появятся экраны установки языка,
часового пояса и летнего времени. Установите значения параметров в
соответствии с инструкциями на экране.
• При подключении консоли к широкоэкранному телевизору установите
“Размер экрана” в меню Конфигурация системы ( стр. 92).
Выключение консоли
1 Нажмите кнопку =/1/RESET и держите ее нажатой более
трех секунд.
Индикатор =/1 загорится красным, показывая, что консоль
перешла в режим ожидания.
Кнопка =/1/RESET
Передняя панель
консоли
Индикатор =/1
RU
Подготовительные операции
2 Нажмите кнопку =/1 RESET/ (вкл./готовность/перезапуск)
на передней панели консоли.
Индикатор =/1 на передней панели консоли загорится
зеленым, и на экране телевизора появится изображение с
консоли.
Кнопка =/1/RESET
Передняя панель
консоли
Индикатор =/1
Предупреждение
Если консоль находится в режиме ожидания, питание полностью не
отключается. Если вы не собираетесь использовать консоль в
ближайшее время, отключите шнур питания АС (переменного тока)
от электрической розетки.
Включение и выключение консоли
67
Page 68

Игры
Игры
Крышка диска
Кнопка =/1/RESETКнопка A (открывание)
Перед началом игры Запуск игры
Поместите диск в консоль этикеткой
вверх.
Уcтaновитe диcк тaким обpaзом,
чтобы тpи выcтyпa нaxодилиcь
вышe eго плоcкоcти.
68
Убедитесь в том, что телевизор и аудиооборудование
подсоединены верно и все меры безопасности соблюдены.
• “Меры предосторожности” ( стр. 56)
• “Подсоединение к телевизору” ( стр. 61)
• “Подключение контроллера” ( стр. 65)
• “Подсоединение адаптера AC (переменного тока) и шнура
питания AC (переменного тока)” ( стр. 65)
Примечание
Чтобы играть в сетевые игры, сначала необходимо создать сеть и
подключиться к ней. Дополнительную информацию см. в разделе
“Подключение к сети” ( стр. 97).
Игры
1 Включите консоль ( стр. 67).
Отображается главное меню ( стр. 90).
2 Нажмите кнопку A (открыть) на передней панели
консоли.
Откроется крышка диска.
3 Поместите диск в консоль.
Поместите диск в лоток этикеткой вверх.
Page 69

4 Закройте крышку диска.
Чтобы зaкpыть кpышкy диcкa, нaжмитe в ee цeнтpe кaк
покaзaно нa pиcyнкe.
Haжмитe в cepeдинe кpышки диcкa.
1 Нажмите кнопку A на передней панели консоли.
2 Извлеките диск.
Придерживая черную центральную часть консоли,
поднимите диск за края.
RU
Игры
Примечания
• Игру можно также запустить из браузера ( стр. 90).
• При включении консоли с вставленным диском игра запустится
автоматически.
Перезапуск игры
Нажмите кнопку \/1/RESET (включение/готовность/
перезапуск) на передней панели консоли. Случайно не нажмите
кнопку @/1/RESET (перезапуск) во время игры, поскольку в
этом случае игра будет запущена заново.
Завершение игры
Предупреждение
Перед извлечением диска убедитесь, что он полностью остановился.
Не касайтесь диска, если он вращается, поскольку это может
привести к травме или порче диска, или стать причиной
неисправности консоли.
Нажмите на черную центральную
часть держателя дисков.
3 Закройте крышку диска.
4 Нажмите кнопку =/1/RESET (перезапуск).
Отображается главное меню ( стр. 90).
Смена игр
1 Откройте крышку диска и извлеките диск.
При извлечении диска из консоли удерживайте черную
центральную часть держателя дисков и поднимите диск за
края.
2 Поместите новый диск.
3 Закройте крышку диска и перезагрузите консоль.
Новая игра запустится.
Игры
69
Page 70

Примечание
Нет необходимости выключать консоль, когда требуется сменить игру.
Использование Аналогового контроллера
(DUALSHOCK®2)
Кнопки Аналогового контроллера (DUALSHOCK®2)
чувствительны к силе нажатия. Он также предоставляет
функцию вибрации.
Названия компонентов
Кнопка SELECT
(выбор)
Кнопка L2
Кнопка L1
Кнопки
направлений
Правый аналоговый
Индикатор
режима
Кнопка ANALOG
(аналогового режима)
* Левый и правый аналоговые джойстики или кнопки L3 и R3 работают
только в аналоговом режиме (индикатор: красный).
* Кнопки L3 и R3 работают только когда нажаты аналоговые
джойстики.
джойстик/ Кнопка R3*
Левый аналоговый
джойстик/ Кнопка L3*
Кнопка START
(пуск)
Кнопка R2
Кнопка R1
Кнопка
Кнопка
Кнопка
Кнопка
Примечание
Перед использованием Аналогового
Контроллера (DUALSHOCK®2), после
включения питания консоли поверните левый
и правый аналоговые джойстики большими
пальцами на один оборот перед тем, как
приступить к игре. Не перекручивайте
аналоговые джойстики, а вращайте их, как бы рисуя круг (см. рисунок).
Переключение режимов
Аналоговый контроллер можно переключать из цифрового
режима в аналоговый и наоборот путем нажатия кнопки
ANALOG (аналогового режима). Переключитесь в
подходящий для пользования режим. Следует иметь в виду, что
некоторое программное обеспечение будет выполнять такое
переключение автоматически.
Цифровой режим
(индикатор: выкл.)
Аналоговый режим
(индикатор: красный)
Примечания
• При использовании Аналогового контроллера в цифровом режиме
левый и правый аналоговые джойстики не работают. Функция
чувствительности кнопок к силе нажатия также отключена.
• При использовании некоторого программного обеспечения
переключать режимы невозможно даже при нажатии кнопки
ANALOG (аналогового режима).
Аналоговые органы управления
• При использовании программного обеспечения формата
PlayStation
®2 в аналоговом режиме можно использовать все
кнопки, кроме START (пуск) и SELECT (выбор), L3 и R3.
70
Игры
Page 71

• При использовании программного обеспечения формата
PlayStation
® в аналоговом режиме можно использовать только
левый и правый аналоговые джойстики.
Примечание
В зависимости от программного обеспечения использование кнопок в
аналоговом режиме может быть ограничено. Для получения более
подробной информации см. инст рукцию по эксплуатации, прилагаемую к
программному обеспечению.
Функция вибрации
Функцию вибрации можно включать или выключать на экране
параметров программного обеспечения.
Примечание
В зависимости от программного обеспечения функция вибрации может
включаться (ВКЛ.) автоматически.
Использование Аналогового контроллера
(DUALSHOCK®) (SCPH-110 E)
Аналоговый контроллер (DUALSHOCK®) (SCPH-110 E)
можно использовать с консолью PlayStation
кнопок в аналоговом режиме могут отличаться от функций в
Аналоговом контроллере (DUALSHOCK
режиме могут использоваться только левый и правый
аналоговые джойстики.
®2, но функции
®2). В аналоговом
Примечание
Не все форматы программного обеспечения PlayStation®2
поддерживают использование Аналогового контроллера
(DUALSHOCK®) (SCPH-110 E). В таких случаях необходимо
использовать Аналоговый контроллер (DUALSHOCK®2).
RU
Игры
Игры
71
Page 72

Использование MEMORY CARD
MEMORY CARD
(карт памяти)
Примечание
Для MEMORY CARD (кapты пaмяти) (для PlayStation®2) иcпользyeтcя
“MagicGate” - тexнология зaщиты оxpaняeмого aвтоpcкими пpaвaми
cодepжaния c помощью шифpовки дaнныx и yдоcтовepeния aппapaтного
обecпeчeния.
Можно сохранять и загружать игру или другие данные,
используя MEMORY CARD (карту памяти). Можно также
удалить игровые данные или скопировать их с одной MEMORY
CARD (карты памяти) на другую.
Типы MEMORY CARD (карт памяти)
Существует два типа MEMORY CARD (карт памяти).
Выберите MEMORY CARD (карту памяти), наиболее
подходящую для используемого программного обеспечения.
Тип MEMORY
CARD (карты
памяти)
MEMORY CARD
(8Mб) (для
PlayStation®2)
(SCPH-10020 E)
MEMORY CARD
(карта памяти)
(SCPH-1020 E)
Совместимое
программное
обеспечение
Программное
обеспечение формата
PlayStation®2
Программное
обеспечение формата
PlayStation®
Объем памяти
Прибл. 8 Мб
15 блоков памяти
(прибл. 120 Кб)
являeтcя тepмином, ознaчaющим тexнологию
зaщиты aвтоpcкиx пpaв, paзpaботaннyю гpyппой компaний
Sony.
нe гapaнтиpyeт cовмecтимоcть c дpyгими
издeлиями, имeющими товapный знaк “MagicGate”.
Вставка MEMORY CARD (карты памяти)
Вставьте Memory Card (карту памяти) в гнездо MEMORY
CARD на передней панели консоли.
Передняя панель консоли
Примечание
Некоторые приложения требуют использования конкретного гнездо
MEMORY CARD. Для получения более подробной информации см.
инструкцию по эксплуатации, прилагаемую к программному
обеспечению.
Использование MEMORY CARD (карт памяти)
72
Page 73

Сохранение или загрузка игровых данных
В зависимости от программного обеспечения процедура
сохранения или загрузки может варьироваться. Для получения
более подробной информации см. инструкцию по эксплуатации,
прилагаемую к программному обеспечению.
Копирование или удаление игровых данных
1 Используйте кнопки направлений на экране браузера
( стр. 90), чтобы выбрать значок нужной MEMORY CARD
(карты памяти) для копирования или удаления данных,
затем нажмите кнопку .
2 Выберите значок данных, которые необходимо
копировать или удалить, затем нажмите кнопку .
3 Выберите “Копирование” или “Удаление”, затем
нажмите кнопку .
При копировании игровых данных убедитесь в том, что
MEMORY CARD (карты памяти) вставлены в консоль.
Если вы выбрали “Удаление”, перейдите к шагу 5.
4 Выберите место назначения, затем нажмите кнопку .
6 После завершения копирования или удаления нажмите
кнопку .
Примечания
• Для просмотра информации об элементе игровых данных выберите
значок данных и нажмите кнопку для получения подробных
сведений.
• Совместимость программного обеспечения и Memory Card (карт
памяти):
– Программное обеспечение формата PlayStation®2 не может быть
сохранено на Memory Card (карту памяти) (SCPH-1020 E).
– Игровые данные формата PlayStation® не могут быть сохранены на
Memory Card (карту памяти) (8 Mб) (для PlayStation®2). Однако
игровые данные формата PlayStation® могут быть скопированы с
Memory Card (карты памяти) (SCPH-1020 E) д ля хранения на Memory
Card (карте памяти) (8 Mб) (для PlayStation®2). Обратите внимание,
что такие игровые данные не могут быть загружены
непосредственно с Memory Card (карты памяти) (8 Mб)
(для PlayStation®2).
RU
Игры
5 Выберите “Да”, затем нажмите кнопку .
Во время копирования или удаления данных не извлекайте
MEMORY CARD (карты памяти).
Использование MEMORY CARD (карт памяти)
73
Page 74

Аудио CD
Воспроизведение аудио CD
Воспроизведение аудио CD
1 Включите консоль и вставьте диск ( стр. 68).
Выполните действия с 1 по 4 раздела “Запуск игры”.
Отобразятся номера композиций.
2 Используя кнопки направлений, выберите номер
композиции для прослушивания и нажмите кнопку .
Начнется воспроизведение.
Примечания
• При включении консоли с вставленным диском номера дорожек
отобразятся автоматически.
• Воспроизведение можно также включить с экрана браузера
( стр. 90).
Предупреждение
Чтобы воспроизвести аудио CD, записанный в формате DTS,
необходимо подсоединить устройство с декодером DTS к разъему
DIGITAL OUT (OPTICAL) (цифрового оптического выхода)
( стр. 64). Следует иметь в виду, что если устройство не
оборудовано декодером DTS или если оно подсоединено к разъему
AV MULTI OUT (аудио/видео мульти-выхода), может возникнуть
очень громкий шум.
Управление проигрывателем CD во время
воспроизведения
Используя кнопки направлений, выберите значок требуемой
композиции и нажмите кнопку .
Значок (кнопка*) Функция
. (Кнопка L1) Перейти к началу текущей или
m (Кнопка L2) Ускоренное возвращение назад
M (Кнопка R2) Ускоренное воспроизведение
> (Кнопка R1) Перейти к началу следующей
N (Кнопка START (пуск)) Начало воспроизведения
X (Кнопка START (пуск)) Пауза воспроизведения
x (Кнопка SELECT
(выбор))
* Проигрывателем CD можно управлять непосредственно кнопками
Аналогового контроллера DUALSHOCK®2).
Примечание
Проигрывателем CD можно также управлять с помощью Пульта
дистанционного управления DVD (для PlayStation®2), который
продается отдельно.
предыдущей дорожки
вперед
композиции
Остановка воспроизведения
Воспроизведение аудио CD
74
Page 75

Завершение воспроизведения аудио CD
1 Используя кнопки направлений, выберите x, затем
нажмите кнопку .
Воспроизведение завершится. Нажмите кнопку A
(открывание) на передней панели консоли, чтобы извлечь
диск.
2 Выберите “Режим воспроизведения” или “Повтор”,
затем нажмите кнопку .
3 Выберите желаемое значение, затем нажмите кнопку
.
При выборе “Программа” отобразится экран для указания
порядка дорожек. Выберите дорожки для воспроизведения.
Воспроизведение в различных режимах
Можно настроить параметры “Режим воспроизведения” и
“Повтор”.
Режим
воспроизведения
Повтор Выкл. Не воспроизводит CD повторно
Обычный Воспроизводит композиции в порядке
Программа Воспроиз ведение дорожек в указанном
Произвольное
воспроизведение
Все Повторное воспроизведение всех
1 Повторное воспроизведение одной
их расположения на компакт-диске
порядке
Воспроизведение дорожек в случа йной
последовательности
дорожек
дорожки
1 На экране браузера ( стр. 90) с помощью кнопок
направлений выберите значок аудио CD и нажмите
кнопку .
Отобразится экран Варианты воспроизведения.
4 Нажмите кнопку .
Отобразится экран браузера.
5 Выберите значок аудио CD, затем нажмите кнопку .
Отобразятся номера дорожек, и в левом нижнем углу экрана
появится вариант настройки.
6 Выберите желаемую дорожку, затем нажмите кнопку
.
Начнется воспроизведение.
Примечания
• К экрану Варианты воспроизведения можно также перейти из экрана,
отображающего дорожки, выбрав в верхнем левом углу экрана значок
Audio CD и нажав кнопку xx.
• “Режим воспроизведения” и “Повтор” можно настроить одновременно.
Воспроизведение аудио CD
RU
Ауди о C D
75
Page 76

Диски DVD
Использование Панели управления
Воспроизведение DVD-видео
Проигрывателем DVD можно управлять следующими
способами.
• С экрана Панели управления
• Непосредственно, с помощью Аналогового контроллера
(DUALSHOCK
• С помощью пульта дистанционного управления DVD (для
PlayStation
Ниже приведены инструкции по управлению проигрывателем
DVD с помощью Панели управления. Некоторые операции
могут разниться в зависимости от используемого метода.
Примечания
• Для получения более подробной информации см. инструкцию по
эксплуатации, прилагаемую к DVD.
• Консоль PlayStation®2 воспроизводит содержание диска согласно
программному обеспечению DVD. Некоторые функции могут быть
недоступны для отдельных DVD.
®2)
®2) (продается отдельно)
1 Воспроизвести DVD ( стр. 78).
2 Нажмите кнопку SELECT (выбор).
Появится изображение Панели управления. Повторное
нажатие кнопки SELECT (выбор) изменит положение
Панели на экране.
3 Используя кнопки направлений, выберите значок, затем
нажмите кнопку .
Примечание
Для отключения Панели управления нажмите кнопку SELECT (выбор)
один или два раза, или нажмите кнопку .
Список элементов Панели управления
С Панели управления можно получить доступ к следующим
элементам.
Значок Функция
Меню
Вызывает на экран меню диска
DVD-видео
Воспроизведение DVD-видео
76
Page 77

Значок Функция
Вызывает на экран меню диска
DVD-видео
Возвращает к ранее выбранному
экрану меню DVD
Вызывает на экран и меняет
параметры звука DVD с
несколькими звуковыми
дорожками
Вызывает на экран и меняет
варианты ракурсов DVD,
записанных с разных ракурсов
Вызывает на экран и меняет
варианты субтитров DVD с
функцией субтитров
Переходит к номеру выбранной
главы или раздела, либо к
временному участку и начинает
воспроизведение ( стр. 79)
Вызывает на экран и меняет
установки языка, качества
изображения, уровня
Родительского контроля, звука и
т.д. ( стр. 83)
Вызывает на экран номер текущей
главы или раздела, время,
прошедшее от начала диска, и т.д.
( стр. 80)
Вызывает на экран изображение
прямых функций Аналогового
контроллера (DUALSHOCK®2)
O
Главное меню
Возврат
Варианты звука
Варианты
ракурсов
Варианты
субтитров
Переход
Установка
Индикация
времени
Справка
Значок Функция
Используйте для ввода номера
раздела, который необходимо
воспроизвести ( стр. 79)
Возврат/переход к началу
текущего, предыдущего или
следующего раздела
Ускоренно воспроизводит
изображение на экране назад/
вперед для поиска определенной
сцены ( стр. 79)
Переходит к воспроизведению
вперед/назад в режиме
замедленного воспроизведения
Приостанавливает и вновь
запускает воспроизведение
Останавливает воспроизведение
( стр. 78)
Выбирает сцену для
воспроизведения и начинает
воспроизведение установленной
сцены ( стр. 82)
Начинает воспроизведение глав и
разделов в произвольном порядке
( стр. 81)
Начинает воспроизведение глав и
разделов в запрограммированном
порядке ( стр. 81)
0~9
./>
/ Поиск
/ Медленно
N
X
x
Переход к
разделу
Предыдущий/
Следующий
Воспроизведение Запускает воспроизведение
Пауза
Стоп
Повтор A-В
Произвольное
воспроизведение
Программа
RU
Диски DVD
Воспроизведение DVD-видео
77
Page 78

Значок Функция
Повторное
воспроизведение
Original/Play List
Очистить
Примечания
• Можно использовать “ ” для проверки элементов, которыми можно
управлять непосредственно кнопками Анaлогового контроллера.
Чтобы управлять элементами непосредственно с помощью
контроллера, необходимо удалить Панель управления с экрана.
• В зависимости от режима воспроизведения некоторые функции могут
быть недоступны или неизменяемы.
Выбирает повторное
воспроизведение всех глав на
диске, одной главы или одного
раздела ( стр. 82)
Для дисков DVD-RW, записанных
в режиме VR, выбирает
воспроизведение Original или Play
List ( стр. 80)
Удаляет из памяти выбранные
номера или режим
воспроизведения ( стр. 82)
Воспроизведение диска DVD
1 Включите консоль и вставьте диск ( стр. 68).
Выполните действия с 1 по 4 раздела “Запуск игры”.
Начнется воспроизведение.
Примечания
• При включении консоли с вставленным диском воспроизведение
начнется автоматически.
• Воспроизведение можно также включить с экрана браузера
( стр. 90).
Завершение воспроизведения DVD x
1 Во время воспроизведения выберите x на Панели
управления ( стр. 76) и нажмите кнопку .
Воспроизведение завершится. Нажмите кнопку A
(открывание) на передней панели консоли, чтобы извлечь
диск.
Воспроизведение с места, где диск был
остановлен ранее (Возобновление
воспроизведения)
1 Во время воспроизведения выберите x на Панели
управления ( стр. 76) и нажмите кнопку .
2 Выберите N, затем нажмите кнопку .
Проигрыватель начнет воспроизведение с точки, где был
остановлен диск в пункте 1.
Чтобы отключить режим Возобновление
воспроизведения
После шага 1 выберите x и нажмите кнопку .
Воспроизведение DVD-видео
78
Page 79

Выбор определенной сцены для
воспроизведения
Поиск определенного места на диске (Поиск)
Выбор сцены по номеру раздела
1 Во время воспроизведения выберите желаемый номер
раздела в Панели управления ( стр. 76) и нажмите
кнопку .
Начнется воспроизведение выбранного раздела. Если вы
хотите воспроизвести раздел с однозначным номером
(т.е. 1-9), введите перед ним ноль. Например, “01”.
Выбор сцены по номеру главы, раздела или указанию
времени
1 Во время воспроизведения выберите с Панели
управления ( стр. 76) и нажмите кнопку .
2 Выберите элемент, затем нажмите кнопку .
Глава Указывает номер главы
Раздел Указывает номер раздела
C XX:XX:XX
(или Т XX:XX:XX)
Указывает время, прошедшее с начала
раздела (или главы)
3 Выберите номер желаемой сцены, затем нажмите
кнопку .
Начнется воспроизведение выбранного раздела.
Поиск можно вести вперед или назад, чтобы найти
определенное место на диске DVD.
1 Во время воспроизведения выберите или на
Панели управления ( стр. 76), затем нажмите и
удерживайте нажатой кнопку .
При нажатии кнопок направлений с одновременно нажатой
кнопкой скорость поиска меняется в следующем порядке.
• Поиск 3
• Поиск 2
• Поиск 1
• Медленно
2 Отпустите кнопку , когда искомая сцена найдена.
Воспроизведение пойдет с обычной скоростью.
Примечание
Чтобы использовать аналоговый контроллер для поиска во время
воспроизведения, нажмите и удерживайте кнопку L2 или R2. Для
изменения скорости при поиске используйте кнопки направлений.
Отпустите кнопку L2 или R2, когда искомая сцена найдена.
RU
Диски DVD
Воспроизведение DVD-видео
79
Page 80

Отображение информации о
воспроизведении
Выбор Original или Play List при
воспроизведении DVD-RW
Можно вызвать на экран такую информацию, как номер
текущей главы или время, прошедшее от начала
воспроизведения.
1 Во время воспроизведения выберите на панели
управления ( стр. 76) и нажмите кнопку .
При каждом нажатии кнопки изображение на экране
будет меняться в следующем порядке.
Глава Х Раздел Х Номер главы и номер раздела
Глава Х Раздел Х С XX:XX:XX Время, прошедшее от начала
текущего раздела
Глава Х Раздел Х C - XX:XX:XX Время, оставшееся до окончания
текущего раздела
Глава Х Раздел Х T XX:XX:XX Время, прошедшее от начала
текущей главы
Глава Х Раздел Х T - XX:XX:XX Время, оставшееся до окончания
текущей главы
(Выкл.)
Для дисков DVD-RW (режим VR) можно выбирать тип глав для
воспроизведения.
1 Остановив воспроизведение, выберите с
Панели управления ( стр. 76) и нажмите кнопку .
При каждом нажатии кнопки поочередно выбирается
Original или Play List.
Original Воспроизведение первоначального
содержания
Play List Воспроизведение отредактированного
содержания. Play List является установкой по
умолчанию для этого параметра.
Примечания
• Замедленное воспроизведение назад недоступно для дисков DVD-RW
(в режиме VR).
• Этот параметр недоступен в режиме Возобновление воспроизведения.
Отключите Возобновление воспроизведения ( стр. 78), прежде чем
выбрать эту функцию.
Воспроизведение DVD-видео
80
Page 81

Использование режимов
1 Во время воспроизведения выберите с Панели
управления ( стр. 76) и нажмите кнопку .
воспроизведения
Используя различные режимы воспроизведения, вы можете
воспроизводить главы или разделы в желаемом порядке или
повторно воспроизводить определенные сцены. Существует
четыре режима воспроизведения:
• Программа ( стр. 81)
• Произвольное воспроизведение ( стр. 81)
• Повторное воспроизведение ( стр. 82)
• Повтор А-В ( стр. 82)
Ниже приведены инструкции по управлению проигрывателем
DVD с помощью Панели управления.( стр. 76).
Примечания
• Можно сочетать режимы Программа, Произвольное воспроизведение
и Повторное воспроизведение. Однако следует иметь в виду, что
некоторые параметры Произвольного и Повторного воспроизведения
могут быть недоступны в разных сочетаниях.
• Консоль PlayStation®2 воспроизводит содержимое диска так, как оно
записано в программном обеспечении на диске DVD.
Программа
Можно создать программу для воспроизведения глав и разделов
в желаемом порядке.
2 Выберите номер программы, затем нажмите кнопку .
Если программы не были установлены, единственный
вариант - “1. Глaвa”.
3 Выберите номер главы, затем нажмите кнопку .
4 Выберите номер раздела, затем нажмите кнопку .
Для воспроизведения всех разделов нажмите “Все”.
Повторите пункты 2-4 для установки других глав или
разделов.
5 Нажмите кнопку START (Пуск).
Начнется воспроизведение в режиме Программа.
Примечание
Установки программы сохраняются даже после завершения
воспроизведения.
Произвольное воспроизведение
Вы можете настроить этот параметр для воспроизведения в
произвольном порядке всех глав и разделов, записанных на
диске. Порядок воспроизведения будет отличаться при каждом
использовании режима Произвольного воспроизведения.
1 Выберите на Панели управления ( стр. 76) и
нажмите кнопку .
При каждом нажатии кнопки изображение на экране
будет меняться в следующем порядке.
RU
Диски DVD
Использование режимов воспроизведения
81
Page 82

Произвольное
воспроизведение глав
Произвольное
воспроизведение разделов
Произвольное
воспроизведение Выкл.
Воспроизведение глав в произвольном
порядке
Воспроизведение разделов в пр оизвольном
порядке
Выключить произвольное
воспроизведение
2 Выберите N, затем нажмите кнопку .
Повтор A-В
Определенную часть диска можно воспроизводить
многократно.
1 Во время воспроизведения выберите с Панели
управления ( стр. 76) и нажмите кнопку в том
месте, с которого необходимо начать повторное
воспроизведение.
Будет установлена начальная точка воспроизведения A.
Повторное воспроизведение
С помощью этого режима главы или разделы диска могут быть
воспроизведены многократно.
1 Выберите на Панели управления ( стр. 76) и
нажмите кнопку .
При каждом нажатии кнопки изображение на экране
будет меняться в следующем порядке.
Повтор диска Повторное воспроизведение всех глав
Повтор главы Повторное воспроизведение главы
Повтор раздела Повторное воспроизведение раздела
Повтор Выкл. Выключить повторное воспроизведение
2 Выберите N, затем нажмите кнопку .
Использование режимов воспроизведения
82
2 Нажмите кнопку в том месте, где повторное
воспроизведение необходимо закончить.
Будет установлена конечная точка воспроизведения В, и
начнется повторное воспроизведение части диска от А до В.
Отключение режимов воспроизведения
Отключает режимы воспроизведения и включает нормальное
воспроизведение.
1 Выберите на Панели управления ( стр. 76) и
нажмите кнопку .
Отображается сообщение “Настройки режима
воспроизведения сброшены”, и консоль возвращается к
нормальному режиму воспроизведения.
Примечание
Если была установлена комбинация из нескольких режимов
воспроизведения, все они будут удалены.
Page 83

Нaстройкa установок DVD
проигрывателя
С помощью Панели управления можно управлять DVD и
регулировать настройки DVD проигрывателя, такие как язык
субтитров, язык звука и уровень Родительского контроля.
Примечания
• Некоторые диски не поддерживают все настройки. Консоль
PlayStation®2 воспроизводит соде ржание диска согласно программному
обеспечению DVD. Если DVD не поддерживает перечисленные
функции, изменить настройки будет невозможно.
• Следующие параметры недоступны во время воспроизведения или
Возобновлении воспроизведения ( стр. 78). Отключите
Возобновление воспроизведения перед изменением этих настроек.
– “Меню”, “Звук” и “Субтитры” в меню Настройка языков
– “Тип экрана” и “Прогрессивный режим” в меню Настройка экрана
– “Родительский контроль” в меню Пользовательские установки
– “DTS” и “Режим автоматического выбора звуковой дорожки” в
меню Настройка звука
Установки проигрывателя DVD можно менять следующим
образом:
1 Выберите на Панели управления ( стр. 76) и
нажмите кнопку .
Появится панель значков Установки.
2 Выберите значок искомого параметра и нажмите кнопку
.
Появится текущее значение каждого элемента.
3 Выберите желаемый элемент, затем нажмите кнопку
.
Параметр меню активизируется, и его можно выбрать.
4 Выберите желаемое значение, затем нажмите кнопку
.
Настройка элемента завершена. Подробные сведения см. в
инструкции для каждого элемента ( стр. 83 - 89).
Примечания
• В нижеприведенных объяснениях установки по умолчанию для
каждого элемента меню подчеркнуты.
• Чтобы вернуться к Панели управления после настройки, нажмите
кнопку SELECT (Выбор).
• Настройки сохраняются, если вы выполняете одно из следующих
действий:
– Завершение воспроизведения (в том числе отключение
Возобновления воспроизведения)
– Откройте крышку диска.
Установка параметров языка
Настройка языков позволяет выбрать язык для меню DVD,
звука и субтитров. Если выбрать язык, который не записан на
диске DVD, автоматически будет выбран один из записанных
языков.
RU
Диски DVD
Нaстройкa установок DVD проигрывателя
83
Page 84

Меню Выбор языка для меню диска DVD.
Звук Выбор языка звуковой дорожки
Субтитры Выбор языка субтитров диска DVD.
4:3 СКАН Выберите это значение, если используется
стандартный телевизор. С этой установкой
широкоэкранное изображение отображается во весь
экран, а те его части, которые не умещаются,
обрезаются.
Примечание
Если выбрать параметр “Как и звук” для субтитров, язык субтитров
автоматически изменится, чтобы соответствовать языку, выбранному
для звуковой дорожки.
Установка режима изображения телевизора
“Настройка экрана” позволяет устанавливать форматное
соотношение экрана и другие параметры изображения.
Тип ТВ экрана
Установка форматного соотношения для соответствия экрану
телевизора.
16:9 Выберите это значение, если используется
широкоэкранный телевизор или стандартный
телевизор, который поддерживает
широкоформатное изображение.
4:3 Выберите это значение, если используется
стандартный телевизор. С этой установкой
широкоэкранное изображение отображается с
границами в верхней и нижней части экрана.
Примечание
При установке “Прогрессивный режим” на “Вкл.” “Тип экрана”
автоматически устанавливается на 16:9.
DNR
С помощью этого параметра можно уменьшить помехи
изображения на экране и сделать его четче.
Выкл. DNR не используется.
DNR1 Увеличивает четкость изображения
DNR2 Увеличивает четкость изображения (максимум)
Примечания
• “DNR2” более эффективен для уменьшения помех, чем “DNR1”, но в
некоторых случаях может появиться остаточное изображение. Если
это происходит, выберите “Выкл.”.
• На некоторых дисках DVD результат использования функции DNR
может быть малозаметным.
• П ри установке “Прогрессивный режим” на “Вкл.” DNR автоматически
отключается и не может быть включен.
Резкость контура
С помощью этого параметра можно сделать контур
изображения более резким или размытым. Чем больше
значение, тем больше резкость контура. Обычно выбирается
значение “0”.
Нaстройкa установок DVD проигрывателя
84
Page 85

•-2 •-1 •0 •+1 •+2
воспроизведенных на экране телевизора, поддерживающего
прогрессивное сканирование (480р).
Примечание
На некоторых дисках DVD результат использования функции Резк ость
контура может быть малозаметным.
Индикация
Во время воспроизведения можно на несколько секунд в правом
верхнем углу экрана отобразить сведения о состоянии
воспроизведения.
Вкл. Сведения о состоянии воспроизведения отображаются в
течение нескольких секунд.
Выкл. Сведения о состоянии воспроизведения не отображаются.
Прогрессивный режим
Этот режим дает изображение, в котором все строчки
обновляются за один проход. В большинстве случаев это дает
более четкое изображение без мерцания. Функция
поддерживается только в случае, если телевизор и кабель AV*
поддерживают прогрессивное сканирование (480р).
* Компонентный кабель AV (аудио/видео) (для PlayStation®2)
(продается отдельно) поддерживает прогрессивное сканирование.
Вкл. Выберите это значение, если консоль подключена к
телевизору, который поддерживает прогрессивный режим
(480р).*
Выкл. Выберите это значение, если консоль подключена к
стандартному телевизору.
* Режим прогрессивного сканирования проигрывателя DVD доступен
только при воспроизведении дисков, записанных в формате NTSC и
Примечания
• Если “Прогрессивный режим” будет установлен на “Выкл.” без
необходимого оборудования, качество изображения может
ухудшиться, или изображение вообще не будет отображаться. Если вы
случайно установите этот параметр на “Вкл.” на таком телевизоре,
качество изображения может ухудшиться или изображение вообще не
будет отображаться. Чтобы отключить этот параметр, сделайте
следующее:
Убедитесь, что в консоли установлен диск DVD.
1
Нажмите кнопку \/1/RESET (включение/готовность/перезагрузка)
2
на передней панели консоли.
Затем нажмите и держите нажатой кнопку START (пуск)
Аналогового контроллера (DUALSHOCK®2) на порте контроллера
1, пока не появится изображение диска DVD. “Прогрессивный
режим” установлен на “Выкл.”, и DVD-Video будет отображаться в
обычном режиме. Вы можете также отменить эту установку с
помощью параметра “Сбросить прогрессивн ый режим” ( стр. 96)
на экране Информация о версии.
• Диски DVD могут содержать видеоматериалы и фильмы с разной
частотой смены кадров. При воспроизведении видеоматериала с
помощью прогрессивной развертки некоторые изображения могут
показаться неестественными. Если это происходит, установите
“Прогрессивный режим” на “Выкл.” и воспользуйтесь стандартным
режимом.
• При установке “Прогрессивный режим” на “Вкл.” “Тип экрана”
( стр. 84) автоматически устанавливается на 16:9.
• Диск DVD-RW с содержанием, записанным в режиме VR, может
воспроизводиться только в стандартном чересстрочном режиме.
Прогрессивный режим недоступен при воспроизведении такого
содержания.
RU
Диски DVD
Нaстройкa установок DVD проигрывателя
85
Page 86

Установка параметров просмотра
3 Выберите “Регион”, затем нажмите кнопку .
Появится список регионов.
Режим паузы
Устанавливает состояние изображения в режиме паузы.
Автоматический Изображение со множеством движущихся
элементов может отображаться без дрожания.
Обычно выбирается это положение.
Рамка Изображение без движущихся элементов
отображается с высоким разрешением.
Родительский контроль
Просмотр содержания некоторых дисков DVD может быть
ограничен в некоторых регионах, исходя из возраста зрителя
или других факторов. Функцию Родительский контроль можно
использовать для ограничения уровня содержания,
воспроизводимого на консоли.
Чем меньше значение, тем строже ограничение.
Установка Родительского контроля
1 Выберите “Родительский контроль”, затем нажмите
кнопку .
Появится изображение экрана установки пароля. Если
пароль был установлен, появится изображение экрана
подтверждения пароля.
2 Выберите цифру, затем нажмите кнопку .
Повторите пункт 2, чтобы ввести 4-значный пароль. Чтобы
стереть цифру, нажмите кнопку . При установке пароля
необходимо ввести его еще раз для подтверждения.
4 Выберите регион для определения уровня
Родительского контроля и нажмите кнопку .
Если выбран “Другие”, см. “Список региональных кодов”
( стр. 86).
5 Выберите “Уровень”, затем нажмите кнопку .
Появится список уровней ограничения.
6 Выберите уровень, затем нажмите кнопку .
Чтобы отключить Родительский контроль
Остановите воспроизведение диска DVD, перейдите к пункту 6
“Установка Родительского контроля” и установите “Уровень”
на “Выкл.”.
Список региональных кодов
Для ввода кода региона Родительского контроля выберите
“Другие” в пункте 4 “Установки Родительского контроля”
( стр. 86). Выберите первую букву с помощью кнопок
направления и нажмите правую кнопку направления. Выберите
следующую букву, затем нажмите кнопку .
Регион Код Регион Код
Австрия AT Мальта MT
Бельгия BE Нидерланды NL
Чешская Республика CZ Норвегия NO
Дания DK Польша PL
Нaстройкa установок DVD проигрывателя
86
Page 87

Регион Код Регион Код
Финляндия FI Португалия PT
Франция FR Россия RU
Германия DE Словакия SK
Греция GR Испания ES
Ирландия IE Швеция SE
Израиль IL Швейцария CH
Италия IT Турция TR
Люксембург LU Великобритания GB
Воспроизведение диска, защищенного функцией
Родительского контроля
1 Воспроизвести DVD ( стр. 78).
Изображение поменяется на дисплей, запрашивающий
разрешение на временную смену уровня Родительского
контроля. Это обычно происходит в начале
воспроизведения, но может также случиться в другое время,
в зависимости от диска.
2 Используя кнопки направлений, выберите “Да”, затем
нажмите кнопку .
Появится изображение экрана для введения пароля.
RU
Диски DVD
Чтобы изменить пароль
В пункте 2 “Установка Родительского контроля” ( стр. 86)
выполните следующие действия:
1 С помощью кнопок направлений выберите “Изменение
пароля” и нажмите кнопку .
Появится изображение экрана для изменения пароля.
2 Выберите цифру, затем нажмите кнопку .
Повторите пункт 2, чтобы ввести 4-значный пароль. Чтобы
подтвердить пароль, введите его еще раз.
3 Выберите цифру, затем нажмите кнопку .
Повторите пункт 3, чтобы ввести 4-значный пароль. После
введения пароля воспроизведение возобновится. Когда
воспроизведение диска DVD завершится, уровень
Родительского контроля вернется к исходному значению.
Примечания
• Если вы забыли пароль, см. раздел “Устранение неисправностей”
( стр. 108).
• Если пароль не установлен, изменить настройки функции
Родительского контроля невозможно.
• Некоторые диски DVD с функцией Родительского контроля не
разрешают использование режимов воспроизведения ( стр. 81 - 82).
Нaстройкa установок DVD проигрывателя
87
Page 88

Установка параметров звука
Цифровой выход звука
Способы вывода аудиосигналов можно переключать при
подключении следующих аудиоустройств к разъему DIGITAL
OUT (OPTICAL) (цифрового оптического выхода).
Предупреждение
Если консоль подсоединена к аудиоустройству без декодера Dolby
Digital, DTS или MPEG, установите значение “Dolby Digital”, “DTS”
и “MPEG” на “Выкл.”. Если они установлены на “Вкл.” без
необходимого декодера, громкоговорители начнут воспроизводить
сильный шум или не будут воспроизводить ничего.
DIGITAL OUT (OPTICAL) (цифровой оптический выход)
Возможность вывода сигнала через разъем DIGITAL OUT
(OPTICAL) (цифрового оптического выхода).
Dolby Digital
Выбор вывода сигнала в формате Dolby Digital через разъем
DIGITAL OUT (OPTICAL) (цифрового оптического выхода).
Вкл. Выберите это значение, если консоль подключена к
аудиоустройству со встроенным декодером Dolby Digital.
Выкл. Выберите это значение, если консоль подключена к
аудиоустройству, не имеющему встроенного декодера Dolby
Digital.
DTS
Выбор вывода сигналов в формате DTS через разъем DIGITAL
OUT (OPTICAL) (цифрового оптического выхода).
Вкл. Выберите это значение, если консоль подключена к
аудиоустройству со встроенным декодером DTS.
Выкл. Выберите это значение, если консоль подключена к
аудиоустройству, не имеющему встроенного декодера DTS.
Вкл. Выберите это значение, если требуется, чтобы звуковой
Выкл. Выберите это значение, если не требуется, чтобы звуковой
Нaстройкa установок DVD проигрывателя
88
сигнал выводился через разъем DIGITAL OUT (OPTICAL)
(цифрового оптического выхода).
Появятся настройки для “Dolby Digital”, “DTS” и “MPEG”.
сигнал выводился через разъем DIGITAL OUT (OPTICAL)
(цифрового оптического выхода).
Настройки для “Dolby Digital”, “DTS” и “MPEG” не
отображаются.
MPEG
Выбор вывода сигналов в формате MPEG AUDIO через разъем
DIGITAL OUT (OPTICAL) (цифрового оптического выхода).
Вкл. Выберите это значение, если консоль подключена к
аудиоустройству со встроенным декодером MPEG.
Выкл. Выберите это значение, если консоль подключена к
аудиоустройству, не имеющему встроенного декодера
MPEG.
Page 89

Режим автоматического выбора звуковой дорожки
При воспроизведении диска DVD, аудиозапись на котором
выполнена в нескольких звуковых форматах (PMC, Dolby
Digital, DTS или MPEG), приоритет отдается звуковой дорожке,
содержащей наибольшее число каналов. Если звуковые
дорожки в формате PCM, Dolby Digital, DTS и MPEG имеют
одинаковое число каналов, консоль выбирает дорожки в
перечисленном порядке.
Предупреждение
Если для этого параметра установлено значение “+1” или “+2”, звук
может искажаться. При искажении звука выберите значение
“Стандартная”. Обратите внимание, что слишком большая
громкость может привести к повреждению слуха или поломке
громкоговорителей.
Вкл. Приоритет установлен
Выкл. Приоритет не установлен
Примечания
• Если параметр “DTS” установлен на “Выкл.” в “Цифровой выход
звука” ( стр. 88), звуковая дорожка DTS не будет воспроизводиться.
• Для некоторых дисков DVD приоритетный звуковой канал может
быть установлен заранее. В этом случае звуковая дорожка будет
выбираться на основе приоритетов диска.
Громкость DVD
Параметр устанавливается, если уровень громкости звука на
диске DVD низкий. Чтобы изменить этот параметр, “DIGITAL
OUT (OPTICAL)” должен быть установлен на “Выкл.” в
“Цифровой выход звука” ( стр. 88).
+2 Увеличивает громкость (максимум)
+1 Увеличивает громкость
Стандартная Обычно выбирается это положение.
Нaстройкa установок DVD проигрывателя
RU
Диски DVD
89
Page 90

Главное меню
Вызов главного меню
Из Главного меню можно получать доступ к информации и
изменять разнообразные настройки. Из Главного меню можно
также перейти к следующим экранам. Главное меню
отображается при включении консоли без вставленного диска.
• Экран браузера ( стр. 90)
• Меню Конфигурация системы ( стр. 91)
• Экран информации о версии ( стр. 94)
1 Включите консоль ( стр. 67).
Главное меню. Вывод на экран главного меню может занять
некоторое время.
Использование экрана браузера
С помощью экрана браузера можно выполнять следующие
операции:
• Копировать или удалять игровые данные на MEMORY CARD
(карте памяти)
• Запускать игры
• Воспроизводить аудио CD
• Воспроизводить DVD
1 Главное меню ( стр. 90).
2 Используя кнопки направлений, выберите “Браузер”,
затем нажмите кнопку .
Отобразится экран браузера.
3 Вставьте диск или MEMORY CARD (карту памяти).
Значок для вставленного диска отображается на экране
браузера.
\
Примечание
При включении консоли с вставленным диском главное меню не
отображается. Чтобы главное меню, на жмите кнопку A (открывание) на
передней панели консоли и извлеките диск. Затем нажмите кнопку
=/1 (вкл./готовность)/RESET, чтобы перезагрузить консоль.
Вызов главного меню
90
Page 91

4 Выберите значок, затем нажмите кнопку .
• После выбора значка MEMORY CARD (карты памяти)
появляются значки данных, сохраненных на MEMORY
CARD (карте памяти). О копировании и удалении игровых
данных см. “Копирование или удаление игровых данных”
( стр. 73).
• При выборе значка для диска с программным
обеспечением формата PlayStation
запускается игра.
• При выборе значка аудио CD отображаются дорожки
компакт-диска. См. “Воспроизведение аудио CD”
( стр. 74).
• При выборе значка диска DVD-видео начнется
воспроизведение DVD.
Примечание
Если в консоли отсутствует MEMORY CARD (карта памяти) или диск,
на экране браузера отображается сообщение “Нет данных”.
®2 или PlayStation®
Использование меню
Конфигурация системы
С помощью меню Конфигурация системы вы можете изменить
настройки множества параметров, включая язык, время и
способ воспроизведения аудио- и видеоданных.
1 Отображать главное меню ( стр. 90).
2 С помощью кнопок направлений выберите
“Конфигурация системы” и нажмите кнопку .
Появится меню Конфигурация системы.
3 Выберите элемент, затем нажмите кнопку .
Параметр меню активизируется, и его можно выбрать.
RU
Главное меню
Использование меню Конфигурация системы
91
Page 92

4 Выберите желаемое значение, затем нажмите кнопку
.
Подробные сведения см. в инструкции для каждого элемента
меню ( стр. 92 - 94).
Примечания
• В нижеприведенных объяснениях установки по умолчанию для
каждого элемента меню подчеркнуты.
• Изменения каждой настройки сохраняются даже после отключения
или перезагрузки консоли.
Настройка часов
Вы можете установить дату и время. Используйте кнопки
направлений для установок “Год”, “Месяц”, “День”, “Час”,
“Минута” и “Секунда”. Установки вступают в силу при нажатии
кнопки .
Дополнительные параметры
При нажатии кнопки на экране “Настройка часов” можно
установить такие параметры, как “Формат даты” или “Формат
времени”. Используйте кнопки направлений и кнопку для
установки каждого параметра.
Летнее время Устанавливает зимнее или летнее время. По
умолчанию установлено “зимнее время”.
Размер экрана
Выбор режима отображения в зависимости от подключаемого
телевизора.
4:3 Выберите это значение, если к консоли
подключается стандартный телевизор.
Весь экран* Выберите это значение, если к консоли
подключается стандартный телевизор.
Черные поля в верхней и нижней частях
экрана будут обрезаны.
16:9 Выберите это значение, если используется
широкоэкранный телевизор или стандартный
телевизор, который поддерживает
широкоформатное изображение.
* Режим “Весь экран” совместим с меню Конфигурация системы,
экраном браузера и экраном аудио CD.
Формат времени Устанавливает системные часы в 12-часовой
Формат даты Устанавливает порядок отображения года,
Часовой пояс Устанавливает часовой пояс
Использование меню Конфигурация системы
92
или 24-часовой формат
месяца и дня
Page 93

DIGITAL OUT (OPTICAL) (цифровой оптический
выход)
Возможность вывода сигнала через разъем DIGITAL OUT
(OPTICAL) (цифрового оптического выхода).
Вкл. Выберите это значение, если необходимо
Выкл. Выберите это значение, если не требуется,
выводить сигнал через разъем DIGITAL OUT
(OPTICAL) (цифрового оптического выхода).
чтобы звуковой сигнал выводился через
разъем DIGITAL OUT (OPTICAL)
(цифрового оптического выхода).
Компонентный видео выход
Настройте этот параметр в соответствии с разъемами входов на
телевизоре, если используется компонентный кабель AV
(интегрированного аудио/видео) (для PlayStation
отдельно).
®2) (продается
Примечание
Параметр “RGB” предназначен только для программного обеспечения
формата PlayStation®2 и PlayStation®. При просмотре DVD режим
автоматически изменяется на “Y Cb/Pb Cr/Pr”.
Пульт дистанционного управления
Настройте этот параметр при использовании пульта
дистанционного управления DVD (для PlayStation
отдельно).
Функция игры Вкл. Выберите это значение, если с помощью
пульта дистанционного управления DVD
осуществляется управление программным
обеспечением формата PlayStation®2 или
PlayStation®.
Функция игры Выкл. Выберите это значение, если с помощью
пульта дистанционного управления DVD не
осуществляется управление программным
обеспечением формата PlayStation®2 или
PlayStation®.
®2) (продается
RU
Главное меню
Y Cb/Pb Cr/Pr Выберите это значение, если консоль
подключается к компонентным разъемам
видеовходов на телевизоре.
RGB Выберите это значение, если консоль
подключается к входу RGB на телевизоре.
Использование меню Конфигурация системы
93
Page 94

Примечание
Когда параметр “Пульт дистанционного управления” установлен в
значении “Функция игры Вкл.”, действуют следующие ограничения:
– В зависимости от программного обеспечения, некоторые кнопки
пульта дистанционного управления могут работать некорректно.
– Пульт дистанционного управления DVD не срабатывает, если
нажаты одновременно две или более кнопок.
– Некоторые диски программного обеспечения могут перестать
работать при удалении контроллера из порта контроллера 1. Если
это происходит, установите значение “Функция игры Выкл.”.
Язык
Выбор языка для Главного меню, экрана браузера, меню
Конфигурация системы и экрана Информация о версии.
Английский Отображает сообщения на английском языке
Русский Отображает сообщения на русском языке
Использование экрана
Информация о версии
Выбрав этот параметр, можно получить сведения о версии
различных компонентов консоли. Можно также изменить
установки различных функций.
1 В Главном меню ( стр. 90) нажмите кнопку .
Появится экран Информация о версии.
Дополнительные параметры
Дополнительные параметры доступны для элементов
“Консоль”, “Драйвер PlayStation
“Проигрыватель DVD” может быть установлен только в
случае, если для параметра “Прогрессивный” проигрывателя
DVD выбрано значение “Вкл.”.
®” и “Проигрыватель DVD”.
Использование экрана Информация о версии
94
1 Используя кнопки направлений, выберите элемент,
затем нажмите кнопку .
Появится текущее значение элемента.
Page 95

2 Выберите элемент, затем нажмите кнопку .
Появятся доступные параметры.
3 Выберите желаемое значение, затем нажмите кнопку
.
Подробные сведения см. в инструкции для каждого элемента
( стр. 95 - 96).
Примечание
В нижеприведенных объяснениях установки по умолчанию для каждого
элемента меню подчеркнуты.
Консоль
Консоль PlayStation®2 автоматически настраивает параметры
для наилучшего качества воспроизведения диска. Когда
значение параметра “Диагностика” установлено на “Вкл.”,
консоль делает дополнительные настройки.
Диагностика
Драйвер PlayStation®
Установка программы Драйвер PlayStation® оптимизирует
работу программного обеспечения формата PlayStation
Примечание
Параметры автоматически возвращаются к значениям по умолчанию в
следующих случаях:
– При выключении консоли
Скорость диска
Стандартная Загружает диски при нормальной скорости
Быстрая Загружает диски при большой скорости
Примечание
Установите значение “Стандартная” в следующих случаях:
– Если быстрая загрузка не улучшает результаты
– Если используется программное обеспечение, несовместимое с
быстрой загрузкой
®.
RU
Главное меню
Выкл. Диагностика отключена.
Вкл. Диагностика включена.
Примечание
Параметр “Диагностика” автоматически возвращается в значение
“Выкл.” (параметр по умолчанию) в следующих случаях:
– При начале воспроизведения программного обеспечения формата
PlayStation®2 или PlayStation®, или диска DVD-видео
– При перезагрузке консоли
– При выключении консоли
Отображение текстуры
Стандартное Обычное отображение
Гладкое Уменьшает зернистость изображения на экране
Использование экрана Информация о версии
95
Page 96

Примечание
Установите значение “Стандартная” в следующих случаях:
– Если гладкое отображение текстуры не улучшает результаты
– Если при выборе значения “Гладкое” изображение не отображается
правильно
5 Дважды нажмите кнопку .
Дисплей вернется к Главному меню.
6 Нажмите кнопку A (открывание) на передней панели
консоли, чтобы поместить в консоль диск DVD.
Проигрыватель DVD
Если установить значение “Прогрессивный режим” на “Вкл.”,
когда консоль подключена к телевизору без необходимого
оборудования, изображение может ухудшиться или исчезнуть. С
помощью приведенной процедуры можно отключить
“Прогрессивный режим”.
Перед сбросом прогрессивного режима извлеките DVD.
Сбросить прогрессивный режим
Нет Сохраняет “Прогрессивный режим” включенным
Да Сбрасывает “Прогрессивный режим”
1 Отображение экрана Информация о версии.
2 Используя кнопки направлений, выберите
“Проигрыватель DVD”, затем нажмите кнопку .
Появится параметр “Отключение прогрессивного режима”.
3 Нажмите кнопку .
4 Выберите “Да”, затем нажмите кнопку .
7 Закройте крышку диска.
Начнется воспроизведение.
Примечание
Параметр не будет сброшен, если 1) после пункта 4 не включать
воспроизведение DVD или 2) консоль будет перезагружена или
отключена до выполнения пункта 6.
Использование экрана Информация о версии
96
Page 97

Работа в сети
Подключение с помощью сетевого кабеля
Подключение к сети
К сведению: на момент выхода данных материалов в печать
игры по сети поддерживаются не во всех странах.
Вы можете играть в сетевые игры, подключив консоль
PlayStation
сетевые игры, необходимо следующее:
• Диск для доступа к сети (продается отдельно)
• MEMORY CARD (карта памяти) (8 Mб) (для PlayStation
(продается отдельно)
• Договор на обслуживание с провайдером широкополосного
Интернет-доступа (заключается отдельно)
• Кабель Ethernet (продается отдельно)
• Внешнее сетевое устройство, такое как цифровая приставка
для телевизора с поддержкой широкополосного доступа,
кабельный модем, модем ADSL или маршрутизатор
(поставляется отдельно)
Примечания
• Невозможно играть в сетевые игры, используя соединение по
коммутируемой линии или ISDN.
• Подключение USB от внешнего сетевого устройства к разъему USB не
Поддерживается.
• Существует два типа сетевых кабелей: прямой и кроссированный. При
подключении консоли PlayStation®2 к широкополосному соединению с
Интернет убедитесь, что вы используете правильный тип кабеля.
Подробности можно узнать в руководстве по эксплуатации,
прилагаемом к сетевому устройству, или у провайдера
широкополосного Интернет-доступа.
®2 к широкополосной сети. Чтобы играть во все
®2)
Подсоединить консоль к сети можно с помощью сетевого
кабеля Ethernet, подключенного к разъему NETWORK (сети)
на задней панели консоли. Можно подключиться к сети 100
Base-TX или 10 Base-T. Для получения более подробной
информации см. инструкцию по эксплуатации, прилагаемую к
сетевому устройству.
Базовая настройка сети
Сетевая линия
Зависит от типа
широкополосных услуг в вашем
доме.
Продающийся
отдельно сетевой кабель
Сетевое оборудование
Используемый тип оборудования
также зависит от типа
предоставляемых услуг.
Широкополосный модем,
маршрутизатор и т.д.
ПК
RU
Работа в сети
Подключение к сети
97
Page 98

Примечание
При подключении консоли и ПК к сети может потребоваться сетевое
устройство, такое как маршрутизатор или концентратор. Для получения
более подробной информации см. инструкцию по эксплуатации,
прилагаемую к сетевому устройству.
2 Вставьте разъем сетевого кабеля в сетевое устройство.
Способ подключения зависит от сетевого устройства. Для
получения более подробной информации см. инструкцию по
эксплуатации, прилагаемую к сетевому устройству.
Для получения более подробной информации о настройке сети
посетите сайт www.playstation.com
Подсоединение консоли
Предупреждение
Не включайте шнур питания АС (переменного тока) консоли в
электрическую розетку до тех пор, пока не произведете все
необходимые подсоединения.
1 Подключите сетевой кабель к разъему NETWORK (сети)
на задней панели консоли.
Задняя панель консоли
Продающийся отдельно
сетевой кабель
Предупреждение
Не подключайте к сетевому разъему сетевые кабели или
телефонные шнуры следующих типов; слишком большая сила тока,
проходящего через разъем, может вызвать его повреждение,
сильный нагрев или возгорание.
– Стандартные домашние телефонные линии
– Сетевые кабели, непригодные к использованию с сетью 10Base-T/
100Base-TX
– Любая телефонная линия или канал передачи данных,
совместимые с ISDN (цифровая)
– Телефонные линии мини-АТС
– Другие “незнакомые” типы телефонных линий
Подключение к сети
98
Page 99

Сетевые настройки
После подсоединения к консоли сетевого кабеля необходимо
создать и сохранить сетевые настройки. Для этого Вам
потребуется диск доступа к сети, который предоставляется
после регистрации Вашей консоли PlayStation
PlayStation
прилагаемую карточку регистрации либо на сайте
www.ps2registration.com
®2 Вы можете зарегистрировать, заполнив
Необходимое оборудование
Для создания сетевых настроек необходимо следующее
оборудование:
• MEMORY CARD (карта памяти) (8 Mб) (для PlayStation
(продается отдельно)
• Информация о настройке сети и регистрации в ней,
предоставляемая вашим провайдером широкополосного
Интернет-доступа
Примечание
В зависимости от типа используемых Интернет-услуг может возникнуть
необходимость предоставления провайдеру широкополосного Интернетдоступа вашего адреса МАС. Адрес MAC для вашей консоли указан на
экране информации о версии ( стр. 94).
®2. Свою консоль
®2)
RU
Работа в сети
Сетевые настройки
99
Page 100

Дополнительная информация
Совместимое программное
обеспечение
О дисках CD-ROM и DVD-ROM формата PlayStation®2, а
также дисках CD-ROM формата PlayStation
®
Консоль может воспроизводить только диски с обозначением
.
Диски с маркировкой , или
не воспроизводятся.
На консоли PlayStation®2 Вы можете воспроизводить диски
следующих типов:
Тип диска Логотип диска
DVD-ROM формата
PlayStation®2
[12 см, Серебряный]
СD-ROM формата
PlayStation®2
[12 см, Голубой]
СD-ROM формата
PlayStation®
[12 см, Черный]
Аудио CD
[12 см, 8 см]
DVD-Video*
[12 см, 8 см]
DVD-RW (режим VR)
[12 см, 8 см]
* В настоящем руководстве термин “DVD-Video” используется
применительно к дискам DVD-R, DVD-RW (видеорежим), DVD+R и
DVD+RW.
Совместимое программное обеспечение
100
“ ”, логотип PlayStation®2 и знак
“ ”, логотип PlayStation®2 и знак
Логотип PlayStation® и знак
Логотип “DVD VIDEO”
является товарным
знаком.
Логотип “DVD-RW”
является товарным
знаком.
О дисках DVD-Video
• Консоль может воспроизводить только диски, записанные в
стандарте PAL. На этой консоли невозможно воспроизводить
диски, записанные в других стандартах (например NTSC)
(кроме случаев, когда на диске в формате NTSC имеется
маркировка “ALL” (“ВСЕ”) и используется телевизор,
поддерживающий стандарт NTSC).
• На некоторых дисках DVD-Video нанесена маркировка
номера региона, в котором этот диск может воспроизводиться.
Диски DVD-видео, на которых указан номер, отличный от “5”
или “ALL” (“ВСЕ”), невозможно воспроизвести на этой
консоли.
ALL
Примечания по воспроизведению дисков DVD-R,
DVD-RW, DVD+R и DVD+RW
• Некоторые диски не могут быть воспроизведены из-за наличия
царапин, пыли или проблем, возникших при записи диска.
• Только диски, прошедшие процесс финализации
(заключительная стадия процесса записи) после записи, могут
быть воспроизведены.
 Loading...