

Page 1
3-084-043-11(2)
Instruction manual
Thank you for purchasing the PlayStation®2 online
pack. Your PlayStation
system includes a pre-installed network adaptor
(Ethernet/modem).
You can play PlayStation®2 format CD-ROM and
DVD-ROM discs, PlayStation
CD-ROM discs, audio CDs and DVD video discs with
NTSC 1 designation with this system.
Before using this product, carefully read this manual
and retain it for future reference.
2 computer entertainment
®
*
format
®
Mode d’emploi
Nous vous remercions d'avoir fait l'acquisition du
PlayStation
interactif PlayStation
réseau (Éthernet/modem) installé.
Avec ce système, vous pouvez lire des disques CDROM et DVD-ROM au format PlayStation
ROM au format PlayStation
disques DVD vidéo portant la désignation NTSC 1.
Avant d’utiliser ce produit, lisez attentivement ce
mode d’emploi et conservez-le pour pouvoir vous y
reporter ultérieurememt.
2 online pack. Votre système de loisir
®
2 est fourni avec un adaptateur
®
*
2, des CD-
, des CD audio et des
®
®
Manual de instrucciones
Gracias por adquirir PlayStation®2 online pack.
Su sistema de entretenimiento computarizado
PlayStation
modem) preinstalado.
Con este sistema, puede reproducir DVD-ROM y CDROM de formato PlayStation
CD-ROM de formato PlayStation
de vídeo DVD con la designación NTSC 1.
Antes de utilizar este producto, lea detenidamente este
manual y consérvelo para consultarlo en el futuro.
* The network adaptor is not for individual resale.
* L'adaptateur réseau ne peut être revendu séparément.
* El adaptador de red no puede ser revendido
individualmente.
2 incluye un adaptador de red (Ethernet/
®
*
2,
®
, CD audio y discos
®
English Français
US ➔ P.2
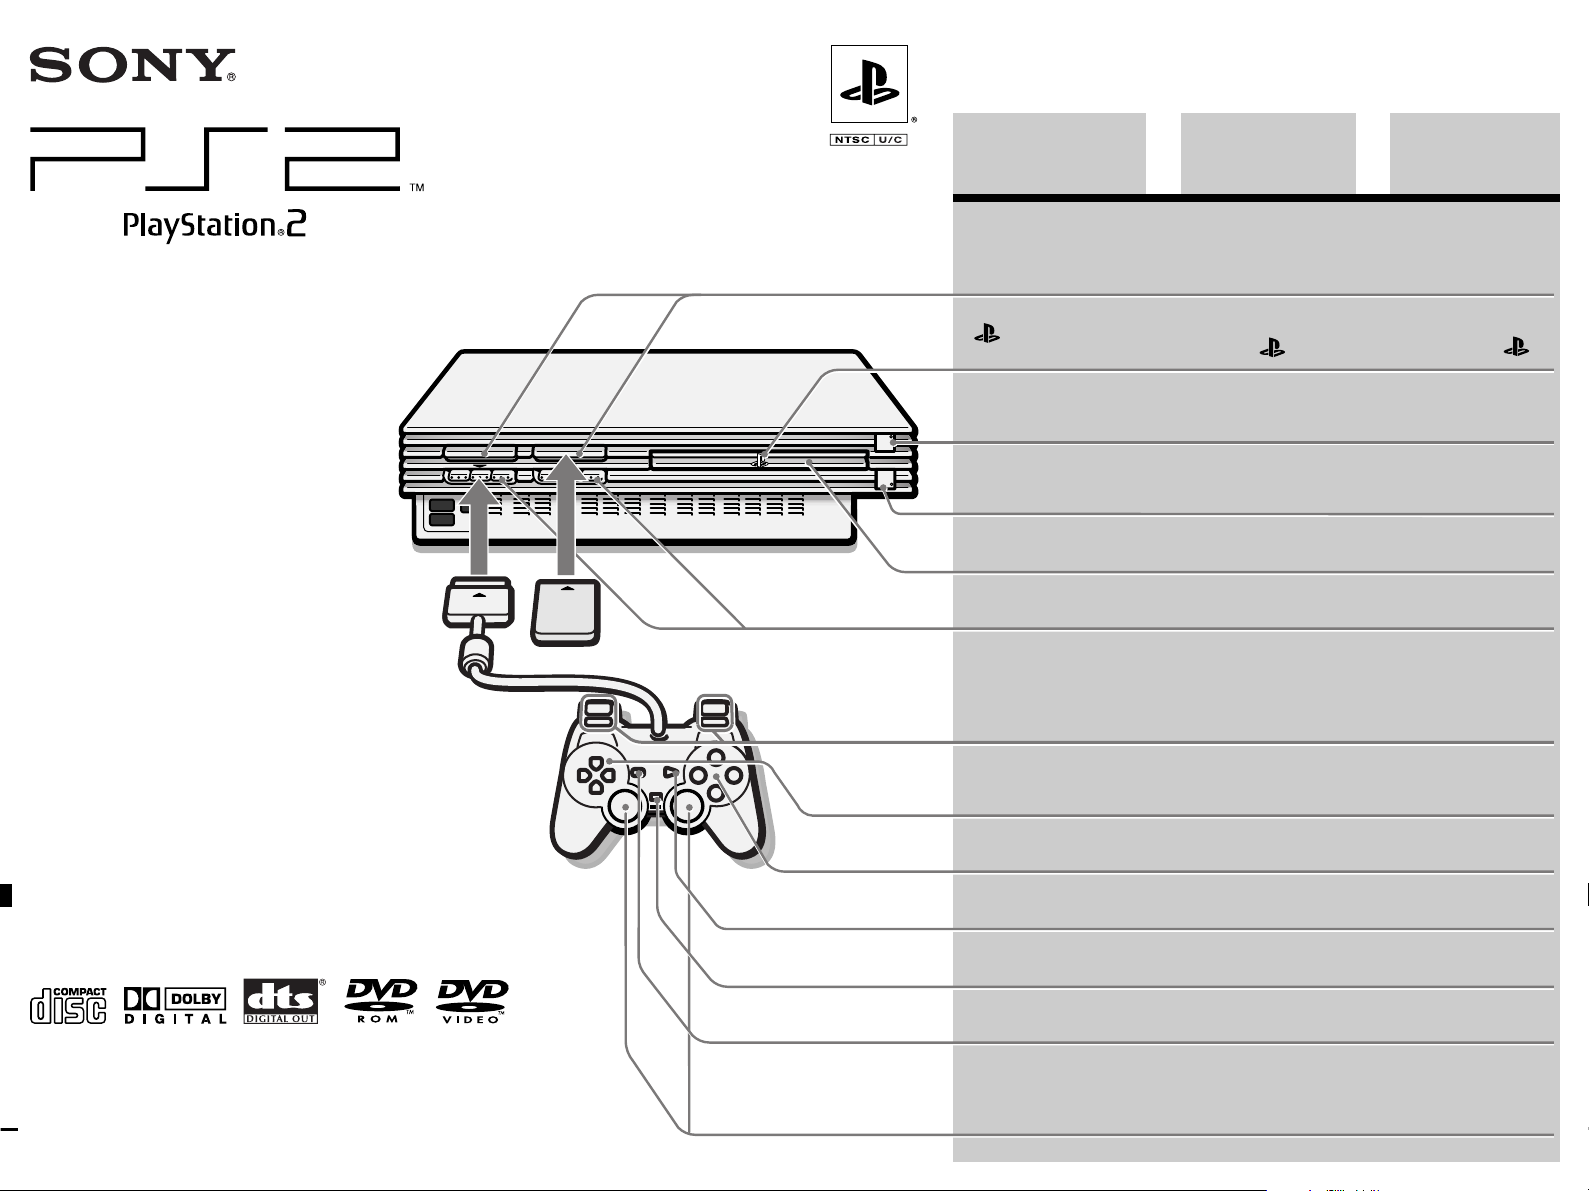
MEMORY CARD slots
” product family
“
logo
1 (standby)/RESET
button and 1 indicator
A (open) button and
A indicator
Disc tray
Controller ports
L2 button, R2 button,
L1 button, R1 button
Directional buttons
¢ button, a button,
✕ button, s button
START button
ANALOG mode button
Fentes pour MEMORY
CARD (carte mémoire)
Logo de la gamme de
produits “
”
Bouton 1 (veille)/
RESET et indicateur 1
Bouton A (ouvrir)
indicateur
et
A
Compartiment à
disque
Ports de manette
Touche L2, touche R2,
touche L1, touche R1
Touches directionnelles
Touche ¢ , touche a ,
touche ✕ , touche s
Touche START
(de mise en marche)
Touche de mode
ANALOG (analogique)
Español
ES ➔ P.62FR ➔ P.32
Ranuras para
MEMORY CARD
(tarjeta de memoria)
Logotipo de la familia
de productos “
Botón 1 (espera) /
RESET (reinicio) e
indicador 1
Botón A (abrir) e
indicador A
Bandeja del disco
Puertos de control
Botón L2, botón R2,
botón L1, botón R1
Botones de dirección
Botón ¢ , botón a ,
botón ✕ , botón s
Botón START (inicio)
Botón modo ANALOG
(analógico)
”
SCPH-39001/N / 97013
SCPH-39010/N / 97015
© 2003 Sony Computer Entertainment Inc. All rights reserved.
SELECT button
Left analog stick,
right analog stick,
L3 button, R3 button
Touche SELECT
(de sélection)
Manche analogique
gauche, manche
analogique droit,
touche L3, touche R3
Botón SELECT
(selección)
Joystick analógico
izquierdo, joystick
analógico derecho,
botón L3, botón R3
Page 2
2
WARNING
To prevent fire or shock hazard, do not
expose the unit to rain or moisture.
To avoid electrical shock, do not disassemble.
Refer servicing to qualified personnel only.
Caution
The use of optical instruments with this
product will increase eye hazard. As the
laser beam used in this unit is harmful to
eyes, do not attempt to disassemble the
cabinet.
Refer servicing to qualified personnel only.
This label is located on the Laser protective housing inside
the enclosure of the PlayStation
This graphical symbol with supplemental marking is
located on the right surface of the PlayStation
(when it is in a vertical position).
This symbol is intended to alert the user to the
presence of uninsulated “dangerous voltage”
within the product’s enclosure that may be of
sufficient magnitude to constitute a risk of
electric shock to persons.
This symbol is intended to alert the user to the
presence of important operating and
maintenance (servicing) instructions in the
literature accompanying the console.
2 console.
®
2 console
®
Caution
TO PREVENT ELECTRIC SHOCK, MATCH
WIDE BLADE OF PLUG TO WIDE SLOT,
FULLY INSERT.
To reduce the risk of fire, use only No. 26
AWG or larger telecommunication line
cord.
For questions about AWG numbers, contact our technical
support line at 1-800-345-7669.
Information
PlayStation®2 console and network adaptor
This equipment has been tested and found to comply with
the limits for a Class B digital device, pursuant to Part 15
of the FCC rules. These limits are designed to provide
reasonable protection against harmful interference in a
residential installation. This equipment generates, uses,
and can radiate radio frequency energy and, if not
installed and used in accordance with the instructions,
may cause harmful interference to radio communications.
However, there is no guarantee that interference will not
occur in a particular installation. If this equipment does
cause harmful interference to radio or television reception,
which can be determined by turning the equipment off
and on, the user is encouraged to try to correct the
interference by one or more of the following measures:
– Reorient or relocate the receiving antenna.
–
Increase the separation between the equipment and receiver.
– Connect the equipment into an outlet on a circuit
different from that to which the receiver is connected.
– Consult the dealer or an experienced radio/TV
technician for help.
If you have questions about this product, call our
technical support line at 1-800-345-7669, or write to:
Sony Computer Entertainment America
Consumer Services/Technical Support
PO Box 5888, San Mateo, CA 94402-0888 U.S.A.
Declaration of Conformity
Trade Name : SONY
Model No. : SCPH-39001/N
Responsible Party : Sony Electronics Inc.
Address : 680 Kinderkamack Road
Telephone No. : 201-930-6972
This device complies with Part 15 of the FCC
Rules. Operation is subject to the following two
conditions: (1) this device may not cause harmful
interference, and (2) this device must accept any
interference received, including interference that
may cause undesired operation.
You are cautioned that any changes or modifications not
expressly approved in this manual could void your
authority to operate this equipment.
SCPH-39010/N
Oradell, NJ 07649 U.S.A.
Network adaptor
For customers in the USA
This network adaptor complies with Part 68 of the FCC
rules and the requirements adopted by the ACTA. On the
bottom surface of this network adaptor is a label that
contains, among other information, a product identifier in
the format US:AAAEQ##TXXXX. If requested, this
number must be provided to the telephone company.
The Ringer Equivalence Number (REN) is used to
determine the number of devices that may be connected to
a telephone line. Excessive RENs on a telephone line may
result in the devices not ringing in response to an
incoming call. In most but not all areas, the sum of the
RENs should not exceed five (5.0). To be certain of the
number of devices that may be connected to a line, as
determined by the total RENs, contact the local telephone
company. For products approved after July 23, 2001, the
REN for this product is part of the product identifier that
has the format US:AAAEQ##TXXXX. The digits
represented by ## are the REN without a decimal point
(e.g., 03 is a REN of 0.3). For earlier products, the REN is
separately shown on the label.
A jack used to connect this equipment to the premises
wiring and telephone network must comply with the
applicable FCC Part 68 rules and requirements adopted by
the ACTA.
This product uses the “RJ-11C” telephone jack.
If this equipment causes harm to the telephone network,
the telephone company will, when practical, notify you in
advance that temporary discontinuance of service may be
required. If advance notice is not practical, the telephone
company will notify you as soon as possible. Also, you
will be advised of your right to file a complaint with the
FCC if you believe it is warranted.
The telephone company may make changes to its facilities,
equipment, operations or procedures that could affect the
operation of equipment. If this happens, the telephone
company will provide advance notice so you can make the
necessary modifications to maintain uninterrupted service.
If you have questions about this product, call our technical
support line at 1-800-345-7669, or write to:
Sony Computer Entertainment America
Consumer Services/Technical Support
PO Box 5888, San Mateo, CA 94402-0888 U.S.A.
This equipment cannot be used on telephone company
provided coin service. Connection to party line service is
subject to state tariffs.
Repair of this product should be made only by an
authorized Sony Service Center. For the Sony Service
Center nearest you, call 1-800-345-7669.
Telephone Consumer Protection Act of 1991
The Telephone Consumer Protection Act of 1991 makes it
unlawful for any person to use a computer or other
electronic device to send any message via a telephone
facsimile machine unless such message clearly contains, in
a margin at the top or bottom of each transmitted page or
on the first page of the transmission, the date and time it is
sent and an identification of the business, other entity, or
individual sending the message, and the telephone
number of the sending machine or such business, other
entity, or individual. In order to program this information
into your facsimile machine, see your facsimile software
documentation.
For customers in Canada
This product is Industry Canada label identified
equipment. This certification means that the equipment
meets certain telecommunications network protective,
operational and safety requirements as prescribed in the
appropriate Terminal Equipment Technical Requirements
document(s). The Department does not guarantee the
equipment will operate to the user’s satisfaction. Before
installing this equipment, users should ensure that it is
permissible to be connected to the facilities of the local
telecommunications company. The equipment must also
be installed using an acceptable method of connection.
The customer should be aware that compliance with the
above conditions may not prevent degradation of service
in some situations.
Repairs to certified equipment should be coordinated by a
representative designated by the supplier. Any repairs or
alterations made by the user to this equipment, or equipment
malfunctions, may give the telecommunications company
cause to request the user to disconnect the equipment.
Users should ensure for their own protection that the
electrical ground connections of the power utility,
telephone lines and internal metallic water pipe system, if
present, are connected together. This precaution may be
particularly important in rural areas.
Caution: Users should not attempt to make such
connections themselves, but should contact the appropriate electric inspection authority or an electrician.
NOTICE: The Ringer Equivalence Number (REN)
assigned to each terminal device provides an indication of
the maximum number of terminals allowed to be
connected to a telephone interface.
The terminals on an interface may consist of any
combination of devices subject only to the requirement
that the sum of the Ringer Equivalence Number of all the
devices does not exceed five (5.0).
The Ringer Equivalence Number for this equipment is 0.1.
The term “IC:” before the certification/registration
number only signifies that the Industry Canada technical
specifications were met.
Before operating your PlayStation®2 console
A very small percentage of individuals may experience
epileptic seizures when exposed to certain light patterns or
flashing lights. Exposure to certain patterns or
backgrounds on a television screen or while playing video
games, including games played on the PlayStation
console, may induce an epileptic seizure in these
individuals. Certain conditions may induce previously
undetected epileptic symptoms even in persons who have
no history of prior seizures or epilepsy.
If you, or anyone in your family, has an epileptic condition,
consult your physician prior to playing. If you experience
any of the following symptoms while playing a video
game - dizziness, altered vision, eye or muscle twitches,
loss of awareness, disorientation, any involuntary
movement, or convulsions - IMMEDIATELY discontinue
use and consult your physician before resuming play.
2
®
Page 3
Precautions
3
Owner’s record
The model and serial numbers of the PlayStation®2 console
are located on the left side of the console (when placed in
the horizontal position). The serial number of the network
adaptor is located on the network adaptor rear. Record the
serial numbers in the spaces provided below. Refer to these
numbers whenever you call for technical assistance at
1-800-345-7669.
Model No.
SCPH-39001/N
SCPH-39010/N
Serial No.
PlayStation®2 console ___________________________
Network adaptor ___________________________
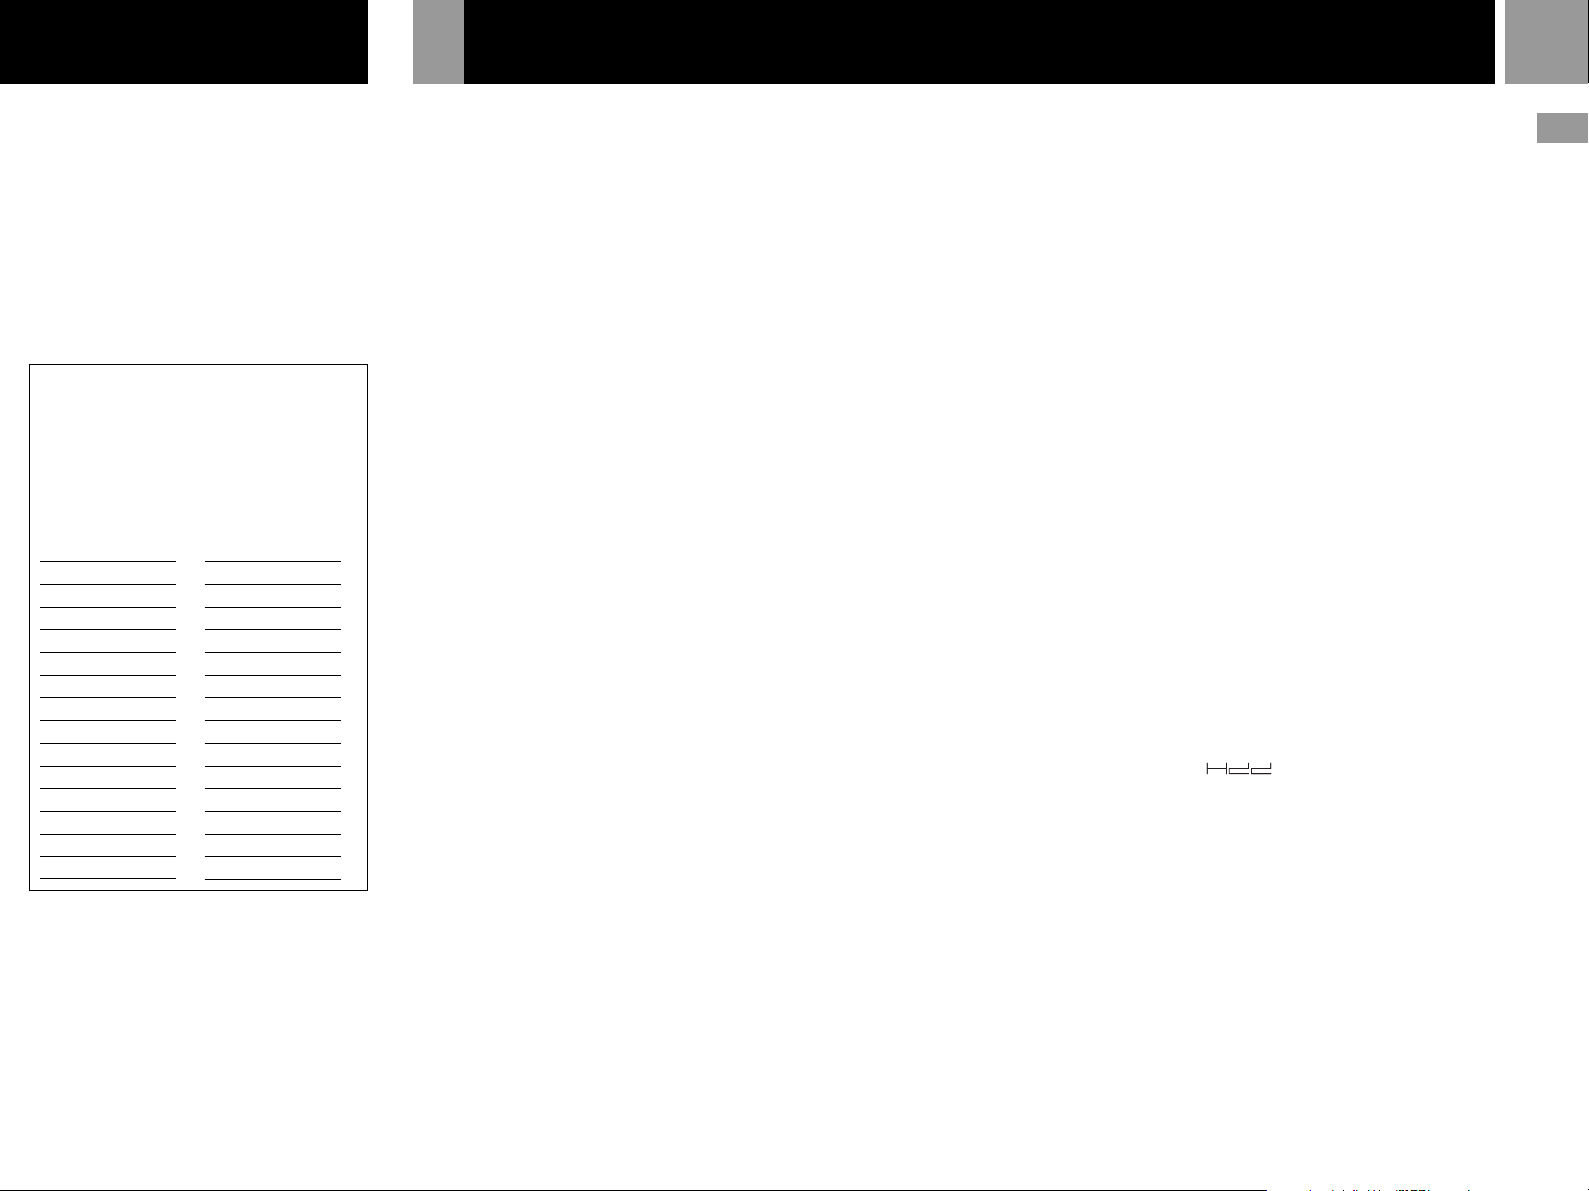
Important notice
Before attaching the network adaptor to other
PlayStation
numbers below. A small percentage of PlayStation
consoles may not be compatible with this network
adaptor. If the serial number of the PlayStation
console (found on the console rear) matches any of the
numbers in this list, contact our technical support line
at 1-800-345-7669 for further information.
Serial numbers
3369556 – 3369651
3372352 – 3372651
3379084 – 3380151
3380260 – 3381867
3381976 – 3382083
3383152 – 3383691
3384652 – 3385191
3386152 – 3386907
3388192 – 3389271
3391084 – 3392055
3393868 – 3394407
3394516 – 3394731
3397192 – 3398055
3399868 – 3400947
2 consoles, review the list of serial
®
3403192 – 3403839
3404692 – 3405339
3406192 – 3406515
3406624 – 3406839
3414661 – 3416388
3417661 – 3418740
3419173 – 3419280
3419821 – 3419928
3420661 – 3421308
3421417 – 3421524
3421633 – 3422064
3423661 – 3424848
3425161 – 3425268
3434377 – 3434592
2
®
2
®
Safety
This product has been designed with the highest concern
for safety. However, any electrical device, if used
improperly, has the potential for causing fire, electrical
shock or personal injury. To ensure accident-free
operation, follow these guidelines:
• Observe all warnings, precautions and instructions.
•
Stop use immediately if the device functions in an
abnormal manner, or produces unusual sounds or smells.
•
Never connect cables of types other than those specified in
this manual to the line connector and network connector.
Connect only cables of the proper type for each connector.
• If the device does not function properly, contact our
technical support line at 1-800-345-7669 for assistance.
Use and handling
• Do not throw or drop the console or network adaptor,
or subject either item to strong physical shock.
•
Do not place the console or network adaptor on
surfaces that are unstable, tilted or subject to vibration.
• Never move or change the position of a console while
it is turned on.
• Do not expose the console or network adaptor to high
temperatures, high humidity or direct sunlight (use in
an environment where temperatures range 5°C –
35°C/41°F – 95°F).
• Do not place the console or network adaptor in
locations subject to sudden temperature change (e.g.
temperature changes of 10°C/18°F per hour or more).
• Do not leave the console or network adaptor in a car
with its windows closed (particularly in summer) as
this may warp the product exterior or cause the
product to malfunction.
• Do not use the console in a dusty location.
• Do not allow liquid or small particles to get into the
console or network adaptor.
• Do not place the console close or network adaptor to
magnetic fields such as those produced by magnets,
loudspeakers or television sets.
• Do not put heavy objects on the console or network
adaptor.
• Do not touch the metal parts or insert foreign objects
into the connectors of the console or the network
adaptor.
• When you do not intend to use the console for an
extended period of time, disconnect the power plug
for the PlayStation
and the telephone cord from the wall jack.
• When disconnecting the power plug from an electrical
outlet, pull it out by grasping the plug. Never pull the
cord itself.
• Do not connect any unauthorized internal peripheral
to the network adaptor.
• Do not place any rubber or vinyl materials on the
exterior of the console or network adaptor for an
extended period of time. Doing so may damage the
plastic surface.
2 console from the electrical outlet
®
Do not touch the connectors on the console
or network adaptor
Do not touch the metal parts of, or insert foreign objects
into, the connectors on the console or the network adaptor.
Do not leave the network adaptor unattached from the
console for extended periods of time. Note that keeping
the network adaptor attached to the console helps to
protect the network adaptor connectors as well as those
within the console's expansion bay.
Do not expose the console to cigarette
smoke or dust
When setting up the PlayStation®2 console, avoid places
subject to excessive cigarette smoke or dust. Cigarette
smoke residue or dust build-up on internal components
such as the lens, may cause the console to malfunction.
Cleaning the vents
Dust can accumulate in both the front and rear vents of
the PlayStation
time and remove any accumulated dust with a lowpowered vacuum cleaner.
Disc handling
• Do not leave discs near a heat source, in direct
sunlight, or in high humidity.
• Store discs in their cases when they are not being used.
Stacking discs or standing them at an angle without
putting them in their cases can cause the discs to warp.
• Do not touch the disc surface when handling a disc;
hold it by the edges.
• Do not stick paper or tape onto the disc.
• Do not write on the disc with a marker, etc.
• Fingerprints or dust on the disc can distort the picture
or reduce sound quality. Make sure discs are always
clean before use.
• Clean discs using a soft cloth, lightly wiping from the
center outwards.
• Do not use solvents such as benzine, commercially
available cleaners not intended for CDs or anti-static
spray intended for vinyl LPs as these may damage your
disc.
Moisture condensation
If the console or the disc is brought directly from a cold
location to a warm one, moisture may condense on the
lens inside the console or on the disc. Should this occur,
the console may not operate properly. In this case,
remove the disc and do not put the disc back in until the
moisture evaporates. (This could take several hours.) If
the console still does not operate properly, call
1-800-345-7669 for technical assistance.
Cleaning the console and network adaptor
For safety reasons, before cleaning the console and
network adaptor, 1) turn off the PlayStation
using the MAIN POWER switch on the console rear, 2)
disconnect the power plug from the electrical outlet and,
3) remove the telephone cord and/or network cable
from the network adaptor.
2 console. Check the vents from time to
®
2 console
®
• Do not use paint thinner, solvents or other chemicals to
clean the exterior of the console or network adaptor, as
these may damage the surface. When using a
commercially available cleaning cloth, follow the
instructions supplied with the cloth.
• If the exterior of the console or network adaptor
becomes dirty, soak a soft cloth in a mild detergent
solution diluted with water, tightly squeeze the cloth
to remove the excess liquid, wipe the affected area of
the exterior, and finish by wiping with a dry cloth.
Never disassemble the console or network
adaptor
• Use your PlayStation®2 console and network adaptor
according to the instructions in this manual. No
authorization for the analysis or modification of the
PlayStation
analysis and use of either product’s circuit configurations, is provided.
• There are no user-serviceable components inside the
PlayStation
Disassembling the console will void the warranty.
Additionally, there is a risk of exposure to laser
radiation as well as to electrical shock hazards.
2 console or network adaptor, nor the
®
2 console or network adaptor.
®
Notes on using the network adaptor
Basic usage
• A dial-up or Broadband Internet connection is required
to use the network adaptor.
• A telephone cord or network cable (not included) is
required to connect to a network.
For specific requirements, see connection details below.
• The network adaptor start-up disc may not work with
all Internet service providers.
• When you connect to a network, the Internet service
provider may charge a usage fee. In some cases, usage
charges may be more than anticipated. For details,
refer to the instructions provided with the software in
use or contact your Internet service provider.
• The network adaptor is marked with the letters
“
conjunction with the internal hard disk drive (for
PlayStation
drive release date to be determined. Check for
availability.
• Parents are encouraged to monitor children in using
the network adaptor to ensure safe and responsible
Internet usage.
Connecting to a telephone line
Do not connect a cord of any type other than a home-use
phone cord to the LINE connector of the network adaptor.
If you connect a telephone cord or network cable of a type
other than that specified to the line connector, too much
electrical current may pass through the connector, causing
a malfunction, excessive heat or fire in the connector. Never
connect phone cords of the following types (especially a
phone cord for a home or business telephone network) to
the line connector:
• An ISDN (digital) compatible public phone
• A PBX phone
• A cellular phone or car phone
• A home or business telephone network phone
” to indicate that it can be used in
2) (sold separately). Internal hard disk
®
US
Getting started
Page 4
4
Precautions (continued)
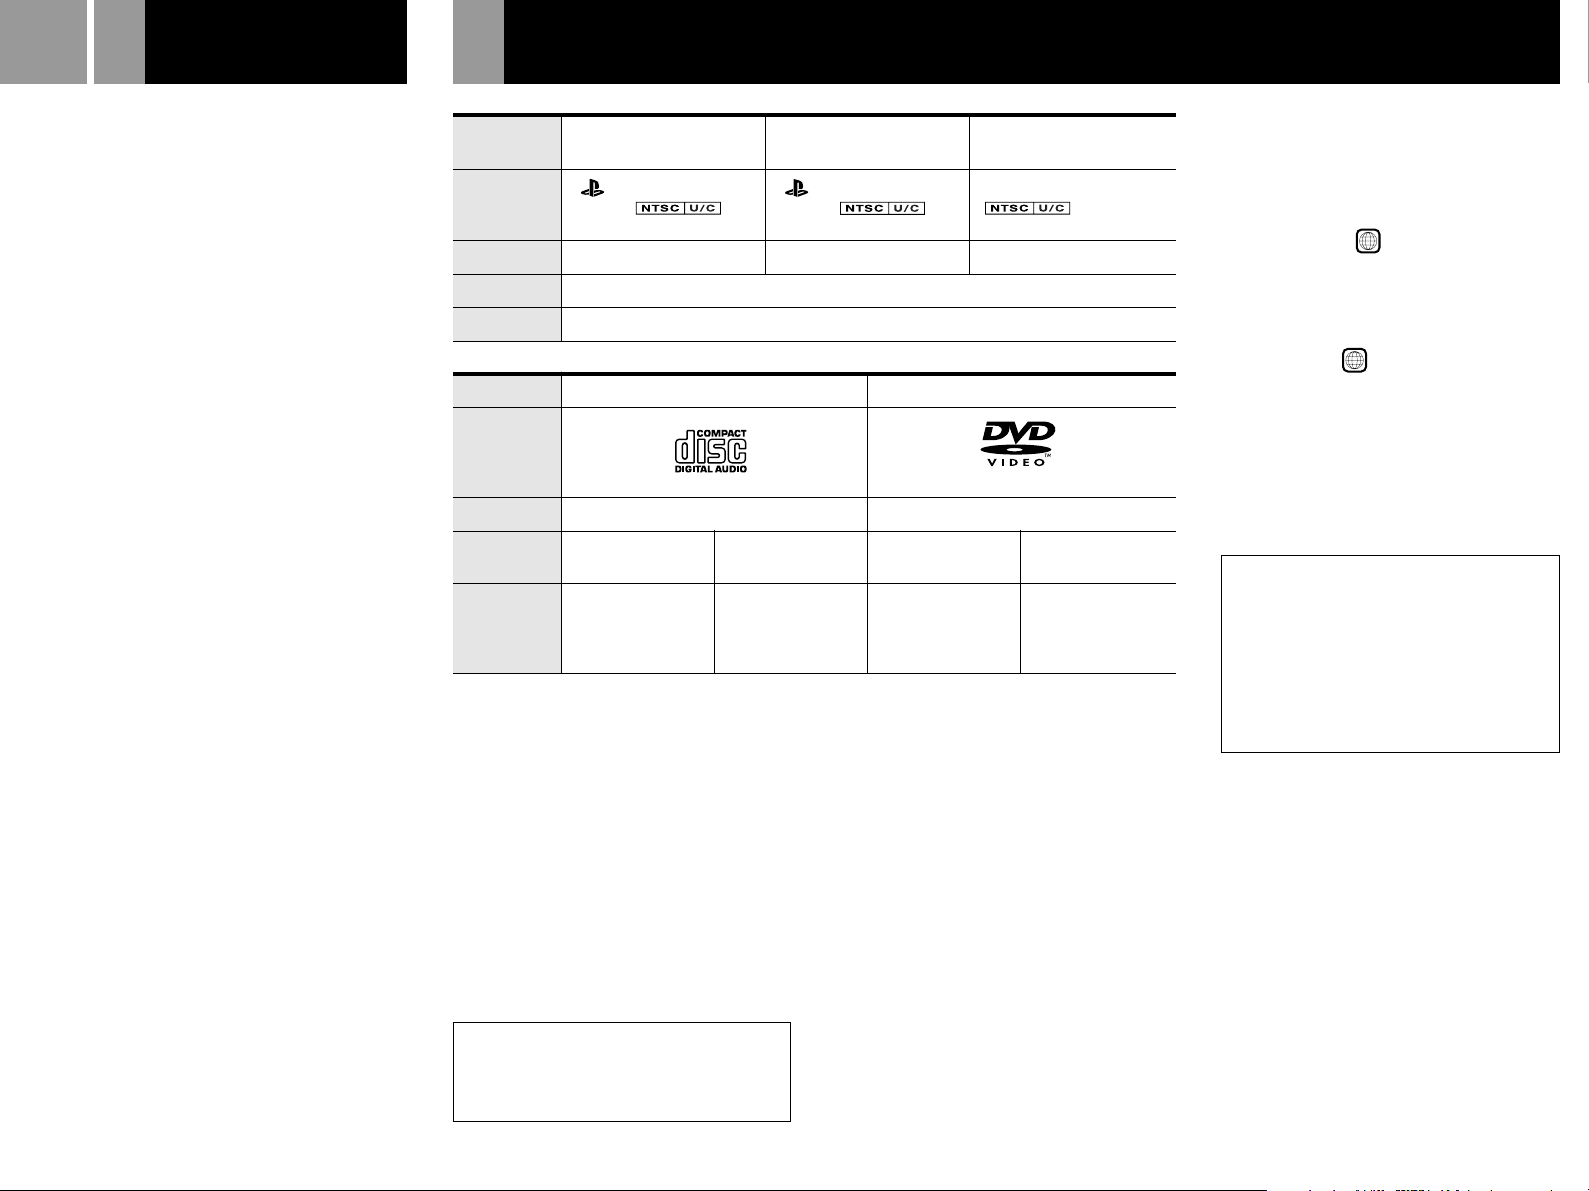
Discs that can be played with the PlayStation®2 console
Connecting with a network cable
Do not connect network cables or telephone cords of the
following types to the NETWORK connector; too much
electrical current may pass through the connector, causing
a malfunction, excessive heat or fire in the connector:
• Network cables of types other than 100Base-TX and
10Base-T
• A normal telephone line
• An ISDN (digital) compatible public phone
• A PBX phone
• A home or business telephone network phone
• Other types of telephone lines
Telephone line usage
• If a telephone call is received while the modem is in
use, the modem connection may fail unless call
waiting has been disabled in your network settings.
For details on creating or editing network settings,
refer to the instruction manual supplied with the
network adaptor start-up disc.
• The modem and the telephone cannot be used at the
same time.
Notes on safety when using the analog
controller (DUALSHOCK
controller (DUALSHOCK
• Stop using this console immediately if you begin to
feel tired or if you experience discomfort or pain in
your hands and/or arms while operating the
controller. If the condition persists, consult a doctor.
• Do not attempt to operate the controller in any way
except with your hands. Do not bring the controller
into close contact with your head, face or near the
bones of any other part of your body.
• The vibration function of the analog controller
(DUALSHOCK
(DUALSHOCK
Do not use the vibration function of the analog
controller (DUALSHOCK
(DUALSHOCK
any ailment in the bones or joints of your hands or
arms.
• Do not use the analog controller (DUALSHOCK
the analog controller (DUALSHOCK
that supports the vibration function if you have
injuries or ailments to the bones or muscles of your
fingers, hands, wrists or arms. The vibration of the
controller may aggravate such conditions.
• Avoid prolonged use of the analog controller
(DUALSHOCK
(DUALSHOCK
intervals.
2) or the analog controller
®
) can aggravate injuries.
®
) supported by software if you have
®
2) and analog controller
®
). Take a break at about 30 minute
®
®2) and analog
®)
2) and analog controller
®
) with software
®
®
2) or
Disc logo
Disc color
Contents
Disc size
PlayStation®2 format
DVD-ROM
“ ”, PlayStation®2 logo
and
designation
Silver
Audio CDs
PlayStation®2 format
CD-ROM
“ ”, PlayStation®2 logo
and
designation
Blue
Audio and video
12 cm
PlayStation® format
CD-ROM
PlayStation® logo and
Black
DVD videos
Disc logo
The “DVD VIDEO” logo is a trademark.
Contents
Disc size
12 cm
Audio
8 cm
Audio and video
*1
12 cm
(CD single)
Play time
*3
74 min
20 min
4 hrs
(single-sided) /
(single-sided) /
8 hrs
(double-sided)
*1 When you position the console vertically and play an 8 cm audio CD, be sure to use an optional adaptor.
*2 When playing an 8 cm DVD, always place the console in the horizontal position.
*3 Actual play time varies depending upon disc content.
Software compatible with the network
adaptor
PlayStation®2 format software that is
compatible with the network adaptor (for
PlayStation®2) can be used with the network
adaptor installed in the PlayStation®2 console
Note
This product includes the network adaptor start-up disc.
To enable online connectivity you must use the start-up
disc to create network settings. For details, refer to the
instruction manual supplied with the start-up disc. Note
that a memory card (8MB) (for PlayStation
separately) is required to save network settings.
(double-sided)
rear.
Network adaptor requirements
Usage of the network adaptor may vary
depending on the software in use. Hardware
requirements may also vary. For details, refer
to the appropriate software manual.
designation
*2
8 cm
80 min
160 min
2) (sold
®
DVD video systems and regional restrictions
•This console conforms to the NTSC broadcast
standard. You cannot play discs recorded for
other broadcast standards (such as PAL or
SECAM) on this console.
•Some DVD videos are marked with region
numbers such as 1. The number contained
within the symbol represents the region
number of DVD players on which the disc can
be played. DVD videos that do not bear this
symbol, or that do not display the number 1
cannot be played on your console.
•DVDs with the
ALL
label can also be played
on this console.
If you attempt to play any other DVDs, a
message stating “This disc cannot be played
due to regional restrictions” will appear on
the screen.
•Some DVDs that have no region code
markings may still be subject to area
restrictions and may not be playable on the
console.
Note on playback operations of DVD video
This console plays back DVD video as
originally designed by the software producers.
Some of the playback features of this console
may not have been incorporated into the DVD
video design. As a result some playback
features may not be available with certain
software. Please refer to the instructions
supplied with your DVD video for details.
Specially shaped discs
Do not use irregularly shaped CDs (for
example, heart- or star-shaped CDs) as they
may cause the console to malfunction.
PlayStation®2 format software compatible
with the network adaptor (for
PlayStation®2) is required to use the
network adaptor.
Page 5
Table of contents
WARNING / Precautions
2
Playing a game
5
US
Getting started
16
Getting started
Connection
Discs that can be played with the PlayStation®2 console
Important safeguards
Checking the package contents
Part names
Positioning the console
Connecting your console to a TV set
Connecting digital audio components
Connecting other digital devices
Connecting the network adaptor to a phone line
Connecting the network adaptor with a network cable
Removing the network adaptor from the console
Reattaching the network adaptor to the console
4
6
8
8
9
10
11
12
12
13
13
14
Games / Audio CDs
DVD videos
Additional
information
Using the analog controller
Using memory cards
Playing an audio CD
Playing a DVD video
Using the Control Panel
Settings and adjustments for the DVD player
Troubleshooting
Specifications
Glossary
LIMITED WARRANTY
17
18
18
19
20
23
27
29
29
30
Using the Main menu
15
Page 6
6
Important safeguards
For your protection, please read these safety instructions
completely before operating the PlayStation®2 console and
network adaptor, and keep this manual for future reference.
Carefully observe all warnings, precautions and instructions
on the console, or those described in the instruction manual
and adhere to them.
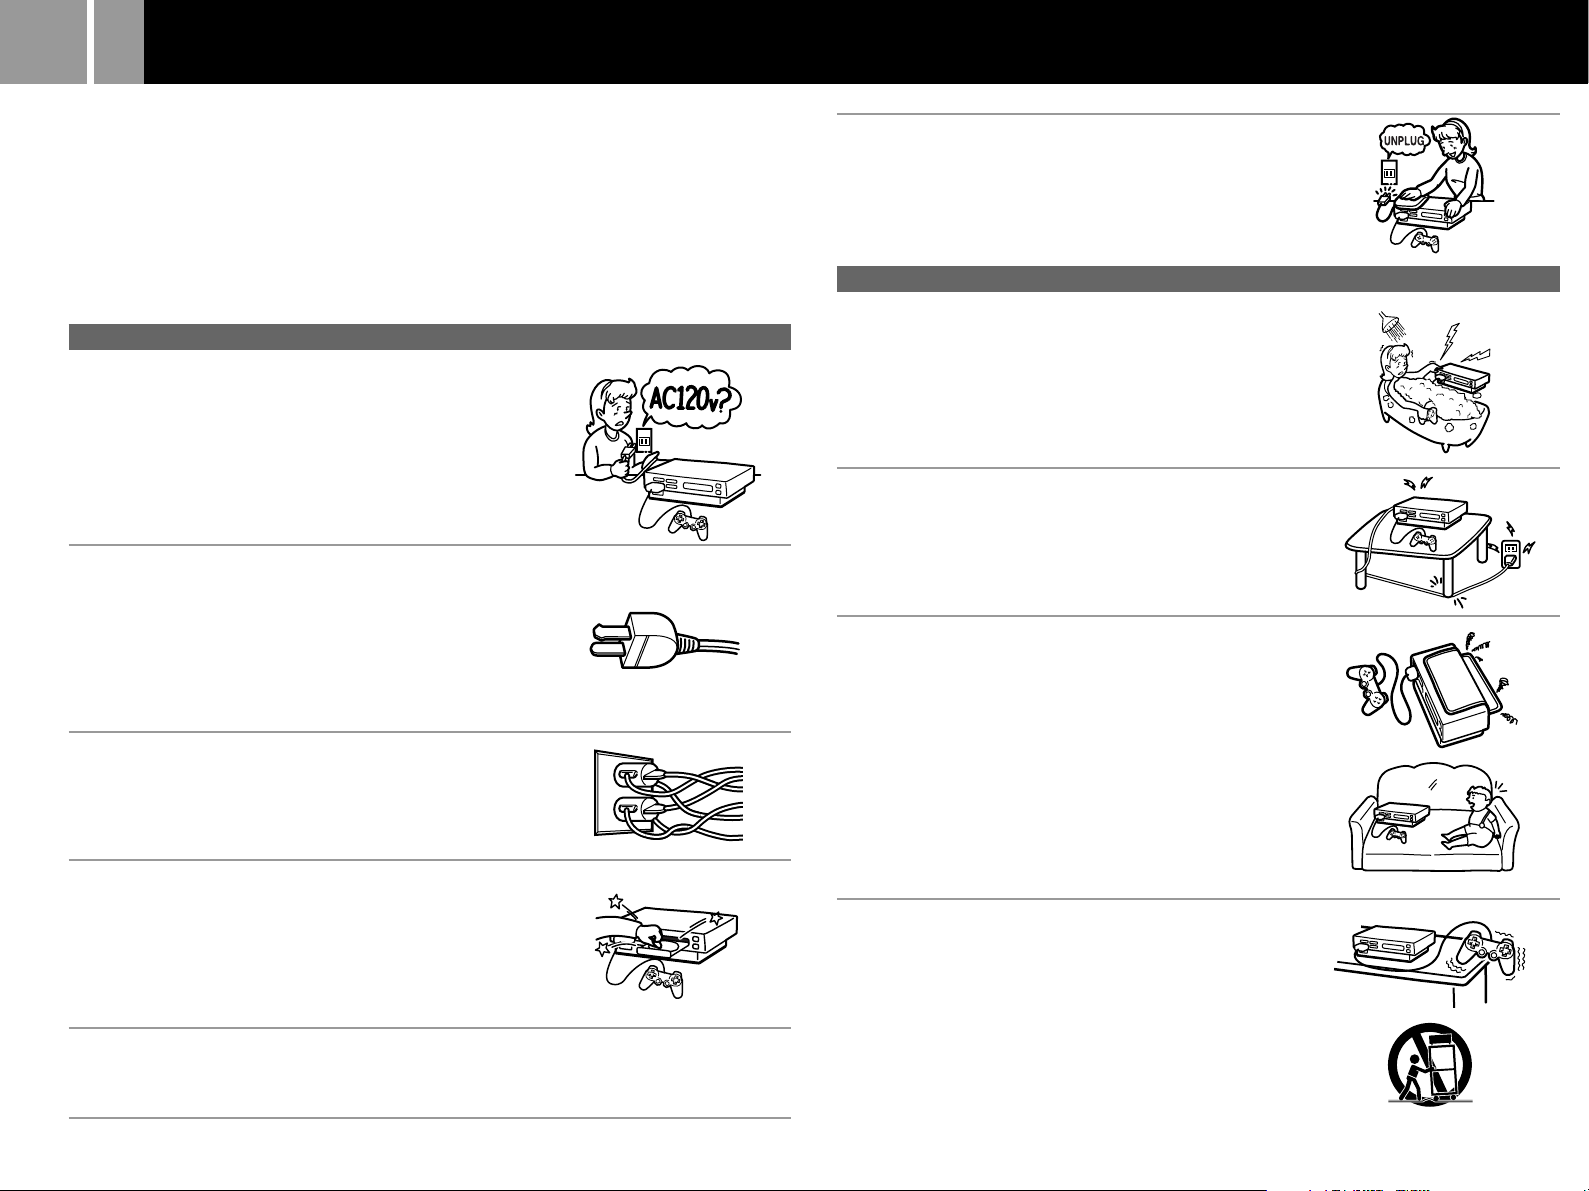
USE
Power sources
This console should be operated only from the type of power
source indicated on the marking label. If you are not sure of the
type of electrical power supplied to your home, consult your
dealer or local power company. For those units designed to
operate from battery power, or other sources, refer to the
operating instructions.
Grounding or polarization
The console is equipped with a polarized AC power cord plug (a
plug having one blade wider than the other). This plug will fit
into the power outlet only one way. This is a safety feature. If you
are unable to insert the plug fully into the outlet, try reversing the
plug. If the plug should still fail to fit, contact your electrician to
have a suitable outlet installed. Do not defeat the safety purpose
of the polarized plug by forcing it in.
Overloading
Do not overload wall outlets, extension cords or convenience
receptacles beyond their capacity, since this can result in fire or
electric shock.
Cleaning
Refer to the precautions section of this manual (page 3) for a
complete description of a safe method for cleaning the exterior of
the console and network adaptor.
INSTALLATION
Water and moisture
Do not use the powerline operated console near water – for
example, near a bathtub, kitchen sink, in a wet basement or near a
swimming pool.
Power cord protection
Route the power cord so that it is not likely to be walked on or
pinched by items placed upon or against it, paying particular
attention to the plugs, receptacles, and the point where the cord
exits from the console.
Ventilation
The slots and openings in the console exterior are provided for
necessary ventilation. To ensure reliable operation of the console,
and to protect it from overheating, these slots and openings must
never be blocked or covered.
– Never cover the slots and openings with a cloth or other
materials.
– Never block the slots and openings by placing the console on a
bed, sofa, rug or other similar surface.
Liquid and foreign objects
Never push objects of any kind, other than authorized items, into
the console or network adaptor openings as they may touch
dangerous voltage points or short out parts that could result in a
fire or electrical shock. Never spill liquid of any kind on the
console or network adaptor.
Attachments
Do not use attachments not recommended by the manufacturer,
as they may cause hazards.
Accessories
Do not place the console or network adaptor on an unstable cart,
stand, bracket or table. The console or network adaptor may fall,
causing serious injury to a child or an adult, and serious damage
to the console or network adaptor.
Use only the vertical or horizontal stand or other accessories
recommended by the manufacturer to stabilize the console.
An appliance and cart combination should be moved with care.
Quick stops, excessive force, and uneven surfaces may cause the
appliance and cart combination to overturn.
Page 7
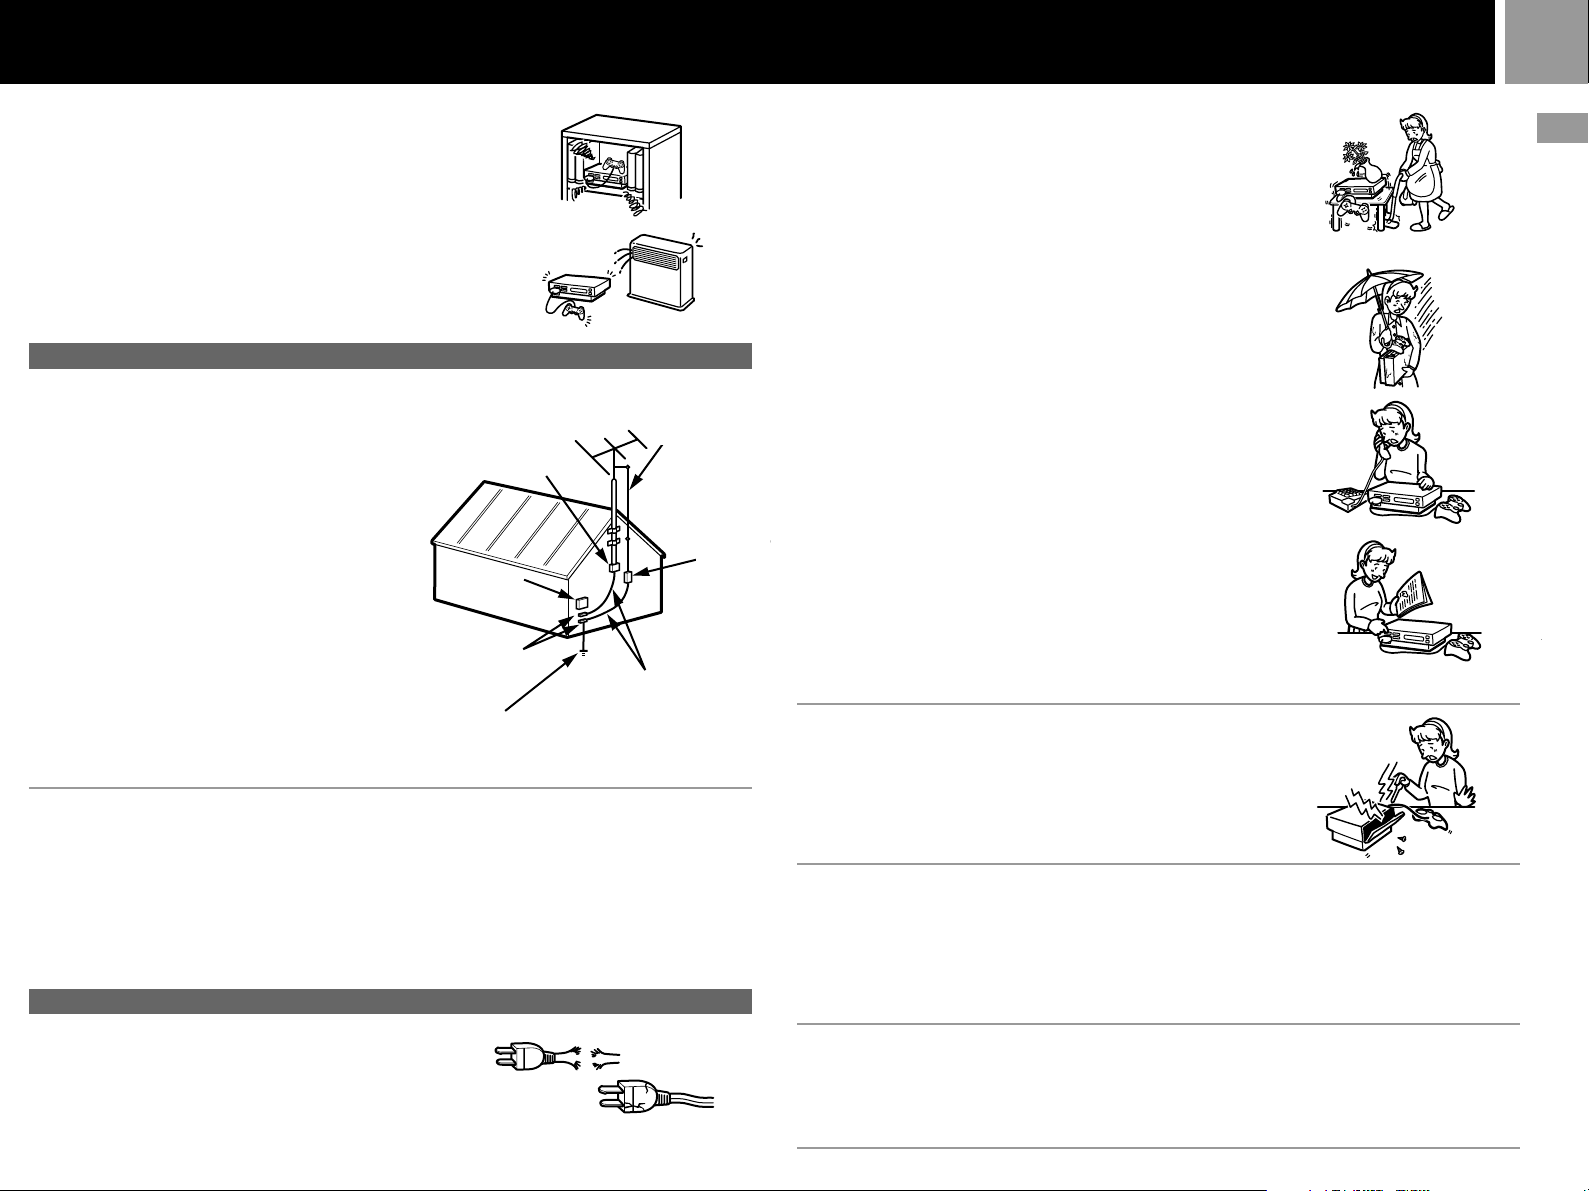
7
– Never place the console in a confined space, such as a bookcase,
or built-in cabinet, unless proper ventilation is provided.
– Do not place the console or network adaptor near or over a
radiator or heat register, or where either item is exposed to
direct sunlight.
ANTENNAS
Outdoor antenna grounding – If an outdoor antenna or
cable system is installed, follow the precautions below.
An outdoor antenna system should not be located in the
vicinity of overhead power lines or other electric light or
power circuits, or where it can come in contact with
such power lines or circuits.
WHEN INSTALLING AN OUTDOOR ANTENNA
SYSTEM, EXTREME CARE SHOULD BE TAKEN TO
KEEP FROM CONTACTING SUCH POWER LINES
OR CIRCUITS AS CONTACT WITH THEM IS
ALMOST INVARIABLY FATAL.
Be sure the antenna system is grounded so as to provide
some protection against voltage surges and built-up
static charges. Section 810 of the National Electrical
Code provides information with respect to proper
grounding of the mast and supporting structure,
grounding of the lead-in wire to an antenna discharge
unit, size of grounding conductors, location of antennadischarge unit, connection to grounding electrodes, and
requirements for the grounding electrode.
Ground clamp
Electric
service
equipment
Ground clamps
Power service grounding
electrode system
(NEC Art 250, Part H)
Lightning
For added protection of this console during a lightning storm, or
when it is left unattended and unused for long periods of time,
unplug it from the wall outlet, disconnect the phone cord and/or
network cable and disconnect the antenna or cable system. This
will prevent damage to the console due to lightning and powerline surges. Do not touch the console or network adaptor during a
lightning storm as this may expose you to the risk of electrical
shock.
SERVICE
Damage requiring service
Unplug the console from the wall outlet and refer servicing to
qualified service personnel under the following conditions:
– When the AC power cord or plug is damaged or frayed.
Antenna lead-in
wire
Grounding conductors
(NEC Section 810-21)
NEC- National Electrical Code
FRAYED OR TAUT AC power cord
CRACKED PLUG
Antenna
discharge unit
(NEC Section
810-20)
– If liquid has been spilled or objects have fallen onto the console
or network adaptor.
– If the console or network adaptor has been exposed to rain or
water.
– If the console or network adaptor has been subject to excessive
physical shock by being dropped, or the console or network
adaptor exterior has been damaged.
– If the console or network adaptor does not operate normally
when following the instruction manual. Adjust only those
controls that are specified in the instruction manual. Improper
adjustment of other controls may result in damage and will
often require extensive work by a qualified technician to restore
the console to normal operation.
– When the console or network adaptor exhibits a distinct change
in performance – this indicates a need for service.
Servicing
Do not attempt to service the console or network adaptor
yourself, as removing the exterior casing may expose you to
dangerous voltage or other hazards.
Refer all servicing to an authorized service center. Call
1-800-345-7669 to receive instructions on obtaining repair/
replacement services.
Replacement parts
When replacement parts are required, be sure the service
technician has used replacement parts specified by the
manufacturer that have the same characteristics as the original
parts.
Unauthorized substitutions may result in fire, electric shock, or
other hazards.
Safety check
Upon completion of any service or repairs to the console or
network adaptor, ask the service technician to perform routine
safety checks (as specified by the manufacturer) to determine that
the unit is in safe operating condition.
US
Getting started
Page 8
8
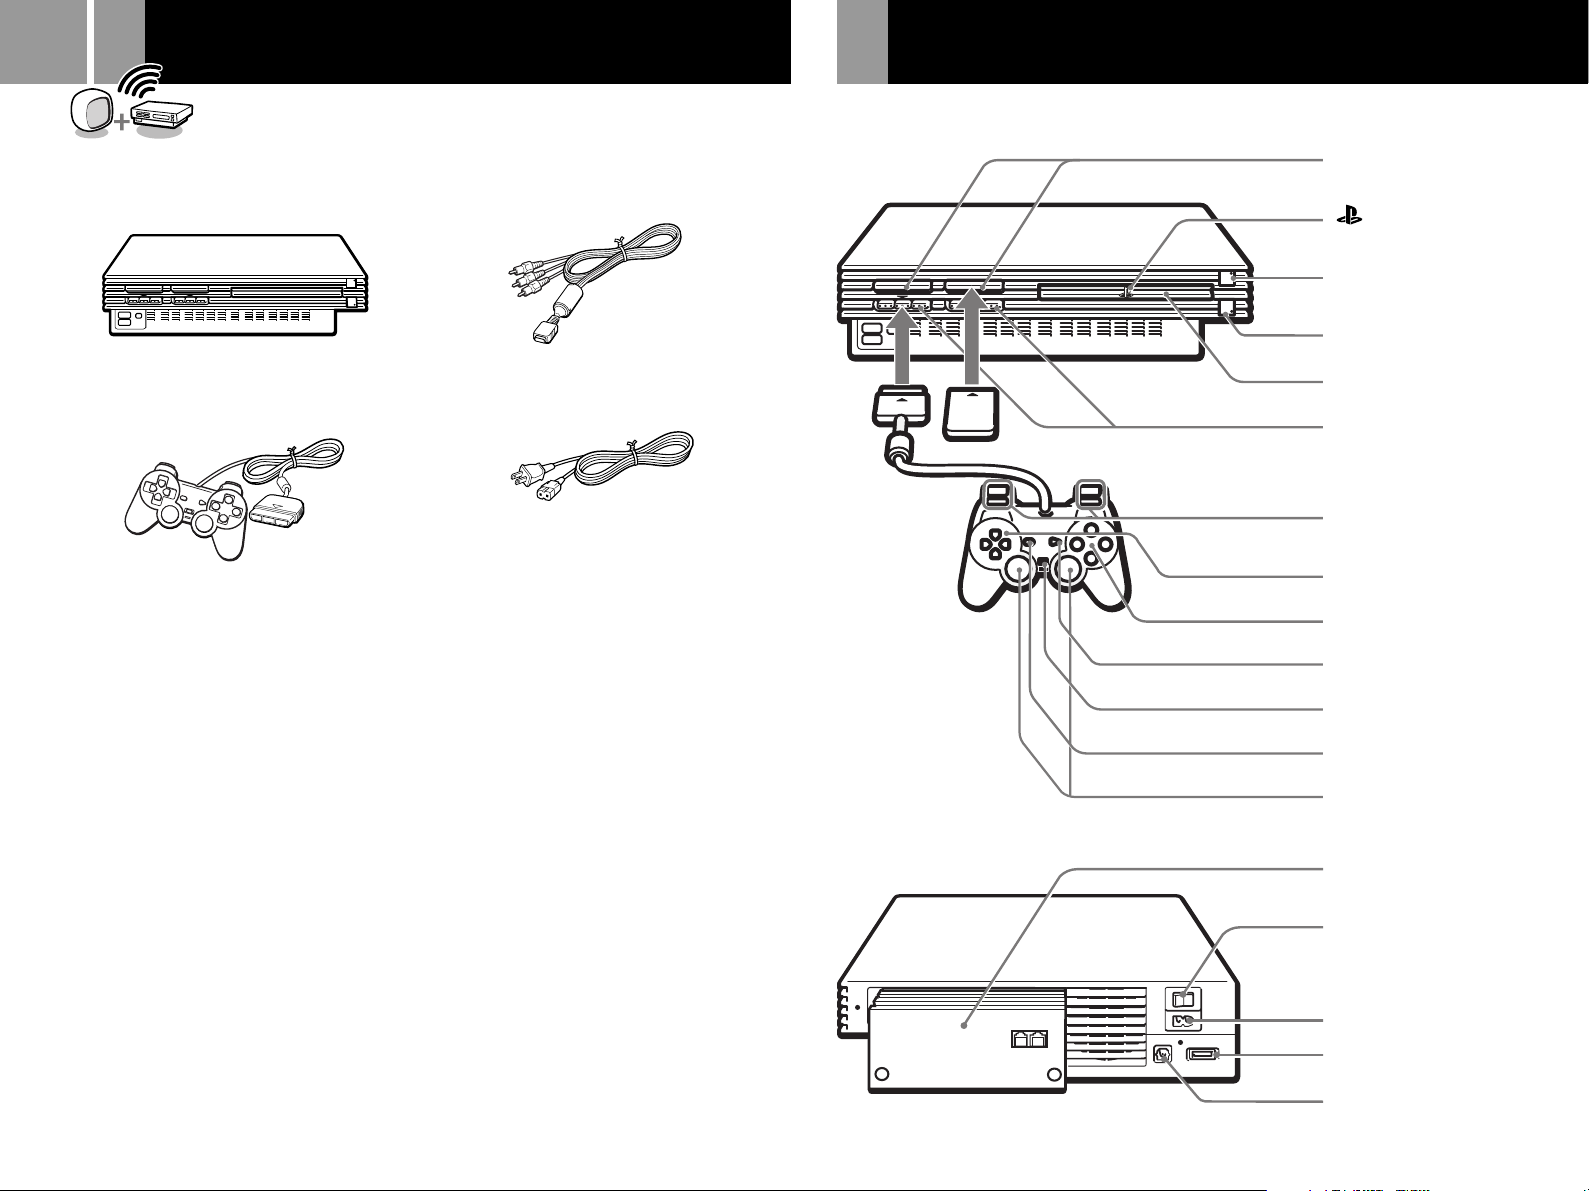
Check that you have the following items:
• Console
Checking the package contents
• AV cable (integrated audio/video)
Part names
PlayStation®2 Console
Front
MEMORY CARD slots
“ ” product family logo
• Analog controller (DUALSHOCK®2)
• PlayStation
• Instruction manual
If any items are missing, contact our technical support line at 1-800-345-7669.
2 format software (1 set)
®
• AC power cord
1 (standby)/RESET
1 indicator
A (open) button and
A indicator
Disc tray
Controller ports
L2 button, R2 button,
L1 button, R1 button
Directional buttons
¢ button, a button,
✕ button, s button
START button
ANALOG mode button
SELECT button
Left analog stick,
right analog stick,
L3 button, R3 button
button and
Rear
Network adaptor
MAIN POWER switch
~ AC IN connector
AV MULTI connector
DIGITAL OUT (OPTICAL)
connector
Page 9
Positioning the console
9
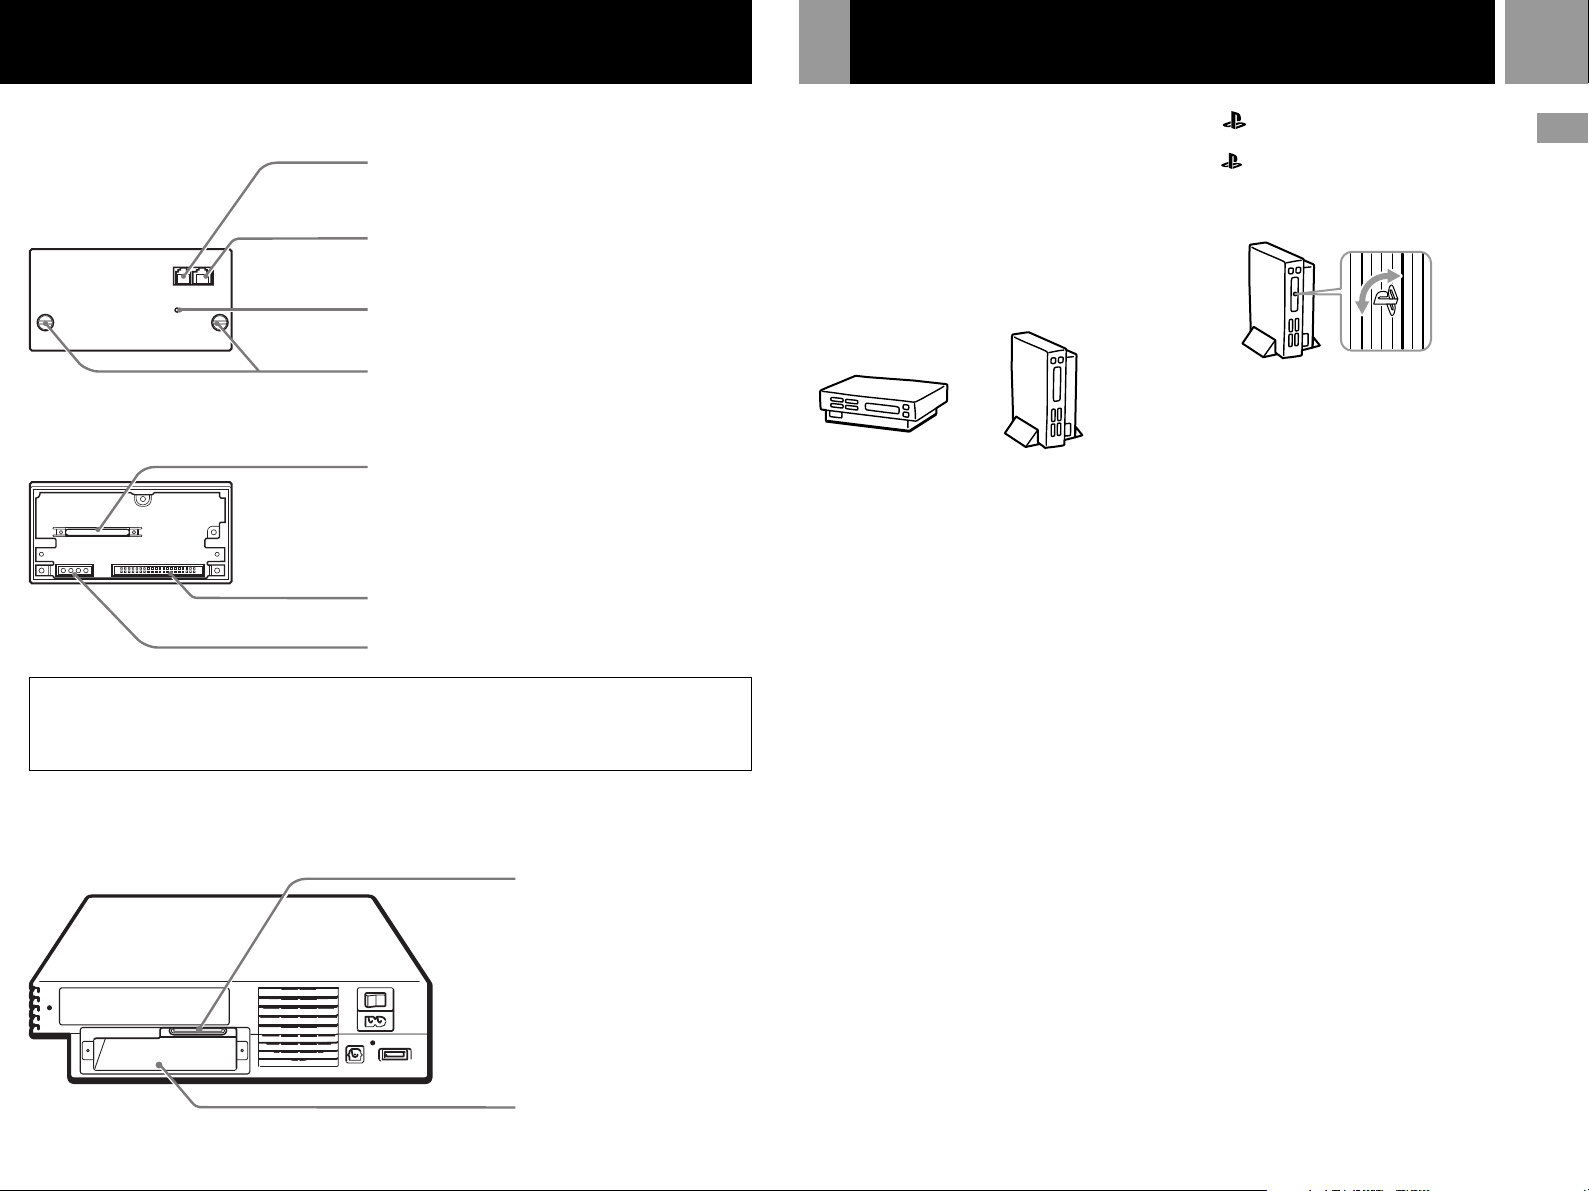
Network adaptor
Front
LINE NETWORK
Line connector
Connect phone cord here for dial-up modem
use only.
Network connector
Insert network cable (100Base-TX/10Base-T)
here for Ethernet connection.
Buzzer port
Mounting screws
To fasten the network adaptor to the
PlayStation®2 console.
Rear
Console connector
Connect to the expansion bus connector of the
PlayStation®2 console.
HDD data connector
HDD power connector
Warning
Never connect phone cords or network cables of types other than those specified in this manual to the
line connector and network connector. For details, see “Connecting the network adaptor to a phone
line” (page 12) or “Connecting the network adaptor with a network cable” (page 13).
You can position the console either horizontally
or vertically.
When positioning the console vertically, use the
SCPH-10040 U vertical stand (for PlayStation®2)
(sold separately). If a vertical stand (for
PlayStation®2) is not available, set the console
in the horizontal position as shown below.
When positioning the console horizontally, you
can use the SCPH-10110
PlayStation®2) (sold separately).
Notes
•
Do not place the console in any position other than the
horizontal or vertical positions as doing so may damage it.
•
Do not change the position of the console (from horizontal
to vertical or vice versa) while it is in operation. Doing so
may damage the disc or cause the console to malfunction.
U
horizontal stand (for
Vertical positionHorizontal position
The ” ” product family logo located on
the disc tray
The “ ” product family logo on the disc tray
can be rotated to match the horizontal or
vertical positioning of the console.
US
Getting started
PlayStation®2 Console
Rear (with network adaptor removed)
Expansion bus connector
EXPANSION BAY
Page 10
10
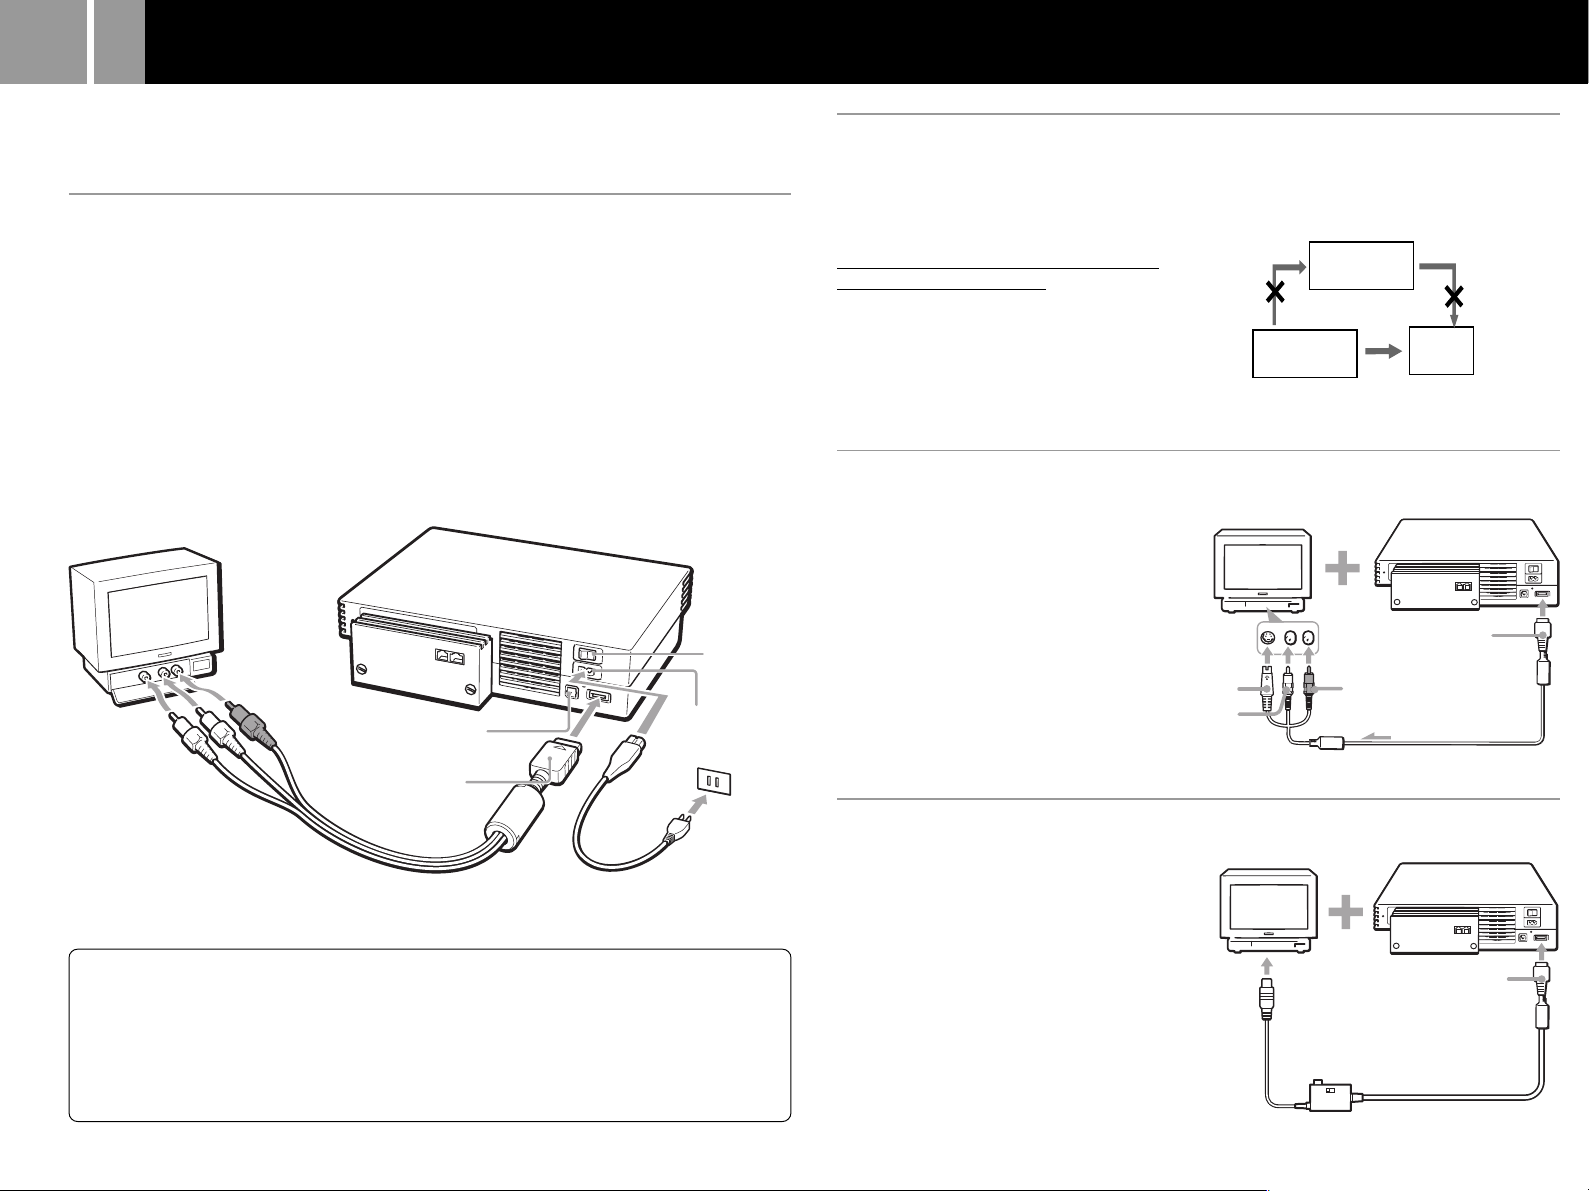
Connecting your console to a TV set
This section explains the connecting method for listening to sound through your TV speakers.
When connecting to audio equipment with digital connectors, see “Connecting digital audio
components” on page 11.
Connecting to a TV with audio/video inputs
Connect your PlayStation®2 console to the TV using the supplied AV cable (integrated audio/video).
When connecting the cords, be sure to match the color-coded cords to the appropriate jacks on the
components: yellow (video) to yellow, red (right audio) to red and white (left audio) to white.
After connecting
Set your TV to the appropriate video input mode. Refer to the instruction manual for your TV.
When connecting to a wide screen TV (16:9 aspect ratio)
Set “Screen Size” in the System Configuration menu to “16:9.” For details on the System
Configuration menu, see page 15.
If your TV is monaural
Do not connect the red plug. If you want to hear both left and right sounds from a monaural TV, use a commercially
available dual phono to single phono (stereo to monaural) type audio cable (sold separately).
MAIN POWER
switch
DIGITAL OUT (OPTICAL)
connector
~ AC IN connector
Connecting to a VCR
Connect your PlayStation®2 console to the VCR
using the supplied AV cable (integrated audio/
video) matching the plug colors.
If your VCR is monaural, do not connect the
When playing a DVD video
red plug.
However, when playing a DVD video, do not
VCR
connect the console to a VCR. If you do,
picture quality may be reduced. Connect the
console directly to the TV.
After connecting
Set your TV and VCR adjustments
Connect directly
PlayStation
console
2
®
appropriately.
Refer to the instruction manuals for your TV
and VCR.
Connecting to a TV with an S VIDEO input connector
Connect your PlayStation®2 console to the
S VIDEO input connector on the TV using the
SCPH-10060 U S VIDEO cable (sold separately).
You will get a better picture than when using
the AV cable (integrated audio/video).
After connecting
Set your TV to the appropriate video input
mode (such as “S VIDEO”).
To S VIDEO
input
To audio input
(left)
To audio input
(right)
TV
To AV MULTI OUT
connector
To AV MULTI OUT
connector
AV cable (integrated audio/video) AC power cord
Do not connect your PlayStation®2 console
to a projection TV
Static, non-moving images, such as DVD menus,
configuration displays or paused images may leave a
faint image permanently on the TV screen if left on for
extended periods of time.
Projection TVs are more susceptible to this than other
types of displays. Do not operate the console in such a
manner that this could occur.
Note about bouncing effect
Some TVs or monitors may experience a bouncing effect
in their pictures when using the PlayStation
There is nothing wrong with the PlayStation
or the way it is manufactured. The problem technically
lies within the television. If you encounter such a
problem with your television/monitor, please contact
our technical support line at 1-800-345-7669.
®2 console.
®2 console
Connecting to a TV with an antenna input
Connect your PlayStation®2 console to the
antenna input on the TV using the SCPH-10071
RFU adaptor (sold separately). In this case, the
sound will be monaural.
After connecting
Set the channel switch on the RFU adaptor and
the channel selector of your TV to VHF channel
CH 3 or CH 4, whichever is not active in your
area.
To antenna
input
To AV MULTI OUT
connector
C
Page 11
Connecting digital audio components
11
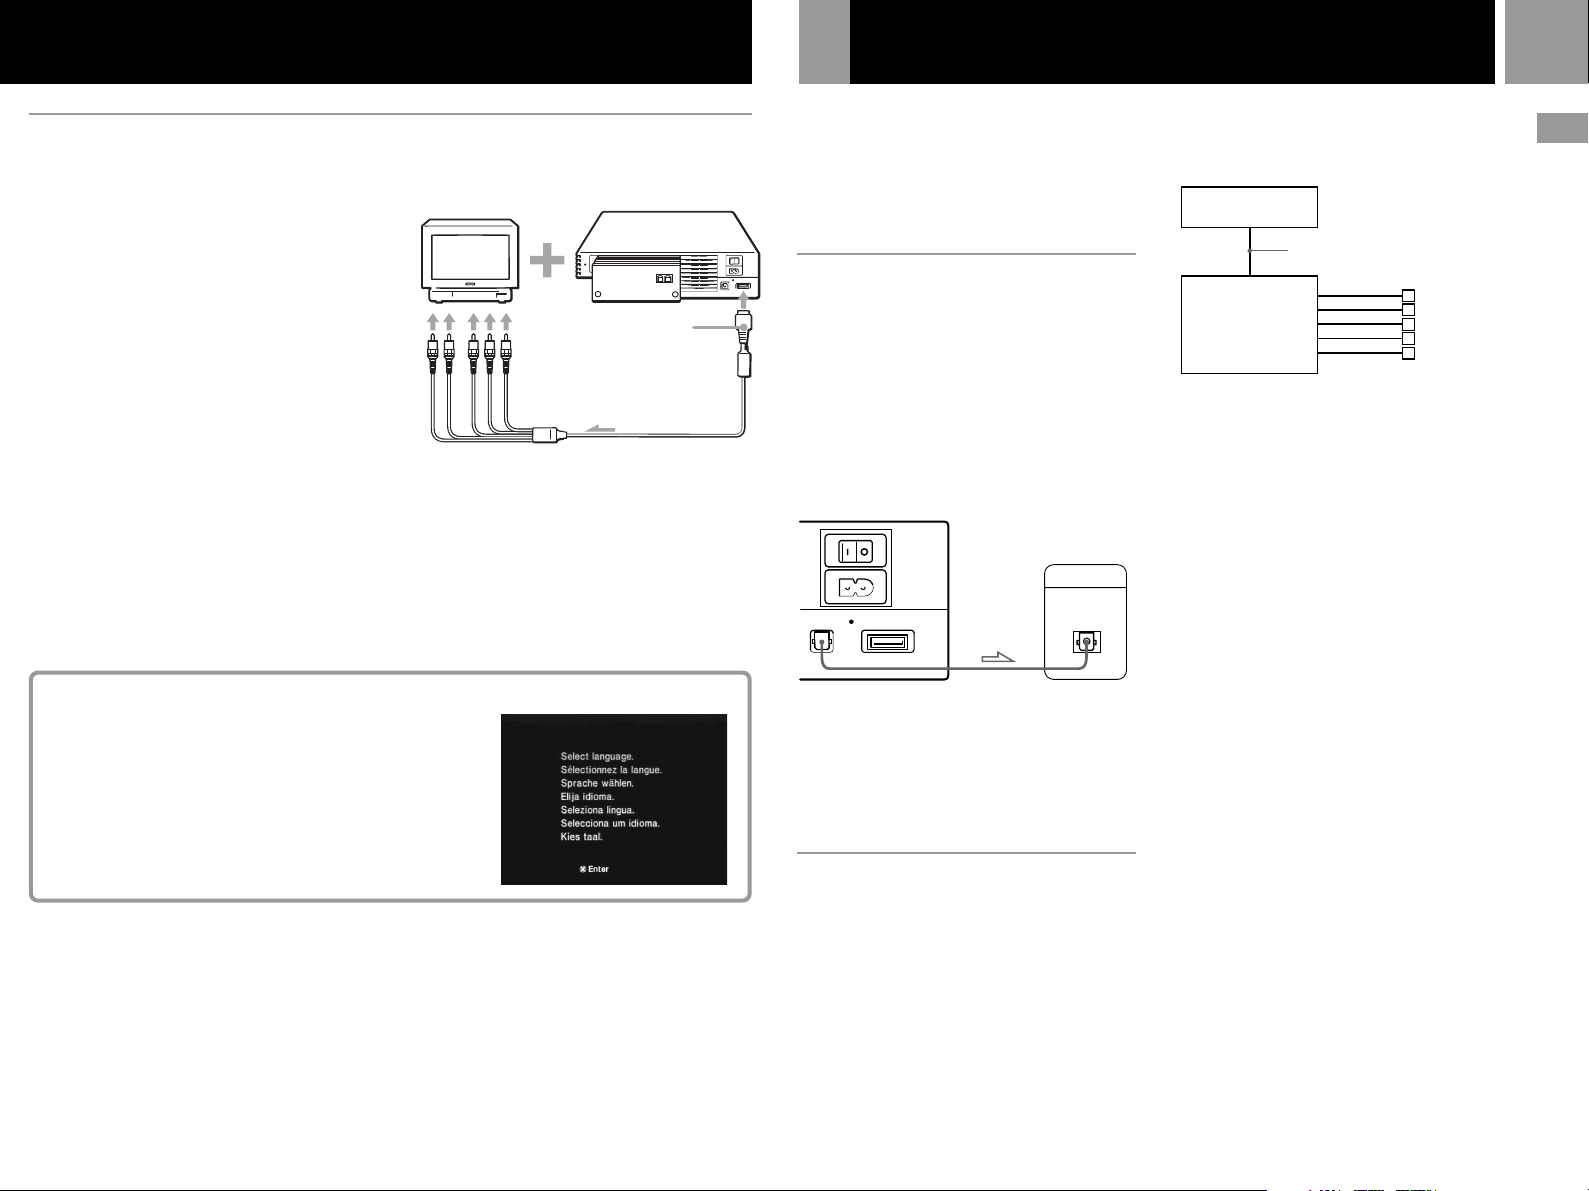
Connecting to a TV with component video input connectors
If your monitor or projector has component
video input connectors (Y, CB/PB, CR/PR),
connect your PlayStation®2 console using the
SCPH-10100 U component AV cable (for
PlayStation®2) (sold separately). This will
provide the best picture.
Before connecting
If you connect your PlayStation®2 console to a
television using the component AV cable
without first setting the “Component Video
Out” option under the “System Configuration”
menu to “Y Cb/Pb Cr/Pr,” the TV screen
might not display properly. Before connecting
To audio
input
To component
video input
connectors
To AV MULTI OUT
connector
your console with the component AV cable,
first use the supplied AV cable (integrated
audio/video) and make sure that the
“Component Video Out” option is set to
“Y Cb/Pb Cr/Pr.”
Note
The PlayStation®2 console is not compatible with HDTV
unless the proper software and connecting devices are
used.
Refer to the instruction manual for your TV for details.
When turning on the console for the first time
The initial setup screen appears.
Set “Language,” “Time Zone” and “Daylight Savings Time
(Summer Time)” according to the instructions on the
screen.
Settings can be adjusted later in the System Configuration
menu. For details, see
menu” on page 9.
“Using the System Configuration
This section explains how to connect the
PlayStation®2 console to audio equipment with
digital connectors (such as Dolby Digital
optical (AC-3) output). Using digital receivers
and amplifiers, you can enjoy features such as
multi-channel sound and surround sound.
Connecting to a receiver or
amplifier, “MD (Minidisc)” deck
or “DAT (Digital Audio Tape)”
deck with a digital connector
Use a commercially available optical digital
cable (sold separately) and set “DIGITAL OUT
(OPTICAL)” in the System Configuration menu
to “On” (the default setting).
For details on the System Configuration menu,
see page 15.
Rear panel
Receiver or amplifier,
MD deck or DAT deck
DIGITAL INPUT
OPTICAL
DIGITAL OUT
(OPTICAL)
AV MULTI OUT
MAIN
POWER
~
AC IN
Notes
• Refer also to the instructions supplied with the
component to be connected.
• You cannot directly make digital audio recordings of
discs recorded in Dolby Digital format or DTS format
using an MD or a DAT deck.
Connecting to an audio
component with a built-in DTS*
or Dolby Digital** decoder
(DVD video only)
By connecting to audio equipment with a builtin DTS or Dolby Digital decoder (sold
separately), you can playback sound recorded
on your DVD video in Dolby Digital (AC-3) or
DTS format to reproduce the effect of listening
in a movie theater or concert hall.
Connect the component via the DIGITAL OUT
(OPTICAL) connector using an optical digital
cable (sold separately).
console
2
®
Optical digital cable
(sold separately)
Speakers
PlayStation
Audio component
with a built-in DTS
or Dolby Digital
decoder
Setups for the DVD player on your
PlayStation
2 console
®
Some setup adjustments are necessary for the
DVD player depending on the components to
be connected.
For details on using the Setup display, see page
23.
• When you connect an audio component with a
built-in DTS decoder
Set “DIGITAL OUT (OPTICAL)” to “On” and
then set “DTS” to “On” in the “Audio Setup”
display.
• When you connect an audio component with a
built-in Dolby Digital decoder
Set “DIGITAL OUT (OPTICAL)” to “On” and
then set “Dolby Digital” to “On” in the
“Audio Setup” display.
Note
Refer to the operating and setup instructions for the audio
components to be connected.
* “DTS” and “DTS Digital Out” are trademarks of Digital
Theater Systems, Inc.
** Manufactured under license from Dolby Laboratories.
“Dolby” and the double-D symbol are trademarks of
Dolby Laboratories.
Confidential unpublished works. ©1992-1997 Dolby
Laboratories. All rights reserved.
US
Connection
Page 12
12
Connecting other digital devices
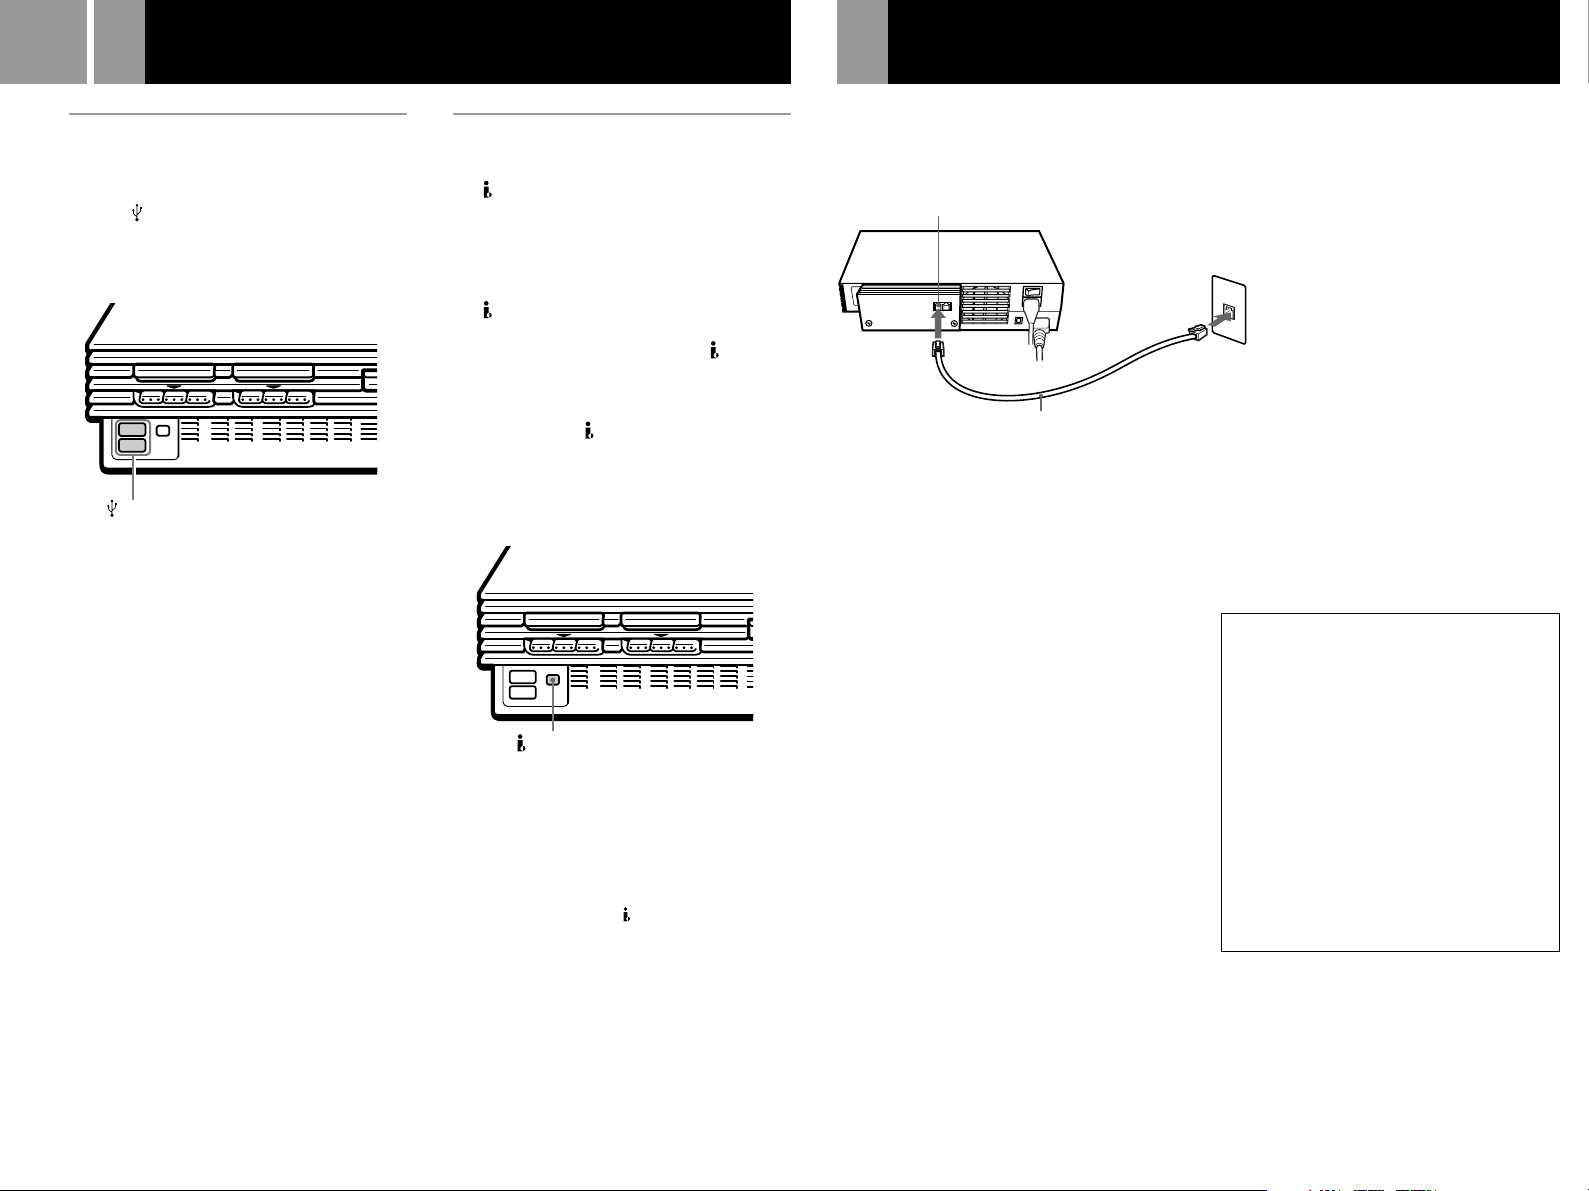
Connecting the network adaptor to a phone line
Connecting a device using the
Universal Serial Bus (USB)
interface
The two USB connectors on the front of the
console can be used to connect USB-compatible
devices. Also refer to the instructions supplied
with the device to be connected.
USB connectors
Note
Not all USB-compatible products work with the
PlayStation
compatible product’s user manual for more information.
2 console. See the appropriate USB-
®
Connecting a device using the
i.LINK interface
The S400 i.LINK connector on the front of the
console can be used to connect an i.LINKcompatible (IEEE 1394) device. Refer also to the
instructions supplied with the device to be
connected.
The S400 i.LINK connector does not supply
power to external devices. Some external
devices that require power from the S400
i.LINK connector will not function properly
when connected to the PlayStation®2 console.
The PlayStation®2 S400 i.LINK connector
supports transfer rates up to 400 Mbps.
However, the actual transfer rate will vary,
depending upon the transfer rate of the
connected i.LINK-compatible device.
S400 i.LINK connector
Note
Not all i.LINK products work with the PlayStation®2
console. Refer also to the appropriate i.LINK product’s
user manual for more information.
i.LINK is a trademarked version of the IEEE 1394-1995
standard and its revisions.
i.LINK and the i.LINK logo “
” are trademarks.
You can connect to a network through a
telephone line by inserting a telephone cord
into the LINE connector on the network
adaptor installed in the PlayStation®2 console.
LINE connector
Telephone cord
1 ... Insert a telephone cord (not included) into
the LINE connector of the network
adaptor.
2 ... Plug the telephone cord into a telephone
wall jack.*
* Do not connect any type of cord other
than a home-use phone cord to the LINE
connector.
If you connect a telephone cord or
network cable of a type other than that
specified to the line connector, too much
electrical current may pass through the
connector, causing a malfunction,
excessive heat or fire in the connector.
Never connect phone cords of the
following types (especially a phone cord
for a home or business telephone
network) to the line connector:
•An ISDN (digital) compatible public
phone
•A PBX phone
•A cellular phone or car phone
•A home or business telephone network
phone
Telephone
wall jack
Telephone wall jacks
The network adaptor can be connected to
telephone cords with standard RJ-11C
telephone connectors. In some cases you may
need to use an adaptor to connect to your
phone line. For details, contact your local
telephone company.
Caution
• When you connect to a network you may be
charged a connection fee by the local telephone
company and a usage fee by the Internet service
provider. In some cases, usage charges may be
more than anticipated. For details, refer to the
instructions provided with the software or contact
your Internet service provider.
• If you have call waiting, you may be disconnected
or the software may function abnormally if a call is
received while you are connected to a network.
• When you are using a fax machine or a telephone
on the same line, you will not be able to connect to
a network using the line connector.
• When the network adaptor is connected to a
network, you will not be able to use your phone or
fax machine.
• When the network adaptor is not in use, connect
the phone line to the device it is normally used for.
Page 13
Connecting the network adaptor with a network cable
Removing the network adaptor from the console
13
You can connect the PlayStation®2 console to a
network through the NETWORK connector on
a network adaptor installed in the
PlayStation®2 console.
You can connect to a 100 mbps network using
100Base-TX cable or to a 10 mbps network
using 10Base-T cable. For details, refer to the
instructions supplied with the network device
you are connecting to (such as a router, DSL
modem or cable modem).
Warning
There is a protective sticker on the network connector
to help prevent accidental connection of the wrong
type of cable. Remove the sticker the first time you use
the network connector. After you have removed the
sticker, be careful not to connect cables of the wrong
type to the network connector.
Do not connect network cables or telephone cords of the
following types to the network connector; too much
electrical current may pass through the connector, causing
a malfunction, excessive heat or fire in the connector:
• Network cables of types other than 100Base-TX and
10Base-T
• Normal telephone lines
• An ISDN (digital) compatible public phone
• A PBX phone
• A home or business telephone network phone
• Other types of telephone lines
Note
When you connect to a network, the Internet service
provider may charge a usage fee. In some cases, the usage
charges may be more than anticipated. For details, refer to
the instructions provided with the software in use or
contact your Internet service provider.
The network adaptor can be removed from the
console. It should only be removed for the
purpose of installing an authorized expansion
bay peripheral.
Caution
• For safety reasons, turn off the console using the
main power switch on the console rear, and
disconnect the power plug for the console from the
electrical outlet before removing the network
adaptor.
• The network adaptor serves as a protective cover
for the expansion bay and the expansion bus
connector, which is located within the expansion
bay. Do not leave the expansion bay uncovered for
an extended period of time. If your network
adaptor is lost or damaged, or for any questions or
problems concerning the network adaptor, contact
our technical support line at 1-800-345-7669.
• Do not connect any unauthorized internal
peripheral to the network adaptor, and do not
insert foreign objects into the expansion bay. Doing
so may damage the console, or cause a malfunction.
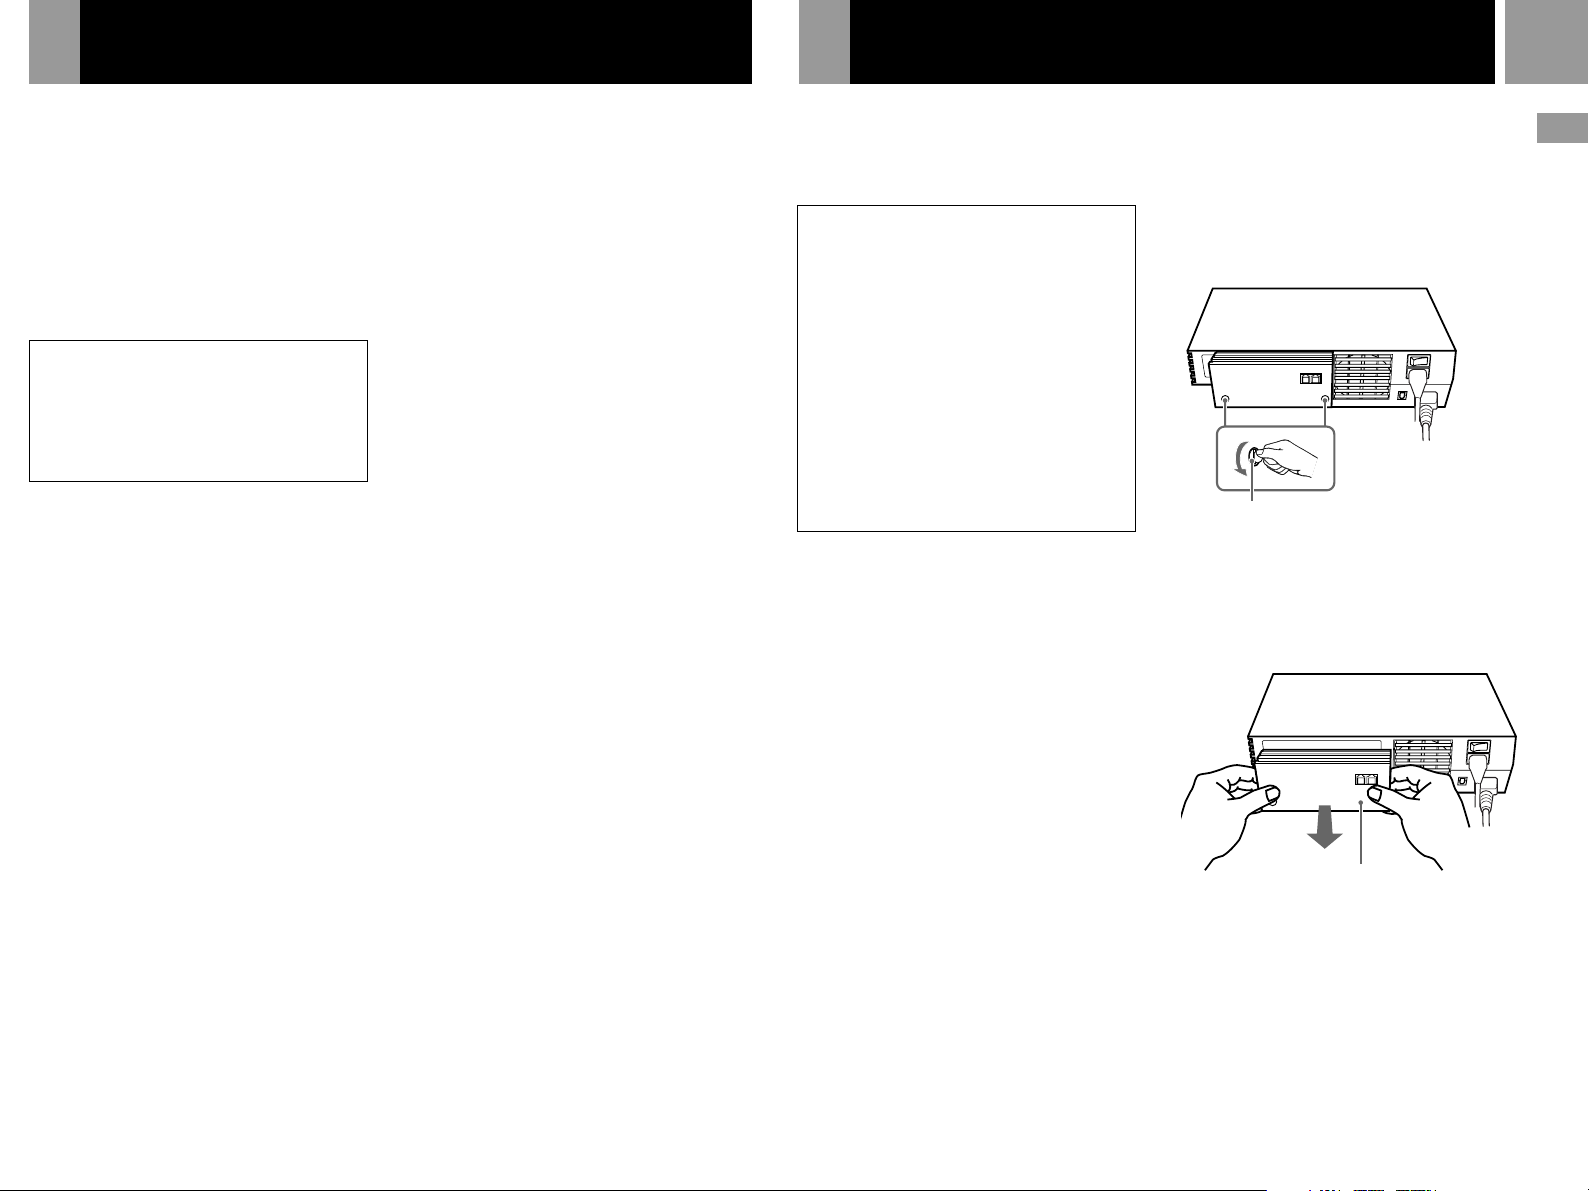
1 ... Check that the 1 (standby) indicator on
the PlayStation®2 console front is lit up in
red, and turn off the PlayStation®2 console
using the MAIN POWER switch on the
console rear.
2 ... Disconnect the power plug for the
PlayStation®2 console from the electrical
outlet.
4 ... Loosen the mounting screws.
Turn the mounting screws in a
counterclockwise direction using a coin.
Note
Do not use a screwdriver to loosen the mounting
screws.
PlayStation®2
console rear
Mounting screw
5 ... Remove the network adaptor from the
console.
Remove the network adaptor by pulling it
away from the console.
US
Connection
3 ... Disconnect the telephone cord and/or
network cable from the network adaptor.
Note
The network adaptor included in the PlayStation®2
online pack is intended only for use with the
PlayStation
2 console provided.
®
Network adaptor
Page 14
14
Caution
• For safety reasons, do not connect the power plug
for the console to an electrical outlet until the
network adaptor has been reattached.
• When installing an authorized internal peripheral
in the console’s expansion bay, refer to the
instructions supplied with the peripheral product.
Reattaching the network adaptor to the console
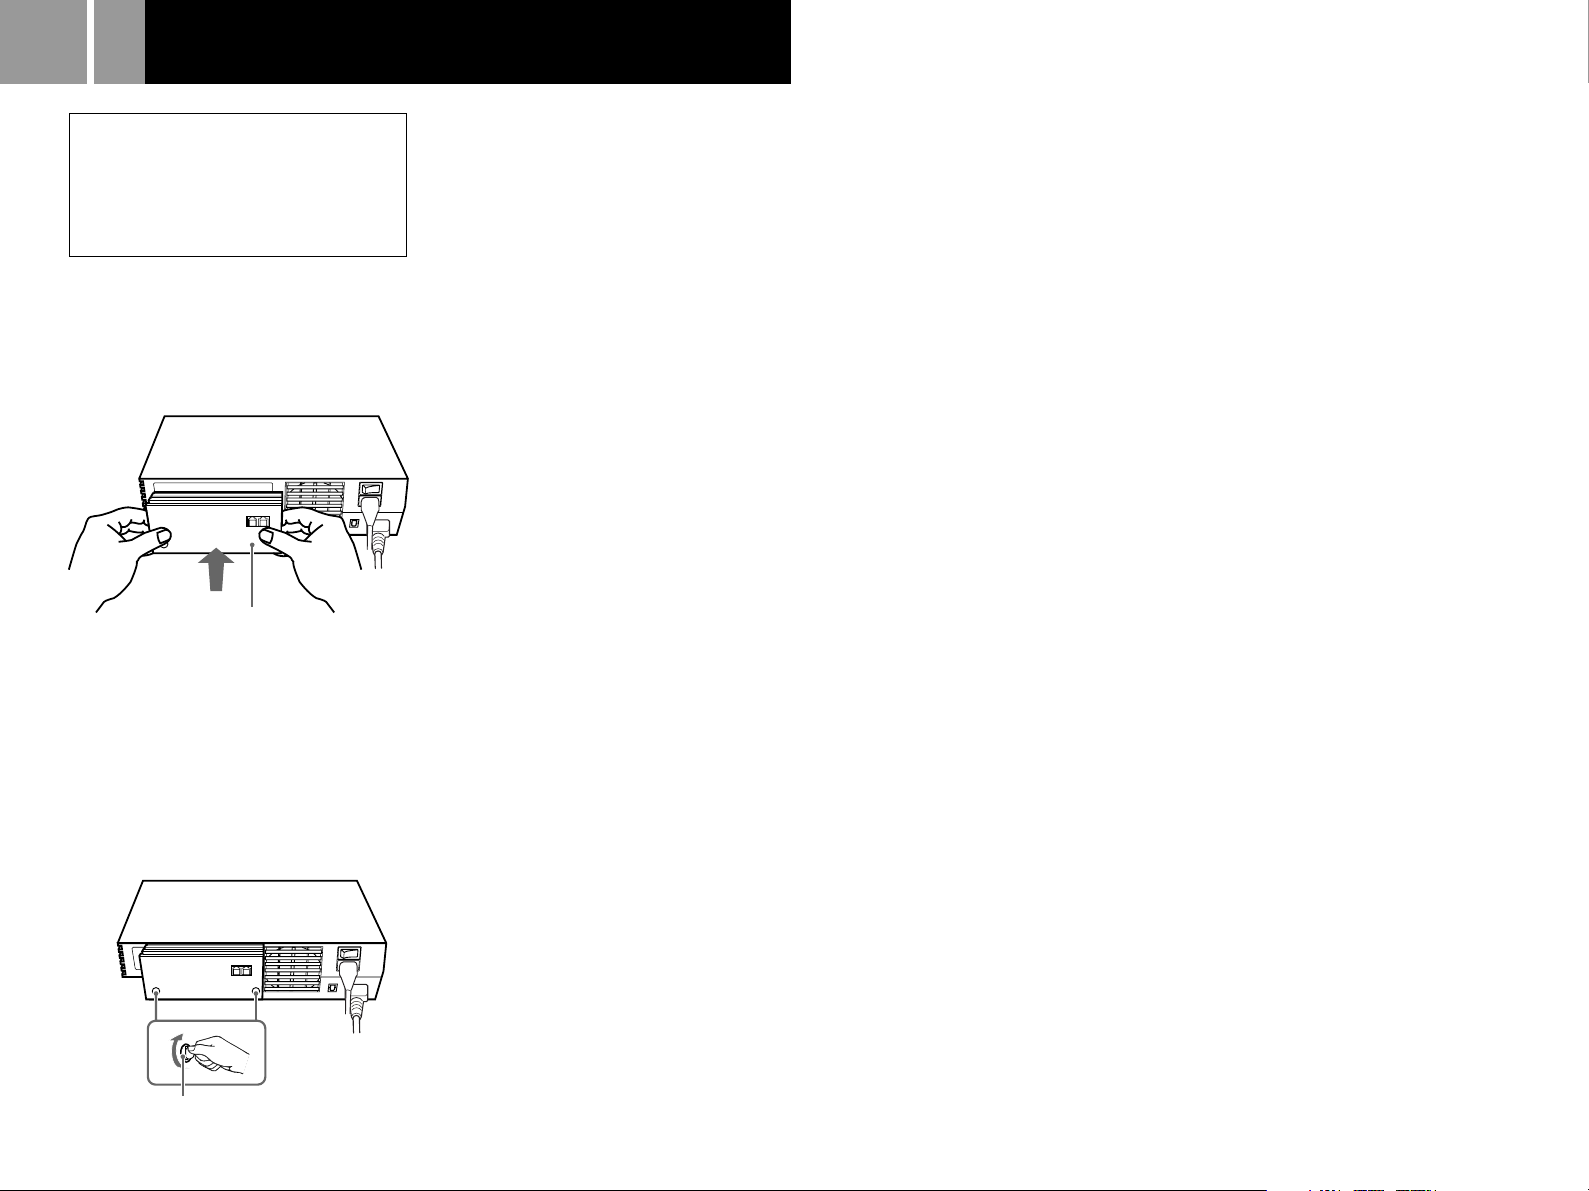
1 ... Place the network adaptor over the
expansion bay so that the mounting
screws line up with the holes in the
console. (The expansion bay is located on
the lower left side of the PlayStation®2
console rear.)
Network adaptor
2 ... Fasten the network adaptor to the
PlayStation®2 console.
Turn the mounting screws in a clockwise
direction using a coin. Do not overtighten.
Notes
• Do not use a screwdriver to tighten the
mounting screws.
• Do not fasten the mounting screws too
tightly, as this may damage the screws
or console.
Mounting screw
Page 15
Using the Main menu
15
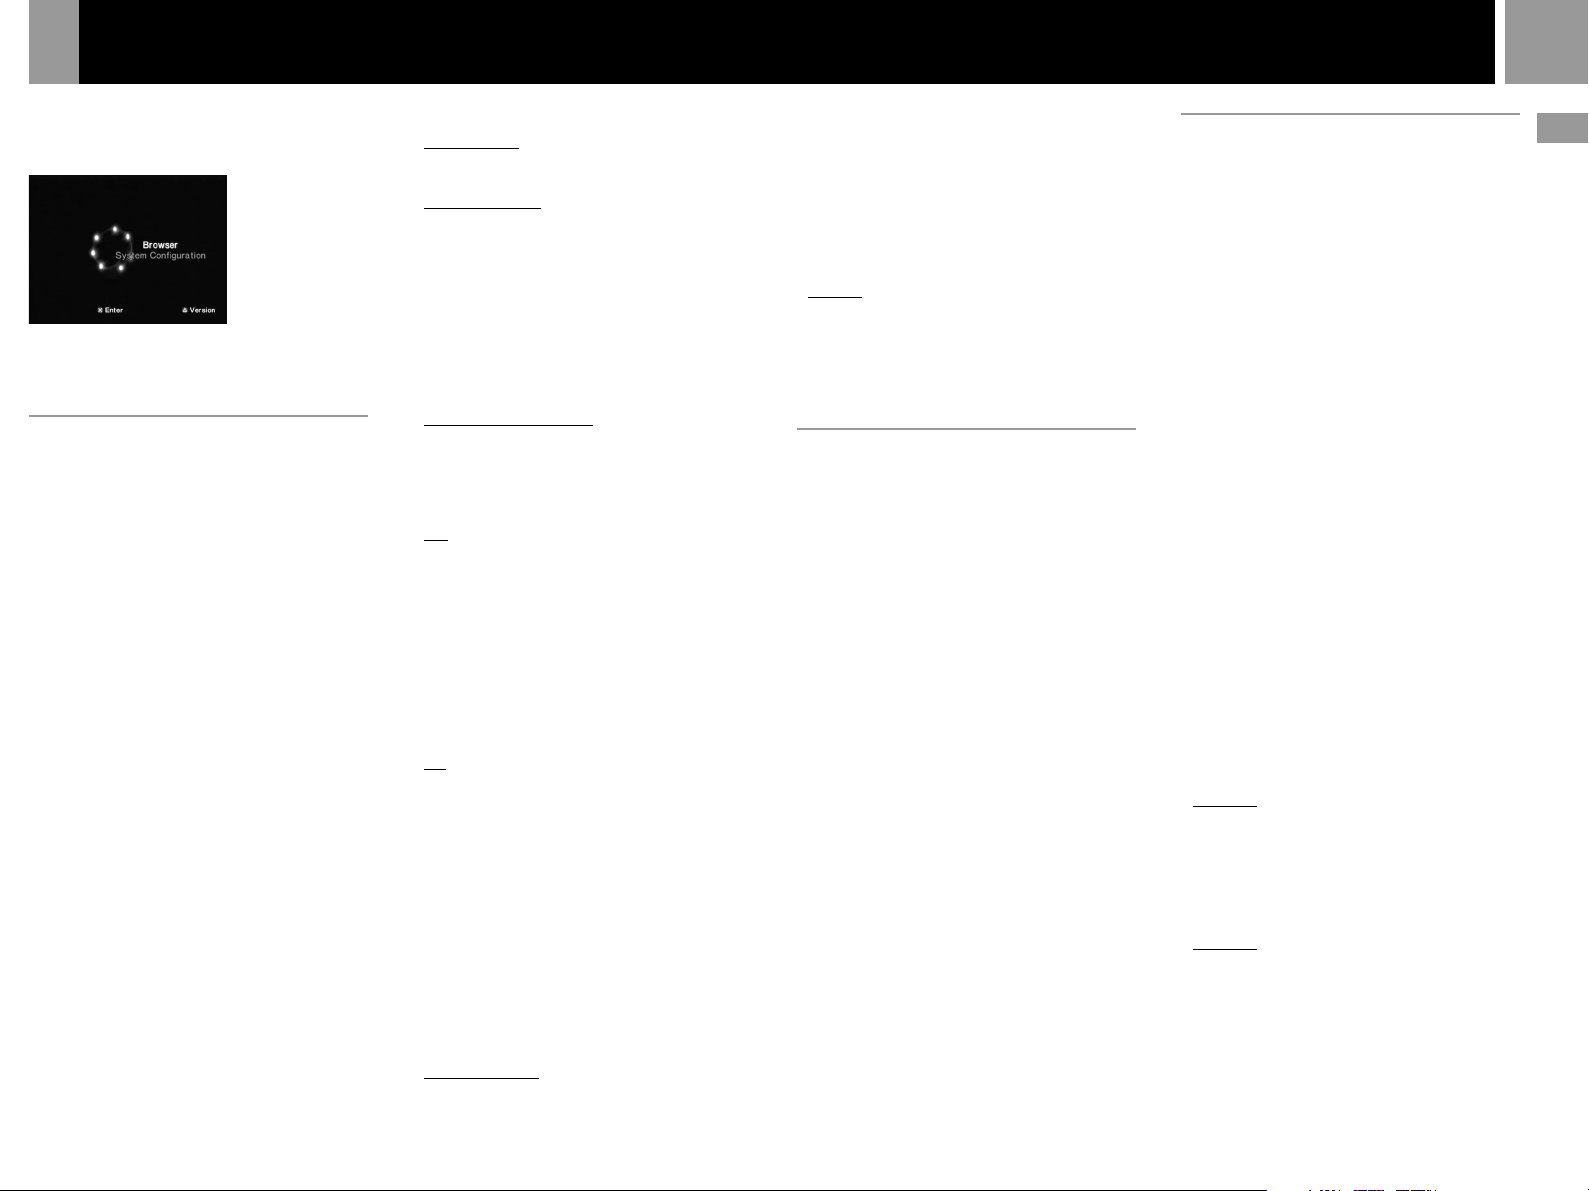
When turning on the console without first
inserting a disc, the Main menu appears on the
TV screen.
You can move to the System Configuration
menu or the Browser screen from the Main
menu.
Using the System Configuration
menu
Using the System Configuration menu, you can
change or update your system settings for the
PlayStation®2 console.
Changes to these settings are saved and remain
in effect even after you turn off the console.
1...... Select “System Configuration” using the
up and down directional buttons and
press the ✕ button.
The System Configuration menu appears
on the TV screen.
2...... Select the item you want using the up and
down directional buttons and press the ✕
button.
The default settings are underlined.
x Clock Adjustment
Sets the clock.
1...... Use the up and down directional buttons
to set the month and then press the right
directional button.
Use the same method to set the day, year,
hour, minute and second. To return to the
previous menu, press the left directional
button.
2...... Press the ✕ button in time with an
accurate clock.
You can select optional settings for the clock
Select “Clock Adjustment” using the up and
down directional buttons and press the ¢
button. You can set the optional items.
Time Format
•12 hour clock
•24 hour clock
Date Format
•MM/DD/YYYY
•DD/MM/YYYY
•YYYY/MM/DD
Time Zone
Select your country or region to set the time
zone.
Daylight Savings Time (Summer Time)
Set this item to “Daylight Savings Time
(Summer Time)” when daylight savings time is
in effect.
•Standard (Winter Time)
•Daylight Savings (Summer Time)
x Screen Size
Selects the display mode according to the TV to
be connected.
•4:3 : select this when you connect a standard
TV to the console.
•Full : select this when you connect a standard
TV to the console. The black margins on the
upper and lower portions of the screen are cut
off.
•16:9 : select this when you connect a widescreen TV to the console.
x DIGITAL OUT (OPTICAL)
Selects whether to output signal via the
DIGITAL OUT (OPTICAL) connector.
•On : select this when you connect with an
optical digital cable (sold separately).
Normally select this option.
•Off : select this when you do not want sound
signal to be output via the DIGITAL OUT
(OPTICAL) connector.
x Component Video Out
If your TV, monitor or projector has a RGB
input connector or component video input
connectors (Y, CB/PB, CR/PR) that conform to
the output signals of the console, set this item.
When connecting the console using the
supplied AV cable (integrated audio/video) or
S VIDEO cable (sold separately), you do not
need to set this item.
•Y Cb/Pb Cr/Pr : select this when you connect
the console to the component video input
connectors.
•RGB : select this when you connect the
console to the RGB input connector.
Note
You can output PlayStation® and PlayStation®2 format
software in either RGB or Y Cb/Pb Cr/Pr format.
However, the PlayStation
override the “Component Video Out” setting in the
System Configuration menu and output all DVD video
software in Y Cb/Pb Cr/Pr.
2 console has been designed to
®
x Language
Selects the language for the on-screen display.
•English
•French
•Spanish
•German
•Italian
•Dutch
•Portuguese
Using the Browser screen
You can do the following operations using the
Browser screen.
•Checking/copying/deleting game data on
the memory card (8MB) (for PlayStation®2) or
memory card
•Starting PlayStation® or PlayStation®2 format
software
•Playing an audio CD
•Playing a DVD video
Select “Browser” using the up and down
directional buttons and press the ✕ button.
The Browser screen appears on the TV screen.
The memory card (8MB) (for PlayStation®2),
memory card or discs inserted in the console
are displayed as icons.
Checking/copying/deleting game data
You can copy game data from one memory card
(8MB) (for PlayStation®2) or memory card to
another or delete data you no longer wish to keep.
You cannot, however, copy game data of the
PlayStation®2 format software to the SCPH1020 U memory card.
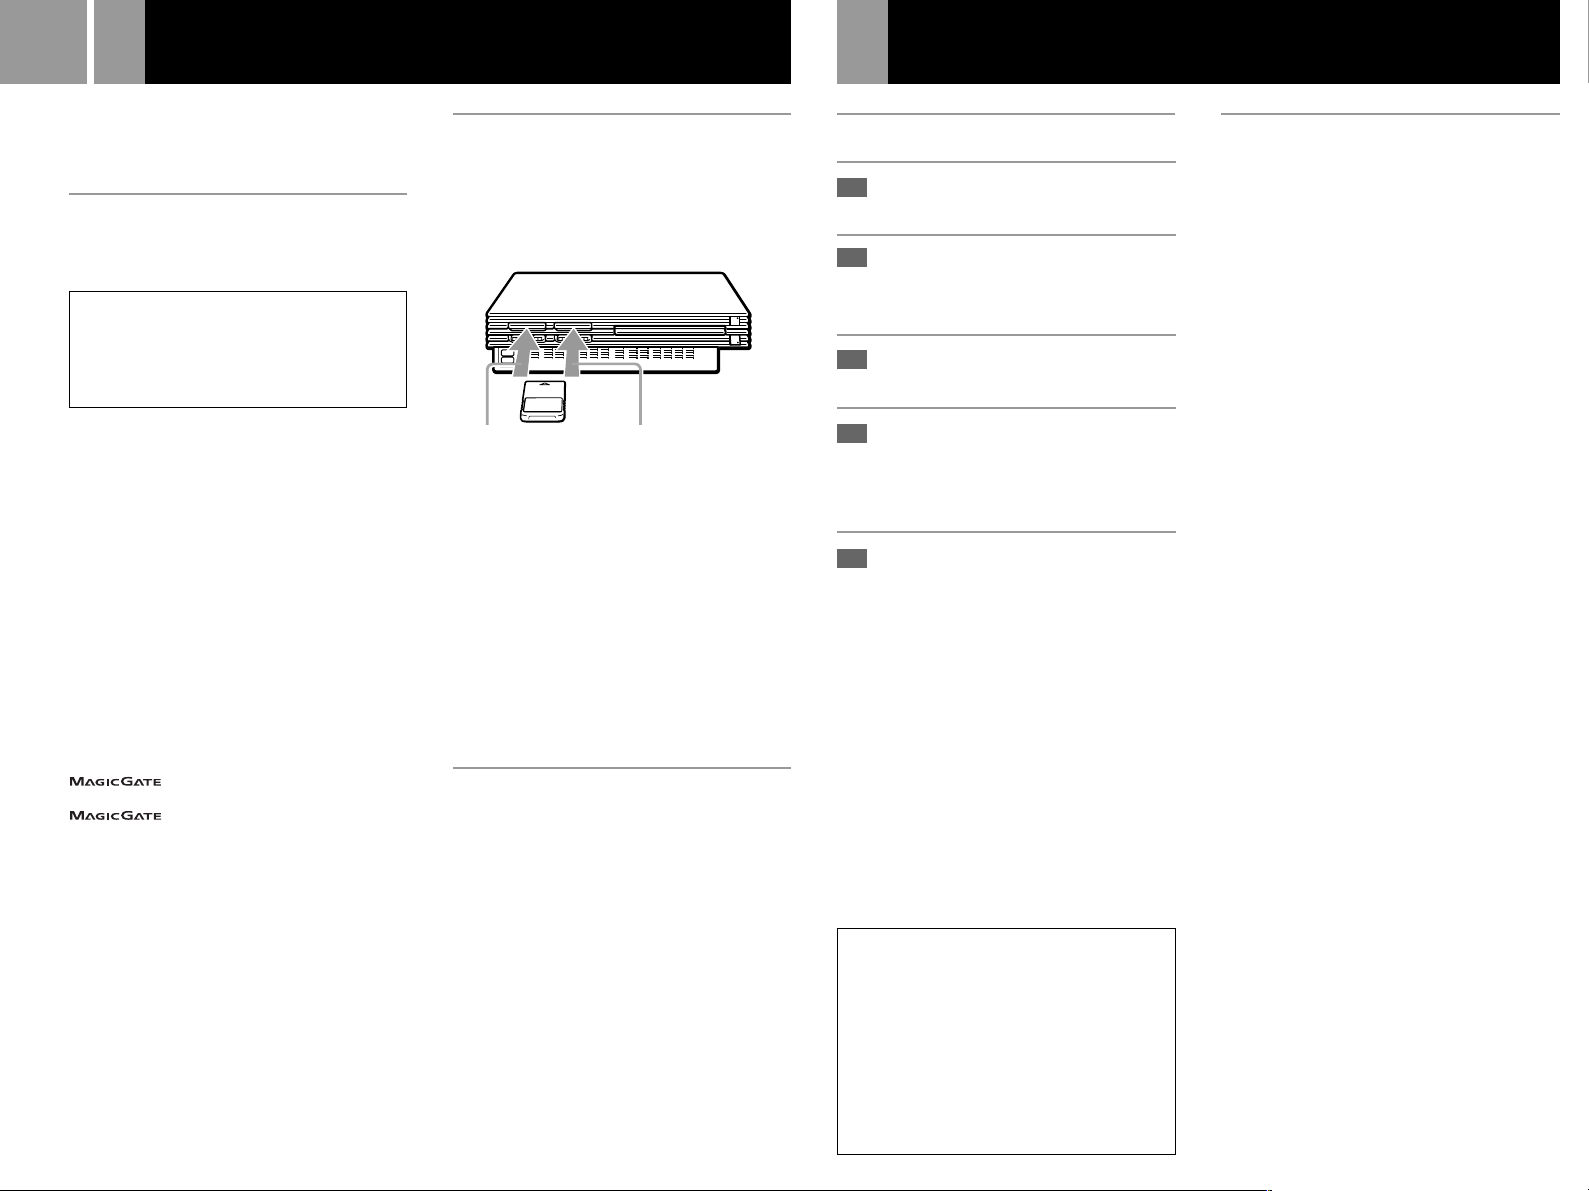
Insert the memory card (8MB) (for
PlayStation®2) or memory card in advance.
1...... Select the icon of the memory card (8MB)
(for PlayStation®2) or memory card where
the game data you want to check/copy/
delete is saved, and then press the ✕
button.
2...... Check/copy/delete game data according
to the instructions on the screen.
Note
While copying or deleting game data, do not remove the
memory card (8MB) (for PlayStation
2) or memory card.
®
Checking version information
You can check the version of the console,
Browser, CD Player, PlayStation
DVD Player.
Press the ¢ button in the Main menu.
Auto-diagnosis feature
The PlayStation
console settings for best possible disc playback.
However, you can also manually start the autodiagnosis feature whenever necessary.
2 console automatically adjusts
®
1...... Select “Console” using the up and down
directional buttons and press the ¢ button.
2...... Select “On” using the up and down
directional buttons and press the ✕ button.
3...... Insert a disc.
The console automatically starts the
diagnosis.
Note
The diagnosis setting automatically returns to “Off”
(default setting) when you press the 1/RESET button or
start playing a PlayStation
format disc or a DVD video disc.
format disc, PlayStation®2
®
Setting the PlayStation® Driver
The PlayStation® Driver is a program for
loading PlayStation® format software.
1...... Select “PlayStation
and down directional buttons and press
the ¢ button.
®
2...... Select the item you want using the up and
down directional buttons and press the ✕
button.
Disc Speed
•Standard: normally select this position.
•Fast: loading time for a PlayStation® format
software disc can be shortened.
Depending on the software, there may be no
effect or the software may unexpectedly fail.
In this case, select “Standard.”
Texture Mapping
•Standard: normally select this position.
•Smooth: you can make the display smoother
when playing certain PlayStation® format
software titles.
Depending on the software, there may be no
effect. In this case, select “Standard.”
Note
The “PlayStation® Driver” setting automatically returns to
“Standard” (default setting) when you press the 1/RESET
button or turn off the console.
Driver and
®
Driver” using the up
US
Connection
Page 16
16
1,3
4
2
Playing a game
Starting a game
1
Turn on the console using the
MAIN POWER switch on the
back of the console.
The 1 (standby) indicator on the
front of the console lights up in red
to indicate that the console is now in
standby mode.
2
Press the 1 (standby) /RESET
button.
The 1 indicator turns green and the
start-up screen appears.
3
Plug the analog controller
(DUALSHOCK
controller (DUALSHOCK
the console.
®2) or analog
®) into
1
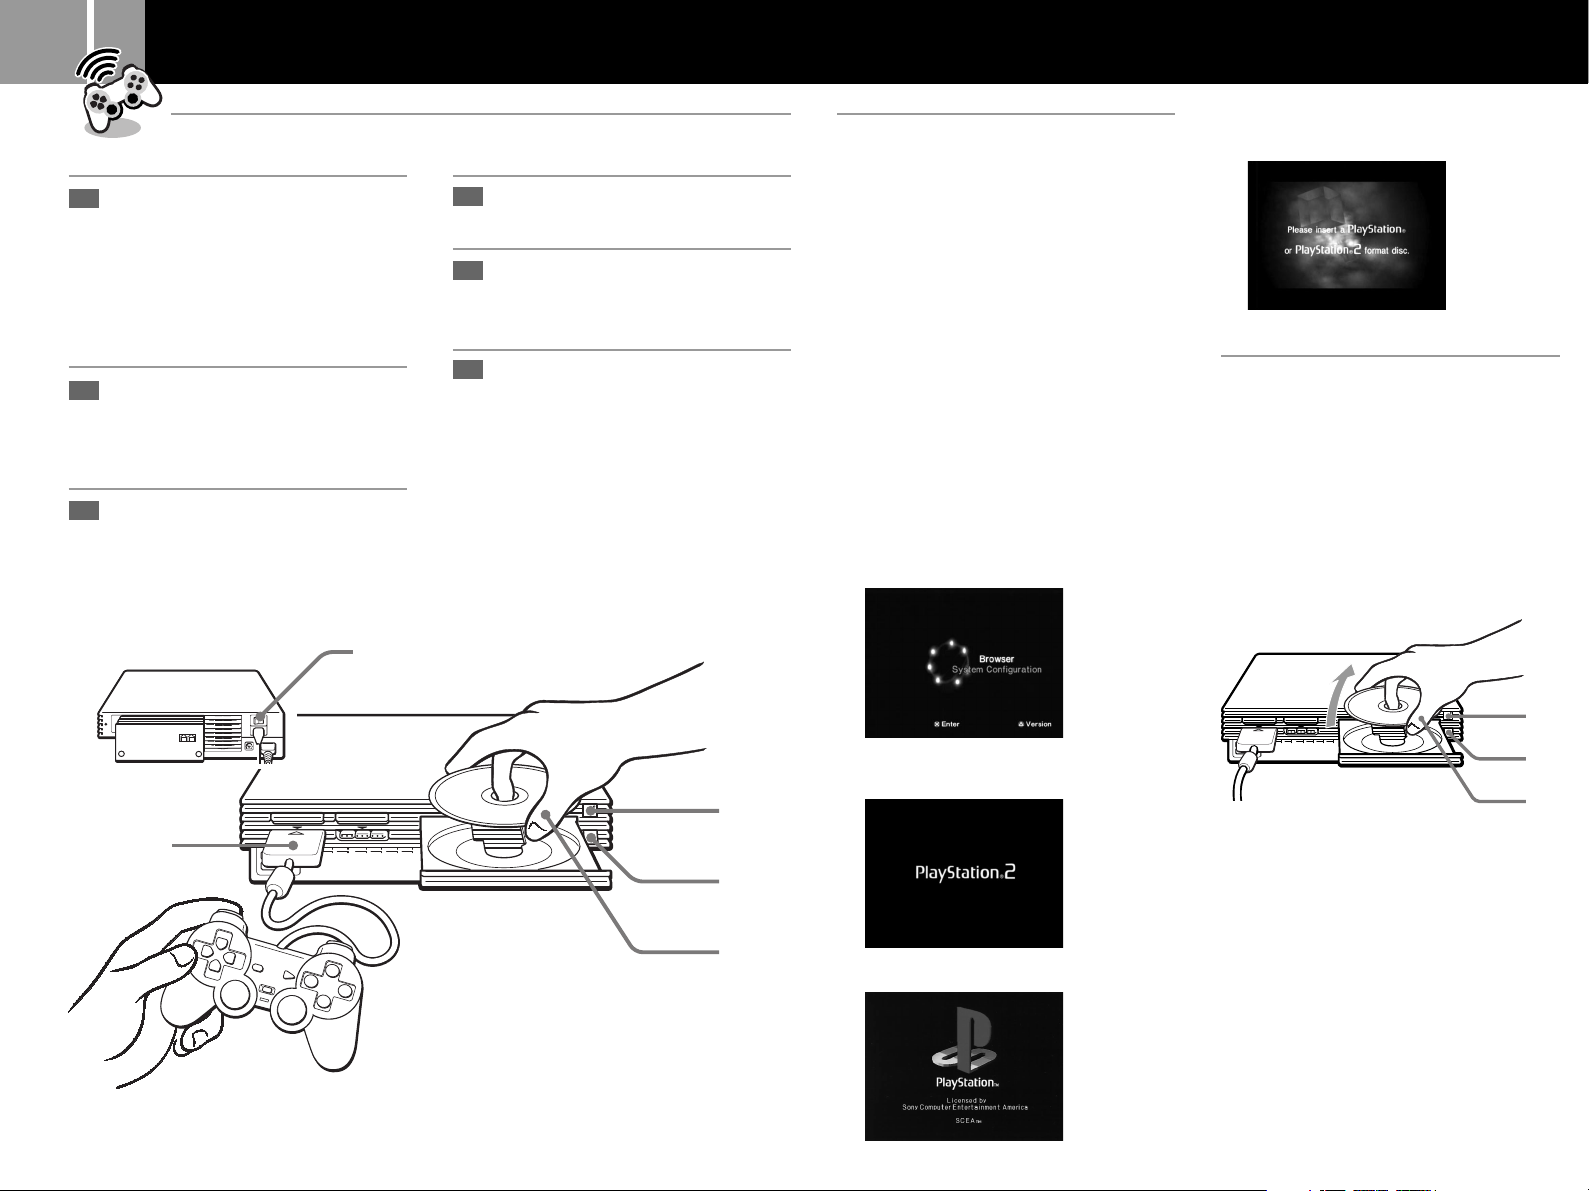
4
Press the A (open) button.
The disc tray opens.
5
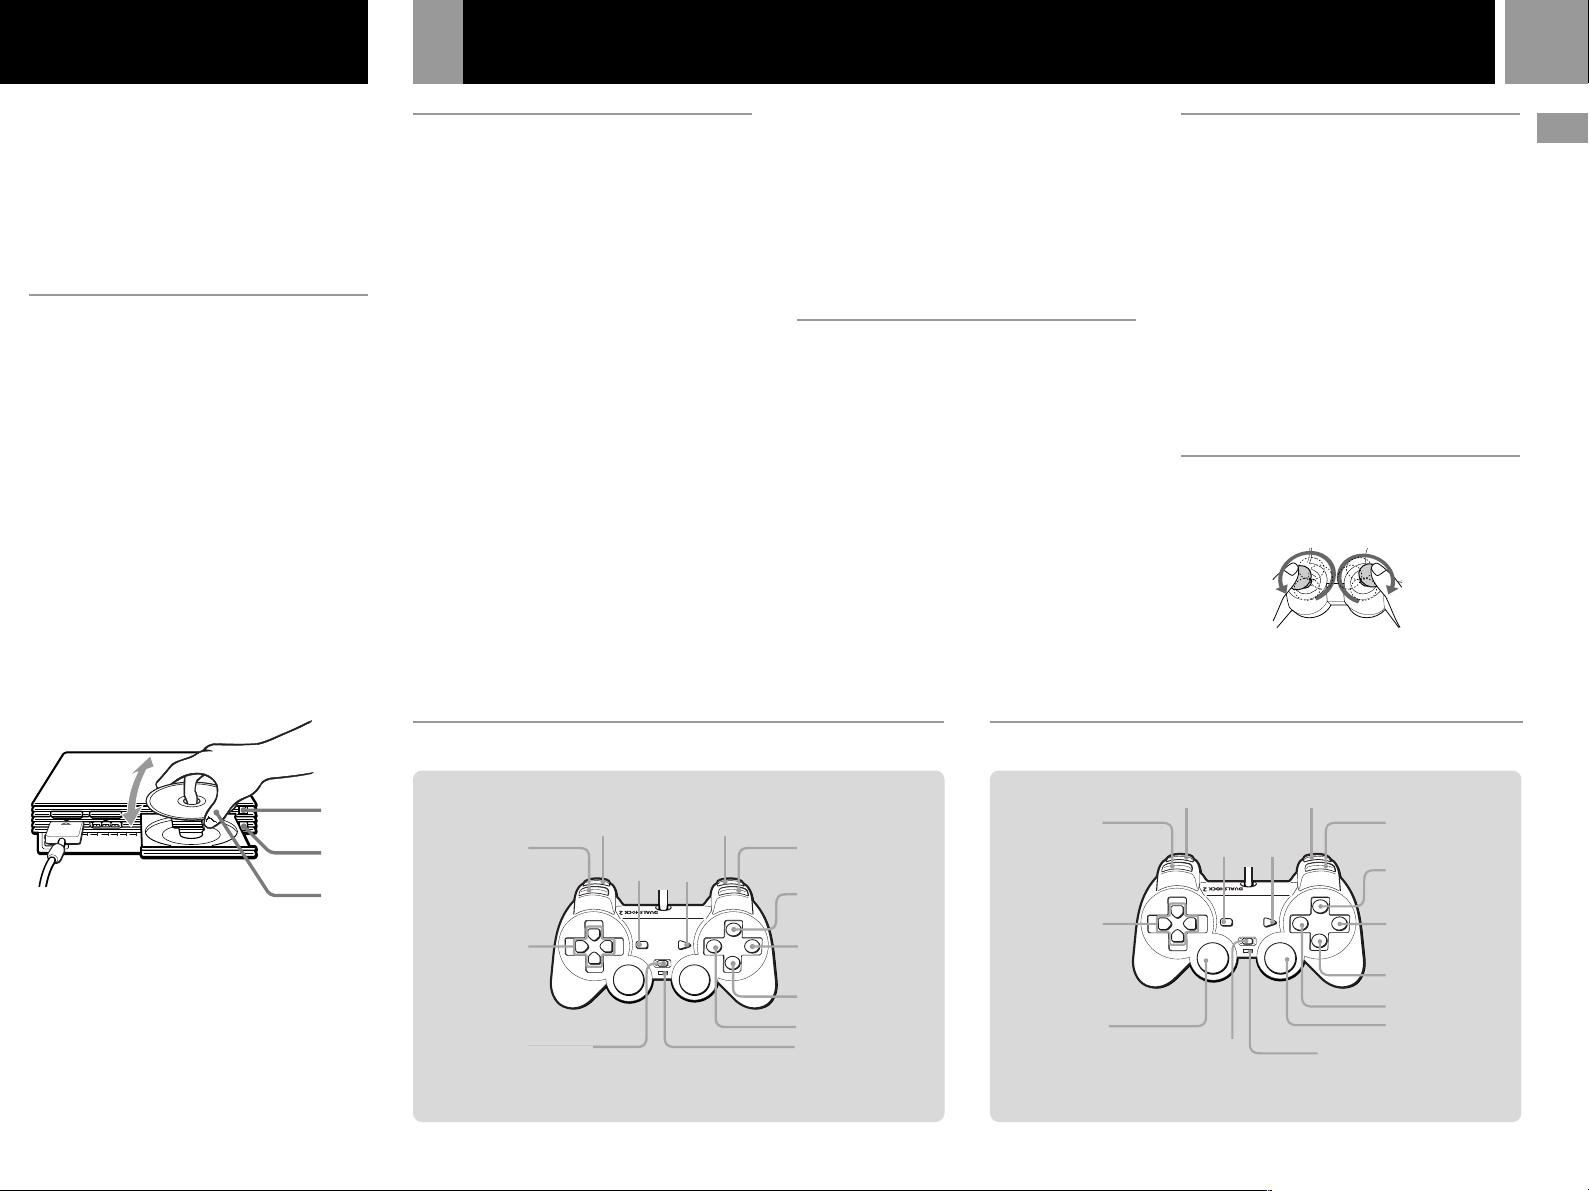
Place a disc on the disc tray
with the label side facing up
(data side down).
6
Press the A button.
The disc tray closes. Screen 2 or 3
appears and the game is ready to
begin.
Note
Set the analog controller (DUALSHOCK®2) or analog
controller (DUALSHOCK
the software (page 17). See the appropriate software
manual for details.
®) to the appropriate mode for
Screens that appear at start-up
When turning on the console without first
inserting a disc
Screen 1 appears.
•When you insert a PlayStation®2 or
PlayStation® format disc after screen 1 has
appeared, screen 2 or 3 will appear and
you can start the game.
•You can move to the System Configuration
menu or the Browser screen from screen 1.
(For details, see “Using the Main menu” on
page 15.)
When turning on the console with a disc
already inserted
Depending on the type of disc inserted, screen
2, 3 or 4 will appear.
If screen 4 appears, it is possible that the
inserted disc is not a PlayStation® or
PlayStation®2 format disc. Check the disc type
(page 4).
1 No disc is inserted (Main menu).
4 A disc that cannot be played with the
PlayStation
2 console is inserted.
®
Ending a game
1...... Press the A button.
The disc tray opens.
2...... Remove the disc.
3...... Press the A button.
The disc tray closes.
4...... Press the 1/RESET button for about two
seconds.
The 1 indicator turns red and the console
enters standby mode.
3
2
4,6
5
Restarting a game
Press the 1/RESET button very briefly. (Be
sure not to hold the button down for any length
of time, as that will put the console in standby
mode.)
Be careful not to accidentally press the 1/
RESET button while playing a game, or the
game will restart.
2 PlayStation
CD-ROM is inserted.
PlayStation® format CD-ROM is inserted.
3
2 format DVD-ROM /
®
Notes
• When playing an online software title, you can use the
1/reset button on the console front to quit the title.
Note that you cannot use this button to restart the title.
• To quit an online software title, follow the on-screen
instructions or the instructions in the software manual.
• If you cannot find instructions, you can quit by
pressing the 1/reset button. The 1 indicator will turn
red when the console has entered standby mode.
• If you are not able to quit using the method above, you
can force the software to quit by pressing and holding
down the 1/reset button until the 1 indicator turns
red.
Page 17
Using the analog controller
17
When not intending to play a game for an
extended period of time
Turn the power off at the MAIN POWER
switch on the back of the console, disconnect
the power plug from the electrical socket and
the telephone cord and/or network cable from
the wall jack.
Changing from one game to
another
There is no need to turn off the console when
you want to change games.
1...... Press the A button.
The disc tray opens.
2...... Remove the disc.
3...... Place a new disc in the disc tray.
4...... Press the A button.
The disc tray closes.
5...... Press the 1/RESET button briefly to reset.
(Warning: holding the 1/RESET button
down for any length of time may cause the
console to go into standby mode.)
After the start-up screen, screen 2 or 3
appears and the game begins.
Differences between the analog
controller (DUALSHOCK®2) and
analog controller (DUALSHOCK®)
1 Analog controller (DUALSHOCK®2)
(supplied / sold separately)
•The analog controller (DUALSHOCK®2) can
be used with PlayStation®2 and PlayStation
format software.
•You can switch between digital and analog
modes. When the controller is in analog
mode, the following buttons and sticks may
operate in analog fashion depending on the
features supported by the software title. Refer
to the software manual for details.
PlayStation®2 format software
Directional buttons / ¢ , a , ✕ , s buttons /
left analog stick / right analog stick / L1, R1,
L2, R2 buttons
PlayStation® format software
Left analog stick / right analog stick
•You can enjoy the vibration function.
2 Analog controller (DUALSHOCK®)
(sold separately)
•The analog controller (DUALSHOCK®) can
be used with PlayStation®2 and PlayStation
format software.
®
®
•You can switch between digital and analog
modes. When in analog mode, you can enjoy
the analog operation of the left analog stick
and right analog stick.
PlayStation®2 format software
Left analog stick / right analog stick
PlayStation® format software
Left analog stick / right analog stick
•You can enjoy the vibration function.
Mode switching and the mode
indicator
The analog controller (DUALSHOCK®2) and
analog controller (DUALSHOCK®) can be
switched between two modes by pressing the
ANALOG mode button.
Each time the ANALOG mode button is
pressed, the mode changes as follows:
Digital mode (indicator: off)
Xx
Analog mode (indicator: red)
Note
Switch to the appropriate mode for use.
Note, however, that some software makes this adjustment
automatically. In such cases, the ANALOG mode button is
overridden by the software. For details, refer to the
software manual.
Vibration function
The analog controller (DUALSHOCK®2) and
analog controller (DUALSHOCK®) both feature
a vibration function when the function is
supported by the software title. The vibration
function can be set to ON or OFF on the
software option screen.
Notes
• When the analog controller (DUALSHOCK®2) and
analog controller (DUALSHOCK
turn the console off or unplug the controller from the
console.
• Before using the vibration function, please read “
on safety when using the
(DUALSHOCK
(DUALSHOCK
®2) and analog controller
®)
”
on page 3.
Before using the
®) is not being used,
Notes
analog controller
analog
controller (DUALSHOCK®2) and
analog controller (DUALSHOCK®)
After turning the console on, rotate the left and
right analog sticks once with your thumbs before
starting a game. Do not twist the analog sticks,
but rotate as if drawing a circle as shown in the
diagram above.
US
Games / Audio CDs
5
1,4
2,3
Note
With a multi-disc game, follow steps 1 through 4 to switch
discs. Refer to the software manual for details.
L1 button
Directional
buttons
ANALOG mode button
L2 button R2 button
SELECT
button
START
button
R1 button
¢ button
a button
✕ button
s button
Mode indicator: Off
Analog mode (indicator: red)Digital mode (indicator: off)
L1 button
Directional
buttons
Left analog stick /
L3 button*
* The R3 button and the L3 button function when the stick is pressed.
L2 button R2 button
START
SELECT
button
button
ANALOG mode button
Mode indicator: Red
R1 button
¢ button
a button
✕ button
s button
Right analog stick /
R3 button*
Page 18
18
Using memory cards
Playing an audio CD
You can save and load game or other data using
the memory card (8MB) (for PlayStation®2) or
memory card (each sold separately).
Differences between the memory
card (8MB) (for PlayStation®2) and
memory card
When playing PlayStation®2 format
software, use the memory card (8MB*)
(for PlayStation®2) (1).
When playing PlayStation® format software,
use the memory card (2).
For the PlayStation® game console, units of
game data are described as “memory blocks,”
however for the PlayStation®2 console, they are
described as “KB” (kilobytes).
* 8 MB = 8,000 KB
1 Memory card (8MB) (for PlayStation®2)
(sold separately)
The memory card (8MB) (for PlayStation®2)
can save and load PlayStation®2 format
software game data. Each memory card (8MB)
(for PlayStation®2) can save about 8 MB of
game data, but some of this may be used as file
control information.
The memory card (8MB) (for PlayStation®2)
uses MAGICGATE, a technology that helps
protect copyrighted content through data
encryption and hardware authentication.
technology developed by Sony Group.
other products bearing the"MagicGate" trademark.
2 Memory card (sold separately)
The memory card can save and load
PlayStation® format software game data. Each
memory card can save 120 KB (15 memory
blocks) of game data.
Note
You cannot copy data to a memory card (8MB) (for
PlayStation
memory available. Before playing, check how much space
is needed to save the game and how much space is
available on the memory card (8MB) (for PlayStation
memory card. Check the appropriate software manual to
determine the amount of space needed to save the data for
a given game.
is a term of copyright protection
does not guarantee compatibility with
2) or memory card that does not have enough
®
®
2) or
Inserting
the memory card (8MB)
(for PlayStation®2) and memory
card
Insert the memory card (8MB) (for PlayStation®2)
or the memory card into the MEMORY CARD
slot, with the arrow side up.
MEMORY CARD slot 2MEMORY CARD slot 1
Notes on using the memory card (8MB) (for
PlayStation
multitap
•When using PlayStation®2 format software,
use the SCPH-10090 U multitap
(for PlayStation®2).
When using PlayStation® format software,
use the SCPH-1070 U multitap.
•When you insert the SCPH-1070 U multitap into
controller port 1, do not insert the memory card
(8MB) (for PlayStation®2) or memory card into
MEMORY CARD slot 1 of the PlayStation®2
console. This also applies when you insert a
multitap into controller port 2. If you do so, the
data may be lost.
2) or memory card with a
®
Copying/deleting game data
You can copy game data from one memory
card (8MB) (for PlayStation®2) or memory card
to another or delete data you no longer wish to
keep.
You cannot, however, copy game data of the
PlayStation®2 format software to the memory
card.
You can check, copy and delete game data in
the Browser screen. For details on the browser,
see “Checking/copying/deleting game data”
on page 15.
Note
You cannot save or load game data in the Browser screen.
For details on game data saving or loading, refer to the
software manual.
Playing an audio CD
Press the A (open) button.
1
The disc tray opens.
2
Place a disc on the disc tray
with the label side facing up
(data side down).
Press the A button.
3
The disc tray closes.
Select the audio CD icon in the
4
Browser screen (page 15), then
press the ✕ button.
The “Audio CD” screen appears.
Select the icon number using
5
the directional buttons, then
press the ✕ button.
The CD operation screen appears
and playback starts.
Operating the CD player
While a disc is playing, select the button in the
CD operation screen using the right and left
directional buttons. Then press the ✕ button.
N Start playing.
X Pause.
x Stop playing.
. Find the beginning of the current or
previous track.
M Fast Forward.
m Fast Reverse.
> Find the beginning of the next track.
Music discs encoded with copyright
protection technologies
The audio CD playback feature of this
product is designed to conform to the
Compact Disc (CD) standard. Recently,
some record companies have started
marketing music discs encoded with
copyright protection technologies. Some of
these music discs do not conform to the CD
standard and may not be playable on this
product.
Playing in various modes
You can change between various play modes.
As a default setting, ”Normal” is selected for
“Play mode,” and “Off” is selected for
“Repeat.”
Select the audio CD icon in the Browser screen,
then press the f button to change the settings.
To play the desired tracks in a specified order
1 ... Select “Play mode” using the up and
down directional buttons and press the ✕
button.
2......
Select “Program” using the right and left
directional buttons and press the ✕ button.
3...... Select the number of the specific track
using the directional buttons then press
the ✕ button.
Repeat this step until you have selected all
the tracks you want to play.
4...... Press the a button to return to the
Browser screen.
To play the tracks in random order
1...... Select “Play mode” using the up and
down directional buttons and press the ✕
button.
2......
Select “Shuffle” using the right and left
directional buttons and press the ✕ button.
3...... Press the a button to return to the
Browser screen.
To play all tracks repeatedly
1...... Select “Repeat” using the up and down
directional buttons and press the ✕ button.
2
......
Select “All” using the right and left
directional buttons and press the ✕ button.
3...... Press the a button to return to the
Browser screen.
To play a track repeatedly
1...... Select “Repeat” using the up and down
directional buttons and press the ✕ button.
2......
Select “1” using the right and left
directional buttons and press the ✕ button.
3...... Press the a button to return to the
Browser screen.
Page 19
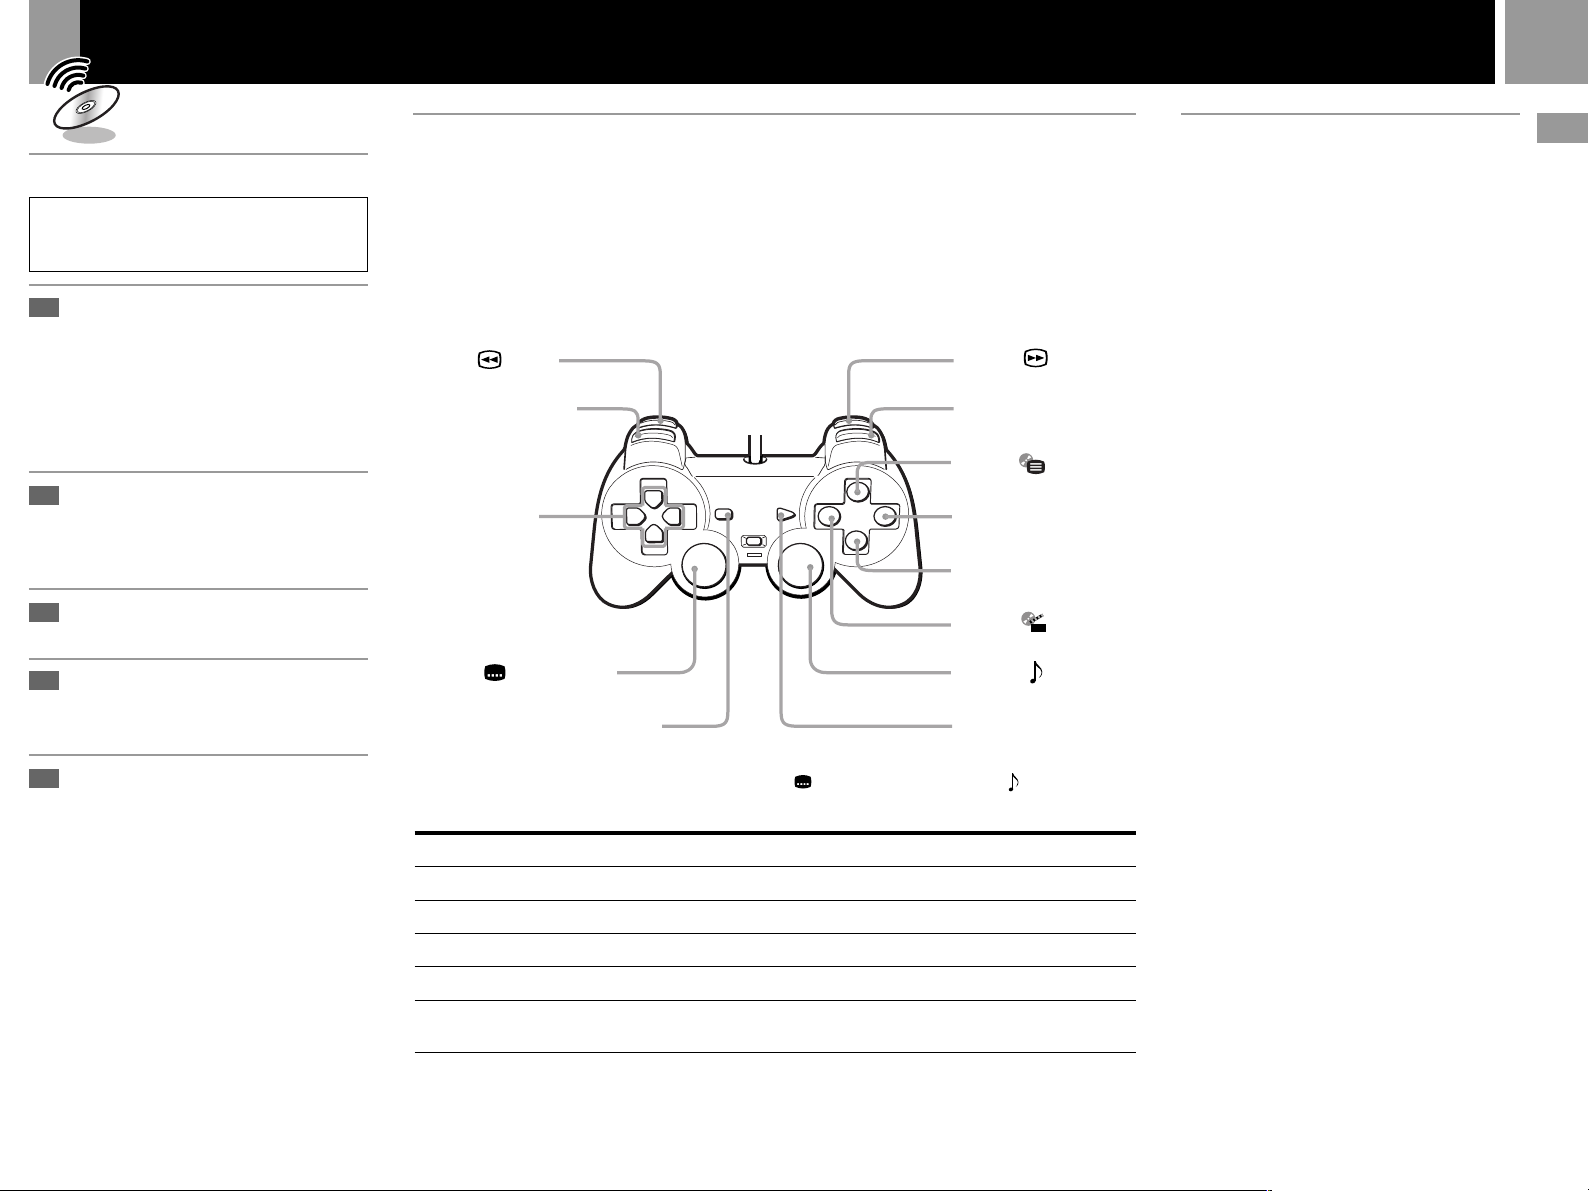
Playing a DVD video
19
Playing a DVD video
Depending on the DVD video, some operations
may be different or restricted. Refer to the
instructions supplied with your disc.
1
Turn on the console using the
MAIN POWER switch on the
back of the console.
The 1 (standby) indicator on the
front of the console lights up in red
to indicate that the console is now in
standby mode.
Press the 1 (standby) /RESET
2
button.
The 1 indicator turns green and the
start-up screen appears.
Press the A (open) button.
3
The disc tray opens.
4
Place a disc on the disc tray
with the label side facing up
(data side down).
5
Press the A button.
The disc tray closes and the console
starts playback.
Notes
• Depending on the DVD, a DVD menu or Title menu
may appear on the TV screen (see page 21).
• If you press the A button after playback, the Browser
screen appears.
• When playing a DVD video, do not connect the console
to a VCR. If you do, picture quality may be reduced.
Connect the console directly to the TV.
If you experience problems playing a DVD video:
In rare instances, certain DVD videos may not operate
properly with PlayStation
variations in the manufacturing process or software
encoding of the DVD video software. If you experience
problems, try restarting your DVD video. If problems
persist, for more information call the publisher of the
DVD video or contact SCEA's customer service.
®2. This is primarily due to
Operating the DVD player directly with a controller
You can operate the DVD player directly with the buttons on a controller when the Control Panel
(page 20) is not displayed. You can also operate the DVD player using the DVD remote control (for
PlayStation®2) (sold separately). For detailed instructions, refer to the instruction manual supplied
with the SCPH-10171 DVD remote control (for PlayStation®2) with IR receiver unit.
This console is equipped with DVD Player software that is compatible with the DVD remote control
(for PlayStation®2). You can use the DVD remote control simply by inserting the IR receiver unit
(supplied with the DVD remote control) into a controller port of the console. No memory card (8MB)
(for PlayStation®2) is required when using the DVD remote control (for PlayStation®2) with this
console.
L2 button: (Search)
(Page 22)
L1 button: . (Previous)
DUALSHOCK
2
Directional buttons:
Cursor control
L3 button*: (Subtitle Options)
(Page 21)
SELECT button: Display the Control Panel
(Page 20)
* When using a controller without the L3 or R3 button, select the (Subtitle Options) function or the (Audio Options)
function using the Control Panel (see page 20).
To
Stop
Pause
Resume play after pause
Go to the next chapter in continuous play mode
Go back to the preceding chapter in continuous
play mode
You can also operate various DVD functions using the on-screen menu (Control Panel). For details,
see “Using the Control Panel” (page 20).
Operation
Press the a button.
Press the START button.
Press the START button.
Press the R1 button.
Press the L1 button twice.
R2 button: (Search)
(Page 22)
R1 button: > (Next)
¢ button:
(Page 21)
a button: Cancel / x (Stop)
✕ button: Enter
s button:
(Page 21)
R3 button*:
(Page 21)
START button:
N (Play) / X (Pause)
(DVD Menu)
(Title Menu)
(Audio Options)
Playback from the last
stopping point (Resume Play)
The DVD player remembers the point where
you stopped the disc, and you can resume
playback from that point.
1...... While playing a disc, press the a button to
stop playback.
“Press [Play] to resume viewing. To start
from the beginning, press [Stop] and then
[Play].” appears, and then the Control
Panel (page 20) is displayed on the TV
screen.
If the message “Resume function cannot
be used here. Play will restart from the
beginning.” appears, Resume Play is not
available.
2...... Select N (Play) using the directional
buttons and press the ✕ button.
The DVD player starts playback from the
point where you stopped the disc in step 1.
To play from the beginning of the disc
After step 1, select x (Stop) and press the ✕
button. The point where you stopped playing is
cleared.
Select N (Play) and press the ✕ button.
Notes
• Resume Play may not be available on some DVDs.
• Depending on where you stop the disc, the console may
resume playback from a slightly different point.
• The point where you stopped playing is cleared when:
– you open the disc tray
– you shift to standby mode by pressing and holding
down the 1/RESET button on the front of the
console
– you turn the power off using the MAIN POWER
switch on the back of the console
– you start playback after selecting a title or chapter.
US
Games / Audio CDs / DVD videos
Page 20
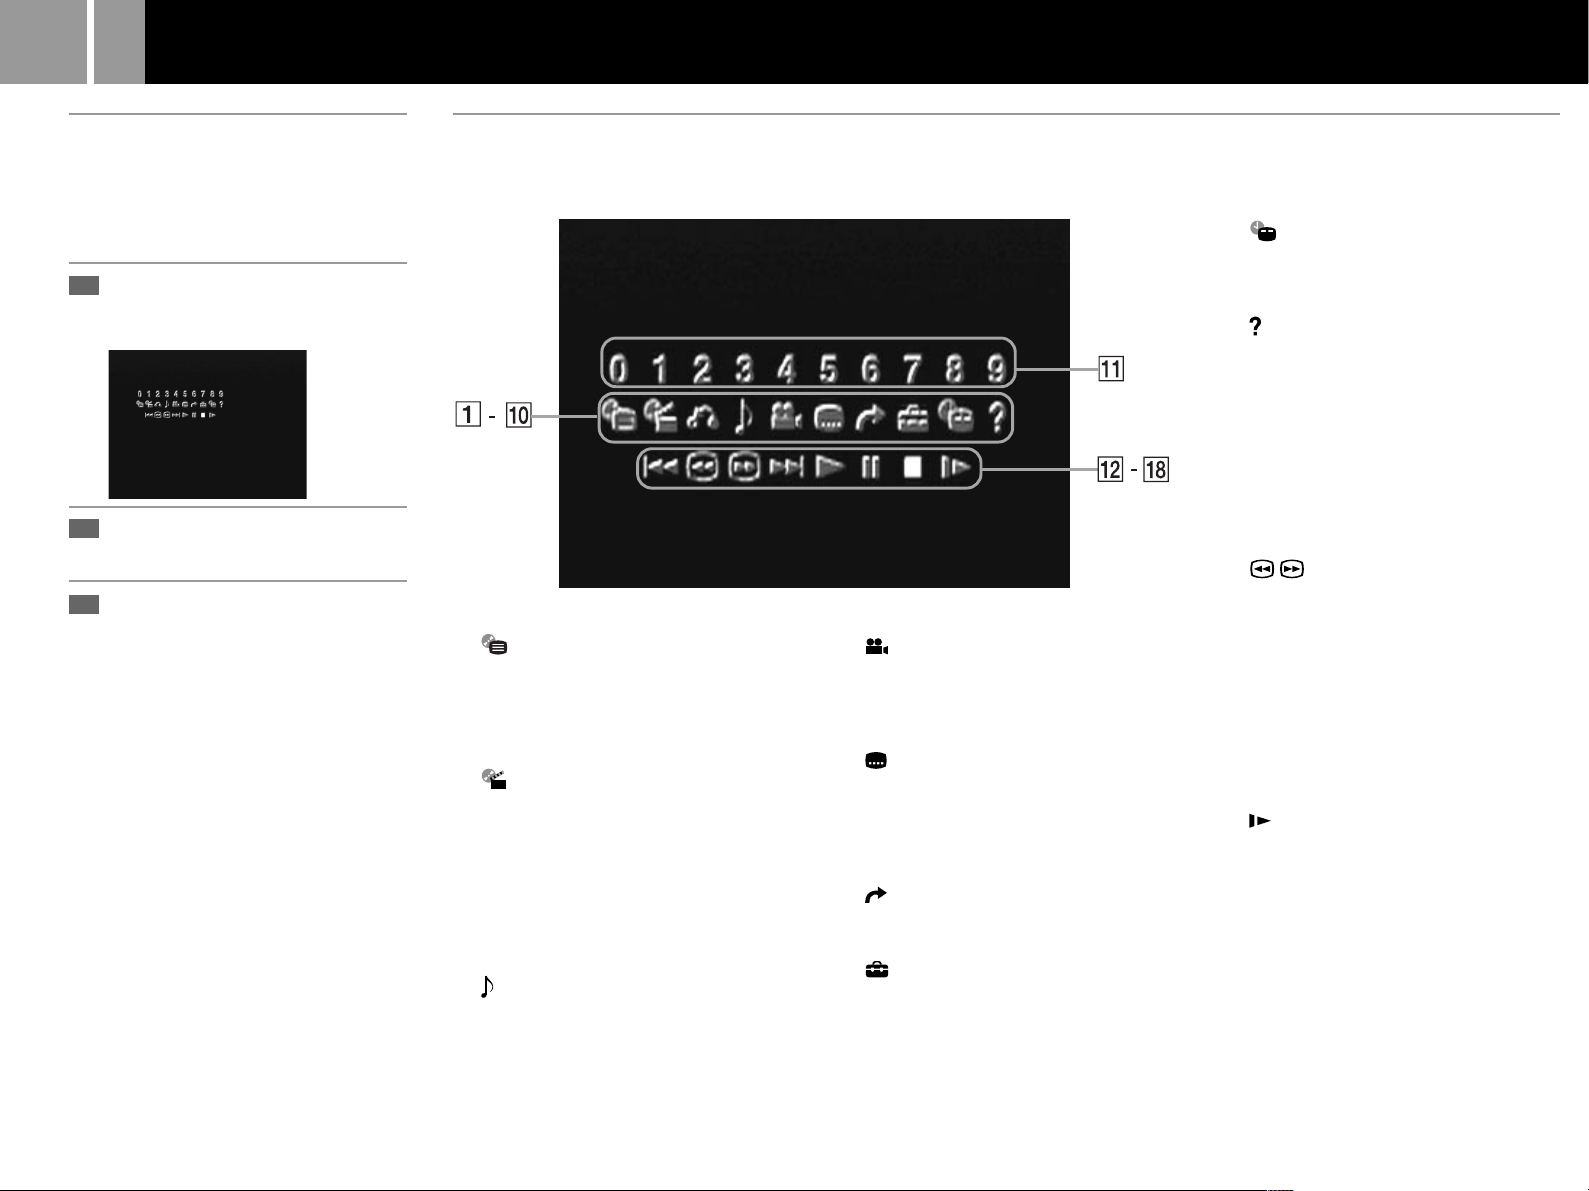
20
Using the Control Panel
Using the Control Panel
You can enjoy various functions using the onscreen menu (Control Panel).
The possible functions are different depending
on the disc.
1
Press the SELECT button.
The Control Panel appears on the TV
screen.
2
Select the item you want using
the directional buttons.
Press the ✕ button.
3
For details on each Control Panel
display item, see pages 21-26.
You can select some items directly with the
controller
See page 19.
Control Panel item list
1 DVD Menu (page 21)
Some DVDs allow you to select the disc
contents using a menu. When you play
these DVDs, you can select the language for
the subtitles, the language for the sound,
etc., using the DVD menu.
2 Title Menu (page 21)
A DVD is divided into long sections of a
movie or a music feature called “titles.”
When you play a DVD that contains several
titles, you can select the title you want
using the Title menu.
3 O Return (page 21)
You can return to the previous screen in the
DVD menu or Title menu.
4 Audio Options (page 21)
If the DVD is recorded with multilingual
tracks, you can select the language you
want to hear while playing the DVD.
5 Angle Options (page 21)
With DVDs on which various angles
(multi-angles) for a scene are recorded,
you can select among the various angles
available.
6 Subtitle Options (page 21)
With DVDs on which subtitles are
recorded, you can change the language
whenever you want while playing the
DVD, and turn it on and off whenever you
want.
7 Go to Title (page 22)
You can select the number of the title you
want to search for.
8 Setup (page 23)
Using the Setup display, you can do the
initial setup, adjust the picture and sound
and set the various outputs. You can also
set a language for the subtitles and the
Setup display, restrict playback by
children, and so on.
9 Chapter Display (page 22)
While playing a disc, you can check the
current title number and current chapter
number on the TV screen.
0 Help (page 22)
The list of the direct buttons on the
controller is displayed on the TV screen.
qa Go to Chapter (page 22) /Number buttons
You can select the number of the chapter
you want to search for.
qs . Previous
You can go to the previous chapter in
continuous play mode.
qd / Search (page 22)
You can locate a particular point on the
DVD quickly by monitoring the picture.
qf > Next
You can go to the next chapter in
continuous play mode.
qg N Play
qh X Pause
qj x Stop
qk Slow (page 22)
You can locate a point on the DVD slowly
by watching the screen.
Page 21
21
Using the DVD menu
Some DVDs allow you to select the disc
contents using a menu. When you play these
DVDs, you can select the language for the
subtitles, the language for the sound, etc., using
the DVD menu.
1...... Select (DVD Menu) using the
directional buttons and press the ✕ button.
The DVD menu appears on the TV screen.
The contents of the menu vary from disc to
disc.
2...... Press the directional buttons to select the
item you want to change.
3...... To change other items, repeat step 2.
4...... Press the ✕ button.
You can display the DVD menu directly
Press the ¢ button on the controller when the
Control Panel is not displayed.
If you want to select the language for the
DVD menu
You can change this setting by choosing
“Language Setup” and then “DVD Menu.”
For details, see page 24.
To return to the previous screen in the DVD
menu
Select O (Return) and press the ✕ button.
This function may not be available on some
DVDs.
Notes
• A DVD menu may not be available on some DVDs.
• Depending on the DVD, the “DVD menu” may be
referred to as a “menu” in the instructions supplied
with the disc.
Using the Title menu
A DVD is divided into long sections of a movie
or a music feature called “titles.” When you
play a DVD which contains several titles, you
can select the title you want using the Title
menu.
1...... Select (Title Menu) using the
directional buttons and press the ✕ button.
The Title menu appears on the TV screen.
The contents of the menu vary from disc to
disc.
2...... Press the directional buttons to select the
title you want to play.
3...... Press the ✕ button.
The console starts playing the selected
title.
You can display the Title menu directly
Press the s button on the controller when the
Control Panel is not displayed.
To return to the previous screen in the Title
menu
Select O (Return) and press the ✕ button.
This function may not be available on some
DVDs.
Notes
• On some DVDs, you may not be able to select the title.
• On some DVDs, the “Title menu” may be referred to as
a “menu” or “title” in the instructions supplied with
the disc. “Press ENTER.” may also be expressed as
“Press SELECT.”
Changing the audio language
If the DVD is recorded with multilingual
tracks, you can select the language you want to
hear when playing the DVD.
The languages you can select are different
depending on the DVD.
Select (Audio Options) using the directional
buttons and press the ✕ button.
Each time you press the ✕ button, the language
changes.
You can select “Audio Options” directly
Press the R3 button on the controller when the
Control Panel is not displayed. Each time you
press the button, the language changes.
Notes
• Due to the programming on some DVDs, you may not
be able to change languages even if multilingual tracks
are recorded on the DVD.
• When playing a DVD, the audio settings may change
when you change titles.
Changing the viewing angle
With DVDs on which various angles (multiangles) for a scene are recorded, you can
change the angles. For example, while playing
a scene of a train in motion, you can display the
view from either the front of the train, the left
window of the train or from the right window
without having the train’s movement
interrupted.
Select (Angle Options) using the directional
buttons and press the ✕ button.
Each time you press the ✕ button, the angle
changes.
Notes
• The number of angles varies from disc to disc or from
scene to scene. The number of angles that can be
changed on a scene is equal to the number of angles
recorded for that scene.
• Due to the programming on some DVDs, you may not
be able to change angles even if multiple angles are
recorded on the DVD.
Displaying subtitles
With DVDs on which subtitles are recorded,
you can turn the subtitles on and off whenever
you want while playing the DVD.
With DVDs on which multilingual subtitles are
recorded, you can also change the subtitle
language whenever you want while playing the
DVD. For example, you can select the language
you want to practice and turn the subtitles on
for better understanding.
Select (Subtitle Options) using the
directional buttons and press the ✕ button.
You can select the subtitle language, and turn it
on or off.
The languages you can select are different
depending on the DVD.
You can select “Subtitle Options” directly
Press the L3 button on the controller when the
Control Panel is not displayed. You can select
the subtitle language, and turn it on or off.
Notes
• When playing a DVD on which no subtitles are
recorded, no subtitles appear.
• Due to the programming on some DVDs, you may not
be able to turn the subtitles on even if there are subtitles
recorded on the DVD.
• Depending on the DVD, you may not be able to turn
the subtitles off.
• The type and number of languages for subtitles vary
from disc to disc.
• Due to the programming on some DVDs, you may not
be able to change the subtitles even if multilingual
subtitles are recorded on the DVD.
• When playing a DVD, the subtitle settings may change
when you change titles.
US
DVD videos
Page 22
22
Using the Control Panel (continued)
Searching for a title
You can select the number of the title you want
to search for using the number buttons.
1...... Select (Go to Title) using the
directional buttons and press the ✕ button.
“Go to Title - -” appears on the TV screen.
2...... Enter the number of the title in 2 digits
using the number buttons.
The DVD player starts playback at the
selected title.
Displaying information while
playing a disc
While playing a disc, you can check the current
title number and current chapter number on
the TV screen.
Select (Chapter Display) using the
directional buttons and press the ✕ button.
Each time you press the ✕ button, you can turn
the display on and off.
Displaying the list of direct
button functions (Help)
The list of the direct buttons on the controller
can be displayed on the TV screen.
Select (Help) using the directional buttons
and press the ✕ button.
To turn off the list
Press the ✕ button.
Searching for a chapter
You can select the number of the chapter you
want to search for using the number buttons.
Enter the number of the chapter in 2 digits
using the number buttons.
The DVD player starts playback at the selected
chapter.
Finding a particular point on a
disc (Search)
You can locate a particular point on a disc
quickly by monitoring the picture or playing
back slowly.
Note
Depending on the DVD, you may not be able to do some
of the operations described.
Locating a point quickly (Search)
1...... While a disc is playing, select (Search
forward) or (Search backward) using
the directional buttons.
2...... Keep the ✕ button pressed until you locate
the point you are looking for.
When you find the point you want, release
the button to return to normal playback
speed.
You can also use the direct buttons
Press the R2 (forward) or L2 (backward) buttons on the
controller when the Control Panel is not displayed.
Locating a point slowly by watching the
screen (Slow-motion play)
1...... While a disc is playing, select (Slow)
using the directional buttons.
2...... Press the ✕ button.
Slow-motion playback starts.
When you find the point you want, select
N (Play) and press the ✕ button to return
to the normal speed.
You can also resume playback by pressing
the START button.
Page 23
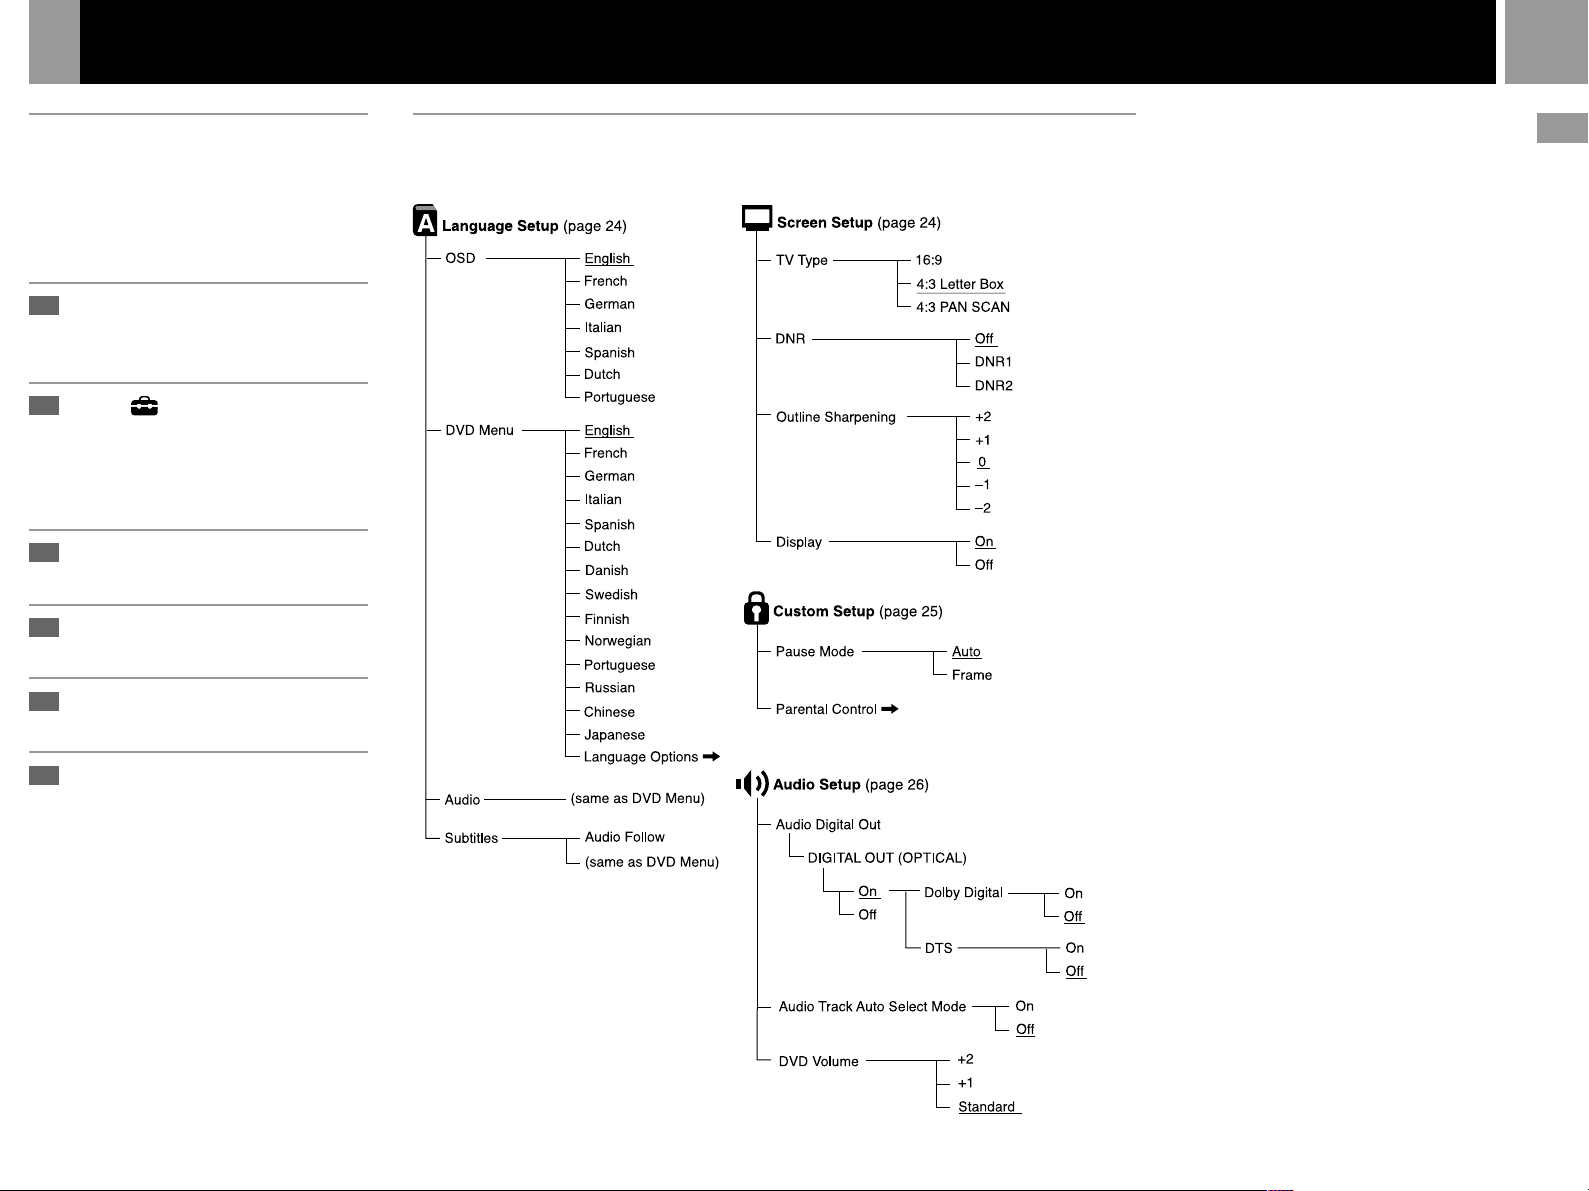
Settings and adjustments for the DVD player
23
Using the Setup display
Using the Setup display, you can change the
initial settings, adjust the picture and sound
and set various other output options. You can
also choose a language for subtitles, restrict
playback by children, and so on.
1
Press the SELECT button to
show the Control Panel on the
TV screen.
2
Select (Setup) using the
directional buttons and press
the ✕ button.
The Setup display appears on the TV
screen.
3
Select the category you want
using the directional buttons.
4
Press the ✕ button.
The selected category is highlighted.
Select the item you want using
5
the directional buttons.
Setup display item list
The default settings are underlined.
US
DVD videos
Press the ✕ button.
6
After changing DVD settings
To save your changes, be sure to eject the DVD
before pressing the 1/RESET button or
turning off the unit with the MAIN POWER
switch. Please note that changes will not be
saved if you reset or turn off the console
without first ejecting the DVD.
Page 24
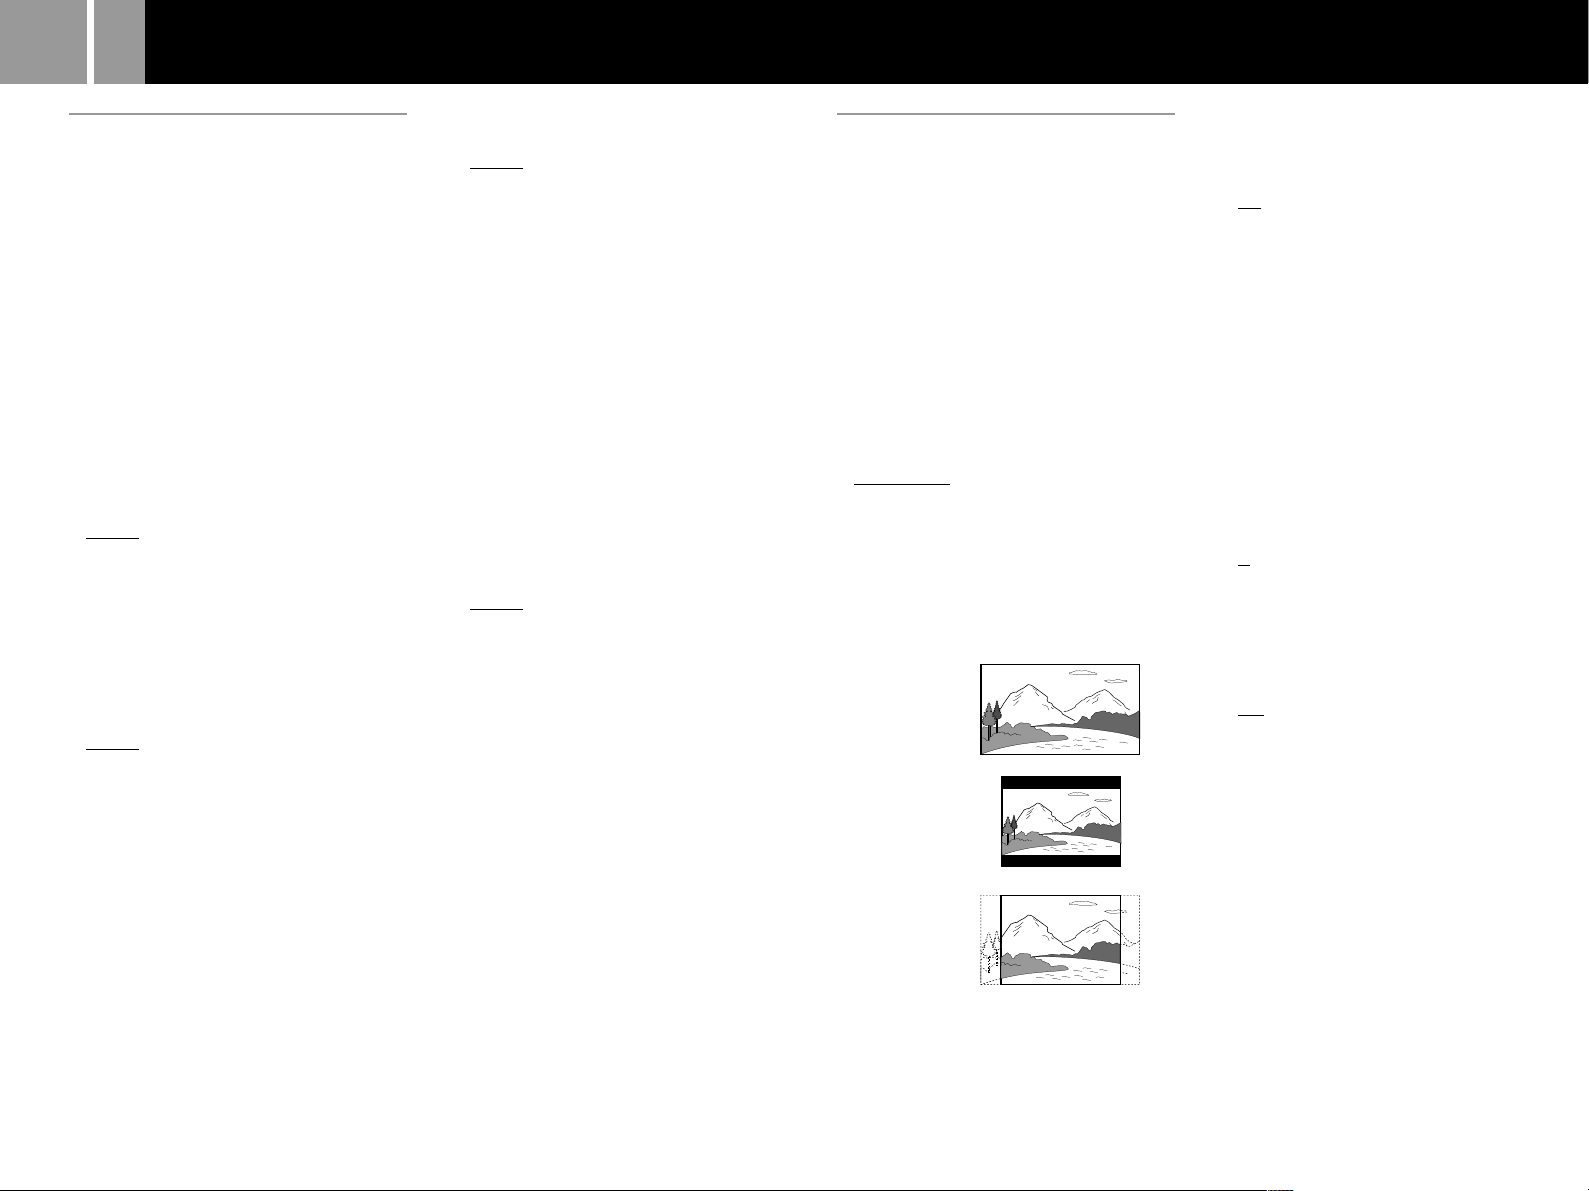
24
Settings and adjustments for the DVD player (continued)
Setting language options
(Language Setup)
“Language Setup” allows you to choose from
among various languages for the on-screen
display or audio track.
The default settings are underlined.
Select “Language Setup” in the Setup display.
Notes
• When you select a language that is not recorded on the
DVD, one of the recorded languages is automatically
selected for the “DVD Menu,” “Audio” and “Subtitles”
settings.
• Depending on the DVD, the console may not start
playing the language you have selected in the “DVD
Menu,” “Audio” or “Subtitles.”
x OSD
Selects the language for the on-screen display.
• English
• French
• German
• Italian
• Spanish
• Dutch
• Portuguese
x DVD Menu
Selects the language for the DVD menu.
• English
• French
• German
• Italian
• Spanish
• Dutch
• Danish
• Swedish
• Finnish
• Norwegian
• Portuguese
• Russian
• Chinese
• Japanese
• Language Options
When you select “Language Options,” the
language list is displayed. Select the
language from the list.
x Audio
Selects the language for the audio track.
• English
• French
• German
• Italian
• Spanish
• Dutch
• Danish
• Swedish
• Finnish
• Norwegian
• Portuguese
• Russian
• Chinese
• Japanese
• Language Options
When you select “Language Options,” the
language list is displayed. Select the language
from the list.
x Subtitles
Selects the language for the subtitles.
• Audio Follow*
• English
• French
• German
• Italian
• Spanish
• Dutch
• Danish
• Swedish
• Finnish
• Norwegian
• Portuguese
• Russian
• Chinese
• Japanese
• Language Options
When you select “Language Options,” the
language list is displayed. Select the
language from the list.
* When you select “Audio Follow,” the language for the
subtitles changes according to the language you
selected for the audio track.
After changing DVD settings
To save your changes, be sure to eject the DVD
before pressing the 1/RESET button or turning
off the unit with the MAIN POWER switch. Please
note that changes will not be saved if you reset or
turn off the console without first ejecting the DVD.
Setting TV display options
(Screen Setup)
“Screen Setup” allows you to set various
options for your TV display.
The default settings are underlined.
Select “Screen Setup” in the Setup display.
x TV Type
Selects the aspect ratio of the TV to be
connected.
You can change this setting only when the
DVD is stopped.
• 16:9: Select this option when using a widescreen TV, or a standard TV that displays in
wide mode.
• 4:3 Letter Box: Select this option when using
a standard TV. This setting displays a wide
picture with margins on the upper and lower
portions of the screen.
• 4:3 PAN SCAN: Select this option when
using a standard TV. Displays a wide picture
adjusted to match the height of the screen,
automatically cutting off the portions at left
and right that do not fit.
16:9
4:3 Letter Box
4:3 PAN SCAN
Note
Depending on the DVD, “4:3 Letter Box“ may be selected
automatically instead of “4:3 PAN SCAN” and vice versa.
x DNR (Digital Noise Reduction)
If the playback picture has noise or
interference, set this item to “DNR1” or
“DNR2.”
• Off: Normally select this position.
• DNR1: makes the picture clear by reducing
noise.
• DNR2: makes the picture even clearer by
reducing noise.
Notes
• When you select “DNR2,” an afterimage may appear.
In this case, select ”Off.”
• Depending on the DVD, the DNR function may
produce limited results.
x Outline Sharpening
Makes the outline of the picture sharpened or
softened. The higher the value, the sharper the
outline.
• +2
• +1
• 0 : Normally select this position.
• -1
• -2
x Display
Displays or turns off the playing status
information on the TV screen.
• On : When you operate the DVD player, the
playing status appears for a few seconds on
the TV screen.
• Off : The playing status is not displayed.
After changing DVD settings
To save your changes, be sure to eject the DVD
before pressing the 1/RESET button or turning
off the unit with the MAIN POWER switch. Please
note that changes will not be saved if you reset or
turn off the console without first ejecting the DVD.
Page 25
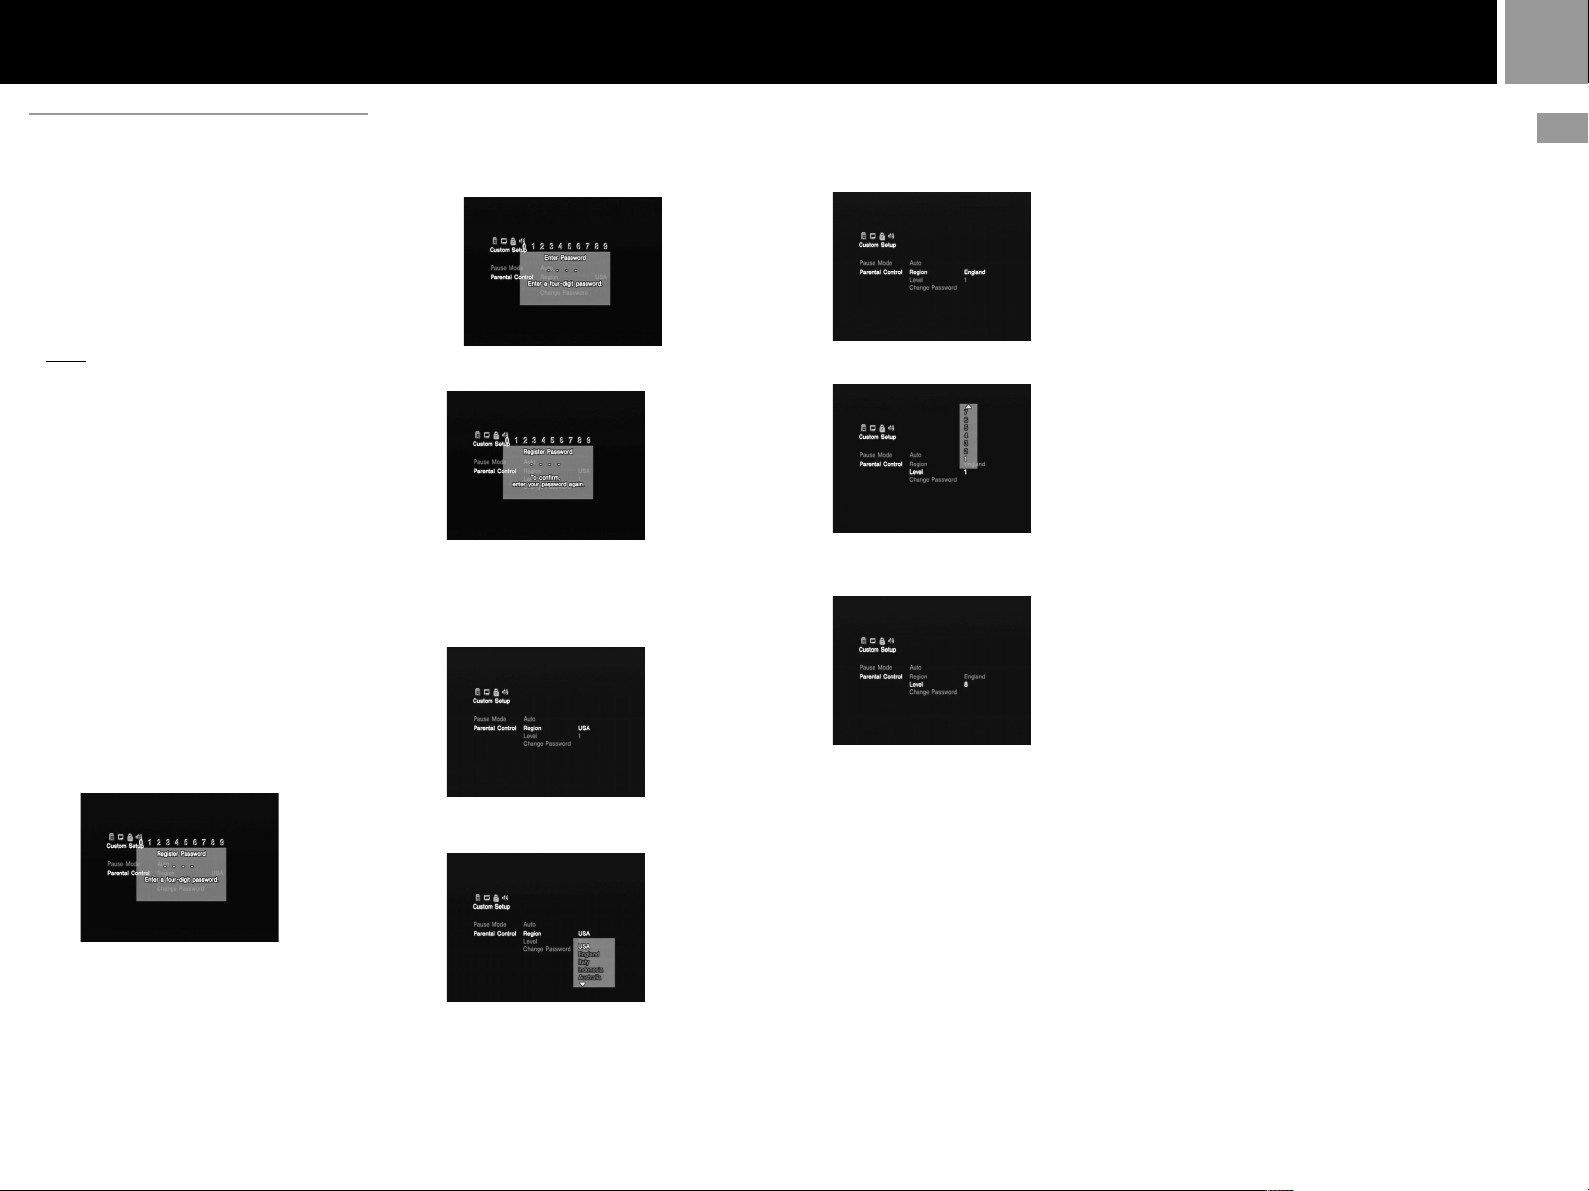
25
Setting viewer options
(Custom Setup)
“Custom Setup” allows you to set the playback
conditions.
The default settings are underlined.
Select “Custom Setup” in the Setup display.
x Pause Mode
Selects the picture in pause mode.
• Auto : A picture, including subjects that
move dynamically, is output without any
jitter. Normally select this position.
• Frame : A picture including subjects that do
not move dynamically is output with high
resolution.
x Parental Control
Playback of some DVDs can be restricted.
The Parental Control function allows you to set
a playback restriction level and a password to
prevent children from viewing certain content.
Select “Custom Setup” in the Setup display.
1...... Select “Parental Control” using the
directional buttons, then press the ✕
button.
x When you have not entered a password
The display for entering a password
appears.
x When you have already registered a
password
The display for confirming the
password appears. Skip step 2.
2...... Enter a password in 4 digits using the
number buttons.
3...... To confirm your password, enter it again
using the number buttons.
You can set the Parental Control level and
change the password.
4...... Select “Region” using the directional
buttons, then press the ✕ button.
5...... Select a geographic region to set the
standard Parental Control level for that
region using the directional buttons, then
press the ✕ button.
6...... Select “Level” using the directional
buttons, then press the ✕ button.
7...... Select the level you want using the
directional buttons, then press the ✕
button.
The lower the value, the more strict the
restriction.
To turn off the Parental Control function
and play the DVD after entering your
password
Set “Level” to “Off” in step 7, then press the ✕
button.
To change the password
1...... After step 3, select “Change Password”
using the directional buttons, then press
the ✕ button.
The display for changing the password
appears.
2...... Follow steps 2 and 3 to enter a new
password.
Playing a disc which is protected by
Parental Control
1...... Insert the disc and press the START
button.
The Parental Control display appears.
2...... Enter your 4-digit password using the
number buttons.
The DVD player starts playback.
When you stop playing the DVD, the
Parental Control level returns to the
original setting.
If you forget your password
Press the SELECT button and enter the 4-digit
number “7444” whenever the Parental Control
display asks you for your password. The old
password is deleted.
Notes
• When you play DVDs that do not have the Parental
Control function, playback cannot be restricted on this
DVD player.
• If you do not set a password, you cannot change the
Parental Control settings.
• Depending on the DVD, you may be asked to change
the Parental Control level while playing the disc. In
this case, enter your password, then change the level.
When you stop playing the DVD, the Parental Control
level returns to the original setting.
US
DVD videos
After changing DVD settings
To save your changes, be sure to eject the DVD
before pressing the 1/RESET button or
turning off the unit with the MAIN POWER
switch. Please note that changes will not be
saved if you reset or turn off the console
without first ejecting the DVD.
Page 26

26
Settings and adjustments for the DVD player (continued)
Setting sound options
(Audio Setup)
“Audio Setup” allows you to adjust your audio
settings according to the playback conditions.
The default settings are underlined.
Select “Audio Setup” in the Setup display.
x Audio Digital Out
Switches the methods of outputting audio
signals when you, connect 1. a digital
component such as a receiver (amplifier) with a
digital connector, 2. an audio component with a
built-in decoder (Dolby Digital or DTS), 3. a
DAT or MD deck, via the DIGITAL OUT
(OPTICAL) connector using an optical digital
cable. For connection details, see page 11.
You cannot adjust “Dolby Digital” and “DTS”
if you set “DIGITAL OUT (OPTICAL)” to
“Off.”
x DIGITAL OUT (OPTICAL)
Selects whether to output signal via the
DIGITAL OUT (OPTICAL) connector.
• On : select this when you connect with an
optical digital cable (sold separately).
Normally select this option.
When you select “On,” you can set “Dolby
Digital” and “DTS.”
• Off : select this when you do not want sound
signal to be output via the DIGITAL OUT
(OPTICAL) connector.
Note
When you select “Off,” you cannot set “Dolby Digital”
and “DTS.”
x Dolby Digital
Selects the Dolby Digital signals to be output
via the DIGITAL OUT (OPTICAL) connector.
• On : when the console is connected to an
audio component with a built-in Dolby
Digital decoder.
If the console is connected to an audio
component without a built-in Dolby Digital
decoder, do not turn this option on. If you
select this option by mistake, when you play
a Dolby Digital audio track, a loud noise (or
no sound) will come out from the speakers,
possibly hurting your ears or damaging the
speakers.
• Off : when the console is connected to an
audio component without a built-in Dolby
Digital decoder.
x DTS
Selects the DTS signals to be output via the
DIGITAL OUT (OPTICAL) connector.
• On : when the console is connected to an
audio component with a built-in DTS
decoder.
If the console is connected to an audio
component without a built-in DTS decoder,
do not turn this option on. If you select this
option by mistake, when you play a DTS
audio track, a loud noise (or no sound) will
come out from the speakers, possibly hurting
your ears or damaging the speakers.
• Off : when the console is connected to an
audio component without a built-in DTS
decoder.
x Audio Track Auto Select Mode
Gives the audio track which contains the
highest number of channels priority when you
play a DVD on which multiple audio formats
(PCM, DTS or Dolby Digital format) are
recorded.
• On : Priority given.
• Off : No priority given.
Notes
• When you set this item to “On,” the language may
change depending on the “Audio” settings in
“Language Setup.”
The “Audio Track Auto Select Mode“ setting has
higher priority than the “Audio” settings in “Language
Setup” (page 24).
• If you set “DIGITAL OUT (OPTICAL)” to “On” and
“DTS” to “Off” in “Audio Setup,” the DTS audio track
is not played even if you set this item to “On” and the
highest-numbered audio channel is recorded in DTS
format.
• If PCM, DTS and Dolby Digital audio tracks have the
same number of channels, the console selects PCM,
Dolby Digital and DTS audio tracks in this order.
• Depending on the DVD, the audio channel with
priority may be predetermined. In this case, you cannot
give priority to the DTS or Dolby Digital format by
selecting “On.”
x DVD Video Volume
If the audio output level of the DVD is low, you
can turn up the volume of the DVD. (Note:
DIGITAL OUT (OPTICAL) must be set to “Off”
to access this function.)
• +2 : You can turn up the volume.
• +1 : You can turn up the volume.
• Standard : Original audio volume. Normally
select this position.
Note
Depending on the DVD, the sound may be distorted if you
select “+1” or “+2.”
After changing DVD settings
To save your changes, be sure to eject the DVD
before pressing the 1/RESET button or
turning off the unit with the MAIN POWER
switch. Please note that changes will not be
saved if you reset or turn off the console
without first ejecting the DVD.
This product incorporates copyright protection
technology that is protected by method claims
of certain U.S. patents and other intellectual
property rights owned by Macrovision
Corporation and other rights owners. Use of
this copyright protection technology must be
authorized by Macrovision Corporation, and is
intended for home and other limited viewing
uses only unless otherwise authorized by
Macrovision Corporation. Reverse engineering
or disassembly is prohibited.
Page 27

Troubleshooting
27
Please go through this
section if you experience
difficulty in operating the
PlayStation®2 console.
• If you experience any of the following
difficulties, use this troubleshooting
guide to help remedy the problem before
requesting repair. Should any problem
persist, contact our technical support line
at 1-800-345-7669 for assistance.
• Make sure the AC power cord is connected to the console and the wall outlet,
and the TV (or VCR) or the supplied
accessories are connected to the console
correctly.
Power
The power is not turned on.
, Make sure the AC power cord is connected
securely.
, The console is not turned on. Turn on the
console using the MAIN POWER switch on
the back of the console.
Picture
There is no picture.
, Make sure the console is connected to the
TV (or VCR) with the AV cable (integrated
audio/video).
,
Make sure the console and the TV (or VCR)
are turned on.
, Make sure you have selected the video
input on the TV (or VCR).
, Make sure the AV cable (integrated audio/
video) is connected securely.
, Make sure the inserted disc can be played
with this console. (see page 4)
, Make sure the disc is placed with the label
side facing up (data side down).
, The disc is not inserted correctly.
, The console is in pause mode.
, Try another set of AV cables .
Picture noise appears.
, The console is placed on an unstable
surface. Place the console on a stable and
flat surface. Do not shake or vibrate the
console.
, Clean the disc.
, Moisture has condensed inside the console.
(see page 3)
, If the video signal from the console has to
go through the VCR to get to the TV, the
copy protection applied to some DVD
videos could affect picture quality. When
playing a DVD video, connect the console
to the TV directly. (see page 10)
The aspect ratio cannot be changed
according to the TV when playing wide
picture DVD videos.
, Depending on the disc, the aspect ratio is
fixed.
, Make sure the console is connected to the
TV directly. (The selector or receiver
(amplifier) may not be connected between
the console and the TV.)
, Depending on the TV, the aspect ratio is
fixed.
Sound
There is no sound.
, Make sure the console is connected to the
TV (or VCR) with the AV cable (integrated
audio/video).
, Make sure the console and the TV (or VCR)
are turned on.
, Make sure you have selected the video
input on the TV (or VCR).
, Make sure the TV volume is set properly or
“mute” is not selected on the TV.
, Make sure the AV cable (integrated audio/
video) is connected securely.
, Make sure the inserted disc can be played
with this console. (see page 4)
, Make sure the disc is placed with the label
side facing up (data side down).
,
Make sure you have connected the console
to the audio input connectors on the receiver
(amplifier) correctly. Refer also to the
instructions supplied with your amplifier.
, Try another set of AV cables.
, Check the speaker connections and
settings. Refer also to the instructions
supplied with your amplifier.
, Make sure you select the appropriate input
on the receiver (amplifier) so that you can
listen to sound from the console. Refer also
to the instructions supplied with your
amplifier.
, The console is in pause mode.
, The console is in search/slow-motion mode
(when playing a DVD video).
, The system setting is not correct for when
the console is connected to audio
equipment with DIGITAL OUT (OPTICAL)
connectors. (see page 11)
Poor sound quality.
,
The console is placed on an unstable surface.
Place the console on a stable and flat surface.
Do not shake or vibrate the console.
, Clean the disc.
, Moisture has condensed on the disc.
(see page 3)
, You are playing an audio CD or a DVD
with DTS audio tracks.
You can play an audio CD or DVD with
DTS audio tracks only when the console is
connected to audio equipment with a DTS
decoder.
The surround effect is difficult to hear when
you are playing a DVD video with a Dolby
Digital audio track.
,
Check the speaker connections and settings.
Refer to the operating manual of your
receiver (amplifier).
,
Depending on the DVD, the output signal
may not comprise the entire 5.1 channel
range. It may be monaural or stereo even if
the audio track is recorded in Dolby Digital.
The sound comes from the center speaker
only.
, Depending on the disc, the sound may
come from the center speaker only.
Operation
The controller does not function.
, Make sure the controller is connected to the
console.
, Make sure the analog controller
(DUALSHOCK®2) or the analog controller
(DUALSHOCK®) is set to the appropriate
mode for the software. (see page 17)
, Try another set of controllers.
The software title does not start.
, Make sure the inserted disc can be played
with this console. (see page 4)
, Make sure the disc is placed with the label
side facing up (data side down).
, Make sure the disc is inserted correctly.
, Clean the disc.
, Moisture has condensed on the disc. (see
page 3)
, Try another copy of the disc.
You cannot save data on the memory card
(8MB) (for PlayStation
, Make sure the memory card (8MB) (for
PlayStation®2) or memory card is inserted
securely.
, Make sure you are playing the game
correctly.
Refer to the appropriate software manual.
, Make sure there are empty blocks on the
memory card (8MB) (for PlayStation®2) or
memory card.
, Try another memory card (8MB) (for
PlayStation®2) or memory card.
The console does not function properly.
, Static electricity, etc. may affect the
console’s operation.
Turn off the MAIN POWER switch and
then turn it back on.
1 indicator flashes in red and the console
does not work.
, A flashing red light indicates a console
“fault” condition and the unit will not
operate. Remove any obstructions from the
vents to allow the console to cool down.
Resume play after the console returns to
standby mode.
2) or memory card.
®
US
DVD videos / Additional information
Page 28

28
Troubleshooting (continued)
The disc tray does not open.
, Make sure the AC power cord is connected
securely.
, Make sure the console is turned on.
Turn on the console using the
MAIN POWER switch on the back of the
console.
DVD video operation
The console does not play from the beginning when playing a disc.
, Resume Play has been selected.
Press the Stop button before you start
playing (see page 19).
, Depending on the disc, a Title menu or a
DVD menu automatically appears.
The disc does not play even if the DVD title
is selected.
, A Parental Control level has been set on the
disc (see page 25).
Playback stops automatically.
, The disc may contain an auto pause signal.
While playing such a disc, the console stops
playback at the signal.
You cannot perform some functions such as
Stop, Search or Slow-motion Play.
, Depending on the disc, you may not be
able to do some of the operations above.
The language for the audio track cannot be
changed.
, Multilingual tracks are not recorded on the
DVD.
, Changing the language for the track is
prohibited on the DVD.
The subtitle language cannot be changed.
, Multilingual subtitles are not recorded on
the DVD.
, Changing the language for the subtitles is
prohibited on the DVD.
The subtitles cannot be turned off.
, Depending on the DVD, you may not be
able to turn the subtitles off.
The angles cannot be changed when you
play a DVD.
, Multi-angles are not recorded on the DVD.
, Changing the angles is prohibited on the
DVD.
Networking
A connection to the network cannot be
established (Ethernet or modem).
, The power plug for the PlayStation®2
console is not fully inserted into the
electrical outlet.
Check that the power plug is fully inserted
into the electrical outlet.
, The network adaptor is not properly
installed in the console.
Check that the network adaptor is properly
installed in the console.
, A PlayStation®2 format software disc
compatible with the network adaptor is not
inserted in the console.
Insert a PlayStation®2 format software disc
compatible with the network adaptor in the
console.
, You are using PlayStation®2 format
software that is not compatible with the
network adaptor.
Insert a PlayStation®2 format software disc
compatible with the network adaptor in the
console.
, The network settings are not correct.
Refer to the instructions for the software in
use and adjust the settings as necessary.
, The network is busy.
Wait a few minutes, and try to access the
network again.
A connection to the network cannot be
established (Ethernet only).
, The network cable is not properly
connected.
Check that the network cable is properly
connected.
, The type of network cable is not correct.
Use the correct type of cable. For details
refer to the instructions for the network
device (router, DSL modem, etc.) you are
connecting to.
, The port or settings for the network device
(router, DSL modem, etc.) are not correct.
Refer to the instructions for the network
device and make the appropriate
connections or settings.
A connection to the network cannot be
established (modem only).
, The telephone cord is not properly
connected.
Check that the telephone cord is properly
connected.
, The telephone line is already in use.
Check that the telephone line is not being
used.
, The line you are using is not a home-use
phone line.
PBX phone lines, home network and
business telephone lines cannot be used to
connect to a network.
, You are using software that can only be
used with certain providers.
Depending on the telephone company you
are using, you may not be able to establish
a connection when using software that
requires connection to certain Internet
service providers. For details, refer to the
instructions for the software in use, or
contact your Internet service provider.
The data transmission rate is slow (modem
only).
, Interference is being generated at your
location.
Do not run your telephone cord near
electronic devices such as microwave
ovens, PC monitors, TVs, radios or
speakers that generate telephone line noise.
You should also avoid using general-use
extension phone cords (audio-only type), or
cords with other phones or fax machines
connected.
, Interference is being generated at a point
between your location (home) and the
telephone company.
Use the same telephone line to call a friend
and listen for interference from radio
transmissions or other noise. Also, check
for an echo effect when you speak. If it is
clear that there is a problem with the public
telephone lines, contact your local
telephone company for assistance.
The connection suddenly fails (modem only).
, You have call waiting.
When you receive a call on a line with call
waiting, the modem may be disconnected.
Temporarily disable the call waiting
feature. Contact your local phone company
for assistance.
A connection cannot be established and,
after trying numerous times, the modem
stopped redialing (modem only).
, There are limitations on how many times a
device can dial a number. Once the
maximum number of tries has been made,
the device stops trying to redial.
Turn off the console, wait a few minutes
and then try again.
Page 29

Specifications
Glossary
29
General
Power requirements
120 V AC, 60 Hz
Power consumption
79 W
Console dimensions (approx.)
301 × 78 × 182 mm (w/h/d)
1
/8 × 7 1/4 in)
(12 × 3
Console weight (approx.)
2.2 kg (4 lb 14 oz)
Network adaptor dimensions (approx.)
133 x 72 x 34 mm (w/h/d)
1
/4 x 2 7/8 x 1 3/8 in)
(5
Network adaptor weight (approx.)
200 g (7 oz)
Operating temperature
5˚C - 35˚C (41˚F - 95˚F)
Laser diode properties
• Material: GaAlAs
• Wavelength: l=650/780 nm
Inputs/outputs on the console front
Controller port (2)
MEMORY CARD slot (2)
USB connector (2)
S400 i.LINK connector (1)
Inputs/outputs on the console rear
AV MULTI OUT connector (1)
DIGITAL OUT (OPTICAL) connector (1)
EXPANSION BAY (1)
Inputs/outputs on the network adaptor
Network connector (1)
Line connector (1)
Communications options
Ethernet
Transmission standards:
100Base-TX/10Base-T compatible
Interface: RJ-45
Modem
Transmission standards:
ITU-T V.90, V.34, V.32bis, V.32, V.23,
V.22bis, V.21
Bell 103, 212A
K56 flex compatible
Maximum transmission rate (bps):
V.90...56K* (receive only)
K56 flex...56K* (receive only)
V.34 and others...33.6K* (send/receive)
Interface: RJ-11C
* Transmission rate may vary depending on the
condition of the line connected.
Supplied accessories
See page 8.
Optional accessories
SCPH-10010 U/97026 Analog Controller
SCPH-10020 U/97027 Memory Card (8MB)
SCPH-10030 U/97028 AV Cable
SCPH-10040 U/97029 Vertical Stand
SCPH-10060 U/97030 S VIDEO Cable
SCPH-10071/94043 RFU Adaptor
SCPH-10090 U/97031 Multitap (for PlayStation
SCPH-10100 U/97032 Component AV Cable
SCPH-10110 U/97033 Horizontal Stand
SCPH-10130 U/97034 AV Adaptor
SCPH-10171 DVD Remote Control
SCPH-1020 U Memory Card
SCPH-1070 U Multitap
SCPH-1100 U/94050 S VIDEO Cable
SCPH-1121/94053 RFU Adaptor
SCPH-1140 U/94055 AV Cable
SCPH-110 U Analog Controller
For additional parts, please call 1-800-345-7669.
Design and specifications are subject to change without
notice.
(DUALSHOCK
(for PlayStation
(integrated audio/video)
(for PlayStation
(for PlayStation
(for PlayStation
(with S VIDEO OUT connector)
(for PlayStation
with IR Receiver Unit
(integrated audio/video)
(DUALSHOCK
®2)
®
®
®
®
®
®)
2)
2)
2)
2)
2)
Chapter (page 22)
Sections of a movie or a music piece on a DVD
that are smaller than titles. A title is composed
of several chapters. Each chapter is assigned a
chapter number enabling you to locate the
chapter you want.
Dolby Digital (page 11, 26)
Digital audio compression technology
2)
®
developed by Dolby Laboratories. This
Audio data is recorded in Dolby Digital as well
as in PCM, allowing you to enjoy a more real
audio presence.
Furthermore, various advanced functions such
as the multi-angle, multilingual, and Parental
Control functions are provided with the DVD.
Multi-angle function (page 21)
Various angles for the scene (viewpoints of the
video camera) are recorded on some DVDs.
US
Additional information
technology conforms to 5.1-channel surround
sound. The rear channel is stereo and there is a
discrete subwoofer channel in this format.
Dolby Digital provides the same 5.1 discrete
channels of high quality digital audio found in
Dolby Digital cinema audio systems. Good
Multilingual function (page 21, 24)
Several languages for the audio track or
subtitles in a picture are recorded on some
DVDs.
channel separation is realized because all of the
channel data is recorded discretely and
processed in digital.
Parental Control (page 25)
A function of the DVD used to restrict playback
of the disc according to the age of the user and
DTS (page 11, 26)
Digital audio compression technology that
Digital Theater Systems, Inc. developed. This
technology conforms to 5.1-channel surround
sound. The rear channel is stereo and there is a
the restriction level in each country. The
restriction varies from disc to disc; when it is
activated, playback can be completely
prohibited, violent scenes are skipped or
replaced with other scenes, and so on.
discrete subwoofer channel in this format. DTS
provides the same 5.1 discrete channels of high
quality digital audio. Good channel separation
is realized because all of the channel data is
recorded discretely and processed in digital.
Title (page 22)
The longest section of a movie or a music piece
on a DVD; a movie, etc., for a picture piece on
video software; or an album, etc., for a music
piece on audio software. Each title is assigned
DVD (page 19)
A disc that contains up to 8 hours of moving
a title number enabling you to locate the title
you want.
pictures even though its diameter is the same
as a CD.
The data capacity of a single-layer and singlesided DVD is 4.7 GB which is 7 times that of a
CD. The data capacity of a dual-layer and
single-sided DVD is 8.5 GB, a single-layer and
double-sided DVD is 9.4 GB, and a dual-layer
and double-sided DVD is 17 GB.
The picture data uses the MPEG 2 format, one
of the worldwide standards of digital
compression technology. The picture data is
compressed to about 1/40 of its original size.
The DVD also uses a variable rate coding
technology that changes the data to be
allocated according to the status of the picture.
Page 30

30
LIMITED WARRANTY
Sony Computer Entertainment America
(SCEA) warrants to the original purchaser that
each of the constituent products of this
PlayStation®2 online pack, namely, console,
network adaptor, software and accessories,
shall be free from defects in material and
workmanship for a period of ninety (90) days
from the date of purchase (the "Warranty
Period"). If one or more of the above-identified
products is determined to be defective during
the Warranty Period, SCEA's liability shall be
limited to the repair or replacement of the
affected console, network adaptor, software or
accessories at SCEA's option. You must call
1-800-345-7669 to receive instructions to obtain
repair/replacement services.
THIS WARRANTY SHALL NOT APPLY IF
THIS PRODUCT: (a) IS USED WITH
PRODUCTS NOT SOLD OR LICENSED BY
SCEA (INCLUDING, BUT NOT LIMITED TO,
NON-LICENSED GAME ENHANCEMENT
DEVICES, CONTROLLERS, ADAPTORS AND
POWER SUPPLY DEVICES) OR OTHERWISE
NOT COMPATIBLE WITH THIS PRODUCT;
(b) IS USED FOR COMMERCIAL PURPOSES
(INCLUDING RENTAL) OR IS MODIFIED OR
TAMPERED WITH; (c) IS DAMAGED BY
ACTS OF GOD, MISUSE, ABUSE,
NEGLIGENCE, ACCIDENT, WEAR AND
TEAR, UNREASONABLE USE, OR BY OTHER
CAUSES UNRELATED TO DEFECTIVE
MATERIALS OR WORKMANSHIP; (d) HAS
HAD THE SERIAL NUMBER ALTERED,
DEFACED OR REMOVED; OR (e) HAS HAD
THE WARRANTY SEAL ON THE CONSOLE
REMOVED. THIS WARRANTY DOES NOT
COVER PRODUCTS SOLD AS IS OR WITH
ALL FAULTS, OR CONSUMABLES (SUCH AS
BATTERIES).
REPAIR OR REPLACEMENT AS PROVIDED
UNDER THIS WARRANTY IS THE
EXCLUSIVE REMEDY OF THE CONSUMER.
ANY APPLICABLE IMPLIED WARRANTIES,
INCLUDING WARRANTIES OF
MERCHANTABILITY AND FITNESS FOR A
PARTICULAR PURPOSE, ARE LIMITED IN
DURATION TO THE DURATION OF THIS
WARRANTY. IN NO EVENT SHALL SCEA
BE LIABLE FOR CONSEQUENTIAL OR
INCIDENTAL DAMAGES FOR BREACH OF
ANY EXPRESS OR IMPLIED WARRANTY ON
THIS PRODUCT. SOME STATES OR
PROVINCES DO NOT ALLOW LIMITATION
ON HOW LONG AN IMPLIED WARRANTY
LASTS AND SOME STATES DO NOT ALLOW
THE EXCLUSION OR LIMITATIONS OF
CONSEQUENTIAL OR INCIDENTAL
DAMAGES, SO THE ABOVE LIMITATIONS
OR EXCLUSION MAY NOT APPLY TO YOU.
This warranty gives you specific legal rights,
and you may also have other rights which vary
from state to state or province to province.
This warranty is valid only in the United States
and Canada.
PROOF OF PURCHASE IN THE FORM OF A
BILL OF SALE OR RECEIPTED INVOICE
WHICH IS EVIDENCE THAT THE UNIT IS
WITHIN THE WARRANTY PERIOD MUST BE
PRESENTED TO OBTAIN WARRANTY
SERVICE.
Page 31

31
US
Page 32

32
AVERTISSEMENT
Afin d’éviter tout risque d’incendie et
d’électrocution, ne pas exposer l’unité à la pluie
ou à l’humidité.
Pour éviter tout risque d’électrocution, ne pas
démonter l’unité. Confiez l’entretien uniquement à
un personnel qualifié.
Attention
L’utilisation d’instruments optiques avec ce
produit augmente les risques de blessures aux
yeux. Comme le faisceau laser utilisé par cette
console PlayStation
yeux, abstenez-vous de démonter le boîtier.
Confiez l’entretien de cet appareil exclusivement à
un technicien qualifié.
Cette étiquette se trouve sur le boîtier de protection laser à
l’intérieur de la console PlayStation
L’inscription ci-dessus figure sur la face droite de la
console PlayStation®2 (à l’installation verticale); les
symboles ont la signification suivante:
Ce symbole signale à l’utilisateur la présence
de tensions dangereuses et non isolées à
l’intérieur du boîtier de la console, et qui
peuvent être suffisamment intenses pour
présenter un risque de chocs électriques aux
personnes.
Ce symbole signale à l’utilisateur que
d’importantes instructions d’utilisation et
d’entretien sont fournies dans la
documentation de la console.
Attention
POUR ÉVITER LES CHOCS ÉLECTRIQUES,
INTRODUIRE LA LAME LA PLUS LARGE DE LA
FICHE DANS LA BORNE
CORRESPONDANTE DE LA PRISE ET POUSSER
JUSQU’AU FOND.
Pour réduire le risque d’incendie, utilisez
uniquement des conducteurs de
télécommunications 26 AWG ou de section
supérieure.
Si vous avez des questions au sujet des numéros AWG, contactez
notre ligne d’assistance technique au 1-800-345-7669.
®2 est dangereux pour les
2.
®
Information
Console PlayStation®2 et adaptateur réseau
Cette unité a été testée et il a été déterminé qu’elle se conforme aux
normes stipulées par l’article 15 des règlements de la FCC pour un
appareil numérique de catégorie B. Ces normes sont établies afin
d’offrir une protection raisonnable contre toute possibilité de
brouillage préjudiciable dans une installation résidentielle. Cette
unité produit, utilise et peut émettre une énergie radiofréquence, et si
elle n’est pas installée et utilisée conformément aux instructions,
pourrait causer un brouillage préjudiciable à la radiocommunication.
Il est toutefois impossible de garantir qu’il n’y aura pas de brouillage
préjudiciable dans une installation donnée. Si cette unité cause un
brouillage préjudiciable à la réception radio ou télévisuelle, ce qui
peut être déterminé en activant ou désactivant l’appareil, l’utilisateur
est encouragé à tenter de corriger le brouillage en prenant l’une ou
plusieurs des mesures proposées suivantes :
- Réorienter ou déplacer l’antenne de réception.
- Éloigner l’unité du récepteur.
- Connecter l’appareil à une prise sur un autre circuit que celui
auquel le récepteur est connecté.
- Demander de l’aide au détaillant ou à un technicien radio/
télévision spécialisé.
Si vous avez des questions au sujet de ce produit,
communiquez avec la ligne d’assistance technique au
1-800-345-7669 ou écrivez à :
Sony Computer Entertainment America
Consumer Services/Technical Support
PO Box 5888, San Mateo, CA 94402-0888 U.S.A.
Nom commercial : SONY
N° de modèle : SCPH-39001/N
Partie responsable : Sony Electronics Inc.
Adresse : 680 Kinderkamack Road
N° de téléphone : 201-930-6972
Cet appareil est conforme aux stipulations de l’article 15 des
règlements de la FCC.
Son opération est sous réserve des deux conditions
suivantes : (1) cet appareil ne peut pas causer de brouillage
préjudiciable et (2) cet appareil doit accepter le brouillage
préjudiciable reçu, y compris un brouillage qui pourrait
causer son fonctionnement irrégulier.
Tout changement ou modification apporté à l’appareil non approuvé
expressément dans ce manuel pourrait annuler le droit d’opérer cet
équipement.
Déclaration de Conformité
SCPH-39010/N
Oradell, NJ 07649 U.S.A.
Adaptateur réseau
Notice réservée aux utilisateurs résidant aux
États-Unis
Cet adaptateur réseau est conforme à la Section 68 des règles de la
FCC et aux exigences adoptées par l’ACTA. Une étiquette apposée
sur la surface inférieure de cet adaptateur réseau contient, parmi
d’autres informations, l’identification de produit au format
US:AAAEQ##TXXXX. Vous devez fournir ce numéro à votre
compagnie de téléphone à sa demande.
Le REN (le numéro d’équivalence de sonnerie), est utilisé pour
déterminer le nombre d’appareils qui peuvent être branchés à une
ligne téléphonique. Des REN en nombre excessif sur la ligne
téléphonique peuvent faire que les appareils ne sonnent pas en
réponse à l’entrée d’un appel. Dans la plupart des régions, mais non
pas toutes, la somme des REN ne devrait pas dépasser cinq (5,0).
Pour s’assurer du nombre d’appareils pouvant être branchés à la
ligne, tel que déterminé par le total des REN, contactez la compagnie
de téléphone. Pour les produits approuvés après le 23 juillet 2001, le
REN pour ce produit fait partie de l’identification de produit qui est
au format US:AAAEQ##TXXXX. Les chiffres représentés par “##”
sont les REN sans virgule décimale (p.ex. 03 correspond à un REN de
0,3). Pour les produits antérieurs, le REN est affiché séparément sur
l’étiquette.
La prise, utilisée pour connecter cet équipement aux câbles et au
réseau téléphonique, doit être conforme à la Section 68 des règles de
la FCC et aux exigences adoptées par l’ACTA.
Ce produit utilise la prise de téléphone “RJ-11C”.
Si cet équipement endommage le réseau téléphonique, la société
téléphonique vous avisera à l’avance, si cela s’avère pratique, qu’il y
aura peut-être une interruption temporaire de service requis. Si un
préavis n’est pas pratique, la société téléphonique vous avisera dès
que possible.
Vous serez aussi avisé de votre droit de déposer une plainte auprès
de la FCC si vous croyez que vous pouvez invoquer la garantie.
La société téléphonique peut apporter des changements à ses
installations, à son équipement, à ses opérations ou à ses procédures
qui pourraient affecter le fonctionnement de l’équipement. Si cela se
produit la société téléphonique vous fera parvenir un préavis pour
effectuer les modifications nécessaires afin de maintenir le service
sans interruption.
Si vous avez des questions au sujet de ce produit, contactez notre
ligne d’assistance technique au 1-800-345-7669 ou écrivez à :
Sony Computer Entertainment America
Consumer Services/Technical Support
PO Box 5888, San Mateo, CA 94402-0888 U.S.A.
Cet équipement ne peut pas être utilisè pour le service à appareil
d’encaissement de la société de téléphone. La connexion à un service
de ligne partagée est soumise aux tarifs des états.
Les réparations de ce produit doivent être effectuées seulement par
un Centre de service Sony autorisé. Pour connaître le centre le plus
près de chez vous, appelez le 1-800-345-7669.
Telephone Consumer Protection Act de 1991
Selon la loi sur la protection des consommateurs en matière
téléphonique (Telephone Consumer Protection Act) de 1991 des
États-Unis, il est illégal pour toute personne d’utiliser un ordinateur
ou tout autre appareil électronique pour expédier un message par
télécopieur téléphonique à moins qu’un tel message contienne
clairement, dans une marge dans la partie supérieure ou inférieure
de chaque page transmise ou sur la première page de la transmission,
la date et l’heure d’expédition ainsi qu’une identification de
l’entreprise, de toute autre entité ou individu expédiant le message
ainsi que le numéro de téléphone de l’appareil expéditeur ou de
toute autre entreprise, entité ou individu responsable de l’envoi.
Pour programmer cette information dans votre télécopieur, consultez
la documentation sur le logiciel de votre télécopieur.
Notice réservée aux utilisateurs résidant au
Canada
AVIS : L’étiquette d’Industrie Canada identifie le matériel
homologué. Cette étiquette certifie que le matériel est conforme aux
normes de protection, d’exploitation et de sécurité des réseaux de
télécommunications, comme le prescrivent les documents concernant
les exigences techniques relatives au matériel terminal. Le Ministère
n’assure toutefois pas que le matériel fonctionnera à la satisfaction de
l’utilisateur. Avant d’installer ce matériel, l’utilisateur doit s’assurer
qu’il est permis de le raccorder aux installations de l’entreprise locale
de télécommunication. Le matériel doit également être installé en
suivant une méthode acceptée de raccordement.
L’abonné ne doit pas oublier qu’il est possible que la conformité aux
conditions énoncées ci-dessus n’empêche pas la dégradation du
service dans certaines situations.
Les réparations au matériel homologué doivent être coordonnées par
un représentant désigné par le fournisseur.
L’entreprise de télécommunications peut demander à l’utilisateur de
débrancher un appareil à la suite de réparations ou de modifications
effectuées par l’utilisateur ou à cause de mauvais fonctionnement.
Pour sa propre protection, l’utilisateur doit s’assurer que tous les fils
de mise à la terre de la source d’énergie électrique, des lignes
téléphoniques et des canalisations d’eau métalliques, s’il y en a, sont
raccordés ensemble. Cette précaution est particulièrement importante
dans les régions rurales.
Attention : l’utilisateur ne doit pas tenter de faire ces raccordements
lui-même; il doit avoir recours à un service d’inspection des
installations électriques ou à un électricien, selon le cas.
AVIS : l’indice d’équivalence de la sonnerie (IES) assigné à chaque
dispositif terminal indique le nombre maximal de terminaux qui
peuvent étre raccordés à une interface.
La terminaison d’une interface téléphonique peut consister en une
combination de quelques dispositifs, à la seule condition que la
somme d’indices d’équivalence de la sonnerie de tous les dipositifs
n’excède pas cinq (5,0).
Le numéro d’équivalence de sonnerie (Ringer Equivalence Number)
de cet équipement est 0,1.
L’expression « IC: » devant le numéro d’homologation/
enregistrement signifie seulement que les spécifications techniques
d’Industrie Canada ont été respectées.
Page 33

Précautions
33
À lire avant d’utiliser votre console PlayStation®2
Un nombre limité de personnes peuvent éprouver des symptômes
d’épilepsie lorsqu’elles sont exposées à certaines lumières ou motifs
clignotants. L’exposition à certains motifs clignotants ou certains
images d’arrière-plan sur des écrans de télévision ou en jouant à des
jeux vidéo, y compris les jeux sur la console PlayStation
provoquer des crises d’épilepsie chez ces personnes. Certaines
conditions peuvent entraîner des symptômes d’épilepsie non
détectés auparavant, même chez des personnes qui n’ont aucun
antécédent médical ou n’ont jamais été sujettes à des crises
d’épilepsie.
Si vous-même ou un membre de votre famille souffrez d’épilepsie,
consultez votre médecin avant de jouer. Si vous ressentez, en jouant
un jeu vidéo, un des symptômes suivants : vertiges, trouble de la
vision, contractions des yeux ou des muscles, perte de conscience,
trouble de l’orientation, mouvement involontaire ou convulsions, il
faut cesser IMMÉDIATEMENT de jouer et consulter un médecin
avant de rejouer.
2, peuvent
®
Références utilisateur
Les numéros de modèle et de série de la console PlayStation®2 sont
situés sur la face gauche de la console (si installée horizontalement).
Le numéro de série de l'adaptateur réseau figure à l'arrière de
l'adaptateur réseau. Inscrivez les numéros de série dans les espaces
prévus à cet effet ci-dessous. Mentionnez ces numéros de référence
chaque fois que vous sollicitez une assistance technique au
1-800-345-7669.
No de modèle
SCPH-39001/N
SCPH-39010/N
No de série
Console PlayStation
Adaptateur réseau _____________________
®2 _____________________
Notice importante
Avant d’installer l'adaptateur réseau sur les autres consoles
PlayStation
®2, veuillez consulter la liste des numéros de série
ci-dessous. Certaines consoles PlayStation
pas compatibles avec cet adaptateur réseau. Si le numéro de
série de la console PlayStation
retrouve dans cette liste, contactez notre ligne d’assistance
technique au 1-800-345-7669 pour plus d’information.
®
Numéros de série
3369556 – 3369651
3372352 – 3372651
3379084 – 3380151
3380260 – 3381867
3381976 – 3382083
3383152 – 3383691
3384652 – 3385191
3386152 – 3386907
3388192 – 3389271
3391084 – 3392055
3393868 – 3394407
3394516 – 3394731
3397192 – 3398055
3399868 – 3400947
2 ne sont peut-être
®
2 (à l’arrière de l’appareil) se
3403192 – 3403839
3404692 – 3405339
3406192 – 3406515
3406624 – 3406839
3414661 – 3416388
3417661 – 3418740
3419173 – 3419280
3419821 – 3419928
3420661 – 3421308
3421417 – 3421524
3421633 – 3422064
3423661 – 3424848
3425161 – 3425268
3434377 – 3434592
Sécurité
Ce produit a été conçu dans le souci d’offrir les meilleures garanties
de sécurité possibles. Cependant, tout dispositif électrique utilisé de
façon incorrecte risque de provoquer incendie, électrocution ou
blessures. Pour un fonctionnement en toute sécurité, veillez à
respecter les points suivants.
• Observez tous les avertissements, précautions et instructions.
• Arrêtez immédiatement d’utiliser l’appareil s’il fonctionne de
manière anormale ou s’il produit des sons ou des odeurs
anormales.
• Ne connectez jamais d’autres types de câbles que ceux spécifiés
dans ce manuel au connecteur LINE (ligne) et au connecteur
NETWORK (réseau). Assurez-vous de connecter seulement de
câbles de types appropriés pour chaque connecteur.
• Si l’appareil ne fonctionne pas correctement contactez notre ligne
d’assistance technique au 1-800-345-7669.
Utilisation et manipulation
• Ne jetez pas ou ne laissez pas tomber la console ou l'adaptateur
réseau, ou ne les exposez pas à de violents chocs physiques.
• Ne placez pas la console ou l'adaptateur réseau sur des surfaces
instables, inclinées ou soumises à des vibrations.
• Ne déplacez pas ou ne changez pas la position d’une console
lorsqu’elle est mise sous tension.
• N’exposez pas la console ou l'adaptateur réseau à des
températures élevées, à une humidité excessive ou au
rayonnement direct du soleil (utilisez-les dans un environnement
où la température est comprise entre
5 °C et 35 °C/41 °F et 95 °F).
• Ne placez pas la console ou l'adaptateur réseau dans des endroits
sujets à de brusques changements de températures (par ex. des
changements de 10 °C/18 °F par heure ou plus).
• Ne laissez pas la console ou l'adaptateur réseau dans une voiture
dont les fenêtres sont fermées (particulièrement en été) car cela
risque de déformer l'extérieur du produit ou de provoquer un
mauvais fonctionnement du produit.
• N’utilisez pas la console dans un endroit poussiéreux.
• Ne laissez pas de liquide ou de petits objets s’introduire dans la
console ou l'adaptateur réseau.
• Ne placez pas la console ou l'adaptateur réseau à proximité de
champs magnétiques comme ceux produits par les aimants, les
haut-parleurs ou les téléviseurs.
• Ne posez pas d’objets lourds sur la console ou l'adaptateur
réseau.
• Ne touchez pas les parties métalliques ou n’insérez pas de corps
étrangers dans les connecteurs de la console ou de l’adaptateur
réseau.
• Si vous n’avez pas l’intention d’utiliser la console pendant une
période prolongée, retirez la fiche d’alimentation de la console
PlayStation
la prise murale.
• Quand vous déconnectez la fiche d’alimentation de la prise
électrique, tirez-la en saisissant la prise. Ne tirez jamais le cordon
proprement dit.
• Ne connectez aucun périphérique interne non autorisé à
l’adaptateur réseau.
• Ne placez pas de matériaux en caoutchouc ou en vinyle sur
l’extérieur de la console ou de l'adaptateur réseau pendant une
période prolongée. Vous risqueriez d’endommager la surface
plastique.
2 de la prise électrique et le cordon téléphonique de
®
Ne touchez pas les connecteurs de la
console ou de l'adaptateur réseau
Ne touchez pas les parties métalliques et n’introduisez pas de corps
étrangers dans les connecteurs de la console ou de l'adaptateur
réseau. Ne laissez pas l'adaptateur réseau sans le fixer à la console
pendant une longue période de temps. Veuillez noter que
l'adaptateur réseau installé sur la console contribue à protéger les
connecteurs de l'adaptateur réseau ainsi que ceux situés à l'intérieur
de l'EXPANSION BAY (baie d'expansion) de la console.
N’exposez pas la console à la fumée
de cigarette ou à la poussière
En installant la console, évitez les endroits sujets à une fumée de
cigarette ou à de la poussière excessive. Les résidus de fumée de
cigarette ou l’accumulation de poussière sur les composants internes
tels que la lentille peuvent provoquer une défaillance de la console.
Nettoyage des grilles d’aération
De la poussière peut s’accumuler dans les grilles d’aération avant et
arrière de la console. Vérifiez-les de temps en temps et retirez toute
poussière accumulée avec un aspirateur à basse puissance.
Manipulation des disques
• Ne laissez pas les disques près d’une source de chaleur et ne les
soumettez pas au rayonnement direct du soleil ou à une humidité
excessive.
• Rangez les disques dans leur boîtier lorsque vous ne les utilisez
pas. Si vous empilez les disques ou les appuyez verticalement
sans les ranger dans leur boîtier, vous risquez de les voiler.
• Ne touchez pas la surface du disque que vous manipulez, mais
tenez-le par les bords.
• Ne collez aucun papier ou autocollant sur le disque.
• N’écrivez pas sur le disque à l’aide d’un marqueur, etc.
• Les traces de doigts ou la poussière accumulées sur le disque
peuvent déformer l’image ou réduire la qualité du son. Assurezvous que les disques sont toujours propres avant de les utiliser.
• Nettoyez les disques à l’aide d’un chiffon doux, en les essuyant
délicatement du centre vers l’extérieur.
• N’utilisez aucun solvant, par exemple de la benzine, aucun
produit de nettoyage commercialisé non prévu pour le nettoyage
des CD ou bombe antistatique pour disques vinyles étant donné
que ces produits peuvent endommager les disques.
Condensation d’humidité
Si vous transportez la console ou un disque directement d’un endroit
froid à un endroit chaud, de l’humidité risque de se condenser sur
l’objectif situé à l’intérieur de la console ou sur le disque. Le cas
échéant, la console risque de ne pas fonctionner correctement. Dans
ce cas, retirez le disque et ne le réintroduisez pas tant que l’humidité
ne s’est pas évaporée (plusieurs heures peuvent être nécessaires). Si
la console ne fonctionne toujours pas correctement, composez le
1-800-345-7669 pour obtenir de l’aide technique.
Nettoyage de la console et de l'adaptateur
réseau
Par sécurité, avant de nettoyer la console et l'adaptateur réseau,
veillez à 1) éteindre la console PlayStation
l’interrupteur d’alimentation principal (MAIN POWER) sur la
console arrière, 2) débrancher la fiche d’alimentation de la prise
électrique et 3) débrancher le cordon téléphonique et/ou le câble de
réseau de l’adaptateur réseau.
• N’utilisez pas de diluant pour peinture, solvants ou autres
produits chimiques pour nettoyer l’extérieur de la console ou de
l'adaptateur réseau, ils risqueraient d’endommager la surface de
l’appareil. Si vous utilisez un chiffon de nettoyage vendu en
commerce, suivez les instructions fournies avec le chiffon.
• Si l’extérieur de la console ou de l'adaptateur réseau est sale,
humidifiez un chiffon doux avec une solution détergente douce
diluée dans l’eau, essorez bien le chiffon pour supprimer l’excès
de liquide, passez-le sur la zone concernée et finissez en essuyant
avec un chiffon sec.
2 en utilisant
®
Ne démontez jamais la console ou
l'adaptateur réseau
• Utilisez votre console PlayStation®2 et l'adaptateur réseau
conformément aux instructions données dans ce mode d’emploi.
Aucune autorisation pour l’analyse ou la modification de la
console PlayStation
et l’utilisation de ses circuits internes n’est fournie dans ce
document.
• Il n’existe aucun composant utilisable par l’utilisateur à l’intérieur
de la console PlayStation
démontage en annule la garantie. En outre, il existe un risque
d’exposition à des radiations laser ainsi qu’à des chocs
électriques.
2 ou de l'adaptateur réseau, ni pour l’analyse
®
2 ou de l'adaptateur réseau. Tout
®
Remarques sur l'utilisation de l'adaptateur
réseau
Utilisation de base
• L'utilisation de l'adaptateur réseau nécessite une connexion
Internet à large bande ou par ligne commutée.
• La connexion au réseau nécessite un cordon téléphonique ou un
câble de réseau (non inclus). Pour plus de détails sur les
paramètres requis, reportez-vous ci-dessous aux informations
spécifiques à la connexion au réseau.
• Il est possible que le disque de lancement pour l’adaptateur
réseau ne fonctionne pas avec tous les fournisseurs de service
Internet.
• Lorsque vous vous connectez à un réseau, le fournisseur de
service Internet peut exiger des frais d’utilisation. Dans certains
cas, les frais d’utilisation peuvent être plus élevés que prévu.
Pour plus de détails, référez-vous aux instructions fournies avec
le logiciel utilisé ou contactez votre fournisseur de service
Internet.
• L’adaptateur réseau porte les lettres “
indiquer qu’il peut servir de pair avec le disque dur interne (pour
PlayStation
dur interne n’est pas fixée. Vérifiez-en la disponibilité.
• Les parents devraient surveiller les enfants pendant l’utilisation
de l'adaptateur réseau pour assurer un usage sécuritaire et
responsable sur Internet.
2) (vendu séparément). La date de sortie du disque
®
Connexion à une ligne téléphonique
Ne raccordez pas de cordon de quelque type que ce soit autre que
celui d’un cordon téléphonique résidentiel au connecteur LINE
(ligne) de l'adaptateur réseau.
Si vous connectez un cordon téléphonique ou un câble de réseau
d’un type autre que celui spécifié au connecteur LINE (ligne), trop de
courant électrique pourrait passer par le connecteur provoquant ainsi
des défaillances, une chaleur excessive ou même un incendie dans le
connecteur. Ne connectez jamais de cordons téléphoniques types
suivants (en particulier un cordon téléphonique pour réseau
téléphonique résidentiel ou commercial) au connecteur LINE (ligne).
• Téléphone public compatible RNIS (réseau numérique à
intégration de services)
• Téléphone PBX
• Téléphone cellulaire ou téléphone de voiture
• Lignes téléphoniques pour réseau téléphonique résidentiel ou
commercial
” pour
FR
Démarrage rapide
Page 34

34
Précautions (suite)
Disques lisibles sur la console PlayStation®2
Connexion avec un câble de réseau
Ne branchez pas des câbles de réseau ni des cordons téléphoniques
de types suivants au connecteur NETWORK (réseau). Le courant
électrique qui traverse le connecteur peut être trop élevé et entraîner
un mauvais fonctionnement, une chaleur excessive ou provoquer un
incendie dans le connecteur.
• Câbles de réseau de types autres que 100Base-TX et 10Base-T
• Lignes téléphoniques normales
• Téléphone public compatible RNIS (réseau numérique à
intégration de services)
• Téléphone PBX
• Lignes téléphoniques pour réseau téléphonique résidentiel ou
commercial
• Autres types de lignes téléphoniques
Utilisation de la ligne téléphonique
• Si vous recevez un coup de téléphone pendant l’utilisation du
modem, la connexion de ce modem peut se couper à moins que le
système d'appel en attente n'ait été mis hors service dans vos
paramètres du réseau. Pour plus de détails sur la création ou le
changement de paramètres du réseau, reportez-vous au mode
d'emploi fourni avec le disque de lancement pour l’adaptateur
réseau.
• Le modem et le téléphone ne peuvent pas être utilisés en même
temps.
Remarques sur la sécurité lors de
l’utilisation de la manette analogique
(DUALSHOCK
analogique (DUALSHOCK
• Arrêtez d’utiliser cette console immédiatement si vous
commencez à vous sentir fatigué ou si vous éprouvez une
sensation ou une douleur désagréable dans vos mains et/ou bras
pendant que vous utilisez la manette. Si les symptômes persistent,
consultez un médecin.
• N’essayez pas de faire fonctionner la manette autrement qu’avec
vos mains. Ne portez pas la manette à proximité de votre tête,
visage ou de tout os d’une autre partie de votre corps.
• La fonction de vibration de la manette analogique
(DUALSHOCK
(DUALSHOCK
N’utilisez pas la fonction de vibration de la manette analogique
(DUALSHOCK
(DUALSHOCK
articulaire au niveau des mains ou des bras.
• N’utilisez pas la fonction de vibration de la manette analogique
(DUALSHOCK®2) ou de la manette analogique
(DUALSHOCK
aves des blessures ou des affections osseuses ou musculairs à vos
doigts, vos mains, vos poignets ou vos bras. Les vibrations de la
manette risquent d’aggraver ces affections.
•Évitez toute utilisation prolongée de la manette analogique
(DUALSHOCK
(DUALSHOCK
®2) et de la manette
2) ou de la manette analogique
®
) est susceptible d’aggraver les blessures.
®
2) ou de la manette analogique
®
) si vous souffrez d’un problème osseux ou
®
) (fonction limitée à certains logiciels) si vous
®
2) et de la manette analogique
®
). Faites une pause toutes les 30 minutes environ.
®
®)
Logo du
disque
Couleur du
DVD-ROM au format
PlayStation
“ ”, logo PlayStation®2
et désignation
®2
Argent
CD-ROM au format
PlayStation®2
“ ”, logo PlayStation®2
et désignation
Bleu
CD-ROM au format
PlayStation
Logo PlayStation® et
désignation
Noir
®
disque
Contenu
Taille du disque
CD audio
Audio et vidéo
12 cm
DVD vidéo
Logo du
disque
Le logo “DVD VIDEO” est une marque commerciale.
Contenu
Taille du
12 cm
disque
Temps de
*3
lecture
*1
Lorsque vous positionnez la console verticalement et lisez un CD audio 8 cm, assurez-vous d’utiliser l’adaptateur optionnel.
*2 Lorsque vous lisez un DVD vidéo 8 cm, installez toujours la console horizontalement.
*3 Le temps réel de lecture peut varier suivant le contenu du disque.
74 minutes
Logiciels compatibles avec l'adaptateur
réseau
Les logiciels au format PlayStation®2
compatibles avec l’adaptateur réseau (pour
PlayStation®2) peuvent être utilisés avec
l'adaptateur réseau installé sur l'arrière de la
console PlayStation®2.
Conditions requises par l'adaptateur réseau
Audio
*1
8 cm
(mini CD)
20 minutes
Audio et vidéo
12 cm
4 heures
(simple face) /
8 heures
(double face)
(simple face) /
*2
8 cm
80 min
160 min
(double face)
Remarque
Ce produit est fourni avec le disque de lancement pour
l’adaptateur réseau. Pour la connexion en ligne, vous
devez utiliser le disque de lancement afin de créer les
paramètres du réseau. Pour plus de détails, reportez-vous
au mode d'emploi fourni avec le disque de lancement
pour l’adaptateur réseau. Veuillez noter qu'une memory
card (carte mémoire) (8 MB) (pour PlayStation
séparément) est requise pour sauvegarder les paramètres
du réseau.
2) (vendue
®
L’utilisation de l’adaptateur réseau et les
exigences en termes de matériel peuvent varier
selon le logiciel utilisé. Pour plus de détails,
reportez-vous au manuel du logiciel
correspondant.
Systèmes DVD vidéo et restrictions régionales
•Cette console est conforme au système de
diffusion NTSC. Il est impossible de lire des
disques enregistrés pour d’autres systèmes de
diffusion (tels que PAL ou SECAM) à l’aide
de cette console.
•Certains DVD vidéo portent des numéros de
région tels que 1. Le nombre indiqué au
milieu du symbole représente le numéro de
région des lecteurs DVD sur lesquels il est
possible de lire le disque. Il est impossible de
lire les DVD vidéo qui ne portent pas ce
symbole ou sur lesquels n’est pas indiqué le
chiffre 1 sur votre console.
•Il est également possible de lire les DVD qui
portent le symbole
ALL
sur cette console.
Si vous essayez de lire tout autre DVD, le
message “Ce disque ne peut être lu en raison
de restrictions territoriales” s’affiche sur
l’écran.
•Certains DVD dépourvus de symbole de code
région risquent tout de même d’être l’objet de
restrictions de zone et par conséquent, d’être
impossibles à lire sur cette console.
Remarque sur la lecture d’un DVD vidéo
Cette console lit les DVD vidéo tels qu’ils
sont conçus par leurs producteurs.
Toutefois, certains DVD vidéo ne supportent
pas toutes les fonctions de la console. Il
s’ensuit que certaines fonctions de la console
ne sont pas disponibles avec certains
logiciels. Pour plus de détails, consultez la
documentation livrée avec le DVD vidéo.
Disques de forme spéciale
N’utilisez pas de CD aux formes irrégulières
(tels que les disques en forme de cœur ou
d’étoile) car ils risquent de provoquer un
dysfonctionnement de la console.
Les logiciels au format PlayStation®2
compatibles avec l’adaptateur réseau (pour
PlayStation®2) sont requis pour utiliser
l'adaptateur réseau.
Page 35

Table des matières
35
Démarrage rapide
Raccordement
AVERTISSEMENT / Précautions
Disques lisibles sur la console PlayStation®2
Précautions de sécurité importantes
Vérification du contenu de l’emballage
Noms des composants
Installation de la console
Raccordement de la console PlayStation®2
à un téléviseur
Raccordement de composants audio numériques
Raccordement d’autres périphériques numériques
Connexion de l'adaptateur réseau à une ligne
téléphonique
Connexion de l'adaptateur réseau avec un câble
de réseau
32
34
36
38
38
39
40
41
42
42
43
Jeu / CD Audio
DVD vidéo
Informations
complémentaires
Comment jouer
Utilisation de la Manette Analogique
Utilisation des memory cards (cartes mémoire)
Lecture d’un CD audio
Lecture d’un DVD vidéo
Utilisation du Panneau de commandes
Paramètres et réglages du lecteur DVD
Guide de dépannage
Spécifications
Glossaire
GARANTIE LIMITÉE
46
47
48
48
49
50
53
57
59
59
60
FR
Démarrage rapide
Retrait de l'adaptateur réseau de la console
PlayStation®2
Réinstallation de l'adaptateur réseau sur la console
PlayStation®2
Utilisation du menu principal
43
44
45
Page 36

36
Précautions de sécurité importantes
Pour votre sécurité, veuillez lire entièrement ces précautions de sécurité
avant de faire fonctionner la console PlayStation®2 et l'adaptateur réseau et
conservez ce manuel en lieu sûr pour toute référence ultérieure.
Prenez connaissance et respectez tous les avertissements, toutes les
mesures de précaution et les instructions de la console ou celles
présentées dans ce mode d’emploi.
UTILISATION
Sources d’alimentation
Cette console ne devra être utilisée qu’avec le type de source
électrique indiqué sur l’étiquette correspondante. Si vous n’êtes pas
sûr de la nature du courant disponible dans votre foyer, demandez
l’avis de votre revendeur ou contactez l’organisme assurant
l’alimentation électrique de votre foyer. Pour les unités conçues
pour utiliser des piles, des batteries ou toute autre source
d’alimentation, reportez-vous au mode d’emploi correspondant.
Prise polarisée
Cette console est équipée d’une prise de cordon d’alimentation
polarisée (disposant d’une fiche plus large qu’une autre). Cette prise
ne peut être insérée que dans un sens. Ce dispositif assure votre
sécurité. Si vous ne pouvez pas insérer totalement la prise dans la
prise murale, essayez de l’insérer dans l’autre sens. Si vous n’arrivez
toujours pas à insérer la prise, contactez votre électricien et
demandez-lui de corriger l’installation. N’essayez pas de démonter
ou de supprimer le dispositif de sécurité de la prise polarisée.
Surcharge
Ne branchez pas un trop grand nombre d’appareils électriques
sur la même prise murale, sur la même rallonge ou sur la même
prise multiple. La surchage de ces dispositifs électriques au-delà
de leur capacité nominale peut entraîner un incendie ou être à
l’origine de décharges électriques.
Nettoyage
Pour nettoyer l’extérieur de la console et de l'adaptateur réseau,
consultez la section “Précautions”(page 33).
INSTALLATION
Eau et humidité
Ne pas utiliser la console près d’une source d’eau ou d’humidité :
baignoire, évier, lavabo, sous-sol, piscine, etc.
Protection du cordon d’alimentation
Acheminez le cordon d’alimentation de sorte que vous ne
puissiez pas marcher dessus et qu’il ne soit pas écraser par
d’éventuels objets qui pourraient être déposés dessus. Apportez
une attention particulière aux prises, aux fiches ainsi qu’à
l’endroit d’où le cordon sort de l’appareil.
Ventilation
Les trous et les orifices présents sur le châssis sont conçus pour
assurer une ventilation satisfaisante. Afin d’assurer le bon
fonctionnement de la console et afin d’éviter toute surchauffe
interne, ne recouvrez et n’obstruez jamais ces trous et ces orifices.
– Ne couvrez jamais les trous et les orifices de ventilation avec un
chiffon ou tout autre objet.
– N’obstruez pas les trous et les orifices en posant la console sur
un lit, sur un canapé, sur un tapis ou sur une surface similaire.
Corps étrangers et liquides
Ne pas insérer d’objets dans les ouvertures de la console ou de
l'adaptateur réseau, car ceux-ci pourraient entrer en contact avec
des parties sous tension ou créer un court-circuit, ce qui risquerait
de provoquer un incendie ou de provoquer une décharge
électrique. Ne pas renverser de liquides sur la console ou
l'adaptateur réseau.
Périphériques
N’utilisez que des périphériques recommandés par le fabricant.
Tout périphérique qui n’est pas recommandé par le fabricant peut
provoquer un dysfonctionnement et présenter un danger.
Accessoires
Ne pas placer la console ou l'adaptateur réseau sur une surface
instable : il risquerait de tomber, de causer des blessures ou d’être
sérieusement endommagé. Utiliser uniquement soit le socle
vertical ou horizontal, soit des accessoires agréés par le fabricant.
Déplacez avec extrême prudence un chariot sur lequel est installé
l’appareil. Des arrêts brutaux, une poussée excessive et des
surfaces irrégulières peuvent provoquer le basculement du
chariot et/ou la chute de l’appareil.
Page 37

37
– Ne placez jamais la console dans un espace confiné, comme sur
une étagère, ou dans un meuble encastré où la ventilation peut
être insuffisante.
– Ne placez la console ou l'adaptateur réseau ni près d’un
radiateur ni près d’un accumulateur de chaleur. Ne les exposez
pas aux rayons directs du soleil.
ANTENNES
Mise à la terre de l’antenne externe - Si vous devez
utiliser une antenne externe ou un système par câble,
suivez les précautions suivantes.
Ne placez pas l’antenne près ou sous une ligne
d’alimentation électrique ou d’éclairage ou de circuits
électriques, ou à un endroit où elle peut entrer en
contact avec de tels lignes ou circuits électriques.
LORS DE L’INSTALLATION D’UNE ANTENNE
EXTERNE, SOYEZ EXTREMEMENT VIGILANT
AFIN D’EVITER TOUT CONTACT AVEC DES
LIGNES OU DES CIRCUITS ELECTRIQUES. CES
CONTACTS RISQUENT EN EFFET D’ENTRAINER
LA MORT.
Assurez-vous que l’antenne est reliée à la terre afin
d’assurer une protection contre les surtensions et les
décharges d’électricité statique. La Section 810 du
National Electrical Code offre des informations sur
les méthodes à suivre afin d’assurer une mise à la
terre correcte du mât de la structure de soutien, sur
la mise à la terre du fil d’antenne via un boîtier de
décharge de l’antenne, sur la taille requise des
conducteurs de mise à la terre, sur l’emplacement du
boîtier de décharge de l’antenne, sur le raccordement
aux électrodes de mise à la terre ainsi que sur les
spécificités des électrodes de mise à la terre.
Attache de
mise à la terre
Equipement
du service
électrique
Attaches de
mise à la terre
Système d’électrodes
de mise à la terre
(NEC Art 250, Part H)
Fil d’antenne
Boîtier de
décharge de
l’antenne(NEC
Section 810-20)
Conducteurs de mise à la
terre (NEC Section 810-21)
NEC- National Electrical Code
– Si vous avez renversé un liquide ou inséré des objets dans la
console ou l'adaptateur réseau.
– Si la console ou l'adaptateur réseau ont été en contact avec la
pluie ou l’humidité.
– Si la console ou l'adaptateur réseau ont été sujets à un choc
violent dû à une chute, ou si l’extérieur de la console ou de
l'adaptateur réseau a été endommagé.
– Si la console ou l'adaptateur réseau ne fonctionnent pas
normalement même si vous suivez les instructions du mode
d’emploi. Ne touchez que les commandes et les contrôles
indiqués dans le mode d’emploi. Une utilisation incorrecte
pourra provoquer des dommages et nécessiter l’intervention
d’un technicien qualifié afin que la console soit réparée.
– Lorsque l’appareil ne semble plus fonctionner normalement,
contactez un technicien qualifié.
Entretien
N’essayez pas d’assurer l’entretien de la console ou de
l'adaptateur réseau en ouvrant son boîtier : vous vous exposeriez
à des tensions dangereuses, ou à d’autres accidents, etc. Pour tout
entretien, appelez le
1-800-345-7669.
FR
Démarrage rapide
Foudre
Pour assurer une protection maximale de cette console pendant
un orage, ou lorsque vous ne l’utilisez pas pendant de longues
périodes, débranchez-la toujours de la prise murale, débranchez
le cordon téléphonique et/ou le câble de réseau et débranchez le
câble de l’antenne ou du boîtier de télévision par câble. La
console sera ainsi protégée des dommages causés par la foudre.
Afin d’éviter tout risque d’électrocution, ne touchez pas la
console ou l’adaptateur réseau pendant un orage.
ENTRETIEN
Dommage nécessitant une intervention
Débranchez la console de la prise murale et contactez un
technicien qualifié dans les circonstances suivantes :
– Lorsque la prise ou le cordon d’alimentation est
endommagé ou dénudé.
CORDON D’ALIMENTATION ENDOMMAGÉ OU DÉNUDÉ
PRISE FÊLÉE
Pièces de rechange
Lorsque des pièces de rechange sont requises, assurez-vous que le
technicien a bien utilisé des pièces homologuées par le fabricant et
qu’elles offrent les mêmes caractéristiques que les pièces d’origine.
Le remplacement de pièces d’origine par des pièces non homologuées
par le fabricant pourra provoquer un incendie ou être à l’origine de
décharges électriques, et d’autres accidents.
Vérification de sécurité
À la fin de tout travail d’entretien ou de réparation, demandez au
technicien qualifié de procéder à des vérifications de routine afin
de s’assurer du bon fonctionnement de l’unité en toute sécurité
(tel que l’exige le fabricant).
Page 38

38
Vérifiez que vous êtes en possession des
accessoires suivants :
• Console
Vérification du contenu de l’emballage
• Câble AV (audio/vidéo intégrés)
Noms des composants
Console PlayStation®2
Avant
Fentes pour MEMORY CARD
(carte mémoire)
Logo de la gamme de produits
“ ”
Bouton 1 (veille)/RESET et
indicateur 1
• Manette analogique (DUALSHOCK®2)
• Logiciels au format PlayStation®2 (1 ensemble)
• Mode d’emploi
Si l’un de ces éléments est manquant, contactez notre ligne d’assistance technique au 1-800-345-7669.
• Cordon d’alimentation
Arrière
Bouton A (ouvrir)
indicateur
Compartiment à disque
Ports de manette
Touche L2, touche R2,
touche L1, touche R1
Touches directionnelles
Touche ¢ , touche a ,
touche ✕ , touche s
Touche START
(de mise en marche)
Touche de mode ANALOG
(analogique)
Touche SELECT (de sélection)
Manche analogique gauche,
manche analogique droit,
touche L3, touche R3
Adaptateur réseau
et
A
Interrupteur d’alimentation
principal (MAIN POWER)
Prise ~AC IN
Connecteur AV MULTI OUT
(sortie AV multiple)
Connecteur DIGITAL OUT
(OPTICAL)
Page 39

Installation de la console
39
Adaptateur réseau
Avant
LINE NETWORK
Arrière
Avertissement
Ne raccordez pas de cordons téléphoniques ou de câbles de réseau de types différents de ceux spécifiés dans ce manuel,
au connecteur LINE (ligne) et au connecteur NETWORK (réseau). Pour plus de détails, reportez-vous à “Connexion de
l'adaptateur réseau à une ligne téléphonique” (page 42) ou “Connexion de l'adaptateur réseau avec un câble de réseau”
(page 43).
Connecteur LINE (ligne)
Raccordez un cordon téléphonique ici pour
l’utilisation du modem numéroteur uniquement.
Connecteur NETWORK (réseau)
Insérez le câble de réseau (100Base-TX/10Base-T) ici
pour la connexion Éthernet.
Port de sonnerie
Vis de montage
Pour fixer l’adaptateur réseau sur la console
PlayStation®2.
Connecteur de la console
Raccordez-le au connecteur du bus d’expansion de la
console PlayStation®2.
Connecteur de données HDD
Connecteur d’alimentation HDD
Vous pouvez installer la console soit
horizontalement, soit verticalement.
Lorsque vous installez la console verticalement,
utilisez le socle vertical (pour PlayStation®2)
SCPH-10040 U (vendu séparément). Si un socle
vertical (pour PlayStation®2) n’est pas
disponible, placez la console horizontalement
tel qu’illustré ci-dessous.
Lorsque vous installez la console
horizontalement, utilisez le socle horizontal
(pour PlayStation®2) SCPH-10110 U (vendu
séparément).
Position verticalePosition horizontale
Remarques
• Ne placez pas la console dans une position autre
qu’horizontale ou verticale, car cela risque de
l’endommager.
• Ne modifiez pas la position de la console (passage d’une
position horizontale à une position verticale ou vice
versa) pendant qu’elle fonctionne. Le disque risquerait
d’être endommagé et la console de ne pas fonctionner
correctement.
Logo de la gamme de produits “
” situé
sur le compartiment à disque
Il est possible de faire pivoter le logo de la
gamme de produits “ ” situé sur le
compartiment à disque afin de l’adapter à la
position de la console.
FR
Démarrage rapide
Console PlayStation®2
Arrière (avec l'adaptateur réseau retiré)
Connecteur du bus
d’expansion
EXPANSION BAY (baie
d'expansion)
Page 40

40
Raccordement de la console PlayStation®2 à un téléviseur
Cette section explique la connexion à effectuer pour entendre le son à travers les haut-parleurs du
téléviseur.
Lorsque vous raccordez l’équipement audio à des connecteurs numériques, voir “Raccordement de
composants audio numériques” page 41.
Raccordement à un téléviseur à l’aide d’entrées audio/vidéo
Raccordez votre console PlayStation®2 à un téléviseur à l’aide du câble AV (audio/vidéo intégrés).
Lors de la connexion des câbles, assurez-vous de les brancher aux prises appropriées en respectant les
couleurs des composants : jaune (vidéo) sur jaune, rouge (droite) sur rouge et blanc (gauche) sur
blanc.
Après le raccordement
Réglez le téléviseur sur le mode d’entrée vidéo approprié. Reportez-vous au mode d’emploi du
téléviseur.
Lors du raccordement à un téléviseur 16:9
Réglez le paramètre de “Taille de l’écran” du menu configuration du système sur “16:9”. Pour obtenir
des détails sur le menu configuration du système, reportez-vous à la page 45.
Si votre téléviseur est monophonique
Ne raccordez pas la prise rouge. Si vous souhaitez entendre le son gauche et le son droit sur un téléviseur monophonique,
utilisez un câble audio de type 2 fiches - 1 fiche (stéréo en mono) disponible dans le commerce.
Interrupteur
d’alimentation
principal (MAIN
POWER)
Connecteur DIGITAL
OUT (OPTICAL)
Prise ~AC IN
Raccordement à un magnétoscope
Raccordez votre console PlayStation®2 au
magnétoscope à l’aide du câble AV fourni
(audio/vidéo intégrés) et faites correspondre
les couleurs des prises.
Si votre magnétoscope est monophonique, ne
Pendant la lecture d’un DVD vidéo
raccordez pas les prises rouges.
Toutefois, lors de la lecture d’un DVD vidéo, ne
raccordez pas la console au magnétoscope.
Magnétoscope
Dans le cas contraire, il est possible que du
bruit apparaisse sur l’image. Raccordez
directement la console au téléviseur.
Après le raccordement
Réglez votre téléviseur et votre magnétoscope
de manière adéquate. Reportez-vous aux
modes d’emploi du téléviseur et du
Console
PlayStation
2
®
Raccordement
direct
Téléviseur
magnétoscope.
Raccordement à un téléviseur à l’aide d’un connecteur d’entrée
S VIDEO
Raccordez la console PlayStation®2 au
connecteur d’entrée S VIDEO situé sur le
téléviseur à l’aide du câble S VIDEO
SCPH-10060 U (vendu séparément).
Vous obtiendrez ainsi une meilleure image
qu’en utilisant le câble AV (audio/vidéo
intégrés).
Après le raccordement
Réglez le téléviseur sur le mode d’entrée
vidéo approprié (tel que “S VIDEO”).
Vers l’entrée
S VIDEO
Vers l’entrée
audio (gauche)
Vers le connecteur
AV MULTI OUT
(sortie AV multiple)
Vers l’entrée
audio (droit)
Vers le connecteur
AV MULTI OUT
(sortie AV multiple)
Câble AV (audio/vidéo intégrés) Cordon d’alimentation
Ne raccordez pas la console PlayStation®2
à un téléviseur à projection
Si vous laissez une image fixe affichée pendant trop
longtemps (par exemple, un menu DVD ou une image
en pause), un effet d’image rémanente risque de se
produire sur l’écran. Cet effet se produit tout
particulièrement avec les téléviseurs de projection.
Remarque sur l’effet de sautillement
Quelques téléviseurs ou moniteurs risquent de produire
un effet de sautillement des images lors de l’utilisation
de la console PlayStation
la console PlayStation
fabriquée. Le téléviseur est à l’origine de ce problème
technique. Si vous rencontrez un tel problème avec votre
téléviseur/moniteur, veuillez contacter notre ligne
d’assistance technique au 1-800-345-7669.
®2. Cela n’est dû en aucun cas à
®2 ou à la manière dont elle est
Raccordement à un téléviseur avec une entrée d’antenne
Raccordez la console PlayStation®2 à l’entrée
d’antenne située sur le téléviseur à l’aide de
l’adaptateur RFU SCPH-10071 (vendu
séparément). Dans ce cas, le son sera
monophonique.
Après le raccordement
Réglez le sélecteur de canal sur l’adaptateur
RFU et celui du téléviseur sur le canal VHF
CH 3 ou CH 4, selon celui qui n’est pas actif
dans votre zone.
Vers l’entrée
d’antenne
Vers le connecteur
AV MULTI OUT
(sortie AV multiple)
C
Page 41

Raccordement de composants audio numériques
41
Raccordement à un téléviseur à l’aide de connecteurs d’entrée
vidéo composant
Si le moniteur ou le projecteur est doté de
connecteurs d’entrée vidéo composant (Y, CB/
PB, CR/PR), raccordez la console PlayStation®2
à l’aide du câble AV composant (pour
PlayStation®2) SCPH-10100 U (vendu
séparément). Vous obtiendrez ainsi une
meilleure image.
Avant la connexion
Si vous connectez votre console PlayStation®2 à
un téléviseur à l’aide du câble AV composant
(pour PlayStation®2), vous devez d’abord
régler l’option “Sortie vidéo” du menu
“Configuration du Système” sur “Y Cb/Pb Cr/
Vers
l’entrée
audio
Vers le connecteur
AV MULTI OUT
(sortie AV multiple)
Vers les
connecteurs
d’entrée vidéo
composant
Pr” ; sinon, l’affichage du téléviseur risque de
ne pas être satisfaisant. Conseil : avant de
connecter votre console à l’aide du câble AV
composant (pour PlayStation®2), connectez-la à
l’aide du câble AV fourni (audio/vidéo
intégrés) et vérifiez que l’option “Sortie vidéo”
est ajustée à “Y Cb/Pb Cr/Pr ”.
Remarque
Vous ne pouvez pas utiliser la console PlayStation®2 avec
un téléviseur haute définition (HDTV), sans installer le
logiciel et les connecteurs nécessaires. Consultez la
documentation de votre téléviseur.
Lors de la première mise sous tension de l’unité
L’écran de configuration initial apparaît.
Réglez “Langue”, “Fuseaux horaires” et “Type d’heure” en
fonction des instructions affichées à l’écran.
Ces réglages pourront être modifiés ultérieurement dans le
menu configuration du système. Pour plus de détails,
reportez-vous à la section “Utilisation du menu
configuration du système”, page 45.
Cette section explique la manière de raccorder
la console PlayStation®2 à un équipement
audio à l’aide de connecteurs numériques (tels
qu’une sortie optique Dolby Digital (AC-3) ). À
l’aide de récepteurs et d’amplificateurs
numériques, vous pouvez tirer le meilleur parti
des fonctions de son multi-plage et de son
ambiophonique.
Raccordement à un récepteur
ou amplificateur, lecteur MD
(Minidisc), lecteur DAT (Digital
Audio Tape) avec connecteur
numérique
Utilisez un cordon numérique optique (vendu
séparément) et réglez le paramètre “DIGITAL
OUT (OPTICAL)” du menu configuration du
système sur “Activé(e)” (réglage par défaut).
Pour obtenir des détails sur le menu
configuration du système, reportez-vous à la
page 45.
Panneau arrière
DIGITAL OUT
(OPTICAL)
AV MULTI OUT
MAIN
POWER
~
AC IN
Récepteur ou
amplificateur,
lecteur MD ou
DAT
DIGITAL INPUT
OPTICAL
Remarques
• Reportez-vous également aux instructions fournies
avec le composant à raccorder.
• Vous ne pouvez pas effectuer directement des
enregistrements audio numériques de disques
enregistrés au format Dolby Digital ou DTS à l’aide
d’un lecteur MD ou DAT.
Raccordement d’un composant
audio doté d’un décodeur DTS*
ou Dolby Digital** intégré
(DVD vidéo uniquement)
Le raccordement à un équipement audio à
l’aide d’un décodeur DTS ou Dolby Digital
intégré (vendu séparément) permet de lire du
son enregistré sur un DVD vidéo au format
Dolby Digital (AC-3) ou DTS pour reproduire
la qualité acoustique d’un cinéma.
Branchez le composant par le connecteur
DIGITAL OUT (OPTICAL) à l’aide d’un cordon
numérique optique (vendu séparément).
Console
PlayStation
Composant audio
avec décodeur DTS
ou Dolby Digital
intégré
2
®
Cordon numérique optique
(vendu séparément)
Haut-parleurs
Configurations du lecteur DVD sur la
console PlayStation
2
®
Certains réglages du lecteur DVD sont
nécessaires en fonction des composants à
connecter.
Pour obtenir des détails sur l’affichage des
réglages, reportez-vous à la page 53.
• Raccordement d’un composant audio doté d’un
décodeur DTS intégré
Réglez le paramètre “DIGITAL OUT
(OPTICAL)” sur “Activé(e)”, puis le
paramètre “DTS” sur “Activé(e)” sur l’écran
“Réglage audio”.
• Raccordement d’un composant audio doté d’un
décodeur Dolby Digital intégré
Réglez le paramètre “DIGITAL OUT
(OPTICAL)” sur “Activé(e)”, puis le
paramètre “Dolby Digital” sur “Activé(e)” sur
l’écran “Réglage audio”.
Remarque
Reportez-vous aux instructions d’installation et
d’utilisation fournies pour les composants audio à
raccorder.
* “DTS” et “DTS Digital Out” sont des marques
commerciales de Digital Theater Systems Inc.
** Fabriqué sous licence de Dolby Laboratories.
“Dolby”et le symbole représentant un double D sont
des marques commerciales de Dolby Laboratories.
Travaux confidentiels non publiés. ©1992-1997 Dolby
Laboratories. Tous droits réservés.
FR
Raccordement
Page 42

42
Raccordement d’autres périphériques numériques
Connexion de l'adaptateur réseau à une ligne téléphonique
Raccordement d’un
périphérique à l’aide de
l’interface USB (Universal
Serial Bus)
Il est possible d’utiliser les deux connecteurs
USB situés à l’avant de la console pour
raccorder des périphériques compatibles USB.
Reportez-vous également aux instructions
fournies avec le périphérique à raccorder.
Connecteurs USB
Remarque
Tous les produits compatibles USB ne fonctionnent pas
avec la console PlayStation
de l’utilisateur du produit compatible USB approprié pour
obtenir des informations supplémentaires.
2. Reportez-vous au manuel
®
Raccordement d’un
périphérique à l’aide de
l’interface i.LINK
Il est possible d’utiliser le connecteur S400
i.LINK situé à l’avant de la console pour
raccorder un périphérique (IEEE 1394)
compatible i.LINK. Reportez-vous également
aux instructions fournies avec le périphérique à
raccorder.
Le connecteur S400 i.LINK n’alimente pas les
périphériques externes. Certains périphériques
externes qui nécessitent une alimentation à
partir du connecteur S400 i.LINK ne
fonctionneront pas correctement lorsqu’ils
seront raccordés à la console PlayStation®2.
Le connecteur S400 i.LINK PlayStation®2
prend en charge des vitesses de transfert allant
jusqu’à 400 Mbps. Cependant, la vitesse de
transfert réelle varie en fonction de celle du
périphérique compatible i-LINK raccordé.
Connecteur S400 i.LINK
Remarque
Tous les produits i.LINK ne fonctionnent pas avec la
console PlayStation
manuel de l’utilisateur du produit i.LINK approprié pour
obtenir des informations supplémentaires.
i.LINK est une marque commerciale de la norme IEEE
1394-1995 et de ses révisions.
i.LINK et le logo i.LINK “
commerciales.
2. Reportez-vous également au
®
“ sont des marques
Vous pouvez vous connecter à un réseau via
une ligne téléphonique en insérant un cordon
téléphonique dans le connecteur LINE (ligne)
de l'adaptateur réseau installé sur la console
PlayStation®2.
Connecteur LINE (ligne)
Cordon téléphonique
1 ... Insérez un cordon téléphonique (non
inclus) dans le connecteur LINE (ligne) de
l’adaptateur réseau.
2 ... Branchez le cordon téléphonique dans une
prise de téléphone murale.*
* Ne raccordez pas de cordon de quelque
type que ce soit autre que celui d’un
cordon téléphonique résidentiel au
connecteur LINE (ligne).
Si vous connectez un cordon
téléphonique ou un câble de réseau d’un
type autre que celui spécifié au
connecteur LINE (ligne), trop de courant
électrique pourrait passer par le
connecteur provoquant ainsi des
défaillances, une chaleur excessive ou
même un incendie dans le connecteur.
Ne connectez jamais de cordons
téléphoniques types suivants (en
particulier un cordon téléphonique pour
réseau téléphonique résidentiel ou
commercial) au connecteur LINE (ligne).
•Téléphone public compatible RNIS
(réseau numérique à intégration de
services)
•Téléphone PBX
•Téléphone cellulaire ou téléphone de
voiture
•Lignes téléphoniques pour réseau
téléphonique résidentiel ou commercial
Prise de
téléphone
murale
Prises de téléphone murales
L’adaptateur réseau peut être connecté aux cordons
téléphoniques en utilisant des connecteurs standard RJ11C. Dans certains cas, il faudra utiliser un adaptateur
pour le raccord à votre ligne téléphonique. Pour plus de
détails, contactez votre société de téléphone locale.
Attention
• En vous raccordant à un réseau, vous devrez payer
des frais de raccord à la société de téléphone locale
et des frais d’utilisation au fournisseur de services
Internet. Dans certains cas, les frais d’utilisation
peuvent être plus élevés que prévu. Pour plus de
détails, reportez-vous aux instructions fournies
avec le logiciel ou contactez votre fournisseur de
services Internet.
• Si vous avez la fonction “appel en attente”, il se
peut que la communication soit coupée et que le
logiciel puisse fonctionner de manière anormale si
vous recevez un appel tandis que vous êtes
raccordé au réseau.
• Si vous utilisez un télécopieur ou un téléphone sur
la même ligne, vous ne pourrez pas vous connecter
à un réseau en utilisant le connecteur LINE (ligne).
• Lorsqu’un adaptateur réseau est connecté à un
réseau, vous ne pouvez pas utiliser votre téléphone
ni votre télécopieur.
• Lorsque l’adaptateur réseau n’est pas utilisé,
connectez la ligne téléphonique au dispositif qui y
est normalement raccordé.
Page 43

Connexion de l'adaptateur réseau avec un câble de réseau
Retrait de l'adaptateur réseau de la console PlayStation
®
2
43
Vous pouvez connecter la console
PlayStation®2 à un réseau par le connecteur
NETWORK (réseau) qui se trouve sur
l’adaptateur réseau installé sur la console
PlayStation®2.
Vous pouvez vous connecter à un réseau de
100 mbps à l’aide d’un câble 100Base-TX ou à
un réseau de 10 mbps à l’aide d’un câble
10Base-T. Pour plus de détails, reportez-vous
aux instructions fournies avec le dispositif de
réseau avec lequel vous vous connectez (tel
qu’un routeur, modem DSL ou modem à
câble).
Avertissement
Il y a un autocollant de protection sur le connecteur
NETWORK (réseau) pour aider à prévenir la
connexion accidentelle au mauvais type de câble.
Retirez l’autocollant la première fois que vous utilisez
le connecteur NETWORK (réseau). Après avoir retiré
l’autocollant, attention de ne pas connecter de câbles
de mauvais type au connecteur NETWORK (réseau).
Ne branchez pas des câbles de réseau ni des cordons
téléphoniques de types suivants au connecteur NETWORK (réseau). Le courant électrique qui traverse le
connecteur peut être trop élevé et entraîner un mauvais
fonctionnement, une chaleur excessive ou provoquer un
incendie dans le connecteur.
• Câbles de réseau de types autres que 100Base-TX et
10Base-T
• Lignes téléphoniques normales
• Téléphone public compatible RNIS (réseau numérique
à intégration de services)
• Téléphone PBX
• Lignes téléphoniques pour réseau téléphonique
résidentiel ou commercial
• Autres types de lignes téléphoniques
Remarque
En vous raccordant à un réseau, le fournisseur de services
Internet pourrait vous facturer des frais d’utilisation. Dans
certains cas, les frais d’utilisation peuvent être plus élevés
que prévu. Pour plus de détails, reportez-vous aux
instructions fournies avec le logiciel utilisé ou contactez
votre fournisseur de services Internet.
Il est possible de retirer l’adaptateur réseau de
la console. Cependant, ceci devrait uniquement
être fait dans le but de permettre l’installation
d’un périphérique autorisé sur l'EXPANSION
BAY (baie d'expansion) de la console.
Attention
• Pour des raisons de sécurité, avant de retirer
l’adaptateur réseau, mettez la console hors tension
à l’aide de l’interrupteur d’alimentation principal
(MAIN POWER) situé à l’arrière de la console, puis
déconnectez la fiche d’alimentation de la console de
la prise électrique.
• L’adaptateur réseau sert de couvercle de protection
pour la baie d’expansion et le connecteur du bus
d’expansion situé à l’intérieur de la baie
d’expansion. Ne laissez pas la baie d’expansion
exposée sans protection pendant une longue
période de temps. Si votre adaptateur réseau est
perdu ou endommagé, ou pour toute autre
question ou problème concernant l'adaptateur
réseau, contactez notre ligne d’assistance technique
au 1-800-345-7669.
• Ne connectez aucun périphérique interne non
autorisé à l’adaptateur réseau, et n’introduisez pas
de corps étrangers dans la baie d'expansion car ceci
risque d’endommager la console ou de provoquer
un mauvais fonctionnement.
1 ... Vérifiez que l’indicateur 1 (veille) situé à
l’avant de la console PlayStation®2 est
allumé en rouge, puis mettez la console
PlayStation®2 hors tension à l’aide de
l’interrupteur d’alimentation principal
(MAIN POWER) situé à l’arrière de la
console.
2 ... Débranchez la fiche d’alimentation de la
console PlayStation®2 de la prise
électrique.
3 ... Débranchez le cordon téléphonique et/ou
le câble de réseau de l’adaptateur réseau.
Remarque
L'adaptateur réseau inclus dans le PlayStation®2
online pack est destiné à être utilisé uniquement
avec la console PlayStation
2 fournie.
®
4 ... Desserrez les vis de montage.
Tournez les vis de montage dans le sens
anti-horaire à l’aide d’une pièce de
monnaie.
Remarque
N’utilisez pas de tournevis pour desserrer les vis de
montage.
Arrière de la
console
PlayStation
Vis de montage
5 ... Déconnectez l’adaptateur réseau de la
console.
Déconnectez l’adaptateur réseau en le
retirant de la console.
Adaptateur réseau
®2
FR
Raccordement
Page 44

44
Attention
• Pour des raisons de sécurité, ne raccordez pas la
• Lors de l’installation d’un périphérique interne
Réinstallation de l'adaptateur réseau sur la console PlayStation
fiche d’alimentation de la console à une prise
électrique avant d’avoir réinstallé l’adaptateur
réseau.
autorisé sur la baie d’expansion de la console,
reportez-vous aux instructions fournies avec le
périphérique.
1 ... Positionnez l'adaptateur réseau sur
l'EXPANSION BAY (baie d'expansion) de
façon à ce que les vis de montage se
trouvent face aux trous de la console. (La
baie d'expansion est située vers le bas, à
gauche, à l'arrière de la console
PlayStation®2.)
®
2
Adaptateur réseau
2 ... Fixez l’adaptateur réseau sur la console
PlayStation®2.
Tournez les vis de montage dans le sens
horaire à l’aide d’une pièce de monnaie.
Ne resserrez pas trop.
Remarques
• N’utilisez pas de tournevis pour serrer les vis de
montage.
• Ne serrez pas les vis de montage trop fort car ceci
peut endommager les vis ou la console.
Vis de montage
Page 45

Utilisation du menu principal
45
Lorsque vous mettez la console sous tension
sans avoir inséré préalablement de disque, le
menu principal apparaît sur l’écran du
téléviseur.
Vous pouvez alors passer au menu
configuration du système ou à l’écran
navigateur depuis le menu principal.
Utilisation du menu configuration
du système
Le menu configuration du système vous
permet de réaliser toutes les opérations de
configuration de la console PlayStation®2.
Ces paramètres sont sauvegardés et restent
activés même si vous mettez la console hors
tension.
1...... Sélectionnez “Configuration du Système”
en utilisant les touches directionnelles
haut et bas puis appuyez sur la touche ✕.
Le menu configuration du système
apparaît sur l’écran du téléviseur.
2...... Sélectionnez l’option désirée en utilisant
les touches directionnelles haut et bas puis
appuyez sur la touche ✕.
Les paramètres par défaut sont soulignés.
x Configuration de l’heure
Permet de régler l’heure.
1......
À l’aide des touches directionnelles haut et
bas, choisissez le mois puis appuyez sur la
touche directionnelle droite. Suivez la
même procédure pour régler le jour,
l’année, l’heure, les minutes et les secondes.
Pour revenir au menu précédent, appuyez
sur la touche directionnelle gauche.
2...... Appuyez sur la touche ✕ pour valider.
Réglage supplémentaire sur l’heure
Sélectionnez “Configuration de l’heure” en
utilisant les touches
puis appuyez sur la touche ¢. Vous pouvez à
présent régler les éléments suivants.
Affichage de l’heure
•Horloge à 12 heures
•Horloge à 24 heures
directionnelles
haut et bas,
Affichage de la date
•MM/JJ/AAAA
•JJ/MM/AAAA
•AAAA/MM/JJ
Fuseaux horaires
Sélectionnez votre pays ou votre région afin de
régler le fuseau horaire correct.
Type d’heure
Vous pouvez choisir l’heure effective avec cette
option.
•Heure d’hiver (heure standard)
•Heure d’été
x Taille de l’écran
Sélectionne le mode d’affichage en fonction du
format du téléviseur à raccorder.
•4:3 : sélectionnez cette option lorsque vous
raccordez la console à un téléviseur standard.
•Plein écran : sélectionnez cette option lorsque
vous raccordez la console à un téléviseur
standard. Les bandes noires situées en bas et
en haut de l’écran sont alors coupées.
•16:9 : sélectionnez cette option lorsque vous
raccordez la console à un téléviseur au format
16:9.
x DIGITAL OUT (OPTICAL)
Pour sélectionner d'émettre les signaux via le
connecteur DIGITAL OUT (OPTICAL) (sortie
numérique optique).
•Activé : sélectionnez cette option lorsque vous
utilisez un câble optique numérique (vendu
séparément) pour raccordement. Sélectionnez
normalement cette option.
•Désactivé : lorsque vous sélectionnez cette
option, les signaux sonores ne sont pas
transmis via le connecteur DIGITAL OUT
(OPTICAL).
x Sortie vidéo
Si votre téléviseur, votre moniteur ou votre
projecteur possède un connecteur RGB ou des
connecteurs d’entrée vidéo (Y, CB/PB, CR/PR)
conformes aux signaux de sortie de la console,
réglez cette option.
Lors du raccordement de la console avec le
câble AV (audio/vidéo intégrés) fourni ou le
câble S VIDEO (vendu séparément), il n’est pas
nécessaire de choisir cette option.
•Y Cb/Pb Cr/Pr : sélectionnez cette option
lorsque vous raccordez la console à des
connecteurs d’entrée de composant vidéo.
•RGB : sélectionnez cette option lorsque vous
raccordez la console à un connecteur RGB.
Remarque
Vous pouvez lire les logiciels au format PlayStation
et PlayStation®2 par le format RGB ou Y Cb/Pb Cr/
Pr. Par contre, la console PlayStation
pour neutraliser le réglage de la “Sortie vidéo” dans le
menu configuration du système et lire tous les
logiciels de DVD vidéo par le format Y Cb/Pb Cr/Pr.
2 est fabriquée
®
®
x Langue
Permet de sélectionner la langue d’affichage
des menus.
•Anglais
•Français
•Espagnol
•Allemand
•Italien
•Néerlandais
•Portugais
Utilisation de l’écran navigateur
L’écran navigateur vous permet de réaliser les
opérations suivantes.
•Vérification/copie/suppression de données
de jeu sur la memory card (carte mémoire)
(8 MB) (pour PlayStation®2) et la memory
card (carte mémoire)
•Démarrage d’un logiciel au format
PlayStation ou PlayStation®2
•Lecture d’un CD audio
•Lecture d’un DVD
Sélectionnez “Navigateur” en utilisant les
touches directionnelles puis appuyez sur la
touche ✕. L’écran navigateur apparaît sur le
téléviseur. La memory card (carte mémoire)
(8 MB) (pour PlayStation®2), la memory card
(carte mémoire) ou les disques insérés dans la
console sont affichés sous la forme d’icônes.
Vérification/copie/suppression de données de jeu
Il vous est possible de copier des données de
jeu depuis une memory card (carte mémoire)
(8 MB) (pour PlayStation®2) ou une memory
card (carte mémoire) sur une autre ou de
supprimer des données de jeu que vous ne
souhaitez plus sauvegarder.
Notez cependant qu’il ne vous est pas possible
de copier des données de jeu d’un logiciel au
format PlayStation®2 sur la memory card (carte
mémoire) SCPH-1020 U.
Insérez préalablement la memory card (carte
mémoire) (8 MB) (pour PlayStation®2) ou la
memory card (carte mémoire).
1......
Sélectionnez l’icône de la memory card
(carte mémoire) (8 MB) (pour PlayStation®2)
ou de la memory card (carte mémoire) sur
laquelle sont stockées les données de jeu
que vous souhaitez vérifier/copier/
supprimer puis appuyez sur la touche ✕.
2...... Vérifiez/copiez/supprimez ensuite les
données de jeu en suivant les instructions
qui apparaissent à l’écran.
Remarque
Ne retirez pas la memory card (carte mémoire) (8 MB)
(pour PlayStation
pendant la copie ou la suppression de données de jeu.
2) et la memory card (carte mémoire)
®
Vérification des informations de
version
Il vous est possible de vérifier la version de la
console, du navigateur, du Lecteur CD, du
Lecteur PlayStation® et du Lecteur DVD.
Appuyez sur la touche ¢ dans le menu principal.
Fonction d’auto-diagnostic
La console PlayStation®2 règle automatiquement
les configurations de la console pour la
meilleure lecture du disque possible.
Vous pouvez toutefois utiliser la fonction
d’auto-diagnostic manuellement au besoin.
1......
Sélectionnez “Console” en utilisant les
touches directionnelles et appuyez sur la
touche ¢.
2......
Sélectionnez “Activé” en utilisant les
touches directionnelles et appuyez sur la
touche ✕.
3...... Insérez un disque.
La console lance le diagnostic automatique.
Remarque
Le réglage de diagnostic revient automatiquement sur
“Désactivé” (valeur par défaut) lorsque vous appuyez sur
le bouton 1/RESET ou lorsque vous lancez la lecture d’un
disque PlayStation
Réglage du lecteur PlayStation®
Le “Lecteur PlayStation®” est un programme
permettant le chargement de logiciels au
format PlayStation®.
1...... Sélectionnez “Lecteur Playstation®” en
utilisant les touches directionnelles et
appuyez sur la touche ¢.
2......
Sélectionnez le réglage que vous souhaitez
configurer en utilisant les touches
directionnelles puis appuyez sur la touche ✕.
Vitesse du disque
•Normale : en règle générale, sélectionnez cette
position.
•
Rapide : le temps de chargement d’un disque
PlayStation® peut être raccourci. Cependant, en
fonction du disque, ce réglage peut n’avoir
aucun effet sur le temps de chargement ou
même provoquer un mauvais chargement du
disque. Dans ce cas, sélectionnez “Normale”.
Textures
•Standard : en règle générale, sélectionnez
cette position.
•Lisse : permet de lisser l’affichage de certains
disques PlayStation®. En fonction du disque,
ce réglage peut n’avoir aucun effet. Dans ce
cas, sélectionnez “Standard”.
Remarque
Le réglage “Lecteur PlayStation®” revient automatiquement
sur “Normale/Standard” (valeur par défaut) lorsque vous
appuyez sur le bouton 1/RESET ou mettez l’unité hors
tension.
®, PlayStation®2 ou d’un DVD vidéo.
FR
Raccordement
Page 46

46
1,3
4
2
Comment jouer
Démarrage d’un jeu
1
Mettez la console sous tension
à l’aide de l’interrupteur
d’alimentation principal (MAIN
POWER) situé à l’arrière de la
console.
L’indicateur 1 (veille) situé à l’avant
de la console s’allume en rouge pour
indiquer que la console est désormais
en mode de veille.
2
Appuyez sur le bouton
1 (veille) / RESET.
L’indicateur 1 devient vert et l’écran
de démarrage s’affiche.
Branchez la manette analogique
3
(DUALSHOCK
analogique (DUALSHOCK
la console.
®) ou la manette
®2) sur
1
4
Appuyez sur le bouton A
(ouvrir).
Le compartiment à disque s’ouvre.
5
Placez un disque sur le
compartiment, l’étiquette
orientée vers le haut (données
vers le bas).
6
Appuyez sur le bouton A.
Le compartiment à disque se ferme.
L’écran 2 ou 3 s’affiche et vous
pouvez démarrer le jeu.
Remarque
Réglez la manette analogique (DUALSHOCK®2) ou la
manette analogique (DUALSHOCK
approprié pour le logiciel (page 47). Reportez-vous au
manuel du logiciel approprié pour obtenir des détails.
®) sur le mode
Écrans affichés lors du
démarrage
Lorsque vous mettez la console sous tension
sans avoir introduit un disque au préalable
L’écran 1 s’affiche.
•Lorsque vous introduisez un disque au
format PlayStation®2 ou PlayStation® une fois
que l’écran 1 s’est affiché, l’écran 2 ou 3
s’affiche et vous pouvez commencer à jouer.
•Vous pouvez basculer vers le menu
configuration du système ou l’écran
navigateur à partir de l’écran 1 (pour obtenir
des détails, reportez-vous à la section
“Utilisation du menu principal” page 45).
Lorsque vous mettez la console sous tension
après avoir introduit un disque
En fonction du type de disque introduit, l’écran
2, 3 ou 4 s’affiche.
Si l’écran 4 s’affiche, il est possible que le
disque introduit ne soit pas un disque au
format PlayStation® ou PlayStation®2. Vérifiez
le type du disque (page 34).
1 Aucun disque n’est introduit (menu
principal).
4 Un disque non pris en charge par la
console PlayStation
2 est introduit.
®
Arrêt d’un jeu
1...... Appuyez sur le bouton A.
Le compartiment à disque s’ouvre.
2...... Retirez le disque.
3...... Appuyez sur le bouton A.
Le compartiment à disque se ferme.
4...... Appuyez sur le bouton 1/RESET pendant
environ deux secondes.
L’indicateur 1 devient rouge et la console
entre en mode de veille.
3
2
4,6
Redémarrage d’un jeu
Appuyez sur le bouton 1/RESET très
rapidement. (Assurez-vous de ne pas maintenir
le bouton enfoncé trop longtemps, car cela
activerait le mode de veille de la console.)
Veillez à ne pas appuyer accidentellement sur
le bouton 1/RESET lorsque vous jouez. Le cas
échéant, le jeu redémarrera.
5
2 Un DVD-ROM / CD-ROM au format
PlayStation
3 Un CD-ROM au format PlayStation
introduit.
2 est introduit.
®
®
est
Remarques
• Lorsque vous jouez un titre de logiciel en ligne, vous
pouvez utiliser le bouton 1/RESET situé à l'avant de la
console pour quitter le titre. Veuillez noter que vous ne
pouvez pas réinitialiser le titre à l'aide de ce bouton.
• Pour quitter un titre de logiciel en ligne, suivez les
instructions à l’écran ou les instructions données dans
le mode d’emploi du logiciel.
• Si vous ne savez pas comment quitter le logiciel, vous
pouvez le faire en appuyant sur le bouton 1/RESET.
L’indicateur 1 s’allume en rouge lorsque la console
passe en mode de veille.
• Si vous ne pouvez pas quitter le logiciel à l’aide de la
procédure ci-dessus, appuyez sur le bouton 1/RESET
pendant plusieurs secondes jusqu’à ce que l’indicateur
1 s’allume en rouge.
Page 47

Utilisation de la Manette Analogique
47
Lorsque vous ne souhaitez pas jouer
pendant une période prolongée
Mettez l’appareil hors tension à l’aide de
l’interrupteur d’alimentation principal (MAIN
POWER) situé à l’arrière de la console,
débranchez la fiche d’alimentation de la prise
électrique et le cordon téléphonique et/ou le
câble de réseau de la prise murale.
Passage d’un jeu à un autre
Il n’est pas nécessaire de mettre la console hors
tension lorsque vous souhaitez changer de jeu.
1...... Appuyez sur le bouton A.
Le compartiment à disque s’ouvre.
2...... Retirez le disque.
3...... Placez un nouveau disque dans le
compartiment à disque.
4...... Appuyez sur le bouton A.
Le compartiment à disque se ferme.
5...... Appuyez sur le bouton 1/RESET très
rapidement pour réinitialiser.
(Attention : Si vous maintenez le bouton
1/RESET enfoncé trop longtemps, cela
fait passer la console en mode de veille.)
Après l’affichage des écrans
d’initialisation, l’écran 2 ou 3 s’affiche et
le jeu commence.
Différences entre la manette
analogique (DUALSHOCK®2) et
la manette analogique
(DUALSHOCK®)
1 Manette analogique (DUALSHOCK®2)
(fournie/vendue séparément)
•La manette analogique (DUALSHOCK®2)
correspond aux logiciels au format
PlayStation®2 et PlayStation®.
•Vous pouvez permuter entre le mode
numérique et le mode analogique. En mode
analogique, vous disposez des touches et
manches suivants (configuration variable
selon le logiciel utilisé – consultez la
documentation du logiciel) :
Logiciel au format PlayStation®2
Touches directionnelles / touches ¢ , a , ✕ ,
s / manche analogique gauche / manche
analogique droit / touches L1, R1, L2, R2
Logiciel au format PlayStation
®
Manche analogique gauche / manche
analogique droit
•Vous pouvez utiliser la fonction de vibration.
2 Manette analogique (DUALSHOCK®)
(vendue séparément)
•La manette analogique (DUALSHOCK®) peut
être utilisée avec les logiciels au format
PlayStation®2 et PlayStation®.
Mode numérique (indicateur : éteint)
•Vous pouvez permuter entre le mode
numérique et le mode analogique. Lorsque
vous passez au mode analogique, les manches
analogiques gauche et droit sont disponibles.
Logiciel au format PlayStation®2
Manche analogique gauche /manche
analogique droit
Logiciel au format PlayStation
®
Manche analogique gauche / manche
analogique droit
•Vous pouvez utiliser la fonction de vibration.
Commutation de mode
Pour commuter la manette analogique
(DUALSHOCK®2) et la manette analogique
(DUALSHOCK®) d’un mode à l’autre, appuyez
sur la touche de mode ANALOG (analogique).
À chaque fois que vous appuyez sur la touche
de mode ANALOG (analogique), le mode
change comme suit :
Mode numérique (indicateur: éteint)
Xx
Mode analogique (indicateur: rouge)
Remarque
Sélectionnez le mode d’utilisation approprié.
Notez cependant que certains logiciels effectuent ce
réglage automatiquement. Dans ce cas, le logiciel remplace
la touche de mode ANALOG (analogique). Pour obtenir
des détails, reportez-vous au manuel du logiciel.
Mode analogique (indicateur : rouge)
Fonction de vibration
La manette analogique (DUALSHOCK®2) et la
manette analogique (DUALSHOCK®)
disposent d’une fonction de vibration (limitée à
certains logiciels). Il est possible de régler la
fonction de vibration sur “Activé(e)” ou
“Désactivé(e)” sur le moniteur à l’aide du
logiciel.
Remarques
• Lorsque vous n’utilisez pas la manette analogique
(DUALSHOCK
(DUALSHOCK
débranchez les manettes de la console.
• Avant d’utiliser la fonction de vibration, veuillez lire la
section “Remarques sur la sécurité lors de l’utilisation
de la manette analogique (DUALSHOCK
manette analogique (DUALSHOCK
®2) et la manette analogique
®), mettez la console hors tension ou
®2) et de la
®)” page 33.
Avant d’utiliser la manette
analogique (DUALSHOCK®2) et
la manette analogique
(DUALSHOCK®)
Après avoir mis la console sous tension et avant de
commencer à jouer, faites pivoter les manches
analogiques gauche et droit une fois à l’aide de vos
pouces. Pour ceci, ne tordez pas les manches
analogiques mais faites-les pivoter comme si vous
dessiniez un cercle. (voir l’illustration ci-dessus).
FR
Jeu / CD Audio
5
1,4
2,3
Remarque
Pour un jeu multi-disques, suivez les étapes 1 à 4 pour
changer les disques. Reportez-vous au manuel du jeu pour
obtenir des détails.
Touche L1
Touches
directionnelles
Touche L2 Touche R2
Touche de mode ANALOG
(analogique)
Touche
SELECT
sélection)
(de
Touche
START
mise en
marche)
(de
Touche R1
Touche ¢
Touche a
Touche ✕
Touche s
Indicateur de mode :
éteint
Touche L2
Touche L1
Touches
directionnelles
Manche
analogique
gauche /
Touche L3 *
Touche de mode ANALOG
(analogique)
* La touche R3 et la touche L3 fonctionnent lorsque le manche est enfoncé.
Touche
SELECT
sélection)
(de
Touche
START
mise en
marche)
Touche R2
(de
Indicateur de mode :
rouge
Touche R1
Touche ¢
Touche a
Touche ✕
Touche s
Manche analogique
droit / Touche R3 *
Page 48

48
Utilisation des Memory Cards (cartes mémoire)
Lecture d’un CD audio
Vous pouvez sauvegarder et charger des
données de jeu à l’aide de la memory card (carte
mémoire) (8 MB) (pour PlayStation
memory card (carte mémoire) (chacune vendue
séparément).
2) ou de la
®
Différences entre la memory card
(carte mémoire) (8 MB) (pour
PlayStation
®2) et la memory card
(carte mémoire)
Lorsque vous jouez avec un logiciel au format
PlayStation
(8 MB*) (pour PlayStation
Lorsque vous jouez avec un logiciel au format
PlayStation
Pour la console de jeux PlayStation®, les unités
de données de jeu sont décrites en tant que “blocs
mémoire”. Pour la console PlayStation
de “KB” (Kilo-octets).
* 8 MB = 8 000 KB
1 Memory card (carte mémoire) (8 MB)
La memory card (carte mémoire) (8 MB) (pour
PlayStation
données de jeu des logiciels au format
PlayStation
mémoire) (8 MB) (pour PlayStation
sauvegarder environ 8 MB de données de jeu,
mais certaines données peuvent être utilisées en
tant qu’informations de contrôle de fichier.
La memory card (carte mémoire) (8 MB) (pour
PlayStation
technologie qui contribue à la protection des
droits d'auteur du contenu par cryptage de
données et par authentification du matériel.
de protection de droits d'auteurs développée par le
Groupe Sony.
compatibilité avec d'autres produits portant la marque
commerciale "MagicGate".
2 Memory card (carte mémoire)
La memory card (carte mémoire) peut
sauvegarder et charger des données de jeu des
logiciels au format PlayStation
card (carte mémoire) peut sauvegarder 120 KB (15
blocs mémoire) de données de jeu.
Remarque
Il est impossible de copier des données sur la memory card
(carte mémoire) (8 MB) (pour PlayStation
(carte mémoire) qui ne dispose pas de suffisamment de
mémoire. Avant de jouer, vérifiez l’espace nécessaire pour
l’enregistrement du jeu ainsi que l’espace disponible sur la
memory card (carte mémoire) (8 MB) (pour PlayStation
memory card (carte mémoire). Consultez le manuel du logiciel
approprié pour déterminer la quantité d’espace nécessaire pour
l’enregistrement des données d’un jeu particulier.
2, utilisez la memory card (carte mémoire)
®
, utilisez la memory card (carte mémoire) (2).
®
(pour PlayStation
2) (1).
®
®
2)
(vendue séparément)
2) peut sauvegarder et charger des
®
2. Chaque memory card (carte
®
2) utilise
®
MAGICGATE
est un terme qui désigne une technologie
ne garantit pas la
(vendue séparément)
®
2, il s’agit
®
2) peut
®
, une
. Chaque memory
®
2) ou la memory card
®
2) ou la
Insertion de la memory card
(carte mémoire) (8 MB) (pour
PlayStation
®2) et de la memory
card (carte mémoire)
Introduisez la memory card (carte mémoire)
(8 MB) (pour PlayStation®2) ou la memory card
(carte mémoire) dans la fente pour MEMORY
CARD (carte mémoire), en orientant la flèche
vers le haut.
Fente pour MEMORY CARD
(carte mémoire) N°1
Fente pour MEMORY CARD
(carte mémoire) N°2
Remarques sur l’utilisation de la memory card
®
(carte mémoire) (8 MB) (pour PlayStation
2) et
la memory card (carte mémoire) avec la multitap
•Lorsque vous utilisez un logiciel au format
PlayStation®2, utilisez la multitap (prise
multiple) (pour PlayStation®2) SCPH-10090 U.
Lorsque vous utilisez un logiciel au format
PlayStation®, utilisez la multitap (prise multiple)
SCPH-1070 U.
• Lorsque vous insérez la multitap (prise multiple)
SCPH-1070 U dans le port de manette N°1, n’insérez
pas la memory card (carte mémoire) (8 MB) (pour
PlayStation®2) ou la memory card (carte mémoire)
dans la fente pour MEMORY CARD (carte mémoire)
N°1 de la console PlayStation®2. Cette règle
s’applique également lorsque vous insérez une
multitap (prise multiple) dans le port de manette
N°2. Le cas échéant, il se peut que les données
soient perdues.
Copie/suppression de données de jeu
Vous pouvez copier des données de jeu d’une
memory card (carte mémoire) (8 MB) (pour
PlayStation®2) ou d’une momory card (carte
mémoire) sur une autre ou supprimer des données
que vous ne souhaitez plus conserver.
Cependant, vous ne pouvez pas copier des données
de jeu d’un logiciel au format PlayStation®2 vers
une memory card (carte mémoire).
Vous pouvez vérifier, copier et supprimer des
données de jeu sur l’écran navigateur. Pour
obtenir des détails sur le navigateur, reportez-vous
à la section “Vérification/copie/suppression de
données de jeu” page 45.
Remarque
Vous ne pouvez pas sauvegarder ou charger des données
de jeu sur l’écran navigateur. Pour obtenir des détails sur
l’enregistrement ou le chargement des données de jeu,
reportez-vous au manuel du logiciel.
Lecture d’un CD audio
1
Appuyez sur le bouton A (ouvrir).
Le compartiment à disque s’ouvre.
2
Placez un disque sur le
compartiment, l’étiquette
orientée vers le haut (données
vers le bas).
Appuyez sur le bouton A.
3
Le compartiment à disque se referme.
Sélectionnez l’icône CD audio
4
dans l’écran navigateur (page
45), puis appuyez sur la touche ✕.
L’écran “CD audio” apparaît.
Sélectionnez le numéro d’icône
5
en utilisant les touches
directionnelles et appuyez sur la
touche ✕.
Le Panneau de commandes du CD
apparaît et la lecture commence.
Contrôle de la lecture d’un CD audio
Lors de la lecture d’un CD, les paramètres
s’affichent sur l’écran. Sélectionnez l’option
correspondante à l’opération souhaitée, à l’aide
des touches directionnelles. Appuyez ensuite sur
la touche ✕.
N Lance la lecture.
X Marque une pause.
x Arrête la lecture.
. Recherche le début de la plage en cours
ou précédente.
M Avance rapide.
m Retour rapide.
>
Recherche le début de la plage suivante.
Disques de musique dotés de technologies de protection du droit d’auteur
La fonction de lecture des CD audio de ce
produit a été conçue pour être conforme aux
normes Disques Compacts (CD) en vigueur.
Depuis peu, des maisons de disques ont mis
sur le marché des disques de musique dotés
de technologies de protection du droit
d’auteur. Certains de ces disques de musique
ne sont pas conformes aux normes CD et
risquent de ne pas être lus par ce produit.
Lecture dans différents modes
Il vous est possible de modifier les modes de
lecture. Par défaut, “Lecture Continue” est
sélectionné pour “Mode de Lecture” et “Désactivé”
est sélectionné pour “Mode Répétition”.
Sélectionnez l’icône CD audio dans l’écran
navigateur, puis appuyez sur la touche f pour
modifier le réglage.
Pour lire les plages désirées dans un ordre
spécifique
1 ... Sélectionnez “Mode de Lecture” en utilisant
les touches directionnelles puis appuyez sur
la touche ✕.
2...... Sélectionnez “Programme” en utilisant les
touches directionnelles vers la gauche et la
droite et appuyez sur la touche
3...... Sélectionnez le numéro de la plage que vous
souhaitez programmer puis appuyez sur la
touche ✕. Répétez cette étape jusqu’à ce que
vous ayez sélectionné toutes les plages que
vous souhaitez lire.
4...... Appuyez sur la touche a pour revenir à
l’écran navigateur.
Pour lire les plages de manière aléatoire
1...... Sélectionnez “Mode de Lecture” en utilisant
les touches directionnelles puis appuyez sur
la touche ✕.
2...... Sélectionnez “Lecture Aléatoire” en utilisant
les touches directionnelles gauche et droite
et appuyez sur la touche ✕.
3...... Appuyez sur la touche a pour revenir à
l’écran navigateur.
Pour lire toutes les plages de manière répétée
1...... Sélectionnez “Mode Répétition” en utilisant
les touches directionnelles haut et bas puis
appuyez sur la touche ✕.
2
...... Sélectionnez “Tout” en utilisant les touches
directionnelles gauche et droite et appuyez
sur la touche ✕.
3...... Appuyez sur la touche a pour revenir à
l’écran navigateur.
Pour lire une seule plage de manière répétée
1...... Sélectionnez “Mode Répétition” en utilisant
les touches directionnelles haut et bas puis
appuyez sur la touche ✕.
2...... Sélectionnez “1” en utilisant les touches
directionnelles gauche et droite et appuyez
sur la touche ✕.
3...... Appuyez sur la touche a pour revenir à
l’écran navigateur.
✕
.
Page 49

Lecture d’un DVD vidéo
49
Lecture d’un DVD vidéo
En fonction du DVD vidéo, certaines
opérations peuvent être différentes ou
restreintes. Reportez-vous aux instructions
fournies avec le disque.
Mettez la console sous tension à
1
l’aide de l’interrupteur
d’alimentation principal (MAIN
POWER) situé à l’arrière de la
console.
L'indicateur 1 (veille) situé à l’avant
de la console s’allume en rouge pour
indiquer que la console est désormais
en mode de veille.
Appuyez sur le bouton 1 (veille)
2
/ RESET.
L'indicateur 1 devient vert et l’écran
de démarrage s’affiche.
Appuyez sur le bouton A (ouvrir).
3
Le compartiment à disque s’ouvre.
Placez un disque sur le
4
compartiment, l’étiquette orientée
vers le haut (données vers le bas).
Appuyez sur le bouton A.
5
Le compartiment à disque se referme
et la console démarre la lecture.
Remarques
• En fonction du DVD, un menu DVD ou un menu des titres
peut s’afficher sur l’écran du téléviseur (voir page 51).
• Si vous appuyez sur le bouton A après la lecture,
l’écran navigation apparaît.
• Lors de la lecture d’un DVD vidéo, raccordez
directement la console au téléviseur. Ne raccordez pas
la console à un magnétoscope car vous risqueriez de
perdre en qualité d’image.
Problème de lecture d’un DVD vidéo :
Dans quelques rares cas, il se peut que certains DVD vidéo
ne fonctionnent pas avec PlayStation®2. Cela est
principalement dû à des variations dans le processus de
fabrication ou dans le codage de leur logiciel. En cas de
problème, relancez le DVD vidéo; si le problème persiste,
contactez l’éditeur du DVD vidéo ou le Support
technique/Service clientèle de SCEA.
Fonctionnement direct du lecteur DVD à l’aide d’une manette
Vous pouvez faire fonctionner le lecteur DVD directement à l’aide des touches d’une manette lorsque
le Panneau de commandes (page 50) n’apparaît pas. Vous pouvez aussi faire fonctionner le lecteur
DVD en utilisant la télécommande DVD (pour PlayStation®2) (vendue séparément). Pour des
instructions détaillées, veuillez vous reporter au mode d’emploi de la télécommande DVD (pour
PlayStation®2) avec unité de récepteur infrarouge SCPH-10171.
Cette console est dotée d’un logiciel de lecteur DVD compatible avec la télécommande DVD (pour
PlayStation®2). Vous pouvez utiliser la télécommande DVD (pour PlayStation®2) tout simplement en
insérant l’unité de récepteur infrarouge (fournie avec la télécommande DVD) dans un port de
manette de la console. Aucune memory card (carte mémoire) (8 MB) (pour PlayStation®2) n’est
nécessaire en utilisant la télécommande DVD (pour PlayStation®2) avec cette console.
Touche L2 : (Arrière)
(Page 52)
Touche L1 : . (Précédent)
DUALSHOCK
2
Touches directionnelles :
Contrôle du curseur
Touche* L3 : (Choix
des sous-titres) (Page 51)
Touche SELECT (de sélection) : Affiche le
Panneau de commandes (Page 50)
* Lorsque vous utilisez une manette dépourvue de la touche L3 ou R3, vous pouvez sélectionner la fonction (Choix des
sous-titres) ou
Pour
Arrêt
Pause
Reprendre la lecture après une pause
Atteindre le chapitre suivant en mode
de lecture continue
Revenir au chapitre précédent en mode
de lecture continue
Vous pouvez aussi faire fonctionner diverses fonctions DVD à l’aide de l’écran de menu (Panneau de
commandes). Pour plus de détails, reportez-vous à "Utilisation du Panneau de commandes" (page 50).
(Choix audio) à l’aide du Panneau de commandes (voir page 50).
Opération
Appuyez sur la touche a.
Appuyez sur la touche START (de mise en marche).
Appuyez sur la touche START (de mise en marche).
Appuyez sur la touche R1.
Appuyez sur la touche L1 deux fois.
Touche R2 : (Avant)
(Page 52)
Touche R1 : > (Suivant)
Touche ¢ :
(Menu DVD) (Page 51)
Touche a : Annuler / x
(Arrêt)
Touche ✕ : Entrée
Touche s :
titres) (Page 51)
Touche* R3 :
(Page 51)
Touche START (de mise en
marche) : N (Lecture) / X
(Pause)
(Menu des
(Choix audio)
Reprise de la lecture depuis le
point où vous avez arrêté le
disque (Reprise de lecture)
Le lecteur garde en mémoire le point où vous
avez arrêté la lecture du disque et vous pouvez
reprendre la lecture à partir de ce point.
1......
Pendant la lecture d’un disque, appuyez sur
la touche a pour interrompre la lecture. Le
message suivant apparaît :
Le message “Appuyez sur [Lecture] pour
reprendre la lecture. Pour recommencer au
début, appuyez sur [Arrêt] puis sur
[Lecture].” L’écran du Panneau de
commandes (page 50) s’affiche sur le
téléviseur.
Si le message “La fonction permettant de
continuer ne peut être utilisée ici. La
lecture va reprendre au début.” apparaît,
la fonction de reprise de lecture n’est pas
disponible.
2......
Sélectionnez N
touches directionnelles et appuyez sur la
touche ✕.
Le lecteur démarre la lecture au point où
vous avez arrêté le disque lors de l’étape 1.
Pour démarrer la lecture au début du disque
Après l’étape 1, sélectionnez x
appuyez sur la touche ✕. L’endroit où vous
avez arrêté la lecture est effacé.
Sélectionnez N (Lecture) et appuyez sur la
touche ✕.
Remarques
• La fonction de reprise de lecture risque de ne pas être
disponible sur certains DVD.
• En fonction du point où vous avez arrêté le disque, la
console risque de reprendre la lecture à partir d’un
point différent.
• L’endroit où vous avez arrêté la lecture est effacé
lorsque :
– Vous ouvrez le compartiment à disque.
– Vous passez en mode de veille en appuyant et en
gardant enfoncé le bouton 1/RESET à l’avant de la
console.
– Vous mettez la console hors tension à l’aide de
l’interrupteur d’alimentation principal (MAIN
POWER) situé à l’arrière de la console.
– Vous commencez la lecture après avoir sélectionné
un titre ou un chapitre.
(Lecture)
en utilisant les
(Arrêt)
et
FR
Jeu / CD Audio / DVD vid
éo
Page 50

50
Utilisation du Panneau de commandes
Utilisation du Panneau de
commandes
Vous pouvez profiter de diverses fonctions à
l’aide de l’écran de menu (Panneau de
commandes).
Les fonctions disponibles varient selon le
disque.
Appuyez sur la touche SELECT
1
(de sélection).
Le Panneau de commandes apparaît
sur l’écran du téléviseur.
2
Sélectionnez le paramètre
souhaité à l’aide des touches
directionnelles.
Appuyez sur la touche ✕.
3
Pour obtenir des détails sur chaque
paramètre du Panneau de
commandes, voir pages 51 à 56.
Vous pouvez sélectionner directement
certains paramètres à l’aide de la manette.
Voir page 49.
Liste des Paramètres du Panneau de commandes
à
1 Menu DVD (page 51)
Certains DVD vous permettent de
sélectionner le contenu du disque à l’aide
d’un menu. Lorsque vous lisez ces DVD,
vous pouvez sélectionner la langue des
sous-titres, la langue de la bande son, etc., à
l’aide du menu DVD.
2 Menu des titres (page 51)
Un DVD est divisé en longues sections
d’image ou de musique appelées “titres”.
Lorsque vous lisez un DVD qui comprend
plusieurs titres, vous pouvez sélectionner le
titre souhaité à l’aide du menu des titres.
3 O Retour (page 51)
Vous pouvez revenir à l’écran précédent du
menu DVD ou du menu des titres.
4 Choix audio (page 51)
Si le disque DVD contient des plages
multilingues, vous pouvez sélectionner la
langue de votre choix lors de la lecture du
disque.
5 Choix d’angle de caméra (page 51)
Il est possible de modifier les angles pour
les DVD sur lesquels divers angles (angles
multiples) d’une scène sont enregistrés.
6 Choix des sous-titres (page 51)
Pour les DVD sur lesquels sont enregistrés
des sous-titres, il est possible de modifier la
langue à tout moment lors de la lecture
d’un DVD, de l’activer et de la désactiver
quand bon vous semble.
7 Aller au titre (page 52)
Vous pouvez sélectionner le numéro du
titre que vous souhaitez rechercher.
8 Réglages (page 53)
À l’aide de l’écran réglages, vous pouvez
effectuer le réglage initial, régler l’image et
le son et définir les diverses sorties. Vous
pouvez également définir la langue des
sous-titres et l’écran réglages, limiter la
lecture par les enfants.
9 Affichage du chapitre (page 52)
Pendant la lecture d’un disque, vous
pouvez vérifier le numéro du titre et du
chapitre en cours sur l’écran du téléviseur.
0 Aide (page 52)
La liste des touches directes de la manette
s’affiche sur l’écran du téléviseur.
qa Aller au chapitre (page 52) / touches
numérotées
Vous pouvez sélectionner le numéro du
à
chapitre que vous souhaitez rechercher.
qs . Précédent
Vous pouvez revenir au chapitre précédent
en mode de lecture continue.
qd / Recherche (page 52)
Vous pouvez rechercher rapidement un
point particulier du DVD en contrôlant
l’image.
qf > Suivant
Vous pouvez aller au chapitre suivant en
mode de lecture continue.
qg N Lecture
qh X Pause
qj x Arrêt
qk Ralenti (page 52)
Vous pouvez rechercher un point
particulier du DVD en regardant l‘image au
ralenti.
Page 51

51
Utilisation du menu DVD
Certains DVD vous permettent de sélectionner
le contenu du disque à l’aide d’un menu.
Lorsque vous lisez ces DVD, vous pouvez
sélectionner la langue des sous-titres, la langue
du son, etc., à l’aide du menu DVD.
1...... Sélectionnez (Menu DVD) à l’aide des
touches directionnelles et appuyez sur la
touche ✕.
Le menu DVD apparaît sur l’écran du
téléviseur. Le contenu du menu varie d’un
disque à l’autre.
2...... Appuyez sur les touches directionnelles
pour sélectionner le paramètre à modifier.
3...... Pour modifier les autres paramètres,
répétez l’étape 2.
4...... Appuyez sur la touche ✕.
Vous pouvez afficher le menu DVD
directement.
Appuyez sur la touche ¢ de la manette
pendant que le Panneau de commandes
n’apparaît pas.
Si vous souhaitez sélectionner la langue du
menu DVD
Pour modifier ce paramètre, utilisez l’option
“Menus DVD” dans l’écran “Sélection de la
langue” de l’écran réglages. Pour obtenir des
détails, reportez-vous à la page 54.
Pour revenir à l’écran précédent du menu
DVD
Sélectionnez O (Retour) et appuyez sur la
touche ✕.
Cette fonction risque de ne pas être disponible
sur certains DVD.
Remarques
• Le menu DVD risque de ne pas être disponible sur
certains DVD.
• En fonction du DVD, le “Menu DVD” peut être tout
simplement appelé “Menu” dans les instructions
fournies avec le disque.
Affichage du menu des titres
Un DVD est divisé en longues sections d’image
ou de musique appelées “titres”. Lorsque vous
lisez un DVD qui comprend plusieurs titres,
vous pouvez sélectionner le titre souhaité à
l’aide du menu des titres.
1...... Sélectionnez (Menu des titres) à l’aide
des touches directionnelles et appuyez sur
la touche ✕.
Le menu des titres apparaît sur l’écran du
téléviseur. Le contenu du menu varie d’un
disque à l’autre.
2...... Appuyez sur les touches directionnelles
pour sélectionner le titre à lire.
3...... Appuyez sur la touche ✕.
La console démarre la lecture du titre
sélectionné.
Vous pouvez afficher le menu des titres
directement.
Appuyez sur la touche s de la manette
pendant que le Panneau de commandes
n’apparaît pas.
Pour revenir à l’écran précédent du menu
des titres
Sélectionnez O (Retour) et appuyez sur la
touche ✕.
Cette fonction risque de ne pas être disponible
sur certains DVD.
Remarques
• Sur certains DVD, il se peut que vous ne puissiez pas
sélectionner un titre.
• Sur certains DVD, le “Menu des titres” peut être tout
simplement appelé “Menu” ou “Titre” dans les
instructions fournies avec le disque. “Appuyez sur
ENTER” peut également être indiqué sous la forme
“Appuyez sur SELECT”.
Changement de langue pour la
bande son
Si le disque DVD contient des plages en plusieurs
langues, vous pouvez sélectionner la langue de
votre choix lors de la lecture du disque.
Les langues que vous pouvez sélectionner
varient en fonction du DVD.
Sélectionnez (Choix audio) à l’aide des
touches directionnelles et appuyez sur la
touche ✕.
Chaque fois que vous appuyez sur la touche ✕,
la langue change.
Vous pouvez sélectionner les “Choix audio”
directement.
Appuyez sur la touche R3 de la manette
pendant que le Panneau de commandes
n’apparaît pas. Chaque fois que vous appuyez
sur cette touche, la langue change.
Remarques
• En fonction du DVD, vous risquez de ne pas pouvoir
changer de langue même si des plages sont
multilingues.
• Pendant la lecture du DVD, le son pourrait être modifié
lorsque vous changez de titre.
Modification des angles de
visionnement
Il est possible de modifier les angles pour les DVD
sur lesquels diverses vues (angles multiples)
d’une scène sont enregistrées. Par exemple, lors
de la lecture d’une scène impliquant un train en
mouvement, vous pouvez afficher la vue à partir
de l’avant du train, de la fenêtre gauche du train
ou de la fenêtre droite sans interrompre le
déplacement du train.
Sélectionnez (Choix d’angle de caméra) à
l’aide des touches
sur la touche ✕.
Chaque fois que vous appuyez sur la touche ✕,
l’angle change.
Remarques
• Le nombre d’angles varie d’un disque à l’autre ou
d’une scène à l’autre. Le nombre d’angles modifiables
d’une scène correspond à celui d’angles filmés.
• En fonction du DVD, vous risquez de ne pas pouvoir
modifier les angles malgré que les scènes soient filmées
sous plusieurs angles.
directionnelles
et appuyez
Affichage des sous-titres
Pour les DVD sur lesquels sont enregistrés des
sous-titres, il est possible d’activer et de
désactiver l’affichage des sous-titres à votre
guise pendant la lecture du DVD.
Pour les DVD sur lesquels sont enregistrés des
sous-titres multilingues, il est possible de
modifier la langue des sous-titres à tout
moment lors de la lecture du DVD et de
l’activer ou de la désactiver à votre guise. Par
exemple, vous pouvez sélectionner une langue
que vous souhaitez apprendre et activer les
sous-titres pour une meilleure compréhension.
Sélectionnez (Choix des sous-titres) à l’aide
des touches directionnelles et appuyez sur la
touche ✕.
Vous pouvez sélectionner la langue des soustitres, l’activer ou la désactiver.
Les langues que vous pouvez sélectionner
varient en fonction du DVD.
Vous pouvez sélectionner les “Choix des
sous-titres“ directement.
Appuyez sur la touche L3 de la manette
pendant que le Panneau de commandes
n’apparaît pas. Vous pouvez sélectionner la
langue des sous-titres, l’activer ou la désactiver.
Remarques
• Lors de la lecture d’un DVD sur lequel aucun sous-titre
n’est enregistré, aucun sous-titre n’apparaît.
• En fonction du DVD, vous risquez de ne pas pouvoir
activer les sous-titres même s’ils sont enregistrés sur le
DVD.
• En fonction des DVD, il se peut que vous ne puissiez
pas désactiver les sous-titres.
• Le type et le nombre de langues des sous-titres varient
d’un disque à l’autre.
• En fonction du DVD, vous risquez de ne pas pouvoir
changer les sous-titres même si des sous-titres
multilingues sont enregistrés sur le DVD.
• Pendant la lecture du DVD, les sous-titres risquent
d’apparaître dans une autre langue lorsque vous
changez de titre.
FR
DVD vid
éo
Page 52

52
Utilisation du Panneau de commandes (suite)
Recherche d’un titre
Sélectionnez le numéro du titre que vous
rechechez à l’aide des touches numérotées.
1...... Sélectionnez (Aller au titre) à l’aide des
touches directionnelles et appuyez sur la
touche ✕.
“Aller au titre - -” apparaît sur l’écran du
téléviseur.
2...... Entrez le numéro à deux chiffres du titre à
l’aide des touches numérotées.
La lecture commence au numéro
sélectionné.
Affichage des informations
pendant la lecture d’un disque
Pendant la lecture d’un disque, vous pouvez
vérifier le numéro du titre et du chapitre en
cours sur l’écran du téléviseur.
Sélectionnez (Affichage du chapitre) à
l’aide des touches directionnelles et appuyez
sur la touche ✕.
Chaque fois que vous appuyez sur la touche ✕,
vous pouvez activer et désactiver l’affichage.
Affichage de la liste des
touches d’accès direct (Aide)
La liste des touches directes de la manette
s’affiche sur l’écran du téléviseur.
Sélectionnez (Aide) avec les touches
directionnelles et appuyez sur la touche ✕.
Pour désactiver la liste
Appuyez sur la touche ✕.
Recherche d’un chapitre
Vous pouvez sélectionner le numéro du
chapitre que vous souhaitez rechercher à l’aide
des touches numérotées.
Entrez le numéro à deux chiffres du chapitre à
l’aide des touches numérotées.
La lecture commence au numéro sélectionné.
Recherche d’un point
spécifique sur le disque
Vous pouvez rechercher rapidement un point
particulier du disque en contrôlant l’image ou
en effectuant un ralenti.
Remarque
Selon le DVD, certaines de ces opérations peuvent être
impossibles.
Recherche rapide d’un point (Recherche)
1...... Pendant la lecture du disque, sélectionnez
(Recherche avant) ou (Recherche
arrière) à l’aide des touches
directionnelles.
2...... Maintenez la touche ✕ enfoncée pour
rechercher le point.
Lorsque vous avez trouvé le point
souhaité, relâchez la touche pour revenir à
une vitesse de lecture normale.
Vous pouvez également utiliser les touches
directes.
Appuyez sur la touche R2 (recherche avant) ou L2
(recherche arrière) de la manette pendant que le panneau
de commandes n’apparaît pas.
Recherche d’un point au ralenti sur l’écran
(Ralenti)
1...... Pendant la lecture du disque, sélectionnez
(Ralenti) à l’aide des touches
directionnelles.
2...... Appuyez sur la touche ✕.
La lecture au ralenti commence.
Lorsque vous avez trouvé le point
souhaité, sélectionnez N (Lecture) et
appuyez sur la touche ✕ pour revenir à
une vitesse normale.
Vous pouvez également reprendre la
lecture en appuyant sur la touche START
(de mise en marche ).
Page 53

Paramètres et réglages du lecteur DVD
53
Utilisation de l’écran réglages
À l’aide de l’écran réglages, vous pouvez
effectuer le réglage initial, régler l’image et le
son et définir les diverses sorties. Vous pouvez
également définir la langue des sous-titres,
limiter les possibilités de lecture pour les
enfants, etc..
1
Appuyez sur la touche SELECT
(de sélection) pour afficher le
Panneau de commandes sur le
téléviseur.
2
Sélectionnez (Réglages) à
l’aide des touches
directionnelles et appuyez sur la
touche ✕.
L’écran réglages s’affiche sur le
téléviseur.
3
Sélectionnez le paramètre
principal souhaité à l’aide des
touches directionnelles.
Options de l’écran réglages
Les paramètres par défaut sont soulignés.
FR
DVD vid
éo
Appuyez sur la touche ✕.
4
Le paramètre principal sélectionné
est mis en surbrillance.
5
Sélectionnez le paramètre
souhaité à l’aide des touches
directionnelles.
6
Appuyez sur la touche ✕.
Après avoir changé les réglages DVD
Pour sauvegarder vos changements, assurez-vous
d’éjecter le DVD avant d’appuyer sur le bouton 1/RESET
ou de mettre l’unité hors tension à l’aide de l’interrupteur
d’alimentation principal (MAIN POWER). Veuillez noter
que les changements ne seront pas sauvegardés si vous
réinitialisez ou mettez la console hors tension sans avoir
d’abord éjecté le DVD.
Page 54

54
Paramètres et réglages du lecteur DVD (suite)
Sélection des options de
langue (Sélection de la langue)
L’écran “Sélection de la langue” vous permet
de choisir plusieurs langues pour l’affichage ou
la bande sonore.
Les paramètres par défaut sont soulignés.
Choisissez “Sélection de la langue” dans l’écran
réglages.
Remarques
• Lorsque vous sélectionnez une langue qui n’est pas
enregistrée sur le DVD, l’une des langues enregistrées
est automatiquement sélectionnée pour les paramètres
“Menus DVD”, “Audio” et “Sous-titres”.
• Avec certains DVD, la console ne peut pas utiliser la
langue sélectionnée pour les paramètres “Menus
DVD”, “Audio” ou “Sous-titres”.
x Écrans
Permet de sélectionner la langue d’affichage
des menus.
• Anglais
• Français
• Allemand
• Italien
• Espagnol
• Néerlandais
• Portugais
x Menus DVD
Sélectionne la langue du menu DVD.
• Anglais
• Français
• Allemand
• Italien
• Espagnol
• Néerlandais
• Danois
• Suédois
• Finnois
• Norvégien
• Portugais
• Russe
• Chinois
• Japonais
• Choix de la langue
Lorsque vous sélectionnez “Choix de la
langue”, la liste des langues s’affiche.
Sélectionnez une langue dans cette liste.
x Audio
Sélectionne la langue de la bande sonore.
• Anglais
• Français
• Allemand
• Italien
• Espagnol
• Néerlandais
• Danois
• Suédois
• Finnois
• Norvégien
• Portugais
• Russe
• Chinois
• Japonais
• Choix de la langue
Lorsque vous sélectionnez “Choix de la
langue”, la liste des langues s’affiche.
Sélectionnez une langue dans cette liste.
x Sous-titres
Sélectionne la langue des sous-titres.
• Idem audio*
• Anglais
• Français
• Allemand
• Italien
• Espagnol
• Néerlandais
• Danois
• Suédois
• Finnois
• Norvégien
• Portugais
• Russe
• Chinois
• Japonais
• Choix de la langue
Lorsque vous sélectionnez “Choix de la
langue”, la liste des langues s’affiche.
Sélectionnez une langue dans cette liste.
* Lorsque vous sélectionnez “Idem audio”, la langue des
sous-titres change en fonction de la langue sélectionnée
pour la bande sonore.
Après avoir changé les réglages DVD
Pour sauvegarder vos changements, assurez-vous
d’éjecter le DVD avant d’appuyer sur le bouton 1/RESET
ou de mettre l’unité hors tension à l’aide de l’interrupteur
d’alimentation principal (MAIN POWER). Veuillez noter
que les changements ne seront pas sauvegardés si vous
réinitialisez ou mettez la console hors tension sans avoir
d’abord éjecté le DVD.
Réglage du mode d’affichage du
téléviseur (Réglage de l’écran)
Le paramètre “Réglage de l’écran” vous permet
de définir l’affichage en fonction des conditions
de lecture.
Les paramètres par défaut sont soulignés.
Sélectionnez “Réglage de l’écran” dans l’écran
réglages.
x Type TV
Permet de sélectionner le rapport hauteur/
largeur du téléviseur à raccorder.
Vous pouvez changer le réglage seulement
lorsque le DVD est arrêté.
• 16:9 : Sélectionnez cette option lorsque vous
raccordez la console à un téléviseur à écran
large ou à un téléviseur standard à mode
élargi.
• 4:3 Letter Box : Sélectionnez cette option
lorsque vous raccordez la console à un
téléviseur standard. Affiche les images de
manière élargie avec des bandes en haut et
en bas de l’écran.
• 4:3 PAN SCAN : Sélectionnez cette option
lorsque vous raccordez la console à un
téléviseur standard. Affiche les images
élargies en fonction de la hauteur de l’écran,
les parties gauche et droite qui ne s’adaptent
pas à l’écran étant automatiquement coupées
16:9
4:3 Letter Box
4:3 PAN SCAN
Remarque
En fonction du DVD, le paramètre “4:3 Letter Box” peut se
sélectionner automatiquement au lieu du paramètre “4:3
PAN SCAN” et vice versa.
x DNR (Digital Noise Reduction, réduction
du bruit numérique)
Si la lecture d’une image est perturbée par un
bruit, réglez ce paramètre sur “DNR1” ou
“DNR2”.
• Désactivé(e) : En règle générale, sélectionnez
cette position.
• DNR1 : Réduit l’interférence pour rendre
l’image nette.
• DNR2 : Réduit l’interférence pour rendre
l’image plus nette.
Remarques
• Lorsque vous sélectionnez “DNR2”, une image
rémanente risque d’apparaître. Dans ce cas,
sélectionnez “Désactivé(e)”.
• En fonction du DVD, la fonction DNR peut ne pas
fonctionner parfaitement.
x Précision des contours
Accentue ou atténue les contours de l’image.
Plus la valeur est élevée, plus les contours sont
accentués.
• +2
• +1
• 0 : En règle générale, sélectionnez cette
position.
•–1
•–2
.
x Affichage
Active et désactive le statut de lecture sur
l’écran du téléviseur.
• Activé(e) : Lorsque vous faites fonctionner le
lecteur DVD, le statut de lecture apparaît
pendant quelques secondes sur l’écran du
téléviseur.
• Désactivé(e) : Le statut de lecture ne s’affiche
pas.
Après avoir changé les réglages DVD
Pour sauvegarder vos changements, assurez-vous
d’éjecter le DVD avant d’appuyer sur le bouton 1/RESET
ou de mettre l’unité hors tension à l’aide de l’interrupteur
d’alimentation principal (MAIN POWER). Veuillez noter
que les changements ne seront pas sauvegardés si vous
réinitialisez ou mettez la console hors tension sans avoir
d’abord éjecté le DVD.
Page 55

55
Réglage personnalisé des options
(Réglage personnalisé)
Le paramètre “Réglage personnalisé” vous
permet de définir les conditions de lecture.
Les paramètres par défaut sont soulignés.
Sélectionnez “Réglage personnalisé” dans
l’écran réglages.
x Mode de pause
Sélectionne l’image en mode de pause.
• Auto : L’image, y compris les sujets en
mouvement qu’elle contient, est affichée sans
sautillement. Choisissez de préférence cette
option.
• Image : L’image, y compris les sujets
immobiles qu’elle contient est affichée à
haute résolution.
x Contrôle parental
On peut limiter la lecture de certains DVD.
La fonction “Contrôle parental” vous permet
de définir un niveau de restriction de lecture et
un code d’accès pour réduire l’accès des
enfants à certains contenus.
Sélectionnez “Réglage personnalisé” dans
l’écran réglages.
1...... Sélectionnez “Contrôle parental” à l’aide
des touches directionnelles, puis appuyez
sur la touche ✕.
x Lorsque vous n’avez pas entré un code
d’accès
L’écran d’entrée du code d’accès
s’affiche.
x Lorsque vous avez déjà enregistré un code
d’accès
L’écran de confirmation du code d’accès
s’affiche. Passez à l’étape 3.
2...... Entrez un code d’accès à 4 chiffres à l’aide
des touches numérotées.
3......
Pour confirmer le code d’accès, entrez-le de
nouveau à l’aide des touches numérotées.
Vous pouvez définir des limitations de
lecture et modifier le code d’accès
.
4...... Sélectionnez “Région” en utilisant les
touches directionnelles et appuyez sur la
touche ✕.
5...... Sélectionnez une zone géographique
de restriction
directionnelles,
touche ✕.
6......
Sélectionnez “Niveau” à l’aide des touches
directionnelles, puis appuyez sur la touche ✕.
à l’aide des touches
puis appuyez sur la
7...... Sélectionnez le niveau souhaité à l’aide des
touches directionnelles, puis appuyez sur
la touche ✕.
Plus la valeur est basse, plus le contrôle est
strict.
Pour désactiver la fonction contrôle
parental et lire le DVD après l’entrée de
votre code d’accès
Réglez le paramètre “Niveau” sur
“Désactivé(e)”, puis appuyez sur la touche ✕.
Pour modifier le code d’accès
1...... Après l’étape 3, sélectionnez “Changer de
code d’accès” à l’aide des touches
directionnelles, puis appuyez sur la touche
✕.
L’écran de modification du code d’accès
s’affiche.
2...... Suivez les étapes 2 et 3 pour entrer un
nouveau code d’accès.
Lecture d’un disque bloqué par le niveau de
restriction de lecture
1...... Introduisez le disque et appuyez sur la
touche START(de mise en marche).
L’écran contrôle parental s’affiche.
2...... Entrez votre code d’accès à 4 chiffres à
l’aide des touches numérotées.
La lecture du disque commence.
Lorsque vous arrêtez la lecture du DVD, le
niveau est rétabli au niveau d’origine.
Si vous avez oublié votre code d’accès
Appuyez sur la touche SELECT (de sélection)
et entrez les quatre chiffres “7444” à chaque
fois que votre code d’accès vous est demandé
sur l’écran contrôle parental. L’ancien code
d’accès est supprimé.
Remarques
• Lorsque vous faites jouer des DVD dépourvus de la
fonction contrôle parental, il est impossible d’en limiter
la lecture sur ce lecteur.
• Si vous ne définissez pas de code d’accès, vous ne
pouvez pas modifier les paramètres de restriction de
lecture.
• En fonction du DVD, il peut vous être demandé de
modifier le niveau de contrôle parental pendant la
lecture d’un disque. Dans ce cas, entrez votre code
d’accès, puis modifiez le niveau.
Lorsque vous arrêtez la lecture du DVD, le niveau
d’origine est rétabli.
FR
DVD vid
éo
Après avoir changé les réglages DVD
Pour sauvegarder vos changements, assurez-vous
d’éjecter le DVD avant d’appuyer sur le bouton 1/RESET
ou de mettre l’unité hors tension à l’aide de l’interrupteur
d’alimentation principal (MAIN POWER). Veuillez noter
que les changements ne seront pas sauvegardés si vous
réinitialisez ou mettez la console hors tension sans avoir
d’abord éjecté le DVD.
Page 56

56
Paramètres et réglages du lecteur DVD (suite)
Réglage du son
(Réglage audio)
Le paramètre “Réglage audio” permet de régler
la sonorité selon les conditions de lecture.
Les paramètres par défaut sont soulignés.
Sélectionnez “Réglage audio” dans l’écran
réglages.
x Sortie audio numérique
Cette fonction détermine les modes de sortie
des signaux audio lorsque vous raccordez
1) un composant numérique tel qu’un
récepteur (amplificateur) doté d’un connecteur
numérique, 2) un composant audio équipé d’un
décodeur (Dolby Digital ou DTS) intégré, 3) un
lecteur DAT ou MD par le connecteur DIGITAL
OUT (OPTICAL) à l’aide d’un câble de
connexion numérique optique. Pour plus de
détails sur le raccordement, reportez-vous à la
page 41.
Vous ne pouvez pas régler les paramètres
“Dolby Digital” et “DTS” si vous réglez
“DIGITAL OUT (OPTICAL)” sur
“Désactivé(e)”.
x DIGITAL OUT (OPTICAL)
Pour sélectionner d’émettre les signaux via le
connecteur DIGITAL OUT (OPTICAL) (sortie
numérique optique).
• Activé : sélectionnez cette option lorsque
vous utilisez un câble optique numérique
(vendu séparément) pour raccordement.
Sélectionnez normalement cette option.
En sélectionnant “Activé”, vous pouvez
régler les paramètres “Dolby Digital” et
“DTS”.
• Désactivé : lorsque vous sélectionnez cette
option, les signaux sonores ne sont pas
transmis via le connecteur DIGITAL OUT
(OPTICAL).
Remarque
Lorsque vous sélectionnez “Désactivé(e)”, vous ne pouvez
pas régler les paramètres “Dolby Digital” et “DTS”.
x Dolby Digital
Sélectionne les signaux Dolby Digital à émettre
par le connecteur DIGITAL OUT (OPTICAL).
• Activé(e) : Lorsque la console est raccordée à
un appareil audio équipé d’un décodeur
Dolby Digital intégré.
Si la console est raccordée à un appareil
audio non équipé d’un décodeur Dolby
Digital, ne sélectionnez pas cette option.
Sinon les haut-parleurs produiront un bruit
très fort (ou pas de son du tout), ce qui est
désagréable et peut même endommager les
haut-parleurs ou votre ouïe.
• Désactivé(e) : Lorsque la console est
raccordée à un appareil audio non équipé
d’un décodeur Dolby Digital intégré.
x DTS
Sélectionne les signaux DTS à émettre par le
connecteur DIGITAL OUT (OPTICAL).
• Activé(e) : Lorsque la console est raccordée à
un appareil audio équipé d’un décodeur DTS
intégré.
Si la console est raccordée à un appareil
audio non équipé d’un décodeur DTS, ne
sélectionnez pas cette option. Si vous
choisissez cette option par erreur en lisant
une piste audio DTS, les haut-parleurs
produiront un bruit très fort (ou pas de son
du tout), ce qui est désagréable et peut même
endommager les haut-parleurs ou votre ouïe.
• Désactivé(e) : Lorsque la console est
raccordée à un appareil audio non équipé
d’un décodeur DTS intégré.
x Sélection automatique de plage audio
Accorde la priorité à la bande sonore contenant
le plus grand nombre de canaux lorsque vous
lisez un DVD sur lequel plusieurs formats
audio (format PCM, DTS ou Dolby Digital
format) sont enregistrés.
• Activé(e) : Priorité accordée.
• Désactivé(e) : Aucune priorité accordée.
Remarques
• Lorsque vous réglez ce paramètre sur “Activé(e)”, la
langue peut changer selon les paramètres “Audio”
dans “Sélection de la langue”.
Le paramètre “Sélection automatique de plage audio” a
une priorité sur les paramètres “Audio” dans
“Sélection de la langue” (page 54).
• Si vous réglez “DIGITAL OUT (OPTICAL)” sur
“Activé(e)” et “DTS” sur “Désactivé(e)” dans “Réglage
audio”, la bande sonore DTS n’est pas reproduite
même si vous réglez ce paramètre sur “Activé(e)” et le
canal audio portant le numéro le plus élevé est
enregistré au format DTS.
• Si des bandes sonores PCM, DTS et Dolby Digital ont le
même nombre de canaux, la console sélectionne les
bandes sonores PCM, Dolby Digital et DTS dans cet
ordre.
• Selon le DVD, le canal audio ayant la priorité peut être
prédéterminé. Dans ce cas, vous ne pouvez pas
accorder la priorité au format DTS ou Dolby Digital en
sélectionnant “Activé(e)”.
x Volume du DVD
Si le niveau de sortie audio du DVD est bas,
vous pouvez augmenter le volume du DVD.
(Note : Pour avoir accès à cette fonction,
l’option ‘’DIGITAL OUT (OPTICAL)’’ doit être
réglée à ‘’Désactivé(e)’’.)
• +2 : Vous pouvez augmenter le volume.
• +1 : Vous pouvez augmenter le volume.
• Normal : Volume audio d’origine. Choisissez
de préférence cette option.
Remarque
En fonction du DVD, il est possible que le son soit déformé
si vous sélectionnez “+1” ou “+2”.
Après avoir changé les réglages DVD
Pour sauvegarder vos changements, assurez-vous
d’éjecter le DVD avant d’appuyer sur le bouton 1/RESET
ou de mettre l’unité hors tension à l’aide de l’interrupteur
d’alimentation principal (MAIN POWER). Veuillez noter
que les changements ne seront pas sauvegardés si vous
réinitialisez ou mettez la console hors tension sans avoir
d’abord éjecté le DVD.
Ce produit incorpore une technologie de
protection des droits d’auteur protégée par les
droits de certains brevets américains ou par
d’autres droits de propriété intellectuelle
appartenant à Macrovision Corporation et à
d’autres propriétaires de droits. L’utilisation de
cette technologie de protection des droits
d’auteur doit être autorisée par Macrovision
Corporation et n’est destinée qu’à des
utilisations individuelles ou limitées, sauf
autorisation expresse contraire de Macrovision
Corporation. Il est interdit de procéder à toute
ingénierie inverse ou tout désassemblage.
Page 57

Guide de dépannage
57
En cas de difficulté avec la
console, consultez cette
section.
• Si vous rencontrez l’un des problèmes ci-
après, vérifiez les points suivants avant
de demander une réparation. Si un
problème persiste, contactez notre ligne
d’assistance technique au
1-800-345-7669.
•
Assurez-vous que le cordon d’alimentation
est raccordé à la console et à la prise
murale et que le téléviseur (ou
magnétoscope) ou les accessoires fournis
sont correctement raccordés à la console.
Alimentation
La console ne se met pas sous tension.
, Assurez-vous que le cordon d’alimentation
est correctement raccordé.
, La console ne se met pas sous tension.
Mettez la console sous tension à l’aide de
l’interrupteur d’alimentation principal
(MAIN POWER) situé à l’arrière de la console.
Image
Il n’y a pas d’image.
, Assurez-vous que la console est raccordée
au téléviseur (ou magnétoscope) à l’aide du
câble AV (audio/vidéo intégrés).
, Assurez-vous de mettre la console et le
téléviseur (ou magnétoscope) sous tension.
, Assurez-vous de sélectionner l’entrée vidéo
sur le téléviseur (ou magnétoscope).
, Assurez-vous que le câble AV (audio/
vidéo intégrés) est correctement raccordé.
, Assurez-vous que le disque introduit peut
être lu par cette console. (voir page 34)
, Assurez-vous que le disque est placé avec
l’étiquette orientée vers le haut (données
vers le bas).
, Le disque n’est pas introduit correctement.
, La console est en mode de pause.
, Essayez un autre jeu de câbles AV.
L’image n’est pas claire (impression de
“bruit”).
, La console est posée sur une surface
instable. Placez la console sur une surface
stable et plane. Ne secouez pas la console et
ne la faites pas vibrer.
, Nettoyez le disque.
, De l’humidité s’est formée à l’intérieur de
la console. (voir page 33)
, Si le signal vidéo de la console doit passer
par le magnétoscope avant d’arriver au
téléviseur, la protection anti-copie de
certains DVD vidéo peut affecter et
détériorer la qualité de l’image. Pour
regarder un DVD vidéo, raccordez la
console directement au téléviseur. (voir
page 40)
Il est impossible de modifier le rapport
hauteur/largeur en fonction du téléviseur
lorsque vous regardez un DVD vidéo en
mode grand écran.
, En fonction du disque, le rapport hauteur/
largeur est fixe.
, Assurez-vous que la console est raccordée
directement au téléviseur. (Le sélecteur ou
récepteur (amplificateur) risque de ne pas
être raccordé entre la console et le
téléviseur.)
, En fonction du téléviseur, le rapport
hauteur/largeur est fixe.
Son
Aucun son n’est émis.
, Assurez-vous que la console est raccordée
au téléviseur (ou magnétoscope) à l’aide du
câble AV (audio/vidéo intégrés).
, Assurez-vous de mettre la console et le
téléviseur (ou magnétoscope) sous tension.
, Assurez-vous de sélectionner l’entrée vidéo
sur le téléviseur (ou magnétoscope).
, Assurez-vous que le volume du téléviseur
est correctement réglé et que la fonction de
coupure du son n’est pas sélectionnée sur le
téléviseur.
, Assurez-vous que le câble AV (audio/
vidéo intégrés) est correctement raccordé.
, Assurez-vous que le disque introduit peut
être lu par cette console. (voir page 34)
, Essayez un autre jeu de câbles AV.
, Assurez-vous que le disque est placé avec
l’étiquette orientée vers le haut (données
vers le bas).
, Assurez-vous de raccorder correctement la
console aux connecteurs d’entrée audio du
récepteur (amplificateur). Reportez-vous
également aux instructions fournies avec
votre amplificateur.
, Vérifiez les connexions et le réglage des
haut-parleurs. Reportez-vous également
aux instructions fournies avec votre
amplificateur.
, Assurez-vous de sélectionner l’entrée
appropriée sur le récepteur (amplificateur)
afin d’écouter le son émis par la console.
Reportez-vous également aux instructions
fournies avec votre amplificateur.
, La console est en mode de pause.
, La console est en mode de recherche/
ralenti (lors de la lecture d’un DVD vidéo).
, Le réglage n’est pas correct lorsque la
console est raccordée à l’équipement audio
par les connecteurs DIGITAL OUT
(OPTICAL). (voir page 41)
Il y a un bruit de fond.
,
La console est posée sur une surface instable.
Placez la console sur une surface stable et
plane. Ne secouez pas la console et ne la
faites pas vibrer.
, Nettoyez le disque.
, De l’humidité s’est formée sur le disque.
(voir page 33)
, Vous lisez un CD ou un DVD vidéo avec
des bandes sonores DTS.
Vous pouvez lire un CD ou un DVD vidéo
avec des bandes sonores DTS uniquement
lorsque vous raccordez la console à
l’équipement audio à l’aide d’un décodeur
DTS.
L’effet ambiophonique est difficile à
entendre lorsque vous lisez une bande
sonore Dolby Digital de DVD vidéo.
, Vérifiez les raccordements et le réglage des
haut-parleurs.
Reportez-vous au manuel d’utilisation de
votre récepteur (amplificateur).
,
En fonction du DVD, le signal de sortie peut
ne pas couvrir les canaux 5.1. Il peut être
mono ou stéréo même si la bande sonore est
enregistrée au format Dolby Digital.
Le son provient du haut-parleur central
uniquement.
, En fonction du disque, le son peut provenir
du haut-parleur central uniquement.
Fonctionnement
La manette ne fonctionne pas.
, Assurez-vous que la manette est raccordée
directement à la console.
, Assurez-vous que la manette analogique
(DUALSHOCK®2) ou la manette
analogique (DUALSHOCK®) sont définies
sur le mode approprié au logiciel. (voir
page 47)
, Essayez un autre jeu de manettes.
Le jeu (DVD vidéo ou CD) ne démarre pas.
, Assurez-vous que le disque introduit peut
être lu par cette console. (voir page 34)
, Assurez-vous que le disque est placé avec
l’étiquette orientée vers le haut (données
vers le bas).
, Assurez-vous que le disque est
correctement introduit.
, Nettoyez le disque.
, De l’humidité s’est formée sur le disque.
(voir page 33)
, Essayez une autre copie de disque.
Vous ne pouvez pas enregistrer de données
sur la memory card (carte mémoire)
(8 MB) (pour PlayStation
card (carte mémoire).
, Assurez-vous que la memory card (carte
mémoire) (8 MB) (pour PlayStation®2) ou
la memory card (carte mémoire) est
correctement introduite.
, Assurez-vous que vous jouez correctement
au jeu.
Reportez-vous au manuel du logiciel
approprié.
, Assurez-vous qu’il reste des blocs vides sur
la memory card (carte mémoire) (8 MB)
(pour PlayStation®2) ou la memory card
(carte mémoire).
, Essayez une autre memory card (carte
mémoire) (8 MB) (pour PlayStation®2) et
memory card (carte mémoire).
2) ou la memory
®
FR
DVD vid
éo / Informations compl
émentaires
Page 58

58
Guide de dépannage (suite)
La console ne fonctionne pas correctement.
, Des éléments externes, comme par exemple
l’électricité statique, peuvent affecter le
fonctionnement de la console.
Éteignez et rallumez la console
(interrupteur d’alimentation principal
(MAIN POWER)).
L’indicateur 1 clignote en rouge et la
console ne fonctionne pas.
, Un indicateur rouge clignotant indique un
problème interne qui empêche le
fonctionnement de la console. Si nécessaire,
dégagez les fentes de ventilation et laissez
la console refroidir. Le jeu peut reprendre
lorsque la console repasse en mode de
veille.
Le compartiment à disque ne s’ouvre pas.
, Assurez-vous que le cordon d’alimentation
est correctement connecté.
, Assurez-vous que la console est sous
tension.
Mettez la console sous tension à l’aide de
l’interrupteur d’alimentation principal
(MAIN POWER) situé à l’arrière de la
console.
Fonctionnement des DVD vidéo
La console ne démarre pas la lecture au
début du disque.
, La fonction de reprise de lecture a été
sélectionnée.
Appuyez sur la touche Arrêt avant de
démarrer la lecture. (voir page 49)
, En fonction du disque, un menu des titres
ou un menu DVD s’affiche
automatiquement.
Le disque n’est pas lu même lorsqu’un titre
DVD est sélectionné.
, Le contrôle parental est défini sur le disque.
(voir page 55)
La lecture s’arrête automatiquement.
, Le disque peut contenir un signal de pause
automatique.
Pendant la lecture d’un tel disque, la
console arrête la lecture lorsqu’il rencontre
ce signal.
Vous ne pouvez pas exécuter certaines
fonctions telles qu’Arrêt, Recherche, Lecture
au ralenti.
, En fonction du disque, il est possible que
vous ne puissiez pas effectuer certaines des
opérations mentionnées ci-dessus.
Vous ne pouvez pas changer la langue de la
bande sonore.
, Les pistes multilingues ne sont pas
enregistrées sur le DVD.
, La modification de la langue de la piste est
interdite sur le DVD.
Vous ne pouvez pas changer la langue des
sous-titres.
, Les sous-titres multilingues ne sont pas
enregistrés sur le DVD.
, La modification de la langue des sous-titres
est interdite sur le DVD.
Impossible de désactiver les sous-titres.
, En fonction des DVD, il se peut que vous
ne puissiez pas désactiver les sous-titres.
Vous ne pouvez pas changer l’angle de
caméra lors de la lecture d’un DVD.
, Des vues à des angles multiples ne sont pas
filmées sur le DVD.
, La modification des angles est interdite sur
le DVD.
Connexion au réseau
Une connexion au réseau ne peut pas être
établie (Éthernet ou modem).
, La fiche d’alimentation de la console
PlayStation®2 n’est pas insérée
complètement dans la prise de courant.
Vérifiez que la fiche d’alimentation est bien
insérée complètement dans la prise de
courant.
, L’adaptateur réseau n’est pas fixé
correctement à la console.
Vérifiez que l’adaptateur réseau est fixé
correctement à la console.
, Un disque de logiciel au format
PlayStation®2 compatible avec l’adaptateur
réseau n’est pas inséré dans la console.
Insérez un disque de logiciel au format
PlayStation®2 compatible avec l’adaptateur
réseau dans la console.
, Vous utilisez un logiciel au format
PlayStation®2 qui n’est pas compatible avec
l’adaptateur réseau.
Insérez un disque de logiciel au format
PlayStation®2 compatible avec l’adaptateur
réseau dans la console.
, Les configurations de réseau ne sont pas
exactes.
Reportez-vous aux instructions pour le
logiciel utilisé et ajustez les réglages au
besoin.
, Le réseau est occupé.
Attendez quelques minutes, puis essayez à
nouveau d’accéder au réseau.
Une connexion au réseau ne peut pas être
établie (Éthernet seulement).
, Le câble de réseau n’est pas connecté
correctement.
Vérifiez que le câble de réseau est connecté
correctement.
, Le type de câble de réseau n’est pas le bon.
Utilisez le bon type de câble. Pour plus de
détails, reportez-vous aux instructions du
dispositif de réseau (routeur, modem DSL,
etc.) que vous utilisez pour la connexion.
, Le port ou les configurations du dispositif
de réseau (routeur, modem DSL, etc.) ne
sont pas exactes.
Reportez-vous aux instructions pour le
dispositif de réseau et faites les connexions
ou les réglages appropriés.
Une connexion au réseau ne peut pas être
établie (modem seulement).
, Le cordon téléphonique n’est pas connecté
correctement.
Vérifiez que le cordon téléphonique est
connecté correctement.
, La ligne téléphonique est déjà utilisée.
Vérifiez que la ligne téléphonique n’est pas
utilisée.
, La ligne que vous utilisez n’est pas une
ligne de téléphone résidentiel.
Les lignes téléphoniques PBX, les lignes
téléphoniques commerciales et de réseau
résidentiel ne peuvent pas être utilisées
pour se connecter à un réseau.
, Vous utilisez un logiciel qui peut être
utilisé seulement avec certains
fournisseurs.
Selon la société de téléphone que vous
utilisez, vous ne pouvez peut-être pas
établir de connexion en utilisant le logiciel
qui exige une connexion à certains
fournisseurs de services Internet. Pour plus
de détails, reportez-vous aux instructions
pour le logiciel utilisé ou contactez votre
fournisseur de services Internet.
Le rythme de transmission des données est
lent (modem seulement).
, Il y a de l’interférence produite à votre
emplacement.
N’acheminez pas votre cordon
téléphonique près de dispositifs
électroniques tels que fours micro-ondes,
moniteurs PC, téléviseurs, radios ou hautparleurs qui produisent des bruits de ligne
téléphonique. Vous devriez éviter d’utiliser
des rallonges de téléphone à usage général
(type audio seulement), ou des cordons
lorsque d’autres téléphones ou télécopieurs
y sont connectés.
, Il y a de l’interférence produite à un point
entre votre emplacement (résidence) et la
société de téléphone.
Utilisez la même ligne téléphonique pour
appeler un ami et écoutez s’il y a de
l’interférence de transmissions radio ou
d’autres bruits. Vérifiez aussi s’il y a un
écho lorsque vous parlez. S’il est évident
qu’il y a un problème avec les lignes de
téléphone public, contactez votre société de
téléphone locale pour obtenir de l’aide.
La connexion tombe en panne
soudainement (modem seulement).
, Appel en attente
Lorsque vous recevez un appel avec l’appel
en attente, le modem peut être déconnecté.
Désactivez temporairement la fonction
d’appel en attente. Veuillez vous adresser à
votre société de téléphone locale pour
assistance.
Une connexion au réseau ne peut pas être
établie, et après plusieurs essais, le modem
a cessé de composer (modem seulement).
, Il y a des limites au nombre de fois qu’un
dispositif peut recomposer un numéro.
Lorsque le nombre maximum d’essais est
atteint, le dispositif cesse de recomposer.
Éteignez la console, attendez quelques
minutes, puis essayez à nouveau.
Page 59

Spécifications
Glossaire
59
Généralités
Alimentation
120 V CA, 60 Hz
Consommation électrique
79 W
Dimensions de la console (approx.)
301 × 78 × 182 mm (l/h/p)
1
/8 × 7 1/4 pouces)
(12 × 3
Poids de la console (approx.)
2,2 kg (4 lb 14 oz)
Dimensions de l'adaptateur réseau (approx.)
133 x 72 x 34 mm (l/h/p)
1
/4 x 2 7/8 x 1 3/8 pouces)
(5
Pois de l'adaptateur réseau
200 g (7 oz)
Température de fonctionnement
5 °C - 35 °C (41 °F - 95 °F)
Propriétés de la diode laser
• Matériaux : GaAlAs
• Longueur d’onde : l=650/780 nm
Entrées/sorties sur le panneau avant de la
console
Port de manette (2)
Fente pour MEMORY CARD (carte mémoire) (2)
Connecteur
Connecteur
USB (2)
S400 i.LINK (1)
Entrées/sorties sur le panneau arrière de la
console
Connecteur AV MULTI OUT (sortie AV multiple) (1)
Connecteur DIGITAL OUT (OPTICAL) (1)
EXPANSION BAY (baie d’expansion) (1)
Entrées/sorties sur l'adaptateur réseau
Connecteur NETWORK (réseau) (1)
Connecteur LINE (ligne) (1)
Options de communication
Éthernet
Normes de transmission :
100Base-TX/10Base-T compatible
Interface : RJ-45
Modem
Normes de transmission :
ITU-T V.90, V.34, V.32bis, V.32, V.23,
V.22bis, V.21
Bell 103, 212A
K56 flex compatible
Vitesse de transmission maximale (bps) :
V.90...56K* (réception seulement)
K56 flex...56K* (réception seulement)
V.34 et les autres normes...33,6K*
(transmission/réception)
Interface : RJ-11C
* La vitesse de transmission peut varier selon la
ligne connectée.
Accessoires fournis
Voir page 38.
Accessoires en option
SCPH-10010 U/97026 Manette analogique
SCPH-10020 U/97027 Memory Card
SCPH-10030 U/97028 Câble AV
SCPH-10040 U/97029 Socle vertical
SCPH-10060 U/97030 Câble S VIDEO
SCPH-10071/94043 Adaptateur RFU
SCPH-10090 U/97031 Multitap(prise multiple)
SCPH-10100 U/97032
SCPH-10110 U/97033 Socle horizontal
SCPH-10130 U/97034 Adaptateur AV
SCPH-10171 Télécommande DVD
SCPH-1020 U Memory Card
SCPH-1070 U Multitap(prise multiple)
SCPH-1100 U/94050 Câble S VIDEO
SCPH-1121/94053 Adaptateur RFU
SCPH-1140 U/94055 Câble AV
SCPH-110 U Manette analogique
Pour obtenir des informations sur les pièces complémentaires,
veuillez appeler le 1-800-345-7669.
Conception et spécifications sujettes à modification sans
préavis.
(DUALSHOCK
(carte mémoire)
(8 MB)(pour PlayStation
(audio/vidéo intégrés)
(pour PlayStation
(pour PlayStation
Câble AV composant
(pour PlayStation®2)
(pour PlayStation
(avec connecteur S VIDEO OUT )
(pour PlayStation
avec Unité de Récepteur
Infrarouge
(carte mémoire)
(audio/vidéo intégrés)
(DUALSHOCK
2)
®
2)
®
2)
®
2)
®
2)
®
)
®
Chapitre (page 52)
Section d’une image ou d’une pièce musicale
d’un DVD plus petite qu’un titre. Un titre est
composé de plusieurs chapitres. Chaque
chapitre est doté d’un numéro de chapitre qui
permet de le localiser aisément.
2)
®
Contrôle parental (page 55)
Fonction dotant les DVD qui consiste à limiter
la lecture des disques suivant l’âge des
utilisateurs et qui repose sur un niveau de
limitation propre à chaque pays. La limitation
varie d’un disque à l’autre; lorsqu’elle est
activée, la lecture est totalement impossible, les
scènes de violence sont omises ou remplacées
par d’autres scènes, etc.
DVD (page 49)
Disque contenant jusqu’à 8 heures d’images
animées pour un format identique à celui d’un
CD ordinaire.
La capacité de données d’un DVD simple
couche et simple face, à 4,7 GB, est 7 fois
supérieure à celle d’un CD ordinaire. La
capacité de données d’un DVD double couche
et simple face est quant à elle de 8,5 GB, celle
d’un DVD simple couche et double face de 9,4
GB et celle d’un DVD double couche et double
face de 17 GB.
Les données vidéo sont enregistrées suivant le
format MPEG 2, l’une des normes
internationales appliquées pour la technologie
de compression numérique. Les données vidéo
sont comprimées environ 40 fois. Le DVD
FR
Informations compl
utilise également la technologie de codage à
Dolby Digital (pages 41, 56)
Technologie de compression audio numérique
développée par Dolby Laboratories. Cette
technologie est compatible avec le son
ambiophonique à 5.1 canaux. Le canal arrière
est de type stéréo. Ce format intègre également
un canal discret d’extrêmes graves. Dolby
Digital fournit les mêmes 5.1 canaux discrets de
haute qualité audio numérique que les
débit variable qui modifie les données à
assigner en fonction du statut de l’image.
Les données audio sont enregistrées en Dolby
Digital ainsi qu’en PCM, ce qui vous permet
d’écouter des sons d’une présence accrue.
Diverses fonctions avancées telles que les
angles multiples, le multilinguisme et le
contrôle parental sont également accessibles sur
les DVD.
émentaires
systèmes de cinéma audio Dolby Digital. Une
séparation efficace des canaux est rendue
possible grâce à un enregistrement discret des
données de canal et un traitement numérique.
Fonction d’angles multiples (page 51)
Plusieurs angles pour la scène (points de vue
de la caméra vidéo) sont filmés sur certains
DVD.
DTS (pages 41, 56)
Technologie de compression audio numérique
développée par Digital Theater Systems Inc.
Cette technologie est compatible avec le son
ambiophonique à 5.1 canaux. Le canal arrière
est de type stéréo et ce format intègre
Fonction de multilinguisme (pages 51, 54)
Plusieurs langues de diffusion sonore ou
d’affichage des sous-titres accompagnant les
images sont enregistrées sur certains DVD.
également un canal discret d’extrêmes graves.
Le DTS fournit les mêmes 5.1 canaux discrets
de haute qualité audio numérique. Une
séparation efficace des canaux est rendue
possible grâce à un enregistrement discret des
données de canal et un traitement numérique.
Titre (page 52)
La plus longue section d’images ou musicale
d’un DVD; un film, etc., pour une séquence
d’images d’un logiciel vidéo; ou un album, etc.,
pour une pièce musicale d’un logiciel audio.
Chaque titre est doté d’un numéro de titre qui
permet de le localiser.
Page 60

60
GARANTIE LIMITÉE
Sony Computer Entertainment America (SCEA)
garantit à l'acheteur d'origine que chacun des
produits constituants de ce PlayStation®2 online
pack, à savoir, la console, l'adaptateur réseau, les
logiciels et les accessoires, n'aura aucun vice de
matériel ni de fabrication pour une période de
quatre-vingt-dix (90) jours à compter de la date
d'achat ("Période de garantie"). S'il advenait
pendant la durée de ladite garantie qu'un ou
plus des produits susdits deviennent
défectueux, la responsabilité de SCEA sera
limitée à la réparation ou au remplacement de la
console, de l'adaptateur réseau, de logiciels ou
d'accessoires endommagés au choix de SCEA.
Composez le 1-800-345-7669 pour obtenir des
instructions sur les services de réparation/
remplacement.
CETTE GARANTIE NE S'APPLIQUERA PAS SI
CE PRODUIT: (a) EST UTILISÉ AVEC DES
PRODUITS QUI NE SONT NI VENDUS NI
AUTORISÉS PAR SCEA (Y COMPRIS MAIS
NON PAS LIMITÉS AUX DISPOSITIFS
D'AMÉLIORATION NON AUTORISÉS, AUX
MANETTES, AUX ADAPTATEURS ET AUX
MODULES D'ALIMENTATION) OU QUI NE
SONT PAS COMPATIBLES AVEC CE
PRODUIT; (b) EST UTILISÉ À DES FINS
COMMERCIALES (Y COMPRIS LA
LOCATION) OU EST MODIFIÉ OU ALTÉRÉ;
(c) A SUBI DES DOMMAGES RÉSULTANT
D'UN CAS DE FORCE MAJEURE, DE
L'UTILISATION IMPROPRE OU ABUSIVE,
D'UN ACCIDENT, DE L'USURE NORMALE,
DE L'USURE ANORMALE OU D'AUTRES
CAUSES QUI N'ONT AUCUN RAPPORT
AVEC DES VICES DE MATÉRIEL NI DE
FABRICATION; (d) DONT LE NUMÉRO DE
SÉRIE A ÉTÉ MODIFIÉ, EFFACÉ OU ENLEVÉ;
OU, (e) LE CACHET DE LA GARANTIE SUR
LA CONSOLE A ÉTÉ ENLEVÉ. CETTE
GARANTIE NE COUVRE PAS DES PRODUITS
VENDUS TELS QUELS OU AVEC TOUS LES
DÉFAUTS, NI DES CONSOMMABLES (TELS
QUE LES PILES).
LA PREUVE D'ACHAT SOUS FORME DE
COUPON DE CAISSE OU DE FACTURE QUI
PROUVE QUE L'UNITÉ EST ENCORE
COUVERTE PAR LA DURÉE DE LADITE
GARANTIE DOIT ÊTRE PRESENTÉE AFIN
D'OBTENIR LE SERVICE SOUS GARANTIE.
LA RÉPARATION OU LE REMPLACEMENT
PRÉVUS PAR LADITE GARANTIE EST LE
RECOURS EXCLUSIF DU CONSOMMATEUR.
TOUTE GARANTIE APPLICABLE ET
IMPLICITE, Y COMPRIS LES GARANTIES DE
QUALITÉ VENDABLE ET DE CONVENANCE
À DES FINS PARTICULIÈRES, EST LIMITÉE
EN DURÉE POUR LA DURÉE DE LADITE
GARANTIE. SCEA NE POURRA EN AUCUN
CAS ÊTRE TENUE RESPONSABLE DE TOUT
DOMMAGE INDIRECT OU ACCESSOIRE
POUR LA CONTRAVENTION DE TOUTE
GARANTIE IMPLICITE OU EXPLICITE SUR
CE PRODUIT. QUELQUES ÉTATS ET
PROVINCES NE PERMETTENT PAS DE
LIMITES SUR LA DURÉE D'UNE GARANTIE
IMPLICITE ET QUELQUES ÉTATS NE
PERMETTENT PAS L'EXCLUSION OU DES
LIMITES DE TOUT DOMMAGE INDIRECT OU
ACCESSOIRE. IL EST, DONC, POSSIBLE QUE
LES LIMITES OU LES EXCLUSIONS
SUSMENTIONNÉES NE S'APPLIQUENT PAS.
Cette garantie vous offre des droits légaux
spécifiques et vous pourriez avoir d'autres
droits qui varient d'état en état ou de province
en province. Cette garantie n'est valable qu'aux
États-Unis et au Canada.
Page 61

61
FR
Page 62

62
ADVERTENCIA
Para evitar el riesgo de incendio o de
descarga eléctrica, no exponga la unidad a
la lluvia ni a la humedad.
Para evitar descargas eléctricas, no desmonte
la unidad. Solicite asistencia técnica
únicamente al personal especializado.
Precaución
El uso de instrumentos ópticos con este
producto aumentará el riesgo de daños oculares.
No desmonte la máquina, ya que el haz láser
utilizado en ella es perjudicial para los ojos.
Solicite asistencia sólo al personal especializado.
Esta etiqueta está situada en la caja protectora de láser
dentro de la consola PlayStation
2.
®
Este símbolo gráfico con marcas suplementarias está
ubicado en la parte derecha de la consola PlayStation
esta última está colocada en la posición vertical).
Este símbolo se utiliza para prevenir al usuario
2 (si
®
de la existencia de un “voltaje peligroso” sin
aislante dentro del producto que podría ser de
la suficiente magnitud como que constituya un
riesgo de descarga eléctrica para las personas.
Este símbolo se utiliza para avisar al usuario
que dispone de importantes instrucciones de
utilización y mantenimiento (servicio) en los
materiales impresos adjuntos al aparato.
Precaución
PARA EVITAR DESCARGA ELÉCTRICA,
ACERQUE LA CLAVIJA MÁS ANCHA A LA
RANURA ANCHA E INSÉRTELA
COMPLETAMENTE.
Para reducir el riesgo de incendios,
solamente utilice un cable de línea de
telecomunicación No.26 AWG o mayor.
Si tuviera alguna pregunta acerca del calibre de los cables
(No. AWG), póngase en contacto con nuestro servicio de
asistencia técnica, llamando al 1-800-345-7669.
Información
Consola PlayStation®2 y adaptador de red
Este equipo ha sido sometido a pruebas y se ha determinado que
cumple con los límites requeridos por los aparatos digitales de
clase B, en cumplimiento con la Sección 15 de las regulaciones de
la FCC (Comisión Federal de Comunicaciones). Estas
especificaciones han sido diseñadas para proporcionar una
protección razonable contra interferencias perjudiciales en una
instalación residencial. Este equipo genera, utiliza y puede emitir
energía de radiofrecuencia y, de no ser instalado y utilizado de
acuerdo con las instrucciones, podría ocasionar interferencias
perjudiciales en las comunicaciones de radio. No obstante, no se
garantiza que no ocurra ninguna interferencia en una instalación
particular. Si el presente equipo causa interferencia en la recepción
de radio o de televisión, la cual puede determinarse al apagar y
encender el equipo, se recomienda que el usuario intente corregir
la interferencia mediante una o más de las medidas siguientes:
– Cambie la orientación o ubicación de la antena de recepción.
– Aumente la separación entre el equipo y el receptor.
– Conecte el equipo en un tomacorriente de circuito distinto al
que está conectado el receptor.
–
Consulte con su distribuidor o con un técnico especializado en
radio/televisión para solicitar asistencia.
Si tiene alguna pregunta relacionada a este producto, póngase en
contacto con nuestro servicio de
1-800-345-7669 ó escriba a:
Sony Computer Entertainment America
Consumer Services/Technical Support
PO Box 5888, San Mateo, CA 94402-0888 U.S.A.
Declaración de Conformidad
Nombre comercial: SONY
Número de modelo: SCPH-39001/N
Responsabilidad: Sony Electronics Inc.
Domicilio: 680 Kinderkamack Road
Número de teléfono: 201-930-6972
Este dispositivo cumple con la Sección 15 de los
reglamentos de la FCC. El funcionamiento se encuentra
sujeto a las dos condiciones siguientes:
(1) este dispositivo no podrá ocasionar interferencia
perjudicial y (2) este dispositivo debe aceptar cualquier tipo
de interferencia recibida, incluyendo interferencias que
puedan afectar al funcionamiento del dispositivo.
Se le previene de que cualquier cambio o modificación que no
haya sido aprobado expresamente en este manual podría
anular su autoridad de utilizar este equipo.
asistencia técnica, llamando al
SCPH-39010/N
Oradell, NJ 07649 U.S.A.
Adaptador de red
Para los clientes en los EE.UU.
Este adaptador de red cumple con la Sección 68 de las
regulaciones de FCC y con los requisitos adoptados por ACTA.
En la etiqueta situada en la parte inferior de este adaptador de
red, se proporciona, entre otros datos, un código para
identificar el producto cuyo formato es US:AAAEQ##TXXXX.
En caso de que la compañía telefónica lo solicitara, se deberá
proveer a esta última con la presente información.
El REN (número equivalente de señales de timbre) se utiliza
para determinar el número de dispositivos que pueden
conectarse a la línea telefónica. El exceso de REN en la línea
telefónica podría ocasionar la ausencia de timbrado de los
dispositivos en respuesta a las nuevas llamadas. En la mayoría
de las áreas, aunque no en todas, el total de señales de timbre
no deberá exceder de cinco (5.0). Para cerciorarse del número
de dispositivos que pueden conectarse a la línea, según lo
determine el total de REN, póngase en contacto con la
compañía telefónica. En el caso de los productos aprobados
después del 23 de julio de 2001, el REN forma parte del código
para identificar el producto cuyo formato es
US:AAAEQ##TXXXX. Los dígitos representados por ## son el
REN sin el punto decimal (por ejemplo, 03 es un REN de 0.3).
En el caso de los productos aprobados antes de dicha fecha, el
REN está impreso en la etiqueta en forma separada.
El enchufe que se use para conectar este equipo al cableado y a
la red telefónica debe cumplir con las regulaciones aplicables
de la Sección 68 de FCC y con los requisitos adoptados por
ACTA.
Este producto utiliza el enchufe telefónico “RJ-11C”.
Si el presente equipo ocasiona daños a la red telefónica, la
compañía telefónica le enviará un preaviso, a su disposición,
sobre la posible necesidad de suspender temporalmente el
servicio. Si dicho aviso resulta no ser factible, la compañía
telefónica le notificará posteriormente lo más pronto posible.
También se le informará sobre su derecho a reclamar a la FCC
si lo considerara necesario.
La compañía telefónica puede hacer cambios en las
instalaciones, equipos, operaciones y procedimientos que
pudieran afectar el funcionamiento del equipo. De ocurrir lo
anterior, la compañía telefónica le enviará un preaviso de
forma que usted pueda hacer las modificaciones necesarias
para mantener un servicio sin interrupción.
Si tiene alguna pregunta relacionada con este producto,
póngase en contacto con nuestro servicio de asistencia técnica,
llamando al 1-800-345-7669, o escribiendo a:
Sony Computer Entertainment America
Consumer Services/Technical Support
PO Box 5888, San Mateo, CA 94402-0888 U. S. A.
Este equipo no se puede utilizar con los equipos telefónicos que
funcionan con monedas que suministra la compañía telefónica.
La conexión del cliente al servicio de línea está sujeta a las
tarifas de cada estado.
La reparación de este producto deberá realizarla únicamente
un centro de servicio Sony autorizado. Para obtener
información sobre el centro de servicio Sony más cercano a su
domicilio, por favor llame al 1-800-345-7669.
La Ley de Protección al Consumidor de servicios
telefónicos de 1991
La Ley de Protección al Consumidor prohibe que cualquier
persona recurra al uso de computadoras o cualquier otro
dispositivo electrónico con el propósito de enviar algún
mensaje por teléfono o fax a menos que el mensaje contenga de
forma clara en la parte superior o inferior de cada página
transmitida, o en la primera página, la fecha y hora en que fue
enviado, así como también la identificación de la empresa
comercial, la entidad o el individuo que envía el mensaje y el
número de fax remitente o de la empresa, entidad o cualquier
individuo que posea dicho número. Para poder programar esta
información en su aparato de fax, por favor consulte la
documentación que contiene el software del aparato de fax.
Para los clientes en Canadá
Este producto está identificado con la etiqueta de la industria
de Canadá. La presente certificación ratifica que este equipo
cumple con los requisitos operativos, de seguridad y protección
de la red de comunicaciones según se recomienda en el(los)
documento(s) de los Requisitos Técnicos del Equipo Terminal.
Este departamento no garantiza el funcionamiento del equipo a
satisfacción del usuario. Antes de instalar este equipo, los
usuarios deberán cerciorarse de que es permisible conectarse a
las instalaciones de la compañía local de telecomunicaciones.
Además, el equipo debe instalarse utilizando un método de
conexión aceptable.
El cliente debe estar informado de la posibilidad de que el
cumplimiento con las condiciones anteriormente citadas no
necesariamente evita el deterioro del servicio en algunas
situaciones.
La reparación del equipo certificado deberá coordinarla el
representante designado por el proveedor. Cualquier
reparación o alteración de este equipo que realice el usuario, así
como las fallas del equipo, podría representar una causa para
que la compañía de telecomunicaciones solicite al usuario la
desconexión de dicho equipo.
Los usuarios deberán cerciorarse, para su propia protección, de
que las conexiones eléctricas a tierra de los servicios de
electricidad, líneas telefónicas y sistemas de tuberías metálicas
internas de agua, en caso de estar presentes, estén unidas en la
misma conexión. Esta última precaución tiene particular
importancia en las áreas rurales.
Precaución: Los usuarios deben evitar realizar por su cuenta las
anteriores conexiones, y en su lugar contactar con las
autoridades de inspección en materia de electricidad o algún
electricista.
NOTA: El número equivalente de señales de timbre (REN)
asignado a cada dispositivo terminal indica el número máximo
de terminales que se permite conectar a la interfaz telefónica.
Las terminales de una interfaz pueden estar integradas por
cualquier combinación de dispositivos, teniendo como único
requisito que el total del número equivalente de señales de
timbre no exceda los cinco (5.0).
El número equivalente de señales de timbre para este equipo es
de 0.1.
El término “IC:” delante del número de certificación/registro
indica que se cumplen con las especificaciones técnicas de la
Industria de Canadá.
Lea lo siguiente antes de utilizar su consola
PlayStation
Existe la posibilidad de que un pequeño porcentaje de personas
sufran ataques epilépticos al exponerse a ciertos patrones
luminosos o luces intermitentes. Estas personas podrían sufrir
un ataque epiléptico al exponerse a ciertos patrones o fondos en
la pantalla del televisor o en los vídeojuegos, incluyendo los
juegos vistos en la consola PlayStation®2. Algunas condiciones
podrían provocar síntomas de una epilepsia no detectada
previamente incluso en personas sin un historial de ataques o
epilepsia.
Si usted, o cualquier miembro de su familia, sufre de epilepsia,
consulte a su médico antes de utilizar un vídeojuego. Deje de
utilizar este último INMEDIATAMENTE y consulte a su
médico antes de volver a utilizarlo, si usted tiene alguno de los
siguientes síntomas al utilizar un vídeojuego: mareo,
alteraciones en la visión, contracciones musculares u oculares,
pérdida del conocimiento, desorientación, movimientos
involuntarios o convulsiones.
®2
Page 63

Precauciones
63
Registro del propietario
Los números de modelo y de serie de la consola PlayStation®2
se encuentran en la parte izquierda de la misma (puesta en
posición horizontal). El número de serie del adaptador de red
se encuentra en la parte trasera del mismo. Registre los
números de serie en los espacios señalados abajo. Menciónelos
siempre que se ponga en contacto con nuestro servicio de
asistencia técnica, llamando al 1-800-345-7669.
Modelo No.
SCPH-39001/N
SCPH-39010/N
No. de Serie
Consola PlayStation®2 ______________________
Adaptador de red ______________________
Aviso importante
Antes de instalar el adaptador de red en otras consolas
PlayStation®2, revise la siguiente lista de números de serie.
Un pequeño porcentaje de consolas PlayStation®2 pueden
ser incompatibles con este adaptador de red. Si el número
de serie de la consola PlayStation®2 (que se encuentra en la
parte trasera de la consola) coincide con alguno de los
números de esta lista, póngase en contacto con nuestro
servicio de asistencia técnica, llamando al 1-800-345-7669
para obtener más información.
Números de serie
3369556 – 3369651
3372352 – 3372651
3379084 – 3380151
3380260 – 3381867
3381976 – 3382083
3383152 – 3383691
3384652 – 3385191
3386152 – 3386907
3388192 – 3389271
3391084 – 3392055
3393868 – 3394407
3394516 – 3394731
3397192 – 3398055
3399868 – 3400947
3403192 – 3403839
3404692 – 3405339
3406192 – 3406515
3406624 – 3406839
3414661 – 3416388
3417661 – 3418740
3419173 – 3419280
3419821 – 3419928
3420661 – 3421308
3421417 – 3421524
3421633 – 3422064
3423661 – 3424848
3425161 – 3425268
3434377 – 3434592
Seguridad
Este producto ha sido diseñado prestando la máxima atención
a las medidas de seguridad. Sin embargo, si se utiliza
inadecuadamente, cualquier dispositivo eléctrico puede causar
un incendio, descargas eléctricas o lesiones personales. Para
asegurar un manejo exento de accidentes, siga las siguientes
indicaciones:
• Observe todas las advertencias, precauciones e
instrucciones.
• Deje de utilizar inmediatamente el dispositivo si éste
funciona de forma inadecuada o produce sonidos u olores
extraños.
• Nunca conecte cables distintos a los especificados en este
manual al conector de línea LINE (RJ-11C) y/o al conector
de red NETWORK. Conecte únicamente los cables del tipo
adecuado a los conectores correspondientes.
• Si el aparato no funciona adecuadamente, póngase en
contacto con nuestro servicio de asistencia técnica, llamando
al 1-800-345-7669.
Utilización y manejo
•
No arroje o deje caer la consola ni el adaptador de red, ni los
someta a golpes fuertes.
• No coloque la consola
inestables, inclinadas o sometidas a vibraciones.
• Nunca mueva ni cambie la posición de una consola mientras
esté encendida.
• No exponga la consola
temperaturas, humedad elevada o luz solar directa (se debe
utilizar en un ambiente a una temperatura entre 5 °C y 35
°C/41 °F y 95 °F).
• No sitúe la consola
sujetas a cambios bruscos de temperatura (ej. cambios de
temperatura de 10 °C/18 °F por hora o más).
• No deje la consola en un automóvil con las ventanillas
cerradas (particularmente en verano), ya que puede
deformarse el exterior de la consola o causar fallas de
funcionamiento de la consola.
• No utilice la consola en una ubicación polvorienta.
• No permita que penetre líquido ni partículas en la consola
ni en el adaptador de red.
• No sitúe la consola
magnéticos como los generados por imanes, altavoces o
televisores.
• No coloque objetos pesados encima de la consola o del
adaptador de red.
• No toque las partes metálicas ni inserte objetos extraños en
los conectores de la consola o del adaptador de red.
• Cuando no piense utilizar la consola por un periodo
prolongado, desconecte el enchufe de alimentación de la
consola PlayStation®2 desde el tomacorriente, y la línea
telefónica desde el enchufe de la pared.
• Para desconectar el enchufe de alimentación del
tomacorriente, sujete directamente el enchufe. Nunca sujete
por el cable.
• No conecte dispositivos periféricos no autorizados al
adaptador de red.
• No sitúe ningún tipo de material de goma o vinilo en el
exterior de la consola o del adaptador de red durante un
período prolongado, porque podría dañar la superficie de
plástico.
ni el adaptador de red
ni el adaptador de red
ni el adaptador de red
ni el adaptador de red
en superficies
a altas
en ubicaciones
cerca de campos
No toque los conectores de la consola o del
adaptador de red
No toque las partes metálicas ni inserte objetos extraños en los
conectores de la consola o del adaptador de red. No deje el
adaptador de red fuera de la consola durante mucho tiempo.
Tenga en cuenta que mantener el adaptador de red instalado en
la consola ayuda a proteger tanto los conectores del adaptador
de red como los que se encuentran dentro de la EXPANSION
BAY (bahía de expansión) de la consola.
No exponga la consola al humo de
cigarrillo o al polvo
Cuando instale la consola PlayStation®2, evite lugares en los
que haya humo de cigarrillo o polvo excesivo. Los residuos de
humo de cigarrillo o la acumulación de polvo en los
componentes internos, como los lentes, pueden ocasionar
problemas de funcionamiento de la consola.
Limpieza de las rejillas
Puede acumularse polvo en las rejillas de ventilación tanto
delantera como trasera de la consola. Revise las rejillas de vez
en cuando y extraiga el polvo acumulado con una aspiradora
de baja potencia.
Manejo de los discos
• No deje los discos cerca de fuentes de calor, bajo la luz solar
directa ni en lugares con mucha humedad.
• Guarde los discos en sus cajas cuando no los utilice. Los
discos pueden deformarse si los apila o los coloca inclinados
sin haberlos guardado en sus cajas.
• No toque la superficie de los discos cuando los maneje;
agárrelos por el borde.
• No adhiera papel ni cinta sobre el disco.
• No escriba en el disco con un marcador, etc.
• La existencia de huellas dactilares o polvo en el disco puede
distorsionar la imagen o reducir la calidad de sonido.
Compruebe que los discos están limpios antes de utilizarlos.
• Limpie los discos con un paño suave, frotando con suavidad
desde el centro hacia fuera.
•
No utilice disolventes como bencina, limpiadores
disponibles en el mercado que no hayan sido diseñados para
discos CD ni aerosoles antiestáticos diseñados para discos de
vinilo, ya que estos podrían dañar el disco.
Condensación de humedad
Si traslada la consola o el disco directamente de un lugar frío a
uno cálido, puede condensarse humedad en la lente del interior
de la consola o en el disco. Si esto ocurre, es posible que la
consola no funcione correctamente. En este caso, extraiga el
disco y no lo introduzca hasta que se haya evaporado la
humedad. (Podrían transcurrir varias horas.) Si la consola sigue
sin funcionar correctamente, póngase en contacto con nuestro
servicio de asistencia técnica, llamando al 1-800-345-7669.
Limpieza de la consola y del adaptador de red
Por motivos de seguridad: 1) apague la consola PlayStation®2
mediante el interruptor principal MAIN POWER situado en la
parte trasera de la consola; 2) desconecte el enchufe de
alimentación del tomacorriente y 3) desconecte el cordón
telefónico y/o el cable de red del adaptador de red, antes de
limpiar la consola y el adaptador de red.
• No utilice diluyente de pintura, disolventes ni otros
productos químicos para limpiar el exterior de la consola o
del adaptador de red, ya que podrían dañar la superficie. Si
utiliza un paño de limpieza disponible comercialmente, siga
las instrucciones suministradas con el mismo.
• Si el exterior de la consola o del adaptador de red se
ensucia, humedezca un paño suave en una solución
detergente diluida con agua, exprima bien el paño para
eliminar el exceso de líquido, limpie la zona afectada del
exterior y, para finalizar, pase un paño seco.
Por ningún motivo desarme la consola ni el
adaptador de red
• Utilice la consola PlayStation®2 y el adaptador de red en
conformidad con este manual de instrucciones. No se otorga
autorización para el análisis ni la modificación de la consola
PlayStation®2 o del adaptador de red, ni el análisis y uso de
la configuración de los circuitos.
• No hay componentes que el usuario pueda reparar en el
interior de la consola PlayStation®2 o del adaptador de red.
Desmontar la consola anula la garantía. Además, existe el
riesgo de exposición a radiación láser y a descargas
eléctricas.
Notas sobre el uso del adaptador de red
Uso básico
• Es necesario tener conexión a Internet mediante acceso
telefónico o banda ancha para usar el adaptador de red.
• Se necesita un cordón telefónico o un cable de red (no
incluidos) para conectarse a una red. Para más información
sobre los requerimientos específicos, consulte las secciones
sobre conexiones descritas abajo.
• Es posible que el disco de inicio del adaptador de red no sea
compatible con todos los proveedores de servicios de
Internet.
• Al conectarse a la red, es posible que el proveedor de
servicios de Internet le cobre una tarifa por el uso del
servicio. En algunos casos, dicho cobro podría ser superior a
lo anticipado. Para obtener más información, consulte las
instrucciones suministradas con el software que esté
utilizando o póngase en contacto con su proveedor de
servicios de Internet.
• El adaptador de red está marcado con las letras
“ ” para indicar que puede ser usado con el disco
duro interno (para PlayStation®2) (vendido por separado). La
fecha de disponibilidad del disco duro interno será
anunciada próximamente. Consulte si hay disponibilidad.
• Los padres son responsables de vigilar a los niños durante la
utilización del adaptador de red para garantizar un uso
seguro y responsable de Internet.
Conexión a una línea telefónica
No conecte al conector de línea LINE (RJ-11C) del adaptador de
red ningún tipo de cable con la excepción de un cordón
telefónico de uso residencial.
Si conecta al conector de línea LINE (RJ-11C) un cordón
telefónico o cable de red de tipo diferente al especificado,
puede pasar demasiada corriente a través del conector,
ocasionando fallas, exceso de calor o fuego en el conector.
Nunca conecte al conector de línea LINE (RJ-11C) cordones
telefónicos de los tipos listados a continuación (especialmente
un cordón telefónico para redes telefónicas residenciales o
comerciales):
•
Un teléfono público compatible con ISDN (digital)
• Un teléfono PBX
• Un teléfono celular o teléfono para vehículos
•
Un teléfono para redes telefónicas residenciales o comerciales
ES
Procedimientos iniciales
Page 64

64
Precauciones (continuación)
Discos que pueden reproducirse con la consola PlayStation®2
Conexión con un cable de red
No conecte al conector de red NETWORK los tipos de cables de
red o cordones telefónicos que se listan a continuación. Esto
podría ocasionar la circulación de corriente excesiva a través
del conector y producir fallas, exceso de calor o fuego en el
conector.
• Cables de red de un tipo que difiera de los 100Base-TX y
10Base-T
• Líneas telefónicas de tipo normal
• Un teléfono público compatible con ISDN (digital)
• Un teléfono PBX
•
Un teléfono para redes telefónicas residenciales o comerciales
• Otros tipos de líneas telefónicas
Uso de la línea telefónica
• Si recibe una llamada telefónica mientras está utilizando el
módem, la conexión podría fallar a menos que la función de
llamada en espera haya sido desactivada en la configuración
de la red. Para obtener más información sobre la creación o
edición de los valores de configuración de la red, consulte el
manual de instrucciones suministrado con el disco de inicio
del adaptador de red.
• El módem y el teléfono no podrán ser utilizados
simultáneamente.
Notas sobre seguridad al utilizar el control
analógico (DUALSHOCK
analógico (DUALSHOCK
•
Deje de utilizar esta consola inmediatamente si comienza a
sentirse cansado o si experimenta una sensación de malestar o
dolor en las manos y/o brazos mientras utiliza el control. Si el
estado persiste, consulte a un médico.
• Utilice el control únicamente con las manos. Evite que el
control entre en contacto directo con la cabeza o la cara.
Tampoco lo acerque a los huesos de cualquier otra parte
del cuerpo.
• La función de vibración del control analógico
(DUALSHOCK®2) y el control analógico (DUALSHOCK®)
pueden agravar las dolencias. No utilice la función de
vibración del control analógico (DUALSHOCK®2) y el
control analógico (DUALSHOCK®) que soporte el software
si sufre de dolencias en los huesos o articulaciones de las
manos o brazos.
• No utilice la función de vibración del control analógico
(DUALSHOCK®2) y el control analógico (DUALSHOCK®)
que soporte el software si sufre de dolencias en los huesos
o músculos de los dedos, manos, muñecas o brazos. Dichas
dolencias pueden empeorar debido a la vibración del
control.
• Evite el uso prolongado del control analógico
(DUALSHOCK®2) y el control analógico (DUALSHOCK®).
Descanse a intervalos de 30 minutos aproximadamente.
2) y el control
®
)
®
Logotipo del
disco
Color del disco
Contenido
Ta ma ño del disco
DVD-ROM de formato
PlayStation
Logotipo “ ”,
PlayStation®2 y
designación
Plateado
®2
CD audio
CD-ROM de formato
PlayStation®2
Logotipo “ ”,
PlayStation®2 y
designación
Azul
Audio y vídeo
12 cm
CD-ROM de formato
PlayStation
Logotipo PlayStation® y
designación
®
Negro
Vídeos DVD
Logotipo del
disco
El logotipo “DVD VIDEO” es una marca comercial.
Contenido
Tamaño del
12 cm
disco
Tiempo de
reproducción
*1 Si coloca la consola en posición vertical y reproduce un CD audio de 8 cm, asegúrese de utilizar el adaptador opcional.
*2 Siempre que utilice un vídeo DVD de 8 cm, coloque la consola en posición horizontal.
*3 El tiempo de reproducción varía según el contenido del disco.
*3
74 min
Software compatible con el adaptador de red
Los software de formato PlayStation®2
compatibles con el adaptador de red (para
PlayStation®2) se pueden usar con el adaptador
de red instalado en la parte trasera de la
consola PlayStation®2.
Requerimientos para el uso del adaptador
de red
Audio
*1
8 cm
(CD sencillo)
20 min
Audio y vídeo
12 cm
4 horas
(cara única)/
8 horas
(cara doble)
*2
8 cm
80 min
(cara única)/
160 min
(cara doble)
Nota
Este producto incluye el disco de inicio del adaptador de
red. Para poder conectarse en línea, debe usar el disco de
inicio para crear los valores de configuración de la red.
Para obtener más información, consulte el manual de
instrucciones suministrado con el disco de inicio. Tenga en
cuenta que se necesita una memory card (tarjeta de
memoria) (8MB) (para PlayStation
separado) para guardar los valores de configuración de la
red.
2) (vendida por
®
El uso del adaptador de red puede variar según
el software que se utilice. Los requisitos de
hardware pueden variar también. Para más
información, consulte el manual del software
correspondiente.
Sistemas de vídeo DVD y restricciones
regionales
•Esta consola cumple con el estándar de
emisión NTSC. No es posible reproducir
discos grabados para otros sistemas de
emisión (como PAL o SECAM) en esta
consola.
•Algunos vídeos DVD están marcados con
números de región, como 1. El número
incluido en el símbolo representa el número
de región de reproductores de DVD en los
que puede reproducirse el disco. Los vídeos
DVD que no contengan este símbolo, o los
que no muestren el número 1, no pueden
reproducirse en su consola.
•Los discos DVD con la etiqueta
ALL
también
pueden reproducirse en esta consola.
Si intenta reproducir cualquier otro tipo de
DVD, la pantalla mostrará el mensaje “El
disco no se puede reproducir debido a
restricciones regionales”.
•Algunos discos DVD que no contengan marca
de código de región también pueden estar
sujetos a restricciones de zona, y es posible
que no puedan reproducirse en la consola.
Nota sobre funciones de reproducción de
un vídeo DVD
Esta consola reproduce un vídeo DVD conforme al
diseño original de los productores de software. Es
posible que algunas funciones de reproducción de
esta consola no hayan sido incorporadas al diseño
del vídeo DVD. Consecuentemente, algunas
funciones de reproducción podrían no estar
disponibles con ciertos títulos de software. Para
obtener información detallada al respecto, por
favor consulte las instrucciones suministradas con
su vídeo DVD.
Discos con formas especiales
No utilice discos compactos con formas irregulares
(por ejemplo, con forma de corazón o estrella), ya que
pueden producir fallas de funcionamiento de la
consola.
Para utilizar el adaptador de red, se requiere
el software de formato PlayStation®2
compatible con el adaptador de red (para
PlayStation®2).
Page 65

Índice
65
Procedimientos
iniciales
Conexión
ADVERTENCIA / Precauciones
Discos que pueden reproducirse con la consola
PlayStation®2
Advertencias de seguridad
Comprobación del contenido del paquete
Denominación de las piezas
Colocación de la consola
Conexión de la consola a un televisor
Conexión de componentes de audio digital
Conexión de otros dispositivos digitales
Conexión del adaptador de red a una línea
telefónica
Conexión del adaptador de red con un cable
de red
62
64
66
68
68
69
70
71
72
72
73
CD audio/juego
Vídeo DVD
Información
complementaria
Para jugar
Uso del Control Analógico
Uso de Memory Card (tarjeta de memoria)
Reproducción de CD audio
Reproducción de vídeo DVD
Utilización del Panel de Control
Ajustes para el reproductor de DVD
Solución de problemas
Especificaciones
Glosario
GARANTÍA LIMITADA
76
77
78
78
79
80
83
87
89
89
90
ES
Procedimientos iniciales
Extracción del adaptador de red de la consola
Reinstalación del adaptador de red en la consola
Uso del menú principal
73
74
75
Page 66

66
Advertencias de seguridad
Para su protección, por favor lea detenidamente estas instrucciones de
seguridad antes de operar la consola PlayStation®2 y el adaptador de red
y mantenga este manual disponible para realizar consultas en el futuro.
Observe cuidadosamente todas las advertencias, precauciones e
instrucciones sobre la consola o las que se describen en el Manual de
Instrucciones y apéguese a las anteriores.
USO
Fuentes de alimentación
Esta consola deberá operarse utilizando únicamente el tipo de
fuente de alimentación que se indica en la etiqueta con la señal para
dicho propósito. Si no está seguro(a) del tipo de alimentación
eléctrica que se suministra a su casa, consulte con su distribuidor o
su compañia de electricidad local. Para aquellas unidades diseñadas
para operarse con alimentación mediante baterías u otras fuentes,
consulte las instrucciones de operación.
Conexión a tierra o polarización
Esta consola está dotada de un enchufe de alimentación AC
polarizado (enchufe con una hoja más ancha que la otra). Este
enchufe sólo podrá insertarse en el tomacorriente de alimentación
de una sola forma. Este es un elemento de seguridad. Si no es
posible insertar el enchufe totalmente en el tomacorriente, intente
invertir la posición del enchufe. Si todavía no es posible insertarlo,
póngase en contacto con su electricista o haga que le instalen un
tomacorriente adecuado. No contravenga el propósito de seguridad
del enchufe polarizado forzándolo hacia adentro.
Sobrecarga
No sobrecargue los tomacorrientes de pared, cables de extensión o
salidas de conveniencia más allá de su capacidad, ya que lo anterior
podría resultar en un incendio o descarga eléctrica.
Limpieza
Sobre la descripción completa del método seguro para la limpieza
del exterior de la consola y del adaptador de red, consulte la sección
de precauciones en la página 63.
INSTALACIÓN
Agua y humedad
No use la consola que funciona a base de electricidad cerca de
fuentes de agua; por ejemplo, cerca de una bañera, lavabo de cocina,
un sótano húmedo o cerca de una piscina, etc.
Protección del cable de alimentación
Dirija el cable de alimentación de forma que haya menos
probabilidad de pisarlo o perforarlo con objetos apoyados en o
sobre aquél, dando especial atención a los enchufes, receptáculos y
el punto en el que el cable sale de la consola.
Ventilación
Las ranuras y aperturas del exterior de la consola se dotaron para
proveer la ventilación necesaria. Para asegurar un funcionamiento
confiable de la consola, y para protegerlo contra el
sobrecalentamiento, estas ranuras y aperturas nunca deben
bloquearse o cubrirse.
– Nunca cubra las ranuras y aperturas con un paño o cualquier otro
tipo de tela.
– Nunca bloquee las ranuras y aperturas colocando la consola en
una cama, sofá alfombra u otra superficie similar.
Entrada de objetos y líquido
Nunca empuje objetos de ninguna clase, más que los autorizados, en
las aperturas de la consola o del adaptador de red, ya que estos
podrían tocar puntos de voltaje peligrosos o causar un corto circuito
en las piezas, lo que podría resultar en un incendio o descarga
eléctrica. Nunca derrame líquidos de ninguna clase sobre la consola
o el adaptador de red.
Conexiones
No utilice conexiones que no sean recomendadas por el fabricante,
puesto que éstas podrían ocasionar daños.
Accesorios
No coloque la consola o el adaptador de red en un carrito, soporte,
repisa o mesa que sea inestable. La consola o el adaptador de red
podría caerse, causando lesiones graves a niños o adultos, y daños
graves a la consola o al adaptador de red.
Utilice solamente el soporte vertical o el horizontal, u otros
accesorios que recomiende el fabricante para estabilizar la consola.
Debe tenerse cuidado al mover un aparato utilizando un carrito. Los
altos súbitos, fuerza excesiva y superficies irregulares podrían
ocasionar que se vuelque el aparato y el carrito que se está
utilizando.
Page 67

67
– Nunca coloque la consola en un espacio reducido, como un
librero o gabinete incorporado, a menos que se provea una
ventilación adecuada.
– No coloque la consola ni el adaptador de red cerca de un
radiador, sobre éste o una rejilla de calefacción, o donde esté
expuesto a la luz solar directa.
ANTENAS
Conexión a tierra de antenas exteriores. Si se instala una
antena o un sistema de cable para exteriores, observe las
precauciones que se dan a continuación.
Los sistemas de antenas para exteriores no deberán
estar ubicados en lugares adyacentes a líneas eléctricas
aéreas u otros circuitos eléctricos, o donde puedan
Abrazadera de
conexión a tierra
entrar en contacto con dichas líneas y circuitos.
AL INSTALAR UN SISTEMA DE ANTENAS PARA
EXTERIORES, DEBERÁ TENER EXTREMO CUIDADO DE
EVITAR EL CONTACTO CON DICHAS LÍNEAS O
CIRCUITOS ELÉCTRICOS, YA QUE EL CONTACTO CON
ÉSTOS ES CASI INVARIABLEMENTE FATAL.
Cerciórese de que el sistema de antena tenga conexión a
Equipo de
servicio
eléctrico
tierra de forma que proporcione alguna protección
contra la sobretensión y cargas estáticas acumuladas. La
Sección 810 del Código Eléctrico Nacional proporciona
información respecto a la conexión a tierra adecuada del
Abrazadera de
conexión a tierra
mástil y estructura de apoyo, conexión a tierra del
conductor de entrada a la unidad de descarga de la
antena, tamaño de los conductores a tierra, ubicación de
la unidad de descarga de la antena, conexión a los
electrodos de conexión a tierra y los requerimientos
Sistema de electrodos de
conexión a tierra del
servicio eléctrico (Artículo
250, Parte H del CEN)
para el electrodo de conexión a tierra.
Rayos
Para obtener protección adicional para esta consola en una tormenta de rayos,
o cuando se deja sin atender o no se utiliza por largos períodos de tiempo,
desenchúfela del tomacorriente de pared, desconecte el cordón telefónico y/o
cable de red y desconecte el sistema de antena o cable. Esto evitará daños a la
consola ocasionados por los rayos y la sobretensión de las líneas eléctricas.
Evite el contacto con la consola o el adaptador de red durante una tormenta
eléctrica, ya que puede exponerse al riesgo de recibir una descarga eléctrica.
SERVICIO DE REPARACIÓN
Daños que requieren servicio de reparación
Desenchufe la consola del tomacorriente de pared y contrate los
servicios de personal de servicio calificado bajo las condiciones
siguientes:
– Cuando el cable o enchufe de alimentación están dañados o
raídos.
Cable de alimentación AC raído o tieso
Conductor de
entrada de la
antena
Unidad de
descarga de la
antena (Sección
810-20 del CEN)
Conductores a tierra
(Sección 810-21 del CEN)
CEN- Código Eléctrico Nacional
Clavija agrietada
– Si se ha derramado líquido o han caído objetos sobre la consola o el
adaptador de red.
– Si la consola o el adaptador de red ha sido expuesto a la lluvia o
humedad.
– Si la consola o el adaptador de red han sido objeto de golpes físicos
excesivos ocasionados por haberlos dejado caer, o si se ha dañado el
exterior de la consola o del adaptador de red.
– Si la consola o el adaptador de red no funciona normalmente al
seguir el Manual de Instrucciones. Ajuste únicamente los controles
que se especifican en el Manual de Instrucciones. El ajuste
inadecuado de otros controles podría ocasionar daños, lo que
frecuentemente requerirá arduo trabajo de un técnico calificado
para restaurar la consola a su funcionamiento normal.
– Cuando la consola o el adaptador de red muestra un claro cambio
en su funcionamiento, ello indica la necesidad de servicio de
reparación.
Servicio de reparación
No intente reparar la consola o el adaptador de red por su cuenta,
ya que extracción de la cubierta exterior de la consola podría
exponerlo a un voltaje peligroso u otros peligros.
Para recibir instrucciones sobre reparación y reemplazo, delegue
todo servicio de reparación al centro de servicio autorizado
llamando al 1-800-345-7669.
Piezas de reemplazo
Cuando se necesiten piezas de reemplazo, cerciórese de que el
técnico de servicio haya utilizado las piezas de reemplazo
especificadas por el fabricante que tengan las mismas
características de las piezas originales. Las substituciones sin
autorización podrían resultar en un incendio, descarga eléctrica u
otros daños.
Revisión de seguridad
Al final de cada revisión o reparación de la consola o del
adaptador de red, pídale al técnico de servicio que realice
verificaciones de seguridad de rutina (como lo especifica el
fabricante) para determinar si el equipo está en una condición de
funcionamiento segura.
ES
Procedimientos iniciales
Page 68

68
Compruebe que dispone de los siguientes
elementos:
• Consola
• Control analógico (DUALSHOCK®2)
Comprobación del contenido del paquete
• Cable AV (audio/vídeo integrados)
• Cable de alimentación AC
Denominación de las piezas
Consola PlayStation®2
Parte Frontal
Ranuras para MEMORY CARD
(tarjeta de memoria)
Logotipo de la familia de
productos “
Botón 1 (espera) /RESET
(reinicio) e indicador 1
Botón A (abrir) e indicador A
Bandeja del disco
Puertos de control
Botón L2, botón R2,
botón L1, botón R1
Botones de dirección
”
• Software de formato PlayStation
• Manual de instrucciones
Si faltara algún elemento, póngase en contacto con nuestro servicio de asistencia técnica, llamando al
1-800-345-7669.
2 (1 juego)
®
Parte Trasera
Botón ¢, botón a,
botón ✕, botón s
Botón START (inicio)
Botón modo ANALOG
(analógico)
Botón SELECT (selección)
Joystick analógico izquierdo,
joystick analógico derecho,
botón L3, botón R3
Adaptador de Red
Interruptor principal MAIN
POWER
Conector ~AC IN
Conector AV MULTI OUT
Conector DIGITAL OUT
(OPTICAL)
Page 69

Colocación de la consola
69
Adaptador de Red
Parte Frontal
LINE NETWORK
Conector de línea LINE (RJ-11C)
Conecte el cordón telefónico aquí para tener acceso a
la red con el módem.
Conector de red NETWORK
Conecte el cable de red (100Base-TX/10Base-T) aquí
para la conexión Ethernet.
Salida de señal
Tornillos de fijación
Para fijar el adaptador de red a la consola
PlayStation®2.
Parte Trasera
Conector para la consola
Conéctelo al conector del bus de expansión de la
consola PlayStation®2.
Conector de datos del HDD
Conector de alimentación HDD
Advertencia
Nunca conecte cordones telefónicos ni cables de red distintos a los especificados en este manual de instrucciones al
conector de línea LINE (RJ-11C) ni al conector de red NETWORK. Para obtener información detallada, consulte
"Conexión del adaptador de red a una línea telefónica" (página 72) o "Conexión del adaptador de red con un cable de red"
(página 73).
Es posible colocar la consola en posición
horizontal o vertical.
Para colocar la consola en posición vertical,
utilice el soporte vertical (para PlayStation®2),
modelo SCPH-10040 U (vendido por separado).
Si no dispone de un soporte vertical (para
PlayStation®2), coloque la consola en posición
horizontal como se muestra a continuación.
Si coloca la consola en posición horizontal,
puede utilizar el soporte horizontal (para
PlayStation®2) SCPH-10110 U (vendido por
separado).
Posición verticalPosición horizontal
Notas
• Coloque la consola sólo en posición horizontal o
vertical, ya que en cualquier otra posición, podría
resultar dañada.
• No cambie la posición de la consola (de horizontal a
vertical o viceversa) mientras la utiliza. Si lo hace,
puede dañar el disco o causar fallas de funcionamiento
de la consola.
Logotipo de la familia de productos “ ”
situado en la bandeja del disco
El logotipo de la familia de productos “ ” de
la bandeja del disco puede girarse para que
corresponda con la posición horizontal o
vertical de la consola.
ES
Procedimientos iniciales
Consola PlayStation
2
®
Parte Trasera (sin el adaptador de red)
Conector del bus de
expansión
EXPANSION BAY
(bahía de expansión)
Page 70

70
Conexión de la consola a un televisor
En esta sección se explica el método de conexión para escuchar el sonido a través de los altavoces del
televisor.
Si conecta el equipo de audio con conectores digitales, consulte “Conexión de componentes de audio
digital” en la página 71.
Conexión a un televisor con entradas de audio/vídeo
Conecte su consola PlayStation®2 al televisor mediante el cable AV suministrado (audio/vídeo
integrados).
Al conectar los cables, asegúrese de hacer coincidir el cable codificado con colores con los enchufes
correspondientes de los componentes: amarillo (vídeo) con amarillo, rojo (derecho) con rojo y blanco
(izquierdo) con blanco.
Después de la conexión
Ajuste el televisor en el modo de entrada de vídeo apropiado. Consulte el manual de instrucciones del
televisor.
Al conectar a un televisor de pantalla panorámica (relación de aspecto de 16:9)
Establezca “Tamaño de la Pantalla” en el menú Configuración del Sistema en el valor “16:9”. Para
obtener información detallada sobre el menú Configuración del Sistema, consulte la página 75.
Si su televisor es monofónico
No conecte la clavija roja. Si desea escuchar el sonido de los canales izquierdo y derecho de un televisor monofónico,
utilice un cable de audio tipo bifónico a monofónico (estéreo a monofónico) disponible en el mercado (vendido por
separado).
Interruptor
principal MAIN
POWER
Conector DIGITAL OUT
(OPTICAL)
A conector AV
MULTI OUT
Cable AV (audio/vídeo integrados) Cable de alimentación
No conecte su consola PlayStation®2 a
un televisor de proyección
Las imágenes estáticas sin movimiento, como los menús
de DVD, pantallas de configuración o las imágenes
paradas en pantalla con la función de pausa, podrían
leves trazos permanentes
dejar
televisor si se dejan durante mucho tiempo. Los
televisores de proyección son más susceptibles que otros
tipos de pantalla a presentar dicho efecto. No utilice la
consola de una manera que pueda producir este efecto.
en la pantalla del
Nota sobre el efecto de salto de las imágenes
Algunos televisores o monitores pueden experimentar
un efecto de salto de las imágenes al utilizar la consola
PlayStation
PlayStation
técnicamente al televisor. Si se produce tal problema con
su televisor/monitor, póngase en contacto con nuestro
servicio de asistencia técnica, llamando al
1-800-345-7669.
2. No existe ningún problema con la consola
®
®2 ni con su fabricación. El problema se debe
Conector ~AC IN
AC
Conexión a una videograbadora
Conecte su PlayStation®2 a la videograbadora
mediante el cable AV suministrado (audio/
Al reproducir un vídeo DVD
vídeo integrados) haciendo coincidir los colores
de las clavijas.
Si la videograbadora es monofónica, no conecte
Videograbadora
la clavija roja.
No obstante, al reproducir un vídeo DVD, no
conecte la consola a una videograbadora. Si lo
hace, se puede disminuir la calidad de la imagen.
Conecte la consola directamente al televisor.
Después de la conexión
Establezca el funcionamiento del televisor y la
Consola
PlayStation
2
®
Conéctela
directamente
videograbadora apropiadamente. Consulte los
manuales de instrucciones del televisor y la
videograbadora.
Conexión a un televisor con conector de entrada S VIDEO
Conecte la consola PlayStation®2 al conector de
entrada S VIDEO del televisor mediante el
cable S VIDEO SCPH-10060 U (vendido por
separado).
Obtendrá una imagen de mejor calidad que al
usar el cable AV (audio/vídeo integrados).
Después de la conexión
Ajuste el televisor en el modo de entrada de
A conector AV
MULTI OUT
vídeo apropiado (como “S VIDEO”).
A entrada
S VIDEO
A entrada de audio
(izquierda)
A entrada de
audio (derecha)
Conexión a un televisor con entrada de antena
Conecte su PlayStation®2 a la entrada de
antena del televisor mediante el adaptador RFU
SCPH-10071 (vendido por separado). En este
caso, el sonido será monofónico.
Después de la conexión
Ajuste el selector de canal del adaptador RFU y
el selector de canales del televisor en el canal
VHF CH 3 o CH 4, según el que no esté activo
en su zona.
A entrada de
antena
A conector AV
MULTI OUT
Televisor
C
Page 71

Conexión de componentes de audio digital
71
Conexión a un televisor con conectores de entrada de vídeo en
componentes
Si su monitor o proyector dispone de
conectores de entrada de vídeo en
componentes (Y, CB/PB, CR/PR), conecte su
consola PlayStation®2 mediante el cable AV en
componentes (para PlayStation®2) SCPH-10100 U
(vendido por separado).
Obtendrá una imagen
de mejor calidad.
Antes de la conexión
Si conecta su consola Playstation®2 a un
televisor utilizando el cable AV en
componentes sin ajustar primero la opción
A entrada
de audio
A conectores de entrada
de vídeo de componente
A conector AV
MULTI OUT
“Salida de Componentes de Imagen” bajo el
menú “Configuración del Sistema” en “Y Cb/
Pb Cr/Pr”, la pantalla del televisor podría no
visualizarse adecuadamente. Antes de conectar
su consola con el cable AV en componentes,
primero utilice el cable AV (audio/vídeo
integrados) suministrado y cerciórese de que la
opción “Salida de Componentes de Imagen”
esté ajustada en “Y Cb/Pb Cr/Pr”.
Nota
La consola PlayStation®2 no es compatible con un
televisor de alta definición, a menos que se utilicen el
software y los dispositivos adecuados. Para más detalles,
consulte el manual de instrucciones de su televisor.
Al encender la consola por primera vez
Aparece la pantalla de configuración inicial.
Ajuste “Idioma”, “Zona horaria” y “Horario de verano”
según las instrucciones en pantalla.
En esta sección se describe cómo conectar la
consola PlayStation®2 a un equipo de audio con
conectores digitales (como la salida óptica Dolby
Digital (AC-3)). El uso de receptores y
amplificadores digitales permite disfrutar de
funciones como sonido multicanal y envolvente.
Conexión a un receptor o
amplificador, platina MD
(Minidisco) o DAT (Cinta de
Audio Digital) con conector
digital
Utilice un cable digital óptico (vendido por
separado) y ajuste “DIGITAL OUT
(OPTICAL)” del menú Configuración del
Sistema en “Activado” (ajuste de fábrica).
Para obtener información detallada sobre el menú
Configuración del Sistema, consulte la página 75.
Panel posterior
MAIN
POWER
~
AC IN
DIGITAL OUT
(OPTICAL)
AV MULTI OUT
Notas
• Consulte también el manual de instrucciones
suministrado con el componente que va a conectar.
• No es posible realizar directamente grabaciones de
audio digital de discos grabados en formato Dolby
Digital o DTS utilizando una platina MD o DAT.
Receptor o
amplificador,
platina MD o DAT
DIGITAL INPUT
OPTICAL
Conecte el componente mediante el conector
DIGITAL OUT (OPTICAL) con un cable digital
óptico (vendido por separado).
La consola
PlayStation
Componente de
audio con
decodificador DTS
o Dolby Digital
incorporado
2
®
Cable digital óptico
(vendido por separado)
Altavoces
Configuraciones para el reproductor de DVD
en su PlayStation
2
®
En función de los componentes que vaya a
conectar, será necesario realizar algunos ajustes
de configuración para el reproductor de DVD.
Para obtener información detallada sobre el uso
de la pantalla de ajustes, consulte la página 83.
• Si conecta un componente de audio con
decodificador DTS incorporado
Ajuste “DIGITAL OUT (OPTICAL)” en
“Activada” y, a continuación, “DTS” en
“Activada” en la pantalla “Audio”.
• Si conecta un componente de audio con
decodificador Dolby Digital incorporado
Ajuste “DIGITAL OUT (OPTICAL)” en
“Activada” y, a continuación, “Dolby Digital”
en “Activada” en la pantalla “Audio”.
Nota
Consulte las instrucciones de operación y configuración
del equipo de audio que vaya a conectar.
ES
Conexión
Los valores pueden ajustarse posteriormente en el menú
Configuración del Sistema. Para obtener información
detallada, consulte “Uso del menú Configuración del
Sistema” en la página 75.
Conexión a un componente de
audio con decodificador DTS* o
Dolby Digital** incorporado
(sólo vídeo DVD)
La conexión a un equipo de audio con
decodificador DTS o Dolby Digital incorporado
(vendido por separado) permite reproducir el
sonido grabado en el vídeo DVD en formato
Dolby Digital (AC-3) o DTS para obtener el
efecto de audición de una sala de cine o de
conciertos.
* “DTS” y “DTS Digital Out” son marcas comerciales de
Digital Theater Systems, Inc.
** Fabricado bajo licencia de Dolby Laboratories.
“Dolby” y el símbolo de la doble D son marcas
comerciales de Dolby Laboratories.
Trabajos confidenciales no publicados. ©1992-1997
Dolby Laboratories. Todos los derechos reservados.
Page 72

72
Conexión de otros dispositivos digitales
Conexión del adaptador de red a una línea telefónica
Conexión de un dispositivo
mediante la interfaz Universal
Serial Bus (USB)
Los dos conectores USB de la parte frontal de
la consola pueden utilizarse para conectar
dispositivos compatibles con USB. Consulte
también el manual de instrucciones
suministrado con el dispositivo que va a
conectar.
Conectores USB
Nota
No todos los productos compatibles con USB funcionan
la consola
con
usuario del producto compatible con USB correspondiente
para obtener más información.
PlayStation®2. Consulte el manual del
Conexión de un dispositivo con
la interfaz i.LINK
El conector S400 i.LINK de la parte frontal de
la consola puede utilizarse para conectar
dispositivos compatibles con i.LINK (IEEE
1394). Consulte también el manual de
instrucciones suministrado con el dispositivo
que va a conectar.
El conector S400 i.LINK no suministra
alimentación a dispositivos externos. Los
dispositivos externos que requieran
alimentación mediante el conector S400
i.LINK no funcionarán correctamente al
conectarse a la consola PlayStation®2.
El conector S400 i.LINK de la PlayStation®2
soporta velocidades de transferencia hasta 400
Mbps. No obstante, la velocidad real variará
según la del dispositivo compatible con i.LINK
que conecte.
Conector S400 i.LINK
Nota
No todos los productos i.LINK funcionan con
PlayStation®2. Consulte también el manual del usuario
del producto i.LINK correspondiente para obtener más
información.
i.LINK es una versión con marca comercial del estándar
IEEE 1394-1995 y sus revisiones.
i.LINK y el logotipo i.LINK “
“ son marcas comerciales.
la consola
Es posible conectarse a una red mediante una
línea telefónica insertando un cordón telefónico
en el conector de línea LINE (RJ-11C) del
adaptador de red instalado en la consola
PlayStation®2.
Conector de línea LINE (RJ-11C)
Cordón telefónico
1 ... Inserte un cordón telefónico (no
suministrado) en el conector de línea LINE
(RJ-11C) del adaptador de red.
2 ... Enchufe el cordón telefónico en el enchufe
telefónico de pared.*
* No conecte al conector de línea LINE (RJ-
11C) ningún tipo de cable que no sea una
línea telefónica para uso residencial.
Si conecta al conector de línea LINE (RJ11C) un cordón telefónico o cable de red
de tipo diferente al especificado, puede
pasar demasiada corriente a través del
conector, ocasionando fallas, exceso de
calor o fuego en el conector. Nunca
conecte al conector de línea LINE (RJ11C) cordones telefónicos de los tipos
listados a continuación (especialmente
un cordón telefónico para redes
telefónicas residenciales o comerciales):
• Un teléfono público compatible con
ISDN (digital)
• Un teléfono PBX
• Un teléfono celular o teléfono para
vehículos
• Un teléfono para redes telefónicas
residenciales o comerciales
Enchufe telefónico
de pared
Enchufes telefónicos de pared
Se puede conectar el adaptador de red a los
cordones telefónicos mediante conectores
RJ-11C estándar. En algunos casos, para poder
conectarse a su línea telefónica podría ser
necesario hacer uso de un adaptador. Para
obtener información detallada, póngase en
contacto con su compañía telefónica.
Precauciones
• Al momento de conectarse a la red, la compañía
telefónica local le cobrará una tarifa por la
conexión, y su proveedor de servicios de Internet lo
hará por el uso del servicio. En algunos casos los
cargos al usuario podrían ser superiores a lo
anticipado. Para obtener información detallada,
consulte las instrucciones suministradas con el
software o póngase en contacto con su proveedor
de servicios de Internet.
• Si recibe una llamada estando conectado a la red y
usted tiene la función de llamada en espera, es
posible que se desconecte o que el software
funcione de forma defectuosa.
• Si está utilizando un aparato de fax o un teléfono en
la misma línea, no podrá conectarse a la red
mediante el conector de línea LINE (RJ-11C).
• Si el adaptador para redes está conectado a una de
éstas, no podrá utilizar su teléfono o aparato de fax.
• Cuando no esté utilizando el adaptador de red,
conecte la línea telefónica al aparato con el que la
utiliza normalmente.
Page 73

Conexión del adaptador de red con un cable de red
Extracción del adaptador de red de la consola
73
Puede conectar la consola PlayStation®2 a una
red mediante el conector de red NETWORK del
adaptador de red instalado en su consola
PlayStation®2.
Puede conectarse a una red de 100 Mbps
mediante un cable 100Base-TX, o hacerlo a una
red de 10 Mbps mediante un cable 10Base-T.
Para obtener información detallada, consulte
las instrucciones suministradas con el
dispositivo de redes al que se esté conectando
(tal como un enrutador, módem DSL o módem
por cable).
Advertencia
Hay una etiqueta protectora en el conector de red
NETWORK cuyo propósito es ayudar a evitar
conexiones accidentales de tipos incorrectos de cable.
Retire la etiqueta la primera vez que utilice el conector
de red NETWORK. Después de que haya retirado la
etiqueta, tenga cuidado de no conectar el tipo
incorrecto de cable al conector de red NETWORK.
No conecte al conector de red NETWORK los tipos de
cables de red o cordones telefónicos que se listan a
continuación. Esto podría ocasionar la circulación de
corriente excesiva a través del conector y producir fallas,
exceso de calor o fuego en el conector.
• Cables de red de un tipo que difiera de los 10Base-T y
100Base-TX
• Líneas telefónicas de tipo normal
• Un teléfono público compatible con ISDN (digital)
• Un teléfono PBX
• Un teléfono para redes telefónicas residenciales o
comerciales
• Otros tipos de líneas telefónicas
Nota
Al momento de conectarse a una red, el proveedor de
servicios de Internet cobrará una tarifa por el uso del
servicio. En algunos casos los cargos podrían ser
superiores a lo anticipado. Para obtener información
detallada, consulte las instrucciones suministradas con el
software que esté utilizando o póngase en contacto con su
proveedor de servicios de Internet.
Es posible extraer el adaptador de red de la
consola. Sólo se debe hacerlo con el propósito
de instalar un dispositivo periférico autorizado
en la EXPANSION BAY(bahía de expansión).
Precauciones
• Por razones de seguridad, apague la consola
mediante el interruptor principal MAIN POWER de
la parte trasera de la consola y desconecte del
tomacorriente el enchufe de alimentación de la
consola antes de extraer el adaptador de red.
• El adaptador de red sirve como una cubierta
protectora de la bahía de expansión y del conector
del bus de expansión situado dentro de dicha bahía.
No deje sin cubrir la bahía de expansión durante
mucho tiempo. Si se pierde o daña el adaptador de
red, o si tuviera alguna pregunta o problema con
relación al adaptador de red, póngase en contacto
con nuestro servicio de asistencia técnica, llamando
al 1-800-345-7669.
• No conecte ningún dispositivo periférico interno no
autorizado al adaptador de red, ni inserte objetos
extraños en la EXPANSION BAY (bahía de
expansión). De hacerlo, podría dañar la consola o
causar fallas de funcionamiento.
1 ... Verifique que el indicador 1 (espera) en la
parte frontal de la consola PlayStation®2
esté iluminado en rojo y, a continuación,
apague la consola PlayStation®2 mediante
el interruptor principal MAIN POWER
situado en la parte trasera de la consola.
2 ... Desconecte el enchufe de alimentación de
la consola PlayStation®2 del
tomacorriente.
3 ... Desconecte el cordón telefónico y/o el
cable de red desde el adaptador de red.
Nota
El adaptador de red incluido en PlayStation®2 online
pack es idóneo para utilizarse únicamente con la
consola PlayStation
2 suministrada.
®
4 ... Afloje los tornillos de fijación.
Gire los tornillos de fijación en la dirección
contraria de las agujas del reloj utilizando
una moneda.
Nota
No utilice un destornillador para aflojar los tornillos
de fijación.
Parte trasera de
la consola
PlayStation
Tornillo de fijación
5 ... Retire el adaptador de red de la consola.
Retire el adaptador de red tirándolo de la
consola.
Adaptador de red
®2
ES
Conexión
Page 74

74
Precauciones
• Por razones de seguridad, no conecte el enchufe de
alimentación de la consola a un tomacorriente hasta
que haya terminado de reinstalar el adaptador de
red.
• Al instalar un dispositivo periférico interno
autorizado en la bahía de expansión de la consola,
consulte las instrucciones proporcionadas con dicho
producto.
Reinstalación del adaptador de red en la consola
1 ... Coloque el adaptador de red en la
EXPANSION BAY (bahía de expansión)
de manera que los tornillos de fijación
coincidan con los agujeros en la consola.
(La bahía de expansión se encuentra en la
parte inferior izquierda de la parte trasera
de la consola PlayStation®2.)
Adaptador de red
2 ... Ajuste el adaptador de red en la consola
PlayStation®2.
Gire los tornillos de fijación en la dirección
de las agujas del reloj utilizando una
moneda. No apriete en exceso.
Notas
• No utilice un destornillador para apretar los
tornillos de fijación.
• No ajuste demasiado los tornillos de fijación
porque podría dañarlos o dañar la consola.
Tornillo de fijación
Page 75

Uso del menú principal
75
Al encender la consola sin haber insertado
primero un disco, el menú principal aparece en
la pantalla del televisor.
Puede acceder al menú Configuración del
Sistema o a la pantalla Navegador desde el
menú principal.
Uso del menú Configuración del
Sistema
El menú Configuración del Sistema permite
configurar el sistema para la consola
PlayStation®2.
Los ajustes realizados se guardarán y serán
efectivos aunque apague la consola.
1...... Seleccione “Configuración del Sistema”
mediante los botones de dirección hacia
arriba y hacia abajo y pulse el botón ✕. El
menú Configuración del Sistema aparece
en la pantalla del televisor.
2...... Seleccione el elemento que desee mediante
los botones de dirección hacia arriba y
hacia abajo y pulse el botón ✕.
Los ajustes predeterminados aparecen
subrayados.
x Ajustar Reloj
Ajuste el reloj.
1...... Utilice los botones de dirección hacia
arriba y hacia abajo para ajustar el mes y, a
continuación, pulse el botón de dirección
hacia la derecha. Utilice el mismo método
para ajustar el día, año, hora, minutos y
segundos. Para volver al menú anterior,
pulse el botón de dirección hacia la
izquierda.
2...... Pulse el botón ✕ en sincronización con un
reloj cuya hora sea precisa.
Puede seleccionar los ajustes opcionales
para el reloj
Seleccione “Ajustar Reloj” mediante los botones
de dirección hacia arriba y hacia abajo y pulse el
botón ¢. Puede ajustar los siguientes elementos
opcionales.
Notación de la hora
•Reloj de 12 horas
•Reloj de 24 horas
Notación de la fecha
•MM/DD/AAAA
•DD/MM/AAAA
•AAAA/MM/DD
Zona horaria
Seleccione su país y/o área geográfica para
ajustar el huso horario.
Horario de verano
Ajuste este elemento en “Horario de verano”
cuando el horario de verano sea efectivo.
•Horario de invierno
•Horario de verano
x Tamaño de la Pantalla
Seleccione el modo de visualización en función
del televisor que conecte.
•4:3: seleccione este elemento cuando conecte
un televisor estándar a la consola.
•Pantalla Completa: seleccione este elemento
cuando conecte un televisor normal a la
consola. Las bandas negras de las partes
superior e inferior de la pantalla se suprimen.
•
16:9: seleccione este elemento cuando conecte un
televisor de pantalla panorámica a la consola.
x DIGITAL OUT (OPTICAL)
Seleccione si la salida de señal se realizará por
el conector DIGITAL OUT (OPTICAL).
•Activado:
un cable digital óptico (vendido por separado).
Seleccione esta opción como su opción normal.
•Desactivado: si selecciona esta opción, la señal
de sonido no será emitida a través del
conector DIGITAL OUT (OPTICAL).
seleccione esta opción cuando conecte
x Salida de Componentes de Imagen
Ajuste este elemento si su televisor, monitor o
proyector dispone de conector de entrada RGB
o de conectores de entrada de vídeo en
componentes (Y, CB/PB, CR/PR) que admitan
las señales de salida de la consola.
Si conecta la consola mediante el cable AV
suministrado (audio/vídeo integrados) o cable
S VIDEO (vendido por separado), no será
preciso ajustar este elemento.
•Y Cb/Pb Cr/Pr: seleccione este elemento si
conecta la consola a los conectores de entrada
de vídeo en componentes.
•RGB: seleccione este elemento si conecta la
consola al conector de entrada RGB.
Nota
Se puede disfrutar los discos del formato PlayStation® y
PlayStation®2 en el formato RGB o Y Cb/Pb Cr/Pr.
Sin embargo, la consola PlayStation®2 ha sido diseñada para
anular el ajuste de la “Salida de Componentes de Imagen” en el
menú de la Configuración del Sistema y reproducir todos los
discos de vídeo DVD en el formato Y Cb/Pb Cr/Pr.
x Idioma
Seleccione el idioma de las indicaciones en pantalla.
•Inglés
•Francés
•Español
•Alemán
•Italiano
•Holandés
•Portugués
Uso de la pantalla Navegador
Puede realizar las siguientes operaciones
mediante la pantalla Navegador:
•Comprobación/copia/eliminación de datos
de juego de la
memoria) (8MB) (para PlayStation®2) o la
memory card (tarjeta de memoria).
•Inicio del software de formato PlayStation® o
PlayStation®2
•Reproducción de CD audio
•Reproducción de vídeo DVD
Seleccione “Navegador” mediante los botones
de dirección hacia arriba y hacia abajo y pulse
el botón ✕. El navegador aparece en la pantalla
del televisor. La
memoria) (8MB) (para PlayStation®2) , la
memory card (tarjeta de memoria)
insertados en la consola aparecen como iconos.
Comprobación/copia/eliminación de datos
de juego
Puede copiar datos de juego de una memory
card (tarjeta de memoria) (8MB) (para
PlayStation®2) o memory card (tarjeta de
memoria) a otra o eliminar los datos que no
desee conservar.
No obstante, no es posible copiar datos de juego
del software de formato PlayStation®2 a la
memory card (tarjeta de memoria) SCPH-1020 U.
Inserte previamente la memory card (tarjeta de
memoria) (8MB) (para PlayStation®2) o la
memory card (tarjeta de memoria).
1...... Seleccione el icono de
(tarjeta de memoria) (8MB) (para
PlayStation®2) o de
de memoria) en la que se encuentren los
datos de juego que desee comprobar/
copiar/eliminar y, a continuación, pulse el
botón ✕.
2......
Compruebe/copie/elimine datos de juego
de acuerdo con las instrucciones en pantalla.
Nota
No extraiga la memory card (tarjeta de memoria) (8MB)
(para PlayStation
memoria) mientras copia o elimina datos de juego.
memory card (tarjeta de
memory card (tarjeta de
o los discos
la memory card
la memory card
®2) o la memory card (tarjeta de
(tarjeta
Comprobación de la
información de versión
Puede comprobar la versión de la consola,
Navegador, Reproductor de CD, PlayStation®
Driver y Reproductor de DVD.
Pulse el botón ¢ en el menú principal.
Función de autodiagnóstico
La consola PlayStation®2 regula automáticamente
los ajustes para obtener la mejor reproducción
posible del disco.
Sin embargo, también es posible recurrir
manualmente a la función de autodiagnóstico cada
vez que esto sea necesario.
1 ..... Seleccione “Consola” mediante los botones
de dirección hacia arriba y hacia abajo y pulse
el botón ¢.
2 ..... Seleccione “Activada” mediante los botones
de dirección hacia arriba y hacia abajo y pulse
el botón ✕.
3 ..... Inserte un disco. La consola inicia el
diagnóstico de forma automática.
Nota
El ajuste de diagnóstico recupera el valor “Desactivada”
automáticamente (ajuste predeterminado) al pulsar el botón
1/RESET (reinicio) o iniciar la reproducción de un disco de
formato PlayStation
DVD.
Ajuste del PlayStation® Driver
El “PlayStation® Driver” es un programa de carga
del software de formato PlayStation®.
1 ..... Seleccione “PlayStation® Driver” mediante
los botones de dirección hacia arriba y hacia
abajo y pulse el botón ¢.
2 .....
Seleccione el elemento deseado mediante los
botones de dirección hacia arriba y hacia abajo
y pulse el botón ✕.
Velocidad del Disco
• Normal: normalmente seleccione esta posición.
• Rápida: el tiempo de carga del software de
formato PlayStation® puede reducirse.
Dependiendo del software, es posible que no se
obtenga ningún efecto o que el software falle
inesperadamente. En este caso, seleccione “Normal”.
Diseño de Texturas
• Estándar: normalmente seleccione esta posición.
• Suave: la pantalla se muestra con mayor
suavidad al reproducir ciertos software de
formato PlayStation®. Dependiendo del software,
es posible que no se obtenga ningún efecto. En
este caso, seleccione “Estándar”.
Nota
El ajuste de “PlayStation® Driver” recupera el valor
“Normal/Estándar” (ajuste de fábrica) automáticamente
al pulsar el botón 1/RESET (reinicio) o apagar la consola.
®
, PlayStation®2 o un disco de vídeo
ES
Conexión
Page 76

76
1,3
4
2
Para jugar
Inicio del juego
1
Encienda la consola con el
interruptor principal MAIN POWER
de la parte trasera de la misma.
El indicador 1 (espera) de la parte
frontal de la consola se ilumina en
rojo para indicar que ésta se
encuentra en el modo de espera.
2
Pulse el botón 1 (espera) /
RESET (reinicio).
El indicador 1 cambia a verde y
aparece la pantalla de inicio.
3
Conecte el control analógico
(DUALSHOCK
analógico (DUALSHOCK
consola.
®) o el control
®2) a la
1
4
Pulse el botón A (abrir).
La bandeja del disco se abre.
5
Coloque un disco en la bandeja
con la cara de la etiqueta hacia
arriba (con la cara de grabación
hacia abajo).
6
Pulse el botón A.
La bandeja del disco se cierra.
Aparece la pantalla 2 ó 3 y el juego
está preparado para iniciarse.
Nota
Ajuste el control analógico (DUALSHOCK®2) o el control
analógico (DUALSHOCK
software (página 77). Consulte el manual del software
correspondiente para obtener información detallada.
®) en el modo apropiado al
Pantallas que aparecen en el
inicio
Si enciende la consola sin insertar un disco
primero
Aparecerá la pantalla 1.
•Si inserta un disco de formato PlayStation®2 o
PlayStation® después de que aparezca la
pantalla 1, aparecerá la pantalla 2 ó 3 y
podrá iniciar el juego.
•Puede desplazarse al menú Configuración del
Sistema o a la pantalla Navegador desde la
pantalla 1. (Para obtener información
detallada, consulte “Uso del menú principal”
en la página 75.)
Al encender la consola con un disco ya
insertado
Dependiendo del tipo de disco insertado,
aparecerá la pantalla 2, 3 ó 4.
Si aparece la pantalla 4, es posible que el disco
insertado no sea de formato PlayStation® o
PlayStation®2. Compruebe el tipo de disco
(página 64).
1 No hay ningún disco insertado (menú
principal).
4 Está insertado un disco que no puede
reproducirse con la consola
PlayStation
2.
®
Finalización del juego
1...... Pulse el botón A.
La bandeja del disco se abre.
2...... Extraiga el disco.
3...... Pulse el botón A.
La bandeja del disco se cierra.
4...... Pulse el botón 1/RESET durante unos dos
segundos.
El indicador 1 se ilumina en rojo y la
consola entra en el modo de espera.
3
2
4,6
5
Reinicio del juego
Pulse el botón 1/RESET brevemente.
(Asegúrese de no mantener el botón pulsado,
ya que si lo hace la consola se ajustará en el
modo de espera.)
Tenga cuidado de no pulsar el botón 1/RESET
accidentalmente mientras juega, o el juego
volverá a iniciarse.
2 Está insertado DVD-ROM / CD-ROM de
formato PlayStation
3 Está insertado CD-ROM de formato
PlayStation®.
2.
®
Notas
• Al estar jugando con un título de software en línea,
puede usar el botón 1/ RESET (reinicio) de la parte
frontal de la consola para salir del título. Tenga en
cuenta que no puede utilizar este botón para reiniciar el
título.
• Para salir de un título de software en línea, siga las
instrucciones en pantalla o las del manual del software.
• Si no puede encontrar las instrucciones, puede salir
pulsando el botón 1/ RESET (reinicio). El indicador 1
se encenderá en rojo cuando la consola haya entrado en
el modo de espera.
• Si no puede salir siguiendo las instrucciones previas,
puede forzar la salida del software manteniendo
pulsado el botón 1/ RESET hasta que el indicador 1
se encienda en rojo.
Page 77

Uso del control analógico
77
Cuando no tenga intención de jugar durante
mucho tiempo
Desactive la alimentación con el interruptor
principal MAIN POWER de la parte trasera de
la consola, desconecte el enchufe de
alimentación del tomacorriente y el cordón
telefónico y/o cable de red del enchufe de
pared.
Cambio de un juego a otro
No es necesario apagar la consola cuando desee
cambiar de juego.
1...... Pulse el botón A.
La bandeja del disco se abre.
2...... Extraiga el disco.
3...... Coloque un disco nuevo en la bandeja.
4...... Pulse el botón A.
La bandeja del disco se cierra.
5...... Pulse el botón 1/RESET (reinicio)
brevemente para reiniciar.
(Advertencia: si mantiene pulsado el
botón 1/RESET (reinicio), la consola
puede entrar en el modo de espera.)
Después de aparecer las pantallas de
inicialización, aparece la pantalla 2 o 3 y
el juego se inicia.
Diferencias entre el control
analógico (DUALSHOCK®2) y
el control analógico
(DUALSHOCK®)
1 Control analógico (DUALSHOCK®2)
(suministrado / vendido por separado)
•El control analógico (DUALSHOCK®2) puede
utilizarse con el software de formato
PlayStation®2 y PlayStation®.
•Puede cambiar entre el modo digital y el
modo analógico. Cuando el control está en el
modo analógico, pueden operar en el modo
analógico los siguientes botones y joysticks,
dependiendo de las funciones que soporta el
título de software. Para obtener más detalles,
consulte el manual del software.
Software de formato PlayStation®2
Botones de dirección / botones ¢ , a , ✕ , s
/ joystick analógico izquierdo / joystick
analógico derecho / botones L1, R1, L2, R2
Software de formato PlayStation
Joystick analógico izquierdo / joystick
analógico derecho
•Puede disfrutar de la función de vibración.
®
2 Control analógico (DUALSHOCK®)
(vendido por separado)
•El control analógico (DUALSHOCK®) puede
utilizarse con el software de formato
PlayStation®2 y PlayStation®.
•Puede cambiar entre el modo digital y el
analógico. Cuando cambie al modo analógico,
podrá realizar la operación analógica de los
joysticks analógicos izquierdo y derecho.
Software de formato PlayStation®2
Joystick analógico izquierdo / joystick
analógico derecho
Software de formato PlayStation
Joystick analógico izquierdo / joystick
analógico derecho
•Puede disfrutar de la función de vibración.
®
Cambio de modo e indicador de
modo
El control analógico (DUALSHOCK®2) y el
control analógico (DUALSHOCK®) pueden
cambiarse entre dos modos pulsando el botón
modo ANALOG (analógico).
Cada vez que pulse el botón modo ANALOG
(analógico), el modo cambiará de la siguiente forma:
Modo digital (indicador: apagado)
Xx
Modo analógico (indicador: rojo)
Nota
Cambie al modo adecuado al uso.
No obstante, tenga en cuenta que ciertos tipos de software
realizan este ajuste de forma automática. En tales casos, el
software ignora el botón modo ANALOG (analógico). Para
obtener información detallada, consulte el manual del
software.
Función de vibración
El control analógico (DDUALSHOCK®2)
control analógico (
una función de vibración cuando el título de
software soporta dicha función. La función de
vibración puede ajustarse en Activada o
Desactivada en la pantalla de opciones de
software.
Notas
• Cuando no utilice el control analógico
(DUALSHOCK
(DUALSHOCK
control.
• Antes de utilizar la función de vibración, lea “Notas
sobre seguridad al utilizar el control analógico
(DUALSHOCK
(DUALSHOCK
DUALSHOCK
®2) y el control analógico
®), apague la consola o desconecte el
®2) y el control analógico
®)” en la página 63.
y el
®) disponen de
Antes de utilizar el control
analógico (DUALSHOCK®2) y el
control analógico
(DUALSHOCK®)
Después de haber encendido la consola, haga girar
los joysticks analógicos derecho e izquierdo con
los pulgares una vez antes de empezar a jugar. No
retuerza los joysticks, hágalos girar como si
dibujara un círculo, como se muestra en el
diagrama de arriba.
ES
CD audio/ juego
5
1,4
2,3
Nota
Con juegos de varios discos, realice los pasos 1 a 4 para
cambiar los discos. Consulte el manual del software para
obtener información detallada.
Botón L2 Botón R2
Botón L1
Botones de
dirección
Botón modo ANALOG
(analógico)
Botón
SELECT
(selección)
Botón
START
(inicio)
Botón R1
Botón ¢
Botón a
Botón ✕
Botón s
Indicador de modo :
apagado
Modo analógico (indicador: rojo)Modo digital (indicador: apagado)
Botón L1
Botones de
dirección
Joystick analógico
izquierdo / Botón L3 *
Botón L2 Botón R2
Botón
SELECT
(selección)
Botón modo
ANALOG (analógico)
* Los botones R3 y L3 funcionan al pulsar el joystick.
Botón
START
(inicio)
Indicador de modo : rojo
Botón R1
Botón ¢
Botón a
Botón ✕
Botón s
Joystick analógico
derecho / Botón R3 *
Page 78

78
Uso de Memory Card (tarjetas de memoria)
Reproducción de CD audio
Puede guardar y cargar datos de juego utilizando la
memory card (tarjeta de memoria) (8MB) (para
PlayStation®2) o la memory card (tarjeta de memoria)
(cada una de ellas vendida por separado).
Diferencias entre la memory card
(tarjeta de memoria) (8MB) (para
PlayStation®2) y la memory card
(tarjeta de memoria)
Cuando reproduzca software de formato
PlayStation®2, utilice la memory card (tarjeta de
memoria) (8MB*) (para PlayStation
Cuando reproduzca software de formato PlayStation
utilice la memory card (tarjeta de memoria) (2).
Para la consola de juegos de vídeo PlayStation®, las
unidades de datos de juego se describen como
“bloques de memoria”. No obstante, para la
consola PlayStation
(kilobytes).
*8 MB = 8,000 KB
2, se describen como “KB”
®
1 Memory card (tarjeta de memoria) (8MB)
(para PlayStation
®
separado)
La memory card (tarjeta de memoria) (8MB) (para
PlayStation
juego de software de formato PlayStation
tarjeta puede guardar unos 8 MB de datos de
juego, aunque algunos de éstos pueden utilizarse
como información de control de archivos.
La memory card (tarjeta de memoria) (8MB) (para
PlayStation
tecnología que ayuda a proteger el contenido
cuyos derechos de autor están registrados,
mediante la encriptación de los datos y la
autenticación del hardware.
derechos de autor, desarrollada por el Grupo Sony.
productos que lleven la marca comercial “MagicGate”.
2) puede guardar y cargar datos de
®
2) está dotada de , una
®
es una tecnología de protección de los
no garantiza la compatibilidad con otros
2 Memory card (tarjeta de memoria)
(vendida por separado)
La memory card (tarjeta de memoria) puede guardar
y cargar datos de juego de software de formato
PlayStation
bloques de memoria) de datos de juego.
Nota
No es posible copiar datos a una memory card (tarjeta de
memoria) (8MB) (para PlayStation
(tarjeta de memoria) que no disponga de suficiente
memoria disponible. Antes de la reproducción, compruebe
la cantidad de espacio necesario para guardar el juego y el
espacio disponible en la memory card (tarjeta de memoria)
(8MB) (para PlayStation
memoria). Consulte el manual del software correspondiente
para determinar la cantidad de espacio necesario para
guardar los datos de un determinado juego.
. Cada tarjeta puede guardar 120 KB (15
®
®2) o memory card (tarjeta de
2) (1).
®
2) (vendida por
®2) o memory card
2. Cada
®
,
®
Inserción de la memory card
(tarjeta de memoria) (8MB) (para
PlayStation®2) y la memory card
(tarjeta de memoria)
Inserte la memory card (tarjeta de memoria)
(8MB) (para PlayStation®2) o la memory card
(tarjeta de memoria) en la ranura para
MEMORY CARD, con el lado de la flecha hacia
arriba.
Ranura para MEMORY
CARD 1
Ranura para MEMORY
CARD 2
Notas sobre el uso de la memory card (tarjeta
®
de memoria) (8MB) (para PlayStation
2) o
memory card (tarjeta de memoria) con un
multitap
•Cuando utilice software de formato
PlayStation®2, emplee el multitap SCPH-10090 U
(para PlayStation®2).
Cuando utilice software de formato
emplee el multitap SCPH-1070 U.
•Si inserta el multitap SCPH-1070 U en el puerto de
control 1, no inserte la memory card (tarjeta de
memoria) (8MB) (para PlayStation®2) o la memory
card (tarjeta de memoria) en la ranura para
MEMORY CARD 1 de la consola PlayStation®2. Esto
también es aplicable a la ranura para MEMORY
CARD 2. Si lo hace, los datos pueden perderse.
PlayStation®,
Copia/eliminación de datos de
juego
Puede copiar datos de juego de una memory card
(tarjeta de memoria) (8MB) (para PlayStation®2) o
memory card (tarjeta de memoria) a otra o eliminar
los datos que no desee conservar.
No obstante, no es posible copiar datos de juego del
software de formato PlayStation®2 a la memory card
(tarjeta de memoria).
Puede comprobar, copiar y eliminar datos de juego
de la pantalla Navegador. Para obtener información
detallada sobre el navegador, consulte
“Comprobación/copia/eliminación de datos de
juego” en la página 75.
Nota
No es posible guardar ni cargar datos de juego en la
pantalla
Navegador
sobre el almacenamiento o la carga de datos de juego,
consulte el manual del software.
. Para obtener información detallada
Reproducción de CD audio
1
Pulse el botón A (abrir).
La bandeja del disco se abre.
2
Coloque un disco en la bandeja
con la cara de etiqueta hacia
arriba (con la cara de grabación
hacia abajo).
3
Pulse el botón A.
La bandeja del disco se cierra.
4
Seleccione el icono de CD audio
en la pantalla Navegador (página
75), y pulse el botón ✕.
Aparece la pantalla “CD Audio”.
5
Seleccione el número de icono
mediante los botones de
dirección y pulse el botón ✕.
Aparece la pantalla de operación de
CD y se inicia la reproducción.
Utilización de la reproducción de CD
Mientras se reproduce un disco, seleccione el
botón de la pantalla de operación de CD mediante
los botones de dirección hacia la derecha y hacia la
izquierda. A continuación, pulse el botón ✕.
N Inicio de la reproducción.
X Pausa.
x Detención de la reproducción.
. Localización del principio de la canción
actual o anterior.
M Avanzar rápidamente.
m Retroceder rápidamente.
> Localización del principio de la siguiente
canción.
Discos de música codificados con tecnología
de protección de los derechos de autor
La función de reproducción de CD audio de este
producto está diseñada en conformidad con las
normas del formato CD (Compact Disc o disco
compacto). Recientemente, algunas compañías
discográficas han empezado a comercializar
discos de música codificados con tecnología de
protección de los derechos de autor. Algunos de
estos discos de música no están en conformidad
con las normas del formato CD y es posible que
este producto no los pueda reproducir.
Reproducción en distintos modos
Puede cambiar los modos de reproducción.
Como ajuste de fábrica, la opción “Normal” está
seleccionada para el “Modo de Reproducción”, y
“Desactivado” para el “Modo de Repetición”
Seleccione el icono de CD audio en la pantalla
Navegador y, a continuación, pulse el botón f
para cambiar los ajustes.
Para reproducir las pistas deseadas en un
orden especificado
1
......
Seleccione “Modo de Reproducción”
mediante los botones de dirección hacia
arriba y hacia abajo y pulse el botón ✕.
2
......
Seleccione “Programada” con los botones de
dirección hacia la derecha y hacia la
izquierda y pulse el botón ✕.
3
......
Seleccione el número de la pista específica
con los botones de dirección y pulse el botón
✕. Repita este paso hasta seleccionar todas las
pistas que desee reproducir.
4
......
Pulse el botón a para volver a la pantalla
Navegador.
Para reproducir las pistas en orden aleatorio
1
......
Seleccione “Modo de Reproducción”
mediante los botones de dirección hacia
arriba y hacia abajo y pulse el botón ✕.
2
......
Seleccione “Aleatoria” con los botones de
dirección hacia la derecha y hacia la
izquierda y pulse el botón ✕.
3
......
Pulse el botón a para volver a la pantalla
Navegador.
Para reproducir todas las pistas de forma
repetida
1
......
Seleccione “Modo de Repetición” mediante
los botones de dirección hacia arriba y hacia
abajo y pulse el botón ✕.
2
......
Seleccione “Todas” con los botones de
dirección hacia la derecha y hacia la
izquierda y pulse el botón ✕.
3
......
Pulse el botón a para volver a la pantalla
Navegador.
Para reproducir una pista de forma repetida
1
......
Seleccione “Modo de Repetición” mediante
los botones de dirección hacia arriba y hacia
abajo y pulse el botón ✕.
2
......
Seleccione “1” con los botones de dirección
hacia la derecha y hacia la izquierda y pulse
el botón ✕.
3...... Pulse el botón a para volver a la pantalla
Navegador.
.
Page 79

Reproducción de vídeo DVD
79
Reproducción de vídeo DVD
Algunas operaciones pueden ser distintas o
estar limitadas en función del DVD. Consulte
las instrucciones suministradas con el disco.
Encienda la consola con el
1
interruptor principal MAIN
POWER de la parte trasera de la
misma.
El indicador 1 (espera) de la parte
frontal de la consola se ilumina en
rojo para indicar que ésta se
encuentra en el modo de espera.
Pulse el botón 1 (espera)/
2
RESET (reinicio).
El indicador 1 cambia a verde y
aparece la pantalla de inicio.
Pulse el botón A (abrir).
3
La bandeja del disco se abre.
Coloque un disco en la bandeja
4
con la cara de la etiqueta hacia
arriba (con la cara de grabación
hacia abajo).
Pulse el botón A.
5
La bandeja del disco se cierra y la
consola inicia la reproducción.
Notas
• Dependiendo del DVD, puede aparecer un menú DVD
o de títulos en la pantalla del televisor (consulte la
página 81).
• Si pulsa el botón A después de la reproducción,
aparecerá la pantalla Navegador.
• Al reproducir un vídeo DVD, no conecte la consola a
una videograbadora, ya que si lo hiciera, se reduciría la
calidad de la imagen. Conecte la consola directamente a
un televisor.
Si encuentra dificultades para reproducir un vídeo DVD:
En raros casos, ciertos vídeos DVD podrían no funcionar
adecuadamente con PlayStation®2. Ello se debe
principalmente a las variaciones en el proceso de
manufactura o de la codificación del software del vídeo
DVD. Si encuentra dificultades, intente reinicializar su
vídeo DVD. Si las dificultades persisten, sírvase llamar al
editor del vídeo DVD para obtener más información sobre
este último o póngase en contacto con el departamento de
servicio al cliente de SCEA.
Utilización del reproductor de DVD directamente con el control
Puede utilizar el reproductor de DVD directamente con los botones del control mientras no se
muestre el panel de control (página 80). Asimismo, es posible utilizar el reproductor de DVD
mediante el control remoto de DVD (para PlayStation®2) (vendido por separado). Para obtener
información detallada, consulte el manual de instrucciones suministrado con el control remoto de
DVD (para PlayStation®2) con unidad de receptor infrarrojo (SCPH-10171).
Esta consola lleva incorporado un software para reproductor de DVD, el cual es compatible con el
control remoto de DVD (para PlayStation®2). Usted puede utilizar el control remoto de DVD (para
PlayStation®2), simplemente insertando la unidad de receptor infrarrojo (suministrada con el control
remoto de DVD) en un puerto de control de la consola. Al momento de utilizar el control remoto de
DVD (para PlayStation®2) con esta consola, no es necesario emplear ninguna memory card (tarjeta de
memoria) (8MB) (para PlayStation®2).
Botón L2:
(Página 82)
Botón L1: . (Anterior)
Botones de dirección:
Cursor
Botón L3*: (Opción de
subtítulos) (Página 81)
Botón SELECT
del panel de control (Página 80)
* Si utiliza el control sin el botón L3 o R3, seleccione la función (Opción de subtítulos) o (Opciones de audio) mediante
el panel de control (consulte la página 80).
Par a
Parar
Pausa
Reanudar la reproducción después de la pausa
Acceder al capítulo siguiente en el modo de
reproducción continua
Retroceder al capítulo anterior en el modo de
reproducción continua
Asimismo, es posible realizar distintas funciones utilizando el menú en la pantalla (Panel de Control).
Para obtener información detallada, consulte la sección “Utilización del Panel de Control” (página 80).
(Buscar)
(selección)
: Visualización
DUALSHOCK
2
Operación
Pulse el botón a.
Pulse el botón START (inicio).
Pulse el botón START (inicio).
Pulse el botón R1.
Pulse el botón L1 dos veces.
Botón R2: (Buscar)
(Página 82)
Botón R1: > (Siguiente)
Botón ¢:
(Página 81)
Botón a: Cancelar/ x
(Parar)
Botón ✕: Aceptar
Botón s:
títulos) (Página 81)
Botón R3* :
audio) (Página 81)
Botón START (inicio): N
(Play (Reproducir)) / X
(Pausa)
(Menú DVD)
(Menú de
(Opciones de
Reproducción desde el último
punto de detención
(Reanudación de la
reproducción)
El reproductor recuerda el punto en el que se
detuvo el disco, y es posible reanudar la
reproducción a partir de ese punto.
1...... Mientras se reproduce un disco, pulse el
botón a para detener la reproducción.
Aparece “Pulse [Play (Reproducir)] para
reanudar la reproducción. Para comenzar
desde el principio pulse [Parar] y, a
continuación, [Play (Reproducir)].” y, a
continuación, la pantalla del televisor
muestra el Panel de control (página 80).
Si aparece el mensaje “La función
Reanudar programa no se puede usar
aquí. La reproducción comenzará desde el
principio.”, la reanudación de
reproducción no estará disponible.
2...... Seleccione N(Play (Reproducir))
mediante los botones de dirección y pulse
el botón ✕.
El reproductor inicia la reproducción a
partir del punto en el que detuvo el disco
en el paso 1.
Para reproducir el disco desde el principio
Después del paso 1, seleccione x (Parar) y
pulse el botón ✕. El punto en el que haya
detenido la reproducción se borra.
Seleccione N (Play (Reproducir)) y pulse el
botón ✕.
Notas
• Es posible que la reanudación de reproducción no esté
disponible en algunos discos DVD.
• Dependiendo de dónde detenga el disco, es posible que
la consola reanude la reproducción a partir de un punto
diferente.
• El punto en el que haya detenido la reproducción se
borrará si:
– abre la bandeja del disco
– se cambia al modo de espera manteniendo pulsado
el botón 1/RESET (reinicio) en la parte frontal de la
consola
– desactiva la alimentación con el interruptor principal
MAIN POWER de la parte trasera de la consola
– inicia la reproducción después de seleccionar un
título o capítulo
ES
CD audio/ juego / V
ídeo DVD
Page 80

80
Utilización del Panel de Control
Utilización del Panel de Control
Puede realizar distintas funciones utilizando el
menú en la pantalla (Panel de control).
Las funciones pueden ser diferentes en función
del disco utilizado.
1
Pulse el botón SELECT (selección).
El panel de control aparece en la
pantalla del televisor.
Seleccione el elemento que
2
desee mediante los botones de
dirección.
Pulse el botón ✕.
3
Para obtener información detallada
sobre cada elemento mostrado en el
panel de control, consulte las páginas
81 a 86.
Puede seleccionar ciertos elementos
directamente con el control
Consulte la página 79.
Lista de elementos del panel de control
1 Menú DVD (página 81)
Algunos discos DVD permiten seleccionar
su contenido mediante un menú. Al
reproducir este tipo de DVD, podrá
seleccionar el idioma de los subtítulos, el
del sonido, etc., mediante el menú DVD.
2 Menú de títulos (página 81)
Los discos DVD se dividen en largas
secciones de una imagen o de música
denominadas “títulos”. Al reproducir un
DVD que contenga varios títulos, podrá
seleccionar el título que desee mediante el
menú de títulos.
3 O Volver (página 81)
Puede volver a la pantalla anterior del
menú DVD o del menú de títulos.
4 Opciones de audio (página 81)
Si el DVD está grabado con pistas en varios
idiomas, podrá seleccionar el idioma que
desee mientras se reproduce el DVD.
5 Opciones de ángulo (página 81)
6 Opción de subtítulos (página 81)
7 Ir al título (página 82)
8 Ajustar (página 83)
Es posible elegir entre los distintos ángulos
disponibles para las escenas si el DVD
dispone de diversos ángulos grabados para
dichas escenas.
Con discos DVD en los que haya subtítulos
grabados, puede cambiar el idioma cuando
desee mientras se reproduce el DVD, así
como activarlo y desactivarlo cuando lo
desee.
Puede seleccionar el número del título que
desee buscar.
Mediante el uso de la pantalla de ajustes,
puede realizar la configuración inicial,
ajustar la imagen y el sonido, y definir las
distintas salidas. También puede establecer
un idioma para los subtítulos y la pantalla
de ajustes, limitar la reproducción para
niños, etc.
9 Presentación de los capítulos
(página 82)
Mientras se reproduce un disco, puede
comprobar los números del título y
capítulo actuales en la pantalla del
televisor.
0 Ayuda (página 82)
La lista de los botones directos del control
se muestra en la pantalla del televisor.
qa Ir al capítulo (página 82) / Botones
numéricos
Puede seleccionar el número del capítulo
que desee buscar.
qs . Anterior
Puede retroceder al capítulo anterior en el
modo de reproducción continua.
qd / Buscar (página 82)
Puede localizar un punto determinado del
DVD rápidamente controlando la imagen.
qf > Siguiente
Puede acceder al capítulo siguiente en el
modo de reproducción continua.
qg N Play (Reproducir)
qh X Pausa
qj x Parar
qk Cámara lenta (página 82)
Puede localizar un punto del DVD
lentamente visualizando la pantalla.
Page 81

81
Uso del menú DVD
Algunos discos DVD permiten seleccionar su
contenido mediante un menú. Al reproducir
este tipo de DVD, podrá seleccionar el idioma
de los subtítulos, el del sonido, etc., mediante el
menú DVD.
1...... Seleccione (Menú DVD) mediante los
botones de dirección y pulse el botón ✕.
El menú DVD aparece en la pantalla del
televisor. El contenido del menú varía
según el disco.
2...... Pulse los botones de dirección para
seleccionar el elemento que desee cambiar.
3...... Para cambiar otros elementos, repita el
paso 2.
4...... Pulse el botón ✕.
Puede mostrar el menú DVD directamente
Pulse el botón ¢ del control mientras no se
muestra el panel de control.
Si desea seleccionar el idioma para el menú
DVD
Puede cambiar el valor mediante “Menú DVD”
en “Selección de idioma” en la pantalla de
ajustes. Para obtener información detallada,
consulte la página 84.
Para volver a la pantalla anterior del menú
DVD
Seleccione O (Volver) y pulse el botón ✕.
Es posible que esta función no esté disponible
en algunos discos DVD.
Notas
• Es posible que el menú DVD no esté disponible en
algunos discos DVD.
• En algunos discos DVD, es posible que el “Menú DVD”
se denomine simplemente “menú” en las instrucciones
suministradas con los mismos.
Visualización del menú de
títulos
Los discos DVD se dividen en largas secciones
de una imagen o de música denominadas
“títulos”. Al reproducir un DVD que contenga
varios títulos, podrá seleccionar el título que
desee mediante el menú de títulos.
1...... Seleccione (Menú de títulos) mediante
los botones de dirección y pulse el botón
✕.
El menú de títulos aparece en la pantalla
del televisor. El contenido del menú varía
según el disco.
2...... Pulse los botones de dirección para
seleccionar el título que desee reproducir.
3...... Pulse el botón ✕.
La consola comienza a reproducir el título
seleccionado.
Puede mostrar el menú de títulos
directamente
Pulse el botón s del control mientras no se
muestra el panel de control.
Para volver a la pantalla anterior del menú
de títulos
Seleccione O (Volver) y pulse el botón ✕.
Es posible que esta función no esté disponible
en algunos discos DVD.
Notas
• Algunos discos DVD no permiten seleccionar el título.
• En algunos discos DVD, es posible que un “Menú de
títulos” se denomine simplemente “menú” o “título” en
las instrucciones suministradas con los mismos.
También es posible que “Pulse ENTER.” se exprese
como “Pulse SELECT.”.
Cambio del idioma para el audio
Si el DVD está grabado con pistas en varios
idiomas, podrá seleccionar el idioma que desee
mientras se reproduce el DVD.
Los idiomas que pueden seleccionarse varían
en función del DVD.
Seleccione (Opciones de audio) mediante los
botones de dirección y pulse el botón ✕.
Cada vez que pulse el botón ✕, el idioma
cambiará.
Puede seleccionar “Opciones de audio”
directamente
Pulse el botón R3 del control mientras no se
muestra el panel de control. El idioma cambiará
cada vez que pulse el botón.
Notas
• Debido a la información programada en ciertos discos
DVD, es posible que no pueda cambiar el idioma
aunque haya pistas grabadas en varios idiomas en los
mismos.
• Si cambia el título mientras se reproduce el DVD, el
sonido puede cambiar.
Cambio del ángulo de visión
Es posible cambiar los ángulos de las escenas si el
DVD dispone de diversos ángulos grabados para
dichas escenas. Por ejemplo, mientras se
reproduce una escena de un tren en movimiento,
puede visualizarla desde la parte frontal del tren o
desde la ventanilla izquierda o derecha del mismo
sin que se interrumpa el movimiento del tren.
Seleccione (Opciones de ángulo) mediante
los botones de dirección y pulse el botón ✕.
Cada vez que pulse el botón ✕, el ángulo
cambiará.
Notas
• El número de ángulos varía según el disco o la escena.
El número de ángulos que pueden cambiarse en una
escena es equivalente al número de ángulos grabados
para esa escena.
• Debido a la información programada en ciertos discos
DVD, es posible que no pueda cambiar los ángulos
aunque haya distintos ángulos grabados en dichos
discos.
Visualización de subtítulos
Con discos DVD en los que haya subtítulos
grabados, es posible activar y desactivar dichos
subtítulos cuando lo desee durante la
reproducción.
Con discos DVD en los que haya subtítulos
multilingües grabados, puede cambiar el
idioma de los subtítulos cuando desee mientras
se reproduce el DVD. Por ejemplo, puede
seleccionar el idioma que desee practicar y
activar los subtítulos para una mejor
comprensión.
Seleccione (Opción de subtítulos) mediante
los botones de dirección y pulse el botón ✕.
Puede seleccionar el idioma de los subtítulos, y
activarlo o desactivarlo.
Los idiomas que pueden seleccionarse varían
en función del DVD.
Puede seleccionar “Opción de subtítulos”
directamente
Pulse el botón L3 del control mientras no se
muestra el panel de control. Puede seleccionar
el idioma de los subtítulos, y activarlo o
desactivarlo.
Notas
• Si reproduce un DVD en el que no haya subtítulos
grabados, no aparecerán subtítulos.
• Debido a la información programada en ciertos discos
DVD, es posible que no pueda activar los subtítulos
aunque estén grabados en los mismos.
• Algunos discos DVD no permiten desactivar los
subtítulos.
• El tipo y número de idiomas para subtítulos varían
según el disco.
• Debido a la información programada en ciertos discos
DVD, es posible que no pueda cambiar los subtítulos
aunque haya subtítulos multilingües grabados en los
mismos.
• Si cambia el título mientras se reproduce el DVD, el
subtítulo puede cambiar.
ES
Vídeo DVD
Page 82

82
Utilización del Panel de Control (continuación)
Búsqueda de títulos
Puede seleccionar el número del título que
desee buscar utilizando los botones numéricos.
1...... Seleccione (Ir al título) mediante los
botones de dirección y pulse el botón ✕.
“Ir al título - -” aparece en la pantalla del
televisor.
2...... Introduzca el número del título mediante 2
dígitos utilizando los botones numéricos.
El reproductor inicia la reproducción en el
título seleccionado.
Visualización de información
durante la reproducción de un
disco
Mientras se reproduce un disco, puede
comprobar los números del título y capítulo
actuales en la pantalla del televisor.
Seleccione (Presentación de los capítulos)
mediante los botones de dirección y pulse el
botón ✕.
Cada vez que pulse el botón ✕, podrá activar y
desactivar la presentación.
Visualización de la lista de
funciones con los botones de
acceso directo (Ayuda)
La lista de los botones directos del control se
muestra en la pantalla del televisor.
Seleccione (Ayuda) mediante los botones de
dirección y pulse el botón ✕.
Para desactivar la lista
Pulse el botón ✕.
Búsqueda de capítulos
Puede seleccionar el número del capítulo que
desee buscar utilizando los botones numéricos.
Introduzca el número del capítulo mediante 2
dígitos utilizando los botones numéricos.
El reproductor inicia la reproducción en el
capítulo seleccionado.
Búsqueda de un punto
determinado de un disco
Es posible localizar rápidamente un punto
determinado de un disco observando la imagen
o reproduciendo a cámara lenta.
Nota
En función del DVD, es posible que no pueda realizar
algunas de las operaciones descritas.
Localización de un punto rápidamente
(Buscar)
1...... Mientras se reproduce el disco, seleccione
(Buscar avance) o (Buscar atrás)
mediante los botones de dirección.
2...... Mantenga pulsado el botón ✕ para
localizar un punto.
Cuando encuentre el punto que desee, deje
de pulsar el botón para volver a la
velocidad normal de reproducción.
También puede utilizar los botones directos
Pulse los botones R2 (Buscar avance) o L2 (Buscar atrás)
del control mientras no se visualiza el panel de control.
Localización de un punto lentamente
observando la pantalla (reproducción a
cámara lenta)
1...... Mientras se reproduce el disco, seleccione
(Cámara lenta) con los botones de
dirección.
2...... Pulse el botón ✕.
Se inicia la reproducción a cámara lenta.
Cuando encuentre el punto que desee,
seleccione N (Play (Reproducir)) y pulse
el botón ✕ para recuperar la velocidad
normal.
También puede reanudar la reproducción
pulsando el botón START (inicio).
Page 83

Ajustes para el reproductor de DVD
83
Uso de la pantalla de ajustes
Mediante el uso de la pantalla de ajustes, puede
realizar la configuración inicial, ajustar la
imagen y el sonido, y definir las distintas
salidas. También puede establecer un idioma
para los subtítulos, limitar la reproducción para
niños, etc.
1
Pulse el botón SELECT
(selección) para que aparezca el
panel de control en la pantalla
del televisor.
2
Seleccione (Ajustar)
mediante los botones de
dirección y pulse el botón ✕.
La pantalla de ajustes aparece en la
pantalla del televisor.
3
Seleccione el elemento principal
que desee mediante los botones
de dirección.
4
Pulse el botón ✕.
El elemento principal seleccionado
aparece resaltado.
Lista de los elementos de la pantalla de ajustes
Los ajustes predeterminados aparecen subrayados.
ES
Vídeo DVD
5
Seleccione el elemento que
desee mediante los botones de
dirección.
6
Pulse el botón ✕.
Después de cambiar los ajustes para el
reproductor de DVD
Para guardar sus cambios, cerciórese de extraer el disco
DVD antes de pulsar el botón 1/RESET (reinicio) o
apagar la unidad con el interruptor principal MAIN
POWER. Por favor tenga en cuenta que no se guardarán
los cambios si reinicia o apaga la consola sin la previa
extracción del disco DVD.
Page 84

84
Ajustes para el reproductor de DVD (continuación)
Ajuste de las opciones de
idioma (Selección de idioma)
“Selección de idioma” permite definir varios
idiomas para las indicaciones en pantalla o la
pista de sonido.
Los ajustes predeterminados aparecen
subrayados.
Seleccione “Selección de idioma” en la pantalla
de ajustes.
Notas
• Si selecciona un idioma que no esté grabado en el DVD,
se seleccionará automáticamente uno de los idiomas
grabados para los ajustes “Menú DVD”, “Audio” y
“Subtítulos”.
• Dependiendo del disco DVD, es posible que la consola
no inicie la reproducción con el idioma seleccionado en
las opciones “Menú DVD”, “Audio” y “Subtítulos”.
x Menú Pantalla
Seleccione el idioma de las indicaciones en la
pantalla.
• Inglés
• Francés
• Alemán
• Italiano
• Español
• Holandés
• Portugués
x Menú DVD
Seleccione el idioma del menú DVD.
• Inglés
• Francés
• Alemán
• Italiano
• Español
• Holandés
• Danés
• Sueco
• Finlandés
• Noruego
• Portugués
• Ruso
• Chino
• Japonés
• Opciones de idioma
Si selecciona “Opciones de idioma”,
aparecerá la lista de idiomas. Seleccione el
idioma en la lista.
x Audio
Seleccione el idioma de la pista de sonido.
• Inglés
• Francés
• Alemán
• Italiano
• Español
• Holandés
• Danés
• Sueco
• Finlandés
• Noruego
• Portugués
• Ruso
• Chino
• Japonés
• Opciones de idioma
Si selecciona “Opciones de idioma”,
aparecerá la lista de idiomas. Seleccione el
idioma en la lista.
x Subtítulos
Seleccione el idioma de los subtítulos.
• Seguimiento Audio*
• Inglés
• Francés
• Alemán
• Italiano
• Español
• Holandés
• Danés
• Sueco
• Finlandés
• Noruego
• Portugués
• Ruso
• Chino
• Japonés
• Opciones de idioma
Si selecciona “Opciones de idioma”,
aparecerá la lista de idiomas. Seleccione el
idioma en la lista.
* Si selecciona “Seguimiento Audio”, el idioma de los
subtítulos cambiará de acuerdo con el idioma del ajuste
seleccionado para la pista de sonido.
Después de cambiar los ajustes para el
reproductor de DVD
Para guardar sus cambios, cerciórese de extraer el disco
DVD antes de pulsar el botón 1/RESET (reinicio) o
apagar la unidad con el interruptor principal MAIN
POWER. Por favor tenga en mente que no se guardarán
los cambios si reinicializa o apaga la consola sin la previa
extracción del disco DVD.
Ajuste del modo de
visualización del televisor
(Ajuste de la pantalla)
“Ajuste de la pantalla” permite ajustar varias
opciones para la visualización en el televisor.
Los ajustes predeterminados aparecen
subrayados.
Seleccione “Ajuste de la pantalla” en la pantalla
de ajustes.
x Formato TV
Seleccione la relación de aspecto del televisor
que conecte.
Es posible realizar este ajuste sólo cuando el
disco DVD esté detenido.
• 16:9: Seleccione esta opción cuando esté
utilizando un televisor de pantalla
panorámica o un televisor estándar que
proyecte en modo panorámico.
• 4:3 Tipo buzón: Seleccione esta opción
cuando esté utilizando un televisor estándar.
Este ajuste mostrará una imagen panorámica
con márgenes en las partes superior e
inferior de la pantalla.
• 4:3 EXPLO PAN: Seleccione esta opción
cuando esté utilizando un televisor estándar.
Mostrará automáticamente una imagen
panorámica ajustada a la altura de la pantalla
y cortará automáticamente las secciones a la
izquierda y derecha que no encajen.
16:9
4:3 Tipo buzón
4:3 EXPLO PAN
Nota
Con algunos discos DVD, es posible que “4:3 Tipo buzón”
se seleccione automáticamente en lugar de “4:3 EXPLO
PAN” y viceversa.
x DNR (Digital Noise Reduction)
Si la imagen de reproducción aparece con ruido
o interferencia, ajuste este elemento en “DNR1”
o “DNR2”.
• Desactivada: Normalmente seleccione esta
posición.
• DNR1: la imagen aparece con nitidez gracias
a la reducción del ruido.
• DNR2: la imagen aparece con mayor nitidez
gracias a la reducción del ruido.
Notas
• Al seleccionar “DNR2”, puede aparecer una imagen
residual. En este caso, seleccione “Desactivada”.
• Con algunos discos DVD, la función DNR puede
producir resultados limitados.
x Nitidez de contornos
Permite mostrar el contorno de la imagen de
forma más o menos aguda. Cuanto mayor sea
el valor, más agudo será el contorno.
• +2
• +1
• 0: Normalmente seleccione esta posición.
•–1
•–2
x Presentación
Muestra o desactiva la información del estado
de reproducción en la pantalla del televisor.
• Activada: Al utilizar el reproductor de DVD,
el estado de reproducción aparece durante
unos segundos en la pantalla del televisor.
• Desactivada: El estado de reproducción no se
muestra.
Después de cambiar los ajustes para el
reproductor de DVD
Para guardar sus cambios, cerciórese de extraer el disco
DVD antes de pulsar el botón 1/RESET (reinicio) o
apagar la unidad con el interruptor principal MAIN
POWER. Por favor tenga en mente que no se guardarán
los cambios si reinicializa o apaga la consola sin la previa
extracción del disco DVD.
Page 85

85
Ajuste de las opciones de
visualización
(Ajuste personalizado)
“Ajuste personalizado” permite establecer las
condiciones de reproducción.
Los ajustes predeterminados aparecen
subrayados.
Seleccione “Ajuste personalizado” en la
pantalla de ajustes.
x Modo Pausa
Seleccione la imagen en el modo de pausa.
•
Auto : Se emite una imagen estable incluyendo
motivos con movimiento dinámico.
Normalmente seleccione esta posición.
• Fotograma : Se emite una imagen incluyendo
motivos sin movimiento dinámico con alta
resolución.
x Control Paterno
Es posible restringir la reproducción de ciertos
discos DVD. La función de Control Paterno le
permite establecer el nivel de restricción de la
reproducción, el cual mediante una contraseña,
impide que los niños vean determinado
contenido.
Seleccione “Ajuste personalizado” en la
pantalla de ajustes.
1...... Seleccione “Control Paterno” mediante los
botones de dirección y pulse el botón ✕.
x Si no ha introducido ninguna contraseña
Aparecerá la pantalla de introducción
de contraseñas.
x Si ya ha registrado una contraseña
Aparecerá la pantalla de confirmación
de la contraseña. Omita el paso 2.
2...... Introduzca una contraseña de 4 dígitos con
los botones numéricos.
3...... Para confirmar la contraseña, introdúzcala
de nuevo mediante los botones numéricos.
Puede establecer el nivel de Control
Paterno y cambiar la contraseña.
4...... Seleccione “Región” mediante los botones
de dirección y pulse el botón ✕.
5...... Seleccione una región geográfica para
ajustar el nivel estándar de Control
Paterno para esa región mediante los
botones de dirección, y pulse el botón ✕.
6...... Seleccione “Nivel” mediante los botones
de dirección y pulse el botón ✕.
7...... Seleccione el nivel deseado mediante los
botones de dirección y pulse el botón ✕.
Cuanto menor sea el valor, más estricta
será la limitación.
Para desactivar la función Control Paterno y
reproducir el DVD después de introducir la
contraseña
Ajuste “Nivel” en “Desactivada” en el paso 7, y
pulse el botón ✕.
Para cambiar la contraseña
1...... Después del paso 3, seleccione “Cambiar
contraseña” mediante los botones de
dirección y pulse el botón ✕.
Aparecerá la pantalla de cambio de
contraseñas.
2...... Realice los pasos 2 y 3 para introducir una
contraseña nueva.
Reproducción de discos bloqueados con
nivel de Control Paterno
1...... Inserte el disco y pulse el botón START
(inicio).
Aparece la pantalla Control Paterno.
2...... Introduzca la contraseña de 4 dígitos con
los botones numéricos.
El reproductor inicia la reproducción.
Al detener la reproducción del DVD, se
recupera el nivel original de Control
Paterno.
Si olvida la contraseña
Pulse el botón SELECT (selección) e introduzca
el número de 4 dígitos “7444” cuando la
pantalla Control Paterno le solicite la
contraseña. La contraseña antigua se elimina.
Notas
• Si reproduce discos DVD que no dispongan de la
función Control Paterno, no será posible limitar la
reproducción en este reproductor.
• Si no define ninguna contraseña, no podrá cambiar los
ajustes de Control Paterno.
• Con algunos discos DVD, es posible que se le solicite
cambiar el nivel de Control Paterno mientras se
reproduce el disco. En este caso, introduzca la
contraseña y, a continuación, cambie el nivel.
Al detener la reproducción del DVD, se recupera el
nivel original de Control Paterno.
ES
Vídeo DVD
Después de cambiar los ajustes para el
reproductor de DVD
Para guardar sus cambios, cerciórese de extraer el disco
DVD antes de pulsar el botón 1/RESET (reinicio) o
apagar la unidad con el interruptor principal MAIN
POWER. Por favor tenga en mente que no se guardarán
los cambios si reinicializa o apaga la consola sin la previa
extracción del disco DVD.
Page 86

86
Ajustes para el reproductor de DVD (continuación)
Ajuste de las opciones de
sonido (Audio)
“Audio” permite adaptar el sonido a las
condiciones de reproducción.
Los ajustes predeterminados aparecen
subrayados.
Seleccione “Audio” en la pantalla de ajustes.
x Salida Audio Digital
Conmuta los métodos de envío de señales de
audio al conectar, 1. un componente digital,
como un receptor (amplificador), con un
conector digital, 2. un componente de audio
con un decodificador incorporado (Dolby
Digital o DTS), 3. una platina DAT o MD
mediante el conector DIGITAL OUT
(OPTICAL) con un cable digital óptico. Para
obtener información detallada sobre la
conexión, consulte la página 71.
No será posible ajustar “Dolby Digital” ni
“DTS” si ajusta “DIGITAL OUT (OPTICAL)”
en “Desactivada”.
x DIGITAL OUT (OPTICAL)
Selecciona si la salida de señal se realizará por
el conector DIGITAL OUT (OPTICAL).
• Activada: seleccione esta opción cuando
conecte un cable digital óptico (vendido por
separado).
Seleccione esta opción como su opción
normal.
Si selecciona “Activada”, podrá ajustar
“Dolby Digital” y “DTS”.
• Desactivada: si selecciona esta opción, la
señal de sonido no será emitida a través del
conector DIGITAL OUT (OPTICAL).
Nota
Si selecciona “Desactivada”, no podrá ajustar “Dolby
Digital” ni “DTS”.
x Dolby Digital
Selecciona el modo de la señal Dolby Digital
que se emite cuando haya conectado la consola
con un cable digital óptico.
• Activada: Seleccione esta opción si ha
conectado la consola a un componente de
audio con decodificador Dolby Digital
incorporado.
Si la consola está conectada a un componente
de audio sin decodificador Dolby Digital
incorporado, no active esta opción. Si
selecciona esta opción por error, al
reproducir una pista de sonido Dolby
Digital, es posible que los altavoces no
emitan ningún sonido o que éstos emitan un
ruido intenso que afectaría sus oídos o
causaría daños a los altavoces.
• Desactivada: Seleccione esta opción si ha
conectado la consola a un componente de
audio sin decodificador Dolby Digital
incorporado.
x DTS
Selecciona la señal DTS que saldrá cuando
conecte la consola con un cable digital óptico.
• Activada: seleccione esta opción si ha
conectado la consola a un componente de
audio con decodificador DTS incorporado.
Si ha conectado la consola a un componente
de audio sin decodificador DTS incorporado,
no active esta opción. Si selecciona esta
opción por error, al reproducir una pista de
audio DTS, es posible que los altavoces no
emitan ningún sonido o que éstos emitan un
ruido intenso que afectaría sus oídos o
causaría daños a los altavoces.
• Desactivada: Seleccione esta opción si ha
conectado la consola a un componente de
audio sin decodificador DTS incorporado.
x Modo Automático de Selección de Pistas
Da prioridad a la pista de sonido que contenga
el número más alto de canales al reproducir un
DVD en el que haya varios formatos de audio
(PCM, DTS o Dolby Digital) grabados.
• Activada: Se da prioridad.
• Desactivada: No se da prioridad.
Notas
• Si ajusta este elemento en “Activada”, el idioma puede
cambiar en función de los ajustes de “Audio” dentro de
“Selección de idioma”.
El ajuste de “Modo Automático de Selección de Pistas”
tiene mayor prioridad que los ajustes de “Audio”
dentro de “Selección de idioma” (página 84).
• Si ajusta “DIGITAL OUT (OPTICAL)” en “Activada” y
“DTS” en “Desactivada” dentro de “Audio”, la pista de
sonido DTS no se reproducirá aunque ajuste este
elemento en “Activada” y el canal de audio de número
más alto esté grabado en formato DTS.
• Si las pistas de sonido PCM, DTS y Dolby Digital tienen
el mismo número de canales, la consola seleccionará las
pistas de sonido PCM, Dolby Digital y DTS por este
orden.
• En algunos discos DVD, el canal de audio con prioridad
puede estar predeterminado. En este caso, no podrá
dar prioridad al formato DTS o Dolby Digital mediante
la selección de “Activada”.
x Volumen DVD
Si el nivel de salida de audio del DVD es bajo,
puede aumentar el volumen de dicho DVD.
(Nota: DIGITAL OUT (OPTICAL) debe estar
fijado en “Desactivado” para tener acceso a esta
función.)
• +2: Puede aumentar el volumen.
• +1: Puede aumentar el volumen.
• Normal: Volumen original de audio.
Normalmente seleccione esta posición.
Nota
Con algunos discos DVD, el sonido puede distorsionarse
si selecciona “+1” o “+2”.
Después de cambiar los ajustes para el
reproductor de DVD
Para guardar sus cambios, cerciórese de extraer el disco
DVD antes de pulsar el botón 1/RESET (reinicio) o
apagar la unidad con el interruptor principal MAIN
POWER. Por favor tenga en mente que no se guardarán
los cambios si reinicializa o apaga la consola sin la previa
extracción del disco DVD.
Este producto incorpora tecnología de
protección de los derechos de autor amparada
por demandas de patentes de EE.UU. y otros
derechos de propiedad intelectual de
Macrovision Corporation y otros propietarios.
El uso de dicha tecnología debe contar con la
autorización de Macrovision Corporation y es
únicamente para uso doméstico y otros usos de
visualización limitados, a menos que
Macrovision Corporation autorice lo contrario.
Está prohibida la ingeniería inversa o
desmontaje de la consola.
Page 87

Solución de problemas
87
Revise esta sección si tiene
problemas en hacer funcionar la
consola.
• Si experimenta cualquiera de las
dificultades siguientes, trate de
solucionarla utilizando esta guía de
solución de problemas antes de solicitar la
reparación de la unidad. Si el problema
persiste, póngase en contacto con nuestro
servicio de asistencia técnica, llamando al
1-800-345-7669.
• Compruebe que el cable de alimentación
AC está conectado a la consola y a la toma
de corriente, y que el televisor (o
videograbadora) o los accesorios
suministrados están conectados a la
consola correctamente.
Alimentación
La alimentación no se activa.
, Compruebe que el cable de alimentación
AC está correctamente conectado.
, La consola no se enciende. Encienda la
consola con el interruptor principal MAIN
POWER de la parte trasera de la misma.
Imagen
La imagen no aparece.
, Compruebe que la consola está conectada
al televisor (o videograbadora) con el cable
AV (audio/vídeo integrados).
, Compruebe que enciende la consola y el
televisor (o videograbadora).
, Asegúrese de que selecciona la entrada de
vídeo en el televisor (o videograbadora).
, Compruebe que el cable AV (audio/vídeo
integrados) está firmemente conectado.
, Asegúrese de que el disco insertado puede
reproducirse con esta consola (consulte la
página 64).
, Cerciórese de que el disco está colocado
con la cara de la etiqueta hacia arriba (con
la cara de grabación hacia abajo).
, El disco no se inserta correctamente.
, La consola está en el modo de pausa.
, Pruebe otro conjunto de cable AV.
Aparece ruido en la imagen.
, La consola está colocada sobre una
superficie inestable. Coloque la consola
sobre una superficie estable y plana. No
agite la consola ni la someta a vibraciones.
, Limpie el disco.
, Se ha condensado humedad en el interior
de la consola (consulte la página 63).
, Si la señal de vídeo de la consola tiene que
transmitirse a través de la videograbadora
para llegar al televisor, la protección contra
copias aplicada a algunos vídeos DVD
podría afectar a la calidad de imagen. Si
reproduce el vídeo DVD, conecte la consola
al televisor directamente (consulte la
página 70).
La relación de aspecto no podrá modificarse
según el televisor al reproducir la imagen
panorámica del vídeo DVD.
, En algunos discos, la relación de aspecto es
fija.
, Compruebe que la consola está conectada
al televisor directamente. (Es posible que el
selector o receptor (amplificador) no esté
conectado entre la consola y el televisor.)
, Con algunos televisores, la relación de
aspecto es fija.
Sonido
El sonido no se oye.
, Compruebe que la consola está conectada
al televisor (o videograbadora) con el cable
AV (audio/vídeo integrados).
, Compruebe que enciende la consola y el
televisor (o videograbadora).
, Asegúrese de que selecciona la entrada de
vídeo en el televisor (o videograbadora).
, Compruebe que el volumen del televisor
está ajustado adecuadamente o que “mute”
(silenciamiento) no está seleccionado en el
televisor.
, Compruebe que el cable AV (audio/vídeo
integrados) está firmemente conectado.
, Asegúrese de que el disco insertado puede
reproducirse con esta consola (consulte la
página 64).
, Cerciórese de que el disco está colocado
con la cara de la etiqueta hacia arriba (con
la cara de grabación hacia abajo).
, Compruebe que conecta la consola a los
conectores de entrada de audio del receptor
(amplificador) correctamente. Consulte
también las instrucciones proporcionadas
con su amplificador.
, Compruebe el ajuste y conexiones de los
altavoces.
Consulte también las instrucciones
proporcionadas con su amplificador.
, Pruebe otro conjunto de cable AV.
, Asegúrese de que selecciona la entrada
apropiada en el receptor (amplificador) con
el fin de poder oír el sonido de la consola.
Consulte también las instrucciones
proporcionadas con su amplificador.
, La consola está en el modo de pausa.
, La consola está en el modo de búsqueda/
cámara lenta (al reproducir un vídeo DVD).
, El ajuste de sistema no es correcto con la
consola conectada al equipo de audio con
los conectores DIGITAL OUT (OPTICAL)
(consulte la página 71).
Sonido de mala calidad.
, La consola está colocada sobre una
superficie inestable.
Coloque la consola sobre una superficie
estable y plana. No agite la consola ni la
someta a vibraciones.
, Limpie el disco.
, Se ha condensado humedad en el disco
(consulte la página 63).
, Reproduce un CD audio o un DVD con
pistas de sonido DTS.
Podrá reproducir un CD audio o un DVD
con pistas de sonido DTS solamente si
conecta la consola al equipo de audio con
decodificador DTS.
El efecto envolvente es difícil de apreciar al
reproducir un vídeo DVD con pista de
sonido Dolby Digital.
, Compruebe el ajuste y conexiones de los
altavoces.
Consulte el manual de instrucciones del
receptor (amplificador).
, Con algunos discos DVD, es posible que la
señal de salida no sea de 5,1 canales. Puede
ser monofónica o estéreo aunque la pista de
sonido esté grabada en Dolby Digital.
El sonido sólo se oye por el altavoz central.
, Con algunos discos, es posible que el
sonido sólo se emita a través del altavoz
central.
Utilización
El control no funciona.
, Compruebe que el control está conectado a
la consola.
, Asegúrese de que el control analógico
(DUALSHOCK®2) o el control analógico
(DUALSHOCK®) está ajustado en el modo
apropiado al software (consulte la página
77).
, Pruebe otro conjunto de controles.
El título de software no se inicia.
, Asegúrese de que el disco insertado puede
reproducirse con esta consola (consulte la
página 64).
, Cerciórese de que el disco está colocado
con la cara de la etiqueta hacia arriba (con
la cara de grabación hacia abajo).
, Compruebe que ha insertado el disco
correctamente.
, Limpie el disco.
, Se ha condensado humedad en el disco
(consulte la página 63).
, Pruebe otra copia del disco.
No es posible guardar datos en la memory
card (tarjeta de memoria) (8MB) (para
PlayStation
memoria)
, Compruebe que la memory card (tarjeta de
, Asegúrese de que emplea el juego
, Asegúrese de que hay bloques vacíos en la
, Pruebe con otra memory card (tarjeta de
La consola no funciona adecuadamente.
, Es posible que la electricidad estática, etc.,
®2) o la memory card (tarjeta de
memoria) (8MB) (para PlayStation®2) o la
memory card (tarjeta de memoria) está
firmemente insertada.
correctamente.
Consulte el manual del software apropido.
memory card (tarjeta de memoria) (8MB)
(para PlayStation®2) o la memory card
(tarjeta de memoria).
memoria)(8MB)(para PlayStation®2) o
memory card (tarjeta de memoria).
afecte al funcionamiento de la consola.
Apague el interruptor principal MAIN
POWER y luego vuelva a encenderlo.
ES
Vídeo DVD / Informaci
ón complementaria
Page 88

88
Solución de problemas (continuación)
El indicador 1 parpadea en rojo y la consola
no funciona.
, Una luz roja parpadeante indica una
condición de “falla” de la consola y ésta no
funcionará. Retire cualquier obstrucción de
las rejillas para que se enfríe la consola.
Reanude la reproducción cuando la consola
vuelva al modo de espera.
La bandeja del disco no se abre.
, Compruebe que el cable de alimentación
AC está correctamente conectado.
, Compruebe que la consola está encendida.
Encienda la consola con el interruptor
principal MAIN POWER de la parte trasera
de la misma.
Funcionamiento de vídeo DVD
La consola no reproduce el disco desde el
principio.
, Ha seleccionado la reanudación de
reproducción.
Pulse el botón Parar antes de iniciar la
reproducción (consulte la página 79).
, Con algunos discos, aparece un menú de
títulos o de DVD automáticamente.
El disco no se reproduce aunque está
seleccionado el título DVD.
, El control paterno está ajustado en el disco
(consulte la página 85).
La reproducción se para automáticamente.
, Es posible que el disco contenga una señal
de pausa automática.
Al reproducir este tipo de discos, la consola
deja de reproducir cuando recibe la señal.
No es posible realizar algunas funciones,
como Parar, Buscar o la Reproducción a
cámara lenta.
, Con algunos discos, es posible que no
pueda realizar algunas de las anteriores
operaciones.
No es posible cambiar el idioma de la pista
de sonido.
, El DVD no dispone de pistas grabadas en
varios idiomas.
, El cambio del idioma de las pistas está
prohibido en el DVD.
No es posible cambiar el idioma de los
subtítulos.
, El DVD no dispone de subtítulos grabados
en varios idiomas.
, El cambio del idioma de los subtítulos está
prohibido en el DVD.
No es posible desactivar los subtítulos.
, Algunos discos DVD no permiten
desactivar los subtítulos.
No es posible cambiar los ángulos al
reproducir un DVD.
, El DVD no dispone de varios ángulos
grabados.
, El cambio de los ángulos está prohibido en
el DVD.
Conexión a la red
No se puede establecer la conexión a la red
(Ethernet o módem).
, El enchufe de alimentación de la consola
PlayStation®2 no está insertado firmemente
en el tomacorriente.
Verifique que el enchufe de alimentación
esté firmemente insertado en el
tomacorriente.
, El adaptador de red no está instalado
correctamente en la consola.
Cerciórese de que el adaptador de red esté
instalado correctamente en la consola.
,
No está insertado en la consola ningún
disco de software de formato PlayStation®2
que sea compatible con el adaptador de red.
Inserte en la consola un disco de software
de formato PlayStation®2 compatible con el
adaptador de red (para PlayStation®2).
, Está utilizando un software de formato
PlayStation®2 que no es compatible con el
adaptador de red.
Inserte en la consola un disco de software
de formato PlayStation®2 que sea
compatible con el adaptador de red.
, Los valores de cofiguración de red no están
correctos.
Consulte las instrucciones para el software
que esté utilizando y realice los ajustes que
sean necesarios.
, La red está ocupada.
Espere por unos minutos y luego intente
nuevamente obtener acceso a la red.
No se puede establecer conexión a la red
(únicamente para Ethernet).
, El cable de conexión a la red no está
conectado correctamente.
Verifique que el cable de conexión a la red
esté conectado correctamente.
, El tipo de cable de conexión a la red no es
el adecuado.
Utilice el tipo de cable adecuado. Para
obtener más detalles consulte las
instrucciones suministradas con el
dispositivo para redes (enrutador, módem
DSL, etc.) al que se está conectando.
, El puerto o los valores de configuración
para el dispositivo para redes (enrutador,
módem DSL, etc.) no son los correctos.
Consulte las instrucciones suministradas
con el dispositivo para redes y realice las
conexiones o ajustes adecuados.
No se puede establecer conexión a la red
(únicamente para módem).
, El cordón telefónico no está conectado
correctamente.
Verifique que el cordón telefónico esté
conectado correctamente.
, La línea telefónica está siendo utilizada.
Verifique que la línea telefónica no esté
siendo utilizada.
, La línea que está utilizando no es una línea
telefónica para uso residencial.
Para conectarse a la red, no es posible
utilizar líneas telefónicas PBX, comerciales
ni las que son para redes residenciales.
, Está utilizando un software que
únicamente puede utilizarse con algunos
proveedores.
Dependiendo de su compañía telefónica, es
posible que no pueda establecer conexión al
utilizar un software que requiera la
conexión con ciertos proveedores de
servicios de internet. Para obtener más
detalles, consulte las instrucciones
suministradas con el software que esté
utilizando, o póngase en contacto con su
proveedor de servicios de internet.
Baja velocidad de la transmisión de datos
(únicamente para módem)
, Se está generando interferencia en su
domicilio.
No coloque su cordón telefónico cerca de
aparatos eléctricos como hornos de
microonda, monitores de computadoras
personales, televisores, radios o altavoces
que puedan generar ruido en las líneas
telefónicas. Deberá también evitar el uso de
extensiones de uso general para cordones
telefónicos (del tipo que es únicamente
para audio) o cordones que estén
conectados a otros teléfonos o aparatos de
fax.
, Se está generando interferencia en
cualquier punto entre su domicilio y la
compañía telefónica.
Utilice la misma línea telefónica para
llamar a algún amigo y escuche las posibles
interferencias ocasionadas por
transmisiones de radio o cualquier otro
ruido. Además, verifique que no se
produzca algún efecto de eco al hablar. Si
no hay duda de que el problema radica en
las líneas telefónicas públicas, póngase en
contacto con su compañía telefónica local
para obtener asistencia.
La conexión falla repentinamente
(únicamente para módem).
, Usted tiene la función de llamada en
espera.
Al recibir una llamada en una línea que
tenga la función de llamada en espera se
desconecta la línea.
Desactive temporalmente la función de
llamada en espera.
Póngase en contacto con su compañía
telefónica local para obtener asistencia.
No se puede establecer la conexión y, luego
de intentar repetidamente, el módem deja
de marcar el número (únicamente para
módem).
, Existen limitaciones en cuanto al número
de veces que un aparato puede marcar un
número. Una vez que se haya realizado el
número máximo de intentos, el aparato
deja de marcar el número.
Apague la consola, espere unos minutos y
luego inténtelo nuevamente.
Page 89

Especificaciones
Glosario
89
Generales
Requisitos de alimentación
120 V AC, 60 Hz
Consumo de energía
79 W
Dimensiones de la consola (aprox.)
301 × 78 × 182 mm (an/al/prf)
1
/8 × 7 1/4 pulgadas)
(12 × 3
Peso de la consola (aprox.)
2.2 kg (4 lb 14 oz.)
Dimensiones del adaptador de red (aprox.)
133 x 72 x 34 mm (an/al/prf)
1
/4 x 2 7/8 x 1 3/8 pulgadas)
(5
Peso del adaptador de red (aprox.)
200 g (7 oz)
Temperatura de funcionamiento
5°C a 35°C (41°F a 95°F)
Propiedades del diodo láser
• Material: GaAlAs
• Longitud de onda: l=650/780 nm
Entradas/salidas de la parte frontal de la
consola
Puerto de control (2)
Ranura para MEMORY CARD (2)
Conector
Conector
USB (2)
S400 i.LINK (1)
Entradas/salidas de la parte posterior de la
consola
Conector AV MULTI OUT (1)
Conector DIGITAL OUT (OPTICAL) (1)
EXPANSION BAY (bahía de expansión) (1)
Entradas/salidas del adaptador de red
Conector de red NETWORK (1)
Conector de línea LINE (RJ-11C) (1)
Opciones de comunicación
Ethernet
Normas de transmisión compatibles :
100Base-TX/10Base-T
Interfaz : RJ-45
Módem
Normas de transmisión compatibles :
ITU-T V.90, V.34, V.32bis, V.32, V.23,
V.22bis, V.21
Bell 103, 212A
K56 flex
Velocidad de transmisión máxima (bps):
V.90...56K* (sólo para recepción)
K56 flex...56K* (sólo para recepción)
V.34 y las demás...33.6K*
Interfaz: RJ-11C
* La velocidad de transmisión puede variar según las
condiciones de la línea a la que se conecte.
(para envío/recepción)
Accesorios suministrados
Consulte la página 68.
Accesorios opcionales
SCPH-10010 U/97026 Control Analógico
(DUALSHOCK
SCPH-10020 U/97027 Memory Card
(Tarjeta de memoria) (8MB)
(para PlayStation
SCPH-10030 U/97028 Cable AV
(audio/vídeo integrados)
SCPH-10040 U/97029 Soporte vertical
(para PlayStation
SCPH-10060 U/97030 Cable S VIDEO
SCPH-10071/94043 Adaptador RFU
SCPH-10090 U/97031 Multitap
(para PlayStation
SCPH-10100 U/97032 Cable AV en componentes
(para PlayStation
SCPH-10110 U/97033 Soporte horizontal
(para PlayStation
SCPH-10130 U/97034 Adaptador AV
(con conector S VIDEO OUT)
SCPH-10171 Control Remoto de DVD
(para PlayStation
con Unidad de Receptor
Infrarrojo
SCPH-1020 U Memory Card
(Tarjeta de memoria)
SCPH-1070 U Multitap
SCPH-1100 U/94050 Cable S VIDEO
SCPH-1121/94053 Adaptador RFU
SCPH-1140 U/94055 Cable AV
(audio/vídeo integrados)
SCPH-110 U Control Analógico
(DUALSHOCK
Con respecto a componentes adicionales, llame al
1-800-345-7669.
El diseño y las especificaciones están sujetos a cambios sin
previo aviso.
2)
®
2)
®
2)
®
2)
®
2)
®
2)
®
2)
®
)
®
Capítulo (página 82)
Secciones de una imagen o de una pieza
musical de un DVD que son de menor tamaño
que los títulos. Un título se compone de varios
capítulos. A cada capítulo se le asigna un
número que permite localizar el capítulo que
desee.
Control paterno (página 85)
Función del DVD utilizada para limitar la
reproducción del disco de acuerdo con la edad
del usuario y el nivel de limitación de cada
país. La limitación varía según el disco; cuando
está activada, la reproducción estará
completamente prohibida (las escenas violentas
se omiten o se sustituyen por otras, etc.).
Dolby Digital (páginas 71, 86)
Tecnología de compresión de audio digital
desarrollada por Dolby Laboratories. Esta
tecnología admite el sonido envolvente de 5.1
canales. El canal posterior es estéreo y existe
un canal de potenciación de graves
independiente en este formato. Dolby Digital
proporciona los mismos 5.1 canales
independientes de audio digital de alta calidad
presentes en los sistemas de audio
cinematográfico Dolby Digital. La óptima
separación entre canales se obtiene gracias a
que todos los datos de los canales se registran
por separado y se procesan digitalmente.
DTS (páginas 71, 86)
Tecnología de compresión de audio digital
desarrollada por Digital Theater Systems, Inc.
Esta tecnología admite el sonido envolvente de
5.1 canales. El canal posterior es estéreo y
existe un canal de potenciación de graves
independiente en este formato. DTS
proporciona los mismos 5.1 canales
independientes de sonido digital de alta
calidad. La óptima separación entre canales se
obtiene gracias a que todos los datos de los
canales se registran por separado y se procesan
digitalmente.
DVD (página 79)
Disco que contiene hasta 8 horas de imágenes
en movimiento, aunque su diámetro es igual
que el de un CD.
La capacidad de datos de un DVD de una capa
y una cara es de 4.7 GB, que es 7 veces mayor
que la de un CD. La capacidad de datos de un
DVD de dos capas y una cara es de 8.5 GB, uno
de una capa y dos caras de 9.4 GB, y uno de dos
capas y dos caras de 17 GB.
Los datos de imagen utilizan el formato MPEG 2,
uno de los estándares mundiales de tecnología de
compresión digital. Los datos de imagen se
comprimen en 1/40 aproximadamente de su
tamaño original. El DVD también emplea una
tecnología de codificación de velocidad variable
que cambia los datos para asignarlos según el
estado de la imagen.
Los datos de audio se graban en formato Dolby
Digital y PCM, lo cual permite obtener una
presencia de audio más real.
Además, el DVD proporciona diversas
funciones avanzadas, como la de ángulos
múltiples, multilingües y de control paterno.
Función de ángulos múltiples (página 81)
Algunos discos DVD disponen de diversos
ángulos grabados para la escena (puntos de
visualización de la cámara de vídeo).
Función multilingüe (páginas 81, 84)
Algunos discos DVD disponen de varios
idiomas para la pista de audio o los subtítulos
de la imagen.
Título (página 82)
Las secciones más extensas de una imagen o de
una pieza musical de un DVD; por ejemplo,
una película para una pieza de imagen dentro
del software de vídeo, o un álbum para una
pieza musical dentro del software de audio. A
cada título se le asigna un número para facilitar
su localización.
ES
Informaci
ón complementaria
Page 90

90
GARANTÍA LIMITADA
Sony Computer Entertainment America
(SCEA) garantiza al comprador original que
cada uno de los productos que constituyen
PlayStation®2 online pack, es decir, la consola,
adaptador de red, software y accesorios,
deberán estar libres de defectos en los
materiales y en la fabricación por un periodo de
noventa (90) días a partir de la fecha de compra
(el “Periodo de la Garantía”). Si se determina
que uno o más de los productos arriba
mencionados está defectuoso durante el
Periodo de la Garantía, la responsabilidad de
SCEA se limitará a reparar o reemplazar la
consola, adaptador de red, software o
accesorios dañados, a discreción de SCEA.
Usted debe llamar al 1-800-345-7669 para
recibir instrucciones sobre cómo obtener los
servicios de reparación o reemplazo.
ESTA GARANTÍA NO DEBE APLICARSE SI
EL APARATO (a) ES UTILIZADO CON UN
PRODUCTO QUE NO SEA VENDIDO O NO
TENGA EL PERMISO DE SCEA
(INCLUYENDO, PERO NO LIMITADO A,
DISPOSITIVOS SIN LICENCIA QUE SIRVAN
PARA REALZAR LOS JUEGOS, CONTROLES,
ADAPTADORES Y DISPOSITIVOS DE
SUMINISTRO DE ENERGÍA) O CON UN
PRODUCTO QUE DE ALGUNA MANERA
NO SEA COMPATIBLE CON ESTE
PRODUCTO; (b) ES USADO PARA
PROPÓSITOS COMERCIALES
(INCLUYENDO RENTARLO) O ES
MODIFICADO O ALTERADO; (c) ES
DAÑADO POR EVENTOS NATURALES, ES
SUJETO A UN MAL USO, ABUSO,
NEGLIGENCIA, ACCIDENTE, DESGASTE Y
DESTRUCCIÓN, USO IRRAZONABLE, O POR
ALGUNA OTRA CAUSA QUE NO ESTÉ
RELACIONADA A MATERIALES O
FABRICACIÓN DEFECTUOSOS; (d) EL
NÚMERO DE SERIE HA SIDO ALTERADO,
BORRADO O RETIRADO; O, (e) LA
ETIQUETA DE GARANTÍA HA SIDO
RETIRADA DE LA CONSOLA.
ESTA GARANTÍA NO CUBRE PRODUCTOS
ADQUIRIDOS CON DEFECTOS BAJO EL
CONOCIMIENTO DEL COMPRADOR,
TAMPOCO CUBRE LOS ARTÍCULOS DE
CONSUMO QUE SE UTILICEN CON EL
PRODUCTO (TALES COMO PILAS).
LA PRUEBA DE COMPRA COMO UN
RECIBO O FACTURA ES LA EVIDENCIA DE
QUE LA UNIDAD SE ENCUENTRA
CUBIERTA BAJO EL PERIODO DE
GARANTÍA, ÉSTA DEBE PRESENTARSE
PARA OBTENER LOS SERVICIOS DE
GARANTÍA.
LA REPARACIÓN O REEMPLAZO COMO SE
OFRECE EN ESTA GARANTÍA, ES EL
RECURSO EXCLUSIVO DEL CONSUMIDOR.
CUALQUIER GARANTÍA IMPLÍCITA QUE
SE APLIQUE, INCLUYENDO GARANTÍAS
DE COMERCIABILIDAD E IDONEIDAD
PARA UN PROPÓSITO EN PARTICULAR,
ESTÁN LIMITADAS A LA DURACIÓN DE
ESTA GARANTÍA. EN NINGÚN CASO SCEA
SERÁ RESPONSABLE POR DAÑOS
EMERGENTES O INCIDENTALES AL
ROMPER CUALQUIER GARANTÍA EXPRESA
O IMPLÍCITA SOBRE ESTE PRODUCTO.
ALGUNOS ESTADOS O PROVINCIAS NO
PERMITEN LIMITACIONES SOBRE LA
DURACIÓN DE UNA GARANTÍA
IMPLÍCITA Y ALGUNOS ESTADOS NO
PERMITEN LA EXCLUSIÓN O LIMITACIÓN
DE DAÑOS EMERGENTES O
INCIDENTALES, DE MANERA QUE LAS
LIMITACIONES O EXCLUSIONES
ANTERIORES PUEDEN NO SER
APLICABLES A USTED.
Esta garantía le da a usted derechos legales
específicos, usted puede también tener otros
derechos que pueden variar de estado a estado
y de provincia a provincia. Esta garantía es
válida únicamente en los Estados Unidos y en
Canadá.
Page 91

91
ES
Page 92

Some PlayStation® format software titles may perform differently on
the PlayStation®2 console than they did on the PlayStation® console,
or may not perform properly on the PlayStation®2 console. For
more information, visit our website at www.us.playstation.com or
call our technical support line at 1-800-345-7669.
Il est possible que certains titres de logiciel au format PlayStation®
fonctionnent différemment avec la console PlayStation®2 qu’ils
marchent avec la PlayStation®, ou il est possible qu’ils fonctionnent
mal avec la console PlayStation®2. Pour en savoir plus, veuillez
visiter notre site Web www.us.playstation.com ou contacter notre
ligne d’assistance technique au 1-800-345-7669.
Es posible que algunos títulos de software de formato PlayStation®
funcionen de forma distinta con la consola PlayStation®2 de cómo lo
hacían con la consola PlayStation®, o que no funcionen adecuadamente
con la consola PlayStation®2. Para obtener más información,
visite la página web: www.us.playstation.com o póngase en
contacto con nuestro servicio de asistencia técnica, llamando al
1-800-345-7669.
“ ”, “PlayStation” and “DUALSHOCK“ are registered trademarks, and “ ” and “ ”
are trademarks of Sony Computer Entertainment Inc.
“SONY” and “ ” are registered trademarks and is a trademark of Sony Corporation.
“ ”, “PlayStation” et “DUALSHOCK” sont des marques déposées et “ ” et “ ” sont
des marques commerciales de Sony Computer Entertainment Inc.
“SONY” et “ ” sont des marques déposées et est une marque commerciale de Sony
Corporation.
“ ”, “PlayStation” y “DUALSHOCK” son marcas comerciales registradas, y “ ” y “ ”
son marcas comerciales de Sony Computer Entertainment Inc.
“SONY” y “ ” son marcas comerciales registradas y es una marca comercial de Sony
Corporation.
Printed in China www.us.playstation.com
 Loading...