

Page 1
Glasstron
3-862-917-21 (1)
Operating Instructions
Mode d’emploi
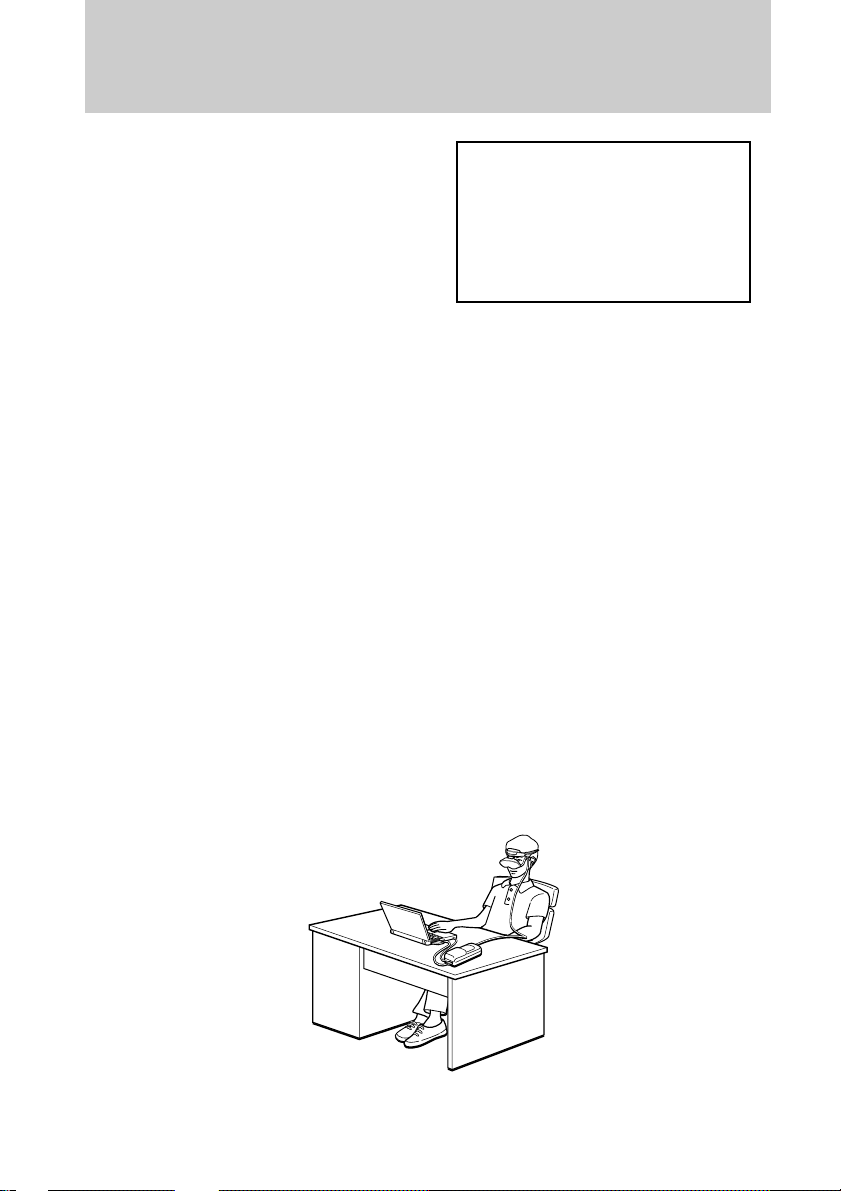
WARNING
YOUR FAILURE TO FOLLOW THESE OPERATING INSTRUCTIONS MAY RESULT IN EYE
FATIGUE, EYE DAMAGE, OR OTHER INJURY.
CAREFULLY READ THIS INSTRUCTION MANUAL AND BECOME FAMILIAR WITH ALL
SAFETY INSTRUCTIONS FOR THIS PRODUCT.
THIS PRODUCT SHOULD NOT BE USED BY CHILDREN AGE 15 OR YOUNGER.
IF YOU HAVE BEEN DIAGNOSED WITH EYE DISEASE OR EYE INJURY, CONSULT YOUR
DOCTOR BEFORE USE AND DO NOT USE WITHOUT YOUR DOCTOR’S APPROVAL.
AVERTISSEMENT
LE NON-RESPECT DES PRESENTES INSTRUCTIONS D’UTILISATION IMPLIQUE DES
RISQUES DE FATIGUE, DE BLESSURE OU AUTRES AUX YEUX.
LISEZ ATTENTIVEMENT LE PRESENT MODE D’EMPLOI ET FAMILIARISEZ-VOUS AVEC
TOUTES LES INSTRUCTIONS DE SECURITE AFFERENTES.
CET APPAREIL NE PEUT ETRE UTILISE PAR DES ENFANTS AGES DE 15 ANS OU MOINS.
SI VOUS SOUFFREZ DE MALADIES OU D’AFFECTIONS OCULAIRES, CONSULTEZ
VOTRE MEDECIN AVANT D’UTILISER CET APPAREIL ET NE L’UTILISEZ PAS SANS
L’AUTORISATION DE VOTRE MEDECIN.
GB
FR
PLM-S700E
© 1998 by Sony Corporation
Page 2

WARNING
To prevent fire or shock hazard,
do not expose the unit to rain or
moisture.
To avoid electrical shock, do not
open the cabinet. Refer servicing
to qualified personnel only.
This product conforms with the following
European Directives:
73/23/EEC, 93/68/EEC (Low Voltage
Directive)
89/336/EEC, 92/31/EEC (EMC Directive)
This equipment complies with EN55022
Class B for use in following areas:
residential, business and light-industrial.
The supplied interference cable must be
used with the equipment in order to comply
with the limits for a digital device pursuant
to EN55022.
Precautions
• The nameplate is located on the bottom
exterior.
• Picture/sound distortion may occur if the
model PLM-S700E is positioned in close
proximity to any equipment emitting
electromagnetic radiation.
•IBM PC/AT and VGA are registered trademarks of IBM Corporation of the U.S.A.
•Microsoft, MS, MS-DOS and Windows are registered trademarks of Microsoft Corporation in the
United States and other countries.
•Macintosh is a trademark licensed to Apple Computer, Inc., registered in the U.S.A. and other
countries.
•VESA is a trademark of Video Electronics Standard Association.
•All other product names mentioned herein may be the trademarks or registered trademarks of
their respective companies. Furthermore, “” and “" are not mentioned in each case in this
manual.
-GB
2
Page 3

Table of Contents
SAFETY INSTRUCTIONS ....................................................................................... 5
About the Glasstron ............................................................................................... 10
Getting Started
Checking the supplied accessories....................................................................... 12
Locating the parts and controls ............................................................................ 13
Connecting the Glasstron
Connecting the PC ............................................................................................ 14
Connecting the video equipment ................................................................... 17
Connecting the power source.......................................................................... 19
Wearing the Glasstron ........................................................................................... 20
Turning on the Glasstron
Checking the display unit position ................................................................ 22
Checking the screen position alignment........................................................ 24
Setting the password .............................................................................................. 27
Operations
Using the Glasstron ................................................................................................ 29
Checking the display indication ..................................................................... 31
Screen warnings against overuse of the Glasstron ...................................... 32
Viewing the surrounding environment .............................................................. 33
Adjusting the sound and picture
Signal compatibility .......................................................................................... 34
Adjusting the sound/picture .......................................................................... 35
Adjusting the RGB signal................................................................................. 38
Adjusting the video signal............................................................................... 39
Resetting the adjustment to the factory preset level .................................... 39
Using the optional battery pack ........................................................................... 40
GB
Additional Information
Precautions .............................................................................................................. 42
Error messages ........................................................................................................ 44
Troubleshooting...................................................................................................... 45
Specifications........................................................................................................... 47
Index ......................................................................................................................... 48
-GB
3
Page 4
Glasstron is a brand-new concept in
visual display
Congratulations on your purchase of a Sony
Glasstron Personal Viewer. The Glasstron,
using current technology in small,
lightweight visual displays, provides a
television viewing experience similar to
watching a 30-inch television from a
distance of approximately 4 feet in SVGA
mode. (Viewing experience may differ
according to individual perception.)
The Glasstron Personal Viewer creates an
image through two separate liquid crystal
displays, in close proximity to your eyes.
To insure your safe use of the Glasstron,
please become familiar with its basic
operations, including proper fitting
instructions, and be aware of any symptoms
of eye fatigue or other discomfort you may
experience.
WARNING
YOUR FAILURE TO FOLLOW THESE
OPERATING INSTRUCTIONS MAY
RESULT IN EYE FATIGUE, EYE
IMPAIRMENT, OR OTHER EYE INJURY,
PROPERTY DAMAGE OR DEATH.
WARNING
THIS PRODUCT SHOULD NOT BE USED
BY CHILDREN AGE 15 OR YOUNGER.
THE EYES OF CHILDREN ARE STILL
DEVELOPING AND MAY BE ADVERSELY
AFFECTED FROM USE OF THIS
PRODUCT.
Note on the LCD (Liquid Crystal
Display)
The LCD screen is made with highprecision technology. However, black
points or bright points of light (red, blue,
or green) may appear constantly on the
LCD screen. This is not malfunction.
(Effective dots: more than 99.999%)
-GB
4
Page 5

SAFETY INSTRUCTIONS
THE SONY GLASSTRON PERSONAL VIEWER SHOULD BE USED IN
STRICT ACCORDANCE WITH ALL INSTRUCTIONS TO PREVENT EYE OR
OTHER INJURY, LOSS OF VISUAL FUNCTIONS, PROPERTY DAMAGE, OR
DEATH.
USE RESTRICTIONS
Warning: No Use by Children Age 15 or Younger.
This product is designed for adult use.
The eyes of children are still developing and may be adversely affected by use of
this product, and it may cause eye fatigue, eye damage, or loss of visual
functions.
In addition, this product may not be adjusted to fit a child’s head.
Safety Password: To prevent use by children age 15 or younger, this product
has been equipped with a safety password protection system.
For instructions on the use of the password protection system,
see page 27.
Warning: Eye Disease/Eye Injury/Glaucoma.
If you have been diagnosed with or are susceptible to eye disease, eye injury, or
glaucoma, consult your doctor before use and do not use without your doctor’s
approval. Use of this product by individuals with conditions such as glaucoma
may cause these conditions to worsen.
Caution: Heart Disease/High Blood Pressure.
If you have a history of heart disease or high blood pressure, consult your doctor
before use and do not use without your doctor’s approval. Use of this product
allows the viewer to feel they are in the action, which may result in increased
anxiety or heart injury. If during viewing any increased anxiety is experienced,
stop using the product immediately and rest. If the symptoms persist after rest,
consult your doctor.
Caution: Seizures.
If you have a history of temporary spasms, unconsciousness, or epileptic
seizures from light stimulation, consult your doctor before use and do not use
without your doctor’s approval. Use of this product by such individuals may
cause spasms, unconsciousness, or seizures. If you experience such symptoms
during use, stop using the product immediately and consult your doctor.
ADDITIONAL SAFETY INFORMATION.
A. Health Concerns. See pages 6 through 7.
B. Instructions for Safe Fit. See page 8.
C. Warnings for Electronic Products. See page 9.
-GB
5
Page 6

SAFETY INSTRUCTIONS (continued)
Health Concerns
Warning: Eye Fatigue/Eye Damage/Loss of Visual Functions.
Misuse or overuse of this product may result in eye fatigue, eye damage, or loss
of visual functions. Stop using if you feel tired or experience headaches or
discomfort.
Warning: No Use by Children Age 15 or Younger.
This product is designed for adult use.
The eyes of children are still developing and may be adversely affected by use of
this product, and it may cause eye fatigue, eye damage, or loss of visual
functions.
In addition, this product may not be adjusted to fit a child’s head.
Caution: Sickness/Headache/Nausea.
If during use you experience any of the following symptoms, stop using this
product immediately and rest. These symptoms may indicate that you are
misusing or overusing the product (see “Instructions for Safe Fit,” page 8) or that
you should not use the product for health reasons. If the following symptoms
persist after rest, consult your doctor.
- sore eyes, eye fatigue, or double vision
- headache
- inability to focus on the screen
- nausea or motion sickness
- stiff or sore shoulders or neck
After six hours the product automatically turns off to prevent eye fatigue or eye
damage. For instructions on these functions, see page 32.
Caution: Motion Sickness from Viewing Programmes.
Some viewers may experience motion sickness, headache, or nausea from
viewing movies or video programmes, especially those with intense action and
movement. If you feel any of these symptoms, stop using the product
immediately. To avoid personal injury or injury to others, do not drive a car or
motorcycle, nor do anything that requires concentration until the symptoms
disappear.
-GB
6
Page 7

Health Concerns
Caution: Motion Sickness from External Motion.
Do not use this product while subject to external motion –– for example, as a
passenger in a car. Use of this product under these conditions may cause motion
sickness.
Caution: Accidents.
Do not use this product while walking, skating, bicycling, operating a motor
vehicle or other power equipment, or while engaged in any other similar
activity.
Use of this product under these conditions may result in an accident, injury, or
death to yourself or others.
Caution: Sound Volume.
Avoid using headphones at high volume. Hearing experts advise against
continuous, loud, and extended play. If you experience a ringing in your ears,
reduce volume or discontinue use.
-GB
7
Page 8

SAFETY INSTRUCTIONS (continued)
Instructions for Safe Fit
Warning: Proper Fit.
Each time this product is used adjustment screens will appear, requiring the
viewer to properly fit the product. Proper fit means that an asterisk (*) will
appear in each corner of the display. Failure to properly fit the product each
time may result in eye fatigue, eye damage, or loss of visual functions and may
result in accident or injury. For instructions on how to properly fit this product,
see pages 22 through 26.
Warning: No Use by Children Age 15 or Younger.
This product is designed for adult use.
The eyes of children are still developing and may be adversely affected by use of
this product, and it may cause eye fatigue, eye damage, or loss of visual
functions.
In addition, this product may not be adjusted to fit a child’s head.
Safety Password: To prevent use by children age 15 or younger, this product
has been equipped with a safety password protection system.
For instructions on the use of the password protection system,
see page 27.
-GB
8
Page 9

Warnings for Electronic Products
Caution: Electric Shock.
Failure to observe all operating and maintenance instructions may cause damage
to your product and may result in property damage or injury or death from
electric shock, fire, or other cause.
Caution: Do Not Disassemble.
Any required service on this product should be performed by a trained
authorised servicer. Failure to comply with this warning may result in property
damage or personal injury or death from electric shock, fire, or other cause.
Caution: Avoid Wet, Humid, Dusty and Smoky
Environments.
This product may be adversely affected by wet, humid, dusty, and smoky
conditions which may result in property damage, personal injury or death. Do
not use this product near or around water. Avoid using or storing this product
under these conditions.
Caution: Avoid High Temperature or Direct Sunlight/Avoid
Mechanical Shock.
This product may be deformed by high temperature or direct sunlight and also
by dropping the product or other mechanical shock. Avoid these conditions, as
the screens may loose proper alignment and it may cause eye fatigue or eye
damage.
Caution: Unplug the Product When Not in Use.
Always unplug this product when it will not be in use for extended periods of
time or during vacations.
-GB
9
Page 10
About the Glasstron
Caution: The screen is always right in front of you.
The Glasstron is a head-mounted display. With this type of display, the screen is always in front
of you even if you move your head. Because of this feature, you can concentrate on the screen
more easily compared with ordinary TVs, and you have a sense of being in the action.
• It is easy to adjust the Glasstron to your eyes. You can use the display unit even while
wearing glasses.
• Every time you use the Glasstron, the adjustment screen appears to help you adjust the
display unit properly. You can also check whether the left and right screen positions are
properly aligned or not.
• Cautions appear on the screen about every two hours to remind you to check for eye fatigue.
The power will automatically turn off if you do not press the PUSH DISPLAY jog dial. If you
keep using the Glasstron continuously for six hours, a warning appears on the screen and the
power will turn off automatically.
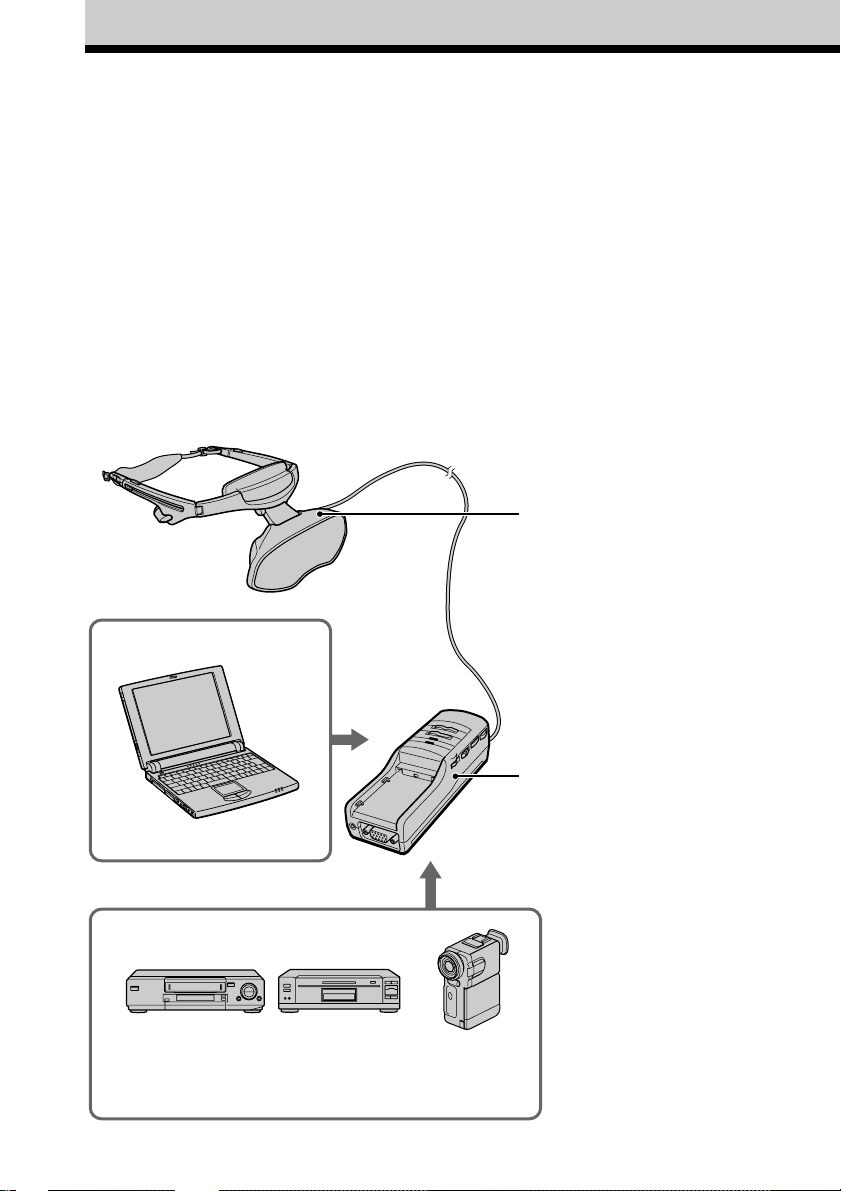
The Glasstron consists of the following items:
Display unit
The display unit is equipped with
two small (left and right) LCDs.
Power supply box
You can supply power using the
supplied AC power adapter or the
optional Sony rechargeable battery
pack.
When using with the Glasstron,
connect your video equipment or
PC to the connector on the power
supply box.
Personal Computer
You can adjust the sound volume.
You can also use the SEETHROUGH control in order to see
the surrounding environment.
10
-GB
VCR Laser disc player,
DVD player
Camcorder
Page 11

Features
• A powerful, big screen experience
comparable to watching a 30-inch screen
from approximately 4 feet (1.2 m) away
(SVGA mode).
• You can connect the Glasstron, which is
equipped with 1.55 million dot LCD, to
your PC to see the screen of the PC in the
SVGA or VGA screen mode.
• You can enjoy high quality picture when
you connect the DVD player, or DV
camcorder, etc.
• The see-through function allows you to
see the surrounding environment while
wearing the Glasstron.
• You can use the Glasstron while wearing
glasses.
• Solid and lightweight components made
of magnesium alloy, with the display unit
weighing about 5.3 oz (120 g).
Getting Started
11
-GB
Page 12
Checking the supplied accessories
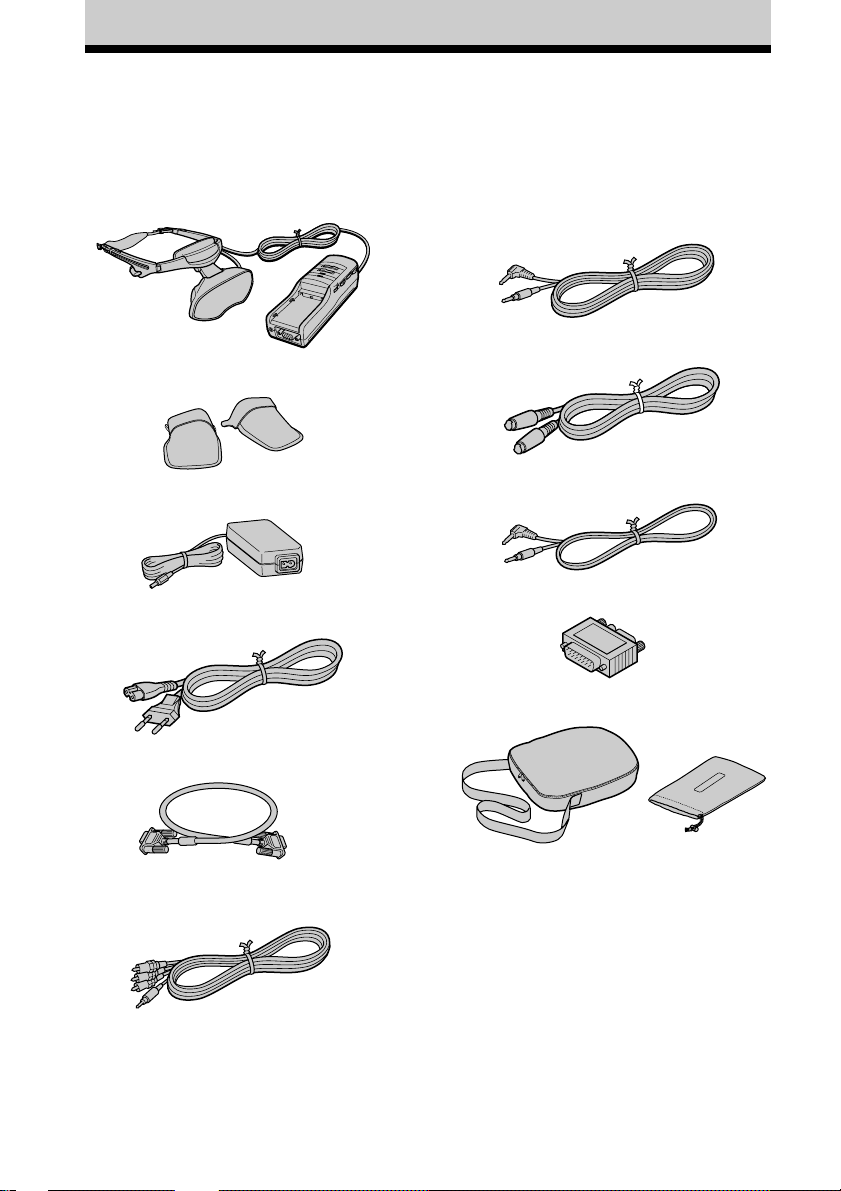
Check that the following accessories are supplied with your Glasstron. If any item is not
supplied, contact your Sony dealer or local authorised Sony service facility.
• Display unit/power supply box (1)
• Sunshades (1 pair)
• AC power adapter AC-PLM3 (1)
• Mains lead (1)
• RGB signal cable (HD15) (1)
• Audio/video cable (special miniplug
special miniplug) (1)
• S-video cable (1)
• Audio cable (stereo miniplug) (1)
• Macintosh adapter (1)
• Carrying cases (2)
• Audio/video cable (special miniplug
phono plug) (1)
-GB
12
• Windows 95/Windows 98 PC Glasstron
Information Disk (1)
• Screen adjustment disk for Macintosh (1)
• Operating instructions (1)
• Warranty (1)
Page 13
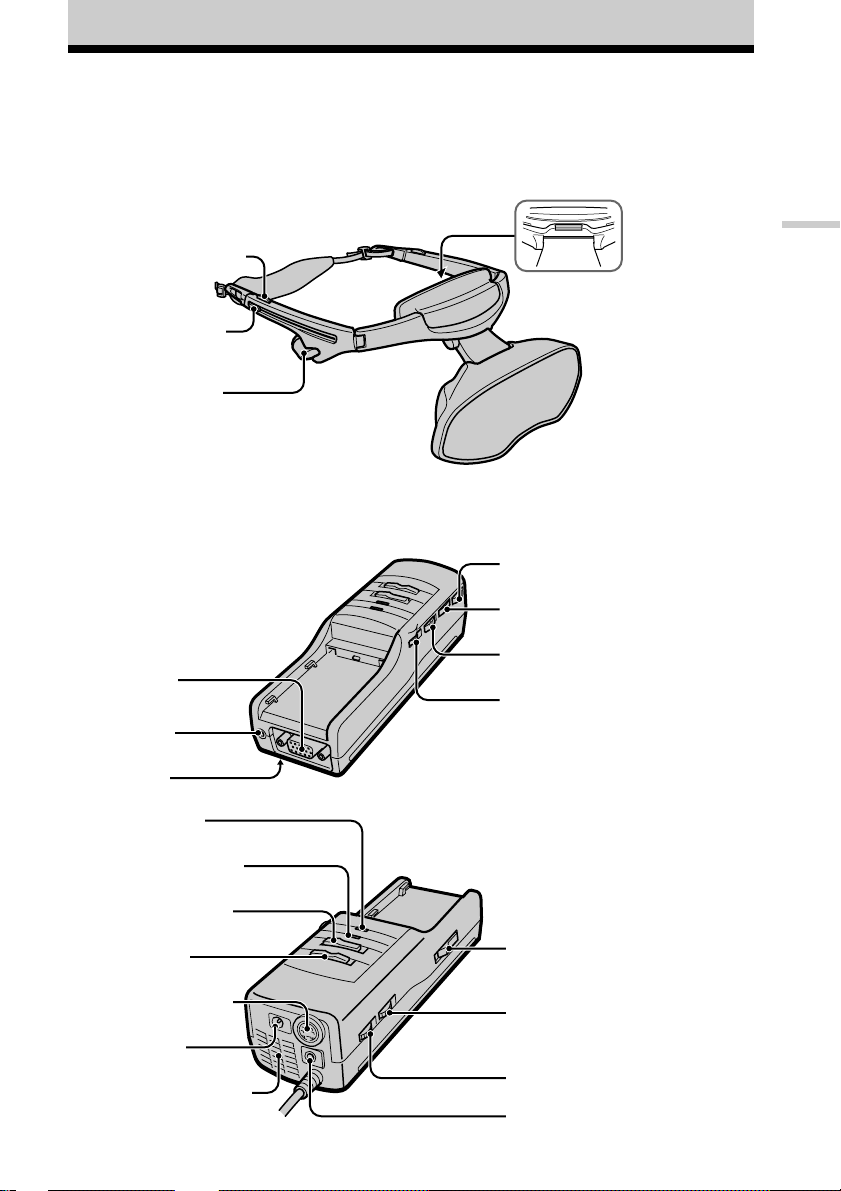
Locating the parts and controls
Refer to the pages indicated in parentheses ( ) for details.
Display unit
Strap release button (20)
POWER SAVING SENSOR
(inner side) (35, 37)
Earphone slide button
(21)
Stereo earphone (21)
Getting Started
Power supply box
RGB connector
(14 to 16, 47)
PC AUDIO jack
(14 to 16)
RESET button
(on the bottom) (28)
CHARGE lamp (40)
POWER/POWER SAVING
lamp (22, 37)
POWER switch (22, 29)
PC-VIDEO switch
(14 to 18, 30)
S VIDEO connector (18)
DC IN connector
(19, 40)
Ventilation openings (44)
PUSH DISPLAY jog dial (22, 36)
MENU button (36)
SCREEN switch (33)
SEE-THROUGH control (33)
BATT RELEASE button (40)
BRIGHT control (31)
VOL control (31)
AUDIO/VIDEO connector (17, 18)
13
-GB
Page 14
Connecting the Glasstron
Connecting the PC
Be sure to turn off your PC before connecting the power supply box.
Notes
• Refer to the instruction manual supplied with your PC as well.
• Depending on your computer, the audio port is indicated as LINE OUT, headphone, speaker, etc.
• Adjust sound volume on the computer.
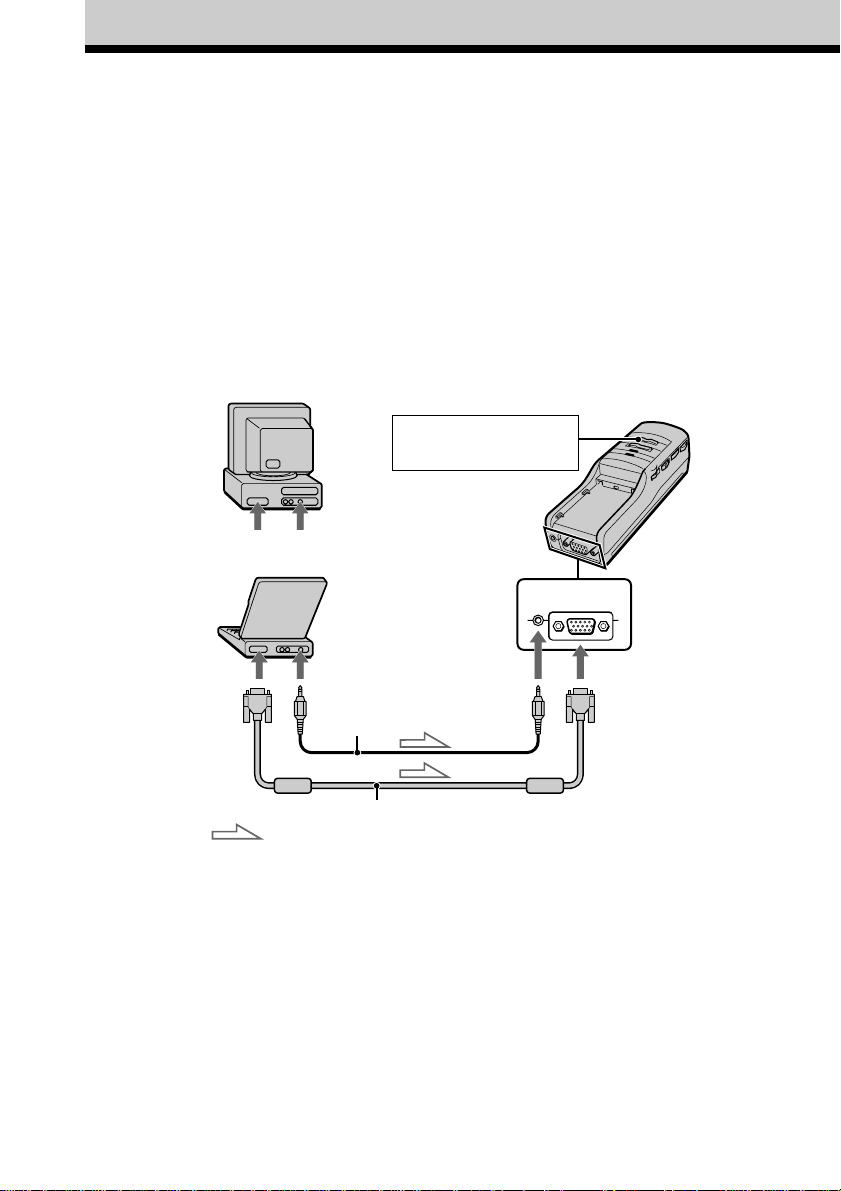
Connecting other IBM compatible PCs
Connect the Glasstron to your PC using the supplied RGB signal (HD15) cable. When you
connect the Glasstron to your PC, set the PC-VIDEO switch on the power supply box to “PC.”
Power supply box
Set the PC-VIDEO switch
to “PC.”
to monitor port to audio port
or
RGB
PC
AUDIO
14
-GB
to monitor port
to audio port
Audio cable (supplied)
RGB signal cable (supplied)
: Signal flow
to PC AUDIO
connector
to RGB connector
Page 15
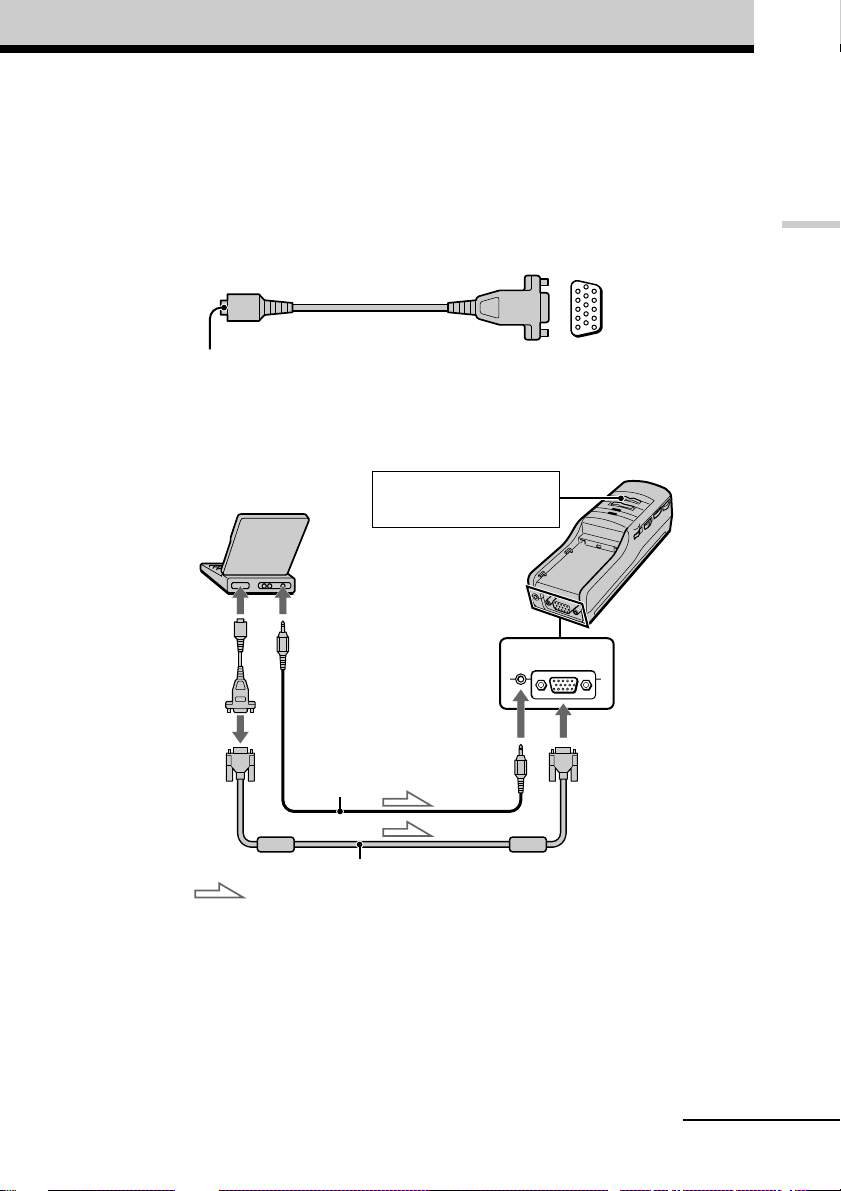
Connecting a Macintosh Powerbook
Depending on the model, you may need to use a commercially available adapter to connect the
RGB signal cable (supplied) as shown below. When you connect the Glasstron to your
Powerbook, set the PC-VIDEO switch on the power supply box to “PC.”
Getting Started
to monitor
port of
Powerbook
?/
Connector should match the monitor
port of your Powerbook model.
to monitor port to audio port
Adapter
Set the PC-VIDEO switch
to “PC.”
to PC AUDIO
connector
Audio cable (supplied)
VGA type connector
(HD15, female)
Power supply box
RGB
PC
AUDIO
to RGB
signal cable
to RGB connector
RGB signal cable (supplied)
: Signal flow
Note on connection
Set the display setting to the 16-inch display mode (832 × 624) or the 13-inch display mode (640 × 480).
The Glasstron does not display the image with the 19-inch display mode (1024 × 768) or more.
continued
15
-GB
Page 16
Connecting the Glasstron (continued)
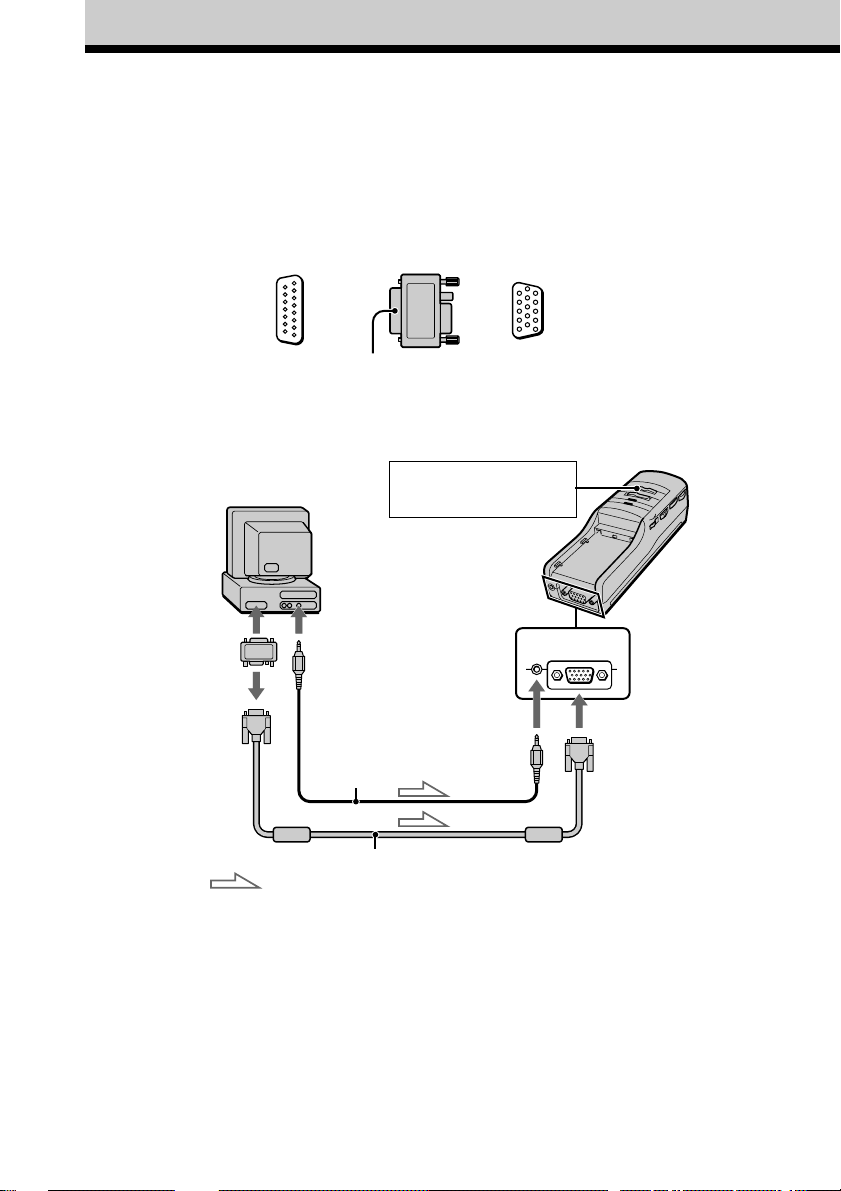
Connecting a Macintosh (desktop models)
Depending on the model, you may need to use the supplied Macintosh adapter to connect the
RGB signal cable (supplied) as shown below. When you connect the Glasstron to your
Macintosh, set the PC-VIDEO switch on the power supply box to “PC.”
to monitor port
of Macintosh
to monitor port to audio port
Macintosh
adapter
?
(D-Sub 15-pin,
male)
Audio cable (supplied)
RGB signal cable (supplied)
: Signal flow
to monitor
port
Set the PC-VIDEO switch
to “PC.”
to PC AUDIO
connector
/
VGA type connector
(HD15, female)
Power supply box
PC
RGB
AUDIO
to RGB connector
to RGB signal cable
Notes on connection
•The supplied display adapter does not support the models before the Macintosh II series.
•Set the display setting to the 16-inch display mode (832 × 624) or the 13-inch display mode (640 × 480).
The Glasstron does not display the image with the 19-inch display mode (1024 × 768) or more.
-GB
16
Page 17
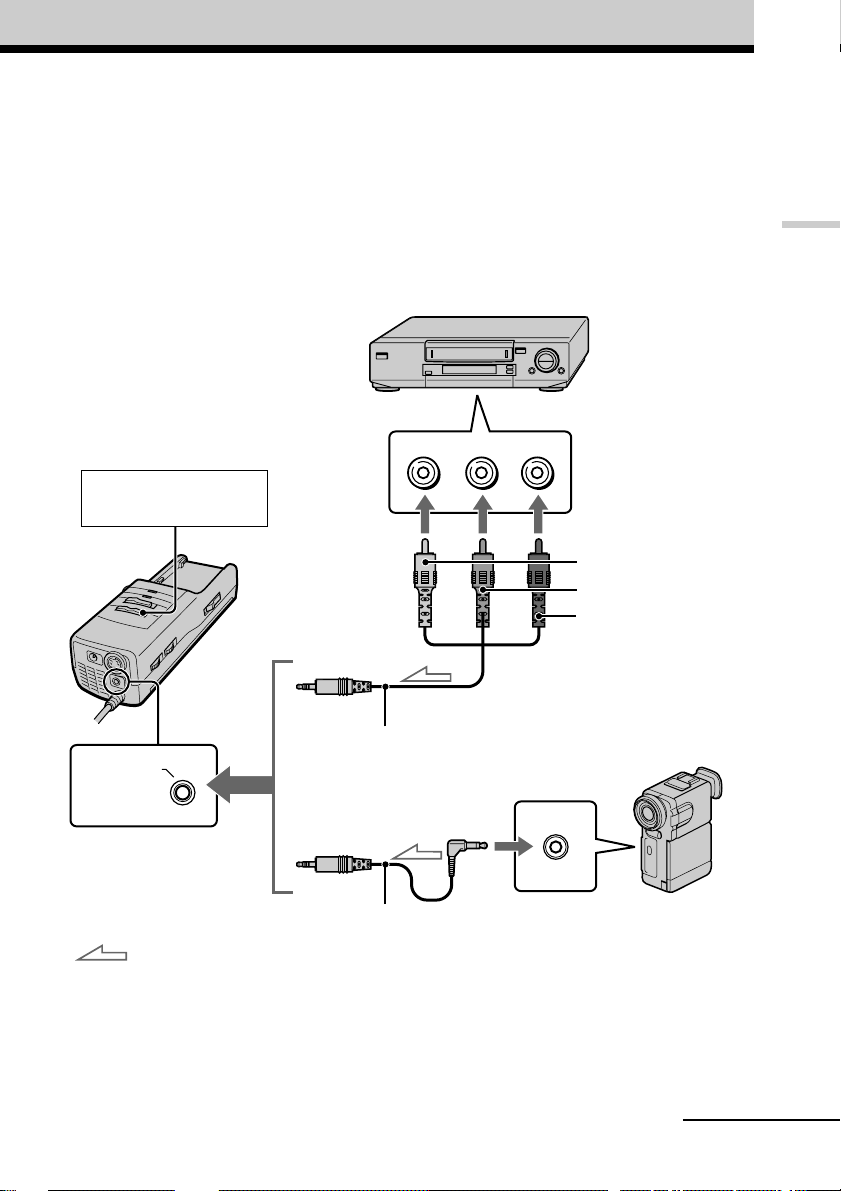
Connecting the video equipment
Connect a VCR, laser disc player, DVD player, or camcorder to the power supply box using one
of the audio/video cables (supplied) as shown below. When you connect the Glasstron to the
video equipment, set the PC-VIDEO switch on the power supply box to “VIDEO.”
VCR, laser disc player, DVD player,
camcorder, etc.
Getting Started
Set the PC-VIDEO switch
to “VIDEO.”
Power supply box
AUDIO / VIDEO
to AUDIO/VIDEO connector
: Signal flow
Audio/video cable (supplied)
(special miniplug phono plug)
to audio/video output
Audio/video cable (supplied)
(special miniplug special miniplug)
to audio/video outputs
Video (yellow)
Audio L (white)
Audio R (red)
Camcorder, etc.
continued
17
-GB
Page 18
Connecting the Glasstron (continued)
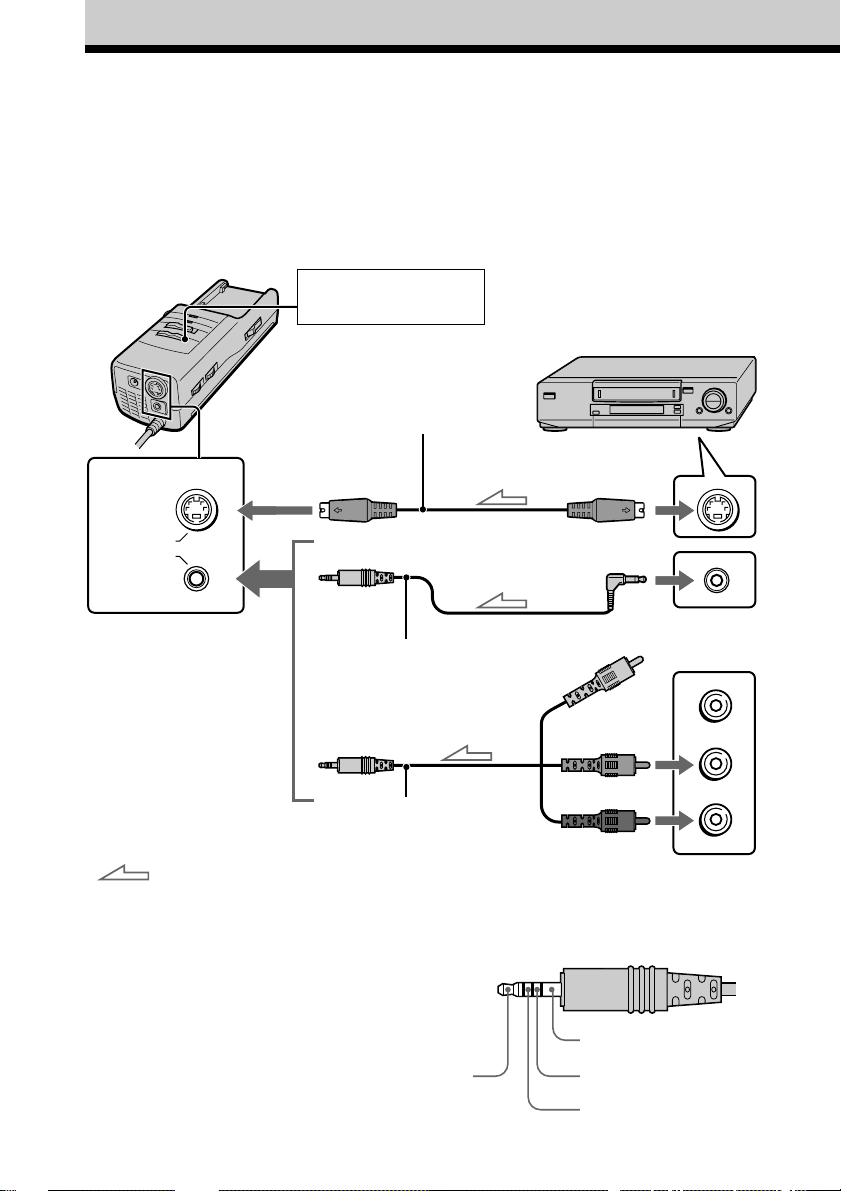
If your video equipment has an S-video jack
Connect the Glasstron to the video equipment using the supplied S-video cable and the audio/
video cable to enjoy the highest quality pictures. In this case, you do not need to connect the video
(yellow) plug. If you connect both the S-video and video plugs, the S-video signal is automatically
selected. When you connect the Glasstron to the video equipment, set the PC-VIDEO switch on the
power supply box to “VIDEO.”
Power supply box
to S VIDEO connector
S VIDEO
AUDIO / VIDEO
to AUDIO/VIDEO connector
: Signal flow
Set the PC-VIDEO switch
to “VIDEO.”
S-video cable (supplied)
Audio/video cable (supplied)
(special miniplug special
miniplug)
Audio/video cable (supplied)
(special miniplug phono
plug)
VCR, Laser disc player, DVD player,
camcorder, etc.
to S-video output
to audio/video output
Video (yellow)
Audio L (white)
Audio R (red)
to audio/video outputs
About the AUDIO/VIDEO input jack
The AUDIO/VIDEO input jack of the
Glasstron is a special minijack, and the signal
connections are aligned as shown on the right.
This alignment may differ depending on the
equipment.
-GB
18
Audio L
Audio R
GND
Video
Page 19

Notes
•Even if you use the supplied audio/video
cable, the audio and video signals may not be
carried to the Glasstron depending on the
video source. In this case, contact your Sony
dealer or local authorised Sony service facility.
•When you connect the Glasstron to the audio
output jacks (phono jacks) of your video
equipment, connect the Glasstron to both the
right and left audio output jacks. If you
connect the Glasstron to just one audio
output jack, you will hear sound from only
one of the stereo earphones.
Connecting the power source
Connect the AC power adapter AC-PLM3 (supplied) to the DC IN connector on the power
supply box. Then, connect the Mains lead (supplied) to the AC power adapter and to a mains.
Do not connect the power source until all other connections are complete.
to mains
Getting Started
AC power adapter
AC-PLM3 (supplied)
to DC IN connector
Display unit
Mains lead (supplied)
DC IN 8.4V
Power supply box
19
-GB
Page 20
Wearing the Glasstron
WARNING
• Failure to properly fit the product (see “Proper Fit,” page 8) each time may result in eye
fatigue, eye damage, or loss of visual functions and may result in accident or injury.
• This product should not be used by children age 15 or younger.
The eyes of children are still developing and may be adversely affected by use of this
product, and it may cause eye fatigue, eye damage, or loss of visual functions.
In addition, this product may not be adjusted to fit a child’s head.
If you normally wear glasses while watching TV, you can use the Glasstron while wearing
glasses.
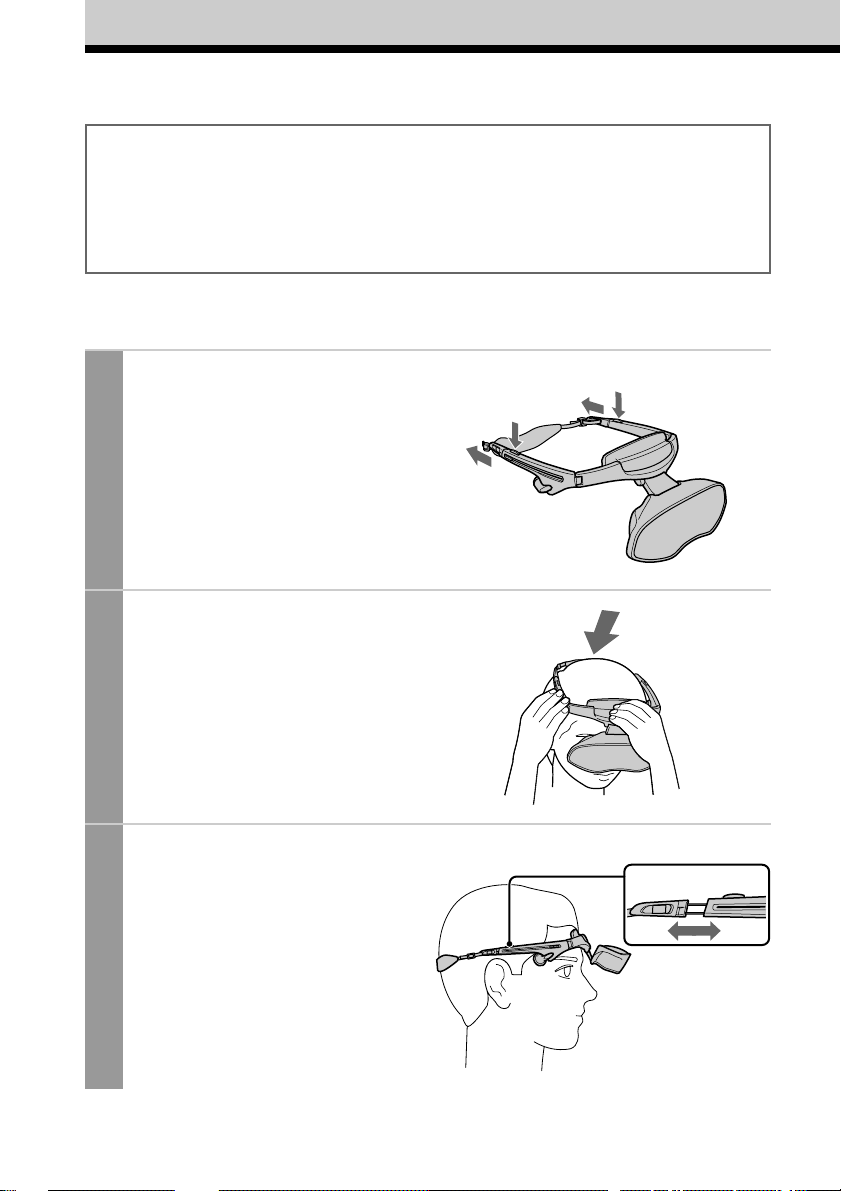
Loosen the back strap.
1
1 Press and hold the strap release
buttons.
2 Then, loosen the back strap in the
direction of the arrows.
Put on the Glasstron.
2
Hold the front pad against your
forehead and place the rear strap so it is
fixed firmly around the back of your
head.
Adjust the strap.
3
Adjust the strap after putting on the
Glasstron.
Make sure the strap is snug but
comfortable.
1
2
1
2
20
-GB
Page 21
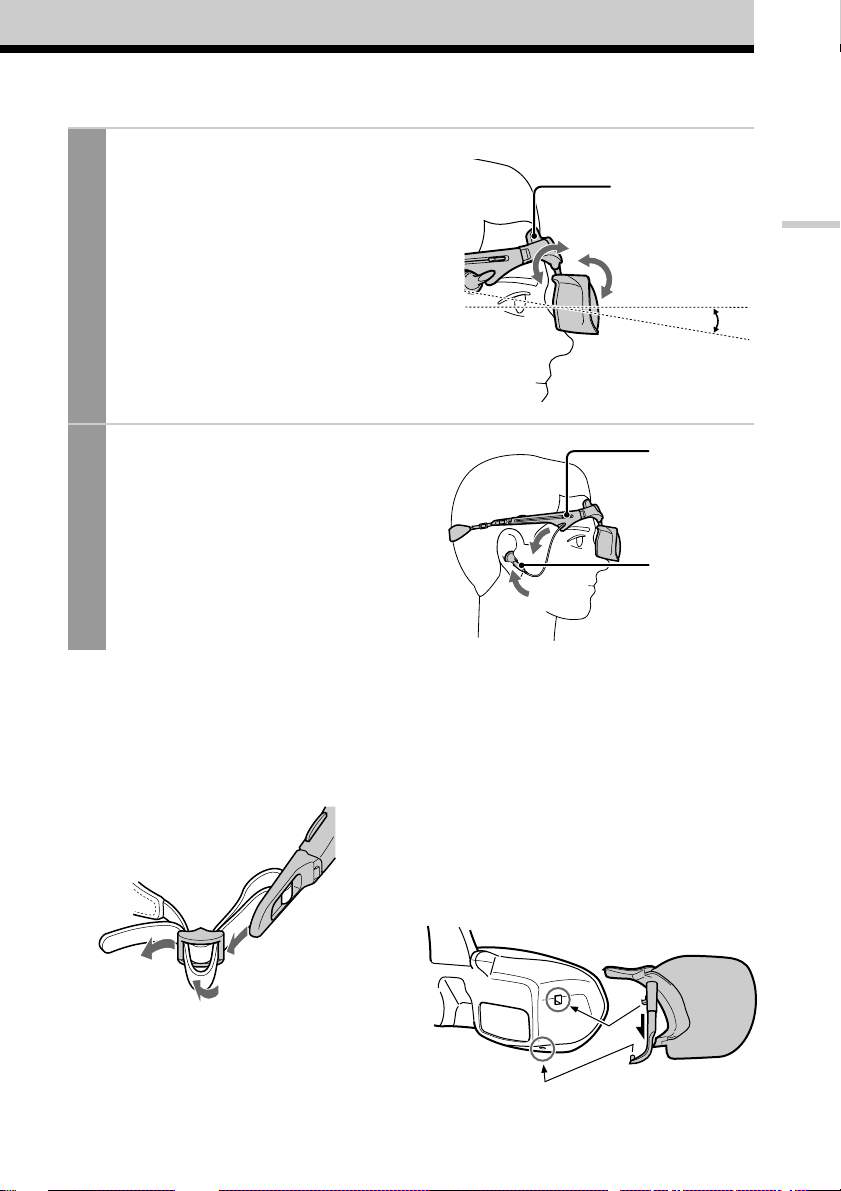
Adjust the angle of the display unit.
4
While holding the front pad against
your forehead, adjust the angle of the
display unit using the two hinges. Move
the display unit close to your eyes at a
slight downward angle. If you wear
glasses, move the display unit as close to
the lenses as possible.
Front pad
Getting Started
5 – 10°
Adjust the stereo earphones.
5
Pull the earphones out.
To adjust the slack, reel in the earphone
cord by pressing the slide button in the
direction of the arrow.
Adjusting the back strap
If the strap does not fit properly in step 3,
adjust the strap by changing the belt length.
Earphones
slide button
Stereo
earphones
Attaching the sunshades
You can attach the supplied sunshades if
you like. The sunshades prevent the LCD
screen from reflecting light that may
interfere with the picture.
Attach the sunshades on the right and left
sides of the display unit. Pull out the tab of
the sun shade, then insert the tabs into the
holes on the display unit as shown below.
Display unit
Sunshades (supplied)
21
-GB
Page 22
Turning on the Glasstron
After you complete all of the connections and put on the Glasstron properly, turn on both the
Glasstron and the connected equipment, and follow the procedures below.
1 Checking the display unit position n This page
2 Checking the screen position alignment n Pages 24
3 Setting a password n Page 27
If you do not want to use a password, you have to set the Glasstron to operate without
using a password in “Setting the password.”
Checking the display unit position
Every time you turn on the Glasstron, the adjustment screen appears to help you adjust the
display unit properly. Adjust the display unit following the procedure below.
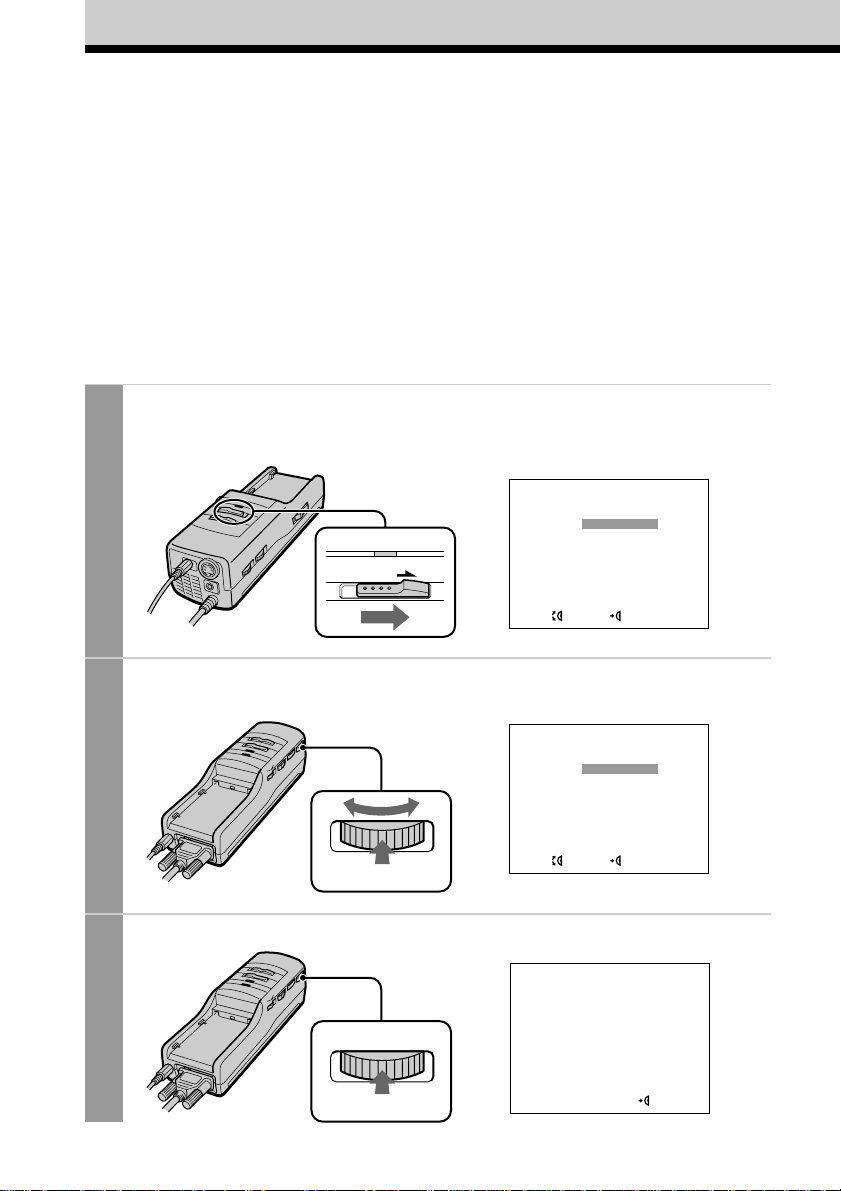
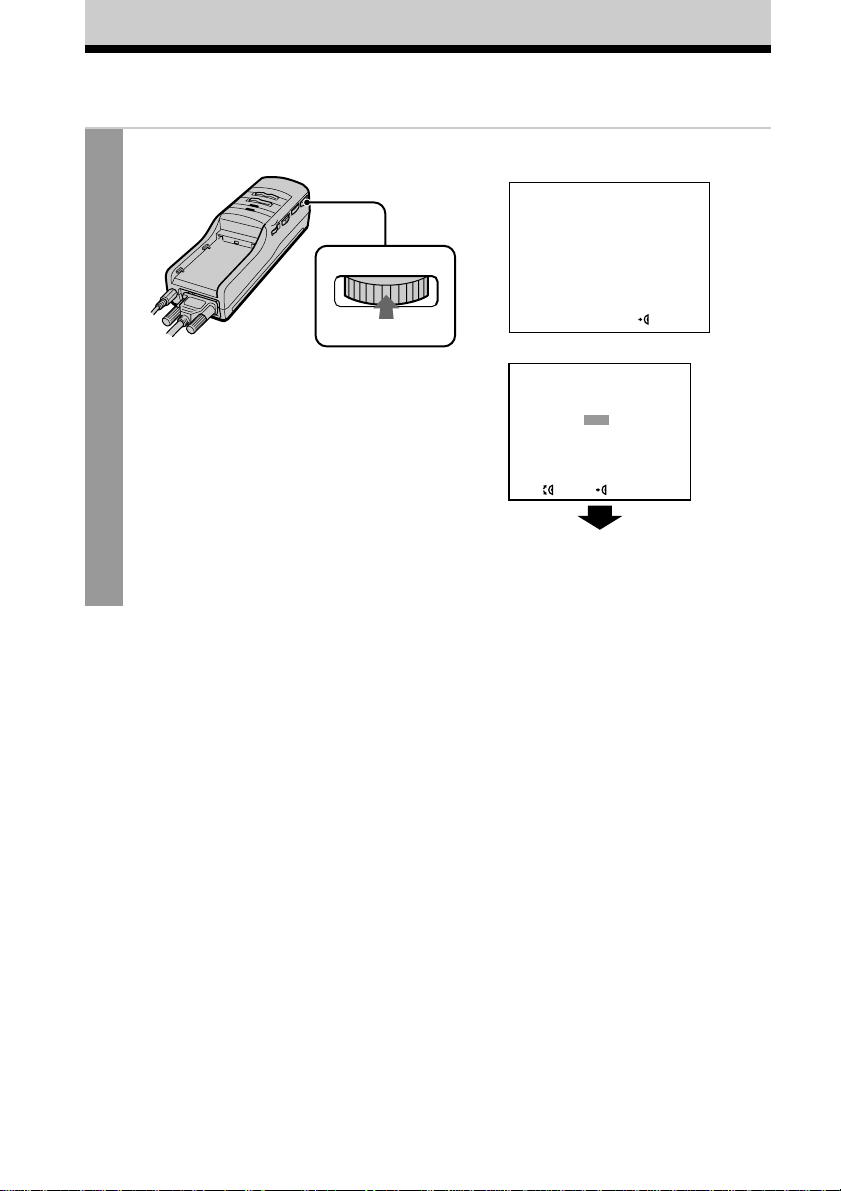
Turn on the Glasstron sliding the POWER switch.
1
The POWER/POWER SAVING lamp
lights up green.
POWER / POWER SAVING
ON / OFF
Screen
DISPLAY LANGUAGE
ENGLISH
FRANÇAIS
DEUTSCH
ITALIANO
NEDERLANDS
ESPAÑOL
SEL
EXEC
22
-GB
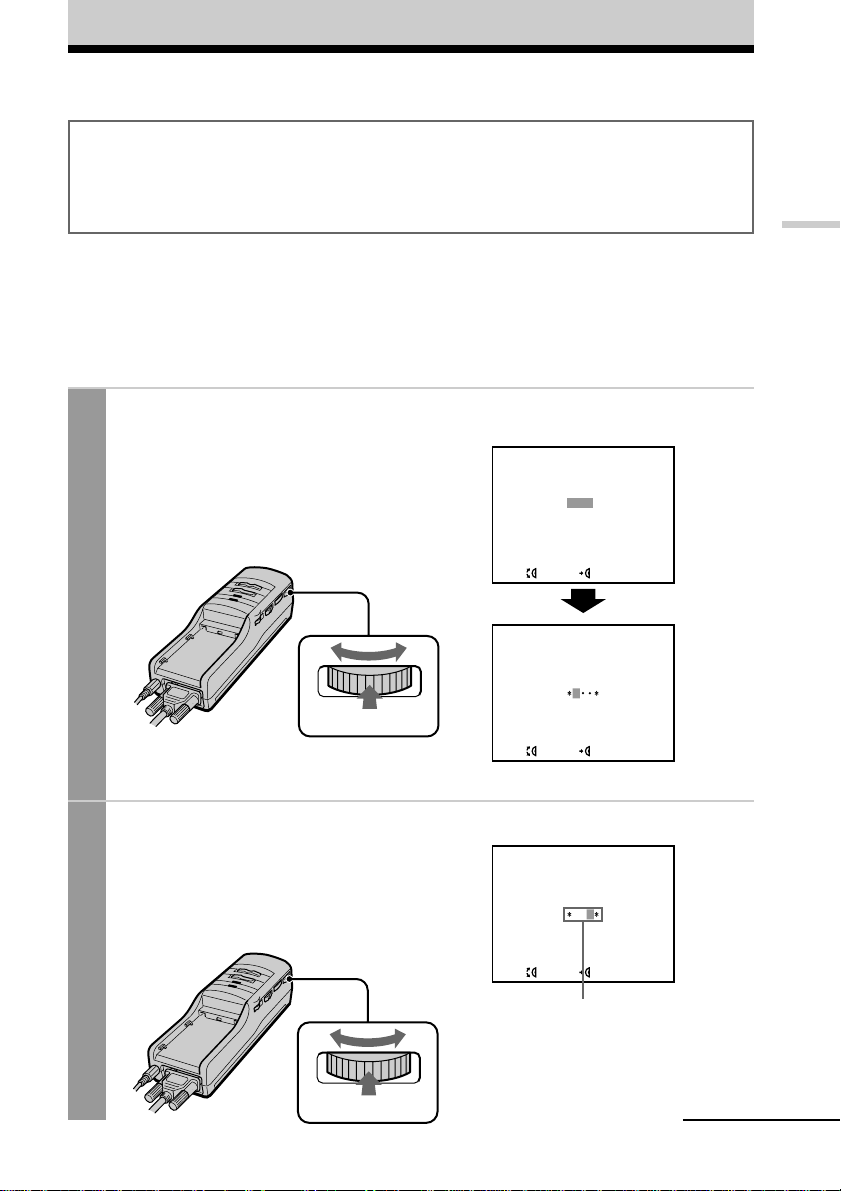
Turn the PUSH DISPLAY jog dial to select the desired language,
2
then press the jog dial.
DISPLAY LANGUAGE
ENGLISH
FRANÇAIS
DEUTSCH
ITALIANO
NEDERLANDS
ESPAÑOL
PUSH DISPLAY
Read the WARNING and press the jog dial.
3
PUSH DISPLAY
SEL
WARNING
FOR YOUR SAFETY AND TO
PREVENT EYE OR OTHER
INJURY, READ AND FOLLOW
ALL INSTRUCTIONS IN THE
USER’S MANUAL.
EXEC
CHECK
Page 23
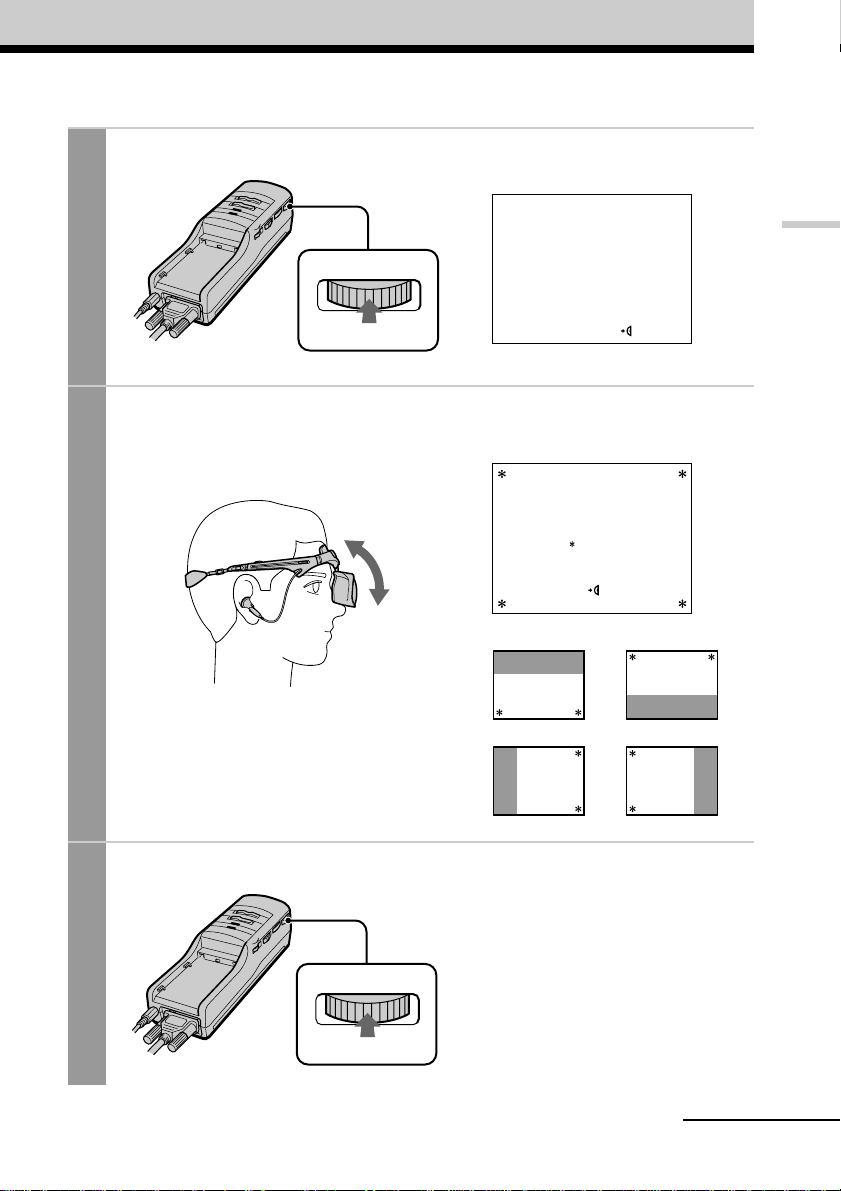
Read the next WARNING and press the jog dial.
4
WARNING
THIS PRODUCT SHOULD NOT
BE USED BY CHILDREN AGE
15 OR YOUNGER.
SEE THE USER’S MANUAL
FOR DETAILS.
Getting Started
PUSH DISPLAY
Adjust the display unit so that you can see an asterisk (*) in each
5
of the four corners as shown below.
After you complete the display unit adjustment, press the jog dial.
6
Correct
WARNING
TO CONFIRM SAFE FIT AND
PREVENT EYE FATIGUE OR
EYE DAMAGE, ADJUST THE
DISPLAY SO THAT AN
ASTERISK [ ] APPEARS IN
EACH CORNER.
SEE THE USER’S MANUAL
FOR DETAILS.
Incorrect
Incorrect Incorrect
CHECK
Incorrect
CHECK
PUSH DISPLAY
continued
23
-GB
Page 24
Turning on the Glasstron (continued)
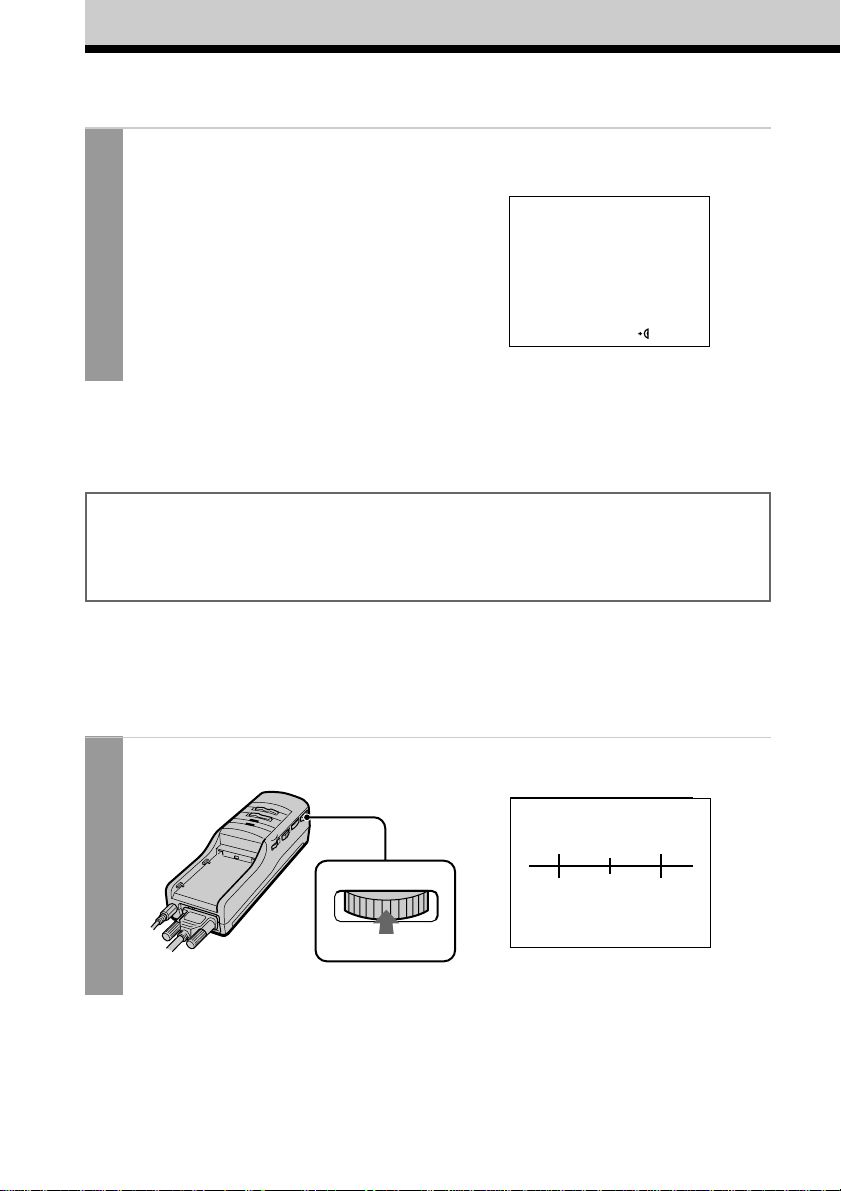
Read the next WARNING, then go to “Checking the screen position
7
alignment.”
WARNING
TO PREVENT EYE DAMAGE,
DO NOT USE THIS PRODUCT
IF THE VERTICAL LINES
DO NOT CROSS THE
HORIZONTAL LINE ON THE
NEXT SCREEN.
SEE THE USER’S MANUAL
FOR DETAILS.
CHECK
Checking the screen position alignment
WARNING
Each time this product is used, adjustment screens will appear, requiring the viewer to
properly fit the product. Proper fit means that an asterisk (*) will appear in each corner of the
display. To prevent eye damage, do not use this product if the vertical lines do not cross the
horizontal line on the next screen.
The Glasstron includes two small (left and right) LCDs. You are watching a combined picture
created from these two screens. Although the screen position is properly aligned at the factory,
it may become misaligned if the Glasstron is deformed or damaged. Check the screen position
alignment every time you turn on the Glasstron. If you cannot have correct screen alignment,
stop using the Glasstron immediately.
24
-GB
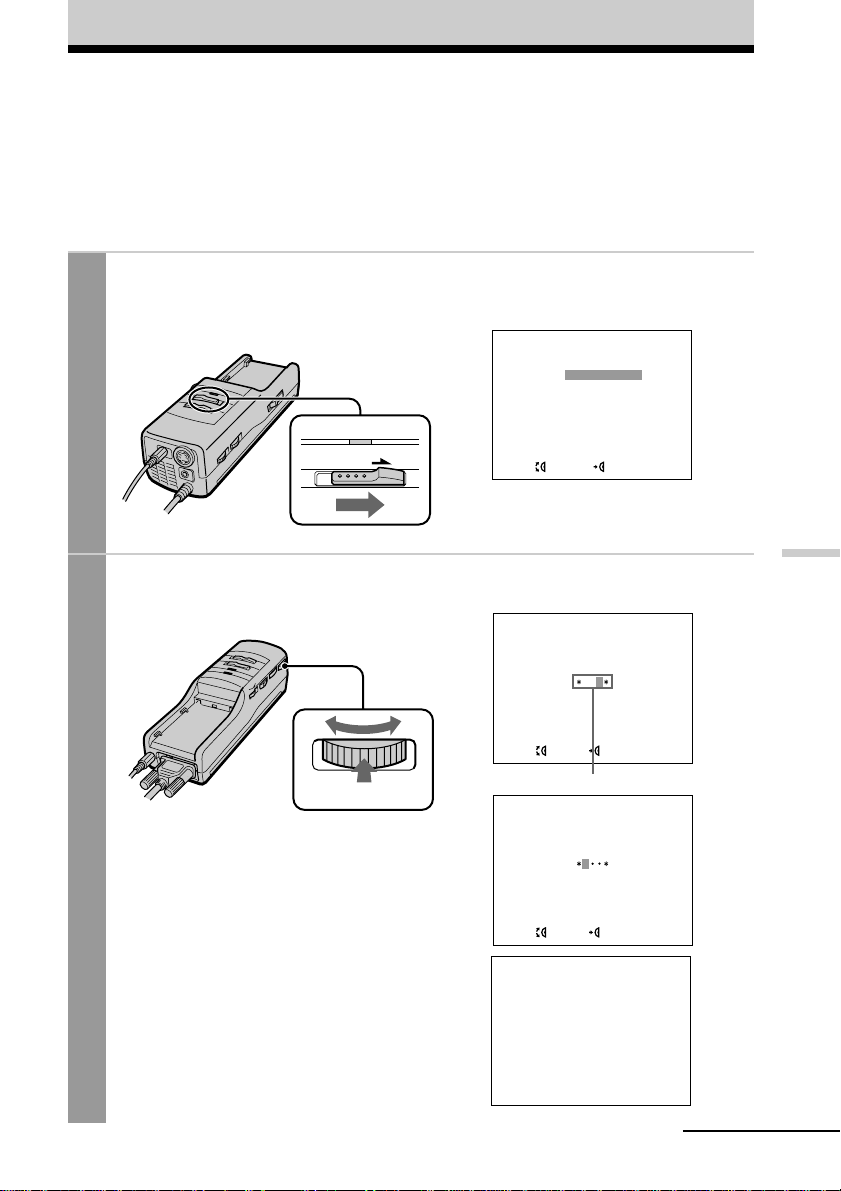
Press the PUSH DISPLAY jog dial.
1
Screen
PUSH DISPLAY
Page 25
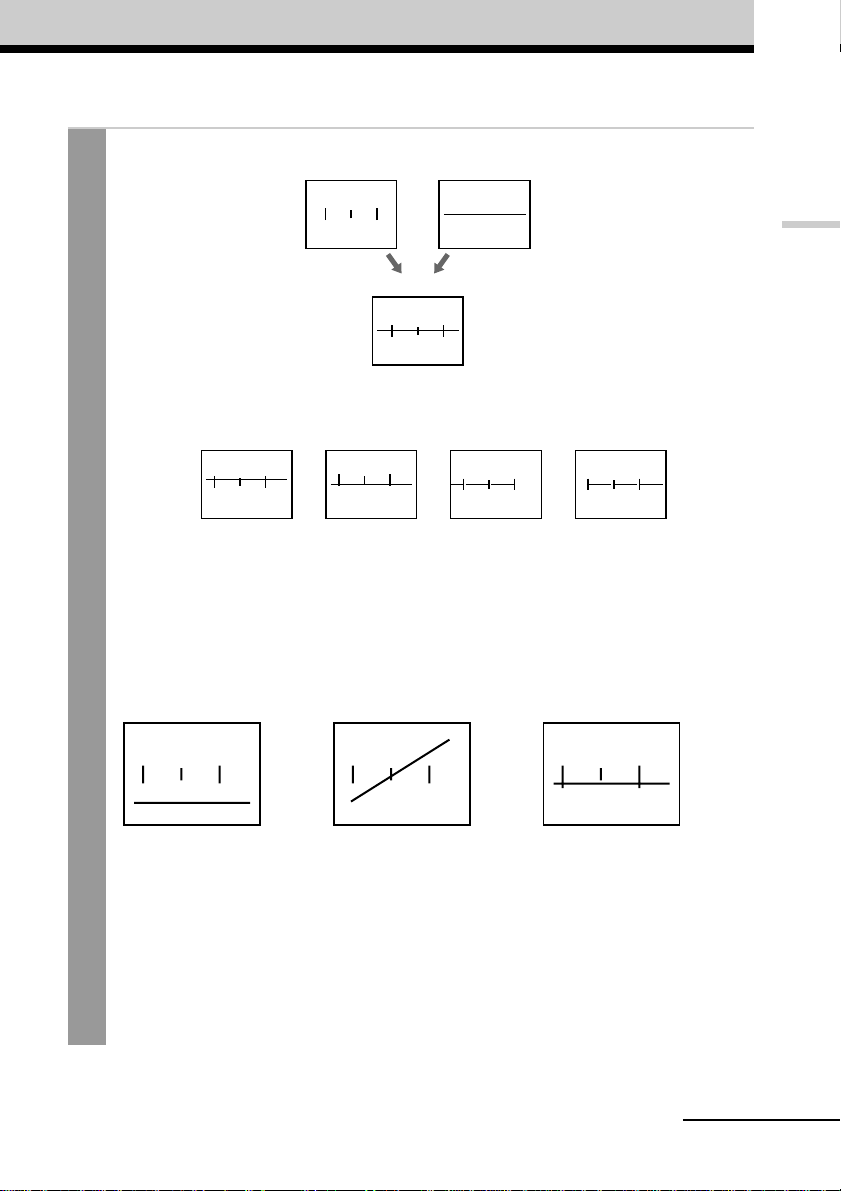
If the screens are aligned, press the jog dial.
2
Left screen
Correct
The combined picture
you see with both eyes
If the image you see matches one of the pictures below, you have
correct screen alignment.
Correct
Correct Correct Correct
Right screen
You may see a horizontal line
on the left screen rather than
the right screen, and vertical
lines on the right screen
rather than the left screen.
This is not a malfunction.
If the image you see matches one of the pictures
below, stop using the Glasstron immediately.
Use of the Glasstron under such conditions may
cause eye fatigue or eye damage.
Incorrect Incorrect Incorrect
Getting Started
When no vertical lines
cross the horizontal
line.
If you cannot see a proper arrangement of these lines even after resting your eyes for a
few hours, the Glasstron may not be operating correctly. Contact your Sony dealer or
local authorised Sony service facility.
When the horizontal
line appears as a
diagonal line.
When the centre vertical
line does not cross the
horizontal line.
continued
25
-GB
Page 26
Turning on the Glasstron (continued)
Read the WARNING and press the jog dial.
3
PUSH DISPLAY
WARNING
MISUSE OR OVERUSE OF THE
PRODUCT MAY RESULT IN
EYE FATIGUE OR EYE
DAMAGE. STOP USING IF YOU
FEEL TIRED OR EXPERIENCE
HEADACHES OR DISCOMFORT.
SEE THE USER’S MANUAL
FOR DETAILS.
CHECK
The password “YES or NO” screen appears.
DO YOU WISH TO SET A
THREE NUMBER PASSWORD?
YES
NO
SEE THE USER’S MANUAL
FOR DETAILS.
SEL EXEC
Go to “Setting the password”
on page 27.
26
-GB
Page 27
Setting the password
WARNING
This product should not be used by children age 15 or younger. The eyes of children are still
developing and may be adversely affected by use of this product. To prevent such use, this
product has been equipped with a safety password protection system. Please use a secure
password if children age 15 or younger may have access to this product.
Once you set a password, you have to input the password every time you use the Glasstron. Do
not forget your password. If you like, you can set the Glasstron to operate without a password.
Before you start…
Follow the procedure in “Turning on the Glasstron” (pages 22 through 26). The password “YES
or NO” screen appears on the screen.
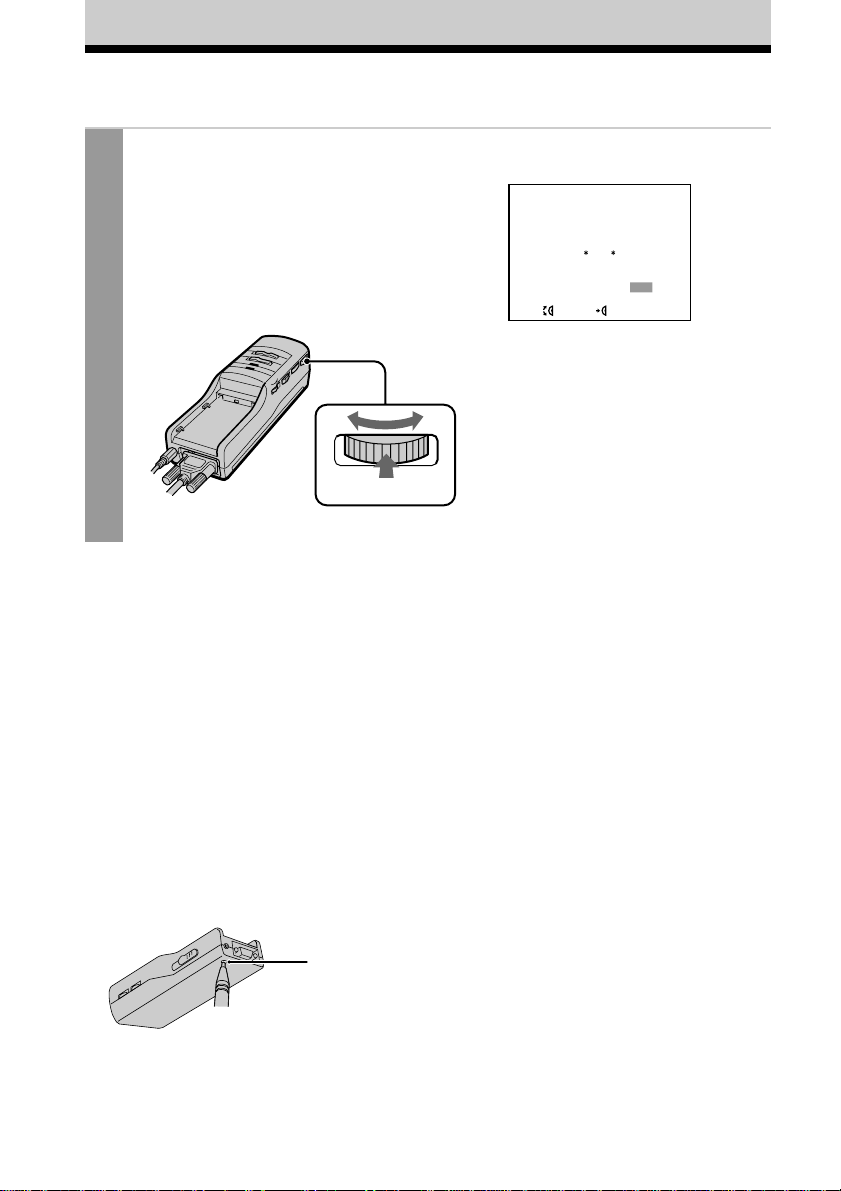
Select whether to set a password or not using the PUSH DISPLAY
1
jog dial.
If you need to set a password, select
YES. If not, select NO by turning the jog
dial. Then press the jog dial. If you do
not need to set a password, go to step 4
in “Using the Glasstron” (page 29).
Screen
DO YOU WISH TO SET A
THREE NUMBER PASSWORD?
YES
NO
SEE THE USER’S MANUAL
FOR DETAILS.
SEL EXEC
ENTER THE FIRST NUMBER.
Getting Started
0
PUSH DISPLAY
SEL EXEC
Enter a three digit password number, one by one, by using the jog
2
dial.
Turn the jog dial to enter the first
number, then press the jog dial. Enter
the second and third numbers in the
same way.
PUSH DISPLAY
ENTER THE THIRD NUMBER.
123
EXEC
SEL
Entered password
continued
27
-GB
Page 28
Setting the password (continued)
Verify a password using the jog dial.
3
If the password is correct, select YES by
turning the jog dial. If not, select NO.
Then press the jog dial.
If you select NO, return to step 1.
If you select YES, go to step 4 in “Using
the Glasstron” (page 30).
PUSH DISPLAY
Changing the password
When the power is on, press RESET on the
bottom of the power supply box with a
pointed object such as a ballpoint pen.
• If you have already read the WARNING
messages (page 22 through 26) (e.g.,
while watching a video picture), the
display will return to step 1 in “Setting
the password” (page 27).
• Before you read the WARNING message
(e.g., you have forgotten your password),
the display will return to step 3 in
“Turning on the Glasstron” (page 22).
If you need to set a password after having
set the Glasstron to operate without a
password, follow the same procedure
above.
IS YOUR PASSWORD
CORRECT?
123
SEL
EXEC
YES
NO
Note
Pressing the RESET button does not affect
picture or sound adjustments in PC and video
mode.
-GB
28
RESET
Page 29
Using the Glasstron
You need to set a password the first time you use the Glasstron or after you reset the Glasstron.
Set the password following the procedure in “Setting the password” (pages 27 and 28).
Before you start…
Be sure to follow the procedures in “Connecting the Glasstron” (pages 14 to 19) and “Wearing
the Glasstron” (page 20).
Turn on the Glasstron using the POWER switch, then press PUSH
1
DISPLAY jog dial.
Change the display language before
pressing the jog dial, if necessary.
POWER / POWER SAVING
ON / OFF
Screen
DISPLAY LANGUAGE
ENGLISH
FRANÇAIS
DEUTSCH
ITALIANO
NEDERLANDS
ESPAÑOL
SEL
EXEC
If you have set the Glasstron to operate without a password, go to step 3.
Turn the PUSH DISPLAY jog dial to enter the first number of your
2
password, then press the jog dial. Enter the second and third
numbers in the same way.
ENTER THE THIRD NUMBER
OF YOUR PASSWORD.
123
EXEC
SEL
PUSH DISPLAY
If you enter a wrong password, the
message shown on the right appears.
Enter the correct password.
If you have entered a wrong password
more than five times, after about ten
seconds, the Glasstron turns off
automatically.
Entered password
INCORRECT PASSWORD.
ENTER THE FIRST NUMBER
AGAIN.
1
SEL
EXEC
INCORRECT PASSWORD.
SEE THE USER’S MANUAL.
Operations
continued
29
-GB
Page 30
Using the Glasstron (continued)
Follow the instructions on the screen.
3
1 Warning message n Follow steps 3 through 7 in “Checking the display unit
position” (pages 22 through 24).
• After carefully reading the warnings and checking the display unit position, press
the jog dial.
2 Screen alignment n Follow steps 1 through 3 in “Checking the screen position
alignment” (pages 24 through 26).
• Read the warning carefully, and press the jog dial.
• Make sure the left and right screens are aligned, and press the jog dial.
Select the input signal using the PC-VIDEO switch.
4
Select PC (RGB signal) or VIDEO (video
signal) depending on the connected
equipment.
When you connect to the S-video
connector
“S VIDEO” appears on the screen.
PC VIDEO
When you select PC (PC mode)
PC / RGB
When you select VIDEO
(Video mode)
VIDEO
30
-GB
Input the signal from the connected equipment.
5
When you connect the PC:
Adjust the screen resolution. For details, see “Signal compatibility” on page 34.
When you display VGA pictures (640 × 480), the picture appears about 60% of the entire
screen.
Notes
•If no picture appears, check the default setting of your PC to output the external RGB signal
from the monitor connector.
•Some PCs do not output external display signal when they turn on, or switch to external
display mode. Change the display mode of your PC, referring to the instruction manual
supplied with your PC.
When you connect the video equipment:
Start playback on the video equipment connected to the Glasstron.
When you display PAL video picture, the picture appears about 84% of the entire screen.
Page 31

Adjust the brightness by turning the BRIGHT control.
6
BRIGHT
darker brighter
Adjust the sound volume by turning the VOL control.
7
When you set AVLS in the menu to on, you cannot turn up the volume beyond the defined
limit (see page 37). If the audio input level is too high, the sound may be distorted. Turn
the volume down using the VOL control.
VOL
lower louder
After you finish using the
Glasstron
Take off the Glasstron, and turn off the
power.
Note on the LCDs
The LCD screen is made with highprecision technology. However, black
points or bright points of light (red, blue, or
green) may appear constantly on the LCD
screen. This is not malfunction.
(Effective dots: more than 99.999%)
BRIGHTNESS
Checking the display
indication
Press the jog dial while the picture is
displayed. The display indication appears
on the screen for five seconds.
To turn off the indication sooner, press the
jog dial again.
PC / RGB 800X600 60Hz
MEGA BASS 2
AVLS
Operations
Input signal
(page 30)
MEGA BASS
(page 37)
AVLS
(page 37)
Remaining battery life*
(page 41)
* When using the AC power adapter, the
“ ” mark appears on the screen.
continued
31
-GB
Page 32

Using the Glasstron (continued)
Screen warnings against
overuse of the Glasstron
To prevent eye fatigue or eye damage, after
you use the Glasstron for a fixed length of
time, the following caution appears on the
screen.
After about 2 hours and 15 minutes of use
YOU HAVE WATCHED FOR
OVER 2 HOURS.
STOP IF YOU FEEL TIRED.
CONTINUE
Stop using the Glasstron if you feel tired or
you experience headaches or discomfort.
If you want to continue using the Glasstron,
press the jog dial.
After about 4 hours and 15 minutes of use
YOU HAVE WATCHED FOR
OVER 4 HOURS.
STOP IF YOU FEEL TIRED.
CONTINUE
Stop using the Glasstron if you feel tired or
you experience headaches or discomfort.
If you want to continue using the Glasstron,
press the jog dial.
After about 6 hours of use
WARNING
YOU HAVE WATCHED FOR
OVER 6 HOURS.
TO PREVENT EYE FATIGUE
OR EYE DAMAGE, GLASSTRON
WILL AUTOMATICALLY SHUT
DOWN SOON.
The power turns off automatically.
Caution: Motion sickness from
viewing programmes.
Some viewers may experience motion
sickness, headache, or nausea from viewing
movies or video programmes, especially
those with intense action and movement. If
you feel any of these symptoms, stop using
the product immediately. To avoid
personal injury or injury to others, do not
drive a car or motorcycle, nor do anything
that requires concentration until the
symptoms disappear.
Caution: Motion sickness from
external motion.
Do not use the product while subject to
external motion –– for example, as a
passenger in a car. Use of this product
under these conditions may cause motion
sickness.
Note
If you do not press the jog dial when the
cautions above appear on the screen, the
Glasstron turns off automatically in both cases.
-GB
32
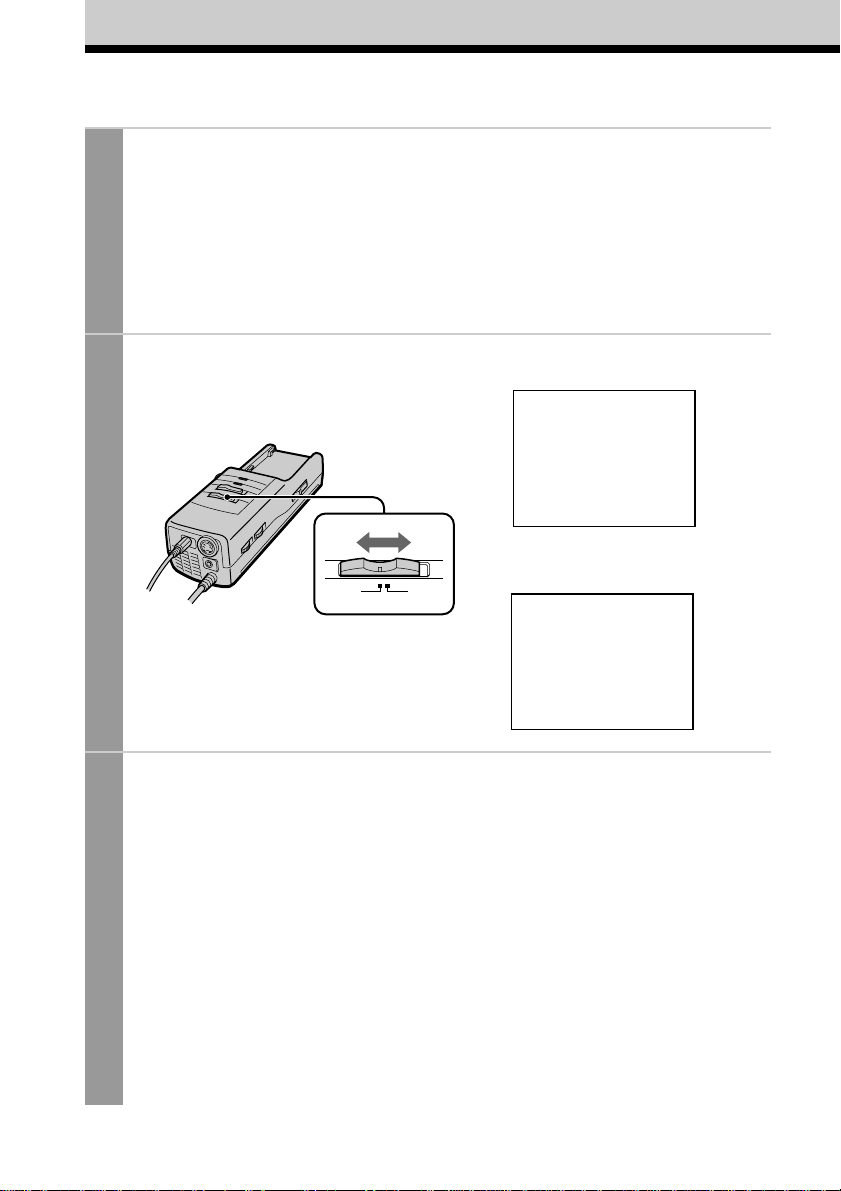
Page 33

Viewing the surrounding environment
While you are wearing the Glasstron, you can view the surrounding environment through the
screen in two ways:
Viewing the surrounding
environment by adjusting the
transparency of the entire
screen (See-through mode)
You can adjust the level of transparency of
the entire screen with the LCD shutter dial.
The picture becomes
transparent.
Turn the SEE-THROUGH dial.
The area surrounding
the picture also becomes
transparent.
Viewing the surrounding
environment in the area
around the picture only
(Screen mode)
You can adjust the level of transparency of
the screen area around the picture only. The
picture remains intact.
The picture remains
intact.
Set the SCREEN switch to
ON.
The area surrounding
the picture also becomes
transparent.
Operations
SEE - THROUGH
CLOSE OPEN
Note
If there is a bright light near the display unit,
you may not be able to completely black out
the surrounding environment by adjusting the
SEE-THROUGH dial.
SCREEN
ON OFF
In this mode, the screen does not
become transparent even if you turn
the SEE-THROUGH dial.
Notes
•When you set the SCREEN switch to ON, the
edges of the picture may fade a bit, but this is
not a malfunction.
•If there is a bright light near the display unit,
you may not be able to completely black out
the surrounding environment arround the
picture by adjusting the SEE-THROUGH dial
when you set the SCREEN switch to on.
33
-GB
Page 34

Adjusting the sound and picture
Signal compatibility
The signal specifications that this unit supports are as follows:
PC mode (RGB signal)
Display mode Screen resolution Horizontal Vertical
(dot × line) frequency (kHz) frequency (Hz)
Macintosh
13” colour 640 × 480 35.0 67
16” colour 832 × 624 49.7 75
IBM PC compatibles
VGA text 640 × 400 31.5 70
VGA graphics 640 × 480 31.5 60
VESA VGA 640 × 480 37.9 72
VESA SVGA 800 × 600 35.2 56
Video mode (video signal)
PAL colour system Displayed in 762 × 572 area
Notes on the PC mode
•This unit does not support XGA mode (1,024 × 768) and above. If you set the vertical frequency to 60
Hz in XGA mode, the picture is displayed but the picture quality is poor due to the signal loss.
Change the screen resolution on your PC to SVGA or VGA.
•Though the Glasstron supports the signals listed above, set the vertical frequency to 60 Hz when
using with SVGA (800 × 600), or to 72 Hz or 75 Hz with VGA (640 × 480) mode. Also adjust the
vertical frequency of the external display output signal of the connected computer.
•When you display VGA pictures (640 × 480) or PAL video pictures (video mode), the pictures are not
displayed across the entire screen. About 60% area of the screen is utilised when VGA pictures
appear, or about 84% area is utilised when PAL video pictures appear.
•Some notebook type PCs do not output the RGB signal in the adjusted screen resolution and the
vertical frequency from the external monitor port until you set the PC to external display mode.
•When you use Microsoft Windows 95 or Windows 98, install the information file included in the
supplied Windows 95/Windows 98 PC Glasstron Information Disk. For details on how to install the
information file, refer to the instruction manual “Windows 95/Windows 98 PC Glasstron Information
Disk/screen adjustment disk for Macintosh”.
640 × 480 37.5 75
640 × 480 43.3 85
800 × 600 37.9 60
800 × 600 48.1 72
800 × 600 46.9 75
800 × 600 53.7 85
34
-GB
Page 35

Adjusting the sound/picture
You can adjust the following items using the menu display.
The menu is displayed only in English.
PC mode (RGB signal) Video mode (video signal)
AVLS (Auto Volume Limiter System):
Keeps the maximum volume down to protect your ear. You cannot turn up the volume
beyond the defined limit even if you try to turn the VOL control.
MEGA BASS:
Creates a deep, powerful sound by emphasizing the bass sound.
POWER SAVE:
The POWER SAVING SENSOR detects the removal of the Glasstron from your head. The unit
enters standby mode in a few seconds, automatically stopping the sound and picture in order
to save the battery power. The sound and picture resume in a few seconds when you put on
the Glasstron again.
V CENT:
Adjusts the vertical position of the
picture.
H CENT:
Adjusts the horizontal position of
the picture.
TRACKING:
Adjusts the tracking of the picture
(e.g., if the picture is not displayed
clearly).
SYNC:
Adjusts the picture with the RGB
signal synchronization (e.g., if the
picture is blurred, or if red or blue
shadows appear in the picture).
Perform this adjustment after
TRACKING adjustment is finished.
CONTRAST:
Adjusts the picture contrast.
COLOUR:
Adjusts the colour intensity.
Operations
continued
35
-GB
Page 36

Adjusting the sound and picture (continued)
Press MENU.
1
The menu display appears on the screen.
MENU
Turn the PUSH DISPLAY jog dial to select the desired item, then
2
press the jog dial.
The setting screen of the selected item appears.
PC mode
MENU
EXIT
AVLS :
MEGA BASS :
POWER SAVE :
V CENT
H CENT
TRACKING
SYNC
PRESET
SEL EXIT
EXEC
VIDEO mode
MENU
EXIT
AVLS :
MEGA BASS :
POWER SAVE :
CONTRAST
COLOUR
RESET
EXEC
SEL EXIT
OFF
0
OFF
OFF
0
OFF
MENU
MENU
36
-GB
PUSH DISPLAY
Adjust the setting using the jog dial.
3
For details on each item, see pages 37 to 39.
To set other items, repeat steps 2 and 3.
Press MENU.
4
The menu display goes off.
You can also turn off the menu display by selecting EXIT in the menu using the jog dial.
Page 37

AVLS (Auto Volume Limiter
System)
Turn the jog dial to set to
ON, then press the jog dial.
POWER SAVE
Turn the jog dial to set to
ON, then press the jog dial.
AVLS :
ON
OFF
SEL
EXEC
When AVLS is on, the volume does
not become louder than the level you
set even if you turn the VOL control.
MEGA BASS
Turn the jog dial to select
the desired value, then
press the jog dial.
2: Maximise the bass sound.
1: Boost the bass sound.
0: Normal bass sound.
MEGA BASS :
2
1
0
SEL
EXEC
POWER SAVE :
ON
OFF
SEL
EXEC
When you take off the display unit
while the POWER SAVE is set to ON,
the POWER SAVING SENSOR (page
13) is activated and automatically
turns off the picture and sound. The
picture and sound resumes a few
seconds after putting the display unit
back on.
When POWER SAVE is set to ON,
you can monitor the status of the
Glasstron by checking the POWER/
POWER SAVING indicator.
Status
POWER/
Picture
POWER
SAVING
indicator
Normal
Lit in
Normal
green
Power save
mode
Lit in
orange
No
picture
Operations
Power
consumption
100%
5%
Note
The power saving function of the Glasstron
does not work together with the power
management function of your PC.
continued
37
-GB
Page 38

Adjusting the sound and picture (continued)
Adjusting the RGB signal
It is recommended to adjust the picture after installing the information file included in the
supplied Windows 95/Windows 98 PC Glasstron Information disk, or the screen adjustment
disk for Macintosh. For details on how to install the information file, refer to the instruction
manual “Windows 95/Windows 98 PC Glasstron Information Disk/screen adjustment disk for
Macintosh”.
Note
When you display the picture on both the LCD display of the notebook PC and on the Glasstron, you
cannot adjust the picture on the Glasstron because of the mismatch of the output signal frequencies
with some notebook PCs. In this case, change the display mode on your PC to the external monitor
only. Then, change the screen resolution according to the list on “Signal compatibility” (page 34).
V CENT
Turn the jog dial to adjust
the centre of the picture,
then press the jog dial.
V CENT
EXECADJ
H CENT
Turn the jog dial to adjust
the centre of the picture,
then press the jog dial.
TRACKING
Turn the jog dial until the
stripes on the picture
disappear, then press the
jog dial.
TRACKING
EXECADJ
SYNC
Turn the jog dial to adjust
the clearance of the picture,
then press the jog dial.
38
-GB
H CENT
SYNC
EXECADJ
EXECADJ
Page 39

Adjusting the video signal
CONTRAST
Turn the jog dial to adjust
the contrast, then press the
jog dial.
CONTRAST
EXECADJ
less more
Resetting the
adjustment to the
factory preset level
AVLS, MEGA BASS, POWER SAVE settings
are not reset to the factory preset level.
Turn the jog dial to select
RESET in the menu, then
press the jog dial.
PC mode
MENU
EXIT
AVLS :
MEGA BASS :
POWER SAVE :
V CENT
H CENT
TRACKING
SYNC
PRESET
OFF
0
OFF
MENU
EXEC
SEL EXIT
COLOUR
Turn the jog dial to adjust
the colour intensity, then
press the jog dial.
COLOUR
EXECADJ
less more
VIDEO mode
MENU
EXIT
AVLS :
MEGA BASS :
POWER SAVE :
CONTRAST
COLOUR
RESET
OFF
0
OFF
EXEC
MENU
SEL EXIT
Note
The settings are retained even when you turn
off the power.
Operations
continued
39
-GB
Page 40

Using the optional battery pack
If you use a battery pack such as the NP-F550/F750/F950, you can use the Glasstron without
connecting to a mains.
Note
You cannot use the Glasstron with the alkaline batteries. Use the AC power adapter (supplied) or the
battery pack (not supplied)
Charging the battery pack
Charge the battery pack before use. You can charge the battery pack using the power supply
box. If you attach the battery pack as described below, the battery pack charges while you are
not using the Glasstron.
Attach the battery pack to the power supply box.
1
Install the battery pack properly making
sure it is not crooked against the power
supply box.
To remove the battery pack, while
sliding BATT RELEASE, pull out the
battery pack.
Connect the AC power adapter to the DC IN connector on the
2
power supply box. Then, connect the mains lead to the AC power
Power supply
box
BATT RELEASE
button
adapter and to a mains.
Charge the battery pack on a flat place
without vibration.
The CHARGE lamp lights up. When the
battery pack is fully charged, the
CHARGE lamp goes out.
Battery life and charging time are shown
in the table on the next page.
to mains
AC power
adapter
Battery pack
CHARGE lamp
to DC IN
Notes
•If the POWER/POWER SAVING lamp flashes while using the battery pack, charge the battery pack.
•If the CHARGE lamp flashes, the power supply box or battery pack is malfunctioning. Contact your
Sony dealer or local authorised Sony service facility.
•Use the supplied AC power adapter only when charging a battery pack.
•Battery life may be shorter in a cold environment. This is a typical battery characteristic.
•You cannot charge the battery pack in power save mode. Turn off the Glasstron, then it starts
charging the battery pack.
-GB
40
Page 41

Battery pack Charging time Battery life (fully charged battery, PC mode)
NP-F550 Approx. 4 hours Approx. 1 hour
NP-F750 Approx. 8 hours Approx. 2 hours
NP-F950 Approx. 12 hours Approx. 3 hours
•The battery life and charging time may change depending on the conditions of use.
•You can also use a battery pack such as the NP-F530/F730/F930 (not supplied) with the Glasstron.
•You can use an InfoLITHIUM™ battery pack with the Glasstron. When using such a battery pack, the
estimated remaining battery life is displayed not with the time counter, but with the indicator.
•The battery life listed above is for PC mode. When you use the Glasstron in video mode, the battery
life is reduced to 80% of the PC mode.
“InfoLITHIUM” is a trademark of Sony Corporation.
Checking the remaining battery life
When no indication or caution appears on the screen, press the
jog dial.
PUSH DISPLAY
Remaining battery life
Operations
Fully
charged
dead
When the battery pack is weak, the
following message appears on the
screen. Replace the battery pack
with a charged one.
THE BATTERY PACK
IS EMPTY.
REPLACE WITH A
CHARGED BATTERY.
When using the AC power adapter, the
“ ” mark appears on the screen.
41
-GB
Page 42

Precautions
Use
• Operate the product only with the
supplied AC power adapter. If you use a
different AC power adapter, it may cause
a malfunction.
Unified polarity plug
• Should any liquid or solid object fall into
the cabinet, unplug the product and have
it checked by qualified personnel before
operating it further.
• Always turn the product off when you do
not use it.
Unplug the product from the mains if you
are not going to use it for several days or
more. To disconnect the cord, pull it out
by the plug. Never pull the cord itself.
• Do not overload mains, extension cords,
or convenience receptacles beyond their
capacity, since this can result in fire or
electric shock.
• Do not use attachments not recommended
by the manufacturer, as they may cause
hazards.
• Avoid using earphones at high volume.
Hearing experts advise against
continuous, loud, and extended play. If
you experience a ringing in your ears,
reduce volume or discontinue use.
• Do not touch the AC power adapter or
power supply box with wet hands. If you
fail to observe this, it may cause electric
shock.
• Do not drop or give a mechanical shock to
the product.
Installation
• To prevent internal heat build-up, do not
block the ventilation openings.
• Avoid operating the product at
temperatures below 41˚F (5˚C).
• Do not subject the product to high
temperature or direct sunlight. If you do
not observe the above instructions, the
product may become deformed and the
screens may become impossible to align.
If you keep watching misaligned screens,
you may develop eye fatigue. Follow the
instructions in “Checking the screen
position alignment” on page 24, to be
sure the screens are aligned. If you find
the screens misaligned, have the product
repaired at your Sony dealer or local
authorised Sony service facility.
• Do not place the product in locations
where it is wet, humid, dusty, smoky, or
steamy. Do not use this product near or
around water. It may cause fire or
electric shock. Especially, do not use the
product in the bathroom.
• If the product is transported directly from
a cold to a warm location, or if the room
temperature has changed suddenly, the
picture may be blurred or show poor
colour. This is because moisture has
condensed on the mirror or lenses inside.
If this happens, let the moisture
evaporate before using the product.
• Do not place the product on an unstable
cart, stand, table, or shelf. The product
may fall, causing serious injury to a child
or an adult, and serious damage to the
product.
• Do not allow anything to rest on or roll
over the main lead, and do not place the
product where the main lead is subject to
wear or abuse.
42
-GB
Page 43

Others
• Unplug the product from the mains and
refer servicing to qualified service
personnel under the following conditions:
- When the main lead or plug is
damaged or frayed.
- If liquid has been spilled into the
product.
- If the product has been exposed to rain
or water.
- If the product has been subject to
excessive shock by being dropped, or
the cabinet has been damaged.
- If the product does not operate
normally when following the operating
instructions. Adjust only those
controls that are specified in the
operating instructions. Improper
adjustment of other controls may result
in damage and will often require
extensive work by a qualified
technician to restore the product to
normal operation.
- When the product exhibits a distinct
change in performance –– this indicates
a need for service.
• Do not disassemble or remodel the
product. It may cause fire or electric
shock. Have the product checked and
repaired at your Sony dealer or local
authorised Sony service facility.
• Do not attempt to service the product
yourself since opening the cabinet may
expose you to dangerous voltage or other
hazards. Refer all servicing to qualified
service personnel.
• When replacement parts are required, be
sure the service technician certifies in
writing that he has used replacement
parts specified by the manufacturer that
have the same characteristics as the
original parts.
Unauthorised substitutions may result in
fire, electric shock, or other hazards.
• Upon completion of any service or
repairs to the product, ask the service
technician to perform routine safety
checks (as specified by the manufacturer)
to determine that the product is in safe
operating condition, and to so certify.
• Unplug the product from the mains
before cleaning. Clean the product with a
dry, soft cloth, or a soft cloth slightly
moistened with a mild detergent solution.
Do not use any type of solvent, such as
alcohol or benzine.
Note on carrying
Use the supplied carrying cases whenever
you carry the Glasstron. Put the display unit
into the small case for protection. Put the
display unit together with the power supply
box and other accessories into the large
case.
Power supply box
AC power adapter
Cables
Display unit
Small case
Additional Information
43
-GB
Page 44

Error messages
The following error messages may appear to indicate the status of the Glasstron or input signal.
OUT OF SCAN RANGE
The input signal does not match the supported specification.
Change the screen resolution on your PC. For details of the signal compatibility, see “Signal
compatibility” (page 34).
NO INPUT SIGNAL
The signal is not input.
• Make sure that the PC-VIDEO switch is correctly set.
• Make sure that the connected equipment is turned on.
• Make sure that the your PC is not in the power saving mode.
HIGH TEMPERATURE
The Glasstron temperature is high.
Turn off the Glasstron for a while, then turn on again.
Note
If you cover the ventilation hole of the power supply box, an error may occur due to a rise in
temperature. In addition, it may cause a fire or malfunction of the unit.
44
-GB
Page 45

Troubleshooting
If you have any questions or problems not listed below, contact your Sony dealer or local
authorised Sony service facility.
Symptom
The picture does not
appear.
The picture is dark or
dim.
The picture suddenly
disappears.
The picture has no sound.
The sound is noisy.
The volume does not
become louder.
The battery pack
discharges quickly.
Cause
Connections are incorrect.
The signal is not input.
The Glasstron enters power save
mode.
When you connect to a notebook
type PC, the display mode is set to
local display mode (LCD panel of
your notebook PC).
You are not wearing the Glasstron
correctly.
—
—
The inside window (where the
picture is displayed) is dirty.
A warning was displayed for more
than two minutes. (The Glasstron
turned off automatically.)
You continued using the Glasstron
for six hours. (The Glasstron turns
off automatically after six hours to
prevent eye fatigue.)
The battery pack or batteries are
dead.
You put off the Glasstron while the
POWER SAVE is set to ON.
—
The AVLS function is on.
The equipments are not connected
propely.
Sound volume of the connected
computer is inappropriate.
The battery pack is not charged
enough.
The battery pack is completely dead.
Remedy
Connect the equipment correctly
(pages 14 to 19).
Select the correct input (page 30).
Put the Glasstron on again to bring
the forehead near to the POWER
SAVING SENSOR (page 13).
Change the display mode. For
details, refer to the instruction
manual of your PC.
Put on the Glasstron correctly (pages
20 and 21).
Adjust the brightness with the
BRIGHT control (page 31).
Adjust the RGB signal
synchronization (page 38).
Clean the display unit with a soft,
dry cloth.
—
—
Charge the battery pack or replace with
new batteries (pages 40).
Put the Glasstron on again to bring
the forehead near to the POWER
SAVING SENSOR (page 13).
Adjust the volume with the VOL
control (page 31).
Set AVLS in the menu to OFF (page
37).
Connect the equipments correctly
(pages 14 to 19).
Adjust the volume on the computer.
Charge the battery pack fully or use a
new one (page 40).
Additional Information
continued
45
-GB
Page 46

Troubleshooting (continued)
Symptom
The battery pack is not
charged.
The black, red, and green
dots do not disappear.
The picture colour is
different.
The picture gets out of
position in the PC mode.
Noises appear on the
picture in the PC mode.
The POWER switch does
not function.
Cause
The battery pack is not installed
properly.
The battery pack is completely dead.
The supplied AC power adapter is
not used.
The LCD is made with highprecision technology. However,
black points or bright points of light
(red, blue, or green) may appear
constantly on the LCD screen. This
is not malfunction.
(Effective dots: more than 99.999%)
The colour intensity is not adjusted.
The external display output signal
of the connected computer does not
match the supported input signal.
The input signal does not match to
the supported specification. See
“Signal compatibility” (page 34).
In this case, the picture does not
appear correctly.
The horizontal frequency of the
signal does not match to the
supported specification.
In this case, the flicker may appear
on the right edge of the picture.
—
Remedy
Install the battery pack properly
(page 40).
Replace the battery pack with a new
one (page 40).
Use the supplied AC-PLM3 AC
power adapter.
—
Adjust the colour intensity in the
menu screen (page 39).
Change the screen resolution and the
vertical frequency on your PC to
match the supported output
frequency (page 34). Refer to the
instruction manual of your PC.
Change the screen resolution or the
vertical frequency of the external
display output signal on your PC to
match the supported vertical
frequency (page 34). Refer to the
instruction manual of your PC.
Change the display mode on your PC
to the external monitor only (page
38).
Disconnect the mains lead from the
mains. After three minutes, reconnect
the mains lead.
46
-GB
Page 47

Specifications
Power supply
AC power adapter: AC-PLM3
100-240 V AC, 50/60 Hz, 18.5 W
Output voltage 8.4 V, 1.6 A
Battery pack: NP-F550/NP-F750/
NP-F950 (not supplied)
Power consumption
10 W (approx., PC mode)
12 W (approx., VIDEO mode)
Operating temperature
41°F to 95°F (5°C to 35°C)
Storage temperature
14°F to 140°F (–10°C to 60°C)
Dimensions
Display unit:
Approx. 5 7/8 × 1 15/16 × 3 1/2 inches
(Approx. 149 × 48 × 86 mm)
(w/h/d folded)
Power supply box:
Approx. 2 1/4 × 1 7/8 × 6 3/8 inches
(Approx. 54 × 47 × 160 mm)
(w/h/d)
not including projecting parts and
controls
Mass
Display unit: Approx. 5.3 oz (120 g)
Power supply box: Approx. 2.7 oz (260 g)
Video signal
PAL colour, CCIR standards
Input
PC mode
RGB signal: HD15
5 4 3 2 1
Pin Assignment
10 9
8 7 6
15 14 13 12 11
Pin No. Signal
1 R (Red)
2 G (Green)
3 B (Blue)
4–
5 GND
6 R (Red) GND
7 G (Green) GND
8 B (Blue) GND
9–
10 GND
11 GND
12 –
13 SYNC (Horizontal)
14 SYNC (Vertical)
15 –
PC AUDIO input: Stereo minijack
VIDEO mode
AUDIO/VIDEO input: Special minijack
Video: 1 Vp-p, 75 ohms, unbalanced,
sync negative
S VIDEO input: 4-pin mini DIN
Y: 1 Vp-p, 75 ohms, unbalanced, sync
negative
C: 0.286 Vp-p, 75 ohms, unbalanced,
sync negative
Screen resolution
Horizontal: 832 dots (max.)
Vertical: 624 lines (max.)
Supplied accessories
AC power adapter AC-PLM3 (1)
Mains lead (1)
RGB signal cable (1)
Audio/video cable (special miniplug
phono plug) (1)
S-video cable (1)
Audio/video cable (special miniplug
special miniplug) (1)
Audio cable (stereo miniplug) (1)
Adapter for Macintosh (1)
Carrying cases (2)
Sunshades (1 pair)
Operating Instructions (1)
Windows 95/Windows 98 PC Glasstron
Information Disk (1)
Screen adjustment disk for Macintosh (1)
Warranty (1)
Design and specifications are subject to
change without notice.
Additional Information
-GB
47
Page 48

Index
A
AC power adapter 19
Accessories supplied 12, 47
Adjusting
brightness 31
colour 39
volume 31
AVLS 35, 37
B
Back strap 21
Battery pack 40
C, D, E, F, G
Carrying case 43
Charging a battery pack 40
Checking
display unit position 22
screen position 24
Colour 39
Connection
battery pack 40
PCs 14
power 19
video equipment 17
Contrast 39
H
Health concerns 6
Horizontal position 38
I, J, K, L,
Instructions for safe fit 8
M, N, O
Mega bass 35, 37
P, Q
Password 27
Power save 37
Precautions 42
R
Remaining battery life 41
Resetting
adjustment 39
password 28
S, T, U, V
Safety instructions 5
Safety password 5, 8, 27
Screen alignment 25
Screen mode 33
See-through mode 33
Signal compotibility 34
Signal synchronization 38
Stereo earphones 21
Sunshades 21
Supplied accessories 12
S-video 18
T, U
Tracking 38
V
Vertical position 38
W, X, Y, Z
WARNING messages 2224, 32
Warnings for electronic
products 9
Wearing the Glasstron 20
48
-GB
Page 49

Additional Information
-GB
49
Page 50

AVERTISSEMENT
Pour éviter tout risque d’incendie
ou de décharge électrique, ne pas
exposer cet appareil à la pluie ou
à l’humidité.
Pour éviter tout risque de
décharge électrique, ne pas ouvrir
le coffret de cet appareil et ne
confier son entretien qu’à un
personnel qualifié.
Ce produit est conforme aux directives
européennes suivantes:
73/23/CEE, 93/68/CEE (directive sur les
basses tensions)
89/336/CEE, 92/31/CEE (directive sur la
compatibilité électromagnétique)
Cet équipement est conforme à la norme
EN55022 Classe B limitant l’emploi dans les
environnements résidentiels, professionnel
et industriel léger.
Le câble antiparasite fourni doit être utilisé
avec l’appareil de manière à satisfaire aux
limitations pour les appareils numériques
conformément à EN55022.
Precautions
• La plaquette signalétique est située sur le
dessous, à l’extérieur.
• Une distorsion du son et de l’image peut
se produire si le PLM-S700E est
positionné à proximité directe d’un
appareil émettant des radiations
électromagnétiques.
•IBM PC/AT et VGA sont des marques de commerce de IBM Corporation déposées aux Etats-Unis.
•Microsoft, MS, MS-DOS et Windows sont des marques de commerce de Microsoft Corporation
déposées aux Etats-Unis et dans d’autres pays.
•Macintosh est une marque de commerce de Apple Computer, Inc., déposée aux Etats-Unis et dans
d’autres pays.
•VESA est une marque de commerce de Video Electronics Standard Association.
•Tous les autres noms de produits mentionnés dans ce mode d’emploi sont des marques de
commerce ou des marques déposées de leur détenteurs respectifs. Par ailleurs, “” et “” ne sont
pas repris à chaque fois dans le mode d’emploi.
-FR
2
Page 51

Table des matières
INSTRUCTIONS DE SECURITE ............................................................................ 5
A propos de la visionneuse Glasstron ................................................................. 10
Préparation
Vérification des accessoires fournis ..................................................................... 12
Localisation des composants et des commandes ............................................... 13
Raccordement du Glasstron
Raccordement de l’ordinateur ........................................................................ 14
Raccordement d’un appareil vidéo ................................................................ 17
Raccordement de la source d’alimentation ................................................... 19
Port du Glasstron.................................................................................................... 20
Mise sous tension du Glasstron
Vérification de la position de l’unité d’affichage ......................................... 22
Vérification de l’alignement de l’écran .......................................................... 24
Saisie du mot de passe ........................................................................................... 27
Opérations
Utilisation du Glasstron......................................................................................... 29
Vérification de l’indication d’affichage.......................................................... 31
Avertissements contre une utilisation excessive du Glasstron .................. 32
Visualisation de l’entourage ................................................................................. 33
Réglage du son et de l’image
Compatibilité de signaux ................................................................................. 34
Réglage du son/image ..................................................................................... 35
Réglage du signal RVB ..................................................................................... 38
Réglage du signal vidéo ................................................................................... 39
Réinitialisation des réglages aux valeurs par défaut ................................... 39
Utilisation de la batterie en option....................................................................... 40
FR
Informations complémentaires
Précautions .............................................................................................................. 42
Messages d’erreur................................................................................................... 44
Dépannage ............................................................................................................... 45
Spécifications........................................................................................................... 47
Index ......................................................................................................................... 48
-FR
3
Page 52

Le Glasstron incarne un tout nouveau
concept de système d’affichage.
Nous vous remercions d’avoir fait
l’acquisition d’une visionneuse individuelle
Glasstron Sony. Le Glasstron, qui fait appel
aux technologies modernes de systèmes
d’affichage miniaturisés légers, assure une
expérience télévisuelle comparable au
visionnage sur un écran de 30 pouces à une
distance d’approximativement 1,2 m en
mode d’écran SVGA. Les impressions de
visionnage peuvent varier suivant les
facultés de perception individuelles.)
La visionneuse individuelle Glasstron crée
une image sur deux écrans d’affichage à
cristaux liquides placés à proximité directe
de vos yeux. Pour garantir la sécurité
d’utilisation du Glasstron, il importe de
vous familiariser avec ses fonctions de base,
y compris les instructions pour un ajustage
approprié. De même, soyez attentif à tous
les symptômes de fatigue oculaire ou de
toute autre sensation d’inconfort que vous
pourriez ressentir.
AVERTISSEMENT
LE NON-RESPECT DES PRESENTES
INSTRUCTIONS D’UTILISATION
IMPLIQUE DES RISQUES DE FATIGUE
OCULAIRE, DES TROUBLES DE LA VUE
OU D’AUTRES BLESSURES AUX YEUX,
AINSI QUE DES DOMMAGES AUX BIENS,
VOIRE LA MORT.
AVERTISSEMENT
CET APPAREIL NE PEUT ETRE UTILISE
PAR DES ENFANTS AGES DE 15 ANS OU
MOINS.
LES YEUX DES ENFANTS SONT
TOUJOURS EN PHASE DE
DEVELOPPEMENT ET PEUVENT ETRE
GRAVEMENT AFFECTES PAR
L’UTILISATION DE CET APPAREIL.
Remarque sur l’affichage à cristaux
liquides (LCD)
L’écran LCD est fabriqué en faisant appel à
des technologies de haute précision. Il se
peut toutefois que de minuscules points
noirs et/ou lumineux (de couleur rouge,
bleue ou verte) apparaissent de manière
continue sur l’écran LCD. Il ne s’agit pas
d’un dysfonctionnement. (Points effectifs:
plus de 99,999 %)
-FR
4
Page 53

INSTRUCTIONS DE SECURITE
LA VISIONNEUSE INDIVIDUELLE GLASSTRON SONY DOIT ETRE
UTILISEE EN STRICTE CONFORMITE AVEC TOUTES LES INSTRUCTIONS
AFFERENTES AFIN D’EVITER LES BLESSURES AUX YEUX ET AUTRES, LA
PERTE DE FONCTIONS VISUELLES, LES DOMMAGES AUX BIENS ET
D’ECARTER LES DANGERS DE MORT.
RESTRICTIONS D’UTILISATION
Avertissement: Cet appareil ne peut être utilisé par des
enfants âgés de 15 ans ou moins.
Cet appareil est destiné à l’usage adulte.
Les yeux des enfants sont toujours en phase de développement et peuvent être
gravement affectés par l’utilisation de cet appareil, qui peut également entraîner
une fatigue et des affections oculaires ainsi que la perte de fonctions visuelles.
Cet appareil peut en outre ne pas être adapté à la tête d’un enfant.
Mot de passe de sécurité: Pour empêcher son utilisation par des enfants âgés de
15 ans ou moins, cet appareil est équipé d’un système
de protection par mot de passe. Pour des instructions
plus détaillées sur l’utilisation du système de protection
par mot de passe, reportez-vous à la page 27.
Avertissement: Affections oculaires, troubles oculaires,
glaucome.
Si vous souffrez d’affections oculaires, de blessures oculaires ou d’un glaucome,
consultez votre médecin avant d’utiliser cet appareil et ne l’utilisez pas sans
l’autorisation de votre médecin. L’utilisation de cet appareil par des personnes
présentant des troubles tels un glaucome peut entraîner une aggravation de ce
symptôme.
Attention: Maladies cardio-vasculaires, hypertension.
Si vous souffrez de maladies cardio-vasculaires ou d’hypertension, consultez
votre médecin avant d’utiliser cet appareil et ne l’utilisez pas sans l’autorisation
de votre médecin. L’utilisation de cet appareil plonge véritablement l’utilisateur
dans l’action, ce qui peut aggraver son anxiété ou ses affections cardiovasculaires. Dès que vous ressentez une anxiété accrue, interrompez
immédiatement l’utilisation de cet appareil et prenez un peu de repos. Si les
symptômes persistent après une période de repos, consultez votre médecin.
Attention: Syncopes.
Si vous souffrez de spasmes temporaires, de pertes de connaissance ou de crises
d’épilepsie provoquées par de faibles stimuli, consultez votre médecin avant
d’utiliser cet appareil et ne l’utilisez pas sans l’autorisation de votre médecin.
L’utilisation de cet appareil par de telles personnes peut provoquer des spasmes,
des pertes de connaissance ou des crises. Si vous ressentez de tels symptômes en
cours d’utilisation, interrompez immédiatement l’utilisation de cet appareil et
consultez votre médecin.
-FR
5
Page 54

INSTRUCTIONS DE SECURITE (suite)
INFORMATIONS DE SECURITE COMPLEMENTAIRES.
A. Problèmes de santé - Voir pages 6 à 7.
B. Instructions d’ajustage - Voir page 8.
C. Avertissements relatifs aux appareils électroniques - Voir page 9.
Problèmes de santé
Avertissement: Fatigue oculaire, affections oculaires, perte
de fonctions visuelles.
Une utilisation inappropriée ou excessive de cet appareil peut entraîner une
fatigue oculaire, des affections oculaires ou encore la perte de fonctions visuelles.
Interrompez toute utilisation lorsque vous vous sentez fatigué, que vous
souffrez de maux de tête ou que vous éprouvez une sensation d’inconfort.
Avertissement: Cet appareil ne peut être utilisé par des
enfants âgés de 15 ans ou moins.
Cet appareil est destiné à l’usage adulte.
Les yeux des enfants sont toujours en phase de développement et peuvent être
gravement affectés par l’utilisation de cet appareil, qui peut également entraîner
une fatigue et des affections oculaires ainsi que la perte de fonctions visuelles.
Cet appareil peut en outre ne pas être adapté à la tête d’un enfant.
Attention: Malaises, migraines, nausées.
Si vous ressentez l’un des malaises mentionnés ci-dessous en cours d’utilisation,
interrompez immédiatement l’utilisation de cet appareil et prenez un peu de
repos. Ces symptômes peuvent être révélateurs d’une utilisation inappropriée ou
excessive de cet appareil (voir “Instructions d’ajustage” à la page 8) ou que vous
ne devriez pas utiliser cet appareil pour des raisons de santé. Si les symptômes
suivants persistent après une période de repos, consultez votre médecin:
- yeux douloureux, fatigue oculaire ou double vision
- maux de tête
- impossibilité de faire la mise au point sur l’écran
- nausées ou troubles de déplacement
- épaules ankylosées ou torticolis
L’appareil se met automatiquement hors tension au terme de six heures
d’utilisation de façon à prévenir la fatigue et les troubles oculaires. Pour les
instructions relatives à ces fonctions, reportez-vous à la page 32.
-FR
6
Page 55

Problèmes de santé
Attention: Mal des transports résultant du visionnage.
Certains utilisateurs ressentent des symptômes de mal des transports, des maux
de tête ou des nausées en visionnant des films ou des enregistrements vidéo, et
plus particulièrement s’ils comportent des scènes d’action intense et très
animées. Si vous ressentez l’un de ces symptômes, interrompez immédiatement
l’utilisation de cet appareil. Pour éviter de vous blesser ou de blesser d’autres
personnes, ne conduisez pas de voiture ou de motocyclette et ne faites rien qui
requière de la concentration tant que ces symptômes n’ont pas disparu.
Attention: Mal des transports résultant des mouvements
externes.
N’utilisez pas cet appareil pendant que vous êtes soumis à un mouvement
externe –– par exemple, lorsque vous êtes passager d’une voiture. L’utilisation
de cet appareil dans de telles conditions peut provoquer le mal des transports.
Attention: Accidents.
N’utilisez pas cet appareil pendant que vous marchez, pratiquez le skate, roulez
à bicyclette, manoeuvrez un véhicule à moteur ou tout autre équipement
motorisé ou pendant que vous êtes engagé dans une autre activité similaire.
L’utilisation de cet appareil dans de telles conditions peut résulter en un
accident, des blessures voire la mort de l’utilisateur ou d’autres personnes.
Attention: Volume sonore.
Evitez d’utiliser le casque d’écoute à volume élevé. Les médecins spécialisés
déconseillent l’écoute continue et prolongée à volume élevé. Si vous percevez
des bourdonnements dans les oreilles, baissez le volume ou interrompez
l’utilisation.
-FR
7
Page 56

INSTRUCTIONS DE SECURITE (suite)
Instructions d’ajustage
Avertissement: Ajustez correctement la visionneuse.
Chaque fois que cet appareil est utilisé, les écrans de réglage s’affichent pour
inviter l’utilisateur à ajuster correctement l’appareil. La visionneuse est
correctement ajustée lorsqu’un astérisque (*) apparaît dans chaque coin de
l’affichage. La négligence de cette précaution à chaque utilisation peut
provoquer une fatigue ou des troubles oculaires, ou encore la perte de fonctions
visuelles et entraîner un accident ou des blessures. Pour des instructions
détaillées sur l’ajustage de cet appareil, reportez-vous aux pages 22 à 26.
Avertissement: Cet appareil ne peut être utilisé par des
enfants âgés de 15 ans ou moins.
Cet appareil est destiné à l’usage adulte.
Les yeux des enfants sont toujours en phase de développement et peuvent être
gravement affectés par l’utilisation de cet appareil, qui peut également entraîner
une fatigue et des affections oculaires ainsi que la perte de fonctions visuelles.
Cet appareil peut en outre ne pas être adapté à la tête d’un enfant.
Mot de passe de sécurité: Pour empêcher son utilisation par des enfants âgés de
-FR
8
15 ans ou moins, cet appareil est équipé d’un système
de protection par mot de passe. Pour des instructions
plus détaillées sur l’utilisation du système de protection
par mot de passe, reportez-vous à la page 27.
Page 57

Avertissements relatifs aux appareils électroniques
Attention: Electrocution.
La non-observation de toutes les instructions d’utilisation et d’entretien peut
endommager votre visionneuse et entraîner des dommages aux biens ou encore
des blessures, voire la mort, à la suite d’une électrocution, d’un incendie ou
d’une autre cause.
Attention: Ne pas démonter.
Les opérations d’entretien de cet appareil doivent être confiées au personnel
d’entretien qualifié. La non-observation de cet avertissement peut entraîner des
dommages aux biens ou encore des blessures, voire la mort, à la suite d’une
électrocution, d’un incendie ou d’une autre cause.
Attention: Evitez les environnements mouillés, humides,
poussiéreux et enfumés.
Cet appareil peut être gravement affecté par les environnements mouillés,
humides, poussiéreux et enfumés, ce qui peut entraîner des dommages aux
biens ou encore des blessures, voire la mort. N’utilisez pas cet appareil à
proximité d’eau. Evitez d’utiliser et de ranger cet appareil dans de telles
conditions.
Attention: Evitez les températures élevées, le rayonnement
direct du soleil et les chocs mécaniques.
Cet appareil peut se déformer sous l’effet d’une température élevée ou du
rayonnement direct du soleil ainsi que par une chute ou d’autres chocs
mécaniques. Evitez de soumettre la visionneuse à de telles conditions parce que
les écrans risquent de se désaligner et de provoquer une fatigue et des troubles
oculaires.
Attention: Débranchez l’appareil lorsque vous ne l’utilisez
pas.
Débranchez toujours cet appareil lorsque vous prévoyez de ne pas l’utiliser
pendant une période prolongée ou durant les vacances.
-FR
9
Page 58

A propos de la visionneuse Glasstron
Attention: L’écran se trouve toujours droit devant vous.
Le Glasstron est une visionneuse que l’on porte sur la tête. Avec une configuration de ce type, la
visionneuse se trouve toujours face à vous même lorsque vous tournez la tête. De ce fait, vous
pouvez plus facilement vous concentrer sur l’écran que dans le cas d’un téléviseur classique et
davantage vous plonger dans l’action.
• Le Glasstron s’ajuste facilement. Vous pouvez même utiliser la visionneuse si vous portez des
lunettes.
• Chaque fois que vous utilisez la visionneuse Glasstron, l’écran de réglage apparaît pour vous
aider à ajuster correctement la visionneuse. Vous pouvez également vérifier si les écrans
gauche et droit sont correctement alignés.
• Des mises en garde apparaissent à l’écran environ toutes les deux heures pour vous avertir
des risques de fatigue oculaire et la visionneuse se met automatiquement hors tension si vous
n’appuyez pas sur la molette de sélection PUSH DISPLAY. Si vous utilisez la visionneuse
Glasstron en continu pendant six heures, un message d’avertissement apparaît à l’écran et la
visionneuse se met automatiquement hors tension.
La visionneuse Glasstron est constituée des éléments suivants:
Unité d’affichage
L’unité d’affichage est équipée de
deux petits écrans LCD (gauche et
droit).
Bloc d’alimentation
Vous pouvez assurer
l’alimentation à l’aide de
l’adaptateur secteur ou de la
batterie rechargeable Sony en
option.
Lors de l’utilisation du Glasstron,
raccordez votre équipement vidéo
ou ordinateur au connecteur du
bloc d’alimentation.
Vous pouvez régler le volume
Ordinateur personnel
sonore. Vous pouvez également
utiliser la commande
SEE-THROUGH afin de visualiser
les alentours.
10
-FR
Magnétoscope Lecteur de
disques laser,
lecteur DVD
Caméscope
Page 59

Caractéristiques
• Une expérience télévisuelle grandiose
comparable au visionnage sur un écran
de 30 pouces à une distance
d’approximativement 1,2 m (mode
d’écran SVGA).
• Le Glasstron, étant équipé d’un écran
LCD de 1,55 millions de points, peut être
raccordé à votre ordinateur afin de
regarder l’écran de l’ordinateur dans le
mode d’écran SVGA ou VGA.
• Vous pouvez bénéficier d’une qualité
d’image exceptionnelle si vous raccordez
le lecteur DVD ou le caméscope DV, etc.
• La fonction de transparence vous permet
de voir les alentours lorsque vous portez
le Glasstron.
• Vous pouvez utiliser le Glasstron tout en
portant des lunettes.
• Composants rigides et légers réalisés en
alliage de magnésium, l’unité d’affichage
pesant environ 120 g.
Préparation
11
-FR
Page 60

Vérification des accessoires fournis
Assurez-vous que les accessoires suivants sont fournis avec le Glasstron. S’il manque l’un de ces
accessoires, veuillez consulter votre revendeur Sony ou un centre de service après-vente Sony
agréé.
• Unité d’affichage/Bloc d’alimentation (1)
• Pare-soleil (1 paire)
• Adaptateur secteur AC-PLM3 (1)
• Cordon d’alimentation secteur (1)
• Câble de signal RVB (HD15) (1)
• Câble audio/vidéo (minifiche spéciale
minifiche spéciale) (1)
• Câble S-Vidéo (1)
• Câble audio (minifiche stéréo) (1)
• Adaptateur Macintosh (1)
• Housses de transport (2)
• Câble audio/vidéo (minifiche spéciale
fiche phono) (1)
-FR
12
• Disquette d’information Windows 95/
Windows 98 PC Glasstron (1)
• Disquette de réglage d’écran pour
Macintosh (1)
• Mode d’emploi (1)
• Garantie (1)
Page 61

Localisation des composants et des
commandes
Pour plus de détails, reportez-vous aux pages indiquées entre parenthèses ( ).
Unité d’affichage
Bouton de dégagement
de la sangle (20)
Bouton coulissant
des écouteurs (21)
Ecouteurs stéréo (21)
Bloc d’alimentation
POWER SAVING SENSOR
(intérieur) (35, 37)
Molette de sélection
PUSH DISPLAY (22, 36)
Bouton MENU (36)
Préparation
Connecteur RVB
(14 à 16, 47)
Prise PC AUDIO
(14 à 16)
Bouton RESET
(sur le dessous) (28)
Témoin CHARGE (40)
Témoin POWER/
POWER SAVING (22, 37)
Commutateur POWER
(22, 29)
Commutateur PC-VIDEO
(14 à 18, 30)
Connecteur S VIDEO
(18)
Connecteur DC IN
(19, 40)
Orifices de ventilation (44)
Commutateur SCREEN (33)
Commande SEE-THROUGH
(33)
Bouton BATT RELEASE (40)
Commande BRIGHT (31)
Commande VOL (31)
Connecteur AUDIO/VIDEO (17, 18)
13
-FR
Page 62

Raccordement du Glasstron
Raccordement de l’ordinateur
Veillez à éteindre votre ordinateur avant de raccorder le bloc d’alimentation.
Remarques
• Reportez-vous également au mode d’emploi accompagnant votre ordinateur.
• Selon votre ordinateur, le port audio est indiqué comme LINE OUT, casque d’écoute, haut-parleur,
etc.
• Réglez le volume sur l’ordinateur.
Raccordement à d’autres ordinateurs compatibles IBM
Raccordez le Glasstron à votre ordinateur à l’aide du câble de signal RVB (HD 15) fourni.
Lorsque vous raccordez le Glasstron à votre ordinateur, mettez le commutateur PC-VIDEO du
bloc d’alimentation sur “PC”.
Bloc d’alimentation
Mettez le commutateur
PC-VIDEO sur “PC”.
vers le port moniteur vers le port audio
ou
RGB
PC
AUDIO
vers le port moniteur
-FR
14
vers le port
audio
Câble audio (fourni)
Câble de signal RVB (fourni)
: Sens du signal
vers le
connecteur
PC AUDIO
vers le connecteur
RGB
Page 63

Raccordement à un Powerbook Macintosh
En fonction du modèle, il se peut que vous ayez besoin d’un adaptateur disponible dans le
commerce pour raccorder le câble de signal RVB (fourni) comme illustré ci-dessous. Lorsque
vous raccordez le Glasstron à votre Powerbook, mettez le commutateur PC-VIDEO du bloc
d’alimentation sur “PC”.
Préparation
vers le port
moniteur du
Powerbook
vers le port moniteur vers le port audio
?/
Le connecteur doit correspondre au port
du moniteur de votre modèle Powerbook.
Mettez le commutateur
PC-VIDEO sur “PC”.
Adaptateur
vers le connecteur
PC AUDIO
Câble audio (fourni)
connecteur de type VGA
(HD15, femelle)
Bloc d’alimentation
RGB
PC
AUDIO
vers le connecteur RGB
vers le câble
de signal
RVB
Câble de signal RVB (fourni)
: Sens du signal
Remarque sur le raccordement
Mettez le réglage d’affichage en mode d’affichage 16 pouces (832 × 624) ou en mode d’affichage 13
pouces (640 × 480). Le Glasstron n’affiche pas d’images en mode d’affichage 19 pouces (1024 × 768) ou
plus.
suite page suivante
15
-FR
Page 64

Raccordement du Glasstron (suite)
Raccordement à un Macintosh (modèles de bureau)
En fonction du modèle, il se peut que vous deviez utiliser l’adaptateur Macintosh fourni afin de
raccorder le câble de signal RVB (fourni) comme illustré ci-dessous. Lorsque vous raccordez le
Glasstron à votre Macintosh, mettez le connecteur PC-VIDEO du bloc d’alimentation sur “PC”.
vers le port moniteur
du Macintosh
vers le port moniteur vers le port audio
Adaptateur
Macintosh
?
(D-Sub à 15
broches, mâle)
Câble audio (fourni)
Câble de signal RVB (fourni)
: Sens du signal
Vers le port
du moniteur
Mettez le commutateur
PC-VIDEO sur “PC”.
vers le connecteur
PC AUDIO
vers le câble de signal RVB
/
Connecteur de type VGA
(HD15, femelle)
Bloc d’alimentation
PC
RGB
AUDIO
vers le connecteur RGB
Remarques sur le raccordement
•L’adaptateur d’écran fourni ne supporte pas les modèles précédant la série II de Macintosh.
•Mettez le réglage d’affichage en mode d’affichage 16 pouces (832 × 624) ou en mode d’affichage 13
pouces (640 × 480). Le Glasstron n’affiche pas d’images en mode d’affichage 19 pouces (1024 × 768)
ou plus.
-FR
16
Page 65

Raccordement d’un appareil vidéo
Raccordez un magnétoscope, un lecteur de disque laser, un lecteur DVD ou un caméscope au
bloc d’alimentation à l’aide d’un des câbles audio/vidéo (fournis) comme illustré ci-dessous.
Lorsque vous raccordez le Glasstron à l’appareil vidéo, mettez le commutateur PC-VIDEO du
bloc d’alimentation sur “VIDEO”.
Magnétoscope, lecteur de disques laser,
lecteur DVD, caméscope, etc.
vers les sorties audio/
Mettez le commutateur
PC-VIDEO sur “VIDEO”.
vidéo
Préparation
AUDIO / VIDEO
vers le connecteur
AUDIO/VIDEO
: Sens du signal
Bloc d‘alimentation
Câble audio/vidéo (fourni)
(minifiche spéciale fiche phono)
Câble audio/vidéo (fourni)
(minifiche spéciale minifiche spéciale)
vers les sorties audio/vidéo
Vidéo (jaune)
Audio L (blanc)
Audio R (rouge)
Caméscope, etc.
suite page suivante
17
-FR
Page 66

Raccordement du Glasstron (suite)
Si votre équipement vidéo dispose d’une prise S-Vidéo
Raccordez le Glasstron à l’appareil vidéo à l’aide du câble S-Vidéo fourni et du câble audio/
vidéo pour bénéficier d’images de haute qualité. Dans ce cas, vous ne devez pas raccorder la
fiche vidéo (jaune). Si vous raccordez à la fois les fiches S-Vidéo et vidéo, le signal S-Vidéo est
automatiquement sélectionné. Si vous raccordez le Glasstron à l’appareil vidéo, mettez le
commutateur PC-VIDEO du bloc d’alimentation sur “VIDEO”.
S VIDEO
AUDIO / VIDEO
vers le connecteur
AUDIO/VIDEO
: Sens du signal
Mettez le commutateur
PC-VIDEO sur “VIDEO”.
Bloc d’alimentation
Câble S-Vidéo (fourni)
vers le connecteur
S VIDEO
câble audio/vidéo (fourni)
(minifiche spéciale
minifiche spéciale)
câble audio/vidéo (fourni)
(minifiche spéciale
fiche phono)
Magnétoscope, lecteur de disques
laser, lecteur DVD, caméscope, etc.
vers la sortie S-Vidéo
vers la sortie audio/vidéo
Vidéo (jaune)
Audio L (blanc)
Audio R (rouge)
vers les sorties audio/vidéo
A propos de la prise d’entrée AUDIO/
VIDEO
La prise d’entrée AUDIO/VIDEO du Glasstron
est une miniprise spéciale et les connexions du
signal sont alignées comme illustré à droite.
Cet alignement peut varier suivant les
appareils.
-FR
18
Audio L
Audio R
Masse (GND)
Vidéo
Page 67

Remarques
•Même si vous utilisez le câble audio/vidéo
fourni, il se peut que les signaux audio et
vidéo ne soient pas transmis au Glasstron
suivant la source vidéo. En pareil cas,
consultez votre revendeur Sony ou un centre
de service après-vente Sony agréé.
•Si vous raccordez le Glasstron aux prises de
sortie audio (prises phono) de votre appareil
vidéo, raccordez le Glasstron aux prises de
sortie audio gauche et droite. Si vous
raccordez le Glasstron à une seule prise de
sortie audio, vous n’entendrez le son que par
un seul des écouteurs stéréo.
Raccordement de la source d’alimentation
Raccordez l’adaptateur secteur AC-PLM3 (fourni) au connecteur DC IN du bloc d’alimentation.
Ensuite, raccordez la prise secteur (fourni) à l’adaptateur secteur et à la prise murale. Ne
raccordez pas la source d’alimentation tant que les autres raccordements ne sont pas effectués.
vers une prise murale
Préparation
Adaptateur secteur
AC-PLM3 (fourni)
vers le connecteur DC IN
Unité d’affichage
Cordon d’alimentation (fourni)
DC IN 8.4V
Bloc d’alimentation
19
-FR
Page 68

Port du Glasstron
AVERTISSEMENT
• Si vous n’ajustez pas correctement la visionneuse (voir “Ajustez correctement la
visionneuse” à la page 8) à chaque utilisation, vous risquez de souffrir de fatigues ou de
troubles oculaires ou encore de perdre certaines fonctions visuelles ce qui peut entraîner
un accident ou des blessures.
• Cet appareil ne peut être utilisé par des enfants âgés de 15 ans ou moins.
Les yeux des enfants sont toujours en phase de développement et peuvent être gravement
affectés par l’utilisation de cet appareil, qui peut également entraîner une fatigue et des
affections oculaires ainsi que la perte de fonctions visuelles.
Cet appareil ne peut en outre s’adapter à la tête d’un enfant.
Si vous portez habituellement des lunettes lorsque vous regardez la télévision, sachez que vous
pouvez utiliser le Glasstron tout en portant vos lunettes.
Desserrez la sangle arrière.
1
1 Maintenez les boutons de
dégagement de la sangle enfoncés,
2 Et détendez ensuite la sangle arrière
dans le sens de la flèche.
Chaussez la visionneuse Glasstron.
2
Maintenez le coussinet frontal contre le
front et placez la sangle arrière de façon
à ce qu’elle soit fermement maintenue à
l’arrière du crâne.
Ajustez la sangle.
3
Ajustez la sangle après avoir chaussé le
Glasstron.
Assurez-vous que la sangle est bien
ajustée, mais confortablement.
1
2
1
2
20
-FR
Page 69

Ajustez l’angle de l’unité d’affichage.
4
Tout en maintenant le coussinet frontal
contre le front, ajustez l’angle de l’unité
d’affichage à l’aide des deux charnières.
Rapprochez l’unité d’affichage de vos
yeux et inclinez-la légèrement vers le
bas. Si vous portez des lunettes,
rapprochez l’unité d’affichage le plus
près possible des verres.
Coussinet frontal
Préparation
5 – 10°
Ajustez les écouteurs stéréo.
5
Extrayez les écouteurs.
Pour ajuster la tension des cordons,
enroulez les cordons des écouteurs en
appuyant sur le bouton coulissant dans
le sens de la flèche.
Réglage de la sangle
arrière
Si la sangle ne s’ajuste pas correctement à
l’étape 3, ajustez la sangle en modifiant la
longueur de sangle.
Bouton
coulissant
des
écouteurs
Ecouteurs
stéréo
Fixation des pare-soleil
Vous pouvez fixer les pare-soleil fournis si
vous le désirez. Les pare-soleil empêchent
les affichages à cristaux liquides de réfléchir
la lumière qui pourrait interférer avec
l’image.
Fixez les pare-soleil des côtés droit et
gauche de l’unité d’affichage. Sortez les
pattes du pare-soleil, puis insérez les pattes
dans les orifices de l’unité d’affichage
comme illustré ci-dessous.
Unité d’affichage
Pare-soleil (fournis)
21
-FR
Page 70

Mise sous tension du Glasstron
Lorsque vous avez terminé tous les raccordements et correctement chaussé le Glasstron, mettezle sous tension et appliquez les procédures suivantes.
1 Vérification de la position de l’unité d’affichage n Cette page
2 Vérification de l’alignement de l’écran n Page 24
3 Saisie du mot de passe n Page 27
Si vous ne souhaitez pas utiliser de mot de passe, configurez le Glasstron pour qu’il
fonctionne sans mot de passe dans la section “Saisie du mot de passe”.
Vérification de la position de l’unité d’affichage
Chaque fois que vous mettez le Glasstron sous tension, l’écran de réglage apparaît pour vous
aider à ajuster correctement l’unité d’affichage. Ajustez l’unité d’affichage en appliquant la
procédure ci-dessous.
Mettez le Glasstron sous tension en faisant coulisser le
1
commutateur POWER.
Le témoin POWER/POWER SAVING
s’allume en vert.
Ecran
DISPLAY LANGUAGE
ENGLISH
POWER / POWER SAVING
ON / OFF
FRANÇAIS
DEUTSCH
ITALIANO
NEDERLANDS
ESPAÑOL
EXEC
SEL
22
-FR
Tournez la molette de sélection PUSH DISPLAY pour sélectionner
2
la langue d’affichage voulue et appuyez ensuite sur la molette de
sélection.
DISPLAY LANGUAGE
ENGLISH
FRANÇAIS
DEUTSCH
ITALIANO
NEDERLANDS
ESPAÑOL
EXEC
SEL
PUSH DISPLAY
Lisez l’AVERTISSEMENT et appuyez ensuite sur la molette de
3
sélection.
AVERTISSEMENT
POUR VOTRE SANTE ET
VOTRE SECURITE, LISEZ ET
CONFORMEZ-VOUS A TOUTES
LES INSTRUCTIONS DU
MODE D’ EMPLOI.
PUSH DISPLAY
CONTROLER
Page 71

Lisez l’AVERTISSEMENT suivant et appuyez ensuite sur la molette
4
de sélection.
AVERTISSEMENT
CET APPAREIL NE PEUT
ETRE UTILISE PAR DES
ENFANTS AGES DE 15 ANS
OU MOINS.
POUR PLUS DE DETAILS,
VOIR LE MODE D’ EMPLOI.
Préparation
PUSH DISPLAY
Ajustez l’unité d’affichage de façon à ce que vous aperceviez un
5
astérisque (*) dans les quatre coins de l’écran comme illustré cidessous.
Correct
AVERTISSEMENT
POUR UN BON REGLAGE ET
EVITER TOUT RISQUE POUR
LES YEUX, REGLEZ-LE EN
AFFICHIANT UN [ ] DANS
LES 4 COINS.
POUR PLUS DE DETAILS,
VOIR LE MODE D’ EMPLOI.
CONTROLER
Incorrect
Incorrect Incorrect
Lorsque vous avez terminé le réglage de l’unité d’affichage,
6
appuyez sur la molette de sélection.
CONTROLER
Incorrect
PUSH DISPLAY
suite page suivante
23
-FR
Page 72

Mise sous tension du Glasstron (suite)
Lisez l’AVERTISSEMENT suivant et passez ensuite à la section de
7
“Vérification de l’alignement de l’écran”.
AVERTISSEMENT
POUR EVITER TOUT RISQUE
POUR LES YEUX, NE PAS
UTILISER SI LES TRAITS
VERTICAUX NE COUPENT PAS
LA LIGNE HORIZONTALE.
POUR PLUS DE DETAILES,
VOIR LE MODE D’ EMPLOI.
CONTROLER
Vérification de l’alignement de l’écran
AVERTISSEMENT
Chaque fois que cet appareil est utilisé, les écrans de réglage s’affichent pour inviter
l’utilisateur à ajuster correctement la visionneuse. La visionneuse est correctement ajustée
lorsqu’un astérisque (*) apparaît dans chaque coin de l’affichage. Pour éviter tout problème
aux yeux, n’utilisez pas cet appareil si les lignes verticales ne coupent pas la ligne horizontale
dans l’écran suivant.
Le Glasstron est équipé de deux petits écrans LCD (gauche et droit). Vous visionnez par
conséquent une image combinée créée à l’aide de ces deux écrans. Bien que la position des
écrans soit correctement alignée en usine, il peut arriver qu’elle soit désalignée à la suite d’une
déformation ou d’une détérioration du Glasstron. Aussi, vérifiez l’alignement des écrans chaque
fois que vous mettez le Glasstron sous tension. Si vous ne parvenez pas à corriger l’alignement
des écrans, cessez immédiatement d’utiliser le Glasstron.
24
-FR
Appuyez sur la molette de sélection PUSH DISPLAY.
1
PUSH DISPLAY
Ecran
Page 73

Si les écrans sont alignés, appuyez sur la molette de sélection.
2
Ecran gauche Ecran droit
Il se peut que vous voyiez
une ligne horizontale sur
l’écran gauche plutôt que
l’écran droit et des lignes
Correct
Image combinée que vous
voyez avec les deux yeux.
Si l’image que vous voyez correspond à l’une des images ci-dessous,
c’est que l’alignement des écrans est correct.
Correct Correct Correct Correct
verticales sur l’écran droit
plutôt que l’écran gauche. Il
ne s’agit pas d’un
dysfonctionnement.
Si l’image que vous voyez correspond à l’une des
images ci-dessous, cessez immédiatement
l’utilisation du Glasstron.
L’utilisation du Glasstron dans de telles
conditions peut provoquer une fatigue ou des
troubles oculaires.
Préparation
Incorrect
Si aucune ligne
verticale ne coupe la
ligne horizontale.
Si vous ne voyez toujours pas une combinaison correcte de ces lignes même après vous
être reposé la vue pendant quelques heures, c’est probablement parce que le Glasstron ne
fonctionne pas correctement. Consultez votre revendeur Sony ou un centre de service
après-vente Sony agréé.
Incorrect Incorrect
Si la ligne
horizontale apparaît
en diagonale.
Si la ligne verticale
centrale ne coupe pas la
ligne horizontale.
suite page suivante
25
-FR
Page 74

Mise sous tension du Glasstron (suite)
Lisez l’AVERTISSEMENT et appuyez sur la molette de sélection.
3
AVERTISSEMENT
TOUTE UTILISATION NON
CONFORME IMPLIQUE DES
RISQUES POUR LES YEUX.
CESSEZ EN CAS DE FATIGUE
MIGRAINE OU MALAISE.
PUSH DISPLAY
L’écran de sélection “OUI ou NON” du mot de
passe apparaît.
CONTROLER
VOULEZ-VOUS PROGRAMMER
UN MOT DE PASSE A TROIS
CHIFFRES ?
OUI
NON
POUR PLUS DE DETAILS,
VOIR LE MODE D’ EMPLOI.
EXECUTERCHOISIR
Passez à la section de “Saisie du
mot de passe” à la page 27.
26
-FR
Page 75

Saisie du mot de passe
AVERTISSEMENT
Cet appareil ne peut être utilisé par des enfants âgés de 15 ans ou moins. Les yeux des enfants
sont toujours en phase de développement et peuvent être gravement affectés par l’utilisation
de cet appareil. Pour empêcher toute utilisation par des enfants âgés de 15 ans ou moins, cet
appareil est équipé d’un système de protection par mot de passe. Nous vous conseillons de
conditionner l’utilisation de cet appareil par la saisie d’un mot de passe si des enfants âgés de
15 ans ou moins peuvent y avoir accès.
Lorsque vous avez saisi un mot de passe, vous devrez saisir le mot de passe chaque fois que
vous utiliserez le Glasstron. Aussi, veillez à ne pas oublier votre mot de passe. Vous pouvez
également configurer le Glasstron pour qu’il fonctionne sans mot de passe.
Avant de commencer...
Appliquez la procédure de “Mise sous tension du Glasstron” (pages 22 à 26). L’écran de
sélection “OUI ou NON” du mot de passe apparaît.
Sélectionnez la saisie d’un mot de passe ou non à l’aide de la
1
molette de sélection PUSH DISPLAY.
Si vous voulez saisir un mot de passe,
sélectionnez “OUI”. Sinon, sélectionnez
“NON” en tournant la molette de sélection.
Appuyez ensuite sur la molette de sélection.
Si vous ne désirez pas saisir de mot de
passe, passez à l’étape 4 de la section
“Utilisation du Glasstron” (page 29).
Ecran
VOULEZ-VOUS PROGRAMMER
UN MOT DE PASSE A TROIS
CHIFFRES ?
OUI
NON
POUR PLUS DE DETAILS,
VOIR LE MODE D’ EMPLOI.
EXECUTERCHOISIR
Préparation
INTRODUISEZ LE PREMIER
CHIFFRE.
0
PUSH DISPLAY
EXECUTERCHOISIR
Introduisez un par un les trois chiffres du mot de passe à l’aide de
2
la molette de sélection.
Tournez la molette de sélection pour
introduire le premier chiffre et appuyez
ensuite sur la molette de sélection. Procédez
de même pour introduire les deuxième et
troisième chiffres du mot de passe.
PUSH DISPLAY
INTRODUISEZ LE TROISIEME
CHIFFRE.
123
CHOISIR
Mot de passe saisi
EXECUTER
suite page suivante
27
-FR
Page 76

Saisie du mot de passe (suite)
Vérifiez le mot de passe à l’aide de la molette de sélection.
3
Si le mot de passe est correct,
sélectionnez “OUI” en tournant la
molette de sélection. Sinon, sélectionnez
“NON”. Appuyez ensuite sur la molette
de sélection.
Si vous sélectionnez “NON”, retournez
à l’étape 1.
Si vous sélectionnez “OUI”, appliquez la
procédure d’“Utilisation du Glasstron”
(page 30) à partir de l’étape 4.
PUSH DISPLAY
VOTRE MOT DE PASSE
EST-IL CORRECT ?
CHOISIR
123
OUI
NON
EXECUTER
Modification du mot de
passe
Alors que le Glasstron est sous tension,
appuyez sur RESET à l’aide d’un objet
pointu comme un stylo à bille.
• Si vous avez déjà lu les messages
AVERTISSEMENT (pages 22 à 26) (par
exemple, pendant que vous regardez une
image vidéo), la fenêtre d’affichage
revient à l’étape 1 de la “Saisie du mot de
passe” (page 27).
• Si vous n’avez pas encore lu le message
AVERTISSEMENT (par exemple, vous
avez oublié votre mot de passe), la fenêtre
d’affichage revient à l’étape 3 de “Mise
sous tension du Glasstron” (page 22).
-FR
28
Si vous étiez amené à devoir saisir un mot
de passe après avoir configuré le Glasstron
pour fonctionner sans mot de passe,
appliquez la même procédure ci-dessus.
RESET
Remarque
Une pression sur la touche RESET n’affecte en
rien les réglages de l’image et du son en mode
PC et vidéo.
Page 77

Utilisation du Glasstron
Vous devez saisir un mot de passe la première fois que vous utilisez le Glasstron ou après que
vous avez réinitialisé le Glasstron. Introduisez le mot de passe en appliquant la procédure de
“Saisie d’un mot de passe” (pages 27 et 28).
Avant de commencer...
Exécutez les procédures de “Raccordement du Glasstron” (pages 14 à 19) et de “Port du
Glasstron” (page 20).
Mettez le Glasstron sous tension à l’aide du commutateur POWER,
1
ensuite appuyez sur la molette de commande PUSH DIAL.
Changez la langue d’affiche à l’écran en appuyant sur la molette de commande, si
nécessaire.
Ecran
LANGUE D’ AFFICHAGE
ENGLISH
POWER / POWER SAVING
ON / OFF
FRANÇAIS
DEUTSCH
ITALIANO
NEDERLANDS
ESPAÑOL
CHOISIR
EXECUTER
Si vous avez configuré le Glasstron pour qu’il fonctionne sans mot de passe, passez à
l’étape 3.
Tournez la molette de sélection PUSH DISPLAY pour introduire le
2
premier chiffre de votre mot de passe et appuyez ensuite sur la
molette de sélection. Introduisez les deuxième et troisième
chiffres de la même manière.
PUSH DISPLAY
Si vous introduisez un mot de passe
erroné, le message indiqué à droite
s’affiche. Introduisez le mot de passe
correct.
Si vous introduisez plus de cinq fois un
mot de passe erroné, le Glasstron se met
automatiquement hors tension au bout
d’environ dix secondes.
INTRODUISEZ LE TROISIEME
CHIFFRE DE VOTRE MOT DE
PASSE.
123
CHOISIR
EXECUTER
Mot de passe introduit
MOT DE PASSE INCORRECT.
INTRODUISEZ A NOUVEAU LE
PREMIER CHIFFRE.
1
CHOISIR
MOT DE PASSE INCORRECT.
CONSULTEZ LE MODE
D’ EMPLOI.
EXECUTER
suite page suivante
29
-FR
Opérations
Page 78

Utilisation du Glasstron (suite)
Suivez les instructions à l’écran.
3
1 Message d’avertissement n Exécutez les étapes 3 à 7 de “Vérification de la position
de l’unité d’affichage” (pages 22 à 24).
• Lorsque vous avez lu attentivement les avertissements et vérifié la position de
l’unité d’affichage, appuyez sur la molette de sélection.
2 Alignement de l’écran n Exécutez les étapes 1 à 3 de la “Vérification de
l’alignement de l’écran” (pages 24 à 26).
• Lisez attentivement l’avertissement et appuyez sur la molette de sélection.
• Assurez-vous que les écrans gauche et droit sont alignés et appuyez sur la molette
de sélection.
Sélectionnez le signal d’entrée à l’aide du commutateur PC-VIDEO.
4
Sélectionnez PC (signal RVB) ou VIDEO
(signal vidéo) en fonction de l’appareil
raccordé.
Lorsque vous sélectionnez ”PC“
(mode PC)
PC / RGB
30
-FR
PC VIDEO
Lorsque vous effectuez un
raccordement au connecteur S-Vidéo
“S VIDEO” apparaît à l’écran.
Entrez le signal de l’appareil raccordé.
5
Lorsque vous raccordez un ordinateur:
Réglez la résolution de l’écran. Pour plus de détails, reportez-vous à “Compatibilité de
signal” à la page 34.
Lorsque vous affichez des images VGA pictures (640 × 480), l’image s’affiche sur environ
60% de l’écran entier.
Remarque
•Si aucune image n’apparaît, vérifiez le réglage par défaut de votre ordinateur pour sortir le
signal RVB externe par le connecteur du moniteur.
•Certains PC ne transmettent pas le signal d’affichage externe à la mise sous tension, ou
commutent le mode d’affichage externe. Changez le mode d’affichage de votre PC en vous
référant au manuel d’instruction qui l’accompagne.
Lorsque vous raccordez un appareil vidéo:
Lancez la lecture sur l’appareil vidéo raccordé au Glasstron.
Lorsque vous affichez des images vidéo PAL, l’image s’affiche sur environ 84% de
l’écran entier.
Lorsque vous sélectionnez ”VIDEO“
(mode vidéo)
VIDEO
Page 79

Ajustez la luminosité en tournant la commande BRIGHT.
6
BRIGHT
plus foncé plus clair
Réglez le volume du son en tournant la commande VOL.
7
Si vous réglez AVLS sur ON dans le MENU, vous ne pouvez pas augmenter le volume
au-delà de la limite définie (voir page 37). Si le niveau d’entrée audio est trop élevé, il est
possible que le son soit distordu. Dans ce cas, baissez le volume à l’aide de la commande
VOL du boîtier d’alimentation.
VOL
plus bas plus élevé
Après avoir utilisé le
Glasstron
Retirez le Glasstron et mettez-le hors
tension.
Remarque sur l’écran LCD
L’écran LCD est fabriqué en faisant appel à
des technologies de haute précision. Il se
peut toutefois que de minuscules points
noirs et/ou lumineux (de couleur rouge,
bleue ou verte) apparaissent de manière
continue sur l’écran LCD. Il ne s’agit pas
d’un dysfonctionnement.
(Points effectifs : plus de 99,999 %)
Vérification de
l’indication d’affichage
Appuyez sur la molette de sélection
pendant que l’image est affichée.
L’indication d’affichage apparaît à l’écran
pendant cinq secondes.
Pour désactiver immédiatement
l’indication, appuyez à nouveau sur la
molette de sélection.
* Si vous utilisez l’adaptateur secteur, c’est
BRIGHTNESS
PC / RGB 800X600 60Hz
MEGA BASS 2
AVLS
Autonomie restante de
la batterie* (page 41)
le symbole “ ” qui apparaît à l’écran.
suite page suivante
Signal d’entrée
(page 30)
MEGA BASS
(page 37)
AVLS
(page 37)
31
-FR
Opérations
Page 80

Utilisation du Glasstron (suite)
Avertissements contre
une utilisation excessive
du Glasstron
Pour éviter la fatigue et les troubles
oculaires à la suite d’une utilisation
prolongée du Glasstron, les messages de
mise en garde suivants apparaissent sur
l’écran.
Au bout d’environ 2 heures et 15 minutes
d’utilisation
VOUS REGARDEZ DEPUIS
PLUS DE DEUX HEURES.
ARRETEZ SI VOUS VOUS
SENTEZ FATIGUE.
CONTINUER
Cessez d’utiliser le Glasstron si vous vous
sentez fatigué, si vous souffrez de maux de
tête ou si vous éprouvez une sensation
d’inconfort.
Si vous voulez continuer à utiliser le
Glasstron, appuyez sur la molette de
sélection.
Au bout d’environ 4 heures et 15 minutes
d’utilisation
VOUS REGARDEZ DEPUIS
PLUS DE QUATRE HEURES.
ARRETEZ SI VOUS VOUS
SENTEZ FATIGUE.
CONTINUER
Cessez d’utiliser le Glasstron si vous vous
sentez fatigué, si vous souffrez de maux de
tête ou si vous éprouvez une sensation
d’inconfort.
Si vous voulez continuer à utiliser le
Glasstron, appuyez sur la molette de
sélection.
Remarque
Si vous n’appuyez pas sur la molette de
sélection lorsque ces mises en garde
apparaissent à l’écran, le Glasstron se met
automatiquement hors tension dans les deux
cas.
Au bout d’environ 6 heures d’utilisation
AVERTISSEMENT
VOUS REGARDEZ DEPUIS
PLUS DE SIX HEURES.
POUR EVITER TOUT RISQUE
POUR LES YEUX, VOTRE
GLASSTRON VA S’ ARRETER
AUTOMATIQUEMENT.
Le Glasstron se met automatiquement hors
tension.
Attention: Mal des transports
résultant du visionnage
Certains utilisateurs ressentent des
symptômes de mal des transports, des
maux de tête ou des nausées en visionnant
des films ou des enregistrements vidéo, et
plus particulièrement s’ils comportent des
scènes d’action intense et très animées. Si
vous ressentez l’un de ces symptômes,
interrompez immédiatement l’utilisation de
cet appareil. Pour éviter de vous blesser ou
de blesser d’autres personnes, ne conduisez
pas de voiture ou de motocyclette et ne
faites rien qui requiert de la concentration
tant que ces symptômes n’ont pas disparu.
Attention: Mal des transports
résultant des mouvements
externes
N’utilisez pas cet appareil pendant que
vous êtes soumis à un mouvement externe
–– par exemple, lorsque vous êtes passager
d’une voiture. L’utilisation de cet appareil
dans de telles conditions peut provoquer le
mal des transports.
32
-FR
Page 81

Visualisation de l’entourage
Lorsque vous portez le Glasstron sur les yeux, vous pouvez visualiser l’entourage à travers
l’écran de deux manières:
Visualisation de l’entourage
en réglant la transparence de
l’écran tout entier (mode
transparence)
Vous pouvez ajuster le degré de
transparence de l’écran complet à l’aide de
la molette de sélection LCD.
L’image devient
transparente.
Tournez la molette de
sélection SEE-THROUGH.
La zone entourant
l’image devient
également transparente.
Visualisation de l’entourage
dans la zone entourant
l’image uniquement (mode
écran)
Vous pouvez ajuster le degré de
transparence de l’écran autour de l’image
uniquement. L’image reste intacte.
L’image reste intacte.
Mettez le commutateur
SCREEN sur ON.
La zone entourant
l’image devient
également transparente.
Opérations
SEE - THROUGH
CLOSE OPEN
Remarque
En présence d’une lumière brillante à côté de
l’unité d’affichage, il se peut que vous ne
puissiez pas occulter complètement
l’entourage en agissant sur la molette de
sélection SEE-THROUGH.
SCREEN
ON OFF
Dans ce mode, l’écran ne devient pas
transparent, même si vous tournez la
molette de sélection SEE-THROUGH.
Remarques
•Lorsque vous réglez SCREEN sur ON, les
bords de l’image pourraient s’assombrir un
peu, mais il ne s’agit pas d’un
dysfonctionnement.
•Si un puissant éclairage se trouve à proximité
de l’unité d’affichage, il se peut que vous ne
puissiez pas complètement occulter
l’environnement autour de l’image en réglant
la molette SEE-THROUGH lorsque vous
réglez le commutateur SCREEN sur ON.
33
-FR
Page 82

Réglage du son et de l’image
Compatibilité de signaux
Les spécifications de signal supportées par l’appareil sont les suivantes:
Mode PC (signal RVB)
Mode d’affichage Résolution d’écran Fréquence Fréquence
(point × ligne) horizontale (kHz) verticale (Hz)
Macintosh
13” couleur 640 × 480 35,0 67
16” couleur 832 × 624 49,7 75
Compatibles PC IBM
VGA text 640 × 400 31,5 70
VGA graphics 640 × 480 31,5 60
VESA VGA 640 × 480 37,9 72
VESA SVGA 800 × 600 35,2 56
Mode vidéo (signal vidéo)
Système de couleur PAL Affiché en 762 × 572
Remarques sur le mode PC
•Cet appareil ne supporte pas le mode XGA (1.024 × 768) et supérieur. Si vous réglez la fréquence
verticale sur 60 Hz en mode XGA, l’image sera affichée mais la qualité de l’image sera médiocre en
raison de la perte de signal. Modifiez la résolution de l’écran de votre ordinateur en SVGA ou VGA.
•Bien que le Glasstron soit compatible avec les signaux mentionnés dans la liste ci-dessus, réglez la
fréquence verticale sur 60 Hz lors de l’utilisation du mode SVGA (800 × 600) ou sur 72 Hz ou 75 Hz
avec le mode VGA (640 × 480). Réglez également la fréquence verticale du signal de sortie de l’écran
d’affichage externe de l’ordinateur raccordé.
•Lorsque vous affichez des images VGA (640 × 480) ou des images vidéo PAL (mode vidéo), les
images ne sont pas affichées sur l’ensemble de l’écran. Environ 60% de la surface de l’écran sont
utilisés lorsque des images VGA apparaissent ou environ 84% de la surface de l’écran lorsque des
images vidéo PAL apparaissent.
•Certains ordinateurs portables n’émettent pas de signal RVB dans la définition d’écran ajustée et dans
la fréquence verticale du port du moniteur externe tant que vous ne réglez pas l’ordinateur en mode
d’écran d’affichage externe.
•Si vous utilisez Microsoft Windows 95 ou Windows 98, installez le fichier d’information qui se trouve
sur la disquette Windows 95/Windows 98 PC Glasstron Information Disk fournie. Pour plus de
détails sur l’installation du fichier d’information, reportez-vous au mode d’emploi “Windows 95/
Windows 98 PC Glasstron Information Disk/screen adjustment disk for Macintosh”.
640 × 480 37,5 75
640 × 480 43,3 85
800 × 600 37,9 60
800 × 600 48,1 72
800 × 600 46,9 75
800 × 600 53,7 85
34
-FR
Page 83

Réglage du son/image
Vous pouvez régler les options suivantes à l’aide de l’affichage du menu.
Le menu ne s’affiche qu’en anglais.
Mode PC (signal RVB) Mode vidéo (signal vidéo)
AVLS (système automatique de limitation du volume):
Réduit le volume maximum afin de protéger vos oreilles. Vous ne pouvez pas augmenter le
volume au-delà de la limite définie, même si vous essayez de tourner la commande VOL.
MEGA BASS:
Crée un son profond et puissant en accentuant les graves.
POWER SAVE:
Le capteur d’économie d’énergie (POWER SAVING SENSOR) détecte le retrait du Glasstron
de votre tête. L’appareil passe en mode de veille après quelques secondes et arrête ainsi
automatiquement le son et l’image afin d’économiser l’énergie de la batterie. Le son et l’image
seront restaurés au bout de quelques secondes lorsque vous porterez à nouveau le Glasstron.
V CENT:
Ajuste la position verticale de
l’image.
H CENT:
Ajuste la position horizontale de
l’image.
TRACKING:
Règle l’alignement de l’image
(p.ex., si l’image ne s’affiche pas
clairement).
SYNC:
Ajuste l’image avec la
synchronisation du signal RVB
(p.ex., si l’image est brouillée ou si
des ombres rouges ou bleues
apparaissent dans l’image).
Effectuez ce réglage après que le
réglage TRACKING est terminé.
CONTRAST:
Ajuste le contraste de l’image.
COLOUR:
Ajuste l’intensité des couleurs.
Opérations
suite page suivante
35
-FR
Page 84

Réglage du son et de l’image (suite)
Appuyez sur MENU.
1
L’écran de menu apparaît.
MENU
Tournez la molette de sélection PUSH DISPLAY pour sélectionner
2
le paramètre voulu et appuyez ensuite sur la molette de sélection.
L’écran de réglage du paramètre sélectionné apparaît.
Mode PC
MENU
EXIT
AVLS :
MEGA BASS :
POWER SAVE :
V CENT
H CENT
TRACKING
SYNC
PRESET
SEL EXIT
EXEC
Mode VIDEO
MENU
EXIT
AVLS :
MEGA BASS :
POWER SAVE :
CONTRAST
COLOUR
RESET
EXEC
SEL EXIT
OFF
0
OFF
OFF
0
OFF
MENU
MENU
36
-FR
PUSH DISPLAY
Ajustez la valeur de réglage à l’aide de la molette de sélection.
3
Pour plus de détails sur chacun des paramètres, voir pages 37 à 39.
Pour régler d’autres paramètres, répétez les étapes 2 et 3.
Appuyez sur MENU.
4
L’écran de menu disparaît.
Vous pouvez également désactiver l’écran de menu en sélectionnant EXIT dans le menu
à l’aide de la molette de sélection.
Page 85

AVLS (système de limitation
automatique du volume)
Tournez la molette de
sélection “ON” et appuyez
ensuite sur la molette de
sélection.
POWER SAVE
Tournez la molette de
sélection pour l’activer, puis
appuyez sur la molette de
sélection.
AVLS :
ON
OFF
SEL
EXEC
Lorsque AVLS est activé, le volume
n’est pas plus fort que si vous tournez
la commande VOL.
MEGA BASS
Tournez la molette de
sélection afin de
sélectionner la valeur
désirée, puis appuyez sur la
molette de sélection.
2: Maximiser les graves.
1: Amplifiez les graves.
0: Graves normales
MEGA BASS :
2
1
0
SEL
EXEC
POWER SAVE :
ON
OFF
SEL
EXEC
Lorsque vous retirez l’unité
d’affichage pendant que POWER
SAVE est mis sur ON, le capteur
d’économie d’énergie (POWER
SAVING SENSOR) (page 13) est
activé et arrête ainsi
automatiquement l’image et le son.
L’image et le son reprennent
quelques secondes après avoir remis
l’unité d’affichage sous tension.
Lorsque POWER SAVE est mis sur
ON, vous pouvez contrôler l’état du
Glasstron en vérifiant l’indicateur
POWER/POWER SAVING.
Etat
Normal
Economie
d’énergie
Indicateur
POWER/
POWER
SAVING
Allumé
en vert
Allumé
en orange
Image
Normale
Pas
d’image
Opérations
Consommation
d’énergie
100%
5%
Remarque
La fonction d’économie d’énergie du Glasstron
ne fonctionne pas avec la fonction de gestion
de l’énergie de votre ordinateur.
suite page suivante
37
-FR
Page 86

Réglage du son et de l’image (suite)
Réglage du signal RVB
Il est recommandé d’ajuster l’image après avoir installé le fichier d’information inclus sur la
disquette d’information Windows 95/Windows 98 PC Glasstron, ou la disquette de réglage de
l’écran pour Macintosh. Pour plus de détails sur l’installation du fichier d’information, reportezvous au mode d’emploi “Windows 95/Windows 98 PC Glasstron Information Disk/screen
adjustment disk for Macintosh”.
Remarque
Lorsque vous affichez l’image sur l’écran LCD du portable et sur le Glasstron, vous ne pouvez pas
ajuster l’image sur le Glasstron en raison de la divergence de fréquences du signal de sortie de certains
ordinateurs portables. Dans ce cas, remplacez le mode d’affichage de votre ordinateur par le moniteur
extérieur uniquement. Ensuite, changez la résolution d’écran selon la liste décrite sous “Compatibilité
de signaux” (page 34).
V CENT
Tournez la molette de
sélection pour ajuster le
centre de l’image, puis
appuyez sur la molette de
sélection.
V CENT
EXECADJ
H CENT
Tournez la molette de
sélection pour ajuster le
centre de l’image, puis
appuyez sur la molette de
sélection.
TRACKING
Tournez la molette de
sélection jusqu’à ce que les
lignes de l’image aient
disparu, puis appuyez sur la
molette de sélection.
TRACKING
EXECADJ
SYNC
Tournez la molette de
sélection pour régler la
synchronisation de l’image,
puis appuyez sur la molette
de sélection.
38
-FR
H CENT
SYNC
EXECADJ
EXECADJ
Page 87

Réglage du signal vidéo
CONTRAST
Tournez la molette de
sélection pour régler le
contraste, puis appuyez sur
la molette de sélection.
CONTRAST
EXECADJ
moins
intenses
COLOUR
Tournez la molette de
sélection pour régler
l’intensité des couleurs et
appuyez ensuite sur la
molette de sélection.
plus
intenses
Réinitialisation des
réglages aux valeurs par
défaut
Les réglages AVLS, MEGA BASS, POWER
SAVE ne sont pas ramenés aux réglages
présélectionnés en usine.
Tournez la molette de
sélection pour sélectionner
RESET dans le menu et
appuyez ensuite sur la
molette de sélection.
mode PC
MENU
EXIT
AVLS :
MEGA BASS :
POWER SAVE :
V CENT
H CENT
TRACKING
SYNC
PRESET
mode VIDEO
MENU
EXIT
AVLS :
MEGA BASS :
POWER SAVE :
CONTRAST
COLOUR
RESET
OFF
0
OFF
EXEC
EXEC
MENU
OFF
0
OFF
MENU
SEL EXIT
SEL EXIT
Opérations
COLOUR
moins
intenses
EXECADJ
plus
intenses
Remarque
Les réglages restent en mémoire même si vous
mettez le Glasstron hors tension.
39
-FR
Page 88

Utilisation de la batterie en option
Avec une batterie comme une NP-F550/F750/F950, vous pouvez utiliser le Glasstron sans le
raccorder à une prise murale.
Remarque
Vous ne pouvez pas utiliser le Glasstron avec des piles alcalines. Utilisez l’adaptateur secteur (fourni)
ou la batterie (non fournie)
Charge de la batterie
Chargez la batterie avant de l’utiliser. Vous pouvez charger la batterie à l’aide du bloc
d’alimentation. Si vous installez la batterie comme décrit ci-dessous, la batterie se charge
pendant que vous n’utilisez pas le Glasstron.
Installez la batterie sur le bloc d’alimentation.
1
Installez correctement la batterie sur le
bloc d’alimentation en veillant à ce
qu’elle ne soit pas de travers.
Pour retirer la batterie, faites coulisser
BATT RELEASE et dégagez la batterie.
Branchez l’adaptateur secteur sur le connecteur DC IN du bloc
2
d’alimentation. Raccordez ensuite le cordon d’alimentation à
Bloc
d’alimentation
Bouton BATT
RELEASE
l’adaptateur secteur et à une prise murale.
Chargez la batterie sur une surface
plane et exempte de vibrations. Le
témoin CHARGE s’allume. Lorsque la
batterie est complètement chargée, le
témoin CHARGE s’éteint.
L’autonomie de la batterie et le temps de
charge sont indiqués dans le tableau à la
page suivante.
vers une prise
murale
Adaptateur
secteur
Batterie
Témoin
CHARGE
vers DC IN
Remarques
•Si le témoin POWER/POWER SAVING se met à clignoter alors que vous utilisez la batterie, chargezla.
•Si le témoin CHARGE se met à clignoter, c’est que le bloc d’alimentation ou la batterie présente un
dysfonctionnement. Consultez votre revendeur Sony ou un centre de service après-vente Sony agréé.
•Utilisez l’adaptateur secteur uniquement lorsque vous rechargez la batterie.
•L’autonomie de la batterie peut être plus courte dans un environnement froid. C’est une
caractéristique typique des batteries.
•Vous ne pouvez pas charger la batterie en mode d’économie d’énergie. Mettez le Glasstron hors
tension, puis la recharge de la batterie commence.
-FR
40
Page 89

Batterie Temps de recharge Autonomie (entièrement rechargée, mode PC)
NP-F550 Approx. 4 heures Approx. 1 heure
NP-F750 Approx. 8 heures Approx. 2 heures
NP-F950 Approx. 12 heures Approx. 3 heures
•L’autonomie de la batterie et le temps de charge peuvent varier suivant les conditions d’utilisation.
•Vous pouvez également utiliser une batterie telle qu’une NP-F530/F730/F930 (non fournie) avec le
Glasstron.
•Vous pouvez utiliser une batterie “InfoLITHIUM™ ”avec le Glasstron. Si vous utilisez une batterie de
ce type, l’autonomie restante estimée n’est pas affichée avec le compteur de durée, mais avec
l’indicateur.
•L’autonomie reprise dans la liste ci-dessus concerne le mode PC. Lorsque vous utilisez le Glasstron
en mode vidéo, l’autonomie de la batterie est réduite à 80% du mode PC.
”InfoLITHIUM” est une marque de commerce de Sony Corporation.
Vérification de l’autonomie résiduelle de la batterie
Si aucune indication ni avertissement n’apparaît sur l’écran,
appuyez sur la molette de sélection.
PUSH DISPLAY
Autonomie résiduelle
de la batterie
Complètement
chargée
Epuisée
Opérations
Lorsque la batterie faiblit, le message
suivant apparaît à l’écran.
Remplacez-la par une batterie
chargée.
LA BATTERIE EST EPUISEE.
REMPLACEZ LA BATTERIE.
Si vous utilisez l’adaptateur secteur, le
symbole “ ” apparaît à l’écran.
41
-FR
Page 90

Précautions
Utilisation
• Faites uniquement fonctionner cet
appareil au moyen de l’adaptateur secteur
fourni. L’utilisation d’un autre adaptateur
secteur risque de provoquer un
dysfonctionnement.
Fiche à polarité unifiée
• Si un liquide ou un solide venait à
s’introduire à l’intérieur du boîtier,
débranchez l’appareil et faites-le vérifier
par un technicien compétent avant de le
remettre en service.
• Mettez toujours l’appareil hors tension
lorsque vous ne l’utilisez pas.
Débranchez l’appareil de la prise murale si
vous prévoyez de ne pas l’utiliser pendant
quelques jours ou plus. Pour débrancher le
cordon, saisissez-le par la fiche. Ne tirez
jamais sur le cordon proprement dit.
• Ne surchargez pas les prises murales,
cordons prolongateurs et autres prises audelà de leur capacité. Vous risqueriez de
provoquer un incendie ou une
électrocution.
• N’utilisez pas de fixations non préconisées
par le fabricant, car elles peuvent
constituer un risque.
• Evitez d’utiliser le casque d’écoute à
volume élevé. Les médecins spécialisés
déconseillent l’écoute continue et
prolongée à volume élevé. Si vous
percevez des bourdonnements dans les
oreilles, baissez le volume ou interrompez
l’utilisation.
• Ne touchez pas l’adaptateur secteur ou le
bloc d’alimentation lorsque vous avez les
mains mouillées. Vous risquez sinon de
subir une électrocution.
• Ne laissez pas tomber l’appareil et ne le
soumettez pas à des chocs.
Installation
• Pour éviter toute surchauffe interne,
n’obstruez pas les ouïes de ventilation.
• Evitez de faire fonctionner l’appareil sous
des températures inférieures à 5°C.
• Ne soumettez pas l’appareil à des
températures élevées ou au rayonnement
direct du soleil. Si vous ne vous
conformez pas à ces instructions,
l’appareil risque de se déformer et les
écrans de devenir impossibles à aligner.
Si vous persistez à visionner des écrans
désalignés, vous risquez de vous fatiguer
la vue. Appliquez les instructions de
“Vérification de l’alignement de l’écran”
à la page 24 pour être certain que les
écrans sont alignés. Si vous estimez que
les écrans sont désalignés, faites réparer
l’appareil par votre revendeur Sony ou
dans un centre de service après-vente
Sony agréé.
• N’installez pas cet appareil dans un
endroit mouillé, humide, poussiéreux,
enfumé ou baigné de vapeur. N’utilisez
pas cet appareil à proximité d’eau. Vous
risqueriez de provoquer un incendie ou
une électrocution. En particulier, ne
l’utilisez pas dans la salle de bains.
• Si l’appareil est transporté directement
d’un endroit froid dans un endroit chaud,
ou si la température de la pièce change
brusquement, l’image peut devenir floue
ou offrir des couleurs médiocres. Ces
phénomènes sont causés par la
condensation d’humidité sur le miroir ou
les lentilles internes. Si cela se produit,
laissez s’évaporer l’humidité avant
d’utiliser l’appareil.
• Ne placez pas l’appareil sur un véhicule,
un support, une table ou une étagère
instable. L’appareil risque en effet de
tomber et de provoquer de graves
blessures à des enfants ou à des adultes et
de gravement endommager l’appareil.
• Ne posez aucun objet sur l’appareil et
n’enroulez pas le cordon autour. De
même, ne placez pas l’appareil là où le
cordon d’alimentation risque d’être
soumis à l’usure ou à des détériorations.
42
-FR
Page 91

Divers
• Débranchez l’appareil de la prise murale
et faites-le vérifier par un centre de
service après-vente qualifié dans les
circonstances suivantes :
- Si le cordon ou la fiche d’alimentation
est endommagé ou effiloché.
- Si un liquide a pénétré à l’intérieur de
l’appareil.
- Si l’appareil a été exposé à la pluie ou à
de l’eau.
- Si l’appareil a été soumis à des chocs
violents à la suite d’une chute ou si le
boîtier est endommagé.
- Si l’appareil ne fonctionne pas
normalement alors que vous appliquez
les instructions d’utilisation. Réglez
uniquement les commandes spécifiées
dans le mode d’emploi. Un réglage
incorrect d’autres commandes peut
entraîner des dommages et nécessiter
une intervention fastidieuse par un
technicien qualifié pour remettre
l’appareil en ordre de marche.
- Si l’appareil présente des altérations
significatives des performances –– Cela
signifie qu’il nécessite un entretien.
• Ne démontez pas et ne transformez pas
l’appareil. Vous risquez sinon de
provoquer un incendie ou une
électrocution. Faites vérifier et réparer
l’appareil par votre revendeur Sony ou
un centre de service après-vente Sony
agréé.
• Ne tentez pas d’effectuer vous-même
l’entretien de cet appareil parce que
l’ouverture du boîtier vous expose à une
tension dangereuse et à d’autres risques.
Confiez-en exclusivement l’entretien au
personnel qualifié.
• Si des pièces de rechange s’avèrent
nécessaires, veillez à ce que le technicien
chargé de l’entretien certifie par écrit
avoir utilisé des pièces de rechange
spécifiées par le fabricant qui présentent
les mêmes spécifications que les pièces
d’origine.
Toute substitution non autorisée peut
provoquer un incendie, une électrocution
ou d’autres risques.
• Au terme de toute intervention
d’entretien ou de réparation de l’appareil,
demandez au technicien d’entretien
d’effectuer un contrôle de sécurité de
routine (tel que spécifié par le fabricant)
de manière à déterminer si l’appareil se
trouve en parfait état de marche et de le
certifier.
• Débranchez l’appareil de la prise murale
avant de le nettoyer. Nettoyez l’appareil
au moyen d’un chiffon doux et sec ou
d’un chiffon doux légèrement imprégné
d’une solution détergente neutre.
N’utilisez aucun type de solvant comme
de l’alcool ou de la benzine.
Remarque sur le transport
Utilisez les housses de transport fournies
lorsque vous transportez le Glasstron.
Mettez l’unité d’affichage et le bloc
d’alimentation et les autres accessoires dans
la poche la plus large.
Bloc d’alimentation
Adaptateur secteur
Câbles
Unité d’affichage
Petit compartiment
Informations complémentaires
43
-FR
Page 92

Messages d’erreur
Les messages d’erreur suivants apparaissent pour indiquer l’état du Glasstron ou du signal
d’entrée.
OUT OF SCAN RANGE
Le signal d’entrée ne correspond pas aux spécifications supportées.
Changez la résolution de l’écran de votre ordinateur. Pour plus de détails sur la compatibilité
des signaux, reportez-vous à “Compatibilité de signaux” (page 34).
NO INPUT SIGNAL
Le signal n‘est pas entré.
• Assurez-vous que le commutateur PC-VIDEO est réglé correctement.
• Assurez-vous que l‘appareil raccordé est sous tension.
• Assurez-vous que votre ordinateur n‘est pas en mode d‘économie d‘énergie.
HIGH TEMPERATURE
La température du Glasstron est trop élevée.
Mettez le Glasstron hors tension quelques instants, puis remettez-le sous tension.
Remarque
Si vous obstruez l’orifice de ventilation du bloc d’alimentation, une erreur risque de se produire suite à
une hausse de température. En outre, cela peut provoquer un incendie ou un dysfonctionnement de
l’appareil.
44
-FR
Page 93

Dépannage
Si vous avez des questions ou des problèmes qui ne figurent pas dans cette liste, consultez votre
revendeur Sony ou un centre de service après-vente Sony agréé.
Symptôme
L’image n’apparaît pas.
L’image est foncée ou
manque de luminosité.
L’image disparaît
soudainement.
L’image n’a pas de son.
Le son est parasité.
Le volume n’augmente
pas.
Cause
Les connexions ne sont pas bien
réalisées.
Le signal n’est pas entré.
Le Glasstron passe en mode
d’économie d’énergie.
Lorsque vous effectuez le
raccordement à un ordinateur
portable, le mode d’affichage est
réglé en mode d’affichage local
(panneau LCD de votre portable).
Vous ne portez pas le Glasstron
correctement.
—
—
La fenêtre intérieure (où l’image est
affichée) est sale.
Un avertissement a été affiché
pendant plus de deux minutes. (Le
Glasstron s’est mis hors tension
automatiquement.)
Vous utilisez le Glasstron depuis six
heures. (Le Glasstron se met hors
tension automatiquement après six
heures d’utilisation afin d’empêcher
une fatigue des yeux.)
La batterie rechargeable ou les piles
sont mortes.
Vous avez éteint le Glasstron alors
que POWER SAVE est réglé sur ON.
—
La fonction AVLS est activée.
Les appareils ne sont pas
correctement raccordés.
Le volume sonore de l’ordinateur
raccordé est inapproprié.
Remède
Raccordez l’équipement
correctement (pages 14 à 19).
Sélectionnez l’entrée correcte (page
30).
Rallumez le Glasstron pour ramener
le front près du capteur POWER
SAVING SENSOR (page 13).
Changez le mode d’affichage. Pour
plus de détails, reportez-vous au
mode d’emploi de votre ordinateur.
Placez le Glasstron correctement
(pages 20 et 21).
Réglez la luminosité à l’aide de la
commande BRIGHT (page 31).
Ajustez la synchronisation du signal
RVB (page 38).
Nettoyez l’unité d’affichage au
moyen d’un chiffon sec et doux.
—
—
Chargez la batterie rechargeable ou
remplacez-la par des piles neuves
(page 40).
Rallumez le Glasstron pour ramener
le front près du capteur POWER
SAVING SENSOR (page 13).
Réglez le volume au moyen de la
commande VOL (page 31).
Mettez AVLS dans le menu sur OFF
(page 37).
Raccordez les appareils correctement
(pages 14 à 19).
Réglez le volume de l’ordinateur.
Informations complémentaires
suite page suivante
45
-FR
Page 94

Dépannage (suite)
Symptôme
La batterie se décharge
rapidement.
La batterie n’est pas
chargée.
Les points noir, rouge et
vert ne disparaissent pas.
La couleur de l’image est
différente.
L’image quitte sa position
en mode PC.
Du bruit apparaît sur
l’image en mode PC.
Le commutateur POWER
ne fonctionne pas.
Cause
La batterie rechargeable n’est pas
suffisamment chargée.
La batterie rechargeable est
complètement morte.
La batterie rechargeable n’est pas
installée correctement.
La batterie rechargeable est
complètement morte.
L’adaptateur secteur fourni n’est pas
utilisé.
L’écran LCD est réalisé à partir
d’une technologie de haute
précision. Toutefois, des points noirs
ou des points de couleur lumineux
(rouge, bleu ou vert) peuvent
apparaître en permanence sur
l’écran LCD. Il ne s’agit pas d’un
dysfonctionnement.
(Points effectifs: plus de 99,999%)
L’intensité des couleurs n’est pas
réglées.
Le signal de sortie d’écran
d’affichage externe de l’ordinateur
raccordé ne correspond pas au
signal d’entrée supporté.
Le signal d’entrée ne correspond pas
aux spécifications supportées.
Reportez-vous à “Compatibilité de
signaux” (page 34).
Dans ce cas, l’image n’apparaît pas
correctement.
La fréquence horizontale du signal
ne correspond pas aux spécifications
supportées.
Dans ce cas, il se peut que le
scintillement disparaisse sur le bord
droit de l’écran.
—
Remède
Chargez complètement la batterie
rechargeable ou utilisez-en une
neuve (page 40).
Installez convenablement la batterie
rechargeable (page 40).
Remplacez la batterie rechargeable
par une neuve (page 40).
Utilisez AC-PLM3 l’adaptateur
secteur fourni.
—
Réglez l’intensité des couleurs sur
l’écran de menu (page 39).
Changez la résolution de l’écran et la
fréquence verticale de votre PC en
fonction de la fréquence de sortie
supportée (page 34). Reportez-vous
au mode d’emploi de votre
ordinateur.
Changez la résolution de l’écran ou
la fréquence verticale du signal de
sortie d’affichage externe de votre PC
en fonction de la fréquence verticale
supportée (page 34). Reportez-vous
au manuel d’instruction de votre PC.
Changez le mode d’affichage de
votre ordinateur et choisissez le
moniteur externe uniquement.
(page 38).
Débranchez le câble d’alimentation
de la prise secteur. Après trois
minutes, rebranchez le câble
d’alimentation.
46
-FR
Page 95

Spécifications
Alimentation
Adaptateur secteur: AC-PLM3
100-240 V CA, 50/60 Hz, 18,5 W
Tension de sortie 8,4 V, 1,6 A
Batterie: NP-F550/NP-F750/NP-F950
(non fournie)
Consommation électrique
10 W (approx., mode PC)
12 W (approx., mode VIDEO)
Température d’utilisation
5°C à 35°C
Température de stockage
–10°C à 60°C
Dimensions
Unité d’affichage:
Approx. 149 × 48 × 86 mm
(l/h/p replié)
Bloc d’alimentation:
Approx. 54 × 47 × 160 mm
(l/h/p)
parties saillantes et commandes non
comprises
Masse
Unité d’affichage: Approx. 120 g
Bloc d’alimentation: Approx. 260 g
Signal vidéo
Système couleur PAL, normes CCIR
Entrée
Mode PC
signal RVB: HD15
Attribution des
broches
N° de broche Signal
1 R (Rouge)
2 G (Vert)
3 B (Bleu)
4–
5 GND
6 R (Rouge) GND
7 G (Vert) GND
8 B (Bleu) GND
9–
10 GND
11 GND
12 –
5 4 3 2 1
10 9
15 14 13 12 11
8 7 6
13 SYNC (Horizontale)
14 SYNC (Verticale)
15 –
Entrée PC AUDIO: Miniprise stéréo
Mode VIDEO
Entrée AUDIO/VIDEO:
Miniprise spéciale
Vidéo: 1 Vp-p, 75 ohms, asymétrique,
sync négative
Entrée S VIDEO: miniconnecteur
DIN à 4 broches
Y: 1 Vp-p, 75 ohms, asymétrique,
sync négative
C: 0,286 Vp-p, 75 ohms, asymétrique,
sync négative
Résolution d’écran
Horizontale: 832 points (max.)
Verticale: 624 lignes (max.)
Accessoires fournis
Adaptateur secteur AC-PLM3 (1)
Cordon d’alimentation secteur (1)
Câble de signal RVB (1)
Câble audio/vidéo (minifiche spéciale
fiche phono) (1)
Câble S-Vidéo (1)
Câble audio/vidéo (minifiche spéciale
minifiche spéciale) (1)
Câble audio (minifiche stéréo) (1)
Adaptateur d’écran pour Macintosh (1)
Etui de transport (2)
Pare-soleil (1 paire)
Mode d’emploi (1)
Disquette d’information Windows 95/
Windows 98 PC Glasstron (1)
Disquette de réglage d’écran pour
Macintosh (1)
Garantie (4)
La conception et les spécifications sont
sujettes à modifications sans préavis.
Informations complémentaires
47
-FR
Page 96

Index
A
Accessoires fournis 12, 47
Adaptateur secteur 19
Alignement 38
Alignement de l’écran 25
Autonomie résiduelle de la
batterie 41
Avertissements relatifs aux
appareils électroniques 9
AVLS 35, 37
B
Batterie 40
C, D
Charge d’une batterie 40
Compatibilité du signal 34
Contraste 39
Couleur 39
E, F, G
Economie d’énergie 37
Ecouteurs stéréo 21
H
Housse de transport 43
I, J, K, L
Instructions de sécurité 5
Instructions d’ajustage 8
M, N, O
Mega bass 35, 37
Mode d’écran 33
Mot de passe 27
Messages d’avertissement
AVERTISSEMENT 22-24,
32
Mot de passe de sécurité 5,
8, 27
P, Q
Pare-soleil 21
Port du Glasstron 20
Position horizontale 38
Position verticale 38
Précautions 42
Problèmes de santé 6
R
Raccordement
alimentation 19
appareil vidéo 17
batterie 40
ordinateurs 14
Réinitialisation
mot de passe 28
réglage 39
Réglage
couleurs 39
luminosité 31
volume 31
S
Sangle arrière 21
Synchronisation du
signal 38
S-Vidéo 18
T, U
Transparence 33
V, W, X, Y, Z
Vérification
position de l’écran 24
position de l’unité
d’affichage 22
Vérification de l’alignement
de l’écran 24
48
-FR
Page 97

Informations complémentaires
-FR
49
Page 98

50
-FR
Page 99

Informations complémentaires
-FR
51
Page 100

Sony Corporation
-FR
52
Printed in Japan
 Loading...