

Page 1

Glasstron
3-862-917-11 (1)
operating Instructions
Mode d'emploi
WARNING
YOUR FAILURE TO FOLLOW THESE OPERATING INSTRUCTIONS MAY RESULT IN EYE
FATIGUE, EYE DAMAGE, OR OTHER INJURY.
CAREFULLY READ THIS INSTRUCTION MANUAL AND BECOME FAMILIAR WITH ALL
SAFETY INSTRUCTIONS FOR THIS PRODUCT.
THIS PRODUCT SHOULD NOT BE USED BY CHILDREN AGE 15 OR YOUNGER.
IF YOU HAVE BEEN DIAGNOSED WITH EYE DISEASE OR EYE INJURY, CONSULT YOUR
DOCTOR BEFORE USE AND DO NOT USE WITHOUT YOUR DOCTOR'S APPROVAL.
AVERTISSEMENT
LE NON-RESPECT DES PRESENTES INSTRUCTIONS D'UTILISATION IMPLIQUE DES
RISQUES DE FATIGUE, DE BLESSURE OU AUTRES AUX YEUX.
LISEZ ATTENTIVEMENT LE PRESENT MODE D’EMPLOI ET FAMILIARISEZ-VOUS AVEC
TOUTES LES INSTRUCTIONS DE SECURITE AFFERENTES.
CET APPAREIL NE PEUT ETRE UTILISE PAR DES ENFANTS AGES DE 15 ANS OU MOINS.
SI VOUS SOUFFREZ DE MALADIES OU D'AFFECTIONS OCULAIRES, CONSULTEZ
VOTRE MEDECIN AVANT D’UTILISER CET APPAREIL ET NE L'UTILISEZ PAS SANS
L’AUTORISATION DE VOTRE MEDECIN.
к
GI
Personal LCD Monitor
K Glasstron
TM
PLM-S700
' 1998 by Sony Corporation
Page 2

WARNING
To prevent fire or shock hazard,
do not expose the unit to rain or
moisture. ^
CAUTION
t
CAUTION
You are cautioned that;
modifications not expr;
this manual could voia
operate this equipmerv
■
.■ T:y-:^h
changes or
■ approved in
ur authority to
CAUTW»* TQftEOUCe THE BiSK Of EtECTWC SHOCK.
OO NOT KWlOVE COVEft K3R ftACIO
HQ US8^^nVCEA8LE BAHTS HSJOt
«EfER SERVK^ TO OUAUREO SERVICE BERSO»MEL
This symbol is intended to
alert the user to the presence
of uninsulated "dangerous
voltage" within the
product's enclosure that may
be of sufficient magrutude to
constitute a risk of electric
shock to persons.
This symbol is intended to
alert the user to the presence
of important operating and
maintenance (servicing)
instructions in the literature
accompanying the appliance.
WARNING
The AC power cord must be changed only
at qualified service shop.
The nameplate is located on the bottom of
the power supply box.
Use a commercially available AC plug
adapter, if necessary, depending on the
design of the wall outlet.
CAUTION
To prevent electric shock, match wide blade
of plug to wide slot, fully insert.
The shielded interface cable recommended
in this manual must be used with this
equipment in order to comply with the
limits for a digital device pursuant to
Subpart B of Part 15 of FCC Rules.
I-US
INFORMATION
This equipment has been tested and found
to comply with the limits for a Class B
digital device, pursuant to Part 15 of the
FCC Rules. These limits are designed to
provide reasonable protection against
harmful interference in a residential
installation. This equipment generates, uses,
and can radiate radio frequency energy and,
if not installed and used in accordance with
the instructions, may cause harmful
interference to radio communications.
However, there is no guarantee that
interference will not occur in a particular
installation. If this equipment does cause
harmful interference to radio or television
reception, which can be determined by
turning the equipment off and on, the user
is encouraged to try to correct the
interference by one or more of the following
mccisures;
• Reorient or relocate the receiving antenna.
• Increase the separation between the
equipment and receiver.
• Connect the equipment into an outlet on
a circuit different from that to which the
receiver is connected.
• Consult the dealer or an experienced
radio/TV technician for help.
Declaration of Conformity
Trade Name: SONY
Model No.: PLM-S700
Responsible Party: Sony Electronics Inc.
Address: 1 Sony Drive, Park Ridge,
N107656 USA
Telephone No.: 201-930-6970
This device complies with part 15 of the
FCC Rules.
Operation is subject to the following two
conditions:
(1) This device may not cause harmful
interference, and
(2) this device must accept any interference
received,
including interference that may cause
undesired operation.
Page 3

Precautions
• One blade of the plug is wider than the
other for safety purposes and will fit into
the power outlet onfy one way. If you are
unable to insert the plug fuUv into the
outlet, contact your dealer.
• You can use your Glasstron in any
country or area with the supplied AC
power adapter within 100 V to 240 V AC,
50/60 Hz. Use a commercially available
AC plug adapter [a], if necessary,
depending on the design of the waU
outlet [b].
AC-PLM3 -«0=—
[a] [b]
DISPOSAL OF LITHIUM ION BATTERY.
LITHIUM ION BATTERY.
DISPOSE OF PROPERLY.
You can return your unwanted lithium ion
batteries to your nearest Sony Service
Center or Factory Service Center.
Note. In some areas the disposal of
lithium ion batteries in household
or business trash may be prohibited.
Owner's record
The model and serial numbers are located at
the rear of the power supply box. Record
these numbers in the spaces provided
below. Refer to them whenever you call
upon your Sony dealer regarding this
product.
Model No.
Serial No.
------------------------------------------------
___________________________________
For the Sony Service Center nearest you call
1-800-222-SONY (United States only)
For the Sony Factory Service Center nearest
you call 416-499-SONY (Canada only)
Caution: Do not handle damaged or
leaking Lithium ion batteries.
‘ IBM PC/AT and VGA are registered trademarks of IBM Corporation of the U.S.A.
' Microsoft, MS, MS-DOS and Windows'® are registered trademarks of Microsoft Corporation in the
United States and other countries.
' Macintosh is a trademark licensed to Apple Computer, Inc., registered in the U.S.A. and other
countries.
' VESA is a trademark of Video Electronics Standard Association.
' All other product names mentioned herein may be the trademarks or registered trademarks of
their respective companies. Furthermore, "™" and "®" are not mentioned in each case in this
manual.
3-
US
Page 4
--=- *-3 ^ ' • ' •‘-i
visuaf^isplay
conraptin^
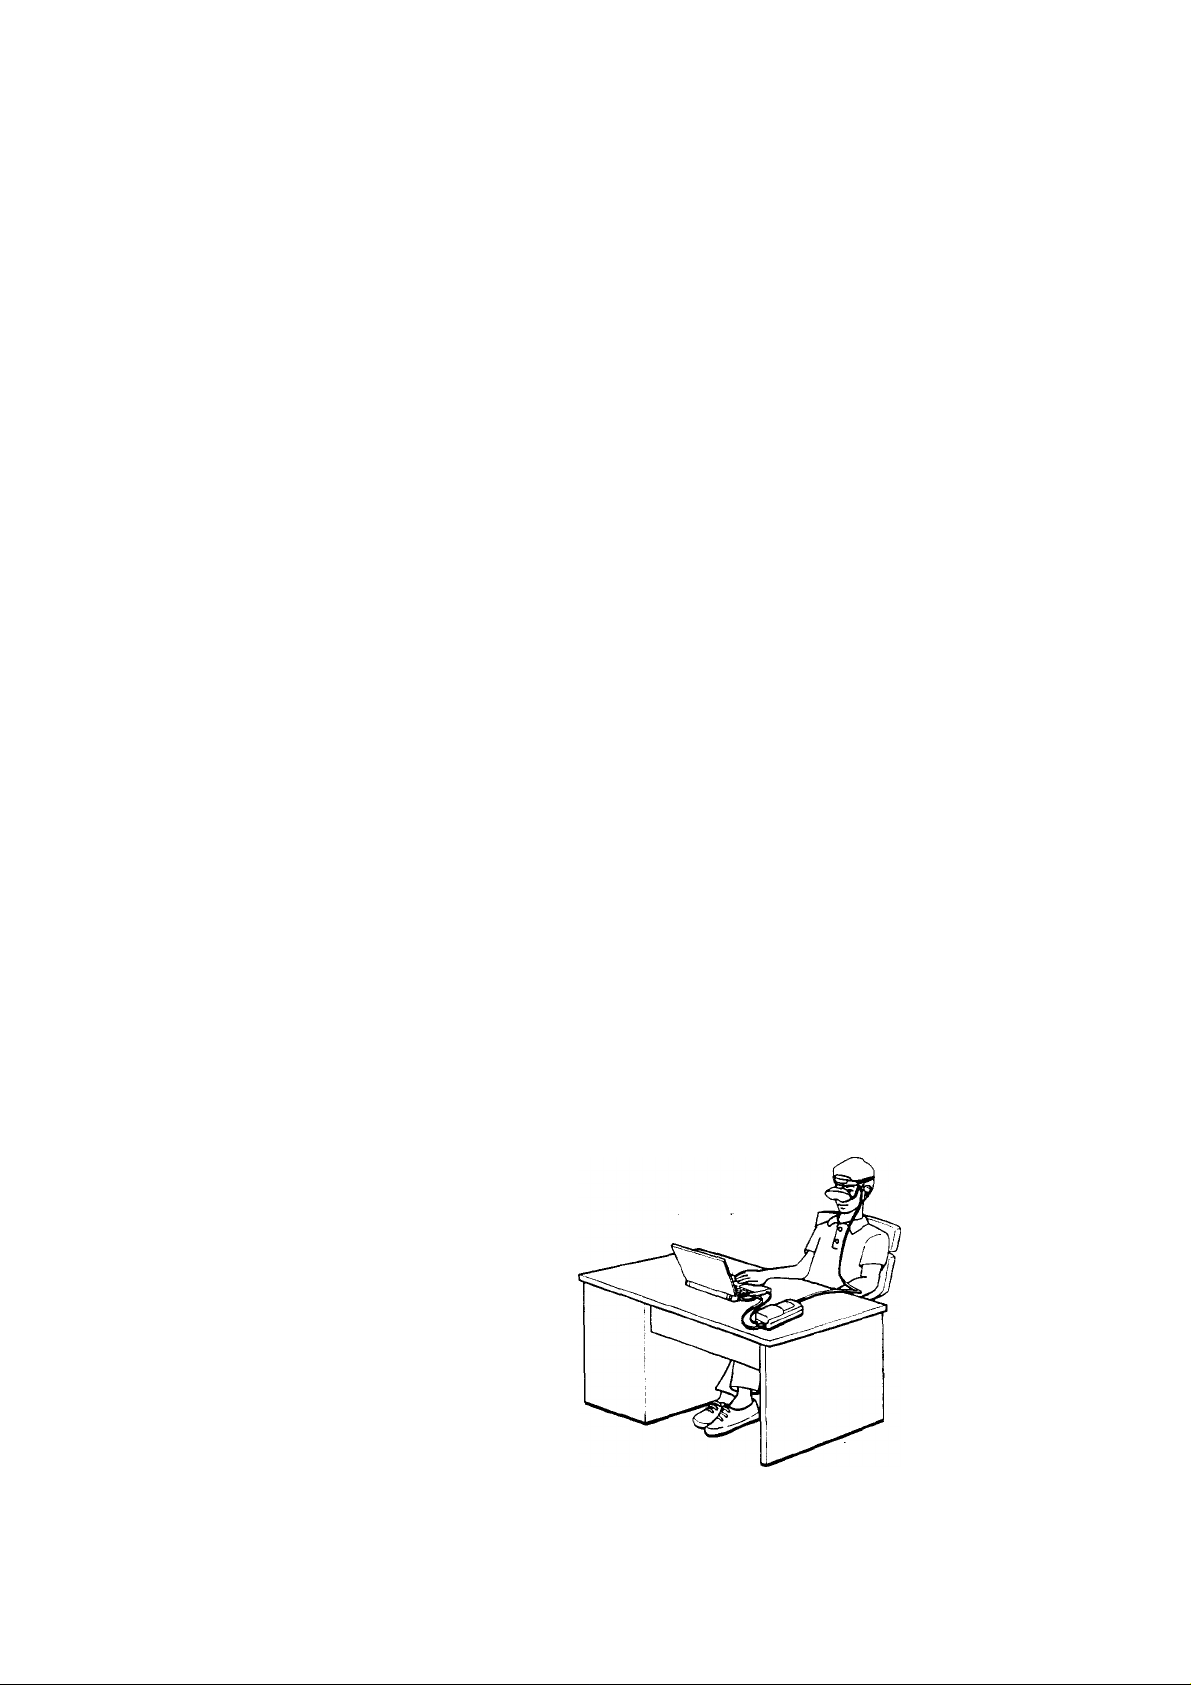
Congratulations on your purchase of a Sony
Glasstron Personal Viewer. The Glasstron,
using current technology in small,
lightweight vi^al displays, provides a
television viewing experience similar to
watching a 30-inch television from a
distance of approximately 4 feet in SVGA
mode. (Viewing experience may differ
according to individual perception.)
The Glasstron Personal Viewer creates an
image through two separate liquid crystal
displays, in close proximity to your eyes.
To insure your safe use of the Glasstron,
please become familiar with its basic
operations, including proper fitting
instructions, and be aware of any symptoms
of eye fatigue or other discomfort you may
experience.
WARNING
YOUR FAILURE TO FOLLOW THESE
OPERATING INSTRUCTIONS MAY
RESULT IN EYE FATIGUE, EYE
IMPAIRMENT, OR OTHER EYE INJURY,
PROPERTY DAMAGE OR DEATH.
Note on the LCD (Liquid Crystal
Display)
The LCD screen is made with highprecision technology. However, black
points or bright points of light (red, blue,
or green) may appear constantly on the
LCD screen. This is not malfunction.
(Effective dots: more than 99.999%)
WARNING
THIS PRODUCT SHOULD NOT BE USED
BY CHILDREN AGE 15 OR YOUNGER.
THE EYES OF CHILDREN ARE STILL
DEVELOPING AND MAY BE ADVERSELY
AFFECTED FROM USE OF THIS
PRODUCT.
t-us
Page 5

SAFETY INSTRUCTIONS..............................................................................................
About the Glasstron.......................................................................................................11
6
Getting Started
Checking the supplied accessories..............................................................................13
Locating the parts and controls....................................................................................14
Connecting the Glasstron
Connecting the PC....................................................................................................15
Cormecting the video equipment..........................................................................18
Cormecting the power source.................................................................................20
Wearing the Glasstron...................................................................................................21
Turning on the Glasstron
Checking the display unit position...................................................................................23 Q
Checking the screen position alignment..............................................................25
Setting the password
.....................................................................................................28
.
...
........................................................... ■ :
Operations
Using the Glasstron........................................................................................................30
Checking the display indication............................................................................32
Screen warnings against overuse of the Glasstron
Viewing the surrounding environment
Adjusting the sound and picture
Signal compatibility.................................................................................................35
Adjusting the sound/picture...................................................................................36
Adjusting the RGB signal.......................................................................................39
Adjusting the video signal......................................................................................40
Resetting the adjustment to the factory preset level
Using the optional battery pack
..................................................................................
.....................................................................
............................................
.........................................
33
34
40
41
Additional Information
Precautions.......................................................................................................................43
Error messages.................................................................................................................45
Troubleshooting..............................................................................................................46
Specifications.................................................................................................................. 48
Index..................................................................................................................................49
5-'
us
Page 6

SAFETY INSTRUCTIONS
THE SONY GLASSTRON PERSONAL VIEWER SHOULD BE USED IN
STRICT ACCORDANCE WITH ALL INSTRUCTIONS TO PREVENT EYE OR
OTHER INJURY, LOSS OF VISUAL FUNCTIONS, PROPERTY DAMAGE, OR
DEATH.
USE RESTRICTIONS
Warning: No Use by Children Age 15 or Younger.
This product is designed for adult use.
The eyes of children are still developing and may be adversely affected by use o
this product, and it may cause eye fatigue, eye damage, or loss of visual
functions.
In addition, this product may not be adjusted to fit a child's head.
Safety Password: To prevent use by children age 15 or yoimger, this product
has been equipped with a safety password protection system
For instructions on the use of the password protection systerr
see page 28.
Warning: Eye Disease/Eye injury/Glaucoma.
If you have been diagnosed with or are susceptible to eye disease, eye injury, or
glaucoma, consult your doctor before use and do not use without your doctor's
approval. Use of tliis product by individuals with conditions such as glaucoma
may cause these conditions to worsen.
Caution: Heart Disease/High Blood Pressure.
If you have a history of heart disease or high blood pressure, consult your doctc
before use and do not use without your doctor's approval. Use of this product
allows the viewer to feel they are in the action, which may result in increased
anxiety or hecut injury. If during viewing any increased anxiety is experienced,
stop using the prod’ji t immediately and rest. If the symptoms persist after rest,
consult vour doctor.
Caution: Seizures.
If you have a history of temporary spasms, unconsciousness, or epileptic
seizures from light stimulation, consult your doctor before use and do not use
without your doctor's approval. Use of this product by such individuals may
cause spasms, unconsciousness, or seizures. If you experience such symptoms
during use, stop using the product immediately and consult your doctor.
Î-US
ADDITIONAL SAFETY INFORMATION.
A. Health Concerns. See pages 7 through 8.
B. Instructions for Safe Fit. See page 9.
C. Warnings for Electronic Products. See page 10.
Page 7

Health Concerns
Warning; Eye Fatigue/Eye Damage/Loss of Visual Functions.
Misuse or overuse of this product may result in eye fatigue, eve damage, or loss
of visual functions. Stop using if you feel tired or experience headaches or
discomfort.
Warning: No Use by Children Age 15 or Younger.
This product is designed for adult use.
The eyes of children are still developing and may be adversely affected by use of
this product, and it may cause eye fatigue, eye damage, or loss of visual
functions.
In addition, this product may not be adjusted to fit a child's head.
Caution: Sickness/Headache/Nausea.
If during use you experience any of the following s3Tnptoms, stop using this
product immediately and rest. These symptoms may indicate that you are
misusing or overusing the product (see "Imtructions for Safe Fit," page 9) or that
you should noi use the product for health reasons. If the following symptoms
persist after rest, consult your doctor.
- sore eyes, eye fatigue, or double vision
- headache
- inability to focus on the screen
- nausea or motion sickness
- stiff or sore shoulders or neck
After six hours the product automatically turns off to prevent eye fatigue or eye
damage. For instructions on these hmchons, see page 33.
Caution: Motion Sickness from Viewing Programmes.
Some viewers may experience motion sickness, headache, or nausea from
viewing movies or video programmes, especially those with intense action and
movement. If you feel any of these symptoms, stop using the product
immediately. To avoid personal injury or injury to others, do not drive a car or
motorcycle, nor do anything that requires concentration until the symptoms
disappear.
'-us
Page 8

SAFETY INSTRUCTIONS (continued)
Health Concerns
Caution: Motion Sickness from External Mot! i.
Do not use this product while subject to external motion - r example, as a
passenger in a car. Use of this product under these cond- s may cause motiot
sickness.
Caution: Accidents.
Do not use this product while walking, skating, bicycling, operating a motor
vehicle or other power equipment, or while engaged in any other similar
activity.
Use of this product under these conditions may result in an accident, injury, or
death to yourself or others.
Caution: Sound Volume.
Avoid using headphones at high volume. Hearing experts advise against
continuous, loud, cind extended play. If you experience a ringing in your ears,
reduce volume or discontinue use.
-us
8
Page 9

Instructions for Sáfe Fit
Warning: Proper Fit.
Each time this product is used adjustment screens will appear, requiring the
viewer to properly fit the product. Proper fit means that an asterisk (♦ ) will
appear in each comer of the display. Failure to properly fit the product each
time may result in eye fatigue, eye damage, or loss of visual functions and may
result in accident or injury. For instructions on how to properly fit this product,
see pages 23 through 27.
Warning: No Use by Children Age 15 or Younger.
This product is designed for adult use.
The eyes of children are still developing and may be adversely affected by use of
this product, and it may cause eye fatigue, eye damage, or loss of visual
functions.
In addition, this product may not be adjusted to fit a child's head.
Safety Password: To prevent use by children age 15 or younger, this product
has been equipped with a safety password protection system.
For instmctions on the use of the password protection system,
see page 28.
g-u:
Page 10

Warnings for Electronic Products
Caution: Electric Shock.
Failure to observe all operating and maintenance instructionr
to your product and may result in property damage or injur
electric shock, fire, or other cause.
Caution: Do Not Disassemble.
Any required service on this product should be performed by a trained
authorized servicer. Failure to comply with this warrring may result in property
damage or personal injury or death from electric shock, fire, or other cause.
Caution: Avoid Wet, Humid, Dusty and Smoky
Environments.
This product may be adversely affected by wet, humid, dusty, and smoky
conditions which may result in property damage, personal injury or deatii. Do
not use this product near or arovmd water. Avoid using or storing this product
under these conditions.
_y cause damage
death from
Caution: Avoid High Temperature or Direct Sunlight/Avoid Mechanical Shock.
This product may be deformed by high temperature or direct sunlight and also
by dropping the product or other mecharucal shock. Avoid these conditions, as
the screens may loose proper alignment and it may cause eye fatigue or eye
damage.
Caution: Unplug the Product When Not in Use.
Always unplug this product when it will not be in use for extended periods of
time or during vacations.
10
rUS
Page 11
About the Glasstron
Caution: The screen is always right in front of you.
The Glasstron is a head-mounted display. With this type of display, the screen is always in front
of you even if you move your head. Because of this feature, you can concentrate on the screen
more easily compared with ordinary TVs, and you have a sense of being in the action.
• It is easy to adjust the Glasstron to your eyes. You can use the display umt even while
wearing glasses.
• Every time you use the Glasstron, the adjustment screen appears to help you adjust the
display unit properly. You can also check whether the left and right screen positions are
properly aligned or not.
• Cautions appear on the screen about every two hours to remind you to check for eye fatigue.
The power will automatically turn off if you do not press the PUSH DISPLAY jog dial. If you
keep using the Glasstron continuously for six hours, a warning appears on the screen and the
power will turn off automatically.
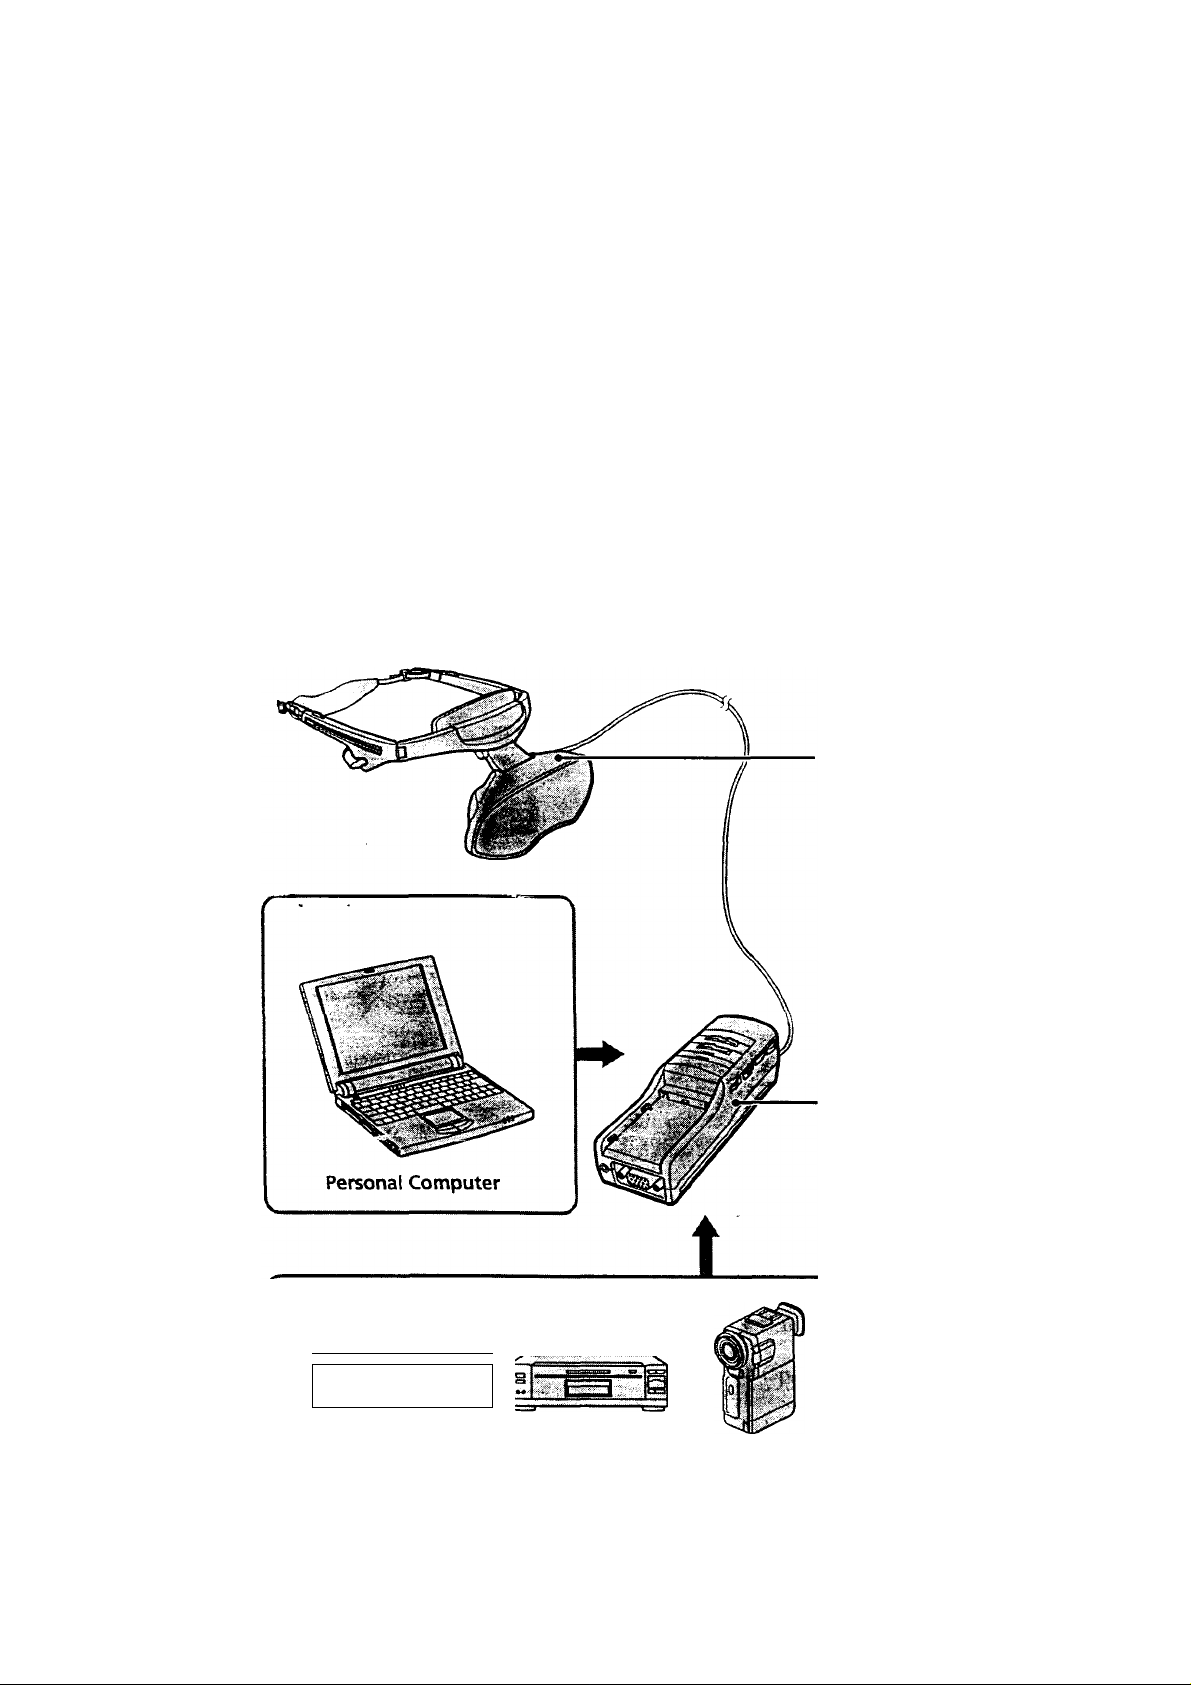
The Glasstron consists of the following items:
Display unit
The display unit is equipped with
two small (left and right) LCDs.
Power supply box
You can supply power using the
supplied AC power adapter or the
optional Sony rechargeable battery
pack.
When using with the Glasstron,
connect your video equipment or
PC to the connector on the power
supply box.
You can adjust the sormd volume.
You can also use the SEETHROUGH control in order to see
the surrounding environment.
VCR
!Ja
Laser disc player,
Camcorder
a
DVD player
continued
11
Page 12

About the Glasstron (continued)
Features
• A powerftil, big screen experience
comparable to Watching a 30-inch screen
from approximately 4 feet (1.2 m) away
(SVGA mode).
• You can connect the Glasstron, which is
equipped with 1.55 milhon dot LCD, to
your PC to see the screen of the PC in the
SVGA or VGA screen mode.
• You can enjoy high quality picture when
you cormect the DVD player, or DV
camcorder, etc.
• The see-through function allows you to
see the surrounding environment while
wearing the Glasstron.
• You can use the Glasstron while wearing
glasses.
• Solid and Lightweight components made
of magnesium alloy, with the display unit
weighing about 5.3 oz (120 g).
«r
12
-us
Page 13
1
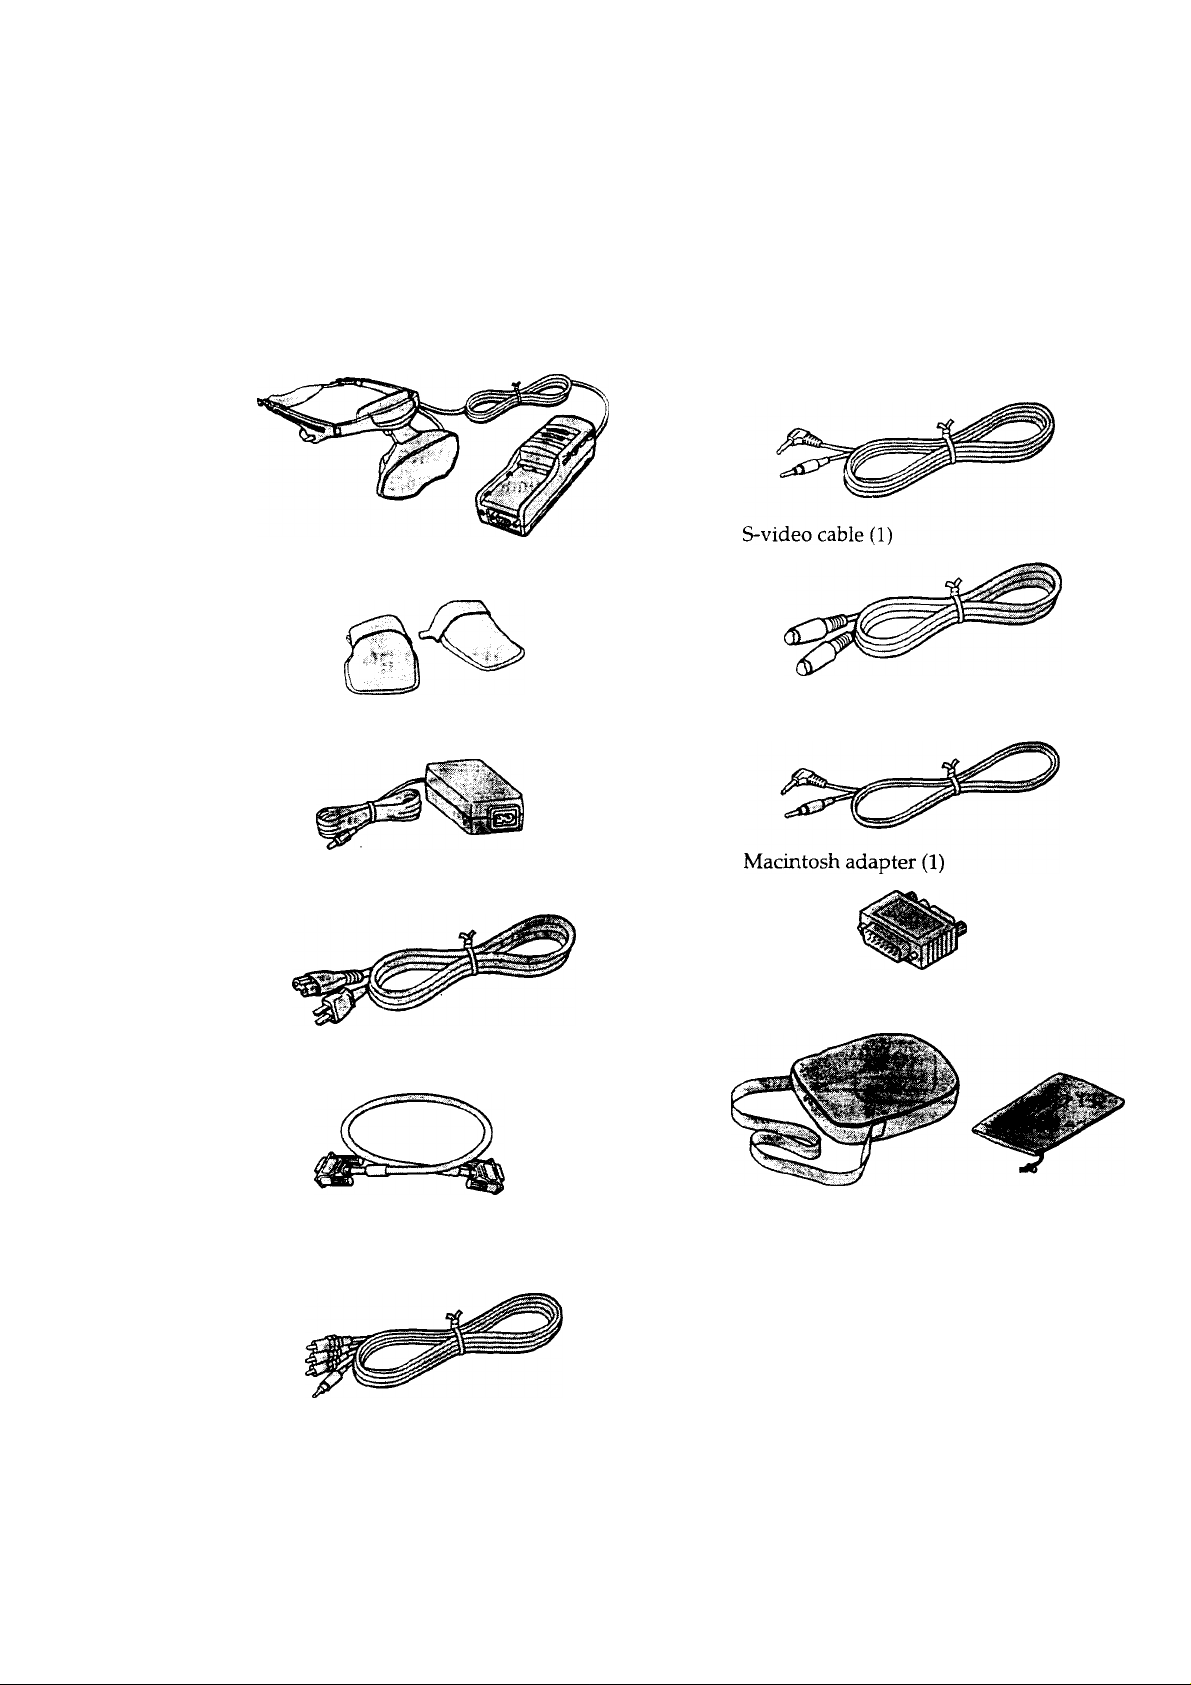
Checking the supplied accessories
Check that the following accessories are supplied with your Glasstron. If any item is not
supplied, contact your Sony dealer or local authorized Sony service facility.
Display unit/power supply box (1)
Sunshades (1 pair)
• AC power adapter AC-PLM3 (1)
AC power cord (1)
Audio/video cable (special miniplug
special miniplug) (1)
Audio cable (stereo miniplug) (1)
RGB signal cable (HD15) (1)
• Audio/video cable (special miniplug •
phono plug) (1)
Carrying cases (2)
Windows 95/Windows 98 PC Glasstron
Information Disk (1)
Screen adjustment disk for Macintosh (1)
Operating instructions (1)
Warranty (1)
13-'
Page 14
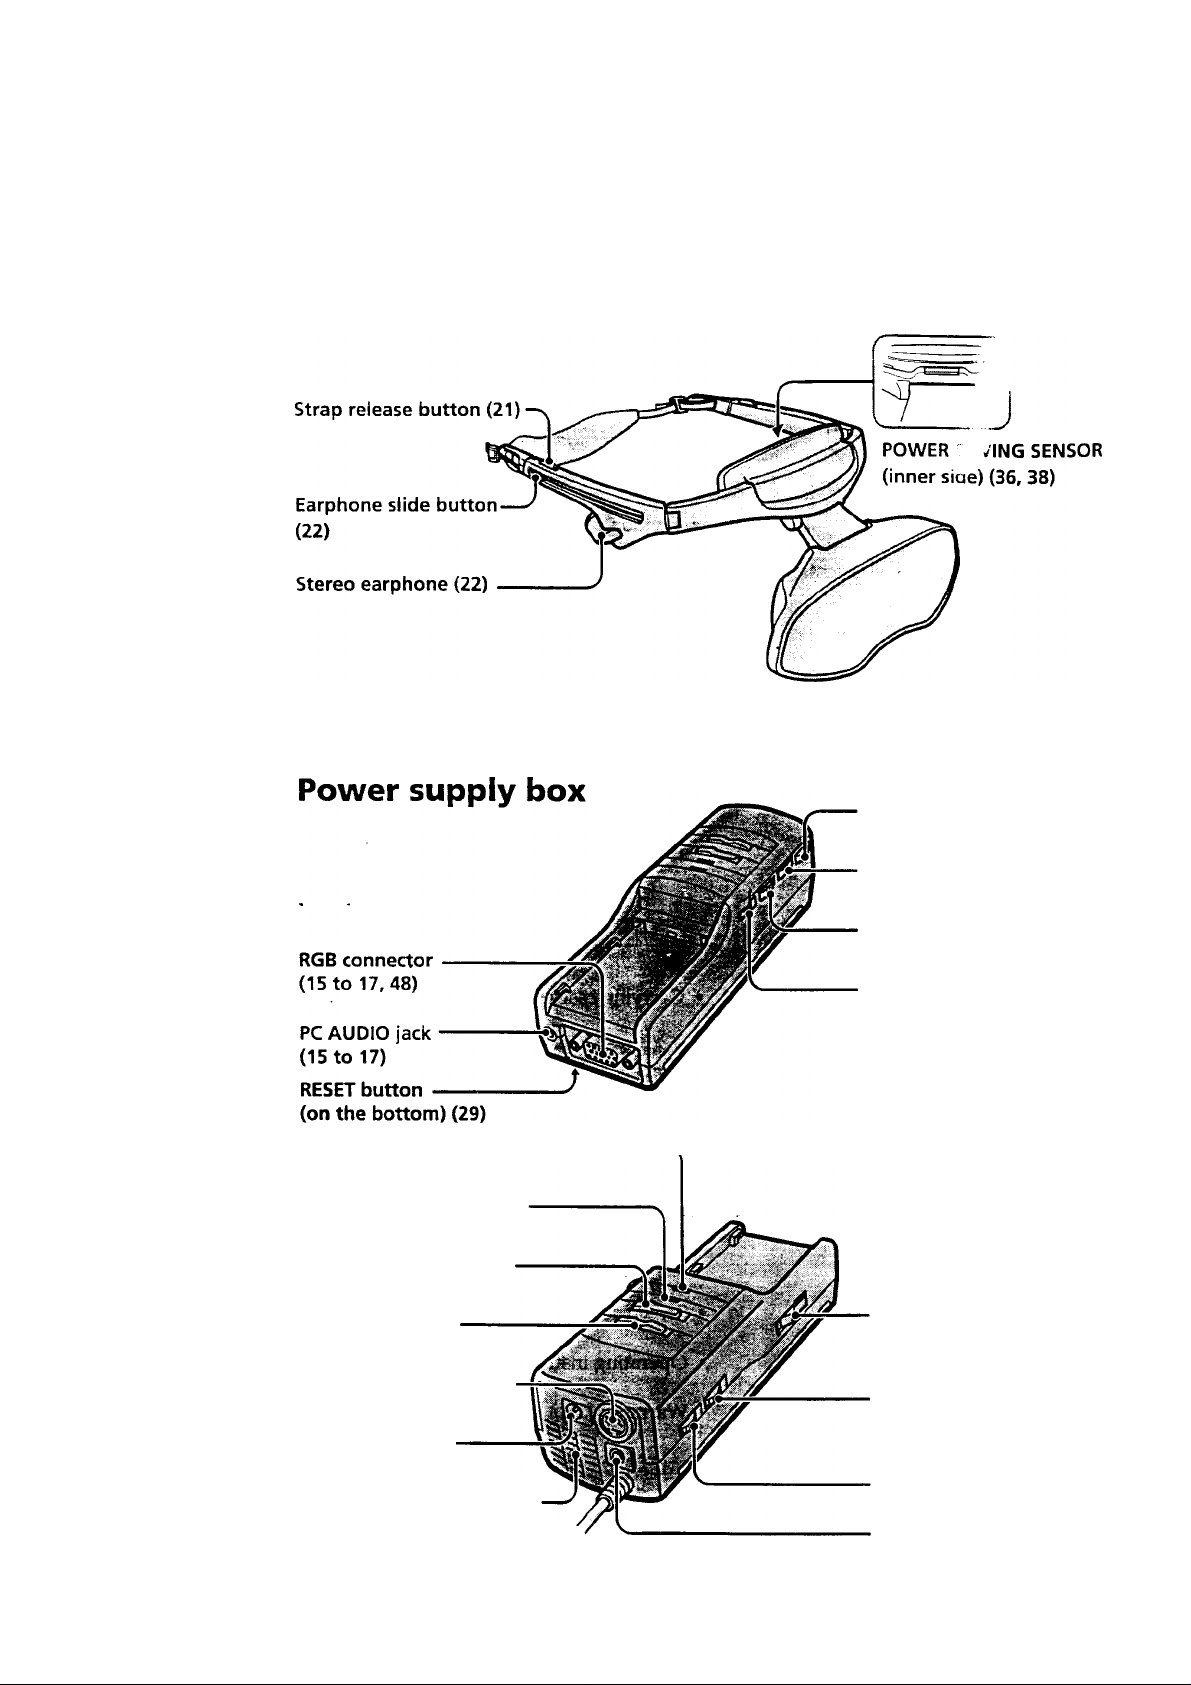
Locating the parts and controls
Refer to the pages indicated in parentheses () for details.
Display unit
CHARGE lamp (41)
POWER/POWER SAVING
lamp (23, 38)
POWER switch (23, 30)
PC-VIDEO switch
(15 to 19,31)
S VIDEO connector (19)
PUSH DISPLAY jog dial (23, 37)
MENU button (37)
SCREEN switch (34)
SEE-THROUGH control (34)
ВАТТ RELEASE button (41)
BRIGHT control (32)
DC IN connector
(20,41)
Ventilation openings (46)
us
14-
VOL control (32)
AUDIO/VIDEO connector (18, 19
Page 15
I; J ^ ’>- • '
Connecting the Glasstron
When connecting the Glasstron to other equipment, use the supplied cables.
Note
If you use the commetdally available cables, and the performance is reduced, check the performance
using the supplied cables.
Connecting the PC
Be sure to turn off your PC before connecting the power supply box.
Notes
• Do not use the RGB signal cable (HD15), which is 6.5 feet (2m) or longer. The performance may be
reduced.
• Refer to the irrstruction manual supplied with your PC as well.
• Depending on your computer, the audio port is indicated as LINE OUT, headphone, speaker, etc.
• Adjust sound volume on the computer.
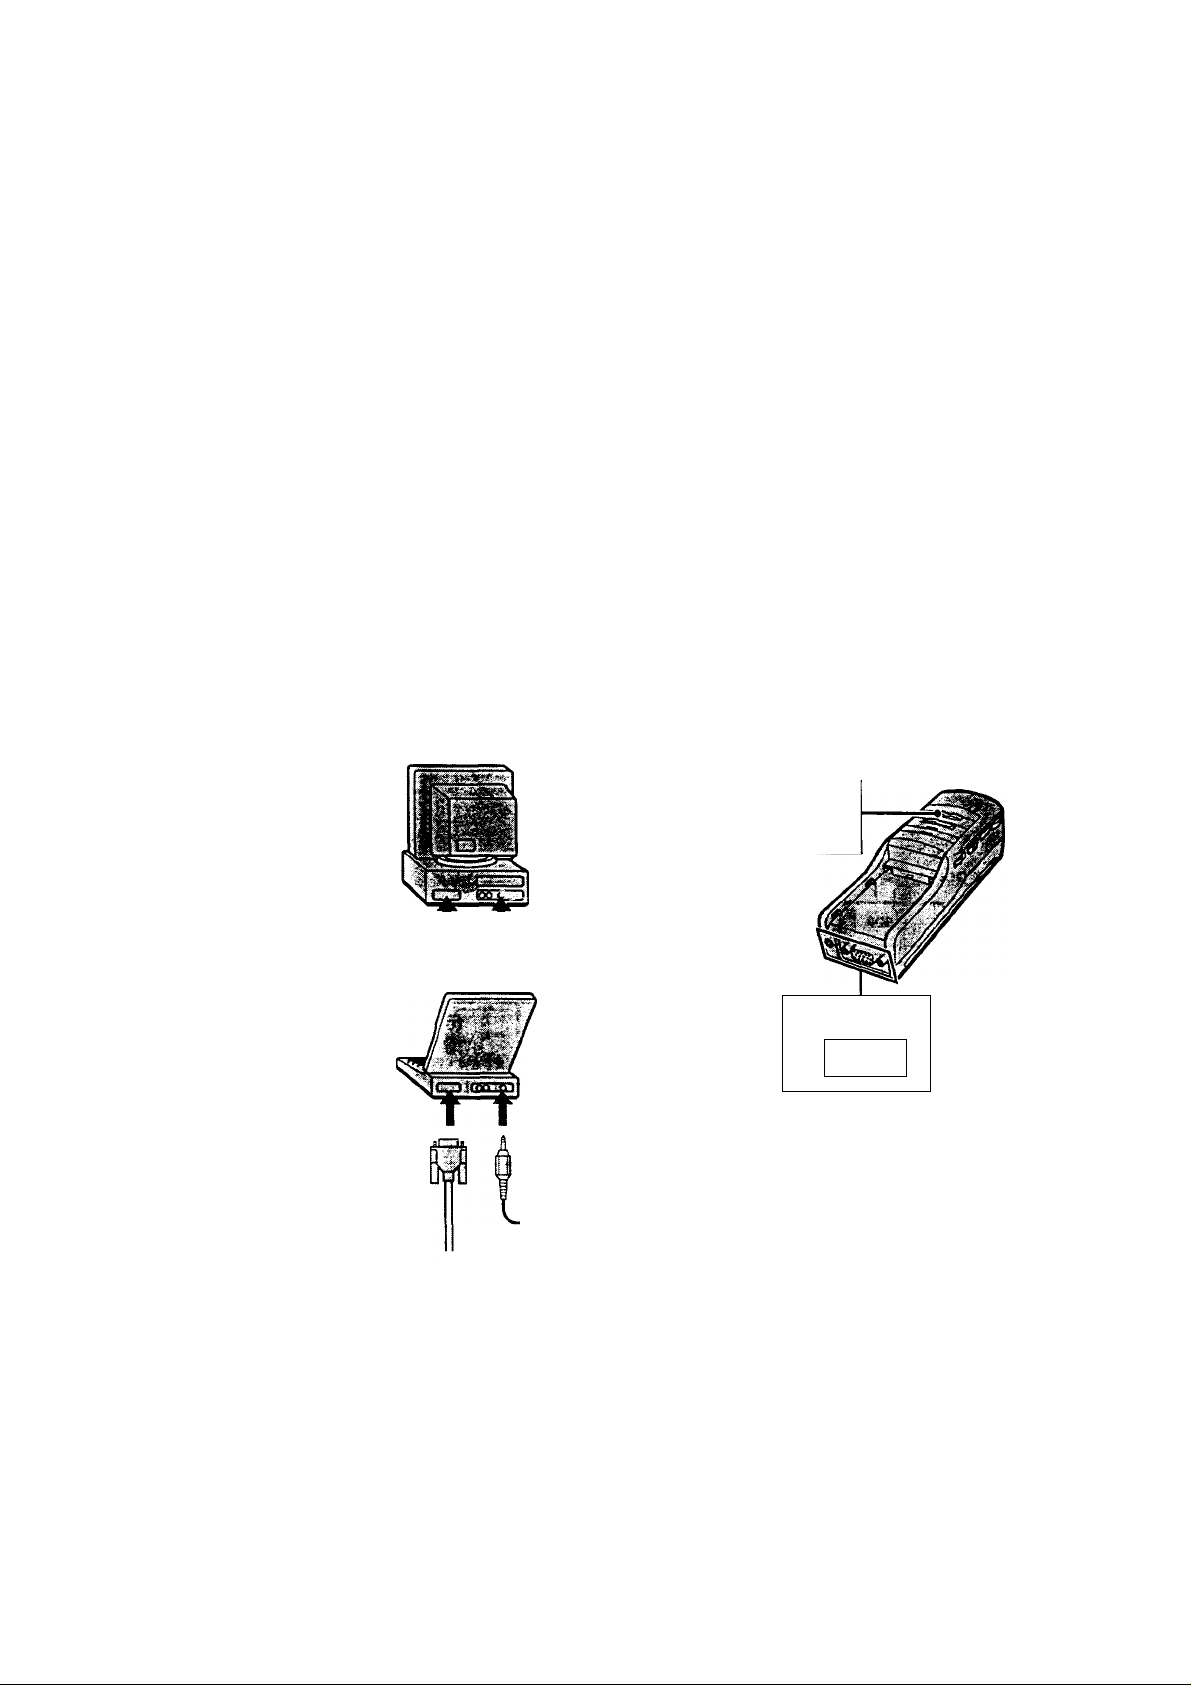
Connecting other IBM compatible PCs
Connect the Glasstron to your PC using the supplied RGB signal (HD15) cable. When you
connect the Glasstron to your PC, set the PC-VIDEO switch on the power supply box to "PC."
to monitor port I I to audio port
or
to monitor port
to audio port to PC AUDIO I
Audio cable (supplied)
RGB signal cable (supplied)
: Signal flow
Set the PC-VIDEO switch
to "PC."
connector
—
------------------------------
PC
AUDIO
Power supply box
RGB
to RGB connector
continued
15-
Page 16
. - î» ’ ■ =" V ->
•|,5
Connecting the Glasstron (continued)
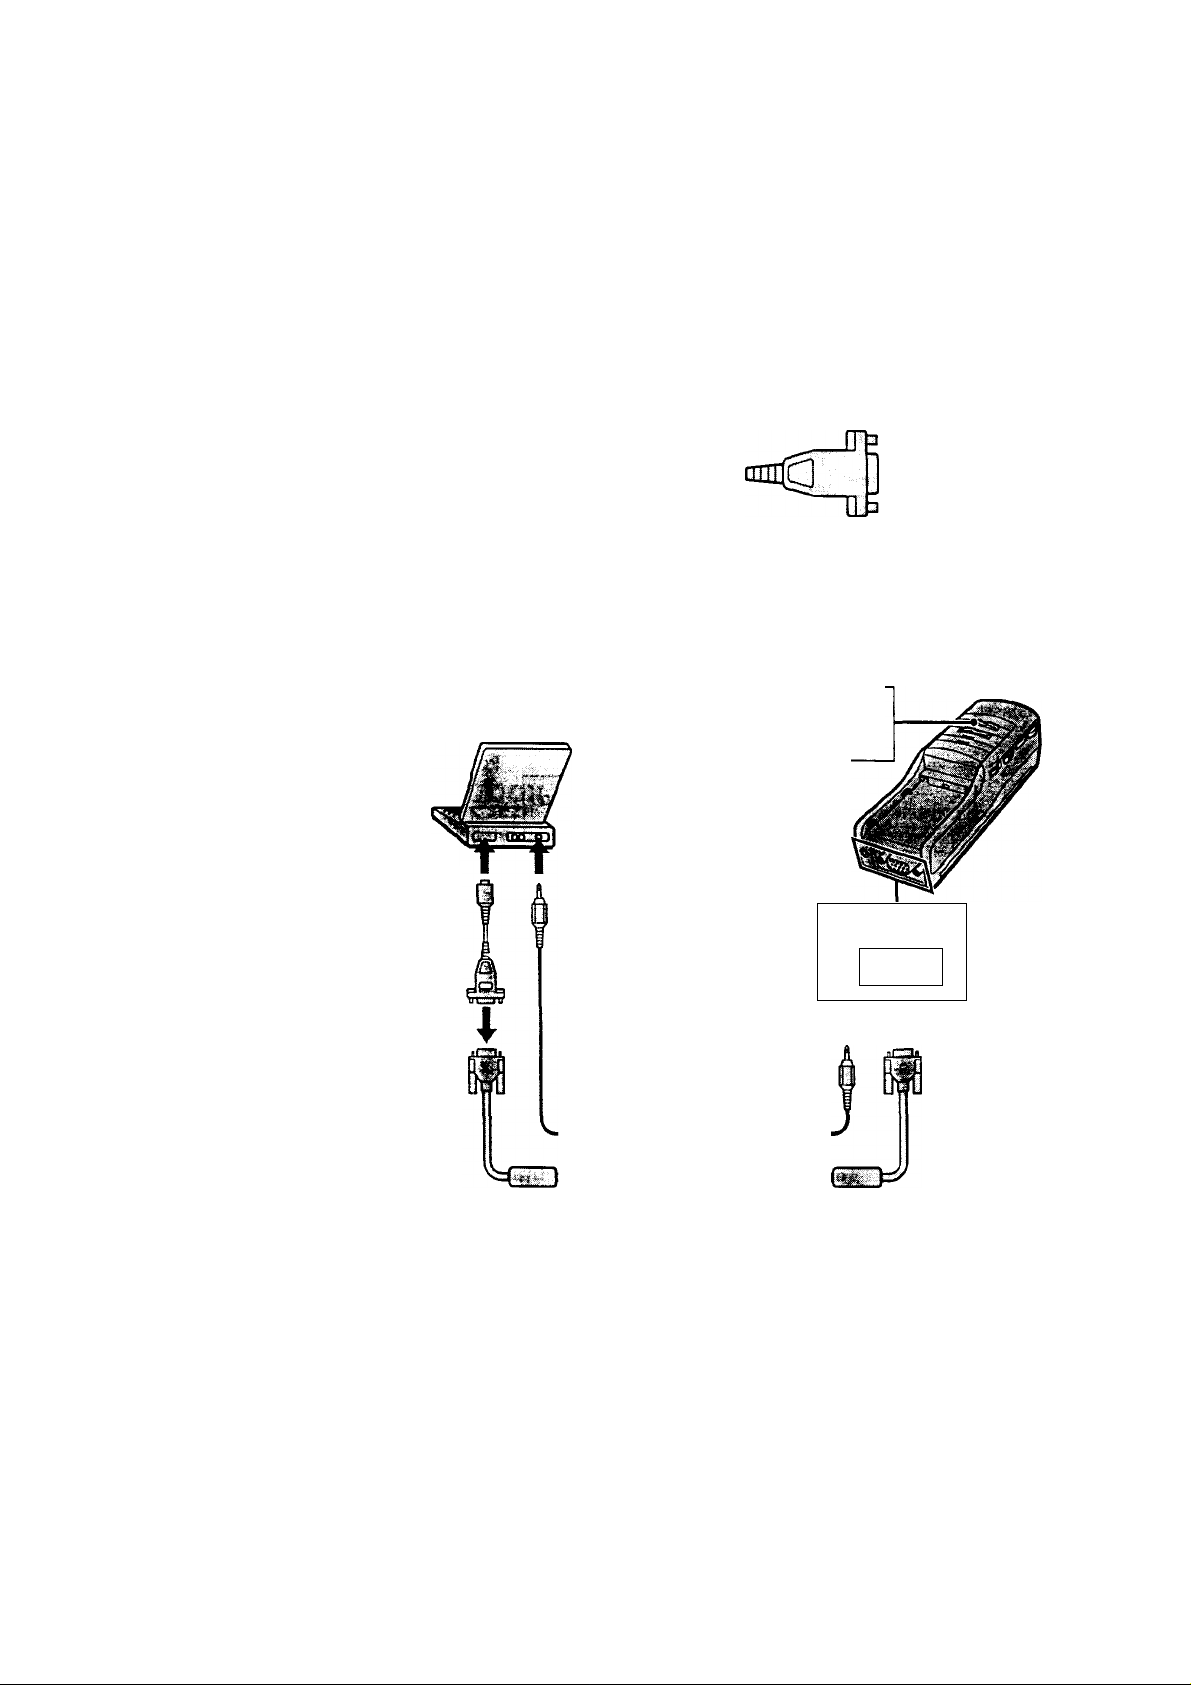
Connecting a Macintosh Powerbook
Depending on the model, you may need to use a commercially available adapt, r connect the
RGB signal cable (supplied) as shown below. When you connect the Glasstron
Powerbook, set thë PC-VIDEO switch on the power supply box to "PC."
our
to monitor
port of
Powerbook
to monitor port
À ^
Connector should match the monitor
port of your Powerbook model.
Set the PC-VIDEO switch
to "PC."
to audio port
Adapter
to PC AUDIO
connector
PC
AUDIO
-©■
to RGB
signal cable
VGA type connector
(HD15, female)
Power supply box
RGB
to RGB connector
Audio cable (supplied)
-----------
!======
RGB signal cable (supplied)
: Signal flow
Note on connection
Set the display setting to the 16-inch display mode (832 x 624) or the 13-inch display mode (640 x 480).
The Glasstron does not display the image with the 19-inch display mode (1024 x 768) or more.
us
16-'
Page 17
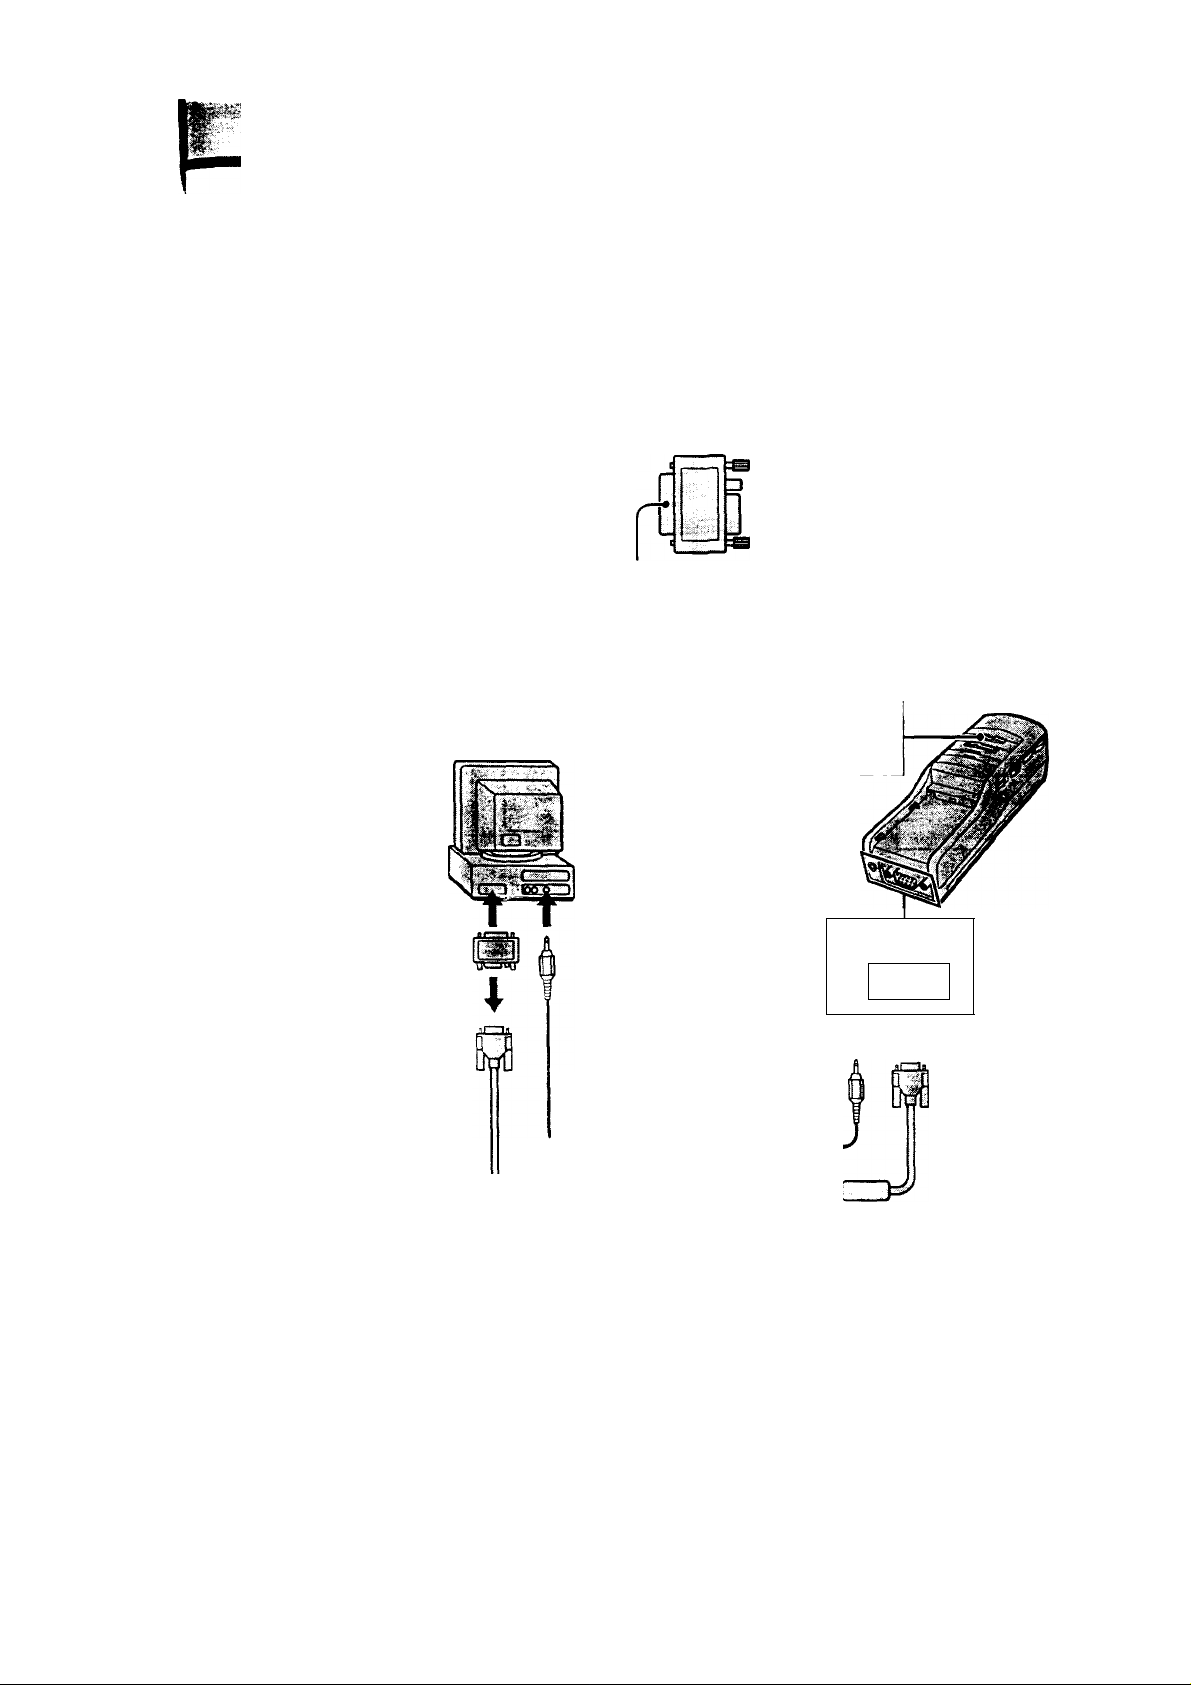
Connecting a Macintosh (desktop models)
Depending on the model, you may need to use the supplied Macintosh adapter to connect the
RGB signal cabl? (supplied) as shown below. When you cormect the Glasstron to your
Macintosh, set the PC-VIDEO switch on the power supply box to "PC."
to monitor port
of Macintosh
to monitor port
Macintosh
adapter
(D-Sub 15-pin,
male)
to audio port
to monitor
port
Set the PC-VIDEO switch
to "PC."
to PC AUDIO
connector
VGA type connector
(HD15, female)
Power supply box
PC RGB
AUDIO
to RGB connector
to RGB signal cable
Audio cable (supplied)
—r—
----------------
RGB signal cable (supplied)
.; Signal flow
Notes on connection
• The supplied display adapter does not support the models before the Macintosh II series.
• Set the display setting to the 16-inch display mode (832 x 624) or the 13-inch display mode (640 x
480). The Glasstron does not display the image with the 19-inch display mode (1024 x 768) or more.
continued
Page 18
K.)- .
Connecting the Glasstron (continued)
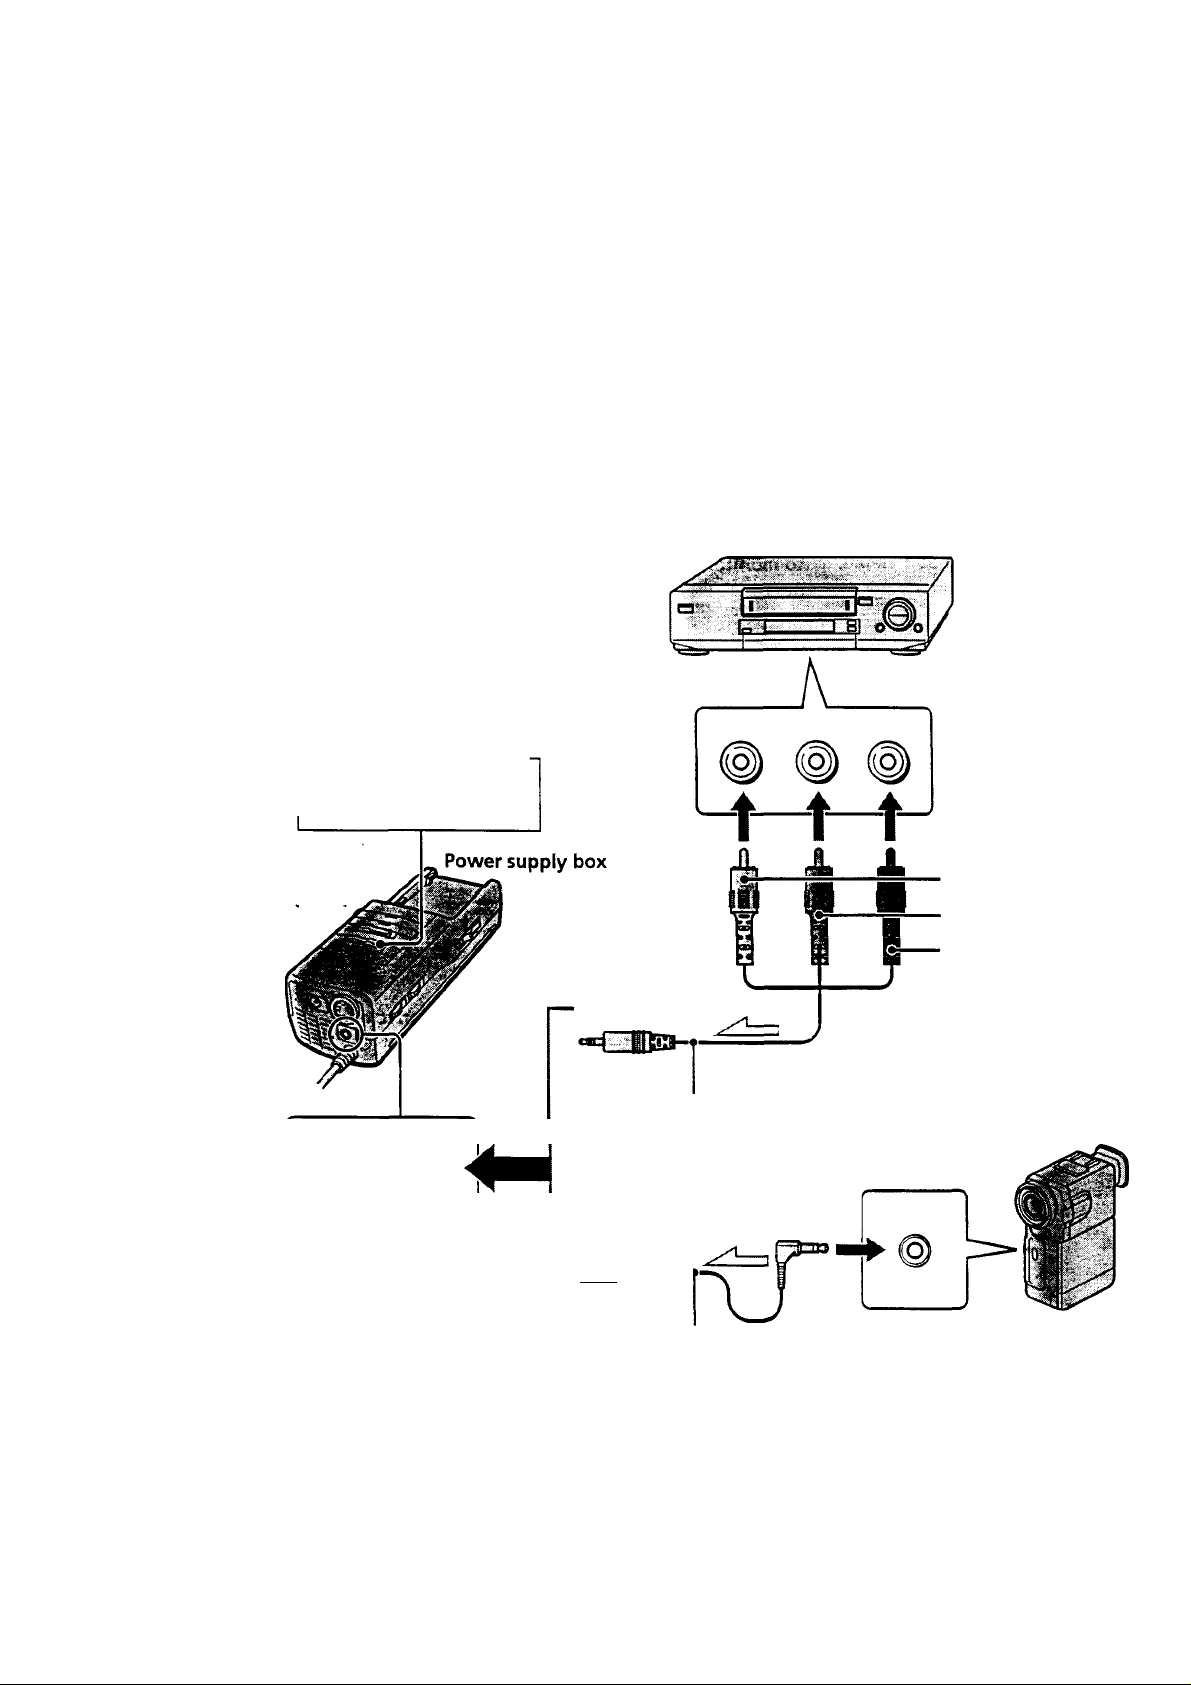
Connecting the video equipment
Connect a VCR, laser disc player, DVD player, or camcorder to the power sup- / box using one
of the audio/vicjeo cables (supplied) as shown below. When you connect the ’ .^sstron to the
video equipment, set the PC-'^DEO switch on the power supply box to "VIE
Note
Do not use the audio, audio/video or S-video connecting cables, which are 9.8 fc (3m) or longer. The
performance mav be reduced.
VCR, laser disc player, DVD player,
camcorder, etc.
Set the PC-VIDEO switch
to "VIDEO."
AUDIO/VIDEO'S,
to AUDIO/VIDEO connector
Audio/video cable (supplied)
(specidl miniplug ■ *—* phono plug)
to audio/video output
^ ■ isa-'
to audio/video outputs
Video (yellow)
Audio L (white)
Audio R (red)
Camcorder, etc.
18
Audio/video cable (supplied)
(special miniplug *—*■ special miniplug)
: Signal flow
-us
Page 19

iSafilSSfW”
If your video equipment has an S-video jack
Connect the Glasstron to the video equipment using the supplied S-video cable and the audio/
video cable to enjoy the highest quality pictures. In this case, you do not need to connect the video
(yeUow) plug. If yoitconnect both the S-video and video plugs, the S-video signal is automatically
selected. When you connect the Glasstron to the video equipment, set the PC-VIDEO switch on the
power supply box to "VIDEO."
Set the PC-VIDEO switch
to "VIDEO."
VCR, Laser disc player, DVD player,
camcorder, etc.
to AUDIO/VIDEO connector
Audio/video cable (supplied)
(special miniplug *—*■ special
miniplug)
Audio/video cable (supplied)
(special miniplug *—*■ phono
plug)
]: Signal flow
About the AUDIO/VIDEO input jack
The AUDIO/VIDEO input jack of the
Glasstron is a special minijack, and the signal
cormections are aligned as shown on the right.
This alignment may differ depending on the
equipment.
to audio/video output
Audio R (red)
to audio/video outputs
Page 20

Connecting the Glasstron (continued)
Notes
• Even if you use the supplied audio/video
cable, the audio and video signals may not be
carried to the Glasstron depending on the
video source. In this case, contact your Sony
dealer or local authorized Sony service
facilitv.
' When you connect the Glasstron to the audio
output (phono lacks) of -our video
equipment, connect the Glas^iton to both the
right and left audio output i: r;s. If you
cormect the Glasstron to just < ne audio
output jack, you will hear sound from only
one of the stereo earphones.
Connecting the power source
Connect the AC power adapter AC-PLM3 (supplied) to the DC IN connector on the power
supply box. Then, cormect the AC power cord (supplied) to the AC power adapter and to a wall
outlet. Do not connect the power source until all other cormections are complete.
to wall outlet
AC power adapter
AC-PLM3 (supplied)
AC power cord (supplied)
Power supply box
20
-us
Page 21

ffj.
Wearing the Glasstron
WARNING
• Failure to properly fit the product (see "Proper Fit," page 9) each time may result in eye
fatigue, eye damage, or loss of visual functions and may result in accident or injury.
• This product should not be used by children age 15 or younger.
The eyes of children are still developing and may be adversely affected by use of this
product, and it may cause eye fatigue, eye damage, or loss of visual functions.
In addition, this product may not be adjusted to fit a child's head.
If you normally wear glasses while watching TV, you can use the Glasstron while wearing
glasses.
Loosen the back strap.
© Press and hold the strap release
buttons.
@ Then, loosen the back strap in the
direction of the arrows.
Put on the Glasstron.
Hold the front pad against your
forehead and place the rear strap so it is
fixed firmly aroimd the back of your
head.
Adjust the strap.
Adjust the strap after putting on the
Glasstron.
Make sure the strap is snug but
comfortable.
Page 22

Wearing the Glasstron (continued)
Adjust the angle of the display unit.
While holding the front pad against
your forehead, adjust the angle of the
display unit using the two hinges. Move
the display unit close to your eyes at a
slight downward angle. If you wear
glasses, move the display unit as close to
the lenses as possible.
Adjust the stereo earphones.
Pull the earphones out.
To adjust the slack, reel in the earphone
cord by pressing the slide button m the
direction of the arrow.
^ si ■*» ' 'i' * ^ :
- '=^v* ' ' ^ R'
Adjusting the back strap
If the strap does not fit properly in step 3,
adjust the strap by changing the belt length.
us
22-'
Attaching the sunshades
You can attach the supplied sunshades if
you like. The sunshades prevent the LCD
screen from reflecting li^t that may
interfere with the picture.
Attach the sunshades on the right and left
sides of the display unit. Pull out the tab of
the sun shade, then insert the tabs into the
holes on the display unit as shown below.
Display unit
Sunshades (supplied)
Page 23

Turning on the Glasstron
After you complete all of the connections and put on the Glasstron properly, turn on both the
Glasstron and the connected equipment, and follow the procedures below.
® Checking the display unit position —► This page
(D Checking the screen position ahgnment —*■ Page 25
(D Setting a password —* Page 28
If you do not want to use a password, you have to set the Glasstron to operate without
using a password in "Setting the password."
Checking the display unit position
Every time you turn on the Glasstron, the adjustment screen appears to help you adjust the
display unit properly. Adjust the display unit following the procedure below.
Turn on the Glasstron sliding the POWER switch.
The POWER/POWER SAVING lamp
lights up green.
Screen
JL
POWER/POWER SAVING
ON/OFF-^
DISPLAY LANGUAGE
FRANQ^
CdSEL «dEXEC
Turn the PUSH DISPLAY jog dial to select the desired language, then press the jog dial.
DISPLAY LANGUAGE
FR^^iis
:d SEL -d EXEC
Read the WARNING and press the jog dial.
I
WARNING
FOR YOUR SAFETY AND TO
PREVENT EYE OR OTHER
INJURY, READ AND FOLLOW
ALL INSTRUCTIONS IN THE
USER'S MANUAL.
*dCHECK
continued
Page 24

Turning on the Glasstron (continued)
Read the next WARNING and press the jog dial.
THIS PRODUCT SHOUi NOT
BE USED BY CHILDRF-. AGE
15 OR YOUNGER.
SEETHE USER'S MANUAL
FOR DETAILS.
PUSH DISPLAY
V
Adjust the display unit so that you can see an asterisk (*) in each
of the four corners as shown below.
Correct
TO CONFIRM SAFE FIT AND
PREVENT EYE FATIGUE OR
EYE DAMAGE, ADJUST THE
DISPLAY SO THAT AN
ASTERISK (») APPEARS IN
EACH CORNER.
SEE THE USER’S MANUAL
FOR DETAILS.
Incorrect
WARNING
•d CHECK
WARNING
•d CHECK
Incorrect
24-'
US
u
Incorrect
c
After you complete the display unit adjustment, press the jog dial.
Incorrect
□
Page 25

Read the next WARNING, then go to "Checking the screen position alignment."
TO PREVENT EYE DAMAGE,
DO NOT USE THIS PRODUCT
IF THE VERTICAL LINES
DO NOT CROSS THE
HORIZONTAL LINE ON THE
NEXT SCREEN.
SEETHE USER'S MANUAL
FOR DETAILS.
WARNING
'<1 CHECK
Checking the screen position alignment
WARNING
Each time this product is used, adjustment screens will appear, requiring the viewer to
properly fit the product. Proper fit means that an asterisk (*) will appear in each comer of the
display. To prevent eye damage, do not use this product if the vertical lines do not cross the
horizontal line on the next screen.
The Glasstron includes two small (left and right) LCDs. You are watching a combined picture
created from these two screens. Although the screen position is properly aligned at the factory,
it may become misaligned if the Glasstron is deformed or damaged. Check the screen position
alignment every time you turn on the Glasstron. If you cannot have correct screen alignment,
stop using the Glasstron immediately.
Press the PUSH DISPLAY jog dial.
Screen
continued
25-‘
r
Page 26

Turning on the Glasstron (continued)
If the screens are aligned, press the jog dial.
Left screen
V ✓
Correct
The combined picture
you see with both eyes
If the image you see matches one of the pictures below, you have
correct screen alignment.
Correct Correct Correct Correct
' 1
----
t > 1
4
t 1 1
Right reen
You y see a horizontal lii
on t ' left screen rather thai
the ght screen, and vertica
lines on the right screen
rather than the left screen.
This is not a malfunction.
1-H-^
If the image you see matches one of the pictures
below, stop using the Glasstron immediately.
Use of the Glasstron under such conditions may
cause eye fatigue or eye damage.
Incorrect
When no vertical lines
cross the horizontal
line.
If you cannot see a proper arrangement of these lines even after resting your eyes for a
few hours, the Glasstron may not be operating correctly. Contact your Sony dealer or
local authorized Sony service facility.
Incorrect
When the horizontal
line appears as a
diagonal line.
Incorrect
When the center vertical
line does not cross the
horizontal line.
26
us
Page 27

—•'X'
Read the WARNING and press the jog dial.
MISUSE OR OVERUSE OF THE
PRODUCT MAY RESULT IN
EYE FATIGUE OR EYE
DAMAGE. STOP USING IF YOU
FEEL TIRED OR EXPERIENCE
HEADACHES OR DISCOMFORT.
SEE THE USER’S MANUAL
FOR DETAILS.
•(J CHECK
DO YOU WISH TO SET A
THREE NUMBER PASSWORD?
NO
SEE THE USER'S MANUAL
FOR DETAILS.
ca SEL -(] EXEC
Go to “Setting the password"
on page 28.
WARNING
Page 28

.£
r> , ",*hV • 1^«'
Setting the password
WARNING
This product should not be used by children age 15 or younger. The eyes of children are still
developing and may be adversely affected by use of this product. To prevent such use, this
product hasheen equipped with a safety password protection system. Plea;:e use a secure
password if children age 15 or younger may have access to this product.
Once you set a password, you have to input the password every time you use the Glasstron. L
not forget your password. If you hke, you can set the Glasstron to operate without a passworc
Before you start...
Follow the procedure in "Turning on the Glasstron" (pages 23 through 27). The password "YI
or NO" screen appears on the screen.
Select whether to set a password or not using the PUSH D1SPLA\ jog dial. screen
If you need to set a password, select
YES. If not, select NO by turning the jog
dial. Then press the jog dial. If you do
not need to set a password, go to step 4 no
in "Using the Glasstron" (page 30). see the user's manual
DO YOU WISH TO SET A
THREE NUMBER PASSWORD?
FOR details.
Id SEL ♦<! EXEC
ENTER THE FIRST NUMBER.
id SEL -d EXEC
Enter a three digit password number, one by one, by using the j
dial.
Turn the jog dial to enter the first
number, then press the jog dial. Enter
the second and third numbers in the
same way.
Entered password
28-us
Page 29

Verify a password using the jog dial.
If the password is correct, select YES by
ttiming the jog dial. If not, select NO.
Then press the jog dial.
If you select NO, return to step 1.
If you select YES, go to step 4 in "Using
the Glasstron" (page 31).
IS YOUR PASSWORD
CORRECT?
• 123*
YES
EB9
CdSEL -dEXEC
Changing the password
When the power is on, press RESET on the
bottom Df the power supply box with a
pointed object such as a ballpoint pen.
• If you have already read ¿re WARNING
messages (page 23 through 27) (e.g.,
while watching a video picture), the
display will return to step 1 in "Setting
the password" (page 28).
• Before you read the WARNING message
(e.g., you have forgotten your password),
the display win return to step 3 in
"Turning on the Glasstron" (page 23).
If you need to set a password after having
set the Glasstron to operate without a
password, follow the same procedure
above.
RESET
Pressing the RESET button does not affect
picture or sound adjustments in PC and video
mode.
Page 30

'iS?sC' ■
Using the Glasstron
You need to set a password the first time you use the Glasstron or after you reset the Glasstron.
Set the password following the procedure in "Setting the password" (pages 28 ana
Before you start... ^
Be sure to follow the procedures in "Connecting the Glasstron" (pages 15 to 20) an. Wearing
the Glasstron" (page 21).
Turn on the Glasstron using the POWER switch, then press PUSH
DISPLAY jog dial.
Change the display language before Screen
pressing the jog dial, if necessary.
DISPLAY LANGUAGE
KHBBKW
FRANÇAIS
CaSEL -a EXEC
If you have set the Glasstron to operate without a password, go to step 3.
Turn the PUSH DISPLAY jog dial to enter the first number of your
password, then press the jog dial. Enter the second and third
numbers in the same way.
ENTER THE THIRD NUMBER
OF YOUR PASSWORD.
I»123«l
Ca SEL • a EXEC
Entered password
INCORRECT PASSWORD.
ENTER THE FIRST NUMBER
AGAIN.
If you enter a wrong password, the
message shown on the right appears.
Enter the correct password.
30-'
:a SEL -a exec
If you have entered a wrong password
more than five times, after about ten
seconds, the Glasstron turns off
automatically.
US
INCORRECT PASSWORD.
SEETHE USER’S MANUAL
Page 31

Follow the instructions on the screen.
© Warning message —♦ Follow steps 3 through 7 in "Checking the display unit
position"^pages 23 through 25).
• After carefully reading the warnings and checking the display unit position, press
the jog dial.
® Screen alignment —*• Follow steps 1 through 3 in "Checking the screen posihon
alignment" (pages 25 through 27).
• Read the warning carefully, and press the jog dial.
• Make sure the left and right screens are aligned, and press the jog dial.
Select the input signal using the PC-VIDEO switch.
Select PC (RGB signal) or VIDEO (video
signal) depending on the connected
equipment.
When you select PC (PC mode)
When you select VIDEO
Video mode)
When you connect to the S-video
connector
"S VIDEO" appears on the screen.
Input the signal fron) the connected equipment.
When you connect the PC:
Adjust die screen resolution. For details, see "Signal compatibility" on page 35.
When you display VGA pictures (640 x 480), the picture appears about 60% of the entire
screen.
Notes
• If no picture appears, check the default setting of your PC to output the external RGB signal
from the monitor connector,
• Some PCs do not output external display signal when they turn on, or switch to external
display mode. Change the display mode of your PC, referring to the instruction manual
supplied with your PC.
When you connect the video equipment:
Start playback on the video equipment connected to the Glasstron.
When you display NTSC video picture, the picture appears about 60% of the entire
screen.
continued
31
Page 32

**»•■'>
................
-- r‘^
Using the Glasstron (continued)
Adjust the brightness by turning the BRIGHT contr
.Vvs*
/
BRIGHT ^
darker -*-> brighter
\
Adjust the sound volume by turning the VOL control.
When you set AVLS in the menu to on, you cannot turn up the volume beyond the defir.
limit (see page 38). If the audio input level is too high, the sound may be distorted. Turn
the volume down using the VOL control.
lower louder
After you finish using the Glasstron
Take off the Glasstron, and turn off the
power.
us
32-'
Checking the display
indication
Press the jog dial while the picture is
displayed. The display indication appea
on the screen for five seconds.
(page 42)
■ When using the AC power adapter, the
" mi: " mark appears on the screen.
Page 33

T
Screen warnings against
overuse of the Giasstron
To prevent eye f^gue or eye damage, after
you use the Giasstron for a fixed length of
time, the following caution appears on the
screen.
After about 2 hours and 15 minutes of use
YOU HAVE WATCHED FOR
OVER 2 HOURS.
STOP IF YOU FEEL TIRED,
*(! CONTINUE
Stop using the Giasstron if you feel tired or
you experience headaches or discomfort.
If you want to continue using the Glcisstron,
press the jog dial.
After about 4 hours and 15 minutes of use
After about 6 hours of use
WARNING
YOU HAVE WATCHED FOR
OVER 6 HOURS.
TO PREVENT EYE FATIGUE
OR EYE DAMAGE, GIASSTRON
WILL AUTOMATICALLY SHUT
DOWN SOON.
The power turns off automatically.
Caution: Motion sickness from viewing programmes.
Some viewers may experience motion
sickness, headache, or nausea from viewing
movies or video programmes, espedaily
those with intense action and movement. If
you feel any of these symptoms, stop using
the product immediately. To avoid
personal injury or injury to others, do not
drive a car or motorcycle, nor do anything
that requires concentration until the
symptoms disappear.
YOU HAVE WATCHED FOR
OVER 4 HOURS.
STOP IF YOU FEEL TIRED.
♦<3 CONTINUE
Stop using the Giasstron if you feel tired or
you experience headaches or discomfort.
If you want to continue using the Giasstron,
press the jog dial.
Note
If you do not press the jog dial when the
cautions above appear on the screen, the
Giasstron turns off automatically in both cases.
Caution: Motion sickness from external motion.
Do not use the product while subject to
external motion — for example, as a
passenger in a car. Use of this product
under these conditions may cause motion
sickness.
Page 34

Viewing the surrounding environment
While you are wearing the Glasstron, you can view the surrounding en\ ^nment through the
screen in two w^avs;
Viewing the'surrounding
environment by adjusting the
transparency of the entire
screen (See-through mode)
You can adjust the level of transparency of
the entire screen with the LCD shutter dial.
. •*;
¡1
i
1
The picture becomes
transparent.
The area surrounding
the picture also becomes
transparent.
Viewing the i rrounding
environment i the area
around the ^ cture only
(Screen mo a)
You can adjust :• level of transparency of
the screen area around the picture only. The
picture remains intact.
The picture remains
intact.
The area surrounding
the picture also becomes
transparent
Turn the SEE-THROUGH dial.
i ^
SEE
■ -THRO
SE
CLOl
Note
If there is a bright light near the display unit,
you may not be able to completely black out
the surrormding environment bv adjusting the
SEE-THROUGH dial.
-us
34
----
UGH
)PEN
Set the SCREEN switch to ON.
J
In this mode, the screen does not
become transparent even if you turn
the SEE-THROUGH dial.
Notes
• When you set the SCREEN switch to ON, the
edges of the picture may fade a bit, but this is
not a malhmction.
• If there is a bright light near the display unit,
you may not be able to completely black out
the surrormding environment arround the
picture by adjusting the SEE-THROUGH dial
when you set the SCREEN switch to on.
Page 35

Adjusting the sound and picture
Signal compatibility
The signal specifications that this unit supports are as follows:
PC mode (RGB signal)
Display mode
Macintosh
13" color
16" color
IBM PC compatibles
VGA text
VGA graphics 640 X 480
VESA VGA 640 X 480
VESA SVGA
Screen resolution
(dot x iine)
640 X 480
832 X 624 49.7
640 X 400
640 X 480
640 X 480
800 X 600
800 X 600
800 X 600
800 X 600
800 X 600
Horizontal
frequency (kHz)
35.0
31.5 70
31.5
37.9
37.5 75
43.3 85
35.2 56
37.9 60
48.1 72
46.9
53.7
Vertical
frequency (Hz)
67
75
60
72
75
85
Video mode (video signal)
NTSC color system
Notes on the PC mode
• This unit does not support XGA mode (1,024 x 768) and above. If you set the vertical frequency to 60
Hz in XGA mode, the picture is displayed but the picture quality is poor due to the signal loss.
Qiange the screen resolution on your PC to SVGA or VGA.
•Though the Glasstron supports the signals listed above, set the vertical frequency to 60 Hz when
using with SVGA (800 x 600), or to 72 Hz or 75 Hz with VGA (640 x 480) mode. Also adjust the
vertical frequency of the external display output signal of the connected computer.
• When you display VGA pictures (640 x 480) or NTSC video pictures (video mode), the pictures are
not displayed across the entire screen. About 60% area of the screen is utilized when VGA pictures
appear, or about 60% area is utilized when NTSC video pictures appear.
• Some notebook type PCs do not output the RGB signal in the adjusted screen resolution and the
vertical frequency from the external monitor port until you set the PC to external display mode.
• When you use Microsoft Windows 95 or Windows 98, install the information file included in the
supplied Windows 95/Windows 98 PC Glasstron Iirformation Disk. For details on how to install the
information file, refer to the Installation Guide "Windows 95/Windows 98 PC Glasstron Information
Disk/screen adjustment disk for Macintosh."
Displayed in 640 x 480 area
continued
35'
r
Page 36

Adjusting the sound and picture (continued)
Adjusting the sound/picture
You can adjust the following items using the menu display.
The menu is displayed only in English.
PC mode (RGB signal)
AVLS (Auto Volume Limiter System):
Keeps the maximum volume down to protect vour ear. You cannot tur p the volume
bevond the defined limit even if vou try to turn the VOL control.
MEGA BASS:
Creates a deep, powerful sound by emphasizing the bass sound.
POWER SAVE:
The POWER SAVING SENSOR detects the removal of the Glasstron from your head. The um
enters standby mode in a few seconds, automatically stopping the sound and picture in order
to save the battery power. The sound and picture resume in a few seconds when you put on
the Glasstron again.
V CENT:
Adjusts the vertical position of the
picture.
HCENT:
Adjusts the horizontal position of
the picture.
TRACKING:
Adjusts the tracking of the picture
(e.g., if the picture is not displayed
clearly).
SYNC:
Adjusts the picture with the RGB
signal synchronization (e.g., if the
picture is blurred, or if red or blue
shadows appear in the picture).
Perform this adjustment after
TRACKING adjustment is finished.
Video mode (video sign:
CONTRAST:
Adjusts the picture contrast.
HUE:
Adjusts the hue, if the picture looks
too red or green.
COLOR:
Adjusts the color intensity.
Notes on power saving function
• The power saving function may not work correctly in the following cases:
- your hair is between your forehead and the POWER SAVING SENSOR.
- the space or angle between your forehead and the POWER SAVING SENSOR is not correct.
In these cases, set POWER SAVE to OFF.
• When the picture disappears immediately, do the following procedures:
1 Turn off the power sliding the POWER switch.
2 Turn on the power again.
3 After checking the screen position (pages 23 to 27), press MENU to display the menu options.
4 Set POWER SAVE to OFF.
US
36
Page 37

Press MENU.
The menu display appears on the screen.
PC mode
MENU
?EXIT
MEGA BASS : 0
POWER SAVE OFF
V CENT
H CENT
TRACKING
SYNC
PRESET
CdSEL »d EXEC (JENyEXlT
VIDEO mode
MENU
>EXrr
MEGA BASS ; 0
POWER SAVE OFF
CONTRAST tlllllllllfllllll»—-«-HUE
COLOR
RESET
Cd SEL »d EXEC txEwuj EXIT
....
Turn the PUSH DISPLAY jog dial to select the desired item, then
press the jog dial.
The setting screen of the selected item appears.
Adjust the setting using the jog dial.
For details on each item, see pages 38 to 40.
To set other items, repeat steps 2 and 3.
Press MENU.
The menu display goes off.
You can also turn off the menu display by selecting EXIT in the menu using the jog dial.
continued
Page 38

Adjusting the sound and picture (continued)
AVLS (Auto Volume Limiter
System)
Turn the^og dial to set to
ON, then press the jog dial.
When AVLS is on, the volume does
not become louder than the level you
set even if you turn the VOL control.
MEGA BASS
Turn the jog dial to select
the desired value, then
press the jog dial.
2: Maximize the bass sound.
1: Boost the bass soimd.
0; Normal bass sound. Status
1
0
CO SEL *0 exec
POWER SAVE
Turn the jog al set to
ON, then prr : th'i jog dial.
When you take off the display unit
while the POWER SAVE is set to ON,
the POWER SAVING SENSOR (page
14) is activated and automatically
turns off the picture and sound.. The
picture and sound resumes a few
seconds after putting the display unit
back on.
When POWER SAVE is set to ON,
you can monitor the status of the
Glasstron by checking the POWER/
POWER SAVING indicator.
POWER/
POWER
SAVING
indicator
Normal Lit in
green
Power Lit in No
save
mode
orange
Picture
Normal 100%
picture
Power
consumption
5%
38
Note
The power saving function of the Glasstron
does not work together with the power
management function of your PC.
us
Page 39

Adjusting the RGB signal
It is recommended to adjust the picture after installing the information file included in the
supplied Windows 95/Windows 98 PC Glasstron Information disk, or the screen adjustment
disk for Macintosh. For details on how to install the information file, refer to the instruction
manual "Windows 95/Windows 98 PC Glasstron Information Disk/screen adjustment disk for
Macintosh".
Note
When you display the picture on both the LCD display of the notebook PC and on the Glasstron, you
cannot adjust the picture on the Glasstron because of the mismatch of the output signal frequencies
with some notebook PCs. In this case, change the display mode on your PC to the external monitor
only. Then, change the screen resolution according to the list on "Signal compatibility" (page 35).
VCENT
Turn the jog dial to adjust
the center of the picture,
then press the jog dial.
HCENT
Turn the jog dial to adjust
the center of the picture,
then press the jog dial.
TRACKING
Turn the jog dial until the
stripes on the picture
disappear, then press the
jog dial.
TRACKING a
tfl /UXJ •»<] EXEC
SYNC
Turn the jog dial to adju
the clearance of the pict
then press the jog dial.
H CENT ^ ^ I
Cd ADJ EXEC i
I
continue
Page 40

Adjusting the sound and picture (continued)
Adjusting the video signal
CONTRAST
Turn the fog dial to adjust
the contrast, then press the
jog dial.
CONTRAST
Til ADJ *6 EXEC
less ■*- more
COLOR
Turn the jog dial to adjust
the color intensity, then
press the jog dial.
Resetting the adjustment to t^e factory preset I*“ /el
AVLS, MEGA BASS, POW
are not reset to the factory
Turn the jog dial to select
RESET in the menu, then
press the jog dial.
PC mode
MENU
P EXIT
AVLS: OFF
MEGA BASS 0
POWER SAVE : OFF
VCENT
H CENT
TRACKING
SYNC
Cd SEL ♦(! EXEC M£NiJ EXIT
VIDEO mode
MENU
PEXrr
AVLS: OFF
MEGABASS. 0
POWER SAVE : OFF
CONTRAST
HUE I
COLOR
mm
SAVE settings
set level.
COLOUR
IIIIUIIIIIIIIIIIUIIlllll
C(1 AOJ ■»(] EXEC
less ■ 4-
............
-► more
HUE
Turn the jog dial to adjust
the hue, then press the jog
dial.
reddish
CdSEL ♦dEXeC KlENUj EXIT
Note
The settings are retained even when you turn
off the power.
greenish
40
us
Page 41

Using the optional battery pack
If you use a battery pack such as the NP-F550/F750/F950, you can use the Glasstron without
connecting to a wail outlet.
Note
You cannot use the Glasstron with the alkaline batteries. Use the AC power adapter (supplied) or the
battery pack (not supplied)
Charging the battery pack
Charge the battery pack before use. You can charge the battery pack using the power supply
box. If you attach the battery pack as described below, the battery pack charges while you are
not using the Glasstron.
Attach the battery pack to the power supply box.
Install the battery pack properly making
sure it is not crooked against the power
supply box. Power supply
To remove the battery pack, while box
sliding ВАТТ RELEASE, puU out the
battery pack. bATT RELEASE
button
Battery pack
Connect the AC power adapter to the DC IN connector on the
power supply box. Then, connect the AC power cord to the AC
power adapter and to a wall outlet.
Charge the battery pack on a flat place
without vibration.
The CFIARGE lamp lights up. When the
battery pack is fully charged, the
CFIARGE lamp goes out.
Battery life and charging time are shown
in the table on the next page.
Notes
' If the POWER/POWER SAVING lamp flashes while using the battery pack, charge the battery pack.
’ If the CHARGE lamp flashes, the power supply box or battery pack is malfunctioning. Contact your
Sony dealer or local authorized Sony service facility.
> Use the supplied AC power adapter only when charging a battery pack.
> Battery life may be shorter in a cold environment. This is a typical battery characteristic.
> You cannot charge the battery pack in power save mode. Turn off the Glasstron, then it starts
charging the battery pack.
to wall outlet
AC power
adapter
to DC IN
CHARGE lamp
continued
41-u
Page 42

Using the optional battery pack (continued)
Battery pack
NP-F550
NP-F750
NP-F950
» The battery life and charging time may change depending on the conditions < ■ ^se.
• You can also use a battery pack such as the NP-500/510/710/F530/F730/F9”0 (not supplied) with
the Glasstron.
• You can use an InfoLITHIUM''” battery pack with the Glasstron. When using such a battery pack, the
estimated remaining battery life is displayed not with the time counter, but with the indicator.
• The battery life listed above is for PC mode. When you use the Glasstron in video mode, the battery
life is reduced to 80% of the PC mode.
"InfoLITHIUM" is a trademark of Sony Corporation.
Charging time
Approx. 4 hours
Approx. 8 hours Approx. 2 hours
Approx. 12 hours Approx. 3 hours
Battery life (fully charged battery, PC ode)
.4pprox. 1 hour
Checking the remaining battery life
When no indication or caution appears on the screen, press the jog dial.
Remaining battery life
Fully
charged
fS] {3 CZ]
When the battery pack is weak, the
following message appecurs on the
screen. Replace the battery pack
with a charged one.
When using the AC power adapter, the
" " mark appears on the screen.
--------------
THE BATTERY PACK
iS EMPTY.
REPLACE WITH A
CHARGED BATTERY.
-dead
42
-us
Page 43

Precautions
Use
• Operate the product only with the
supplied AC power adapter. If you use a
different AC^ower adapter, it may cause
a malfunction.
Unified polarity plug
Should any liquid or solid object fall into
the cabinet, unplug the product and have
it checked by qualified personnel before
operating it further.
Always turn the product off when you do
not use it.
Unplug the product from the wall outlet if
you are not going to use it for several days
or more. To disconnect the cord, pull it
out by the plug. Never pull the cord itself.
Do not overload wall outlet, extension
cords, or convenience receptacles beyond
their capacity, since this can result in fire
or electric shock.
Do not use attachments not recommended
by the manufacturer, as they may cause
hazards.
Avoid using earphones at high volume.
Hearing experts advise against
continuous, loud, and extended play. If
you experience a ringing in your ears,
reduce volume or discontinue use.
Do not touch the AC power adapter or
power supply box with wet hands. If you
fail to observe this, it may cause electric
shock.
Do not drop or give a mechanical shock to
the product.
Installation
• To prevent internal heat build-up, do no
block the ventilation operungs.
• Avoid operating the product at
temperatures below 41’F (5°C).
• Do not subject the product to high
temperature or direct sunlight. If you dc
not observe the above instructions, the
product may become deformed and the
screens may become impossible to align.
If you keep watching misaligned screens
you may develop eye fatigue. Follow th
instructions in "Checking the screen
position alignment" on page 25, to be
sure the screens are aligned. If you find
the screens misaligned, have the produc
repaired at your Sony dealer or local
authorized Sony service facility.
• Do not place the product in locations
where it is wet, humid, dusty, smoky, or
steamy. Do not use this product near or
aroimd water. It may cause fire or
electric shock. Especially, do not use the
product in the bathroom.
• If the product is transported directly froi
a cold to a warm location, or if the room
temperature has changed suddenly, the
picture may be bliured or show poor
color. This is because moisture has
condensed on the mirror or lenses inside
If this happens, let the moisture
evaporate before using the product.
• Do not place the product on an unstable
cart, stand, table, or shelf. The product
may fall, causing serious injury to a chile
or an adult, and serious damage to the
product.
• Do not allow anything to rest on or roll
over the power cord, and do not place th
product where the power cord is subject
to wear or abuse.
continue
Page 44

Precautions (continued)
Others
• Unplug the product from the wall outlet
and refer servicing to qualified service
personnel under’fhe following condihons;
- When the power cord or plug is
damaged or frayed.
- If liquid has been spilled into the
product.
- If the product has been exposed to ram
or water.
- If the product has been subject to
excessive shock by being dropped, or
the cabinet has been damaged.
- If the product does not operate
normally when following the operating
instructions. Adjust only those
controls that are specified in the
operating instructions. Improper
adjustment of other controls may result
in damage and will often require
extensive work by a qualified
technician to restore the product to
normal operation.
- When the product exhibits a distinct
change in performance — this indicates
a need for service.
• Do not disassemble or remodel the
product. It may cause fire or electric
shock. Have the product checked and
repaired at your Sony dealer or local
authorized Sony service facility.
• Do not attempt to service the product
yourself since opening the cabinet may
expose you to dangerous voltage or other
hazards. Refer all servicing to qualified
service persormel.
• When replacement parts are required, be
sure the service technician certifies in
writing that he has used replacement
parts specified by the manufacturer that
have the same characteristics as the
original parts.
Unauthorized subshtutions may result in
fire, electric shock, or other hazards.
Upon completion ot.
repairs to the produc.
. -iuncian to oerform
checks (as spr :ified h
to determine mat th
operating conditior
Unplug the produ
before cleaning. <
dry, soft cloth, o
moistened with
Do not use an
alcohol or be'
ervice or
; the service
.tme safety
le manufacturer)
jduct IS in safe
i to so certify.
)m the wall outlet
i the product with a
t cloth slightly
i detergent solution,
jf solvent, such as
Note on c£ ¿g
Use the supplied carrying cases whenever
you carry the Glasstron. Put the display unit
into the small case for protection. Put the
display unit together with the power supply
box and other accessories into the large
case.
Power supply box
44
-us
Page 45

Error messages
The following error messages may appear to indicate the status of the Glasstron or input signal.
OUT OF SCAN RANGE
The input signal does not match the supported specification.
Change the screen resolution on your PC. For details of the signal compatibility, see "Signal
compatibility" (page 35).
NO INPUT SIGNAL
The signal is not input.
• Make sure that the PC-VIDEO switch is correctly set.
• Make sure that the connected equipment is turned on.
• Make sure that the your PC is not in the power saving mode.
HIGH TEMPERATURE
The Glasstron temperature is high.
Turn off the Glasstron for a while, then turn on again.
Note
If you cover the ventilation hole of the power supply box, an error may occur due to a rise in
temperature. In addition, it may cause a fire or malfunction of the unit.
Page 46

...
Troubleshooting
If you have any questions or problems not listed below, contact your Sony de. or i; cal
authorized Sony service facility.
Symptom Cause
The picture does not
appear.
The picture is dark or
dim.
The picture suddenly
disappears
The picture has no sound.
The sound is noisy.
The volume does not
become louder.
The battery pack
discharges quickly.
Connections are incorrect.
The signal is not input.
The Glasstron enters power save
mode.
When you connect to a notebook
type PC, the display mode is set to
local display mode (LCD panel of
your notebook PC).
You are not wearing the Glasstron
correctly.
—
— Adjust the RGB signal
The inside window (where the
picture is displayed) is dirty.
A warning was displayed for more
than two minutes. (The Glasstron
turned off automatically.)
You continued using the Glasstron
for six hours. (The Glasstron turns
off automahcally after six hours to
prevent eye fatigue.)
The battery pack or battenes are
dead.
You put off the Glasstron while the
POWER SAVE is set to ON.
—
The AVLS function is on. Set AVLS in the menu to OFF (page
The equipments are not connected
propely.
Sound volume of the connected
computer is inappropriate.
The battery pack is not charged
enough.
The battery pack is completely dead
Remedy
Connect the eqi .em _orrectly
(pages 15 to 20
Select the cor mput (page 31).
Put the Gla.s s on again to bring
the forehea ir to the POWER
SAVING Si. JR (page 14).
Change the Display mode. For
details, refer to the instruction
manual of your PC.
Put on the Glasstron correctly (pages
21 and 22).
Adjust the brightness with the
BRIGHT control (page 32).
synchronization (page 39).
Clean the display unit with a soft,
dry cloth.
Charge the battery pack or replace with
new batteries (page 41).
Put the Glasstron on again to bring
the forehead near to the POWER
SAVING SENSOR (page 14).
Adjust the volume with the VOL
control (page 32).
38).
Connect the equipments correctly
(pages 15 to 20).
Adjust the volume on the computer.
Charge the battery pack fully or use a
new one (page 41).
46
us
Page 47

Symptom
The battery pack is not
charged.
The black, red, and green
dots do not disappear.
The picture color is
different.
The picture gets out of
position in the PC mode.
Noises appear on the
picture in the PC mode.
The POWER switch does
not function.
Cause Remedy
The battery pack is not installed
properly.
The battery pack is completely dead. Replace the battery pack with a new
The supplied AC power adapter is
not used.
The LCD is made with high-
precision technology. However,
black points or bright points of light
(red, blue, or green) may appear
constantly on the LCD screen. This
is not malfunction.
(Effective dots; more than 99.999%)
The color interrsity and hue are not
adjusted.
The external display output signal
of the connected computer does not
match the supported input signal.
The input signal does not match to
the supported specification. See
"Signal compatibility" (page 35).
In this case, the picture does not
appear correctly.
The horizontal frequency of the
signal does not match to the
supported specification.
In this case, the flicker may appear
on the right edge of the picture.
Install the battery pack properly
(page 41).
one (page 41).
Use the supplied AC-PLM3 AC
power adapter.
Adjust the color inteirsity and hue in
the menu screen (page 40).
Change the screen resolution and the
vertical frequency on your PC to
match the supported output
frequency (page 35). Refer to the
instruction manual of your PC.
Change the screen resolution or the
vertical frequency of the external
display output signal on your PC to
match the supported vertical
frequency (page 35). Refer to the
instruction manual of your PC.
Change the display mode on your PC
to the external monitor only (page
39).
Disconnect the AC power cord from
the wall outlet. After three minutes,
reconnect the AC power cord.
47-u:
Page 48

Specifications
Power supply
AC power adapter: AC-PLM3
100-240 V AC, 50/60 Hz, 16 W
Output voltage 8.4 V, 1.6 A
Battery pack; NP-F550/NP-F750/
NP-F950 (not supplied)
Power consumption
10 W (approx., PC mode)
12 W (approx., VIDEO mode)
Operating temperature
41 °F to 95°F (5°C to 35°C)
Storage temperature
14°F to 140°F (-10°C to 60°C)
Dimensions
Display unit:
Approx. 5^/sxl 'Vi6 X 3 V; inches
(Approx. 149 X 48 X 86 mm)
(w/h/d folded)
Power supply box:
Approx. 2 V-t X 1 ^/s X 6 Vs inches
(Approx. 54 X 47 X 160 mm)
(w/h/d)
not including projecting parts and
controls
Mass
. Display unit: Approx. 4.2 oz (120 g)
Power supply box: Approx. 9.2 oz (260 g)
Video signal
NTSC color, EIA standards
input
PC mode
RGB signal; HD15
Pin .Assignment
48
Pin No.
1
0
3
4
5
6
7
8
9
10
us
Signal
R (Red)
G (Green)
B (Blue)
-
GND
R (Red) GND
G (Green) GND
B (Blue) GND
GND
11 GND
12
13
14
15
PC AUDIO input;' reo
SYNC (Horizo:
SYNC (Vertic
-
d)
mmijack
VIDEO mode
AUDIO/VIDEO input: Special minijack
Video: 1 Vp-p, 75 ohms, unbalanced,
sync negative
S VIDEO input: 4-pin mini DIN
Y: 1 Vp-p, 75 ohms, unbalanced, sync
negative
C: 0.286 Vp-p, 75 ohms, unbalanced,
sync negative
Screen resolution
Horizontal: 832 dots (max.)
Vertical: 624 lines (max.)
Supplied accessories
AC power adapter AC-PLM3 (1)
AC power cord (1)
RGB signal cable (1)
Audio/video cable (special miniplug
phono plug) (1)
S-video cable (1)
Audio/video cable (special miniplug -*—*■
special miniplug) (1)
Audio cable (stereo miniplug) (1)
Adapter for Macintosh (1)
Carrying cases (2)
Sunshades (1 pair)
Operating Instructions (1)
Windows 95/Windows 98 PC Glasstron
Information Disk (1)
Screen adjustment disk for Macintosh (1)
Warranty (1)
Design and specifications are subject to
change without notice.
Page 49

Index
AC power adapter 20
Accessories supplied 13, 48
Adjusting
brightness 32
color 40 ^
hue 40
volume 32
AVLS 36,38
B
Back strap 22
Battery pack 41
C D, E, F, G
Carrying case 44
Charging a battery pack 41
Checking
display unit position 23
screen position 25
Color 40
Connection
battery pack 41
PCs 15
power 20
video equipment 18
Contrast 40
H
Health concerns 7
Hon~ontal position 39
Hue 45
1. J. K, L.
Instructions for safe fit 9
M, N, O
Mega bass 36,38
P,Q
Password 28
Power save 38
Precautions 43
Remaining battery life 42
Resetting
adjustment 40
password 29
S, T, U, V
Safety instructions 6
Safety password 6,9, 28
Screen alignment 26
Screen mode 34
See-through mode 34
Signal compotibility 35
Signal synchronization 39
Stereo earphones 22
Sunshades 22
Supplied accessories 13
S-video 19
T. u
Tracking 39
V
Vertical position 39
w, X, Y, Z
WARNING messages 2325,33
Warnings for electronic
products 10
Wearing the Glasstron 21
r
49
>
Q.
a
o
3
Q)
3
o
3
01
o
3
us
Page 50

4-557-091-01 (T
SONY.
S)
LIMITED WARRANTY
Sony Electronics inc. ("Sony") warrants this Product (including any accessories) against defects in material or
workmansnip as follows:
1. LABOR; For a period of 90 days from the date of purchase, if this Product is determined to be defective,
Sony will repair or replace the Product, at its option, at no charge, or pay the labor charges to any Sony autho
rized service facility. After the Warranty Period, you must pay for all labor charges,
2. PARTS; In addition, Sony will supply, at no charge, new or rebuilt replacements in exchange for defective
parts for a period of one (1) year. After 90 days from the date of purchase, labor for removal and installation is
available from Sony authorized service facilities or a Sony Service Center at your expense.
To obtain warranty service, you must take the Product, or deliver the Product freight prepaid, in either its original
oackaging or pacxaging affording an eauai degree of orotection, to anv authorized Sony service facility.
This warranty does not cover customer instruction, installation, set up aoiustments or signal reception prob
lems.
This warranty does not cover cosmetic damage or damage due to acts of God, accident, misuse, abuse, negli
gence, commercial use, or modification of, or to any part of the Product, including the antenna. This warranty
does not cover damage due to improper operation or maintenance, connection to improper voltage supply, or
attempted repair by anyone other than a facility authorized by Sony to service the Product. This warranty does
not cover Products sold AS IS or WITH ALL FAULTS, or consumables (such as fuses or batteries). This warranty
is valid only in the United States.
r^roof of purchase in the form of a bill of sale or receipted invoice wnich is evidence that the unit is within the
Warranty period must be presented to obtain warranty service.
This warranty is invalid if the factory applied serial number has been altered or removed from the Product.
REPAIR OR REPLACEMENT AS PROVIDED UNDER THIS WARRANTY IS THE EXCLUSIVE REMEDY OF THE
CONSUMER. SONY SHALL NOT BE LIABLE FOR ANY INCIDENTAL OR CONSEQUENTIAL DAMAGES FOR
BREACH OF ANY EXPRESS OR IMPLIED WARRANTY ON THIS PRODUCT, EXCEPT TO THE EXTENT PROHIB
ITED BY APPLICABLE LAW, ANY IMPLIED WARRANTY OF MERCHANTABILITY OR FITNESS FOR A PARTICUi.V^R PURPOSE ON THIS PRODUCT IS LIMITED IN DURATION TO THE DURATION OF THIS WARRANTY.
Some states do not allow the exclusion or limitation of Incidental or conseguential damages, or allow limitations
on how long an implied warranty lasts, so the above limitations or exclusions may not apply to you. In addition,
f you enter into a service contract with the Sony Partnership within 90 days of the date of sale, the limitation on
how long an imolied warrant lasts does not apply to you. This warranty gives you specific legal rights, and you
may have other rights which van/ from state to state.
i^or your convenience. Sony Electronics inc. nas established telephone numbers for freauently asked questions:
To locate the servicer or dealer nearest you. or for service assistance or resolution of a sevice problem, or for
product information or operation, call;
Sony Direct Response Center
1-(8001-222-7669
or write to;
Sony Direct Response Center
12451 Gateway Bivd.
Fort Myers, FL 33913
.'.y
-or an accesson/ or part not available from your authorizea dealer, call:
-(800)-488-SONY (7669)
Page 51

Sony^^line
http://www.worid.sony.com/
Printed on recycled paper
I
Sony Corooration
Printed in Japan
Page 52

3-865-654-01(1)
Windows® 95!
Windows® 98
PC Giasstron
Information Disk
Installation Guide
Guide d'installation
Installationsanleitung
Guía de instalación
Guida alTinstallazione
Personal LCD Monitor
IP© G ia ss tr o n
PLM-S700/S700E
Sony Corporation ©1998 Printed in Japan
Page 53

English
The "Windows 95/Windows 98 PC Glasstron Information Disk" includes the information file on choosing the
correct screen resolurions. When you use Microsoft Windows 95 or Windows 98, you must match the screen
resolution of the Glasstron to the output signal of your computer for optimal Glasstron performance. In order
for the Glasstron to receive the output signal from the computer correctly, and to set up the functions of the
Glasstron, install the files from the disk onto the hard disk of your computer using Windows 95 or Windows
98.
• Microsoft, MS, MS-EXZ)S and Windows* are registered trademarks of Microsoft Corporation in the United States and other
countries.
• All other product names menhoned herein may be the trademarks or registered trademarks of their respective companies.
Furthermore, "™" and "®" are not mentioned in each case in this manual.
Installing the "Windows 95/Windows 98 PC Glasstron Information Disk"
1 Start Windows 95 or Windows 98.
2 Click [Start], then point to [Settings] and click [Control Panel].
3 Doubleclick the [Display] icon.
For Windows 95
4 Click the [Setting] tab, then click the [Change Display] button.
5 Click the [Change...] button.
Or
4 Click the [Settings] tab, then click the [Advanced Properties] button.
5 Click the [Monitor] tab on the [Advanced Display Properties] dialog box, then click the [Change (Monitor
Type)] button.
6 Click the [Have Disk...] button on the [Select Device] dialog box.
7 Insert the "Windows 95/Windows 98 PC Glasstron Information Disk" into the floppy disk drive.
8 Type the drive name of the inserted "Windows 95/Windows 98 PC Glasstron Information Disk" (Default:
a:\) in the [Copy manufacture’s files from] box in the [Install From Disk] dialog box, and click the [OK]
button.
9 Select the display model you use in the [Models:] box.
10 Restart your computer to apply the new setting.
For Windows 98
4 Click the [Settings] tab, then click the [Advanced Properties] button.
5 Click the [Monitor] tab, then click the [Change] button.
6 Click the [Next] button.
7 Click the radio button beside [Display a list of all the drives in a specific location, so you can select the drive
you want], then click the [Next] button.
8 Click the [Have Disk] button.
9 Insert the "Windows 95/Windows 98 PC Glasstron Information Disk" into the floppy disk drive. Тзфе the
drive name of the inserted "Windows 95/Windows 98 PC Glasstron Information Disk" (Default: a:\) in the
[Copy manufacture's files from] box in the [Install From Disk] dialog box, and click the [OK] button.
10 CUck the [Next] button and check the message, then click the [Next] button again.
11 Click the [Finish] button.
12 Click the [Apply] button, then click the [OK] button.
13 Restart your computer to apply the new setting.
Page 54

e
3-865-887-01(1)
Windows® 9SIWindows® 98
PC Glasstron Information
DiskIScreen adjustment disk
for Macintosh
f/Operating Instructions/Mode d'emploi/
Bedienungsanleitung/Handleiding/Bruksanvisning/
Kayttooh j eet/B ru ksa n visn i ng/Betj en i ngsvej led n i ng/
Manual de instruçôes/
Manual de instrucdones/lstruzioni per Tuso/
OôTiYieq Xpf|or|9
Personal LCD Monitor
IP@ G la ss tr on
PLM-S700/S700E
Sony Corporation ©1998 Printed in Japan
Page 55

English
The "Windows 95/Windows 98 PC Glasstron
Information Disk" and "Screen adjustment disk for
Macintosh" contain the PC Glasstron ADJ Tool for
performing the correct screen adjustment.
The "Windows 95/Windows 98 PC Glasstron
Information Disk" includes the information file on
choosing the correct screen resolutionsT Refer to the
"Ir\stallation Guide" for the installation procedure.
For Macintosh, refer to the instruction manned
supplied with your computer to set the correct
screen resolution.
• Microsoft, MS, MS-DOS and Windows* are registered
trademarks of Microsoft Corporation in the United
States and other countries.
• Macintosh is a trademark licensed to Apple Computer,
Inc., registered in the U.S.A. and other countries.
• All other product names mentioned herein may be the
trademarks or registered trademarks of their respective
compaiues. Furthermore, "™" and "®" are not
mentioned in each case in this manual.
Displaying the adjustment screen
Before starting the screen adjustment, be sure to
coimect the Glasstron to your computer, and check
the display unit position and the screen position
adjustment. For details, refer to the Operating
Instructions of the Glasstron.
After checking, display the adjustment screen
following the procedures below.
For Windows 95 or Windows 98
1 Start Windows 95 or Windows 98.
2 Insert the "Windows 95/Windows 98 PC
Glasstron Information Disk" into the floppy disk
drive.
3 Double-click the [My Computer] icon
4 Double-click the (3 V 2 Floppy] icon.
5 E)ouble-click the [PC Glasstron ADJ Tool] icon.
For Macintosh
1 Start Macintosh.
2 Insert the "Screen adjustment disk for
Macintosh" into the floppy disk drive.
3 Double-click the icon in the Floppy Disk
window.
Notes
• When you use Windows 95 or Windows 98, install the
information file included in the supplied Windows 95/
Windows 98 PC Glasstron Ii\formation Disk, and select
the correct screen resolution.
• When you use a notebook PC, you may not be able to
perform the screen adjustment correctly. In this case,
change the display mode on your notebook PC to the
external monitor only.
Adjusting the screen
After the adjustment screen appears, press the
MENU button on the power supply box. Perform
the fine adjustment following the procedure below.
VCENT
1 Turn the jog dial to select V CENT, and press the
jog dial.
2 Adjust the line positions by turning the jog dial
to display both the upper and bottom lines (refer
to illustration H), and press the jog dial.
H CENT
1 Turn the jog dial to select H CENT, and press
the jog dial.
2 Adjust the line positions by turning the jog dial
to display both the left and right lines (refer to
illustration ID) , and press the jog dial.
Note
If the adjustment is not successful, adjust TRACKING first,
then try again.
TRACKING
1 Turn the jog dial to select TRACKING, and press
the jog dial.
2 Adjust the screen by turning the jog dial until
vertical stripes do not appear in area ® of tite
screen (refer to illustration 0), and press the jog
dial.
Note
If the tracking is not correct, dim vertical stripes appear.
Adjust the tracking again.
SYNC
1 Turn the jog diiil to select SYNC, and press the
jog dial.
2 Adjust the screen by turning the jog dial to clear
the vertical thin lines (refer to illustration 0),
<ind press the jog dial.
Notes
• If the frequencies are not synchronized, horizontal noise
appears on the vertical thin lines. Adjust to minimize the
horizontal noise.
• If the tracking is not correct, horizontal noise appears on
the vertical thin lii^s. Adjust the tracking again.
Finishing the screen adjustment
1 Press the MENU button on Ihe power supply
box so that the adjustment screen disappears.
2 Click the screen when the pointer appears.
3 Eject the floppy disk.
Page 56

at-'S-f:/
White lines
Lignes blanches
Weiße Linien
Witte lijnen
Vita linjer
m
White lines
Lignes blanches
Weiße Linien
Witte lijnen
Vita linjer
J
iEUU ŒU<3ô:U
Correct
incorrect
Correct Incorrect
Richtig
Juist
Rätt
Falsch
, Fout
Fei
Page 57

iEUl^ iEU<ö:t\
Correct
Correct
Richtig Falsch
Juist
Rätt
Incorrect
Incorrect
Fout
Fel
 Loading...