

Page 1
Glasstron
3-868-186-31 (1)
Operating Instructions
Mode d’emploi
Bedienungsanleitung
WARNING
YOUR FAILURE TO FOLLOW THESE OPERATING INSTRUCTIONS AND THE SUPPLIED SAFETY
INSTRUCTIONS MAY RESULT IN EYE FATIGUE, EYE DAMAGE, OR OTHER INJURY.
CAREFULLY READ THESE OPERATING INSTRUCTIONS AND THE SUPPLIED SAFETY INSTRUCTIONS,
AND BECOME FAMILIAR WITH ALL SAFETY INSTRUCTIONS FOR THIS PRODUCT.
THIS PRODUCT SHOULD NOT BE USED BY CHILDREN AGE 15 OR YOUNGER.
IF YOU HAVE BEEN DIAGNOSED WITH EYE DISEASE OR EYE INJURY, CONSULT YOUR DOCTOR
BEFORE USE AND DO NOT USE WITHOUT YOUR DOCTOR’S APPROVAL.
AVERTISSEMENT
VEILLEZ A RESPECTER LES INSTRUCTIONS DU MODE D’EMPLOI ET LES INSTRUCTIONS DE SECURITE
FOURNIES POUR EVITER UNE FATIGUE OU DES TROUBLES OCULAIRES OU D’AUTRES PROBLEMES
DE SANTE.
LISEZ ATTENTIVEMENT LES INSTRUCTIONS DU MODE D’EMPLOI ET LES INSTRUCTIONS DE
SECURITE FOURNIES ET FAMILIARISEZ-VOUS AVEC TOUTES LES INSTRUCTIONS CONCERNANT CE
PRODUIT.
CET APPAREIL NE PEUT ETRE UTILISE PAR DES ENFANTS AGES DE 15 ANS OU MOINS.
SI VOUS SOUFFREZ DE MALADIES OU D’AFFECTIONS OCULAIRES, CONSULTEZ VOTRE MEDECIN
AVANT D’UTILISER CET APPAREIL ET NE L’UTILISEZ PAS SANS L’AUTORISATION DE VOTRE
MEDECIN.
ACHTUNG
WENN SIE DIE ANWEISUNGEN IN DIESER ANLEITUNG SOWIE DIE MITGELIEFERTEN
SICHERHEITSHINWEISE NICHT BEACHTEN, KANN ES ZU EINER ERMÜDUNG DER AUGEN,
AUGENSCHÄDEN ODER ANDEREN SCHÄDIGUNGEN KOMMEN.
LESEN SIE DAHER DIESE BEDIENUNGSANLEITUNG SOWIE DIE MITGELIEFERTEN
SICHERHEITSHINWEISE SORGFÄLTIG DURCH, UND MACHEN SIE SICH MIT ALLEN
SICHERHEITSMASSNAHMEN FÜR DIESES GERÄT VERTRAUT.
DIESES GERÄT IST FÜR KINDER BIS ZU 15 JAHREN NICHT GEEIGNET.
WENN BEI IHNEN EINE AUGENKRANKHEIT ODER -VERLETZUNG VORLIEGT, WENDEN SIE SICH VOR
DEM GEBRAUCH DES GERÄTS BITTE AN IHREN ARZT, UND VERWENDEN SIE ES NUR MIT
ZUSTIMMUNG DES ARZTES.
GB
FR
DE
PLM-A35E
© 2000 Sony Corporation
Page 2

WARNING
To prevent fire or shock hazard,
do not expose the unit to rain or
moisture.
To avoid electrical shock, do not
open the cabinet. Refer servicing
to qualified personnel only.
This product conforms with the following
European Directives:
73/23/EEC, 93/68/EEC (Low Voltage
Directive)
89/336/EEC, 92/31/EEC (EMC Directive)
This equipment complies with EN55013 for
use in following areas: residential, business
and light-industrial.
Precautions
• The nameplate is located on the bottom
exterior.
• Picture/sound distortion may occur if the
model PLM-A35E is positioned in close
proximity to any equipment emitting
electromagnetic radiation.
-GB
2
Page 3
Glasstron is a brand-new concept in
visual display
Congratulations on your purchase of a Sony
Glasstron Personal Viewer. The Glasstron,
using current technology in small,
lightweight visual displays, provides a
television viewing experience similar to
watching a 52-inch television from a
distance of approximately 2 m (6.6 feet).
(Viewing experience may differ according
to individual perception.)
The Glasstron Personal Viewer creates an
image through two separate liquid crystal
displays, in close proximity to your eyes.
To insure your safe use of the Glasstron,
please become familiar with its basic
operations, including proper fitting
instructions, and be aware of any symptoms
of eye fatigue or other discomfort you may
experience.
WARNING
YOUR FAILURE TO FOLLOW THESE
OPERATING INSTRUCTIONS MAY
RESULT IN EYE FATIGUE, EYE
IMPAIRMENT, OR OTHER EYE INJURY,
PROPERTY DAMAGE OR DEATH.
WARNING
THIS PRODUCT SHOULD NOT BE USED
BY CHILDREN AGE 15 OR YOUNGER.
THE EYES OF CHILDREN ARE STILL
DEVELOPING AND MAY BE ADVERSELY
AFFECTED FROM USE OF THIS
PRODUCT.
Note on the LCD (Liquid Crystal
Display)
The LCD screen is made with highprecision technology. However, black
points or bright points of light (red, blue,
or green) may appear constantly on the
LCD screen. This is not a malfunction.
(Effective dots: more than 99.99%)
GB
-GB
3
Page 4

Table of Contents
About the Glasstron ........................................................ 5
Getting Started
Checking the supplied accessories ............................... 6
Locating the parts and controls..................................... 7
Connecting the Glasstron............................................... 8
Connecting video equipment .................................. 8
Connecting other equipment ................................... 9
Connecting the power source ................................ 11
Wearing the Glasstron .................................................. 12
Operations
Using the Glasstron....................................................... 15
Setting the user lock ...................................................... 19
Using an optional battery pack ................................... 20
Additional Information
Precautions ..................................................................... 22
Troubleshooting ............................................................ 24
Specifications ................................................................. 25
Index................................................................................ 25
-GB
4
Page 5
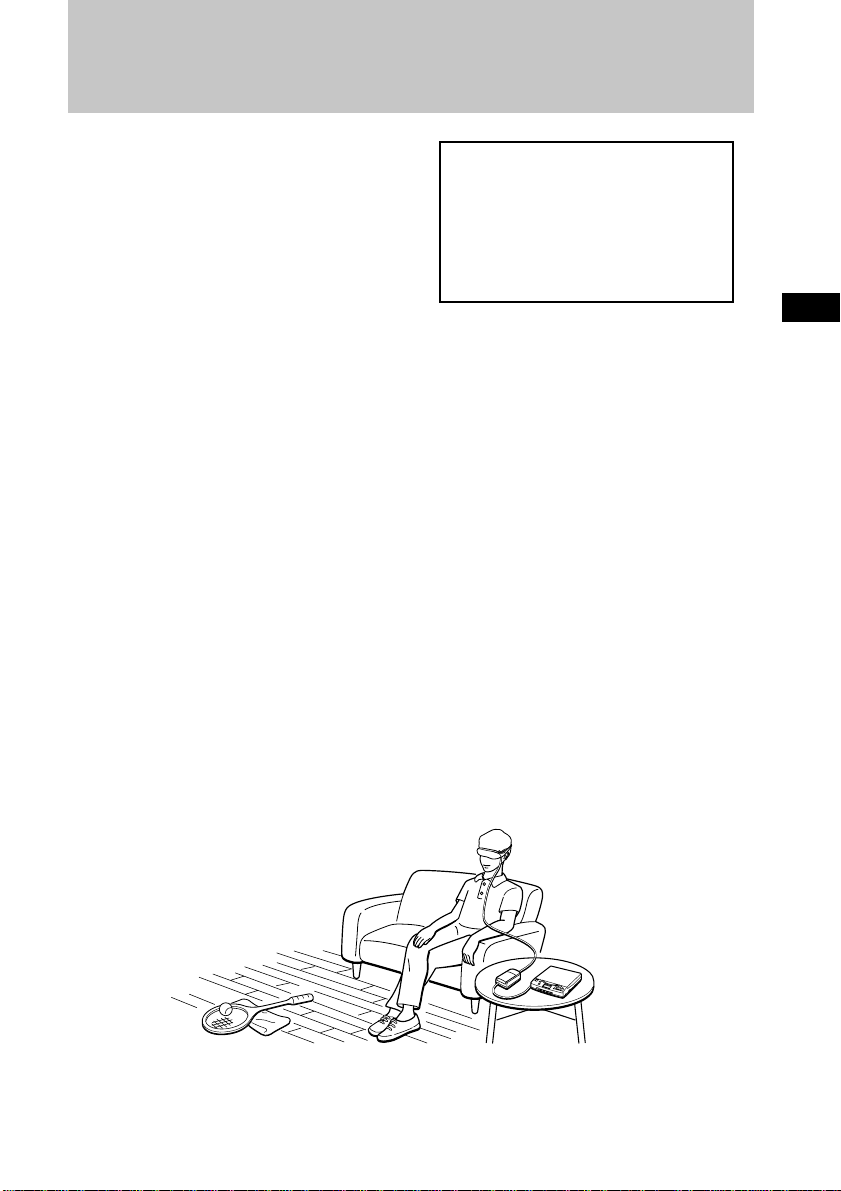
About the Glasstron
Caution: The screen is always right in front of you.
The Glasstron is a face-mounted display. With this type of display, the screen is always in front
of you, even if you move your head. Because of this feature, you can concentrate on the screen
more easily compared with ordinary TVs, and you have a sense of being in the action.
• It is easy to adjust the Glasstron to your eyes. You can use the display unit even while wearing
glasses.
• Every time you use the Glasstron, the adjustment screen appears to help you adjust the
display unit properly. You can also check whether the left and right screen positions are
properly aligned or not.
• If you keep using the Glasstron continuously for three hours, a warning appears on the screen
and the power will turn off automatically.
The Glasstron consists of the following items:
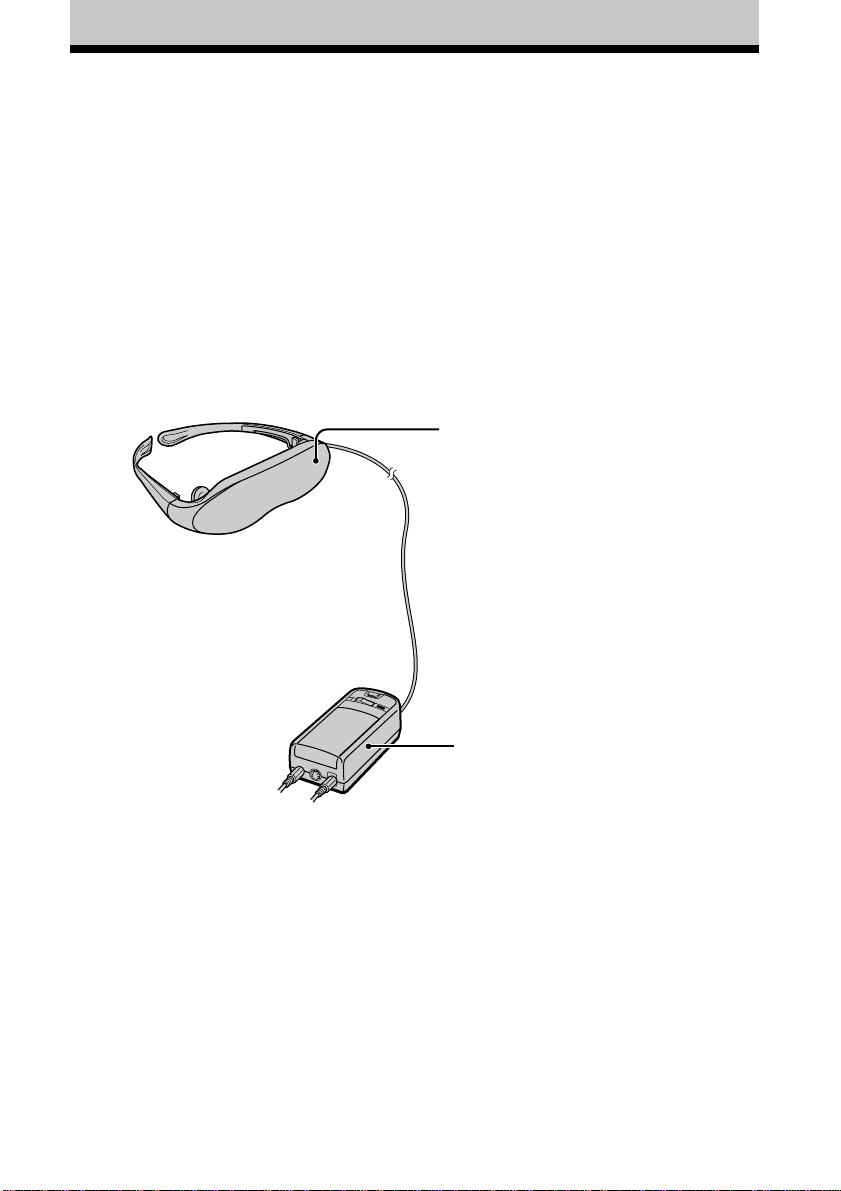
Display unit
The display unit is equipped with two
small (left and right) LCDs.
Getting Started
Features
• A powerful, big screen experience
comparable to watching a 52-inch screen
from approximately 2 m (6.6 feet) away.
• Handy portable folding display.
• The display unit weighs only 100 g (4 oz).
• Approximate continuous use for up to
seven hours with Sony’s recommended
battery pack, NP-F550.
Power supply box
You can use Sony’s recommended
optional battery pack. You can also use
the house current. To use the Glasstron,
connect your video equipment to A/V
IN on the power supply box.
-GB
5
Page 6

Checking the supplied accessories
Check that the following accessories are supplied with your Glasstron. If any item is not
supplied, contact your Sony dealer or local authorized Sony service facility.
• Display unit/Power supply box (1)
• AC power adaptor AC-PLM2 (1)
• Mains lead (1)
• Audio/video cable
(special miniplug y phono plug) (1)
• Plug adaptors
(phono jack y phono jack) (3)
• Nose piece (black) (1)
• Side piece pads (2)
• Operating instructions manual (1)
• Safety Instructions (1)
• Warranty (1)
• Audio/video cable (special miniplug y
stereo miniplug) (1)
-GB
6
Page 7
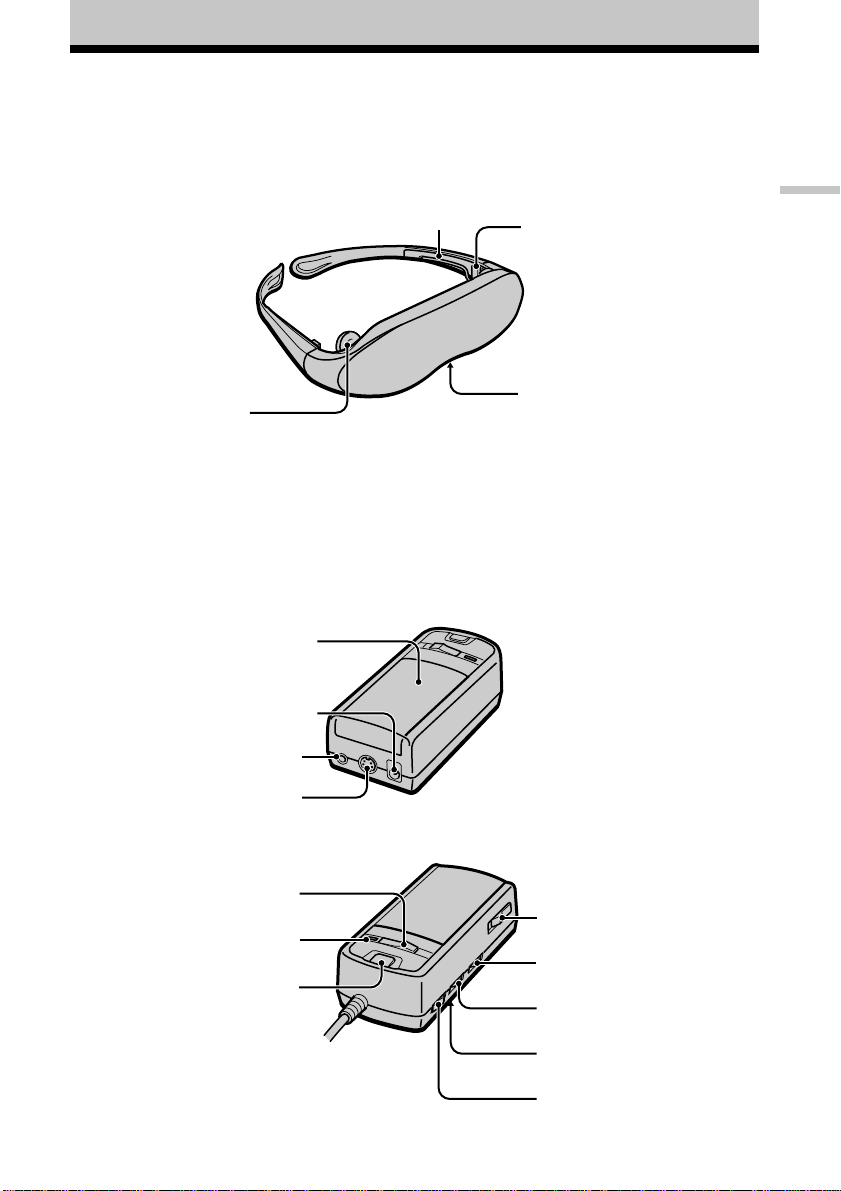
Locating the parts and controls
Refer to the pages indicated in parentheses ( ) for details.
Display unit
Side piece (12)
Side piece
adjuster (13)
Getting Started
Earphone (14)
Power supply box
Cover (20)
DC IN 9V connector (11)
A/V IN (audio/video) jack
(8, 9)
S VIDEO IN jack (10)
POWER ON/OFF switch (15)
POWER lamp (15)
START/BATT CHECK button
(16, 21)
Nose piece (12)
BATT/COVER RELEASE
button (20)
BRIGHT (brightness)
control (17)
VOL (volume) control (17)
User lock switch (19)
AVLS ON/OFF switch (18)
-GB
7
Page 8
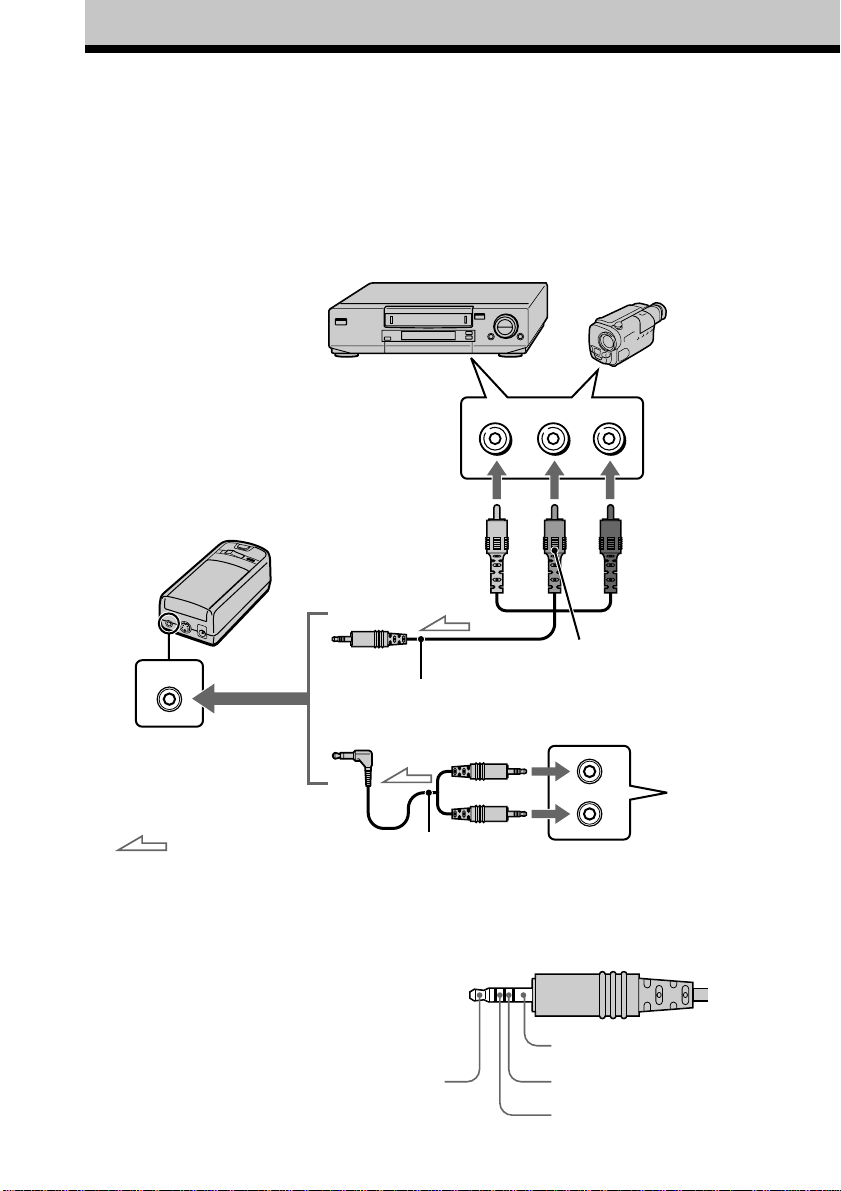
Connecting the Glasstron
Connecting video equipment
Connect a VCR, laser disc player, DVD player, or camcorder to the power supply box as shown
below. Two AV cables are supplied. Select the correct AV cable according to the shape of the
connectors on the unit to be connected.
VCR, laser disc player, DVD player, camcorder, etc.
to audio/video outputs
(phono jack)
Power supply box
A/V IN
to A/V IN
(special minijack)
: Signal flow
Audio/video cable
(special miniplug y phono
plug) (supplied)
Audio/video cable (special
miniplug y stereo miniplug)
(supplied)
About the audio/video input jack
The audio/video input jack of the Glasstron is a
special minijack, and the signal connections are
aligned as shown on the right. This alignment
may differ depending on the equipment.
-GB
8
Video
(yellow)
Audio L
Video (yellow)
Audio (black)
Audio R
(red)
Audio L
(white)
to video output
(minijack)
DVD player,
Video CD
player
to audio output
(stereo minijack)
Audio R
GND
Video
Page 9
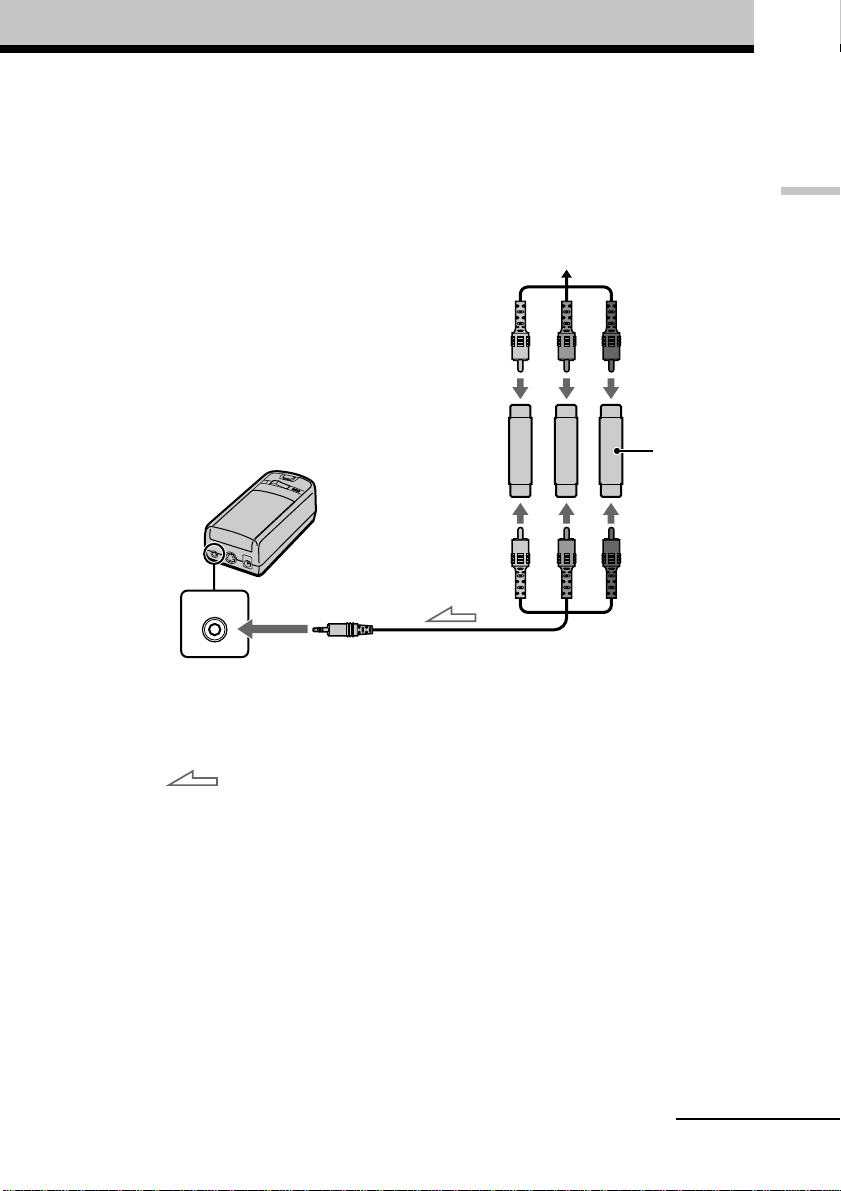
Connecting other equipment
The plug adaptor (phono jack y phono jack) is supplied. Use the plug adaptor according to the
equipment you want to connect.
TV game, DVD player, camcorder, etc.
Plug adaptor
(supplied)
A/V IN
Audio/video cable
to A/V IN
(special minijack)
(special miniplug y phono plug)
(supplied)
Getting Started
: Signal flow
continued
-GB
9
Page 10
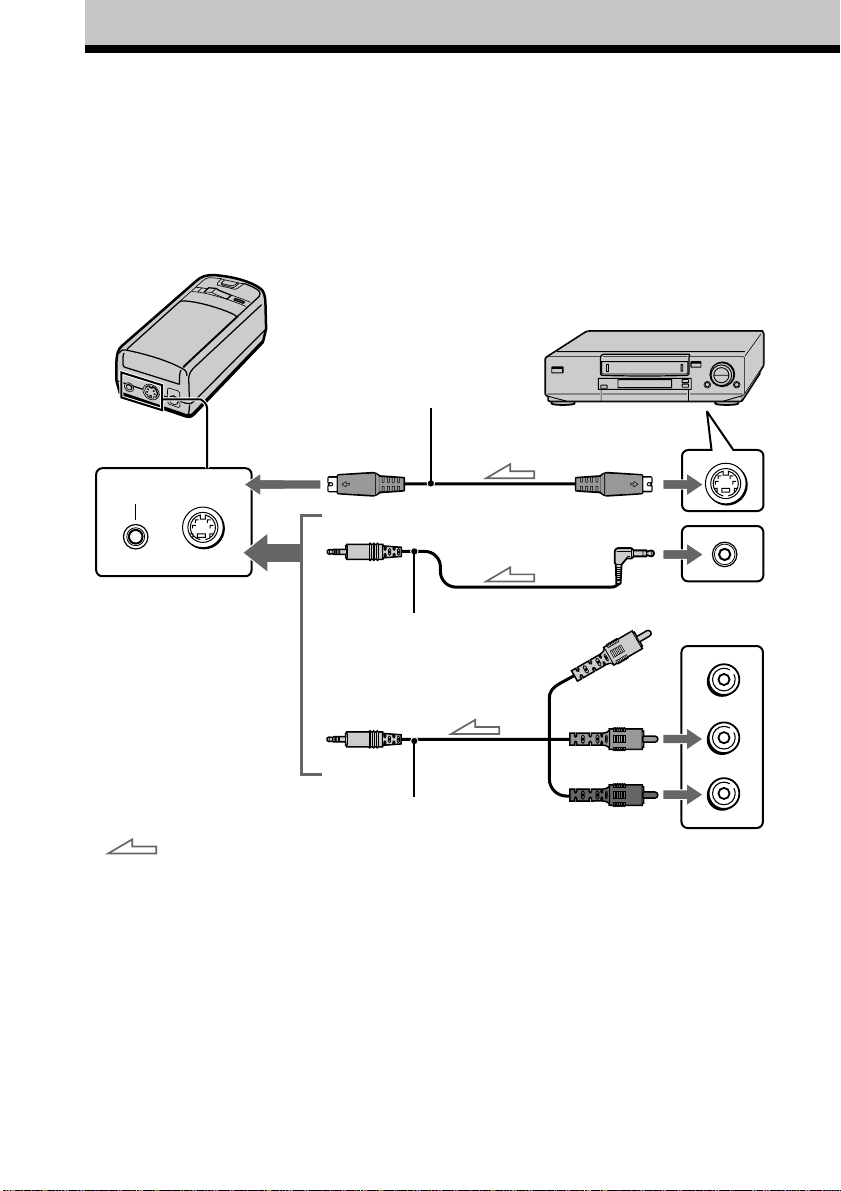
Connecting the Glasstron (continued)
If your video equipment has an S video jack
We recommend connecting the Glasstron to your video equipment using an S video cable and the
audio/video cable to enjoy the highest quality pictures. In this case, you do not need to connect the
video (yellow) plug. If you connect both the S video and video plugs, the S video signal is
automatically selected.
Power supply box
VCR, laser disc player, DVD player,
camcorder, etc.
S video cable
(not supplied)
to S VIDEO IN
A/V IN
S VIDEO IN
to A/V IN
: Signal flow
Audio/video cable
(special miniplug y special
miniplug) (not supplied)
Audio/video cable
(special miniplug y phono plug)
(supplied)
Notes
•Even if you use the supplied audio/video
cable, the audio and video signals may not be
carried to the Glasstron depending on the
video source. In this case, contact your Sony
dealer or local authorized Sony service
facility.
to S video output
to audio/video output
Video (yellow)
Audio L (white)
Audio R (red)
to audio/video outputs
•When you connect the Glasstron to the audio
output jacks (phono jacks) of your video
equipment, connect the Glasstron to both the
right and left audio output jacks. If you
connect the Glasstron to just one audio output
jack, you will hear sound from only one of the
stereo earphones.
10
-GB
Page 11
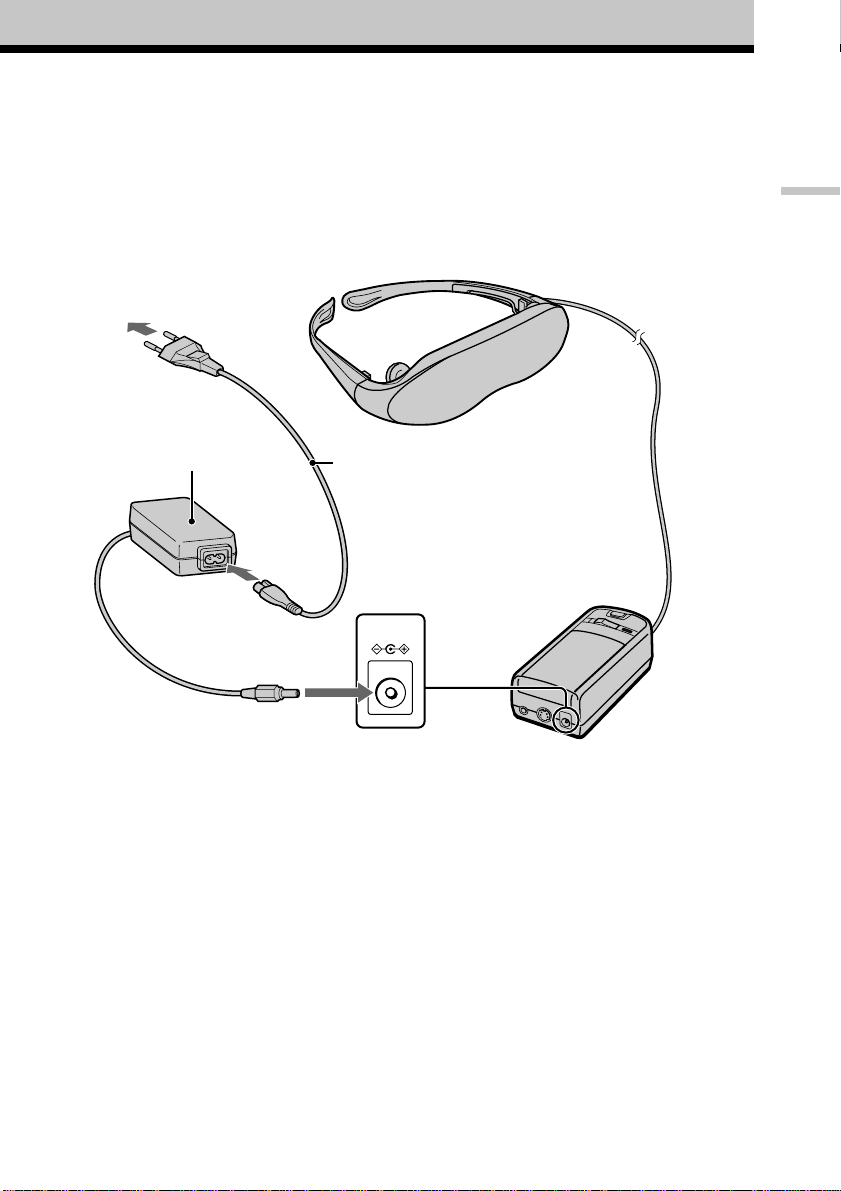
Connecting the power source
Connect the AC power adaptor AC-PLM2 (supplied) to mains. Do not connect the power source
until all other connections are complete.
Display unit
to mains
AC power adaptor
AC-PLM2 (supplied)
to DC IN 9V
Mains lead
(supplied)
DC IN 9V
Getting Started
Power supply box
11
-GB
Page 12
Wearing the Glasstron
WARNING
• Failure to properly fit the product (see “Proper Fit,” page 5 on the Safety Instructions) each
time may result in eye fatigue, eye damage, or loss of visual functions and may result in
accident or injury.
• This product should not be used by children age 15 or younger.
The eyes of children are still developing and may be adversely affected by use of this
product, and it may cause eye fatigue, eye damage, or loss of visual functions.
In addition, this product may not be adjusted to fit a child’s head.
If you normally wear glasses while watching TV, you can use the Glasstron while wearing
glasses. When you take the Glasstron off, be careful that your regular glasses not get caught on
the Glasstron.
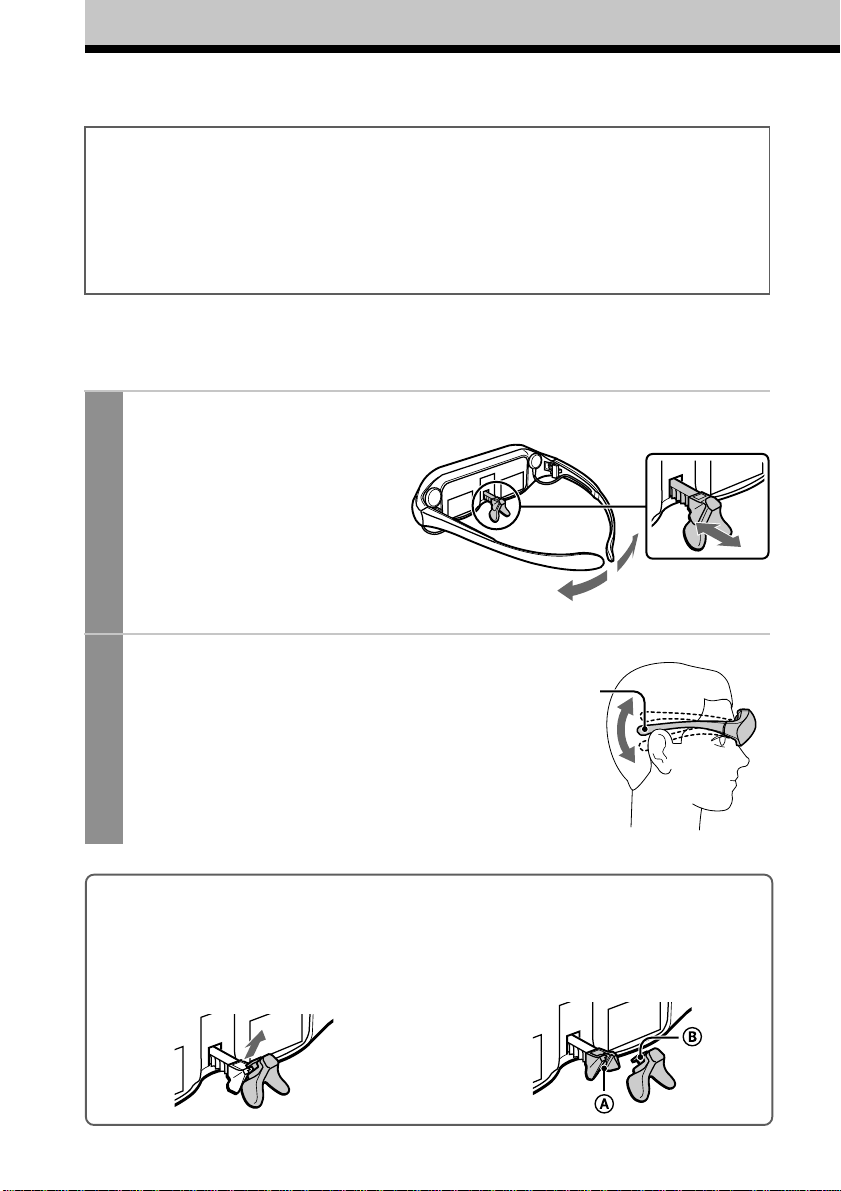
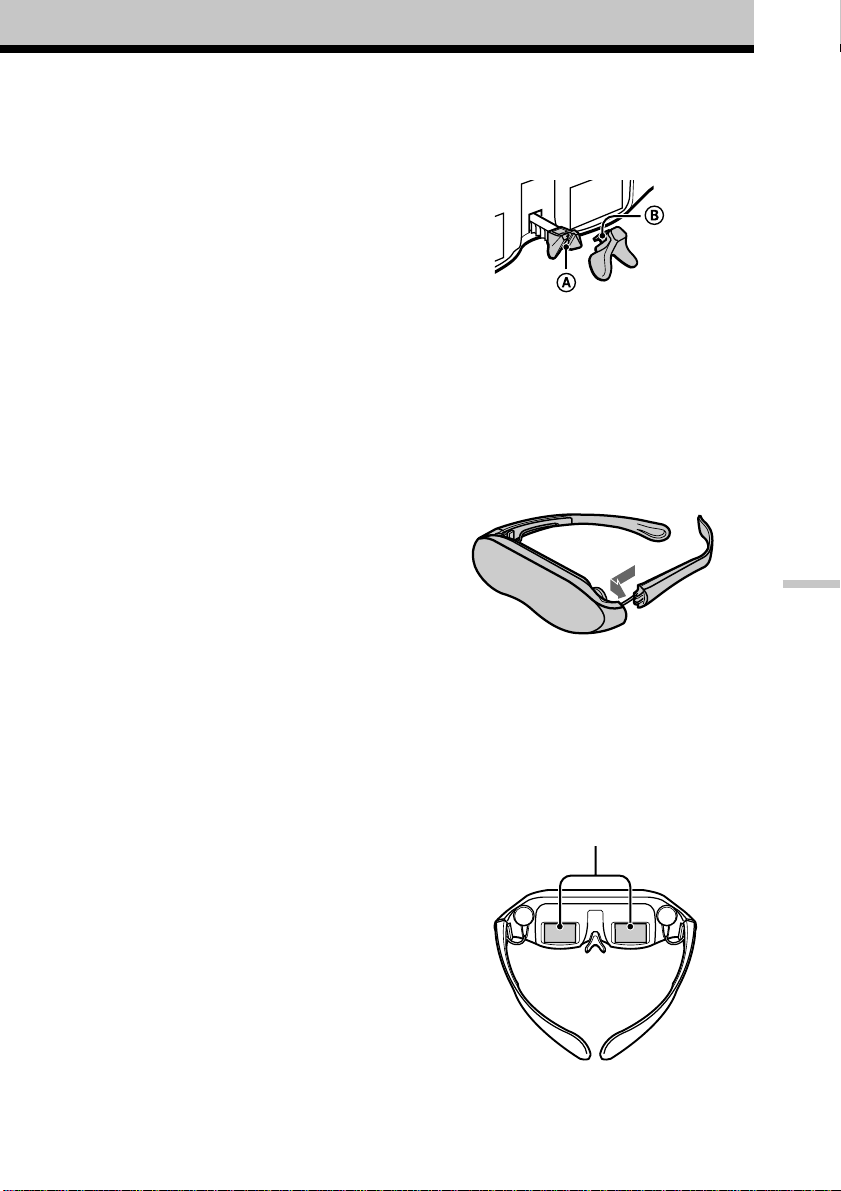
Adjust the nose piece and put on the Glasstron.
1
Pull out the nose piece if you wear
glasses.
Open the side pieces by grasping the
side piece tips and put on the
Glasstron.
Caution:
Be careful not to poke your eyes
with the side piece tips when
putting the Glasstron on or off.
Adjust the angle of the display unit.
2
Adjust the angle of the side pieces by
grasping the side piece tips to adjust the
display unit to the most suitable viewing
position.
You do not necessarily have to rest the
side pieces on your ears.
Side piece
Nose piece
To use the supplied nose piece
If you are still unable to have a full view of the screen or clear picture colour on the Glasstron after
performing step 2 above, replace the nose piece with the supplied nose piece (black).
1 Remove the nose piece in an upward direction
while grasping the nose piece support.
-GB
12
2 Insert B of the supplied nose piece
(black) into the round notch A.
Page 13
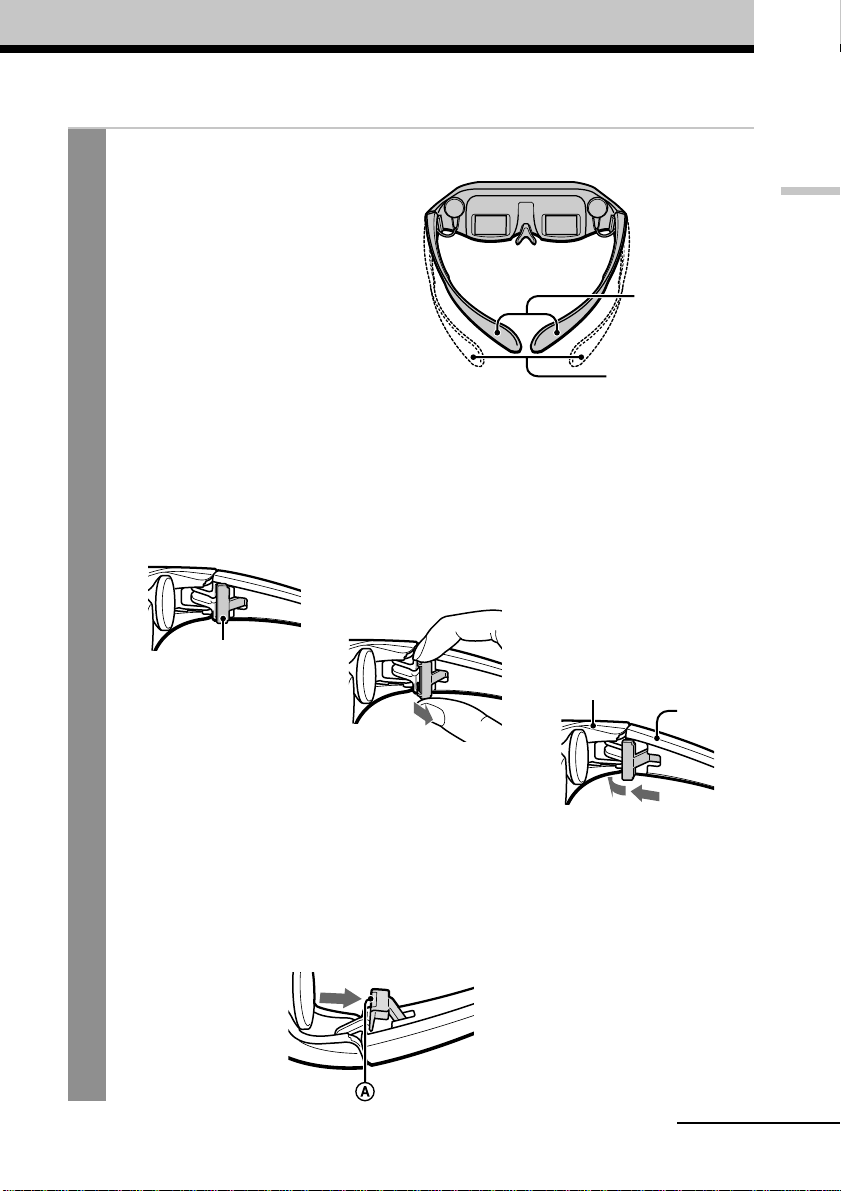
Adjust the width of the side pieces.
3
There are two settings for the side piece
width adjustment.
If the fit seems loose, insert the side
piece adjusters to the hinges of the left
and right side pieces.
To use the side piece adjusters
1 This is the original
position. Normally keep
adjusters here.
Side piece adjuster
2 Turn the side pieces
inside slightly then
gently squeeze the top
and bottom of the side
piece adjuster and pull
out to release.
Getting Started
Using side piece
adjusters
Not using side piece
adjusters
3 Slide the side piece
adjuster toward the
display unit.
4 Reinsert the side piece
adjuster tines into the
hinge area between the
side piece and display
unit. Repeat the
procedure for the other
side piece.
Display unit
Side piece
4
3
To reset the side piece adjusters, turn the side pieces inside slightly and reverse the
above procedure.
To put the side piece adjuster back, press A to the illustrated direction until it “clicks”
into place.
continued
13
-GB
Page 14
Wearing the Glasstron (continued)
For increased comfort while wearing Glasstron
If the Glasstron fit is loose or uncomfortable, place the supplied side piece pads onto the tip of each
side piece.
Note
Use the side peace pads pocket-side inward.
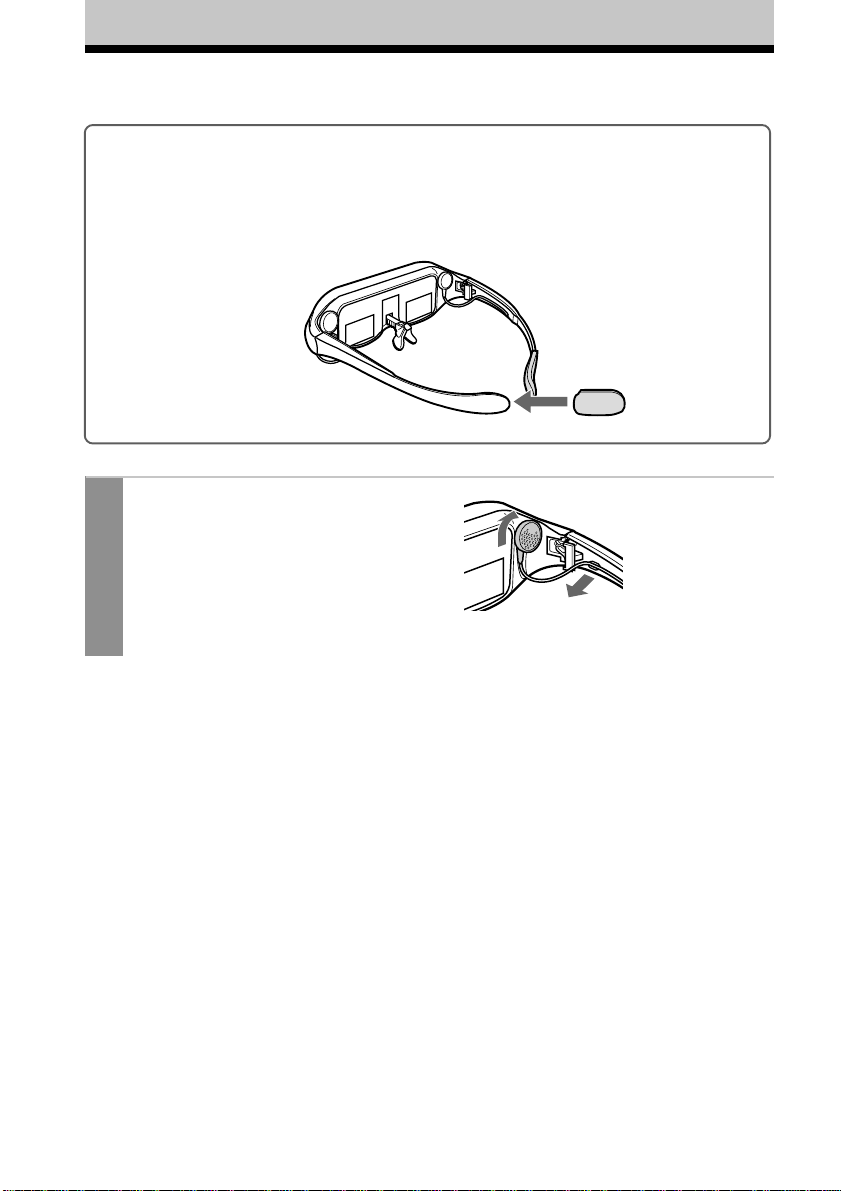
Wear the stereo earphones.
4
Detach the stereo earphones from the
display unit and put them in your ears.
Notes
•If the stereo earphones are loose, we
recommend using the spare ear-pads (not
supplied).
•If your head is small, you may not be able to
use the Glasstron.
•Depending on your eyesight, you may not be
able to focus on the picture properly. In such
a case, it is not a malfunction.
-GB
14
Page 15
Using the Glasstron
If you set the user lock, unlock it (page 19).
Before you start…
Be sure to follow the procedures in “Connecting the Glasstron” (pages 8 - 11) and “Wearing the
Glasstron” (pages 12 - 14).
WARNING
Each time you use this product, adjustment screens will appear, requiring the viewer to
properly fit the product. To prevent eye damage, do not use this product if the vertical lines
do not cross the horizontal line on the next screen.
The Glasstron includes two small (left and right) LCDs. You are watching a combined picture
created from these two screens. Although the screen position is properly aligned at the factory, it
may become misaligned if the Glasstron is deformed or damaged. Check the screen position
alignment every time you turn on the Glasstron. If you cannot have correct screen alignment,
stop using the Glasstron immediately.
Turn on the Glasstron using the POWER ON/OFF switch.
1
The POWER lamp lights up.
Screen
Operations
POWER
ON/OFF
continued
15
-GB
Page 16
Using the Glasstron (continued)
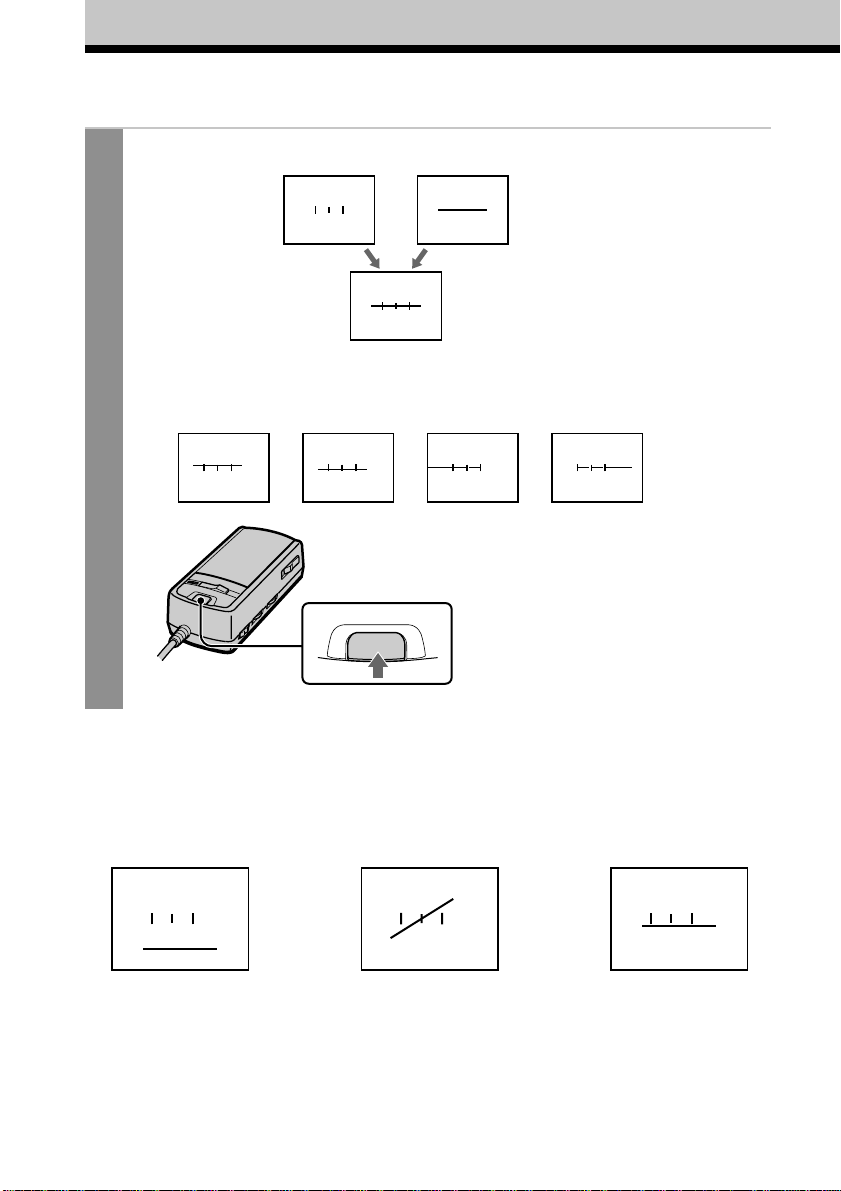
If the screens are aligned, press the START/BATT CHECK button.
2
Left screen Right screen
You may see a horizontal line
on the left screen rather than
the right screen and vertical
Correct
The combined picture
you see with both eyes
If the image you see matches one of the pictures below, you have
correct screen alignment.
Correct Correct Correct Correct
START/BATT CHECK
lines on the right screen
rather than the left screen.
This is not a malfunction.
If the image you see matches one of the pictures
below, stop using the Glasstron immediately.
Use of the Glasstron under such conditions may cause
eye fatigue or eye damage.
Incorrect Incorrect Incorrect
16
When no vertical lines
cross the horizontal
line.
If you cannot see a proper arrangement of these lines even after resting your eyes for a
few hours, the Glasstron may not be operating correctly. Contact your Sony dealer or
local authorized Sony service facility.
-GB
When the horizontal
line appears as a
diagonal line.
When the centre vertical
line does not cross the
horizontal line.
Page 17
Start playback on the video equipment connected to the
3
Glasstron.
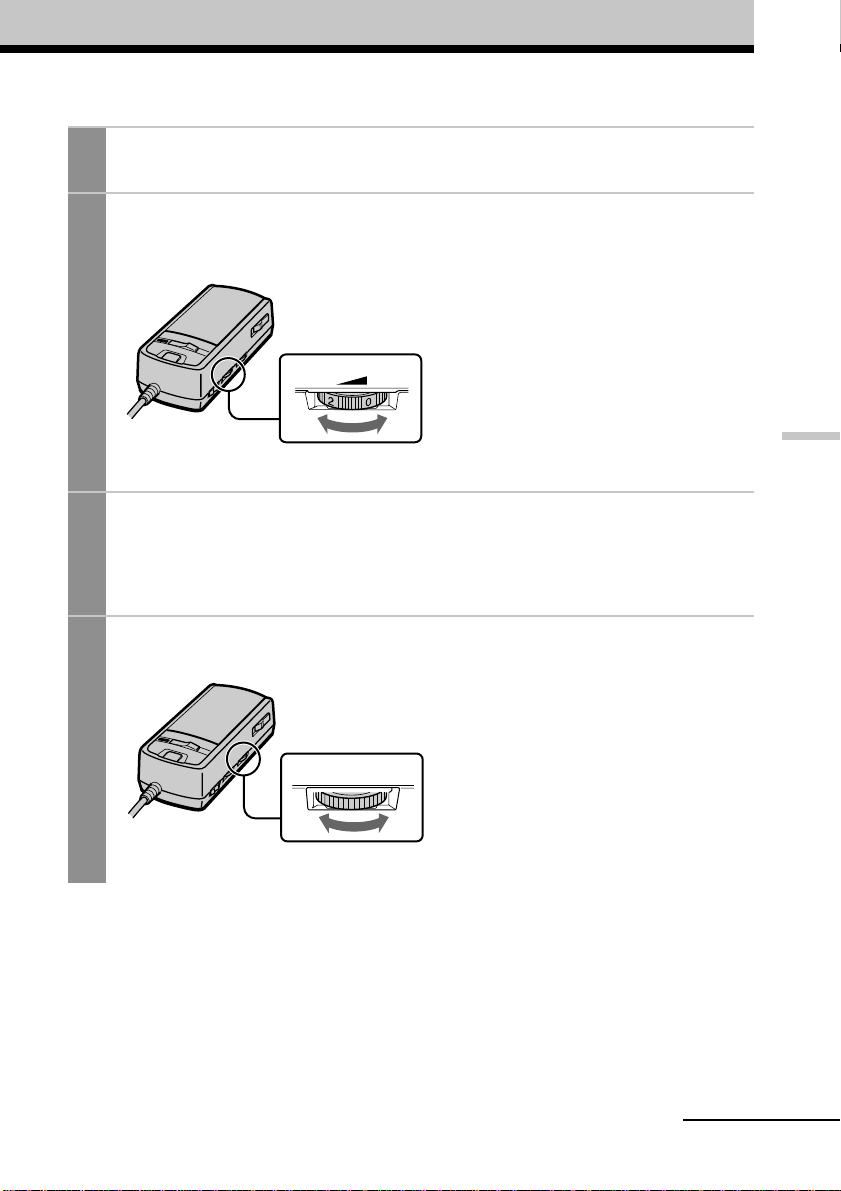
Adjust the volume by turning the VOL control.
4
When you set the AVLS ON/OFF switch to ON, you cannot turn up the volume beyond
the defined limit (see page 18).
VOL
lower louder
Check that the four corners of the screen are clear.
5
If the four corners of the screen are not clear, do the step 2 (page 16) to check the screen
position alignment again.
Adjust the brightness by turning the BRIGHT control.
6
BRIGHT
+−
less bright brighter
Operations
continued
17
-GB
Page 18
TIME OUT
ZEIT ZU ENDE
TEMPS DEPASS
Using the Glasstron (continued)
After you finish using the
Glasstron
Take off the Glasstron, and turn off the
power.
Note on the LCDs
The LCD screen is made with highprecision technology. However, black
points or bright points of light (red, blue, or
green) may appear constantly on the LCD
screen. This is not a malfunction.
(Effective dots: more than 99.99%)
Preventing sound from
escaping through the stereo
headphones
–– AVLS (Auto Volume Limiter
System):
Keeps down the maximum volume to
protect your ear. You cannot turn up the
volume beyon d the defined limit even if
you try to turn it up.
Set the AVLS ON/OFF switch
to ON.
AVLS
OFF ON
Screen warnings against
overuse of the Glasstron
To prevent eye fatigue or eye damage, after
you use the Glasstron for three hours the
following caution appears on the screen and
the power turns off automatically.
Caution: Motion sickness from
viewing programmes.
Some viewers may experience motion
sickness, headache or nausea from viewing
movies or video programmes, especially
those with intense action and movement. If
you feel any of these symptoms, stop using
the product immediately. To avoid personal
injury or injury to others, do not drive a car
or motorcycle, nor do anything that requires
concentration until the symptoms
disappear.
Caution: Motion sickness from
external motion.
Do not use the product while subject to
external motion –– for example, as a
passenger in a car. Use of this product
under these conditions may cause motion
sickness.
To turn the AVLS off
Set the AVLS ON/OFF switch to OFF.
-GB
18
Page 19

Setting the user lock
WARNING
This product should not be used by children age 15 or younger. The eyes of children are still
developing and may be adversely affected by use of this product. To prevent such use, this
product is equipped with the user lock system.
When the user lock is on, audio and video signals are not input and all operations except power
on/off are disabled.
To use the Glasstron, unlock the user lock.
Set the user lock switch as shown in the illustration.
USER LOCK
BEN. –SPERRE
VERR. UTILIS
Bottom of the Power
supply box
To unlock the user lock
Set the user lock switch to the opposite position.
Lock
Unlock
Operations
19
-GB
Page 20
Using an optional battery pack
If you use a battery pack such as the NP-F550/F750/F950, you can use the Glasstron without
connecting to mains.
Charge the battery pack before use by using the optional battery charger, BC-V615. You cannot
charge the battery pack while it is on the unit.
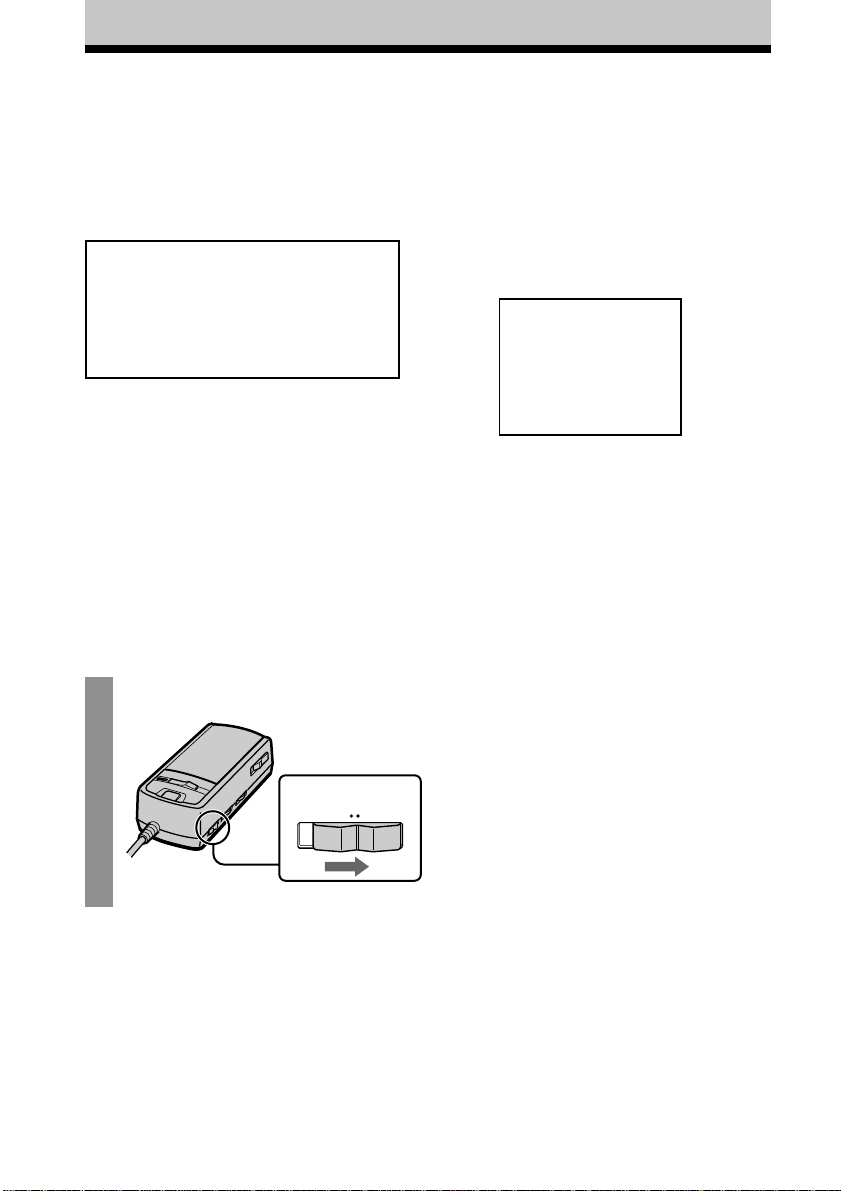
Slide the BATT/COVER RELEASE button to remove the cover.
1
When not using the unit, keep the cover
on the power supply box.
BATT/COVER RELEASE
button
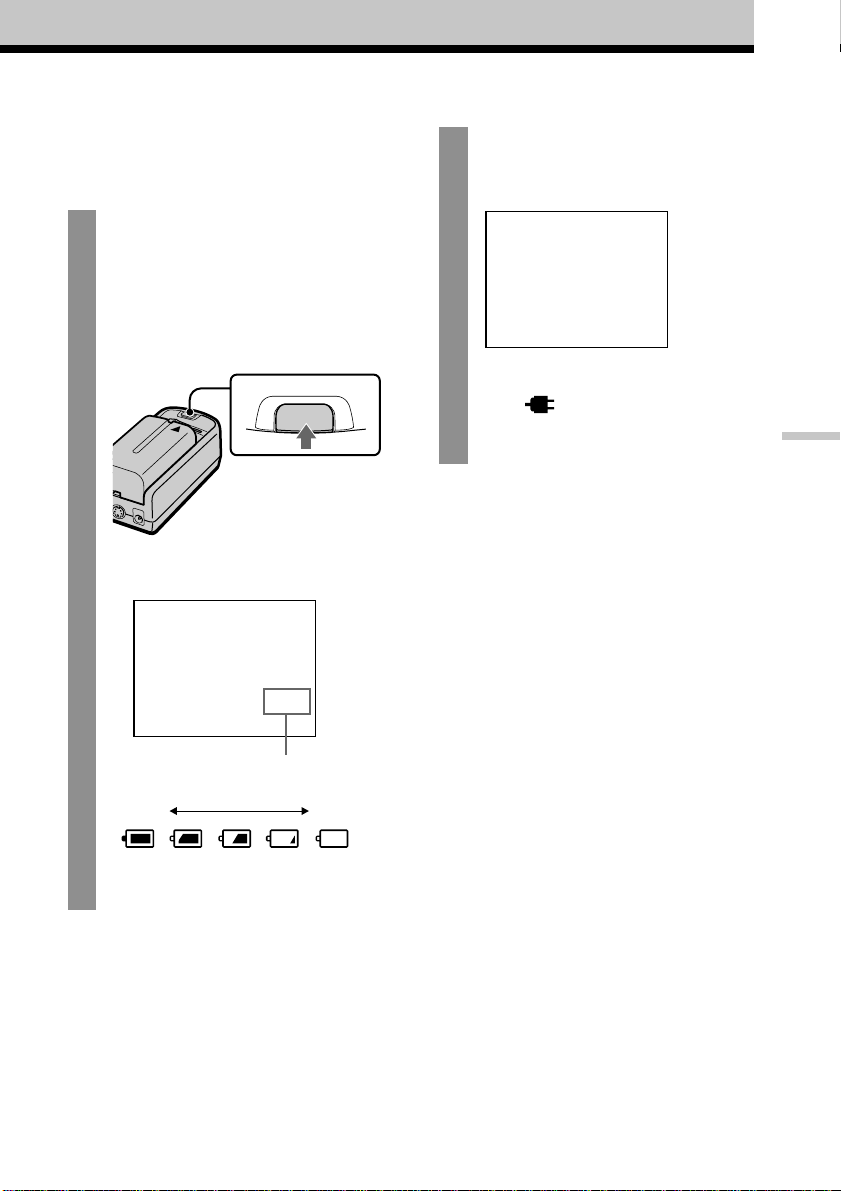
Attach the battery pack to the power supply box.
2
Install the battery pack properly making
sure it is not crooked against the power
supply box.
To remove the battery pack, slide and
hold the BATT/COVER RELEASE
button and pull the battery pack off.
BATT/COVER RELEASE
button
Power supply box
Battery pack
Battery pack Battery life
NP-F550 Approx. 7 hours
* The above indications are for fully charged
batteries.
* Actual battery life depends on conditions of
use.
* You can also use a battery pack such as the
NP-F530/F730/F750/F930/F950 (not
supplied) with the Glasstron.
* You can use an “InfoLITHIUM™” battery
pack with the Glasstron. When using such a
battery pack, the estimated remaining battery
life is displayed with the indicator instead of
the time counter.
-GB
20
Notes
•While using the battery pack, if you connect
or disconnect the AC power adaptor, the
power turns off. To turn the power on, press
the POWER ON/OFF switch again.
•If the POWER lamp flashes while using the
battery pack, replace the battery pack with a
fresh one.
•Battery life may be shorter in a cold
environment. This is a typical battery
characteristic.
“InfoLITHIUM” is a trademark of Sony
Corporation.
Page 21
Checking the remaining
battery life
When no indication or
caution appears on the
screen, press the START/
BATT CHECK button.
The remaining battery life appears
and the picture disappears.
When the battery pack is weak, the
following message appears on the
screen. Replace the battery pack with
a charged one.
BATTERY DOWN
AKKU LEER
PILE PLATE
Fully
charged
START/BATT CHECK
Remaining battery life
dead
When using the AC power adaptor,
the “ ” mark appears on the
screen.
Operations
-GB
21
Page 22

Precautions
Use
• Operate the product only with the
supplied AC power adaptor (AC-PLM2).
If you use a different AC power adaptor, it
may cause a malfunction.
Unified polarity plug
• Should any liquid or solid object fall into
the cabinet, unplug the product and have
it checked by qualified personnel before
operating it further.
• Always turn the product off when you do
not use it.
Unplug the product from the mains if you
are not going to use it for several days or
more. To disconnect the cord, pull it out
by the plug. Never pull the cord itself.
• Do not overload mains, extension cords,
or convenience receptacles beyond their
capacity, since this can result in fire or
electric shock.
• Do not use attachments not recommended
by the manufacturer, as they may cause
hazards.
• Avoid using earphones at high volume.
Hearing experts advise against
continuous, loud, and extended play. If
you experience a ringing in your ears,
reduce volume or discontinue use.
• Do not touch the AC power adaptor or
power supply box with wet hands. If you
fail to observe this, it may cause electric
shock.
• Do not drop or give a mechanical shock to
the product.
Installation
• To prevent internal heat buildup, do not
block the ventilation openings.
• Avoid operating the product at
temperatures below 5°C (41°F).
• Do not subject the product to high
temperature or direct sunlight. If you do
not observe the above instructions, the
product may become deformed and the
screens may become impossible to align.
If you keep watching misaligned screens,
you may develop eye fatigue. Follow the
instructions in “Using the Glasstron”
(pages 15 - 18), to be sure the screens are
aligned. If you find the screens
misaligned, have the product repaired at
your Sony dealer or local authorized
Sony service facility.
• Do not place the product in locations
where it is wet, humid, dusty, smoky, or
steamy. Do not use this product near or
around water. It may cause fire or electric
shock. Especially, do not use the product
in the bathroom.
• If the product is transported directly from
a cold to a warm location, or if the room
temperature has changed suddenly, the
picture may be blurred or show poor
colour. This is because moisture has
condensed on the lenses inside. If this
happens, let the moisture evaporate
before using the product.
• Do not place the product on an unstable
cart, stand, table, or shelf. The product
may fall, causing serious injury to a child
or an adult, and serious damage to the
product.
• Do not allow anything to rest on or roll
over the power cord, and do not place the
product where the power cord is subject
to wear or abuse.
22
Others
• Unplug the product from the wall outlet
and refer servicing to qualified service
personnel under the following conditions:
- When the power cord or plug is
damaged or frayed.
- If liquid has been spilled into the
product.
-GB
Page 23
- If the product has been exposed to rain
or water.
- If the product has been subject to
excessive shock by being dropped, or
the cabinet has been damaged.
- If the product does not operate
normally when following the operating
instructions. Adjust only those controls
that are specified in the operating
instructions. Improper adjustment of
other controls may result in damage
and will often require extensive work
by a qualified technician to restore the
product to normal operation.
- When the product exhibits a distinct
change in performance –– this indicates
a need for service.
• Do not disassemble or modify the
product. It may cause fire or electric
shock. Have the product checked and
repaired at your Sony dealer or local
authorized Sony service facility.
• Do not attempt to service the product
yourself since opening the cabinet may
expose you to dangerous voltage or other
hazards. Refer all servicing to qualified
service personnel.
• When replacement parts are required, be
sure the service technician certifies in
writing that he has used replacement
parts specified by the manufacturer that
have the same characteristics as the
original parts.
Unauthorized substitutions may result in
fire, electric shock, or other hazards.
• Upon completion of any service or
repairs to the product, ask the service
technician to perform routine safety
checks (as specified by the manufacturer)
to determine that the product is in safe
operating condition, and to so certify.
• Unplug the product from the mains
before cleaning. Clean the product gently
with a dry, soft cloth, or a soft cloth
slightly moistened with a mild detergent
solution. Do not use any type of solvent,
such as alcohol or benzine.
If the nose piece is disconnected
Reinsert the nose piece to its position.
Insert B to A.
If the side pieces are
disconnected
You can reattach the side piece.
Insert the side piece to the inner side of the
display unit. Gently push until it clicks into
position.
However, reattaching the side pieces may
cause a malfunction. Be careful not to
reattach them too often.
Additional Information
Window coating
To avoid reflection, the windows are coated.
Do not place the product in locations subject
to sudden temperature changes, or where it
is excessively hot (above 60ºC/96ºF). For
example, inside a car parked in direct
sunlight.
The coating may develope cracks.
Windows
23
-GB
Page 24

Troubleshooting
If you have any questions or problems not listed below, contact your Sony dealer or local
authorized Sony service facility.
Symptom
The playback picture does
not appear.
The picture is dark or
dim.
Horizontal stripes appear.
The picture suddenly
disappears.
Picture and/or sound has
noise.
The picture has no sound.
The sound is noisy.
The volume does not
become louder.
The battery pack
discharges quickly.
The black, red, and green
dots do not disappear.
The POWER ON/OFF
switch does not function.
Cause
Connections are incorrect.
The user lock is set.
You are not wearing the Glasstron
correctly.
—
The window (where the picture is
displayed) is dirty.
You continued using the Glasstron
for three hours. (The Glasstron turns
off automatically after three hours to
prevent eye fatigue.)
The battery pack is dead.
The plugs of the audio/video cable
are dirty.
—
The AVLS function is on.
The battery pack is not charged
enough.
The battery pack is completely dead.
The LCD is made with highprecision technology. However,
black points or bright points of light
(red, blue, or green) may appear
constantly on the LCD screen. This is
not a malfunction.
(Effective dots: more than 99.99%)
—
Remedy
Connect the equipment correctly
(pages 8 - 11).
Unlock the user lock (page 19).
Put on the Glasstron correctly (pages
12 - 14).
Adjust the brightness (page 17).
Clean the display unit with a soft,
dry cloth (page 23).
—
Replace the battery pack (page 20).
Clean the plugs of the audio/video
cable.
Adjust the volume with the VOL
control (page 17).
Set the AVLS ON/OFF switch to OFF
(page 18).
Charge the battery pack fully or use a
new one (page 20).
—
Disconnect the mains lead from the
mains. After three minutes, reconnect
the mains lead.
24
-GB
Page 25

Specifications
Power supply
AC power adaptor: AC-PLM2
100-240 V AC, 50/60 Hz, 16 W
Output voltage 9 V, 1.3 A
Battery pack: NP-F550 (not supplied)
Power consumption
1.8 W Approx.
Operating temperature
5°C to 35°C (41°F to 95°F)
Storage temperature
–10°C to 60°C (14°F to 140°F)
Dimensions
Display unit:
Approx. 173 × 53 × 56 mm
(Approx. 6 7/8 × 2 1/8 × 2 1/4 inches)
(w/h/d, folded up)
Power supply box:
Approx. 53 × 39 × 104 mm
(Approx. 2 1/8 × 1 9/16 × 4 1/8 inches)
(w/h/d)
not including projecting parts and
controls
Mass
Display unit: Approx. 100 g (4 oz)
Power supply box: Approx. 90 g (3.2 oz)
Video signal
PAL colour, EIA standards
Audio/video input
Special minijack
1 Vp-p, 75 ohms, unbalanced, sync
negative
S video input
4-pin mini DIN
Y: 1 Vp-p, 75 ohms, unbalanced, sync
negative
C: 0.286 Vp-p, 75 ohms, unbalanced, sync
negative
Supplied accessories
AC power adaptor AC-PLM2 (1)
Mains lead (1)
Audio/video cable (special miniplug y
phono plug) (3 m) (1)
Audio/video cable (special miniplug y
stereo miniplug) (0.5 m) (1)
Plug adaptors
(phono jack y phono jack) (3)
Nose piece (black) (1)
Side piece pads (2)
Operating instructions manual (1)
Safety Instructions (1)
Warranty (1)
Index
A
Accessories supplied 6
AC power adaptor 11
Adjusting
brightness 17
nose piece 12
side pieces’ width 13
volume 17
AVLS 18
B
Battery pack 20
C, D, E, F, G, H, I, J, K, L, M, N, O
Checking the screen position alignment 16
Connection
battery pack 20
power 11
video equipment 8 - 10
P, Q
Precautions 22
R
Remaining battery life 21
S, T
Screen alignment 16
Stereo earphones 14
U, V
User lock 19
W, X, Y, Z
Wearing the Glasstron 12 - 14
Additional Information
Design and specifications are subject to
change without notice.
25
-GB
Page 26

AVERTISSEMENT
Pour éviter tout risque d’incendie
ou de décharge électrique, ne
pas exposer cet appareil à la
pluie ou à l’humidité.
Pour éviter tout risque de
décharge électrique, ne pas
ouvrir le coffret de cet appareil
et ne confier son entretien qu’à
un personnel qualifié.
Ce produit est conforme aux directives
européennes suivantes :
73/23/CEE, 93/68/CEE (directive sur les
basses tensions)
89/336/CEE, 92/31/CEE (directive sur la
compatibilité électromagnétique)
Cet équipement est conforme à la norme
EN55013 limitant l’emploi dans les
environnements résidentiels, professionnels
et industriels léger.
Précautions
• La plaquette signalétique est située sur le
dessous, à l’extérieur.
• Une distorsion du son et de l’image peut
se produire si le PLM-A35E est positionné
à proximité directe d’un appareil
émettant des radiations
électromagnétiques.
-FR
2
Page 27

Le Glasstron incarne un tout nouveau
concept de système d’affichage.
Nous vous remercions d’avoir fait
l’acquisition d’une visionneuse individuelle
Glasstron Sony. Le Glasstron, qui fait appel
aux technologies modernes de systèmes
d’affichage miniaturisés légers, assure une
expérience télévisuelle comparable au
visionnage sur un écran de 52 pouces à une
distance d’approximativement 2 m. (Les
impressions de visionnage peuvent varier
suivant les facultés de perception
individuelles.)
La visionneuse individuelle Glasstron crée
une image sur deux écrans d’affichage à
cristaux liquides placés à proximité directe
de vos yeux. Pour garantir la sécurité
d’utilisation du Glasstron, il importe de
vous familiariser avec ses fonctions de base,
y compris les instructions pour un ajustage
approprié. De même, soyez attentif à tous
les symptômes de fatigue oculaire ou de
toute autre sensation d’inconfort que vous
pourriez ressentir.
AVERTISSEMENT
LE NON-RESPECT DES PRESENTES
INSTRUCTIONS D’UTILISATION
IMPLIQUE DES RISQUES DE FATIGUE
OCULAIRE, DES TROUBLES DE LA VUE
OU D’AUTRES BLESSURES AUX YEUX,
AINSI QUE DES DOMMAGES AUX BIENS,
VOIRE LA MORT.
AVERTISSEMENT
CET APPAREIL NE PEUT ETRE UTILISE
PAR DES ENFANTS AGES DE 15 ANS OU
MOINS.
LES YEUX DES ENFANTS SONT
TOUJOURS EN PHASE DE
DEVELOPPEMENT ET PEUVENT ETRE
GRAVEMENT AFFECTES PAR
L’UTILISATION DE CET APPAREIL.
Remarque sur l’affichage à cristaux
liquides (LCD)
L’écran LCD fait appel à des technologies
de haute précision. Il se peut toutefois que
de minuscules points noirs et/ou lumineux
(de couleur rouge, bleue ou verte)
apparaissent de manière constante sur
l’écran LCD. Il ne s’agit pas d’un
dysfonctionnement. (Points effectifs : plus
de 99,99 %)
FR
-FR
3
Page 28

Table des matières
A propos du Glasstron ................................................... 5
Préparation
Vérification des accessoires fournis.............................. 6
Localisation des composants et des commandes ....... 7
Raccordement du Glasstron .......................................... 8
Raccordement d’un appareil vidéo......................... 8
Raccordement d’un autre appareil ........................ 9
Raccordement de la source d’alimentation.......... 11
Port du Glasstron .......................................................... 12
Opérations
Utilisation du Glasstron ............................................... 15
Réglage du verrou utilisateur...................................... 19
Utilisation de la batterie en option ............................. 20
Informations complémentaires
Précautions ..................................................................... 22
Dépannage...................................................................... 24
Spécifications ................................................................. 25
Index................................................................................ 25
-FR
4
Page 29

A propos du Glasstron
Attention: L’écran se trouve toujours droit devant vous.
Le Glasstron est un écran d’affichage à placer sur le visage. Avec ce type d’affichage, l’écran se
trouve toujours devant vous, même si vous tournez la tête. Cette caractéristique vous permet de
vous concentrer sur l’écran plus facilement qu’avec des téléviseurs ordinaires, et vous avez
réellement l’impression d’être en pleine action.
• Le Glasstron s’ajuste facilement. Vous pouvez même utiliser la visionneuse si vous portez des
lunettes.
• Chaque fois que vous utilisez la visionneuse Glasstron, l’écran de réglage apparaît pour vous
aider à ajuster correctement la visionneuse. Vous pouvez également vérifier si les écrans
gauche et droit sont correctement alignés.
• Si vous utilisez la visionneuse Glasstron en continu pendant trois heures, un message
d’avertissement apparaît à l’écran et la visionneuse se met automatiquement hors tension.
La visionneuse Glasstron est constituée des éléments suivants :
Unité d’affichage
L’unité d’affichage est équipée de deux
petits écrans LCD (gauche et droit).
Préparation
Caractéristiques
• Une expérience télévisuelle grandiose
comparable au visionnage sur un écran
de 52 pouces à une distance
d’approximativement 2 m.
• Visionneuse pliante portable très
pratique.
• L’unité d’affichage pèse seulement 100 g.
• Utilisation continue approximative
jusqu’à sept heures avec la batterie
rechargeable NP-F550 recommandée par
Sony.
Bloc d’alimentation
Vous pouvez employer la batterie en
option recommandée par Sony. Vous
pouvez également utiliser le secteur
comme source d’alimentation. Pour
pouvoir utiliser votre Glasstron,
raccordez votre appareil vidéo à la prise
A/V IN du bloc d’alimentation.
-FR
5
Page 30

Vérification des accessoires fournis
Vérifiez si les accessoires suivants vous ont été fournis avec votre Glasstron. S’il manque l’un de
ces accessoires, veuillez consulter votre revendeur Sony ou un centre de service après-vente
Sony agréé.
• Unité d’affichage/Bloc d’alimentation (1)
• Adaptateur secteur AC-PLM2 (1)
• Cordon d’alimentation secteur (1)
• Câble audio/vidéo (minifiche spéciale
y fiche phono) (1)
• Adaptateurs des fiche
(prise phono y prise phono) (3)
• Pontet (noir) (1)
• Coussinets des branches (2)
• Mode d’emploi (1)
• Instructions de sécurité (1)
• Garantie (1)
• Câble audio/vidéo (minifiche spéciale
y minifiche stéréo) (1)
-FR
6
Page 31

Localisation des composants et des
commandes
Pour plus de détails, reportez-vous aux pages indiquées entre parenthèses ( ).
Unité d’affichage
Branche (12)
Dispositif de réglage
de la branche (13)
Préparation
Ecouteur (14)
Bloc d’alimentation
Couvercle (20)
Connecteur DC IN 9V (11)
Prise A/V IN (audio/vidéo)
(8, 9)
Prise S VIDEO IN (10)
Commutateur POWER
ON/OFF (15)
Témoin POWER (15)
Bouton START/BATT CHECK
(16, 21)
Pontet (12)
Bouton BATT/COVER RELEASE
(20)
Commande BRIGHT (luminosité)
(17)
Commande VOL (volume) (17)
Commutateur du verrou
utilisateur (19)
Commutateur AVLS ON/OFF (18)
-FR
7
Page 32

Raccordement du Glasstron
Raccordement d’un appareil vidéo
Raccordez un magnétoscope, un lecteur de disques laser, un lecteur DVD ou un caméscope au
bloc d’alimentation comme illustré ci-dessous. Deux câbles AV sont fournis. Sélectionnez le
câble AV correct en fonction de la forme des connecteurs de l’appareil à raccorder.
Magnétoscope, lecteur de disques laser,
lecteur DVD, caméscope, etc.
vers les sorties
audio/vidéo
(prise phono)
Bloc d‘alimentation
A/V IN
vers A/V IN
(miniprise spéciale)
: Sens du signal
Câble audio/vidéo
(minifiche spéciale y fiche
phono) (fourni)
Câble audio/vidéo
(minifiche spéciale y
minifiche spéciale) (fourni)
A propos de la prise d’entrée audio/vidéo
La prise d’entrée audio/vidéo du Glasstron est
une miniprise spéciale et les connexions du
signal sont alignées comme illustré à droite.
Cet alignement peut différer suivant les
appareils.
-FR
8
Vidéo
(jaune)
Audio L
Vidéo (jaune)
Audio (noir)
Audio R
(rouge)
Audio L
(blanche)
vers les sorties vidéo
(miniprise)
Lecteur DVD,
lecteur CD
vidéo
vers les sorties audio
(miniprise stéréo)
Audio R
Masse (GND)
Vidéo
Page 33

Raccordement d’un autre appareil
L’adaptateur de fiche (prise phono y prise phono) est fourni. Utilisez l’adaptateur de fiche en
fonction de l’appareil que vous voulez raccorder.
Jeu vidéo, lecteur DVD,
caméscope, etc.
Adaptateur de
fiche (fourni)
A/V IN
Câble audio/vidéo
vers A/V IN (miniprise
spéciale)
(minifiche spéciale y fiche phono)
(fourni)
Préparation
: Sens du signal
suite page suivante
-FR
9
Page 34

Raccordement du Glasstron (suite)
Si votre appareil vidéo dispose d’une prise S vidéo
Nous vous recommandons de raccorder le Glasstron à votre appareil vidéo à l’aide du câble S
vidéo et du câble audio/vidéo pour bénéficier des images de la plus haute qualité possible. Dans
ce cas, vous ne devez pas raccorder la fiche vidéo (jaune). Si vous raccordez les fiches S vidéo et
vidéo, le signal S vidéo sera automatiquement sélectionné.
Bloc d’alimentation
Magnétoscope, lecteur de
disques laser, lecteur DVD,
caméscope, etc.
Câble S vidéo
(non fourni)
vers S VIDEO IN
A/V IN
S VIDEO IN
vers A/V IN
Câble audio/vidéo
(minifiche spéciale y
minifiche spéciale) (non
fourni)
Câble audio/vidéo
: Sens du signal
(minifiche spéciale y fiche
phono) (fourni)
Remarques
•Même si vous utilisez le câble audio/vidéo
fourni, il se peut que les signaux audio et
vidéo ne soient pas transmis au Glasstron en
fonction de la source vidéo. Dans ce cas,
consultez votre revendeur Sony ou un centre
de service après-vente Sony agréé.
vers la sortie
S vidéo
vers la sortie
audio/vidéo
Vidéo
(jaune)
Audio L (blanche)
Audio R (rouge)
vers les sorties
audio/vidéo
•Si vous raccordez la visionneuse Glasstron
aux prises de sortie audio (fiches phono) de
votre appareil vidéo, raccordez le Glasstron
aux prises de sortie gauche et droite. Si vous
raccordez uniquement le Glasstron à une
seule prise de sortie audio, vous n’entendez
le son que par l’un des deux écouteurs stéréo.
10
-FR
Page 35

Raccordement de la source d’alimentation
Raccordez l’adaptateur secteur AC-PLM2 (fourni) à une prise murale. Ne raccordez pas la source
d’alimentation avant d’avoir terminé tous les autres raccordements.
vers une
prise murale
Adaptateur secteur
AC-PLM2 (fourni)
Cordon d’alimentation
(fourni)
DC IN 9V
Unité d’affichage
Préparation
vers DC IN 9V
Bloc d’alimentation
11
-FR
Page 36

Port du Glasstron
AVERTISSEMENT
• La négligence de cette précaution (voir “Ajustez correctement la visionneuse” à la page 5
des Instructions de sécurité) à chaque utilisation peut provoquer une fatigue ou des
troubles oculaires, ou encore la perte de fonctions visuelles et entraîner un accident ou des
blessures.
• Cet appareil ne doit pas être utilisé par des enfants de 15 ans ou moins.
Les yeux des enfants sont toujours en phase de développement et peuvent être gravement
affectés par l’utilisation de cet appareil, qui peut également entraîner une fatigue et des
affections oculaires ainsi que la perte de fonctions visuelles.
Cet appareil peut en outre ne pas être adapté à la tête d’un enfant.
Si vous portez habituellement des lunettes lorsque vous regardez la télévision, sachez que vous
pouvez utiliser le Glasstron tout en portant vos lunettes. Lorsque vous retirez le Glasstron,
veillez à ce que vos lunettes optiques ne soient pas coincées par le Glasstron.
Ajustez le pontet et mettez le Glasstron sur la tête.
1
Retirez le pontet si vous portez des
lunettes.
Ouvrez les branches en les
saisissant par l’extrémité et placezles sur le Glasstron.
Attention :
Veillez à ne pas vous blesser les yeux avec
l’extrémité des branches lorsque vous
mettez ou enlevez le Glasstron.
Ajustez l’angle de la visionneuse.
2
Ajustez l’angle des branches en les
saisissant par l’extrémité de manière à
adapter l’unité d’affichage dans la
position de visualisation la plus
confortable.
Vous ne devez pas nécessairement faire
reposer les branches sur vos oreilles.
Utilisation du pontet fourni
Si vous ne parvenez toujours pas à visionner l’intégralité de l’écran ou à afficher des couleurs claires
sur le Glasstron après avoir exécuté l’étape 2 ci-dessus, remplacez le pontet par le pontet fourni
(noir).
1 Déposez le pontet par le haut tout en
maintenant le support du pontet.
-FR
12
2 Insérez la partie B du pontet fourni (noir)
Branche
dans l’encoche ronde A.
Pontet
Page 37

Ajustez la largeur des branches.
3
Il y a deux positions de réglage de la
largeur des branches.
Si l’ajustage est trop lâche, insérez les
dispositifs de réglage des branches dans
les charnières gauche et droite.
Pour régler les dispositifs de réglage des branches
1 Il s’agit de la position
d’origine. En principe,
laissez les dispositifs de
réglage dans cette
position.
Dispositif de
réglage des
branche
2 Tournez légèrement les
branches vers l’intérieur
et pressez ensuite
délicatement les parties
supérieure et inférieure
du dispositif de réglage
des branches et tirez vers
l’extérieur pour le
dégager.
Préparation
Avec dispositifs
de réglage des
branches
Sans dispositifs
de réglage des
branches
3 Faites glisser le dispositif
de réglage des branches
vers l’unité d’affichage.
4 Réintroduisez les dents
du dispositif de réglage
des branches dans la
zone de la charnière
entre la branche et
l’unité d’affichage.
Répétez la procédure
pour l’autre branche.
Unité d’affichage
Branche
4
3
Pour remettre les dispositifs de réglage des branches à leur position de départ, tournez
légèrement les branches vers l’intérieur et inversez la procédure ci-dessus.
Pour reculer le dispositif de réglage des branches, poussez A dans la direction illustrée
jusqu'à ce qu'elle s'encliquette en position.
suite page suivante
13
-FR
Page 38

Port du Glasstron (suite)
Pour un confort accru lorsque vous portez le Glasstron
Si le Glasstron ne s’adapte pas correctement ou procure une sensation d’inconfort, glissez les
coussinets fournis sur l’extrémité des branches.
Remarque
Utilisez les coussinets des branches vers l'intérieur.
Mettez les écouteurs stéréo sur les oreilles.
4
Enlevez les écouteurs stéréo de l’unité
d’affichage et mettez-les dans les
oreilles.
Remarques
•Si les écouteurs stéréo ne restent pas en
position, nous vous recommandons d’utiliser
les coussinets d’écouteur de remplacement
(non fournis).
•Si vous avez une petite tête, il se peut que
vous ne puissiez pas utiliser le Glasstron.
•Selon votre acuité visuelle, il se peut que
vous ne parveniez pas à correctement mettre
l’image au point. En pareil cas, il ne s’agit pas
d’un dysfonctionnement.
-FR
14
Page 39

Utilisation du Glasstron
Si vous réglez le verrou utilisateur, déverrouillez-le (page 19).
Avant de commencer...
Appliquez les procédures de “Raccordement du Glasstron” (pages 8-11) et de “Port du
Glasstron” (pages 12-14).
AVERTISSEMENT
Chaque fois que vous utilisez cet appareil, les écrans de réglage s’affichent pour inviter
l’utilisateur à ajuster correctement l’appareil. Pour éviter tout dommage oculaire, n’utilisez
pas ce produit si les lignes verticales ne coupent pas la ligne horizontale sur l’écran suivant.
Le Glasstron est équipé de deux petits écrans LCD (gauche et droit). Vous visionnez par
conséquent une image combinée créée à l’aide de ces deux écrans. Bien que la position des
écrans soit correctement alignée en usine, il peut arriver qu’elle soit désalignée à la suite d’une
déformation ou d’une détérioration du Glasstron. Aussi, vérifiez l’alignement des écrans chaque
fois que vous mettez le Glasstron sous tension. Si vous ne parvenez pas à corriger l’alignement
des écrans, cessez immédiatement d’utiliser le Glasstron.
Mettez le Glasstron sous tension à l’aide du commutateur POWER
1
ON/OFF.
Le témoin POWER s’allume.
Ecran
Opérations
POWER
ON/OFF
suite page suivante
15
-FR
Page 40

Utilisation du Glasstron (suite)
Si les écrans sont alignés, appuyez sur START/BATT CHECK.
2
Ecran gauche Ecran droit
Il se peut que vous voyiez
une ligne horizontale sur
l’écran gauche plutôt que
l’écran droit et des lignes
Correct
Image combinée que vous
voyez avec les deux yeux.
Si l’image que vous voyez correspond à l’une des images ci-dessous,
c’est que l’alignement des écrans est correct.
Correct Correct Correct Correct
START/BATT CHECK
verticales sur l’écran droit
plutôt que l’écran gauche. Il
ne s’agit pas d’un
dysfonctionnement.
Si l’image que vous voyez correspond à l’une des
images ci-dessous, cessez immédiatement l’utilisation
du Glasstron.
L’utilisation du Glasstron dans de telles conditions
peut provoquer une fatigue ou des troubles oculaires.
Incorrect Incorrect Incorrect
16
Si aucune ligne
verticale ne coupe la
ligne horizontale.
Si vous ne voyez toujours pas une combinaison correcte de ces lignes même après vous
être reposé la vue pendant quelques heures, c’est probablement parce que le Glasstron ne
fonctionne pas correctement. Consultez votre revendeur Sony ou un centre de service
après-vente Sony agréé.
-FR
Si la ligne
horizontale apparaît
en diagonale.
Si la ligne verticale
centrale ne coupe pas
la ligne horizontale.
Page 41

Démarrez la lecture sur l’appareil vidéo raccordé à la visionneuse
3
Glasstron.
Ajustez le volume en tournant la commande VOL.
4
Si vous réglez le commutateur AVLS ON/OFF sur ON, vous ne pouvez pas augmenter
le volume au-delà de la limite définie (voir page 18).
VOL
plus fortmoins fort
Vérifiez si les quatre angles de l’écran sont clairs.
5
Si les quatre angles de l’écran ne sont pas clairs, répétez l’étape 2 (page 16) pour vérifier
de nouveau l’alignement de l’écran.
Ajustez la luminosité à l’aide de la commande BRIGHT.
6
Opérations
moins
lumineux
BRIGHT
+−
plus
lumineux
suite page suivante
17
-FR
Page 42

TIME OUT
ZEIT ZU ENDE
TEMPS DEPASS
Utilisation du Glasstron (suite)
Après avoir utilisé le
Glasstron
Retirez le Glasstron et mettez-le hors
tension.
Remarque sur l’écran LCD
L’écran LCD fait appel à des technologies
de haute précision. Il se peut toutefois que
de minuscules points noirs et/ou lumineux
(de couleur rouge, bleue ou verte)
apparaissent de manière constante sur
l’écran LCD. Il ne s’agit pas d’un
dysfonctionnement.
(Points effectifs : plus de 99,99 %)
Prévention de la diffusion du
son via les écouteurs stéréo
— AVLS
Maintient le volume maximum à un faible
niveau pour vous protéger l’ouïe. Vous ne
pouvez pas augmenter le volume au- delà
de la limite définie, même si vous continuez
à agir sur la commande.
Réglez le commutateur
AVLS ON/OFF sur ON.
AVLS
OFF ON
Pour désactiver la fonction AVLS
Réglez le commutateur AVLS ON/OFF sur
OFF.
Avertissements contre
une utilisation excessive
du Glasstron
Pour éviter la fatigue et les troubles
oculaires, les messages de mise en garde
suivants apparaissent sur l’écran au bout de
trois heures d’utilisation et le Glasstron se
met hors tension.
Attention: Mal des transports
résultant du visionnage
Certains utilisateurs ressentent des
symptômes de mal des transports, des
maux de tête ou des nausées en visionnant
des films ou des enregistrements vidéo, et
plus particulièrement s’ils comportent des
scènes d’action intense et très animées. Si
vous ressentez l’un de ces symptômes,
interrompez immédiatement l’utilisation de
cet appareil. Pour éviter de vous blesser ou
de blesser d’autres personnes, ne conduisez
pas de voiture ou de motocyclette et ne
faites rien qui requière de la concentration
tant que ces symptômes n’ont pas disparu.
Attention: Mal des transports
résultant des mouvements
externes
N’utilisez pas cet appareil pendant que
vous êtes soumis à un mouvement externe
–– par exemple, lorsque vous êtes passager
d’une voiture. L’utilisation de cet appareil
dans de telles conditions peut provoquer le
mal des transports.
-FR
18
Page 43

Réglage du verrou utilisateur
USER LOCK
BEN. –SPERRE
VERR. UTILIS
AVERTISSEMENT
Ce produit ne doit pas être utilisé par des enfants de 15 ans au moins. Les yeux des enfants
sont en plein développement et peuvent être affectés par l’utilisation de ce produit. Pour
éviter que des enfants n’utilisent l’appareil, il est muni d’un verrou utilisateur.
Lorsque le verrou utilisateur est activé, les signaux audio et vidéo ne sont pas transmis et toutes
les opérations sauf la mise sous/hors tension sont désactivées.
Pour utiliser le Glasstron, déverrouillez le verrou utilisateur.
Mettez le commutateur du verrou utilisateur comme illustré.
Bas du bloc
d’alimentation
Pour déverrouiller le verrou utilisateur
Mettez le commutateur de verrou utilisateur sur la position opposée.
Verrouillage Déverrouillage
Opérations
19
-FR
Page 44

Utilisation de la batterie en option
Avec une batterie comme une NP-F550/F750/F950, vous pouvez utiliser le Glasstron sans le
raccorder à une prise murale.
Chargez la batterie avant de l’utiliser à l’aide d’un chargeur de batterie BC-V615 en option. Vous
ne pouvez pas charger la batterie alors qu’elle se trouve sur le Glasstron.
Faites coulisser le bouton BATT/COVER RELEASE pour déposer le
1
couvercle.
Lorsque vous n’utilisez pas l’appareil,
laissez le couvercle sur le bloc
d’alimentation.
Bouton BATT/COVER
RELEASE
Installez la batterie sur le bloc d’alimentation.
2
Installez correctement la batterie sur le
bloc d’alimentation en veillant à ce
qu’elle ne soit pas de travers.
Pour retirer la batterie, faites coulisser le
bouton BATT/COVER RELEASE et
maintenez-le et dégagez la batterie.
Bouton BATT/COVER
RELEASE
Bloc d’alimentation
Batterie
Batterie Autonomie
NP-F550 Approx. 7 heures
* Les indications ci-dessus concernent des
batteries complètement chargées.
*L’autonomie de la batterie dépend des
conditions d’utilisation.
* Vous pouvez également utiliser une batterie
telle qu’une NP-F530/F730/F750/F930/F950
(non fournie) avec le Glasstron.
* Vous pouvez utiliser une batterie
“InfoLITHIUM™” avec le Glasstron. Si vous
utilisez une batterie de ce type, l’autonomie
résiduelle de la batterie s’affiche avec
l’indicateur au lieu du compteur de durée.
-FR
20
Remarques
•Si, lorsque vous utilisez la batterie, vous
branchez ou débranchez l’adaptateur secteur,
l’appareil se met hors tension. Pour le
remettre sous tension, appuyez de nouveau
sur le commutateur POWER ON/OFF.
•Si le témoin POWER clignote pendant
l’utilisation de la batterie, remplacez la
batterie.
•L’autonomie de la batterie peut être réduite
dans un environnement froid. C’est une
caractéristique typique des batteries.
”InfoLITHIUM” est une marque commerciale
de Sony Corporation.
Page 45

Vérification de
l’autonomie résiduelle
de la batterie
Lorsque la batterie faiblit, le message
suivant apparaît à l’écran.
Remplacez-la par une batterie
chargée.
Si aucune indication ni
avertissement n’apparaît sur
l’écran, appuyez sur le
bouton START/BATT CHECK.
L’autonomie résiduelle de la batterie
apparaît et l’image disparaît.
START/BATT CHECK
Autonomie résiduelle
de la batterie
Complètement
chargée
Epuisée
BATTERY DOWN
AKKU LEER
PILE PLATE
Si vous utilisez l’adaptateur secteur,
le symbole “ ” apparaît à l’écran.
Opérations
-FR
21
Page 46

Précautions
Utilisation
• Faites uniquement fonctionner cet appareil
au moyen de l’adaptateur secteur (ACPLM2) fourni. L’utilisation d’un autre
adaptateur secteur risque de provoquer un
dysfonctionnement.
Fiche à polarité unifiée
• Si un liquide ou un solide venait à
s’introduire à l’intérieur du boîtier,
débranchez l’appareil et faites-le vérifier par
un technicien compétent avant de le
remettre en service.
• Mettez toujours l’appareil hors tension
lorsque vous ne l’utilisez pas.
Débranchez l’appareil de la prise murale si
vous prévoyez de ne pas l’utiliser pendant
quelques jours ou plus. Pour débrancher le
cordon, saisissez-le par la fiche. Ne tirez
jamais sur le cordon proprement dit.
• Ne surchargez pas les prises murales,
cordons prolongateurs et autres prises audelà de leur capacité. Vous risqueriez de
provoquer un incendie ou une électrocution.
• N’utilisez pas de fixations non préconisées
par le fabricant, car elles peuvent constituer
un risque.
• Evitez d’utiliser le casque d’écoute à volume
élevé. Les médecins spécialisés déconseillent
l’écoute continue et prolongée à volume
élevé. Si vous percevez des bourdonnements
dans les oreilles, baissez le volume ou
interrompez l’utilisation.
• Ne touchez pas l’adaptateur secteur ou le
bloc d’alimentation lorsque vous avez les
mains mouillées. Vous risquez sinon de
subir une électrocution.
• Ne laissez pas tomber l’appareil et ne le
soumettez pas à des chocs.
Installation
• Pour éviter toute surchauffe interne,
n’obstruez pas les ouïes de ventilation.
• Evitez de faire fonctionner l’appareil sous
des températures inférieures à 5°C.
• Ne soumettez pas l’appareil à des
températures élevées ou au rayonnement
direct du soleil. Si vous ne vous conformez
pas à ces instructions, l’appareil risque de se
déformer et les écrans de devenir
impossibles à aligner. Si vous persistez à
visionner des écrans désalignés, vous
risquez de vous fatiguer la vue. Appliquez
les instructions de “Utilisation du
Glasstron” (pages 15-18) pour être certain
que les écrans sont alignés. Si vous estimez
que les écrans sont désalignés, faites réparer
l’appareil par votre revendeur Sony ou dans
un centre de service après-vente Sony agréé.
• N’installez pas cet appareil dans un endroit
mouillé, humide, poussiéreux, enfumé ou
embué. N’utilisez pas cet appareil à
proximité d’eau. Vous risqueriez de
provoquer un incendie ou une électrocution.
En particulier, ne l’utilisez pas dans la salle
de bains.
• Si l’appareil est transporté directement d’un
endroit froid dans un endroit chaud, ou si la
température de la pièce change
brusquement, l’image peut devenir floue ou
offrir des couleurs médiocres. Ces
phénomènes sont causés par la condensation
d’humidité sur les lentilles internes. Si cela
se produit, laissez s’évaporer l’humidité
avant d’utiliser l’appareil.
• Ne placez pas l’appareil sur un véhicule, un
support, un table ou une étagère instable.
L’appareil risque en effet de tomber et de
provoquer de graves blessures à des enfants
ou à des adultes et de gravement
endommager l’appareil.
• Ne posez aucun objet sur l’appareil et
n’enroulez pas le cordon autour. De même,
ne placez pas l’appareil là où le cordon
d’alimentation risque d’être soumis à l’usure
ou à des détériorations.
22
Divers
• Débranchez l’appareil de la prise murale et
faites-le vérifier par un centre de service
après-vente qualifié dans les circonstances
suivantes :
-FR
Page 47

- Si le cordon ou la fiche d’alimentation est
endommagé ou effiloché.
- Si un liquide a pénétré à l’intérieur de
l’appareil.
- Si l’appareil a été exposé à la pluie ou à de
l’eau.
- Si l’appareil a été soumis à des chocs
violents à la suite d’une chute ou si le
boîtier est endommagé.
- Si l’appareil ne fonctionne pas
normalement alors que vous appliquez
les instructions d’utilisation. Réglez
uniquement les commandes spécifiées
dans le mode d’emploi. Un réglage
incorrect d’autres commandes peut
entraîner des dommages et nécessiter une
intervention fastidieuse par un technicien
qualifié pour remettre l’appareil en ordre
de marche.
- Si l’appareil présente des altérations
significatives des performances, cela
signifie qu’il nécessite un entretien.
• Ne démontez pas et ne transformez pas
l’appareil. Vous risquez sinon de provoquer
un incendie ou une électrocution. Faites
vérifier et réparer l’appareil par votre
revendeur Sony ou un centre de service
après-vente Sony agréé.
• Ne tentez pas d’effectuer vous-même
l’entretien de cet appareil parce que
l’ouverture du boîtier vous expose à une
tension dangereuse et à d’autres risques.
Confiez-en exclusivement l’entretien au
personnel qualifié.
• Si des pièces de rechange s’avèrent
nécessaires, veillez à ce que le technicien
chargé de l’entretien certifie par écrit avoir
utilisé des pièces de rechange spécifiées par
le fabricant qui présentent les mêmes
spécifications que les pièces d’origine.
Toute substitution non autorisée peut
provoquer un incendie, une électrocution ou
d’autres risques.
• Au terme de toute intervention d’entretien
ou de réparation de l’appareil, demandez au
technicien d’entretien d’effectuer un
contrôle de sécurité de routine (tel que
spécifié par le fabricant) de manière à
déterminer si l’appareil se trouve en parfait
état de marche et de le certifier.
• Débranchez l’appareil de la prise murale
avant de le nettoyer. Nettoyez l’appareil au
moyen d’un chiffon doux et sec ou d’un
chiffon doux légèrement imprégné d’une
solution détergente neutre. N’utilisez aucun
type de solvant comme de l’alcool ou de la
benzine.
Si le pontet s’enlève
Réinstallez-le en position.
Insérez B dans A.
Si les branches se démontent
Vous pouvez les réinstaller.
Introduisez les branches dans la partie
intérieure de l’unité d’affichage. Poussez
délicatement jusqu’à ce qu’elles s’encliquettent
en position.
La réinstallation des branches risque
cependant de provoquer un
dysfonctionnement. Veillez à ne pas les
remonter trop souvent.
Revêtement des verres
Pour éviter les reflets, les verres sont revêtus.
Ne placez pas l’unité à des endroits soumis à
de brusques changements de température ou
excessivement chauds (au-delà de 60°C). Par
exemple à l’intérieur d’une voiture parquée en
plein soleil.
Le revêtement des verres risquerait de se
craqueler.
Verres
Informations compl
émentaires
23
-FR
Page 48

Dépannage
Si vous avez des questions ou des problèmes qui ne figurent pas dans cette liste, consultez votre
revendeur Sony ou un centre de service après-vente Sony agréé.
Symptômes
L’image de lecture
n’apparaît pas.
L’image est sombre ou
foncée.
Des lignes horizontales
apparaissent.
L’image disparaît
brusquement.
L’image et/ou le son
présente des parasites.
L’image n’est pas
accompagnée de son.
Le son comporte des
parasites.
Impossible d’augmenter
le volume.
La batterie se décharge
rapidement.
Les points noirs, rouges
et verts ne disparaissent
pas.
Le commutateur
POWER ON/OFF ne
fonctionne pas.
Cause
Les connexions sont incorrectes.
Le verrou utilisateur est réglé.
Vous ne portez pas correctement
le Glasstron.
—
La fenêtre (où l’image est
affichée) est souillée.
Vous avez utilisé le Glasstron en
continu pendant trois heures. (Le
Glasstron se met
automatiquement hors tension au
bout de trois heures pour éviter la
fatigue oculaire.)
La batterie est déchargée.
Les fiches du câble audio/vidéo
sont encrassées.
—
La fonction AVLS est activée.
La batterie n’est pas
suffisamment chargée.
La batterie est complètement
déchargée.
L’écran LCD fait appel à des
technologies de haute précision. Il
se peut toutefois que de
minuscules points noirs ou
lumineux (de couleur rouge,
bleue ou verte) apparaissent de
manière constante sur l’écran
LCD. Il ne s’agit pas d’un
dysfonctionnement.
(Points effectifs : plus de 99,99 %.)
—
Remèdes
Branchez correctement les appareils
(pages 8-11).
Déverrouillez le verrou utilisateur
(page 19).
Portez correctement le Glasstron
(pages 12-14).
Ajustez la luminosité (page 17).
Nettoyez l’unité d’affichage à l’aide
d’un chiffon doux et sec (page 23).
—
Remplacez la batterie (page 20).
Nettoyez les fiches du câble audio/
vidéo.
Réglez le volume à l’aide de la
commande VOL (page 17).
Réglez le commutateur AVLS ON/
OFF sur OFF (page 18).
Chargez complètement la batterie ou
utilisez-en une neuve (page 20).
—
Débranchez le cordon d’alimentation
de la prise murale. Au bout de trois
minutes, rebranchez le cordon
d’alimentation.
24
-FR
Page 49

Spécifications
Index
Alimentation
Adaptateur secteur: AC-PLM2
100-240 V CA, 50/60 Hz, 16 W
Tension de sortie 9 V, 1,3 A
Batterie: NP-F550 (non fournie)
Consommation électrique
1,8 W Approx.
Température d’utilisation
5°C à 35°C
Température de stockage
–10°C à 60°C
Dimensions
Unité d’affichage:
Approx. 173 × 53 × 56 mm
(l/h/p, repliée)
Bloc d’alimentation:
Approx. 53 × 39 × 104 mm
(l/h/p)
parties saillantes et commandes non
comprises
Masse
Unité d’affichage: Approx. 100 g
Bloc d’alimentation: Approx. 90 g
Signal vidéo
Système couleur PAL, normes EIA
Entrée audio/vidéo
Miniprise spéciale
1 Vp-p, 75 ohms, asymétrique, sync
négative
Entrée S vidéo
Miniconnecteur DIN à 4 broches
Y:1 Vp-p, 75 ohms, asymétrique, sync
négative
C:0,286 Vp-p, 75 ohms, asymétrique, sync
négative
Accessoires fournis
Adaptateur secteur AC-PLM2 (1)
Cordon d’alimentation (1)
Câble audio/vidéo (minifiche spéciale
y fiche phono) (3 m) (1)
Câble audio/vidéo (minifiche spéciale
y minifiche stéréo) (0,5 m) (1)
Adaptateurs des fiche
(prise phono y prise phono) (3)
Pontet (noir) (1)
Coussinets des branches (2)
Mode d’emploi (1)
Instructions de sécurité (1)
Garantie (1)
A
Accessoires fournis 6
Adaptateur secteur 11
Alignement de l’écran 16
Autonomie résiduelle de la batterie 21
AVLS 18
B, C, D
Batterie 20
E, F, G, H, I, J, K, L, M, N, O
Ecouteurs stéréo 14
P, Q
Port du Glasstron 12-14
Précautions 22
R, S, T, U
Raccordement
alimentation 11
appareil vidéo 8-10
batterie 20
Réglage
largeur des branches 13
luminosité 17
pontet 12
volume 17
V, W, X, Y, Z
Vérification de l’alignement de l’écran 16
Verrou utilisateur 19
Informations compl
émentaires
La conception et les spécifications sont
sujettes à modifications sans préavis.
25
-FR
Page 50

ACHTUNG
Um Feuergefahr und die Gefahr
eines elektrischen Schlags zu
vermeiden, setzen Sie das Gerät
weder Regen noch sonstiger
Feuchtigkeit aus.
Um einen elektrischen Schlag zu
vermeiden, öffnen Sie das
Gehäuse nicht. Überlassen Sie
Wartungsarbeiten stets nur
qualifiziertem Fachpersonal.
Dieses Gerät erfüllt die folgenden
europäischen Richtlinien:
73/23/EWG, 93/68/EWG
(Niederspannungsrichtlinie)
89/336/EWG, 92/31/EWG
(EMV-Richtlinien)
Dieses Gerät erfüllt den Standard EN55013
für folgende Gebiete: Wohngebiete,
Gewerbegebiete und Leichtindustriegebiete.
Sicherheitsmaßnahmen
• Das Typenschild befindet sich außen an
der Unterseite des Geräts.
• Bild-/Tonstörungen können auftreten,
wenn sich der PLM-A35E sehr nahe bei
Geräten befindet, die elektromagnetische
Strahlung abgeben.
-DE
2
Page 51

Glasstron - die neue Welt der
Bildanzeige!
Herzlichen Glückwunsch zum Kauf dieses
Glasstron Personal Viewer von Sony! Mit
dem Glasstron, der sich die neueste
Leichtbildschirmtechnologie zunutze
macht, können Sie Fernsehen so erleben, als
ob Sie einen 52-Zoll-Fernsehschirm in einem
Abstand von etwa 2 m vor sich hätten. Die
Wirkung dieses neuen Fernseherlebnisses
kann sich individuell unterscheiden.
Der Glasstron Personal Viewer erzeugt ein
Bild über zwei getrennte LCD-Displays
(Flüssigkristallbildschirme), die sich
unmittelbar vor den Augen des Betrachters
befinden. Um Sicherheit beim Gebrauch des
Glasstron zu gewährleisten, machen Sie sich
bitte mit den Grundfunktionen des Geräts,
einschließlich der Anweisungen zum
richtigen Aufsetzen, vertraut. Achten Sie
außerdem auf Symptome wie Ermüdung
der Augen usw.
ACHTUNG
WENN SIE DIE ANWEISUNGEN IN
DIESER ANLEITUNG NICHT BEACHTEN,
KANN ES ZU EINER ERMÜDUNG ODER
BEEINTRÄCHTIGUNG DER AUGEN, ZU
AUGENVERLETZUNGEN,
SACHSCHÄDEN ODER TODESFÄLLEN
KOMMEN.
Hinweis zum LCD-Display
(Flüssigkristallbildschirm)
Das LCD-Display wird in einer
Hochpräzisionstechnologie hergestellt.
Schwarze oder helle Lichtpunkte (rot,
blau oder grün) können jedoch
permanent auf dem LCD-Bildschirm zu
sehen sein. Dies ist keine Fehlfunktion
(effektive Punkte: über 99,99 %).
DE
ACHTUNG
DIESES GERÄT IST FÜR KINDER BIS ZU
15 JAHREN NICHT GEEIGNET.
DIE AUGEN VON KINDERN BEFINDEN
SICH NOCH IN DER ENTWICKLUNG
UND KÖNNEN DURCH DIESES GERÄT
GESCHÄDIGT WERDEN.
-DE
3
Page 52

Inhalt
Informationen zum Glasstron ....................................... 5
Vorbereitungen
Überprüfen des mitgelieferten Zubehörs .................... 6
Lage und Funktion der Teile und
Bedienelemente................................................................ 7
Anschließen des Glasstron............................................. 8
Anschließen des Videogeräts................................... 8
Anschließen anderer Geräte..................................... 9
Anschließen der Stromquelle................................. 11
Aufsetzen des Glasstron............................................... 12
Betrieb
Verwenden des Glasstron ............................................ 15
Aktivieren der Benutzersperre.................................... 19
Der gesondert erhältliche Akku .................................. 20
Weitere Informationen
Sicherheitsmaßnahmen ................................................ 22
Störungsbehebung ........................................................ 24
Technische Daten .......................................................... 25
Index................................................................................ 25
-DE
4
Page 53

Informationen zum Glasstron
Vorsicht: Der Bildschirm befindet sich immer genau vor Ihren Augen.
Der Glasstron ist ein Display, das Sie wie eine Brille vor den Augen tragen. Damit befindet sich
der Bildschirm immer direkt vor Ihren Augen, auch wenn Sie den Kopf drehen. Deshalb können
Sie sich im Vergleich zu herkömmlichen Fernsehschirmen leichter auf den Bildschirm
konzentrieren und haben das Gefühl, mitten im Geschehen zu sein.
• Der Glasstron läßt sich einfach auf Ihre Augen einstellen. Sie können, wenn Sie den Glasstron
benutzen, auch eine Brille tragen.
• Jedesmal, wenn Sie den Glasstron einschalten, erscheint ein Einstellbildschirm, mit dem Sie
die Anzeigeeinheit richtig ausrichten können. Sie können auch überprüfen, ob die Position des
linken und rechten Bildschirms korrekt ist.
• Wenn Sie den Glasstron drei Stunden lang ununterbrochen benutzen, erscheint eine
Warnmeldung, und das Gerät schaltet sich automatisch aus.
Der Glasstron besteht aus folgenden Komponenten:
Anzeigeeinheit
Die Anzeigeeinheit setzt sich aus zwei
kleinen LCD-Displays (links und rechts)
zusammen.
Vorbereitungen
Merkmale und
Funktionen
• Ein beeindruckendes Fernseherlebnis,
vergleichbar mit einem ca. 2 m entfernten
52-Zoll-Bildschirm.
• Handliches, tragbares Display zum
Zusammenklappen.
• Die Anzeigeeinheit wiegt nur 100 g.
• Der empfohlene Akku NP-F550 von Sony
ermöglicht die ununterbrochene Nutzung
des Geräts bis zu 7 Stunden lang.
Stromversorgungseinheit
Sie können den empfohlenen, gesondert
erhältlichen Akku von Sony benutzen.
Sie können das Gerät aber auch über
Netzstrom betreiben. Bevor Sie den
Glasstron benutzen, schließen Sie Ihr
Videogerät an die Buchse A/V IN an
der Stromversorgungseinheit an.
-DE
5
Page 54

Überprüfen des mitgelieferten Zubehörs
Überprüfen Sie, ob das folgende Zubehör mit Ihrem Glasstron geliefert wurde. Sollte ein
Zubehörteil fehlen, wenden Sie sich bitte an Ihren Sony-Händler oder Ihren autorisierten SonyKundendienst.
• Anzeigeeinheit/Stromversorgungseinheit
(1)
• Netzteil AC-PLM2 (1)
• Netzkabel (1)
• Audio-/Videokabel (Spezialministecker
y Cinchstecker) (1)
• Zwischenstecker (Cinchbuchse y
Cinchbuchse) (3)
• Nasensteg (schwarz) (1)
• Seitenteilpolster (2)
• Bedienungsanleitung (1)
• Sicherheitshinweise (1)
• Garantie (1)
• Audio-/Videokabel (Spezialministecker
y Stereoministecker) (1)
-DE
6
Page 55

Lage und Funktion der Teile und
Bedienelemente
Näheres finden Sie auf den in Klammern ( ) angegebenen Seiten.
Anzeigeeinheit
Vorbereitungen
Seitenteil (12)
Ohrhörer (14)
Stromversorgungseinheit
Abdeckung (20)
Anschluß DC IN 9V (11)
Audio-/Videobuchse A/V IN
(8, 9)
Buchse S VIDEO IN (10)
Justierteil für
Seitenteil (13)
Nasensteg (12)
Netzschalter POWER ON/OFF
(15)
Netzanzeige POWER (15)
Taste START/BATT CHECK
(16, 21)
Taste BATT/COVER RELEASE
(20)
Regler BRIGHT (Helligkeit)
(17)
Regler VOL (Lautstärke) (17)
Benutzersperrschalter (19)
Schalter AVLS ON/OFF (18)
-DE
7
Page 56

Anschließen des Glasstron
Anschließen des Videogeräts
Schließen Sie einen Videorecorder, Laser-Disc-Player, DVD-Player oder Camcorder wie in der
Abbildung unten dargestellt an die Stromversorgungseinheit an. Zwei AV-Kabel werden
mitgeliefert. Verwenden Sie das AV-Kabel, das in die Anschlüsse des anzuschließenden Geräts
paßt.
Videorecorder, Laser-Disc-Player,
DVD-Player, Camcorder usw.
an Audio-/Videoausgänge
(Cinchbuchse)
Stromversorgungseinheit
A/V IN
an A/V IN
(Spezialminibuchse)
: Signalfluß
Audio-/Videokabel
(Spezialministecker y
Cinchstecker) (mitgeliefert)
Audio-/Videokabel
(Spezialministecker y
Stereoministecker)
(mitgeliefert)
Hinweis zur Audio-/Videoeingangsbuchse
Die Audio-/Videoeingangsbuchse des
Glasstron ist eine Spezialminibuchse, und die
Signalanschlüsse sind wie in der Abbildung
rechts dargestellt angeordnet. Diese
Anordnung kann sich je nach Gerät
unterscheiden.
-DE
8
Audio L
Video
(gelb)
Video (gelb)
Audio (schwarz)
Audio R
(rot)
Audio L
(weiß)
an Videoausgang
(Minibuchse)
DVD-Player,
Video-CDPlayer
an Audioausgang
(Stereominibuchse)
Audio R
Masse
Video
Page 57

Anschließen anderer Geräte
Zwischenstecker (Cinchbuchse y Cinchbuchse) werden mitgeliefert. Verwenden Sie je nach
Gerät, das Sie anschließen wollen, diese Zwischenstecker.
Spielekonsole, DVD-Player, Camcorder usw.
Zwischenstecker
(mitgeliefert)
A/V IN
Audio-/Videokabel
an A/V IN
(Spezialminibuchse)
(Spezialministecker y Cinchstecker)
(mitgeliefert)
Vorbereitungen
: Signalfluß
Fortsetzung
-DE
9
Page 58

Anschließen des Glasstron (Fortsetzung)
Wenn das Videogerät mit einer S-Videobuchse ausgestattet ist
Schließen Sie den Glasstron möglichst mit einem S-Videokabel und dem Audio-/Videokabel an
das Videogerät an. So erzielen Sie eine optimale Bildqualität. In diesem Fall brauchen Sie den
gelben (Video-)Stecker nicht anzuschließen. Wenn Sie den S-Video- und den Videostecker
angeschlossen haben, wird automatisch das S-Video-Signal ausgewählt.
Stromversorgungseinheit
Videorecorder, Laser-Disc-Player,
DVD-Player, Camcorder usw.
S-Videokabel
(nicht mitgeliefert)
an S VIDEO IN
A/V IN
S VIDEO IN
an A/V IN
: Signalfluß
Audio-/Videokabel
(Spezialministecker y
Spezialministecker)
(nicht mitgeliefert)
Audio-/Videokabel
(Spezialministecker y
Cinchstecker) (mitgeliefert)
Hinweise
•Auch wenn Sie das mitgelieferte Audio-/
Videokabel anschließen, gehen die Audiound Videosignale je nach Videoquelle
möglicherweise nicht am Glasstron ein.
Wenden Sie sich in diesem Fall an Ihren
Sony-Händler oder Ihren autorisierten SonyKundendienst .
an S-Videoausgang
an Audio-/Videoausgang
Video (gelb)
Audio L (weiß)
Audio R (rot)
an Audio-/Videoausgänge
•Wenn Sie den Glasstron mit den
Audioausgängen (Cinchbuchsen) Ihres
Videogeräts verbinden, schließen Sie ihn an
die rechte und die linke
Audioausgangsbuchse an. Wenn Sie nur eine
Audioausgangsbuchse anschließen, ist der
Ton nur von einem der Stereoohrhörer zu
hören.
10
-DE
Page 59

Anschließen der Stromquelle
Schließen Sie das Netzteil AC-PLM2 (mitgeliefert) an eine Netzsteckdose an. Schließen Sie die
Stromquelle erst an, wenn alle anderen Anschlüsse vorgenommen wurden.
Anzeigeeinheit
an eine
Netzsteckdose
Netzteil AC-PLM2
(mitgeliefert)
an DC IN 9V
Netzkabel
(mitgeliefert)
DC IN 9V
Vorbereitungen
Stromversorgungseinheit
11
-DE
Page 60

Aufsetzen des Glasstron
ACHTUNG
• Wenn Sie das Gerät nicht jedes Mal richtig einstellen (siehe „Richtiges Tragen des Geräts“,
Seite 5 der Sicherheitshinweise), kann es zu Augenermüdung, Augenschäden oder dem
Verlust von Sehfunktionen kommen, und es besteht Unfall- und Verletzungsgefahr.
• Dieses Gerät ist für Kinder bis 15 Jahren nicht geeignet.
Die Augen von Kindern befinden sich noch in der Entwicklung und können durch dieses
Gerät geschädigt werden. Außerdem kann es zu Augenermüdung, Augenschäden oder
dem Verlust von Sehfunktionen kommen.
Darüber hinaus kann das Gerät nicht so eingestellt werden, daß es auf den Kopf eines
Kindes paßt.
Wenn Sie beim Fernsehen normalerweise eine Brille tragen, können Sie dies auch beim Benutzen
des Glasstron tun. Wenn Sie den Glasstron absetzen, achten Sie darauf, daß Ihre Brille nicht am
Glasstron hängenbleibt.
Stellen Sie den Nasensteg ein, und setzen Sie den Glasstron auf.
1
Ziehen Sie den Nasensteg heraus,
wenn Sie eine Brille tragen.
Öffnen Sie die Seitenteile, indem Sie
sie an den Enden fassen, und setzen
Sie den Glasstron auf.
Vorsicht:
Stechen Sie sich beim Auf- und
Absetzen des Glasstron nicht mit den
Enden der Seitenteile in die Augen!
Nasensteg
Stellen Sie den Winkel der Anzeigeeinheit ein.
2
Stellen Sie den Winkel der Seitenteile
ein, indem Sie die Seitenteile an den
Enden fassen. Bringen Sie so die
Anzeigeeinheit in eine geeignete
Position.
Die Seitenteile müssen nicht unbedingt
auf den Ohren aufliegen.
So verwenden Sie den mitgelieferten Nasensteg
Wenn Sie Schritt 2 oben ausgeführt haben und immer noch nicht den ganzen Bildschirm sehen oder
die Bildfarben nicht zufriedenstellend sind, tauschen Sie den Nasensteg gegen den mitgelieferten
Nasensteg (schwarz) aus.
1 Halten Sie die Nasensteghalterung fest, und
nehmen Sie den Nasensteg nach oben ab.
-DE
12
2 Führen Sie Teil B des mitgelieferten
Nasenstegs (schwarz) in die runde Öffnung
A ein.
Seitenteil
Page 61

Stellen Sie die Breite der Seitenteile ein.
3
Die Seitenteile lassen sich auf zwei
Breiten einstellen.
Wenn die Seitenteile zu locker sind,
versetzen Sie die Justierteile für die
Seitenteile in den Scharnieren des
Seitenteils links und rechts.
So verwenden Sie die Justierteile für die Seitenteile
1 Dies ist die
ursprüngliche Position.
Normalerweise
befinden sich die
Justierteile hier.
Justierteil für
Seitenteil
2 Drehen Sie die
Seitenteile leicht nach
innen, drücken Sie das
Justierteil von unten
und oben vorsichtig
zusammen, und ziehen
Sie das Justierteil
heraus, um es zu lösen.
Vorbereitungen
Mit Justierteilen
für die
Seitenteile
Ohne Justierteile
für die Seitenteile
3 Schieben Sie das
Justierteil in Richtung auf
die Anzeigeeinheit.
4 Setzen Sie die Zacken des
Justierteils wieder in das
Scharnier zwischen dem
Seitenteil und der
Anzeigeeinheit ein.
Führen Sie diese Schritte
auch für das andere
Seitenteil aus.
Anzeigeeinheit
Seitenteil
4
3
Wenn Sie die Justierteile für die Seitenteile wieder in ihre ursprüngliche Position bringen
wollen, drehen Sie die Seitenteile leicht nach innen und gehen umgekehrt wie oben
beschrieben vor.
Um das Justierteil zurückzuschieben, drücken Sie an Stelle A wie unten abgebildet in
Pfeilrichtung, bis das Teil mit einem Klicken einrastet.
Fortsetzung
13
-DE
Page 62

Aufsetzen des Glasstron (Fortsetzung)
Mehr Tragekomfort
Wenn der Glasstron zu locker sitzt oder nicht angenehm zu tragen ist, bringen Sie die mitgelieferten
Seitenteilpolster an den Enden der Seitenteile an.
Hinweis
Bringen Sie die Seitenteilpolster mit der Tasche nach innen an.
Setzen Sie die Stereoohrhörer auf.
4
Nehmen Sie die Stereoohrhörer von der
Anzeigeeinheit ab, und setzen Sie sie in
die Ohren ein.
Hinweise
•Wenn die Stereoohrhörer locker sitzen,
empfiehlt es sich, Ersatzohrpolster (nicht
mitgeliefert) zu verwenden.
•Wenn Ihr Kopf klein ist, können Sie den
Glasstron möglicherweise nicht verwenden.
•Je nach individueller Sehkraft können Sie das
Bild möglicherweise nicht scharf sehen. In
diesem Fall handelt es sich nicht um eine
Fehlfunktion.
-DE
14
Page 63

Verwenden des Glasstron
Wenn Sie die Benutzersperre aktiviert haben, müssen Sie zunächst die Sperre aufheben (Seite 19).
Vorbereitungen
Beachten Sie unbedingt die Anweisungen unter „Anschließen des Glasstron“ (Seite 8 - 11) und
„Aufsetzen des Glasstron“ (Seite 12 - 14).
ACHTUNG
Jedes Mal, wenn Sie das Gerät einschalten, erscheinen Einstellbildschirme, anhand derer Sie
das Gerät richtig ausrichten können. Um Augenschäden zu vermeiden, verwenden Sie das
Gerät nur, wenn die vertikalen Linien die horizontale Linie schneiden.
Zum Glasstron gehören zwei kleine LCD-Displays (links und rechts). Was Sie sehen, ist das
kombinierte Bild dieser beiden Bildschirme. Die Bildschirmposition wird zwar werkseitig
korrekt ausgerichtet, sie kann sich aber verschieben, wenn der Glasstron verbogen oder
beschädigt wird. Überprüfen Sie bei jedem Einschalten des Glasstron die Ausrichtung der
Bildschirme. Wenn sich die Bildschirme nicht korrekt ausrichten lassen, schalten Sie den
Glasstron sofort aus.
Schalten Sie den Glasstron mit dem Schalter POWER ON/OFF ein.
1
Die Anzeige POWER leuchtet auf.
Bildschirm
Betrieb
POWER
ON/OFF
Fortsetzung
15
-DE
Page 64

Verwenden des Glasstron (Fortsetzung)
Wenn die Bildschirme ausgerichtet sind, drücken Sie die Taste
2
START/BATT CHECK.
Linker
Bildschirm
Richtig
Kombiniertes Bild, das Sie
mit beiden Augen sehen.
Wenn das Bild, das Sie sehen, einem der Bilder unten entspricht, ist die
Bildschirmausrichtung korrekt.
Richtig Richtig Richtig Richtig
START/BATT CHECK
Rechter Bildschirm
Unter Umständen sehen Sie
die horizontale Linie auf dem
linken statt auf dem rechten
und die vertikalen Linien auf
dem rechten statt auf dem
linken Bildschirm. Dies ist
keine Fehlfunktion.
Wenn das Bild, das Sie sehen, einem der Bilder unten
entspricht, benutzen Sie den Glasstron nicht weiter!
Wenn Sie den Glasstron unter diesen Bedingungen
benutzen, kann es zu Augenermüdung oder
Augenschäden kommen.
Falsch Falsch Falsch
16
Die vertikalen Linien
schneiden die
horizontale Linie nicht.
Wenn diese Linien auch dann noch falsch angeordnet erscheinen, wenn Sie die Augen ein
paar Stunden ausgeruht haben, arbeitet der Glasstron möglicherweise nicht korrekt. Wenden
Sie sich an Ihren Sony-Händler oder Ihren autorisierten Sony-Kundendienst.
-DE
Die horizontale Linie
wird diagonal
angezeigt.
Die mittlere vertikale
Linie schneidet die
horizontale Linie nicht.
Page 65

Starten Sie die Wiedergabe am Videogerät, das an den Glasstron
3
angeschlossen ist.
Stellen Sie die Lautstärke durch Drehen des Reglers VOL ein.
4
Wenn Sie den Schalter AVLS ON/OFF auf ON stellen, können Sie die Lautstärke nur bis
zu einer definierten Obergrenze erhöhen (siehe Seite 18).
VOL
leiser lauter
Überprüfen Sie, ob die vier Ecken des Bildschirms klar zu erkennen
5
sind.
Wenn die vier Ecken des Bildschirms nicht deutlich zu sehen sind, führen Sie Schritt 2
auf Seite 16 aus, um die Ausrichtung der Bildschirmposition nochmals zu überprüfen.
Stellen Sie die Helligkeit mit dem Regler BRIGHT ein.
6
BRIGHT
+−
dunkler heller
Betrieb
Fortsetzung
17
-DE
Page 66

TIME OUT
ZEIT ZU ENDE
TEMPS DEPASS
Verwenden des Glasstron (Fortsetzung)
Wenn Sie den Glasstron nicht
mehr benutzen wollen
Nehmen Sie den Glasstron ab, und schalten
Sie ihn aus.
Hinweis zu den LCD-Displays
Das LCD-Display wird in einer
Hochpräzisionstechnologie hergestellt.
Schwarze oder helle Lichtpunkte (rot, blau
oder grün) können jedoch permanent auf
dem LCD-Bildschirm zu sehen sein. Dies ist
keine Fehlfunktion (effektive Punkte: über
99,99 %).
Verhindern von
Geräuschbelästigung durch
die Stereoohrhörer
–– AVLS (Automatic Volume
Limiter System = automatisches
Lautstärkebegrenzungssystem)
Begrenzt die Lautstärke auf einen
bestimmten Höchstwert, damit Ihr Gehör
nicht geschädigt wird. Die Lautstärke kann
dann nicht höher als auf den festgelegten
Höchstwert eingestellt werden.
Stellen Sie den Schalter
AVLS ON/OFF auf ON.
Bildschirmwarnungen
vor übermäßigem
Gebrauch des Glasstron
Wenn Sie den Glasstron drei Stunden lang
benutzt haben, erscheint folgende Warnung
auf dem Bildschirm, und das Gerät schaltet
sich automatisch aus, um Augenermüdung
oder Augenschäden zu vermeiden.
Vorsicht: Übelkeit und Schwindel
beim Fernsehen
Bei einigen Benutzern kommt es
möglicherweise zu Übelkeit,
Kopfschmerzen oder Schwindel, wenn sie
Fernsehprogramme oder Videofilme
anschauen, besonders bei Filmen mit viel
„Action“ und Bewegung. Wenn Sie diese
Symptome verspüren, schalten Sie das
Gerät bitte sofort aus. Lenken Sie kein Auto
oder Motorrad, und üben Sie keine
Tätigkeiten aus, die Konzentration
erfordern, bis die Symptome abgeklungen
sind. Andernfalls können Sie sich und
andere gefährden.
So schalten Sie die AVLSFunktion aus
Stellen Sie den Schalter AVLS ON/OFF auf
18
OFF.
-DE
AVLS
OFF ON
Vorsicht: Übelkeit und Schwindel
bei Fortbewegung
Verwenden Sie dieses Gerät nicht, während
Sie sich fortbewegen, z. B. als Beifahrer in
einem Auto. In diesem Fall kann es zu
Übelkeit und Schwindel kommen.
Page 67

Aktivieren der Benutzersperre
ACHTUNG
Dieses Gerät ist für Kinder bis 15 Jahren nicht geeignet. Die Augen von Kindern befinden sich
noch in der Entwicklung und können durch dieses Gerät geschädigt werden. Damit Kinder
bis zu 15 Jahren dieses Gerät nicht verwenden, ist es mit einem Benutzersperrsystem
ausgestattet.
Wenn die Benutzersperre aktiviert ist, werden keine Audio- und Videosignale eingespeist, und
das Gerät läßt sich nur noch ein- bzw. ausschalten.
Wenn Sie den Glasstron benutzen wollen, müssen Sie zuvor die Sperre aufheben.
Stellen Sie den Benutzersperrschalter wie in der Abbildung gezeigt
ein.
USER LOCK
BEN. –SPERRE
VERR. UTILIS
Unterseite der
Stromversorgungseinheit
Sperren Sperre
aufheben
So deaktivieren Sie die Benutzersperre
Stellen Sie den Benutzersperrschalter in die entgegengesetzte Position.
Betrieb
19
-DE
Page 68

Der gesondert erhältliche Akku
Wenn Sie einen Akku wie z. B. den NP-F550/F750/F950 benutzen, brauchen Sie den Glasstron
nicht an eine Netzsteckdose anzuschließen.
Laden Sie den Akku vor dem Gebrauch mit dem gesondert erhältlichen Ladegerät BC-V615. Sie
können den Akku nicht laden, solange er am Gerät angebracht ist.
Schieben Sie die Taste BATT/COVER RELEASE in Pfeilrichtung,
1
wenn Sie die Abdeckung abnehmen wollen.
Wenn Sie das Gerät nicht benutzen,
sollten Sie die Abdeckung an der
Stromversorgungseinheit angebracht
lassen.
Taste BATT/COVER
RELEASE
Bringen Sie den Akku an der Stromversorgungseinheit an.
2
Installieren Sie den Akku
ordnungsgemäß an der
Stromversorgungseinheit. Er darf nicht
schief angebracht werden.
Zum Abnehmen des Akkus schieben Sie
die Taste BATT/COVER RELEASE in
Pfeilrichtung, halten Sie sie fest, und
nehmen Sie den Akku ab.
Taste BATT/COVER
RELEASE
Stromversorgungseinheit
Akku
Akku Betriebsdauer des Akkus
NP-F550 ca. 7 Stunden
* Die Angaben oben gelten bei einem
vollständig aufgeladenen Akku.
* Die tatsächliche Betriebsdauer des Akkus
hängt von den Betriebsbedingungen ab.
* Sie können auch einen Akku wie z. B. den
NP-F530/F730/F750/F930/F950 (nicht
mitgeliefert) mit dem Glasstron verwenden.
* Sie können einen „InfoLITHIUM™“-Akku
mit dem Glasstron verwenden. Bei einem
solchen Akku wird die geschätzte
Restladung des Akkus nicht mit dem
Zeitzähler, sondern mittels einer Anzeige
angegeben.
-DE
20
Hinweise
•Wenn Sie das Gerät mit dem Akku betreiben
und das Netzteil anschließen oder lösen,
schaltet sich das Gerät aus. Schalten Sie das
Gerät mit dem Schalter POWER ON/OFF
wieder ein.
•Wenn Sie das Gerät mit dem Akku betreiben
und die Anzeige POWER blinkt, tauschen Sie
den Akku gegen einen frischen Akku aus.
•Die Betriebsdauer des Akkus kann in einer
kalten Umgebung kürzer sein. Dies ist eine
typische Eigenschaft von Akkus.
„InfoLITHIUM“ ist ein Warenzeichen der Sony
Corporation.
Page 69

Überprüfen der
Restladung des Akkus
Drücken Sie die Taste
START/BATT CHECK, wenn
keine Anzeige oder
Warnmeldung auf dem
Bildschirm angezeigt wird.
Die restliche Betriebsdauer des Akkus
wird angezeigt, und das Bild wird
ausgeblendet.
START/BATT CHECK
Wenn der Akku schwach ist,
erscheint folgende Meldung auf dem
Bildschirm. Tauschen Sie den Akku
gegen einen geladenen Akku aus.
BATTERY DOWN
AKKU LEER
PILE PLATE
Wenn Sie das Netzteil angeschlossen
haben, erscheint das Symbol „ “
auf dem Bildschirm.
Betrieb
Vollständig
geladen
Akkurestladung
Leer
21
-DE
Page 70

Sicherheitsmaßnahmen
Betrieb
• Betreiben Sie das Gerät ausschließlich mit
dem mitgelieferten Netzteil (AC-PLM2).
Bei einem anderen Netzteil kann es zu
Fehlfunktionen kommen.
Vereinheitlichter Polaritätsstecker
• Sollten Fremdkörper oder Flüssigkeiten in
das Gerät gelangen, trennen Sie es von der
Netzsteckdose. Lassen Sie das Gerät von
qualifiziertem Fachpersonal überprüfen,
bevor Sie es wieder benutzen.
• Schalten Sie das Gerät immer aus, wenn
Sie es nicht benutzen.
Wollen Sie das Gerät einige Tage oder
länger nicht benutzen, ziehen Sie den
Netzstecker aus der Steckdose. Ziehen Sie
dabei immer am Stecker, niemals am
Kabel.
• Belasten Sie Netzsteckdosen,
Verlängerungskabel oder
Gerätesteckdosen nicht über ihre
Kapazität hinaus. Andernfalls besteht
Feuergefahr oder die Gefahr eines
elektrischen Schlages.
• Bringen Sie kein Zubehör an, das nicht
vom Hersteller empfohlen wurde.
Unpassendes Zubehör stellt ein
Sicherheitsrisiko dar.
• Stellen Sie die Lautstärke der Ohrhörer
nicht zu hoch ein. Ohrenärzte warnen vor
ständigen, lauten Geräuschen. Wenn Sie
Ohrengeräusche wahrnehmen, senken Sie
die Lautstärke, oder schalten Sie das
Gerät aus.
• Berühren Sie das Netzteil oder die
Stromversorgungseinheit nicht mit
nassen Händen. Andernfalls kann es zu
einem elektrischen Schlag kommen.
• Lassen Sie das Gerät nicht fallen, und
schützen Sie es vor mechanischen Stößen.
Umgebungsbedingungen
• Blockieren Sie die Lüftungsöffnungen
nicht, damit sich im Gerät kein
Wärmestau bildet.
• Betreiben Sie das Gerät nicht bei
Temperaturen unter 5° C.
• Schützen Sie das Gerät vor hohen
Temperaturen oder direktem
Sonnenlicht. Andernfalls kann sich das
Gerät verformen, und die Bildschirme
lassen sich dann nicht mehr korrekt
ausrichten. Wenn Sie das Gerät in diesem
Fall weiter benutzen, kann es zu
Augenermüdung kommen. Gehen Sie
wie in den Anweisungen unter
„Verwenden des Glasstron“ (Seite 15 - 18)
erläutert vor, um die Bildschirme korrekt
auszurichten. Wenn Sie die Bildschirme
nicht mehr richtig ausrichten können,
lassen Sie das Gerät bei Ihrem SonyHändler oder Ihrem autorisierten SonyKundendienst reparieren.
• Legen Sie das Gerät nicht an einen Ort, an
dem es Nässe, Feuchtigkeit, Staub, Rauch
und Dampf ausgesetzt ist. Halten Sie das
Gerät von Wasser fern. Andernfalls
besteht das Risiko eines Feuers oder eines
elektrischen Schlags. Benutzen Sie das
Gerät insbesondere nicht im Badezimmer.
• Wenn das Gerät direkt von einem kalten
an einen warmen Ort gebracht wird oder
sich die Raumtemperatur erheblich
ändert, kann das Bild verschwommen
oder etwas farblos sein. In diesem Fall hat
sich Feuchtigkeit auf den Linsen im
Inneren niedergeschlagen. Lassen Sie die
Feuchtigkeit verdunsten, bevor Sie das
Gerät wieder benutzen.
• Legen Sie das Gerät nicht auf instabile
Ablagen, Tische, Regale usw. Andernfalls
kann das Gerät herunterfallen und
Personen ernsthaft verletzen bzw. stark
beschädigt werden.
• Stellen Sie nichts auf das Netzkabel,
rollen Sie nichts darüber, und legen Sie
das Gerät nicht an einen Ort, an dem das
Netzkabel zu stark strapaziert wird oder
beschädigt werden könnte.
Sonstiges
• Trennen Sie das Gerät in folgenden Fällen
vom Netzstrom, und überlassen Sie die
Wartungsarbeiten qualifiziertem
Fachpersonal:
- Netzkabel oder -stecker ist beschädigt
oder durchgescheuert.
-Flüssigkeit wurde auf dem Gerät
verschüttet.
- Das Gerät wurde Regen oder Wasser
ausgesetzt.
22
-DE
Page 71

- Das Gerät wurde fallengelassen und
erhielt einen heftigen Stoß, oder das
Gehäuse wurde beschädigt.
- Das Gerät funktioniert nicht wie üblich,
obwohl Sie die Anweisungen der
Bedienungsanleitung befolgen. Stellen
Sie nur die Regler ein, die in der
Bedienungsanleitung angegeben sind.
Wenn Sie andere Bedienelemente falsch
einstellen, kann das Gerät beschädigt
werden, und es werden umfangreiche
Reparaturarbeiten eines Fachmanns
erforderlich, um das Gerät für den
normalen Betrieb wiederherzustellen.
- Die Leistung des Geräts ändert sich
drastisch — dies zeigt Wartungsbedarf
an.
• Zerlegen Sie das Gerät nicht, und nehmen
Sie keine Veränderungen daran vor.
Andernfalls besteht das Risiko eines
Feuers oder eines elektrischen Schlags.
Lassen Sie das Gerät bei Ihrem SonyHändler oder Ihrem lokalen, autorisierten
Sony-Kundendienst überprüfen und
reparieren.
• Versuchen Sie nicht, selbst
Wartungsarbeiten an dem Gerät
vorzunehmen. Wenn Sie das Gehäuse
öffnen, können Sie hohen Spannungen
oder sonstigen Gefahren ausgesetzt
werden. Überlassen Sie Wartungsarbeiten
stets nur qualifiziertem Fachpersonal.
• Wenn Ersatzteile erforderlich sind, lassen
Sie sich vom Wartungsfachmann
schriftlich bestätigen, daß er nur
Ersatzteile verwendet, die vom Hersteller
zugelassen sind und die dieselben
Eigenschaften aufweisen wie die
Originalteile.
Beim nicht autorisierten Austausch von
Teilen besteht Feuergefahr, die Gefahr
eines elektrischen Schlages o. ä.
• Wenn Wartungs- oder Reparaturarbeiten
am Gerät vorgenommen wurden, lassen
Sie vom Wartungsfachmann
routinemäßige Sicherheitsüberprüfungen
(wie vom Hersteller angegeben)
vornehmen, um sicherzustellen, daß das
Gerät sicher betrieben werden kann.
Lassen Sie sich dies schriftlich bestätigen.
• Trennen Sie das Gerät vor dem Reinigen
vom Netzstrom. Reinigen Sie das Gerät
vorsichtig mit einem weichen, trockenen
Tuch oder einem weichen Tuch, das Sie
leicht mit einer milden Reinigungslösung
angefeuchtet haben. Verwenden Sie keine
Lösungsmittel wie Alkohol oder Benzin.
Wenn sich der Nasensteg gelöst
hat
Bringen Sie den Nasensteg wieder an.
Führen Sie B in
A ein.
Wenn sich die Seitenteile gelöst
haben
Bringen Sie die Seitenteile wieder an.
Setzen Sie die Seitenteile an der Innenseite
der Anzeigeeinheit ein. Drücken Sie sie
vorsichtig an, bis sie mit einem Klicken
einrasten.
Das Anbringen der Seitenteile kann jedoch
Fehlfunktionen verursachen. Achten Sie
darauf, daß sich die Seitenteile nicht lösen,
damit Sie sie nicht allzu häufig wieder
anbringen müssen.
Beschichtung der Gläser
Um Reflexionen zu vermeiden, sind die
Gläser mit einer Beschichtung versehen.
Bringen Sie das Gerät nicht an einen Ort, an
dem die Temperaturen plötzlich stark
schwanken oder extrem (auf über 60 °C)
ansteigen können. Dies kann zum Beispiel
in einem in der Sonne geparkten Auto der
Fall sein.
In der Beschichtung könnten sonst Risse
entstehen.
Gläser
Weitere Informationen
-DE
23
Page 72

Störungsbehebung
Sollten Sie Fragen zum Gerät haben oder Probleme auftreten, die unten nicht aufgeführt sind,
wenden Sie sich bitte an Ihren Sony-Händler oder Ihren autorisierten Sony-Kundendienst.
Symptom
Das Wiedergabebild
erscheint nicht.
Das Bild ist zu dunkel.
Horizontale Streifen
erscheinen.
Das Bild verschwindet
plötzlich.
Bild und/oder Ton sind
verrauscht.
Das Bild wird ohne Ton
wiedergegeben.
Der Ton ist gestört.
Die Lautstärke läßt sich
nicht erhöhen.
Der Akku entlädt sich
sehr schnell.
Schwarze, rote und grüne
Punkte sind ständig zu
sehen.
Der Netzschalter POWER
ON/OFF funktioniert
nicht.
Ursache
Die Anschlüsse sind nicht korrekt.
Die Benutzersperre ist aktiviert.
Sie haben den Glasstron nicht richtig
aufgesetzt.
—
Die Oberfläche des Display, auf der
das Bild angezeigt wird, ist
schmutzig.
Sie haben den Glasstron drei
Stunden lang benutzt. Nach drei
Stunden schaltet sich der Glasstron
automatisch aus, um eine Ermüdung
der Augen zu vermeiden.
Der Akku ist entladen.
Die Stecker des Audio-/Videokabels
sind verschmutzt.
—
Die AVLS-Funktion wurde aktiviert.
Der Akku ist nicht ausreichend
geladen.
Der Akku ist vollständig entladen.
Das LCD-Display wird in einer
Hochpräzisionstechnologie
hergestellt. Schwarze oder helle
Lichtpunkte (rot, blau oder grün)
können jedoch permanent auf dem
LCD-Bildschirm zu sehen sein. Dies
ist keine Fehlfunktion (effektive
Punkte: über 99,99 %).
—
Abhilfemaßnahme
Schließen Sie das Gerät
ordnungsgemäß an (Seite 8 bis 11).
Heben Sie die Benutzersperre auf
(Seite 19).
Setzen Sie den Glasstron richtig auf
(Seite 12 bis 14).
Stellen Sie die Helligkeit ein (Seite 17).
Reinigen Sie die Anzeigeeinheit mit
einem weichen, trockenen Tuch
(Seite 23).
—
Tauschen Sie den Akku aus (Seite 20).
Reinigen Sie die Stecker des Audio-/
Videokabels.
Stellen Sie die Lautstärke mit dem
Regler VOL ein (Seite 17).
Stellen Sie den Schalter AVLS ON/
OFF auf OFF (Seite 18).
Laden Sie den Akku vollständig auf,
oder verwenden Sie einen neuen
(Seite 20).
—
Lösen Sie das Netzkabel von der
Netzsteckdose. Schließen Sie das
Netzkabel nach drei Minuten wieder
an.
24
-DE
Page 73

Technische Daten
Stromversorgung
Netzteil: AC-PLM2
100-240 V Wechselstrom, 50/60 Hz,
16 W
Ausgangsspannung 9 V, 1,3 A
Akku: NP-F550 (nicht mitgeliefert)
Leistungsaufnahme
ca. 1,8 W
Betriebstemperatur
5° C bis 35° C
Lagertemperatur
–10° C bis 60° C
Abmessungen
Anzeigeeinheit:
ca. 173 × 53 × 56 mm
(B/H/T, zusammengeklappt)
Stromversorgungseinheit:
ca. 53 × 39 × 104 mm
(B/H/T)
ohne vorstehende Teile und
Bedienelemente
Gewicht
Anzeigeeinheit: ca. 100 g
Stromversorgungseinheit: ca. 90 g
Videosignal
PAL-Farbsystem, EIA-Standards
Audio-/Videoeingang
Spezialminibuchse
1 Vp-p, 75 Ohm, unsymmetrisch, syncnegativ
S-Videoeingang
4polig, Mini-DIN
Y: 1 Vp-p, 75 Ohm, unsymmetrisch, syncnegativ
C: 0,286 Vp-p, 75 Ohm, unsymmetrisch,
sync-negativ
Mitgeliefertes Zubehör
Netzteil AC-PLM2 (1)
Netzkabel (1)
Audio-/Videokabel (Spezialministecker
y Cinchstecker) (3 m) (1)
Audio-/Videokabel (Spezialministecker
y Stereoministecker) (0,5 m) (1)
Zwischenstecker
(Cinchbuchse y Cinchbuchse) (3)
Nasensteg (schwarz) (1)
Seitenteilpolster (2)
Bedienungsanleitung (1)
Sicherheitshinweise (1)
Garantie (1)
Index
A
Akku 20
Akkurestladung 21
Anschließen
Akku 20
Stromquelle 11
Videogerät 8 - 10
Aufsetzen des Glasstron 12 - 14
AVLS 18
B
Benutzersperre 19
Bildschirmausrichtung 16
E
Einstellen
Breite der Seitenteile 13
Helligkeit 17
Lautstärke 17
Nasensteg 12
M
Mitgeliefertes Zubehör 6
N
Netzteil 11
S
Sicherheitsmaßnahmen 22
Stereoohrhörer 14
U
Überprüfen der Ausrichtung der
Bildschirmposition 16
Weitere Informationen
Änderungen, die dem technischen
Fortschritt dienen, bleiben vorbehalten.
25
-DE
Page 74

26
-DE
Page 75

Weitere Informationen
-DE
27
Page 76

Sony Corporation
-FR
76
Printed in Japan
 Loading...