

Sony PLAYSTATION SCPH-103 User Manual
3-066-615-43(1)
Instruction Manual
Thank you for purchasing the PlayStation
(PS one™) video game console.
You can enjoy playing PlayStation® format
CD-ROM discs with both the PlayStation
logo and (and “FOR KOREA
ONLY” for customers in Korea) designation,
and audio CDs with this unit. Before using
the unit, please read this manual and retain
it for future reference.
®
®
使用說明書
謝謝您購買這一台 PlayStation
(PS one™)電視遊戲機-
本機對應標示 PlayStation® 和
“FOR KOREA ONLY”的字樣)的 CD-
ROM﹐也可以當做音響裝置使用﹐放入音樂
CD 收聽-使用本機以前﹐請先詳細閱讀本說
明書﹐並妥善保存﹐以備將來參考之用-
標誌(韓國專用機還必須具備
®
사용설명서
PlayStation®(PS one™) 비디오게임 콘솔을
구입해 주셔서 감사합니다.
본 기기에서는 PlayStation®로고와
KOREA ONLY] 표기도 필요) 규격
CD-ROM디스크와 음악 CD를 재생하실 수
있습니다. 본 제품을 사용하시기 전에 사용
설명서를 잘 읽어보시고, 나중에 참조할 수
있도록 잘 보관하십시오.
가 표기된(한국은 [FOR
SCPH-103
GB English KR 한국어
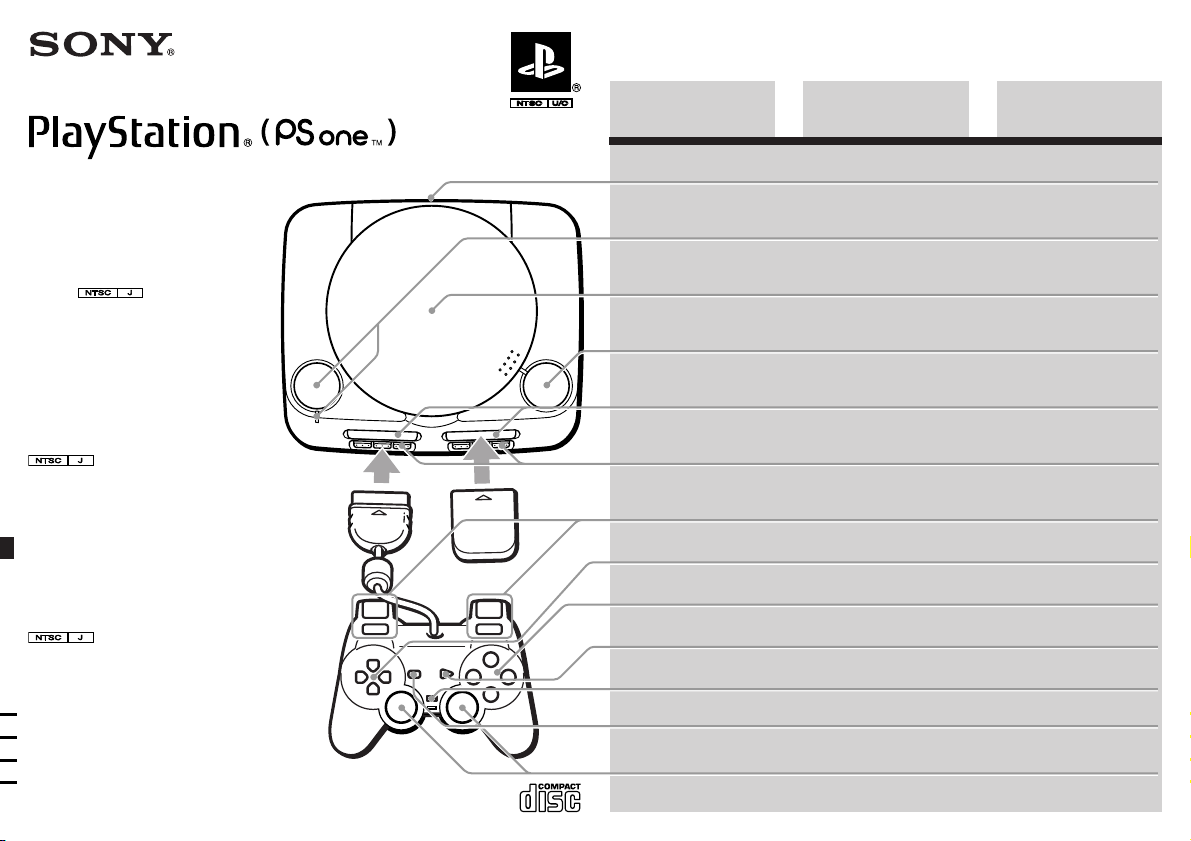
Connector section
`/1/RESET button and
`/1 indicator
Disc cover
A (open) button
MEMORY CARD slots
Controller ports
L2 button, R2 button,
L1 button, R1 button
Directional buttons
f , a , ✕ , s buttons
START button
ANALOG mode button
SELECT button
Left analog stick, right analog
stick, L3 button, R3 button
CT 中文
連接端子部位
`/1/RESET(再啟動)
按鈕和 `/1 顯示燈
CD 蓋
A(打開)按鈕
MEMORY CARD
(記憶卡)插口
控制器端子
L2 按鈕﹐R2 按鈕﹐
L1 按鈕﹐R1 按鈕
方向按鈕
f , a , ✕ , s 按鈕
START (開始)按鈕
ANALOG(類比)方式開關
SELECT (選擇)按鈕
左類比操作桿﹐右類比操
作桿﹐L3 按鈕﹐R3 按鈕
단자부
`/1/RESET (리셋) 버튼과
`/1 LED 표시
디스크 커버
A(열기) 버튼
MEMORY CARD
(메모리 카드) 슬롯
컨트롤러 포트
L2 버튼, R2 버튼,
L1 버튼, R1 버튼
방향키
f, a, ✕, s 버튼
START(시작) 버튼
ANALOG(아날로그)
모드 버튼
SELECT(선택) 버튼
왼쪽 스틱, 오른쪽 스틱,
L3 버튼, R3 버튼
© 2002 Sony Computer Entertainment Inc. All rights reserved.
2
Table of contentsWARNING
To prevent fire or shock hazard,
do not expose the unit to rain or
moisture.
To avoid electrical shock, do not
open the cabinet. Refer servicing
to qualified personnel only.
Caution
The use of optical instruments
with this product will increase
eye hazard.
Read before operating
your PlayStation®
(PS one™) console
A few people may experience
epileptic seizures when viewing
flashing lights or patterns in our
daily environment. These persons
may experience seizures while
watching TV pictures or playing
video games. Even players who
have never had any seizures may
nonetheless have an undetected
epileptic condition.
Consult your doctor before playing
video games if you have an
epileptic condition or if you
experience any of the following
symptoms during play: altered
vision, muscle twitching, other
involuntary movements, loss of
awareness of your surroundings,
mental confusion, and/or
convulsions.
Use the supplied AC adaptor only. If
you use other types, it may cause fire,
electrical shocks or a malfunction.
Notice
If this unit is affected by static electricity or
burst-noise, it may not work correctly.
2 WARNING
3 Unpacking
4 Precautions
5 Connecting your PlayStation®
(PS one™) console to a TV set
6 Playing a game
8 Using the Analog Controller
(DUALSHOCK®)
10 Using the Memory Card
12 Playing an audio CD
15 Enjoying SoundScope
17 Troubleshooting
20 Warranty
20 Specifications

Unpacking
Check that you have the following items:
3
• Console
• AV Cable
(integrated audio/
video)
• Analog Controller
(DUALSHOCK
®)
• AC Adaptor for
customers in Korea
• AC Adaptor for
customers in Hong Kong
• AC Adaptor for
customers in Taiwan
• AC Adaptor for
customers in Singapore,
Malaysia, and Thailand
4
Precautions
On safety
• The laser beam emitted from the lens
of your PlayStation
console is harmful to the eyes. Do
not attempt to disassemble the casing.
Servicing should be carried out by
qualified personnel only.
• Should any solid objects or liquid fall
into your PlayStation
console, unplug it immediately and
have it checked by qualified
personnel before any further use.
• Unplug your PlayStation
console from the wall outlet when it
is not in use. When disconnecting the
AC adaptor from the wall outlet, pull
it out by grasping the plug. Never
pull the cord by itself.
® (PS one
® (PS one
® (PS one
™
)
™
)
™
For your health
To prevent eyestrain:
• Be sure to take a break of about 15
minutes after each hour of play.
• Do not play a game when you are
very tired or short of sleep.
• Play in a well-lit room, sitting as far
from the screen as possible.
On operation
• Operate your PlayStation® (PS one™)
console on 110 V, 50/60 Hz in
Taiwan, and on 220-240 V, 50/60 Hz
in other countries.
• Do not block the air vents or wrap up
your PlayStation
as heat may build up internally.
• Avoid rough handling or shock, and
do not put any heavy objects on your
PlayStation
could damage the console or the disc.
• Do not leave your PlayStation
(PS one™) console near heat sources,
)
or in a place subject to direct sunlight
(operating temperature: 5˚C-35˚C),
excessive dust or sand, moisture,
liquid, on an uneven surface, or in a
car with its windows closed.
• If your PlayStation
console causes interference to radio
or television reception, turn it off or
move it away from the radio or
television.
• Do not touch the lens inside the disc
cover. To protect the lens from dust
keep the disc cover closed except
when inserting or removing the disc.
If the lens is not clean, your
PlayStation
not operate properly.
• The SCPH-1040 G link cable cannot
be used with this unit.
® (PS one
® (PS one
® (PS one
™
® (PS one
™
™
) console
) console. This
®
™
)
) console may
• The method for resetting the
PlayStation
® (PS one
that for the PlayStation
™
) is different to
® (SCPH-5003,
SCPH-5503, SCPH-5903, SCPH-7003,
SCPH-7503, SCPH-9003). For more
information, see “Restarting a game”
on page 7.
• Do not touch the AC adaptor or the
console for a long time. This may
cause low temperature burn.
About the discs
You can use two kinds of discs with
your PlayStation
CD-ROM discs with both PlayStation
logo and (and "FOR KOREA
ONLY" for customers in Korea)
designation, and audio CD discs.
® (PS one
™
) console:
About the nameplate
The nameplate is located on the bottom
of the unit.
On handling discs
• Do not leave the discs near heat
sources or in direct sunlight or
excessive moisture.
• Store the discs in their cases when
they are not in use.
• Do not touch the surface when
handling the discs.
• Do not stick paper or tape on the
discs.
• Do not write on the discs with a
marker.
On moisture condensation
If your PlayStation® (PS one™) console is
brought directly from a cold to a warm
location, or is placed in a very damp
room, moisture may condense on the
lens inside. Should this occur, your
PlayStation
® (PS one
™
operate properly. In this case, remove
the disc for several hours until the
moisture evaporates. If your
PlayStation
® (PS one
™
not operate properly, call the
PlayStation
on your warranty card for technical
®
assistance.
® service line number listed
Do not connect your
PlayStation
® (PS one
to a projection TV
Do not connect your PlayStation®
(PS one™) console to a projection TV
without first consulting the user manual
for your projection TV, unless it is of the
LCD type. Otherwise, it may
permanently damage your TV screen.
Never analyze or modify your
PlayStation
To use your PlayStation® (PS one™)
console, follow the instruction in this
manual. Sony Computer Entertainment
Inc. expressly prohibits the analysis or
modification of the PlayStation
(PS one™) console, and also prohibits the
analysis or use of its circuit
configurations without express written
permission of Sony Computer
Entertainment Inc.
® (PS one
) console may not
) console still does
™
) console
™
) console
®

Connecting your PlayStation® (PS one™) console to a TV set
Connecting to a VCR
B
IMPORTANT INFORMATION
A few TVs or monitors may have a difficulty of playing PlayStation® (PS one™) with the
failure of the picture such as bouncing effect.
Connecting to a TV with audio/
A
video inputs
To wall outlet
Connect your PlayStation® (PS one™) to the TV using the supplied AV
cable (integrated audio/video) matching the plug colors.
If your TV is monaural, do not connect the red plugs. If you want to hear
both left and right sounds from a monaural TV, use a commercially
available 3-phono to 2-phono (stereo to monaural) type audio/video cable.
If your TV has an S VIDEO INPUT connector, you can connect it by using
the SCPH-10060G S Video cable (not supplied).
After connecting
Set your TV to the appropriate video input mode (Refer to the instruction
manual for your TV).
Connect your PlayStation® (PS one™) to the VCR using the supplied AV
cable (integrated audio/video) matching the plug colors.
If your VCR is monaural, do not connect the red plugs.
After connecting
Set your TV and VCR operation appropriately (Refer to the instruction
manuals for your TV and VCR).
To wall outlet
5
6
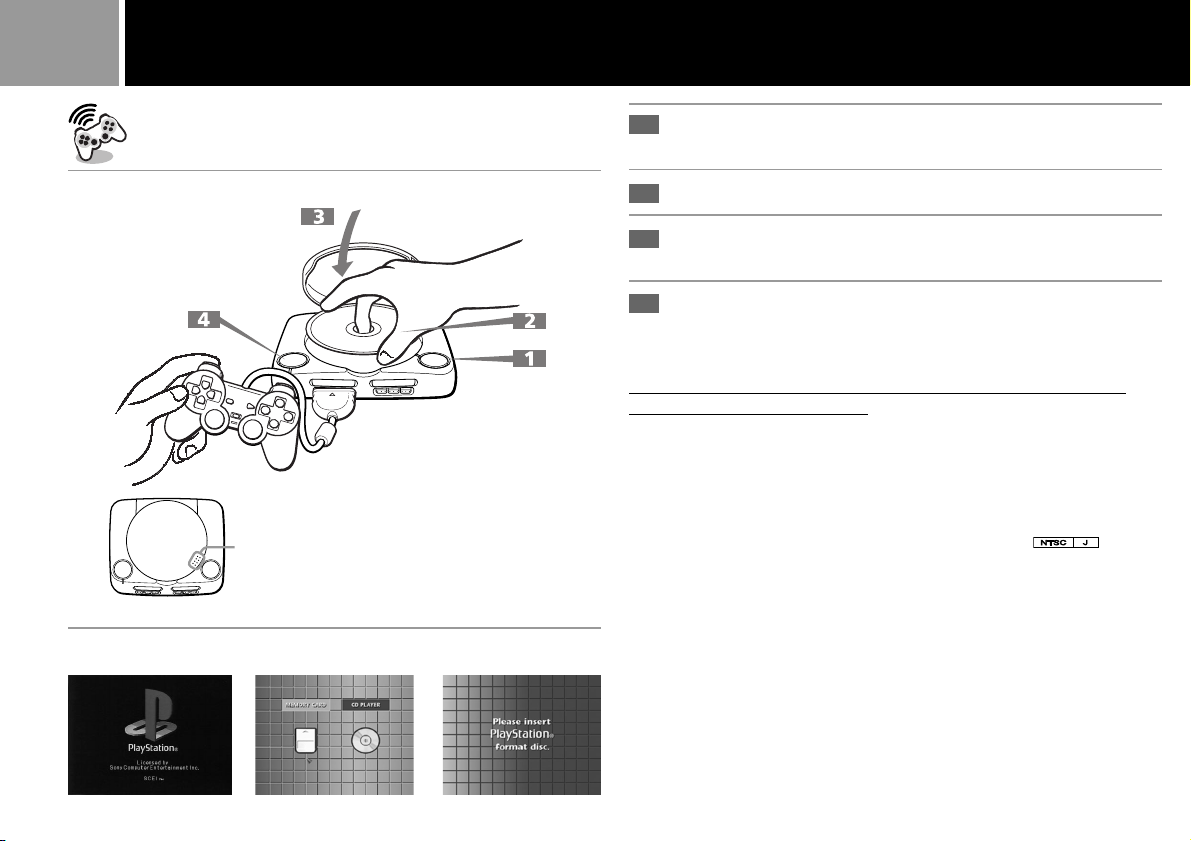
Playing a game
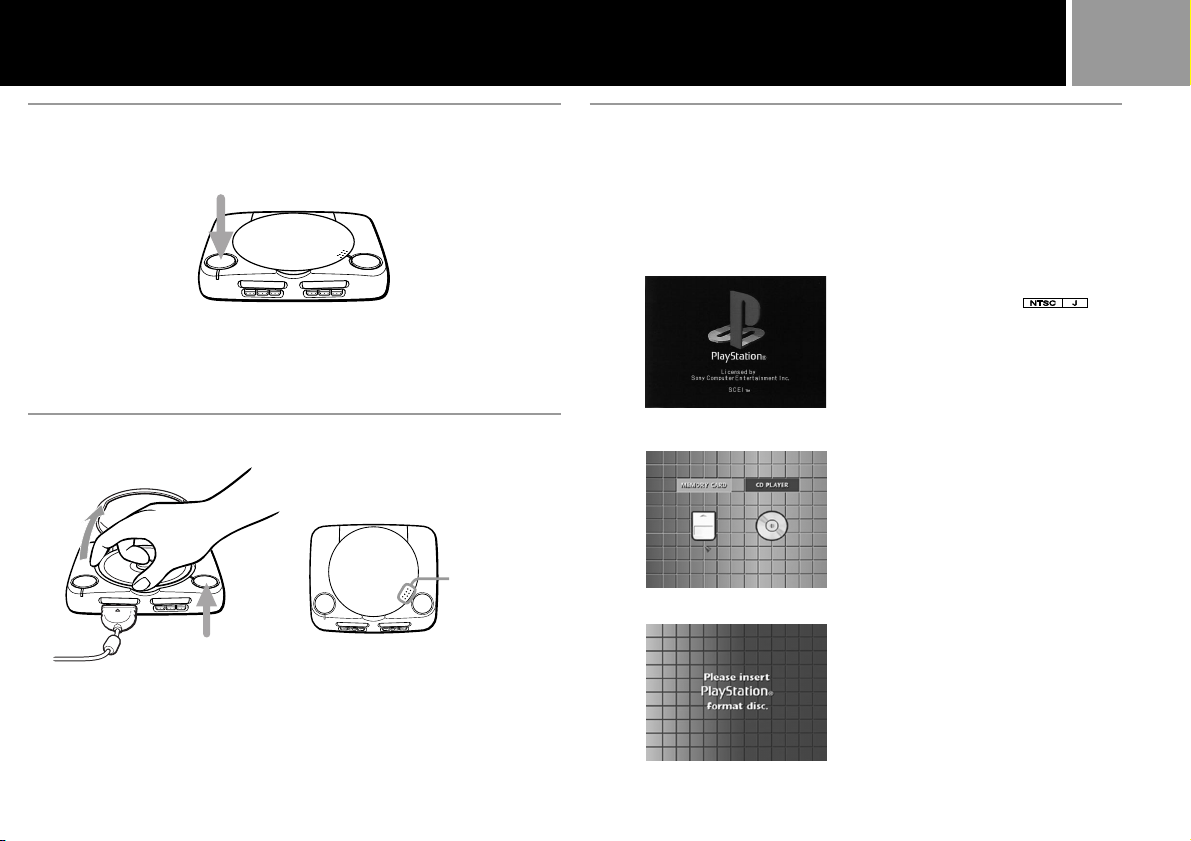
When you close the disc cover, push here firmly until it clicks.
231
1
Press § (open) button.
The disc cover opens.
Insert a disc in the disc holder with the label side up.
2
Close the disc cover.
3
When you close the disc cover, close it firmly until it clicks.
4
Press 1/u (on/stand-by) /RESET button.
The 1/u (on/stand-by) indicator lights up.
After the start-up screen, screen 1 appears and the game starts.
Set the supplied analog controller (DUALSHOCK®) to the appropriate
mode for the software (see page 8).
Tips
• When you end a game, press § button, remove a disc and press 1/u/RESET button to
turn off the PlayStation
• You can also start the game by inserting a PlayStation
2 appears.
• If screen 3 appears, the placed disc may be of a different format than the PlayStation®
format. Check to ensure that it has both the PlayStation® logo and
"FOR KOREA ONLY" for customers in Korea) designation on it.
Notes
• When inserting a disc, push the disc gently but firmly until it sits snugly on the pivot.
MWARNING
Before removing a disc, press the § button and make sure that the disc completely stops
spinning.
Never touch the disc while it is spinning. Otherwise, you may hurt yourself, or damage the
disc or your PlayStation
® (PS one
® (PS one
™
) console.
™
) console.
® format CD-ROM disc after screen
(and
7
A Restarting a game
1/u/RESET button
Press 1/u/RESET button twice.
Be careful not to accidentally press 1/u/RESET button twice while playing
the game, or the game will end.
B Removing a disc
When you close
the disc cover,
push here firmly
until it clicks.
§ button
Press § button.
While pressing the pivot gently, pick up the disc holding it by the edge.
When you close the disc cover, close it firmly until it clicks.
C Screens that appear after
start-up screen
When you turn on your PlayStation® (PS one™) console, one of the
following screens will appear.
1 A CD-ROM with both the
PlayStation® logo and
(and "FOR KOREA ONLY" for
customers in Korea) designation is
inserted.
2 No disc is inserted.
3 A disc that cannot be played with
the PlayStation® (PS one™) console
is inserted.

8
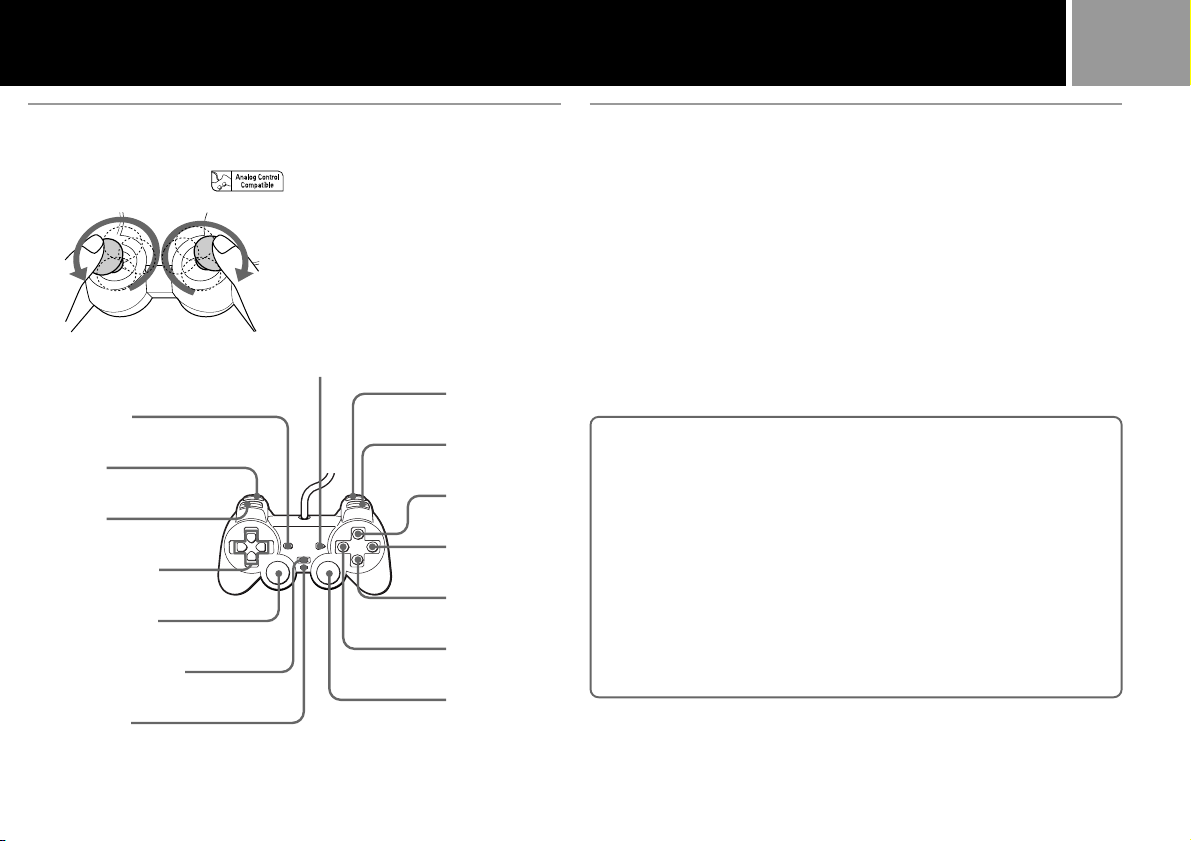
Using the Analog Controller (DUALSHOCK®)
A
Mode switching and mode indicator
B Digital mode (indicator: off)
You can use this controller in the same manner as the SCPH-1080 controller.
ANALOG mode button
Mode indicator
This analog controller (DUALSHOCK®) can be switched between two
modes by pressing the ANALOG mode button.
Each time the ANALOG mode button is pressed, the mode changes as
follows.
Digital mode (indicator : off)
µ
Analog mode (indicator : red)
Note
After checking the “ ” icons are present on the software
package, switch to the appropriate mode for use.
Note, however, that some games make this adjustment automatically. In such cases, the
ANALOG mode button is overridden by the game. For details, refer to the software
instruction manual.
SELECT button
L2 button
L1 button
Directional
buttons
ANALOG mode
button
START button
R2 button
R1 button
¢ button
® button
✕ button
π button
Indicator: off
9
C Analog mode (indicator: red)
Supports software with “ ” icon.
Before using the analog controller
(DUALSHOCK®), rotate the sticks once with
your thumbs as if drawing a circle, as
shown in the diagram at left. Do not twist
the sticks.
START button
SELECT button
L2 button
L1 button
Directional buttons
Left analog stick /
L3 button *
ANALOG mode button
Indicator: red
R2 button
R1 button
¢ button
® button
✕ button
π button
Right analog stick /
R3 button *
Vibration function
This analog controller (DUALSHOCK®) is a touch sensitive controller with
a vibration function. The vibration function can be set to ON or OFF using
the appropriate game operations screen on your TV. The function of each
button may vary depending on the game played. Refer to individual
software instruction manual for further details.
Notes
• When the analog controller (DUALSHOCK®) is not being used, turn the PlayStation® (PS
™
) console off or unplug the controller from the PlayStation® (PS one™).
one
• Before using the vibration function of this controller, please read the following notes on
safety.
• The vibration function for the PlayStation
of the PlayStation
SCPH-7003, SCPH-7503, SCPH-9003).
® in order to save power (SCPH-5003, SCPH-5503, SCPH-5903,
For safety
• Stop using this unit immediately if you become tired or if you experience
unpleasantness or pain in your hands or arms while using. If the condition persists,
consult your doctor.
• Do not attempt to operate the analog controller (DUALSHOCK
than with your hands. Do not bring the analog controller (DUALSHOCK
contact with your head, face or near the bones of any other parts of your body.
• Do not use the vibration function of the analog controller (DUALSHOCK
have any ailment in the bones or joints of your hands or arms.
• Do not use the vibration function of the analog controller (DUALSHOCK
your fingers, hands, wrists, or arms are broken, dislocated, or sprained; or if you have
a pulled muscle. These ailments may become worse due to the vibration of the
controller.
• Avoid prolonged use of the analog controller (DUALSHOCK
30 minute intervals.
® (PS one
™
) is designed differently from that
®) in any way other
®) into close
®) if you
®) when
®). Take a rest at about
* The R3 button and the L3 button function when the sticks are pressed.
10
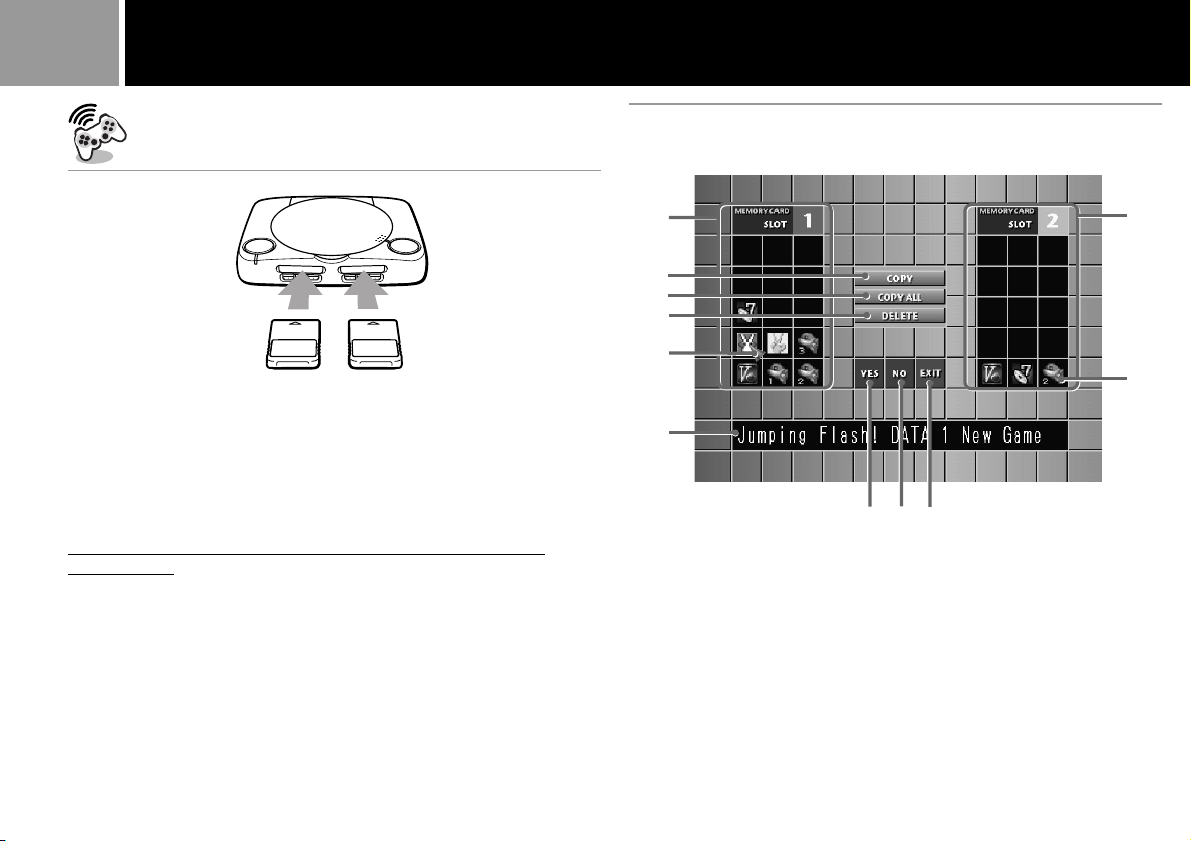
Using the Memory Card
A MEMORY CARD screen
Memory card 1 Memory card 2
You can save and load game data using the optional SCPH-1020 memory
card (sold separately). You can also copy data from one memory card to
another or delete unnecessary data.
Each memory card has 15 memory blocks, and you cannot save game data
which requires more blocks than there are empty blocks on your memory card.
Before playing, check how many memory blocks the game requires.
Refer to the software manual of the individual game for the required number of memory blocks.
Set the supplied analog controller (DUALSHOCK®) to digital mode
(indicator: off).
To start Memory Card operation
1 Turn on your PlayStation® (PS one
™
) without inserting a disc.
2 Insert a memory card (or two memory cards).
3 Select “MEMORY CARD” with the directional buttons and press the ®
button.
To cancel the MEMORY CARD screen
Select “EXIT ” (9) on the memory card screen with the directional buttons
and press the ® button.
1
!¡
2
3
4
5
!º
6
987
1 Contents of memory card 1. The game data is displayed as icons.
2 Copy the game data onto the memory card.
3 Copy entire game data onto the memory card.
4
Delete unnecessary game data.
5 Move with the directional buttons to select icons.
6 Name of the game data.
7 “YES”
8 “NO”
9 Exit from the memory card operation.
!º Icons. The number of icons shows the number of used memory blocks.
!¡ Contents of memory card 2.

B Memory Card operation
Directional buttons
How to use the controller for the MEMORY CARD screen
• To move the arrow: Press the directional buttons.
• To select the items: Press the ® button.
To copy a part of the game data
1 Check that the memory card has enough memory blocks, then select
“COPY”.
2 Select the memory card that has the data to be copied.
3 Select the icon of the data to be copied.
4 Press the ® button.
To cancel copying, select “NO”.
Notes
• You cannot copy the data to a memory card that does not have enough empty memory
blocks. You may need to delete unnecessary data.
• Do not remove the memory card until the icons stop moving.
® button
11
To copy all the game data
1 Check that the memory card has enough empty memory blocks, then
select “COPY ALL”.
2 Select the memory card to be copied .
3 Press the ® button.
To cancel copying, select “NO”.
Notes
• Do not remove the memory card until the icons stop moving.
• If the data you are trying to copy already exists on the memory card, the data will not be
copied.
To delete the game data
1 Select “DELETE”.
2 Select the memory card that has the data to be deleted.
3 Select the icon of the game data to be deleted.
4 Select “YES”.
To cancel deleting, select “NO”.
12
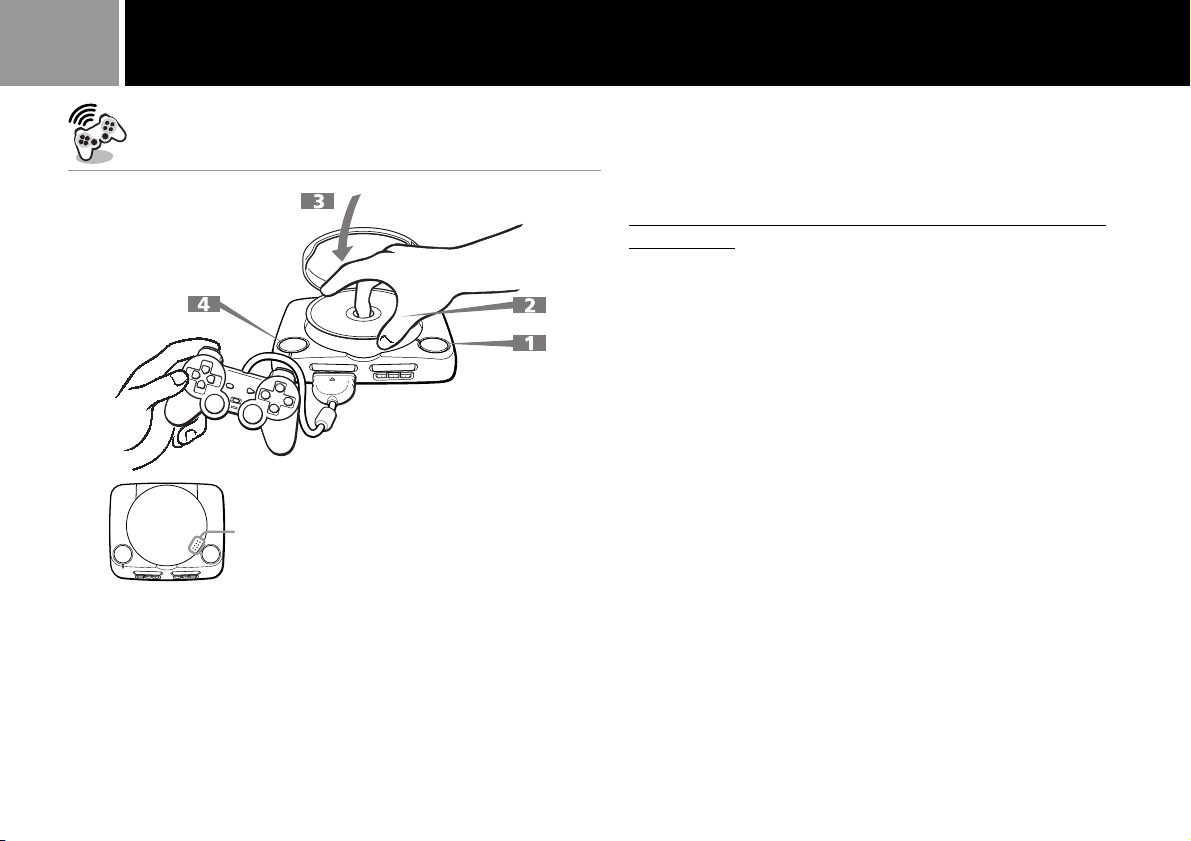
Playing an audio CD
When you close the disc cover, push here firmly until it clicks.
You can also listen to audio CDs with your PlayStation® (PS one™).
There are two ways to play CDs:
• Selecting the buttons on the screen (page 13 A)
• Pressing the buttons on the controller (direct button operation)
(page 14 C)
Set the supplied analog controller (DUALSHOCK®) to digital mode
(indicator: off).
Note
Both of the methods above function simultaneously, so be sure not to confuse them.
To start audio CD operation
1 Press § (open) button.
The disc cover opens.
2 Insert a disc in the disc holder with the label side up.
3 Close the disc cover.
When you close the disc cover, close it firmly until it clicks.
4 Press 1/u (on/stand-by) /RESET button.
The 1/u (on/stand-by) indicator lights up.
After the start-up screen, the screen for CD operation appears.
You can also play an audio CD by inserting the CD after turning the
power on.
To cancel audio CD operation
Select “EXIT ” (7) on the screen with the directional buttons and press the
® button.
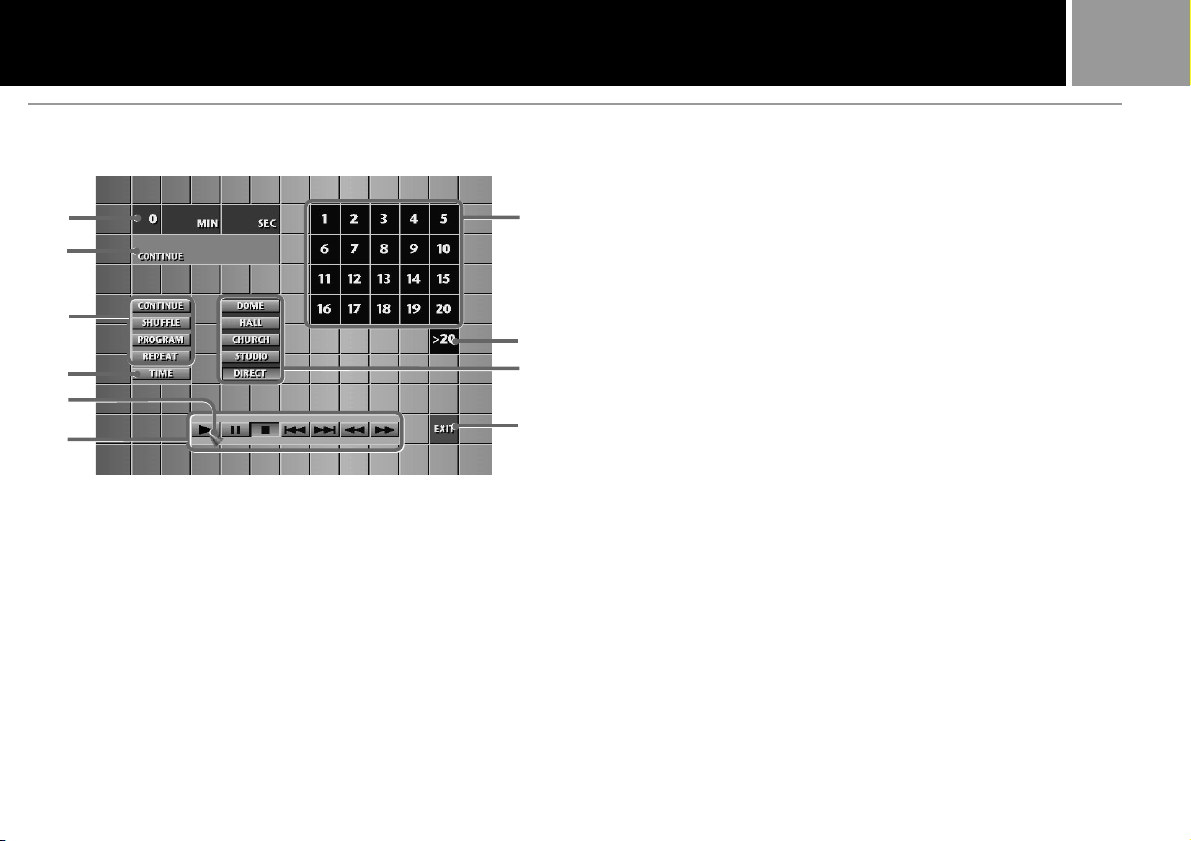
A Screen for CD operation
1
2
3
4
5
6
0
9
8
7
13
1 Display of the elapsed or remaining playback time. Press the “TIME”
button to switch the display.
2 Display of the selected playback mode.
3 “CONTINUE”: Play all tracks on the disc in order.
“SHUFFLE”: Play the tracks in random order.
“PROGRAM”: Play the desired tracks in a specified order.
“REPEAT”: Play a track or all the tracks repeatedly.
4 Change the playback time display.
5 Move with the directional buttons to select the button.
6 “(”: Start playing.
“P”: Pause.
“p”: Stop playing.
“=”: Find the beginning of the current or previous track.
“+”: Find the beginning of the next track.
“0”: Rewind.
“)”: Fast Forward.
7 Cancel the audio CD operation.
8 Sound effect buttons.
Select “DIRECT” to cancel the sound effect you chose.
9 Select a track number higher than 20 (Appears only when there are
more than 20 tracks on a CD).
0 Select the track number you want to play.
(continued)
14
Playing an audio CD (continued)
B Various playback modes
Directional buttons
To play the tracks you want
1 Select “PROGRAM”.
2 Select the track number you want to play.
Repeat this step until you have selected all the tracks you want to play.
3 Select “(”.
To resume normal play, select “CONTINUE”.
To play the tracks in random order
1 Select “SHUFFLE”.
2 Select “(”.
To resume normal play, select “CONTINUE“.
® button
How to use the controller for the CD operation screen
• To move the arrow: Press the directional buttons.
• To select the items: Press the ® button.
To play a CD until the end once
Select “(”.
To play tracks repeatedly
• To repeat the current track, select “REPEAT” until “REPEAT 1” appears,
then select the number of the specific track you want to repeat.
• To repeat all the tracks, select “REPEAT” until “REPEAT ALL” appears,
then select “(”.
To resume normal play, select “REPEAT” until the “REPEAT” indication
disappears.
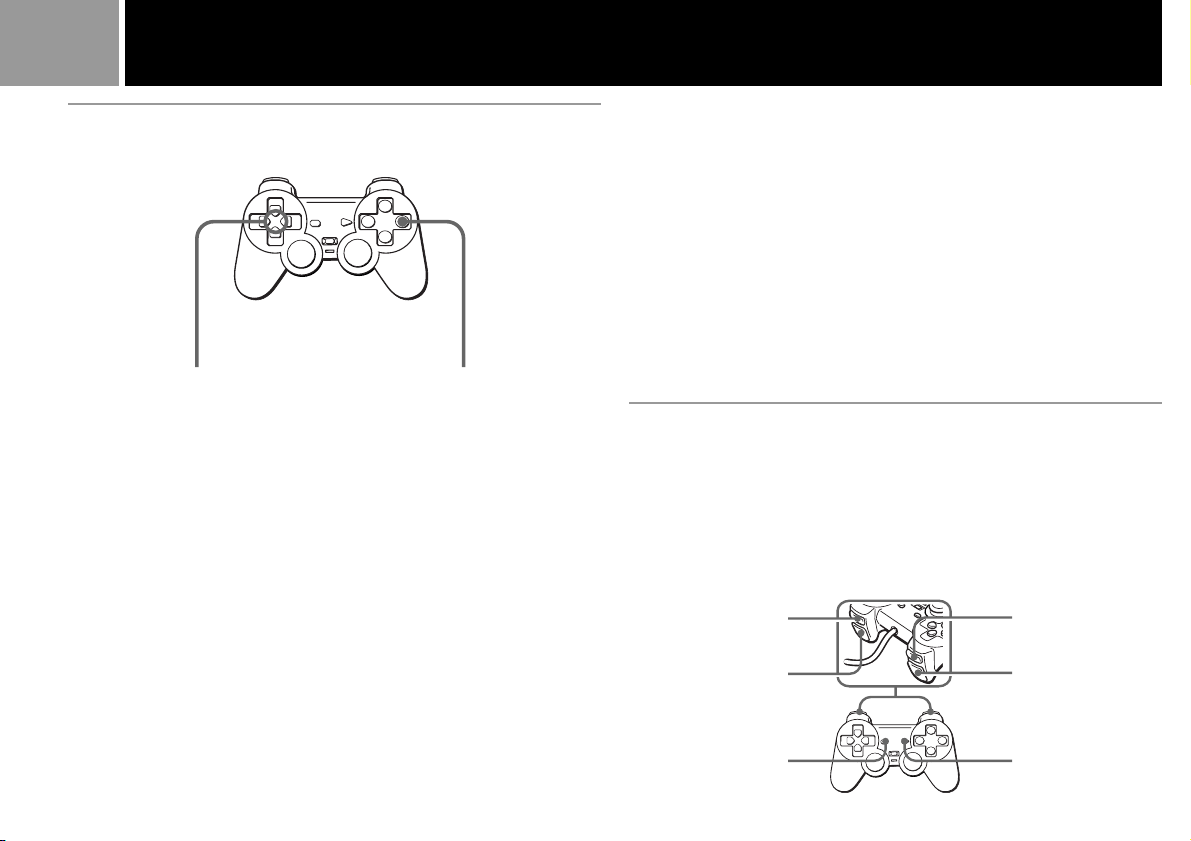
C To operate the CD directly with the
controller
Using the buttons on the controller, you can control basic CD
operations without looking at the screen.
+
)
Start SoundScope
(See the next page)
=
0
(, P
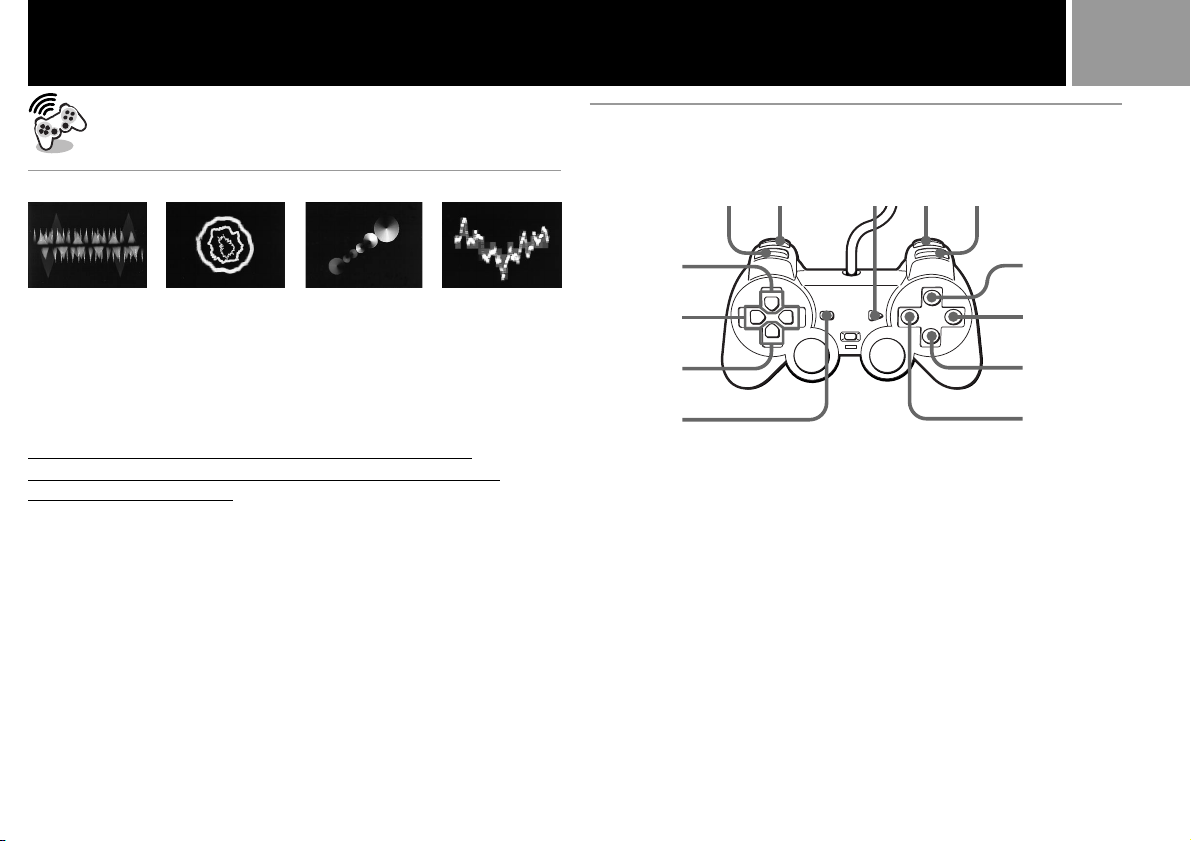
Enjoying SoundScope
A SoundScope operation
1*
2*
3
4*
15
5*
Playing audio CDs on your PlayStation® (PS one™) console will activate the
SoundScope feature, a graphical representation of the music you are
playing. Using the buttons on the controller, you can choose your favorite
image from 24 patterns, change the color of the image or add the effect of
an afterimage. You can also save and load your SoundScope settings using
the memory card.
When enjoying SoundScope, set the supplied analog controller
(DUALSHOCK®) to digital mode and operate the CD directly with
the controller (indicator: off).
To start SoundScope operation
Press the SELECT button when the CD operation screen is displayed.
To return to the CD operation screen
Press the SELECT button.
6*
7
8*
9
* : Press these buttons while holding down the ✕ button to save the operation or
change the size of the image. For details, see "B Additional operations" on page
16.
1
- 5
Audio CD operation:
1
Find the beginning of the current or previous track.
2 Rewind.
3 Play / Pause.
4 Fast Forward.
5 Find the beginning of the next track.
6 Shorten the time of image display.
7 Change the pattern of the image.
8 Lengthen the time of image display.
9 Return to the CD operation screen.
0 Add an afterimage effect to the image.
!¡ Select the pattern of the image in random order.
!™ Press this button with other buttons for additional operations.
!£ Change the color of the image.
0
!¡
!™
!£
(continued)
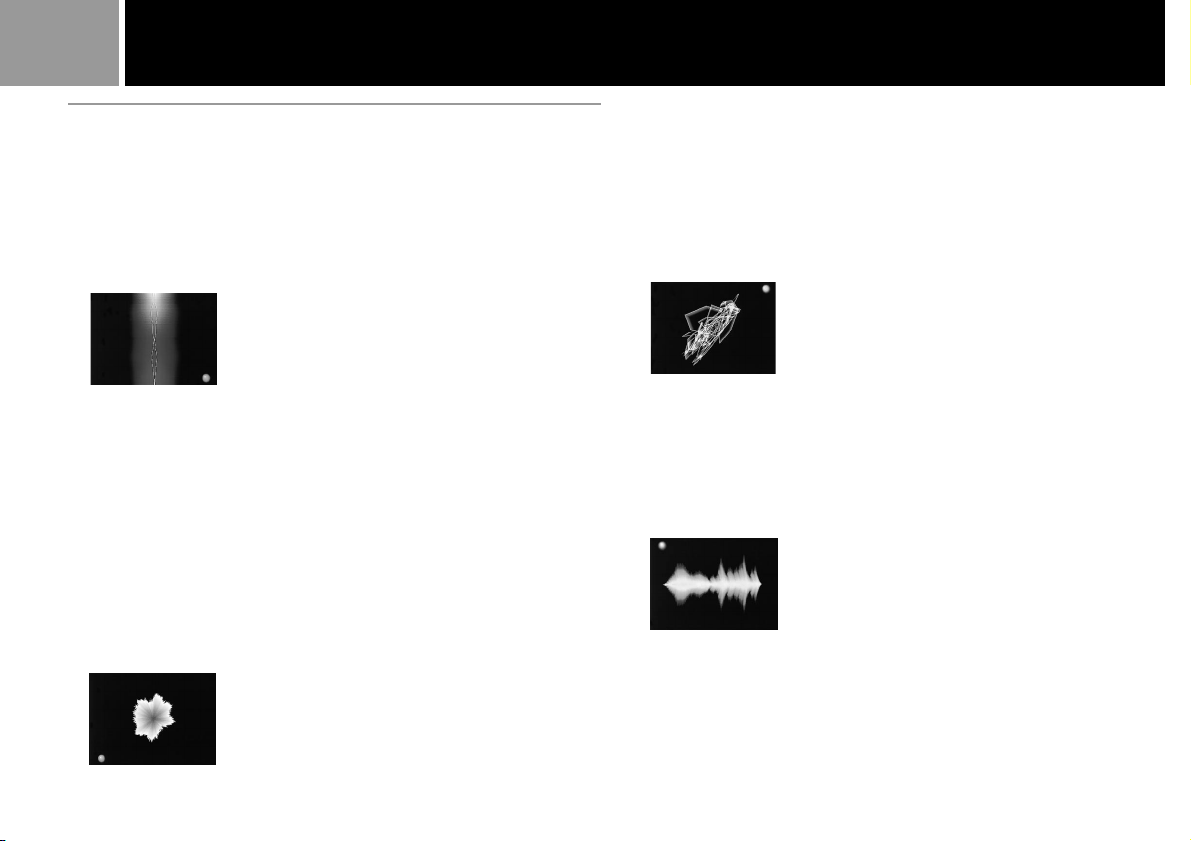
16
Enjoying SoundScope (continued)
B Additional operations
To change the size of the image
Press the directional buttons (up or down) while holding down the ✕ button.
To change and save the settings
1 During playback, press the R1 button while holding down the ✕ button.
A round mark flashes on the lower right of the screen.
2 Press the L1 button while holding down the ✕ button.
The round mark disappears and the procedure is completed.
Tip
Your saved setting will be lost when you turn off the PlayStation® (PS one™). If you want to
keep the data, you can save and load it using a memory card with one memory block.
To save the saved operation on a Memory Card
Press the R2 button while holding down the ✕ button.
A round mark appears on the upper right of the screen.
2 Operate the controller.
While the round mark is displayed, any changes you make to the
SoundScope operation with the controller are saved.
3 When you are finished, press the R1 button while holding down the ✕
button.
The round mark disappears and the procedure is completed.
Note
Do not unplug the controller during these procedures.
To switch to saved settings
1 During playback, press the L1 button while holding down the ✕ button.
A round mark appears on the lower left of the screen, and the
SoundScope image is transformed by the saved operation.
Note
You can store only one custom SoundScope operation setting. If the data already exists, it
will be erased.
To load the data onto a Memory Card
Press the L2 button while holding down the ✕ button.
A round mark appears on the upper left of the screen. To use the loaded
data, follow the procedure above.

Troubleshooting
17
Please check again.
1 Check the console again before
sending it in for repair.
If the problem persists, please call the
PlayStation® service line number listed on
your warranty card for technical
assistance.
2 Check that the TV and the console
or the console and the accessories
are connected properly.
Symptoms
If the problem you are experiencing displays the symptoms described below, read the
instructions indicated in “Checks” or “Diagnostics” on pages 18 to 19.
1 There is no sound ∫ Check
2 The screen and sound are distorted. ∫ Check
3 The game (or CD) does not start. ∫ Check
4 The screen and sound skip. ∫ Check
5 The screen and sound freeze, or the game
(or CD) stops during the play. ∫ Check
6 The controller connected with the console
does not work. ∫ Check
7 The vibration function of the analog
controller (DUALSHOCK®) does not work. ∫ Check
8 You cannot save game data using
the memory card inserted into the
MEMORY CARD slot of the console. ∫ Check
1
1
3
4
4
5
5
7
18
Troubleshooting (continued)
Checks
1 Is the AV cable properly connected
to the TV or VCR?
If not, connect it properly.
If the problem persists, bCheck 2
2 Is the channel position or input
selector on the TV set correctly?
If not, set it to the correct position.
If the problem persists, bCheck 3
3 Is the inserted disc a CD-ROM with
both the PlayStation® logo and
(and "FOR KOREA ONLY"
for customers in Korea) designation
or an audio CD disc?
If not, insert a CD-ROM disc that can be
used with the console.
If the problem persists, bCheck 4
4 Check to see if another game (or
CD) will work or game (or CD) you
played before will work?
If “Yes”, b Diagnosis A
If “No”, b Diagnosis B/C
5 Is the analog controller
(DUALSHOCK®) set to the
appropriate mode for the game?
If not, switch to the appropriate mode.
If the problem persists, bCheck 6
6 Check to see if anoter controller
will work.
If “Yes”, b Diagnosis D
If “No”, b Diagnosis C
7 Follow messages from the game (or
CD).
If the problem persists, bDiagnosis E
Diagnostics
19
A There may be a problem
with the disc.
Clean the underside of the disc with a CD
cleaner and try playing it again.
To clean the disc, refer to the CD cleaner
usage manual.
If the problem persists, the disc may be
defective or there may be a problem with
the console.
Please call the PlayStation® service line
number listed on your warranty card for
technical assistance.
B There may be a problem
with the cable.
If the screen and the sound are still
distorted, the plugs may be dirty or there
may be a short inside the cable. If the
problem persists even after trying another
cable, there may be a problem with the
console.
The distortion of screens depends on TVs
connected with. Consult the instructions
on page 5 for further information.
Please call the PlayStation® service line
number listed on your warranty card for
technical assistance.
C There may be a problem
with the console.
Please call the PlayStation® service line
number listed on your warranty card for
technical assistance.
D There may be a problem
with the controller.
Please call the PlayStation® service line
number listed on your warranty card for
technical assistance.
E There may be a problem
with the memory card.
Please call the PlayStation® service line
number listed on your warranty card for
technical assistance.

20
SpecificationsWarranty
• Refer to the enclosed document regarding warranty that is country/areaspecific.
For Customers in Korea
•Please do not discard the outer box. The warranty card is printed on this
outer box, therefore please do not discard the box. Also, when repairing,
this outer box will protect the product.
•On repairing, please do not cut off the warranty from the outer box. To
ensure that this warranty is for this product, bar code label may not be
detached from the outer box.
General
Power requirements: ! DC IN 7.5V
Power consumption: 9 W
Dimensions (approx.): 193 x 38 x 144 mm (w/h/d)
Mass (approx.): 560 g
Operating Temperature: 5˚C-35˚C
Laser diode properties
•Material: GaAlAs
•Wavelength: l=780 nm
•Emission duration: Continuous
•Laser output: Less than 44.6 µW
(measured at a distance of 200 mm from the lens surface on
the optical pick-up block)
Inputs/outputs on the front
Controller port (2)
MEMORY CARD slot (2)
Output on the rear
AV MULTI OUT connector (1)
Supplied accessories
AC Adaptor (1)
Analog Controller (DUALSHOCK
AV Cable (integrated audio/video) (1)
Instruction Manual (1)
®) (1)
Optional accessories
SCPH-110* Analog Controller (DUALSHOCK®)
SCPH-1020HI* Memory Card
SCPH-110F** Analog Controller (DUALSHOCK
SCPH-133D** LCD Screen
SCPH-170F** Car Adaptor (for PS one
SCPH-1020FHI** Memory Card
SCPH-10060G S VIDEO Cable
™
) (coming soon)
®)
* For Hong Kong, Taiwan, Singapore, Malaysia and Thailand
** For Korea only
Design and specifications are subject to change without notice.

21

2
目錄警告
為防止走火或受衝擊﹐請勿將本
機放在下雨或者潮濕的地方/
為避免觸電﹐請勿拆卸或分解本
機/維修應委託持有執照的專業技術
人員進行/
注意事項
本機若和光學儀器一起使用﹐有
可能增加對眼睛的傷害/
使用 PlayStation®
(PS one™)以前務必
閱讀以下的注意事項
有極少部分的人﹐當看到閃光或
受強烈的光線照射時會引起癲癇-這
種人當觀看電視﹐或觀看如這架
PlayStation® 等遊戲機的畫面時﹐有
時會引起癲癇發作-沒有任何發作經
驗的人﹐大概是不會有癲癇症狀的 如果您在使用電視遊戲機時﹐有
下列癥狀之一(眼花撩亂﹐痙攣﹐癱
瘓﹐昏迷不醒﹐精神錯亂或極度興奮
等等)﹐或曾經發作過的話﹐在使用
本機以前﹐請先跟醫生商量-
請僅使用本機附屬品的交流電源
轉換器-若使用其他類型的轉換器﹐
可能會導致火災、觸電或故障-
注意事項
靜電或突發性噪音﹐可能導致主
機故障或部分異常-
2 警告
3 附屬品檢查
4 使用前須知事項
5 連接 PlayStation®
(PS one™)主機和電視機
6 如何開始玩遊戲
8 類比控制器
(DUALSHOCK®)的使用方法
10 如何使用 MEMORY CARD
(記憶卡)
12 收聽音樂
15 啟動 SoundScope
17 故障檢修
20 保證維修責任
20 規格
 Loading...