

Page 1
Read
This
First
4-675-240-12 (1)
Setting up your
1
CLIÉ™ handheld
Basic operations of your
2
CLIÉ™ handheld
Have a try
3
Taking pictures / Recording
movies
Recording a voice memo
Listening to music
Managing schedules /
addresses
Viewing computer documents
Using the Bluetooth™
function
Connecting to the Internet
Operating Instructions
Personal Entertainment Organizer
PEG-NX80V
PEG-NX73V
CLIÉ™ handheld
components
© 2003 Sony Corporation
Page 2
The following manuals are included with your CLIÉ handheld.
Refer to the following together with this manual.
Before you start using your CLIÉ handheld (This manual)
Read This First (Operating Instructions)
Explains the following:
• Setting up your CLIÉ handheld and computer
• Basic operations
• What you can do with the applications
Be sure to read the supplied “Safety & Regulations Guide” to use your
CLIÉ handheld safely.
When you want to become more familiar with the basic operations
of the CLIÉ handheld
When you want to change the settings of your CLIÉ handheld
Handbook
Using CLIÉ handheld for the first time
The basic features and operations are explained in detail.
CLIÉ handheld advanced operations
Useful and advanced features to make full use of your CLIÉ
handheld are explained in detail.
When you want to become more familiar with using the supplied applications
When you want to install additional applications
CLIÉ Application Manual (HTML format: Read via a
computer screen)
Explains how to use the supplied applications in detail.
This manual will be automatically installed on the computer when you
install the Palm™ Desktop for CLIÉ software.
For details on using the manual, refer to “Using the CLIÉ Application Manual” on
page 62 of this manual.
When you have problems
Troubleshooting Q&A
Helps in solving common problems that you may have while using your CLIÉ
handheld.
2
Page 3

Before use
Caution
IN NO EVENT SHALL SONY BE LIABLE FOR
ANY INCIDENTAL, INDIRECT OR
CONSEQUENTIAL DAMAGES OR OTHER
DAMAGES INCLUDING WITHOUT
LIMITATION LOSS OF PROFITS, LOSS OF
REVENUE, LOSS OF DATA, LOSS OF USE
OF THE PRODUCT OR ANY ASSOCIATED
EQUIPMENT, DOWNTIME, AND
PURCHASER’S TIME RELATED TO OR
ARISING OUT OF THE USE OF THIS
PRODUCT, ITS HARDWARE AND/OR ITS
SOFTWARE.
On the supplied software
• Copyright laws prohibit reproducing the
software or the software manual in whole or
in part or renting the software without the
permission of the copyright holder.
• In no event will SONY be liable for any
financial damage or loss of profits, including
claims made by third parties, arising out of
the use of the software supplied with this
product.
• In the event a problem occurs with this
software as a result of defective
manufacturing, SONY will replace it at
SONY’s option or issue a refund. However,
SONY bears no other responsibility.
• The software provided with this product
cannot be used with equipment other than
that which it is designated for use with.
• Please note that, due to continued efforts to
improve quality, the software specifications
may be changed without notice.
• The software library incorporated in the
CLIÉ handheld is based i n part on the work of
the Independent JPEG Group.
CAUTION
Please contact your nearest Sony dealer regarding
any problems you have with your Sony product.
NOTES
• Sony does not support third party add-on
applications. If you have a problem with a
third party application, please contact the
developer or publisher of that software.
• The illustrations in this manual may differ
from the actual software.
• Explanations in this manual assume that you
are familiar with basic operations of
®
Windows
and operating system, please refer to their
respective manuals.
Program © 2003 Sony Corporation, © 2003 Palm,
Inc., or its subsidiaries. All rights reserved.
Documentation © 2003 Sony Corporation
. For how to use your computer
3
Page 4

Table of Contents
Setting up your CLIÉ™ handheld
Confirming the package
contents . . . . . . . . . . . . . . . . 6
Setting up your CLIÉ™
handheld. . . . . . . . . . . . . . . . 8
Charging your CLIÉ handheld. . . . . . . . . . . . . 8
Performing the initial setup after turning on
your CLIÉ handheld for the first time. . . . 11
Using your CLIÉ™ handheld with
your computer . . . . . . . . . . . .18
Installing the software on your computer. . . 18
Connecting the cradle to your computer . . . 21
Entering a user name for your CLIÉ
handheld . . . . . . . . . . . . . . . . . . . . . . . . . 22
Synchronizing data between your CLIÉ
handheld and computer (HotSync
®
) . . . . 23
Basic operations of your CLIÉ™
handheld
Starting an application . . . . . . .26
Using the Jog Dial™ navigator and
the BACK button . . . . . . . . . . . . . . . . . . . 26
Other ways to start an application . . . . . . . . 28
Entering text. . . . . . . . . . . . . . .30
Restarting your CLIÉ handheld . .31
Have a try
Enjoying image files. . . . . . . . . . . . . . . . . . . 34
Enjoying movies. . . . . . . . . . . . . . . . . . . . . . 38
Recording a voice memo (Voice Recorder) . 42
Viewing handwritten memos and image files,
and playing back voice memos . . . . . . . . 44
Listening to music . . . . . . . . . . . . . . . . . . . . 46
Managing schedules (Date Book). . . . . . . . . 48
Managing addresses and telephone numbers
(Address Book) . . . . . . . . . . . . . . . . . . . . 50
Exchanging Date Book and Address Book
data between your CLIÉ handheld and
computer. . . . . . . . . . . . . . . . . . . . . . . . . 52
Viewing computer documents on your CLIÉ
handheld (Picsel Viewer for CLIE) . . . . . . 53
Using the Bluetooth™ function
(for Bluetooth™ built-in models only) . . . 55
Connecting to the Internet . . . . . . . . . . . . . . 61
Using applications. . . . . . . . . . .62
Using the CLIÉ Application Manual . . . . . . . 62
Installing applications on your CLIÉ
handheld . . . . . . . . . . . . . . . . . . . . . . . . . 64
Introducing add-on applications . . . . . . . . . 66
Additional information . . . . . . . .80
Making a backup of the data on your CLIÉ
handheld . . . . . . . . . . . . . . . . . . . . . . . . . 80
Troubleshooting. . . . . . . . . . . . . . . . . . . . . . 81
Customer Support and Customer
Registration. . . . . . . . . . . . . . . . . . . . . . . 82
Notes on use . . . . . . . . . . . . . . . . . . . . . . . . 83
Specifications . . . . . . . . . . . . . . . . . . . . . . . 87
CLIÉ™ handheld components
Front panel. . . . . . . . . . . . . . . . . . . . . . . . . . 92
Back panel . . . . . . . . . . . . . . . . . . . . . . . . . . 94
Locating the components of
the initial screen . . . . . . . . . . . . . . . . . . 102
Locating cradle components . . . . . . . . . . . 107
Locating audio remote control components 107
INDEX. . . . . . . . . . . . . . . . . . .108
4
Page 5

Notes on this manual
• This manual supports PEG-NX80V and PEG-NX73V.
– The illustrations in this manual are for PEG-NX80V, unless specified otherwise.
– Differences between PEG-NX80V and PEG-NX73V are specified in each
corresponding section.
• Screen shots in this manual may be different from the actual displays in the supplied
software.
• The contents of this manual are written for users with knowledge of using Windows
For details about computer operation, refer to the manual for the computer.
®
LCD display and camera lens
The LCD of your CLIÉ handheld is designed with precision technology. However, some
pixels may not work or may be permanently lit in some cases. Also, brightness of the
display may be inconsistent depending on the angle of view. These are caused by the
nature of the LCD and do not indicate a malfunction.
Please note that Sony does not guarantee a replacement or refund in these cases.
Do not keep the LCD and camera lens to direct sunlight for long periods of time. It may
result in a malfunction. Be careful when you place it outdoors or next to a window.
Before taking pictures (CLIE Camera), recording movies (Movie Recorder) or recording sounds (Voice Recorder)
It is recommended that a test picture is taken and saved on your CLIÉ handheld or storage
media. View the results of this test before you start taking pictures. Similarly, it is
recommended that a test movie and test sound is recorded, saved, and played back, before
making a full movie or sound recording.
.
No guarantee for lost data or damaged data
Sony does not provide any guarantee for lost data or damaged data.
Copyrights
Television programs, films, video tapes, and other materials may be copyrighted.
Unauthorized recording of such materials may violate the provision of the copyright laws.
5
Page 6
Setting up your CLIÉ™ handheld
This chapter explains how to charge your CLIÉ handheld and use it with your computer.
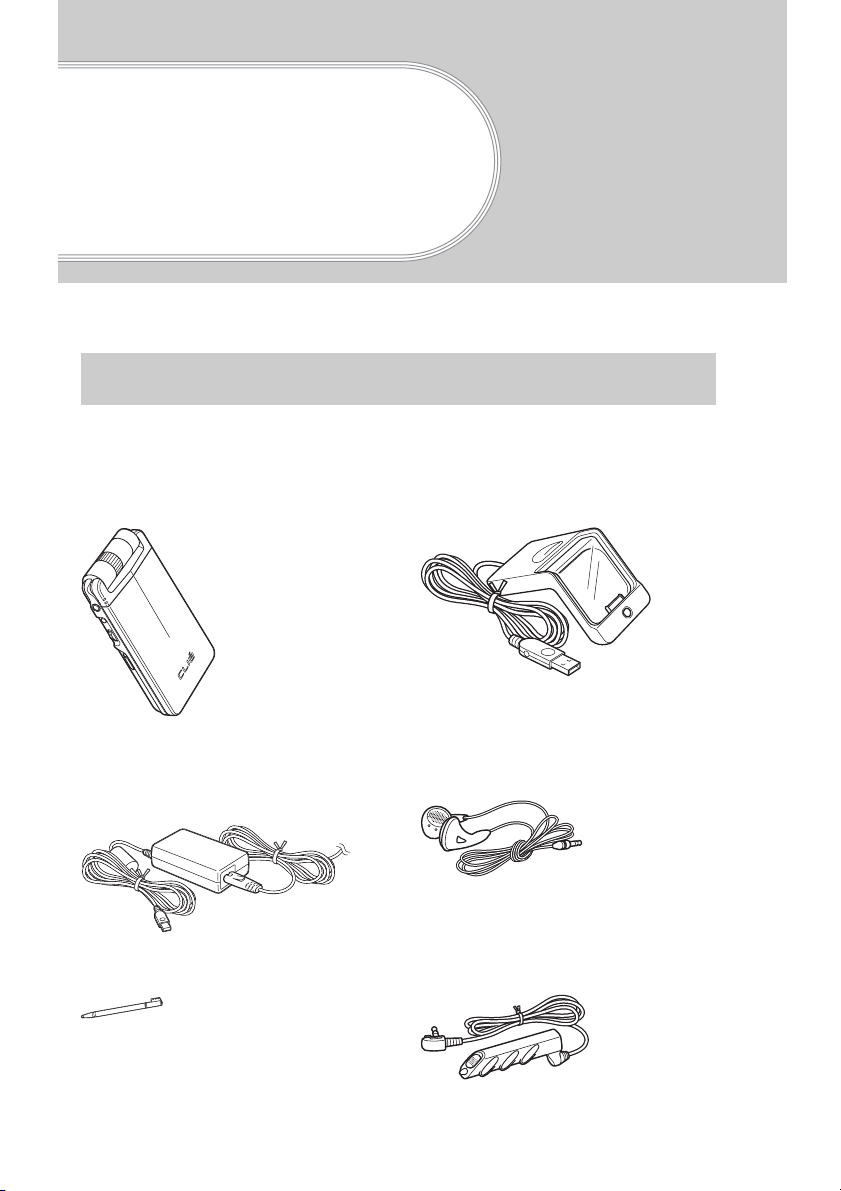
Confirming the package contents
Please confirm the accessories in the package before you start setting up your CLIÉ
handheld.
CLIÉ handheld (1) Cradle (1)
The illustration is for PEG-NX80V.
AC power adapter (1)
(including AC cord)
Stylus (1)
The stylus is stored in your CLIÉ
handheld at the factory.
6
Headphones (1)
Audio remote control (1)
Page 7

Plug adapter (1)
Plug adapter attachment
(1)
Installation CD-ROM
Strap (1)
Refer to the illustration below to attach the strap.
Read This First - Operating Instructions (1, this manual)
Safety & Regulations Guide (1)
Troubleshooting Q&A (1)
Software license agreement (1)
Other printed materials
Make sure that the package contains all of the above contents. If any item is missing,
contact the Sony Customer Information Service Center or a Sony dealer.
Setting up your CLIÉ™ handheld
Use the strap to avoid dropping your CLIÉ handheld
Attaching the strap
7
Page 8
Setting up your CLIÉ™ handheld
Perform the following before setting up your CLIÉ handheld.
Step 1: Charging your CLIÉ handheld
Step 2: Performing the initial setup after turning on your
CLIÉ handheld for the first time
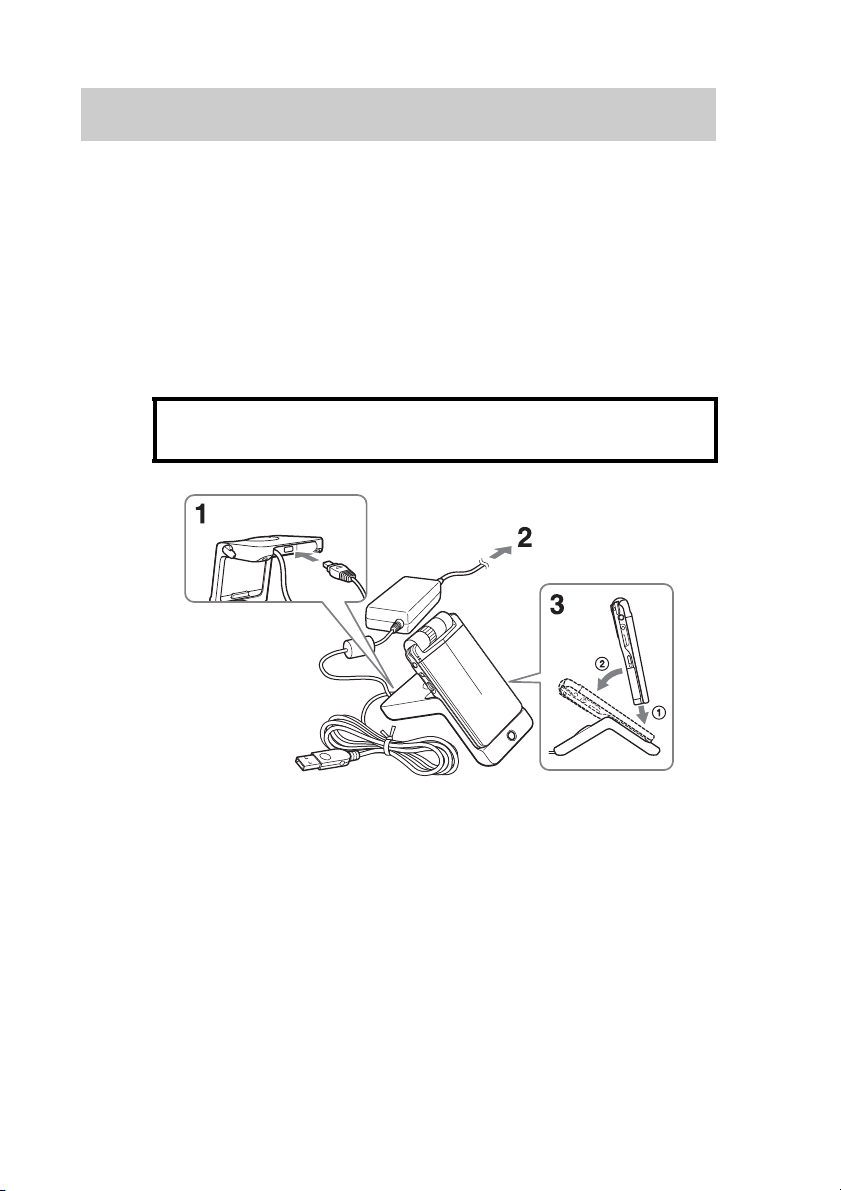
Step 1: Charging your CLIÉ handheld
Before you use your CLIÉ handheld for the first time,
be sure to fully charge the battery.
To a wall outlet
1
Connect the AC power adapter to the cradle’s AC adapter
connector.
2
Connect the AC power adapter to a wall outlet.
8
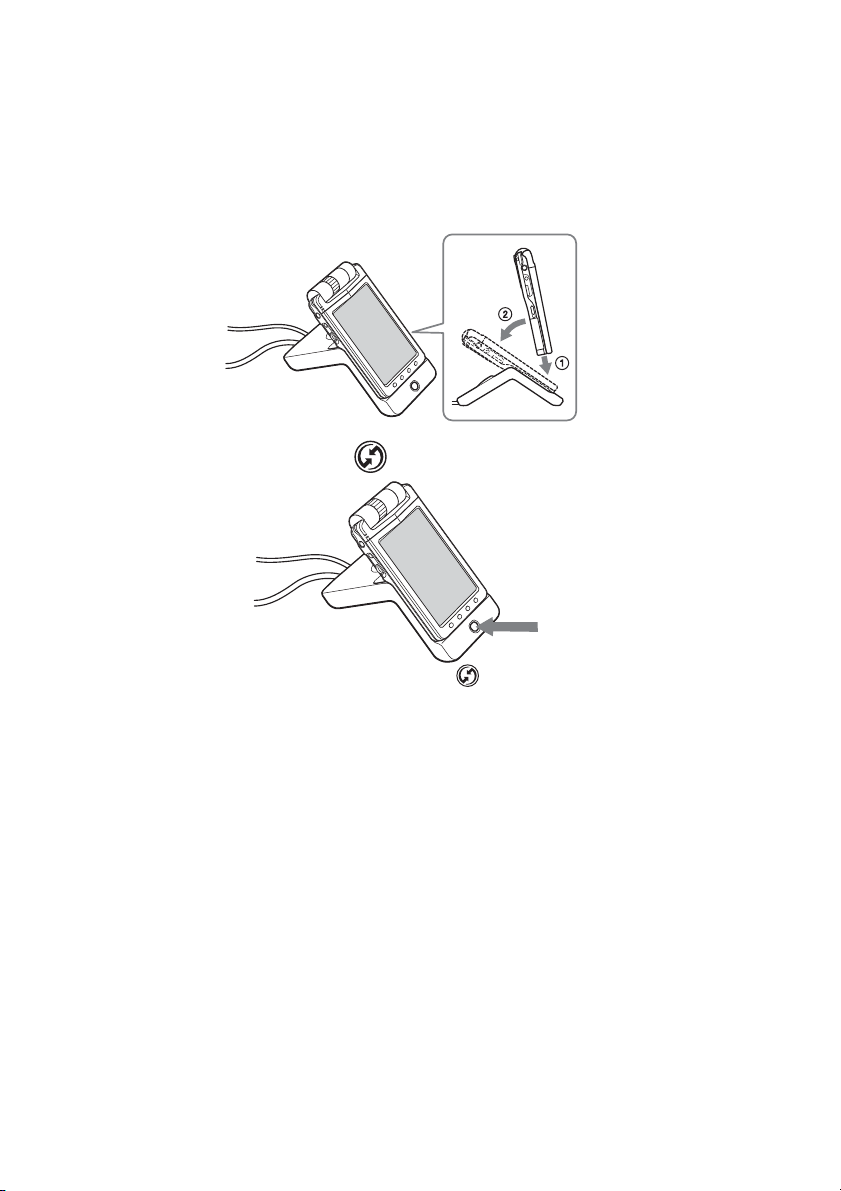
Page 9

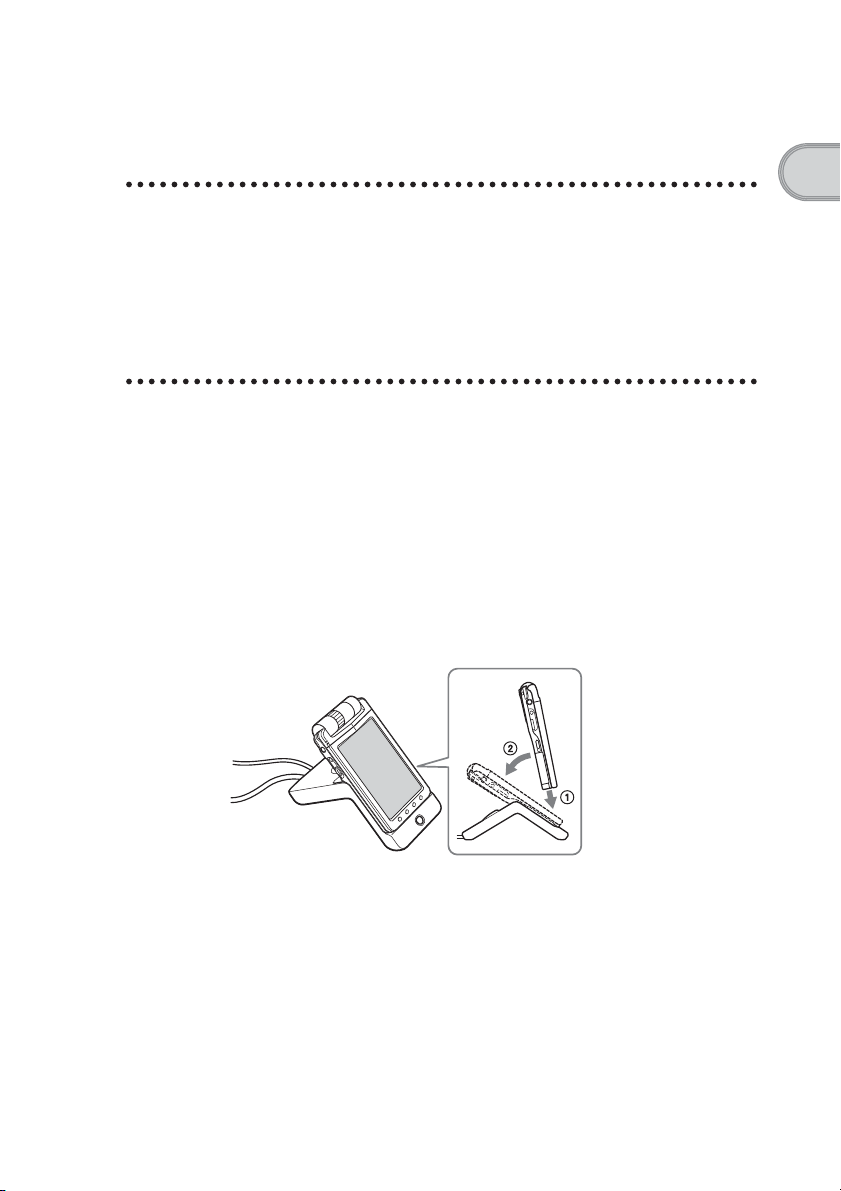
3
Insert your CLIÉ handheld at an angle into the cradle, then
lay it back into place.
The POWER LED indicator of your CLIÉ handheld turns on when
charging starts.
It takes about four hours to charge your CLIÉ handheld fully for the first time.
The POWER LED indicator turns off when charging is complete.
Tip
Subsequent charges will require less time if you charge your CLIÉ handheld
frequently.
Note
If the battery of your CLIÉ handheld is completely discharged, all user data stored
in the internal memory of your CLIÉ handheld will be lost.
Charging your CLIÉ handheld without a cradle
You can charge your CLIÉ handheld using the plug adapter.
Attaching the plug adapter
Connect the AC power adapter to the DC IN connector of the plug adapter (1),
and then connect the plug adapter to the interface connector of your CLIÉ
handheld (2).
Setting up your CLIÉ™ handheld
AC power
adapter
Continued on next page
• • • • • • • • • • • • • • • • • • • • • • • • • • •
9
Page 10
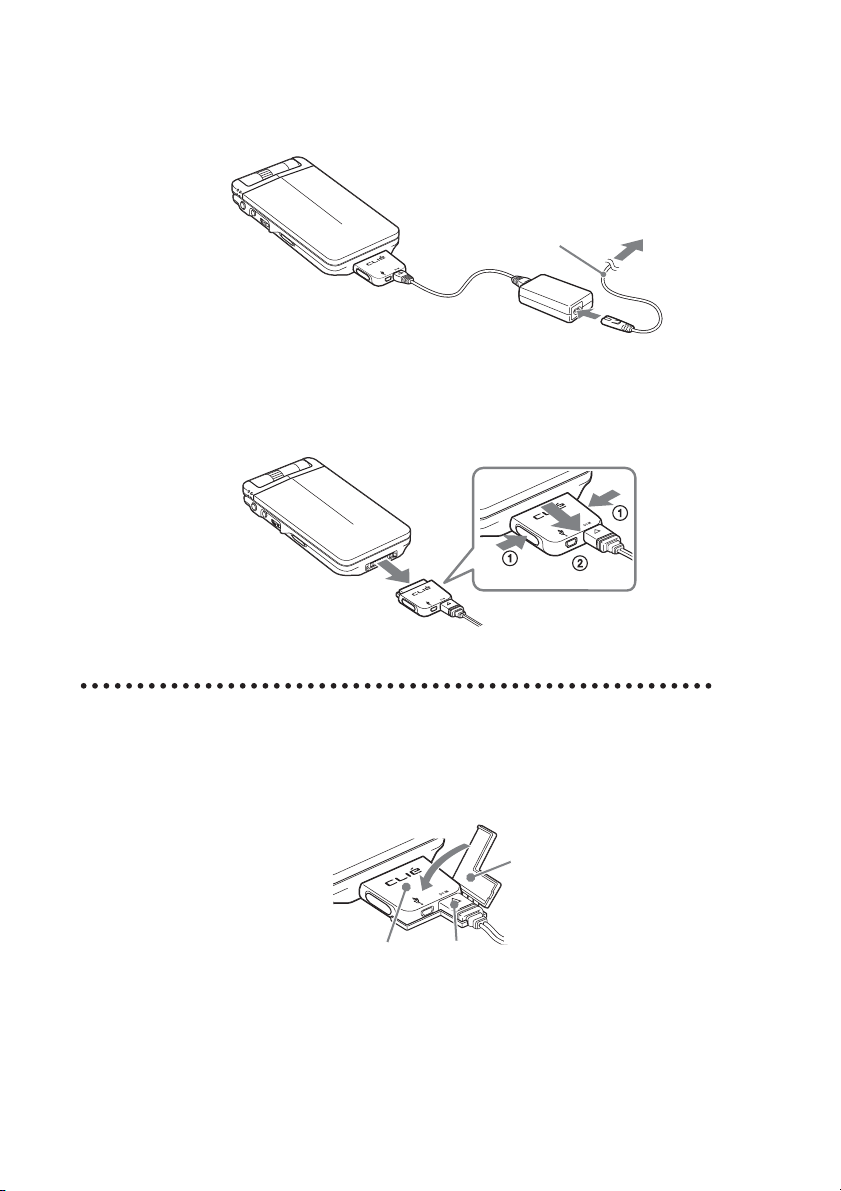
Connect the AC cord to the AC power adapter and then plug the AC cord into
a wall outlet.
To a wall
AC cord
outlet
Removing the plug adapter
Push the release buttons on both sides of the plug adapter (1), and then remove
the plug adapter (2).
Using the supplied plug adapter attachment
Attaching the plug adapter attachment
Refer to the illustration below to attach the supplied plug adapter attachment.
Plug adapter
attachment
Plug adapter
10
AC power
adapter
Page 11
Step 2: Performing the initial setup after
turning on your CLIÉ handheld for
the first time
The first time you turn on your CLIÉ handheld, you are required to make initial
settings. Follow the on-screen instructions to complete the initial setup and to
become familiar with operating your CLIÉ handheld.
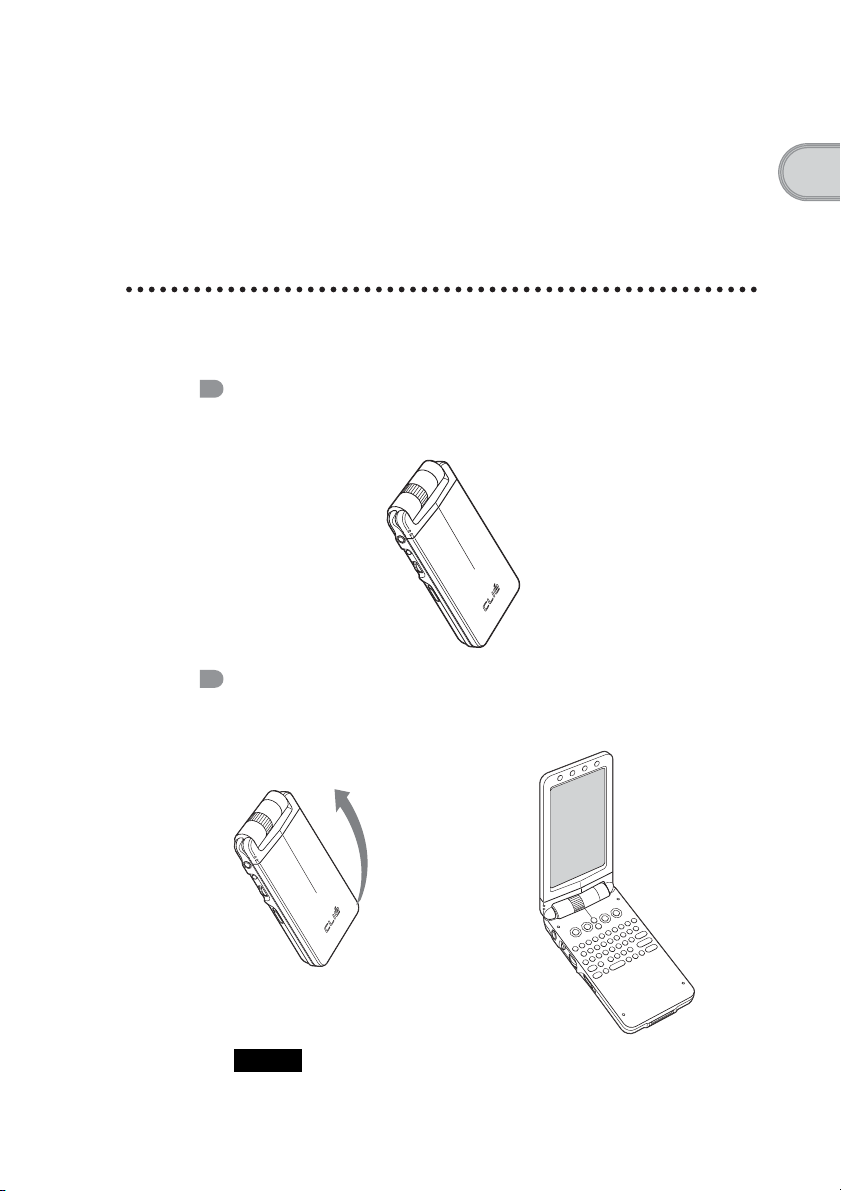
Changing the operating style
You can use your CLIÉ handheld with the display panel set in three different styles.
Carrying style
Put your CLIÉ handheld in the “carrying style” when carrying it in your
bag or pocket to prevent the screen from damage.
Opened style
Put your CLIÉ handheld in the “opened style” when you enter data with
the hardware keyboard.
Setting up your CLIÉ™ handheld
b
Open the display
panel
Note
With some CF cards, you cannot fully open your
CLIÉ handheld.
Continued on next page
• • • • • • • • • • • • • • • • • • • • • • • • • • •
11
Page 12
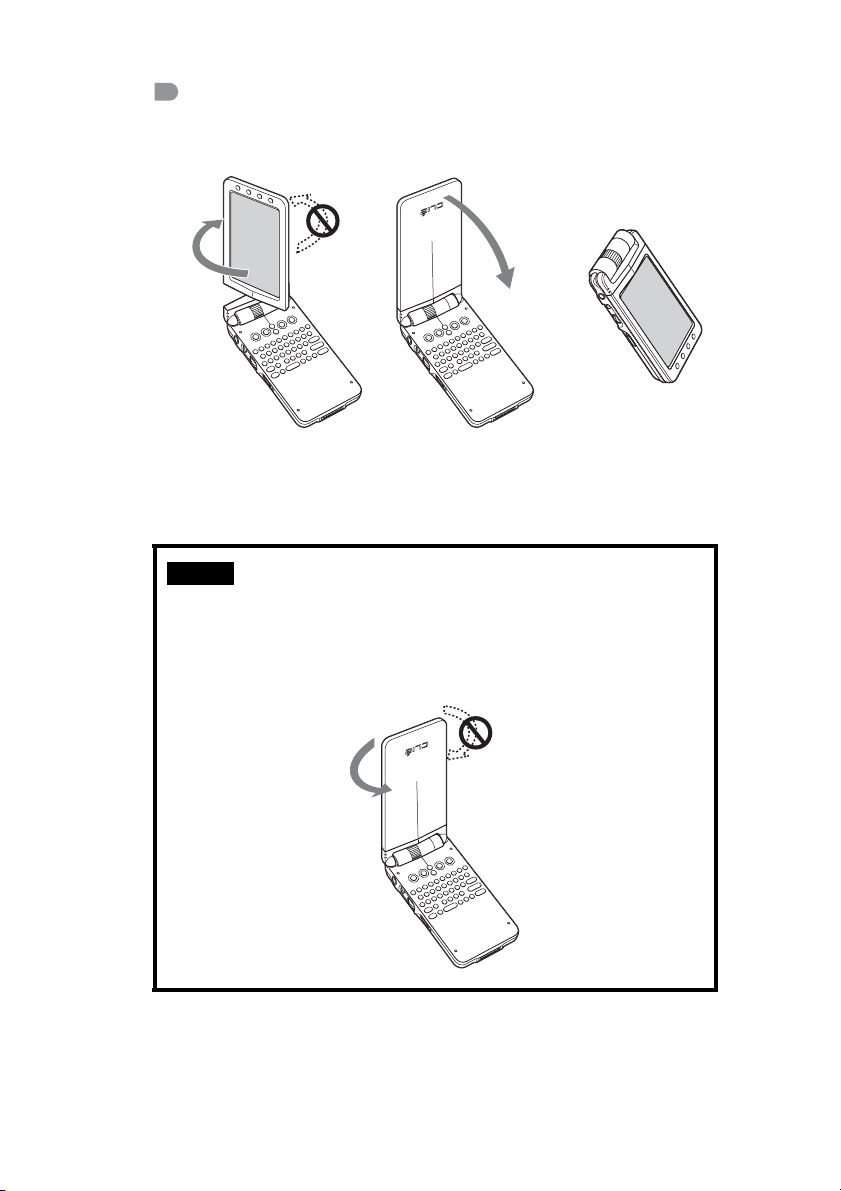
Turned style
Put your CLIÉ handheld in the “turned style” to make it compact when
you operate it with the stylus or use it in camera mode.
bb
Open the display and rotate
it as indicated by the arrow
until it clicks into place
Note
Do not rotate the display panel wrong direction. Do not apply too much force.
Fold the display over the
keyboard
Closing the display panel
Close the display panel by rotating it as indicated by the arrow.
12
Page 13
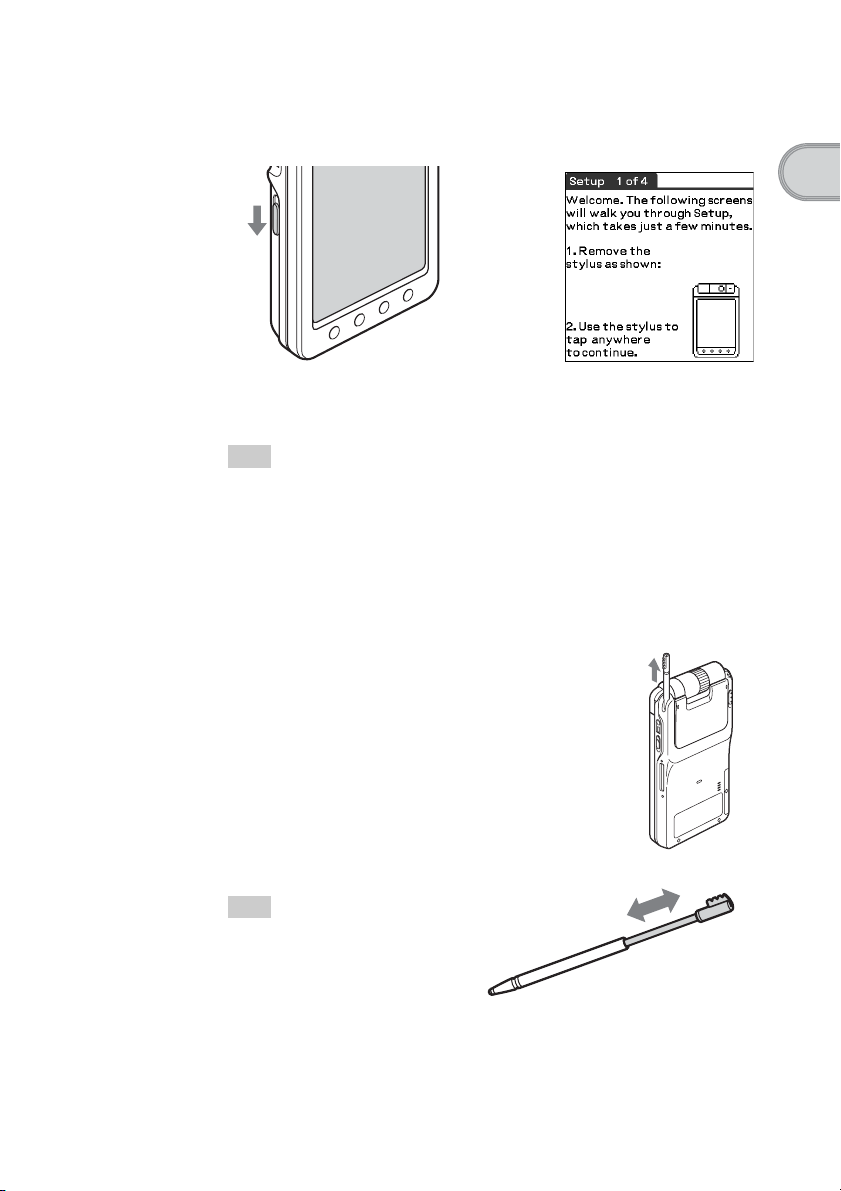
1
Slide down the POWER/HOLD switch.
Your CLIÉ handheld turns on, and the Welcome screen is displayed.
b
Slide down the POWER/HOLD
switch
Tip
If you cannot turn on your CLIÉ handheld
• Did you charge your CLIÉ handheld as described on page 8?
b For more help, refer to the supplied manual “Troubleshooting Q&A.”
• Perform a soft reset if you cannot turn on your CLIÉ handheld even after charging
it (page 31).
2
Take out the stylus.
You can use the stylus to enter
text or to select applications.
Take out the stylus
Setting up your CLIÉ™ handheld
Tip
You can extend the stylus, as shown
in the illustration.
Continued on next page
• • • • • • • • • • • • • • • • • • • • • • • • • • •
13
Page 14

Notes
• Always use the pointed end of the stylus for tapping or making strokes on your
CLIÉ handheld screen. Never use a writing pen, pencil, or other sharp object to
write on the screen.
• When you put the stylus back in its holder, push it in until it clicks into place.
3
Press lightly on the screen with the stylus.
This action is called “tapping.”
The Setup screen for digitizer calibration is displayed.
b
Press lightly on the
screen (Tap)
4
Following the on-screen instructions, tap exactly in the
center of the displayed mark.
Tap the next targets, which are displayed at
the bottom right and then in the center of
the screen.
14
Note
If the digitizer is not configured correctly, the
scroll bar may not operate properly, “tapping”
may not work as expected, or other problems
may occur.
b For details on reconfiguring the digitizer,
refer to “Customizing your CLIÉ™ handheld
(Preferences): Adjusting the Digitizer” in the “Handbook.”
After calibration is complete, a screen for setting the time and date is
displayed.
Page 15
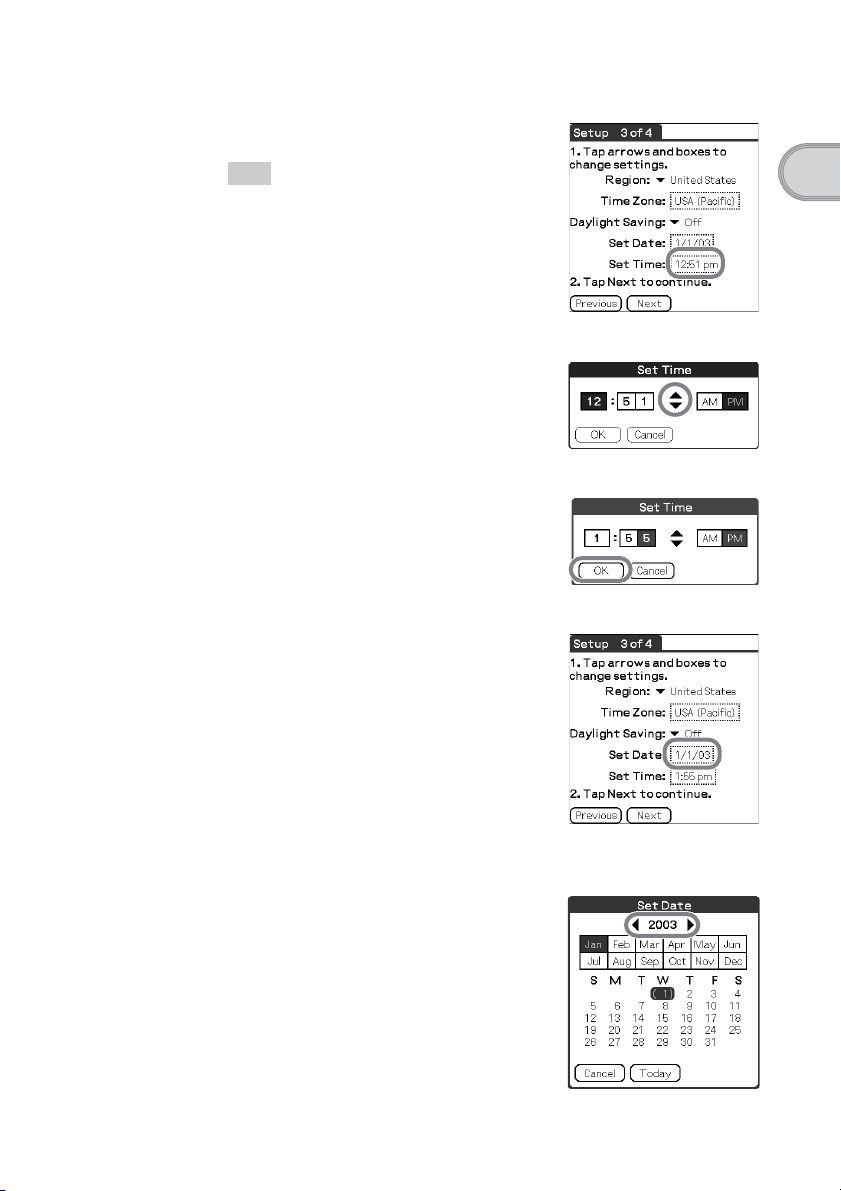
5
Tap the Set Time box.
The Set Time screen is displayed.
Tip
You can reconfigure the date and time settings in
the Preferences screen.
b For details, refer to “Customizing your
CLIÉ™ handheld (Preferences): Setting up
the Date & Time preferences” in the
“Handbook.”
6
Tap the arrow v or V to set the current time.
Tap each box to set the hour and
minute.
7
Tap OK.
The current time is set and the
Setup screen is displayed.
8
Tap the Set Date box.
The Set Date screen is displayed.
Setting up your CLIÉ™ handheld
9
Tap the arrow b or B next to the year to select the current
year.
Continued on next page
• • • • • • • • • • • • • • • • • • • • • • • • • • •
15
Page 16
10
Tap the current month and then tap the current date.
The Set Date screen closes.
11
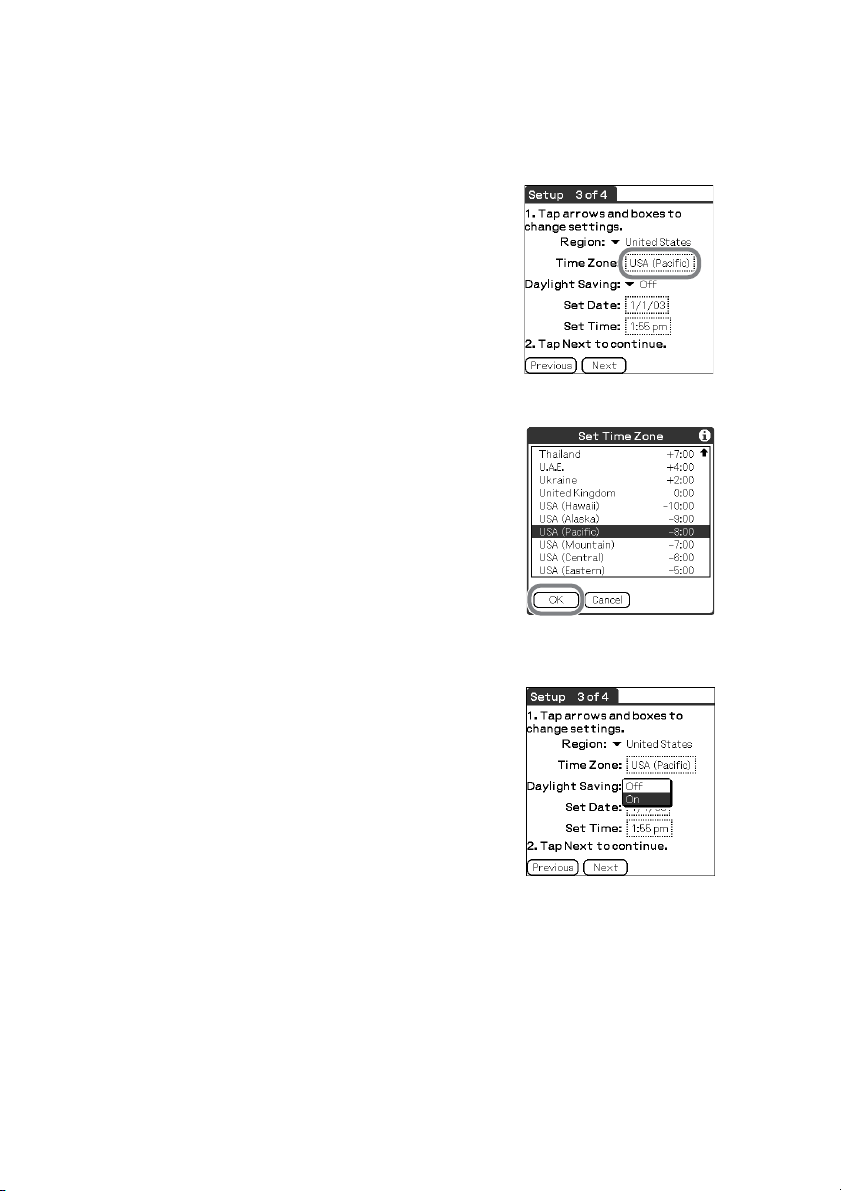
Tap the Time Zone box.
The Set Time Zone screen is displayed.
12
Tap the region to set the time zone and then tap OK.
13
Tap the arrow V next to Daylight Saving and select On or
Off.
16
Page 17
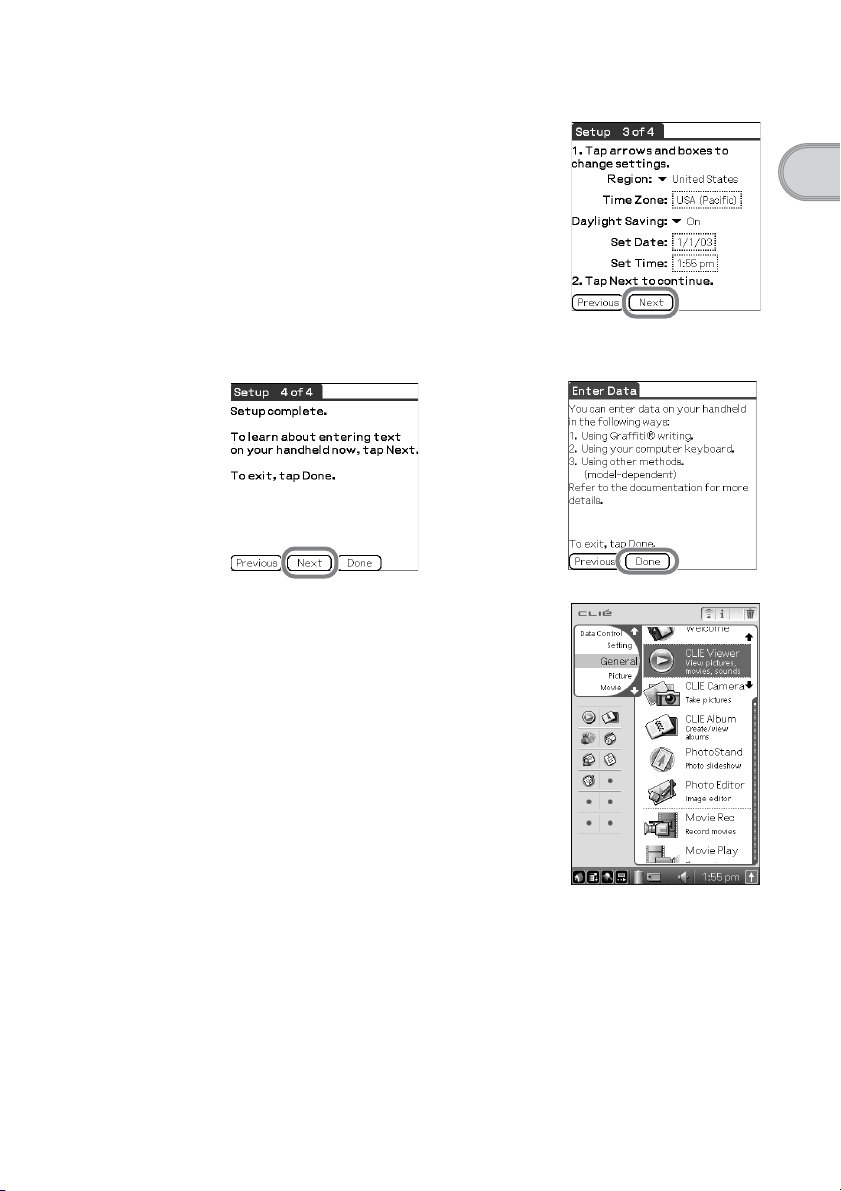
14
Tap Next.
15
Tap Next and Done.
The CLIE Launcher screen is displayed.
Setting up your CLIÉ™ handheld
b
The initial setup is complete!
17
Page 18

Using your CLIÉ™ handheld with your computer
You can perform the following if you use your CLIÉ handheld with your computer.
• Synchronize the latest schedules and addresses, between your CLIÉ
handheld and your computer.
• Save a backup copy of your CLIÉ handheld data on your computer.
• Transfer images and music from your computer to your CLIÉ handheld.
• Learn how to use add-on applications in detail with the “CLIÉ Application
Manual” installed on your computer.
Follow the procedure below prior to using your CLIÉ handheld with your
computer.
Step 1: Installing the software on your computer
Step 2: Connecting the cradle to your computer
Step 3: Entering a user name for your CLIÉ handheld
Step 1: Installing the software on your
computer
Do not connect the supplied cradle to your computer
before installing the software. Otherwise, the
software may not be installed properly.
18
The Palm™ Desktop for CLIÉ software stored on the supplied Installation CDROM must be installed on your computer. The software is used for data
transfer between your CLIÉ handheld and computer, and handling data such as
Address Book on your computer.
b For details of the required computer specifications, refer to “System requirements” on
page 91.
Page 19

Notes
• Do not simply copy the Palm™ Desktop for CLIÉ folder from the supplied
Installation CD-ROM to your computer. To install the software properly, follow the
installation procedure described in this manual.
• If you use Windows 2000 Professional or Windows XP, log on with a User Name in
the Administrators group before installing the software.
• If you have more than one CLIÉ handheld and the old version of Palm™ Desktop for
CLIÉ software has already been installed on your computer, follow the procedure
below to upgrade to the new version.
* If you are using PEG-N710C Series or PEG-S300 Series, refer to your CLIÉ
handheld support website. (Refer to the URL shown on the back cover of this
manual.)
b For details, refer to “Transferring data from another CLIÉ™ handheld” in the
“Handbook.”
1
Quit all applications running in Windows®.
2
Insert the supplied Installation CD-ROM into the CD-ROM
drive of your computer.
The Installation Launcher window is displayed.
3
Click the Install button for the Palm™ Desktop for CLIÉ
software.
The setup program starts and the InstallShield Wizard window is
displayed.
4
Click Next.
The Select Synchronization Application window is displayed.
5
Select the software you will use to synchronize your CLIÉ
handheld with your computer.
If you select Synchronize with Palm Desktop for CLIÉ, Intellisync
Lite will not be installed. If you select Synchronize with Microsoft
Outlook or Lotus Organizer, both the Palm™ Desktop for CLIÉ
software and Intellisync Lite will be installed.
Setting up your CLIÉ™ handheld
6
Click Next.
The Setup Type window is displayed.
7
Select the setup type (Complete or Custom) and the
destination folder (if you select Custom).
Continued on next page
• • • • • • • • • • • • • • • • • • • • • • • • • • •
19
Page 20

8
Click Next.
The Create User Account window is displayed.
9
Enter a user name in the Create User Account window.
You can enter any user name you prefer.
Note
If you have more than one CLIÉ handheld
Enter a user name that is different from the one you use for another CLIÉ handheld.
If you set an identical user name to multiple CLIÉ handhelds, errors may occur.
Tip
When you transfer data between CLIÉ handhelds
Refer to “Transferring data from another CLIÉ™ handheld” in the “Handbook.”
10
Click Next.
The Connections window is displayed.
11
Select USB or Serial Port, depending on how you want to
connect your CLIÉ handheld to your computer.
12
Click Next.
The Ready to Install the Program window is displayed.
13
Click Install.
The Palm™ Desktop for CLIÉ software installation starts.
20
14
Click Finish.
Installation of the Palm™ Desktop for CLIÉ software on
your computer is complete.
Page 21
Step 2: Connecting the cradle to your
computer
When you have completed the Palm™ Desktop for CLIÉ software installation,
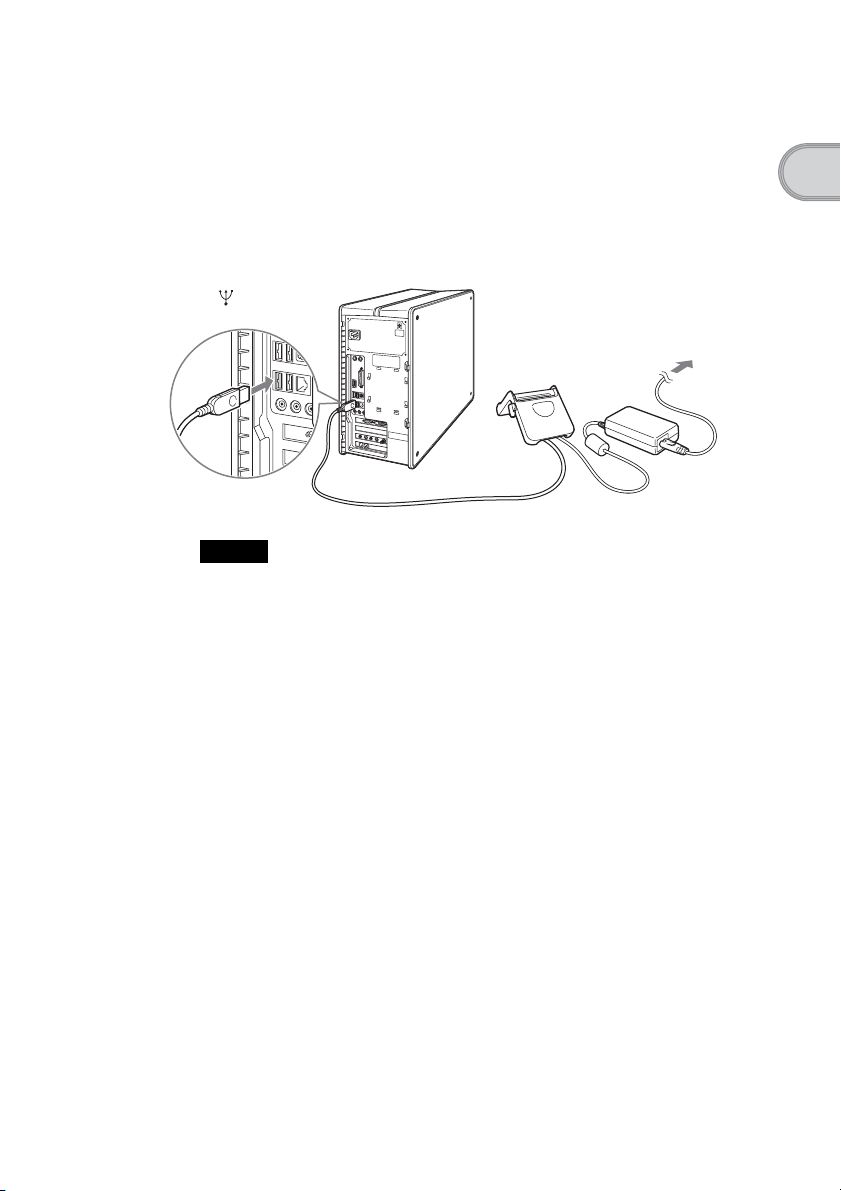
connect the cradle to a USB port of your computer.
Connect the cradle to your computer
Setting up your CLIÉ™ handheld
To a USB port
of your computer
Note
Be sure to connect the cradle directly to a USB port of your computer. If the cradle is
connected to a computer via another device, such as a USB hub, the HotSync
may not perform correctly.
To a wall
outlet
®
operation
21
Page 22
Step 3: Entering a user name for your CLIÉ
handheld
1
Place your CLIÉ handheld in the cradle.
2
Press the HotSync button on the cradle.
Press the HotSync button
22
3
Click OK on the Users dialog box.
A beep sounds and the HotSync® operation starts.
Your user name, entered in the Palm™ Desktop for CLIÉ software
installation window, is registered on your CLIÉ handheld.
When the setup is complete, “HotSync operation complete.” will be
displayed on your CLIÉ handheld.
4
Click OK on the computer window.
Setup is complete!
Page 23
Synchronizing data between your CLIÉ handheld
and computer (HotSync
®
)
What is the HotSync® operation?
The HotSync® operation is a one-step operation that allows you to synchronize
data between your CLIÉ handheld and your computer, back up the data of your
CLIÉ handheld to your computer, and install add-on applications.
b For details, refer to “Exchanging and updating files/data using the HotSync
operation (Other HotSync
®
operations)” in the “Handbook.”
Performing the HotSync® operation
The following procedure explains how to synchronize data between your CLIÉ
handheld and computer, using Date Book as an example.
1
Turn on the computer.
2
Refer to the procedure on page 48 and enter schedules in
Date Book.
3
Place your CLIÉ handheld in the cradle.
Setting up your CLIÉ™ handheld
®
Continued on next page
• • • • • • • • • • • • • • • • • • • • • • • • • • •
23
Page 24

4
Press the HotSync button on the cradle.
The HotSync® operation between your CLIÉ handheld and computer
starts.
Press the HotSync button
When the HotSync
displayed.
5
Double-click the Palm™ Desktop for CLIÉ icon on the
®
operation is complete, the following screen is
Windows desktop.
You can also click Start, select Programs (for
Windows XP, select All Programs), Sony
handheld, and click Palm Desktop for
CLIÉ to start the application. The Palm™
Desktop for CLIÉ software starts and the Date
Book window is displayed. If you select the
same date you entered in step 2, you will see
that schedule.
24
Page 25

To access other information screens (Address Book,
To Do List and Memo Pad)
Click each icon at the left side of the screen.
Making a backup is recommended
If problems occur, even those requiring a hard reset, you can restore your CLIÉ
handheld to the same state as it was at the last HotSync
You cannot back up some applications installed later or some data created with
such applications.
®
operation.
b For details, refer to “Making a backup of the data on your CLIÉ handheld” on page 80.
Setting up your CLIÉ™ handheld
25
Page 26

Basic operations of your CLIÉ™ handheld
This chapter explains how to start an application, enter text and perform a reset.
Starting an application
To work with your CLIÉ handheld, you need to start applications.
The following explains the basic operations to start an application.
Displaying the CLIE Launcher screen
1
Selecting an application
2
Quitting the application
3
The following shows how to start applications from the CLIE Launcher
screen using the Jog Dial™ navigator.
Using the Jog Dial™ navigator and the BACK button
1 Displaying the CLIE Launcher screen
1
Tap the Home icon.
The CLIE Launcher screen is displayed.
26
Page 27
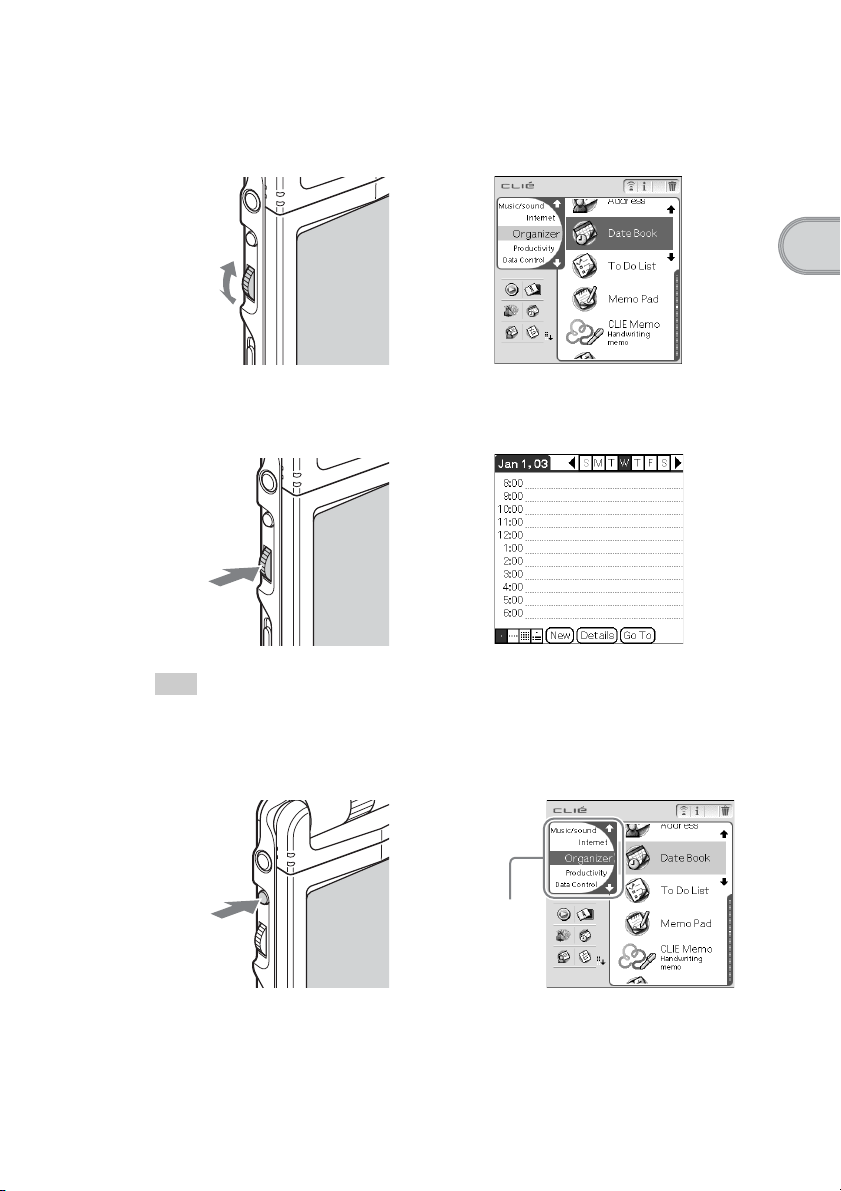
2 Selecting an application
1
Rotate the Jog Dial™ navigator to select an application to start.
Rotate
up and
down
2
Press the Jog Dial™ navigator.
The selected application starts.
b
M
Move up
and down
m
Basic operations of your CLIÉ™ handheld
Press
Tip
To select each group
The group list is highlighted in the CLIE Launcher screen when you press the BACK button.
You can also select an application by selecting the group first while rotating the Jog Dial™
navigator.
Press
b
b
The
group
list
Continued on next page
• • • • • • • • • • • • • • • • • • • • • • • • • • •
27
Page 28
3 Quitting the application
You do not need to save data manually on your CLIÉ handheld as you do with
the computer.
All the changes in the application that you are working on are automatically saved,
and the last screen you worked on is displayed when you restart the application.
Display the CLIE Launcher screen to switch to another application while you
are working on an application. You can select either of the following methods
to display the CLIE Launcher screen.
Return to the CLIE Launcher screen by tapping
the Home icon.
Return to the CLIE Launcher screen by pressing
and holding the BACK button.
Tip
You can switch an application to another application by pressing the Application button
(page 29).
Note
For some applications, you need to save data manually.
b For details, refer to the “CLIÉ Application Manual” installed on your computer.
Other ways to start an application
You can also start an application with the supplied stylus or application buttons.
Using the stylus
Start the application by pressing the screen directly with the supplied stylus.
1
Tap the Mm on the CLIE Launcher screen to display the
application you want to start.
28
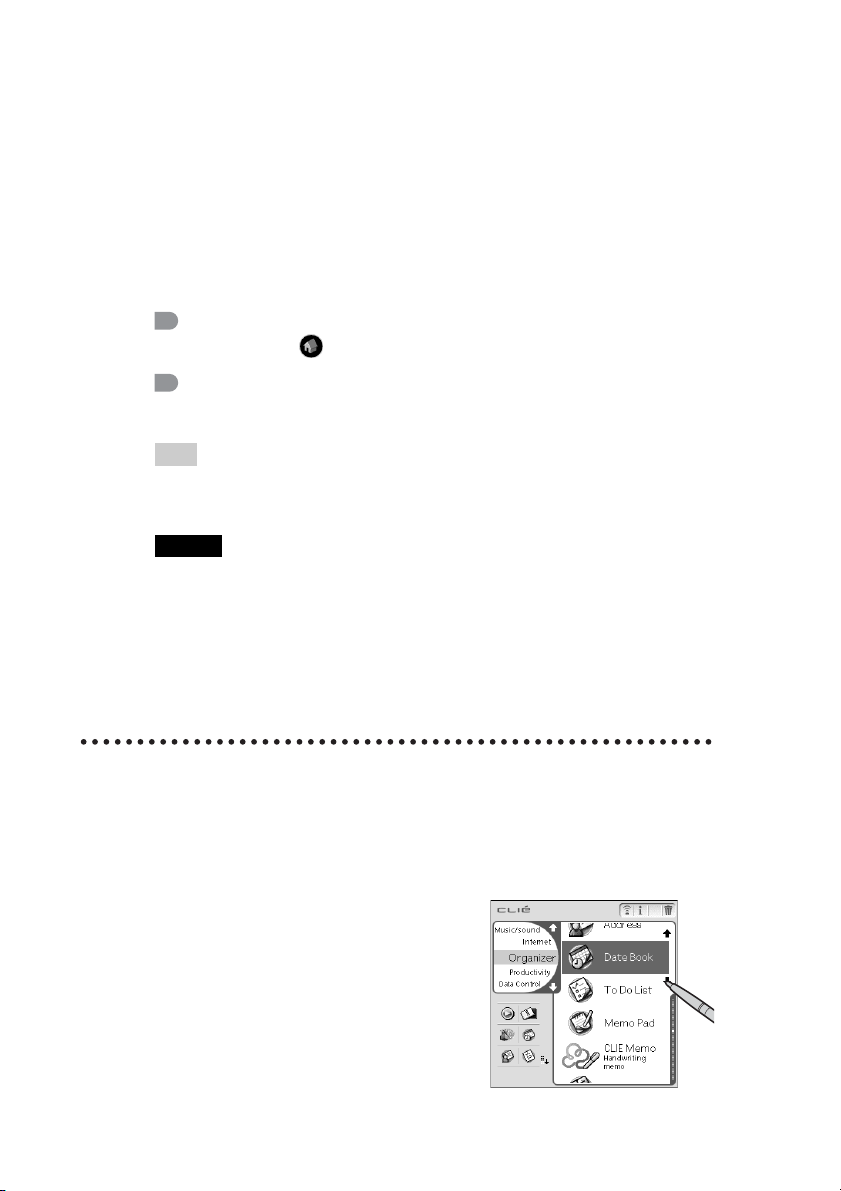
Page 29
2
Tap the application icon.
The selected application starts.
Pressing the application buttons
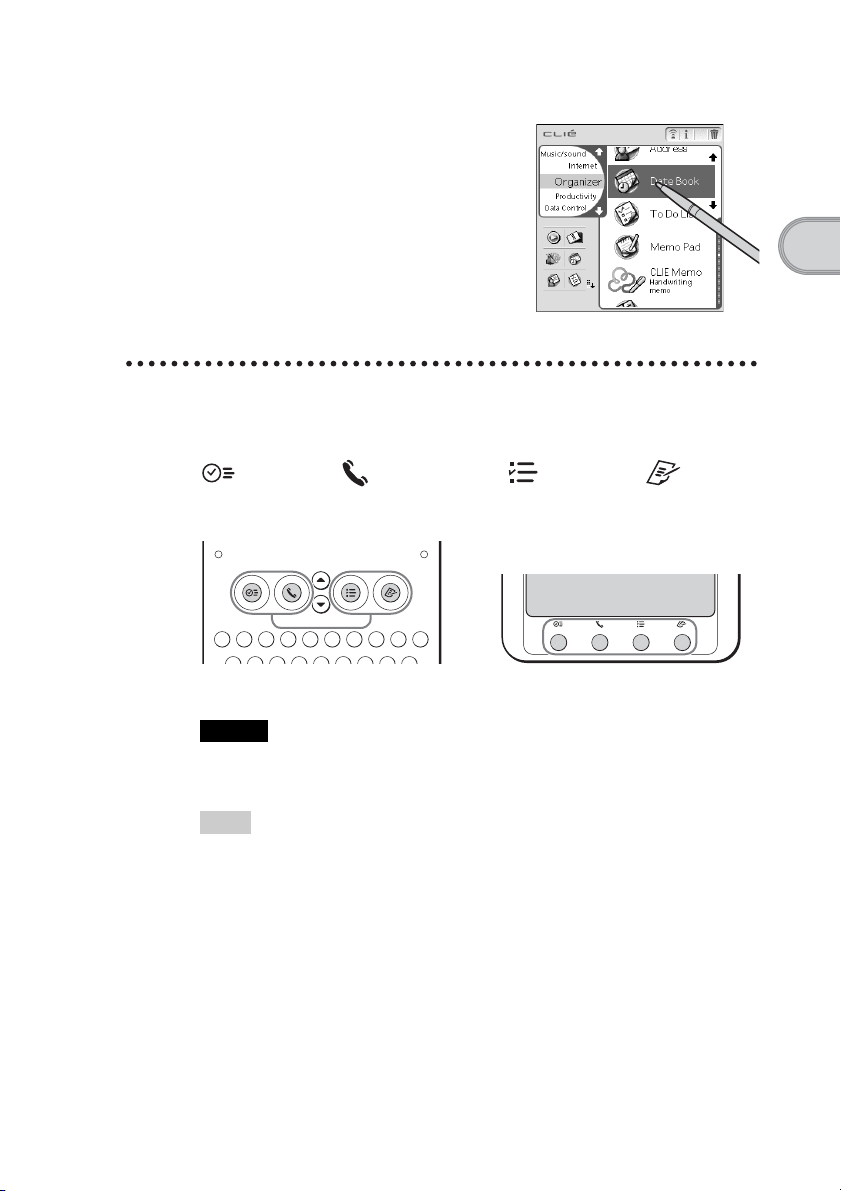
You can also start the applications by pressing the application buttons.
The default setting of the application buttons are:
Date Book, Address Book, To Do List, Memo
Pad
Basic operations of your CLIÉ™ handheld
Hardware keyboard side Display panel side
Note
The application buttons on the display panel side are used only when your CLIÉ
handheld is in the “turned style” (page 12).
Tips
• Even when your CLIÉ handheld is off, you can start an application by pressing one of
the application buttons.
• You can assign your favorite applications to the application buttons.
b For details, refer to “Customizing your CLIÉ™ handheld (Preferences): Assigning
applications to application buttons” in the “Handbook.”
29
Page 30

Entering text
There are six ways to enter text into your CLIÉ handheld. You can use whichever is the
most comfortable for you.
z Hardware keyboard (page 99)
You can enter text using the hardware keyboard in the same way as your
computer’s keyboard. This is useful when you want to enter lots of text.
z Handwritten input system
There are two ways of using the handwritten input system.
b For details, refer to “Entering text on your CLIÉ™ handheld” in the “Handbook.”
Graffiti® writing
You can enter text using an exclusive input system called Graffiti® writing.
Decuma Input
Decuma Input converts your handwritten into typed text and you can use this
to input text with any application. Simply write in the input area in the lower
part of the screen. The interpretation of your handwritten appears in the same
place as you wrote.
z On-screen keyboard
You can enter text by tapping the keyboard that appears on the screen.
b For details, refer to “Entering text on your CLIÉ™ handheld: Using the on-screen
keyboard to enter text” in the “Handbook.”
30
z Software keyboard (page 106)
Operating the software keyboard is the same as the on-screen keyboard,
however, you can use the applications without minimizing the current
screen.
z HotSync® operation with a computer
You can enter text using your computer keyboard and then perform the
HotSync
CLIÉ handheld by the HotSync
CLIÉ software.
®
operation. The text data is transferred from your computer to your
®
operation using the Palm™ Desktop for
b For details, refer to the Help menu in the Palm™ Desktop for CLIÉ software.
Page 31

Restarting your CLIÉ handheld
Normally, you do not need to reset your CLIÉ handheld. However, should your CLIÉ
handheld not turn on or not respond, you can perform a soft reset to solve the problem.
Follow the procedure below to reset your CLIÉ handheld.
Performing a soft reset
All records and entries stored on your CLIÉ handheld are retained even after
performing a soft reset.
Use the stylus to gently press the RESET button.
The system shuts down and then restarts.
After restarting, the system displays “palm
POWERED,” “CLIÉ,” and “SONY,”
followed by the Preferences screen for
setting up the time and date.
Basic operations of your CLIÉ™ handheld
Notes
• After the RESET button is pressed, it takes a while before the Preferences
screen is displayed. Be sure not to press the RESET button again while resetting.
• Do not press the RESET button with anything other than the stylus. It may cause
a malfunction.
31
Page 32

Performing a hard reset
If the soft reset does not solve the problem, you will need to perform a hard
reset to restart your CLIÉ handheld.
Notes
• All records and add-on applications stored on your CLIÉ handheld
will be erased by performing a hard reset.
• Perform a hard reset only if a soft reset does not solve your problem.
You can restore your CLIÉ handheld data if you have made a backup on your
computer.
b For details, refer to “Backing up your CLIÉ™ handheld data and applications” in
the “Handbook.”
1
Slide down and hold the POWER/HOLD switch.
2
Press the RESET button gently with the stylus, and then
release the stylus.
Note
Keep the POWER/HOLD switch held down.
32
3
Three seconds after the palm POWERED screen is
displayed, release the POWER/HOLD switch.
A message warning that you are about to erase all the data stored on your
CLIÉ handheld is displayed.
Page 33

4
Press the v button.
Press the v button
A hard reset is performed on your CLIÉ handheld.
After restarting, the system displays “palm POWERED,” “CLIÉ,” and
“SONY,” followed by the Welcome screen. Refer to “Step 2: Performing the
initial setup after turning on your CLIÉ handheld for the first time” on page 11.
After a hard reset, only the current date and time are retained. Formats,
Preferences, and other controls, revert to the factory settings.
Notes
• After the RESET button is pressed, it takes a while before the Welcome screen is
displayed. Be sure not to press the RESET button again while resetting.
• If the scroll button is not pressed for long enough, the hard reset might not be
performed.
Basic operations of your CLIÉ™ handheld
33
Page 34

Have a try
Enjoying image files
You can take and view pictures using your CLIÉ handheld as a digital still
camera.
• Application to be used:
– Taking pictures: CLIE Camera
– Viewing image files: CLIE Viewer
b For details, refer to “Still images” in the “CLIÉ Application Manual” installed on your
computer.
Taking pictures
1
Press the CAPTURE button to start CLIE Camera.
34
Tip
You can tap the CLIE Camera icon in
the CLIE Launcher screen to start CLIE
Camera.
2
Point the built-in camera directly at the subject, by
rotating the camera lens.
Page 35

3
Position the subject in the viewfinder and press the
CAPTURE button.
A picture is taken.
Note
By taking pictures, hold your CLIÉ
handheld fiemly with both hand s and press
the CAPTURE button slowly. After the
CAPTURE button is pressed when the
viewfinder blacks out, your CLIÉ
handheld captures an image. At this
moment, do not move your CLIÉ
handheld, otherwise the picture will be
blurred. Since shutter speed is slow when
using CAPTURE light or slow shutter, be
careful not to move your CLIÉ handheld.
Tip
You can tap the CAPTURE icon on the CLIE Camera screen to take a picture.
Taking pictures with the ND (Neutral Density) FILTER (PEG-NX80V only)
When you take pictures in very bright sunlight (such as the beach or a skiing
ground,) turn the ND FILTER on. The ND FILTER will prevent over exposure,
and improve contrast and detail of the picture.
Have a try
1
Turn the ND FILTER switch to the front by rotating the
camera lens.
Continued on next page
• • • • • • • • • • • • • • • • • • • • • • • • • • •
35
Page 36

2
Slide the ND FILTER switch to the ON.
3
Take pictures as outlined in step 1 to step 3 of "Taking
pictures" on page 34.
4
Slide the ND FILTER switch to the OFF.
Note
The brightness of the screen may change suddenly if the ND FILTER is used. This is not
a malfunction.
Viewing image files
You can view image files in CLIE Viewer.
b For details, refer to “Viewing handwritten memos and image files, and playing back
voice memos” on page 44.
Tip
You can tap the icon on the CLIE Camera screen to start CLIE Viewer.
36
Page 37

Enjoying image files
Getting Ready
Taking pictures
CLIE Camera................................................................................page 66
Importing image files from your computer
Image Converter...........................................................................page 68
Viewing/Selecting
Viewing/Selecting image files by searching
from the list
CLIE Viewer ................................................................................page 66
Utilizing features
Organizing image files in albums
CLIE Album.................................................................................page 66
Exporting image files to your computer
PictureGear Studio.......................................................................page 68
Displaying image files one after the other
PhotoStand ...................................................................................page 67
Editing image files
Photo Editor..................................................................................page 67
Attaching image files to the address
Address Book...............................................................................page 73
Sending image files with e-mail messages
CLIE Mail ....................................................................................page 73
Uploading image files to “Sony Style Imaging”
Image Upload Utility*..................................................................page 67
Have a try
Transferring image files to your computer
Data Import ..................................................................................page 78
* Only supported areas
“Sony Style Imaging” is supported only for customers in Europe as of June, 2003.
37
Page 38

Enjoying movies
You can record movies using your CLIÉ handheld as digital video camera.
Your movies are saved on “Memory Stick” media.
• Application to be used:
– Recording movies: Movie Recorder
– Viewing movies: Movie Player, CLIE Viewer
• Required media: “Memory Stick” media
b For details, refer to “Movies” in the “CLIÉ Application Manual” installed on your
computer.
Recording movies
1
Insert “Memory Stick” media into your CLIÉ handheld.
For details on “Memory Stick”
b
media, refer to “Using “Memory
Stick” media” on page 96.
38
2
Select Movie Rec icon in the CLIE Launcher screen to
start Movie Recorder.
Page 39

3
Point the built-in camera directly at the subject, by
rotating the camera lens.
4
Position the subject in the viewfinder and press the
CAPTURE button.
Start recording the movie.
Tip
You can tap the REC icon on the Movie
Recorder screen to record.
5
Press the CAPTURE button once again to stop recording.
Recording movies with the ND (Neutral Density) FILTER (PEG-NX80V only)
Have a try
When you take pictures in very bright sunlight (such as the beach or a skiing
ground,) turn the ND FILTER on. The ND FILTER will prevent over exposure,
and improve contrast and detail of the picture.
1
Turn the ND FILTER switch to the front by rotating the
camera lens.
Continued on next page
• • • • • • • • • • • • • • • • • • • • • • • • • • •
39
Page 40

2
Slide the ND FILTER switch to the ON.
3
Record movies as outlined in step 1 to step 4 of
"Recording movies" on page 38.
4
Slide the ND FILTER switch to the OFF.
Notes
• If the ND FILTER is switched during recording, a picture may be confused or noise
may mix with a sound.
• The brightness of the screen may change suddenly if the ND FILTER is used. This is
not a malfunction.
Viewing movies
You can view movies in CLIE Viewer.
b For details, refer to “Viewing handwritten memos and image files, and playing back
voice memos” on page 44.
40
Page 41

Enjoying movies
Getting Ready
Recording movies
Movie Recorder............................................................................page 69
Importing movie files from your computer
Image Converter...........................................................................page 68
Giga Pocket Plugin.......................................................................page 70
Viewing/Selecting
Viewing/Selecting movies by searching from
the list
CLIE Viewer ................................................................................page 66
Playing back movies
Movie Player................................................................................page 69
Sending
Sending movies with e-mail messages
CLIE Mail ....................................................................................page 73
Have a try
41
Page 42

Recording a voice memo (Voice Recorder)
You can record sounds using the built-in microphone of your CLIÉ handheld.
You can also use the voice memo as an alarm sound or attach it to an e-mail.
• Application to be used:
– Recording a voice memo: Voice Recorder
– Playing back a voice memo: Voice Recorder, CLIE Viewer
b For details, refer to “Voice Recorder” in the “CLIÉ Application Manual” installed on
your computer.
Recording a voice memo
1
Select the Voice Rec icon in the CLIE Launcher
screen to start Voice Recorder.
b
42
2
Slide down the VOICE REC switch.
The recording starts.
Speak into the built-in microphone.
Tips
• As soon as you slide
down the VOICE REC
switch, Voice
Recorder is activated
and recording starts.
• There are two modes of
recording for voice
memo, High (to record at
meetings or in a quiet
and/or spacious place)
and Low (to record dictation or in a noisy place).
b For details, refer to “Voice Recorder” in the “CLIÉ Application Manual” installed
on your computer.
REC LED
Lights when
recording.
VOICE REC switch
Slide down the switch.
Built-in
microphone
Page 43

3
Slide down the VOICE REC switch once again to stop
recording.
Playing back a voice memo
You can play back a voice memo using Voice Recorder or CLIE Viewer.
b For details about Voice Recorder, refer to “Voice Recorder” in the “CLIÉ
Application Manual” installed on your computer.
b For details about CLIE Viewer, refer to “Viewing handwritten memos and image
files, and playing back voice memos” on page 44.
Have a try
43
Page 44

Viewing handwritten memos and image files, and playing back voice memos
You can use CLIE Viewer to view handwritten memos, image files, or movie
files and play back the voice memos saved on your CLIÉ handheld or “Memory
Stick” media. Different kinds of file are displayed in date order. This makes it
easier to find the file you want to display or play back.
You can also attach image files or movie files to your message, or select data to use
with applications, such as PhotoStand, CLIE Album or Photo Editor.
• Application to be used: CLIE Viewer
• Data to be used:
– Image files: JPEG (DCF) format, PictureGear Pocket format
– Movie files: Movie Player format, MPEG Movie format
– Handwritten memos
– Voice memos
b For details on the file format you can play back or view with your CLIÉ handheld, refer
to “CLIE Viewer” in the “CLIÉ Application Manual” installed on your computer.
Opening/Playing back files
1
Select the CLIE Viewer icon in the CLIE Launcher
screen to start CLIE Viewer.
The file list screen is displayed.
44
b
Tip
You can tap the CLIE Viewer icon on the CLIE Camera screen to start.
2
Rotate the Jog Dial™ navigator to select the file you want
to display and press the Jog Dial™ navigator.
The selected file is displayed or played back.
Tips
• You can also tap the file icon to display or play back the file.
• The files are listed in order of creation date and time.
Page 45

Selecting/Deleting files
You can select a file from the list screen in CLIE Viewer to attach image files
or movie files of your CLIÉ handheld or “Memory Stick” media to e-mails, to
use the image files in PhotoStand (page 67), CLIE Album (page 66) and
Photo Editor (page 67), or to delete files.
1
Start CLIE Viewer.
2
Tap a command button to choose a function.
: The selected file will be attached to
an e-mail
: The selected image file will be used
in PhotoStand
: The selected image file will be
uploaded to “Sony Style Imaging”*
You need to install Image Upload
Utility on your CLIÉ handheld.
b For details, refer to “Image Upload Utility” in the “CLIÉ Application
Manual” installed on your computer.
* Only supported areas
“Sony Style Imaging” is supported only for customers in Europe as
of June, 2003.
: The selected file will be deleted
: Choose other applications such as Photo Editor or CLIE Album by
using the pull-down menu
Have a try
3
Tap to select the check box of the file.
Tip
Tap Select All to select all the files.
4
Tap OK.
The function chosen in step 2 is executed.
45
Page 46

Listening to music
You can listen to music on your CLIÉ handheld by transferring music files
from your computer to the “Memory Stick” media inserted into your CLIÉ
handheld.
• Application to be used:
– Transfer music file in ATRAC3 format: Audio Player, SonicStage
(for PC)
– Transfer music file in MP3 format: Data Import, Data Export (for PC)
– Play back music file on your CLIÉ handheld: Audio Player
• Required accessories and media: Audio remote control and
headphones (supplied), “Memory Stick” media
• Data to be used: ATRAC3, MP3
• Setup:
1 You need to connect your CLIÉ handheld to your computer.
b For details, refer to “Using your CLIÉ™ handheld with your computer” on page 18.
2 You need to install SonicStage, Data Export on your computer.
b For details, refer to “Installing applications on your CLIÉ handheld” on page 64.
b For details, refer to “Music” in the “CLIÉ Application Manual” installed on your
computer.
Transferring music files to your CLIÉ handheld
You can transfer music files using SonicStage or Data Export from your
computer to your CLIÉ handheld.
46
Page 47

Playing back music data
1
Connect the supplied audio remote control and
headphones to your CLIÉ handheld.
2
Select the AudioPlayer icon in the CLIE Launcher
screen to start Audio Player.
Have a try
3
Tap the playback button to play music.
Tap the stop button to stop the
music.
Tip
You can use the audio remote control to play
music.
Playback
button
Stop
button
47
Page 48

Managing schedules (Date Book)
You can save the date and times of your schedules.
You can efficiently manage your schedules, such as conferences or business
trips.
• Application to be used: Date Book
b For details, refer to “Date Book” in the “CLIÉ Application Manual” installed on your
computer.
Entering a schedule
1
Press the button on the display panel to start Date
Book.
48
2
Tap New and set the start time and end time of the
schedule.
1 Tap to set the start time.
2 Tap to set the end time.
3 Tap to select “hour.”
4 Tap to select “minute.”
5 Tap to confirm the settings.
Page 49

3
Enter a schedule.
Tip
b For details on entering text, refer to “Entering
text on your CLIÉ™ handheld” in the
“Handbook.”
Deleting a schedule
1
Tap a schedule you want to delete and tap the Menu
icon.
The menu screen is displayed.
2
Tap Delete Event... from the Record menu.
The confirmation message is displayed.
3
Tap OK.
Tip
The deleted data from your CLIÉ handheld will be saved on your computer the next
time you synchronize your CLIÉ handheld with your computer.
To view the saved data on your computer, open the Palm™ Desktop for CLIÉ
software, and select Open Archive... in the File menu of the Date Book screen.
Have a try
49
Page 50

Managing addresses and telephone numbers (Address Book)
You can register information such as names, addresses, telephone numbers and
an image attachment.
You can select your own Address Book record to be set as Name Card.
You can send the Address Book record to another CLIÉ handheld or Palm OS
compatible device by beaming.
• Application to be used: Address Book
b For details, refer to “Address Book” in the “CLIÉ Application Manual” installed on
your computer.
Entering a new address
1
Press the button on the display panel to start Address
Book.
2
Tap New.
The Address Edit screen is displayed.
®
50
3
Tap each item to enter details.
Tip
You can scroll the screen by tapping the v/V
button at the bottom right.
Page 51

Deleting an address entry
1
Tap the address you want to delete and tap the Menu
icon.
The menu screen is displayed.
2
Tap Delete Address... from the Record menu.
The confirmation message is displayed.
3
Tap OK.
Tip
The deleted data from your CLIÉ handheld will be saved on your computer the next
time you synchronize your CLIÉ handheld with your computer.
To view the saved data on your computer, open the Palm™ Desktop for CLIÉ
software, and select Open Archive... in the File menu of the Address Book
screen.
Have a try
Continued on next page
• • • • • • • • • • • • • • • • • • • • • • • • • • •
51
Page 52

Exchanging Date Book and Address Book data between your CLIÉ handheld and computer
The HotSync® operation (page 23) enables you to exchange Date Book data
and the Address Book data between your CLIÉ handheld and computer.
Depending on the softwares on your computer, there are two ways to exchange
data.
Exchanging data between your CLIÉ handheld and the Palm™ Desktop for CLIÉ software on your computer
You can synchronize data between Date Book or Address Book managed
by the Palm™ Desktop for CLIÉ software on your computer, and your CLIÉ
handheld.
• Setup: You need to install the Palm™ Desktop for CLIÉ software on your
computer.
b For details on how to exchange data with the Palm™ Desktop for CLIÉ software, refer
to “Synchronizing data between your CLIÉ handheld and computer (HotSync
page 23.
Exchanging data between your CLIÉ
handheld and Microsoft
(Intellisync
• Setup: You need to install Intellisync Lite on your computer.
b For details on how to install, refer to “Installing applications on your CLIÉ handheld”
on page 64.
Tip
Intellisync Lite can be installed with the “Using your CLIÉ handheld” option of the
installer menu screen.
b For details on how to start and set up, refer to the help text of Intellisync Lite.
To view the help text, click Start, select Programs (for Windows XP, select All
Programs), Intellisync Lite, and click Intellisync Help.
52
®
Lite) on your computer
®
Outlook
®
)” on
Page 53

Viewing computer documents on your CLIÉ handheld (Picsel Viewer for CLIE)
You can view documents created in Microsoft® Word/Excel/PowerPoint® or
PDF files on your CLIÉ handheld.
• Application to be used: Picsel Viewer for CLIE, Data Import and
Data Export (for PC)
• Required media: Storage media (“Memory Stick” media or
CompactFlash compatible memory card)
• Data to be used: doc format, xls format, ppt format, txt format, JPEG
format, GIF format, PNG format, BMP format, PDF format, HTML format
• Setup:
1 You need to connect your CLIÉ handheld to your computer.
b For details, refer to “Using your CLIÉ™ handheld with your computer” on page 18.
2 You need to install Data Export on your computer.
b For details, refer to “Installing applications on your CLIÉ handheld” on page 64.
b For details, refer to “Picsel Viewer for CLIE” in the “CLIÉ Application Manual”
installed on your computer.
Transferring the documents to your CLIÉ handheld
Have a try
1
Prepare the documents on your computer that you wish
to view on your CLIÉ handheld.
2
Insert the storage media into your CLIÉ handheld.
For details on “Memory Stick” media, refer to “Using “Memory Stick” media” on
b
page 96.
b For details on CompactFlash compatible memory card, refer to “CF Card Slot” on
page 97.
Continued on next page
• • • • • • • • • • • • • • • • • • • • • • • • • • •
53
Page 54

3
Copy the documents you want to the storage media
inserted into your CLIÉ handheld.
Use Data Import and Data Export to transfer documents to the storage
media in your CLIÉ handheld.
Data Export
(for PC)
Viewing the documents
1
Select the PicselViewer icon in the CLIE Launcher
screen to start Picsel Viewer for CLIE.
b
2
Tap the Carousel icon at the bottom right of the
screen.
The Carousel menu is displayed.
Data Import
(for CLIÉ handheld)
54
3
Tap the Folder View icon, and then tap the document
you want to view.
The document is displayed.
Page 55

Using the Bluetooth™ function (for Bluetooth™ built-in models only)
The Bluetooth™ function is a new technology that enables wireless
communication for mobile phones, computers and other mobile devices.
The Bluetooth™ function enables wireless communication within a range of
approximately 33 feet (approximately 10 meters)
to exchange data, such as image files, between your CLIÉ handheld and other
Bluetooth™ compliant devices.
1)
. You can use the function
What you can do with the Bluetooth™ function
Exchanging data such as image files or Date Book
data with another CLIÉ handheld
2)
Synchronizing your CLIÉ handheld with a
computer wirelessly
2)
Operating a digital still camera2) or camcorder2)
from the CLIÉ handheld remotely
Connecting to the Internet via a mobile phone
Have a try
2)
Continued on next page
• • • • • • • • • • • • • • • • • • • • • • • • • • •
55
Page 56

1)
The actual range will vary depending on factors such as obstacles between devices,
magnetic fields around a microwave oven, static electricity, interference, radio wave
conditions, reception sensitivity or antenna performance, the operating system, or
software application, etc.
2)
The Bluetooth™ function is required in the target devices.
b For information on the compliant devices, refer to the URL shown on the back
cover of this manual.
• Setup: You need to set Bluetooth to Enabled from the Bluetooth
Preferences screen.
Enabling/Disabling the Bluetooth™ function
b
Select the Prefs icon in the
CLIE Launcher screen
b
Tap V at the top right of the
screen and select Bluetooth
Select Enabled
or Disabled
56
Page 57

Bluetooth LED/Bluetooth antenna
The LED lights up during data exchange
using the Bluetooth™ function.
It blinks when the function is on standby.
b For details, refer to “Customizing your CLIÉ™ handheld (Preferences): Setting the
Bluetooth™ function (for Bluetooth™ built-in models only)” in the “Handbook.”
Notes
• Communication performance decreases if the antenna comes in contact with a metal
object.
Place your CLIÉ handheld in its cradle when you use your CLIÉ handheld on a metal
table.
• Avoid covering the antenna with hands while using the Bluetooth™ function. Using
the Bluetooth™ function may interrupt radio reception.
Have a try
57
Page 58

Exchanging data such as image files or Date Book data with another CLIÉ handheld
Note
Depending on where you live, this function may not be available.
1
Select a file.
Sending an image file, movie file, voice
memo, or handwritten memo
Start CLIE Viewer (page 44),
tap the Menu icon to
display the menu screen, select
Send… from the Data menu,
and tap the file you want to
send.
Tip
Sending image files
You can select a method for sending data, from the Send With dialog box.
(The dialog box below may not be displayed depending on your operating
environment)
58
Example
Bluetooth (BIP): This is to send file in a format optimized for the target
devices.
Notes
• Install Remote Camera to display Bluetooth (BIP).
• Remote Camera is not available in some areas.
b For details, refer to “CLIÉ Application Manual” installed on your computer.
Sending Date Book data or Address Book data
Tap the schedule data or address data you want to send, tap the Menu
icon to display the menu screen, and then select Send Event (for
Date Book) or Send Address (for Address Book) from the
menu.
Page 59

2
Send a file.
After the Bluetooth Discovery dialog box is displayed, the list of
Bluetooth™ compatible CLIÉ handhelds within the range of the
communication area is displayed on the Discovery Results dialog box.
Tap to select the CLIÉ handheld to which you want to send data.
The Bluetooth Progress dialog box will be displayed on both CLIÉ
handhelds. Follow the on-screen instructions.
Tip
If you have renamed a target Bluetooth™ compatible device registered on your CLIÉ
handheld, the device may be listed in the previous name when you detect target
Bluetooth™ compatible devices.
In this case, follow the procedure below.
1 Open the setup screen of the Bluetooth™ (page 56) and tap the Menu icon.
2 Tap Disable device name cache from the Options menu.
3 Detect target Bluetooth™ compatible devices.
Note
To view or edit received data/files, applications supporting each data/file must be
installed on your CLIÉ handheld.
Synchronizing your CLIÉ handheld with a computer wirelessly
If you are using a Bluetooth™ compatible computer, you can wirelessly
synchronize information, such as calendars, contacts and tasks, between your
CLIÉ handheld and your computer without connecting the cradle to the
computer.
b For details, refer to “Exchanging and updating files/data using the HotSync
operation (Other HotSync
Bluetooth™ function (for Bluetooth™ built-in models only)” in the “Handbook.”
®
operations): Performing the HotSync® operation using the
b For information on the compliant devices, refer to the URL shown on the back cover
of this manual.
®
Have a try
59
Page 60

Operating a digital still camera or camcorder from the CLIÉ handheld remotely
Note
Depending on where you live, this function may not be available.
You can remotely control and capture images on a Bluetooth™ BIP compatible
digital still camera (DSC-FX77)* and camcorder (DCR-TRV80 or DCRTRV80E)* using your CLIÉ handheld.
b For details, refer to “CLIÉ Application Manual” installed on your computer.
* Not available in some areas.
Connecting to the Internet via a mobile phone
You can browse websites or exchange e-mails using a Bluetooth™ compatible
mobile phone.
• Application to be used:
– To browse websites: NetFront v3.0 for CLIE
– To exchange e-mails: CLIE Mail
• Required device: Bluetooth™ compatible mobile phone
• Setup: You must establish internet access through an internet service
provider in advance. To use the network, you must configure the network
properties, set up an internet connection and register your mobile phone.
60
b For details, refer to “Using the Bluetooth™ function (for Bluetooth™ built-in models
only): Connecting to the Internet by communicating with a Bluetooth™ compatible
mobile phone” in the “Handbook.”
Page 61

Connecting to the Internet
Note
b For connecting to the Internet using the Bluetooth™ function, refer to “Connecting to
the Internet via a mobile phone” on page 60.
Tip
You can set up an internet connection using Mobile Manager Ver.1.0 and Mobile
Connection Wizard Ver.1.0. (For customers in the U.S.A. and Canada only)
• Application to be used:
– To browse websites: NetFront v3.0 for CLIE
– To exchange e-mails: CLIE Mail
• Setup: You must establish internet access through an internet service
provider in advance. You must have a network card such as a Wireless LAN
card that is compliant with your CLIÉ handheld.
b For details about the necessary setup of each application, refer to the “CLIÉ
Application Manual” installed on your computer.
Setting up a network card
Set up a network card such as the Wireless LAN card (sold separately).
b For details of compatible network cards, refer to the URL shown on the back cover of
this manual.
Have a try
Tip
For details on how to set up a network card, refer to the manual of that network card.
Connecting to the Internet
1
Insert the network card into your CLIÉ handheld.
2
Select the desired application icon in the CLIE Launcher
screen to start it.
3
Start browsing websites, sending and receiving e-mails.
Internet connection starts automatically.
Tip
When you want to attach image files or movie files from your CLIÉ handheld to an
e-mail, you can select those files from the list displayed in CLIE Viewer.
b For details, refer to “Selecting/Deleting files” on page 45.
61
Page 62

Using applications
This chapter explains how to use add-on applications and the “CLIÉ Application
Manual.” For details about add-on applications, refer to the manual for each add-on
application.
Add-on applications
Applications are divided into three types:
• Applications already installed on your CLIÉ handheld
• Applications you need to install on your CLIÉ handheld
b For details about using the Installation CD-ROM, follow the procedure “Installing
with the supplied Installation CD-ROM” on page 64.
• Applications you need to install on your computer
Using the CLIÉ Application Manual
For details about using the add-on applications, read the “CLIÉ Application
Manual” installed on your computer.
Notes
• Prior to using applications, refer to “Step 1: Installing the software on your computer”
on page 18 to install the Palm™ Desktop for CLIÉ software. The “CLIÉ Application
Manual” will be installed at the same time.
• To be displayed properly the “CLIÉ Application Manual” requires “Microsoft Internet
Explorer Version 5.0” or later.
62
Page 63

Opening the CLIÉ Application Manual
1
Double-click the CLIÉ info icon on the Windows desktop.
CLIÉ info window is displayed.
2
Select the CLIÉ Application Manual.
Tips
• To close the CLIÉ Application Manual, click the icon at the top right of the CLIÉ
Application Manual window.
• You can minimize the CLIÉ Application Manual window by clicking the icon at
the top right of the window. You can reopen the minimized window by clicking the
CLIÉ Application Manual button in the task bar.
• You can operate other software while the CLIÉ Application Manual window is
displayed on the Windows desktop.
• You can also view the manual directly from the Installation CD-ROM.
1 Insert the Installation CD-ROM into the CD-ROM drive of your computer.
2 Click the Manuals button.
3 Click View of View Manuals.
Have a try
63
Page 64

Installing applications on your CLIÉ handheld
You can install applications with the supplied Installation CD-ROM by
following procedure below.
You must install the Palm Desktop for CLIÉ software on your computer, before
installing the supplied applications on your CLIÉ handheld. Your CLIÉ
handheld must be connected to your computer using the USB cradle.
Note
The add-on applications are designed to operate on this CLIÉ handheld only.
Compatibility with other CLIÉ handheld or Palm OS
Installing with the supplied Installation
CD-ROM
1
Quit all applications running in Windows®.
2
Insert the supplied Installation CD-ROM into the CD-ROM
drive of your computer.
The Installation Launcher window is displayed.
3
Click CLIÉ Desktop.
4
Click Install to the right of CLIÉ Add-ons.
®
PDAs is not guaranteed.
64
5
Select the add-on applications you want to install.
6
Click Next.
7
Select the User.
8
Click OK.
The Install Tool dialog box is displayed.
9
Click Done.
10
To install the application on your CLIÉ handheld, press
the HotSync button on the cradle.
The HotSync® operation starts and the selected application is transferred
and installed on your CLIÉ handheld.
Page 65

Tip
You can also install applications on your CLIÉ handheld with the Palm™ Desktop for
CLIÉ software.
b For details, refer to “Enhancing features with add-on applications: Installing:
Installing from your computer” in the “Handbook.”
Have a try
65
Page 66

Introducing add-on applications
In this section, add-on applications for your CLIÉ handheld are described in the
same group order as the CLIE Launcher.
b For details on the CLIE Launcher group, refer to “CLIÉ™ handheld basic operations:
Using CLIE Launcher” in the “Handbook.”
General
Viewing/Playing back a file after selecting from the list
Application to be used
CLIE Viewer
Summary
For managing and displaying image files, movie files, handwritten memos and voice memo files.
b For details, refer to the “CLIÉ Application Manual” installed on your computer.
Picture
Taking pictures
Application to be used
CLIE Camera
Keyword
JPEG (DCF) format
Summary
For taking pictures using the built-in camera of your CLIÉ handheld.
b For details, refer to the “CLIÉ Application Manual” installed on your computer.
CLIÉ handheld
CLIÉ Handheld
Organizing image files in albums
Application to be used
CLIE Album
Summary
For managing image files saved on your CLIÉ handheld or “Memory
Stick” media, in an album format.
You can use the albums with your computer using PictureGear Studio installed on your
computer.
b For details, refer to the “CLIÉ Application Manual” installed on your computer.
CLIÉ handheld
66
Page 67

Displaying image files one after the other
Application to be used
PhotoStand
Keyword
JPEG (DCF) format
Summary
For automatically displaying image files one after the other.
CLIÉ handheld
b For details, refer to the “CLIÉ Application Manual” installed on your computer.
Editing image files
Application to be used
Photo Editor
Keyword
JPEG (DCF) format
Summary
For drawing or writing on an image file. You can also draw pictures on a new blank canvas.
CLIÉ handheld
b For details, refer to the “CLIÉ Application Manual” installed on your computer.
Uploading image files to “Sony Style Imaging”
Have a try
Note
Only supported areas
“Sony Style Imaging” is supported only for customers in Europe as of
June, 2003.
Application to be used
Image Upload Utility
Keyword
JPEG (DCF) format
Summary
For uploading image files to “Sony Style Imaging,” a digital imaging website.
“Sony Style Imaging” is Sony’s online service for storing, organizing, and sharing your
photos and video clips free of charge.
Preparation for use:
Must be installed
CLIÉ Handheld
b For details, refer to the “CLIÉ Application Manual” installed on your computer.
67
Page 68

Importing image/movie files from your computer
Application to be used
Image Converter
Keyword
JPEG (DCF) format, Movie Player format
Summary
For converting image and movie files on your computer to a format that is viewable on your
CLIÉ handheld.
Preparation for use:
Installation CD-ROM Menu
“CLIÉ Image”
PC
Must be installed Requires a “Memory Stick”
b For details, refer to the “CLIÉ Application Manual” installed on your computer.
Exporting albums and binders to your computer
Application to be used
PictureGear Studio
Summary
What you can do with PictureGear Studio:
• Create albums and binders on your computer and import binders to your CLIÉ handheld.
• Export images to your computer and manage them.
• Print out labels for CD-ROM, “Memory Stick” media and more.
Preparation for use:
Installation CD-ROM Menu
“CLIÉ Image”
b For details, refer to the “CLIÉ Application Manual” installed on your computer.
PC
Must be installed Requires a “Memory Stick”
68
Page 69

Movie
Recording movies
Application to be used
Movie Recorder
Keyword
Movie Player format (movie formats shot with your CLIÉ handheld
or converted using Image Converter or Giga Pocket Plugin)
Summary
For recording movies using the built-in camera of your CLIÉ handheld.
Preparation for use:
CLIÉ handheld
Requires a “Memory Stick”
b For details, refer to the “CLIÉ Application Manual” installed on your computer.
Playing back movies
Application to be used
Movie Player
Keyword
Movie Player format (movie formats shot with CLIÉ handheld or
converted using Image Converter), MPEG Movie format (MPEG1
format movie files shot with a Sony Digital Still Camera or
Handycam), Play List, Repeat function, and Index function.
Summary
For playing back movies recorded with the built-in camera of your CLIÉ handheld or playing
back movies on your CLIÉ handheld using Image Converter or Giga Pocket Plugin on
your computer.
Preparation for use:
b For details, refer to the “CLIÉ Application Manual” installed on your computer.
CLIÉ handheld
Requires a “Memory Stick”
www.aibo.com
Have a try
www.aibo.com
69
Page 70

Playing back Macromedia®
Flash
Application to be used
Macromedia Flash Player 5
Keyword
swf format
Summary
For playing back the Macromedia Flash contents.
Some Flash contents for computers may not play back normally on your CLIÉ handheld.
Preparation for use:
b For details, refer to the “CLIÉ Application Manual” installed on your computer.
™ files
CLIÉ handheld
Requires a “Memory Stick” or
CF compatible memory card
Importing movie files from your computer
Note
Only supported areas
Application to be used
Giga Pocket Plugin
PC
Note
b For details, refer to “CLIÉ Application Manual” installed on your computer.
Keyword
Movie Player format
Summary
For converting movie files on your computer to a format that is viewable on your CLIÉ
handheld.
You need to install the “Giga Pocket” for VAIO software on your computer.
Preparation for use:
Installation CD-ROM Menu
“CLIÉ Image”
Must be installed Requires a “Memory Stick”
b For details, refer to the Help files of Giga Pocket Plugin installed on your computer.
70
Page 71

Music/Sound
Listening to music with your CLIÉ handheld
Application to be used
Audio Player
Keyword
MP3, ATRAC3
Summary
For playing back music files saved on a “Memory Stick” media.
Preparation for use:
CLIÉ handheld
Needs to be connected to your computer
Requires a “Memory Stick”
b For details, refer to the “CLIÉ Application Manual” installed on your computer.
Recording voice memo
Application to be used
Voice Recorder
Summary
For recording and playing back a voice memo using the built-in
microphone of your CLIÉ handheld.
b For details, refer to the “CLIÉ Application Manual” installed on your computer.
CLIÉ handheld
Have a try
Customizing the sound settings
Application to be used
Sound Utility
Summary
For managing the audio data converted with Sound Converter 2.
The audio data files are transferred from your computer to your CLIÉ handheld via a
®
HotSync
Preparation for use:
b For details, refer to the “CLIÉ Application Manual” installed on your computer.
operation.
CLIÉ handheld
Needs to be connected to your computer
71
Page 72

Transferring music files to your CLIÉ handheld
Application to be used
SonicStage
Keyword
ATRAC3
Summary
For managing and creating music files on your computer, to be played back with your CLIÉ
handheld.
The application is also used for transferring music files to a “Memory Stick” media.
Preparation for use:
Installation CD-ROM Menu
“CLIÉ Audio”
PC
Must be installed
b For details, refer to the “CLIÉ Application Manual” and Help files of SonicStage installed on your
computer.
Sending audio data to your CLIÉ handheld
Application to be used
Sound Converter 2
Keyword
WAVE (PCM) format, MIDI (Standard MIDI File Format 0/1) format
Summary
For converting the audio data of WAVE (PCM) format or MIDI format on your computer, to
CLIÉ handheld format audio data.
Preparation for use:
PC
Must be installed
Installation CD-ROM Menu
“CLIÉ Utilities”
b For details, refer to the “CLIÉ Application Manual” installed on your computer.
72
Page 73

Internet
Browsing websites
Application to be used
NetFront v3.0 for CLIE
Keyword
Websites, Internet, WWW browser
Summary
For browsing websites with your CLIÉ handheld.
b For details, refer to the “CLIÉ Application Manual” installed on your computer.
CLIÉ handheld
Sending and receiving e-mail messages
Application to be used
CLIE Mail
Summary
For sending and receiving e-mail messages on your CLIÉ handheld.
b For details, refer to the “CLIÉ Application Manual” installed on your computer.
CLIÉ handheld
Organizer
Have a try
Managing addresses and telephone numbers
Application to be used
Address Book
Summary
For entering and editing information such as names, addresses or telephone numbers.
b For details, refer to the “CLIÉ Application Manual” installed on your computer.
CLIÉ handheld
73
Page 74

Managing schedules and events
Application to be used
Date Book
Summary
For managing schedules and events such as meetings or business trips.
CLIÉ handheld
b For details, refer to the “CLIÉ Application Manual” installed on your computer.
Managing tasks and things to do
Application to be used
To Do List
Summary
For displaying tasks that you want to be reminded of later. You can
assign a priority to any task.
CLIÉ handheld
b For details, refer to the “CLIÉ Application Manual” installed on your computer.
Taking memos
Application to be used
Memo Pad
Summary
For taking memos or displaying documents created on your computer.
b For details, refer to the “CLIÉ Application Manual” installed on your computer.
CLIÉ handheld
Taking handwritten memos using the stylus
Application to be used
CLIE Memo
Summary
For taking handwritten memos using the stylus.
CLIÉ handheld
b For details, refer to the “CLIÉ Application Manual” installed on your computer.
74
Page 75

Using the calculator
Application to be used
Calculator
Summary
For calculating with your CLIÉ handheld. You can save and recall
calculations with the calculator’s memory.
b For details, refer to the “CLIÉ Application Manual” installed on your computer.
CLIÉ handheld
Telephone
Sending/Receiving messages and data via a connected GSM mobile phone device (for Bluetooth™ built-in models only)
Application to be used
SMS
Summary
For sending/receiving messages from your CLIÉ handheld via a connected GSM device, such
as a mobile phone.
b For details, refer to the “CLIÉ Application Manual” installed on your computer.
CLIÉ handheld
Productivity
Displaying the worldwide local time
Application to be used
World Alarm Clock
Summary
For displaying worldwide local times. You can also use the application as an alarm clock.
b For details, refer to the “CLIÉ Application Manual” installed on your computer.
CLIÉ handheld
Have a try
75
Page 76

Viewing computer documents on your CLIÉ handheld
Application to be used
Picsel Viewer for CLIE
Keyword
doc format, xls format, ppt format, txt format, JPEG format, GIF format, PNG format, BMP
format, PDF format, HTML format
Summary
For viewing documents created in Microsoft® Word/Excel/PowerPoint® or PDF files on your
CLIÉ handheld.
Preparation for use:
Requires a “Memory Stick” or
CF compatible memory card
CLIÉ handheld
b For details, refer to the “CLIÉ Application Manual” installed on your computer.
Using as a remote control
Application to be used
CLIE Remote Commander
CLIÉ handheld
Keyword
Beaming
Summary
For using your CLIÉ handheld as a remote control.
b For details, refer to the “CLIÉ Application Manual” installed on your computer.
76
Page 77

Operating a digital still camera or
camcorder from the CLIÉ handheld
remotely
(for Bluetooth™ built-in
models only)
Note
Depending on where you live, this function may not be available.
Application to be used
Remote Camera
Summary
You can remotely control and capture images on a Bluetooth BIP compatible digital still came ra
(DSC-FX77)* and camcorder (DCR-TRV80 or DCR-TRV80E)* using your CLIÉ handheld.
Preparation for use:
b For details, refer to the “CLIÉ Application Manual” installed on your computer.
* Not available in some areas.
CLIÉ handheld
Must be installed
Data Control
Making a backup on a “Memory Stick” media
Have a try
Application to be used
Memory Stick Backup
Summary
For making a backup of an application or data on your CLIÉ handheld to a “Memory Stick”
media.
Preparation for use:
b For details, refer to the “CLIÉ Application Manual” installed on your computer.
Requires a “Memory Stick”
CLIÉ handheld
77
Page 78

Exchanging data between your CLIÉ handheld and storage media
Application to be used
CLIE Files
Summary
For exchanging data (copy, move, delete) between your CLIÉ handheld and storage media
such as a “Memory Stick” media or a CF compatible memory card inserted into your CLIÉ
handheld, or for editing data on the storage media.
Preparation for use:
CLIÉ handheld
Requires a “Memory Stick” or
CF compatible memory card
b For details, refer to the “CLIÉ Application Manual” installed on your computer.
Accessing “Memory Stick” media or CF compatible memory card in your CLIÉ handheld from a computer
Application to be used
Data Import
Data Export
Summary
For installing applications or copying data from your computer to a “Memory Stick” media
or CF compatible memory card in your CLIÉ handheld, without using a HotSync
Preparation for use:
Data Export
CLIÉ handheld
PC
Requires a “Memory Stick” or
CF compatible memory card
Must be installed
®
operation.
Installation CD-ROM Menu
“CLIÉ Utilities”
b For details, refer to the “CLIÉ Application Manual” installed on your computer.
78
Page 79

Synchronizing data with Microsoft® Outlook or Lotus Organizer
Application to be used
Intellisync Lite
Summary
For synchronizing data between Date Book, Address Book, To Do List, etc., on your
CLIÉ handheld with Microsoft Outlook or Lotus Organizer on your computer.
Preparation for use:
Installation CD-ROM Menu
Select Palm Desktop for CLIÉ from CLIÉ Desktop, and follow the
on-screen instructions.
b For details, refer to the “CLIÉ Application Manual” and Help files of Intellisync Lite installed
on your computer.
PC
Must be installed
Needs to be connected to your computer
Have a try
79
Page 80

Additional information
This section describes how to solve common problems you may have when using your
CLIÉ handheld.
Making a backup of the data on your CLIÉ handheld
We recommend that you make a backup of your data in case of unexpected
problems. Backing up your data will ensure that it can be restored again on your
CLIÉ handheld, even if you have to perform a hard reset.
Making a backup using Memory Stick Backup
Use “Memory Stick” media and the supplied Memory Stick Backup on your
CLIÉ handheld to back up data and applications on your CLIÉ handheld.
b “Memory Stick” media (sold separately) is required.
For details, refer to “Backing up your CLIÉ™ handheld data and applications” in the
“Handbook.”
Making a backup using the HotSync® operation
Data on your CLIÉ handheld is backed up to your computer when the
HotSync
would erase all user data stored on your CLIÉ handheld. However, this can be
restored with the next HotSync
®
operation is performed. If you need to perform a hard reset, this
®
operation.
80
Note
Some applications installed later or some data created with such applications, cannot be
backed up using the HotSync
or data installed through beaming or “Memory Stick” media by synchronizing your
computer with your CLIÉ handheld. Use Memory Stick Backup to make such
backups.
®
operation. In particular, you cannot back up applications
Page 81

Troubleshooting
Should you have problems, please follow the procedure below.
Make note of any messages or alerts that are displayed.
Step 1 Refer to “Troubleshooting Q&A” or the
manuals for the specific application
• Read “Troubleshooting Q&A” carefully.
• Double-click the CLIÉ Info icon on your computer, and select Manuals
to read the details about the specific application.
Step 2 Refer to the Sony CLIÉ handheld Support
website
Double-click the CLIÉ Info icon on your computer, and select Support
Information for CLIÉ handheld and Applications.
Have a try
Note
Thousands of third party add-on applications are available for the Palm OS
Sony does not support third party applications. If you have a problem with a third party
application, contact the developer or publisher of that application.
®
platform.
81
Page 82

Customer Support and Customer Registration
■ For customer support information
Double-click the CLIÉ Info icon on your computer, and select Support
Information for CLIÉ handheld and Applications.
■ For online customer registration (For customers in the
U.S.A. and Canada only)
Double-click the CLIÉ Info icon on your computer, and select Support
Information for CLIÉ handheld and Applications.
82
Page 83

Notes on use
Handling your CLIÉ handheld
• Make sure you do not scratch or damage your CLIÉ handheld’s screen or the
• Do not expose your CLIÉ handheld to rain or moisture. Should water enter
• Your CLIÉ handheld’s screen is made of glass. Do not drop or submit your
• Avoid using or storing your CLIÉ handheld in locations subject to:
• The rubber feet of the cradle may lose their adhesion if they become dirty. If
®
Graffiti
Do not use a writing pen, pencil, or other sharp object on the screen.
the circuitry through the buttons and switches, your CLIÉ handheld may be
damaged.
CLIÉ handheld to excessive shock. Do not carry your CLIÉ handheld in your
pocket. If you sit down with your CLIÉ handheld in the pocket, your CLIÉ
handheld may break.
– extremely high temperatures, such as inside a car exposed to the sun, or
– direct sunlight
– high humidity
– excessive dust
this occurs, clean the rubber feet with a soft damp cloth.
writing area. Always use the supplied stylus to tap on the screen.
near a heater.
Cleaning your CLIÉ handheld
• Clean your CLIÉ handheld with a soft, dry cloth.
• Wipe any dirt and dust from the camera lens by using a soft damp cotton
swab.
Have a try
If condensation occurs
Turn off your CLIÉ handheld for approximately one hour to clear condensation
before use. If you leave condensation within the camera lens, you may not be
able to take clear pictures.
Cleaning the stylus
Tapping or dragging the screen with a dirty stylus may damage the screen
surface.
Wipe the stylus with a dry cloth when it gets dirty.
83
Page 84

Battery considerations
Battery safety
To avoid possible damage from battery leakage, observe the following:
• Do not use any other type of battery in your CLIÉ handheld.
• Do not charge the battery in any other way than as specified in this manual.
• Do not throw the battery into fire.
• Do not attempt to short-circuit the battery.
• Do not take the battery apart.
• Do not modify the battery.
• Do not heat the battery in an oven.
• Do not charge the battery near an open flame or in direct sunlight.
• Do not leave the battery in a car.
• Do not subject your CLIÉ handheld or the battery to excessive shock.
• Take care not to drop your CLIÉ handheld, give pressure to it with a sharp
object, or crush with a heavy object.
• If you have skin contact with battery leakage or get some in your eye, wash
with water immediately and consult a doctor.
Charging
• It takes approximately four hours to charge your CLIÉ handheld when the
battery is empty.
• If you charge your CLIÉ handheld every day, it takes only a few minutes to
charge the battery.
• You can operate your CLIÉ handheld while the battery is being charged.
• Data stored in the internal memory (not on the “Memory Stick”) is retained
with battery power. If the battery becomes completely discharged, data
stored in the internal memory is lost. You should charge the battery regularly
and back up your data using Memory Stick Backup.
84
Battery life
Battery life varies depending on the conditions and environment where you use
your CLIÉ handheld and applications used.
b For details about battery life, refer to “Specifications” on page 87.
Page 85

Conserving the battery
• Turn off the backlight under good lighting conditions.
b For details, refer to “POWER/HOLD switch” on page 95.
• Change the automatic power-off time setting so that your CLIÉ handheld
will automatically turn off after a short period of inactivity.
b For details, refer to “Customizing your CLIÉ™ handheld (Preferences): Setting the
automatic power-off time” in the “Handbook.”
Using peripheral devices
If a low battery warning is displayed while using peripheral devices, connect
to wall outlet immediately. Otherwise data in the internal memory may be lost.
When the battery power gets low
• When the battery power gets low, a warning message is displayed on the
screen, “Memory Stick” media becomes inaccessible, and the backlight
adjustment no longer operates. If this occurs, connect your CLIÉ handheld
to wall outlet and perform a HotSync
• If your CLIÉ handheld does not turn on when you slide down the POWER/
HOLD switch, charge your CLIÉ handheld immediately.
• The remaining battery indicator may not always reflect the actual battery
power remaining. To prevent loss of battery power, charge it frequently.
• You do not have to replace batteries. When battery power gets low, place
your CLIÉ handheld in the USB cradle and start charging immediately.
Never disassemble your CLIÉ handheld to take out the battery.
®
operation.
Have a try
Do not let the remaining battery power indicator reach 0
If you leave your CLIÉ handheld in an uncharged state (the remaining
battery power indicator reaches 0 ), all user data stored on your CLIÉ
handheld will be erased. To avoid this, you should charge your CLIÉ
handheld frequently.
Other information
Your CLIÉ handheld may get warm if turned on for long periods of time. This
is not a malfunction.
Continued on next page
• • • • • • • • • • • • • • • • • • • • • • • • • • •
85
Page 86

Recycling Lithium-Ion batteries
The following information for recycling batteries is ONLY intended for
customers in the U.S.A. and Canada.
Lithium-Ion batteries are recyclable.
You can help preserve our environment by returning your used rechargeable
batteries to the collection and recycling location nearest you.
For more information regarding recycling of rechargeable batteries, call toll
free 1-800-822-8837, or visit the website (http://www.rbrc.org/).
When you dispose of a CLIÉ handheld, remove the battery for recycling.
How to remove a rechargeable button battery
1
Remove the screw from the back
of your CLIÉ handheld with a
Phillips screwdriver.
3
Remove the jack of the battery
cord from your CLIÉ handheld.
2
Remove the battery cover.
4
Pull the battery cord attached to
the battery.
Do not damage the released battery.
86
Page 87

Specifications
OS
Palm OS® 5 (Ver.5.0)
CPU
PXA263 200 MHz
Memory
PEG-NX80V: 32 MB (RAM)
User memory available:
Approx. 16 MB
PEG-NX73V: 16 MB (RAM)
User memory available:
Approx. 11 MB
External input/output
Interface connector
IrDA (1.2)
IR port for AV control
“Memory Stick” slot
Bluetooth™ (for Bluetooth™ built-in
models only)
CF Card Slot (CompactFlash
Display
TFT color display with backlight,
320 × 480 dots, 65,536 colors
Other functions
FM synthesizer
16 chords
IMA ADPCM sound (monaural)
Monaural Speaker
Monaural Microphone
Dimensions (excluding
projections)
Approx. 2 7/8 × 5 1/4 × 7/8 inches
(71.9 × 131.5 × 21.8 mm) (w/h/d)
Weight
PEG-NX80V: Approx. 8 oz (235 g)
PEG-NX73V: Approx. 8 oz (230 g)
(including the supplied stylus)
®
type II)
Operating temperature
41 ºF to 95 ºF (5 ºC to 35 ºC)
Audio frequency response
20 Hz to 20,000 Hz
Audio recording format
ATRAC3
MP3 (32 k~320 kbps)
Sampling frequency
44.1 kHz
Output
Headphone: Stereo mini-jack
Voice encoding/decoding
format
IMA ADPCM (1ch, 4bit)
SP mode (22 kHz),
LP mode (8 kHz)
Maximum recording time
ATRAC3 format
(when using a 128MB “MagicGate
Memory Stick” media, sold
separately):
Approx. 120 minutes
(bit rate: 132 kbps)
Approx. 160 minutes
(bit rate: 105 kbps)
Approx. 240 minutes
(bit rate: 66 kbps)
MP3 format
(when using a 128MB “Memory
Stick” media, sold separately):
Approx. 65 minutes
(bit rate: 256 kbps)
Approx. 130 minutes
(bit rate: 128 kbps)
Approx. 170 minutes
(bit rate: 96 kbps)
Continued on next page
• • • • • • • • • • • • • • • • • • • • • • • • • • •
Have a try
87
Page 88

Maximum audio recording
time
(when using a 128MB “Memory
Stick” media, sold separately)
SP mode: Approx. 190 minutes
LP mode: Approx. 520 minutes
Power requirements
AC power adapter (supplied):
DC 5.2 V (dedicated connector)
(Use an appropriate AC cord from
the supplied AC cords)
Battery:
Lithium-ion battery
Battery life
Operating PIMs (Personal
Information Management
applications):
Approx. 14 days
(when PIMs, such as Date Book,
are operated for 30 minutes per day
with the backlight off)
Approx. 7 days
(when PIMs, such as Date Book,
are operated for 30 minutes per day
with the backlight on*)
Playing audio files
(in continuous mode):
Approx. 7 hours
(when playing audio files in the
HOLD mode)
Approx. 2.5 hours
(when playing audio files with the
HOLD switch off and the backlight
on*)
Recording movie files
(in continuous mode):
Approx. 2 hour
(when recording movie files with
the HOLD switch off and the
backlight on*)
Viewing movie files
(in continuous mode):
Approx. 3.5 hours
(when viewing movie files with the
backlight off)
Approx. 2 hours
(when viewing movie files with the
backlight on*)
Recording voice memos
(in continuous mode):
Approx. 10.5 hours
(when recording voice memos in
the HOLD mode)
Approx. 3 hours
(when recording voice memos with
the HOLD switch off and the
backlight on*)
Performing data communication
(in continuous mode):
Approx. 2.5 hours
(when performing data
communication with the backlight
on*)
(when using PEGA-WL110)
The battery life span varies depending on
the temperature and conditions of use.
* The brightness level of your CLIÉ
handheld is at the default setting when
the backlight is on.
88
Page 89

Camera
Effective pixels
PEG-NX80V:
Approx. 1,270,000 pixels
PEG-NX73V:
Approx. 310,000 pixels
Image pickup device
PEG-NX80V: 1/
scan CCD image sensor (1,340,000
pixels in total)
PEG-NX73V:
image sensor (370,000 pixels in total)
Lens
PEG-NX80V:
F4.0/focal length 4.15 mm
(35 mm film equivalent
f=approx. 37.7 mm)
PEG-NX73V:
F2.8/focal length 2.6 mm
(35 mm film equivalent
f=approx. 34.3 mm)
Focus range
PEG-NX80V: AF = 0.5 m to ∞
PEG-NX73V: AF = 0.3 m to ∞
CAPTURE light range
(for PEG-NX80V only)
0.5 m
Camera Rotating Angle
Approx. 300º
Camera finder
On the CLIÉ handheld display
Image file: 320 × 240,
Movie file: 320 × 224 dots
inch progressive
3.6
1
/
inch scan CMOS
5.5
160 × 240 dots
Others
White Balance:
Auto, Indoor A (incandescent
light), Indoor B (fluorescent light),
Outdoor
Picture effect:
Off, B&W, Sepia, Neg. Art
(negative art), Solarization
Brightness Control:
-2 to +2
Self-timer function:
Approx. 10 seconds (for image files
only)
Picture size (when recording)
Image file: 1280 × 960 (for PEG-
NX80V only), 640 × 480,
320 × 480 (vertical
frame), 320 × 240,
160 × 120 (for PEGNX73V only) dots
Movie file: 160 × 112 dots
Formats (when recording)
Image file: JPEG (DCF) format
Movie file: Movie Player format
Picture size (when viewing)
On the CLIÉ handheld display
Image file: 320 × 480, 320 × 240,
160 × 120 dots
Movie file: 426 × 320, 320 × 240
160 × 112 dots
Formats (when viewing)
Image file: JPEG (DCF) format
Movie file: Movie Player format,
MPEG Movie format
Have a try
Continued on next page
• • • • • • • • • • • • • • • • • • • • • • • • • • •
89
Page 90

Maximum movie recording
time
(when using 128MB “Memory Stick”
media, sold separately)
Note that the maximum movie
recording time in continuous
operation is approx. 60 minutes.
V:192/A: 32kbps :
Approx. 70 minutes
V:96/A: 32kbps :
Approx. 120 minutes
Maximum image file
recording capacity
(when using a 128MB “Memory
Stick” media in the standard mode)
1280 × 960 dots: Approx. 350 files
(for PEG-NX80V only)
640 × 480 dots: Approx. 1,000 files
320 × 480 dots: Approx. 1,500 files
320 × 240 dots: Approx. 2,000 files
160 × 120 dots: Approx. 6,000 files
(for PEG-NX73V only)
Operation confirmed network card
b For details of compatible network cards,
refer to the URL shown on the back
cover of this manual.
Bluetooth™ function (for Bluetooth™ built-in models only)
Communication method
Bluetooth standard Ver.1.1
Output
Bluetooth standard Power Class 2
Communication range
Line of sight approx. 10 m
Supported Bluetooth™
profiles
2)
Serial Port Profile
Dial-up Networking Profile
LAN Access Profile
Object Push Profile
Basic Imaging Profile
Frequency band
2.4 GHz band
(2.4000 GHz - 2.4835 GHz)
1)
The actual range will vary
depending on factors such as
obstacles between devices,
magnetic fields around a
microwave oven, static electricity,
areas with heavy radio and/or
magnetic interference, radio wave
conditions, reception sensitivity or
antenna performance, and the
operating system or software
application, etc.
2)
Bluetooth standard profiles specify
the requirements of the protocol
software and application software
for Bluetooth™ devices to
communicate with each other.
1)
90
Page 91

System requirements
The following are the system
specifications required to run the
Palm™ Desktop for CLIÉ software
and software supplied on the
Installation CD-ROM:
• OS: Microsoft Windows 98 Second
Edition, Windows Millennium
Edition, Windows 2000
Professional, Windows XP Home
Edition, Windows XP Professional
• CPU: Pentium II 400MHz or faster
(Pentium III 500MHz or faster is
recommended)
• RAM: 96MB or more (128MB or
more is recommended, 256MB or
more is recommended for Windows
XP)
• Hard disc drive space: 200MB
(350MB or more is recommended)*
* Requires 100MB or more to print
using the PictureGear Studio
software.
• Display: High Color or better,
800 × 600 dots or more is
recommended
•CD-ROM drive
•USB port
• Pointing device such as a mouse or
touchpad
Have a try
Design and specifications are subject
to change without notice.
91
Page 92

CLIÉ™ handheld components
This chapter explains each part of your CLIÉ handheld and the supplied accessories.
Front panel
92
Page 93

A CAPTURE light
(for PEG-NX80V only)
Lights when you are taking pictures
and recording movies.
B POWER LED
(Page 9)
Lights or blinks when turned on. The
LED indicator shows the status of
your CLIÉ handheld by its color.
Lights green: The power is on. (It
also lights in the HOLD mode)
Blinks green: Blinks a few
moments when you operate any
button on your CLIÉ handheld in
HOLD mode.
Lights orange: The battery is being
charged.
Blinks orange: Alarm function that
notifies you at a preset time if you
have set an alarm in an application,
such as Date Book.
OFF: The power is off.
C REC LED
(Page 42)
Lights when you are recording a
voice memo.
D Bluetooth Antenna
(for Bluetooth™ built-in
models only)
(Page 57)
E CAPTURE Button
(Pages 35, 39)
Press the CAPTURE button to take
pictures or record movies.
F BACK Button
Cancels the selection of an item or an
operation. Depending on the
application, unique features such as
restoring to the previous screen are
assigned.
G Jog Dial™ navigator
(Page 27)
Use to select and run applications or
items. Depending on the application,
unique features are assigned.
H POWER/HOLD Switch
(Pages 13, 95)
Turns your CLIÉ handheld on and
off, and sets your CLIÉ handheld to
HOLD mode.
I Application Buttons
(Display Panel side)
(Page 29)
Available only when your CLIÉ
handheld is in the “turned style.”
J Display Panel
(Page 11)
K Screen
(Page 102)
L Silk Screen Area
(Page 103)
M Camera Lens
(Pages 34, 39, 40)
N ND FILTER switch
(Page 35, 39)
O Scroll Button
Displays text and other information that
extends beyond the area of the screen.
Pushing the V button scrolls down to
display information below the current
viewing area, and pushing the
v button scrolls up to display the
information above the current viewing
area. Depending on the application,
unique features are assigned.
P Application Buttons
(Page 29)
Even when your CLIÉ handheld is
turned off, pressing an application
button turns on your CLIÉ handheld
and starts that application.
Q Hardware Keyboard
(Page 99)
CLIÉ™ handheld components
93
Page 94

Back panel
A Microphone
(Page 42)
Use this to record sounds.
B Stylus
(Page 13)
A pointed tool to operate your CLIÉ
handheld by touching the screen with it.
C Headphone Jack
For connecting the supplied audio
remote control and headphones.
D VOICE REC Switch
(Page 42)
Slide down the switch to start and
stop sound recording.
E “Memory Stick” LED
(Page 96)
Blinks orange while your CLIÉ
handheld is writing data to, or reading
data from, a “Memory Stick” media.
F “Memory Stick” Slot
(Page 96)
Insert a “Memory Stick” media into
this slot.
G RESET Button
(Pages 31, 32)
Press to restart your CLIÉ handheld.
H Bluetooth LED
(for Bluetooth™ built-in
models only)
(Page 57)
I IR Port
(Page 98)
You can beam data between your
CLIÉ handheld and another CLIÉ
handheld or Palm OS
J Strap Hook
K CF Card Slot Switch
(Page 97)
Use this to open the CF card slot.
L CF Card Slot
(Page 97)
Insert a CompactFlash compatible
network or memory card into this slot.
There is no LED indicator to show
when the CF card is writing files/data
or is connecting to the Internet.
M Speaker
N Interface Connector
(Page 9)
Connects the cradle or mobile
communication adapter (sold
separately).
®
PDA.
94
Page 95

POWER/HOLD switch
Turning on/off your CLIÉ handheld
POWER/HOLD Switch
Turning on/off the LCD backlight
Slide down the POWER/HOLD switch and hold it for more than two
seconds.
Turning on/off the HOLD mode
Slide down the POWER/HOLD
switch
The POWER/HOLD switch will return
to the center position after being
released. Your CLIÉ handheld powers
on, the last screen viewed is displayed,
and the POWER LED indicator lights
green. To turn off your CLIÉ
handheld, slide down the POWER/
HOLD switch again and then release.
Slide up the POWER/HOLD
switch
Putting your CLIÉ handheld in HOLD
mode deactivates the touch screen. If
you put the POWER/HOLD switch
into the HOLD position while the
power is on, the screen display turns
off, even during an operation. To
release the HOLD mode, slide up the
POWER/HOLD switch again and then
release.
CLIÉ™ handheld components
95
Page 96

Using “Memory Stick” media
Inserting “Memory Stick” media
“Memory Stick” LED
The “Memory Stick” LED blinks orange while
your CLIÉ handheld is writing data to, or
reading data from, a “Memory Stick” media.
Note
Insert a “Memory Stick” media in the right direction. If you forcibly insert
“Memory Stick” media in the wrong direction, the “Memory Stick” slot may be
damaged.
Removing “Memory Stick” media
96
b
Pull “Memory Stick” media outPush “Memory Stick” media in
Note
Make sure that your CLIÉ handheld is not writing files/data to, or reading files/data
from, a “Memory Stick” media before removing it. (The “Memory Stick” LED
blinks when it is reading or writing files/data.) If you remove a “Memory Stick”
media while the “Memory Stick” LED is blinking, recorded files/data may be
deleted or damaged.
Page 97

CF Card Slot
The type of CF card you can use with your CLIÉ
handheld
• You can use only a CompactFlash compatible card in the CF card slot. Do
not use any other card in your CLIÉ handheld, since this may damage CLIÉ
handheld and CF card slot.
In particular, do not use a different shaped terminal with your CLIÉ
handheld, since this may damage the CF card slot.
• If your CLIÉ handheld is not working properly, turn off your CLIÉ handheld
and then remove the CF card. Insert the CF card again.
CF compatible network card
• Depending on the CF card and Internet Service Provider (ISP) that you are
using, there may be some data network services that cannot be used. For
details, refer to the operating instructions of your CF card or contact your
ISP.
b For details of CF compatible network cards, refer to the URL shown on the back
cover of this manual.
CF compatible memory card
b For details of CF compatible memory cards, refer to the URL shown on the back cover
of this manual.
b For details of applications you can use with the CF memory card, refer to the “CLIÉ
Application Manual” installed on your computer.
Inserting the CF card
b
Slide down the CF card slot switch
to open the CF card slot
Note
If you forcibly insert the CF card in the wrong direction or at the wrong angle, your
CLIÉ handheld and CF card may be damaged.
Insert the CF card
Continued on next page
• • • • • • • • • • • • • • • • • • • • • • • • • • •
97
CLIÉ™ handheld components
Page 98

IR port
Removing the CF card
Make sure that your CLIÉ handheld is turned off, and then pull out the CF
card.
There is no LED indicator to show when the CF card is writing files/data
or is connecting to the Internet.
b
Pull out the CF card Push the CF card slot to close it
Notes
• Do not remove the CF card while it is connected to the Internet or reading/writing
files/data, as the recorded files/data will be lost. In addition, your CLIÉ handheld
and CF card may be damaged.
Make sure you turn off your CLIÉ handheld before you remove the CF card.
• If the CF card is forcibly removed from the CF card slot in the wrong direction
or at the wrong angle, your CLIÉ handheld and CF card may be damaged.
98
You can beam data or applications between your CLIÉ handheld and another
CLIÉ handheld or Palm OS
®
PDA.
b For details, refer to “Beaming” in the “Handbook.”
When using the remote control function, direct your
CLIÉ handheld towards a target device as indicated by
the upper arrow in the illustration.
* Move your CLIÉ handheld gradually to find the most
sensitive direction.
When using the beaming function,
direct your CLIÉ handheld towards
a target device as indicated by the
right arrow in the illustration.
Tip
You can also use your CLIÉ handheld as a remote control with CLIE Remote
Commander.
b For details, refer to the “CLIÉ Application Manual” installed on your computer.
Page 99

Hardware Keyboard
Red
character
Blue
character
You can use the hardware
keyboard in the same way as
you would use the keyboard of
your computer.
For details about the key
(Blue)
(Red)
arrangement, check your CLIÉ
handheld.
Input commands
You can perform commands using the hardware keys in combination.
Key combinations
Example: Ctrl + C t Hold down the Ctrl key and press the character C key.
Basic operations
Combination Function
(Blue) +
blue character
(Red) +
red character
Caps Lock To type in capitals continuously.
(Blue) +
Caps Lock
To type the characters in blue.
To type the characters in red.
(To return to normal typing, press Caps Lock
again)
To type the characters in blue continuously.
(Repeat to return to normal typing)
CLIÉ™ handheld components
Continued on next page
• • • • • • • • • • • • • • • • • • • • • • • • • • •
99
Page 100

Edit
Combination Function
Ctrl + C Copy the selected text.
Ctrl + D Delete the selected text.
Ctrl + V Paste the selected text.
Ctrl + X Cut the selected text.
Ctrl + Right/Left Selects until the last/first letter of the word.
Shift + Right/Left Selects a continuing/preceding text.
Functions
Combination Function
Ctrl + G Show/hide the silkscreen.
Ctrl + H Go to the Home screen.
Ctrl + L Turn the backlight on/off.
Ctrl + M Display the menu.
Ctrl + O Go to the previous field.
Ctrl + P Go to the next field.
Ctrl + R Perform a full-screen pen stroke.*
* You can change this function by selecting “Prefs” t Buttons t Pen.
100
Dialogs
Combination Function
Ctrl + A Display the Adjust Volume dialog.
Ctrl + B Display the Battery Information dialog.
Ctrl + E Display the Media Info dialog.
Ctrl + F Display the Find dialog.
Ctrl + K Display the Keyboard Help dialog.
Ctrl + T Display the command tool bar.
(Red) + Q Display the Adjust Brightness dialog.
 Loading...