

Sony PEG-N710C Memory Stick Gate v2.0, CLIE PEG-N710C Read This First Manual

Read
This
4-653-877-11(1)
Chapter 1
What is the Sony
CLIE Handheld?
Chapter 2
Setting up your Sony
CLIE Handheld
- Basics
Chapter 3
Setting up your Sony
CLIE Handheld
- Advanced
First
Personal Entertainment Organizer
PEG-N710C
© 2001 Sony Corporation

Program © 2001 Sony Corporation, © 2001 Palm, Inc. or its subsidiaries. All
rights reserved.
Documentation © 2001 Sony Corporation
Sony, Memory Stick, the Memory Stick logo, Jog Dial, OpenMG, and
PictureGear are trademarks of Sony Corporation.
Graffiti, HotSync, Palm Modem, and Palm OS are registered trademarks, and
the HotSync logo and Palm are trademarks of Palm, Inc. or its subsidiaries.
Microsoft and Windows are registered trademarks of Microsoft Corporation.
MMX and Pentium are registered trademarks of Intel Corporation.
AvantGo, the AvantGo Client and the AvantGo logo are registered
trademarks of AvantGo, Inc.
Pumatech, the Pumatech logo, Intellisync and Intellisync Lite are trademarks
of Pumatech, Inc. that may be registered in some jurisdictions.
Adobe
and Adobe Acrobat Reader are trademarks of Adobe Systems
Incorporated.
QuickTime and the QuickTime logo are trademarks used under license.
QuickTime is registered in the U.S. and other countries.
This product includes fonts owned by TypeBank Co., Ltd. under license.
RealJukebox is copyrighted by RealNetworks, Inc.
All other trademarks are trademarks of their respective owners.
Notes
• Sony does not support third-party add-on applications. If you are having a problem
with a third-party application, please contact the developer or publisher of that
software.
• The illustrations in this manual may differ from the actual software.
• Explanations in this manual assume that you are familiar with basic operations of
Windows®. For how to use your computer and operating system, please refer to their
respective manuals.
Before using your CLIE handheld, be sure to read the accompanying
End-User’s License Agreement.
2

Table of Contents
About this manual ........................... 4
Which manual to read? .................... 6
Chapter 1
What is the Sony CLIE Handheld?
What can you do with your
Sony CLIE Handheld? ....................... 8
System requirements ....................... 9
Sony CLIE Handheld components .......
10
Locating front panel controls ........... 10
Locating back panel components .... 12
Locating cradle components ............ 14
Elements of the CLIE interface ......... 15
What is on the CLIE Installation
CD-ROM? ........................................ 17
CD-ROM contents ............................ 17
How to read the PDF manuals
on the CD-ROM ............................... 18
Chapter 2
Setting up your Sony CLIE
Handheld – Basics
Step 1: Charging your Sony CLIE
Handheld ............................ 20
Charging with the cradle ................. 20
Charging directly from
the power supply ............................. 21
Step 2:
Turning on your Sony CLIE
Handheld for the first time .....
Step 3: Entering data into your
Sony CLIE Handheld ........... 26
Step 4: Installing the Palm
™
Desktop for CLIE software
onto your computer ........... 28
Step 5: Connecting your Sony CLIE
Handheld and your computer
via the cradle ..................... 32
22
Step 6:
Performing a HotSync® operation
for the first time ..................
33
Chapter 3
Setting up your Sony CLIE
Handheld – Advanced
Checking the bundled applications
on your Sony CLIE Handheld .......... 36
Overview of basic Palm OS
applications ..................................... 37
Overview of Sony applications......... 40
Installing the supplied applications
onto your computer ....................... 42
Installing the OpenMG
Jukebox for CLIE software ............... 42
Installing RealJukebox
Installing PictureGear
Installing QuickTime 4 ..................... 44
Installing DirectX® 6 ........................ 45
Installing AvantGo
add-on applications ......................... 45
Installing Acrobat Reader® 4.05 ...... 46
Uninstalling the supplied
applications ..................................... 47
Installing add-on applications onto
your Sony CLIE Handheld ............... 48
Installing add-on applications from the
Palm™ Desktop for CLIE software .........
Installing add-on applications from
“Memory Stick®” media .................. 51
Installing add-on applications by
beaming them from another
®
Palm OS
device .............................. 52
Removing add-on applications ........ 54
Recommendation for installing
the Up-date file .............................. 55
Customer registration .................... 56
®
™
®
for Sony ..... 43
™
4.3Lite ........ 44
®
and other
48
3

About this manual
Welcome to the Sony Personal Entertainment Organizer (referred to as
CLIE handheld or Sony Handheld in this manual).
Your CLIE handheld comes with three manuals:
■ Read This First (this guide)
■ Operating Instructions (as a PDF file contained in the CD-ROM)
■ Add-on Application Guide
Before using your CLIE handheld, read this guide for overview of
features, setup and installation instructions, and other important
details.
After you set up your CLIE handheld and become familiar with its
basic functionality, you can use the other two manuals (Operating
Instructions and Add-on Application Guide) as references for detailed
features, less common tasks, and for maintaining your CLIE handheld.
These manuals can also serve as a source of information if you have
problems operating your CLIE handheld.
The contents of the three manuals are:
Read This First (this guide)
This guide is designed to help you get up and running quickly on your
CLIE handheld.
This guide shows you how to:
■ Identify all the parts of your CLIE handheld
■ Set up your CLIE handheld
■ Install supplied applications onto your CLIE handheld and your
computer
■ View and enter data
4

Operating Instructions
The Operating Instructions manual is contained in the supplied
CD-ROM as a PDF file, allowing you to view or print it as soon as you
need it.
The manual describes how to use your CLIE handheld and the
Personal Information Management (PIM) applications that come with
your CLIE handheld.
The manual shows you how to:
■ View and enter data in greater detail
■ Use your CLIE handheld with your computer
■ Use Personal Information Management applications (Date Book,
Address Book, To Do List, Memo Pad, Expense, and Calculator)
■ Personalize your CLIE handheld with your own preference
settings
■ Maintain your CLIE handheld
Add-on Application Guide
The Add-on Application Guide describes how to install and use the
supplied add-on applications that include:
■ Audio Player
■ PictureGear™ Pocket/PictureGear 4.3Lite
■ gMovie™ player
■ MS Autorun
5

Which manual to read?
After you set up your CLIE handheld and become familiar with its
basic functionality, you can use the rest of the manuals as follows:
When you want to: Read:
Manage your personal
information using your
CLIE applications.
Use your CLIE handheld
and your computer in
synchronization.
Exchange and share
information with
other handheld users.
Enjoy music on your
CLIE handheld.
Enjoy viewing images on
your CLIE handheld.
Enjoy watching movies on
your CLIE handheld.
Operating Instructions
Chapter 2
Using your basic applications
Operating Instructions
Chapter 3
Exchanging and updating data
®
using a HotSync
Operating Instructions
Chapter 4
Communicating using your
Sony CLIE Handheld
Add-on Application Guide
Chapter 1
Playing audio files
(Audio Player)
Add-on Application Guide
Chapter 2
Viewing image files
(PictureGear Pocket)
Add-on Application Guide
Chapter 3
Playing a movie
(gMovie player)
operation
6

Chapter 1
What is the Sony CLIE Handheld?
This chapter explains the features of your CLIE handheld, its system
requirements, its buttons and controls, and the contents of the Installation
CD-ROM.
Contents
What can you do with your Sony CLIE Handheld?............................ 8
System requirements ........................................................................ 9
Sony CLIE Handheld components ................................................... 10
Locating front panel controls .................................................... 10
Locating back panel components .............................................. 12
Locating cradle components ..................................................... 14
Elements of the CLIE interface .................................................. 15
What is on the CLIE Installation CD-ROM? .................................... 17
CD-ROM contents .................................................................... 17
How to read the PDF manuals on the CD-ROM ......................... 18
Chapter 1

What can you do with your Sony CLIE Handheld?
Your CLIE handheld can help you remember appointment and
meeting times, people’s names and personal details, and items on your
To Do List. Your CLIE handheld can also help you improve your track
record in all these areas, both at work and at home.
Once you familiarize yourself with the basic workings of your CLIE
handheld, you’ll easily be able to:
■ Enter all your schedule details in the Date Book and view them by
the day, week, or month, and even set an alarm to remind you of
an important event.
■ Keep all your contact names, addresses, phone numbers, and other
details in the Address Book. In addition, you can paste an image to
an address record using the supplied PictureGear™ Pocket
software.
■ Add your tasks to the To Do List, prioritize them, and assign them
a due date.
■ Synchronize your data with the Palm™ Desktop for CLIE software
on your computer so you always have a backup copy of your
important information.
■ Customize your CLIE handheld and set different levels of security
to prevent unauthorized users from viewing your data.
■ Track expenses for your expense reports when you’re out of the
office, and then transfer the data to your computer for further use.
■ Exchange data with your computer, other Sony CLIE handhelds,
digital cameras, or other portable devices with Sony’s “Memory
®
Stick
” media.
■ Play back image files with the PictureGear™ Pocket software on
your CLIE handheld or with the PictureGear™ Lite software on
your computer.
■ Play back MP3 or ATRAC3 audio files with the Audio Player
Ver. 2.0 software.
■ Watch a movie with the gMovie player software on your CLIE
handheld.
■ Use other add-on applications for the Palm OS
®
.
8

System requirements
To install and operate the Palm™ Desktop software on your computer,
your computer system must meet the following requirements:
■ OS: Microsoft
Windows
■ CPU: Pentium processor 233 MHz or greater (MMX™ technology
Pentium processor recommended)
■ RAM: 64 MB or more
■ Hard disk drive: 128 MB or more available space
■ Display: High Color or more (640 x 480 pixels or more/800 x 600
pixels or more recommended)
■ CD-ROM drive
■ Mouse or similar pointing device
■ One available USB connector
Notes
•To install the Palm Desktop for CLIE software onto Windows® 2000
Professional, log on as “Administrator.”
•We don’t support Macintosh computer.
®
Windows® 98/Windows® 98 Second Edition/
®
2000 Professional/Windows® Millennium Edition
Chapter 1
What is the Sony CLIE Handheld?
9
Sony CLIE Handheld components
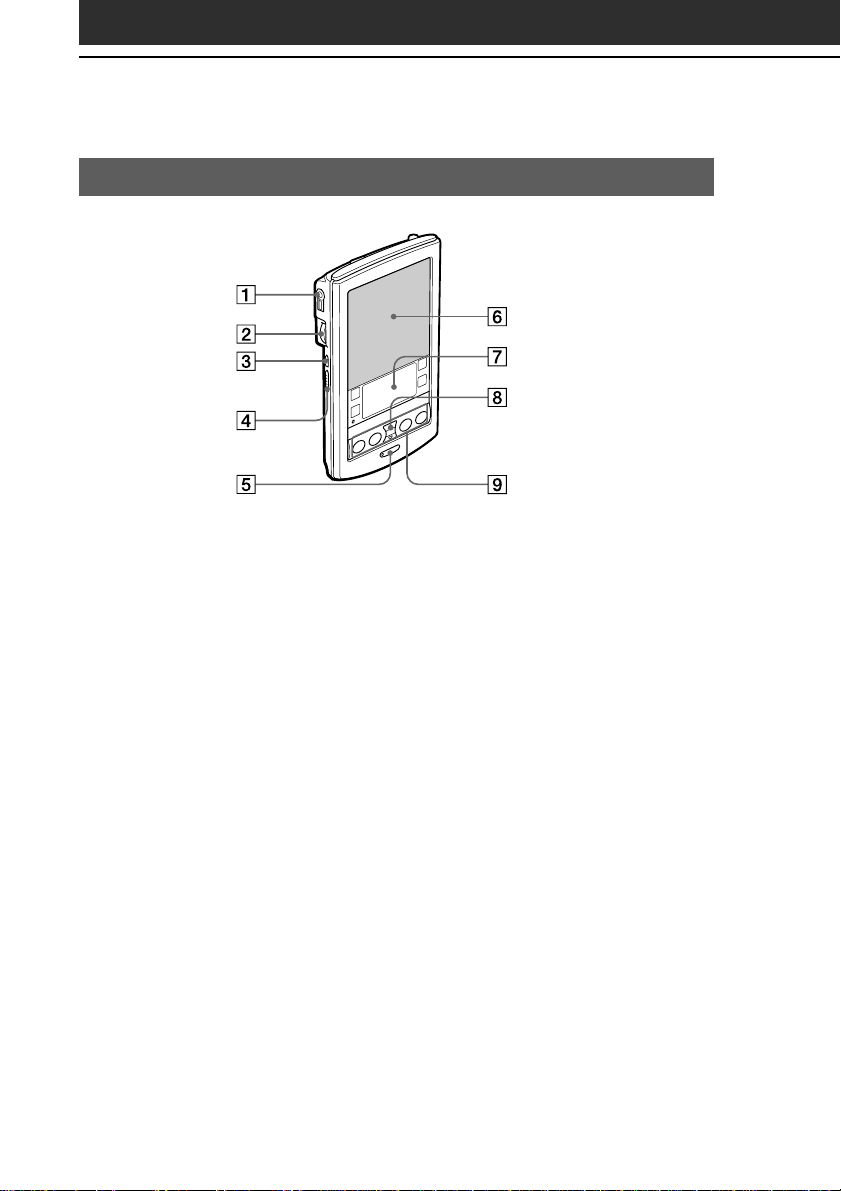
Locating front panel controls
1 Headphones jack
Plug into the supplied headphones jack with a remote control unit or
stereo mini jack. For details, see “Connecting/attaching the
supplied headphones” in the Add-on applications manual.
2 Jog Dial™ Navigator
Used to select and run applications or items. Depending on the
application you use, specific functions are assigned to the navigator.
For details, see “Using the Jog Dial™ navigator” in the Operating
Instructions manual.
3 Back Button
4 HOLD Switch
10
Releases the selection of an item or cancels the operation. Depending
on the application you use, returning to the previous screen or other
specific functions are assigned to this button.
Protects your CLIE handheld from accidental tapping on the screen
or pressure on the POWER button when you are carrying your CLIE
handheld. If you slide this switch to activate it while the power is on,
the screen display turns off even during an operation. Sliding the
switch to deactivate HOLD will resume normal operation.

5 POWER Button
Used to turn your CLIE handheld on or off.
Also, press the POWER button and hold it down for two seconds or
longer to turn the frontlight of the color LCD display on or off.
6 Screen
Displays the applications and information stored in your CLIE
handheld. It is touch-sensitive and responds to the stylus.
For details, see “Elements of he CLIE interface” on page 15.
7 Graffiti Writing Area
The area where you write letters and numbers using the Graffiti
alphabet. See “Using Graffiti® writing to enter data” in the
Operating Instructions manual to learn how to write Graffiti
characters.
8 Scroll Button
Displays text and other information that extends beyond the area of
the screen. Pressing the lower half of the scroll button scrolls down
to display information below the current viewing area, and pressing
the upper half of the button scrolls up to display the information
above the current viewing area. Depending on the application you
use, specific functions are assigned to the scroll button.
9 Application Buttons
Activates the individual applications that correspond to the icons on
the buttons:
Memo Pad. See “Assigning applications to buttons” in the
Operating Instructions manual for details on reassigning these
buttons to activate any application on your CLIE handheld.
Date Book, Address Book, To Do List, and
Chapter 1
What is the Sony CLIE Handheld?
®
Tip
If your CLIE handheld is turned off, pressing any application button activates
your CLIE handheld and opens the corresponding application.
11

Sony CLIE Handheld components
Locating back panel components
1 Stylus
Used to tap icons and buttons on the screen, or to write characters on
the Graffiti writing area.
For details, see “Using the stylus” in the Operating Instructions
manual.
2 “Memory Stick®” access indicator
Lights in orange while your CLIE handheld is reading/writing the
data in “Memory Stick” media.
3 “Memory Stick” Slot
Insert “Memory Stick” media into this slot.
4 Infrared Communication Port
Uses infrared technology to transmit data to and receive data from
other CLIE or Palm OS
operations.
For details, see “Beaming between your Sony CLIE Handheld and
another Palm OS
®
PDA” in the Operating Instructions manual.
12
®
handhelds, and to perform HotSync
®
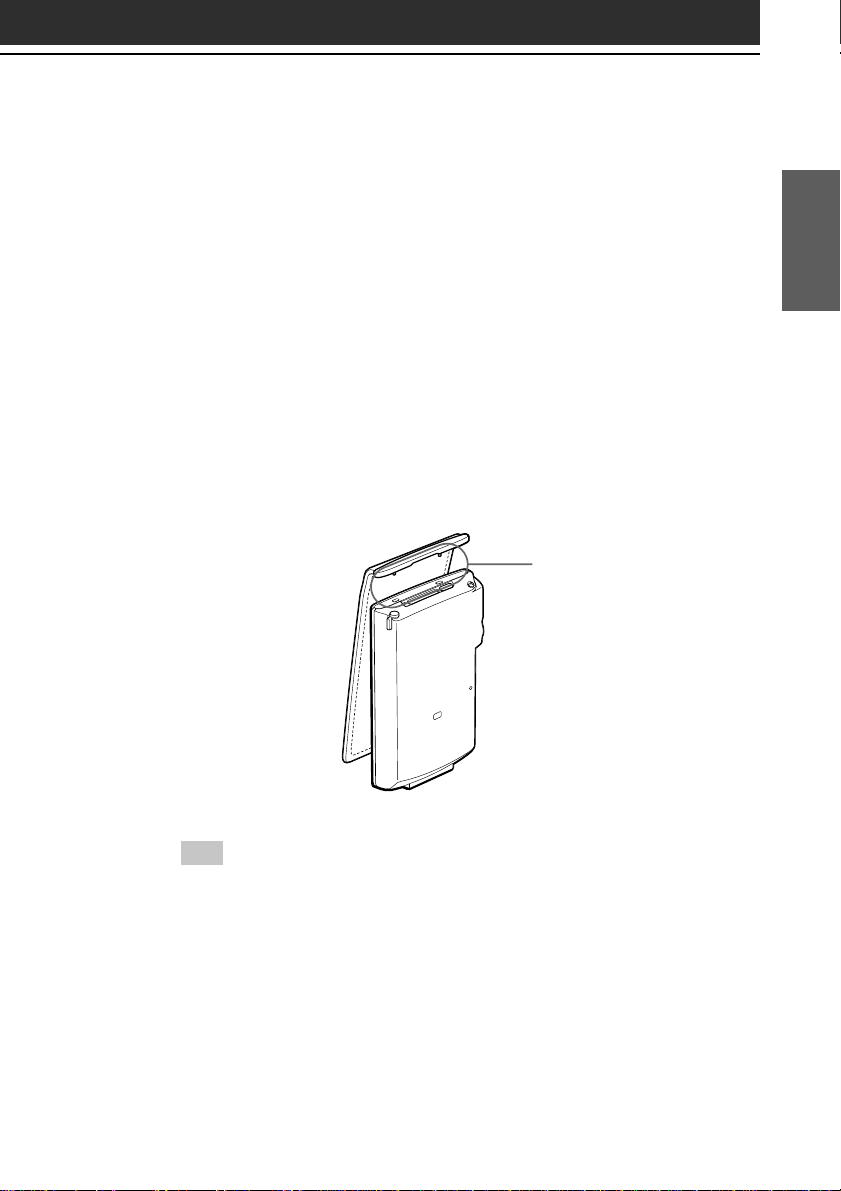
5 Reset Button
Under normal use, you should not have to use this button.
For details, see “Resetting your Sony CLIE Handheld” in the
Operating Instructions manual.
6 Interface Connector
Used to connect your CLIE handheld to the cradle, AC adapter, or
CLIE Modem (not supplied).
Removing the supplied protective soft cover from your CLIE
handheld
On the marked area in the illustration below, lift to remove the
protective soft cover. If you attempt to remove the cover forcibly, it
may be damaged.
Lift here to remove the
cover.
Chapter 1
What is the Sony CLIE Handheld?
Tip
Please remove the protective soft cover from your CLIE handheld when placing
it on the cradle or connecting it to the AC adapter.
13
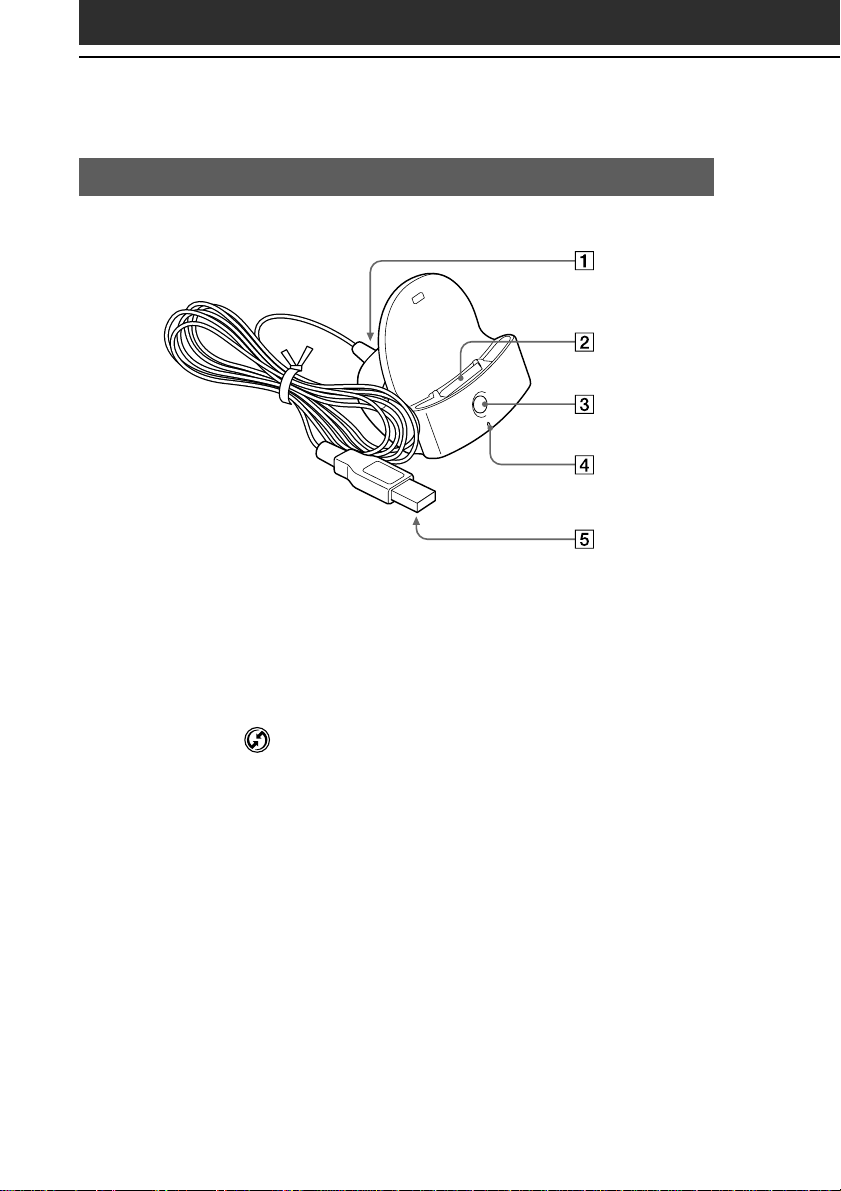
Sony CLIE Handheld components
Locating cradle components
1 AC Adapter Connector
Connect the supplied AC adapter here.
2 Interface Connector
Connect your CLIE handheld here.
4 HotSync Button
Synchronizes data in your CLIE handheld with the data saved on
your computer.
For details, see “Exchanging and updating data using a HotSync
operation” in the Operating Instructions manual.
4 Cradle Indicator
When you connect the cradle to the AC adapter and place your CLIE
handheld on the cradle, the indicator lights in green and charging
will start.
5 USB Connector
Connects to your computer’s USB port.
14
®
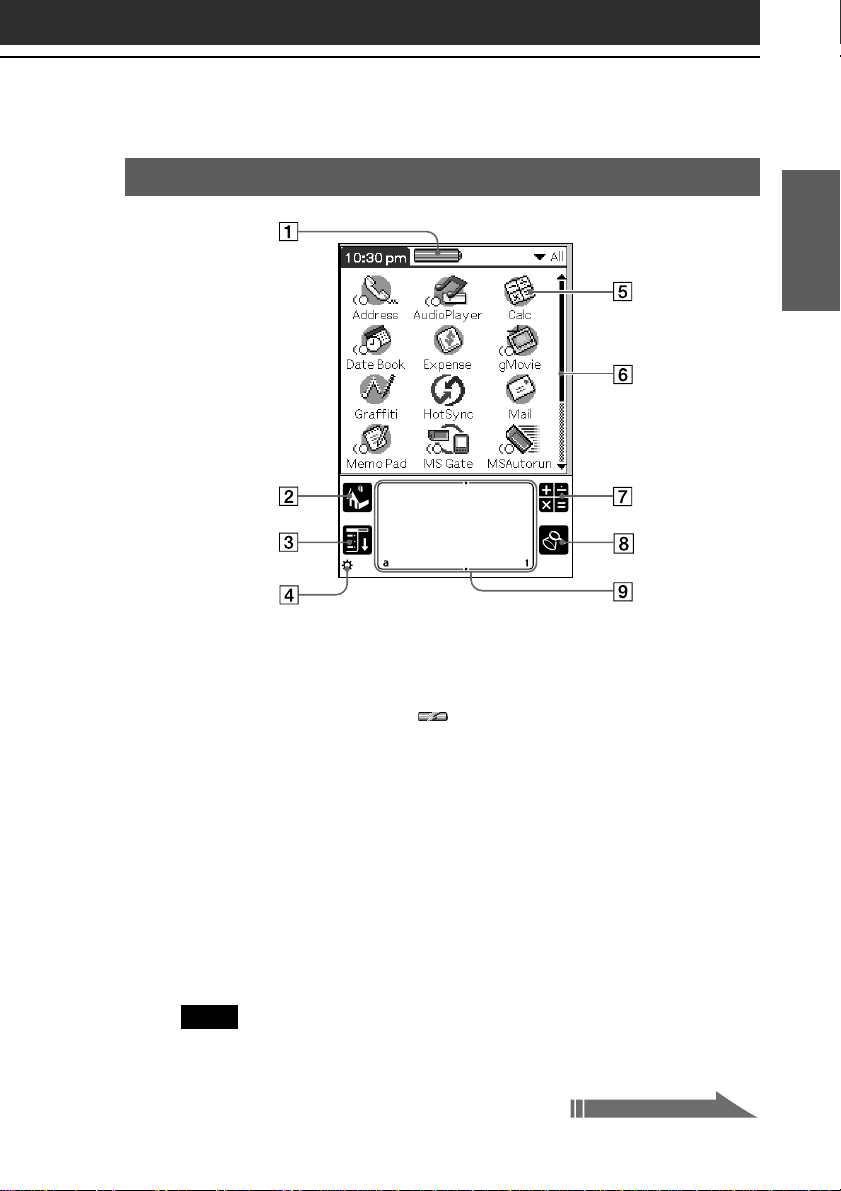
Elements of the CLIE interface
1 Battery Icon
Displays the remaining charge in the battery. While your CLIE
handheld is placed in the cradle or operates on the AC power source,
the battery charging icon (
2 Home Icon
Tap this icon and the Application Launcher screen appears,
displaying a list of applications.
) is displayed.
Chapter 1
What is the Sony CLIE Handheld?
3 Menu Icon
Tap this icon and a menu of current applications appears.
4 Brightness Adjustment Icon
Tap this icon to display the window used for adjusting the frontlight
level on the LCD screen of your CLIE handheld.
Note
If the digitizer preferences are not set correctly, you cannot adjust the frontlight
level properly. For details, see “Changing the frontlight level” in the Operating
Instructions manual.
Continued on next page
15

Sony CLIE Handheld components
5 Application Icon
Tap an icon to activate the corresponding application.
6 Scroll Bar
Drag the slider up or down or tap the scroll arrows v or V on the
ends of the bar to scroll the screen.
7 Calculator Icon
Tap this icon to display the onscreen Calculator.
8 Find Icon
Tap this icon to open the Find screen.
9 Graffiti Writing Area
This area is for hand-writing input with the Graffiti alphabet.
Tip
When the tip i icon is displayed, you can tap the icon to display online
operational tips on the screen.
Tip i icon
Note on display resolutions
Your CLIE handheld uses original technology to provide a 320 x 320
dot high resolution display. When you start an application supporting
the high resolution, the screen switches automatically to the high
resolution mode. When you start an application that does not support
high resolution, the screen returns to the standard 160 x 160 dot
resolution mode.
Note
In some third-party applications, the screen may not be displayed properly.
16

What is on the CLIE Installation CD-ROM?
CD-ROM contents
The Installation CD-ROM that comes with your CLIE handheld
contains the following applications and manuals:
■ PC applications
You can install the following PC applications and related online
help files from the installer’s main launcher window:
– Palm Desktop for CLIE 3.1
including Intellisync Lite 1.0
– OpenMG Jukebox for CLIE
– RealJukebox for Sony
– PictureGear 4.3Lite
– QuickTime 4
– DirectX 6
The following PC application has separate installer package:
– Adobe Acrobat Reader 4.05
■ Palm OS applications
You can install the following CLIE specific Palm OS® applications
onto your CLIE handheld:
– Audio Player Ver.2.0
– AvantGo
– PowerOne Personal
The following sample data and demonstration files are also
available:
– Sample data for Audio Player, gMovie player,
and PictureGear Pocket
– GoAmerica Wireless Service Demo (ISP)
– CLIE demo
Chapter 1
What is the Sony CLIE Handheld?
Continued on next page
17

What is on the CLIE Installation CD-ROM?
■ Manuals
The following manuals are available as PDF files on the CD-ROM:
– Read This First (this guide)
– Operating Instructions
– Add-on Application Guide
– Audio Player manual
– gMovie manual
– PictureGear Pocket manual
– MSGate manual
– MSAutorun manual
Tip
You can view the manuals by clicking Manuals in the installation launcher
window of the CLIE handheld.
How to read the PDF manuals on the CD-ROM
To view the PDF manuals contained on the Installation CD-ROM, you
need the Acrobat Reader software installed on your computer. To
install the Acrobat Reader software, see “Installing Acrobat Reader
4.05” on page 46.
To open a PDF manual, do either of the following:
• Double-click a PDF file on the CD-ROM.
The Acrobat Reader software starts and the selected PDF manual is
displayed. You can read and print the file.
• Start the Acrobat Reader software and select Open from the File
menu. In the Open dialog box, select a PDF file and click Open.
The selected PDF manual is displayed. You can read and print the
file.
®
18
 Loading...