

Page 1

*3-278-781-02*
PROFESSIONAL DISC CAMCORDER
PDW-510/510P
PDW-530/530P
(1)
The supplied CD-ROM includes operation manuals for the PDW-510/
510P/530/530P Professional Disc Camcorder (English, Japanese,
French, German, Italian, Spanish and Chinese versions) in PDF format.
For more details, see 1-4 “Using the CD-ROM Manual” on page 18.
OPERATION MANUAL [English]
1st Edition (Revised 10)
Page 2

WARNING
To reduce the risk of fire or electric shock,
do not expose this apparatus to rain or
moisture.
To avoid electrical shock, do not open the
cabinet. Refer servicing to qualified
personnel only.
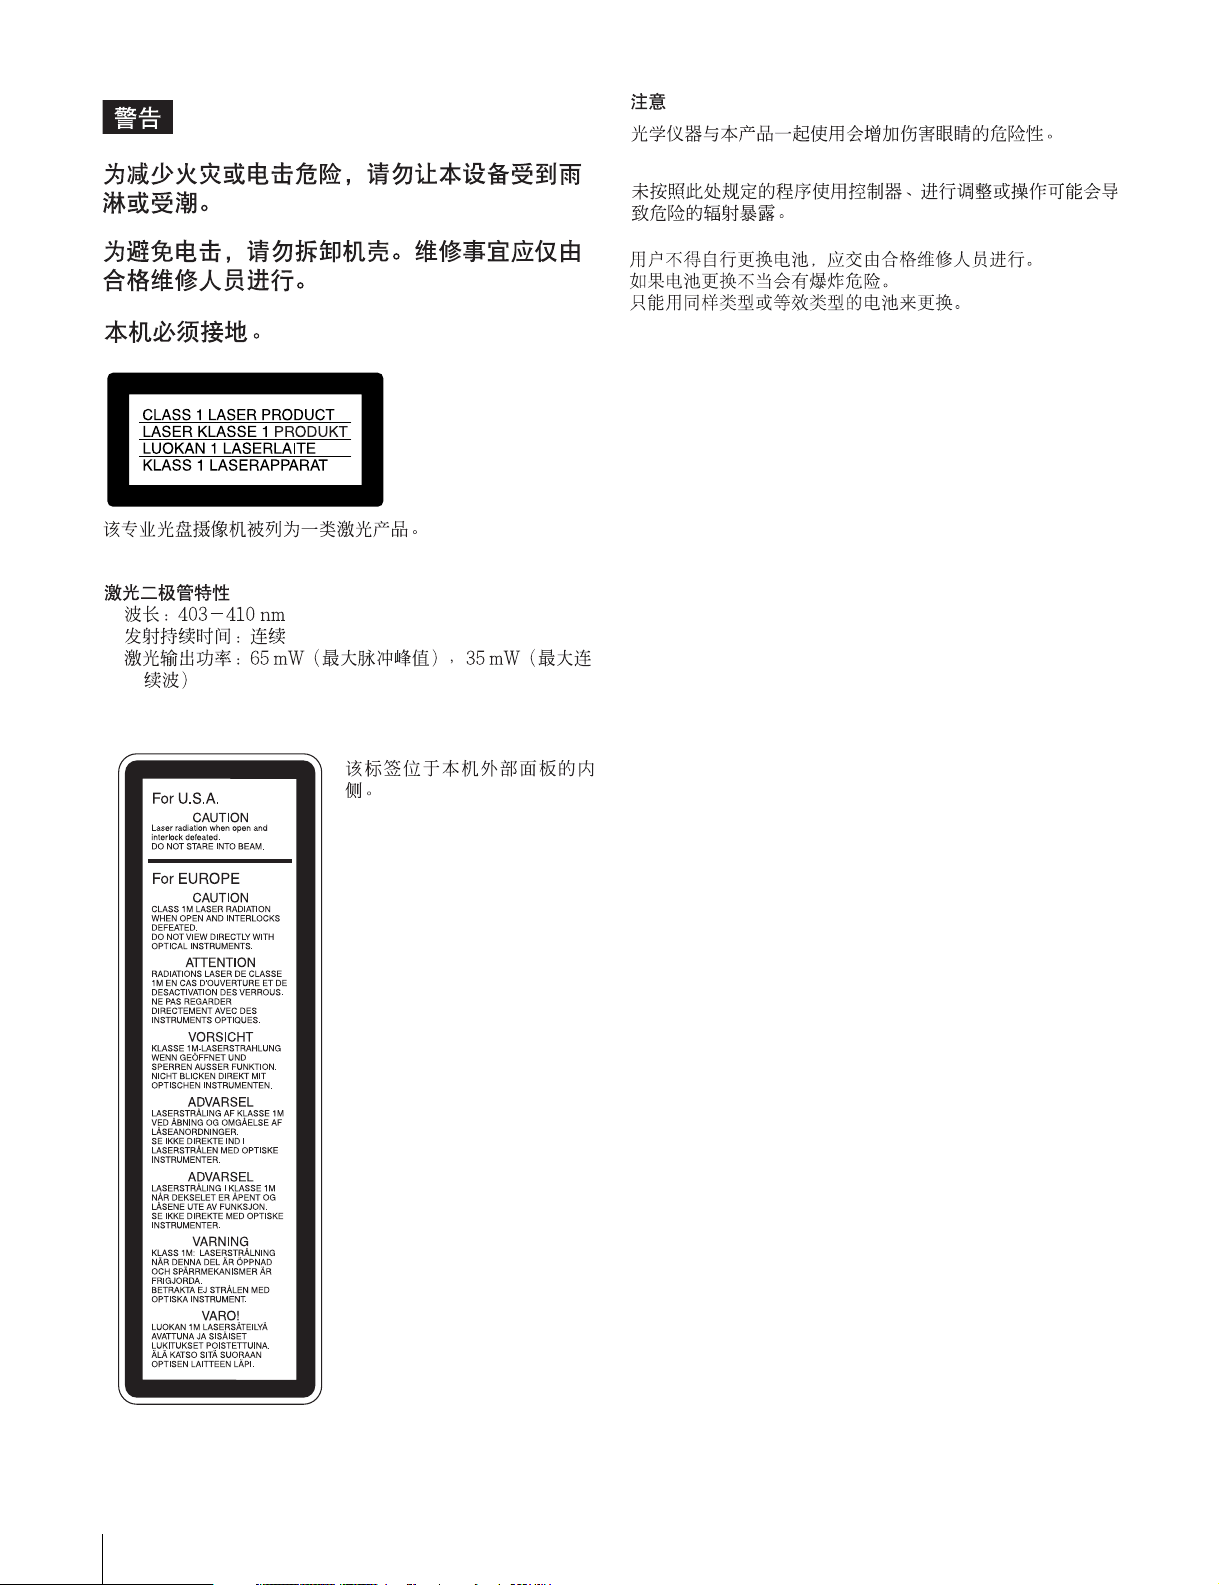
This Professional Disc Camcorder is classified as a CLASS 1
LASER PRODUCT.
Laser diode properties
Wavelength: 403 to 410 nm
Emission duration: Continuous
Laser output power: 65 mW (max. of pulse peak), 35 mW
(max. of CW)
Standard: IEC60825-1 (2001)
Tekniska data för laserdiod
Våglängd: 403 till 410 nm
Emissionslängd: Kontinuerlig
Laseruteffekt: 65 mW (max. för pulstopp), 35 mW (max. för
kontinuerlig våg)
Standard: IEC60825-1 (2001)
Egenskaber for laserdiode
Bølgelængde: 403 til 410 nm
Strålingsvarighed: Kontinuerlig
Afgivet lasereffekt: 65 mW (maks stråletoppunkt), 35 mW
(maks ved kontinuerlig stråling)
Standard: IEC60825-1 (2001)
Laserdiodin ominaisuudet
Aallonpituus: 403 - 410 nm
Säteilyn kesto: jatkuva
Laserin teho: 65 mW (pulssin huipun maks.), 35 mW
(jatkuvan aallon maks.)
Standardi: IEC60825-1 (2001)
This label is located inside
the outside panel of the unit.
Denna etikett finns på
apparatens ovansida.
Denne mærkat sidder på
apparatets øverste panel.
Tämä kyltti sijaitsee laitteen
yläpinnalla.
Dette merket er plassert på
oversiden av produktet.
CAUTION
The use of optical instruments with this product will increase
eye hazard.
Use of controls or adjustments or performance of procedures
other than those specified herein may result in hazardous
radiation exposure.
VAROITUS!
LAITTEEN KÄYTTÄMINEN MUULLA KUIN TÄSSÄ
KÄYTTÖOHJEESSA MAINITULLA TAVALLA SAATTAA
ALTISTAA KÄYTTÄJÄN TURVALLISUUSLUOKAN 1
YLITTÄVÄLLE NÄKYMÄTTÖMÄLLE LASERSÄTEILYLLE.
VARNING
OM APPARATEN ANVÄNDS PÅ ANNAT SÄTT ÄN I DENNA
BRUKSANVISNING SPECIFICERATS, KAN ANVÄNDAREN
UTSÄTTAS FÖR OSYNLIG LASERSTRÅLNING, SOM
ÖVERSKRIDER GRÄNSEN FÖR LASERKLASS 1.
For the customers in the USA
This equipment has been tested and found to comply with the
limits for a Class B digital device, pursuant to Part 15 of the
FCC Rules. These limits are designed to provide reasonable
protection against harmful interference in a residential
installation. This equipment generates, uses, and can radiate
radio frequency energy and, if not installed and used in
accordance with the instructions, may cause harmful
interference to radio communications.
However, there is no guarantee that interference will not occur
in a particular installation. If this equipment does cause
2
Page 3

harmful interference to radio or television reception, which can
be determined by turning the equipment off and on, the user is
encouraged to try to correct the interference by one or more of
the following measures;
– Reorient or relocate the receiving antenna.
– Increase the separation between the equipment and
receiver.
– Connect the equipment into an outlet on a circuit different
from that to which the receiver is connected.
– Consult the dealer or an experienced radio/TV technician for
help.
You are cautioned that any changes or modifications not
expressly approved in this manual could void your authority to
operate this equipment.
All interface cables used to connect peripherals must be
shielded in order to comply with the limits for a digital device
pursuant to Subpart B of Part 15 of FCC Rules.
For the customers in the USA
Lamp in this product contains mercury. Disposal of these
materials may be regulated due to environmental
considerations. For disposal or recycling information, please
contact your local authorities or the Electronic Industries
Alliance (www.eiae.org).
For the customers in Taiwan only
For the State of California, USA only
Perchlorate Material - special handling may apply, See
www.dtsc.ca.gov/hazardouswaste/perchlorate
Perchlorate Material : Lithium battery contains perchlorate.
For the customers in Europe
This product with the CE marking complies with the EMC
Directive issued by the Commission of the European
Community.
Compliance with this directive implies conformity to the
following European standards:
• EN55103-1: Electromagnetic Interference (Emission)
• EN55103-2: Electromagnetic Susceptibility (Immunity)
This product is intended for use in the following
Electromagnetic Environment(s):
E1 (residential), E2 (commercial and light industrial), E3
(urban outdoors) and E4 (controlled EMC environment, ex. TV
studio).
The manufacturer of this product is Sony Corporation, 1-7-1
Konan, Minato-ku, Tokyo, Japan.
The Authorized Representative for EMC and product safety is
Sony Deutschland GmbH, Hedelfinger Strasse 61, 70327
Stuttgart, Germany. For any service or guarantee matters
please refer to the addresses given in separate service or
guarantee documents.
3
Page 4
AVERTISSEMENT
Afin de réduire les risques d’incendie ou
d’électrocution, ne pas exposer cet
appareil à la pluie ou à l’humidité.
Afin d’écarter tout risque d’électrocution,
garder le coffret fermé. Ne confier
l’entretien de l’appareil qu’à un personnel
qualifié.
Cet camescope de disques pour professionnels est classé
PRODUIT LASER DE CLASSE 1.
Propriétés de la diode laser
Longueur d’onde: 403 à 410 nm
Durée d’émission: Continue
Puissance de sortie laser: 65 mW (maxi de crête
d’impulsion), 35 mW (maxi d’ondes entretenues)
Norme: IEC60825-1 (2001)
ATTENTION
L’emploi d’instruments optiques avec ce produit augmentera
les risques pour les yeux.
L’emploi de commandes ou ajustements ou l’exécution de
procédures autres que celles spécifiées ici peut provoquer
une exposition dangereuse au rayonnement.
Pour les clients européens
Ce produit portant la marque CE est conforme à la Directive
sur la compatibilité électromagnétique (EMC) émise par la
Commission de la Communauté européenne.
La conformité à cette directive implique la conformité aux
normes européennes suivantes :
EN55103-1 : Interférences électromagnétiques (émission)
EN55103-2 : Sensibilité électromagnétique (immunité)
Ce produit est prévu pour être utilisé dans les environnements
électromagnétiques suivants :
E1 (résidentiel), E2 (commercial et industrie légère),
E3 (urbain extérieur) et E4 (environnement EMC contrôlé, ex.
studio de télévision).
Le fabricant de ce produit est Sony Corporation, 1-7-1 Konan,
Minato-ku, Tokyo, Japon.
Le représentant autorisé pour EMC et la sécurité des produits
est Sony Deutschland GmbH, Hedelfinger Strasse 61, 70327
Stuttgart, Allemagne. Pour toute question concernant le
service ou la garantie, veuillez consulter les adresses
indiquées dans les documents de service ou de garantie
séparés.
Cette étiquette est placée à
l’intérieur du panneau
extérieur de l’appareil.
4
Page 5
WARNUNG
Um die Gefahr von Bränden oder
elektrischen Schlägen zu verringern, darf
dieses Gerät nicht Regen oder Feuchtigkeit
ausgesetzt werden.
Um einen elektrischen Schlag zu
vermeiden, darf das Gehäuse nicht
geöffnet werden. Überlassen Sie
Wartungsarbeiten stets nur qualifiziertem
Fachpersonal.
Dieses Gerät ist als CLASS 1 LASER PRODUCT eingestuft.
Eigenschaften der Laserdiode
Wellenlänge: 403 bis 410 nm
Emissionsdauer. Ununterbrochen
Laser-Ausgangsleistung: 65 mW (max. Impulsspitze), 35
mW (max. Dauerstrich)
Standard: IEC60825-1 (2001)
Dieser Aufkleber befindet
sich hinter der
Außenabdeckung des
Geräts.
VORSICHT
Der Einsatz von optischen Hilfen verstärkt die Gefahr von
Augenschäden.
Bei Betätigung von Bedien- und Einstellteilen oder
Ausführung von Bedienvorgängen, die nicht ausdrücklich in
dieser Bedienungsanleitung aufgeführt sind, droht u.U. die
Einwirkung gefährlicher Laserstrahlung.
GEFAHR
Bei geöffnetem Laufwerk und beschädigter oder deaktivierter
Verriegelung tritt ein unsichtbarer Laserstrahl aus.
Direkter Kontark mit dem Laserstrahl ist unbedingt zu
vermeiden.
Für Kunden in Europa
Dieses Produkt besitzt die CE-Kennzeichnung und erfüllt die
EMV-Richtlinie der EG-Kommission.
Angewandte Normen:
• EN55103-1: Elektromagnetische Verträglichkeit
(Störaussendung)
• EN55103-2: Elektromagnetische Verträglichkeit
(Störfestigkeit),
für die folgenden elektromagnetischen Umgebungen:
E1 (Wohnbereich), E2 (kommerzieller und in beschränktem
Maße industrieller Bereich), E3 (Stadtbereich im Freien) und
E4 (kontrollierter EMV-Bereich, z.B. Fernsehstudio).
Der Hersteller dieses Produkts ist Sony Corporation, 1-7-1
Konan, Minato-ku, Tokyo, Japan.
Der autorisierte Repräsentant für EMV und Produktsicherheit
ist Sony Deutschland GmbH, Hedelfinger Strasse 61, 70327
Stuttgart, Deutschland. Bei jeglichen Angelegenheiten in
Bezug auf Kundendienst oder Garantie wenden Sie sich bitte
an die in den separaten Kundendienst- oder
Garantiedokumenten aufgeführten Anschriften.
5
Page 6
ATTENZIONE
Per ridurre il rischio di incendi o scosse
elettriche, non esporre questo apparato
alla pioggia o all’umidità.
CAUTELA
L’uso di strumenti ottici con questo prodotto aumenta il rischio
per la vista.
L’uso di comandi o regolazioni o l’esecuzione di procedimenti
diversi da quelli specificati in questo manuale possono
causare esposizione a radiazioni pericolose.
Per evitare scosse elettriche, non aprire
l’involucro. Per l’assistenza rivolgersi
unicamente a personale qualificato.
Questo camcorder di dischi professionale è classificato come
PRODOTTO LASER CLASSE 1.
Proprietà del laser a diodo
Lunghezza d’onda: da 403 a 410 nm
Durata emissione: Continua
Potenza d’emissione del laser: 65 mW (mass. a picco di
impulso), 35 mW (mass. di CW)
Norma: IEC60825-1 (2001)
Questa etichetta si trova
all’interno del pannello
esterno dell’unità.
Per i clienti in Europa
Questo prodotto recante il marchio CE è conforme sia alla
direttiva sulla compatibilità elettromagnetica (EMC) emesse
dalla Commissione della Comunità Europea.
La conformità a queste direttive implica la conformità alle
seguenti normative europee:
EN55103-1: Interferenza elettromagnetica (Emissione)
EN55103-2: Sensibilità ai disturbi elettromagnetici (Immunità)
Questo prodotto è destinato all’uso nei seguenti ambienti
elettromagnetici:
E1 (residenziali), E2 (commerciali e industriali leggeri), E3
(esterni urbani) e E4 (ambienti EMC controllati, ad esempio
studi televisivi).
Il fabbricante di questo prodotto è la Sony Corporation, 1-7-1
Konan, Minato-ku, Tokyo, Giappone.
La rappresentanza autorizzata per EMC e la sicurezza dei
prodotti è la Sony Deutschland GmbH, Hedelfinger Strasse
61, 70327 Stoccarda, Germania. Per qualsiasi questione
riguardante l’assistenza o la garanzia, si prega di rivolgersi
agli indirizzi riportati nei documenti sull’assistenza o sulla
garanzia a parte.
6
Page 7
ADVERTENCIA
Para reducir el riesgo de electrocución, no
exponga este aparato a la lluvia ni a la
humedad.
PRECAUCIÓN
El uso de instrumentos ópticos con este producto aumentará
el peligro a los ojos.
La utilización de controles o ajustes, o la realización de
procedimientos no especificados aquí pueden resultar en la
exposición a radiación peligrosa.
Para evitar descargas eléctricas, no abra el
aparato. Solicite asistencia écnica
únicamente a personal especializado.
Este grabador de discos profesional está clasificado como
CLASS 1 LASER PRODUCT.
Propiedades del diodo láser
Longitud de onda: 403 a 410 nm
Duración de la emisión: Continua
Potencia de salida láser: 65 mW (máx. de pico de pulso),
35 mW (máx. de onda continua)
Estándar: IEC60825-1 (2001)
Esta etiqueta se encuentra
en el interior del panel
exterior de la unidad.
Para los clientes de Europa
Este producto cumple con las directivas de compatibilidad
electromagnética de la Comisión Europea.
El cumplimiento de estas directivas implica la conformidad
con los siguientes estándares europeos:
• EN55103-1: Interferencia electromagnética (Emisión)
• EN55103-2: Susceptibilidad electromagnética (Inmunidad)
Este producto está ha sido diseñado para utilizarse en los
entornos electromagnéticos siguientes:
E1 (zona residencial), E2 (zona comercial e industrial ligera),
E3 (exteriores urbanos), y E4 (entorno con EMC controlada,
p. ej., estudio de televisión).
El fabricante de este producto es Sony Corporation, con
dirección en 1-7-1 Konan, Minato-ku, Tokio, Japón.
El Representante autorizado para EMC y seguridad del
producto es Sony Deutschland GmbH, Hedelfinger Strasse
61, 70327 Stuttgart, Alemania. Para asuntos relacionados con
el servicio y la garantía, consulte las direcciones entregadas
por separado para los documentos de servicio o garantía.
7
Page 8
8
Page 9

Table of Contents
Chapter 1 Overview
1-1 Features............................................. 13
1-1-1 Principal Differences Between the
PDW-510/510P and PDW-530/530P13
1-1-2 Camera Features ..............................13
1-1-3 Features of the Optical Disc Drive
(VDR) ..............................................14
1-1-4 Inputs and Outputs...........................15
1-1-5 Other Functions ...............................16
1-2 Example of System Configuration .. 17
1-3 Precautions ....................................... 18
1-4 Using the CD-ROM Manual .............. 18
1-4-1 Preparations .....................................18
1-4-2 Reading the CD-ROM Manual........18
1-5 MPEG-4 Visual Patent Portfolio License
........................................................... 19
1-6 MPEG-2 Video Patent Portfolio License
........................................................... 19
Chapter 2 Locations and Functions
of Parts and Controls
2-1 Power Supply .................................... 21
2-2 Accessory Attachments................... 23
2-3 Audio Functions................................ 24
2-4 Shooting and Recording/Playback
Functions .......................................... 27
2-5 Output Video Operating Section ..... 34
2-6 Menu Operating Section................... 35
2-7 Time Code System............................ 37
2-8 Warnings and Indications ................ 39
2-9 Warnings and Indications on the LCDs
........................................................... 40
2-9-1 Monochrome LCD........................... 40
2-9-2 Color LCD ....................................... 41
2-10 Indicators in the Viewfinder........... 42
Chapter 3 Recording and Playback
3-1 Handling Discs.................................. 45
3-1-1 Discs Used for Recording and Playback
.........................................................45
3-1-2 Notes on Handling ...........................45
3-1-3 Write-Protecting Discs ....................45
3-1-4 Loading and Unloading a Disc ........ 46
3-1-5 Formatting a Disc ............................47
3-1-6 Handling of Discs When Recording
Does Not End Normally (Salvage
Function).......................................... 47
3-2 Recording .......................................... 49
3-2-1 Basic Procedures.............................. 49
3-2-2 Deleting Clips ..................................51
3-2-3 Recording Essence Marks................51
3-2-4 Starting a Shoot With a Few Seconds of
Pre-Stored Picture Data (Picture Cache
Function).......................................... 53
3-2-5 Time-Lapse Video (Interval Rec
Function).......................................... 55
3-2-6 Retaking the Most Recent Clip........60
3-2-7 Auto Clip List Recoding for Automatic
Inclusion of Recorded Clips in Clip Lists
..........................................................61
3-2-8 Assigning User-Defined Clip Titles
Automatically...................................61
3-2-9 Assigning User-Defined Clip and Clip
List Names .......................................64
3-2-10 Recording in Live Logging Mode .66
3-2-11 Recording Proxy Data to Memory
Cards (With CBK-PC01 Installed) ..67
3-3 Checking Recording and Playback. 70
3-3-1 Normal Playback .............................70
3-3-2 Checking the Last Two Seconds of the
Recording — Recording Review.....71
3-3-3 Checking the Recording on the Color
Video Monitor — Playback in Color71
3-3-4 Thumbnail Search............................ 71
3-3-5 Clip List Playback............................73
3-3-6 Locking and Deleting Clips............. 74
3-4 Recording Video Signals From External
Equipment......................................... 76
3-4-1 Recording a DV Stream From External
Equipment........................................76
3-4-2 Recording Analog Composite Signals
(With the CBK-SC01 Installed)....... 77
3-5 Freezing a Picture During Playback 78
Chapter 4 Scene Selection
4-1 Overview............................................ 79
4-2 Creating Clip Lists............................ 82
4-2-1 Selecting Clips.................................82
4-2-2 Reordering Sub Clips.......................83
Table of Contents
9
Page 10

4-2-3 Trimming a Sub Clip ....................... 84
4-2-4 Deleting a Sub Clip..........................85
4-2-5 Previewing the Current Clip List.....86
4-2-6 Saving the Current Clip List to Disc86
4-3 Managing Clip Lists (CLIP Menu) .... 87
4-3-1 Loading a Clip List From Disc Into Unit
Memory............................................ 87
4-3-2 Deleting Clip Lists From a Disc...... 88
4-3-3 Clearing the Current Clip List From the
Unit Memory....................................88
4-3-4 Setting the Start Time Code of the
Current Clip List .............................. 88
4-3-5 Sorting Clip Lists.............................89
4-4 Using the PDZ-1 Proxy Browsing
Software ............................................ 90
Chapter 5 Adjustments and Settings
for Recording
5-1 Setting the Recording Format
(PDW-530/530P Only)....................... 91
5-1-1 Setting the Video Recording Format91
5-1-2 Setting the Audio Recording Format92
5-2 Adjusting the Black Balance and the
White Balance................................... 93
5-2-1 Adjusting the Black Balance ...........93
5-2-2 Adjusting the White Balance........... 94
5-3 Setting the Electronic Shutter ......... 97
5-3-1 Shutter Modes..................................97
5-3-2 Selecting the Shutter Mode and Shutter
Speed................................................ 97
5-4 Changing the Reference Value for
Automatic Iris Adjustment............. 100
5-5 Adjusting the Audio Level.............. 102
5-5-1 Manually Adjusting the Audio Levels of
the Audio Inputs From the AUDIO IN
CH1/CH2 Connectors ....................102
5-5-2 Manually Adjusting the Audio Level of
the Front Microphone ....................103
5-5-3 Recording Audio on Channels 3 and 4
.......................................................104
5-6 Setting the Time Data ..................... 105
5-6-1 Setting the Time Code ................... 105
5-6-2 Saving the Actual Time in the Time
Code ...............................................105
5-6-3 Setting the User Bits ......................105
5-6-4 Synchronizing the Time Code ....... 106
5-7 Setting the Thumbnail Image......... 108
Chapter 6 File Operations
6-1 Overview.......................................... 109
6-1-1 Directory Structure ........................109
6-1-2 File Operation Restrictions............110
6-2 File Access Mode File Operations (for
Windows) ........................................ 112
6-2-1 Making FAM connections .............113
6-2-2 Operating on files ..........................113
6-2-3 Exiting file operations....................114
6-2-4 Reconnecting .................................114
6-3 File Operations in File Access Mode (for
Macintosh) ...................................... 115
6-3-1 Making FAM Connections ............ 115
6-3-2 Operating on Files..........................115
6-3-3 Exiting File Operations..................116
6-4 FTP File Operations........................ 116
6-4-1 Making FTP connections...............116
6-4-2 Command List ...............................117
6-5 Recording Continuous Time Code With
FAM and FTP Connections............ 124
Chapter 7 Menu Displays and
Detailed Settings
7-1 Menu Organization and Operation 125
7-1-1 Menu Organization ........................125
7-1-2 Displaying Menus..........................126
7-1-3 Basic Menu Operations..................126
7-1-4 Editing the USER Menu ................128
7-2 Status Display on the Viewfinder
Screen ............................................. 132
7-2-1 Layout of the Status Display on the
Viewfinder Screen .........................132
7-2-2 Selecting the Display Items ...........134
7-2-3 Display Modes and Setting Change
Confirmation/Adjustment Progress
Messages ........................................135
7-2-4 Setting the Marker Display............135
7-2-5 Setting the Viewfinder...................136
7-2-6 Recording Shot Data Superimposed on
the Color Bars ................................137
7-2-7 Setting the Shot ID.........................138
7-2-8 Displaying the Status Confirmation
Windows ........................................139
7-2-9 Confirming the Image of the Return
Video Signal in the Viewfinder .....140
7-3 Adjustments and Settings From Menus
......................................................... 141
10
Table of Contents
Page 11

7-3-1 Setting Gain Values for the GAIN
Selector Positions........................... 141
7-3-2 Selecting the Output Signals..........142
7-3-3 Setting the Color Temperature Manually
.......................................................143
7-3-4 Specifying an Offset for the Auto White
Balance Setting ..............................144
7-3-5 Assigning Functions to ASSIGN 1/2/3/4
Switches .........................................144
7-3-6 Setting the Date/Time of the Internal
Clock.............................................. 146
7-3-7 Selecting the Lens File ..................147
7-3-8 Selecting the Aspect Ratio............. 147
7-3-9 Setting the CCD Scan Mode.......... 149
7-3-10 Using UMID Data ......................150
7-3-11 Making Network Settings............ 152
7-4 Resetting USER Menu Settings to the
Standard Settings........................... 154
Chapter 8 Saving and Loading User
Setting Data
8-1 Saving and Loading User Files to and
from a “Memory Stick” .................. 155
8-1-1 Handling the “Memory Stick”....... 155
8-1-2 Saving User Menu Data to the “Memory
Stick” .............................................156
8-1-3 Loading Saved Data From a “Memory
Stick” .............................................158
8-2 Saving and Loading Scene Files ... 159
8-2-1 Saving a Scene File........................ 159
8-2-2 Loading Scene Files.......................162
8-2-3 Resetting the Settings of the Camcorder
to the Standard Settings Saved in the
Reference File ................................163
8-3 Jumping to a File-Related Menu Page
When Inserting a “Memory Stick” 164
9-2-2 Adjusting the Viewfinder Focus and
Screen............................................. 167
9-2-3 Detaching the Viewfinder..............168
9-2-4 Moving the Viewfinder Shoe Up... 168
9-2-5 Using the BKW-401 Viewfinder
Rotation Bracket ............................168
9-2-6 Detaching the Eyepiece .................169
9-3 Mounting the Lens.......................... 170
9-4 Adjusting the Flange Focal Length171
9-5 Audio Input System ........................ 171
9-5-1 Using the Supplied Microphone ....171
9-5-2 Using an External Microphone...... 172
9-5-3 Attaching a UHF Portable Tuner (for a
UHF Wireless Microphone System)173
9-5-4 Connecting Line Input Audio
Equipment......................................175
9-6 Tripod Mounting.............................. 176
9-7 Attaching the Shoulder Strap ........ 177
9-8 Adjusting the Shoulder Pad Position
......................................................... 177
9-9 Connecting the Remote Control Unit
......................................................... 178
Chapter 10 Maintenance
10-1 Testing the Camcorder Before
Shooting.......................................... 181
10-1-1 Preparations for Testing............... 181
10-1-2 Testing the Camera ......................181
10-1-3 Testing the VDR ..........................182
10-2 Maintenance .................................. 185
10-2-1 Cleaning the Viewfinder..............185
10-2-2 Note About the Battery Terminal 185
10-3 Operation Warnings...................... 186
Appendixes
Chapter 9 Setting Up the Camcorder
9-1 Power Supply .................................. 165
9-1-1 Using a Battery Pack .....................165
9-1-2 Avoiding Breaks in Operation Due to an
Exhausted Battery ..........................166
9-1-3 Using an AC Adaptor ....................166
9-1-4 Using the Anton Bauer Ultralight
System............................................ 166
9-2 Adjusting the Viewfinder................ 167
9-2-1 Adjusting the Viewfinder Position 167
Specifications........................................ 189
General ....................................................189
Video Camera Section.............................189
Optical Disc Drive Section......................190
Recommended Additional Equipment ....191
Menu List ............................................... 192
OPERATION Menu List.........................192
PAINT Menu List....................................200
MAINTENANCE Menu List ..................205
FILE Menu List.......................................214
DIAGNOSIS Menu List..........................216
About a “Memory Stick”....................... 218
Table of Contents
11
Page 12

Glossary................................................. 220
Index....................................................... 223
12
Table of Contents
Page 13

Overview
Chapter
1
1-1 Features
The PDW-510/510P/530/530P is a camcorder for ENG
and EFP
high-definition CCDs of a 16:9 aspect ratio and a
Professional Disc drive are combined integrally. The
camera’s CCDs have approximately 1,000,000 picture
elements (pixels) (the number of effective pixels:
approximately 500,000).
In addition to the well-established high image quality and
vibration resistant, dustproof, and dripproof constructions
of the Betacam SP/SX camcorders, this unit adds a range
of new functionality exploiting the capabilities of optical
discs.
1) ENG: Electronic News Gathering
2) EFP: Electronic Field Production
2)
, in which a color video camera using 2/3-inch
1-1-1 Principal Differences Between
the PDW-510/510P and PDW530/530P
There are the following differences between the PDW510/510P and PDW-530/530P in the specifications of
recording format, internal optical filters, and so on.
PDW-510/510P recording format and internal optical
filters
Recording
format
Optical
filters
DVCAM
compatible
recording
Single integrated filter system for CC (color
correction) and ND (neutral density)
Video
Audio 16 bits, 48 kHz,
Recording
time
25 Mbps
DVCAM
4 channels
85 minutes
1)
format
1)
PDW-530/530P recording format and internal optical
Recording
format
Optical
filters
1) DVCAM is a trademark of Sony Corporation.
2) MPEG IMX is a trademark of Sony Corporation.
3) For analog audio input, the effective bit length is maximum 20 bits.
The following characteristics are common to the PDW510/510P and PDW-530/530P.
DVCAM
compatible
recording
MPEG IMX
compatible
recording
Separate CC filters and ND filters; two filters
can be used simultaneously
filters
Video 25 Mbps
Audio 16 bits, 48 kHz,
Recording
time
Video
Audio
Recording
time
DVCAM format
4 channels
85 minutes
2)
MPEG IMX
(4:2:2 high image
quality video
recording using
MPEG2 intra
frames)
16 bits or 24 bits
48 kHz sampling,
4 channels
50 Mbps: 45 minutes
40 Mbps: 55 minutes
30 Mbps: 68 minutes
format
3)
,
1-1-2 Camera Features
2
/3-inch Power HAD EX CCDs
The three high sensitivity, low smear 2/3-inch Power
1)
HAD
the top of its class for a standard definition camcorder.
• The unit is switchable between a 16:9 aspect ratio wide
EX CCDs provide high image quality which is at
image and 4:3 standard aspect ratio.
1-1 Features
13
Page 14

• You can select an interlaced scan mode or progressive
scan mode (30 fps (frames
Chapter 1 Overview
510/530, 25 fps for the PDW-510P/530P).
• With the optional CBK-FC01 Pull Down Board
installed, a 24 fps
3)
progressive scan video can be
per second)2) for the PDW-
recorded subjected to pull-down, providing imaging
quality close to that of film. (PDW-510/530 only)
1) Abbreviation of “Power Hole-Accumulated Diode.” “Power HAD” is a
registered trademark of Sony Corporation.
2) More precisely, 29.97 fps
3) More precisely, 23.98 fps
You can also assign any settings to the USER menu, to
create customized menus.
Saving and recalling settings in a “Memory
Stick”
Using an optional “Memory Stick”1), you can save menu
settings for particular shooting conditions, for recall as
required.
1) “Memory Stick” is a trademark of Sony Corporation.
Camera signal processing for high quality
video
• The 12-bit A/D converter provides high image quality,
stability, and reliability.
• The high-performance electronic shutter allows you to
select extended clear scan mode (ECS
vertical resolution mode (EVS
2)
1)
) and high
), to obtain clear, high-
quality video.
1) ECS: Extended Clear Scan
2) EVS: Super Enhanced Vertical Definition System
Shooting functions to cope with different
shooting conditions
• A slow shutter function (up to 1/2 second) is provided as
a standard feature. This allows noiseless shooting under
very poor lighting conditions and a variety of expressive
possibilities, such as shots of flowing streams which are
smoothed out by afterimages.
• You can easily recall sets of adjustment values from
memory, to match the particular lighting conditions.
•The ATW
adjustment in response to changing lighting conditions.
• The TruEye
1)
function provides automatic white balance
TM 2)
process yields distortion-free video,
even with high intensity colors.
• The TURBO GAIN button enables an instantaneous
boost of the video gain to the maximum 48 dB.
1) ATW: Auto Tracing White balance
2) TruEye: “TruEye” is a registered trademark of Sony Corporation.
Freeze mix function
This allows a still image from the previously captured
video to be aligned with the video output from the camera.
Thus you can adjust the camera position to get exactly the
same framing for new shooting.
High-functionality viewfinder
The 2-inch monochrome viewfinder allows accurate
focusing.
The switch settings, automatic black balance and white
balance items, status, warnings and so on appear on the
viewfinder screen.
1-1-3 Features of the Optical Disc
Drive (VDR)
Recording and playback in clip units
Each time you start and stop recording, this creates an
independent clip.
• During recording, material is always written to unused
parts of the disc. Therefore, even when playing back
between shooting sessions, there is no danger of
inadvertently overwriting the previous recording.
• Immediately after recording, you can delete clips you
decide not to keep, allowing efficient use of the available
disc capacity.
• During playback, you can check the recorded video and
audio by viewing thumbnail images of clips on the disc
and jumping instantly to the first frames of other clips.
•The i.LINK
allows you to transfer clip files by connecting a
computer, or by connecting the unit to a network with the
CBK-NC01 Network Adaptor (option).
1) i.LINK is a trademark of Sony Corporation.
Picture cache recording
Video and audio for a maximum of 10 seconds is always
held in memory, so that when you start recording, it is
possible to record from just before the REC START button
was pressed.
1)
(FAM (File Access Mode)) function
Wide range of menu settings
The menus provide the following operations, among
others.
• Status display, message, and marker display settings
• Camera adjustment settings
• Switch function assignment
• “Memory Stick” operations
14
1-1 Features
Time-lapse video (intermittent recording)
function
You can record video intermittently, capturing any number
of frames at any desired time interval.
Page 15

Proxy AV data
• Proxy AV data is low-resolution data with a video
bandwidth of 1.5 Mbps and an audio bandwidth of 64
Kbps per channel. This unit records proxy AV data on
the Professional Disc whenever MPEG IMX or
DVCAM format data is recorded on the main channel.
• Proxy AV data is much smaller in size than the fullresolution IMX or DVCAM data. It can be transferred
quickly over computer networks, easily edited in the
field with laptop computers, and readily used in a wide
variety of applications, such as content management on
small-scale servers.
Wide range of metadata recording
In addition to video and audio, various types of additional
information can be recorded on the Professional Disc
metadata.
• Essence marks can be added to mark important locations
in the video and audio data.
Essence marks can be added manually at any frame by
pressing the lens RET button or an assignable button.
They can also be added automatically at locations where
there is a sudden change in luminance or audio input
above a specified threshold.
• The supplied logging software can be used to add titles,
comments, and other text data to clips.
• Computer-readable text files can be recorded on the
Professional Disc to enable systematic content
management.
The ability to search metadata for the required audio and
video scenes brings greater efficiency to various stages of
the video production process, such as editing, and
archiving.
1) Professional Disc is a trademark of Sony Corporation.
1)
as
Thumbnail search
Thumbnail images of the clips on the disc can be displayed
on the LCD panel and in the viewfinder by pressing the
THUMBNAIL button. They can also be shown in external
video output.
You can check the content of a clip simply by moving the
cursor to its thumbnail and pressing the play button.
Scene selection
You can create and play back clip lists of selected clips
from the disc, arranged in any order.
One disc can store up to 99 clip lists.
Clip lists make it simple to perform offline editing in the
field for later use with full-scale nonlinear editing systems
(XPRI
1) XPRI is a trademark of Sony Corporation.
1)
, etc.).
High reliability under tough operating
conditions
With resistance to vibration and dust comparable to tape
based camcorders, this unit can be relied on just like a
conventional unit.
1-1-4 Inputs and Outputs
Range of audio inputs and outputs
• A super-cardioid directional monaural microphone with
external power supply is supplied as standard
equipment. By changing the connector (service
component replacement), a stereo microphone can be
fitted.
• The optional slot-in type WRR-855A/855B UHF
Synthesized Tuner Unit can be installed in the unit.
• The two AUDIO IN connectors (XLR type, 3-pin) on the
rear panel of the unit can be switched to line input,
microphone input, or + 48V external power, and also to
AES/EBU digital audio inputs (maximum 24 bits).
• When audio cables are connected to the two AUDIO IN
connectors (XLR type, 3-pin) on the rear panel of the
unit, an automatic detection function forces the
recording of the audio input signals from these
connectors as channels 1 and 2.
• The AUDIO OUT connectors (XLR type, 5-pin) provide
two channels of audio output.
(i.LINK) connector
The i.LINK connector of this unit supports the following
two functions.
Input and output of DV streams (AV/C (Audio/
Video Control) mode)
DV streams can be output from this unit and recorded on
standard DV equipment.
In the same way, the output from external DV devices
(VTRs, nonlinear editors, etc.) can be input to this unit and
recorded on Professional Discs.
DV-compliant nonlinear editors may also be connected.
1) In the case of the PDW-530/530P, DV stream output is also possible when
the unit is set to IMX recording mode. Audio data is recorded after
conversion according to the specifications of this unit.
2) In the case of the PDW-530/530P, this is possible only when the unit is set
to DVCAM recording mode.
Computer access to files (File Access Mode)
Use of application software
series
enables random access to video, audio, and metadata
files on Professional Discs, with the ability to display file
lists and perform file-based reads and writes.
Files can be transferred at high speed, and thumbnail lists
of disc contents can be viewed on computer screens.
1) Such software includes the supplied PDZ-1 Proxy Browsing Software and
the XPRI series.
1)
2)
1)
which supports the XDCAM
Chapter 1 Overview
1-1 Features
15
Page 16

Remote control connectors
By connecting an optional RM-B150/B750 or similar
Chapter 1 Overview
remote control unit, you can control the shooting functions
of this unit externally.
Function extension interface
• Installing the optional CBK-SD01 SDI Output Board
enables SDI signal output from the VIDEO OUT
connectors.
• By installing the optional CBK-SC01 Analog Composite
Input Board, a composite video signal input to the
GENLOCK connector can be recorded on this unit.
• An extension connector can be attached to the battery
attachment on the rear panel, to allow various camera
adapters to be fitted.
Instant operation assignable switches
Two switches provided on the side panel and on the top of
the grip, respectively, can be assigned to any functions, by
a menu operation.
Furthermore, the TURBO GAIN button can also be used as
an assignable switch.
Alarm function
If a fault is detected on the optical disc drive, or if the disc
or battery capacity is low, notication is provided by
warning indicators and audible alarms.
SMPTE (PDW-510/530)/EBU (PDW-510P/
530P) color bars, and 1 kHz reference
signal output
Network connector (option)
The optional CBK-NC01 Network Adaptor can be
installed on this unit to enable connections to computers
and networks. This makes it possible to transfer files at
high speeds, and to display of lists of the video, audio, and
metadata files stored on Professional Discs. Workflows
can be improved by the ability to use FTP commands to
transfer files to remote locations over networks.
Adjustment of a color monitor or external audio device is
easy. Color bars for an SNG
1) SNG: Satellite News Gathering
1)
uplink are also provided.
Viewfinder height adjustable
In addition to the front to rear and left to right directions,
the viewfinder can be adjusted vertically in two steps.
1-1-5 Other Functions
Usability-oriented design
• There is more space around the rear panel connectors
than on previous models, making cable connections and
switch operations easier.
• The adjustment range of the shoulder pad in the front to
rear direction is increased, making it easier to ensure
proper balance when using the unit.
2.5-inch color LCD panel
The side of the unit has an LCD that can be switched to
show the following images and data.
• Status information, including audio level meters and
time code
• Thumbnails of the video recorded on the Professional
Disc
• A playback image of the video recorded on the
Professional Disc
•The camera image
Monochrome LCD panel
Even when this unit is powered off, the time code,
remaining disc capacity, battery capacity, and other status
information appears on the monochrome LCD. (This
requires either a battery or a DC power supply connected.)
Supports SNMP for maintenance and
service (option)
The SNMP-compliant Sony Remote Maintenance and
Monitoring Software can be used when the optional CBKNC01 Network Adaptor is installed on this unit. Via a
TCP/IP network connection, this software can monitor the
hardware status of this unit in real time and record
monitoring logs. This allows you to analyze the problem
immediately and take the necessary steps whenever a
hardware failure is detected.
16
1-1 Features
Page 17
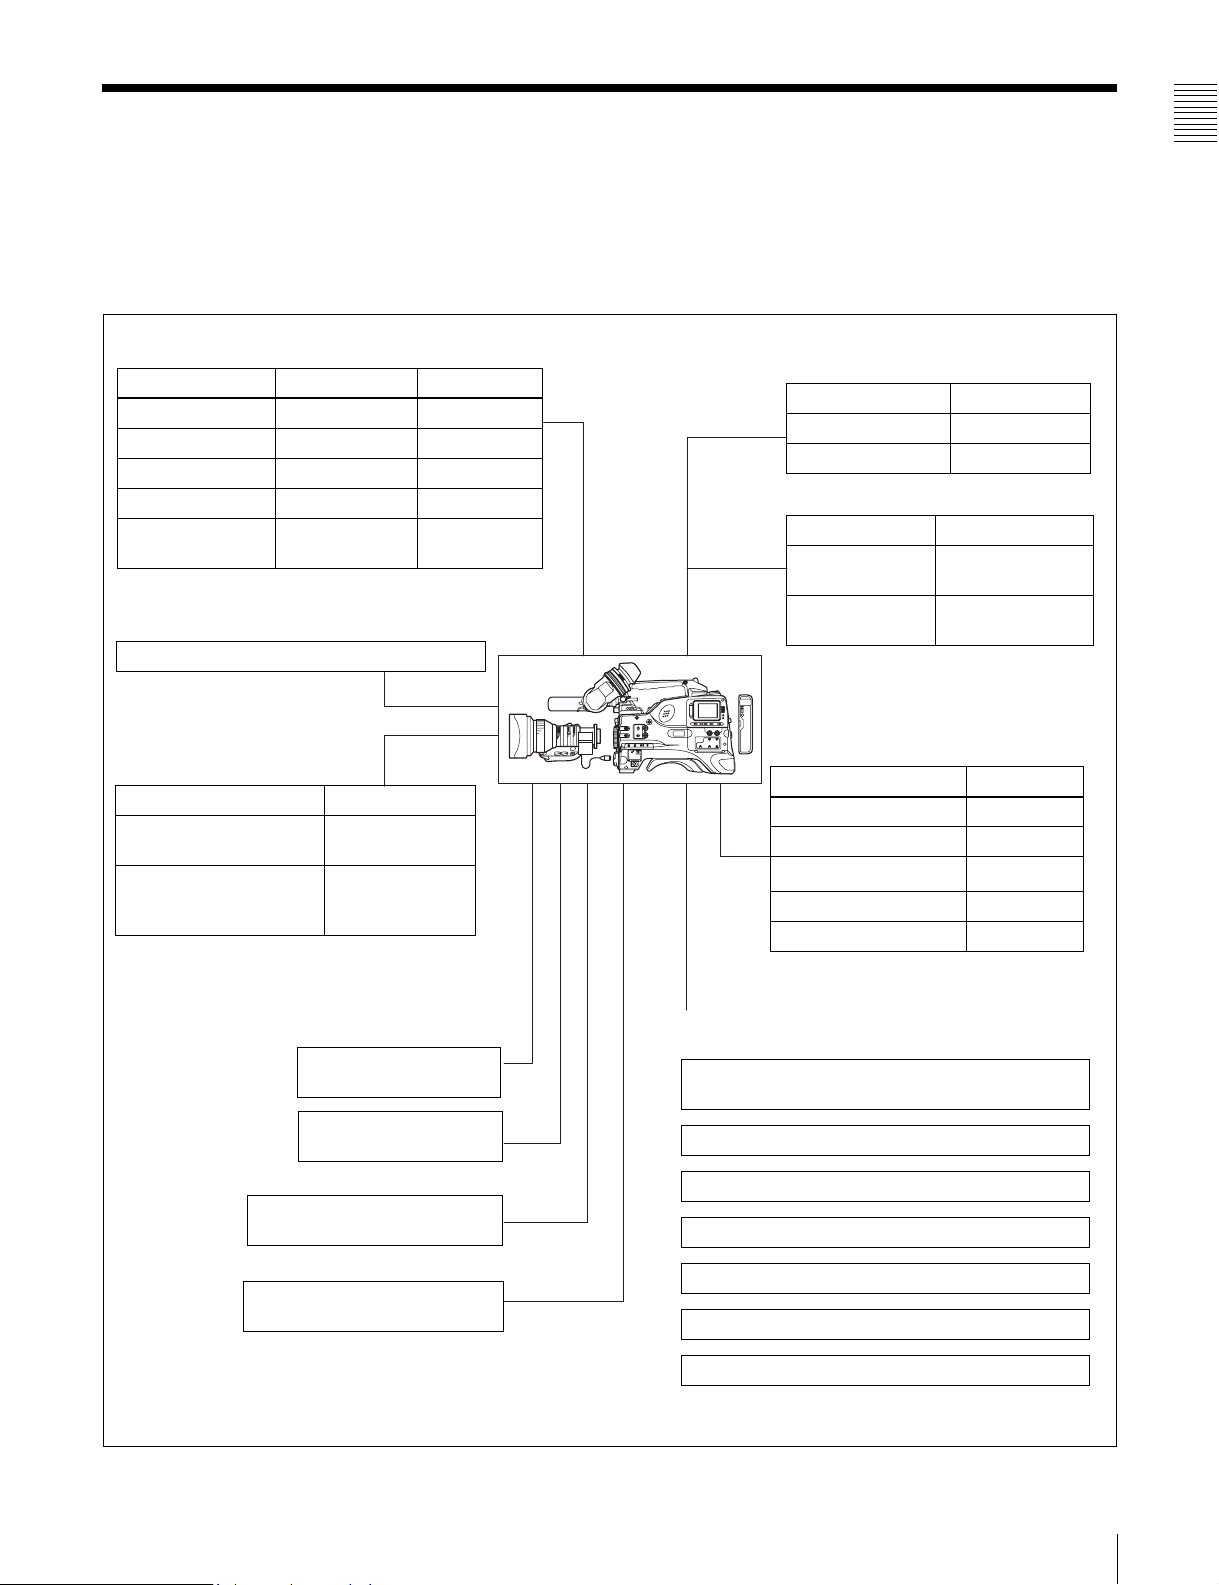
1-2 Example of System Configuration
Chapter 1 Overview
The diagram below shows a typical configuration of the
camcorder for ENG and EFP.
Viewfinder-related equipment
Name / Purpose Magnification Part No.
Fog-proof filter – 1-547-341-11
Lens assembly –2.8 D to +2.0 D A-8262-537-A
Lens assembly –3.6 D to –0.8 D A-8262-538-A
Lens assembly –3.6 D to +0.4 D A-8267-737-A
Lens assembly
(3 × magnification)
Connection through i.LINK interface
Devices with a DV connector
Camera adaptor
Product Model name
Input of audio channels
3/4 and SDI output
CCZ (26-pin) output/
analog composite/SDI
input
–2.4 D to +0.5 D A-8314-798-A
CA-701
CA-702/702P
For more information about the fittings, connections, or
use of additional equipment and accessories, see Chapter
9 as well as the operation manuals for the connected
equipment.
AC power supply
Product Model name
AC Adaptor AC-550/550CE
AC Adaptor AC-DN10
Battery
Product Model name
Battery Charger BC-M150/L500/
Battery Pack
1) BP-L40/M50 cannot be used.
Extension board
Product Model name
SDI Output Board CBK-SD01
Composite Input Board CBK-SC01
Pull Down Board
Network Adaptor CBK-NC01
Memory Card Adaptor CBK-PC01
L70
1)
BP-GL65/GL95/
L60S/L80S
CBK-FC01
2)
“Memory Stick”
(see page 218.)
RM-B150/B750 Remote
Control Unit
Video monitor for color image
check during shooting
XLR 5-pin connector for stereo
microphone (service part)
2) For PDW-510/530 only
Audio signal source
External microphone ECM-670/678 or similar
microphone
CAC-12 Microphone Holder
Audio equipment
WRR-861/862 series UHF Portable Tuner
WRR-855 series UHF Synthesized Tuner Unit
CCXA-53 audio cable
DMX-P01 Portable Digital Mixer
1-2 Example of System Configuration
17
Page 18

1-3 Precautions
Chapter 1 Overview
1-4 Using the CD-ROM
Manual
Use and Storage
Do not subject the unit to severe shocks
The internal mechanism may be damaged or the body
warped.
After use
Always turn off the power.
Before storing the unit for a long period
Remove the battery pack.
Use and storage locations
Store in a level, ventilated place. Avoid using or storing the
unit in the following places.
• Places subject to temperature extremes
• Very damp places
• Places subject to severe vibration
• Near strong magnetic fields
• In direct sunlight or close to heaters for extended periods
To prevent electromagnetic interference from
portable communications devices
The use of portable telephones and other communications
devices near this unit can result in malfunctions and
interference with audio and video signals.
It is recommended that the portable communications
devices near this unit be powered off.
Note on laser beams
Laser beams may damage the CCDs. If you shoot a scene
that includes a laser beam, be careful not to let the laser
beam be directed into the lens of the camera.
The supplied CD-ROM includes versions of the operation
manual for the PDW-510/510P/530/530P in English,
Japanese, French, German, Italian, Spanish, and Chinese
in PDF format.
1-4-1 Preparations
The following program must be installed on your computer
in order to read the operation manuals contained on the
CD-ROM.
• Adobe Reader Version 6.0 or higher
If Adobe Reader is not installed, you can download it from
the following URL:
http://www.adobe.com/
Adobe and Adobe Reader are trademarks of Adobe Systems Incorporated in
the United States and/or other countries.
1-4-2 Reading the CD-ROM Manual
To read the operation manual contained on the CD-ROM,
do the following.
1
Insert the CD-ROM in your CD-ROM drive.
A cover page appears automatically in your browser.
If it does not appear automatically in the browser,
double-click the index.htm file on the CD-ROM.
Use at a high temperature
If the unit is used at a high temperature, white flecks may
appear on the screen.
About the LCD panels
LCD panels are manufactured with extremely highprecision technology that yields effective pixel rates of
99.99% or higher. However, very rarely, one or more
pixels may be permanently dark or permanently lit in
white, red, blue, or green.
This phenomenon is not a malfunction. Such pixels have
no effect on the recorded data, and the unit may be used
with confidence even if they are present.
2
Select and click the operation manual that you want to
read.
This opens the PDF file of the operation manual.
Memo
Memo
The files may not be displayed properly, depending on the
version of Acrobat Reader. In such a case, install the latest
version you can download from the URL mentioned in 1-
4-1 “Preparations” above.
Note
If you have lost or damaged the CD-ROM, you can
purchase a new one to replace it. Contact your Sony
service representative.
18
1-3 Precautions / 1-4 Using the CD-ROM Manual
Page 19

1-5 MPEG-4 Visual
Patent Portfolio
1-6 MPEG-2 Video
Chapter 1 Overview
Patent Portfolio
License
THIS PRODUCT IS LICENSED UNDER THE MPEG-4
VISUAL PATENT PORTFOLIO LICENSE FOR THE
PERSONAL AND NON-COMMERCIAL USE OF A
CONSUMER FOR
(i) ENCODING VIDEO IN COMPLIANCE WITH THE
MPEG-4 VISUAL STANDARD (“MPEG-4 VIDEO”)
AND/OR
(ii) DECODING MPEG-4 VIDEO THAT WAS
ENCODED BY A CONSUMER ENGAGED IN A
PERSONAL AND NON-COMMERCIAL
ACTIVITY AND/OR WAS OBTAINED FROM A
VIDEO PROVIDER LICENSED BY MPEG LA TO
PROVIDE MPEG-4 VIDEO.
NO LICENSE IS GRANTED OR SHALL BE IMPLIED
FOR ANY OTHER USE. ADDITIONAL
INFORMATION INCLUDING THAT RELATING TO
PROMOTIONAL, INTERNAL AND COMMERCIAL
USES AND LICENSING MAY BE OBTAINED FROM
MPEG LA, LLC. SEE HTTP://WWW.MPEGLA.COM
License
ANY USE OF THIS PRODUCT OTHER THAN
CONSUMER PERSONAL USE IN ANY MANNER
THAT COMPLIES WITH THE MPEG-2 STANDARD
FOR ENCODING VIDEO INFORMATION FOR
PACKAGED MEDIA IS EXPRESSLY PROHIBITED
WITHOUT A LICENSE UNDER APPLICABLE
PATENTS IN THE MPEG-2 PATENT PORTFOLIO,
WHICH LICENSE IS AVAILABLE FROM MPEG LA,
L.L.C., 250 STEELE STREET, SUITE 300, DENVER,
COLORADO 80206.
“PACKAGED MEDIA” means any storage media storing
MPEG-2 video information such as DVD movie which are
sold/distributed to general consumers. Disc replicators or
sellers of the PACKAGED MEDIA need to obtain licenses
for their own business from MPEG LA. Please contact
MPEG LA for any further information. MPEG LA. L.L.C.,
250 STEELE STREET, SUITE 300, DENVER,
COLORADO 80206
http://www.mpegla.com
MPEG LA is offering licenses for (i) manufacturing/sales
of any storage media storing MPEG-4 Visual video
information (ii) distribution/broadcasting of MPEG-4
Visual video information in any manner (such as online
video distribution service, internet broadcasting, TV
broadcasting). Other usage of this product may be
required to obtain license from MPEGLA. Please contact
MPEG LA for any further information. MPEG LA, L.L.C.,
250 STEELE STREET, SUITE 300, DENVER,
COLORADO 80206, http://www.mpegla.com
1-5 MPEG-4 Visual Patent Portfolio License / 1-6 MPEG-2 Video Patent Portfolio License
19
Page 20

Chapter 1 Overview
20
1-6 MPEG-2 Video Patent Portfolio License
Page 21
Locations and Functions
of Parts and Controls
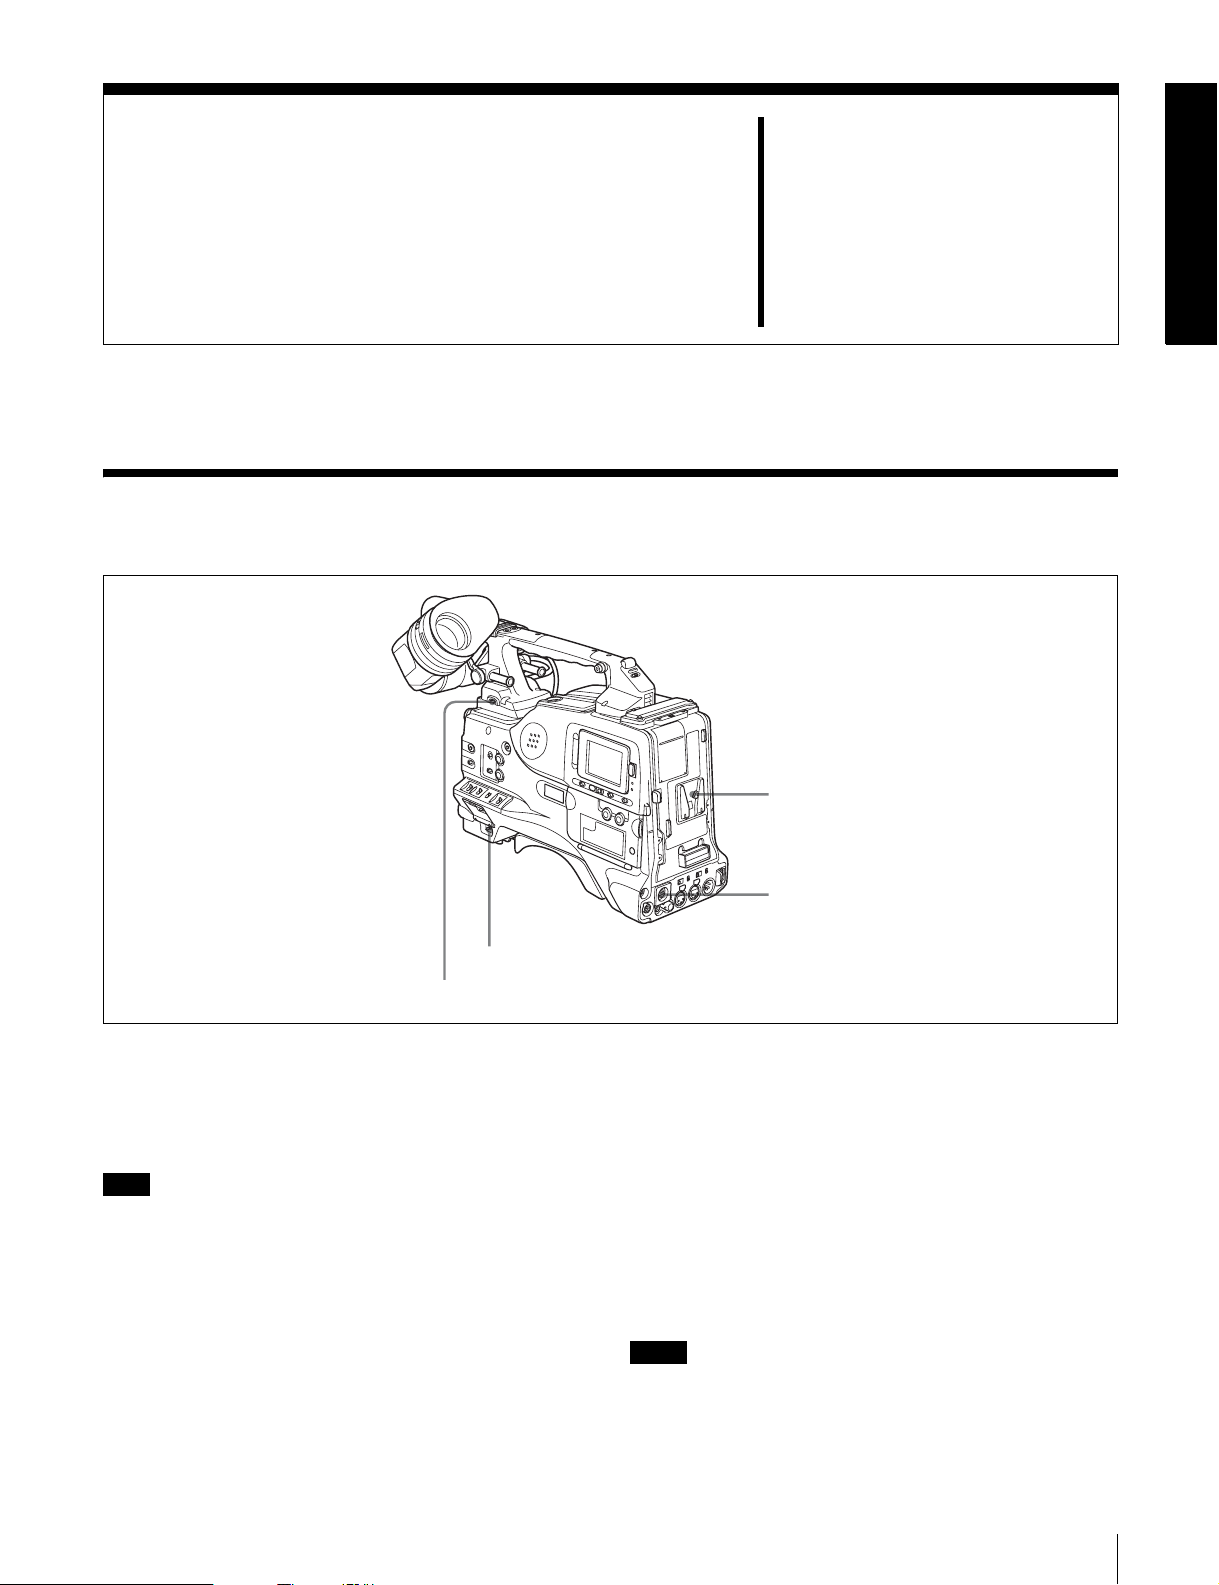
2-1 Power Supply
Chapter
1 Battery attachment
2
3 POWER switch
4 LIGHT switch
a Battery attachment
Attach a BP-GL65/GL95/L60S/L80S battery pack.
Furthermore, by attaching an AC-DN10 AC Adaptor, you
can operate the camcorder from AC power.
Note
For your safety, and to ensure proper operation of the unit,
Sony recommends the use of the following battery packs:
BP-GL65, BP-GL95, BP-L60S, and BP-L80S.
b DC IN connector (XLR type, 4-pin, male)
To operate the camcorder using an AC power supply,
connect an AC-550/550CE AC Adaptor with the DC
output cable supplied with the adaptor.
c POWER switch
This switch turns the main power supply on and off.
2 DC IN connector
d LIGHT switch
This determines how a video light connected to the LIGHT
connector is turned on and off.
AUTO: When the switch on the video light is in the on
position, putting the camcorder in recording mode
turns the video light on automatically. When using the
auto interval recording mode, the video light is
automatically turned on immediately before recording
starts.
MANUAL: You can turn the video light on or off
manually, using its own switch.
Notes
• When AUTO is selected, unevenly lit video is recorded
between the start of recording and the time when the
light comes on. We recommend that you select
MANUAL when the start of a recording is important.
2-1 Power Supply
21
Page 22

However, the light can be turned on before the start of
recording in auto interval recording mode.
• To ensure proper operation of the video light with the
unit, Sony recommends the use of the following battery
packs: BP-GL65, BP-GL95, BP-L60S, and BP-L80S.
Chapter 2 Locations and Functions of Parts and Controls
22
2-1 Power Supply
Page 23
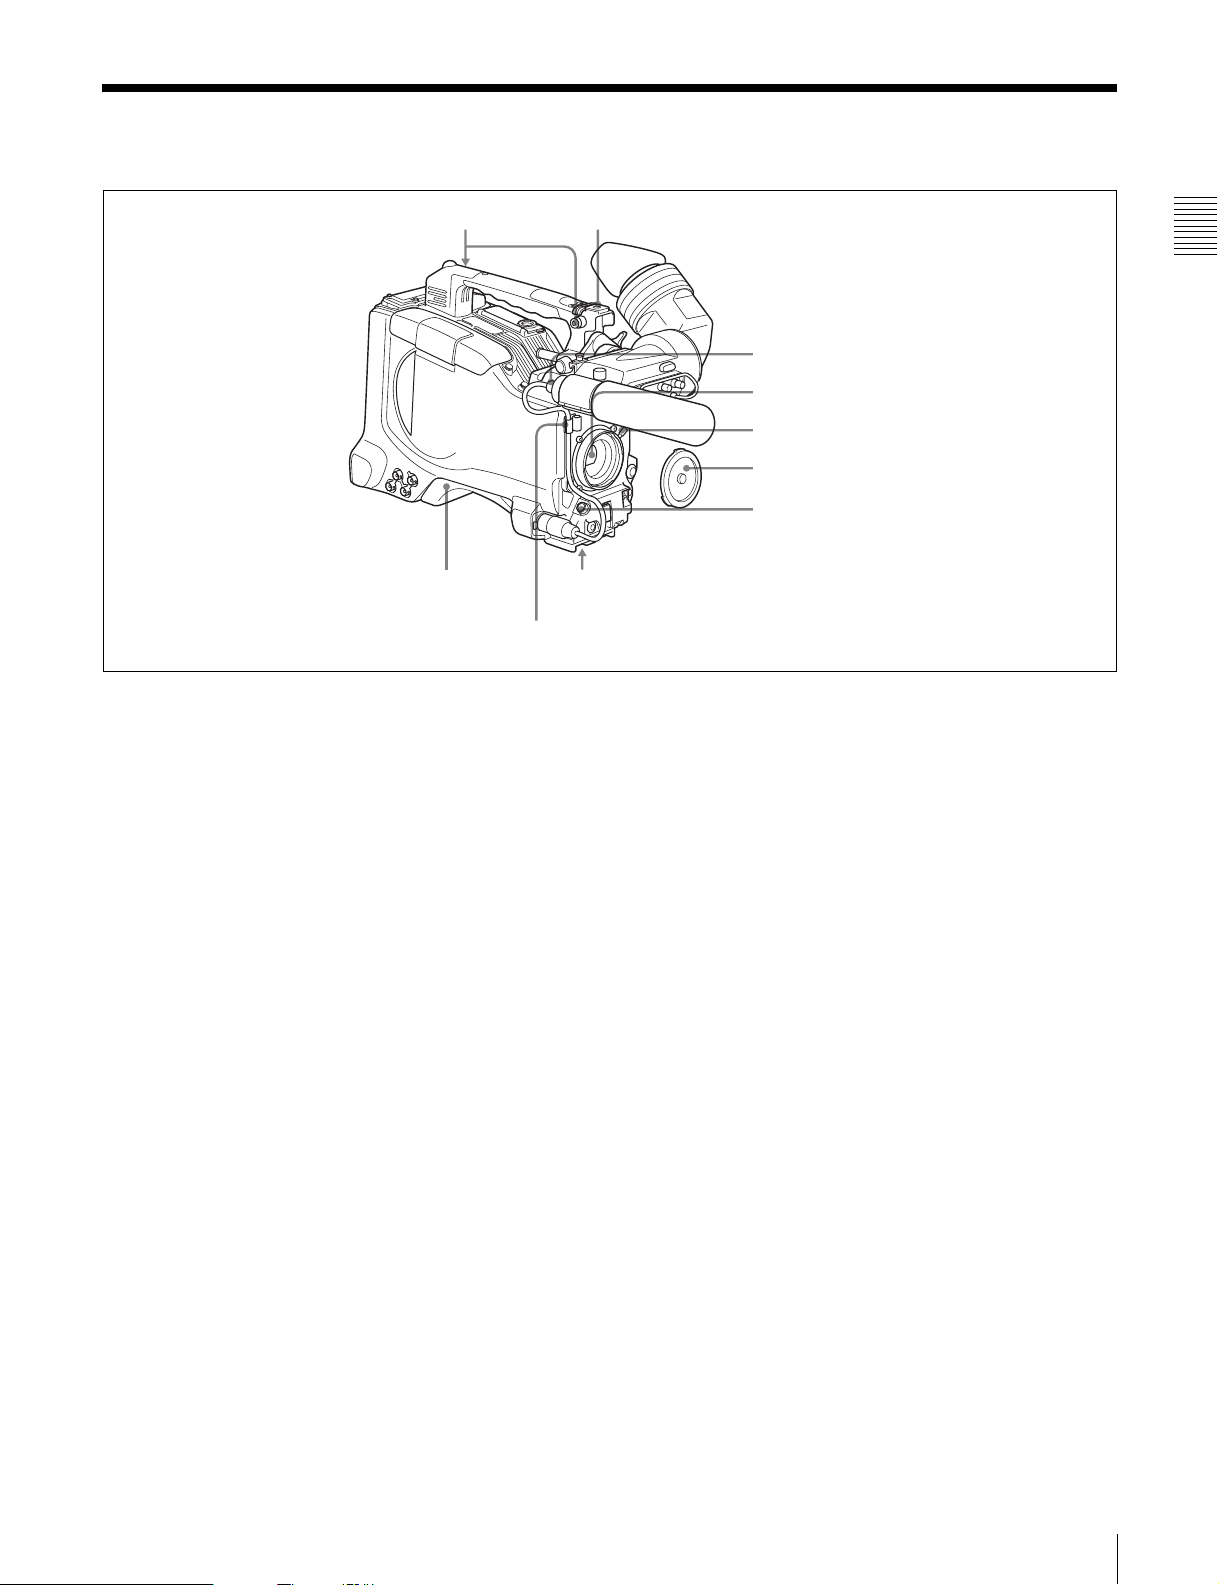
2-2 Accessory Attachments
1 Shoulder strap posts
9 Shoulder pad
Lens cable clamp
a Shoulder strap posts
Attach the supplied shoulder strap to these posts.
For details, see 9-7 “Attaching the Shoulder Strap” on
page 177.
b Light shoe
Attach an optional accessory such as a video light to this
shoe.
2 Light shoe
Chapter 2 Locations and Functions of Parts and Controls
3 LIGHT connector
4 Lens mount
5 Lens locking lever
6 Lens mount cap
7 LENS connector
8 Tripod mount
h Tripod mount
When using the camcorder on a tripod, attach the tripod
adaptor (option).
i Shoulder pad
You can move the shoulder pad forwards or backwards by
raising up the shoulder pad locking lever. Do this to ensure
the best balance when shooting with the camcorder on
your shoulder.
c LIGHT connector (2-pin, female)
Connect the cable of an Anton Bauer Ultralight System
attached to the light shoe. The system operates with lights
powered by 12 V, with a maximum power consumption of
50 W.
d Lens mount (special bayonet mount)
Use this for mounting the lens.
e Lens locking lever
After inserting the lens in the lens mount, rotate the lens
mount ring with this lever to lock the lens in position.
f Lens mount cap
Remove this cap by pushing up the lens locking lever.
When no lens is mounted, keep this cap fitted for
protection from dust.
g LENS connector (12-pin)
Fit the lens cable to this connector. Contact your Sony
representative for more information about the lens you can
use.
For details, see 9-8 “Adjusting the Shoulder Pad
Position” on page 177.
2-2 Accessory Attachments
23
Page 24
2-3 Audio Functions
8 Built-in speaker
Chapter 2 Locations and Functions of Parts and Controls
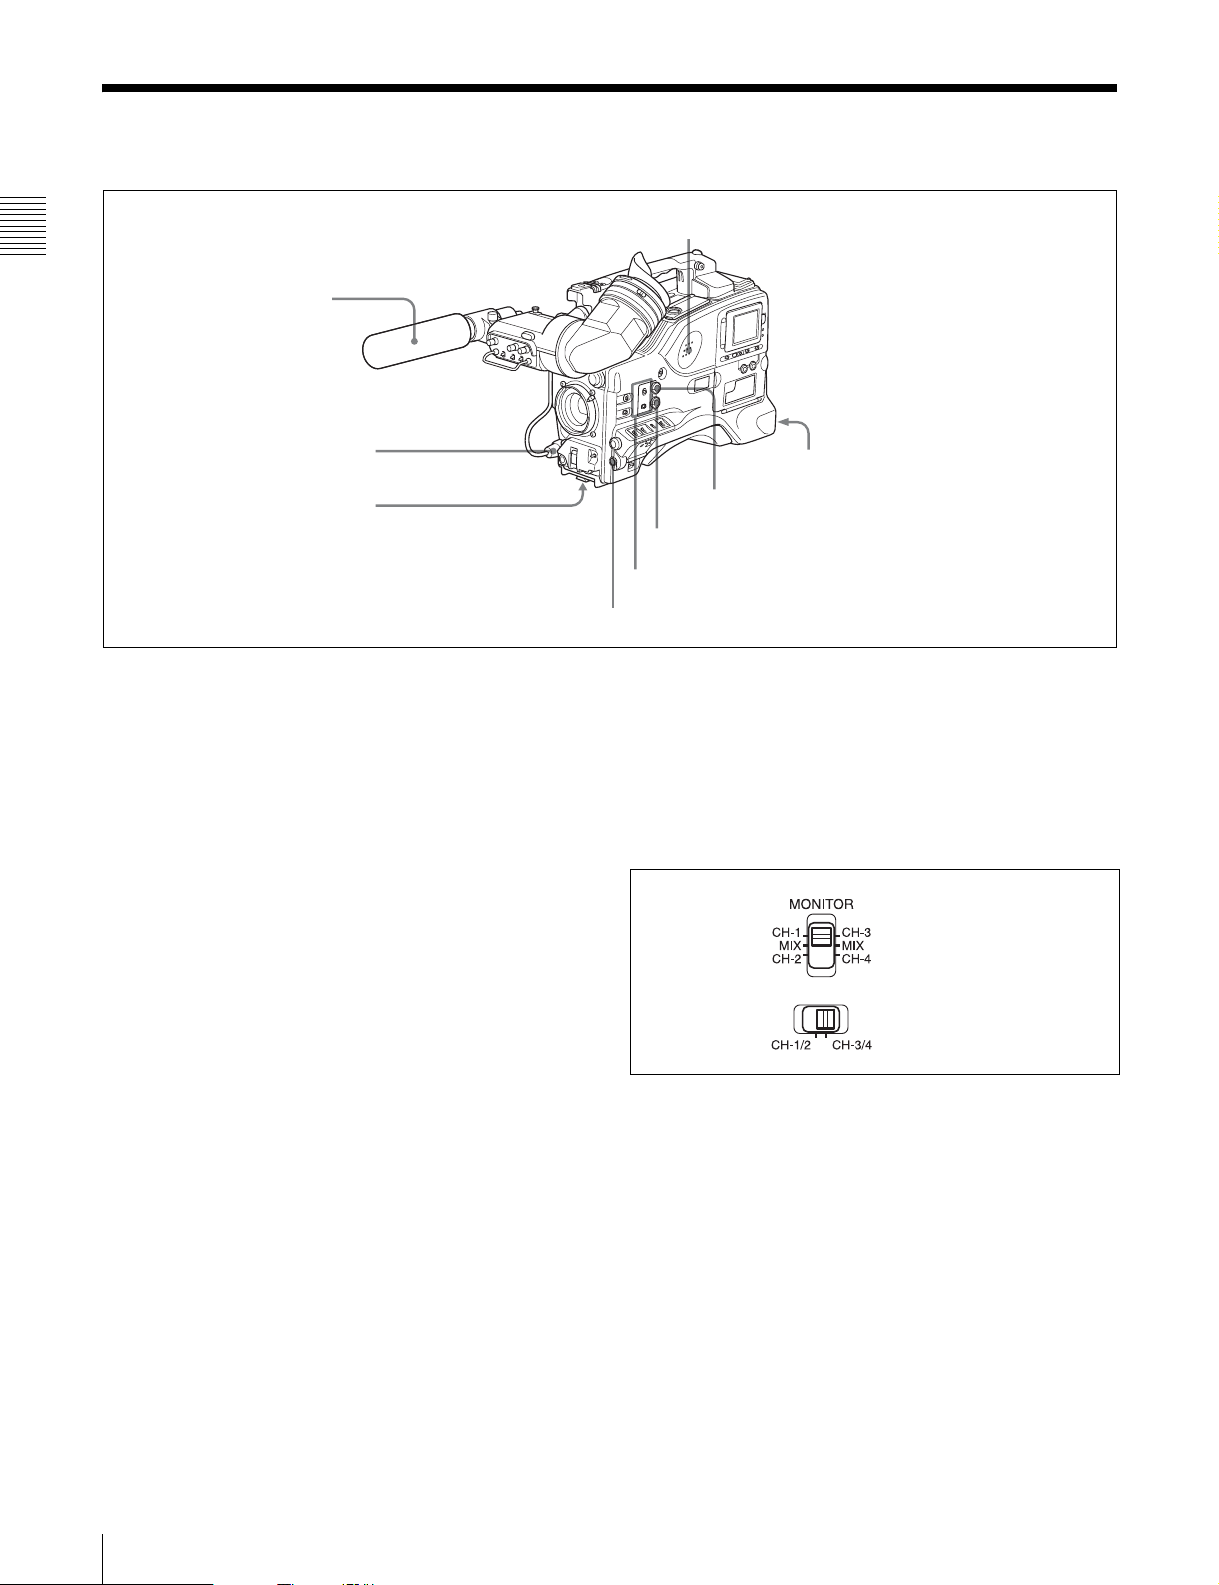
1 Microphone
2 MIC IN connector
3 MIC LEVEL control
Audio functions (1)
a Microphone
This is a super-cardioid directional monaural microphone
with an external power supply (+48 V) system.
b MIC IN (microphone input) connector (XLR type,
3-pin, female)
Connect the supplied microphone to this connector. A
microphone other than the supplied one may also be
connected as long as it can operate with the power (+48 V)
supplied from this connector.
By fitting a 5-pin connector (service part number: A-1053453-A), you can also use a stereo microphone.
c MIC (microphone) LEVEL control
This control adjusts the audio level of the microphone
connected to the MIC IN connector.
d EARPHONE jack (front) (monaural, minijack) /
EARPHONE jack (rear) (monaural/stereo
switchable, minijack)
You can monitor the E-E sound
1)
during recording and
playback sound during playback. Plugging an earphone
into the jack automatically cuts off the built-in speaker.
When an alarm is indicated, you can hear the alarm sound
through the earphone.
You can use the rear EARPHONE jack for stereo output,
by setting the HEADPHONE OUT item in the AUDIO-1
page of the MAINTENANCE menu to “STREO”. You can
also connect a monaural earphone to the front jack and a
monaural/stereo earphone set to the rear jack
simultaneously.
4 EARPHONE jack (rear, stereo)
7 ALARM volume control
6 MONITOR volume control
5 MONITOR switch and CH-1/2 / CH-3/4 switch
4 EARPHONE jack (front, monaural)
1) E-E: Abbreviation of “Electric-to-Electric.” In E-E mode, video and audio
signals input to the camcorder are output after passing through internal
electric circuits only. This can be used to check input signals.
e MONITOR switch and CH-1/2 / CH-3/4 switch
These switches together determine the channel selection
for audio monitor output.
MONITOR switch
CH-1/2 / CH-3/4 switch
MONITOR switch and CH-1/2 / CH-3/4 switch
CH-1/2 / CH-3/4 switch:
This determines the pair of audio channels selected with
the MONITOR switch.
CH-1/2 position: channels 1 and 2
CH-3/4 position: channels 3 and 4
The signals output from the AUDIO OUT connector and
EARPHONE jacks also depend on the setting of this
switch.
MONITOR switch:
This selects the audio monitor channels output to the
monaural earphone or speaker, depending on the setting of
the CH-1/2 / CH-3/4 switch.
24
2-3 Audio Functions
Page 25
CH-1/2 CH-3/4
switch
position
MONITOR
switch
position
Audio output
CH-1/2 CH-1 Audio channel 1
MIX Mix sound of channels 1 and 2
CH-2 Audio channel 2
CH-3/4 CH-3 Audio channel 3
MIX Mix sound of channels 3 and 4
CH-4 Audio channel 4
f MONITOR volume control
This control adjusts the speaker or earphone volume for
sounds other than the alarm sound. At the minimum
position, no sound can be heard.
g ALARM volume control
This control adjusts the speaker or earphone alarm volume.
At the minimum position, no sound can be heard.
However, if in the AUDIO-1 page of the
MAINTENANCE menu the MIN ALARM VOL item is
set to “SET”, the alarm tone is audible even when this
volume control is at the minimum position.
Minimum Maximum
ALARM volume control
h Built-in speaker
The speaker can be used to monitor E-E sound during
recording, and playback sound during playback. The
speaker also sounds alarms to reinforce visual warnings.
The output level of the speaker can be lowered by
changing the setting of the SP ATT LEVEL item on the
AUDIO-1 page of the MAINTENANCE menu.
If you connect an earphone to the EARPHONE jack, the
speaker is automatically muted.
See 10-3 “Operation Warnings” on page 186 for
information about alarms.
Chapter 2 Locations and Functions of Parts and Controls
THUMBNAIL
ESSENCE MARK
SUB CLIP
PRESET
REGEN
CLOCK
F-RUN
R-RUN
SEL/SET
S.SEL
SET
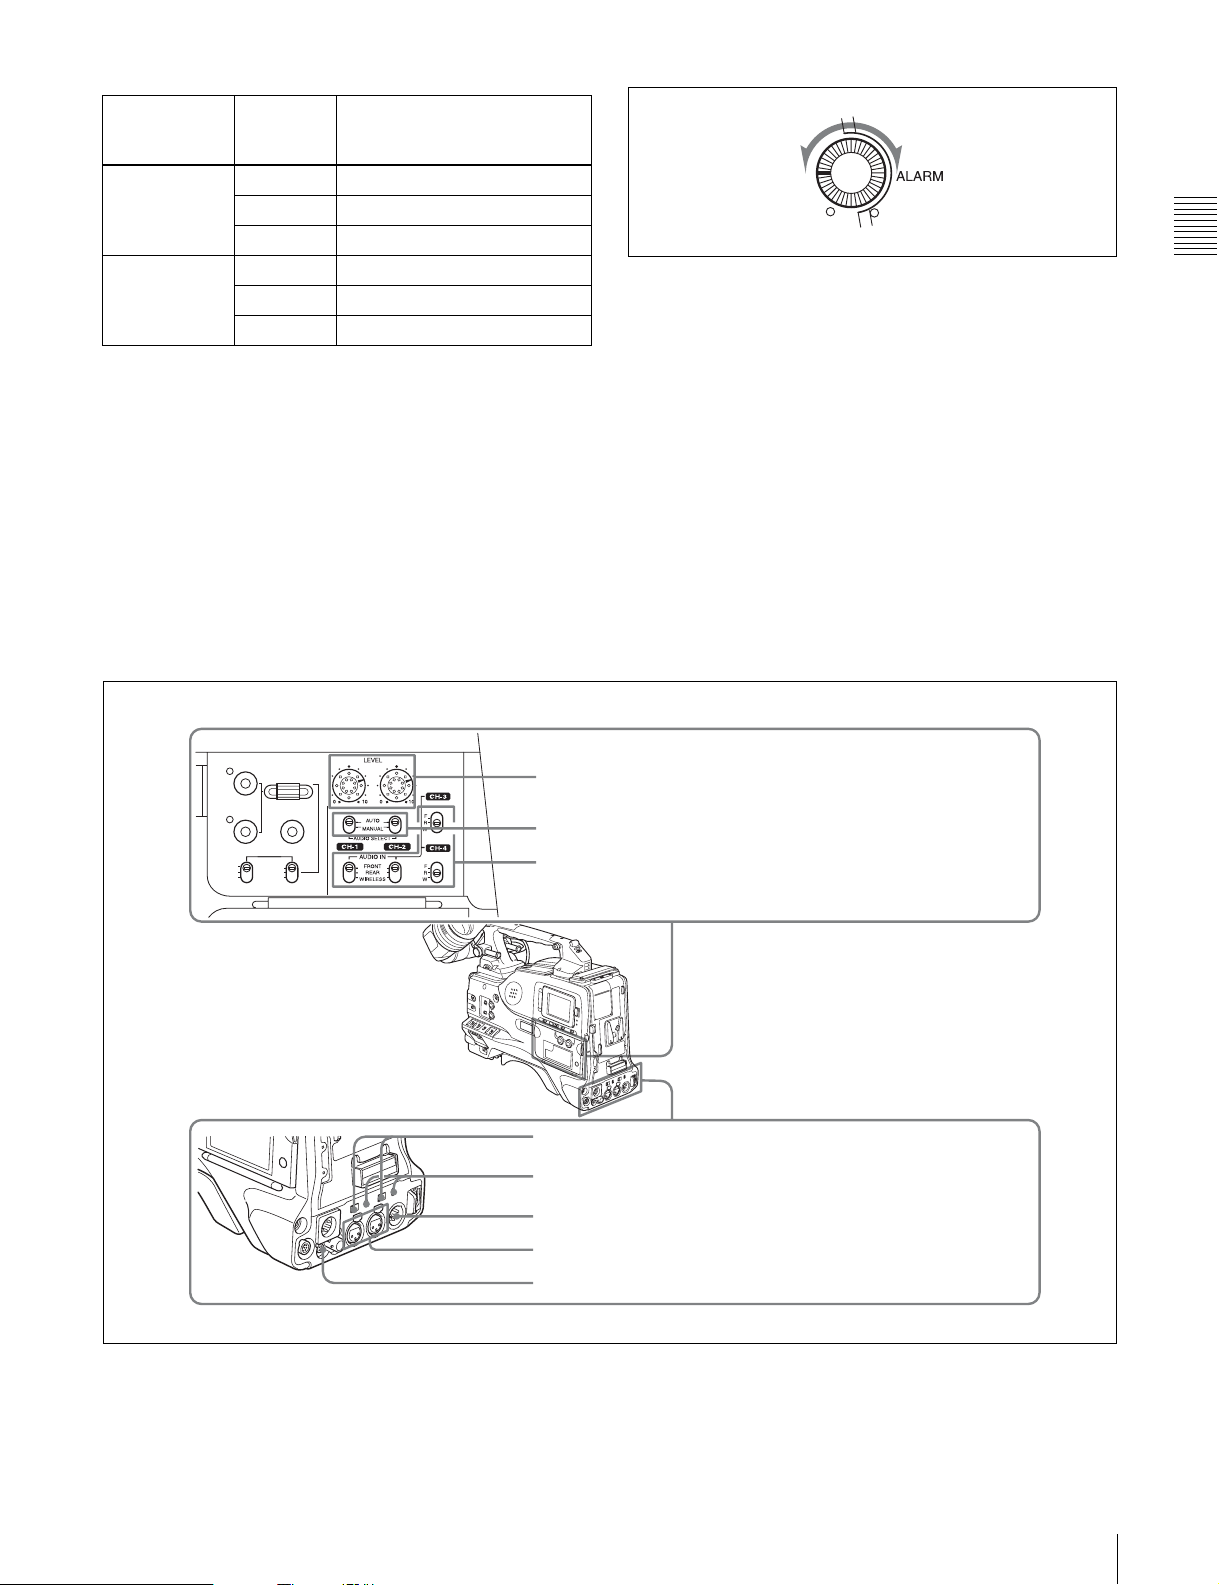
9 LEVEL (CH-1/CH-2) controls
0 AUDIO SELECT CH-1/CH-2 switches
SHIFTCLIP MENU
qa AUDIO IN CH-1/CH-2 / CH-3/CH-4 switches
qs LINE / AES/EBU / MIC selectors
qd +48V/OFF switches
qf AUDIO OUT connector
qg AUDIO IN CH1/CH2 connectors
qh DC OUT 12V connector
i LEVEL (CH-1/CH-2) (audio channel-1 and
channel-2 recording level) controls
Audio functions (2)
These controls adjust the audio levels of channels 1 and 2
when the AUDIO SELECT switches are set to MANUAL.
2-3 Audio Functions
25
Page 26

j AUDIO SELECT CH-1/CH-2 (audio channel-1
and channel-2 adjustment method selection)
switches
These switches select the audio level adjustment method
for each of audio channels 1 and 2.
AUTO: Select this setting for automatic adjustment.
n AUDIO OUT (audio output) connector (XLR type,
5-pin, male)
This connector outputs the audio signals recorded on audio
channels 1 and 2 or audio channels 3 and 4.
The MONITOR CH-1/2 / CH-3/4 switches allow you to
select the audio signal to be monitored.
MANUAL: Select this setting for manual adjustment.
Chapter 2 Locations and Functions of Parts and Controls
k AUDIO IN CH-1/CH-2 / CH-3/CH-4 (audio input
selection) switches
o AUDIO IN CH1/CH2 (audio channel-1 and
channel-2 input) connectors (XLR type, 3-pin,
female)
These are audio input connectors for channels 1 and 2 to
AUDIO IN CH-1/CH-2 switches
These switches select the audio input signals to be
recorded on audio channels 1 and 2.
FRONT: The input signal source is the microphone
which you can connect audio equipment or a microphone.
When the LINE / AES/EBU / MIC selector is set to AES/
EBU, the CH1 connector is used for channel-1 and -2
inputs, and the CH2 connector, for channel-3 and -4 inputs.
connected to the MIC IN connector.
REAR: The input signal source is the audio equipment
connected to the AUDIO IN CH1/CH2 connectors.
WIRELESS: The input signal source is a WRR-855A/
855B UHF Synthesized Tuner Unit (option).
p DC OUT 12 V (DC power output) connector (4-pin,
female)
This connector supplies power for a WRR-862 UHF
Portable Tuner (option). Do not connect any equipment
other than the UHF portable tuner.
AUDIO IN CH-3/CH-4 switches
These switches select the audio input signals to be
recorded on audio channels 3 and 4.
F (front): The input signal source is the microphone
connected to the MIC IN connector.
R (rear): The input signal source is the audio equipment
connected to the AUDIO IN CH1/CH2 connectors.
W (wireless): The input signal source is a WRR-855A/
855B UHF Synthesized Tuner Unit.
With a CA-701 Camera Adaptor (option) connected to the
camcorder, you can record separate sounds on audio
channels 3 and 4.
l LINE /AES/EBU / MIC selectors
These select the audio source of the audio input signals
input to the AUDIO IN CH1/CH2 connectors.
LINE: Line input audio equipment
AES/EBU: AES/EBU format audio signal
MIC: Microphone input
Note
When these switches are in the MIC position, and the
+48V switch described below is on, if you inadvertently
connect any audio device other than a microphone to the
AUDIO IN CH1/CH2 connectors, the device may be
damaged.
m +48V/OFF switches
Select either of the following positions for the
microphones to be connected.
+48V: For a microphone to use an external power supply
OFF: For a microphone to use an internal power supply
26
2-3 Audio Functions
Page 27
2-4 Shooting and Recording/Playback Functions
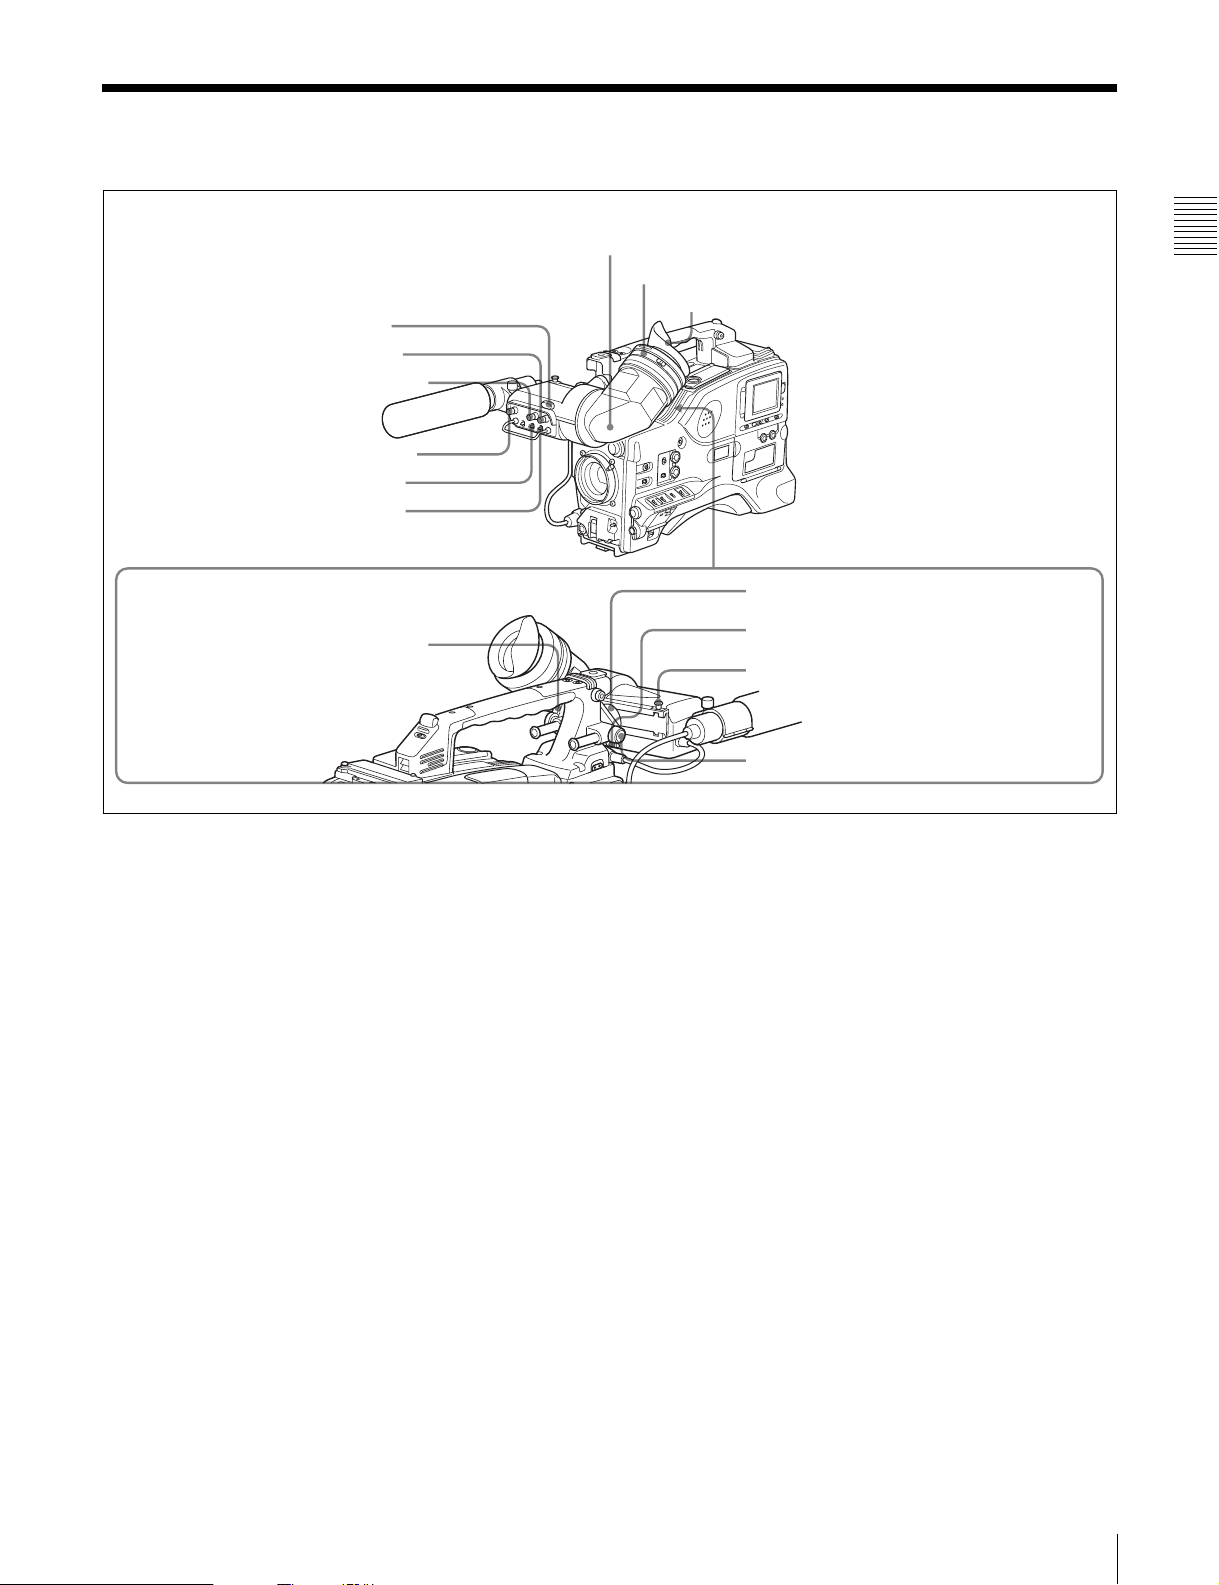
1 Tally indicator
2 BRIGHT control
3 CONTRAST control
4 PEAKING control
5 ZEBRA switch
6 TALLY switch
9 Viewfinder front-rear positioning lever
7 Viewfinder
8 Diopter adjustment ring
Eyecup
Chapter 2 Locations and Functions of Parts and Controls
0 Viewfinder left-right positioning ring
qa Camera operator tally indicator
qs Viewfinder stopper
qd LOCK knob
Shooting and recording/playback functions (1)
a Tally indicator
Setting the TALLY switch to HIGH or LOW enables this
indicator. The indicator lights during recording on the
VDR (video disc recorder). Like the REC indicator in the
viewfinder, it flashes to indicate a problem. You can set the
indicator brightness with the TALLY switch.
b BRIGHT (brightness) control
This control adjusts the picture brightness on the
viewfinder screen. It has no effect on the camera output
signal.
c CONTRAST control
This control adjusts the picture contrast on the viewfinder
screen. It has no effect on the camera output signal.
d PEAKING control
This control adjusts the sharpness of the picture on the
viewfinder screen to make focusing easier. It has no effect
on the camera output signal.
e ZEBRA switch
This switch controls the zebra pattern on the viewfinder
screen.
ON: The zebra pattern
1)
is displayed and stays.
OFF: No zebra pattern is displayed.
MOMENT: The zebra pattern is displayed and stays for 5
to 6 seconds.
The zebra pattern is factory set to indicate picture areas
where the video level is approximately 70%.You can use
the setup menu to change the setting so that areas where
the video level is 100% and above are also displayed at the
same time.
For information about how to change the zebra pattern
setting in the setup menu, see 7-2-5 “Setting the
Viewfinder” on page 136.
1) The zebra pattern aids in manual iris adjustment by indicating areas of the
picture where the video level is approximately 70% and 100% and above.
f TALLY switch
This switch controls the tally indicator, setting its
brightness (HIGH or LOW) or turning it off.
HIGH: The tally indicator brightness is high.
OFF: The tally indicator is disabled.
LOW: The tally indicator brightness is low.
2-4 Shooting and Recording/Playback Functions
27
Page 28
g Viewfinder
The viewfinder lets you view the image in black and white
j Viewfinder left-right positioning ring
Loosen this ring to move the viewfinder sideways.
while shooting, recording or playing back. It also displays
various warnings and messages related to the settings or
operating conditions of the camcorder, a zebra pattern,
safety zone marker
1) The safety zone marker is a rectangle indicating the effective picture area.
Chapter 2 Locations and Functions of Parts and Controls
2) The center marker indicates the center of the picture with a crosshair.
1)
, and center marker 2).
k Camera operator tally indicator
This indicator lights while the camcorder is recording.
Slide the window open when you shoot with your eye
away from the viewfinder. This indicator flashes when the
battery level is running low or the disc is almost full.
For details, see 7-2-4 “Setting the Marker Display” on
page 135.
h Diopter adjustment ring
Use this ring to adjust the viewfinder image for your
vision.
i Viewfinder front-rear positioning lever
To adjust the viewfinder position in the front-rear
direction, loosen this lever and the LOCK knob. After
adjustment, retighten this lever and the LOCK knob.
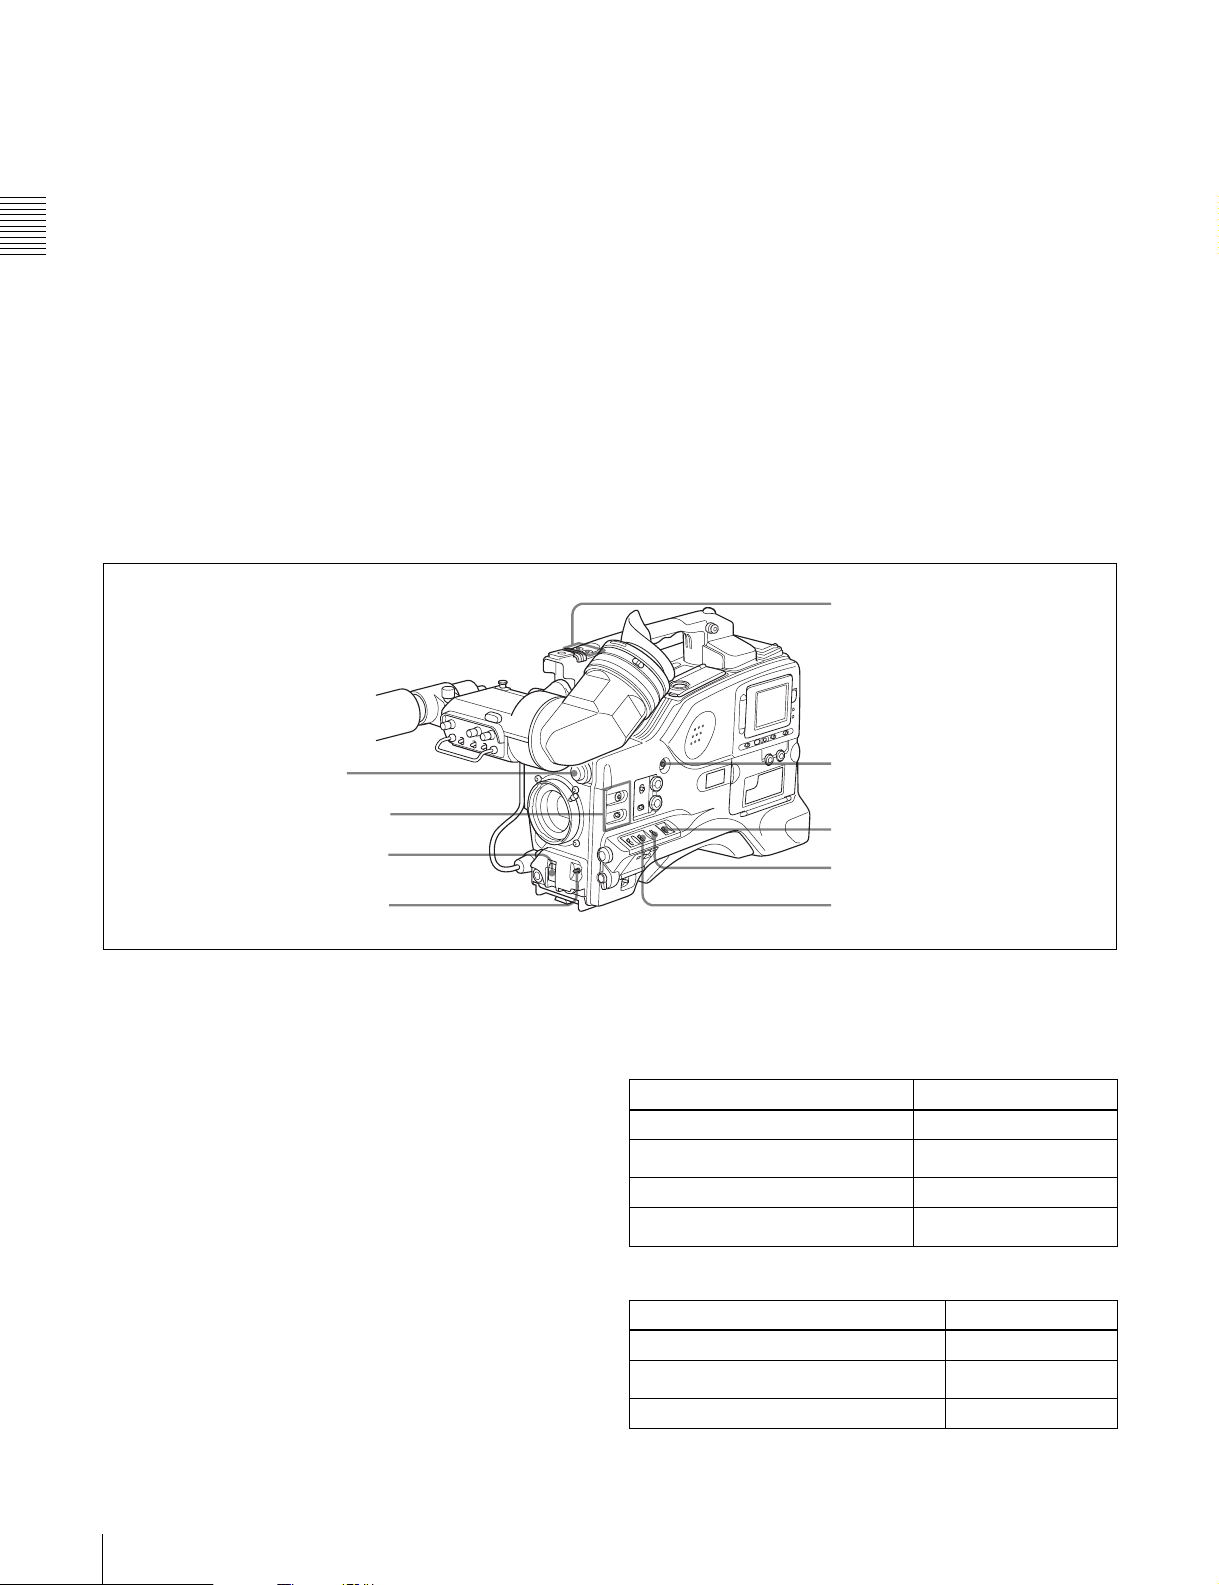
qf FILTER selector
qg ASSIGN. 1/2 switches
qh SHUTTER selector
l Viewfinder stopper
Pull up this stopper to detach the viewfinder from the
camera.
m LOCK knob
To adjust the viewfinder position in the front-rear
direction, loosen this knob and the viewfinder front-rear
positioning lever. After adjustment, retighten this knob
and the viewfinder front-rear positioning lever.
ws ASSIGN 3/4 switches
wa TURBO GAIN button
w; WHITE BAL switch
ql OUTPUT/DCC selector
qj AUTO W/B BAL switch
Shooting and recording/playback functions (2)
n FILTER selector
Use this selector to select the most appropriate filter to
match the light source illuminating the subject.
When this selector is used with the display mode set to 3,
the new setting appears on the viewfinder screen for about
3 seconds. (e.g.: FILTER: 3)
The PDW-510/510P has one switchable filter, and the
PDW-530/530P has two switchable filters.
The relationships between the selector settings and filter
selections as well as examples of filters for different
shooting conditions are as follows.
qk GAIN selector
For the PDW-510/510P
FILTER selector setting and filter selection
FILTER selector setting Filter selection
1 3200 K
2
3 5600 K
4
Examples of shooting conditions and appropriate filters
Shooting condition Filter
Sunrise and sunset; inside studio 1 (3200 K)
Clear skies
Cloudy or raining 3 (5600 K)
5600 K +
5600 K +
1
/8 ND
1
/
ND
64
2 (5600 K +
1
/8 ND)
28
2-4 Shooting and Recording/Playback Functions
Page 29

Examples of shooting conditions and appropriate filters
Shooting condition Filter
Very bright conditions such as snow, at
high altitudes, or at the seashore
4 (5600 K +
1
/
ND)
64
For the PDW-530/530P
FILTER selector (outer knob) setting and CC filter
selection
FILTER selector (outer knob) setting CC filter selection
A
B 3200 K
C 4300 K
D 6300 K
1) A type of special effect filter. Generates a cross of light on a highlighted
portion.
FILTER selector (inner knob) setting and ND filter
selection
FILTER selector (inner knob) setting ND filter selection
1 Clear
2
3
4
Examples of shooting conditions and appropriate filters
Cross filter
1
/4 ND
1
/16 ND
1
/64 ND
1)
For details about the shutter speed and mode settings, see
5-3 “Setting the Electronic Shutter” on page 97.
q AUTO W/B BAL (automatic white/black balance
adjustment) switch
This switch activates the white balance and black balance
automatic adjustment functions.
WHITE: Automatic adjustment of the white balance. If
the WHITE BAL switch is set to A or B, the white
balance setting is stored in the corresponding memory.
On the PDW-530/530P models with two switchable
filters, the memory stores a separate white balance
setting for each CC filter setting.
BLACK: Automatic adjustment of the black set and black
balance.
r GAIN selector
This selector switches the gain of the video amplifier to
match the lighting conditions during shooting. The gains
corresponding to the L, M, and H settings can be selected
from the setup menu. The factory settings are L = 0 dB, M
= 9 dB, and H = 18 dB.
When this selector is adjusted, the new setting appears on
the setting change/adjustment progress message display
area of the viewfinder screen for about 3 seconds.
For details about setting the gain values, see 7-3-1
“Setting Gain Values for the GAIN Selector Positions” on
page 141.
Chapter 2 Locations and Functions of Parts and Controls
Shooting condition CC filter ND filter
Sunrise and sunset; inside
studio
Clear skies C (4300 K) or
Cloudy or raining D (6300 K) 1 (clear) or 2
Very bright conditions such
as snow, at high altitudes,
or at the seashore
B (3200 K) 1 (clear)
1
/4 ND) or 3
D (6300 K)
C (4300 K) or
D (6300 K)
2 (
1/
(
16 ND)
1
/4 ND)
(
1
/16 ND) or
3 (
1
4 (
/64 ND)
o ASSIGN. 1/2 switches
You can assign the desired functions to each of the
ASSIGN. 1 switch (push button) and ASSIGN. 2 switch
(sliding) on the FUNCTION 1 page of the USER menu.
For details, see 7-3-5 “Assigning Functions to ASSIGN 1/
2/3/4 Switches” on page 144.
p SHUTTER selector
Set this selector to ON to use the electronic shutter. Push it
down to SELECT to switch the shutter speed or mode
setting within the range previously set with the setup
menu.
When this selector is operated, the new setting appears on
the setting change/adjustment progress message display
area for about 3 seconds.
s OUTPUT/DCC (output signal/dynamic contrast
control) selector
This selector switches the video signal that is output to the
VDR, viewfinder, and video monitor, between the
following two.
BARS: Outputs the color bar signal.
CAM: Outputs the video signal from the camera. When
this is selected, you can switch DCC
1)
on and off with
this selector.
1) DCC (Dynamic Contrast Control)
Against a very bright background with the iris opening adjusted to the
subject, objects in the background will be lost in the glare. The DCC
function will suppress the high intensity and restore much of the lost detail
and is particularly effective in the following cases.
• Shooting people in the shade on a sunny day
• Shooting a subject indoors, against a background through a window
• Any high contrast scene
2-4 Shooting and Recording/Playback Functions
29
Page 30
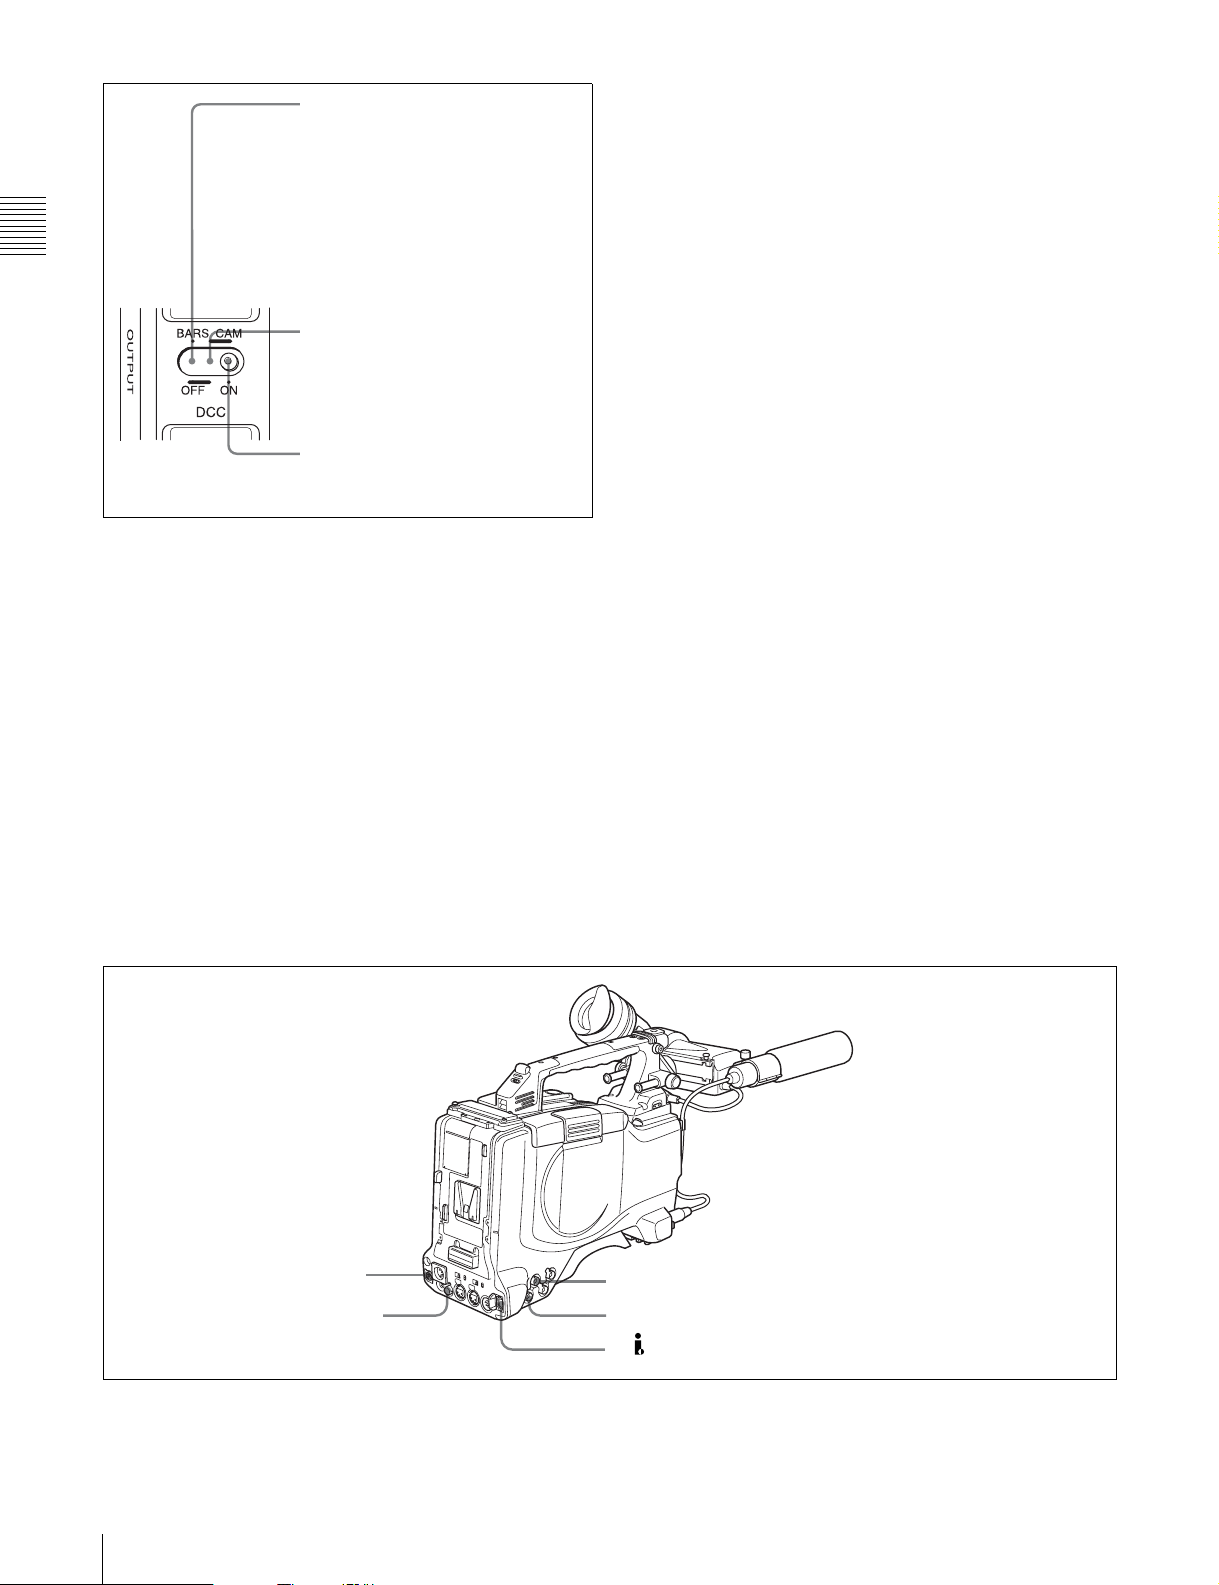
BARS, DCC OFF
A color bar signal is output and the
DCC circuit does not operate. For
example, use the setting for the
following purposes.
• Adjusting the video monitor
• Recording the color bar signal
Chapter 2 Locations and Functions of Parts and Controls
switch and the FILTER selector.
You can use the AUTO W/B BAL switch even when
1)
ATW
is in use.
B (ATW): When this switch is set to B and on the
FUNCTION 2 page of the OPERATION menu,
“WHITE B CH” is set to “ATW”
1) ATW (Auto Tracing White Balance)
The white balance of the picture being shot is adjusted automatically for
varying lighting conditions.
1)
, ATW is activated.
CAM, DCC OFF
The video signal from the camera is
output, and the DCC circuit does not
operate.
CAM, DCC ON
The video signal from the camera is
output, and the DCC circuit operates.
OUTPUT/DCC selector
t WHITE BAL (white balance memory) switch
This switch controls the white balance setting.
PRST (preset): Adjusts the color temperature
corresponding to the position of the FILTER selector.
Use the PRST setting when you have no time to adjust
the white balance.
A or B: When the AUTO W/B BAL switch is pushed to
WHT, the white balance is automatically adjusted
according to the current position of the FILTER
selector, and the adjusted value is stored in either
memory A or memory B. (There are two memories for
each CC filter, allowing a total of eight adjustments to
be stored.) When this switch is set to A or B, the
camcorder automatically adjusts itself to the stored
value corresponding to the current settings of this
When this switch is adjusted, the new setting appears on
the setting change/adjustment progress message display
area of the viewfinder screen for about 3 seconds.
You can assign the ATW ON/OFF function to the
ASSIGN 1 switch (push button) on the FUNCTION 1 page
of the USER menu.
For details, see 7-3-5 “Assigning Functions to ASSIGN 1/
2/3/4 Switches” on page 144.
u TURBO GAIN button
When shooting under extremely poor lighting conditions,
press the button once to boost the video gain to the value
preset on the GAIN SW page of the USER menu (up to
48 dB). To stop boosting the gain, press the button once
more.
v ASSIGN 3/4 switches
You can assign the desired functions to each of the
ASSIGN 3 switch and ASSIGN 4 switch on the
FUNCTION 1 page of the USER menu.
For details, see 7-3-5 “Assigning Functions to ASSIGN 1/
2/3/4 Switches” on page 144.
wf REMOTE connector
wd VIDEO OUT connector
30
2-4 Shooting and Recording/Playback Functions
wg GENLOCK IN connector
wh TEST OUT connector
wj DV IN/OUT S400 connector
Shooting and recording/playback functions (3)
Page 31

w VIDEO OUT connector (BNC type)
This connector outputs a composite video signal for a
video monitor. With a video monitor connected to this
connector, you can monitor the picture being shot by the
camera or the picture played back by the VDR. To choose
between the composite video signal output and SDI signal
output, use the menu. When synchronizing the time code
of an external VDR with that of the camcorder, connect
this connector to the GENLOCK IN connector of the
external VDR.
By installing the CBK-SD01 extension board (not
supplied), you can output an SDI signal (supporting
embedded audio and the EDH function) from this
connector.
For details on how to select the output signal, see 7-3-2
“Selecting the Output Signals” on page 142.
x REMOTE connector (8-pin)
Connect the RM-B150/B750 Remote Control Unit, which
makes it possible to control the VDR and camera remotely.
y GENLOCK IN connector (BNC type)
• This connector inputs a reference signal when the
camera is to be genlocked or when time code is to be
synchronized with external equipment. Use the
MAINTENANCE menu to adjust the genlock H-phase
(phase of horizontal sync signal) and the sub-carrier
phase.
wj (i.LINK) DV IN/OUT S400 connector (6-pin,
IEEE1394 compliant)
Connect to a device supporting the DV format or a
computer, using a i.LINK cable.
Notes
• If video and audio signals are not output to an external
device connected to the i.LINK DV IN/OUT S400
connector, try disconnecting the i.LINK cable and then
reconnecting it, making sure that it is firmly seated.
• When you connect this unit to an external device with a
6-pin i.LINK connector, always power this unit off and
disconnect the DC cable from the DC IN connector, or
remove the battery pack, before connecting or
disconnecting the i.LINK cable.
If you connect or disconnect the i.LINK cable while
power is being supplied to this unit, high voltage (8 to 40
V) can flow into this unit from the i.LINK connector of
the connected equipment, possibly damaging this unit.
• When you connect this unit to an external device with a
6-pin i.LINK connector, always connect the 6-pin
i.LINK connector on the external device first.
Chapter 2 Locations and Functions of Parts and Controls
For details, refer to the Maintenance Manual.
• This connector also inputs a return video signal. You can
display the return video signal in the viewfinder screen
while holding the RET button down with “RETURN
VIDEO” set to “ON” on the GENLOCK page of the
OPERATION menu.
• This connector also inputs an external analog composite
video signal.
When the CBK-SC01 extension board is installed, you
can record the external analog composite video signal
input to this connector.
z TEST OUT connector (BNC type)
This connector outputs the video signal for a video
monitor. The output signal can be selected from composite
or RGB. The factory setting is composite, and the setting
returns to composite whenever the unit is powered on.
Depending on internal board and menu settings, menus,
time code, and shot data can be superimposed on the image
on the monitor. Like the VIDEO OUT connector, this
connector can also be used to synchronize the time code of
an external VTR with the time code of the camcorder.
For details on how to select the test output signal, refer to
the Maintenance Manual.
2-4 Shooting and Recording/Playback Functions
31
Page 32

Chapter 2 Locations and Functions of Parts and Controls
wk REC START button
wl VDR SAVE/STBY connector
e; EJECT button and indicator
ea F REV button and indicator
es PLAY/PAUSE button and indicator
E
S
U
A
/P
Y
LA
P
NEXT
V
E
R
P
Shooting and recording/playback functions (4)
ed F FWD button and indicator
ef NEXT button
eg STOP button
eh PREV button
wk REC START button
Press this button to start recording. Press it again to stop
recording. The effect is exactly the same as that of the VTR
button on the lens.
When the REC SWITCH function is assigned to the
ASSIGN 1, 3 or 4 switch (push button), you can use the
switch as the REC START button.
wl VDR SAVE/STBY (standby) switch
This switch controls the VDR power mode during pauses
in recording.
SAVE: Power saving mode. Although an internal
operating sound is recorded as noise when you start
recording, power consumption in this mode is less than
in standby mode, so that battery life is extended. When
the switch is set to SAVE, the SAVE indicator in the
viewfinder lights.
STBY: Standby mode. Recording starts as soon as you
press the REC START button.
e; EJECT button and indicator
Press this button to eject or load a disc. The indicator
flashes while the disc is being ejected.
ea F REV (fast reverse) button and indicator
Plays back at high speed in the reverse direction. The
indicator lights during high-speed playback in the reverse
direction.
es PLAY/PAUSE button and indicator
Press this to view a playback image using the viewfinder
screen or a color video monitor. The indicator lights during
playback.
During playback, pressing this button pauses the playback,
showing a still image. At this time, the indicator flashes.
This camcorder is capable of color-image search at
approximately four-times normal playback speed, making
it easy to check recorded material. To use the color-image
search, press the F REV button or F FWD button during
playback. When the buttons are pressed, the PLAY
indicator and the F REV or F FWD indicator light.
ed F FWD (fast forward) button and indicator
Plays back at high speed in the forward direction. The
indicator lights during high-speed playback in the forward
direction.
ef NEXT button
This jumps to the beginning of the next clip, and pauses.
During the jump, the F FWD indicator flashes.
Pressing this button together with the F FWD button jumps
to the last frame of the last clip recorded on the disc.
eg STOP button
Press this button to stop disc playback.
32
2-4 Shooting and Recording/Playback Functions
Page 33

eh PREV button
This jumps to the beginning of the current clip, and pauses.
During the jump, the F REV indicator flashes.Pressing this
button together with the F REV button jumps to the first
frame of the first clip recorded on the disc.
Chapter 2 Locations and Functions of Parts and Controls
2-4 Shooting and Recording/Playback Functions
33
Page 34

2-5 Output Video Operating Section
Chapter 2 Locations and Functions of Parts and Controls
a SEL/SET (select/set) dial
When thumbnails (each representing a clip) are shown on
the color LCD, you can select a particular thumbnail with
this dial.
Turning the dial upward moves the cursor to the left, and
when it reaches the left edge, to the rightmost position in
the row above. Turning the dial downward moves the
cursor to the right, and when it reaches the right edge, to
the leftmost position in the row below. After selecting the
1 SEL/SET dial
2 THUMBNAIL button
3 Thumbnail indicator
4 Sub clip indicator
5 SUB CLIP button
6 SHIFT button
Output video operating section
e SUB CLIP button
Press this to play back according to a clip list.
You can play back a particular clip or sequential clips, or
carry out a search of the selected clip list.
When no clip list is selected, pressing this button has no
effect, and the operation is invalid.
To carry out operations such as saving, recalling, or
deleting a clip list, hold down the SHIFT button and press
this button.
THUMBNAIL
ESSENCE MARK
SUB CLIP
PRESET
REGEN
REGEN
CLOCK
CLOCK
F-RUN
R-RUN
SEL/SET
S.SEL
SHIFTCLIP MENU
SET
desired thumbnail with the cursor, press the dial in to
confirm.
To carry out a scene selection setting, hold down the
f SHIFT button
Use this in combination with other buttons.
SHIFT button, and press in this dial.
b THUMBNAIL button
To carry out a search using thumbnails, or to create a clip
list, press this button.
Pressing it switches from the whole-screen display to a
thumbnail display. Press once more to return to the wholescreen display.
To search thumbnails by essence marks, hold down the
SHIFT button and press this button.
c Thumbnail indicator
This lights when thumbnails are shown.
d Sub clip indicator
This lights when playing back following a clip list.
34
2-5 Output Video Operating Section
Page 35

2-6 Menu Operating Section
1 MENU knob
a MENU knob
Use this knob to change the page selection or a setting
within the menu.
Press: If you press this knob when the arrow (b) is placed
at the page title on the menu, the arrow changes to a
question mark (?) and you can change the page by
turning this knob.
When the arrow mark is placed at a position other than
the page title, you can change the setting of the current
item by pressing and turning this knob.
Turn: Turn this knob to change the page or change item
settings.
b STATUS ON/SEL / OFF (menu display on/page
selection/display off) switch
To enable this switch, set the MENU ON/OFF switch to
OFF.
Closing the cover automatically sets the MENU ON/OFF
switch to OFF.
ON/SEL: Each time this switch is pushed upward, a
window to confirm the menu settings and status of the
camcorder appears on the viewfinder screen. The
window consists of three pages, which are switched
each time the switch is pushed upward. Each page is
displayed for about 10 seconds.
OFF: To clear the page immediately after display, push
this switch down to the OFF position.
You can select the pages to be displayed on the menu.
2 STATUS ON/SEL / OFF switch
3 MENU ON/OFF switch
MENU
4 CANCEL/PRST / ESCAPE switch
5 “Memory Stick” compartment
Cover
c MENU ON/OFF switch
To use this switch, open the cover.
This switch is used to display the menu on the viewfinder
screen or the test signal screen.
Closing the cover automatically sets this switch to OFF.
ON: Displays the menu on the viewfinder screen or the test
signal screen, at the last accessed page. When the
menu is used for the first time, the first page is
displayed.
OFF: Removes the menu from the viewfinder screen or
the test signal screen.
d CANCEL/PRST (preset) / ESCAPE switch
To enable this switch, set the MENU ON/OFF switch to
ON.
Closing the cover automatically sets the MENU ON/OFF
switch to OFF.
CANCEL/PRST: Pushing this switch up to this position
displays the message to confirm whether the previous
settings are cancelled or settings are reset to their
initial values, depending on the menu operating
condition.
Pushing this switch up to this position again cancels
the previous settings or resets the settings to their
initial values.
ESCAPE: Use this switch when the menu page, which has
a hierarchical structure, is opened. Each time the
switch is pushed to this position, the page returns to
one stage higher in the hierarchy.
Chapter 2 Locations and Functions of Parts and Controls
For details, see 7-2-8 “Displaying the Status Confirmation
Windows” on page 139.
2-6 Menu Operating Section
35
Page 36

e “Memory Stick” compartment
“Memory Stick”
Access indicator
Chapter 2 Locations and Functions of Parts and Controls
How to insert a “Memory Stick”
Label
“Memory Stick”
Open the lid of the menu operating section, and insert a
“Memory Stick”, with the notch facing downward, in the
direction shown by the arrow, so that it clicks into place.
To remove a “Memory Stick”, first press it in to release the
lock, then withdraw.
The “Memory Stick” access indicator lights when the
“Memory Stick” is being accessed (for reading or writing).
For details about types of “Memory Stick”, see “About a
“Memory Stick”” on page 218.
Notes
• Do not insert/remove a “Memory Stick” while the
“Memory Stick” access indicator is lit or flashing. Doing
so may cause a loss of data.
• This device uses a standard “Memory Stick”, a “Memoy
Stick PRO”, and a “MagicGate Memory Stick” equipped
with MagicGate copyright protection technology.
36
2-6 Menu Operating Section
Page 37

2-7 Time Code System
Time code functions (1)
Chapter 2 Locations and Functions of Parts and Controls
1 TC IN connector
2 TC OUT connector
3 GENLOCK IN connector
a TC IN (time code input) connector (BNC type)
To synchronize the time code of this unit to an external
time code, input the reference time code to this connector.
b TC OUT (time code output) connector (BNC type)
To synchronize the time code of an external VTR to that of
the camcorder, connect this connector to the reference time
code input connector of the external VTR.
c GENLOCK IN connector (BNC type)
• This connector inputs a reference signal when the
camera is to be genlocked or when the time code is to be
synchronized with external equipment. Use the
MAINTENANCE menu to adjust the genlock H-phase
(phase of horizontal sync signal) and the sub-carrier
phase.
For details, refer to the Maintenance Manual.
• This connector also inputs a return video signal.
You can display the return video signal in the viewfinder
screen while holding the RET button down with
“RETURN VIDEO” set to “ON” on the GENLOCK
page of the OPERATION menu.
• This connector also inputs an external analog composite
video signal.
When the CBK-SC01 extension board is installed, you
can record the external analog composite video signal
input to this connector.
For details, see 3-4 “Recording Video Signals From
External Equipment” on page 76.
2-7 Time Code System
37
Page 38

4 DISPLAY switch
5 RESET button
6 HOLD button
Chapter 2 Locations and Functions of Parts and Controls
d DISPLAY switch
This cycles the data displayed in the counter display
7 SEL/SET dial
8 PRESET/REGEN/CLOCK switch
9 F-RUN/SET/R-RUN switch
Time code functions (2)
Turning the dial upward increases the value of the flashing
digit, and turning it downward decreases the value.
THUMBNAIL
ESSENCE MARK
SUB CLIP
PRESET
REGEN
CLOCK
F-RUN
R-RUN
SEL/SET
S.SEL
SHIFTCLIP MENU
SET
through the sequence COUNTER, TC, and U-BIT.
COUNTER: Display the elapsed recording/playback time
(hours, minutes, seconds, frames).
TC: Display time code.
U-BIT: Display user bit data.
h PRESET/REGEN (regeneration)/CLOCK switch
This switch selects whether to set a new time code or to
follow the already recorded time code.
PRESET: Records time code with a preset initial value.
REGEN: Records time code continuous with the existing
For details, see “Time code display” on page 42.
time code recorded on the disc. Regardless of the
setting of the F-RUN/SET/R-RUN switch, the
e RESET button
Pressing this button resets the time data displayed on the
counter display section to “00:00:00:00” or the user bit
data to “00000000.”
camcorder operates in R-RUN mode.
CLOCK: Records time code synchronized to the internal
clock. Regardless of the setting of the F-RUN/SET/RRUN switch, the camcorder operates in F-RUN mode.
f HOLD (display hold) button
Pressing this button instantly freezes the time data
displayed in the counter display section. (The time code
generator continues running.) Pressing this button again
releases the hold. You can use this button, for example, to
determine the exact time of a particular shot.
When the HOLD button is activated, the time data is
displayed in the following format:
For details of the counter display, see 2-9 “Warnings and
Indications on the LCDs” on page 40.
g SEL/SET (select/set) dial
To set a time code, user bit, or real time value, press this
dial so that the digit you want to change flashes.
38
2-7 Time Code System
i F-RUN/SET/R-RUN (free run/set/recording run)
switch
This switch selects the operating mode for the internal time
code generator.
F-RUN: Time code keeps advancing, regardless of the
operating state of the VDR. Use this setting when
aligning the time code with real time or when
synchronizing the time code with an external time
code.
SET: Set the switch to this position to set the time code or
user bits.
R-RUN: The time code value advances only during
recording. Use this setting to have a consecutive time
code on the disc.
For details, see 5-6-3 “Setting the User Bits” on page 105
and 5-6-1 “Setting the Time Code” on page 105.
Page 39

2-8 Warnings and Indications
Besides the viewfinder, speaker and earphones, the
indicators and displays described in this section also
1 Tally indicator
2 DISPLAY switch
3 TALLY switch
provide you with information such as the operating state of
the camcorder and warnings.
Chapter 2 Locations and Functions of Parts and Controls
4 Back tally indicator
5 Back tally switch
8 Color LCD
6 Monochrome LCD
7 DISP SEL switch
Warning and indication functions
a Tally indicator
Setting the TALLY switch on the viewfinder to HIGH or
LOW enables this indicator. It lights when the VDR starts
recording. Like the REC indicator in the viewfinder, it also
flashes to provide warnings. The brightness of this
indicator when it is lit can be switched with the TALLY
switch.
b DISPLAY switch
This switches the indications on the viewfinder screen on
or off.
ON: The indications appear on the viewfinder screen.
OFF: The indications do not appear on the viewfinder
screen.
9 WARNING indicator
q; ACCESS indicator
qa Rear tally indicator
qs LCD switch
Note
Setting the MENU ON/OFF switch to ON displays the
menu on the viewfinder screen even if the DISPLAY
switch is set to OFF.
c TALLY switch
This switch controls the tally indicator as follows.
HIGH: The tally indicator brightness is high.
OFF: The tally indicator is disabled.
LOW: The tally indicator brightness is low.
d Back tally indicator
When the back tally switch is set to ON, this indicator has
the same function as the tally indicator.
2-8 Warnings and Indications
39
Page 40

e Back tally switch
This switch enables or disables the back tally and rear tally
indicators.
ON: The back tally and rear tally indicators are enabled.
2-9 Warnings and
Indications on the
OFF: The back tally and rear tally indicators are disabled.
LCDs
f Monochrome LCD
Chapter 2 Locations and Functions of Parts and Controls
This shows the remaining battery capacity, remaining disc
capacity, time data, and so on.
For details, see 2-9-1 “Monochrome LCD” on page 40.
g DISP SEL (display selection) switch
This switches the display in the color LCD.
CHAR: Display video with superimposed text. With the
MENU ON/OFF switch set to OFF, also display
camcorder status indications similar to those displayed
in the viewfinder (see 7-2 “Status Display on the
Viewfinder Screen” on page 132).
MONI: Display video without superimposed text.
STATUS: Display counter, warnings, and audio levels.
2-9-1 Monochrome LCD
Disc status and battery status
Disc status indicator
Full capacity is available.
h Color LCD
This displays VDR-related warnings, remaining battery
capacity, remaining disc capacity, audio levels, time data,
and so on.
For details, see 2-9-2 “Color LCD” on page 41.
i WARNING indicator
This indicator lights up or flashes when there is a fault in
the VDR.
For details, see 10-3 “Operation Warnings” on page 186.
j ACCESS indicator
This lights when data is written to or read from the disc.
k Rear tally indicator
When the back tally switch is set to ON, this indicator has
the same function as the tally indicator.
l LCD switch
This controls the backlights of the color LCD and the
monochrome LCD.
OFF: The color LCD is turned off (the backlight of the
monochrome LCD is off).
L: The color LCD is adjusted for viewing indoors (the
backlight of the monochrome LCD is on).
H: The color LCD is adjusted for viewing outdoors (the
backlight of the monochrome LCD is on).
Close to full state: “DISC” flashes.
Full (disc must be replaced):
“DISC” and “E” flash.
Battery status indicator
Fully charged
Nearly dead: “BATT” flashes.
Dead battery (battery must be
charged): “BATT” and “E” flash.
Display of remaining disc capacity and remaining battery capacity on
the monochrome LCD
40
2-9 Warnings and Indications on the LCDs
Page 41

Time code display
Lights when the time code or real time is
displayed.
Time counter display: Shows the time
code, user bits, and real time.
Lights when the HOLD button is pressed.
2-9-2 Color LCD
Disc status, battery status and audio level
Disc status indicator
Full capacity is available.
Close to full state: “DISC” flashes.
Full (disc must be replaced): “DISC” and “E” flash.
1)
Chapter 2 Locations and Functions of Parts and Controls
1) When the HOLD button is pressed to hold the time code value,
the time code is displayed in the format shown below. When
the HOLD button is pressed again to release the hold, the time
code is displayed in the normal format
Time code display on the monochrome LCD
Formats of video and audio
signals to be redorded.
Audio level meters
Battery status indicator
Fully charged
Nearly dead: “BATT” flashes.
Dead battery (battery must be charged): “BATT”
and “E” flash.
Display of remaining disc capacity, remaining battery capacity, and
audio levels on the color LCD
2-9 Warnings and Indications on the LCDs
41
Page 42

VDR operation status and status
indicators
2-10 Indicators in the
Viewfinder
Several indicators are provided above and below the
Chapter 2 Locations and Functions of Parts and Controls
Warning display area
This shows a message if a recording fault or
condensation is detected.
For details, see 10-3 “Operation Warnings” on
page 186.
viewfinder screen to indicate the current state and
adjustments of the camera.
1 TALLY indicator
2 REC (recording) indicator
3 BATT (battery) indicator
Viewfinder screen
4 (warning) indicator
VDR operation and status indicators on the color LCD
Time code display
Lights in playback mode.
Lights in non-drop frame
mode. (PDW-510/530 only)
Lights when the camcorder is
synchronized with an external time code.
Lights when the time code
generator is on hold.
Lights when the HOLD button is pressed
Lights when the time code or real time is displayed.
5 Spare indicator
6 SAVE indicator
Indicators on the viewfinder
a TALLY (green tallly) indicator
This indicator lights when the camcorder is in Picture Cash
mode. Also, this indicator lights when a green tally signal
is received from the camera control unit.
b REC (recording, red tally) indicator
This indicator lights red when recording starts and remains
lit during recording. It also lights when a red tally signal is
received from the camera control unit and flashes to give a
warning.
For details, see 10-3 “Operation Warnings” on page 186.
c BATT (battery) indicator
This indicator starts flashing when the battery connected to
the camcorder is nearly exhausted, and stays lit when the
battery is completely exhausted.
1)
The battery power level at which the indicator starts
flashing can be set on the BATTERY 1 page of the
MAINTENANCE menu.
Time counter display: Shows the time code, user
bit data, and real time.
1) When the HOLD button is pressed to hold the time code value,
the time code is displayed in the format shown below. When the
HOLD button is pressed again to release the hold, the time code
is displayed in the normal format.
Time code display on the color LCD
42
2-10 Indicators in the Viewfinder
For details, refer to the Maintenance Manual.
d (warning) indicator
This indicator lights when any of the following conditions
occurs with the corresponding item set to ON on the “!”
LED page of the USER menu.
• The gain is set to other than 0 dB.
• The SHUTTER selector is set to ON (scan mode I).
• The shutter speed is set to a value other than 1/60 (scan
mode PsF).
Page 43

• The WHITE BAL switch is set to PRST.
• ATW is enabled.
• The lens extender is used.
• The FILTER selector is set to other than ND:1/CC:B.
• The reference value of auto iris adjustment is not the
standard value.
e Spare indicator
This is a spare indicator.
This can be used as a REC indicator by setting REC
TALLY to BOTH in the FUNCTION 3 page of the
MAINTENANCE menu.
f SAVE indicator
This indicator lights when the VDR SAVE/STBY switch
is set to SAVE, putting the VDR into power save mode.
Chapter 2 Locations and Functions of Parts and Controls
2-10 Indicators in the Viewfinder
43
Page 44

Chapter 2 Locations and Functions of Parts and Controls
44
2-10 Indicators in the Viewfinder
Page 45

Recording and Playback
• Do not leave cartridges where dust may be able to gain
3-1 Handling Discs
3-1-1 Discs Used for Recording and
Playback
This camcorder uses the following disc for recording and
playback:
PFD23 Professional Disc (capacity 23.3 GB)
ingress.
• Store cartridges in their cases.
Care of the discs
• Remove dust and dirt on the outside of a cartridge using
a soft dry cloth.
• If condensation forms, allow ample time to dry before
use.
3-1-3 Write-Protecting Discs
Chapter
3
Note
It is not possible to use the following discs for recording or
playback:
• Blu-ray Disc
• Professional Disc for Data
3-1-2 Notes on Handling
Handling
The Professional Disc is housed in a cartridge, and is
designed to allow handling free of risk from dust or
fingerprints. However, if the cartridge is subjected to a
severe shock, for example by dropping it, this can result in
damage or scratching of the disc. If the disc is scratched, it
may be impossible to record video/audio, or to play back
the content recorded on the disc. The discs should be
handled and stored carefully.
• Do not touch the surface of the disc itself within the
cartridge.
• Deliberately opening the shutter may cause damage.
• Do not disassemble the cartridge.
• The supplied adhesive labels are recommended for
indexing discs. Apply the label in the correct position.
To protect the content recorded on the disc from accidental
erasure, move the Write Inhibit tab on the lower surface of
the disc in the direction of the arrow, as shown in the
following figure.
Lower surface of the disc
Write Inhibit tab settings
SAVE SAVE
Recording enabled Recording disabled
Write Inhibit tab
E
V
A
S
Slide in the direction of the arrow
Storage
• Do not store discs where they may be subjected to direct
sunlight, or in other places where the temperature or
humidity is high.
You can lock individual clips to prevent them from being
deleted. For details, see “Locking Clips” (page 74).
3-1 Handling Discs
45
Page 46

3-1-4 Loading and Unloading a Disc
Insert the disc.
Loading a disc
Proceed as follows.
1
Turn on the POWER switch.
Chapter 3 Recording and Playback
V indication on
the outside
Push and
close the lid.
The disc is loaded.
POWER switch
HUMID indicator
Note
If there is condensation inside the VDR section, the
message “HUMID” appears in the viewfinder screen
and the color LCD. If this happens, wait until the
indicator goes off before going on to step 2.
2
Press the EJECT button.
This opens the lid of the disc compartment.
EJECT button
Lid of the disc
compartment
Note
To insert the disc correctly, make sure that the
camcorder is in the upright position (the grip upside,
the bottom downside).
Unloading a disc
With the power supply on, press the EJECT button to open
the disc compartment lid and eject the disc. Then remove
the disc. If you are not going to insert another disc, close
the disc compartment lid.
Unloading a disc when the power supply is off
If the battery is exhausted, it is not possible to remove the
disc by pressing the EJECT button. In such cases, use the
following emergency procedure to remove the disc
manually.
1
Turn off the POWER switch.
2
Carry out the operation shown in the following figure.
3
46
Insert the disc in the V direction, and close the disc
compartment lid manually.
3-1 Handling Discs
Page 47

1 Open this rubber cover.
2 Using a screwdriver or
similar implement, slide
the black metal plate
visible inside, in the
direction of the rear of the
camcorder.
The disc compartment lid
opens. A red Phillips
screw is visible inside the
rubber cap.
3 Insert a screwdriver into
the Phillips screw, and
turn counterclockwise
(the direction shown on
the rubber cap).
This ejects the disc.
4 Close the rubber cover
firmly.
2
Turn the MENU knob to move the b mark to
“MAINTENANCE”, and press the MENU knob.
If this is the first time the MAINTENANCE menu has
been displayed, the CONTENTS page of the
MAINTENANCE menu appears. If the menu has been
used before, the last accessed page appears.
3
If the CONTENTS page is displayed, turn the MENU
knob to move the b mark to “DISC”, and press the
MENU knob to display the DISC page.
If a different page is displayed, turn the MENU knob
until the DISC page appears, then press the MENU
knob to select the page.
M19 DISC TOP
DELETE LAST CLIP: EXEC
DELETE ALL CLIPS: EXEC
QUICK FORMAT : EXEC
Chapter 3 Recording and Playback
Unloading a disc manually when the power supply is off
You need not return the screw to its original position after
taking out the disc. Turning on the power makes the disc
compartment mechanism operable again.
3-1-5 Formatting a Disc
Using a new disc
An unused disc requires no formatting operation. The disc
is automatically formatted so that it is ready to use when
loaded into this unit.
Using a disc on which material is recorded
To format a recorded disc, load the disc into the unit then
do as follows.
Note
When a recorded disc is formatted, all the data on the disc
is erased. (Locked clips (see page 74) are also erased.)
1
Holding down the MENU knob, move the MENU ON/
OFF switch from OFF to ON.
The TOP menu appears.
4
Press the MENU knob, then turn it to move the b mark
to “QUICK FORMAT”, and press the MENU knob
again.
The message “EXECUTE OK? YES b NO” appears.
5
Turn the MENU knob to move the b mark to “YES”,
and press the MENU knob again.
Formatting is completed and the message
“COMPLETE” appears.
3-1-6 Handling of Discs When
Recording Does Not End
Normally (Salvage Function)
Recording processing does not end normally if, for
example, the battery pack is removed during recording, or
if the power cord is disconnected during recording.
Because the file system is not updated, video and audio
data recorded in real time is not recognized as files and clip
contents recorded up to that point are lost.
3-1 Handling Discs
47
Page 48

However, this unit has a salvage function which can hold
losses to the minimum by reconstructing clips on such
2
Turn the MENU knob to move the b mark to YES,
then press the MENU knob.
discs.
Note that no recorded clip contents are lost when the
POWER switch is turned off and when battery exhaustion
Salvage processing starts, and the message
“EXECUTING.” appears.
is detected, because the unit does not enter power saving
mode until after the end of recording processing.
A results message appears when the processing
finishes.
Notes
• Do not disconnect the battery pack or power cord until
recording processing has finished and the ACCESS
indicator has gone out.
Chapter 3 Recording and Playback
• This function salvages as much recorded material as
possible after an unforeseen accident, but 100%
restoration cannot be guaranteed.
• Even when this function is used, it is not possible to
recover data from immediately before the interruption of
recording. The amount of data lost is as follows.
- Quick salvage: From 2 to 4 seconds of data before the
interruption of recording.
- Full salvage: From 4 to 6 seconds of data before the
• If the salvage succeeded, the message
“COMPLETED.” appears.
• If the salvage failed, the message
“INCOMPLETED.” appears. Clips for which
recording did not end normally are lost.
To exit without salvaging
Select NO in step 2 to exit without performing salvage
processing.
However, the status of the disc does not change. Salvage is
still required to recover the clips for which recording did
not end normally. The salvage message will appear again
when that disc is inserted again, or when the camcorder is
powered on again.
interruption of recording.
More data may be lost when functions such as Picture
Cache and Interval Rec are being used.
Note
If salvage processing is not done, sections which were
recorded normally can be played back, but no new
Quick salvage
recording can be done on the disc.
When the unit is powered on again after a recording
interruption due to a power interruption, with the disc still
loaded in the unit, clips are reconstructed on the basis of
backup data stored in nonvolatile memory and markers
recorded on the disc.
Processing time is about 5 seconds.
Full salvage
When recording on an XDCAM device is interrupted
because of a power interruption, and a disc is manually
ejected from that device with the power off, clips are
reconstructed on the basis of markers recorded on the disc
when the disc is loaded in this unit. Therefore, processing
takes longer than for a quick salvage (about 30 seconds,
although it depends on the state of the disc).
Proceed as follows to perform a full salvage.
1
Insert the disc on which recording did not end
normally.
The following salvage message appears.
SALVAGE
TO RECORD ON THE
DISC, IT IS NECESSARY
TO EXECUTE SALVAGE.
SALVAGE OK?
YES NO
48
3-1 Handling Discs
Page 49

1
Attach a fully charged battery pack.
3-2 Recording
3-2-1 Basic Procedures
This section describes the basic procedures for shooting
and recording.
Before a shooting session, ensure that the camcorder is
functioning properly.
For details, see 10-1 “Testing the Camcorder Before
Shooting” on page 181.
Recording format settings (PDW-530/530P
only)
With the PDW-530/530P you can select the recording
formats for each of video and audio.
Note that it is not possible to use different recording
formats on a single disc.
Be sure to select the same format as the existing recording
if you use a disc on which material is recorded, or
otherwise use a different disc.
For details of the setting operations, see 5-1-1 “Setting the
Video Recording Format” on page 91 and see 5-1-2
“Setting the Audio Recording Format” on page 92.
Thumbnail image setting
As required, you can select the frame to display as the
thumbnail image of a clip.
(The factory default setting is to display the first frame in
the clip as the thumbnail image.)
For details, see 9-1 “Power Supply” on page 165.
2
Turn on the POWER switch.
3
Set the DISP SEL switch to STATUS, and check on
the color LCD that the following conditions are met.
• The HUMID indicator is not showing.
If it is, wait until it disappears.
• The battery status indicator (x) shows at least five
segments.
If it does not, replace the battery pack with a fully
charged one.
4
Check that there are no obstructions such as cables
near the disc compartment lid. Then press the EJECT
button to open the disc compartment lid.
5
After checking that the disc is not write-protected (see
page 45), load it and close the disc compartment lid.
Basic procedure for shooting: from
adjusting the black balance and white
balance to stopping recording
Switch settings
After turning on the power and loading a disc, set the
switches and selectors as shown below and begin
operation.
DISPLAY: ON
AUDIO SELECT
CH-1/CH-2: AUTO
Chapter 3 Recording and Playback
See 5-7 “Setting the Thumbnail Image” on page 108 for
more information about how to make this setting.
Basic procedure for shooting: from turning
on the camcorder to loading a disc
Proceed as follows.
4
5
1
2
Basic procedure for shooting: from power supply to disc loading
3
Iris: Automatic
Zoom: Automatic
OUTPUT/DCC: CAM, DCC ON
F-RUN/SET/R-RUN: F-RUN or R-RUN
(set as needed)
Switch and selector settings before shooting
Shooting
Proceed as follows.
3-2 Recording
49
Page 50

1,2
For details, see 7-3-5 “Assigning Functions to
ASSIGN 1/2/3/4 Switches” on page 144.
3,5
During recording, the REC indicator lights in the
viewfinder. Perform zooming and focus control, if
necessary.
2
4
5,6
Note
During recording (while the ACCESS indicator is lit)
do not remove the battery pack. If you do, the internal
processing for recording may not finish properly,
which may cause the last few seconds of recording to
Chapter 3 Recording and Playback
Basic procedure for shooting: from adjusting the black balance and
white balance to stopping recording
1
Push the AUTO W/B BAL switch to BLK to adjust the
black balance.
For details of black balance adjustment, see 5-2-1
“Adjusting the Black Balance” on page 93.
be lost.
For details, see 3-1-6 “Handling of Discs When
Recording Does Not End Normally (Salvage
Function)” (page 47).
6
To stop recording, press the REC START button or the
VTR button on the lens again.
The REC indicator in the viewfinder goes off.
2
Select the CC filter and ND filter to match the lighting
conditions, and adjust the white balance.
When the white balance settings are already in
memory
Set the WHITE BAL switch to A or B.
The material recorded from step 5 to step 6 is saved as
a single clip.
To play back the recorded clip
Press the PREV button, then press the PLAY/PAUSE
button to play from the beginning of the clip.
When the white balance setting is not in memory
and you do not have enough time to adjust the
white balance
Set the WHITE BAL switch to PRST.
This automatically adjusts the white balance as
follows, depending on the setting of the FILTER knob.
• For the PDW-530/530P:
B: 3200 K, C: 4300 K, D: 6300 K
• For the PDW-510/510P:
1: 3200 K, 3: 5600 K
For details, see 5-2-2 “Adjusting the White Balance”
on page 94.
3
Aim the camera at the subject and adjust the focus and
zoom.
4
If necessary, set the electronic shutter for an
appropriate mode and speed.
For details, see 5-3 “Setting the Electronic Shutter”
on page 97.
5
To start recording, press the REC START button or
the VTR button on the lens.
If the recording start/stop function is assigned to the
ASSIGN 1/3/4 switch, this switch functions as REC
START button.
7
Repeat steps 5 and 6 as required for shooting.
Each time you repeat steps 5 and 6, successive clips
are recorded on the disc.
Clip 1 Clip 2 Clip 3
Notes
REC
START
REC
STOP
REC
START
REC
STOP
REC
START
REC
STOP
• It is not possible to record a clip shorter than 2 seconds.
If you stop recording within 2 seconds of starting, this
results in a 2-second clip.
If you stop recording and restart within 2 seconds of the
original start, this creates a single continuous clip from
the original start time.
• The maximum number of clips that can be recorded on a
single disc is 300. If an attempt is made to record more
than 300 clips, the error message “DISC FULL!”
appears, even if there is free capacity on the disc.
Playback control buttons
During recording, the playback control buttons (EJECT, F
REV, F FWD, NEXT, PREV, PLAY/PAUSE, STOP)
have no effect.
50
3-2 Recording
Page 51

3-2-2 Deleting Clips
With this camcorder you can delete clips one at a time, in
sequence from the last recorded clip, or you can delete all
clips in a single operation.
The message “DELETE OK? YES b NO” appears.
5
Turn the MENU knob to move the b mark to “YES”,
and press the MENU knob again.
The last recorded clip is deleted.
You can use the THUMBNAIL menu to delete the selected
clip or all clips. For details, see “Deleting clips” (page
75).
To delete the last recorded clip
Note
If the clip is locked, it cannot be deleted.
Proceed as follows.
1
Holding down the MENU knob, move the MENU ON/
OFF switch from OFF to ON.
The TOP menu appears.
2
Turn the MENU knob to move the b mark to
“MAINTENANCE”, and press the MENU knob.
If this is the first time the MAINTENANCE menu has
been displayed, the CONTENTS page of the menu
appears. If the menu has been used before, the last
accessed page appears.
6
By repeating steps 4 and 5, you can delete a number of
clips in sequence from the last recorded clip.
Clip 1 Clip 2 Clip 3
Clips can be deleted in the sequence 3 t 2 t 1.
To delete all clips within the disc
Note
Carrying out the following procedure deletes all clips that
are not locked.
Proceed as follows.
1
On the DISC page (see the previous item), move the b
mark to “DELETE ALL CLIPS”, and press the MENU
knob.
The message “DELETE OK? YES b NO” appears.
2
To execute deleting, turn the MENU knob to move the
b mark to “YES”, and press the MENU knob.
This deletes all clips within the disc.
3-2-3 Recording Essence Marks
Chapter 3 Recording and Playback
3
If the CONTENTS page is displayed, turn the MENU
knob to move the b mark to “DISC”, and press the
MENU knob.
If a different page is displayed, turn the MENU knob
until the DISC page appears, then press the MENU
knob to select the page.
M19 DISC TOP
DELETE LAST CLIP: EXEC
DELETE ALL CLIPS: EXEC
QUICK FORMAT : EXEC
4
Press the MENU knob, then turn it to move the b mark
to “DELETE LAST CLIP”, and press the MENU knob
again.
Shot marks and other essence marks can be recorded on the
disc.
Recording essence marks for scenes containing important
images and sounds enables quick access to the marked
points. This increases editing efficiency.
Some essence marks are recorded automatically, for
example when recording starts and when the flash
operates. Others are recorded manually.
To specify essence marks to be recorded on the
disc
Proceed as follows.
3-2 Recording
51
Page 52

SHUTTER CHG. MARK: Recorded when the
shutter speed is changed.
WHITE CHG. MARK: Recorded when the white
balance is changed.
FLASH MARK: Recorded when a sudden brightness
change occurs as when the flash operates or when
the camcorder in recording mode is suddenly
moved into an indoor space from a bright outdoor
MENU knob
MENU ON/OFF
switch
5
1
Holding down the MENU knob, move the MENU ON/
Chapter 3 Recording and Playback
OFF switch from OFF to ON.
space.
Turn the MENU knob to move the b mark to “SHOT
MARK 1”.
The TOP menu appears.
2
Turn the MENU knob to move the b mark to
“MAINTENANCE”.
3
Press the MENU knob.
If this is the first time the MAINTENANCE menu has
been displayed, the CONTENTS page of the menu
appears. If the menu has been used before, the last
accessed page appears.
4
If the CONTENTS page is displayed, turn the MENU
knob to move the b mark to “ESSENCE MARK”,
then press the MENU knob.
If a different page is displayed, turn the MENU knob
until the ESSENCE page appears, then press the
MENU knob to select the page.
?M10 ESSENCE MARK TOP
SHOT MARK 1 : OFF
SHOT MARK 2 : OFF
OVER AUDIO LIMIT : OFF
GAIN CHG. MARK : OFF
FILTER CHG. MARK : OFF
SHUTTER CHG. MARK: OFF
WHITE CHG. MARK : OFF
FLASH MARK : OFF
FLASH MARK LEVEL : 10
INDEX PIC. POS. : 0SEC
The items show the following types of essence marks.
SHOT MARK 1/2: Recorded manually.
OVER AUDIO LIMIT: Recorded when the audio
level exceeds 0 dBFS.
GAIN CHG. MARK: Recorded when the gain value
is changed.
FILTER CHG. MARK: Recorded when the filter is
changed.
M10 ESSENCE MARK TOP
SHOT MARK 1 : OFF
SHOT MARK 2 : OFF
OVER AUDIO LIMIT : OFF
GAIN CHG. MARK : OFF
FILTER CHG. MARK : OFF
SHUTTER CHG. MARK: OFF
WHITE CHG. MARK : OFF
FLASH MARK : OFF
FLASH MARK LEVEL : 10
INDEX PIC. POS. : 0SEC
6
Press the MENU knob.
The b mark to the left of “SHOT MARK 1” changes
to a z mark and the z mark to the left of the setting
changes to a ? mark.
7
If you want to record the essence mark, turn the
MENU knob to display “ON”. If you do not want to
record it, turn the MENU knob to display “OFF”.
8
Press the MENU knob.
9
Repeat steps 5 to 8 to set the remaining essence marks.
10
When FLASH MARK is “ON”, use the FLASH
MARK LEVEL item to set the threshold brightness
value (in the range 1 to 20) for essence mark
recording.
11
Set the MENU ON/OFF switch to OFF to end the
menu operation.
Recording a SHOT MARK 1 essence mark
Press the RET button once.
“ShotMark1” appears on the viewfinder screen for about
one second near the time code display.
If SHOT MARK 1 recording has been assigned to one of
the assignable switches, you can also use that switch to
record a SHOT MARK 1 essence mark.
See section 7-3-5 “Assigning Functions to ASSIGN 1/2/3/
4 Switches” (page 144) for more information about how to
make assignments.
52
3-2 Recording
Page 53

Recording a SHOT MARK 2 essence mark
Press the RET button twice in quick succession during
recording or playback.
“ShotMark2” appears in the viewfinder screen for about
one second near the time code display.
If SHOT MARK 2 recording has been assigned to one of
the assignable switches, you can also use that switch to
record a SHOT MARK 2 essence mark.
3-2-4 Starting a Shoot With a Few
Seconds of Pre-Stored Picture
Data (Picture Cache Function)
The camcorder has a large capacity internal memory, in
which you can cache the last few seconds (maximum 12
seconds) of captured video and audio, so that recording
starts from a point just before you press the REC START
button or VTR button on the lens.
Setting the Picture Cache time/Picture
Cache mode
To record in Picture Cache mode, you need to turn on
Picture Cache mode and set the picture data storage time
(Picture Cache time) using the USER menu.
The Picture Cache time determines the number of seconds
recorded from the Picture Cache, counting back from the
time when you press the REC START button or the VTR
button on the lens to start recording. However, the number
of seconds actually recorded from the Picture Cache may
be shorter immediately after the setting of the VDR SAVE/
STBY switch is changed, and in the special situations
explained in the following notes.
Notes
• The contents of picture cache memory are unstable for a
short time immediately after you select Picture Cache
mode or change the Picture Cache time. Therefore, if
you put the unit into recording mode by pressing the
REC START button or the VTR button on the lens
immediately after such operation, pictures just before
such operation cannot be recorded.
Also, a certain amount of time is required to actually
start recording to a disc immediately after you insert a
disc and when the VDR SAVE/STBY switch is set to
SAVE. In these cases, the number of seconds that can
actually be recorded from the picture cache may be
fewer than the specified picture cache time.
• During playback or recording review, no data is saved to
the picture cache memory. Thus it is not possible to use
this function to rerecord the last few seconds of material
from playback or recording review.
MENU knob MENU ON/OFF
1
Set the MENU ON/OFF switch to ON.
switch
The last accessed menu page appears on the screen.
2
Turn the MENU knob until the FUNCTION 1 page
appears.
? 03 FUNCTION1 TOP
ASSIGN SW <1> : ATW
ASSIGN SW <2> : OFF
ASSIGN SW <3> : OFF
ASSIGN SW <4> : OFF
TURBO SW : TURBO
DF/NDF : DF
CACHE/INTVAL REC: OFF
3
Press the MENU knob.
A b mark appears on the left of the currently selected
item and a z mark appears on the left of the setting.
03 FUNCTION1 TOP
ASSIGN SW <1> : ATW
ASSIGN SW <2> : OFF
ASSIGN SW <3> : OFF
ASSIGN SW <4> : OFF
TURBO SW : TURBO
DF/NDF : DF
CACHE/INTVAL REC: OFF
4
Turn the MENU knob to move the b mark to
“CACHE/INTVAL REC”.
5
Press the MENU knob.
The b mark on the left of “CACHE/INTVAL REC”
changes to a z mark and the z mark on the left of the
setting changes to a ? mark.
03 FUNCTION1 TOP
ASSIGN SW <1> : ATW
ASSIGN SW <2> : OFF
ASSIGN SW <3> : OFF
ASSIGN SW <4> : OFF
TURBO SW : TURBO
DF/NDF : DF
CACHE/INTVAL REC: OFF
Chapter 3 Recording and Playback
To turn Picture Cache mode on, proceed as follows.
3-2 Recording
53
Page 54

6
Turn the MENU knob until “CACHE” appears.
As you turn the MENU knob, the setting changes in
the following sequence: OFF y CACHE y A. INT
y M. INT.
When “CACHE” appears, the camcorder is in Picture
Cache mode, where picture, sound, and time code are
constantly saved in memory. The TALLY indicator
(green) is on while picture data is being stored in
memory.
The menu disappears, and the display indicating the
current status of the camcorder appears along the top
and bottom of the screen.
Settings made in Picture Cache mode are maintained until
changed.
You can turn Picture Cache mode on and off by assigning
the Picture Cache ON/OFF function to one of the
assignable switches (ASSIGN 1/2/3/4 and TURBO GAIN
buttons), and pressing the switch.
03 FUNCTION1 TOP
Chapter 3 Recording and Playback
ASSIGN SW <1> : ATW
ASSIGN SW <2> : OFF
ASSIGN SW <3> : OFF
ASSIGN SW <4> : OFF
TURBO SW : TURBO
DF/NDF : DF
CACHE/INTVAL REC: CACHE
CACHE REC TIME : 0-2s
For detailed information on the ASSIGN 1/2/3/4 switches,
see 7-3-5 “Assigning Functions to ASSIGN 1/2/3/4
Switches” on page 144.
Notes
• You can change the Picture Cache mode menu settings
while recording; any changes that you make, however,
do not take effect until after the recording operation is
7
Press the MENU knob.
completed.
• In Picture Cache mode, the internal time code generator
The z mark changes to a b mark and the ? mark
changes to a z mark.
8
Turn the MENU knob to move the b mark to “CACHE
REC TIME”.
operating mode is always F-RUN regardless of the
setting of the F-RUN/SET/R-RUN switch.
Camcorder operations in Picture Cache mode
The recording procedure in Picture Cache time is basically
the same as that for normal recording. However, note the
following differences.
03 FUNCTION1 TOP
ASSIGN SW <1> : ATW
ASSIGN SW <2> : OFF
ASSIGN SW <3> : OFF
ASSIGN SW <4> : OFF
TURBO SW : TURBO
DF/NDF : DF
CACHE/INTVAL REC: CACHE
CACHE REC TIME : 0-2s
• When you record in Picture Cache mode, the picture you
are shooting now is recorded to disc after the picture data
stored in memory (equal to the Picture Cache time) is
recorded to disc. For this reason, disc access may
continue for a short time after you press the REC
START button to stop recording. During this time, the
playback control buttons are disabled, as in recording
mode. Also, if you press the REC START button or the
9
Press the MENU knob.
VTR button on the lens to restart recording during this
time, a separate clip is recorded.
The b mark on the left of “CACHE REC TIME”
changes to a z mark and the z mark on the left of the
setting changes to a ? mark.
• When you press the REC START button or the VTR
button on the lens to restart recording during disc access,
the start point of the recorded clip may be later than the
Picture Cache time, especially when there are a large
10
Turn the MENU knob until the desired Picture Cache
time appears.
As you turn the MENU knob, the Picture Cache time
changes in the following sequence: 0-2s y 2-4s y
4-6s y 6-8s y 8-10s y 10-12s.
11
Press the MENU knob.
The z mark changes to a b mark and the ? mark
changes to a z mark.
number of clips recorded on the disc. In Picture Cache
mode, you should avoid stop and start recording
operations in quick succession.
• The time disc access stops after the REC START button
is pressed equals the Picture Cache time. However, if
you start recording within the Picture Cache time
immediately after selecting Picture Cache mode,
changing the Picture Cache time or performing playback
or recording review, the picture data for the duration of
the Picture Cache time will not be stored in memory.
Thus, the time disc access stops after the STOP button is
12
To end the menu operation, set the MENU ON/OFF
switch to OFF.
pressed becomes shorter than the Picture Cache time.
• In Picture Cache mode, you cannot set the F-RUN/SET/
R-RUN switch to SET to make time code settings. To
make time code settings, first exit Picture Cache mode.
54
3-2 Recording
Page 55

When power is lost during recording
• When the power is turned off during recording, the
camcorder will switch itself off after disc access has
continued for a few seconds to record the picture in the
instant of power off.
• If you remove the battery, pull out the DC cable, or cut
power to the AC adaptor during recording, video and
audio stored in memory will be lost without being
recorded to the disc. For this reason, make sure you do
not change the battery while recording.
Notes
• To make settings for Auto Interval Rec mode, set
“TAKE TOTAL TIME” first, then “REC TIME”.
• To turn on the light automatically before starting to
record, set the LIGHT switch to AUTO.
To turn on Auto Interval Rec mode, proceed as follows.
3-2-5 Time-Lapse Video (Interval
Rec Function)
Using the memory in the camcorder, you can capture timelapse video. There are two modes for this function, which
is known as “Interval Rec.”
• Auto Interval Rec mode
In Auto Interval Rec mode, pictures are automatically
shot a frame at a time at the specified interval and stored
in memory. To use this function you must set the total
time for shooting (TAKE TOTAL TIME) and the length
of time for recording on the disc (REC TIME).
• Manual Interval Rec mode
A specified number of frames (NUMBER OF FRAME)
is recorded when you press the REC START button or
the lens VTR button.
There are two Manual Interval Rec modes: a single shot
mode in which recording is done once with each press of
the button, and a consecutive mode in which recording is
done repeatedly at a specified interval after the button is
pressed.
A pre-lighting function is available in Auto Interval Rec
mode and the consecutive mode of Manual Interval Rec
mode. This function automatically turns on the light before
recording starts, which allows you to record pictures under
stable light and color temperature conditions.
MENU knob
1
Set the MENU ON/OFF switch to ON.
MENU ON/OFF switch
The last accessed menu page appears on the screen.
2
Turn the MENU knob until the FUNCTION 1 page
appears.
? 03 FUNCTION1 TOP
ASSIGN SW <1> : ATW
ASSIGN SW <2> : OFF
ASSIGN SW <3> : OFF
ASSIGN SW <4> : OFF
TURBO SW : TURBO
DF/NDF : DF
CACHE/INTVAL REC: OFF
3
Press the MENU knob.
A b mark appears on the left of the currently selected
item and a z mark appears on the left of the setting.
Chapter 3 Recording and Playback
Note
The camcorder cannot be put into Interval Rec mode when
the scanning mode is 24P (with the CBK-FC01 expansion
board (see page 149) installed).
Auto Interval Rec mode settings and
shooting
To make settings before shooting
To record in Auto Interval Rec mode, you need to turn on
Auto Interval Rec and set the total time from start to finish
of shooting (TAKE TOTAL TIME) and the length of time
for recording on the disc (REC TIME), using the USER
menu.
03 FUNCTION1 TOP
ASSIGN SW <1> : ATW
ASSIGN SW <2> : OFF
ASSIGN SW <3> : OFF
ASSIGN SW <4> : OFF
TURBO SW : TURBO
DF/NDF : DF
CACHE/INTVAL REC: OFF
4
Turn the MENU knob to move the b mark to
“CACHE/INTVAL REC”.
5
Press the MENU knob.
The b mark on the left of “CACHE/INTVAL REC”
changes to a z mark and the z mark on the left of the
setting changes to a ? mark.
3-2 Recording
55
Page 56

5MIN y 10MIN y 15MIN y 20MIN y
03 FUNCTION1 TOP
ASSIGN SW <1> : ATW
ASSIGN SW <2> : OFF
ASSIGN SW <3> : OFF
ASSIGN SW <4> : OFF
TURBO SW : TURBO
DF/NDF : DF
CACHE/INTVAL REC: OFF
30MIN y 40MIN y 50MIN y 1H y 2H y
3H y 4H y 5H y 7H y 10H y 15H y 20H
y 30H y 40H y 50H y 70H y 100H.
Here MIN means minutes (5MIN is 5 minutes) and H
means hours (1H is one hour).
11
Press the MENU knob.
6
Turn the MENU knob until A. INT appears.
As you turn the MENU knob, the setting changes in
Chapter 3 Recording and Playback
the following sequence: OFF y CACHE y A. INT
y M. INT.
When A. INT appears, the camcorder is in Auto
The z mark changes to a b mark and the ? mark
changes to a z mark.
12
Turn the MENU knob to move the b mark to “REC
TIME”.
Interval Rec mode. The TALLY indicator (green) in
the viewfinder flashes (one flash/second) while the
camcorder is in this mode. Also, TAKE TOTAL
TIME, REC TIME and PRE-LIGHTING appear.
03 FUNCTION1 TOP
ASSIGN SW <1> : ATW
ASSIGN SW <2> : OFF
ASSIGN SW <3> : OFF
ASSIGN SW <4> : OFF
TURBO SW : TURBO
DF/NDF : DF
CACHE/INTVAL REC: A.INT
TAKE TOTAL TIME : 5MIN
REC TIME : 5SEC
PRE-LIGHTING : OFF
13
Press the MENU knob.
The b mark on the left of “REC TIME” changes to a
? 03 FUNCTION1 TOP
ASSIGN SW <1> : ATW
ASSIGN SW <2> : OFF
ASSIGN SW <3> : OFF
ASSIGN SW <4> : OFF
TURBO SW : TURBO
DF/NDF : DF
CACHE/INTVAL REC: A.INT
TAKE TOTAL TIME : 20M
REC TIME : 5SEC
PRE-LIGHTING : OFF
z mark and the z mark on the left of the setting
7
Press the MENU knob.
changes to a ? mark.
The z mark changes to a b mark and the ? mark
changes to a z mark.
8
Turn the MENU knob to move the b mark to “TAKE
TOTAL TIME” (see “Time required for shooting and
time required for recording on the disc” (page 57)).
? 03 FUNCTION1 TOP
ASSIGN SW <1> : ATW
ASSIGN SW <2> : OFF
ASSIGN SW <3> : OFF
ASSIGN SW <4> : OFF
TURBO SW : TURBO
DF/NDF : DF
CACHE/INTVAL REC: A.INT
TAKE TOTAL TIME : 5MIN
REC TIME : 5SEC
PRE-LIGHTING : OFF
9
Press the MENU knob.
The b mark on the left of “TAKE TOTAL TIME”
changes to a z mark and the z mark on the left of the
setting changes to a ? mark.
10
Turn the MENU knob until the desired setting of
“TAKE TOTAL TIME” appears.
14
Turn the MENU knob until the desired time to be
recorded on the disc appears.
As you turn the MENU knob, the setting of REC
TIME changes in the following sequence: 5SEC y
10SEC y 15SEC y 20SEC y 30SEC y
40SEC y 50SEC y 1MIN y 2MIN y
.......85MIN.
Here SEC means seconds (5SEC is 5 seconds) and
MIN means minutes (1MIN is one minute).
You cannot set a REC TIME that is more than one
thirtieth of TAKE TOTAL TIME.
For example: When TAKE TOTAL TIME is set to 1H,
the maximum value of REC TIME is 2 MIN. (60
minutes divided by 30 gives 2 minutes.)
15
Press the MENU knob.
The z mark changes to a b mark and the ? mark
changes to a z mark.
16
Turn the MENU knob to move the b mark to “PRE-
LIGHTING”.
56
As you turn the MENU knob, the setting of TAKE
TOTAL TIME changes in the following sequence:
3-2 Recording
Page 57

? 03 FUNCTION1 TOP
ASSIGN SW <1> : ATW
ASSIGN SW <2> : OFF
ASSIGN SW <3> : OFF
ASSIGN SW <4> : OFF
TURBO SW : TURBO
DF/NDF : DF
CACHE/INTVAL REC: A.INT
TAKE TOTAL TIME : 20M
REC TIME : 5SEC
PRE-LIGHTING : OFF
17
Press the MENU knob.
The b mark on the left of “PRE-LIGHTING” changes
to a z mark and the z mark on the left of the setting
changes to a ? mark.
18
Turn the MENU knob until the desired time to turn on
the light before starting to record appears.
As you turn the MENU knob, the PRE-LIGHTING
time changes in the following sequence: OFF y
2SEC y 5SEC y 10SEC.
Notes
• Set the LIGHT switch on the camcorder to AUTO to
turn on the light before recording.
The light switch must also be set to ON. With these
settings, the light turns on and off automatically.
(However, the light remains on continuously if the
off time is less than 5 seconds.)
• When the LIGHT switch is set to MANUAL and the
light switch is set to ON, the light remains on
continuously.
19
Press the MENU knob.
The z mark changes to a b mark and the ? mark
changes to a z mark.
20
To end the menu operation, set the MENU ON/OFF
switch to OFF.
The menu disappears from the screen and the message
“AUTO INTERVAL **M**S” indicating Auto
Interval Rec mode appears along the bottom of the
screen.
“**M**S” indicates the shooting interval. For
example, the message “AUTO INTERVAL 00M04S”
indicates that the shooting interval is four seconds.
Note
The camcorder exits Auto Interval Rec mode whenever it
is powered off. However, the TAKE TOTAL TIME and
REC TIME settings are maintained. You do not need to set
them again the next time you use Auto Interval Rec mode.
To shoot and record in Auto Interval Rec mode
Proceed as follows.
1
After performing the basic procedures for shooting
and recording, following the instructions in 3-2-1
“Basic Procedures” (page 49), secure the camcorder
so that it will not move.
2
Press the REC START button on the camcorder or the
VTR button on the lens.
The camcorder starts recording in Auto Interval Rec
mode. When you use the PRE-LIGHTING function,
recording starts after the light is switched on.
The actual recording to disc begins when the
camcorder has saved about ten seconds of video in
memory, so disc access is intermittent.
While recording in Auto Interval Rec mode, the
TALLY indicator (green) in the viewfinder flashes (4
flashes/second) and the message “AUTO INTERVAL
**M**S” flashes on the viewfinder screen.
When the camcorder is capturing the picture in
memory, the REC indicator (red) in the viewfinder
lights.
After the length of time for recording on the disc (REC
TIME) has elapsed, the camcorder automatically stops
recording.
To continue auto interval recording
Press the REC START button on the camcorder or the
VTR button on the lens again.
The camcorder starts recording in Auto Interval Rec mode
again.
To interrupt auto interval recording
Press the REC START button or the VTR button on the
lens. The camcorder stops recording.
However, disc access may occur for recording picture data
already stored in memory.
To end auto interval recording
You can exit Auto Interval Rec mode using the following
two methods:
• Set the POWER switch to OFF.
• Set CACHE/INTVAL REC to OFF on the FUNCTION
1 page.
Time required for shooting and time required for
recording on the disc
Auto Interval Rec mode is effective for shooting objects
that move very slowly. To use this function, you need to
set the total time for shooting (TAKE TOTAL TIME) and
the length of time for recording on the disc (REC TIME).
The time required for shooting is the time required to
capture the very slowly moving subject, and the camcorder
must be arranged so that during this time the subject is
always in the frame.
The disc recording time indicates the running time of the
completed recording. The camcorder calculates the timelapse interval from these two times.
Chapter 3 Recording and Playback
3-2 Recording
57
Page 58

Single shot mode: Each time the REC START button or
Total time for shooting (TAKE TOTAL TIME)
VTR button on the lens is pressed, the camcorder
captures to memory a single shot consisting of the
Shooting interval
specified number of video frames.
Consecutive mode: Once the REC START button or VTR
button on the lens is pressed, the camcorder captures
consecutive shots to memory at the specified interval,
with each shot consisting of the specified number of
video frames.
To make settings before shooting
Time for recording on the disc (REC TIME)
Chapter 3 Recording and Playback
Notes on Auto Interval Rec mode
Note the following points.
Proceed as follows.
1
Carry out steps 1 to 5 of the procedure “To make
settings before shooting” (page 55), to select CACHE/
INTVAL REC on the FUNCTION 1 page.
i.LINK
2
During interval recording, signal input/output through the
Turn the MENU knob until “M. INT” appears.
i.LINK interface is impossible.
Time code
In Auto Interval Rec mode, the internal time code
generator runs in R-RUN mode regardless of how the FRUN/SET/R-RUN switch is set.
Audio
Audio signals are not recorded in Auto Interval Rec mode.
Playback control buttons
While recording in Auto Interval Rec mode, you cannot
use the playback control buttons (EJECT, F REV, F FWD,
NEXT, PREV, PLAY/PAUSE and STOP). To use these
buttons, stop recording by pressing the REC START
button or the VTR button on the lens.
Menu operation
While recording in Auto Interval Rec mode, you cannot
change the settings of CACHE/INTVAL REC, TAKE
TOTAL TIME and REC TIME. To change the settings,
stop recording by pressing the REC START button or the
VTR button on the lens.
When the camcorder power is switched off during
recording in Auto Interval Rec mode
• When you set the POWER switch to OFF, the camcorder
will switch off by itself after disc access has continued
for a few seconds to record the picture data stored in
memory.
• If you remove the battery, unplug the DC cable, or cut
power to the AC adaptor during auto interval recording,
picture data stored before recording stops (a maximum
of ten seconds) may be lost. Take care when changing
the battery.
Manual Interval Rec mode settings and
shooting
Manual Interval Rec has the following two modes.
03 FUNCTION1 TOP
ASSIGN SW <1> : ATW
ASSIGN SW <2> : OFF
ASSIGN SW <3> : OFF
ASSIGN SW <4> : OFF
TURBO SW : TURBO
DF/NDF : DF
CACHE/INTVAL REC:? M.INT
NUMBER OF FRAME : 1
TRIGGER INTERVAL: 1SEC
PRE-LIGHTING : OFF
As you turn the MENU knob, the setting changes in
the following sequence: OFF y CACHE y A. INT
y M. INT.
When M. INT appears, the camcorder is in Manual
Interval Rec mode and the TALLY indicator (green) in
the viewfinder flashes. “NUMBER OF FRAME” and
“TRIGGER INTERVAL” appear. When TRIGGER
INTERVAL is set to other than “M”, “PRELIGHTING” also appears.
3
Press the MENU knob.
The z mark on the left of “CACHE/INTVAL REC”
changes to a b mark and the ? mark on the left of the
setting changes to a z mark.
4
Turn the MENU knob to move the b mark to
“NUMBER OF FRAME”.
03 FUNCTION1 TOP
ASSIGN SW <1> : ATW
ASSIGN SW <2> : OFF
ASSIGN SW <3> : OFF
ASSIGN SW <4> : OFF
TURBO SW : TURBO
DF/NDF : DF
CACHE/INTVAL REC: M.INT
NUMBER OF FRAME : 1
TRIGGER INTERVAL: 1SEC
PRE-LIGHTING : OFF
5
Press the MENU knob.
58
3-2 Recording
Page 59

The b mark on the left of “NUMBER OF FRAME”
changes to a z mark and the z mark on the left of the
setting changes to a ? mark.
6
Turn the MENU knob until the desired number of
frames to be recorded in each shot appears.
As you turn the MENU knob, the number changes in
the following sequence: 1 y 2 y 4 y 8.
7
Press the MENU knob.
03 FUNCTION1 TOP
ASSIGN SW <1> : ATW
ASSIGN SW <2> : OFF
ASSIGN SW <3> : OFF
ASSIGN SW <4> : OFF
TURBO SW : TURBO
DF/NDF : DF
CACHE/INTVAL REC: S.INT
NUMBER OF FRAME : 2
TRIGGER INTERVAL: 1SEC
PRE-LIGHTING : OFF
13
Press the MENU knob.
The z mark changes to a b mark and the ? mark
changes to a z mark.
8
Turn the MENU knob to move the b mark to
“TRIGGER INTERVAL”.
9
Press the MENU knob.
The b mark on the left of “TRIGGER INTERVAL”
changes to a z mark and the z mark on the left of the
setting changes to a ? mark.
10
Turn the Menu knob to select the desired Manual
Interval Rec mode.
• To select the single shot mode (recording only one
shot after one operation), set “TRIGGER
INTERVAL” to “M”. In the viewfinder, the TALLY
indicator (green) flashes twice per second.
• To select the consecutive mode (recording shots
repeatedly after one operation), set “TRIGGER
INTERVAL” to the desired length of interval. In the
viewfinder, the TALLY indicator (green) flashes
once per second.
03 FUNCTION1 TOP
ASSIGN SW <1> : ATW
ASSIGN SW <2> : OFF
ASSIGN SW <3> : OFF
ASSIGN SW <4> : OFF
TURBO SW : TURBO
DF/NDF : DF
CACHE/INTVAL REC: M.INT
NUMBER OF FRAME : 2
TRIGGER INTERVAL: 2SEC
PRE-LIGHTING : OFF
As you turn the MENU knob, the setting changes in
the following sequence: M y 1SEC y
2SEC........12H y 24H.
11
Press the MENU knob.
The b mark to the left of “PRE-LIGHTING” changes
to a z mark, and the z mark to the left of the setting
changes to a ? mark.
14
Turn the MENU knob to display the length of time to
light before recording.
The setting changes in the following sequence: OFF
y 2SEC y 5SEC y 10SEC.
Notes
• Set the LIGHT switch on the camcorder to AUTO to
turn on the light before recording.
The light switch must also be set to ON. With these
settings, the light turns on and off automatically.
However, the light remains on continuously if the
off time is less than 5 seconds.
• When the LIGHT switch is set to MANUAL and the
light switch is set to ON, the light remains on
continuously.
15
Press the MENU knob.
The z mark changes to a b mark and the ? mark
changes to a z mark.
16
To end the menu operation, set the MENU ON/OFF
switch to OFF.
The menu disappears from the viewfinder screen and
the following message appears along the bottom of the
screen, indicating the current Manual Interval Rec
mode.
In single shot mode: MANU INTERVAL *FRAME
In consecutive mode: MANU INTERVAL *SEC
*FRAME
“*FRAME” means the number of frames and “*SEC”,
the length of interval for the consecutive mode.
Chapter 3 Recording and Playback
The z mark changes to a b mark and the ? mark
changes to a z mark.
12
If you selected the consecutive mode in step 10
(anything other than “M”), turn the MENU knob to
move the b mark to “PRE-LIGHTING”.
Note
The camcorder exits Manual Interval Rec mode whenever
it is powered off. However, the NUMBER OF FRAME,
TRIGGER INTERVAL and PRE-LIGHTING settings are
maintained. You do not need to set them again the next
time you use Manual Interval Rec mode.
3-2 Recording
59
Page 60

To shoot and record in Manual Interval Rec mode
After making the required settings, proceed as follows.
1
After performing the basic procedure for shooting and
recording following the instructions in 3-2-1 “Basic
Procedures” (page 49), secure the camcorder so that it
will not move.
2
Press the REC START button on the camcorder or the
VTR button on the lens.
The camcorder starts recording in Manual Interval Rec
Chapter 3 Recording and Playback
mode. In the viewfinder, “MANU INTERVAL
*FRAME” and the TALLY indicator (green) flash.
• In the single shot mode, the TALLY indicator
flashes twice per second.
• In the consecutive mode, the TALLY indicator
flashes four times per second.
To exit Manual Interval Rec mode
Do one of the following.
• In the single shot mode, press the EJECT button.
• In the consecutive mode, press the camcorder REC
START button or the lens VTR button to stop recording.
• Set the camcorder POWER switch to OFF.
After the camcorder has exited from Manual Interval Rec
mode, it records picture data stored in memory to the disc.
Notes on Manual Interval Rec mode
Take note of the following points.
i.LINK
During interval recording, signal input/output through the
i.LINK interface is impossible.
Menu operation
In the single shot mode of Manual Interval Rec mode, you
cannot change the settings of “CACHE/INTVAL REC”
and “NUMBER OF FRAME” on the FUNCTION 1 page
after the camcorder starts recording. To change the
settings, stop recording by pressing the EJECT button or
setting the POWER switch to OFF.
While recording in the consecutive mode of Manual
Interval Rec mode, you cannot change the settings of
CACHE/INTVAL REC, NUMBER OF FRAME and
TRIGGER INTERVAL on the FUNCTION 1 page. To
change these settings, stop recording by pressing the REC
START button or the VTR button on the lens.
When the camcorder power is switched off during
recording in Manual Interval Rec mode
• When you set the POWER switch to OFF, the camcorder
will switch off by itself after disc access has continued
for a few seconds to record the picture data stored in
memory.
• If you remove the battery, unplug the DC cable, or cut
the power to the AC adaptor during manual interval
recording, picture data stored before recording stops (a
maximum of ten seconds) may be lost. Take care when
changing the battery.
3-2-6 Retaking the Most Recent Clip
A retake function is available, making it easy to erase and
retake the most recently recorded clip.
To use the retake function, you need use the FUNCTION
1 menu to assign it to one of the assignable switches
(ASSIGN 1, ASSIGN 3, ASSIGN 4, or TURBO GAIN).
Time code
In Manual Interval Rec mode, the internal time code
generator runs in R-RUN mode regardless of how the FRUN/SET/R-RUN switch is set.
Audio
Audio signals are not recorded in Manual Interval Rec
mode.
Playback control buttons
While recording in the single shot mode of Manual
Interval Rec mode (the TALLY indicator (green) in the
viewfinder flashes twice per second), you cannot use most
of playback control buttons (F REV, F FWD, NEXT,
PREV, PLAY/PAUSE, and STOP). To exit the single shot
mode, press the EJECT button.
While recording in the consecutive mode of Manual
Interval Rec mode (the TALLY indicator (green) flashes
four times per second), you cannot use the disc control
buttons (EJECT, F REV, F FWD, NEXT, PREV, PLAY/
PAUSE and STOP). To use these buttons, stop recording
by pressing the REC START button or the VTR button on
the lens.
For details about operation, see section 7-3-5 “Assigning
Functions to ASSIGN 1/2/3/4 Switches” (page 144).
Example: After recording clip 3, you want to delete it and
record a new clip 3 after clip 2.
Clip 1 Clip 2 Clip 3
New clip
To retake the most recent clip
With recording paused or after the end of a preview (see
page 71), proceed as follows.
1
Press the switch or button to which the retake function
has been assigned.
While the button is pressed, the last frame of the
recorded clip and the message “PUSH RET FOR CLIP
DELETE” appears.
2
In this state, press the RET button.
60
3-2 Recording
Page 61

The message “DELETING LAST CLIP” appears, and
the processing for deleting the last recorded clip
begins.
When the deleting has finished, the message “LAST
CLIP WAS DELETED” appears.
For operations, see 4-3-1 “Loading a Clip List From
Disc Into Unit Memory” (page 87).
3
Press the SUB CLIP button, turning on the sub clip
indicator.
Note
If an operation (other than recording review) which is not
a retake operation is carried out after the last clip has been
recorded, the retake function does not work even when the
camcorder is in the recording pause state.
In this case, the message “RE-TAKE NOT ALLOWED!”
appears. When you want to replace the last clip with a new
clip, see 3-2-2 “Deleting Clips” (page 51). Once you carry
out a retake operation, the last clip is deleted even if you
do not carry out a recording operation afterwards.
3-2-7 Auto Clip List Recoding for
Automatic Inclusion of
Recorded Clips in Clip Lists
Auto clip list recoding is a function for automatically
including the clips generated by recording operations in a
selected clip list. The updated clip list is saved to the disc.
Proceed as follows.
THUMBNAIL
SEL/SET
SUB CLIP
button
ESSENCE MARK
PRESET
REGEN
REGEN
CLOCK
CLOCK
SUB CLIP
S.SEL
SHIFTCLIP MENU
F-RUN
SET
R-RUN
The camcorder enters auto clip list recording mode.
The viewfinder screen shows the number of the clip
list loaded in the current clip list.
The number of the clip list loaded in the current clip list
16:9 E0004
30
18
4
Press the REC START button or the VTR button on
45-40
the lens to start recording, and press again to stop
recording.
A clip is generated automatically from the video and
audio recorded in this interval, and added as a sub clip
to the the currently loaded clip list. The updated list is
also written to disc automatically.
5
Repeat the process of recording and stopping until you
have included all the required clips.
To change target clip lists, carry out step 2 once more
to load the desired clip list into the current clip list.
Chapter 3 Recording and Playback
1
Insert a disc.
2
Load a clip list from the disc.
• To create a new clip list, load a NEW FILE (empty)
clip list.
• To add clips to an existing clip list, load that clip list.
Note
Always load either a new or existing clip list from disc.
To exit auto clip list coding mode
Press the SUB CLIP button, turning off the sub clip
indicator.
3-2-8 Assigning User-Defined Clip
1)
Titles Automatically
1) This is supported from firmware version 1.4.
About the automatic title generation
function
By default, clips on each disc are assigned names in the
range C0001.MXF to C0300.MXF. For this reason, two
discs can contain clips with the same names. The
automatic title generation function allows you to assign
titles to all of the clips on several discs, which facilitates
clip management. For example, if the titles TITLE00001 to
TITLE00020 are assigned to clips C0001.MXF to
C0020.MXF on disc 1, then the titles TITLE00021 to
3-2 Recording
61
Page 62

TITLE00037 are assigned to clips C0001.MXF to
The TOP menu appears.
C0017.MXF on disc 2.
Titles are made up of prefixes, up to 10 characters in
length, and five-digit serial numbers such as TITLE 00001.
C0020.MXF
C0002.MXF
C0001.MXF
Chapter 3 Recording and Playback
TITLE00020
TITLE00001
Clips recorded on Disc 1
TITLE00020
2
Turn the MENU knob to move the b mark to
“OPERATION”, and then press the MENU knob.
If this is the first time the OPERATION menu has been
displayed, the CONTENTS page of the OPERATION
menu appears.
If the menu has been used before, the last accessed
page appears.
3
C0017.MXF
C0002.MXF
C0001.MXF
TITLE00037
TITLE00022
TITLE00021
Clips recorded on Disc 2
If the CONTENTS page is displayed, turn the MENU
knob to move the b mark to “CLIP TITLE ”, and then
press the MENU knob.
If a different page is displayed, turn the MENU knob
until the CLIP TITLE page appears, and then press the
MENU knob.
The CLIP TITLE page appears.
Setting the title prefix
You can assign title prefixes by choosing from a prefix list
stored in internal memory, or by entering the prefix
directly.
However, to choose from a prefix list, you must create the
list beforehand on a computer and transfer it to the unit’s
internal memory with a “Memory Stick”.
Setting the initial value of the serial number
The initial value of the serial number can be set to 00001
(the default) or to any other number. The number is
automatically incremented by 1 each time you record a
clip. When it reaches 99999, it returns to 00001 for the
next clip.
Note
Duplicate clip titles can be generated depending on the
serial number setting, for example if you reset the serial
number to the original value after recording several clips.
Care should be taken when setting the serial number.
To assign user-defined titles automatically
when clips are recorded
Proceed as follows.
1
Holding down the MENU knob, move the MENU ON/
OFF switch to ON.
23 CLIP TITLE TOP
TITLE : DSABL
4
Select “TITLE”, and then press the MENU knob.
The z mark beside DSABL changes to a ? mark.
5
Turn the MENU knob to display “ENABL”, and then
press the MENU knob.
The following items appear.
23 CLIP TITLE TOP
TITLE : ENABL
SELECT PREFIX : EXEC
CLEAR NUMERIC : EXEC
LOAD PREFIX DATA: EXEC
PREFIX : TITLE
NUMERIC : 00001
Clip titles will be generated automatically if you
record in this state.
62
3-2 Recording
Page 63

The title of the next clip to be recorded will be a
combination of the prefix in the PREFIX field and the
serial number in the NUMERIC field.
To create a list of title prefix strings
Prepare the data beforehand according to the following
rules.
File name
Assign the name “TITLES.TXT” to the file.
Input format
Enter title prefixes one at time, separated by newline
(CRLF) characters.
Prefixes can be up to 10 characters long. A prefix file can
contain up to 20 prefixes.
Allowable characters
• Digits: 0 to 9
• Alphabetic characters: a to z, A to Z
• The following symbols:!, #, $, %, &, ’, ( , ), ~, =, -, ^, @,
[, ], {, }, +, ; (semicolon), , (comma), . (period), _
(underscore)
• Space
Note
The message “FILE NOT FOUND!” appears if no list
of title prefixes is found.
Check the location where the file is stored on the
“Memory Stick”.
To select a prefix from the title prefix list
Proceed as follows.
1
On the CLIP TITLE page of the OPERATION menu
(see page 63), select “SELECT PREFIX” and then
press the MENU knob.
A list of up to 20 title prefixes appears.
P00 TITLE PREFIX ESC
001: Tennis
002: Basketball
003: Skiing_1
004: Skiing_2
005: Athletics
006: Aquatics
007: Cycling
008: Softball
009: Fencing
010: Sailing
Chapter 3 Recording and Playback
Title prefix list example
Tennis<CRLF>
Basketball<CRLF>
Skiing_1<CRLF>
Skiing_2<CRLF>
To transfer a title prefix list to the unit’s
internal memory
Proceed as follows.
1
Copy the title prefix file (TITLES.TXT) to the
following folder on the “Memory Stick”.
\\MSSONY\PRO\XDCAM\GENERAL\VAL_LIST
Note
This folder is created when you insert a “Memory
Stick” into the camcorder. Do not create this folder
yourself on a computer.
2
Insert a “Memory Stick” with the title prefix file
(TITLES.TXT) into the “Memory Stick” slot of the
camcorder.
3
On the CLIP TITLE page of the OPERATION menu
(see page 63), select “LOAD PREFIX DATA” and
then press the MENU knob.
Note
When no list of title prefixes has been transferred to
the internal memory of this unit, only the initial value
“TITLE” appears.
2
Select the desired title prefix from the list, and then
press the MENU knob.
The CLIP TITLE page appears again, and the selected
prefix appears in the PREFIX field.
To enter a title prefix directly
Proceed as follows.
1
On the CLIP TITLE page of the OPERATION menu
(see page 63), select “PREFIX” and then press the
MENU knob.
A prefix string appears.
23 CLIP TITLE TOP
TITLE : ENABL
SELECT PREFIX : EXEC
CLEAR NUMERIC : EXEC
LOAD PREFIX DATA: EXEC
PREFIX : TITLE
!#$%&'()+,-.0123456789;
=@ABCDEFGHIJKLMNOPQRSTUV
WXYZ[]^_abcdefghijklmnop
qrstuvwxyz{}~
INS DEL RET ESC END
“MEMORY STICK ACCESS” appears, and the file
on the “Memory Stick” (TITLES.TXT) is transferred
to the internal memory of the unit.
The message “COMPLETE!” appears when the
transfer finishes.
2
Move the x mark to the character you want to change
and then press the MENU knob.
3-2 Recording
63
Page 64

3
Rotate the MENU knob to move the x mark to the
desired character in the list of selectable characters,
and then press the MENU knob.
5
When you have finished entering the value, rotate the
MENU knob to move the x mark to “END”, and then
press the MENU knob.
4
Repeat steps 2 and 3 to enter the remaining characters.
5
When you have finished entering the prefix, rotate the
MENU knob to move the x mark to “END”, and then
press the MENU knob.
The camcorder exits prefix input mode, and the
original CLIP TITLE page appears.
Chapter 3 Recording and Playback
To set the initial value of the clip title serial
number
You can set the initial value of the clip title serial number
to 00001 (default) or to any 5-digit value.
To return the initial value to 00001
Proceed as follows.
1
On the CLIP TITLE page of the OPERATION menu
(see page 63), select “CLEAR NUMERIC” and then
press the MENU knob.
The message “CLEAR OK? bYES NO” appears.
2
Select YES and then press the MENU knob.
The camcorder exits numeric input mode, and the
original CLIP TITLE page appears.
To check clip titles
Press the THUMBNAIL button to display thumbnail
screen, and select the clip whose title you want to
check.
The title of the selected clip appears in the upper left of
the screen.
See “Cuing up with sub clip thumbnails” (page 73) for
more information about the thumbnail screen.
Notes
• It is not possible to specify 00000 as the initial value.
Even if you enter 00000, the value is reset to 00001
when the camcorder exits numeric input mode.
• The value of the serial number is incremented by 1
every time a title is generated. When the value
reaches 99999, the next number restarts from 00001.
• Duplicate clip titles can be generated if you reset the
serial number after recording several clips or the
same is true depending on the value setting. Care
should be taken when setting the serial number.
The value in the NUMERIC field returns to 00001.
To set the initial value to any number
Proceed as follows.
1
On the CLIP TITLE page of the OPERATION menu
(see page 63), select “CLEAR NUMERIC” and then
press the MENU knob.
An initial value appears.
23 CLIP TITLE
0123456789
INS DEL RET ESC END
CLEAR NUMERIC : EXEC
LOAD PREFIX DATA: EXEC
PREFIX : TITLE
NUMERIC : 00001
2
Move the x mark to the digit you want to change and
then press the MENU knob.
3
Rotate the MENU knob to move the x mark to the
desired digit in the list of selectable digits, and then
press the MENU knob.
4
Repeat steps 2 and 3 to enter the remaining digits.
3-2-9 Assigning User-Defined Clip
and Clip List Names
The following standard format names are assigned
automatically to clips and clip lists that are created or
recorded by XDCAM devices.
Clips: C0001.MXF to C0300.MXF
Clip lists: E0001E01.SMI to E0099E01.SMI
When you record or create clips and clip lists, you can
assigned user-defined names instead of the standard
format names.
clip lists can facilitate file management.
1) This is supported from firmware version 1.5.
Limitations
• Letters, numbers and symbols from the Unicode 2.0
character set can be used.
However, the following control characters and symbols
cannot be used.
- Control characters: U+0000 to U+001F, U+007F
- Symbols: ", *, /, :, <, >, ?, \, |
• Depending on the character type, names may be limited
to 14 characters in length.
(The limit for ASCII characters is 56 characters.)
• All file name extensions are converted automatically to
uppercase.
1)
Assigning meaningful names to clips and
64
3-2 Recording
Page 65

• Titles are used as user-defined clip names on this unit.
Therefore, the available characters are limited to those
supported by the title function.
• Files generated along with clips and clip lists use the
same names (the “C*” or “E*” part of the following file
names).
- Clips: Metadata files (C*M01.XML), proxy AV files
(C*S01.MXF)
- Clip lists: Metadata files (E*M01.XML)
• The following names cannot be assigned.
- Clips: C0000.MXF
- Clip lists: E0000E01.SMI, E0100E01.SMI to
E9999E01.SMI, E0000.SMI, E0100.SMI to
E9999.SMI
• The following names should be avoided.
- Clips: C5000.MXF to C9999.MXF
- Clip lists: E0001.SMI to E0099.SMI
To assign clip names on this unit
The title assigned to clip becomes its clip name (file
name).
4
If the CONTENTS page is displayed, turn the MENU
knob to move the b mark to “FILE NAMING”, and
then press the MENU knob.
If a different page is displayed, turn the MENU knob
to scroll the screen to “FILE NAMING”, and then
press the MENU knob.
The FILE NAMING page appears. The current
settings of the items on the page appear to the right of
the items.
5
Turn the MENU to select “NAMING FORM”, and
then press the MENU knob.
6
Turn the MENU to display “FREE”, and then press the
MENU knob.
You can now enter a user-defined name.
M24 FILE NAMING TOP
NAMING FORM: free
AUTO NAMING: C****
Chapter 3 Recording and Playback
C0001.MXF
TITLE00001
When sub item “AUTO NAMING” is set to “C****”
TITLE00001.MXF
TITLE00001
When sub item “AUTO NAMING” is set to “TITLE”
1
Before starting, set TITLE in the “CLIP TITLE” page
to “ENABL”, and set a title (see page 62).
2
Holding down the MENU knob, move the MENU ON/
OFF switch from OFF to ON.
The TOP menu appears.
3
Turn the MENU knob to select “OPERATION”, and
press the MENU knob.
If this is the first time the OPERATION menu has been
displayed, the CONTENTS page of the OPERATION
menu appears. If the menu has been used before, the
last accessed page appears.
7
Turn the MENU knob to select “AUTO NAMING”,
and then press the MENU knob.
8
Turn the MENU knob to display “TITLE”, and then
press the MENU knob.
The same name will now be given to newly recorded
clips.
Note
• An FTP client that supports UTF-8 is required to use
Unicode characters other than ASCII characters.
Command prompt FTP commands do not support
UTF-8.
• When the first letter of the title setting on the CLIP
AUTO TITLING menu is a space or period (.), the
clip name is the title string minus the first letter.
To use clip names and clip list names by FAM and
FTP
Carry out steps 2 and 6 of “To assign clip names on this
unit”.
It is now possible to write, transfer, and rename clips and
clip lists with user-defined names over file access mode
(FAM) connections (see page 113) and FTP connections
(see page 116).
3-2 Recording
65
Page 66

3
If the CONTENTS page is displayed, turn the MENU
knob to move the b mark to “CLIP STATUS”, and
press the MENU knob.
Fuji.MXF
If a different page is displayed, turn the MENU knob
to scroll the screen to “CLIP STATUS”, and then press
the MENU knob.
User-defined clip names can be used by FAM and FTP
The CLIP STATUS page appears. The current settings
of the items on the page appear to the right of the
items.
Chapter 3 Recording and Playback
User-defined clip list names can be used by FAM and FTP
Sakura.SMI
D08 CLIP STATUS TO P
CLIP NO : 001/010
NAME : C0001
TITLE: (no name)
RECORD DEVICE: PDW-530
SERIAL: 10001
DATE : 08/01/06
TIME : 19:54:38
To check clip names
Press the THUMBNAIL button to display the thumbnail
screen, and select the clip whose name you want to check.
The name of the selected clip appears in the upper left of
the screen.
See “Cuing up with sub clip thumbnails” (page 73) for
more information about the thumbnail screen
3-2-10Recording in Live Logging
1)
Mode
1) This is supported from firmware version 1.4 and PDZ-1 version 1.4.
Live logging is a function that allows you to
simultaneously transfer logging data as you record live
Notes
• The item at the upper left of the screen is displayed
according to the following order of priority.
Title > User-defined clip name > Standard format clip
name
Therefore, the display of this item changes as following,
depending on whether there is a title.
When a title has been set as a clip name on this unit, for
clips recorded on this unit, the title is displayed.
material.
You can install the optional CBK-NC01 Network Adaptor
in the camcorder, and connect to the adaptor’s network
connector from the PDZ-1 Proxy Browsing Software to do
the following.
• View proxy AV data.
• Add and modify metadata (titles, comments, essence
marks, etc.).
• Create clip lists.
The user-defined name or standard format name is
displayed for clips without a title.
• If the firmware of your XDCAM device is version 1.4x
or lower, clips with user-defined names appear as
After adding or modifying metadata and clip lists, you can
transfer them from the computer back to the camcorder for
recording on the original disc.
“C5000” to “C9999”, in order of recording.
To check clip information (name, title, etc.) in the
CLIP STATUS menu
Refer to the PDZ-1 help for more information about PDZ1 functions and operations.
66
1
Holding down the MENU knob, move the MENU ON/
OFF switch from OFF to ON.
The TOP menu appears.
2
Turn the MENU knob to select “DIAGNOSIS”, and
press the MENU knob.
If this is the first time the DIAGNOSIS menu has been
displayed, the CONTENTS page of the DIAGNOSIS
menu appears. If the menu has been used before, the
last accessed page appears.
3-2 Recording
To record in live logging mode
With the optional CBK-NC01 network adaptor installed
on the camcorder, proceed as follows.
1
Use an Ethernet cable to connect the camcorder to a
computer with PDZ-1 installed.
2
In the TOP menu, select “OPERATION”.
Page 67

3
Turn the MENU knob to scroll to the OUTPUT page.
Alternatively, in the CONTENTS page, select
“OUTPUT”.
The OUTPUT page appears.
4
Turn the MENU knob to select “LIVE LOGGING”,
and then press the MENU knob.
U01 OUTPUT
LCD BRIGHT <L> : 0
LCD BRIGHT <H> : 0
LCD COLOR : 0
i.LINK MODE : AV/C
PB WIDE ID(IMX) : THROU
REAR BNC OUT SEL: VBS
LIVE LOGGING : OFF
5
Turn the MENU knob to display “ON”, and then press
the MENU knob.
The camcorder enters Live Logging mode.
6
Start recording in the normal way, by pressing the
REC START button or the VTR button on the lens.
TOP
(titles, comments, essence marks, etc.). You can also
create clip lists.
Note
Proxy data cannot be recorded to a “Memory Stick”
inserted into the camcorder’s “Memory Stick” slot.
Usable memory card or “Memory Stick” types
Refer to the CBK-PC01 Installation Manual for
information on the types of memory card and “Memory
Stick” that can be used with the camcorder.
Note
Never remove a memory card while it is being accessed
(while the camcorder’s ACCESS indicator is lit). Doing so
can corrupt the data on the memory card and render the
card unusable.
To record proxy data to memory cards in
synchronization with disc recording
With the CBK-PC01 installed on this unit, proceed as
follows.
1
Insert a memory card into the PC card slot.
Chapter 3 Recording and Playback
Notes
• In Live Logging mode, you cannot set the F-RUN/SET/
R-RUN switch to SET to make time code settings. To
make time code settings, first exit Live Logging mode.
• During Live Logging operations, the time code
generator run mode is always F-RUN, regardless of the
setting of the F-RUN/SET/R-RUN switch.
• In Live Logging mode, you cannot set the PRESET/
REGEN/CLOCK switch to REGEN to read time code
from the disc and generate consecutive time code.
• The Picture Cache and Interval Rec functions are not
available in Live Logging mode.
Even if you turn these functions on, they are turned off
when the camcorder enters Live Logging mode.
3-2-11Recording Proxy Data to
Memory Cards (With CBKPC01 Installed)
1) This is supported from firmware version 1.4 and PDZ-1 version 1.4.
When the optional CBK-PC01 memory card reader is
installed on this unit, you can save proxy AV data and
metadata (this chapter refers to both types of data as
“proxy data”) for the clip being recorded or the clips on the
disc to a memory card (or “Memory Stick”) inserted into
the CBK-PC01.
You can then insert these memory cards into a computer
with the PDZ-1 Proxy Browsing Software installed to
review the proxy AV data and modify or add metadata
1)
2
Check the memory symbol (see page 69) and the
remaining memory display (see page 69).
Note
You cannot record proxy data to a memory card if you
start recording before the memory symbol and
remaining memory display appear. Especially just
after inserting a memory card and after powering the
camcorder on, it may take some time for the memory
card to be recognized.
3
Check to be sure that there is enough remaining
memory, and then press the REC START button or the
VTR button on the lens to start recording in the normal
way.
Proxy data is recorded in synchronization with
recording to the disc.
Notes
• Never remove the battery pack or the power cord during
recording to the memory card (while the camcorder’s
ACCESS indicator is lit). Recording processing will not
finish normally, which means that the clip proxy data
recorded immediately before the interruption will be
lost.
• If the remaining memory on a memory card is exhausted
during recording, the message “MEM REC NG!”
appears. The clip proxy data that was being recorded
immediately before the message appeared is lost.
If this occurs, exchange the memory card, refer to the
3-2 Recording
67
Page 68

next section “To copy proxy data for all clips on the disc
to a memory card”, and copy the data that could not be
recorded.
• It is not possible to record only proxy data to a memory
card without recording to the disc.
To stop recording
Recording to memory cards stops when recording to the
disc stops.
You do not need to take any special steps to stop recording
to memory cards.
During the copy, the message “MEMORY ACCESS
**%” (where ** is a progress percentage number from
0 to 99) appears in the viewfinder and color LCD.
To copy proxy data for all clips on the disc
to a memory card
To copy proxy data to a memory card for all clips on the
disc, proceed as follows..
1
Insert a memory card into the PC card slot.
Chapter 3 Recording and Playback
To delete recorded proxy data
To delete material recorded on a disc and proxy data
recorded on a memory card at the same time, execute
DELETE LAST CLIP, DELETE ALL CLIPS, or QUICK
FORMAT on the DISC page of the MAINTENANCE
menu (see page 213).
To delete only proxy data on a memory card, carry out the
steps in “To delete all proxy data in a memory card”
(page 68).
To copy proxy data for selected clips on
the disc to a memory card
To select clips on the disc and copy proxy data to a
memory card, one clip at a time, proceed as follows.
1
Insert a memory card into the PC card slot.
2
Search for the video of the clip that you want to copy.
(The camcorder can be either playing or stopped.)
3
In the TOP menu, select “OPERATION”.
4
Turn the MENU knob to scroll to the MEMORY REC
page. Alternatively, select “MEMORY REC” on the
CONTENTS page.
The MEMORY REC page appears.
24 MEMORY REC TOP
COPY CURRENT CLP : EXEC
COPY ALL CLIPS : EXEC
ABORT COPY : EXEC
DEL ALL MEM CLP : EXEC
FORMAT MEMORY : EXEC
2
Insert the disc that you want to copy into the
camcorder.
3
On the MEMORY REC page of the OPERATION
menu (see page 68), select “COPY ALL CLIPS” and
then press the MENU knob.
The message “EXECUTE OK?” appears.
4
Select YES to execute the copy.
Proxy data for all clip on the disc is copied to the
memory card.
During the copy, the message “MEMORY ACCESS
**%” (where ** is a progress percentage number from
0 to 99) appears in the viewfinder and color LCD.
Notes
• No DV stream is output from the camcorder’s i.LINK
DV IN/OUT S400 connector while proxy data is being
copied from a disc to a memory card.
• The message “MEMORY CARD ERROR!” appears if a
copy is attempted while the unusable memory symbol
(see page 69) is visible in the viewfinder.
When there is not enough free memory
The message “M. shortage” appears when the amount to
data to copy is greater than the amount of remaining
memory, and the message “MEMORY CARD FULL!”
appears when there is no remaining memory. The copy
cannot be executed if either of these messages appears.
Insert another memory card.
To cancel a copy to a memory card
Proceed as follows.
68
5
Select “COPY CURRENT CLP” with the MENU
knob and then press the MENU knob.
The message “EXECUTE OK?” appears.
6
Select YES to execute the copy.
Proxy data for the playing or stopped clip is copied to
the memory card.
3-2 Recording
1
On the MEMORY REC page of the OPERATION
menu (see page 68), select “ABORT COPY”.
The message “EXECUTE OK?” appears.
2
Select YES to cancel the copy.
The copy is cancelled.
To delete all proxy data in a memory card
Proceed as follows.
Page 69

1
On the MEMORY REC page of the OPERATION
menu (see page 68), select “DEL ALL MEM CLP”.
The message “EXECUTE OK?” appears.
2
Select YES to execute the deletion.
All proxy data in the memory card is deleted.
Note
If the usable memory card symbol does not appear after
you insert a memory card, power the camcorder off and on,
and then try inserting it again.
The symbol may never appear, no matter how many times
you try, if you were using a memory card other than the
recommended products.
To format a memory card
Proceed as follows.
1
On the MEMORY REC page of the OPERATION
menu (see page 68), select “FORMAT MEMORY”.
The message “EXECUTE OK?” appears.
2
Select YES to execute the format.
The message “COMPLETE” appears when the format
finishes. All of the data in the memory card is deleted.
Notes
• The message “MEMORY CARD INHIBIT!” or
“M.Card INHI” appears if you insert a write-protected
memory card and attempt to record to it. In this case,
eject the memory card, clear the Write-Inhibit tab, and
insert the memory card again.
• The message “NO MEMORY CARD” appears if you
attempt to record with no memory card inserted. Insert a
memory card and try again.
To check the memory symbol and the
remaining memory
As shown below, a memory symbol and a remaining
memory indication appear in the viewfinder while a
memory card is in use.
Remaining memory indications
Examples of remaining memory recording time indications
Indication Remaining memory recording time
F - 95 Full to 95 minutes
95 - 90 95 to 90 minutes
90 - 85 90 to 85 minutes
: :
15 - 10 15 to 10 minutes
10 - 5 10 to 5 minutes
5 MIN 5 to 4 minutes
4 MIN 4 to 3 minutes
3 MIN 3 to 2 minutes
2 MIN 2 to 1 minutes
1 MIN 1 to 0 minutes
0 MIN 0 minutes
0 MIN (flashing) None
INH Record inhibited
Note
An “INH” remaining memory indication means that the
memory card is record inhibited. If this appears, remove
the memory card, enable recording to the memory card,
and then reinsert it.
Chapter 3 Recording and Playback
Memory symbol
35-30
Remaining memory
About the memory symbol
This symbol indicates the following states.
: A usable memory card is loaded.
: An unusable memory card is loaded. Exchange the
memory card, or format it.
3-2 Recording
69
Page 70

Deteriorating playback conditions
3-3 Checking Recording
and Playback
Disc playback start position
Although this unit uses optical discs, it is designed to offer
the most convenient features of tape playback by VTRs.
One of these is the playback start position, which works in
the same way as tape, as described below.
Chapter 3 Recording and Playback
After playback stop
The unit stops at the position where the STOP button was
pressed.
Press the PLAY/PAUSE button to resume playback at the
stop position.
After recording
The unit stops at the position where recording ended.
To play back a clip, press the PREV button to move to the
start frame of any clip, or press the PREV button with the
PLAY/PAUSE button held down to move to any position.
After disc insertion
The unit stops at the position of the disc when it was most
recently ejected.
Press the PLAY/PAUSE button to resume playback at the
most recent position.
The playback position is saved to the disc when the disc is
ejected, which allows playback to start at that position
whenever it is loaded into any XDCAM player.
Note
The playback position is not recorded to the disc if the disc
is set to REC INH.
3-3-1 Normal Playback
Deteriorating playback may be due to the following
causes.
• Scratches and dust on the disc surface
This includes fingerprints, dust from the air, tar from
cigarette smoke, and so on.
Scratches and soiling which occur before recording are
not a problem because they are registered in advance as
defects, and recording avoids them. However, scratches
and soiling which occur after recording can lead to
deteriorating playback conditions.
• Aging of disc recording layers
Over several decades, the recording layers of optical
discs can age and cause deteriorating playback
conditions.
You can use this function to check archival discs and
other discs which have been stored for extended periods,
so that you can take action before the deterioration
progresses further.
• Deteriorating laser diodes performance
The performance of the laser diodes used in optical
heads can worsen with age, leading to deteriorating
playback conditions.
You can use the digital clock to check the total optical
output time of optical heads.
Refer to the Maintenance Manual for an approximate
guide to when it is time to replace optical heads.
To prevent playback conditions from
deteriorating
Pay attention to the following points when handling discs.
• Do not open disc cartridges and touch discs directly with
your hands.
• Do not store for long periods in locations which are
dusty or exposed to air circulated by fans.
• Do not store for long periods under high temperatures or
in locations exposed to direct sunlight.
By pressing the PLAY/PAUSE button, you can review any
length of recording on the viewfinder screen in black and
white or in color on the color LCD. There are two other
ways to review the recording.
• Recording review: You can view the last two seconds of
the recording on the viewfinder screen in black and
white or in color on the color LCD.
• Color playback: You can see the recording in color on a
color video monitor without the need for any external
adaptor.
You may also view the picture during a fast forward or
reverse search.
See 2-3 “Audio Functions” on page 24 for details about
the switches and controls used to select the audio output
signal and to adjust the audio level.
70
3-3 Checking Recording and Playback
If playback conditions have deteriorated
Read errors occur when playback conditions continue to
deteriorate.
When a read error occurs, the message “DISC DEFECT”
appears, the video freezes, and audio is muted.
If this happens, check the following points.
Whether the disc displays the same playback condition
on other XDCAM devices: If so, the surface of the
disc may be dirty or scratched, or the performance of
the recording layers on the disc may have worsened
due to age. Do not use discs with these symptoms.
Whether every disc inserted into an XDCAM device
displays the same playback conditions: If so, the
performance of the laser diodes may have deteriorated.
Check the total optical output time.
Page 71

3-3-2 Checking the Last Two
Seconds of the Recording —
Recording Review
If you press the RET button on the lens while recording is
paused, the last two seconds of the recording is played
back on the viewfinder screen and the color LCD. Use this
function to check whether recording went smoothly. If you
hold down the RET button, a low-speed reverse search
begins at a position two seconds before the recording end
position. When you release the RET button, the reverse
search stops and playback in the forward direction begins.
After playback, the camcorder is ready to start recording
again.
By assigning the the same function as that of the RET
button on the lens to the ASSIGN 1/3/4 switch, you can use
the switch in the same way as the lens RET button.
For details, see 7-3-5 “Assigning Functions to ASSIGN 1/
2/3/4 Switches” on page 144.
3-3-4 Thumbnail Search
Cuing up a desired clip
To display the thumbnail images of all clips on the disc,
and cue up a desired clip, proceed as follows.
2,3
1
Thumbnail
indicator
Sub clip
indicator
THUMBNAIL
ESSENCE MARK
SUB CLIP
PRESET
REGEN
REGEN
CLOCK
CLOCK
SEL/SET
S.SEL
SHIFTCLIP MENU
F-RUN
SET
R-RUN
3
Chapter 3 Recording and Playback
3-3-3 Checking the Recording on
the Color Video Monitor —
Playback in Color
Connect a color video monitor to the VIDEO OUT
connector of the camcorder. By pressing the PLAY/
PAUSE button, you can view the recorded picture.
When the CBK-SD01 SDI Output Board is installed, you
can connect a color video monitor provided with an SDI
input connector.
PDW-510/510P/530/530P
Color video monitor
VIDEO IN
connector
SDI IN connector
1) When VBS is selected as the output signal of the VIDEO OUT
connector
2) When SDI is selected as the output signal of the VIDEO OUT
connector (only when the CBK-SD01 is installed)
1)
2)
VIDEO OUT connector
2
1
With the sub clip indicator off, press the
THUMBNAIL button, turning on the thumbnail
indicator.
The thumbnails of all clips on the disc appear.
Notes
• If the MENU ON/OFF switch is set to ON, set it to
OFF and press the THUMBNAIL button.
• If you set the MENU ON/OFF to ON during
thumbnail display, thumbnail display is cancelled
and replaced with menu display.
Color playback
Note
You can select either VBS or SDI as the output signal of
the VIDEO OUT connector when the CBK-SD01 is
installed.
For details, see 7-3-2 “Selecting the Output Signals” on
page 142.
3-3 Checking Recording and Playback
71
Page 72

a)
Name
of currently selected clip
Thumbnail of currently selected clip
(first frame or specified
Sixth clip is selected from
a total of 143 clips.
b)
frame)
Cuing up a frame including an essence
mark
Proceed as follows.
2~5
1
THUMBNAIL
SEL/SET
ESSENCE MARK
S.SEL
SUB CLIP
Chapter 3 Recording and Playback
PRESET
REGEN
REGEN
CLOCK
CLOCK
SHIFTCLIP MENU
F-RUN
SET
R-RUN
5
Recording date and time
of selected clip
a) When a title has been assigned to a clip (see page 61), the
title is enclosed in double quotation marks, for example
“TITLE00001”.
b) The thumbnail frame can be specified by a menu selection
when the clip is recorded (see page 108).
To switch between duration and timecode display
in the thumbnail display
Press the HOLD button. Each press of the HOLD
button switches the display between duration ant time
code.
To escape from the thumbnail display to the fullscreen display
Press the THUMBNAIL button, turning off the
indicator.
Duration of selected clip or
time code of first frame
4,5
1
Hold down the SHIFT button, and press the
THUMBNAIL button.
The essence mark selection screen appears.
Notes
• If the MENU ON/OFF switch is set to ON, set it to
OFF and press the THUMBNAIL button.
• If you set the MENU ON/OFF to ON during
thumbnail display, thumbnail display is cancelled
and replaced with menu display.
2
Turn the SEL/SET dial or the MENU knob to select
the desired clip.
You can also select clips with the following
operations.
Press the PREV or NEXT button: Select the
previous or next clip.
Press the PREV or NEXT button with the F REV
or F FWD button held down: Select the first or
last clip.
3
To cue up the selected clip, press the SEL/SET dial or
the MENU knob.
To start playback from the selected clip, press the
PLAY/PAUSE button.
72
3-3 Checking Recording and Playback
To escape from the essence mark selection screen to
the previous screen
Press the RESET button.
2
Turn the SEL/SET dial or the MENU knob to select
the desired essence mark.
Page 73

3
Press the SEL/SET dial or the MENU knob.
Thumbnails of the frames including the selected
essence mark appear.
(The example shows the case where SHOTMARK1 is selected
as the essence mark.)
This indicates that the thumbnail
images are the frames including
the essence mark
(SHOTMARK1).
Currently selected
SHOTMARK1 frame
Sixth frame is selected
from a total of 31
SHOTMARK1 frames.
1
If the clip list that you want to play exists on the disc,
load it into the current clip list (see page 81).
For the clip list loading operation, see 4-3-1 “Loading
a Clip List From Disc Into Unit Memory” (page 87).
2
Press the SUB CLIP button, turning it on.
3
Press the PLAY/PAUSE button.
Playback begins from the first sub clip in the current
clip list.
Note
Depending on the length of sub clips in the clip list and
their arrangement on the disc, playback may freeze
momentarily between sub clips.
Cuing up with sub clip thumbnails
With the desired clip list loaded in the current clip list,
proceed as follows.
1
Press the SUB CLIP button and the THUMBNAIL
button, turning on the indicators.
Thumbnails of the first frames in the sub clips appear.
Chapter 3 Recording and Playback
Recording date and time
of selected frame
4
Turn the SEL/SET dial or the MENU knob to select
the desired frame.
You can also select frames with the following
operations.
Press the PREV or NEXT button: Select the
previous or next frame.
Press the PREV or NEXT button with the F REV
or F FWD button held down: Select the first or
last frame.
5
Press the SEL/SET dial or the MENU knob to cue up
the selected clip.
To start playback from the selected frame, press the
PLAY/PAUSE button.
3-3-5 Clip List Playback
You can play back clips in the order of clip lists created
with the scene selection function (see page 79).
Notes
• If the MENU ON/OFF switch is set to ON, set it to
OFF and press the THUMBNAIL button.
• If you set the MENU ON/OFF to ON during
thumbnail display, thumbnail display is cancelled
and replaced with menu display.
Playing back in clip list order
Proceed as follows.
3-3 Checking Recording and Playback
73
Page 74

Name of the current clip list
• Clips cannot be locked or unlocked when the Write
a)
Sixth frame is selected
from a total of 34 sub clips.
Inhibit tab of the disk is in the recording disabled
position.
Total duration of sub clips in clip list
Proceed as follows. You can lock one clip at a time.
1
With the sub clip indicator off, press the
THUMBNAIL button.
The thumbnail indicator lights, and the thumbnails of
the clips on the disc appear.
2
Chapter 3 Recording and Playback
Turn the SEL/SET dial or MENU knob to select the
clip to lock.
3
Holding down the SHIFT button and press the SUB
CLIP button.
The THUMBNAIL menu appears.
Currently selected sub clip
Recording date and time of
selected sub clip
a) When a title has been assigned to a clip (see page 61), the title is
enclosed in double quotation marks, for example “TITLE00001”.
Duration of selected
sub clip or time code
of first frame
To escape from the thumbnail display to the fullscreen display
Press the THUMBNAIL button, turning it off.
2
Turn the SEL/SET dial or the MENU knob to select
the sub clip you want to cue up.
3
To cue up the selected sub clip, press the SEL/SET dial
or the MENU knob.
To start playback from the selected sub clip, press the
PLAY/PAUSE button.
3-3-6 Locking and Deleting Clips
In the thumbnail screen, you can delete selected clips or
lock them so that they cannot be deleted.
1) This function is supported from firmware version 1.5.
Locking Clips
Locking prevents the following operations on clips.
• Delete
• Rename by FAM or FTP
Notes
• Locked clips are deleted along with other clips when you
format a disc.
1)
To escape from the THUMBNAIL menu and
return to the thumbnail screen
Press the RESET button.
4
With “LOCK/UNLOCK CLIP” selected, press the
SEL/SET dial or the MENU knob.
You return to the thumbnail screen, and a lock icon
appears on the thumbnail of the selected clip to show
that it is locked.
74
3-3 Checking Recording and Playback
Page 75

Lock icon
Locked clips cannot be deleted or renamed. Unlock the
clip if you want to perform any of these operations.
To unlock clips
Carry out step 2 of “Locking Clips” to select a locked clip
(one with the lock icon displayed on its thumbnail), then
carry out steps 3 and 4 of “Locking Clips”.
To lock or unlock clips without displaying the
THUMBNAIL menu
After carrying out step 2 in the procedure, press the STOP
button with the SHIFT button held down (shortcut
operation).
Deleting clips
Notes
• Clips cannot be deleted when the Write Inhibit tab of the
disc is in the recording disabled position.
• Locked clips cannot be deleted.
• If a clip which is referenced in a clip list is deleted, that
clip list is also deleted.
You can use the DISC menu to delete the last clip or all
clips. For details, see “To delete the last recorded clip”
(page 51).
1
With the sub clip indicator off, press the
THUMBNAIL button.
The thumbnail indicator lights, and the thumbnails of
the clips on the disc appear.
2
Turn the SEL/SET dial or MENU knob to select the
thumbnail to delete.
3
Holding down the SHIFT button, press the SUBCLIP
button.
The THUMBNAIL MENU appears (see step 3 of
“Locking Clips” (page 74)).
To escape from the THUMBNAIL menu to the
previous screen
Press the RESET button.
Chapter 3 Recording and Playback
To lock all clips
1
Carry out steps 1 and 3 of “Locking Clips” to display
the THUMBNAIL menu.
2
Turn the SEL/SET dial or MENU knob to select
“LOCK ALL CLIPS”, and then press the dial or knob.
A confirmation screen appears.
To cancel the lock operation and return to the
thumbnail screen
Do one of the following.
• With “CANCEL” selected, press the SEL/SET dial
or the MENU knob.
• Press the RESET button.
3
Turn the SEL/SET dial or MENU knob to select
“OK”, and then press the dial or knob.
All clips are locked, and you return to the thumbnail
screen.
To unlock all clips
Carry out the procedure in “To lock all clips”, selecting
“UNLOCK ALL CLIPS” in step 2.
4
Turn the SEL/SET dial or MENU knob to select
“DELETE CLIP”, and then press the dial or knob.
Thumbnails of 4 frames in the target clip appear.
One of the following messages appears in a
confirmation dialog, depending on whether the target
clip is referenced in a clip list.
When the target clip is not referenced in a clip list:
“DELETE CLIP?”
When the target clip is referenced in a clip list:
“DELETE CLIP & CLIP LIST?” (The clip list
that references the clip will also be deleted.)
3-3 Checking Recording and Playback
75
Page 76

To go to the clip deletion screen without displaying
the THUMBNAIL menu
After step 2, press the RESET button with the SHIFT
button held down (shortcut operation).
3-4 Recording Video
Signals From
To cancel the deletion and return to the thumbnail
screen
Do one of the following.
• With “CANCEL” selected, press the SEL/SET dial
or the MENU knob.
• Press the RESET button.
5
Chapter 3 Recording and Playback
Turn the SEL/SET dial or MENU knob to select
“OK”, and then press the dial or knob.
The clip is deleted and you return to the thumbnail
screen.
To delete all clips
1
Carry out steps 1 and 3 of “Deleting Clips” to display
the THUMBNAIL menu (see page 74).
2
Turn the SEL/SET dial or MENU knob to select
“DELETE ALL CLIPS”, and then press the dial or
knob.
A cofirmation screen appears.
To cancel the deletion and return to the
thumbnail screen
Do one of the following.
• With “CANCEL” selected, press the SET button.
• Press the RESET button.
3
Turn the SEL/SET dial or MENU knob to select
“OK”, and then press the dial or knob.
All clips are deleted, and you return to the thumbnail
screen.
With this camcorder, you can select in the OPERATION
menu whether to record the video captured by the camera,
or whether to record a signal from an external video
device.
If this switching function is assigned to the ASSIGN 2
switch, regardless of the setting in the OPERATION
menu, you can make the selection with the ASSIGN 2
switch. While you are recording a DV stream from an
external DV device, the indication “EXT-DV” appears on
the viewfinder screen. While you are recording analog
composite signals (with the CBK-SC01 installed), the
indication “EXT IV” appears on the viewfinder screen.
Notes
• You can switch the signals to be recorded using the
ASSIGN 2 switch or by a menu operation at any time
while recording on the disc. However, the signals
recorded at the point where the signal is switched may be
distorted. If the camera/external switching function is
assigned to the ASSIGN 2 switch, you cannot use the
following menu operations to switch between camera
and external source input.
• Even when the REC VIDEO SOURCE item is set to
“EXT”, if the external video signal is not input to the
i.LINK DV IN/OUT S400 connector or the GENLOCK
IN connector, the camcorder does not switch to EXT
mode, and the pictures being shot by the camcorder are
recorded on the disc.
External Equipment
3-4-1 Recording a DV Stream From
76
3-4 Recording Video Signals From External Equipment
External Equipment
Notes
• Recording a DV stream is possible only when the video
recording format is DVCAM.
If the currently set video recording format is other than
DVCAM, change it to DVCAM referring to 5-1-1
“Setting the Video Recording Format” on page 91.
• If i.LINK MODE is set to “FAM” on the OUTPUT page
(page 192) or SOURCE SEL page (page 198) of the
OPERATION menu, it is not possible to record DV
streams. To record DV streams, set i.LINK MODE to
“AV/C”.
Proceed as follows.
Page 77

21 SOURCE SEL TOP
REC VIDEO SOURCE: CAM
EXT REC CONTROL : OFF
i.LINK MODE : AV/C
MENU knob
1
Holding down the MENU knob, set the MENU ON/
MENU ON/OFF switch
OFF switch to ON.
The TOP menu appears.
2
Turn the MENU knob to move the b mark to
“OPERATION”.
3
Press the MENU knob.
If this is the first time the OPERATION menu has been
displayed, the CONTENTS page of the OPERATION
menu appears. If the menu has been used before, the
last accessed page appears.
4
If the CONTENTS page is displayed, turn the MENU
knob to move the b mark to “SOURCE SEL”, and
press the MENU knob.
Item Description
CAM Records the pictures being shot by the
EXT Records video signals from the
camcorder.
external equipment connected to the
i.LINK DV IN/OUT or GENLOCK IN
connector.
The b mark on the left of “REC VIDEO SOURCE”
changes to a z mark and the z mark on the left of the
setting changes to a ? mark.
6
Turn the MENU knob to display “EXT”.
21 SOURCE SEL TOP
REC VIDEO SOURCE: EXT
EXT REC CONTROL : OFF
i.LINK MODE : AV/C
7
Press the MENU knob.
The z mark changes to a b mark and the ? mark
changes to a z mark.
Chapter 3 Recording and Playback
If a different page is displayed, turn the MENU knob
until the SOURCE SEL page appears, then press the
MENU knob to select the page.
21 SOURCE SEL TOP
REC VIDEO SOURCE: CAM
EXT REC CONTROL : OFF
i.LINK MODE : AV/C
5
Turn the MENU knob to move the b mark to “REC
VIDEO SOURCE”, then press the MENU knob.
Notes
• During i.LINK DV stream input, the image on the
viewfinder screen and the color LCD may occasionally
show an overlapped frame or skipped frame, but this
does not affect the recording on the disc.
• During i.LINK DV stream input, the audio within the
DV stream is recorded as the audio input.
• During i.LINK DV stream input, a black picture is
shown on the viewfinder screen and on the color LCD,
and nothing is recorded, if the DV device on the sending
side of the i.LINK DV connection is also in a stream
input state.
3-4-2 Recording Analog Composite
Signals (With the CBK-SC01
Installed)
Installing the CBK-SC01 Composite Input Board in the
camcorder enables you to record analog composite signals
3-4 Recording Video Signals From External Equipment
77
Page 78

from external equipment connected to the GENLOCK IN
connector.
3-5 Freezing a Picture
Proceed as follows.
1
Display the SOURCE SEL page on the screen.
For the operation, see 3-4-1 “Recording a DV Stream
From External Equipment” on page 76.
Viewing frozen pictures
Proceed as follows.
1
Chapter 3 Recording and Playback
2
Move the b mark to “EXT VIDEO SOURCE”, and
press the MENU knob.
3
Turn the MENU knob to display “CMPST”.
This ends the setting.
When you input analog composite signals to the
GENLOCK IN connector of the camcorder, these
signals are displayed on the viewfinder screen and the
color LCD, and can be recorded on the disc.
21 SOURCE SEL TOP
REC VIDEO SOURCE: CAM
EXT REC CONTROL : OFF
i.LINK MODE : AV/C
EXT VIDEO SOURCE: ILINK
EXT OUTPUT DELAY: SYNC
SET UP REMOVE : 0.0%
2
3
When remotely controlling the camcorder from
an RM-B150/B750 remote control unit
You can perform the same operation from the RM-B150/
B750.
During Playback
Press the PLAY/PAUSE button to start playback.
Press the PLAY/PAUSE button again at the instant
when you want to freeze the picture.
A frozen picture appears.
The time code is displayed in the counter display and
the PLAY/PAUSE indicator flashes (one flash/
second).
To restart playback, press the PLAY/PAUSE button
once again.
Note
Even when the GENLOCK ON/OFF item is set to “OFF”
on the GENLOCK page of the MAINTENANCE menu,
the camcorder is automatically synchronized with the
external reference video signal when the external video
signal is input to the GENLOCK IN connector in EXT
mode. When the setting is switched to CAM mode, or
when no signals are input to the GENLOCK IN connector
even in EXT mode, the camcorder is reset to the original
setting.
78
3-5 Freezing a Picture During Playback
Page 79

Scene Selection
4-1 Overview
What is scene selection?
Scene selection is a function which allows you to select
material (clips) from the material recorded on a disc and
perform cut editing. You can do this by operating on this
unit only.
• Scene selection is a convenient way to perform cut
editing in the field and in other offline situations.
• Clip lists (edit data) created with the scene selection
function can be used on XPRI and other full-feature
nonlinear editing systems.
Chapter
4
4-1 Overview
79
Page 80

Flow of scene selection editing
Record material or insert disc containing
recorded material into this unit
Disc
PDW-510/510P/530/530P
Chapter 4 Scene Selection
To edit a clip list
Create and edit a clip list
• Selecting clips (see page 82)
• Reordering sub clips (see page 83)
• Trimming sub clips (see page 84)
• Deleting sub clips (see page 85)
• Previewing clip lists (see page 86)
Save the clip list to disc (see page 86)
Load clip lists (see page 87)
Clip 1 Clip 2 Clip 3
Recorded material Clip list 1
Clip 1
Clip 2
Clip 3
Clip 4
Select
clips
Clip list 1
Sub Clip 1 Sub
Clip 2
Disc
Sub
Clip 3
80
Play back the clip list (see page 73)
4-1 Overview
PDW-510/510P/530/530P
Sub Clip 1 Sub
Clip 2
Play back clip list
Sub
Clip 3
Page 81

Clips
Material recorded with this unit is managed in units called
“clips.” A clip contains the material between a recording
start point (In point) and a recording end point (Out point).
Clips have numbers beginning with C, for example C0001.
In point
r
Out point
In point
r
Clip 1
(C0001)
Clip number
Clip 2
(C0002)
Out point
In point
r
Clip 3
(C0003)
Out point
In point
r
Out
point
r
Clip 4
(C0004)
Sub clips (clips in clip lists)
The specified clips (or parts of clips) in a clip list are called
“sub clips.” Sub clips are virtual data specifying ranges in
the original clips. Clip data in the original clips is not
overwritten. For this reason, sub clips do not have clip
management numbers.
Clip 1
(C0001)
Example: Clip list (E0001)
Clip 2
(C0002)
Sub clip 1 Sub clip 2 Sub clip 3
Clip 3
(C0003)
Clip 4
(C0004)
Clip list editing (current clip list)
Clip lists cannot be edited on disc. To edit clip lists, you
need to load them, one at a time, into the unit memory.
The clip list which is currently loaded into the unit memory
is called the “current clip list.”
The current clip list is always the target of sub clip creation
and editing. Clip list playback also uses the current clip
list.
After creating and editing a clip list, you need to save it to
disc.
Chapter 4 Scene Selection
Clip lists
Data called a “clip list” is created when you use the scene
selection function to select desired clips from the clips
stored on a disc.
Clip lists have numbers beginning with E, for example
E0001. Up to 99 clip lists can be saved on a disc.
Clip list number
Thumbnails of selected clips
Unit memory
Current clip list
Can be edited (adding, deleting,
and reordering sub clips)
SAVE m
Disc
C0001 (Clip 1)
C0002 (Clip 2)
C0003 (Clip 3)
:
:
M LOAD
t Clip list playback
and thumbnail
display
E0001 (Clip list 1)
E0002 (Clip list 2)
E0003 (Clip list 3)
:
:
E0099 (Clip list 99)
Clip list playback
Clips and clip lists are saved together on a disc.
Clips are played back according to clip list data.
4-1 Overview
81
Page 82

Chapter 4 Scene Selection
4-2 Creating Clip Lists
4-2-1 Selecting Clips
You can create a clip list by selecting a desired clip from
the thumbnail display, and including it in the clip list as a
sub clip.
Note
Up to 99 clip lists can be handled in the CLIP menu.
Including a clip selected from the
thumbnail display in the clip list
Proceed as follows.
2~4
1
Thumbnail
indicator
Sub clip
indicator
3
THUMBNAIL
ESSENCE MARK
SUB CLIP
PRESET
REGEN
REGEN
CLOCK
CLOCK
F-RUN
R-RUN
SEL/SET
S.SEL
SHIFTCLIP MENU
SET
2
Use the SEL/SET dial or the MENU knob to select the
clip you want to include in the clip list.
3
Hold down the SHIFT button, and press the SEL/SET
dial or MENU knob.
The scene selection window appears.
2
To select from the thumbnail screen
Proceed as follows.
1
With the sub clip indicator off, press the
THUMBNAIL button, turning on the thumbnail
indicator.
The thumbnails of the clips on the disc appear.
Notes
• If the MENU ON/OFF switch is set to ON, set it to
OFF and press the THUMBNAIL button.
• If you set the MENU ON/OFF to ON during
thumbnail display, thumbnail display is cancelled
and replaced with menu display.
To return to the previous screen
Press the RESET button.
4
Press the SEL/SET dial or the MENU knob.
This adds the selected clip to the current clip list as a
sub clip.
At the same time, this closes the scene selection
window and returns to the original thumbnail display.
5
Repeat steps 2 to 4 until all desired clips have been
added to the current clip list.
You can select the same clip any number of times.
The scene selection window shows the thumbnails of
the sub clips that have been added to the current clip
list. The cursor within the window indicates the
position in which the next sub clip will be added.
82
4-2 Creating Clip Lists
Page 83

Total duration of the sub
clips in the current clip list
4-2-2 Reordering Sub Clips
SEL/SET dial
THUMBNAIL
button
Thumbnail
indicator
SUB CLIP button
SHIFT button
THUMBNAIL
ESSENCE MARK
SUB CLIP
PRESET
REGEN
REGEN
CLOCK
CLOCK
SEL/SET
S.SEL
SHIFTCLIP MENU
F-RUN
SET
R-RUN
Cursor (indicates where the
next sub clip will be added)
Thumbnails of sub clips already
added to the current clip list
To move the cursor in the scene selection window
When the scene selection window appears as you carry
out step 3, turn the SEL/SET dial or the MENU knob
to move the cursor in the desired direction.
6
When you have finished selecting all the clips you
want, save the current clip list to disc.
For details, see 4-2-6 “Saving the Current Clip List to
Disc” (page 86).
Note
Unless the current clip list has been saved to disc, its
contents will be lost when the camcorder is powered
off or the disc is ejected. After creating a clip list, be
sure to save it.
MENU knob
Proceed as follows.
1
Press the SUB CLIP button, turning on the indicator.
2
Press the THUMBNAIL button, turning on the
indicator.
Thumbnails of the sub clips within the current clip list
appear.
Notes
• If the MENU ON/OFF switch is set to ON, set it to
OFF and press the THUMBNAIL button.
• If you set the MENU ON/OFF to ON during
thumbnail display, thumbnail display is cancelled
and replaced with menu display.
Chapter 4 Scene Selection
If the clip list you want to edit is not the current clip
list
4-2 Creating Clip Lists
83
Page 84

Load the clip list from the disc into the unit memory
(see page 87).
To return to the full-screen display
Press the THUMBNAIL button, turning off the
indicator.
3
Turn the SEL/SET dial or the MENU knob to select
the desired sub clip.
4
Hold down the SHIFT button, and press the SEL/SET
dial or MENU knob.
The sub clip operation menu appears.
Indicates that the third sub clip will be
moved to the position of the eighth sub clip.
Chapter 4 Scene Selection
To return to the thumbnail display without moving
the sub clip
Do either of the following.
• Turn the SEL/SET dial or the MENU knob to select
EXIT, and press the dial/knob.
• Press the RESET button.
5
Turn the SEL/SET dial or the MENU knob to select
MOVE, and press the dial/ knob.
The sub clip movement screen appears. The sub clip
selected in step 3 appears surrounded by a frame.
Cursor indicating the move destination
for the selected sub clip
To return to the previous screen
Press the RESET button.
6
Turn the SEL/SET dial or the MENU knob to move the
cursor to the position where you want to move the
selected sub clip.
To return to the previous screen
Press the THUMBNAIL button.
7
Press the SEL/SET dial or the MENU knob.
The sub clip thumbnail display appears, and you can
check the new position of the sub clip.
84
4-2 Creating Clip Lists
8
Save the current clip list to disc.
See 4-2-6 “Saving the Current Clip List to Disc” (page
86).
4-2-3 Trimming a Sub Clip
Proceed as follows.
Page 85

1
Carry out steps 1 to 4 of 4-2-2 “Deleting a Sub Clip”
to select a sub clip and display the sub clip operation
menu.
5
When the new IN and/or OUT points are set, hold
down the SHIFT button and press the SEL/SET dial or
MENU knob.
2
Turn the SEL/SET dial or the MENU knob to select
TRIM, and press the dial/knob.
The first frame of the selected sub clip appears. In this
state, you can carry out playback and search all clips
on the disc.
To cancel the trim and return to the previous
screen
Hold down the SHIFT button and press the SEL/SET
dial or MENU knob.
3
Carry out playback and search to find the new location
of the IN point or OUT point of the selected sub clip.
This carries out the trimming, and the screen returns to
the sub clip thumbnail display.
To cancel the trim operation
Reset the IN point and the OUT point to return to the
state before the sub clip trimming screen was
displayed, then hold down the SHIFT button and press
the SEL/SET dial.
This cancels the trim, and the screen returns to the sub
clip thumbnail display.
6
Save the current clip list to disc.
Chapter 4 Scene Selection
4
At the point where you want to set the new IN point or
OUT point, turn the SEL/SET dial or the MENU knob
to select the IN (when changing the IN point) or the
OUT (when changing the OUT point), and press the
dial/knob.
To change both the IN point and the OUT point,
repeat steps 3 and 4.
To reset the IN point or OUT point, selecting IN or
OUT, hold down the RESET button and press the
SEL/SET dial. The IN or OUT point is restored to the
value it had before the sub clip trim screen opened.
To cue up the IN point or OUT point, hold down the
SHIFT button and press the NEXT or PREV button.
When you set IN and OUT points stretching across
several clips, one sub clip is created for each of the
clips.
Note
You can press the THUMBNAIL button to return to
full-screen sub clip display, without trimming a sub
clip.
See 4-2-6 “Saving the Current Clip List to Disc” (page
86).
4-2-4 Deleting a Sub Clip
Proceed as follows.
1
Carry out steps 1 to 4 in the procedure, 4-2-2
“Reordering Sub Clips” (page 83).
2
Turn the SEL/SET dial or the MENU knob to select
DELETE, and press the dial/knob.
The sub clip deletion screen appears.
4-2 Creating Clip Lists
85
Page 86

Chapter 4 Scene Selection
To cancel the deletion, and return to the sub clip
deletion screen
Do either of the following.
• Select CANCEL, and press the SEL/SET dial or the
MENU knob.
• Press the RESET button.
The screen returns to the sub clip thumbnail display.
3
Turn the SEL/SET dial or the MENU knob to select
OK, and press the dial/knob.
This deletes the sub clip, and the screen returns to the
sub clip thumbnail display.
“NEW FILE” is displayed for clip lists without any
registered data.
The date of creation or the title is displayed for each
clip list. The date of creation is always displayed for
clip lists without titles.
SAVE CLIP LIST
E0001 04/08/08 21:57
E0002 04/08/24 11:15
E0003 04/08/25 15:30
E0004 NEW FILE
E0005 NEW FILE
E0006 NEW FILE
E0007 NEW FILE
E0008 NEW FILE
E0009 NEW FILE
TITLE : SHIFT+SET KEY
To switch between display of dates of
creation, titles, and clip list names
With the SHIFT button held down, press the SET
button.
With each press, the display changes as follows.
Dates of creation > titles > clip list names > dates of
creation …
3
Use the SEL/SET dial or the MENU knob to select the
desired clip list name, and press the dial/knob.
4
Save the current clip list to disc.
See 4-2-6 “Saving the Current Clip List to Disc” (page
86).
4-2-5 Previewing the Current Clip
List
Press the SUB CLIP button, turning it on, and then press
the PLAY button.
If the thumbnail indicator is not lit, playback starts from
the first sub clip.
If the thumbnail indicator is lit, playback starts from the
first frame of the selected clip.
4-2-6 Saving the Current Clip List to
Disc
Proceed as follows.
1
Display the CLIP menu.
The message “SAVE OK? YES b NO” appears.
4
Turn the SEL/SET dial or the MENU knob to move the
b mark to “YES” and press the dial/knob.
The current clip list is saved to disc.
5
Hold down the SHIFT button and press the SUB CLIP
button.
CLIP menu operations end.
To assign a title to a clip list
Use the supplied PDZ-1 software.
For details, see the PDZ-1 online help.
2
86
4-2 Creating Clip Lists
See “Displaying the CLIP menu” (page 87).
Use the SEL/SET dial or the MENU knob to select
SAVE in the CLIP menu, and press the dial/knob.
A clip list appears.
Page 87

4-3 Managing Clip Lists
(CLIP Menu)
After you create a clip list, you can use the CLIP menu to
save it to disc, load it from disc into the unit memory, and
delete it from the disc.
The CLIP menu also allows you to clear and edit the
current clip list.
4-3-1 Loading a Clip List From Disc
Into Unit Memory
Proceed as follows.
1
Display the CLIP menu.
See “Displaying the CLIP menu” (page 87).
2
In the CLIP menu, move the cursor to LOAD and press
the SEL/SET dial or the MENU Knob.
Displaying the CLIP menu
Proceed as follows.
Note
The CLIP menu can handle up to 99 clip lists.
With the thumbnail indicator off, hold down the SHIFT
button and press the SUB CLIP button.
The CLIP menu appears.
Notes
• If the MENU ON/OFF switch is set to ON, set it to OFF,
then press the SUB CLIP button with the SHIFT button
held down.
• If you set the MENU ON/OFF switch to ON while the
CLIP menu is being displayed, thumbnail display is
cancelled and replaced with menu display.
<CLIP MENU>
LOAD
SAVE
DELETE
CLEAR
TC PRESET
SORT BY
A clip list appears.
The date of creation or the title is displayed for each
clip list.
LOAO CLIP LIST ESC
E0001 04/08/08 21:57
E0002 04/08/24 11:15
E0003 04/08/25 15:30
E0004 NEW FILE
E0005 NEW FILE
E0006 NEW FILE
E0007 NEW FILE
E0008 NEW FILE
E0009 NEW FILE
TITLE : SHIFT+SET KEY
To switch between display of dates of
creation, titles, and clip list names
With the SHIFT button held down, press the SET
button.
With each press, the display changes as follows.
Dates of creation > titles > clip list names > dates of
creation …
3
Select the desired clip list and press the SEL/SET dial
or the MENU knob.
The message “LOAD OK? YES b NO” appears.
Chapter 4 Scene Selection
Item Operation
LOAD Load a clip list from the disc into the current
SAVE Save the current clip list to disc (see page 86)
DELETE Delete a clip list from the disc (see page 88)
CLEAR Clear the current clip list from the unit memory
TC
PRESET
SORT BY Sort the clip lists by name or date of creation
clip list (see page 87)
(see page 88)
Preset the first time code in the current clip list
(see page 88)
(see page 89)
To escape from the CLIP menu
Hold down the SHIFT button and press the SUB CLIP
button.
4
Turn the SEL/SET dial or the MENU knob to move the
b mark to “YES” and press the dial/knob.
The selected clip list is loaded into the current clip list.
5
Hold down the SHIFT button and press the SUB CLIP
button.
CLIP menu operations end.
To display thumbnails of the sub clips in the
newly loaded current clip list
Press the SUB CLIP button and the THUMBNAIL button,
turning on the indicators.
Thumbnails of the sub clips in the clip list appear.
Notes
• If the MENU ON/OFF switch is set to ON, set it to OFF
and press the THUMBNAIL button.
4-3 Managing Clip Lists (CLIP Menu)
87
Page 88

Chapter 4 Scene Selection
• If you set the MENU ON/OFF to ON during thumbnail
display, thumbnail display is cancelled and replaced
with menu display.
• Unless the current clip list has been saved to disc, its
contents will be lost when you load a new clip list from
the disc.
4-3-2 Deleting Clip Lists From a
Disc
Proceed as follows.
1
Display the CLIP menu.
See “Displaying the CLIP menu” (page 87).
2
Select DELETE in the CLIP menu, and press the SEL/
SET dial or the MENU knob.
A clip list appears.
The date of creation or the title is displayed for each
clip list. The date of creation is always displayed for
clip lists without titles.
To switch between display of dates of
creation, titles, and clip list names
With the SHIFT button held down, press the SET
button.
With each press, the display changes as follows.
Dates of creation > titles > clip list names > dates of
creation …
2
Select CLEAR in the CLIP menu, and press the SEL/
SET dial or the MENU knob.
The following screen display appears.
CLEAR CLIP LIST ESC
CLEAR CLIP LIST : EXEC
3
Press the SEL/SET dial or the Menu knob.
The message “EXECUTE OK? YES b NO” appears.
4
Turn the SEL/SET dial or the MENU knob to move the
b mark to “YES” and press the dial/knob.
The current clip list is cleared, leaving it with no clip
list loaded.
5
Hold down the SHIFT button and press the SUB CLIP
button.
CLIP menu operations end.
4-3-4 Setting the Start Time Code of
the Current Clip List
3
Select the name of the clip list to delete and press the
SEL/SET dial or the MENU knob.
The message “DELETE OK? YES b NO” appears.
4
Turn the SEL/SET dial or the MENU knob to move the
b mark to “YES” and press the dial/knob.
The selected clip list is deleted from the disc.
5
Hold down the SHIFT button and press the SUB CLIP
button.
CLIP menu operations end.
4-3-3 Clearing the Current Clip List
From the Unit Memory
Proceed as follows to clear the current clip list, leaving it
with no clip list loaded.
1
Display the CLIP menu.
See “Displaying the CLIP menu” (page 87).
The start time code (LTC) of the current clip list is set to
00:00:00:00 when the camcorder is powered on and when
a disc is inserted.
You can set the start time code to any value. Proceed as
follows.
1
Load an existing clip list for which you want to set the
initial time code into to the unit memory as the current
clip list.
For details, see 4-3-1 “Loading a Clip List From Disc
Into Unit Memory” (page 87).
2
Display the CLIP menu.
See “Displaying the CLIP menu” (page 87).
3
Select TC PRESET in the CLIP menu, and press the
SEL/SET dial or the MENU knob.
The following screen display appears.
88
4-3 Managing Clip Lists (CLIP Menu)
Page 89

CLIP LIST TC PRS ESC
HOUR : 00
MIN : 00
SEC : 00
FRAME : 00
OK
The time code shown in this screen is the current initial
time code of the current clip list. If you have already
set the initial time code for this clip list, that time code
is displayed.
4
Turn the SEL/SET dial or the MENU knob to select
the item (HOUR, MIN, SEC, or FRAME) which you
want to set, then press the dial/knob.
5
Turn the SEL/SET dial or the Menu knob until the
desired value is displayed, then press the dial/knob.
6
After all items have been set, select OK, and press the
SEL/SET dial or the MENU knob.
2
Turn the SEL/SET dial or MENU knob to move the
cursor to “SORT BY” in the CLIP menu, and then
press the dial or knob.
A screen like the following appears.
SORT CLIP LISTS BY ESC
NAME(A-Z)
DATE(MOST RECENT 1ST)
3
Turn the SEL/SET dial or MENU knob to select
“NAME” or “DATE”, and then press the dial or knob.
NAME: Sort the clip lists in ascending order by clip
list name.
DATE: Sort the clip lists by date of creation, with the
newest clip list first.
The message “SORT OK?” appears.
Chapter 4 Scene Selection
The starting time code of the current clip list is set to
the specified LTC value. The count starts from that
value when playback starts.
To check the time code after setting it
Press the SUB CLIP button and the THUMBNAIL
button, turning their indicators on, and then rotate the
SEL/SET dial or the MENU knob to select the first sub
clip.
The initial time code of the current clip list appears in
the color LCD and the monochrome LCD.
7
Save the current clip list to disc.
See 4-2-6 “Saving the Current Clip List to Disc” (page
86).
8
Hold down the SHIFT button and press the SUB CLIP
button.
CLIP menu operations end.
4-3-5 Sorting Clip Lists
4
Select “YES”, and then press the SEL/SET dial or
MENU knob.
The clip lists are sorted by the method you chose in
step 3.
Unused clip lists are excluded from the sort.
Proceed as follows to sort the existing clip lists by clip list
name or by date of creation.
1
Display the CLIP menu.
See “Displaying the CLIP menu” (page 87).
4-3 Managing Clip Lists (CLIP Menu)
89
Page 90

4-4Using the PDZ-1 Proxy
Browsing Software
When a computer with the PDZ-1 Proxy Browsing
Software installed is connected to this unit, you can
transfer the proxy AV data and metadata files recorded on
a disc to the computer. On the computer side, PDZ-1
enables you to browse the proxy AV data, add or modify
metadata (titles, comments, essence marks, etc.), or create
a clip list.
The modified metadata and the created clip list can then be
written back to the disc loaded in this unit.
Chapter 4 Scene Selection
System requirements
The following are required to use PDZ-1.
• Computer:
- When using the live logging function:
PC with Intel Pentium 4 CPU, at least 2 GHz (installed
memory: at least 512 MB)
- When not using the live logging function:
PC with Intel Pentium M CPU, at least 1 GHz
(installed memory: at least 512 MB)
• Operating system: Microsoft Windows XP Professional
SP2 or higher, Windows Vista Ultimate/Business
(32bit), or Mac OS X v10.4.11 or higher
• Web browser: Internet Explorer 6.0 SP1 or higher
• DirectX: DirectX 8.1b or higher
To install the PDZ-1
Insert the supplied CD-ROM (XDCAM Application) into
the CD-ROM drive of your computer, and run the installer
in the PDZ-1 directory.
For details, refer to the ReadMe file in the CD-ROM.
Notes
• Make sure that the hard disk drive on which the work
folder to store the material transferred from this unit has
adequate free space. The amount of proxy AV data
transferred is about 1.4 GB per disc (when recording in
the DVCAM format).
• To transfer files between the computer and this unit
requires this unit’s IP address and other network-related
settings to be made.
For details, see 7-3-11 “Making Network Settings” (page
152).
90
4-4 Using the PDZ-1 Proxy Browsing Software
Page 91

Adjustments and
Settings for Recording
5-1 Setting the
Recording Format
(PDW-530/530P
Only)
Before recording with the PDW-530/530P, it is necessary
to set the recording format for each of video and audio.
Video recording format: MPEG IMX 50 Mbps, 40 Mbps,
30 Mbps, or DVCAM
Audio recording format: 16-bit/48 kHz or 24-bit/48 kHz
Note
It is not possible to combine different recording formats on
a single disc.
Chapter
<TOP MENU>
USER
USER MENU CUSTOMIZE
ALL
OPERATION
PAINT
MAINTENANCE
FILE
DIAGNOSIS
3
Turn the MENU knob to move the b mark to
“MAINTENANCE”.
<TOP MENU>
USER
USER MENU CUSTOMIZE
ALL
OPERATION
PAINT
MAINTENANCE
FILE
DIAGNOSIS
5
5-1-1 Setting the Video Recording
Format
You can select the video recording format in a menu, from
MPEG IMX 50 Mbps, MPEG IMX 40 Mbps, MPEG IMX
30 Mbps, and DVCAM.
The factory default selection is “IMX50”.
Proceed as follows.
For menu operations, see 7-1-3 “Basic Menu Operations”
on page 126.
1
Turn on the POWER switch.
2
Holding down the MENU knob, move the MENU ON/
OFF switch from OFF to ON.
The TOP menu appears.
4
Press the MENU knob.
If this is the first time the MAINTENANCE menu has
been displayed, the CONTENTS page of the
MAINTENANCE menu appears.
If the menu has been used before, the last accessed
page appears.
5
If the CONTENTS page is displayed, turn the MENU
knob to move the b mark to “VDR MODE”, and press
the MENU knob to display the VDR MODE page.
If a different page is displayed, turn the MENU knob
until the VDR MODE page appears, then press the
MENU knob to select the page.
5-1 Setting the Recording Format (PDW-530/530P Only)
91
Page 92

M09 VDR MODE TOP
REC TALLY BLINK : ON
REC START/STOP : OFF
MODE SELECT : SEL
TIMER SET : IH
REC FORMAT : IMX50
For the operation, see the descriptions of steps 1 to 5
of the procedure “Setting the Video Recording
Format” on page 91.
2
Press the MENU knob, then turn it to move the b mark
to “AU DATA LEN (IMX)”, and press the MENU
knob.
Chapter 5 Adjustments and Settings for Recording
6
Turn the MENU knob to move the b mark to “REC
FORMAT”, and press the MENU knob again.
M09 VDR MODE TOP
REC TALLY BLINK : ON
REC START/STOP : OFF
MODE SELECT : SEL
TIMER SET : IH
REC FORMAT :? IMX50
The b mark at the side of “REC FORMAT” changes
to a z mark, and the z mark by “IMX50” changes to
a ? mark.
7
Turn the MENU knob to display the desired recording
format.
M09 VDR MODE TOP
REC TALLY BLINK : ON
REC START/STOP : OFF
MODE SELECT : SEL
TIMER SET : IH
REC FORMAT :? IMX40
M06 AUDIO-2 TOP
AU DATA LEN (IMX):?16bit
AU REF LEVEL : -20db
AU REF OUT : 0db
AU CH12 AGC MODE : MONO
AU CH34 AGC MODE : MONO
AU AGC SPEC : -6db
AU LIMITER MODE : OFF
AU LIMITER : ON
I.LINK AUDIO OUT : 2CH
3
Turn the MENU knob to display the desired format,
and press the MENU knob.
4
Move the MENU ON/OFF switch to OFF.
This ends the menu operation.
The above procedure completes the setting of the
recording format.
8
Press the MENU knob.
This confirms the selection.
9
Align the b mark with “TOP” at the top right of the
menu page, and press the MENU knob.
This returns to the TOP menu.
5-1-2 Setting the Audio Recording
Format
On the PDW-530/530P, when the video recording format
is IMX50/40/30, you can select the audio recording format
in a menu, from 16-bit/48 kHz and 24-bit/48 kHz. The
factory default selection is “16bit”.
Proceed as follows.
1
Display the AUDIO-2 page of the MAINTENANCE
menu.
92
5-1 Setting the Recording Format (PDW-530/530P Only)
Page 93

5-2 Adjusting the Black
Balance and the
White Balance
To ensure excellent image quality when using this
camcorder, conditions may require that both the black
balance and the white balance be adjusted.
OUTPUT/DCC switch
AUTO W/B BAL switch
To adjust the black balance, proceed as follows.
Black balance adjustment
The black balance will require adjustment in the following
cases.
• When the camcorder is used for the first time
• When the camcorder has not been used for a long time
• When the camcorder is used under conditions in which
the surrounding temperature has changed greatly
• When the GAIN selector (L/M/H) values have been
changed by using the USER menu
It is not usually necessary to adjust the black balance when
using the camcorder after it has been off.
White balance adjustment
Always readjust the white balance when the lighting
conditions change.
Viewfinder screen displays
If the black balance or white balance adjustment is started,
messages that report on the progress and results are
displayed on the viewfinder screen when the VF DISP
MODE item is set to “2” or “3” on the VF DISP 1 page of
the USER menu.
Note
Black balance and white balance adjustment values that
are automatically set by the camcorder and the various
settings are stored in the camcorder memory and retained
even when the power is turned off.
5-2-1 Adjusting the Black Balance
In automatic black balance mode, adjustments are
performed in the following order: clamp level, black set,
and black balance. Manual black balance adjustment can
be selected from the setup menu.
1
Set the OUTPUT/DCC switch to CAM.
2
Push the AUTO W/B BAL switch to BLK and release
the switch.
The switch returns to the center position, and the
adjustment is executed.
During adjustment, the following message is displayed
on the viewfinder screen.
The messages change
in the following
sequence :
-BLACK SET- t
ABB:EXECUTING
-BLACK SET-
The black balance adjustment ends in a few seconds
with the message “ABB:OK” and the adjustment value
is automatically stored in memory.
Notes
• During the black balance adjustment, the iris is
automatically closed.
• During the black balance adjustment, the gain selection
circuit is automatically activated so you may see
flickering on the viewfinder screen, but this is not a fault.
-BLACK BALANCE-
If automatic black balance adjustment
cannot be made
If the black balance adjustment cannot be completed
normally, an error message will appear for about 3 seconds
on the viewfinder screen (in display mode 2 or 3).
Possible messages are listed below.
Black balance adjustment error messages
Chapter 5 Adjustments and Settings for Recording
For details of manual black balance adjustment, refer to
the Maintenance Manual.
Error message Meaning
ABB : NG
IRIS NOT
CLOSED
ABB : NG
TIME LIMIT
The lens iris did not close; adjustment
was impossible.
Adjustment could not be completed
within the standard number of attempts.
5-2 Adjusting the Black Balance and the White Balance
93
Page 94

Error message Meaning
ABB : NG
R (or G or B) :
OVERFLOW
The difference between the reference
value and the current value is so great
that it exceeds the range. Adjustment
was impossible.
If any of the above error messages is displayed, retry the
black balance adjustment.
Keep pushing the AUTO W/B BAL to BLK until “BLACK SET-” appears after “-BLACK BALANCE-”
appears. If the error message occurs again, an internal
check is necessary.
For information about this internal check, refer to the
Maintenance Manual.
Note
If the lens cable is not firmly connected to the LENS
connector, it may not be possible to adjust the lens iris. If
this happens, the black balance will be incorrect.
FILTER selector
OUTPUT/DCC
switch: CAM
WHITE BAL
switch: A or B
1)
Chapter 5 Adjustments and Settings for Recording
Black balance memory
Values stored in memory are held until the black balance
is next adjusted.
If a memory error occurs
If the error message “: STORED DATA : NG” flashes on
the viewfinder screen when the camcorder is turned on, the
black balance and white balance memory contents have
been lost.
Adjust the black balance and white balance again. Contact
your Sony representative if this message continues to
appear even after the black balance and white balance have
been adjusted again.
For details, refer to the Maintenance Manual.
5-2-2 Adjusting the White Balance
To automatically adjust the white balance
When you make automatic white balance adjustment, the
adjustment value obtained is saved in memory.
Proceed as follows.
1
Set the switches and selectors as shown in the figure
below.
GAIN selector: Set as low as
possible.
1) White balance setting values are stored in memory B only
when the WHITE SWITCH <B> item is set to “MEM” on
the FUNCTION 2 page of the OPERATION menu.
If the setting of the GAIN selector or WHITE BAL
switch is changed, a message reporting the new setting
position appears for about 3 seconds in the setting
change and adjustment progress message display area
of the viewfinder screen.
2
Set the FILTER selector to suit the lighting conditions
as follows.
For the PDW-530/530P:
FILTER selector (outer knob) setting and CC filter
selection
FILTER selector (outer knob)
setting
A Cross filter
B 3200 K
C 4300 K
D 6300 K
FILTER selector (inner knob) setting and ND filter
selection
CC filter
94
5-2 Adjusting the Black Balance and the White Balance
FILTER selector (inner knob)
setting
1 Clear
2
3
ND filter
1
/4 ND
1
/16 ND
Page 95

FILTER selector (inner knob) setting and ND filter
selection
FILTER selector (inner knob)
setting
4
ND filter
1
/64 ND
For the PDW-510/510P:
FILTER selector setting and filter selection
FILTER selector setting Filter selection
1 3200 K
2
3 5600 K
4
5600 K +
5600 K +
1
/8 ND
1
/64 ND
If the setting of the FILTER selector is changed, a
message reporting the setting appears for about 3
seconds in the setting change and adjustment progress
message display area of the viewfinder screen (in
display mode 3).
3
Place a white test card under the same lighting
conditions as for the subject to be shot and zoom up to
it.
Alternatively, any white object such as a cloth or a
wall can be used.
The absolute minimum white area is as follows.
AUTO W/B BAL switch
The switch returns to the center position, and the
adjustment is executed.
During adjustment, the message “WHITE : OP” is
displayed on the viewfinder screen (in display mode 2
or 3).
The white balance adjustment ends in about one
second with the message shown in the following
figure, and the adjustment setting is automatically
stored in the memory (A or B) that was selected in step
1.
AWB:OK
. K
Approximate color
temperature of the
subject
Chapter 5 Adjustments and Settings for Recording
Rectangle centered on
the screen. The lengths
of the sides are 70% of
the length and width of
the screen.
The white object must
be within the rectangle
and have an area of at
least 10% of the screen.
Note
Make sure there are not bright spots in the rectangle.
4
Adjust the lens iris.
Manually adjusted lens: set the iris to an appropriate
setting.
Lens with automatic iris: set the automatic/manual
switch on the lens to automatic.
5
Push the AUTO W/B BAL switch to WHT and then
release the switch.
Note
If the camera has a zoom lens with an automatic iris,
the iris may hunt
1)
during the adjustment. To prevent
this, adjust the iris gain knob (indicated as IG, IS, or S)
on the lens.
For details, refer to the lens operation manual.
1)Hunting
Repeated brightening and darkening of the image, resulting from
repeated response to automatic iris control.
If the automatic white balance adjustment
cannot be made
If the white balance adjustment cannot be completed
normally, an error message will appear for about 3 seconds
on the viewfinder screen.
Possible messages are listed below.
White balance adjustment error messages
Error message Meaning
WHITE : NG
LOW LEVEL
The white video level is too low.
Either open the lens iris or increase
the gain.
5-2 Adjusting the Black Balance and the White Balance
95
Page 96

Error message Meaning
WHITE : NG
COLOR TEMP HIGH
WHITE : NG
COLOR TEMP LOW
WHITE : NG
TIME LIMIT
WHITE : NG
POOR WHITE AREA
WHITE : NG
OVER LEVEL
The color temperature is too high.
Select a suitable filter setting.
The color temperature is too low.
Select a suitable filter setting.
Adjustment could not be completed
within the standard number of
attempts.
The white area could not be
checked.
The white video level is too high.
Either stop down the lens iris or
change the ND filter.
If any of the above error messages is displayed, retry the
white balance adjustment. If the error message occurs
again, an internal check is necessary.
For information about this internal check, refer to the
Maintenance Manual.
If a memory error occurs
If the error message “: STORED DATA : NG” flashes on
the viewfinder screen when the camcorder is turned on, the
white balance and black balance memory contents have
been lost.
Adjust the white balance and black balance again. Contact
your Sony representative if this message continues to
appear even after the white balance and black balance have
been adjusted again.
For details, refer to the Maintenance Manual.
Chapter 5 Adjustments and Settings for Recording
If you have no time to adjust the white
balance
Set the WHITE BAL switch to PRST.
The white balance is automatically set as follows,
depending on the FILTER selector setting.
• PDW-530/530P:
B: 3200K, C: 4300 K, D: 6300K
• PDW-510/510P:
1: 3200 K, 3: 5600 K
For details about setting the white balance manually, see
“To automatically adjust the white balance” on page 94.
White balance memory
Values stored in memory are held until the white balance
is next adjusted.
There are two sets of white balance memories, A and B,
and adjustments for each of the filters can be automatically
stored in the memory corresponding to the setting (A or B)
of the WHITE BAL switch. The camcorder has four builtin filters, so a total of eight (4 × 2) adjustments can be
stored. The number of memories allocated to each of A and
B can be limited to one by setting the WHT FILTER INH.
item to “ON” on the FUNCTION 3 page of the
MAINTENANCE menu. In this case, the memory
contents are not linked to the filter settings.
If the WHITE BAL switch is set to B, and on the
FUNCTION 2 page of the OPERATION menu, the
WHITE SWITCH <B> item is set to “ATW”, the ATW
function is activated to automatically adjust the white
balance of the picture being shot for varying lighting
conditions.
96
5-2 Adjusting the Black Balance and the White Balance
Page 97

5-3 Setting the
Electronic Shutter
This section describes the shutter modes that can be used
with the electronic shutter of the camcorder, and describes
the procedure for selecting the shutter speed and shutter
mode.
5-3-1 Shutter Modes
The shutter modes that can be used with the electronic
shutter and the shutter speeds that can be selected are listed
below.
Selectable shutter modes and shutter speeds
Shutter
mode
Standard PDW-510/
ECS
(Extended
Clear
Scan)
2)
SLS
(slow
speed
shutter)
Shutter speed Application
Scan Mode:I
530
PDW510P/
530P
PDW-510/
530
PDW510P/
530P
1 (1/30 sec for PDW-510/530,
1/25 sec for PDW-510P/530P)
to 8, 16 frames (1/2 sec for
PDW-510/530, 2/3 sec for
PDW-510P/530P)
1/100, 1/125,
1/250, 1/500,
1/1000, 1/2000
(sec.)
Scan Mode:PsF
1/40, 1/60, 1/120,
1/125, 1/250,
1/500, 1/1000,
1/2000 (sec.)
Scan Mode:24P
1/32, 1/48, 1/96,
1/125, 1/250,
1/500, 1/1000,
1/2000 (sec.):
Scan Mode:I
1/60, 1/125,
1/250, 1/500,
1/1000, 1/2000
(sec.)
Scan Mode:PsF
1/33, 1/50, 1/100,
1/125, 1/250,
1/500, 1/1000,
1/2000 (sec.)
Scan Mode:I
60.0 to 6000 Hz
Scan Mode:PsF
30.0 to 7000 Hz
Scan Mode:24P
24.0 Hz to 5000
Hz
Scan Mode:I
50.0 to 6000 Hz
Scan Mode:PsF
25.0 to 6000 Hz
1)
For shooting
fast-moving
subjects with
little blurring.
For obtaining
images with
no horizontal
bands of noise
1)
when shooting
subjects such
as monitor
screens.
For shooting
subjects in low
level lighting
conditions
Shutter
mode
EVS
(Enhanced
Vertical
definition
System)
1) Only when the CBK-FC01 is installed.
2) The SLS mode can only be selected when the CCD scan mode(see page
149) is set to “I (interlace scan)”.
Notes
Shutter speed Application
Shutter speed currently
selected in the Standard or
ECS mode
Improved
vertical
resolution.
However, the
sensitivity and
dynamic range
are reduced.
• Whatever the operating mode of the electronic shutter,
the sensitivity of the CCD decreases with increasing
shutter speed.
• When the automatic iris is used, the iris opens wider as
the shutter speed increases, thus reducing the depth of
field.
• Under artificial light, particularly fluorescent or mercury
lamps, the light intensity may appear to be constant, but
the red, green, and blue intensities are actually changing
in synchronization with the frequency of the power
supply causing flicker. Using an electronic shutter under
such lighting could make the flicker even worse. Color
flicker is particularly likely to happen when the power
supply frequency is 60 Hz (with the PDW-510/530) or
50 Hz (with the PDW-510P/530P). However, if the
power frequency is 50 Hz (with the PDW-510/530) or 60
Hz (with the PDW-510P/530P), setting the shutter speed
to 1/100 or 1/60 can reduce this flicker.
• When a bright object is shot in EVS mode or ECS mode
in such a manner that it fills the screen, the upper edge of
the picture may have poor quality because of an inherent
characteristic of CCDs. Before using EVS mode or ECS
mode, check the shooting conditions.
You can turn on or off the EVS mode on the SW STATUS
page of the PAINT menu.
5-3-2 Selecting the Shutter Mode
and Shutter Speed
Use the SHUTTER selector to select a shutter mode or a
standard-mode shutter speed. To set the shutter speed in
ECS or SLS mode, with the SHUTTER selector set to ON
and the ECS or SLS mode selected, use the MENU knob
for adjustment.
You can use the SHT ENABLE page of the OPERATION
menu to narrow the range of choice in advance, or to select
in advance whether or not you use ECS/SLS.
Chapter 5 Adjustments and Settings for Recording
5-3 Setting the Electronic Shutter
97
Page 98

Chapter 5 Adjustments and Settings for Recording
Setting the shutter mode and standardmode shutter speed
Once the shutter speed is selected, it is retained even when
the camcorder power is turned off.
1
Follow the procedure described in 7-2-2 “Selecting the
Display Items” (page 134) to set the VF DISPLAY
MODE item to “2” or “3” on the VF DISP 1 page of
the USER menu.
2
Push the SHUTTER selector from ON to SELECT.
Standard mode (with scan mode:I)
SLS mode
1/100: for PDW-510/530
1/60: for PDW-510P/530P
Shutter speeds in standard mode can also be switched
to angle display by using SHT DISP MODE in the
FUNCTION 3 page of the MAINTENANCE menu.
ECS mode
Setting the shutter speed in ECS mode
Proceed as follows.
SHUTTER selector
The current shutter setting indication appears for about
3 seconds in the setting change and adjustment
progress message display area of the viewfinder
screen.
Examples: “: SS : 1/250”, “: SLS : 1/30 : 1FRAME”,
“: ECS : 60.0 Hz”
3
Before the shutter setting indication disappears, push
the SHUTTER selector down to SELECT again and
repeat this until the desired mode or speed appears.
Pushing the SHUTTER selector down to SELECT
repeatedly allows you to cycle through the settings of
mode and speed preselected on the SHT ENABLE
page of the OPERATION menu.
Note that all modes and all standard-mode speeds
listed in the table on page 97 are preselected using the
SHT ENABLE page of the OPERATION menu.
By factory default, all available shutter modes and
shutter speeds are displayed in the sequence shown in
the following figure. (You can use the SHT ENABLE
page of the OPERATION menu to make a setting so
that only the desired (or most frequently used) modes
and speeds are displayed.)
12
Setting the shutter speed in ECS (Extended Clear Scan) mode
1
Set the shutter speed mode to ECS.
For the operation, see the previous item “Setting the
shutter mode and standard-mode shutter speed”.
ECS:60.00Hz
Example of view finder screen display for ECS setting operation
2
Turn the MENU knob clockwise or counterclockwise
until the desired frequency appears.
See the table “Selectable shutter modes and shutter
speeds” (page 97) for the frequency range which can
be changed.
98
5-3 Setting the Electronic Shutter
Page 99

When the RM-B150 Remote Control Unit is
connected
You can set the shutter speed of ECS with the rotary
encoder of the RM-B150.
Setting the shutter speed in SLS mode
Proceed as follows.
12
Setting the shutter speed in SLS (Slow Speed Shutter) mode
1
Set the shutter speed mode to SLS.
For the operation, see “Setting the shutter mode and
standard-mode shutter speed” on page 98.
SLS: 1/30 : 1FRAME
Example of viewfinder screen display for SLS setting operation
MENU knob
Changing the range of choice of shutter mode and speed settings
1
Set the MENU ON/OFF switch to ON while holding
MENU ON/OFF switch
down the MENU knob.
The TOP menu appears.
2
Turn the MENU knob to move the b mark to
OPERATION.
3
Press the MENU knob.
If this is the first time the OPERATION menu has been
displayed, the CONTENTS page of the OPERATION
menu appears. If the menu has been used before, the
last accessed page appears.
Chapter 5 Adjustments and Settings for Recording
2
Turn the MENU knob until the desired number of
frames appears.
The number of frames can be set to values in the range
1 to 8, and 16. (1 frame nearly equals to 1/30 second
(PDW-510/530) or 1/25 second (PDW-510P/530P)).
Changing the range of choice of shutter
mode and speed settings
You can reduce the time required to select the shutter mode
and speed by narrowing the choice of settings in advance.
This can be done by using the SHT ENABLE page of the
OPERATION menu.
Proceed as follows.
Note
The settings selected on the SHT ENABLE page of the
OPERATION menu become invalid when the RM-B150
Remote Control Unit is connected to the camcorder.
4
If the CONTENTS page is displayed, turn the MENU
knob to move the b mark to “SHT ENABLE”, then
press the MENU knob to display the SHT ENABLE
page.
If a different page is displayed, turn the MENU knob
until the SHT ENABLE page appears, then press the
MENU knob to select the page.
17 SHT ENABLE
SHUTTER SLS : ON
SHUTTER ECS : ON
SHUTTER 1/100 : ON
SHUTTER 1/125 : ON
SHUTTER 1/250 : ON
SHUTTER 1/500 : ON
SHUTTER 1/1000 : ON
SHUTTER 1/2000 : ON
(This menu display is for the PDW-510/530. For the
PDW-510P/530P, “SHUTTER 1/60” is displayed
instead of “SHUTTER 1/100”.)
5-3 Setting the Electronic Shutter
99
Page 100

Chapter 5 Adjustments and Settings for Recording
5
Turn the MENU knob to move the b mark to the
shutter mode or shutter speed you want, then press the
MENU knob.
The b mark on the left of the selected item changes to
a z mark and the z mark on the left of the setting
changes to a ? mark.
6
Turn the MENU knob until “ON” appears, then press
the MENU knob.
The z mark on the left of the selected item changes to
a b mark and the ? mark on the left of the setting
changes to a z mark.
To set another mode or speed, return to step 5.
Note that only the shutter speeds set to “ON” can be
selected with the SHUTTER selector.
7
To end the menu operation, set the MENU ON/OFF
switch to OFF or close the cover of the menu operating
section.
The menu disappears from the screen and the display
indicating the current status of the camcorder appears
along the top and bottom of the screen.
5-4 Changing the
Reference Value for
Automatic Iris
Adjustment
The reference value for automatic iris adjustment can be
changed to aid the shooting of clear pictures of back-lit
subjects, or to prevent blown-out highlights. The reference
value for the lens iris can be set within the following range
with respect to the standard value.
• 0.5: about 0.5 stop further open
• 1: about 1 stop further open
• –0.5: about 0.5 stop further closed
• –1: about 1 stop further closed
Also you can set the area where light detection occurs.
Changing the reference value
Proceed as follows.
1
Set the MENU ON/OFF switch to ON.
If this is the first time the USER menu has been
displayed, the CONTENTS page of the USER menu
appears. If the menu has been used before, the last
accessed page appears.
2
If the CONTENTS page is displayed, turn the MENU
knob to move the b mark to AUTO IRIS, then press
the MENU knob to display the AUTO IRIS page.
If a different page is displayed, turn the MENU knob
until the AUTO IRIS page appears, then press the
MENU knob to select the page.
3
Turn the MENU knob to move the b mark to “IRIS
OVERRIDE”, then press the MENU knob.
The b mark on the left of the selected item changes to
a z mark and the z mark on the left of the setting
changes to a ? mark.
100
5-4 Changing the Reference Value for Automatic Iris Adjustment
4
Turn the MENU knob until “ON” appears, then press
the MENU knob.
 Loading...