

Page 1

4-670-644-11 (1)
Checking the package contents
1
2
3
™
Sony CLIÉ
Charging your Sony
CLIÉ
Performing the initial
settings
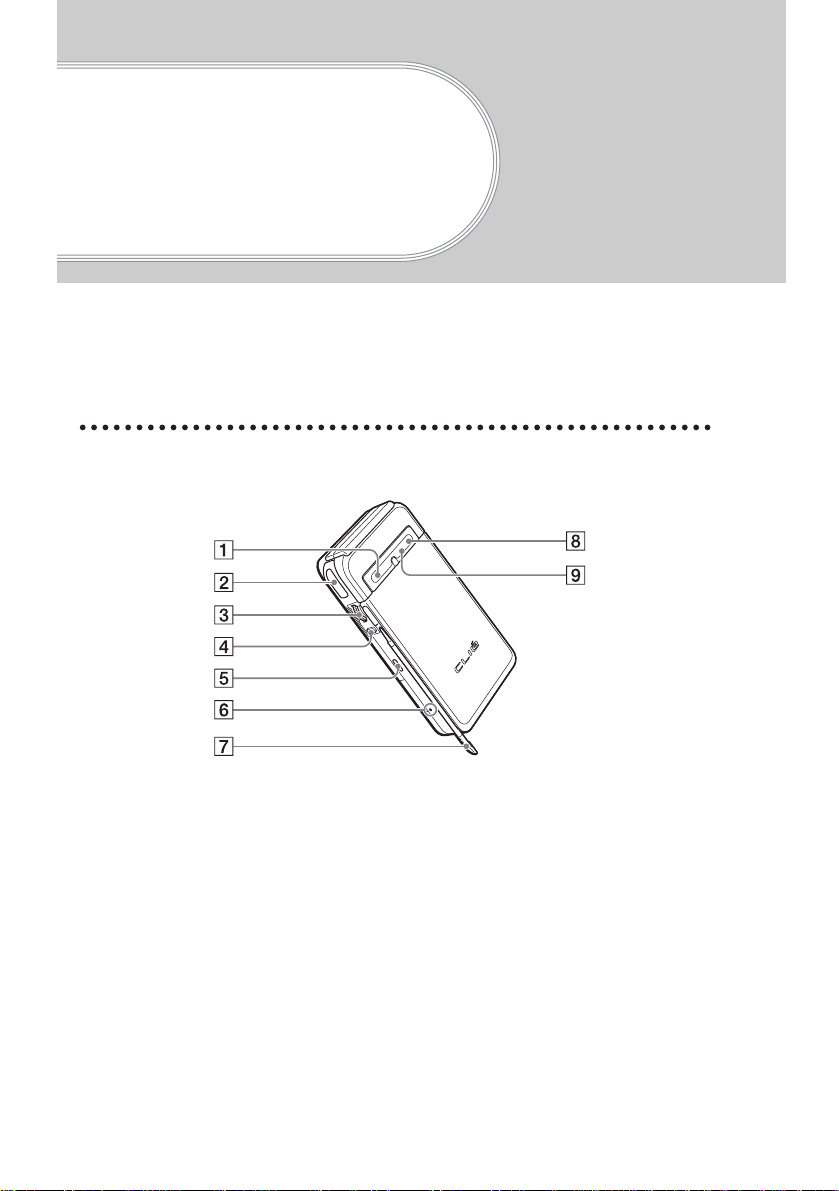
handheld components
™
handheld
Read
This
First
Operating Instructions
Personal Entertainment Organizer
Basic operations of your
4
Sony CLIÉ
Taking images/movies
5
Using your CLIÉ™ handheld
6
with your computer
Enjoying your CLIÉ™
handheld
Using applications
™
handheld
PEG-NZ90
© 2003 Sony Corporation
Page 2
About this manual
This manual provides an overview of your CLIÉ™ handheld’s features including information
about setting up your CLIÉ
Checking the package
contents
™
handheld and what you can do with your CLIÉ™ handheld.
Page 10
Make sure that all the accessories are
supplied in the package.
Page 12
Sony CLIÉ™ handheld
components
Learn about the parts of your CLIÉ
handheld and other accessories.
Page 19
Charging your Sony
CLIÉ™ handheld
Be sure to charge your CLIÉ
handheld before you start using it
for the first time.
Page 23
Performing the initial
settings
Configure the initial settings before
operating your CLIÉ handheld.
Page 29
Basic operations of your
Sony CLIÉ™ handheld
Learn about the basic operations of
your CLIÉ handheld.
Taking images/movies
Using your CLIÉ™ handheld
with your computer
Enjoying your CLIÉ™
handheld
Using applications
2
Page 50
Learn about the basic operations of
your CLIÉ handheld.
Page 65
Use your CLIÉ handheld with your
computer.
Page 73
Learn about your CLIÉ handheld’s
features.
Page 86
Learn about the applications supplied
with your CLIÉ handheld.
Page 3

Refer to the following together with this manual.
Handbook (A PDF file in the CD-ROM)
• When using CLIÉ handheld for the first time
The basic features and operations are explained in detail.
• CLIÉ handheld advanced operations
The convenient features and how to make full use of your
CLIÉ handheld are explained in detail.
CLIÉ Application Manual (HTML format:
Start up on a computer)
The manual explains about how to use the supplied
applications in detail.
For details on using the manual, refer to “Using CLIÉ
Application Manual” on page 86 in this manual.
Troubleshooting Q&A
The manual helps in solving problems that you may face
while using your CLIÉ handheld.
3
Page 4

WARNING
To prevent fire or shock hazard, do
not expose the unit to rain or
moisture. To avoid electrical
shock, do not open the cabinet.
Refer servicing to qualified
personnel only.
For customers in the U.S.A and
Canada
Owner’s Record
The model number and serial number are
located on the back of the product. Record the
model number and the serial number in the space
provided belo w . Re fer to them w he nev er yo u ca ll
upon your Sony dealer regarding this product.
Model No._____________
Serial No.______________
The soc k et- ou tle t s h a ll b e in s ta lle d ne a r th e
equipment and shall be easily accessible.
CAUTION
You are cautioned that any changes or
modifications not expressly approved in this
manual could void your warranty on this
equipment.
This Cla ss B d ig ita l a p p ar atu s c omplies with
Canadian ICES-003.
Cet appareil numerique de la classe B est
conforme à la norme NM B-00 3 du C an ada.
Danger of explosion if b a ttery is incorrectly
replaced.
Replace only with the same or equivalent type
recommended b y the m a nufacturer. D ispose of
used batteries according to the manufacturer’s
instructions.
NOTE
This equipment has been tested and found to
comply with the lim its for a Clas s B digital de vice,
pursuant to Part 1 5 of the FCC Rule s. These limits
are designed to provide reasonable protection
against ha rmful interferen ce in a res id en tia l
installation. This equipment generates, uses, and
can radiate radio frequency energy and, if not
installed and used in accordance with the
instruction s, may cause h a rmful interferen ce to
radio communications. However, there is no
guarante e th a t in te rfe re n c e will not occur in a
particular in sta ll atio n . If th is e q uip ment does
cause harmful interference to radio or television
reception, which can be determined by rotating
the equipment off and on, the user is encouraged
to try to correct the interference using one or more
of the following measures:
– R eo r ie nt o r re lo c a te the re ce iv in g antenna.
– Increase the separation between the
equipment and receiver.
– Connect the equipment into an outlet on a
circuit differ en t fr o m that to whic h th e
receiver is connected.
– Consult the dealer or an experienced radio/
TV technician for help.
If you have a question about this product, call the
Sony Customer Information Center at keep on
next line 1-877-760-7669; or write to the Sony
Customer Information Center at 12451 Gateway
Boulevard, Fort Myers, FL 33913. The number
below is fo r F C C-related m atte rs o n ly.
Declaration of Conformity
Trade Name: S O N Y
Model No.: PEG-NZ90/U
Responsible Party: Sony Electronics Inc.
Address: 680 Kinderkamack Road, Oradell,
NJ 07649 USA
Telephone No.: 201-930-6972
This device complies with part 15 of the FCC
Rules.
Operatio n is s u bje c t to th e fo llo w i ng two
conditions:
(1) This device may not cause harmful
interference, and
(2) This device must accept any
interference received, including
interference that may cause unde sired
operation.
The sup plied interf ace cable must be used w ith the
equipm ent in o rder to com ply with the lim its for a
digital device pursuant to Subpart B of Part 15 of
FCC Rules.
4
Page 5

RECYCLING LITHIUM-ION
BATTERIES
Lithium -Io n b a tter ie s a re
recyclable.
You can help preserve our
environment by returning
your used rechargeable
batteries to th e co lle c tio n
and recycling location
nearest you.
For more in fo rmation regard in g rec y cl in g o f
rechargea b le ba tte rie s , cal l to ll fre e 1- 80 0 822-8837, or visit
http://www.rbrc.org/
Caution: Do not handle damaged or leaking
lithium-ion batteries.
IN NO EVENT SHALL SONY BE LIABLE FOR
ANY INCIDENTAL, INDIRECT OR
CONSEQUENTIAL DAMAGES OR OTHER
DAMAGES INCLUDING WITHOUT
LIMITATION LOSS OF PROFITS, LOSS OF
REVENUE, LOSS OF DATA, LOSS OF USE
OF THE PRODUCT OR ANY ASSOCIATED
EQUIPMENT, DOWNTIME, AND
PURCHASER’S TIME RELATED TO OR
ARISING OUT OF THE USE OF THIS
PRODUCT, ITS HARDWARE AND/OR ITS
SOFTWARE .
On the supplied software
• Copyright laws prohibit reproducing the
software or the software manual in whole or
in part or ren tin g the software with o u t th e
permission of the copyright holder.
• In no event will SONY be liable for any
financial damage or loss of profits, including
claims m a d e b y th ird p a rtie s , aris in g o ut o f
the use of th e so ftware supplie d w ith t his
product.
• In the event a problem occu rs with this
software as a re su lt of de fe ct ive
manufacturing, SONY will replace it at
SONY’s option or issue a refund. However,
SONY bears no other responsibility.
• The software provided with this product
cannot be used with equipment other than
that which it is d e sig n a te d f or u se with.
• Please note that, due to continued efforts to
improve q u a lity , th e s o ftware specific atio n s
may be changed without notice.
• The software library incorporated in CLIÉ
handheld is b as ed in p ar t o n th e work of the
Independent JPEG Group.
Program © 2002 Son y Corporation, © 2002 Palm ,
Inc., or its subsid ia ries . A ll rig hts re se rv ed .
Documentation © 2003 So ny C orporation
CAUTION
Please contact your nearest Sony dealer regarding
any problems you are experiencing with your
Sony product.
Notes
• Sony does not support third-party add-on
applications. If you are having a problem
with a thir d-p arty ap plic atio n, p lea se co n tact
the developer or publisher of that software.
• The illus tra tio n s in this manual may differ
from the actual software.
• Explanations in this manual assume that you
are familia r with basic ope ra tio n s o f
®
Windows
and operating system, please refer to their
respectiv e manuals.
Before using your CLIÉ handheld, be sure to read
the accompanying End-User’s License Agreement.
Sony, CLIÉ, “Memory Stick”, “MagicG ate
Memory Stick”, Jog Dial, PictureGear Studio and
their logos are trademarks of Sony Corporation.
Palm OS, Graffiti and HotSync are registered
trademar ks of P alm, Inc. and its sub si dia ries , and
Palm, Pa lm Powered , P a lm Desktop , the P a lm
logo, the P a lm Powered logo, the HotS y nc lo g o
and Palm OS5 logo are tradem ark s of Palm , Inc
and its sub sidiaries.
Microsoft and Windows are registered trademarks
of Microsoft Corporation.
Pentium is a re g ist ere d tra de mark of Intel
Corporation.
Pumate ch , th e P umatech log o, In te lliS y n c an d
IntelliSync Lite ar e tradem arks of Pum atec h, Inc.,
that may be registered in some jurisdictions.
Adobe and Acroba t are tradem arks of A do be
Systems Incorporated.
Bluetooth is a trademark that is owned by the
proprietor and used by Sony under license.
QuickT ime and the Q u ic k T ime logo are
trademarks of Apple Computer, Inc.
NetFront is a trademark of ACCESS CO, Ltd.
Picsel and the Picsel logo are trademarks of Picsel
Technologies, Ltd.
Contains Macromedia
technology by Macromedia, Inc.,
Copyright © 1995-2001 Macromedia, Inc. All
rights reserved .
Macromedia, Flash and Macromedia Flash are
trademarks or registered trademarks of
Macromedia, Inc. in the United S tates and
internationally.
This product includes fonts owned by TypeBank
Co., Ltd. under license.
CompactFlash is a U.S. registered trademark of
SanDisk Corporation.
All other trademarks are trademarks of their
respective owners.
. For how to use your computer
®
Flash™ Player
5
Page 6

FCC Radio-Frequency Exposure Statement
This equipment generates and radiates radio-frequency energy. In order to
comply with FCC radio-frequency radiation exposure guidelines for an
uncontrolled environment, this equipment has to be installed and operated
while maintaining a minimum body to antenna distance of 2.5 cm. Based on
continuous exposure of 30 minutes.
Users are not permitted to make changes or modify the system in any way.
The term “IC:” before the radio certification number only signifies that
Industry Canada technical specifications were met.
Le terme ‹‹IC›› avant le numéro d’homologation ne signie seulement que les
normes d’Industrie Canada ont été respectées.
This Class B digital apparatus complies with Canadian ICES-003.
Cet appareil numérique de la classe B est conforme à la norme NMB-003 du Canada.
Operation is subject to the following two conditions: (1) this device may not
cause interference, and (2) this device must accept any interference, including
interference that may cause undesired operation of the device.
L’utilisation de ce dispositif est autorisée seulement aux conditions suivantes:
(1) il ne doit pas produire de brouillage et (2) l’utilisateur du dispositif doit être
prêt à accepter tout brouillage radioélectrique reçu, même si ce brouillage est
susceptible de compromettre le fonctionnement du dispositif.
To prevent radio interference to the licensed service, this device is intended to be
operated indoors and away from windows to provide maximum shielding.
Equipment (or its transmit antenna) that is installed outdoors is subject to licensing.
Pour empêcher que cet appareil cause du brouillage au service faisant l’objet
d’une licence, il doit être utilisé à l’intérieur et devrait être placé loin des
fenêtres afin de fournir un écran de blindage maximal. Si le matériel (ou son
antenne d’émission) est installé à l’extérieur, il doit faire l’objet d’une licence.
WARNING
• The Bluetooth™ function equipped with CLIÉ handheld is valid
only in those countries where CLIÉ handheld is sold.
• In some situations or environments, the use of the Bluetooth™ technology
might be restricted by the proprietor of the building or responsible
representatives of the organization, for example on board of airplanes, in
hospitals or in any other environment where the risk of interference with
other devices or services is perceived or identified as harmful.
• If you are uncertain about the policy applying to the use of Bluetooth™
technology in a specific organization or environment, you are encouraged to
first ask for authorization prior to switching it on.
• Consult your physician or the manufacturer of personal medical devices
(pacemakers, hearing aids, etc.) regarding any restrictions on the use of
Bluetooth™ technology.
• To disable the Bluetooth™ function, turn off your CLIÉ handheld
(page 31).
6
Page 7
Recycling the Battery Pack (Lithium-Ion battery)
The supplied Battery Pack (Lithium-Ion battery) is recyclable.
You can help preserve our environment by returning your used Lithium-Ion
batteries to the collection and recycling location nearest you.
For more information regarding recycling of rechargeable batteries, call toll
free 1-800-822-8837, or visit the website (http://www.rbrc.org/).
When you dispose of a CLIÉ handheld, remove the battery for recycling.
How to remove the Battery Pack
(Lithium-Ion battery)
Follow “Inserting/Replacing the battery” (page 19) to remove the battery.
How to remove a rechargeable button battery
1
Remove the screw from the side
of your CLIÉ handheld with a
Phillips screwdriver.
3
Pull the ribbon attached to the
button battery.
2
Remove the battery cover.
4
Pull the button battery and
disconnect it from your CLIÉ
handheld.
7
Page 8

Table of Contents
Checking the package contents
. . . . . . . . . . . . . . . . . . . . 10
Sony CLIÉ™ handheld
components. . . . . . . . . . . . 12
Locating the parts of your Sony CLIÉ
handheld. . . . . . . . . . . . . . . . . . 12
Changing the operating style . . . . . . 15
Locating cradle components . . . . . . 17
Locating the controls on the supplied
audio remote control. . . . . . . . . . 18
Charging your Sony CLIÉ™
handheld. . . . . . . . . . . . . . 19
Step 1: Inserting/Replacing the
battery . . . . . . . . . . . . . . . . . . . 19
Step 2: Charging the battery . . . . . . 21
Performing the initial settings
. . . . . . . . . . . . . . . . . . . . 23
Basic operations of your Sony
CLIÉ™ handheld. . . . . . . . . 29
Basic operations . . . . . . . . . . . . . . 29
Functions of parts . . . . . . . . . . . . . 31
Restarting your Sony CLIÉ
handheld. . . . . . . . . . . . . . . . . . 40
Locating the components of the initial
screen. . . . . . . . . . . . . . . . . . . . 43
Using applications . . . . . . . . . . . . . 47
Entering data. . . . . . . . . . . . . . . . . 49
Taking images/movies. . . . . 50
Viewing/Playing back files
(CLIE Viewer). . . . . . . . . . . . . . . 63
Using your CLIÉ™ handheld
with your computer . . . . . . .65
Step 1: Install the software on your
computer. . . . . . . . . . . . . . . . . . 65
Step 2: Connect the cradle to your
computer. . . . . . . . . . . . . . . . . . 68
Step 3: Enter a user name for your CLIÉ
handheld. . . . . . . . . . . . . . . . . . 69
Synchronizing data between your CLIÉ
handheld and computer
(HotSync
®
) . . . . . . . . . . . . . . . . 71
Enjoying your CLIÉ™ handheld
. . . . . . . . . . . . . . . . . . . . .73
Using your CLIÉ handheld to view image
files and movie files taken with
“Memory Stick”-compliant
devices. . . . . . . . . . . . . . . . . . . 73
Using voice recorder . . . . . . . . . . . 74
Listening to music . . . . . . . . . . . . . 75
Managing schedules (Date Book). . . 76
Managing addresses and telephone
numbers (Address). . . . . . . . . . . 78
Exchanging Date Book and Address data
between your CLIÉ handheld and
computer. . . . . . . . . . . . . . . . . . 79
Viewing computer documents on your
CLIÉ handheld
(Picsel Viewer for CLIE) . . . . . . . 80
Connecting to the Internet. . . . . . . . 81
Using the Bluetooth™ function . . . . 82
Taking images. . . . . . . . . . . . . . . . 50
Recording movies . . . . . . . . . . . . . 61
8
Page 9

Using applications . . . . . . . 86
Troubleshooting. . . . . . . . 101
Using CLIÉ Application Manual . . . . .86
Installing add-on applications on your
CLIÉ handheld . . . . . . . . . . . . . . .88
Introducing add-on applications . . . .89
Preventing problems . . . . . . . . . . . 101
Solving problems . . . . . . . . . . . . . 102
Getting Help. . . . . . . . . . . . . . . . . 103
Additional information . . . 104
Notes on use . . . . . . . . . . . . . . . . 104
Specifications . . . . . . . . . . . . . . . 107
INDEX . . . . . . . . . . . . . . . . . . . . . 112
Notes on this manual
• Screen pictures in this manual may be different from the actual displays in the supplied
software.
• Contents of this manual are written for users with knowledge of using Microsoft
Windows
for the computer.
®
operating system. For details about computer operation, refer to the manual
®
About display (LCD) and camera lens
The LCD of your CLIÉ handheld is designed with precision technology. However, some
pixels may not work or may light always in some cases. Also, brightness of the display
may be inconsistent depending on the angle of view. These are caused by the nature of
the LCD and do not indicate a malfunction.
Please note that Sony does not guarantee for replacement or return in cases like those.
Do not keep the LCD or camera lens directed toward the sun for long time. It may cause
a malfunction. Please be careful when you locate it at an outdoor environment or place
next to a window.
Testing for taking pictures/movies and recording voices
Prior to taking pictures/movies and recording voices, check that those f iles are no rmally
saved in your CLIÉ handheld or a “Memory Stick” media.
No guarantee for lost data or damaged data
Sony does not provide any guarantee for lost data or damaged data caused by improper
operations.
Copyrights
Television programs, films, video tapes, and other materials may be copyrighted.
Unauthorized recording of such materials may be contrary to the provision of the
copyright laws.
9
Page 10
Checking the package contents
Please check the accessories in the package before you start.
CLIÉ handheld (1) Cradle (1)
AC power adapter (1) Headphones (1)
Stylus (1) Audio remote control (1)
The stylus is stored in your CLIÉ
handheld at the factory.
10
Page 11
USB cable (1) Printer cable (1)
Checking the package contents
AV cable (1)
Battery Pack (1)
Installation CD-ROM Strap (1)
Refer to the illustration below to attach the
strap.
Protection card (1)
The protection card is stored in your CLIÉ
handheld at the factory.
Read This First - Operating Instructions (1, this manual)
Troubleshooting Q&A (1)
Customer Registration Guide (1)
Customer Registration card (Warranty)
Graffiti label (1)
Software license agreement (1)
Other printed materials
Make sure that the package contains all of the listed accessories. If any item is missing,
contact the Sony Customer Information Service Center or a Sony dealer.
Attaching the strap
11
Page 12
Sony CLIÉ™ handheld components
Each part of the CLIÉ handheld and the supplied accessories is explained in the following.
Locating the parts of your Sony CLIÉ handheld
Front panel
A POWER LED (Page 32)
B IR port (Page 35)
C Jog Dial™ navigator
(Page 30)
D BACK Button (Page 34)
E VOICE REC Button
(Page 33, 74)
12
F RESET Button (Page 40)
G Stylus (Page 29)
H Bluetooth LED (Page 82)
I “Memory Stick” LED
(Page 36)
Page 13
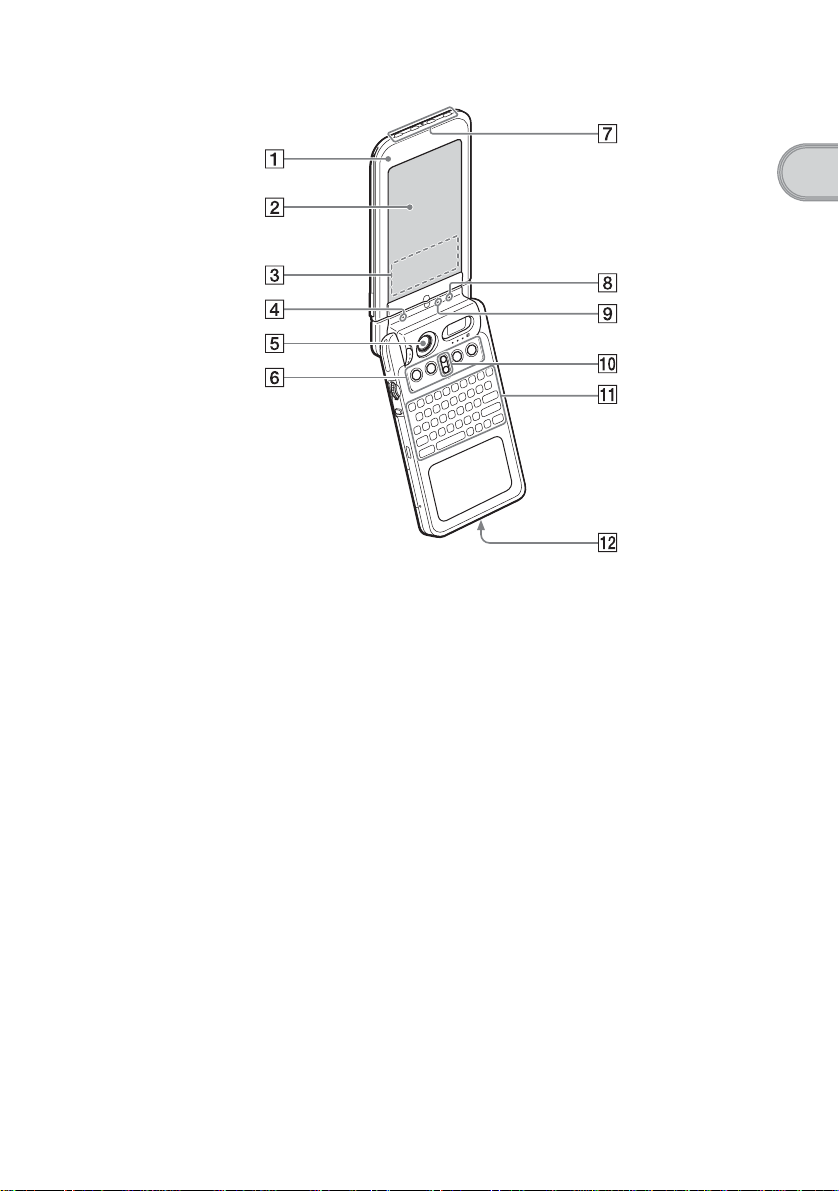
Sony CLIÉ™ handheld components
A Display Panel (Page 15)
B Screen (Page 43)
C Graffiti Writing Area
(Page 43)
D POWER LED (Page 32)
E Camera Lens Cover (Page 33)
F Application Buttons
(Page 48)
G Application Buttons
(Page 48)
Available only when your CLIÉ
handheld is set to the turned style.
H Bluetooth LED (Page 82)
I “Memory Stick” LED
(Page 36)
J Scroll Button (Page 35)
K Hardware Keyboard
(Page 37)
L Wireless Communication
Slot (Page 38)
13
Page 14
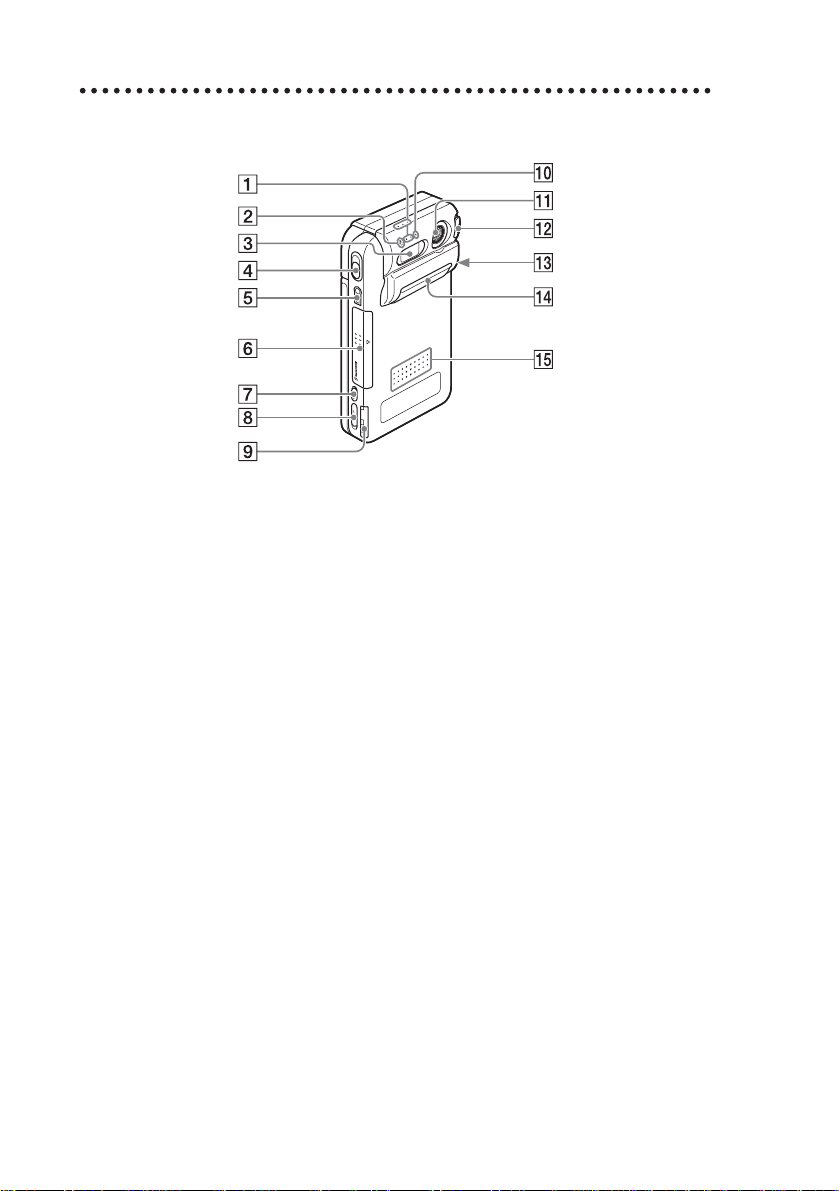
Back panel
A Microphone (Page 74)
B Flash Photometric Sensor
C Flash (Page 58)
D CAPTURE Button
(Page 32, 50, 52, 62)
E Headphone Jack (Page 75)
F Battery Cover (Page 19)
G HOLD Switch (Page 34)
H POWER Switch (Page 31)
I “Memory Stick” Slot
(Page 36)
J REC LED (Page 33)
K Camera Lens (Page 33)
L Lens Cover Lever (Page 33)
M Strap Hook (Page 11)
N Interface Connector Cover
(Page 22)
O Speaker (Page 45)
14
Page 15
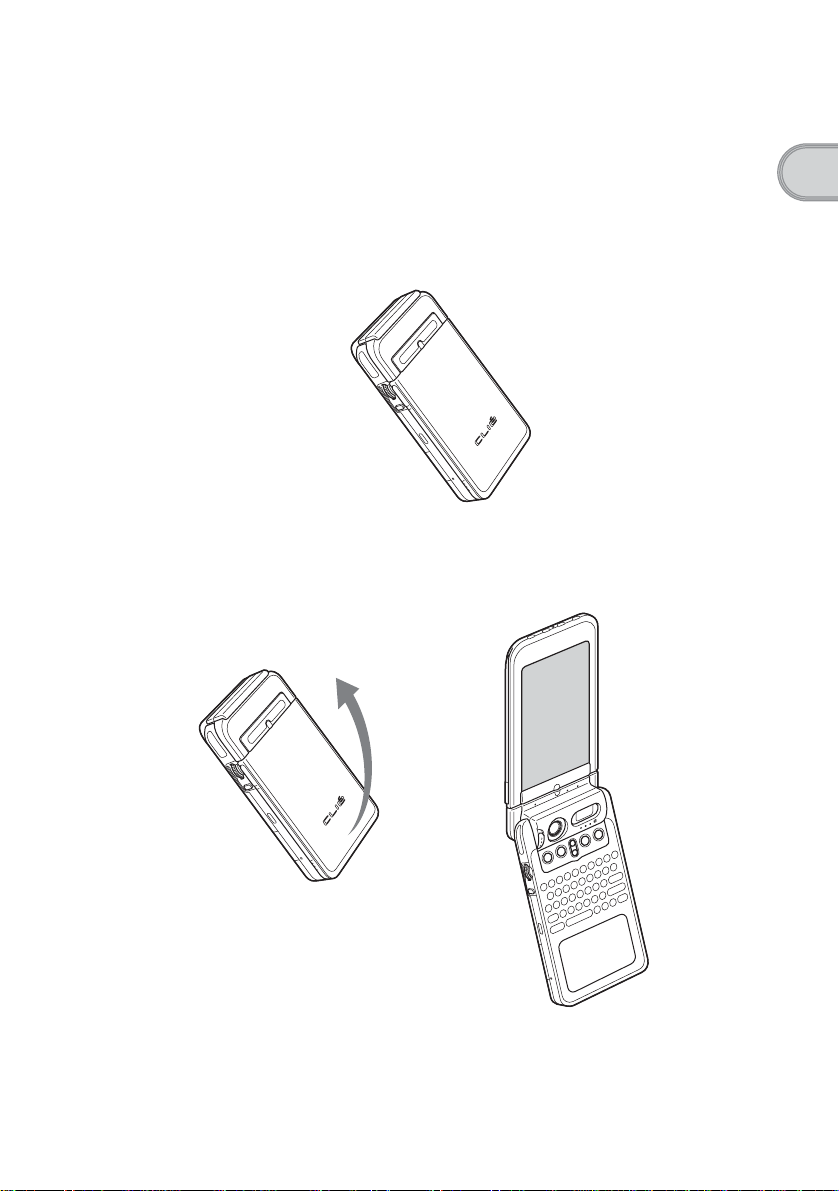
Changing the operating style
Your CLIÉ handheld can be used with the display panel set in three different
styles.
Carrying style
Set your CLIÉ handheld to the “carrying style,” when carrying it around in
your baggage or pocket to guard the screen from damage.
Opened style
Set your CLIÉ handheld to the “opened style,” when you enter data with the
hardware keyboard or take images/movies of yourself.
b
Sony CLIÉ™ handheld components
Open the display panel until it clicks into place.
15
Page 16
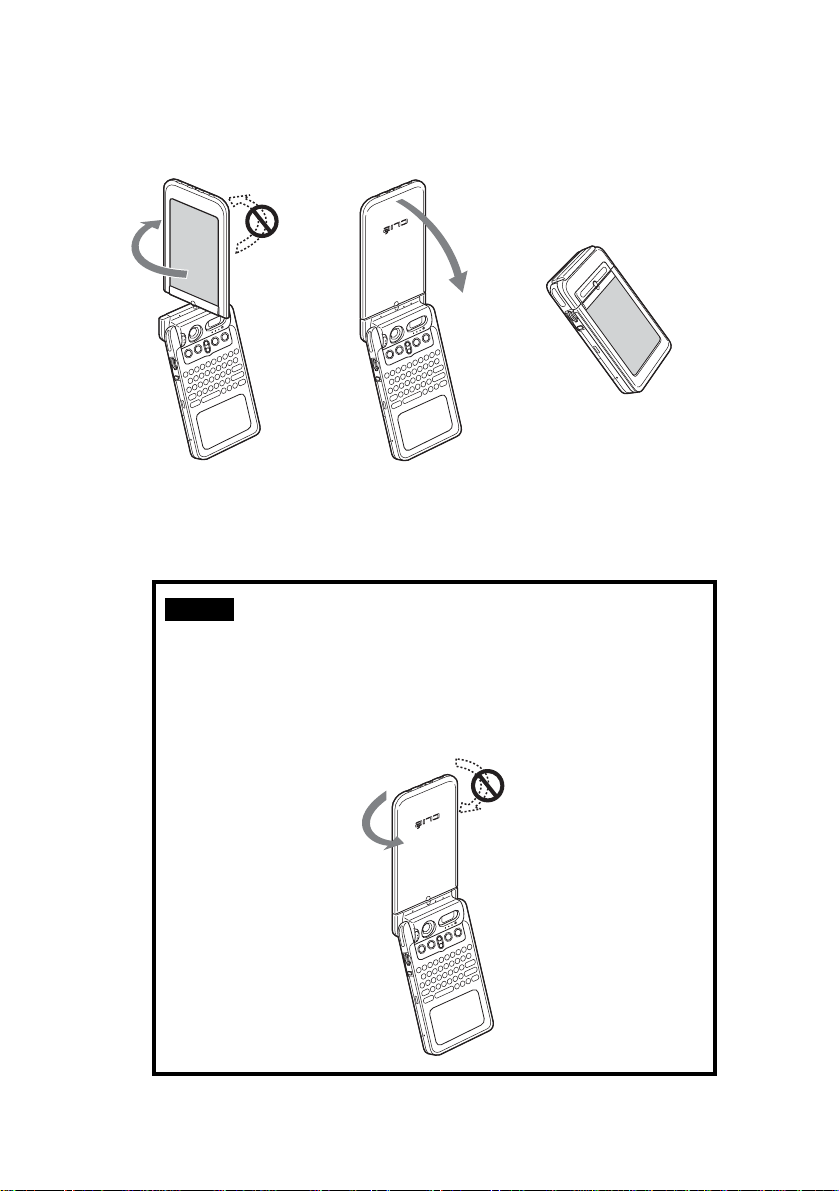
Turned style
Set your CLIÉ handheld to “turned style” to make it compact when you operate
it with the Stylus or use it in the Camera mode.
bb
Open the display and
rotate it as indicated by an
arrow until it clicks into
place
Note
Do not turn the display panel in any direction other than that specified and do not
apply too much force.
Fold the display over the
keyboard
Closing the display panel
Close the display panel by rotating it as indicated by an arrow.
16
Page 17
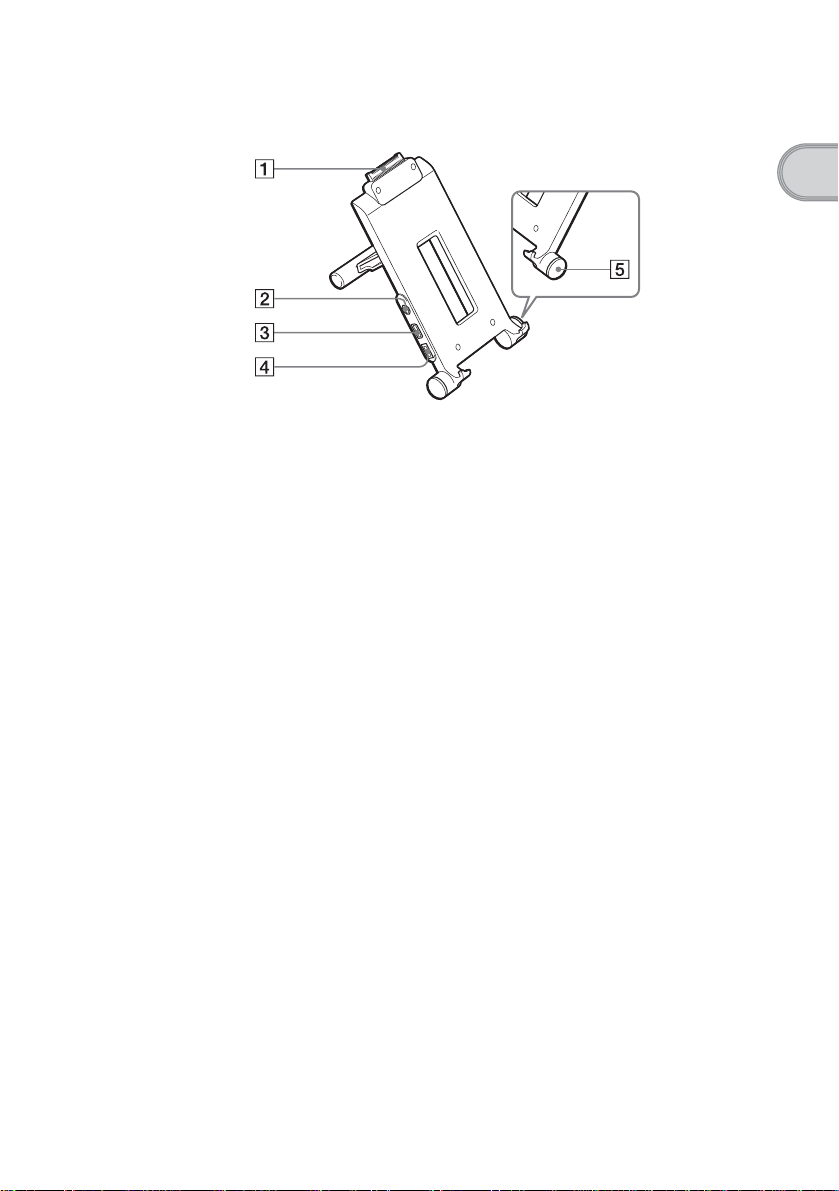
Locating cradle components
Sony CLIÉ™ handheld components
A Interface Connector
(Page 22)
B AV output jack
You can connect the supplied AV
cable to view the screen of “CLIE
Album” with your television
(page 90).
C USB Cable Connector
You can connect the supplied USB
cable to connect the cradle and your
computer (page 68). You can also
connect the supplied printer cable to
print out the contents of the “CLIE
Album” screen or “CLIE Viewer”
screen with your printer.
D AC Adapter Connector
(Page 21)
E HotSync Button (Page 69, 72)
17
Page 18
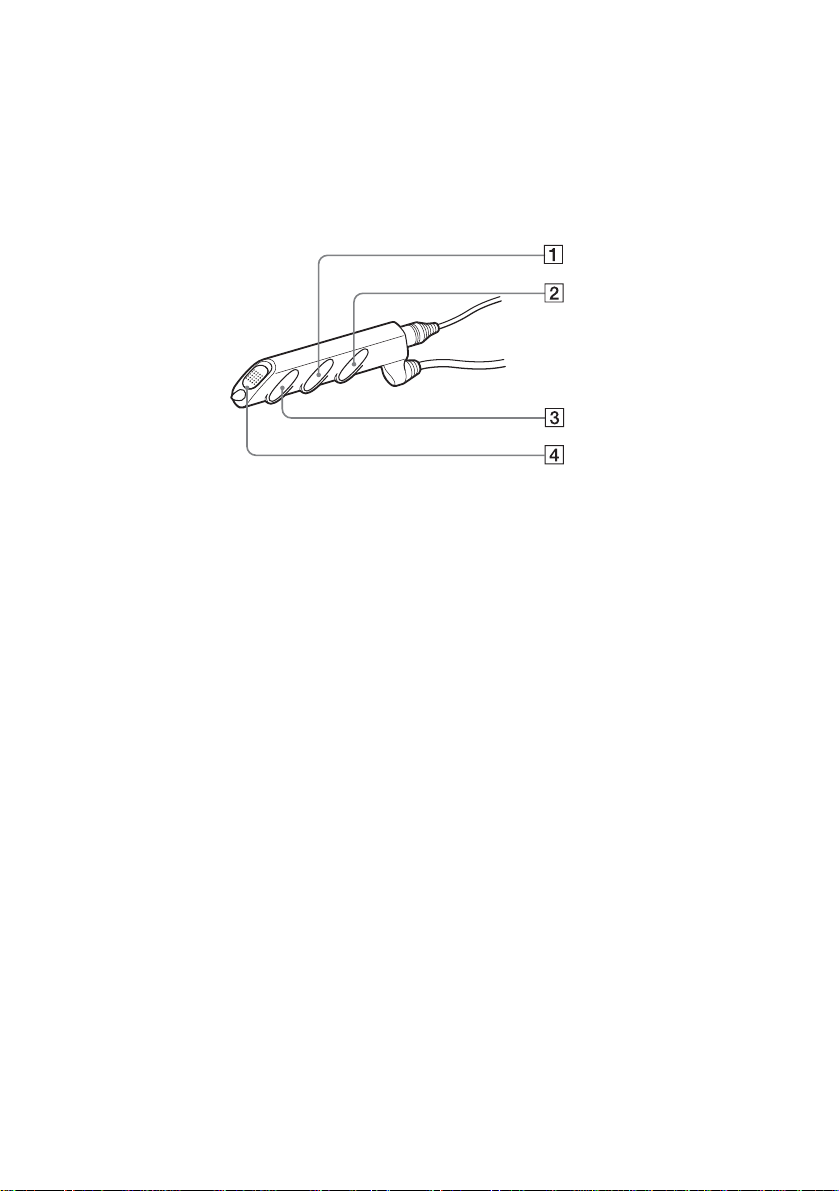
Locating the controls on the supplied audio remote control
You can use the audio remote control when you play back music or audio
movies with an application such as Audio Player or Movie Player.
A ./> Button
B Volume Control Button
For details on operating each application, refer to the “CLIÉ Application Manual”
b
installed on your computer.
C N/x Button
D HOLD Switch
18
Page 19
Charging your Sony CLIÉ™ handheld
Before you use your CLIÉ handheld for the first time,
insert the supplied Battery Pack into your CLIÉ
handheld and be sure to charge the battery.
Step 1: Inserting/Replacing the battery
When you replace the battery, be sure to turn off your
CLIÉ handheld and check that the POWER LED and
“Memory Stick” LED are off prior to opening the
battery cover.
If you open the battery cover while the power is on,
data stored on your CLIÉ handheld or data being
recorded to a “Memory Stick” media may be deleted.
Charging your Sony CLIÉ™ handheld
1
Open the battery cover.
2
Insert the battery.
You can easily insert the
battery by sliding the battery
release knob with the tip of the
battery.
Face th e b a ttery termina l
towards the display panel
side
Continued on next page
• • • • • • • • • • • • • • • • • • • • • • • • • • •
19
Page 20
3
Close the battery cover.
Verify that the battery is
completely inserted into the
slot and close the battery cover.
Removing the battery
Slide the battery release knob as directed by the arrow and remove the battery.
Tip
About the built-in rechargeable button battery
Your CLIÉ handheld uses the built-in rechargeable button battery to maintain data stored
in the built-in memory while replacing the Battery Pack.
The rechargeable button battery is automatically charged while you use your CLIÉ
handheld. However, the rechargeable button ba ttery will be completely discharged in
approximately twelve hours if the power is not supplied from the Battery Pack. Make
sure you recharge the button battery before it gets completely discharged.
20
How to charge the rechargeable button battery
• Place your CLIÉ handheld in the cradle while the Battery Pack is inserted.
• Turn off your CLIÉ handheld for 24 hours or more while the charged Battery Pack is
inserted.
Page 21
About the Battery Pack
■ Supplied Battery Pack
The “Smart Lithium” function enables to exchange information about
battery conditions between your CLIÉ handheld and the Battery Pack.
Your CLIÉ handheld calculates the discharge rate according to the battery
condition and displays the battery’s remaining charge on the minute time
scale (page 44).
■ Remaining charge indicator
If the battery runs out quickly while sufficient remaining charge is read in
the display, recharge the battery fully to correct a misreading.
However, this operation may not work in the following cases.
• You use the battery at a high temperature for a long time.
• You leave the fully-charged battery for a long time.
• The battery has been worn-out .
■ Operating life
The efficiency of a battery is gradually reduced as the battery is charged or
time go on. If the operation time of your battery becomes shortened notably,
you may need a new one.
The operating life of your Battery Pack varies depending on storage
environments, operating environments, and battery model.
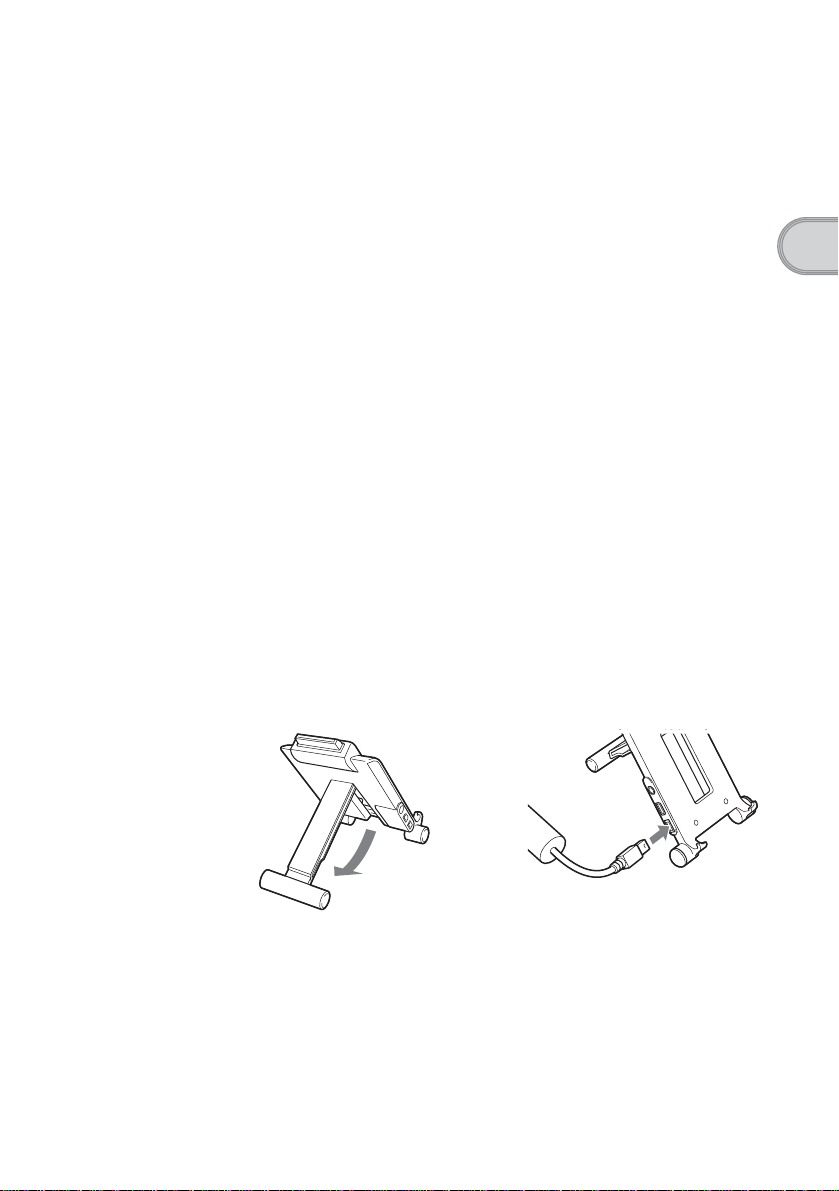
Step 2: Charging the battery
Charging your Sony CLIÉ™ handheld
1
Set up the stand of the
cradle.
2
Connect the AC adapter
to the cradle.
Continued on next page
• • • • • • • • • • • • • • • • • • • • • • • • • • •
21
Page 22
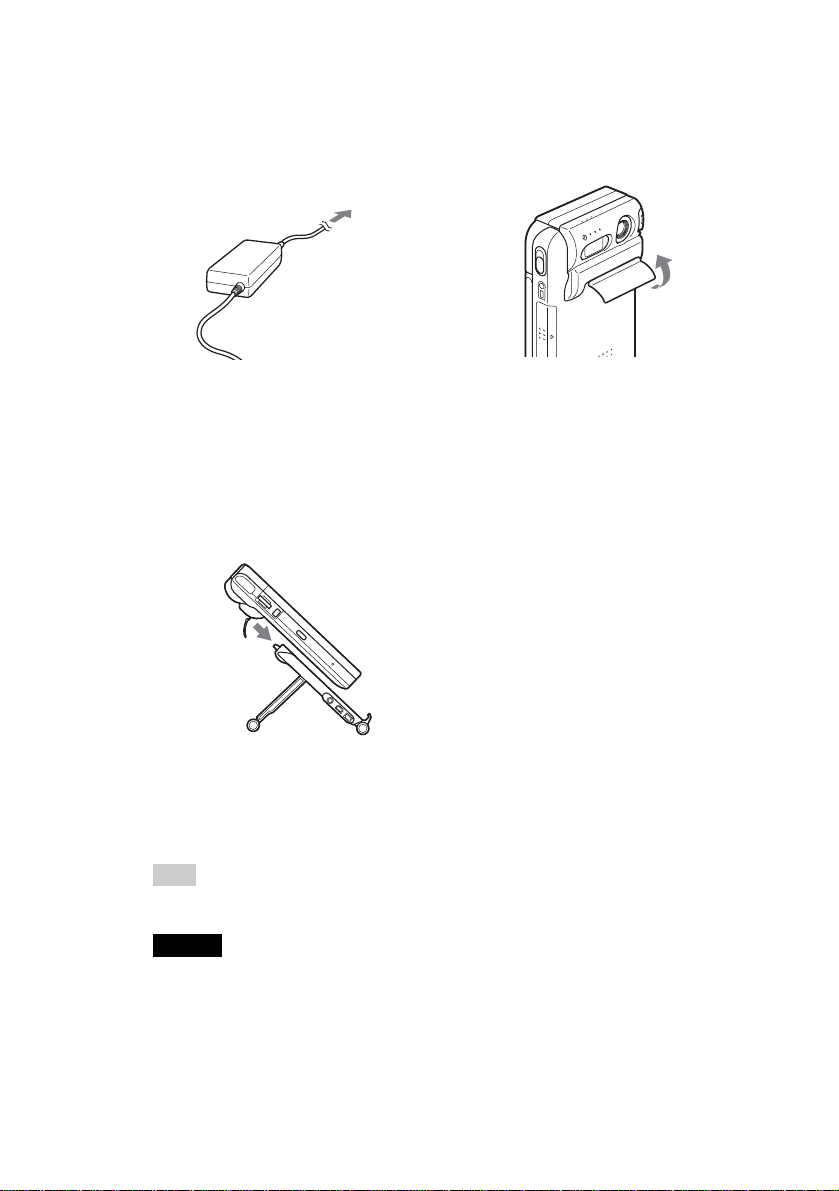
3
Connect the AC adapter
to a wall outlet.
To a wall outlet
5
Insert your CLIÉ
handheld at an angle
into the cradle and lay it
back to fit into place.
The POWER LED indicator of
your CLIÉ handheld turns on and
charging starts.
4
Open the interface
connector cover of your
CLIÉ handheld.
22
It takes about four hours for your CLIÉ handheld to be fully charged for the
first time. The POWER LED indicator of your CLIÉ handheld turns off when
charging is completed.
Tip
If your CLIÉ handheld is charged frequently, subsequent charges will require less time.
Notes
• If the battery in your CLIÉ handheld is fully discharged, all data stored in the memory
on your CLIÉ handheld will be lost.
• Insert your CLIÉ handheld into the cradle completely until the POWER LED indicator
of your CLIÉ handheld turns on.
• When you remove your CLIÉ handheld from the cradle, hold the stand of the cradle.
Page 23
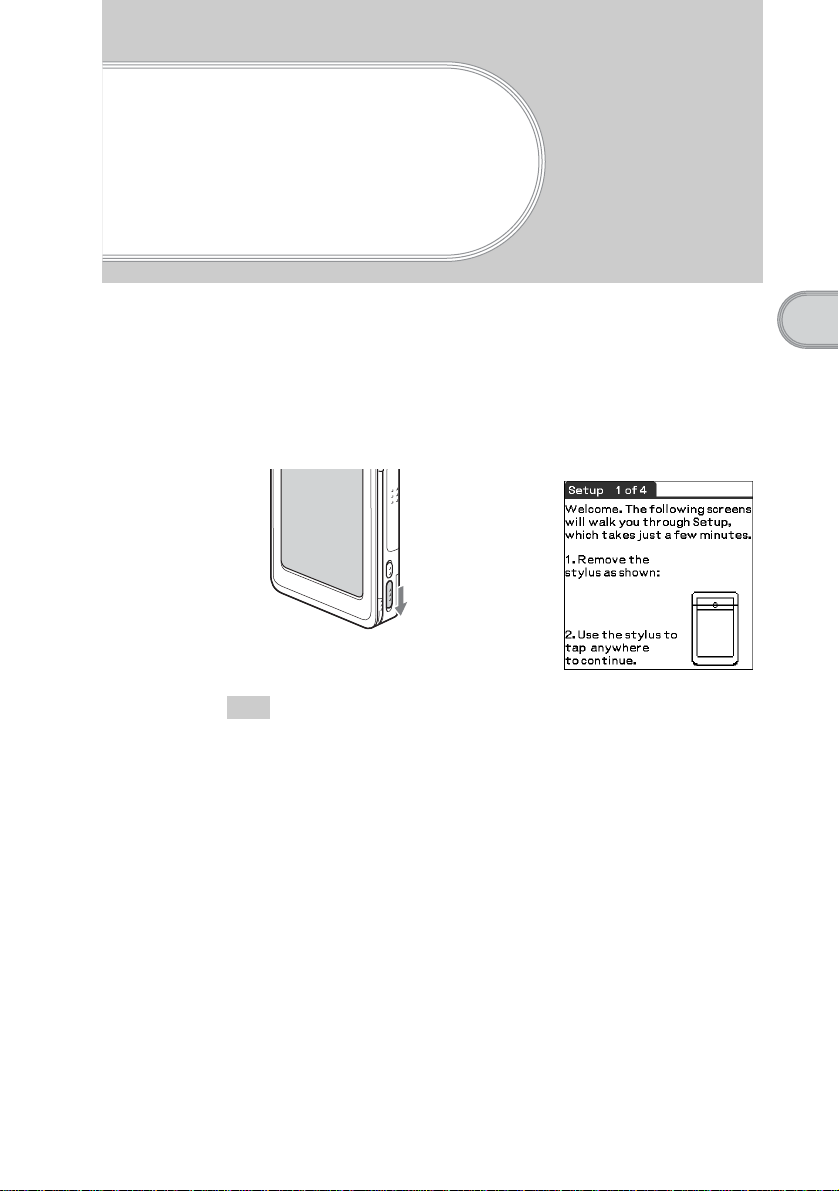
Performing the initial settings
The first time you turn on your CLIÉ handheld, you are required to make initial settings.
Follow the on-screen instructions to configure the initial settings and to get accustomed to
operations on your CLIÉ handheld.
1
Slide the POWER switch.
Your CLIÉ handheld turns on, and the Welcome screen is displayed.
b
Slide the POWER switch
Performing the initial settings
Tip
If you cannot turn on your CLIÉ handheld
• Is the HOLD switch (page 34) set to HOLD?
• Did you charge your CLIÉ handheld following the steps on page 19?
For details, refer to the supplied manual “Troubleshooting Q&A.”
b
• If you cannot turn on your CLIÉ handheld even after charging it, perform a soft
reset (page 40).
Continued on next page
• • • • • • • • • • • • • • • • • • • • • • • • • • •
23
Page 24
2
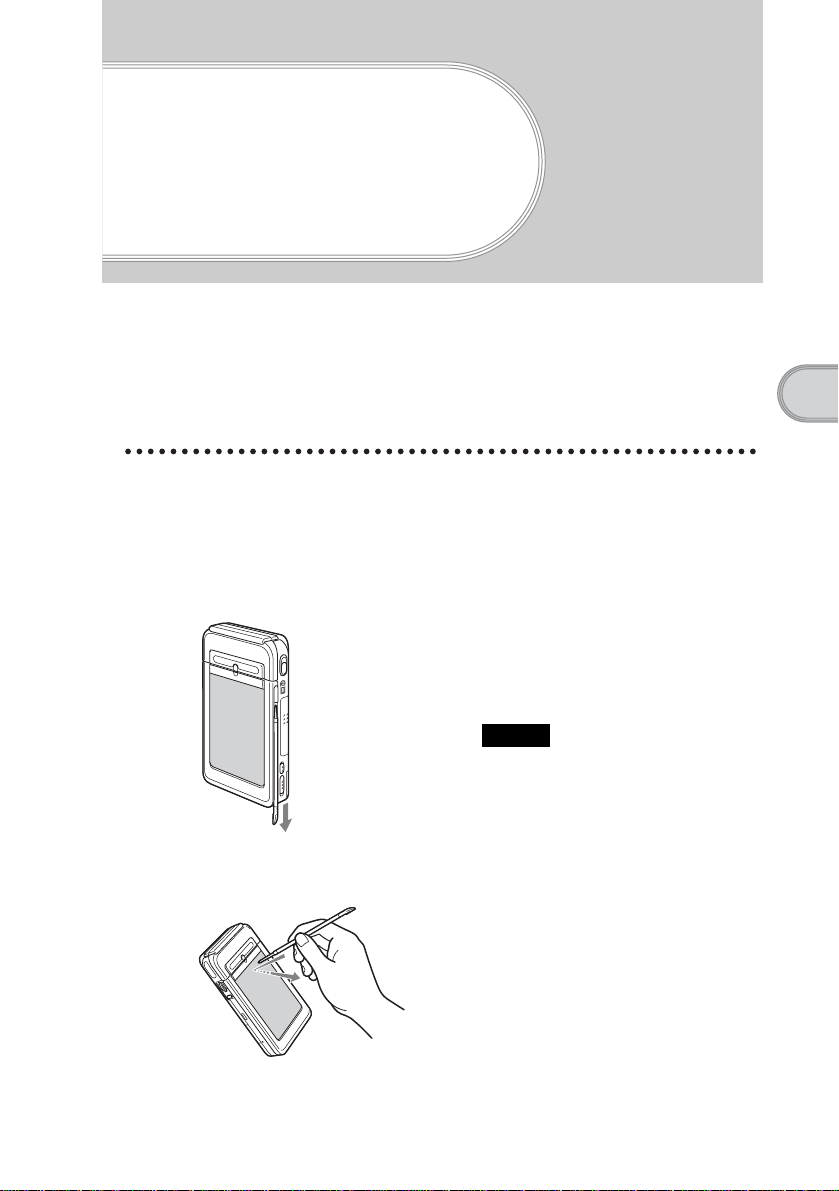
Take out the Stylus.
You can use the stylus to enter
data or to select applications.
Take out the Sty lus
Notes
• Always use the point of the stylus for tapping or making strokes on the CLIÉ
handheld screen. Never use a real pen, pencil, or other sharp object to write on
the screen.
• When you put the stylus back in its holder, push it in until it clicks into place.
3
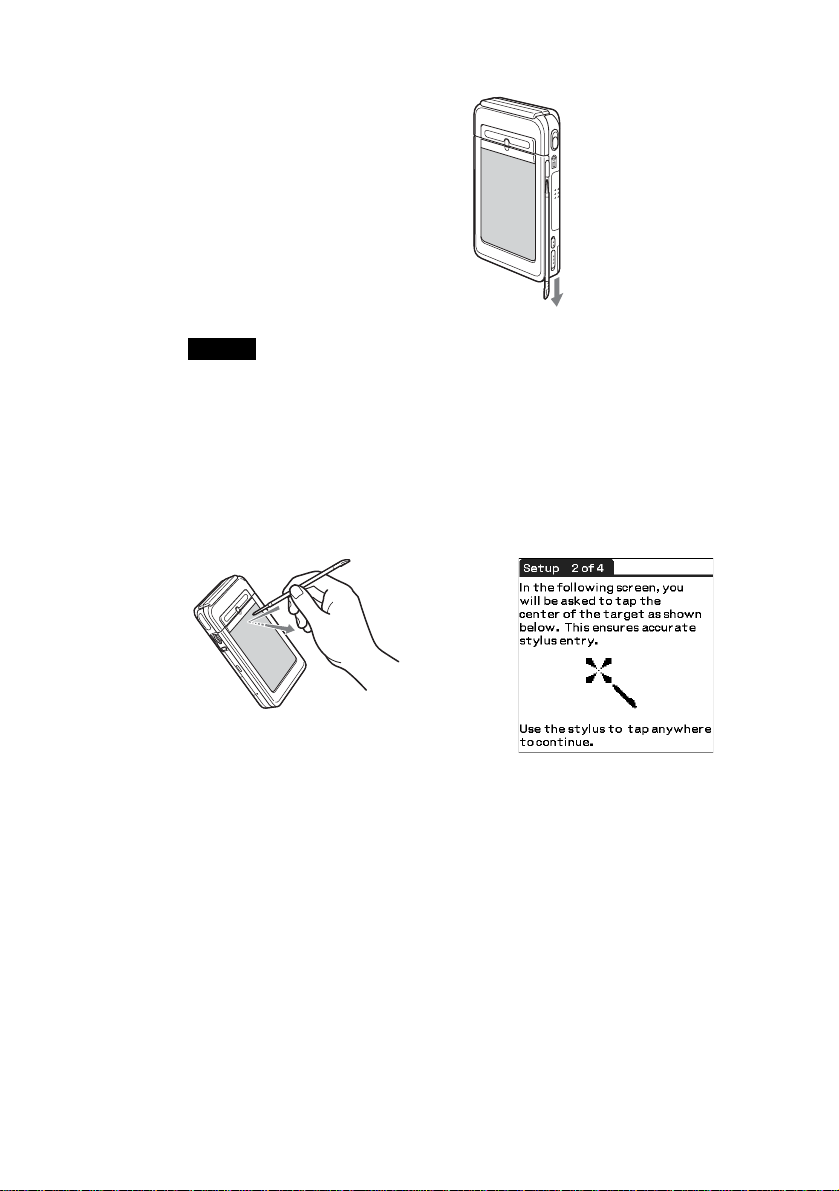
Press lightly on the screen with the stylus.
This action is called “tapping.”
The Setup screen for digitizer calibration is displayed.
b
24
Press lightly on the
screen (Tap)
Page 25
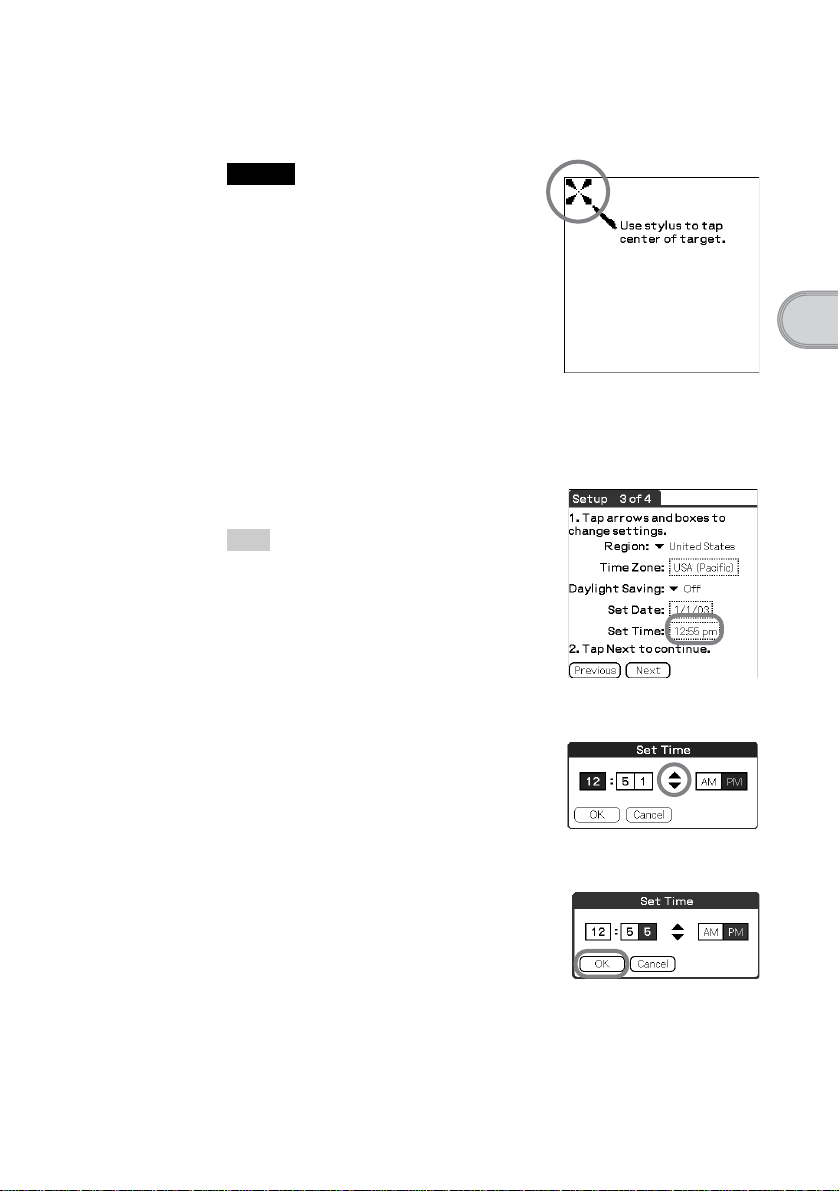
4
Following the on-screen instruction, tap the center of th e
displayed mark.
Note
If the digitizer is not configured correctly, the
scroll bar may not operate properly, “tapping”
may not work as expected, or other problems
may occur. For re-configuring the digitizer, refer
to “Customizing your Sony CLIÉ handheld
(Preferences): Adjusting the digitizer” in the
“Handbook.”
After calibration is completed, a screen for setting the time and date
appears.
5
Tap the Set Time box.
The Set Time screen is displayed.
Tip
You can reconfigure the date and time settings in the
Preferences screen.
For details, refer to “Setting the Date & Time
b
preferences” in the “Handbook.”
Performing the initial settings
6
Tap the arrow v or V to set the current time.
Tap each box to set the current
hour and minute.
7
Tap OK.
The current time is set and the
Setup screen is displayed.
Continued on next page
• • • • • • • • • • • • • • • • • • • • • • • • • • •
25
Page 26
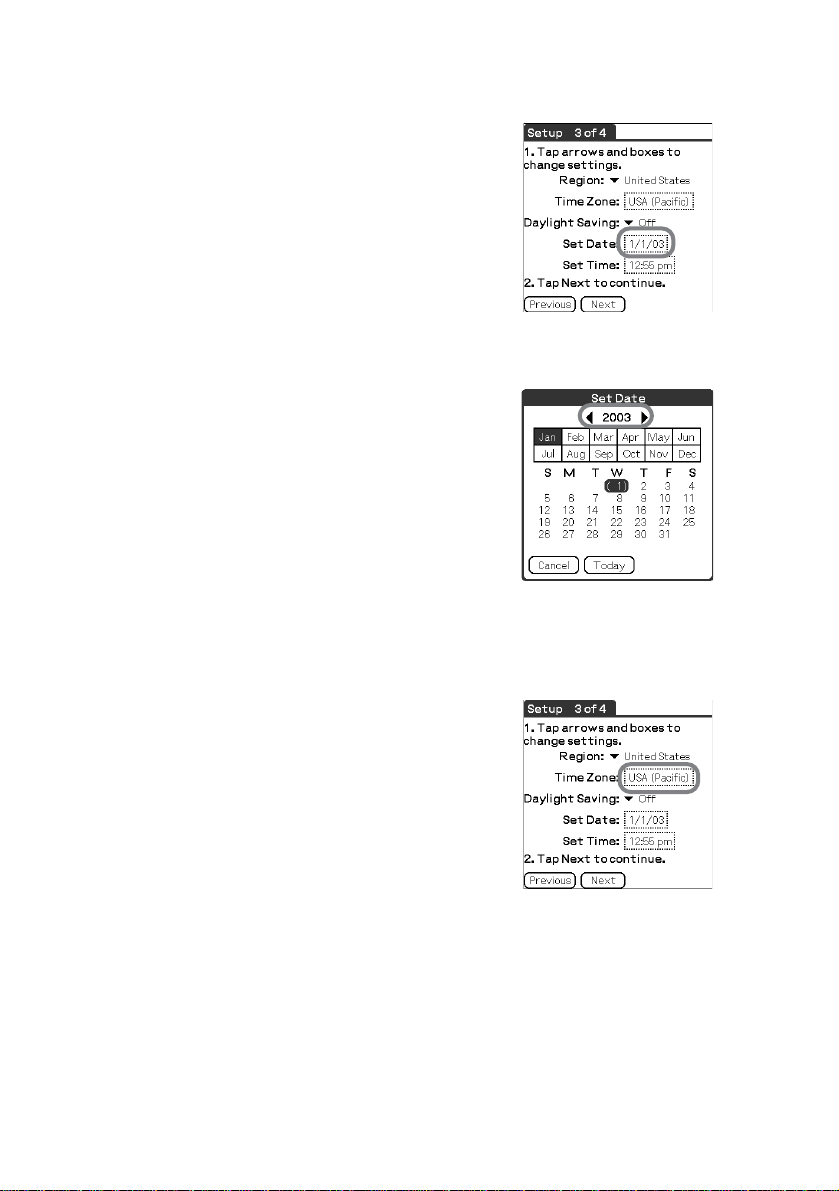
8
Tap the Set Date box.
The Set Date screen is displayed.
9
Tap the arrow b or B next to the year to select the current
year.
10
Tap the current month and then tap the current date.
The Set Date screen closes.
11
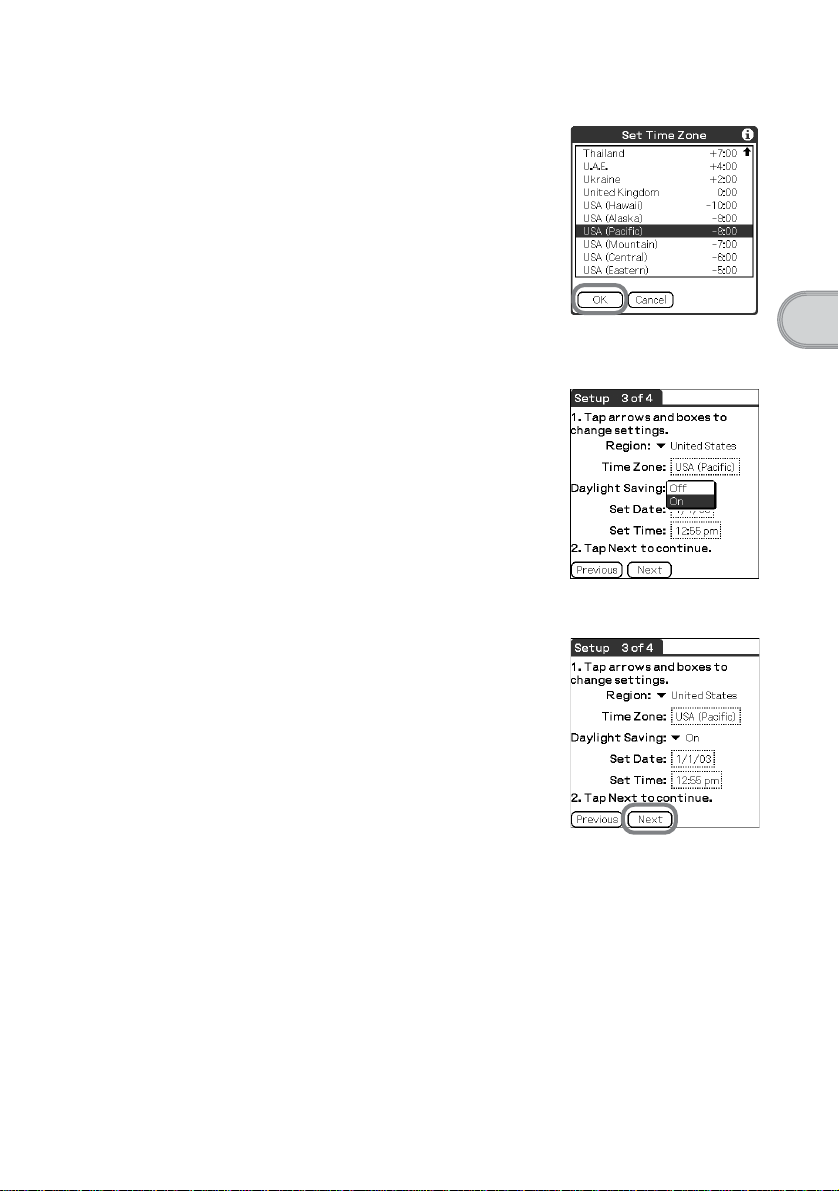
Tap the Time Zone box.
The Set Time Zone screen is displayed.
26
Page 27
12
Tap the region to set the time zone and then tap OK.
13
Tap the arrow V next to Daylight Saving and select ON or
OFF.
14
Tap Next.
Performing the initial settings
Continued on next page
• • • • • • • • • • • • • • • • • • • • • • • • • • •
27
Page 28
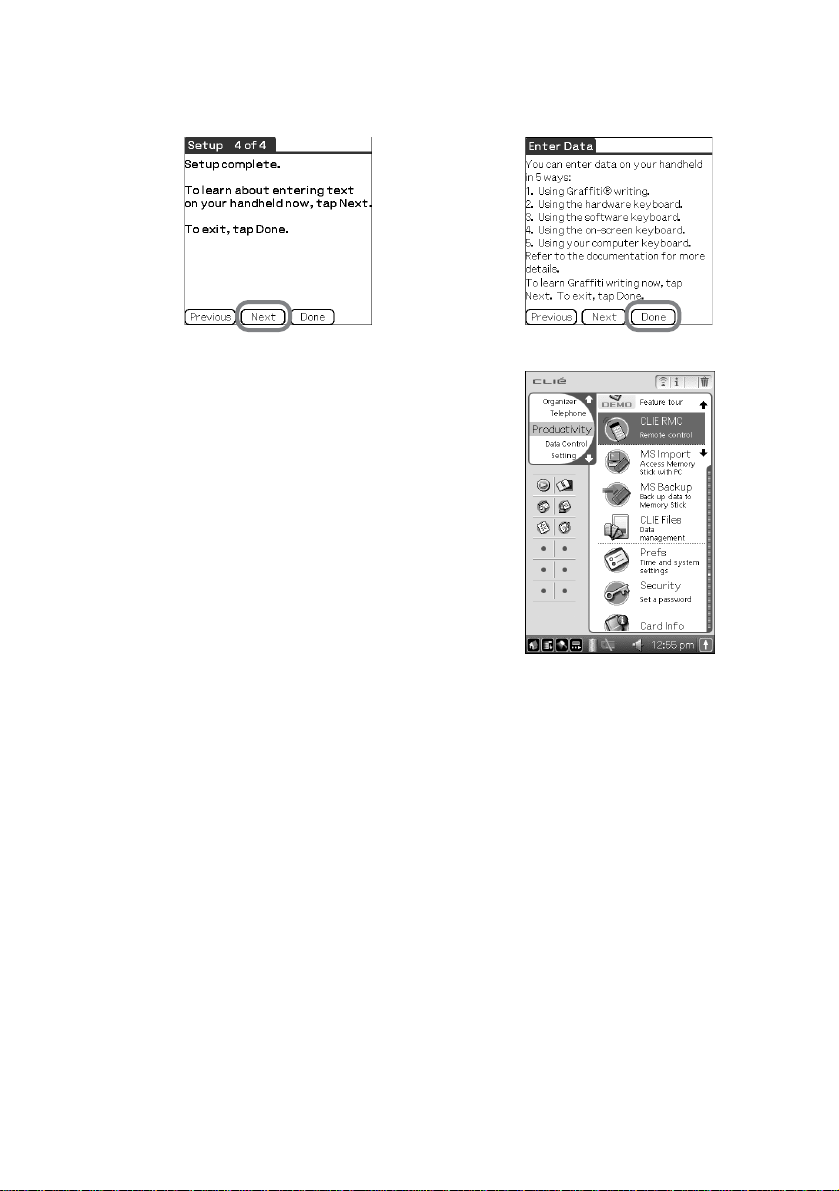
15
Tap Next and Done.
The initial settings are complete, and the
CLIE Launcher screen is displayed.
b
28
Initial settings are complete.
Page 29
Basic operations of your Sony CLIÉ™ handheld
This chapter describes how to start applications, enter data, and perform other basic
operations.
Basic operations
Using the stylus
With your CLIÉ handheld, you can use the supplied stylus to enter characters
or specify an application you want to run.
Taking out the stylus
The stylus is stored in the holder on the
display panel of your CLIÉ handheld.
Basic operations of your Sony CLIÉ™ handheld
Tapping
Note
To avoid losing the stylus, always put it
back in its holder after use.
The action of pressing lightly on the
screen with the stylus is called
“tapping.”
Continued on next page
• • • • • • • • • • • • • • • • • • • • • • • • • • •
29
Page 30
Dragging
Just as you can drag the mouse to select
(and drag) text or move objects on your
computer, you can use the stylus to
drag an item on the screen of your
CLIÉ handheld. Press the stylus lightly
on the item, and move it along the
screen surface.
Using the Jog Dial™ navigator
Your CLIÉ handheld is equipped with a Jog Dial™ navigator, which allows
you to perform all major operations without the stylus. You can operate your
CLIÉ handheld using the Jog Dial™ navigator with just one hand.
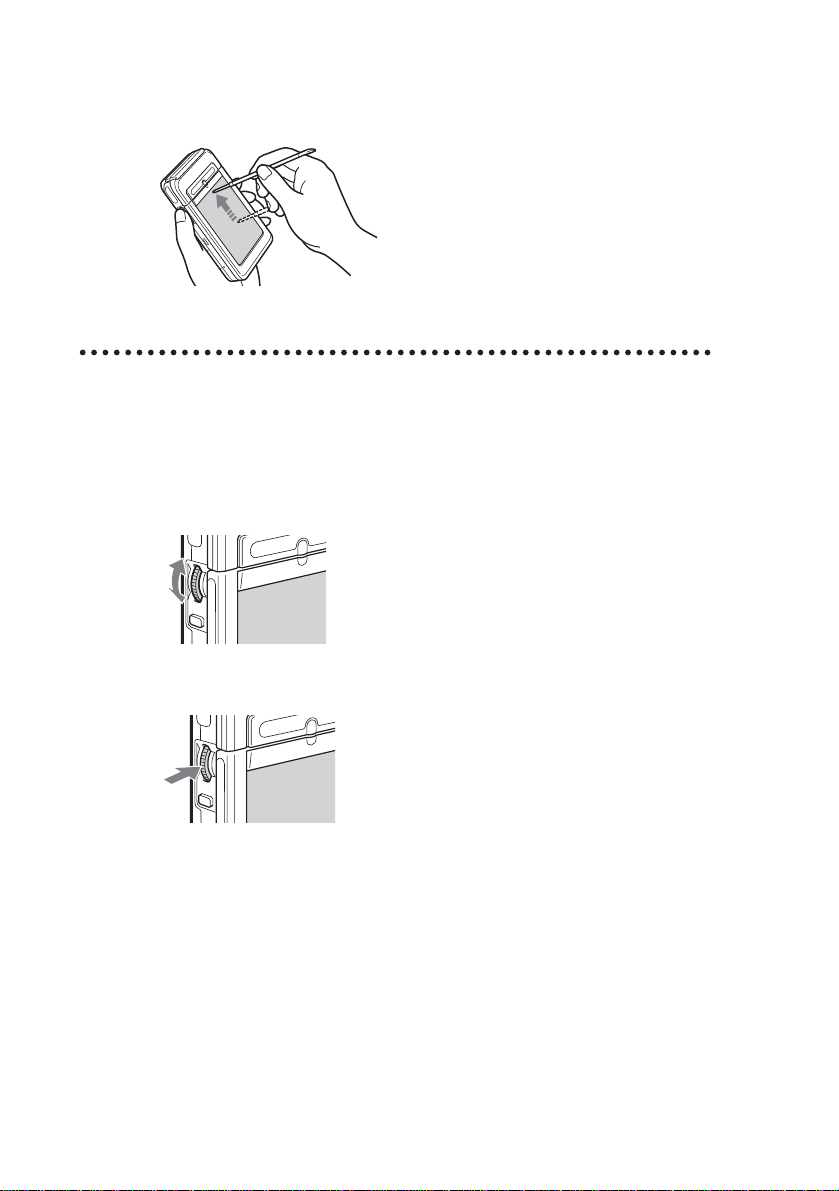
Rotating the Jog Dial™ navigator
Rotate the Jog Dial™ navigator to
select various items or to select an
application to start.
30
Pressing the Jog Dial™ navigator
Press the Jog Dial™ navigator to
decide the selected item or to run the
selected application.
Rotating while holding down the Jog Dial™
navigator
Some applications support operations executed by rotating while pressing the
Jog Dial™ navigator.
Page 31

Functions of parts
POWER Switch
Turning on your CLIÉ handheld
POWER Switch
Slide the POWER switch.
Your CLIÉ handheld turns on and the
last screen you viewed is displayed.
When your CLIÉ handheld turns on,
the POWER LED (page 32) indicator
lights green.
Tip
When you turn on your CLIÉ handheld for the first time, the Welcome screen is
displayed (page 23).
Note
If you cannot turn on your CLIÉ handheld, make sure that if the HOLD switch is not in
the HOLD position.
If you try to turn on your CLIÉ handheld while the HOLD switch is in the HOLD
position, the POWER LED indicator blinks green three times.
Turning off your CLIÉ handheld
Slide the POWER switch again.
Tip
You do not have to save data, quit an application, or perform any o f the oth er shutd own
procedures that your computer requires.
Sliding the POWER switch for more than two
seconds
You can switch on/off the backlight of the LCD.
Basic operations of your Sony CLIÉ™ handheld
31
Page 32

POWER LED
Carrying style
Opened style
The LED indicator shows the status of your CLIÉ handheld by its color.
LED The status of your CLIÉ handheld
Lights green The power is ON.
Lights orange The battery is being charged.
Blinks orange Alarm notifies you at a given time if you have
Blinks green
(three times)
OFF The power is OFF.
CAPTURE Button
Turned style
made an alarm setting in an application, such as
Date Book.
The HOLD switch is in the HOLD position
(blinks when you try to turn on your CLIÉ
handheld).
Press the button to take images or
movies.
32
For details, refer to “Taking images/movies” on page 50.
b
Page 33

Camera
For details, refer to “Taking images/movies” on page 50.
b
REC LED
For details, refer to the explanation of each application in the “CLIÉ Application
b
Manual” installed on your computer.
VOICE REC Button
CLOSE
OPEN
You can take still images or movies.
Note
When the camera is not in use, close the
lens cover by sliding the lens cover lever to
the “CLOSE” position.
Lights when you are recording a movie
or voice memo.
Press the button to record sounds.
Basic operations of your Sony CLIÉ™ handheld
For details, refer to “Using voice recorder” on page 74.
b
33
Page 34

HOLD Switch
Note
If you cannot turn on or operate your CLIÉ handheld, check if the HOLD switch is not
in the HOLD position.
If you try to turn on your CLIÉ handheld while the HOLD switch is in the HOLD
position, the POWER LED indicator blinks green three times.
BACK Button
HOLD
Protects your CLIÉ handheld from
accidental tapping on the screen or
pressure on the POWER switch when
you are carrying your CLIÉ handheld.
If you slide this switch while the power
is on, the screen display turns off, even
during an operation.
Cancels the selection of an item and
cancels the operation. Depending on
the application, unique features such as
restoring to the previous screen are
assigned.
Tip
Press the BACK button for a few
seconds to switch to the CLIE
Launcher screen.
34
For details, refer to the explanation of each application in the “CLIÉ Application
b
Manual” installed on your computer.
Page 35

Scroll Button
For details, refer to the explanation of each application in the “CLIÉ Application
b
Manual” installed on your computer.
IR port
Displays text and other information
that extends beyond the area of the
screen. Pushing the V button scrolls
down to display information below the
current viewing area, and pushing the
v button scrolls up to display the
information above the current viewing
area. Depending on the application,
unique features are assigned.
Basic operations of your Sony CLIÉ™ handheld
You can beam data between your CLIÉ handheld and another CLIÉ handheld
or Palm OS
For details, refer to “Beaming” in the “Handbook.”
b
Direct your CLIÉ handheld
towards a target device as
indicated by an arrow when
using the beaming function.
Tip
You can also use your CLIÉ handheld as a remote control with the CLIE Remote
Commander application.
For details, refer to the “CLIÉ Application Manual” installed on your computer.
b
®
PDA.
Direct your CLIÉ handheld towards a target device
as indicated by an arrow when using the remote
control function.
* Move your CLIÉ handheld gradually to find the
most sensitive direction.
35
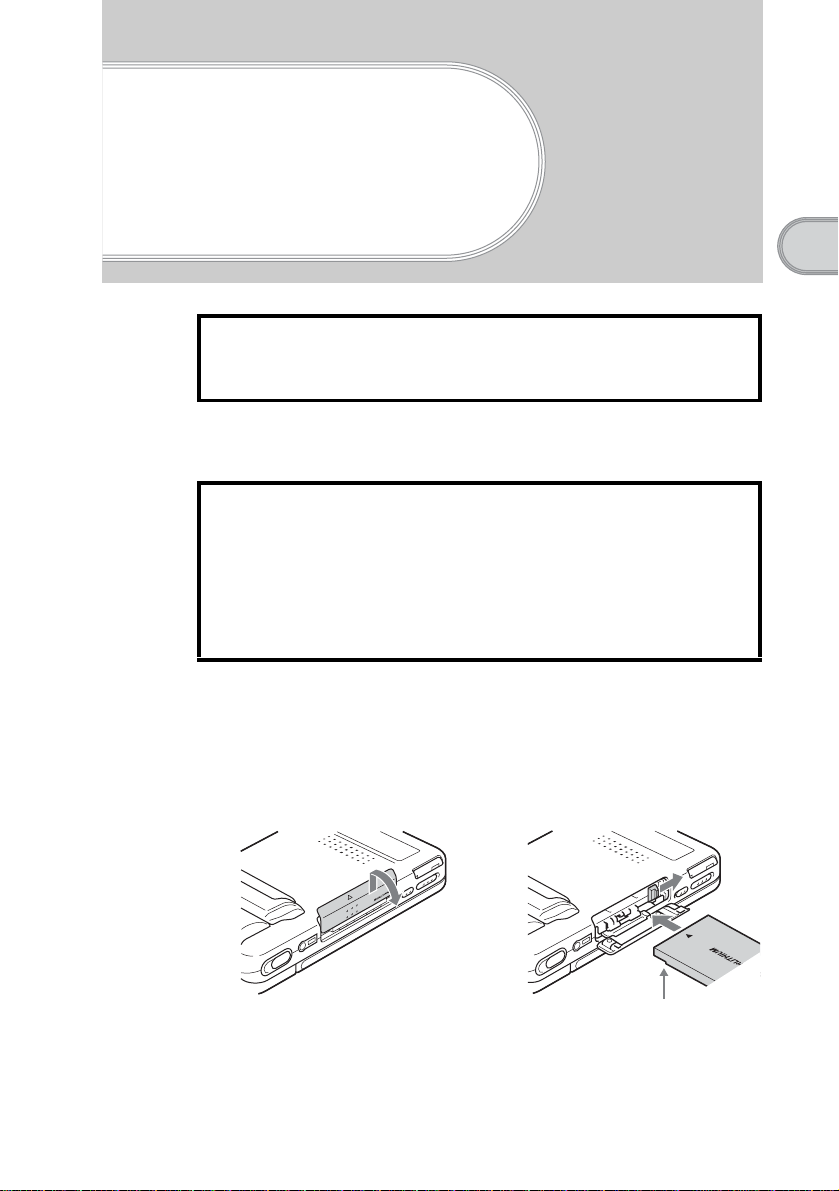
Page 36

“Memory Stick” Slot
For details, refer to “Using “Memory Stick®” media” in the “Handbook.”
b
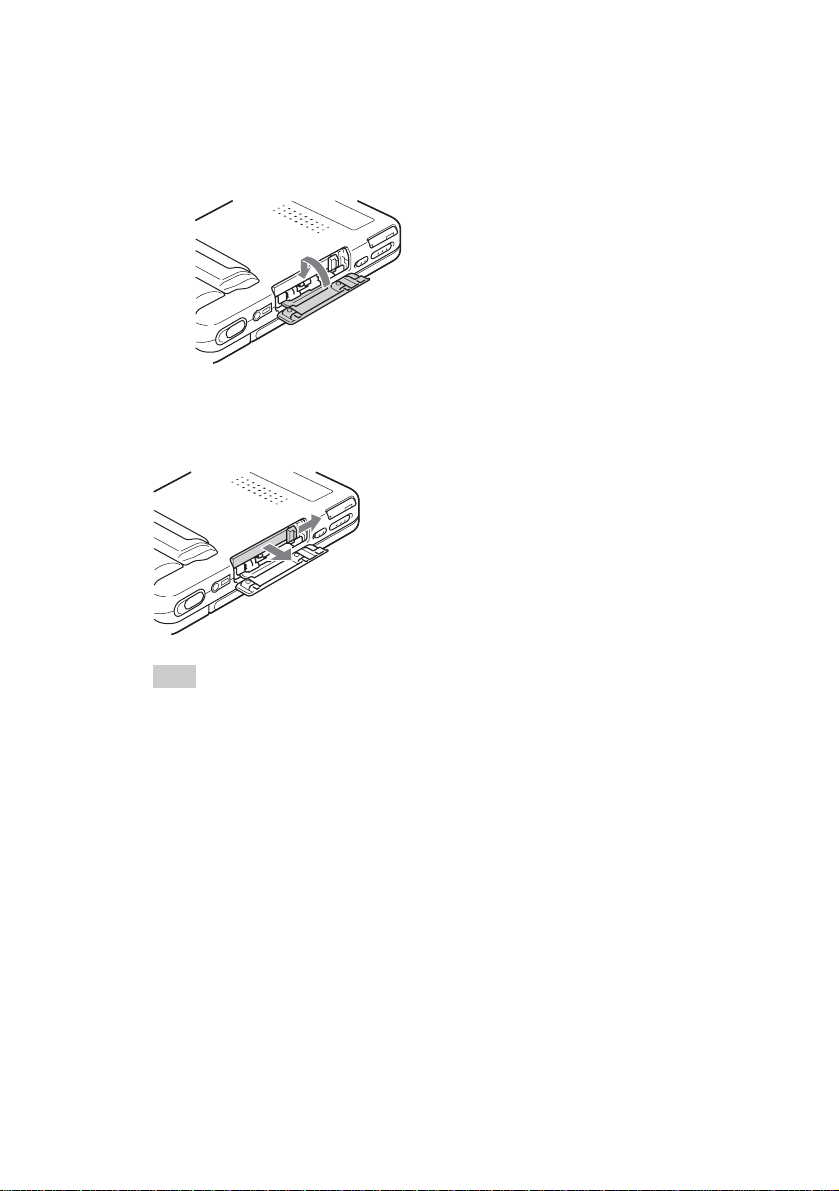
Inserting “Memory Stick” media
“Memory Stick” LED
The “Memory Stick” LED blinks orange while
your CLIÉ handheld is writing to or reading
data from “Memory Stick” media.
Insert “Memory Stick” media into this
slot.
The “Memory Stick” LED blinks
orange while your CLIÉ handheld is
writing data to or reading data from
“Memory Stick” media.
36
Carrying style
Opened style
Notes
• Insert “Memory Stick” media in the right direction. If “Memory Stick” media is
forcibly inserted in the wrong direction, the “Memory Stick” slot may be damaged.
• Do not insert “Memory Stick” media other than the “Memory Stick” slot.
Turned style
Page 37

Removing “Memory Stick” media
b
Push “Memory Stick”
media in
Note
Make sure that your CLIÉ handheld is not writing to or reading data from “Memory
Stick” media (the “Memory Stick” LED is not blinking) before removing it.
If you remove “Memory Stick” media while the “Memory Stick” LED is blinking,
recorded data may be deleted or damaged.
Hardware Keyboard
Input commands list
You can carry out commands using the hardware keys in combination.
Key combinations
Example: Ctrl+C t Hold down the Ctrl key and press the key of the
character C.
Pull “Memory
Stick” media out
Basic operations of your Sony CLIÉ™ handheld
You can use the hardware keyboard in
the same way as with the keyboard of
your computer. This is useful when
you want to enter lots of data.
Combination Function
Fn + character Enter the numbers and marks printed in blue.
Shift + character Enter letters in upper case when “Caps” is off.
Shift + / Selects a continuing/preceding text.
Shift + Ctrl + Selects until the first letter of the text.
Shift + Ctrl + Selects until the last letter of the text.
Ctrl + C Copies the selected text.
Ctrl + X Cuts the sele ct ed text.
Continued on next page
• • • • • • • • • • • • • • • • • • • • • • • • • • •
37
Page 38

Ctrl + V Pastes the selected text.
Ctrl + D Deletes the selected text.
Ctrl + L Turns the backlight on and off.
Ctrl + H Switches to the CLIE Launcher screen.
Ctrl + M Displays the menu.
Ctrl + F Opens the Find dialog box.
Ctrl + Same as rotating the Jog Dial™ navigator upwards.
Ctrl + Same as rotating the Jog Dial™ navigator
downwards.
Ctrl + 3 Same as pressing the Jog Dial™ navigator.
Ctrl + 3 and hold Same as keeping the Jog Dial™ navigator pressed.
Ctrl + BS Same as pressing the BACK button.
Ctrl + BS and hold Same as keeping the BACK button pressed.
Ctrl + Shift + Same as rotating the Jog Dial™ navigator upwards
while pressing it.
Ctrl + Shift + Same as rotating the Jog Dial™ navigator
downwards while pressing it.
Ctrl + Tab Jumps to the next field.
Ctrl + Shift + Tab Jumps back to the previous field.
Wireless Communication Slot
You can connect to the Internet by
using the compact flash type data
network card (from this point, referred
to as network card).
For details, refer to “Connecting to the Internet” on page 81.
b
For details about an operation confirmed network card, refer to “Operation confirmed
b
natwork card” on page 110.
38
Page 39

Notes
• Only the compact flash type data network card can be inserted into the wireless
communication slot. Network cards or memory cards other than the above-mentioned
will not work. Do not use any other card in your CLIÉ handheld, as it may cause a
malfunction.
• If your CLIÉ handheld is not working properly, remove the network card once, and
insert the network card again.
• There may be some data network services that may not be used, depending on the
network card and provider that you are using. For details, refer to the operating
instructions of your network card or contact your Internet service provider.
Inserting the network card
Tip
The protection card is inserted into the wireless communication slot at the factory.
Note
Do not insert the network card forcibly in the wrong direction or at the wrong angle. It
may cause a malfunction or damage your CLIÉ handheld.
Basic operations of your Sony CLIÉ™ handheld
Removing the network card
Make sure that your CLIÉ handheld is turned off prior to removing the network
card.
Notes
• Do not remove the network card while it is connected to the Internet. It may cause a
malfunction.
• When the wireless communication slot is empty, always insert the protection card to
protect the slot.
• Do not remove the network card forcibly in the wrong direction or at the wrong angle.
It may cause a malfunction, or damage your CLIÉ handheld or network card.
39
Page 40

Restarting your Sony CLIÉ handheld
Normally, you do not need to reset your CLIÉ handheld. However, should your
CLIÉ handheld not turn on or not respond, you can perform a soft reset to solve
the problem.
Follow the procedure below to reset your CLIÉ handheld.
Performing a soft reset
All records and entries stored in your CLIÉ handheld are retained even after
performing a soft reset.
1
Take out the stylus pin by unscrewing the metal barrel
from the stylus quill.
2
Use the stylus pin to gently press the RESET button.
The system shuts down and then restarts.
After restarting, the system displays “palm
powered,” “CLIÉ,” and “SONY,” followed
by the Preferences screen for setting the
time and date.
40
Notes
• After the RESET button is pressed, it takes a while until the Preferences
screen is displayed. Be sure not to press the RESET button again while resetting.
• Do not press the RESET button with a tool other than the stylus pin. It may cause
a malfunction.
Page 41

Performing a hard reset
If the soft reset does not solve the problem, you need to perform a hard reset to
restart your CLIÉ handheld.
Notes
• All records and add-on applications stored in your CLIÉ handheld
will be erased by performing a hard reset.
• Perform a hard reset only if a soft reset does not solve your problem.
You can restore your CLIÉ handheld data if you have made a backup on your
computer or “Memory Stick” media.
For details, refer to “Backing up your Sony CLIÉ™ handheld data” in the
b
“Handbook.”
1
Slide the POWER switch.
2
While sliding the POWER switch, press the RESET button
gently with the stylus pin.
Press the RESET button
with the stylus pin as
illustrated on page 40
Basic operations of your Sony CLIÉ™ handheld
3
When the palm powered screen is displayed, release the
POWER switch after three seconds.
A message warning that you are about to erase all the data stored on your
CLIÉ handheld is displayed.
Continued on next page
• • • • • • • • • • • • • • • • • • • • • • • • • • •
41
Page 42

4
Press the v button on the keyboard panel of your CLIÉ
handheld.
Press the v button
A hard reset is performed on your CLIÉ handheld.
After restarting, the system displays “palm powered,” “CLIÉ,” and “SONY,”
followed by the Welcome screen. Refer to “Performing the initial settings” on
page 23.
After a hard reset, only the current date and time are retained. Form ats,
Preferences, and other settings are restored to the factory settings.
Notes
• After the RESET button is pressed, it takes a while until the Welcome screen is
displayed. Be sure not to press the RESET button again while resetting.
•If the v button is not pressed for long enough, the hard re set ma y not be performed.
42
Page 43

Locating the components of the initial screen
Tip
If a different screen is displayed, tap the Home icon.
Basic operations of your Sony CLIÉ™ handheld
A CLIE Launcher Groups List
The list of CLIE Launcher groups is
displayed.
B Favorite Applications
(shortcuts)
You can create shortcuts to favorite
applications.
C Home Icon
If you tap this icon, the Application
Launcher (List of applications) screen
will be displayed.
D Menu Icon
If you tap this icon, the menu of the
current application will be displayed.
E Brightness Adjustment Icon
(page 45)
F Status Bar (page 44)
G Application Manager Icons
(page 46)
H Application Icons (page 47)
I Position Indicator
®
J Graffiti
This is the area for manually entering
data with Graffiti® characters.
K Calculator (page 96)
If you tap this icon, the on-screen
Calculator will be displayed.
L Find Icon
If you tap this icon, the Find dialog
box will be displayed.
M Graffiti/Software Keyboard
Icon (page 46)
N Resize Icon
If you tap this icon, the screen view
will be switched.
Writing Area
43
Page 44

Status Bar
The status bar displays the following icons for all applications. Additional icons appear
according to the applications in use.
Tap this icon to display the CLIE Launcher screen.
Tap this icon to display the menus of the current application.
Tap this icon to open the Find dialog box.
Tap this icon to display the Silk Plug-In dialog
box.
If the Silk Plug-In is installed, you can edit the
display and functions of the Silk Screen area by
switching the Silk Plug-In.
Silk Screen area
Displays the battery’s remaining charge. The icon is displayed while the battery
is being charged.
Tap this icon to display the Battery Information dialog box.
Information display icon
Power used
Battery status
Remaining charge of the battery
Estimated time for chargin g and op e ration
Tap this icon to display the information for the “Memory Stick” media inserted in
your CLIÉ handheld.
When the Data Protection switch of the “Memory Stick” media is in the “Lock”
position, the icon is displayed.
When you insert a “Memory Stick”-type device in your CLIÉ handheld, the
icon is displayed.
When the “Memory Stick” media cannot be read normally, the icon is
displayed.
When the “Memory Stick” slot of your CLIÉ handheld is empty, the icon is
displayed.
44
Page 45

Tap this icon to display the Adjust Volume dialog box.
1 Turns off the sound of your CLIÉ
handheld irrespective of the volume
level setting.
While the Muting mode is selected, the
icon is displayed in the status bar.
2 Adjusts the volume level for playback
sound of audio files or movie files.
3 Adjusts the volume level for System
sound, Alarm sound, and Game sound.
The setting affects the General in the
Preferences.
For details, refer to “Customizing your
b
Sony CLIÉ handheld (Preferences): Setting
sounds” in the “Handbook.”
Displays the current time. To change the display format, tap Time at the
Formats in the Preferences.
For details, refer to “Customizing your Sony CLIÉ handheld ( Preferences): Setting the
b
Date & Time preferences” in the “Handbook.”
Tap this icon to show or hide the Graffiti writing area (for Graffiti-compatible
applications only).
Basic operations of your Sony CLIÉ™ handheld
Brightness Adjustment Icon
Tap this icon to adjust the brightness level of
your CLIÉ handheld's LCD screen.
Note
If the digitizer preferences are not set correctly, you
may have difficulty in tapping.
For details, refer to “Customizing your Sony CLIÉ
b
handheld (Preferences): Adjusting the Digitizer” in
the “Handbook.”
45
Page 46

Application Manager Icons
You can manage your applications with the
application manager icons.
The followings are featured as standard functions.
: Beam, Send
: Info
: Delete
For details, refer to “Sony CLIÉ™ handheld basic operations: Using “CLIE
b
Launcher”: Application manager icon” in the “Handbook.”
Tip
Application manager functions may be added when you install certain applications.
Icons for switching the Graffiti/Software Keyboard
You can switch between the Graffiti
writing area and the software keyboard
by tapping this icon.
The software keyboard is much like as
the on-screen keyboard, however the
applications can be used without
minimizing the current screen.
Tip
To switch the software keyboard display
You can switch the keyboard display by tapping the following icons:
: The alphanumeric keyboard
: The international keyboard
: The symbol keyboard
46
Page 47

Using applications
Your CLIÉ handheld can carry out various functions through applications.
Starting an application using the Jog Dial™ navigator
1
Tap the Home icon to display the CLIE Launcher
screen.
2
Rotate the Jog Dial™ navigator to select an application
icon and press it to start.
Tip
You can also tap the desired application icon in
the CLIE Launcher screen to start the
application.
For details, refer to “Sony CLIÉ™ handheld basic operations: Starting an
b
application” or “Sony CLIÉ™ handheld basic operations: Using ‘CLIE
Launcher’” in the “Handbook.”
Basic operations of your Sony CLIÉ™ handheld
47
Page 48

Starting an application using the application buttons
Main body side Display panel side
You can press the application button to start an application. By default, the
application buttons are set to start Date Book, Address, To Do, and Memo Pad
as the icons on each button show.
Note
Application Buttons on the display panel side are available only when your CLIÉ
handheld is set to the turned style (page 16).
Tips
• Even when your CLIÉ handheld is turned off, pressing an application button turns on
your CLIÉ handheld to start an application.
• You can assign your desired application to each application button.
For details, refer to “Customizing your Sony CLIÉ handheld (Preferences): Ass igning
b
applications to application buttons” in the “Handbook.”
Quitting an application and opening another application
You can only operate one application at a time on your CLIÉ handheld. When
you start another application, the previous application automatically closes,
therefore you do not need to quit an application.
To open an application when another application has been already started, tap
the Home icon or press the application button.
Tip
You do not need to manually save data when you quit an application.
All the changes in the application that you are working on are automatically saved.
Note
For some applications, you need to operate Finish or Save.
For details, refer to the “CLIÉ Application Manual” installed on your computer.
b
48
Page 49

Entering data
Entering data
There are five ways to enter data on your CLIÉ handheld. Select the one that
best suits you.
z Hardware keyboard (page 37)
You can enter data using the hardware keyboard in the same way as with the
keyboard of your computer. This is useful when you want to enter lots of
data.
z On-screen keyboard
You can enter data by tapping the keyboard that appears on the screen.
For details on entering data using the on-s creen keyboard, refer to “Entering data in
b
your Sony CLIÉ™ handheld: Practicing entering data using the on-screen
keyboard” in the “Handbook.”
z Software keyboard (page 46)
The working of the software keyboard is the same as the on-screen keyboard,
however the applications can be used without minimizing the current screen.
Basic operations of your Sony CLIÉ™ handheld
z Graffiti
You can enter data using an exclusive input system called Graffiti
you get used to writing with Graffiti
using the on-screen keyboard.
For details on using Graffiti®, refer to “Entering data in your Sony CLIÉ™
b
handheld: Using Graffiti
z HotSync
You can enter data using your computer keyboard with a HotSync®
operation. Text data is transferred from your computer to your CLIÉ
handheld by a HotSync
software.
For details, refer to the Help menu in the Palm™ Desktop for CLIÉ software.
b
®
®
, you will find that it is much faster than
®
writing to enter data” in the “Handbook.”
®
operation with a computer
®
operation using the Palm™ Desktop for CLIÉ
®
. Once
49
Page 50

Taking images/ movies
Taking images
The simple way to take images
1
Set your CLIÉ handheld to the
turned style and open the
camera lens cover.
Tip
Set your CLIÉ handheld to the opened style
when you take images of yourself.
2
Press the CAPTURE button to
start “CLIE Camera S.”
The application starts after a few
seconds.
50
Tip
You can also select the CLIE Cam S
icon in “CLIE Launcher” (page 47) to start “CLIE Camera S.”
3
Capture the subject in the
viewfinder and press and
hold the CAPTURE button
half way down.
Your CLIÉ handheld beeps and
focuses on the subject.
4
Press the CAPTURE button fully down.
The shutter clicks and an image is taken.
Page 51

Locating components on the “CLIE Camera S” screen
Taking images/movies
A EV Adjustment (Page 59)
B
“Movie Recorder” Start
Button
Switches the application to “Movie
Recorder” for taking movies.
C
Custom Button (Page 56)
D Zoom Magnification
(Page 59)
E Setup Button
Displays the Camera Setup screen.
F Image Size/Quality Display
(Page 53)
G Image Thumbnail Display
Displays the last three images you
have taken.
H Flash Mode Button (Page 58)
I
CAPTURE Button
Tap the button to take an image.
J Album Start Button
Starts “CLIE Album.”
K Album Select Button
Tap the button to select the album
where the taken images are located.
L Viewer Start Button
Starts “CLIE Viewer” to display the
taken images.
M
Image Size/Quality Select
Button (Page 53)
N Delete Button
Deletes an image selected in the
image thumbnail display.
O Rotate Button
Rotates an image selected in the
image thumbnail display 90 degrees
clockwise.
51
Page 52

Using functions
Using the self-timer
1
Tap the Setup button to display the Camera Setup
screen.
2
Tap Self Timer and select On. Tap the OK button.
(Self-timer) is displayed on the screen.
b
52
3
Capture the subject in the viewfinder and press the
CAPTURE button fully down.
Countdown starts and the image will
be taken after approximately 10
seconds.
Tip
To cancel the self-timer during the
operation
Tap the button on the right of the
countdown bar.
Note
If you stand in front of the camera and press the CAPTURE button, the focus and
exposure may not be configured properly.
Page 53

Selecting the image size/quality
You can select the image size (number of pixels) and image quality
(compression ratio), depending on the purpose. By tapping the button,
you can select a favorite setting from three kinds of preset entries.
Presetting image size/quality
1
Tap the Setup button to display the Camera Setup
screen.
2
Tap Size, Quality to display the Size, Quality screen.
Taking images/movies
3
Select the image size/quality from the list and tap the OK
button.
Tip
The larger image size or lower
compression ratio improves images but
then requires a larger amount of memory.
This means the number of images you can
save in the memory of your CLIÉ handheld
or “Memory Stick” media will be reduced.
Select the image size and image quality that
suits your purpose.
For details, refer to “CLIE Camera S” in the “CLIÉ Application Manual” installed
b
on your computer.
53
Page 54

Selecting the location to where the captured
images are to be saved
1
Tap the Setup button to display the Camera Setup
screen.
2
Tap Save to to select the location to where the captured
images are to be saved.
Priority MS If a “Memory Stick” media is inserted into the slot,
captured images will be saved on the “Memory Stick”
media. If not, captured images will be saved in the me mory
of your CLIÉ handheld.
Even if the free space of an inse rted “Memory Stick” media
is insufficient, captured images will not be saved in the
memory of your CLIÉ handheld.
(Default)
MS Captured images will be saved on “Memory Stick” media.
Internal Captured images will be saved in the memory of your
CLIÉ handheld.
54
Page 55

Selecting the scene mode
When taking images of scenes or people at night, you can use the scene mode
to enhance the impact of the image.
1
Tap the Setup button to display the Camera Setup
screen.
2
Tap Scene to select the scene mode.
Normal Select this mode normally. (Default)
Twilight
Twilight
Portrait
You can take images of a night
scene without ruining the
effect of the scene.
Since the shutter speed
becomes slower, make sure
you keep the camera still.
The flash is not available in
this mode.
You can select this mode when
taking images of people and a
night scene at a time. You can
take images of people with
distinct outlines as well as a
night scene without ruining the
effect of the scene.
Since the shutter speed becomes slower, make sure you
keep the camera still.
The flash works automatically.
Taking images/movies
55
Page 56

Assigning a function to the custom button
You can assign your favorite function to the custom button.
1
Tap the Setup button to display the Camera Setup
screen.
Custom button
The icon varies depending on
the assigned function.
2
Tap Custom Button and to select a function you want to
assign.
56
Page 57

Selecting the shutter sound
You can select the volume and tone quality of the shutter sound.
1
Tap the Setup button to display the Camera Setup
screen.
2
Tap Shutter Sound Vol to set the volume of the shutter
sound.
Tap Shutter Sound to select the tone quality of the
shutter sound.
Taking images/movies
57
Page 58

Selecting the flash mode
You can select the flash mode according to the situation.
1
Tap the flash mode button and select a flash mode.
The Flash mode
icon is disp la y e d .
Auto The flash works automatically in poor light conditions.
(Default)
On
(Flashes forcibly)
Off
(No flash)
The flash works every time.
The flash is turned off.
58
Note
Do not use a flash towards the eyes from a short distance, as a visual disturbance may
occur, especially when taking pictures of a baby. Be sure to maintain a distance of at least
one meter from the baby when taking a picture with a flash.
Page 59

Other functions
For details, refer to “CLIE Camera S” in the “CLIÉ Application Manual” installed on
b
your computer.
Main screen
Zoom Tap the button to switch between the two stages of
adjustment.
EV Adjustment Tap the / button to adjust the exposure.
Camera Setup screen
White Balance You can adju st the white balance.
When the white balance is set to Auto, the white balance is
adjusted automatically according to the condition. If you
want to fix the setting or to take images under specific
lighting conditions, you can adjust the white balance
manually.
(Default: Auto)
Spot Metering You can adjust the exposure to the subject even when
taking images against the sun or the contrast between the
subject and background is high.
(Default: OFF)
Flash Level You can adjust the brightness of the flash.
(Default: Normal)
Red Eye
Reduction
Focus You can select a focusing method
Effect You can add special effects to bring out the contrast in
Save Settings You can choose either to maintain current settings or
Jog Dial You can assign your favorite function to the Jog Dial™
Before taking images, the flash pre-strobes to reduce the
red-eye phenomenon.
(Default: OFF)
(Default: AF (Always))
images.
(Default: OFF)
restore default settings at the start of the next function.
(Default: Restoring default settings for all)
navigator.
(Default: ZOOM)
Taking images/movies
59
Page 60

Enjoying image files
Preparing
Taking images
CLIE Camera S ............................................................................page 89
Importing image files from your computer
Image Converter...........................................................................page 89
Viewing/Selecting
Viewing/Selecting image files by searching
from the list
CLIE Viewer ................................................................................page 90
Using features
Managing image files in albums
CLIE Album.................................................................................page 90
Importing image files from your CLIÉ handheld
to your computer
PictureGear Studio .......................................................................page 91
Displaying image files automatically
PhotoStand....................................................................................page 91
60
Editing image files
Photo Editor..................................................................................page 92
Attaching image files to an address
Address.........................................................................................page 94
Sending image files by e-mail
CLIE Mail.....................................................................................page 96
Transferring image files to your computer
Memory Stick Import...................................................................page 98
Page 61

Recording movies
Recording movies
1
Set your CLIÉ handheld to the turned style and open the
camera lens cover.
Tip
Set your CLIÉ handheld to the opened style
when you record movies of yourself.
2
Insert the “Memory Stick” media to which you want to
save movie files.
s
Taking images/movies
3
Select Movie Rec icon in “CLIE Launcher” (page 47) to
start.
The application starts after a few
seconds.
Continued on next page
• • • • • • • • • • • • • • • • • • • • • • • • • • •
61
Page 62

4
Capture the subject in the viewfinder and press the
CAPTURE button.
Movie recording starts.
5
Press the CAPTURE button once again to stop movie
recording.
Enjoying movies
Preparing
Recording movies
Movie Recorder...................................... .......................... ............page 92
Importing movie files from your computer
Image Converter...........................................................................page 89
Giga Pocket Plugin ................ ........................... ...........................page 90
Viewing/Selecting
Viewing/selecting a movie file after searching
from the list
CLIE Viewer ................................................................................page 90
Playing movies
Movie Player ................................................................ ................page 92
Sending
Sending movie files by e-mail
CLIE Mail.....................................................................................page 96
62
Page 63

Viewing/Playing back files (CLIE Viewer)
You can use “CLIE Viewer” to view image files, movie files, handwritten
memos and play back voice memos saved on your CLIÉ handheld.
For details, refer to the “CLIÉ Application Manual” installed on your computer.
b
Opening/Playing back files
1
Tap the Home icon to display the CLIE Launcher
screen.
2
Select the CLIE Viewer icon to start “CLIE Viewer.”
Tip
You can also start “CLIE Viewer” by
selecting the icon in the “CLIE
Camera S” window.
3
Rotate the Jog Dial™ navigator to select the file you want
to display and press the Jog Dial™ navigator.
The selected file is displayed.
Taking images/movies
Tip
You can also display the file by tapping the file
icon.
The files are listed in order of creation date and
time.
63
Page 64

Selecting/Deleting files
You can select a file from the list screen in CLIE Viewe r when attaching image
files or movie files of your CLIÉ handheld to e-mails, when using the image
files in “PhotoStand” (page 91), “CLIE Album” (page 90) and “Photo Editor”
(page 92), or when deleting files.
1
Start “CLIE Viewer” and tap the command button to
select the function.
: Select the file to be atta ched to an
e-mail
This icon is displayed if “CLIE Mail”
is installed.
: Select the image file to be used in
“PhotoStand”
: Select the file to be deleted
: Select other applications such as
“Photo Editor” or “CLIE Album” by
using the pull-down menu
2
Tap to select the check box of the file.
Tip
Tap Select All to select all the files.
64
3
Tap OK.
The function selected in step 1 is executed.
Page 65

Using your CLIÉ™ handheld with your computer
Follow the procedure below prior to using your CLIÉ handheld with your
computer.
1
Install the software on your computer
2
Connect the cradle to your computer
3
Enter a user name for your CLIÉ handheld
Step 1: Install the software on your
computer
Do not connect the supplied cradle to your computer
before installing the software. The software may not
be installed properly.
Using your CLIÉ™ handheld with your computer
The “Palm™ Desktop for CLIÉ” software stored on the supplied CD-ROM
must be installed on your computer. The software is used for data transfer
between your CLIÉ handheld and computer, and handling data such as Address
Book on your computer.
For details on the system required on a computer, refer to “System required on a
b
computer” on page 111.
Notes
• Do not simply copy the “Palm™ Desktop for CLIÉ” folder from the supplied CDROM to your computer. To install the software properly, follow the installation
procedure described in this manual.
• If you use Windows 2000 Professional or Windows XP operating system, log on with
a User Name in the Administrators group before installing the software.
Continued on next page
• • • • • • • • • • • • • • • • • • • • • • • • • • •
65
Page 66

• If you own another CLIÉ handheld and the old version of “Palm™ Desktop for CLIÉ”
has been already installed on your computer, follow the procedure below to upgrade
to the new version.
* If you are using PEG-N710C or PEG-S300, refer to the official Sony CLIÉ website
(refer to the back cover of this manual for the URL).
For details, refer to “Using data with another Sony CLIÉ handheld” in the
b
“Handbook.”
1
Quit all applications running in Windows®.
2
Insert the supplied CD-ROM into the CD-ROM drive of
your computer.
The “Installation Launcher” window is displayed.
3
Click the Install button for the Palm Desktop for CLIÉ
software.
The setup program starts and the Welcome screen is displayed.
4
Click Next.
The Palm™ Desktop for CLIÉ software installation begins.
Follow the on-screen instructions.
5
Select the software you will use to synchronize your CLIÉ
handheld with your computer.
If you select “Synchronize with Palm Desktop for CLIÉ,” Intellisync Lite
software will not be installed. If you select “Synchronize with Microsoft
Outlook or Lotus Organizer,” the Palm™ Desktop for CLIÉ software and
Intellisync Lite software will be installed.
66
6
Click Next.
The Setup Type window is displayed.
7
Select the setup type (Complete or Custom) and the
destination folder (if Custom is chose).
8
Fill in the user name in the Create User Account screen.
9
Click Next.
The Connections dialog box is displayed.
10
Select USB or Serial Port.
Page 67

11
Click Next.
The Ready to Install the Program dialog box is displayed, Click
Install to start installation.
12
Follow the on-screen instructions to finish installing the
Palm™ Desktop for CLIÉ software.
13
Click Finish.
Installation of the Palm™ Desktop for CLIÉ software on
your computer is completed.
Using your CLIÉ™ handheld with your computer
67
Page 68

Step 2: Connect the cradle to your computer
When you have completed the Palm™ Desktop for CLIÉ software installation,
connect the cradle to a USB port of your computer so you can use your CLIÉ
handheld with your computer.
Connect the cradle to your computer
To a US B port
of your computer
To a wall
outlet
Note
Be sure to connect the cradle directly to a USB port of your computer. If the cradle is
connected to a computer via another device, such as a USB hub, a HotSync
may not be performed properly.
®
operation
68
Page 69

Step 3: Enter a user name for your CLIÉ
handheld
1
Place your CLIÉ handheld in the cradle.
2
Press the HotSync button on the cradle.
Using your CLIÉ™ handheld with your computer
Press the HotSync button
The USB Driver installation starts automatically.
Continued on next page
• • • • • • • • • • • • • • • • • • • • • • • • • • •
69
Page 70

3
When the New User dialog box is displayed on your
computer window, enter your user name.
You can enter any user name you prefer.
Note
If you have already used another CLIÉ handheld
Enter a user name that is different from the one you use for another CLIÉ handheld.
If you set an identical user name to multiple CLIÉ handhelds, improper operation
may occur.
Tip
When you import data from another CLIÉ handheld
Refer to “Using data with another Sony CLIÉ handheld” in the “Handbook.”
4
Click OK on the computer window.
A beep sounds and the HotSync® operation starts.
Your user name selected in step 3 is transferred to the CLIÉ handheld.
When the setup is complete, “HotSync operation complete.” will be
displayed on your CLIÉ handheld.
Setup is completed!
70
Page 71

Synchronizing data between your CLIÉ handheld
®
and computer (HotSync
What is a HotSync® operation?
A HotSync® operation is a one-step operation that allows you to synchronize
data between your CLIÉ handheld and your computer, back up the data of your
CLIÉ handheld on your computer, and install add-on applications.
For details, refer to “Exchanging and updating data using a HotSync® operation
b
(Other HotSync
Performing a HotSync® operation
The following procedure explains how to synchronize data between your CLIÉ
handheld and computer, using “Date Book” as an example.
1
Turn on the computer.
2
Refer to the procedure on page 76 and enter data in
“Date Book.”
3
Place your CLIÉ handheld in the cradle.
®
operations)” in the “Handbook.”
)
Using your CLIÉ™ handheld with your computer
Continued on next page
• • • • • • • • • • • • • • • • • • • • • • • • • • •
71
Page 72

4
Press the HotSync button on the cradle.
The HotSync operation between your CLIÉ handheld and computer starts.
Press the HotS y n c button
When the HotSync
the following screen is displayed.
5
Double-click the “Palm™ Desktop for CLIÉ” icon on the
®
operation is complete,
Windows desktop.
You can also click Start, select Programs (All Programs in Windows
XP), Sony handheld, and click Palm Desktop for CLIÉ to start the
application.
The Palm™ Desktop for CLIÉ software starts.
72
6
Click the Date Book icon.
The Date Book window is
displayed.
If you select the same date you
entered the schedule for in step
2, you will see the entered
schedule.
Page 73

Enjoying your CLIÉ™ handheld
Using your CLIÉ handheld to view image files and
movie files taken with “Memory Stick”compliant devices
Tip
You can view the following file formats on your CLIÉ handheld:
Image files: JPEG (DCF) format, PictureGear Pocket format
Movie files: Movie Player format (movies taken with your CLIÉ handheld or converted
using the Image Converter software), MPEG Movie format (MPEG1 format movies
taken with a Sony Digital Still Camera or Handycam)
For formats of pictures that can be taken with your “Memory Stick” compliant devices,
refer to their respective operating instructions.
1
Insert the “Memory Stick” media to which you have saved
image files and movie files in your CLIÉ handheld.
Enjoying your CLIÉ™ handheld
2
Start “CLIE Viewer” to view image files or movie files.
For details, refer to “Viewing/Playing back files (CLIE Viewer)” on page 63.
b
73
Page 74

Using voice recorder
Recording a voice memo
1
Select the Voice Rec icon in the CLIE Launcher screen
(page 47) and start it.
2
Press the VOICE REC button.
The recording starts. Speak into the built-in
microphone.
Tip
As soon as the VOICE REC button is pressed,
“Voice Recorder” automatically starts and then
recording starts.
3
Press the button once again to stop recording.
Playing back a voice memo
A voice memo can be played using “Voice Recorder” or “CLIE Viewer.”
For details about “Voice Recorder,” refer to “Voice Recorder” in the “CLIÉ
b
Application Manual” installed on your computer.
For details about “CLIE Viewer,” refer to “Viewing/Playing back files (CLIE
b
Viewer)” on page 63.
74
Page 75

Listening to music
Note
You need to perform the following procedure to listen to music on your CLIÉ handheld.
1
Transfer music files you want to play, from your computer
to your CLIÉ handheld.
For details, refer to “Music” in the “CLIÉ Application Manual” installed on your
b
computer.
2
Connect the supplied remote
control and headphones to
the CLIÉ handheld.
3
Select the AudioPlayer
icon in the CLIE Launcher
screen (page 47) and start it.
Enjoying your CLIÉ™ handheld
4
Tap the playback button to
play music.
Tap the stop button to stop the
music.
Tip
You can also use the remote control.
Playback
button
Stop
button
75
Page 76

Managing schedules (Date Book)
Entering a schedule
1
Press the button to start “Date Book.”
2
Tap New and set the start time and end time of the
schedule.
1 T a p to set the s ta rt time.
2 T a p to set the e n d time.
3 Tap to determine the settings.
4 T a p to select “h o u r .”
5 T a p to select “ minute.”
76
3
Enter a schedule.
Page 77

Deleting a schedule
1
Tap a schedule you want to delete and tap the Menu
icon from the Date Book list screen.
2
Tap Delete Event... from the Record menu.
The confirmation message is displayed.
3
Tap OK.
Enjoying your CLIÉ™ handheld
77
Page 78

Managing addresses and telephone numbers (Address)
Entering a new address
1
Press the button to start “Address”.
2
Tap New and enter details.
Tip
You can scroll the screen by tapping the v/V
arrow in the bottom right-hand corner.
Deleting an address entry
78
1
Tap an address you want to delete and tap the Menu
icon.
2
Tap Delete Address... from the Record menu.
The confirmation message is displayed.
3
Tap OK.
Page 79

Exchanging Date Book and Address data between your CLIÉ handheld and computer
HotSync® operation (page 71) enables you to exchange Date Book data and the
Address data between your CLIÉ handheld and computer.
Depending on the applications that you use on your computer, there are two
ways to exchange data.
Exchanging data between your CLIÉ handheld and
Palm™ Desktop for CLIÉ software on your computer
You can synchronize data between “Date Book” or “Address” managed by the
Palm™ Desktop for CLIÉ software on your computer and your CLIÉ
handheld.
For details on how to exchange data with the Palm™ Desktop for CLIÉ software, refer
b
to “Synchronizing data between your CLIÉ handheld and computer (HotSync
(page 71).
®
)”
Exchanging data between your CLIÉ handheld and
®
Microsoft
Outlook (Intellisync® Lite) in your
computer
“Intellisync Lite” must be installed on your computer to connect with
“Microsoft
For details on how to install, refer to “Installing add-on applications on your CLIÉ
b
handheld” (page 88).
Tip
The Intellisync Lite software can be installed with the option “Using your CLIÉ
handheld” of the installer menu screen.
For details on how to start and setup, refer to the help of “Intellisync Lite.”
b
To view help, click Programs (In case of Windows XP, click All Programs) from
the Start menu, then click Intellisync Lite and Intellisync Help.
®
Outlook” and “Lotus Organizer.”
Enjoying your CLIÉ™ handheld
79
Page 80

Viewing computer documents on your CLIÉ handheld (Picsel Viewer for CLIE)
Note
Perform the following procedure before using “Picsel Viewer for CLIE” application.
1
Install “Picsel Viewer for CLIE” in your CLIÉ handheld.
2
Transfer documents from your computer to a “Memory
Stick” media.
Use “Memory Stick Import” to transport documents to the “Memory Stick”
media inserted into the slot of your CLIÉ handheld.
3
Start “Picsel Viewer for CLIE” on your CLIÉ handheld and
view the documents transferred from your computer.
For details, refer to “Picsel Viewer for CLIE” in
b
the “CLIÉ Application Manual” installed on your
computer.
80
Page 81

Connecting to the Internet
Note
For an internet connection, you must have a network card that is compliant with your
CLIÉ handheld and you must be registe red with an Internet Service Provider.
Installing applications in your CLIÉ handheld
Install applications on your CLIÉ handheld for your purposes.
Browsing websites on your CLIÉ handheld: NetFront v3.0 for CLIE (page 96)
Exchanging e-mail: CLIE Mail (page 96)
For details about the necessary set-up of each application, refer to the “CLIÉ
b
Application Manual” installed on your computer.
Setting up a network card
Set up a network card, such as “Wireless LAN card PEGA-WL100”.
Tip
For details on how to set up a network card, refer to the manual of each network card.
Connecting to the Internet
1
Insert the network card into your CLIÉ handheld.
2
Select the desired application in “CLIE Launcher”
(page 47) and start it.
3
Start browsing websites, sending or receiving e-mail.
Internet connection starts automatically.
Tip
When you want to attach image files or movie files from your CLIÉ handheld to an
e-mail, you can select those files from the list displayed in “CLIE Viewer”.
For details, refer to “Selecting/Deleting files” (page 64).
b
Enjoying your CLIÉ™ handheld
81
Page 82

Using the Bluetooth™ function
Note
The communication speed and communication range vary depending on factors such as
obstacles between devices, radio wave conditions, or specifications of a target device.
The Bluetooth™ function enables wireless communication within a range of
approximately 10 meters. You can use the function to exchange data between
your CLIÉ handheld and other Bluetooth compliant devices.
To use the Bluetooth™ function, select Bluetooth in the Preferences
screen and set to Enabled for the Bluetooth item.
b
Set to Enabled
b
82
Bluetooth LED
The LED lights up during data exchange
using the Bluetooth™ function.
It blinks when the fu n ction is on standby .
Carrying style
Opened style
For details, refer to “Customizing your Sony CLIÉ handheld (Pre ferences): Setting the
b
Bluetooth™ function” in the “Handbook.”
Turned style
Page 83

Sending data such as image files or Date Book data to another CLIÉ handheld with the built-in Bluetooth function or Bluetooth Module (optional)
1
Select a file.
Sending an image file, movie file, voice
memo, or handwritten memo
Start CLIE Viewer (page 63),
tap the Menu icon, select
Send… from the Data menu,
and tap a file you want to send.
Enjoying your CLIÉ™ handheld
Tip
Sending image files
You can select a method of sending data in the dialog box.
(The dialog box below may not be displayed depending on your operating
environment)
Sending Date Book data or Address data
Tap schedule data or address data you want to send, tap the Menu
icon, and then select Send Event (for “Date Book”) or Send
Address (for “Address”) from the menu.
Continued on next page
• • • • • • • • • • • • • • • • • • • • • • • • • • •
83
Page 84

2
Send a file.
After the Bluetooth Discovery dialog box is displayed, the list of
Bluetooth compatible CLIÉ handhelds within a range of the
communication area is displayed on the Discovery Results dialog box.
Tap to select a CLIÉ handheld to which you want to send data.
b
The Bluetooth Progress dialog box will be displayed on both CLIÉ
handhelds. Follow the on-screen instructions.
Tip
If you have renamed a target Bluetooth™ compatible device registered on CLIÉ
handheld, the device may be listed in the previous name when you detect target
Bluetooth™ compatible devices.
In this case, follow the procedure below.
1
Tap the Menu icon from the Bluetooth Preferences screen (page 82).
2
Tap Disable device name cache from the Options menu.
3
Detect target Bluetooth™ compatible devices.
84
Note
To view or edit received data/files, applications supporting each data/file must be
installed on the CLIÉ handheld.
Page 85

Performing a wireless HotSync® operation with a computer
If you are using a Bluetooth compatible computer, you can perform a wireless
HotSync
b
®
operation between your CLIÉ handheld and computer.
For details, refer to “Exchanging and updating data using a HotSync® operation
(Other HotSync
Bluetooth™ function” in the “Handbook.”
For information about Bluetooth™ compatible computers, refer to the Sony CLIÉ
handheld Support website (http://www.ita.sel.sony.com/support/clie/).
®
operations) : Performing a HotSync® operation using the
Using the Bluetooth function between your CLIÉ handheld and other Bluetooth compliant devices
You can make full use of the Bluetooth function between your CLIÉ handheld
and other Bluetooth compliant devices.
For details, refer to the official Sony CLIÉ website.
b
Customers in the U.S.A, Canada and Mexico: http://www.ita.sel.sony.com/
support/clie/sccess/
Customers in Asia-Pacific Countries: http://vaio-online.sony.com/clie/
Enjoying your CLIÉ™ handheld
85
Page 86

Using applications
This chapter describes how to use add-on applications and the “CLIÉ Application Manual.”
For details about add-on applications, refer to the manuals for each add-on application.
About add-on applications
Applications are divided into three types as follows:
• Applications already installed on your CLIÉ handheld
• Applications you need to install on your CLIÉ handheld
For details about using the Installation CD-ROM, follow the procedure on
page 88.
• Applications you need to install on your computer
Using CLIÉ Application Manual
For details about using the add-on applications, refer to the “CLIÉ Application
Manual” installed on your computer.
86
Notes
• Prior to using applications, refer to “Installing the software on your computer” on page
65 to install the Palm™ Desktop for CLIÉ software. The “CLIÉ Application Manual”
will be installed at the same time.
• The “CLIÉ Application Manual” requires “Microsoft Internet Explorer Version 5.0”
or later to be displayed properly.
Page 87

Opening CLIÉ Application Manual
1
Double-click the CLIÉ info icon on the Windows desktop.
“CLIÉ info” window is displayed.
2
Select the manual by following the on-screen
instructions.
Tips
• To close the “CLIÉ Application Manual,” click the icon in the top right-hand
corner in the CLIÉ Application Manual window.
• You can minimize the CLIÉ Application Manual window by clicking the icon
in the top right-hand corner in the window. The minimized window can be reopened
by clicking the CLIÉ Application Manual button in the task bar.
• You can operate other software while the CLIÉ Application Manual window is
displayed on the Windows desktop.
87
Using applications
Page 88

Installing add-on applications on your CLIÉ handheld
You can install applications with the supplied Installation CD-ROM by
following the procedure below.
Prior to installing applications, install the Palm™ Desktop for CLIÉ software
on your computer with the supplied Installation CD-ROM and connect the
cradle to your computer.
Note
The add-on applications are designed to operate on PEG-NZ90 only. Compatibility
with other CLIÉ handheld or Palm OS PDAs is not guaranteed.
1
Quit all applications running on the Windows® operating
system.
2
Insert the Installation CD-ROM into the CD-ROM drive of
your computer.
The installation launcher window appears.
3
Click CLIÉ Desktop.
4
Click Install to the right of CLIÉ Add-ons.
5
Select the add-on applications to install.
88
6
Click Next.
7
Select the User.
8
Click OK.
9
Click Done.
10
To install the application on your CLIÉ handheld, press
the HotSync button on the cradle.
Page 89

Introducing add-on applications
Taking images
Application to be used
CLIE Camera S
Keyword
JPEG (DCF) format
Summary
For taking images using the built-in camera of the CLIÉ handheld.
Preparation for use:
For details, refer to the “CLIÉ Application Manual” installed on your computer.
b
Importing image/movie files from your computer
Application to be used
Image Converter
Keyword
JPEG (DCF) format, Movie Player format
Summary
For converting the formats of pictures on your computer so that they can be viewed on your
CLIÉ handheld.
Preparation for use:
Installation CD-ROM Menu
“CLIÉ Image”
For details, refer to the “CLIÉ Application Manual” installed on your computer.
b
CLIÉ handheld
Installed
PC
Must be installed
Requires a “Memory Stick” media
Using applications
89
Page 90

Importing movie files from your computer
Application to be used
Giga Pocket Plugin
Keyword
Movie Player format
Summary
For converting the formats of movie files on your computer so that they can be viewed on
your CLIÉ handheld.
Preparation for use:
Installation CD-ROM Menu
“CLIÉ Image”
For details, refer to Help files of the “Giga Pocket Plugin” installed on you r co mp uter.
b
PC
Must be installed
Requires a “Memory Stick” media
Viewing/Playing back a file after searching from the list
Application to be used
CLIE Viewer
Summary
For managing and displaying image files, movie files, handwriting memos and Voice memo files.
Preparation for use:
For details, refer to the “CLIÉ Application Manual” installed on your computer.
b
CLIÉ handheld
Installed
Managing image files in albums
Application to be used
CLIE Album
Summary
For managing image files saved on your CLIÉ handheld or “Memory
Stick” media, in an album format.
You can print out contents of the “CLIE Album” screen or view them on a television.
Preparation for use:
For details, refer to the “CLIÉ Application Manual” installed on your computer.
b
90
CLIÉ handheld
Installed
Page 91

Managing image files taken with your CLIÉ handheld on your computer
Application to be used
PictureGear Studio
Summary
For importing image files from your CLIÉ handheld to your computer and managing the
image files.
• Creates albums or binders for image files
• Imports image files to the computer and manages the image files
• Prints out labels
• Exchanges data created using the CLIE Album application between your CLIÉ handheld
and computer.
Preparation for use:
Installation CD-ROM Menu
“CLIÉ Image”
For details, refer to the “CLIÉ Application Manual” installed on your computer.
b
PC
Must be installed
Requires a “Memory Stick” media
Displaying image files automatically
Application to be used
PhotoStand
Keyword
JPEG (DCF) format
Summary
For displaying automatically image files one after the other.
Preparation for use:
For details, refer to the “CLIÉ Application Manual” installed on your computer.
b
CLIÉ handheld
Installed
Using applications
91
Page 92

Editing images
Application to be used
Photo Editor
Keyword
JPEG (DCF) format
Summary
For drawing pictures on an image file saved on your CLIÉ handheld. You can also draw
pictures on a new blank canvas.
Preparation for use:
For details, refer to the “CLIÉ Application Manual” installed on your computer.
b
CLIÉ handheld
Installed
Recording movies
Application to be used
Movie Recorder
Keyword
Movie Player format (movie formats shot with your CLIÉ handheld
or converted using the Image Converter software)
Summary
For recording movies using the built-in camera of the CLIÉ handheld.
Preparation for use:
For details, refer to the “CLIÉ Application Manual” installed on your computer.
b
CLIÉ handheld
Installed Requires a “Memory Stick” media
www.aibo.com
Playing back movies
Application to be used
Movie Player
Keyword
Movie Player format (movie formats shot with your CLIÉ handheld
or converted using the Image Converter software), MPEG Movie
format (MPEG1 format movie files shot with a Sony Digital Still
Camera or Handycam),
Play List, Repeat function, Index function
Summary
For playing back movies recorded with the built-in camera of the CLIÉ handheld or playing
back movies on your CLIÉ handheld using “Image Converter” software on your computer.
Preparation for use:
For details, refer to the “CLIÉ Application Manual” installed on your computer.
b
92
CLIÉ handheld
Installed Requires a “Memory Stick” media
www.aibo.com
Page 93

Playing back Macromedia® Flash
Application to be used
™
Macromedia Flash Player 5
CLIÉ handheld
Keyword
swf format
Summary
For playing back the Macromedia Flash contents.
Some Flash contents for computers may not be played back normally on your CLIÉ handheld.
Preparation for use:
For details, refer to the “CLIÉ Application Manual” installed on your computer.
b
Installed Requires a “Memory Stick” media
Listening to music with your CLIÉ
handheld
Application to be used
Audio Player
Keyword
MP3, ATRAC3
Summary
For playing back music files saved on a “Memory Stick” media.
Preparation for use:
For details, refer to the “CLIÉ Application Manual” installed on your computer.
b
CLIÉ handheld
Installed
Needs to be connected to your computer
Requires a “Memory Stick” media
Using applications
93
Page 94

Transferring music files to your CLIÉ handheld
Application to be used
SonicStage 1.5
Keyword
ATRAC3
Summary
For managing and creating music files to be played back with your CLIÉ handheld in your
computer.
The application is also used for transferring music files to a “Memory Stick” media.
Preparation for use:
Installation CD-ROM Menu
“CLIÉ Audio”
For details, refer to the “CLIÉ Application Manual” and Help files of “SonicStage” on your computer.
b
PC
Must be installed
Recording voice memo
Application to be used
Voice Recorder
Summary
For recording and playing back a voice memo using the built-in
microphone of your CLIÉ handheld.
Preparation for use:
For details, refer to the “CLIÉ Application Manual” installed on your computer.
b
CLIÉ handheld
Installed
Managing addresses and telephone numbers
Application to be used
Address
Summary
For entering and editing Address information such as names, addresses or telephone numbers.
Preparation for use:
For details, refer to the “CLIÉ Application Manual” installed on your computer.
b
94
CLIÉ handheld
Installed
Page 95

Managing schedules and events
Application to be used
Date Book
Summary
For managing schedules and events such as meetings or business trips.
Preparation for use:
For details, refer to the “CLIÉ Application Manual” installed on your computer.
b
CLIÉ handheld
Installed
Managing tasks and things to do
Application to be used
To Do List
Summary
For displaying tasks that you want to be reminded of later. You can
assign priority to any task.
Preparation for use:
For details, refer to the “CLIÉ Application Manual” installed on your computer.
b
CLIÉ handheld
Installed
Taking memos
Application to be used
Memo Pad
CLIÉ handheld
Summary
For taking memos or displaying documents created on your computer.
Preparation for use:
For details, refer to the “CLIÉ Application Manual” installed on your computer.
b
Installed
Taking handwritten memos using the stylus
Application to be used
CLIE Memo
Summary
For taking handwritten memos using the stylus.
Preparation for use:
For details, refer to the “CLIÉ Application Manual” installed on your computer.
b
CLIÉ handheld
Installed
Using applications
95
Page 96

Using the calculator
Application to be used
Calculator
Summary
For calculating with your CLIÉ handheld. You can save and recall
calculations with the calculator’s memory.
Preparation for use:
For details, refer to the “CLIÉ Application Manual” installed on your computer.
b
CLIÉ handheld
Installed
Sending and receiving e-mail messages
Application to be used
CLIE Mail
Summary
For sending and receiving e-mail messages on your CLIÉ handheld.
Preparation for use:
Installation CD-ROM Menu
“CLIÉ Desktop” – “CLIÉ Add-ons”
For details, refer to the “CLIÉ Application Manual” installed on your computer.
b
CLIÉ handheld
Must be installed
Browsing websites
Application to be used
NetFront v3.0 for CLIE
Keyword
Websites, Internet, WWW browser
Summary
For browsing websites with your CLIÉ handheld.
Preparation for use:
Installation CD-ROM Menu
“CLIÉ Desktop” – “CLIÉ Add-ons”
For details, refer to the “CLIÉ Application Manual” installed on your computer.
b
Must be installed
96
CLIÉ handheld
Page 97

Using as a remote control
Application to be used
CLIE Remote Commander
CLIÉ handheld
Keyword
Beaming
Summary
For using your CLIÉ handheld as a remote control.
Preparation for use:
For details, refer to the “CLIÉ Application Manual” installed on your computer.
b
Installed
Displaying the worldwide local time
Application to be used
World Alarm Clock
Summary
For displaying the worldwide local time. You can also use the application as an alarm clock.
Preparation for use:
Installation CD-ROM Menu
“CLIÉ Desktop” – “CLIÉ Add-ons”
For details, refer to the “CLIÉ Application Manual” installed on your computer.
b
CLIÉ handheld
Must be installed
Using applications
Exchanging data between your CLIÉ handheld and “Memory Stick” media
Application to be used
CLIE Files
Summary
For exchanging data (copy, move, delete) between your CLIÉ handheld and “Memory Stick”
media inserted in the CLIÉ handheld or for editing data on your “Memory Stick” media.
Preparation for use:
For details, refer to the “CLIÉ Application Manual” installed on your computer.
b
CLIÉ handheld
Installed Requires a “Memory Stick” media
97
Page 98

Making a backup on a “Memory Stick” media
Application to be used
Memory Stick Backup
Summary
For making a backup of the application or data in a “Memory Stick” media.
Preparation for use:
For details, refer to the “CLIÉ Application Manual” installed on your computer.
b
Installed Requires a “Memory Stick” media
CLIÉ handheld
Using a “Memory Stick” media in your CLIÉ handheld on a computer
Application to be used
Memory Stick Import
Memory Stick Export
Summary
For installing application or copying data from your computer to a “Memory Stick” media in
your CLIÉ handheld without using a HotSync
Preparation for use:
Memory Stick Import:
Memory Stick Export:
Requires a “Memory Stick” media
Installed
Must be installed
CLIÉ handheld
PC
®
operation.
Installation CD-ROM Menu
“CLIÉ Utilities”
For details, refer to the “CLIÉ Application Manual” installed on your computer.
b
Customizing the sound settings
Application to be used
Sound Utility
Summary
For managing the audio data converted with Sound Converter 2. The
audio data files are transferred from your computer to your CLIÉ handheld via a HotSync
operation.
Preparation for use:
For details, refer to the “CLIÉ Application Manual” installed on your computer.
b
98
CLIÉ handheld
Installed
Needs to be connected to your computer
®
Page 99

Sending audio data to your CLIÉ handheld
Application to be used
Sound Converter 2
Keyword
WAVE (PCM) format, MIDI (Standard MIDI File Format 0/1) format
Summary
For converting the audio data of WAVE (PCM) format or MIDI format in your computer to
audio data of the CLIÉ handheld format.
Preparation for use:
Installation CD-ROM Menu
“CLIÉ Utilities”
For details, refer to the “CLIÉ Application Manual” installed on your computer.
b
PC
Must be installed
Viewing computer documents on your CLIÉ handheld
Application to be used
Picsel Viewer for CLIE
Keyword
doc format, xls format, ppt format, txt format, JPEG format, GIF
format, PNG format, BMP format, PDF format, HTML format,
MHTML format
Summary
For viewing computer documents such as Microsoft Word/Excel data on your CLIÉ
handheld.
Preparation for use:
Installation CD-ROM Menu
“CLIÉ Desktop” – “CLIÉ Add-ons”
For details, refer to the “CLIÉ Application Manual” installed on your computer.
b
Must be installed
Requires a “Memory Stick” media
CLIÉ handheld
Using applications
99
Page 100

Exchanging data with Microsoft® Outlook
Application to be used
Intellisync Lite
Summary
For exchanging the data between Microsoft Outlook/Lotus Organizer and Date Book,
Address, To Do, etc., of the CLIÉ handheld.
Preparation for use:
Installation CD-ROM Menu
Select Palm Desktop for CLIÉ from CLIÉ Desktop, and follow the
on-screen instructions.
For details, refer to the “CLIÉ Application Manual” and Help files of “Intellisync Lite” installed
b
on your computer.
PC
Must be installed
Needs to be connected to your computer
Sending/Receiving messages and data via a connected GSM wireless device
Application to be used
SMS
CLIÉ handheld
Summary
For sending/receiving messages and data from your CLIÉ handheld via a connected GSM
wireless device, such as a mobile phone.
Preparation for use:
For details, refer to the “CLIÉ Application Manual” installed on your computer.
b
Installed
100
 Loading...