

Sony UPX-C200, UP-DX100, DKC-C200X, PCS-AC08 Operating Instructions Manual

Digital Printing
System
3-207-402-15(1)
Operating Instructions (Basic Operations)
_____________________ GB
UPX-C200
© 2003 Sony Corporation

Owner’s Record
The model and serial numbers are located at the rear.
Record these number in the space provided below.
Refer to these numbers whenever you call upon your
Sony dealer regarding this product.
Model No. __________________________________
Serial No. __________________________________
All interface cables used to connect peripherals must be
shielded in order to comply with the limits for a digital
device pursuant to Subpart B of Part 15 of FCC Rules.
If you have any questions about this product, you may
call:
Sony’s Business Information Center (BIC) at
1-800-686-SONY (7669) or Sony Web site at
www.sony.com.
WARNING
To prevent fire or shock hazard, do not
expose the unit to rain or moisture.
To avoid electrical shock, do not open the
cabinet. Refer servicing to qualified
personnel only.
for the UP-DX100 Printer, DKC-C200X
Digital Still Camera, and the PCS-AC08
AC Power Adaptor
For the customers in the USA
This equipment has been tested and found to comply
with the limits for a Class B digital device, pursuant to
Part 15 of the FCC Rules. These limits are designed to
provide reasonable protection against harmful
interference in a residential installation. This equipment
generates, uses, and can radiate radio frequency energy
and, if not installed and used in accordance with the
instructions, may cause harmful interference to radio
communications. However, there is no guarantee that
interference will not occur in a particular installation. If
this equipment does cause harmful interference to radio
or television reception, which can be determined by
turning the equipment off and on, the user is encouraged
to try to correct the interference by one or more of the
following measures:
– Reorient or relocate the receiving antenna.
– Increase the separation between the equipment and
receiver.
– Connect the equipment into an outlet on a circuit
different from that to which the receiver is connected.
– Consult the dealer or experienced radio/TV technician
for help.
Declaration of conformity
Trade Name: SONY
Model: UP-DX100, DKC-C200X
Responsible Party: Sony Electronics Inc.
Address: 16530 Via Esprillo,
San Diego, CA 92127 U.S.A.
Telephone Number: 858-942-2230
This device complies with part 15 of the FCC Rules.
Operation is subject to the following two conditions:
(1) This device may not cause harmful interference,
and (2) this device must accept any interference
received, including interference that may cause
undesired operation.
For the customers in Canada
This Class B digital apparatus complies with Canadian
ICES-003.
Operation is subject to the following two conditions: (1)
this device may not cause interference, and (2) this
device must accept any interference, including
interference that may cause undesired opoeration of the
device.
The term “IC” before the certification/registration
number only signifies that the Industry Canada technical
specifications were met.
for the DKC-C200X Digital Still Camera
CAUTION
Danger of explosion if the battery is incorrectly
replaced. Replace only with the same or equivalent type
recommended by the manufacturer. Dispose of used
batteries according to the manufacturer’s instructions.
You are cautioned that any changes or modifications not
expressly approved in this manual could void your
authority to operate this equipment.
This device requires shielded interface cables to comply
with FCC emission limits
2

for the UP-DX100 Printer
WARNING
This unit has no power switch.
When installing this unit, incorporate a readily
accessible disconnect device in the fixed wiring, or
connect the power cord to socket-outlet which must be
provided near the unit and easily accessible.
If a fault should occur during operation of the unit,
operate the disconnect device to switch the power
supply off, or disconnect the power cord.
For the customers in the USA and Canada
For the customers in Europe
Hereby, Sony Corporation, declares that these
DKC-C200X and UP-DX100 are in compliance with the
essential requirements and other relevant provisions of
the Directive 1999/5/EC.
For details, please access the following URL:
http://www.compliance.sony.de/
RECYCLING NICKEL METAL HYDRIDE
BATTERIES
Nickel Metal Hydride batteries are recyclable.
You can help preserve our environment by returning
your used rechargeable batteries to the collection
and recycling location nearest you.
For more information regarding recycling of
rechargeable batteries, call toll free 1-800-822-8837, or
http://www.rbrc.org/.
visit
Caution: Do not handle damaged or
leaking Nickel Metal Hydride
batteries.
Voor de klanten in Nederland
– Dit apparaat bevat een vast ingebouwde batterij die
niet vervangen hoeft te worden tijdens de levensduur
van het apparaat.
– Raadpleeg uw leverancier indien de batterij toch
vervangen moet worden.
De batterij mag alleen vervangen worden door
vakbekwaam servicepersoneel.
– Gooi de batterij niet weg maar lever deze in als klein
chemisch afval (KCA).
– Lever het apparaat aan het einde van de levensduur in
voor recycling, de batterij zal dan op correcte wijze
verwerkt worden.
This product is intended to be used in the following
countries :
Austria, Belgium, the Czech Republic, Denmark,
Finland, France, Germany, Greece, Ireland, Italy,
Luxembourg, The Netherlands, Portugal, the Republic
of Hungary, the Republic of Poland, Spain, Sweden,
United Kingdom, Iceland, Norway, Switzerland, and
Liechtenstein.
Para clientes na Europa
A Sony Corporation declara que os modelos
DKC-C200X e UP-DX100 estáo em conformidade com
os requisitos essenciais e outras disposições importantes
da Directiva 1999/5/CE.
Para mais informações, aceda ao URL apresentado em
seguida:
http://www.compliance.sony.de/
Este produto destina-se a ser utilizado nos seguintes
países :
Alemanha, Áustria, Bélgica, Dinamarca, Espanha,
Finlândia, França, Grécia, Hungria, Irlanda, Islândia,
Itália, Liechtenstein, Luxemburgo, Noruega, Países
Baixos, Polónia, Portugal, Reino Unido, República
Checa, Suécia e Suiça.
Voor klanten in Europa
Sony Corporation verklaart hierbij dat deze
DKC-C200X en UP-DX100 voldoen aan de primaire
vereisten en andere relevante voorschriften van richtlijn
1999/5/EG van de Europese Unie.
Voor verdere informatie bezoekt u de volgende website:
http://www.compliance.sony.de/
Dit product is bedoeld voor gebruik in de volgende
landen:
België, Denemarken, Duitsland, Finland, Frankrijk,
Griekenland, Hongarije, Ierland, IJsland, Italië,
Liechtenstein, Luxemburg, Nederland, Noorwegen,
Oostenrijk, Polen, Portugal, Spanje, Tsjechië, Verenigd
Koninkrijk, Zweden en Zwitserland.
3

För kunder i Europa
Sony Corporation förkunnar härmed att dessa
DKC-C200X och UP-DX100 uppfyller de huvudsakliga
kraven och andra relevanta villkor i direktivet 1999/5/
EC.
Se följande URL för närmare detaljer:
http://www.compliance.sony.de/
Denna produkt är avsedd för användning i följande
länder:
Österrike, Belgien, Tjeckien, Danmark, Finland,
Frankrike, Tyskland, Grekland, Irland, Italien,
Luxemburg, Nederländerna, Portugal, Ungern, Polen,
Spanien, Sverige, Storbritannien, Island, Norge,
Schweiz och Liechtenstein.
For kunder i Europa
Sony Corporation erklærer herved, at DKC-C200X og
UP-DX100 er i overensstemmelse med de essentielle
krav og andre relevante bestemmelser i direktiv 1999/5/
EC.
Åbn venligst den følgende URL angående detaljer:
http://www.compliance.sony.de/
Dette produkt er beregnet til brug i følgende lande:
Østrig, Belgien, Tjekkiet, Danmark, Finland, Frankrig,
Tyskland, Grækenland, Irland, Italien, Luxembourg,
Holland, Portugal, Ungarn, Polen, Spanien, Sverige,
Storbritannien, Island, Norge, Schweiz, Liechtenstein.
Euroopassa oleville asiakkaille
Sony Corporation vakuuttaa täten, että DKC-C200X ja
UP-DX100 vastaa direktiivin 1999/5/EC olennaisia
vaatimuksia ja muita asiaankuuluvia määräyksiä. Katso
tarkemmat tiedot osoitteesta:
http://www.compliance.sony.de/
Tämä tuote on tarkoitettu käytettäväksi seuraavissa
maissa:
Itävalta, Belgia, Tsekki, Tanska, Suomi, Ranska, Saksa,
Kreikka, Irlanti, Italia, Luxemburg, Alankomaat,
Portugali, Unkari, Puola, Espanja, Ruotsi, Iso-Britannia,
Islanti, Norja, Sveitsi ja Liechtenstein.
4
• Windows® is a registered trademark of Microsoft
Corporation in the United States and other countries.
• All other companies and product names mentioned
herein may be the trademarks or registered
trademarks of their respective companies.
Furthermore, “™” and “®” are not mentioned in
each case in this manual.
Duplication, edition, or printing of a CD, TV
programs, copyrighted materials such as pictures or
publications, or any other materials except for your
own recording or creation is limited to private or
domestic use only. Unless you hold copyright or have
permission of copyright holders for the materials to be
duplicated, use of those materials beyond this limit
may infringe the provisions of the copyright law and
be subject to the copyright holder’s claim for damages.
When using photo images with this printer, pay special
attention not to infringe the provisions of the copyright
law. Any unauthorized use or modification of others’
portrait may also infringe their rights.
For some demonstrations, performances, or exhibits,
photography may be forbidden.
Para os clientes no Brasil
Este equipamento funciona em uma base secundária e,
conseqüentemente, deverá aceitar interferência
prejudicial, incluindo de uma estação do mesmo tipo, e
poderá não causar interferência prejudicial em sistemas
que funcionam em uma base primária.
DKC-C200X
Agência Nacional de Telecomunicaçöes
Cód. Homol. n : 0606-03-1965
UP-DX100
Agência Nacional de Telecomunicaçöes
Cód. Homol. n : 0605-03-1965
5

Table of Contents
System Overview ................................................... 7
System Configuration ........................................ 7
Printouts that Can Be Made with This
System .............................................................. 8
Flash Modes and Examples of Shooting
Conditions ......................................................10
Supplied Accessories ........................................... 11
Unpacking ........................................................11
Reading the Supplied CD-ROM Manual ......... 11
Preparations ......................................................... 12
Preparation of the Camera ................................ 12
Preparation of the Printer ................................. 14
Operation ............................................................. 17
Preparations ......................................................17
Taking a Picture ................................................ 18
Printing a Picture .............................................. 20
Reprinting a Picture Stored in Memory of the
Printer (COPY PRINT) .................................. 22
Viewing a Picture .............................................22
Deleting a Picture ............................................. 23
Protecting a Picture (PROTECT) ..................... 24
Turning Off the Power ......................................26
Menu ..................................................................... 27
Menu Configuration ......................................... 27
Functions of the Menu Items ........................... 30
Displaying the Setup display ............................ 34
Displaying the Menu display in CAMERA
mode ............................................................... 34
Various Functions ................................................ 35
Using the Camera with Batteries ..................... 35
Setting the Clock (CLOCK) ............................. 37
Setting the Record Resolution
(RESOLUTION) ............................................37
Setting the Zoom Range (ZOOM) ................... 38
Setting the Shooting Conditions ...................... 39
Setting the Print Size to be Displayed (PRINT
SIZE LIST) .................................................... 41
Setting the Frame (FRAME) ............................ 42
Setting Power Save Mode
(POWER SAVE) ............................................47
Setting the Size Units (SIZE UNIT) ................ 48
Selecting the Format of the Output Signal (VIDEO
OUT) .............................................................. 48
Selecting Sound During Operation
(SOUND) ....................................................... 49
Selecting the USB Class (USB) ....................... 49
Moving a Picture Displayed on a Nine-Picture
Multiple Display (MOVE) ............................. 50
Locking the Menu of the Camera .................... 51
Setting the Lens for Transportation
(TRANSPORT SETTING) ............................ 51
Adjusting the Print Quality
(COLOR ADJUST) ........................................ 52
Adjusting the Printing Location (PRINT
SETTING) ......................................................54
If the Bluetooth lamp of the camera is off ........55
Bluetooth ...............................................................55
Bluetooth wireless technology ..........................55
The “Basic Imaging Profile” ............................55
Communication between the Camera and Printer
Using the Bluetooth ........................................56
Locations of Parts ................................................58
Camera ..............................................................58
Printer ...............................................................62
Precautions ...........................................................64
Safety ................................................................64
Installation ........................................................64
Operation ..........................................................65
Cleaning ............................................................65
Batteries ............................................................65
Specifications ........................................................66
Troubleshooting ....................................................68
Camera ..............................................................68
While Shooting .................................................68
Liquid Crystal Display of the Camera ..............68
Picture Quality ..................................................69
Printer ...............................................................69
Bluetooth Function ...........................................71
Battery Charger .................................................71
Error messages ..................................................72
Index ......................................................................73
6
Table of Contents
System Overview
The Sony UPX-C200 digital printing system is designed
allow you to take pictures with a digital camera and to
to
print them on two types of paper
: UPC-X46 series or
UPC-X34 series.
If an optional UPA-DX100TR paper tray is inserted in
the printer, you can also use
UPC-X45 series print paper.
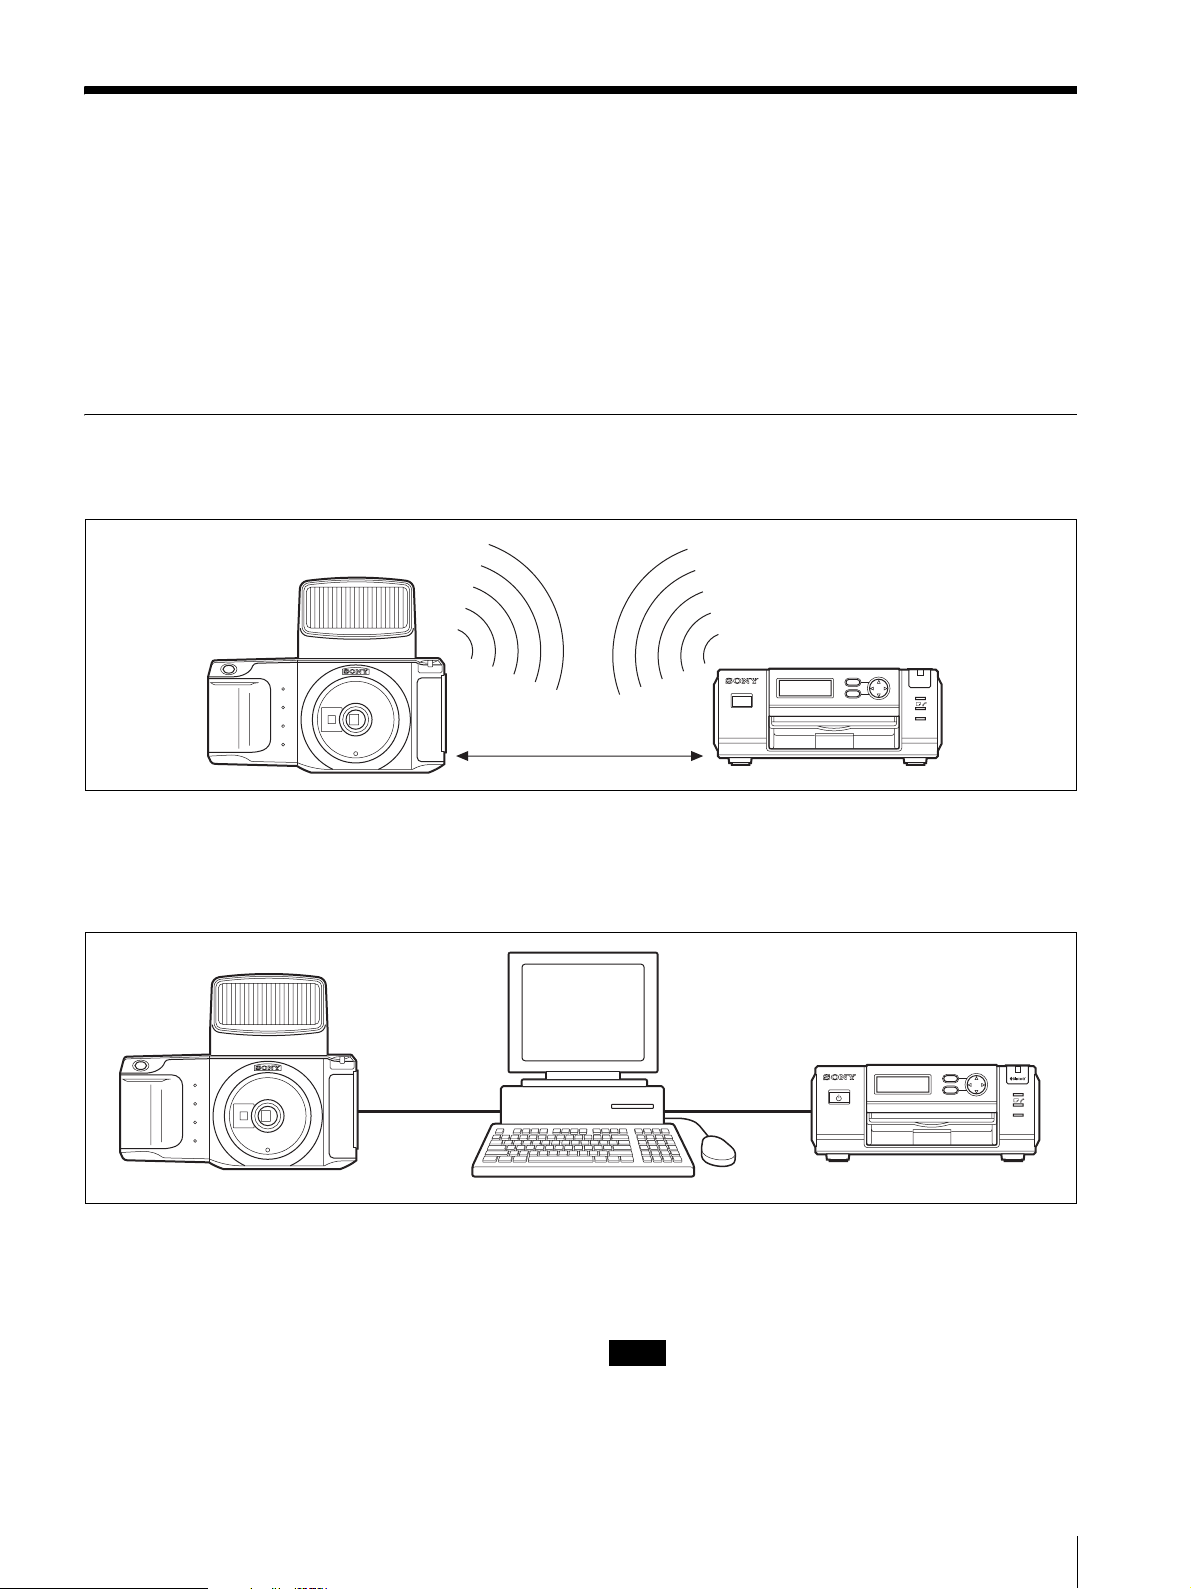
The system adopts Bluetooth wireless technology,
which enables communication between the camera and
printer without using cables.
System Configuration
Using the Bluetooth function
Bluetooth transmission
Camera
less than 10 m
without obstruction
Notice for the optional accessories
The following optional accessories may not be marketed
in certain countries/regions.
• UPA-DX100TR Paper Tray
•10UPC-X45 Series Self-laminating Color Printing
Pack
For detailed information, contact your nearest Sony
dealer.
Printer
MENU
EXEC
PRINT
ALARM
You can send images from the camera to the printer
without a cable.
Connecting to a computer
Camera
USB cable
Using the utility software stored on the CD-ROM, you
can store camera pictures on the computer, read and
print the image data stored in the computer. It is also
possible to print different images, color and black
white images, or different sizes of images on a single
sheet of print paper.
When using this system with a computer, refer to
“Utility Software User’s Guide” on the supplied CD-
.
ROM
-and-
For details on the Bluetooth function, see “Bluetooth”
on page 55.
Computer
Printer
MENU
USB cable
EXEC
DIGITAL PHOTO PRINTER
PRINT
ALARM
To operate the system with a computer, install the
supplied printer driver on the computer. For details on
the printer driver, refer to “Readme (English)” on the
supplied CD-ROM.
Note
When connecting a computer using a USB cable,
depending on the type of computer, normal operation
may not be obtained. In such a case, use a commercially
available USB hub.
System Overview
7
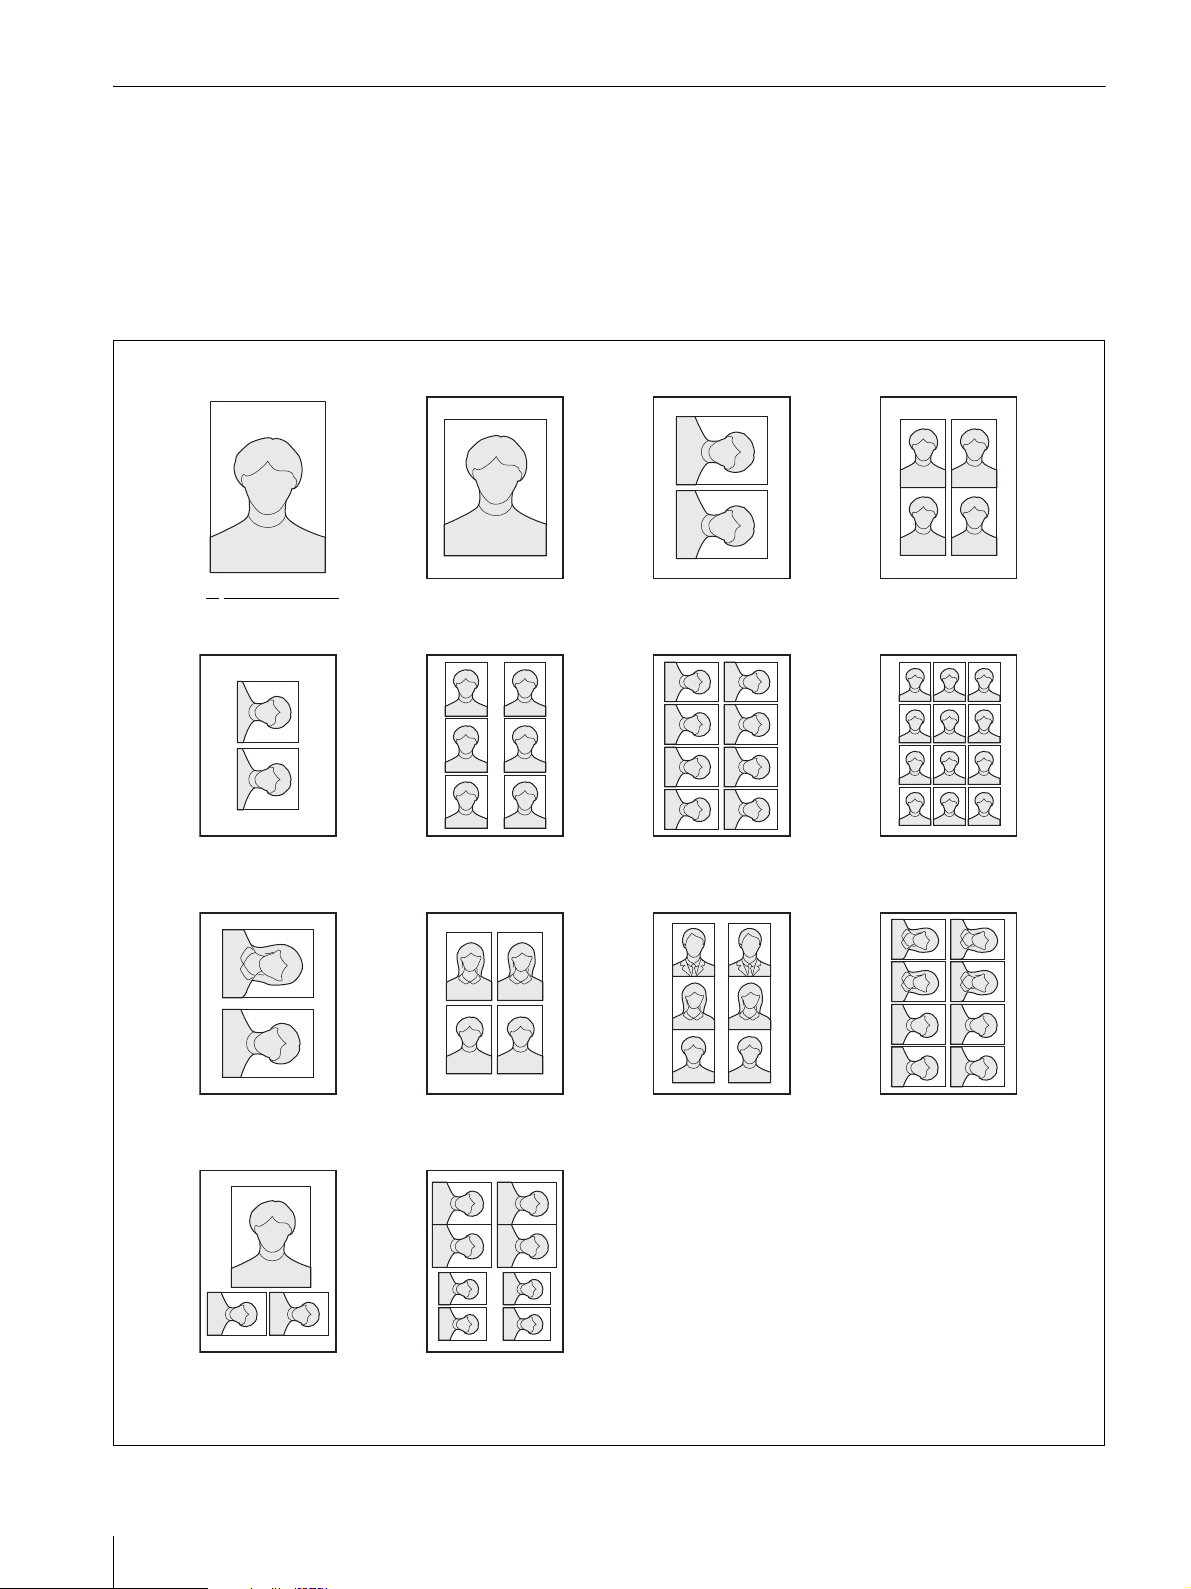
Printouts that Can Be Made with This System
The system can print 22 types of printouts and two types
of guide
types of printouts are available, while with the
series
print. When the UPC-X46 series is used, all
UPC-X34
, the types that can be printed are limited.
The figures below show the number of images on a
single sheet of print paper, and the directions and types
When the UPC-X46 series is used
1. 151 × 101.6 mm X46
(Size number) (Size)
2. 120 × 90 mm X46
3. 95 × 70 mm
of images. The
printed. Below each image
. D2, D4, D6, and D8 indicate that there are
shown
different types o
y do not show the exact sizes to be
, the size number and size is
f printouts for the same size, and X46
shows that the size is available only when the
is used.
series
4. 80 × 60 mm
5. 70 × 53 mm
6. 70 × 50 mm
7. 60 × 40 mm
9. 50 × 48.5 mm
UPC-X46
8. 54 × 54 mm 2×2inch 10. 47 × 37 mm
17. 80 × 60 mm D2 X46 18. 60 × 40 mm D4 X46 19. 47 × 37 mm D6 X46 20. 45 × 35 mm D8
21. Special-1
(108 × 81 mm/
47 × 37 mm)
12. 45 × 45 mm
22. Special-2
(47 × 37 mm/
43 × 33 mm)
11. 45 × 35 mm
13. 43 × 33 mm
14. 38 × 32 mm
15. 34 × 28 mm
16. 23 × 23 mm
8
System Overview
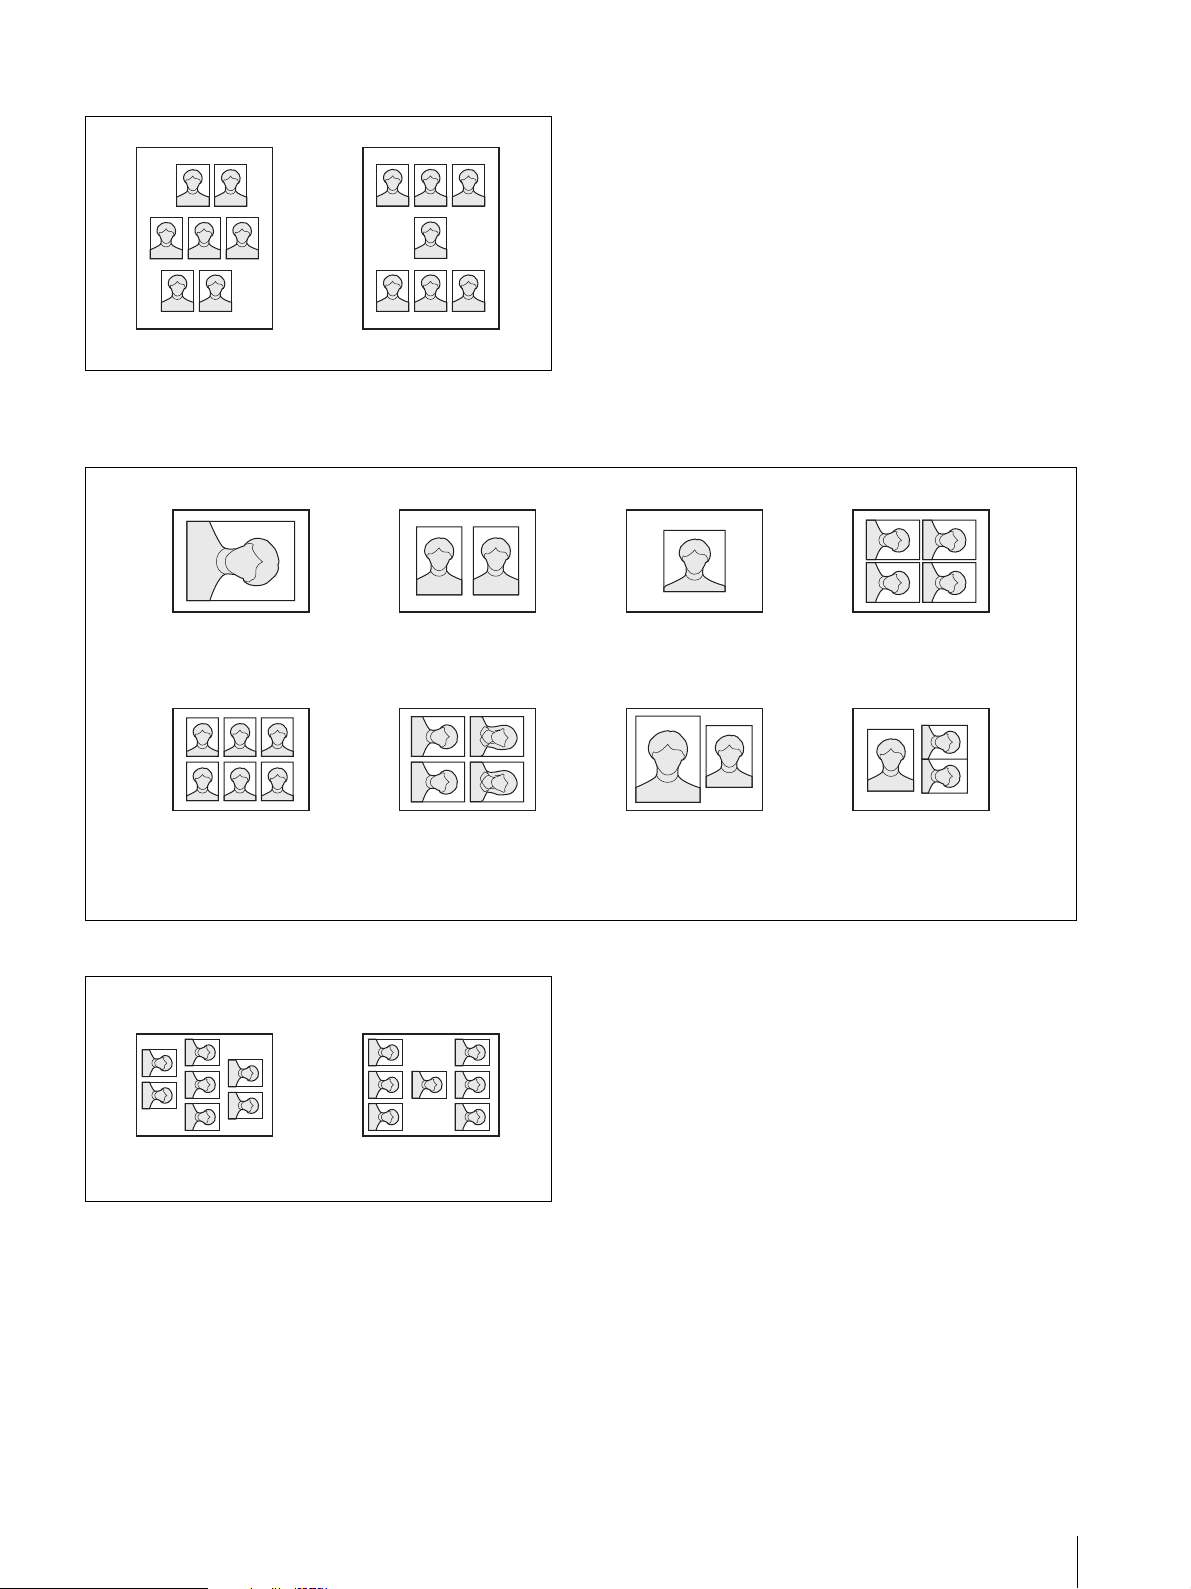
Guide print
Guide Print-RGB Guide Print-DLGm
When the UPC-X34 series is used
3. 95 × 70 mm
4. 80 × 60 mm
5. 70 × 53 mm
6. 70 × 50 mm
15. 34 × 28 mm
16. 23 × 23 mm
Guide print
Guide Print-RGB Guide Print-DLGm
7. 60 × 40 mm
10. 47 × 37 mm
12. 45 × 45 mm
20. 45 × 35 mm D4 21. Special-1
8. 54 × 54 mm 2×2inch
9. 50 × 48.5 mm
(70 × 53 mm/
47 × 37 mm)
11. 45 × 35 mm
13. 43 × 33 mm
14. 38 × 32 mm
22. Special-2
(47 × 37 mm/
43 × 33 mm)
System Overview
9

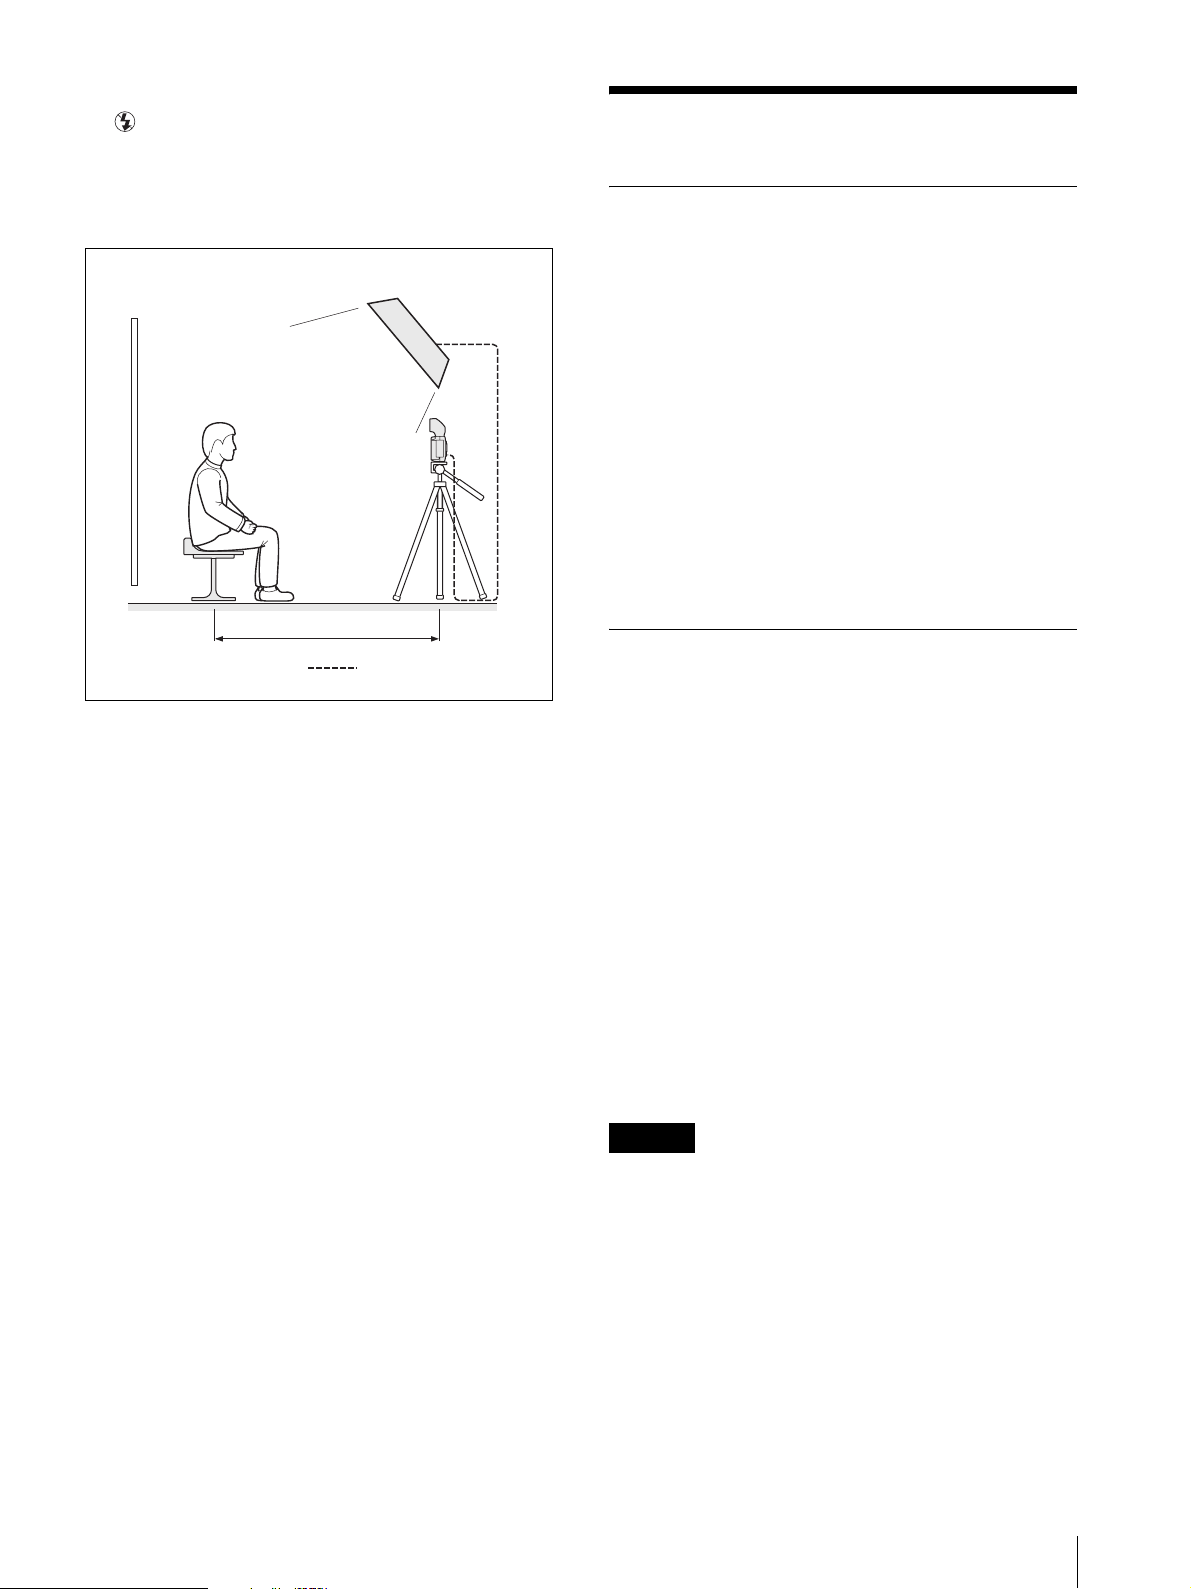
Flash Modes and Examples of Shooting Conditions
The system offers five types of flash modes. Shooting
examples in each mode are introduces here.
The distance between the camera and the subject (L)
should be decided so that
selected frame (guideline).
For details on selecting the frame, see “Setting the
Frame (FRAME)” on page 42.
For details on shooting conditions and their setting
procedures, see
“Setting the Shooting Conditions” on
page 39.
For details on shooting conditions and operations of the
camera
, refer to the Operating Instructions (Advanced
Operations).
Auto flash and auto exposure mode (A )
This is the default mode of the camera, and is suitable
for outdoor and indoor portrait shots. When the subject
is not bright enough, the flash automatically lights.
Forced flash and auto exposure mode ( )
The built-in flash always lights. The camera measures
the brightness of the subject with prelighting, then the
flash lights with the optimum brightness.
and shutter speed are automatically adjusted. This mode
is suitable for indoor portraits and identification shots
using the built-in flash as the main light source and the
shadow-clearing flash connected to the camera with a
synchronization cord.
apparent face size fits the
The exposure
No flash and auto exposure mode ( )
The built-in flash does not light. This mode is suitable
for shooting under stable light sources such as studio
light, video light, fluorescent light, etc.
Studio light (halogen light, etc.)
L
Forced flash and manual exposure mode
(M )
The built-in flash lights to illuminate a subject about 1.5
meters away with optimum brightness. You can take a
picture with the default settings for aperture and shutter
speed, and if necessary, you can set them manually.
If the distance L is less than 1.5 meters, set the EV value
the minus side, and if it is more than 1.5 meters, set it
to
the plus side. Be sure to take a test picture to check the
to
.
results
This mode is suitable for indoor portraits and
identification shots using the built-in flash as the main
light source and the shadow-clearing flash connected to
the camera with a synchronization cord.
10
Flash with
synchronization
cord
System Overview
L
: Synchronization cord
Synchronized
flash
L
No flash and manual exposure mode
(M )
This mode does not use the built-in flash, but uses an
external flash connected with the synchroniz
or is suitable for shooting under stable light sources such
as studio light, video light, fluorescent light, etc.
Flash
L
: Synchronization cord
ation cord,
Supplied Accessories
Unpacking
Make sure that the following accessories are supplied
with your system.
Paper tray for the UPC-X46 series (1)
Paper tray for the UPC-X34 series (1)
Tray cover (1)
Paper holders (2)
AC power cords (2 or 3)
AC power adaptor PCS-AC08/1 (1)
Batteries NH-AA (4)
Lithium button battery CR-2025 (1)
Battery charger (1)
Cleaning cassette (1)
CD-ROM (1)
Operating Instructions (Basic Operations) (1 or 2)
Software License Agreement (1)
Reading the Supplied CD-ROM Manual
The supplied CD-ROM includes manuals (for basic
operations and advanced operations) and utility
instructions for the UPX-C200 (in Japanese, English,
French, German, Spanish, Italian, Portuguese, Chinese,
and Korea) and also the utility software.
The copies of these manuals are created in PDF
(Portable Document Format)
This manual describes basic operations. When you wish
to know advanced operations or to use supplied utility
software, read the supplied CD-ROM.
files.
Preparation
To read the manuals included on the supplied CD-ROM,
the Adobe Reader is required.
Adobe Reader can be downloaded from Adobe website
for free, if necessary.
Caution
Do not play back this CD-ROM using an audio CD
player. Doing so may result in damage to your hearing
or to the audio equipment due to loud sounds.
Supplied Accessories
11
CD-ROM System Requirements
The followings are required to access the supplied CDROM.
Computer:
•Intel® Pentium® processor or personal computer
equipped with a 100% compatible processor
• External or built-in CD-ROM drive
Operating system:
•Microsoft® Windows® 95
•Microsoft® Windows® 98
•Microsoft® Windows® 98 Second Edition
•Microsoft® Windows® Millennium Edition
•Microsoft® Windows® NT 4.0
•Microsoft® Windows® 2000 Professional
•Microsoft® Windows® XP Home Edition
•Microsoft® Windows® XP Professional
Reading the CD-ROM Manual
To read the manual on the CD-ROM, proceed as follows.
Preparations
Preparation of the Camera
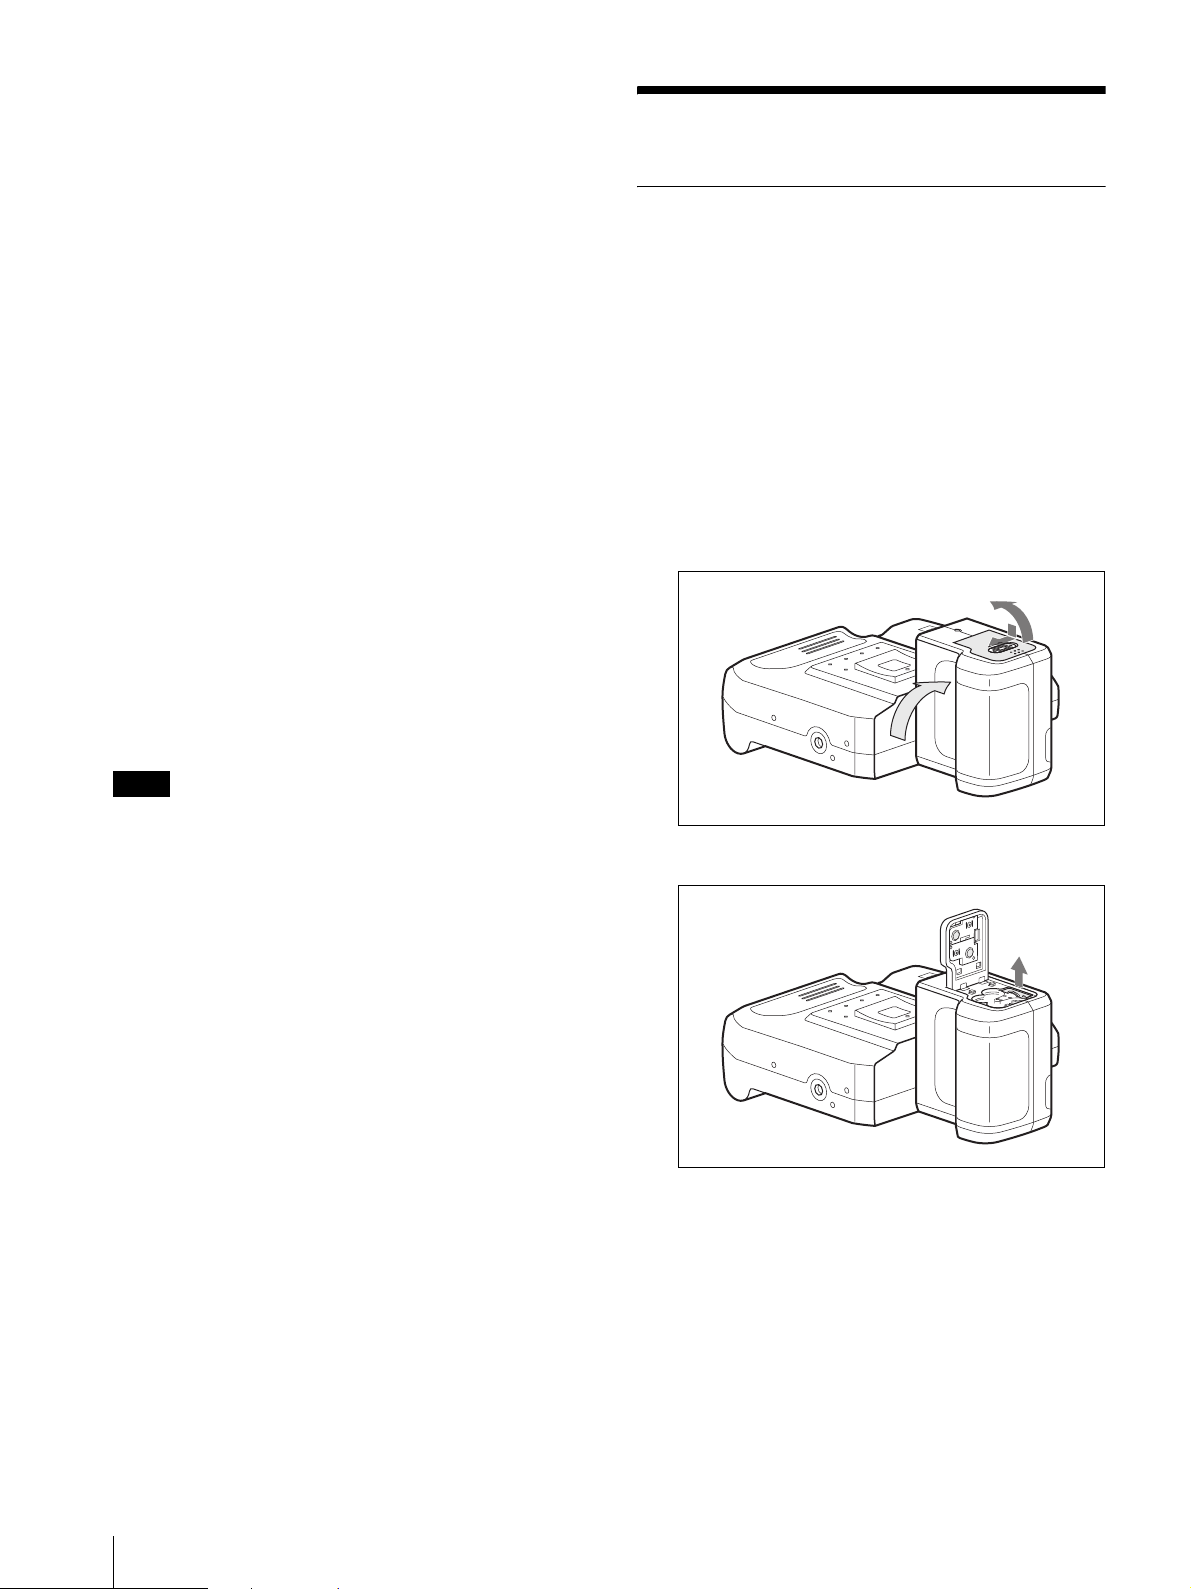
Inserting batteries
Four NH-AA batteries and a lithium button battery CR2025 are supplied. Insert them as described below.
If you operate the camera with the batteries, charge the
batteries before use.
For details on charging the batteries, see “Charging
batteries” on page 35.
1
Open the battery compartment lid on the bottom of
the camera by sliding the button to OPEN with the
center projection of the button pressed.
1 Insert the CD-ROM disc in your CD-ROM drive.
2 Open the folder shown below, and select the manual
that you want to read.
· Basic Instructions
· Advanced Instructions
· Utility Instructions
Note
When you use the utility software, the followings are
required:
Microsoft® Windows® 98 Second Edition
Microsoft® Windows® Millennium Edition
Microsoft® Windows® 2000 Professional
Microsoft® Windows® XP Home Edition
Microsoft® Windows® XP Professional
For details, refer to the Utility Software User’s Guide.
Trademarks
Intel and Pentium are registered trademarks of Intel
Corporation or its subsidiaries in the United States and
other countries.
Microsoft, Windows and Windows NT are registered
trademarks of Microsoft Corporation in the United
States and/or other countries.
Adobe is a registered trademark of Adobe System
Incorporated in the United States and/or other countries.
2
Pull out the button battery case.
CLOSE
CLOSE
OPEN
OPEN
CLOSE
CR2025
OPEN
12
Preparations
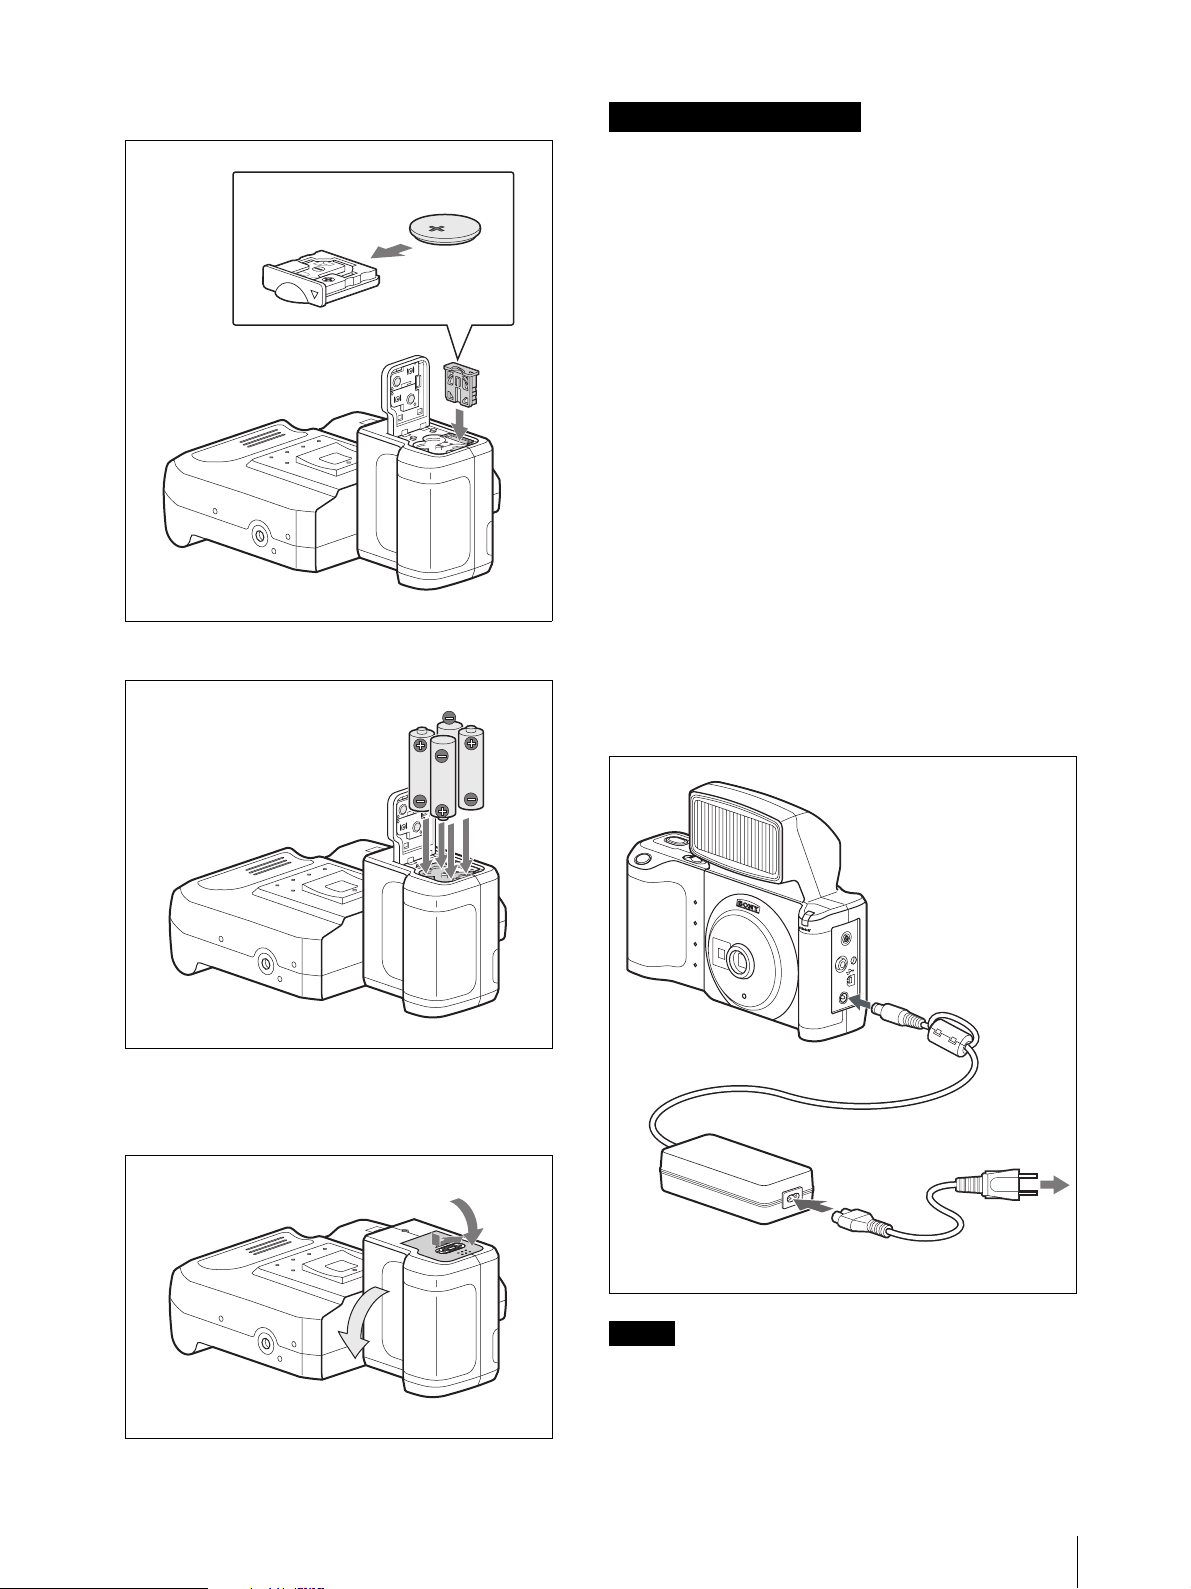
3
Install the button battery CR-2025 in its case, and
insert the case.
CR2025
CR2025
CLOSE
O
P
EN
4
Insert four NH-AA batteries.
Note on replacing batteries
When replacing batteries, they may drop down if the
battery compartment lid faces down. To avoid this, turn
the grip so that the lid faces up.
Role of the button battery
The button battery supplies power to the built-in clock.
Be sure to insert the battery.
The service life of the lithium button battery for the
built-in clock is normally about two or three years, but it
CR2025
depends on the operating conditions. When the battery
life ends, the clock setting returns to midnight,
service
’s
January 1, 2003. Once you see the time and date reset
like this, replace the battery with a new one. When
power is supplied to the camera, advance of the time and
date begins from this point.
You can check the time and date of a picture in Play
or on the properties display.
mode
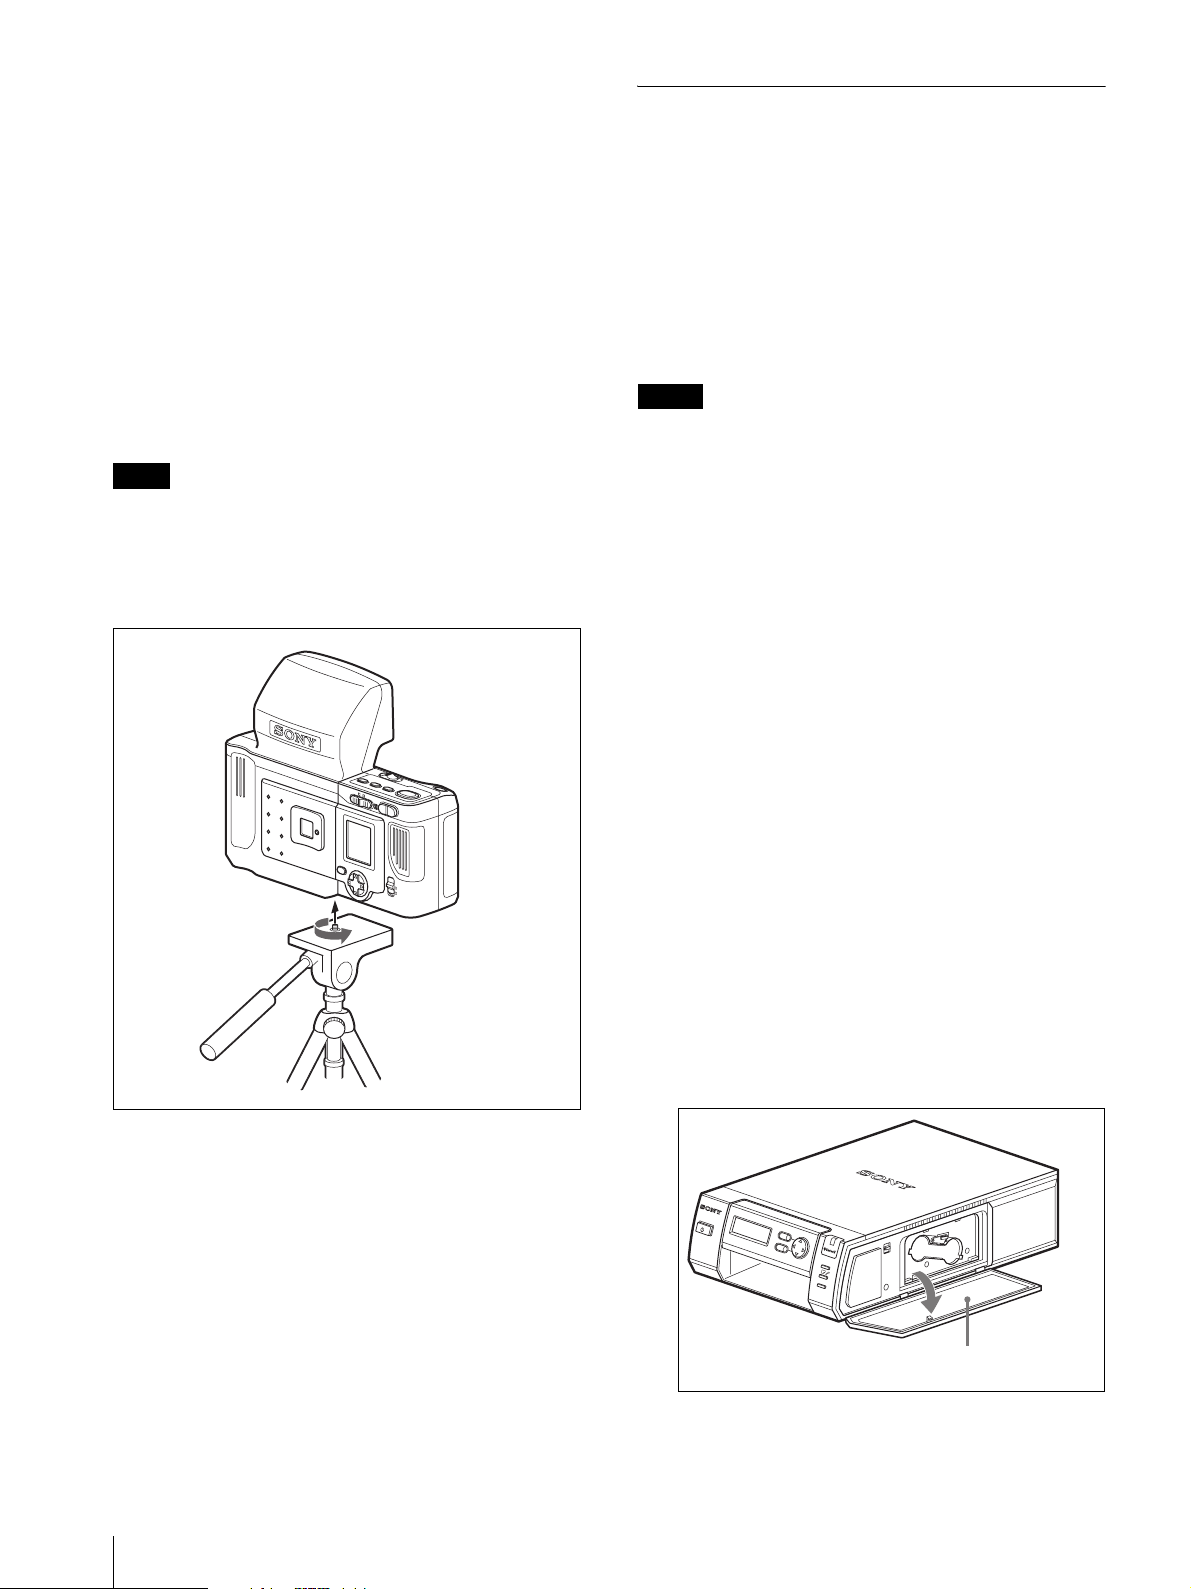
Connecting the camera to a wall outlet
Connect the DC cord of the PCS-AC08/1 AC power
adaptor (supplied) to the DC
Then connect the AC power adaptor to
Now you can use the camera on AC power. Using an AC
power adaptor, you need not worry about the remaining
battery power.
IN 8.4V jack of the camera.
a wall outlet.
OPEN
5
Close the lid and lock it by sliding the button to
CLOSE while pushing the lid.
Be sure to lock the lid securely.
OPEN
OPEN
CLOSE
FLASH
RELEASE
VIDEO OUT
DC IN 8.4V
DC IN 8.4V
Camera
to wall outlet
CLOSE
CLOSE
PCS-AC08/1
AC power adaptor
(supplied)
AC power cord
(supplied)
Notes
• Use the AC power adaptor near the wall outlet. If some
trouble occurs during operation, immediately
disconnect the AC power adaptor from the wall outlet
to cut power supply.
Preparations
13
• The inserted NH-AA batteries cannot be charged with
the AC power adaptor connected to the camera. To
charge them, see
“Charging batteries” on page 35.
Setting the clock, frame, and power save
You can set the date and time, frame, and power save
mode on the
Setup display that appears on the LCD of
the camera.
For details on the setting procedures, see “Various
Functions” on page 35.
Attaching to a tripod
You can attach the camera to a tripod using the tripod
screw hole on the bottom of the camera.
Note
Run in the screw of the tripod and tighten firmly but not
with excessive force. If the screw has not been tightened
securely, the camera may drop. If too tight, the screw
thread may be damaged. Be sure that the screw is run in
smoothly, then tighten securely.
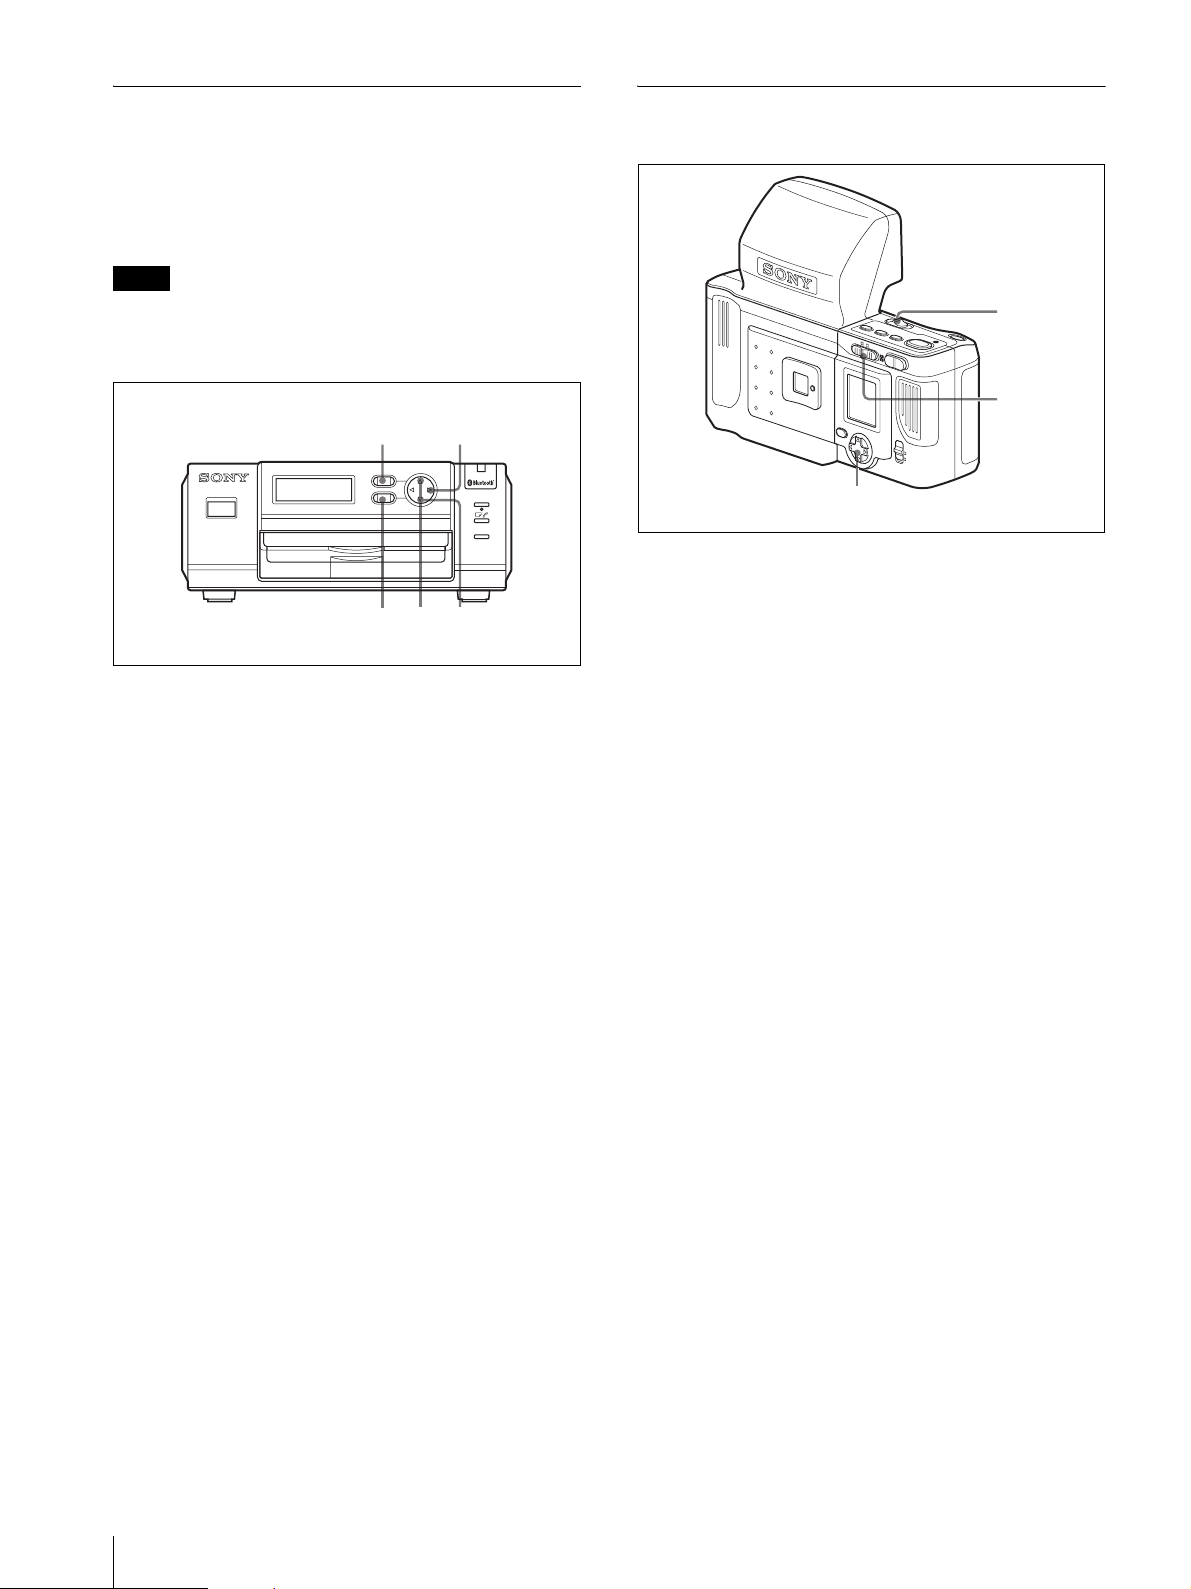
PRINTER
COLOR
B/W
SIZE
PRINTER
ALARM
PRINT
PLAY
CAMERA
W
T
MENU
MONITOTR
ENTER
(P
AL)
LCD
VIDEO OUT
Camera
Preparation of the Printer
Before using the printer for the first time, you need to
install a print cartridge and the paper tray, as indicated
below. These preparations are not needed for everyday
print operations, but are to be done as required.
Preparing a print pack
You need an optional printing pack (UPC-X46 series or
UPC-X34 series) designed for the printer. The pack
contains a set of print paper and a print cartridge.
Notes
• Do not rewind the ink ribbon and use the rewound
print cartridge for printing. Otherwise, proper printing
result will not be obtained, or even a breakdown may
occur.
• Use the printing pack for this printer only.
• Always use the print cartridge designed for the size of
the print paper you use. If you mix cartridges and
paper of different types or sizes, printing may not be
possible, or a paper jam or other trouble may occur.
• Do not print on the used print paper. Printing an image
twice on the same paper will not make the printed
image thicker. This may even cause a malfunction or
breakdown.
• Do not touch the ink ribbon of the print cartridge or the
printing surface of the print paper. If there are
fingerprints or dust on the printing surface or the ink
ribbon, the printing quality may deteriorate.
• For high quality prints, avoid placing the printing pack
in locations that are subject to high temperature, high
humidity, excessive dust, or direct sunlight.
• When storing a partially used pack of the print
cartridge and print paper, store it in its original bag or
in a similar container.
14
Preparations
Tripod
Loading the print cartridge
1
Push on PUSH OPEN to open the cartridge
compartment cover.
MENU
DIGITAL PHOTO PRINT
ER
EXEC
PRINT
ALARM
Cartridge
compartment cover
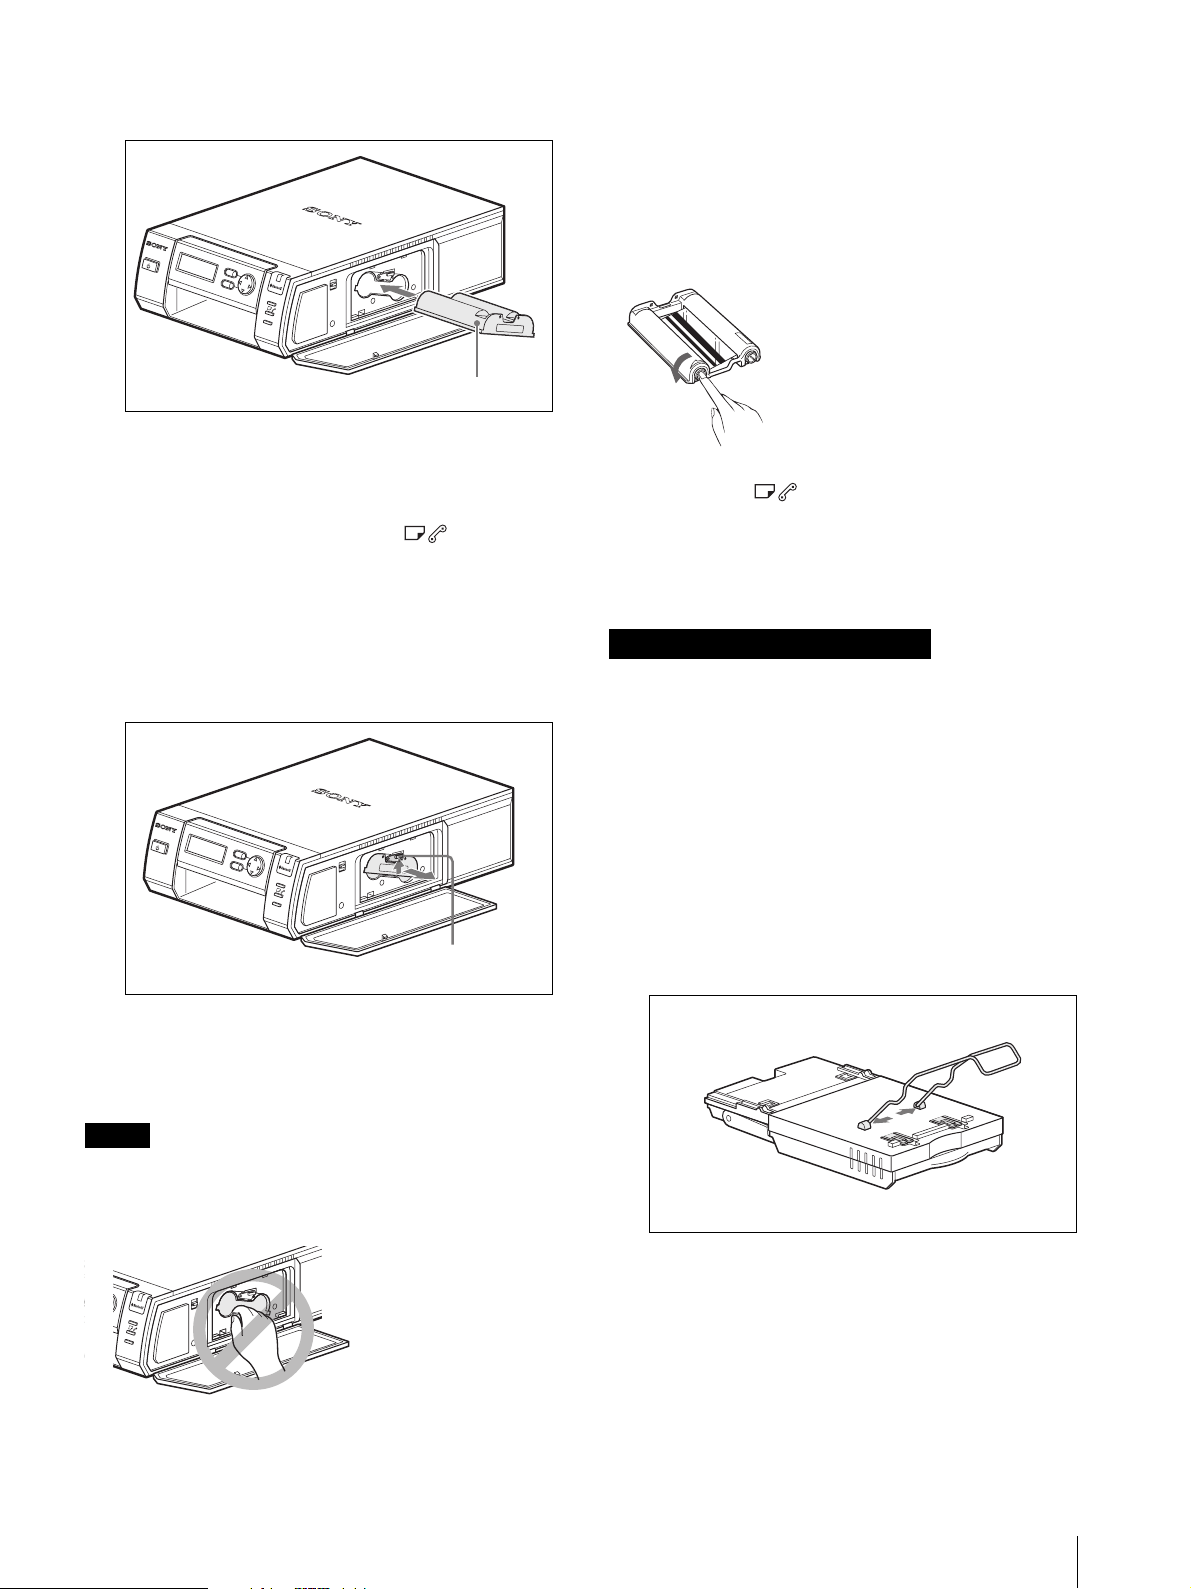
2
E
Insert the print cartridge into the cartridge
compartment
DIGITAL PHOTO PRINT
ER
3
Close the cartridge compartment cover.
firmly until it clicks into place.
MENU
EXEC
PRINT
ALARM
Print cartridge
Changing the print cartridge
When the print cartridge runs out, the lamp lights
and an error message appears on the operation display.
Replace the print cartridge.
1
Push on PUSH OPEN to open the cartridge
compartment cover.
2
Press up the cartridge release lever.
• Do not rewind the ink ribbon and use the rewound
print cartridge for printing. Otherwise, proper printing
result will not be obtained, or even a breakdown may
occur.
• If the print cartridge does not click into place, remove
it and then re-insert it. If the ink ribbon is too slack to
be loaded, wind the ink ribbon in the direction of the
arrow to remove the slack.
• If the print cartridge is not loaded when you turn on
the printer, the
lamp lights up.
• Do not touch the ink ribbon or place the print cartridge
in a dusty location. Fingerprints or dust on the ink
ribbon may result in imperfect printing.
• Do not change the print cartridge while printing.
Notes on storing the print cartridge
• Avoid placing the print cartridge in a location subject
to high temperatures, high humidity, excessive dust or
direct sunlight
.
• When you are going to store a partially used cartridge,
store it in its original bag.
MENU
DIGITAL PHOTO PRINT
ER
EXEC
PRINT
ALARM
Cartridge release
lever
The cartridge pops out. Remove the cartridge.
3
Insert a new print cartridge, and close the cover.
Notes
• Never put your hand into the cartridge compartment.
The thermal head reaches high temperatures,
especially after repeated printing.
MENU
XEC
PRINT
ALARM
Attaching the paper holder
Attach the supplied paper holder to the paper tray as
follows:
1
Insert the tips of both ends of the paper holder into
the holes located
pinching the portions near the
at the bottom of the paper tray,
two ends.
Paper holder
Paper tray
Preparations
15

2
Push the paper holder into the stoppers firmly until
snaps into place, making a click sound.
it
Stoppers
Removing the paper holder
Push out the paper holder gently from the stoppers, and
remove it
, pinching the portions near the two ends.
Inserting the print paper
1
Set the print paper into the tray.
Print paper
Riffle the print paper. Then insert the print paper
with its printing surface (the side with no imprint)
facing up and the arrow pointing in the same
direction as the arrow in the tray.
You can set 25 sheets when the UPC-X46 series is
used, and 30 sheets when the
used.
2
Remove the protective sheet on the print paper.
Note
Be sure to keep the protective sheet, which is used
for cleaning the inside of the printer.
UPC-X34 series is
3
Insert the tray to the printer.
MENU
DIGITAL PHOTO PRINTER
Note
EXEC
PRINT
PUSH OPEN
ALARM
Do not touch the printing surface. Fingerprints on
the printing surface may result in imperfect
printing.
Notes
• Set the paper of the UPC-X46 series into the large
paper tray, and that of the
UPC-X34 series into the
small paper tray. If the paper size and tray size do not
match, a paper jam may occur.
• Do not remove or insert the paper tray during printing.
• If print paper does not feed automatically, the
lamp lights. Pull out the paper tray and check for a
paper jam.
• When adding print paper to a partially full tray, make
sure that the total number of sheets does not exceed 25
UPC-X46 series or 30 for the UPC-X34 series.
for the
Do not place different types or sizes of paper in the
tray. Otherwise, a paper jam or malfunction may
occur.
• Do not write or type on the printing surface of the
paper before printing. You may not be able to proceed
with printing. If you want to write greetings or draw
on the printed surface after printing, use an oil ink pen.
• Do not attach stickers or anything else on the printing
surface before printing.
• Do not print on the used print paper. Printing an image
twice on the same paper will not make the printed
image thicker. This may even cause a malfunction or
breakdown.
• Before printing, do not fold or bend the print paper.
• Do not leave the ejected printed paper exceeding five
sheets on the paper tray.
Notes on storing the print paper
• Avoid placing the print paper in a location subject to
high temperatures, high humidity, excessive dust or
direct sunlight.
• Avoid storing the paper with the printed faces
touching each other or in contact with rubber or plastic
16
Preparations

products including vinyl chloride or plasticizer for an
extended period of time; color changes or
deterioration of the printed image may occur.
• When you are going to store partially-used print paper,
store it in its original bag.
Attaching the tray cover
Keep the supplied tray cover attached to the paper tray
when not in use to protect
print paper placed in the tray
from dust. The tray cover can be attached to either paper
tray for the
UPC-X46 series or for the UPC-X34 series.
Tray c o v er
Connecting the printer to a wall outlet
Connect the supplied AC power cord to the AC IN
connector of the printer and then to wall outlet.
Operation
This section describes the basic procedures for taking
and print
system has additional functions, which are described
“Various Functions” on page 35 or in the Operating
Instructions (Advanced Operations) stored on the
supplied CD-ROM
Preparations
ing a picture, and also displaying a picture. The
.
1
MENU
DIGITAL PHOTO PRINTER
EXEC
PRINT
PUSH OPEN
ALARM
in
Printer
AC power cord
(supplied)
-AC IN
-AC IN
to wall outlet
PRIN
TER
COLOR
B/W
SIZE
PRINTER
ALARM
PRINT
CAMERA
W
T
MONITOTR
ENTER
(PAL)
LCD
VIDEO OUT
1
Turn on the printer.
PLAY
MENU
MENU button
Check that Ready BT RSSI [- - - -] appears on the
operation display.
2
Set the PLAY/CAMERA switch to CAMERA.
3
Set the POWER switch of the camera to ON.
The camera starts searching for the printer, and
“DISCOVERING” appears on the LCD. When the
camera
finds the printer, “DISCOVERED” appears,
and the printer name and Bluetooth address are
displayed in black on the LCD. If the color of the
printer name and Bluetooth address do not change
to black but remain in gray, turn the printer and
camera off and perform steps 1 through 3 again.
3
2
Operation
17
4
Press any button on the camera.
The Bluetooth display is turned off, and you can
start taking a picture.
If the printer name and Bluetooth address are still
displayed in gray, and “DISCOVERED” does not
appear, or “NO PRINTER” appears, see
“Troubleshooting” on page 68, and take appropriate
action. If the problem still persists, refer to the Operating
Instructions (Advanced Operations) or contact your
Sony dealer or your Sony service facility.
Taking a Picture
PRINTER
COLOR
B/W
SIZE
PRINTER
ALARM
PRINT
PLAY
CAMERA
W
T
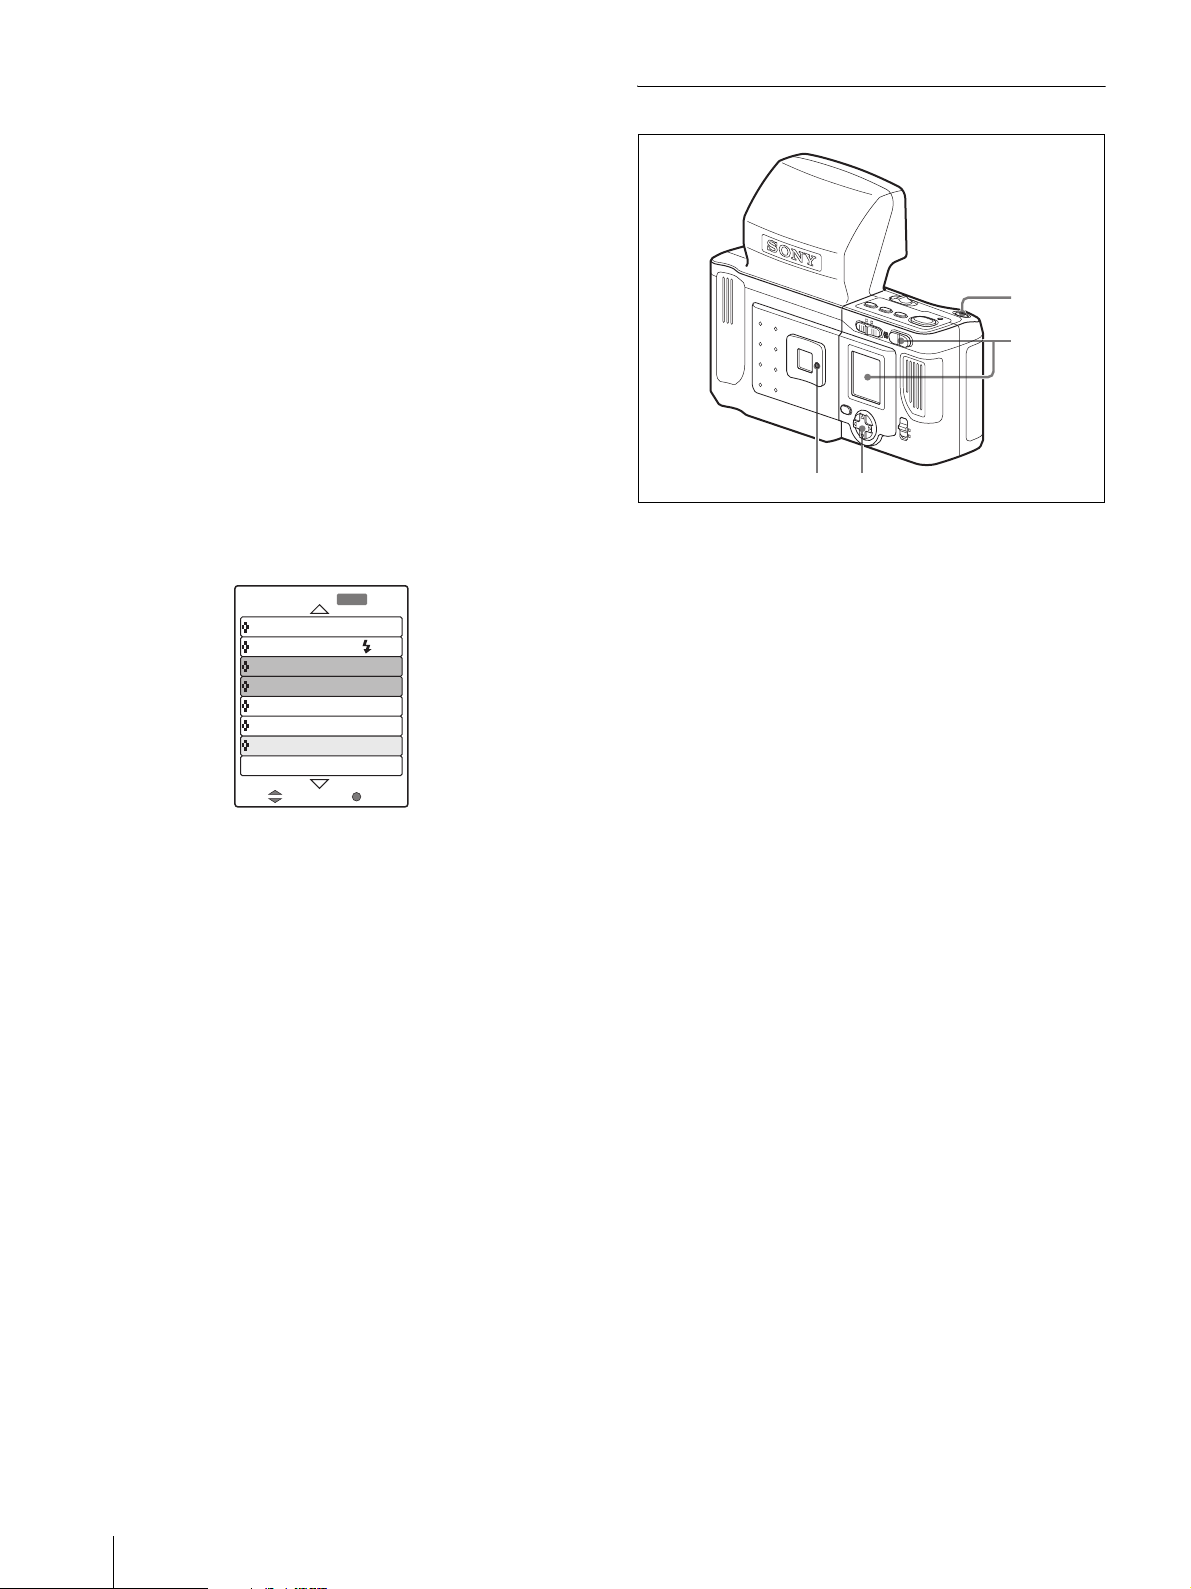
2
1
Shooting conditions set at the factory
The conditions for taking a picture are set at the factory
so that they
not been changed, you can check the
pressing the MENU button then
can be controlled automatically. If they have
factory settings by
V of the control button,
as shown below. After checking, be sure to press the
MENU button to turn off the Menu display.
Menu
PROGRAM AUTO
FLASH MODE: A
APERTURE: AUTO
SHUTTER: AUTO
EXPOSURE:
W.B .: AUTO
LOAD/SAVE SET TING
AE AREA: AVERAGE
MENU
EXIT
+
0.00EV
-
SELECT OK
Setting the record resolution
Before starting shooting, it is recommended to set a
record resolution appropriate
For details on record resolution, see “Setting the Record
Resolution (RESOLUTION)” on page 37.
for the print size.
MENU
MONITOTR
ENTER
(PAL)
LCD
VIDEO OUT
Standby lamp Control button
1
Point the camera at the subject, and adjust the frame
by monitoring the LCD of the camera.
Zooming is available for easily adjusting the frame
by pressing the zoom lever.
For details, see “Setting the Zoom Range (ZOOM)”
on page 38.
You can display the guidelines for adjusting the
frame.
For details on the guidelines, see “Setting the
Frame (FRAME)” on page 42.
2
Press the release button halfway until the green dot
appears at the top of the LCD, then press the button
the rest of the way
.
A picture is taken, and the picture just taken appears
on the LCD. This is called the quick-review display.
Simultaneously the picture is stored in memory.
During
lamp flash
the transfer of data for storage, the standby
es in red. Once the data are stored in
memor, and the built-in flash is charged for the next
picture, the standby lamp lights in green.
18
Operation
You can print the picture just taken from the quickreview display without
using the PLAY/CAMERA
switch.
For details, see “Printing a Picture” on page 20.
If a red dot appears when you press the release button
halfway, the picture is not in focus, or the automatic
exposure control has failed. Slowly press the release
button halfway again.
To take a new picture, press the release button or zoom
lever to
turn off the quick-review display, and then
repeat steps 1 and 2.
Deleting the picture just taken
You can delete the picture just taken (quick-review
display) from the memory
1
Press ENTER of the control button.
. Follow the procedures below.
“Delete?” appears.
2
Select OK by pressing v of the control button, and
press ENTER
of the control button.
The picture on the LCD will be deleted, and the
camera can take a picture.
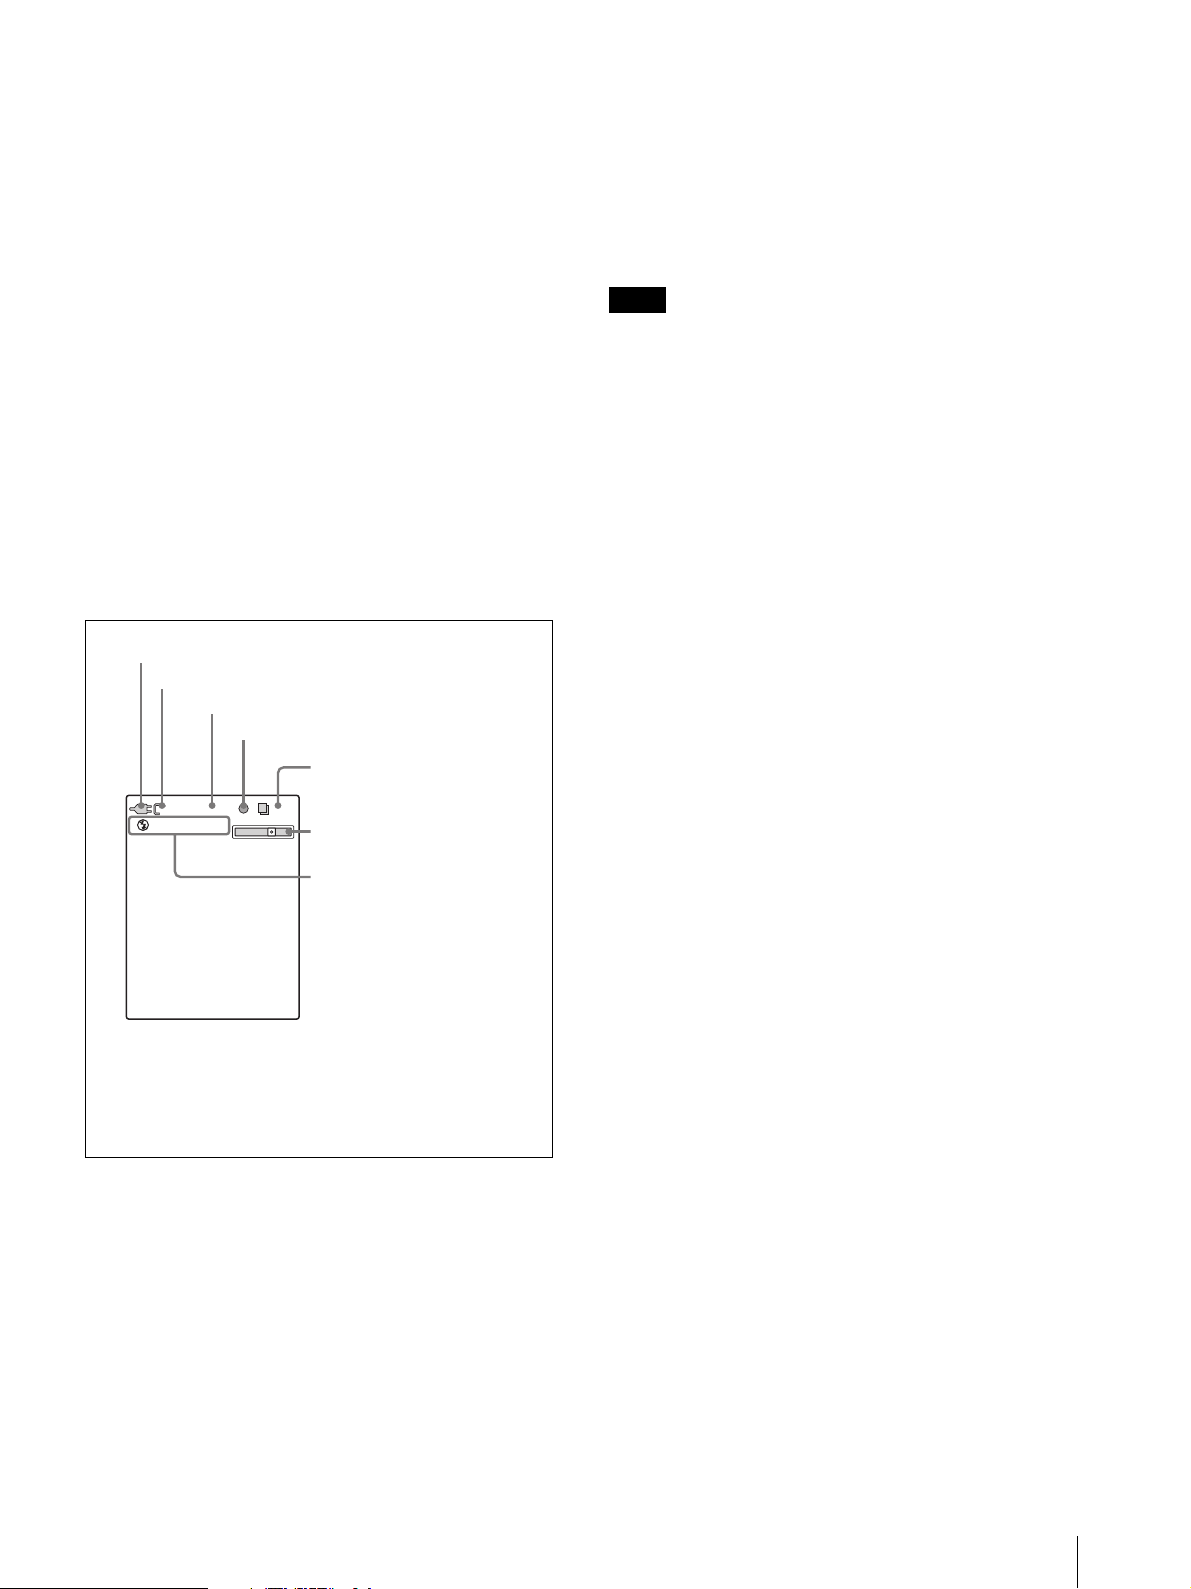
Display on the LCD in CAMERA mode
An example of the display when the PLAY/CAMERA
switch is set to CAMERA is shown below.
the release button the rest of the way, and the shutter
released.
be
will
Even if you press the release button fully instead of
halfway, the auto focus function
will be activated, and
you can take a picture.
If SOUND of the SETUP menu is set to SHUTTER or
ON, a sound is heard when the release button is pressed
halfway and
Note
when pressed again the rest of the way.
The auto-focus function may not work properly in any of
the situations below:
• The subject lacks enough contrast.
• The subject includes an extremely bright object.
• The subject has no horizontal line.
• The background is abnormally dark.
Compensating the exposure
Exposure compensation can easily be obtained by
pressing v or V of the control button. Each time you
press the button, the exposure compensation value
displayed on the LCD changes.
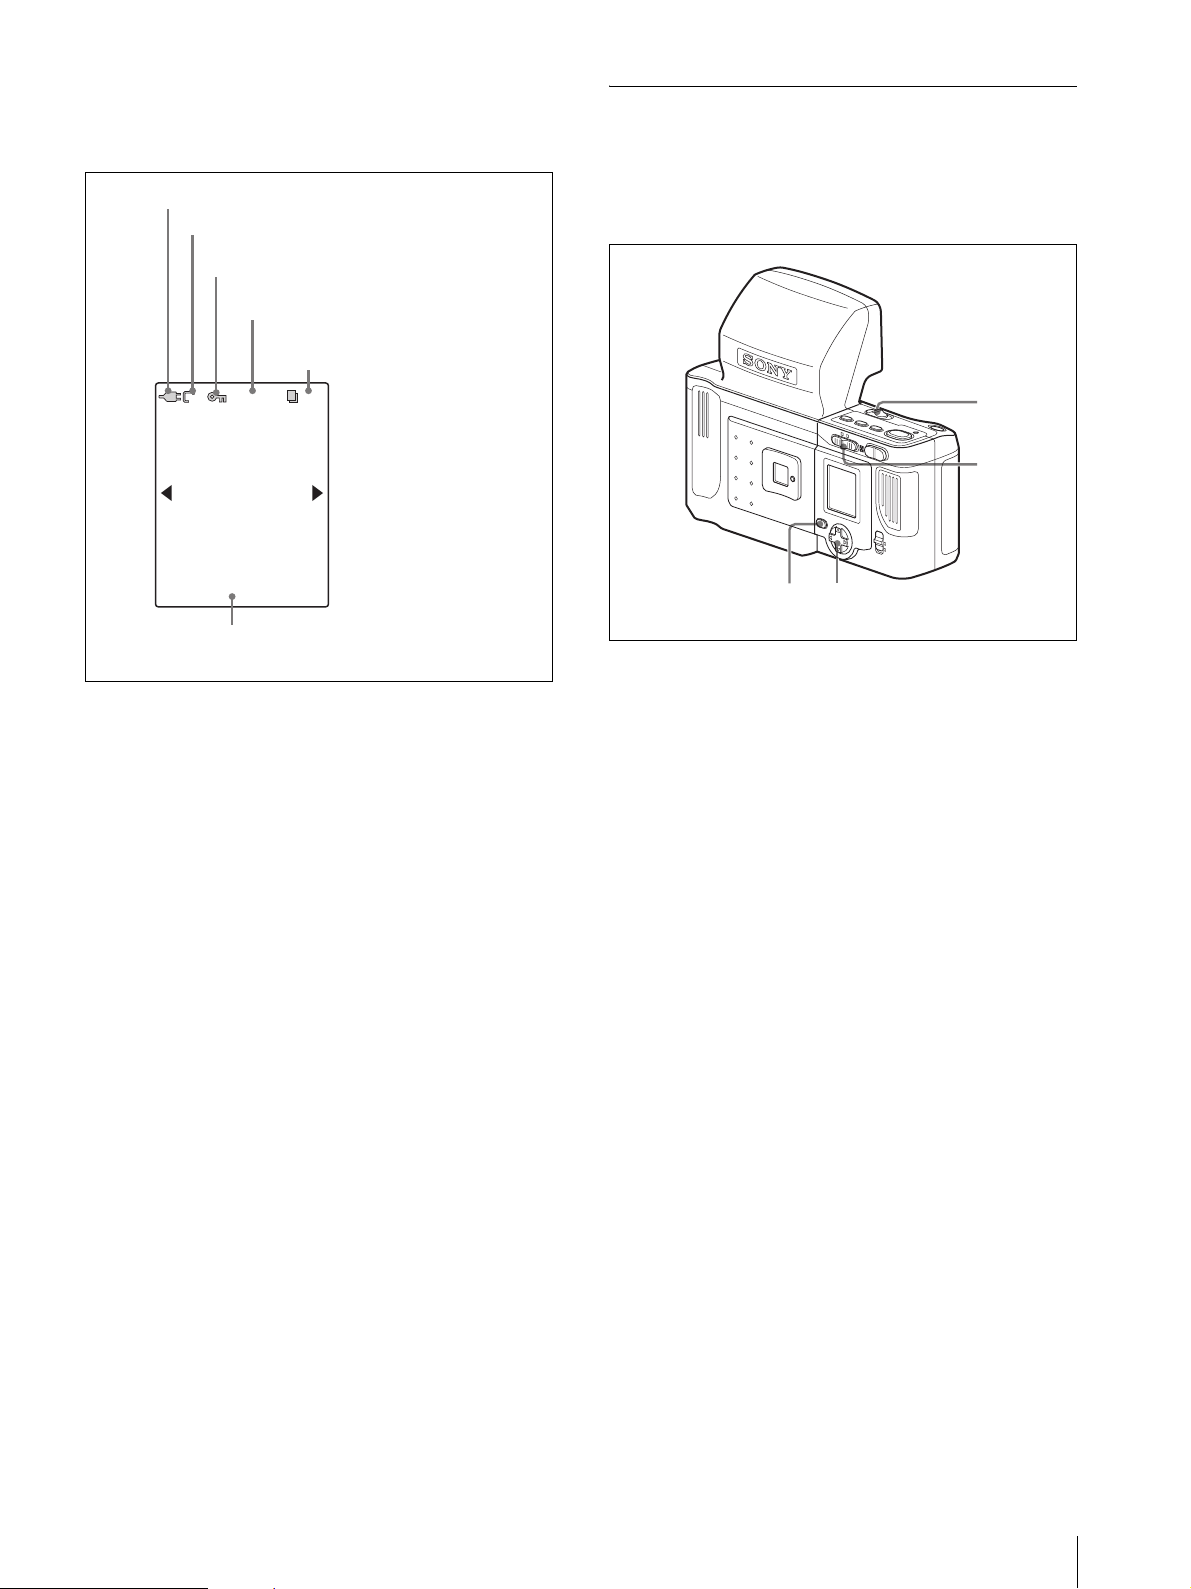
Power source (Battery indicator or AC power adaptor)
Resolution
Exposure compensation
Focus lock (green)/unlock (red) indicator
Remaining number of pictures
(The number of pictures to be
+0.00EV 107
STD
-
M
1/250 F4.1
1) This appears only when the release button is pressed.
2) This appears only when the zoom lever is pressed.
Settings for the flash mode, shutter speed, and aperture
3)
appear only when the release button is pressed.
Displayed items depends on the exposure control
mode.
WT
stored in memory with the set
resolution)
Zoom bar
Shooting conditions
2)
1)
3)
Auto focus function
When you press the release button halfway, the auto
focus function is activated, and the
automatically
put in focus. Once the subject is in focus,
a green dot appears on the LCD. When you press the
button the rest of the way, the shutter is released, and the
image is stored in
the camera’s memory.
If a subject is out of focus, a red dot appears on the LCD.
Release the release button, then slowly press the button
halfway again. Even if the red dot appears, you can press
subject is
For details on the exposure compensation, see “Revising
the exposure (EXPOSURE)” on page 40.
Operation
19
Printing a Picture
The picture just taken can be printed with the procedure
below.
3
Select COLOR or B/W by pressing the COLOR/
B/W button.
Each time you press the button, the selection is
toggled.
COLOR: For printing a picture in color
B/W: For printing a picture in black and white
4
Press v or V of the control button to set the number
of sheet
s to be printed.
3
PRINTER
COLOR
B/W
SIZE
PRINTER
ALARM
PRINT
PLAY
CAMERA
W
T
MENU
MONITOTR
ENTER
(PAL)
LCD
VIDEO OUT
2
1,5
4
1
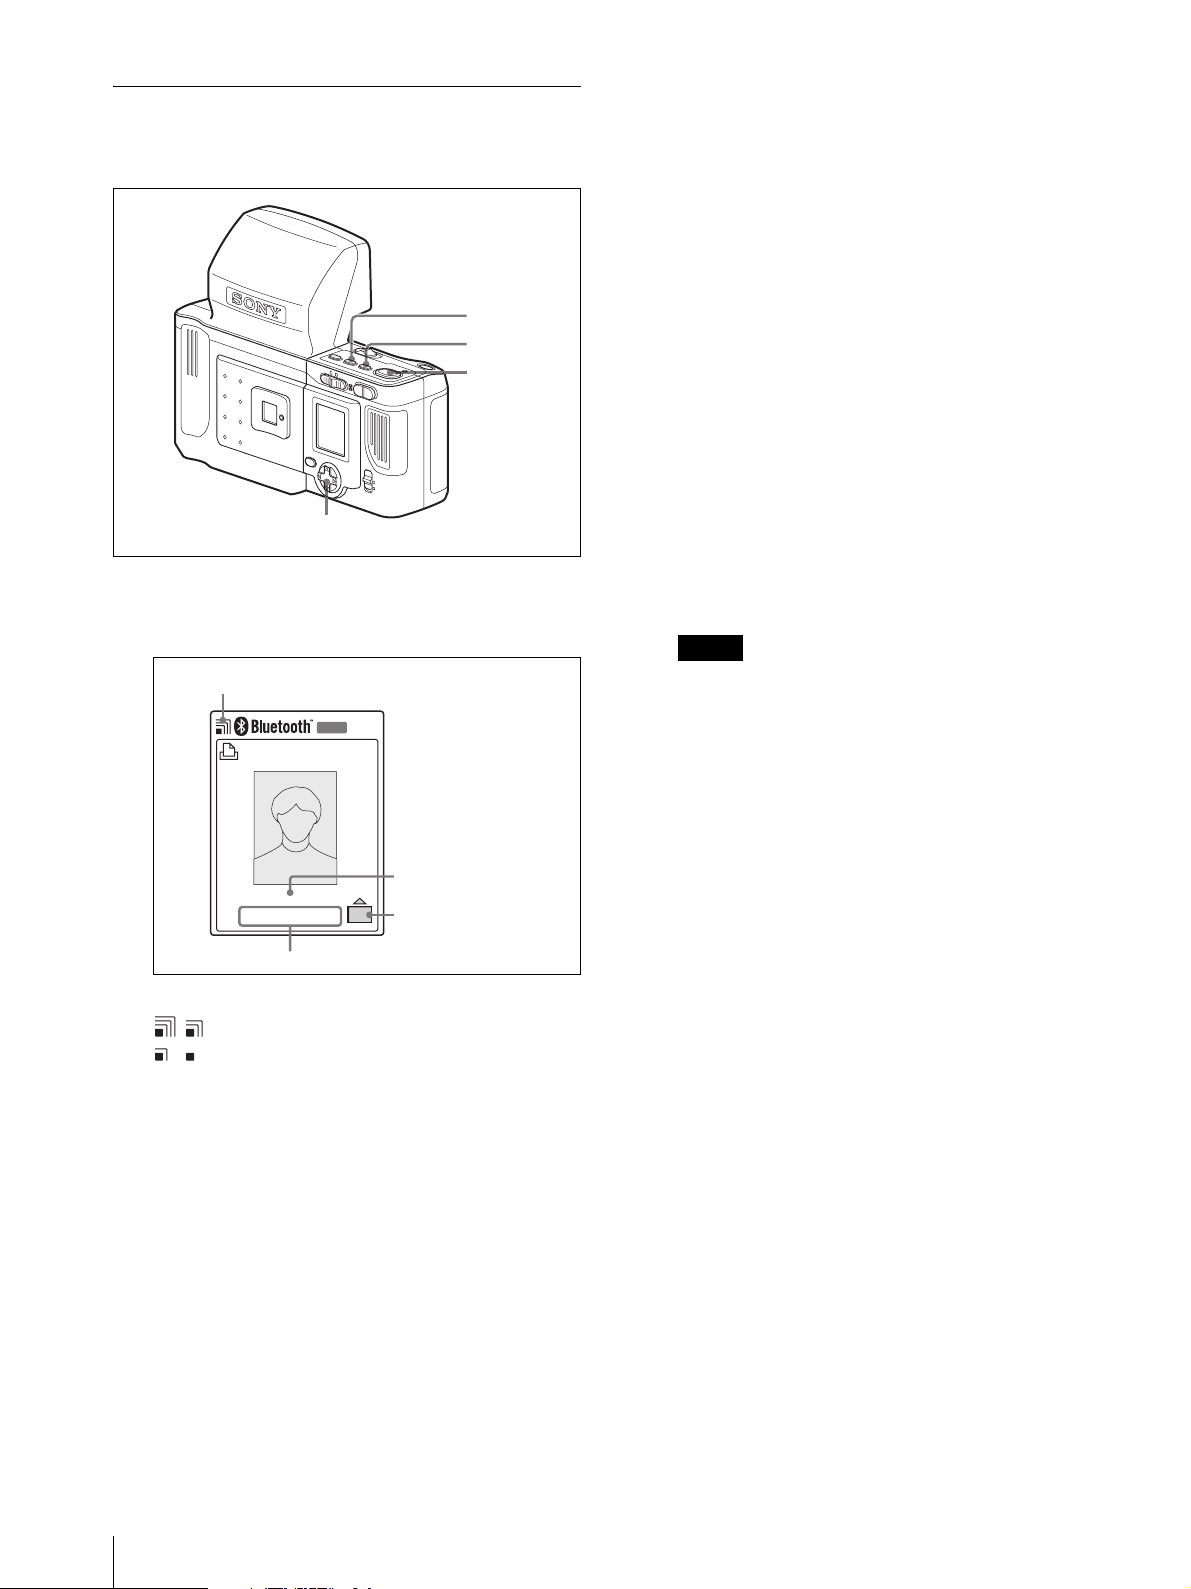
Press the PRINT button.
A layout display appears.
Radio wave strength indicator
MENU
EXIT
1. Sony UP-DX100
Selection of the COLOR/
COLOR
1. 151x101.6mm
Print size
You can check the radio wave strength.
: The radio wave strength is good.
: The radio wave strength is a little weak, and
data transmission may require a long period of
time.
Do not move the camera and printer until data
transmission is finished.
If the layout display does not appear, the radio wave
is too weak to transmit the image data. Put the
camera and printer more closely together
the PRINT button again
2
Select the print size using the SIZE button.
1) Press the SIZE button.
The layout display of the selected size appears.
2) Press the SIZE button repeatedly until the
desired size appears.
B/W button
The number of sheets
x1
to be printed
.
, and press
5
Press the PRINT button again.
Picture data are transmitted to the printer, and
“TRANSMITTING” and the progress bar appear
on the LCD.
While the CANCEL button is lit in orange, you can
cancel data transmission by pressing the ENTER
button.
When data transmission ends, the CANCEL button
changes to gray
. The printer checks the print pack
then starts printing.
Notes
• Once the CANCEL button changes to gray, you
cannot cancel the print operation.
• Do not touch any button on the camera while the
CANCEL button is gray.
Once printing begins, “TRANSMISSION END. PUSH
MENU KEY TO CONTINUE.” appears
the camera
the message.
. Press the MENU or control button to remove
on the LCD of
If the PLAY/CAMERA switch is set to CAMERA, the
quick-review display is retrieved.
you can
print the same picture again.
Once printing ends,
If multiple printers are used, you can send the data to
another printer before printing ends.
You can take another picture during printing. To take
another picture, press the release button halfway or the
zoom lever to release the quick-review display.
If the switch is set to PLAY, a playback picture is
retrieved.
Selection of the print size and COLOR/
B/W
You can select the print size and COLOR or B/W before
pressing the PRINT button to display the layout display.
Press the SIZE or COLOR/B/W button, and press it
again while the print size or COLOR or B/W is
displayed on the LCD. Then press the PRINT button to
print the picture.
20
For details on the size of printouts, see “Setting the
Frame (FRAME)” on page 42.
Operation

Printing multiple pictures on a single
sheet of paper
Two or three different pictures can be printed on a single
sheet of paper. Select the print size from among 17, 18,
19, and 20. When you select print size 17, 18, or 20, two
pictures are printed, and when you select print size 19,
three pictures are printed. When the
used, only print size 20 can be selected.
In CAMERA mode, the picture just taken and the
previous one (or the two pictures before it in print
size 19) are printed, and in PLAY mode, the currently
selected picture and the previous one (or two pictures
before it in print size 19) are printed.
To pr i nt pictures, that are not in the desired order, onto
a print paper, change the order of
to “Moving a Picture Displayed on a Nine-Picture
Multiple Display (MOVE)” (page 50).
UPC-X34 series is
the pictures, referring
overlaying yellow, magenta, and cyan
achromatic picture
may not be obtained. You can adjust
, so a perfectly
the black tone using the color adjustment function of the
printer.
For details on adjustment, refer to the Operating
Instructions (Advanced Operations).
Printing a picture stored in the camera’s
memory
When you take pictures, their data are stored in the
camera’s memory. To print them, view and select a
picture to be printed
printing.
For viewing a picture stored in memory, see “Viewing a
Picture” on page 22.
then perform the procedures for
(A): The picture just taken
or currently selected
(C)
(B) (A)
Note
Printout for
19. 47 x 37 mm D6
(C)
(B)
(A)
(C)
(B)
(A)
Printing of multiple pictures cannot be canceled, and the
CANCEL button appears in gray during data
transmission. Do not touch any button on the camera
while the CANCEL button is displayed in gray.
Adjusting the print quality
You can adjust the print quality for color pictures and
black-and-white picture
can store the adjusted values. For printing color picture
the adjusted value for color picture
selected
picture
by the printer, and for printing black-and-white
s, the adjusted value for black-and-white pictures
is selected.
s respectively, on a printer and
s,
s is automatically
For details on adjusting the print quality, see “Adjusting
the Print Quality (COLOR ADJUST)” on page 52.
Adjusting the quality of a black-and-white
picture
When you print a picture by selecting B/W with the
COLOR/B/W button, the picture is printed by
Operation
21
Reprinting a Picture Stored in
Memory
of the Printer
(COPY PRINT)
The data of the last picture printed are stored in memory
of the printer. You can reprint the picture.
Note
If you press the on/standby button, the lamp goes out,
data stored in memory are deleted, and you cannot
and
reprint the picture.
Viewing a Picture
You can view pictures stored in memory on the LCD.
PRINTER
COLOR
B/W
SIZE
PRINTER
ALARM
PRINT
PLAY
CAMERA
W
T
2
13
MENU
1
DIGITAL PHOTO PRINTER
EXEC
54
1
Press the MENU button.
2
Press V of the control button to display “COPY
PRINT [>>]
3
Press B of the control button.
“COPY PRINT: 1 [1–9 PRINT: EXEC]” appears.
4
Press v or V of the control button to set the number
of sheets to be printed.
.”
PRINT
ALARM
2
MENU
MONITOTR
ENTER
(PAL)
LCD
VIDEO OUT
4
1
Set the PLAY/CAMERA switch to PLAY.
2
Set the POWER switch to ON.
3
Press any button to turn off the Bluetooth display.
A picture in memory appears on the LCD.
4
Select a picture displayed on the LCD by pressing
b or B of the control button.
Displaying the nine-picture multiple
display
Nine pictures stored in the camera’s memory can be
displayed at a time on the LCD. Then you can quickly
search for a desired picture.
1
22
A value from 1 to 9 can be set.
5
Press the EXEC button.
The number of pictures set in step 4 is printed.
When printing is completed, the display returns to
Ready display.
the
Operation
1
Press the W side of the zoom lever.
You can see nine pictures stored in camera's
memory on the LCD.
2
Select a picture by pressing b, B, v or V of the
control button.
3
Display a picture by pressing ENTER of the control
button or with the
T side of the zoom lever.
Display on the LCD in PLAY mode
An example of the display when the PLAY/CAMERA
switch is set to PLAY is shown below.
Power source (Battery indicator or AC power adaptor)
Resolution
Protect mark (This appears only when
the picture is protected.)
Number of the current picture/Total number
of pictures stored in memory
Remaining number of pictures
(The number of pictures to be stored
in memory with the set resolution)
006/006 092
STD
Deleting a Picture
Pictures stored in the memory of the camera can be
deleted one by one or all at
once.
Deleting pictures one by one
PRINTER
COLOR
B/W
SIZE
PRINTER
ALARM
PRINT
PLAY
CAMERA
W
T
2
1
MENU
MONITOTR
ENTER
(PAL)
LCD
VIDEO OUT
2003/05/01 12:00
Date that the picture currently displayed
is stored in memory
5-94
1
Set the PLAY/CAMERA switch to PLAY.
2
Set the POWER switch to ON.
3
Press any button to turn off the Bluetooth display.
4
Press the MENU button.
The Menu display appears.
5
Select a picture to be deleted by pressing b or B of
the control button
6
Select DELETE by pressing v or V of the control
button.
7
Press ENTER of the control button.
The Delete display appears.
8
Select OK by pressing v of the control button.
.
9
Press ENTER of the control button to delete the
picture.
The selected picture is deleted from the memory.
To delete the other picture
Repeat steps 5, 8, and 9.
Operation
23
 Loading...