

Page 1

Welcome.......................................................7
Powering Yo ur Computer...... .....................9
Using AC Power........................................................10
Connecting the AC adapter................................................10
Turnin g o n the c o m p u t e r.... ........ ........................................11
Using the Battery.......................................................13
Inserting a battery ..............................................................13
Removing a battery ............................................................14
Display i n g b a t t e ry i n fo rmatio n..... ........ .............. ...............15
Chargi n g a ba t tery.......... ................................ ....................18
Notes on batteries.... ........ .............. .............. .............. .........19
Frequently asked questions................................................20
Conservi n g Batt e ry Po w er ........ ................................21
Using power saving modes................................................21
Using PowerPanel..............................................................22
Frequently asked questions................................................26
Internet and Network Connections..........27
Internet Connections .................................................28
Setting up a dial-up Internet connection............................28
Setting u p a n Ethernet Internet co n n e c t i o n............. ...........3 0
Customizing your Internet connection...............................32
Frequently asked questions................................................33
Network Co nnections......... ................ .......................34
Using Ethernet and dial-up connections ............................34
Using wireless LAN connections ......................................37
Checking your network connection status................ ......... 42
Frequently asked questions................................................43
1
Page 2

VAI O C om puter Quic k Sta rt
Connecting Anot h er VAIO Computer................. .....46
Connecting VAIO computers............................................ 46
Disconnecting VAIO computers....................................... 48
Frequently asked questions............................................... 49
CDs, DVDs, and Optical Drives................51
Inserting and Ejecting CDs or DVDs .......................52
Copying and Playing CDs ..... ....................................54
Playin g C D s......................................................................54
Copying files to a CD-RW or CD-R................................. 55
Playing DVDs...........................................................57
Watching DVDs on your computer ...................... ............ 57
Frequently asked questions............................................... 58
Printer Conn e c ti ons.......... ........................61
Printing With Your Computer..................................62
Connecting a printer.............. ................ ................ ............ 62
Disconnecting a printer..................................................... 64
Frequently asked questions............................................... 64
Computer Features................................... 67
Using the Keyboard ..................................................68
Key locations and descriptions ......................................... 68
Combinations and functions with the Windows key ........ 70
Indicators........................................................................... 71
Combinations and functions with the Fn key.................... 72
Using the Touch Pad.................................................75
Describ ing the tou c h p ad... ........ .............. .............. ............ 75
Customizing the touch pad................................................76
Frequently asked questions............................................... 77
2
Page 3

Using the Jog Dial Control........................................79
Locating the Jog Dial Control............................................79
Using the Jog Dial Navigator icon.....................................80
Using the Jo g D i a l Ba r....... ................................................80
Using Jog Dial Launcher...................................................81
Using Application and Scroll modes.................................82
Changin g Jo g Dial Navigat o r setting s .. ........ ........ ............. 8 4
Using Memory Stick Media.....................................86
Selecting Memory Stick media..........................................86
Inserting Memor y Stick medi a ................. .............. ...........87
Viewing the contents .........................................................87
Write-protecting Memory Stick media..............................88
Forma t t in g Memory Sti c k m e d i a.......................................88
Removing Memory Stick media ........................................89
Frequently asked questions................................................90
Changing the Window Design of Sony Programs ....92
Connecting Mice and Keyboards.............93
Using External Mice and Keyboards ........................94
Connecting a mouse or keyboard.......................................94
Disconnecting a mouse or keyboard.................................. 96
Frequently asked questions................................................96
Floppy Disk Drives and PC Cards ...........97
Using Flo ppy Disk Drives..................... ....................98
Inserting and removing floppy disks .................................98
Frequently asked questions................................................99
Using PC Cards.......................................................101
Inserting PC Cards...........................................................101
Removing PC Cards.........................................................102
Frequently asked questions..............................................103
3
Page 4

VAI O C om puter Quic k Sta rt
Docking Stations...... ...............................105
Connecting t he Do ck ing St at i on.............................106
Locatin g feature s an d p o rt s............................................. 106
Connecting the docking station....................................... 108
Disconnecting the docking station.................................. 109
Frequently asked questions.............................................112
Audio and Video Connections...............115
Using i.LINK Digital-Video Recorders..................116
Connecting an i.LINK digital video recorder ................. 116
Disconnecting the i.LINK digital video recorder............ 117
Using a dig i t a l v ideo came ra record er .............. .............. 118
Notes on co n n e c t i n g a n i. LINK devi c e...................... ..... 118
Frequently asked questions.............................................119
Using Computer Monitors and Projectors..............120
Connecting a computer monitor...................................... 120
Connecting a projector...................... .................. ............ 122
Selec ti n g a D i s p l ay Mode...... .........................................123
Disconnecting a computer monitor or projector............. 124
Using Speakers .......................................................125
Connecting speakers ....................... ............ .......... .......... 125
Disconnecting external speakers..................................... 126
Adjusting the volume...................................................... 126
Enabling the audio feature .............................................. 127
Frequently asked questions.............................................128
Using Microphones.................................................130
Connecting a microphone ................... .................... ........ 130
Disconnecting a microphone........................................... 130
Using a microphone or other device to record.......... ...... 131
Frequently asked questions.............................................132
4
Page 5

Preinstalled Programs........... .................133
Software Programs On Your Computer..................134
Program overview............................................................134
Frequently asked questions..............................................138
DVgate Application Notes......................................140
Recordi n g ima g es to a digita l v i d e o de v ice.............. .......140
Adjusting image resolution..............................................140
Saving to your hard disk drive.........................................140
Program Support Information .................................142
Sony Service Center.........................................................143
Memory Upgrades...................................145
Upgrading Your Computer’s Memory....................146
Precautions and procedures .............................................146
Typical expansion memory configuration .......................147
Removing and installing memory modules.....................147
Confirming add e d m e m o ry ca p a city................................150
Using the Recovery CDs.........................153
Application and System Recovery CDs..................154
Using Your Recovery CDs......................................154
Using the Application Recovery CD(s)...........................154
Using th e Syst em Recov ery CD (s)... ........ .............. .........156
Troubleshooting and Support................159
Troubleshooting Your Computer ............................1 60
Troubleshooting Batteries ............. ..................... .....164
Troubleshooting the Printer........... .............. ....... .....165
Troubleshooting the Mouse and Touch pad............167
5
Page 6

VAI O C om puter Quic k Sta rt
Troubleshooting the Modem............. ....... .............. .1 70
Troubleshooting Networks .....................................1 71
Troubleshooting DVDs and CDs............................174
Troubleshooting PC C ards.................. ..... .... ... ...... . .177
Troubleshooting Audio-Video Connections...........178
Troubleshooting the Computer Screen (LCD)........181
Troubleshooting Memory Stick Media........... ...... . .1 82
Troubleshooting Program s......................................184
Troubleshooting the Docking Station...... .... ... ....... .1 86
Computer Support Information ...............................1 88
6
Page 7

Welcome
Congratulations on your purchase of this Sony VAIO® computer, and
welcome to the online VAIO® Computer User Guide.
This user guide pr ovide s detaile d informati on on all aspe cts of usin g your
new V AIO computer, from keyboard functions to preinstalled soft ware
programs.
In the left navigation window, click the topics you want to learn more
about, and that information will be displayed in this main window.
✍ Vi ew the Electronic Flyer, which provides updates and supplemental information
about your com puter.
✍ View the VAIO® Computer Specifications, which lists your computer’s hardware
specif ications and preinst alled software inform ation, such as descri ptions and
contact information.
7
Page 8

VAI O C om puter Quic k Sta rt
8
Page 9

Powering Your Computer
Your VAIO® computer comes with a battery and an AC adapter. This
chapter explains how to install and use these supplied accessories to
power your computer. It also describes ways y ou can eff iciently utilize the
battery as a power sour ce.
❑ Using AC Power
❑ Using the Battery
❑ Conserving Battery Power
9
Page 10
VAI O C om puter Quic k Sta rt
Using AC Power
The supplied ba ttery is not c harg ed whe n you rec eive yo ur compu ter. To use your
computer immediately, use the supplied AC adapter as the power source . While
the computer uses AC power, it automatically charges the battery if it is inserted.
See “Using the Battery” for more information on installing and using your
battery.
❑ Connecting the AC adapter
❑ Turning on the computer
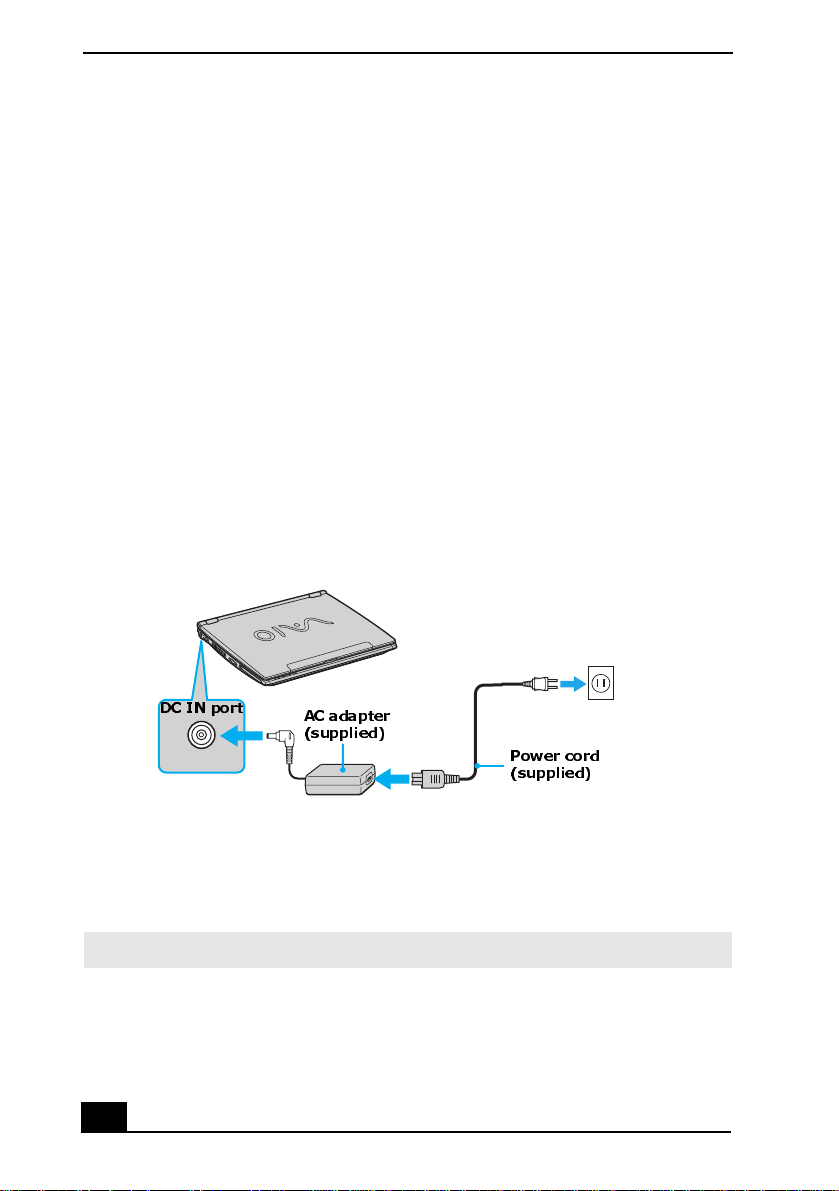
Connecting the AC adapter
To connect the AC adapter
1 Plug the cable attached to the AC adapter into the DC IN port on your
com pu t e r or do cking stati on.
Connecting the AC Adapter to the Computer
DC IN port
AC adapter
(supplied)
Power cord
(supplied)
2 Plug one end of the power cord into the AC adapter, and plug the other end
into an AC outle t.
.
✍ Use only the AC ad apter supplied with your com puter.
10
Page 11
Using AC Power
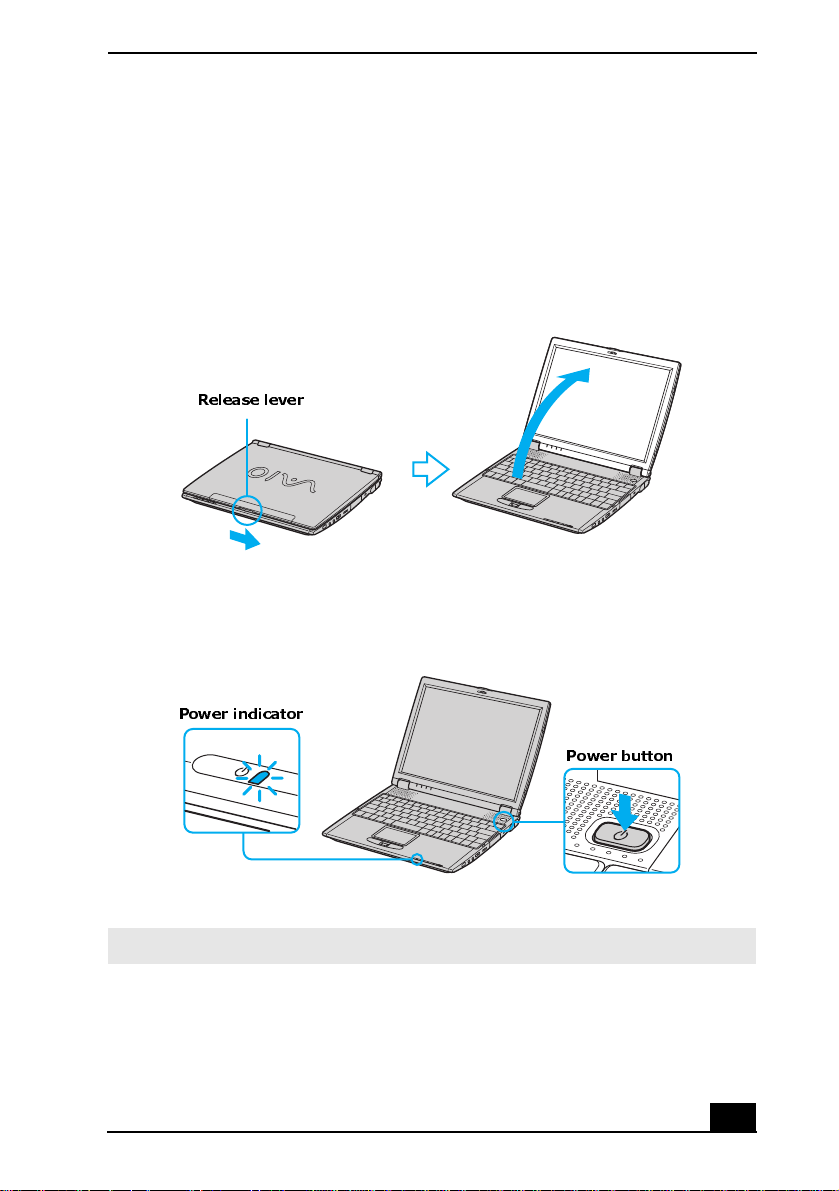
Turning on the computer
To turn on the computer
1 Slide the release lever to the right, and li ft the cover while holding the
bottom of the compute r firmly.
Opening the Computer
Release lever
2 Press the power button until the power indicator turns on.
Turning on the Computer
Power indicator
Power button
✍ If you hold th e po w e r bu tt on down, th e co m p u te r tu rn s off.
3 If necessary, adjust the brightness controls for the computer screen (LCD)
display as follows:
11
Page 12

VAI O C om puter Quic k Sta rt
❑ To increase light intensity, press Fn+F5 and then or .
❑ To decrease light intensity, press Fn+F5 and then or .
12
Page 13

Using the Battery
Using the Battery
A battery is an auxiliary power source you can use when your com puter is not
plugged into an AC outlet. Your computer may come equipped with one or two
battery bays, de pending on the model you purchased. If your computer comes
with two battery ba ys, you can purchase a second rech argeable batte ry to extend
your computing ti me . Regardless how many batteries you use, you can always
extend the life of the battery by conserv ing power. See “Conserving Battery
Power” for more information.
❑ Inserting a battery
❑ Remo v ing a ba t tery
❑ Displaying ba ttery information
❑ Chargi ng a battery
❑ Notes on batteries
❑ Frequently asked questions
✍ The battery that comes with your computer is not fully charged at the time of
purchase.
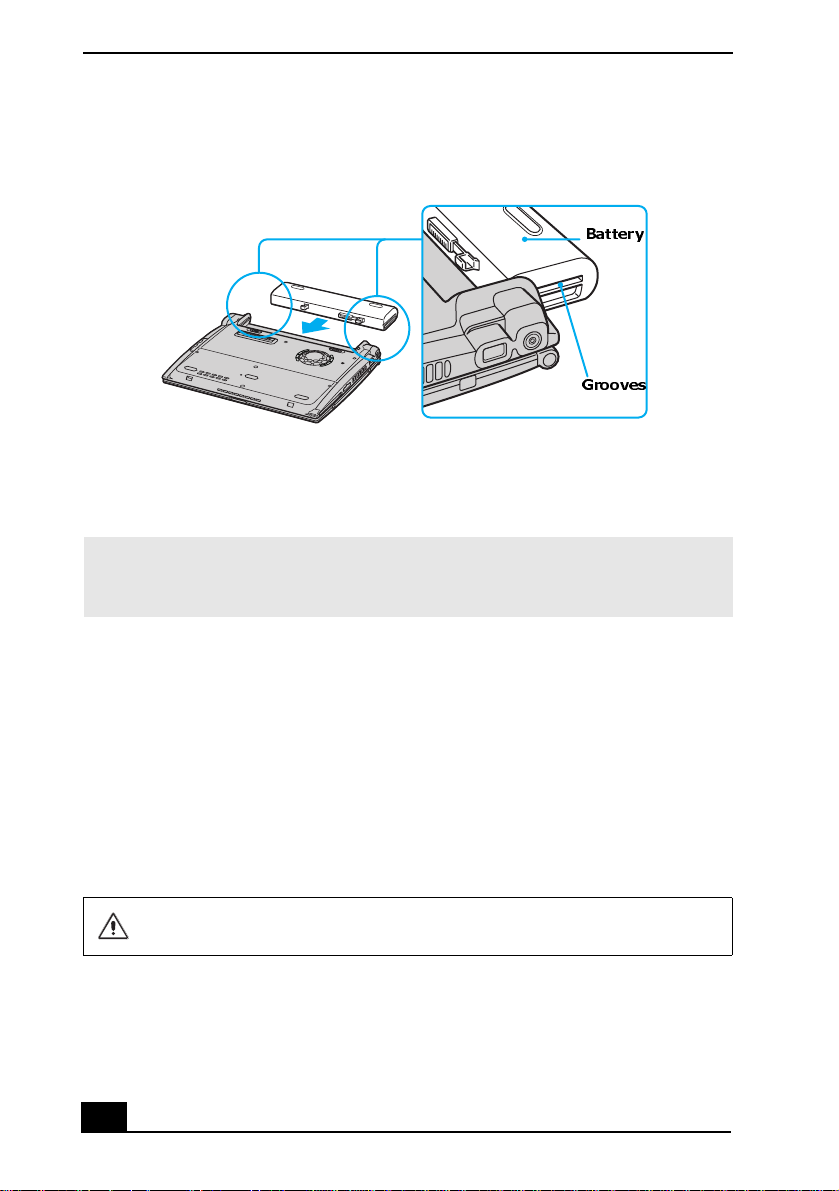
Inserting a battery
To insert a battery
1 Turn the com p ut er o ve r, and sli d e th e LOCK/UNLOCK switch on the
bottom of the computer to the UNLOCK position.
2 Align the grooves and ta bs on the battery with those on the back of the
computer.
13
Page 14
VAI O C om puter Quic k Sta rt
Inserting a Battery
Battery
Grooves
3 Slide the battery into the computer until it clicks into place.
4 Slide th e LOCK/UNLOCK switc h in t o the LOCK position.
✍ If the port replicator is attached to your computer, do not ins ert or remove the
battery. Lifting and turning the computer with the port replica tor attache d could
cause a temporary loss of power.
Some software programs and per ipheral devices prevent the system from
enablin g H ib erna te m ode when b atte ry p ower is low. Y o u can m an ual ly ac tivat e a
power management mode (such as St andby or Hibernate) to conserve power, but
you should s ave your data fre quentl y to avoid da ta lo ss. See “Usin g powe r savi ng
modes” for more information.
Removin g a b attery
If you are not using the computer for an extended period of time, remove the
battery from the computer to avoid damaging the battery. You can re move the
battery when the computer is on or off.
If the computer is on, connect the AC adapter and exit a power saving
mode before you remove the battery.
14
Page 15
Using the Battery
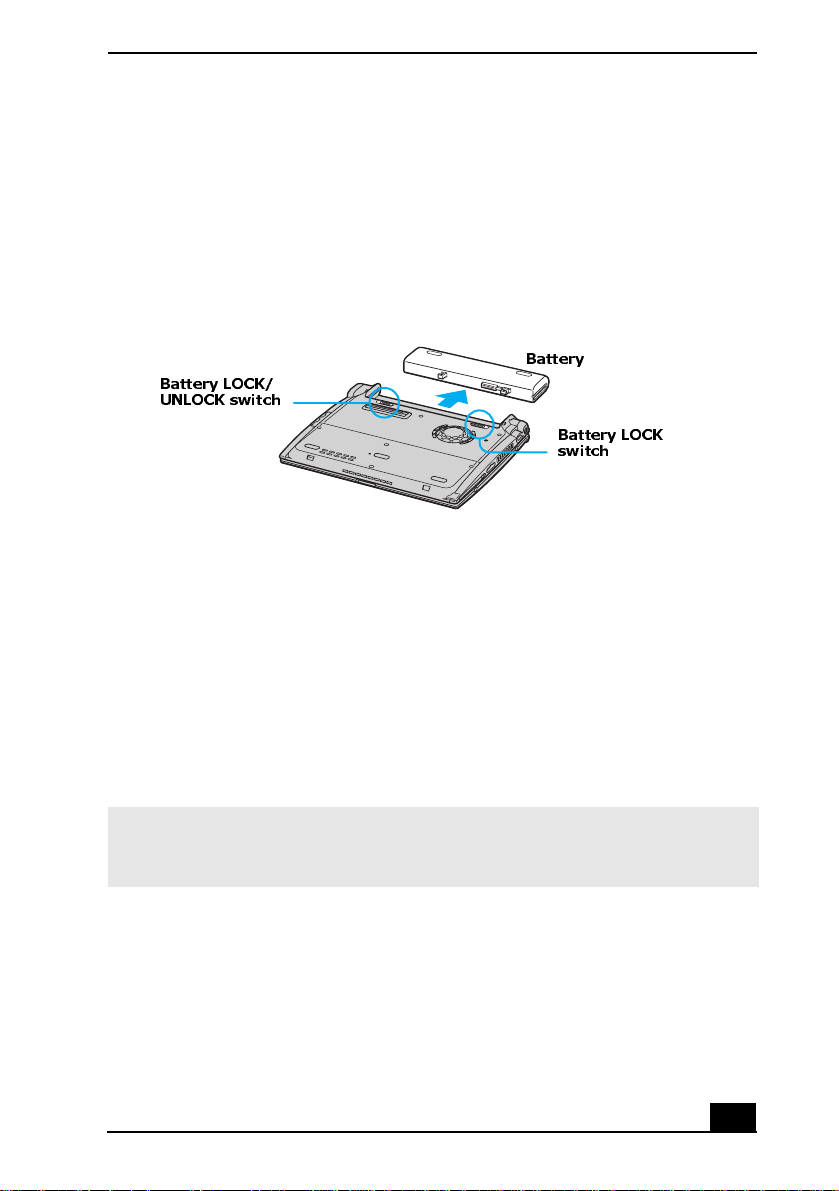
To remove a battery
1 Turn the com p ut er o ve r, and sli d e th e LOCK/UNLOCK switch on the
bottom of the computer to the UNLOCK position.
2 Slide th e b attery away from the computer.
Removing a Battery
Battery
Battery LOCK/
UNLO C K sw i tch
Battery LOCK
switch
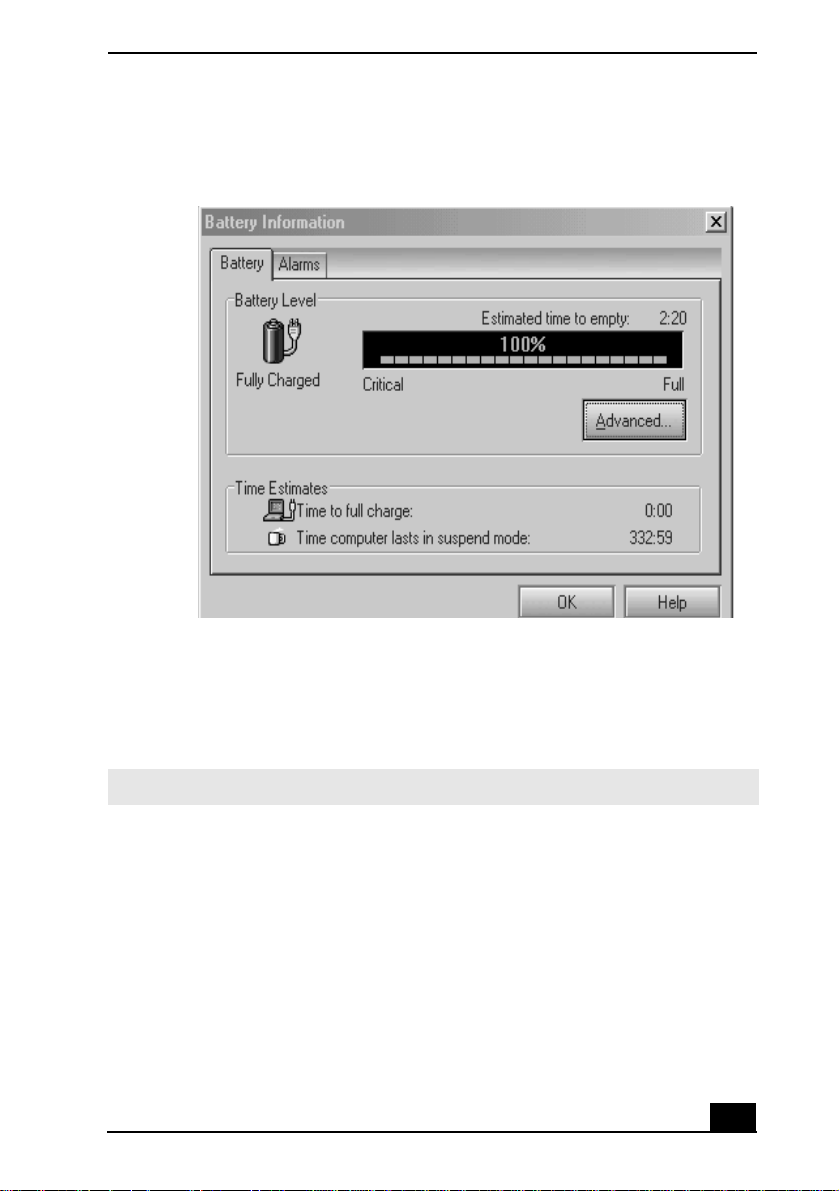
Display ing b attery infor mation
You can display the remaining batter y cha rge on the Battery Inform ation toolbar
and/or the Battery Inform ation window.
To displa y the Battery Informat ion toolbar
1 Right-clic k the center of the Windows® taskbar.
2 Select Toolbars from the shortcut menu, and click Ba ttery I nformation.
The Battery Information toolbar appears on the taskba r.
✍ If the Battery Informat ion to olbar is hidde n be hi nd the tas kbar i co ns, r ig ht-cl ic k the
taskbar and click to cancel Lock the Taskbar . Click and dr ag th e edge of the
Battery Information toolbar to the left until it is in clear view.
The to tal charge remai n ing in the battery is listed in percent and real- time val u es.
The followi ng toolb ar indica tes there is 100 p ercent or approxi mately 2 ho urs an d
40 minutes of battery charge left.
15
Page 16

VAI O C om puter Quic k Sta rt
Battery Information Toolbar
❑ Percentage indicator — Displays the percentage of the remaining capacity.
❑ Time indicator — Displays estim ated time (hours : minutes) remaining
before the battery fully discharges, a ls o known as the time-to-empty.
To close the Battery Information toolbar
1 Right- click th e Battery Information toolbar.
2 Select Toolbars from the shortcut menu, and click to cancel Battery
Information. The Battery Information toolbar disappears from the toolbar.
To display th e Battery Informat ion win dow
Doubl e- click th e CPU icon on the Windows taskbar. The Battery
Information window appears.
16
Page 17
Using the Battery
Battery Information Window
❑ Battery tab — Displays the total charge remaining in the battery . You can
click Advanced for specific information on the battery.
❑ Alarms tab — Displays the alarm settings, which notify you when the
battery is ful ly charged and is too low. You can change your compute r’s
alarm settings on this window.
✍ Click Help in the lower right corner of the window for more information.
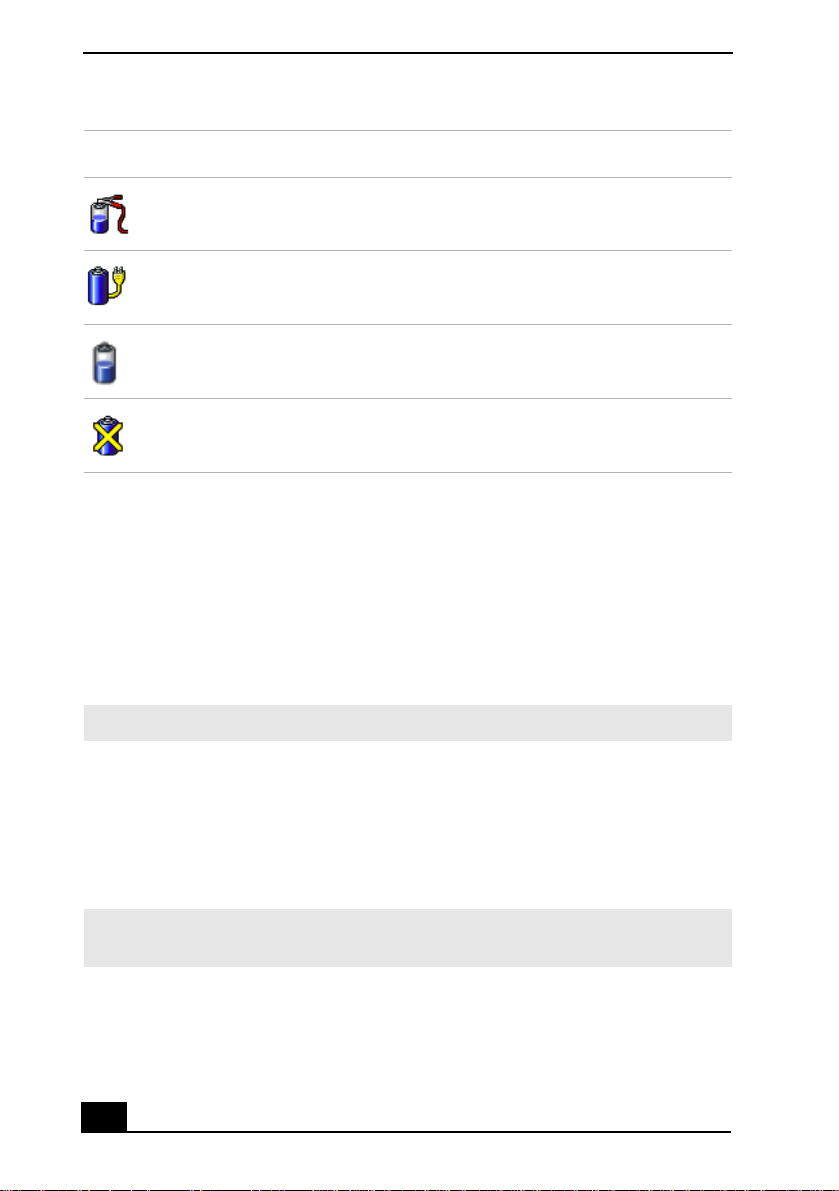
The battery icons th at appea r o n t he Batte ry Information toolba r and the
Battery Information window indicate the current status of the installed battery .
17
Page 18
VAI O C om puter Quic k Sta rt
Battery ic on Battery status
Charging
Fully ch arged
Discharging
No battery
Charging a battery
You will need to charge the battery if battery power drops below 10 percent or
you have not us ed the battery for a considera ble amount of tim e. The lithium-ion
battery suppl ied with your computer may be recharged at any time, whether you
wait until the ba ttery is completely or partially discharged. Charging a partially
dischar ged ba ttery does not affe ct battery life. If you charge the battery and find
that batter y power is s till low, the battery may be reaching the end of its life, and
you may need to replace it.
✍ The battery supplied with your comput er is not char ged at the time of pu rchase.
To charge a battery
You can charge the battery when the computer is on or off. However, the battery
will charge faster when the computer is off. Charging the battery takes seve ral
hours. See your VAIO® Computer Spe cifications on the “Welcome” page for the
approximate tim e needed to charge your battery.
✍ Charge the battery at temperatures between 50°F and 80°F (10°C to 30°C). Lower
temperatures require more time to charge.
18
Page 19
Using the Battery
1 Insert the batte r y into the battery bay. If you want to charge more than one
battery, insert the second battery into the computer. See “Displaying battery
information” for more information.
2 Connect the AC adapter to the computer. The computer automatically
charges the battery as long as the computer is using AC powe r.
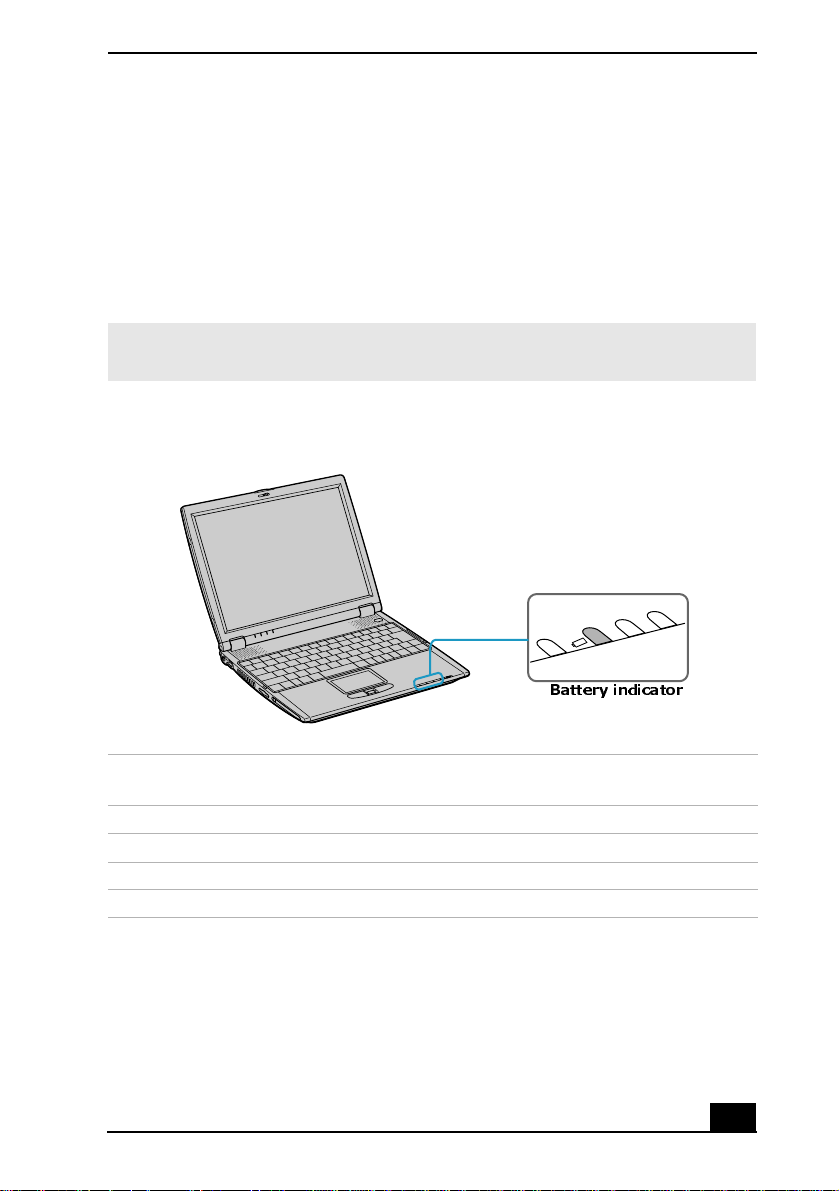
The batter y indica tor blin ks while the batte ry char ge s. The batte ry i ndicat or stop s
blinking when the ba ttery is 100 percent ful l.
✍ When us in g tw o ba tt eries, the ba tt ery you insert first ch arg e s fir st. The sec o nd
battery you insert beg ins charging when the first battery is 85 percent ful l.
Battery Indicator
Battery indicator
Battery indicator
status Description
On The computer is using ba ttery power.
Single blink The battery is running out of power.
Double blink The battery is charging.
Off The computer is using AC power.
Notes on batteries
❑ Never leave the battery in temperatures above 140°F (60°C), such as under
direct sunlight or in a car parked in the sun.
19
Page 20

VAI O C om puter Quic k Sta rt
❑ While the batter y is in use or being dischar g ed, the battery heats up. This is
normal and is not cause for concern.
❑ Keep the battery away from all sources of heat.
❑ Keep the battery dry.
❑ Do not open or disassemb le the battery.
❑ Do not expose the batte ry to any mechanical sho ck.
❑ Battery life is shorter in a cold environm ent because of decreased battery
efficiency at low temperatures.
Frequently asked questions
How do I know when the batt er y is ch arged?
To determine the remaining ba ttery char ge, see “Displa ying battery information.”
When is the computer using AC powe r?
When th e c om p ut er is direct ly co n n ected to th e A C ada p ter, it uses AC p ower,
even if a battery is insta ll ed .
When should I recharge the battery?
❑ When the battery level falls below 10 percent.
❑ When both the battery and power indicators blink.
❑ When you have not used the batte r y for a con siderable amount of time.
20
Page 21

Conserving Battery Power
Conservin g Bat ter y Pow er
You may use the power saving modes and PowerPanel or power schemes to
conserve batte ry power. Conserving battery power may signifi cantl y extend your
computing ti me , depending on how you use your compute r.
❑ Using power saving modes
❑ Using PowerPanel
❑ Frequently asked questions
Using power saving modes
In addition to the normal operating mode, which allows you to turn off specific
devices, your computer has two distinct power saving modes: Standby and
Hibernate . You can use the Stand by and Hibernate power saving modes to
override a profile setting or initiate an immediate action.
❑ Standby — Saves the state of the system and peripheral devi ces in memory
(RAM). Power consumption is reduced to a minimum. The system remains
on, and t h e computer screen ( LCD) is off .
❑ Hibernate — Saves the state of the system and peripheral devices in the
Save to Disk Partiti on on t he hard disk. Power c onsumpti on is re duced to t he
lowest possible setting without be ing completely off. Hibernate mode
consumes the lowest level of power. Your computer enters Hibernate mode
with th e re m ainin g batte r y charge dr ops be lo w 5 perc en t, rega r d less of th e
setting you select.
✍ Some software programs and peripheral devices prevent the system from enabling
Hiberna te mode when battery power is low. You can manuall y activate a po w er
management mode to conserve power, but you should save your data frequently to
avoid data loss.
To activate Standby mode
1 Press the key combination Fn+Esc. The power indicator blinks in this mode.
2 Press any key to return to Normal mod e.
21
Page 22
VAI O C om puter Quic k Sta rt
To activa te H ibernate mode
1 Press the key combi nation Fn+F12 press the power button and release it
immediately. Do not move the computer until the power indicator turns off.
2 Press the power button to return to normal mode.
✍ If the computer does not activate Hibernate mode, see “Frequ ently asked question s”
for more information.
Using PowerPanel
The PowerPanel utility enables you t o select and customize a predefined power
management pr ofile t o conse rve bat tery li fe. Th e followi ng ta ble de scrib es all th e
predefined power management profiles in PowerP anel. Your computer is set to
Automatic P r ofile Selection by defaul t. You can customize the settings for all the
following profiles, except the Disable Power Man age ment profile.
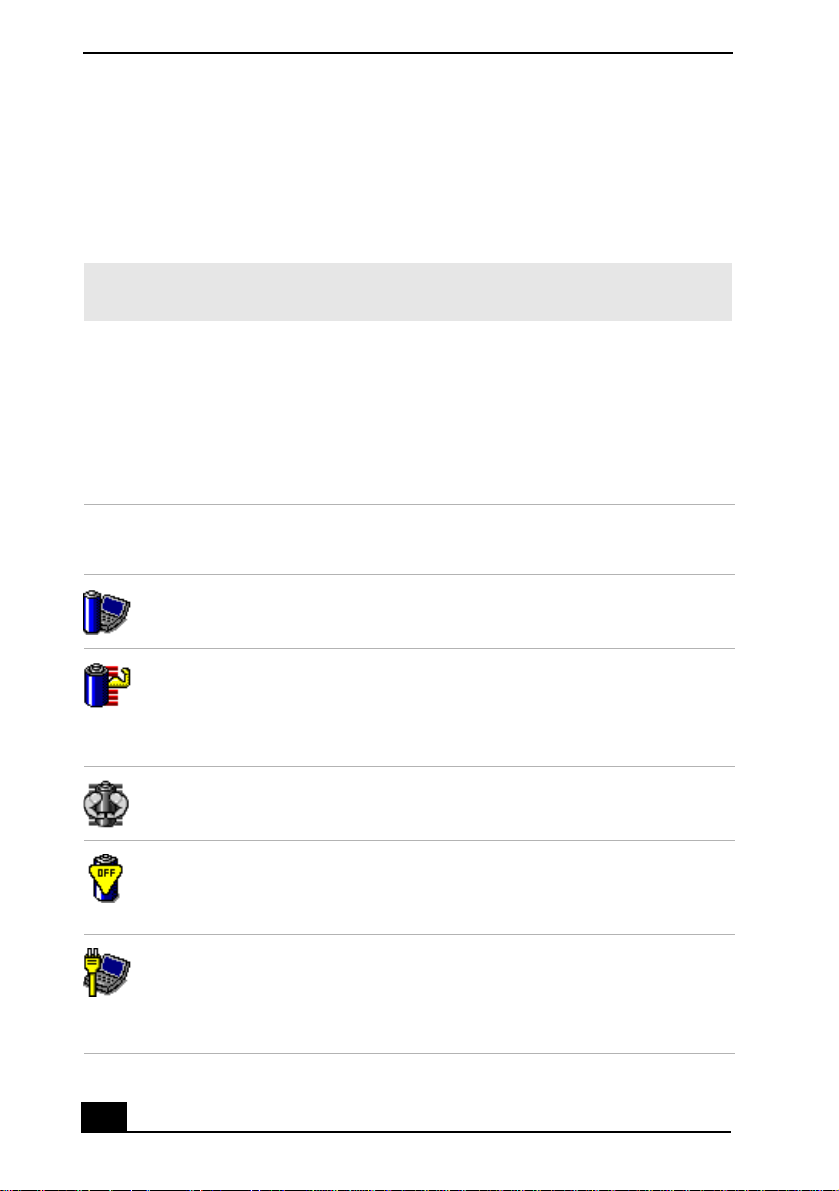
Profile
Icon Description
Maximum Performance
Provides the best system performance but cons erves little power.
22
Maximum Battery Life
Provides power saving features to give you maximum battery life and
good performance. It slows the computer and puts it into Standby
mode after a specifi ed time period.
Ultimate Battery Life
Extends the Maximum Battery Life by disabling the i.LINK port.
Power Management Off
Disables all power management settings, such as S tandby and
Hibernate modes. You cannot change the settings of this profile .
AC Power
Indicates when AC power is in use. Similar to the Power Mana gement
Off sett ing. Power Manage me nt automatically loads the AC pro f ile
unless you disa ble this feature.
*
Page 23

Profile
Icon Description
Games
Disables the dis play and the Hard Disk Stan dby timer.
Presentation
Keeps the dis p lay on at all times while it conserves p ower. This option
is ideal f or slide show presentations. You can establish se ttings for
LCD (Video) Standby, Hard Disk Standby, and Standby mode to
optimize power management for your system.
Camera
Optimizes performance and power req uire ments for camera usage.
DVD
Optimizes performance and power req uirements for DVD usage.
Word Processing
Optimizes power management with longer time-outs on the hard disk
and display screen . You can also establish s ettings for LCD (Video)
Standby, Hard Disk Standby, and Standby mode to optimize power
management for your syst em.
Conserving Battery Power
Spreadsheet
Optimizes performance and power require ments for spreadsheet
programs.
Communications
Extends batte ry life by initi ating a quick dis play tim e-out . The Internal
modem remains powered. You can also establish settings for LCD
(Video) Standby, Hard Disk Standby, and Stand by mode to optimize
power management for your syste m.
Automatic Profile Selection
Switc he s au to matical ly to a pro f il e s u it ab l e for active so f tw a r e
programs.
23
Page 24

VAI O C om puter Quic k Sta rt
* On selected models.
✍ Do not choose the Automa tic Profile Selection when connected to AC power.
To select a profile
1 Right- click th e CPU icon on the Windows taskbar.
2 Select Profiles, and click the profile on the shortcut menu. The profile
settings are implemented instantly. See “Using PowerPanel” for descriptions
of available profiles.
When you use the battery to power your computer, your system automatically
selects the Maximum Battery Life power management profile by default. If you
select a different power management profile while using battery power, that
profile is selected automatic ally the next time you use the ba ttery to power your
computer.
✍ See PowerPanel Help for information on customizing the power managem ent
profiles.
To customize yo ur profile settings
You can customize your profile sett ings to sustain enough powe r for a particular
computing func tion.
1 Right- click th e CPU icon on the Windows® taskbar.
2 Select Edit/C rea t e Pro f il es from the shortcut menu.
3 In the left panel , s elect the profile that you want to change.
4 Right-clic k the setting under System, LCD(Video), Hard Disk, o r Other
Devices tha t you want to change. See the followi ng table for a description of
each power profil e.
5 Make your changes from the drop -down menu.
6 Click File, and click Save.
24
Page 25

Power profil e D escrip ti o n
*
CPU Control
Controls the processor speed. You can select either
Performance, Adaptive, Batt ery Life, or More Battery Li f e.
These selections are listed in order from th e greatest to least
amount of power consumed.
Conserving Battery Power
System Standby
Timer
Controls the time it takes the system to activate the Standby
mode when it is idle. The longer you allow the computer to sit
idle while it is not in a power saving mode th e more power the
computer will consume.
Hibernate T imerControl s the time it takes the system to activate the Hi b er nate
mode when it is idle. The longer you allow the computer to sit
idle while it is not in a power saving mode th e more power the
computer consumes. Hibernate mode conserves more power
than Stan dby mode.
Thermal Cont rol
Strategy
*
Controls the speed of the processor fan. You can adjust the fan
speed to Quiet, which conserves the most power, or
Performance.
Lid Close
Action
Controls the state of yo ur syste m when you clos e the comp uter’ s
lid. You can select eit h er Standby or Hibernate mode, or you
can select LCD Off. Hibernate or LCD Off conserves the most
power.
Hibernate on
Low Batter y
Controls the stat e of your system when the batt ery power is low.
You can turn this setting On or Off. Selecting On conserves the
most power when the batt ery is low.
LCD BrightnessControls the brightness of the comput er s creen (LCD) screen.
You can select a brightness level of one to nine, with one being
the darkest setting. The darker you set the com puter screen
(LCD) the more power you conserve.
25
Page 26

VAI O C om puter Quic k Sta rt
Power profile Description
LCD Standby
Timer
Contr o ls the tim e it tak es the sy stem to sw it ch th e LCD to
Standby mode when the system is idle. This setting only tur n s
off power to the LCD. The system itself still functions on full
power.
HDD Standby
Timer
Controls the time it takes the system to switch the hard disk
drive to S tandby mode when the s ystem i s idle . Thi s sett ing only
turns off power to the hard disk drive.
i.LINK Port Controls the power supply to the i. LINK® port. You can disable
power to the i.LINK port to conserve power .
Memory Stick
Port Power-
Controls the power supply to the Memory Stic k® s lot. You can
disable power to the Memory Stick slot to conserve power .
saving
* Slows the processor speed.
Frequently asked questions
Can my computer en ter Hibernate mode while using battery power?
Some software programs and per ipheral devices prevent the system from
activati ng Hibernate mode when the battery is low or the computer i s running on
AC power. To avoid loss of data when usi ng battery po wer, you should save your
data frequent ly and manually activate a power management mode, such as
Standby or Hibernate. See “Using power saving modes” for more information.
When should I replace the battery?
If, after fully charging the batt ery, the battery power is still low, the battery may
be reaching the end of its life and should be replace d.
Why is the battery warm?
While the batter y is in use or being dischar g ed, the battery heats up. This is
normal and is not cause for concern.
26
Page 27

Internet and Network Connections
❑ Internet Connections
❑ Network Connections
❑ Connecting Another VAIO Computer
27
Page 28

VAI O C om puter Quic k Sta rt
Internet Connections
This section des cribes the basic steps for setting up your dial-up or Ethernet
connection to the Internet. The New Connection Wizard guides you through the
process of connecting to the Internet and c hoosing an Internet service provider
(ISP) or setting up an exi st ing account. When you connect to the Int ernet, you
can register your VAIO® comput er, use online services, and gain acces s to Sony
Computing Support.
❑ Setting up a dial-u p Internet connectio n
❑ Setting up an Ethernet Internet connec tion
❑ Customizing your Internet connection
❑ Frequently asked questions
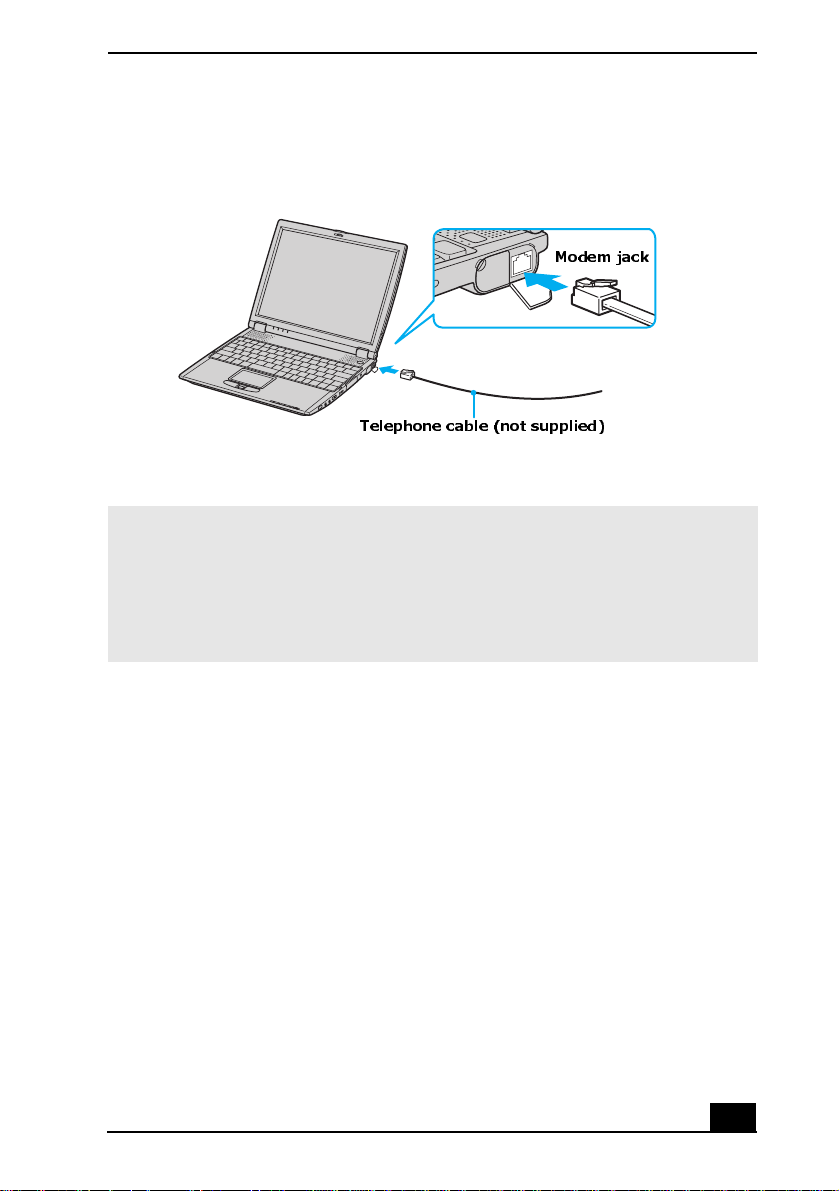
Setting up a dial-up Internet connection
Before you can connect to the Internet, you need to conne ct your computer to a
telephone li ne via a telephone cable (not supplied). Once you have se t up your
telephone cable, you’re ready to connect to the Internet.
To co n n e ct a te lephon e ca b le
1 Locate the Modem jack on your computer. For location information, see
Locating Ports and Controls in the Setting Up chapter of your printed
VAIO® Com puter Quic k Star t .
2 Plug one end of t he t eleph one ca ble int o t he Mo dem jack . Make sur e i t clic ks
into pl ace.
3 Plug the other end into the wall jack.
28
Page 29
Internet Connections
Connecting a Telephone Cabl e
Modem jack
Telephone cable (not supplied)
✍ Your computer does not work with party lines, cannot be connected to a coin-
operat ed telephone, and may not work wit h multiple telephone lines or a private
branch ex change (PBX). Some of these connections may r esult in excess electrical
current and could cause a malfunction in the internal modem.
If you con nect a telep hone cable coming through a splitter, the modem or connected
device may not work proper ly.
To set up a dial-up c on ne ction to the Internet
1 Connect your computer to a telephone line. See “To connect a telephone
cable” for more information.
2 Click Start, point to All Programs , Accessories, Communications, and
click New Connection Wizard. The New Connection Wizard appears.
29
Page 30

VAI O C om puter Quic k Sta rt
New Connection Wizard
3 Click Next. If the Location Information dialog box appears, follow the on-
screen instruction s.
4 If it is not alre ady select ed, c lick t o sel ect Connect to the Internet, and cl ick
Next.
5 Follo w th e on- s c r ee n in s t r u ct io n s .
Setting up an Ethernet Internet connection
Your computer accommodates both 10BASE-T and 100BASE-TX Ethernet
connections, with data transfer sp eeds of between 10 and 100 Mbps, dependi ng
on the line condit ions and Ethernet cabl e.
30
Page 31

Internet Connections
To co n nect an Eth e rn et ca b le
1 Locate the Ethernet port on your computer. For location information, see
Locating Ports and Controls in the Setting Up chapter of your printed
VAIO® Computer Quick Start.
Connecting an Eth er net Cable
Ethernet
port
Ethernet
cable
2 Plug one end of the Ethernet cable into your computer’s Ethernet port
and the other into the network connection.
To s et up an Ethernet co n nection to the Internet
1 Connect your computer to a network connection. See “To connect an
Ethernet cable” for more information.
2 Click Start, point to All Programs , Accessories, Communications, and
click New Connection Wizard. The New Connection Wizard appears.
31
Page 32

VAI O C om puter Quic k Sta rt
New Connection Wizard
3 Click Next.
4 If it is not alre ady select ed, c lick t o sel ect Connect to the Internet, and cl ick
Next.
5 Follo w th e on- s c r ee n in s t r u ct io n s .
Customizing your Internet connection
The Internet Properties dialog box enables you to change the way you view the
Internet. You can change your home page, fonts, language, and colors. You can
also regulate content and set your bro wsi ng preferences.
To open the Internet Properties dialog box
1 Click Start on the Wind ows ® taskbar, a nd then Control Panel.
2 Click Network and Internet connections, and then Internet Options. The
Inter net Propertie s dialog box appears.
3 Click the tabs to view options.
4 Make changes, and click Apply to activate your changes.
5 Click OK.
32
Page 33

Internet Connections
Frequently asked questions
Why doesn’t my modem work?
❑ Make sure the tele phone cable is securely plugged into the Modem jack and
the wall jack. See “To connect a telephone cable” for more information.
❑ Make sure the telephone cable is working by plu gging the cable into an
ordinary telephone and listening for a dial tone.
❑ Make sure the telephone number the program is diali ng is correct.
❑ Make sure the software you are using is compatible with the computer’s
modem. (All preinstalled Sony programs are compatible.)
❑ If you are still experiencing problem s, use the supplied Application
Recovery CD(s) to reinstall the modem driver software. See “Using the
Application Recovery CD(s)” for more information.
Why is my mo dem connection slow?
Your computer is equipped with a V.90 compatible modem. Many factors may
influence modem connection speed , including telephone line noise or
compatibility with telephone equipment, suc h as fax m ac hines or other modems.
If you think your modem is not connecting properly to other PC-based modems,
fax machines, or your Internet Service Provider (ISP), follow thes e step s:
❑ Ask your telephone company to ver ify your tele phone line is free of any line
noise.
❑ If your problem is fax-related, make sure there are no problems with the fax
machine you are ca lling and that it is compatible with fax modems.
❑ If you are having a proble m connecting with your ISP, make sure the ISP is
not experiencing technical problems.
❑ If you ha ve a second telephone cabl e available, try connecting the modem to
that cable.
33
Page 34

VAI O C om puter Quic k Sta rt
Network Connections
With a Sony computer, you can easily set up or connect to a variety of networks.
The New Connection Wizard and Network Setup Wizard make it easy to gain
access to remote and loca l area networks (LANs) using wireless, Ethernet, or
dial-up connections.
For more information about networking, click Start, Help and Support, and
then Networking and the Web.
❑ Using Ethernet and dial-up connections
❑ Using wireless LAN connections
❑ Checking your network connection status
❑ Frequently asked questions
Types of Net works
Access point (wireless)
Computer-to-computer
(wireless)
Ethernet (cables)
Using Ethernet and dial-up connections
Local area networ ks (LANs) comprise a group of computers and assoc iated
devices within a small geographic area , s uch a s a home or of fice building. Fo r
setting up LANs, Ethernet is a widely installed t echnology. Your computer
34
Page 35

Network Connections
accommodates both 10BASE-T and 100BASE-TX Ethernet connections, with
data transf er s peeds of between 10 and 100 Mbps, depending on the Ethernet
cable.
To set up an Etherne t LAN
1 Plug one end of the Ethernet cable into your computer’s Ethernet port and
the other into the network connection.
Connecting an Eth er net Cable
Ethernet
port
Ethernet
cable
2 Click Start, point to All Programs , Accessories, Communications, and
click Network Setup Wizard. The Network Setup Wizard appears.
35
Page 36

VAI O C om puter Quic k Sta rt
The Network Setup Wizard
3 Click Next.
4 Follo w th e on- s c r ee n in s t r u ct io n s .
Only connect 10BASE-T and 100BASE-TX cables to th e Ethernet port
. Do not connect any other type of netw ork cable or any telephone
cable. Conne cting cables other than those listed above may result in an
electric current overload and coul d cause a malfunction, excessive heat, or
fire in the port. To connect the unit to the network, contact your network
administrator.
You can connect to your company network from a remote location and use data,
programs, and network resources. See Microsoft ® Windows® Help by clicki ng
Help and Support from the Start menu, and the n clicking Networking and the
Web in the left panel.
36
Page 37

Network Connections
To connect to a r em ote network using a telephone or Ethern et cable
1 Connect an Ethernet or telephone cable to your computer. See “Connecting
an Ethernet Cable” an d “Setting up a dial-up Intern et connection” for more
information.
2 From the Start menu, point to Al l Programs, Accessories,
Communications, and click New Connection Wizard.
3 Click Next. If you are prompted to the Local Info rm a t io n dialog box,
follow the on-screen instructions.
4 Click Connect to the network at my workplace, and th en click Next.
5 Follow the on-screen ins tructions.
6 Ask your network administrator for the detailed set tings and devices needed
to connect to an exis ting network.
Using wireless LAN connections
A wireless local area network (LAN) is a network in which you can connect to a
LAN through a wireless (radio) connection. You can opt to purchase a Sony
Wireless LAN Access Point to set up a LAN.
The wireless LAN access point is designed for building a wireless LAN
environment. B ecause a wireless LAN configuration requi res no wiring, you c an
operat e mu l ti p le computers m o r e fr eely than ev er be fo re .
You can also purchase an external Wirel ess LAN PC Card separately, but your
computer (depending on the model you purchased) may al ready come with a
built-in mini PCI card that allows for wireless connections. For information
about your computer’s wireless ca pabilities, see the “Welcome” page to vie w
your VAIO® Computer Specificati ons. The Wireles s LAN PC Card is designed
for a wireless LAN e nvironment. You can use the Wireless LAN PC Card wi th or
without the access point.
✍ For more infor mat io n on Sony Wireless LAN, go to http:/ / www.sonystyle.com/ vaio.
There are two types of wireless connections:
❑ An infrastructure network is one that extend s a n exis ting wired local
network to wireless devices by provid ing an access point. The acce s s point
bridges the wireless and wired LAN and acts as a central controller for the
37
Page 38

VAI O C om puter Quic k Sta rt
wireless LAN. T he ac cess point c oordi nate s tra nsmissi on and r ec eption from
multiple wireless devic es within a specif ic range.
❑ A computer -to-com puter (a d-hoc) ne twor k is one in wh ich a l ocal ne twork is
created only by the wireless devices themselves, with no other central
controller or access point. Each device communicates dire ctly with other
devices in the net w ork. You can set up an ad-hoc ne twork easily at home.
To connect to an existing wireless network
1 Move the Wir eless LAN switch to ON or insert a Wireless LAN PC Card
into the PC Card slot. See “Inserting PC Cards” for more information.
The Wirel ess LAN indicator lights up.
2 From the Start menu, click Control Panel.
3 Click Network and I nternet Connections, and then click Network
Connections.
4 Double-click Wireless Network Connection. The Connect t o Wire le s s
Network dialog box appears.
Connecting to a Wireless LAN
38
yyy
xxx
zzz
Page 39

Network Connections
5 Select a network from the Available networks list box.
6 Type the network key of the a vailable network in the Network key box. See
your network administrator for this information.
7 Click Connect.
To set up a wireless netwo rk
1 Move the Wir eless LAN switch to ON or insert a Wire less LAN PC Card
into the PC Card slot. See “Inserting PC Cards” for more information.
The Wirel ess LAN indicator lights up.
2 From the Start menu, click Control Panel, Network and Internet
Connections, and then click Network Connections.
3 Right-click Wireless Network Connection, and select Properties. The
Wireless Network Connection Properties dailog box appears.
4 Click the Wireless Networks tab, and then click Add.
Setting Wireless Network Connection Properties
39
Page 40

VAI O C om puter Quic k Sta rt
5 Type up to 32 ASCII characters in the Network name (SSID) box.
6 Click to select the Data encryption (WEP enabled) check box.
7 Click to select the Network Authentication (Shared mode) chec k box.
8 Click to cance l the The key is provided for me automatical ly check box.
9 T ype betwee n 5 and 13 ASCII charac ters or 10 to 26 hexadec imal cha racte rs
in the Network key box.
10 Click OK. Your new network name appears in the Preferred networks list
box.
To set up a computer-to-computer (ad-hoc) network
1 Move the Wir eless LAN switch to ON or insert a Wireless LAN PC Card
into the PC Card slot. See “Inserting PC Cards” for more information.
The Wireless LAN indica tor turns on.
2 From the Start menu, click Control Panel, Net work and Internet
Connections, and then click Network Connections. The Network
Connections window appears.
3 Right-click Wireless Network Connection, and sele ct Properties. The
Wireless Network Connection Properties dailog box appears.
4 Click the Wireless Networks tab, and then click Add.
40
Page 41

Network Connections
Setting Wireless Network Connection Properties
5 Type up to 32 ASCII characters in the Network name (SSID) box.
6 Click to sel ect the Data encryption (WEP enabled) check box.
7 Click to sel ect the Network Authentication (Shared mode) check box.
8 Click to cancel the The key is provided for me automatically check box.
9 Type between 5 to 13 ASCII characters or 10 to 26 hexadecimal charac ters
in the Network key box.
10 Click to sel ect the This is a computer-to-com puter (ad-hoc) network;
wireless access points are not used check box.
11 Click OK. Your new network name appears in the Pref err ed networks
window. It may take a few moments for both computer systems to recognize
each other.
41
Page 42

VAI O C om puter Quic k Sta rt
To d isco nnect from a wireless net wo rk
❑ For computers with buil t-in wireless LAN functional ity, open the Wireless
Network Connection Status window, and click Disable. See “Checking
your network connec tion status.” Move the Wireless LAN switch to OFF.
The Wireless LAN indica tor turns off.
❑ For Wirel ess LAN PC Card connections, open the Wireless Network
Connection Status window, and click Disable. See “Checking your network
connection sta tus.” Follow these steps to remove the Wire less LAN PC
Card:
1 Doubl e- click th e Safely Remove Hardware icon on the taskbar.
The Safely Remove Hardware window appears.
2 Select the appropriate device name in the Hardware devices window , if
it is not already s elected, and click Stop. The Stop a Hardware device
window appears.
3 Make sure the appropri ate device name is selected, and click OK. A
message appears sta ting it is now safe to remove the har dware device.
4 Remove the PC Card. See “Removing PC Cards” for more information.
Turning off the wireless LAN functionality while accessi ng remote
documents, files, or resources may result in data loss.
Checking your network connection status
Whether you have a wireless, Ethernet, or dial-up connection, you can check the
status of that connection by double-clicking the Wireless Network Connec tion
icon on your taskbar. The Wireless Network Connection Status window
appears.
42
Page 43

Wireless Network Connection St atus Window
Frequently asked questions
Network Connections
Why can’t my computer c o nn ec t to a wire l es s LA N ac cess point?
❑ Connection ava ilability is affected by dist anc e and obstructions . You may
need to move your computer away from obstructions or closer to any access
point you may be using.
❑ Make sur e the Wirele ss LA N s w it ch o n th e comp ut er is in the ON position
or the Wireless LAN PC Card is properly inserted.
❑ Make sure power to the acce ss point is on.
❑ Make sure the access point is displayed in the Available networks window.
1 From the Start menu, click Control Panel, Network and Internet
Connections, and then Network Connections.
2 Right-click Wirel ess Network Connection, and sele ct Properties. The
Wireless Network Connection Properties dialog box appears.
43
Page 44

VAI O C om puter Quic k Sta rt
3 Select the Wireless Networks tab, and make sure the access point is
displayed in the Available networks box. If it is not displayed, see “To
connect to an existing wireless network” for more information.
❑ Make sure the encryption key is correct.
Why can’t I access the Internet?
❑ Make sure the Wireless LAN PC Card is properly inserted into the PC Card
slot. For more information, see “Inserting PC Cards.”
❑ Check th e access poi n t set tings. R ef er to the ins t r u ct io n s su pplied wi th th e
access po i n t.
❑ Make sure your computer and the access point are connected to one another.
❑ Move your computer away from obstructions or closer to any access point
you may be using.
❑ Make sure your computer is properly configured for Internet access.
Why is the data transfer speed slow?
❑ The wir el ess LAN data tr a ns f er spe ed is affe ct ed by di st an ce and
obstructio ns bet ween de vices a nd acce ss poin ts. Ot her fac tors i nclude devic e
configurations, radio conditions, and software compati bility. To maximize
the data transfer speed, move your compute r away from obstructions or
closer to any access point you may be using.
❑ If you are us ing a wireless LAN access point, the device may be temporarily
overloaded depending on the number of other device s communicating via
the access point.
❑ If your ac ce s s po i n t in t er f er e s with o th er access poi nt s , cha n g e th e ac cess
point channel. See your access point instructions for more information.
Why is th e co mmunica t io n s p ee d interrup t ed or sl ow e d d o wn w hen M PE G 2
data is transferred?
The typi ca l eff e ct iv e dat a transfer sp eed via an ac ce ss point is 4-5 M b ps when
adhering to the IEEE 802.11b standard. High-rate stream transf ers with MPEG2
data may lower this rate.
44
Page 45

Network Connections
How do I avoid data transfer interruptions?
❑ Data transfer interruptions may occur with large files or use of micro waves
and cordless telephones when connected to an access point.
❑ Move the co mputer closer to th e access point.
❑ Make sure the access point connection is int act.
1 From the Start menu, click Control Panel, Network and Internet
Connections. The Network and Internet Connections window
appears.
2 Click Network Connections. The Network Connections window
appears.
3 Check the connection status.
❑ Change th e a cc ess poi nt c hann el . S ee yo u r ac ces s p oint ins tr uct ion s fo r mo re
information.
Can I connect to a IEEE 802.11a device?
Computers with built-in wireless LAN support the IEEE 802.11b standa rd only.
Devices connecting to a wireless LAN using the IEEE 802.11a standard cannot
connect to devices using the IEEE 802.11b standard.
What are channels?
Wireless LAN communication occurs on divided frequency bands known as
channels. Third-party wireless LAN access point channels may be preset to
different channels from Sony devices.
If you are using a wireless LAN access point, refer to connectivity information
contained in your acces s point instruct ions.
45
Page 46

VAI O C om puter Quic k Sta rt
Connecting Another VAIO Computer
The preinstalled Microsoft® Windows® XP operating system enables you to
connect a compatible i.LINK®
*
cable (not supplied) between your VAIO®
computer and another compatible computer.
❑ Connecting VAIO computers
❑ Disconnecting VAIO computers
❑ Frequently asked questions
Connecting V AIO computers
When you connect two VAIO compute rs, y ou can use one com puter t o edit, copy,
or delete file s on the othe r comput er. You c an also pri nt from a pri nter at tache d to
either computer.
To connect VAIO computers
1 Plug one end of the i.LIN K cable into the i.LINK port on each computer.
2 Click Start on the Wind ows ® taskbar, and click Control Panel.
3 Click Network and I nternet Connections, and click S et up or change
your home or small office network. The Network Setup Wizard appears.
* i.LINK is a trademar k of Sony used to des ignate that a product contain s a n I EE E 1394
connection. The i.LINK conne ction may vary, depending on the software programs ,
operating system, and compatible i.LINK devices. All products with an i.LINK connector
may not communica te with each other. Refer to the documentation that came with your
compatible i. LIN K device for information on operating conditions and proper connection.
Before connecting compatible i.LINK PC peripher als to your system, such as a CD-RW or
hard disk driv e, confirm their operating system compatibility and required operating
conditions.
46
Page 47

Connecting Another VAIO Computer
The Network Setup Wizard window
4 Follow the on-screen Network Setup Wizard instructions.
5 When you are prompted, type i n a unique computer na me for eac h computer.
You will use this unique name to dif f erentiate the two co mputers once they
are networked together.
✍ The Workgroup name should remain the same for the two networked computers.
6 When you finish the Network Setup Wizard on-screen instru ctions, cli ck
Start on the Windows® taskbar and click My Computer.
7 Click My Network Places in the Other Places menu. The My Network
Places window appears.
8 Click V i ew workgroup computer s in the Network Tasks menu. The
computers tha t are networke d und er the same work group name are displ ayed
in this wi n do w.
47
Page 48

VAI O C om puter Quic k Sta rt
Connect ing Another Co mputer
* This graphic is for illustration purposes only and may not resemble the unit you purchased.
*
i.LINK cable (not supplied)
Disconnecting VAIO computers
You can disconnect two VAIO® computers when the computers are on or off.
To disconnect VAIO computers when the computers are on
1 Close all open files that are shared with the connected computers.
*
2 Unplug the i.LINK®
cable from the i.LINK port on each compute r.
To disconnect VAIO computer when the computer s are of f
❑ Unplug the i.LINK cable fr om th e i.LINK port on each computer.
* i.LINK is a trademar k of Sony used only to designate t hat a product contains an IEEE 1394
connection. The i.LINK connection may vary, depending on the software applications,
operating system, and compatible i.LINK devices. All products with an i.LINK connection
may not communica te with each other. Refer to the documentation that came with your
compatible i. LIN K device for info rmation on operating conditions and proper co nnection.
Before connecting compatibl e i. LINK PC peripheral s to your system, such as CD-RW or
hard disk driv e, confirm their operating system compatibility and required operating
conditions.
48
Page 49

Connecting Another VAIO Computer
Frequently asked questions
Why can’t I es ta b li sh a con n e ct io n b et w een two VAIO compu ters?
❑ Your computer may not re cogniz e an i. LINK
is not plugged securely into the i.LINK ports. Disconnect the i.LINK cable
and securely reconne ct it to both computers. If neither computer responds
after a few moments, restart both computers.
❑ If the computers do not reco gnize the i.LINK connecti on after resuming
from a power saving mode (Standby or Hibernate), restart both computers.
For more information, see “Connecting VAIO computers.”
*
connecti on if t he i.LINK cable
* i.LINK is a trademark of Sony us ed only to designat e that a product c ontains an IEEE 139 4
connection . T he i.LINK connection may vary, depending on the software applications,
operating system, and compatible i.LINK devices. All products with an i.LINK connection
may not communica te with each other. Refer to the documentation that came w ith your
compatible i. LIN K device for information on operating condit ions and proper co nnection.
Before connecting compatible i .L INK PC peripherals t o your system, such as CD-RW or
hard disk drive, confirm their operating system compatibility and required operating
conditions.
49
Page 50

VAI O C om puter Quic k Sta rt
50
Page 51

CDs, DVDs, and Optical Drives
❑ Inserting and Eject ing CDs or DVDs
❑ Copying and Playing CDs
❑ Playing DVDs
51
Page 52

VAI O C om puter Quic k Sta rt
Inserting and Ejecting CDs or DVDs
✍ Avoid us ing adhesive l abels to identify your CDs or DVDs. Adhesive labels may
damage the optical driv e if they come o ff while the disc is in the d rive.
To insert a CD or DVD
1 Turn on the computer or exit a power saving mode (S tandby or Hibern ate ) if
one is active. For more inf orm ation, see “Using power saving modes.”
2 Press the Eject button on the optical drive cover to open the drive tray. The
drive tray slides out.
Ejecting the Drive Tray
Eject button
3 Place a disc on the drive tray with the label facing up.
✍ You can play some DVDs on both sides. Insert this type of DVD with the side you
want to play facing up.
52
Page 53

Inserting and Ejecting CDs or DVDs
Inserting a Disc
Disc (label
facing up)
4 Press the disc onto the hub until the disc clicks securely into place.
If you do not seat the disc firmly over the hub, the dis c ma y come loose
while it is in the drive. A loose disc may damage the optical drive and
make opening the drive tray diffic ult.
5 Push the drive tray gently to c lose it. The Busy indicator on the drive blinks
while your computer is rea ding data from the drive.
To eject a CD or DVD
1 Turn on the computer or exit a power saving mode (Standby or Hibernate) if
one is active. For more in formation, see “Using power saving modes.”
2 Close all prog rams tha t are open from the opt ic al dri ve, and wai t fo r the L ED
indicator to turn of f.
3 Press the Ejec t button on the optica l drive cover to open the drive tray. The
drive tray sli des out.
✍ If the Eject button does not work, turn off the computer and insert a thin, straight
object (such as a paper clip) into the manual eject hole next to the Eject button.
4 Lift the disc from the drive.
5 Push the drive tr ay gently to close it.
53
Page 54

VAI O C om puter Quic k Sta rt
Copying and Playing CDs
Your optical drive can read CDs and DVDs. The type of optical drive installed in
or connecte d to your c ompute r may var y , depen ding on the model you pu rchased.
If you are usin g a CD-RW/DVD Combo Drive, you can write data to CD-Rs and
CD-RWs.
❑ Playing CDs
❑ Copying files to a CD-RW or CD-R
Playing CDs
Before you play an audio CD, you may need to enable your computer’s audio
feature.
To enable the audio feature
1 Click Start on the Wind ows® taskbar , click Control Panel, Performance
and Maintenance, and System. The System Properties window appears.
2 Select the Hardware tab, and click Device Manager in the Device
Manager box. A window with a listi ng of the computer’s hardwa re dev ices
appears.
3 Double-click DVD/CD-ROM drives.
4 Doubl e- c li ck th e listed dri v e na m e , an d se le ct th e Properties tab.
5 Click to select the Enab le digital CD audio for this CD-ROM devic e
check box if it is not already selected.
6 Click OK.
To adjust the volume for playing CDs and DVDs
Some programs have buil t-in volume control s, which you can adjust. If there are
no volume controls , then you can adjust the volum e of your computer’s bui lt-in
speakers by doing one of the following:
❑ Using the Functio n keys . An on-screen display may appear, noti f ying you
when a change occurs.
❑ To increase volume , press Fn+F4, then or .
❑ T o decrease volume, press Fn+F4, then or .
54
Page 55

Copying and Playing CDs
❑ Using the Volume icon.
1 Double click the Volume icon on the Windows® taskbar. The
Volume Control dialog box appears .
2 In the Volume Control and AC Audio columns, move the Volume
sliders up to increase the volume and down to decrease the volume.
To play an audio CD
1 Insert the disc into the optical drive. See “To insert a CD or DVD.”
2 Select an option in the Audio CD window.
3 Click OK.
Copying files to a CD-RW or CD-R
*
Before you write data to a CD-RW or CD-R, read the following notes to avoid a
computer malfunction and ensure the best writing results:
❑ Deactivate the screen sa ver and exit anti-virus software.
❑ Deactivate memory-resident disc utilities to avoid data loss.
❑ Turn o ff the FindFast application if your computer has preinstall ed
Microsoft® Office applica tions, such as Excel, Word, and Outlook.
❑ Connect and use the AC adapt er to power your computer.
❑ Use CD-Rs that are compatible with 16x speed.
❑ Insert the disc into the optical dri ve, and open the preinstalled Sony
SonicStage™ software by clicking Start, All Programs, and then
SonicStage.
❑ For instructions on how to use SonicStage software, follow these steps:
1 Click Start, and then Help and Support.
2 Click VAIO Multim edia, and t h en VAIO AV Applica tions.
3 Click SonicStage Software.
❑ Once you finish copying files to a CD-R that is readable in a CD-ROM
drive, cl ick Finish to complete the writing process before you eject the disc
from the optical drive.
* For computer models equipped with a CD-RW/DVD Combo Drive.
55
Page 56

VAI O C om puter Quic k Sta rt
Do not strike or shake the computer while writing data to a disc.
56
Page 57

Playing DVDs
Playing DVDs
You can play DVDs in your computer’s optical drive and view the video on the
computer screen. The type of optical drive installed in or connected to your
computer may vary, depending on the model you purchased.
❑ Watching DVDs on your computer
❑ Frequently asked questions
Watching DVDs on your computer
Your computer is equipped with a CD-RW/DVD Combo (optical) drive, which
enables you to watch most DVDs on your computer.
To play a DVD while connected to the AC adapter
1 Close all open programs.
2 Insert the DVD into the CD-RW/DVD Combo drive.
3 Select a preinstalled DVD program in which to play the DVD. The
preinstalle d DVD program launches the video automatically. See “Program
overview” for a description of your preinstalled DVD software. For deta iled
instructions on how t o use the preinstalle d DVD software, see the help guide
included with th e DVD software .
To play a DVD while usi n g battery power
1 Set the power management profile to DVD.
1 Close all open programs.
2 Right- c lick the CPU icon on the Windows® taskbar.
3 Select Profiles from the shortcut me nu, and then select DVD from the
submenu. You can also select Automatic Profile Selection, which s ets
the power management profi le to DVD whenever a DVD is i nsert ed int o
the optical drive. See “Conserving Battery Power” for more
information.
2 Restart the computer by pressing Ctrl+Alt+Delete, and the n se lecting
Restart from the Shut Down menu of the Windows Task Manager dialog
box.
57
Page 58

VAI O C om puter Quic k Sta rt
3 Insert the DVD into the CD-RW/DVD Combo Drive.
4 Select a preinstalled DVD program in which to play the DVD. The
preinstalled DVD program launches the video automatic ally . See “Program
overview” for a description of your preinstalled DVD program. For detailed
instructions on how to use the preins talle d DVD program, see the help guide
included with the DVD program.
Some discs recorded at 20 or 24 bit s m ay produce noise while playing. If
you have audio devices connecte d , this may damage your hearing and the
speakers. Reduce the volume before playing a DVD.
Do not switch the power saving modes while you are playing the DVD.
Do not use memory-resident u tility softwar e to speed up disc access. This
may cause the computer to malfunction.
Frequently asked questions
How do I maintain CDs and DVDs?
❑ Avoid touching the surface of the disc with your finge rs. Fingerprint s an d
dust on the surface of the disc may cause reading errors.
❑ To clean the disc, hol d the edge of the disc, and use a soft clo th to wipe the
surface from the cente r out. If the disc is badly soiled, moisten a soft clot h
with water, wring it out well, and use it to wipe the surface of the disc from
the center out. Wipe off any remaining moisture with a dry, soft cloth.
❑ Do not clean the disc with solvents (such as benzine, thinner, commercially
available cleaners, or anti-static spray), which may damage the disc.
❑ Do not drop or bend the disc.
Why does my computer f reeze when I try to rea d a d i sc?
The disc your computer is trying to read may be dirty or damaged. Restart the
computer, and eject the disc fr om th e optical drive. Examine the disc for dirt or
damage. If the disc is dirty, see “How do I maintain CDs and DVDs?” for
instr u ct io n s on h ow to cl ean it.
Why won’t th e drive tray open ?
❑ Make sure the computer is on.
58
Page 59

Playing DVDs
❑ Press the Eject button on the optical drive.
❑ If the Eject button does not work, click Start on the Win dows® taskbar, and
click My Computer. Right clic k DVD/CD-RW Drive, and select Eject
from the shortcut m enu.
❑ If none of the above options work, insert a thin, straight object (such as a
paper clip) in the manual eject hole to the right of the Eject button.
Why isn’t the optical drive playing my CD or DVD properly?
❑ Make sure the CD or DVD was inserted into the drive with the label facing
up.
❑ Make sure the necessary so ftware program(s) is installed according to the
manufacturer’s instructions.
❑ If the CD or DVD is dirty or damaged, the computer will stop responding.
Follow these steps:
1 Restart the computer by pressing Ctrl+Alt+Delete, and selecting
Restart from the Shut Down menu of the Windows Task Manger
dialog box.
2 Remove the CD or DVD from the optical drive.
3 Check the disc for dirt or damage. If you need to clean the disc, see
“How do I maintain CDs and DVDs?” for instructions.
❑ If you are playing a CD or DVD and cannot hear sound, follow these steps:
❑ Doubl e- click th e Volume icon on the Windows tas kbar, and click
to cancel th e Volume Control and CD Audio Mute check boxes.
❑ Check the volume setting in the audio mixer.
❑ If you are using external speakers, check the volume settings on the
speakers and the connections between the speakers and the comp uter.
❑ Make sure the CD audio f eature is en abled and the correct driver
software is installed. Follow these steps:
1 Click Start on the Windows® taskbar, and click Control Panel,
Performance and Maintenance, and System. The System Pro p er t ie s
window appears.
2 Select the Hardware tab, and then cl ick Device Manager. The Device
Manager window appears.
59
Page 60

VAI O C om puter Quic k Sta rt
3 Doubl e- c li ck the list ed DVD/C D-ROM dr i v e . Th e Properties window
appears.
4 Click the Properties tab, and click to select the Enable digital CD
audio for this CD-ROM device check box, if it is not selected.
5 Select the Driver tab, and click Driver Details to co nfirm th e dr iv er
software.
❑ Make sure an adhesive labe l was not attached to the CD or DVD. Adhesive
labels ca n come off while the disc is in the optical drive and damage the
drive or cause it to malfu nction.
❑ If a region code warning appears, the disc may be incompatible with the
optical drive . Che ck the DVD package to make sure the region code is
compatible with the optical drive .
❑ If you notice condensation on the computer, do not use the computer for at
least one hour. Condensation can cause the computer to malfunction.
Why did the computer scree n (LCD) go blank?
❑ Your LCD screen may go blank i f the c omput er has l ost powe r or has ent ered
a power saving mode (Standby or Hibernate). If the computer is in LCD
(V ideo) S ta ndb y mode, p ress a ny k ey to activ at e the LCD scre en. See “Usin g
power saving modes” for more information.
❑ Make sure the co mputer is plug ged into a power s ource a nd is on. The po wer
indicator on the com puter will be on if the comput er is on.
❑ If your computer is using battery power, make sure the battery is ins erted
properly and is charged. See “Using the Battery” for more information.
❑ If the display mode is set to external display, use the Fn+F7 key
combination. See “Selecting a display mode” for more information.
Why don’t my changes appear on the computer screen (LCD)?
You may need to refresh the computer screen. Press the Windows key and
press D twice.
60
Page 61

Printer Connection s
❑ Printing With Your Computer
61
Page 62

VAI O C om puter Quic k Sta rt
Printing With Your Computer
You can connect a universal serial bus (USB) printer or a parall el port printer to
your computer. To print properly, the printer you connect mus t be co mpatible
with the Microso f t® Windows® opera ting system installed on your computer.
❑ Connecting a pri n ter
❑ Disconnecting a printer
❑ Frequently asked questions
Connecting a printer
Your computer is compatible with many popula r print ers. In many cases , you can
simply connect the printer to the computer and begin printing. Some printers
require separate driver software installa tion. See the instructions that
accompanied your printer for more information. If you cannot print once you
have connected your computer to your printe r, see “Frequently asked questions”
in this section for more information.
To co n n e ct a U SB printe r
1 Locate a U S B p o rt on the com pu t er an d th e pri n ter.
2 Plug the USB cable into the USB port on your computer.
3 Plug the other end of the USB cable into the USB port on the printer.
62
Page 63

Printing With Your Computer
Connecting a USB Pr in ter Cable
Printer
Power cord
USB ports
USB cable connector
.
USB cable (not supplied)
✍ See the guide that came with the USB printer for more information on its installation
and use.
To connect a parallel port printer
1 Locate the Pri nter port on your computer.
2 Plug the printer cable into the Printer port on your computer
3 Plug the other end of the printer cable into the port on the printer.
63
Page 64

VAI O C om puter Quic k Sta rt
Connecting a Parallel Port Printer
Printer
Printer cable
Printer
parallel
port
Parallel connector
(not supplied)
Power cord
✍ See the guide that came with the parallel port pri nter for more information on its
installa tion and use .
Disconnecting a printer
You can disconnect the printer cable when the com puter is on or off.
Disconnecting the printer cable while the computer is in a power saving mode
(Standby or Hibernate) may cause the comuter to malfunction.
To disconnect the printer cable
❑ Unplug the printer c able from the USB or Printer port on the computer.
Frequently asked questions
Why can’t I print a document?
❑ Make sure the printer is on, and the printer ca ble is se curel y connect ed to the
ports on your printer and computer. See “Connecting a printer” for more
information.
❑ Make sure the printer is compatible with the Microsoft® Windows®
operating system installed on your computer.
64
Page 65

Printing With Your Computer
❑ You may need to install th e pri nter dr ive r soft ware bef ore you us e th e print er.
See the instructions that came with your printer for information about
installing these drivers.
❑ If the printer is not functioning after the computer resumes from a power
saving mode (Standby or Hibernate), reset the printer connection.
1 Click Start, and click Control Panel.
2 Click Printers and Other Hardware, and click Printers and Faxes.
3 Right-clic k the pri nter i con that is not functi oni ng, and se le ct Properties
to open the Properties window.
4 Click OK.
❑ Change the default printer port setting, although this setting is generally
correct for most printers.
1 Click Start, and click Control Panel.
2 Click Performance and Maintenance, and click System. The System
Properties dialog box appears.
3 Select the Hardware tab, and click Device Manager. The Device
Manager window appears.
4 Double-click Ports ( COM &LP T), and double-click ECP Printer Port
(LPT1).
5 Select the Port Settings tab, and select a diffe r ent LPT Por t Number.
❑ You may need to enable the computer ’s printer settings.
1 Click Start, and point to All Program s, Sony Notebook Setup, and
click Sony Notebook Setup again.
2 Click the Device tab.
3 In the left panel, make sure the Printe r Po r t check box is sele cted, and
click Setting.
4 In the Pr inter port mode box, click the ECP option.
5 Click OK.
65
Page 66

VAI O C om puter Quic k Sta rt
66
Page 67

Computer Features
❑ Using the Keyboard
❑ Using the Touch Pad
❑ Using the Jog Dial Cont rol
❑ Using Memory Stick Media
❑ Changing the Window Design of Sony Programs
67
Page 68

VAI O C om puter Quic k Sta rt
Using the Keyboard
Your keyboard is very similar to a typewriter’s, but your computer keyboard has
additional keys that perform specific c omputer-related tasks.
❑ Key locations and desc riptions
❑ Combination s a nd f unctions with the Windows key
❑ Indicators
❑ Combinations and functions with the Fn key
Key locations and descriptions
Keyboard
Escape key
Shift
key
Ctrl key
Fn key
Applications
key
Alt key
Function keys
Space bar
Numeric
keypad
Print Screen key
Windows
key
Correction keys
Fn
key
Navigation
keys
68
Page 69

Using the Keyboard
Key Description
Numeric keypad Contains the keys found on a typical calculator. Use the
numeric keypad area to type numbers or to perform
mathemati ca l calculations such as addition and subtraction.
Numbers appear on the front beveled edge of the numeric
keys. Press the Num L o ck k ey to activate the nu meric
keypad. (When you do so , the Num Lock indi cator ligh ts up.)
Press the Num Lock key aga in to deactivate the numeric
keypad.
Arrow keys The Left, Right, Up, an d Down arrow key s move the pointer
on the screen and also function as the Home, End, Page Up,
and Page Down keys, respec tively.
Correction key s The Insert, Bac k Sp ace, and Delete keys enable you to make
corrections in your documents.
Function keys The 12 function keys along the top of the keyboard are used
to perform design ated ta sks. For exa mple, in many progra ms,
F1 is the Help key. The task associated with each f unction
key may vary from one program to the next.
Escape key The Esc (Escape) key is used to cancel commands.
Print Screen key The Print Screen key takes an elec tronic snapshot of th e
screen and moves it to the Clipboard. You can then paste the
screen shot int o a document and print it.
Operator keys
(Shift, Ctrl, Alt
keys)
Several keys a re always us ed wit h at le ast one othe r key: C trl ,
Alt, and Shift. When held down with another key, the Ctrl
(Control) and Alt (Alternate) keys offe r another way to give
commands. For example, in many programs, instead of
choosing the Save command from a menu, you can hold
down Ctrl and pres s S (referred to as Ctrl+S). The Shift ke y
operat es th e same wa y as on a typew r it er ; it is u s ed to
produce capital letters or special symbols such as @ and $.
69
Page 70

VAI O C om puter Quic k Sta rt
Key Description
Windows key The key with the Micros oft® Windows ® operating system
logo displays the Start men u ; it is the equivalent of clicking
Start on the taskbar. See “Combinations and functions with
the Windows key” for more information.
Fn key The Fn key is used in combination with other keys to issue
commands. See “Combinations and functions with the Fn
key” for more information.
Applications key The Applications key displays a shortcut menu of context-
sensitive choices. Pressing this key is the equivalent of
clicking the right mouse button.
Combinations and functions with the Windows key
Combination Function
+ F1 Displays the VAIO Help and Support Center window.
+ Tab Switches the se lected button on the taskbar.
+ D Displays the desktop.
+ E Displays the My Com puter window.
+ F Displays the Search Results window, where you can find a
file or folder. This is the equivalent of selecting Search from
the Star t me nu.
+ Ctrl + F Displays the Search Results - Computers window, where you
can locat e othe r compu ters. T his i s the eq uivale nt of s elec ting
Search, and the n Computer from the Start menu.
+ M Minimizes al l displayed windows.
70
Page 71

Using the Keyboard
Combination Function
Shift + + M Returns all minimized wind ows to their previous size.
+ R Displays the Run window. This is the equivalent of selecting
Run from the Star t menu.
Fn + + Insert Displays the System Properties window. This is the
equivalent of selecting Control Panel, and then System from
the Start m en u .
Indicators
Indicator Function
Power Lights up when th e power to the computer is on, flashes in
Standb y mode, and turns off when the comput er is in
Hibernate mode or off.
Battery Lights up when th e computer is using batt ery power, flashes
1
when the battery is running out of power, double-flashes
when the battery is charging.
Memory Stick® Lights up when data is read from or written to the Memory
Stick media. (Do not enter Standby m ode or turn off the
computer when this indica tor is on.) When the indicator is
off, the Memory S tick media is not being accessed.
Hard disk Lights up when data is read from or written to the hard disk.
Do not enter Standby mod e or turn off the computer when
this indicator is on.
Num Lock Lights up when the number ke ys area in the numeric keypad
are activ e. When the in di c a t or is o ff, th e al p h an u m e ri c
character keys in th e keypad area are active.
71
Page 72

VAI O C om puter Quic k Sta rt
Indicator Function
Caps Lock Lights up when the letters appear in uppercase as you type.
The Shift key lower s the case of typ ed le tt er s w h en Caps
Lock is on. When the indica tor is off, th e letters appear in
lower case as you type (unless you hold down the Shift key).
Scroll Lock Ligh ts up when the screen s crolls differ en tly. (Exa ctly how it
scrolls depends on the specific program. This function does
not work with all programs.) When the indicator is off,
information moves across the display normally.
Wireless*
LAN
* On selected models only .
Lights up when the Wireless LAN function is running.
Combinations and functions with the Fn key
✍ If you switch user identities during a com puting session, the Fn+F7 key
functionality (if available on your computer) will be interrupted. To switch to an
external display or monitor, see “Selecting a display mod e” for more information.
72
Page 73

Combinations/
Feature Function
Using the Keyboard
Fn + (F3)
Mute On/Off
Fn + (F4)
Speaker volume
Fn + (F5)
Brightness control
LCD
Fn + /
(F7)
Switch to the
external
monitor/LCD
Fn + (F12)
Hibernate
Toggles the built-in speaker off and on.
Adjusts the built-in speaker volume. An on-screen display
appears notifying you when a change occurs.
To increase vol ume, press Fn+F4, then or .
To decrease volume, press Fn+F4, then or .
Adjusts the b rightness of the computer screen (LCD).
To increase light inte nsity, press Fn+F5 and then or .
To decrease li ght intensity, press Fn+F5 and then or .
Toggles between the computer screen (LCD), a connected
external display, and both the LCD and external display.
Only LCD
LCD and external display
Only external display
Select one display at a time to playback DVDs. Connect the
cable before you turn on the computer, otherwise Fn+F7 will
not work.
Provides for the lowest level of power consumption.
When you run this command, the s tate of the system a nd st ate
of the peripheral devices are writt en to the hard disk and the
system power is turned off. To return the system to its
original state, use the power button to turn on power.
Fn + Esc
Standby
Fn + B
Bass Boost
Puts the system into Standby mode, a power management
state. To return the system to the active state, press any key or
press the power button.
Toggles the bass-boost function off and on. This feature is
available only while using headphones.
73
Page 74

VAI O C om puter Quic k Sta rt
✍ You can also carry out the se functions using the Jog Dial™ Control. Some functions
are not available unti l the Microsoft® Windows® operating system launches.
74
Page 75

Using the Touch Pad
Using the Touch Pa d
The keyboard c ontains a pointing device called a touch pad. You can point to,
select, drag, and scroll objects on the screen using the bui lt-in touch pad.
❑ Describing the touch pad
❑ Customizing the touch pad
❑ Frequently asked questions
Describing the touch pad
Locating and desc ribing the touch pad
Touch pad
Right button
Left button
Action Description
Point Slide one finger on the touch pad to place th e pointer on an
item or object.
Click P ress the left button once.
Double-cl ick Press the left button twice.
75
Page 76

VAI O C om puter Quic k Sta rt
Action Description
Right-click Press the right button once. In many programs, this actio n
displays a sho r tcut menu of context-sensitive choices.
Drag Slide one finger while pressing the lef t button.
Scroll Move your finger along the right edge of the touch pad to
scroll vertically. Move your finger al ong the bottom to scroll
horizontally. (The scroll functi on is available only with
programs that support a touch pad scroll feat ure. )
Customizing the touch pad
Sony Notebook Setup lets you customize your touch pad, such as enable or
disable the touch pad. You can also open the Mouse Properties dialog box, which
enables you to set your touch pad and mouse prefere nces, such as changing
pointers, enabling or disabling the tapping feature, clicking both buttons
simult aneously , and adjust in g the touch p ad speed.
To disable the touch pad
1 Click Start on the Wind ows ® taskbar, a nd point to All Programs.
2 Point to Sony Notebook Setup, and click Sony Notebook Setup in the
submenu. The Sony Notebook Setup dialog box appears.
3 Click the Device tab.
4 In the lef t panel, click to cancel the Pointing Device check box.
5 Click Apply.
To enable the touch pad
1 Press the Windows key . The Start menu appears.
2 Press the Up Arrow key to select All Programs, and press Enter.
3 Press the Up Arrow key to select Sony Notebook Setup, and press
Enter. A submenu appears with Sony Notebook Setup preselected.
4 Press Enter. The Sony Notebook Setup dialog box appears.
76
Page 77

Using the Touch Pad
5 Press the Right Arrow key to select the De vice tab.
6 Press the Tab key to select the Default button, and press Enter. A pop-up
window appears.
7 Press the Le ft A rro w key to select OK, and press Enter. The Enable
Touchpad opti on is aut o m a tically se le ct ed .
8 Press the Tab key to select the Apply button, and press Enter.
9 Click OK.
To open the Mouse Properties dialog box
❑ Right- c lick the Touchpad icon on the Windows® taskbar, and click
Mouse Properties from the shortc ut menu. The Mous e Properties dialog
box appears.
Frequently asked questions
Why doesn’t the touch pad work?
❑ You may have disabled the touch pad without connecting a mouse to the
computer. See “To enable the touch pad.”
❑ Restart the com puter to activate the touch pad again.
❑ If your touch pad is interpreting a single tap as a double-click, adjus t the
button assignments. Follow these steps:
1 Press the Windows key . The Start menu appears.
2 Press the Up Arrow key to s el e c t All Programs, and press Enter.
3 Press the Up Arrow key to s el e c t Sony Notebook Setup, and press
Enter. A submenu appears with Sony Notebook Setup preselected.
4 Press Enter. The Sony Notebook Setup dialog box appears.
5 Press the Right Arrow key to select the De vice tab.
6 Press the Tab key to select the left panel, and then pre ss the Down
Arrow key to select Point i ng Devi ce.
7 Press Alt+S simultaneously. The Mouse Properties dialog box appears.
77
Page 78

VAI O C om puter Quic k Sta rt
8 Make sure the Buttons tab is open, and press the Up Arrow and
Down Arrow keys to change the button as signments. Pre ss the Tab
key to move between shortcut menus.
9 Press Enter to save your changes and close the dialog box.
❑ If you are still experi encing problems, make sure another mouse was not
installed.
❑ You may need to use your Application Recovery CD(s) to re install the
mouse drivers. Se e “Using the Application Recov er y CD(s)” fo r more
information.
Why doesn’ t the pointer move when I use the touch pad?
❑ Try restarting your computer. Follow these steps:
1 Press the Windows key .
2 Press U. The Turn off computer window opens.
3 Press R to restart the computer.
❑ If the computer does not restart,
1 Press Ctrl+Alt+Delete simultaneously. The Windows Task Ma nager
window appears.
2 Press Alt to highlight the menu bar, and press the Right Arrow key
to select Shut Down.
3 Press Enter.
4 Press R to restart the comput er.
❑ If you still cannot restart your computer, press and hold the powe r button to
turn off th e co mputer.
❑ If the pointer does not m ove while playing a disc, pre ss Ctrl+Alt+Delete
simultaneou sl y to stop playback and restart the computer.
❑ You may need to use your supplied Application Recovery CD(s) to reinstall
the touch pad or mouse drivers. See “Using the Appli cation Recovery
CD(s)” for more information.
78
Page 79

Using the Jog Dial Control
Using the Jog Dial Control
Your computer is equipped with a Jog Dial™ Control and Jog Dial Navigator
software, which enabl es you to scroll through programs, folders, and documents
from a predefined list. The Jog Dial Control and Jog Dia l Navigator are
compatible with preinstalled so ftware programs that support J og Dial Navigator
functions.
❑ Locating the Jog Dial Control
❑ Using the Jog Dial Bar
❑ Using Jog Dial Launcher
❑ Using Application and Scroll modes
❑ Changing Jog Dial Navigator settings
Locating the Jog Dial Control
Jog Dial Control
*
Rotate
Press
Jog Dial Control
To use the Jog Dial Control
❑ Rotate the Jog Di al™ Control to scroll up and down a menu.
❑ Press the Jog Dial Contro l to select a menu ite m.
❑ Press the Back button (on selected models) to return to the previous menu.
* Some progr ams do not sup por t Jog Dial Navigator.
79
Page 80

VAI O C om puter Quic k Sta rt
✍ If your computer does not come with a Back butt on, you can select Return on the
Jog Dial Laun cher to go back to the previous m enu.
Using the Jog Dial Navigator icon
The Jog Dial ™ Navigator icon appears on the taskbar when you turn on your
computer. The arrows on the Jog Dial Navigator icon on the taskbar change to
show the direction in which you are turning the Jog Dial™ Control. No arrows
appear on the taskba r icon if the Application mode is selected and the Jog Dial
Control is not in use.
Using the Jog Dial Bar
The Jog Dial Bar appears as a floating window on your desktop when you
double-click the Jog Dial Navigator icon on the taskbar.
Jog Dial Bar
Features Action
1 Jog Dial icon Right-click to display a shortcut menu. This icon
is also displayed on the Microsoft® Windows®
taskbar.
2 VAIO Se tt ings
button
3 Jog Dial
Settings button
4 Close button Click to display the Jog Dial Navigator window,
80
Click to display computer settings, such as
volume and screen brightness.
Click to display the Jog Dial Setting dialog box.
from which you can close the Jog Dia l Bar.
Page 81

Using the Jog Dial Control
5 Launcher button Click to dis play the Jog Dial Launcher
6 Mode button C lick to switch the display betwee n sc r oll mode
and application mode
7 He lp button Click to display the Help guide, which offers
detailed J og Dial informati o n
To move, hide, or close the Jog Dial bar
❑ Click and drag the Jog Dial Bar to another locati on on the desktop.
❑ Click the Close button .
❑ Right-click the Jog Dial Bar, and select Hide Jog Dial Bar from the sho rtc ut
menu. To make the Jog Dial Bar reappear, righ t-click the Jog Dial
Navigator icon on the taskbar, and select Display Jog Dial Bar.
Using Jog Dial Launcher
Jog Dial Launch er displays a menu of programs installed on your computer. Y ou
can use the Jog Dial™ Control to scroll and open these programs.
To open Jog Dial Launcher
❑ Click the Launcher button on the Jog Dial Bar .
❑ Press and hold Ctrl, and then press the Jog Dial Control.
To open a program
1 Open Jog Dial Launcher. See “To open Jog Dial Launcher” for more
information.
2 Rotate the Jog Dial Control until the program you want to select appears
highlighted in the center window.
81
Page 82

VAI O C om puter Quic k Sta rt
Jog Dial Launcher
Center window
Program name
3 Press the Jog Dial Control.
4 Repeat steps 2 and 3 as necessary to open a program.
Using Application and Scroll modes
Jog Dial Navigator operates in one of two modes: Scroll or Application. Once a
program is open, you can ea si ly switch modes.
Mode Description
Application Enables you t o carry o ut com mands for s pecifi c Sony
programs.
Scroll Enables you to scroll through an active window and
the Sta r t m enu of specific Sony pr o gram s .
To select Application mode when a program is open
❑ Click APPS on the Jog Dial Bar. When you selec t Application mode, the
Jog Dial Navigator window appears at the lower right side of the pro gram
window. The Jog Dial Navigator window appears in either the List Display
or Guide Display format, de pending on the program.
82
Page 83

Using the Jog Dial Control
Jog Dial Navigator (Guide Dis play) Jog Dial Navigator (List Displ ay)
Jog Dial Navigator
windows Descriptions
Guide Display Appears when a program that supports Jo g Dial
Navigator ha s a udio feat ures, s uch as v olume contro l.
This shows the operation guide for the Jog Dial
Control.
List Display Appears when a program that supports Jo g Dial
Navigator is active. This shows menu item s and file
names.
When using a program that ha s audio and v ideo fea tur es, you can switc h Jog Dia l
Navigator displays.
To switch from Guide Display to List Display
❑ Press and hold the Jog Dial Control.
No windows appear when you select the Scroll mode. Simply rotate the Jog Dial
Control and the ac tive window scrolls up and down or side to side if it has a
scroll option.
To select Scroll mode when a program is open
❑ Click SCROLL on the Jog Dial Bar .
83
Page 84

VAI O C om puter Quic k Sta rt
❑ On the Jog Dial Navigator List Display, select SCROLL MODE and press
the Jog Dial Contr ol.
Selecting Scroll Mode from Application Mode
Changing Jog Dial Navigator settings
You can change the Jog Dial Navigator sett ings to modify the Jog Dial Navigator
functionality and appearance.
84
Page 85

Using the Jog Dial Control
To change settings
1 Click the Jog Dial S etting button on the taskbar. The Jog Dial Setting
dialog box appears.
Jog Dial Setting Dialog Box
2 Click the tabs nea r the top of the dialog box to view options, and then make
your changes.
3 Click Apply, and then click OK.
For information ab out Jog Dial settings, right-click the Jog Dial Navigator icon
on the taskbar, and click Help.
85
Page 86

VAI O C om puter Quic k Sta rt
Using Memory Stick Media
This compact, portable, and versatile recording medium has a data capacity
exceeding th at of a floppy disk. The medium is speci ally designed for
exchanging and sharing digital data with compatible products. Because it is
removable, the media c an be used for external data stor age .
❑ Selecting Memory Stick media
❑ Inserting Memory Stick media
❑ Viewing the contents
❑ Write-protecting Memory Stick media
❑ Formatting Memory Stick media
❑ Removing Memory Stick media
❑ Frequently asked questions
Selecting Memory Stick media
The following two types of Memory Stick® media can be us ed with your
computer:
❑ MagicGate™ Memory Stick media (hereafter called MG Memory Stick
media), which is provided with copyright protection
❑ Memory Stick media, which does not have the same copyright
protection as MagicGate Memory Stick media
Some music files with secure copyright protection may be stored on MG
Memory Stick media but not on regular Memory Stick media.You can also use
MagicGate media-compatible devices to record and playback music when they
are connected to your computer.
You can store mixed data on the Memory Stick medi a. For exam ple, you can
copy an ordinary fil e on a MG Memory Stick media that already contains music.
What is MagicGate Memory Stick media?
MagicGate Memory Stick media provid es copyright protection that consists of
authentica tion and encrypti on technology. Authentication technology ensures
that protected content is only transferred between compliant devices and media.
Protected content is recorded and transferred in an encrypted format to prevent
unauthorized duplication or playback.
86
Page 87

Using Memory Stick Media
✍ MG Memory Stick media has the MG mark.
Inserting Memory Stick media
Before using Memory Stick® media, back u p imp ortant data. The media sl ot
accomm o da t es onl y on e M emory Stick me d ia at a ti me.
To insert Memory Stick media
1 Insert the Memory St ick media with the arrow facing up and toward the
Memory Stick media slot.
✍ Inserting the media in the wrong dire ction may damage the connector pins.
2 Carefully slide the Memor y S tick media into the slot until it clicks in plac e.
The Memory Stick media indicator brie fly flashes.
Inserting Memory Stick Media
Memory Stick
media
Insert Memory Stick media
with the arrow facing toward
the Memory Stick media slot.
Viewing the contents
Depending on the model you purchased, the Sony Memory Stick window
appears autom atically when you inse rt a Memory Stick medi a. From this
window, you can choose to view, pri nt, copy or organize your Memory Stick
images or data. If the Sony Memory Stick window does not appear when you
insert your Memory Stick media, then follow these steps:
87
Page 88

VAI O C om puter Quic k Sta rt
LOCK
LOCK LOCK
To view the contents
1 From the Star t menu, click My Computer. The My Computer window
appears.
2 Click Sony MemoryStick. The Sony MemoryStick window appears,
displaying the contents stored on the Memory Stick media.
Write-protecting Memory St ic k media
Memory Stick® media is designed with a write-protect tab to protect data from
accidental erasure or overwriting. Move the tab to the right or left to set or release
write-protec tion. When the write-protect tab of the Memory S tick media is set to
LOCK, data cannot be recorded or erased.
Write-protect off Data can be saved on the Memory Stick media.
Write-protect on Data can be read from but not saved on the Memory Stick
media.
Using the Write-Protect Tab
Write-protect
off
(Back of Memory Stick Media)
Write-protect
on
Formatting Memory Stick media
Memory Stick® media is formatted for immediate use when you purchase it. If
you need to reformat Memory Stick media, use the Memory Stick Format ter that
is provided with th e media. For more information ab out using Memory Stick
Formatter , ref er to Formatter Help.
88
Page 89

Using Memory Stick Media
Formatting Memory Sti ck m edia erases all data, includi ng music data,
previously saved to it. Befor e you refor ma t M em ory Stick media, confirm
that the media does not contain files you want to keep and back up
important data.
To format M emory Stic k m edia
1 Insert the Memory Stick media into the Memory Stick media slot. See “To
insert Memory Stick media” for more information.
2 From the Start menu, click My Computer. The My Computer window
appears.
3 Right-click Sony MemoryStick, and click Format from the menu. The
Format Sony MemoryStick dialog box appears.
4 Select Quick Format in th e Format options box, and then click Start.
Removing Memory Stick media
If the media is remove d premature ly, a blue screen with an error message appe ars
prompting you to cont inue or exit. Reinsert the media into the slot and press
Enter to continue. This enable s the m edia to finish reading or writing data.
To remove Memory Stick media
1 Wait a minimum of 10 seconds after the Memory Stick media finish es
reading or writing data before removing the media.
2 Make sure the access light is off.
3 Push th e Me m o ry Sti ck me d i a in to w a rd th e computer.
4 When the Memory Stick media ejects, pull it out.
✍ Be careful wh en r emoving t he Memory S t ick m edia, as i t may ej ect comp letel y f rom
the slot.
89
Page 90

VAI O C om puter Quic k Sta rt
Frequently asked questions
Why can’t I open my image files?
You may need to reformat your Memory Stick media.
Formatting Memory Stick media erases all data, including music data,
previously saved to i t. Before you reformat Memory Stick media, confirm
that the media does not contain files you want to keep and back up
important data.
1 Copy the data from th e Memory S tick media onto you r computer’s hard disk
to save data or images.
2 Format the Memory Stick media using Memory Stick Formatter software
preinstalle d on your computer. For instructions about formatting a Memory
Stick medi a, se e “Format ting Memory Stick media.”
Why can’t I sa ve music files onto my Memory Stick media?
❑ Only MagicGate Memory S tick media can be used with copyright protected
data, such as music.
❑ Copyright prot ected music cannot be checked out to any Memory Stick
media other than MG Memory Stick media.
❑ Recorded music is limited to private use only. Using recorded music for any
other purpose requires permission of the copyright holders.
❑ Sony is not respo ns ible for music files tha t cannot be recorded from a CD or
downloaded from other sourc es .
Can I copy images from a digital video camera usi ng Memory Stick media?
Yes, and you can view video clips that you have recorded with Memory Stick
media-compatible video camera recorders.
How do I prevent damage to the Memory Stick media?
❑ Do not use the medi a in locations that are subject to static electricity or
electri cal noise .
❑ Do not touch the media connector with your finger or metallic objects.
❑ Do not attach labels other than the supplied label to a media.
90
Page 91

Using Memory Stick Media
❑ Do not bend, drop, or apply strong shock to the media.
❑ Do not disassemble or modify the media.
❑ Do not allow the media to get wet .
How do I extend the life of the Memory Sti ck m edia?
❑ Use the supplied sto r age case. See the instructi ons that came with your
media for more information on its use.
❑ Do not use or store the media in a location that is subject to:
❑ Extreme ly hi g h temperatu r es, such as in a car par k ed in th e su n
❑ Direct sunlight
❑ High humidity or place s with corrosive substances
91
Page 92

VAI O C om puter Quic k Sta rt
Changi ng the Window Design of Sony Programs
This feature is ava ilable with UI Design Select or-compatible programs only .
To change the window design
1 Click Start, and then Control Panel.
2 In the left panel, click Switch to Classic View.
3 Double-click UI Design Selector.
4 Click << or >> to view the designs.
5 Click Apply to select a design that appears in the center window. The UI
Design Selector window design changes. The window design for your Sony
software will match the UI Design Selector window.
6 Click OK.
92
Page 93

Connecting Mice and Keyboards
❑ Using External Mic e and Keyboards
93
Page 94

VAI O C om puter Quic k Sta rt
Using Extern al Mice and Keybo ards
You can connect a universal serial bus (USB) mouse or keyboard to your
computer. To function properly, the device you connect must be compa tible with
the Microsoft ® W indows® operating syste m installed on your computer. For
information about your computer’s built-in keyboard and key functions, see
“Using the Keyboard” in the “Computer Features” chapter.
❑ Connecting a mouse or keyboard
❑ Disconnecting a mouse or keyboard
❑ Frequently asked questions
Connecting a mouse or keyboard
Your computer is compatible with many popular mice and keyboards. The New
Hardware Wizard guides you through the software installation process. Some
devices require se parate driver software installati on. See the instructions that
accompanied your mouse or keyboard for more information. If the mous e or
keyboard does not work once you have connected it to your computer, see
“Frequently aske d ques tions” for more information.
Your computer can be on or off when connecting a mouse or keyboard.
To connect a USB mouse or keyboard to your computer
1 Locate the USB port on your computer, port replicator, or docking
station.
2 Plug the USB cable into the USB port on the computer. (One USB port
supports one USB device .) The New Hardware Wizard appears.
3 Follow the on-screen instructions to complete the installation process.
94
Page 95

Using External Mice and Keyboards
Connecting a USB Mouse or Keyboard
USB ports
USB cable
✍ See the guide that came with your mouse or keyboard for more information on its
insta lla ti on an d use .
Connecting a USB Mouse or Keyboard to a Docking Statio n
USB ports
USB cable
95
Page 96

VAI O C om puter Quic k Sta rt
Disconnecting a mouse or keyboard
You can disconnect a USB mouse or keyboard when the computer is on or off.
Disconnecting the USB mouse or keyboard when the computer is in a power
saving mode (Standby or Hibernate) may cause the c omp uter to malfunction.
To disconnect the USB mouse or keyboard
Unplug the USB cable from the USB port on the computer.
Frequently asked questions
Why doesn’t the comput er recogn ize the USB mouse?
❑ Make sure the mouse is securely plugged into the USB port . See
“Connecting a mouse or keyboard” for more information.
❑ You may need to install or reinstall the mouse driver software. Use the
supplied Appli cation Recovery CD to insta ll the drivers. See “Using the
Application Re covery CD(s)” for more information.
Why doesn’t the pointer move when I use the USB mouse?
❑ Make sure another mous e was not ins talled.
❑ You may need to install or reinstall the mouse driver software. Use the
supplied Appl icat ion Rec overy CD(s ). S ee “Using th e Appl icat ion Recove ry
CD(s)” for more information.
❑ If you are playing a disc , press the Ctrl+Alt+Delete keys simult aneously to
stop playback and re st art the computer.
❑ If you still cannot us e the pointer , restart the computer . You can restart the
computer three different ways.
❑ Press the Windows key , and press U. When the Turn off computer
window appears, press R.
❑ Press the Ctrl+Alt+Delete keys simult aneously. When the Windows
T as k Manage r window appears , press the Alt key to highli ght the m enu
bar, and press the Right Arrow key to select Shut Down. Press
Enter, and then press R.
❑ Press and hold the powe r button. When the com puter t urns of f, pres s the
power button again to restart the computer.
96
Page 97

Floppy Disk Drives and PC Cards
❑ Using Floppy Disk Drives
❑ Using PC Cards
97
Page 98

VAI O C om puter Quic k Sta rt
Using Fl oppy Disk Drives
You can connect a floppy disk dr ive to your c omputer , port repli cator, or docking
station. The floppy disk drive enables you to read da ta stored on a floppy disk.
❑ Inserting and removing floppy disks
❑ Frequently asked questions
Inserting and removing floppy disks
Floppy disks are portable devices that store data. To protect your floppy disks,
keep them away from magnets and direct sunlight or other heat sources.
To insert a floppy disk
1 Hold the floppy disk with the label facing up.
2 Push the flopp y dis k into the drive until it clicks into place.
Inserting a Floppy Disk
Floppy disk
Floppy disk drive
✍ Do not open the shutter manual ly and touch the surface of the floppy disk.
To remove a floppy di sk
1 Close all programs that were opened from the disk and wait for the LED
indicator to turn off.
2 Push the Eject button, and remove the disk.
98
Page 99

Using Floppy Disk Drives
✍ T o avoid losing data, do not push the Eject button when the LED indicator is on.
Removing a Floppy Disk
Eject button
Frequently asked questions
Why doesn’t the Safety Remove Hardware icon appear on the taskbar
when the drive is connected?
The computer does not recognize that the floppy disk drive is connected to the
computer. First, make sure the USB connector is properly inserted into the USB
port. If you need to secur e the conne ction, wait a few moments for the computer
to recognize the drive. If the icon still does not appear, follow these steps:
1 Close all open programs to avoid data loss.
2 Eject the floppy disk from the floppy disk drive.
1 Close all progra ms that we re opene d from the dis k and wait fo r the LED
indicator to turn of f.
2 Push the Eject button, and remove the disk.
3 Reconnect th e floppy disk drive.
1 Close any active programs to prevent data lo ss.
2 Insert the USB conne ctor (wi th the USB i con facing upward) into the
USB port .
99
Page 100

VAI O C om puter Quic k Sta rt
4 Restart the computer.
1 Click Start on the Wind ows ® taskbar, and click Turn Off Computer.
2 Click Restart.
Why is the drive unable to write data to a floppy disk?
The floppy disk drive cannot write data to a di sk if it is inserted into the drive
improperly. See “Inserting and removing f loppy disks” for ins truct ions on how to
insert the disk properly.
If the disk is inserted properly and you are still unable to write data to it, the disk
may be write-protected. You can either use a floppy disk that is not writeprotected or disable the write-prote ct feature.
100
 Loading...