

Sony PCGA-BM1 Operating Manual

4-654-362-11(1)
Bluetooth™
Modem Station
Operating Instructions
Bedienungsanleitung
Mode d’emploi
Istruzioni per l’uso
GB
DE
FR
IT
PCGA-BM1
2001 Sony Corporation

Before using the PCGA-BM1, be sure
to read the End User Software License
Agreement that accompanies it.
❑Copyright laws prohibit reproducing
the software or the manual
accompanying it in whole or in part,
or renting the software without the
permission of the copyright holder.
❑In no event will SONY be liable for
any financial damages, or loss of
profits, including claims made by
third parties, arising out of the use
of the software supplied with this
drive.
❑If a problem occurs with this
product as a result of defective
manufacturing, SONY will replace
it. However, SONY bears no other
responsibility.
❑The software provided with this unit
cannot be used with other units.
❑Please note that, due to continued
efforts to improve quality, the
software specifications may be
changed without notice.
❑Operation of this unit with software
other than that provided is not
covered by the warranty.
Owner’s Record
The model number and serial number
are located on the bottom of this unit.
Record the serial number in the space
provided here. Refer to the model and
serial number when you contact
VAIO-Link.
Model Number : PCGA-BM1
Serial Number : __________________
Regulatory
information
Sony hereby declares that the
PCGA-BM1 Bluetooth™ Modem
Station is in compliance with the
essential requirements and other
relevant provisions of European
Directive 1999/5/EC.
Making use of the 2.4 GHz frequency
band (2.4 GHz ... 2.4835 GHz) and the
Frequency Hopping Spread Spectrum
(FHSS) technique, this product is a
radio device whose intended purpose
is to give other Bluetooth enabled
Sony notebooks access to Public
Switched Telephone Networks
(PSTN) via its built-in modem which
is intended to be used for data
communications using DTMF (Dual
Tone Multi Frequency) signalling
(tone dialling) on the PSTN networks.
Sony Bluetooth™ Modem Station
complies with all applicable
regulations in the following countries
and can therefore only be operated in:
Austria, Belgium, Germany, Ireland,
Netherlands, Switzerland, and the
United Kingdom. The PCGA-BM1
Bluetooth™ Modem Station cannot be
used in France and Italy.
The PCGA-BM1 Bluetooth™ Modem
Station has been tested and found
compliant with the limits set out in the
EMC directive using a shielded
twisted pair interconnection cable not
longer then 3 metres (9.8 feet).
The PCGA-BM1 Bluetooth™ Modem
Station complies with EN 300328-2
and EN 301489-1 for use in the
following areas: residential,
commercial and light-industrial.
GB
2

The PCGA-BM1 Bluetooth™ Modem
Station is not designed to support
communication via fax. You cannot
send or receive fax messages on this
modem station.
Before using the modem, make sure
that the Windows Regional Setting has
been set to the country where you are
using the product.
For information about how to set the
Windows Regional Settings, please
refer to the documentation of your
VAIO computer.
Warnings
❑In some situations or environments,
the use of the Bluetooth™
technology might be restricted by
the proprietor of the building or
responsible representatives of the
organization, for example on board
of airplanes, in hospitals or in any
other environment where the risk of
interference with other devices or
services is perceived or identified as
harmful.
❑If you are uncertain about the policy
applying to the use of Bluetooth™
technology in a specific
organization or environment, you
are encouraged to first ask for
authorization prior to switching it
on.
❑Consult your physician or the
manufacturer of personal medical
devices (pacemakers, hearing aids,
etc.) regarding any restrictions on
the use of Bluetooth™ technology.
❑Use your PCGA-BM1 only with the
supplied AC adapter.
❑Make sure that the socket outlet is
easily accessible.
❑To disconnect it completely from
mains voltage, unplug the ACadapter.
❑To avoid electrical shock, do not
open the cabinet. Refer servicing to
qualified personnel only.
❑To prevent fire or shock hazard, do
not expose the unit to rain or
moisture.
❑Never install modem or telephone
wiring during a storm.
❑Never install telephone jacks in wet
locations unless the jack is
specifically designed for wet
locations.
❑Never touch uninsulated telephone
wires or terminals unless the
telephone line has been
disconnected at the network
interface.
• Sony, VAIO and the VAIO logo are
registered trademarks of Sony
Corporation.
• Microsoft and Windows are
registered trademarks of Microsoft
Corporation in the United States
and/or other countries.
• The Bluetooth trademarks are
owned by their proprietor and used
by Sony Corporation under license.
• All other names of systems,
products and services are trademarks
of their respective owners. In the
manual, the ™ or ® marks are not
specified.
GB
GB
3

Alvorens de PCGA-BM1 in gebruik te
nemen, moet u de bijgaande software
licentieovereenkomst voor
eindgebruikers lezen.
❑De wet op de auteursrechten
verbiedt het geheel of gedeeltelijk
reproduceren van de software of de
handleiding, alsook het verhuur van
de software zonder toestemming van
de eigenaar van de auteursrechten.
❑SONY kan in geen geval
aansprakelijk worden gesteld voor
financiële verliezen noch
winstderving, met inbegrip van claims
ingediend door derden, ten gevolge
van het gebruik van de software die
bij deze drive wordt geleverd.
❑Indien dit product problemen geeft
door constructiefouten, zal SONY het
vervangen. SONY draagt echter geen
enkele andere verantwoordelijkheid.
❑De software die bij dit toestel wordt
geleverd, kan niet met andere
toestellen worden gebruikt.
❑Merk op dat in het kader van ons
permanent streven naar
kwaliteitsverbetering de software
specificaties steeds kunnen worden
gewijzigd zonder voorafgaande
kennisgeving.
❑Gebruik van dit toestel met andere
software dan de bijgeleverde is niet
gedekt door de waarborg.
Niet Vergeten
Het model- en serienummer staan
vermeld achteraan op het toestel.
Noteer hier het serienummer. Vermeld
model en serienummer wanneer u
contact opneemt met VAIO-Link.
Modelnummer : PCGA-BM1
Serienummer : __________________
GB
4

Wettelijke
informatie
Sony verklaart hierbij dat de PCGABM1 Bluetooth™ modem voldoet aan
de essentiële vereisten en andere
relevante bepalingen van
richtlijn1999/5/EC.
Dit product maakt gebruik van de 2,4
GHz (2.4 GHz … 2.4835 GHz)
frequentieband (2.4 GHz … 2.4835
GHz) en de DDSS-technologie.
Hierdoor kunt u Sony notebooks met
Bluetooth™ technologie aansluiten op
het PSTN netwerk door middel van de
ingebouwde modem. Deze modem
wordt gebruikt voor datacommunicatie
met behulp van DTMF signalen op de
PSTN netwerken.
De Sony Bluetooth™ modem voldoet
aan alle regels in de volgende landen:
België, Duitsland, Ierland, Nederland,
Oostenrijk, Verenigd Koninkrijk en
Zwitserland. Bijgevolg mag de modem
uitsluitend in deze landen worden
gebruikt. Dit product kan niet worden
gebruikt in Frankrijk en Italië.
Dit product is getest en voldoet aan de
limieten die zijn vastgelegd in de
EMC-richtlijn voor het gebruik van
een beschermde, gedraaide
verbindingskabel, niet langer dan 3
meter (9,8 voet).
Dit product beantwoordt aan de
normen EN 300328-2 en EN 301489-1
voor gebruik in de volgende
omgevingen: residentieel,
commercieel en licht industrieel.
De PCGA-BM1 modem ondersteunt
geen communicatie via fax. Bijgevolg
kunt u dus geen faxberichten zenden
of ontvangen met behulp van deze
modem.
Alvorens u de modem gaat gebruiken,
moet u nagaan of u de regionale
instellingen van Windows goed
gedefinieerd heeft. Meer informatie
hierover vindt u in de documentatie
van uw VAIO computer.
Waarschuwing
❑In bepaalde gevallen of omgevingen
kan het gebruik van de Bluetooth™
technologie beperkt worden door de
eigenaar van het gebouw of de
verantwoordelijke
vertegenwoordiger van de
organisatie. Bijvoorbeeld: aan boord
van een vliegtuig, in ziekenhuizen
of in andere omgevingen waar het
interferentierisico met andere
apparaten of diensten als schadelijk
wordt geëvalueerd of als zodanig
bepaald wordt.
❑Als u niet zeker bent over het
toegepaste beleid betreffende het
gebruik van de Bluetooth™
technologie in een specifieke
organisatie of omgeving, raden wij u
aan om eerst toelating te vragen
voor tot gebruik over te gaan.
❑Raadpleeg uw dokter of de fabrikant
van prsoonlijke medische apparaten
(pacemakers, hoorapparaten, enz.)
betreffende mogelijke beperkingen
in het gebruik van de Bluetooth™
technologie.
GB
5

❑Gebruik uw PCGA-BM1 alleen
maar met de meegeleverde
netspanningsadapter.
❑Zorg dat het stopcontact
gemakkelijk toegankelijk is.
❑Als u het volledig van het
electriciteitsnet wilt loskoppelen,
verwijdert u de netspanningsadapter
uit het stopcontact.
❑Ter voorkoming van elektrische
schokken mag u de behuizing niet
openen. Laat service uitsluitend
uitvoeren door deskundig personeel.
❑Ter voorkoming van het gevaar van
brand of elektrische schokken, mag
u het product niet blootstellen aan
regen of vocht.
❑Installeer nooit modem- of
telefoonkabels tijdens onweer.
❑Installeer nooit
telefoonaansluitingen op vochtige
plaatsen, tenzij de aansluiting
hiervoor speciaal bedoeld is.
❑Raak nooit telefoondraden of
aansluitingen aan die onbeschermd
zijn, tenzij de telefoonlijn bij de
aansluiting op het netwerk is
losgekoppeld.
• Sony, VAIO en het VAIO logo zijn
geregistreerde handelsmerken van
Sony Corporation.
• Microsoft en Windows zijn
geregistreerde handelsmerken van
Microsoft Corporation in de
Verenigde Staten en/of andere
landen.
• De BLUETOOTH handelsmerken
zijn eigendom van hun eigenaar en
worden door Sony Corporation
onder licentie gebruikt.
• Alle andere namen van systemen,
producten en diensten zijn
handelsmerken van hun respectieve
eigenaars. ™ en ® staan niet in de
gebruiksaanwijzing vermeld.
GB
6

Contents
Introduction .......................................8
How to use this product.............9
Names of Parts.................................10
Installation .......................................12
Telephone line connection ......12
Power connection ....................13
Attaching or removing
the base ................................13
Power-on/power-off ................15
DIP Switch Settings.........................16
Enabling Communication ................ 18
Notebook bonding ...................18
Installing the Country
Selector ................................20
Selecting the Country Code ....20
Communication ...............................23
To terminate communication ..23
Changing the PCGA-BM1 Settings.24
Installing the modem station
utility....................................24
Changing the Passkey .............24
Deleting unnecessary bonding
information .......................... 26
Changing the device name ......28
Resetting the unit to the factory
defaults ................................ 30
Usage Precautions ...........................31
Maintenance ....................................32
Bluetooth Wireless Technology ......33
Connection format...................33
Speed .......................................34
Communication range
and power ............................34
Bluetooth standard ..................34
Security............................................35
Getting Help ....................................36
Specifications ..................................37
Troubleshooting...............................39
GB
7

Introduction
This product is a Bluetooth modem station that enables wireless dial-up
access from a Bluetooth compatible notebook. Within the communication
range, this allows the notebook user to freely move around while accessing
the Internet.
z Bluetooth wireless technology
Bluetooth wireless technology provides instant short-range connectivity without the need
for cumbersome cabling. For details on this exciting new development, refer to the
section “Bluetooth Wireless Technology” on page 34.
This unit has the following features.
• Bluetooth support enables wireless communications within a range of
10 - 100 metres. (The actual range will vary, depending on factors such
as the presence of obstacles between devices, interference, and the
operating system or the software used).
• Inbuilt V.90 compatible modem supports a maximum data transfer rate of
56 kbps for receiving and 33.6 kbps for sending.
• Up to 16 Bluetooth enabled notebooks can be bonded to one modem
station. A security feature prevents any non-bonded computers from
accessing the modem station.
Note
The data transfer rate between the Bluetooth compatible device and the modem station is
about 30 kbps for a dial-up connection. (The actual data transfer rate will vary, depending
on factors such as the presence of obstacles between devices, interference, and the
operating system or the software used. The 30 kbps value applies only to use of the
modem station in conjunction with the PCG-SR31K or PCG-C1VFK).
Bluetooth compatible notebooks that can be used with the
modem station
The following Bluetooth compatible notebooks can be used with this
product (as of November 2001):
PCG-SR31K, PCG-C1VFK
For models other than above, refer to the brochure.
GB
8

How to use this product
The PCGA-BM1 can communicate with a Bluetooth compatible notebook,
eliminating the need for a cable connection. Communication between the
PCGA-BM1 and the Bluetooth enabled computer takes place on a 1-on-1
basis.
Notes
• Some Bluetooth compatible devices may not function with the PCGA-BM1, depending
on the type of equipment, software version, and other factors. Before purchasing a
Bluetooth compatible device, check its operating environment requirements.
• The data transfer rate between the Bluetooth compatible device and the modem station
is about 30 kbps for a dial-up connection. (The actual data transfer rate will vary,
depending on factors such as the presence of obstacles between devices, interference,
and the operating system or the software used. The 30 kbps value applies only to use of
the modem station in conjunction with the PCG-SR31K or PCG-C1VFK.)
A typical configuration is shown below.
Analog telephone line
The PCGA-BM1 is connected to the analog telephone line and the built-in
modem is used to establish a dial-up connection.
Telephone line (analog)
Modem station (slave)* Computer (master)*
* For information about master device and slave device, see “Bluetooth Wireless
Technology” on page 34.
GB
9
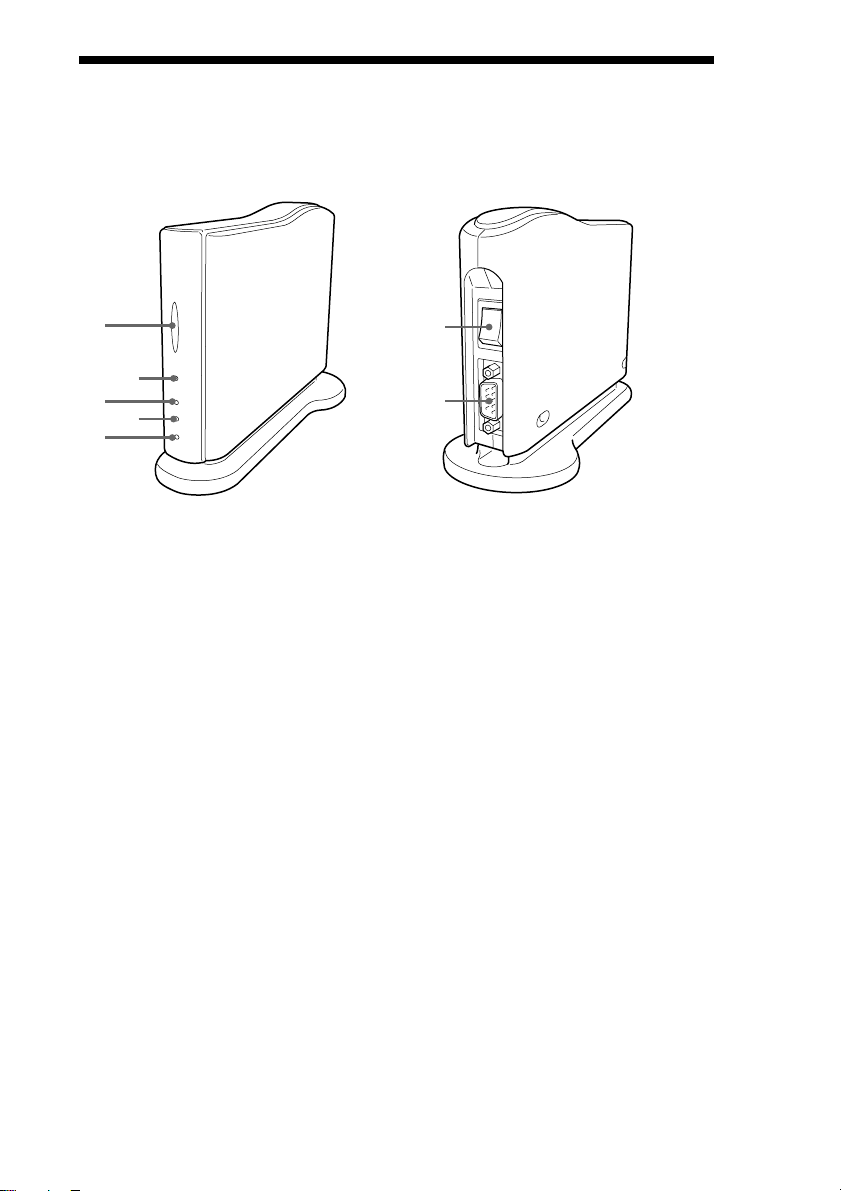
Names of Parts
Front view Rear view
1
6
2
3
7
4
5
1 BLUETOOTH indicator
This indicator flashes slowly when Bluetooth communications are active.
2 POWER indicator
This indicator lights up when the unit is powered.
3 PRIVATE indicator
This indicator shows that the security feature of the PCGA-BM1 is active. If the DIP
switch 3 (Private ON/OFF selector) on the bottom of the unit is set to ON, this
indicator will light when power is turned on.
4 MODEM indicator
This indicator lights up when the unit is powered and modem communication is in
progress.
5 TA indicator
This indicator is not used in Europe.
6 Power switch
7 Serial connector
This connector is not used in Europe.
GB
10

Bottom view
1 3
2 4
5
1 DC IN connector
The AC adapter cable is connected here.
2 DIP switches
This bank of three switches sets the operation mode of the unit. The switch functions
are as follows.
Switch 1 (Setup/normal operation mode selector)
Switch 2 (Always set to OFF in Europe)
Switch 3 (Private ON/OFF selector)
2 3
1
r
ON
Factory default settings
Switch 1: OFF Switch 2: OFF Switch 3: ON
For details on DIP switch settings, refer to the section “DIP Switch Settings” on page
17.
3 Reset switch
By pressing this switch with a paper clip or other pointed object, you can reset stored
settings (information about bonded notebooks, Passkey string) to the factory defaults.
The device name will not be changed by a reset.
Notes
• To prevent the possibility of unit damage, do not push the reset switch with the tip of a
pencil or other object that may break.
• If the device name of the unit has been changed, the name will not revert to the initial
setting even when the reset switch is pressed.
4 LINE connector
To connect the unit to the telephone line, plug the supplied telephone cable into this
jack.
5 Serial number label
The serial number of the unit is shown here.
11
GB

Installation
LINE
CLEAR
Telephone line connection
Use the supplied telephone cable to connect the PCGA-BM1 to the
telephone line.
Note
The data transfer rate between the Bluetooth compatible device and the modem station is
about 30 kbps for a dial-up connection. (The actual data transfer rate will vary, depending
on factors such as the presence of obstacles between devices, radio interference, and the
operating system or the software used. The 30 kbps value applies only to use of the
modem station in conjunction with the PCG-SR31K or PCG-C1VFK).
Telephone cable
(supplied)
To telephone
line
To LINE
connector
Telephone cable
(supplied)
Telephone line precautions
• Your computer cannot be connected to a coin-operated telephone, and
may not work with multiple phone lines or a private branch exchange
(PBX). If you connect the modem to a parallel connected phone line, the
modem or the other connected device may not function properly. Some
of these connections may result in excess of electrical current and could
cause a malfunction in the internal modem.
• If the Internet Service Provider (ISP) provides V.90 or K56flex
compatibility, data transfer rates of up to 56 kbps are possible. However,
the actual rate will depend on line conditions. V.90 or K56flex is selected
automatically.
12
GB

Continued on next page
Power connection
Use the supplied AC adapter to power the PCGA-BM1.
The unit comes with two different AC cables. Choose the correct AC cable
for the country where the PCGA-BM1 is used.
Note
Plug in the DC cable from the AC adapter only after the telephone line connection has
been established.
1 Insert the plug of the AC adapter into the mains.
2 Insert the plug of the DC cable from the AC adapter into the
DC IN connector on the PCGA-BM1.
Connect to mains
When using the unit in a European
country other than the UK
Connect to mains
When using the unit in the UK
Connect to mains
AC Adapter (supplied)
Adapter for continental Europe
Adapter for UK
Attaching or removing the base
The PCGA-BM1 comes with a base which should be attached in normal
use. To change a DIP switch setting or to plug in or unplug the telephone
line, the base must be removed.
DC IN 6V
DC IN
connector
13
GB

Attaching the base
Preparation
When installing the PCGA-BM1 for the first time, make a note of the serial
number of the unit shown on the serial number label. This number is
required as a Passkey for bonding notebooks (see page 19). For the location
of the label, refer to “Bottom view” in the section “Names of Parts” on
page 12.
Note
If the Passkey becomes known to other persons, they can perform Bluetooth bonding of a
computer to the PCGA-BM1 and use it to access a dial-up service which may incur
charges to the subscriber. Always handle your Passkey (serial number) with care, in order
to prevent unauthorized access.
1 Align the three grooves on the base with the corresponding
protrusions on the bottom of the unit and join the two parts
together.
2 Slide the unit in the arrow direction until it clicks into place.
The base should be situated at the bottom when joining the parts.
1
Bring the telephone
cable out as shown.
Note
Take care not to pinch the telephone cable when joining the parts.
GB
14
Protrusion
2
Groove

Observe the following points regarding installation of the unit:
• Choose a stable, level surface.
• If there are obstacles between the unit and the notebook, communications
may be impaired and the data transfer rate may drop.
Removing the base
Grasp the unit and the stand and separate the parts by performing the above
steps in reverse order.
Power-on/power-off
The power switch for this unit is located on the rear panel.
Power-on
Power-off
Connect to mains
15
GB

DIP Switch Settings
The DIP switches serve to set up the operation mode of the unit. When
installing the PCGA-BM1, make the required settings. When you make
changes later, the DIP switch settings will also have to be changed.
To change DIP switch settings, the power of the unit should be turned off.
1 If the unit is on, turn the power off.
2 Remove the base to gain access to the DIP switches on the
bottom.
Switch 1 (Setup/normal operation mode selector)
Switch 2 (Always set to OFF in Europe)
Switch 3 (Private ON/OFF selector)
OFF
2 3
1
ON
Factory default settings
ON
r
Set the DIP switches using the information on the next page.
GB
16

Switch number
Switch 1
(Setup/normal operation mode
selector)
Factory default setting: OFF
Switch 2
Factory default setting: OFF
Switch 3
(Private ON/OFF selector)
Factory default setting: ON
Setting
In normal dial-up communications and when
performing notebook bonding (page 19), this switch
must be OFF. Set the switch to ON only in the
following cases:
• When changing the Passkey (page 25)
• When deleting unnecessary bonding information
(page 27)
• When changing the device name (page 29)
Always set to OFF in Europe.
In normal operation, this switch must be ON. When
performing notebook bonding (page 19) or when using
the modem station utility to change the settings of the
unit (page 24), set the switch to OFF.
When this switch is set to OFF, the presence of the
unit can be detected by other Bluetooth compatible
devices. If users of such devices know the Passkey,
Bluetooth bonding is possible.
3 When the switch settings have been made, reattach the
base.
The settings become active the next time power is turned on.
17
GB

Enabling Communication
Before this unit can be used for communication with a notebook, the
following steps are necessary:
• Bluetooth bonding of notebook and PCGA-BM1
• Modem driver installation on notebook. For information on the modem
driver installation procedure, refer to the separate information booklet
“Read Me First”
• Selecting the country code
Notebook bonding
To prevent access from unauthorized Bluetooth compatible devices, the
communicating device must be identified. This identification process is
referred to as “bonding”. A common Passkey is used to bond a notebook to
the PCGA-BM1.
z What is a Passkey?
A Passkey is a secret code entered by the user to enable two Bluetooth compatible devices
to communicate. When the same alphanumeric string is entered at both devices,
communication becomes possible. The Passkey may be changed for every communication
session. Once a valid link has been established, communication is possible without further
Passkey input for a preset period of time.
The PCGA-BM1 retains the current Passkey until the unit is reset to the factory defaults
or until the bonding information is deleted.
The factory default Passkey for the PCGA-BM1 is the serial number of the unit, as shown
on a label affixed to the bottom panel. For the location of the label, refer to “Bottom
view” in the section “Names of Parts” on page 12. The Passkey can be changed to any
alphanumeric string, as described in “Changing the Passkey” on page 25.
Note
The Passkey is case-sensitive.
GB
18

Continued on next page
1 Set the DIP switch 1 (setup/normal operation mode selector)
and the DIP switch 3 (private ON/OFF selector) on the
bottom panel of the unit to OFF.
For details, refer to “DIP Switch Settings” on page 17.
2 Turn on the power of the PCGA-BM1.
3 Activate Bluetooth communications at the notebook and
perform a device discovery for the PCGA-BM1, then perform
a service discovery.
For details on how to terminate communications, refer to the manuals
provided with your Sony notebook.
When the service discovery is carried out, the Passkey input dialog box
for the PCGA-BM1 appears on the display of the notebook.
4 Enter the Passkey for the PCGA-BM1 to bond the PCGA-
BM1 to the notebook.
The factory default Passkey for the PCGA-BM1 is the serial number of
the unit, as shown on a label affixed to the bottom panel. For the
location of the label, refer to “Bottom view” in the section “Names of
Parts” on page 12.
This step also bonds the notebook to the PCGA-BM1.
5 When the link is established, terminate communications at
the notebook.
For details on how to terminate communications, refer to the manuals
provided with your Sony notebook.
6 Turn off the power of the PCGA-BM1 and set the DIP switch
3 (private ON/OFF selector) to ON.
Leave DIP switch 1 (setup/normal operation mode selector) in the OFF
position.
Note
For normal communications, the DIP switch 1 (setup/normal operation mode selector)
must be in the OFF position and the DIP switch 3 (private ON/OFF selector) in the ON
position. If the DIP switch 3 is left in the OFF position, other Bluetooth compatible
devices can detect the presence of the PCGA-BM1. If users of such devices know the
Passkey, they can bond a computer to the PCGA-BM1 and use it to access a dial-up
service which may incur charges to the subscriber. Therefore the DIP switch 3 should
only be set to ON when performing bonding or changing settings.
19
GB

Installing the Country Selector
Use the Country Selector application to select the country where the
PCGA-BM1 is used. Install the Country Selector from the supplied
CD-ROM.
1 Insert the utility CD-ROM into the notebook’s CD-ROM drive
or other drive capable of reading CD-ROMs, such as a DVD
drive.
2 Double-click the “My Computer” icon and then click the
CD-ROM drive icon.
3 Double-click the “MsCtySlt” folder.
4 Double-click “Setup.exe”.
The installation program for the modem station Country Selector starts.
Install the program by following the prompts that appear on the
display.
Selecting the Country Code
“United Kingdom” is the default country code of the PCGA-BM1. When
using the PCGA-BM1 in any other country, you must make the appropriate
country code settings in the Country Selector application.
Perform the following steps.
1 If the power of the PCGA-BM1 is on, turn it off.
2 Set the DIP switch 1 (setup/normal operation mode selector)
on the bottom of the PCGA-BM1 to OFF, and then turn the
PCGA-BM1 on.
For information on the DIP switches, see the section “DIP Switch
Settings” (page 17).
3 Activate Bluetooth communication on the notebook and
establish a link to the PCGA-BM1.
For details, refer to the manuals provided with your Sony notebook.
GB
20

Continued on next page
4 Check the communications port allocated to Bluetooth
communications.
5 Click the “Start” button and move the pointer to “Programs”,
then “Modem Station Utility” and click “Modem Station
Country Selector” to start the Country Selector.
The Modem Station Country Selector dialog box appears. The modem
connected to the default COM4 port is detected, and the current
country code setting is shown in the Current Country field.
6 If the number shown in the Com Port field does not match
the current port, click V and select the number allocated with
BlueSpace or other software.
If the number is correct, proceed to step 7.
Note
If the message “Modem answer error. Please try another port or check modem.”
appears, the wrong COM port was chosen. Select the correct port.
7 If the country shown in the Current Country field is not
correct, select the country in the Available Country field.
If the country is correct, proceed to step 8.
8 Click the “Select” button.
The country code change process starts.
When the process is completed, the message “Modem station country
selection is OK” is shown.
9 When you are happy with the content of the Current Country
field, click the “Cancel” button to close the Country Selector.
This completes the country code selection process.
21
GB

Bonding multiple notebooks
After the procedure described in the previous paragraph is completed, it is
possible to bond further notebooks. Repeat the steps starting on page 16 for
each notebook.
The maximum number of notebooks that can be bonded to the PCGA-BM1
is 16. When attempting to bond a notebook after the maximum has been
reached, an error message appears. In this case, use the supplied modem
station utility to delete bonding information for notebook that is no longer
required. For details on this procedure, refer to “Deleting unnecessary
bonding information” on page 27.
22
GB

Communication
To use the PCGA-BM1 to establish a dial-up connection, proceed as
follows:
Notes
• Before using the PCGA-BM1 for dial-up access, the preparations described in the
previous section (starting on page 19) must be completed.
• The notebook must have been set up for dial-up access. For details on how to set up
dial-up access, refer to the manuals provided with your Sony notebook and to the
documentation of the ISP.
1 Set the DIP switch 1 (setup/normal operation mode selector)
on the bottom panel of the unit to OFF and the DIP switch 3
(private ON/OFF selector) to OFF.
2 Turn on the power of the PCGA-BM1.
3 Activate Bluetooth communications on the notebook and
establish a link to the PCGA-BM1.
For details, refer to the manuals provided with your Sony notebook.
4 Execute a dial-up connection at the notebook.
On the modem selection dialog box, select “PCGA-BM1 (Modem)”.
When the dial-up connection has been established, the MODEM
indicator lights up and stays lit until the connection is terminated.
To terminate communication
To terminate communication between the PCGA-BM1 and the notebook,
hang up the dial-up connection at the notebook and then terminate
Bluetooth communication. For details, refer to the manuals provided with
your Sony notebook.
23
GB

Changing the PCGA-BM1 Settings
Installing the modem station utility
The modem station utility serves for changing PCGA-BM1 settings. Install
the utility from the supplied CD-ROM.
Note
Before starting the procedure below, the notebook must be set up to read CD-ROM discs.
For details on CD-ROM use, refer to the manuals provided with your Sony notebook and/
or the CD-ROM drive.
1 Insert the utility CD-ROM into the notebook’s CD-ROM drive
or other drive capable of reading CD-ROMs, such as a DVD
drive.
2 Double-click the “My Computer” icon and then double-click
the “CD-ROM” drive icon.
3 Double-click the “MSUtil” folder.
4 Double-click “Setup.exe”.
The installation program for the modem station utility starts. Install the
program by following the prompts that appear on the display.
Changing the Passkey
The Passkey that is used for Bluetooth bonding of the notebook can be
changed to any alphanumeric string with the modem station utility.
The factory default Passkey for the PCGA-BM1 is the serial number of the
unit, as shown on a label on the bottom panel. For the location of the label,
refer to “Bottom view” in the section “Names of Parts” on page 12.
Notes
• If the modem station utility is not installed, it must first be installed as described above.
• The Passkey is case-sensitive.
GB
24

Continued on next page
1 Set the DIP switch 1 (setup/normal operation mode selector)
on the bottom panel of the unit to ON and the DIP switch 3
(private ON/OFF selector) to OFF.
For details, refer to “DIP Switch Settings” on page 17.
2 Turn on the power of the PCGA-BM1.
3 Activate Bluetooth communication on the notebook and
establish a link to the PCGA-BM1.
For details, refer to the manuals provided with your Sony notebook.
4 Click the “Start” button and go to “Programs”, then “Modem
Station Utility”, and click “Modem Station Utility”.
The “Destination” dialog box appears.
5 From the “Communication Port” list box, select the port
assigned to Bluetooth communications, and click the “OK”
button.
If you are not sure about the communications port, refer to the manuals
provided with your Sony notebook.
Clicking the “OK” button starts the modem station utility.
6 Click the “Passkey” tab.
7 Enter the old Passkey and new Passkey in the respective
fields, then re-enter the new Passkey in the confirmation
field.
The Passkey can be any alphanumeric string of up to 16 characters.
8 Click the “Change” button.
A confirmation message for the Passkey change appears.
9 Click the “OK” button to close the message.
A message indicating the result of the Passkey change procedure
appears.
25
GB

10
Click the “OK” button to close the message.
11
Click the “OK” button to quit the modem station utility.
12
Terminate Bluetooth communications.
For details, refer to the manuals provided with your Sony notebook.
13
Turn off the power of the PCGA-BM1 and set the DIP switch
1 (setup/normal operation mode selector) on the bottom
panel of the unit to OFF and the DIP switch 3 (private ON/
OFF selector) to ON.
The new Passkey becomes valid when you turn on the power of the
PCGA-BM1 again.
Deleting unnecessary bonding information
The supplied modem station utility can be used to check which notebooks
have been bonded to the PCGA-BM1. It is also possible to delete bonding
information that is no longer needed.
The maximum number of notebooks that can be bonded to the PCGA-BM1
is 16. To bond further notebooks, bonding information must be deleted
first.
Note
If the modem station utility is not installed, it must first be installed as described on page
25.
1 Set the DIP switch 1 (setup/normal operation mode selector)
on the bottom panel of the unit to ON and the DIP switch 3
(private ON/OFF selector) to OFF.
For details, refer to “DIP Switch Settings” on page 17.
2 Turn on the power of the PCGA-BM1.
GB
26

Continued on next page
3 Activate Bluetooth communication on the notebook and
establish a link to the PCGA-BM1.
For details, refer to the manuals provided with your Sony notebook.
4 Click the “Start” button and go to “Programs”, then “Modem
Station Utility”, and click “Modem Station Utility”.
The “Destination” dialog box appears.
5 From the “Communication Port” list box, select the port
assigned to Bluetooth communications, and click the “OK”
button.
If you are not sure about the communications port, refer to the manuals
provided with your Sony notebook.
Clicking the “OK” button starts the modem station utility.
6 Click the “Bonded Devices” tab.
Device addresses are shown in the “Bonded Devices List”.
The device address of bonded notebooks can be checked on the
respective computer.
For the notebooks PCG-SR31K, PCG-C1VFK etc., the BlueSpace
software can be used to check the device address. Open the “Bluetooth
Setup” dialog box. The device address is shown under the “Properties”
tab.
7 From the “Bonded Devices List”, select the device you want
to delete, and click the “Delete” button.
A confirmation message for the deletion appears.
8 Click the “OK” button to close the message.
A message indicating the result of the deletion procedure appears.
9 Click the “OK” button to close the message.
10
Click the “OK” button to quit the modem station utility.
11
Terminate Bluetooth communications.
For details, refer to the manuals provided with your Sony notebook.
27
GB

12
Turn off the power of the PCGA-BM1 and set the DIP switch
1 (setup/normal operation mode selector) on the bottom
panel of the unit to OFF and the DIP switch 3 (private ON/
OFF selector) to ON.
The deletion becomes valid when you turn on the power of the PCGA-BM1
again.
Changing the device name
The device name of the PCGA-BM1 can be changed to any alphanumeric
string using the supplied modem station utility. The device name is shown
on the notebook when performing Bluetooth bonding.
Note
If the modem station utility is not installed, it must first be installed as described on page
25.
1 Set the DIP switch 1 (setup/normal operation mode selector)
on the bottom panel of the unit to ON and the DIP switch 3
(private ON/OFF selector) to OFF.
For details, refer to “DIP Switch Settings” on page 17.
2 Turn on the power of the PCGA-BM1.
3 Activate Bluetooth communication on the notebook and
establish a link to the PCGA-BM1.
For details, refer to the manuals provided with your Sony notebook.
4 Click the “Start” button and go to “Programs”, then “Modem
Station Utility”, and click “Modem Station Utility”.
The “Destination” dialog box appears.
GB
28

Continued on next page
5 From the “Communication Port” list box, select the port
assigned to Bluetooth communications, and click the “OK”
button.
If you are not sure about the communications port, refer to the manuals
provided with your Sony notebook.
Clicking the “OK” button starts the modem station utility.
6 Click the “Device Name” tab.
7 Click the “Change” button.
8 Enter the new device name.
The maximum length of the device name is 20 alphanumeric
characters.
9 Click the “OK” button to close the device name change
dialog box.
A message indicating the result of the name change procedure appears.
10
Click the “OK” button to close the message.
11
Click the “OK” button to quit the modem station utility.
12
Terminate Bluetooth communications.
For details, refer to the manuals provided with your Sony notebook.
13
Turn off the power of the PCGA-BM1 and set the DIP switch
1 (setup/normal operation mode selector) on the bottom
panel of the unit to OFF and the DIP switch 3 (private ON/
OFF selector) to ON.
The device name change becomes valid when you turn on the power of the
PCGA-BM1 again.
29
GB

Resetting the unit to the factory defaults
N
You can return the unit to the factory default settings (bonded notebook
information and Passkey string). This is useful if you have forgotten a
changed Passkey or want to delete all bonded notebooks in one operation.
Note
Any changes made to the device name will not be affected by the reset operation.
1 Remove the base.
2 Turn on the power of the unit.
3 Push the reset switch with a paper clip or other pointed
object until all indicators light up.
Reset switch
CLEAR
Note
To prevent the possibility of unit damage, do not push the reset switch with the tip of
a pencil or other object that may break.
LI
4 Turn off the power of the unit.
The reset becomes valid when you turn on the power of the PCGA-BM1
again.
GB
30
 Loading...