

Sony NSS-S2 Installation Manual

MEDIA STORAGE UNIT
NSS-S2
INSTALLATION MANUAL
1st Edition (Revised 1)
Serial No. 10001 and Higher

! WARNING
This manual is intended for qualified service personnel only.
To reduce the risk of electric shock, fire or injury, do not perform any servicing other than that
contained in the operating instructions unless you are qualified to do so. Refer all servicing to
qualified service personnel.
! WARNUNG
Die Anleitung ist nur für qualifiziertes Fachpersonal bestimmt.
Alle Wartungsarbeiten dürfen nur von qualifiziertem Fachpersonal ausgeführt werden. Um die
Gefahr eines elektrischen Schlages, Feuergefahr und Verletzungen zu vermeiden, sind bei
Wartungsarbeiten strikt die Angaben in der Anleitung zu befolgen. Andere als die angegeben
Wartungsarbeiten dürfen nur von Personen ausgeführt werden, die eine spezielle Befähigung
dazu besitzen.
! AVERTISSEMENT
Ce manual est destiné uniquement aux personnes compétentes en charge de l’entretien. Afin
de réduire les risques de décharge électrique, d’incendie ou de blessure n’effectuer que les
réparations indiquées dans le mode d’emploi à moins d’être qualifié pour en effectuer d’autres.
Pour toute réparation faire appel à une personne compétente uniquement.
For safety, do not connect the connector for peripheral
device wiring that might have excessive voltage to the
following port(s).
: 100BASE-TX connector
Follow the instructions for the above port(s).
WARNING
This unit has no AC power switch.
When installing the unit, incorporate a readily
accessible disconnect device in the fixed wiring, or
connect the power cord to a socket-outlet which must be
provided near the unit and easily accessible, so that the
user can turn off the power in case a fault should occur.
WARNUNG
Dieses Gerät hat keinen AC-Netzschalter.
Beim Einbau des Geräts ist daher im Festkabel ein
leicht zugänglicher Unterbrecher einzufügen, oder das
ß
Netzkabel mu
befindlichen, leicht zugänglichen Wandsteckdose
verbunden werden, damit sich bei einer
Funktionsstörung die Stromversorgung zum Gerät
jederzeit unterbrechen lä
mit einer in der Nähe des Geräts
ß
t.
NSS-S2
Attention-when the product is installed in Rack:
CLASS 1 LASER PRODUCT
LASER KLASSE 1 PRODUKT
LUOKAN 1 LASERLAITE
KLASS 1 LASER APPARAT
1. Prevention against overloading of branch circuit
When this product is installed in a rack and is
supplied power from an outlet on the rack, please
make sure that the rack does not overload the supply
circuit.
2. Providing protective earth
When this product is installed in a rack and is
supplied power from an outlet on the rack, please
confirm that the outlet is provided with a suitable
protective earth connection.
Laser Diode Properties
Wave length : 850 nm
Emission duration : Continuous
Laser output power : 0.5 mW (max.) (Specification
of an optical pickup)
3. Internal air ambient temperature of the rack
When this product is installed in a rack, please make
sure that the internal air ambient temperature of the
rack is within the specified limit of this product.
4. Prevention against achieving hazardous
condition due to uneven mechanical loading
When this product is installed in a rack, please make
sure that the rack does not achieve hazardous
condition due to uneven mechanical loading.
5. Install the equipment while taking the operating
temperature of the equipment into consideration
For the operating temperature of the equipment, refer
to the specifications of the Operation Manual.
6. When performing the installation, keep the
following space away from walls in order to
obtain proper exhaust and radiation of heat.
Rear: 10 cm (4 inches) or more
This Media Storage Unit is classified as a CLASS 1
LASER PRODUCT.
CAUTION
Use of controls or adjustments or performance of
procedures other than those specified herein
may result in hazardous radiation exposure.
CAUTION
The use of optical instruments with this product
will increase eye hazard.
NSS-S2
1 (P)

PRECAUTIONS
Use the specified power cord only
Use of power cords other than the specified ones may
cause fire or electric shock.
Do not damage the power cord
A damaged power cord may cause fire or electric shock.
When mounting the unit in a rack, be careful not to
catch the power cord in the rails.
Do not install the unit in humid or dusty locations
Dust, soot, and oil particles in the ambient atmosphere
may cause fire or electric shock.
Install the dedicated circuit breaker or power switch
This unit is not equipped with an AC power switch.
Install the dedicated circuit breaker or power switch,
and/or plug the power cord in the outlet.
Do not block the ventilation slots
If the ventilation slots are blocked, overheating inside
the unit may cause fire. Observe the following points to
ensure adequate ventilation.
. Do not install in narrow or sealed locations.
. Remove dust from the fan and air filter.
Install in a stable location
Installation in an unstable place may cause the unit fall,
resulting in injury.
Mount only with the specified rack mount rails
Rack mount rails other than those specified for this unit
may not be strong enough to support the unit, risking
possible collapse and injury.
Secure the unit to a rack with the screws
If the unit is not secured completely, this may cause the
unit fall off, resulting in injury. Be sure to secure the unit
with the screws when mounting to the rack. (Refer to
“1-6. Rack Mounting”)
Plug and connector of the power cord must be
inserted as far as they can go
Plug and connector of the power cord must be inserted
into the AC inlet as far as they can go.
Do not stack the units
Do not stack two or more units on top of each other.
Mount in a rack to avoid the risk of the unit sliding and
causing injury.
Ground the unit safely
Failure to ground the unit may cause electric shock.
Handling the unit by holding the designated
positions
When handling the unit, be sure to hold the following
positions.
Otherwise, the unit may break and fall, causing injury.
. Rack angle
. Bottom case
Especially, do not hold the front panel or the handle of
the power supply unit.
Carry the unit with more than two persons
The total weight of this unit is 32 kg.
Carrying the unit with less than two persons may cause
injury.
Mount with more than two persons
The total weight of this unit is 32 kg.
Mounting the unit with less than two persons may cause
injury.
2 (P)
NSS-S2

Table of Contents
Manual Structure
Purpose of this manual ........................................................... 3 (E)
Related manuals ..................................................................... 3 (E)
Contents .................................................................................. 3 (E)
Trademark .............................................................................. 3 (E)
1. Installation
1-1. Cautions before Installation ..................................... 1-1 (E)
1-2. Installation Procedure .............................................. 1-2 (E)
1-3. Operating Conditions and Installation Space .......... 1-2 (E)
1-4. Power Supply ........................................................... 1-4 (E)
1-4-1. Information for Power Supply ........................ 1-4 (E)
1-4-2. Recommended Power Cord ............................ 1-4 (E)
1-5. Setting the Switch for the Backup Battery .............. 1-5 (E)
1-6. Rack Mounting ........................................................ 1-6 (E)
1-7. Installing the HDD Unit ........................................... 1-8 (E)
1-8. Signal Input and Output ........................................... 1-9 (E)
1-9. Connecting Connectors and Cables ......................... 1-9 (E)
1-10. Connection ............................................................. 1-10 (E)
1-11. Checks after Connection ........................................ 1-11 (E)
1-12. Menu Settings ........................................................ 1-13 (E)
1-12-1. Displaying of Menus .................................... 1-13 (E)
1-12-2. Setting of Device Name ............................... 1-14 (E)
1-12-3. Setting of Network ....................................... 1-15 (E)
1-12-4. Executing of Logical Formatting ................. 1-16 (E)
1-13. SNMP .................................................................... 1-17 (E)
1-13-1. Setting of Community Name ........................ 1-17 (E)
1-13-2. Setting of TRAP IP ...................................... 1-18 (E)
1-14. Setting of FAN MODE .......................................... 1-18 (E)
2. Service Overview
2-1. Cleaning the Air Filter ............................................. 2-1 (E)
2-2. Functional Descriptions of Board Switches
and LEDs ................................................................. 2-2 (E)
2-2-1. PU-124 Board ................................................. 2-2 (E)
2-2-2. MPU-136 Board ............................................. 2-8 (E)
2-2-3. DP-405 Board ............................................... 2-10 (E)
NSS-S2
1 (E)


Purpose of this manual
Related manuals
Manual Structure
This manual is the installation manual of Media Storage Unit NSS-S2.
This manual is intended for use by trained system and service engineers, and
describes the information regarding installation.
Besides this Installation Manual, the following manuals are available for the
NSS-S2.
..
. NSS-S2 Operation Manual (supplied with the NSS-S2)
..
This manual describes the application and operation of the NSS-S2.
Part number: 3-903-843-XX
..
. NSS-S2 Maintenance Manual (available on request)
..
This manual describes the information that premise the service based on main
parts replacement (service overview, maintenance functions, replacement of the
parts and boards, circuit descriptions and block diagram, etc.).
If this manual is required, please contact your local Sony Sales Office/Service
Center.
Part number: 9-968-191-XX
Contents
Trademark
The following is a summary of all the section for understanding the contents of this
manual.
Section 1 Installation
Explains the operating conditions, installation space, power supply, rack mounting,
installing the HDD unit, connection, and checks after connection.
Section 2 Service Overview
Explains the cleaning procedure of the air filter, the function and factory setting of
the switches and LEDs on the board.
Trademarks and registered trademarks used in this manual are follows.
. Ethernet is a registered trademark of Xerox Corporation.
NSS-S2
3 (E)


Section 1
Installation
1-1. Cautions before Installation
The Hard Disk Drives (HDD) are installed in this unit. The HDD is a precision part. The causes such as
shock, vibration and static electricity to the unit, and the conditions of temperature and humidity may
damage HDD or its data.
Before installation, read fully the following cautions, and perform the installation with extra care.
Cautions about shock and vibration
When transporting and moving;
. Pack the unit using the packaging materials specified by the manufacturer.
. Use a proper cart.
. Avoid rough routes, and manage the cart gently.
When placing on a floor or table;
. Put a cushion on stable and horizontal place, and put the unit on it gently.
. Do not place the unit near vibrating equipments.
For the unit;
. Never hit the unit, and drop the tool on the unit.
Take extra care;
. Never give vibration or shock to the unit while the power is turned on, or within about 30 seconds after
turning off the power.
. Be extremely careful when removing and/or installing the HDD unit or power supply unit while the unit
is in live state.
Cautions about rack mounting the unit
. Mount in the rack after removing all built-in HDD from the unit.
. Never give shock to all the rack mounted unit which has a HDD.
Caution about static electricity
. Keep static-producing items such as plastics (air caps or others) away from the working area.
. When touching the HDD unit, be sure to wear a grounded earth-band to protect against static electricity.
Cautions about temperature and humidity
. Temperature and humidity of storage and operating condition must be kept within the correct specified
range.
. Never turn on the power with the cabinet is removed in consideration of the air-cooling effect.
Cautions when an error appears in a HDD
. Treat this unit conform to the above cautions, even when an error appeared.
. Keep the unit in the condition in which the error appeared, and record the details of the error.
NSS-S2
1-1 (E)
1-2. Installation Procedure
n
Keep the packing materials, such as carton, cushion, and so
on after unpacking.
When the unit is transported, pack the unit using the
supplied materials.
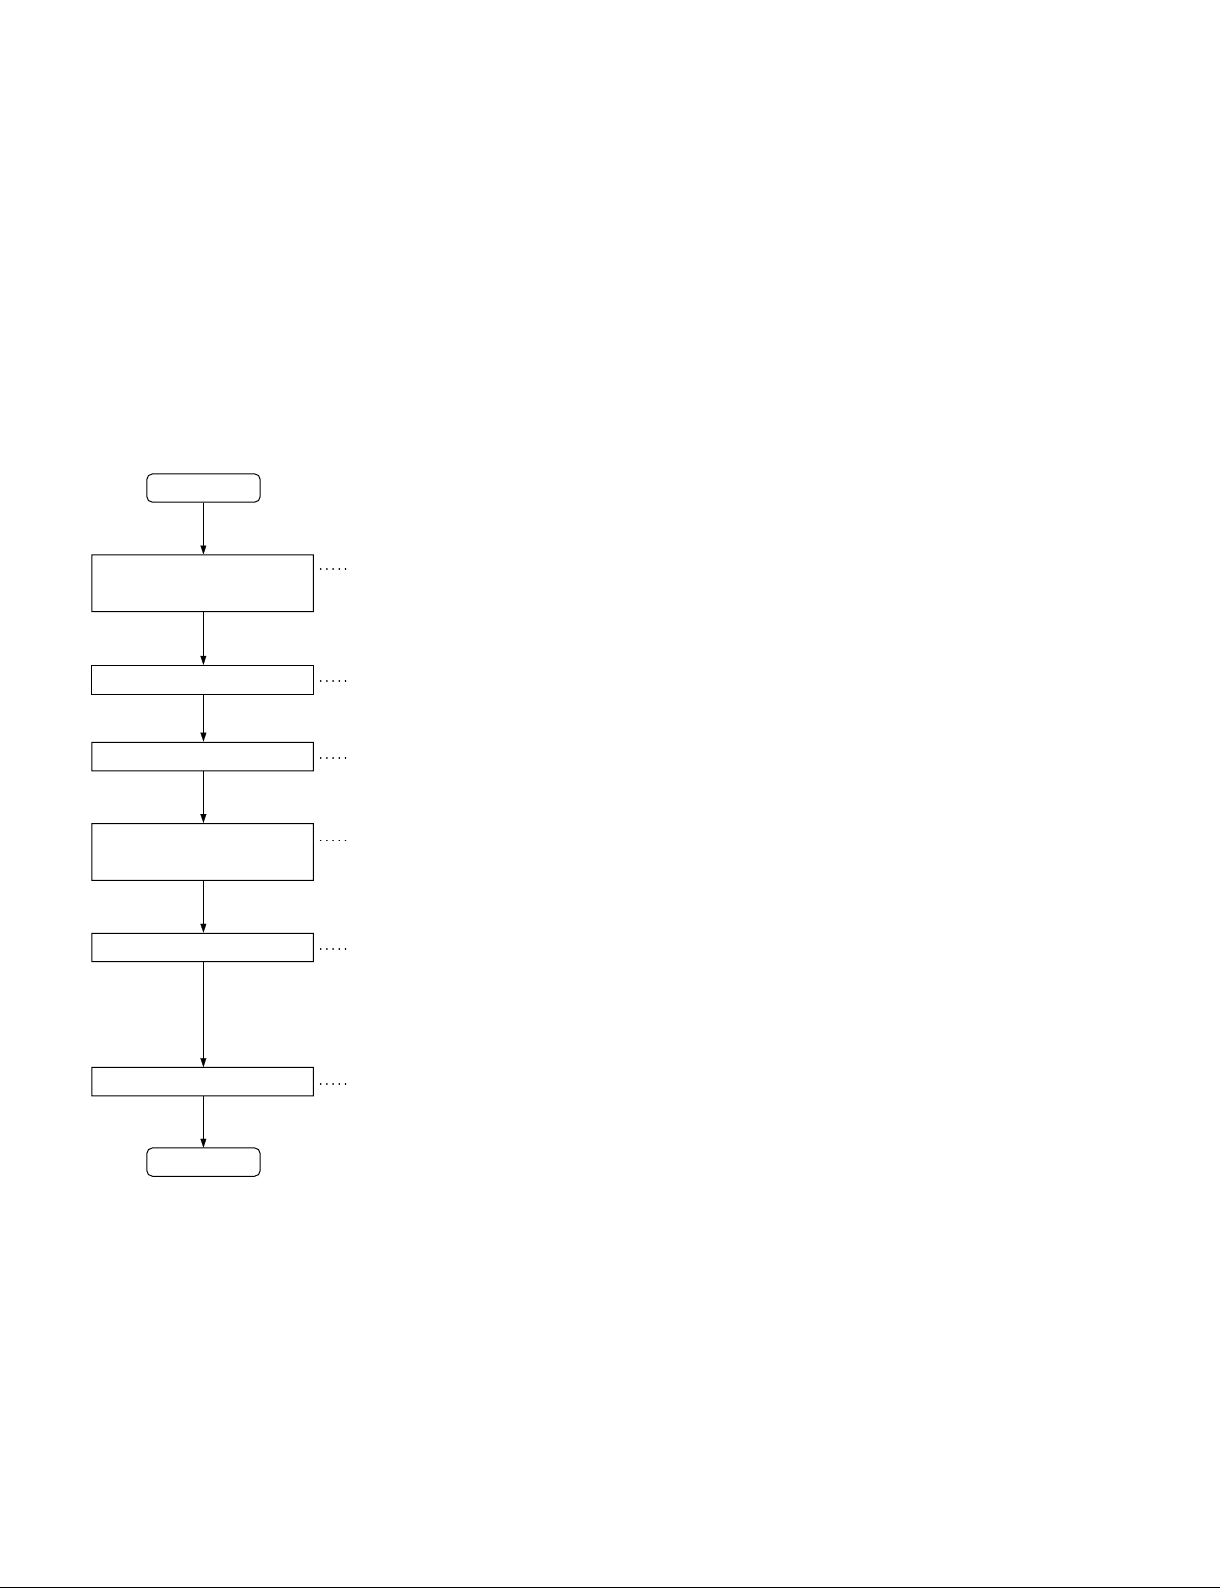
The following flowchart shows the installation procedure
of this unit.
Refer to each item in this manual for details.
Start
Determination
of installation place
Switch setting
Rack mounting
Installing the
HDD unit
1-3. Operating Conditions
and Installation Space
1-4. Power Supply
1-5. Setting the Switch for
the Backup Battery
1-6. Rack Mounting
1-7. Installing the HDD Unit
1-3. Operating Conditions and
Installation Space
1. Set the operating temperature and humidity
within the following conditions.
Operating temperature +5 dC to +40 dC
Operating humidity +20 % to +90 %
(No condensation)
Storage temperature _20 dC to +60 dC
2. Do not install this unit in the following
locations.
. Areas where the unit will be exposed to direct
sunlight or any other strong lights
. Dusty areas or areas where is subjected to vibration
. Areas with strong electric or magnetic fields
. Areas near heat sources
. Areas where is subjected to electrical noise
. Areas where is subjected to static electricity noise
. Unstable and unbalanced areas
3. To prevent the internal temperature rise, pay
attention to circulation of air in the place
where this unit is installed.
The rear side of this unit should be 10 cm away from
the walls for ventilation.
Connection
Checks after connection
End
1-8. Signal Input and Output
1-9. Connecting Connectors
and Cables
1-10. Connection
1-11. Checks after Connection
1-2 (E)
NSS-S2
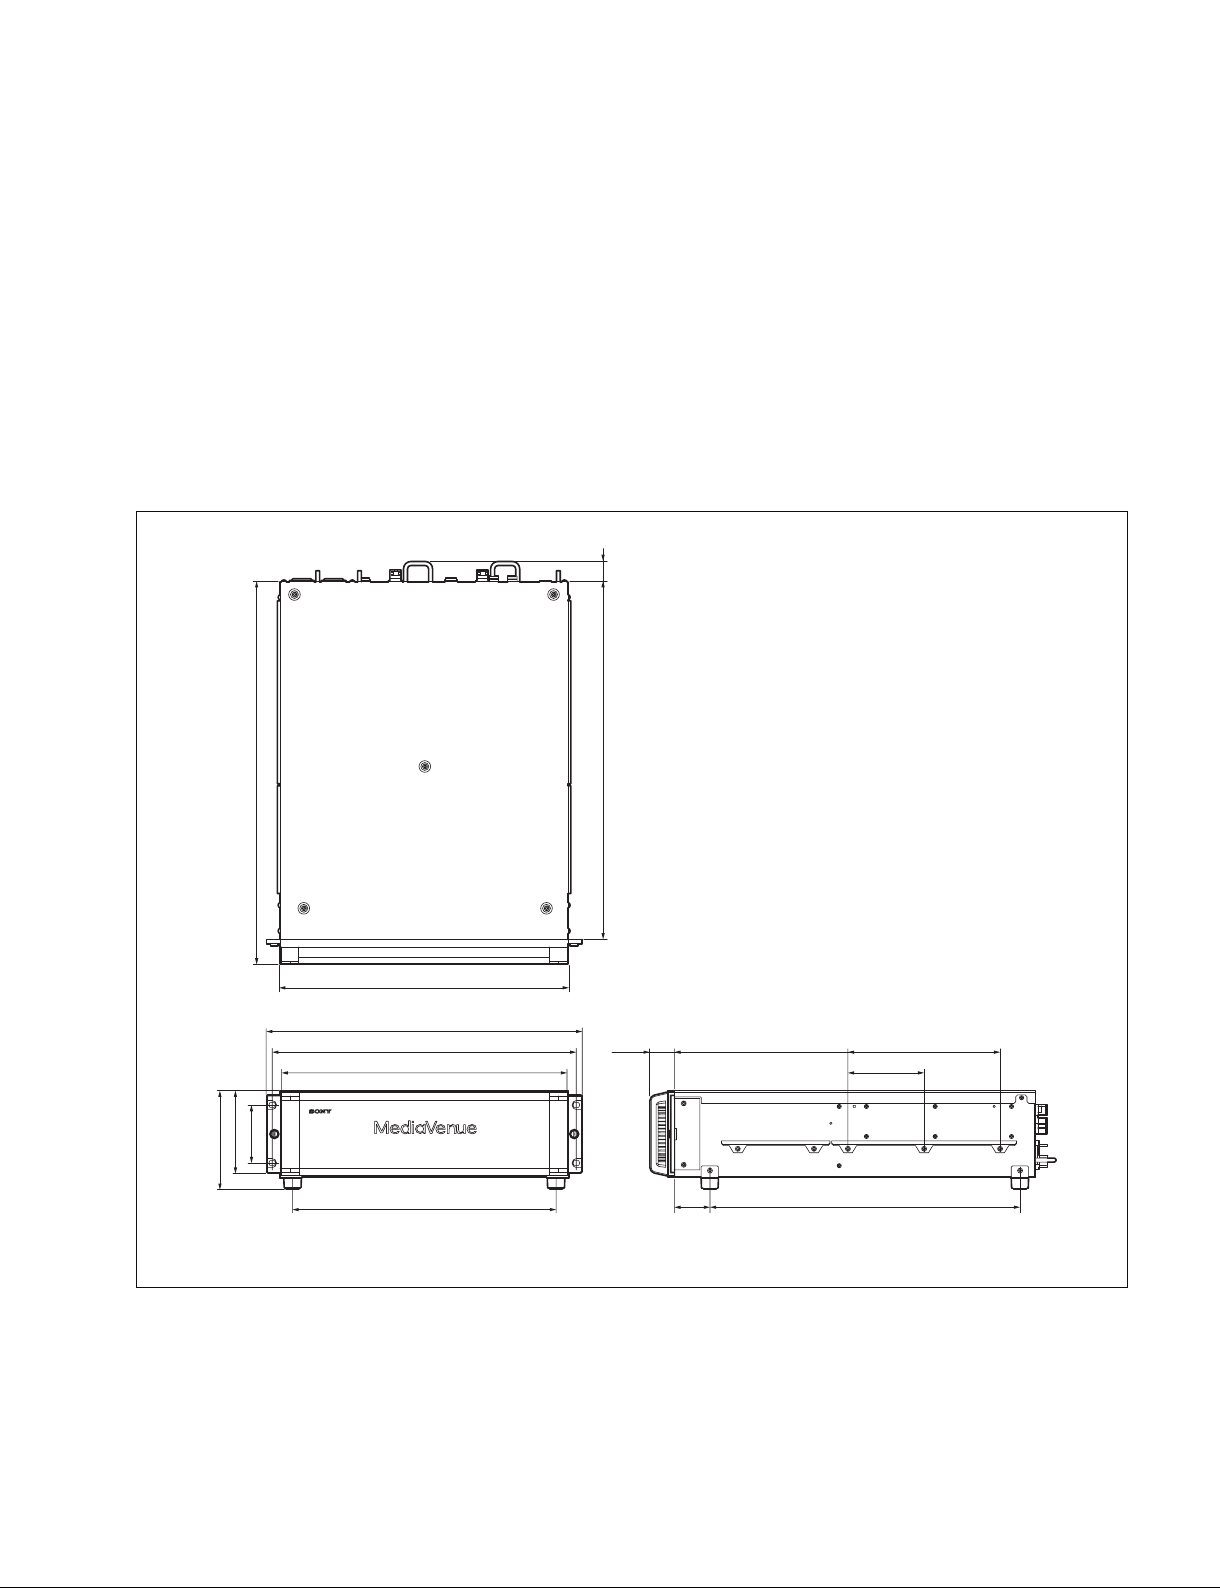
4. Installation Space
c
Do not block the ventilation slots.
If the ventilation slots are blocked, overheating inside the unit may cause fire. The rear side of this unit
should be 10 cm away from the walls for ventilation.
m
. The rear side of this unit should be 50 cm away from the walls for maintenance and replacement of the
power supply unit.
. If the power is turned on with the cabinet removed, the air-cooling effect of the fan is greatly reduced
which can result in damaging the PU-124 board and HDD or its data. Avoid the operation when the
cabinet is removed.
30
131
150.1
584.9
89
POWER SYSTEM BUSY
(440)
482
465
440
MEDIA STORAGE UNIT NSS-S2
402
547.9
35.4
55
263.5
231
115.5
469.5
Unit : mm
NSS-S2
1-3 (E)
1-4. Power Supply
1-4-2. Recommended Power Cord
1-4-1. Information for Power Supply
A switching regulator is used for the power supply of this
unit. The voltage within the range of 100 V to 240 V can
be used without changing the supply voltage.
Power voltage : AC 100 V to 240 V
Power frequency : 50/60 Hz
Power consumption : 490 W (500 VA)
(continuous rating)
w
This unit has no AC power switch.
When installing the unit, incorporate a readily accessible
disconnect device in the fixed wiring, or connect the power
cord to a socket-outlet which must be provided near the
unit and easily accessible, so that the user can turn off the
power in case a fault should occur.
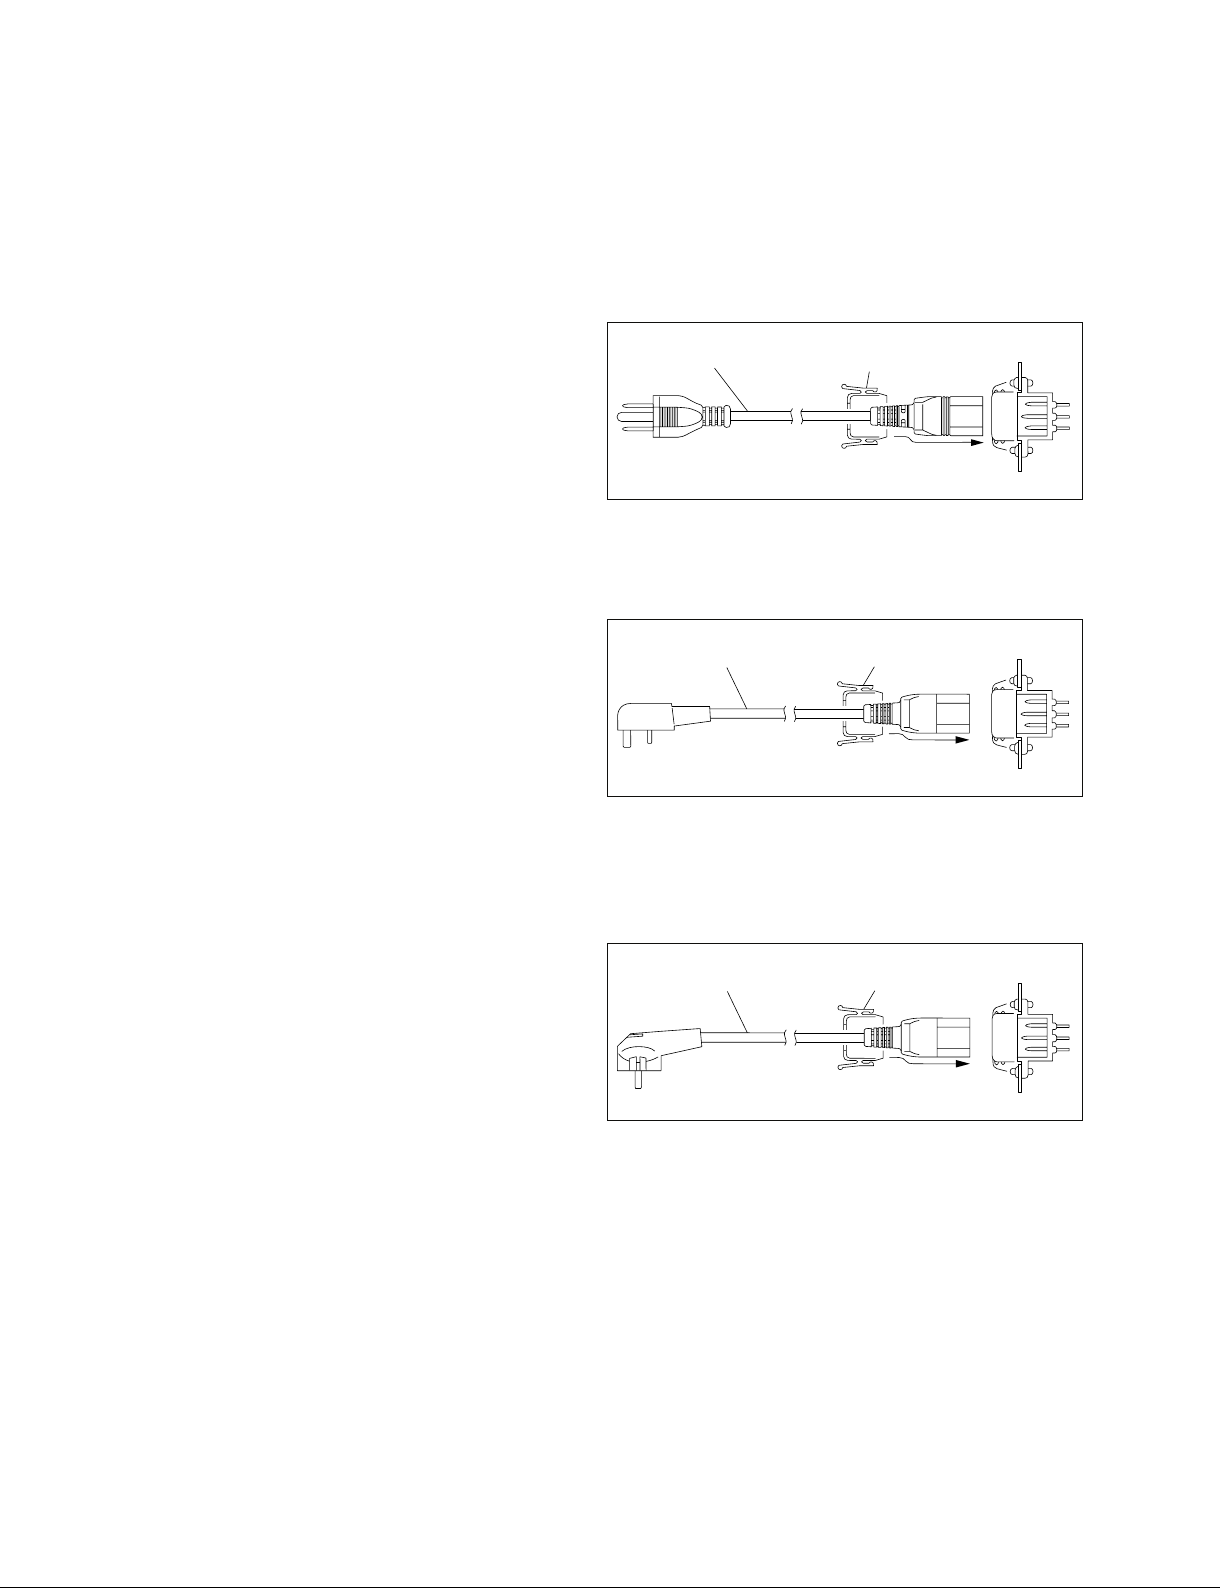
Recommended parts
For customers in the U.S.A. and Canada:
1 Power cord 125 V 10 A (2.4 m): ! 1-551-812-31
2 Plug holder (Brown): 3-613-640-01
1
2
AC inlet
For customers in the United Kingdom:
1 Power cord 250 V 10 A (2.4 m): ! 1-551-631-61
2 Plug holder (Brown): 3-613-640-01
21
AC inlet
For customers in European countries except the
United Kingdom:
1 Power cord 250 V 10 A (2.4 m): ! 1-551-631-00
2 Plug holder (Brown): 3-613-640-01
21
AC inlet
If the unit is used in the area except above, please contact
your local Sony Sales Office/Service Center.
w
. Use the specified power cord only.
. Do not damage to the power cord.
c
. Ground the unit safely.
. Plug and connector of the power cord must be inserted
into the AC inlet as far as they can go.
1-4 (E)
NSS-S2
 Loading...