

Page 1

Network
Surveillance
Recorder
4-262-345-02 (1)
Installation Manual ________ GB
設置説明書 ________________ JP
NSR-S10/S20
お買い上げいただきありがとうございます。
電気製品は安全のための注意事項を守らないと、
火災や人身事故になることがあります。
この取扱説明書には、事故を防ぐための重要な注意事項と製品の
取り扱いかたを示してあります。この取扱説明書をよくお読みのうえ、
製品を安全にお使いください。お読みになったあとは、
いつでも見られるところに必ず保管してください。
© 2010 Sony Corporation
Manuel d’installation ______ FR
Installationsanleitung ______ DE
Manuale all’installazione ___ IT
Manual de instalacion _____ ES
Page 2

WARNING
To reduce the risk of fire or
electric shock, do not expose
this apparatus to rain or
moisture.
To avoid electrical shock, do not
open the cabinet. Refer
servicing to qualified personnel
only.
IMPORTANT NOTICE
This equipment is assigned a Model No. for
regulatory compliance certifications.
The number is indicated on the model
number label on your product along with
the rated voltage and current.
Ordering Model Name. and Type No.
Ordering
Information
Model NSR-S10/S20
1 HDD
Model NSR-S10/S20
0 HDD
Model No. for
Certification
AVOM001
AVOM002
WARNING
Use the AC power adapter provided with
this equipment as a power supply source.
Manufacture: Sony
Type No.: NSR-AC1
Any other power sources may result in
hazards such as a fire.
Disconnect device of this equipment is the
mains plug of the AC adapter.
The mains plug on this equipment must be
used to disconnect mains power. Please
ensure that the socket outlet is installed near
the equipment and shall be easily
accessible. In the event of abnormal
operations, disconnect the mains plug.
NOTICE
Use the power cord set approved by the
appropriate testing organization for the
specific countries where this unit is to be
used.
CAUTION for LAN port
For safety reason, do not connect the LAN
port to any network devices that might have
excessive voltage.
Installing battery (IR Remote
Commander)
A CR2025 type lithium battery is supplied
for IR Remote Commander.
To avoid risk of explosion, use the same
type of lithium battery.
CAUTION
Danger of explosion if battery is incorrectly
replaced. Replace only with the same or
equivalent type recommended by the
manufacturer. Dispose of used battery
according to the manufacturer’s
instructions.
Caution for System Developers
in the USA
Additional requirements may be necessary
when the product is used in access control
system applications.
For the customers in the USA
WARNING
This device complies with Part 15 of the
FCC Rules.
Operation is subject to the following two
conditions: (1) this device may not cause
harmful interference, and (2) this device
must accept any interference received,
including interference that may cause
undesired operation.
NOTE: This equipment has been tested and
found to comply with the limits for a Class
B digital device, pursuant to part 15 of the
FCC Rules. These limits are designed to
provide reasonable protection against
harmful interference in a residential
installation. This equipment generates, uses
and can radiate radio frequency energy and,
if not installed and used in accordance with
the instructions, may cause harmful
interference to radio communications.
However, there is no guarantee that
2
Page 3

interference will not occur in a particular
installation. If this equipment does cause
harmful interference to radio or television
reception, which can be determined by
turning the equipment off and on, the user is
encouraged to try to correct the interference
by one or more of the following measures:
- Reorient or relocate the receiving
antenna.
- Increase the separation between the
equipment and receiver.
- Connect the equipment into an outlet on
a circuit different from that to which the
receiver is connected.
- Consult the dealer or an experienced
radio/TV technician for help.
You are cautioned that any changes or
modifications not expressly approved in
this manual could void your authority to
operate this equipment.
All interface cables used to connect
peripherals must be shielded in order to
comply with the limits for a digital device
pursuant to Subpart B of Part 15 of FCC
Rules.
For the State of California, USA
only
Perchlorate Material - special handling may
apply, See
www.dtsc.ca.gov/hazardouswaste/
perchlorate
Perchlorate Material : Lithium battery
contains perchlorate.
For the customers in Canada
This Class B digital apparatus complies
with Canadian ICES-003.
Cet appareil numérique de la classe B est
conforme à la norme NMB-003 du Canada.
For the customers in Europe
The manufacturer of this product is Sony
Corporation, 1-7-1 Konan, Minato-ku,
Tokyo, Japan.
The Authorized Representative for EMC
and product safety is Sony Deutschland
GmbH, Hedelfinger Strasse 61, 70327
Stuttgart, Germany. For any service or
guarantee matters please refer to the
addresses given in separate service or
guarantee documents.
Somente para clientes no Brasil
DESCARTE DE PILHAS E BATERIAS
Pilhas e Baterias Não Recarregáveis
Atenção:
Verifique as instruções de uso do aparelho
certificando-se de que as polaridades (+) e
(-) estão no sentido indicado. As pilhas
poderão vazar ou explodir se as polaridades
forem invertidas, expostas ao fogo,
desmontadas ou recarregadas.
Evite misturar com pilhas de outro tipo ou
com pilhas usadas, transportá-las ou
armazená-las soltas, pois aumenta o risco
de vazamento.
Retire as pilhas caso o aparelho não esteja
sendo utilizado, para evitar possíveis danos
na eventualidade de ocorrer vazamento.
As pilhas devem ser armazenadas em local
seco e ventilado.
No caso de vazamento da pilha, evite o
contato com a mesma.
Lave qualquer parte do corpo afetado com
água abundante.
Ocorrendo irritação, procure auxílio
médico.
Não remova o invólucro da pilha.
Mantenha fora do alcance das crianças. Em
caso de ingestão procure auxílio médico
imediatamente.
For the customers in Taiwan only
GB
3
Page 4

Table of Contents
Usage Precautions .......................... 5
Overview ......................................... 7
Confirming the contents of
the box ............................................. 8
System Requirements ..................... 9
Using the CD-ROM manual ........ 10
Preparations ............................ 10
Reading the CD-ROM
Manual .................................... 10
Features and Functions................ 11
Front panel .............................. 11
Rear panel ............................... 11
Infrared remote control unit ... 12
Setup .............................................. 15
Setting up the unit ................... 15
Connecting each device .......... 15
Connecting e-SATA Storage
Connecting the network
cameras ................................... 16
Connecting the AC adapter .... 17
Turning on the power and
registering the cameras ................ 18
Settings that require individual
configuration .......................... 20
I/O Port .......................................... 21
Troubleshooting ............................ 22
Specifications ................................ 23
NSR-S10/S20 ......................... 23
... 16
Trademarks
• “IPELA” and are
trademarks of Sony Corporation.
Other products or system names appearing
in this document are trademarks or
registered trademarks of their respective
owners.
Further, the ® or ™ symbols are not used in
the text.
• Reproduction or duplication, in whole or
part, of the software or operation manual
supplied with the recorder, as well as renting
or leasing of the software without the
authorization of the ri ght holder is prohibited
under copyright law.
• Sony assumes no responsibility for
damages, loss of income, or any claims from
a third party arising out of use of the recorder
or supplied software.
• For complete terms and conditions of the
warranty for the recorder, refer to the
warranty card included in the package.
• The software supplied with the recorder
cannot be used with any other recorders.
• It is not possible to install any software into
the equipment other than the software
supplied by Sony specifically for use with
the equipment.
• Note that the specifications of the recorder
and supplied software are subject to change
for improvement without prior notice.
Disclaimer of liability for
recorded content
Sony Corporation does not accept any liability
whatsoever for any problems arising from a
failure to record, or from damage or erasure of
recorded content on this equipment, for any
reason. This includes claims for compensation of
recorded content, and for any concomitant and
consequential damages. Sony Corporation will
not repair, restore, or duplicate any recorded
content. Your use of this product is subject to
these conditions.
Table of Contents
4
Page 5

Usage
Precautions
Important Information About
Safety
• Be sure to connect the unit to a power
source that conforms fully to the
electrical specifications of this unit.
• Use only the supplied power cord and AC
adapter. Do not coil the power cord or
bundle it with other cords. Do not piggy
back connections. If current ratings are
exceeded, there is a risk of fire and other
accidents.
• Do not use the unit with the cover or case
opened or removed. Otherwise there is a
risk of fire and electric shock. Do not
attempt to open or remove the cover or
case yourself. Always consult your
supplier if opening is necessary.
Important Information About
Installation
Locations for use/storage
To prolong the life of the product, avoid use
or storage in the following locations.
• Locations that can become extremely hot
or cold. (Be sure to use the unit that
conforms fully to the specifications of
this unit.)
• Locations exposed for an extended time
to direct sunlight, and locations near
heating appliances. (Note that the
temperature in a closed car in summer
can exceed +50 ºC/+122 ºF.)
• Locations with high levels of humidity or
dust
• Locations subject to strong vibrations
• Locations subject to strong magnetic
fields
• Locations in the vicinity of radio or TV
transmitters creating a strong magnetic
field
Do not stack units or place the unit
on other objects that generate heat
When one unit is stacked on top of another
unit, the heat generated by both units can
get extremely hot. Do not stack units on top
of each other or place the unit on other
objects that may generate heat.
Do not block the ventilation
openings
• The ventilation openings on the sides of
the unit serve to prevent internal heat
buildup. Always leave a clearance on
both sides as well as behind and above
the unit.
• Do not use the unit in a closed box or
other enclosure.
Use the unit in a horizontal
position
• The unit is designed to be operated in a
horizontal position.
• Do not install the unit on a slanted
surface, and protect the unit from shocks.
• When the unit is dropped or otherwise
subject to strong shocks, it can be
seriously damaged.
Maintenance
• Before cleaning the unit or performing
any other kind of maintenance, be sure to
disconnect the power cord from the AC
outlet.
• For cleaning, lightly wipe the cabinet and
panels with a dry cloth. To remove
stubborn stains, lightly moisten the cloth
with a mild, neutral detergent and wipe
with a dry cloth afterwards.
• Do not use cleaning alcohol, solvents,
benzine, insecticide, or any other volatile
substances, because these may damage
the finish and lead to discoloration.
Usage Precautions
5
Page 6

Transport
Use the original packing material or similar
packing to protect the unit from shocks.
even to very light shocks. After this period,
the hard disk will be fully stopped and the
unit can be manipulated.
Precautions for products with
built-in HDD
This unit has a built-in hard disk drive
(HDD). The HDD is a precision device. If
subject to shock, vibration, static
electricity, high temperature or humidity,
data loss can occur. When installing and
using the unit, closely observe the
following precautions.
Protect from shocks and
vibrations
When subject to shocks or vibrations, the
HDD can be damaged and loss of data on
the HDD can occur.
• When transporting the unit, use the
specified packing material. When
transporting on a dolly or similar, use a
type which does not transmit excessive
vibrations. Excessive shocks and
vibrations can damage the HDD.
• Never move the unit while it is powered.
• Do not remove panels or outer parts of
the unit.
• When placing the unit on a floor or other
surface, make sure that the unit is
equipped with the specified rubber feet,
and put the unit down carefully. If there
are no feet, mount the rubber feet first.
• Do not place the unit near other devices
that may become a source of vibrations.
Wait for 30 seconds after turning
power off
For a brief interval after the power is turned
off, the platters inside the HDD will still
keep spinning and the heads will be in an
insecure position. During this interval, the
unit is more susceptible to shocks and
vibrations than during normal operation.
For a period of at least 30 seconds after
turning power off, avoid subjecting the unit
Temperature and humidity related
precautions
Use and store the unit only in locations
where the specified temperature and
humidity ranges are not exceeded. (Be sure
to use the unit that conforms fully to the
specifications of this unit.)
When HDD seems to be faulty
Even if the HDD is showing signs of
malfunction, be sure to observe all the
above precautions. This will prevent further
damage from occurring until the problem
can be diagnosed and corrected.
Replacement of the HDD and other
consumable parts
The HDD, and battery of the unit are
consumable parts that will need periodic
replacement. When operating at room
temperature, the recommended
replacement cycle is about two to three
years. However, this replacement cycle
represents only a general guideline and does
not imply that the life expectancy of these
parts is guaranteed. For details on parts
replacement, contact your dealer.
Precautions for using USB devices
• This unit supports USB 2.0 Mass Storage
devices. However, it does not support
USB 2.0 Mass Storage HDDs or CD/
DVD drives. Do not connect mass
storage devices other than USB flash
memory devices to the unit. Be aware
that errors may still occur when writing
data to a USB 2.0 Mass Storage memory
device, depending on the type of device
used. If errors occur when writing data,
use a USB memory device of a different
type.
Usage Precautions
6
Page 7

• To ensure proper operation of USB
devices, do not connect the devices via a
USB hub. Connect the devices directly to
the USB connectors on the unit.
Operation is not guaranteed when
devices are connected via a USB hub,
USB switch, or extension cable.
Overview
The NSR-S10/S20 is a network
surveillance recorder for network cameras.
The server allows you to monitor and
record JPEG, MPEG-4, and H.264 images
from network cameras via the network. The
server also allows you to easily search for
and play back previously recorded images.
Manage and control compatible
cameras from remote locations
You can manage, control, and display the
images from up to four network cameras
with the NSR-S10, and up to eight network
cameras with the NSR-S20. You can pan,
tilt, and perform zoom operations of
compatible cameras.
Large-capacity hard disks allow
recording for long periods of time
Models with internal hard disks are
equipped with large-capacity storage that
enables recording for extended periods of
time. In addition, the unit allows you to
connect storage devices that support the eSATA interface.
Monitor from a browser
You can access the NSR from a browser,
which then can be used to monitor images.
Other features
• The NSR is capable of continuous
recording, motion detection, and alarm
recording, among others.
• Run searches for recorded images by date
and time, sensors, movement detection,
video signal loss, etc.
• Audio recording and playback
supported from compatible cameras.
1) Optional audio amplifiers or speakers are
required.
1)
are also
Overview
7
Page 8

Important
• This manual describes the installation
and initial setup of this unit. For details
on the various settings for this unit, refer
to the First Step Guide (PDF), and the
User’s Guide (PDF).
• For details on the system requirements
for client computers, supported camera
models, and other important information,
refer to the Release Note (PDF).
Access the following URL to download
the Release Note.
http://www.sony.co.jp/Products/NSR/
NSR-S_ReleaseNote_E.pdf
Confirming the
contents of the
box
After opening the carton, makes sure that all
of the items listed below are included. If
any of the accessories are missing, contact
your Sony dealer.
• Main unit (1)
• AC adapter (1)
• Cable clamp (1)
Confirming the contents of the box
8
• Infrared remote control unit (1)
• Installation Manual (this manual) (1)
• CD-ROM (First Step Guide, User’s
Guide) (1)
• Warranty booklet (1)
Page 9

Notes
• The carton may include other manuals or
materials that are not listed above.
• The carton and packing materials can be
used if it is ever necessary to move or
ship the unit. Retain these materials for
future use.
System
Requirements
The hardware required in order to use this
recorder is as follows.
• Monitor
• Sony Network Camera
• Contact your dealer for details about
• USB keyboard
•USB mouse
• Network switch
• 1000Base-T/100Base-TX/10Base-T
• USB flash memory device
1) This unit supports computer displays that
2) Use a USB keyboard with a cable. However,
3) Use a USB mouse with a cable. Wireless or
4) Required when backing up system
1)
compatible Sony network cameras.
cable
support analog RGB input.
keys other than the standard may not function.
Wireless or infrared USB keyboards may also
not function properly.
infrared USB mice may not function properly.
Functions such as three-button and wheel
operations may also function improperly.
information such as logs.
- This unit supports USB 2.0 Mass Storage
devices. However, it does not support USB
2.0 Mass Storage HDDs or CD/DVD drives.
Do not connect mass storage devices other
than USB memory devices to the unit. Be
aware that errors may still occur when
writing data to a USB 2.0 Mass Storage
memory device, depending on the type of
device used. If errors occur when writing
data, use a USB flash memory device of a
different type.
2)
3)
4)
Note
Even if no USB keyboard is connected, the
screen-based soft keyboard can be used.
System Requirements
9
Page 10

Using the CD-ROM manual
The supplied CD-ROM includes manuals (First Step Guide and User’s Guide) for NSR
(Japanese, English, French, German, Italian, Spanish and Simplified Chinese versions).
The copies of these manuals are created in pdf (Portable Document Format).
Preparations
One of the following programs must be installed on your computer in order to use the manuals
contained on the CD-ROM disc.
• Adobe Reader Version 6.0 or higher
Note
If Adobe Reader is not installed, you can download it from the following URL:
http://www.adobe.com/
Adobe and Adobe Reader are trademarks of Adobe Systems Incorporated in the United States
and/or other countries.
Reading the CD-ROM Manual
To read the manual on the CD-ROM, proceed as follows.
1 Insert the CD-ROM disc in your CD-ROM drive.
The manuals are saved in the Manual folder.
2 Select and click the manual that you want to read.
Note
Depending on the version of Adobe Reader you are using, the file may not display properly.
If the file does not display properly, download the latest version of Adobe Reader from the
URL found in the “Preparations” section.
Caution
If you lose the CD-ROM disc or you cannot read it for some reason, you can purchase a new
CD-ROM disc. Contact your nearest Sony service representative.
Using the CD-ROM manual
10
Page 11

Features and Functions
Front panel
A POWER LED
Lights green when the unit is turned on.
B HDD LED
Blinks green when the internal hard
disks are accessed.
C Infrared sensor
Receives signals from the infrared
remote control unit.
Rear panel
A Security slot
Attach an anti-theft cable here.
B USB connector
Use this connector to connect a USB
keyboard, USB mouse or USB flash
memory to the NSR.
D NETWORK LED (1, 2)
Lights green when there is activity at the
corresponding LAN connector at the
rear of the NSR.
E USB connector
Use this connector to connect a USB
keyboard, USB mouse or USB flash
memory to the NSR.
C Monitor connector
Use this connector to connect a monitor.
Features and Functions
11
Page 12

D I/O Port
Use this connector to connect audio,
sensor inputs, and relay outputs.
For connection details and wiring
diagrams for sensor inputs, see “I/O
Port” (page 21).
E e-SATA connector
Use this connector to connect storage
devices that support the e-SATA
interface.
F LAN connectors (1, 2)
Use these connectors to connect 10
Base-T, 100 Base-TX, or 1000 Base-T
network cables.
The top connector is LAN2, and the
bottom connector is LAN1.
LAN1: Network camera
LAN2: Network camera (LAN2 can
only be used when using a different
segment from LAN1.)
CAUTION for LAN ports
For safety reason, do not connect the
LAN ports to any network devices that
might have excessive voltage.
Follow the instructions for the above
ports.
I Cable clamp hole
Attach the supplied cable clamp here to
prevent the power cord from
disconnecting.
Infrared remote control
unit
If a button on the infrared remote control
unit is pressed while the remote control unit
is pointed at the infrared sensor on the main
unit, then the main unit will perform the
operation corresponding to that button.
G 1 Power switch
Press this to turn on the unit.
Note
Although this button can be used to
force a shut off of power to the unit,
under normal circumstances the
shutdown command on the screen
should be used.
H DC IN connector (12 V)
Use this connector to connect the AC
adapter.
Features and Functions
12
A Play button
Use this button to play recorded images.
m (Fast Rewind) button
Use this button for fast rewind. (2x, 4x,
8x, 16x, 32x, 64x speed)
n (Reverse Play) button
Use this button to play recorded images
in reverse.
Page 13

u (Play/Pause) button
During pause: Use this button for
playback. (1x speed).
During playback: Use this button to
pause playback.
M (Fast Forward) button
Use this button for fast forward. (2x, 4x,
8x, 16x, 32x, 64x speed)
t (Slow Rewind) button
Use this button for slow rewind. (1/2
speed, 1/4 speed)
c (Previous) button
Use this button to go back one frame.
T (Slow Forward) button
Use this button for slow forward. (1/2
speed, 1/4 speed)
C (Next) button
Use this button to advance one frame.
B LIVE/PB button
Use this button to switch between live
image display and playback of recorded
images.
C (Soft Keyboard) button
Use this button to display the soft
keyboard that is used for text input.
D PRESET button
Use this button to move the camera to a
preset position.
E + / – (Camera Number) Button
Use these buttons to switch between
cameras for selection.
Press the [+] button to select the next
camera number, and the [–] button to
select the previous camera number.
G (1 × 1 Layout) button
This button switches the screen layout
to 1 × 1. (1 screen)
H Numeric keys
Use these keys to input numbers.
I Operation selection buttons
Use these buttons to select items, etc.
V button
Use this button to move the focus cursor
upwards in order to select an item that is
higher on the screen.
B button
Use this button to move the focus cursor
to the left in order to select an item that
is located to the left on the screen.
v button
Use this button to move the focus cursor
downwards in order to select an item
that is lower on the screen.
b button
Use this button to move the focus cursor
to the right in order to select an item that
is located to the right on the screen.
ENTER button
Use this button to confirm the selection
of the current item or monitor frame,
and to execute other operations.
Before using the infrared
remote control unit
Remove the insulating sheet.
F (2 × 2 Layout) button
This button switches the screen layout
to 2 × 2. (4 screens)
Insulating sheet
Features and Functions
13
Page 14

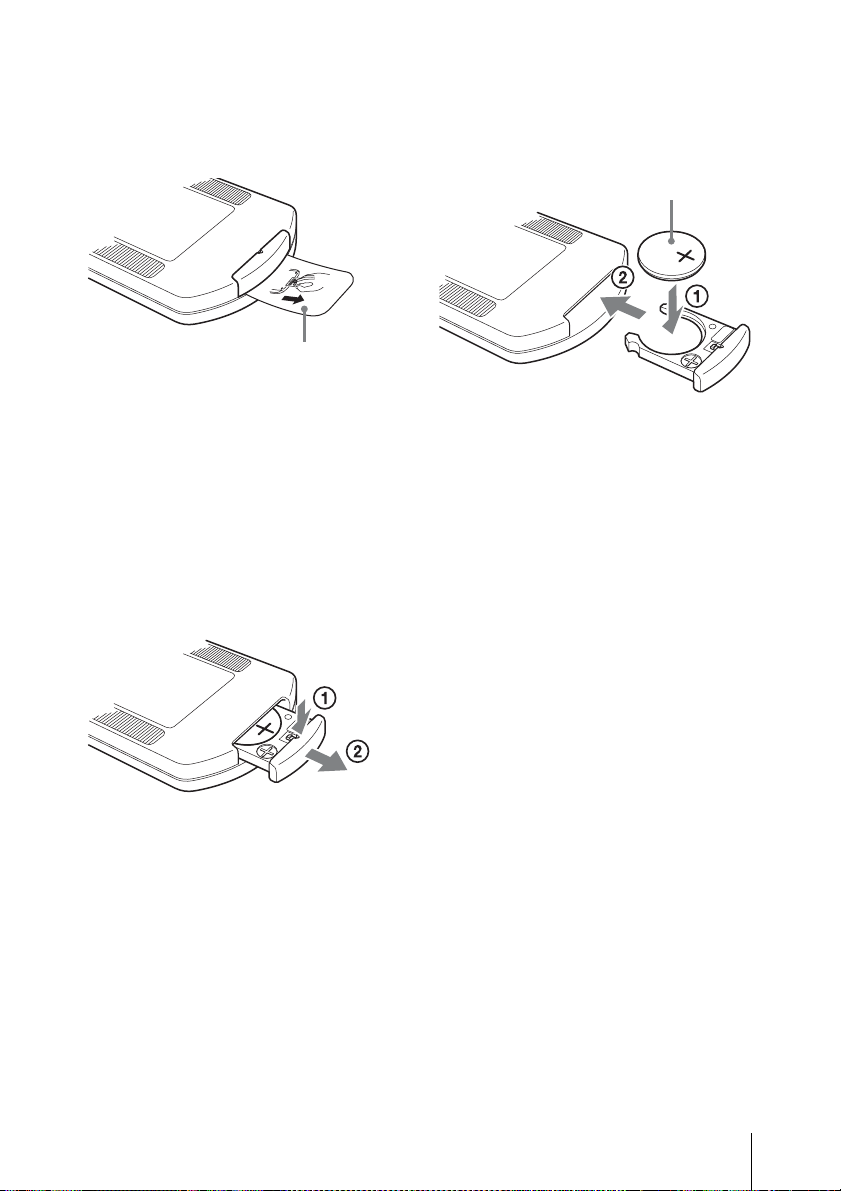
Replacing the lithium battery in the
infrared remote control unit
The infrared remote control unit uses a
standard CR2025 lithium battery. Do not
use any battery other than the CR2025.
1 While holding down the locking lever
(1), pull the battery holder out (2).
2 Insert the battery with the “+” side
facing up (1) and then push the
battery holder in until it clicks into
place (2).
“+” side faces up
does not respond when buttons on the
remote control are pressed, replace the
battery and try the operation again.
CAUTION
Danger of explosion if battery is incorrectly
replaced.
Replace only with the same or equivalent
type recommended by the manufacturer.
When you dispose of the battery, you must
obey the law in the relative area or country.
Battery replacement interval
When the lithium battery becomes weak,
the unit may not respond even when the
buttons are pressed. The average life of a
lithium battery used in this unit is one year,
but this will vary according to how
frequently the unit is used. If the main unit
Features and Functions
14
Page 15

Setup
Setting up the unit
Decide where the unit is to be installed, and then connect all of the equipment.
In this manual, a local network consisting only of the NSR, cameras, and a client computer
(when necessary) such as follows is used as an example for explanation.
Monitor
NSR-S10/S20
Caution
• When connecting to an existing network, be sure to refer to the First Step Guide (PDF).
• For details on operations from a client computer, refer to the User’s Guide (PDF).
Network switch
Windows PC
Network cameras
Connecting each device
Connect the monitor, USB mouse, and USB keyboard to the appropriate connectors on the
front panel of the unit.
Setup
15
Page 16

Connecting e-SATA Storage
Use the e-SATA cable when using external e-SATA storage.
e-SATA storage
Caution
• Configure necessary settings on the e-SATA storage before connecting it to this unit.
• When using an external e-SATA storage device, refer to the First Step Guide (PDF).
Connecting the network cameras
Connect the network cameras and the unit to the same segment of the network.
When using a client computer, connect it to the same segment of the network.
16
Windows PC
Network cameras
Setup
Page 17

Connecting the AC adapter
Connect the AC adapter and power cord.
Attach the cable clip to prevent the plug from
disconnecting.
AC adapter
Power cord
Setup
17
Page 18

Turning on the power and registering
the cameras
After turning on the NSR, you can begin monitoring immediately if you register the cameras
automatically.
Note
The power comes on automatically when the power cord of the AC adapter is plugged into
the power outlet. After the NSR has been turned off either by a screen-based operation or by
the power switch on the rear panel, the power can be turned back on by pressing the power
switch.
1 Plug the power cord of the AC adapter into the power outlet.
The unit beeps, and the POWER LED on the front panel lights green.
After a minute or two, the message “System Starting, Please Wait...” appears on the
monitor.
The “Main” screen appears after the unit starts up.
Notes
• The user ID and password for logging in to the “Main” screen are as follows.
Default user ID: admin
Default password: admin
• For details how to change the auto login setting, refer to “Settings Related to the
System” in the User’s Guide (PDF).
Turning on the power and registering the cameras
18
Page 19

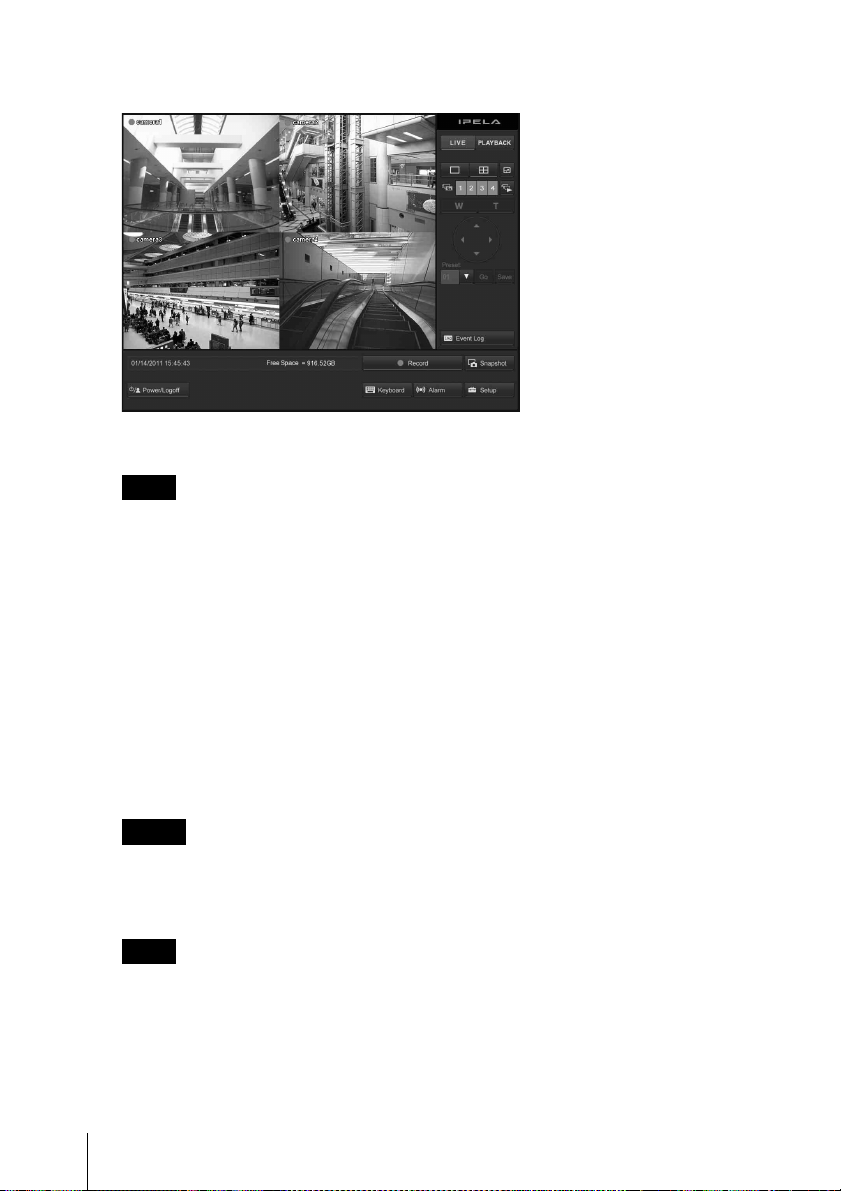
Cameras connected to the same segment on the network are automatically located and
registered to the NSR, and images from these cameras appear on the “Main” screen.
Screen example: NSR-S10
Continuous recording starts automatically after the cameras are registered.
Notes
• Only Sony cameras will be located and registered.
• Only cameras with IP address settings that have not been changed from factory default
conditions will be located and registered. To register cameras with IP addresses that
have been changed, return the camera IP address settings to default conditions and
restart the NSR.
• When there are multiple cameras connected, the cameras are registered in the order in
which they are located, and up to 4 cameras can be registered for NSR-S10 and up to
8 cameras for NSR-S20.
This completes connections.
You can now refer to the First Step Guide (PDF) to perform operation verification and
other setup operations.
Caution
When connecting to an existing network, be sure to refer to the First Step Guide (PDF).
Important
You can download the latest firmware for NSR-S10/S20 from the following URL.
For the firmware update procedure, refer to the User’s Guide (PDF).
http://www.sony.co.jp/Products/NSR/NSR-S.zip
Turning on the power and registering the cameras
19
Page 20

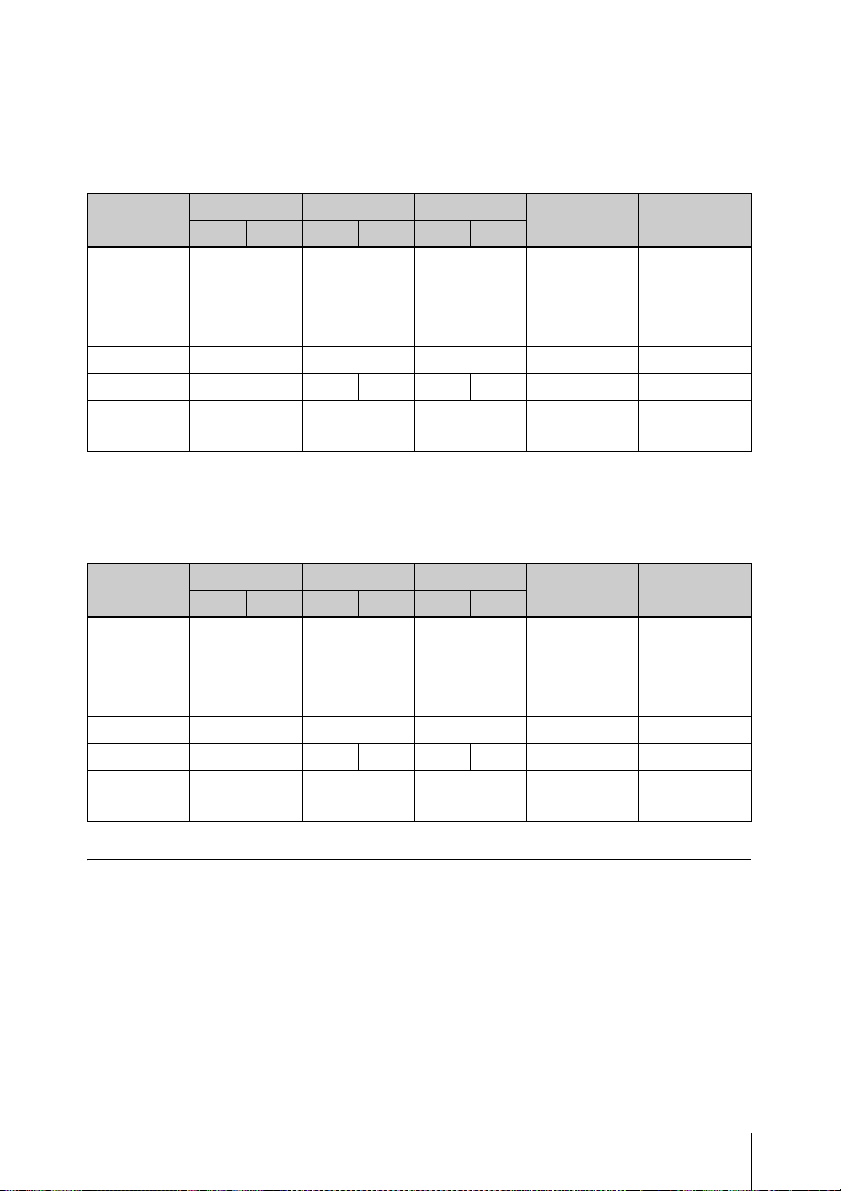
Setting values for automatic registration
Cameras are registered with the following setting values.
For monitoring
SNC-RZ25 SNC-RZ50 SNT series 1280 × 720
NTSC
Video Size
Video
Format
Frame rate 15 15 12 15 12 15 15
Quality/
Bitrate
1) Cameras that support only 16:9 mode are registered with the default value 640 × 368. For the default
value for each camera model, refer to Release Note (PDF).
PAL
NTSC
640 × 480
MPEG-4 MPEG-4 MPEG-4 MPEG-4 MPEG-4
1,024 kbps 1,024 kbps 1,024 kbps 1,024 kbps 1,024 kbps
PAL
NTSC
704 × 480
PAL
704 × 576
NTSC
640 × 480 640 × 480
PAL
compatible
model
1920 × 1080
compatible
1)
640 × 480
model
1)
For recording
SNC-RZ25 SNC-RZ50 SNT series 1280 × 720
NTSC
Video Size 640 × 480
Video
Format
Frame rate 15 15 12 15 12 10 10
Quality/
Bitrate
PAL
NTSC
MPEG-4 MPEG-4 H.264 H.264 H.264
1,024 kbps 1,024 kbps 1,024 kbps 2,048 kbps 3,072 kbps
PAL
NTSC
704 × 480
PAL
704 × 576
NTSC
NTSC
720 × 480
PAL
720 × 576
compatible
PAL
model
1280 × 720 1920 × 1080
1920 × 1080
compatible
model
Settings that require individual configuration
The following functions are disabled or not configured under automatic registration settings.
For details on enabling these functions, refer to the User’s Guide (PDF).
• Camera audio
•Sensor input
• Relay output
Turning on the power and registering the cameras
20
Page 21

I/O Port
Pin Assignment of I/O Port
Audio In/Out
Pin NO. AUDIO
1 AUDIO IN
2 AUDIO IN GND
3 AUDIO OUT
4 AUDIO OUT GND
Caution
Do not use excessive force when inserting
the screwdriver into the slot. Doing so may
result in damage.
1
2
3
Repeat this procedure to connect all
required wires.
Caution
AUDIO IN is intended for future
expansions and is not currently supported.
Sensor In and Relay Out
Pin NO. SENSOR
5 SENSOR IN 1
6 SENSOR IN 1 GND
7 SENSOR IN 2
8 SENSOR IN 2 GND
9 SENSOR IN 3
10 SENSOR IN 3 GND
11 SENSOR IN 4
12 SENSOR IN 4 GND
13 RELAY OUTPUT +
14 RELAY OUTPUT –
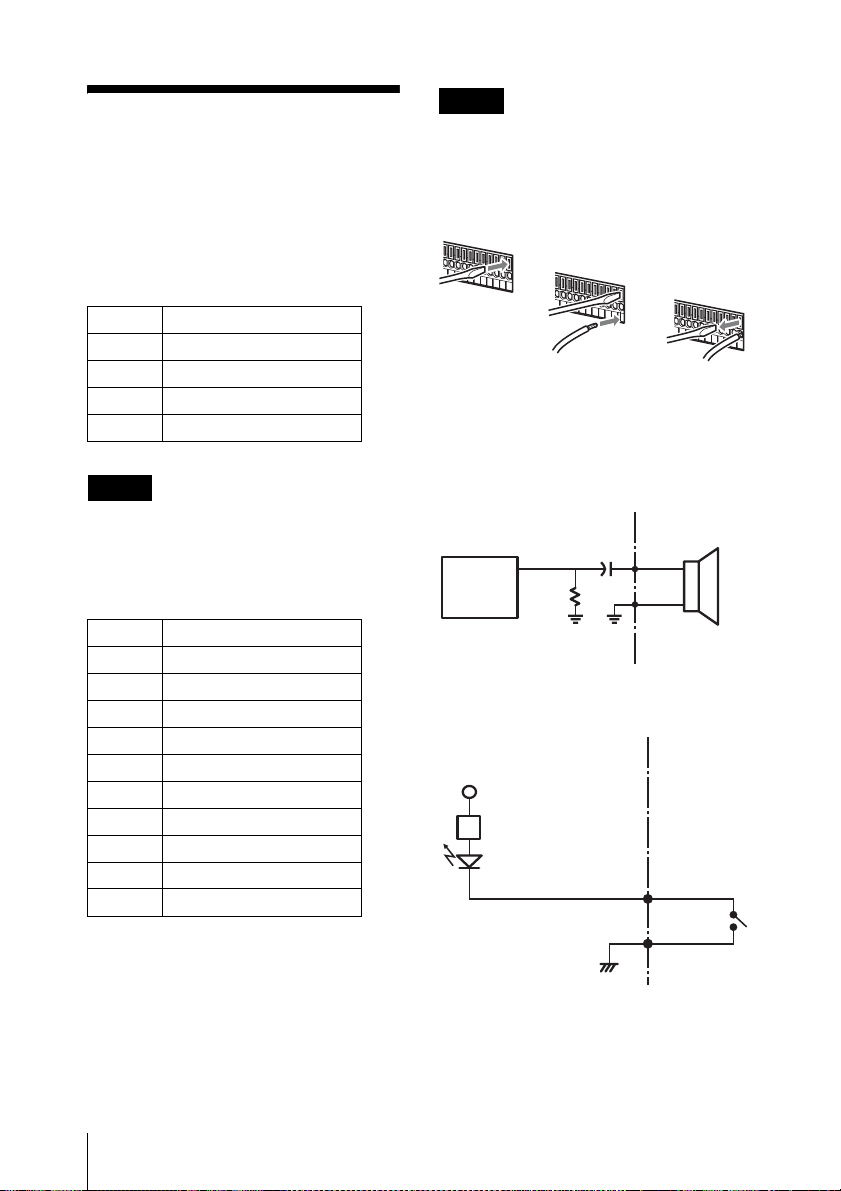
Using the I/O Receptacle
Insert a small slotted screwdriver into the
upper or lower slot of the hole you want to
connect a wire to (AWG No. 26 to 20).
Hold down the screwdriver and insert the
wire, then release the screwdriver.
Wiring Diagram for Audio
Output
Inside of this unit
Audio
Codec
47 kΩ
220 μF
Outside
Example)
Headphone
RL=16 Ω/32 Ω
Wiring Diagram for Sensor
Input
Inside of this unit
Vcc = 5 V
200 Ω
Sensor In 1, 2, 3, 4
Sensor In 1G, 2G, 3G, 4G
Outside
(Example)
I/O Port
21
Page 22

Wiring Diagram for Relay
Output
Inside of this unit Outside
Vcc
Relay Out +
Relay
30 V DC
125 V AC
1 A or less
Relay Out –
(Example)
Troubleshooting
Before contacting your retailer or a Sony
Support Center, please check the following
items. If the problem persists, contact them.
The NSR does not work.
• Verify that the power cable is connected
correctly.
• Make sure the wall outlet has power. Test
it by plugging another device.
The monitor remains blank.
• Verify whether the power cord is
correctly connected.
• Verify whether the monitor cable is
correctly connected. Confirm that the
monitor is connected to monitor
connector.
The new external hardware is not
working properly.
• Make sure the cables for the new external
device are firmly connected and the pins
are not bent.
22
An external device connected to a
USB connector does not work.
• This unit supports USB 2.0 Mass Storage
devices. However, it does not support
USB 2.0 Mass Storage HDDs or CD/
DVD drives. Do not connect mass
storage devices other than USB flash
memory devices to the unit. Be aware
that errors may still occur when writing
data to a USB 2.0 Mass Storage memory
device, depending on the type of device
used. If errors occur when writing data,
use a USB flash memory device of a
different type.
• To ensure proper operation of USB
devices, do not connect the devices via a
USB hub. Connect the devices directly to
the USB connectors on the unit.
Operation is not guaranteed when
Troubleshooting
Page 23

devices are connected via a USB hub,
USB switch, or extension cable.
• Refer to the documentation that came
with the USB device.
The NETWORK LED does not light
up.
• Check the cabling and network
equipment for the proper connection.
Cannot access the hard disk drive.
• Due to rapid flashing during frequent
access to the hard disk drive, the HDD
LED may appear to be steadily lit.
The NSR heats up quickly
• When one unit is stacked on top of
another unit, the heat generated by both
units can get extremely hot. Do not stack
units on top of each other, place the unit
on other objects that may generate heat,
or install the unit in confined spaces.
Specifications
NSR-S10/S20
External connectors
Front USB: USB 2.0 (1)
Rear Monitor output:
Analog RGB (mini D-SUB 15
pin) (1)
LAN (1000Base-T/100Base-TX/
10Base-T) (RJ-45) (2)
USB: USB 2.0 (2)
e-SATA connector (1)
Audio input (MIC) (response
frequency 4 kHz, sample rate
8 kHz, input signal level 1
Vrms, input resistance 10 k
ohm) (1) (used for future
expansion)
Audio output (output level 30 Vrms
(RL = 32 ohm), 60 Vrms (RL =
16 ohm), full-scale output
voltage 1 Vrms, output
impedance 16/32 ohm, output
channel 1 (mono) (1)
Sensor input (compatible with 5 V
to 6 V DC devices, photo
coupler input, insulated from
main unit) (4)
Relay output (maximum 30 V DC,
125 V AC, 1 A, mechanical
relay output, insulated from
main unit) (1)
Operating environment
Operating temperature: 5 °C to 40 °C (41 °F
to 104 °F)
Operating humidity: 20% to 80%
(maximum wet-bulb
temperature: 30 °C (86 °F)
no condensation)
Temperature range for storage: –20 °C to
+60 °C (–4 °F to +140 °F)
Specifications
23
Page 24

Humidity range for storage: 20% to 90%
relative humidity (maximum
wet-bulb temperature 35 °C/95
°F, no condensation)
Power and miscellaneous
Power: 12 V DC
Current consumption: Max. 4.0 A
AC adapter: 100-240 V AC to 50/60 Hz
Dimensions: 245 × 53 × 160 mm
(9 3⁄4 × 2
1
⁄
× 6 3⁄8 in.) (W/H/D,
8
excluding protrusions)
Weight: approximately 1.4 kg (3.1 lb.)
(including 0.6 kg (1.3 lb.) for
HDD)
Supplied accessories
AC adapter (1)
SATA cable (1) (only for models without
internal HDDs)
SATA power cable (1) (only for models
without internal HDDs)
Cable clamp (1)
Infrared remote control unit (1)
Installation Manual (this manual) (1)
CD-ROM (First Step Guide, User’s Guide)
(1)
Warranty booklet (1)
Notes
• Always make a test recording, and
verify that it was recorded
successfully.
SONY WILL NOT BE LIABLE FOR
DAMAGES OF ANY KIND
INCLUDING, BUT NOT LIMITED TO,
COMPENSATION OR
REIMBURSEMENT ON ACCOUNT
OF FAILURE OF THIS UNIT OR ITS
RECORDING MEDIA, EXTERNAL
STORAGE SYSTEMS OR ANY
OTHER MEDIA OR STORAGE
SYSTEMS TO RECORD CONTENT
OF ANY TYPE.
• Always verify that the unit is operating
properly before use. SONY WILL NOT
BE LIABLE FOR DAMAGES OF ANY
KIND INCLUDING, BUT NOT
LIMITED TO, COMPENSATION OR
REIMBURSEMENT ON ACCOUNT
OF THE LOSS OF PRESENT OR
PROSPECTIVE PROFITS DUE TO
FAILURE OF THIS UNIT, EITHER
DURING THE WARRANTY PERIOD
OR AFTER EXPIRATION OF THE
WARRANTY, OR FOR ANY OTHER
REASON WHATSOEVER.
Design and specifications are subject to
change without notice.
Specifications
24
Page 25

安全のために
ソニー製品は安全に充分配慮して設計されています。し
かし、電気製品は、まちがった使いかたをすると、火災
や感電などにより死亡や大けがなど人身事故につながる
ことがあり、危険です。
事故を防ぐために次のことを必ずお守りください。
安全のための注意事項を守る
27 〜 31 ページの注意事項をよくお読みください。製品
全般の注意事項が記されています。
定期点検をする
長期間、安全にお使いいただくために、定期点検をする
ことをおすすめします。点検の内容や費用については、
お買い上げ店またはソニーのサービス窓口にご相談くだ
さい。
故障したら使わない
すぐに、お買い上げ店またはソニーのサービス窓口に
ご連絡ください。
万一、異常が起きたら
• 煙が出たら
• 異常な音、においがしたら
• 内部に水、異物が入ったら
• 製品を落としたり、キャビネットを破損したときは
警告表示の意味
取扱説明書および製品で
は、次のような表示をし
ています。表示の内容を
よく理解してから本文を
お読みください。
この表示の注意事項を守
らないと、火災や感電な
どにより死亡や大けがな
ど人身事故につながるこ
とがあります。
この表示の注意事項を守
らないと、感電やその他
の事故によりけがをした
り周辺の物品に損害を与
えたりすることがありま
す。
注意を促す記号
JP
m
a 電源を切る。
b 電源コードや接続ケーブルを抜く。
cお買い上げ店またはソニーのサービス窓口に連絡する。
行為を禁止する記号
25
Page 26

目次
警告 ........................................ 27
注意 ........................................ 30
電池についての安全上のご注意 .. 30
その他安全上のご注意................. 31
使用上のご注意 ........................... 31
機能概要 ...................................... 34
箱の中身を確認する .................... 35
必要なシステム ........................... 36
CD-ROM マニュアルの
使いかた .................................... 37
準備...............................................37
CD-ROM マニュアルを読むには .. 37
各部の名称................................... 38
前面...............................................38
後面...............................................38
赤外線リモートコントロール
ユニット..................................... 39
設置する ...................................... 42
本機を設置する............................. 42
各機器を接続する......................... 43
e-SATA ストレージを接続する.... 4 3
ネットワークカメラを接続する ... 44
AC アダプターを接続する ........... 44
電源を入れ、カメラを登録する .. 45
個別に設定が必要な項目に
ついて......................................... 47
I/O ポートについて..................... 48
商標について
• “IPELA” および は、
ソニー株式会社の商標です。
その他、本書に記載されているシステム
名、製品名は、一般に各開発メーカーの
登録商標あるいは商標です。なお、本文
中では ™、® マークは明記していませ
ん。
• 権利者の許諾を得ることなく、本
機に付属のソフトウェアおよび取
扱説明書の内容の全部または一部
を複製すること、およびソフト
ウェアを賃貸することは、著作権
法上禁止されております。
• 本機、および本機に付属のソフト
ウェアを使用したことによって生
じた損害、逸失利益、および第三
者からのいかなる請求等につきま
しても、当社は一切その責任を負
いかねます。
• 本機の保証条件は、同梱の当社規
定の保証書の規定をご参照くださ
い。
• 本機に付属のソフトウェアは、本
機以外には使用できません。
• ソニーが配布した本機用のソフト
ウェア以外のソフトウェアをイン
ストールすることはできません。
• 本機、および本機に付属のソフト
ウェアの仕様は、改良のため予告
なく変更することがありますが、
ご容赦ください。
故障かな?と思ったら................. 49
仕様 ............................................. 50
NSR-S10/S20.................................50
目次
26
Page 27

録画内容の補償に関する免責事
項
本機の不具合など何らかの原因で記録が
できなかった場合、不具合・修理など何
らかの原因で記録内容が破損、消滅した
場合等、いかなる場合においても記録内
容の補償およびそれに付随するあらゆる
損害について、当社は一切の責任を負い
かねます。また、いかなる場合において
も、当社にて記録内容の修復、復元、複
製等はいたしません。あらかじめご了承
ください。
電源コードや AC アダ
プター、接続ケーブル
を傷つけない
電源コードや AC アダプ
ター、接続ケーブルを傷つ
けると、火災や感電の原因
となることがあります。
• 設置時に、製品と壁や
ラック、棚などの間に、
はさみ込んだりしない。
• 電源コードや AC アダプ
ター、接続ケーブルを加
工したり、傷つけたりし
ない。
• 重いものをのせたり、
引っ張ったりしない。
• 熱器具に近づけたり、加
熱したりしない。
• 電源コードや AC アダプ
ター、接続ケーブルを抜
くときは、必ずプラグを
持って抜く。
万一、電源コードが傷んだ
ら、お買い上げ店またはソ
ニーのサービス窓口に交換
をご依頼ください。
指定の電源で使用する
本機に付属の AC アダプ
ターでお使いください。指
定以外の製品でのご使用は、
火災の原因となります。
警告
27
Page 28

指定された電源コー
ド、AC アダプターを
使う
この取扱説明書に記されて
いる電源コード、AC アダ
プターを使わないと、火災
や故障の原因となることが
あります。
AC アダプター本体の形状
や電源端子の形状が同じも
のもありますので、ご注意
ください。
電源コードや AC アダ
プター、接続ケーブル
のはさみ込みに注意す
る
漏電、感電、火災の原因と
なります。
接続の際は電源を切る
電源コードや接続コードを
接続するときは、電源を
切ってください。感電や故
障の原因となることがあり
ます。
屋内の安定した場所で
使用する
本製品は屋内で使用してく
ださい。また、ぐらついた
台の上や傾いたところなど
に置かないでください。落
ちたり、倒れたりしてけが
の原因となることがありま
す。
油煙、湯気、湿気、ほ
こりの多い場所には設
置しない
上記のような場所に設置す
ると、火災や感電の原因と
なることがあります。
本書に記されている仕様条
件以外の環境での使用は、
火災や感電の原因となるこ
とがあります。
内部に水や異物を入れ
ない
水や異物が入ると火災や感
電の原因となることがあり
ます。
万一、水や異物が入ったと
きは、すぐに電源を切り、
電源コードや接続ケーブル
を抜いて、お買い上げ店ま
たはソニーのサービス窓口
にご相談ください。
内部を開けない
内部には電圧の高い部分が
あり、キャビネットや裏ぶ
たを開けたり改造したりす
ると、火災や感電の原因と
なることがあります。
直射日光の当たる場所
や熱器具の近くに設
置・保管しない
内部の温度が上がり、火災
や故障の原因となることが
あります。
28
警告
Page 29

接続ケーブルを傷つけ
ない
接続ケーブルを傷つけると、
火災や故障の原因となるこ
とがあります。次の項目を
お守りください。
• 接続ケーブルを加工した
り、傷つけたりしない。
• 重いものをのせたり、
引っ張ったりしない。
• 熱器具に近づけたり、加
熱したりしない。
• 接続ケーブルを抜くとき
は、必ずプラグを持って
抜く。
芯線の露出や断線などで接
続ケーブルが傷んだら、お
買い上げ店またはソニーの
サービス窓口に交換をご依
頼ください。そのまま使用
すると、火災の原因となり
ます。
排気口、通風口をふさ
がない
排気口や通風口をふさぐと
内部に熱がこもり、火災や
故障の原因となることがあ
ります。風通しをよくする
ために次の項目をお守りく
ださい。
• 壁から10cm以上離して設
置する。
• 密閉された狭い場所に押
し込めない。
• 毛足の長い敷物(じゅう
たんや布団など)の上に
設置しない。
• 布などで包まない。
ぬれた手で電源プラグ
をさわらない
ぬれた手で電源プラグを抜
き差しすると、感電の原因
となることがあります。
警告
29
Page 30

機器を移動する場合、
あるいはお手入れの際
は、電源を切って電源
プラグを抜く
電源を接続したままお手入
れをすると、感電の原因と
なることがあります。
接続ケーブルなどもはずし
てください。
長時間機器を使用しないと
きは、安全のため必ず電源
プラグをコンセントから抜
いてください
ひざ上に載せて使用し
ない
落ちたり、壊れたりして、
けがの原因となることがあ
ります。
電池についての
安全上のご注意
電池の使いかたを誤ると、液漏れ・発
熱・破裂・発火・誤飲による大けがや失
明の原因となるので、次のことを必ず
守ってください。
ここでは、本機で使用可能な(コイン
型)リチウム電池についての注意事項を
記載しています。
• 乳幼児の手の届かないところに置く。
• 電池は充電しない。
• 火の中に入れたり、加熱・分解・改造
をしない。
• 電池の(+)と(−)を正しく入れ
る。
• 電池の液が目に入ったときは、失明の
原因となるので、こすらずにすぐに水
道水などのきれいな水で充分に洗った
後、医師の治療を受ける。
• 電池の液をなめた場合には、すぐにう
がいをして医師に相談する。
• ショートの原因となるので、金属製の
ネックレス、ヘアピンなどと一緒に持
ち運んだり、保管しない。
• 電池に液漏れや異臭があるときは、す
ぐに火気から遠ざける。
• 電池に直接はんだ付けをしない。
• 電池を保管する場合および廃棄する場
合は、テープなどで端子(金属部分)
を絶縁する。
• 皮膚に障がいを起こすおそれがあるの
で、テープなどで貼り付けない。
30
注意 / 電池についての安全上のご注意
Page 31

• 電池を落下させたり、強い衝撃を与え
たり、変形させたりしない。
• 直射日光の強いところや炎天下の車内
などの高温・多湿の場所で使用、放
置、保管しない。
• 電池を水で濡らさない。
• ショートさせないように機器に取り付
ける。
その他安全上の
ご注意
警告
設置の際には、容易にアクセスできる固
定配線内に専用遮断装置を設けるか、使
用中に、容易に抜き差しできる、機器に
近いコンセントに電源プラグを接続して
ください。
万一、異常が起きた際には、専用遮断装
置を切るか、電源プラグを抜いてくださ
い。
注意
付属の電源コードは本機の専用品です。
他の機器には使用できません。
使用上のご注意
安全上のご注意
• 本機の電源仕様に適合する電源を使用
してください。
• 付属の電源コードや AC アダプターを
使用し、束ねたり、タコ足配線しない
でください。定格をこえた電流が流れ
ると、火災などの原因となります。
• カバー類を外した状態で使用しないで
ください。カバー類を外した状態で使
用すると、火災、感電の原因となるこ
とがあります。カバー類を外す必要が
あるときは、必ずお買い上げ店に依頼
してください。
設置上のご注意
使用・保管場所
長期間ご愛用いただくために、次のよう
な場所での使用および保管は避けてくだ
さい。
• 極端に暑いところや寒いところ(仕様
を守ってお使いください。)
• 直射日光が長時間あたるところや暖房
器具の近く(真夏、窓を閉め切った自
動車内では 50 ℃を超えることがあり
ますのでご注意ください。)
• 湿気・ほこりの多いところ
• 激しい振動があるところ
• 強い磁気の発生するものの近く
• 強力な磁気を発生するテレビ、ラジオ
の送信所の近く
その他安全上のご注意 / 使用上のご注意
31
Page 32

本機を段積みしない、発熱物の上に置
かない
本機を段積みして使用していると、互い
の発熱で非常に熱くなります。段積みし
たり、発熱物の上に置いたりしないでく
ださい。
通風孔をふさがない
• 本機内の温度の上昇を防ぐため、本機
の側面にある通風孔をふさがないでく
ださい。本機の両側面、後面、上面
は、壁や天井に密着させてないでくだ
さい。
• 本機を密閉された箱に入れて使用しな
いでください。
水平位置で使用してください
• 本機は水平平面上で動作するように設
計されています。
• 傾いた場所に設置しないでください。
強い衝撃を与えないでください。
• 落としたりして強い衝撃を与えると故
障することがあります。
お手入れについて
• お手入れをする前に、電源プラグをコ
ンセントから抜いてください。
• キャビネットやパネルの汚れは、乾い
た柔らかい布で軽くふき取ってくださ
い。汚れがひどいときは、中性洗剤溶
液を少し含ませた布で汚れをふき取
り、乾いた布で仕上げてください。
• アルコール、シンナー、ベンジンや殺
虫剤など、揮発性のものをかけると、
変質したり塗料がはげることがありま
す。
輸送のときは
付属のカートン、または同等品で梱包
し、急激な衝撃を与えないようにご注意
ください。
HDD 内蔵機器に対する注意事項
本機には、ハードディスクドライブ(以
下 HDD と称する)が搭載されています。
HDD は精密部品であり、衝撃・振動・
静電気・温度・湿度が原因で故障した
り、HDD 内のデータが破損する恐れが
あります。本機を設置・使用するとき
は、以下の注意事項をよくお読みのう
え、慎重に取り扱ってください。
衝撃・振動を与えない
衝撃・振動が加わると HDD が故障ある
いは HDD 内のデータが破損される恐れ
があります。
• 本機を輸送する場合は、指定の梱包材
料で梱包してください。台車などで搬
送する場合は、振動の少ない台車を使
用してください。過度な衝撃・振動が
加わると HDD が故障するおそれがあ
ります。
• 通電中は本機を移動しないでくださ
い。
• 本機の外装を取り外さないでくださ
い。
• 本機を床などに置くときは、本機の底
に必ず指定のゴム脚がついている状態
で、静かに降ろしてください。脚が付
いていない場合は、脚を取り付けてか
ら置いてください。
• 振動を発生する機器の近くには置かな
いでください。
32
使用上のご注意
Page 33

電源オフ後 30 秒間は作業しない
電源をオフにした後もしばらくの間は、
HDD 内のディスクは慣性で回転してお
り、ヘッドは不安定な状態にあります。
この期間は、通電中以上に衝撃・振動に
弱い状態です。電源オフ後、最低 30 秒
間は軽い衝撃も与えないようにご注意く
ださい。30 秒以上経過すれば、(ディス
クが静止するので)作業を開始できま
す。
温度・湿度に関するご注意
適正範囲内の温度・湿度のある場所で、
保管・使用してください。(仕様を守っ
てお使いください。)
HDD に不良症状が現れた場合
万一、本機の HDD が故障した(不良症
状が現れた)と思われる場合でも、本機
の取り扱いは、上記と同様に行ってくだ
さい。不良内容の確認や不良解析を行う
までの損傷の拡大を防ぎます。
しないでください。また、USB2.0 マ
スストレージの USB フラッシュメモ
リーでも一部の製品によっては、デー
タの書き込みの際にエラーとなる可能
性があります。書き込みの際にエラー
が発生した場合には、別の機種の USB
フラッシュメモリーをお使いくださ
い。
• USB デバイスを正しくご使用いただく
ために、USB ハブ経由などでなく本機
の USB コネクターに直接接続してお
使いください。USB ハブ、USB ス
イッチ、延長ケーブル経由でご使用の
場合は、動作保証いたしません。
HDD を含む有寿命部品の交換
HDD、バッテリーは有寿命部品として定
期的な交換が必要です。常温でのご使用
の場合、2〜3 年を目安に交換すること
を推奨します。ただし、交換時間は目安
であり、部品の寿命を保証するものでは
ありません。交換の際はお買い上げ店に
ご相談ください。
USB ご使用時の注意事項
• USB フラッシュメモリーは、USB2.0
マスストレージに対応しています。
USB2.0 マスストレージでも USB
HDD や CD/DVD ドライブには対応し
ていません。USB フラッシュメモリー
以外のマスストレージデバイスは接続
使用上のご注意
33
Page 34

機能概要
NSR-S10/S20 は、ネットワークカメラに
対応したネットワークサーベイランスレ
コーダーです。ネットワークカメラの
JPEG、MPEG-4 または H.264 の画像を
ネットワーク経由でモニタリングした
り、記録することができます。また、記
録した画像を簡単な操作で検索、再生す
ることもできます。
対応ネットワークカメラの管理や遠隔
操作が可能
NSR-S10 では最大 4 台、NSR-S20 では最
大 8 台のネットワークカメラの画像を表
示し、カメラの管理、コントロールがで
きます。パン(左右)・チルト(上下)・
ズーム(拡大)に対応したカメラであれ
ば、カメラの動作を制御できます。
大容量ハードディスクに長時間記録
ハードディスク内蔵モデルでは、大容量
ハードディスクを内蔵していますので、
長時間記録可能です。また、e-SATA イ
ンターフェース対応のストレージデバイ
スを接続することもできます。
• 日時、センサー、動体検知、ビデオ信
号消失などをキーにして、記録画像を
検索できます。
• 対応ネットワークカメラからの音声の
記録/再生
1)別売のオーディオアンプやスピーカーが必要で
す。
重要
• 本書では、本機の設置について説明し
ています。本機の設定や操作について
は、『ファーストステップガイド』
(PDF)、『ユーザーガイド』(PDF)を
参照してください。
• クライアント PC の動作環境や、対応し
ているカメラの機種、重要なお知らせ
については、『リリースノート』
(PDF)をご覧ください。
リリースノートは、以下の URL から
ダウンロードできます。
http://www.sony.co.jp/Products/
NSR/NSR-SReleaseNoteJ.pdf
1)
にも対応しています。
ブラウザからもモニタリングが可能
コンピューターのブラウザから本機にア
クセスし、画像のモニタリングが行えま
す。
その他の機能
• 常時記録、動体検知記録、アラーム記
録などの多彩な記録モードをサポート
しています。
機能概要
34
Page 35

箱の中身を確認す
る
パッケージを開けたら、以下のものが
揃っているかお確かめください。付属品
の中に欠けているものがあるときは、お
買い上げ店またはソニーのサービス窓口
にご連絡ください。
• 本体(1)
• AC アダプター(1)
• 電源コード(1)
メモ
• 上記以外に、説明書や書類などが同梱
されている場合があります。
• 箱と梱包材は、本機を移動したり輸送
したりするときに必要です。捨てない
で必ず保管してください。
• ケーブルクランプ(1)
• 赤外線リモートコントロールユニット
(1)
• 設置説明書(本書)(1)
• CD-ROM(ファーストステップガイ
ド、ユーザーガイド)(1)
• 保証書(1)
箱の中身を確認する
35
Page 36

必要なシステム
本機を操作するために必要なハードウェ
アは以下のとおりです。
• モニター
• ソニー製ネットワークカメラ
• 本機で使用できるソニー製ネットワー
クカメラについては、お買い上げ店に
お問い合わせください。
• USB キーボード
• USB マウス
• ネットワークスイッチ
• 1000Base-T/100Base-TX/10Base-T
ケーブル
• USB フラッシュメモリー
1)本機で使用できるモニターは、アナログ RGB
入力対応のコンピューターディスプレイです。
2)USB キーボードは、ケーブル接続タイプをお
使いください。無線接続や赤外線接続タイプの
USB キーボードでは動作しない場合がありま
す。また、拡張ボタンなど、標準以外の機能も
動作しない場合があります。
3)USB マウスは、ケーブル接続タイプをお使い
ください。無線接続や赤外線接続タイプの
USB マウスでは動作しない場合があります。
また、3 ボタンやホイールなどの機能も動作し
ない場合があります。
4)ログなどのシステム情報を取得するときに必要
です。
- USB フラッシュメモリーは、USB2.0 マスス
トレージに対応しています。USB2.0 マスス
トレージでも USBHDD や CD/DVD ドライ
ブには対応していません。USB フラッシュメ
モリー以外のマスストレージデバイスは接続
しないでください。また、USB2.0 マススト
レージの USB フラッシュメモリーでも一部
の製品によってはデータの書き込みの際にエ
ラーとなる可能性があります。書き込みの際
にエラーが発生した場合には、別の機種の
USB フラッシュメモリーをお使いください。
1)
2)
3)
メモ
USB キーボードを接続しなくても、画面
上のソフトキーボードで操作できます。
4)
36
必要なシステム
Page 37

CD-ROM マニュアルの使いかた
付属の CD-ROM には本機の取扱説明書(ファーストステップガイド、ユーザーガイ
ド)が記録されています。(日本語、英語、フランス語、ドイツ語、イタリア語、スペ
イン語、中国語)
この取扱説明書は、PDF(PortableDocumentFormat)で作成されています。
準備
付属の CD-ROM に収納されているユーザーガイドを使用するためには、以下のソフト
ウェアがコンピューターにインストールされている必要があります。
• AdobeReader6.0 以上
メモ
AdobeReaderがインストールされていない場合は、下記 URLよりダウンロードできます。
http://www.adobe.co.jp/
Adobe および Acrobat は、AdobeSystemsIncorporated(アドビシステムズ社)の商標です。
CD-ROM マニュアルを読むには
CD-ROM に収納されている取扱説明書を読むには、次のようにします。
1
CD-ROMを、CD-ROM ドライブに入れます。
2
「Manual」フォルダー内の、読みたい言語の取扱説明書を選択します。
メモ
AdobeReader のバージョンによって、ファイルが正しく表示されないことがありま
す。その場合は、「準備」の項に記載されている URL から最新のバージョンをダウン
ロードしてください。
ご注意
CD-ROM が破損または紛失したため、新しい CD-ROM をご希望の場合は、お買い上げ
店、または業務用製品ご相談窓口のご案内(付属)にあるソニーのご相談窓口にご依頼
ください。(有料)
CD-ROM マニュアルの使いかた
37
Page 38

各部の名称
前面
A POWERLED
電源が入ると、緑色に点灯します。
B HDDLED
内蔵ハードディスクのアクセス時に
緑色に点滅します。
C 赤外線受光部
赤外線リモートコントロールユニッ
トは、ここに向けて操作します。
後面
A セキュリティスロット
物理的な盗難防止のためのワイヤー
ケーブルを取り付けます。
D NETWORKLED(1、2)
背面の LANコネクター(1、2)にそ
れぞれアクティビティがあるときに
緑色に点灯します。
E USB 端子
USB マウス、USB キーボード、USB
フラッシュメモリーなどを接続しま
す。
B USB 端子
USB マウス、USB キーボード、USB
フラッシュメモリーなどを接続しま
す。
38
各部の名称
Page 39

C モニター端子
モニターを接続します。
D I/O ポート
オーディオ、センサー入力、リレー
出力を接続します。
接続のしかたとセンサー入力への配
線図については、「I/O ポートについ
て」(48 ページ)を参照してくださ
い。
E e-SATA 端子
e-SATA インターフェース対応のス
トレージデバイスを接続します。
F LAN 端子(1、2)
10Base-T/100Base-TX/1000Base-T
のネットワークケーブルを接続しま
す。
上が LAN2 端子で、下が LAN1 端子
です。
LAN1:ネットワークカメラ
LAN2:ネットワークカメラ(LAN1
と別のセグメントを使用する場合の
み LAN2 の使用が可能です。)
メモ
電源ボタンを押して強制的に電源を
切ることもできますが、通常は画面
操作で電源を切ってください。
H DCIN 端子(12V)
付属の AC アダプターを接続します。
I ケーブルクランプ穴
電源コードが抜けないように、付属
のケーブルクランプを取り付けます。
赤外線リモートコント
ロールユニット
赤外線リモートコントロールユニットを、
本体の赤外線受光部に向けてボタンを押
すと、対応する操作が実行されます。
ご注意
安全のために、周辺機器を接続する
際は、過大電圧を持つ可能性がある
コネクターを以下のポートに接続し
ないでください。
-LAN1 端子
-LAN2 端子
上記のポートについては本書の指示
に従ってください。
G 1 電源スイッチ
押すと、電源が入ります。
A 再生操作ボタン
記録画像の再生時に使用します。
各部の名称
39
Page 40

m(早戻し再生)ボタン
早戻し再生します。(2 倍速、4 倍速、
8 倍速、16 倍速、32 倍速、64 倍速)
n(逆再生)ボタン
巻き戻し再生します。
E +/−(カメラ番号)ボタン
選択しているカメラを切り替えると
きに使います。
[+]を押すとカメラ番号が 1 つ進
み、[−]を押すと 1 つ戻ります。
u(一時停止/再生)ボタン
停止中:再生します。(1 倍速)
再生中:再生を一時停止します。
M(早送り再生)ボタン
早送り再生します。(2 倍速、4 倍速、
8 倍速、 16 倍速、32 倍速、64 倍速)
t(スロー戻し再生)ボタン
スロー巻き戻し再生します。(1/2 倍
速、1/4 倍速)
c(コマ戻し)ボタン
1 コマ戻します。
T(スロー送り再生)ボタン
スロー送り再生します。(1/2 倍速、
1/4 倍速)
C(コマ送り)ボタン
1 コマ送ります。
B LIVE/PB ボタン
ライブ画像と記録画像再生を切り替
えます。
C (ソフトキーボード)ボタン
文字入力用のソフトキーボード画面
を表示します。
D PRESET(プリセット)ボタン
カメラをプリセット位置に移動しま
す。
F (2 × 2 レイアウト)ボタン
画面のレイアウトを 2 × 2(4 面)に
切り替えます。
G (1 × 1 レイアウト)ボタン
画面のレイアウトを 1 × 1(1 面)に
切り替えます。
H 10 キー
数字を入力するときに使います。
I 選択操作ボタン
項目などを選択するときに使用しま
す。
V ボタン
フォーカスを上に移動させたり、上
の項目を選択するときに使用します。
B ボタン
フォーカスを左に移動させたり、左
の項目を選択するときに使用します。
v ボタン
フォーカスを下に移動させたり、下
の項目を選択するときに使用します。
b ボタン
フォーカスを右に移動させたり、右
の項目を選択するときに使用します。
ENTER(確定)ボタン
選択している項目やモニターフレー
ムを決定したり、操作を実行すると
きに使用します。
40
各部の名称
Page 41
赤外線リモートコントロールユ
ニットをご使用になる前に
絶縁シートを引き抜いてください。
絶縁シート
赤外線リモートコントロールユニット
のリチウム電池を交換するには
赤外線リモートコントロールユニットに
は市販のリチウム電池 CR2025 を使用し
ます。CR2025 以外の電池は使用しない
でください。
1
ロックレバーを押したまま(1)、
電池ホルダーを引き出す(2)。
2
+を上向きにして新しい電池を入れ
(1)、カチッと音がするまで電池ホ
ルダーを押し込む(2)。
+を上向きにする
注意
指定以外の電池に交換すると、破裂する
危険があります。必ず指定の電池に交換
してください。
使用済みの電池は、国・地域の法令に
従って処理してください。
電池の交換時期
リチウム電池の能力が低下すると、ボタ
ンを押しても操作できないことがありま
す。リチウム電池の寿命は通常約 1 年で
すが、使用頻度によって変わります。リ
モコンのボタンを押しても本機がまった
く動作しない場合は、電池を交換し、動
作を確認してください。
各部の名称
41
Page 42

設置する
本機を設置する
設置場所を決め、各機器を接続します。
本書では、本機とカメラ、クライアントコンピューター(必要に応じて)だけで、以下
のようなローカルネットワークを構成する場合を例に説明します。
モニター
NSR-S10/S20
ご注意
• 既存のネットワークに接続する場合は、必ず『ファーストステップガイド』(PDF)
をご覧ください。
• クライアントコンピューターからの操作方法に関しては、『ユーザーガイド』(PDF)
をご覧ください。
ネットワーク
スイッチ
Windows
コンピューター
ネットワークカメラ
42
設置する
Page 43

各機器を接続する
本機後面の各端子にモニター、USB マウス、USB キーボードを接続します。
e-SATA ストレージを接続する
外部ストレージとして e-SATA ストレージを使用する場合は、e-SATA ケーブルで接
続します。
e-SATA ストレージ
ご注意
• ストレージ側で必要な設定を行ってから、本機に接続してください。
• 外付けの e-SATA のストレージをお使いの場合は、『ファーストステップガイド』
(PDF)をご覧ください。
設置する
43
Page 44

ネットワークカメラを接続する
同一セグメントのネットワークにネットワークカメラと本機を接続します。
クライアントコンピューターを使用する場合も、同一セグメントのネットワークに接続
します。
Windows
ネットワークカメラ
コンピューター
AC アダプターを接続する
付属の AC アダプターと電源コードを接続します。
プラグが抜けないように、ケーブルクランプ
で固定してください。
設置する
44
AC アダプター
電源コード
Page 45

電源を入れ、カメラを登録する
本機の電源を入れ、カメラが自動登録されると、すぐにモニタリングできるようになり
ます。
メモ
AC アダプターの電源コードをコンセントに接続すると、自動的に電源が入ります。画
面操作または本機後面の電源スイッチで本機の電源を切った後、再度電源を入れるとき
は、電源スイッチを押してください。
1
AC アダプターの電源コードをコンセントに接続する。
「ピー」と音が鳴り、本機前面の POWERLED が緑色に点灯します。
しばらくすると、モニターに「SystemStarting.PleaseWait...」と表示されます
(画面が表示されるまで 1 〜 2 分かかります)。
本機が起動すると、「メイン」画面が表示されます。
メモ
• 「メイン」画面にログインするユーザー ID とパスワードは以下になります。
初期設定ユーザー ID:admin
初期パスワード:admin
• 自動ログインの設定の変更については、『ユーザーガイド』(PDF)の「シ
ステムに関する設定をする」をご覧ください。
同一セグメントのネットワークに接続されているカメラが探索され、本機に自動登
録されると、「メイン」画面にカメラからの画像が表示されます。
電源を入れ、カメラを登録する
45
Page 46
画面例)NSR-S10
カメラが自動登録されると、自動的に常時記録が開始されます。
メモ
・ ソニー製カメラを探索して登録します。
・ IP アドレスの設定がお買い上げ時から変更されていないカメラが対象になりま
す。IP アドレスを変更したカメラを登録するには、カメラの IP アドレスを工場
出荷状態に戻してから、本機を再度起動してください。
・ 複数のカメラが接続されている場合は、探索された順に NSR-S10 は 4 台まで、
NSR-S20 は 8 台まで登録されます。
以上で接続は完了です。
このあとは『ファーストステップガイド』(PDF)を参照し、動作確認などを行っ
てください。
ご注意
既存のネットワークに接続する場合は、必ず『ファーストステップガイド』
(PDF)をご覧ください。
重要
最新の NSR-S10/S20 のファームウェアは、以下の URL からダウンロードできま
す。
ファームウェアのアップデート方法は、『ユーザーガイド』(PDF)をご覧くださ
い。
http://www.sony.co.jp/Products/NSR/NSR-S.zip
電源を入れ、カメラを登録する
46
Page 47
自動登録の設定値
カメラは、以下の設定値で登録されます。
モニタリングの場合
SNC-RZ25 SNC-RZ50 SNT シリーズ
NTSC
ビデオサイズ 640 × 480
ビデオ形式 MPEG-4 MPEG-4 MPEG-4 MPEG-4 MPEG-4
フレームレート
画質 /
ビットレート
1) 16:9 モードのみに対応しているカメラでは、初期設定値は 640 × 368 で登録されます。カメラの機種
ごとの初期設定値については、『リリースノート』(PDF)をご覧ください。
PAL
NTSC
15 15 12 15 12 15 15
1,024kbps 1,024kbps 1,024kbps 1,024kbps 1,024kbps
PAL
NTSC
704 × 480
PAL
704 × 576
NTSC
640 × 480 640 × 480
記録の場合
SNC-RZ25 SNC-RZ50 SNT シリーズ
NTSC
ビデオサイズ 640 × 480
ビデオ形式 MPEG-4 MPEG-4 H.264 H.264 H.264
フレームレート
画質 /
ビットレート
PAL
NTSC
15 15 12 15 12 10 10
1,024kbps 1,024kbps 1,024kbps 2,048kbps 3,072kbps
PAL
NTSC
704 × 480
PAL
704 × 576
NTSC
NTSC
720 × 480
PAL
720 × 576
PAL
PAL
1280 × 720
対応機種
1280 × 720
対応機種
1280 × 720 1920 × 1080
1920 × 1080
1)
640 × 480
1920 × 1080
対応機種
対応機種
1)
個別に設定が必要な項目について
自動登録では、以下の機能は無効または未設定の状態になっています。機能を有効にし
たい場合は、『ユーザーガイド』(PDF)をご覧ください。
• カメラの音声
• センサー入力
• リレー出力
電源を入れ、カメラを登録する
47
Page 48
I/O ポートについ
て
ご注意
マイナスドライバーは、極端に強く差し
込まないでください。故障の原因となり
ます。
I/O ポートのピン配列
オーディオ入出力
PinNO. AUDIO
1 AUDIOIN
2 AUDIOINGND
3 AUDIOOUT
4 AUDIOOUTGND
ご注意
AUDIOIN は将来拡張用です。現在は対
応していません。
センサー入力、リレー出力
PinNO. SENSOR
5 SENSORIN1
6 SENSORIN1GND
7 SENSORIN2
8 SENSORIN2GND
9 SENSORIN3
10 SENSORIN3GND
11 SENSORIN4
12 SENSORIN4GND
13 RELAYOUTPUT +
14 RELAYOUTPUT −
I/O ポートの接続方法
ワイヤー(AWGNo.26 〜 20)を接続し
たい穴の上、または下のスロットにマイ
ナスドライバーを差し込み、ワイヤーを
差し込んでから、マイナスドライバーを
引き抜く。
1
2
3
同じ手順で、必要なワイヤーをすべて接
続します。
オーディオ出力への配線図
本機内部
オーディオ
コーデック
220μF
47kΩ
外部
例)ヘッドホン
RL=16Ω/
32Ω
センサー入力への配線図
本機内部
Vcc=5V
200Ω
SensorIn1、2、3、4
SensorIn1G、2G、
3G、4G
外部
(例)
I/O ポートについて
48
Page 49

リレー出力への配線図
本機内部 外部
Vcc
RelayOut+
リレー
DC30V
AC125V
1A 以下
RelayOut−
(例)
故障かな?と思っ
たら
まず初めに、下記の項目をもうー度
チェックしてみてください。それでも解
決しないときは、お買い上げ店またはソ
ニー業務用商品相談窓口にご相談くださ
い。
本機が起動しない
• 電源コードが正しく接続されているか
確認してください。
• お使いのコンセントに他の機器を接続
してみるなどして、コンセントが通電
しているか確認してください。
モニターに何も表示されない
• 電源コードが正しく接続されているか
確認してください。
• モニターケーブルが正しく接続されて
いるか確認してください。モニターが
モニター端子に接続されているか確認
してください。
外部接続機器が正しく動作しない
• ケーブルが正しく接続されているか、
ピンが折れたり曲がっていないかなど
を確認してください。
USB 接続した機器が動作しない
• USB フラッシュメモリーは、USB2.0
マスストレージに対応しています。
USB2.0 マスストレージでも USB
HDD や CD/DVD ドライブには対応し
ていません。USB フラッシュメモリー
以外のマスストレージデバイスは接続
故障かな?と思ったら
49
Page 50

しないでください。また、USB2.0 マ
スストレージの USB フラッシュメモ
リーでも一部の製品によっては、デー
タの書き込みの際にエラーとなる可能
性があります。書き込みの際にエラー
が発生した場合には、別の機種の USB
フラッシュメモリーをお使いくださ
い。
• USB デバイスを正しくご使用いただく
ために、USB ハブ経由などでなく本機
の USB コネクタに直接接続してお使
いください。USB ハブ、延長ケーブル
経由でご使用の場合は、動作保証いた
しません。
• 接続する USB 機器の説明書を参照して
ください。
NETWORKLED が点灯しない
• ネットワークケーブルが正しく接続さ
れているか確認してください。
ハードディスクにアクセスできない
• ハードディスクへのアクセスが頻繁に
なると、HDDLED が高速で点滅する
ため、ゆっくりと点灯しているように
見えます。
すぐに温度が上昇する
• 本機を段積みして使用していると、互
いの発熱で非常に熱くなります。段積
みしたり、発熱物の上に置いたり、狭
い所に押し込んだりしないでくださ
い。
仕様
NSR-S10/S20
外部コネクター
前面 USB:USB2.0(1)
背面 モニター出力:
アナログ RGB(ミニ DSUB15ピン)(1)
LAN 端子(1000Base-T/
100Base-TX/10Base-T)
(RJ-45)(2)
USB:USB2.0(2)
e-SATA 端子(1)
オーディオ入力(マイク)
(応答周波数 4kHz、サン
プルレート 8kHz、入力
信号レベル 1Vrms、入力
抵抗 10kΩ)(1)(将来拡
張用)
オーディオ出力(出力レベル
30Vrms(RL = 32Ω)、
60Vrms(RL = 16Ω)、
フルスケール出力電圧 1
Vrms、出力インピーダン
ス 16/32Ω、出力チャン
ネル 1(モノラル))(1)
センサー入力(DC5V〜6V
デバイス対応、フォト
カップラー入力、本体と
は電気的に絶縁)(4)
リレー出力(最大 DC30V、
AC125 V 1A)
(メカニカルリレー出力、
本体とは電気的に絶縁)
(1)
50
仕様
Page 51

使用環境
動作温度:5℃〜40℃
動作湿度:20% 〜80%(最大湿球温度:
30℃)
(結露のないこと)
保存温度:− 20℃〜+ 60℃
保存湿度:20% 〜 90%(最大湿球温度
35℃、結露のないこと)
電源・その他
電源: DC 12 V
消費電流:最大 4.0 A
AC アダプター:AC100-240V 〜
50/60Hz
外形寸法:245(W)× 53(H)× 160
(D)mm(突起含まず)
本体重量:約 1.4 kg(HDD0.6kg を含
む)
付属品
AC アダプター(1)
電源コード(1)
SATA ケーブル(1)(HDD が内蔵され
ていないモデルのみ)
SATA 電源ケーブル(1)(HDD が内蔵
されていないモデルのみ)
ケーブルクランプ(1)
赤外線リモートコントロールユニット(1)
設置説明書(本書)(1)
CD-ROM(ファーストステップガイド、
ユーザーガイド)(1)
保証書(1)
重要
本機は安全規格用の型番として
AVOM001 または AVOM002 を用いてい
ます。この番号は電圧・電流定格が表示
された本体上の定格ラベルに記載してあ
ります。
この装置は、クラス B 情報技術装置です。
この装置は、家庭環境で使用することを目的
としていますが、この装置がラジオやテレビ
ジョン受信機に近接して使用されると、受信
障害を引き起こすことがあります。
取扱説明書に従って正しい取り扱いをして
下さい。
VCCI-B
・ 必ず事前に記録テストを行い、正常に記録
されていることを確認してください。本機
や記録メディア、外部ストレージなどを使
用中、万一これらの不具合により記録され
なかった場合の記録内容の補償について
は、ご容赦ください。
・ お使いになる前に、必ず動作確認を行って
ください。故障その他に伴う営業上の機会
損失等は保証期間中および保証期間経過後
にかかわらず、補償はいたしかねますので
ご了承ください。
仕様および外観は、改良のため予告なく
変更することがありますが、ご了承くだ
さい。
仕様
51
Page 52
AVERTISSEMENT
Afin de réduire les risques
d’incendie ou d’électrocution, ne
pas exposer cet appareil à la
pluie ou à l’humidité.
Afin d’écarter tout risque
d’électrocution, garder le coffret
fermé. Ne confier l’entretien de
l’appareil qu’à un personnel
qualifié.
AVIS IMPORTANT
Cet équipement correspond au modèle Nº
en ce qui concerne les certifications de
conformité réglementaires. Le numéro de
référence est indiqué sur l’étiquette du
numéro de modèle de votre produit ainsi
que la tension nominale et le courant
nominal.
Nom du modèle et numéro de type pour la
commande
Informations de
commande
Modèle NSR-S10/S20
1 disque dur
Modèle NSR-S10/S20
Pas de disque dur
Numéro de
modèle pour la
certification
AVOM001
AVOM002
AVERTISSEMENT
Utilisez l’adaptateur d’alimentation CA
fourni avec l’appareil en tant que source
d’alimentation électrique.
Fabricant: Sony
Nº de type: NSR-AC1
Une source d’alimentation différente peut
s’avérer dangereuse et présenter, par
exemple, un risque d’incendie.
Le dispositif de coupure de l’appareil est la
fiche secteur de l’adaptateur CA.
La fiche secteur de cet appareil doit être
utilisée pour couper l’alimentation secteur.
Veuillez vous assurer que la prise est
installée à proximité de l’appareil et qu’elle
est facilement accessible. En cas
d’anomalie, débranchez la fiche secteur.
AVIS
Utilisez l’ensemble de cordon
d’alimentation approuvé par l’organisme de
test approprié pour les pays spécifiques où
l’appareil est utilisé.
ATTENZIONE - porta LAN
Per motivi di sicurezza, non collegare la
porta LAN a dispositivi di rete a tensione
eccessivamente elevata.
Installation de la pile
(télécommande infrarouge)
Une pile au lithium de type CR2025 est
fournie pour la télécommande infrarouge.
Pour éviter le risque d’explosion, utilisez
toujours le même type de pile au lithium.
ATTENTION
Il y a danger d’explosion s’il y a
remplacement incorrect de la batterie.
Remplacer uniquement avec une batterie du
même type ou d’un type équivalent
recommandé par le constructeur. Mettre au
rebut les batterie usagées conformément
aux instructions du fabricant.
Pour les clients au Canada
Cet appareil numérique de la classe B est
conforme à la norme NMB-003 du Canada.
Pour les clients en Europe
Le fabricant de ce produit est Sony
Corporation, 1-7-1 Konan, Minato-ku,
Tokyo, Japon.
Le représentant autorisé pour EMC et la
sécurité des produits est Sony Deutschland
GmbH, Hedelfinger Strasse 61, 70327
Stuttgart, Allemagne. Pour toute question
concernant le service ou la garantie,
veuillez consulter les adresses indiquées
dans les documents de service ou de
garantie séparés.
52
Page 53

Table des
matières
Précautions d’utilisation .............. 54
Vue d’ensemble ............................. 56
Vérification du contenu de
l’emballage .................................... 57
Conditions requises du
système ........................................... 58
Utilisation du manuel sur
CD-ROM ....................................... 60
Préparatifs ............................... 60
Lecture du manuel sur
CD-ROM ................................ 60
Caractéristiques et fonctions....... 61
Panneau avant ......................... 61
Panneau arrière ....................... 61
Télécommande infrarouge ...... 62
Configuration ................................ 65
Configuration de l’appareil .... 65
Raccordement de chaque
dispositif ................................. 66
Raccordement d’un dispositif de
stockage e-SATA ................... 66
Raccordement des caméras
réseau ...................................... 67
Raccordement de l’adaptateur
CA .......................................... 67
Mise sous tension et enregistrement
des caméras ................................... 68
Réglages nécessitant une
configuration individuelle ...... 71
Port d’E/S ...................................... 72
Dépannage ..................................... 73
Caractéristiques techniques ........ 74
NSR-S10/S20 ......................... 74
Marques commerciales
• « IPELA » et sont des
marques de fabrique de Sony
Corporation.
Les autres noms de produits ou de systèmes
mentionnés dans ce document sont des
marques de fabrique ou des marques
déposées de leurs propriétaires respectifs.
Par conséquent, les symboles ® ou ™ ne
sont pas utilisés dans le texte.
• La reproduction ou la duplication, en tout ou
partie, du logiciel ou du manuel d’utilisation
fourni avec l’enregistreur, ainsi que le prêt
ou la location du logiciel, sans l’autorisation
du détenteur des droits, sont interdits par la
loi sur le droit d’auteur.
• Sony décline toute responsabilité pour des
dommages, des pertes de revenu, ou toute
réclamation d’une tierce partie provenant de
l’utilisation de l’enregistreur ou du lo-giciel
fourni.
• Pour en savoir plus sur les termes et les
conditions de la garantie de l’enregistreur,
consultez la carte de garantie incluse dans le
paquet.
• Le logiciel fourni avec l’enregistreur ne peut
pas être utilisé avec d’autres enregistreurs.
• Il est impossible d’installer dans
l’équipement un autre logiciel que celui
fourni par Sony pour être utilisé avec cet
équipement.
• Notez que les caractéristiques de
l’enregistreur et du logiciel fourni sont
sujettes à modifications sans préavis pour
amélioration.
Décharge de responsabilité pour
les contenus enregistrés
Sony Corporation décline toute responsabilité
quelle qu’elle soit pour de quelconques
problèmes provenant d’une panne
d’enregistrement, ou d’un dommage ou d’un
effacement du con-tenu enregistré sur cet
appareil, quelle qu’en soit la raison. Cela inclut
les réclamations pour un dédommage-ment du
contenu enregistré, et pour tout dommage
concomitant ou indirect. Sony Corporation ne
réparera, ne restaurera ou ne dupliquera aucun
contenu enregistré. Votr e utilisation de ce produit
est sujette à ces conditions.
FR
Table des matières
53
Page 54

Précautions
d’utilisation
Importantes informations
concernant la sécurité
• Veillez bien à raccorder l’appareil à une
source d’alimentation conforme à ses
caractéristiques.
• Utilisez uniquement le cordon
d’alimentation fourni. N’enroulez pas le
cordon d’alimentation et ne le regroupez
pas avec d’autres cordons. Ne superposez
pas les connexions. Le non-respect des
courants nominaux entraîne un risque
d’incendie ou d’autres accidents.
• N’utilisez pas l’appareil si son couvercle
ou son boîtier est ouvert ou a été retiré.
Sinon, il existe un risque d’incendie ou de
choc électrique. N’essayez pas d’ouvrir
le couvercle ou le boîtier vous-même.
Contactez toujours votre fournisseur, s’il
est nécessaire d’ouvrir l’appareil.
Importantes informations
concernant l’installation
Endroits où l’appareil peut être
utilisé/rangé
Pour prolonger la durée de vie de l’appareil,
évitez de l’utiliser ou de le ranger dans les
endroits suivants :
• endroits soumis à des températures
extrêmes. (Je suis les spécifications de
cet appareil par tous les moyens et s’il
vous plaît l’utilise.) ;
• endroits exposés de manière prolongée à
la lumière directe du soleil et près
d’appareils de chauffage. (Notez que la
température d’été à l’intérieur d’une
voiture fermée peut dépasser +50 °C/
+122 °F) ;
• endroits très humides ou poussiéreux ;
• endroits soumis à de fortes vibrations ;
• endroits soumis à de forts champs
magnétiques ;
• à proximité d’émetteurs radio ou TV
produisant un fort champ magnétique.
N’empilez pas les appareils et ne
placez pas l’appareil sur d’autres
objets générant de la chaleur
Lorsqu’un appareil est empilé sur un autre
appareil, la chaleur générée par les deux
appareils peut être extrêmement élevée.
N’empilez pas les appareils les uns sur les
autres et ne placez pas l’appareil sur
d’autres objets pouvant générer de la
chaleur.
N’obstruez pas les orifices de
ventilation
• Les orifices de ventilation sur les côtés de
l’appareil empêchent toute surchauffe
interne. Laissez toujours un espace libre
des deux côtés ainsi que derrière et audessus de l’appareil.
• N’utilisez pas l’appareil dans un endroit
fermé ou tout autre espace confiné.
Utilisez l’appareil en position
horizontale
• L’appareil est conçu pour fonctionner
uniquement à l’horizontale.
• N’installez pas l’appareil sur une surface
inclinée et protégez l’appareil contre tout
choc.
• Si l’appareil tombe ou s’il est sujet à des
chocs violents, il risque d’être
sérieusement endommagé.
Entretien
• Avant de nettoyer l’appareil ou
d’effectuer toute autre tâche d’entretien,
déconnectez le cordon d’alimentation de
la prise murale.
• Pour nettoyer l’appareil, essuyez
légèrement le boîtier et les panneaux à
l’aide d’un chiffon sec. Pour éliminer les
taches tenaces, humidifiez légèrement le
chiffon avec un détergent neutre non
Précautions d’utilisation
54
Page 55

agressif, puis essuyez à l’aide d’un
chiffon sec.
• N’utilisez pas de nettoyant à l’alcool, de
solvant, d’essence, d’insecticide ou
d’autre substance volatile, car cela risque
d’attaquer la finition et d’entraîner une
décoloration.
équipé des pieds spécifiés et posez
l’appareil avec précaution. En l’absence
de pieds, commencez par monter les
pieds spécifiés.
• Ne placez pas l’appareil près d’autres
appareils susceptibles de provoquer des
vibrations.
Transport
Utilisez le matériel d’emballage d’origine
ou un emballage similaire pour protéger
l’appareil des chocs.
Précautions pour les
appareils avec lecteur de
disque dur intégré
Cet appareil est équipé d’un lecteur de
disque dur (HDD) interne. Il s’agit d’un
appareil de précision. En cas de choc, de
vibrations, d’électricité statique et de
température ou d’humidité élevée, une
perte de données risque de se produire.
Observez attentivement les précautions
suivantes lors de l’installation et de
l’utilisation de l’appareil.
Protection contre les chocs et les
vibrations
En cas de chocs ou de vibrations, le lecteur
de disque dur risque d’être endommagé et
une perte de données est susceptible de se
produire.
• Lors du transport de l’appareil, utilisez le
matériel d’emballage spécifié. Lors du
transport sur un diable ou un autre
appareil similaire, utilisez un type de
dispositif amortissant les vibrations
excessives. Les chocs et vibrations
excessifs risquent d’endommager le
lecteur de disque dur.
• Ne déplacez jamais l’appareil lorsque
celui est sous tension.
• Ne retirez pas les panneaux ou les parties
externes de l’appareil.
• Si vous placez l’appareil sur le sol ou sur
toute autre surface, vérifiez qu’il est
Attendez 30 secondes après avoir
mis l’appareil hors tension
Les plateaux à l’intérieur du lecteur de
disque dur intégré continuent à tourner
pendant un court instant après la mise hors
tension et les têtes de lecture se trouvent en
position dangereuse. Pendant ce court
instant, l’appareil est plus sensible aux
chocs et aux vibrations qu’en
fonctionnement normal. Evitez de
soumettre l’appareil à des chocs, même très
légers, pendant au moins 30 secondes après
la mise hors tension. Ensuite, le disque dur
s’arrête complètement et l’appareil peut
être déplacé.
Précautions relatives à la
température et à l’humidité
Utilisez et rangez l’appareil uniquement
dans des endroits respectant les plages de
températures et d’humidité spécifiées. (Je
suis les spécifications de cet appareil par
tous les moyens et s’il vous plaît l’utilise.)
En cas de lecteur de disque dur
défectueux
Même si le lecteur de disque dur intégré
montre des signes de problème de
fonctionnement, veuillez observer toutes
les précautions ci-dessus. Cela évitera
d’aggraver les dommages jusqu’à ce que le
problème puisse être diagnostiqué et
corrigé.
Remplacement du disque dur et
d’autres consommables
Le disque dur et la batterie de l’appareil
sont des consommables qui doivent être
régulièrement remplacés. En situation de
fonctionnement à température ambiante, le
Précautions d’utilisation
55
Page 56

cycle de remplacement recommandé est
d’environ deux ou trois ans. Mais ce cycle
de remplacement ne représente qu’une
indication et ne garantit pas la durée de vie
de ces consommables. Pour plus de détails
sur le remplacement de ces pièces, veuillez
contacter votre revendeur.
Précautions pour l’utilisation de
dispositifs USB
• Cet appareil prend en charge les
dispositifs de stockage de masse USB
2.0. Cependant, il ne prend pas en charge
les lecteurs CD/DVD et les disques durs
de stockage de masse USB 2.0. Ne
raccordez pas de dispositifs de stockage
de masse autres que des dispositifs de
mémoire USB à l’appareil. Sachez que
des erreurs peuvent tout de même se
produire lors de l’écriture de données sur
un dispositif de mémoire de stockage de
masse USB 2.0, selon le type de
dispositif utilisé. Si des erreurs se
produisent lors de l’écriture de données,
utilisez un autre type de dispositif de
mémoire flash USB.
• Pour garantir un bon fonctionnement des
dispositifs USB, évitez de raccorder les
dispositifs à l’aide d’un concentrateur
USB. Raccordez les dispositifs
directement aux connecteurs USB de
l’appareil. Le fonctionnement n’est pas
garanti quand les dispositifs sont
raccordés à l’aide d’un concentrateur
USB, un commutateur USB ou un câble
d’extension.
Vue d’ensemble
Le NSR-S10/S20 est un enregistreur de
surveillance réseau pour des caméras
réseau. Le serveur vous permet de surveiller
et d’enregistrer des images JPEG, MPEG-4
et H.264 à partir de caméras de réseau par
l’intermédiaire du réseau. Le serveur vous
permet également de rechercher et de lire
facilement des images enregistrées
précédemment.
Gestion et pilotage de caméras
compatibles à partir
d’emplacements distants
Vous pouvez gérer, contrôler et afficher les
images à partir de maximum quatre caméras
en réseau avec le NSR-S10 et huit caméras
en réseau avec le NSR-S20. Vous pouvez
panoramiquer, incliner et zoomer avec des
caméras compatibles.
Des disques durs de grande
capacité permettent des
enregistrements de longue durée
Les modèles avec des disques durs internes
sont équipés d’une grande capacité de
stockage permettant d’enregistrer pendant
des périodes prolongées. De plus, l’appareil
vous permet de raccorder des dispositifs de
stockage prenant en charge l’interface eSATA.
Surveillance à partir d’un
navigateur
Vous pouvez accéder au NSR à partir d’un
navigateur, qui peut ensuite être utilisé pour
surveiller les images.
56
Autres caractéristiques
• Le NSR peut faire des enregistrements
enr. continu, détection de mouvement et
d’alarme, entre autres.
Vue d’ensemble
Page 57

• Recherches d’images enregistrées par
date et heure, capteurs, détection de
mouvement, perte de signal vidéo, etc.
• L’enregistrement et la lecture
caméras compatibles sont aussi pris en
charge.
1) Des haut-parleurs ou des amplificateurs audio
en option sont requis.
Important
• Ce manuel décrit l’installation et la
configuration initiale de cet appareil.
Pour les détails sur les différents
paramètres de cet appareil, consultez le
guide des premiers pas (PDF) et le guide
de l’utilisateur (PDF).
• Pour les détails sur les conditions
système pour les ordinateurs, les modèles
de caméras compatibles et les
importantes notifications, reportez-vous
à la note de mise à jour (PDF).
Vous pouvez télécharger la note de mise
à jour à partir de l’URL suivant.
http://www.sony.co.jp/Products/NSR/
NSR-S_ReleaseNote_E.pdf
1)
audio de
Vérification du
contenu de
l’emballage
Après l’ouverture du carton, assurez-vous
d’avoir tous les éléments énumérés cidessous. Si l’un des accessoires manque,
contactez votre revendeur Sony.
• Unité principale (1)
• Adaptateur CA (1)
• Attache de câble (1)
• Télécommande infrarouge (1)
• Manuel d’installation (ce manuel) (1)
• CD-ROM (guide des premiers pas, guide
de l’utilisateur) (1)
• Brochure de garantie (1)
Remarques
• Le carton peut contenir d’autres manuels
et documents qui ne sont pas énumérés
ci-dessus.
Vérification du contenu de l’emballage
57
Page 58

• Le carton et les matériaux d’emballage
peuvent être utilisés si vous avez besoin
de déplacer ou transporter l’appareil.
Conservez ces matériaux pour une
utilisation future.
Conditions
requises du
système
Le matériel nécessaire à l’utilisation de cet
enregistreur est le suivant.
• Moniteur
• Caméra réseau Sony
• Contactez votre revendeur pour en savoir
plus sur les caméras réseau compatibles
Sony.
•Clavier USB
•Souris USB
• Commutateur réseau
• Câble 1000Base-T/100Base-TX/
10Base-T
• Dispositif mémoire flash USB
1) Cet appareil prend en charge les écrans
d’ordinateurs qui prennent en charge l’entrée RVB
analogique.
2) Utilisez un clavier USB avec un câble.
Cependant, il se peut que les touches autres
que les touches standard ne fonctionnent pas.
Il se peut aussi que les claviers USB
infrarouges ou sans fil ne fonctionnent pas
correctement.
3) Utilisez une souris USB avec un câble. Les
souris sans fil ou à infrarouge peuvent ne pas
fonctionner correctement. Des fonctions telles
que les opérations à trois boutons ou à molette
peuvent aussi fonctionner de manière
incorrecte.
4) Nécessaire lors de la sauvegarde
d’informations de système, comme avec les
journaux.
- Cet appareil prend en charge les dispositifs de
1)
2)
3)
4)
stockage de masse USB 2.0. Cependant, il ne
prend pas en charge les lecteurs CD/DVD et les
disques durs de stockage de masse USB 2.0. Ne
raccordez pas de dispositifs de stockage de
masse autres que des dispositifs de mémoire
flash USB à l’appareil. Sachez que des erreurs
peuvent tout de même se produire lors de
l’écriture de données sur un dispositif de
mémoire de stockage de masse USB 2.0, selon
le type de dispositif utilisé. Si des erreurs se
Conditions requises du système
58
Page 59

produisent lors de l’écriture de données,
utilisez un autre type de dispositif mémoire
flash USB.
Remarque
Même si aucun clavier USB n’est raccordé,
le clavier logiciel à l’écran peut être utilisé.
Conditions requises du système
59
Page 60

Utilisation du manuel sur CD-ROM
Le CD-ROM fourni contient les manuels (guide des premiers pas, guide de l’utilisateur) pour
NSR (en japonais, anglais, français, allemand, italien, espagnol et chinois simplifié).
Les copies de ces manuels sont créées au format PDF (Portable Document Format).
Préparatifs
L’un des programmes suivants doit être installé sur votre ordinateur afin d’utiliser les
manuels de fonctionnement contenus sur le CD-ROM.
• Adobe Reader Version 6.0 ou supérieure
Remarque
Si Adobe Reader n’est pas installé, vous pouvez le télécharger à l’adresse suivante :
http://www.adobe.com/
Adobe et Adobe Reader sont des marques commerciales d’Adobe Systems Incorporated aux
Etats-Unis et/ou dans d’autres pays.
Lecture du manuel sur CD-ROM
Pour lire le manuel sur le CD-ROM, procédez comme suit.
1 Insérez le CD-ROM dans votre lecteur de CD-ROM.
Les manuels sont enregistrés dans le dossier Manual.
2 Sélectionnez et cliquez sur le manuel que vous souhaitez lire.
Remarque
Il arrive, en raison de la version d’Adobe Reader que vous utilisez, que le fichier ne s’affiche
pas correctement. Si le fichier ne s’affiche pas correctement, téléchargez la dernière version
d’Adobe Reader à partir de l’adresse mentionnée dans la section « Préparatifs ».
Attention
Si vous perdez le CD-ROM ou si vous ne pouvez pas le lire pour quelque raison que ce soit,
vous pouvez acheter un nouveau CD-ROM. Contactez votre représentant commercial Sony
le plus proche.
Utilisation du manuel sur CD-ROM
60
Page 61
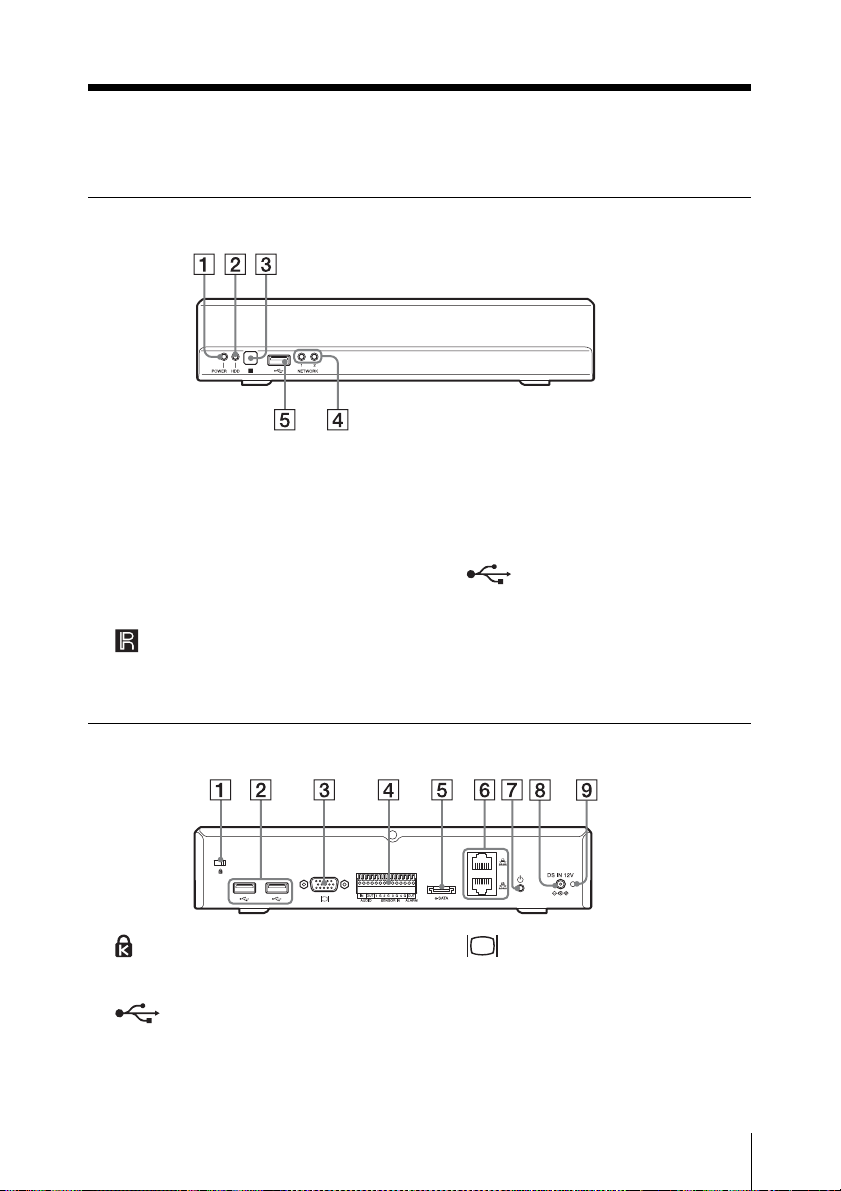
Caractéristiques et fonctions
Panneau avant
A Diode POWER
S’allume en vert lorsque l’appareil est
sous tension.
B Diode HDD
Clignote en vert lors des accès aux
disques durs internes.
C Capteur infrarouge
Reçoit des signaux de la télécommande
infrarouge.
Panneau arrière
A Logement de sécurité
Fixez ici un câble antivol.
B Connecteur USB
Utilisez ce connecteur pour raccorder
un clavier USB, une souris USB ou une
mémoire flash USB au NSR.
D Diode NETWORK (1, 2)
S’allume en vert en cas d’activité au
connecteur LAN correspondant à
l’arrière du NSR.
E Connecteur USB
Utilisez ce connecteur pour raccorder
un clavier USB, une souris USB ou une
mémoire flash USB au NSR.
C Connecteur moniteur
Utilisez ce connecteur pour raccorder
un moniteur.
Caractéristiques et fonctions
61
Page 62

D Port d’E/S
Utilisez ce connecteur pour raccorder
l’audio, les entrées de capteur et les
sorties relais.
Pour les détails et schémas de
connexion des entrées de capteur,
consultez « Port d’E/S » (page 72).
E Connecteur e-SATA
Utilisez ce connecteur pour raccorder
des dispositifs de stockage prenant en
charge l’interface e-SATA.
F Connecteurs LAN (1, 2)
Utilisez ces connecteurs pour raccorder
des câbles réseau 10 Base-T, 100 BaseTX ou 1000 Base-T.
Le connecteur du haut est LAN2 et celui
du bas LAN1.
LAN1 : Caméra réseau
LAN2 : Caméra réseau (LAN2 ne peut
être utilisé que lors de l’utilisation d’un
segment différent pour LAN1.)
ATTENTION aux ports LAN
Pour des raisons de sécurité, ne
raccordez pas les ports LAN à un
dispositif réseau pouvant avoir une
tension excessive.
Suivez les instructions pour les ports cidessus.
H Connecteur DC IN (12 V)
Utilisez ce connecteur pour raccorder
l’adaptateur CA.
I Orifice pour l’attache de câble
Fixez ici l’attache de câble fournie pour
éviter que le cordon d’alimentation ne
se débranche.
Télécommande infrarouge
Si vous appuyez sur une touche de la
télécommande infrarouge quand la
télécommande est dirigée vers le capteur
infrarouge de l’unité principale, alors
l’unité principale exécutera l’opération
correspondant à cette touche.
G 1 Commutateur d’alimentation
Appuyez sur ce commutateur pour
mettre l’appareil sous tension.
Remarque
Bien que ce commutateur puisse être
utilisé pour forcer la mise hors tension
de l’appareil, dans des circonstances
normales il est préférable d’utiliser la
commande d’arrêt à l’écran.
Caractéristiques et fonctions
62
A Touche de lecture
Utilisez cette touche pour lire des
images enregistrées.
Page 63

Touche m (Retour rapide en
arrière)
Utilisez cette touche pour effectuer un
retour rapide en arrière. (2x, 4x, 8x, 16x,
32x, 64x la vitesse)
Touche n (Lecture arrière)
Utilisez cette touche pour lire des
images enregistrées en arrière.
Touche u (Lecture/Pause)
Pendant la pause : Utilisez cette touche
pour lancer la lecture. (1x la vitesse)
Pendant la lecture : Utilisez cette touche
pour mettre en pause la lecture.
Touche M (Avance rapide)
Utilisez cette touche pour effectuer une
avance rapide. (2x, 4x, 8x, 16x, 32x, 64x
la vitesse)
Touche t (Retour lent en arrière)
Utilisez cette touche pour effectuer un
retour lent en arrière. (1/2 de la vitesse,
1/4 de la vitesse)
Touche c (Précédent)
Utilisez cette touche pour reculer d’une
image.
Touche T (Avance lente)
Utilisez cette touche pour effectuer une
avance lente. (1/2 de la vitesse, 1/4 de la
vitesse)
Touche C (Suivant)
Utilisez cette touche pour avancer d’une
image.
B Touche LIVE/PB
Utilisez cette touche pour basculer entre
l’affichage des images en direct et celui
des images enregistrées.
C Touche (Clavier logiciel)
Utilisez cette touche pour afficher le
clavier logiciel utilisé pour la saisie de
texte.
D Touche PRESET
Utilisez cette touche pour déplacer la
caméra vers une position prédéfinie.
E Touche + / – (Numéro de caméra)
Utilisez ces touches pour basculer entre
les caméras pour la sélection.
Appuyez sur la touche [+] pour
sélectionner le numéro de caméra
suivant et sur la touche [–] pour
sélectionner le numéro de caméra
précédent.
F Touche (Disposition 2 × 2)
Cette touche permet de passer à la
disposition d’écran 2 × 2 (4 écrans).
G Touche (Disposition 1 × 1)
Cette touche permet de passer à la
disposition d’écran 1 × 1 (1 écran).
H Touches numériques
Utilisez ces touches pour saisir des
nombres.
I Touches de sélection d’opérations
Utilisez ces touches pour sélectionner
des éléments, etc.
Touche V
Utilisez cette touche pour déplacer le
curseur de mise au point vers le haut
afin de sélectionner un élément situé
plus haut sur l’écran.
Touche B
Utilisez cette touche pour déplacer le
curseur de mise au point vers la gauche
afin de sélectionner un élément situé à
gauche sur l’écran.
Touche v
Utilisez cette touche pour déplacer le
curseur de mise au point vers le bas afin
de sélectionner un élément situé plus
bas sur l’écran.
Caractéristiques et fonctions
63
Page 64

Touche b
Utilisez cette touche pour déplacer le
curseur de mise au point vers la droite
afin de sélectionner un élément situé à
droite sur l’écran.
2 Insérez la pile avec le côté « + » tourné
vers le haut (1) puis poussez le
support de pile vers l’intérieur jusqu’à
ce qu’il se mette en place en émettant
un déclic (2).
Touche ENTER
Utilisez cette touche pour confirmer la
sélection de l’élément actuel ou de
l’écran de moniteur, et pour exécuter
d’autres opérations.
Avant d’utiliser la
télécommande infrarouge
Retirez la feuille isolante.
Feuille isolante
Remplacement de la pile au lithium
de la télécommande infrarouge
La télécommande infrarouge utilise une
pile standard CR2025 au lithium. N’utilisez
pas d’autre pile que la CR2025.
1 Tout en maintenant le levier de
verrouillage enfoncé (1), sortez le
support de pile (2).
Côté « + » tourné vers le haut
ATTENTION
Il y a danger d’explosion s’il y a
remplacement incorrect de la batterie.
Remplacer uniquement avec une batterie du
même type ou d’un type équivalent
recommandé par le constructeur.
Lorsque vous mettez la batterie au rebut,
vous devez respecter la législation en
vigueur dans le pays ou la région où vous
vous trouvez.
Intervalle de remplacement de la
pile
Lorsque la pile au lithium est faible, il se
peut que l’appareil ne réponde pas même
lorsque les touches sont enfoncées. La
durée de vie moyenne d’une pile au lithium
utilisée dans cet appareil est d’un an, mais
elle peut varier en fonction de la fréquence
d’utilisation de l’appareil. Si l’unité
principale ne répond pas lorsque vous
appuyez sur les touches de la
télécommande, remplacez la pile et
recommencez l’opération.
Caractéristiques et fonctions
64
Page 65

Configuration
Configuration de l’appareil
Décidez de l’endroit où installer l’appareil, puis raccordez l’ensemble de l’équipement.
Dans ce manuel, un réseau local constitué uniquement du NSR, de caméras et d’un ordinateur
client (si nécessaire) comme suit est utilisé en guise d’exemple pour les explications.
Moniteur
NSR-S10/S20
Attention
• Lors du raccordement à un réseau existant, assurez-vous de consulter le guide des premiers
pas (PDF).
• Pour les détails sur les opérations à partir d’un ordinateur client, reportez-vous au guide de
l’utilisateur (PDF).
Commutateur
réseau
PC Windows
Caméras réseau
Configuration
65
Page 66

Raccordement de chaque dispositif
Raccordez le moniteur, la souris USB et le clavier USB aux connecteurs appropriés sur le
panneau avant de l’appareil.
Raccordement d’un dispositif de stockage e-SATA
Utilisez le câble e-SATA lors de l’utilisation d’un dispositif de stockage e-SATA externe.
Stockage e-SATA
Attention
• Configurez les réglages nécessaires sur le dispositif de stockage e-SATA avant de le
raccorder à cet appareil.
• Lorsque vous utilisez un dispositif de stockage e-SATA externe, consultez le guide des
premiers pas (PDF).
Configuration
66
Page 67
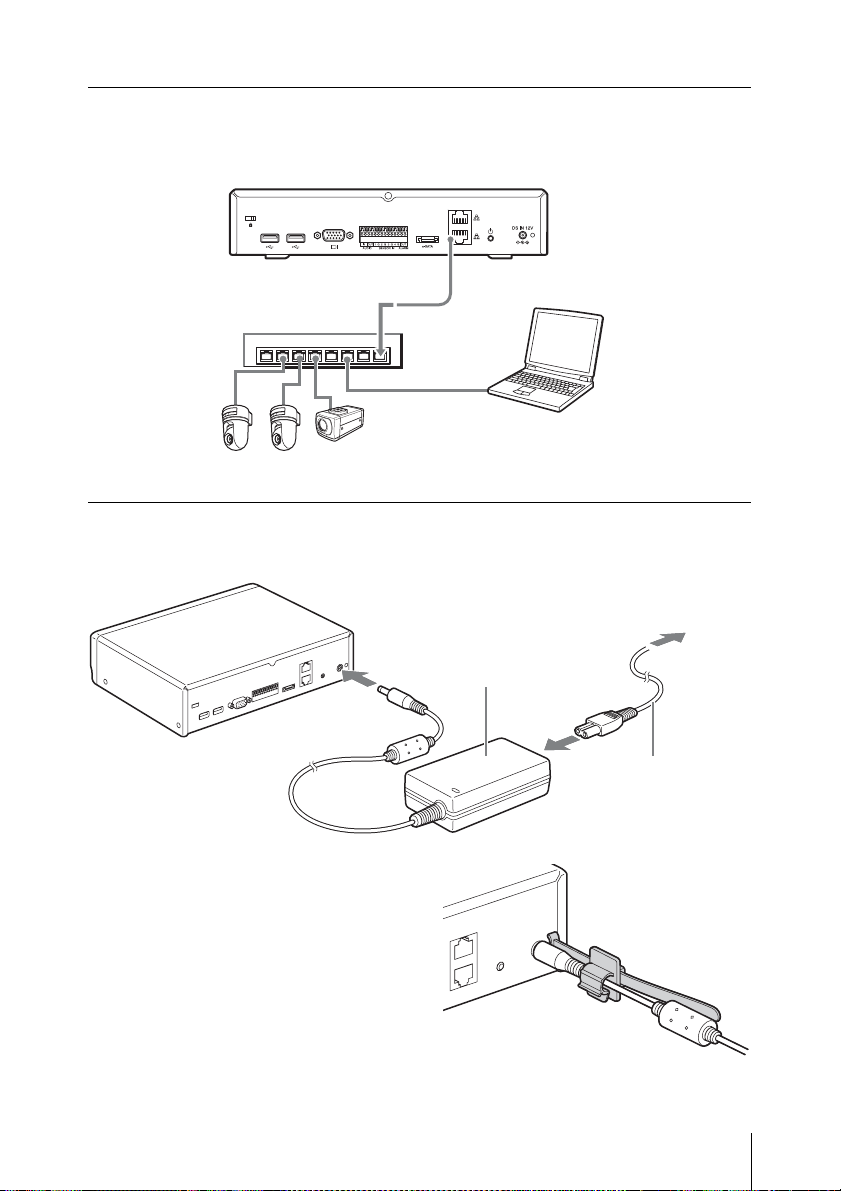
Raccordement des caméras réseau
Raccordez les caméras réseau et l’appareil au même segment du réseau.
Lorsque vous utilisez un ordinateur client, raccordez-le au même segment du réseau.
PC Windows
Caméras réseau
Raccordement de l’adaptateur CA
Raccordez l’adaptateur CA et le cordon d’alimentation.
Adaptateur CA
Fixez l’attache de câble pour éviter que la fiche
ne se débranche.
Cordon
d’alimentation
Configuration
67
Page 68

Mise sous tension et enregistrement
des caméras
Après la mise sous tension du NSR, vous pouvez commencer à surveiller immédiatement si
vous enregistrez les caméras automatiquement.
Remarque
L’appareil se met automatiquement sous tension lorsque le cordon d’alimentation de
l’adaptateur CA est branché dans une prise de courant. Après la mise hors tension du NSR,
soit par une opération à l’écran, soit au moyen du commutateur d’alimentation sur le panneau
arrière, appuyez sur le commutateur d’alimentation pour remettre l’appareil sous tension.
1 Branchez le cordon d’alimentation de l’adaptateur CA dans la prise de courant.
L’appareil émet un bip sonore et la diode POWER sur le panneau avant s’allume en vert.
Après une minute ou deux, le message « System Starting, Please Wait... » apparaît sur le
moniteur.
L’écran « Main » s’affiche après le démarrage de l’appareil.
Remarque
• L’identifiant d’utilisateur et le mot de passe pour ouvrir la session du l’écran « Main »
sont les suivants :
Identifiant d’utilisateur par défaut : admin
Mot de passe par défaut : admin
• Pour les détails sur la façon de modifier les réglages d’ouverture de session
automatique, consultez la section « Réglages relatifs au système » du guide de
l’utilisateur (PDF).
Mise sous tension et enregistrement des caméras
68
Page 69

Les caméras raccordées au même segment du réseau sont automatiquement localisées et
enregistrées sur le NSR et les images de ces caméras apparaissent sur l’écran « Main ».
Exemple d’écran : NSR-S10
L’enregistrement continu démarre automatiquement une fois que les caméras sont
enregistrées.
Remarques
• Seules les caméras Sony seront localisées et enregistrées.
• Seules les caméras dont les paramètres d’adresse IP n’ont pas été modifiés par rapport
aux valeurs d’usine par défaut seront localisées et enregistrées. Pour enregistrer des
caméras dont les adresses IP ont été modifiées, remettez les paramètres d’adresse IP
de la caméra sur les valeurs par défaut et redémarrez le NSR.
• Lorsque plusieurs caméras sont raccordées, elles sont enregistrées dans l’ordre de leur
emplacement et il est possible d’enregistrer jusqu’à quatre caméras pour le NSR-S10
et jusqu’à huit caméras pour le NSR-S20.
Les raccordements sont ainsi terminés.
Vous pouvez à présent consulter le guide des premiers pas (PDF) pour procéder à une
vérification du fonctionnement et à d’autres opérations de configuration.
Attention
Lors du raccordement à un réseau existant, assurez-vous de consulter le guide des
premiers pas (PDF).
Important
Vous pouvez télécharger la dernière version du microprogramme pour le NSR-S10/S20
à partir de l’URL suivant.
Pour la procédure de mise à jour du microprogramme, reportez-vous au mode d’emploi
(PDF).
http://www.sony.co.jp/Products/NSR/NSR-S.zip
Mise sous tension et enregistrement des caméras
69
Page 70

Valeurs de réglage pour l’enregistrement automatique
Les caméras sont enregistrées avec les valeurs de paramétrage suivantes.
Pour la surveillance
SNC-RZ25 SNC-RZ50 Série SNT Modèle
NTSC
Taille vidéo 640 × 480
Format
vidéo
Fréquence
d’images
Qualité/
Débit binaire
1) Les caméras compatibles avec le mode 16:9 seulement sont enregistrées avec la valeur par défaut
640 × 368. Pour la valeur par défaut pour chaque modèle de caméra, reportez-vous à la note de mise
à jour (PDF).
PAL
NTSC
MPEG-4 MPEG-4 MPEG-4 MPEG-4 MPEG-4
15 15 12 15 12 15 15
1 024 kbps 1 024 kbps 1 024 kbps 1 024 kbps 1 024 kbps
PAL
NTSC
704 × 480
PAL
704 × 576
NTSC
640 × 480
PAL
compatible
1280 × 720
640 × 480
compatible
1920 × 1080
1)
640 × 480
Modèle
Pour l’enregistrement
SNC-RZ25 SNC-RZ50 Série SNT Modèle
NTSC
Taille vidéo 640 × 480
Format
vidéo
Fréquence
d’images
Qualité/
Débit binaire
PAL
MPEG-4 MPEG-4 H.264 H.264 H.264
15 15 12 15 12 10 10
1 024 kbps 1 024 kbps 1 024 Kbps 2 048 kbps 3 072 kbps
NTSC
NTSC
704 × 480
PAL
704 × 576
PAL
NTSC
NTSC
720 × 480
PAL
720 × 576
compatible
PAL
1280 × 720
1280 × 720 1920 × 1080
Modèle
compatible
1920 × 1080
1)
Mise sous tension et enregistrement des caméras
70
Page 71

Réglages nécessitant une configuration individuelle
Les fonctions suivantes sont désactivées ou ne sont pas configurées avec les réglages
d’enregistrement automatique. Pour les détails sur l’activation de ces fonctions, reportezvous au guide de l’utilisateur (PDF).
• Audio des caméras
• Entrée d’capteur
• Sortie relais
Mise sous tension et enregistrement des caméras
71
Page 72

Port d’E/S
Distribution de contacts du
port d’E/S
Entrée/sortie audio
Contact No. AUDIO
1 AUDIO IN
2 AUDIO IN GND
3 AUDIO OUT
4 AUDIO OUT GND
Attention
AUDIO IN est destiné à des extensions
futures et n’est pas pris en charge
actuellement.
Entrée de capteur et sortie relais
Contact No. SENSOR
5 SENSOR IN 1
6 SENSOR IN 1 GND
7 SENSOR IN 2
8 SENSOR IN 2 GND
9 SENSOR IN 3
10 SENSOR IN 3 GND
11 SENSOR IN 4
12 SENSOR IN 4 GND
13 RELAY OUTPUT +
14 RELAY OUTPUT –
Utilisation du réceptacle
d’E/S
Insérez un petit tournevis plat dans la fente
supérieure ou inférieure de l’emplacement
où vous voulez placer un câble (AWG No.
26 à 20). Tenez le tournevis enfoncé et
insérez le câble, puis relâchez le tournevis.
Attention
Ne forcez pas sur le tournevis lorsque vous
l’insérez dans la fente. Sinon vous pourriez
endommager l’appareil.
1
2
3
Répétez ce procédé pour connecter tous les
câbles nécessaires.
Schéma de câblage pour la
sortie audio
Intérieur de cet
appareil
Codec
audio
47 kΩ
220 μF
Extérieur
Exemple)
Casque
RL=16 Ω/32 Ω
72
Port d’E/S
Page 73

Schéma de câblage pour
l’entrée de contact
Intérieur de cet
appareil
Vcc = 5 V
200 Ω
Entrée de capteur
1, 2, 3, 4
Entrée de capteur
1G, 2G, 3G, 4G
Extérieur
(Exemple)
Dépannage
Avant de contacter votre revendeur ou un
centre de service Sony, veuillez vérifier les
éléments suivants. Si le problème persiste,
veuillez les contacter.
Le NSR ne fonctionne pas.
• Vérifiez que le câble d’alimentation est
bien raccordé.
• Vérifiez que la prise est elle-même
alimentée. Testez-la en branchant un
autre dispositif.
Schéma de câblage pour la
sortie relais
Intérieur de cet
appareil
Sortie relais +
Relay
30 V CC
125 V CA
1 A ou moins
Sortie relais –
Extérieur
Vcc
(Exemple)
Le moniteur reste vierge.
• Vérifiez que le cordon d’alimentation est
bien raccordé.
• Vérifiez que le câble de moniteur est bien
raccordé. Vérifiez que le moniteur est
raccordé au connecteur de moniteur.
Le nouveau matériel externe ne
fonctionne pas correctement.
• Vérifiez que les câbles du nouveau
dispositif externe sont fermement
connectés et que les broches ne sont pas
courbées.
Un dispositif externe raccordé à un
connecteur USB ne fonctionne
pas.
• Cet appareil prend en charge les
dispositifs de stockage de masse USB
2.0. Cependant, il ne prend pas en charge
les lecteurs CD/DVD et les disques durs
de stockage de masse USB 2.0. Ne
raccordez pas de dispositifs de stockage
de masse autres que des dispositifs de
mémoire flash USB à l’appareil. Sachez
que des erreurs peuvent tout de même se
produire lors de l’écriture de données sur
un dispositif de mémoire de stockage de
masse USB 2.0, selon le type de
dispositif utilisé. Si des erreurs se
produisent lors de l’écriture de données,
Dépannage
73
Page 74

utilisez un autre type de dispositif de
mémoire flash USB.
• Pour garantir un bon fonctionnement des
dispositifs USB, évitez de raccorder les
dispositifs à l’aide d’un concentrateur
USB. Raccordez les dispositifs
directement aux connecteurs USB de
l’appareil. Le fonctionnement n’est pas
garanti quand les dispositifs sont
raccordés à l’aide d’un concentrateur
USB, un commutateur USB ou un câble
d’extension.
• Consultez la documentation fournie avec
le dispositif USB.
Le voyant LED NETWORK (réseau)
ne s’allume pas.
• Vérifiez les connexions des câbles et des
appareils du réseau.
Accès au disque dur impossible.
• En raison du clignotement rapide pendant
les accès fréquents au disque dur, le
voyant LED HDD peut sembler allumé
en continu.
Le NSR s’échauffe rapidement.
• Lorsqu’un appareil est empilé sur un
autre appareil, la chaleur générée par les
deux appareils peut être extrêmement
élevée. N’empilez pas les appareils les
uns sur les autres, ne placez pas l’appareil
sur d’autres objets pouvant générer de la
chaleur et n’installez pas l’appareil dans
des espaces restreints.
Caractéristiques
techniques
NSR-S10/S20
Connecteurs externes
Avant USB : USB 2.0 (1)
Arrière Sortie moniteur :
RVB analogique (mini D-SUB
15 broches) (1)
LAN (1000Base-T/100Base-TX/
10Base-T) (RJ-45) (2)
USB : USB 2.0 (2)
Connecteur e-SATA (1)
Entrée audio (MIC) (fréquence de
réponse 4 kHz, taux
d’échantillonnage 8 kHz,
niveau du signal d’entrée
1 Vrms, résistance d’entrée
10 kiloohms) (1) (sert à une
extension ultérieure)
Sortie audio (niveau de sortie
30 Vrms (RL = 32 ohms),
60 Vrms (RL = 16 ohms),
tension de sortie à pleine
échelle 1 Vrms, impédance de
sortie 16/32 ohms, canal de
sortie 1 (mono) (1)
Entrée de capteur (compatible avec
les dispositifs 5 V à 6 V CC,
entrée de photocoupleur, isolée
de l’unité principale) (4)
Sortie relais (maximum 30 V CC,
125 V CA, 1 A, sortie relais
mécanique, isolée de l’unité
principale) (1)
Caractéristiques techniques
74
Environnement de fonctionnement
Température de fonctionnement : 5 °C à
40 °C (41 °F à 104 °F)
Page 75

Humidité de fonctionnement : 20% à 80%
(température maximale de
bulbe humide : 30 °C (86 °F)
sans condensation)
Plage de température pour le stockage :
–20 °C à +60 °C (–4 °F à
+140 °F)
Plage d’humidité pour le stockage : 20% à
90% d’humidité relative
(température maximale de
bulbe humide : 35 °C/95 °F,
sans condensation)
Alimentation et divers
Alimentation : 12 V CC
Consommation de courant : Max. 4,0 A
Adaptateur CA : 100-240 V CA à 50/60 Hz
Dimensions : 245 × 53 × 160 mm
(9
3
⁄4 × 2
1
⁄
× 6 3⁄8 po) (L/H/P,
8
sans les parties saillantes)
Poids : Environ 1,4 kg (3,1 lb) (y compris
0,6 kg (1,3 lb) pour le disque
dur)
Accessoires fournis
Adaptateur CA (1)
Câble SATA (1) (uniquement pour les
modèles sans disque dur
interne)
Câble d’alimentation SATA (1)
(uniquement pour les modèles
sans disque dur interne)
Attache de câble (1)
Télécommande infrarouge (1)
Manuel d’installation (ce manuel) (1)
CD-ROM (guide des premiers pas, guide de
l’utilisateur) (1)
Brochure de garantie (1)
Remarques
• Effectuez toujours un essai
d’enregistrement pour vérifier que
l’enregistrement s’est fait
correctement. Sony n’assumera pas
de responsabilité pour les dommages
de quelque sorte qu’ils soient, incluant
mais ne se limitant pas à la
compensation ou au remboursement,
suite au manquement de cet appareil
ou de son support d’enregistrement,
de systèmes de mémoire extérieurs
ou de tout autre support ou système
de mémoire à enregistrer un contenu
de tout type.
• Vérifiez toujours que l’appareil
fonctionne correctement avant
l’utilisation. Sony n’assumera pas de
responsabilité pour les dommages de
quelque sorte qu’ils soient, incluant
mais ne se limitant pas à la
compensation ou au remboursement,
à cause de la perte de profits actuels
ou futurs suite à la défaillance de cet
appareil, que ce soit pendant la
période de garantie ou après son
expiration, ou pour toute autre raison
quelle qu’elle soit.
L’apparence et les caractéristiques sont
sujettes à modification sans préavis.
Caractéristiques techniques
75
Page 76
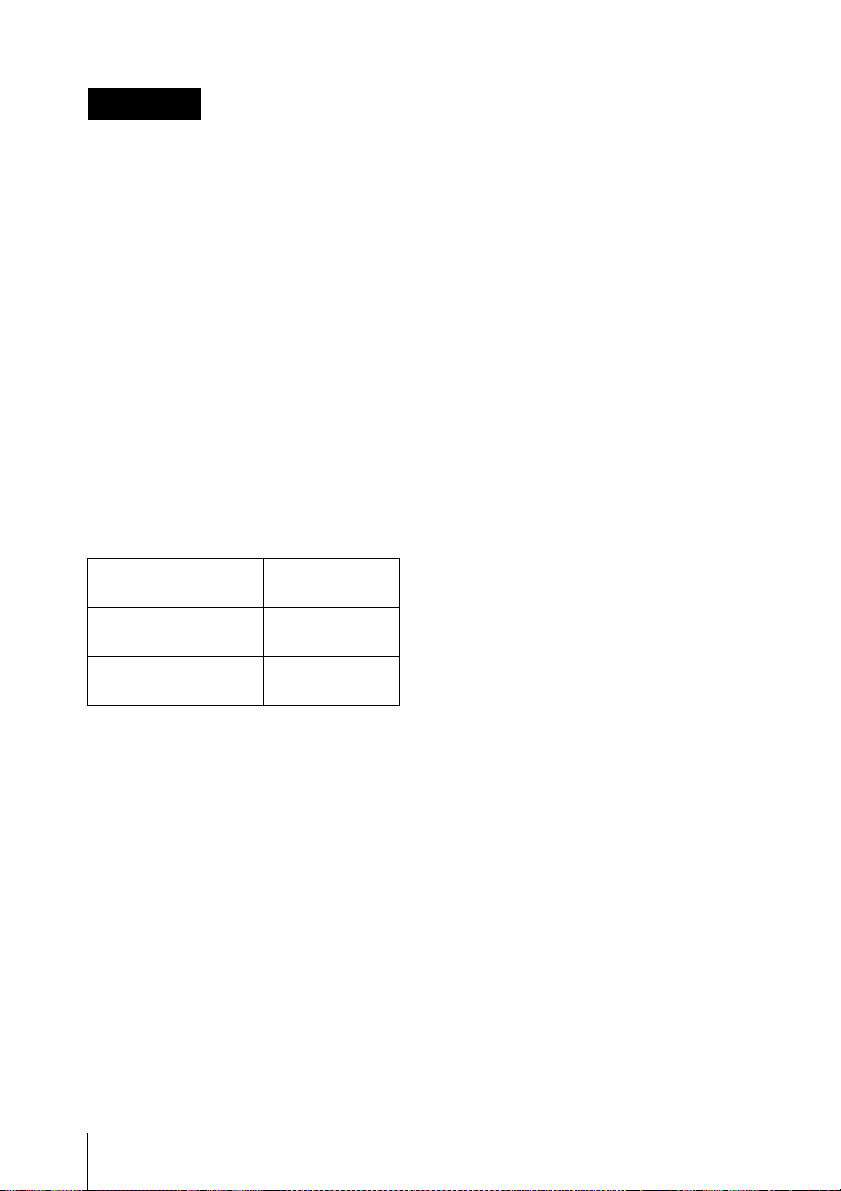
WARNUNG
Um die Gefahr von Bränden oder
elektrischen Schlägen zu
verringern, darf dieses Gerät
nicht Regen oder Feuchtigkeit
ausgesetzt werden.
Um einen elektrischen Schlag zu
vermeiden, darf das Gehäuse
nicht geöffnet werden. Überlassen
Sie Wartungsarbeiten stets nur
qualifiziertem Fachpersonal.
WICHTIGER HINWEIS
Diesem Gerät wurde zu
Zertifizierungszwecken die Modellnummer
zugewiesen. Die Nummer ist gemeinsam
mit der Nennspannung und
Nennstromstärke auf dem Typenschild
verzeichnet.
Bestellungs-Modellname und Typen-Nr.
Bestellinformationen
Modell NSR-S10/S20
1 HDD
Modell NSR-S10/S20
0 HDD
ZertifizierungsModell-Nr.
AVOM001
AVOM002
VORSICHT
Verwenden Sie ausschließlich das
mitgelieferte Netzteil zur Stromversorgung.
Hersteller: Sony
Typ-Nr.: NSR-AC1
Bei Verwendung anderer Netzteile
bestehen Brand- und andere Gefahren.
Um das Gerät vom Stromnetz zu trennen,
ziehen Sie den Stecker des Netzteils aus der
Steckdose.
Stellen Sie sicher, dass das Gerät in der
Nähe einer leicht zugänglichen Steckdose
installiert wird. Bei unnormalem
Betriebsverhalten ziehen Sie den Stecker
des Netzteils aus der Steckdose.
HINWEIS
Verwenden Sie nur das Netzkabel, welches
für den Einsatzort von der entsprechend
zuständigen Prüfstelle zugelassen ist.
VORSICHT bei einem LANAnschluss
Verbinden Sie den LAN-Anschluss aus
Sicherheitsgründen nicht mit
Netzwerkgeräten, bei denen die Gefahr von
Überspannung besteht.
Installieren der Batterie (IRFernbedienung)
Für die IR-Fernbedienung liegt eine
Lithiumbatterie vom Typ CR2025 bei.
Um Explosionsgefahr zu vermeiden, dürfen
nur Lithiumbatterien dieses Typs
verwendet werden.
VORSICHT
Explosionsgefahr bei Verwendung falscher
Batterien. Batterien nur durch den vom
Hersteller empfohlenen oder einen
gleichwertigen Typ ersetzen. Verbrauchte
Batterien entsprechend den Anweisungen
des Herstellers entsorgen.
Für Kunden in Europa
Der Hersteller dieses Produkts ist Sony
Corporation, 1-7-1 Konan, Minato-ku,
Tokyo, Japan.
Der autorisierte Repräsentant für EMV und
Produktsicherheit ist Sony Deutschland
GmbH, Hedelfinger Strasse 61, 70327
Stuttgart, Deutschland. Bei jeglichen
Angelegenheiten in Bezug auf
Kundendienst oder Garantie wenden Sie
sich bitte an die in den separaten
Kundendienst- oder Garantiedokumenten
aufgeführten Anschriften.
Für Kunden in Deutschland
Entsorgungshinweis: Bitte werfen Sie nur
entladene Batterien in die Sammelboxen
beim Handel oder den Kommunen.
Entladen sind Batterien in der Regel dann,
wenn das Gerät abschaltet und signalisiert
„Batterie leer“ oder nach längerer
Gebrauchsdauer der Batterien „nicht mehr
einwandfrei funktioniert“. Um
sicherzugehen, kleben Sie die Batteriepole
z.B. mit einem Klebestreifen ab oder geben
Sie die Batterien einzeln in einen
Plastikbeutel.
76
Page 77

Inhaltsverzeichnis
Sicherheitsmaßnahmen ................ 78
Kurzbeschreibung ........................ 80
Überprüfen des
Packungsinhalts ............................ 81
Systemanforderungen .................. 82
Verwenden des
CD-ROM-Handbuchs .................. 84
Vorbereitung ........................... 84
Lesen des
CD-ROM-Handbuchs ............. 84
Eigenschaften und Funktionen ... 85
Frontseite ................................ 85
Rückseite ................................ 85
Infrarot-Fernbedienung .......... 86
Einrichtung ................................... 89
Konfigurieren des Geräts ........ 89
Anschließen der einzelnen
Geräte ..................................... 90
Anschließen eines
e-SATA-Speichermediums .... 90
Anschließen der
Netzwerkkameras ................... 91
Anschließen des Netzteils ...... 91
Einschalten des Gerätes und
Registrieren der Kameras ........... 92
Einstellungen, die individuelle
Konfiguration erfordern ......... 95
E/A-Anschluss ............................... 96
Fehlersuche ................................... 97
Technische Daten .......................... 98
NSR-S10/S20 ......................... 98
Warenzeichen
• „IPELA“ und sind
Warenzeichen der Sony Corporation.
Andere in diesem Dokument erwähnte
Produkt- oder Systemnamen sind
Warenzeichen oder eingetragene
Warenzeichen ihrer jeweiligen Eigentümer.
In den Textabschnitten werden die Symbole
® und ™ nicht verwendet.
• Die vollständige oder auszugsweise
Reproduktion und Vervielfältigung der
Software und des mit dem Recorder
gelieferten Handbuchs ohne Zustimmung
des Rechteinhabers ist urheberrechtlich
verboten. Gleiches gilt für Vermietung und
Verleih.
• Sony haftet nicht für Schäden, entgangene
Gewinne oder andere Ansprüche Dritter, die
sich aus der Verwendung de s Recorders oder
der mitgelieferten Software- ergeben.
• Die vollständigen Garantiebedingungen des
Recorders befinden sich auf der
beiliegenden Garantiekarte.
• Die im Lieferumfang enthal tene Software ist
nicht für die Verwendung mit anderen
Recordern geeignet.
• Es ist nicht möglich, andere als die von Sony
mitgelieferte, speziell für den Gebrauch mit
diesem Gerät vorgesehene Software im
Gerät zu installieren.
• Die technischen Daten des Recorders und
der mitgelieferten Software können aus
Gründen des technischen Fortschritts
jederzeit ohne Ankündigung geändert
werden.
Haftungsausschluss bezüglich
aufgenommener Inhalte
Sony Corporation lehnt jegliche Haftung für
Konsequenzen ab, die aus nicht erfolgter
Aufzeichung oder aus Beschädigung bzw.
Löschung von Aufnahmen auf diesem Gerät
gleich aus welchem Grund resultieren.- Dies
umfasst auch Schadensersatzansprüche, die sich
auf das aufgezeichnete Material beziehen sowie
auf gleichzeitig einhergehende und
Folgeschäden.- Sony Corporation leistet keine
Wiederherstellung, Reparatur oder
Vervielfältigung von aufgezeichneten Inhalten.
Der Gebrauch des Produkts unterliegt diesen
Bedingungen.
DE
Inhaltsverzeichnis
77
Page 78

Sicherheitsmaßnahmen
Wichtige
Sicherheitsinformationen
• Schließen Sie das Gerät nur an eine
Stromquelle an, die vollständig den
elektrischen Spezifikationen des Gerätes
entspricht.
• Verwenden Sie ausschließlich das
mitgelieferte Netzkabel. Wickeln Sie das
Netzkabel nicht auf und bündeln Sie es
nicht mit anderen Kabeln. Schließen Sie
nicht zu viele Geräte an eine Steckdose
an. Wenn die Stromstärke zu hoch ist,
bestehen Feuergefahr und die Gefahr
anderer Unfälle.
• Verwenden Sie das Gerät nicht, wenn
Abdeckungen oder das Gehäuse geöffnet
oder abgenommen wurden. Andernfalls
besteht Feuergefahr und die Gefahr eines
elektrischen Schlags. Versuchen Sie
nicht selbst, Abdeckungen oder das
Gehäuse zu öffnen oder abzunehmen.
Wenden Sie sich immer an Ihren
Händler, wenn das Öffnen des Geräts
erforderlich ist.
Wichtige
Installationsinformationen
Ort für Betrieb/Lagerung
Um die Lebensdauer des Produkts zu
verlängern, verwenden oder lagern Sie es
möglichst nicht an Orten, die folgenden
Bedingungen ausgesetzt sind:
• Extremer Hitze oder Kälte. (Ich folge den
genauen Angabe dieses Gerätes und
benutze es bitte.)
• Direktem Sonnenlicht über längere Zeit
hinweg und Hitze von Heizgeräten.
Beachten Sie, dass die Temperatur in
einem geschlossenen Fahrzeug im
Sommer +50 °C/122 °F übersteigen
kann.
• Hoher Luftfeuchtigkeit oder übermäßig
viel Staub
• Starken Vibrationen
• Starken magnetischen Feldern
• Unmittelbarer Nähe zu Radio- oder
Fernsehsendern, die ein starkes
magnetisches Feld erzeugen.
Geräte nicht übereinander und
nicht auf Gegenständen aufstellen,
die Wärme abstrahlen
Wenn mehrere Geräte dieses Typs
übereinander aufgestellt werden, kann es zu
übermäßiger Erhitzung kommen. Stellen
Sie nicht mehrere Geräte dieses Typs
aufeinander, und stellen Sie das Gerät nicht
auf Gegenstände, die Wärme abstrahlen.
Blockieren Sie die
Lüftungsöffnungen nicht
• Die Lüftungsöffnungen an den Seiten des
Geräts dienen zum Verhindern eines
Hitzestaus im Gerät. Halten Sie daher
stets mit allen vier Seiten des Geräts
Abstand zu Wänden und anderen
Gegenständen.
• Verwenden Sie das Gerät nicht in einem
geschlossenen Schrank, einem
geschlossenen Regal o. ä.
Verwenden Sie das Gerät in
waagrechter Position
• Dieses Gerät ist für den Betrieb in
waagrechter Position konzipiert.
• Stellen Sie das Gerät nicht auf eine
geneigte Oberfläche und schützen Sie das
Gerät vor Stößen.
• Wenn das Gerät herunterfällt oder auf
andere Weise heftigen Stößen ausgesetzt
wird, kann es schwer beschädigt werden.
Wartung
• Ziehen Sie vor dem Reinigen des Geräts
und anderen Wartungsarbeiten unbedingt
den Netzstecker aus der Netzsteckdose.
Sicherheitsmaßnahmen
78
Page 79

• Wischen Sie zum Reinigen mit einem
trockenen Tuch vorsichtig über das
Gehäuse und die Abdeckungen. Bei
hartnäckigen Verschmutzungen feuchten
Sie das Tuch mit einem milden, neutralen
Reinigungsmittel leicht an und wischen
mit einem trockenen Tuch nach.
• Verwenden Sie keinen
Reinigungsalkohol, keine Lösungsmittel,
kein Benzin, keine Insektizide oder
andere flüchtige Substanzen, da diese die
Oberfläche angreifen und zu
Verfärbungen führen können.
• Nehmen Sie keine Abdeckungen oder
äußeren Teile vom Gerät ab.
• Wenn Sie das Gerät auf den Boden oder
eine andere Oberfläche stellen,
vergewissern Sie sich, dass die
zugehörigen Unterlagen angebracht sind,
und setzen Sie das Gerät vorsichtig ab.
Sind keine Unterlagen angebracht,
montieren Sie zunächst die
erforderlichen Unterlagen.
• Stellen Sie das Gerät nicht in die Nähe
anderer Geräte, die Vibrationen
verursachen könnten.
Transport
Verpacken Sie das Gerät im Original- oder
ähnlichem Verpackungsmaterial, um es vor
Stößen zu schützen.
Sicherheitshinweise für
Produkte mit eingebauter
Festplatte
Dieses Gerät ist mit einer eingebauten
Festplatte ausgestattet. Die Festplatte ist ein
Präzisionsgerät. Wenn sie Stößen,
Vibrationen, statischer Elektrizität, hohen
Temperaturen oder hoher Luftfeuchtigkeit
ausgesetzt wird, kann es zu Datenverlusten
kommen. Beachten Sie beim Installieren
und Verwenden des Geräts unbedingt
folgende Sicherheitshinweise.
Schutz vor Stößen und Vibrationen
Wenn die Festplatte Stößen und
Vibrationen ausgesetzt wird, kann sie
beschädigt werden und Daten können
verloren gehen.
• Verwenden Sie zum Transport des Geräts
das angegebene Verpackungsmaterial.
Beim Transport auf einem fahrbaren
Rollwagen oder ähnlichem dürfen keine
übermäßigen Vibrationen auftreten. Bei
starken Stößen und Erschütterungen
kann die Festplatte beschädigt werden.
• Stellen Sie das Gerät nie um, solange es
eingeschaltet ist.
Warten Sie nach dem Ausschalten
des Geräts 30 Sekunden lang
Nach dem Ausschalten des Geräts drehen
sich die Platten im Festplattenlaufwerk eine
kurze Weile weiter und die Köpfe befinden
sich in einer instabilen Position. In dieser
Zeit ist das Gerät bei Stößen und
Vibrationen noch empfindlicher als im
normalen Betrieb. Schützen Sie das Gerät
nach dem Ausschalten mindestens 30
Sekunden lang selbst vor äußerst geringen
Erschütterungen. Danach befindet sich die
Festplatte vollständig im Ruhezustand und
das Gerät kann transportiert werden.
Sicherheitshinweise hinsichtlich
Temperatur und Luftfeuchtigkeit
Verwenden und lagern Sie das Gerät nur an
Orten, an denen die angegebenen
Temperatur- und Luftfeuchtigkeitswerte
nicht über- oder unterschritten werden. (Ich
folge den genauen Angabe dieses Gerätes
und benutze es bitte.)
Bei defekter Festplatte
Beachten Sie bitte alle oben genannten
Sicherheitshinweise, auch wenn die
Festplatte bereits Fehlfunktionen aufweist.
Damit lassen sich weitere Schäden
verhindern, bis das Problem festgestellt und
behoben werden kann.
Sicherheitsmaßnahmen
79
Page 80

Ersetzen der Festplatte und
anderer Verbrauchsmaterialien
Festplatte und Batterie des Geräts sind
Verbrauchsmaterialien, die regelmäßig
ersetzt werden müssen. Wenn das Gerät bei
Raumtemperatur betrieben wird, sollten die
Teile ca. alle zwei bis drei Jahre ersetzt
werden. Diese Ersatzfristen stellen jedoch
nur eine allgemeine Richtlinie und keine
Garantie der Lebensdauer dieser Teile dar.
Weitere Informationen zum Austausch von
Komponenten erhalten Sie bei Ihrem
Händler.
Sicherheitshinweise für die
Verwendung von USB-Geräten
• Dieses Gerät unterstützt USB 2.0Massenspeichergeräte. USB 2.0Massenspeicher-HDDs sowie CD- bzw.
DVD-Laufwerke werden jedoch nicht
unterstützt. Schließen Sie keine anderen
Massenspeichergeräte als USB-FlashSpeichergeräte an das Gerät an. Je nach
dem verwendeten Gerätetyp können
beim Schreiben von Daten auf USB 2.0Massenspeichergeräte Fehler
auftreten.Verwenden Sie in diesem Fall
ein USB-Flash-Speichergerät eines
anderen Typs.
• Schließen Sie zur Gewährleistung des
korrekten Betriebs USB-Geräte nicht
über einen USB-Hub an. Schließen Sie
die Geräte direkt an die USB-Anschlüsse
an der Vorderseite und Rückseite des
Geräts an. Wenn Geräte über einen USBHub, einen USB-Switch oder ein
Verlängerungskabel angeschlossen
werden, wird die Funktion nicht
garantiert.
Kurzbeschreibung
Der NSR-S10/S20 ist ein NetzwerkÜberwachungsrecorder für
Netzwerkkameras. Mit dem Server können
Sie Bilder von Netzwerkkameras in den
Formaten JPEG, MPEG-4 und H.264 über
das Netzwerk anzeigen und aufzeichnen.
Weiterhin können Sie mit dem Server
unkompliziert nach aufgezeichneten
Bildern suchen und diese wiedergeben.
Fernverwaltung und
Fernsteuerung kompatibler
Kameras
Mit dem NSR-S10 können Sie Bilder von
bis zu vier Netzwerkkameras verwalten,
kontrollieren und anzeigen, mit dem
NSR-S20 von bis zu acht
Netzwerkkameras. Sie können kompatible
Kameras schwenken, neigen und zoomen
lassen.
Großzügig dimensionierte
Festplatten gestatten
Aufzeichnungen über längere
Zeiträume.
Modelle mit internen Festplatten verfügen
über eine hohe Speicherkapazität und
ermöglichen Aufzeichnungen von langer
Dauer. Außerdem können Speichergeräte
mit Unterstützung für die e-SATASchnittstelle an das Gerät angeschlossen
werden.
Überwachung per Browser
Sie können mit einem Browser auf den
NSR zugreifen und dessen Bilder
überwachen.
80
Andere Eigenschaften
• Der NSR eignet sich u.a. für
Kontinuierliche Aufzeichnung,
Bewegungserkennung und
alarmgesteuerte Aufzeichnungen.
Kurzbeschreibung
Page 81

• Aufgezeichnete Bilder können nach
Datum/Uhrzeit, Sensoren,
Bewegungserkennung, Verlust des
Videosignals usw. gesucht werden.
• Tonaufnahme und -wiedergabe
mit kompatiblen Kameras möglich.
1)
sind
Überprüfen des
Packungsinhalts
1) Hierzu w erden optionale Audioverstärker oder
Lautsprecher benötigt.
Wichtig
• Dieses Handbuch beschreibt die
Installation und Ersteinrichtung des
Gerätes. Ausführliche Informationen
über die verschiedenen Einstellungen des
Gerätes finden Sie in der Kurzanleitung
(PDF-Datei) und im Benutzerhandbuch
(PDF-Datei).
• Informationen zu den
Systemanforderungen für die
Clientcomputer, die unterstützten
Kameramodelle und weitere wichtige
Hinweise finden Sie in der Datei Release
Note (PDF-Datei).
Diese Datei kann von der folgenden
URL-Adresse herunter geladen werden.
http://www.sony.co.jp/Products/NSR/
NSR-S_ReleaseNote_E.pdf
Überprüfen Sie nach dem Öffnen der
Verpackung, dass diese die im Folgenden
genannten Teile enthält. Sollte eines der
aufgeführten Teile fehlen, wenden Sie sich
an Ihren SONY-Händler.
•Gerät (1)
• Netzteil (1)
• Kabelklemme (1)
• Infrarot-Fernbedienung (1)
• Installationsanleitung (dieses Handbuch)
(1)
• CD-ROM (Kurzanleitung,
Benutzerhandbuch) (1)
• Garantiebroschüre (1)
Hinweise
• Unter Umständen enthält die Packung
weitere, hier nicht aufgeführte,
Dokumentationen oder Materialien.
Überprüfen des Packungsinhalts
81
Page 82

• Der Karton und die
Verpackungsmaterialien können zum
Transport oder Versand des Gerätes
verwendet werden. Bewahren Sie diese
Materialien daher zur späteren
Verwendung auf.
Systemanforderungen
Folgende Hardware ist für die Nutzung
dieses Recorders erforderlich.
• Monitor
• Sony-Netzwerkkamera
• Informationen über kompatible Sony-
• USB-Tastatur
•USB-Maus
• Netzwerkswitch
• 1000Base-T/100Base-TX/10Base-T-
• USB-Flash-Speichergerät
1) Das Gerät ist für Computermonitore mit
2) Verwenden Sie eine USB-Tastatur mit Kabel.
3) Verwenden Sie eine USB-Maus mit Kabel.
4) Erforderlich zum Erstellen von
1)
Netzwerkkameras erhalten Sie bei Ihrem
Händler.
Kabel
Unterstützung für analoge RGBEingangssignale geeignet.
Die Funktion von Nichtstandardtasten kann
nicht garantiert werden. Ebenso funktionieren
USB-Tastaturen mit Funk- oder
Infrarotschnittstelle unter Umständen nicht.
USB-Mäuse mit Funk- oder
Infrarotschnittstelle funktionieren unter
Umständen nicht. Funktionen wie z. B. die
Bedienung mit drei Tasten und dem Mausrad
sind unter Umständen ebenfalls nicht
verfügbar.
Sicherungskopien von Systeminformationen
wie z. B. Protokolldateien.
- Dieses Gerät unterstützt USB 2.0Massenspeichergeräte. USB 2.0Massenspeicher-HDDs sowie CD- bzw.
DVD-Laufwerke werden jedoch nicht
unterstützt. Schließen Sie keine anderen
Massenspeichergeräte als USB-FlashSpeichergeräte an das Gerät an. Je nach dem
verwendeten Gerätetyp können beim
Schreiben von Daten auf USB 2.0Massenspeichergeräte Fehler auftreten.
Verwenden Sie in diesem Fall ein USBFlash-Speichergerät eines anderen Typs.
2)
3)
4)
Systemanforderungen
82
Page 83

Hinweis
Die Monitortastatur auf dem Bildschirm
kann auch dann verwendet werden, wenn
keine USB-Tastatur angeschlossen ist.
Systemanforderungen
83
Page 84

Verwenden des CD-ROM-Handbuchs
Auf der beiliegenden CD-ROM sind Benutzerhandbücher (Kurzanleitung,
Benutzerhandbuch) für NSR gespeichert (in japanischer, englischer, französischer,
deutscher, italienischer, spanischer und chinesischer Sprache).
Die Kopien dieser Handbücher sind im PDF-Format erstellt.
Vorbereitung
Um die auf der CD-ROM gespeicherten Benutzerhandbücher verwenden zu können, muss
eines der folgenden Programme auf dem Computer installiert sein.
• Adobe Reader ab Version 6.0
Hinweis
Wenn Adobe Reader nicht installiert ist, können Sie die Anwendung von der folgenden URLAdresse herunterladen:
http://www.adobe.com/
Adobe und Adobe Reader sind in den USA und anderen Ländern Warenzeichen oder
eingetragene Warenzeichen von Adobe Systems Incorporated.
Lesen des CD-ROM-Handbuchs
Gehen Sie wie im Folgenden beschrieben vor, um das Handbuch auf der CD-ROM zu lesen.
1 Legen Sie die CD-ROM in das CD-ROM-Laufwerk ein.
Die Dokumentationen sind im Ordner „Manual“ gespeichert.
2 Doppelklicken Sie auf das Handbuch, das Sie lesen möchten.
Hinweis
Abhängig von der verwendeten Version von Adobe Reader kann die Datei möglicherweise
nicht ordnungsgemäß angezeigt werden. Wenn die Datei nicht ordnungsgemäß angezeigt
wird, laden Sie von der im Abschnitt „Vorbereitung“ angegebenen URL-Adresse die aktuelle
Version von Adobe Reader herunter.
Achtung
Wenn Sie die CD-ROM verlieren oder diese nicht lesbar ist, können Sie eine neue CD-ROM
erwerben. Wenden Sie sich dazu an Ihren Sony-Vertreter.
Verwenden des CD-ROM-Handbuchs
84
Page 85

Eigenschaften und Funktionen
Frontseite
A LED POWER
Leuchtet grün, wenn das Gerät
eingeschaltet ist.
B LED HDD
Blinkt grün, wenn auf die internen
Festplatten zugegriffen wird.
C Infrarotsensor
Zum Empfang der Signale der InfrarotFernbedienung.
Rückseite
A Sicherheitssteckplatz
Zum Anbringen eines SicherheitsDrahtseils.
D LED NETWORK (1, 2)
Leuchtet grün, wenn der entsprechende
LAN-Anschluss auf der Rückseite des
NSR aktiv ist.
E USB-Anschluss
Schließen Sie hier eine USB-Tastatur,
USB-Maus oder einen USB-FlashSpeicher an den NSR an.
B USB-Anschluss
Schließen Sie hier eine USB-Tastatur,
USB-Maus oder einen USB-FlashSpeicher an den NSR an.
C Anschluss Monitor
Schließen Sie hier einen Monitor an.
Eigenschaften und Funktionen
85
Page 86

D Anschluss I/O
Zum Anschließen der Audio- und
Sensoreingänge sowie der
Relaisausgänge.
Weitere Informationen zu den
Anschlüssen sowie Schaltpläne für
Sensoreingänge finden Sie unter „E/A-
Anschluss“ (Seite 96).
H Anschluss DC IN (12 V)
Schließen Sie hier das Netzteil an.
I Kabelklemmenöffnung
Bringen Sie die mitgelieferte
Kabelklemme hier an, um ein
Herausrutschen des Netzkabels zu
verhindern.
E Anschluss e-SATA
Zum Anschluss von Speichergeräten
mit Unterstützung für die e-SATASchnittstelle.
F Netzwerkanschlüsse (1, 2)
Schließen Sie hier 10 Base-T-, 100
Base-TX- oder 1000 Base-TNetzwerkabel an.
Der obere Anschluss ist LAN2, der
untere Anschluss LAN1.
LAN1: Netzwerkkamera
LAN2: Netzwerkkamera (LAN2 kann
nur mit einem anderen
Netzwerksegment als LAN1 verwendet
werden.)
Sicherheitshinweis für LANAnschlüsse
Verbinden Sie die LAN-Anschlüsse
nicht mit Netzwerkgeräten, die
unzulässig hohe Spannungen abgeben.
Beachten Sie die Anweisungen für die
oben genannten Anschlüsse.
G 1 Netzschalter
Zum Einschalten des Geräts drücken.
Infrarot-Fernbedienung
Wenn die Infrarot-Fernbedienung auf den
Infrarotsensor der Haupteinheit zeigt und
eine Taste auf der Fernbedienung gedrückt
wird, wird an der Haupteinheit die der Taste
entsprechende Funktion ausgelöst.
Hinweis
Diese Taste kann auch verwendet
werden, um das Abschalten des Gerätes
zu erzwingen. Unter normalen
Umständen sollte dies jedoch stets über
den Befehl „Shut down“ auf dem
Bildschirm erfolgen.
Eigenschaften und Funktionen
86
A Wiedergabetaste
Zum Wiedergeben der aufgezeichneten
Bilder.
m (Schneller Rücklauf)
Zum schnellen Zurückspulen. (in
2facher, 4facher, 8facher, 16facher,
32facher oder 64facher
Geschwindigkeit)
Page 87

n (Wiedergabe rückwärts)
Zur Rückwärtswiedergabe der
aufgezeichneten Bilder.
u (Wiedergabe/(Pause)
Bei angehaltener Wiedergabe: Diese
Taste setzt die Wiedergabe fort. (in
einfacher Geschwindigkeit).
Bei der Wiedergabe: Diese Taste
unterbricht die Wiedergabe.
M (schneller Vorlauf)
Zum schnellen Vorspulen. (in 2facher,
4facher, 8facher, 16facher, 32facher
oder 64facher Geschwindigkeit)
t (Langsamer Rücklauf)
Zum langsamen Zurückspulen. (in 1/2
oder 1/4 Geschwindigkeit)
c (Voriges Einzelbild)
Mit dieser Taste können Sie ein
Einzelbild zurück gehen.
T (Langsamer Vorlauf)
Zum langsamen Vorspulen. (in 1/2 oder
1/4 Geschwindigkeit)
C (Weiter)
Mit dieser Taste können Sie ein
Einzelbild weiter gehen.
B Taste LIVE/PB
Mit dieser Taste können Sie zwischen
der Livebildanzeige und der
Wiedergabe aufgezeichneter Bilder
wechseln.
C (Monitortastatur)
Mit dieser Taste können Sie die
Monitortastatur für die Texteingabe
anzeigen.
D Taste PRESET
Mit dieser Taste können Sie die Kamera
in eine voreingestellte Position bringen.
E + / – (Kameranummer) -Taste
Mit diesen Tasten wählen Sie Kameras
aus.
Drücken Sie die Taste [+] zum
Auswählen der nächsten
Kameranummer, und die Taste [–] zum
Auswählen der vorherigen
Kameranummer.
F Taste (2 × 2-Layout)
Mit dieser Taste wird das 2 × 2-Layout
des Bildschirms (4 Bildschirme)
aktiviert.
G Taste (1 × 1-Layout)
Mit dieser Taste wird das 1 × 1-Layout
des Bildschirms (1 Bildschirm)
aktiviert.
H Numerische Tasten
Mit diesen Tasten können Sie Zahlen
eingeben.
I Funktionsauswahltasten
Mit diesen Tasten können Sie Optionen
usw. auswählen.
Taste V
Mit dieser Taste setzen Sie den Cursor
auf ein darüber liegendes Objekt.
Taste B
Mit dieser Taste setzen Sie den Cursor
auf ein links daneben liegendes Objekt.
Taste v
Mit dieser Taste setzen Sie den Cursor
auf ein darunter liegendes Objekt.
Taste b
Mit dieser Taste setzen Sie den Cursor
auf ein rechts daneben liegendes Objekt.
Taste ENTER
Mit dieser Taste können Sie die
Auswahl der aktuellen Option bzw. des
aktuellen Monitorfensters bestätigen
und weitere Funktionen ausführen.
Eigenschaften und Funktionen
87
Page 88

Bevor Sie die InfrarotFernbedienung einsetzen
Entfernen Sie das Isolierblatt.
Isolierblatt
Austauschen der Lithiumbatterie
in der Infrarot-Fernbedienung
Die Infrarot-Fernbedienung verwendet eine
Standard-Lithiumbatterie CR2025.
Verwenden Sie nur Batterien des Typs
CR2025.
1 Drücken Sie den Verschlusshebel (1)
herunter, und ziehen Sie das
Batteriefach heraus. (2).
VORSICHT
Explosionsgefahr bei Verwendung falscher
Batterien. Batterien nur durch den vom
Hersteller empfohlenen oder einen
gleichwertigen Typ ersetzen.
Wenn Sie die Batterie entsorgen, müssen
Sie die Gesetze der jeweiligen Region und
des jeweiligen Landes befolgen.
Batterie-Austauschfristen
Wenn das Gerät nicht auf den Tastendruck
reagiert, ist möglicherweise die
Lithiumbatterie erschöpft. Im Durchschnitt
hält eine Lithiumbatterie in diesem Gerät
ein Jahr lang. Dieser Wert variiert jedoch
entsprechend der Nutzungshäufigkeit.
Wenn die Haupteinheit nicht auf die
Betätigung der Tasten auf der
Fernbedienung reagiert, ersetzen Sie die
Batterie.
2 Legen Sie die Batterie mit der Seite
„+“ nach oben ein (1), und schieben
Sie den Batteriehalter wieder ein, bis er
hörbar einrastet (2).
Seite „+“ zeigt nach oben
Eigenschaften und Funktionen
88
Page 89
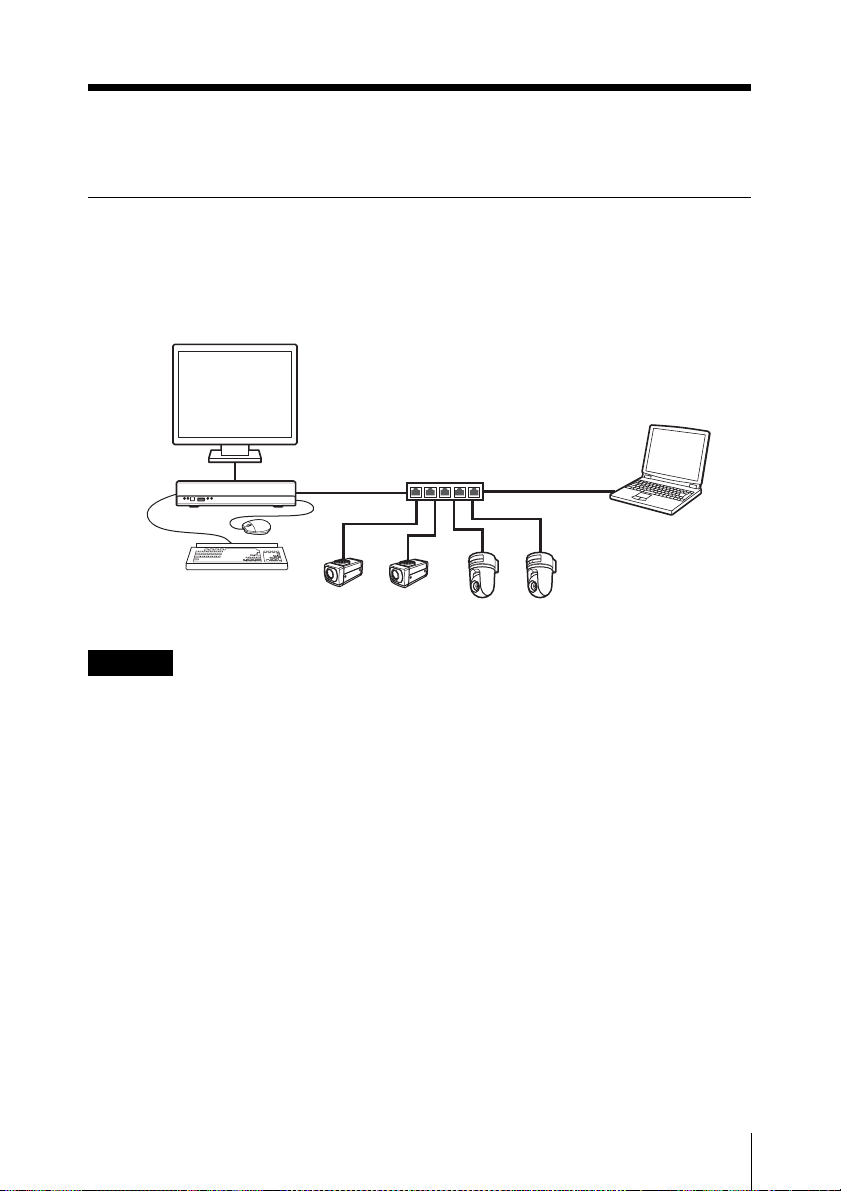
Einrichtung
Konfigurieren des Geräts
Legen Sie den Aufstellungsort für das Gerät fest, und schließen Sie dann alle Peripheriegeräte
an.
In diesem Handbuch wird als Beispiel zur Erklärung ein lokales Netzwerk verwendet, das nur
aus dem NSR, den Kameras und (bei Bedarf) einem Client-Computer besteht.
Monitor
NSR-S10/S20
Achtung
• Beachten Sie beim Anschließen des Gerätes an ein vorhandenes Netzwerk die
Kurzanleitung (PDF-Datei).
• Weitere Informationen über die Bedienung mittels eines Client-Computers finden Sie im
Benutzerhandbuch (PDF-Datei).
Netzwerkswitch
Windows-Computer
Netzwerkkameras
Einrichtung
89
Page 90

Anschließen der einzelnen Geräte
Schließen Sie den Monitor, die USB-Maus und die USB-Tastatur an die entsprechenden
Anschlüsse auf der Frontseite des Geräts an.
Anschließen eines e-SATA-Speichermediums
Schließen Sie externe e-SATA-Speichermedien mit dem e-SATA Kabel.
e-SATA-Speichermediums
Achtung
• Nehmen Sie die erforderlichen Einstellungen des e-SATA-Speichermediums vor, ehe Sie
es an dieses Gerät anschließen.
• Beachten Sie bei der Verwendung eines externen e-SATA-Speichergeräts die
Kurzanleitung (PDF-Datei).
Einrichtung
90
Page 91

Anschließen der Netzwerkkameras
Schließen Sie die Netzwerkkameras und das Gerät an dasselbe Segment des Netzwerks an.
Wenn Sie einen Client-Computer verwenden, schließen Sie auch diesen an dasselbe
Netzwerksegment an.
Windows-Computer
Netzwerkkameras
Anschließen des Netzteils
Schließen Sie das Netzteil und das Netzkabel an.
Bringen Sie die Kabelklemme an, ein
Herausrutschen des Steckers zu verhindern.
Netzteil
Netzkabel
Einrichtung
91
Page 92

Einschalten des Gerätes und
Registrieren der Kameras
Nach dem Start des NSR können Sie sofort mit der Überwachung beginnen, wenn Sie die
Kameras automatisch registrieren lassen.
Hinweis
Das Gerät wird automatisch eingeschaltet, wenn das Netzkabel des Netzteils in die
Netzsteckdose gesteckt wird. Wenn das NSR über den Bildschirm oder mit Hilfe des
Netzschalters auf der Rückseite ausgeschaltet wurde, kann es durch Drücken des
Netzschalters wieder eingeschaltet werden.
1 Stecken Sie das Netzkabel des Netzteils in eine Netzsteckdose.
Ein Signalton ertönt, und die LED „Power“ auf der Frontseite leuchtet grün.
Nach ein bis zwei Minuten wird auf dem Monitor die Meldung „System Starting, Please
Wait...“ angezeigt.
Nach dem Start des Gerätes wird der Bildschirm „Main“ angezeigt.
Hinweis
• Benutzer-ID und Kennwort zur Anmeldung am Bildschirm „Main“ lauten
folgendermaßen:
Standard-Benutzer-ID: admin
Standardkennwort: admin
• Ausführliche Informationen zum Ändern der Einstellung für die automatische
Anmeldung finden Sie im Benutzerhandbuch (PDF-Datei) unter „Einstellungen für
das System“.
Einschalten des Gerätes und Registrieren der Kameras
92
Page 93

Im selben Netzwerksegment angeschlossene Kameras werden automatisch erkannt und
im NSR registriert. Die Bilder der automatisch erkannten Kameras erscheinen auf dem
Bildschirm „Main“.
Bildschirmbeispiel: NSR-S10
Wenn die Kameras registriert sind, wird die kontinuierliche Aufzeichnung automatisch
gestartet.
Hinweise
• Nur Sony-Kameras werden gefunden und registriert.
• Es werden nur Kameras mit unveränderten Standard-IP-Adressen (Werkseinstellung)
gefunden und registriert. Um Kameras mit geänderten IP-Adressen zu registrieren,
setzen Sie die IP-Adressen der Kameras auf die Standardwerte zurück, und starten Sie
den NSR neu.
• Wenn mehrere Kameras angeschlossen sind, werden diese in der Reihenfolge ihrer
Position registriert. Für den NSR-S10 können bis zu 4 Kameras registriert werden, für
den NSR-S20 bis zu 8 Kameras.
Hiermit sind die Verbindungen hergestellt.
Sie können jetzt entsprechend der Kurzanleitung (PDF-Datei) die Funktionsprüfung
ausführen und weitere Konfigurationsschritte vornehmen.
Achtung
Beachten Sie beim Anschließen des Gerätes an ein vorhandenes Netzwerk die
Kurzanleitung (PDF-Datei).
Einschalten des Gerätes und Registrieren der Kameras
93
Page 94

Wichtig
Sie können die aktuelle Firmware für den NSR-S10/S20 unter der folgenden URLAdresse herunterladen.
Informationen zum Aktualisieren der Firmware finden Sie im Benutzerhandbuch (PDFDatei).
http://www.sony.co.jp/Products/NSR/NSR-S.zip
Einstellen der Werte für die automatische Registrierung
Kameras werden mit folgenden Einstellungen registriert.
Zur Überwachung
SNC-RZ25 SNC-RZ50 SNT-Serie 1280 × 720-
NTSC
Videogröße 640 × 480
Videoformat MPEG-4 MPEG-4 MPEG-4 MPEG-4 MPEG-4
Bildfrequenz
Bildqualität/
Bitrate
1) Kameras, die nur den Modus 16:9 unterstützen, werden mit dem Standardwert 640 × 368 gespeichert.
Die Standardwerte jedes einzelnen Kameramodells finden Sie in der Datei Release Note (PDF-Datei).
PAL
NTSC
15 15 12 15 12 15 15
1.024 kb/s 1.024 kb/s 1.024 kb/s 1.024 kb/s 1.024 kb/s
PAL
NTSC
704 × 480
PAL
704 × 576
NTSC
640 × 480
PAL
kompatibles
Modell
640 × 480
1920 × 1080-
kompatibles
1)
640 × 480
Modell
1)
Zur Aufzeichnung
SNC-RZ25 SNC-RZ50 SNT-Serie 1280 × 720-
NTSC
Videogröße 640 × 480
Videoformat MPEG-4 MPEG-4 H.264 H.264 H.264
Bildfrequenz
Bildqualität/
Bitrate
PAL
NTSC
15 15 12 15 12 10 10
1.024 kb/s 1.024 kb/s 1.024 kb/s 2.048 kb/s 3.072 kb/s
PAL
NTSC
704 × 480
PAL
704 × 576
NTSC
NTSC
720 × 480
PAL
720 × 576
kompatibles
PAL
Modell
1280 × 720 1920 × 1080
1920 × 1080-
kompatibles
Modell
Einschalten des Gerätes und Registrieren der Kameras
94
Page 95

Einstellungen, die individuelle Konfiguration erfordern
In den Einstellungen für die automatische Registrierung sind die folgenden Funktionen
deaktiviert oder nicht konfiguriert. Informationen zum Aktivieren dieser Funktionen finden
Sie im Benutzerhandbuch (PDF-Datei).
• Kamera-Audio
•Sensorelngang
• Relais-Ausgang
Einschalten des Gerätes und Registrieren der Kameras
95
Page 96

E/A-Anschluss
Stiftzuweisung des E/AAnschlusses
Audioeingang/-ausgang
Pin-Nr. AUDIO
1 AUDIO IN
2 AUDIO IN GND
3 AUDIO OUT
4 AUDIO OUT GND
Achtung
Der Anschluss AUDIO IN ist für
zukünftige Erweiterungen vorgesehen und
wird gegenwärtig nicht unterstützt.
Sensoreingang und
Relaisausgang
Pin-Nr. SENSOR
5 SENSOR IN 1
6 SENSOR IN 1 GND
7 SENSOR IN 2
8 SENSOR IN 2 GND
9 SENSOR IN 3
10 SENSOR IN 3 GND
11 SENSOR IN 4
12 SENSOR IN 4 GND
13 RELAY OUTPUT +
14 RELAY OUTPUT –
Verwenden der E/A-Buchsen
Stecken Sie einen kleinen Schraubenzieher
in den oberen oder unteren Schlitz neben
der Öffnung, in die Sie ein Kabel stecken
möchten (AWG Nr. 26 bis 20). Stecken Sie
das Kabel ein, und lassen Sie dann den
Schraubenzieher los.
Achtung
Drücken Sie den Schraubenzieher nicht zu
fest in den Schlitz, da sonst etwas
beschädigt werden könnte.
1
2
3
Schließen Sie auf dieselbe Weise alle
benötigten Kabel an.
Schaltplan für Audioausgang
Innerhalb dieses
Geräts
Audio
Codec
47 kΩ
220 μF
Außerhalb
Beispiel)
Kopfhörer
RL=16 Ω/32 Ω
96
E/A-Anschluss
Page 97

Schaltplan für Sensoreingang
Innerhalb dieses
Geräts
Vcc = 5 V
200 Ω
Sensoreingang
1, 2, 3, 4
Sensoreingang
1G, 2G, 3G, 4G
Außerhalb
(Beispiel)
Schaltplan für Relaisausgang
Innerhalb dieses
Geräts
Relaisausgang +
Relais
30 V-/
125 V~,
max. 1 A
Relaisausgang –
Außerhalb
Vcc
(Beispiel)
Fehlersuche
Überprüfen Sie die folgenden Punkte, ehe
Sie sich an Ihren Händler oder ein SonyKundendienstcenter wenden. Wenn sich
das Problem hierdurch nicht beheben lässt,
wenden Sie sich an ein SONYServicecenter.
Das NSR funktioniert nicht.
• Überprüfen Sie, ob das Stromkabel
ordnungsgemäß angeschlossen ist.
• Überprüfen Sie, ob die Steckdose Strom
führt. Schließen Sie hierzu ein anderes
Gerät an.
Der Monitor bleibt leer.
• Prüfen Sie, ob das Netzkabel richtig
angeschlossen ist.
• Prüfen Sie, ob das Monitorkabel richtig
angeschlossen ist. Prüfen Sie, ob der
Monitor mit dem Monitoranschluss
verbunden ist.
Die neue externe Hardware
funktioniert nicht richtig.
• Stellen Sie sicher, dass die Kabel für das
neue externe Gerät fest angeschlossen
sind und die Kontaktstifte nicht verbogen
sind.
Ein an den USB-Anschluss
angeschlossenes externes Gerät
funktioniert nicht.
• Dieses Gerät unterstützt USB 2.0Massenspeichergeräte. USB 2.0Massenspeicher-HDDs sowie CD- bzw.
DVD-Laufwerke werden jedoch nicht
unterstützt. Schließen Sie keine anderen
Massenspeichergeräte als USB-FlashSpeichergeräte an das Gerät an. Je nach
dem verwendeten Gerätetyp können
beim Schreiben von Daten auf USB 2.0Massenspeichergeräte Fehler auftreten.
Fehlersuche
97
Page 98

Verwenden Sie in diesem Fall ein USBFlash-Speichergerät eines anderen Typs.
• Schließen Sie zur Gewährleistung des
korrekten Betriebs USB-Geräte nicht über
einen USB-Hub an. Schließen Sie die
Geräte direkt an die USB-Anschlüsse an
der Vorderseite und Rückseite des Geräts
an. Wenn Geräte über einen USB-Hub,
einen USB-Switch oder ein.
Verlängerungskabel angeschlossen
werden, wird die Funktion nicht garantiert.
• Beachten Sie die mit dem USB-Gerät
gelieferte Dokumentation.
Die Netzwerk-Anzeige leuchtet
nicht auf.
• Prüfen Sie die Netzwerkkabel und geräte auf korrekte Funktion.
Auf die Festplatte kann nicht
zugegriffen werden.
• Bei häufigen Zugriffen auf die Festplatte
blinkt die Festplatten-LED sehr schnell.
Dies kann unter Umständen als
ununterbrochenes Leuchten
wahrgenommen werden.
Das NSR wird schnell heiß
• Wenn mehrere Geräte dieses Typs
übereinander aufgestellt werden, kann es
zu übermäßiger Erhitzung kommen.
Stapeln Sie nicht mehrere Geräte dieses
Typs, stellen Sie das Gerät nicht auf
Gegenstände, die Wärme abstrahlen, und
stellen Sie es nicht in beengten Räumen
auf.
Technische Daten
NSR-S10/S20
Externe Anschlüsse
Frontseite
USB: USB 2.0 (1)
Rückseite
Monitorausgang:
Analog RGB (Mini-D-SUB 15polig) (1)
LAN (1000Base-T/100Base-TX/
10Base-T) (RJ-45) (2)
USB: USB 2.0 (2)
Anschluss e-SATA (1)
Audioeingang (MIC)
(Reaktionsfrequenz 4 kHz,
Abtastrate 8 kHz,
Eingangssignalpegel 1 Vrms,
Eingangswiderstand
10 Kiloohm) (1) (zur
zukünftigen Erweiterung)
Audioausgang (Ausgangspegel
30 Vrms (RL = 32 Ohm),
60 Vrms (RL = 16 Ohm),
Ausgangsspannung bei
Vollaussteuerung 1 Vrms,
Ausgangsimpedanz 16/32
Ohm, Ausgangskanal 1 (Mono)
(1)
Sensoreingang (kompatibel mit 5-
V- bis 6-V-
Gleichspannungsschnittstellen,
durch Optokoppler, isoliert von
der Haupteinheit) (4)
Relaisausgang (max. 30 V
Gleichspannung, 125 V
Wechselspannung / 1 A, durch
mechanisches Relais, isoliert
von der Haupteinheit (1)
98
Technische Daten
Page 99

Betriebsumgebung
Betriebstemperatur: 5 °C bis 40 °C (41 °F
bis 104 °F)
Betriebsluftfeuchtigkeit: 20% bis 80%
(maximale
Feuchtlufttemperatur: 30 °C
(86 °F)
(nicht kondensierend)
Temperaturbereich bei Aufbewahrung
–20 °C bis +60 °C (–4 °F bis
+140 °F)
Luftfeuchtigkeit bei Aufbewahrung 20%
bis 90% (maximale
Feuchtlufttemperatur 35 °C
95 °F, nicht kondensierend)
Stromversorgungsdaten und
Verschiedenes
Stromversorgung: Gleichspannung 12 V
Stromaufnahme: Max. 4,0 A
Netzteil: 100-240 V Wechselspannung mit
50/60 Hz
Abmessungen: 245 × 53 × 160 mm
(9
3
⁄4 × 2
1
⁄
× 6 3⁄8 Zoll)
8
(BxHxT, ohne herausragende
Teile)
Gewicht: ca. 1,4 kg (3,1 lb.) (einschließlich
0,6 kg HDD)
Mitgeliefertes zubehör
Netzteil (1)
Kabel SATA (1) (nur bei Modellen ohne
interne HDDs)
SATA-Stromkabel (1) (nur bei Modellen
ohne interne HDDs)
Kabelklemme (1)
Infrarot-Fernbedienung (1)
Installationsanleitung (dieses Handbuch)
(1)
CD-ROM (Kurzanleitung,
Benutzerhandbuch) (1)
Garantiebroschüre (1)
Hinweise
• Führen Sie immer eine
Probeaufnahme aus, und bestätigen
Sie, dass die Aufnahme erfolgreich
war.
SONY KANN KEINE HAFTUNG FÜR
SCHÄDEN JEDER ART,
EINSCHLIESSLICH ABER NICHT
BEGRENZT AUF KOMPENSATION
ODER ERSTATTUNG, AUFGRUND
VON FEHLFUNKTION DIESES
GERÄTS ODER SEINER
DATENTRÄGER, EXTERNEN
SPEICHERSYSTEMEN ODER
JEGLICHEN ANDEREN
DATENGRÄGERN ODER
SPEICHERSYSTEMEN ZUR
AUFNAHME VON INHALTEN JEDER
ART ÜBERNEHMEN.
• Bestätigen Sie vor dem Gebrauch
immer, dass das Gerät richtig arbeitet.
SONY KANN KEINE HAFTUNG FÜR
SCHÄDEN JEDER ART,
EINSCHLIESSLICH ABER NICHT
BEGRENZT AUF KOMPENSATION
ODER ERSTATTUNG, AUFGRUND
VON VERLUST VON AKTUELLEN
ODER ERWARTETEN PROFITEN
DURCH FEHLFUNKTION DIESES
GERÄTS ODER AUS JEGLICHEM
ANDEREN GRUND, ENTWEDER
WÄHREND DER GARANTIEFRIST
ODER NACH ABLAUF DER
GARANTIEFRIST, ÜBERNEHMEN.
Änderungen, die dem technischen
Fortschritt dienen, bleiben vorbehalten.
Technische Daten
99
Page 100

AVVERTENZA
Per ridurre il rischio di incendi o
scosse elettriche, non esporre
questo apparato alla pioggia o
all’umidità.
Per evitare scosse elettriche,
non aprire l’involucro. Per
l’assistenza rivolgersi
unicamente a personale
qualificato.
AVVISO IMPORTANTE
A questo apparecchio è stato assegnato il
numero di modello per la certificazione di
conformità normativa. Tale numero è
riportato sull’etichetta numero modello
applicata sul prodotto stesso, insieme ai
valori nominali di tensione e di corrente.
Nome modello e numero tipo per l’ordine
Informazioni per
l’ordine
Modello NSR-S10/S20
1 disco rigido
Modello NSR-S10/S20
0 dischi rigidi
N. modello
per la
certificazione
AVOM001
AVOM002
AVVERTENZA
Per l’alimentazione elettrica utilizzare
l’adattatore CA fornito in dotazione
all’apparecchiatura.
Produttore: Sony
Sigla modello: NSR-AC1
L’utilizzo di qualsiasi altro alimentatore
comporta rischi, in particolare pericolo di
incendi.
Il sezionatore di questa apparecchiatura è la
spina di alimentazione dell’adattatore CA.
Per scollegare l’alimentazione elettrica è
necessario utilizzare la spina di questa
apparecchiatura. Assicurarsi che la presa di
corrente si trovi accanto all’apparecchiatura
e sia facilmente accessibile. In caso di
anomalie, scollegare la spina di
alimentazione.
AVVISO
Utilizzare il cavo di alimentazione
approvato dall’organizzazione di prova
specifica del paese in cui verrà utilizzata
l’unità.
ATTENZIONE - porta LAN
Per motivi di sicurezza, non collegare la
porta LAN a dispositivi di rete a tensione
eccessivamente elevata.
Installazione della batteria
(Telecomando IR)
Per l’utilizzo nel telecomando IR viene
fornita una batteria al litio tipo CR2025.
Per evitare il pericolo di esplosione,
utilizzare sempre lo stesso tipo di batteria al
litio.
ATTENZIONE
Se una batteria non viene sostituita
correttamente vi è il rischio di esplosione.
Sostituire una batteria con una uguale o
simile seguendo le raccomandazioni del
produttore. Lo smaltimento delle batteria
usate va effettuato seguendo le istruzioni
del produttore.
Per i clienti in Europa
Il fabbricante di questo prodotto è la Sony
Corporation, 1-7-1 Konan, Minato-ku,
Tokyo, Giappone.
La rappresentanza autorizzata per EMC e la
sicurezza dei prodotti è la Sony
Deutschland GmbH, Hedelfinger Strasse
61, 70327 Stoccarda, Germania. Per
qualsiasi questione riguardante l’assistenza
o la garanzia, si prega di rivolgersi agli
indirizzi riportati nei documenti
sull’assistenza o sulla garanzia a parte.
100
 Loading...