

Page 1

Sony NSP-1 / BZNP-D1 Tutorials
Revision 1.10 2/11/2005
Sony Electronics Inc.
www.sony.com/nsp1
Page 2

Sony NSP-1 / BZNP-D1 Tutorials
Contents
1. Scope
2. NSP-1 related products
3. Update NSP-1 and BZNP-D1 when necessary
4. Equipment and Configuration
5. Setup of NSP-1
6. Setup of BZNP-D1
7. Ingest content
8. Create a playlist
9. Scheduling
10. Content Production guidelines
11. FAQ
12. Appendix
(A) Video file conversion with Canopus ProCoder Express
(B) Video file conversion with Discreet Cleaner XL
- 2 -
Page 3
Sony NSP-1 / BZNP-D1 Tutorials
1. Scope
This document describes basic usage of Sony NSP-1 "Digital Signage Player" and BZNP-D1 software.
Please contact "The Product Operations
Support Center (POSC)" at (800) 883-6817 about product related
questions. Please download sample content “Content4Tutorials.zip” from www.sony.com/nsp1.
2. NSP-1 related products
Product Name SRP1 Description
NSP-1 $1,995 NSP-1 and BZNP-D1 software with 1 player license
BZNP-D1EXD $995
BZNP-DP10 $500 Additional 10 player license
BZNP-DP50 $1,000 Additional 50 player license
Sony NSP-1 is a network appliance (hardware) to play back video, graphic and text content.
Sony BZNP-D1 is system software to ingest content, create a playlist, schedule play out, distribute content and
monitor status. BZNP-D1 can manage up to 210 units of NSP-1. BZNP-D1 software can be purchased as
BZNP-D1EXD, a package product that consists of BZNP-D1 software, 10 player license and Canopus
ProCoder Express software.
Canopus ProCoder Express software can encode almost all types of video file to MPEG2 file that is
compatib le with NSP-1.
When you purchase BZNP-D1EXD, you will receive a key code for 10 player license. If you need to manage
more than 10 NSP1s, you can add licenses by purchasing BZNP-DP10 (additional 10 player license) and/or
BZNP-DP50 (additional 50 player license).
BZNP-D1 software with 10 player license and Canopus ProCoder
Express software
3. Update NSP-1 and BZNP-D1 when necessary
This document is described based on NSP-1 (version 2.01) and BZNP-D1 (version 2.01).
Latest firmware of NSP1 and BZNP-D1 software can be downloaded from the following web site.
www.sony.com/nsp1
Please refer to a release note for details.
1
as of 12/23/2004
- 3 -
Page 4
Sony NSP-1 / BZNP-D1 Tutorials
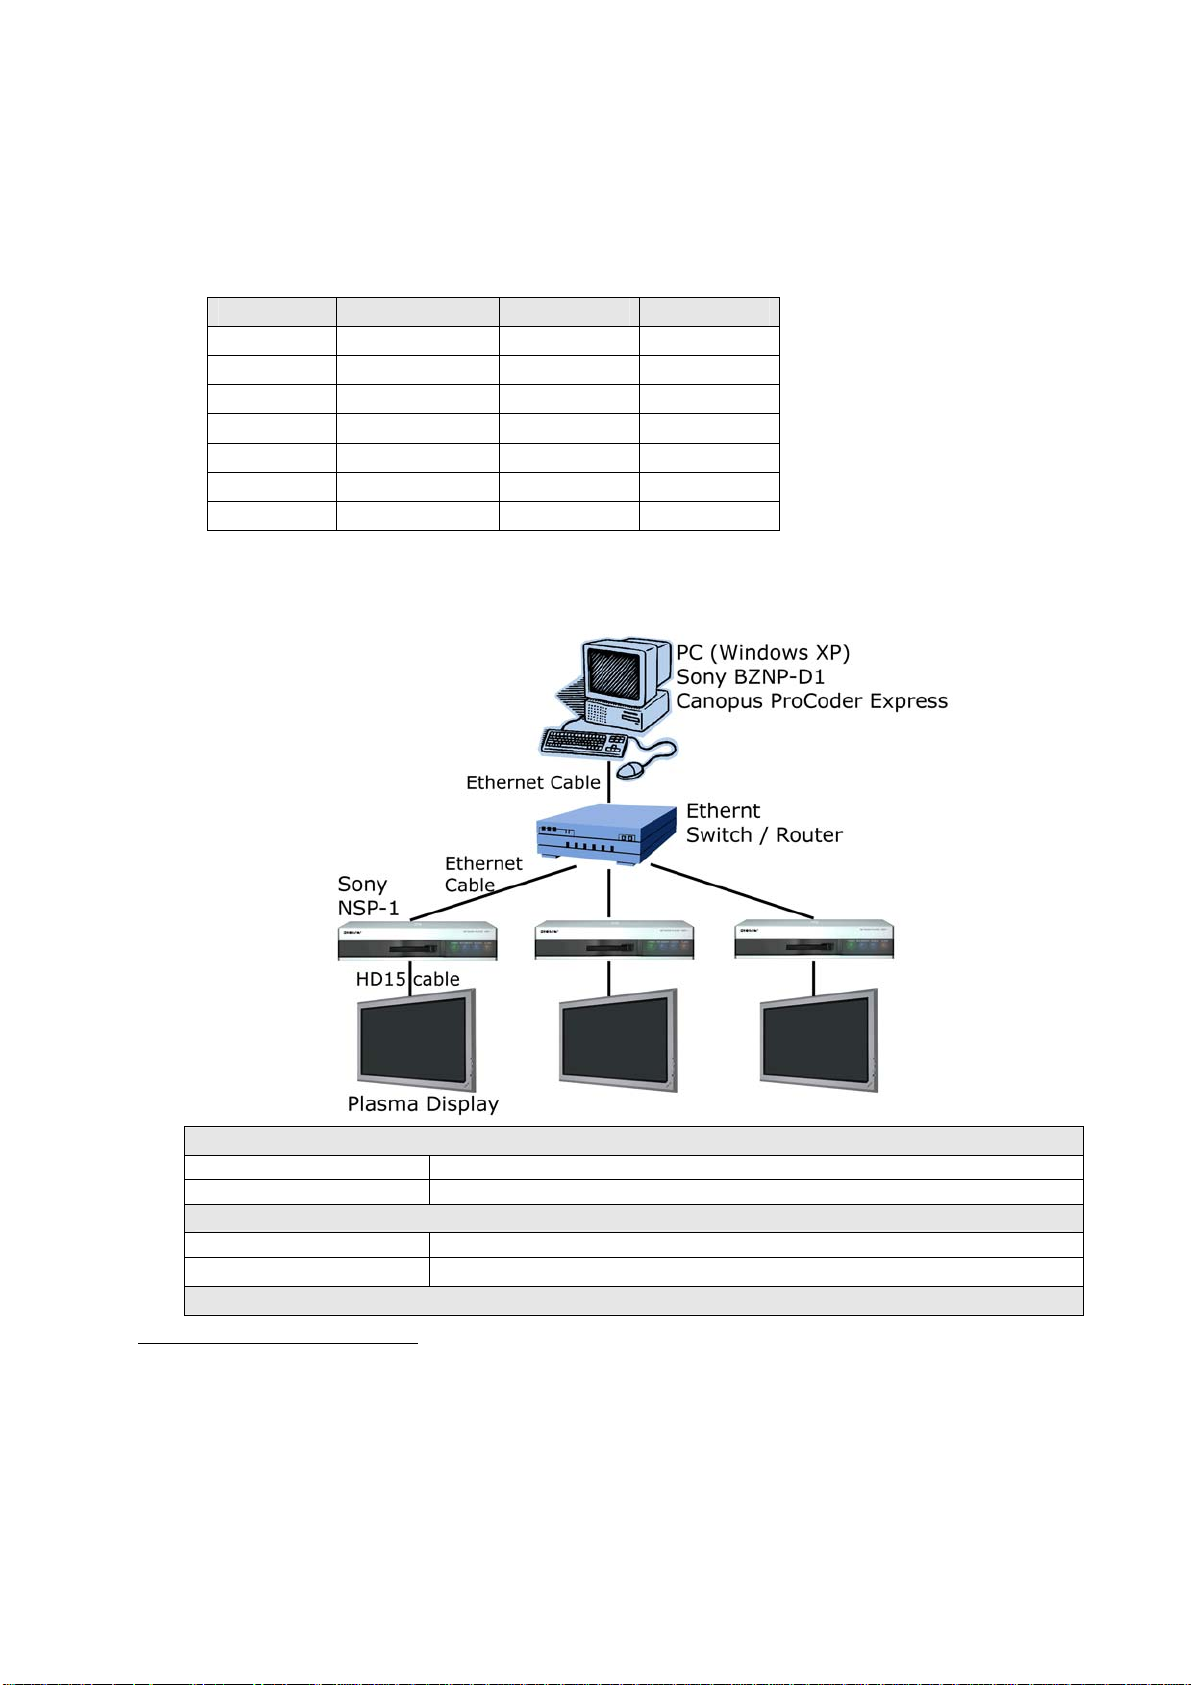
4. Equipment and Configuration
4.1 Number of NSP-1 and software license
Here is a sample of required software license and number of NSP1
# of NSP-1 BZNP-D1EXD BZNP-DP10 BZNP-DP50
1 0 *2 00
2-10 1 0 0
11-20 1 1 0
21-60 1 0 1
61-110 1 0 2
111-160 1 0 3
161-210 1 0 4
4.2 Sample of system configuration and req uired equipment
Here is a sample of configuration for a small system.
PC (Hardware)
General spec Nothing special
Graphics/Sound card Microsoft DirectX compatible card is recommended
PC (OS)
OS Microsoft Windows XP professional *3
Direct X Microsoft DirectX 9.1 or later is required *4.
PC (Software)
2
BZNP-D1 software w/ 1 player license comes with NSP1, though Canopus ProCoder Express software is not included.
3
Sony does not guarantee, but BZNPD1 may run on Windows 2000 when gdiplus.dll is installed.
4
How to check the version of DirectX
1. Click START button on Windows
2. Select RUN...
3. Type dxdiag, and click OK
4. Version number will be displayed at the System tab
- 4 -
Page 5
Sony NSP-1 / BZNP-D1 Tutorials
Web browser Microsoft Internet Explorer 6.0 or later is recommended.
Windows Media Player Microsoft Windows Media Player version 9 or later is recommended
MPEG2 encoding software is required to utilize video file. Sony
MPEG2 encoding
software
certified followings.
- Canopus ProCoder Express
- Canopus ProCoder V2.0
5
- Discreet Cleaner XL
Network
100BT router/switch/hub Nothing special
Ethernet cable
Regular straight cable to connect PC and NSP1 via router/switch/hub
Cross over cable to connect PC and NSP1 directly
Display for NSP1
Any kind of display with VGA (HD15) interface such as Plasma
Display
display, LCD, or CRT monitor. NSP1 supports following resolutions.
VGA, WVGA (848x480), SVGA and XGA
Display cable VGA cable (HD15)
RS232C cable This is optional. RS232C cable is utilized to control a display.
5
Canopus ProCoder Express is included in BZNPD1EXD
- 5 -
Page 6
Sony NSP-1 / BZNP-D1 Tutorials
5. Set up NSP-1
You need to do followings using web browser.
• Confirm firmware version
• Set IP address of NSP1 if necessary
• Set Date and Time
• Set Screen resolution
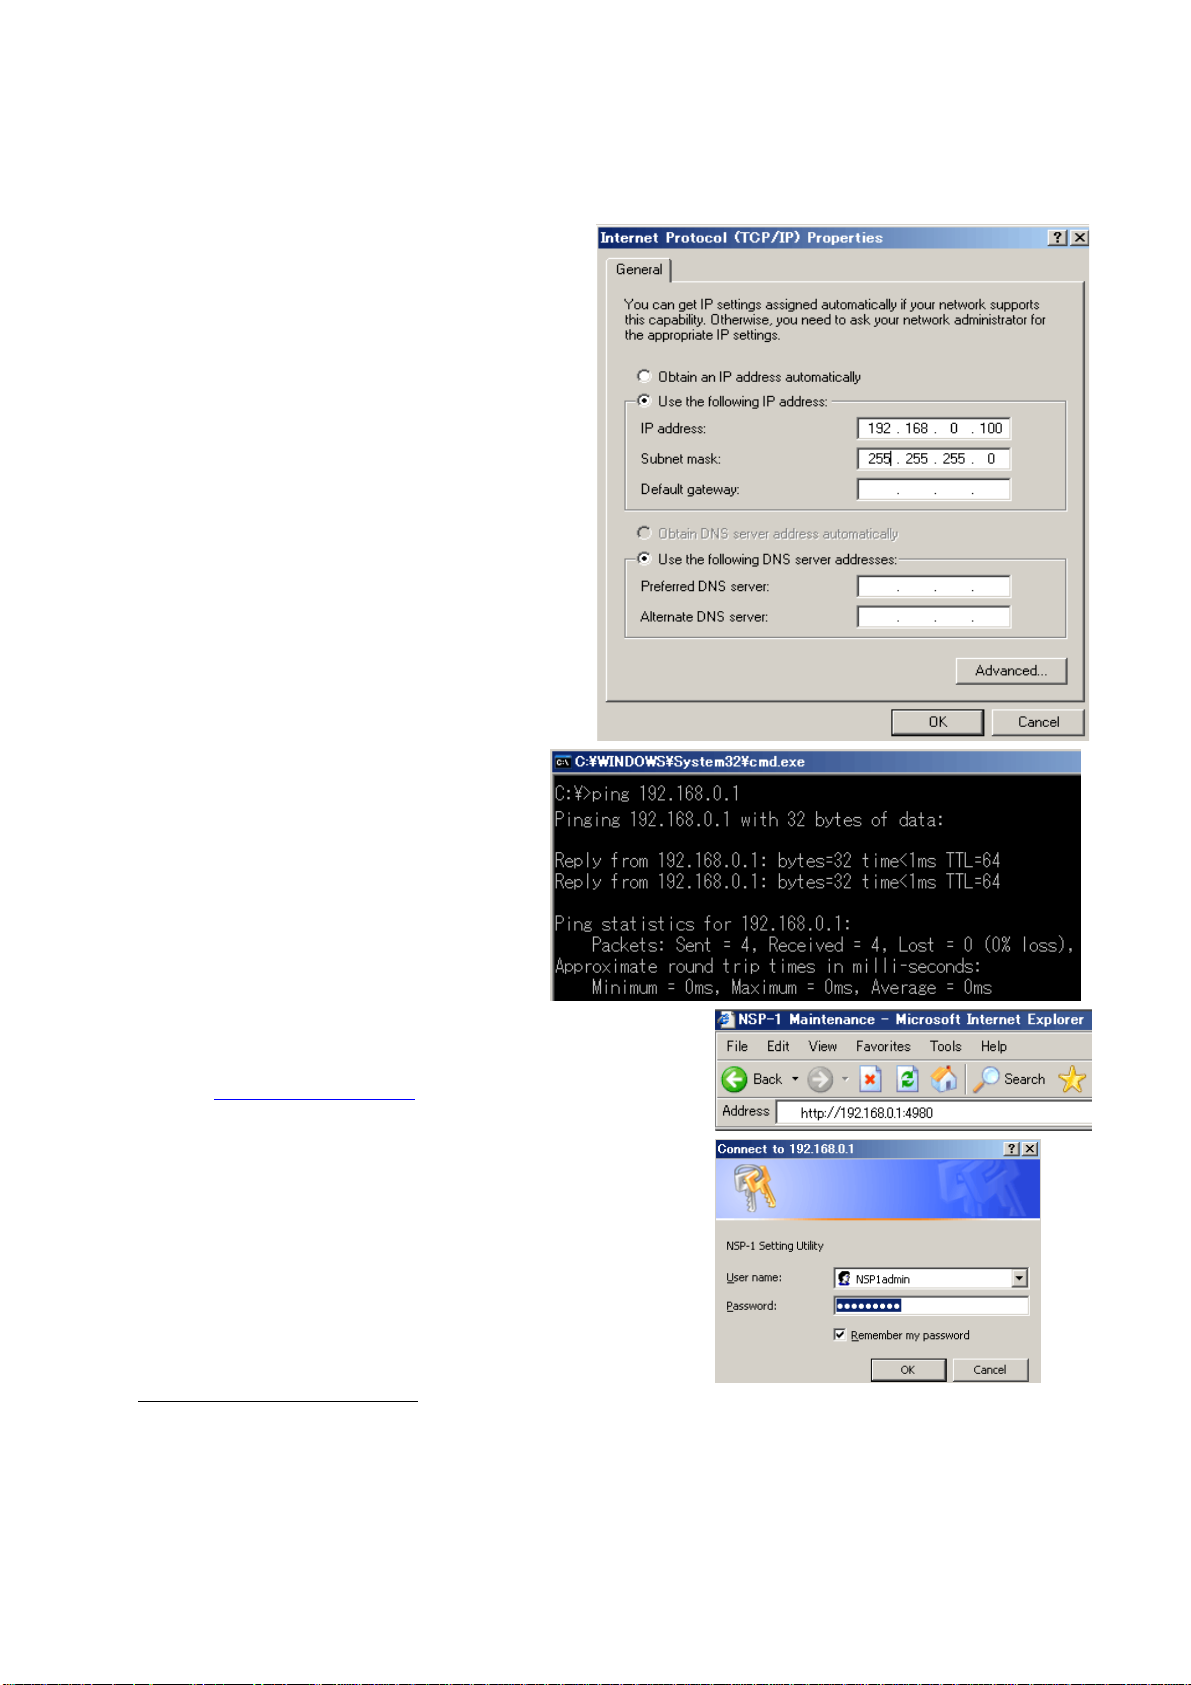
Change Network settings of PC
- Start / Settings / Network Connections
- Right click “Local Area Connection” and Select
properties
- Select Internet Protocol (TCP/IP), Click
Properties
- Select “Use the following IP address”
- Enter “192.168.0.100” at IP address
- Enter “255.255.255.0” at Subnet mask
- Click OK, Click OK
- Start / Run…
- Type “cmd” and click OK then “cmd.exe”
window opens
- Type “ipconfig” and Confirm IP address and
Subnet mask
Confirm network connection
- In the cmd.exe window,
- Type ping 192.168.0.1
- Confirm “Reply from 192.168.0.1”
- When ping fails, please refer to this
foot note
6
.
Launch Web browser and connect to NSP1
- Launch Web browser such as Internet Explore
- Enter http://192.168.0.1:4980
at the address
- Then a login window is popped up
- Type “NSP1admin” at User name (case sensitive)
- Type “NSP1admin” at Password (case sensitive)
- Click OK
6
“192.168.0.1” is factory default. If you are not sure the IP address of NSP1, here is a tip.
A) Change Dip SW-1 at the rear panel “ON”, and then turn on NSP1. IP address will be displayed after “Loading3…..”.
Then you can change Dip SW-1 “OFF”, and NSP1 resumes booting process.
B) Change Dip SW-3 at the rear panel “ON”, and then turn on NSP1. NSP1 will boot with an address of “192.168.0.1”.
- 6 -
Page 7
Sony NSP-1 / BZNP-D1 Tutorials
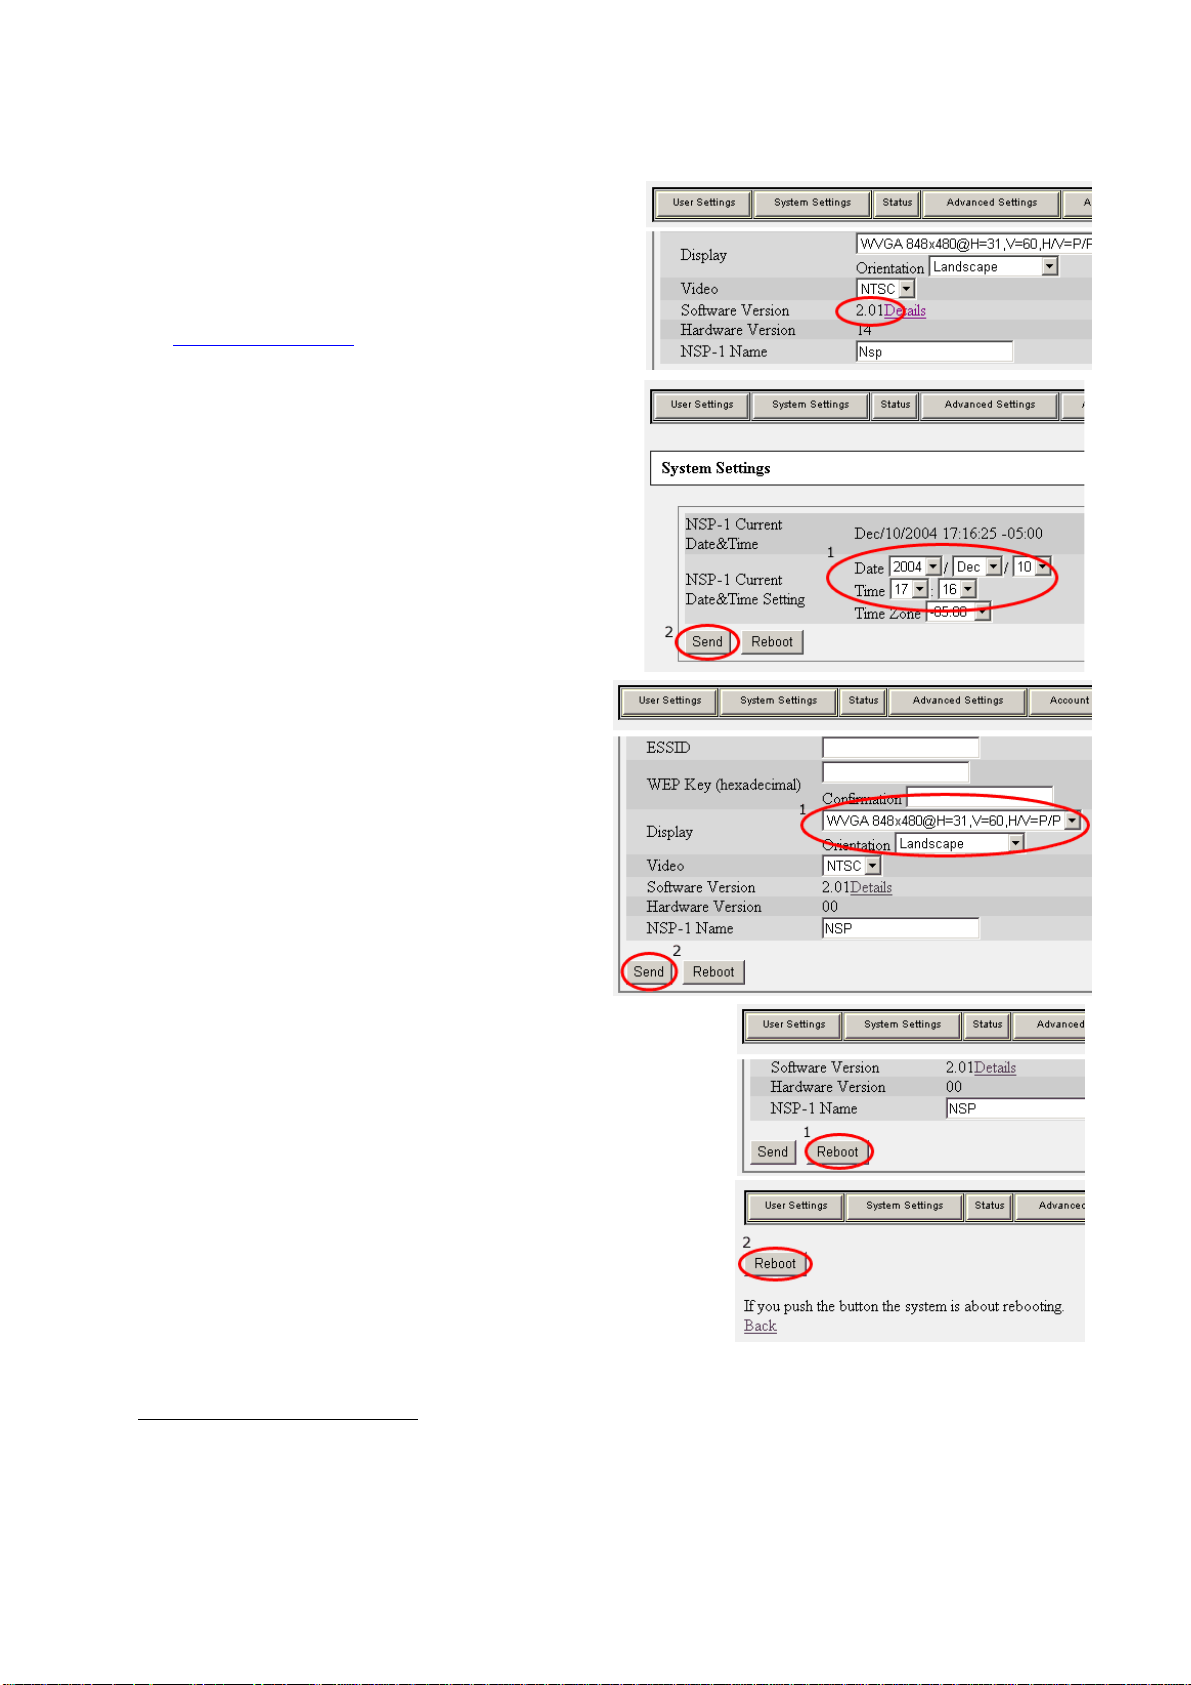
Confirm firmware version of NSP1
- Click “System Settings”
- Check the Software Version
- If the Software Version is lower than 2.01, please
update NSP1 referring to a release note at
www.sony.com/nsp1
,
Set Date and Time
1. Set Date and Time 7
2. Click Send
Set Display resolution and orientation
1. Set Display settings
Select resolution from VGA, WVGA, SVGA,
XGA and composite
8
. WVGA (848x480) is
recommended to drive a plasma display because
square pixel ratio makes it easy to produce
content.
Select Orientation from Landscape or Portrait
(WVGA / Landscape is assumed in the
following trainings. )
2. Click Send
Reboot NSP1
1. Click Reboot
2. Click Reboot
7
Time Zone does matter only when NTP is utilized to adjust date and time automatically over network. Currently NSP1
doesn’t support “Daylight Saving Time”. Followings are for normal time. -5 (EST). -6 (CST), -8 (PST).
8
There is no simultaneous video output on “Composite video signal” and “Analog RGB - VGA (HD15) signal”
- 7 -
Page 8
Sony NSP-1 / BZNP-D1 Tutorials
6. Set up BZNP-D1
6.1 Install BZNP-D1 software
BZNP-D1 can be downloaded from www.sony.com/nsp1
code is installed. A 10 players’ key code comes with BZNPD1EXD. Install it as followings.
1. Launch BZNP-D1 software
2. Select Help / License settings from the menu
3. Click Add license
4. Type the key code and click OK
5. Click OK
Install Canopus ProCoder Express, if you purchased BZNPD1EXD. This software installs DirectShow
compatible MPEG2 codec software that is important to ingest MPEG2 video content.
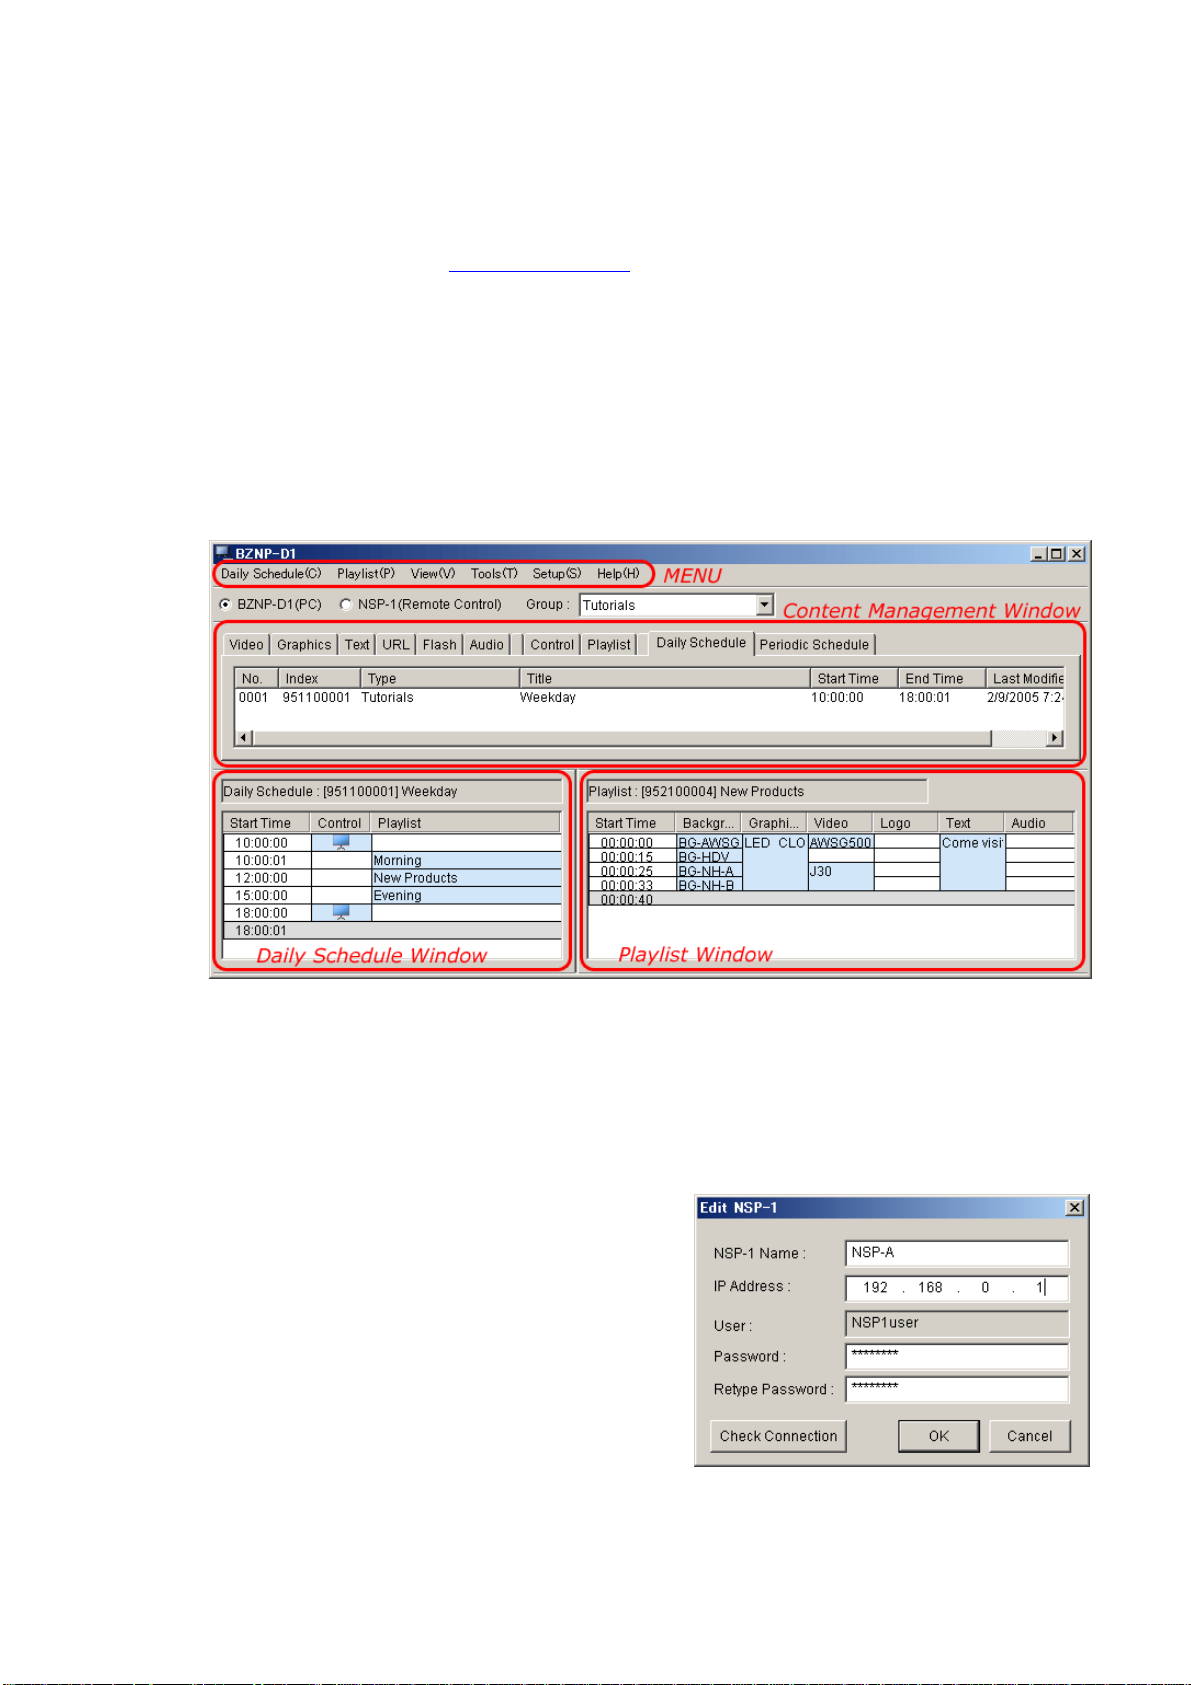
6.2 BZNP-D1 GUI
. BZNPD1 can control only one NSP1 unless a key
6.3 Set up BZNP-D1
Following setups are required on BZNPD1 software before you do a regular operation.
• Register NSP1
• Create a group
• Setup a group
• Create a template
• Assign NSP1 to a group
6.3.1 Register NSP1
1. Select Setup / Group Setup
2. Click “New NSP1”
3. Enter “NSP-A” at NSP1 name
4. Enter “192 .168.0.1” at IP address
5. Enter “NSP1 user” at Password and Retype
Password if those are blank
6. Click Check Connection if the NSP1 is online
7. Click OK
- 8 -
Page 9
Sony NSP-1 / BZNP-D1 Tutorials
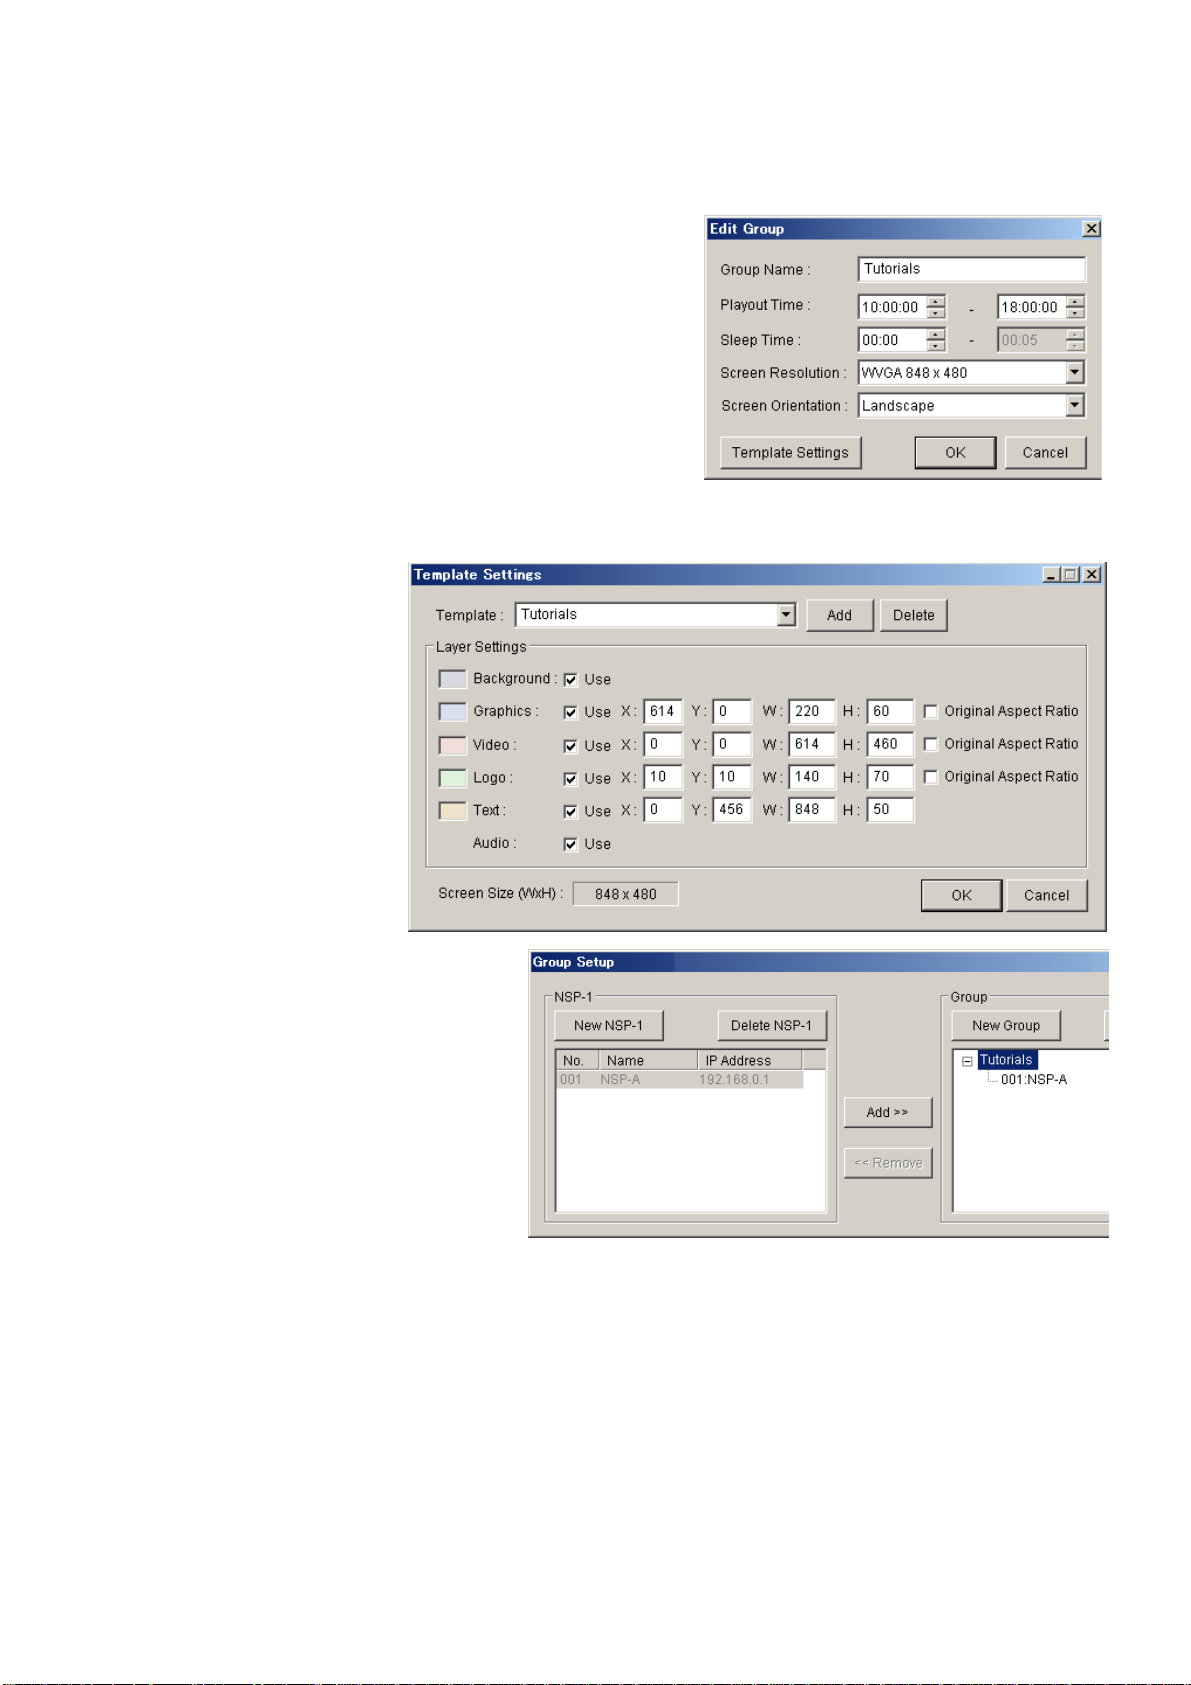
6.3.2 Create and set up a group
1. Click “New Group” in Group Setup window
2. Enter “Tu torials” at “Gro up name”
3. Selec t “10:00 :00” and “18:00:00” at Playout Time
4. Leave “00”00” at Sleep Time
5. Select “WVGA” at Screen Resolution and “Landscape”
at Screen Orientation (These must match to settings on
NSP1.)
6.3.3 Create a Template
1. Click “Template Settings” in Edit Group window
2. Type “Tutorials” at Template
3. Enter following nu mbers at X, Y, W and H
4. Click OK in “Template Settings” window
5. Click OK in “Edit Group” window
6.3.4 Assign NSP1 to a group
1. Click “Tutorials” on the right side in
the “Group Setup” window
2. Click “NSP-A” on the left side
3. Click Add
4. Clo se this window
6.4 Group
In order to simplify operations, creating playlists, scheduling playout and distributing content are based on
groups. If you do NOT purchase BZNPD1EXD and install a license, you can create only one group.
6.5 Template
NSP1 can play back several types of content with layered. In order to make authoring easy, you can create a
template of content arrangement in advance, and you can apply it to each group of NSP1 as a default.
It is not mandatory to create a template and assign it to a group, because you can change display arrangement
while you create a playlist, but you will realize that a template can save your time to create a playlist.
- 9 -
Page 10

Sony NSP-1 / BZNP-D1 Tutorials
7. Ingest content
The following procedures are based on WVGA / Landscape setting. Please refer to chapter 5 and 7 for details.
Sample content that is utilized in these trainings can be downloaded as “Content4Tutorials.zip” from
www.sony.com/nsp1
You can ingest content by dragging it from Explorer to upper window of BZNPD1 software. Please note that
BZNPD1 software does NOT copy content but creates a link to the original file. So if you have content on CDROM or DVD-ROM, it is suggested to copy them to a local hard disk drive in advance.
Ingest Video content
1. Select V ideo tab
2. Drag A WSG500.mpg and J30.mpg files in video folder from Explorer and drop to the Content
Management window
3. In case Duration shows “00:00:00”
. Please unzip the file onto your local hard disk drive.
9
, double click the duration and enter “00:00:15”
Preview Video content
1. Rig ht click the video content and select “Send to NSP1 and Preview”
Ingest Graphics content
1. Selec t Graphics tab
2. Drag BG-AWSG.bmp, BG-HDV.bmp, BG-NH-A.bmp and BG-NH-B.bmp files in Graphics folder
from Explorer and drop to the Content Management window
Ingest Flash content
1. Select Flash tab
2. Drag LED_CLOCK.swf file in Flash folder from Explo rer and d rop to the Content Management
window
9
Duration may show “00:00:00” in the following case.
A) Direct Show compatible MPEG2 codec is not installed. (Canopus ProCoder Express includes this.).
B) Direct Show incompatible codec has higher "merit" value
C) MPEG4 (.mp4) file is ingested
- 10 -
Page 11

Sony NSP-1 / BZNP-D1 Tutorials
Ingest Text content
1. Select Text ta b
2. Righ t click in the material management window and select New
3. Select “Ar ial” at Font and “18 ” at Font Siz e
4. Click “Read Text File” and Select “NAB.txt” in Text folder and Click Open
5. Click properties
6. Select Scroll at Effect
7. Select Slow at Scroll Speed
8. Click OK in Text Properties window
9. Click OK in Edit Text window
- 11 -
Page 12

Sony NSP-1 / BZNP-D1 Tutorials
8. Create a playlist
When you create a playlist, you decide two things.
A) Order of playout of content and layer for the content
B) Arrange size and position of each content
Here is a playlist we are going to create in this chapter.
Looking at the Background column, you
will understand foll owi ngs.
BG-AWSG plays 15 seconds, then
BG-HDV plays 10 seconds, then
BG-NH-A plays 8 seconds, then
BG-NH-B plays 7 seconds
Looking at the first row, you will
understand followings.
Through 00:00:00 and 00:00:15,
BG-AWSG is played at Background layer,
LED_CLOCK is played at Graphics layer,
AWSG500 is played at Video layer and
“Come visit” is played at Text layer
You will understand how laye r works with this graphic.
- 12 -
Page 13

Sony NSP-1 / BZNP-D1 Tutorials
8.1 Preparation
1. Confirm “BZNP-D1(PC)” is
selected
2. Co nfir m “Tuto rials” is selected
at Group
3. If P laylist window is not
empty, select Playlist/New
from the menu
8.2 Create a playlist
1. Select video tab, drag AWSG500 in Content Management window and drop it to the Playlist Window.
Notice that the Start Time of the second column becomes 00:00:15.
2. Select Graphics tab, drag BG-AWSG in Content Management window and drop it to the first row at
Background column in the Playlist Window. Notice that three columns (Background, Graphics and
Logo) are highlighted because still graphics can be placed one of these layers, so that you need to drop
it in the Background column.
- 13 -
Page 14

Sony NSP-1 / BZNP-D1 Tutorials
3. Drag BG-HDV and drop it to the second row at Background column.
4. Select Video tab, drag J30 and drop it to the third row at Video column.
5. Select Graphics tab, drag BG-NH-A and drop it to the third row at Background column.
- 14 -
Page 15

Sony NSP-1 / BZNP-D1 Tutorials
6. Right click BG-NH-A at Background
column in the Playlist Window, and select
“Change Duration”.
7. Enter “00:00:08” in the
Change Duration Window,
and click OK.
8. Drag BG-NH-B and drop it to the 4th row in the Playlist Window.
9. Select Flash tab, drag LED_CLOCK and drop it to the first row at Flash column.
- 15 -
Page 16

Sony NSP-1 / BZNP-D1 Tutorials
10. Right Click “LED_CLOCK” in the pl aylist
window, select “Change Duration”, enter
“00:00:40” and click OK.
11. Select Text tab, drag “Come visit Sony Booth…”and drop it to the first row at Text co lumn.
12. Right Click “Come visit…” in the playlist
window, select “Change Duration”, enter
“00:00:40” and click OK.
13. Select “Playlist / Save” from the menu and select Playlist tab. You will see one playlist with blank at
type and title. Enter “Tutorials” at Type and “New Products” at Title by double clicking the cell.
14. Right click the playlist and select “Send to NSP-1 and Preview”. BZNPD1 will send the playlist and
associated content to NSP1, and then NSP1 will play it back automatically.
- 16 -
Page 17

Sony NSP-1 / BZNP-D1 Tutorials
15. If you’d like to modify layout of content
such as size and position, right click it in the
playlist window and select “Change layout”.
Position (X, Y). and size (W, H) of content
can be modified.
16. Right click the playlist and select “Change Screen Saver”. This playlist will be played back as loop
when there is no scheduled playlist at that time. This is convenient to utilize NSP1 when scheduling is
not required.
17. Select “NSP-1 (Remote Control)”, select NSP-A at NSP-1 pull down menu and click Update. BZNP-
D1 will retrieve list of content from the NSP1. Click “Periodic Schedule tab. You will see one item
with 12/31/9999 at Start Date and End Date. This represents the Screen Saver. Right click it and select
Delete. NSP1 will play back default screen saver.
- 17 -
Page 18

Sony NSP-1 / BZNP-D1 Tutorials
8.3 Tips
1. To utilize “External Video”
1. Right click at the video
column and select
2. Right click “External
Input” and select
“Change Duration” and
enter the duration
2. Overwrite or Insert
When you drag and drop content on existing content in a playlist, it is “Overwrite”.
When you drag and drop content on existing content in a playlist with [Ctrl] key pressed, it is “Insert”
3. Trim end point of Video or FLASH content
You can trim end point of Video or FLASH by editing “Duration” or “End Time”
- 18 -
Page 19

Sony NSP-1 / BZNP-D1 Tutorials
9. Scheduling
9.1 Create a daily schedule
1. Crea te two more playlists and put
Titles as “Morning” and “Evening”
2. Select Control Tab, drag “Power
On” and drop it to the first row at
control column in Daily Schedule
window.
3. Select Playlist Tab, drag
“Morning” and drop it to the
second row at playlist column in
Daily Schedule window.
4. Select Playlist Tab, drag “New
Products” and drop it to the third
row at playlist column.
5. Select Playlist Tab, drag “Evening”
and drop it to the 4
th
row at playlist
column.
6. Right click “Morning”, select “Change End Time”, enter
“12:00:00” and click OK.
7. Righ t c lick “New Products”, select “Change End Time”,
enter “15:00:00” and click OK.
8. Right click “Evening”, select “Change End Time”, enter
“18:00:00” and click OK.
- 19 -
Page 20

Sony NSP-1 / BZNP-D1 Tutorials
9. Select Control Tab, drag “Power
Off” and drop it to the 5th row at
control column in Daily Schedule
window.
10. Select “Daily Schedule /
Save” from the menu,
select “Daily Schedule”
tab and enter “Tutorials”
at Type cell and
“Weekday” at Title cell.
9.2 Assign a daily schedule to a specific day
11. Right click the daily schedule
“Weekday” and select
“Periodic Schedule Settings”
12. Select appropriate date at “Period”, uncheck
“Sun” and “Sat” at “Day of the week” and click
OK.
13. Click Periodic Schedule tab, righ t click a periodic schedule “Weekday”, and select “Send to NSP1”.
- 20 -
Page 21

Sony NSP-1 / BZNP-D1 Tutorials
10. Content Production guidelines
10.1 Still graphics
NSP1 can play back Bitmap file (.BMP) and JPEG file (.JPG).
Adobe Photoshop is the most common professional tool to create graphics.
In case you utilize Microsoft PowerPoint to create graphics, here are some tips.
Tips for Microsoft PowerPoint
Tip1. How to create a graphics to match to each resolution
1. Select File / “Page Setup”
2. Enter the following value at “Width” and “Height” (default resolution is 72dpi for PowerPoint 2002 or
earlier and 96dpi for PowerPoint 2003)
Resolution
VGA (640 x 480) 8.89 6.67 6.67 5
WVGA (848 x 48 0 ) 11.78 6.67 8.83 5
SVGA (800 x 600) 11.12 8.34 8.33 6.25
XGA (1024 x 768) 14.23 10.67 10.67 8
Tip 2. How to export each slide as a separate bitmap file.
1. Select File / “Save As…”
2. Select “Bitmap (*.bmp)” at “Save As Type:”
3. Click Save
4. Click “Every Slide”
10.2 Video
NSP1 can playback MPEG2 and MPEG4 video. Using MPEG4 it is also possible to do live streaming. Please
refer to a white paper about MPEG4 live streaming.
In order to utilize MPEG2 video file, Sony certified following software and hardware encoders.
Canopus ProCod er Ex press (software encod er)
Canopus ProCoder 2 (software encoder)
Discreet Cleaner XL (software encoder)
Canopus MPEG PRO MVR (hardware encoder)
Optibase MPEG MovieMaker 200S (hardware encoder)
Please refer to Appendix about setups for “ProCoder Express” and “Cleaner XL”
Resolution of MPEG2 video content is 720 x 480. In case of portrait mode of display orientation,
A) Create video content at 480 x 720 with Adobe After Effects, then rotate it to 720 x 480 with Apple
LiveType that comes with Final Cut Pro 4
B) Shoot footage with a camera sideway. Edit it on nonlinear as a normal way, and export it as 720x480.
In order to utilize MPEG4 video file, Sony certified following software and hardware encoders.
Apple QuickTime Pro (software encoder)
Envivio 4Caster (hardware encoder)
VBrick (In the process of certification)
10.3 FLASH
Because FLASH is rendered on the fly when it is played back, playback may not be smooth depending on
effects, size of objects or frame rate.
PowerPoint2002 or earlier PowerPoint 2003
Width Height Width Height
- 21 -
Page 22

Sony NSP-1 / BZNP-D1 Tutorials
11. FAQ
Q. Can NSP1 control non-Sony Plasma or LCD display via RS232C
A. Yes. Please refer to “Registering Additional Control Commands” in the BZNP-D1 manual.
Q. NSP1 stops playing back in few minutes and then resumes everyday at the same time. Why?
A. Please check internal clock of NSP1 and set correct time referring to chapter 5 of this Tutorials. Because of
specification of hard disk drive, NSP1 stops playing back once a day at mid night, but factory default of
internal clock is set to Japan Time. Mid night in Japan Time is day time in US.
Q. I’d like to change color of text, but I can not change “Base Character Color” in the Text Properties window.
A. “Base Character Color” can be changed before you type any text. If you’d like to change color of text you
have already typed, right click words in “Edit Text” window and select “Change Character Color”.
Q. I received NSP1 with a default playlist that plays back automatically after turning on the unit. I tried
“Change Screen Saver” and realized I want to get back the default playlist. When I right click the playlist in
the Content Management window for NSP1 on the NZBPD1, only “Delete” is available.
A. Yes, that’s possible. Please refer to the section 17 of Chapter 8.2 of this Tutorials.
- 22 -
Page 23

Sony NSP-1 / BZNP-D1 Tutorials
12. Appendix
(A) Video file conversion with Canopus ProCoder Express
Almost all types of video file format such as AVI or QuickTime can be encoded to MPEG file that is
compatible to NSP1 using Canopus ProCoder Express software.
When you export a video file out of non-linear editing program, followings are suggested parameters.
File format: AVI or QuickTime
Video Compression: DV, M-JPEG or uncompressed
Audio: 48k Hz, 16 bits, uncompressed
1. Launch Canopus ProCoder Express
2. Click "Convert a source file to a different
format?" then click Next in a "Welcome" window
3. Click Load and select a source file then Click
Next in a "Load Source" window.
(Check "Config Source File Setting" if trimming is
necessary)
4. Click "Select a generic target" then Click Next in
a "Use the Wizard or Select a History Entry"
window
- 23 -
Page 24

Sony NSP-1 / BZNP-D1 Tutorials
5. Click MPEG then Click Next in a "Select
Generic Target" window
6. Select output file name when necessary then
Click Next in a "Saving Your File" window
7. Click Advanced Output Settings in a "Job
Summary"
8. Enter the following value in each item then Click Close
Interlaci n g Lower/Bottom Field First
Video Bit Rate between 4000 and 9000
Quality/Speed Highest Quality
Stream Format DVD (MPEG Program/Elementary Stream)
Stream Type MPEG-2 Program Stream
Use Audio Use Always
Audio Stream Type MPEG Audio Layer-2
Audio Bit Rate 224kbps
- 24 -
Page 25

Sony NSP-1 / BZNP-D1 Tutorials
9. Click Convert in a "Job Summary" window
- 25 -
Page 26

Sony NSP-1 / BZNP-D1 Tutorials
(B) Video file conversion with Discreet CleanerXL
Almost all types of video file format such as AVI, QuickTime can be encoded to MPEG file that is compatible
toNSP-1 using Discreet CleanerXL software. BZNP-D1 version 3.00 or later is required.
When you export a video file out of non-linear editing program, followings are suggested parameters.
File format: AVI or QuickTime
Video Compression: DV, M-JPEG or uncompressed
Audio: 48k Hz, 16 bits, uncompressed
1. Double click a file "NTSC_NSP.cjb*10", and then CleanerXL is launched with correct setups.
2. A warning window may appear if you use a newer version of CleanerXL than that was used to create
the ".cjb" file. Then click OK.
3. Select File/Save As, and save it in a different name
4. Select View/Destination Editor and select a folder where encoded files are saved.
5. Select Job/Add Source Media... and select a source file
6. Select View/Encoder Setting Editor and change "Bit Rate Control" and/or "Bit Rate" if necessary
10
This file can be downloaded from www.sony.com/NSP1
- 26 -
Page 27

Sony NSP-1 / BZNP-D1 Tutorials
7. Select Job/Encode Now..., then encoding starts
8. Progress is displayed in Job Queue window
9. MPEG file ".mpg" will be created as specified at step 4.
©2005 Sony Corporation. All rights reserved.
Canopus, ProCoder and MPEG PRO-MVR are registered trademarks of Canopus Corporation.
Discreet and Cleaner are registered trademark of Autodesk Incorporated.
Adobe, Photoshop and Photoshop Element are registered trademarks of Adobe Systems Incorporated.
Apple, Final Cut Pro and Live Type are registered trademarks of Apple Computer, Inc.
Microsoft, Windows2000, WindowsXP, Excel and PowerPoint are registered trademarks of Microsoft Corporation.
- 27 -
 Loading...